
Loading ...
Loading ...
Loading ...
10
Always unplug Rotary Tool before changing accessories, changing
collets or servicing your Rotary Tool.
Assembly
LIGHT MODULE
The light module included with your tool is
intended to provide you with improved visibility
while working on your project. It uses 2
replaceable CR1025 batteries (included) to
power the LED and can be rotated around the
front of the tool depending on your needs.
Changing Batteries
Chemical Burn Hazard.
Keep batteries away from
children. This product contains a lithium
button/coin cell battery. If a new or used lithium
button/coin cell battery is swallowed or enters
the body, it can cause severe internal burns and
can lead to death in as little as 2 hours. Always
completely secure the battery compartment. If
the battery compartment does not close
securely, stop using the product, remove the
batteries, and keep it away from children. If you
think batteries might have been swallowed or
placed inside any part of the body, seek
immediate medical attention.
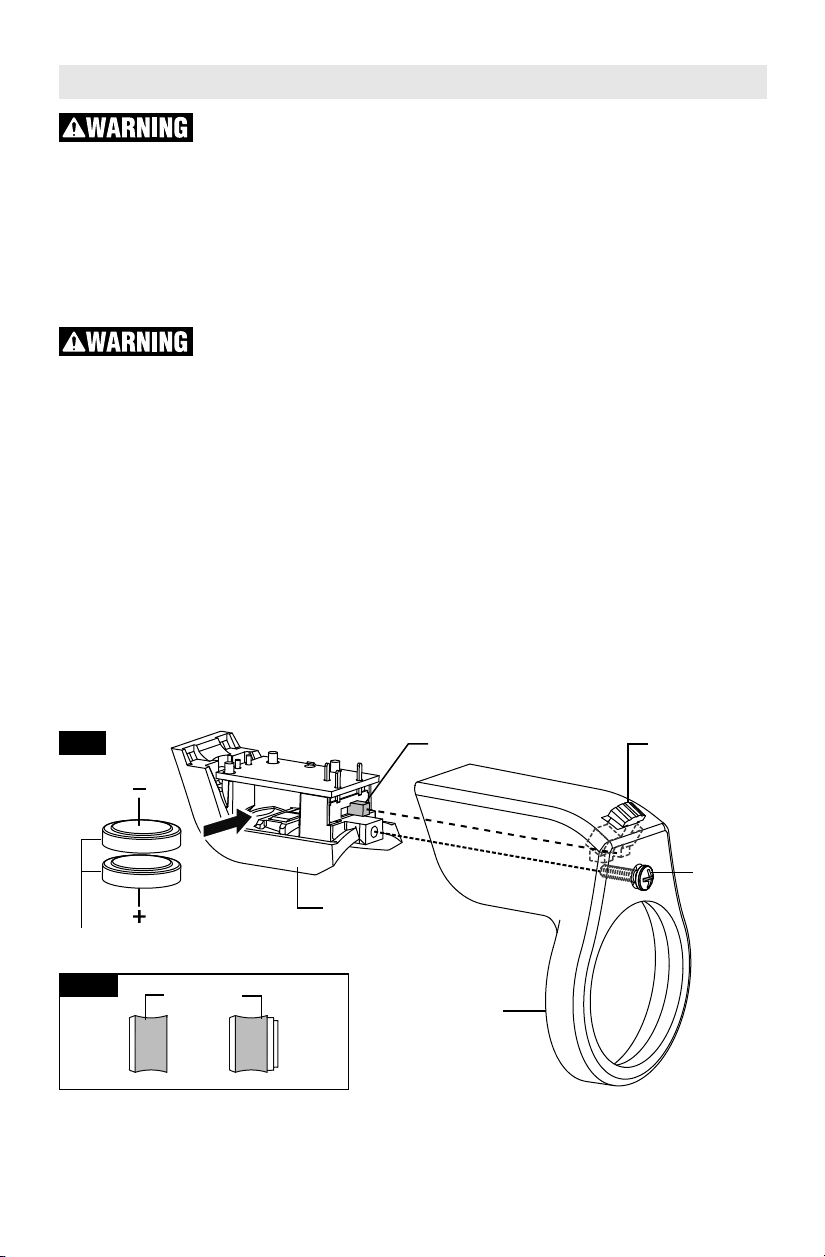
To change the batteries for the light module,
begin by unscrewing the nose cap to remove
the light module. Once it is removed, use a
small screwdriver to loosen the screw on the
battery compartment. Do not pull the screw
out completely! Remove the battery
compartment housing from the underside of the
module. Slide the old batteries out and replace
with new batteries making sure to replicate the
orientation of the original batteries. With the
new batteries in place, replace the battery
compartment housing and re-tighten the screw.
When reassembling make sure that the switch
and the slider are both in the same ON (I) or
OFF (O) position. This way the switch will match
the “fork” of the slider (Fig. 2).
Installation and Use
To install the light module on the tool, begin by
unscrewing the nose cap from the end of the
tool. Slide the light module onto the end of the
tool with the light pointing forward. Re-tighten
the nose cap on the end of the tool to squeeze
the light module ring in place (Fig. 1). The light
module will only work with the new style nose
cap that came with your tool. The difference
between the old and new nose cap are shown
in Fig. 2a.
Depending on how you are using your rotary
tool, you may find that the light module is either
in the way or that you would like to illuminate
your workpiece differently. To reposition the light
module, simply loosen the nose cap, rotate the
light module as desired, and re-tighten the nose
cap.
FIG. 2
CR1025 BATTERIES
BATTERY
COMPARTMENT
LIGHT
MODULE
SWITCH SLIDER
SCREW
OLD
NOSE CAP
NEW
FIG. 2a
1600A012FN.qxp_4300 1/30/17 10:06 AM Page 10
Loading ...
Loading ...
Loading ...