
Loading ...
Loading ...
Loading ...
CHARGING
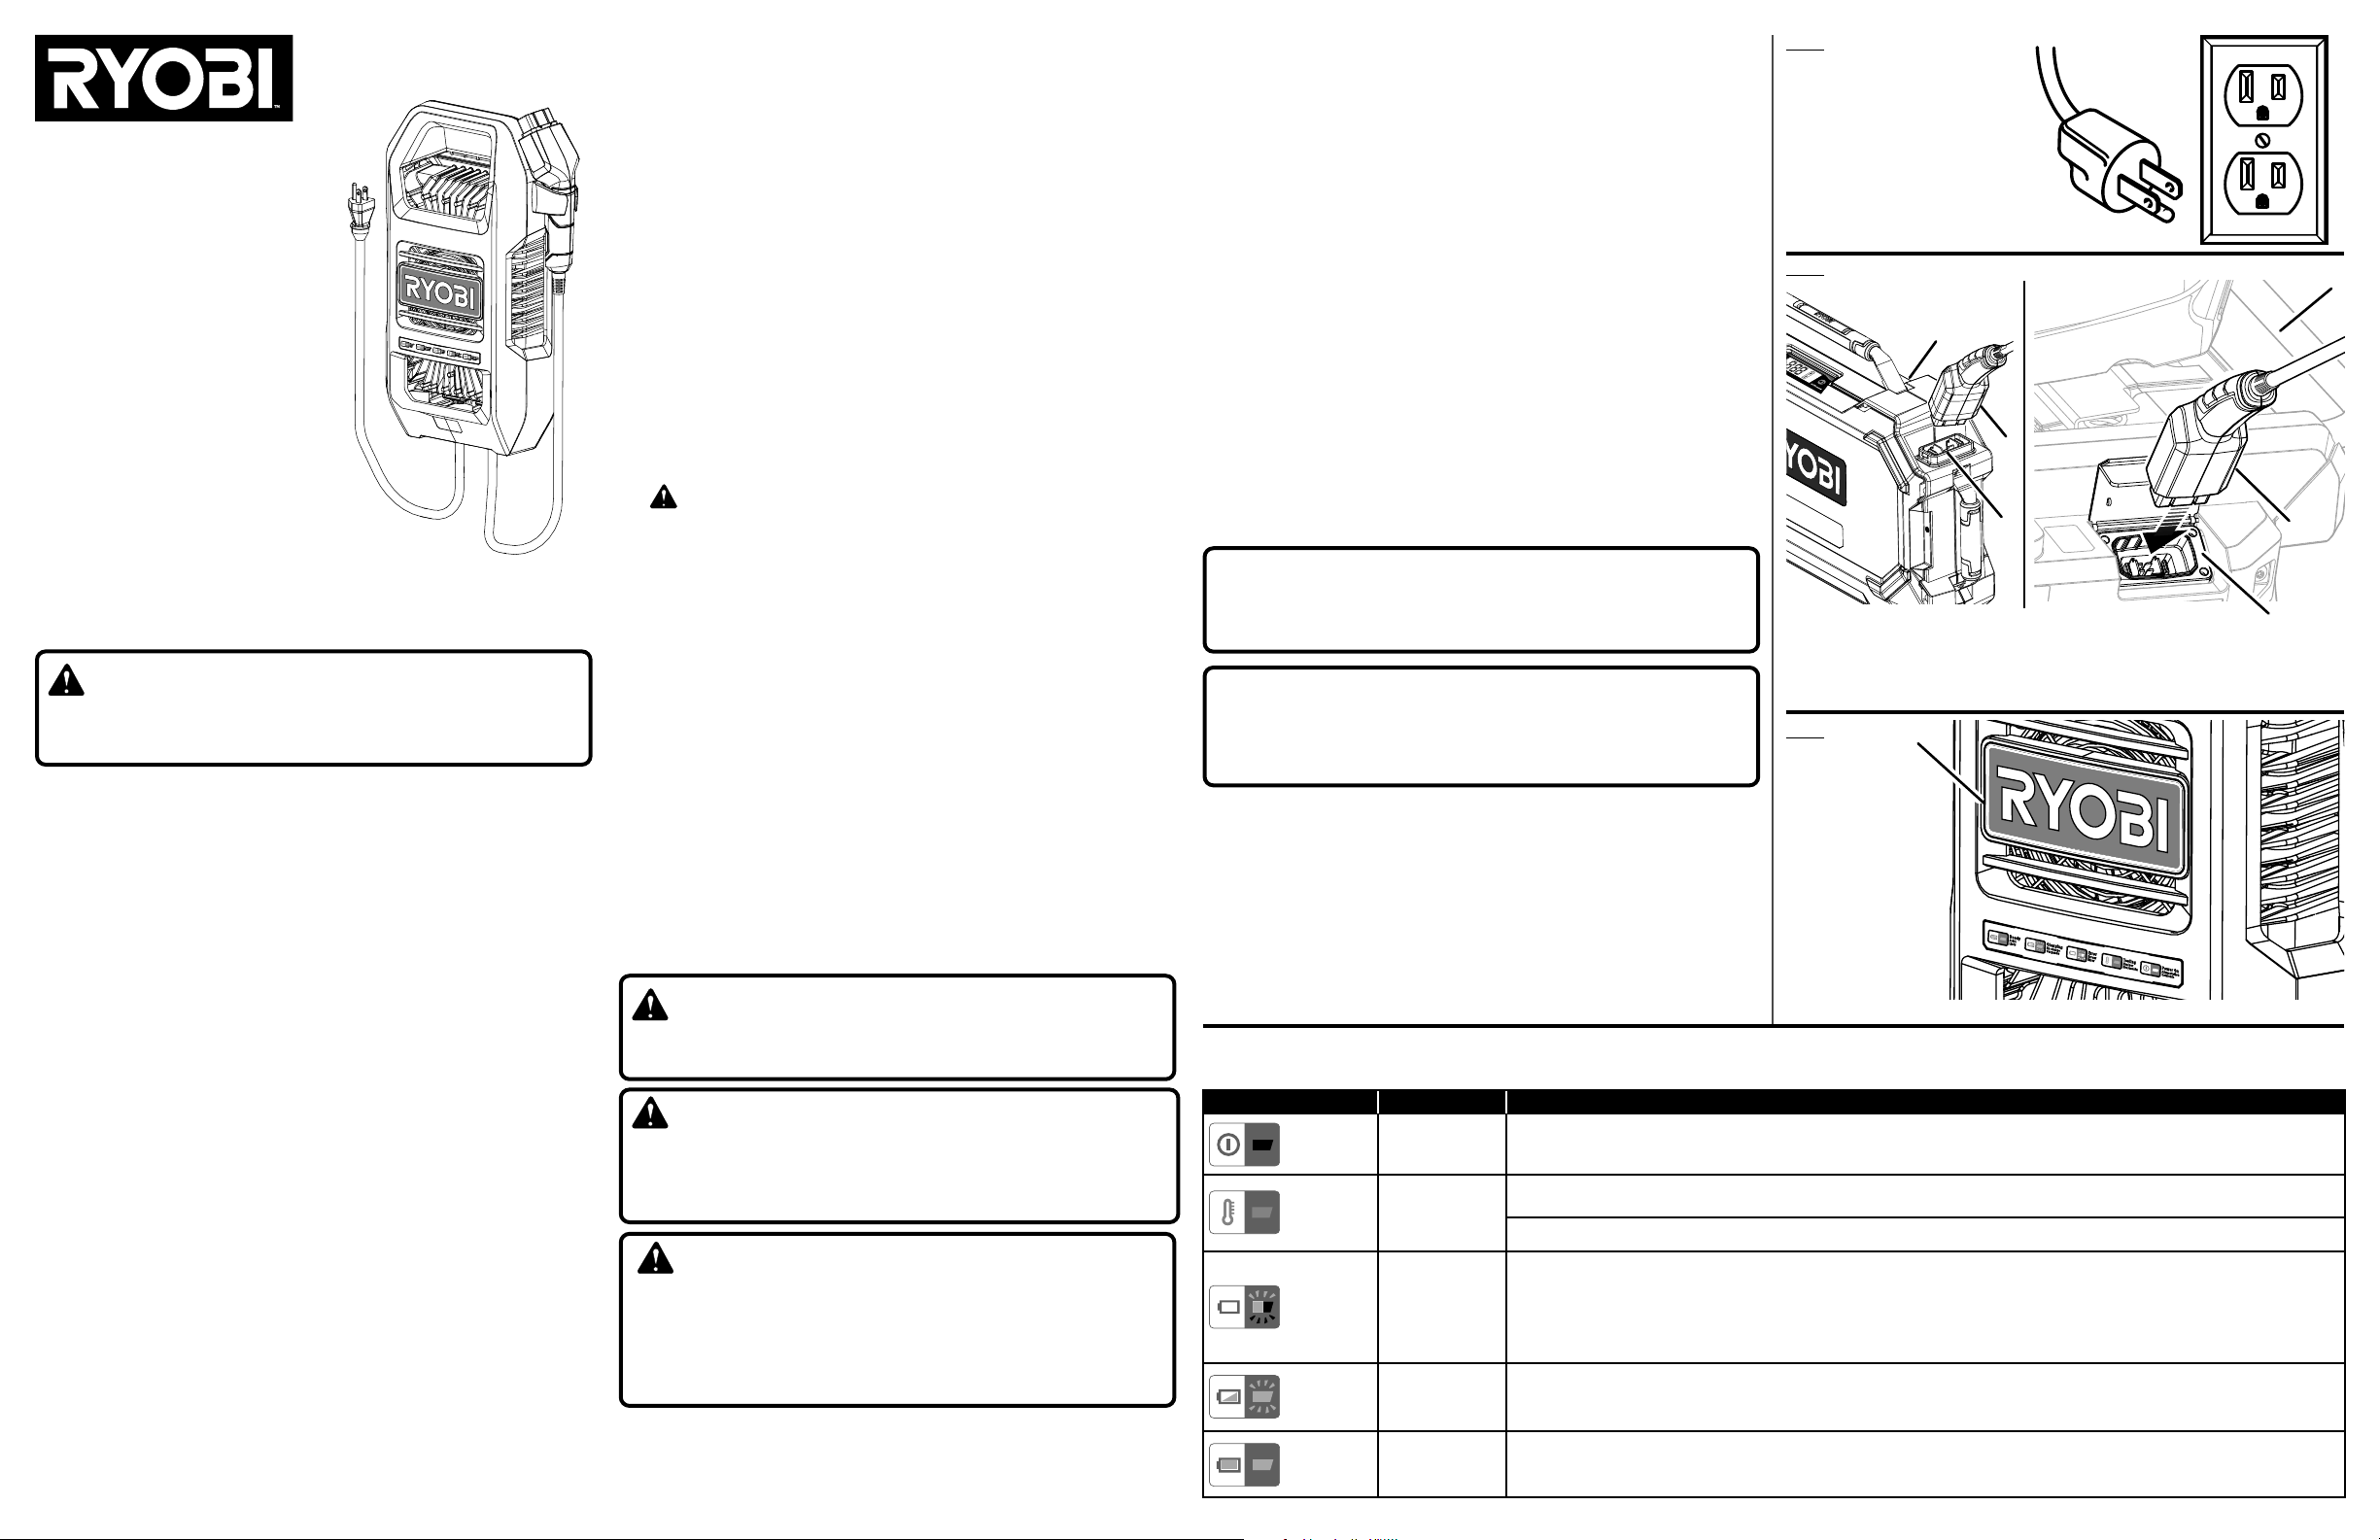
See Figures 1 - 3.
WARNING:
NEVER use this product with an extension cord, outlet adaptor, conversion
plug, multi-outlet surge protector, or power strip.
WARNING:
The RYOBI 80V battery charger is designed for use with normal household
voltage, 120 volts, AC only, 60Hz. Whenever possible, the charger should be
connected to a dedicated receptacle with a single outlet. If the receptacle has
multiple outlets, do not plug other products into the remaining outlets.
. WARNING:
Only charge RYOBI 80V tools with onboard charging capabilities or
RYOBI 80V Lithium-ion Battery Packs indoors in a dry location. Do not
charge battery or expose tools to rain or damp locations. Water and
liquids can come in contact with tool components and the battery and
damage connections and electronic components, which can result in a
short circuit, increased risk of fire, and serious personal injury.
RYOBI 80V tools with onboard
charging capabilities or RYOBI 80V Lithium-
ion Battery Packs must be charged before first use. To verify tools or battery
packs are fully charged, check the battery level indicator.
For best results:
Do not charge in an area of extreme heat or cold.
Never charge a frozen battery.
Mount or place the charger in an area with adequate ventilation. The
charger should be mounted in the vertical position with the handle facing
up or resting on its base during use.
To charge:
Make sure both the charger and tool or battery pack connections are
clean and free of dirt or debris.
Insert charger plug into charging port on tool or battery pack, making
sure it is properly connected.
Connect charger to power supply using normal household current of
120V, AC only, 60 Hz. The batteries should automatically begin to charge.
NOTE: The charger is equipped with a plug featuring a grounding pin and
must be plugged into a matching standard three-prong outlet that has
been properly installed and grounded in accordance with all local codes
and ordinances. Do not use a two-prong outlet, adaptors, or modify the
plug provided. If it will not fit the outlet, have the proper outlet installed
by a qualified electrician.
When powered and connected to the tool or battery pack, the LED indica-
tor encircling the logo will illuminate to indicate the charger’s status. See
the RYOBI that follows to determine the meaning of the LED’s display.
When the tool or battery pack is fully charged, disconnect the charger
from the power supply, then disconnect the charger from the tool or
battery pack.
NOTICE:
When charging tools with onboard charging capabilities, always turn
the tool off before connecting the charger and disconnect the charger
before turning the tool on.
NOTICE:
Charge RYOBI 80V tools with onboard charging capabilities or RYOBI
80V Lithium-ion Battery Packs frequently. Charge tools or battery packs
after each use. Make sure to charge the tool or battery pack fully at
least once a month.
PLUG THE CHARGER
INTO A POWER OUTLET
BRANCHER LE CHARGEUR
DANS UNE PRISE MURALE
ENCHUFE EL CARGADOR
EN UN TOMACORRIENTE
ELÉCTRICO
DANGER!
TO REDUCE THE RISK OF FIRE, ELECTRIC SHOCK, DEATH,
OR SERIOUS PERSONAL INJURY, CAREFULLY FOLLOW THESE
INSTRUCTIONS.
The charger is not meant for use by children.
Provide adequate ventilation for the charger to dissipate heat dur-
ing charging. The charger will get hot. Keep away from flammable and
combustible material and do not cover the charger.
Risk of Burn Hazard — Charger surfaces may be hot during operation.
Use the charger handle only. The charger should be mounted in the verti-
cal position with the handle facing up or resting on its base during use.
Risk of electric shock. Do not touch uninsulated portion of output con-
nector or uninsulated battery terminal.
Do not use charger outdoors or expose to wet or damp conditions.
Water entering charger will increase the risk of electric shock. The charger
must be plugged into a Class A GFCI receptacle when used outdooors.
Keep charger and charger plug free of contamination and dirt. Do not
let gasoline, oils, petroleum-based products, etc. come in contact
with plastic parts. They contain chemicals that can damage, weaken,
or destroy plastic.
Keep cord and charger away from heat to prevent damage to hous-
ing or internal parts.
Do not abuse cord or charger. Never use the cord to carry the charger.
Do not pull the charger cord rather than the plug when disconnecting
from the charge port. Damage to the cord or charger could occur and
create an electric shock hazard. Have damaged cords replaced by an
authorized service center immediately.
Do not charge battery in a damp or wet location. Do not store or
charge battery packs or charger in locations where the temperature
is less than 50 F or more than 100 F. Do not store outside or in vehicles.
Do not operate charger with a damaged cord or plug, which could
cause shorting and electric shock. If damaged, have the charger re-
placed by an authorized service person.
Do not operate charger if it has received a sharp blow, been dropped,
or otherwise damaged in any way. Take it to an authorized service
person for electrical check to determine if the charger is in good working
order.
Make sure cords are located so that they will not be stepped on,
tripped over, come in contact with sharp edges or moving parts, or
otherwise subjected to damage or stress. This will reduce the risk
of accidental falls, which could cause injury, and damage to the cords,
which could result in electric shock.
Do not disassemble charger. Opening the charger will void its warranty.
If charger requires service or repair during the warranty period, take it to
an authorized service center to be replaced.
Service person must unplug charger from the AC wall outlet and
from the mower charge port before attempting any maintenance or
cleaning to reduce the risk of electric shock.
IMPORTANT SAFETY INSTRUCTIONS
1.
SAVE THESE INSTRUCTIONS - DANGER: TO
REDUCE RISK OF FIRE OR ELECTRIC SHOCK
CAREFULLY FOLLOW THESE INSTRUCTIONS.
Thismanual contains important safety and operating instructions
for charger OP80RM.
2. Before using battery charger, read all instructions and cautionary
markings on battery charger, battery, and product using battery.
3.
CAUTION: To reduce the risk of injury, charge only RYOBI
80V tools with onboard charging capabilities or RYOBI 80V
Lithium-ion Battery Packs. Other types of batteries may burst,
causing personal injury or damage.
PRODUCT SPECIFICATIONS
Charger Input......................................................... 120 V, AC only, 60 Hz
Charge Rate .......................................................................................14A
Cord Length
............................................................ 7.6 ft DC / 6.6 ft. AC
KEYHOLE HANGING
The charger has a key hole hanging feature for convenient, space saving
storage. Always mount in such a way that the charger LED indicator is
visible while charging.
A - Charging port (prise de charge, puerto de carga)
B - Charger plug (fiche du chargeur, clavija del cargador)
C - Battery pack (bloc-piles, paquete de baterías)
D - Tool with onboard charging capabilities (outil avec capacité de charge intégrée, herramienta
con capacidad de carga integrada)
A - Charger LED indicator (indicateur DEL de la chargeur, indicador LED del cargador)
MODE LED DESCRIPTION
Power On
Solid Red Plugged into AC power supply but not connected to tool or battery pack.
Testing
Solid Orange
Hot battery pack - When battery pack reaches cooled temperature, charger begins charge mode.
Cold battery pack - When battery pack reaches warmed temperature, charger begins charge mode.
Error
Flashing Red
and Green
Battery pack/tool or charger error.
• Try to repeat the conditions a second time by removing and reconnecting the charger. If the LED Error status repeats
a second time, try charging a different battery pack/tool.
• If a different battery pack/tool charges normally, contact customer service.
• If a different battery pack/tool also indicates Error, the charger should be replaced.
Charging
Flashing Green Batteries are being charged.
Ready
Solid Green Battery charging is complete. LED will turn off 10 minutes after charging has been completed.
LED FUNCTIONS
See Figure 3.
D
998000902
5-24-23 (REV:04)
B
A
SAFETY INSTRUCTIONS
FEATURES
OPERATION
This product has a five-year limited warranty for personal, fam-
ily, or household use. Two years if used for any other purpose,
including without limitation commercial or rental use.
For warranty details go to www.ryobitools.com.
OPERATOR’S MANUAL
80V CHARGER
OP80RM
B
A
C
A
Fig. 1
Fig. 2
Fig. 3
TTI OUTDOOR POWER EQUIPMENT, INC.
P.O. Box 1288, Anderson, SC 29622
1-800-525-2579
www.ryobitools.com
Loading ...
Loading ...
Loading ...