
INSTRUCTION MANUAL
ITEM #93609
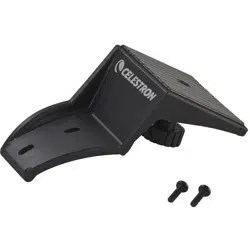
Pi g g y b a c k Mo u n t – Fo r a l l Sct’S
In s ta l l at I o n – Fo r 5”, 6”, 8” a n d 9.25” Mo d e l s
1. Remove the two screws on the rear cell of the telescope
tube that attach the StarPointer finderscope.
2. Align the slotted holes on the piggyback mount with the
holes in the rear cell of the telescope.
3. For NexStar SE models - Place the StarPointer on top of
the piggyback adapter so that the holes on the
StarPointer bracket overlap the holes on the adapter.
(It may be easier to remove the StarPointer from its
bracket first).
4. Take the appropriate size screws included with the
adapter and insert them through the holes, tightening
them until the adapter is flush against the rear cell.
5. You are now ready to mount a camera or spotting scope
on top of the piggyback mount. To do this, locate the
threaded mounting hole on the bottom of your camera
or spotting scope. Place the camera or spotting scope
on the top of the piggyback adapter and thread in the
1/4 - 20 bolt and tighten.
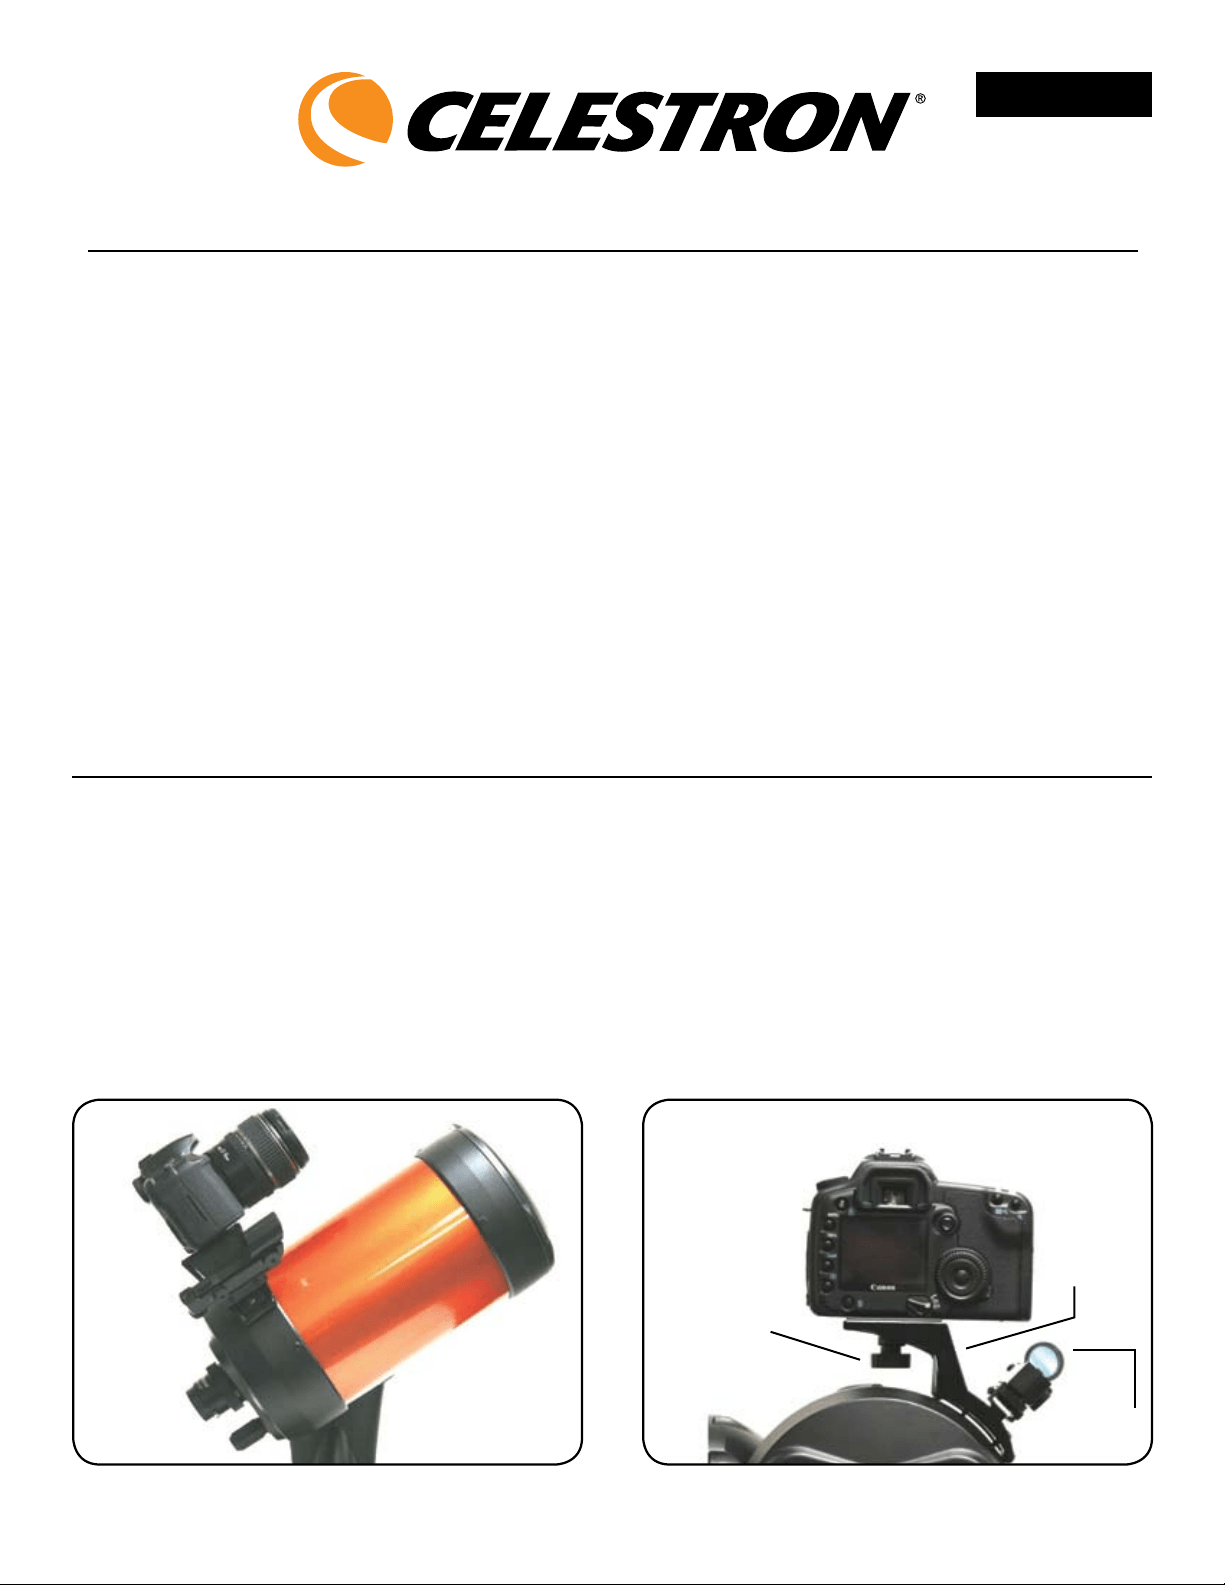
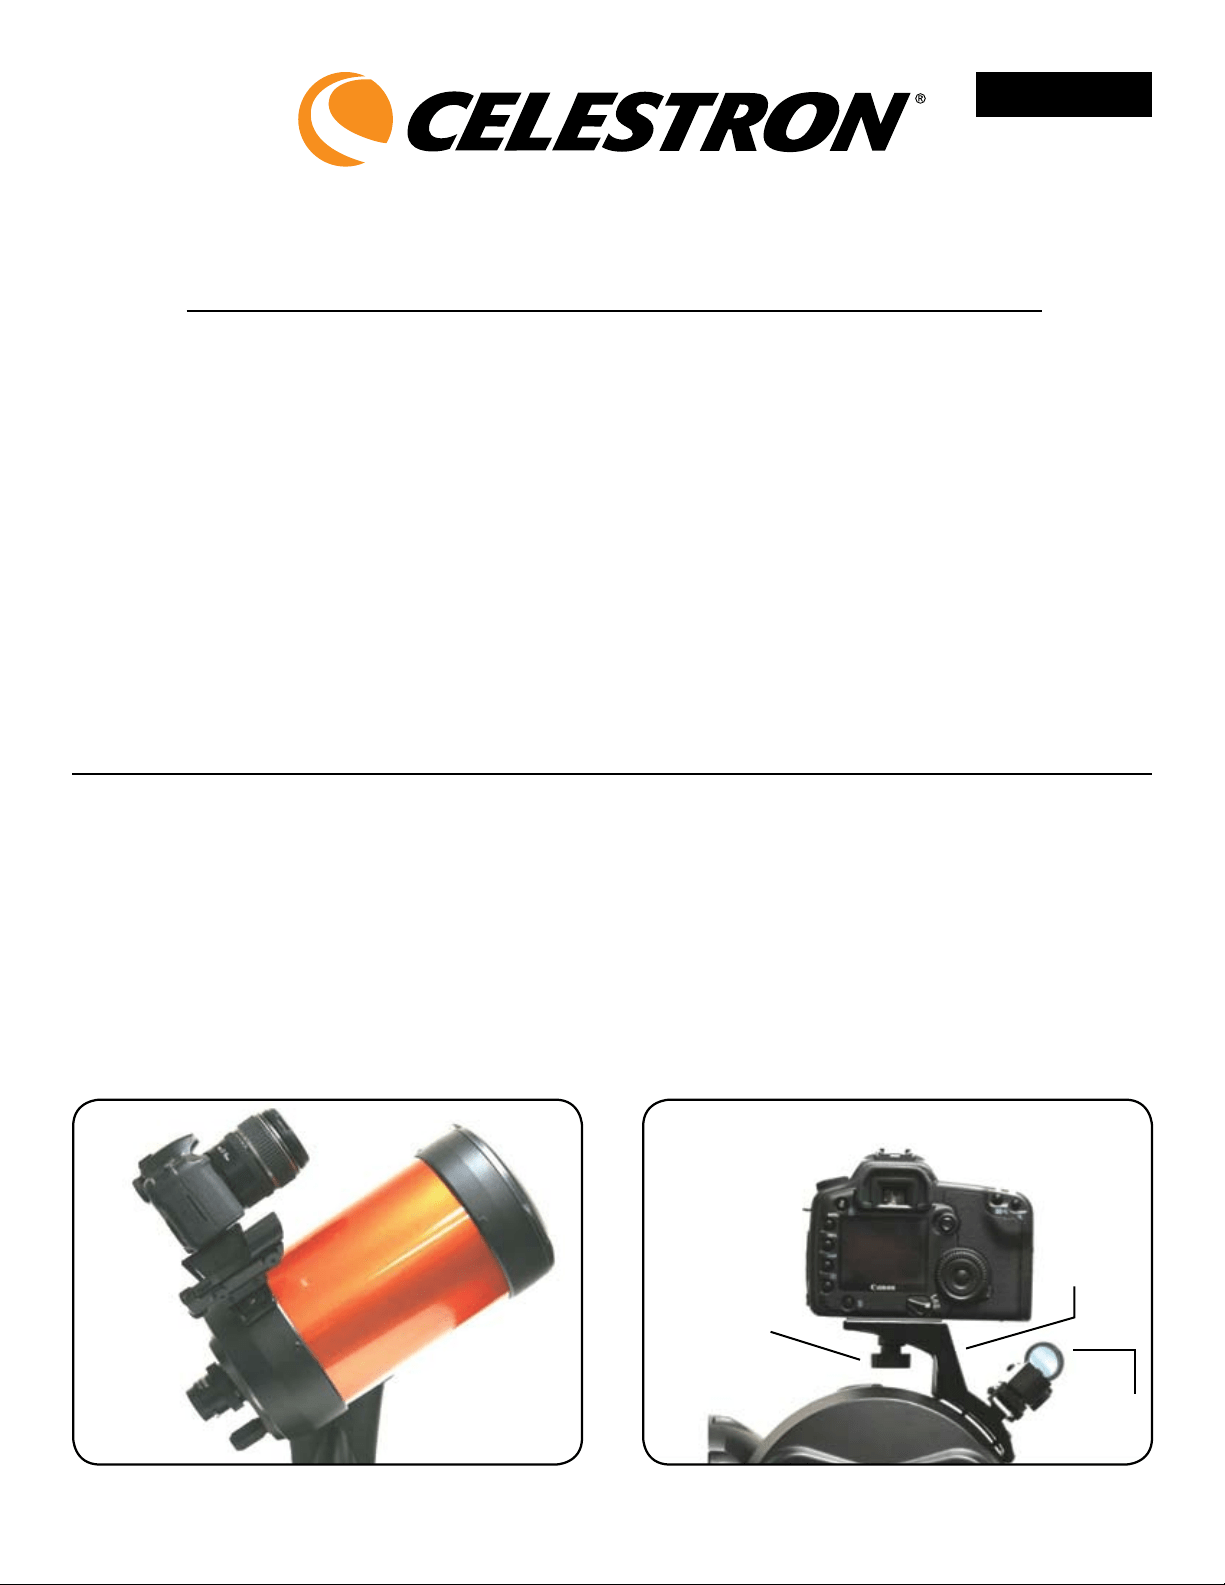
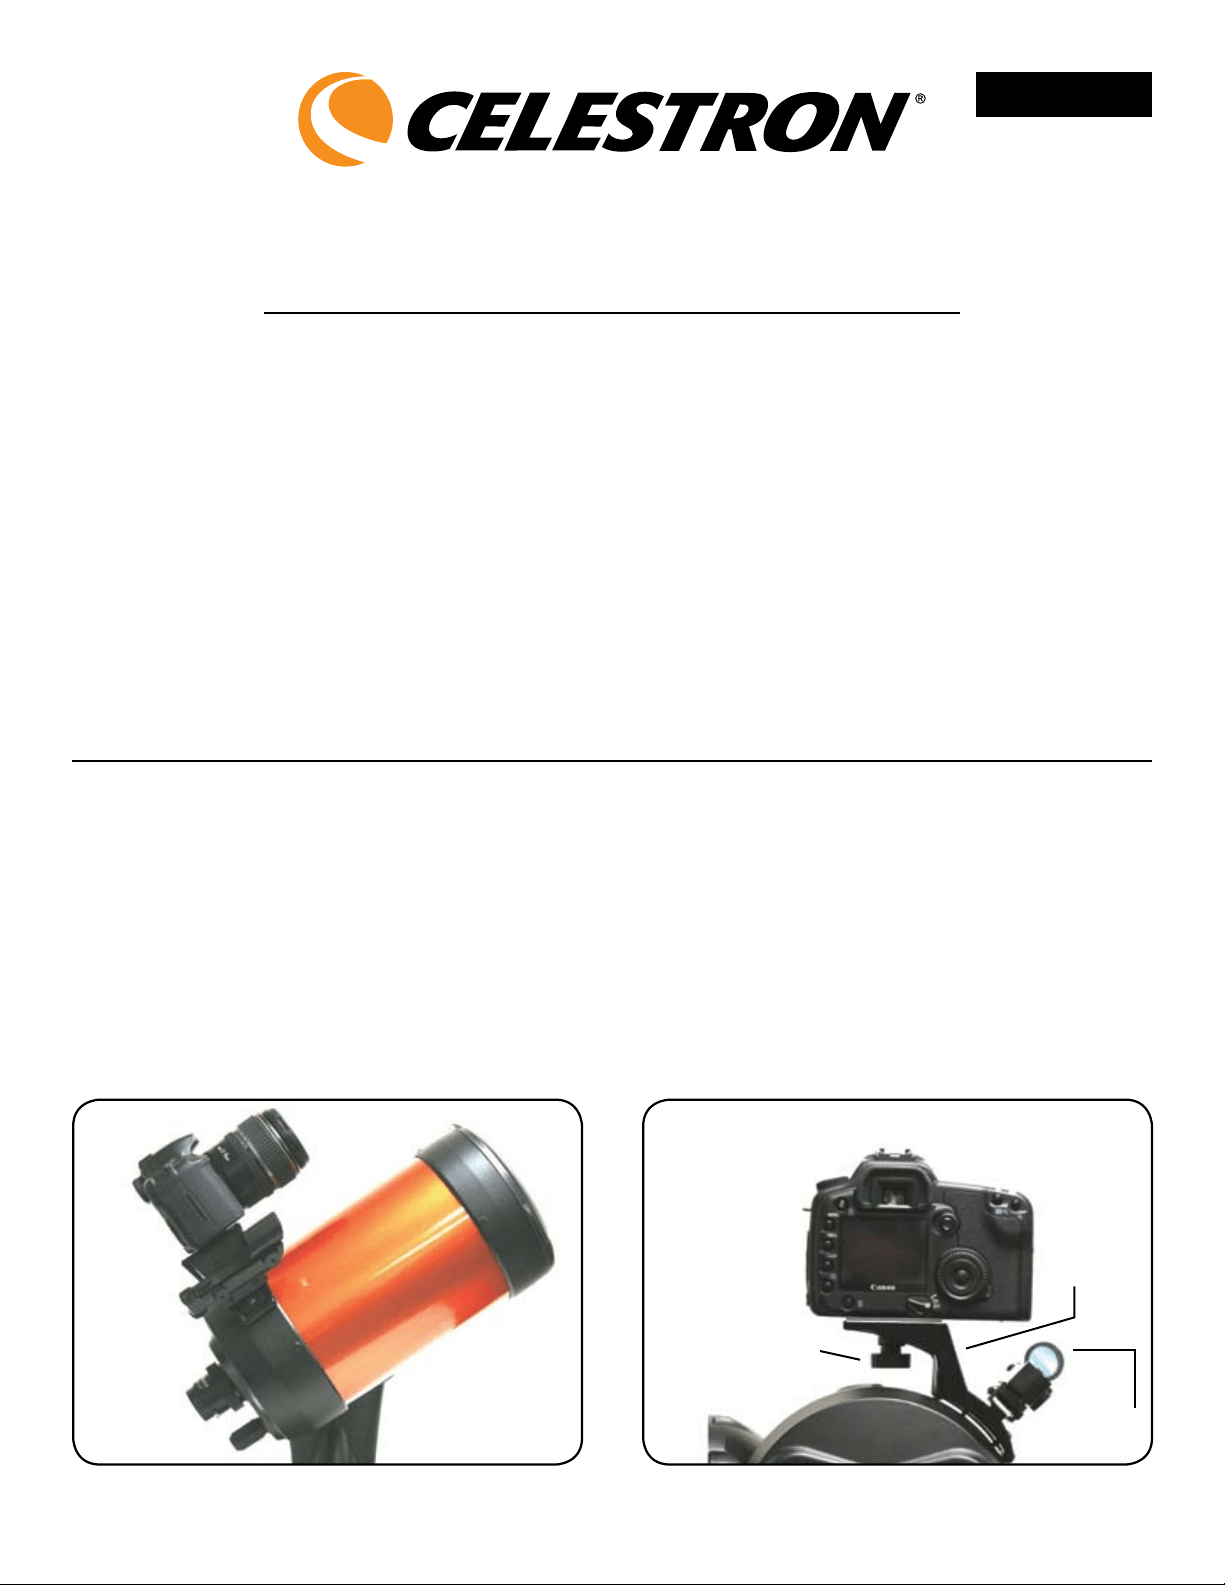
F
i g u r e 1 – Pi g g y b a c k a d a P t e r o n nXSe
Fi g u r e 2 – Wi t h t h e Pi g g y b a c k ad a P t e r , St a r Po i n t e r
a n d ca m e r a a t t a c h e d .
StarPointer
Finderscope
t
Piggyback
Adapter
t
¼”x20
Mounting Bolt
t
The Celestron Piggyback Mount is a great accessory for
all observers interested in deep-sky astrophotography.
This specially designed adapter allows you to attach
your camera to the top of any Celestron SCT/ EdgeHD
telescope. When using with a NexStar SE model,
the adapter can be mounted while still utilizing your
StarPointer finderscope for telescope alignment.
Included with the Piggyback Mount are the following items:
• PiggybackMountAssembly
• Adapterplate(for11”and14”SCT)
• Two–M4x16mmMountingScrewsfor6SE
Telescopes
• Two–8-32x5/8”MountingScrewsfor5SE,
8”and9.25”Telescopes
• Two–8-32x7/8”MountingScrewsforC11andC14
english

In s ta l l at I o n – Fo r C11 a n d C14 Mo d e l s
1. Remove the two screws on the rear cell of the telescope
tube (opposite the position of your finderscope).
2. Align the slotted holes on the adapter plate with the
holes in the rear cell of the telescope.
3.Insertthe8-32x7/8”screwsthroughtheholesinthe
adapter plate and thread them into the rear cell.
4. For C11 Telescopes - Place the Piggyback adapter on
top of the adapter plate so that the holes in the
piggyback adapter are aligned with the two left-most
holes (when standing behind the rear cell of the
telescope). Using these holes ensure that your camera
will be level when placed on the mounting platform of
the adapter.
5. For C14 Telescopes - Place the Piggyback adapter on
top of the adapter plate so that the holes in the
piggyback adapter are aligned with the two right-most
holes (when standing behind the rear cell of the
telescope). Using these holes ensure that your camera
will be level when placed on the mounting platform of
the adapter.
6.Insertthe8-32x5/8” screws through the holes in the
piggyback adapter and thread them into the holes on
the adapter plate.
7.Youarenowreadytomountacameraorspottingscope
on top of the piggyback mount. To do this, locate the
threaded mounting hole on the bottom of your camera
or spotting scope. Place the camera or spotting scope
on the top of the piggyback adapter and thread in the
1/4 - 20 bolt and tighten.
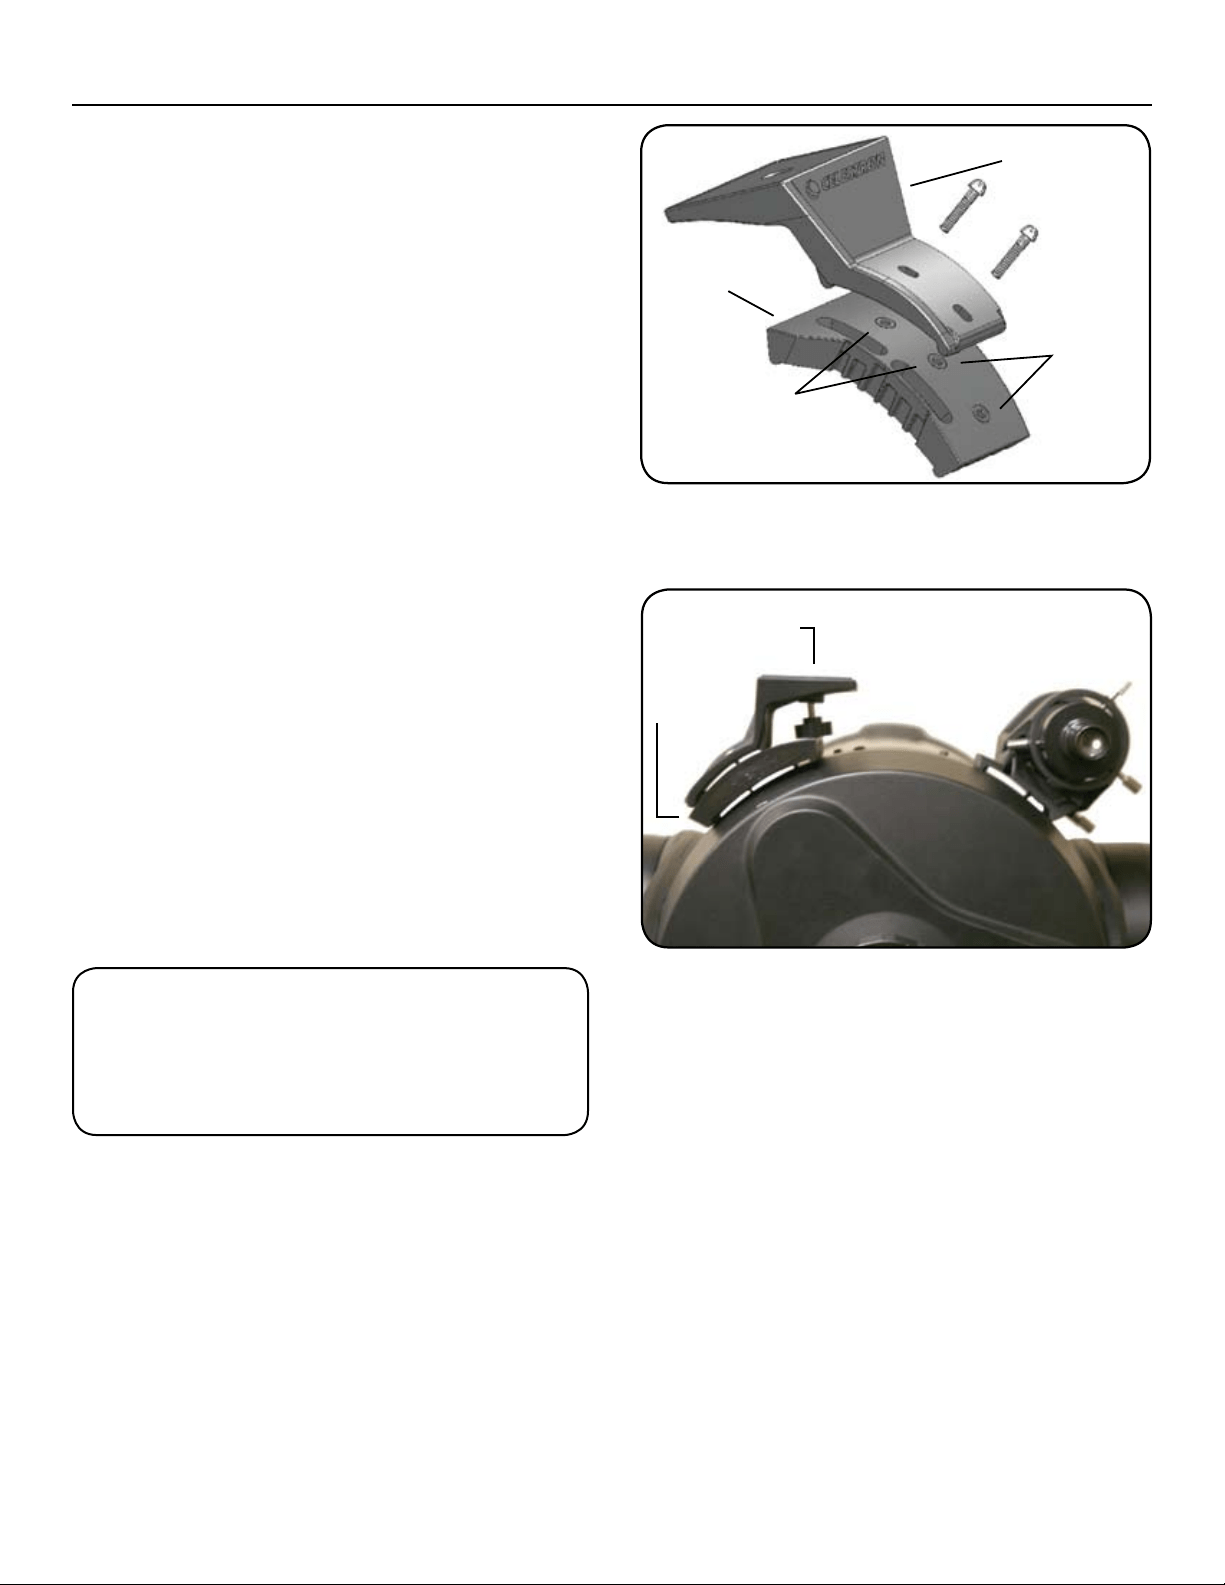
F
i g u r e 3 – Wi t h t h e Pi g g y b a c k ad a P t e r , ad a P t e r Pl a t e
F o r c11/c14
Piggyback
Mount
Adapter
Plate
C11 Holes
t
t
t
t
t
t
C14 Holes
Fi g u r e 4 – Wi t h t h e Pi g g y b a c k ad a P t e r , ad a P t e r Pl a t e
F o r c11/c14
Adapter
Plate
t
PiggyBack Adapter
t
2835ColumbiaStreet•Torrance,CA90503U.S.A.
Telephone:310.328.9560•Fax:310.212.5835
©2010 Celestron
Allrightsreserved.•PrintedinChina•08-10
Product design and specifications are subject to change
without prior notification.
Designed and intended for those 13 years of age and older.
WarnInG: IF y o u r e M o v e t h e PI G G y b a C k Mo u n t ,
d o n o t t h r e a d t h e s C r e W s b a C k I n t o t h e r e a r C e l l
o F t h e t e l e s C o P e a l l t h e W a y . th e s C r e W s a r e l o n G
e n o u G h t o o b s t r u C t t h e M o v e M e n t o F , a n d P o s s I b ly
C h I P t h e P r I M a r y M I r r o r .
yo u r Ce l e s t r o n a C C e s s o r y h a s a o n e y e a r l IM Ite d W a r r a n t y .
P
l e a s e s e e t h e Ce l e s t r o n W e b s I t e F o r d e t a I l e d I n F o r M a t I o n o n a l l
C
e l e s t r o n a C C e s s o r I e s a t W W W .C e l e s t r o n .C o M .
Manuel de l’utilisateur
référence n° 93609
Mo n t u r e Pi g g y b a c k – Po u r t o u s l e s sct
In s t a l l a t I o n – Po u r m o d è l e s d e 127 m m (5 P o ), 152 m m (6 P o ), 203 m m (8 P o )
e t 235 m m (9,25 P o )
1. Retirez les deux vis situées sur la cellule arrière du tube
télescopique à l’endroit où le chercheur StarPointer
est fixé.
2. Alignez les trous oblongs de la monture Piggyback sur
ceux de la cellule arrière du télescope.
3. Sur les modèles NexStar SE - Placez le StarPointer sur le
dessus de l’adaptateur Piggyback de manière à ce que
les trous du support du StarPointer se superposent sur
ceux de l’adaptateur. (Il peut être plus facile de retirer
d’abord le StarPointer de son support).
4. Prenez les vis de la taille correspondante livrées avec
l’adaptateur et introduisez-les dans les trous, puis
serrez jusqu’à ce que l’adaptateur soit aligné sur la
cellule arrière.
5. Vous pouvez maintenant monter un appareil photo
ou une longue-vue sur la monture Piggyback. Pour cela,
repérez le trou de montage fileté situé sur la partie
inférieure de votre appareil photo ou longue-vue.
Mettez l’appareil photo ou la longue-vue sur l’adaptateur
Piggyback et vissez le boulon ¼ - 20, puis serrez.
Fi g u r e 1 – Ad A p t A t e u r pi g g y b A c k s u r l e NXse
Fi g u r e 2 – Av e c A d A p t A t e u r pi g g y b A c k , st A r po i N t e r e t
A p p A r e i l p h o t o F i X é s d e s s u s
Chercheur
StarPointer
t
Adaptateur
Piggyback
t
Boulon de fixation
¼ po x 20
t
La monture Piggyback de Celestron est l’accessoire
idéal de tous les observateurs qui s’intéressent à
l’astrophotographie du ciel profond. Cet adaptateur
spécialement conçu vous permet de fixer votre appareil
photo sur le dos de n’importe quel télescope SCT/
EdgeHD Celestron. Utilisé avec le modèle NexStar SE,
l’adaptateur peut être monté tout en continuant à se servir
du chercheur StarPointer pour aligner le télescope.
Les articles suivants sont livrés avec la monture Piggyback
•MonturePiggyback
•Platineadaptatrice(pourSCTde274mm[11po]
et355mm[14po])
•Deux–VisdemontageM4x16mmpour
télescopes6SE
•Deux–Visdemontage8x32x5/8popourtélescopes
5SE,203mm(8po)et235mm(9,25po)
•Deux–Visdemontagede8x32x7/8popour
C11 et C14
FRANÇAIS

In s ta l l at I o n – Po u r m o d è l e s C11 e t C14
1. Retirez les deux vis situées sur la cellule arrière du tube
télescopique (position opposée à celle du chercheur
StarPointer).
2. Alignez les trous oblongs de la platine de l’adaptateur
sur ceux de la cellule arrière du télescope.
3.Introduisezlesvisde8x32x7/8podanslestrousdela
platine de l’adaptateur et vissez-les dans la cellule arrière.
4. Pour les télescopes C11 - Placez l’adaptateur Piggyback
sur la platine de l’adaptateur de manière à ce que les
trous de l’adaptateur Piggyback soient alignés sur les
deux trous les plus à gauche (lorsque l’on se tient
derrière la cellule du télescope). Ces trous permettent
d’assurer que votre appareil photo reste stable lorsqu’il
est placé sur la plate-forme de montage de l’adaptateur.
5. Pour les télescopes C14 - Placez l’adaptateur Piggyback
sur la platine de l’adaptateur de manière à ce que les
trous de l’adaptateur Piggyback soient alignés sur les
deux trous les plus à droite (lorsque l’on se tient derrière
la cellule du télescope). Ces trous permettent d’assurer
que votre appareil photo reste stable lorsqu’il est placé
sur la plate-forme de montage de l’adaptateur.
6.Introduisezlesvisde8x32x5/8podanslestrousde
l’adaptateur Piggyback et vissez-les dans ceux de la
platine de l’adaptateur.
7.Vouspouvezmaintenantmonterunappareilphoto
ou une longue-vue sur la monture Piggyback. Pour
cela, repérez le trou de montage fileté situé sur la partie
inférieure de votre appareil photo ou longue-vue.
Mettez l’appareil photo ou la longue-vue sur
l’adaptateurPiggybacketvissezleboulonde1/4–20,
puis serrez.
F
i g u r e 3 – Av e c A d A p t A t e u r pi g g y b A c k , p l A t i N e A d A p t A t r i c e
p o u r c11/c14
Monture Piggyback
Platine
d’adaptateur
Trous C11
t
t
t
t
t
t
Trous C14
Fi g u r e 4 – Av e c l’A d A p t A t e u r pi g g y b A c k , p l A t i N e d’A d A p t A t e u r
p o u r c11/c14
Platine
d’adaptateur
t
Adaptateur
Piggyback
t
2835ColumbiaStreet•Torrance,CA90503U.S.A.
Téléphone:310.328.9560•Fax:310.212.5835
©2010 Celestron
Tousdroitsréservés.•ImpriméenChine•08-10
Le design et les spécifications du produit sont sujets à des
modifications sans notification préalable.
Conçu et destiné aux personnes âgées de 13 ans et plus.
aVertIssement : sI V o u s r e t I r e z l a m o n t u r e
P
I g g y b a C k , n e r e V I s s e z P a s à f o n d l e s V I s d a n s
l a C e l l u l e a r r I è r e d u t é l e s C o P e . le s V I s s o n t
s u f f I s a m m e n t l o n g u e s P o u r g ê n e r l e m o u V e m e n t ,
V o I r e m ê m e a b î m e r l e m Iro Ir P r I m a I r e .
ga r a n t I e : ga r a n t I e lI mI té e d’u n a n .
V
e u I l l e z C o n s u l t e r l e s I t e w e b Ce l e s t r o n P o u r d e s I n f o r m a t I o n s d é t a I l l é e s s u r
t o u s l e s a C C e s s o I r e s Ce l e s t r o n s u r w w w .C e l e s t r o n .C o m .
MANUAL DE INSTRUCCIONES
ARTÍCULO Nº 93609
Mo n t a j e Pi g g y b a c k – Pa r a t o d o s
l o s M o d e l o s sct
In s t a l a c I ó n : Pa r a m o d e l o s d e 127, 152, 203 y 235 m m (5, 6, 8 y 9,25 P u l g .)
1. Quite los dos tornillos del elemento posterior del tubo
del telescopio que se conecta al telescopio buscador
StarPointer.
2. Alinear las ranuras del montaje Piggyback con los
orificios del elemento posterior del telescopio.
3. Para los modelos NexStar SE: Colocar el StarPointer
encima del adaptador piggyback de forma que los
orificios del soporte del StarPointer estén encima de los
del adaptador. (Quizás sea más fácil quitar primero el
StarPointer de su soporte).
4. Insertar los tornillos de tamaño apropiado que vienen
con el adaptador en los orificios, apretándolos hasta
que el adaptador esté ajustado sobre el elemento
posterior.
5. Ya está listo para montar una cámara o telescopio
encima del montaje piggyback. Para hacer esto, busque
el orificio de montaje roscado en la parte inferior de su
cámara o telescopio. Coloque la cámara o telescopio
en la parte superior del adaptador piggyback y enrosque
y apriete el perno de 1/4 – 20.
Fi g u r a 1 – ad a p t a d o r pi g g y b a c k s o b r e NXse
Fi g u r a 2 – co N e l a d a p t a d o r pi g g y b a c k , st a r po i N t e r
y ca m e r a m o N t a d o s
Telescopio
buscador
StarPointer
t
Adaptador
Piggyback
t
Perno de
montaje ¼
pulg. x20
t
El montaje Piggyback de Celestron es un estupendo
accesorio para todos los observadores interesados en la
astrofotografía del firmamento profundo. Este adaptador
ha sido especialmente diseñado para poder colocar su
cámara encima de cualquier telescopio SCT/ EdgeHD de
Celestron. Cuando se utiliza con un modelo NexStar SE, el
adaptador puede permanecer montado mientras que se
utiliza el telescopio buscador StarPointer para la alineación
del telescopio.
Con el montaje Piggyback vienen los siguientes artículos
• EnsamblajedelmontajePiggyback
• Placadeladaptador(paraSCTde274y355mm
[11 y 14 pulg.])
• DostornillosdemontajeM4x16mmparatelescopios
6SE
• Dostornillosdemontaje8x32x5/8pulgadaspara
telescopios5SE,203y235mm(8y9,25pulg.)
• Dostornillosdemontaje8x32x7/8pulgadaspara
C11 y C14
ESPAÑOL
In s t a l a c I ó n : Pa r a m o d e l o s c11 y c14
1. Quite los dos tornillos del elemento posterior del tubo
del telescopio (opuestos a la posición de su telescopio
buscador).
2. Alinee las ranuras de la placa del adaptador con los
orificios del elemento posterior del telescopio.
3.Insertelostornillosde8x32x7/8pulgadasenlos
orificios de la placa del adaptador y enrósquelos dentro
del elemento posterior.
4. Para telescopios C11: Coloque el adaptador Piggyback
encima de la placa del adaptador de forma que los
orificios del adaptador Piggyback estén alineados
con los dos orificios más a la izquierda (al estar detrás
del elemento posterior del telescopio). Utilizando
estos orificios, asegúrese de que su cámara esté
nivelada cuando se coloque en la plataforma de
montaje del adaptador.
5. Para telescopios C14: Coloque el adaptador Piggyback
encima de la placa del adaptador de forma que los
orificios del adaptador Piggyback estén alineados
con los dos orificios más a la derecha (al estar detrás
del elemento posterior del telescopio). Utilizando
estos orificios, asegúrese de que su cámara esté
nivelada cuando se coloque en la plataforma de
montaje del adaptador.
6.Insertelostornillosde8x32x5/8pulgadasenlos
orificios del adaptador Piggyback y enrósquelos dentro
de los orificios de la placa del adaptador.
7.Yaestálistoparamontarunacámaraotelescopio
encima del montaje piggyback. Para hacer esto, busque
el orificio de montaje roscado en la parte inferior de su
cámara o telescopio. Coloque la cámara o telescopio en
la parte superior del adaptador del piggyback y
enrosque y apriete el perno de 1/4 – 20.
F
i g u r a 3 – co N e l a d a p t a d o r pi g g y b a c k ,
p l a c a d e l a d a p t a d o r p a r a c11/c14
Montaje
Piggyback
Placa del
adaptador
Orificios
del C11
t
t
t
t
t
t
Orificios del C14
Fi g u r a 4 – co N e l a d a p t a d o r pi g g y b a c k ,
p l a c a d e l a d a p t a d o r p a r a c11/c14
Placa del
adaptador
t
Adaptador
PiggyBack
t
2835ColumbiaStreet•Torrance,CA90503U.S.A.
Teléfono:310.328.9560•Fax:310.212.5835
©2010 Celestron
Todoslosderechosreservados.•ImpresoenChina08-10
El diseño y las especificaciones del producto están sujetos a
cambio sin previo aviso.
Diseñado para edades de 13 años en adelante.
adVertencIa: sI q u I t a e l m o n t a j e PI g g y b a c k ,
n o e n r o q u e d e n u e V o l o s t o r n I l l o s d e l t o d o e n e l
e l e m e n t o P o s t e r I o r d e l t e l e s c o P I o . lo s t o r n I l l o s
s o n s u f I c I e n t e m e n t e l a r g o s c o m o P a r a I mP ed Ir e l
m o V I m I e n t o y P o s I b l e m e n t e d a ñ a r e l e s P e j o P r I n c I P a l .
ga r a n t í a : ga r a n t í a lI mI ta da d e u n a ñ o .
c
o n s u l t e e l sI tI o We b d e ce l e s t r o n W W W .c e l e s t r o n .c o m P a r a o b t e n e r
I n f o r m a c I ó n d e t a l l a d a s o b r e t o d o s s u s a c c e s o r I o s .
IBedIenungsanleItung
art.-nr. 93609
Hu c k e p a c k -Mo n t i e r u n g –
f ü r a l l e Sct-te l e S k o p e
In s ta l l at I o n – Fü r 5, 6, 8 u n d 9,25 Zo l l Mo d e l l e
1. Entfernen Sie die beiden Schrauben an der rückwärtigen
Zelle des Teleskoptubus, mit denen das StarPointer
Sucherfernrohr befestigt ist.
2. Richten Sie die Langlöcher an der Huckepack-
Montierung mit den Öffnungen an der hinteren Zelle
des Teleskops aus.
3. Für NexStar SE-Modelle: Setzen Sie das StarPointer-
Sucherfernrohr oben auf den Huckepack-Adapter, so
dass die Öffnungen an der StarPointer-Halterung
mit den Öffnungen am Adapter überlappen. (Es ist u.U.
einfacher, das StarPointer-Sucherfernrohr zuerst von
seiner Halterung abzunehmen).
4. Stecken Sie die mit dem Adapter mitgelieferten
Schrauben der richtigen Größe durch die Löcher und
ziehen Sie sie an, bis der Adapter direkt an der hinteren
Zelle anliegt.
5. Nun kann die Kamera oder das Spotting-Scope oben
auf der Huckepack-Montierung installiert werden. Dazu .
machen Sie zuerst die Gewindelöcher unten an der
Kamera oder dem Spotting-Scope ausfindig. Setzen
Sie die Kamera oder das Spotting-Scope oben auf den
Huckepack-Adapter und schrauben Sie die ¼ -20
Schraube fest.
A
b b . 1 – Hu c k e p A c k -Ad A p t e r A n nXSe
Ab b . 2 – Mit A u f g e S e t z t e M Hu c k e p A c k -Ad A p t e r ,
St A r po i n t e r u n d kA M e r A
StarPointer-
Sucherfernrohr
t
Huckepack-
Adapter
t
¼ Zoll x 20
Befestigungsschraube
t
Die Celestron Huckepack-Montierung ist ein nützliches
Zubehörteil für alle Beobachter, die an Deep-Sky-
Astrofotografie interessiert sind. Dieser speziell entwickelte
Adapter ermöglicht den Aufsatz einer Kamera oben auf
allen Celestron SCT/EdgeHDTeleskopen. Bei Verwendung
mit einem NexStar SE-Modell kann der Adapter installiert
und das StarPointer-Sucherfernrohr trotzdem noch für die
Teleskopausrichtung verwendet werden.
Im Lieferumfang der Huckepack-Montierung sind folgende
Teile enthalten:
• Huckepack-Montierung
• Adapterplatte(für11-Zoll-und14-Zoll-SCT)
• Zwei-M4x16mmBefestigungsschraubenfür
6SE-Teleskope
• Zwei–8x32x5/8ZollBefestigungsschraubenfür
5SE-,8-Zoll-und9,25-Zoll-Teleskope
• Zwei-8x32x7/8ZollBefestigungschraubenfür
C11 und C14
• Two–8-32x7/8”MountingScrewsforC11andC14
DEUTSCH

In s ta l l at I o n – Fü r C11- u n d C14-Mo d e l l e
1. Entfernen Sie die beiden Schrauben auf der hinteren
Zelle des Teleskoptubus (gegenüber der Position des
Sucherfernrohrs).
2. Richten Sie die Langlöcher an der Adapterplatte mit den
Öffnungen an der hinteren Zelle des Teleskops aus.
3.SteckenSiedie8x32x7/8ZollSchraubendurchdie
Löcher in der Adapterplatte und schrauben Sie sie in die
hintere Zelle.
4.FürC11-Teleskope–SetzenSiedenHuckepack
Adapter so oben auf die Adapterplatte, dass die Löcher
im Huckepack-Adapter mit den beiden äußerst linken
Löchern (wenn Sie hinter der hinteren Zelle des
Teleskops stehen) ausgerichtet sind. Stellen Sie
mit Hilfe dieser Löcher sicher, dass Ihre Kamera
waagerecht ist, wenn sie auf der Montageplattform des
Adapters platziert wird.
5.FürC14-Teleskope–SetzenSiedenHuckepack-
Adapter so oben auf die Adapterplatte, dass die Löcher
im Huckepack-Adapter mit den beiden äußerst rechten
Löchern (wenn Sie hinter der hinteren Zelle des
Teleskops stehen) ausgerichtet sind. Stellen Sie mit Hilfe
dieser Löcher sicher, dass Ihre Kamera waagerecht ist,
wenn sie auf der Montageplattform des Adapters
platziert wird.
6.SteckenSiedie8x32x5/8ZollSchraubendurchdie
Löcher im Huckepack-Adapter und schrauben Sie sie in
die Löcher an der Adapterplatte.
7.NunkanndieKameraoderdasSpotting-Scopeoben
auf der Huckepack-Montierung installiert werden. Dazu
machen Sie zuerst die Gewindelöcher unten an der
Kamera oder dem Spotting-Scope ausfindig. Setzen
Sie die Kamera oder das Spotting-Scope oben auf den
Huckepack-Adapter und schrauben Sie die ¼ -20
Schraube fest.
A
b b . 3 – Mit Hu c k e p A c k -Ad A p t e r , Ad A p t e r p l A t t e f ü r c11/c14
Huckepack-
Montierung
Adapter-
platte
C11
Öffnungen
t
t
t
t
t
t
C14 Öffnungen
Ab b . 4 – Mit Hu c k e p A c k -Ad A p t e r , Ad A p t e r p l A t t e f ü r c11/c14
Adapterplatte
t
Huckepack-Adapter
t
2835ColumbiaStreet•Torrance,CA90503U.S.A.
Telefon:310.328.9560•Fax:310.212.5835
©2010 Celestron
AlleRechtevorbehalten.•GedrucktinChina•08-10
Produktdesign und Spezifikationen können ohne vorherige
Mitteilung geändert werden.
Für Benutzer von mindestens 13 Jahren entwickelt und bestimmt.
aCHtunG: sC H r a u b e n sI e d I e sC H r a u b e n b e I M
e
n t F e r n e n d e r Hu C k e p a C k -Mo n t I e r u n G n I C H t
G a n Z I n d I e H I n t e r e Ze l l e d e s te l e s k o p s e I n . dIe
s
C H r a u b e n s I n d s o l a n G , d a s s s I e d I e be w e G u n G d e s
p r I M ä r e n sp I e G e l s b e H I n d e r n u n d I H n M ö G l I C H e r w e I s e
Z e r b r e C H e n k ö n n t e n .
Ga r a n t I e : eI n G e s C H r ä n k t e eI n-Ja H r e s -Ga r a n t I e .
a
u F d e r Ce l e s t r o n -we b s I t e w w w .C e l e s t r o n .C o M F I n d e n sI e d e t a I l l I e r t e
I
n F o r M a t I o n e n Z u M k o M p l e t t e n Ce l e s t r o n -Zu b e H ö r .

Manuale di istruzioni
articolo n. 93609
Mo n t a t u r a Pi g g y b a c k P e r t u t t i g l i Sct
In s t a l l a z I o n e p e r I m o d e l l I d a 5, 6, 8 e 9,25 p o l l I c I
1. Togliere le due viti sulla cella posteriore del tubo
del telescopio che si collega al cannocchiale cercatore
StarPointer.
2. Allineare i fori a fessura sulla montatura Piggyback con i
fori della cella posteriore del telescopio.
3. Per i modelli NexStar SE: sistemare lo StarPointer sulla
parte superiore dell’adattatore Piggyback in modo che i
fori sulla staffa dello StarPointer si sovrappongano a
quelli sull’adattatore. (Potrebbe essere più facile togliere
prima lo StarPointer dalla sua staffa).
4. Scegliere le viti della misura opportuna in dotazione
all’adattatore e inserirle nei fori serrandole fino a quando
l’adattatore non è in piano con la cella posteriore.
5. A questo punto si è pronti a montare la fotocamera o
lo spotting scope sulla montatura Piggyback. Per farlo,
individuare il foro filettato di montatura sul fondo
della fotocamera o dello spotting scope. Posizionare
la fotocamera o lo spotting scope sopra l’adattatore
Piggyback, avvitare il bullone 1/4 - 20 e serrare.
F
i g u r a 1 – ad a t t a t o r e Pi g g y b a c k s u NXse
Fi g u r a 2 – co N a d a t t a t o r e Pi g g y b a c k st a r Po i N t e r e
F o t o c a m e r a c o l l e g a t i .
Cannocchiale
cercatore
StarPointer
t
Adattatore
Piggyback
t
Bullone di
montaggio
¼ poll. x20
t
La montatura Piggyback di Celestron è un accessorio
importante per tutti coloro che sono interessati alla
fotografia astrale nel cielo profondo. Questo adattatore è
stato specificamente concepito per montare la fotocamera
sulla parte superiore di qualsiasi telescopio Celestron SCT/
EdgeHD. Quando si usa il modello NexStar SE, l’adattatore
può essere montato mentre si sta utilizzando il
cannocchiale cercatore StarPointer per allineare il telescopio.
La montatura Piggyback comprende quanto segue:
• GruppodellamontaturaPiggyback
• Piastraadattatore(perSCTda11e14pollici)
• DuevitidimontaggioM4x16mmperitelescopi6SE
• Duevitidimontaggio8x32x5/8dipolliceperi
telescopi5SE,8e9,25pollici
• Duevitidimontaggio8x32x7/8dipolliceperilC11
e il C14
ITALIANO

In s t a l l a z I o n e p e r I m o d e l l I c11 e c14
1. Togliere le due viti sulla cella posteriore del tubo del
telescopio (in posizione opposta a quella del
cannocchiale cercatore).
2. Allineare i fori a fessura sulla piastra adattatore con i fori
della cella posteriore del telescopio.
3.Inserireleviti8x32x7/8dipolliceattraversoiforisulla
piastra adattatore e avvitarle nella cella posteriore.
4. Per i telescopi C11: posizionare l’adattatore Piggyback
sulla piastra adattatore in modo che i fori sull’adattatore
Piggyback siano allineati con i due fori di estrema
sinistra (guardando da dietro alla cella posteriore del
telescopio). Servirsi dei fori per garantire che la
fotocamera sia in piano quando sarà sistemata sulla
piattaforma di montaggio dell’adattatore.
5. Per i telescopi C14: posizionare l’adattatore Piggyback
sulla piastra adattatore in modo che i fori sull’adattatore
Piggyback siano allineati con i due fori di estrema destra
(guardando da dietro alla cella posteriore del
telescopio). Servirsi dei fori per garantire che la
fotocamera sia in piano quando sarà sistemata sulla
piattaforma di montaggio dell’adattatore.
6.Inserireleviti8x32x5/8dipolliceattraversoifori
sulla piastra Piggyback e avvitarle nei fori della piastra
adattatore.
7.Aquestopuntosièprontiamontarelafotocameraolo
spotting scope sulla montatura Piggyback. Per fare
questo, individuare il foro filettato di montatura sul
fondo della fotocamera o dello spotting scope.
Posizionare la fotocamera o lo spotting scope sopra
l’adattatore Piggyback, avvitare il bullone 1/4 - 20
e serrare.
F
i g u r a 3 – co N a d a t t a t o r e Pi g g y b a c k e P i a s t r a a d a t t a t o r e
P e r c11/c14
Montatura
Piggyback
Piastra
Adattatore
Fori C11
t
t
t
t
t
t
Fori C14
Fi g u r a 4 – co N a d a t t a t o r e Pi g g y b a c k e P i a s t r a a d a t t a t o r e
P e r c11/c14
Adattatore
PiggyBack
t
Adattatore
PiggyBack
t
2835ColumbiaStreet•Torrance,CA90503U.S.A.
Telefono:310.328.9560•Fax:310.212.5835
©2010 Celestron
Tuttiidirittisonoriservati.•StampatoinCina•08-10
La progettazione e i dati tecnici del prodotto sono soggetti
a cambiamenti senza preavviso.
Progettato e concepito per persone di almeno 13 anni di età.
aVVertenza: q u a n d o s I t o g l I e l a m o n t a t u r a
p
I g g y b a c k n o n r I a V V I t a r e d e l t u t t o l e V I t I n e l l a c e l l a
p o s t e r I o r e d e l t e l e s c o p I o . le V I t I s o n o d I l u n g h e z z a
t a l e c h e p o s s o n o I n t e r f e r I r e c o n I l m o V I m e n t o e
a n c h e s c h e g g I a r e l o s p e c c h I o p r I m a r I o .
ga r a n z I a : g a r a n z I a l I m I t a t a d I u n a n n o .
p
e r I n f o r m a z I o n I d e t t a g l I a t e s u t u t t I g l I a c c e s s o r I ce l e s t r o n ,
c o n s u l t a r e I l s I t o We b d I ce l e s t r o n a l l ’In dI rIz zo W W W .c e l e s t r o n .c o m .