
2
Before using this unit, carefully read “USING THE UNIT SAFELY” and “IMPORTANT NOTES” (the leaet “USING THE
UNIT SAFELY”). After reading, keep the document(s) where it will be available for immediate reference.
Copyright © 2022 ROLAND CORPORATION
Intellectual Property Right
• It is forbidden by law to make an audio recording, video recording, copy or revision of a third party’s copyrighted
work (musical work, video work, broadcast, live performance, or other work), whether in whole or in part, and dis-
tribute, sell, lease, perform, or broadcast it without the permission of the copyright owner.
• Do not use this product for purposes that could infringe on a copyright held by a third party. We assume no re-
sponsibility whatsoever with regard to any infringements of third-party copyrights arising through your use of this
product.
• The copyright of content in this product (the sound waveform data, style data, accompaniment patterns, phrase
data, audio loops and image data) is reserved by Roland Corporation.
• Purchasers of this product are permitted to utilize said content (except song data such as Demo Songs) for the
creating, performing, recording and distributing original musical works.
• Purchasers of this product are NOT permitted to extract said content in original or modied form, for the purpose of
distributing recorded medium of said content or making them available on a computer network.
• Roland is an either registered trademark or trademark of Roland Corporation in the United States and/or other
countries.
• Company names and product names appearing in this document are registered trademarks or trademarks of their
respective owners.
Changes or Modications not expressly approved by the party responsible could void the user’s authority to operate
this device.
This equipment has been tested and found to comply with the limits for a Class B digital device, pursuant to Part 15 of
the FCC Rules. These limits are designed to provide reasonable protection against harmful interference in a residential
installation. This equipment generates, uses and can radiate radio frequency energy and, if not installed and used in
accordance with the instructions, may cause harmful interference to radio communications. However, there is no guar-
antee that interference will not occur in a particular installation.
If this equipment does cause harmful interference to radio or television reception, which can be determined by turn-
ing the equipment o and on, the user is encouraged to try to correct the interference by one or more of the following
measures:
-- Reorient or relocate the receiving antenna.
-- Increase the separation between the equipment and receiver.
-- Connect the equipment into an outlet on a circuit dierent from that to which the receiver is connected.
-- Consult the dealer or an experienced radio/TV technician for help.
The device has been evaluated to meet general RF exposure requirement.
This device contains licence-exempt transmitter(s)/receiver(s) that comply with Innovation, Science and Economic De-
velopment Canada’s licence-exempt RSS(s). Operation is subject to the following two conditions:
1. This device may not cause interference.
2. This device must accept any interference, including interference that may cause undesired operation of the device.
Le présent appareil est conforme aux CNR d’Industrie Canada applicables aux appareils radio exempts de licence.
L’exploitation est autorisée aux deux conditions suivantes :
(1) l’appareil ne doit pas produire de brouillage, et
(2) l’utilisateur de l’appareil doit accepter tout brouillage radioélectrique subi, même si le brouillage est susceptible d’en
compromettre le fonctionnement.

3
Contents
Panel & Display Description ........................................ 4
Front Panel .......................................................................... 4
Rear Panel ........................................................................... 5
LCD .................................................................................... 5
Setup ................................................................................. 6
Power Supply ...................................................................... 6
Setting a Music Rest ............................................................. 6
Connections .................................................................... 7
Connecting a Pair of Headphones .......................................... 7
Connecting a USB Flash Drive ............................................... 7
Connecting a Computer ........................................................ 7
Connecting a Footswitch ....................................................... 7
Connecting an Audio Equipment ............................................ 8
Connecting a Microphone ..................................................... 8
Power / Master Volume ................................................8
Turning the Power On / O .................................................... 8
Adjusting the Master Volume ................................................. 8
Typical Modes ................................................................. 9
Tone Mode .......................................................................... 9
Style Mode .......................................................................... 9
Song Mode .......................................................................... 9
Function Menu ..................................................................... 9
Playing Demo Song ....................................................... 9
Playing Tones ................................................................ 10
Selecting a Tone ................................................................. 10
Playing Two Tones Simultaneously ....................................... 10
Playing Dierent Tones with Both Hands ............................... 10
Pitch Bend......................................................................... 11
Transpose.......................................................................... 11
Auto Accompaniment ................................................. 12
Selecting Chord Modes ....................................................... 12
Playing Auto Accompaniment (Rhythm Track) ........................ 12
Playing Auto Accompaniment (All Tracks) .............................. 13
One Finger Key .................................................................. 13
Accompaniment Sections .................................................... 13
Fade In / Out ...................................................................... 14
Accompaniment Volume ..................................................... 14
Chord Fingering ................................................................. 15
Tempo .............................................................................. 16
Metronome ..................................................................... 16
Registration Memory................................................... 17
Selecting a Registration Bank .............................................. 17
Registering the Panel Settings ............................................. 17
Recalling the Registered Settings ......................................... 17
One Touch Setting........................................................ 18
Recording ....................................................................... 18
Prepare Recording .............................................................. 18
Start Recording .................................................................. 18
Stop Recording .................................................................. 19
Play Back Recording .......................................................... 19
Delete Recording ................................................................ 19
Bluetooth ........................................................................ 20
Bluetooth paring and playback ............................................ 20
Turning Bluetooth Function On/O ....................................... 20
Adjusting Bluetooth Volume ................................................. 20
Disabling Bluetooth Connection ........................................... 20
Pedal Function .............................................................. 21
Sustain Pedal ..................................................................... 21
Soft Pedal ......................................................................... 21
Memory Pedal .................................................................... 21
Style Start/Stop Pedal......................................................... 21
Sustain Type .................................................................. 22
Scale Tune ...................................................................... 22
Audio Pad ....................................................................... 23
Connecting USB Flash Drive ..................................... 24
Playing a Style/Song from USB Flash Drive ........................... 24
Saving User Song to USB Flash Drive ................................... 24
Loading User Song from USB Flash Drive ............................. 25
Saving User Style to USB Flash Drive ................................... 25
Loading User Style from USB Flash Drive ............................. 26
Saving User Setting to USB Flash Drive ................................ 26
Loading User Setting from USB Flash Drive...........................27
Formatting the USB Flash Drive ........................................... 27
Function Menu .............................................................. 28
Factory Reset ................................................................ 31
MIDI .................................................................................. 32
The main application of MIDI ............................................... 32
Connecting to a MIDI Software on Computer ......................... 32
Troubleshooting ............................................................ 33
Specications ............................................................... 34
Tone List ......................................................................... 35
Style List ......................................................................... 42
Demo List ....................................................................... 45
MIDI Implementation Chart ....................................... 46
4
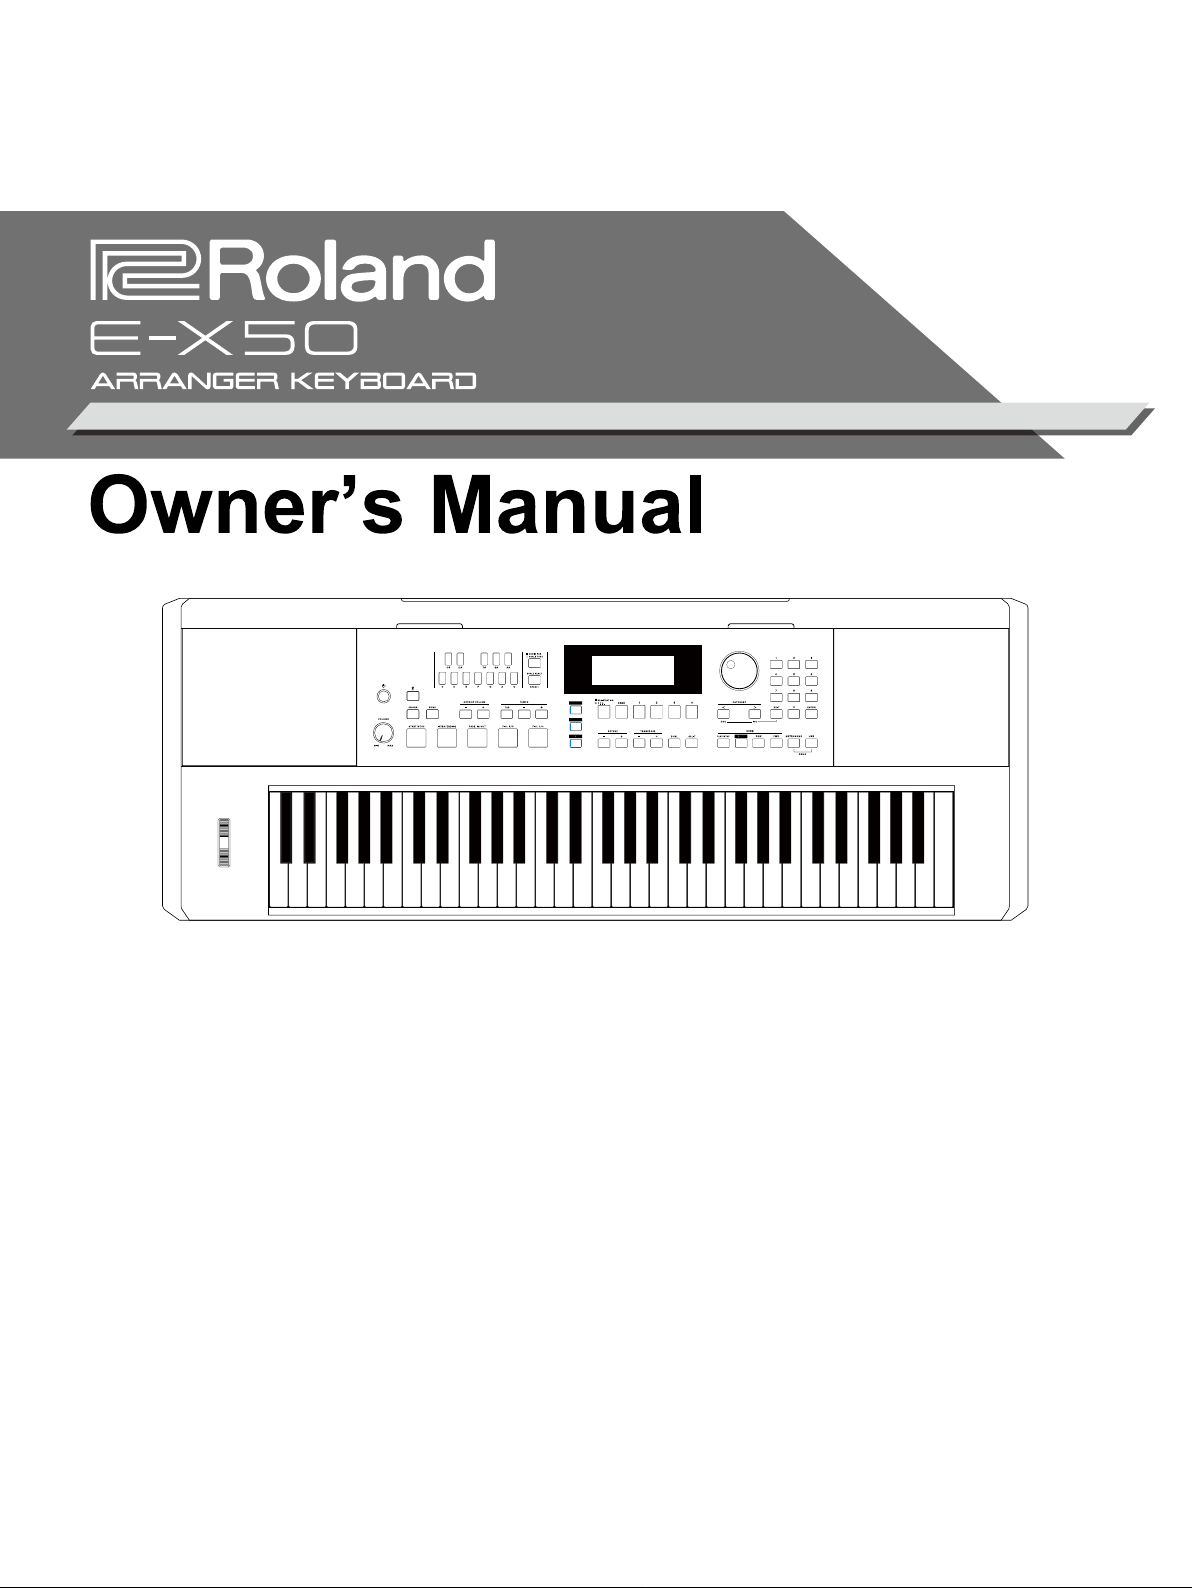
Panel & Display Description
1. [POWER] switch
Switch the power on or o.
2. [MASTER VOLUME] knob
Adjust the master volume.
4. [AUDIO PAD / SCALE TUNE] button
Switch between Scale Tune mode and
Audio Pad mode.
In Scale Tune mode:
3. SCALE TUNE buttons
Set the Scale parameters.
5. [SCALE RESET / RECALL] button
Reset the scale / recall scale parameters.
In Audio Pad mode:
3. AUDIO PAD buttons
Play back the selected MP3 / WAV.
6. [ ] button
Enter or exit the Bluetooth menu.
7. [CHORD] button
Enter the Chord mode.
8. [SYNC] button
Turn the Sync function on or o.
9. ACCOMP VOLUME [-] / [+] buttons
Adjust the accompaniment volume.
10. TEMPO [TAP] / [-] / [+] buttons
Adjust the current tempo.
11. [START/STOP] button
Start or stop playing the style.
12. [INTRO/ENDING] button
Click to play the long Intro or long
Ending.
Double click to play the short Intro or
short Ending.
13. [FADE IN/OUT] button
Turn the fade-in or fade-out func-
tion on or o.
14. [FILL 1/3] button
Click to play Fill 1.
Double click to play Fill 3.
15. [FILL 2/4] button
Click to play Fill 2.
Double click to play Fill 4.
16. [MENU] button
Enter the Function menu.
17. [STYLE] button
Enter the Style mode.
18. [TONE] button
Enter the Tone mode.
19. [REGISTRATION/O.T.S.] button
Switch between registration func-
tion and O.T.S. function.
20. [BANK] button
Select a memory bank.
21~24. [1]~[4] buttons
Recall a registered panel setting.
25. OCTAVE [-] / [+] buttons
Adjust the octave setting of the
current tone.
26. TRANSPOSE [-] / [+] buttons
Adjust the transpose setting.
27. [DUAL] button
Turn the dual function on or o.
28. [SPLIT] button
Turn the split function on or o.
29. LCD display
Display all parameters and values
related to the current operation.
30. Data dial
Adjust the parameter.
31. CATEGORY [<] / [>] buttons
Change the category in the cur-
rent menu.
32. [EXIT] / [ENTER] and Numeric
buttons
Go back / conrm current setting
or select the Style/Tone number.
33. SONG buttons
[PLAY/STOP]: When in other
mode, press to enter Song
mode, or press and hold it to
enter Song mode and play
back the song. When in Song
mode, press to play or pause
the song.
[REC]: Enter the Record mode.
[REW]: Rewind song playback.
[FWD]: Fast forward song play-
back.
34. [METRONOME] button
Turn the metronome on or o.
35. [USB] button
Enter the USB Play menu or the
USB menu.
36. Pitch bend wheel
Roll it to apply pitch-bend eect.
37. PHONES Jack
For connecting to headphones.
38. BASS REFLEX ports
For enhancing the bass part.
Front Panel
1
36
29
30
31
32
33
34 35
6
7 8
9
10
11 12
13 14 15
16
17
18
19 20
21
22
23 24
25 26
27 28
4
5
3
2
37
38
5
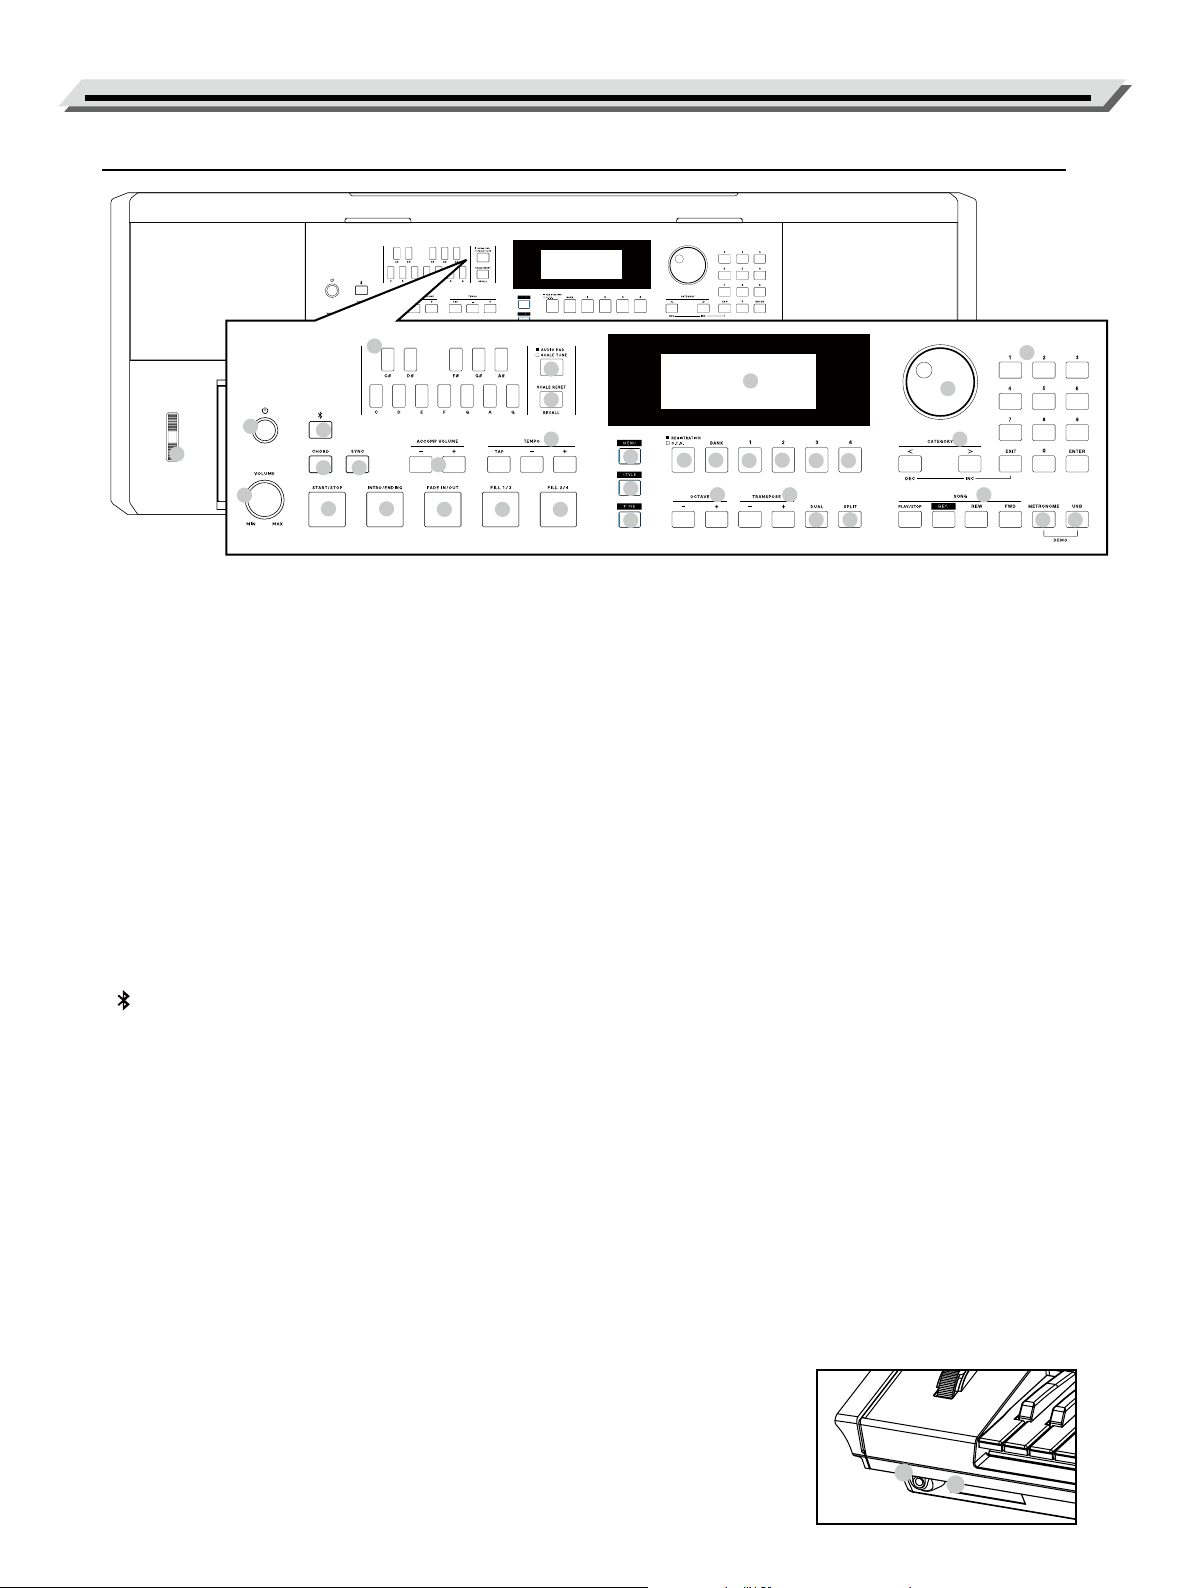
Panel & Display Description
Rear Panel
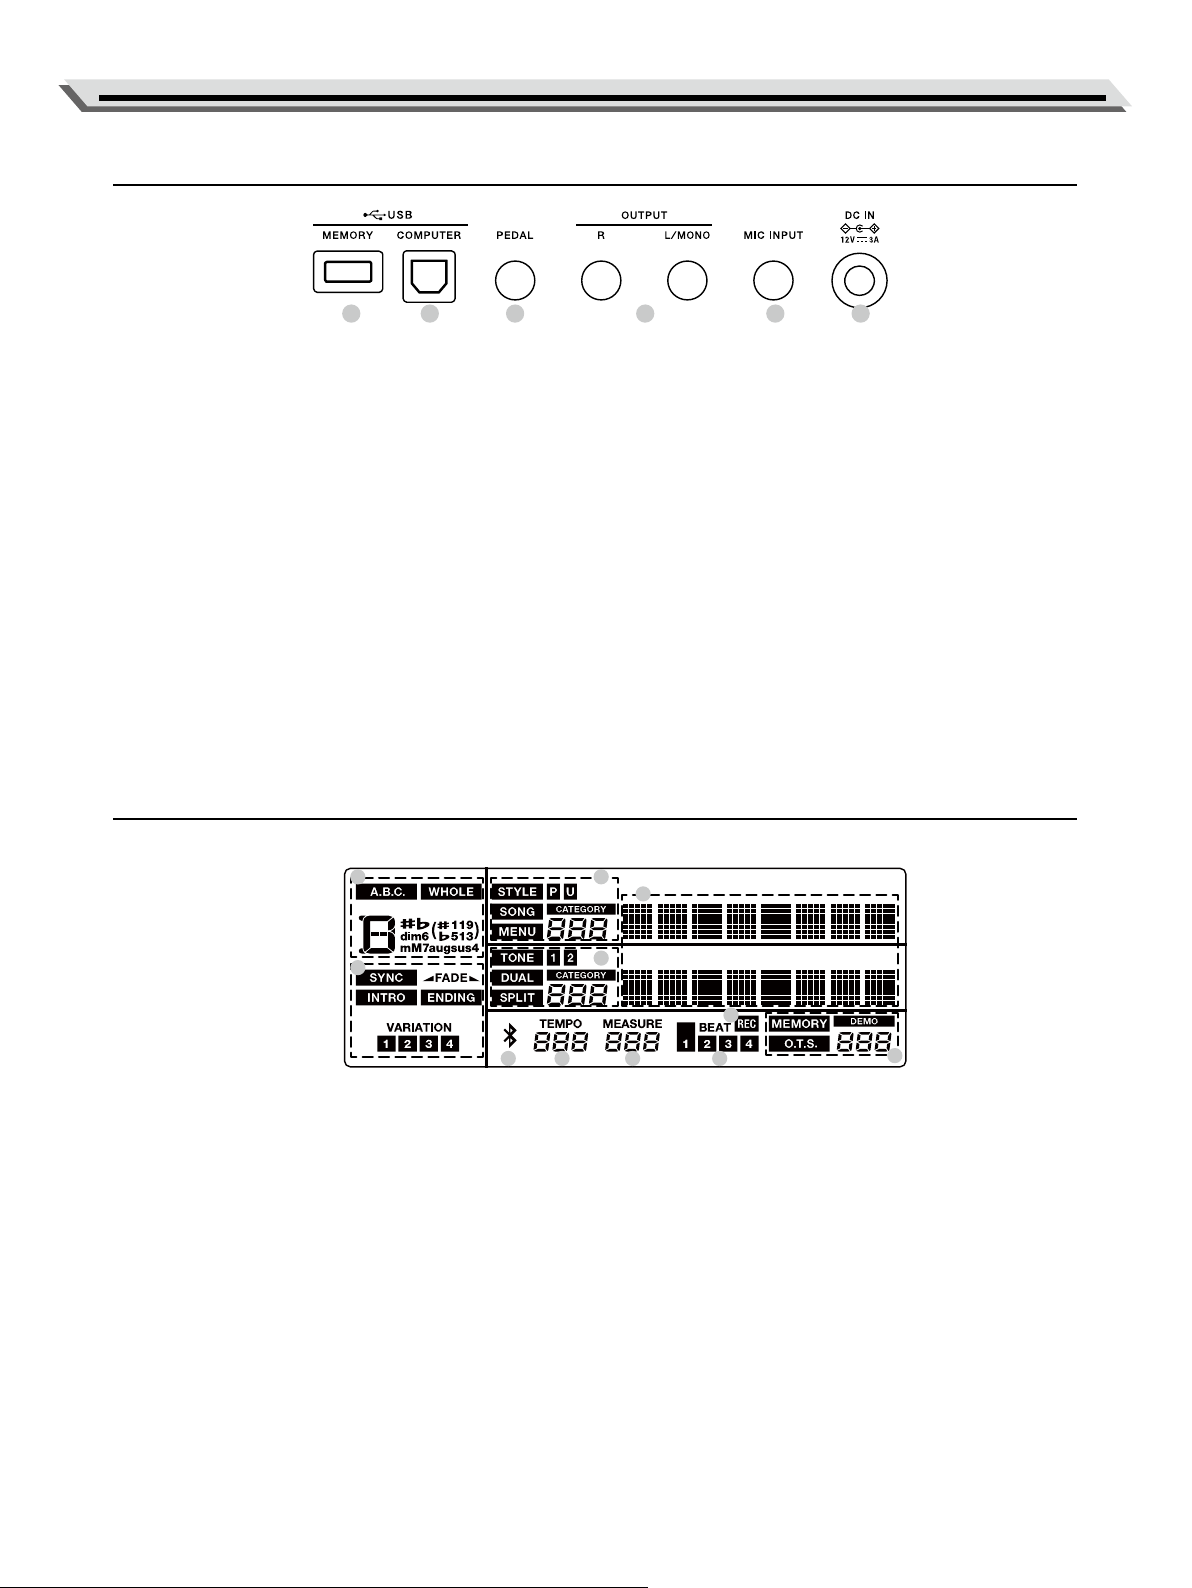
LCD
39. USB MEMORY jack
For connecting a USB ash drive.
40. USB COMPUTER jack
For connecting to a computer.
41. PEDAL jack
For connecting a sustain pedal.
1. A.B.C. / WHOLE / CHORD
2. SYNC / FADE / INTRO / ENDING / VARIATION
3. STYLE / SONG / MENU
4. TONE / DUAL / SPLIT
5. CHARACTERS
6. BLUETOOTH
7. TEMPO
8. MEASURE
9. BEAT
10. RECORD
11. MEMORY / O.T.S. / DEMO
42. OUTPUT jacks
For connecting external audio equipment.
43. MIC INPUT jack
For connecting a microphone.
44. DC IN jack
For connecting the DC 12 V power adaptor.
39 40 41 42 43 44
1
2
3
4
5
6 7 8 9
11
10
6
Setup
This section contains information about setting up your instrument and
preparing to play. Please go through this section carefully before turning
the power on.
Power Supply
You can power the instrument by using the included power adaptor.
Turn down the volume of instrument and the connected audio equip-
ment before you switch the instrument on.
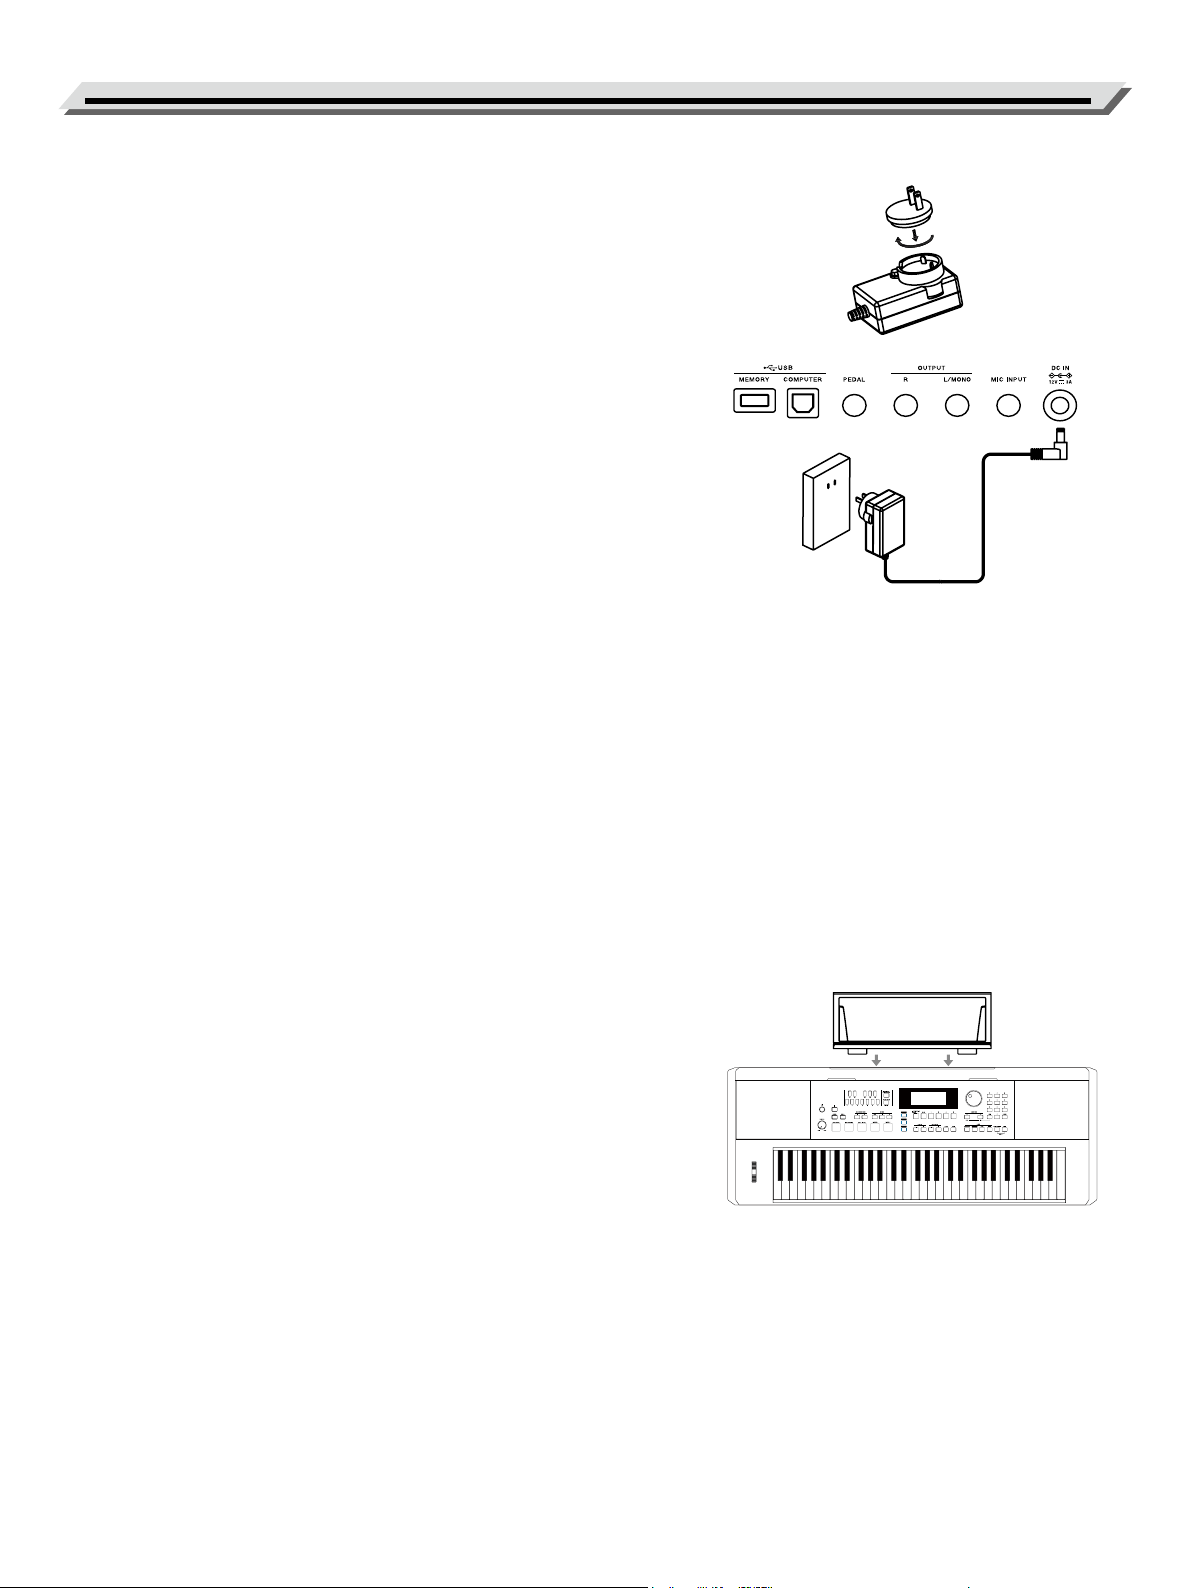
1. If the included power adaptor is interchangeable plug type, choose
the included adaptor plug that ts the type of AC outlet used in your
region.
Follow the image to put the adaptor plug into the grooves the power
adaptor unit and rotate the adaptor plug clockwise to lock.
If the included power adaptor is not interchangeable plug type, skip
this process.
2. Connect one end of the power adaptor to the DC IN jack on the rear
panel of the instrument.
3. Plug the power adaptor into an appropriate AC outlet.
4. Press the [POWER] switch, the LCD screen turns on, which indicates
the instrument is powered on.
5. If you are ready to turn o the instrument, press and hold the [POW-
ER] switch again.
Notes:
● The power to this unit will be turned o automatically after a pre-
determined amount of time has passed since it was last used for
playing music, or its buttons or controls were operated (Auto O
function).
If you do not want the power to be turned o automatically, disen-
gage the Auto O function (P. 30).
● Unsaved data is lost when the power turns o. Before turning the
power o, save the data that you want to keep.
● To restore power, turn the power on again.
● For your safety, please unplug the instrument when it is not in use or
during a thunderstorm.
Setting a Music Rest
A music rest is supplied with the instrument. You can easily attach it by
inserting it into the slots at the rear of the panel.
7
Connections
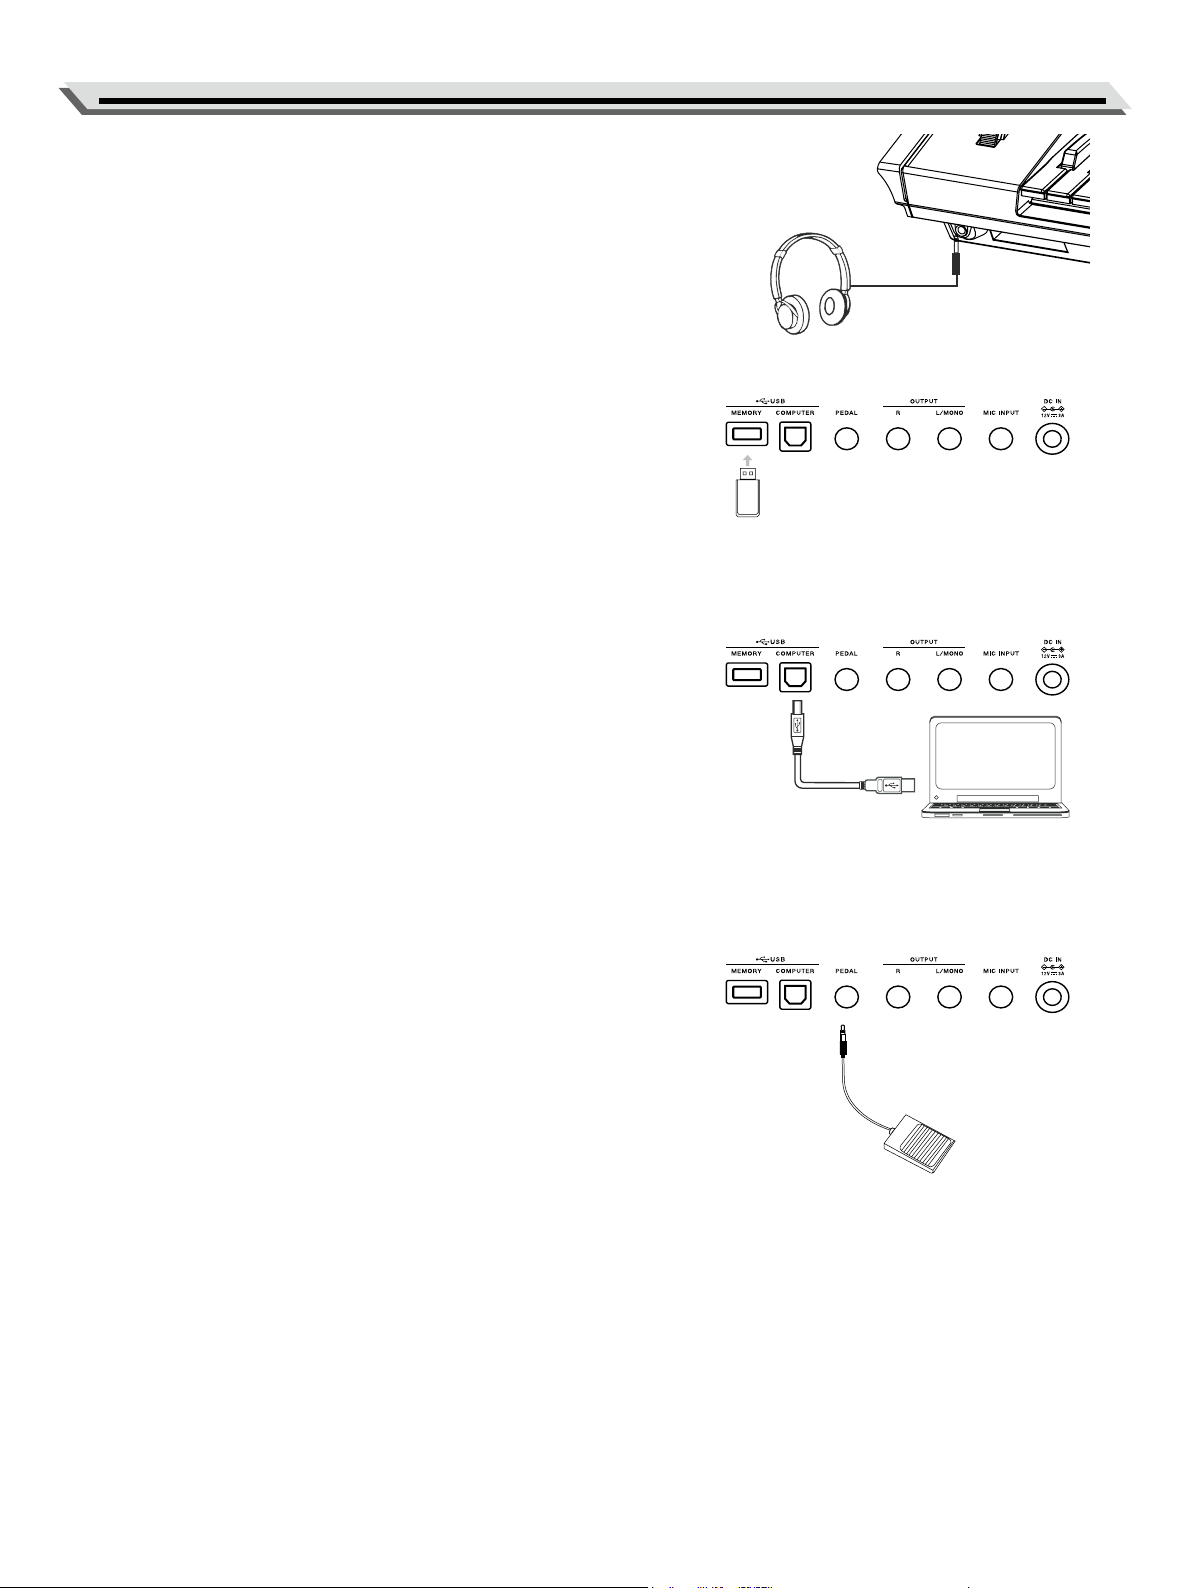
Connecting a Pair of Headphones
A standard pair of stereo headphones can be connected to the
PHONES jack for private practice or late-night playing. The internal ste-
reo speaker system is automatically shut o when a pair of headphones
is plugged into this jack.
Note:
To avoid the risk of hearing loss, do not listen with headphones at high
volume level for a long period of time.
Connecting a USB Flash Drive
Connect a USB ash drive to the instrument, you can save the data
you’ve created such as recorded data to USB ash drive, load les from
USB ash drive to the instrument, or use the instrument to play back
les saved on USB ash drive.
Note:
To avoid errors or damaging the USB ash drive, do not remove it when
reading or writing is in progress.
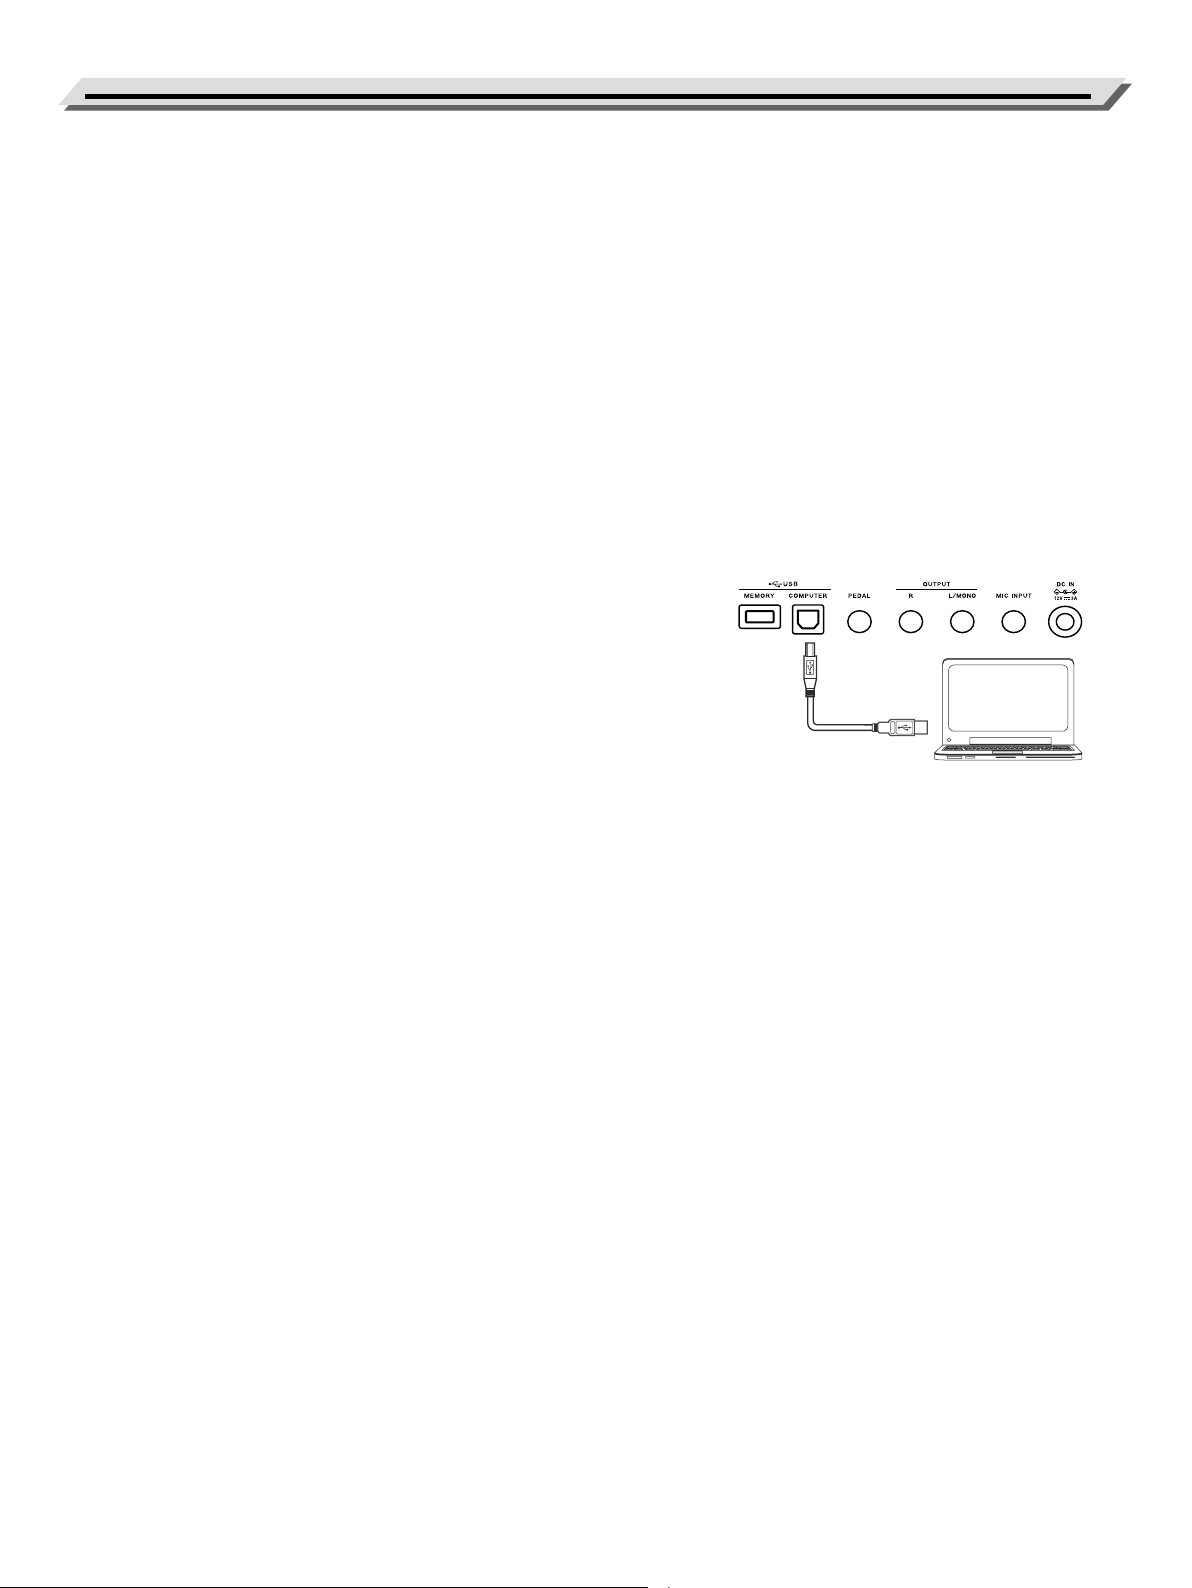
Connecting a Computer
The instrument receives and transmits MIDI messages via the USB
computer jack. Use a USB cable to connect the instrument to a com-
puter.
Notes:
● Do not set the USB MIDI device to be both input and output simulta-
neously when conguring the software on your computer.
Otherwise, the sound will be overlapped when playing the keyboard.
● Using a USB2.0 interface is recommended when connecting the
instrument to a computer.
Connecting a Footswitch
An optional footswitch can be plugged into the PEDAL jack. You can
assign dierent functions to the pedal in the function menu.
If you select sustain pedal function, when you step on the pedal, all
notes you play on the keyboard will have a longer sustain. (Refer to the
function menu for details.)
Notes:
● Please connect the plug of the pedal to the PEDAL jack before turn-
ing the power on.
● The polarity of dierent pedals may vary. If the connected sustain
pedal works in reversed behavior, please plug the pedal to the PED-
AL jack before turning the power on.
8
Connections
Power / Master Volume
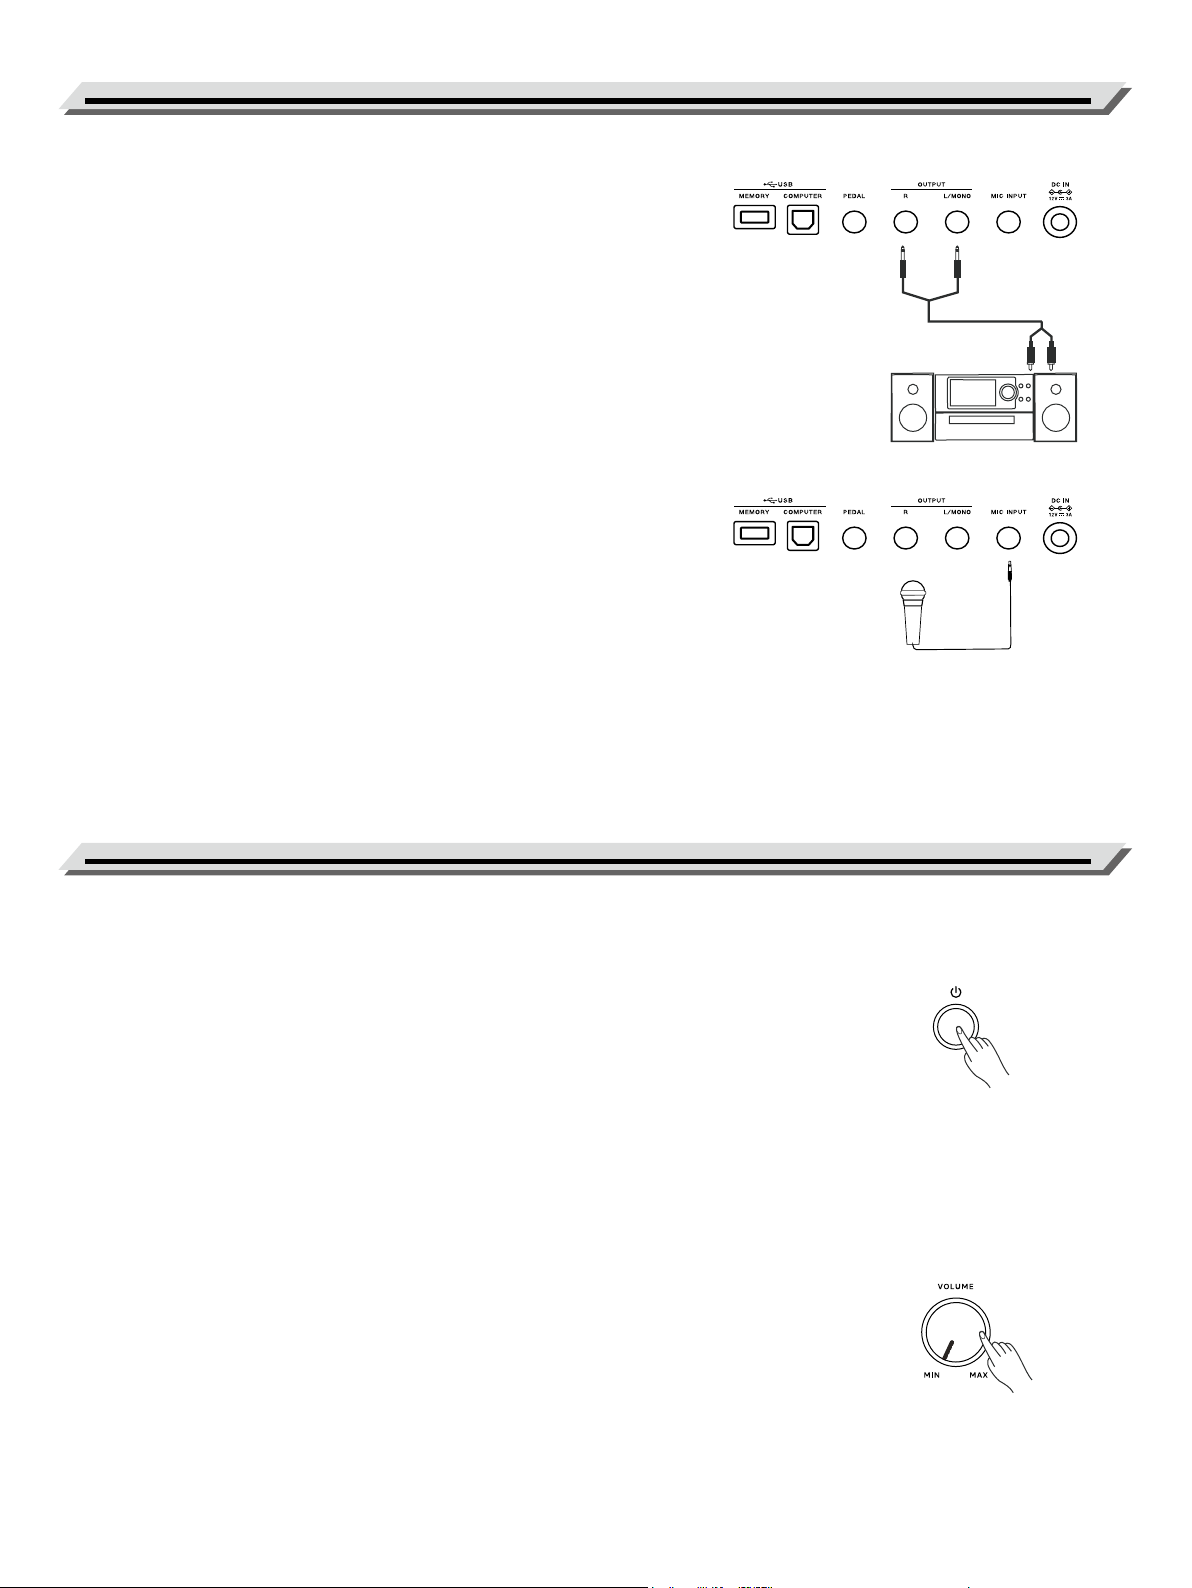
Connecting an Audio Equipment
The rear-panel OUTPUT jacks deliver the output of the instrument to
external audio equipment such as a keyboard amplier, a stereo sound
system, a mixing console, or a tape recorder. Use an audio cable to
connect the OUTPUT jacks of the instrument to the AUX IN jack of the
external audio equipment.
Use the R and L / MONO jacks for stereo output or just the L / MONO
jack for mono output.
Note:
To avoid damaging the speakers, please set the volume level to mini-
mum before connecting to power and other devices.
Connecting a Microphone
Before connecting or disconnecting a microphone, please set the mas-
ter volume to minimum level.
Plug a microphone into the MIC INPUT jack, then adjust the master
volume to an appropriate level.
Note:
Please unplug the microphone when it is not used.
Turning the Power On / O
1. Make sure the instrument is properly connected to power supply.
2. Press the [POWER] switch, the LCD screen turns on, indicating the
instrument is powered on.
3. If you are ready to turn o the instrument, press and hold the [POW-
ER] switch again.
Notes:
If the LCD isn’t lit after you turn on the instrument, please check the
power connection. When power on, the [POWER] switch LED will stay
lit.
Adjusting the Master Volume
Rotate the [VOLUME] knob clockwise to increase the master volume or
counter-clockwise to decrease it. Adjust to set the desired volume level.
Note:
If the keyboard keeps silent, check if the volume has been set to mini-
mum or if headphones are plugged into the PHONES jack.
9
Typical Modes
Playing Demo Song
The instrument features 4 typical modes. They are Tone mode, Style
mode, Song mode and Function Menu.
Tone Mode
Press the [TONE] button to enter Tone mode.
In Tone mode, you can select a desired tone and use it for performance.
For the operation details, please see the chapter Playing Tones (P. 10).
Style Mode
Press the [STYLE] button to enter Style mode.
In Style mode, you can select a preset style or user style to play back.
For the operation details, please see the chapter Auto Accompaniment (P.
12).
Song Mode
Press the [PLAY/STOP] button to enter Song mode.
In Song mode, you can play back the recorded songs. For the operation
details, please see the chapter Play Back Recording (P. 19).
You can also play back the songs from a USB ash drive. For the opera-
tion details, please see the chapter Loading User Song from USB Flash
Drive (P. 25).
Function Menu
Press the [MENU] button to enter the Function Menu.
In the Function Menu, you can edit the parameters and functions of this
instrument. For the operation details, please see the chapter Function
Menu (P. 28).
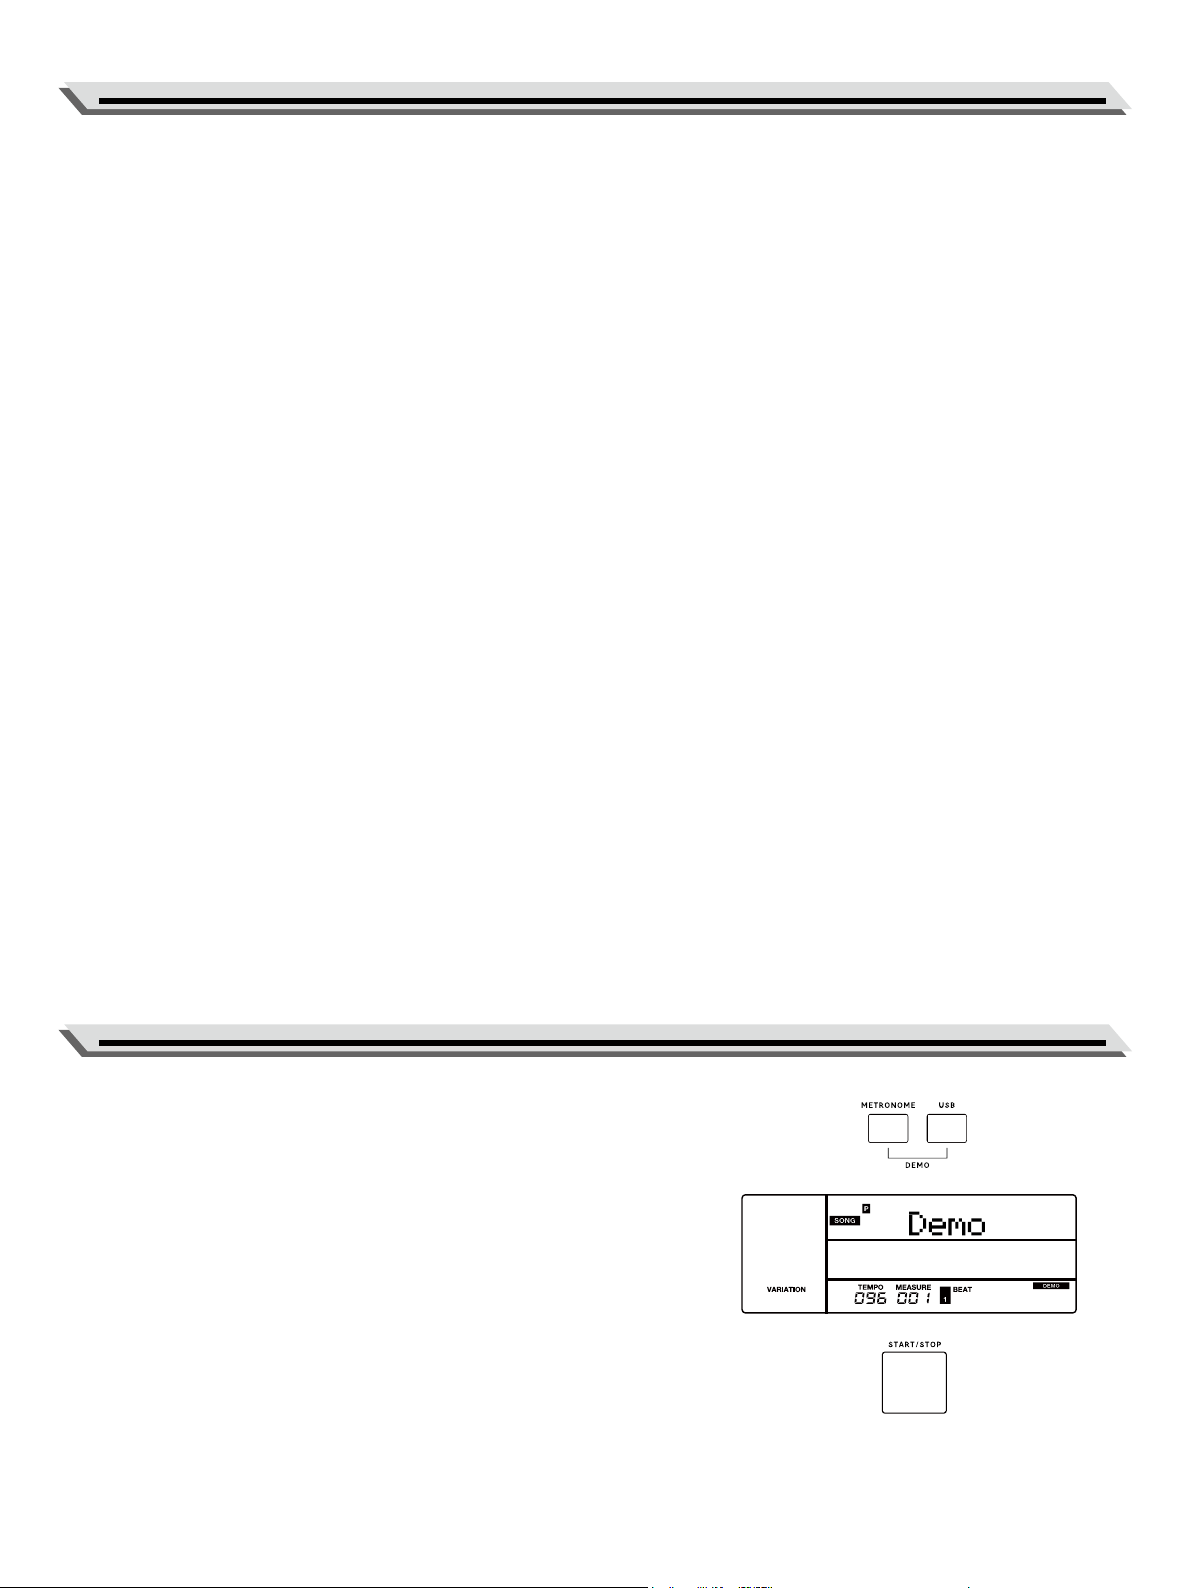
1. Press the [METRONOME] + [USB] buttons simultaneously to play the
demo song. The demo song will play repeatedly.
2. Press the [METRONOME] + [USB] buttons again to stop playing and
exit demo song.
Or you can press the [EXIT], [START/STOP] button to stop playing and
exit demo song.
Note:
While demo song is playing, all buttons and keys are unavailable except
[EXIT], [START / STOP], TEMPO [TAP] / [-] / [+], [VOLUME], [METRO-
NOME] + [USB], and the POWER switch.
10
Playing Tones
The instrument features a variety of built-in tones. Please refer to the
Tone List (P. 35).
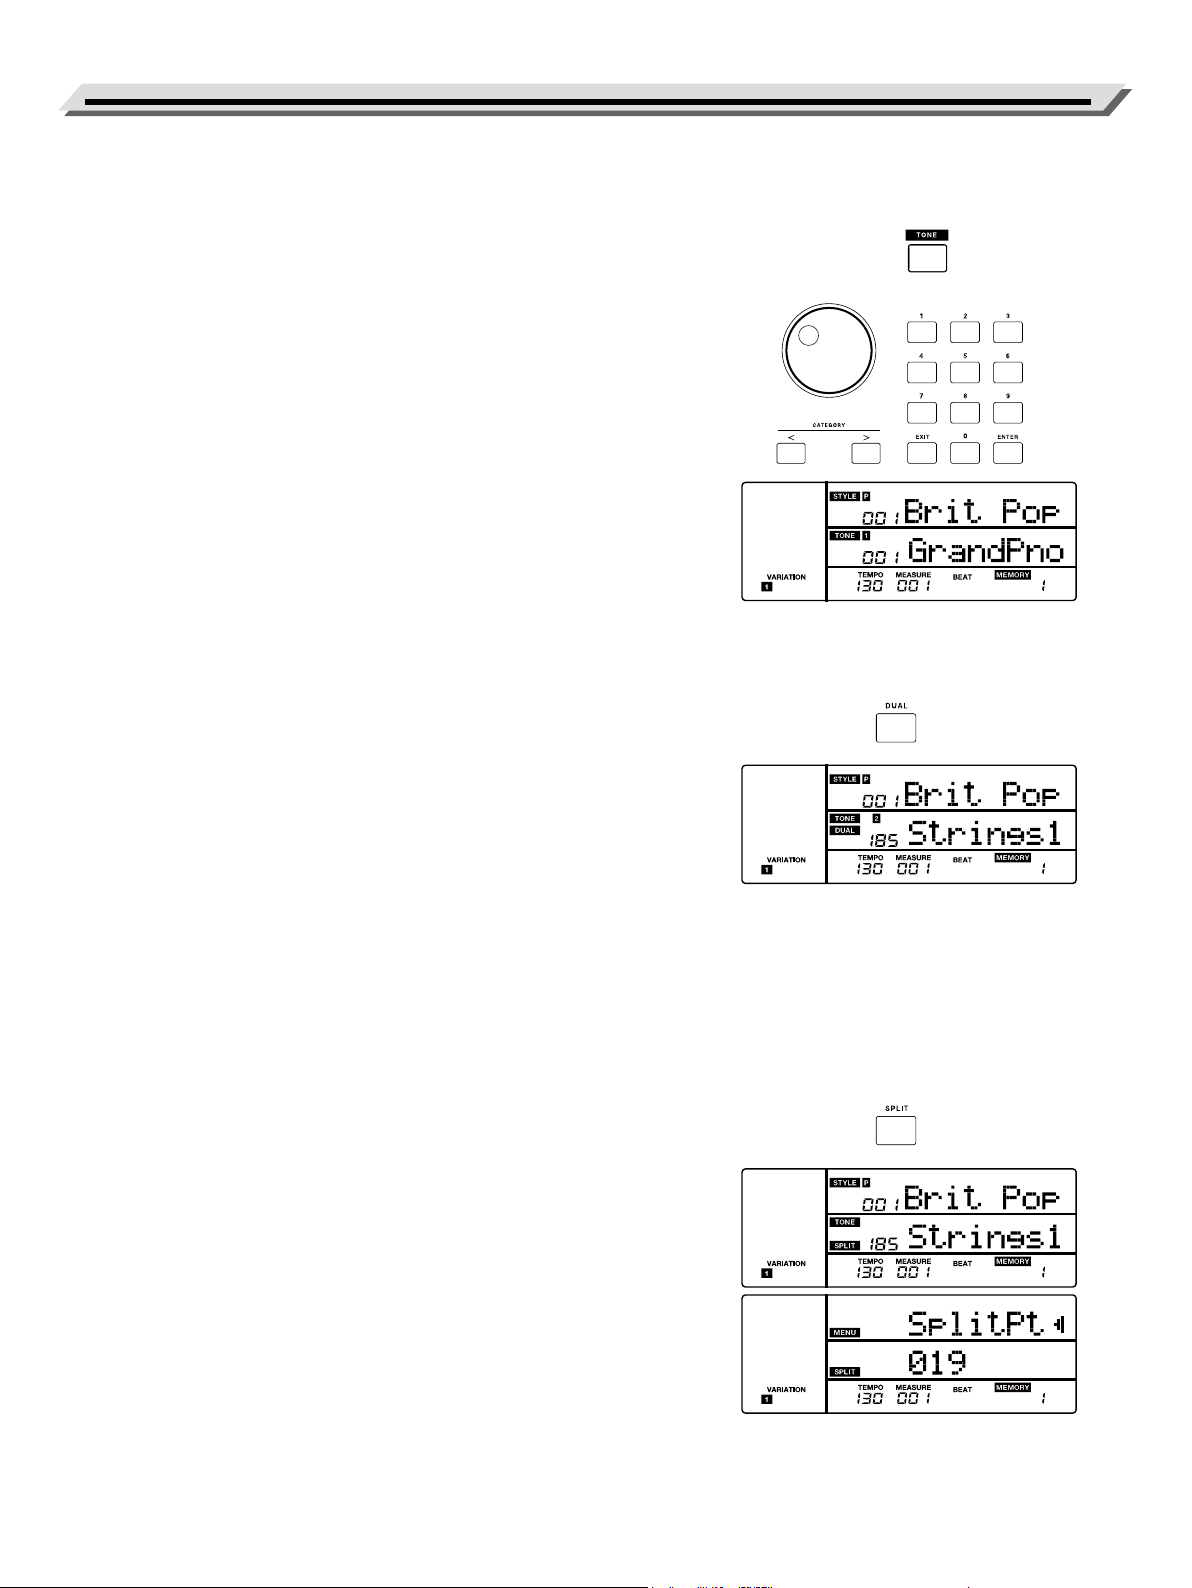
Selecting a Tone
1. Press the [TONE] button to enter Tone mode. The “TONE 1” icon on
LCD will light up and the LCD displays the current tone name and
number.
2. Use the data dial or the [EXIT] + [<] / [>] buttons to select a tone you
want to play.
Or use the numeric buttons to select a preset tone. You can also use
the [<] / [>] button to change the tone category. When switching the
category, it will select the rst tone in the current category by default.
3. Play the keyboard to use the tone for performance.
Note:
When Dual and Split functions are in use, you can press the [TONE]
button repeatedly to switch between the tone layers.
Playing Two Tones Simultaneously
The dual function allows you to layer two dierent tones together, creat-
ing a much richer sound.
1. Press the [DUAL] button to enter Dual mode. The “DUAL” icon on
LCD will light up and the LCD displays the current name and number
for “TONE 2”.
2. Use the data dial or the [EXIT] + [<] / [>] buttons to select a tone you
want to play.
Or use the numeric buttons to select a preset tone. You can also use
the [<] / [>] button to change the tone category. When switching the
category, it will select the rst tone in the current category by default.
3. Play the keyboard. You will hear two dierent tones layered together.
It seems like two dierent instruments playing at the same time.
4. Press the [DUAL] button again to turn o the dual function.
Playing Dierent Tones with Both Hands
The split function splits the keyboard into the left and the right hand
areas, each with a dierent tone. The left hand tone is the split tone. The
default split point is F#3 (19). You can set the split point to any key as
required. (Please refer to Split Point in the function menu.)
1. Press the [SPLIT] button to enter Split mode. The “SPLIT” icon on
LCD will light up and the LCD displays the current split tone name
and number.
2. Use the data dial or the [EXIT] + [<] / [>] button to select a tone you
want to play.
Or use the numeric buttons to select a preset tone. You can also use
the [<] / [>] button to change the tone category. When switching the
category, it will select the rst tone in the current category by default.
3. Play the keyboard with both hands and you will hear two dierent
tones.
4. Press the [SPLIT] button again to turn o the split function.
11
Playing Tones
Notes:
● When the keyboard is split, only the right hand area will use the dual
tones.
● You can set the volume level for each tone layer in the mixer. (Please
refer to Mixer in the function menu.)
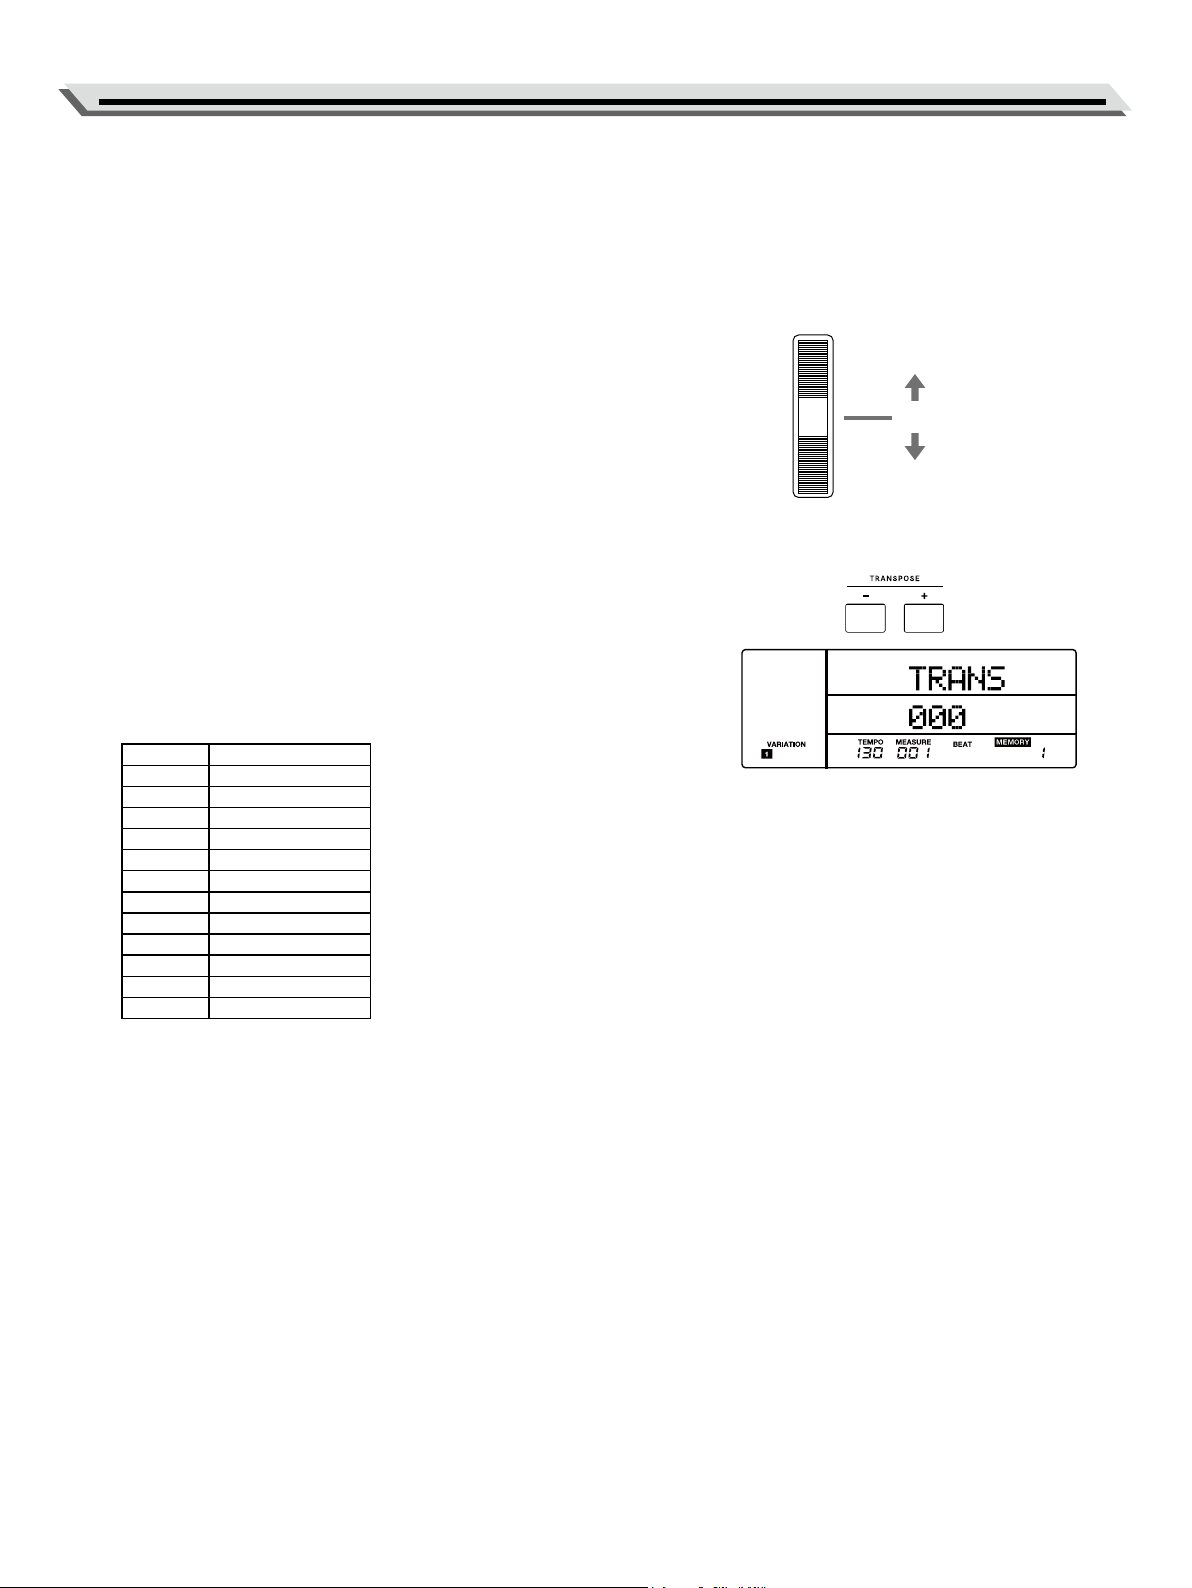
Pitch Bend
Use the pitch bend wheel to bend notes up (roll the wheel away from you)
or down (roll the wheel toward you) while playing the keyboard. The pitch
bend wheel is self-centering and will automatically return to normal pitch
when released.
With the pitch bend wheel, you can easily imitate the pitch bend eect of
the guitar, violin, saxophone or other instruments.
Transpose
This function will shift the pitch of the entire keyboard in semitone steps.
1. Press the TRANSPOSE [-] / [+] button. The LCD temporarily displays
the transpose menu.
2. Use the data dial or the TRANSPOSE [-] / [+] button to change the
transpose value. Press the TRANSPOSE [-] and [+] buttons simultane-
ously to restore the default transpose setting.
3. Press and hold the TRANSPOSE [-] or [+] button, then press a specic
key to fast set the transpose value.
Key Transpose value
C 0
C# +1
D +2
D# +3
E +4
F +5
F# -6
G -5
G# -4
A -3
A# -2
B -1
UP
CENTER (Normal Pitch)
DOWN

12
Auto Accompaniment
The auto accompaniment feature puts a full backing band at your nger-
tips. To use it, all you have to do is to play the chords with your left hand
in the selected accompaniment style, and then the accompaniment will
automatically play along, instantly following the chords you play. With
auto accompaniment, even a solo performer can enjoy playing with the
backing of an entire band or orchestra. This instrument features a variety
of styles.
Try selecting some of the dierent styles and enjoy the auto accompani-
ment feature. Please refer to the Style List (P. 42).
Selecting Chord Modes
When chord mode is o, you can press the [START/STOP] button to start
playing the rhythm tracks.
When chord mode is on, the [CHORD] button LED lights up. You can
press the [START/STOP] button to start the rhythm tracks, then play a
chord in the chord section to start all tracks.
When in chord mode, you can play back chords in the A.B.C mode and
the WHOLE mode.
Press the [CHORD] button once to enter the “A.B.C.” (Auto Bass Chord)
mode. The chord button LED lights up red. The “A.B.C.” icon on LCD
lights up. The keyboard is split into two sections. Left hand section is the
chord section. You can play single nger chords and normal chords in
the chord section.
Press the [CHORD] button again to enter the “WHOLE” mode. The chord
button LED lights up green. The “WHOLE” icon on LCD lights up. You
can play normal chords over the entire keyboard.
Press the [CHORD] button again to turn o chord mode. The chord but-
ton LED and the “WHOLE” icon on LCD turn o.
Playing Auto Accompaniment (Rhythm Track)
1. Press [STYLE] button to enter Style mode. The “STYLE” icon on LCD
will light up. The LCD displays the current style name and number.
2. Use the data dial or the [EXIT] + [<] / [>] buttons to select a style you
want to play.
Or use the numeric buttons to select a preset style. You can also use
the [<] / [>] button to change the style category. When switching the
category, it will select the rst style in the current category by default.
3. Press the [START / STOP] button to start playing the rhythm tracks.
Or you can press the [SYNC] button to turn on the Sync function. The
button LED lights up and the beats on LCD blink. The Sync function
puts the playback on standby. You can press any key on the keyboard
to start the rhythm tracks.
Note:
You can play back the rhythm tracks while chord mode is on or o.
13
Auto Accompaniment
Playing Auto Accompaniment (All Tracks)
1. Press the [CHORD] button to enter Chord mode.
2. Press the [SYNC] button to turn on the Sync function. The button LED
lights up and the beats on LCD blink. The Sync function puts the play
back on standby. You can play a chord in the chord section to start
playing all tracks.
Or you can press the [START/STOP] button to start the rhythm tracks.
Then play a chord in the chord section to start all tracks.
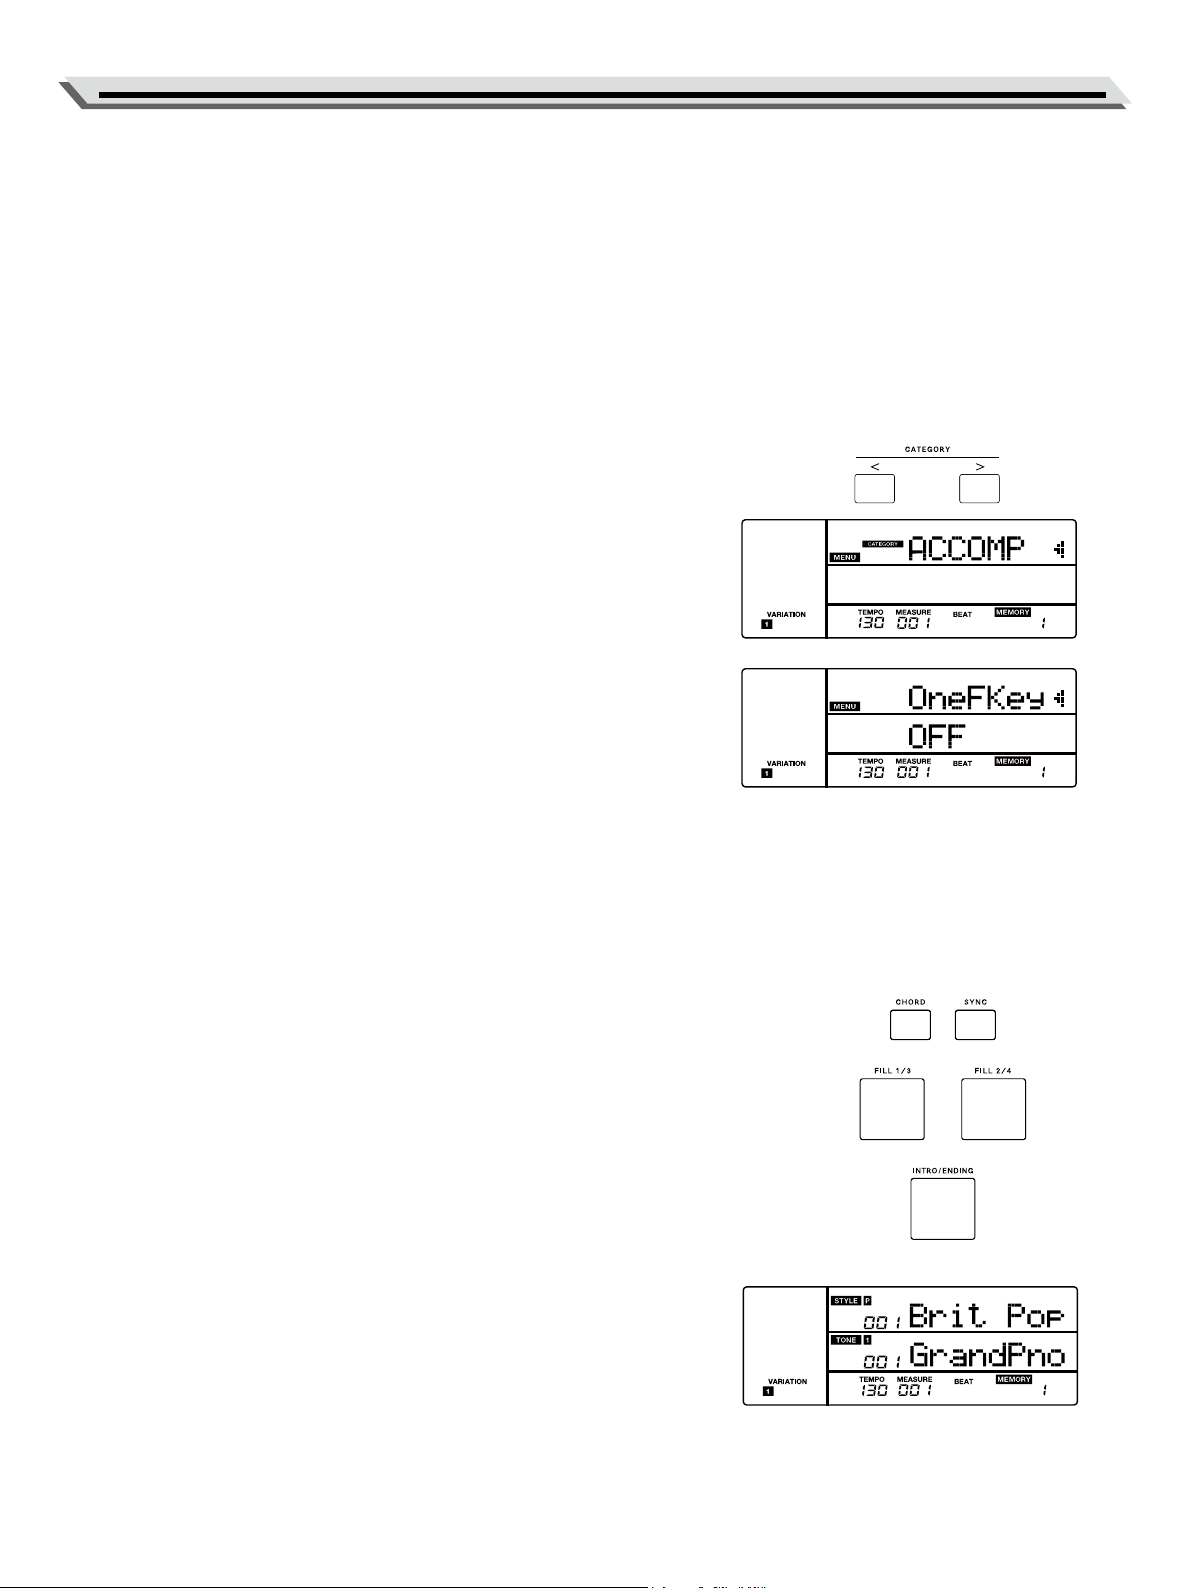
One Finger Key
The one nger key function allows you to play various chords with only
one nger by setting the key of the music you want to play.
1. In A.B.C. mode, press the [MENU] button to enter the Function menu.
2. Use the [<] / [>] button to select the “ACCOMP” menu. Then use the
data dial or the [EXIT] + [<] / [>] buttons to select the “OneFKey” param-
eter. Then press the [ENTER] button.
3. Use the data dial or the [EXIT] + [<] / [>] buttons to adjust the parameter.
(Please refer to the function menu.)
When setting it to “OFF”, it will only produce major chords when using
one nger key. For example, when you press the key G, it will play G
major chord.
When setting it to “C / C# / ... / B”, it will play a specic chord when
using one nger key.
Accompaniment Sections
There are various types of accompaniment sections. They are: Intro (1, 2),
Main (1, 2, 3, 4), Fill (1, 2, 3, 4), and Ending (1, 2).
1. Press the [STYLE] button.
2. Use the data dial to select a style.
3. Press the [CHORD] button to enter A.B.C. mode. The “A.B.C.” icon on
LCD lights up.
4. Press the [SYNC] button to enter Sync Start status. The button LED
lights up.
5. Press the [FILL 1/3] button to select the Main 1 section.
6. Press the [INTRO/ENDING] button. The “INTRO” icon on LCD lights up.
7. Now if you can play a chord in the left hand chord section, the auto
accompaniment will start. When the Intro section is nished, it will auto-
matically lead into Main section.
8. Press the [FILL 2/4] button. It will play Fill 2, then automatically lead to
the corresponding Main 2 section.
9. Press the [INTRO/ENDING] button. The “ENDING” icon on LCD lights
up. It will play the Ending section. When the Ending is nished, the
playback will stop.
14
Auto Accompaniment
Notes:
● When style stops, press the [INTRO/ENDING] button to engage the
long Intro. The button LED and the “INTRO” icon on LCD stay lit. Or
you can fast double press the [INTRO/ENDING] button to engage the
short Intro. The button LED and the “INTRO” icon on LCD blink. Press
the [INTRO/ENDING] button again to disengage Intro. The button LED
and the “INTRO” turn o.
● When style is playing, press the [INTRO/ENDING] button to engage
the long Ending. The button LED and the “ENDING” icon on LCD
stay lit. Or you can fast double press the [INTRO/ENDING] button to
engage the short Ending. The button LED and the “ENDING” icon
on LCD blink. When the Ending is nished, the button LED and the
“ENDING” icon on LCD turn o.
● When style is playing, you can press [FILL 1/3] or [FILL 2/4] button
to play Fill 1 or Fill 2. Or you can fast double-press [FILL 1/3] or [FILL
2/4] button to play Fill 3 or Fill 4.
● When style is playing, if you hold down the [FILL 1/3] / [FILL 2/4]
button, the selected ll pattern will keep playing until the button is
released.
● When style stops, you can press or fast double-press the [FILL 1/3] or
[FILL 2/4] button to select a Main section. The button LED and icon on
LCD will light up.
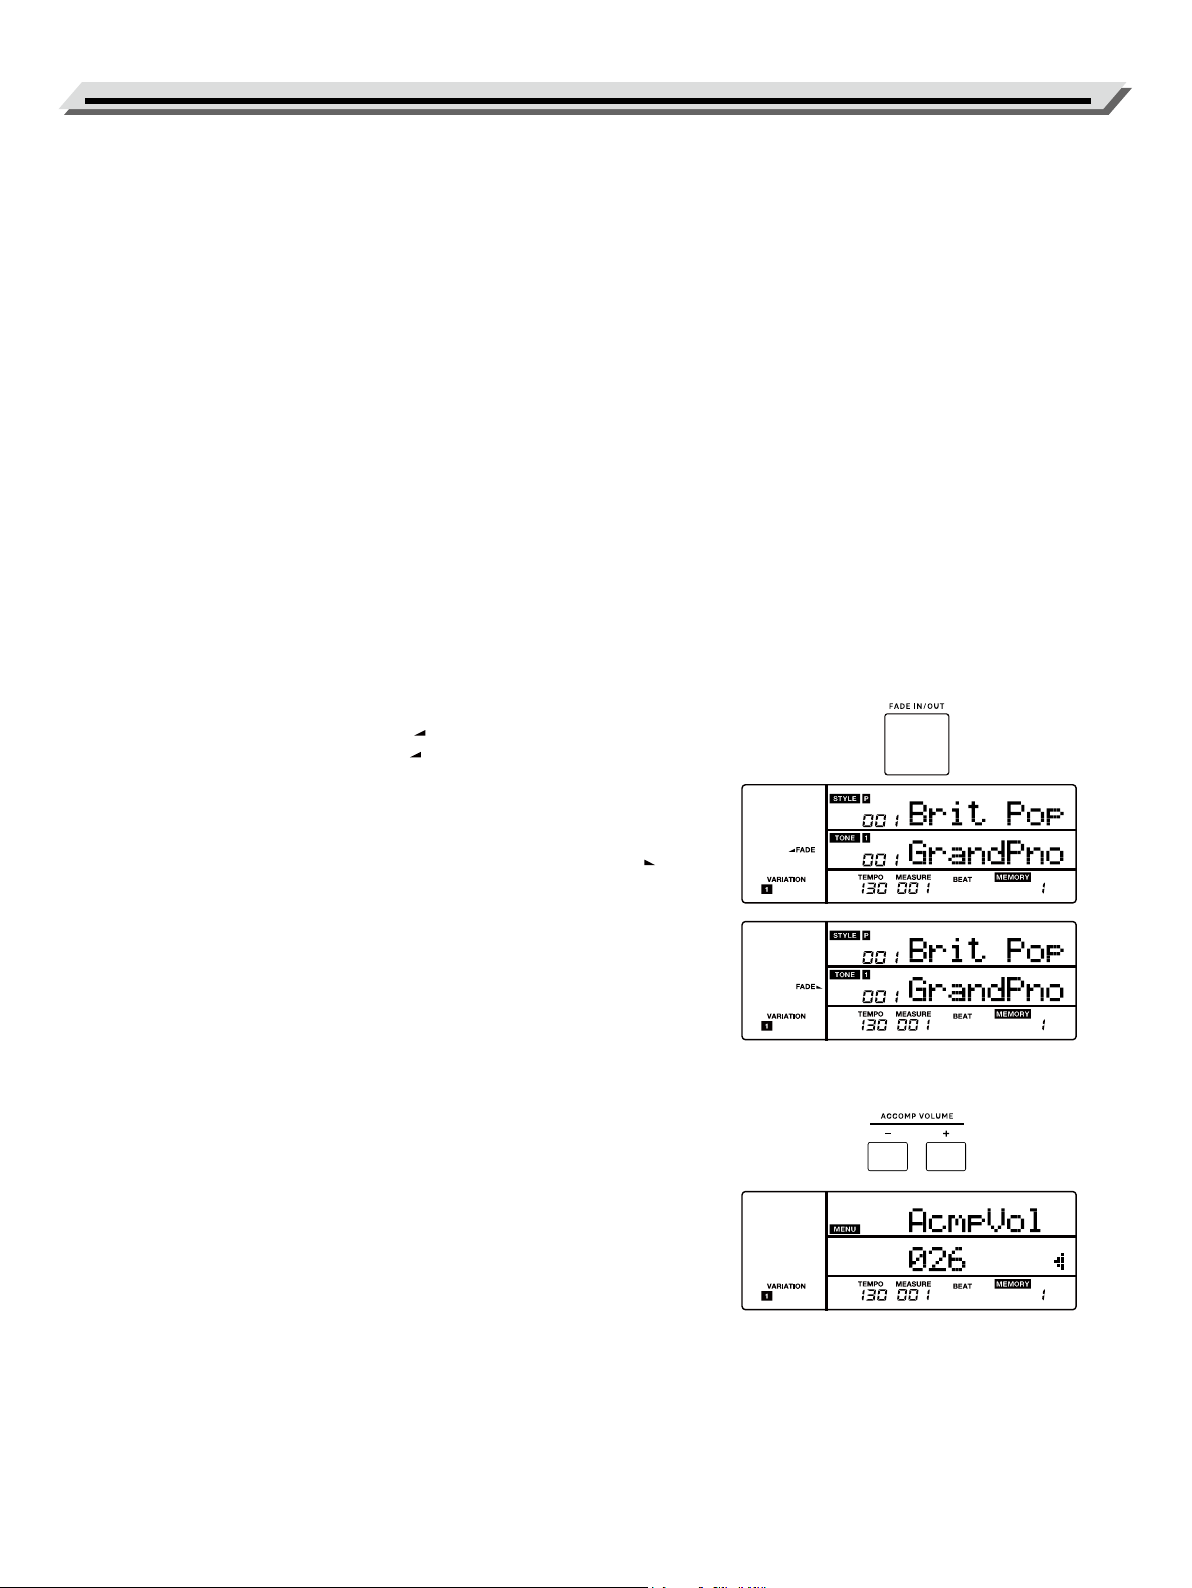
Fade In / Out
1. Fade In
When style stops, press the [FADE IN/OUT] button to turn on the Fade
In function. The button LED and the “ FADE” icon on LCD light up.
Now if you start style playback, the “ FADE” icon on LCD blinks and
the volume will increase from low to high.
2. Fade Out
When style is playing, you can press the [FADE IN/OUT] button to turn
on the Fade Out function. The button LED light up and the “FADE
” icon on LCD blinks. The volume will decrease from high to low until
the playback stops.
Note:
The default fade time is 10 seconds. You can change this time setting in
the function menu (P. 28).
Accompaniment Volume
You can adjust the accompaniment volume to keep an appropriate bal-
ance between the accompaniment volume and the tone volume.
1. Press the ACCOMP VOLUME [-] / [+] button. The LCD displays the
current accompaniment volume level.
2. Use the ACCOMP VOLUME [-] / [+] button, the [EXIT] + [<] / [>] but-
tons or the data dial to adjust the volume level.
3. Press the ACCOMP VOLUME [-] and [+] buttons simultaneously to
restore the default volume.
15
Auto Accompaniment
Chord Fingering
How the chords are played or indicated with your left hand (in the auto
accompaniment section of the keyboard) is referred to as “ngering.”
There are 2 types of ngerings as described below.
Chord Basics
A chord, in music, is any harmonic set of three or more notes that is
heard as if sounding simultaneously. The most frequently encountered
chords are triads. A triad is a set of three notes that can be stacked in
thirds. When stacked in thirds, the triad’s members, from lowest pitched
tone to highest, are called: the Root, the Third, and the Fifth.
Triad Type
There are following basic triad types:
Major Triad A root with a major third added above and a perfect
fth will consist as a “Major Triad.”
Minor Triad A root with a minor third added above and a perfect
fth will consist as a “Minor Triad.”
Augmented Triad A root with a major third added above and an aug-
mented fth will consist as an “Augmented Triad.”
Diminished Triad A root with a minor third added above and a dimin-
ished fth will consist as a “Diminished Triad.”
Chord Inversion
We dene this chord its root is not in the bass (i.e. the root is not the
lowest note) as an inversion chord. When the root is in the bass, we call
the chord: root-position chord. If we put the Third and Fifth in the root
position, then it forms “Inversion,” we call this chord “Inversion Chord.”
See the following major triad and its inverted chord.
Chord Name
The chord name contains two parts content: Chord root and Chord type.
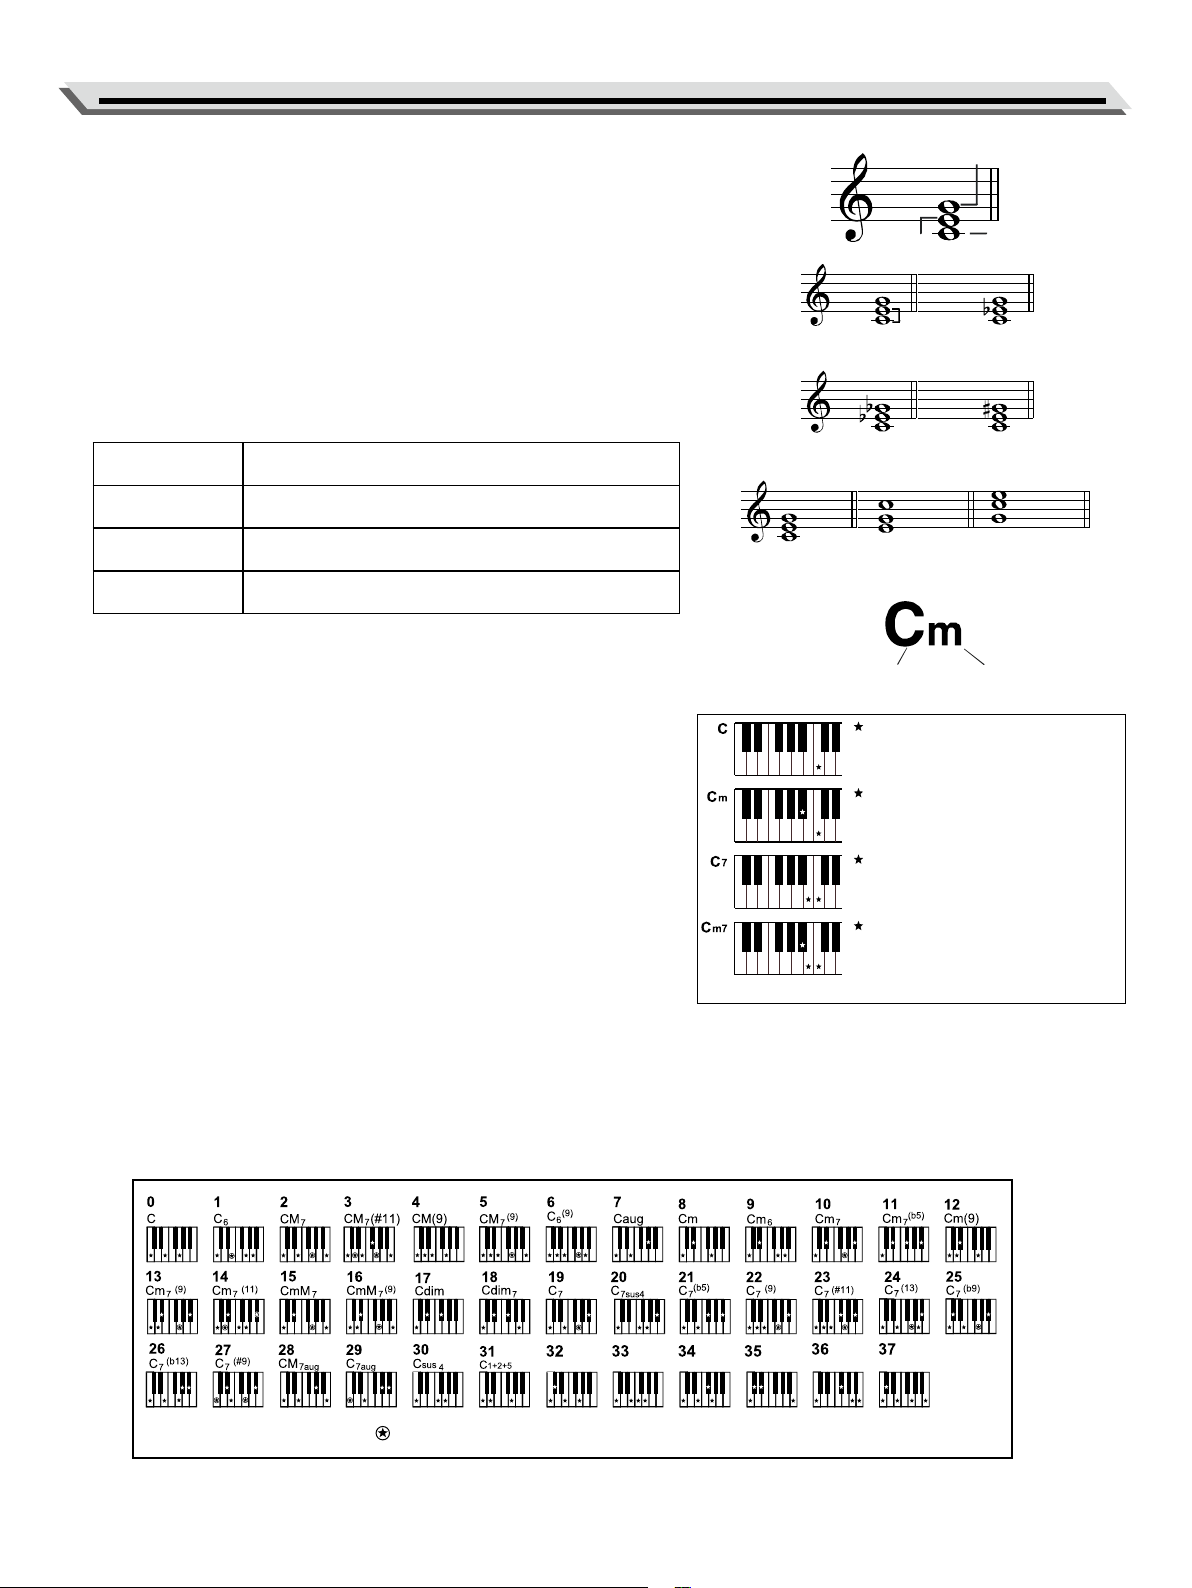
Single Finger
Single nger type not only can detect single nger but also can detect
multi nger. And the single nger makes it easily to play chords through
only one, two or three keys. Including major, minor, seventh, and minor
seventh chord. Refer to relevant picture on the right for details.
Multi-nger
Multi-nger allows you to play chords in normal ngering. Try playing the
38 chord types in C scale as listed on the right.
Note:
In WHOLE mode, the entire keyboard will only recognize chords played
in normal ngering.
Notes: enclosed in parentheses are optional; the chords could be recognized without them.
C
b9
C
11
C
#11
Cdim
b9
CdimM
7
CM
7
(b9)
Mаjor Triad
Only press the root note on the key-
board.
Minor Triad
Press the root note and the nearest
left black key simultaneously.
Seventh chord
Press the root note and the nearest
left white key simultaneously.
Minor seventh chord
Press the root note and the nearest
left white and black keys simultane-
ously .
Major Triad Minor Triad
Augmented TriadDiminished Triad
Root Position First Inversion Second Inversion
Fifth
Root
Third
Chord Root Chord Type
16
Tempo
Metronome
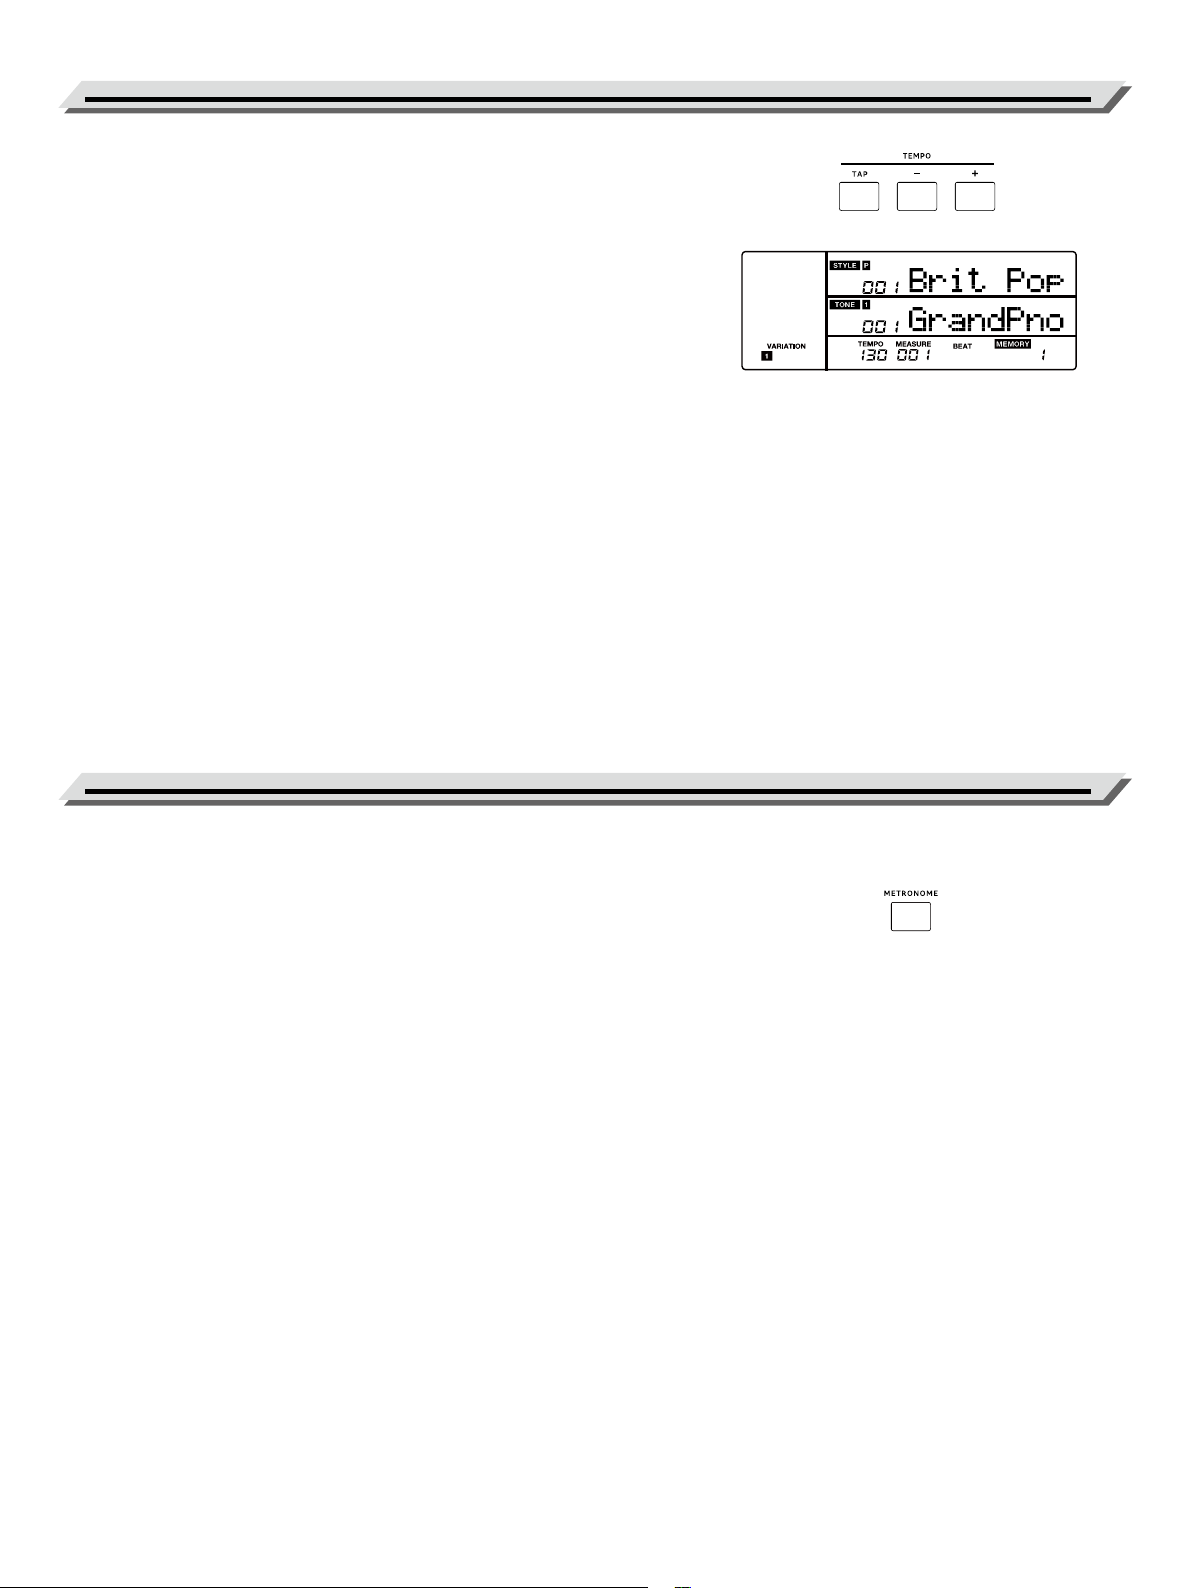
1. Press the Tempo [-] / [+] button to change the tempo. The tempo
value on LCD blinks.
2. When the tempo value blinks, use the data dial to fast change the
tempo. Press the TEMPO [-] and [+] buttons simultaneously to restore
the default tempo.
3. You can use the [TAP] button to set the tempo.
When style stops, press the [TAP] button 5 times at an even speed, it
will start the style at the tapping speed.
When style is playing, press the [TAP] button twice, the tempo will be
reset to the tapping speed.
Notes:
● When style stops, if you change the style, the tempo will be reset to
the default tempo of the current style.
● When style is playing, if “Tempo Remain” is turned on, when you
change the style, the tempo will remain unchanged. If “Tempo
Remain” is turned o, when you change the style, the tempo will be
reset to the default tempo of the current style. You can turn the Tempo
Remain on/o in the function menu (P. 28).
The metronome provides a steady beat to help you practice at a preset
tempo.
1. Press [METRONOME] button to start the metronome. The button LED
will blink in sync with the metronome sound.
2. Press the [METRONOME] button again to stop the metronome. The
button LED turns o.
3. The default time signature is “4”. You can change it in the function
menu.
Press the [MENU] button to enter the Function Menu, then use the [<]
/ [>] button to select the “OTHERS” menu. Use the data dial to select
the “MtrBeat” parameter, then press the [ENTER] button. Use the data
dial or the [EXIT] + [<] / [>] buttons to change the beat.
Notes:
● The metronome will respond in the next beat if it is turned on during
style playback.
● If you turn on the metronome in record mode, the metronome sound
will not be recorded.
17
Registration Memory
This function allows you to save virtually all panel settings to a regis-
tration memory, and you can instantly recall these setting by pressing a
single button.
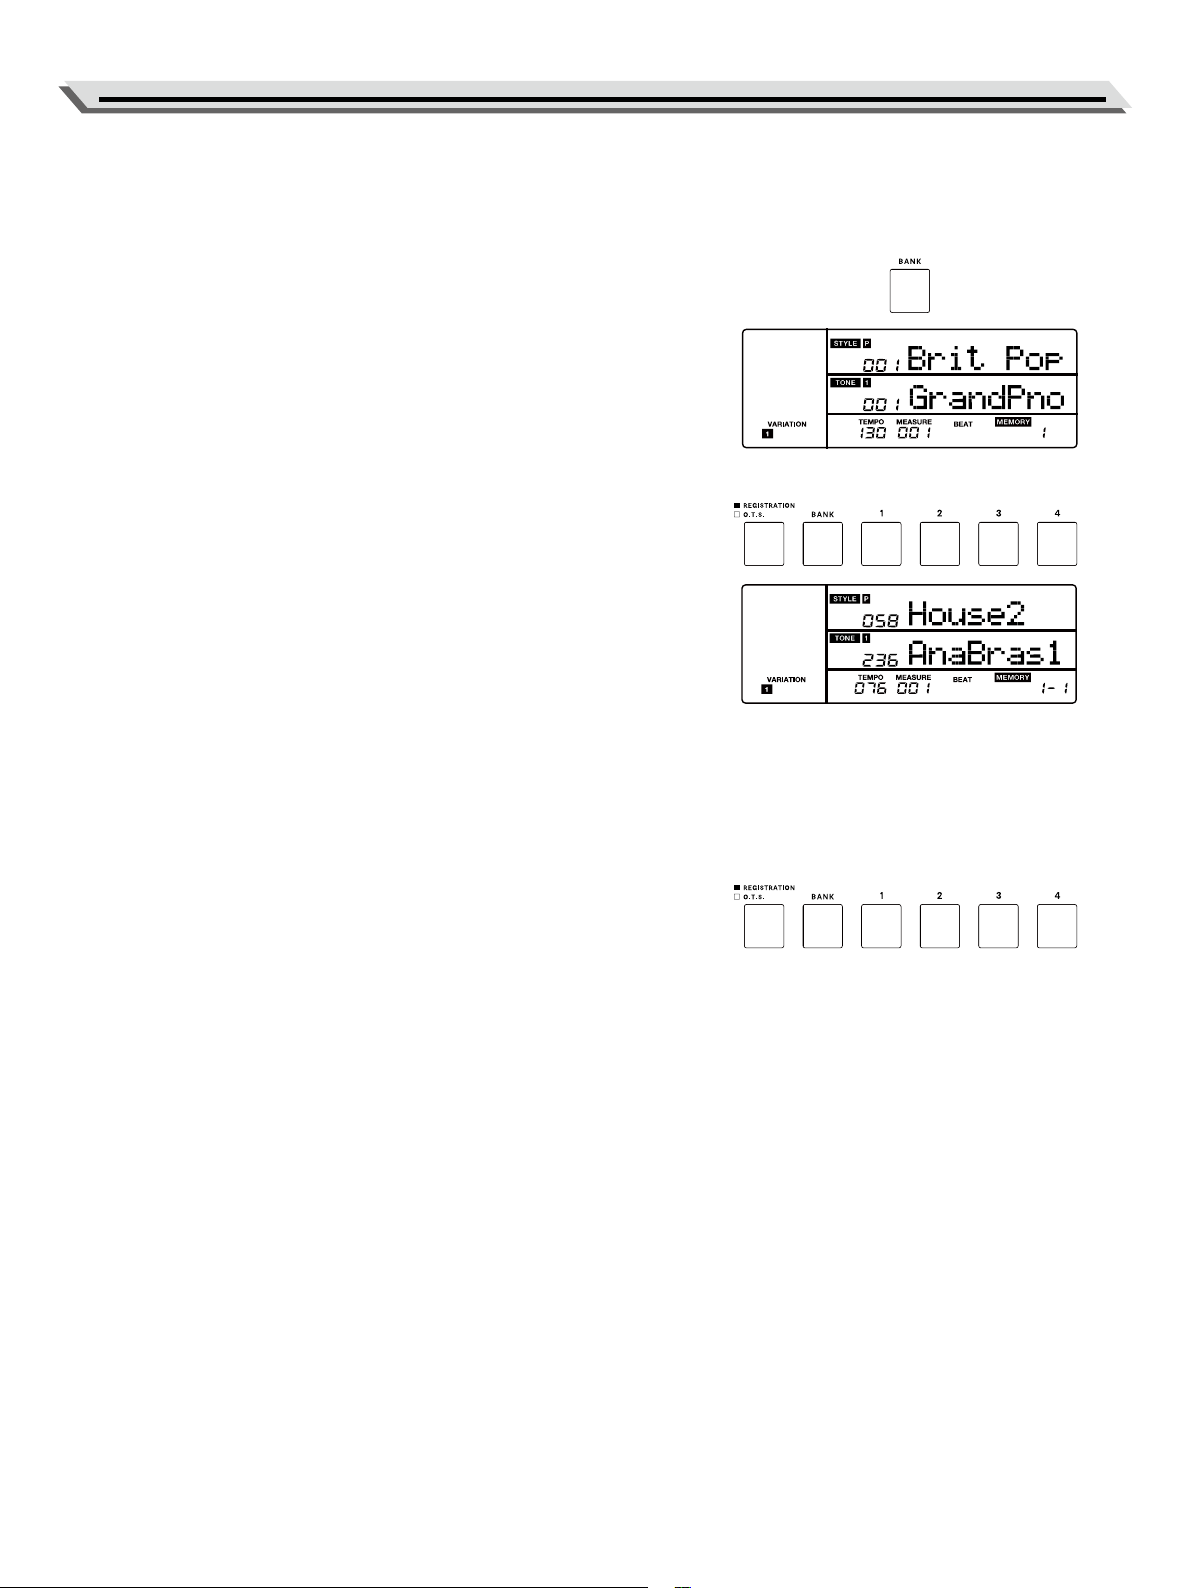
Selecting a Registration Bank
Press the [BANK] button repeatedly to select a memory bank. The LCD
displays the current bank number.
The instrument provides 8 banks. Each bank has 4 registration memories
(button [1] - [4]).
Registering the Panel Settings
1. The memory function is turned on by default when the power is turned
on. When this function is turned o, you can press the [REGISTRA-
TION] button to turn this function on, the button LED and the “MEMO-
RY” icon on LCD light up.
2. Press and hold the [REGISTRATION] button, then press one of the
memory buttons [1] - [4] to save the panel settings to that button.
Note: this operation will overwrite the previous data saved in that
button.
3. Parameters that can be saved to registration memory include:
Tone: main tone, dual tone, split tone, DSP eects, mixer settings.
Accompaniment: style, tempo, Chord mode.
Function: touch response, mic eect and some parameters in the
function menu.
Recalling the Registered Settings
Press one of the memory buttons [1] - [4]. It will recall the settings saved
in that button. This will reset related parameters on the control panel.
Notes:
● Registration memory cannot be recalled when the O.T.S. function is in
use.
● When power o, you can press and hold the [EXIT] and [ENTER] but-
tons and turn on the power. LCD display shows “Reset OK” and the
registration memory will be reset to factory default setting.
18
One Touch Setting
Recording
When one touch setting function is in use, you can instantly recall the
related tone settings to match the current style with a single touch of a
button.
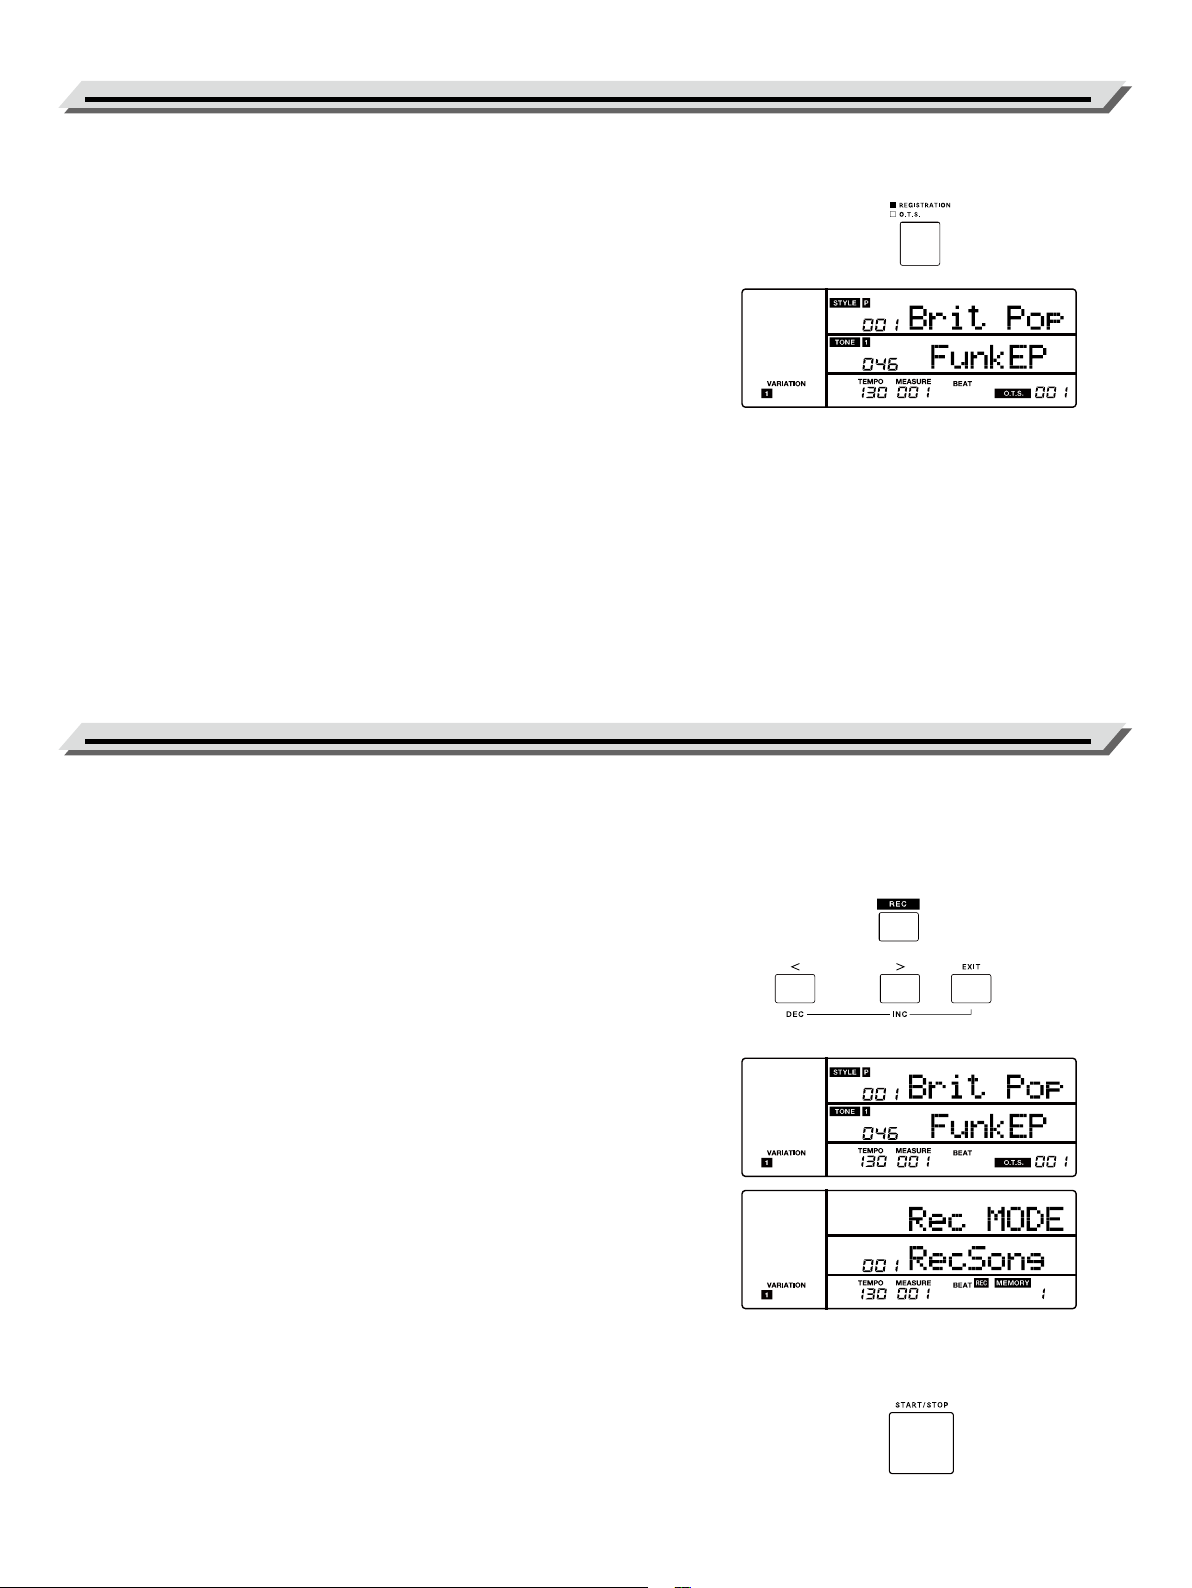
1. Press the [O.T.S.] button. The button LED turns o and the “O.T.S.”
icon on LCD lights up. When chord mode is o, the A.B.C. function is
turned on automatically. If the WHOLE mode is selected, it will stay in
WHOLE mode when O.T.S. is turned on.
2. Press one of the O.T.S. buttons [1]–[4]. It will recall the tone and eect
setting that match the selected style.
One Touch Setting parameters include:
Main tone (Volume, Reverb Level, Octave)
Dual tone (Volume, Reverb Level, Octave)
Split tone (Volume, Reverb Level, Octave)
3. Press the [O.T.S.] button again to turn o this function. It will auto-
matically switch to the registration memory. The button LED and the
“MEMORY” icon on LCD lights up.
Note:
Registration Memory is not available when O.T.S. is in use.
You can record your performance in real time and save it as a user song.
The user songs can be exported to a USB ash drive. (Please refer to
Connecting USB Flash Drive for details.)
Prepare Recording
1. Before you start recording, you need to select a user song to which
the recording will be saved.
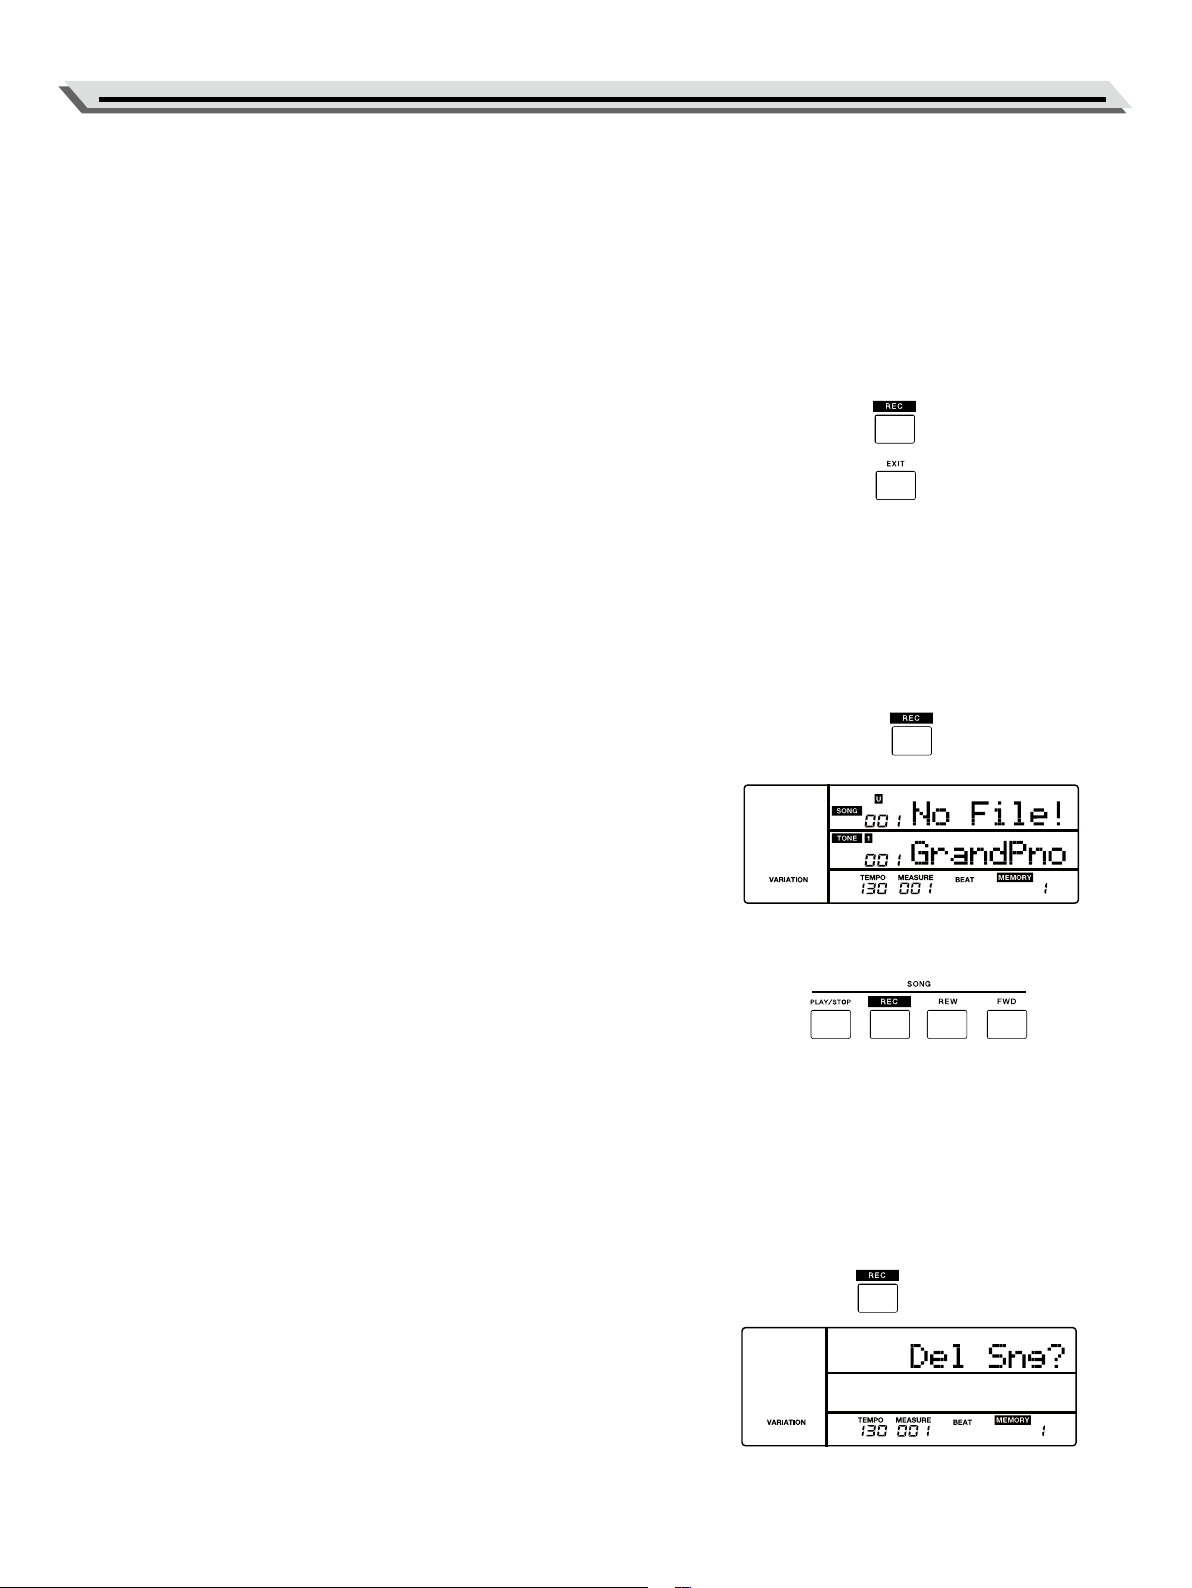
2. Press the [REC] button to enter the user song menu. The button LED
and “REC” icon on LCD light up. You can use the data dial or [EXIT] +
[<] / [>] buttons to select a user song.
The LCD will display “No File!” if the user song has no data. Or the
LCD will display “RecSong” if the user song has data.
3. Press the [REC] or [ENTER] button again to enter the recording stand-
by mode. The button LED and the “REC” icon on LCD blink. Now you
can set the desired tone, style etc. for recording.
4. In recording standby mode, if you press the [EXIT] button, it will go
back to the user song menu.
Note:
You can record up to 10 user songs. If all user songs are already full,
when you press the [REC] button, it will go to “Del Sng?” automatically
to delete the current user song for preparing recording.
Start Recording
In recording standby mode, press the [START/STOP] button to start
recording. The style starts playing. The four beats and the measure start
counting. You can stop style playback by pressing the [START/STOP]
button.
19
Recording
Or you can play the keyboard to start recording. When the A.B.C. and
Sync functions are engaged, you can play any key in left hand section to
start the accompaniment.
Note:
If the user song you select has data, after recording, the previous data
will be overwritten.
Stop Recording
Manually Stop Recording:
During recording, you can press the [REC] button to stop recording.
The button LED and the “REC” icon on LCD turn o. The beat counting
stops.
Or you can press the [EXIT] button to stop recording. It will go back to
the user song menu.
Automatically Stop Recording:
When memory is used up, recording will stop automatically and be
saved.
If you are recording the accompaniment, recording will stop when the
Ending nishes.
Play Back Recording
1. During recording, if you press the [REC] button to stop recording, it
will then enter Song mode.
When in other modes, you can press the [PLAY/STOP] button to enter
Song mode.
When in Song mode, the [PLAY/STOP] button LED and the “SONG”
icon on LCD light up. The LCD displays the current song name and
number. If the current song has data, the LCD displays “PlaySong”, or
it will display “No File!” if the current song is blank.
2. Use the data dial or the [EXIT] + [<] / [>] buttons to select a song.
3. Press the [PLAY/STOP] button to start the song. During song play
back, you can use the [PLAY/STOP] button to pause or continue the
playback. Or use the [FWD] or [REW] button to fast forward or rewind
the song.
4. During song playback, you can press the [STYLE], [EXIT] or [USB]
(when USB ash drive is connected) to stop and exit Song mode.
Note:
When in other modes except USB song mode, you can press and hold
the [PLAY/STOP] button to enter Song mode and start the playback.
By default, it will loop playing all songs. You can change the song loop
mode in the function menu. Please refer to the function menu (P. 28).
Delete Recording
In Song mode, when the LCD displays “PlaySong”, you can press
the [REC] button to enter delete menu. The LCD displays “Del Sng?”,
prompting that it’s going to delete the song. You can press the [ENTER]
button to delete the user song; or press the [EXIT] button to cancel.
Note:
The saved user songs will not be lost after power o.

20
Bluetooth paring and playback
1. The instrument’s Bluetooth function is turned on by default. The Blue-
tooth Audio name is E-X50 Audio.
2. Turn on the Bluetooth function on mobile device, search the Bluetooth
Audio name “E-X50 Audio”. Tap this name to pair it. After it is paired,
the [ ] button LED and the Bluetooth icon on LCD will light up.
3. You can play back songs on your mobile device and hear the play
back from the instrument speakers.
Turning Bluetooth Function On/O
1. Press the [ ] button to enter the Bluetooth menu, use the data dial or
[EXIT] + [<] / [>] buttons to select “Bluetooth”, then press the [ENTER]
button to move the cursor to the lower menu.
2. Use the data dial or [EXIT] + [<] / [>] buttons to turn the Bluetooth on
or o. When Bluetooth function is turned o, the instrument’s Blue-
tooth name cannot be found by a mobile device.
Adjusting Bluetooth Volume
1. Press the [ ] button to enter the Bluetooth menu, use the data dial or
[EXIT] + [<] / [>] buttons to select “Volume”, then press the [ENTER] to
move the cursor to the lower menu.
2. Use the data dial or [EXIT] + [<] / [>] buttons to adjust the volume level.
Disabling Bluetooth Connection
1. Press the [ ] button to enter the Bluetooth menu, use the data dial to
select “Disconnect”, then press the [ENTER] to move the cursor to the
lower menu.
2. Use the data dial , [EXIT] + [<] / [>] buttons, or the [ENTER] button to
disable Bluetooth connection. When Bluetooth connection is disabled,
the button LED and the Bluetooth icon on LCD will turn o.
Bluetooth
21
You can assign dierent functions to the connected footswitch in the
function menu (P. 28).
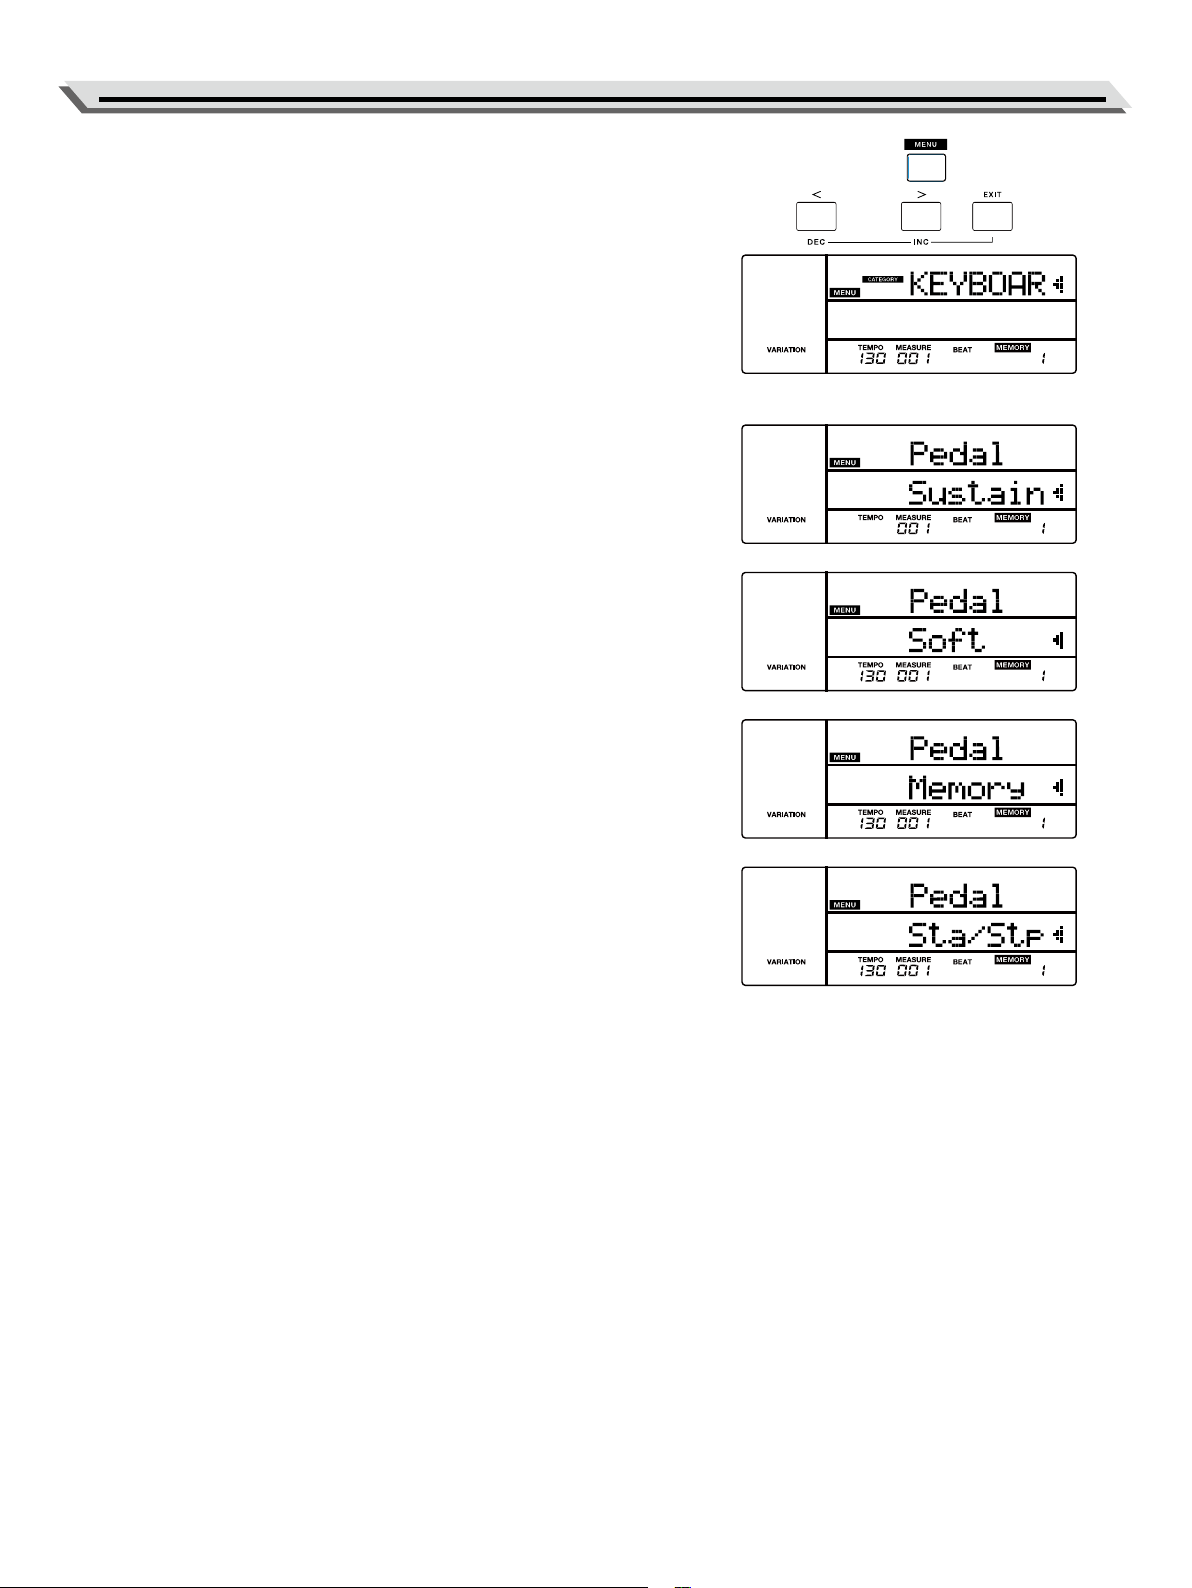
1. Press the [MENU] button to enter the function menu.
2. Use the [<] / [>] button to select the “KEYBOARD” menu. Then use
the data dial to select the “Pedal” parameter.
3. Press the [ENTER] button to move the cursor to the lower menu.
Now use the data dial or the [EXIT] + [<] / [>] buttons to change the
pedal function.
Sustain Pedal
This pedal function performs the same function as the damper pedal
on an acoustic piano, letting you sustain the sound even after releas-
ing the keys. Step and press on the pedal to turn the sustain eect
on. Release the pedal to turn the sustain eect o
Soft Pedal
When the soft pedal is selected, pressing this pedal will make the
notes you play sound softer.
Memory Pedal
When the memory pedal is selected, press this pedal to call up the
registration memory, and then you can call up each memory one by
one. The memory number on LCD will be updated in sync.
Style Start/Stop Pedal
When the style start/stop pedal is selected, press this pedal to start/
stop accompaniment.
Pedal Function
22
Sustain Type
Scale Tune
You can set the sustain pedal so that it will produce a dierent sustain
eect. When setting to ON, when you press the pedal, it will produce
the same sustain eect as holding the keys. When setting to OFF,
when you press the pedal, it will produce natural decay of the sound.
1. Press the [MENU] button to enter the Function menu.
2. Use the [<] / [>] button to select the “KEYBOARD” menu. Then use
the data dial to select the “PedRel” parameter.
3. Press the [ENTER] button to move the cursor to “OFF” in the lower
menu. Now use the data dial or the [EXIT] + [<] / [>] buttons to turn
this function on or o. Please refer to the function menu (P. 28).
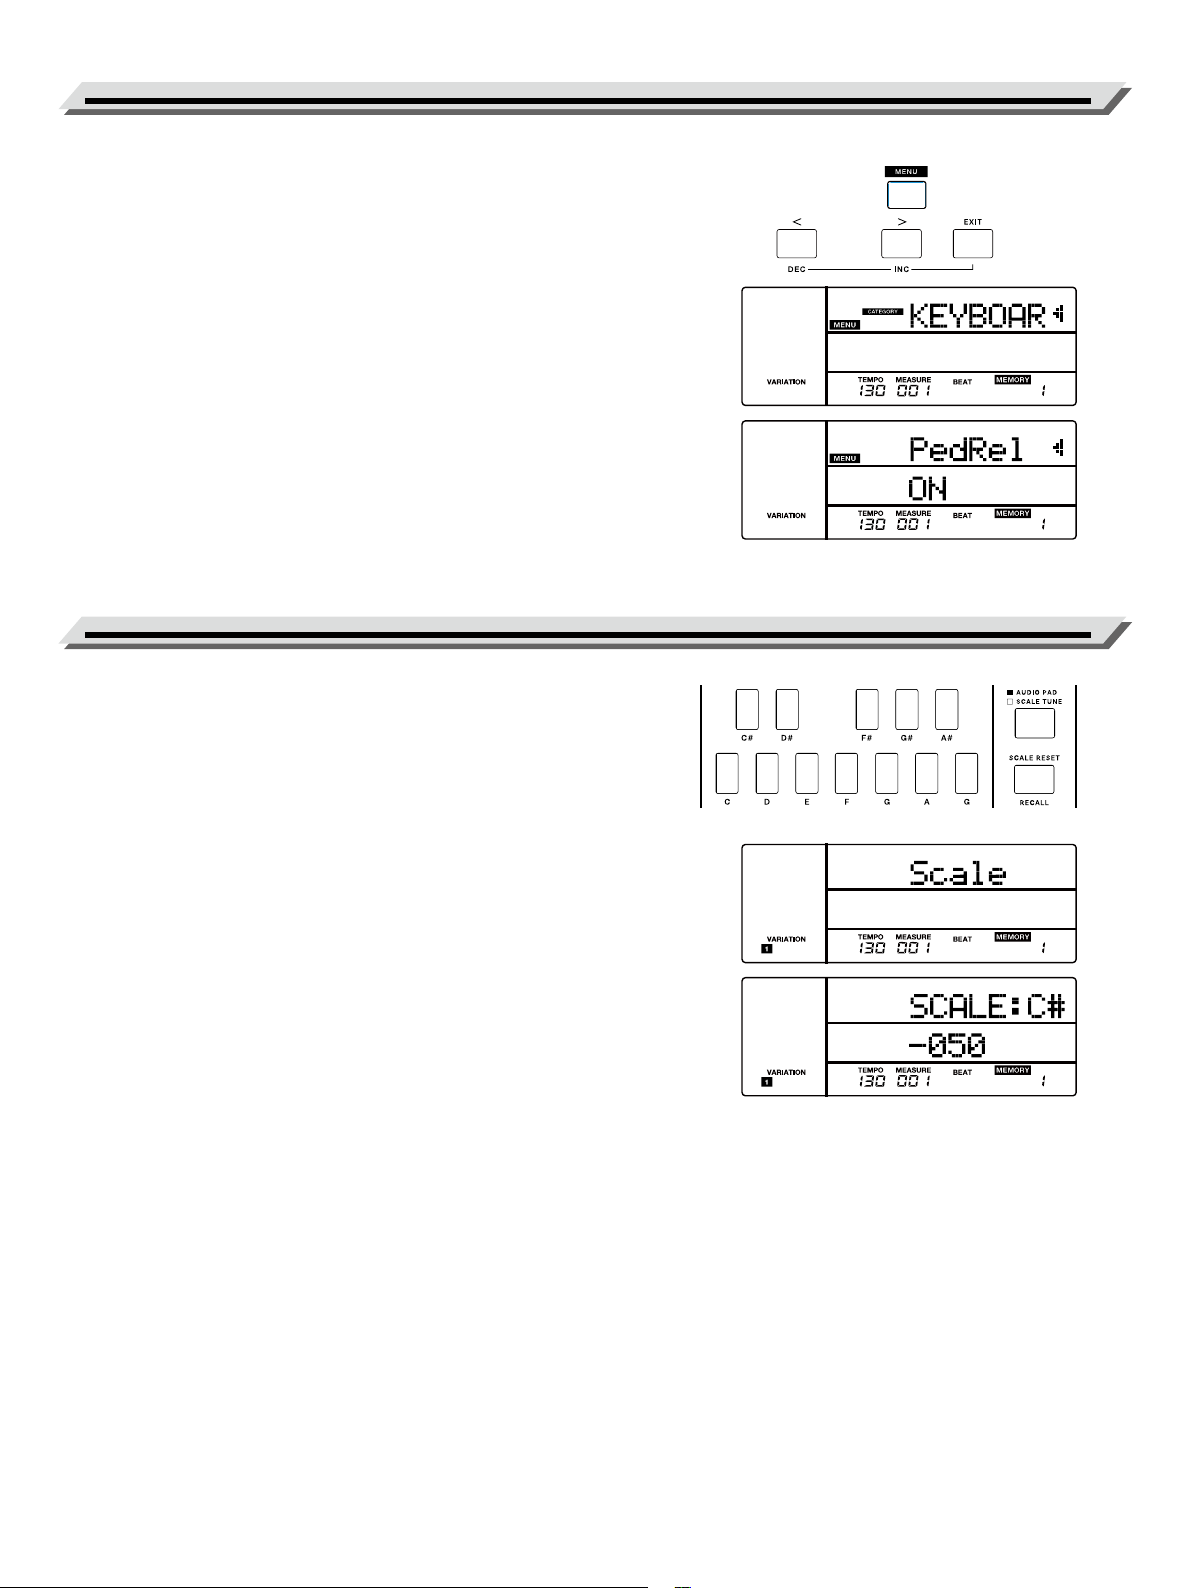
There are two modes: “SCALE TUNE” and “AUDIO PAD”. Scale Tune
mode is turned on by default.
You can press the [AUDIO PAD / SCALE TUNE] button to switch
between the Scale Tune mode and the Audio Pad mode (only when a
USB ash drive is connected). When you switch to Scale Tune mode,
the LCD will temporarily display “Scale”.
1. Scale Tune buttons are [C], [C#], [D], [D#], [E], [F], [F#], [G], [G#], [A],
[A#] and [B].
In Scale Tune mode, press one of the Scale Tune buttons to turn the
selected scale on or o.
When a scale is turned on, the corresponding button LED will turn
on. The related pitch will decrease by 1/2 semitone. When switched
o, the corresponding button LED will turn o. The related pitch will
return to normal.
2. Reset the scale
Press the [SCALE RESET] button. All the Scale Tune button LEDs
will turn o, and go back to normal pitch.
3. Scale ne tune
Press and hold one of the Scale Tune buttons to enter edit mode.
Use the data dial or the [EXIT] + [<] / [>] buttons to edit the selected
scale.
For example, press and hold [C#], the LCD displays “SCALE: C#,
-50”. Use the data dial to adjust the value, from -50 to 50. If there’s
no operation, it will go back automatically from the editing display.
4. Store a scale
Press and hold the [SCALE TUNE] button, then press one of the
Scale Tune buttons to save the scale settings to that button.
5. Recall a scale
Press and hold the [RECALL] button, then press one of the Scale
Tune buttons to recall the scale settings saved in that button.
23
Audio Pad
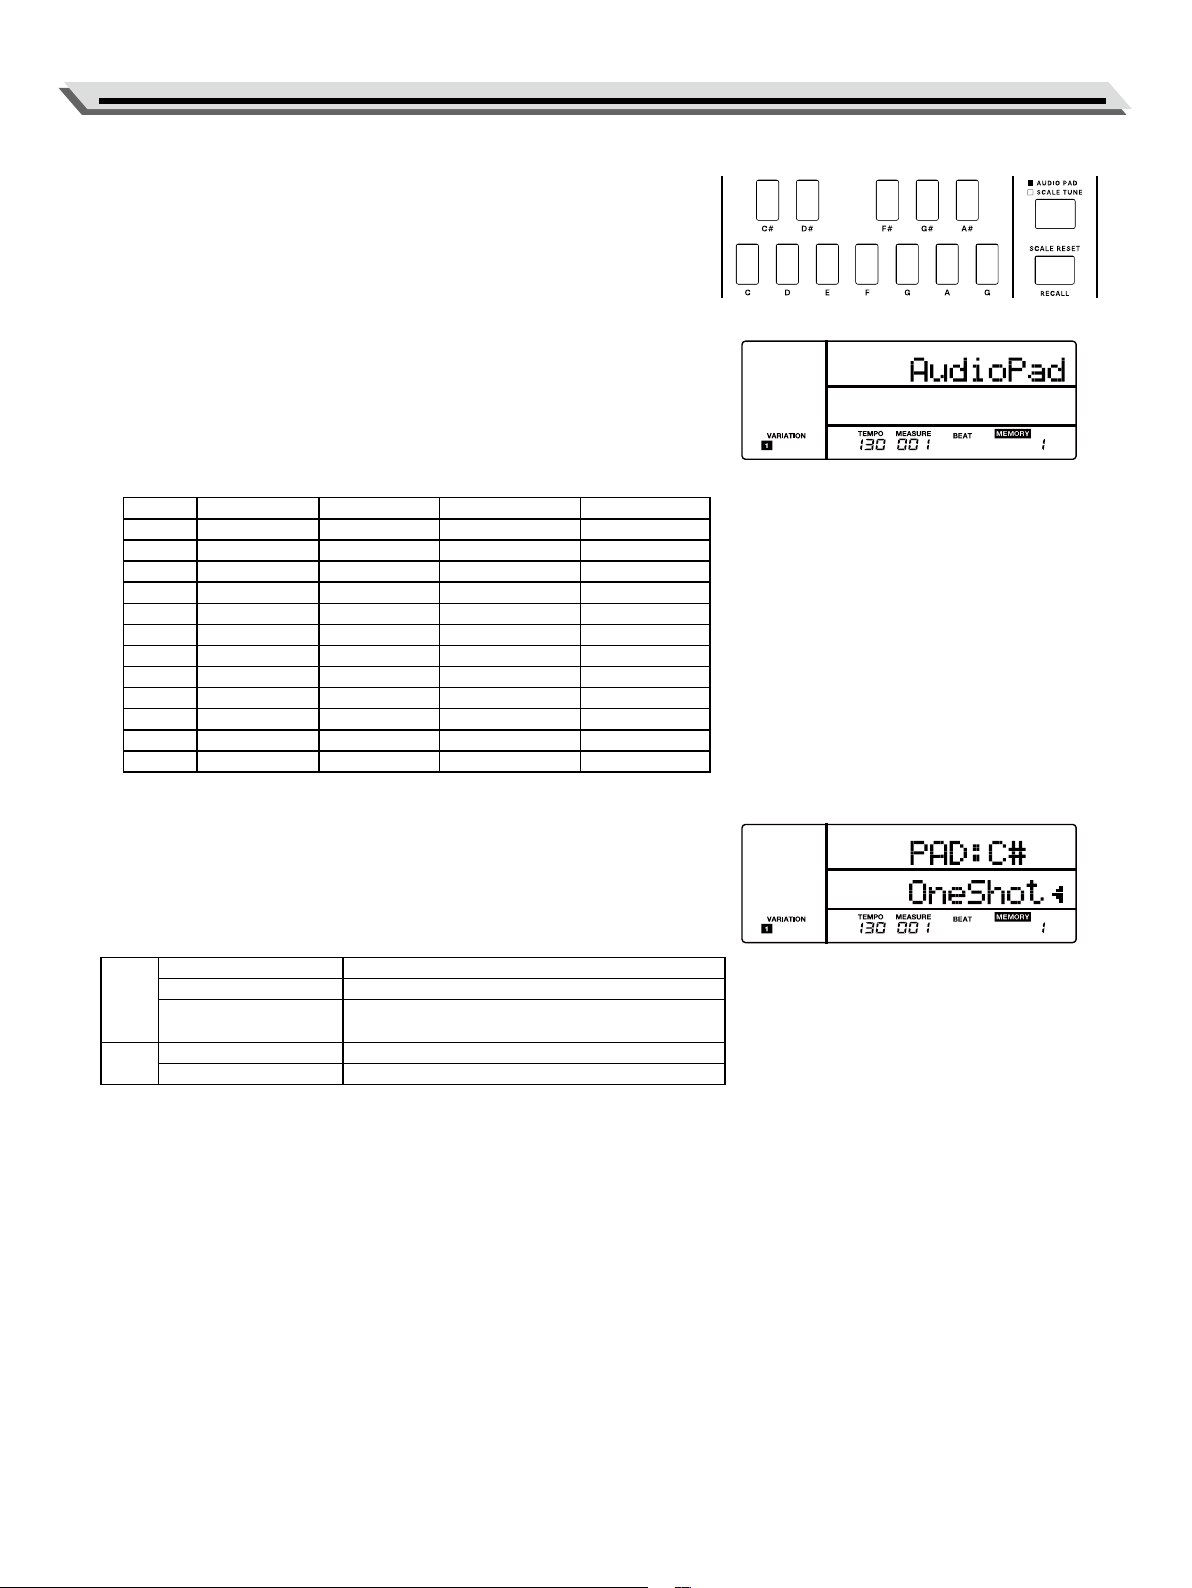
When a USB ash drive is connected and recognized, you can press the
[AUDIO PAD / SCALE TUNE] button to switch to Audio Pad mode. The
button LED lights up and the LCD will temporarily display “AudioPad”.
1. Audio Pad buttons are [C], [C#], [D], [D#], [E], [F], [F#], [G], [G#], [A],
[A#] and [B].
When the audio les on USB ash drive are recognized, the corre-
sponding button LED will turn on. Press one of the lit buttons to play
back the corresponding MP3/WAV le. During playback, the selected
button LED will blink. Press the corresponding button again to stop
the audio playing back.
2. Audio Pad le names
Audio Pad les on USB ash drive should be named as below: “File
name 1” to “File name 4” can be recognized, but “FILE NAME 1” has
priority.
Button File name 1 File name 2 File name 3 File name 4
[C] PAD_C.wav PAD_1.wav PAD_C.mp3 PAD_1.mp3
[C#] PAD_C#.wav PAD_2.wav PAD_C#.mp3 PAD_2.mp3
[D] PAD_D.wav PAD_3.wav PAD_D.mp3 PAD_3.mp3
[D#] PAD_D#.wav PAD_4.wav PAD_D#.m03 PAD_4.mp3
[E] PAD_E.wav PAD_5.wav PAD_E.mp3 PAD_5.mp3
[F] PAD_F.wav PAD_6.wav PAD_F.mp3 PAD_6.mp3
[F#] PAD_F#.wav PAD_7.wav PAD_F#.mp3 PAD_7.mp3
[G] PAD_G.wav PAD_8.wav PAD_G.mp3 PAD_8.mp3
[G#] PAD_G#.wav PAD_9.wav PAD_G#.mp3 PAD_9.mp3
[A] PAD_A.wav PAD_10.wav PAD_A.mp3 PAD_10.mp3
[A#] PAD_A#.wav PAD_11.wav PAD_A#.mp3 PAD_11.mp3
[B] PAD_B.wav PAD_12.wav PAD_B.mp3 PAD_12.mp3
3. Audio Pad playback mode
You can set the playback mode for each audio pad button. Press and
hold one of the Audio Pad buttons to enter edit mode. Then use the
data dial or the [EXIT] + [<] / [>] buttons to select “One Shot” mode or
“Loop” mode.
Audio les that can be played:
MP3 Format MPEG-1 audio layer 3
Sampling Frequency 44.1kHz
Bit Rate 32, 40, 48, 56, 64, 80, 96, 112, 128, 160, 192,
224, 256, 320 kbps, VBR (Variable Bit Rate)
WAV Sampling Frequency 22KHz, 44.1KHz, 48KHz
Bit Rate 16bit
Notes:
● Two or more audio les cannot be played at the same time.
● The tempo of an audio le cannot be changed.
24
Connecting USB Flash Drive
The instrument recognizes USB ash drives (32MB to 128GB) in FAT32
format. It does not support multi-partitioned USB ash drives. We rec-
ommend formatting the USB ash drive on the instrument before using.
Note:
The instrument supports up to 512 les under the root directory of a
USB ash drive of FAT32 format. Exceeding this limit will make it una-
ble to save to the USB ash drive.
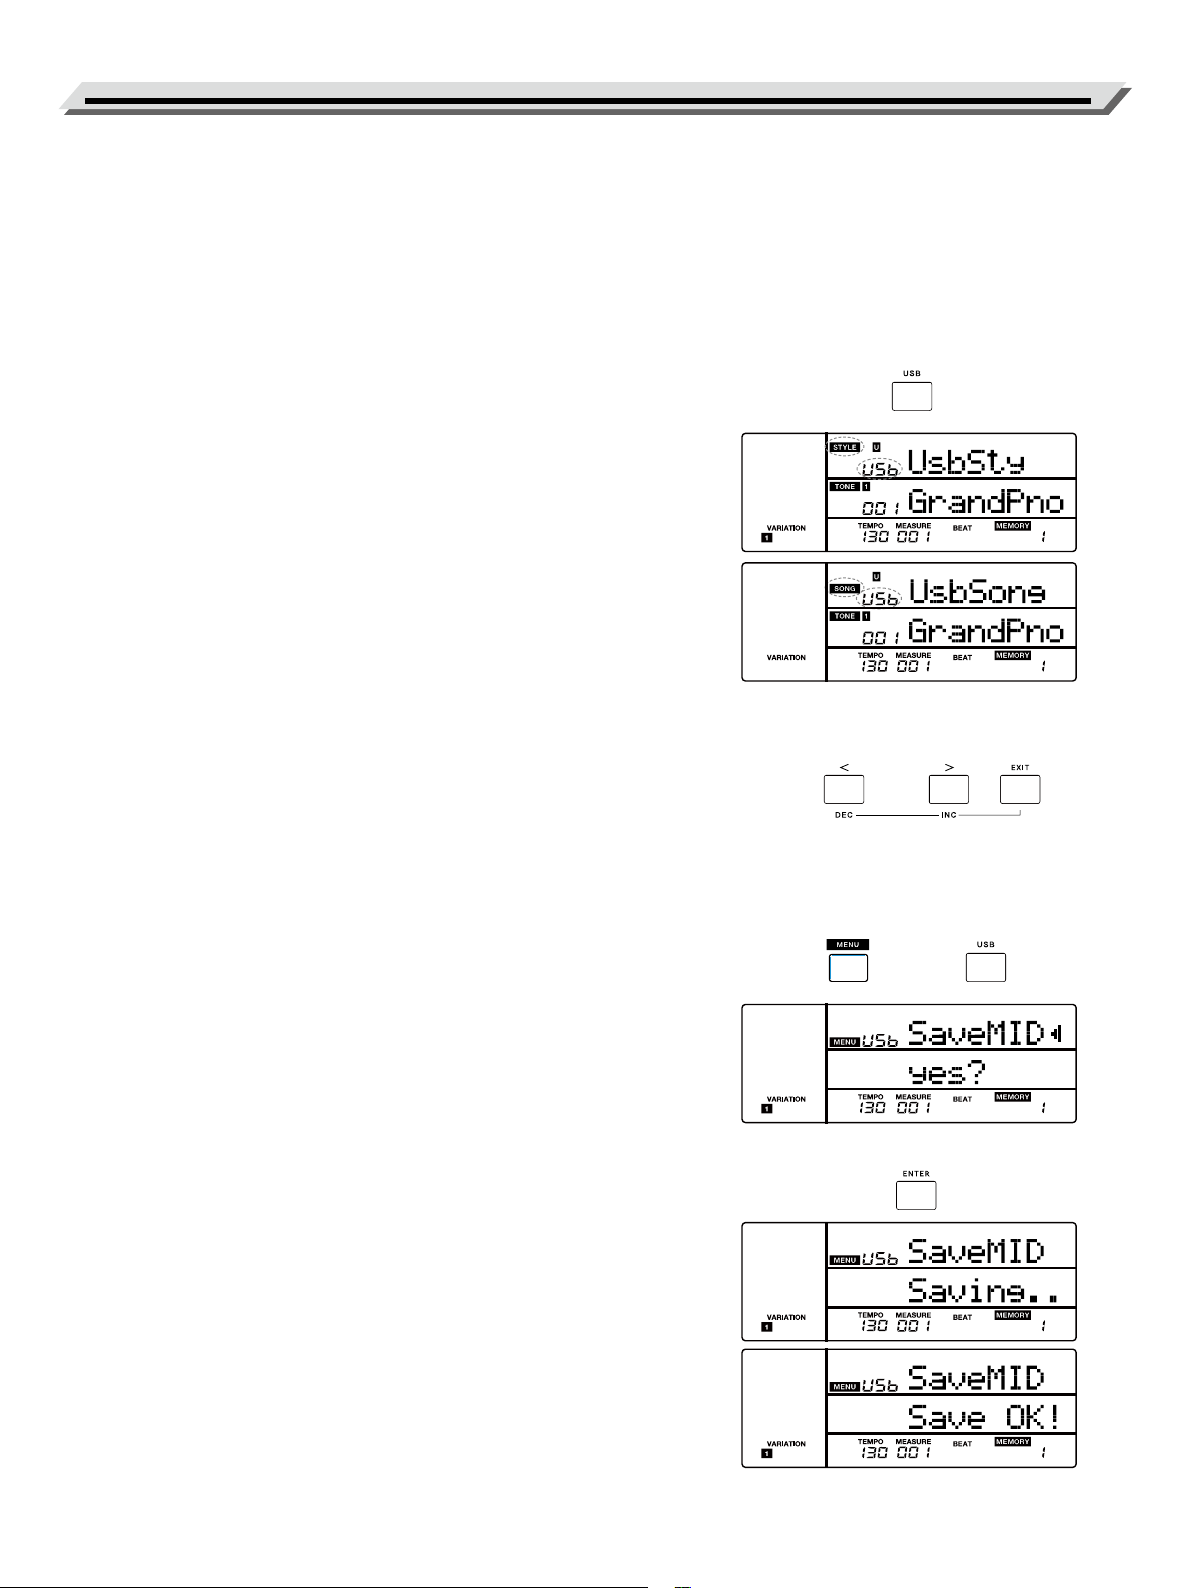
Playing a Style/Song from USB Flash Drive
1. When in style mode, press the [USB] button to enter the USB Style
menu. The LCD can display all styles in the USB ash drive by using
data dial. The “STYLE” and “USb” icons on LCD light up. Press the
[START/STOP] button to start style playback. Press this button again
to stop the playback.
When in USB Style menu, you can use these buttons to control the
style: TEMPO [TAP] / [-] / [+], [CHORD], [SYNC], [INTRO/ ENDING],
[FADE IN/OUT], [FILL 1/3] and [FILL 2/4].
2. When in song mode, press the [USB] button to enter the USB Song
menu. The “SONG” and “USB” icons on LCD light up. The LCD can
shows all songs and MP3/WAV songs in the USB ash drive by us-
ing data dial. Press the [PLAY/STOP] button to start song playback.
Press this button again to stop the playback.
When in USB Song menu, you can use these buttons to control the
song (only for MIDI songs): TEMPO [TAP] / [-] / [+], [REW], [FWD] and
Scale Tune buttons.
3. Use the data dial or the [EXIT] + [<] / [>] buttons to select a song or
style.
4. You can set the playback mode in the function menu. Please refer to
the function menu (P. 28).
Saving User Song to USB Flash Drive
1. Press the [MENU] button to enter the function menu, then press the
[USB] button to enter the USB menu. Use the data dial to select
“SaveMID”.
2. Press the [ENTER] button to move the cursor to “Yes?” in the lower
menu. Press the [ENTER] button, the LCD will display “Saving..”.
The user songs will be saved to the root directory of the USB ash
drive. The les will be named as “RecSng_XX_NUB.MIDI”.
3. After saving, the LCD will prompt “Save OK!”, then return to the USB
menu.
File name description:
“RecSng_XX” is the user song name and number (corresponding to
the user songs on the instrument).
“NUB” is the number of the saved song (01~512).
25
Connecting USB Flash Drive
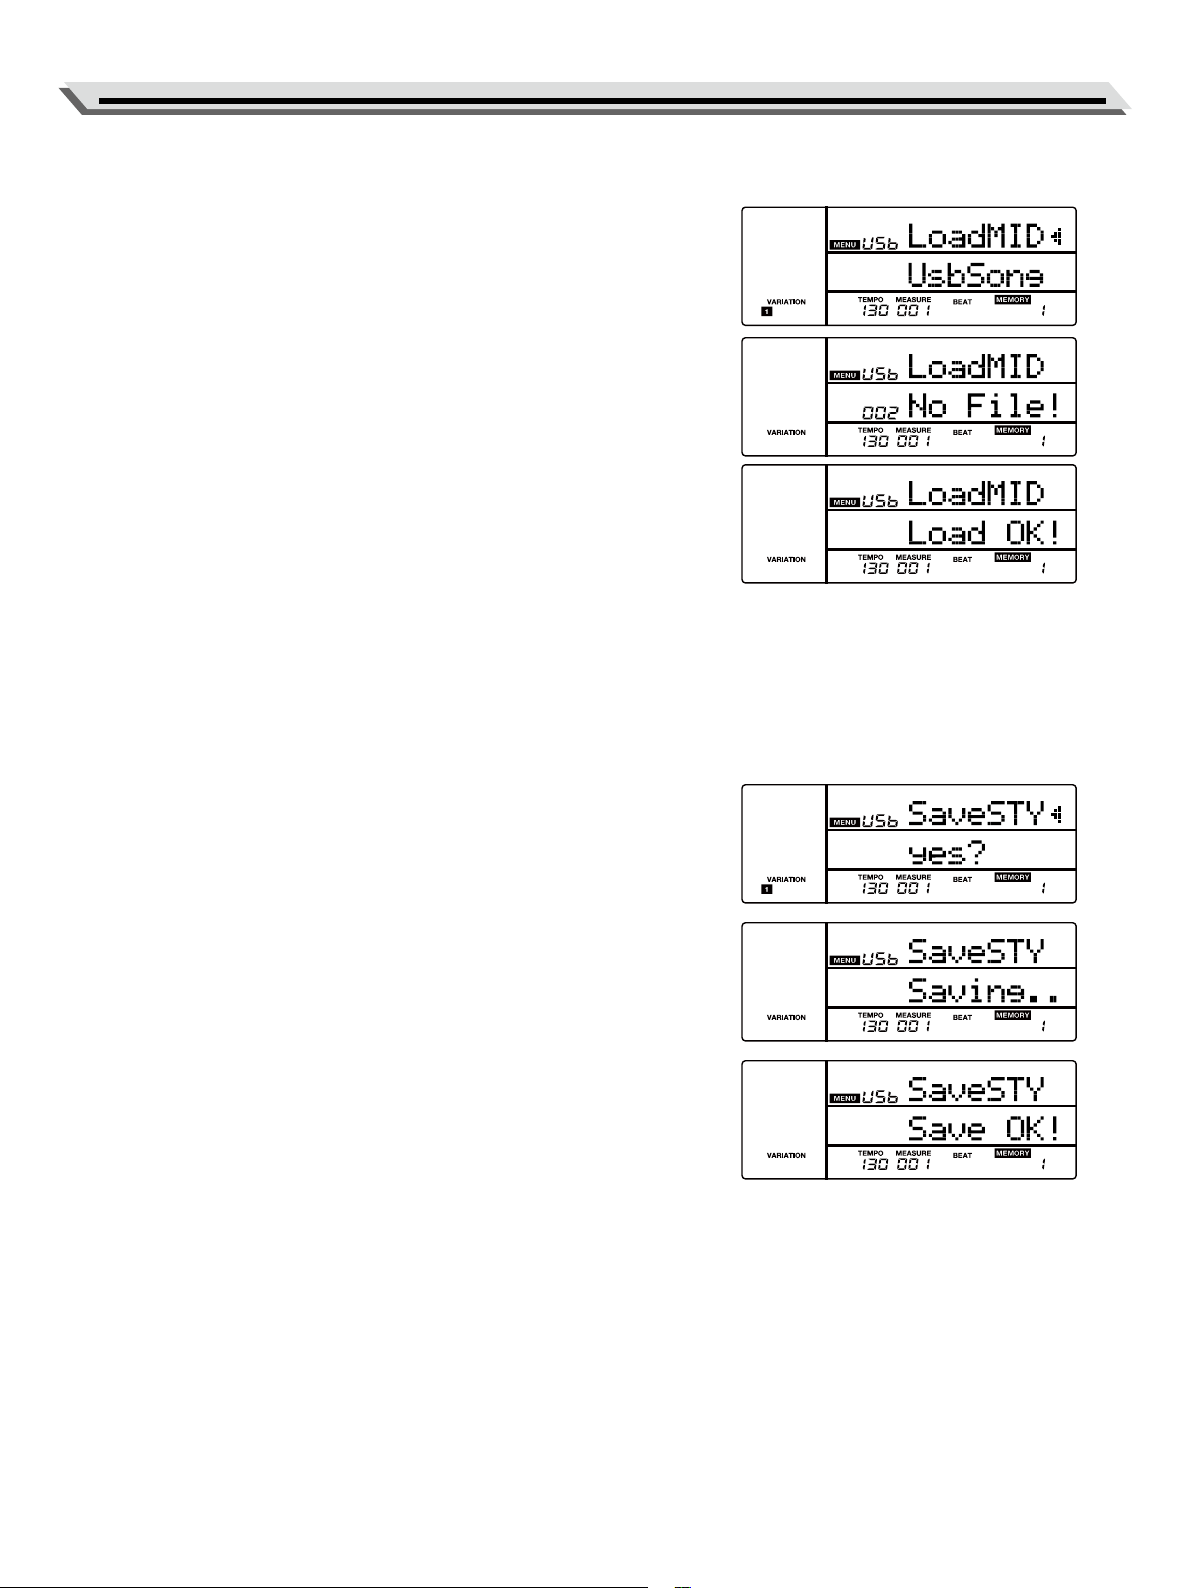
Loading User Song from USB Flash Drive
1. Press the [MENU] button to enter the function menu, then press the
[USB] button to enter the USB menu. Use the data dial to select
“LoadMID”.
2. Press the [ENTER] button to move the cursor to the MIDI le name
(*.mid) in the lower menu. Use the data dial to select a MIDI le from
the USB ash drive.
3. Press the [ENTER] button. The LCD will display the user songs (max-
imum 10 songs) on the instrument. Use the data dial to select a user
song. If the selected user song has data, the LCD will prompt “0XX
RecSong”. If the user song is blank, the LCD will prompt “No File!”.
4. Press the [ENTER] button. The LCD will prompt “Load OK!”.
If the selected user song has data, the LCD will prompt “Cover?”
Now press the [ENTER] button to conrm loading, or press the [EXIT]
button to cancel. This operation will overwrite the previous user song
on the instrument.
5. After loading, the LCD will return to the USB menu.
Saving User Style to USB Flash Drive
You can download user styles and save them to style no. 301~330 on the
instrument. These user styles can be exported to the USB ash drive by
using this operation.
Note:
Preset styles cannot be saved to the USB ash drive.
1. Press the [MENU] button to enter the function menu, then press the
[USB] button to enter the USB menu. Use the data dial to select “Sav-
eSTY”.
2. Press the [ENTER] button to move the cursor to “Yes?” in the lower
menu. Press the [ENTER] button, the LCD will display “Saving..”. The
user styles will be saved to the root directory of the USB ash drive
using the original style names. If the user styles on the instrument are
blank, the LCD will prompt “No File!”.
3. After saving, the LCD will prompt “Save OK!”, then return to the USB
menu.
File name description:
If you’re using the same le names to save the user styles to USB ash
drive, it will automatically add a number to the style name, for example,
FILE1, FILE2, FILE3 etc.
26
Connecting USB Flash Drive
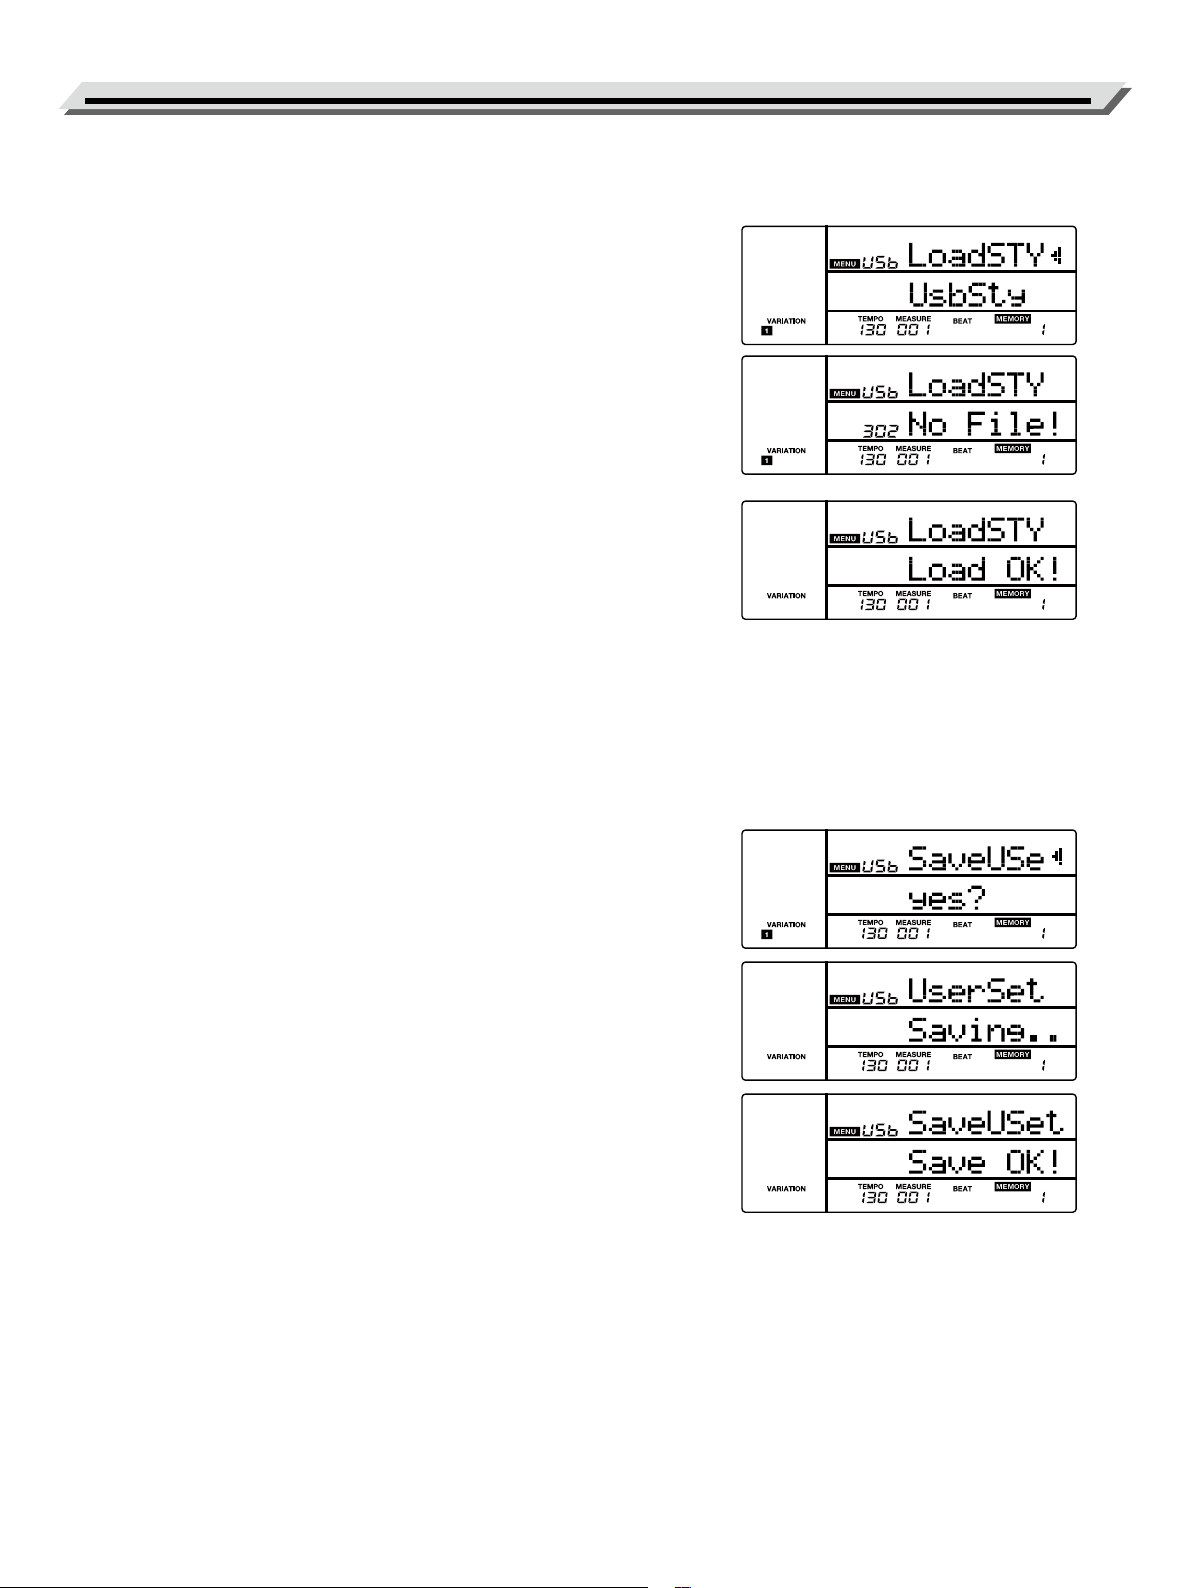
Loading User Style from USB Flash Drive
You can import user styles from the USB ash drive and save them to
style no. 301~330 on the instrument.
1. Press the [MENU] button to enter the function menu, then press the
[USB] button to enter the USB menu. Use the data dial to select “Load-
STY”.
2. Press the [ENTER] button to move the cursor to the style le name
(*.sty) in the lower menu. Use the data dial to select a style le from the
USB ash drive.
3. Press the [ENTER] button. The LCD will display the user styles on the
instrument. Use the data dial to select a user style. If the selected user
style has data, the LCD will display the style name. If the USB ash
drive has no style data, the LCD will prompt “No File!”.
4. Press the [ENTER] button. The LCD will prompt “Load OK!”.
If the selected user style has data, the LCD will prompt “Cover?” Now
press the [ENTER] button to conrm loading, or press the [EXIT] button
to cancel. This operation will overwrite the previous user style on the
instrument.
5. After loading, the LCD will return to the USB menu.
Saving User Setting to USB Flash Drive
These user settings can be saved to USB ash drive: Audio Pad playback
mode, scale tune setting, octave, transpose, eect parameter setting,
main tone number, dual tone number, split tone number, function menu
settings (except factory reset), mixer menu setting (except Percussion -
Accomp 5 volume), and registration memory.
When exporting the user settings, user songs and user styles will be saved
to the USB ash drive as well.
1. Press the [MENU] button to enter the function menu, then press the
[USB] button to enter the USB menu. Use the data dial to select
“SaveUSet”.
2. Press the [ENTER] button to move the cursor to “Yes?” in the lower
menu. Press the [ENTER] button, the LCD will display “Saving..”. The
user settings will be saved to the root directory of the USB ash drive.
The les will be named as “UserSetupX.usp” (X is the user setting num-
ber). It will also export the user styles and user songs from the instru-
ment to the USB ash drive.
3. After saving, the LCD will prompt “Save OK!”, then return to the USB
menu.
27
Connecting USB Flash Drive
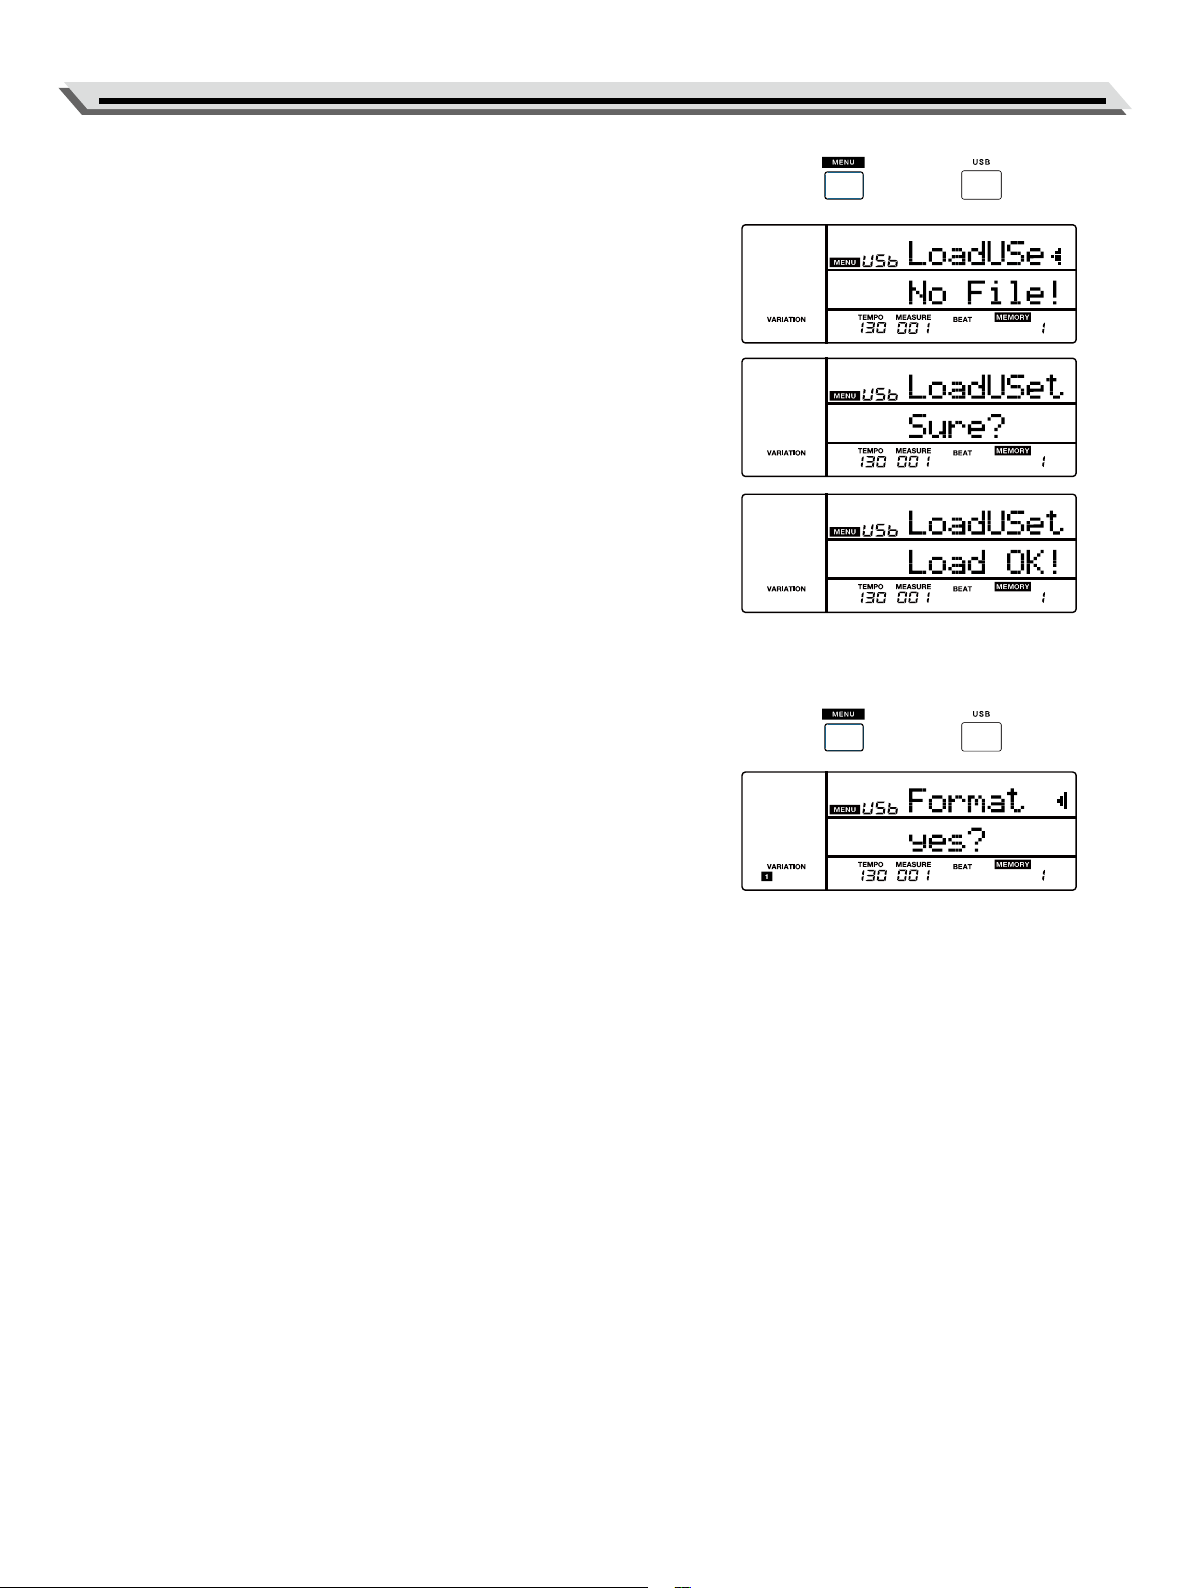
Loading User Setting from USB Flash Drive
1. Press the [MENU] button to enter the function menu, then press the
[USB] button to enter the USB menu. Use the data dial to select
“LoadUSet”.
2. Press the [ENTER] button to move the cursor to the user setting le
name (*.usp) in the lower menu. Use the data dial to select a user
setting.
3. Press the [ENTER] button. The LCD will prompt “Sure?”.
4. Press the [ENTER] button. It will load the user settings to the instru-
ment. The related user styles and user songs will also be loaded to
the instrument.
5. After loading, the LCD will prompt “Load OK!”, then return to the USB
menu.
Note:
This operation will overwrite the previous settings on the instrument.
Formatting the USB Flash Drive
1. Press the [MENU] button to enter the function menu, then press the
[USB] button to enter the USB menu. Use the data dial to select
“Format”.
2. Press the [ENTER] button to move the cursor to “Yes?” in the lower
menu.
3. Press the [ENTER] button to format the USB ash drive, or press the
[EXIT] button to cancel.
4. After formatting, it will return to the USB menu.
Note:
Formatting will delete all data on the USB ash drive. It may take several
minutes to format a USB ash drive of large capacity.
28
Function Menu
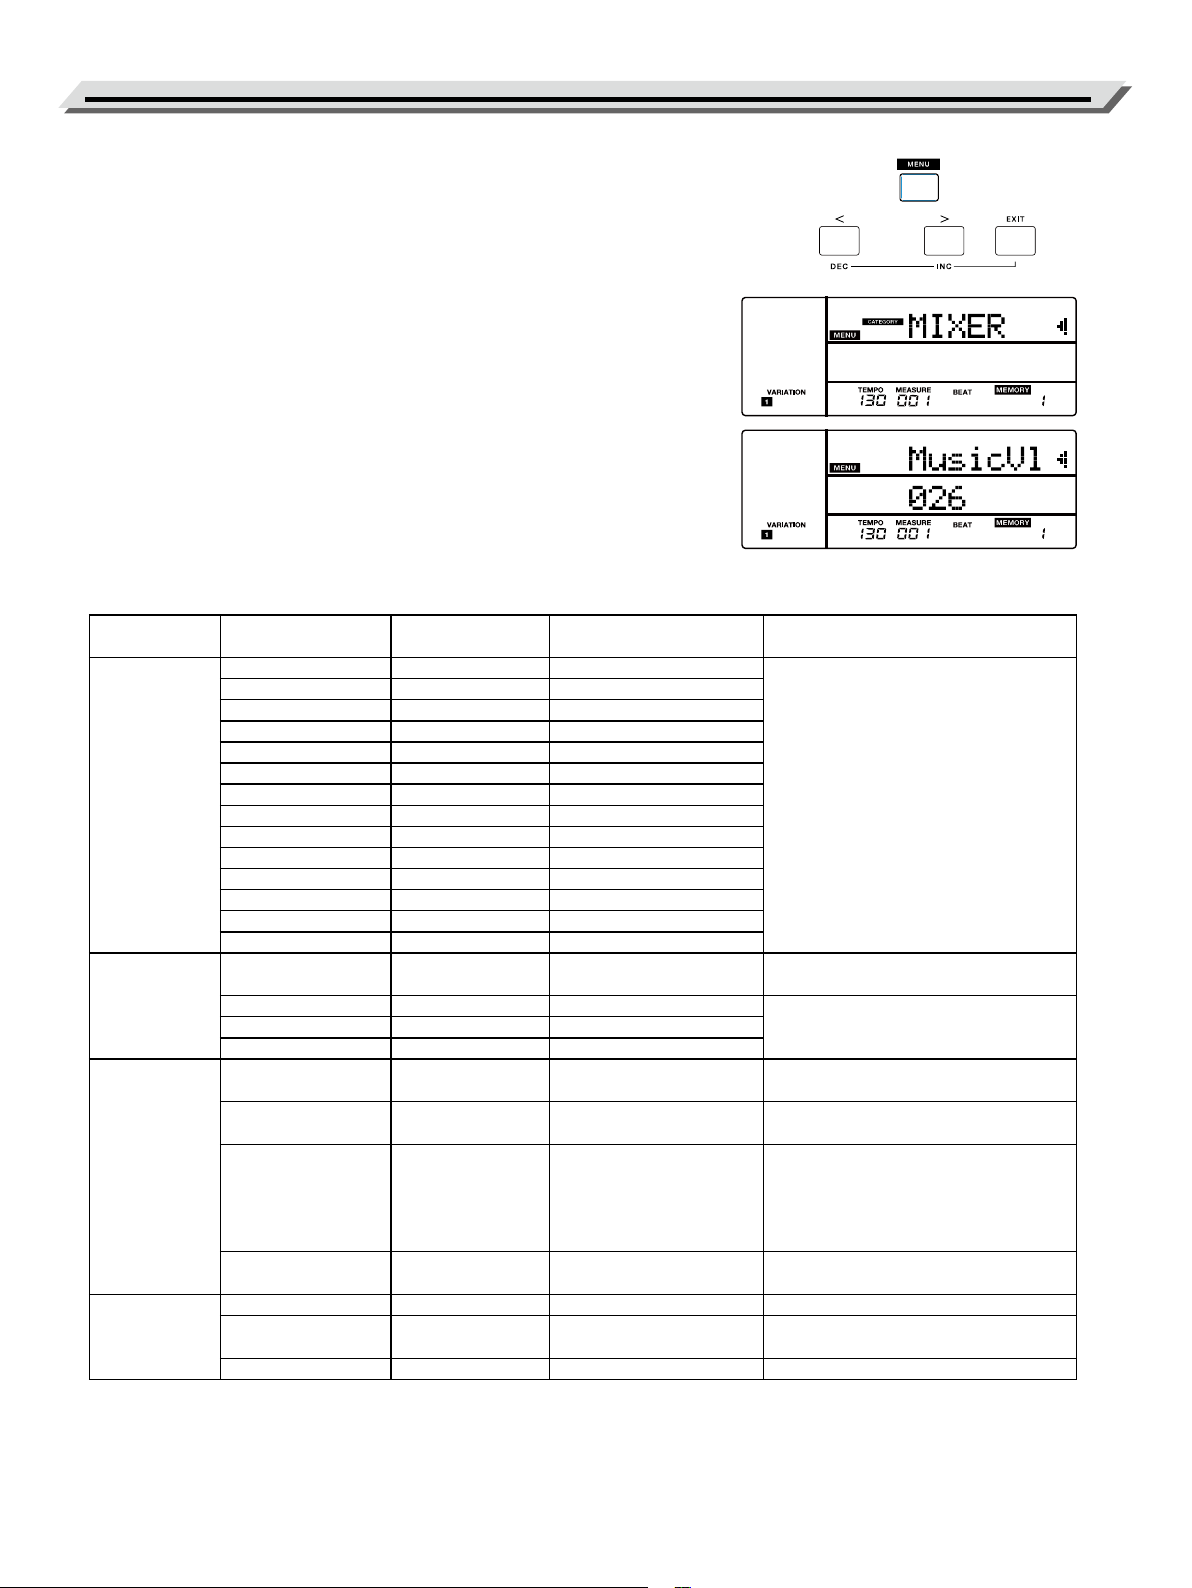
1. Press the [MENU] button to enter the function menu.
2. Use the [<] / [>] button to select a parameter category. After a sec-
ond,the LCD automatically shows the parameter.
3. Use the data dial to select a parameter. Then press the [ENTER] but-
ton to move the cursor to the lower menu to set the parameter.
4. Use the data dial or the [EXIT] + [<] / [>] buttons to change the setting.
Press [EXIT] + [<] + [>] buttons simultaneously to restore the default
setting of the current parameter.
5. Press the [EXIT] button to go back.
6. Press the [STYLE] or [TONE] button to exit the function menu.
Detailed parameters and their ranges:
Parameter
category
Parameter LCD display Range Description
MIXER
Music volume MusicVl 0 ~ 32 (default: 26)
You can separately adjust the volume
of each track for appropriate volume
balance.
Upper tone volume Upper1 0 ~ 32 (default: 25)
Dual tone volume Upper2 0 ~ 32 (default: 20)
Split tone volume Lower 0 ~ 32 (default: 18)
Metronome volume MetroVl 0 ~ 32 (default: 25)
Mic volume Mic Vol 0 ~ 32 (default: 12)
Percussion volume Perc 0 ~ 32
Drum volume Drum 0 ~ 32
Bass volume Bass 0 ~ 32
Accomp 1 volume Accomp1 0 ~ 32
Accomp 2 volume Accomp2 0 ~ 32
Accomp 3 volume Accomp3 0 ~ 32
Accomp 4 volume Accomp4 0 ~ 32
Accomp 5 volume Accomp5 0 ~ 32
TUNING
Tune Tune -50 ~ +50 (default: 0)
Adjust the pitch of the keyboard up or
down in a 2-cent increment.
Upper tone octave OctvR1 -2 ~ +2 (default: 0)
Shift the pitch of the specied tone
layer up or down by one octave.
Dual tone octave OctvR2 -2 ~ +2 (default: 0)
Split tone octave OctvL -2 ~ +2 (default: 1)
KEYBOARD
Touch response Touch OFF,1 ~ 3 (default: 2)
Set the velocity response of the
keyboard.
Split point SplitPt 1 ~ 61 (default: 19)
Set the split point for Split mode and
Chord mode.
Pedal function Pedal
Sustain
Soft
Memory
Sta/Stp
(default: Sustain)
Assign dierent functions to the
footswitch.
Sustain type Ped Rel ON,OFF (default: ON)
Set the sustain type so that it will
produce dierent sustain eect.
ACCOMP
Accomp volume AcmpVol 0 ~ 32 (default: 26) Adjust the accompaniment volume.
One nger key OneFKey
OFF,C,C#,D,D#,E,F,F#,G,
G#,A,A#,B (default: OFF)
Set the root note of one nger key
function.
Fade time FdTime 1 ~ 20 (default: 10) Set the fade in/out time.
29
Function Menu
EFFECT
Reverb type RevType
Hall 1
Hall 2
Hall 3
Hall 4
PnoHall
Room 1
Room 2
Room 3
Church
Garage
RevStdH
(default: RevStdH)
Select the reverb type.
Reverb Level Rev Lv 0 ~ 32 (default: 28)
Adjust the overall reverb level.
Upper tone reverb level RevLvR1 0 ~ 32 (default: 9) Adjust the reverb level of the upper tone.
Dual tone reverb level RevLvR2 0 ~ 32 (default: 9) Adjust the reverb level of the dual tone.
Split tone reverb level RevLvL 0 ~ 32 (default: 9) Adjust the reverb level of the split tone.
EQ EQ
Piano
Pop
Rock
Class
Jazz
R&B
(default: Piano)
Select the EQ type.
Chorus type ChrTYPE
Chorus1
Chorus2
Chorus3
Chorus4
ChrGMC1
ChrGMC2
ChrCel1
ChrCel2
ChrSym1
ChrSym2
ChrDoub
ChrStd.
(default: ChrStd.)
Select the chorus type.
Chorus level Chr Lev 0 ~ 32 (default: 0) Adjust the chorus level of the current chorus type.
30
Function Menu
MEFFECT
Mic EQ low gain LowGain -10 ~ +10 (default: 0)
Set the low/mid/high gain for the microphone. Mic EQ mid gain MidGain -10 ~ +10 (default: 0)
Mic EQ high gain HighGain -10 ~ +10 (default: 0)
Mic reverb type MRvType
MRevHal1
MRevHal2
MRevHal3
MRevHal4
MRevPnoH
MRevRom1
MRevRom2
MRevRom3
MRevChrh
MRevGrg
MRevStdH
(default: MRevStdH)
Select the mic reverb type.
Mic reverb level MRevLev 0 ~ 32 (default: 15) Adjust the mic reverb level.
Mic eect type MEfType
MChorus1
MChorus2
MChorus3
MChorus4
MChrGMC1
MChrGMC2
MChrCel1
MChrCel2
MChrSym1
MChrSym2
MChrDoub
MChrStd.
MWah
MPhaser
MDist.
MOvDr.
MPan
(default: MChrStd.)
Select the mic eect type.
Mic eect level MEfLev 0 ~ 32 (default: 0) Adjust the mic eect level.
Mic delay type MDlType
MDelay
MPanDly
(default: MDelay)
Select the mic delay type.
Mic delay time MDlTime 0 ~ 32 (default: 10) Set the mic delay time.
Mic delay feedback MDlyFb 0 ~ 32 (default: 14) Set the mic delay feedback.
Mic delay level MDlyLev 0 ~ 32 (default: 8) Set the mic delay level.
LOCKRmn
Tempo remain TempRmn ON,OFF (default: OFF)
Tempo will remain unchanged when changing
style during style playback.
Tempo lock TempLck ON,OFF (default: OFF)
Lock the tempo / tone / style / transpose / mic
eect, so that they will remain unchanged when
recalling the memory.
Tone lock ToneLck ON,OFF (default: OFF)
Style lock Stl Lck ON,OFF (default: OFF)
Transpose lock TrnsLck ON,OFF (default: OFF)
Mic eect lock Mregist ON,OFF (default: ON)
Bluetooth
Bluetooth function Bluetooth ON,OFF (default: ON) Turn Bluetooth function on /o.
Bluetooth volume Volume OFF,1 ~ 5 (default: 4) Adjust the Bluetooth volume.
Bluetooth connection Disconnect - Disable Bluetooth connection.
OTHERS
Metronome beat type MtrBeat 0, 2 ~ 9 (default: 4) Set the metronome beat type.
MIDI out MIDIout 1 ~ 16 (default: 1) Set the MIDI out channel.
Song loop SngLoop
1
ALL
OFF
(default: ALL)
Set the playback mode:
Loop a single song
Loop all songs
No looping (o).
Auto O AutoO
30, 60, OFF (default:
30)
The instrument will automatically shut down
after 30 minutes of inactivity. Selecting OFF will
disable this function.
Note: When Bluetooth is connected, the Auto O
function will not turn o the instrument.
Factory reset Reset Restore factory settings.
31
Factory Reset
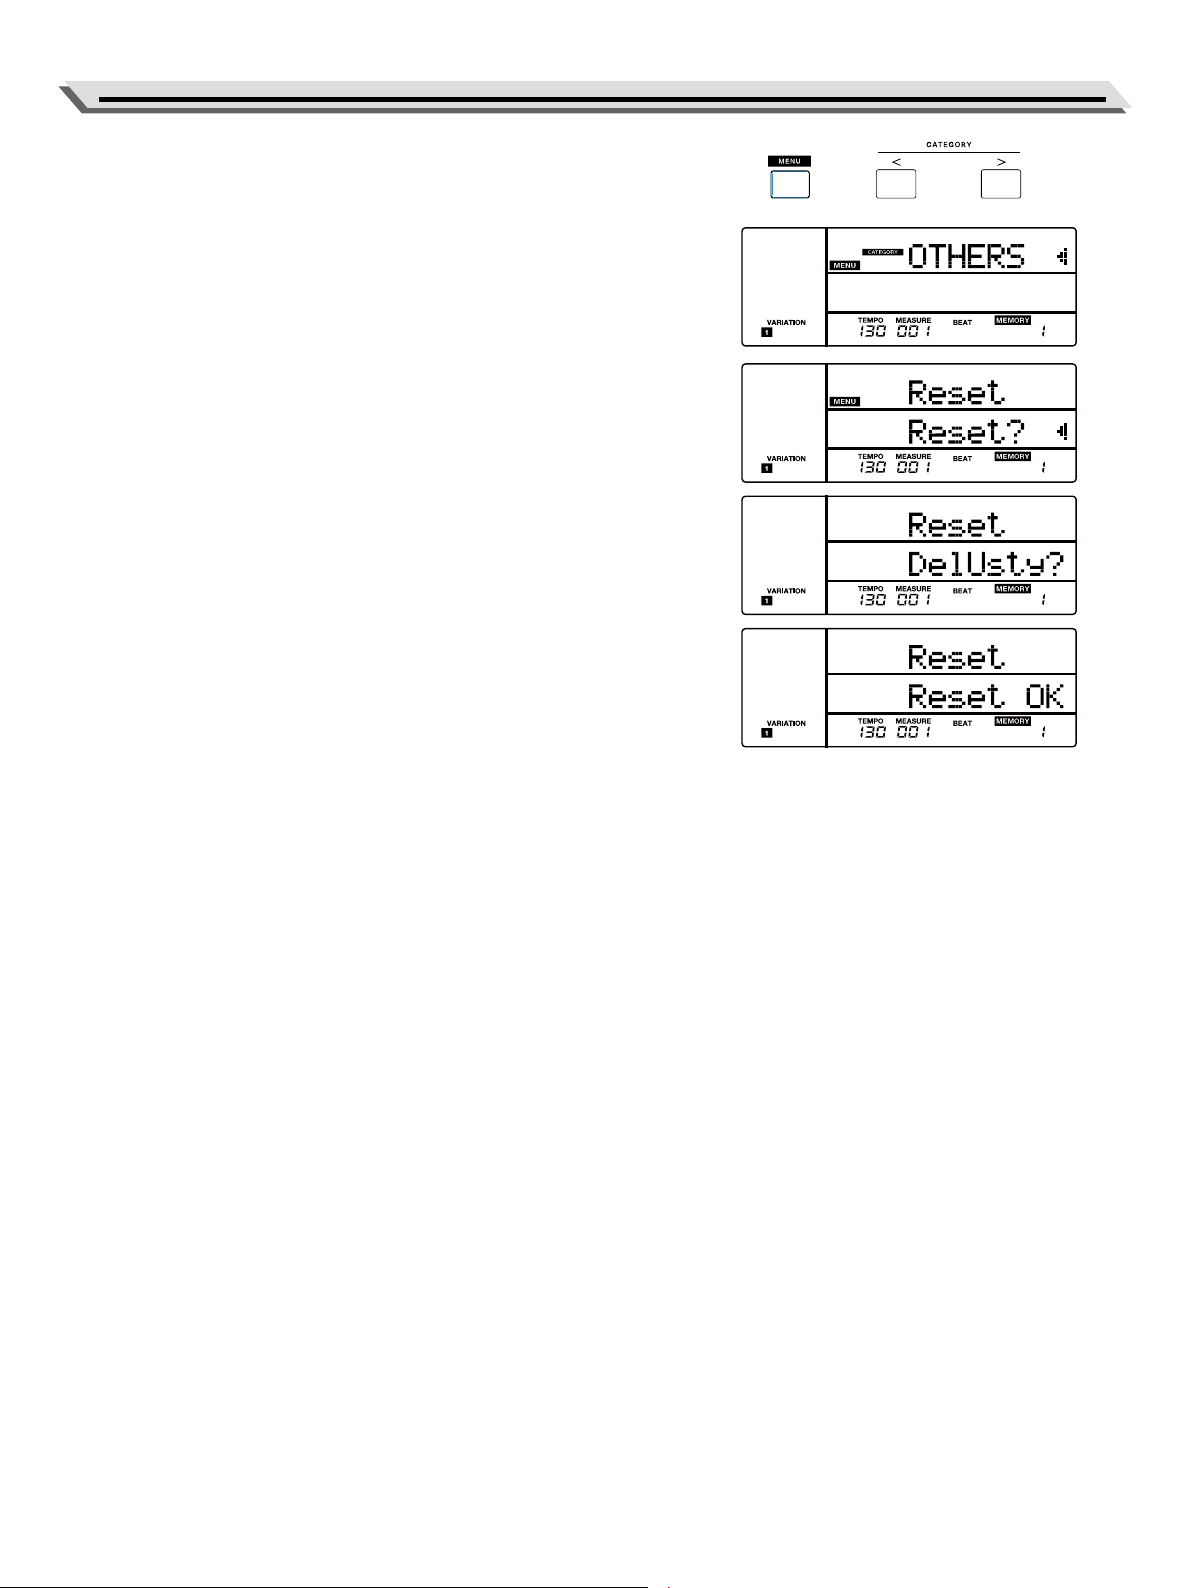
1. Press the [MENU] button to enter the function menu (P. 30). Use the
[<] / [>] button to select “OTHERS”, then use the data dial to select
“Reset”.
2. Press the [ENTER] button to move the cursor to “Reset?” in the lowe
menu. You’re going to execute factory reset.
3. Rotate the data dial clockwise to conrm and execute factory reset.
Note: This operation will delete all user settings.
4. The LCD continues to display “DelUSng?”, prompting it’s going to
delete all user songs.
5. Press the [ENTER] button to delete all user songs, or press the [EXIT]
button to cancel.
Note: The deleted user songs cannot be recovered.
6. The LCD continues to display “DelUSty?”, prompting it’s going to
delete all user styles.
7. Press the [ENTER] button to delete all user styles, or press the [EXIT]
button to cancel.
Note: The deleted user styles cannot be recovered.
8. The reset procedure may take several minutes to complete.
Note:
● Do not turn o the power when factory reset is in progress, otherwise
it may corrupt the internal data and cause malfunction.
● When power is turned o, you can press and hold the [EXIT] and
[ENTER] buttons and turn on the power, it will execute factory reset
and delete all user settings, but user songs and user styles will not be
deleted.
32
MIDI
MIDI (short for Musical Instrument Digital Interface) allows a wide variety
of electronic musical instruments, computers and other related devices
to connect and communicate with one another.
MIDI carries event messages that specify notation, pitch and velocity,
control signals for parameters such as volume, vibrato, audio panning,
and program change information to change the tone selections.
The instrument can output the real-time playback information via MIDI
messages and control external MIDI devices. The instrument can also
accept incoming MIDI messages and generate sound accordingly.
Note:
This instrument has a USB computer jack (P. 7), which can be connected
to a computer as a MIDI input or MIDI output. This can not be connected
with another instrument, unless the instrument has a USB host terminal.
The main application of MIDI
1. Used as a tone generator.
This instrument can receive MIDI data from computer, and execute
MIDI controls to change channels, change tones, add eect and make
sound and so on. Refer to MIDI Implementation Chart for more MIDI
controls.
2. Used as a MIDI Keyboard
When you play the keyboard, change the tones or turn the DSP on/
o, the instrument will send MIDI data to the computer, which will be
saved as records (It only records your keyboard performance when
playing along with accompaniment.) You can edit the records on
the computer, such as changing the channels or tones, adding DSP
eects. Then play back the records with the instrument or other sound
source (such as a sound card). You can play the keyboard along with
the playback. Refer to MIDI Implementation Chart for more MIDI
controls.
Connecting to a MIDI Software on Computer
To use the USB computer jack (P. 7) of the instrument, you may need to
congure the software on computer. For example, setting Digital Audio
Workstation (DAW) software under WINDOWS10 operating system:
1. Use a standard USB cable to connect the instrument to computer.
Make sure the instrument is turned on.
2. Open Digital Audio Workstation (DAW) software on computer.
3. The software will automatically recognize the E-X50 USB DEVICE
either as the MIDI Input or as the MIDI Output. For more conguration
information, please refer to the HELP of the software.
4. You can follow the above operations when using other similar MIDI
software.
33
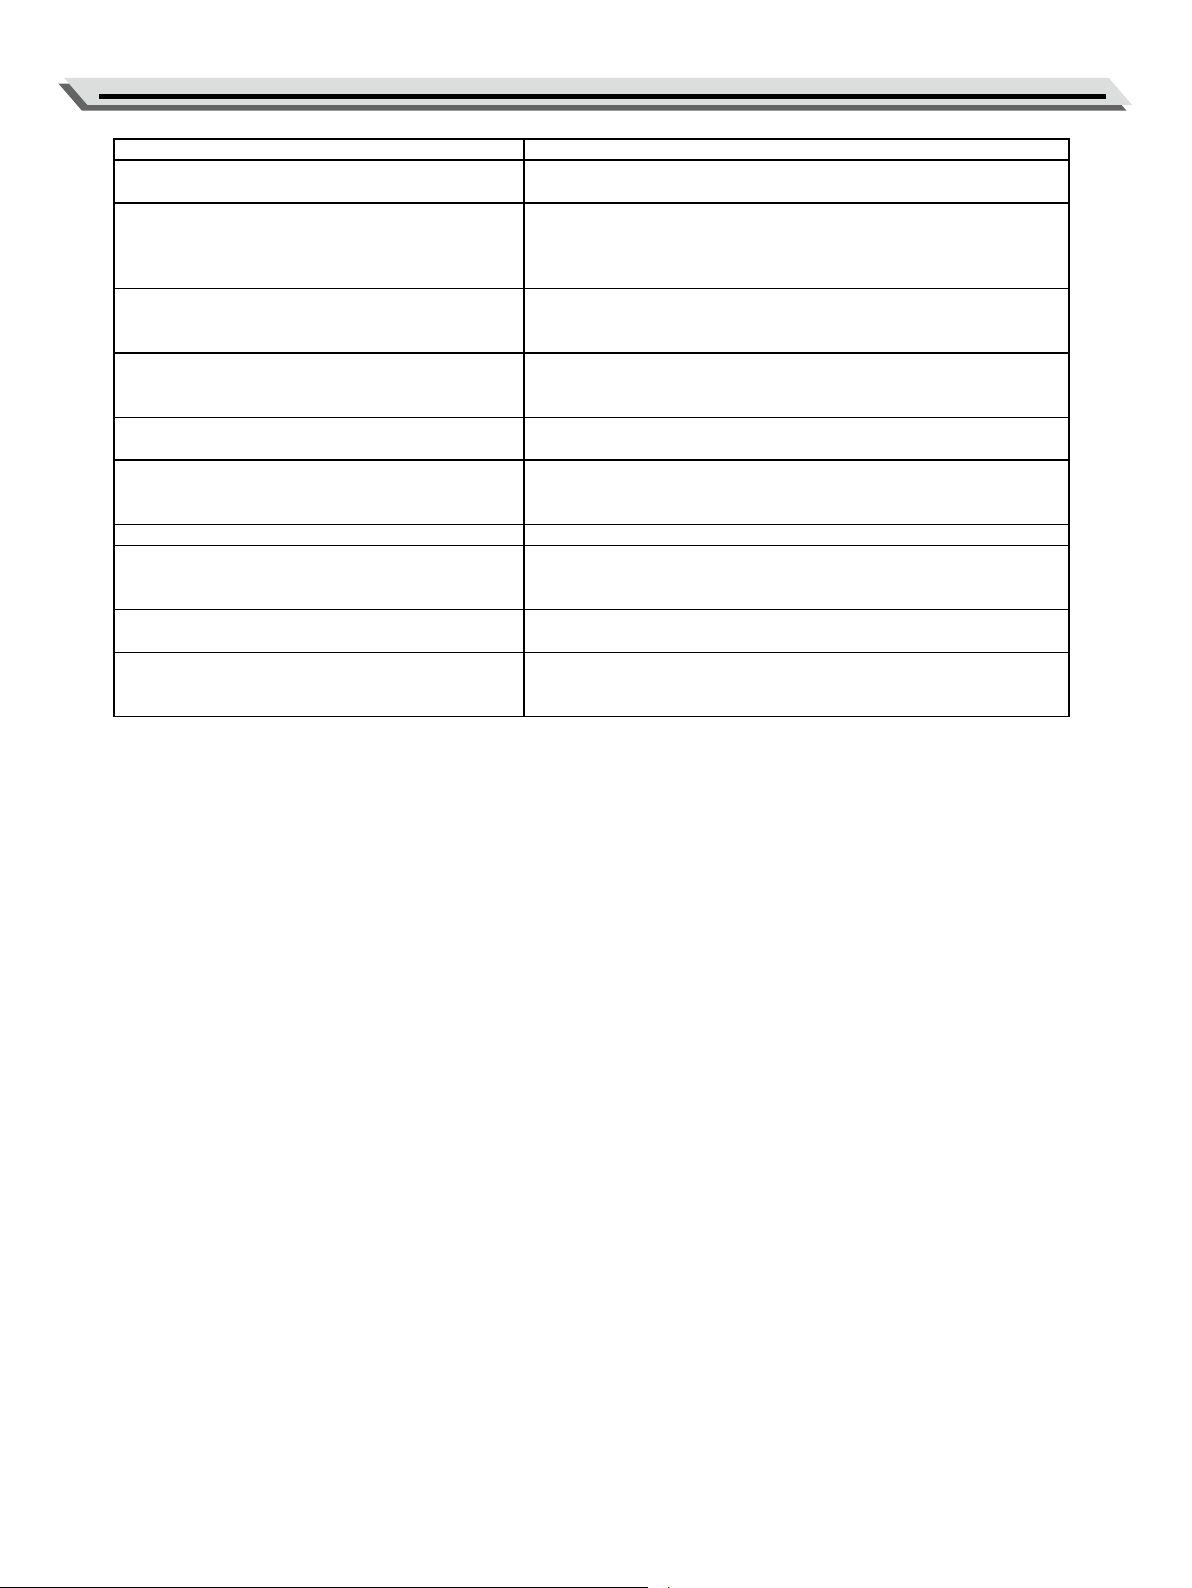
Troubleshooting
Problem Possible Cause and Solution
The speakers produce a pop sound whenever the
power is turned on or o.
This is normal and does not indicate a malfunction.
Speakers do not produce sound when the key-
board is played.
1. Check if the master volume is set too low.
2. Check if the R1/R2/L1 sound volume is set too low in the mixer
in the function menu.
3. Check if headphones are plugged into the PHONES jack.
The speakers produce noise when a mobile
phone is put near them.
Using a mobile phone in close proximity to the instrument may
produce interference. To prevent this, turn o the mobile phone or
use it farther away from the instrument.
The auto accompaniment does not play back
even when sync start is engaged and a key is
pressed.
You may be playing keys in the right hand range of the keyboard.
To start the accompaniment with sync start, make sure to play
keys in the left-hand range.
Certain notes seem to be in the wrong pitch.
Make sure that the tune value is set to 0. Hold down the [EXIT] and
[ENTER] buttons and turn on the power to restore factory settings.
When connecting to computer, the instrument
cannot be recognized.
Check if the USB cable is rmly connected. Try connecting another
USB port on the computer. This instrument is plug and play and
should work without installing a driver.
The pedal does not respond. Check if the pedal cable is rmly connected.
When using a sustain pedal, it doesn’t sustain the
notes when the pedal is pressed, but it sustain the
notes when the pedal is released.
The polarity of dierent pedals may vary. If the connected sustain
pedal works in reversed behavior, please plug the pedal to the
PEDAL jack before turning the power on.
It cannot read/save to the USB ash drive.
Make sure your USB ash drive is in FAT32 format and not mul-
ti-partitioned.
It shuts down after a period of time.
The Auto O function will turn o the instrument after a preset
period of time when the instrument is not in use. You can disable
this function in the function menu.
34
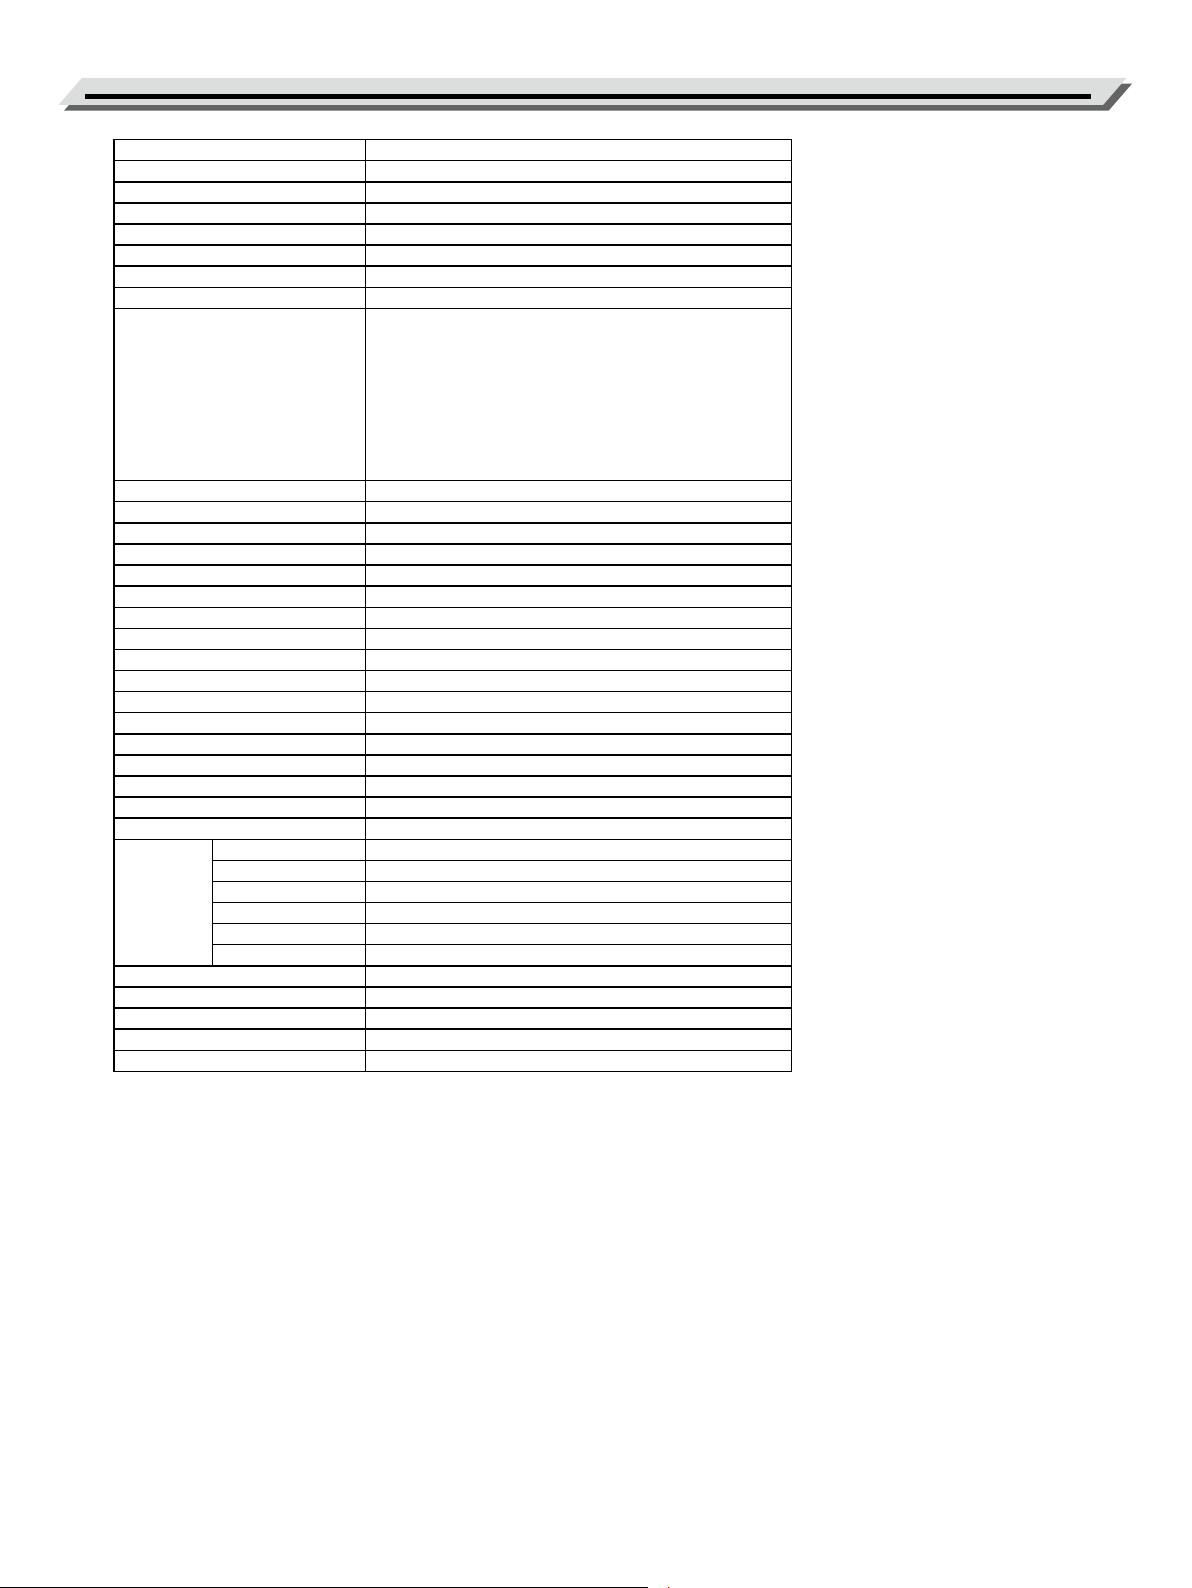
Specications
Keyboard 61 keys with touch response
Display Multi-functional LCD
Max polyphony 256
Tone 707
Style 300 presets + 30 users
Demo song 1
Layer L, R1, R2
Split Yes
Style control Start / Stop
Sync Start
Intro (1, 2)
Main (1, 2, 3, 4)
Fill (1, 2, 3, 4)
Ending (1, 2)
Chord mode
Fade in / out
Chord type 38
Reverb 11 types, 33 levels
Chorus 12 types, 33 levels
Eects DSP eects, Mic eects
Master EQ 6 types
Mixer Yes
Sequencer 10 user songs
Registration memory 4 x 8 banks, parameter lock
O.T.S. Yes
Assignable controllers 1 pedal
Pitch Bend Yes
Pitch adjustment Transpose, octave, tune
Metronome Yes
Tempo 30-280
Other control Touch response, Scale tune, Audio Pad
Interaction & expansion Bluetooth audio
External drive USB ash drive (128GB max.)
Connector USB USB MIDI
Headphone 1 standard stereo
Input -
Output L/MONO, R
Microphone Ye s
Pedal Sustain pedal
Amplier 2 x 10 watt
Speaker 2 x [12cm + 3 cm]
Power DC12V, 3000mA
Dimension 1048 x 391 x 141mm
Weight 9.6 kg
● This document explains the specications of the product at the time that the document was issued.
For the latest information, refer to the Roland website.
● All specications are subject to change without notice.
35
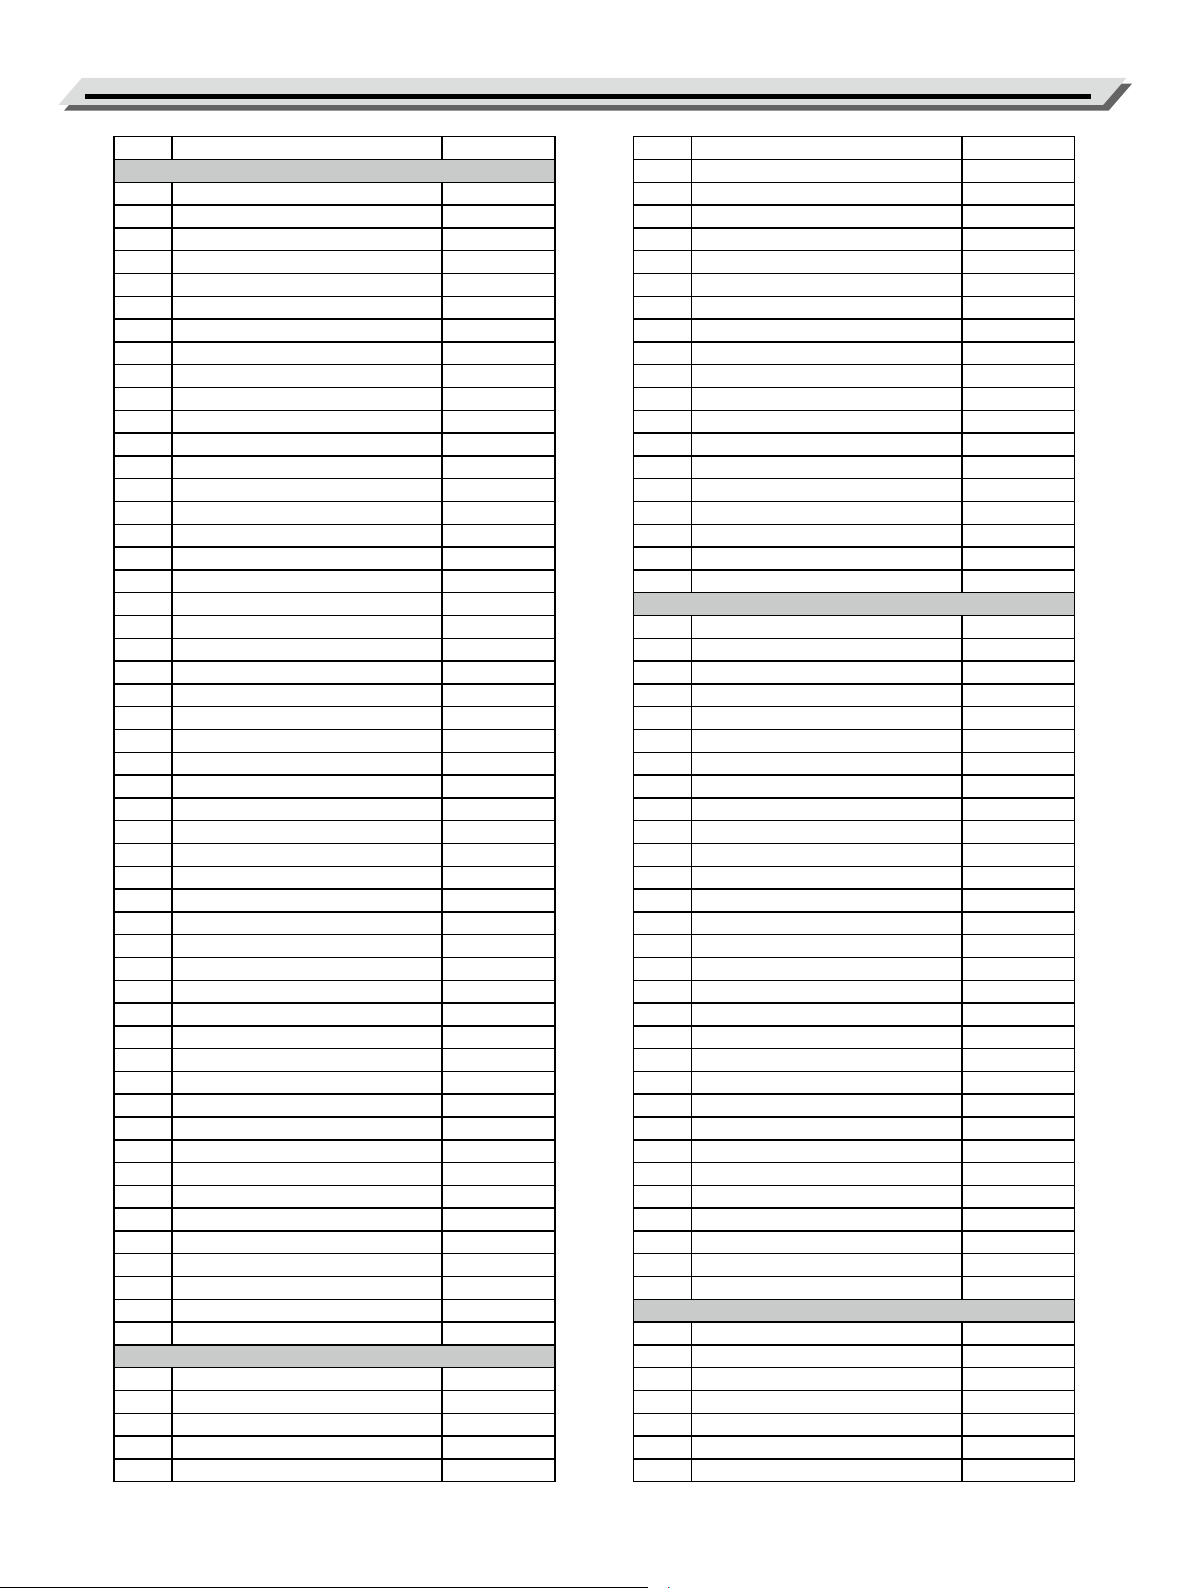
Tone List
NO. English Name LCD Name
PIANO(Piano)
1 Grand Piano GrandPno
2 Ballad Piano BalladP
3 Mellow Piano MellowP
4 Bright Piano BrightP
5 Acoustic Piano AcPiano
6 Acoustic Piano (wide) AcPianoW
7 Acoustic Piano (dark) AcPianoD
8 Octave Grand Piano 1 OctPno1
9 Octave Grand Piano 2 OctPno2
10 Piano & Strings Pno&Str
11 Piano & Pad Pno&Pad
12 Piano & Choir Pno&Cho
13 Piano & EP Pno&EP
14 Piano & Vibraphone Pno&Vib
15 Harpsichord 1 Harpsi1
16 Harpsichord 2 Harpsi2
17 Harpsichord (octave mix) HarpsiO
18 Harpsichord (wide) HarpsiW
19 Harpsichord (with key o) HarpsiOf
20 Honky Tonk Piano 1 HnyTonk1
21 Honky Tonk Piano 2 HnyTonk2
22 Honky Tonk Piano (wide) HnyTonkW
23 Honky Tonk Piano (dark) HnyTonkD
24 Electric Grand Piano 1 E.Grand1
25 Electric Grand Piano 2 E.Grand2
26 Electric Grand Piano (wide) E.GrandW
27 Electric Grand Piano (dark) E.GrandD
28 Detuned Electric Piano 1 DetunEP1
29 Detuned Electric Piano 2 DetunEP2
30 Electric Piano 1 E.Piano1
31 Electric Piano 2 E.Piano2
32 Electric Piano 3 E.Piano3
33 Electric Piano 4 E.Piano4
34 Electric Piano 1 (velocity mix) E.PnoV1
35 Electric Piano 2 (velocity mix) E.PnoV2
36 60's Electric Piano 60'sEP
37 EP Legend EPLegend
38 Phase EP PhaseEP
39 Clavi 1 Clavi1
40 Clavi 2 Clavi2
41 Phase Clavi PhaseClv
42 Wah Clavi WahClv
43 Pulse Clavi PluseClv
44 Dream EP DreamEP
45 Tremolo EP TremoEP
46 Funk EP FunkEP
47 Warm EP WarmEP
48 ChoirEP ChoirEP
49 Wah EP WahEP
50 Modern EP ModernEP
51 EP Pad EPPad
CHROMATIC PERCUSSION(ChroPerc)
52 Celesta 1 Celesta1
53 Celesta 2 Celesta2
54 Celesta 3 Celesta3
55 Glockenspiel 1 Glocken1
56 Glockenspiel 2 Glocken2
57 Glockenspiel 3 Glocken3
58 Music Box 1 MuscBox1
59 Music Box 2 MuscBox2
60 Music Box 3 MuscBox3
61 Vibraphone 1 Vibra1
62 Vibraphone 2 Vibra2
63 Vibraphone (wide) VibraW
64 Marimba 1 Marimba1
65 Marimba 2 Marimba2
66 Marimba (wide) MarimbaW
67 Xylophone 1 Xylopho1
68 Xylophone 2 Xylopho2
69 Xylophone 3 Xylopho3
70 Tubular Bells 1 TubulBe1
71 Tubular Bells 2 TubulBe2
72 Church Bell ChurBell
73 Carillon Carillon
74 Dulcimer 1 Dulcime1
75 Dulcimer 2 Dulcime2
76 Santur Santur
ORGAN(Organ)
77 Italian 60's Organ 60'sOrgn
78 Drawbar Organ 1 DrawOrg1
79 Drawbar Organ 2 DrawOrg2
80 Drawbar Organ 3 DrawOrg3
81 Detuned Drawbar Organ DeDraOrg
82 Detuned Percussive Organ DePerOrg
83 Percussive Organ 1 PercOrg1
84 Percussive Organ 2 PercOrg2
85 Percussive Organ 3 PercOrg3
86 70's Percussive Organ 70'sPcOr
87 Rock Organ 1 RockOrg1
88 Rock Organ 2 RockOrg2
89 Rock Organ 3 RockOrg3
90 Church Organ 1 ChurOrg1
91 Church Organ 2 ChurOrg2
92 Church Organ 3 ChurOrg3
93 Church Organ (octave mix) ChurOrgO
94 Detuned Church Organ DeChuOrg
95 Reed Organ 1 ReedOrg1
96 Reed Organ 2 ReedOrg2
97 Rotary Organ RotyOrgn
98 Pu Organ PuOrgn
99 Accordion 1 Acordin1
100 Accordion 2 Acordin2
101 Accordion 3 Acordin3
102 Harmonica 1 Harmnic1
103 Harmonica 2 Harmnic2
104 Harmonica 3 Harmnic3
105 Tango Accordion 1 TangAcd1
106 Tango Accordion 2 TangAcd2
GUITAR(Guitar)
107 Acoustic Guitar (nylon) 1 NylonGt1
108 Acoustic Guitar (nylon) 2 NylonGt2
109 Acoustic Guitar (nylon) 3 NylonGt3
110 Acoustic Guitar (nylon + key o) NylGtrOf
111 Ukulele Ukulele
112 Acoustic Guitar (steel) 1 SteelGt1
113 Acoustic Guitar (steel) 2 SteelGt2
36
Tone List
114 12-Strings Guitar 12StrGtr
115 Mandolin 1 Mandoli1
116 Mandolin 2 Mandoli2
117 Steel Guitar with Body Sound SteelBdy
118 Electric Guitar (jazz) 1 JazzGtr1
119 Electric Guitar (jazz) 2 JazzGtr2
120 Electric Guitar (pedal steel) PedalGtr
121 Electric Guitar (clean) 1 CleanGt1
122 Electric Guitar (clean) 2 CleanGt2
123 Electric Guitar (detuned clean) DetClnGt
124 Mid Tone Guitar MidTonGt
125 Electric Guitar (muted) 1 MutedGt1
126 Electric Guitar (muted) 2 MutedGt2
127 Electric Guitar (funky cutting) FunkGt
128 Electric Guitar (muted velo-sw) MutVelGt
129 Jazz Man JazzMan
130 Overdriven Guitar 1 Ovrdriv1
131 Overdriven Guitar 2 Ovrdriv2
132 Guitar Pinch GtPinch
133 Distortion Guitar 1 DistGtr1
134 Distortion Guitar 2 DistGtr2
135 Distortion Guitar (with feedback) FeedbkGt
136 Guitar Feedback GtrFedbk
137 Distorted Rhythm Guitar DistRyth
138 Guitar Harmonics 1 GtrHarm1
139 Guitar Harmonics 2 GtHarmo2
140 Velocity Nylon Guitar NylnGtVe
BASS(Bass)
141 Acoustic Bass 1 AcoBass1
142 Acoustic Bass 2 AcoBass2
143 Wah Bass WahBass
144 Electric Bass (nger) FngrBass
145 Finger Slap Bass FngrSlap
146 Electric Bass (pick) 1 PickBas1
147 Electric Bass (pick) 2 PickBas2
148 Fretless Bass 1 Fretles1
149 Fretless Bass 2 Fretles2
150 Slap Bass 1 SlapBas1
151 Slap Bass 2 SlapBas2
152 Slap Bass 3 SlapBas3
153 Slap Bass 4 SlapBas4
154 Synth Bass 1 SynBass1
155 Synth Bass 2 SynBass2
156 Synth Bass 3 SynBass3
157 Synth Bass 4 SynBass4
158 Warm Synth Bass WarmBass
159 Rsonance SynBass ResoBass
160 Clavi Bass ClavBass
161 Hammer Hammer
162 Attack Bass AtackBas
163 Synth Bass (rubber) 1 RubbBas1
164 Synth Bass (rubber) 2 RubbBas2
165 Attack Pulse AtackPls
STRINGS & ORCHESTRAL(Str&Orch)
166 Violin 1 Violin1
167 Violin 2 Violin2
168 Violin (slow attack) SlViolin
169 Viola 1 Viola1
170 Viola 2 Viola2
171 Cello 1 Cello1
172 Cello 2 Cello2
173 Contrabass 1 Contrbs1
174 Contrabass 2 Contrbs2
175 Tremolo Strings 1 TremStr1
176 Tremolo Strings 2 TremStr2
177 Tremolo Strings 3 TremStr3
178 Pizzicato Strings 1 PizzStr1
179 Pizzicato Strings 2 PizzStr2
180 Orchestral Harp 1 Harp1
181 Orchestral Harp 2 Harp2
182 Yang Chin YangChin
183 Timpani 1 Timpani1
184 Timpani 2 Timpani2
185 String Ensembles 1 Strings1
186 String Ensembles 2 Strings2
187 String Ensembles 3 Strings3
188 String Ensembles 4 Strings4
189 Strings & Brass Str&Bras
190 60's Strings 60'sStr
191 Synth Strings 1 SynStrs1
192 Synth Strings 2 SynStrs2
193 Synth Strings 3 SynStrs3
194 Synth Strings 4 SynStrs4
195 Synth Strings 5 SynStrs5
196 Choir Aahs 1 ChorAah1
197 Choir Aahs 2 ChorAah2
198 Choir Aahs 3 ChorAah3
199 Voice Oohs 1 VoicOoh1
200 Voice Oohs 2 VoicOoh2
201 Humming Humming
202 Analog Voice AnaVoice
203 Synth Voice 1 SynVoic1
204 Synth Voice 2 SynVoic2
205 Orchestra Hit 1 OrchHit1
206 Orchestra Hit 2 OrchHit2
207 Bass Hit Plus BassHit
208 6th Hit 6thHit
209 Euro Hit EuroHit
BRASS(Brass)
210 Trumpet 1 Trumpet1
211 Trumpet 2 Trumpet2
212 Dark Trumpet DarkTrp
213 Trombone 1 Trmbone1
214 Trombone 2 Trmbone2
215 Trombone 3 Trmbone3
216 Bright Trombone BritBone
217 Tuba 1 Tuba1
218 Tuba 2 Tuba2
219 Muted Trumpet 1 MuteTrp1
220 Muted Trumpet 2 MuteTrp2
221 Muted Trumpet 3 MuteTrp3
222 French Horn 1 FrHorn1
223 French Horn 2 FrHorn2
224 French Horn 3 FrHorn3
225 Brass Section 1 Brass1
226 Brass Section 2 Brass2
227 Brass Section 3 Brass3
228 Synth Brass 1 SynBras1

37
Tone List
229 Synth Brass 2 SynBras2
230 Synth Brass 3 SynBras3
231 Synth Brass 4 SynBras4
232 Synth Brass 5 SynBras5
233 Synth Brass 6 SynBras6
234 Synth Brass 7 SynBras7
235 Synth Brass 8 SynBras8
236 Analog Synth Brass 1 AnaBras1
237 Analog Synth Brass 2 AnaBras2
238 Analog Synth Brass 3 AnaBras3
239 Rock Brass 1 RockBrs1
240 Rock Brass 2 RockBrs2
241 Funny 1 Funny1
242 Funny 2 Funny2
243 French Horn FrHorn
REED(Reed)
244 Soprano Sax 1 SprnSax1
245 Soprano Sax 2 SprnSax2
246 Soprano Sax 3 SprnSax3
247 Alto Sax 1 AltoSax1
248 Alto Sax 2 AltoSax2
249 Alto Sax 3 AltoSax3
250 Tenor Sax 1 TenoSax1
251 Tenor Sax 2 TenoSax2
252 Tenor Sax 3 TenoSax3
253 Baritone Sax 1 BariSax1
254 Baritone Sax 2 BariSax2
255 Baritone Sax 3 BariSax3
256 Oboe 1 Oboe1
257 Oboe 2 Oboe2
258 Oboe 3 Oboe3
259 2 Oboes 2Oboes
260 English Horn 1 EngHorn1
261 English Horn 2 EngHorn2
262 English Horn 3 EngHorn3
263 2 English Horns 2EngHons
264 Bassoon 1 Bassoon1
265 Bassoon 2 Bassoon2
266 Bassoon 3 Bassoon3
267 2 Bassoons 2Basoons
268 Clarinet 1 Clarine1
269 Clarinet 2 Clarine2
270 Clarinet 3 Clarine3
271 2 Clarinets 2Clarins
PIPE(Pipe)
272 Piccolo 1 Piccolo1
273 Piccolo 2 Piccolo2
274 Piccolo 3 Piccolo3
275 2 Piccolos 2Picolos
276 Sweet Flute SweeFlut
277 Flute 1 Flute1
278 Flute 2 Flute2
279 Flute 3 Flute3
280 2 Flutes 2Flutes
281 Recorder 1 Recorde1
282 Recorder 2 Recorde2
283 2 Recorders 2Records
284 Pan Flute 1 PanFlut1
285 Pan Flute 2 PanFlut2
286 Sweet Pan Flute SwPanFlu
287 Blown Bottle 1 Bottle1
288 Blown Bottle 2 Bottle2
289 Shakuhachi 1 Shakhch1
290 Shakuhachi 2 Shakhch2
291 Whistle 1 Whistle1
292 Whistle 2 Whistle2
293 Ocarina 1 Ocarina1
294 Ocarina 2 Ocarina2
SYNTH LEAD(SynthLd)
295 Lead 1 (square) 1 SquarLd1
296 Lead 1 (square) 2 SquarLd2
297 Lead 1 (square) 3 SquarLd3
298 Lead 1b (sine) SineLead
299 Lead 2 (sawtooth) 1 SawLead1
300 Lead 2 (sawtooth) 2 SawLead2
301 Lead 2 (sawtooth) 3 SawLead3
302 Lead 2b (saw + pulse) SawPlsLd
303 Lead 2c (double sawtooth) DubSawLd
304 Lead 2d (sequenced analog) 1 SqAnaLd1
305 Lead 2d (sequenced analog) 2 SqAnaLd2
306 Wavy Sawtooth 1 WavySaw1
307 Bauble Lead BaubleLd
308 Super Analog SuperAna
309 Lead 3 (calliope) 1 CalipLd1
310 Lead 3 (calliope) 2 CalipLd2
311 Lead 4 (chi) 1 ChiLd1
312 Lead 4 (chi) 2 ChiLd2
313 Lead 4 (chi) 3 ChiLd3
314 Lead 4 (chi) 4 ChiLd4
315 Lead 5 (charang) 1 CharaLd1
316 Lead 5 (charang) 2 CharaLd2
317 Lead 5 (charang) 3 CharaLd3
318 Lead 5 (charang) 4 CharaLd4
319 Lead 5a (wire lead) 1 WireLd1
320 Lead 5a (wire lead) 2 WireLd2
321 Lead 6 (voice) 1 VoiceLd1
322 Lead 6 (voice) 2 VoiceLd2
323 Lead 7 (fths) 1 FifthLd1
324 Lead 7 (fths) 2 FifthLd2
325 Lead 8 (bass + lead) 1 BasLead1
326 Lead 8 (bass + lead) 2 BasLead2
327 Lead 8 (bass + lead) 3 BasLead3
328 Lead 8a (soft wrl) SftWrlLd
329 Massiness Massin
330 Square Square
331 Slow Square Lead SlwSquLd
332 Sine Solo SineSolo
333 Lead 1 (square) 4 SquarLd4
334 Thick Square ThickSqu
335 2Oscillators Lead 2OscLd
336 Wavy Sawtooth 2 WavySaw2
337 Analog Lead AnaLead
338 Big Lead BigLead
339 Fat Lead FatLead
340 PWM 4th Rezz4th
341 Delayed Lead 1 DlyLead1
342 Delayed Lead 2 DlyLead2
343 Fifth Lead FifLead
38
Tone List
344 Corrie Corrie
345 Quint Quint
SYNTH PAD(SynthPad)
346 Pad 1 (new age) 1 NewAge1
347 Pad 1 (new age) 2 NewAge2
348 Pad 1 (new age) 3 NewAge3
349 Pad 1 (new age) 4 NewAge4
350 Pad 2 (warm) 1 WarmPad1
351 Pad 2 (warm) 2 WarmPad2
352 Pad 2 (warm) 3 WarmPad3
353 Pad 2a (sine pad) SinePad
354 Pad 3 (polysynth) 1 PolySyn1
355 Pad 3 (polysynth) 2 PolySyn2
356 Pad 3 (polysynth) 3 PolySyn3
357 Pad 3 (polysynth) 4 PolySyn4
358 Pad 4 (choir) 1 ChoirPd1
359 Pad 4 (choir) 2 ChoirPd2
360 Pad 4a (itopia) ItopiaPd
361 Pad 5 (bowed) 1 BowedPd1
362 Pad 5 (bowed) 2 BowedPd2
363 Pad 5 (bowed) 3 BowedPd3
364 Pad 5 (bowed) 4 BowedPd4
365 Pad 6 (metallic) 1 MetalPd1
366 Pad 6 (metallic) 2 MetalPd2
367 Pad 6 (metallic) 3 MetalPd3
368 Pad 7 (halo) 1 HaloPad1
369 Pad 7 (halo) 2 HaloPad2
370 Pad 7 (halo) 3 HaloPad3
371 Pad 7 (halo) 4 HaloPad4
372 Pad 8 (sweep) 1 SweepPd1
373 Pad 8 (sweep) 2 SweepPd2
374 Pad 8 (sweep) 3 SweepPd3
375 Pan Pad 1 PanPad1
376 Pan Pad 2 PanPad2
377 Dipolar Pad DipolPad
378 PWM Pad PWMPad
379 Warmly Pad WarmlyPd
380 Horn Pad HornPad
381 Click Pad ClickPad
382 Analog Pad AnalogPd
383 80's Poly Pad 80'sPoly
384 PWM 4th Soft PWM4thSf
385 Synth Calliope Soft SynCalSf
386 Soft Vox SoftVox
387 5th SawWave 5thSaw
388 5th Lead Soft 5thLdSf
389 Slow Square SlSquare
390 New Year Pad NewYear
391 Space Voice SpcVoice
392 Rising Rising
393 Congregate Congrega
SYNTH SFX(SynthSFX)
394 FX 1 (rain) 1 FXRain1
395 FX 1 (rain) 2 FXRain2
396 FX 2 (soundtrack) 1 Sondtrk1
397 FX 2 (soundtrack) 2 Sondtrk2
398 Prelude Prelude
399 FX 3 (crystal) 1 Crystal1
400 FX 3 (crystal) 2 Crystal2
401 FX 3 (crystal) 3 Crystal3
402 FX 3a (synth mallet) SynMalet
403 FX 4 (atmosphere) 1 Atmosph1
404 FX 4 (atmosphere) 2 Atmosph2
405 Warm Air WarmAir
406 FX 5 (brightness) 1 Bright1
407 FX 5 (brightness) 2 Bright2
408 Smog Smog
409 FX 6 (goblins) 1 Goblins1
410 FX 6 (goblins) 2 Goblins2
411 FX 6 (goblins) 3 Goblins3
412 Choir Bell 1 ChorBel1
413 Choir Bell 2 ChorBel2
414 FX 7 (echoes) 1 Echoes1
415 FX 7 (echoes) 2 Echoes2
416 FX 7 (echoes) 3 Echoes3
417 FX 7b (echo pan) EchoPan
418 FX 7a (echo bell) 1 EchoBel1
419 FX 7a (echo bell) 2 EchoBel2
420 FX 7a (echo bell) 3 EchoBel3
421 FX 8 (sci-) 1 Sci-Fi1
422 FX 8 (sci-) 2 Sci-Fi2
423 FX 8 (sci-) 3 Sci-Fi3
INDIA(India)
424 Harmonium 1 Hrmnium1
425 Harmonium 2 Hrmnium2
426 Harmonium 3 Hrmnium3
427 Sitar 1 Sitar1
428 Sitar Drone SitarDrn
429 Classic Sitar ClsSitar
430 Sitar 2 Sitar2
431 Sitar 3 Sitar3
432 Detuned Sitar DtnSitar
433 Sitar Glissand GlsSitar
434 Tanpura Tanpura
435 Tanpura Low TanpuraL
436 Tanpura Mid TanpuraM
437 Sarod Sarod
438 Santur Ex SanturEx
439 Santur 1 Santur1
440 Santur 2 Santur2
441 Santur 3 Santur3
442 Mountain Dulcimer MtDulcmr
443 India Stroke IndStrok
444 TablaTarang IndTarng
445 Indian Flute 1 IndFlut1
446 Indian Flute 2 IndFlut2
447 Sitar 4 Sitar4
448 Sitar 5 Sitar5
449 Sitar 6 Sitar6
INDONESIA(Indonesi)
450 Talempong Talempng
451 Suling Hl SulingHl
452 Suling Hs SulingHs
453 Suling Lv SulingLv
VIETNAM(Vietnam)
454 Taj Mahal TajMahal
455 QuDi Vib QuDiVib
456 Twin Sine TwinSine
39
Tone List
ORIENTAL(Oriental)
457 Accordion c1 Acord.c1
458 Accordion 4L Acord.4L
459 Oud Sad Verd OudSdVrd
460 Divan Orn 1 DivanOrn
461 NAY 1 NAY1
462 Kanoun 3 Trm Kanun3Tr
463 Mizmar Trm V MizmrTrV
464 Strings Stage StrStage
465 Aks-Baglama AksBaglm
466 Ney Ney
467 Zurna TR ZurnaTR
468 Pick Bs Line PickBsLn
469 Violin Mono VlnMono
470 Truba Truba
471 Bouzuki /Gld Bozuk/Gl
TURKEY(Turkey)
472 Aks-Baglama AksBaglm
473 Elk-Baglama ElkBaglm
474 4st-Elk Bagla 4ElkBglm
475 Kanun Kanun
476 TR-Klarnet TR-Klrnt
477 TR-Yayli TR-Yayli
478 TR-Keman TR-Keman
479 UD UD
480 Ney Ney
481 Zurna-E Zurna-E
482 Zurna TR ZurnaTR
483 Vib-Zurna-A VibZrnA
484 Vib-Zurna-D VibZrnD
485 Vib-Zurna-E VibZrnE
BRAZIL(Brazil)
486 Acc. Master AcMaster
487 Acc. Classic AcClasic
488 Cavaquinho Cavaqnho
489 Warm JP STR WmJP-STR
490 Blow Alto Vib BlwAltVb
491 2600 Sine 2600Sine
ETHNIC MISC.(EthMisc.)
492 Banjo 1 Banjo1
493 Banjo 2 Banjo2
494 Banjo 3 Banjo3
495 Shamisen 1 Shamise1
496 Shamisen 2 Shamise2
497 Shamisen 3 Shamise3
498 Koto 1 Koto1
499 Koto 2 Koto2
500 Taisho Koto TaishoKt
501 Kalimba 1 Kalimba1
502 Kalimba 2 Kalimba2
503 Kalimba 3 Kalimba3
504 Bag Pipe 1 BagPipe1
505 Bag Pipe 2 BagPipe2
506 Bag Pipe 3 BagPipe3
507 Fiddle 1 Fiddle1
508 Fiddle 2 Fiddle2
509 Fiddle 3 Fiddle3
510 Shanai 1 Shanai1
511 Shanai 2 Shanai2
512 Shanai 3 Shanai3
PERCUSSION(Perc.)
513 Tinkle Bell 1 TnklBel1
514 Tinkle Bell 2 TnklBel2
515 Tinkle Bell 3 TnklBel3
516 Agogo 1 Agogo1
517 Agogo 2 Agogo2
518 Agogo 3 Agogo3
519 Steel Drums 1 StelDrm1
520 Steel Drums 2 StelDrm2
521 Steel Drums 3 StelDrm3
522 Woodblock 1 WodBlok1
523 Woodblock 2 WodBlok2
524 Woodblock 3 WodBlok3
525 Castanets 1 Castant1
526 Castanets 2 Castant2
527 Taiko Drum 1 TaikDrm1
528 Taiko Drum 2 TaikDrm2
529 Taiko Drum 3 TaikDrm3
530 Concert Bass Drum 1 ConBsDm1
531 Concert Bass Drum 2 ConBsDm2
532 Acoustic Bass Drum BassDrum
533 Room Kick RoomKick
534 Power Kick PowrKick
535 Electric Bass Drum ElBsDrum
536 Analog Bass Drum AnBsDrum
537 Jazz Kick JazzKick
538 Side Stick SidStick
539 Analog Rim Shot AnRiShot
540 Acoustic Snare A.Snare
541 Room Snare RomSnare
542 Power Snare PowSnare
543 Electric Snare E.Snare
544 Analog Snare AnaSnare
545 Jazz Snare JazSnare
546 Brush Tap BrushTap
547 Concert SD ConcetSD
548 Hand Clap HandClap
549 Tom Tom
550 Room Tom RoomTom
551 Power Tom PowerTom
552 Electric Tom ElecTom
553 Analog Tom AnaTom
554 Brush Tom BrushTom
555 Closed Hi-hat ClosedHH
556 Analog Closed Hi-hat AnCloHH
557 Pedal Hi-hat PedalHH
558 Open Hi-hat OpenHH
559 Crash Cymbal CrashCym
560 Analog Cymbal AnaCym
561 Ride Cymbal RideCym
562 China Cymbal ChinaCym
563 Ride Bell RideBell
564 Tambourine Tambouri
565 Splash Cymbal SplashCy
566 Cowbell Cowbell
567 Analog Cowbell AnaCowbl
568 High Bongo HiBongo
569 Low Bongo LoBongo
40
Tone List
570 Mute Hi Conga MuHiCnga
571 Open Hi Conga OpHiCnga
572 Low Conga LowConga
573 Analog Hi Conga AnHiCnga
574 Analog Mid Conga AnMiCnga
575 Analog Low Conga AnLoCnga
576 High Timbale HiTimbal
577 Low Timbale LoTimbal
578 Cabasa Cabasa
579 Maracas Maracas
580 Analog Maracas AnMaraca
581 Short Guiro ShGuiro
582 Long Guiro LoGuiro
583 Claves Claves
584 Mute Cuica MuCuica
585 Open Cuica OpCuica
586 Mute Triangle MuTrgle
587 Open Triangle OpTrgle
588 Shaker Shaker
589 Mute Surdo MuSurdo
590 Open Surdo OpSurdo
591 Melodic Tom 1 MeloTom1
592 Melodic Tom 2 MeloTom2
593 Melodic Tom 3 MeloTom3
594 Synth Drum 1 SynDrum1
595 Synth Drum 2 SynDrum2
596 Rhythm Box Tom RhythBox
597 Electric Drum 1 EleDrum1
598 Electric Drum 2 EleDrum2
599 Reverse Cymbal 1 RevCymb1
600 Reverse Cymbal 2 RevCymb2
SFX(SFX)
601 Guitar Fret Noise 1 FreNoiz1
602 Guitar Fret Noise 2 FreNoiz2
603 Guitar Cutting Noise 1 GtCtNoz1
604 Guitar Cutting Noise 2 GtCtNoz2
605 Acoustic Bass String Slap 1 BsStSlp1
606 Acoustic Bass String Slap 2 BsStSlp2
607 Breath Noise 1 BrthNoz1
608 Breath Noise 2 BrthNoz2
609 Flute Key Click 1 FlKeyCk1
610 Flute Key Click 2 FlKeyCk2
611 Seashore 1 Seashor1
612 Seashore 2 Seashor2
613 Rain Rain
614 Thunder Thunder
615 Wind Wind
616 Stream Stream
617 Bubble Bubble
618 Bird Tweet 1 Tweet1
619 Bird Tweet 2 Tweet2
620 Dog Dog
621 Horse Gallop HouseGlp
622 Telephone Ring 1 Telphon1
623 Telephone Ring 2 Telphon2
624 Door Creaking DoorCrek
625 Door Door
626 Scratch Scratch
627 Wind Chime WindChim
628 Helicopter Helicptr
629 Car Engine CarEngin
630 Car Stop CarStop
631 Car Pass CarPass
632 Car Crash CarCrash
633 Siren Siren
634 Train Train
635 Jetplane Jetplane
636 Starship Starship
637 Burst Noise BurtNois
638 Applause Applause
639 Laughing Laughing
640 Screaming Scream
641 Punch Punch
642 Heart Beat HeartBet
643 Footsteps Footstep
644 Gunshot Gunshot
645 Machine Gun MachnGun
646 Lasergun Lasergun
647 Explosion Explosio
COMBINED VOICE(CombVoc)
648 Stereo Piano & Strings Pad Pn&StrPd
649 Stereo Piano & Choir Pn&Choir
650 Stereo Piano & Synth Strings Pn&SyStr
651 Stereo Piano & Warm Pad Pn&WrmPd
652 Stereo Piano & Soft EP Pn&SfEP
653 FM Electric Piano FMEP
654 Digital Piano DigitlPn
655 E.Piano & Strings EP&Str
656 E.Piano & Acoustic Guitar EP&Gtr
657 E.Piano & Vibraphone EP&Vibra
658 E.Piano 2 & Pad EP2&Pad
659 E.Piano 2 & Strings EP2&Str
660 Harpsichord & Stereo Strings Hrps&Str
661 Music Box & Stereo Strings MBox&Str
662 Vibraphone & Stereo Strings Vib&Str
663 Vibraphone Octave VibraOct
664 Vibraphone & Marimba & Kalimba Vib&M&K
665 Marimba & Kalimba Mar&Kal
666 Marimba Delay MarDelay
667 Xylophone Octave XylopOct
668 Organ & Stereo Strings Orgn&Str
669 Stereo Organ & Piano Orgn&Pno
670 Rock Organ & Strings RkOr&Str
671 Church Organ & Choir ChOr&Cho
672 Church Organ & Strings ChOr&Str
673 Acoustic Guitar & Flute Gtr&Flut
674 Acoustic Guitar & Clavi Gtr&Clav
675 24 String Guitar 24StrGtr
676 Steel Guitar & Warm Pad StGt&Pad
677 Stereo Strings & Horn Str&Horn
678 Orchestra Orchestr
679 Full Strings 1 FullStr1
680 Full Strings 2 FullStr2
681 Symphonic Symphon
682 Stereo Choir & Strings Cho&Str
683 Stereo Choir & Steel Guitar Cho&Gtr
684 3 Trumpets Loose 3Trumpet
685 Trombone & Stereo Strings Tomb&Str
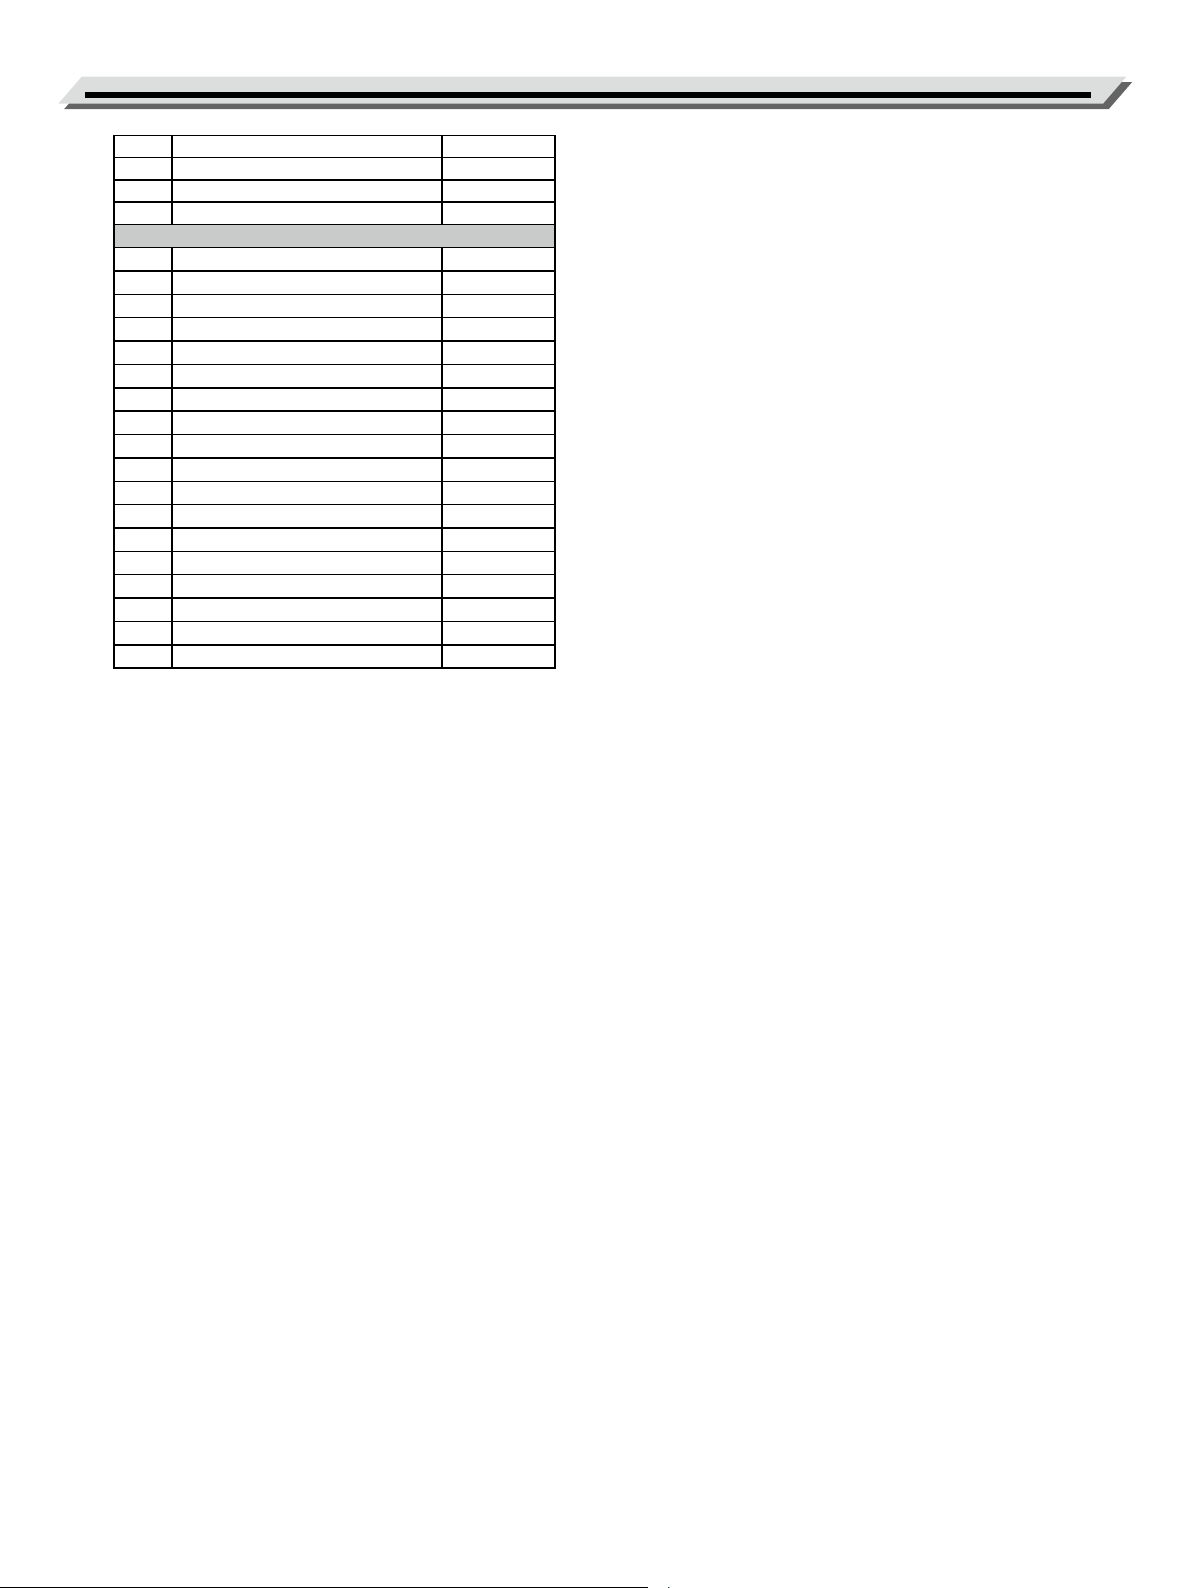
41
Tone List
686 3 Trombones Loose 3Trmbone
687 3 Muted Trumpets Loose 3MuTrump
688 Club Brass ClubBras
689 Brass & Woodwinds Brs&Wood
DRUMS(Drums)
690 Standard Kit StandKit
691 Room Kit RoomKit
692 Power Kit PowerKit
693 Electronic Kit ElectKit
694 Analog Kit AnalgKit
695 Jazz Kit JazzKit
696 Brush Kit BrushKit
697 Orchestra Kit OrcheKit
698 SFX Kit SFXKit
699 Khaligi 1 Khaligi1
700 Khaligi 2 Khaligi2
701 Sharkiyat Kit Sharkiyt
702 Oriental Kit 2 OrKit2
703 TR-Perc-Kit TR-Perc1
704 TR-Drum-Kit TR-Drum
705 Latin Drm Kit LatinDrm
706 LD Std Kit LD-Std
707 IndoMix4 IndoMix4
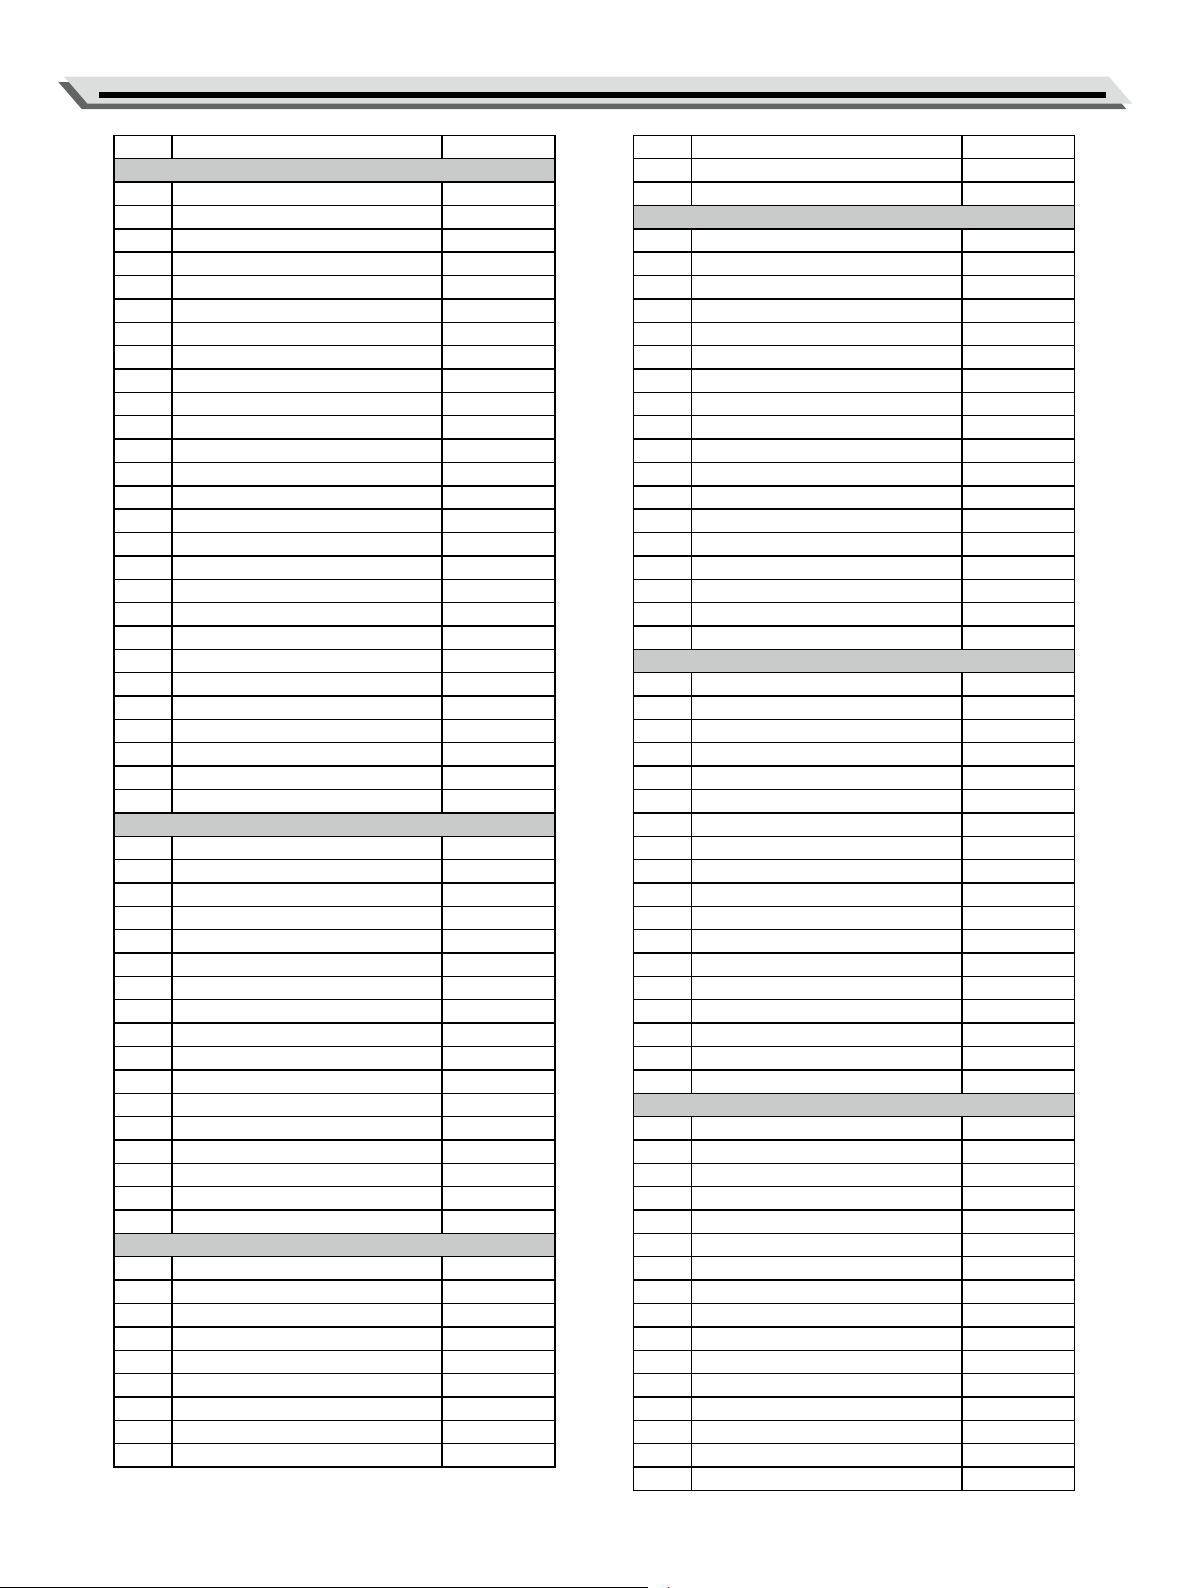
42
Style List
NO. English Name LCD Name
8 BEAT
1 Brit Pop Brit Pop
2 Bad Beat Bad Beat
3 Mersey Rock MerseyRk
4 8Beat Pop 8BeatPop
5 8Beat 1 8Beat 1
6 Pop Funk Pop Funk
7 Power Rock Power Rk
8 Rhythm&Beat Rhy&Bt
9 8Beat 2 8Beat 2
10 Pop Rock Pop Rock
11 Pop Fusion Pop Fusn
12 Sting Latin StigLatn
13 Rock Rock
14 Guitar Pop Gt Pop
15 70's Rock&Roll 70'sRock
16 Folk Rock FolkRock
17 Soft Rock SoftRock
18 Old Rock OldRock
19 Rock&Roll R'N'R
20 Rock Shue RockSh
21 Disco Beat DiscoBt
22 Gospel Gospel
23 Soul 1 Soul 1
24 Soul 2 Soul 2
25 British Soul Pop BritSoul
26 Easy R&B Pop EzR&BPop
27 8Beat Blues Rock 8BtBluRk
16 BEAT
28 16Beat Pop 16Bt Pop
29 16Beat Funk 1 16BtFnk1
30 16Beat Funk 2 16BtFnk2
31 Philly Pop Phil Pop
32 16Beat Dance 16BtDanc
33 Pop Shue Pop Sh
34 Fusion Shue FusShu
35 16Beat Soul 16BtSoul
36 16Beat R&B 16BtR&B
37 Pop 16Beat 1 Pop16Bt1
38 Pop 16Beat 2 Pop16Bt2
39 Pop 16Beat 3 Pop16Bt3
40 Slow 16Beat Slow16Bt
41 Rock Hip Hop RkHipHop
42 Soft Disco SoftDisc
43 Funk Funk
44 Classic Funk ClasFunk
BALLAD & 6/8
45 Nu Folk Nu Folk
46 Pop Ballad 1 PopBald1
47 Electro Pop Ele Pop
48 Natural Ballad NatulBld
49 Love Ballad LoveBald
50 Blues Ballad 2 BluBld 2
51 Pop Ballad 2 PopBald2
52 EP Ballad EPBallad
53 12/8 Swing 12/8Swng
54 New Shue NewShu
55 6/8 Pop 1 6/8Pop1
56 6/8 Pop 2 6/8Pop2
DANCE & DISCO
57 Techno 1 Techno 1
58 Hip Hop Hip Hop
59 Groove Groove
60 House 1 House 1
61 House 2 House 2
62 Euro Dance 1 EuroDnc1
63 Euro Dance 2 EuroDnc2
64 Pop Dance PopDance
65 Down Beat DownBeat
66 Techno 2 Techno 2
67 Progressive Progress
68 Disco Party DscParty
69 Techno Disco TecDisco
70 Club DJ Club DJ
71 Club Dance ClubDanc
72 Garage Garage
73 Twist 1 Twist 1
74 Twist 2 Twist 2
JAZZ
75 Mid BigBand BigBand
76 Piano Jazz PianoJz
77 Jazz Fusion JzFusion
78 Gospel Swing 1 GpSwing1
79 Gospel Swing 2 GpSwing2
80 Latin Jazz 1 LatinJz1
81 Guitar Swing 1 GtSwing1
82 Broadway Big Band BwayBand
83 Swing Swing
84 Latin Jazz 2 LatinJz2
85 Cool Jazz Ballad CoolJzBd
86 Guitar Swing 2 GtSwing2
87 Modern Jazz Ballad MdJzBald
88 Orchestra Swing OrhSwing
89 Dixieland 1 Dixland1
90 Dixieland 2 Dixland2
91 Smooth Jazz 1 SmthJz1
92 Swing Shue SwShu
LATIN
93 Reggaeton 1 Regaton1
94 Reggaeton 2 Regaton2
95 Colombian Cumbia Cumbia 1
96 Grupera Cumbia Cumbia 2
97 Iztapa Cumbia Cumbia 3
98 Sinaloan Banda Sinaloan
99 Norteno 1 Norteno 1
100 Norteno 2 Norteno 2
101 Corrido Corrido
102 Grupera Ballad Grupera
103 Mexican Salsa SalsaMex
104 Salsa 1 Salsa 1
105 Salsa 2 Salsa 2
106 Merengue Merengue
107 Tikitikita Tikitkta
108 Meneito Meneito
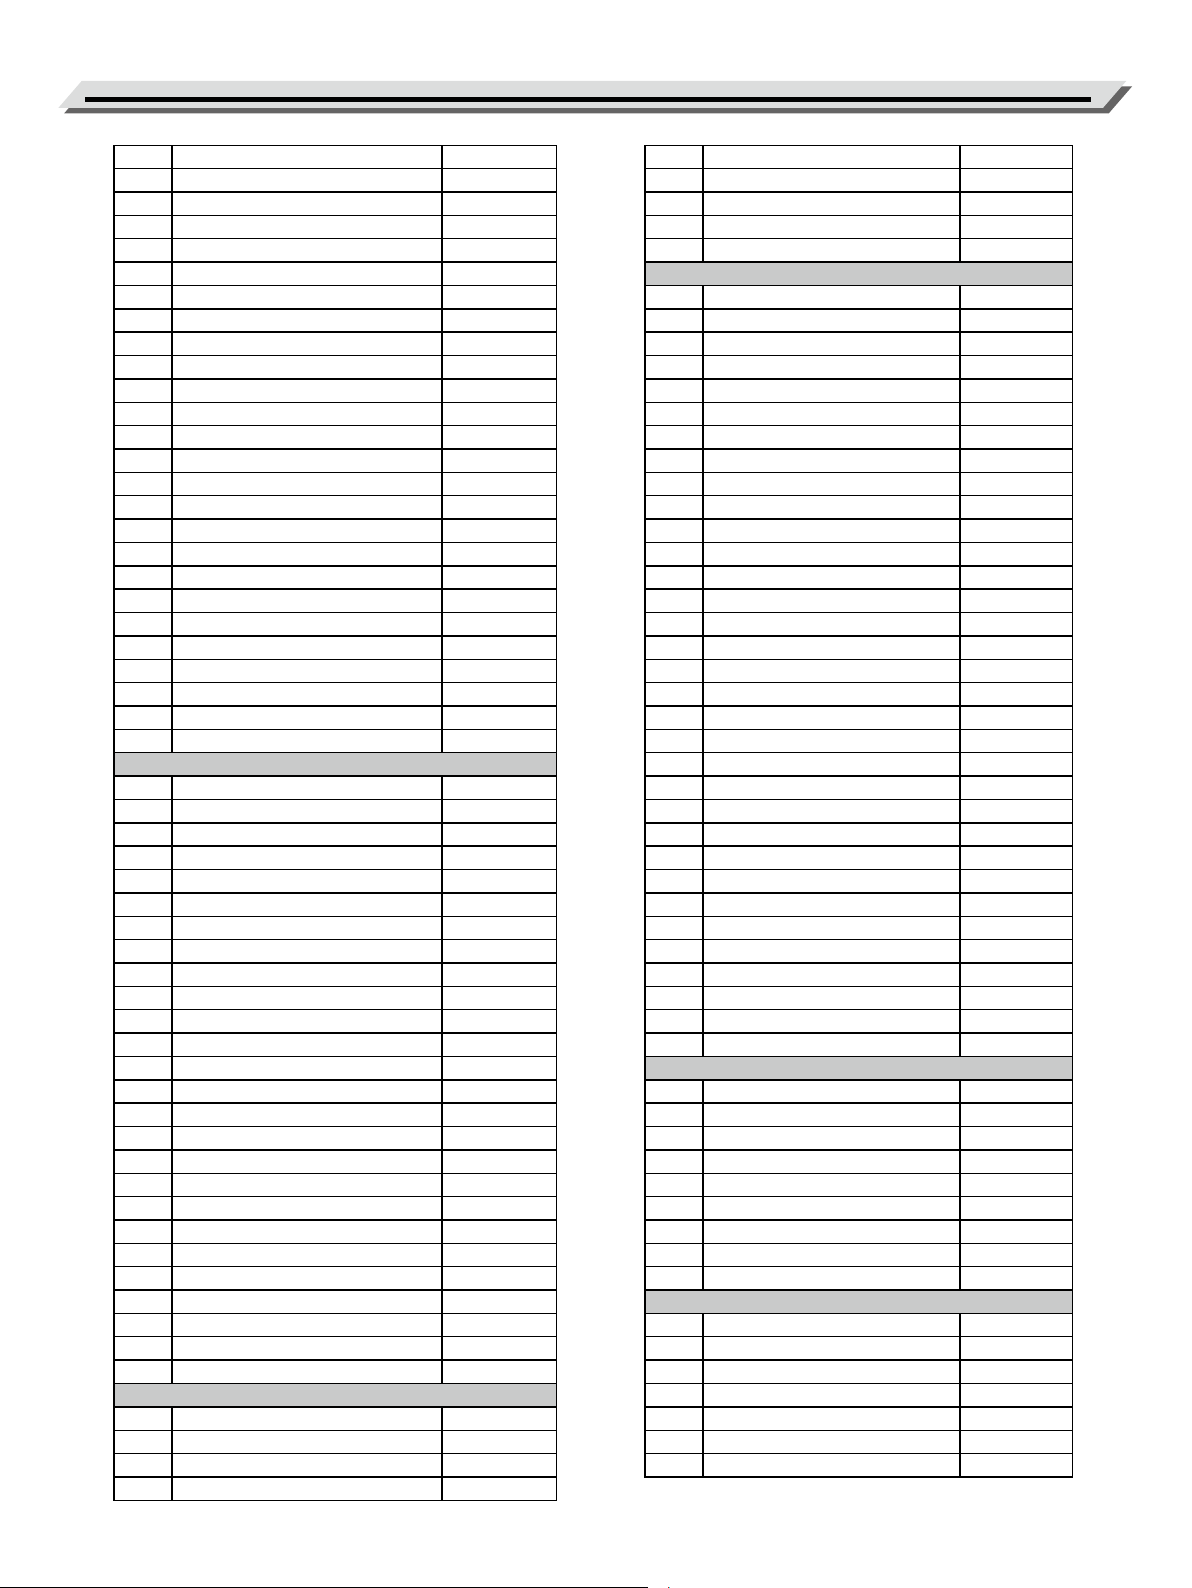
43
Style List
109 Mambo Mambo
110 Cha Cha 1 ChaCha 1
111 Slow Bolero SlBolero
112 Rumba 1 Rumba 1
113 Rumba 2 Rumba 2
114 Latin Rock LatinRck
115 Tango 1 Tango 1
116 New Reggae NewRegga
117 Reggae Dance DanRegga
118 Bachata Bachata
119 Lambada Lambada
120 Brega Brega
121 Pagode Pagode
122 Arrastape Arrastap
123 Arrocha 1 Arrocha1
124 Bossa Nova BosaNova
125 Chamame Chamame
126 Forro Forro
127 Baiao Baiao
128 Guarania Guarania
129 Pisadinha Pisadinha
130 Samba Samba
131 Samba de Rua SmbDeRua
132 Sertanejo 2 Sertanj2
133 Vanerao Vanerao
134 Xote Xote
TRADITIONAL
135 Spain Matador Matador
136 Slow Waltz 1 SlowWlz1
137 Swing Fox SwingFox
138 Beguine 1 Beguine1
139 Beguine 2 Beguine2
140 Jive Jive
141 Fox Trot FoxTrot
142 Waltz Waltz
143 Old Waltz OldWaltz
144 English Waltz EngWaltz
145 German Waltz GemWaltz
146 Italian Mazurka ItaMazuk
147 Mexico Waltz MexWaltz
148 Vienna Waltz VinaWltz
149 Slow Waltz 2 SlwWltz2
150 Jazz Waltz JazzWltz
151 Polka Polka
152 6/8 March 6/8March
153 German Polka GemPolka
154 Party Polka PtyPolka
155 Army March ArmMarch
156 March March
157 US March USMarch
158 Musette Musette
159 French Musette FMusette
160 Mazurka Mazurka
WORLD
161 Enka Ballad EnkaBald
162 Laendler Laendler
163 Hawaiian Hawaiian
164 Sirtake Sirtake
165 Dangdut Dangdut
166 6/8 Flipper 6/8Flipp
167 New Age NewAge
168 Tarantella Tarantel
169 Scottish Scottish
INDIA
170 Dep/Rupak Dep/Rupk
171 Dadra Dadra
172 Bangla Bangla
173 Bhajan Bhajan
174 Keherwa 1 Keherwa1
175 Keherwa 2 Keherwa2
176 Dholki Dholki
177 Ghazal Ghazal
178 Aasamee Aasamee
179 Koli Pattern KoliPtn
180 Lavani Lavani
181 South Pattern 1 SouthPt1
182 South Pattern 2 SouthPt2
183 Pramad NM PramadNM
184 Keral Keral
185 Dhamaal Dhamaal
186 DesiRock DesiRock
187 Su Su
188 Filmy Masti 1 FilmyMs1
189 Filmy Masti 2 FilmyMs2
190 In Masti 1 InMasti1
191 In Masti 2 InMasti2
192 Punjabi Punjabi
193 Bhangra 1 Bhangra1
194 Bhangra 2 Bhangra2
195 Garba 1 Garba1
196 Garba 2 Garba2
197 Qawaali Qawaali
198 Raja Bha RajaBha
199 Sun Belia SunBelia
200 Rajasthan Rajsthan
201 Goa Masti GoaMasti
202 Congo Congo
INDONESIA
203 Dangdut std Dangduts
204 House Dangdut Koplo Housdplo
205 Langgam Jawa LanggamJ
206 Keroncongan Kroncong
207 Keroncong Dangdut CongDut
208 Batak Batak
209 Tarling Crbntarling Crbn Tarling
210 Minang Minang
211 Pop Sunda PopSunda
VIETNAM
212 Bolero 1 Bolero 1
213 Bolero 2 Bolero 2
214 Bonton 1 Bonton 1
215 Bonton 2 Bonton 2
216 Cha Cha 3 ChaCha 3
217 Cha Dance ChaDance
218 Dance Remix DanceRmx
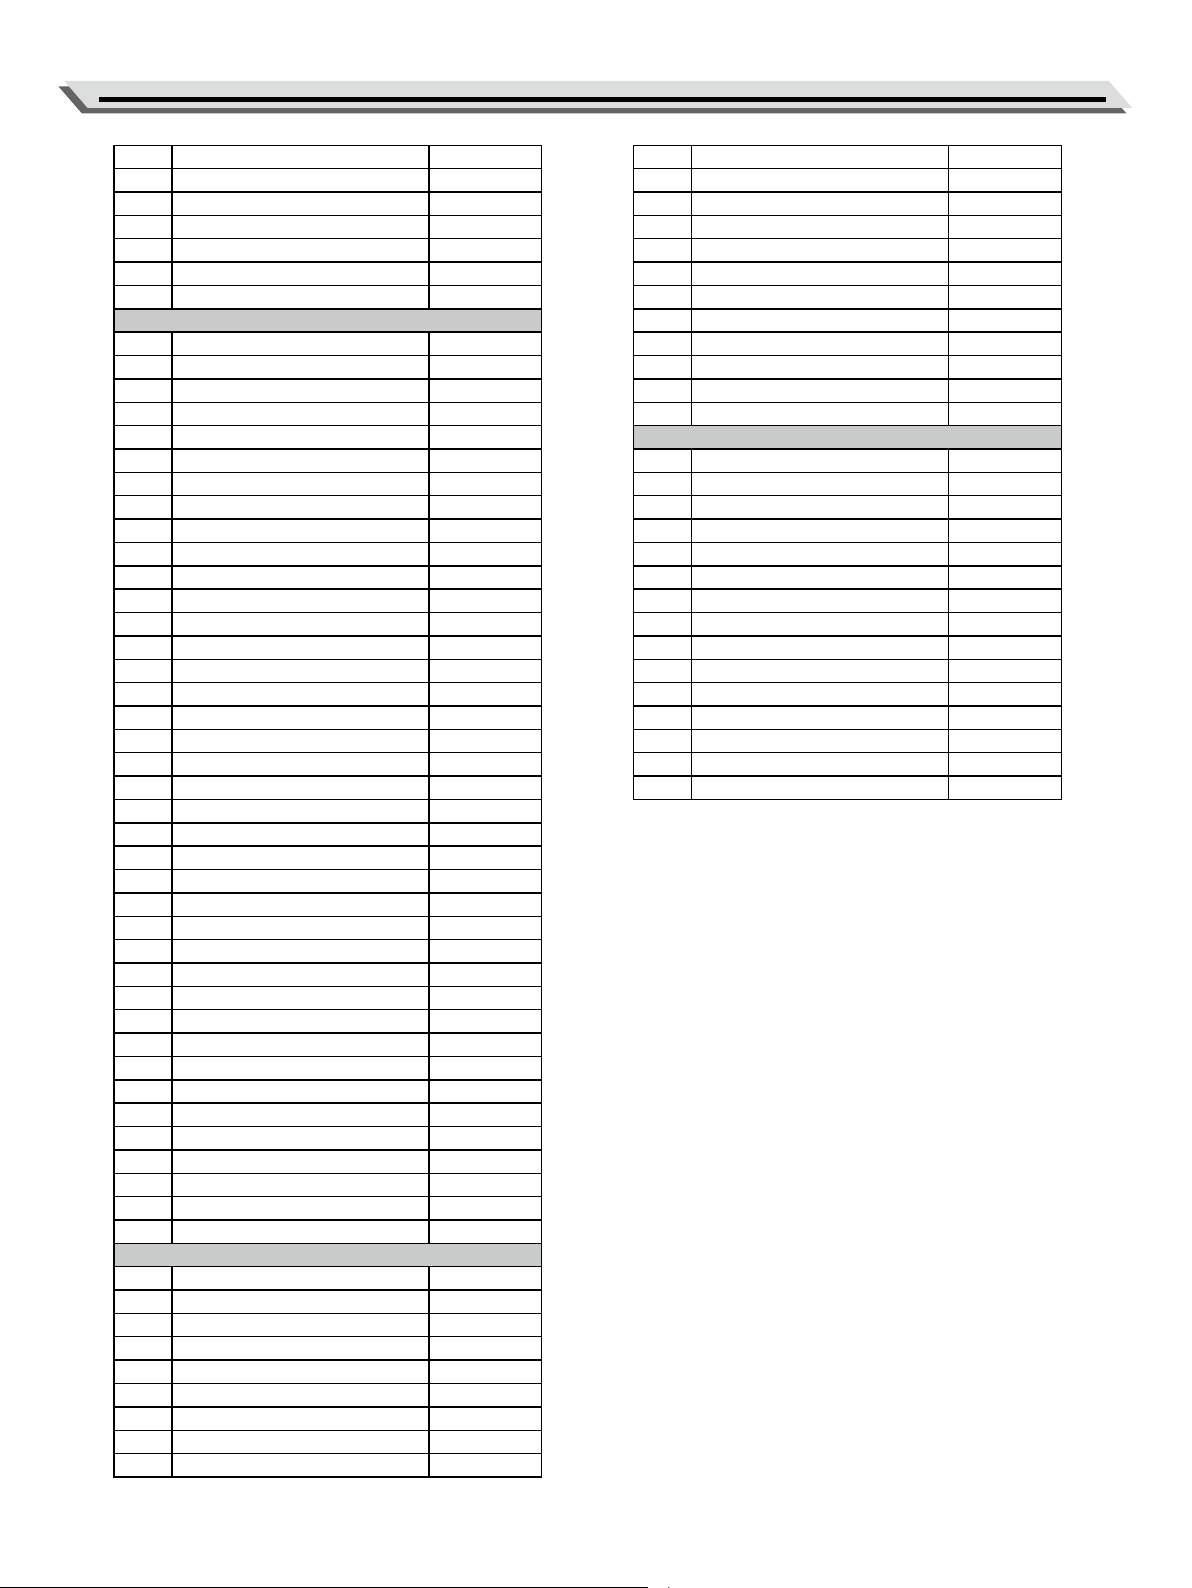
44
Style List
219 Disco Band DiscoBnd
220 DJ DJ
221 Rumba Pop RumbaPop
222 Slow Rock 2 SlowRk 2
223 Slow Surf SlowSurf
224 Habanera Habanera
225 Tango Cha TangoCha
ORIENTAL
226 Baladi Live BaladiLv
227 RAYE2 RAYE2
228 Maksoum Sarei MaksmSar
229 RMXALL RMXALL
230 4444 4444
231 Sa3idi Sa3idi
232 Fox Mix Fox Mix
233 Gypsy La GypsyLaf
234 Katakofti Katakoft
235 Konga Mix KongaMix
236 Sha3by 1 Sha3by1
237 Sha3by 2 Sha3by2
238 Rumba Mix RumbaMix
239 Slow Rock SlwRck
240 Super Waltz SuperWlz
241 AybDnc AybDnc
242 Wahda Modern WahdMdrn
243 Zaa Mix ZaaMix
244 Dance Dance
245 Baladi Baladi
246 Tabtaba Tabtaba
247 LAFF2 LAFF2
248 Reggatone Rgtone
249 Romba 1 Romba 1
250 Adani Adani
251 Khubety 2 Khubety2
252 Dosary Dosary
253 Harby Harby
254 Ayala Ayala
255 Basta Basta
256 Khubety 1 Khubety1
257 Sharh 2 Sharh 2
258 Adany 2 Adany 2
259 Liwa Liwa
260 Mallaya 1 Mallaya1
261 Rumba 1 Rumba 1
262 Rumba 2 Rumba 2
263 Sout 2 Sout 2
264 Zaa Khaligi ZafKhalg
TURKEY
265 2-4-Dugun 2-4Dugun
266 4-4-OR-1 4-4-OR-1
267 6-8-TSM 6-8-TSM
268 7-8-KRDNZ 7-8KRDNZ
269 9-8-1 9-8-1
270 9-8-TSM 9-8-TSM
271 10-8-TSM 10-8-TSM
272 10-THM-1 10-THM-1
273 10-THM-2 10-THM-2
274 ACS-2-4 ACS-2-4
275 Ciftetelli-1 Ciftetl1
276 Duble-Vahde DblVahde
277 Harmandali Harmandl
278 Misket Misket
279 Moulfo Moulfo
280 Pop Halay PopHalay
281 Top Pop Top Pop
282 Turk-Pop-1 TurkPop1
283 Turku Pop TurkuPop
284 Vahde-R&B VahdeR&B
285 Zeybek Zeybek
PIANIST
286 Pianist 1 Pianist1
287 Pianist 2 Pianist2
288 Jazz Jazz
289 Jazz Pub JazzPub
290 Piano Rock PianoRk
291 Pop Bossa PopBossa
292 March March
293 Piano Beat PianoBt
294 Piano Bar PianoBar
295 Blues Blues
296 Pop Waltz PopWaltz
297 Ballad Ballad
298 6/8 Ballad 6/8Bald
299 Pop 1 Pop 1
300 Pop 2 Pop 2
45
Demo List
NO. English Name LCD Name
1 Demo Demo
46
MIDI Implementation Chart
Function
Basic
Channel
Mode
Note
Number
Velocity
After
Touch
Pitch Bend
Control
Change
Program
Change
System Exclusive
System
Common
System
Real Time
Aux
Messages
Notes:
Default
Changed
Default
Messages
Altered
Note
: True Voice
Note on
Note o
key’s
Ch’s
0,32
1
5
6, 38
7
10
11
64
65
66
67
80
81
91
93
120
121
123
: True Number
: Song Position
: Song Select
: Tune
: Clock
: Commands
: Local On/O
: Active sense
: Reset
Transmitted
1
1-16
x
x
********
0-127
********
o 9nH,V=1-127
x (9nH,V=0)
x
x
x
o
o
x
o
o
x
x
o
x
o
o
x
x
o
o
o
x
o
o
********
x
x
x
x
o
x *1
x
o
x
Recognized
1-16
1-16
3
x
x
0-127
0-127
o 9nH,V=1-127
o (9nH,V=0; 8nH,V=0-127)
x
x
o
o
o
o
o
o
o
o
o
o
o
o
o
o
o
o
o
x
o
o
0-127
o
x
x
x
x
x
x
o
x
Remarks
Bank Select
Modulation
Portamento Time
Data Entry
Volume
Pan
Expression
Sustain Pedal
Portamento On/O
Sostenuto Pedal
Soft Pedal
Reverb Program
Chorus Program
Reverb Level
Chorus Level
All Sound O
Reset All Controllers
All Notes O
*1
When the accompaniment is started, an FAH message is transmitted.
When the accompaniment is stopped, an FCH message is transmitted.
● Mode 1: OMNI ON, POLY ● Mode 3: OMNI OFF, POLY o: YES
● Mode 2: OMNI ON, MONO ● Mode 4: OMNI OFF, MONO x: NO
E-X50_eng03