VersiOn en Espahol ........................... 2
Product Registration ........................ 2
Important Safety Instructions ....... 2-3
First Steps ..................................... 3-4
Energy Saving Ideas ......................... 5
Setting the Controls ........................ 5
Fresh Food Storage .......................... 6
Shelves ............................................ 7
Automatic Ice and Water
Dispenser .................................... 8-10
Care and Cleaning .................... 11-12
Removing Handles and Doors ... 12-13
Avoid Service Checklist ............ 14-17
Normal Operating Sounds .............. 17
Warranty ........................................ 18
Service Information (Canada) ........ 19
P/N 218953801 (0101)
Product Registration
Version en espa_ol
Si desea obtener una copia en espanol de este
Manual del Usuario, slrvase escribir la direcciOn
que se incluye a continuacion, Solicite la P/N
218953900,
Spanish Ownerrs Guides
Electrolux Home Products
P.O. Box 212378
Augusta, Georgia 30917
Record the Model Number and Serial Number of this refrigerator in the space
provided below. Thesenumbers are found on the serial plate, located on the ceiling
of the refrigerator compartment.
Model Number:
Serial Number:
Register Your Product
Theselfladdressed PRODUCTREGISTRATIONCARD should be Filledin completely,
signed and returned Electrolux Home Products.
Important Safety
Instructions [:,,,v_,v_,,,i,,c,_For Your Safety
Do not store or use gasoline or other flammable vapors and liquids in the vicinity
of this,or anyother appliance. Readproduct labelsfor flammability and otherwarnings.
Read all instructions before
using this refrigerator.
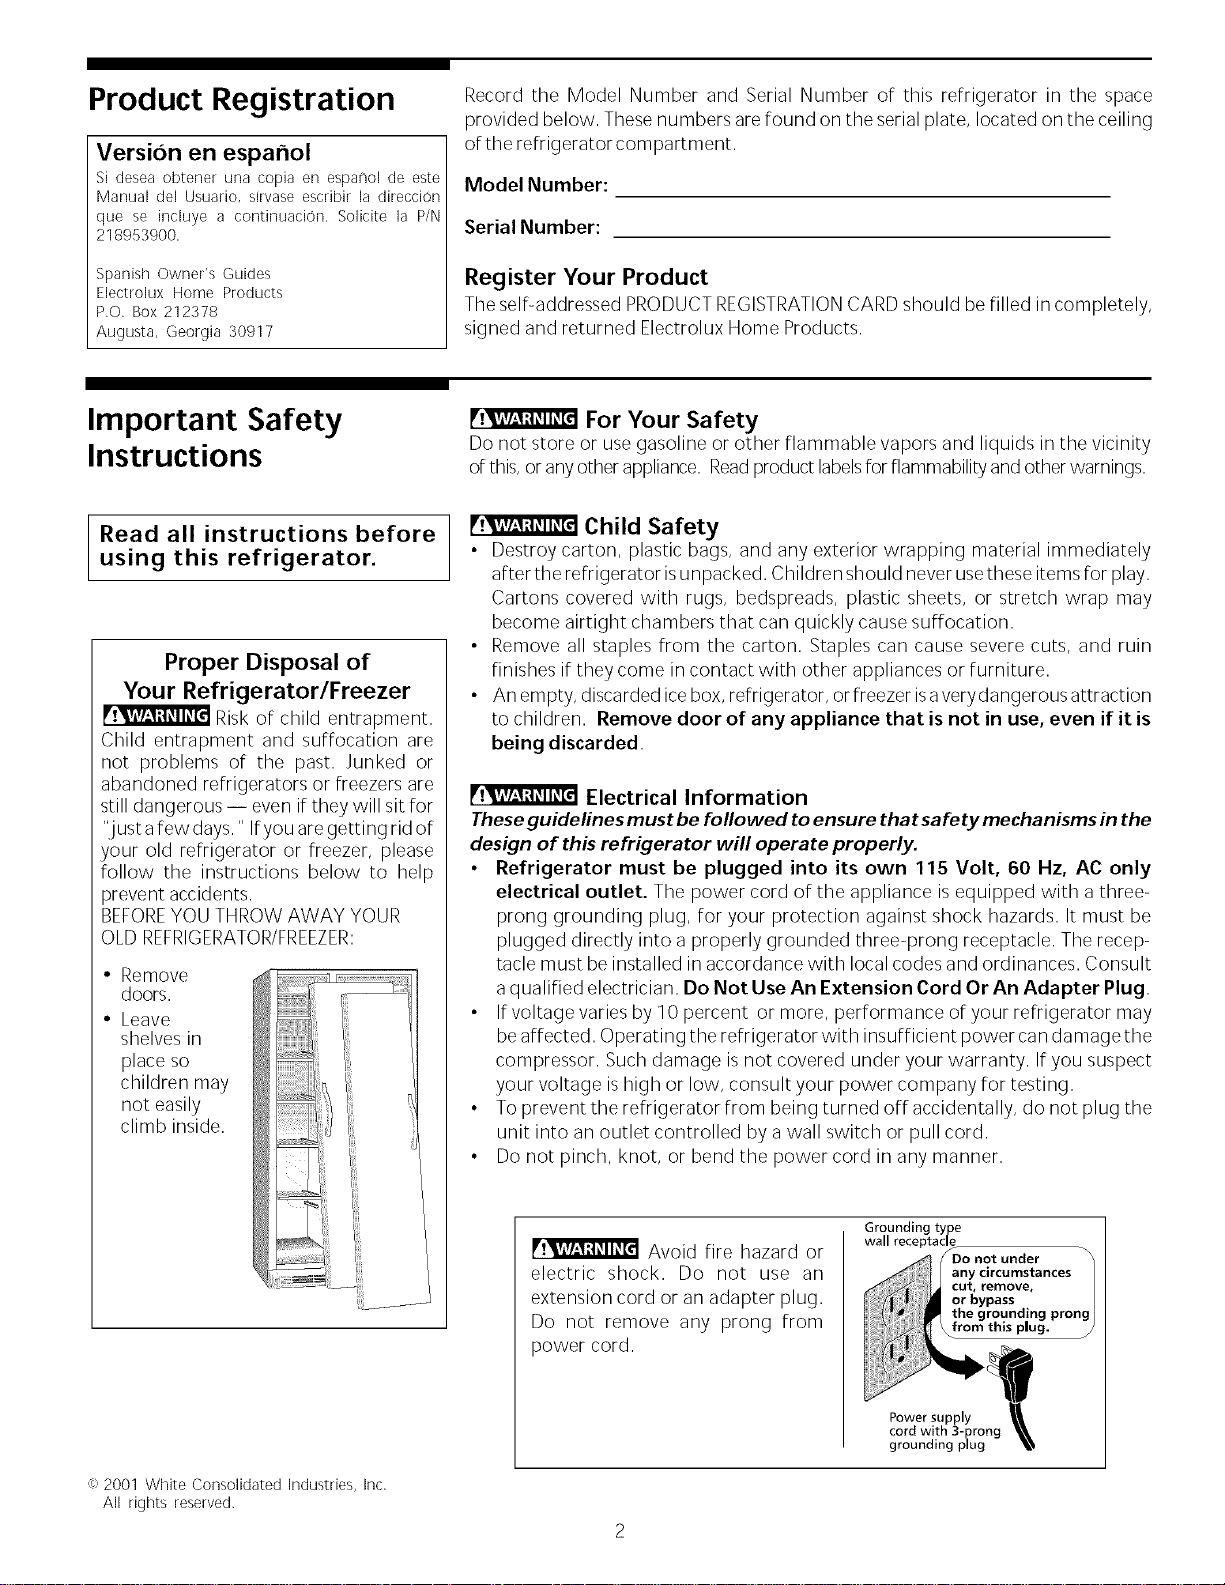
Proper Disposal of
Your Refrigerator/Freezer
!'vAV-'1:t_ll_[_ Risk of child entrapment.
Child entrapment and suffocation are
not problems of the past. Junked or
abandoned refrigerators or freezers are
still dangerous -- even if they will sit for
"just afew days." Ifyou are getting rid of
your old refrigerator or freezer, please
follow the instructions below to help
prevent accidents.
BEFOREYOU THROW AWAY YOUR
OLD REFRIGERATOR/FREEZER:
• Remove
doors.
• Leave
shelves in
place so
children may
not easily
climb inside.
'i!iij
,, 2001 White Consolidated Industries, Inc,
All rights reserved,
pv,v-_.'_,._,c_Child Safety
•Destroy carton, plastic bags, and any exterior wrapping material immediately
after the refrigerator isunpacked. Children should neverusethese items for play.
Cartons covered with rugs, bedspreads, plastic sheets, or stretch wrap may
become airtight chambers that can quickly cause suffocation.
• Remove all staples from the carton. Staples can cause severe cuts, and ruin
finishes if they come in contact with other appliances or furniture.
• An empty, discarded icebox, refrigerator, or freezer isaverydangerous attraction
to children. Remove door of any appliance that is not in use, even if it is
being discarded.
r!v,v-'_:_"_[=l Electrical Information
Theseguidelines must be followed to ensure that safety mechanisms in the
design of this refrigerator will operate properly.
•Refrigerator must be plugged into its own 115 Volt, 60 Hz, AC only
electrical outlet. The power cord of the appliance is equipped with a three-
prong grounding plug, for your protection against shock hazards. It must be
plugged directly into a properly grounded three-prong receptacle. The recep-
tacle must be installed in accordance with local codesand ordinances. Consult
aqualified electrician. Do Not Use An Extension Cord Or An Adapter Plug.
• If voltage varies by 10 percent or more, performance of your refrigerator may
be affected. Operating the refrigerator with insufficient power can damage the
compressor. Such damage is not covered under your warranty. If you suspect
your voltage ishigh or low, consult your power company for testing.
• To preventthe refrigerator from being turned off accidentally, do not plug the
unit into an outlet controlled by a wall switch or pull cord.
• Do not pinch, knot, or bend the power cord in any manner.
!_rAV-'1:t_ll_[€l Avoid fire hazard or
electric shock. Do not use an
extension cord or an adapter plug.
Do not remove any prong from
power cord.
Grounding type
wall receptacle
Power supply
cord with 3-prong
grounding plug
Important Safety
Instructions (continued)
[:,'*'/-'_",'_'_ Other Precautions
•Never unplug the refrigerator by pulling on the power cord. Always grip the plug
firmly, and pull straight out from the receptacle.
• To avoid electrical shock, unplug the refrigerator before cleaning and before
replacing a light bulb. NOTE: Turning the control to OFFturns off the compressor,
but does not disconnect power to the light bulb or other electrical components.
•Do not operate the refrigerator in the presence of explosive fumes.
• Avoid contact with any moving parts of the automatic ice maker.
First Steps
Roller Adjusting Bok
Adjusting Front Rollers
Replacing Toe Grille
This Owner's Guide provides specific operating instructions for your model. Use
refrigerator only asinstructed in this Owner's Guide. Before starting refrigerator,
follow these important first steps:
Location
Installrefrigerator:
• nearagrounded electricaloutlet. DONOT usean extensioncord or an adapterplug.
• out of direct sunlight and away from range, dishwasher, or other heat sources,
if possible.
• on a floor that islevel and strong enough to support a fully loaded refrigerator.
• where a water supply is available for automatic ice maker.
Installation
• Do not install refrigerator where temperature will drop below 60°F (15°C), or rise
above 110°F (43°C). Compressorwill not beableto maintain proper temperatures.
• In a recessed installation, allow an extra 1/2 inch (10-15 mm) on each side for
easeof installation.
• If the hinge side of the unit will be placed against a wall, allowa 1-3/4 inch (44
mm) space between wall and refrigerator to permit proper door swing.
Door Opening
Forbest useof drawers and freezer basket, refrigerator should be in a position where
both the refrigerator and freezer doors can be opened about 135 °.
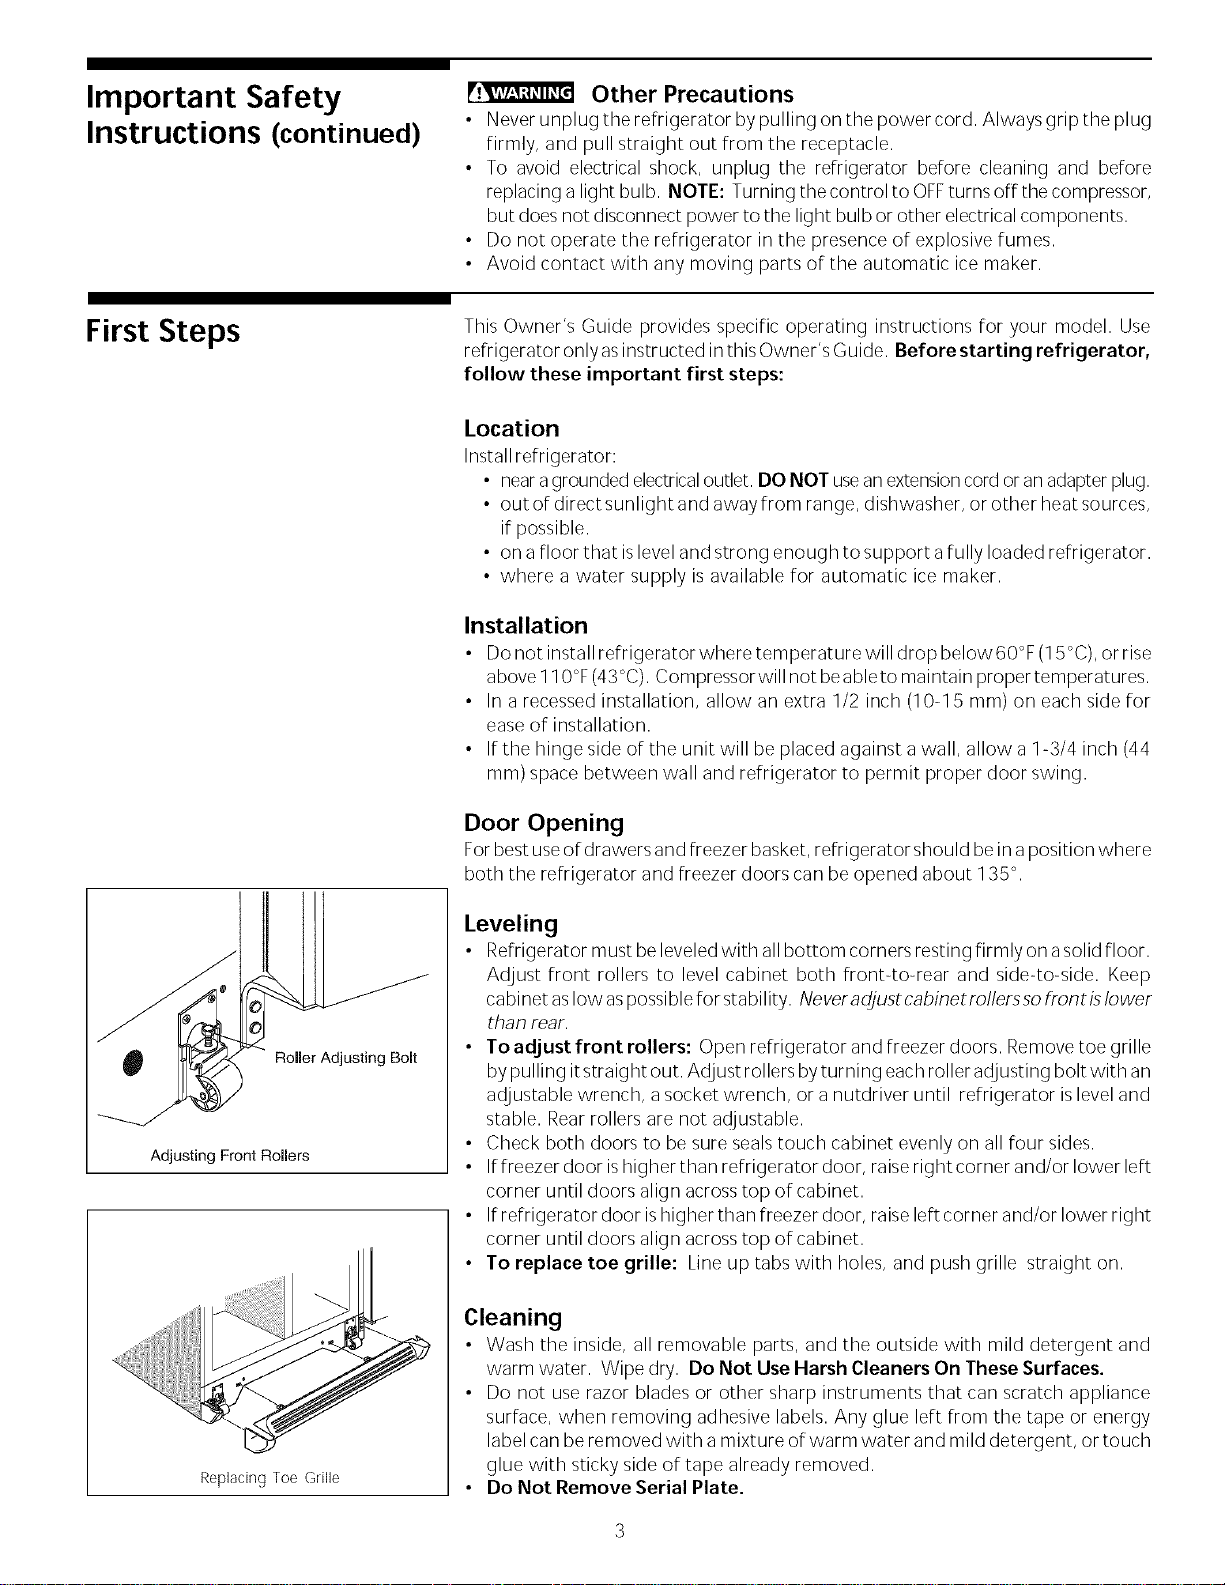
Leveling
• Refrigerator must be leveledwith allbottom corners resting firmly on asolid floor.
Adjust front rollers to level cabinet both front-to-rear and side-to-side. Keep
cabinet aslow aspossiblefor stability. Neverac_ustcabinetrollerssofrontislower
than rear.
•To adjust front rollers: Open refrigerator and freezer doors. Removetoe grille
by pulling itstraight out. AdJustrollers byturning eachroller adjusting bolt with an
adjustable wrench, a socket wrench, or a nutdriver until refrigerator islevel and
stable. Rearrollers are not adjustable.
• Check both doors to be sure sealstouch cabinet evenly on all four sides.
• If freezer door ishigher than refrigerator door, raiseright corner and/or lower left
corner until doors align acrosstop of cabinet.
• If refrigerator door ishigher than freezer door, raiseleft corner and/or lower right
corner until doors align acrosstop of cabinet.
•To replace toe grille: Line up tabs with holes, and push grille straight on.
Cleaning
• Wash the inside, all removable parts, and the outside with mild detergent and
warm water. Wipe dry. Do Not Use Harsh Cleaners On These Surfaces.
• Do not use razor blades or other sharp instruments that can scratch appliance
surface, when removing adhesive labels. Any glue left from the tape or energy
label can be removed with a mixture of warm water and mild detergent, or touch
glue with sticky side of tape already removed.
• Do Not Remove Serial Plate.
First Steps
(continued)
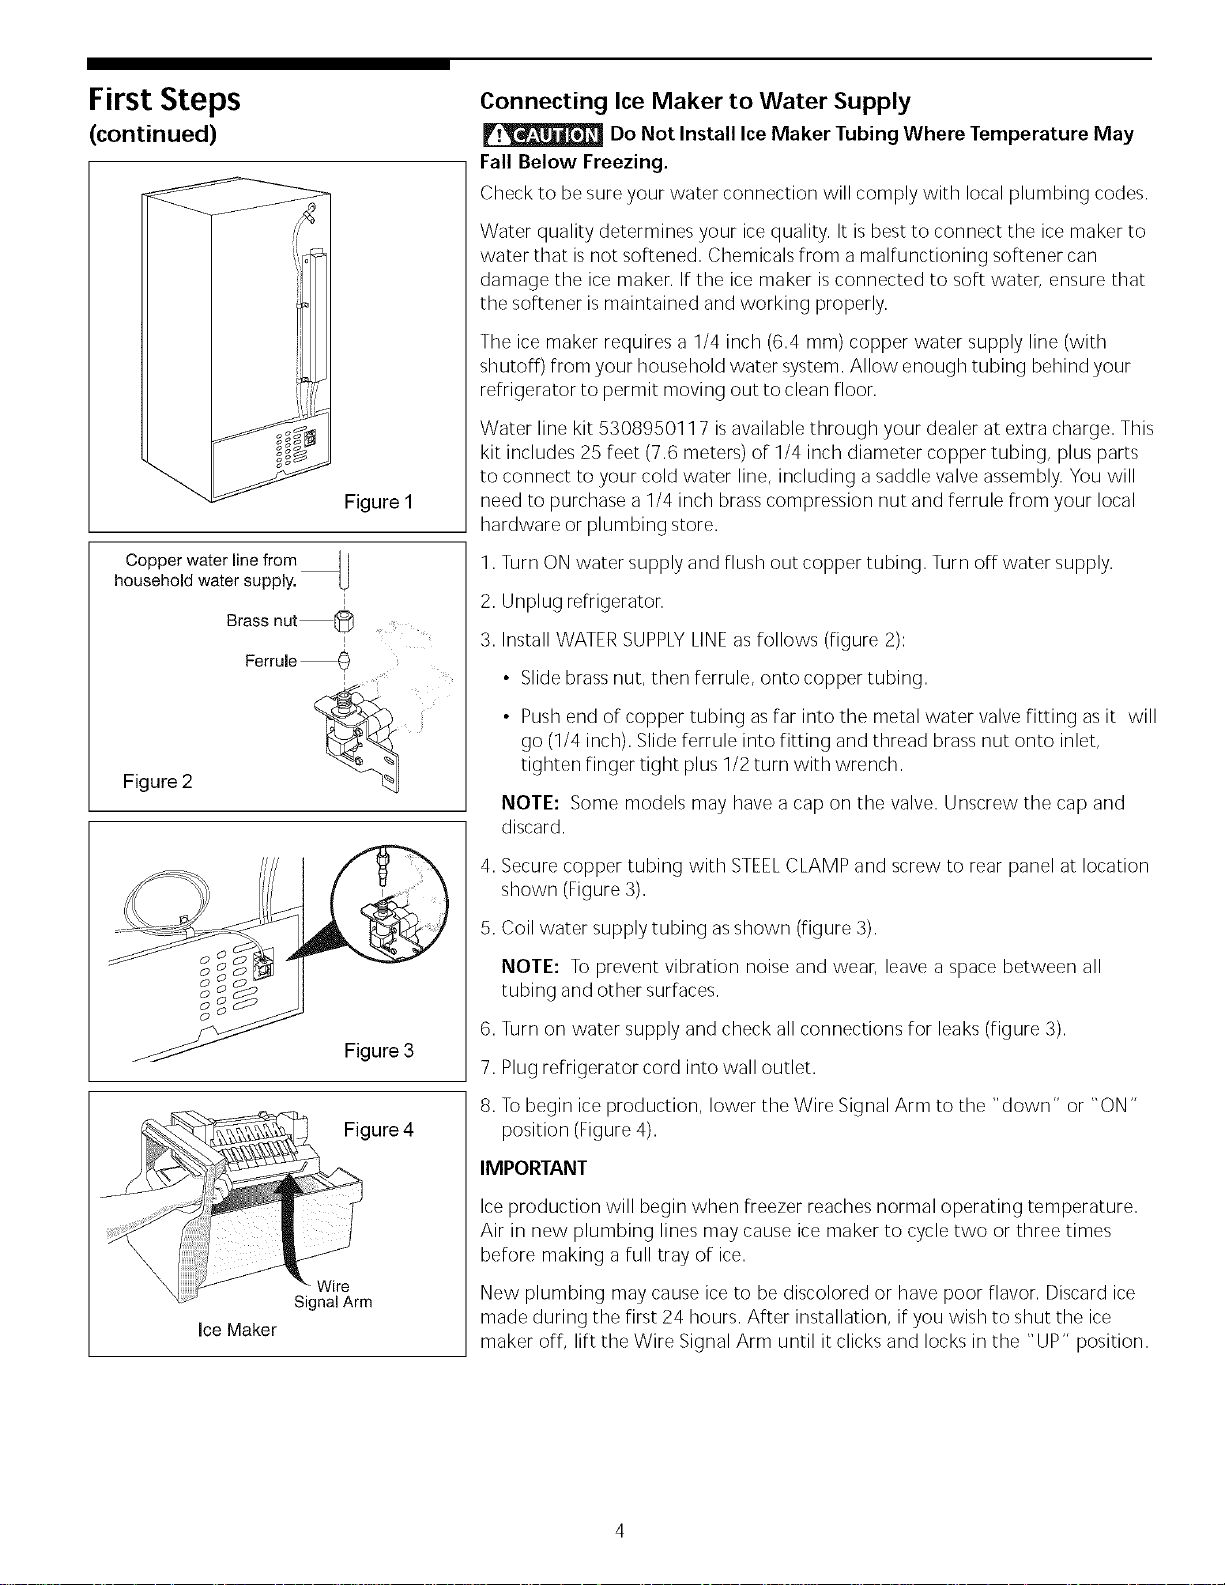
Figure 1
Copper water line from
household water supply.
Figure 2
u
Brass nut !
Ferrule 0
0
0
0
0
0
Figure 3
Figure 4
Wire
Signal Arm
Ice Maker
Connecting Ice Maker to Water Supply
Do Not Install Ice Maker Tubing Where Temperature May
Fall Below Freezing.
Check to be sure your water connection will comply with local plumbing codes.
Water quality determines your ice quality. It is best to connect the ice maker to
water that is not softened. Chemicals from a malfunctioning softener can
damage the ice maker. Ifthe ice maker is connected to soft water, ensure that
the softener is maintained and working properly.
The ice maker requires a 1/4 inch (6.4 mm) copper water supply line (with
shutoff) from your household water system. Allow enough tubing behind your
refrigerator to permit moving out to clean floor.
Water line kit 530895011 7 isavailable through your dealer at extra charge. This
kit includes 25 feet (7.6 meters) of 1/4 inch diameter copper tubing, plus parts
to connect to your cold water line, including a saddle valve assembly. You will
need to purchase a 1/4 inch brass compression nut and ferrule from your local
hardware or plumbing store.
1. Turn ON water supply and flush out copper tubing. Turn off water supply.
2. Unplug refrigerator.
3. Install WATERSUPPLYLINEas follows (figure 2):
• Slide brass nut, then ferrule, onto copper tubing.
• Push end of copper tubing asfar into the metal water valve fitting asit will
go (1/4 inch). Slide ferrule into fitting and thread brass nut onto inlet,
tighten finger tight plus 1/2 turn with wrench.
NOTE: Some models may have a cap on the valve. Unscrew the cap and
discard.
4. Secure copper tubing with STEELCLAMP and screw to rear panel at location
shown (Figure 3).
5. Coil water supply tubing asshown (figure 3).
NOTE: To prevent vibration noise and wear, leave a space between all
tubing and other surfaces.
6. Turn on water supply and check all connections for leaks (figure 3).
7. Plug refrigerator cord into wall outlet.
8. Tobegin ice production, lower the Wire Signal Arm to the "down" or "ON"
position (Figure4).
IMPORTANT
Ice production will begin when freezer reaches normal operating temperature.
Air in new plumbing lines may cause ice maker to cycle two or three times
before making a full tray of ice.
New plumbing may cause ice to be discolored or have poor flavor. Discard ice
made during the first 24 hours. After installation, if you wish to shut the ice
maker off, lift the Wire Signal Arm until it clicks and locks in the "UP" position.
Energy Saving Ideas • Install the refrigerator in the coolest part of the room, out of direct sunlight and
away from heating ducts or registers. Do not place the refrigerator next to heat-
producing appliances such asa range, oven, or dishwasher. If this isnot possible,
asection of cabinetry, or an added layerof insulation between the two appliances
will help the refrigerator operate more efficiently.
• Levelrefrigerator so doors close tightly.
• Refer to this Owner's Guide for the suggested refrigerator settings.
• Periodiccleaning of the condenser will help the refrigerator run more efficiently.
See "Outside" in the Care and Cleaning Section.
• Donot overcrowd the refrigerator or block cold air vents, which are located in the
refrigerator compartment at the top center of the rear wall. Doing so causesthe
refrigerator to run longer and use more energy. Shelvesshould not be lined with
aluminum foil, wax paper, or paper toweling. Liners interfere with cold air
circulation, making the refrigerator lessefficient, which could causefood spoilage.
• Cover foods and wipe containers dry before placing them in the refrigerator. This
cuts down on moisture build-up inside the unit.
• Organize the refrigerator to reduce door openings. Remove as many items as
needed at one time, and close door assoon as possible.
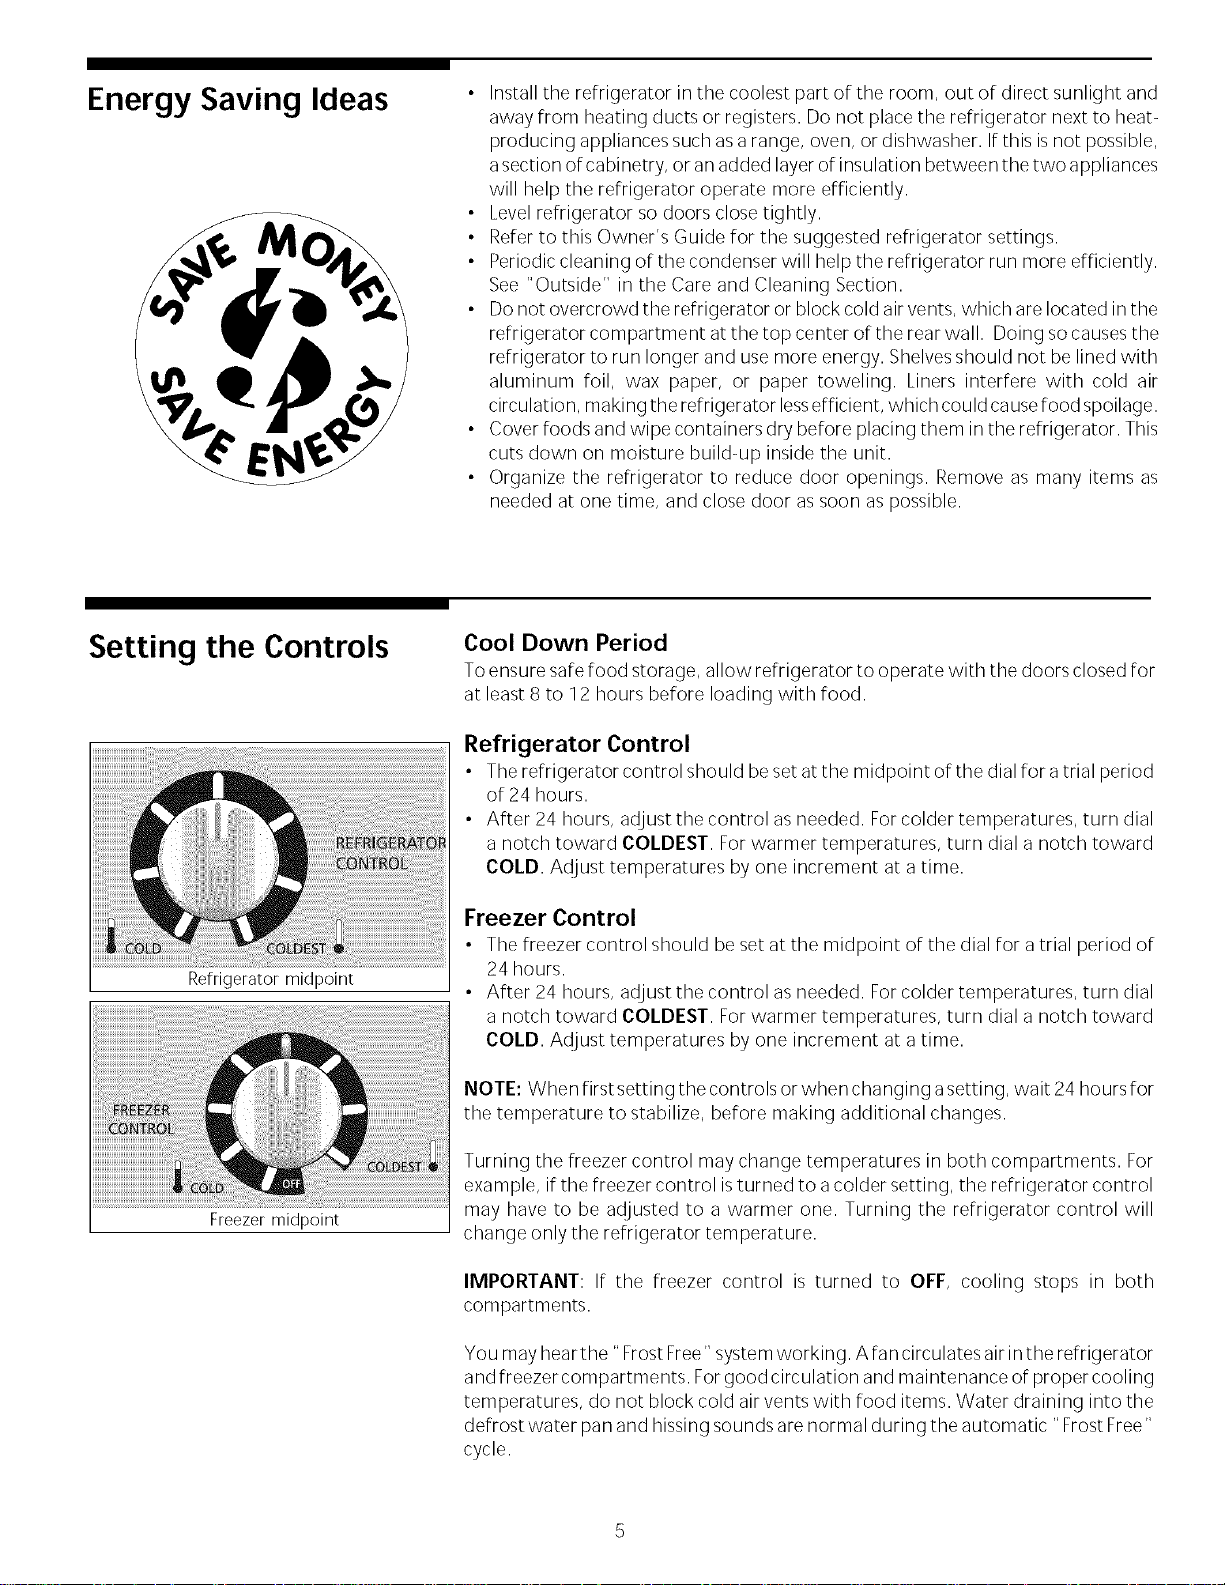
Setting the Controls
Refrigerator midpoint
Freezer midpoint
Cool Down Period
To ensure safe food storage, allow refrigerator to operate with the doors closed for
at least 8 to 12 hours before loading with food.
Refrigerator Control
• Therefrigerator control should be set at the midpoint of the dial for a trial period
of 24 hours.
• After 24 hours, adjust the control as needed. Forcolder temperatures, turn dial
a notch toward COLDEST. Forwarmer temperatures, turn dial a notch toward
COLD. Adjust temperatures by one increment at a time.
Freezer Control
• The freezer control should be set at the midpoint of the dial for a trial period of
24 hours.
• After 24 hours, adjust the control as needed. Forcolder temperatures, turn dial
a notch toward COLDEST. Forwarmer temperatures, turn dial a notch toward
COLD. Adjust temperatures by one increment at a time.
NOTE: When first setting the controls or when changing asetting, wait 24hours for
the temperature to stabilize, before making additional changes.
Turning the freezer control may change temperatures in both compartments. For
example, if the freezer control isturned to acolder setting, the refrigerator control
may have to be adjusted to a warmer one. Turning the refrigerator control will
change only the refrigerator temperature.
IMPORTANT: If the freezer control is turned to OFF, cooling stops in both
compartments.
You may hearthe "Frost Free" systemworking. A fan circulates air in the refrigerator
and freezercompartments. Forgood circulation and maintenance of proper cooling
temperatures, do not block cold air vents with food items. Water draining into the
defrost water pan and hissing sounds are normal during the automatic "Frost Free"
cycle.
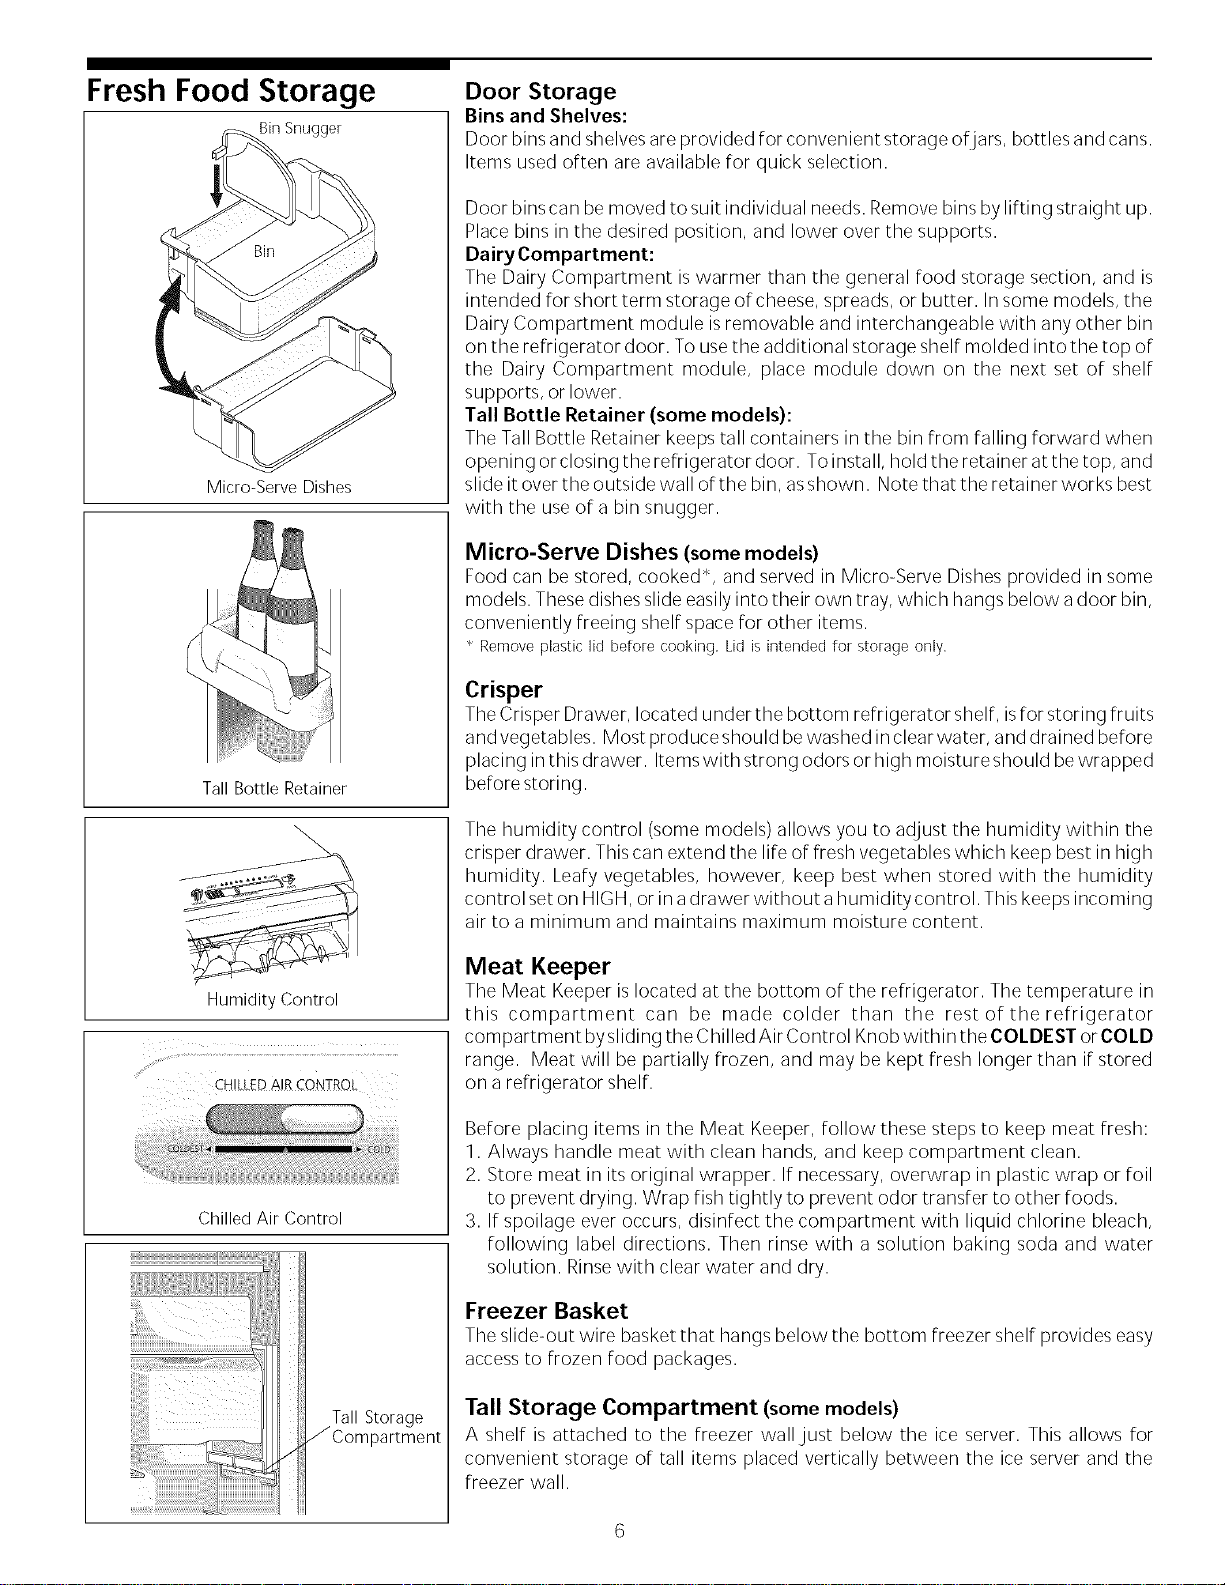
Fresh Food Storage
Bin Snugger
Micro-Serve Dishes
Tall Bottle Retainer
Humidity Control
..... CHILLED AIR CONTROL
Chilled Air Control
TallStorage
JCompartment
Door Storage
Bins and Shelves:
Door binsand shelvesare provided for convenient storage of jars, bottles and cans.
Items used often are available for quick selection.
Door binscan be moved to suit individual needs. Remove bins bylifting straight up.
Place bins in the desired position, and lower over the supports.
Dairy Compartment:
The Dairy Compartment iswarmer than the general food storage section, and is
intended for shortterm storage of cheese, spreads, or butter. In some models, the
Dairy Compartment module isremovable and interchangeable with any other bin
on the refrigerator door. To usethe additional storage shelf molded into the top of
the Dairy Compartment module, place module down on the next set of shelf
supports, or lower.
Tall Bottle Retainer (some models):
The Tall Bottle Retainer keeps tall containers in the bin from falling forward when
opening or closing the refrigerator door. Toinstall, hold the retainer at the top, and
slide it over the outside wall of the bin, asshown. Note that the retainer works best
with the useof a bin snugger.
Micro-Serve Dishes (some models)
Food can be stored, cooked -v, and served in Micro-Serve Dishes provided in some
models. These dishesslide easilyinto their own tray, which hangs below a door bin,
conveniently freeing shelf space for other items.
Remove plastic lid before cooking. Lid is intended for storage only.
Crisper
TheCrisper Drawer, located under the bottom refrigerator shelf, isfor storing fruits
and vegetables. Most produce should bewashed in clearwater, and drained before
placing in this drawer. Items with strong odors or high moisture should bewrapped
before storing.
The humidity control (some models) allows you to adjust the humidity within the
crisper drawer. This can extend the life of fresh vegetables which keep best in high
humidity. Leafy vegetables, however, keep best when stored with the humidity
control set on HIGH, or in adrawer without a humidity control. This keeps incoming
air to a minimum and maintains maximum moisture content.
Meat Keeper
The Meat Keeper is located at the bottom of the refrigerator. The temperature in
this compartment can be made colder than the rest of the refrigerator
compartment bysliding the Chilled Air Control Knob within the COLDEST or COLD
range. Meat will be partially frozen, and may be kept fresh longer than if stored
on a refrigerator shelf.
Before placing items in the Meat Keeper, follow these steps to keep meat fresh:
1. Always handle meat with clean hands, and keep compartment clean.
2. Store meat in its original wrapper. If necessary,overwrap in plastic wrap or foil
to prevent drying. Wrap fish tightly to prevent odor transfer to other foods.
3. If spoilage ever occurs, disinfect the compartment with liquid chlorine bleach,
following label directions. Then rinse with a solution baking soda and water
solution. Rinse with clear water and dry.
Freezer Basket
The slide-out wire basket that hangs below the bottom freezer shelf provides easy
access to frozen food packages.
Tall Storage Compartment (some models)
A shelf is attached to the freezer wall.just below the ice server. This allows for
convenient storage of tall items placed vertically between the ice server and the
freezer wall.
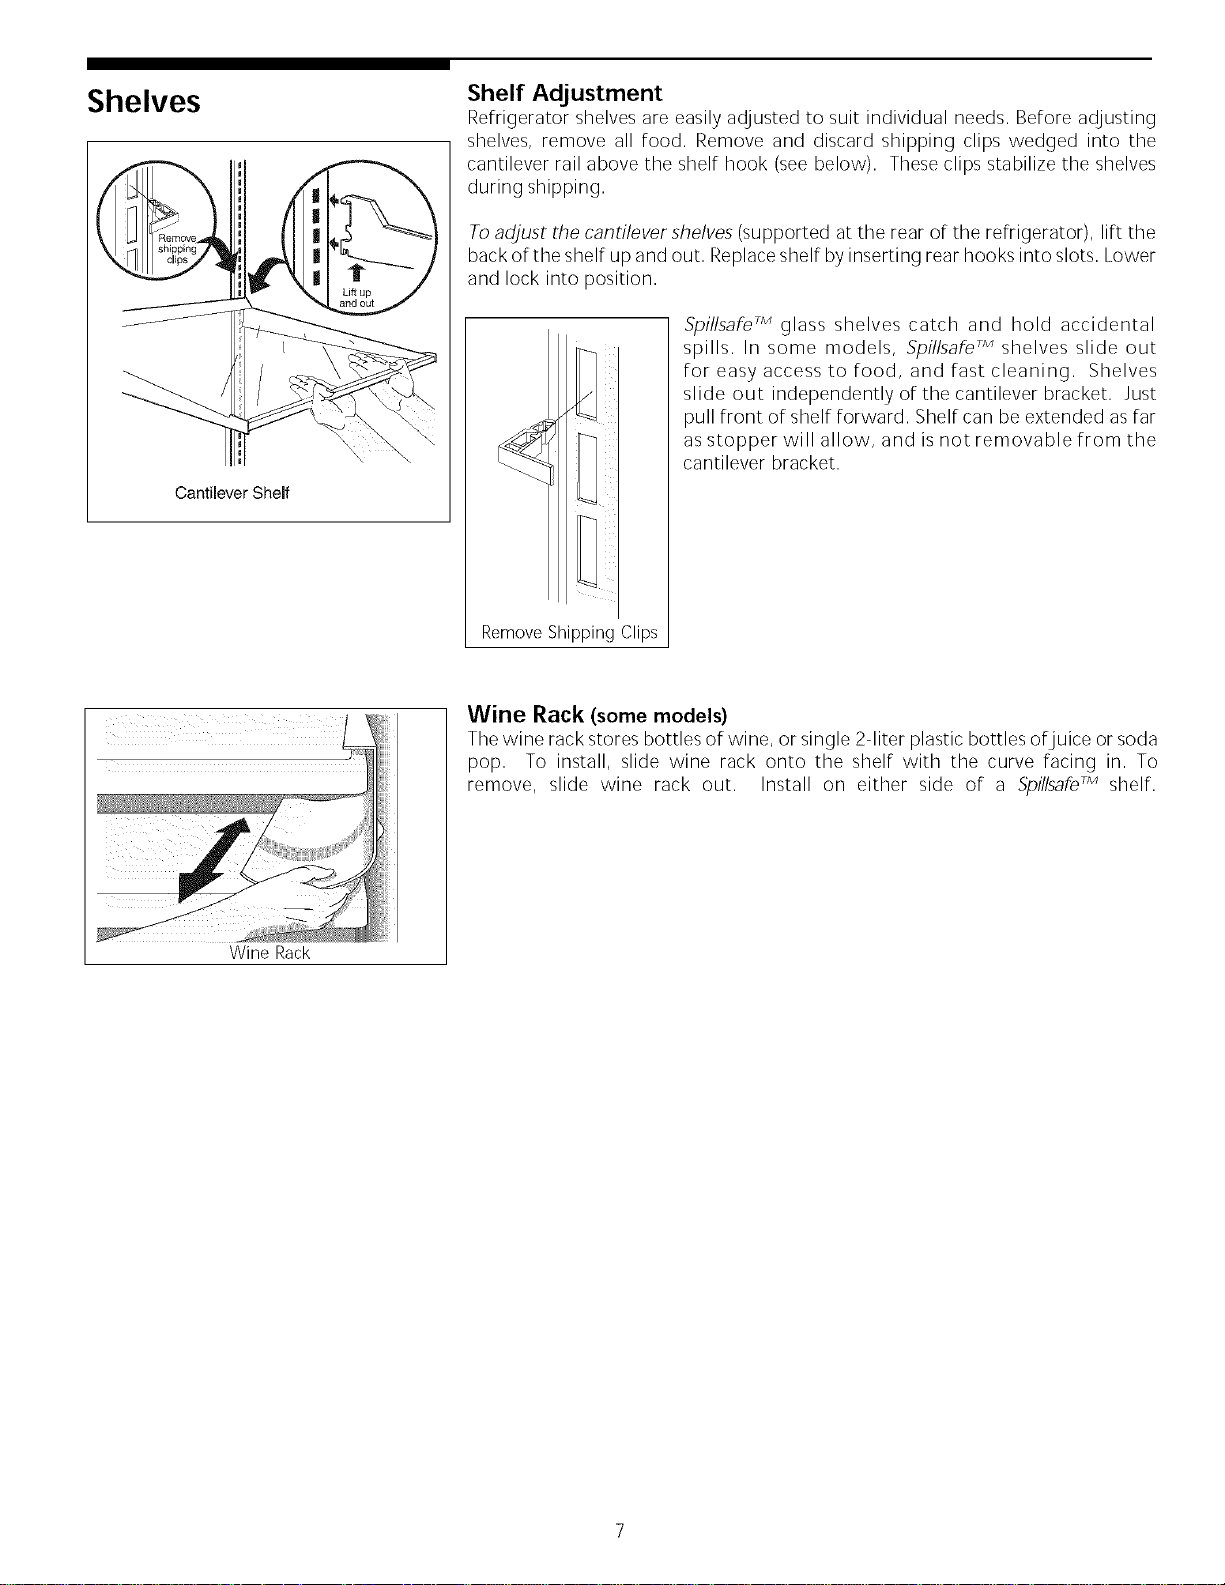
Shelves
Cantilever Shelf
Shelf Adjustment
Refrigerator shelves are easily adjusted to suit individual needs. Before adjusting
shelves, remove all food. Remove and discard shipping clips wedged into the
cantilever rail above the shelf hook (see below). These clips stabilize the shelves
during shipping.
Toadjust the cantilever shelves (supported at the rear of the refrigerator), lift the
back of the shelf up and out. Replaceshelf by inserting rear hooks into slots. Lower
and lock into position.
RemoveShippingClips
SpillsafeTMglass shelves catch and hold accidental
spills. In some models, SpflsafeTMshelves slide out
for easy access to food, and fast cleaning. Shelves
slide out independently of the cantilever bracket. Just
pull front of shelf forward. Shelf can be extended asfar
as stopper will allow, and is not removable from the
cantilever bracket.
Wine Rack
Wine Rack (some models)
The wine rack stores bottles of wine, or single 2-liter plastic bottles of juice or soda
pop. To install, slide wine rack onto the shelf with the curve facing in. To
remove, slide wine rack out. Install on either side of a SpillsafeTMshelf.
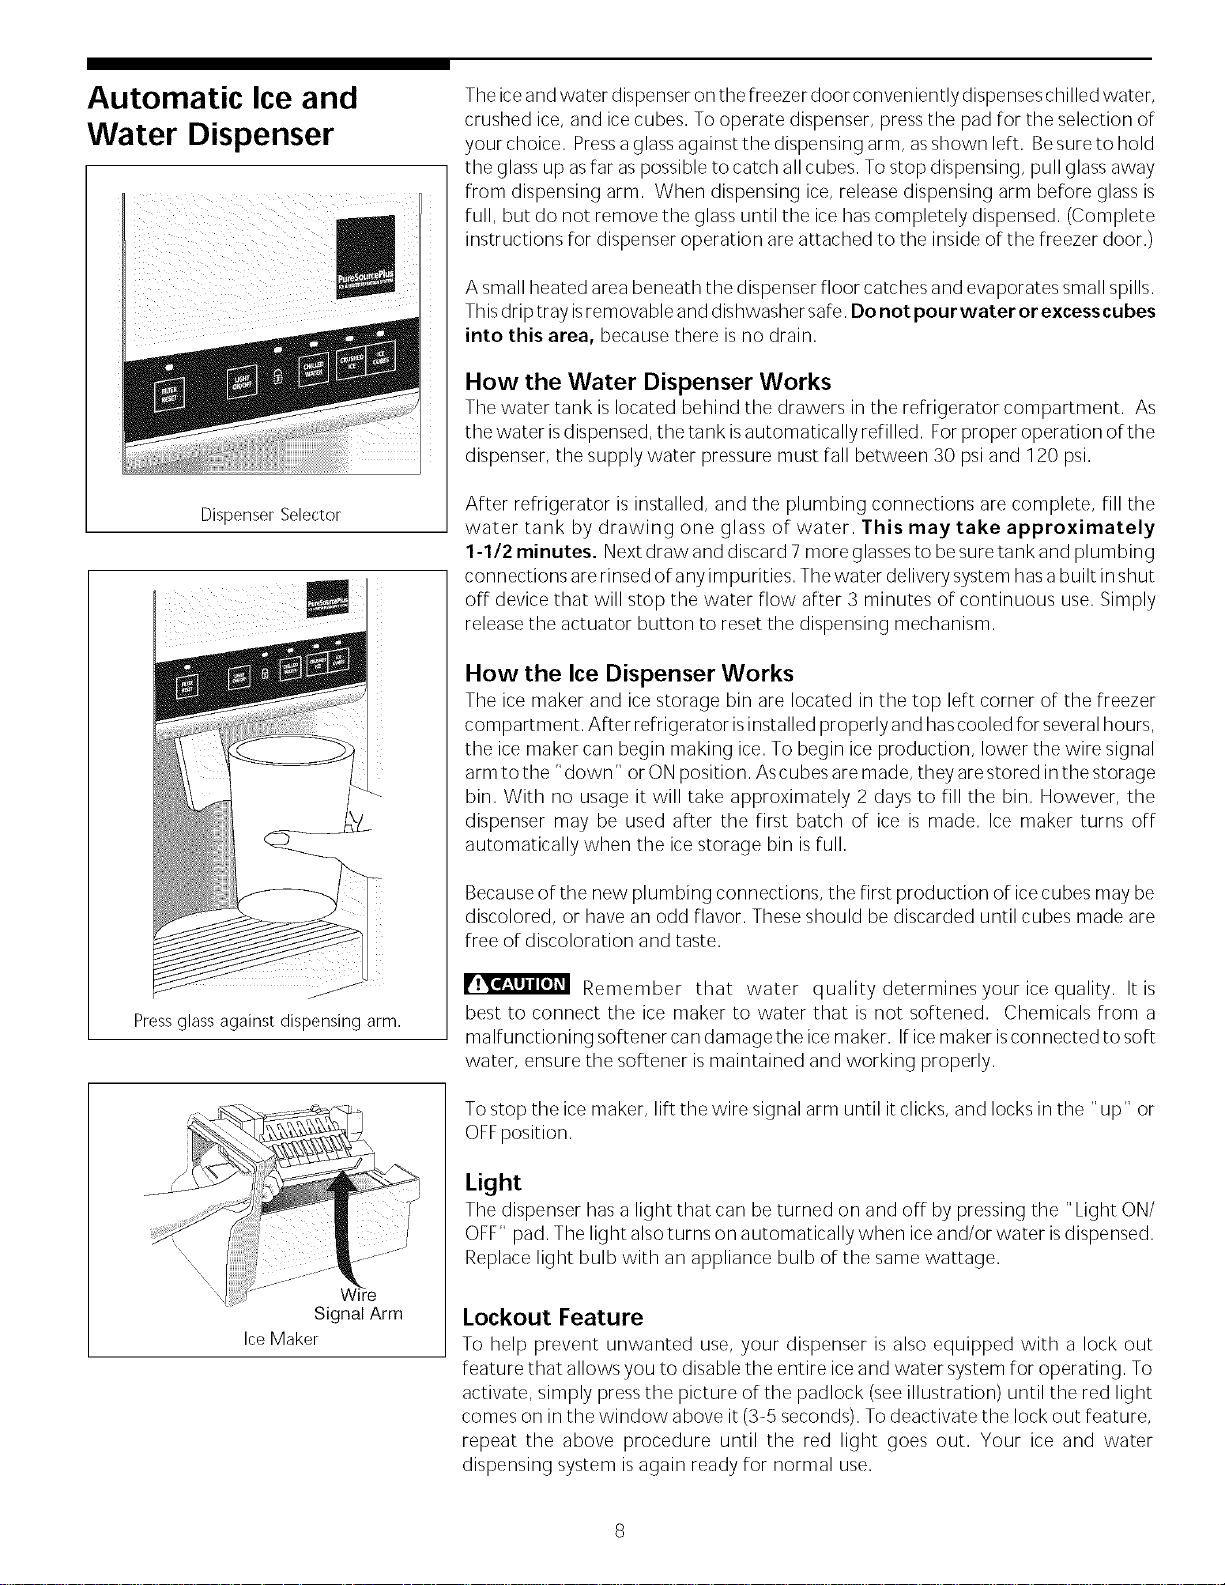
Automatic Ice and
Water Dispenser
Dispenser Selector
Press glass against dispensing arm.
W_iFe
Signal Arm
IceMaker
Theiceand water dispenser on the freezer door conveniently dispenseschilled water,
crushed ice, and ice cubes. To operate dispenser, pressthe pad for the selection of
your choice. Pressa glassagainst the dispensing arm, asshown left. Besure to hold
the glass up asfar aspossible to catch all cubes. To stop dispensing, pull glass away
from dispensing arm. When dispensing ice, release dispensing arm before glass is
full, but do not remove the glass until the ice hascompletely dispensed. (Complete
instructions for dispenser operation are attached to the inside of the freezer door.)
A small heated area beneath the dispenser floor catches and evaporates small spills.
Thisdrip tray isremovable and dishwasher safe. Do not pour water or excesscubes
into this area, because there isno drain.
How the Water Dispenser Works
The water tank is located behind the drawers in the refrigerator compartment. As
the water isdispensed, the tank isautomatically refilled. Forproper operation of the
dispenser, the supply water pressure must fall between 30 psi and 120 psi.
After refrigerator is installed, and the plumbing connections are complete, fill the
water tank by drawing one glass of water. This may take approximately
1-1/2 minutes. Nextdraw and discard 7 more glassesto be suretank and plumbing
connections are rinsed of any impurities. Thewater delivery system hasabuilt inshut
off device that will stop the water flow after 3 minutes of continuous use. Simply
release the actuator button to reset the dispensing mechanism.
How the Ice Dispenser Works
The ice maker and ice storage bin are located in the top left corner of the freezer
compartment. After refrigerator isinstalled properly and hascooled for severalhours,
the ice maker can begin making ice. To begin ice production, lower the wire signal
arm to the "down" or ONposition. Ascubes are made, they are stored in the storage
bin. With no usage it will take approximately 2 days to fill the bin. However, the
dispenser may be used after the first batch of ice is made. Ice maker turns off
automatically when the icestorage bin isfull.
Becauseof the new plumbing connections, the first production of icecubes may be
discolored, or have an odd flavor. These should be discarded until cubes made are
free of discoloration and taste.
Remember that water quality determinesyouricequality. It is
best to connect the ice maker to water that is not softened. Chemicals from a
malfunctioning softener candamagethe ice maker. If icemaker isconnected to soft
water, ensure the softener ismaintained and working properly.
To stop the ice maker, lift the wire signal arm until it clicks, and locks in the "up" or
OFFposition.
Light
The dispenser hasa light that carl be turned on and off by pressing the "Light ON/
OFF" pad. The light alsoturns on automatically when iceand/or water isdispensed.
Replace light bulb with an appliance bulb of the same wattage.
Lockout Feature
To help prevent unwanted use, your dispenser is also equipped with a lock out
feature that allows you to disable the entire iceand water system for operating. To
activate, simply press the picture of the padlock (seeillustration) until the red light
comes on in the window above it (3-5 seconds). Todeactivate the lock out feature,
repeat the above procedure until the red light goes out. Your ice and water
dispensing system isagain ready for normal use.
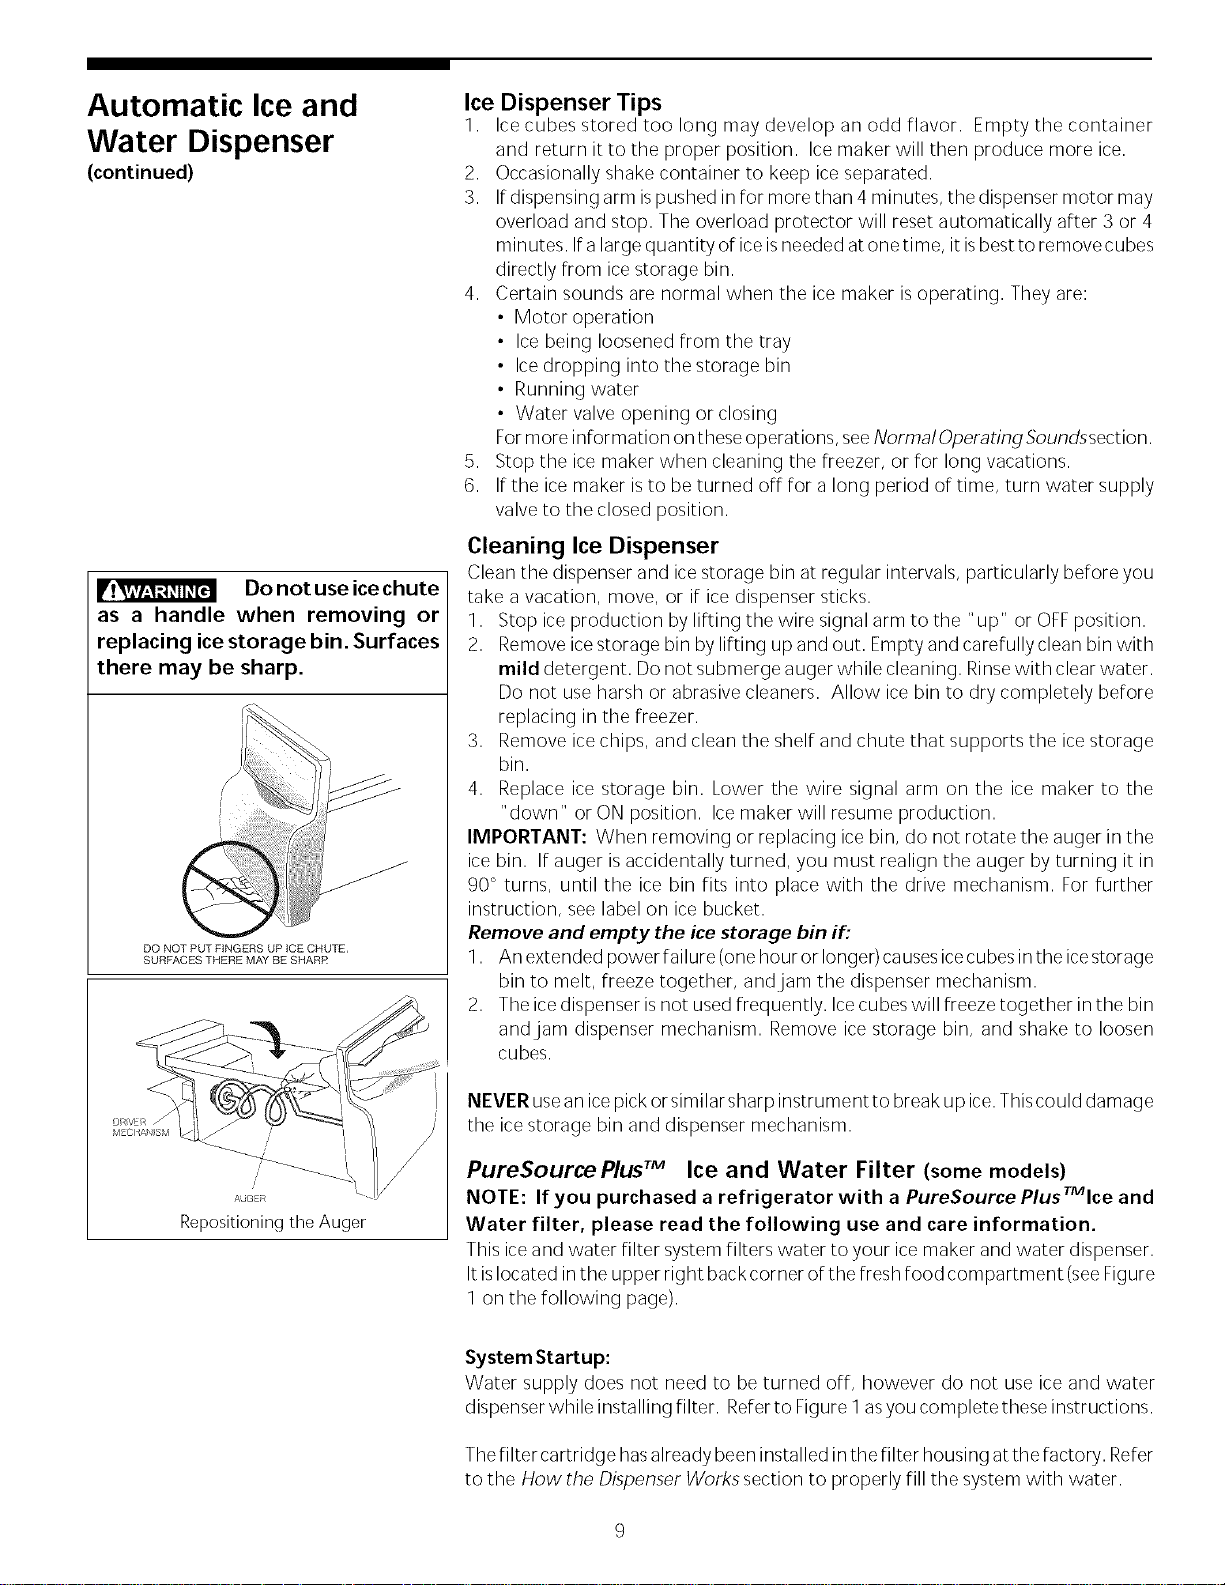
Automatic Ice and
Water Dispenser
(continued)
Do not use icechute
as a handle when removing or
replacing ice storage bin. Surfaces
there may be sharp.
DO NOT PUT FINGERS UP ICE CHUTE,
SURFACES THERE MAY BE SHARR
Ice Dispenser Tips
1. Ice cubes stored too long may develop an odd flavor. Empty the container
and return it to the proper position. Ice maker will then produce more ice.
2. Occasionally shake container to keep iceseparated.
3. If dispensing arm ispushed in for more than 4 minutes, the dispenser motor may
overload and stop. The overload protector will reset automatically after 3 or 4
minutes. If a large quantity of ice isneeded at one time, it isbest to remove cubes
directly from ice storage bin.
4. Certain sounds are normal when the ice maker isoperating. They are:
• Motor operation
• Ice being loosened from the tray
• Icedropping into the storage bin
• Running water
• Water valve opening or closing
Formore information on these operations, seeNormal Operating Soundssection.
5. Stop the ice maker when cleaning the freezer, or for long vacations.
6. If the ice maker isto be turned off for a long period of time, turn water supply
valve to the closed position.
Cleaning Ice Dispenser
Clean the dispenser and icestorage bin at regular intervals,particularly before you
take a vacation, move, or if icedispenser sticks
1. Stop ice production by lifting the wire signal arm to the "up" or OFFposition.
2. Remove icestorage bin by lifting up and out. Empty and carefully clean bin with
mild detergent. Do not submerge auger while cleaning. Rinsewith clear water.
Do not use harsh or abrasive cleaners. Allow ice bin to dry completely before
replacing in the freezer.
3. Remove icechips, and clean the shelf and chute that supports the icestorage
bin.
4. Replace ice storage bin. Lower the wire signal arm on the ice maker to the
"down" or ON position. Ice maker will resume production.
IMPORTANT: When removing or replacing ice bin, do not rotate the auger in the
ice bin. If auger isaccidentally turned, you must realign the auger by turning it in
90 ° turns, until the ice bin fits into place with the drive mechanism. For further
instruction, see label on ice bucket.
Remove and empty the ice storage bin if:
1. Anextended power failure (one hour or longer) causesicecubes in the icestorage
bin to melt, freeze together, and jam the dispenser mechanism.
2. Theice dispenser isnot usedfrequently. Icecubes will freeze together in the bin
and jam dispenser mechanism. Remove ice storage bin, and shake to loosen
cubes.
DRVFR f
MFCqA SM
Repositioning the Auger
NEVER usean icepick or similar sharp instrument to break up ice.Thiscould damage
the icestorage bin and dispenser mechanism.
PureSourcePlus TM Ice and Water Filter (some models)
NOTE: If you purchased a refrigerator with a PureSource PlusTMIce and
Water filter, please read the following use and care information.
This iceand water filter systemfilters water to your ice maker and water dispenser.
It islocated inthe upper right back corner of the fresh food compartment (seeFigure
1 on the following page).
System Startup:
Water supply does not need to be turned off, however do not use ice and water
dispenser while installing filter. Referto Figure1 asyou completethese instructions.
Thefilter cartridge hasalready been installed inthe filter housing atthe factory. Refer
to the How the Dispenser Works section to properly fill the system with water.
Automatic Ice and
Water Dispenser (continued)
Order new filter cartridges through the
dealer where you bought the
refrigerator, or contact the Frigidaire
Consumer Assistance Center at 1-800-
944-9044. It might be good to order
some filters when you first install your
refrigerator. Be sure to ask for the RC-
200 PureSource Plus TM replacement
cartridge.
The PureSource Plus TM RF-200 ice and
water filter system is tested and certified
by NSF International, the nationally
recognized and respected, not for profit,
certification organization for public
health safety. The PureSource Plus TM
system is tested and certified to ANSI/
NSF Standards 42 and 53. See
performance data sheet for specific
claims. This system should not be used on
water that is microbiologically unsafe or
with water of unknown quality unless
the water has been adequately
disinfected before or after traveling
through the filtration system.
Rated service flow- .37 GPM
Maximum Rated Pressure- 125 PSI
Maximum Operating Temp. - 100 °
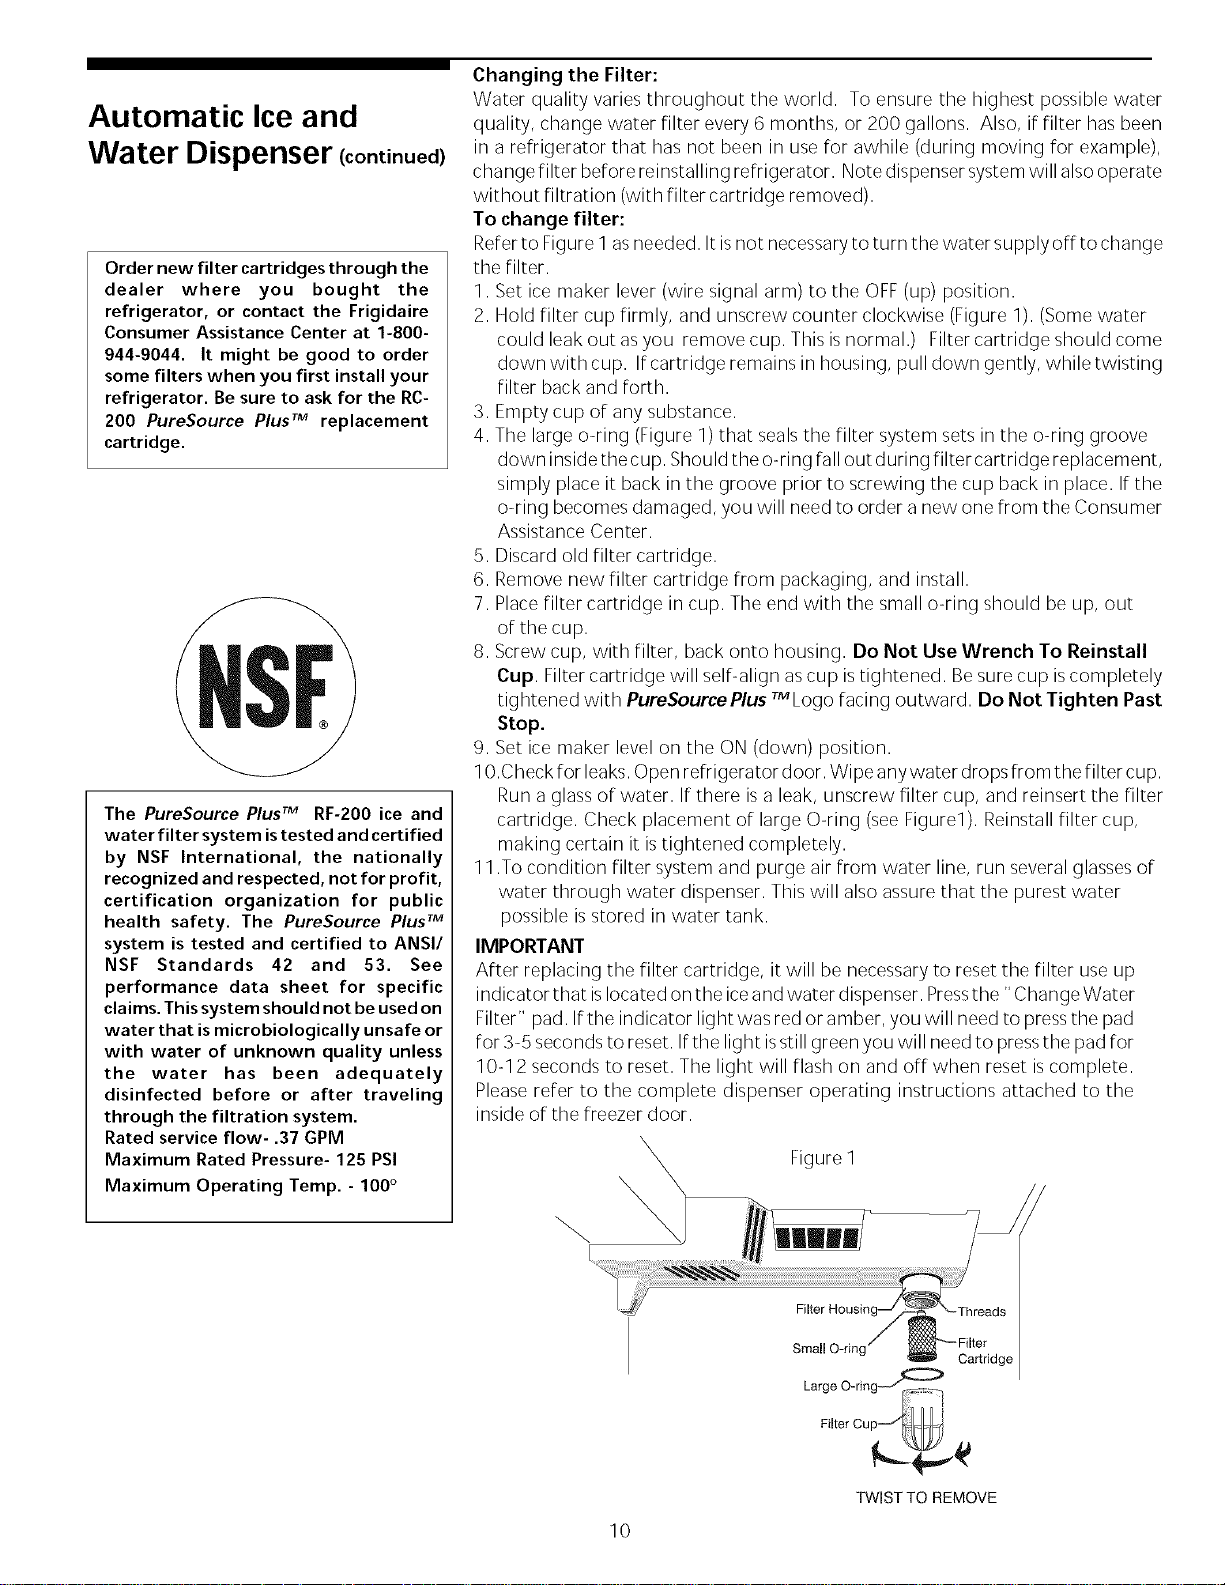
Changing the Filter:
Water quality varies throughout the world. To ensure the highest possible water
quality, change water filter every 6 months, or 200 gallons. Also, if filter has been
in a refrigerator that has not been in use for awhile (during moving for example),
change filter before reinstalling refrigerator. Note dispenser system will alsooperate
without filtration (with filter cartridge removed).
To change filter:
Referto Figure 1 asneeded. It isnot necessaryto turn the water supply off to change
the filter.
1. Set ice maker lever (wire signal arm) to the OFF(up) position.
2. Hold filter cup firmly, and unscrew counter clockwise (Figure 1). (Some water
could leak out asyou remove cup. This isnormal.) Filter cartridge should come
down with cup. Ifcartridge remains in housing, pull down gently, while twisting
filter back and forth.
3. Empty cup of any substance.
4. The large o-ring (Figure 1) that sealsthe filter system sets in the o-ring groove
down inside the cup. Should the o-ring fall out during filter cartridge replacement,
simply place it back in the groove prior to screwing the cup back in place. If the
o-ring becomes damaged, you will need to order a new one from the Consumer
Assistance Center.
5. Discard old filter cartridge.
6. Remove new filter cartridge from packaging, and install.
7. Placefilter cartridge in cup. The end with the small o-ring should be up, out
of the cup.
8. Screw cup, with filter, back onto housing. Do Not Use Wrench To Reinstall
Cup. Filter cartridge will self-align ascup istightened. Besure cup iscompletely
tightened with Pure$ource Plus TMLogo facing outward. Do Not Tighten Past
Stop.
9. Set ice maker level on the ON (down) position.
10.Check for leaks.Open refrigerator door. Wipe anywater drops from the filter cup.
Run a glass of water. If there isa leak, unscrew filter cup, and reinsert the filter
cartridge. Check placement of large O-ring (seeFigure1). Reinstall filter cup,
making certain it istightened completely.
11.To condition filter system and purge air from water line, run several glassesof
water through water dispenser. This will also assure that the purest water
possible isstored in water tank.
IMPORTANT
After replacing the filter cartridge, it will be necessary to reset the filter use up
indicator that islocated on the iceand water dispenser. Pressthe "Change Water
Filter" pad. If the indicator light was red or amber, you will need to pressthe pad
for 3-5 seconds to reset. Ifthe light isstill green you will need to pressthe pad for
10-12 seconds to reset. The light will flash on and off when reset iscomplete.
Pleaserefer to the complete dispenser operating instructions attached to the
inside of the freezer door.
Figure 1
10
Small O-tin Cartridge
Large O-r eg_
Filter Cu pd_'_i i
TWIST TO REMOVE
Care and Cleaning Keep your refrigerator and freezer clean to prevent odor build-up. Wipe any spills
immediately, and clean both sections at least twice a year. Never use metallic
scouring pads, brushes, abrasivecleaners, orstrong alkalinesolutions on anysurface.
Do not wash any removable parts in a dishwasher.
Always unplug the power cord from the wall outlet before cleaning. NOTE:
Turning the control to OFFdoes not disconnect power to the controls, light bulb, or
other electrical components.
_!_"d___,lbd[el Damp objects stick to
cold metal surfaces. Do not touch
refrigerated surfaces with wet or damp
hands.
Inside
Wash insiderefrigerator and freezer surfaces with asolution of 2 tablespoons baking
soda in 1 quart warm water. Rinseand drythoroughly. Besure to wringexcess water
out of sponge or cloth before cleaning around thecontrols, light bulb, or anyelectrical
parts.
Wash removable partssuch asshelvesand drawers with baking sodasolution, or mild
detergent and warm water. Do Not Use Harsh Cleaners On These Surfaces. Rinse
and drythoroughly. Clean the door gasketswith mild suds,rinsewith clear water and
wipe dry. Do not use razor blades or other sharp instruments that can scratch the
appliance surface when removing adhesive labels. Any glue left from the tape or
energy label can be removed with a mixture of warm water and mild detergent, or
touch the glue with the sticky side of tape already removed. Do Not Remove The
Serial Plate.
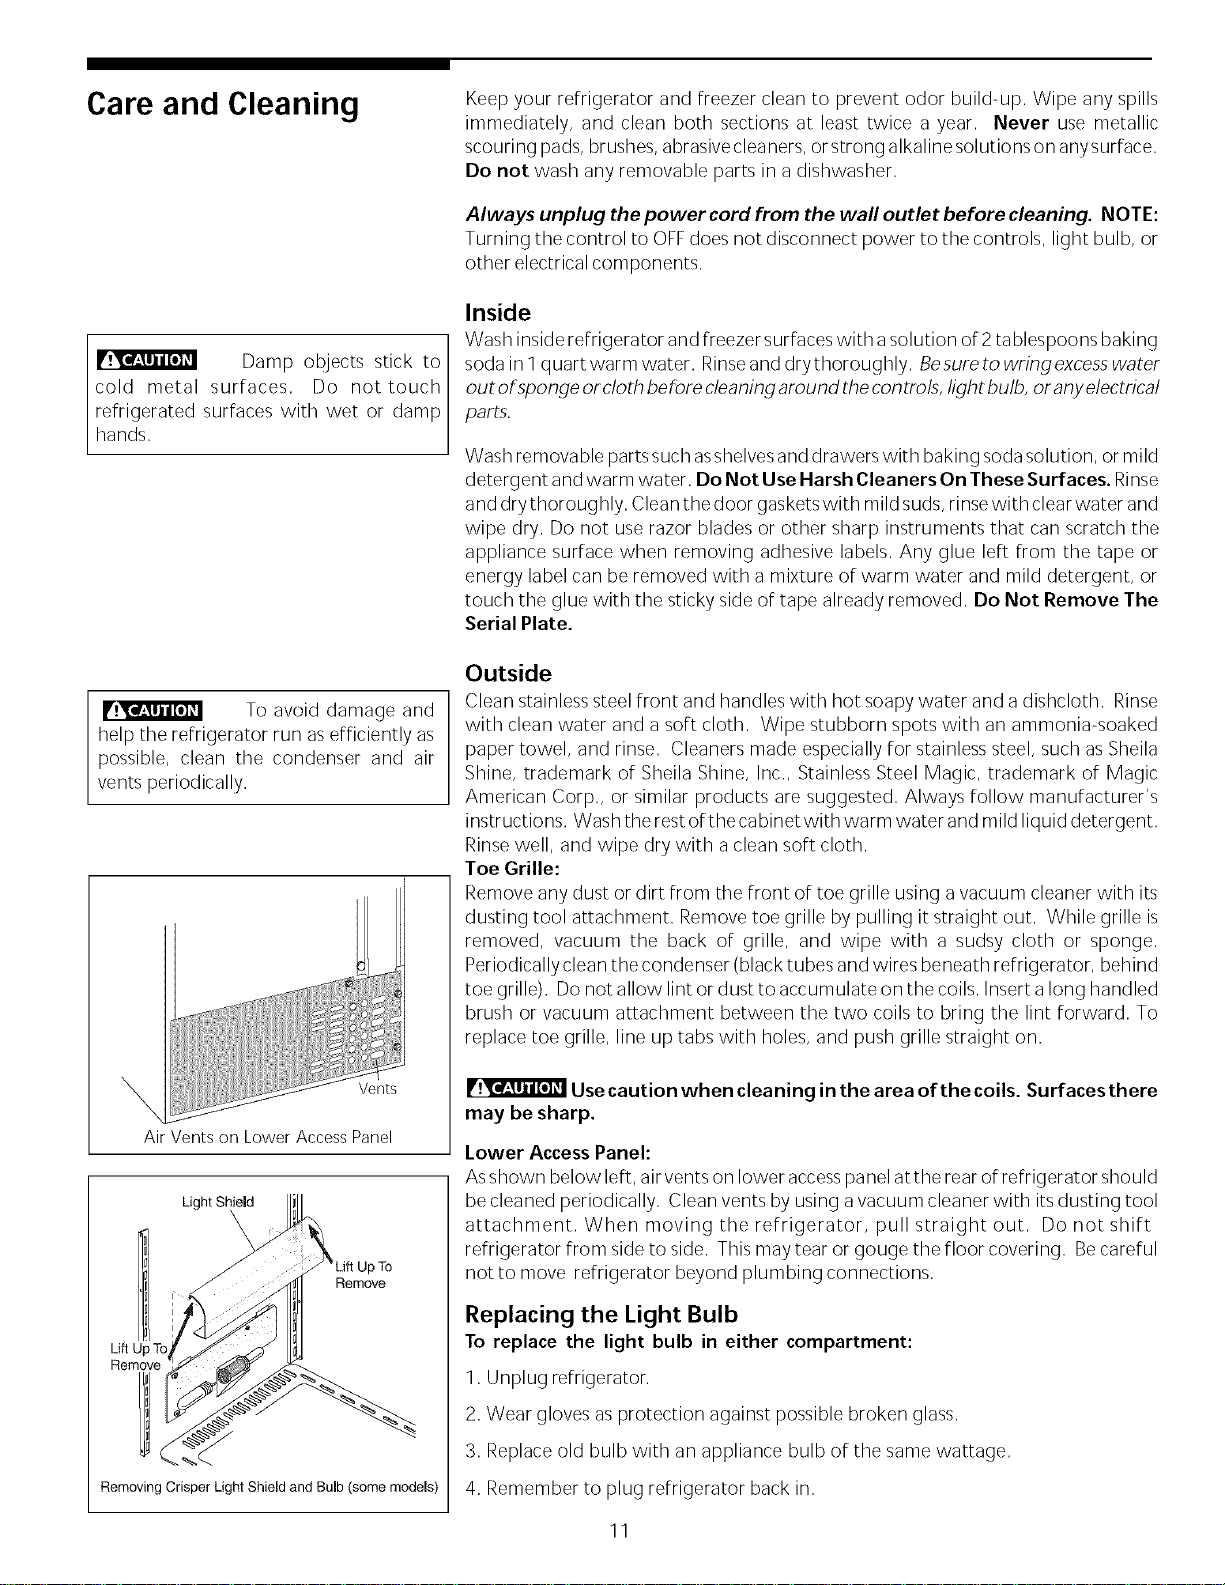
To avoid damage and
help the refrigerator run as efficiently as
possible, clean the condenser and air
vents periodically.
Vents
Air Vents on Lower Access Panel
Light Shield
\
/
/Remove
Removing Crisper Light Shield and Bulb (some models)
Outside
Clean stainless steel front and handles with hot soapy water and a dishcloth. Rinse
with clean water and a soft cloth. Wipe stubborn spots with an ammonia-soaked
paper towel, and rinse. Cleaners made especially for stainless steel, such as Sheila
Shine, trademark of Sheila Shine, Inc., Stainless Steel Magic, trademark of Magic
American Corp., or similar products are suggested. Always follow manufacturer's
instructions. Wash the rest ofthe cabinet with warm water and mild liquid detergent.
Rinse well, and wipe dry with a clean soft cloth.
Toe Grille:
Remove any dust or dirt from the front of toe grille using a vacuum cleaner with its
dusting tool attachment. Removetoe grille by pulling it straight out. While grille is
removed, vacuum the back of grille, and wipe with a sudsy cloth or sponge.
Periodically clean the condenser (black tubes and wires beneath refrigerator, behind
toe grille). Do not allow lint or dust to accumulate on the coils. Insert a long handled
brush or vacuum attachment between the two coils to bring the lint forward. To
replace toe grille, line up tabs with holes, and push grille straight on.
Usecaution when cleaning in the area of the coils. Surfaces there
may be sharp.
Lower AccessPanel:
Asshown below left, air vents on lower accesspanel atthe rear of refrigerator should
be cleaned periodically. Clean vents by using a vacuum cleaner with its dusting tool
attachment. When moving the refrigerator, pull straight out. Do not shift
refrigerator from side to side. This may tear or gouge the floor covering. Becareful
not to move refrigerator beyond plumbing connections.
Replacing the Light Bulb
To replace the light bulb in either compartment:
1. Unplug refrigerator.
2. Wear gloves as protection against possible broken glass.
3. Replace old bulb with an appliance bulb of the same wattage.
4. Remember to plug refrigerator back in.
11
Care and Cleaning
(continued) Vacation and Moving Tips
Short vacations: Leaverefrigerator operating during vacations of 3 weeks or less.
Use up all perishable items from the refrigerator section.
Wrap and store other items in the freezer.
Turn off automatic ice maker, even if you will be gone just a few days.
Long vacations: Remove all food and ice if you will be gone 1 month or more.
•Turn controls to OFF,and disconnect power.
Turn off automatic ice maker, and turn water supply valve to the closed
position.
Clean the interior thoroughly. Leave both doors open to prevent odor and
mold build-up.
Block open if necessary.
Moving: When moving refrigerator, follow these guidelines to prevent damage:
• Remove all food and other items from the refrigerator and freezer
compartments.
Empty icestorage bin.
If a hand truck isused in moving, load refrigerator from the side.
Turn rollers asfar up aspossible. Thiswill protect them during sliding or moving.
• The cabinet should be well padded and handled with care. DO NOT DROP.
IMPORTANT:
If the refrigerator isgoing to be stored or moved in freezing temperatures, the
water in the ice and water system must be drained completely. Failure to do so
could result in water leaks when the refrigerator isput back in service.Contact a
servicerepresentative to perform this operation.
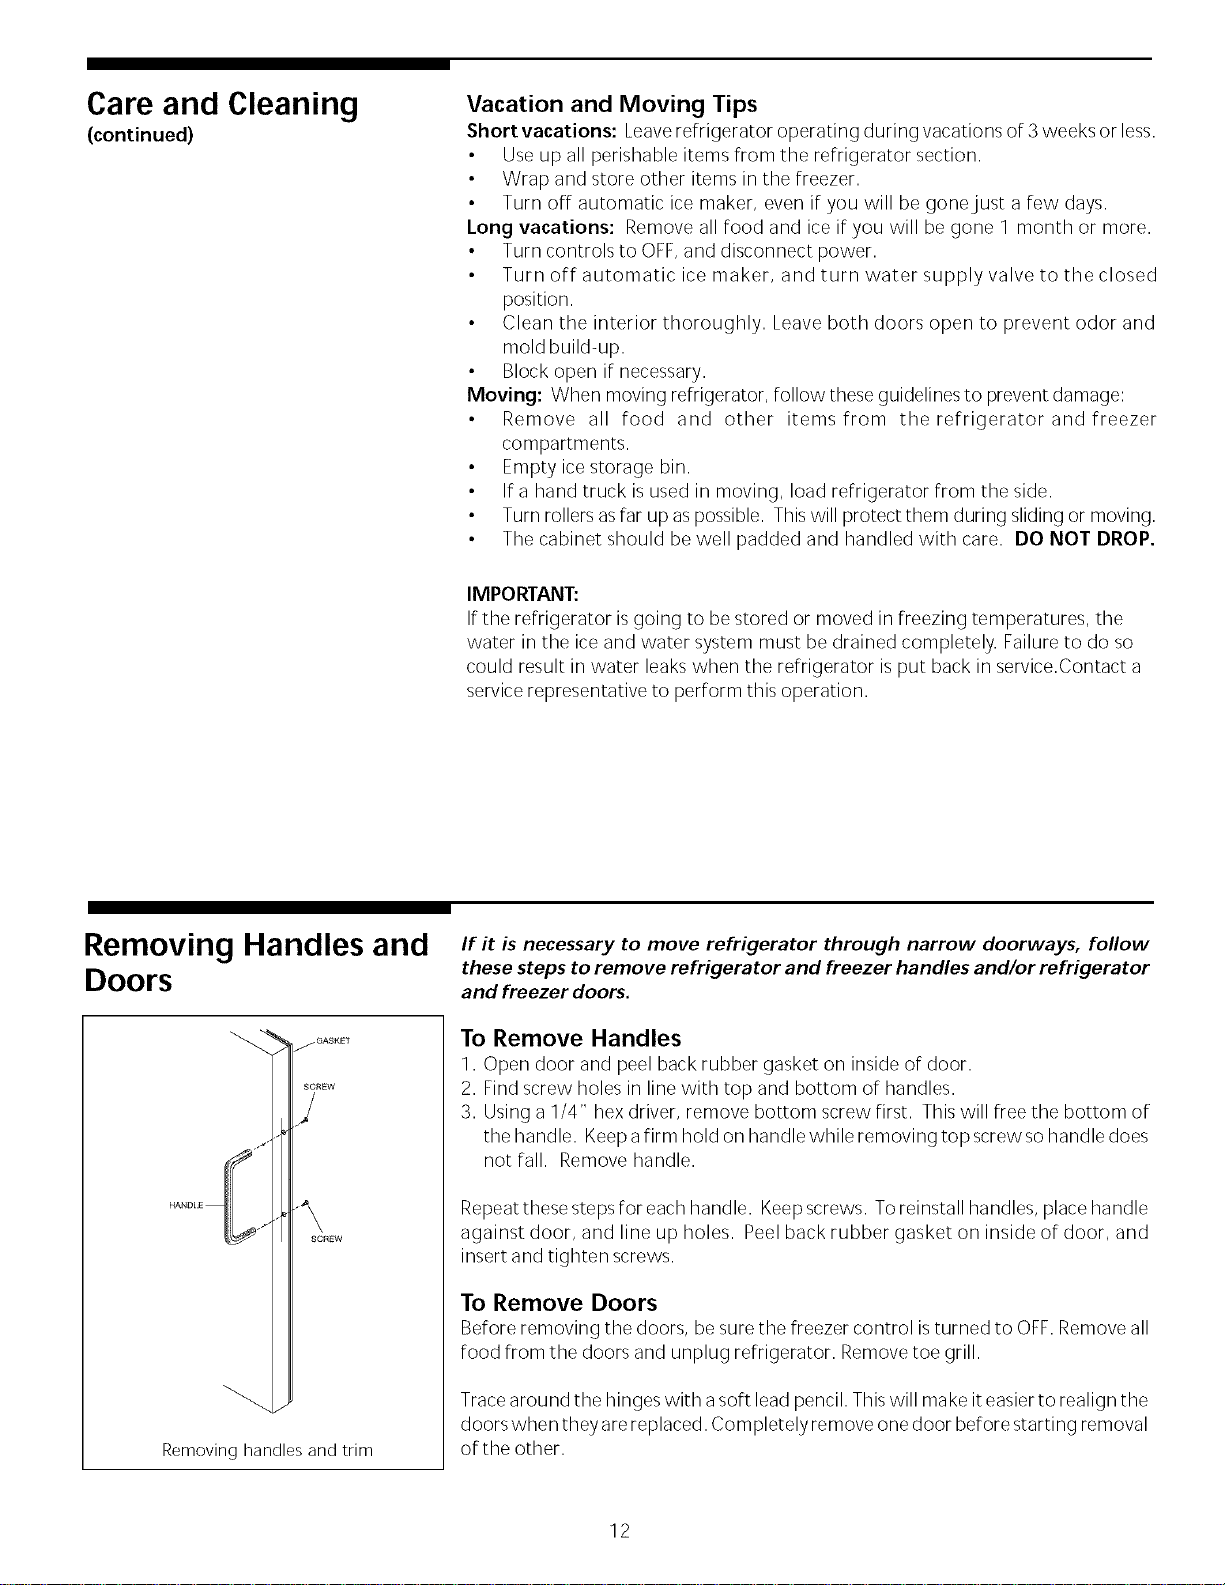
Removing Handles and
Doors
/GASKE T
SCREW
HANDI £{ .
SCREW
Removing handles and trim
If it is necessary to move refrigerator through narrow doorways, follow
these steps to remove refrigerator and freezer handles and/or refrigerator
and freezer doors.
To Remove Handles
1. Open door and peel back rubber gasket on inside of door.
2. Findscrew holes in line with top and bottom of handles.
3. Using a 1/4" hex driver, remove bottom screw first. This will free the bottom of
the handle. Keep afirm hold on handle while removing top screw sohandle does
not fall. Remove handle.
Repeat these steps for each handle. Keepscrews. Toreinstall handles, place handle
against door, and line up holes. Peel back rubber gasket on inside of door, and
insert and tighten screws.
To Remove Doors
Before removing the doors, be sure the freezer control isturned to OFF.Remove all
food from the doors and unplug refrigerator. Removetoe grill.
Tracearound the hinges with a soft lead pencil. This will make it easierto realign the
doors when they are replaced. Completely remove one door before starting removal
of the other.
12
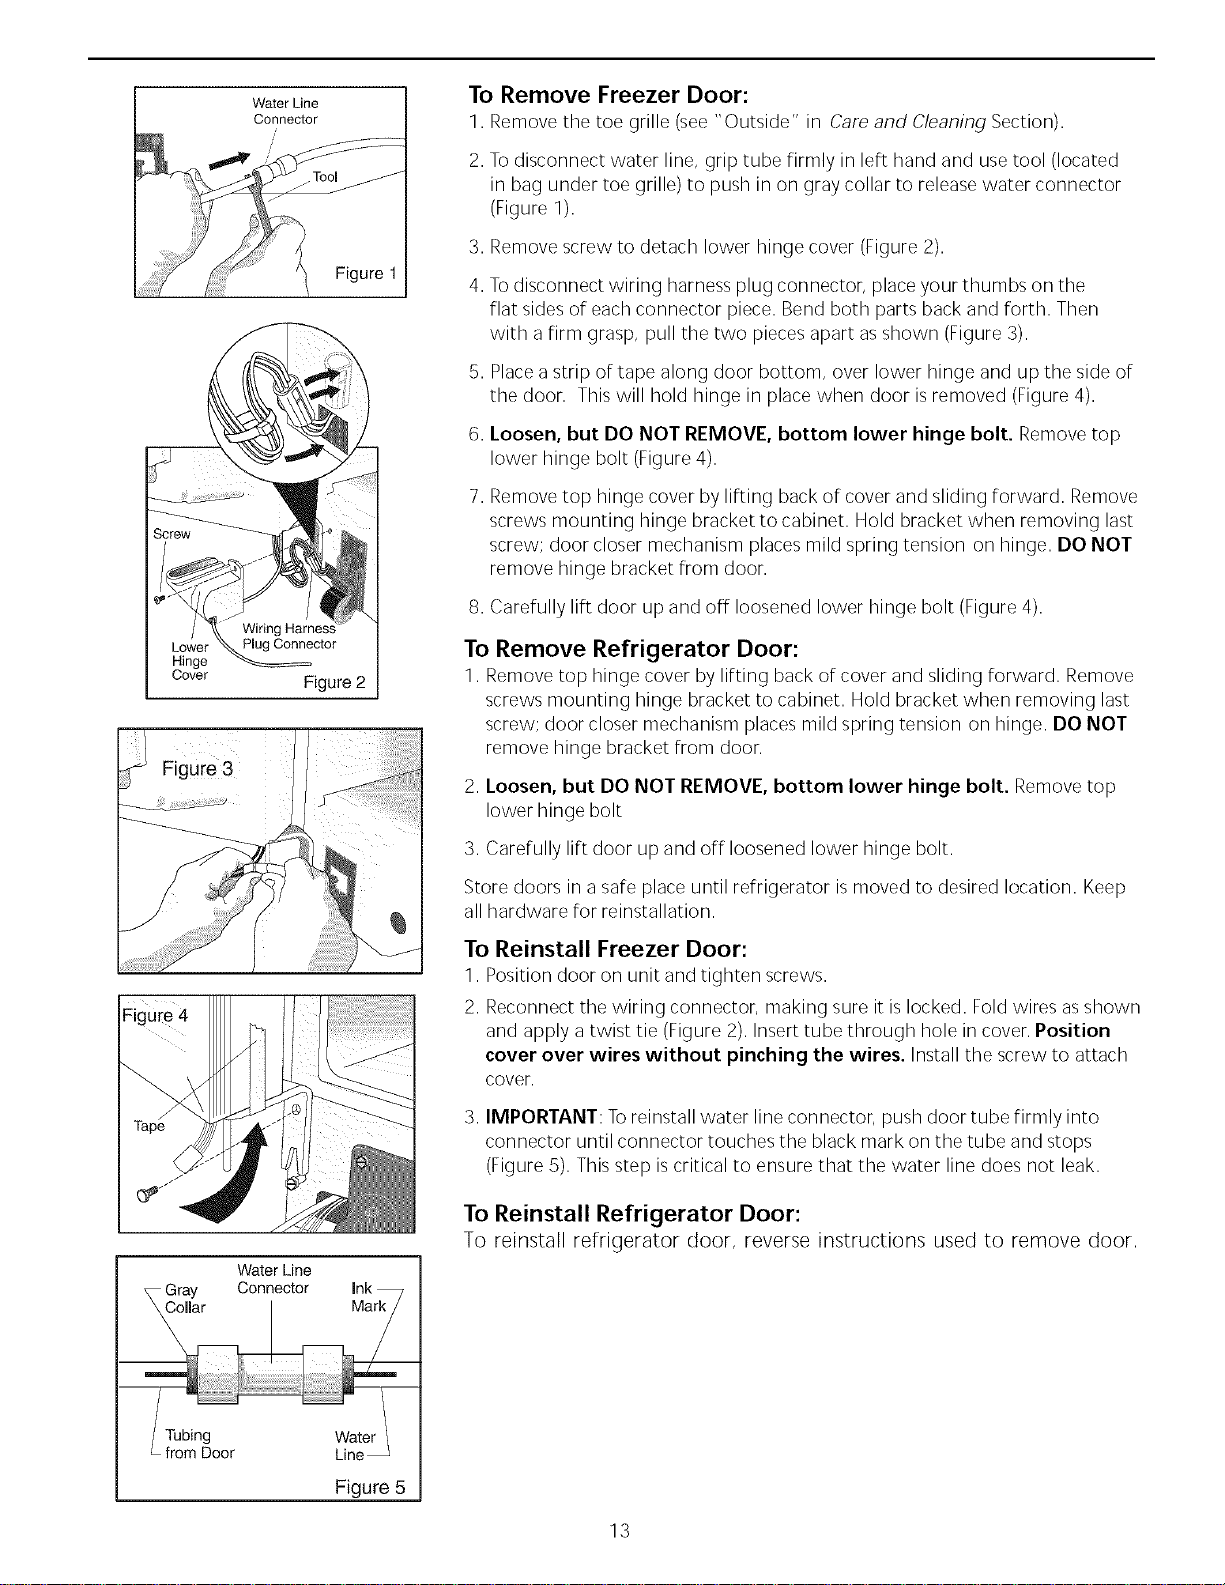
Hinge
Cover
Figure 4
Water Line
Connector
Figure 1
Figure 2
Water Line
To Remove Freezer Door:
1. Remove the toe grille (see "Outside" in Careand Cleaning Section).
2. To disconnect water line, grip tube firmly in left hand and use tool (located
in bag under toe grille) to push in on gray collar to releasewater connector
(Figure 1).
3. Remove screw to detach lower hinge cover (Figure 2).
4. Todisconnect wiring harness plug connector, placeyour thumbs on the
flat sides of each connector piece. Bend both parts back and forth. Then
with a firm grasp, pull the two pieces apart asshown (Figure 3).
5. Placea strip of tape along door bottom, over lower hinge and up the side of
the door. This will hold hinge in place when door isremoved (Figure4).
6. Loosen, but DO NOT REMOVE, bottom lower hinge bolt. Remove top
lower hinge bolt (Figure4).
7, Removetop hinge cover by lifting back of cover and sliding forward. Remove
screws mounting hinge bracket to cabinet. Hold bracket when removing last
screw; door closer mechanism places mild spring tension on hinge. DO NOT
remove hinge bracket from door.
8. Carefully lift door up and off loosened lower hinge bolt (Figure 4).
To Remove Refrigerator Door:
1. Remove top hinge cover by lifting back of cover and sliding forward. Remove
screws mounting hinge bracket to cabinet. Hold bracket when removing last
screw; door closer mechanism places mild spring tension on hinge. DO NOT
remove hinge bracket from door.
2. Loosen, but DO NOT REMOVE, bottom lower hinge bolt. Remove top
lower hinge bolt
3. Carefully lift door up and off loosened lower hinge bolt.
Store doors in a safe place until refrigerator is moved to desired location. Keep
all hardware for reinstallation.
To Reinstall Freezer Door:
1. Position door on unit and tighten screws.
2. Reconnect the wiring connector, making sure it is locked. Fold wires asshown
and apply a twist tie (Figure 2). Insert tube through hole in cover. Position
cover over wires without pinching the wires. Install the screw to attach
cover.
3. IMPORTANT: Toreinstall water line connector, push door tube firmly into
connector until connector touches the black mark on the tube and stops
(Figure 5). This step iscritical to ensure that the water line does not leak.
To Reinstall Refrigerator Door:
To reinstall refrigerator door, reverse instructions used to remove door,
m
Tubing
from Door Water
Line
Figure 5
13

Avoid Service Checklist
OCCURRENCE
RUNNING OF REFRIGERATOR
Refrigerator compressor does not run.
Refrigerator runs too much or too
long.
Before calling for service, review this list. It may saveyou time and expense.This list
includes common occurrences that are not the result of defective workmanship or
materials in this appliance.
SOLUTION
Freezer control is off, Set freezer control. See Setting the Controls.
Refrigerator is in defrost cycle. This is normal for a fully automatic defrosting refrigerator, The defrost
cycle occurs periodically, lasting about 20 minutes.
Plug at wall outlet isdisconnected. Make sure plug is tightly pushed into outlet.
House fuse has blown or circuit breaker has tripped, Check and/or replace fusewith a 15 amp time-delay
fuse, Reset circuit breaker.
Power outage. Check house lights. Call local electric company.
Room or outside weather is hot, It is normal for the refrigerator to work longer under these conditions.
Refrigerator has recently been disconnected for a period of time, It takes about 8-12 hours for the
refrigerator to cool down completely,
Automatic ice maker is operating. Ice maker operation causes refrigerator to run slightly more,
Doors are opened too frequently or too long. Warm air entering the refrigerator causes it to run more,
Open doors less often.
Refrigerator or freezer door may be slightly open. Make sure refrigerator is level. Keep food and
containers from blocking door. See Occurrence section OPENIN6/CLOSIN¢OFOOORS/ORAWERS.
Refrigerator control (found in refrigerator section) is set too cold. Set refrigerator control to a warmer
setting until refrigerator temperature is satisfactory, Allow 24 hours for the temperature to stabilize,
Refrigerator or freezer gasket is dirty, worn, cracked, or poorly fitted. Clean or change gasket. Leaks
in door seal will cause refrigerator to run longer in order to maintain desired temperatures,
Refrigerator compressor goes on and Thermostat is keeping refrigerator at a constant temperature, This is normal. Refrigerator goes on and
off frequently, off to keep temperature constant.
TEMPERATURES ARE TOO COLD
Temperature in freezer is too cold and Freezer control is set too cold. Set freezer control to a warmer setting until freezer temperature is
refrigerator temperature is satisfactory. Allow 24 hours for thetemperatureto stabilize, Then, if refrigerator temperature isnot right,
satisfactory, set refrigerator control to a colder setting.
Temperature in refrigerator is too cold Refrigerator control is set too cold, Set refrigerator control to a warmer setting. Allow 24 hours for
and freezer temperature is satisfactory, temperatures to stabilize,
Food stored in drawers freezes. Refrigerator control is set too cold. See solution above.
Food stored in Meat Keeper (some Meatsh_u_dbest_redatatemperaturejustbe__wthefreezingp_int_fwater(32°F__°C)f_rmaximum
models) freezes, fresh storage time, It is normal for ice crystals to form due to the moisture content of meat.
TEMPERATURES ARE TOO WARM
Temperature in freezer or
refrigerator is too warm.
Chilled Air Control set too cold. Adjust Chilled Air Control to a lower setting.
Doors are opened too frequently or too long. Warm air enters the refrigerator whenever the door is
opened. ()pen the door less often.
Door is open slightly, See Occurrence section OPENING/CLOSINGOFDOORS/DRAWERS,
Condenser is dirty, Clean condenser, See "Outside" in Care and Cleaning.
14
OCCURRENCE
TEMPERATURES ARE TOO WARM
Temperature in freezer is too warm.
Temperature in the refrigerator is too
warm and the freezer temperature is
satisfactory.
Temperature in Meat Keeper (some
models) is too warm.
SOLUTION
Freezer control is set too warm. Set freezer control to a colder setting until freezer temperature is
satisfactory. Allow 24 hours for the temperature to stabilize. Then, if refrigerator temperature is not
right, set refrigerator control to a warmer setting.
Refrigerator control is set too warm. Set refrigerator control to a colder setting. Allow 24 hours for the
temperature to stabilize.
Chilled Air Control isset too warm, Adjust Chilled Air Control to a colder setting.
WATER/MOISTURE/FROST INSIDE REFRIGERATOR
Moisture collects on inside of refrigerator Weather is hot and humid, which increases rate of frost buildup and internal sweating. This isnormal.
walls. Door is slightly open, See Occurrence section OPENING/CLOSINGOFDOORS/DRAWERS.
Door is opened too often or too long. Open door lessoften,
Water collects on bottom side of drawer Vegetablescontainandgiveoffmoisture, Itisnotunusualtohavemoistureonthebottomsideofthe
cover, cover,
Water collects in bottom of drawer. Washed vegetables and fruits drain while in the drawer, Dry items before putting them into drawer,
Water collecting in bottom of drawer is normal,
WATER/MOISTURE/FROST OUTSIDE REFRIGERATOR
Moisture forms on outside of refrigerator Weather is humid. This is normal in humid weather, When humidity is lower, the moisture should
or between doors, disappear,
Door is slightly open, causing cold air from inside refrigerator to meet warm air from outside, See
Occurrence section OPENING/CLOSING OF DOORS/DRAWERS,
AUTOMATIC ICE MAKER (some models)
Ice maker is not making any ice.
Ice maker is not making enough ice.
Ice maker will not stop making ice.
Ice maker is not separating the cubes.
Ice has bad odor and taste.
Ice maker wire signal arm isin "up" or OFF position, Move wire signal arm to "down" or ON position,
Household water line valve is not open, Turn on household water line valve,
Freezer is not cold enough, See Occurrence section TEMPERATURES ARE TOO WARM,
Saddle valve on cold water pipe is clogged or restricted by foreign material, Turn off household water
line valve, Remove, clean or replace valve,
Check to see if the water dispenser is dispensing water, If not, the PureSource Plus TM water filter
is clogged or restricted by foreign material, and must be replaced,
Ice maker is producing less ice than you expect. Ice maker should produce approximately
2 1/2 to 4 pounds of ice every 24 hours,
Freezer is not cold enough, See Occurrence section TEMPERATURES ARE TOO WARM,
Household water line valve is not completely open, Turn on household water line valve,
Check to see if water dispenser isdispensing slower than normal, If it is, replace the PureSourcePlus TM
filter cartridge,
Ice maker wife arm isbeing held down by some item in freezer, Move item, and release arm, Remove
any ice cubes frozen together over arm.
Ice cubes are not being used frequently enough, Remove and shake ice bucket to separate cubes,
If cubes are smaller than normal, or hollow, the PureSource Plus TM filter could be clogged, Replace
filter,
Ice has picked up odor or flavor from strong food stored in refrigerator or freezer, Cover foods tightly,
Discard stale ice, Ice maker will produce fresh supply,
Water running to ice maker has poor taste or odor, Add filter to ice maker, Consult a water purifying
company,
15
OCCURRENCE
ICE DISPENSER
Dispenser will not dispense ice.
SOLUTION
Ice storage bin isempty. When tile first supply of ice is dropped into bin, dispenser should operate,
Freezer temperature is set too warm. Turn freezer control to a higher setting so that ice cubes will
be made, When first supply of ice is made, dispenser should operate.
Household water line valve is not open. Open household water line valve, and allow sufficient time
for ice to be made, When ice is made, dispenser should operate.
Freezer door is not closed. Be sure freezer door is closed.
Ice dispensing arm has been held in for more than 4-5 minutes. Motor isoverloaded, Motor overload
protector will reset in approximately 3 minutes. Ice can then be dispensed.
Ice dispenser Jsjammed. Ice has melted and frozen around auger due to infrequent use, temperature fluctuations, and/or
power outages. Remove ice storage bin, thaw, and empty the contents. Clean bin, wipe dry and
replace in proper position, When new ice is made, dispenser should operate,
Ice cubes arejammed between ice maker arm and back of bin. Remove ice cubes that arejamming
dispenser,
Ice cubes are frozen together, Use the dispenser often so that cubes do not freeze together,
WATER DISPENSER
If cubes are smaller than normal, or hollow, the Pure$out_ePlus TM filter could be clogged. Replace
filter. Dispensing system operates best at 30-120 psi water pressure. Well water system pressures
should fall within this range.
Dispenser will not dispense water. Household water lineva Ive isnot open, Open household waterline vaIve. SeeOccurrence "Ice maker
is not making any ice."
Freezer door is not closed, Be sure freezer door is closed,
Water has an odd taste and/or odor.
PureSourcePlus TM filter is clogged, and must be replaced.
Water has been in the tank for a period of time. Draw and discard 7-8 glasses of water to freshen
the supply. Draw and discard an additional 3-6 glasses to completely rinse out tank.
Unit not properly connected to cold water line. Connect unit to cold water line that supplies water
to kitchen faucet.
Tubing used in the household water supply and installation of unit may affect water taste and odor,
For best results, use copper tubing for water connection.
Water pressure is extremely low.
ODORS IN REFRIGERATOR
Water has a high mineral content. Contact water treatment plant for help,
Have someone turn up the cut-off and cut-on pressure on the water pump system.
Interior needs to be cleaned, Clean interior with sponge, warm water, and baking soda.
OPENING/CLOSING OF DOORS/DRAWERS
Door(s) will not close.
Food with strong odor is in refrigerator, Cover food tightly.
Door is not designed to swing shut automatically. Close door securely,
Door was closed too hard, causing other door to open slightly, Close both doors gently.
Refrigerator isnot level. It rocks on the floor when it is moved slightly, Be sure floor islevel and solid,
and can adequately support refrigerator, Adjust rollers as needed,
Floor isuneven or weak. Refrigerator rocks on the floor when it ismoved slig htly. Be sure floor islevel
and can adequately support refrigerator. Contact carpenter to correct sagging or sloping floor,
Refrigerator is touching the wall or cabinets. Be sure floor is level, and can adequately support
refrigerator. Contact carpenter to correct sagging or sloping floor.
Drawers are difficult to move. Food is touching shelf on top of drawer, Keep less food in drawer,
Track that drawers slides on is dirty. Clean drawer, rollers, and track,
16
OCCURRENCE
LIGHT BULB IS NOT ON
SOLUTION
Light bulb is burned out. See "Repladng tile Light Bulb" hl Care and Cleaning.
Light switch is stuck. Light switch islocated on interior door frame next to the temperature control
in each compartment. Push in plunger to release,
No electric current is reaching refrigerator. See Occurrence section RUNNIN6OFREFmCERATOR.
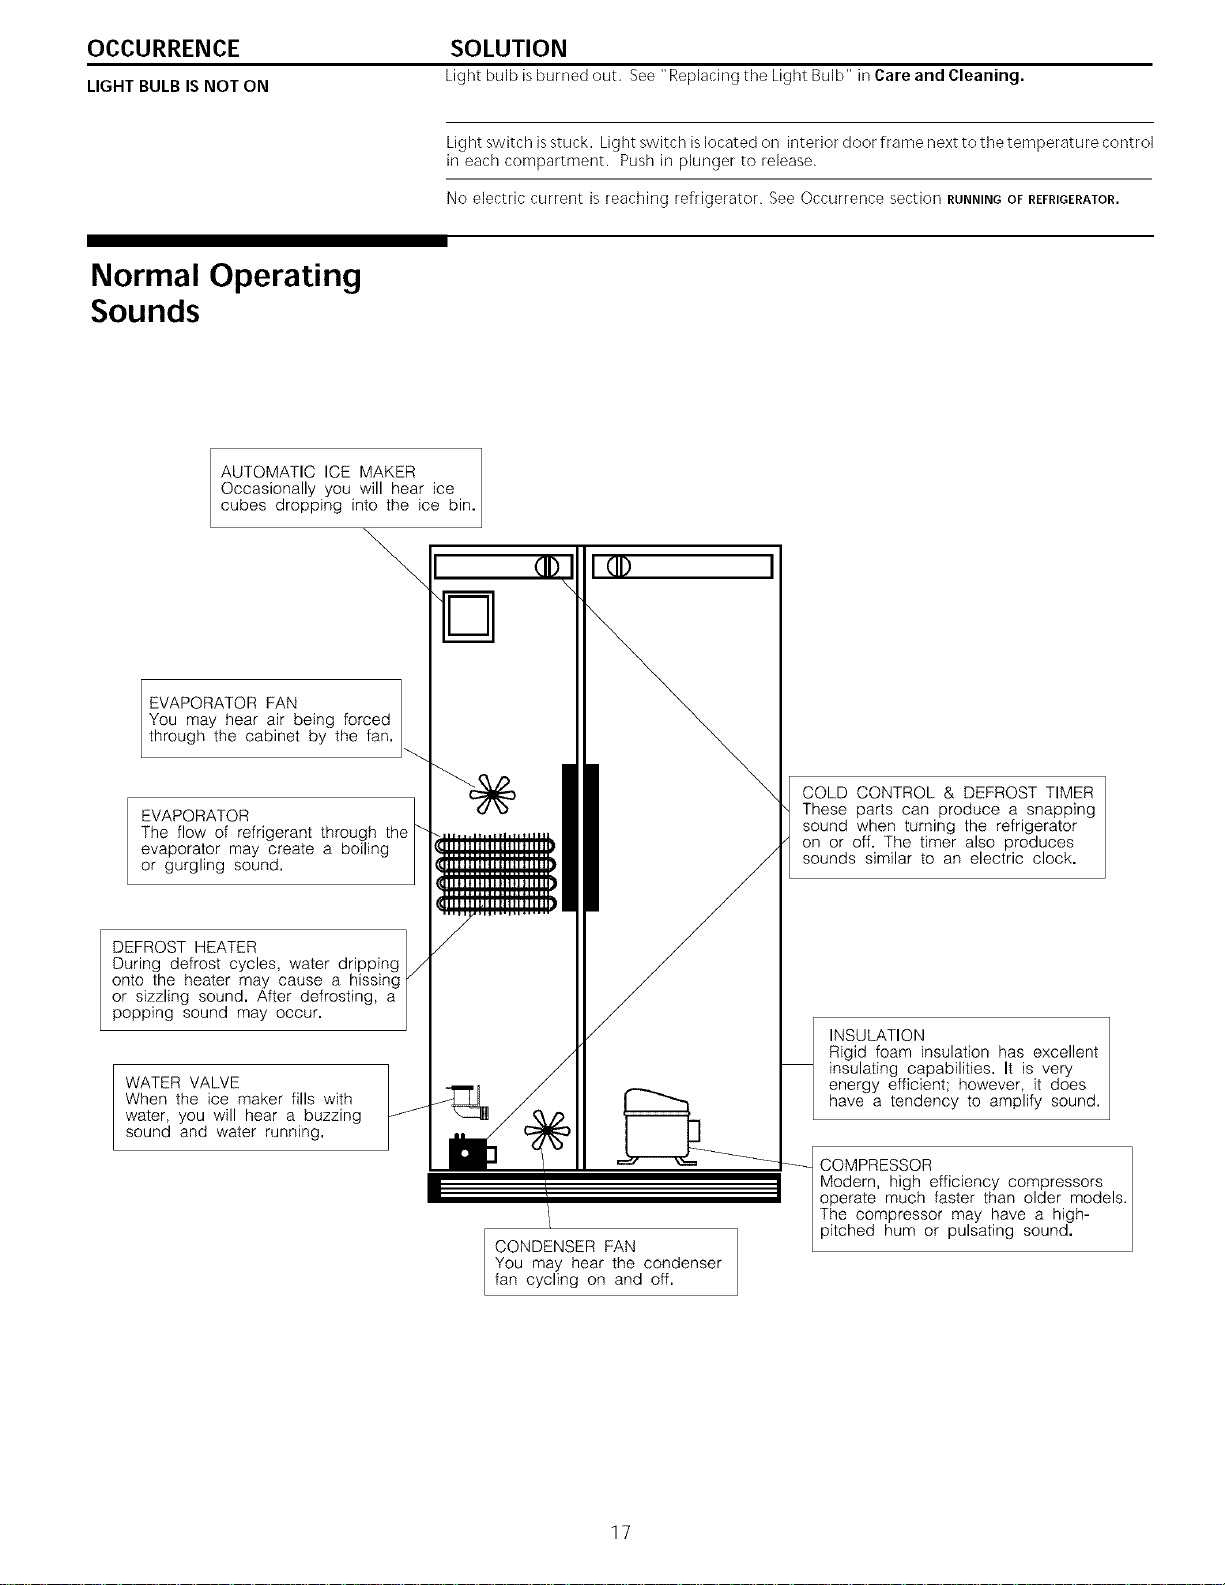
Normal Operating
Sounds
AUTOMATIC ICE MAKER
Occasionally you will hear ice
cubes dropping into the ice bin.
EVAPORATOR FAN
You may hear air being forced
through the cabinet by the fan.
EVAPORATOR
The flow of refrigerant through the
evaporator may create a boiling
or gurgling sound.
DEFROST HEATER
During defrost cycles, water dripping
onto the heater may cause a hissing
or sizzling sound. After defrosting, a
popping sound may occur.
WATER VALVE
When the ice maker fills with
water, you will hear a buzzing
sound and water running.
|
/
I@
CONDENSER FAN
You may hear the condenser
fan cycling on and off.
COLD CONTROL & DEFROST TIMER
These parts can produce a snapping
sound when turning the refrigerator
on or off. The timer also produces
sounds similar to an electric clock.
INSULATION
Rigid foam insulation has excellent
insulating capabilities. It is very
energy efficient; however, it does
have a tendency to amplify sound.
COMPRESSOR
Modern, high efficiency compressors
operate much faster than older models.
The compressor may have a high-
pitched hum or pulsating sound.
17
REFRIGERATOR WARRANTY
Your refrigerator is protected by this warranty
WARRANTY THROUGHOURAUTHORIZEDSERVICERS, THECONSUMERWILL BE RESPONSIBLEFOR:
PERIOD WEWILL:
FULLONE-YEAR Oneyearfromoriginal Payatlcostsfor repaidngor replacingany partsofthis Costs of service calls that are listed under NORMAL
WARRANTY purchasedate appliancewhichprove to be defectivein materialsor RESPONSIBILITIESOFTHECONSUMER.*
workmanship.Excludesoriginaland replacementIce
& Water filter cartridges (if equipped). Original and
replacement cartridges are warranted for 30 days
(partsonly).
LIMITED2_D-5TÈ Secondthroughfifth Repairor replaceany partsin thecabinetlineror Costsfor pick upand deliveryoftheappliancerequiredbecause
YEARWARRANTY yearsfromoriginal SealedRefrigerationSystem(compressor,condenser, ofservice.Costsforlabor,partsandtransportationotherthan
(Cabinet Liner and purchasedate evaporator,drierandtubing)whichprovetobe with respectto thecabinetlineror SealedRefrigerationSystem.
Sealed System) defectivein materialsor workmanship.
LIMITED Time periodslisted Alloftheprovisionsofthefullwarrantiesaboveand Costsofthetechnician'stravelto thehomeandanycostsfor
WARRANTY above, theexclusionslistedbelowapply, pick upand deliveryofthe appliancerequiredbecauseof
(Applicableto the service.
Stateof Alaska)
ADDITIONAL COVERAGE FOR "THROUGH-THE-DOOR" ICE AND WATER DISPENSER AND/OR ICE ONLY DISPENSER MODELS:
WARRANTY THROUGH OUR AUTHORIZED SERVICERS, THE CONSUMER WILL BE RESPONSIBLE FOR:
PERIOD WE WILL:
FULLTWO-YEAR Duringthe second Repairor replace,withoutcharge,anypart(s)of the Costsfor pick upand deliveryofthe appliancerequiredbecause
WARRANTY(Iceand yearfromoriginal iceandwaterdispensingsystemwhichprovestobe of service.Costsforlabor, partsandtransportationotherthan
WaterDispensing purchasedate defectiveinmaterialsorworkmanship,andalt labor with respecttothe iceandwaterdispensingsystem.
System) associatedwithsuchrepair.
In the U.S.A., your appliance is warranted by Electrolux Home Products North America, a division of White Consolidated Industries, Inc. We
authorize no person to change or add to any of our obligations under this warranty. Our obligations for service and parts under this warranty must
be performed by us or an authorized EIectroIux Home Products North America servicer. In Canada, your appliance is warranted by WCl Canada, Inc.
*NORMAL
RESPONSIBILITIES
OFTHECONSUMER
EXCLUSIONS
IFYOU NEED
SERVICE
This warranty applies only to products in ordinary household use, and the consumer is responsible for the
items listed below:
1. Proper use of the appliance in accordance with instructions provided with the product.
2. Proper installation by an authorized servicer in accordance with instructions provided with the appliance and in
accordance with all local plumbing, electrical and/or gas codes.
3. Proper connection to a grounded power supply of sufficient voltage, replacement of blown fuses, repair of loose
connections or defects in house wiring.
4. Expenses for making the appliance accessible for servicing, such as removal of trim, cupboards, shelves,etc.,
which are not a part of the appliance when it was shipped from the factory.
5. Damages to finish after installation.
6. Replacement of light bulbs and/or fluorescent tubes (on models with these features).
This warranty does not cover the following:
1. CONSEQUENTIAL OR INCIDENTAL DAMAGES SUCH AS PROPERTY DAMAGE AND INCIDENTAL
EXPENSES RESULTING FROM ANY BREACH OF THIS WRITTEN OR ANY IMPLIED WARRANTY.
NOTE: Some states do not allow the exclusion or limitation of incidental or consequential damages, so this
limitation or exclusion may not apply to you.
2. Service calls which do not involve malfunction or defects in workmanship or material, or for appliances not in
ordinary household use. The consumer shall pay for such service calls.
3. Damages caused by services performed by servicers other than Electrolux Home Products North America or
its authorized servicers; use of parts other than genuine Electrolux Home Products parts; obtained from persons
other than such servicers; or external causes such as abuse, misuse, inadequate power supply or acts of God.
4. Products with original serial numbers that have been removed or altered and cannot be readily determined.
Keep your bill of sale, delivery slip, or some other appropriate payment record. The date on the bill establishes the
warranty period should service be required. If service is performed, it is in your best interest to obtain and keep all
receipts. This written warranty gives you specific legal rights. You may also have other rights that vary from state to
state. Service under this warranty must be obtained by contacting ElectroIux Home Products:
This warranty only applies in the 50 states dthe U.S.A., Puerto Rico, and Canada. Product features or specifications as described or illustrated
are subject to change without notice. All warranties are made by Electrolux Home Products North America, a division of White Consolidated
Industries, Inc. In Canada, your appliance is warranted by WCl Canada, Inc. 01-U-RE-03 (Rev. 01/2001)
USA
800,944,9044
Electrolux Home Products North America
RO. Box 212378
Augusta, GA 30917
Canada
866,213,9397
Electrolux Home Products North America
6!50 McLaughlin Road
Mississauga, Ontario
L5R 4C2
18
Service Information
(Canada)
To avoid unnecessary cost and inconvenience, make a few simple checks before
calling for service. Common occurrences and their solutions can be found in the
Avoid Service Checklist. Be sure you have followed the instructions in this
manual.
If you are unable to locate the cause of a problem, call for service. Insist on
factory service by an authorized ELECTROLUX PARTSAND SERVICEdepot.
ELECTROLUX PARTS AND SERVICE
All Electrolux appliances are backed by ELECTROLUXPARTSAND SERVICE,one
of Canada's largest parts and service networks.
The Electrolux reputation means you can enjoy complete professional service
from one of our hundreds of trained technicians across the country.
ELECTROLUX PARTSAND SERVICE
6150 McLaughlin Road
Mississauga, Ontario
L5R 4C2
Place the name, address and telephone number of your service depot in the
spaces below.
Product and lea ture specifications as described or illustrated are subject
to change without notice.
19

Notes
Notes