1
ELECTRONIC CONTROL BOARD REPLACEMENT - Model 625.386200 with Wi-Fi
7354222 (Rev. A 5/6/16)
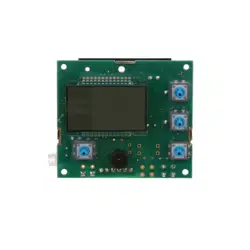
NO
Valve
Motor
Position
Switch
NC
Back of Electronic
Controller (PWA)
Pwr.
In
Position/
Turbine
Motor
28V DC
120V AC
60 Hz
Power
Supply
C
org
grn
Turbine
Sensor
+5
OUT
GND
Salt Lid
Sensor
Tank
Light
Figure 2
3. Press the SELECT button once to display a flashing
“25” and the word “HARDNESS”.
4. Press the
r UP or s DOWN buttons to set your
water supply’s hardness in grains per gallon.
5. Press the SELECT button again to display a flashing
“2:00AM” and the words “RECHARGE TIME”. This is
a good time for the recharge to start in most house-
holds, because water is not in use.
6. If you want to change the recharge start time, press
the
r UP or s DOWN buttons until the desired
time shows. Be sure AM or PM is correct.
7. Press the SELECT button again to display a flashing
“nACL”.
8. Press the
r UP or s DOWN buttons to specify
whether you use sodium chloride (NaCl), which is
regular softener salt, or potassium chloride (KCl).
9. Press the SELECT button once again to return to
normal operating (time of day) display.
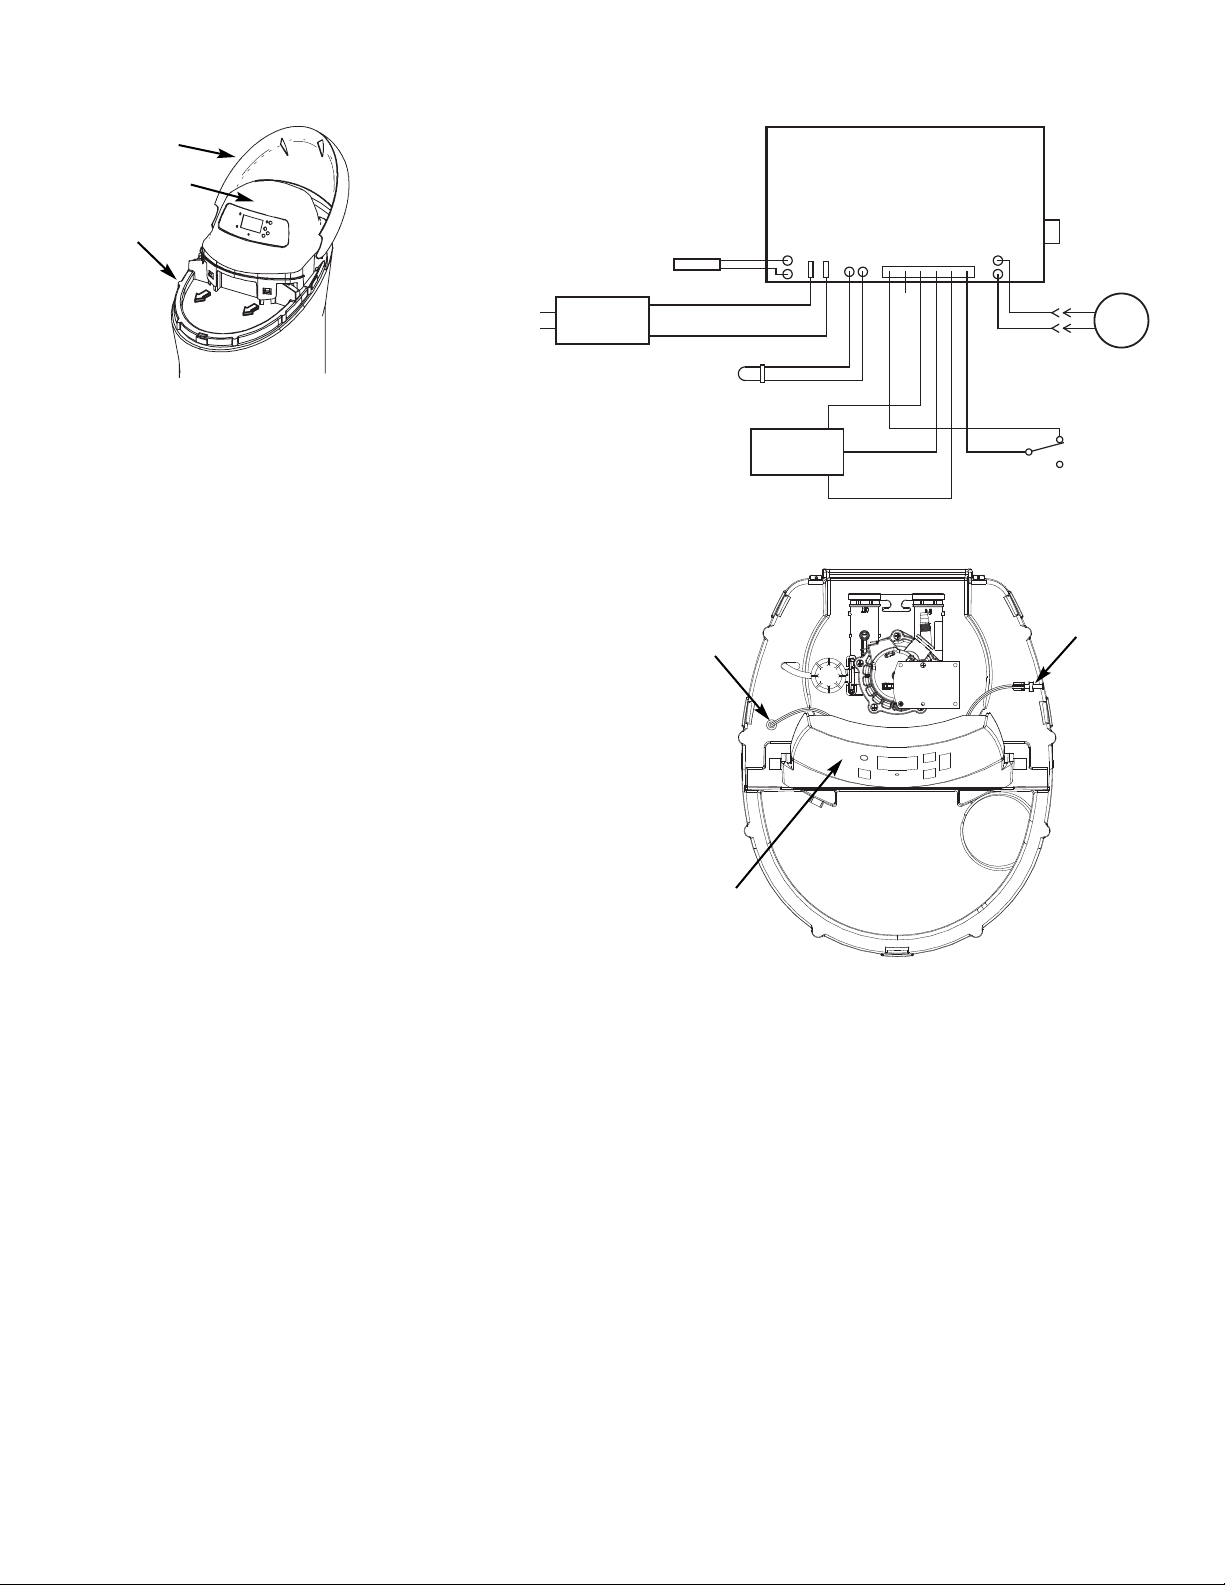
A. REMOVE OLD ELECTRONIC BOARD
1. Unplug the softener’s power supply.
2. Open the salt lid and unsnap the top cover from
the rim (See Fig. 1). Lift off the top cover / lid
assembly to expose the valve and faceplate.
3. Remove the salt lid sensor from the mounting clip
on the rim (See Fig. 3).
4. Remove the tank light from the mounting hole in
the rim (See Fig. 3).
5. Unplug the wiring connections from the electronic
board (See Fig. 2).
6. Unsnap the board from the clips holding it on the
back of the faceplate.
B. INSTALL NEW ELECTRONIC BOARD
1. Carefully snap the new electronic board into the
holding clips on the back of the faceplate.
2. Reconnect the wiring to the new board (See Fig.
2), including the power supply, valve motor connec-
tor, and turbine/position switch connector.
3. Slide the new board’s tank light into the mounting
hole in the rim (See Fig. 3), with the bulb angled
toward the front.
4. Slide the new board’s salt lid sensor into the
mounting clip on the rim (See Fig. 3), with the
wires leading toward the inside.
5. Snap the top cover / lid assembly back into place
on the rim, taking care not to pinch any wires.
C. PROGRAM THE NEW BOARD
1. Plug the power supply into the electrical outlet. A
model code (620) and version are briefly shown in
the display. Then the words “PRESENT TIME”
appear and “12:00 PM” begins to flash.
2. Press the
r UP or s DOWN buttons to set the
present time. Up moves the display ahead; down
sets the time back. Be sure AM or PM is correct.
NOTE: Once the unit has been connected to the
Kenmore
®
cloud, as detailed on Page 2, the
present time will be up dated and maintained
automatically via Wi-Fi.
Salt Lid
Top Cover
Rim
Figure 1
If you have questions about installation, call the Kenmore Water Line at 1-800-426-9345.
Figure 3
Tank
Light
Salt Lid
Sensor
Faceplate
Top View (cover removed)
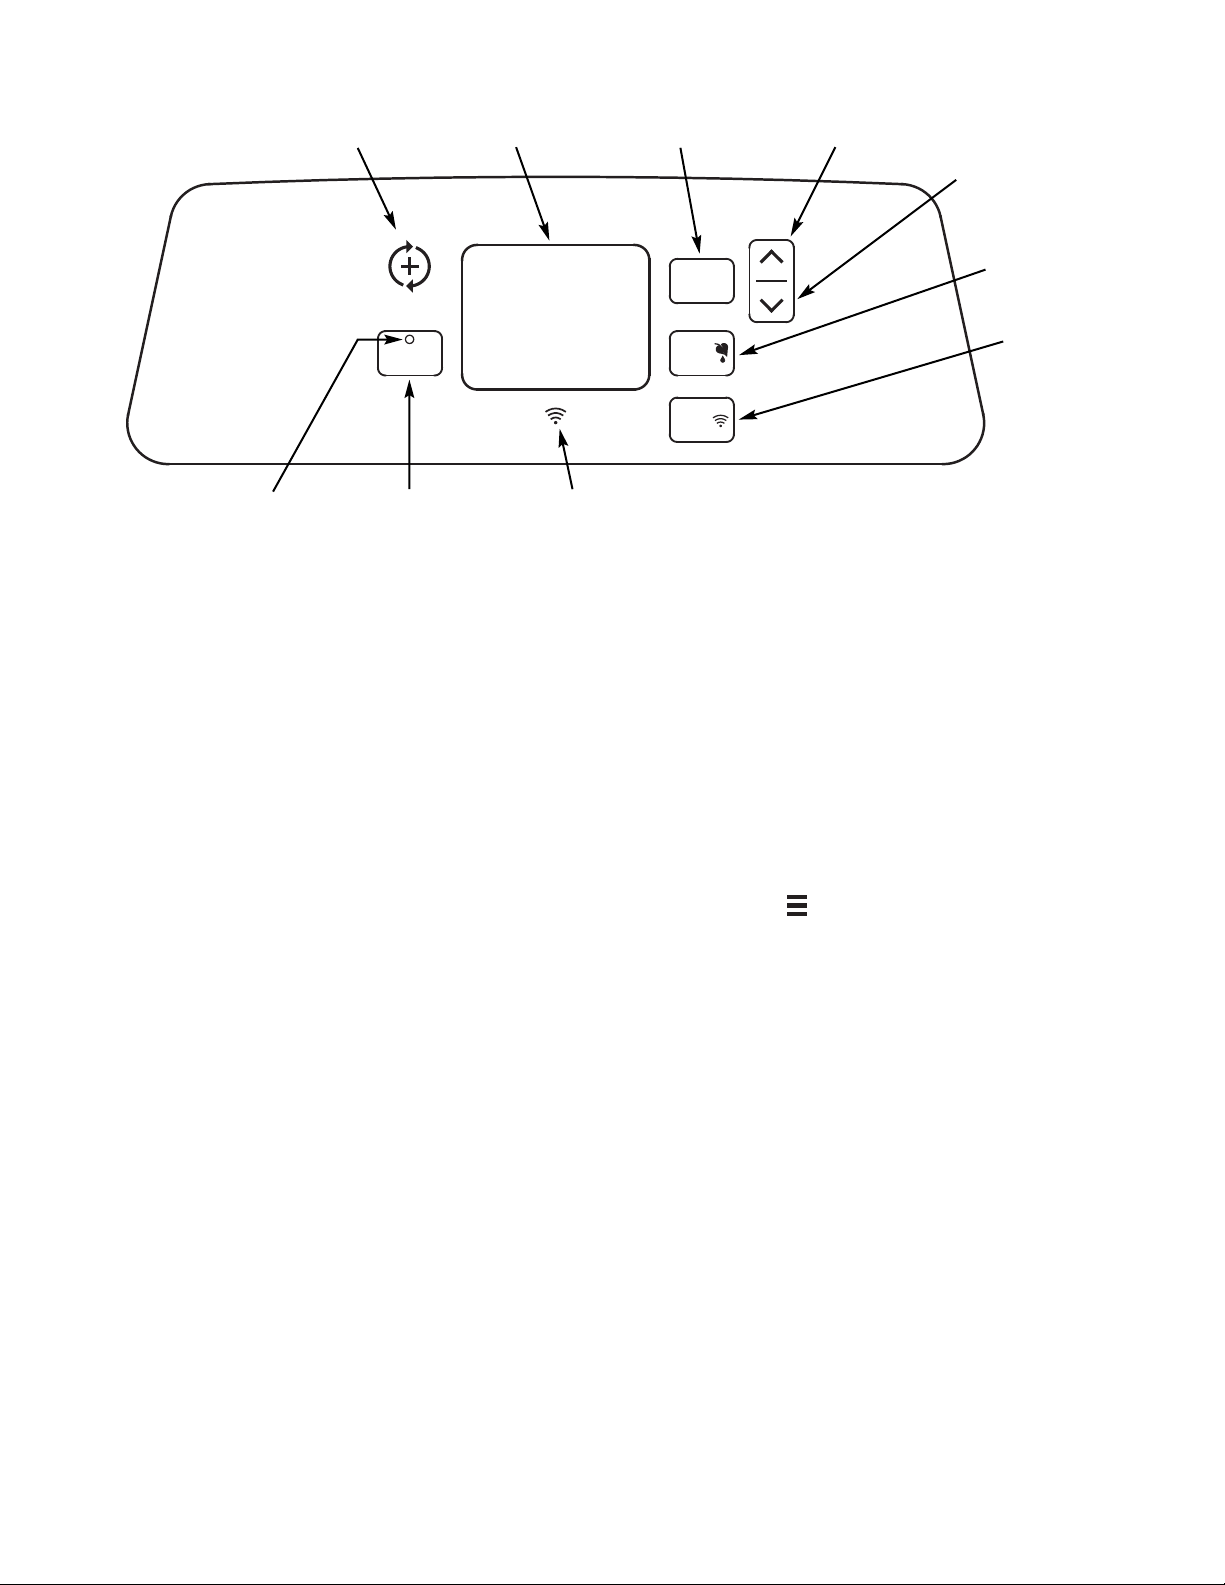
press for tonight
hold for immediate
Salt Level
Set
Use
Water
Select
Smart
HOLD 5 SEC
SMART
CONNECT
If the blue light stops flashing before you are ready
to connect, press and hold the CONNECT SMART
button for 5 seconds. The blue light will begin
flashing for 5 minutes, allowing the connection
process to take place.
4. Standing in front of the water softener, open the
Kenmore
®
Smart app on your smartphone (you
downloaded and installed this app when you
created your Kenmore
®
account and connected the
original electronic controller).
5. Sign in to your password-protected account.
6. Click on the icon in the upper right:
7. On the drop-down menu, click “Add Product” and
follow the instructions to register your softener.
8. If you have not done so already, delete the old
softener controller from the Kenmore
®
Smart app.
Select the information screen for the unit labeled
“not connected” or “offline” and remove it.
D. CONNECT TO WI-FI
Although you connected the softener to the Kenmore
®
cloud when it was originally installed, now that the
electronic controller has been replaced, the unit must
be connected again, and added to your Kenmore
®
account as if it were a new system. Use your previ-
ously established Kenmore
®
account and password:
1. Complete the procedures on the previous page for
installing and programming the new electronic con-
troller.
2. Make sure that you have a good working internet
connection and Wi-Fi home router. This is essen-
tial for a successful connection.
3. When the Kenmore
®
Smart hybrid water softener is
plugged in after replacing the controller, the blue
Connection status light will flash for 5 minutes, indi-
cating it is ready to connect.
ELECTRONIC CONTROL BOARD REPLACEMENT (continued)
2
If you need help connecting your Smart Water Softener, visit
www.Kenmore.com/smart
SOFTENER
status light
SET SALT LEVEL
button
WATER USE
button
Display
UP button
REGENERATION button
SELECT button
DOWN button
CONNECT
SMART
button
CONNECTION
status light
Figure 4