
Safetyo Assembly o Operation oTips & Techniques oMaintenance * Troubleshooting o Parts Lists oWarranty
®
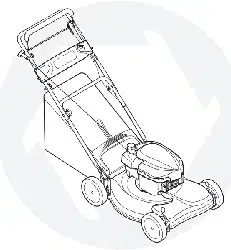
21-inch Rotary Mower -- Model Series 836
READ SAFETY RULES AND mNSTRUCTmONS CAREFULLY BEFORE OPERATION
Warning: This unitis equippedwithan internalcombustionengineandshouldnot beusedon or nearany unimprovedforest-covered,brush=
coveredor grass=coveredlandunlessthe engine'sexhaustsystemis equippedwitha sparkarrestermeetingapplicablelocalorstate laws(if any),
If a sparkarresteris used,it shouldbemaintainedineffectiveworkingorderby the operator,Inthe Stateof Californiathe aboveis requiredbylaw
(Section4442of the CaliforniaPublicResourcesCode),Otherstatesmayhavesimilarlaws,Federallawsapplyonfederallands,A sparkarrester
for the muffleris availablethroughyournearestengineauthorizedservicedealeror contactthe servicedepartment,RO,Box361131Cleveland,
Ohio44136=0019,
PRINTEDIN U,S,A
MTD LLC, RO. BOX 361131 CLEVELAND, OHiO 44136-0019 FORMNO,769=01541B
11/29/2005
This Operator's Manua_ is an important part of your new lawn mower. JtwH_ he_p you assembJe,
prepare, and maintain the unit for best performance. P_ease read and understand what it says.
Table of Contents
SJope Gauge ....................................................... 3
Safe Operation Practices ................................... 4
Setup and Adjustment ....................................... 6
Operating Your Lawn Mower .............................. 8
Maintaining Your Lawn Mower ......................... 10
Troub{eshooting ................................................ 14
Safety Labels .................................................... 15
Parts List ........................................................... 16
Warranty ............................................ Back Cover
Finding and Recording Model Number
BEFOREASSEMBLINGYOUR NEW EQUIPMENT,please
locate the model plate on the equipment and copy the
information to the sample model plate providedto the right.
You can locatethe model plate by standing at the operating
position and looking down at the rear of the deck. This infor-
mation will be necessary to use the manufacturer'sweb site,
obtain assistance from the Customer Support Department, or
when contacting an authorized service dealer.
Modet Number Serial Number
O TRI:IItf B#LT' TRO¥-BULTLLC
P. O. BOX 361131
www.troybimt.com CLEVELAND,OH44136
338-558-7228
Customer Support
P_ease DO NOT return the unit to the retai_er from which it was purchased without first
contacting Customer Support.
If you have difficulty assembling this product or have any questions regardingthe controls, operation, or maintenanceof this
unit, you can seek help from the experts. Choose from the options below:
1. Visit www.troybilt.com
2. Phone a CustomerSupport Representativeat 1o866o840o6483.
3. The engine manufactureris responsible for all engine-relatedissues with regards to performance,power-rating,specifica-
tions, warranty, and service. Pleaserefer to the engine manufacturer'sOwner's/Operator's Manual, packed separatelywith
your unit, for more information.
2
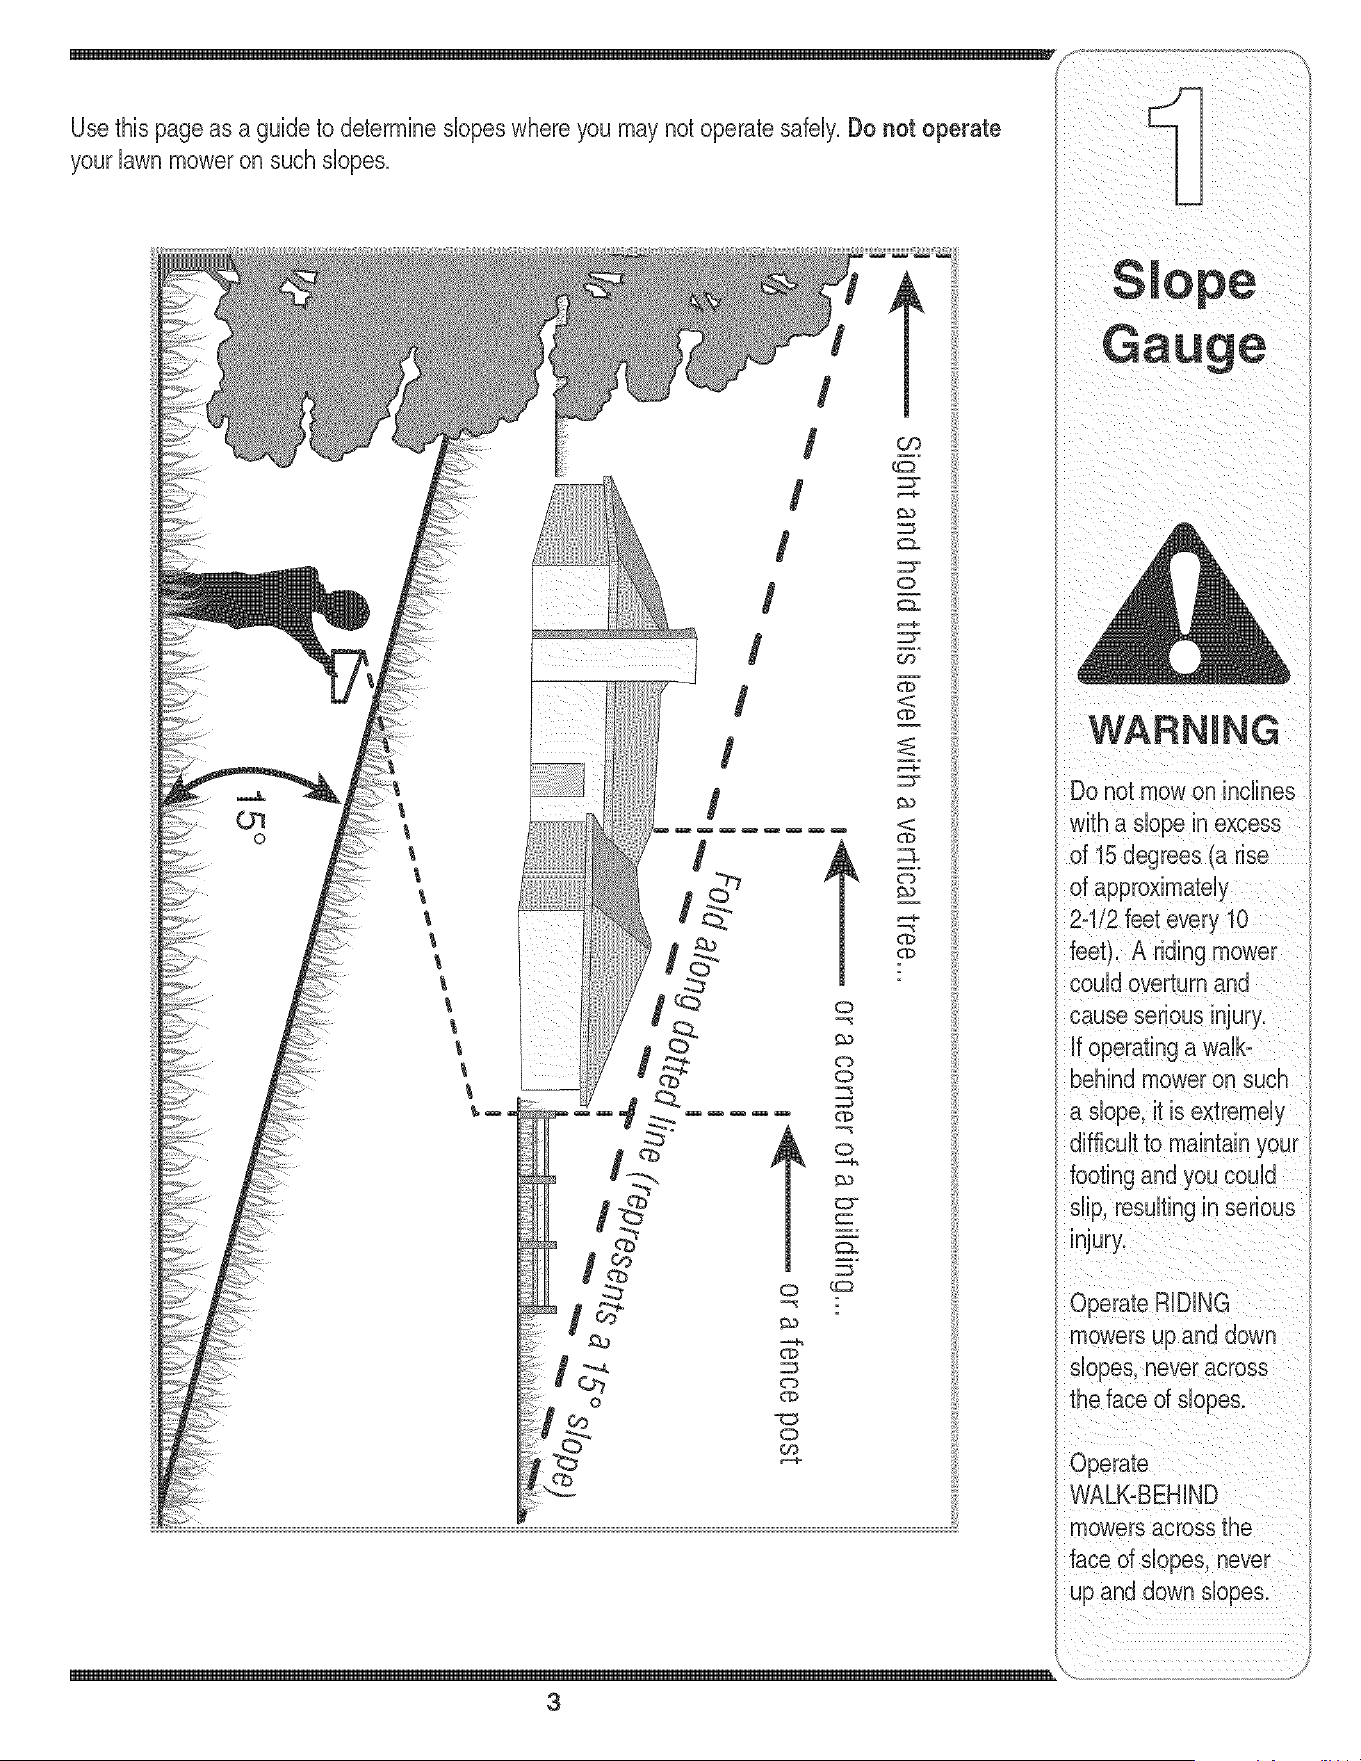
yourlawnmoweronsuchslopes.
/
/
/
/
o
/
/
t
o
w_
WARNING
Do not mowon inclines
with a dope in excess
of 15 degrees (a rise
of approximately
2-"
feet). A riding r
could overturn and
cause serious injury.
if operating a walb
behind mower on such
a dope, it is extremely
footing and you could
dip, resultingin serious
injury.
Operate RiDiNG
mowers up and down
dopes, neveracross
the face of dopes.
Operate
WALK-BEHIND
mowers across the
face of dopes, never
up and down slopes.
\
3
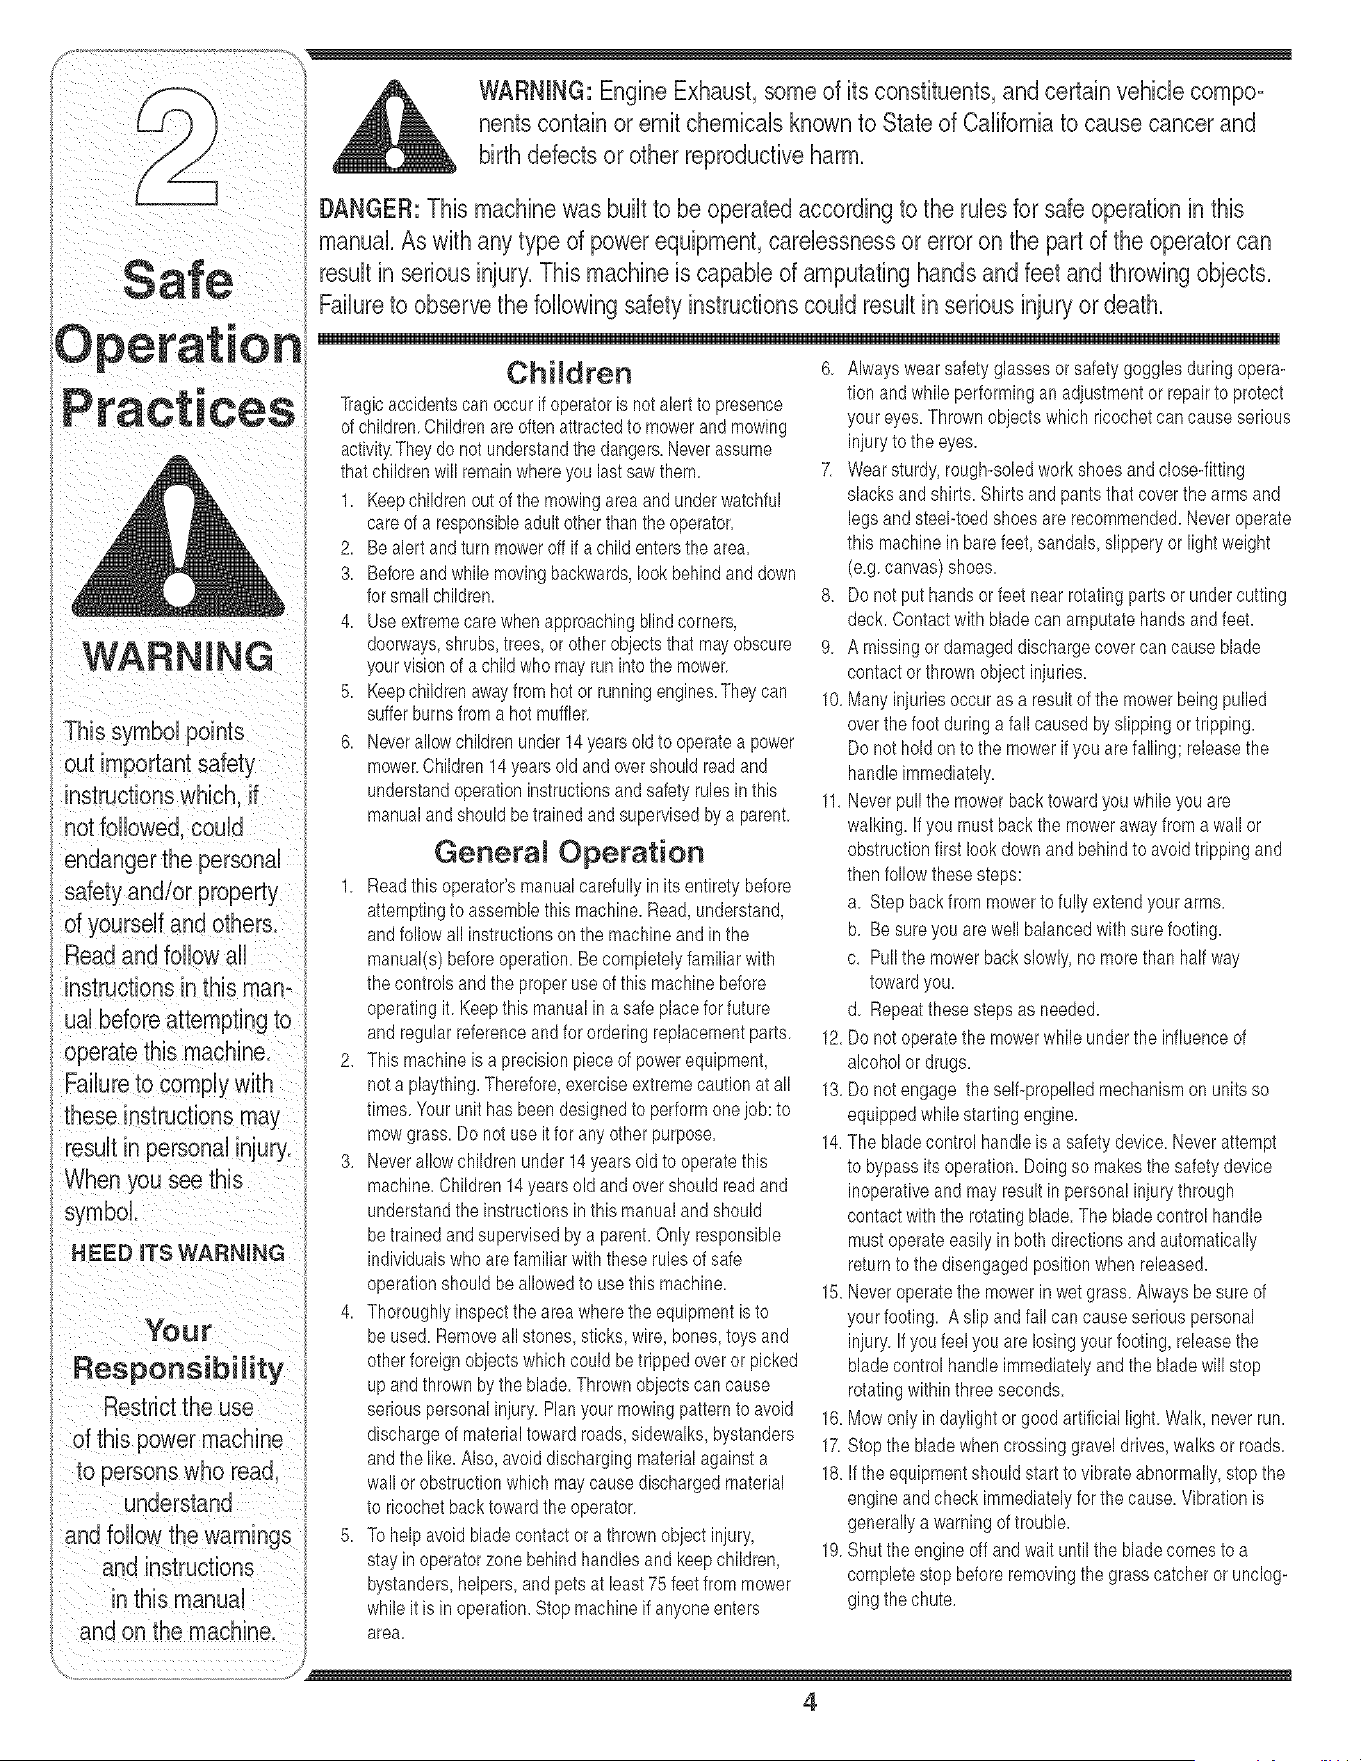
manual.Aswithanytypeofpowerequipment,carelessnessorerroronthepartoftheoperatorcan
resultinseriousinjury.Thismachineiscapableofamputatinghandsandfeetandthrowingobjects.
! Failuretoobservethefollowingsafetyinstructionscouldresultin seriousinjuryordeath.
endangerthepersonal
safetyand/orproperty
Children
Tragicaccidentscan occurifoperatoris notalert to presence
of children.Childrenare oftenattractedto mowerandmowing
activity.They do not understandthe dangers.Neverassume
thatchildrenwill remainwhereyou lastsawthem.
1. Keepchildrenout of the mowingarea andunderwatchful
careof a responsibleadultotherthanthe operator.
2. Be alert andturn moweroff if a childenters thearea.
3. Beforeand whilemovingbackwards,look behindanddown
forsmallchildren.
4. Useextremecare when approachingblindcorners,
doorways,shrubs,trees,orother objectsthat mayobscure
yourvisionof a childwho mayrun into the mower.
5. Keepchildrenawayfrom hot orrunningengines.Theycan
sufferburnsfrom a hot muffler.
6. Neverallowchildrenunder14yearsoldto operatea power
mower.Children14yearsold andovershouldreadand
understandoperationinstructionsandsafetyrulesinthis
manualandshouldbe trainedandsupervisedbya parent.
General Operation
1. Readthis operator'smanualcarefullyin its entiretybefore
attemptingto assemblethis machine.Read,understand,
andfollow all instructionsonthe machine andin the
manual(s)beforeoperation.Be completelyfamiliarwith
thecontrolsandthe properuseof this machinebefore
operatingit.Keepthis manualin a safe placeforfuture
and regularreferenceandfor orderingreplacementparts.
2. Thismachine is a precisionpieceof powerequipment,
nota plaything.Therefore,exerciseextremecautionat all
times.Yourunithas been designedto performonejob: to
mow grass.Do not use itfor any otherpurpose.
3. Neverallowchildrenunder 14yearsold to operatethis
machine.Children 14yearsold and overshould readand
understandthe instructionsinthis manualandshould
be trainedand supervisedbya parent.Only responsible
individualswho arefamiliar withthese rulesof safe
operationshould be allowedto use this machine.
4. Thoroughlyinspectthe areawherethe equipmentis to
be used. Removeall stones,sticks,wire,bones,toys and
otherforeignobjectswhichcould betripped overor picked
up and thrownby the blade.Thrownobjectscan cause
seriouspersonalinjury.Plan yourmowingpatternto avoid
dischargeof materialtoward roads, sidewalks,bystanders
andthe like.Also, avoiddischargingmaterialagainsta
wall or obstructionwhich maycausedischargedmaterial
to ricochet backtoward the operator.
6. Alwayswear safetyglassesor safetygogglesduringopera-
tion andwhile performinganadjustmentor repairto protect
youreyes.Thrownobjectswhich ricochetcan causeserious
injuryto the eyes.
7. Wearsturdy, rough-soledwork shoesand close-fitting
slacksandshirts. Shirtsand pantsthat coverthe arms and
legs andsteel-toedshoesare recommended.Neveroperate
this machinein bare feet,sandals, slipperyor lightweight
(e.g. canvas)shoes.
8. Do not puthands or feet near rotatingparts or undercutting
deck.Contactwithblade can amputatehands andfeet.
9. A missingor damageddischargecovercan causeblade
contactor thrownobject injuries.
10.Manyinjuriesoccur asa resultof the mowerbeing pulled
overthefoot during a fall causedby slipping ortripping.
Do nothold on to the mowerifyou are falling; releasethe
handle immediately.
11.Neverpullthe mowerbacktowardyou whileyouare
walking.If you mustback the mowerawayfrom a wall or
obstructionfirst look downandbehind to avoid trippingand
thenfollow thesesteps:
a. Stepback from mowerto fully extendyour arms.
b. Be sureyou arewell balancedwithsure footing.
c. Pullthe mowerbackslowly,no morethan half way
towardyou.
d. Repeatthese stepsas needed.
12.Do not operatethe mowerwhileunderthe influenceof
alcoholor drugs.
13.Do not engage the self-propelledmechanismon units so
equippedwhilestartingengine.
14.The bladecontrol handleis a safetydevice.Neverattempt
to bypassits operation.Doing so makesthe safetydevice
inoperativeandmay resultinpersonal injurythrough
contactwith the rotatingblade.The bladecontrol handle
mustoperate easilyin bothdirectionsandautomatically
returnto the disengagedpositionwhenreleased.
15.Neveroperatethe mowerinwet grass. Alwaysbesure of
yourfooting. A slip and fallcan causeseriouspersonal
injury.If you feel you are losingyour footing,releasethe
bladecontrolhandleimmediatelyandthe bladewill stop
rotatingwithinthreeseconds.
16.Mow only indaylightor good artificial light. Walk,never run.
17.Stopthe bladewhencrossinggraveldrives,walks or roads.
18.If the equipmentshouldstart to vibrateabnormally,stopthe
engine andcheck immediatelyforthe cause.Vibrationis
and follow the warnings 5. Tohelpavoid bladecontact or a thrown objectinjury, ._ generallya '_arningof !rouble.. .......
]_ _nut the engne errandwar unl: me Daaecomes-coa
and i..struction2 stay inoperatorzone behindhandles andkeepchildren, "
u _ compete stop beforeremovng the grasscatcheror unc og
, ,; bystanders,helpers,andpets at least75 feet from mower .
un_nusmanuau glngthe chute
whileit is in operation.Stopmachineif anyoneenters
and on the machine, area.
..... ,J
4
The cutting bladecontinuesto rotatefor a fewseconds after
the engineis shut off. Neverplaceany part of the bodyin
the blade area untilyou are surethe blade has stopped
rotating.
20.Neveroperatemowerwithoutpropertrailshield, discharge
cover, grasscatcher,bladecontrolhandle,or othersafety
protectivedevicesin placeandworking.Neveroperate
mowerwithdamagedsafetydevices.Failureto do socan
resultin personalinjury.
21.Mufflerandengine becomehot and can causea burn.Do
nottouch.
22.Onlyuse parts and accessoriesmadefor this machineby
manufacturer.Failureto do so can result inpersonalinjury.
23.If situationsoccurwhichare not coveredin this manual,
use careand goodjudgment.Contactyour dealerfor
assistance.Telephone1-866-840-6483forthe nameof your
nearestdealer.
SJope Operation
Slopesare a majorfactorrelatedto slip andfallaccidentswhich
can resultinsevereinjury.Operationon slopesrequiresextra
caution.Ifyou feel uneasyon a slope,do not mow it.Foryour
safety,use the slopegaugeincludedas part of this manualto
measureslopesbeforeoperatingthis unit on a slopedor hilly
area.If theslope is greaterthan 15 degrees,do notmowit.
Do:
1. Mowacrossthe faceof slopes;neverup anddown.
Exerciseextremecautionwhen changingdirectionon
slopes.
2. Watchfor holes,ruts, rocks,hiddenobjects,or bumpswhich
can causeyou to slip or trip.Tall grasscan hideobstacles.
3. Alwaysbe sure of yourfooting.A slip andfall can cause
seriouspersonalinjury.If youfeel you are losingyour
balance,releasethe blade controlhandle immediately,and
the blade will stop rotatingwithin 3 seconds.
Do Not:
1. Do not mowneardrop-offs, ditchesor embankments,where
you couldloseyour footing orbalance.
2. Do not mowslopesgreaterthan 15degrees as shownon
the slopegauge.
3. Do not mowon wetgrass. Unstablefooting could cause
slipping.
Service
Safe Handling Of Gaso%e:
1. To avoid personalinjury or propertydamageuseextreme
care in handlinggasoline.Gasolineis extremelyflammable
andthe vapors are explosive.Serious personalinjurycan
occurwhengasolineis spilledon yourself or your clothes
which can ignite.
2. Washyour skinand change clothesimmediately.
3. Useonly an approvedgasolinecontainer.
4. Neverfill containersinsidea vehicle or ona truckor trailer
bedwith a plasticliner.Alwaysplace containerson the
groundawayfromyourvehicle beforefilling.
5. Removegas-poweredequipmentfrom the truck ortrailer
andrefuel it on the ground.Ifthis is not possible,then refuel
such equipmentona trailer witha portablecontainer,rather
than from a gasoline dispensernozzle.
6. Keepthe nozzlein contactwith therim of the fuel tank or
container openingat all times until fuelingis complete.Do
notuse a nozzlelock-opendevice.
7. Extinguishallcigarettes,cigars, pipes andothersources
of ignition.
8. Neverfuel machineindoorsbecauseflammablevaporswill
accumulatein the area.
9. Neverremovegascap or add fuel while engine is hot or
running. Allowengineto cool at least two minutesbefore
refueling.
10.Neverover fill fuel tank. Fill tank to no morethan _ inch
belowbottom of filler neckto providefor fuel expansion.
11.Replacegasolinecapandtighten securely.
12.If gasolineis spilled,wipe it offthe engineand equipment.
Moveunit to anotherarea.Wait 5 minutesbeforestarting
engine.
13.Neverstore the machineor fuel containernear an open
flame,spark or pilot light as ona water heater,space
heater,furnace, clothesdryer,or othergas appliances.
14.Toreducefire hazard,keepmowerfree of grass, leaves,
or otherdebrisbuild-up.Clean up oil orfuel spillageand
removeanyfuel soakeddebris.
15.Allow a mowerto cool at least5 minutesbeforestoring.
General Service:
1. Neverrun an engineindoorsor ina poorlyventilatedarea.
Engineexhaustcontainscarbonmonoxide,an odorlessand
deadlygas.
2. Beforecleaning,repairing,or inspecting,makecertainthe
bladeandall movingparts havestopped.Disconnectthe
sparkplugwire andgroundagainsttheengineto prevent
unintendedstarting.
3. Checkthe bladeandenginemountingbolts atfrequent
intervalsfor propertightness.Also,visuallyinspectbladefor
damage(e.g.,bent, cracked,worn)Replacebladewith the
originalequipmentmanufacture's(O.EM.) bladeonly,listed
inthis manual."Useof parts whichdo notmeettheoriginal
equipmentspecificationsmay leadto improperperformance
andcompromisesafety!"
4. Mowerbladesare sharp andcan cut.Wrap the bladeorwear
gloves,anduse extracautionwhen servicingthem.
5. Keepall nuts,bolts,andscrewstight to be surethe equip-
ment is in safeworkingcondition.
6. Nevertamperwithsafetydevices.Checktheirproperopera-
tion regularly.
7. Afterstrikinga foreignobject,stop the engine,discon-
nectthe spark plugwire andgroundagainsttheengine.
Thoroughlyinspectthe mowerfor any damage.Repairthe
damagebeforestartingandoperatingthe mower.
8. Neverattempt to makea wheel orcutting height adjustment
whilethe engineis running.
9. Grasscatchercomponents,dischargecover,and trail
shieldare subjectto wear anddamagewhichcould expose
movingparts or allow objectsto be thrown. For safety
protection,frequentlycheck componentsand replaceim-
mediatelywithoriginal equipmentmanufacturer's(O.EM.)
parts only,listed in this manual."Useof partswhich do
not meetthe original equipmentspecificationsmaylead to
improperperformanceandcompromisesafety!"
10.Donot changethe engine governorsettingor overspeedthe
engine.The governorcontrolsthe maximumsafe operating
speedof the engine.
11.Maintainor replacesafetylabels,as necessary'.
12.Observeproperdisposallawsand regulations.Improper
disposalof fluidsand materialscanharmthe environment.
w o°,°o
This Symbolpoints
ua! before attempting to
resuUt in personal injury_
::When you see th s
_symbol
,EEDMTSWARNmNG
Responsibility
Restrictthe use
of this power machine
to persons who read
understand
5
Stand behind the
moweras if you were
going to operate it,
respondsto the right
side of the mower;your
eft hand corresponds
to the left side of the
mower.
For shipping purposes
your mower is set with
the wheels in a low
cutting height position.
For best results rase
the tutti ng position
until it is determined
which heiaht is best
for your lawn, refer to
instructions,
IMPORTANT
DO NOT crimp the
canes when lifting the
handb up.
iMPORTANT
without gasoline or
up gasoline and oil
as instructed in the
accompanyingengine
manual BEFORE
operating your mower,
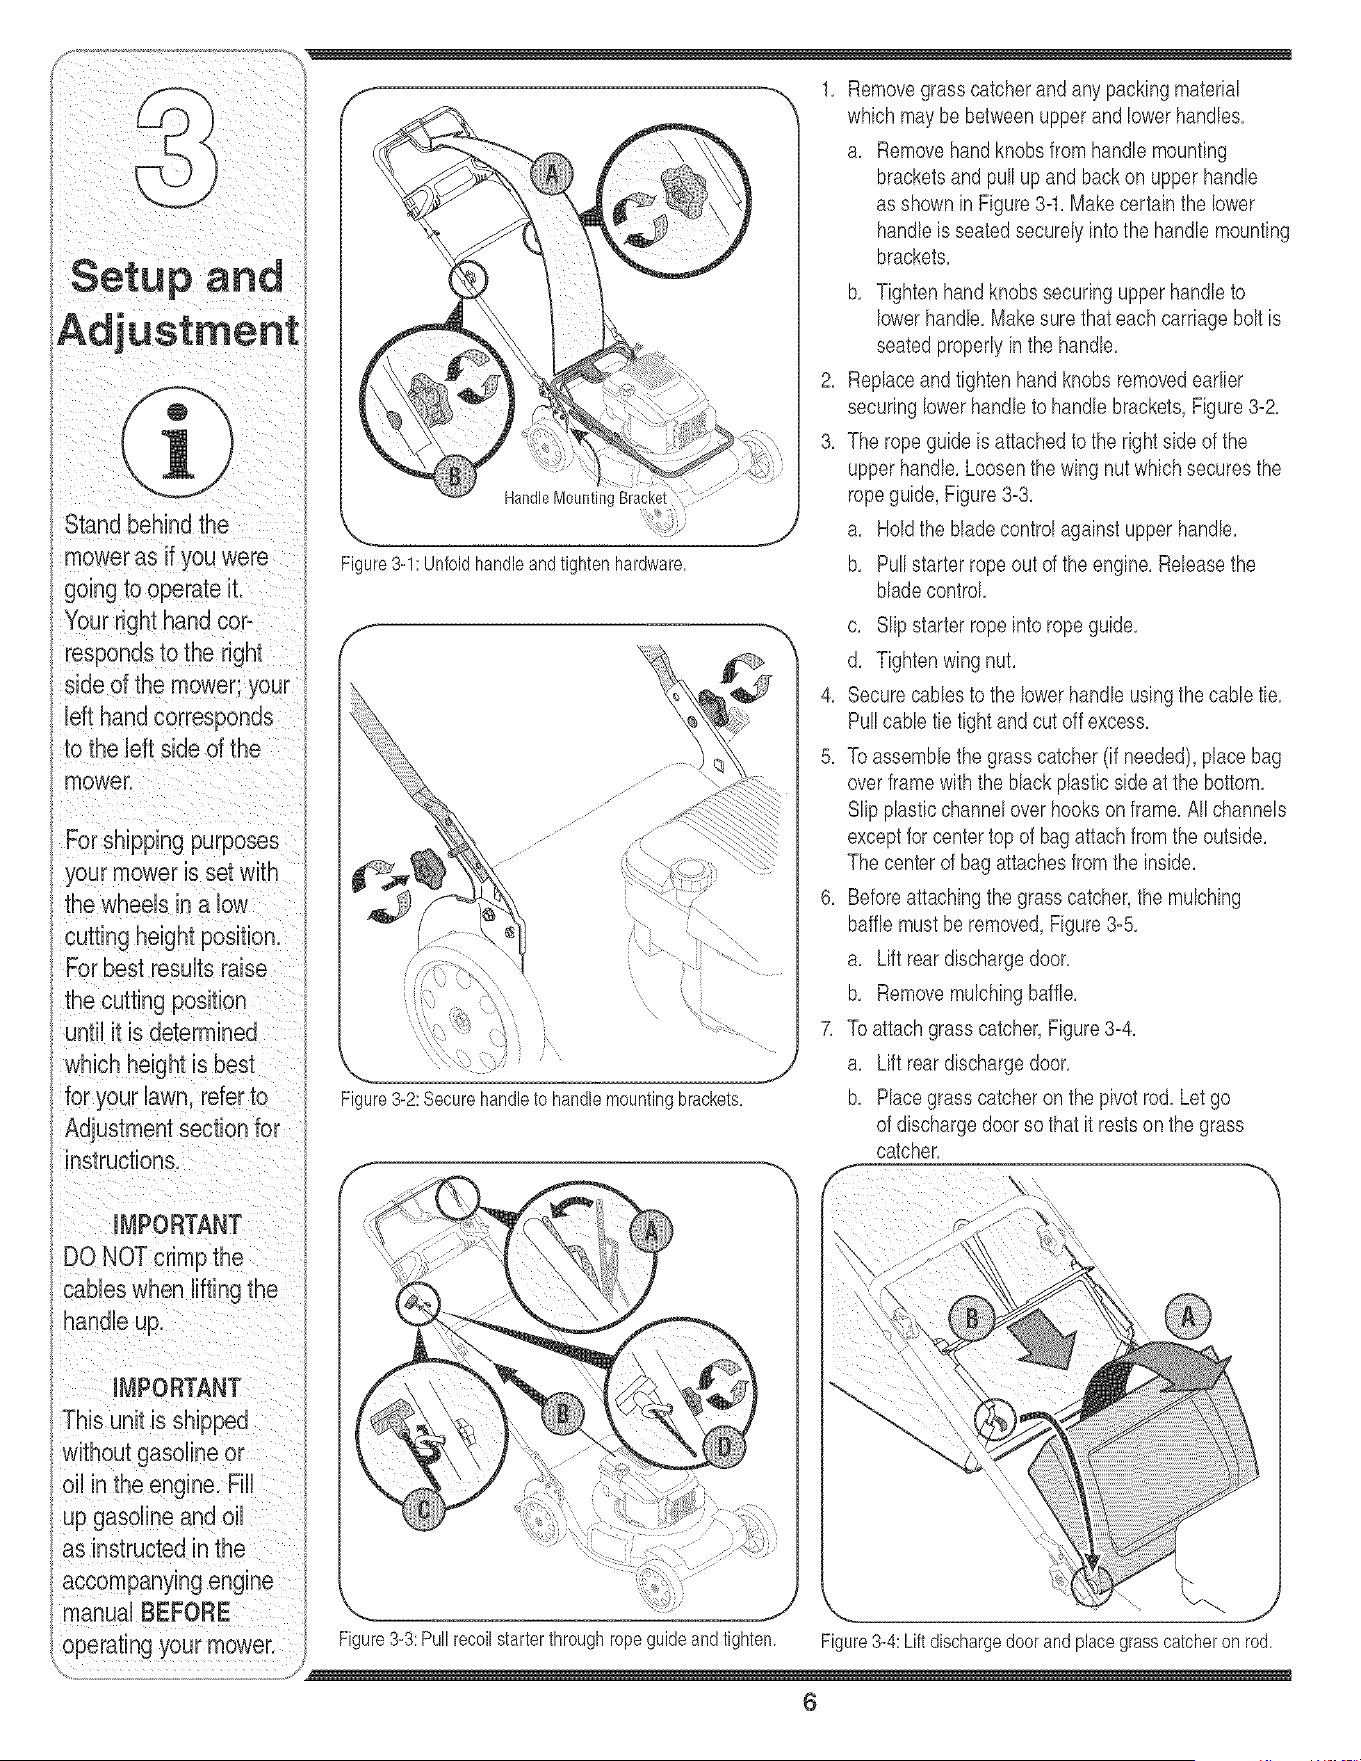
HandleMounting
Figure3-1:Unfoldhandleandtighten hardware,
f
Figure3-2:Securehandleto handlemountingbrackets,
as shownin Figure34. Makecertain the lower
handleis seatedsecurelyinto the handlemounting
brackets.
b. Tightenhandknobs securingupperhandleto
lowerhandle.Makesure thateach carriagebolt is
seatedproperlyin the handb.
2. Replaceandtighten hand knobsremovedearlbr
securinglowerhandb to handlebrackets,Figure3-2.
3. The ropeguide is attachedto the right sideof the
upperhandle.Loosenthe wingnut whichsecuresthe
ropeguide,Figure3-3.
a. Holdthe bladecontrol againstupperhandle.
b. Pullstarterrope outof the engine.Releasethe
bladecontrol.
c. Slipstarterropeintoropeguide.
d. Tightenwingnut.
4. Securecanes to the lowerhandb usingthe cane tie.
Pullcane tie tight and cut off excess.
5. Toassembb the grasscatcher(if needed),placebag
overframewiththe black plastb sideat the bottom.
Slipplastb channeloverhookson frame.All channels
exceptfor centertop of bag attachfrom the outside.
Thecenterof bag attachesfrom the inside.
6. Beforeattachingthe grass catcher,the mulching
bafflemustbe removed,Figure3-5.
a. Lift reardischargedoor.
b. Removemulchingbaffle.
7. Toattachgrasscatcher,Figure3-4.
a. Lift reardischargedoor.
b. Placegrasscatcheronthe pivot rod.Let go
of dischargedoorso that it restson the grass
catcher.
Figure3-3:Pullrecoilstarterthroughropeguideandtighten. Figure3-4:Liftdischargedoorandplacegrasscatcheron rod.
6
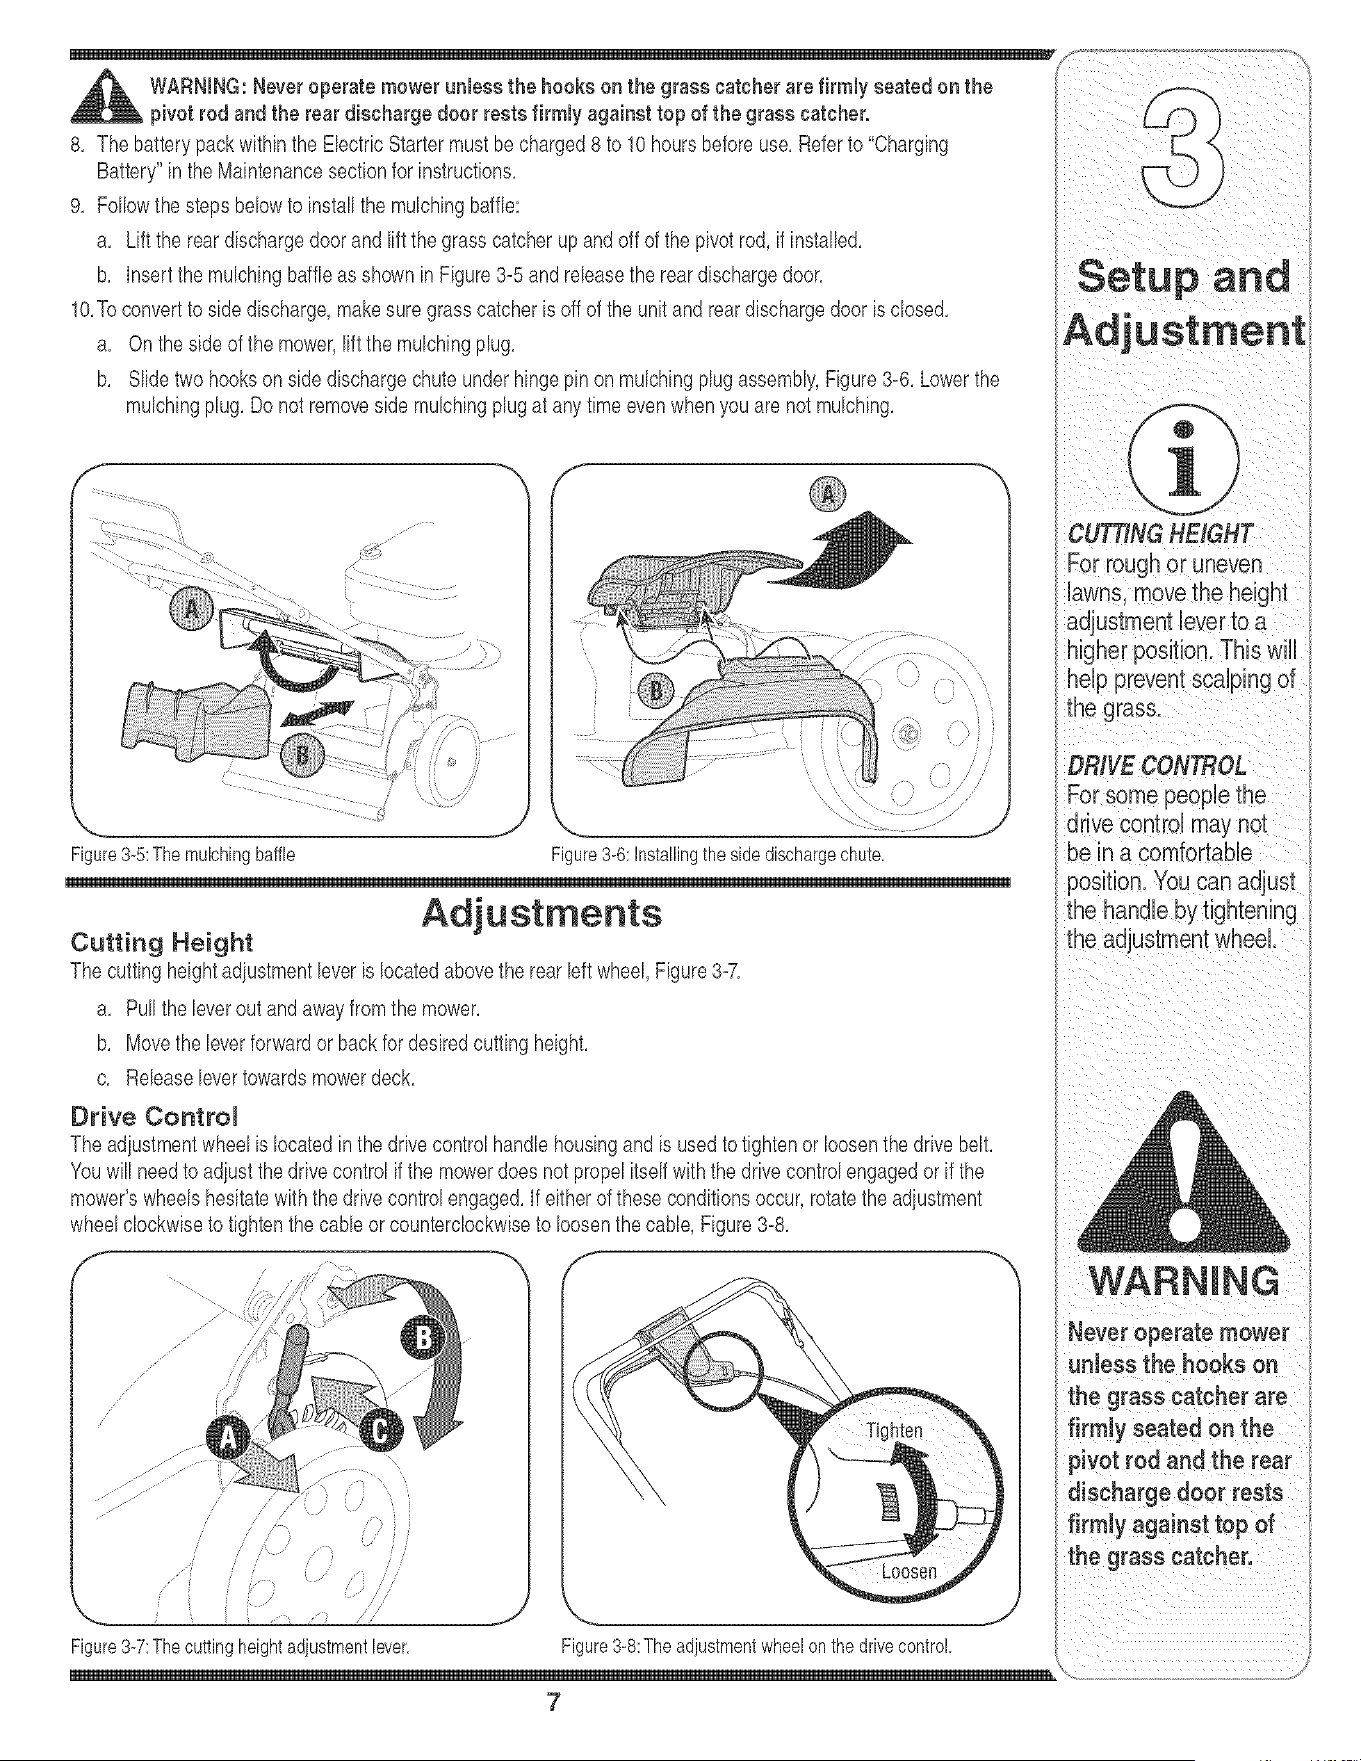
8. The batterypackwithin the ElectricStartermustbe charged8 to 10 hoursbeforeuse. Referto "Charging
Battery"in the Maintenancesectionfor instructions.
9. Followthe stepsbelowto install the mulchingbaffle:
a. Liftthe reardischargedoorandliftthe grasscatcherupandoff ofthe pivotrod, if installed.
b. Insertthemulchingbaffleas shown in Figure3-5 and releasethe reardischargedoor.
10.Toconvertto side discharge,makesure grasscatcheris off of the unitand rear dischargedoor is closed.
a. On theside of the mower,liftthe mulchingplug.
b. Slidetwo hooksonside dischargechuteunderhingepin onmulchingplugassembly,Figure3-6. Lowerthe
mulchingplug.Do not removeside mulchingplugat any timeevenwhenyou are not mulching.
J
Figure3-5:Themulchingbaffle Figure3-6:Installingthesidedischargechute.
Adjustments
Cutting Height
The cuttingheightadiustmentleveris locatedabovethe rear left wheel,Figure3-7.
a. Pullthe leverout andawayfromthe mower.
b. Movethe leverforwardor backfor desiredcuttingheight.
c. Releaselevertowardsmowerdeck.
Drive Control
The adiustmentwheelis locatedin the drivecontrol handlehousingand is usedto tightenor loosenthedrive belt.
Youwill needto adiust thedrivecontrol if the mowerdoesnot propelitselfwith the drivecontrolengagedor if the
mower'swheelshesitatewiththe drivecontrolengaged.If eitherof these conditionsoccur,rotatethe adiustment
wheelclockwiseto tightenthe cableor counterclockwiseto loosenthe cable, Figure3-8.
,,%
f
/'
the grass.
drive control may not
post on You can adjust
the handle by tightening
the adjustment wheeL
i
Figure3-8:Theadjustmentwheelonthedrivecontrol.
7
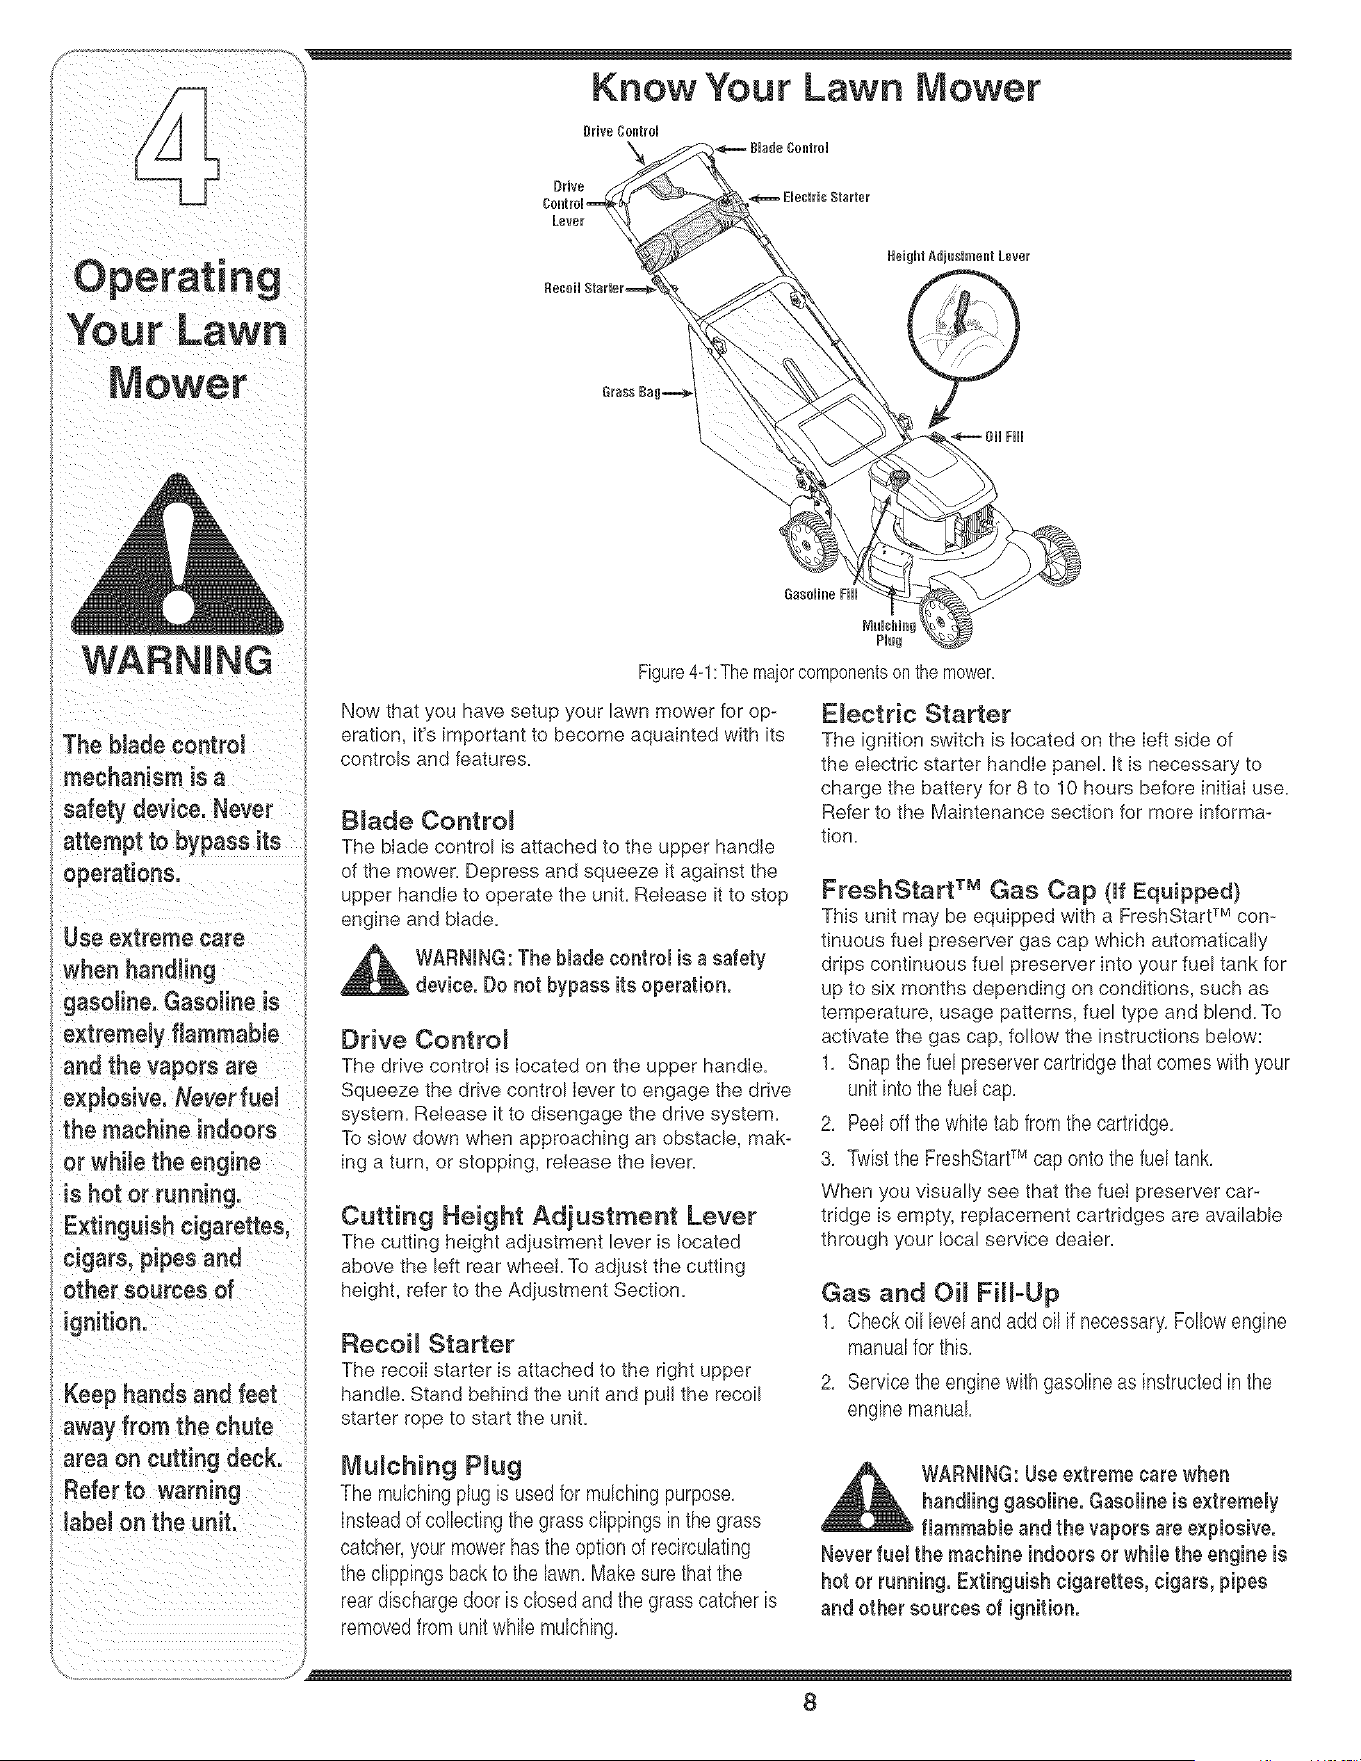
Know Your Lawn Mower
Drive Control
WARNING
The blade control
mechanism is a
safety device. Never
attempt to bypass its
operations.
Use extreme care
when handling
gasoline. Gasoline is
extremely flammabb
and the vapors are
explosive. Neverfuel
the machine indoors
or while the engine
is hot or running.
Extinguish cigarettes,
cigars, pipes and
other sources of
ignition.
Keep hands and feet
:way from the chute
tea on cutting deck.
Refer to warning
Jabelon the unit.
Oil Fill
Figure4-1:The major componentson the mower.
Now that you have setup your lawn mower for op-
eration, it's important to become aquainted with its
controls and features.
B_ade Contro_
The blade control is attached to the upper handle
of the mower. Depress and squeeze it against the
upper handle to operate the unit. Release it to stop
engine and blade.
WARNING: The blade control is a safety
device. Do not bypass its operation.
Drive Contro_
The drive controi is Iocated on the upper handIe.
Squeeze the drive control Iever to engage the drive
system. ReIease it to disengage the drive system.
To slow down when approaching an obstacle, mak-
ing a turn, or stopping, release the lever.
Cutting Height Adjustment Lever
The cutting height adiustment lever is located
above the left rear wheel To adjust the cutting
height, refer to the Adiustment Section.
Recoi_ Starter
The recoiI starter is attached to the right upper
handle. Stand behind the unit and puII the recoil
starter rope to start the unit.
E_ectrie Starter
The ignition switch is located on the Ieft side of
the electric starter handle panel. It is necessary to
charge the battery for 8 to 10 hours before initial use.
Refer to the Maintenance section for more informa-
tion.
FreshStart TM Gas Cap (if Equipped)
This unit may be equipped with a FreshStart TM con-
tinuous fuel preserver gas cap which automatically
drips continuous fuel preserver into your fuel tank for
up to six months depending on conditions, such as
temperature, usage patterns, fuel type and blend. To
activate the gas cap, follow the instructions below:
1, Snap the fuel preserver cartridge that comes with your
unit into the fuel cap,
2, Peel off the white tab from the cartridge,
3, Twist the FreshStartTM cap onto the fuel tank,
When you visually see that the fuei preserver car-
tridge is empty, replacement cartridges are available
through your local service deaIer.
Gas and Oi_ Fii{-Up
1, Check oil level and add oil if necessary, Follow engine
manual for this,
2, Service the engine with gasoline as instructed in the
engine manual
Mu_ching P_ug
The mulching plug is used for mulching purpose,
Instead of colbcting the grass clippings in the grass
catcher, your mower has the option of recirculating
the clippings back to the lawn, Make sure that the
rear discharge door is closed and the grass catcher is
removed from unit while mulching,
WARNING:Usee×trernecare when
handling gasoline. Gasoline is e×tremely
flammable andthe vapors are explosive.
Neverfuel the machine indoors or while the engine is
hot or running. Extinguish cigarettes, cigars, pipes
and other sources of ignition.
8
WARNING:Theoperation of any lawn f
l
mower can result inforeign objects being
thrown intothe eyes, which can damage
your eyes severely.Always wear safety glasses
while operating the mower or while performing any
adjustments or repairs on it.
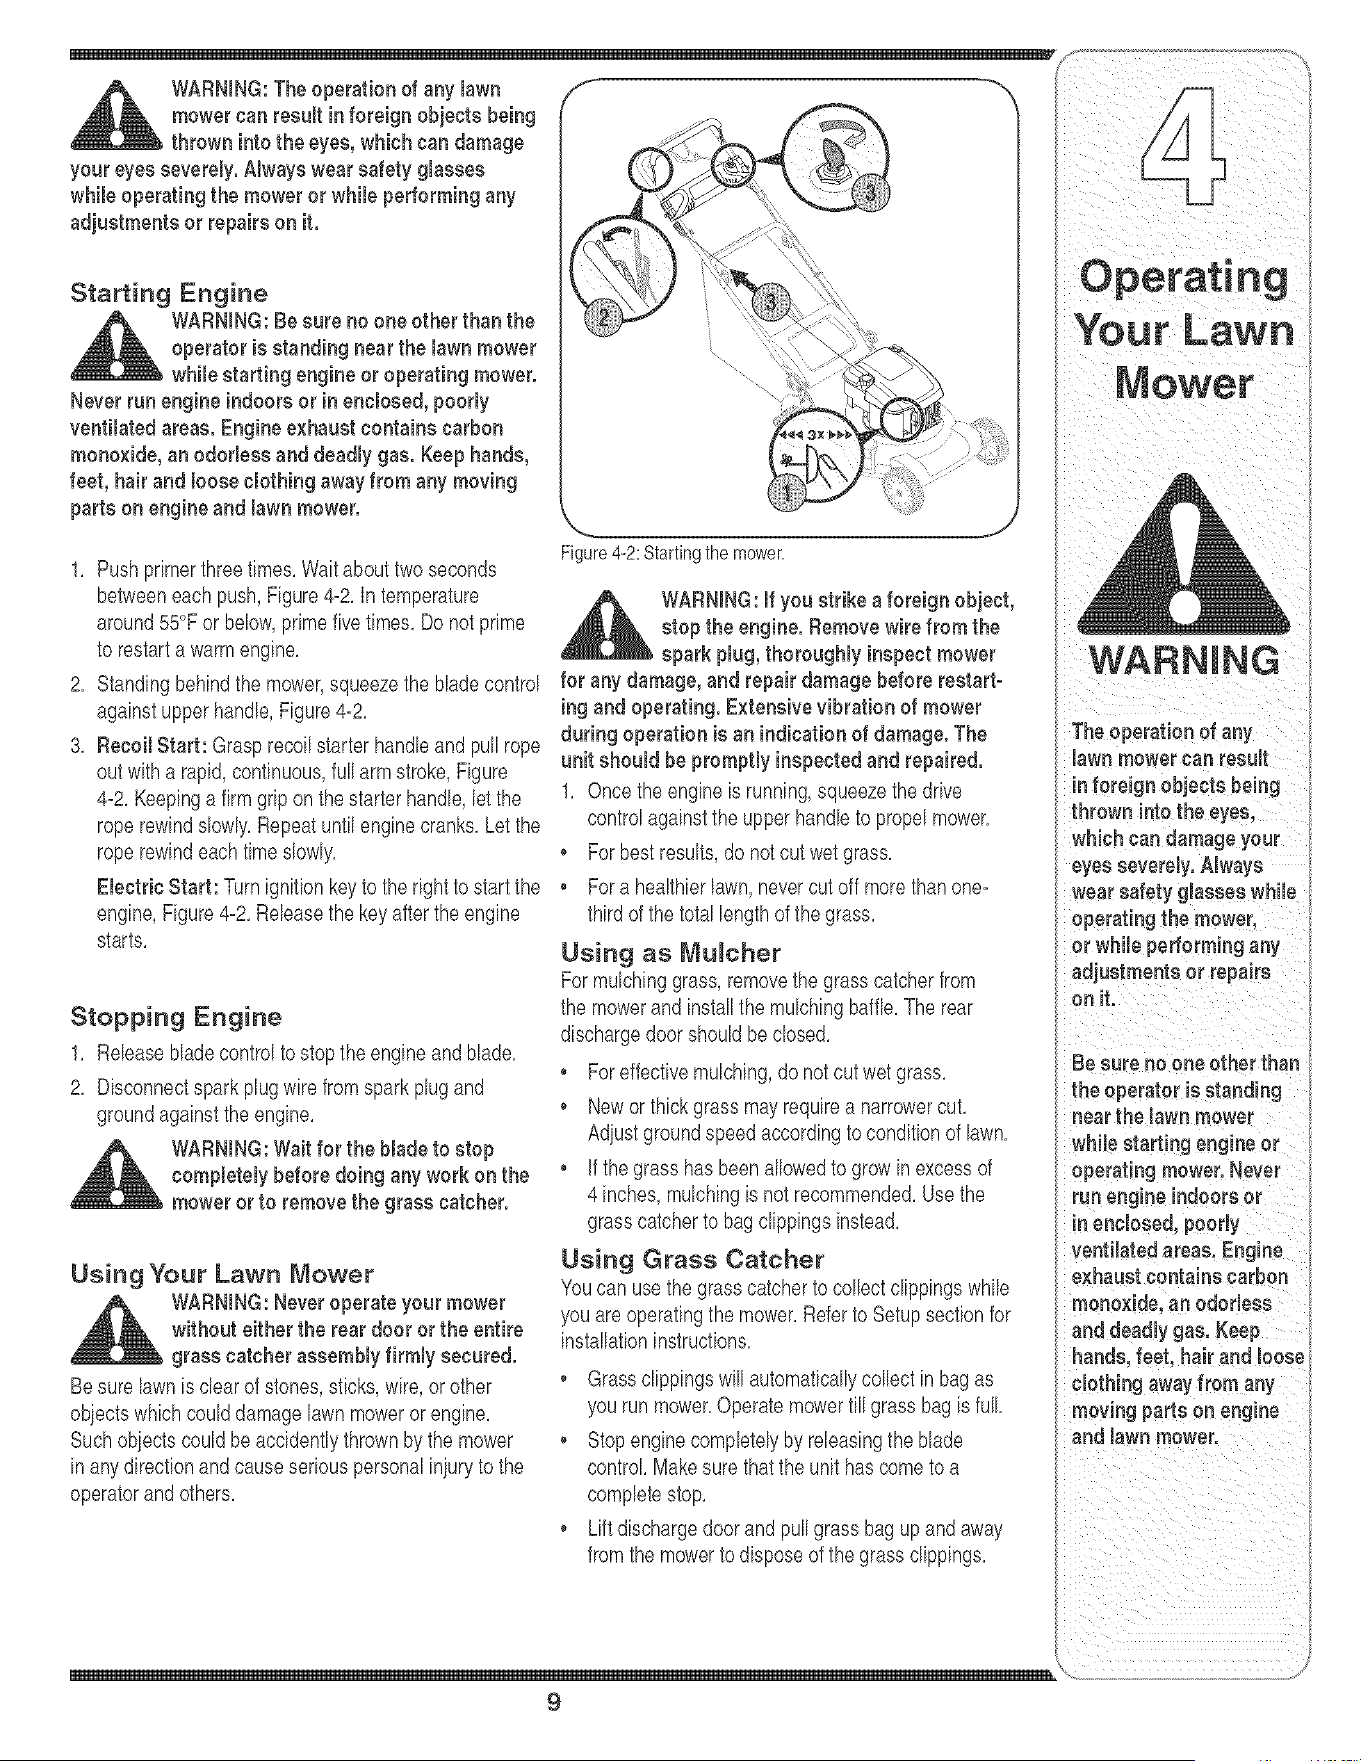
1. Pushprimerthreetimes.Wait abouttwo seconds
betweeneachpush,Figure4=2.In temperature
around55°For below,primefive times. Do notprime
to restarta warmengine.
2. Standingbehindthe mower,squeezethe blade control
againstupperhandle,Figure4=2.
3. RecoilStart: Grasprecoilstarterhandleand pull rope
out with a rapid,continuous,fullarm stroke,Figure
4=2.Keepinga firmgripon thestarter handle,let the
roperewindslowly.Repeatuntil enginecranks.Letthe
roperewindeachtimeslowly.
Electric Start: Turnignitionkeyto the rightto startthe
engine,Figure4=2.Releasethe keyafterthe engine
starts.
Stopping Engine
1. Releasebladecontrolto stopthe engine and blade.
2. Disconnectsparkplugwire fromspark plug and
groundagainstthe engine.
WARNING:Wait for the bladeto stop
completely before doing any work on the
mower or to removethe grass catcher.
Using Your Lawn Mower
WARNING:Neveroperate your mower
without either the rear door or the entire
grass catcher assembly firmly secured.
Be surelawnis dear of stones,sticks,wire,or other
obiectswhichcoulddamagelawnmowerorengine.
Suchobiectscouldbe accidentlythrownby the mower
in anydirectionandcauseserious personaliniuryto the
operatorandothers.
Figure4-2:Startingthe mower.
_ ARNING:If you strike aforeign object,
stop the engine. Removewire from the
spark plug,thoroughly inspectmower
for any damage, and repair damage before restart-
ingand operating. Extensive vibration of mower
during operation is an indicationof damage. The
unit should be promptly inspectedand repaired.
1. Oncethe engineis running,squeezethe drive
controlagainstthe upperhandleto propelmower.
• For bestresults,do notcut wet grass.
. Fora healthierlawn,nevercutoff morethanone=
thirdof the total lengthof the grass.
Using as Mulcher
Formulchinggrass,removethe grasscatcherfrom
the mowerand installthe mulchingbaffle.The rear
dischargedoorshouldbeclosed.
• Foreffectivemulching,do notcut wet grass.
• New or thickgrass may requirea narrowercut.
Adiustgroundspeedaccordingto conditionof lawn.
• if thegrass has beenallowedto growin excessof
4 inches,mulchingis not recommended.Usethe
grasscatcherto bag clippingsinstead.
Using Grass Catcher
Youcan usethe grass catcherto collectclippingswhile
youareoperatingthe mower.Referto Setupsectionfor
installationinstructions.
Grassclippingswill automaticallycollect in bag as
yourun mower.Operatemowertill grassbagis full.
. Stopenginecompletelyby releasingtheblade
control Makesure that the unit hascometo a
moving partsoneng!ne
and awn mower.
comp otestopd schargodoorandgrassbagupandaway
fromthe mowerto disposeof the grass clippings.
9
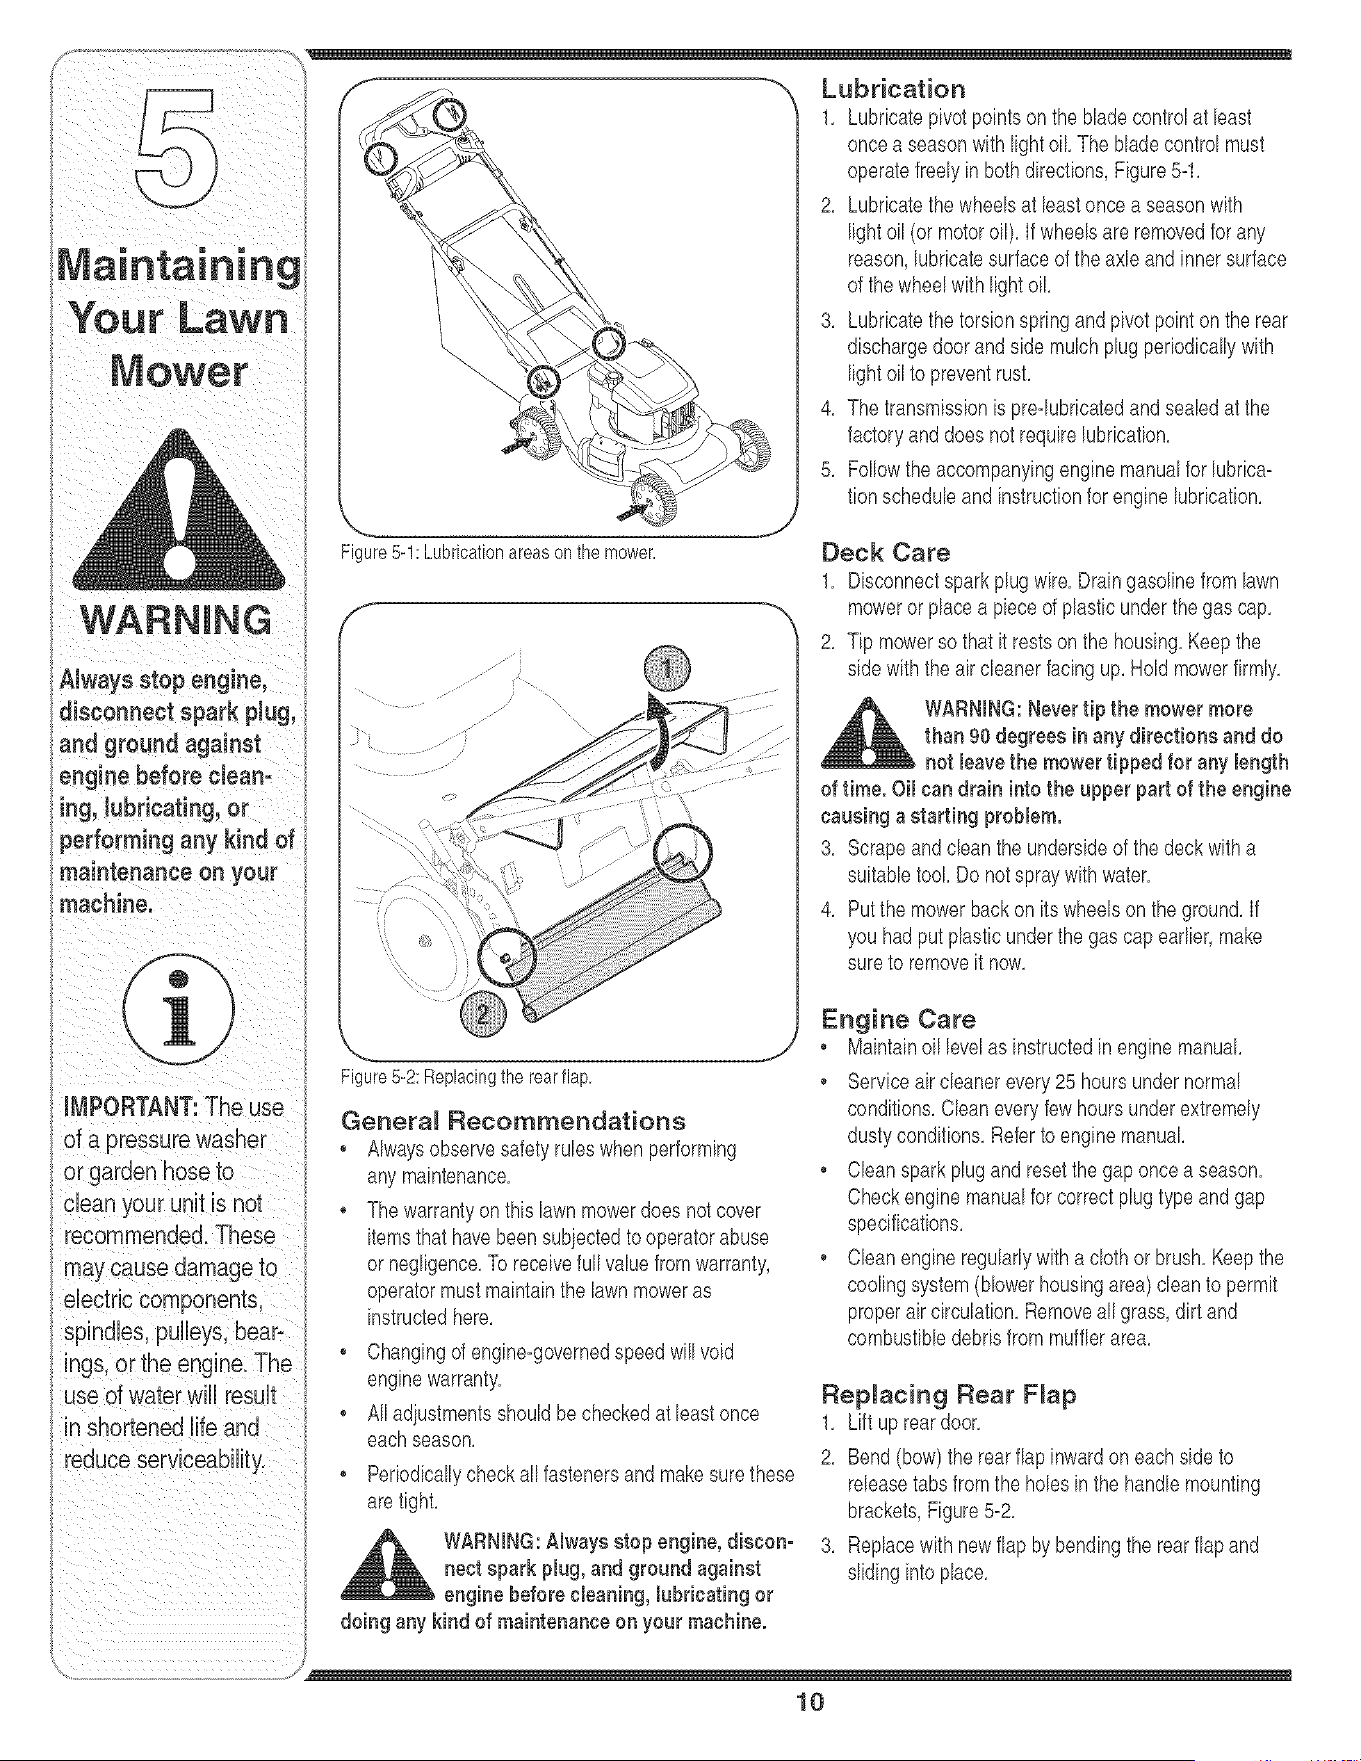
f "_ Lubrication
i ii
IMPORTANT: The use
of a pressure washer
eUectricComponents,
\
Figure5-1:Lubricationareasonthemower.
f
Figure5-2:Replacingthe rearflap.
General Recommendations
• Alwaysobservesafetyruleswhen performing
any maintenance,
Thewarrantyon thislawnmowerdoes notcover
itemsthathavebeensubjectedto operatorabuse
or negligence,Toreceivefull valuefrom warranty,
operatormustmaintainthe lawnmoweras
instructedhere,
, Changingofengine-governedspeedwill void
enginewarranty,
, Alladiustmentsshouldbecheckedat leastonce
eachseason,
• Periodicallycheckall fastenersand makesurethese
aretight,
WARNING:Always stop engine, discon-
nect spark plug, and ground against
engine before cleaning, lubricating or
doing any kind of maintenanceon your machine.
1, Lubricatepivotpointson the bladecontrolat least
oncea seasonwithlightoil The bladecontrol must
operatefreelyin both directions,Figure54,
2, Lubricatethe wheelsat least oncea seasonwith
lightoil (or motoroil), Ifwheelsare removedfor any
reason,lubricatesurfaceof the axleand innersurface
of the wheelwith lightoiL
3, Lubricatethe torsionspringand pivot pointon the rear
dischargedoorandside mulchplug periodicallywith
lightoil to preventrust,
4, Thetransmissionis pre-lubricatedand sealedat the
factoryanddoes notrequirelubrication,
5, Followthe accompanyingenginemanualfor lubrica-
tionscheduleandinstructionfor engine lubrication,
Deck Care
1, Disconnectsparkplug wire,Draingasolinefrom lawn
mowerorplacea pieceof plasticunderthegas cap,
2, Tip mowerso that it restson the housing,Keepthe
sidewiththe air cleanerfacingup,Hold mowerfirmly,
WARNING:Nevertip the mower more
than 90 degrees in any directions and do
not leavethe mower tipped for any length
of time. Oil can drain intothe upper part ofthe engine
causing a starting problem.
3, Scrapeand clean the undersideof the deck with a
suitabletool,Do notspraywith water,
4, Putthe mowerback on its wheelson the ground,If
you hadput plasticunderthe gas capearlier,make
sureto removeit now,
Engine Care
, Maintainoil levelas instructedin enginemanual,
, Serviceaircleanerevery25 hoursundernormal
conditions,Cleaneveryfewhoursunderextremely
dustyconditions,Referto engine manual
, Cleansparkplugandreset thegap oncea season,
Checkenginemanualfor correctplugtype and gap
specifications,
• Cleanengineregularlywith a cloth or brush, Keepthe
coolingsystem(Newerhousingarea)cleanto permit
properaircirculation,Removeall grass,dirt and
combustibledebrisfrom mufflerarea,
Replacing Rear F_ap
1, Lift uprear door,
2, Bend(bow)the rearflap inwardon eachside to
releasetabsfrom the holesin the handlemounting
brackets,Figure5-2,
3, Replacewith newflap bybendingthe rear flapand
slidinginto place,
10

the carburetorareup,
2, Removebolt,blade bell support,blade,and adapter
fromthe enginecrankshaft,Figure5=3,
NOTE:Whenremovingthe blade,adapter,etc,,becare=
ful notto removeor misplaceparts aboveit associated
withthe engine pulley,
3, The bladecan be sharpenedwith a file or on a grind=
ingwheel Do notattemptto sharpenthe blade while
it is stillon the mower,Whensharpeningblade,follow
originalangleof grind,Grind cuttingedgesequallyto
keepbladebalanced,
4, Removebladefromthe adapterfor testingbalance,
Balancethe bladeon a roundshaftscrewdriverto
check,Removemetalfromthe heavyside untilit
balancesevenly,
WARNING:An unbalanced blade will
cause excessivevibration when rotating
at high speeds. It may cause damageto
mower, and could breakcausing personalinjury.
5, Lubricatetheenginecrankshaftand the inner surface
of the bladeadapterwith lightoil Slidethe blade
adapterontotheenginecrankshaft.Placethe blade
on the adaptersuchthat theside of the blade marked
"Bottom"(or with part number)facesthe groundwhen
the moweris in the operatingposition,Makesurethat
bladeis alignedand seatedon bladeadapterflanges,
6, Placeblade bell supporton the blade,Align notches
on the bladebell support with smallholesin blade,
Replacehexbolt andtightenhex boltto torque: 450
in, Ibs,min,,600 in, Ibs,max,
Toensuresafeoperationof yourmower,periodically
checkthe blade boltfor correcttorque,
Belt Care
1, Disconnectsparkplugwire andground against
engine,
2, Drainthe fuel tank or placea pieceof plasticbeneath
the cap to preventgasolineleakage,
3, Tip moweron its side (air cleanerside of engineup),
4, Removeblade,bladeadapter,and relatedhardware,
Figure5=3,
5, Loosenself=tappingscrewthat securesdeck baffleto
the deck, Figure5=4,
6, Workingfromthe rearof the mower,carefullyremove
beltfromtransmissionpulley,
J
Figure5-3:Removethebolt,support,blade,andadapterto
accessthebladeandundersidecomponents.
j J/
Figure5-4:Removescrewholdingbaffletodeck.
f
/ ......... ;_:;_........... "
.........i ¸¸
Figure5-5:Removebeltfromtransmissionthenengine.
7, Oncebelt is off transmissionpulley,pushdownon
deckbaffleto access enginepulleyand slide belt off
thispulleyandout from underthe deck,Figure5=5,
8, Replacewith newbelt,workingit betweenthe deck
andbaffle,firstaroundthe transmissionpulleyand
thenthe enginepulley,Tightenscrewloosened
earlierandreplacebladeand hardware,
9, Tip mowerbackonto its wheelsand removepieceof
plasticfromundergascap (ifapplicable),
11
WARNING ;
When removing
the cutting blade
for sharpening or
replacement or
when sliding the belt
around it, protect
your hands with a
pair of heavy gloves
or use a heavy rag to
hold the blade.
An unbalanced
blade will cause
excessive vibration
when rotating at high
speeds, it may cause
damage to mower and
could break causing
personaJ injury.
Make certain that bert
is seated correctly
and that it is riding
smoothJy on the en-
gine pulley and is
not pinched between
the lower and upper
pulley halves.
WARNING
Batteries contain
sulfuric acid which may
cause burns. Do not
short circuit or mutilate
batteries in any way. Do
not put batteries in fire
as these may buret or
releasetoxic materials.
Useonlythe battery
charger supplied with
this mower,
Do not remove the
battery packfrom the
electric starter housing
for any reason other
than replacement.
release toxic materials.
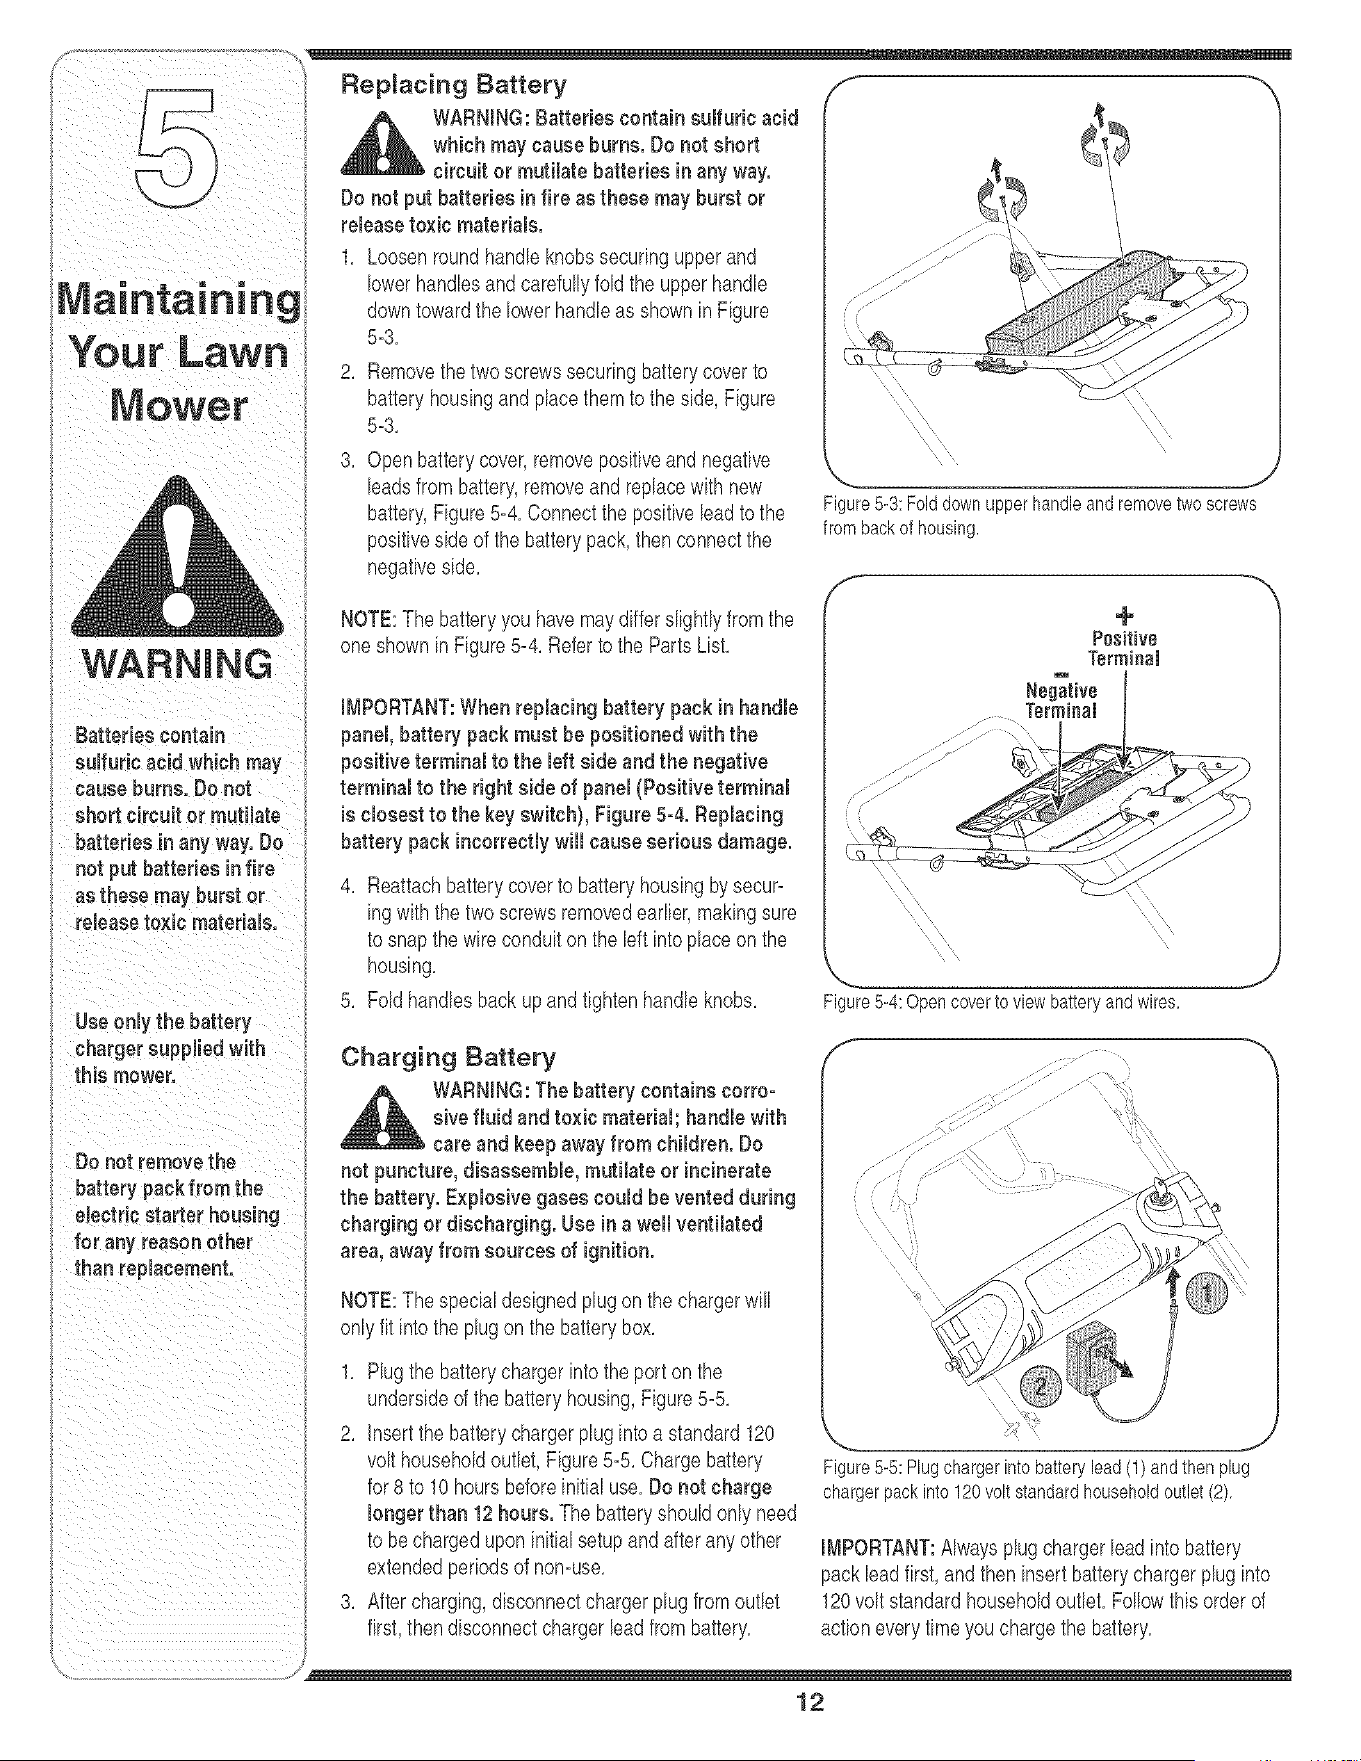
1. Loosenround handleknobssecuringupperand
lowerhandlesandcarefullyfold the upperhandle
downtowardthe lowerhandleas showninFigure
5=3.
2. Removethetwo screwssecuringbatterycoverto
batteryhousingand placethem to the side, Figure
5=3.
3. Openbatterycover,removepositiveand negathfe
leadsfrombattery,removeandreplacewith new
battery,Figure5-4. Connectthe positiveleadto the
positiveside of the batterypack,then connectthe
negativeside.
NOTE:The batteryyou havemaydiffer slightlyfrom the
oneshownin Figure5-4. Referto the PartsList.
IMPORTANT:When replacing battery pack in handle
panel, battery pack must be positioned with the
positive terminal to the left side and the negative
terminal to the right side of panel (Positive terminal
is closest to the key switch}, Figure 5°4.Replacing
battery pack incorrectly will causeserious damage.
4. Reattachbatterycoverto batteryhousingbysecur-
ingwith the two screwsremovedearlier,makingsure
to snapthe wireconduiton the left intoplaceon the
housing.
5. Foldhandlesbackupand tightenhandleknobs.
Charging Battery
WARNING:The battery contains corroo
sire fluid and toxic material; handle with
care and keep away from children. Do
not puncture, disassemble, mutilate or incinerate
the battery. Explosive gases could be vented during
charging or discharging. Use in a well ventilated
area, away from sources of ignition.
NOTE:The specialdesignedplugon thechargerwill
onlyfit intothe plugon the batterybox.
1. Plugthe batterychargerintothe port on the
undersideof the batteryhousing,Figure5=5.
2. Insertthe batterychargerplug intoa standard120
volthouseholdoutlet,Figure5-5. Chargebattery
for 8 to 10 hoursbeforeinitial use. Do not charge
longer than 12 hours. The batteryshouldonly need
to be chargedupon initialsetupand after anyother
extendedperiodsof non=use.
3. Aftercharging,disconnectchargerplugfrom outlet
first,thendisconnectchargerleadfrom battery.
Figure5-3: Folddownupperhandleand removetwoscrews
from backof housing.
f
Figure5-4:Opencovertoviewbatteryandwires.
f
J
Figure5-5:Plugchargerintobatterylead(1)andthenplug
chargerpackinto120voltstandardhouseholdoutlet(2),
IMPORTANT:Alwaysplugchargerleadinto battery
packleadfirst, and then insert batterychargerplug into
120volt standardhouseholdoutlet. Followthis orderof
actioneverytime youchargethe battery.
12
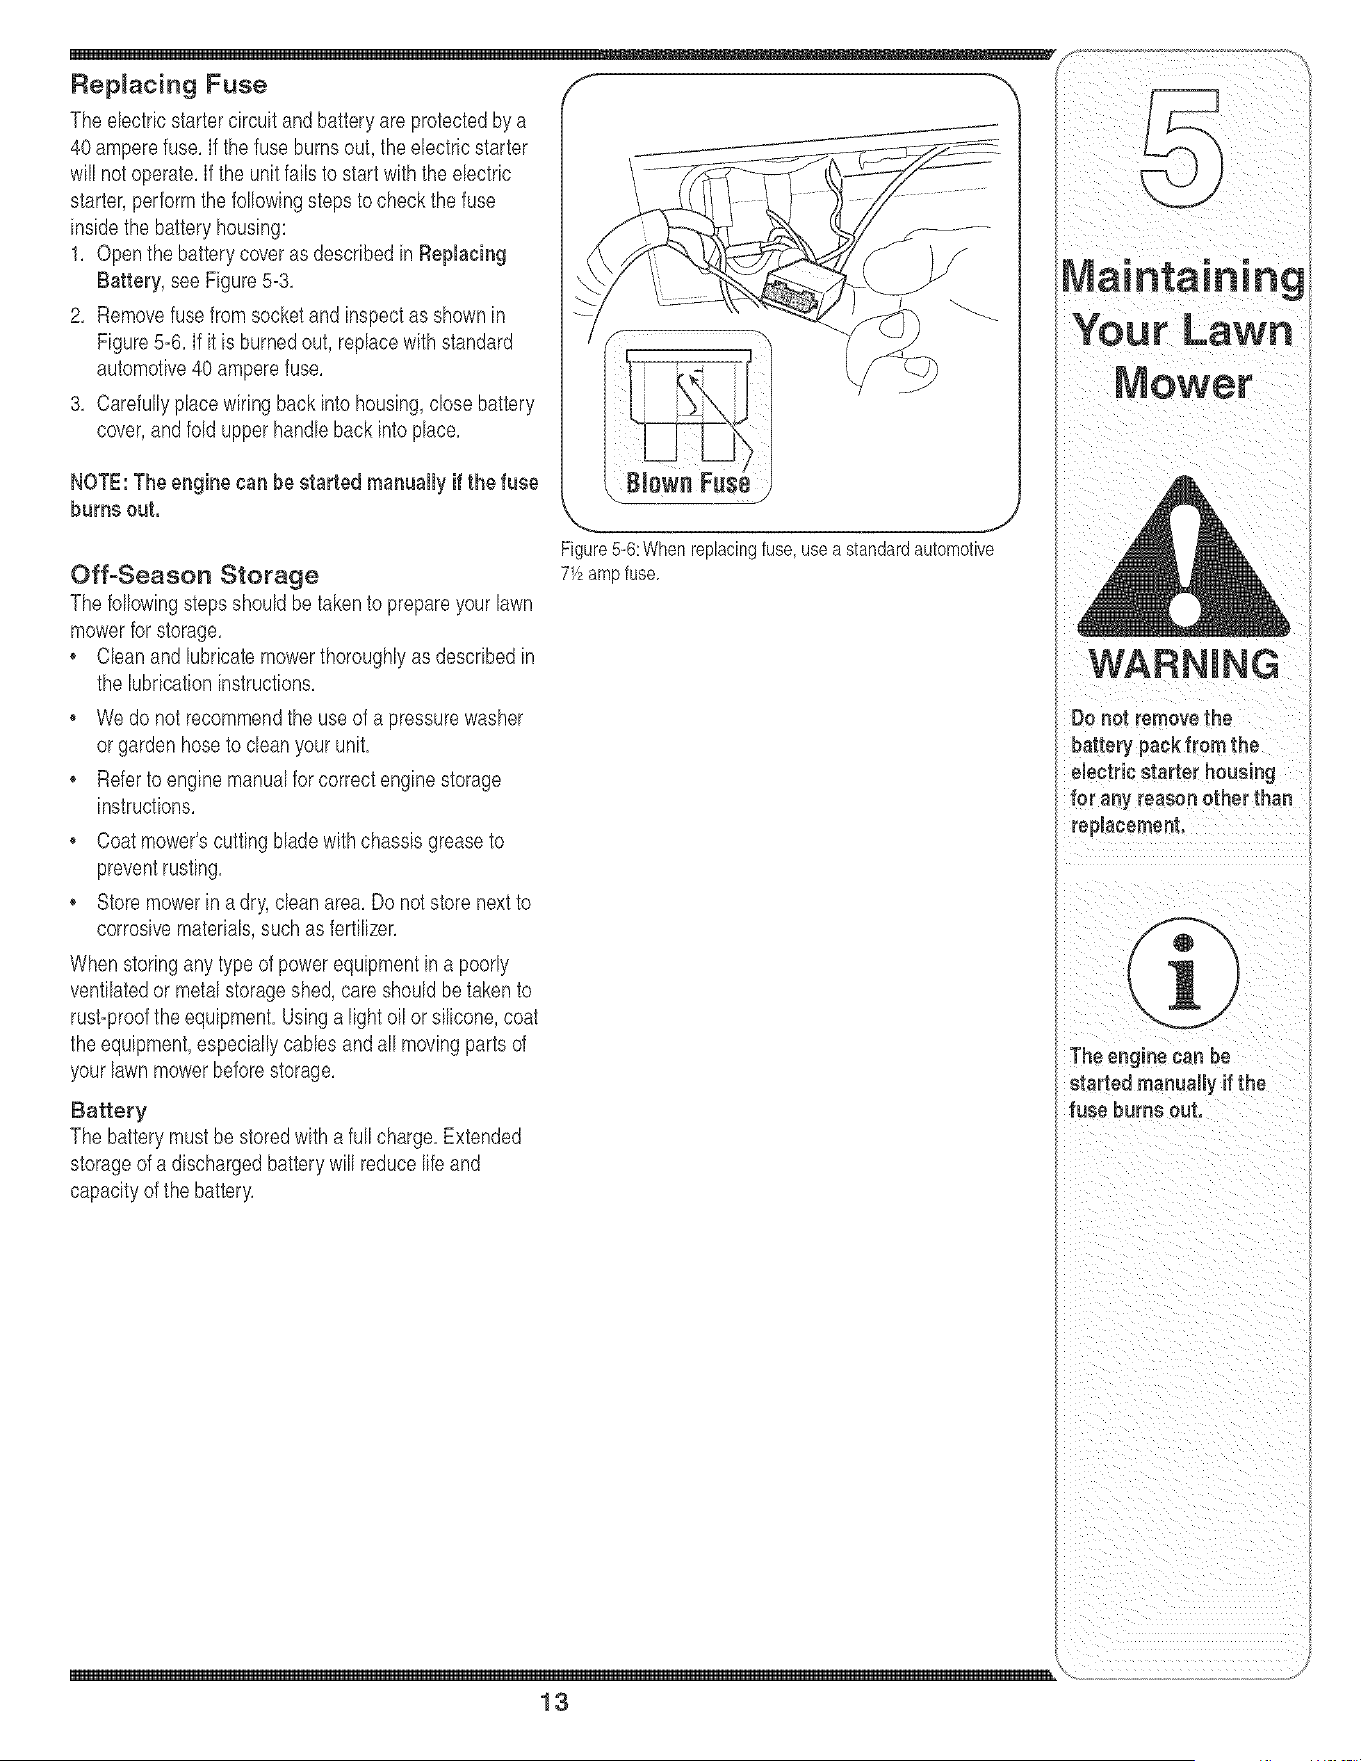
Replacing Fuse "_
The electricstartercircuit andbatteryare protectedby a
40 amperefuse,If the fuse burnsout, theelectricstarter
will not operate,If the unitfails to startwith the electric
starter,performthe followingstepsto checkthe fuse
insidethe batteryhousing:
1. Openthe batterycover as describedin Replacing
Battery,see Figure5-3.
2. Removefuse from socketand inspectasshown in _-
Figure5-6. If it is burnedout, replacewithstandard
automotive40amperefuse.
3. Carefullyplacewiringback into housing,close battery
cover,andfold upper handleback intoplace.
NOTE: The engine can be started manually if the fuse
burns out.
Off-Season Storage
The followingstepsshouldbetaken to prepareyourlawn
mowerfor storage.
Cleanand lubricatemowerthoroughlyas describedin
the lubricationinstructions.
We donot recommendthe useof a pressurewasher
or gardenhoseto dean your unit.
Referto enginemanualfor correctenginestorage
instructions.
Coatmower'scuttingbladewithchassisgreaseto
preventrusting.
. Storemowerin adry,clean area.Do notstorenext to
corrosivematerials,suchas fertilizer.
Whenstoringany type of powerequipmentin a poorly
ventilatedor metalstorageshed,careshould betaken to
rust-proofthe equipment.Usinga light oil or silicone,coat
the equipment,especiallycables andall movingparts of
your lawnmowerbeforestorage.
Battery
The batterymustbe storedwith a full charge.Extended
storageof a dischargedbatterywill reducelifeand
capacityof the battery.
J
Figure5-6:Whenreplacingfuse,usea standardautomotive
7_f2ampfuse.
The engine can be
started manuaity ifthe
fuse burns out,
\
13

For repairs beyond
the minoradjust-
mentslisted here,
eentact an authorize d
serviee dealer,
I
Engine runs erratic
1. Sparkplugwire loose.
2. Blockedfuel line or stale fuel
3. Ventingas cap plugged.
4. Wateror dirt in fuelsystem.
1. Connectandtightenspark plug
wire.
2. Cleanfuel line; fill tank with clean,
freshgasoline.
3. Clearvent.
4. Drainfueltank. Refillwith fresh
fuel
5. Dirtyair cleaner. 5. Referto enginemanual
6. Carburetorout of adiustment. 6. Referto enginemanual
Eng ne overheats 1. Engineoil levellow. 1. Fil crankcasew th proper oil.
l
2. Airflow restricted. 2. RemoveNowerhousing
and clean.
' 3. Carburetornot adjustedproperly. 3. Referto enginemanual
Occasional skips 1. Sparkpluggap tooclose. 1. Adiustgap to .030 inch.
(hesitates) at 2. Carburetoridle mixtureadiustment 2. Referto enginemanual
high speed improperlyset.
Idles poorly
3. Referto enginemanual
Excessive 1. Cuttingblade looseor unbalanced. 1. Tightenbladeand adapter.Balance
Vibration blade.
2. Bentcuttingblade. 2. Seean authorizedservicedealer.
Mowerwill not 1 Wet grass 1. Do notmowwhen grassis wet wait
mulchy-rass unt aterto cut
2. Excessivelyhighgrass. 2 Mowonceat a highcutting height,
j then mowagainat desiredheightor
I makea narrowercuttingpath.
3. Dullblade. 3 Sharpenor replaceblade.
Unevencut 1. Dullblade. 1. Sharpenor replaceblade.
1. Checkbelt for properpulleyinstaila-
3. Damagedorwornbelt. ' 3. inspectand replacebelt.
14
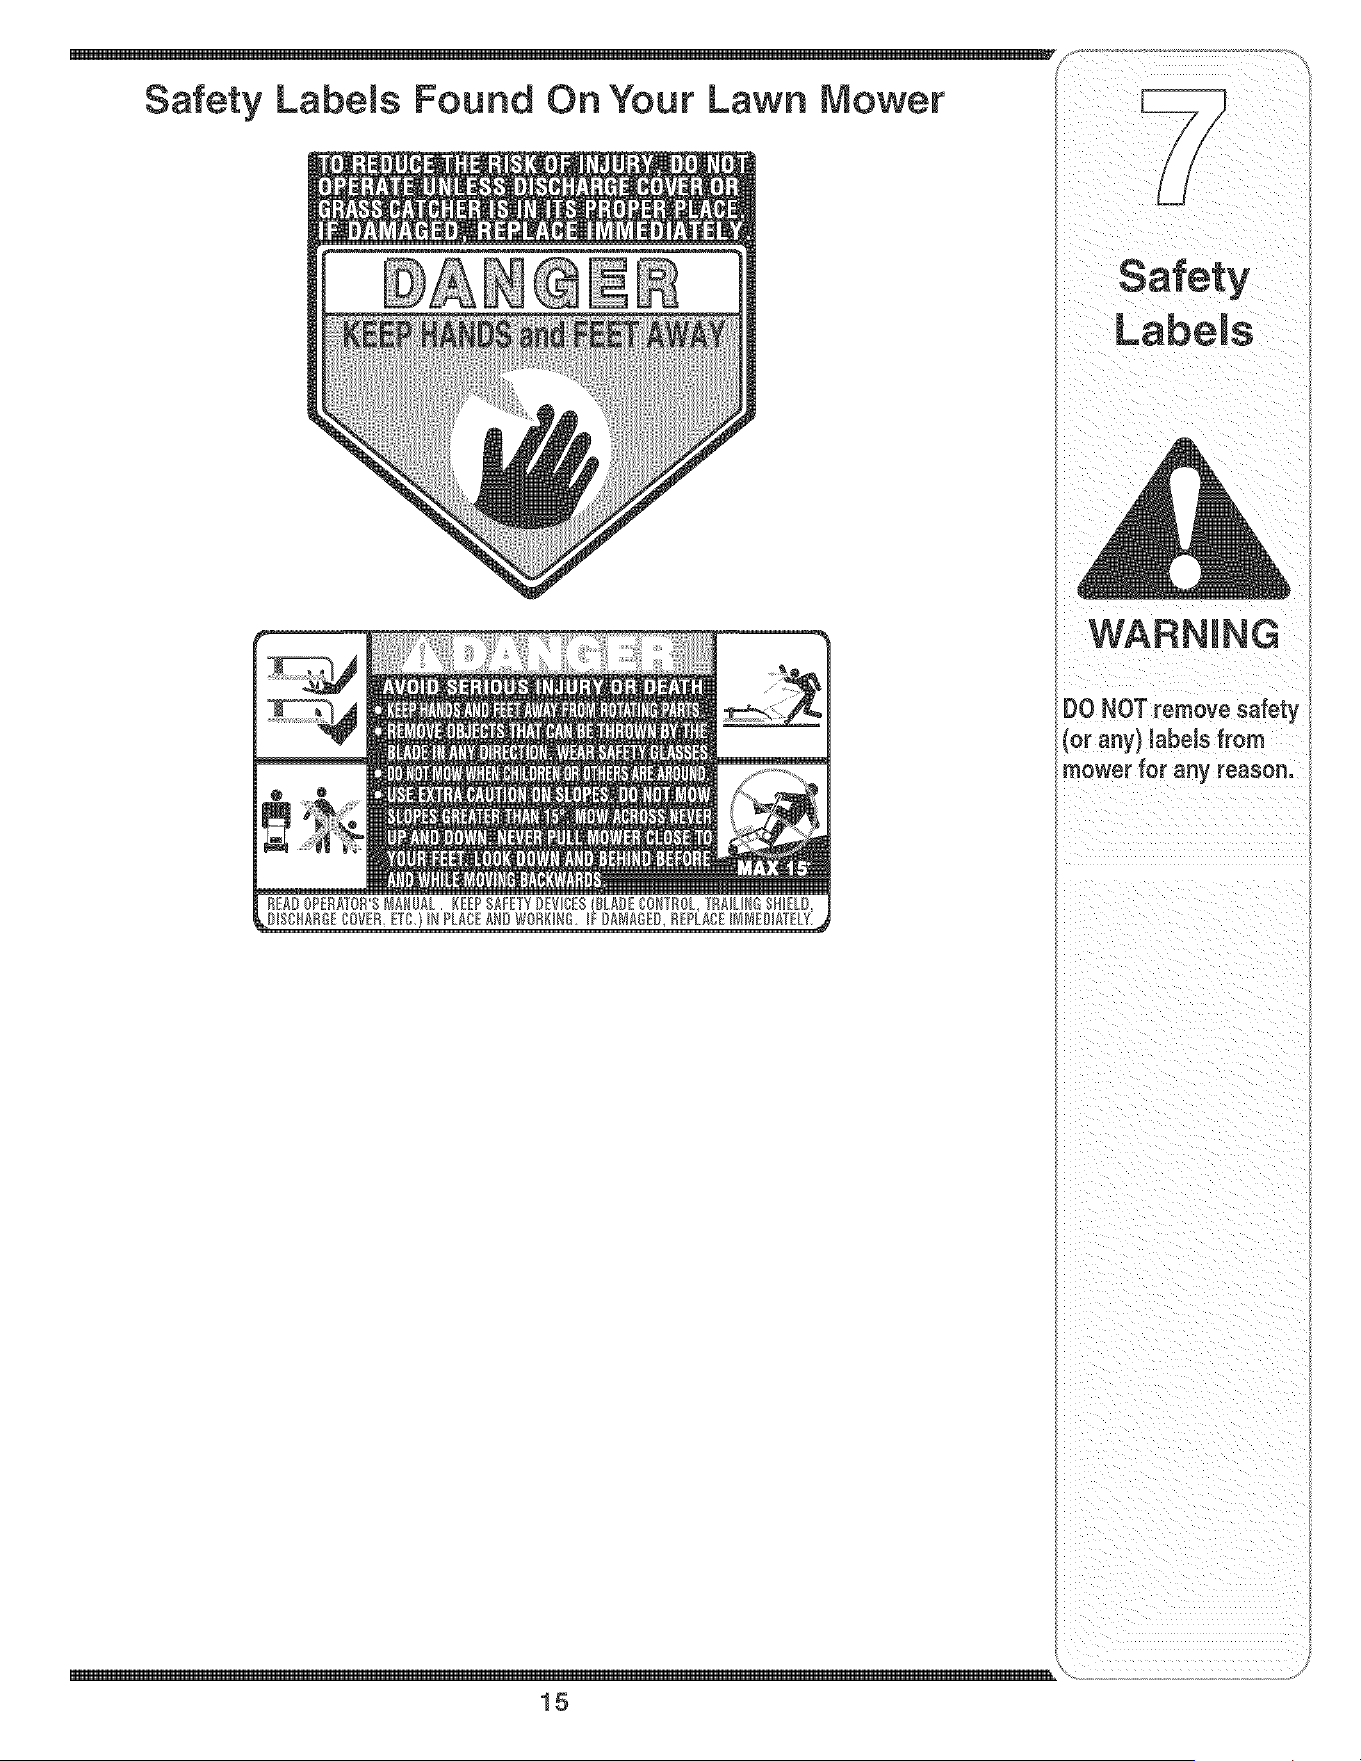
Safety Labels Found On Your Lawn Mower
mower fet any reasen,
\
15
Shown fo_rde_el_ce _
Q
Q
Shown for
relerence
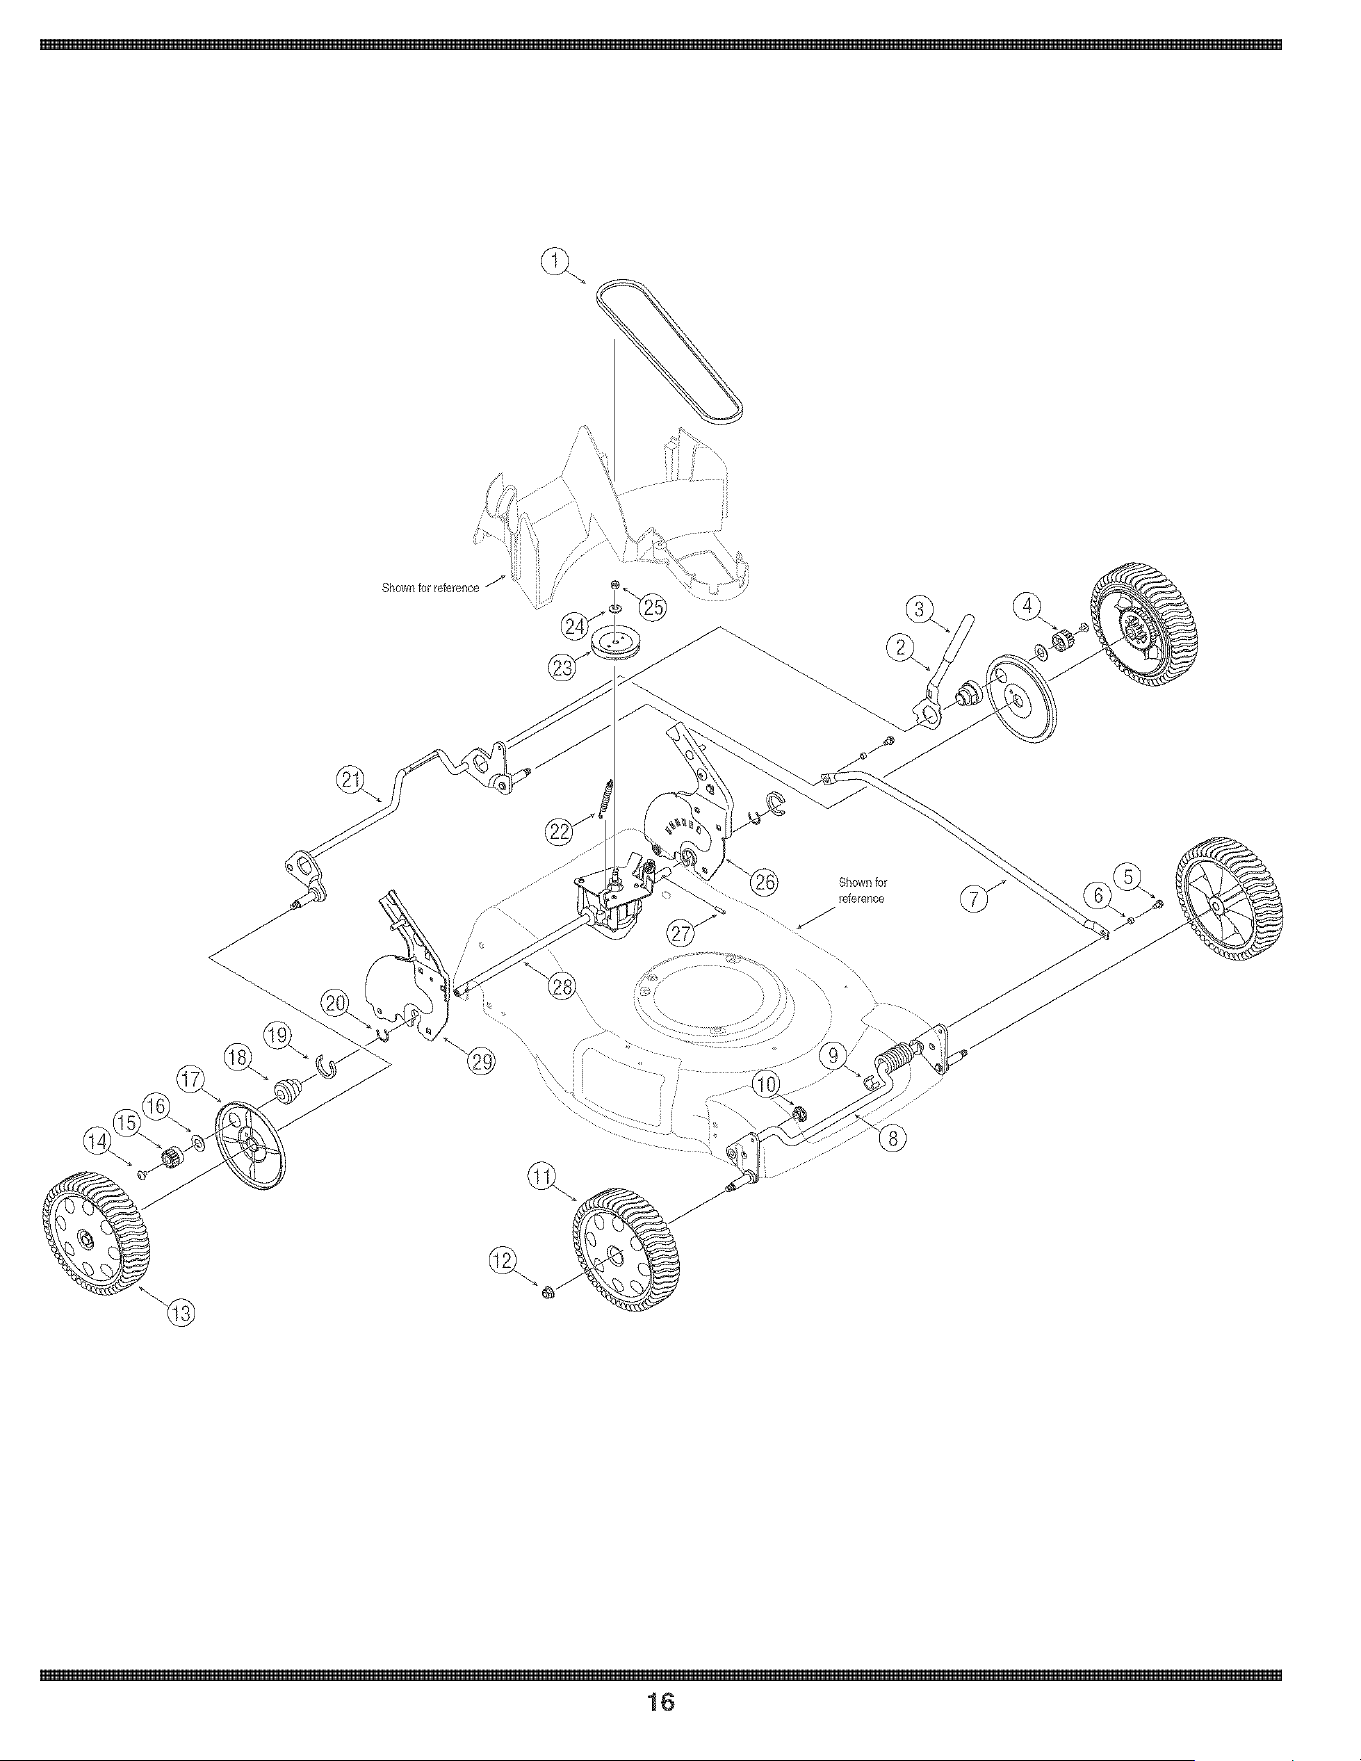
16

1 75&04093 WBelt
2 73b04338 SpringLever
3 720-0230 FoamGrip
4 717-04184A SpurGear,14T-LH
5 710-0599 TT Screw,1/&20 x 0.50
6 750-04305A Spacer
7 749-04267 CrossBracket
8 687_02204 FrontBracketAssembly
9 731-05470 C@ Spacer
10 741-04136B SplitHex FlangeBearing
11 73&O4014B FrontWheel
12 71b04065 FlangeLockNut,3/8d6
13 63&04207C RearWheel
14 710-04531 Screw,1/&20x.39
15 717-04192A SpurGear,14T-RH
16 736-3084 FlatWasher
17 7867551A WheeIDustCover
18 74&04073C TransmissionBearingSupport
19 750-04317 Clip Spacer
20 716-0198 RetainingRing.875
21 687_02199 RearBracketAssembly
22 73b0320 ExtensionSpring
23 756-04151A Pulley,3.36 OD
24 736-0105 BellWasher,.375x .870x .063
25 71b0411 HexLockNut,5/16_24
26 687_02205 HandleBracketAssemblyLH
27 715-0221 DowelPin
28 61&04378 TransmissionAssembly
29 687_02206 HandleBracketAssemblyRH
To order replacement
parts, call
1o800o648-6776
or visit
www.troybiff.eom
MPORTANT: For
a proper working
machine, use Factory
@proved Parts,
V-BELTS are speciaJJy
designed to engage
and disengage
safely. A substitute
(non=OEM) V-Belt
can be dangerous
by not disengaging
completely.
17

\
\
\
18

1 746-04265A
2 735-04059
3 753-05096A
4 731-04204
5 747d161A
6 746_04213
7 749-04037
8 725-0157
9 73b04265
10 710-0599
11 787-01341
12 710-0654A
13 787-01346
14 756-04157B
15 756-04156B
16 736-0514
17 748-0376C
18 710=1044
19 736_0524B
20 74b0741
21 736-0513
22 750=1071
23 710_0653
24 731-05463
25 710-0260A
26 71b04063
27 731-05462
28 731-05157
DriveCable 29 731-05017A
RubberGrommet 30 710=1241
DriveControlAssembly 31 720_04072
BailCover 32 73b04264
BladeControl 33 711_04374
ControlCable 34 647_04051
LowerHandle 35 664-04045
CableTie 36 710=1174
TorsionSpring,LH 37 720_0279
TT Screw,1/4-20x,500 38 710q205
21dnchDeck 39 749-04209
TTScrew, 3/8=16x 1,00 40 736-0270
DeckBaffle 41 7361014
UpperEnginePulley 42 17032A
LowerEnginePulley 43 747_0710
FlatWasher,,885x 1,850x ,060 44 987-02055
BladeAdapter 45 731-04177
Screw,3/8-24x 1,50 46a 725=1276
BladeBell Support 46b 725_04323
21"MulchingBlade 47 725-04329
SpringWasher,,890x 1,70x ,048 48 725-04293
SleeveSpacer 49 728-0199
TT Screw,1/4-20x ,375 50 725-04347
DeckBaffle 51 725-0201
CarriageBolt,5/16-18x,62 52 731_05505
FlangeLockNut,5/16q8 731-05459
Trailshield 53 710q667A
MulchPlug
Rear Door
Screw,1/4=15x 1,00
Star Knob
TorsionSpring,RH
Door PivotRod
GrassCatcherFrame
GrassCatcher
CarriageBolt,5/16=18x 2,00
WingNut
Eye Bolt
UpperHandle
BellWasher,,265x ,75x ,062
TorsionSpring
ChuteDeflectorAdapter
HingePin
MulchPlugAssembly
SideDischargeChute
12Volt Battery
12Volt Battery
BatteryCharger
ElectricStarterHarness
Rivet
Key Switch
Key
BatteryHsg, (usedw/ref, #46a)
BatteryHsg, (usedw/ref, #46b)
Screw,#10q6 x ,750
To order replacement
parts, ca[[
1-800-648-6776
or visit
www.troybiJt.eom
\
19

MANUFACTURER'S LIMITED WARRANTY FOR
®
The limitedwarrantyset forthbelowis givenbyTroy_BiltLLCwithrespect
to newmerchandisepurchasedand usedin the UnitedStates,its posses_
sionsandterritories.
"Troy_Bilt"warrantsthis productagainstdefects in materialand workmam
shipfor a periodof two(2) years commencingon thedate of original
purchaseandwill,at its option,repairor replace,freeof charge,any part
foundto be defectivein materialsor workmanship.This limitedwarranty
shallonly applyif this producthasbeen operatedand maintainedin
accordancewiththe Operator'sManualfurnishedwiththe product,and
has notbeen subiectto misuse,abuse,commercialuse,neglect,accident,
impropermaintenance,alteration,vandalism,theft,fire,water,or damage
becauseof other perilor naturaldisaster.Damageresultingfromthe
installationor use ofany part, accessoryor attachmentnot approvedby
Troy_Biltfor use with theproduct(s)coveredby this manualwill voidyour
warrantyas to any resultingdamage.
Normalwearpartsarewarrantedto befree fromdefects in materialand
workmanshipfor aperiodof thirty (30) days from thedate of purchase.
Normalwearpartsinclude,butare notlimitedto itemssuch as: batteries,
belts,blades,bladeadapters,grass bags,rider deck wheels,seats,snow
throwerskidshoes,shaveplates,augerspiralrubberandtires.
NOWTO OBTAIN SERVICE: Warranty service is available, WITH
PROOFOF PURCHASE,through your local authorized service
dealer. To locate the dealer in your area, check your Yellow Pages,
or contact Troy-Bilt LLC at RO. Box 361131,Cleveland, Ohio 44136-
0019, or can 1-866-840-6483 or 1-330-558-7220,or log on to our
Web site at www.troybilt.com.
This limitedwarrantydoesnot providecoverageinthe followingcases:
a. The engineor componentparts thereof.These itemsmay
carrya separatemanufacturer'swarranty.Referto applicable
manufacturer'swarrantyfor termsand conditions.
b. Logsplitterpumps,valves,and cylindershavea separateone
yearwarranty.
c. Routinemaintenanceitemssuch as lubricants,filters, blade
sharpening,tune_ups,brakeadiustments,clutch adiustments,
deckadiustments,and normaldeteriorationof the exteriorfinish
dueto use or exposure.
d. Servicecompletedbysomeoneotherthanan authorizedservice
dealer.
e. Troy_Biltdoesnot extendanywarrantyfor productssold or
exportedoutsideof the UnitedStates,its possessionsand
territories,exceptthosesold throughTroy_Bilt'sauthorized
channelsof exportdistribution.
f. Replacementpartsthatare notgenuineTroy_Biltparts.
g. Transportationchargesandservicecalls.
No impliedwarranty, includingany impliedwarranty of merchant°
ability of fitness for a particular purpose, applies after the applicable
period of express written warranty above as to the parts as identi-
fied. No other express warranty, whether written or oral, except as
mentioned above,given by any person or entity, includinga dealer or
retailer,with respect to any product, shall bind Troy-Bilt. During the
period of the warranty,the exclusive remedy is repair or replacement
of the product as set forth above.
The provisions as set forth inthis warranty providethe sole and
exclusive remedy arising from the sale. Troy-Bilt shall not be liable
for incidental or consequential loss or damage including, without
limitation, expenses incurred for substitute or replacement lawn care
services or for rental expenses to temporarily replace a warranted
product.
Somestatesdo not allowtheexclusionor limitationof incidentalor
consequentialdamages,or limitationson howlongan impliedwarranty
lasts,so the aboveexclusionsor limitationsmaynotapplyto you.
In no eventshall recoveryof any kind be greaterthanthe amountof the
purchasepriceof the productsold. Alteration of safety features of the
product shall void this warranty. Youassumethe risk and liability for
loss,damage,or injuryto youand yourpropertyand/or to othersand their
propertyarisingout of the misuseor inabilityto use the product.
This limitedwarrantyshall notextendto anyoneotherthanthe original
purchaseror to the personfor whom it was purchasedas a gift.
HOWSTATELAW RELATESTO THiSWARRANTY:This limitedwar-
rantygh,'esyouspecificlegalrights,andyou mayalso haveother rights
whichvaryfromstateto state.
IMPORTANT:OwnermustpresentOriginalProofof Purchaseto obtain
warrantycoverage.
TROYBILT LLC, P.O. BOX 361131 CLEVELAM D, OHIO 44136-0019; Phone: 1(866} 840-6483, 1-330-558-7220