
说明书
技术要求:
2.单色印刷,要求无色差、无污点;
3.20P,骑马钉,裁切均匀、无连页。
4.以封样为准。
5.料件需符合格力博HSF文件(编号:GLB-CGR-146) 里关于环保和有害物质的具体要求。
60g双胶纸。
P0801553-00
P0801553-00
210mm
145mm
赵丹
陈丽
周艳 李海平
2019.11.22
宋提提
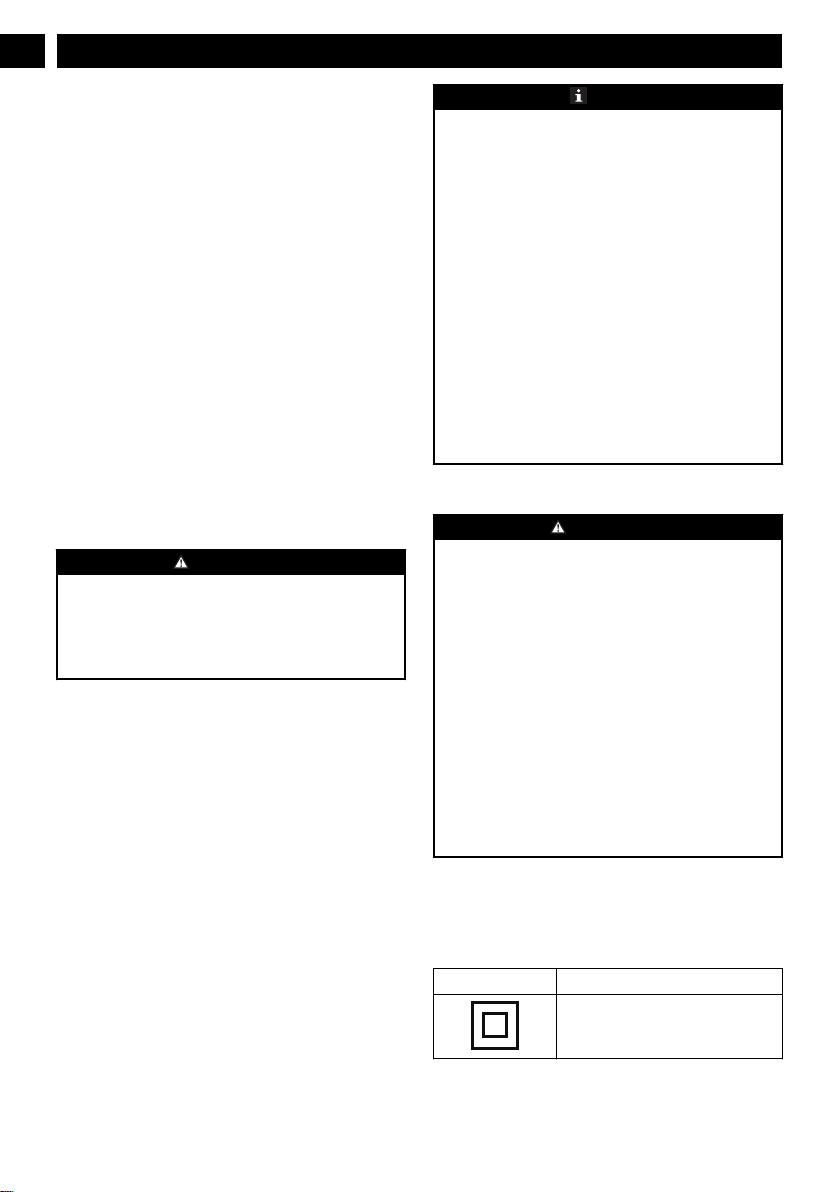
GWK 40V 充电器
29482/2936402/2938302ME
B
29482/CAF806
EN OPERATOR MANUAL
FR MANUEL D’OPÉRATEUR
CHARGER
CHARGEUR
ES MANUAL DEL OPERADORCARGADOR
www.greenworkstools.com
29482
CAF806
29482/CAF806
EN OPERATOR MANUAL
FR MANUEL D’OPÉRATEUR
CHARGER
CHARGEUR
ES MANUAL DEL OPERADORCARGADOR
www.greenworkstools.com
29482
CAF806


1 Important Safety Instructions..........4
2 Special rules for charger...................4
3 Proposition 65....................................4
4 Symbols on the machine................... 4
5 Recycle................................................5
6 Operation........................................... 5
6.1 Charge procedure...............................................5
6.2 Examine the charger.......................................... 6
6.3 Mount the charger..............................................6
7 Maintenance.......................................7
7.1 Clean the machine............................................. 7
7.2 Stow the machine...............................................7
8 Troubleshooting.................................7
9 Technical data....................................7
10 Limited warranty.............................. 7
3
English
EN
1 IMPORTANT SAFETY
INSTRUCTIONS
• SAVE THESE INSTRUCTIONS - DANGER: TO
REDUCE RISK OF FIRE OR ELECTRICAL SHOCK
CAREFULLY OBEY THESE INSTRUCTIONS.
• Confirm the voltage available at each country location
before using the charger.
• If the sharp of the plug does not fit the power outlet, use
an attachment plug adaptor of the proper configuration
for the power outlet.
• DO NOT probe the charger with conductive materials.
• DO NOT allow liquid inside the charger.
• DO NOT try to use the charger for any other purpose than
what is presented in this manual.
• Unplug the charger before cleaning and when there is no
battery pack in the charger.
• Do not try to connect two chargers together.
• Do not use the charger in the circumstances that the
output Polarity does not match the load polarity.
• For indoor use only.
• The cover may under no circumstances be opened. If the
cover is damaged, then the charger may no longer be
used.
• Do not recharge non-rechargeable batteries.
WARNING
To avoid risk of fire, electrical shock, or electrocution:
• Do not use a damp cloth or detergent on the battery or
battery charger.
• Always remove the battery pack before cleaning,
inspecting, or performing any maintenance on the tool.
2 SPECIAL RULES FOR
CHARGER
This device complies with Part 15 of the FCC Rules.
Operation is subject to the following two conditions:
• This device may not cause harmful interference.
• This device must accept any interference received,
including interference that may cause undesired
operation.
NOTE
This equipment has been tested and found to comply with
the limits for a Class B digital device, pursuant to Part 15 of
the FCC Rules.
These limits are designed to provide reasonable protection
against harmful interference in a residential installation.
This equipment generates, uses and can radiate radio
frequency energy, and if not installed and used in
accordance with the instructions, may cause harmful
interference to radio or television reception, The reception
can be determined by turning the equipment off and on, the
user is encouraged to try to correct the interference by one
or more of the following measures:
• Reorient or relocate the receiving antenna.
• Increase the separation between the equipment and the
receiver.
• Connect the equipment into an outlet on a circuit
different from that to which the receiver is connected.
• Consult the dealer or an experienced radio/TV
technician for help.
3 PROPOSITION 65
WARNING
This product contains a chemical known to the state of
California to cause cancer, birth defects or other
reproductive harm. Some dust created by power sanding,
sawing, grinding, drilling, and other construction activities
contains chemicals known to cause cancer, birth defects or
other reproductive harm. Some examples of these chemicals
are:
• Lead from lead-based paints;
• Crystalline silica from bricks and cement and other
masonry products;
• Arsenic and chromium from chemically treated lumber.
Your risk of exposure to these chemicals varies depending
on how often you do this type of work. To reduce your
exposure to these chemicals, work in a well-ventilated area,
and work with approved safety equipment, such as dust
masks that are specially designed to filter out microscopic
particles.
4 SYMBOLS ON THE MACHINE
You can use below symbols on the machine. Please study
them and learn their definitions. Correct interpretation of
these symbols let you operate the tool better and safer.
Symbol
Explanation
Class II
4
English
EN
Symbol Explanation
For indoor use only
Before charging, read the instructions
Fuse
5 RECYCLE
Separate collection. You must not discard
with usual household waste. If it is necessa-
ry to replace the machine, or if it is no more
use to you, do not discard it with household
waste. Make this machine available for sepa-
rate collection.
Separate collection of used machine and
packaging let you recycle materials and use
them again. Use of the recycled materials
helps prevent environmental pollution and
decreases the requirements for raw materi-
als.
At the end of their useful life, discard batter-
ies with a precaution for our environment.
The battery contains material that is danger-
ous to you and the environment. You must
remove and discard these materials separate-
ly at a equipment that accepts lithium-ion
batteries.
6 OPERATION
6.1 CHARGE PROCEDURE
NOTE
Before use charge the battery pack fully to make sure that
the battery pack can get the maximum run time. This battery
pack does not have a memory. You can charge it all the
time.
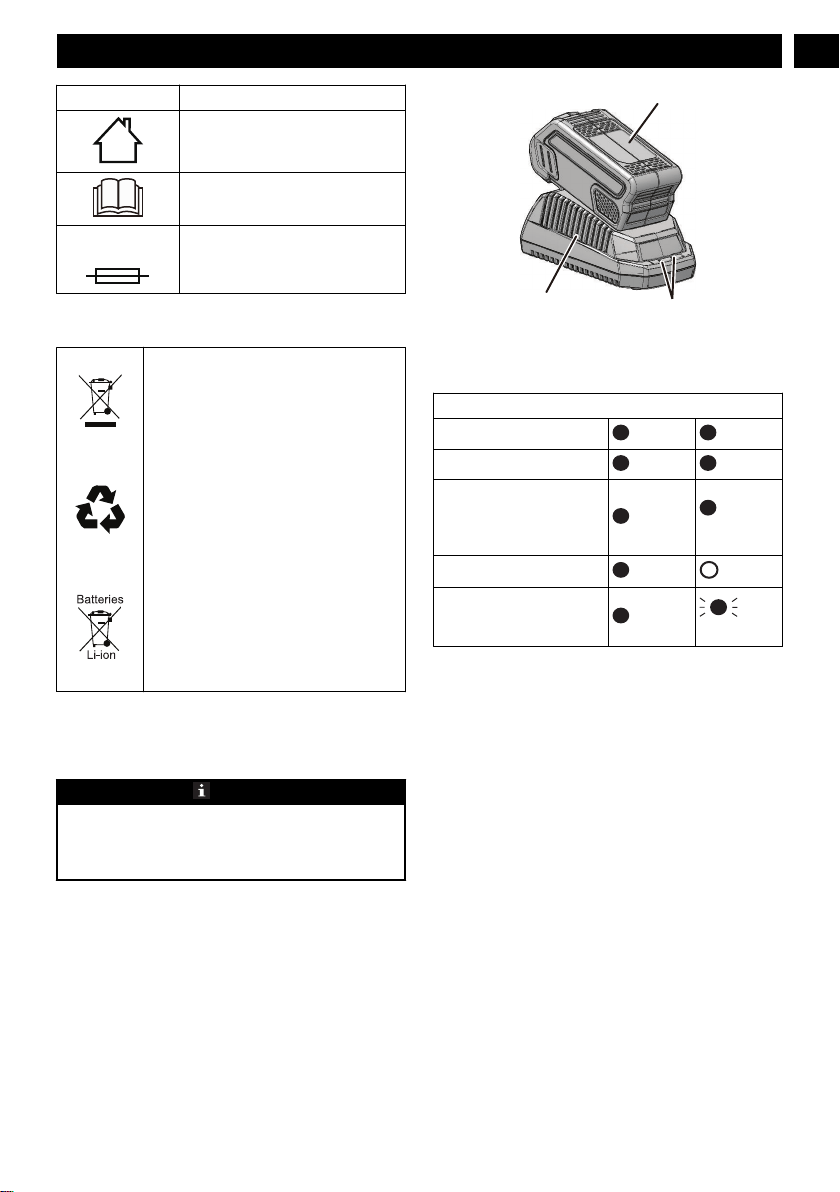
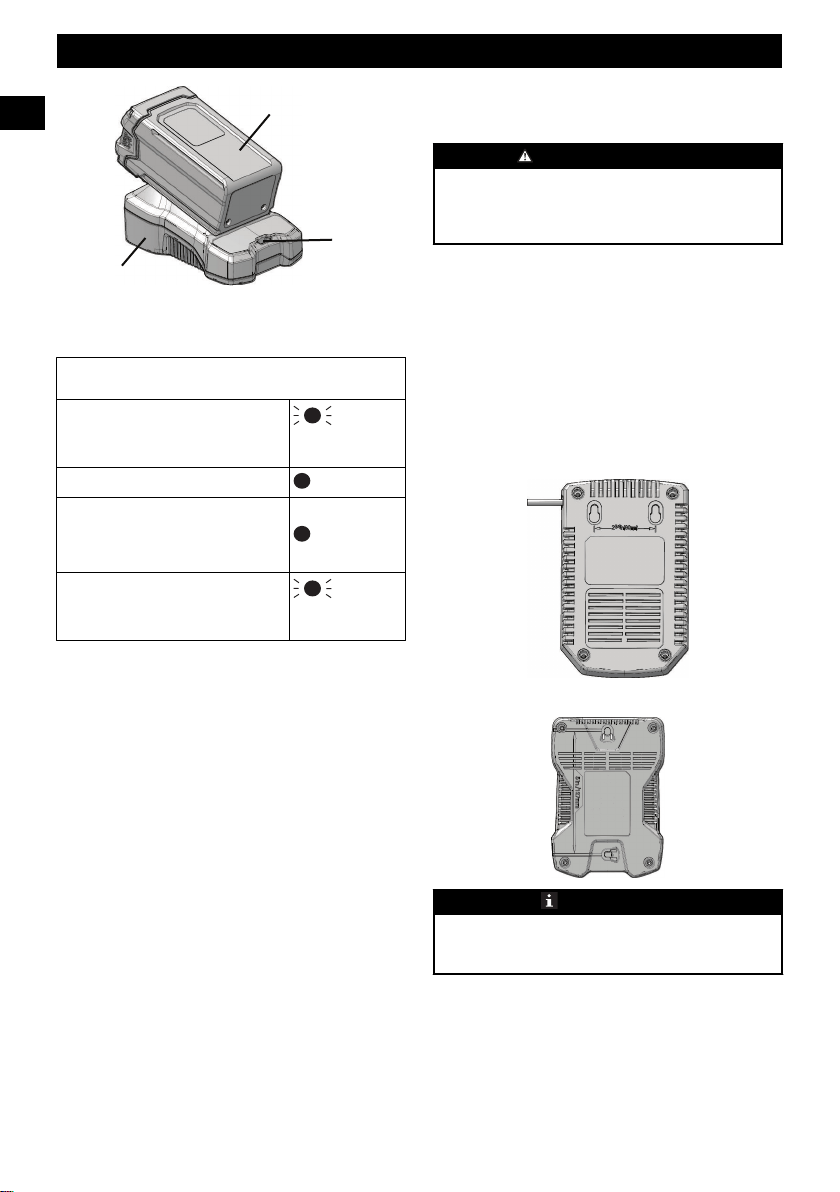
1. Connect the plug of charger (2) to an AC power outlet.
2. Put the battery pack (1) into the charger (2).
For charger: 29482
2
3
1
This is a diagnostic charger. The Charger LED Light (3)
illuminates in a specified order to show the current battery
status. They are as follows:
CHARGING PROCEDURE (LED INDICATOR)
BATTERY IS CHARGING
RED RED
FULLY CHARGED
RED GREEN
BATTERY IS TOO
WARM (REMOVE FOR
APPROX. 30 MINUTES TO
ALLOW TO COOL)
RED
OR-
ANGE
NO BATTERY PRESENT
RED
OFF
DEFECTIVE BATTERY
(REMOVE AND REPLACE
WITH A NEW BATTERY)
RED
RED
BLINKING
1. Put the battery pack into the charger.
• If the status LED flashes, remove the battery pack
from the charger for 1 minute.
2. Put the battery pack into the charger again.
• If the status LED shows correct, the battery pack is
good.
• If the status LED stays blinking, remove the battery
pack and disconnect the charger.
3. Wait for 1 minute and put the battery pack into the
charger again.
• If the status LED shows correct, the battery pack is
good.
• If the status LED stays blinking, the battery pack is
defective and it is necessary to replace the battery
pack.
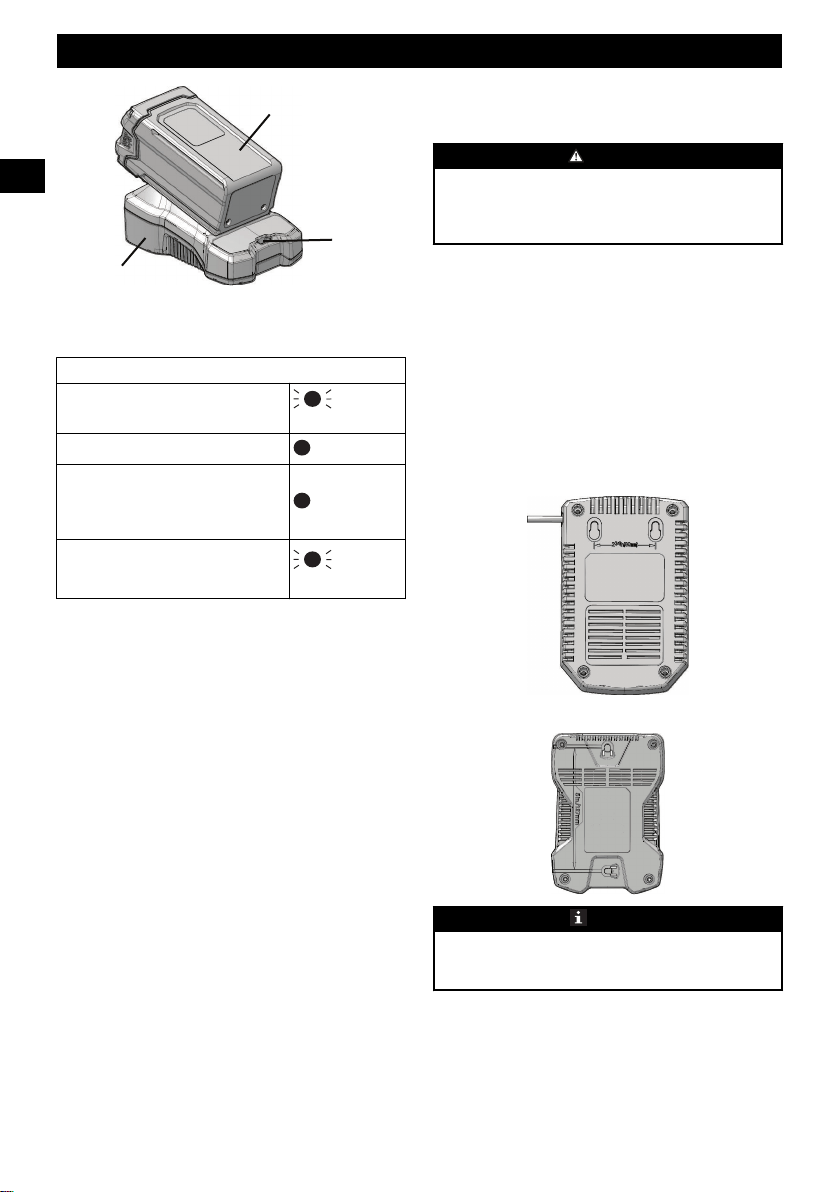
For charger:
5
English
EN
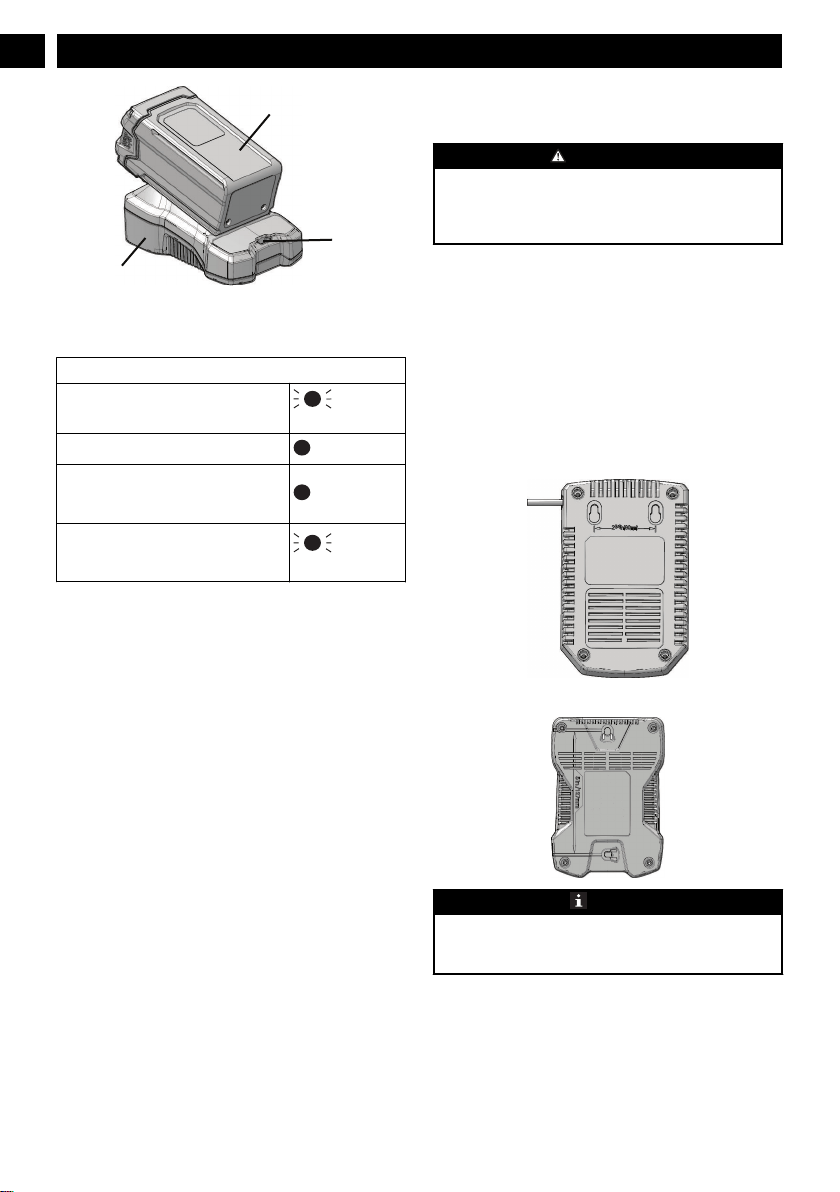
1
2
3
This is a diagnostic charger. The Charger LED Light (3)
illuminates in a specified order to show the current battery
status. They are as follows:
CHARGING PROCEDURE (LED INDICATOR)
BATTERY IS CHARGING
GREEN
BLINKING
FULLY CHARGED
GREEN
BATTERY IS TOO WARM (RE-
MOVE FOR APPROX. 30 MINUTES
TO ALLOW TO COOL)
RED
DEFECTIVE BATTERY (REMOVE
AND REPLACE WITH A NEW BAT-
TERY)
RED
BLINKING
Incorrect Defect Note:
1. Put the battery pack into the charger.
• If the status LED1 flashes red and LED2 flashes
green, remove the battery pack from the charger for 1
minute.
2. Put the battery pack into the charger again.
• If the status LEDs show correct, the battery pack is
good.
• If the status LED1 and LED2 stay blinking, remove
the battery pack and disconnect the charger.
3. Wait for 1 minute and put the battery pack into the
charger again.
• If the status LEDs show correct, the battery pack is
good.
• If the statusLED1 and LED2 stay blinking, the
battery pack is defective and it is necessary to replace
the battery pack.
6.2 EXAMINE THE CHARGER
If the battery pack does not charge correctly:
1. Examine the current of the power outlet with different
machines. Make sure that the outlet works.
2. Examine that the charger contacts are not short-circuited.
3. If the charger is not under usual room temperature, move
the charger and battery pack to a location where the
temperature is between 6 ˚C and 40˚C .
WARNING
If you put the battery pack into the charger in warm or hot
environment, the charger LED light is red. Pull out the
battery pack and let the battery cool for approximately 30
minutes.
6.3 MOUNT THE CHARGER
1. Get the location of the wall to attach the charger.
2. Use 2 wood screws to attach the charger on the wood
studs.
3. For charger 29482: Drill two paralleled holes 2 3/8” (60
mm) on center. For charger CAF806: Drill two paralleled
holes 5” (127 mm)on center.
4. Use wall anchors and screws to attach the charger to the
drywall.
For charger 29482:
For charger CAF806:
NOTE
If you do not use the battery pack and charger for a long
time, please remove the battery from the charger and pull
out the AC power plug.
6
English
EN
7 MAINTENANCE
7.1 CLEAN THE MACHINE
NOTE
Keep the air vent free of blockage, saw dust, and wood dust.
Do not spray, wash, or put the air flow in water.
• Clear the unwanted material out of the air vent with a
vacuum.
• Clean housing and the plastic components with a dry and
soft cloth.
IMPORTANT
Do not use strong solvents or detergents on the plastic
housing or components.
7.2 STOW THE MACHINE
• Remove the battery pack before you store the charger or
disconnect the charger.
8 TROUBLESHOOTING
PROBLEM POSSIBLE
CAUSE
SOLUTION
Charger doesn't
work. Charger
shows defective
mode. (LED
flashes Red)
Battery pack or
charger is defective
or there is a bad
connection be-
tween the battery
pack and charger.
Try to remove and
reinsert the battery
pack in the charg-
er.
Try charging a dif-
ferent battery
pack.
Unplug the charg-
er and wait until
the red LED goes
out, then reconnect
the plug to the
power supply.
Charger doesn't
work. Charger
shows evaluation
mode (LED indi-
cates Red solid
ON).
Battery pack is ei-
ther too hot, or too
cold.
Allow the battery
pack to reach nor-
mal temperature.
Charging will be-
gin when the bat-
tery pack returns
to 3°C-47°C
(37°F-117°F).
9 TECHNICAL DATA
Model 29482
Voltage 40 V
Input 120V AC 50/60Hz, 1.5A Max
Output 40V DC 2.2A
Weight 1.79 lbs
Class Class 2 Battery Charger
Model CAF806
Voltage 40 V
Input 120V AC 50/60Hz, 2.5A Max
Output 40V DC 2A
Weight 1.27 lbs
Class Class 2 Battery Charger
10 LIMITED WARRANTY
YEAR
ANS
AÑOS
LIMITED WARRANTY
GARANTIE LIMITÉE
GARANTÍA
LIMITADA
3
Greenworks hereby warranties this product, to the original
purchaser with proof of purchase, for a period of three (3)
years against defects in materials, parts or workmanship.
Greenworks, at its own discretion will repair or replace any
and all parts found to be defective, through normal use, free
of charge to the customer. This warranty is valid only for
units which have been used for personal use that have not
been hired or rented for industrial/commercial use, and that
have been maintained in accordance with the instructions in
the owners’ manual supplied with the product from new.
ITEMS NOT COVERED BY WARRANTY:
1. Any part that has become inoperative due to misuse,
commercial use, abuse, neglect, accident, improper
maintenance, or alteration; or
2. The unit, if it has not been operated and/or maintained in
accordance with the owner's manual; or
3. Normal wear, except as noted below;
4. Routine maintenance items such as lubricants, blade
sharpening;
5. Normal deterioration of the exterior finish due to use or
exposure.
HELPLINE:
Warranty service is available by calling our toll-free helpline,
at 1-888-909-6757.
TRANSPORTATION CHARGES:
Transportation charges for the movement of any power
equipment unit or attachment are the responsibility of the
purchaser. It is the purchaser’s responsibility to pay
7
English
EN

transportation charges for any part submitted for replacement
under this warranty unless such return is requested in writing
by Greenworks.
USA address: Canadian address:
Greenworks Tools Greenworks Tools Canada Inc.
P.O. Box 1238 1110 Stellar Drive Unit 102
Mooresville, NC 28115 Newmarket, ON, L3Y 7B7
8
English
EN

1 Instructions de sécurité
importantes...................................... 10
2 Règles spéciales pour le chargeur.. 10
3 Proposition 65..................................10
4 Symboles figurant sur la
machine............................................ 10
5 Recyclage..........................................11
6 Utilisation......................................... 11
6.1 Procédure de chargement.................................11
6.2 Contrôlez le chargeur.......................................12
6.3 Montez le chargeur ......................................... 12
7 Entretien...........................................13
7.1 Nettoyez la machine........................................ 13
7.2 Entreposez la machine.....................................13
8 Dépannage........................................13
9 Données techniques......................... 13
10 Garantie limitée...............................13
9
Français
FR

1 INSTRUCTIONS DE SÉCURITÉ
IMPORTANTES
• CONSERVEZ CES INSTRUCTIONS - DANGER :
POUR RÉDUIRE LE RISQUE DE FEU OU DE CHOC
ÉLECTRIQUE RESPECTEZ ATTENTIVEMENT CES
INSTRUCTIONS.
• Confirmez le voltage disponible dans chaque pays avant
d'utiliser le chargeur.
• Si les pôles ne rentrent pas dans la prise, utilisez un
adaptateur de prise de courant.
• N'utilisez PAS le chargeur avec des matériaux
conducteurs.
• NE permettez PAS que du liquide entre dans le chargeur.
• N'essayez PAS d'utiliser le chargeur pour toute autre
utilisation que celle pour laquelle il est conçu.
• Débranchez le chargeur avant de le nettoyer et lorsqu'il
n'y a pas de batterie dans le chargeur.
• N'essayez pas de brancher deux chargeurs ensemble.
• N'utilisez pas le chargeur dans le cas où la polarité de la
prise n'est pas compatible avec la polarité de charge.
• Pour un usage ménager seulement.
• La protection ne doit en aucune circonstance être retirée.
Si la protection est endommagée, n'utilisez plus le
chargeur.
• Ne rechargez pas de piles non-rechargeables.
AVERTISSEMENT
Pour éviter les risques d'incendies, de choc électrique ou
d'électrocution :
• N'utilisez pas de chiffon humide ni de détergent sur la
batterie ou sur le chargeur.
• Retirez toujours la batterie avant de nettoyer, de
contrôler ou de faire l'entretien de l'appareil.
2 RÈGLES SPÉCIALES POUR LE
CHARGEUR
Cet appareil est conforme aux normes Partie 15 du FCC. Le
fonctionnement dépend des deux conditions suivantes :
• Cet appareil ne devrait pas causer d'interférence.
• Cet appareil doit accepter toute interférence reçue, y
compris une interférence pouvant provoquer une
opération non souhaitée.
REMARQUE
Cet appareil a été testé et jugé conforme aux limites des
appareils digitaux de classe B, en vertu des normes de la
Partie 15 du FCC.
Ces limites sont conçues pour apporter une protection
contre les brouillages préjudiciables dans un quartier
résidentiel. Cet appareil génère, utilise et émet une énergie
de fréquence radio, et s'il n'est pas utilisé et utilisé
conformément aux instructions, il peut causer des
brouillages préjudiciables avec la réception de la radio ou
de la télévision. La réception peut être réglée en allumant ou
en éteignant l'appareil, nous invitons l'utilisateur à essayer
de corriger l'interférence en effectuant les actions
suivantes :
• Réorientez ou déplacez l'antenne de réception.
• Augmentez la distance entre l'appareil et le récepteur.
• Branchez l'appareil dans une prise ou à un réseau
différent de celui où le récepteur est branché.
• Consultez le vendeur ou un expert en installation
radio/TV pour obtenir de l'aide.
3 PROPOSITION 65
AVERTISSEMENT
Ce produit contient un produit chimique connu dans l'état
de Californie comme étant une cause de cancer, de
malformations congénitales ou d'autres problèmes de
reproduction. Certaines poussières produites par le ponçage
mécanique, le sciage, le meulage, le perçage et d'autres
activités de construction contiennent des produits chimiques
connus pour causer le cancer, des malformations
congénitales ou d'autres problèmes de reproduction. Voici
quelques exemples de ces produits chimiques :
• Plomb provenant de peintures à base de plomb;
• Silice cristalline provenant de briques, de ciment et
d'autres produits de maçonnerie;
• Arsenic et chrome provenant de bois traité
chimiquement.
Votre risque d'exposition à ces produits chimiques varie
selon la fréquence à laquelle vous faites ce type de travail.
Pour réduire votre exposition à ces produits chimiques,
travaillez dans un endroit bien ventilé et utilisez un
équipement de sécurité approuvé, comme des masques anti-
poussière spécialement conçus pour filtrer les particules
microscopiques.
4 SYMBOLES FIGURANT SUR
LA MACHINE
Vous pouvez utilisez les symboles suivants sur la machine.
Veuillez les étudier et apprendre leur signification. Une bonne
interprétation de ces symboles vous permettra de mieux
utiliser l'outil et de manière plus sécuritaire.
10
Français
FR
Symbole Explication
Classe II
Pour un usage ménager seulement
Avant de charger, lisez les instructions
Fusible
5 RECYCLAGE
Collecte séparée. Vous ne devez pas jeter ces
déchets avec les ordures ménagères habi-
tuelles. S'il est nécessaire de remplacer la
machine, ou si elle ne vous est plus utile, ne
la jetez pas avec les déchets ménagers. Met-
tez cette machine à la disposition d’une col-
lecte séparée.
La collecte séparée des machines et des em-
ballages usagés vous permet de recycler les
matériaux et de les réutiliser. L'utilisation de
matériaux recyclés contribue à la prévention
de la pollution de l'environnement et à la ré-
duction des besoins en matières premières.
À la fin de leur durée de vie utile, jetez les
batteries en prenant des précautions pour
l'environnement. La batterie contient des
matières dangereuses pour les humains et
pour l'environnement. Vous devez enlever et
jeter ces matériaux séparément dans un équi-
pement qui accepte les batteries au lithium-
ion.
6 UTILISATION
6.1 PROCÉDURE DE CHARGEMENT
REMARQUE
Avant utilisation, chargez la batterie à 100 % afin de vous
assurer un temps maximum d'utilisation. Cette batterie n'a
pas de mémoire. Vous pouvez la charger à tout moment.
1. Branchez la prise du chargeur (2) à une prise de courant
c.a.
2. Placez le support (1) dans le chargeur (2).
Pour le chargeur : 29482
2
3
1
Ceci est un chargeur avec diagnostic. Le témoin lumineux
LED (3) s'allume dans un ordre spécifique pour montrer le
niveau de charge de la batterie. Ils sont comme suit :
PROCÉDURE DE CHARGEMENT (INDICATEUR
LED)
BATTERIE EN CHARGE
ROUGE
CLIGNOTE-
MENT VERT
CHARGE COMPLÈTE
ROUGE
VERT
LA BATTERIE EST TROP
CHAUDE (RETIREZ DU-
RANT ENVIRON 30 MI-
NUTES POUR LAISSER
REFROIDIR)
ROUGE
ORANGE
AUCUNE BATTERIE PRÉ-
SENTE
ROUGE
ARRÊT
BATTERIE DÉFEC-
TUEUSE (RETIREZ-LA ET
REMPLACEZ PAR UNE
NOUVELLE BATTERIE)
ROUGE
CLIGNOTE-
MENT
ROUGE
1. Placez la batterie dans le chargeur.
• Si le témoin LED clignote en ROUGE, retirez la
batterie du chargeur durant 1 minute.
2. Replacez la batterie dans le chargeur.
• Si le témoin LED clignote en VERT, la batterie est
bonne.
• Si le témoin LED continue à clignoter en ROUGE,
retirez la batterie et débranchez le chargeur.
3. Attendez 1 minute et replacez la batterie dans le chargeur.
• Si le témoin LED clignote en VERT, la batterie est
bonne.
• Si le témoin LED continue à clignoter en ROUGE, la
batterie est défectueuse et il faut la remplacer par une
autre.
Pour le chargeur :
11
Français
FR
1
2
3
Ceci est un chargeur avec diagnostic. Le témoin lumineux
LED (3) s'allume dans un ordre spécifique pour montrer le
niveau de charge de la batterie. Ils sont comme suit :
PROCÉDURE DE CHARGEMENT (INDICATEUR
LED)
BATTERIE EN CHARGE
CLIGNOTE-
MENT VERT
CHARGE COMPLÈTE
VERT
LA BATTERIE EST TROP CHAUDE
(RETIREZ DURANT ENVIRON 30
MINUTES POUR LAISSER REFROI-
DIR)
ROUGE
BATTERIE DÉFECTUEUSE (RETIR-
EZ-LA ET REMPLACEZ PAR UNE
NOUVELLE BATTERIE)
CLIGNOTE-
MENT ROUGE
Incorrect Defect Note:
1. Placez la batterie dans le chargeur.
• Si le témoin LED clignote en ROUGE, retirez la
batterie du chargeur durant 1 minute.
2. Replacez la batterie dans le chargeur.
• Si le témoin LED clignote en VERT, la batterie est
bonne.
• Si le témoin LED continue à clignoter en ROUGE,
retirez la batterie et débranchez le chargeur.
3. Attendez 1 minute et replacez la batterie dans le chargeur.
• Si le témoin LED clignote en VERT, la batterie est
bonne.
• Si le témoin LED continue à clignoter en ROUGE, la
batterie est défectueuse et il faut la remplacer par une
autre.
6.2 CONTRÔLEZ LE CHARGEUR
Si la batterie ne se charge pas correctement :
1. Contrôlez la prise avec différents appareils. Assurez-vous
que la prise fonctionne.
2. Vérifiez que les contacts du chargeur ne sont pas court-
circuités.
3. Si le chargeur n'est pas dans une pièce à température
ambiante, emmenez le chargeur et la batterie dans une
pièce où la température est entre 6 ˚C et 40˚C .
AVERTISSEMENT
Si vous mettez la batterie dans le chargeur dans un
environnement chaud ou très chaud, le témoin LED est
rouge. Retirez la batterie et laissez-la refroidir durant 30
minutes environ.
6.3 MONTEZ LE CHARGEUR
1. Localisez le mur sur lequel le chargeur sera branché.
2. Utilisez 2 vis en bois pour attacher le chargeur aux
montants en bois.
3. Pour le chargeur 29482: Percez deux trous parallèles de 2
3/8” (60 mm) au centre. Pour le chargeur CAF806:
Percez deux trous parallèles de 5” (127cm) au centre.
4. Utilisez les ancrages muraux et les vis pour fixer le
chargeur dans la plaque de plâtre.
Pour le chargeur 29482:
Pour le chargeur CAF806:
REMARQUE
Si vous n'utilisez pas la batterie et le chargeur pendant une
longue période, veuillez retirer la batterie du chargeur et
retirer la prise AC.
12
Français
FR
7 ENTRETIEN
7.1 NETTOYEZ LA MACHINE
REMARQUE
Préservez la ventilation de tout blocage, de poussière et de
sciure. N'aspergez pas, ne lavez pas et ne submergez pas
l'évent d'air dans l'eau.
• Enlevez les matières indésirables de l'évent d'air à l'aide
d'un aspirateur.
• Nettoyez le boîtier et les composants en plastique avec un
chiffon doux et humide.
IMPORTANT
N'utilisez pas de solvants ou de détergents puissants sur le
boîtier ou les composants en plastique.
7.2 ENTREPOSEZ LA MACHINE
• Retirez la batterie avant de ranger le chargeur ou de le
débrancher.
8 DÉPANNAGE
PROBLÈME CAUSE POSSI-
BLE
SOLUTION
Le chargeur ne
fonctionne pas.
Le chargeur pré-
sente des défail-
lances. (Le té-
moin LED est
ROUGE)
La batterie ou le
chargeur est défec-
tueux ou il y a un
mauvais branche-
ment entre la batt-
erie et le chargeur.
Essayez d'enlever
et de remettre la
batterie dans le
chargeur.
Essayez de charger
une autre batterie.
Débranchez le
chargeur et attend-
ez jusqu'à ce que
le témoin LED
s'éteigne, puis re-
branchez à la
prise.
Le chargeur ne
fonctionne pas.
Le chargeur est en
mode évaluation
(le témoin LED
est Rouge fixe
MARCHE).
La batterie est soit
trop chaude, soit
trop froide.
Laissez la batterie
atteindre une tem-
pérature normale.
Le chargement dé-
butera lorsque la
batterie retrouvera
une température de
3°C-47°C
(37°F-117°F).
9 DONNÉES TECHNIQUES
Modèle 29482
Voltage 40 V
Entrée 120V AC 50/60Hz, 1.5A Max
Prise 40V DC 2.2A
Poids 1.79 lb.
Classe Chargeur de batterie classe 2
Modèle CAF806
Voltage 40 V
Entrée 120V AC 50/60Hz, 2.5A Max
Prise 40V DC 2A
Poids 1.27 lb.
Classe Chargeur de batterie classe 2
10 GARANTIE LIMITÉE
YEAR
ANS
AÑOS
LIMITED WARRANTY
GARANTIE LIMITÉE
GARANTÍA
LIMITADA
3
Greenworks garantit par la présente ce produit, à l'acheteur
original avec preuve d'achat, pour une période de trois (3) ans
contre tout défaut de matériaux, de pièces ou de main-
d'œuvre. Greenworks, à sa propre discrétion, réparera ou
remplacera toutes les pièces défectueuses, dans des conditions
normales d'utilisation, sans frais pour le client. Cette garantie
n'est valable que pour les appareils qui ont été utilisés à des
fins personnelles, qui n'ont pas été loués à des fins
industrielles ou commerciales et qui ont été entretenus
conformément aux instructions du manuel du propriétaire
fourni avec le produit neuf.
ARTICLES NON COUVERTS PAR LA GARANTIE :
1. Toute pièce qui est devenue inopérante en raison d'une
mauvaise utilisation, d'une utilisation commerciale, d'un
abus, d'une négligence, d'un accident, d'un entretien
inapproprié ou d'une modification ; ou
2. L'appareil, s'il n'a pas été utilisé et/ou entretenu
conformément au manuel du propriétaire ; ou
3. Usure normale, sauf comme indiqué ci-dessous ;
4. Articles d'entretien courant tels que lubrifiants, affûtage
des lames ;
5. Détérioration normale du fini extérieur due à l'utilisation
ou à l'exposition.
ASSISTANCE TÉLÉPHONIQUE :
Le service de garantie est disponible en appelant notre ligne
d'assistance téléphonique sans frais, au 1-888-909-6757.
13
Français
FR

FRAIS DE TRANSPORT :
Les frais de transport pour le déplacement de tout équipement
motorisé ou accessoire sont à la charge de l'acheteur. Il
incombe à l'acheteur de payer les frais de transport pour toute
pièce retournée pour remplacement en vertu de la présente
garantie, à moins qu'un tel retour soit demandé par écrit par
Greenworks.
Adresse aux Etats-Unis : Adresse au Canada :
Greenworks Tools Greenworks Tools Canada Inc.
P.O. Box 1238 1110 Stellar Drive Unit 102
Mooresville, NC 28115 Newmarket, ON, L3Y 7B7
14
Français
FR

1 Instrucciones importantes de
seguridad..........................................16
2 Normas especiales para
cargadores........................................16
3 Propuesta 65.....................................16
4 Símbolos en la máquina..................16
5 Reciclaje........................................... 17
6 Funcionamiento...............................17
6.1 Procedimiento de carga....................................17
6.2 Examen del cargador....................................... 18
6.3 Mount the charger............................................18
7 Mantenimiento.................................19
7.1 Limpieza de la máquina...................................19
7.2 Almacenamiento de la máquina...................... 19
8 Solución de problemas.................... 19
9 Datos técnicos.................................. 19
10 Garantía limitada............................19
15
Español
ES
1 INSTRUCCIONES
IMPORTANTES DE
SEGURIDAD
• CONSERVE ESTAS INSTRUCCIONES - PELIGRO:
RESPETE ESTRICTAMENTE ESTAS
INSTRUCCIONES PARA REDUCIR EL RIEGO DE
INCENDIO O DESCARGA ELÉCTRICA.
• Confirme la tensión disponible en cada país antes de
utilizar el cargador.
• Si la clavija del enchufe no encaja en la toma eléctrica,
utilice un adaptador de enchufe con la configuración
adecuada para la toma eléctrica.
• NO sonde el cargador con materiales conductores.
• NO permita que penetre líquido en el cargador.
• NO intente utilizar el cargador para cualquier fin que no
sea el indicado en este manual.
• Desenchufe el cargador antes de limpiarlo y cuando no
haya una batería en el cargador.
• No intente conectar juntos dos cargadores.
• No utilice el cargador en los casos en que la polaridad de
salida no coincida con la polaridad de carga.
• Para uso exclusivo en interior.
• Bajo ninguna circunstancia puede abrirse la cubierta. Si la
cubierta está dañada, el cargador ya no puede utilizarse.
• No recargue baterías no recargables.
AVISO
Para evitar el riesgo de incendio, descarga eléctrica o
electrocución:
• No utilice un paño húmedo ni detergente en la batería o
el cargador de batería.
• Retire siempre la batería antes de limpiar, inspeccionar
o realizar tareas de mantenimiento en la herramienta.
2 NORMAS ESPECIALES PARA
CARGADORES
Este dispositivo cumple la Parte 15 de las Normas de la FCC.
El funcionamiento está sujeto a las siguientes dos
condiciones:
• Este dispositivo no puede producir interferencias
perjudiciales.
• Este dispositivo debe aceptar cualquier interferencia
recibida, incluidas las interferencias que puedan producir
un funcionamiento no deseado.
NOTA
Este equipo ha sido probado y cumple con los límites para
un dispositivo digital de Clase B, de conformidad con la
Parte 15 de las Normas de la FCC.
Estos límites se han diseñado para proporcionar una
protección razonable contra interferencias perjudiciales en
una instalación residencial. Este equipo genera, utiliza y
puede radiar energía de radiofrecuencia y, si no se instala y
utiliza de acuerdo con las instrucciones, puede producir
interferencias perjudiciales en la recepción de radio o
televisión. La recepción puede determinarse encendiendo y
apagando el equipo. Se recomienda al usuario que intente
corregir la interferencia mediante una o más de las
siguientes medidas:
• Reoriente o reubique la antena receptora.
• Aumente la separación entre el equipo y el receptor.
• Conecte el equipo a una toma de corriente en un
circuito diferente al que está conectado el receptor.
• Consulte con el distribuidor o con un técnico de
radio/TV experimentado para obtener ayuda.
3 PROPUESTA 65
AVISO
Este producto contiene una sustancia química conocida en
el estado de California como causante de cáncer, defectos
de nacimiento u otros daños reproductivos. El polvo
generado por el lijado eléctrico, el serrado, el esmerilado, la
perforación y otras actividades de construcción contiene
sustancias químicas que se sabe que son causantes de
cáncer, defectos de nacimiento u otros daños reproductivos.
Algunos ejemplos de estas sustancias químicas son:
• Plomo de pinturas con base de plomo;
• Sílice cristalina de ladrillos y cemento y otros productos
de albañilería;
• Arsénico y cromo de la madera tratada químicamente.
El riesgo de exposición a estas sustancias químicas varía
según la frecuencia con la que realice este tipo de trabajo.
Para reducir su exposición a estas sustancias químicas,
trabaje en una zona bien ventilada y trabaje con equipos de
seguridad aprobados, como máscaras antipolvo, que estén
especialmente diseñadas para filtrar partículas
microscópicas.
4 SÍMBOLOS EN LA MÁQUINA
Puede ver los siguientes símbolos en la máquina. Le rogamos
que los estudie y aprenda sus definiciones. La interpretación
correcta de estos símbolos le permite manejar la herramienta
mejor y de manera más segura.
16
Español
ES

Símbolo Explicación
Clase II
Para uso exclusivo en interior
Lea las instrucciones antes de cargar
Fusible
5 RECICLAJE
Recogida selectiva. Este producto no debe
desecharse junto con la basura doméstica. Si
fuera necesario sustituir la máquina, o si ya
no la necesita, no la deseche junto con la ba-
sura doméstica. Lleve esta máquina a un
punto de recogida selectiva.
La recogida selectiva de máquinas y emba-
lajes utilizados permite reciclarlos y volver a
utilizarlos. El uso de materiales reciclados
ayuda a evitar la contaminación medioam-
biental y disminuye la necesidad de usar ma-
terias primas.
Al final de su vida útil, deseche las baterías
de forma respetuosa con el medio ambiente.
La batería contiene materiales peligrosos
para usted y para el medio ambiente. Deberá
retirar y desechar estos materiales de forma
selectiva en unas instalaciones que acepten
baterías de ion de litio.
6 FUNCIONAMIENTO
6.1 PROCEDIMIENTO DE CARGA
NOTA
Antes del uso, cargue la batería totalmente para asegurarse
de que esta pueda alcanzar el tiempo de funcionamiento
máximo. Esta batería no tiene memoria. Puede cargarla
continuamente.
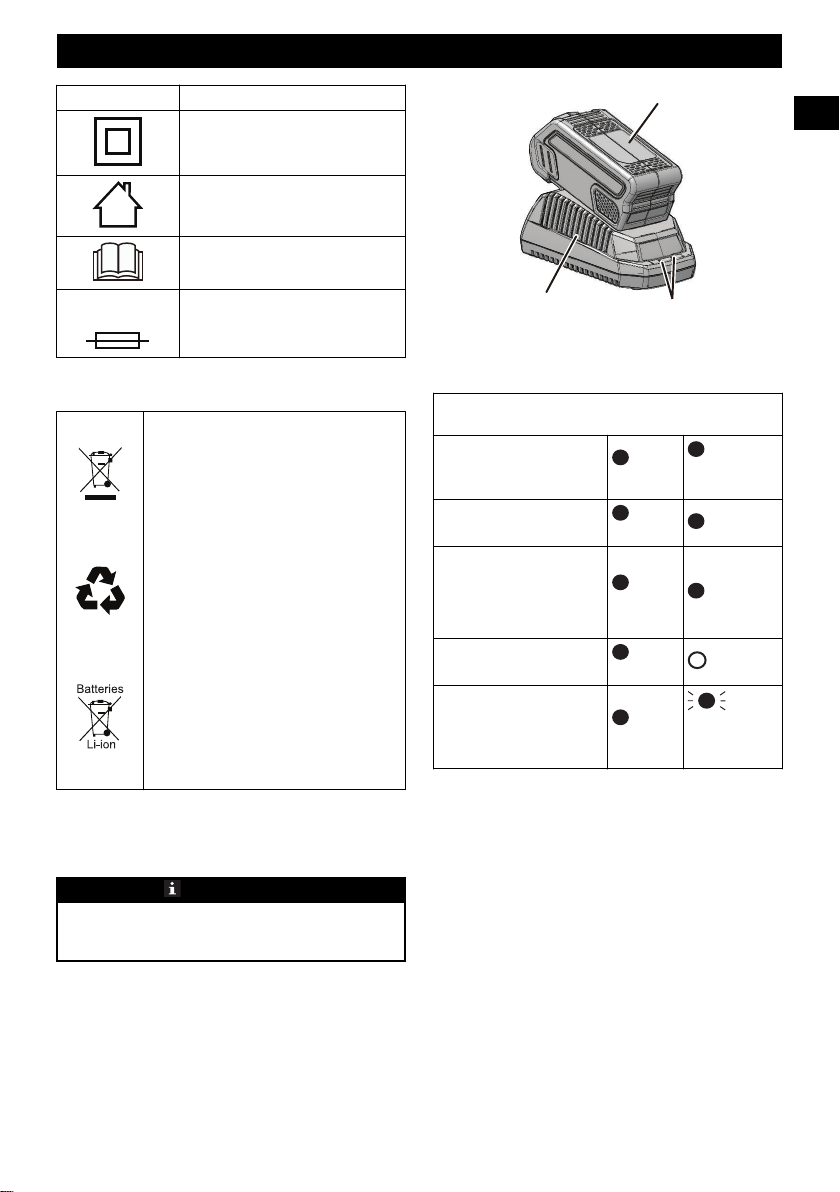
1. Conecte el enchufe del cargador (2) a una toma de
alimentación CA.
2. Ponga la batería (1) en el cargador (2).
Para cargador: 29482
2
3
1
Este es un cargador con diagnóstico. La luz LED del cargador
(3) se ilumina en un orden específico para mostrar el estado
actual de la batería. Son los siguientes:
PROCEDIMIENTO DE CARGA (INDICADOR LED)
BATERÍA CARGANDO
ROJO ROJO
TOTALMENTE CARGA-
DA
ROJO VERDE
BATERÍA DEMASIADO
CALIENTE (RETIRE DU-
RANTE APROX. 30 MINU-
TOS PARA DEJAR QUE SE
ENFRÍE)
ROJO
NARAN-
JA
BATERÍA NO PRESENTE
ROJO
APAGA-
DO
BATERÍA DEFECTUOSA
(RETIRE Y SUSTITUYA
POR UNA BATERÍA NUE-
VA)
ROJO
ROJO
INTERMI-
TENTE
1. Ponga la batería en el cargador.
• Si el LED de estado parpadea, retire la batería del
cargador durante 1 minuto.
2. Vuelva a poner la batería en el cargador.
• Si el LED de estado se muestra correcto, la batería
está bien.
• Si el LED de estado sigue parpadeando, retire la
batería y desconecte el cargador.
3. Espere 1 minuto y vuelva a poner la batería en el
cargador.
• Si el LED de estado se muestra correcto, la batería
está bien.
• Si el LED de estado sigue parpadeando, la batería
está defectuosa y es necesario sustituirla.
Para cargador:
17
Español
ES
1
2
3
Este es un cargador con diagnóstico. La luz LED del cargador
(3) se ilumina en un orden específico para mostrar el estado
actual de la batería. Son los siguientes:
PROCEDIMIENTO DE CARGA (INDICADOR LED)
BATERÍA CARGANDO
PARPA-
DEA EN VERDE
TOTALMENTE CARGADA
VERDE
BATERÍA DEMASIADO CALIENTE
(RETIRE DURANTE APROX. 30
MINUTOS PARA DEJAR QUE SE
ENFRÍE)
ROJO
BATERÍA DEFECTUOSA (RETIRE
Y SUSTITUYA POR UNA BATERÍA
NUEVA)
ROJO IN-
TERMITENTE
Nota de defecto incorrecto:
1. Ponga la batería en el cargador.
• Si el LED de estado parpadea en ROJO, retire la
batería del cargador durante 1 minuto.
2. Vuelva a poner la batería en el cargador.
• Si el LED de estado parpadea en VERDE, la batería
está bien.
• Si el LED de estado sigue parpadeando en ROJO,
retire la batería y desconecte el cargador.
3. Espere 1 minuto y vuelva a poner la batería en el
cargador.
• Si el LED de estado parpadea en VERDE, la batería
está bien.
• Si el LED de estado sigue parpadeando en ROJO, la
batería está defectuosa y es necesario sustituirla.
6.2 EXAMEN DEL CARGADOR
Si la batería no carga correctamente:
1. Examine la corriente de la toma eléctrica con distintas
máquinas. Asegúrese de que la toma de pared funcione.
2. Examine que los contactos del cargador no estén
cortocircuitados.
3. Si el cargador no está a la temperatura ambiente habitual,
mueva el cargador y la batería a un lugar donde la
temperatura esté entre 6 °C y 40 °C.
AVISO
Si pone la batería en el cargador en un ambiente cálido o
caliente, la luz LED del cargador estará roja. Extraiga la
batería y deje que se enfríe durante aproximadamente 30
minutos.
6.3 MOUNT THE CHARGER
1. Busque un lugar en la pared para fijar el cargador.
2. Utilice 2 tornillos para madera para fijar el cargador en
los montantes de madera.
3. Para cargador 29482: Taladre dos orificios paralelos de
2 3/8" (60 mm) en el centro. Para cargador CAF806:
Taladre dos orificios paralelos de 5" (127 mm) en el
centro.
4. Utilice anclajes de pared y tornillos para fijar el cargador
a la pared de yeso.
Para cargador 29482:
Para cargador CAF806:
NOTA
Si no utiliza la batería y el cargador durante un periodo de
tiempo prolongado, retire la batería del cargador y saque el
enchufe de alimentación CA.
18
Español
ES

7 MANTENIMIENTO
7.1 LIMPIEZA DE LA MÁQUINA
NOTA
Mantenga el respiradero libre de obstrucciones, polvo de
serrado y polvo de madera. No pulverice, lave ni introduzca
el flujo de aire en agua.
• Quite el material no deseado del respiradero con un
aspirador.
• Limpie la carcasa y los componentes de plástico con un
paño seco y suave.
IMPORTANTE
No utilice disolventes o detergentes fuertes en la carcasa o
los componentes de plástico.
7.2 ALMACENAMIENTO DE LA
MÁQUINA
• Retire la batería antes de almacenar o desconectar el
cargador.
8 SOLUCIÓN DE PROBLEMAS
PROBLEMA POSIBLE CAU-
SA
SOLUCIÓN
El cargador no
funciona. El car-
gador muestra el
modo de defecto.
(LED parpadea en
rojo)
La batería o el car-
gador está defec-
tuoso o hay una
mala conexión en-
tre la batería y el
cargador.
Intente retirar y
volver a insertar la
batería en el carga-
dor.
Intente cargar una
batería diferente.
Desenchufe el car-
gador y espere
hasta que se apa-
gue el LED rojo,
posteriormente
vuelva a conectar
el enchufe al sumi-
nistro de alimenta-
ción.
El cargador no
funciona. El car-
gador muestra el
modo de evalua-
ción (LED indica
rojo continuo en-
cendido).
La batería está de-
masiado caliente o
fría.
Deje que la batería
alcance la temper-
atura normal. La
carga comenzará
cuando la batería
vuelva a
3 °C-47 °C
(37 °F-117 °F).
9 DATOS TÉCNICOS
Modelo 29482
Tensión 40 V
Entrada 120V CA 50/60Hz, 1.5A Máx.
Salida 40V CC 2.2A
Peso 1.79 lbs
Clase Cargador de batería de clase 2
Modelo CAF806
Tensión 40 V
Entrada 120V CA 50/60Hz, 2.5A Máx.
Salida 40V CC 2A
Peso 1.27 lbs
Clase Cargador de batería de clase 2
10 GARANTÍA LIMITADA
YEAR
ANS
AÑOS
LIMITED WARRANTY
GARANTIE LIMITÉE
GARANTÍA
LIMITADA
3
Greenworks Por la presente, se garantiza este producto al
comprador original en posesión de la prueba de compra por
un periodo de tres (3) años contra defectos de material, piezas
o mano de obra. Greenworks, a su propia discreción, reparará
o reemplazará todas y cada una de las piezas que se
encuentren defectuosas, en base a un uso normal, sin costo
alguno para el cliente. Esta garantía es válida para aparatos de
los que se ha realizado un uso personal y no han sido
alquilados para aplicaciones comerciales/industriales, y que
han sido sometidos a un mantenimiento tal y como se indica
en las instrucciones del manual del usuario suministrado con
el producto nuevo.
LO QUE NO CUBRE LA GARANTÍA:
1. Cualquier pieza que no funcione debido al uso incorrecto,
uso comercial, abusivo, negligencia, accidente,
mantenimiento inadecuado, o alteración; o
2. La unidad, si no ha sido utilizada y/o mantenida
siguiendo el manual del propietario; o
3. El desgaste normal, excepto según se indica a
continuación.
4. Piezas que requieren un mantenimiento rutinario como
lubricantes, afilar la cuchilla;
5. El deterioro normal del acabado exterior debido al uso o
exposición.
19
Español
ES

ASISTENCIA AL USUARIO:
El servicio de garantía está disponible llamando a nuestra
línea de asistencia gratuita al 1-888-909-6757.
GASTOS DE TRANSPORTE:
Los gastos de transporte del traslado de cualquier herramienta
eléctrica o accesorio será responsabilidad del comprado. Es
responsabilidad del comprador pagar los gastos de transporte
de cualquier pieza enviada para su reemplazo bajo esta
garantía, salvo que dicha devolución sea solicitada por escrito
por Greenworks.
Dirección en EE.UU.: Dirección en Canadá:
Greenworks Tools Greenworks Tools Canada Inc.
P.O. Box 1238 1110 Stellar Drive Unit 102
Mooresville, NC 28115 Newmarket, ON, L3Y 7B7
20
Español
ES