
User's Guide

SL-D1000 Series User's Guide
Copyrights and Trademarks
2
Copyrights and Trademarks
No part of this publication may be reproduced, stored in a retrieval system, or transmitted in any form or by any means, electronic, mechanical,
photocopying, recording, or otherwise, without the prior written permission of Seiko Epson Corporation. The information contained herein is designed
only for use with this Epson printer. Epson is not responsible for any use of this information as applied to other printers.
Neither Seiko Epson Corporation nor its affiliates shall be liable to the purchaser of this product or third parties for damages, losses, costs, or expenses
incurred by the purchaser or third parties as a result of accident, misuse, or abuse of this product or unauthorized modifications, repairs, or alterations
to this product, or (excluding the U.S.) failure to strictly comply with Seiko Epson Corporation's operating and maintenance instructions.
Seiko Epson Corporation shall not be liable for any damages or problems arising from the use of any options or any consumable products other than
those designated as Original Epson Products or Epson Approved Products by Seiko Epson Corporation.
Seiko Epson Corporation shall not be held liable for any damage resulting from electromagnetic interference that occurs from the use of any interface
cables other than those designated as Epson Approved Products by Seiko Epson Corporation.
EPSON, EPSON EXCEED YOUR VISION, EXCEED YOUR VISION and their logos are registered trademarks or trademarks of Seiko Epson
Corporation.
Microsoft
®
and Windows
®
are registered trademarks of Microsoft Corporation.
Apple, Mac, macOS, OS X, Bonjour, Safari, AirPrint, iPad, iPhone, iPod touch, iBeacon, iTunes and ColorSync are trademarks of Apple Inc., registered
in the U.S. and other countries.
Use of the Works with Apple badge means that an accessory has been designed to work specifically with the technology identified in the badge and has
been certified by the developer to meet Apple performance standards.
Adobe, Photoshop, Photoshop Elements, Photoshop Lightroom, Acrobat, and Reader are either registered trademarks or trademarks of Adobe in the
United States and/or other countries.
Firefox is a trademark of the Mozilla Foundation in the U.S. and other countries.
Chrome, Chromebook, Android and Google Play are trademarks of Google Inc.
Mopria
®
and the Mopria
®
Logo are registered trademarks and service marks of Mopria Alliance, Inc. in the United States and other countries.
Unauthorized use is strictly prohibited.
General Notice: Other product names used herein are for identification purposes only and may be trademarks of their respective owners. Epson
disclaims any and all rights in those marks.
© 2022 Seiko Epson Corporation.
CPD-61561R2

3
Contents
Copyrights and Trademarks
Notes on Manuals
Meaning of Symbols. . . . . . . . . . . . . . . . . . . . . . . . . . . . . 6
Screen Shots In the Guide . . . . . . . . . . . . . . . . . . . . . . . . 6
Manual Organization. . . . . . . . . . . . . . . . . . . . . . . . . . . . 6
Viewing PDF Manuals. . . . . . . . . . . . . . . . . . . . . . . . . . . 6
Before Use
Printer Parts . . . . . . . . . . . . . . . . . . . . . . . . . . . . . . . . . . . 8
Front . . . . . . . . . . . . . . . . . . . . . . . . . . . . . . . . . . . . . . . 8
Rear . . . . . . . . . . . . . . . . . . . . . . . . . . . . . . . . . . . . . . . 11
Feeding Unit. . . . . . . . . . . . . . . . . . . . . . . . . . . . . . . . 13
Platen Area . . . . . . . . . . . . . . . . . . . . . . . . . . . . . . . . . 14
Spindle Unit . . . . . . . . . . . . . . . . . . . . . . . . . . . . . . . . 15
Control Panel . . . . . . . . . . . . . . . . . . . . . . . . . . . . . . . 16
Understanding and Operating the Display . . . . . . . . 17
Home Screen . . . . . . . . . . . . . . . . . . . . . . . . . . . . . . . 17
Text Input Screen . . . . . . . . . . . . . . . . . . . . . . . . . . . 19
Notes on Usage . . . . . . . . . . . . . . . . . . . . . . . . . . . . . . . . 20
Notes when Handling the Main Unit . . . . . . . . . . . 20
Notes on Paper. . . . . . . . . . . . . . . . . . . . . . . . . . . . . . 20
Notes on Handling Ink Supply Units . . . . . . . . . . . 22
Introducing the Software. . . . . . . . . . . . . . . . . . . . . . . . 23
Installing Maintenance Tool (Windows Only) . . . . . 26
Printer Driver Functions. . . . . . . . . . . . . . . . . . . . . . . . 26
How to Use EPSON Software Updater . . . . . . . . . . . . 26
Checking Software Update Availability . . . . . . . . . 26
Receiving Update Notifications. . . . . . . . . . . . . . . . 27
How to Use Web Config . . . . . . . . . . . . . . . . . . . . . . . . 27
Instructions for Starting . . . . . . . . . . . . . . . . . . . . . . 27
Exiting Procedure . . . . . . . . . . . . . . . . . . . . . . . . . . . 27
Uninstalling Software . . . . . . . . . . . . . . . . . . . . . . . . . . 27
Windows. . . . . . . . . . . . . . . . . . . . . . . . . . . . . . . . . . . 27
Mac . . . . . . . . . . . . . . . . . . . . . . . . . . . . . . . . . . . . . . . 28
Basic Operations
Notes When Loading/Replacing Paper. . . . . . . . . . . . 29
Notes when Loading Roll Paper . . . . . . . . . . . . . . . 29
How to Replace Roll Paper . . . . . . . . . . . . . . . . . . . . . . 30
Preparing to Replace Paper . . . . . . . . . . . . . . . . . . . 30
Removing the Spindle Unit . . . . . . . . . . . . . . . . . . . 30
Removing the Roll Paper . . . . . . . . . . . . . . . . . . . . .31
Attaching the Roll Paper. . . . . . . . . . . . . . . . . . . . . .31
Installing the Spindle Unit . . . . . . . . . . . . . . . . . . . .33
How to Load Cut Paper . . . . . . . . . . . . . . . . . . . . . . . . .36
Required Items . . . . . . . . . . . . . . . . . . . . . . . . . . . . . .36
Loading in the Paper Feed Unit. . . . . . . . . . . . . . . .36
Loading in the Cassette (Option) . . . . . . . . . . . . . .36
Basic Printing Methods (Windows)
How to Print from Photoshop . . . . . . . . . . . . . . . . . . .39
How to Cancel Printing (from the Computer). . . . . .43
How to Cancel Printing (from the Printer) . . . . . . . .43
Basic Printing Methods (Mac)
How to Print from Photoshop . . . . . . . . . . . . . . . . . . .44
How to Cancel Printing (from the Computer). . . . . .47
How to Cancel Printing (from the Printer) . . . . . . . .47
Printing Using Various Print Functions
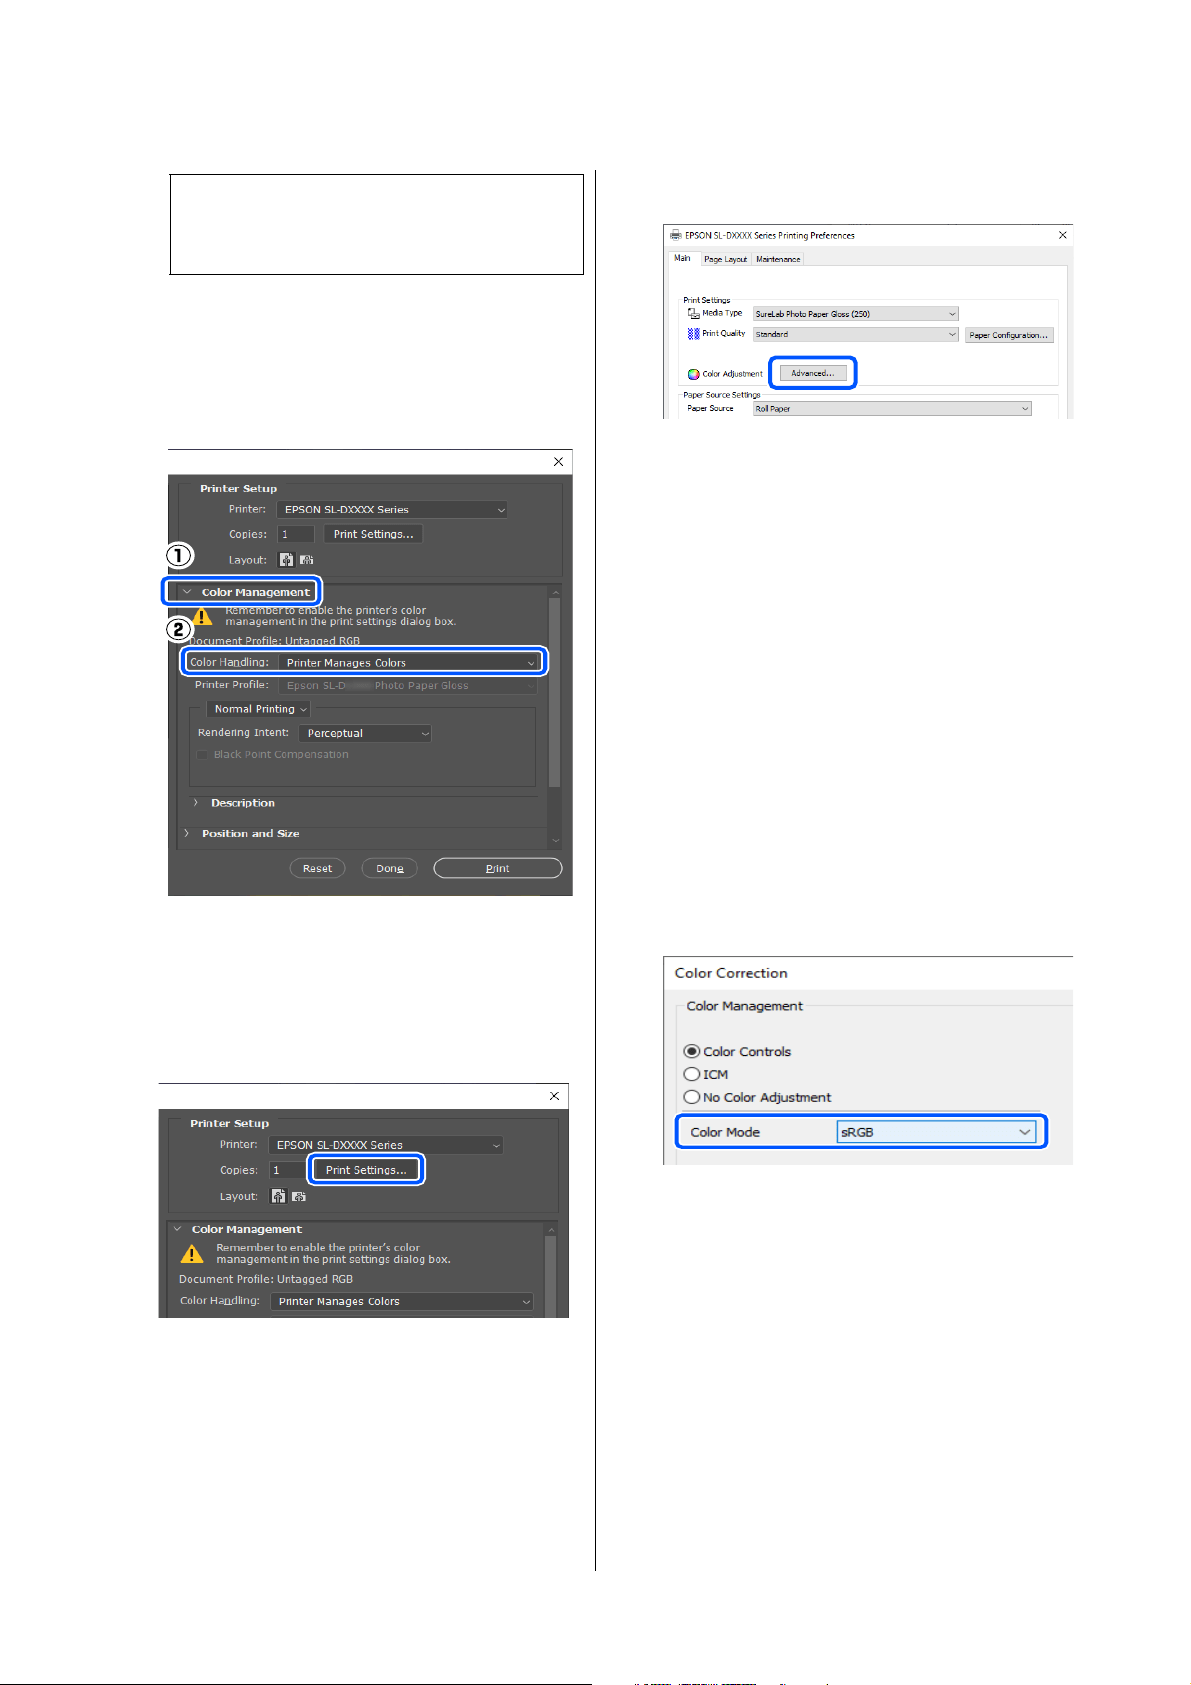
Color Management. . . . . . . . . . . . . . . . . . . . . . . . . . . . .48
Color Management Settings. . . . . . . . . . . . . . . . . . .48
Setting Colors Manually . . . . . . . . . . . . . . . . . . . . . .48
Color Management from the Application (No Color
Management) . . . . . . . . . . . . . . . . . . . . . . . . . . . . . . .51
Color Management from the Printer Driver (ICM)
(Windows) . . . . . . . . . . . . . . . . . . . . . . . . . . . . . . . . .52
Color Management from the Printer Driver (Col-
orSync) (Mac). . . . . . . . . . . . . . . . . . . . . . . . . . . . . . .53
Borderless Printing on All Sides. . . . . . . . . . . . . . . . . .54
Types of Borderless Printing Methods . . . . . . . . . .54
Setting Procedure. . . . . . . . . . . . . . . . . . . . . . . . . . . .55
Printing on Paper of Non-Standard Sizes. . . . . . . . . .56
Settings on Windows. . . . . . . . . . . . . . . . . . . . . . . . .57
Settings on Mac . . . . . . . . . . . . . . . . . . . . . . . . . . . . .58
Double-Sided Printing . . . . . . . . . . . . . . . . . . . . . . . . . .58
Settings on Windows. . . . . . . . . . . . . . . . . . . . . . . . .59
Settings on Mac . . . . . . . . . . . . . . . . . . . . . . . . . . . . .59
Printing from Smart Devices
Printing Photos Using Epson Smart Panel . . . . . . . . .61
Printing Documents Using Epson Smart Panel . . . . .61
Use AirPrint. . . . . . . . . . . . . . . . . . . . . . . . . . . . . . . . . . .62
Printing Using Mopria Print Service . . . . . . . . . . . . . .62
Contents

TOC.FM (A4 size) Rev.
4
Contents
Printing from Cloud Services
Registering to Epson Connect from the Control Panel
63
Maintenance
List of Maintenance Items. . . . . . . . . . . . . . . . . . . . . . . 64
Disposal of Used Consumables . . . . . . . . . . . . . . . . . . 65
Precautions Regarding Maintenance . . . . . . . . . . . . . 65
Replacing Ink Supply Units . . . . . . . . . . . . . . . . . . . . . 66
Replacing Maintenance Box . . . . . . . . . . . . . . . . . . . . . 67
Emptying the Scrap Paper Box. . . . . . . . . . . . . . . . . . . 69
Cleaning Airflow Vents. . . . . . . . . . . . . . . . . . . . . . . . . 70
Cleaning the Platen and Roll Paper Unit . . . . . . . . . . 70
How to Clean the Platen. . . . . . . . . . . . . . . . . . . . . . 70
How to Clean the Roll Paper Unit . . . . . . . . . . . . . 71
Cleaning and Replacing the Rollers in the Duplex
Feeder (Option) . . . . . . . . . . . . . . . . . . . . . . . . . . . . . . . 72
Notes on Handling Rollers. . . . . . . . . . . . . . . . . . . . 72
Replacing Feed Rollers . . . . . . . . . . . . . . . . . . . . . . . 72
Cleaning the Feed Rollers and Transfer Rollers . . 76
Maintenance Functions That Can Be Executed from
the Printer . . . . . . . . . . . . . . . . . . . . . . . . . . . . . . . . . . . . 78
Print Head Nozzle Check and Cleaning. . . . . . . . . 78
Powerful Cleaning . . . . . . . . . . . . . . . . . . . . . . . . . . . 79
Using the Maintenance Tool (Win-
dows)
Summary of the Maintenance Tool . . . . . . . . . . . . . . .80
Starting and Closing . . . . . . . . . . . . . . . . . . . . . . . . . 80
Explanation of the Main Screen . . . . . . . . . . . . . . . 81
Explanation of the Printer settings . . . . . . . . . . . . . 82
Explanation of the System Environment Settings
Screen . . . . . . . . . . . . . . . . . . . . . . . . . . . . . . . . . . . . . 88
Printer Maintenance . . . . . . . . . . . . . . . . . . . . . . . . . . . 89
Maintenance Operations . . . . . . . . . . . . . . . . . . . . . 89
Nozzle Check Methods. . . . . . . . . . . . . . . . . . . . . . . 89
Print Nozzle Check Pattern Method. . . . . . . . . . . . 90
Print Head Cleaning Method. . . . . . . . . . . . . . . . . . 91
Print Head Alignment Method . . . . . . . . . . . . . . . . 93
Paper Feed Adjustment Method . . . . . . . . . . . . . . .94
Using the Maintenance Tool (Mac)
Summary of the Maintenance Tool . . . . . . . . . . . . . . .95
Starting and Closing . . . . . . . . . . . . . . . . . . . . . . . . . 95
Explanation of the Main Screen . . . . . . . . . . . . . . . 96
Explanation of the Printer Window Screen. . . . . . 98
Explanation of the Operation Condition Settings
Screen. . . . . . . . . . . . . . . . . . . . . . . . . . . . . . . . . . . . . .99
Explanation of the Auto Nozzle Check Settings
Screen. . . . . . . . . . . . . . . . . . . . . . . . . . . . . . . . . . . . .100
Printer Maintenance. . . . . . . . . . . . . . . . . . . . . . . . . . .103
Maintenance Operations . . . . . . . . . . . . . . . . . . . .103
Nozzle Check Methods . . . . . . . . . . . . . . . . . . . . . .103
Print Nozzle Check Pattern Method. . . . . . . . . . .104
Print Head Cleaning Method. . . . . . . . . . . . . . . . .105
Print Head Alignment Method . . . . . . . . . . . . . . .106
Paper Feed Adjustment Method . . . . . . . . . . . . . .107
Adding Paper Information
Adding Paper Information by Using a Paper Type File
109
Settings on Windows. . . . . . . . . . . . . . . . . . . . . . . .109
Settings on Mac . . . . . . . . . . . . . . . . . . . . . . . . . . . .110
Adding Paper Information from Custom Settings
(Windows Only) . . . . . . . . . . . . . . . . . . . . . . . . . . . . . .111
Control Panel Menu
Menu List . . . . . . . . . . . . . . . . . . . . . . . . . . . . . . . . . . . .113
Details of the Menu . . . . . . . . . . . . . . . . . . . . . . . . . . .117
Wireless LAN Connection
Types of Wireless LAN Connection . . . . . . . . . . . . .126
Wi-Fi Connection . . . . . . . . . . . . . . . . . . . . . . . . . .126
Wi-Fi Direct (Simple AP) Connection . . . . . . . . .126
Connecting to a Computer . . . . . . . . . . . . . . . . . . . . .126
Connecting to a Smart Device . . . . . . . . . . . . . . . . . .127
Connecting to a Smart Device Over a Wireless Rout-
er. . . . . . . . . . . . . . . . . . . . . . . . . . . . . . . . . . . . . . . . .127
Connecting to an iPhone, iPad, iPod touch Using
Wi-Fi Direct . . . . . . . . . . . . . . . . . . . . . . . . . . . . . . .127
Connecting to Devices Other Than iOS Using Wi-Fi
Direct . . . . . . . . . . . . . . . . . . . . . . . . . . . . . . . . . . . . .129
Making Wi-Fi Settings from the Printer . . . . . . . . . .129
Making Wi-Fi Settings by Entering the SSID and
Password . . . . . . . . . . . . . . . . . . . . . . . . . . . . . . . . . .129
Making Wi-Fi Settings by Push Button Setup . . .130
Setting Up Using Wi-Fi Auto Connect. . . . . . . . .131
Making Wi-Fi Settings by PIN Code Setup (WPS). .
131
Printing a Network Connection Report . . . . . . . . . .132
Messages and Solutions on the Network Connection
Report . . . . . . . . . . . . . . . . . . . . . . . . . . . . . . . . . . . .132
E-1 . . . . . . . . . . . . . . . . . . . . . . . . . . . . . . . . . . . . . . .133
E-2, E-3, E-7 . . . . . . . . . . . . . . . . . . . . . . . . . . . . . . .133

TOC.FM (A4 size) Rev.
5
Contents
E-5 . . . . . . . . . . . . . . . . . . . . . . . . . . . . . . . . . . . . . . .133
E-6 . . . . . . . . . . . . . . . . . . . . . . . . . . . . . . . . . . . . . . .134
E-8 . . . . . . . . . . . . . . . . . . . . . . . . . . . . . . . . . . . . . . .134
E-9 . . . . . . . . . . . . . . . . . . . . . . . . . . . . . . . . . . . . . . .134
E-10 . . . . . . . . . . . . . . . . . . . . . . . . . . . . . . . . . . . . . .134
E-11 . . . . . . . . . . . . . . . . . . . . . . . . . . . . . . . . . . . . . .134
E-12 . . . . . . . . . . . . . . . . . . . . . . . . . . . . . . . . . . . . . .135
E-13 . . . . . . . . . . . . . . . . . . . . . . . . . . . . . . . . . . . . . .135
Message on the Network Environment . . . . . . . .136
Replacing or Adding New Wireless Routers . . . . . .137
Making Settings for Connecting to the Computer . .
137
Making Settings for Connecting to the Smart Device
137
Problem Solver
When a Message Is Displayed . . . . . . . . . . . . . . . . . .138
Messages Displayed on the Printer . . . . . . . . . . . .138
Error Messages (Windows) . . . . . . . . . . . . . . . . . .141
Error Messages (Mac) . . . . . . . . . . . . . . . . . . . . . . .142
Troubleshooting . . . . . . . . . . . . . . . . . . . . . . . . . . . . . .144
When Paper Jams . . . . . . . . . . . . . . . . . . . . . . . . . . 144
You Cannot Print (Because the Printer Does Not
Work) . . . . . . . . . . . . . . . . . . . . . . . . . . . . . . . . . . . . 157
The Printer Sounds Like It Is Printing, but Nothing
Prints . . . . . . . . . . . . . . . . . . . . . . . . . . . . . . . . . . . . .158
Cannot Do Borderless Printing . . . . . . . . . . . . . . .158
The Prints Are Not What You Expected . . . . . . .158
Trouble when Printing from a Cassette . . . . . . . .159
Troubles when Cutting Roll Paper . . . . . . . . . . . .160
Cannot print from smart device even though it is
connected (iOS) . . . . . . . . . . . . . . . . . . . . . . . . . . . .160
Others . . . . . . . . . . . . . . . . . . . . . . . . . . . . . . . . . . . .161
If Troubles Are Not Resolved . . . . . . . . . . . . . . . .161
Appendix
Consumables and Optional Items . . . . . . . . . . . . . . .162
Supported Media . . . . . . . . . . . . . . . . . . . . . . . . . . . . .163
Epson Special Media . . . . . . . . . . . . . . . . . . . . . . . .163
Other Commercially Available Paper. . . . . . . . . .165
Moving and Transporting the Printer. . . . . . . . . . . .166
Moving the Printer . . . . . . . . . . . . . . . . . . . . . . . . .166
Transport . . . . . . . . . . . . . . . . . . . . . . . . . . . . . . . . .168
System Requirements. . . . . . . . . . . . . . . . . . . . . . . . . .168
Printer Driver. . . . . . . . . . . . . . . . . . . . . . . . . . . . . .168
Maintenance Tool . . . . . . . . . . . . . . . . . . . . . . . . . .169
Web Config. . . . . . . . . . . . . . . . . . . . . . . . . . . . . . . .169
Specifications Table . . . . . . . . . . . . . . . . . . . . . . . . . . .169
Necessary Space . . . . . . . . . . . . . . . . . . . . . . . . . . . .174
OPEN SOURCE SOFTWARE LICENSE TERMS. .174
Boost Software License - Version 1.0 - August 17th,
2003 . . . . . . . . . . . . . . . . . . . . . . . . . . . . . . . . . . . . . .175
Inno Setup License. . . . . . . . . . . . . . . . . . . . . . . . . .175
7-Zip Command line version. . . . . . . . . . . . . . . . .176
GNU LESSER GENERAL PUBLIC LICENSE Ver-
sion 2.1, February 1999 . . . . . . . . . . . . . . . . . . . . . .177
PDFsharp License . . . . . . . . . . . . . . . . . . . . . . . . . .186
HTML-Renderer / LICENSE . . . . . . . . . . . . . . . . .187
EPSON END USER SOFTWARE LICENSE AGREE-
MENT. . . . . . . . . . . . . . . . . . . . . . . . . . . . . . . . . . . . . . .188
Where To Get Help
Technical Support Web Site . . . . . . . . . . . . . . . . . . . .197
Contacting Epson Support . . . . . . . . . . . . . . . . . . . . .197
Before Contacting Epson . . . . . . . . . . . . . . . . . . . .197
Help for Users in North America . . . . . . . . . . . . .198
Help for Users in Latin America . . . . . . . . . . . . . .198
SL-D1000 Series User's Guide
Notes on Manuals
6
Notes on Manuals
Meaning of Symbols
Screen Shots In the Guide
O Screen shots used in this manual may differ to the
actual screens. Also, the screens may differ
depending on the operating system used and the
usage environment.
O Unless otherwise noted, screen shots in this
manual shows case of Windows 10 and macOS
High Sierra.
Manual Organization
The manuals for the product are organized as shown
below.
You can view the PDF manuals using Adobe Acrobat
Reader or Preview (Mac).
Viewing PDF Manuals
This section uses the Adobe Acrobat Reader DC as an
example to explain the basic operations for viewing the
PDF in Adobe Acrobat Reader.
!
Warning:
Warnings must be followed to
avoid serious bodily injury.
!
Caution:
Cautions must be followed to avoid
damage to this product or bodily
injury.
c
Important:
Important must be followed to
avoid damage to this product.
Note:
Notes contain important
information on the operation of this
product.
Setup Guide
(poster)
This poster explains the work to
do after removing the printer
from the box so that the printer
can be used.
Safety Instructions This manual explains rules that
must be followed to prevent
damage to property and the
risk of injury to customers and
other people. Be sure to read
this manual to use the product
safely and correctly.
Notices (PDF) This manual contains necessary
arbitration and certification
information..
User's Guide
(this manual)
This manual explains the
general ways to use the printer,
such as operating procedures,
things required for everyday
usage, maintenance work, and
troubleshooting.
Administrator's Guide
(PDF)
This manual explains how
system administrators set up
and manage the printer.
A
Click to print the PDF manual.
B
Each time it is clicked the bookmarks are hidden or
shown.
C
Click the title to open the relevant page.
Click [+] to open the titles lower in the hierarchy.

SL-D1000 Series User's Guide
Notes on Manuals
7
D
If the reference is in blue text, click the blue text to
open the relevant page.
To return to the original page, do the following.
For Windows
While pressing the Alt key press the key.
For Mac
While pressing the command key press the key.
E
You can input and search for keywords, such as the
names of items you want to confirm.
For Windows
Right click on a page in the PDF manual and select Find
in the menu that is displayed to open the search
toolbar.
For Mac
Select Find in the Edit menu to open the search
toolbar.
F
To enlarge the text in the display that is too small to see
well, click . Click to reduce the size. To specify a
part of an illustration or screenshot to enlarge, do the
following.
For Windows
Right click on the page in the PDF manual and select
Marquee Zoom in the menu that is displayed. The
pointer changes to a magnifying glass, use it to specify
the range of the place you want to enlarge.
For Mac
Click View menu - Zoom - Marquee Zoom in this
order to change the pointer to a magnifying glass. Use
the pointer as a magnifying glass to specify the range
of the place you want to enlarge.
G
Opens the previous page or next page.

SL-D1000 Series User's Guide
Before Use
8
Before Use
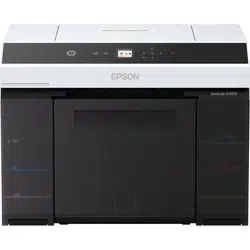
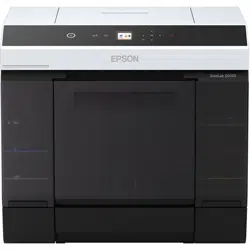
Printer Parts
Front
When the optional
duplex feeder is installed
While the scrap paper box is
removed and the ink supply unit
cover is open
A Printer cover
Remove when doing maintenance or removing paper jams.
B Rear paper feed slot cover
Open this cover when loading cut paper to print from the rear paper feed slot.
C Status display light
This light indicates when the printer's status is normal or if an error has occurred.
D Ink supply unit cover (left)
Open to replace ink supply unit.
U
“Replacing Ink Supply Units” on page 66

SL-D1000 Series User's Guide
Before Use
9
E Security slot
Located alongside the ink supply unit cover.
Insert a commercially available security cable and lock to prevent theft of the printer and to lock the ink supply unit cover
F Scrap paper box
Scraps cut from roll paper while printing are collected here. Be sure to dispose of scrap paper when you replace the roll
paper. Also, remove it when loading or removing roll paper.
U
“Emptying the Scrap Paper Box” on page 69
G Output tray
The output tray is integrated with the scrap paper box.
Printed paper is collected on the output tray. To use it, pull it out toward you and raise the front end.
See the following for how many sheets of paper can accumulate on the tray.
U
“Specifications Table” on page 169
Also, until paper that has been printed on has sufficiently dried, do not leave it stacked up for a long time. If paper that has
not dried is left stacked up for a long time, the colors in the parts that overlap could change.
See the following for more details.
U
“Notes on Paper” on page 20
H Ink supply unit cover (right)
Open to replace the ink supply unit and maintenance box.
U “Replacing Ink Supply Units” on page 66
U “Replacing Maintenance Box” on page 67
I Control panel
U
“Control Panel” on page 16
J Cassette
For loading cut paper.
K Ink supply unit
For loading 6 colors of ink supply units.
U
“Replacing Ink Supply Units” on page 66
L Ink supply unit tray
The colors on the labels indicate which ink supply unit is installed. Load all of the ink supply unit trays in the printer.
The ink supply unit trays are common parts, so they can be used the same with any color ink.

SL-D1000 Series User's Guide
Before Use
10
M Roll paper unit
Pull this out toward you to remove the spindle.
If the back side of printed roll paper is dirty, clean the roll paper unit.
U
“Cleaning the Platen and Roll Paper Unit” on page 70
N Maintenance box
Container that holds the waste ink fluid.
U
“Replacing Maintenance Box” on page 67
SL-D1000 Series User's Guide
Before Use
11
Rear
When the optional duplex feeder is installed
A Airflow vents
Air passes through these to adjust the temperature of the inside of the printer. There are multiple airflow vents. Do not
obstruct any of the airflow vents.
B AC inlet
Connects the power cord to the printer.
C LAN port
Connects the LAN cable.
D USB port
Connect the USB cable here.
E Paper feed unit
Open this cover to load cut paper into the rear paper feed slot. Close this cover when not using the rear paper feed slot.
Remove when doing maintenance or removing paper jams.
F Lock lever
This lever releases the lock for removing the paper feed unit.

SL-D1000 Series User's Guide
Before Use
12
G Rear cover
Open when doing maintenance or removing paper jams.
H Lock lever
This lever releases the lock for opening the rear cover.
I Feed rollers
The cut sheets that are loaded in the cassette are fed via these rollers. When assembling the duplex feeder, install the feed
rollers before using the machine.
The feed rollers need to be replaced according to the type of cut sheets being used. Also, if paper feeding problems occur
repeatedly, clean and wipe any dirt from the surface of the rollers.
See the following for more details.
U
“Cleaning and Replacing the Rollers in the Duplex Feeder (Option)” on page 72
J Transfer rollers
Cut sheets that are fed from the cassette are transferred to the platen via these rollers.
If paper feeding problems occur repeatedly, clean and wipe any dirt from the surface of the rollers.
See the following for more details.
U
“Cleaning and Replacing the Rollers in the Duplex Feeder (Option)” on page 72
SL-D1000 Series User's Guide
Before Use
13
Feeding Unit
Roll paper unit Paper feed unit Cassette (when the optional
duplex feeder is installed)
A Spindle unit
For loading roll paper.
B Handle
Turn this to rewind roll paper to the spindle unit.
C Edge guide
Align them with the edges of the paper when loading paper.
D Paper slot
Insert the leading edge of the roll paper to load it.
SL-D1000 Series User's Guide
Before Use
14
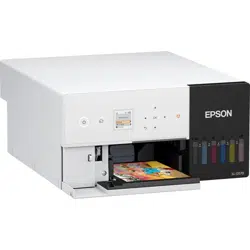
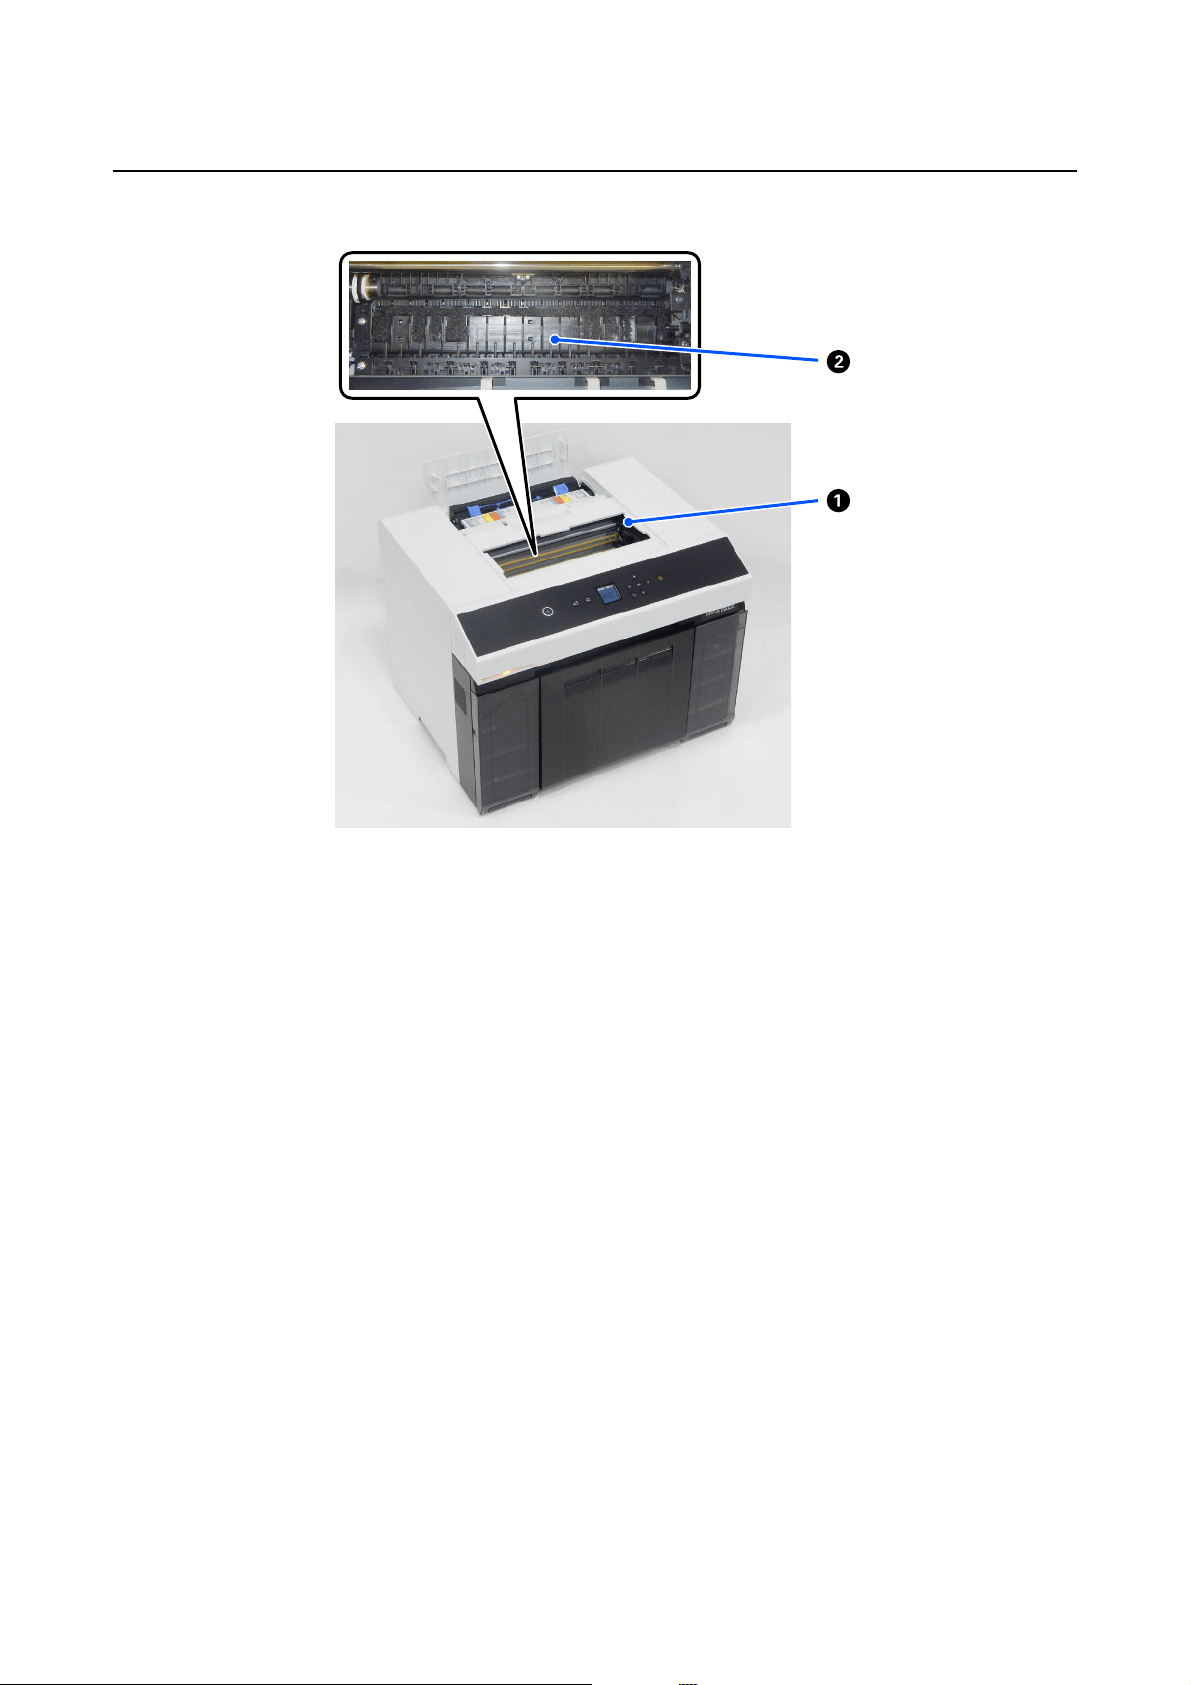
Platen Area
A Print head unit
The print head prints by moving left and right while emitting ink. Do not move the print head unit manually with too much
force. Otherwise, it may break down.
B Platen
Clean the platen if the back of printed paper is dirty.
U
“Cleaning the Platen and Roll Paper Unit” on page 70
SL-D1000 Series User's Guide
Before Use
15
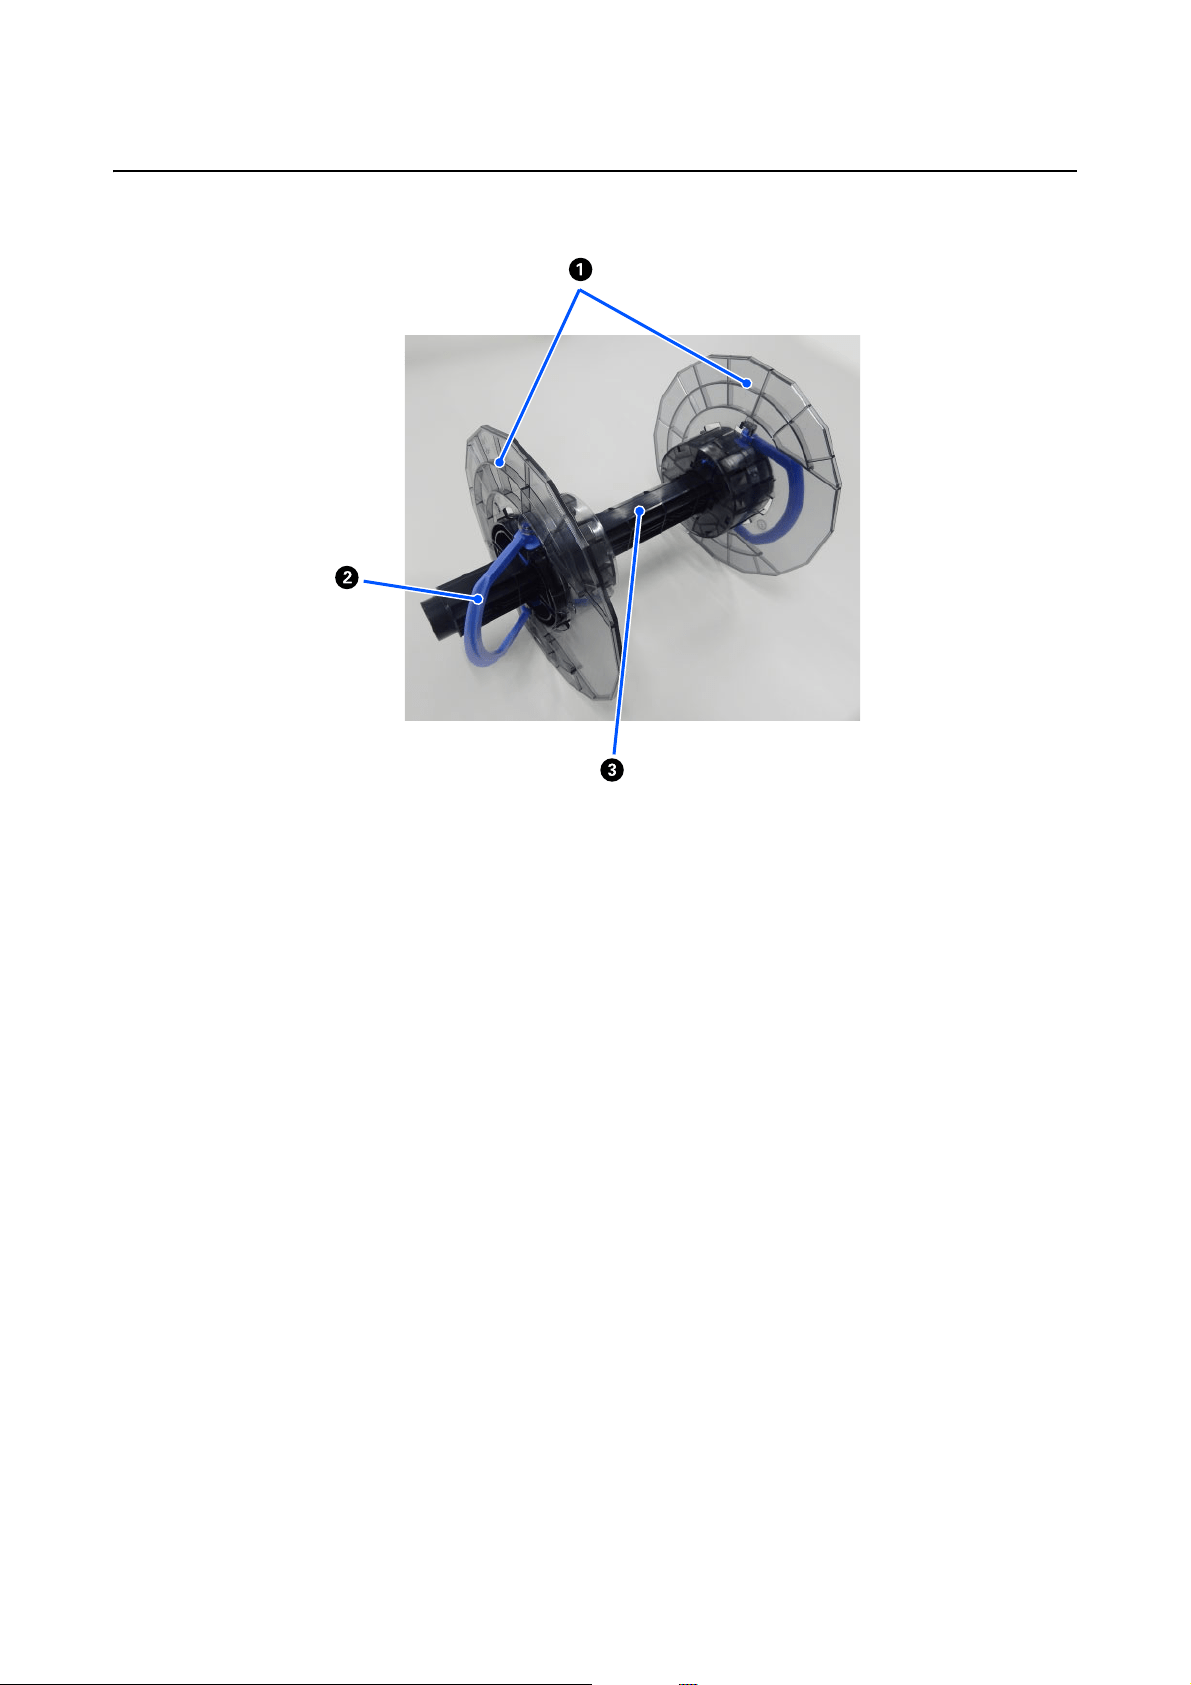
Spindle Unit
A Media edge guide
Insert into the roll paper's left and right ends to secure it. The media edge guides are the same on the left and right.
B Knob
Secures/releases the media edge guides, which are mounted on the spindle.
C Spindle
Insert into the roll core of the roll paper. When loading onto the printer, engage the gear on the right side so the rotation
can be controlled from the printer.
SL-D1000 Series User's Guide
Before Use
16
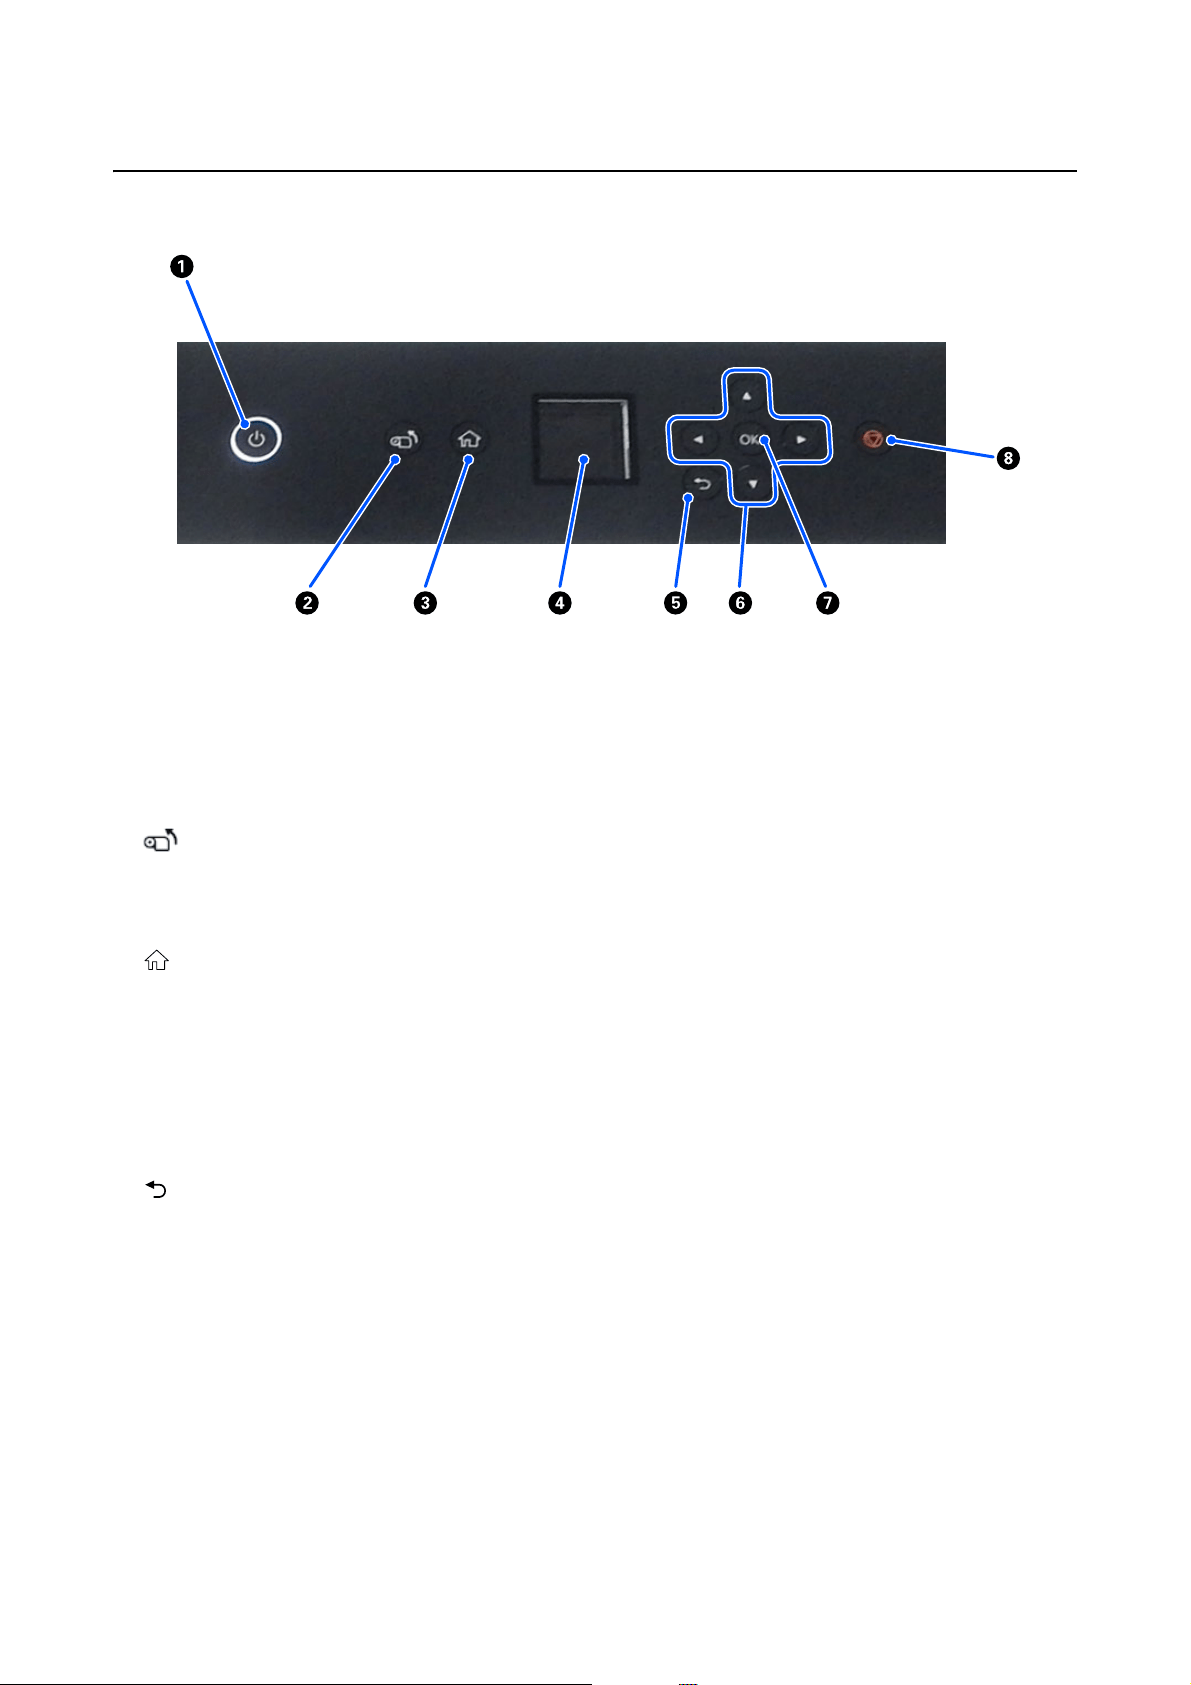
Control Panel
A P button (power button), P light (power light)
This is normally on (the light is lit) during use. If an emergency occurs, or when the printer is not going to be used for an
extended period, turn this off (the light turns off).
The light flashes while the printer is operating.
B button (take-up button)
Press to replace the roll paper. The roll paper is wound back to the replacement position.
C button (home button)
Press this, such as when a settings menu is displayed, to return to the Home screen.
D Screen
Displays the printer's status, menus, and error messages.
E button (back button)
Press to go back up one level in the displayed settings menu.
F u/d/l/r buttons (arrow buttons)
Press when selecting items or entering text in settings menus.
G Z button
Press to execute functions, and to apply selections and inputs.
SL-D1000 Series User's Guide
Before Use
17
Understanding and Operating the Display
Home Screen
H button (stop button)
Press to stop operations.
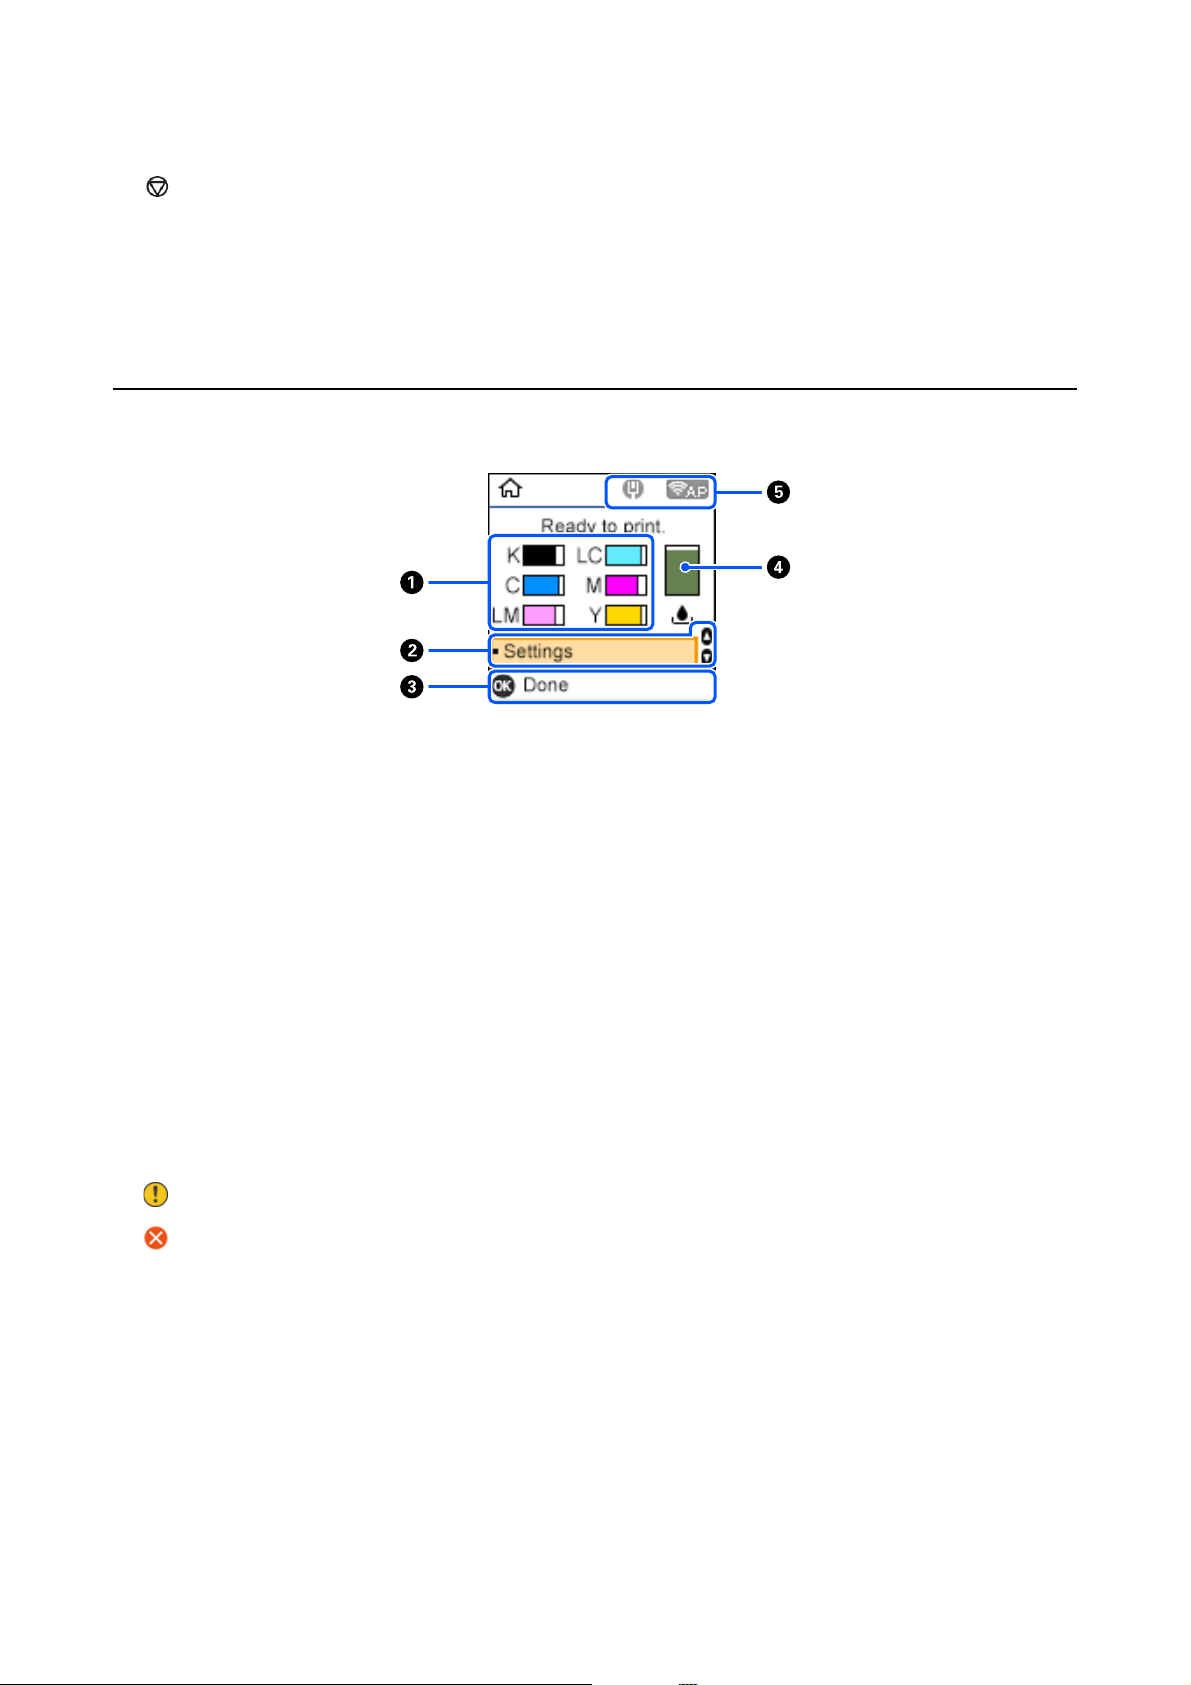
A Ink information
The statuses and estimates of ink levels are shown by horizontal bar displays. As the amount of ink runs low, the bar display
becomes shorter.
The code to the left of the bar display indicates the ink color.
K : Black
C:Cyan
LM : Light Magenta
LC : Light Cyan
M:Magenta
Y : Yellow
Icons are displayed as notification of the following statuses.
: Ink is running low.
: Ink Level is below the minimum value. Replace the ink supply unit with a new one.
U
“Replacing Ink Supply Units” on page 66
B Settings menu
Set the printer and execute maintenance functions.
Use the u/d buttons to select items and press the Z button to go to the next screen.
U “Control Panel Menu” on page 113

SL-D1000 Series User's Guide
Before Use
18
C Operation Button Guide
Buttons that can be operated appear as icons. This example shows you can go to a selected menu by using the Z button.
D Maintenance box information
The status and estimate of the approximate amount of space in the maintenance box are shown by a vertical bar display. As
the amount of available space decreases, the bar display becomes shorter.
Icons are displayed as notification of the following statuses.
: Available space is running low.
: There is no available space in the maintenance box. Replace the maintenance box with a new one.
U
“Replacing Maintenance Box” on page 67
E Network Status
The network connection statuses are shown by icons.
: Wired LAN is not connected, network is not set.
: Wired LAN is connected
: Wireless LAN (Wi-Fi) is disabled or processing the connection
: Wireless LAN (Wi-Fi) has a problem with or is searching for a connection
: Wireless LAN (Wi-Fi) is connected
The number of lines shows the status of the signal. More lines indicate a better signal status.
: Wi-Fi Direct (simple AP) connection enabled
: Wi-Fi Direct (simple AP) connection disabled
SL-D1000 Series User's Guide
Before Use
19
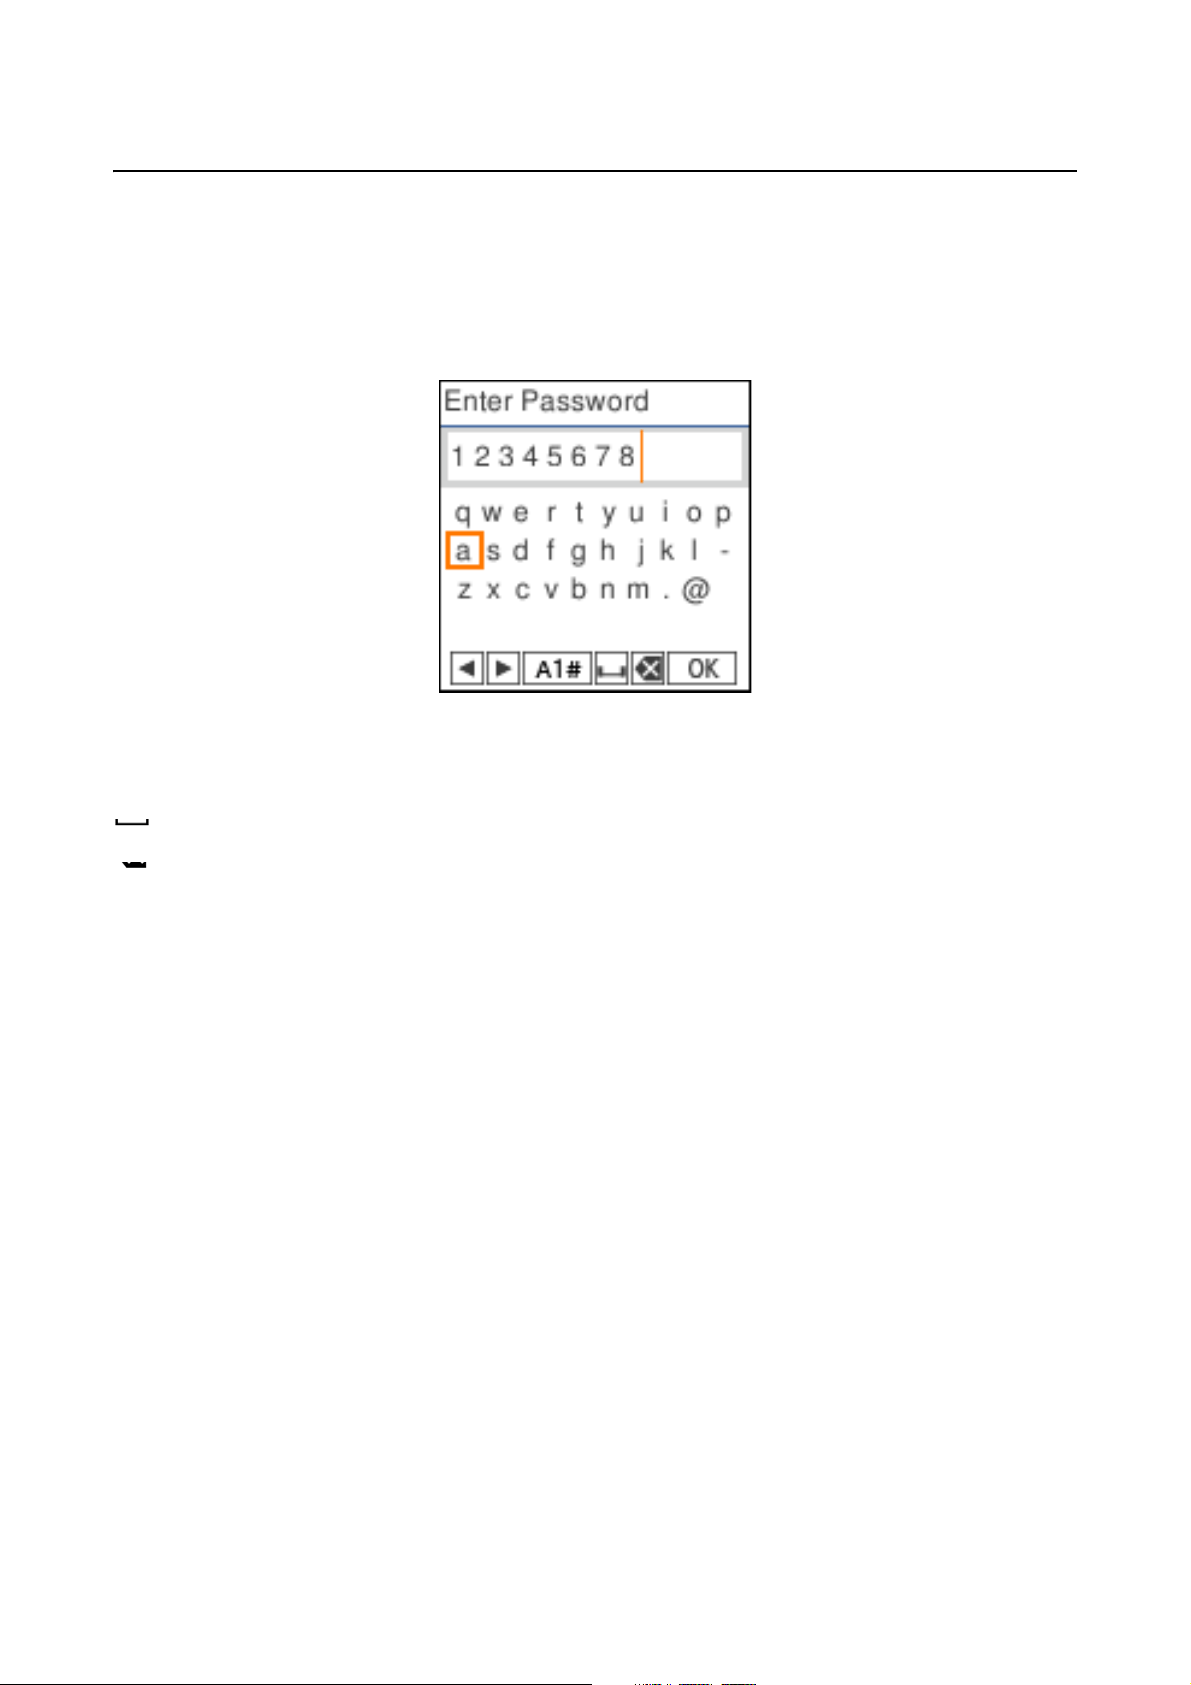
Text Input Screen
To enter characters and symbols for network settings from the control panel, use the u/d/l/r buttons and the
software keyboard on the screen. Press the u/d/l/r button to select a character or function button on the keyboard,
and then press the Z button. When you have finished entering characters, select OK, and then press the Z
button.
l r : Moves the cursor to the left or right.
A 1 # : Switches the character type. You can enter alphanumerics or symbols.
: Enters a space.
: Deletes a character to the left (backspace).
OK : Enters the selected characters.

SL-D1000 Series User's Guide
Before Use
20
Notes on Usage
Notes when Handling the Main Unit
O Do not suddenly change the temperature in the room where the printer is installed.
If the temperature changes suddenly, drops of water (condensation) could occur inside the printer which may
have an adverse effect on operations.
O Use the printer in an environment with a temperature of 10 to 35 °C, and a humidity of 20 to 80%. When the
printer is placed on a system rack, make sure the environment of the rack is within these ranges.
Even when the conditions above are met, you may not be able to print properly if the environmental conditions
are not suitable for the paper. Be sure to use the printer in an environment where the paper's requirements are
met. For more details, see the documentation supplied with the paper.
Also, when operating in dry areas, air conditioned environment, or under direct sunlight, maintain the
appropriate humidity.
O Do not place any containers containing water, such as vases or cups, on the printer. If water enters the printer,
it may break down. Also, do not put any heavy objects on the printer.
O The printer is equipped with several airflow vents. The airflow vents allow air to go in and out of the printer. Do
not block these airflow vents by placing any objects near them, or by covering them with film sheets or paper.
O Do not use accessories designed for this printer with any other products.
O If the printer's covers are opened during printing, a safety mechanism is activated and printing is stopped
automatically. Do not turn off the printer in this condition. This could cause the print head nozzles to dry and
print quality to decline.
O Depending on the performance of the computer being used, the printer stops printing temporarily; however,
this is not a malfunction.
O If the printer is not used for an extended period of time, make sure you leave the ink supply units and
maintenance box installed.
O Do not leave the printer for more than three days in a state in which the power was not turned off correctly, such
as due to a power outage. Roll paper may curl which could cause a decline in printer performance.
Notes on Paper
Note the following points when handling and storing the paper. If the paper is not in good condition, print quality
may decline.
Check the documentation supplied with each paper.
Notes on Handling
Use paper recommended by our company.
SL-D1000 Series User's Guide
Before Use
21
Note the following points when handling paper.
O Use Epson special media under normal room conditions (temperature: 15 to 25 °C, humidity: 40 to 60%).
O Do not fold the paper or scratch the surface of the paper.
O Avoid touching the printable surface of the paper with your bare hands. Moisture and oil from hands can have
an adverse effect on the print quality.
O Handle paper by the edges of the paper. We recommend wearing cotton gloves.
O Do not throw away the paper packaging as you can use it for storing the paper.
O If roll paper is left loaded on the printer, the leading edge of the paper may curl and print quality may decline.
We recommend removing roll paper from the printer when it is not in use.
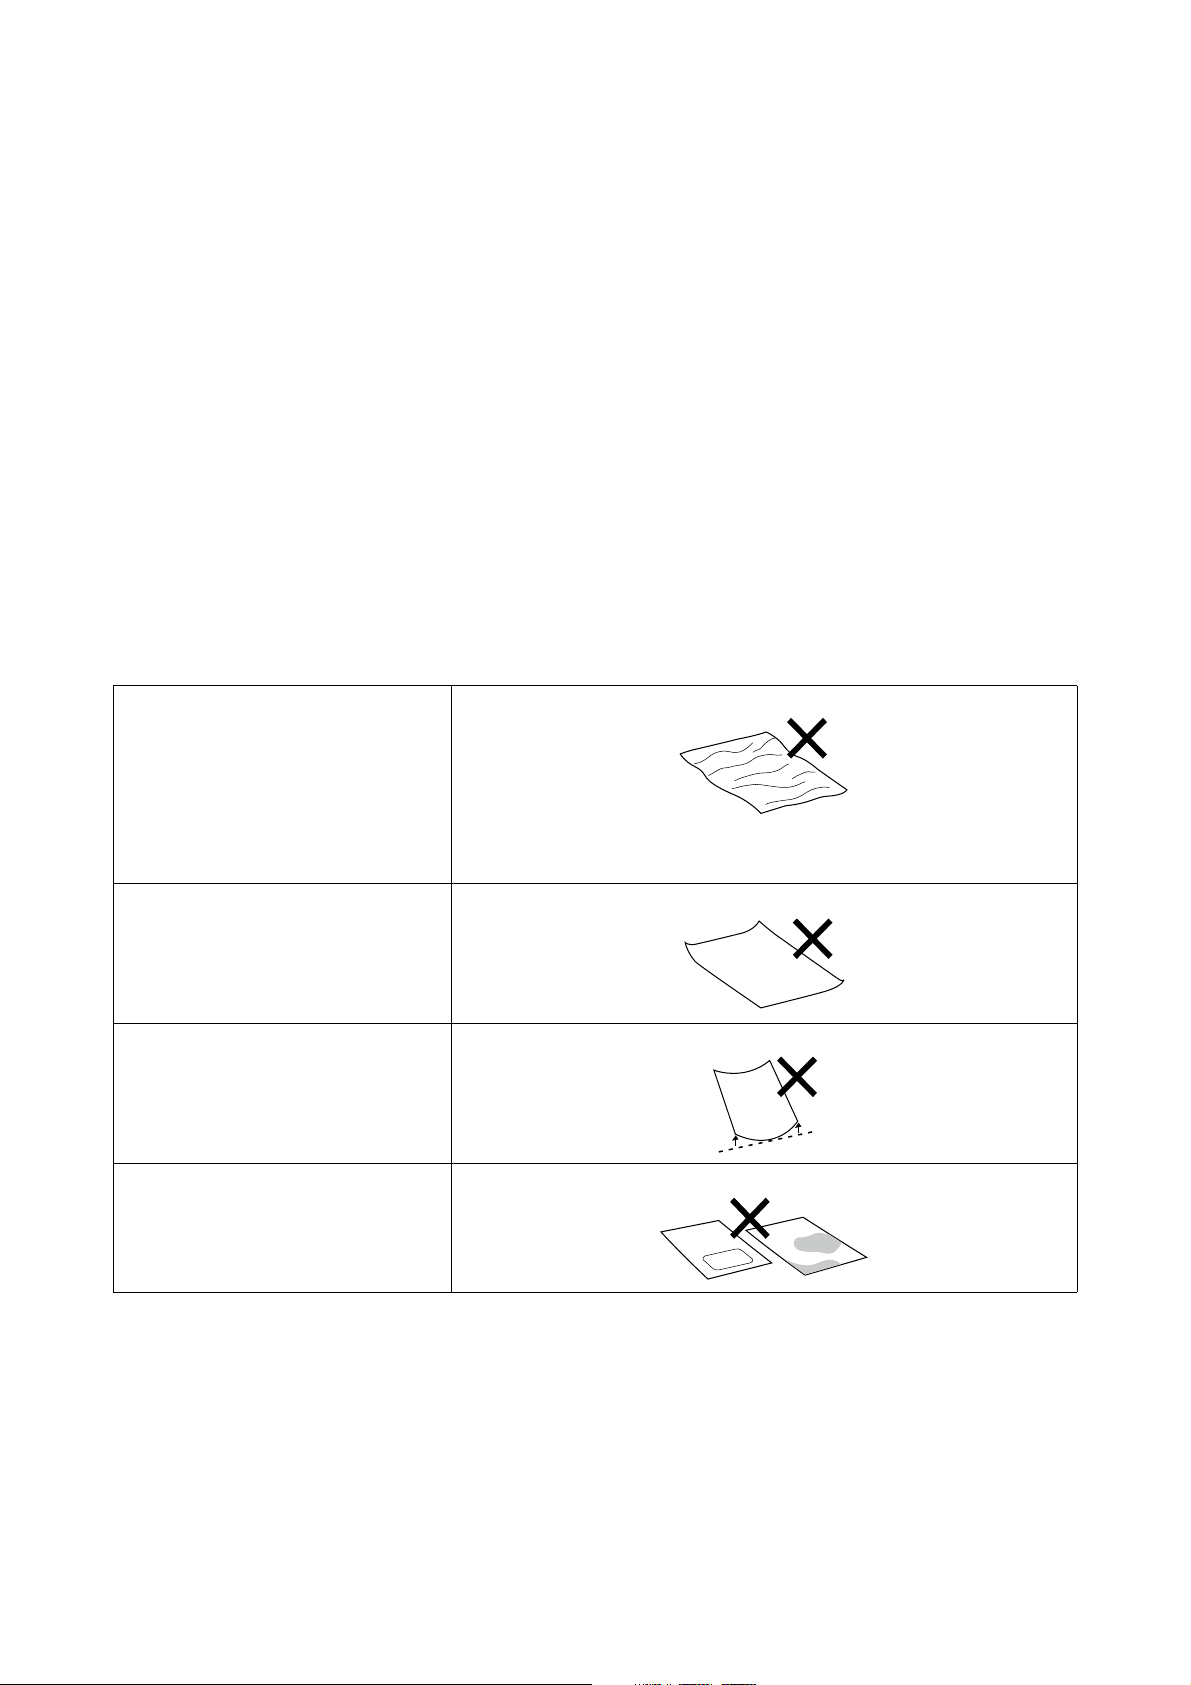
Paper that cannot be used
Do not load paper as described below. Doing so could cause paper jams and dirty printouts.
Notes before Loading Paper
When using the duplex feeder (option), before loading paper in the cassette, carefully riffle the stack of paper so the
sheets do not stick together, and then align all four edges.
How to riffle U
“Loading in the Cassette (Option)” on page 36
O Paper that is wavy
O Paper that is torn
O Paper that is cut
O Paper that is too thick
O Paper that is too thin
O Paper that is hard
O Paper that has folded corners
O Paper that is creased
O Paper that has been rolled up
O Paper that has been folded
O Paper on which stickers, etc., have
been stuck
O Paper that is damp

SL-D1000 Series User's Guide
Before Use
22
Notes on storage
O Do not throw away the paper packaging as you can use it for storing the paper.
O Avoid locations that are subject to direct sunlight, excessive heat, or humidity.
O Keep cut sheets in their original package after opening, and keep them in a flat place.
O Remove roll paper that is not in use from the spindle unit. Rewind it correctly and then store it in the original
packaging that came with the roll paper. If you leave the roll paper in the printer for a long time, its quality may
decline.
O We recommend removing roll paper from the printer if you are continuously using cut sheets. The back side of
the roll paper may become dirty due to the increased amount of ink mist inside the printer, which sticks to the
back of the roll paper. However, if Auto Nozzle Check Settings is set to High quality, then leave the roll paper
loaded. In this case, it will be become dirty because check patterns are periodically printed on the roll paper.
Notes on Printing
Make sure that the leading edge of the paper is perpendicular to the long side and cut completely straight.
Storing and displaying printouts
O Make sure you do not rub or scratch the printed side.
O Make sure the print outs are completely dry before folding of stacking; otherwise, the color may change where
they touch (leaves a mark). These marks will disappear if they are separated immediately and dried; however,
they will remain if not separated.
O Do not use a dryer to dry the print outs.
O Avoid locations that are subject to high temperature, humidity, and direct sunlight, and store in a dark place.
O Avoid displaying print outs outdoors or in direct sunlight. This may accelerate the fading.
O When displaying print outs indoors, we recommend placing them in glass frames and so on. This allows you to
display your print outs for a long time without them fading.
Notes on Handling Ink Supply Units
O Store the ink supply units away from direct sunlight at room temperature.
O To ensure print quality, we recommend using all the ink before the earlier of the following dates:
O Recommended use-by-date printed on the package of the ink supply unit
O Within one year after installing the ink supply unit to the printer.
O If ink supply units have been stored in a cold place for a long time, leave them at room temperature for more
than 3 hours before use.
O The ink level and other data are stored in the IC chip, allowing ink supply units to be used after being removed
and replaced.

SL-D1000 Series User's Guide
Before Use
23
O Store ink supply units that are removed before all the ink has been used so that dust does not get on the ink
supply ports. The ink supply port has a valve in it so it does not need to be capped.
O Removed ink supply units may have ink around the ink supply port, so be careful not to get any ink on the
surrounding area.
O Do not touch the IC chip of the ink supply unit. Doing so may prevent normal operation and printing.
O Do not subject ink supply units to extreme shock, such as by dropping them. Ink may leak from the ink supply
units.
O Even while nothing is printed, the printer uses ink from all ink supply units during head cleaning and other
maintenance operations to keep the print head in good condition.
O Although the ink supply units may contain recycled materials, this does not affect printer function or
performance.
O Do not leave the printer without ink supply units installed. The ink in the printer may dry and the printer will
not print correctly. When you are not using the printer, make sure there is an ink supply unit installed in each
slot.
O Load all colors of ink supply units. You cannot print unless all the colors are loaded.
O To maintain the quality of the head, the printer stops printing before the ink supply units are completely
expended; therefore, some ink is left in used ink supply units.
O Do not dismantle or modify ink supply units. You may not be able to print properly.
Introducing the Software
Install the printer driver and Maintenance Tool on your computer to use the printer.
SL-D1000 Series User's Guide
Before Use
24
Software Name Summary
Printer Driver This software is for printing from the printer according to print commands from
application software.
U
“Printer Driver Functions” on page 26
Maintenance Tool This software can execute maintenance functions, such as checking the printer's
status, making settings, and doing Print Head Cleaning.
Also, the Maintenance Tool must be installed in the following cases, so install
Maintenance Tool on your computer.
O To use the automatic print head nozzle check.
O To add types of paper to be used on the printer.
O To use EPSON SureLab OrderController/EPSON SureLab OrderController LE.
Maintenance Tool is not installed automatically if you are using Windows. See
the following to install it.
It is installed together with the printer driver if you are using Mac.
U
“Installing Maintenance Tool (Windows Only)” on page 26
See the following for more details on Maintenance Tool.
U
“Using the Maintenance Tool (Windows)” on page 80
U “Using the Maintenance Tool (Mac)” on page 95
SL Paper Type Additional Tool Software to add paper types for Mac. It is installed together with the printer
driver if you are using Mac.
See the following for more details on SL Paper Type Additional Tool.
U
“Adding Paper Information by Using a Paper Type File” on page 109
EPSON Software Updater The software checks if new software or update information is available on the
Internet and installs it when available. You can also update the manuals for this
printer.
U
“How to Use EPSON Software Updater” on page 26
EPSON NetConfig SE With this software, you can configure various network settings for the printer
from your computer. This is useful as it allows you to enter addresses and names
using the keyboard.
This manual is also installed during installation.
Web Config This software comes preinstalled in the printer. Start and use it from a Web
browser via the network.
Do the network security settings from Web Config. This software also has an
email notification function for notifying of printer errors and other problems.
U “How to Use Web Config” on page 27
EPSON SureLab OrderController/EPSON
SureLab OrderController LE
*1
This software is for receiving orders, and managing and processing photos to be
printed as orders. It also has image processing functions, such as auto
compensation. EPSON SureLab OrderController LE has limited functionality of
EPSON SureLab OrderController.
EPSON Print Factory for DPE
*1
This software is for terminals that receive orders and that support EPSON
SureLab OrderController/EPSON SureLab OrderController LE. Simple operability
and audio guidance mean that orders can be placed easily. It has functions for
multiple split screens, calendars, design templates, and more.
SL-D1000 Series User's Guide
Before Use
25
*1 This is optional software.
*2 Download this software from App Store or Google Play if necessary.
*3 This is not installed automatically. Download it from Epson's website and install it, if necessary.
EPSON SureLab Layout and ID
*1
This software has photo processing functions and layout functions. It can do
various processes to received photos, such as creating ID photos, inserting text,
and creating frames.
Printing cannot be done with just EPSON SureLab Layout and ID alone. Use it
with EPSON SureLab OrderController/EPSON SureLab OrderController LE.
EPSON SureLab FrameEditor
*1
This software creates frames by using EPSON SureLab Layout and ID.
Epson Photo Creator (for users)/Epson
Mobile Order Manager (for shops)
*2
This software is used at photo shops for ordering and printing photo-books and
snapshots from smart devices.
The user app is used to edit, save, and upload photo-books and snapshots, while
the shop app is used to receive, download, and print the data.
Epson Smart Panel
*2
This app is for printing and for checking the status of the printer from a smart
device.
Epson Device Admin
*3
This software can centrally manage the status of and do settings for multiple
printers connected over a network or by USB. It can also notify administrators
with error information, such as paper jams and ink depletion, as well as allow
settings to be changed remotely, such as IP addresses when a new printer is
installed.
Firmware Updater
*3
This software is for updating firmware. It uses EFU format files for firmware
updates to update the printer firmware.
Software Name Summary

Before Use
26
SL-D1000 Series User's Guide
Installing Maintenance
Tool (Windows Only)
If you need to install the Maintenance Tool
separately from the printer driver, use the
following procedure.
1
Download the Maintenance Tool from the
Epson support site and run the executable.
2
When the setup wizard starts, click Next.
Follow the on-screen instructions to install.
See the following for more details on
Maintenance Tool.
U
“Using the Maintenance Tool (Windows)”
on page 80
Printer Driver Functions
The printer driver coordinates print instructions from
other applications to print on the printer.
The main functions of the printer driver are described
below.
O Converts print data received from applications
into printable data and sends it to the printer.
O Set print conditions, such as the paper type and
paper size, on the printer driver's settings screen.
O Windows only ;
O Start Maintenance Tool and you can
perform adjustment and maintenance
operations, such as checking the printer's
status, making settings, and performing
head cleaning, from your computer.
U
“Using the Maintenance Tool
(Windows)” on page 80
O Start up Paper Type Additional Tool to be
able to add paper information to the printer
and printer driver.
U
“Adding Paper Information” on page
109
How to Use EPSON
Software Updater
Checking Software Update
Availability
1
Check the following status.
O The computer is connected to the Internet.
O The printer and the computer can
communicate.
2
Start EPSON Software Updater.
Windows 8.1
Enter the software name in the search charm,
and select the icon displayed.
Windows 10
Click the Start button, and then select All Apps
- Epson Software-EPSON Software Updater in
this order.
Mac
Click Go - Applications - Epson Software -
EPSON Software Updater.
3
Update the software and manuals.
Follow the on-screen instructions to continue.
Note:
If your computer runs on a Mac OS, Maintenance Tool
is installed together when you install the printer driver.
Note:
In Windows, you can also start by clicking the
printer icon on the desktop toolbar and selecting
Software Update.
c
Important:
Do not turn off the computer or printer while
updating.
SL-D1000 Series User's Guide
Before Use
27
Receiving Update Notifications
1
Start EPSON Software Updater.
2
Click Auto update settings.
3
Select an interval for checking for updates on
the printer's Interval to Check box, and then
click OK.
How to Use Web Config
This section explains how to start and close Web
Config. See the Administrator's Guide in the Online
Manual for details about using Web Config.
Instructions for Starting
Launch a browser on a computer connected to the
same network as the printer.
1
Check the IP address of the printer.
From the Home screen, press Settings -
Network Settings - Advanced Setup - TCP/IP -
Manual, in this order.
2
Launch a Web browser on a computer
connected to the printer via a network.
3
Enter the IP address of the printer in the address
bar of the Web browser and press the Enter or
Return key.
Format:
IPv4: https://IP address of printer/
IPv6: https://[IP address of printer]/
Example:
IPv4: https://192.168.100.201/
IPv6: https://[2001:db8::1000:1]/
Exiting Procedure
Close the Web browser.
Uninstalling Software
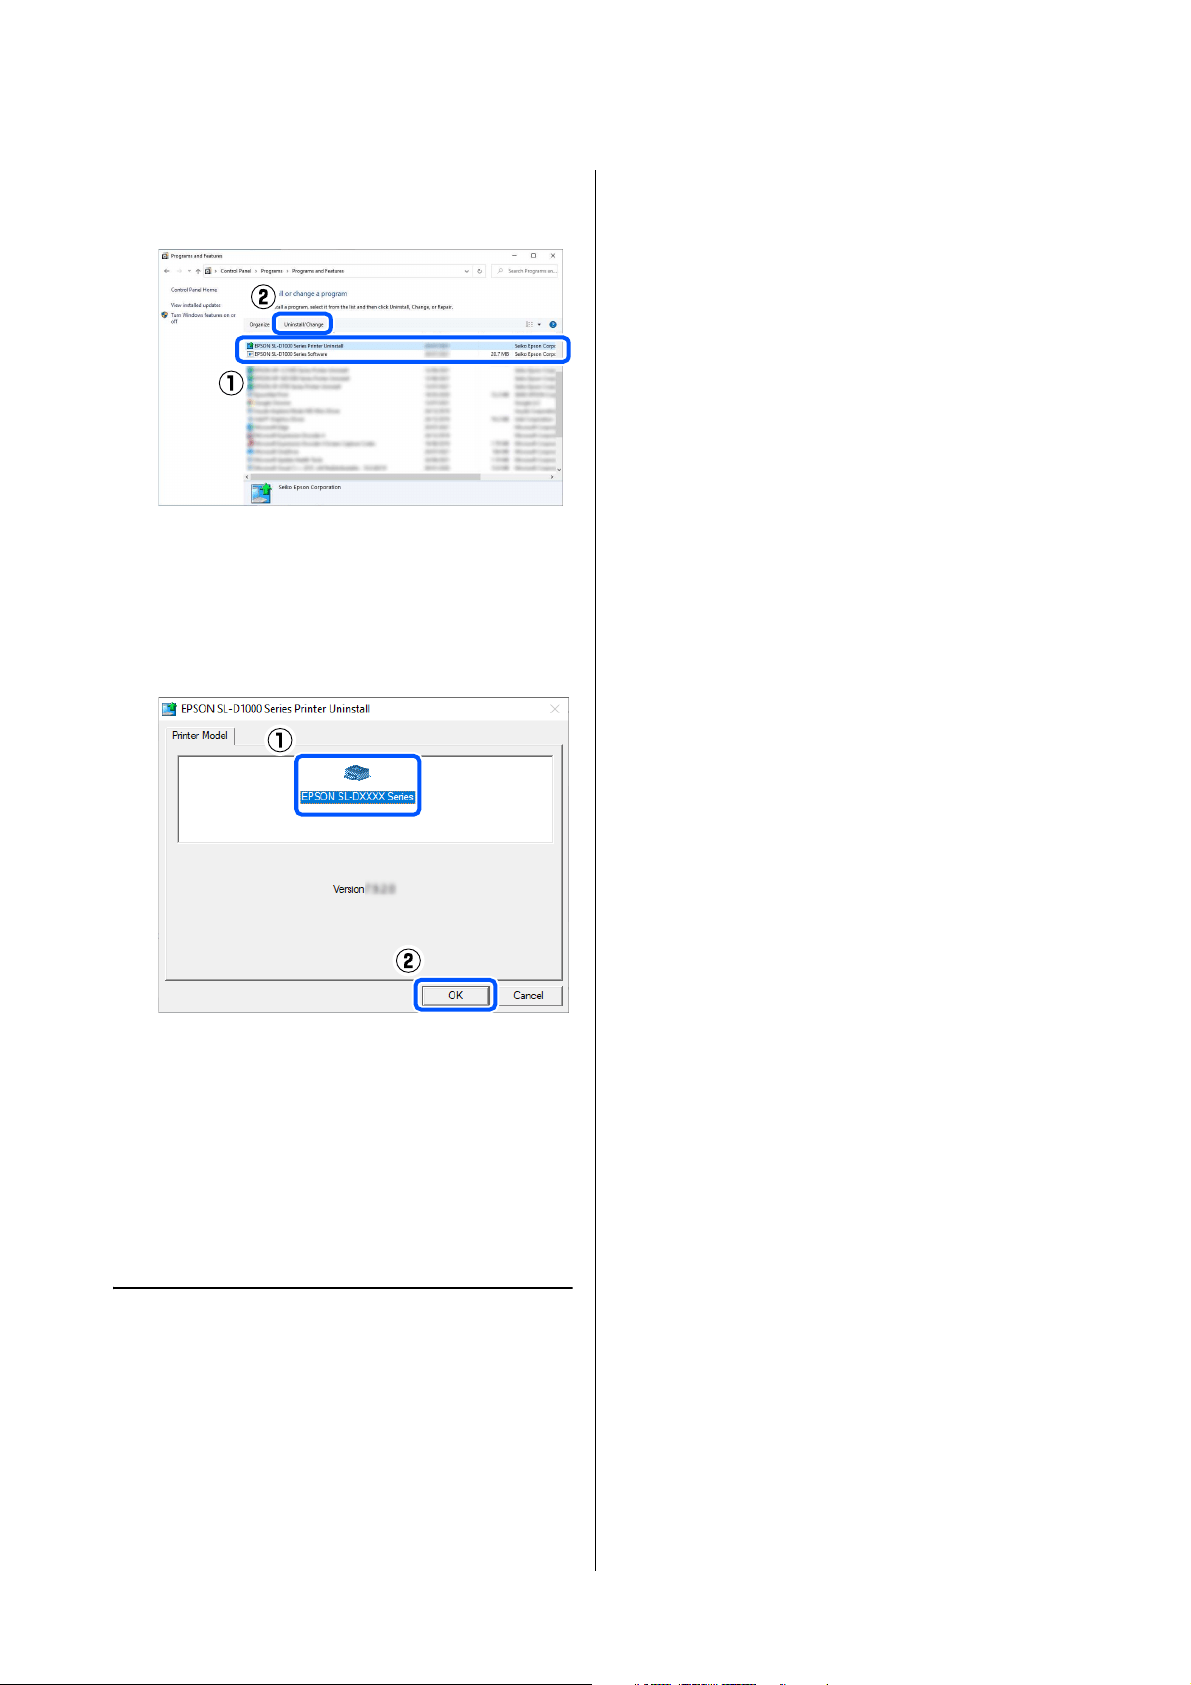
Windows
The printer driver and Maintenance Tool need to be
deleted individually.
1
Open the Control Panel, and then click
Uninstall a program.
2
Select the software to delete, and then click
Uninstall/Change (or Uninstall).
To Delete the Printer Driver
Select EPSON SL-D1000 Series Printer
Uninstall.
Note:
Software that is not displayed in the list cannot be
updated using EPSON Software Updater. Check for the
latest versions of the software from the Epson Web site.
https://www.epson.com
Note:
The initial value for the administrator’s user name is
blank (nothing has been input), and the initial value for
the administrator’s password is the product’s serial
number. Confirm the product serial number printed on
a label on the printer.
c
Important:
O You must log in as an Administrator.
O If the password or confirmation of an
administrator is requested, enter the
password and then continue with the
operation.
SL-D1000 Series User's Guide
Before Use
28
To Delete Maintenance Tool
Select EPSON SL-D1000 Series Software.
To delete the printer driver, go to step 3.
To delete Maintenance Tool, go to step 4.
3
Select the target printer icon, and then click OK.
4
Follow the on-screen instructions to continue.
When the delete confirmation message appears,
click Yes.
Restart the computer if you are reinstalling the printer
driver.
Mac
When the printer driver is deleted, Maintenance Tool
is also deleted.
Use the "Uninstaller" to uninstall the printer driver.
Downloading the Uninstaller
Download the "Uninstaller" from the Epson website.
https://www.epson.com/
Using the Uninstaller
Check the procedure when downloading "Uninstaller"
on the Epson website, and follow the instructions.

SL-D1000 Series User's Guide
Basic Operations
29
Basic Operations
Notes When
Loading/Replacing Paper
Notes when Loading Roll Paper
Do not load roll paper if the left and right edges are
uneven
Loading roll paper whose left and right edges are
uneven, will cause paper feeding problems. Align the
edges before using it or use a roll of paper that has no
such issues.
Repeatedly winding and unwinding the same roll
paper on the spindle unit may tend to make the left and
right ends uneven.
When removing roll paper, do not allow the paper to
become loose, and when loading it, keep the left and
right edges even.
Do not load roll paper if the leading edge is ragged.
If the leading edge of the roll paper is ragged, cut it
straight with a pair of scissors, or something, and then
load it.
!
Caution:
O Do not rub the edges of the printing paper
with your hand. The edges of the paper are
thin and sharp and could cause an injury.
O When opening and closing the covers, do not
place your hands near the points where the
main unit and the cover join. If your fingers
or hands are trapped, an injury could occur.
O When moving the roll paper unit in or out,
grip the handle. If you place your hands into
any other sections, either side of your hand or
fingers could be injured.
SL-D1000 Series User's Guide
Basic Operations
30
How to Replace Roll Paper
This section explains how to remove paper from the
roll paper unit, and then load new paper.
Preparing to Replace Paper
Prepare the following items.
Replace the roll paper in the following order. Follow
the steps for each procedure.
O
“Removing the Spindle Unit” on page 30
O “Removing the Roll Paper” on page 31
O “Attaching the Roll Paper” on page 31
O “Installing the Spindle Unit” on page 33
Removing the Spindle Unit
1
Confirm that the power is on.
2
Press the button to rewind roll paper to the
spindle.
3
Store the output tray.
4
Remove the scrap paper box, and dispose of the
scraps.
5
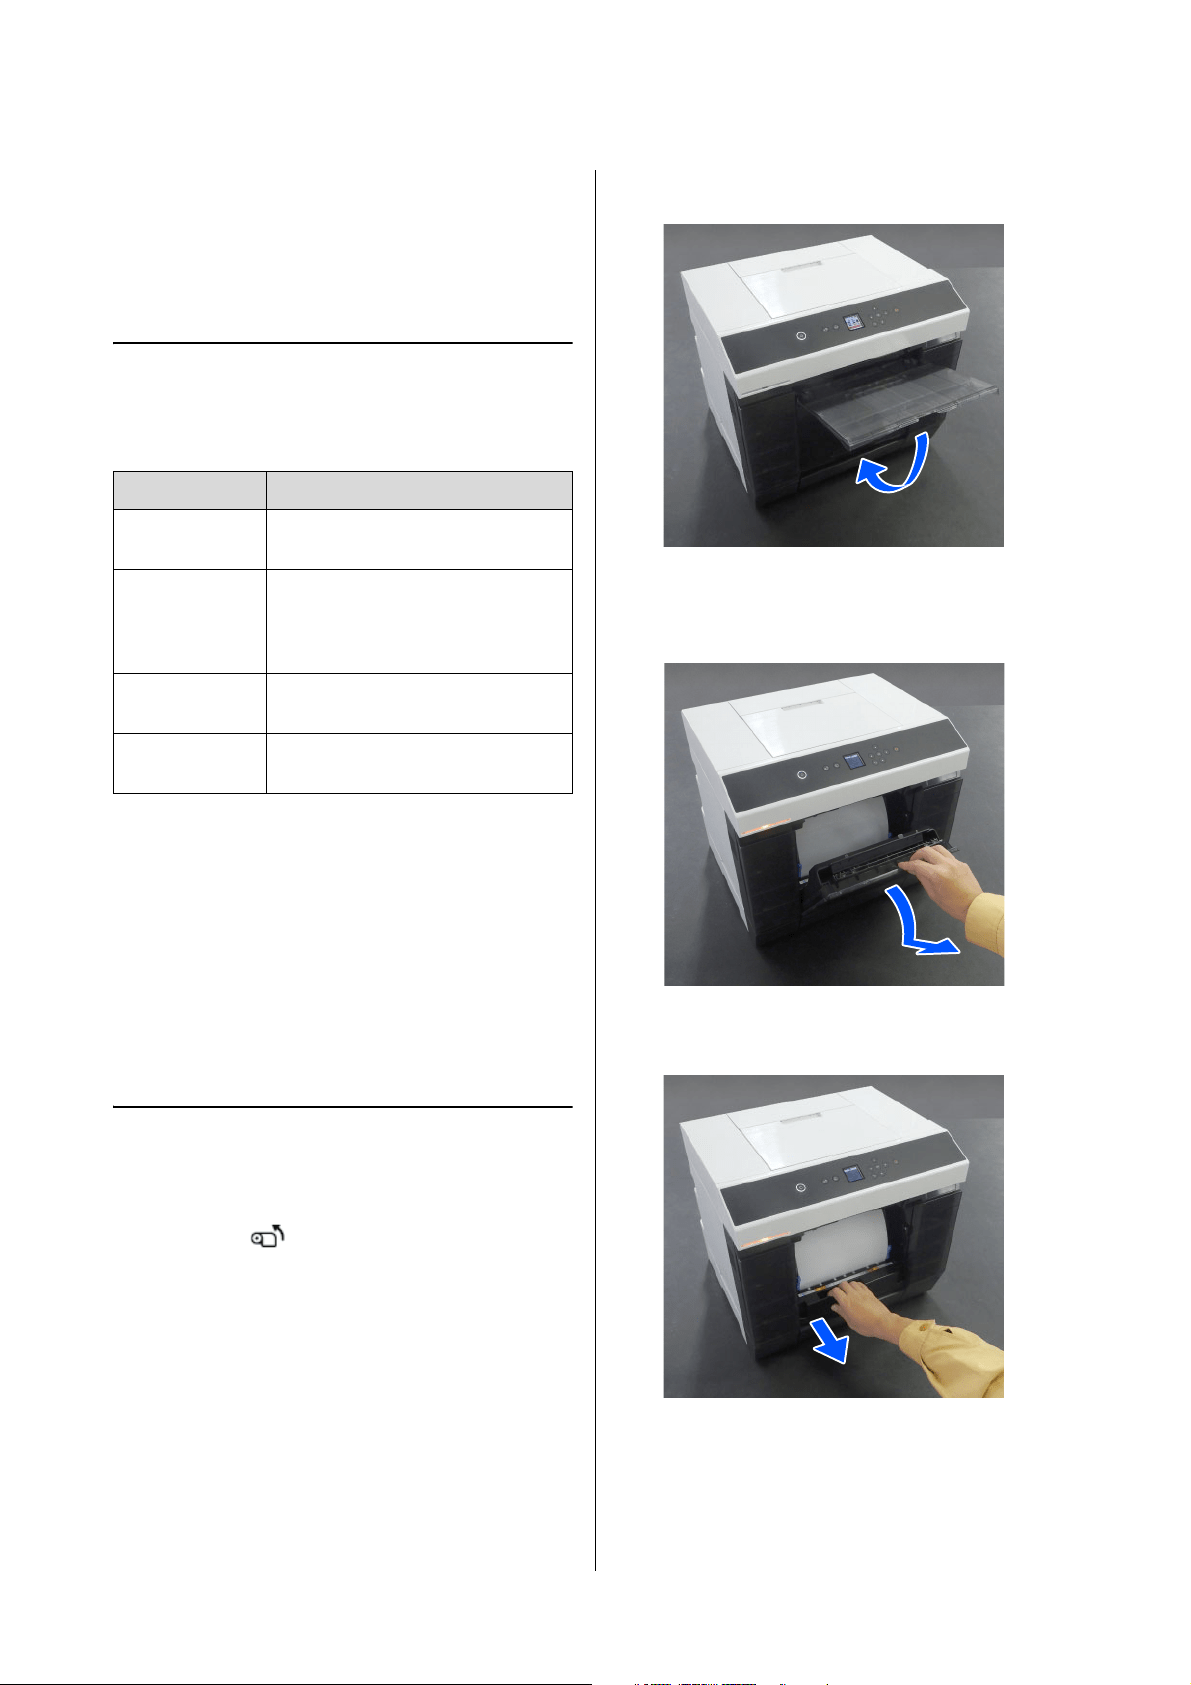
Pull out the roll paper unit.
Item Prepared Explanation
New roll paper
to be loaded
-
Cloth or vinyl
rug
Spread it out where the roll paper will
be loaded/removed from the spindle
unit so that the roll paper does not
get dirty.
Soft cloth Clean the edges of the roll paper
before installing the roll paper.
Gloves Wear when handling the roll paper so
that the paper does not get dirty.
SL-D1000 Series User's Guide
Basic Operations
31
6
Remove the spindle unit.
Do not lift the spindle unit by the knobs when
removing it. The roll paper could fall.
Removing the Roll Paper
1
Raise the knob and remove the left-side media
edge guide.
2
Raise the knob and remove the right-side media
edge guide and the spindle.
Attaching the Roll Paper
Attach the roll paper so it is in the center of the spindle
unit. Follow the steps below to attach it.
1
Remove the new roll paper from its packaging,
and stand it on end on a flat surface. Next, wipe
the end of the roll paper with a soft cloth several
times to remove any dirt, such as paper dust.
Place the roll paper so the leading edge is facing
as shown in the illustration below.
2
Raise the knob on the media edge guide and
place it on the roll paper.
Press it in until there is no gap between the
media edge guide and the roll paper.
SL-D1000 Series User's Guide
Basic Operations
32
If the spindle is inserted into the media edge
guide, first remove the spindle and then press
the media edge guide in to securely attach it to
the roll paper.
3
Insert the spindle into the media edge guide
until the position of the width of the paper being
loaded.
Insert the end of the spindle that has no gear
first.
The illustration shows an example of alignment
with A4.
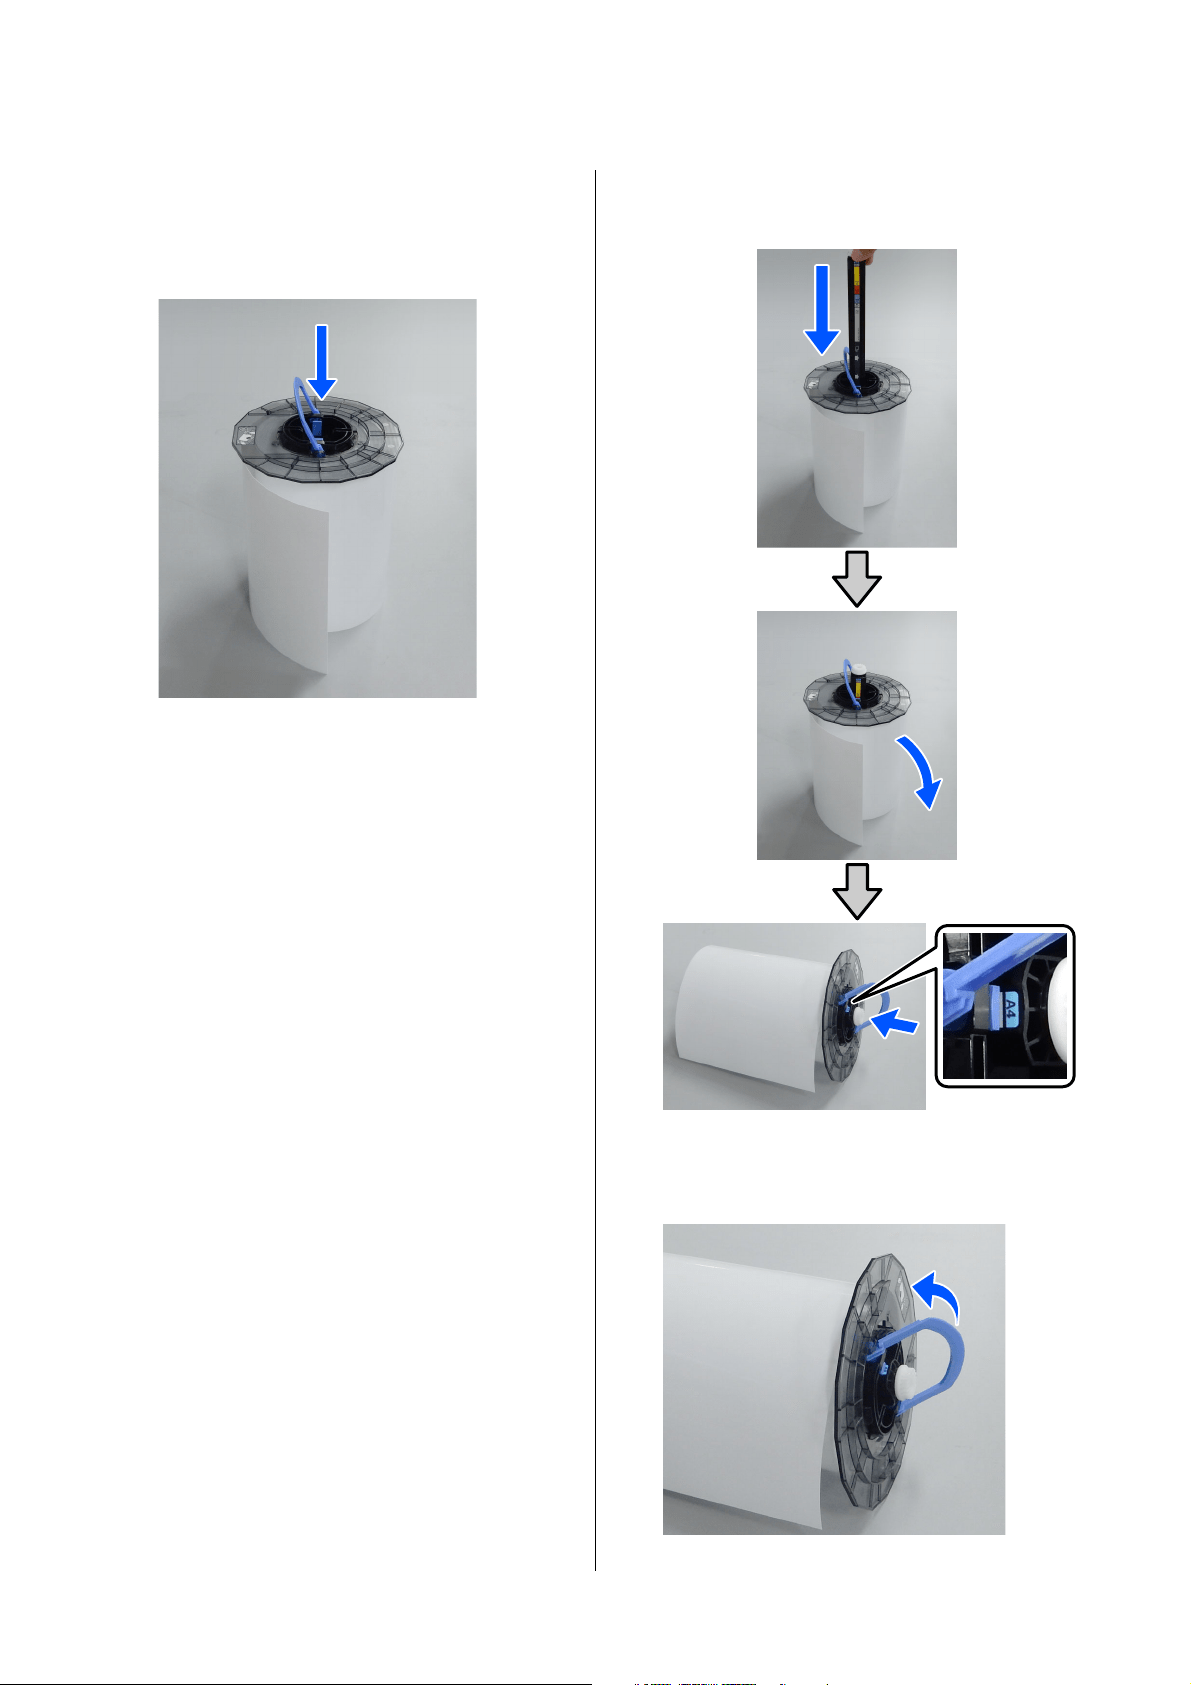
4
Lower the knob, and secure the media edge
guide.
SL-D1000 Series User's Guide
Basic Operations
33
When doing this, confirm that there are no gaps
between the media edge guides and the roll
paper.
5
Insert the media edge guide into the side
opposite to the shaft of the spindle unit, and
firmly clamp the roll paper between the media
edge guides.
6
Confirm that there are no gaps between the
media edge guide and the roll paper, lower the
knob, and then secure the media edge guide.
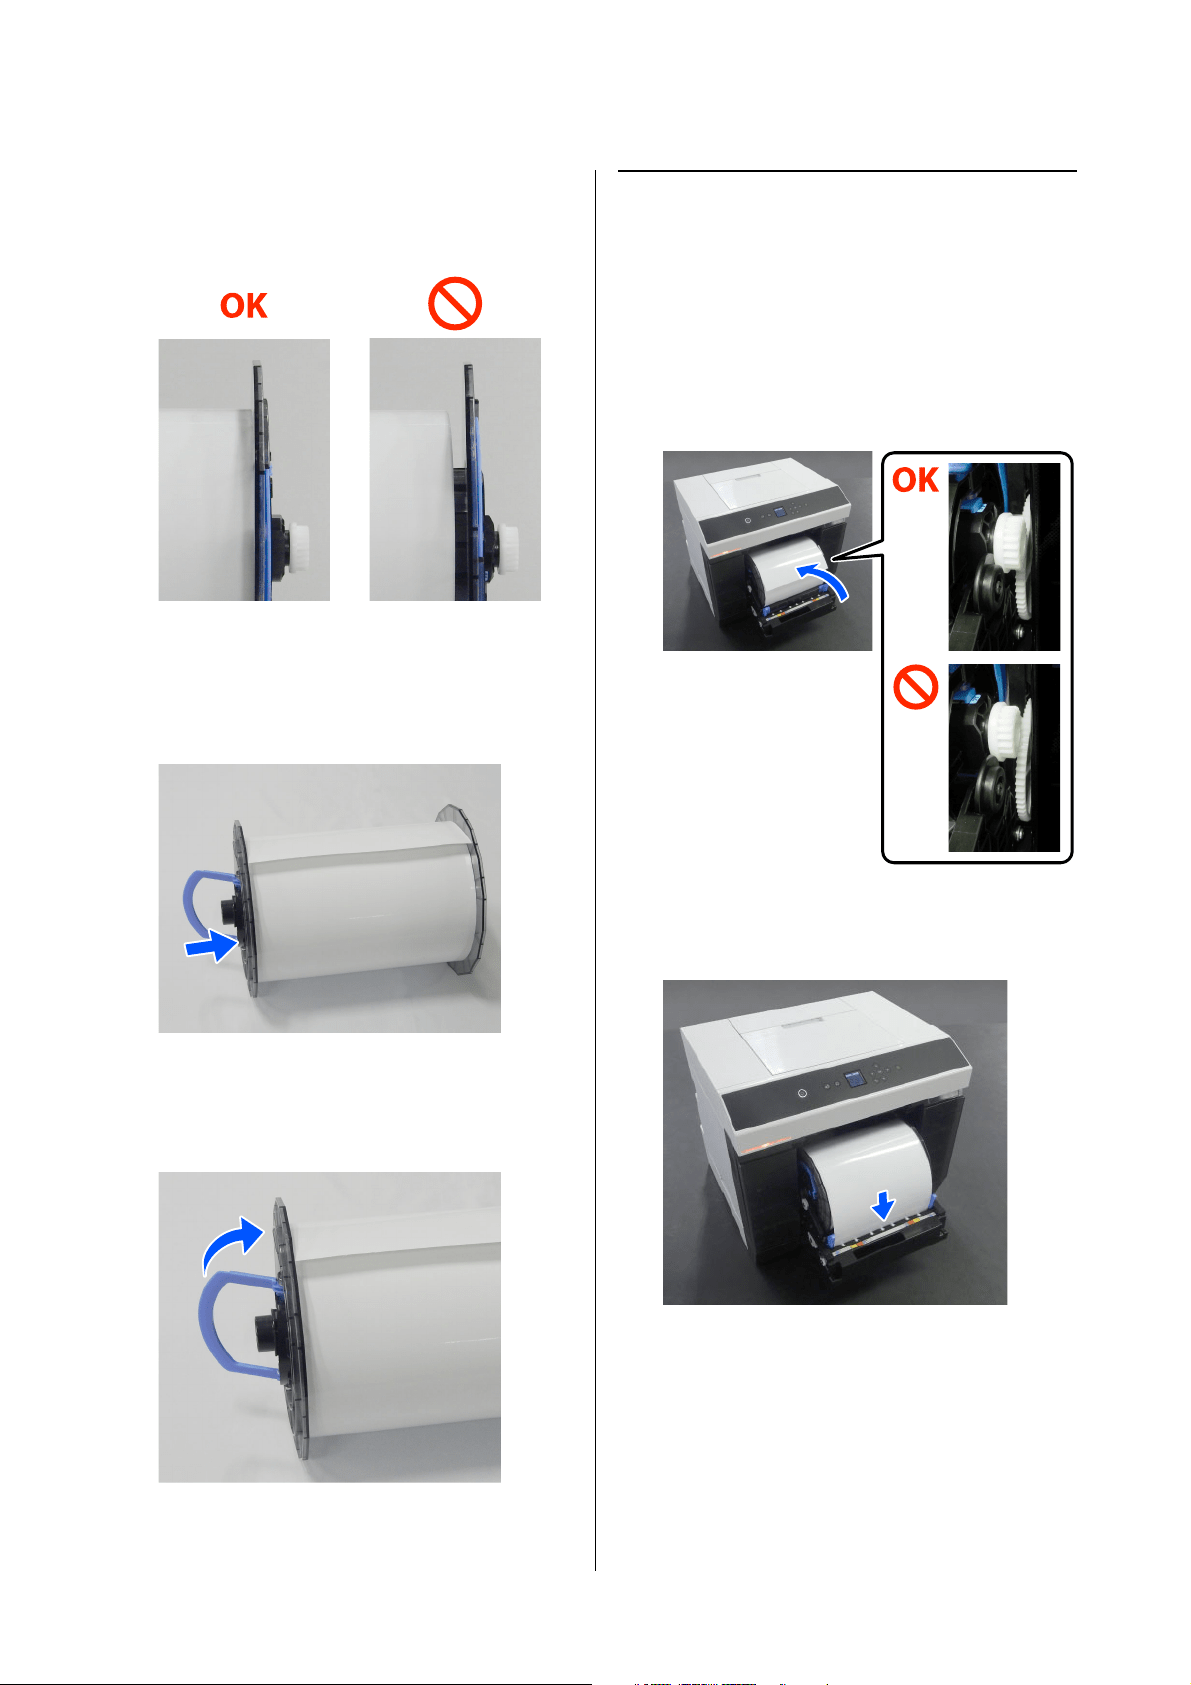
Installing the Spindle Unit
1
Load the spindle unit into the roll paper unit.
Position the gear on the end of the spindle on
the right side.
Check that the shaft of the spindle unit fits into
the bearing and that the gears engage.
2
Insert the leading edge of the roll paper into the
paper slot until you hear a beep.
SL-D1000 Series User's Guide
Basic Operations
34
3
Align the edge guides to the width of the roll
paper.
At this time, confirm that the position of the
edge of the roll paper matches the label showing
the paper size, and that there are no gaps
between the left and right edge guides and the
edges of the roll paper.
If the labels do not match or there are gaps at the
left or right edge guides, then the position in
which the roll paper is loaded is not aligned with
the spindle unit. Reload the roll paper in the
correct position.
SL-D1000 Series User's Guide
Basic Operations
35
4
Push the roll paper unit all the way in.
5
Attach the scrap paper box.
Paper feed starts after it is attached. When paper
feed stops, the control panel screen displays the
paper type settings.
6
Set the paper type on the control panel screen.
Press Z if the type of paper displayed matches
the type of roll paper inserted.
If it is not, select Change and choose the correct
type.
7
Extend the output tray.
Lift it up toward you and push it slightly in to
secure it.
Pull the second stage out toward you and raise
the front edge part.
SL-D1000 Series User's Guide
Basic Operations
36
How to Load Cut Paper
This section explains the procedure to load cut paper in
the paper feed unit and the optional cassette.
Required Items
Prepare the following items.
Loading in the Paper Feed Unit
First start printing to transmit the print data to the
printer, and then load cut paper into the paper feed
unit.
1
Open the rear paper feed slot cover.
2
Spread apart the edge guides.
3
Load the paper in the center between the edge
guides with the printable side facing you.
4
Align the edge guides to the width of the paper.
5
Push the paper about 2 inches (5 cm) into the
paper slot.
At this time, push the paper gradually in as you
press on the left and right edge guides so the
paper does not skew. You can load the paper
correctly and prevent it from skewing.
Loading in the Cassette (Option)
Confirm in advance that the feed rollers that are
installed are suitable for the type of paper that is
loaded.
U
“Cleaning and Replacing the Rollers in the Duplex
Feeder (Option)” on page 72
Item Prepared Explanation
Cut paper to be
loaded
-
Gloves Wear when handling the paper so
that the paper does not get dirty.
SL-D1000 Series User's Guide
Basic Operations
37
1
Pull the cassette out toward you.
2
Spread apart the left, right, and front edge
guides all the way.
Pinch the levers as you move them.
3
Riffle the paper to be loaded.
Static electricity may cause sheets of paper in a
stack to stick to each other. Loading paper like
that into the cassette could cause paper feeding
problems, so follow the procedure below to riffle
the paper. Riffling paper forces air between the
sheets, which causes them to separate.
Riffle the short edges of the paper two times
each. For square paper, riffle whichever two
opposing sides.
4
Load the paper with the printable side facing
down.
The number of sheets that can be loaded is
either 100 sheets or up to the limit line on the
edge guide, whichever is fewer.
(1) Riffle the short edges of the paper as shown in the
illustration.
O Hold the paper lightly, without gripping it too
tightly. If you grip to tightly, air cannot get into
the edges of the paper to separate the sheets
that are stuck together.
O When riffling large sheets of paper, support
the stack of paper against your arm as shown
in the illustration.
(2) Riffle the other short edges two times in the same
way.
(3) Align all four edges of the paper.
SL-D1000 Series User's Guide
Basic Operations
38
See the following for the number of sheets of
genuine Epson paper that can be loaded.
U
“Supported Media” on page 163
5
Align the left, right, and front edge guides to the
paper.
Pinch the levers as you move them.
If there are gaps between the edge guides and the
paper, the paper may skew during printing, so
align them accurately.
Also, confirm that the top of the paper does not
exceed the upper limit line on the left and right
edge guides.
6
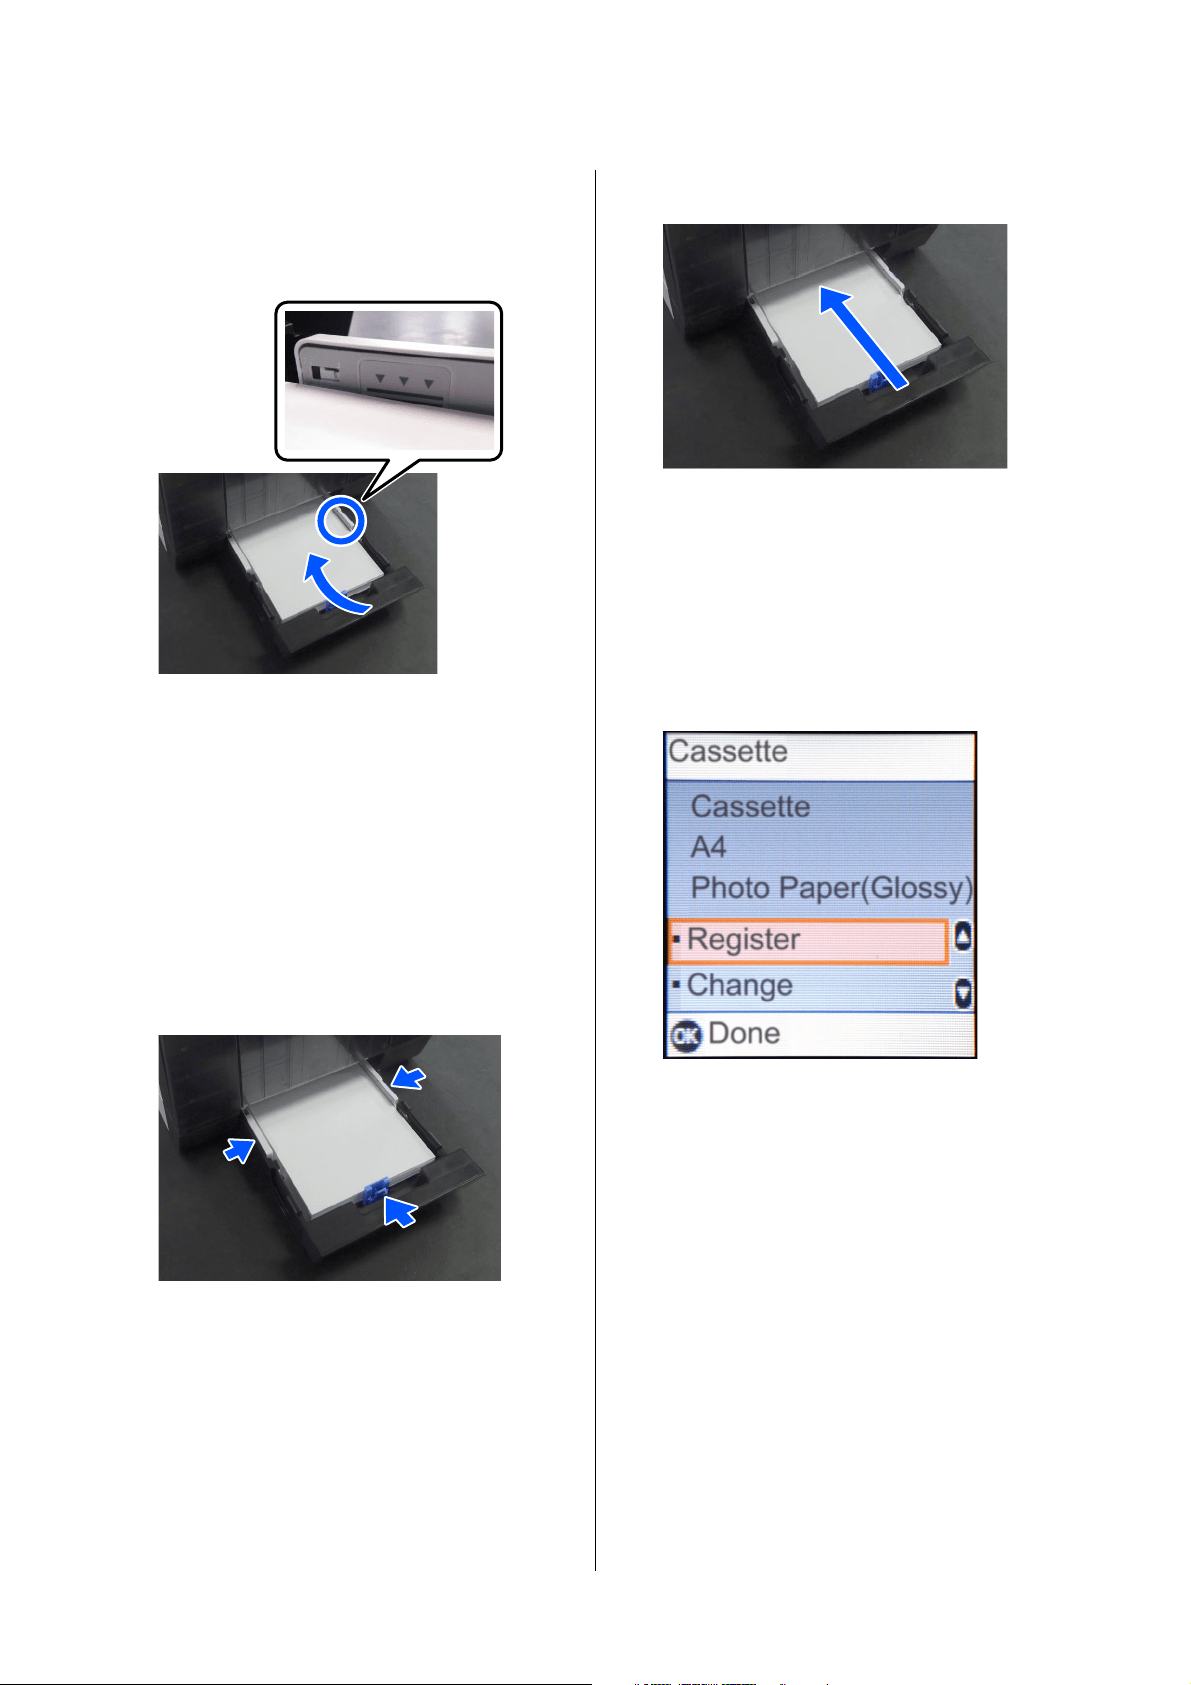
Close the cassette.
After closing it, set the paper size and paper type
on the control panel screen.
Press Z if the type of paper displayed matches
the type of paper inserted.
If it is not, select Change and choose the correct
type.
SL-D1000 Series User's Guide
Basic Printing Methods (Windows)
39
Basic Printing
Methods (Windows)
This section explains how to print and how to cancel
printing.
Printing is executed from application software on a
computer connected to the printer.
See the following for more details on stopping printing.
U
“How to Cancel Printing (from the Computer)”
on page 43
How to Print from
Photoshop
This section uses Adobe Photoshop 2021 as an example
of how to print image data.
Operations may differ depending on the application
software being used. See the manual supplied with the
application for more details.
1
Turn on the printer, and load the paper to be
used.
U
“Basic Operations” on page 29
When paper is loaded in the duplex feeder
When using the optional duplex feeder for the
first time, do the following settings.
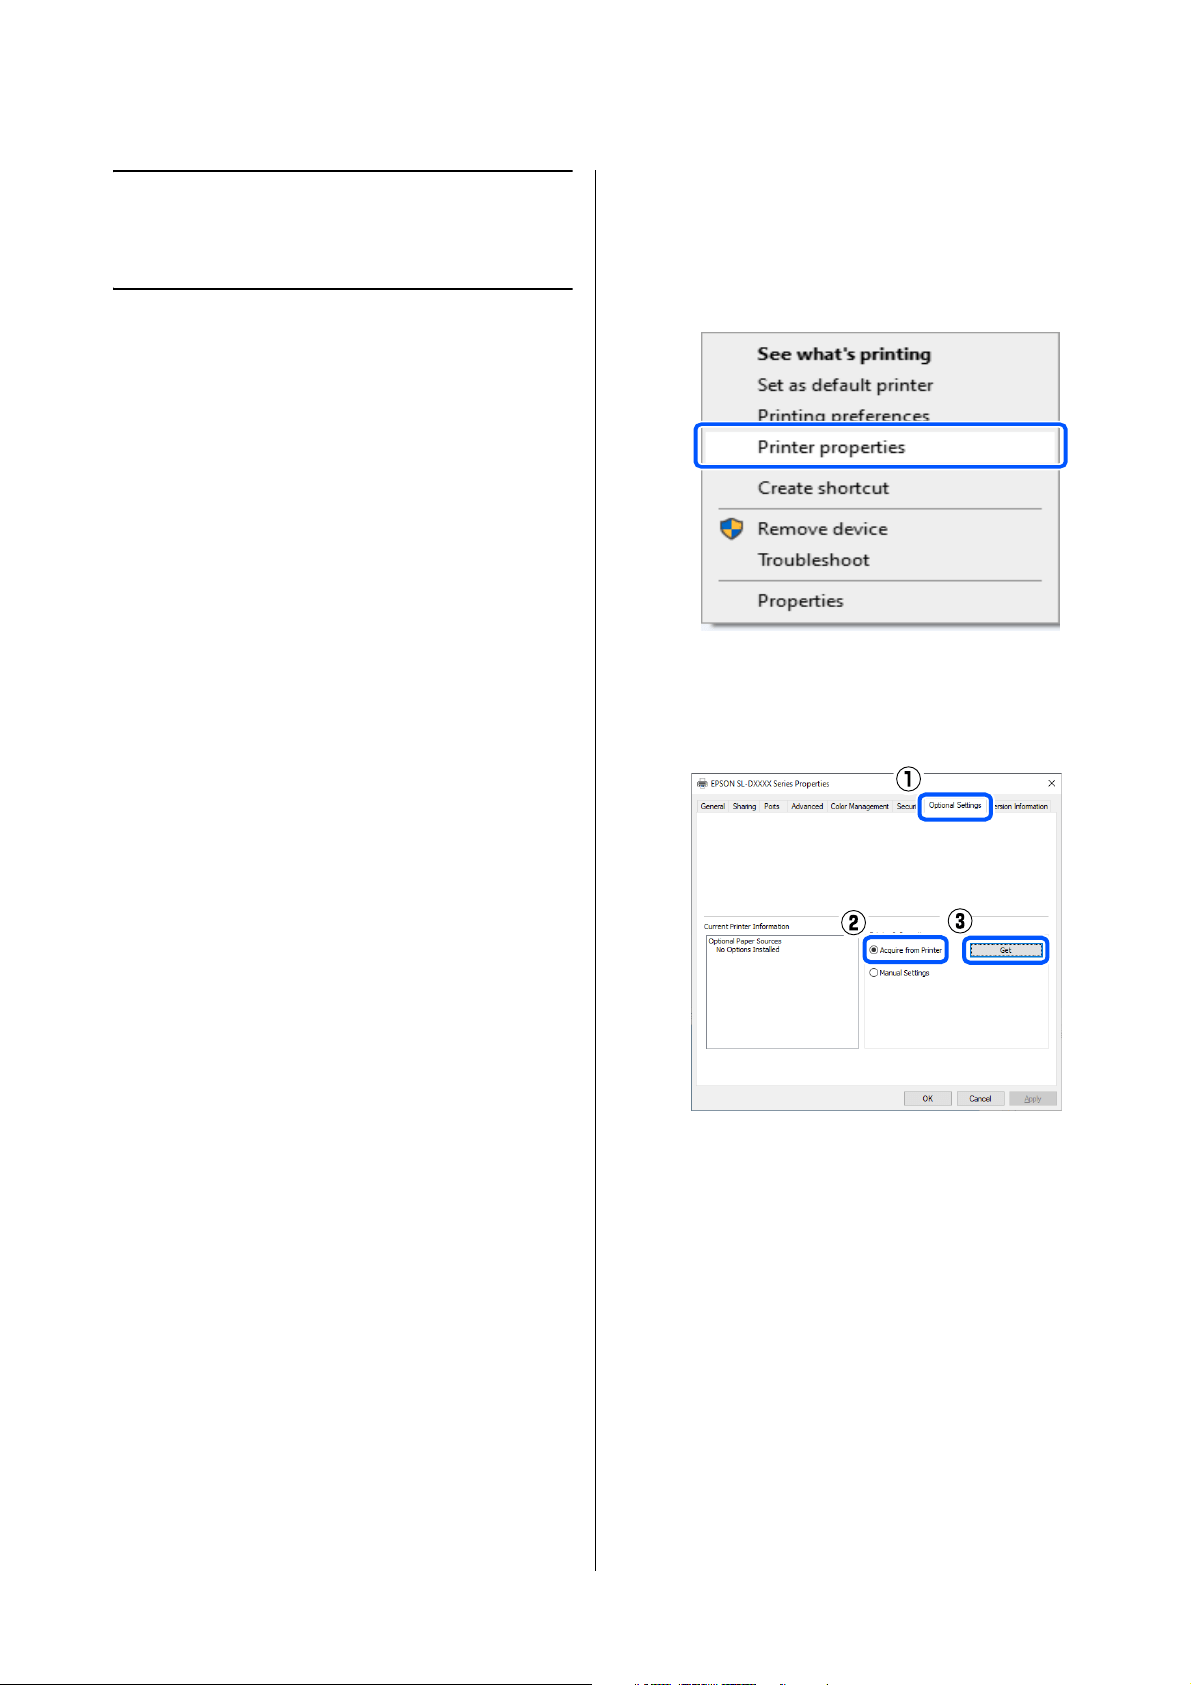
(1) Open the Control Panel, and click Hardware and
Sound - Devices and Printers, in this order.
(2) Right-click the target printer icon, and select
Printer properties.
(3) Select Optional Settings, select Acquire from
Printer, and then click Get.

SL-D1000 Series User's Guide
Basic Printing Methods (Windows)
40
2
Start Adobe Photoshop 2021, and open an
image.
3
Click Image - Image Size, in this order.
The Image Size screen is displayed.
4
Set the Image Size and Resolution, and then
click OK.
Select Original Size for Fit To, and then match
the Width and Height to the size of the paper
being printed.
Set the Resolution.
Setting the Width or Height changes Fit To to
Custom.
5
Click File - Print in this order.
(4) Confirm that Cassette is displayed in Optional
Paper Sources for Current Printer Information,
and then click OK.
Note:
We recommend Resolution normally be set to 360
dpi.
However, if all the following printing preferences
are met, setting 720 dpi can produce very clear
printouts.
O When Finest Detail is selected in the printer
driver.
O When a setting other than Draft is set for
Print Quality in the printer driver.
O When the paper length is less than 305 mm
SL-D1000 Series User's Guide
Basic Printing Methods (Windows)
41
The Photoshop Print Settings screen is
displayed.
6
Select the printer in Printer, and then click
Print Settings.
The Main screen of the printer driver is
displayed.
7
Set the various items in Print Settings.
O Media Type
Select the type of paper that is loaded in the
printer.
O Print Quality
The print qualities that you can select vary
depending on the type of paper that was
selected.
Normally, set Standard. If you want to print
with an emphasis on quality, set High
Quality. If you want to print quickly, set
Draft. When Draft is set, the printing speed
is quicker, however the print quality may
decline a little.
To do advanced settings according to your
preferences for color management and color
modes, click Advanced.
U
“Color Management” on page 48
8
Set the various items in Paper Source Settings.
O Paper Source
Settings depend on the type of paper that
was selected.
To print from the duplex feeder, select
Cassette.
O Paper Size
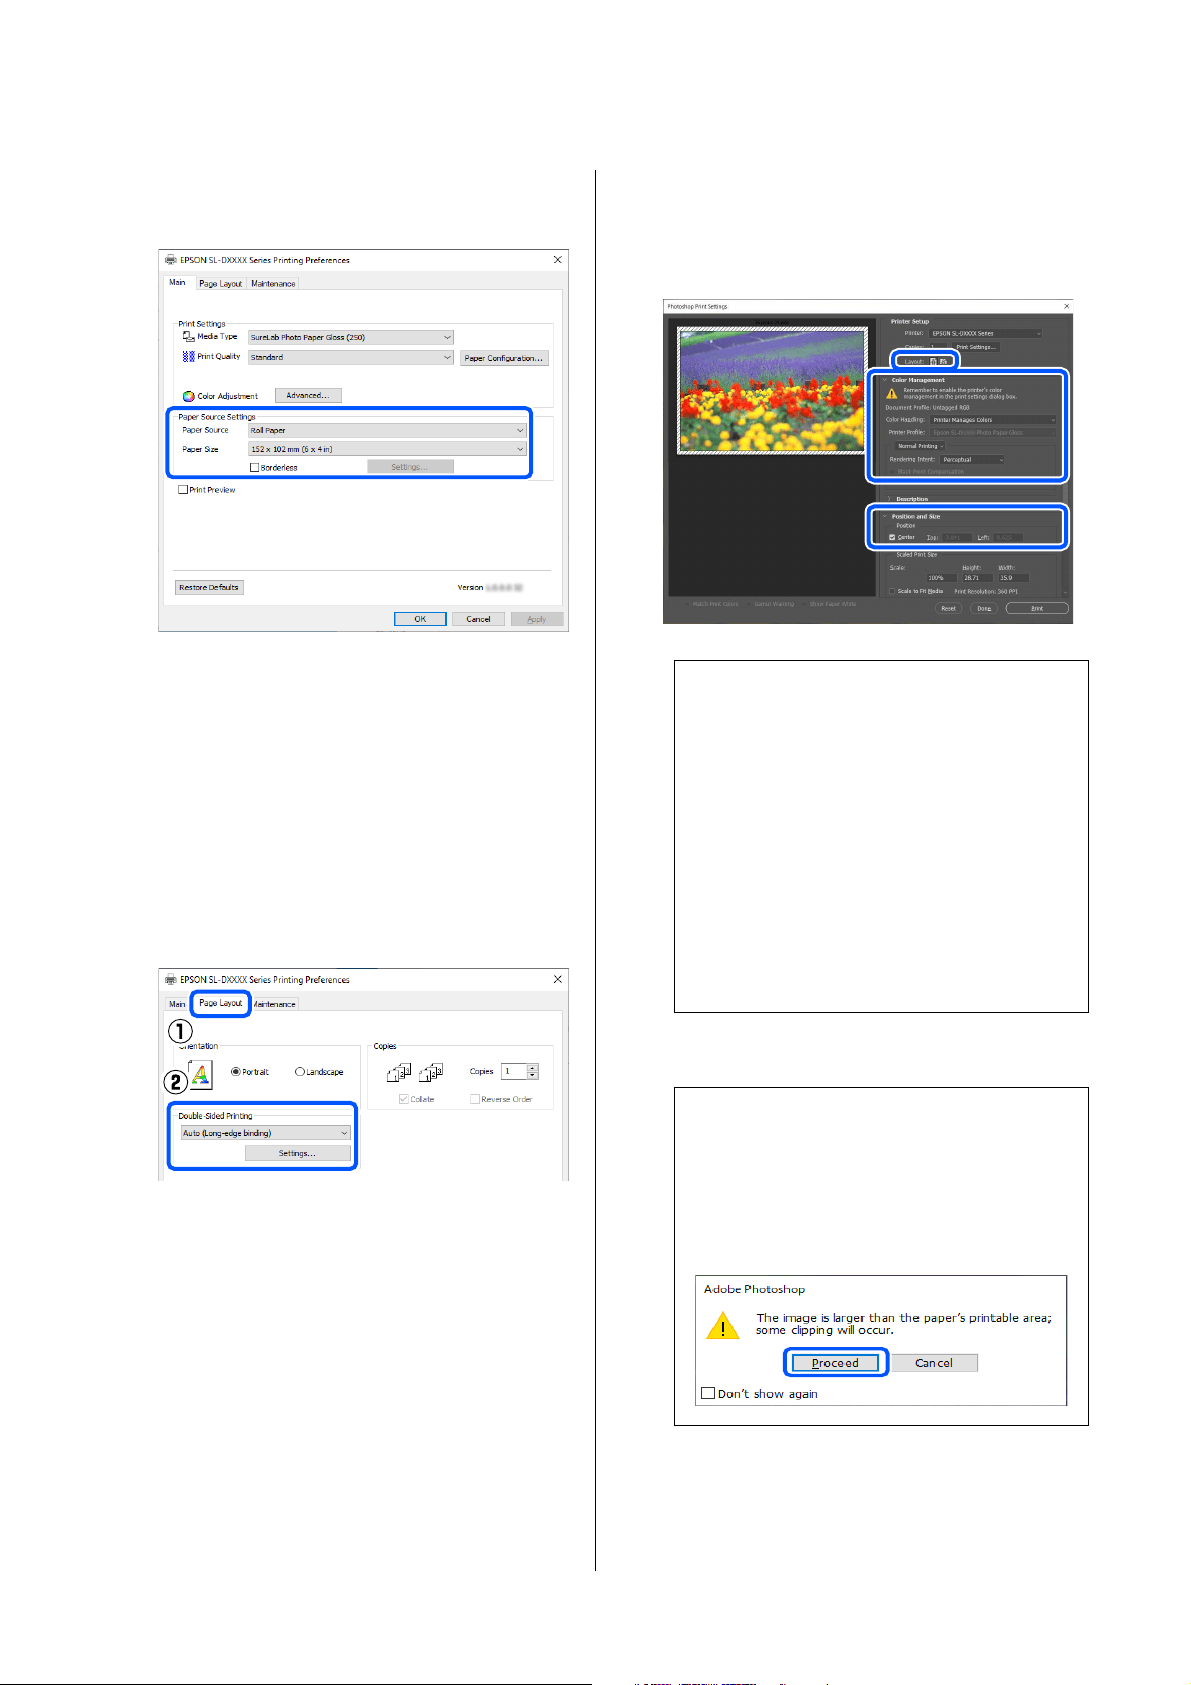
SL-D1000 Series User's Guide
Basic Printing Methods (Windows)
42
Select a size to print. Make sure this is the
same as the image size you set in step 4.
To print without borders (margins), select
Borderless.
U
“Borderless Printing on All Sides” on page
54
9
To do double-sided printing on cut sheets, click
Page Layout, and set the binding position in
Double-Sided Printing.
U “Double-Sided Printing” on page 58
10
Click OK.
11
Set each item, such as color management and
print position, while checking the image
displayed on the Photoshop Print Settings
screen.
12
Click Print.
Print data is sent to the printer and printing
starts.
Note:
O When the printer driver's Color Adjustment
is set to Color Controls, select Printer
Manages Colors in Color Handling in Color
Management.
O When performing detailed color
management using the Photoshop functions,
set Color Management according to the
conditions.
See the following for more details on color
adjustment.
U
“Color Management” on page 48
Note:
If the image size is larger than the print size, the
following screen is displayed.
Click Proceed. If you click Cancel, printing is
canceled and you are returned to the application's
screen.
SL-D1000 Series User's Guide
Basic Printing Methods (Windows)
43
How to Cancel Printing
(from the Computer)
When the computer has finished sending data to the
printer, you cannot cancel the print job from the
computer. Cancel on the printer.
U
“How to Cancel Printing (from the Printer)” on
page 43
1
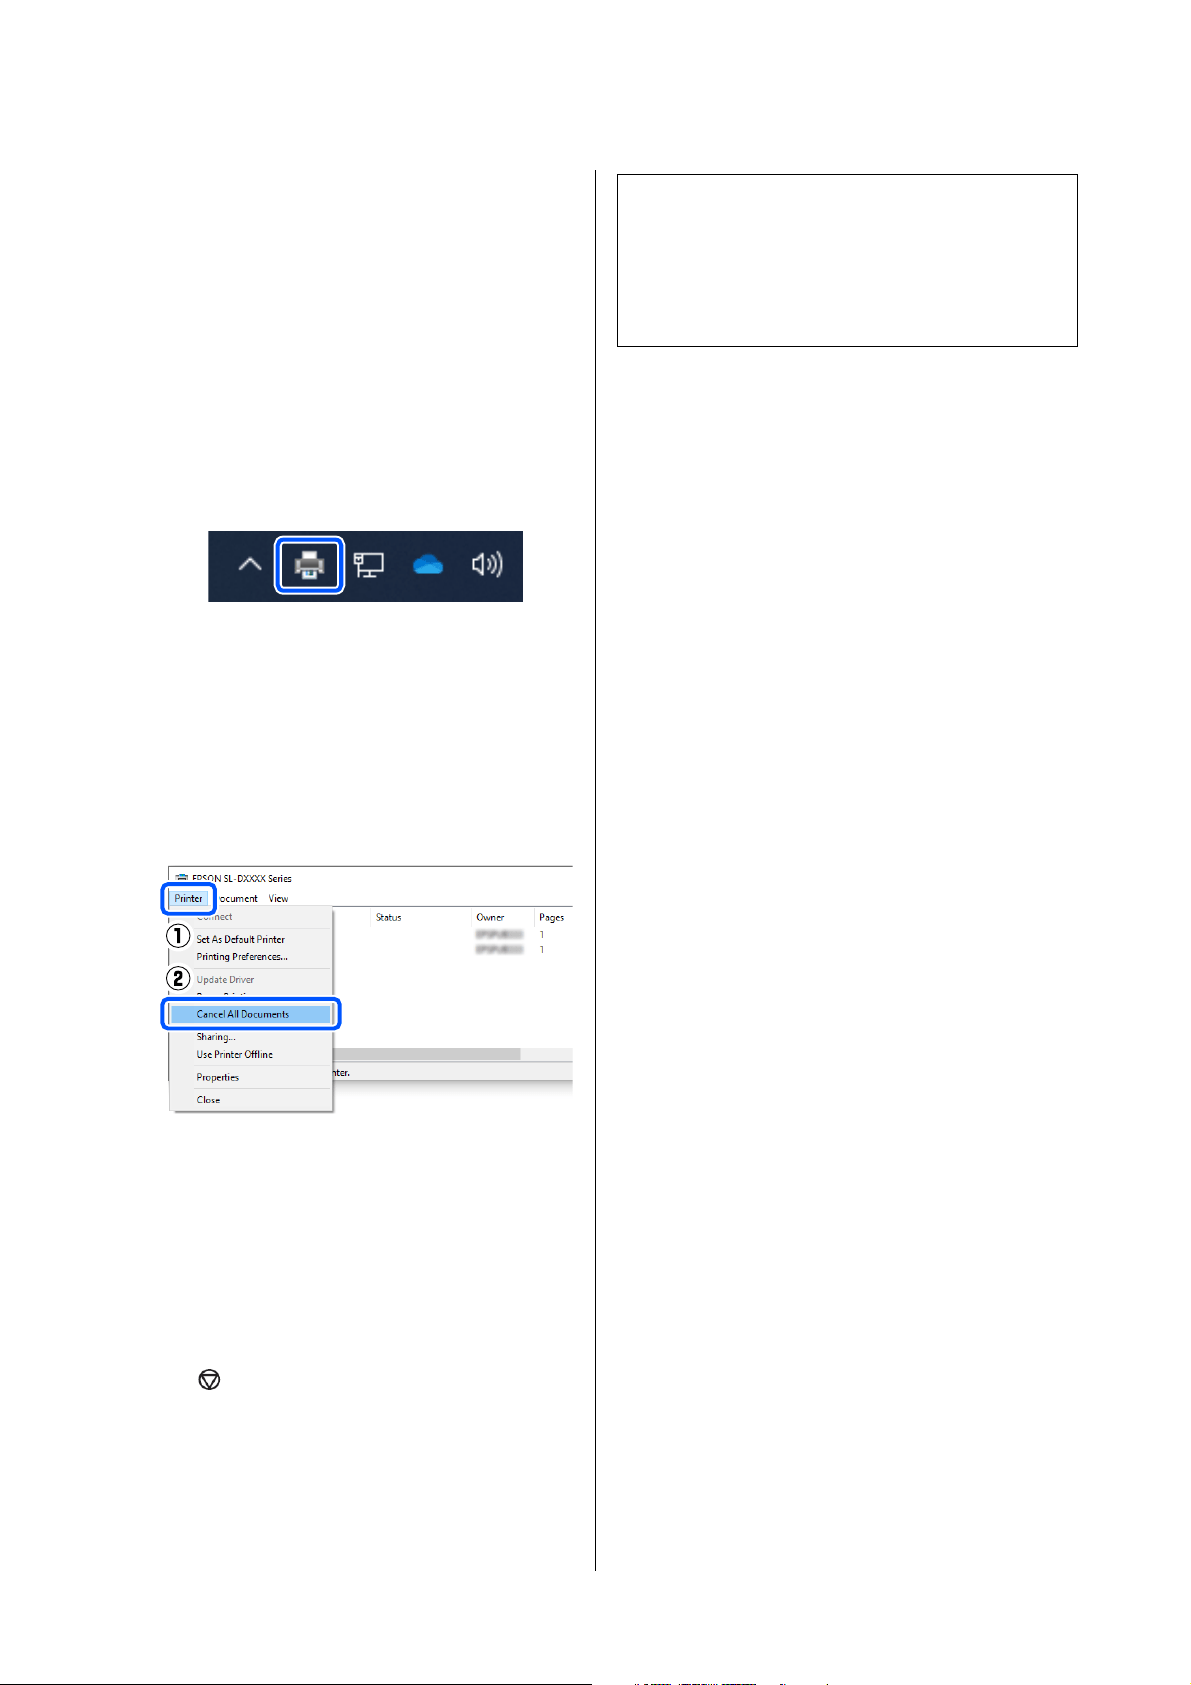
Click the printer icon on the taskbar.
Whether or not an icon is displayed depends on
the settings selected for Windows.
2
Select the job you want to cancel, and then select
Cancel from the Document menu.
To cancel all jobs, click Cancel All Documents
in the Printer menu.
If the job has been sent to the printer, print data
is not displayed on the above screen.
How to Cancel Printing
(from the Printer)
Press the button (stop button) on the control
panel.
The print job is canceled even in the middle of printing.
After cancelling, it may take a while before the printer
returns to the ready status.
Note:
You cannot delete print jobs which are in the print
queue on the computer using the above operation. See
"How to Cancel Printing (from the Computer)" in the
previous section to delete print jobs from the print
queue.

SL-D1000 Series User's Guide
Basic Printing Methods (Mac)
44
Basic Printing
Methods (Mac)
This section explains how to print and how to cancel
printing.
Printing is executed from application software on a
computer connected to the printer.
See the following for more details on stopping printing.
U
“How to Cancel Printing (from the Computer)” on
page 47
How to Print from
Photoshop
This section uses Adobe Photoshop 2021 as an example
of how to print image data.
Operations may differ depending on the application
software being used. See the manual supplied with the
application for more details.
1
Turn on the printer, and load the paper to be
used.
U
“Basic Operations” on page 29
2
Start Adobe Photoshop 2021, and open an
image.
3
Click Image - Image Size, in this order.
The Image Size screen is displayed.
4
Set the Image Size and Resolution, and then
click OK.
Select Original Size for Fit To, and then match
the Width and Height to the size of the paper
being printed.
Set the Resolution.
Setting the Width or Height changes Fit To to
Custom.
SL-D1000 Series User's Guide
Basic Printing Methods (Mac)
45
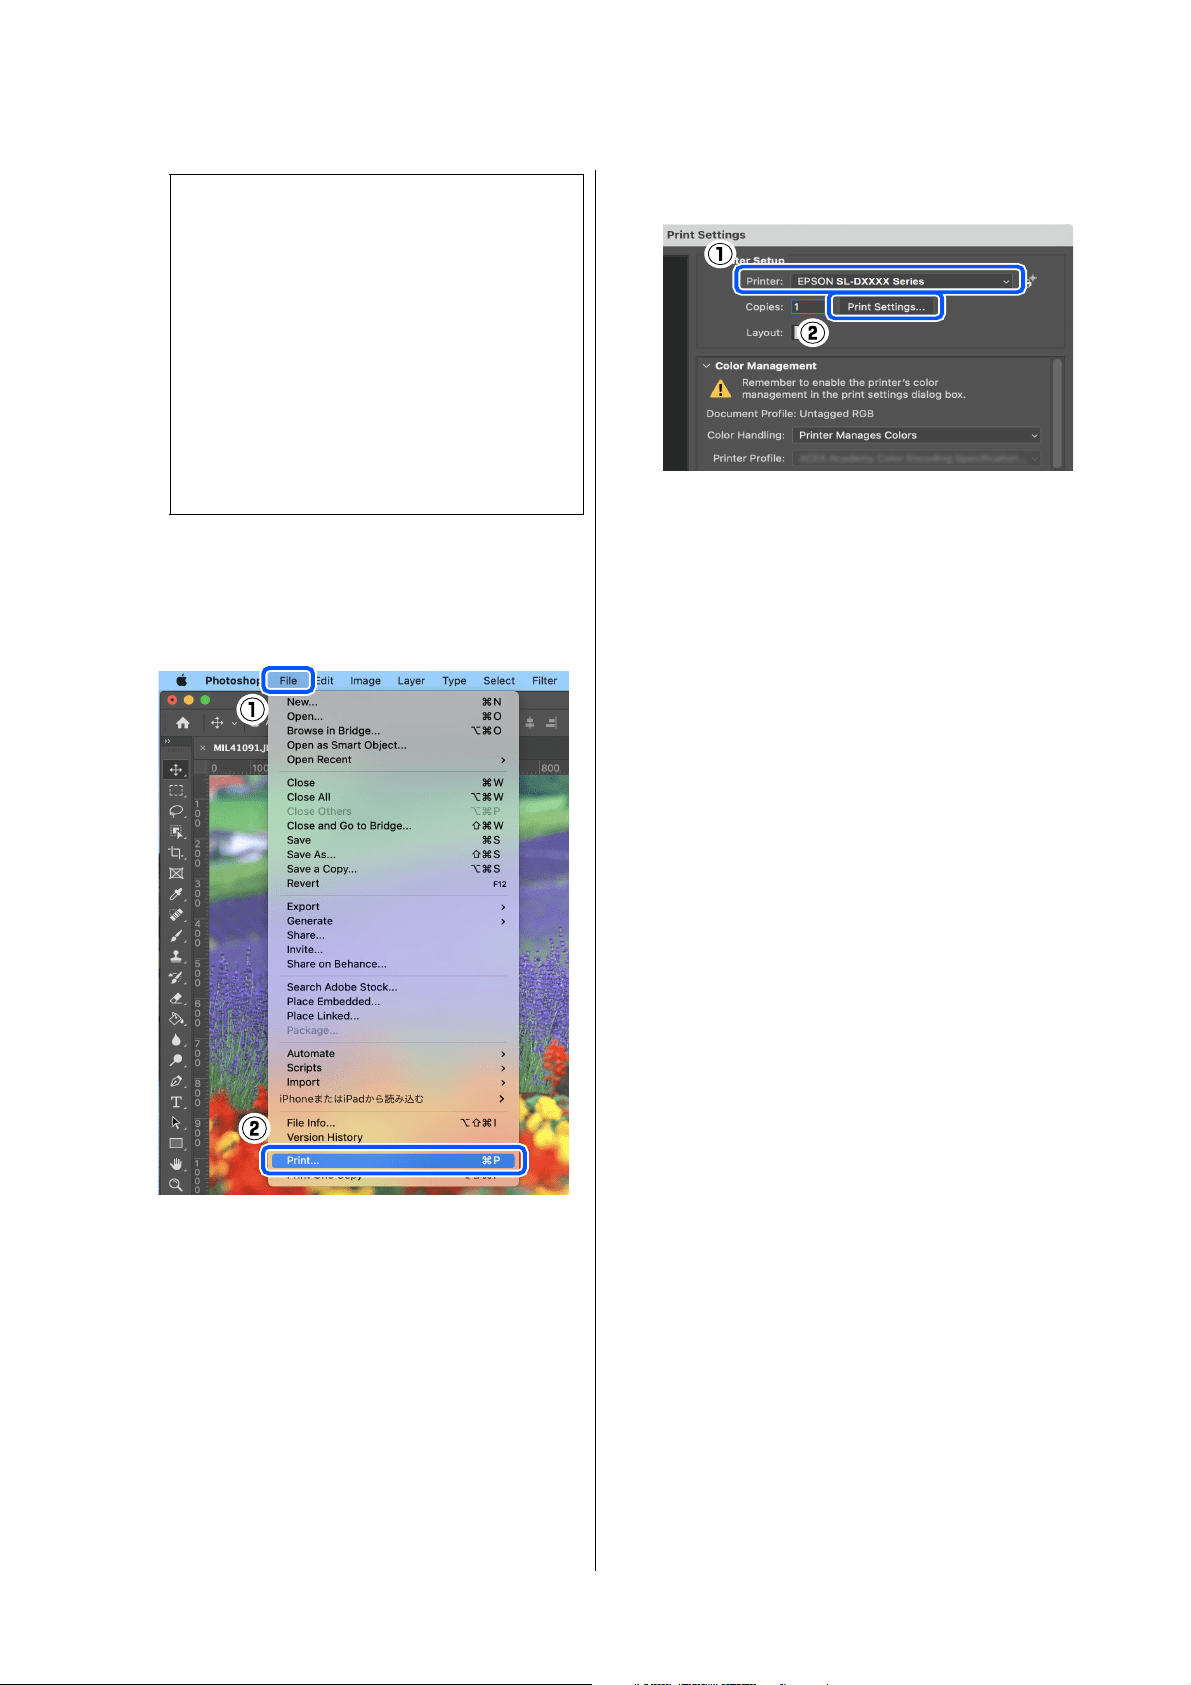
5
Click File - Print in this order.
The Photoshop Print Settings screen is
displayed.
6
Select the printer in Printer, and then click
Print Settings.
The Print screen is displayed.
7
Make the necessary settings.
You can set the Media Type and Print Quality
by selecting Print Settings in the pop-up menu.
O Paper Size
Select a size to print. Make sure this is the
same as the image size you set in step 4.
O Media Type
Select the type of paper that is loaded in the
printer.
O Print Quality
The print qualities that you can select vary
depending on the type of paper that was
selected.
Note:
We recommend Resolution normally be set to 360
dpi.
However, if all the following printing preferences
are met, setting 720 dpi can produce very clear
printouts.
O When Finest Detail is selected in the printer
driver.
O When a setting other than Draft is set for
Print Quality in the printer driver.
O When the paper length is less than 305 mm
SL-D1000 Series User's Guide
Basic Printing Methods (Mac)
46
Normally, set Normal. If you want to print
with an emphasis on quality, set High
Quality. If you want to print quickly, set
Draft. When Draft is set, the printing speed
is quicker, however the print quality may
decline a little.
To print without borders (margins), select a
paper size for borderless printing in Paper Size.
U “Borderless Printing on All Sides” on page
54
8
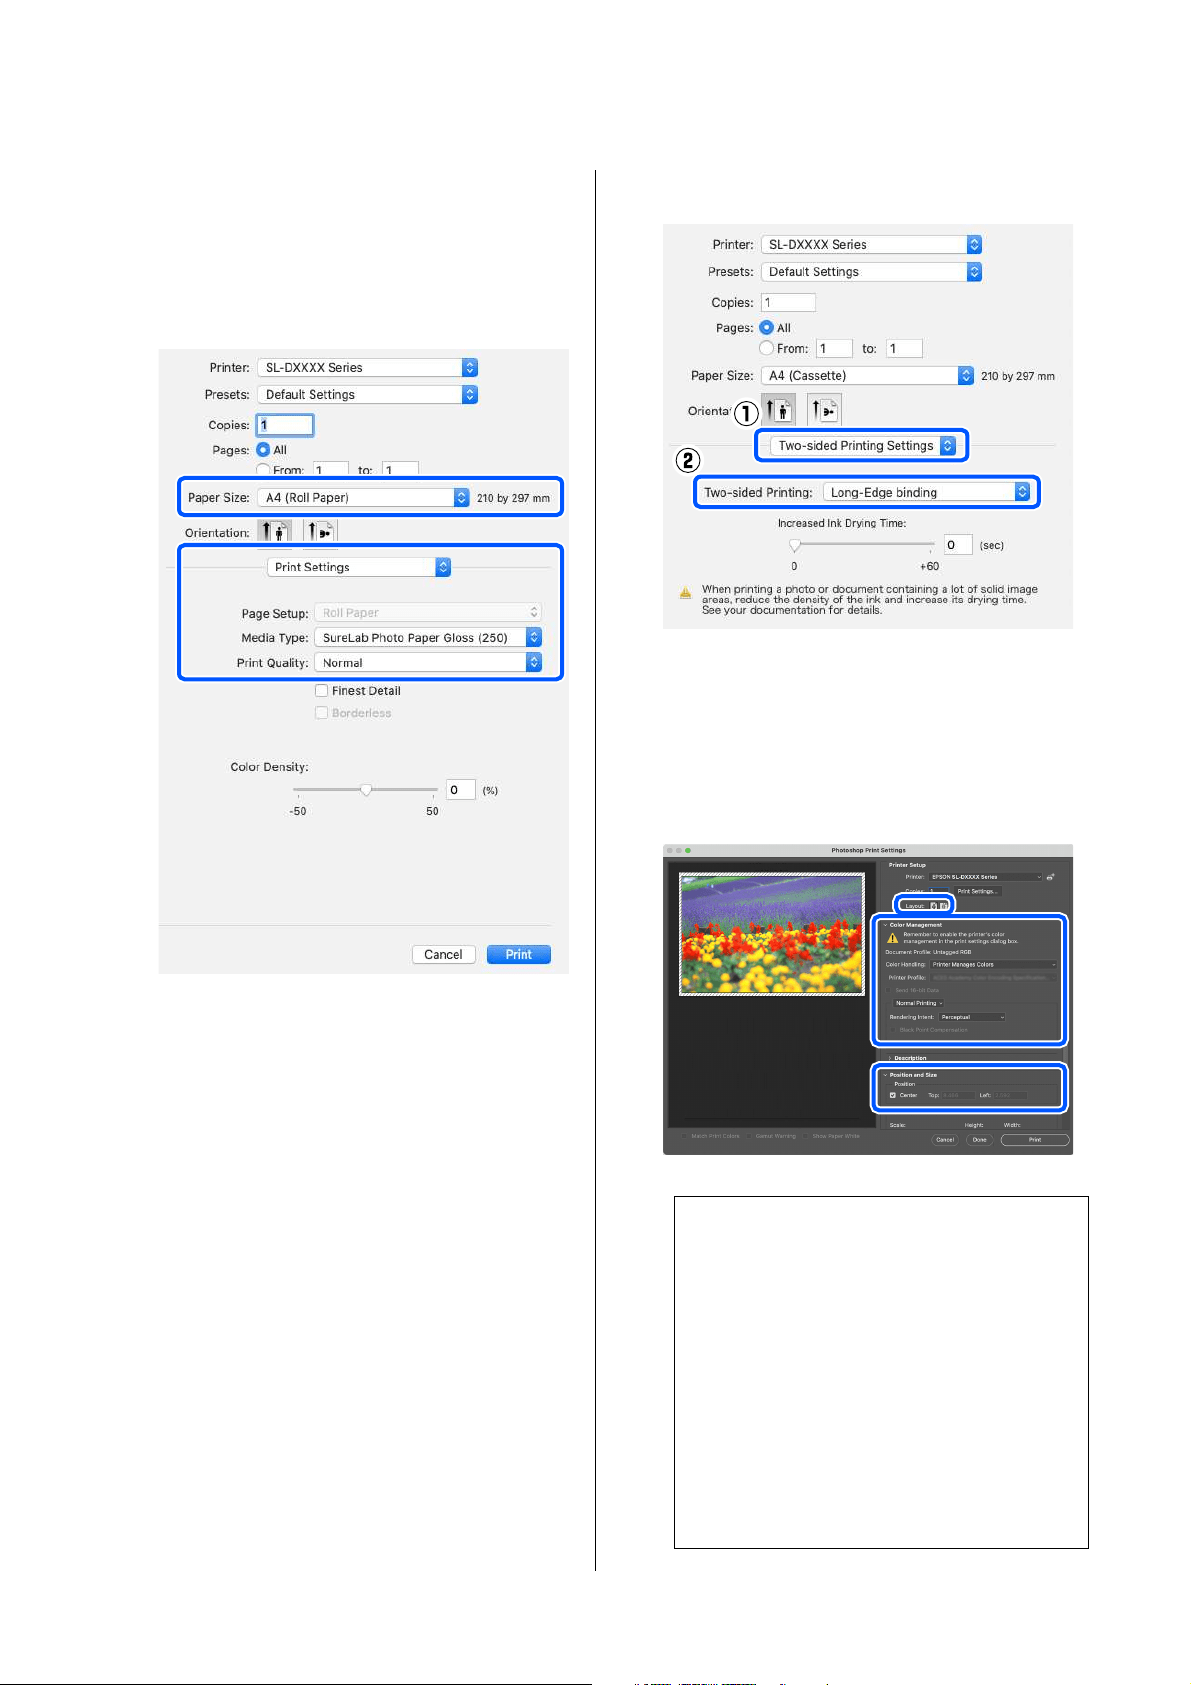
To do two-sided printing on cut sheets, select
Two-sided Printing Settings in the pop-up
menu, and set the binding position in
Two-sided Printing.
U
“Double-Sided Printing” on page 58
9
Click Print.
10
Set each item, such as color management and
print position, while checking the image
displayed on the Photoshop Print Settings
screen.
Note:
O When the printer driver's color adjustment is
set to Manual Settings, select Printer
Manages Colors in Color Handling in Color
Management.
O When performing detailed color
management using the Photoshop functions,
set Color Management according to the
conditions.
See the following for more details on color
adjustment.
U
“Color Management” on page 48
SL-D1000 Series User's Guide
Basic Printing Methods (Mac)
47
11
Click Print.
Print data is sent to the printer and printing
starts.
How to Cancel Printing
(from the Computer)
When the computer has finished sending data to the
printer, you cannot cancel the print job from the
computer. Cancel on the printer.
U
“How to Cancel Printing (from the Printer)” on
page 47
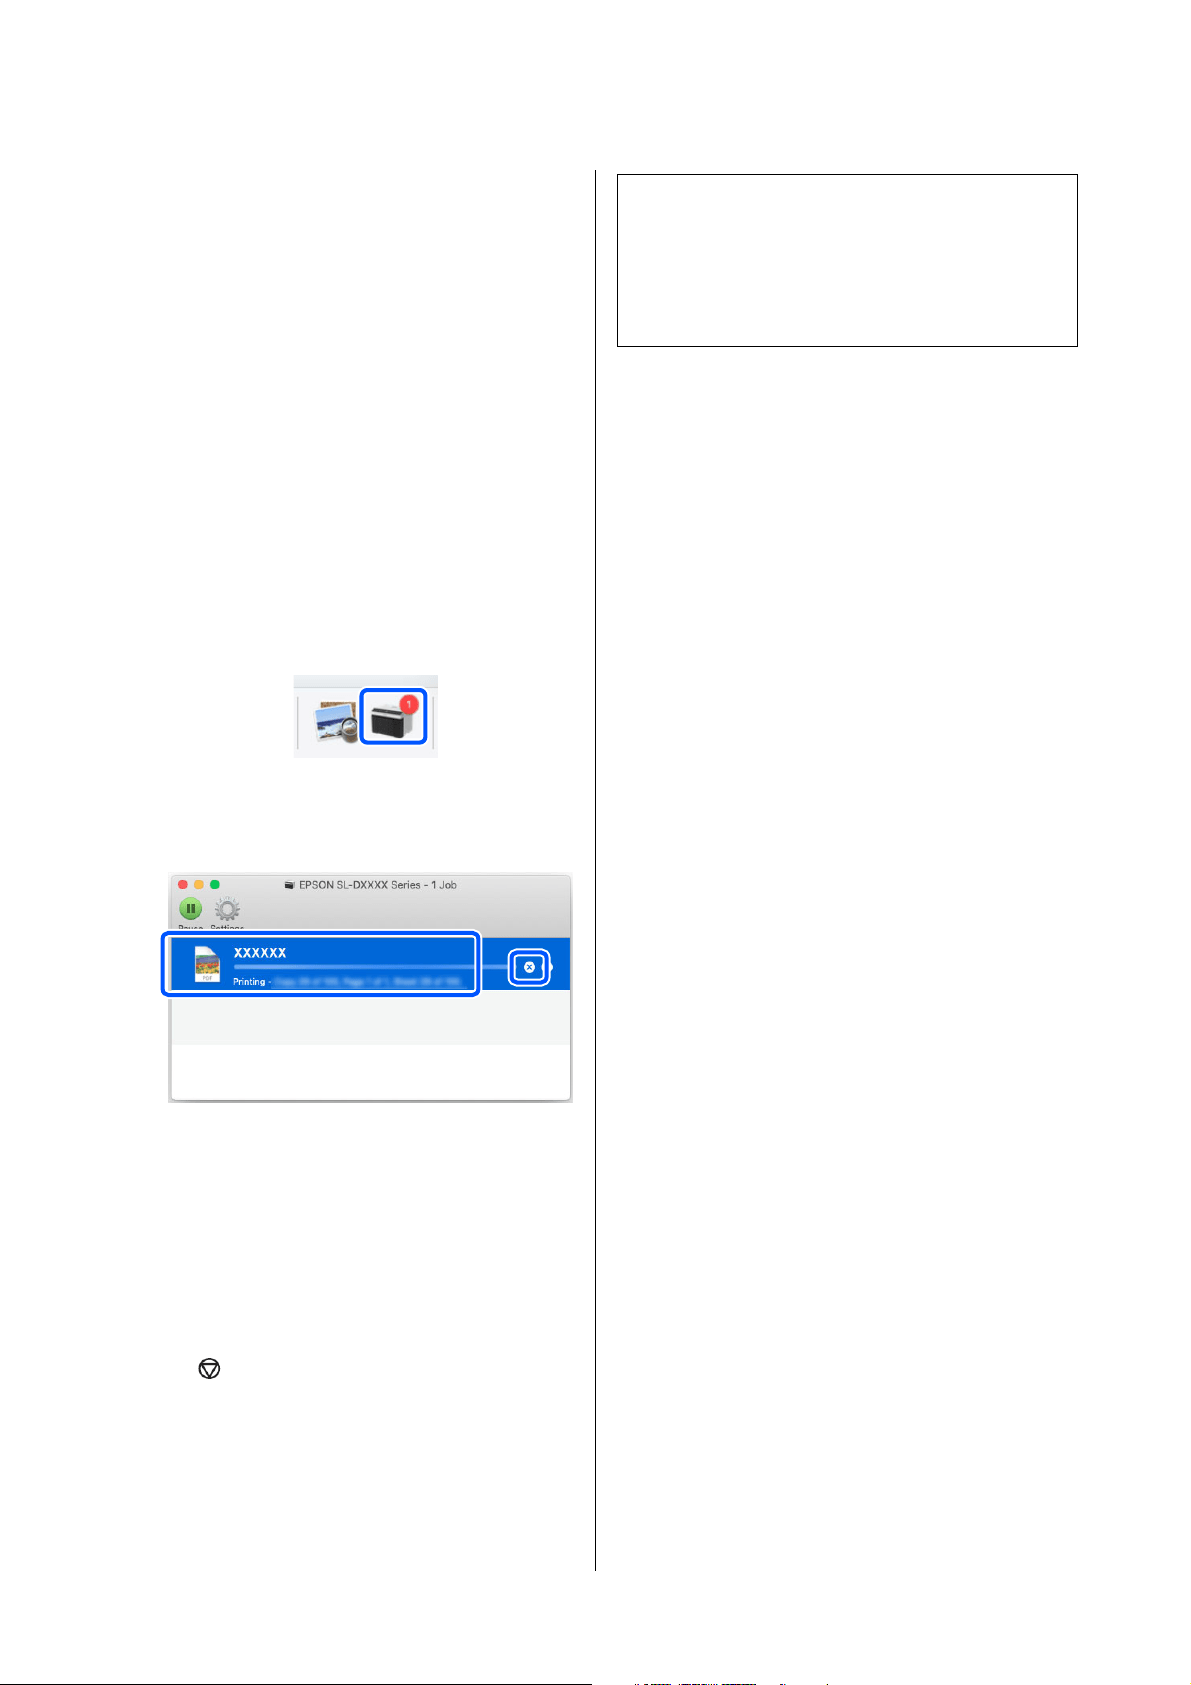
1
Click the printer icon in the Dock.
2
Select the print data you want to cancel, and
then click[×].
If the job has been sent to the printer, print data
is not displayed on the above screen.
How to Cancel Printing
(from the Printer)
Press the button (stop button) on the control
panel.
The print job is canceled even in the middle of printing.
After cancelling, it may take a while before the printer
returns to the ready status.
Note:
You cannot delete print jobs which are in the print
queue on the computer using the above operation. See
"How to Cancel Printing (from the Computer)" in the
previous section to delete print jobs from the print
queue.

SL-D1000 Series User's Guide
Printing Using Various Print Functions
48
Printing Using
Various Print
Functions
Color Management
Color Management Settings
When printing on the printer, you can select from the
following color correction methods.
Choose the best method according to the application
you are using, the operating system environment, and
the aim of the printout.
Setting colors manually
Manually adjust the color space and color tone settings
used for printing. Use this option when the application
in use does not have a color correction function.
U
“Setting Colors Manually” on page 48
Color management from the
application (no color management)
This method is for printing from applications that
support color management. All color management
processes are carried out by the application's color
management system. This method is used when you
want to obtain the same color management results
using a common application among different
operating system environments.
U
“Color Management from the Application (No
Color Management)” on page 51
Color management from the printer
driver
The printer driver uses the operating system's color
management system and carries out all color
management processes. This is used when you want to
produce similar print results from different
applications under the same operating systems.
However, to do this, you also need an application that
supports color management.
U
“Color Management from the Printer Driver
(ICM) (Windows)” on page 52
U “Color Management from the Printer Driver
(ColorSync) (Mac)” on page 53
Setting Colors Manually
You can select one of the following color correction
modes. In addition, you can fine tune the brightness,
contrast, saturation, and color balance, while looking
at a preview image.
O sRGB: Optimizes the sRGB space and corrects the
color. This should normally be selected.
O Adobe RGB: Optimizes the Adobe RGB space and
corrects the color. Select when printing image data
using the Adobe RGB color space information.
Settings on Windows
1
When using applications featuring a color
management function, specify how to adjust
colors from these applications.
When using applications without a color
management function, start from step 2.
When using the following applications, select
the Printer Manages Colors color management
option.
O Adobe Photoshop CS6 or later
O Adobe Photoshop Elements 11 or later
O Adobe Photoshop Lightroom 5 or later
In other applications, set No Color
Management.
SL-D1000 Series User's Guide
Printing Using Various Print Functions
49
Example of Adobe Photoshop 2021
The Photoshop Print Settings screen opens.
Select Color Management, then select Printer
Manages Colors in Color Handling.
2
Display the printer driver's Main screen.
When using Adobe Photoshop 2021, click Print
Settings to display the printer driver's Main
screen.
3
Click Advanced in Color Adjustment.
4
Select Color Controls in Color Management.
The setting items are displayed on the Color
Correction screen.
5
Select Color Mode.
O sRGB
Manages colors using sRGB. Prints at the
optimum color tones. This should normally
be selected.
O Adobe RGB
Manages colors based on the larger Adobe
RGB color space. Select when printing
image data using the Adobe RGB color
space information.
6
Set the various items, and then click OK.
O Color Adjustment Method
Select the color adjustment method.
By selecting Color Circle, you can click on
the color circle to adjust the colors and
move the density slide bar to adjust the
density.
By selecting Slide Bar, you can move the
slide bar of each color to adjust the colors.
O Brightness
Note:
For information on supported platforms, see the
website for the application in question.
SL-D1000 Series User's Guide
Printing Using Various Print Functions
50
Adjusts the brightness of the image.
O Contrast
Adjusts the contrast (difference between
light and dark) of the image.
When the contrast is raised, bright sections
become brighter, and dark sections become
darker. When the contrast is lowered, the
difference between light and dark sections
decreases.
O Saturation
Adjusts the saturation (color clarity) of the
image.
When the saturation is raised, colors
become vivid. When the saturation is
lowered, the colors become dull until they
are close to gray.
7
Set other items if necessary, and then print.
Settings on Mac
1
When using applications featuring a color
management function, specify how to adjust
colors from these applications.
When using applications without a color
management function, start from step 2.
When using the following applications, select
the Printer Manages Colors color management
option.
O Adobe Photoshop CS6 or later
O Adobe Photoshop Elements 12 or later
O Adobe Photoshop Lightroom 5 or later
In other applications, set No Color
Management.
Example of Adobe Photoshop 2021
The Photoshop Print Settings screen opens.
Select Color Management, then select Printer
Manages Colors in Color Handling.
2
Display the Print screen.
When using Adobe Photoshop 2021, click Print
Settings to display the print screen.
Note:
You can adjust the colors while checking the
sample image on the right side of the screen.
Note:
For information on supported platforms, see the
website for the application in question.
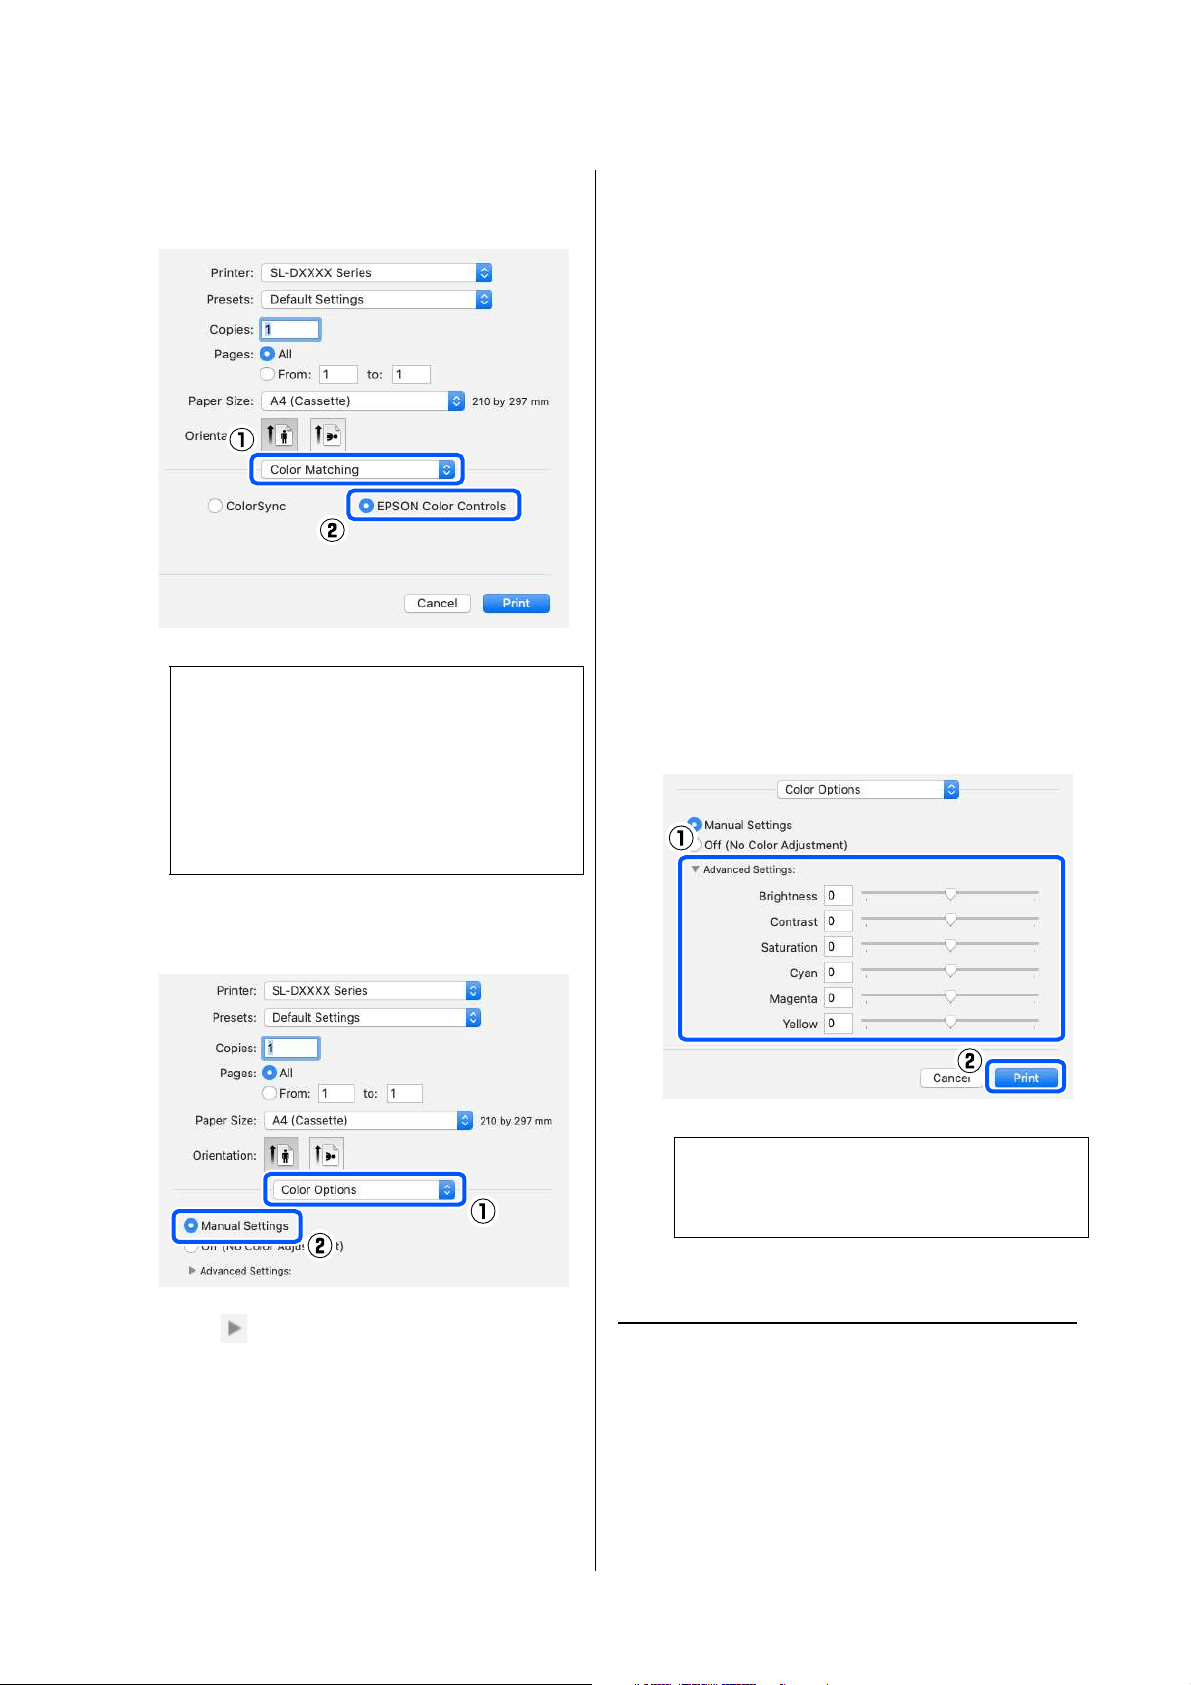
SL-D1000 Series User's Guide
Printing Using Various Print Functions
51
3
Select Color Matching from the pop-up menu,
and then select EPSON Color Controls.
4
Select Color Options from the pop-up menu,
and then select Manual Settings.
5
Click for Advanced Settings, and then set
the various items and click Print.
O Brightness
Adjusts the brightness of the image.
O Contrast
Adjusts the contrast (difference between
light and dark) of the image.
When the contrast is raised, bright sections
become brighter, and dark sections become
darker. When the contrast is lowered, the
difference between light and dark sections
decreases.
O Saturation
Adjusts the saturation (color clarity) of the
image.
When the saturation is raised, colors
become vivid. When the saturation is
lowered, the colors become dull until they
are close to gray.
O Cyan, Magenta, Yellow
Move the slide bar of each color to adjust
the colors.
6
Set other items if necessary, and then print.
Color Management from the
Application (No Color
Management)
Print using applications with a color management
function. Enable the color management settings in the
application and disable the printer driver's color
adjustment function.
Note:
EPSON Color Controls will not be available in
the following applications if step 1 is omitted.
O Adobe Photoshop CS6 or later
O Adobe Photoshop Elements 12 or later
O Adobe Photoshop Lightroom 5 or later
Note:
You can adjust the colors while checking the
sample image on the left side of the screen.
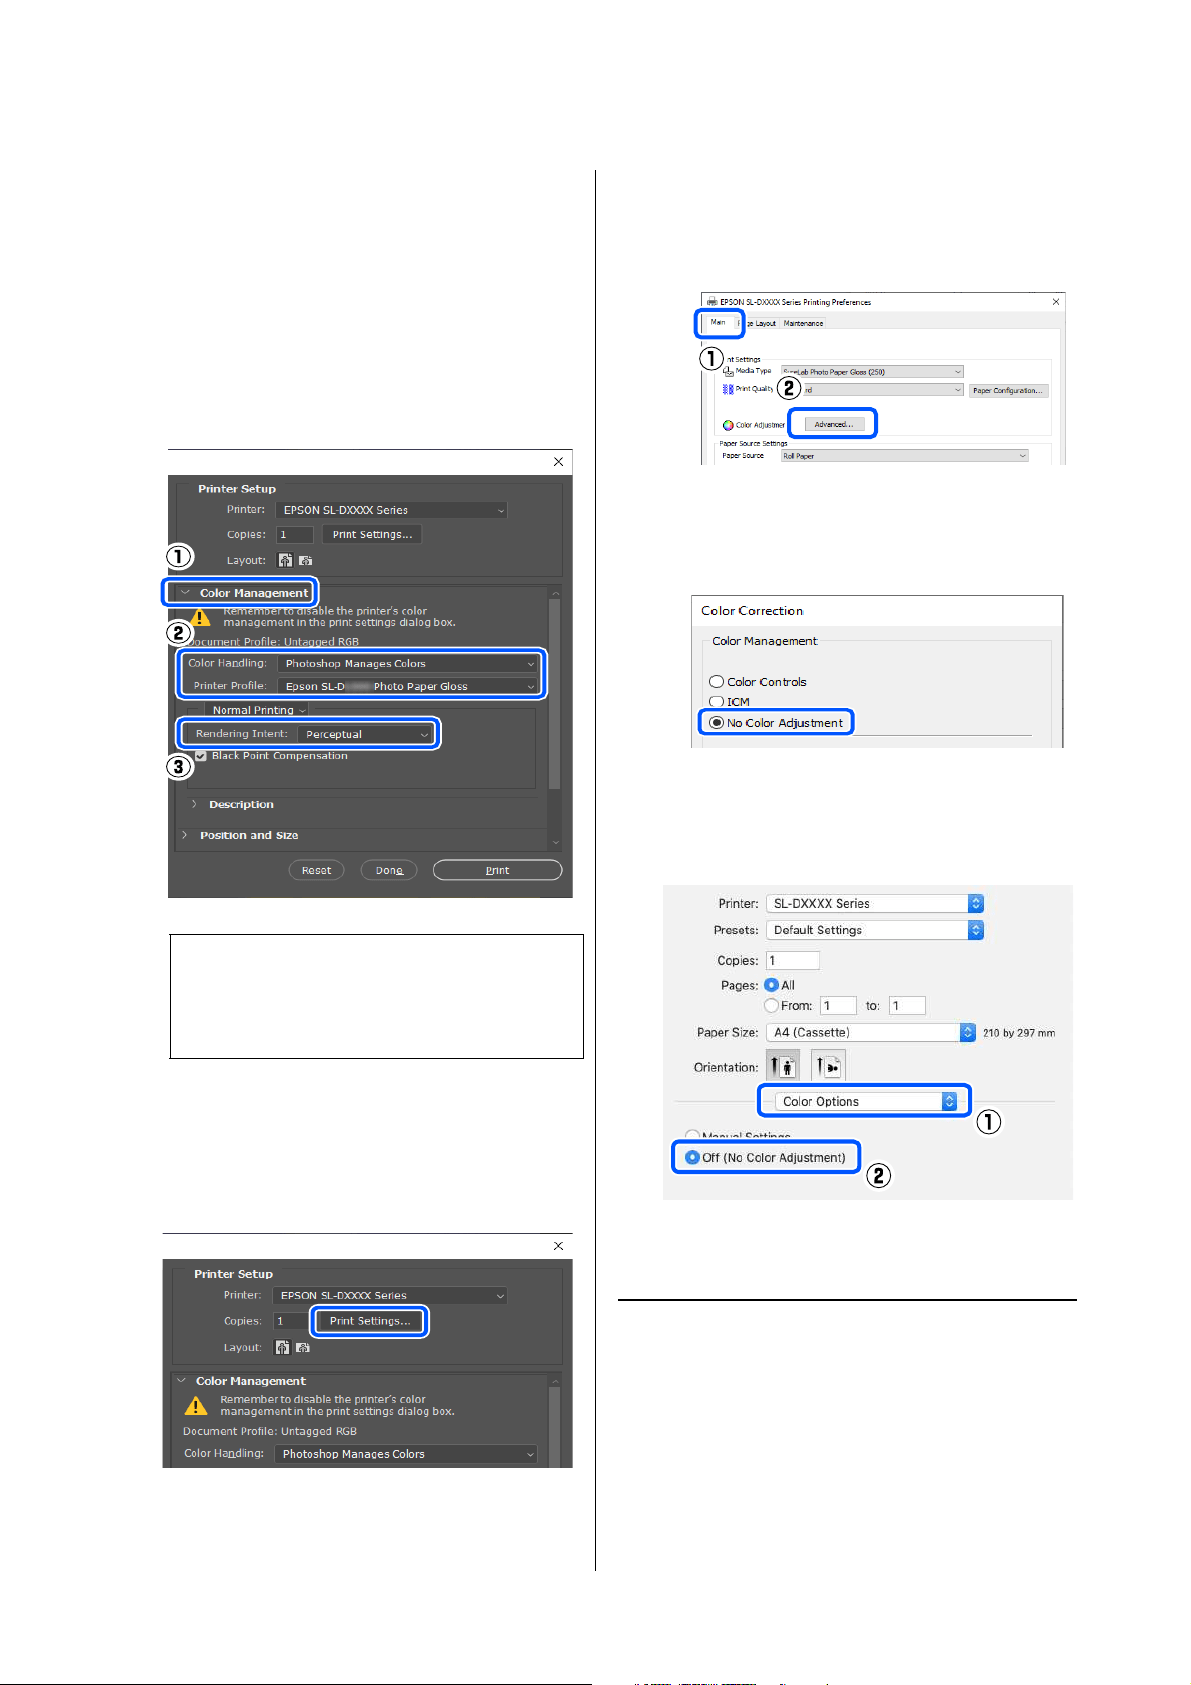
SL-D1000 Series User's Guide
Printing Using Various Print Functions
52
1
Make the settings for color adjustment using the
application.
Example of Adobe Photoshop 2021
The Photoshop Print Settings screen opens.
Select Color Management, then select
Photoshop Manages Colors in Color
Handling, and then select Printer Profile and
Rendering Intent.
2
Display the printer driver's settings screen
(Windows) or Print screen (Mac).
When using Adobe Photoshop 2021, click Print
Settings to display the various screens.
3
Set color management to off.
For Windows
For Mac
Select Color Options from the pop-up menu,
and then select Off (No Color Adjustment).
4
Set other items if necessary, and then print.
Color Management from the
Printer Driver (ICM) (Windows)
Performs color management from the printer driver.
An ICC profile that supports the paper type set in the
printer driver is automatically selected for doing color
adjustment.
Note:
If you are not using an original printer profile,
select a profile for the paper type being used from
Printer Profile.
(1) Click Advanced in Color Adjustment in the Main
screen.
(2) In Color Management, select No Color
Adjustment, and then click OK.

SL-D1000 Series User's Guide
Printing Using Various Print Functions
53
1
When using applications featuring a color
management function, specify how to adjust
colors from these applications.
When using applications without a color
management function, start from step 2.
When using the following applications, select
the Printer Manages Colors color management
option.
O Adobe Photoshop CS6 or later
O Adobe Photoshop Elements 11 or later
O Adobe Photoshop Lightroom 5 or later
In other applications, set No Color
Management.
Example of Adobe Photoshop 2021
The Photoshop Print Settings screen opens.
Select Color Management, then select Printer
Manages Colors in Color Handling.
2
Display the printer driver's Main screen.
When using Adobe Photoshop 2021, click Print
Settings to display the printer driver's Main
screen.
3
Click Advanced in Color Adjustment.
4
In Color Management, select ICM, and then
click OK.
5
Set other items if necessary, and then print.
Color Management from the
Printer Driver (ColorSync) (Mac)
Performs color management from the printer driver.
The application needs to support ColorSync. When
performing color management using ColorSync, use
image data in which an input profile is embedded.
Note:
For information on supported platforms, see the
website for the application in question.
Note:
Depending on the application, color management
printing by ColorSync may not be supported.
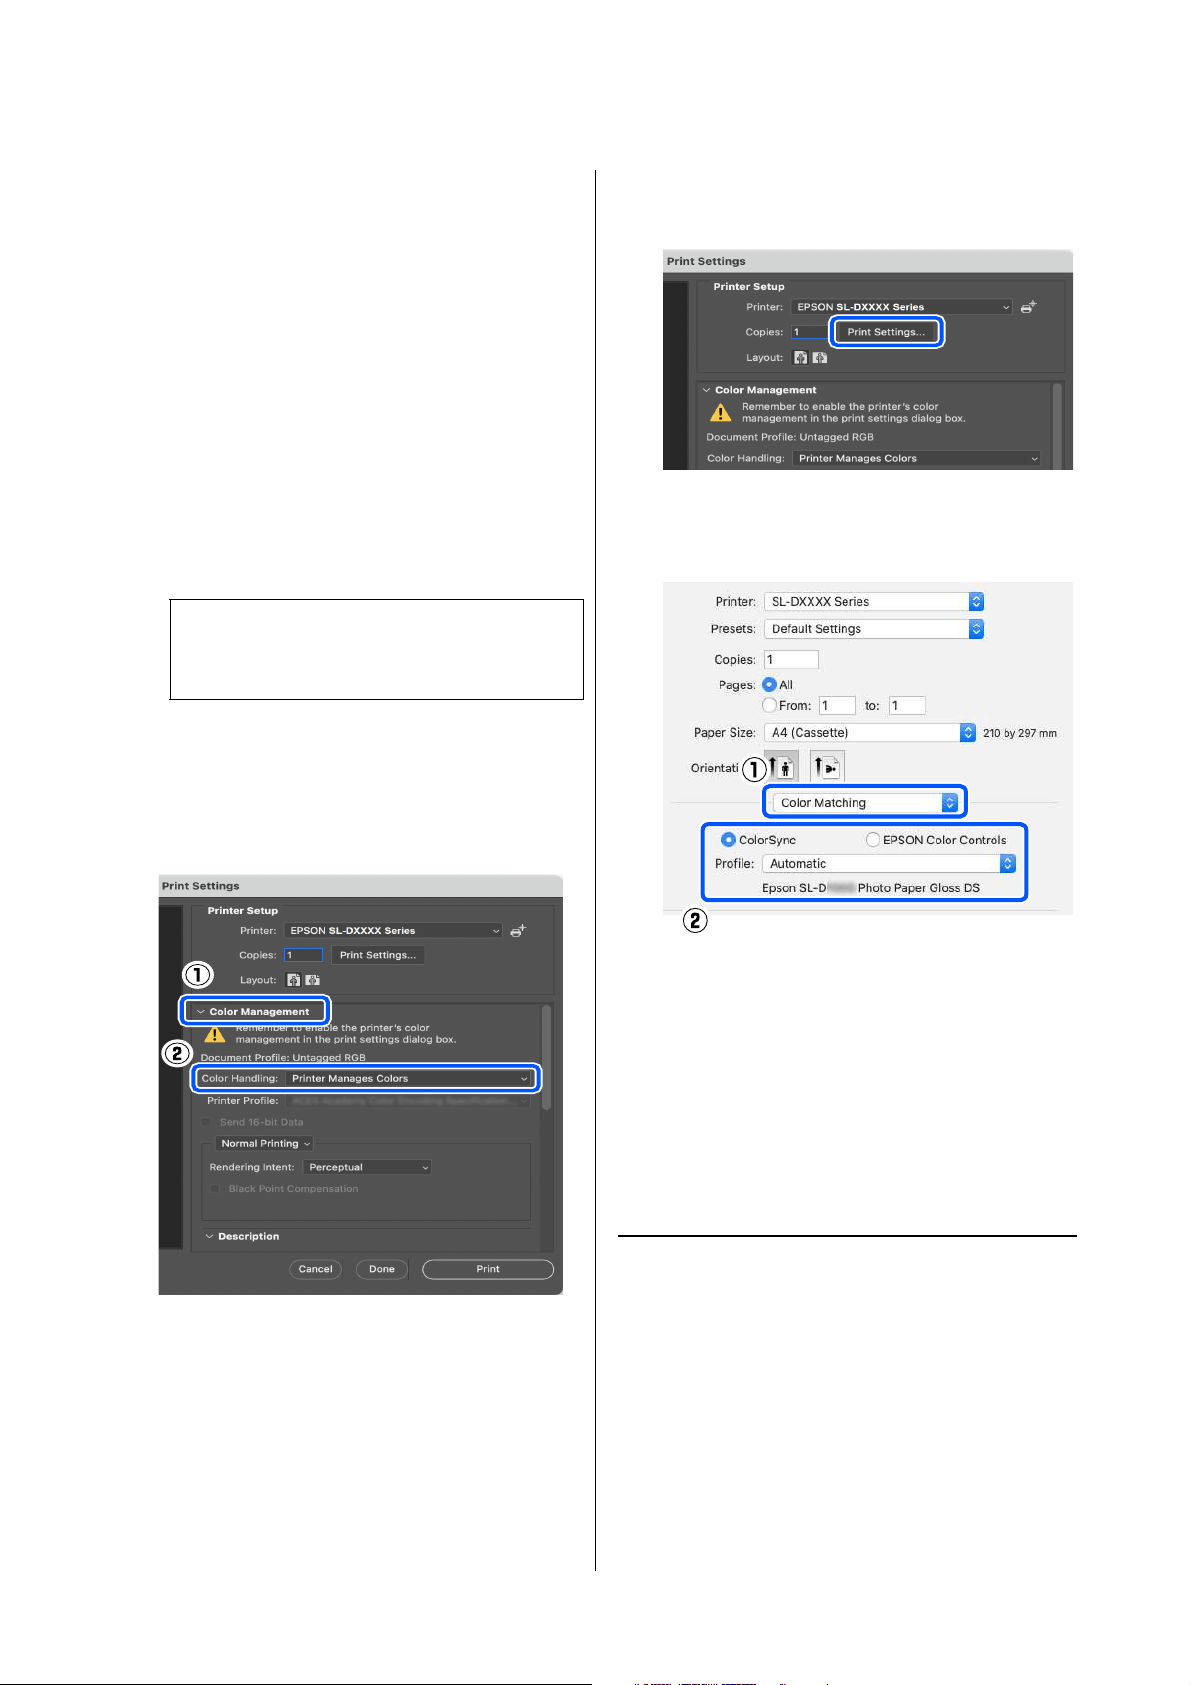
SL-D1000 Series User's Guide
Printing Using Various Print Functions
54
1
Make the settings for color adjustment using the
application.
When using the following applications, select
the Printer Manages Colors color management
option.
O Adobe Photoshop CS6 or later
O Adobe Photoshop Elements 12 or later
O Adobe Photoshop Lightroom 5 or later
In other applications, set No Color
Management.
Example of Adobe Photoshop 2021
The Photoshop Print Settings screen opens.
Select Color Management, then select Printer
Manages Colors in Color Handling.
2
Display the Print screen.
When using Adobe Photoshop 2021, click Print
Settings to display the print screen.
3
Select Color Matching from the pop-up menu,
then select ColorSync, and then select Profile.
4
Set other items if necessary, and then print.
Borderless Printing on All
Sides
You can print your data without margins on the paper.
Types of Borderless Printing
Methods
You can perform borderless printing using the
following two methods: Auto Expand or Retain Size.
For simple borderless printing, we recommend Auto
Expand. To prevent the printer driver from enlarging
your image, we recommend Retain Size.
Note:
For information on supported platforms, see the
website for the application in question.
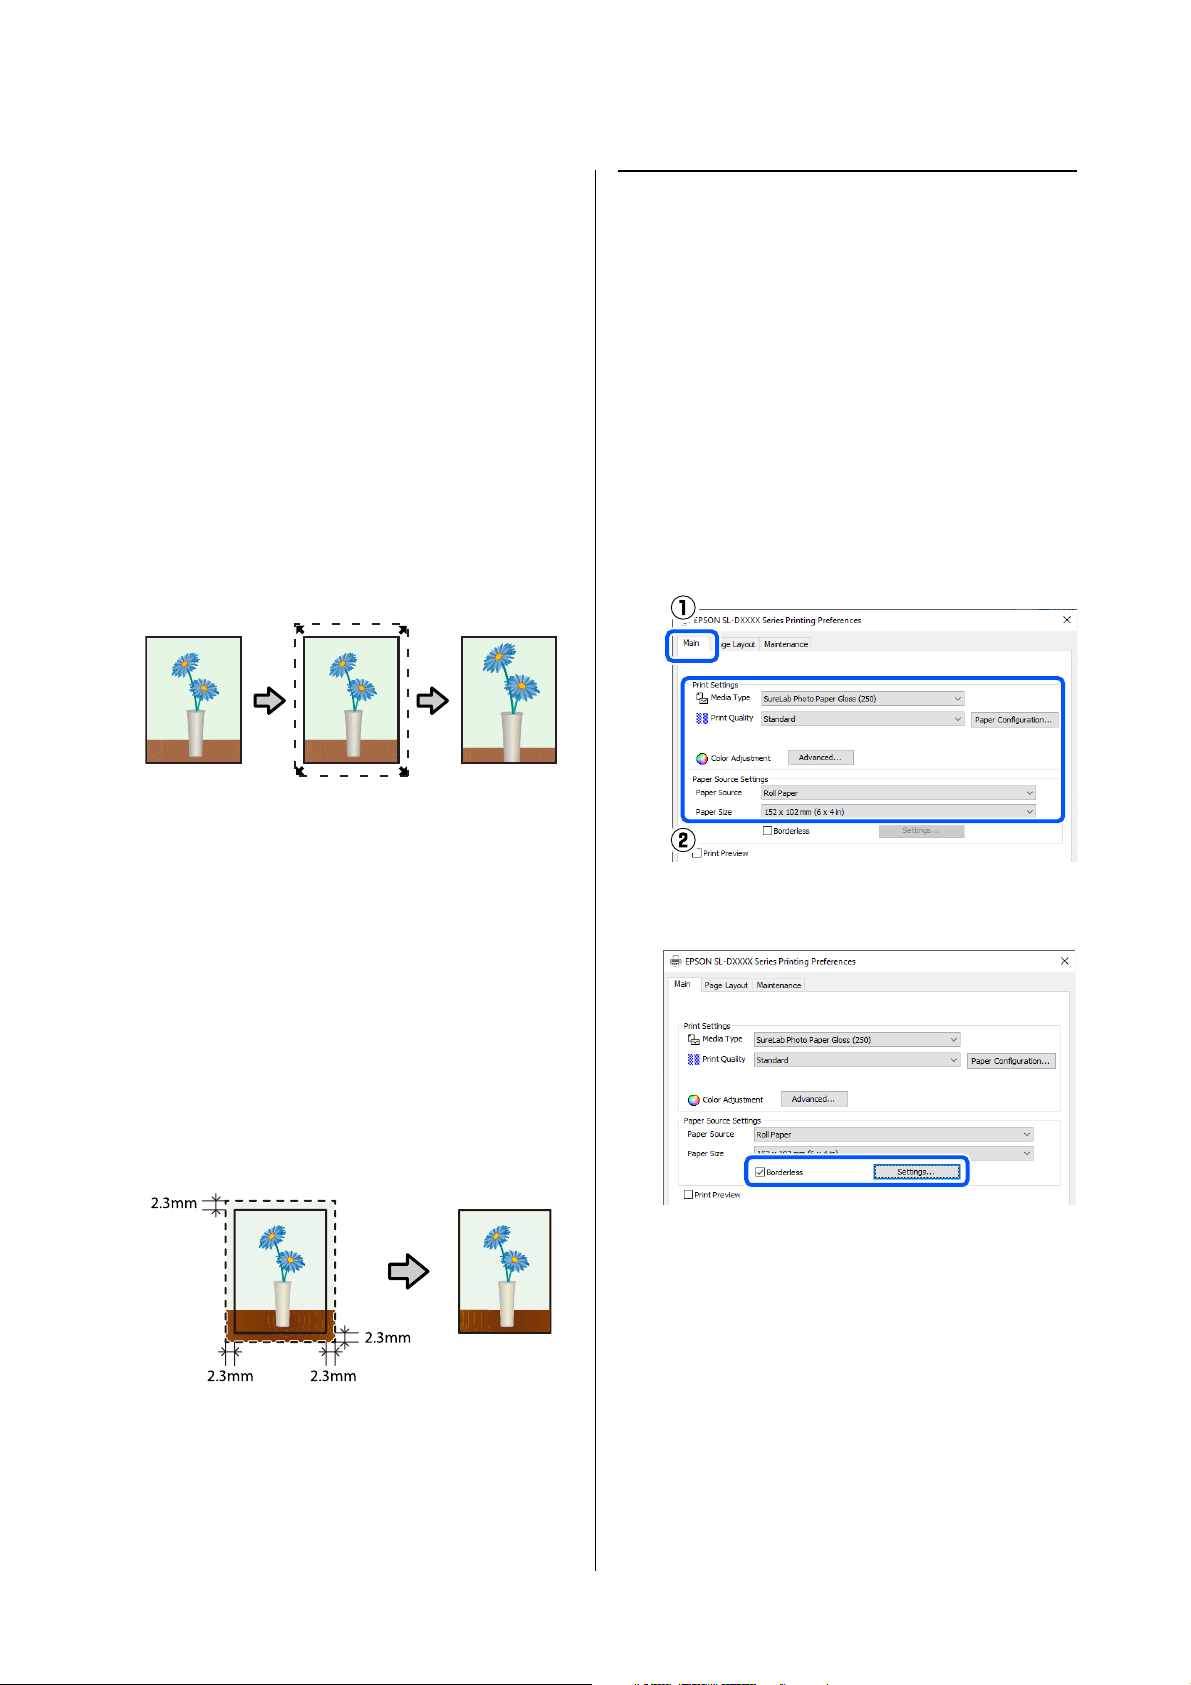
SL-D1000 Series User's Guide
Printing Using Various Print Functions
55
Auto Expand
The printer driver enlarges the print data to a size
slightly larger than the paper size and prints the
enlarged image. The sections which are beyond the
paper edges are not printed; therefore, resulting in
borderless printing.
Use settings such as Page Layout in the applications to
set the size of the image data as follows.
O Match the paper size and page setting for the print
data.
O If the application has margin settings, set the
margins to 0 mm.
O Make the image data as large as the paper size.
Retain Size
Create the print data larger than the paper size in the
applications to produce borderless output. The printer
driver does not enlarge the image data. Use settings
such as Page Layout in the applications to set the size of
the image data as follows.
O Set the page layout to extend 0.09 inches (2.3 mm)
beyond the actual paper size on all four edges.
O If the application has margin settings, set the
margins to 0 mm.
O Make the image data as large as the paper size.
Setting Procedure
Settings on Windows
1
Open the printer driver's Main screen, and set
the various settings required for printing, such
as Media Type, Print Quality, Paper Source,
and Paper Size.
See the following for how to display the Main
screen.
U
“Basic Printing Methods (Windows)” on
page 39
2
Select Borderless, and then click Settings.
3
Select Auto Expand or Retain Size as the
Method of Enlargement, and then click OK.
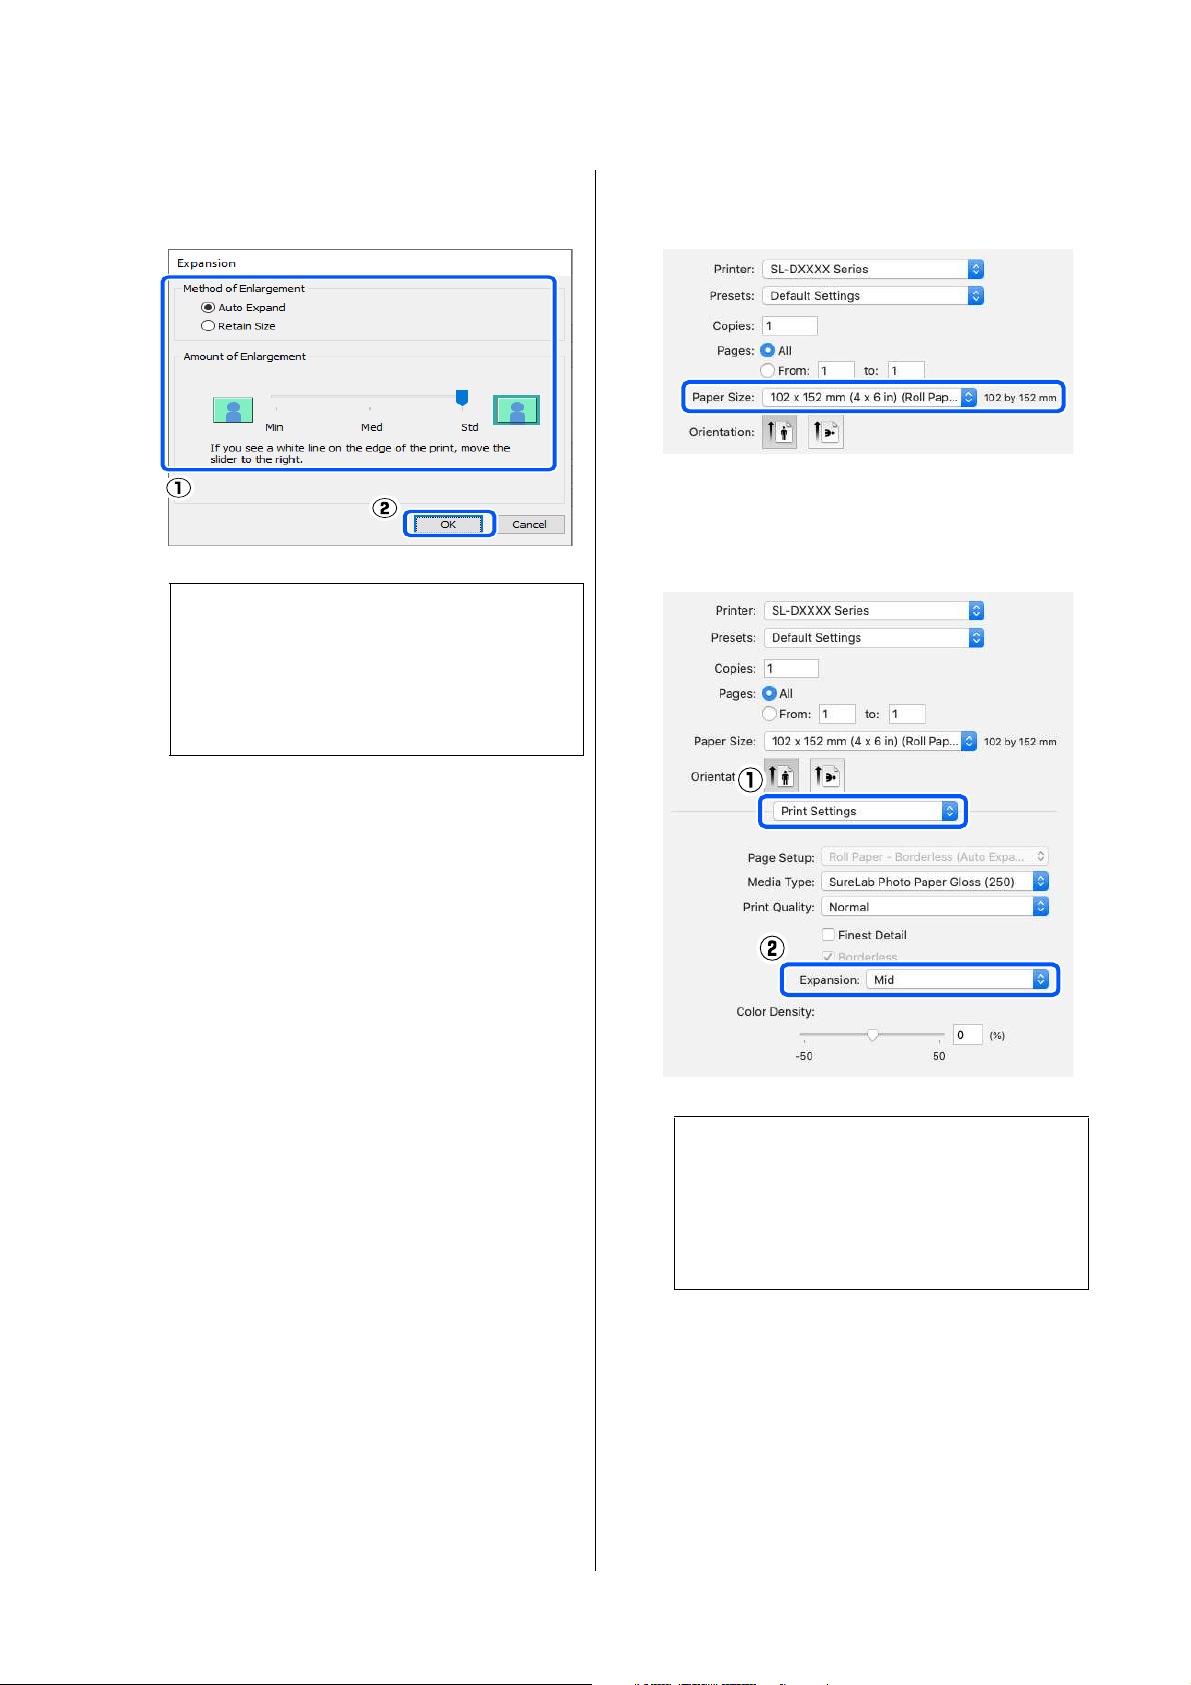
SL-D1000 Series User's Guide
Printing Using Various Print Functions
56
When Auto Expand is selected, set the slider to
set the amount of enlargement.
4
Set other items if necessary, and then print.
Settings on Mac
1
Open the Print screen and in Paper Size select
the paper size and a borderless printing method.
See the following for how to display the Print
screen.
U
“Basic Printing Methods (Mac)” on page 44
The selections for borderless printing methods
are displayed as shown below.
XXXX (Roll Paper - Borderless (Auto Expand))
XXXX (Roll Paper - Borderless (Retain Size))
XXXX (Manual - Borderless (Auto Expand))
XXXX (Manual - Borderless (Retain Size))
XXXX (Cassette - Borderless (Auto Expand))
XXXX (Cassette - Borderless (Retain Size))
Where XXXX is the actual paper size, such as
A4.
2
When Auto Expand is selected in Paper Size,
select Print Settings in the pop-up menu, and
then select the Expansion.
3
Set other items if necessary, and then print.
Printing on Paper of
Non-Standard Sizes
You can print on paper sizes not included in the printer
driver.
Note:
Moving the slider towards Med or Min decreases
the image enlargement ratio. Therefore, some
margins may appear at the edges of the paper
depending on the paper and printing
environment.
Note:
Moving the slider towards Mid or Min decreases
the image enlargement ratio. Therefore, some
margins may appear at the edges of the paper
depending on the paper and printing
environment.
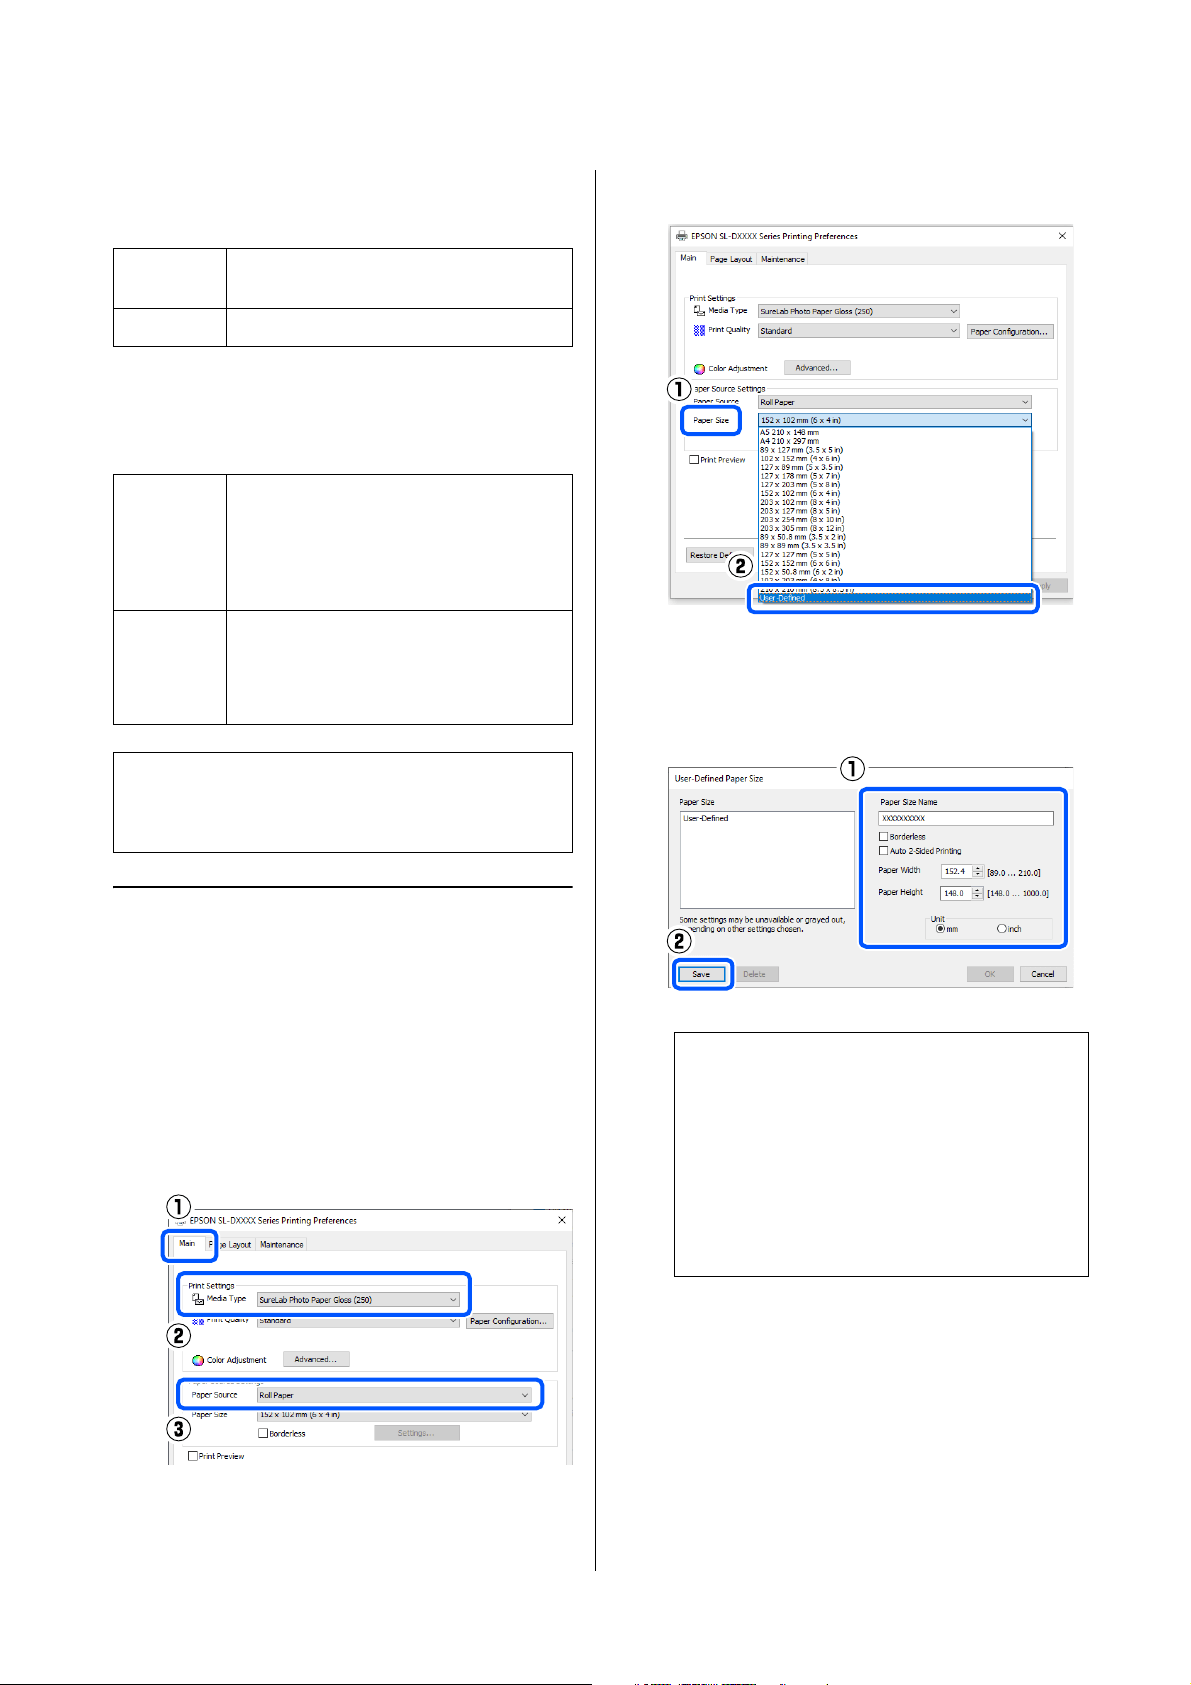
SL-D1000 Series User's Guide
Printing Using Various Print Functions
57
The paper sizes you can set are shown below.
Roll Paper
*Although you can set 3.5 to 8.26 inches (89 to 210 mm) in
Mac, paper sizes that are not supported by this printer
cannot be printed correctly.
Cut sheet
Settings on Windows
1
Open the printer driver's Main screen, and then
select Media Type and Paper Source.
See the following for how to display the Main
screen.
U
“Basic Printing Methods (Windows)” on
page 39
2
Select User-Defined for Paper Size.
3
On the User-Defined Paper Size screen, enter
Paper Size Name, set a paper size to use, and
then click Save.
4
Click OK.
You can now select the saved paper size from
Paper Size in the Main screen.
You can now print as normal.
Width
*
3.5, 4, 5, 6, 8, 8.26 inches
(89.0, 101.6, 127.0, 152.4, 203.2, 210.0 mm)
Length 1.96 to 39.3 inches (50 to 1,000 mm)
Width Printing with margins: 3.5 to 8.26 inches
(89 to 210 mm)
Borderless printing: 3.5, 4, 5, 6, 8, 8.26
inches (89.0, 100.0, 101.6, 127.0, 152.4,
203.2, 210.0 mm)
Length Single-sided printing: 5.8 to 39.3 inches
(148 to 1000 mm)
Double-sided printing: 15.8 to 11.7 inches
(48 to 297 mm)
c
Important:
Output sizes may be restricted by the application
being used for printing.
Note:
O To change the information you saved, click
the Paper Size Name in the list on the left side
of the screen.
O To delete a paper you saved, select the Paper
Size Name in the list on the left side of the
screen, and then click Delete.
O You can save up to 30 paper sizes.

SL-D1000 Series User's Guide
Printing Using Various Print Functions
58
Settings on Mac
1
Open the Print screen, and select Manage
Custom Sizes for Paper Size.
See the following for how to display the Print
screen.
U
“Basic Printing Methods (Mac)” on page 44
2
Click +, and then enter a name for the paper
size.
3
Enter the Width and Height for the Paper Size
as well as the margins.
Set the page size range and the margin sizes
according to what can be specified for the
printing method.
4
Click OK.
You can select the paper size you saved from the
Paper Size pop-up menu.
You can now print as normal.
Double-Sided Printing
You can print on both sides of cut sheets. Double-sided
printing is automatic, so that after the front side is
printed the back side is printed automatically.
Note:
O To edit saved information, click the paper size
name from the list on the left side of the
custom paper sizes screen.
O To copy a saved paper size, select the paper
size name in the list on the left side of the
screen, and then click Duplicate.
O To delete a saved paper size, select the paper
size name in the list on the left side of the
screen, and then click
−
.
O The custom paper size setting differs
depending on the operating system version.
See your operating system's documentation
for details.
Note:
O Double-sided printing cannot be done on roll
paper.
O Paper jams may occur if you load thick cut sheets in
landscape orientation.
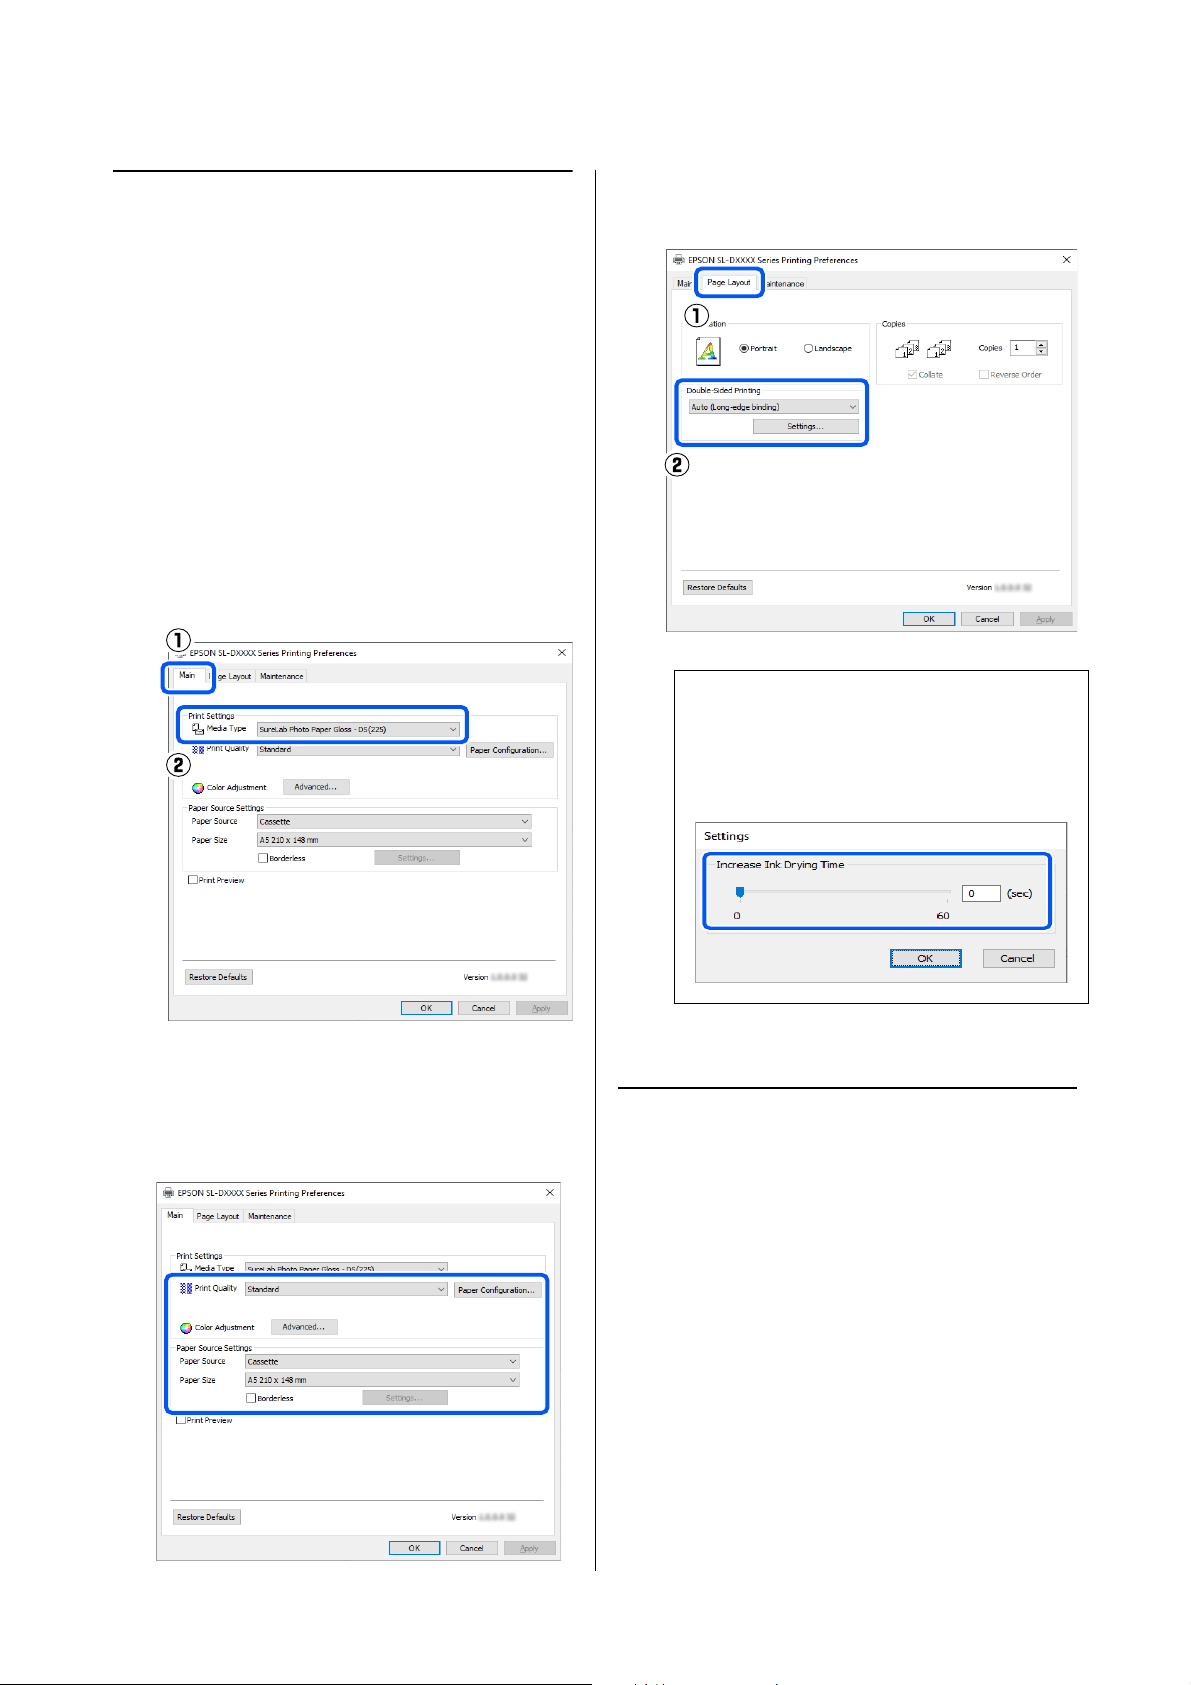
SL-D1000 Series User's Guide
Printing Using Various Print Functions
59
Settings on Windows
1
Load the paper to be used in the paper feed unit
or the optional duplex feeder.
U
“How to Load Cut Paper” on page 36
2
Open the printer driver's Main screen, and then
set the paper type for the cut sheets that you
loaded in step 1 in Media Type.
See the following for how to display the Main
screen.
U
“Basic Printing Methods (Windows)” on
page 39
3
Do the settings needed for printing, such as
Print Quality and Paper Size, and then select
Rear Paper Feed Slot or Cassette for the Paper
Source.
4
Select Page Layout, and then select the binding
position in Double-Sided Printing.
5
Set other items if necessary, and then print.
Settings on Mac
1
Load the paper to be used in the paper feed unit
or the optional duplex feeder.
U
“How to Load Cut Paper” on page 36
2
Open the print screen, and then set the source
and paper size of the cut sheets that you loaded
in step 1 in Paper Size.
See the following for how to display the Print
screen.
Note:
If you notice scratching or the transfer of ink to the
back side of other sheets of paper in the print
results, click Settings and set additional drying
time.
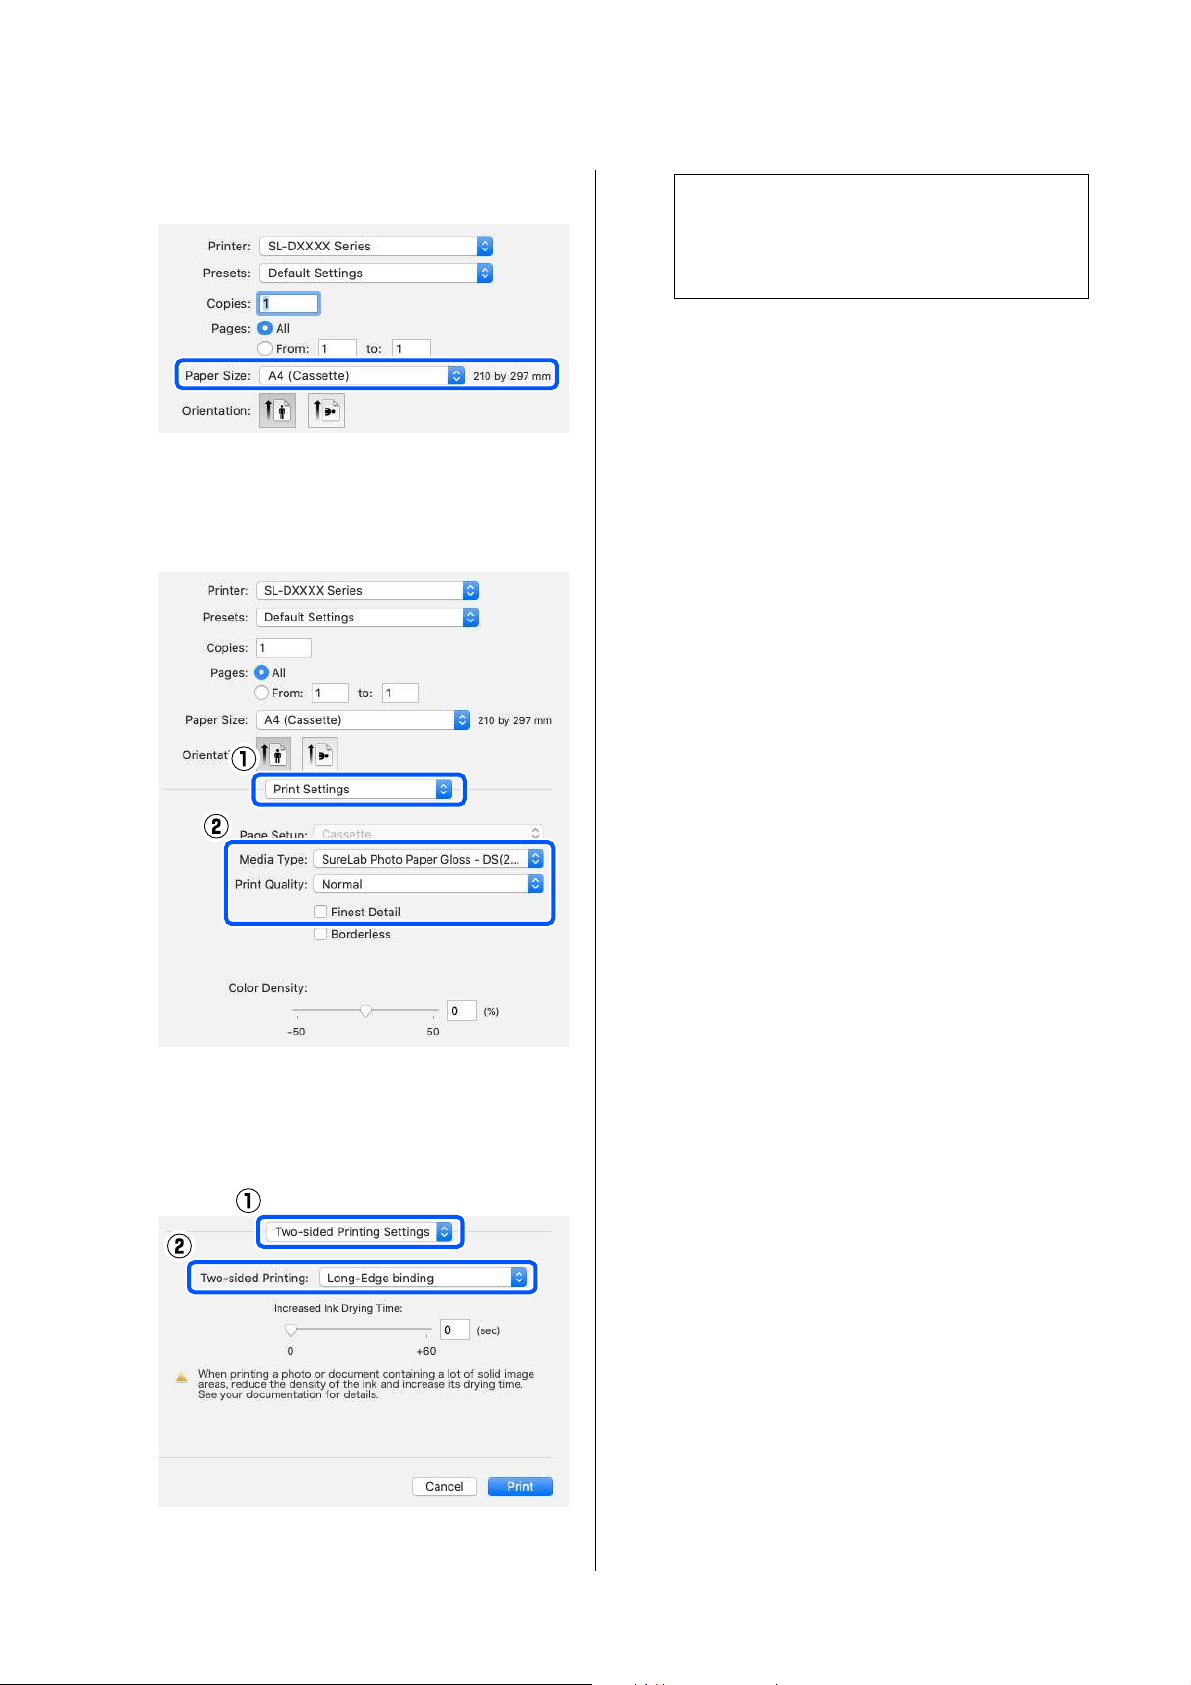
SL-D1000 Series User's Guide
Printing Using Various Print Functions
60
U
“Basic Printing Methods (Mac)” on page 44
3
Select Print Settings in the pop-up menu, and
then do the settings needed for printing, such as
Media Type and Print Quality.
4
Select Two-sided Printing Settings in the
pop-up menu, and set the binding method in
Two-sided Printing.
5
Set other items if necessary, and then print.
Note:
If you notice scratching or the transfer of ink to the
back side of other sheets of paper in the print
results, set Increased Ink Drying Time.
SL-D1000 Series User's Guide
Printing from Smart Devices
61
Printing from Smart
Devices
You can print photos and text from a smart device,
such as a smartphone or tablet.
Printing Photos Using
Epson Smart Panel
1
Load paper in the printer.
U
“Basic Operations” on page 29
2
Set up your printer for wireless printing.
3
If Epson Smart Panel is not installed, install it.
U
“Introducing the Software” on page 23
4
Connect your smart device to the same wireless
network as your printer.
5
Start Epson Smart Panel.
6
Select the print photo menu on the home screen.
7
Select the photo you want to print.
8
Start printing.
Printing Documents
Using Epson Smart Panel
1
Load paper in the printer.
U
“Basic Operations” on page 29
2
Set up your printer for wireless printing.
3
If Epson Smart Panel is not installed, install it.
U
“Introducing the Software” on page 23
4
Connect your smart device to the same wireless
network as your printer.
5
Start Epson Smart Panel.
6
Select the print document menu on the home
screen.
7
Select the document you want to print.
8
Start printing.
Note:
Operations may differ depending on the device.
Note:
Operations may differ depending on the device.
SL-D1000 Series User's Guide
Printing from Smart Devices
62
Use AirPrint
AirPrint enables instant wireless printing from iPhone,
iPad, iPod touch, and Mac without the need to install
drivers or download software.
1
Load paper in the printer.
2
Set up your printer for wireless printing.
3
Connect your smart device to the same wireless
network as your printer.
4
Print from your device to your printer.
Related information
U
“Cannot print from smart device even though it is
connected (iOS)” on page 160
U “Basic Operations” on page 29
Printing Using Mopria
Print Service
Mopria Print Service enables instant wireless printing
from Android smart phones or tablets.
1
Install Mopria Print Service from Google Play.
2
Load paper in the printer.
U
“Basic Operations” on page 29
3
Set up your printer for wireless printing.
4
Connect your smart device to the same wireless
network as your printer.
5
Print from your device to your printer.
Note:
If you disabled paper configuration messages on your
product control panel, you cannot use AirPrint. See the
link below to enable the messages, if necessary.
Note:
For details, see the AirPrint page on the Apple
website.
Note:
For more details, access the Mopria Web site at
https://mopria.org.
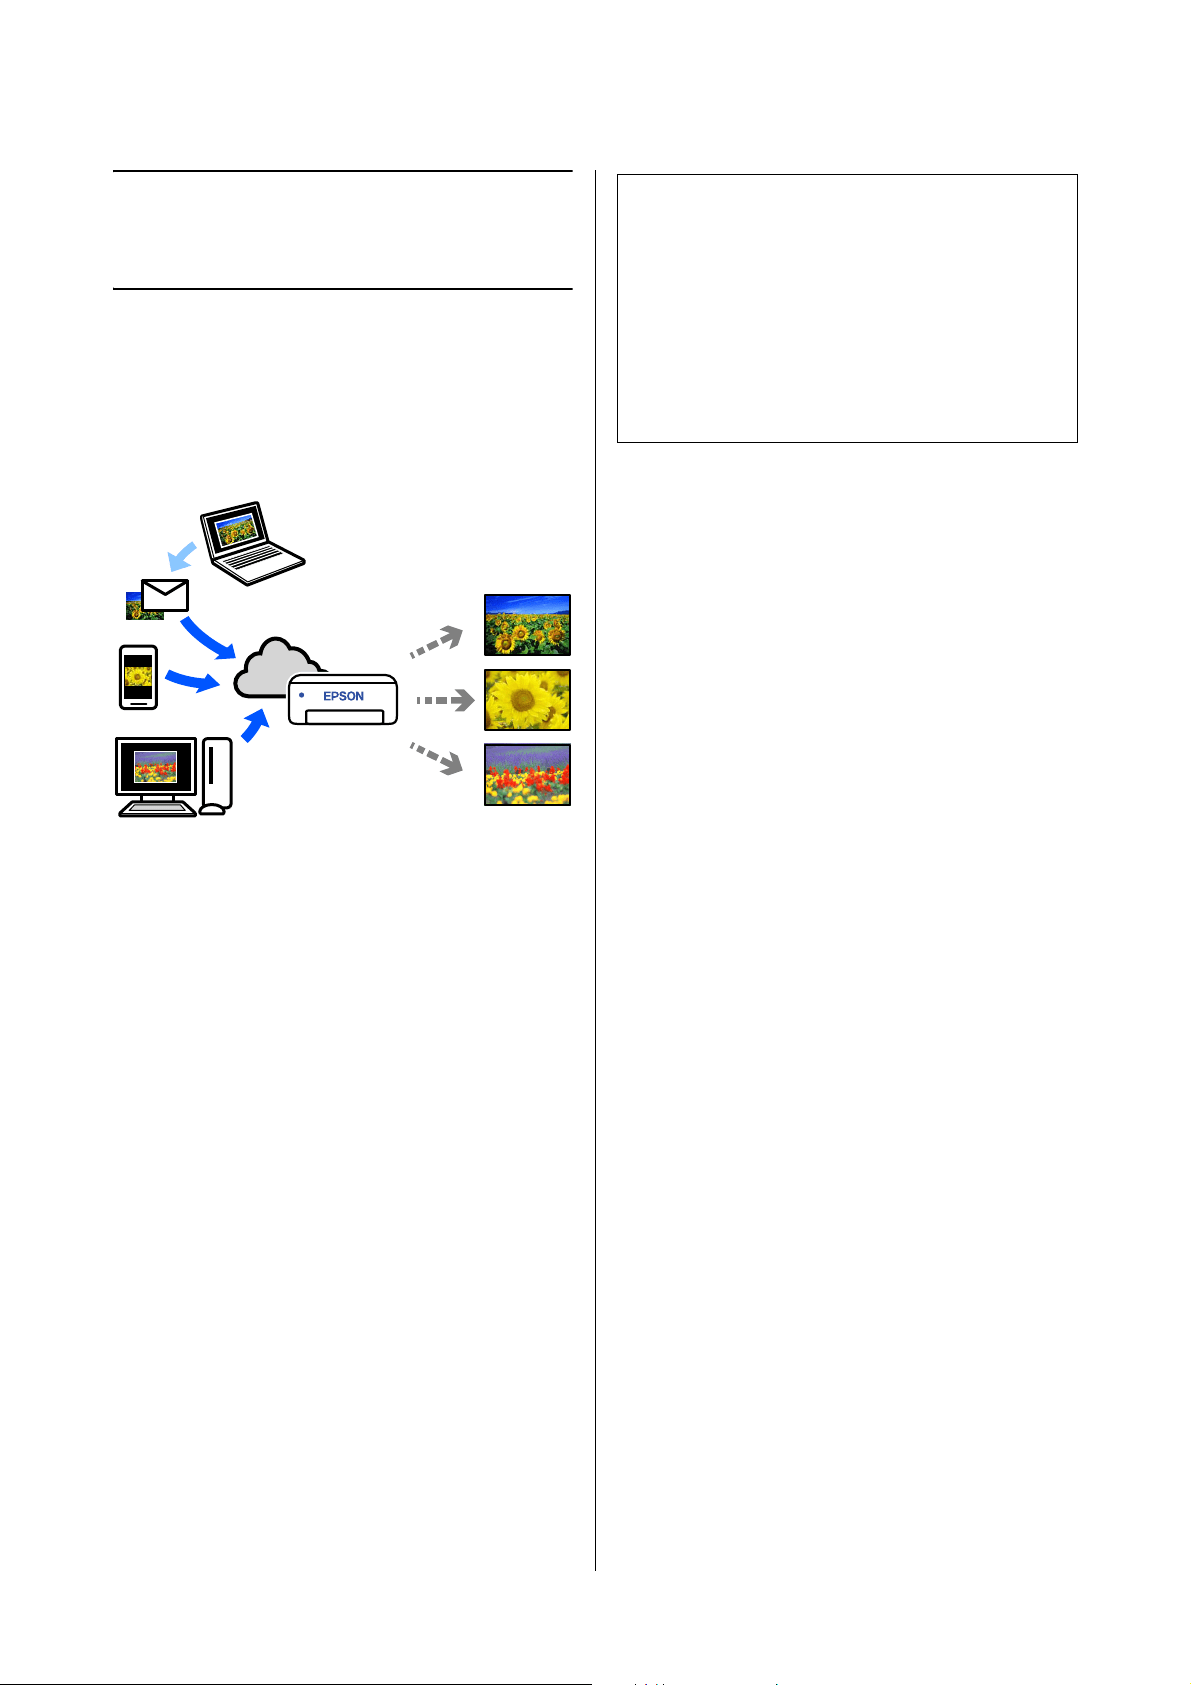
SL-D1000 Series User's Guide
Printing from Cloud Services
63
Printing from Cloud
Services
By using Epson Connect service available on the
Internet, you can print from your smart phone, tablet
PC, or laptop, anytime and practically anywhere. To
use this service, you need to register the user and the
printer in Epson Connect.
The features available on the Internet are as follows.
O Email Print
When you send an email with attachments, such as
documents or images that you want to print, to the
email address assigned to the printer, you can print
the email and attached files. You can print on your
printer from remote locations.
O Remote Print Driver
This is a shared driver supported by Remote Print
Driver. When printing using a printer in a remote
location, you can print by changing the printer on
the usual applications window.
See the Epson Connect web portal for details on how to
setup or print.
https://www.epsonconnect.com/
Registering to Epson
Connect from the Control
Panel
Follow the steps below to register the printer.
1
Load roll paper in the printer.
U
“Basic Operations” on page 29
2
Select Settings on the home screen.
To select an item, use the u/d buttons to move,
and then press the Z button.
3
Select Epson Connect Services -
Register/Delete, in this order.
To select an item, move the focus to the item
using the u/d/l/r buttons, and then press the
Z button.
4
Follow the on-screen instructions to do
operations, and print a registration sheet.
Continue printing without stopping printing
when a paper size error appears on the control
panel screen.
5
Follow the instructions on the registration sheet
to register the printer.
Note:
When printing from a cloud service, printing is
supported only on the following standard sizes using roll
paper.
O Email Print: 3.5 x 5 in (9 x 13 cm), 4 x 6 in
(10 x 15 cm)
O Remote Print: A4 210 x 297 mm, 3.5 x 5 in
(9 x 13 cm), 4 x 6 in (10 x 15 cm), 5 x 7 in
(13 x 18 cm), 8 x 10 in (20 x 25 cm)
SL-D1000 Series User's Guide
Maintenance
64
Maintenance
List of Maintenance Items
See the following table for details on maintenance.
The printer has other maintenance functions, that can be executed from the maintenance tool, than those
mentioned above. See the following for more details.
U
“Using the Maintenance Tool (Windows)” on page 80
U “Using the Maintenance Tool (Mac)” on page 95
Contents When to perform Reference
Replacing ink supply units
Replacing Maintenance Box
When a Remaining Alert is displayed on the
control panel screen
U
“Replacing Ink Supply Units” on
page 66
U “Replacing Maintenance Box” on
page 67
Emptying the Scrap Paper Box When Replacing Roll Paper U “Emptying the Scrap Paper Box”
on page 69
Cleaning airflow vents Once every 3 months U “Cleaning Airflow Vents” on page
70
Cleaning the platen and roll paper
unit
When the Back of Printed Paper is Dirty U “Cleaning the Platen and Roll
Paper Unit” on page 70
Cleaning Feed Rollers and Transfer
Rollers in the Duplex Feeder (Option)
When paper feed trouble repeatedly occurs U “Cleaning and Replacing the
Rollers in the Duplex Feeder
(Option)” on page 72
Replacing feed rollers in the duplex
feeder (option)
O When the type of paper that is loaded
in the cassette is changed.
O When paper feed trouble repeatedly
occurs even after doing the following
O Is the paper loaded correctly in
the cassette?
O Are you using the feed roller that
is appropriate for the type of
paper?
O Have the feed rollers and transfer
rollers been cleaned?
U
“Cleaning and Replacing the
Rollers in the Duplex Feeder
(Option)” on page 72
Doing a Print Head Nozzle Check O When checking if nozzles are clogged
O When checking which colors are
clogged
O Horizontal stripes or tint unevenness
(banding) have appeared
U “Print Head Nozzle Check and
Cleaning” on page 78
Cleaning the print head When a clogged nozzle is found U “Print Head Nozzle Check and
Cleaning” on page 78

SL-D1000 Series User's Guide
Maintenance
65
Disposal of Used Consumables
Dispose of consumables and optional parts in accordance with your local laws and statutes, such as by entrusting
them to an industrial waste disposal company. In such cases, submit the “Safety data sheet” to the industrial waste
disposal company.
You can download it at your local Epson Web site.
Precautions Regarding Maintenance
!
Caution:
O Do not disassemble ink supply units or maintenance boxes.
Failure to observe this precaution could result in ink getting in your eyes or on your skin.
O Do not shake the ink supply units too hard.
Ink may leak from the ink supply unit if you shake it or swing it around too hard.
O Keep ink supply units and maintenance boxes out of reach of children.
O If ink gets in the eyes or mouth, or stains the skin, treat the area as follows.
O If ink adheres to your skin, immediately wash it off using soapy water.
O If ink enters your eyes, rinse immediately with water. Failure to observe this precaution could result in bloodshot eyes
or mild inflammation. If you notice any abnormalities, consult a physician immediately.
O If ink enters your mouth, consult a physician immediately.
O Do not touch any areas inside the printer except for those indicated in the manual. An electric shock or burn
could occur.
O Do not disassemble anything except when indicated to do so in the manual.
O When opening and closing the covers, do not place your hands near the points where the main unit and the
cover join. If your fingers or hands are trapped, an injury could occur.
O When moving the roll paper unit in or out, grip the handle. If you place your hands into any other sections,
either side of your hand or fingers could be injured.
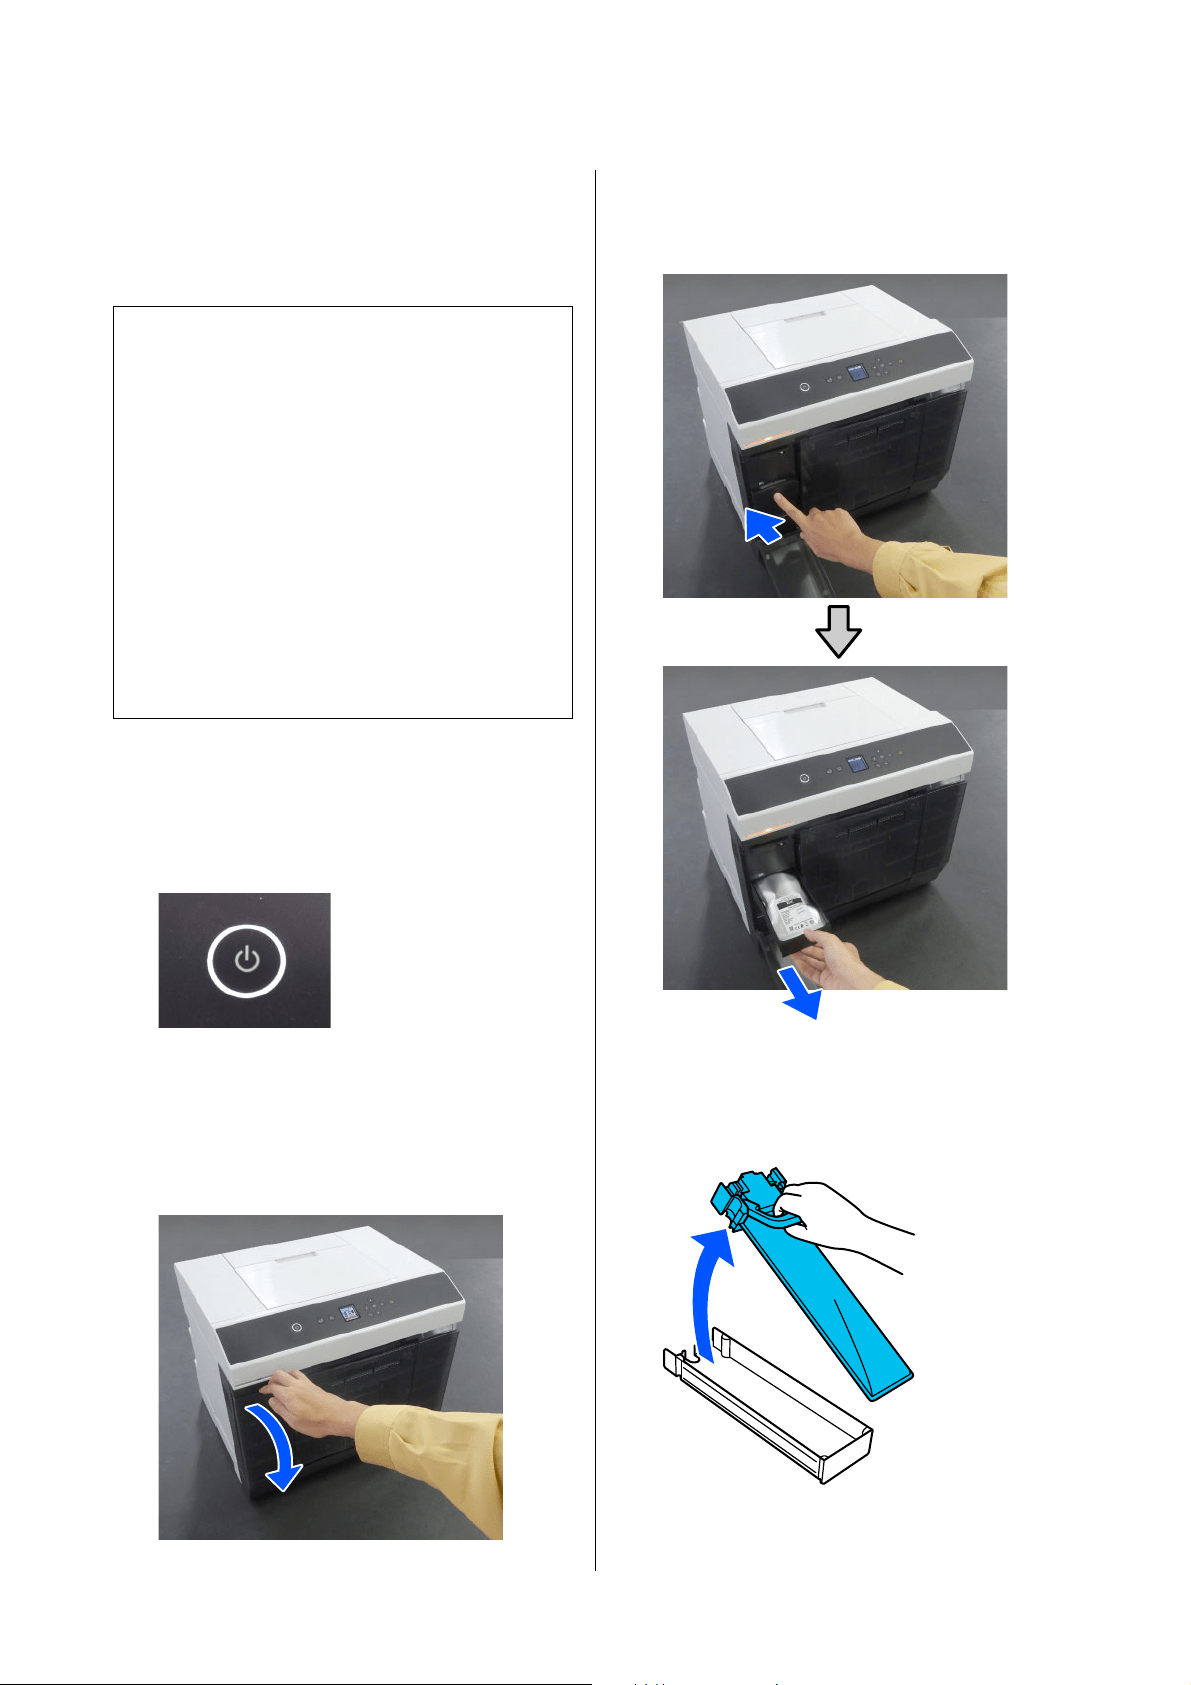
SL-D1000 Series User's Guide
Maintenance
66
Replacing Ink Supply
Units
1
Check that the power light is lit.
If the power light is flashing, the printer is
operating. Wait until all operations have
stopped.
2
On the control panel, check which ink supply
units need to be replaced.
3
Open the ink supply unit cover on the side to be
replaced.
When the cover is opened, the status light lights.
4
Push in the ink supply unit tray to pull it out.
5
Remove the ink supply unit.
Lift up the handle and then remove it.
c
Important:
O If you do not have a new ink supply unit for
installation, leave the expended ink supply
unit in the printer until the new one is ready.
If the printer is left without an ink supply
unit, it may malfunction.
O When the ink supply unit being used falls
below the limit, replace it with a new ink
supply unit as soon as possible.
O Do not leave the printer without ink supply
units installed. The inks inside the printer
may dry and you may not be able to print.
When you are not using the printer, make
sure there is an ink supply unit installed in
each slot.
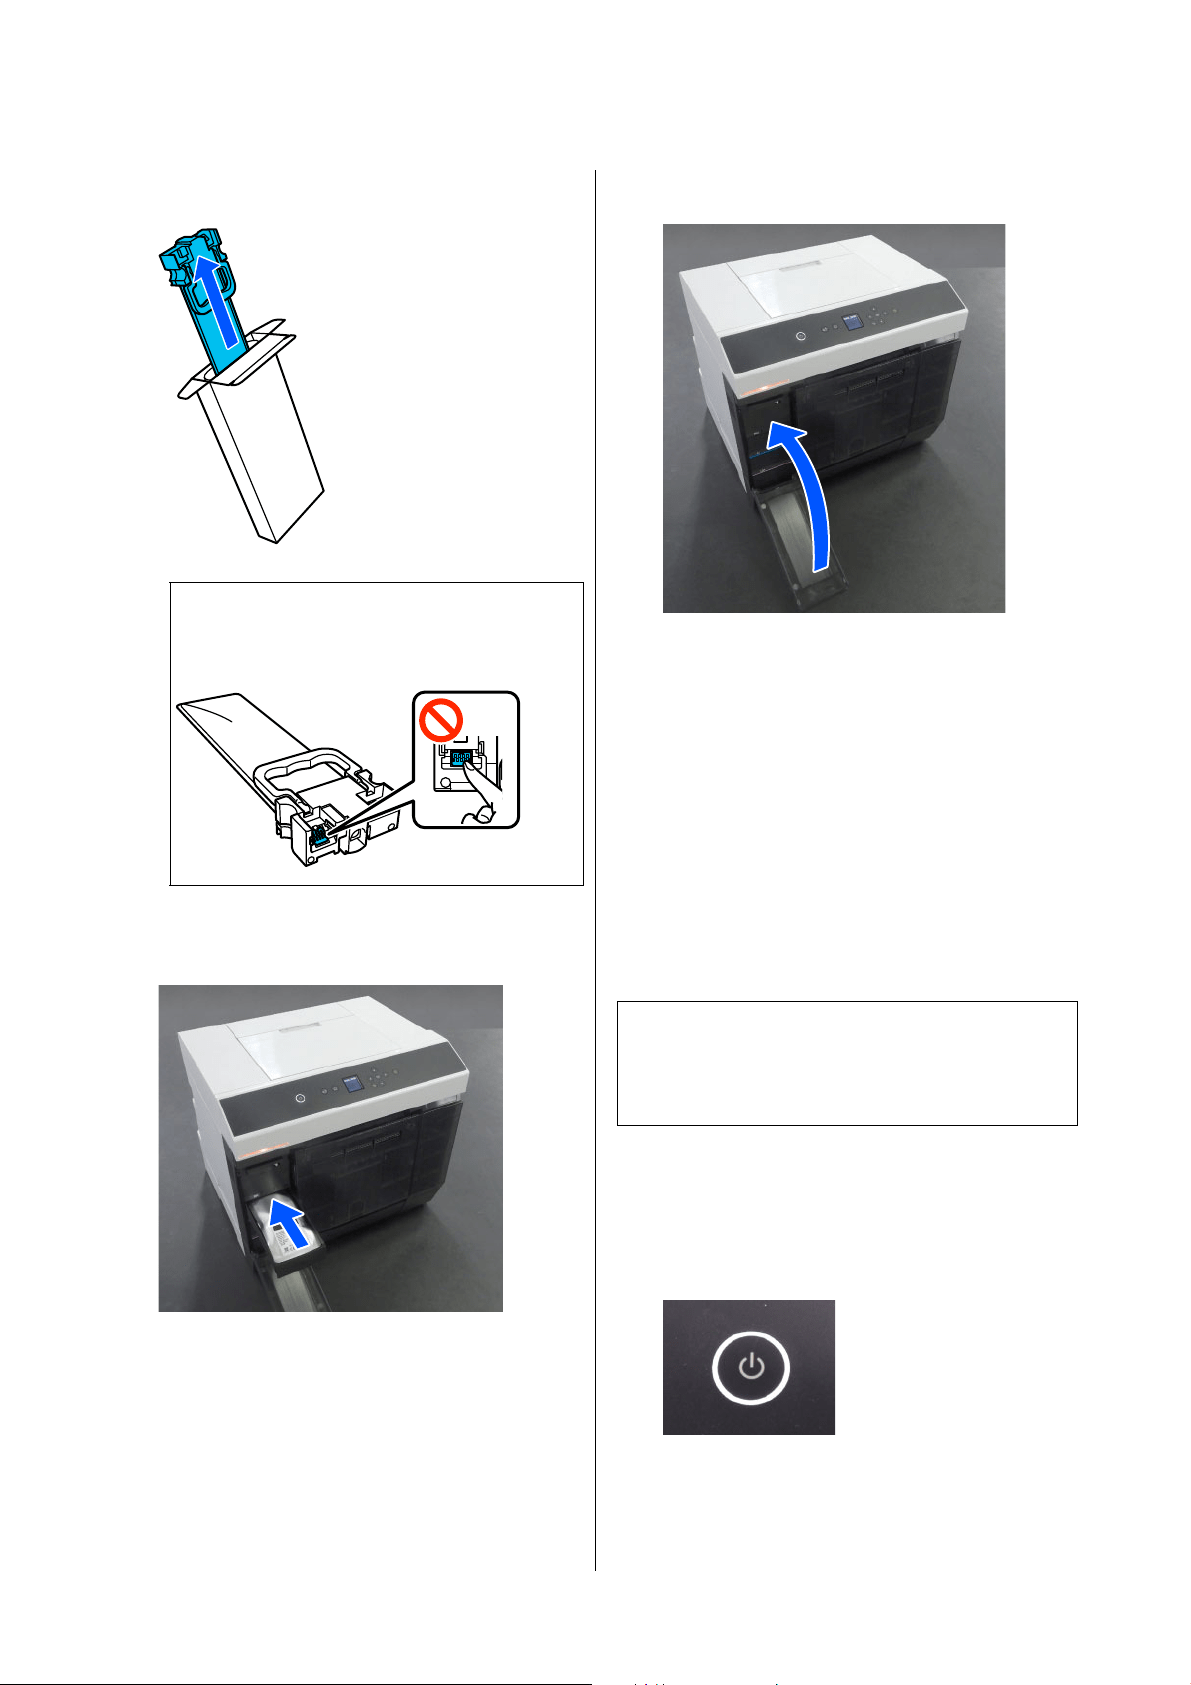
SL-D1000 Series User's Guide
Maintenance
67
6
Remove the new ink supply unit from the box.
7
Confirm the color of the label, and then put the
ink supply unit tray back into the printer.
8
Close the ink supply unit cover.
9
Confirm that the status light is off.
Replacing Maintenance
Box
The maintenance box is to absorb ink consumed when
Print Head Cleaning is executed.
If a replace the maintenance box message appears,
follow the steps below to replace it.
1
Check that the power light is lit.
If the power light is flashing, the printer is
operating. Wait until all operations have
stopped.
2
Open the ink supply unit cover on the right side.
c
Important:
Do not touch the chip on the ink supply unit.
You may not be able to print properly.
c
Important:
After removing the maintenance box, replace it
immediately, do not leave the ink supply unit
cover open.
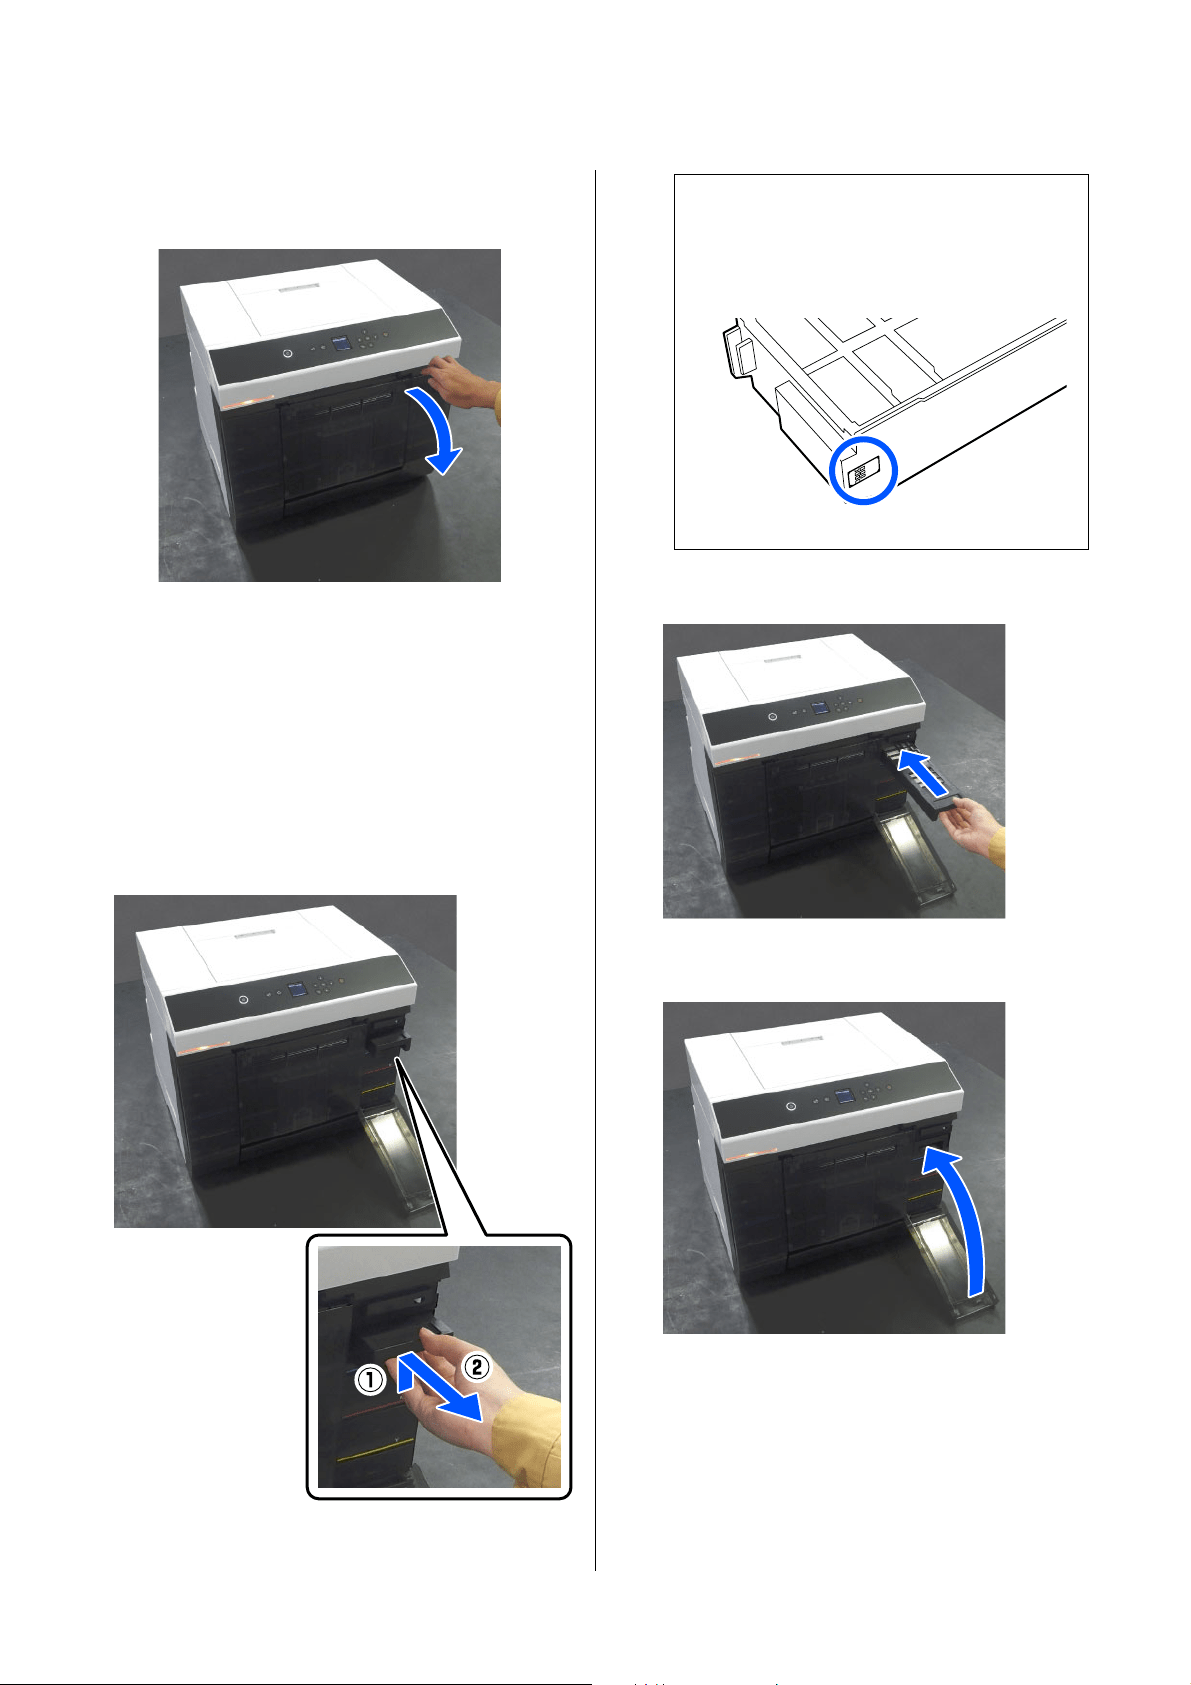
SL-D1000 Series User's Guide
Maintenance
68
A warning buzzer sounds when you open the
cover.
3
Remove the maintenance box slowly without
tilting it.
Push up, and then pull it out.
See the following for more information on
disposing of the maintenance box.
U
“Disposal of Used Consumables” on page
65
4
Prepare a new maintenance box.
5
Insert the new maintenance box.
6
Close the ink supply unit cover.
7
Check that the power light has lit.
This completes this section.
c
Important:
Do not touch the chip on the maintenance
box. Doing so may prevent normal
operation and printing.
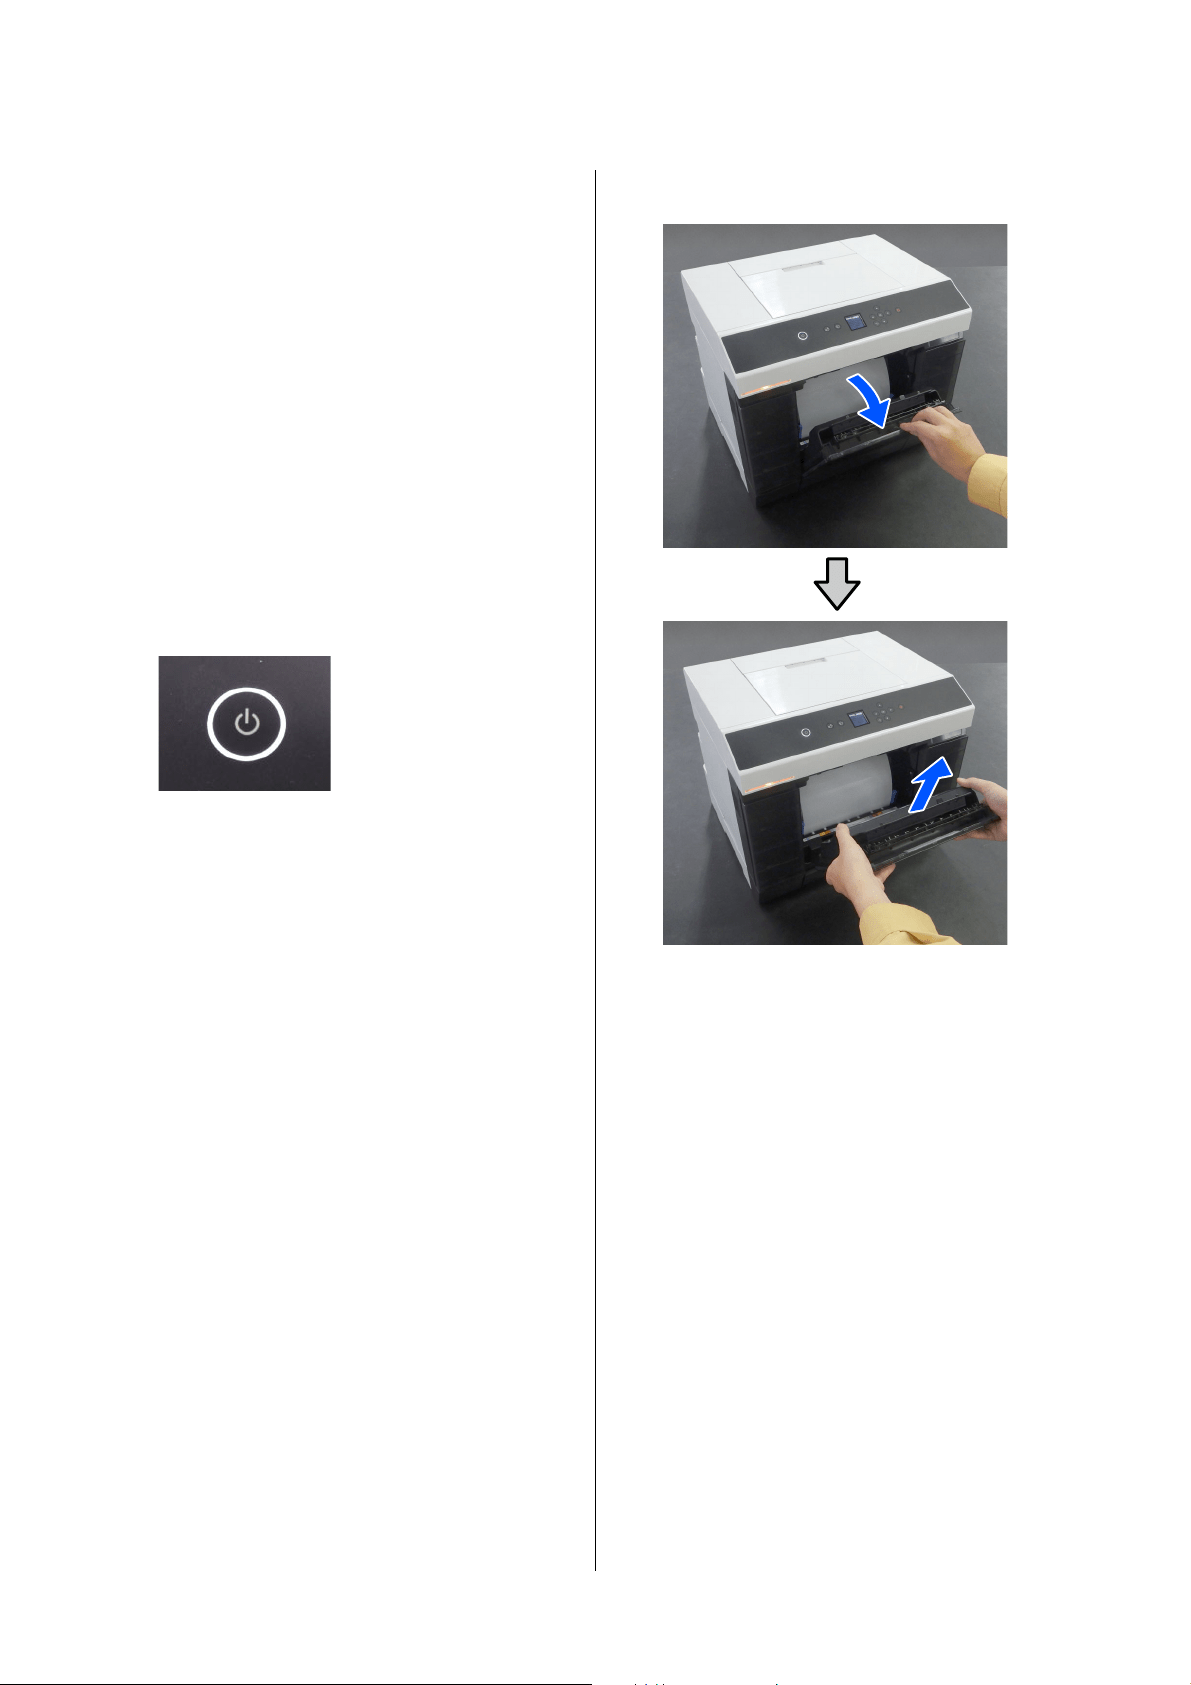
SL-D1000 Series User's Guide
Maintenance
69
Emptying the Scrap Paper
Box
Scraps of paper cut during printing accumulate in the
scrap paper box. You need to empty out the paper
scraps before the box is full.
Check visually how much scrap paper has accumulated
in the box. Be sure to dispose of scrap paper when you
replace the roll paper.
1
Check that the power light on the printer is lit.
When the power light is flashing, the printer is
operating. Wait until all operations have
stopped.
2
Remove the scrap paper box.
When the scrap paper box is removed, the status
light lights.
3
Empty out the scrap paper.
Turn over the scrap paper box to throw away the
scrap paper that has collected in the box.
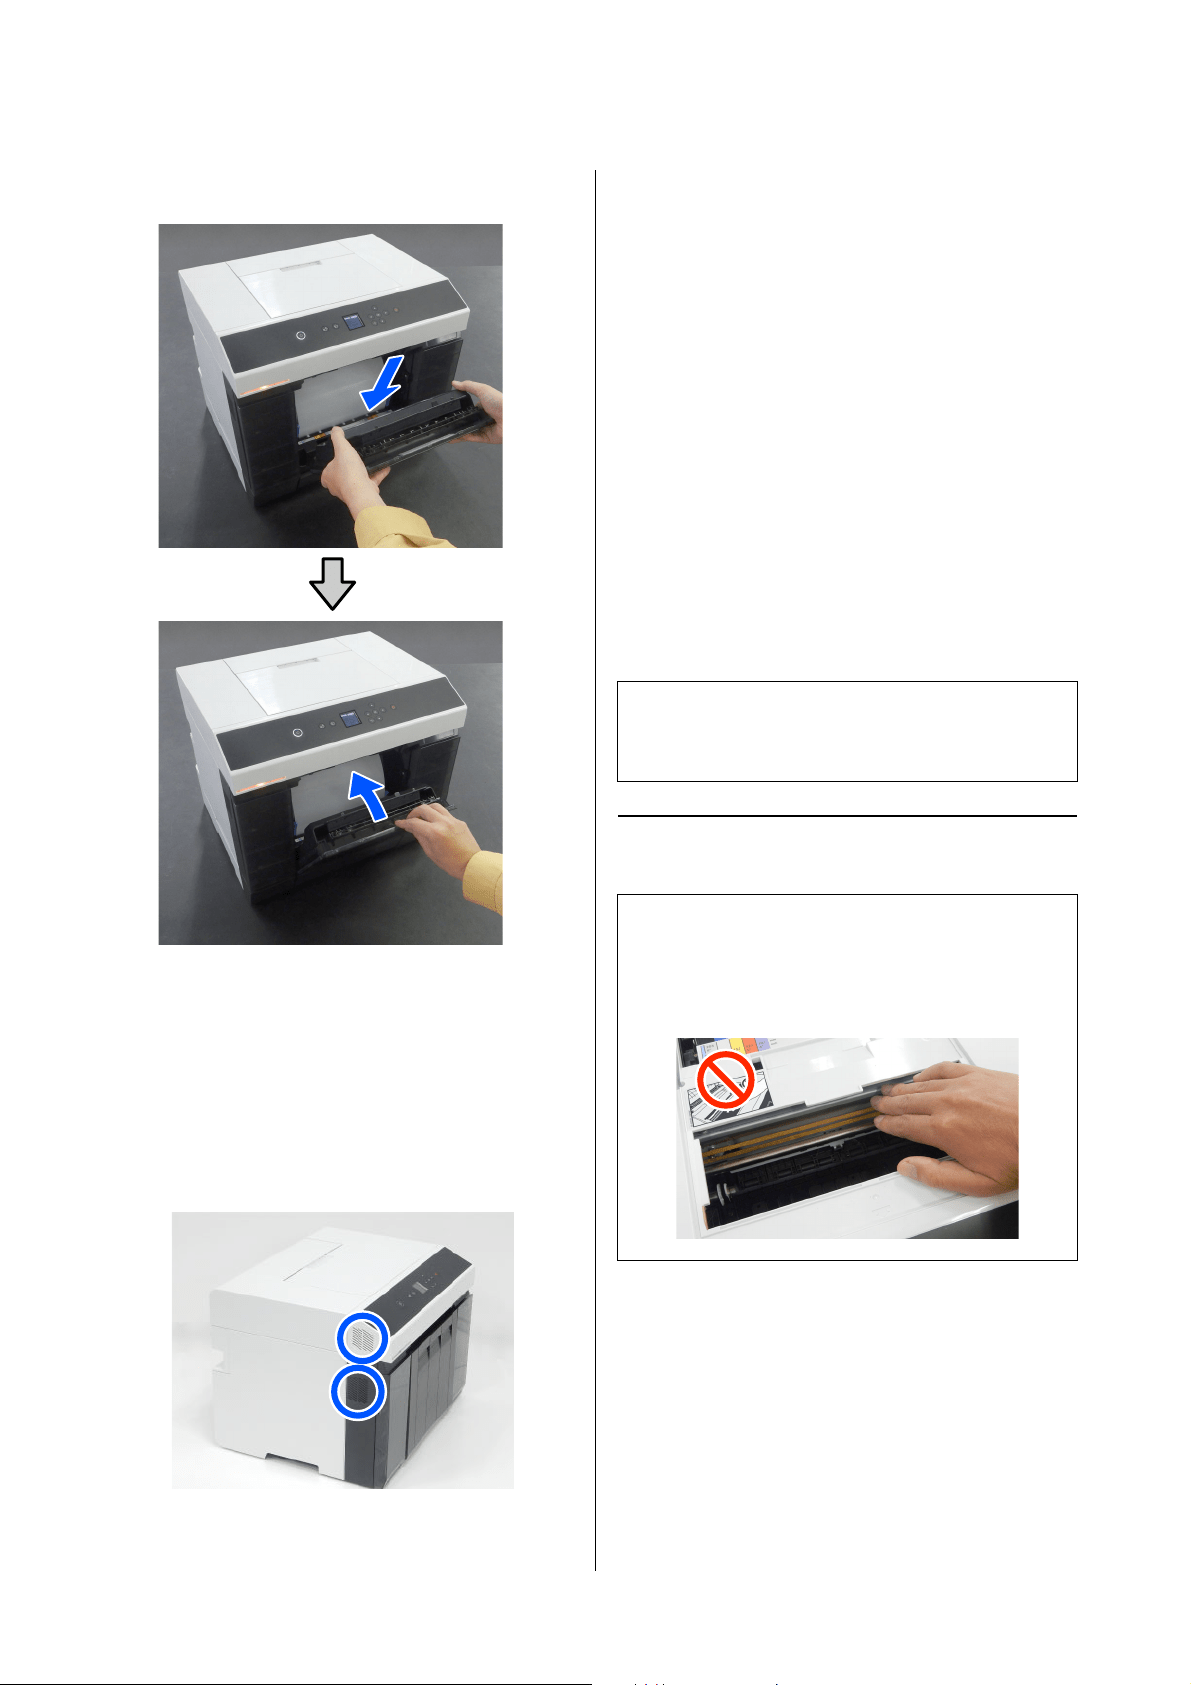
SL-D1000 Series User's Guide
Maintenance
70
4
Attach the scrap paper box.
5
Confirm that the status light is off.
Cleaning Airflow Vents
Clean the airflow vent filter with a vacuum cleaner
once every 3 months.
Cleaning the Platen and
Roll Paper Unit
If the back of printed paper is dirty, paper dust (white
dust) has accumulated on the platen and roll paper
unit, making them dirty. Clean the platen and roll
paper unit according to the procedure in the next
section.
If you are using roll paper, clean the platen and the roll
paper unit. If you are using cut sheets, clean the platen.
Execute cleaning with the power on.
If you are using roll paper, remove the roll paper from
the roll paper unit in advance.
U
“Removing the Spindle Unit” on page 30
How to Clean the Platen
1
Remove the printer cover
c
Important:
Do not touch the rollers inside the printer. This
could cause print outs to be soiled and so on.
c
Important:
Do not touch any part of the platen except where
instructed to clean. Otherwise, it may break down
or reduce print quality.
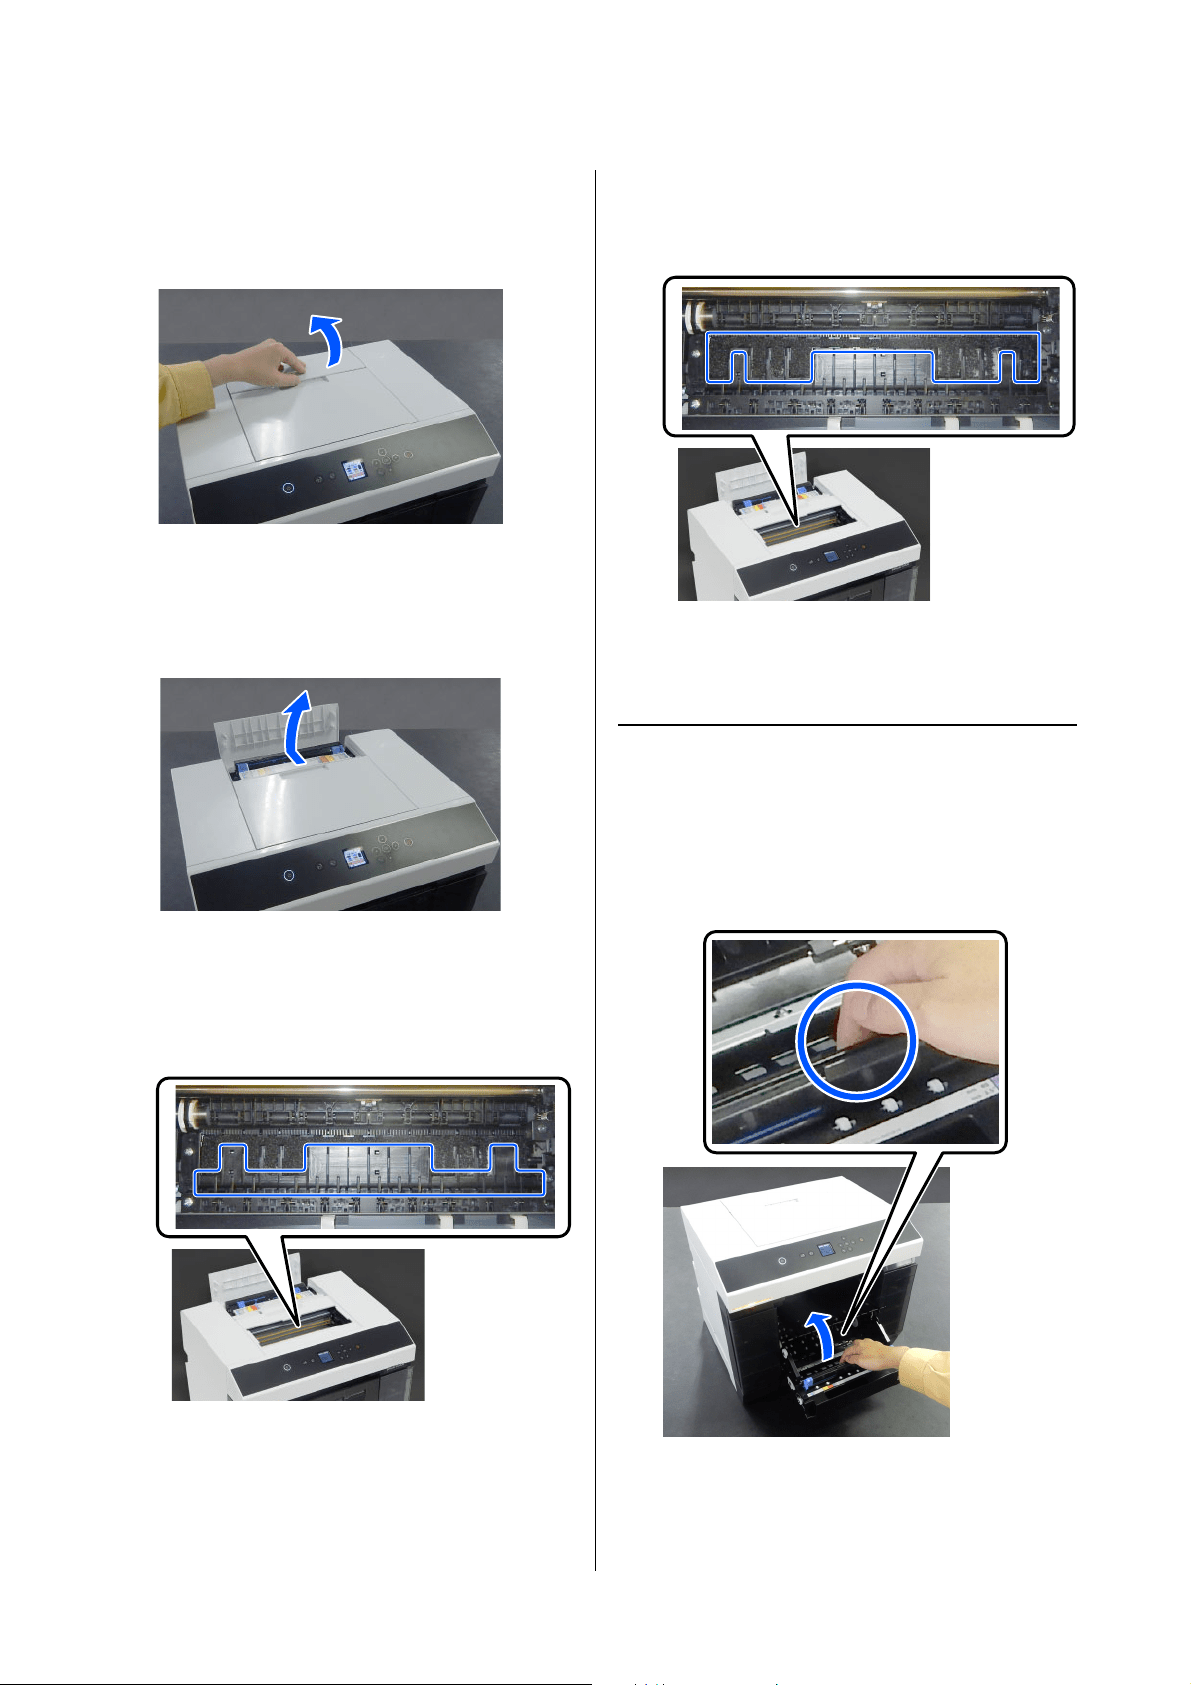
SL-D1000 Series User's Guide
Maintenance
71
2
Wipe off any dirt, such as paper dust, on the
platen (the area outlined in blue in the
illustration below) with a commercially
available cotton swab.
3
Wipe off any dirt, such as paper dust, that has
accumulated on the ink absorbing areas (the
area outlined in blue in the illustration below)
with a commercially available cotton swab.
Be careful as you wipe the ink off the ink
absorbing area so that the ink does not spread to
any other areas.
4
Install the printer cover in the reverse order of
step 1.
How to Clean the Roll Paper Unit
1
Open the front plate inside the roll paper unit.
Place your finger in the hole at the bottom and
lift to open.
(
1
)
Open the rear paper feed slot cover.
(
2
)
Slide the printer cover backwards, and then
remove it.
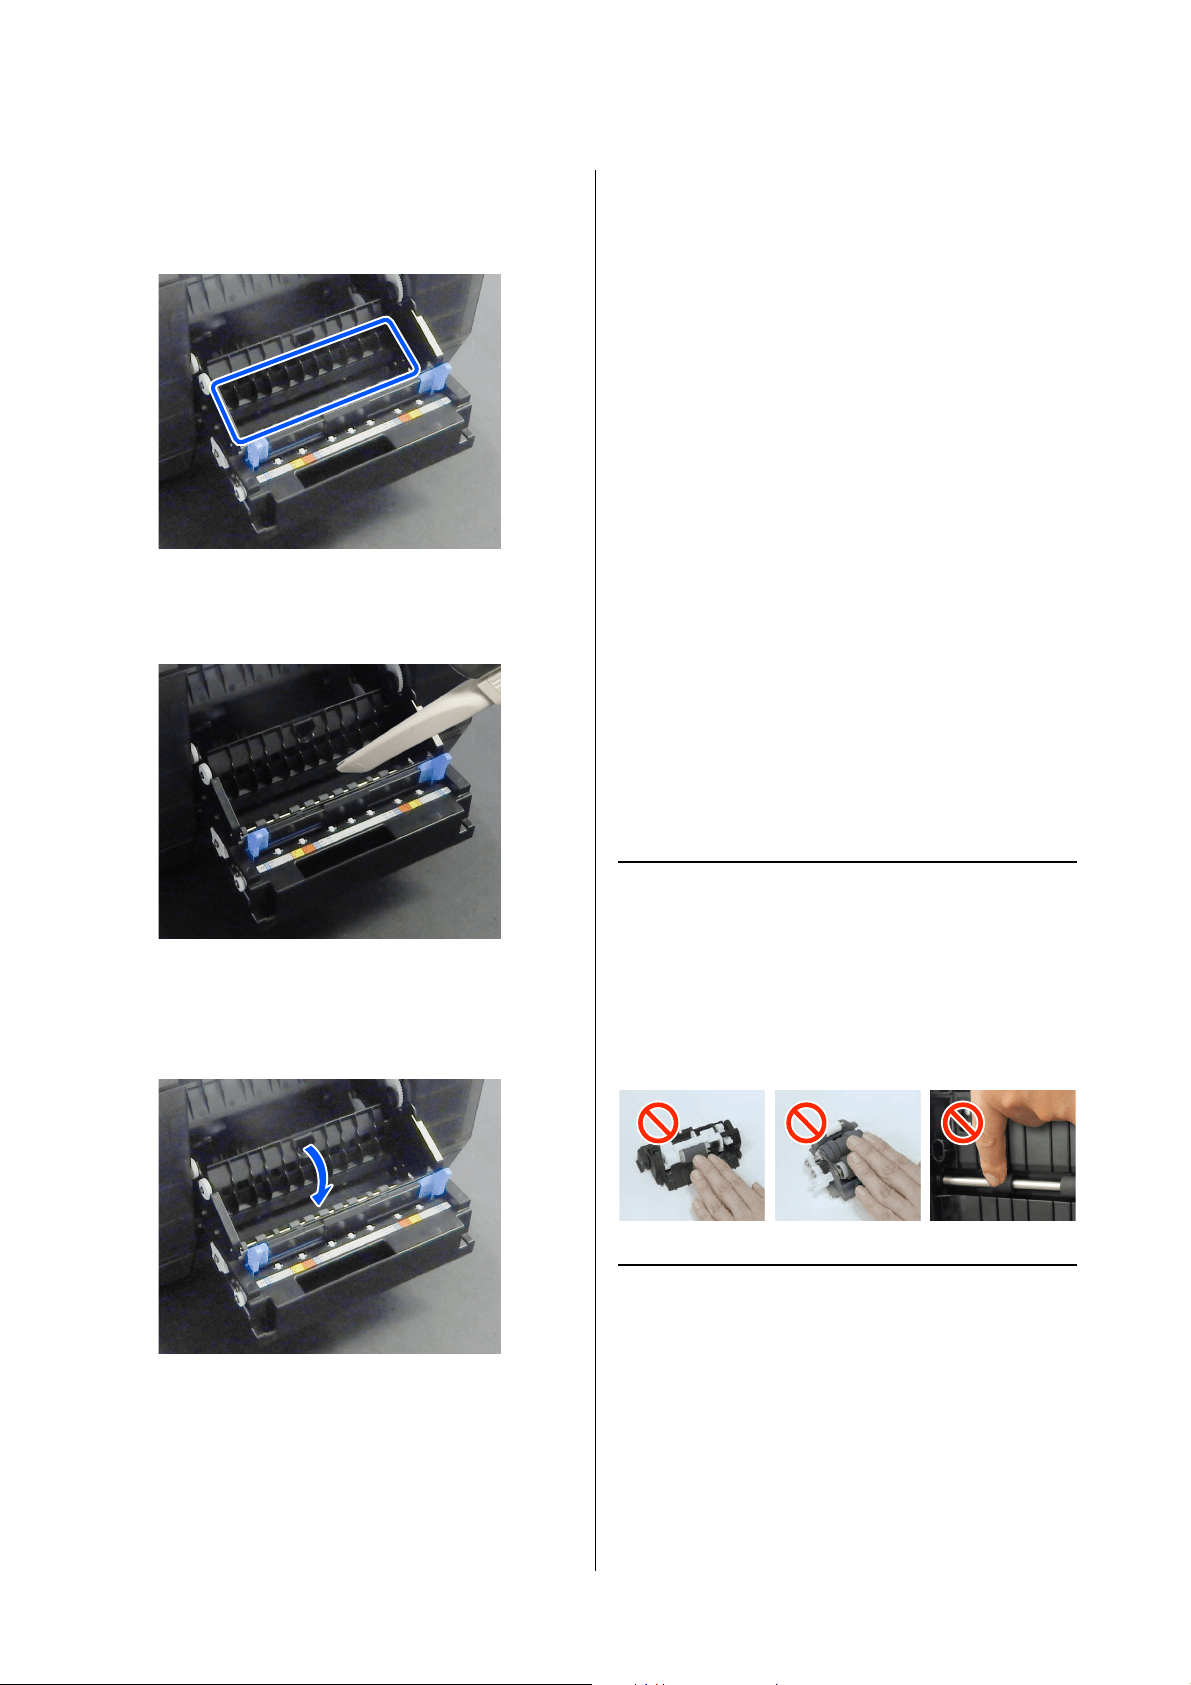
SL-D1000 Series User's Guide
Maintenance
72
2
Use a vacuum cleaner to remove dirt, such as
paper dust, that has collected in the locations
shown in the illustration.
Use a vacuum cleaner that has a nozzle type
head with no brush.
3
Replace the plate.
Press down until you hear it click into place.
4
Reload the roll paper.
U
“Installing the Spindle Unit” on page 33
Cleaning and Replacing
the Rollers in the Duplex
Feeder (Option)
The feed rollers and transfer rollers in the duplex
feeder need the following maintenance depending on
the state of the printer.
O Feed rollers: Clean or replace
O Transfer rollers: Clean
If they are not appropriately cleaned and replaced,
paper feed trouble may occur. Follow the instructions
below to do this.
Install the feed rollers when assembling the duplex
feeder
The feed rollers are not installed when the duplex
feeder is assembled. See the following to install the feed
rollers before using the machine.
U
“Replacing Feed Rollers” on page 72
Notes on Handling Rollers
Do not touch the roller surfaces of the paper feed
rollers or transfer rollers.
Oil from your skin could stick to them and make
printed materials dirty.
Replacing Feed Rollers
Types of Feed Rollers
The following A and B feed rollers are installed in the
duplex feeder.
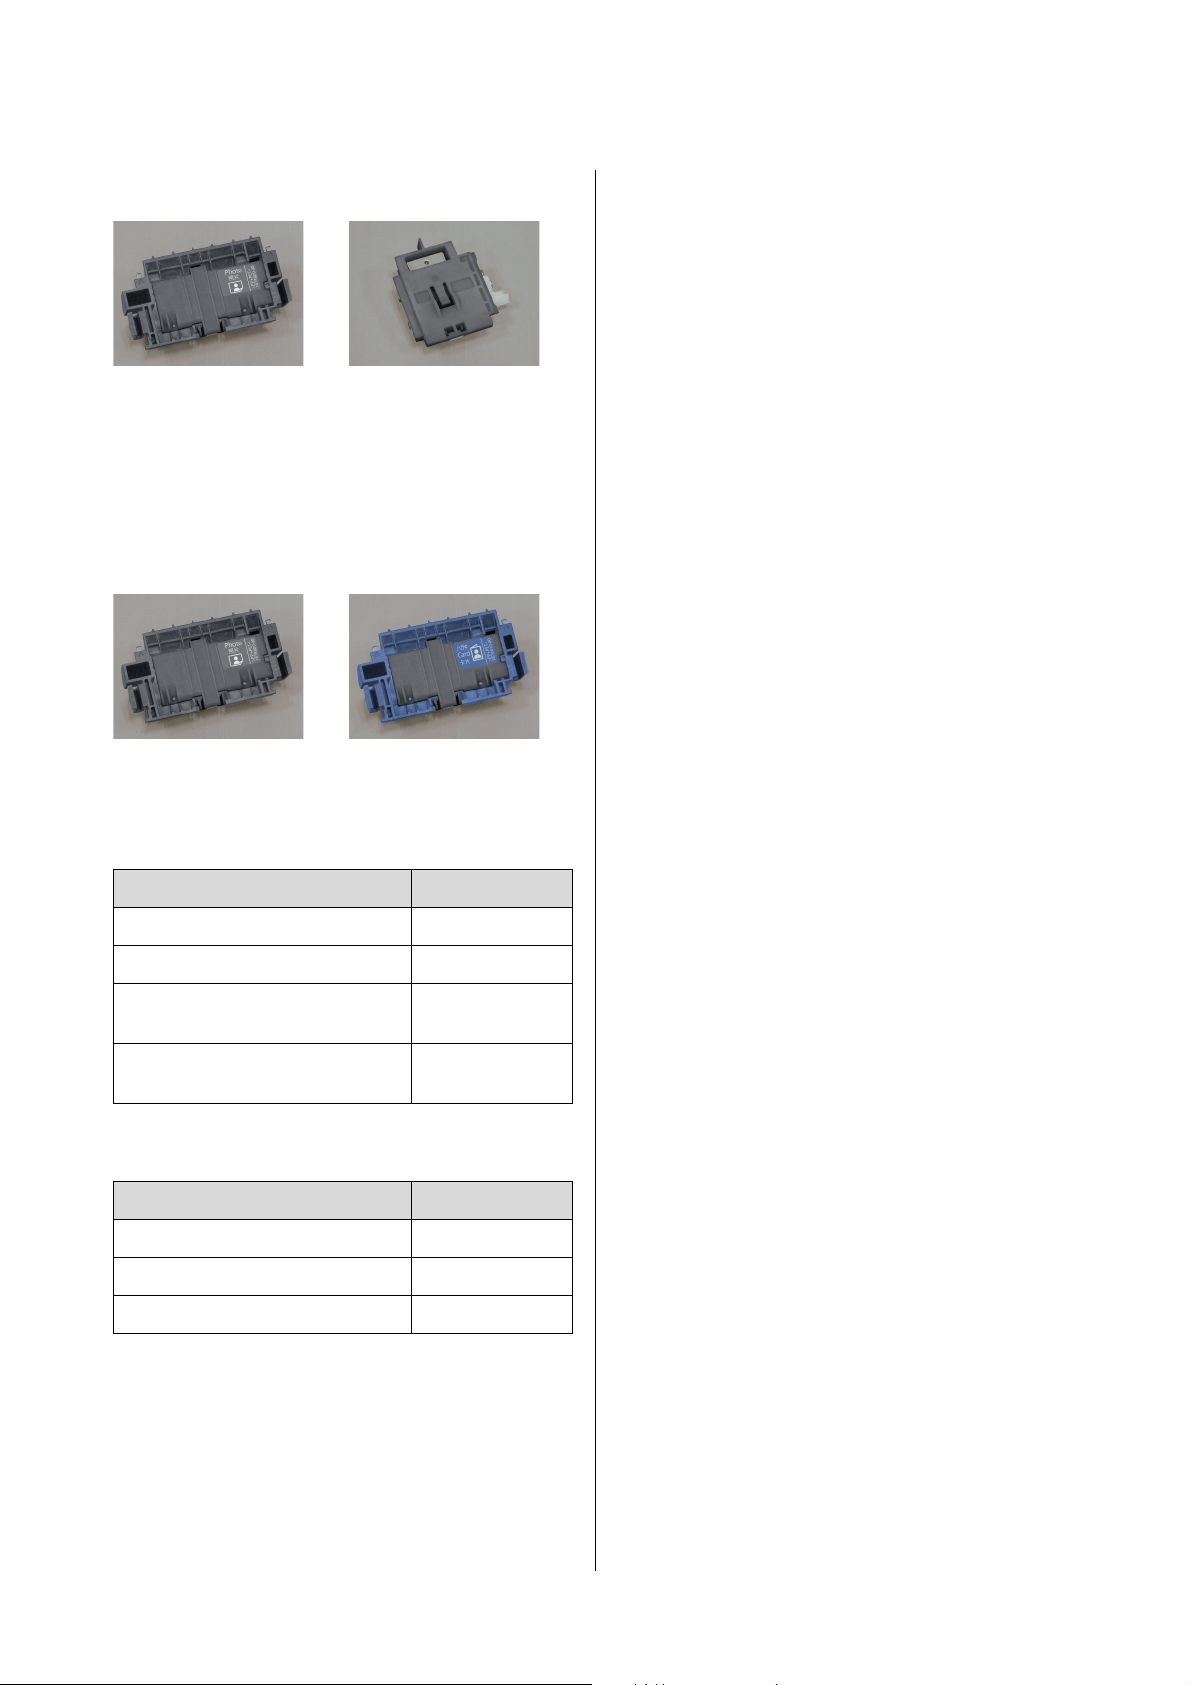
SL-D1000 Series User's Guide
Maintenance
73
Also, there are 2 types of A feed roller, one for photo
paper and one for card stock. See the following table to
replace and use them according to the type of paper
being used.
Compatibility of paper types and feed rollers
Epson Special Media
Other Commercially Available Paper
When to replace
Replace the feed rollers at the following times.
When the type of paper being used is changed
If the A feed roller is not installed correctly, then paper
feed problems and scratches on the back side of the
paper may occur. Replace the feed rollers as
appropriate, according to the table of compatibility of
paper types and feed rollers. The B feed rollers do not
need to be replaced.
When using paper other than Epson Special Media,
paper feed problems may occur because of the paper,
even if you follow the guidelines in the table of
compatibility of paper types and feed rollers. Because
of this, we recommend first printing some paper to
confirm whether it feeds. If paper feed problems occur,
install and use the other feed rollers.
Compatibility of paper types and feed
rollersU
“Types of Feed Rollers” on page 72
When feed rollers reach the end of their service life
Faulty paper feeding, such as paper not feeding from
the cassette, may occur when the feed rollers reach the
end of their service life. If faulty paper feeding occurs
repeatedly, even after doing the following, then replace
both A and B feed rollers with new ones.
O Is the paper loaded correctly in the cassette?
O Are you using the feed roller that is appropriate for
the type of paper?
O Have the feed rollers and transfer rollers been
cleaned?
How to Load Paper in the CassetteU
“How to Load
Cut Paper” on page 36
How to Clean the Feed Rollers and Transfer Rollers
U
“Cleaning the Feed Rollers and Transfer Rollers”
on page 76
How to Replace
1
Turn off the printer.
AB
For photo paper For card stock
Name of paper Feed rollers
SureLab Photo Paper Gloss - DS(225) For photo paper
SureLab Photo Paper Gloss - DS(190) For photo paper
SureLab Photo Paper Luster -
DS(225)
For photo paper
SureLab Photo Paper Luster -
DS(190)
For photo paper
General name of paper Feed rollers
Matte photo paper For card stock
Glossy photo paper For photo paper
Card stock For card stock
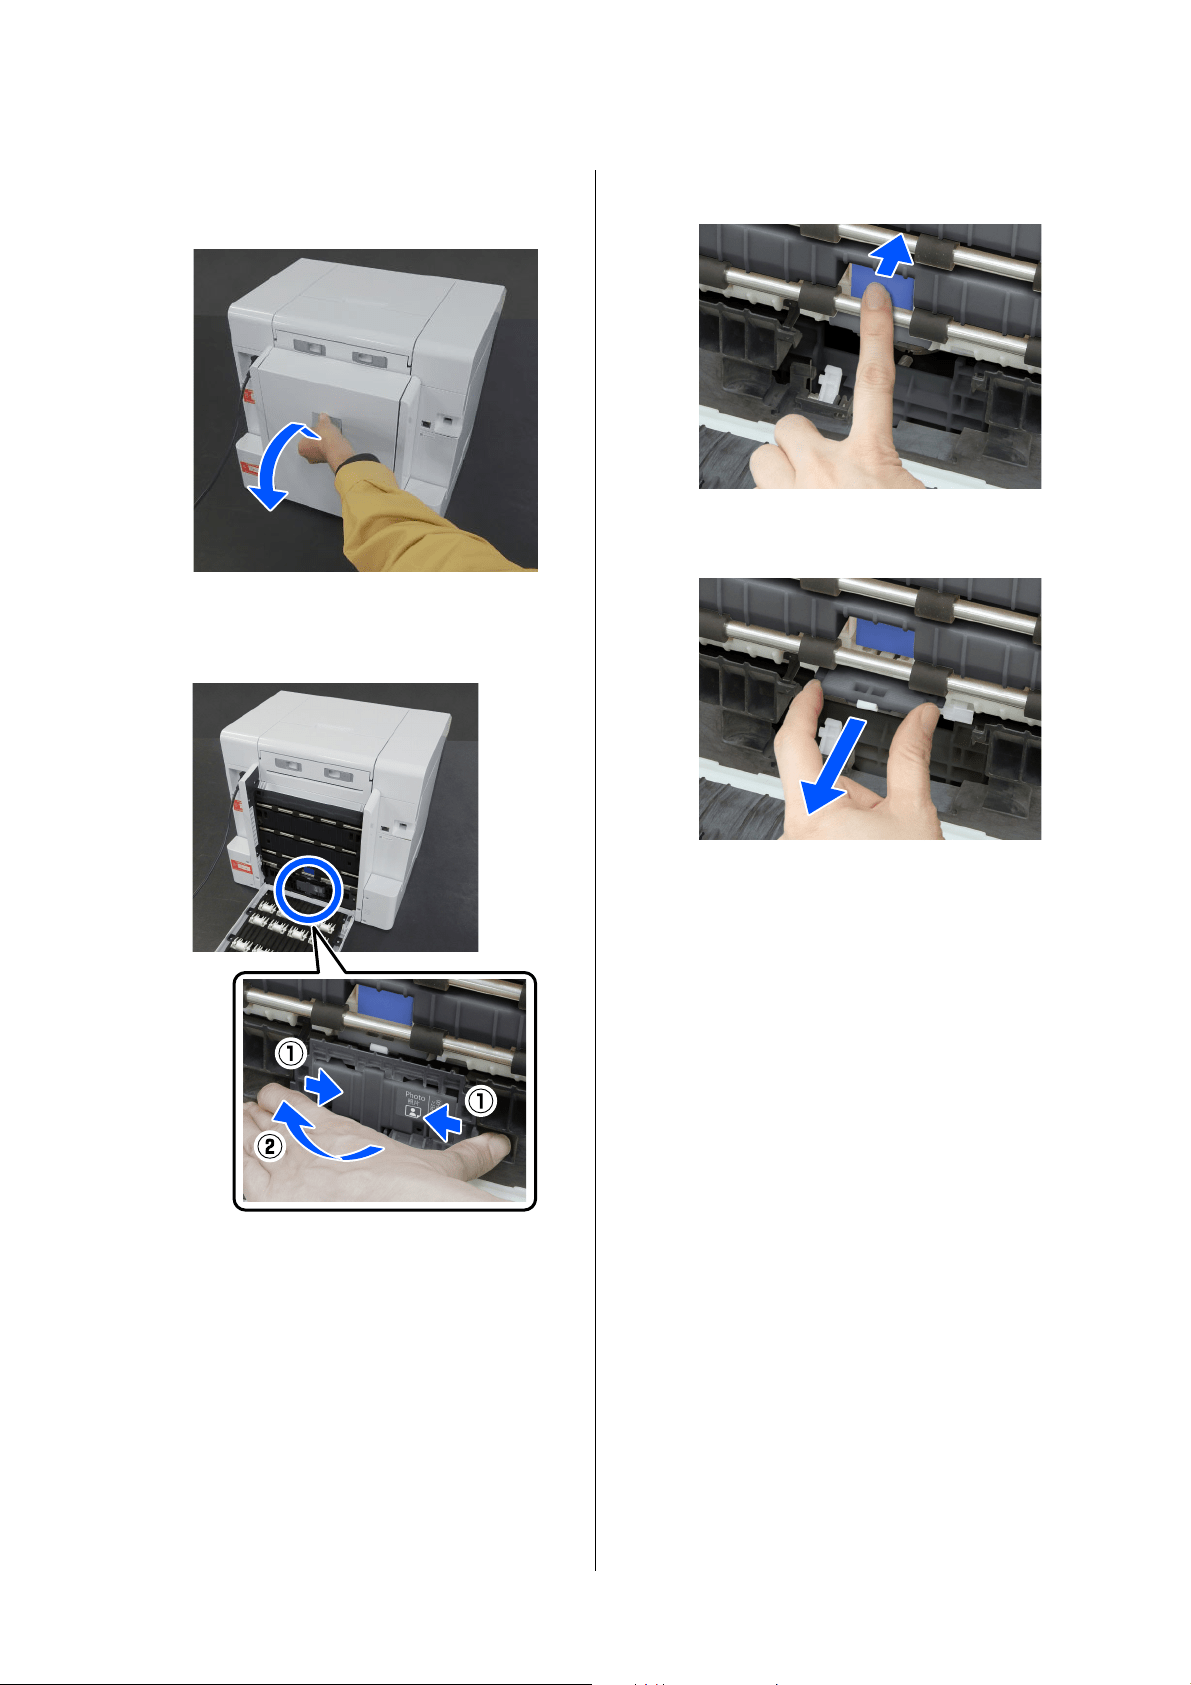
SL-D1000 Series User's Guide
Maintenance
74
2
Move to the back, and open the cover of the
duplex feeder.
3
Press on both sides of the A feed roller to
remove it.
If you are replacing only the A feed roller,
proceed to step 7.
4
Press in the button shown in the illustration.
The B feed roller comes out toward you.
5
Remove the B feed roller.
6
Orient the new feed roller as shown in the
illustration, and insert it until it stops.
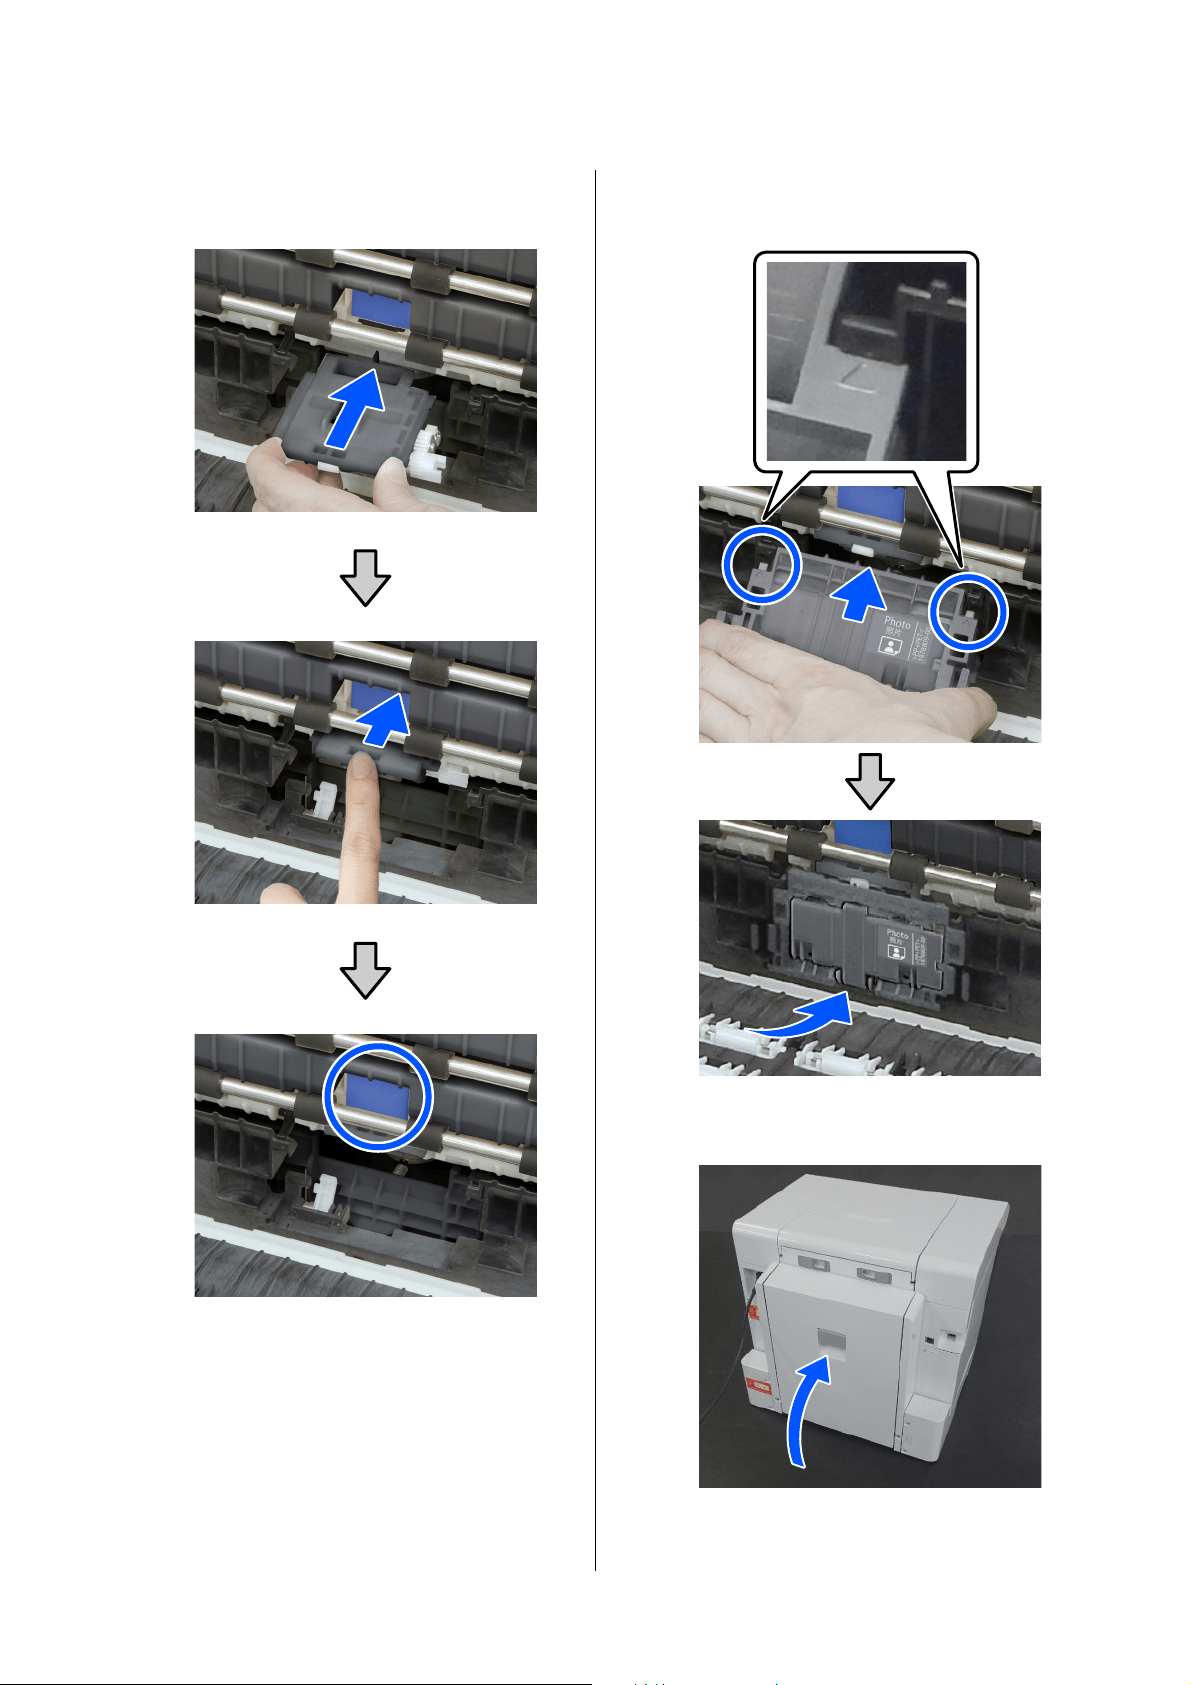
SL-D1000 Series User's Guide
Maintenance
75
When you press it all the way in, the button you
pressed in comes back out.
7
Align the triangle on top of the cover with the
triangle on the printer and then insert the A feed
roller and press on its lower part to install it.
Install a new feed roller if you are replacing the
feed roller at the end of its service life.
8
Close the cover of the duplex feeder.
9
Move to the front, and turn on the printer.
SL-D1000 Series User's Guide
Maintenance
76
10
If you are replacing it at the end of its service life,
then, in the control panel screen, select Settings
- Maintenance, and execute Reset Counter.
The amount that has been fed from the cassette
is reset. You can confirm the amount that has
been fed from the cassette in Maintenance Tool.
Cleaning the Feed Rollers and
Transfer Rollers
When to clean
Clean the feed rollers and transfer rollers together at
the following times.
When paper feed trouble repeatedly occurs and one
of the following messages is displayed on the
control panel screen
O Paper jammed in Inside. Remove the jammed
paper.
O Paper jammed in Cassette. Remove it.
The paper feed trouble described above may occur if
the feed rollers or transfer rollers are dirty, such as with
paper dust. Clean the rollers according to the next
section.
See the following for details on troubleshooting paper
feed trouble.
U
“When Paper Jams” on page 144
Item Prepared
Use a soft commercially available cloth to clean the
rollers. Prepare this in advance. We recommend using
a cloth that is low-lint and anti-static.
How to Clean the Feed Rollers
1
Remove the A and B feed rollers.
See the following for the removal procedure.
U
“Replacing Feed Rollers” on page 72
2
Use a soft cloth that has been dipped in water
and carefully wrung out to wipe any dirt, such as
paper dust, off of the feed rollers.
A feed roller
Wipe off any dirt stuck to the surface of the
roller in the illustration.
B feed roller
Wipe off any dirt stuck to the surfaces of the
rollers A and B in the illustration.
The C roller does not need to be wiped.
Rotate both rollers A and B to wipe their entire
surfaces. Rotating the part shown in the
illustration rotates the rollers.
c
Important:
Do not wipe the rollers with a dry cloth.
This could scratch the surface of the rollers.
SL-D1000 Series User's Guide
Maintenance
77
The A roller has a combination of different
cross-sectional shapes. Wipe off the surfaces
that protrude, indicated by in the
illustration. The places that do not protrude do
not contact the paper when feeding, so they do
not need to be wiped.
3
Leave the A and B feed rollers for a short time so
their surfaces dry, and then install them in the
duplex feeder.
See the following for the installation procedure.
U
“Replacing Feed Rollers” on page 72
Continue to the next section to clean the transfer
rollers.
How to clean the transfer rollers
1
Confirm that the printer’s power is turned off
and the cover of the duplex feeder is open.
2
Use a soft cloth that has been dipped in water
and carefully wrung out to wipe any dirt, such as
paper dust, off of the transfer rollers.
O Wipe the surface of all 16 rollers shown in
the image.
O Rotate the metal shafts of the rollers to spin
the rollers to wipe their entire surfaces.
O Besides paper dust, dirt that is difficult to
check visually, such as the residue of paper
coatings, could be stuck to the surface of the
rollers. Do not just wipe off the paper dust,
carefully wipe the entire circumference of
the rollers. Also, always wipe with a clean
part of the cloth.
c
Important:
Do not wipe the rollers with a dry cloth.
This could scratch the surface of the rollers.
SL-D1000 Series User's Guide
Maintenance
78
3
Leave the rollers alone for a short time so their
surfaces dry, and then close the cover of the
duplex feeder.
Maintenance Functions
That Can Be Executed
from the Printer
Print Head Nozzle Check and
Cleaning
If the nozzles are clogged, the printouts become faint,
or banding may appear. The printer has an auto nozzle
check function that automatically detects clogged
nozzles and does Print Head Cleaning or prints by
using normal nozzles to compensate for clogged
nozzles. Because of this, you do not need to regularly
do manual cleaning or Print Head Nozzle Check.
The auto nozzle check function is set from
Maintenance Tool.
U
“Using the Maintenance Tool (Windows)” on
page 80
U “Using the Maintenance Tool (Mac)” on page 95
If you do not use the auto nozzle check function, follow
the procedure below to execute a Print Head Nozzle
Check if there are problems with print quality or when
you want to check for clogged nozzles. If the nozzles
are clogged, clean the print head.
1
Load paper in the location set in Printer Setup -
Paper Source Settings - Paper path for
maintenance printing.
U
“Basic Operations” on page 29
2
Select Settings - Maintenance on the home
screen.
To select an item, move the focus to the item
using the u/d/l/r buttons, and then press the
Z button.
3
Select Print Head Nozzle Check.
4
Follow the on-screen instructions to print a
nozzle check pattern.
5
Look at the printed pattern to check for print
head nozzles that are clogged.
O Same as A:
All lines are printed. Select No. No further
steps are needed.
O Close to B:
Some nozzles are clogged. Select Yes, check
the messages, and then select Cleaning.
Note:
O When ink is low, you may not be able to do
cleaning.
O If the clogs are not cleared after repeating Print
Head Cleaning about three times, then execute
Powerful Cleaning.
U
“Powerful Cleaning” on page 79
If the clogs are not cleared after doing Powerful
Cleaning, contact your dealer or Epson Support.

SL-D1000 Series User's Guide
Maintenance
79
O Close to C:
If most lines are missing or not printed, this
indicates most nozzles are clogged. Select
Yes, press the Z button to proceed to the
next screen, and then select Powerful
Cleaning.
6
Follow the on-screen instructions to execute
Print Head Cleaning or Powerful Cleaning.
7
When cleaning is finished, the nozzle check
pattern is printed again. Repeat checking and
cleaning until all the lines in the nozzle check
pattern are printed.
Powerful Cleaning
Executing Powerful Cleaning may improve quality in
the following cases.
O When most nozzles are clogged.
O Clogs are not cleared even after doing Print Head
Cleaning three times
1
Load paper in the location set in Printer Setup -
Paper Source Settings - Paper path for
maintenance printing.
U “Basic Operations” on page 29
2
Select Settings - Maintenance on the home
screen.
3
Select Powerful Cleaning.
4
When cleaning is finished, the nozzle check
pattern is printed again. Check whether all of
the lines in the nozzle check pattern were
printed correctly.
Note:
Powerful Cleaning consumes more ink than normal
cleaning.

SL-D1000 Series User's Guide
Using the Maintenance Tool (Windows)
80
Using the Maintenance Tool (Windows)
This section explains how to use Maintenance Tool by starting it from the computer connected to the printer.
Summary of the Maintenance Tool
From your computer you can perform adjustment and maintenance operations such as checking the printer's status,
making settings, performing head cleaning and so on.
When multiple printers are connected to a single computer, you can operate multiple printers at one time.
Starting and Closing
Starting
On the computer, click Start - Applications List - EPSON - EPSON SL-D1000 Series Maintenance Tool in this
order.
Closing
Click Close at the bottom-right of the screen.
Note:
You can also start it by clicking Maintenance Tool in the Maintenance tab of the printer driver screen.
SL-D1000 Series User's Guide
Using the Maintenance Tool (Windows)
81
Explanation of the Main Screen
The following main screen appears when you start Maintenance Tool.
The configuration and functions of the main screen are shown below.
Item Functions
A
Printer list area Displays a list of printers that are connected to the computer.
Status Displays the printer's status.
Displays the ink level for each color. The following is shown for each color of ink.
: No problems with ink levels.
: New ink supply unit needs to be prepared because remaining ink level is low.
: Remaining ink level is below the minimum value. Replace with a new ink
supply unit. Or, an error has occurred. Check the printer history (E) and clear the
error.
Printer Name Displays the printer name.
Paper Remaining/Paper
Type
The paper sources are shown by the following icons.
: Roll Paper
: Duplex feeder
Information about the paper that is currently loaded is shown to the right of the
icon.
For roll paper, the remaining amount of paper is shown to the left of the icon.
SL-D1000 Series User's Guide
Using the Maintenance Tool (Windows)
82
Explanation of the Printer settings
Clicking on Printer settings in the main screen displays the following Printer settings screen.
B
Printer maintenance The following maintenance functions can be executed for the printer selected in
the printer list area (A).
Diagnostic Cleaning Detects clogged nozzles and automatically performs cleaning.
U
“Diagnostic Cleaning” on page 91
Forced Cleaning Performs manual cleaning.
U
“Forced Cleaning” on page 92
Nozzle Check Checks for clogged nozzles.
A nozzle check pattern can also be printed.
U
“Nozzle Check Methods” on page 89
U “Print Nozzle Check Pattern Method” on page 90
C
Printer settings button A screen for setting printer operations, Auto Nozzle Check Settings, and adjusting
the printer is displayed.
U
“Explanation of the Printer settings” on page 82
D
System Environment Settings
button
A screen for saving log files and status sheets is displayed.
U
“Explanation of the System Environment Settings Screen” on page 88
E
Printer history Shows a history of settings and maintenance executed from Maintenance Tool and
information about errors that occur on printers that are connected to the
computer.
This operation history is not retained at the next startup, it is deleted automatically
when you exit Maintenance Tool.
Item Functions
SL-D1000 Series User's Guide
Using the Maintenance Tool (Windows)
83
The configuration and functions of the Printer settings screen are shown below.
Item Functions
A
Printer list area Displays a list of printers that are connected to the computer.
The settings of the items indicated by the following icons can be changed in the
Printer settings tab.
, , , ,
U
“Printer settings tab” on page 84
Printer Name Displays the printer name.
Status Displays the printer's status.
Indicates the state of the warning buzzer settings.
Indicates the sleep mode threshold.
Indicates the state of Quick Print Mode settings.
Indicates the state of Remaining Paper Management settings.
Indicates the state of Heater setting.
Serial number Displays the printer's serial number.
Paper information The paper sources are shown by the following icons.
: Roll Paper
: duplex feeder
Information about the paper that is currently loaded is shown to the right of the
icon.
For roll paper, the remaining amount of paper is shown to the right of the paper
information.
SL-D1000 Series User's Guide
Using the Maintenance Tool (Windows)
84
Printer settings tab
The configuration and functions of the Printer settings tab in the Printer settings screen are shown below.
After changing the settings in items B to G, the changes are applied for each item by clicking Set.
B
Tabs and information display
area
The following three types of tabs are displayed.
Printer settings tab You can set the printer’s various operations.
U
“Printer settings tab” on page 84
Auto Nozzle Check
Settings tab
You can set the various settings related to auto nozzle checks.
U
“Auto Nozzle Check Settings tab” on page 86
Paper Setting tab You can adjust the printer, such as Print Head Alignment and Paper Feed
Adjustment.
U “Paper Settings tab” on page 87
Item Functions
A
Apply to all printers By selecting this, the results of settings changed in B to G are batch applied to all
printers displayed in the printer list area at the top of the screen.
Select this and then change the settings in B to G, and then click Set for each
item.
B
Buzzer Set volume of and whether to sound the warning buzzer.
C
Sleep Mode Threshold Set the time before switching to Sleep Mode.
If an error has not occurred on the printer and no print jobs have been received for
the specified length of time, the printer automatically switches to Sleep Mode.
Item Functions
SL-D1000 Series User's Guide
Using the Maintenance Tool (Windows)
85
D
Quick Print Mode Set whether to enable/disable Quick Print Mode.
Quick Print Mode is a mode that increases print speed by shortening the drying
time when printing one sheet at a time.
We recommend using this when printing one sheet at a time such as for an event.
Be sure to note the following points.
O Do not stack printouts as the drying time is shorter.
O Depending on the paper type, color may be uneven or ink may be smudged.
If this occurs, set Quick Print Mode to Off.
E
Remaining Paper Management Set whether to enable/disable Remaining Paper Management.
When this is On, information, such as the paper type and remaining paper, is
printed as a barcode on the leading edge of the roll paper.
F
Postcard False Set Alert Set whether, when printing postcards, to detect the type and orientation of the
postcard paper loaded on the printer, and to then send a notification.
The following shows the setting items.
Detect Postal Frame Detects the orientation and print side of postcards loaded in the printer and sends
notification if they are judged incorrect according to the postcard paper type set
on the printer’s control panel.
When First Sheet is set, only the orientation of the first postcard loaded on the
printer is detected.
When All Sheets is set, the orientation of all postcards loaded on the printer are
detected.
The print speed is reduced by the amount of time to make these detections when
First Sheet or All Sheets is set. To prioritize print speed, set this to Off.
Paper Type Detection When this is On, notification is sent when the type of postcard paper loaded in the
printer is different from the type of postcard paper set on the printer’s control
panel.
The type of paper used for postcards is different from normal paper or inkjet paper,
so notification is sent in the following situations.
Example: When inkjet paper postcards are set on the printer’s control panel, but
regular paper postcards are loaded on the printer.
G
Heater setting Set whether to turn on the heater that is built-in to the printer.
If it is turned On, then the internal heater is turned on when printing on either roll
paper or cut sheets. The printing time may become longer because of the added
time for drying by the heater.
When printing on both sides of cut sheets of photo paper and stacking them on
paper that has been printed on, if a side with dark colors and a side with light colors
are stacked together, then one side may look uneven, due to the differences in
drying time. Set this to On if this unevenness is an issue.
If you set Auto, then the internal heater turns on when printing on roll paper, but
the internal heater turns off when printing on cut sheets.
Also, if you are using the printer in any of the following environments, then the
internal heater turns off regardless of this setting.
O When the temperature exceeds 27 °C
O When the humidity is below 20%
Item Functions
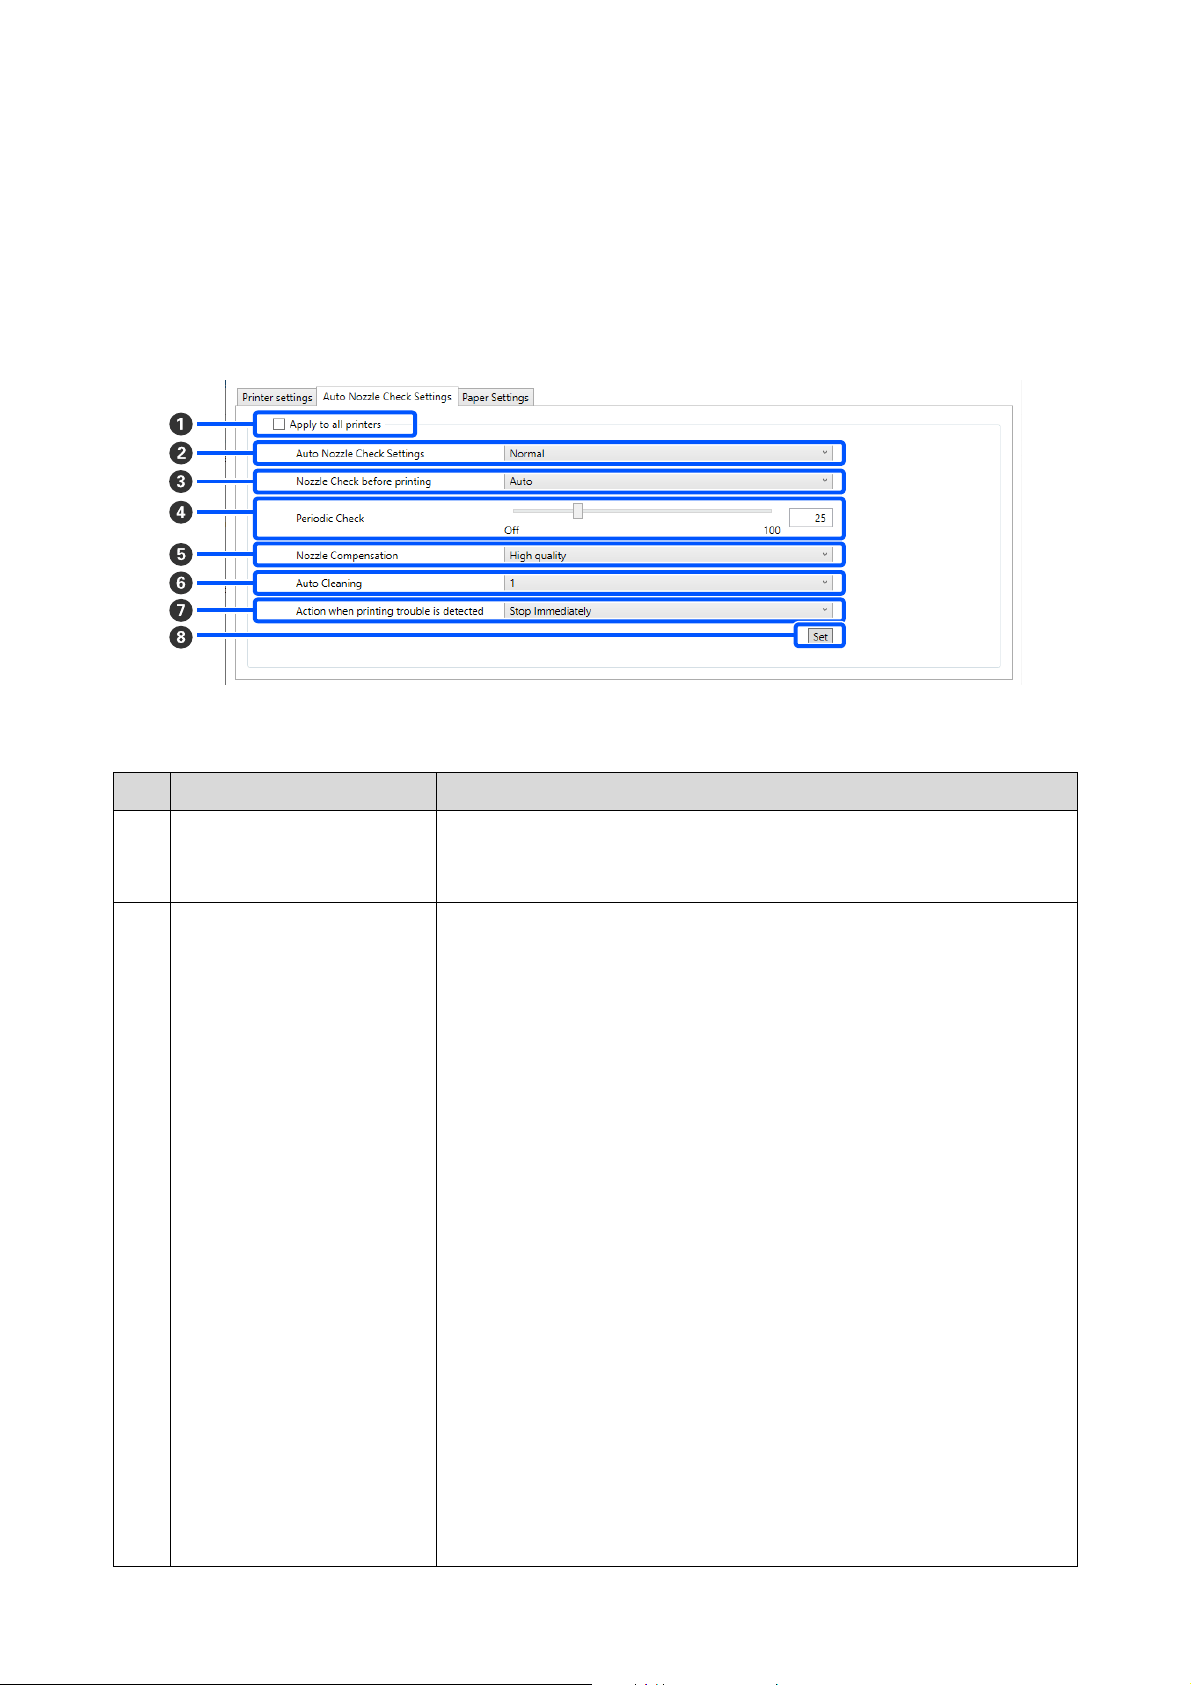
SL-D1000 Series User's Guide
Using the Maintenance Tool (Windows)
86
Auto Nozzle Check Settings tab
In this section you can do advanced settings for auto nozzle check to confirm the state of the nozzles when the
printer is turned on and at specified times so that the nozzles are automatically cleaned if they clog.
The configuration and functions of the Auto Nozzle Check Settings tab in the Printer settings screen are shown
below.
After changing the settings in items B to G, the changes are applied by clicking Set.
Item Functions
A
Apply to all printers By selecting this, the results of settings changed in B to G are batch applied to all
printers displayed in the printer list area at the top of the screen.
Select this and then change the settings in B to G, and then click Set.
B
Auto Nozzle Check Settings Set the conditions in which an automatic nozzle check is done. Select one of the
following.
O High quality
Prints a check pattern on roll paper and automatically checks the state of the
nozzles. Nozzles are checked in the same way as when the printer is turned on
too.
Roll paper must always be loaded on the printer.
O Normal
When printing on roll paper, prints a check pattern on roll paper and
automatically checks the state of the nozzles. When printing on cut sheets,
does not print a check pattern and automatically checks the state of the
nozzles.
When roll paper is loaded, nozzles are checked in the same way as when the
printer is turned on too.
O Saving Ink
Does not print a check pattern and automatically checks the state of the
nozzles, whether roll paper or cut sheets are loaded on the printer. Nozzles are
checked in the same way as when the printer is turned on too.
O Off
Nozzles are not checked automatically. Select his when you want to visually
confirm the printed check pattern to confirm the state of the nozzles.
O Default
Returns all the settings (B to G) in the Auto Nozzle Check Settings tab to
the manufacturer’s settings.
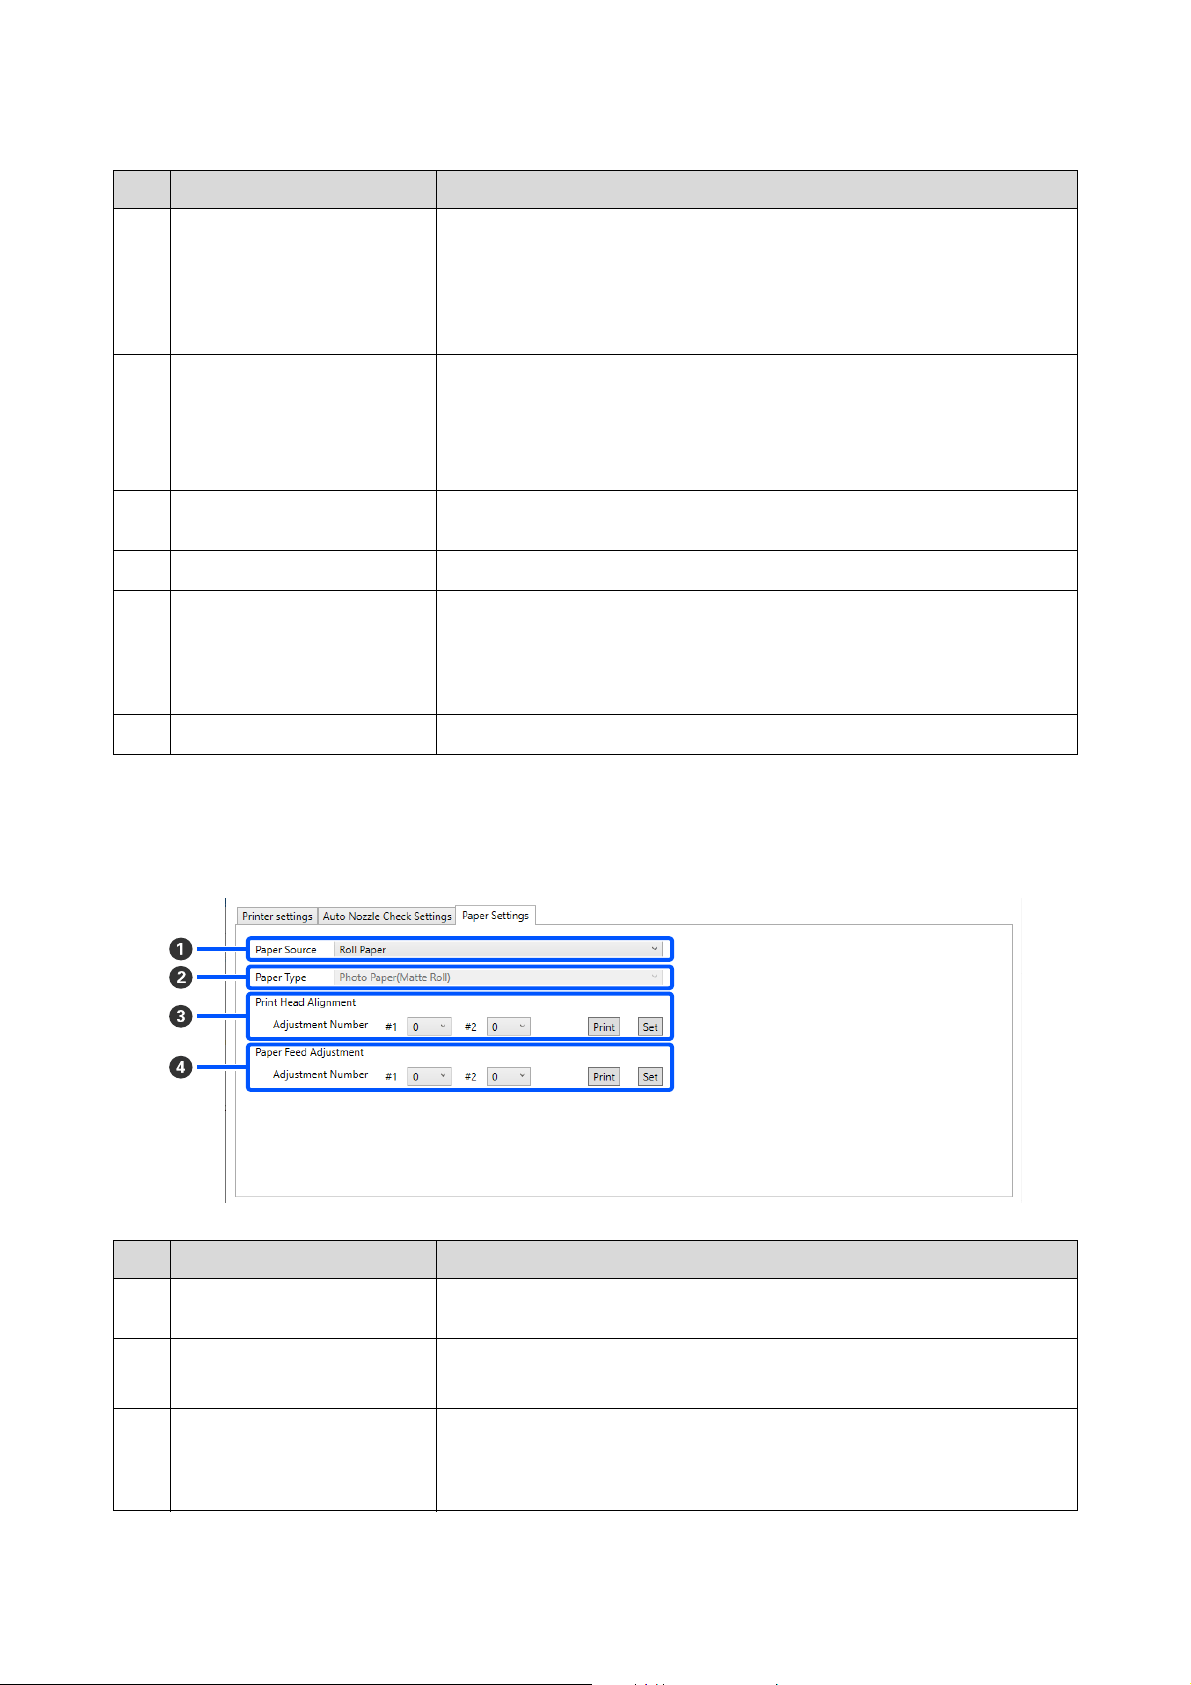
SL-D1000 Series User's Guide
Using the Maintenance Tool (Windows)
87
Paper Settings tab
The configuration and functions of the Paper Settings tab in the Printer settings screen are shown below.
C
Nozzle Check before printing Set whether to execute auto nozzle check before printing.
When set to Auto, auto Nozzle Check is executed according to the state of the
printer, such as after changing the auto nozzle check settings, or after executing
nozzle cleaning.
When set to Every time, auto nozzle check is executed for each print job.
D
Periodic Check Set the time to execute auto nozzle check according to the number of sheets
printed.
If the number of sheets being printed for a single job exceeds the number of
printed sheets set for this item, then the number of sheets for that job is printed,
after which auto nozzle check is executed.
E
Nozzle Compensation Set the print quality for when normal nozzles compensate for the ink that could not
be ejected by clogged nozzles.
F
Auto Cleaning Sets the number of times to do auto cleaning when clogged nozzles are detected.
G
Action when printing trouble is
detected
Sets whether to stop printing when clogged nozzles are detected.
When set to Stop Immediately, printing is stopped when clogged nozzles are
detected.
When set to Ignore, printing is continued even if clogged nozzles are detected.
H
Set button Clicking this reflects the changes to each item B to G.
Item Functions
A
Paper Source Select the paper source for doing Print Head Alignment and Paper Feed
Adjustment.
B
Paper Type This is enabled only when Rear Paper Feed Slot is selected for Paper Source (A).
Select the type of paper that is loaded in the rear paper feed slot.
C
Print Head Alignment Corrects print head misalignments when printing.
See the following for details on Print Head Alignment.
U
“Print Head Alignment Method” on page 93
Item Functions
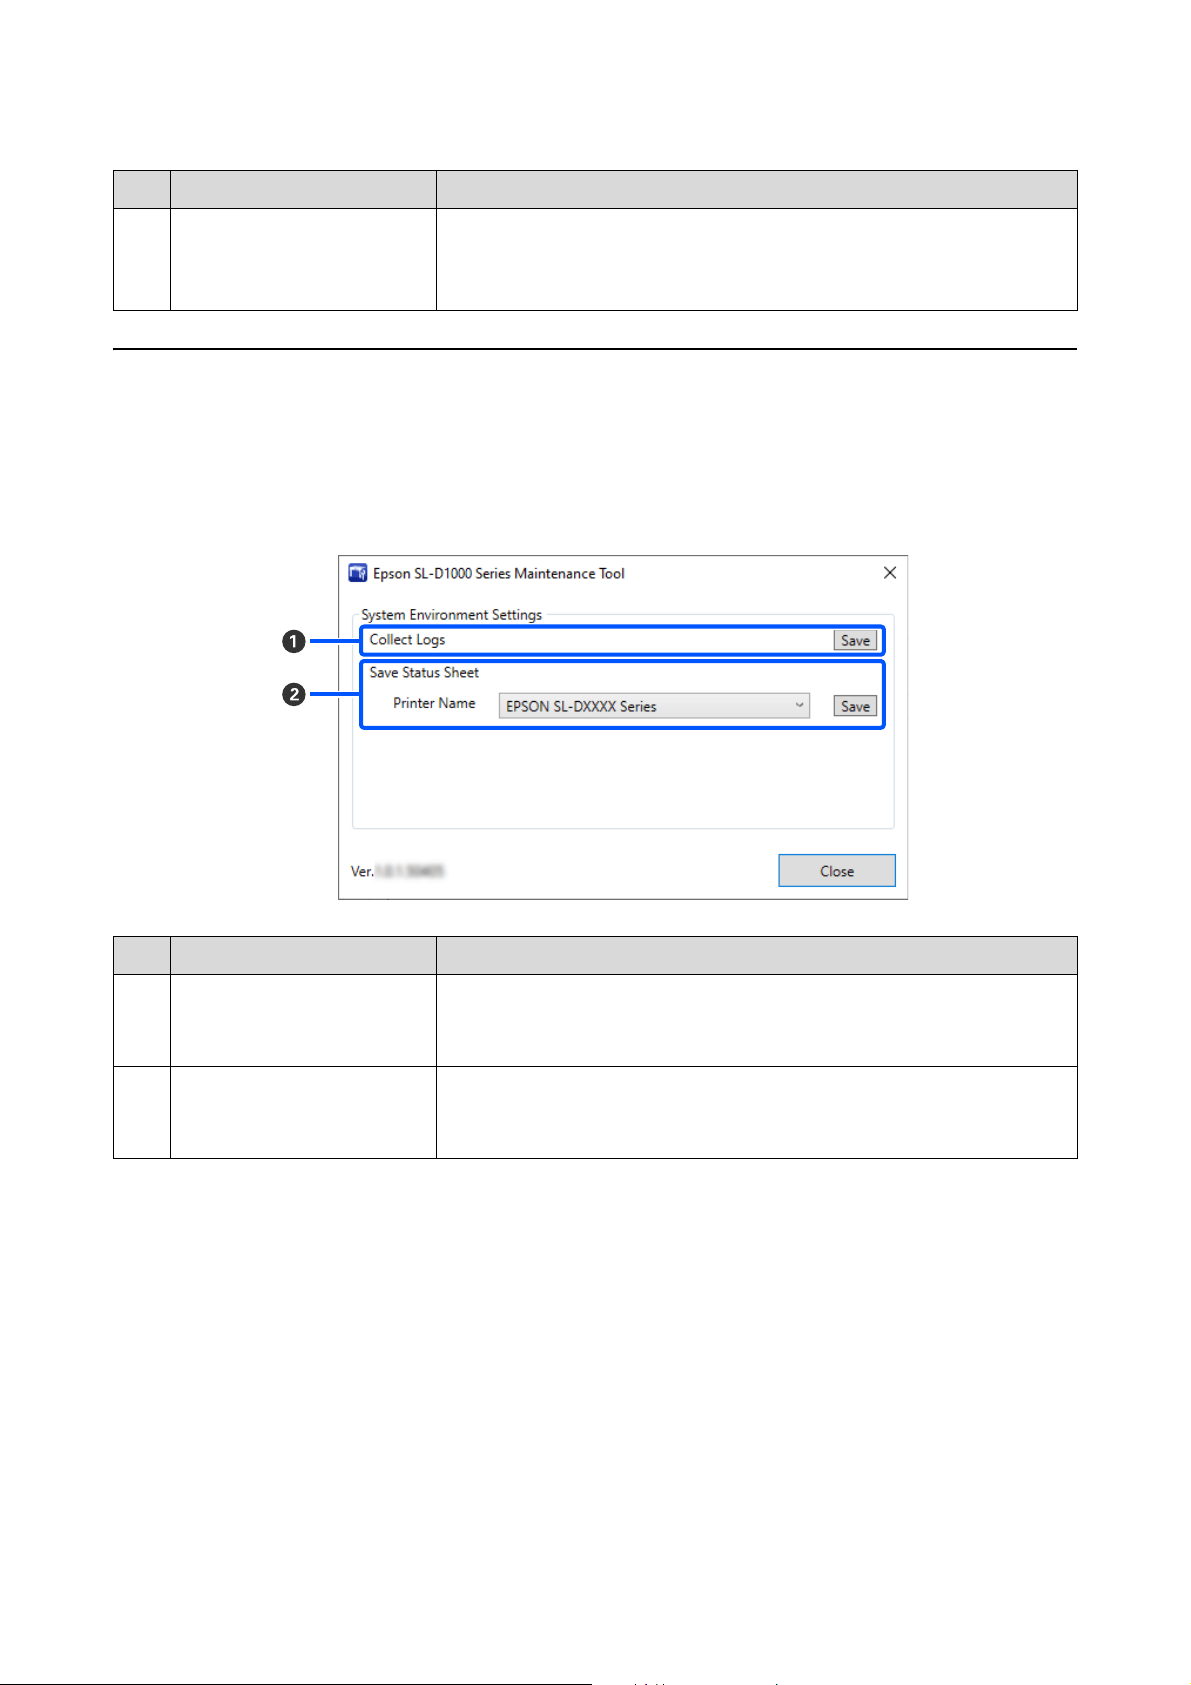
SL-D1000 Series User's Guide
Using the Maintenance Tool (Windows)
88
Explanation of the System Environment Settings Screen
Clicking on System Environment Settings in the main screen displays the following System Environment Settings
screen.
The configuration and functions of the System Environment Settings screen are shown below.
D
Paper Feed Adjustment Adjusts the amount of paper feed.
See the following for details on Paper Feed Adjustment.
U
“Paper Feed Adjustment Method” on page 94
Item Functions
A
Collect Logs Clicking Save saves log files saved on the printer to the desktop of the computer.
The following shows the file name.
EPSON SL-D1000_<saved date>.zip
B
Save Status Sheet Select a printer in Printer Name, and then click Save to save a status sheet of the
selected printer to a PDF file.
You can change the file name and where the file is stored.
Item Functions

SL-D1000 Series User's Guide
Using the Maintenance Tool (Windows)
89
Printer Maintenance
You need to perform print head maintenance if there
are problems in the printed results, such as streaks in
the printouts or if printed colors are different from
usual.
Maintenance Operations
Maintenance Tool has the following functions to keep
the print head in good condition and to get the best
print results.
Carry out appropriate maintenance depending on the
print results and situation.
Auto Nozzle Check
By enabling this setting, you can confirm the state of
the nozzles when the printer is turned on and at
specified times so that the nozzles are automatically
cleaned if they clog.
You can change the conditions to execute a nozzle
check and the timing for nozzle checks in Auto Nozzle
Check. You can also disable this setting so nozzles are
not checked automatically.
U
“Auto Nozzle Check Settings tab” on page 86
Manual Nozzle Check
Executes a nozzle check to check for clogged nozzles,
such as when auto nozzle check is disabled, if you have
not used the printer for an extended period, or before
printing an important job. The printer automatically
detects clogged nozzles.
U
“Nozzle Check Methods” on page 89
Print Nozzle Check Pattern
Print a nozzle check pattern when you want to confirm
whether clogged nozzles have been cleared after
cleaning the print head or when you want to confirm
the condition of nozzles visually with a printed nozzle
check pattern.
U
“Print Nozzle Check Pattern Method” on page 90
Print Head Cleaning
Do this if there are streaks in the printouts or if printed
colors are different from usual. This function clears
clogged nozzles.
There are two types, Forced Cleaning, which is
cleaning the print head manually, and Diagnostic
Cleaning, which detects clogged nozzles and cleans the
print head automatically.
U
“Print Head Cleaning Method” on page 91
Print Head Alignment
If the print results appear grainy or out of focus,
perform Print Head Alignment. The Print Head
Alignment function corrects print head misalignments
when printing.
U
“Print Head Alignment Method” on page 93
Paper Feed Adjustment
Execute this when streaks and unevenness that occur in
print results are not improved even though print head
cleaning was executed.
U “Paper Feed Adjustment Method” on page 94
Nozzle Check Methods
There are two types of nozzle checks, Normal and
Saving Ink.
Normal prints a check pattern on roll paper and
automatically checks the status of the nozzles. Roll
paper must be loaded on the printer.
Saving Ink does not print a check pattern and
automatically checks the state of the nozzles, whether
roll paper or cut sheets are loaded on the printer.
1
Select a printer, in the printer list area on the
main screen, on which to execute a nozzle
check.
When you select multiple printers, press and
hold Ctrl as you select the targeted printers.
See the following for more details on the main
screen.
U
“Explanation of the Main Screen” on page
81
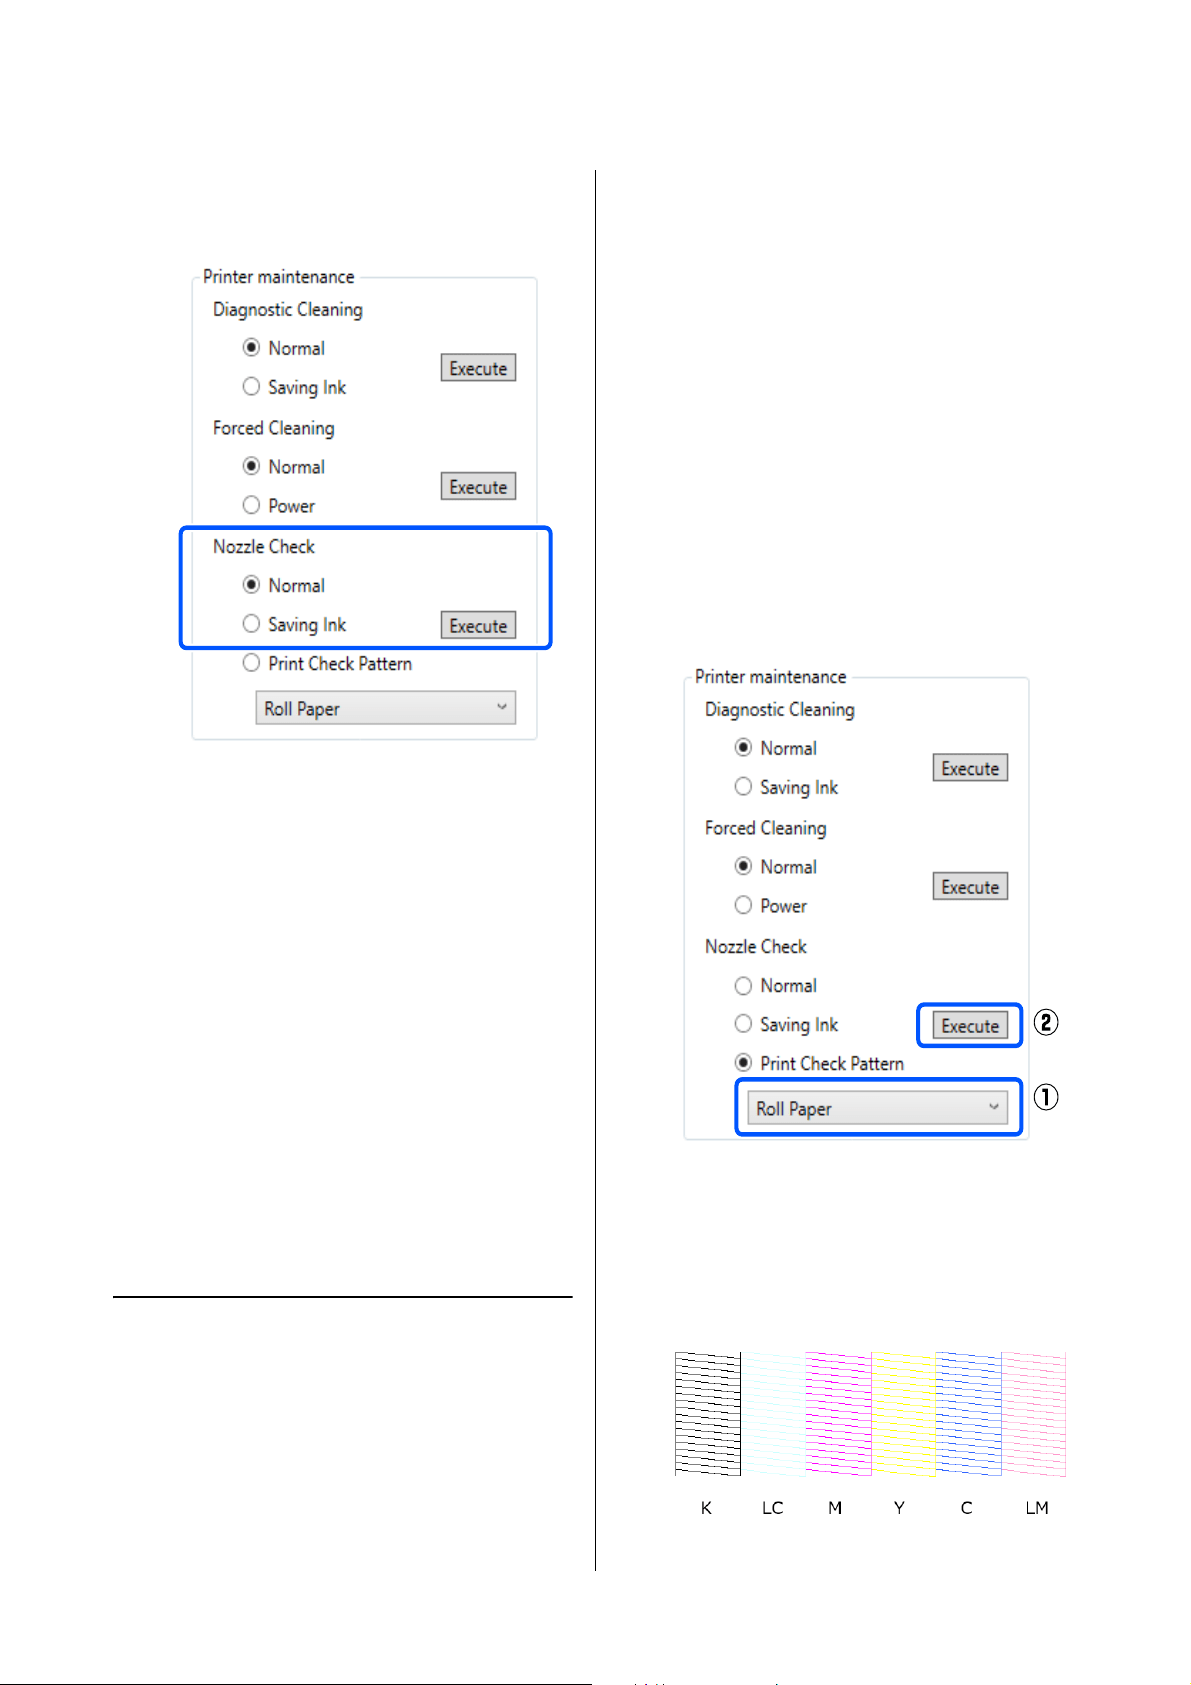
SL-D1000 Series User's Guide
Using the Maintenance Tool (Windows)
90
2
In Printer maintenance - Nozzle Check, select
Normal or Saving Ink, and then click Execute.
Nozzle check is executed.
3
Check the results of nozzle checks in the
message displayed in Printer history.
When "<Printer name>-Nozzle Check is
complete." is displayed, the work is complete.
When "Clogged nozzles detected. Perform
[Forced Cleaning].” is displayed, execute
Forced Cleaning.
U
“Forced Cleaning” on page 92
Perform Print Check Pattern to check the
condition of the nozzles.
U
“Print Nozzle Check Pattern Method” on
page 90
Print Nozzle Check Pattern
Method
1
Load paper to print a nozzle check pattern.
U
“Basic Operations” on page 29
2
Select a printer, in the printer list area on the
main screen, on which to print a nozzle check
pattern.
When you select multiple printers, press and
hold Ctrl as you select the targeted printers.
See the following for more details on the main
screen.
U
“Explanation of the Main Screen” on page
81
3
In Printer maintenance - Nozzle Check, select
Print Check Pattern.
4
Select the paper source for the paper loaded in
step 1, and then click Execute.
The check pattern is printed.
5
Review the printed check pattern while referring
to the following section.
Example of clean nozzles
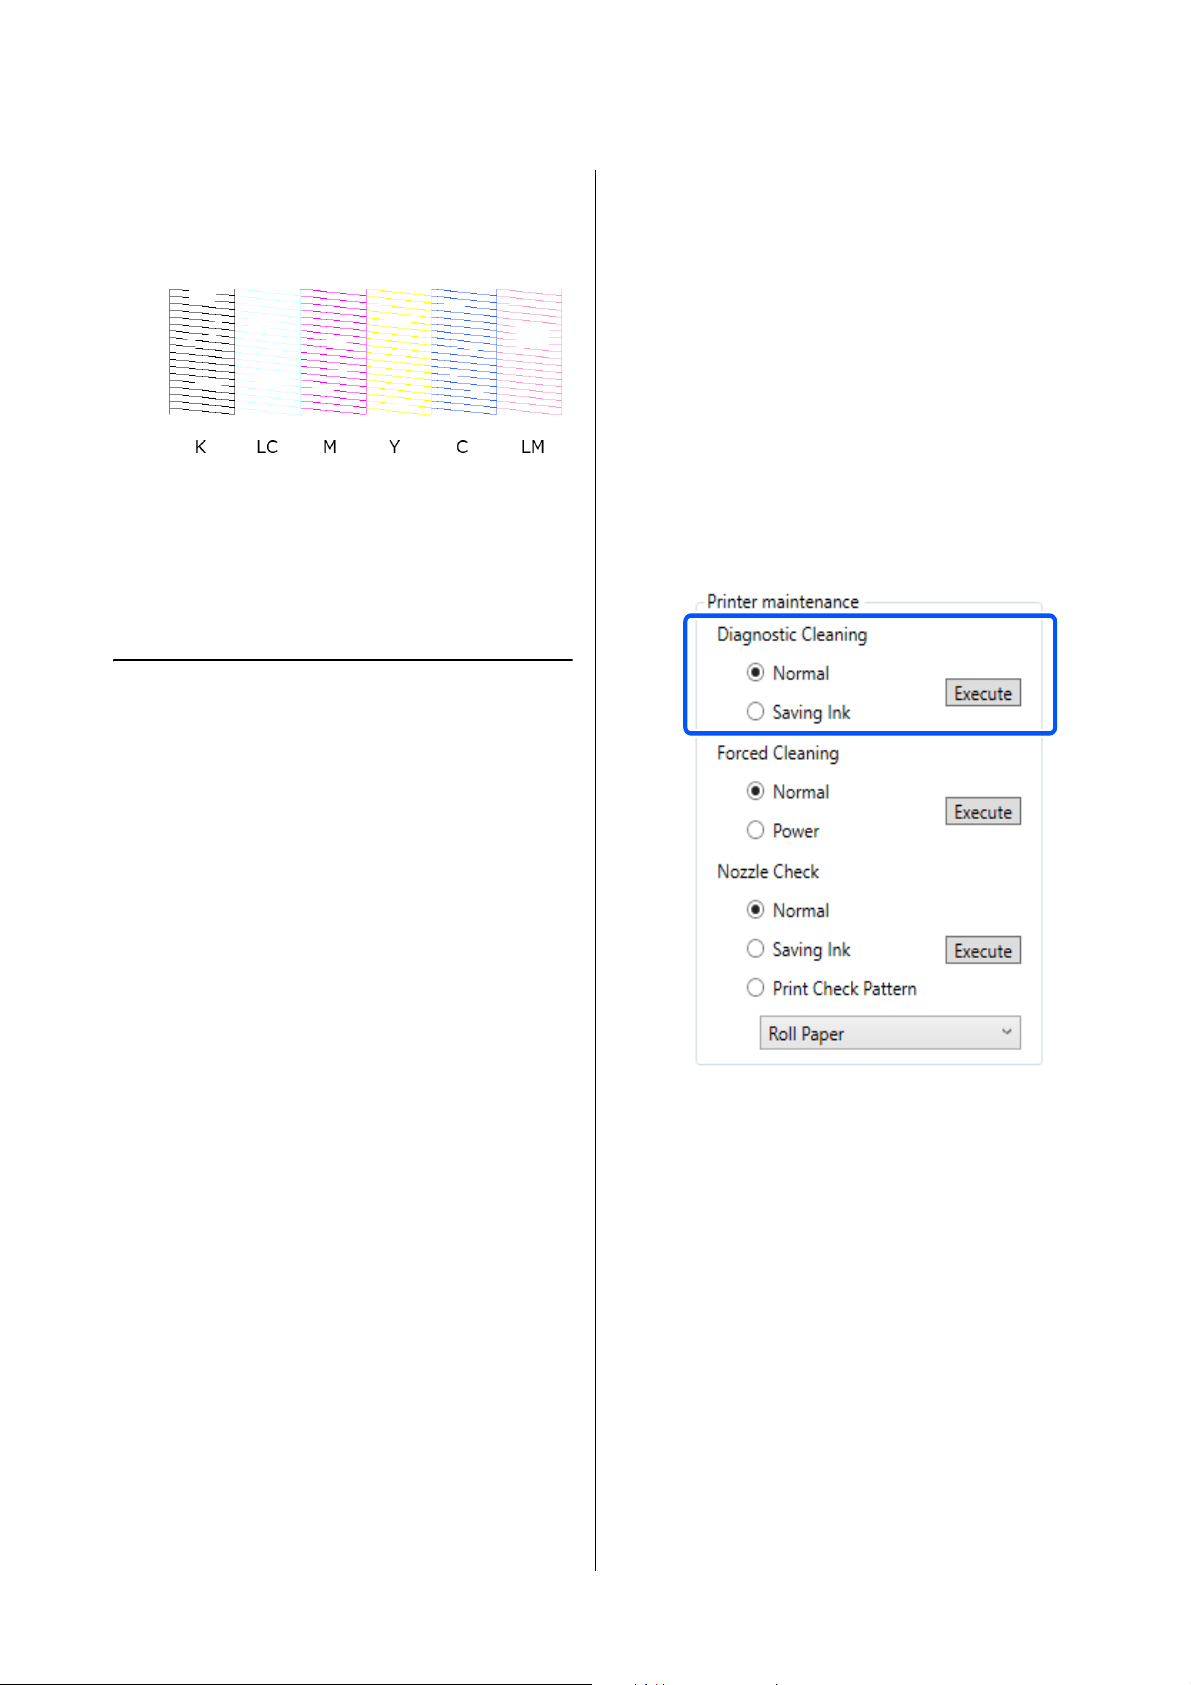
SL-D1000 Series User's Guide
Using the Maintenance Tool (Windows)
91
If none of the check pattern is missing, then the
print head nozzles are not clogged.
Example of clogged nozzles
If part of the pattern is missing, then the print
head nozzles are clogged. The print head needs
to be cleaned.
U
“Print Head Cleaning Method” on page 91
Print Head Cleaning Method
Types of Cleaning and Order of
Implementation
There are two types of cleaning, Forced Cleaning,
which is cleaning the print head manually, and
Diagnostic Cleaning, which detects clogged nozzles
and cleans the print head automatically.
First, implement Diagnostic Cleaning.
After doing that, when "Clogged nozzles detected.
Perform [Forced Cleaning].” is displayed in Printer
history on the main screen, implement Diagnostic
Cleaning.
If the clogged nozzles are not cleared after repeating
Diagnostic Cleaning three times, then do Forced
Cleaning set to Power.
Diagnostic Cleaning
1
Select a printer, in the printer list area on the
main screen, on which to execute cleaning.
When you select multiple printers, press and
hold Ctrl as you select the targeted printers.
See the following for more details on the main
screen.
U
“Explanation of the Main Screen” on page
81
If an error is displayed for the printer you want
to select, clear the error before selecting it.
2
In Printer maintenance - Diagnostic Cleaning,
select Normal or Saving Ink, and then click
Execute.
Normal prints a check pattern on roll paper and
automatically checks the status of the nozzles.
Roll paper must be loaded on the printer.
Saving Ink does not print a check pattern and
automatically checks the state of the nozzles,
whether roll paper or cut sheets are loaded on
the printer.
The nozzle check starts and cleaning is executed
if necessary.
The time needed for cleaning varies according
to the status of the nozzles.
3
Check the results of Diagnostic Cleaning in the
message displayed in Printer history.
When "Clogged nozzles detected. Perform
[Forced Cleaning].” is displayed, execute
Diagnostic Cleaning again.
If "Auto Nozzle Check has failed." is displayed,
contact service support.
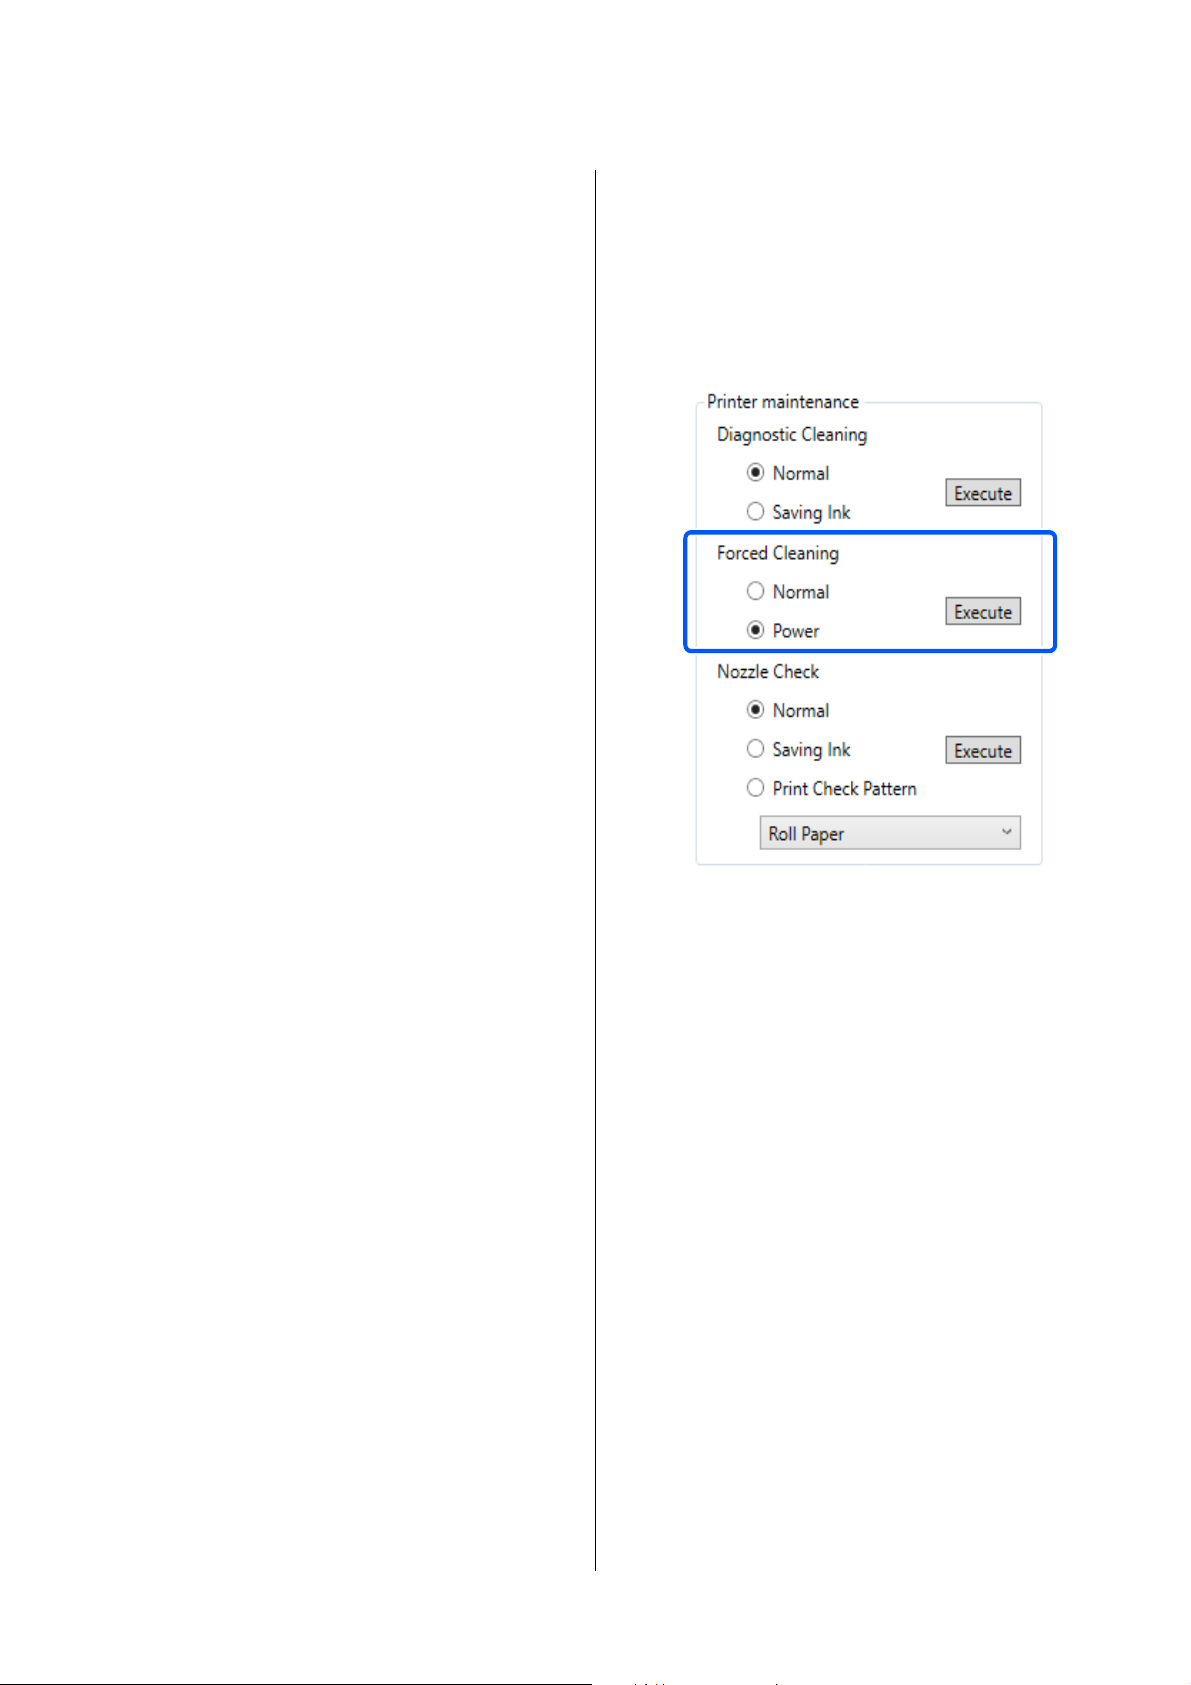
SL-D1000 Series User's Guide
Using the Maintenance Tool (Windows)
92
If the clogged nozzles are not cleared after
repeating Diagnostic Cleaning three times,
then execute Forced Cleaning set to Power.
U
“Forced Cleaning” on page 92
Forced Cleaning
1
Select a printer, in the printer list area on the
main screen, on which to execute cleaning.
When you select multiple printers, press and
hold Ctrl as you select the targeted printers.
See the following for more details on the main
screen.
U
“Explanation of the Main Screen” on page
81
If an error is displayed for the printer you want
to select, clear the error before selecting it.
2
In Printer maintenance - Forced Cleaning,
select Normal or Power, and then click Execute.
Select Normal to clean the surface of the print
head and to clear clogged nozzles.
Power cleans more powerfully than Normal.
Use this setting if the nozzles are still clogged
even after repeating Normal cleaning several
times. Power consumes more ink than Normal
cleaning. If a message is displayed informing
you that here is not enough ink remaining,
replace the ink supply unit before continuing.
Cleaning is executed.
Cleaning may take some time depending on the
selected cleaning level.
When cleaning is complete, the results are
displayed in Printer history.
3
Check the results of Forced Cleaning.
There are the following two ways to check the
cleaning results.
O Execute a nozzle check to check for clogged
nozzles.
U
“Nozzle Check Methods” on page 89
O Print a nozzle check pattern to check for
clogged nozzles.
U
“Print Nozzle Check Pattern Method”
on page 90
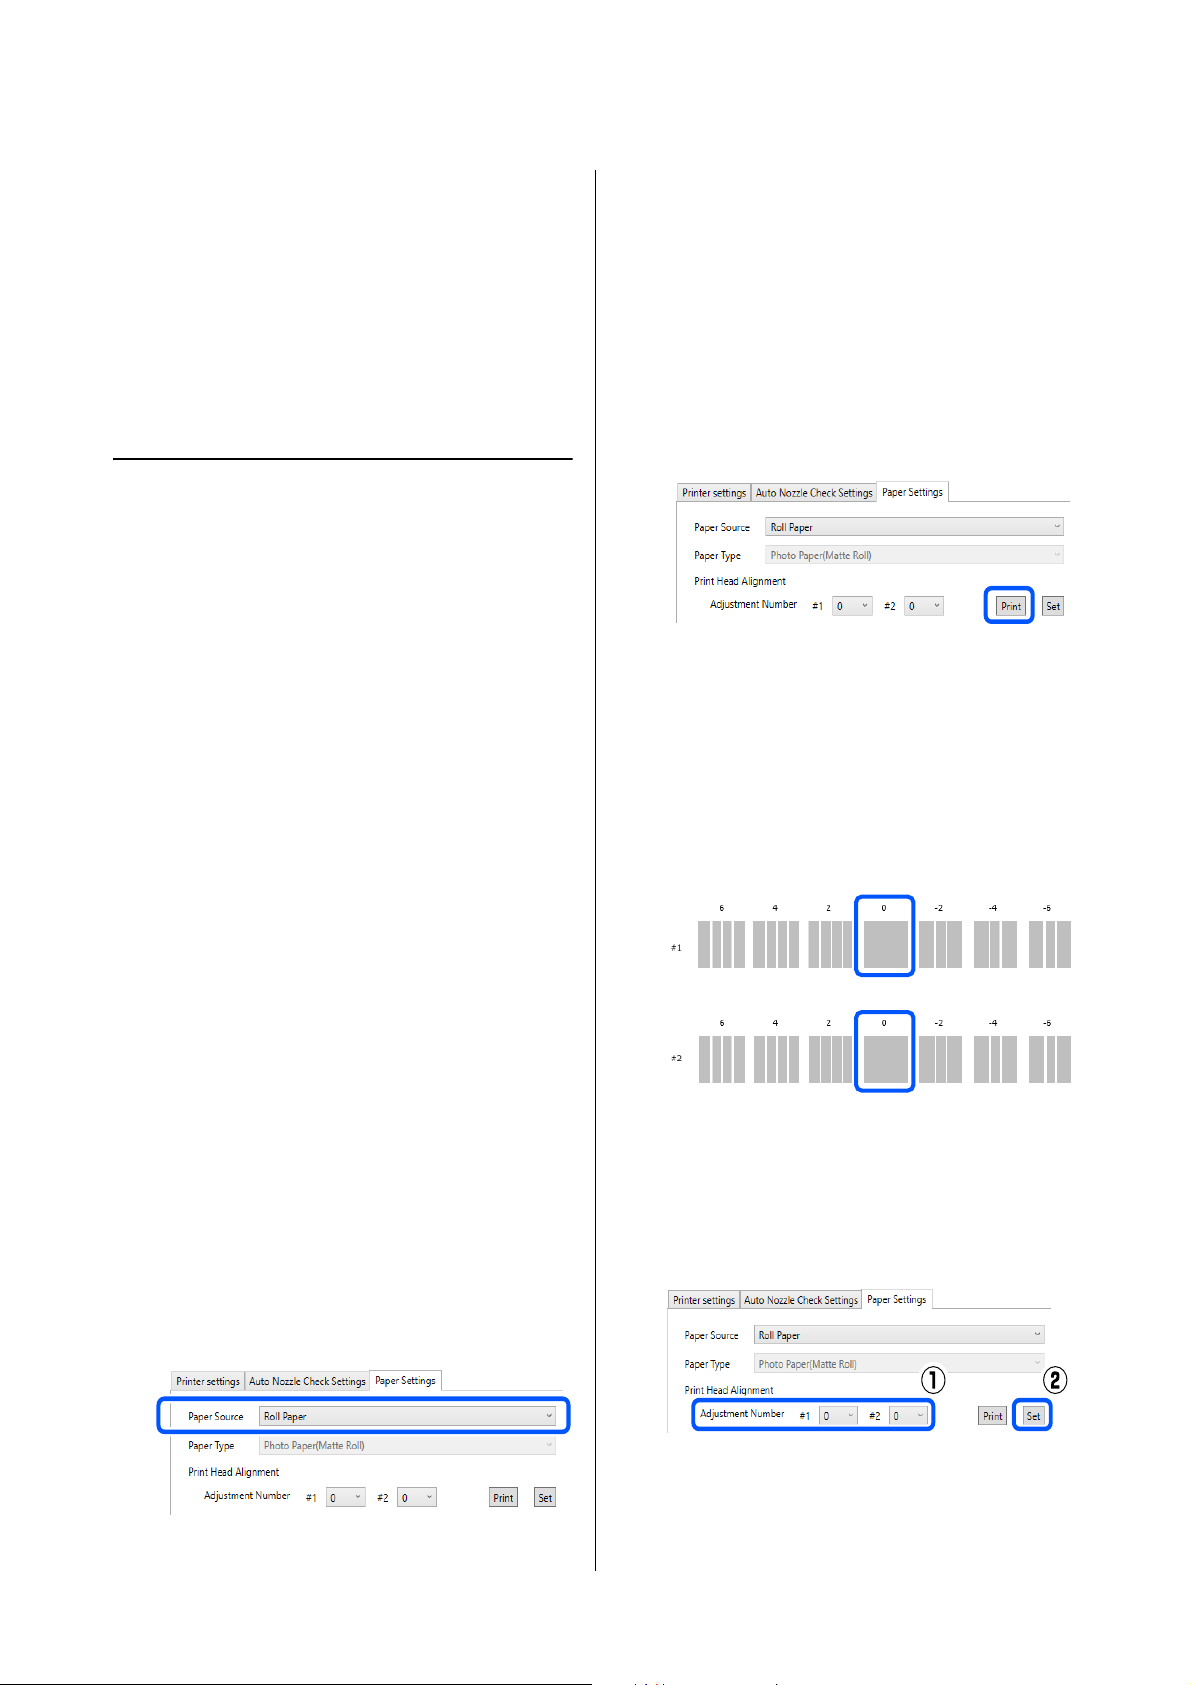
SL-D1000 Series User's Guide
Using the Maintenance Tool (Windows)
93
If the clogged nozzles are not cleared by
executing Normal cleaning, execute Normal
cleaning again. If the clogged nozzles are not
cleared even by repeating this several times,
execute Power cleaning.
If the clogged nozzles are not cleared even by
executing Power cleaning, contact service
support.
Print Head Alignment Method
If the print results appear grainy or out of focus,
perform Print Head Alignment. The Print Head
Alignment function corrects print head misalignments
when printing.
1
Load paper to print an adjustment pattern.
U
“Basic Operations” on page 29
2
Click Printer settings on the main screen.
See the following for more details on the main
screen.
U
“Explanation of the Main Screen” on page
81
3
Select a printer, in the printer list area on the top
of the Printer settings screen, on which to
execute Print Head Alignment, and then select
Paper Settings.
You cannot select multiple printers.
See the following for more details on the printer
settings screen.
U
“Explanation of the Printer settings” on
page 82
4
In Paper Source, select the paper source in
which you loaded paper in step 1.
If you selected Rear Paper Feed Slot for Paper
Source, then go to step 5.
If you selected something other than Rear
Paper Feed Slot for Paper Source, then go to
step 6.
5
In Paper Type, select the type of paper that is
loaded in the rear paper feed slot.
6
Click Print in Print Head Alignment.
Adjustment patterns are printed.
7
Check the printed adjustment pattern.
Two groups of adjustment patterns, #1 and #2,
are printed. Confirm which of the print pattern
numbers has no gaps between the nozzles in
each group.
8
Select the number of the print pattern you
confirmed, and then click Set.
Select the number of the print pattern you
confirmed individually for both #1 and #2.
The adjustment values are applied.

SL-D1000 Series User's Guide
Using the Maintenance Tool (Windows)
94
Paper Feed Adjustment Method
Execute this when streaks and unevenness that occur in
print results are not improved even though print head
cleaning was executed.
1
Load paper to print an adjustment pattern.
U
“Basic Operations” on page 29
2
Click Printer settings on the main screen.
See the following for more details on the main
screen.
U
“Explanation of the Main Screen” on page
81
3
Select a printer, in the printer list area on the top
of the Printer settings screen, on which to
execute Paper Feed Adjustment, and then select
Paper Settings.
You cannot select multiple printers.
See the following for more details on the printer
settings screen.
U
“Explanation of the Printer settings” on
page 82
4
In Paper Source, select the paper source in
which you loaded paper in step 1.
If you selected Rear Paper Feed Slot for Paper
Source, then go to step 5.
If you selected something other than Rear
Paper Feed Slot for Paper Source, then go to
step 6.
5
In Paper Type, select the type of paper that is
loaded in the rear paper feed slot.
6
Click Print in Paper Feed Adjustment.
Adjustment patterns are printed.
7
Check the printed adjustment pattern.
Two groups of adjustment patterns, #1 and #2,
are printed. Confirm the number of the print
pattern with the least amount of overlapping or
gaps for each group.
If all of the adjustment patterns contain overlaps
or gaps, and you cannot narrow it down to one,
select the pattern with the least overlap or gap.
8
Select the number of the print pattern you
confirmed, and then click Set.
Select the number of the print pattern you
confirmed individually for both #1 and #2.
The adjustment values are applied.
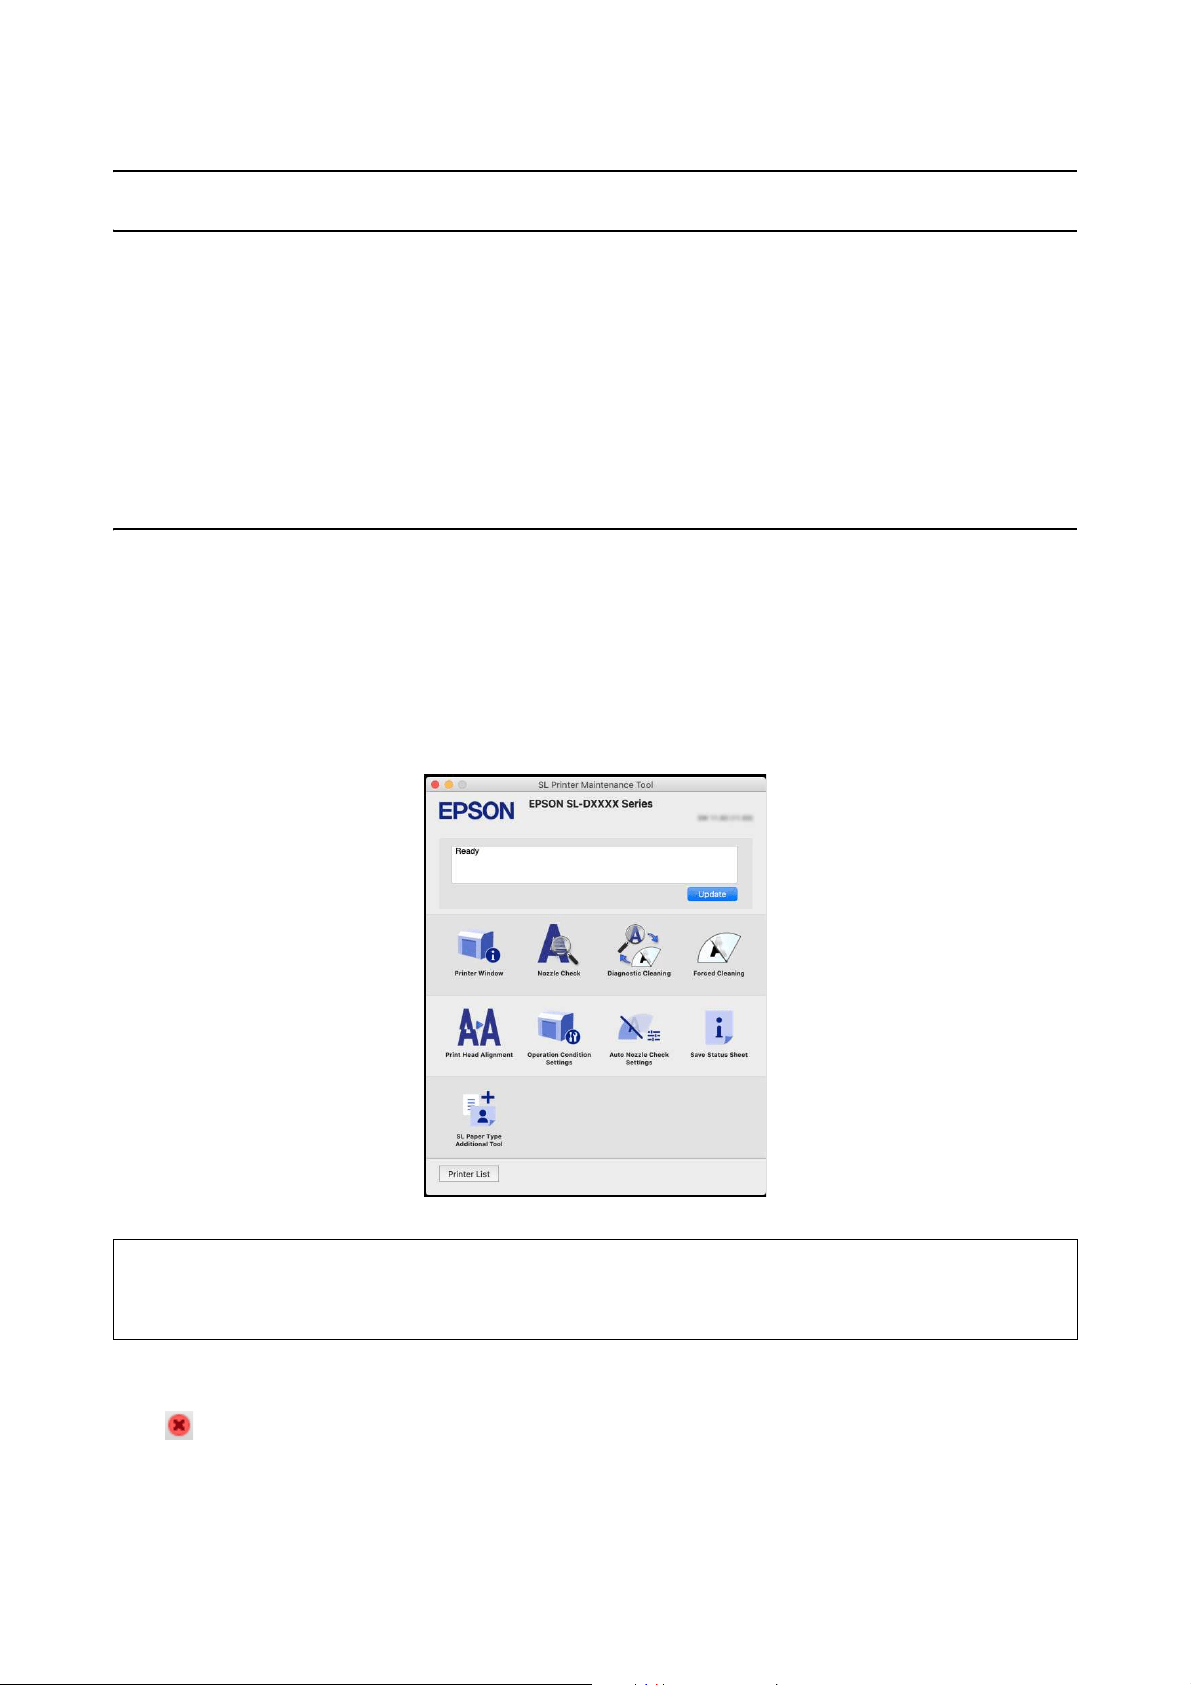
SL-D1000 Series User's Guide
Using the Maintenance Tool (Mac)
95
Using the Maintenance Tool (Mac)
This section explains how to use Maintenance Tool by starting it from the computer connected to the printer.
Summary of the Maintenance Tool
From your computer you can perform adjustment and maintenance operations such as checking the printer's status,
making settings, performing head cleaning and so on.
Starting and Closing
Starting
1
Click the Apple menu - System Preferences - Printers & Scanners, in this order.
2
Select the printer and click Options & Supplies - Utility - Open Printer Utility.
Closing
Click on the top left of the screen.
Note:
When multiple printers are connected to a single computer, after starting Maintenance Tool, you can change which
printer is being operated.
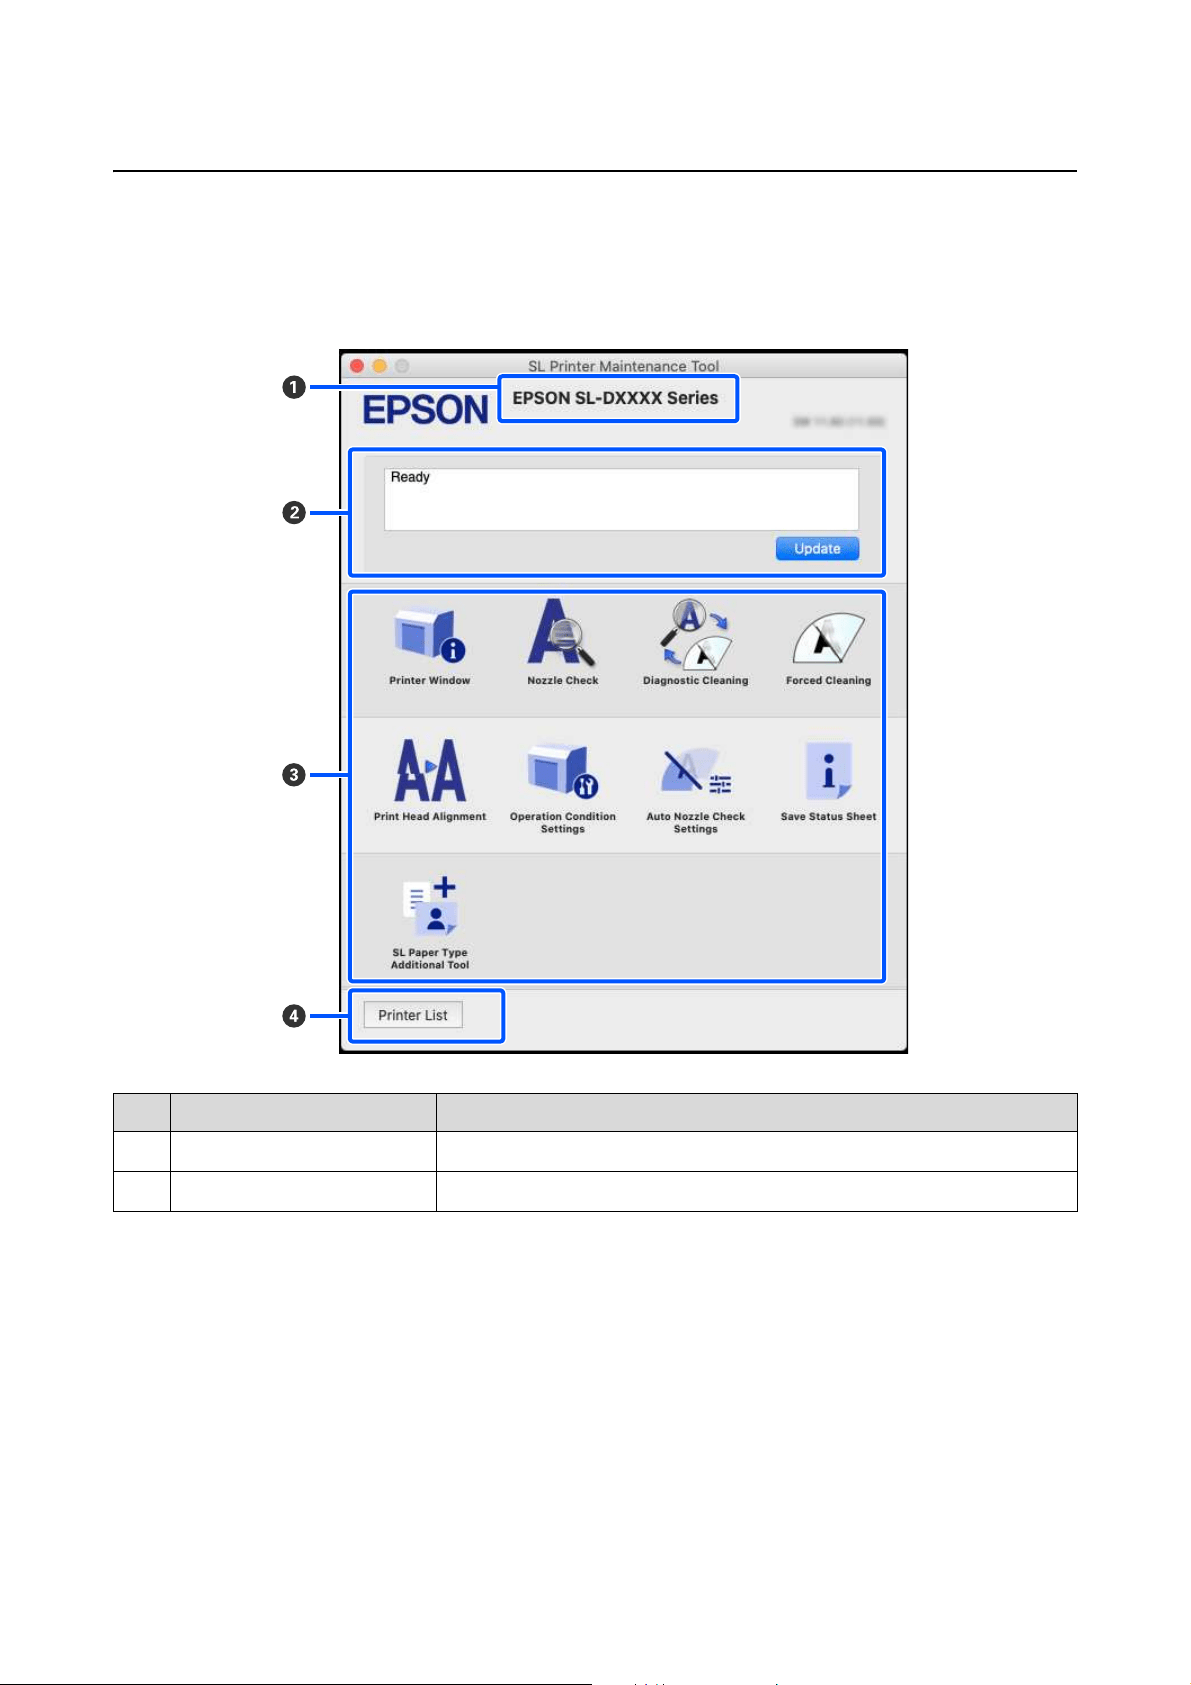
SL-D1000 Series User's Guide
Using the Maintenance Tool (Mac)
96
Explanation of the Main Screen
The following main screen appears when you start Maintenance Tool.
The configuration and functions of the main screen are shown below.
Item Functions
A
Printer Name Displays the printer name.
B
Status Display Area Displays the printer's status. Clicking Update updates the status information.
SL-D1000 Series User's Guide
Using the Maintenance Tool (Mac)
97
C
Menu List Clicking on an icon executes the following functions for the printer displayed in
printer name (A).
Printer Window Displays information about the loaded paper, the approximate amount of space in
the maintenance box, and the ink levels.
U
“Explanation of the Printer Window Screen” on page 98
Nozzle Check Checks for clogged nozzles.
A nozzle check pattern can also be printed.
U
“Nozzle Check Methods” on page 103
U “Print Nozzle Check Pattern Method” on page 104
Diagnostic Cleaning Detects clogged nozzles and automatically performs cleaning.
U
“Diagnostic Cleaning” on page 105
Forced Cleaning Performs manual cleaning.
U
“Forced Cleaning” on page 105
Print Head Alignment Corrects print head misalignments and corrects paper feed amounts when
printing.
U “Print Head Alignment Method” on page 106
U “Paper Feed Adjustment Method” on page 107
Operation Condition
Settings
Sets the various operations of the printer.
U
“Explanation of the Operation Condition Settings Screen” on page 99
Auto Nozzle Check
Settings
Sets the details for automatic nozzle checks.
U
“Explanation of the Auto Nozzle Check Settings Screen” on page 100
Save Status Sheet Saves the status sheet of the printer as a PDF file.
You can change the file name and where the file is stored.
SL Paper Type Additional
Tool
Starts a tool for adding paper information to a printer or printer driver.
U
“Adding Paper Information by Using a Paper Type File” on page 109
D
Printer List button This is enabled only when multiple printers are registered to a computer.
Clicking this displays a list, on the side of the main screen, of printers that can be
operated. You can change the printer to be operated by selecting a printer from
the list.
Click the button again to close the list of printers.
Item Functions
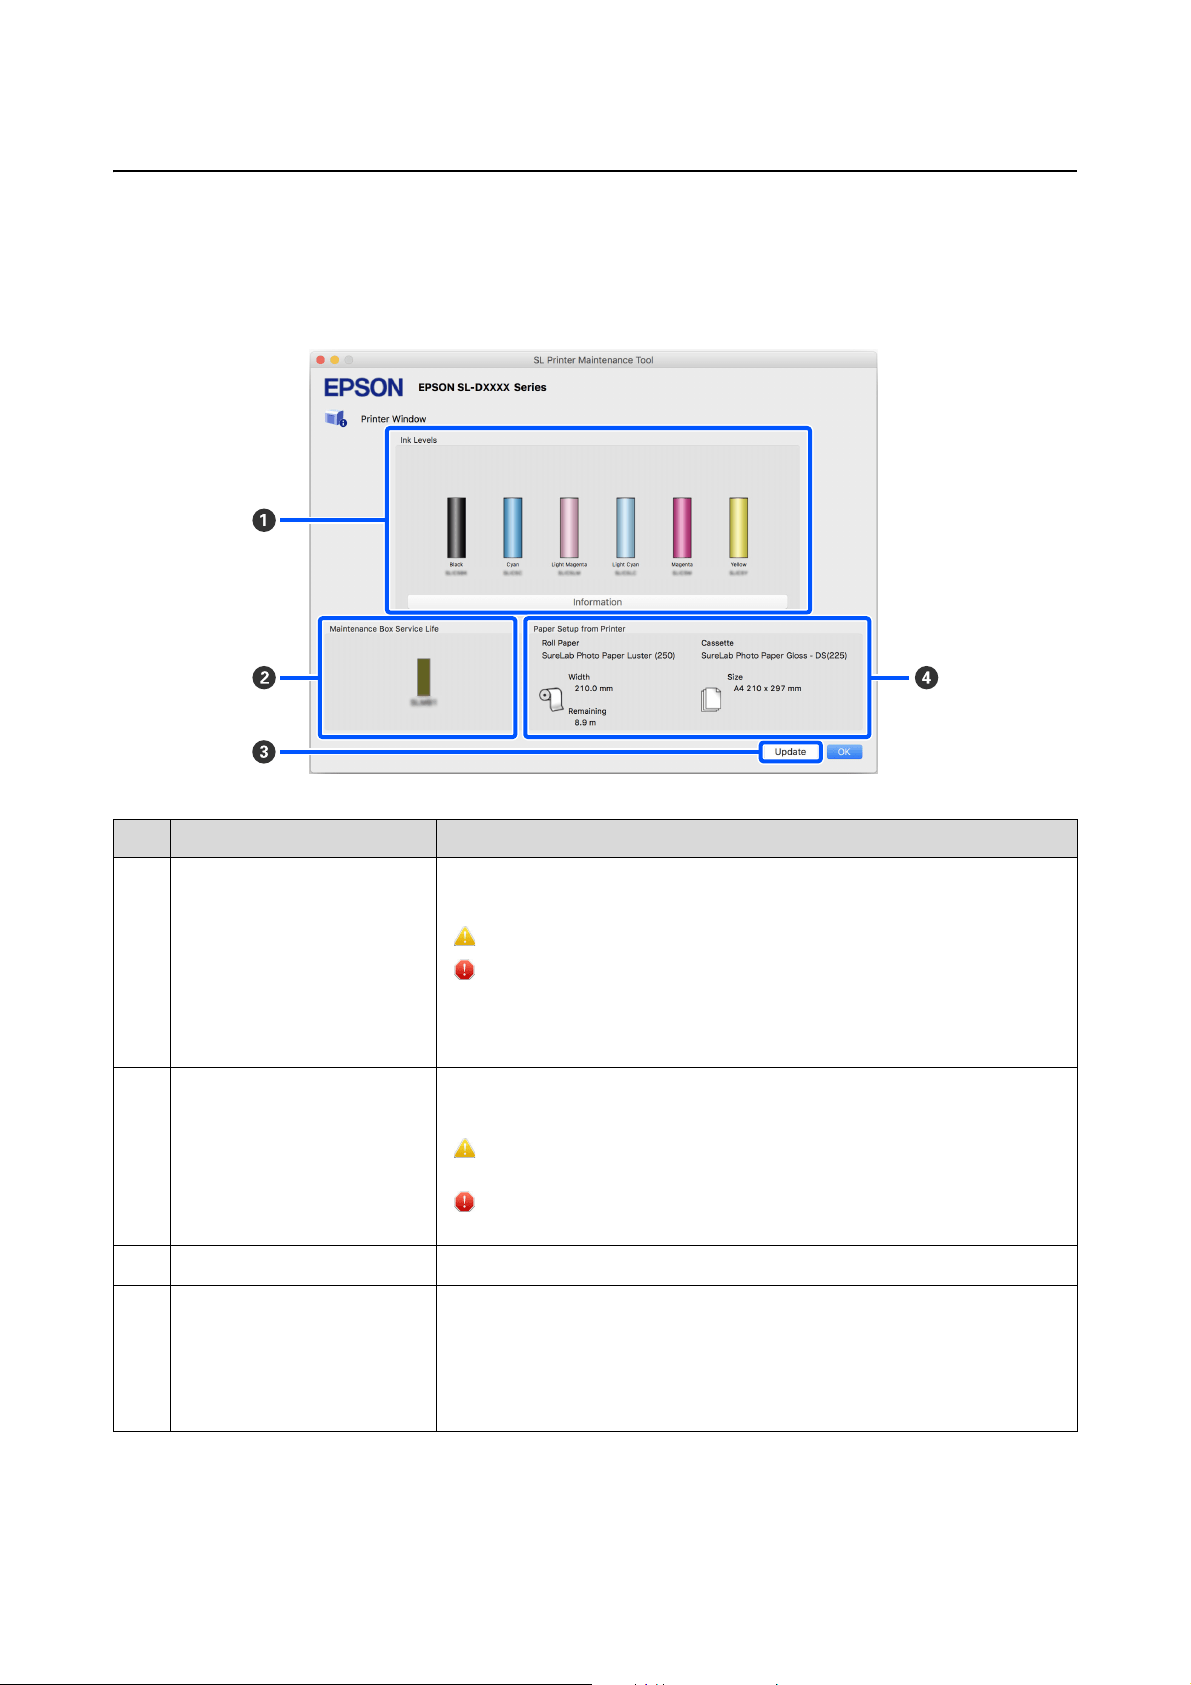
SL-D1000 Series User's Guide
Using the Maintenance Tool (Mac)
98
Explanation of the Printer Window Screen
Clicking on Printer Window in the main screen displays the following Printer Window screen.
The configuration and functions of the Printer Window screen are shown below.
Item Functions
A
Ink Levels Displays the ink level for each color. The following is shown for each color of ink.
No icon display: No problems with ink levels.
: New ink supply unit needs to be prepared because remaining ink level is low.
: Remaining ink level is below the minimum value. Replace with a new ink
supply unit.
Clicking on Information displays detailed information about the ink supply unit on
the side of the Printer Window screen.
B
Maintenance Box Service Life The approximate amount of space in the maintenance box is shown below.
No icon display: No problems with the amount of space in the maintenance box.
: Free space in the maintenance box is running low, prepare a new maintenance
box.
: Amount of free space in the maintenance box is below the minimum value.
Replace the maintenance box with a new one.
C
Update button Clicking this acquires the printer status and updates the A, B, and D information.
D
Paper Setup from Printer Displays information about the paper that is currently loaded in the printer.
The left half of the display area displays paper information, and the right half
displays paper information for the duplex feeder. Paper information is not
displayed for the rear paper feed slot.
The remaining amount of roll paper is also displayed.
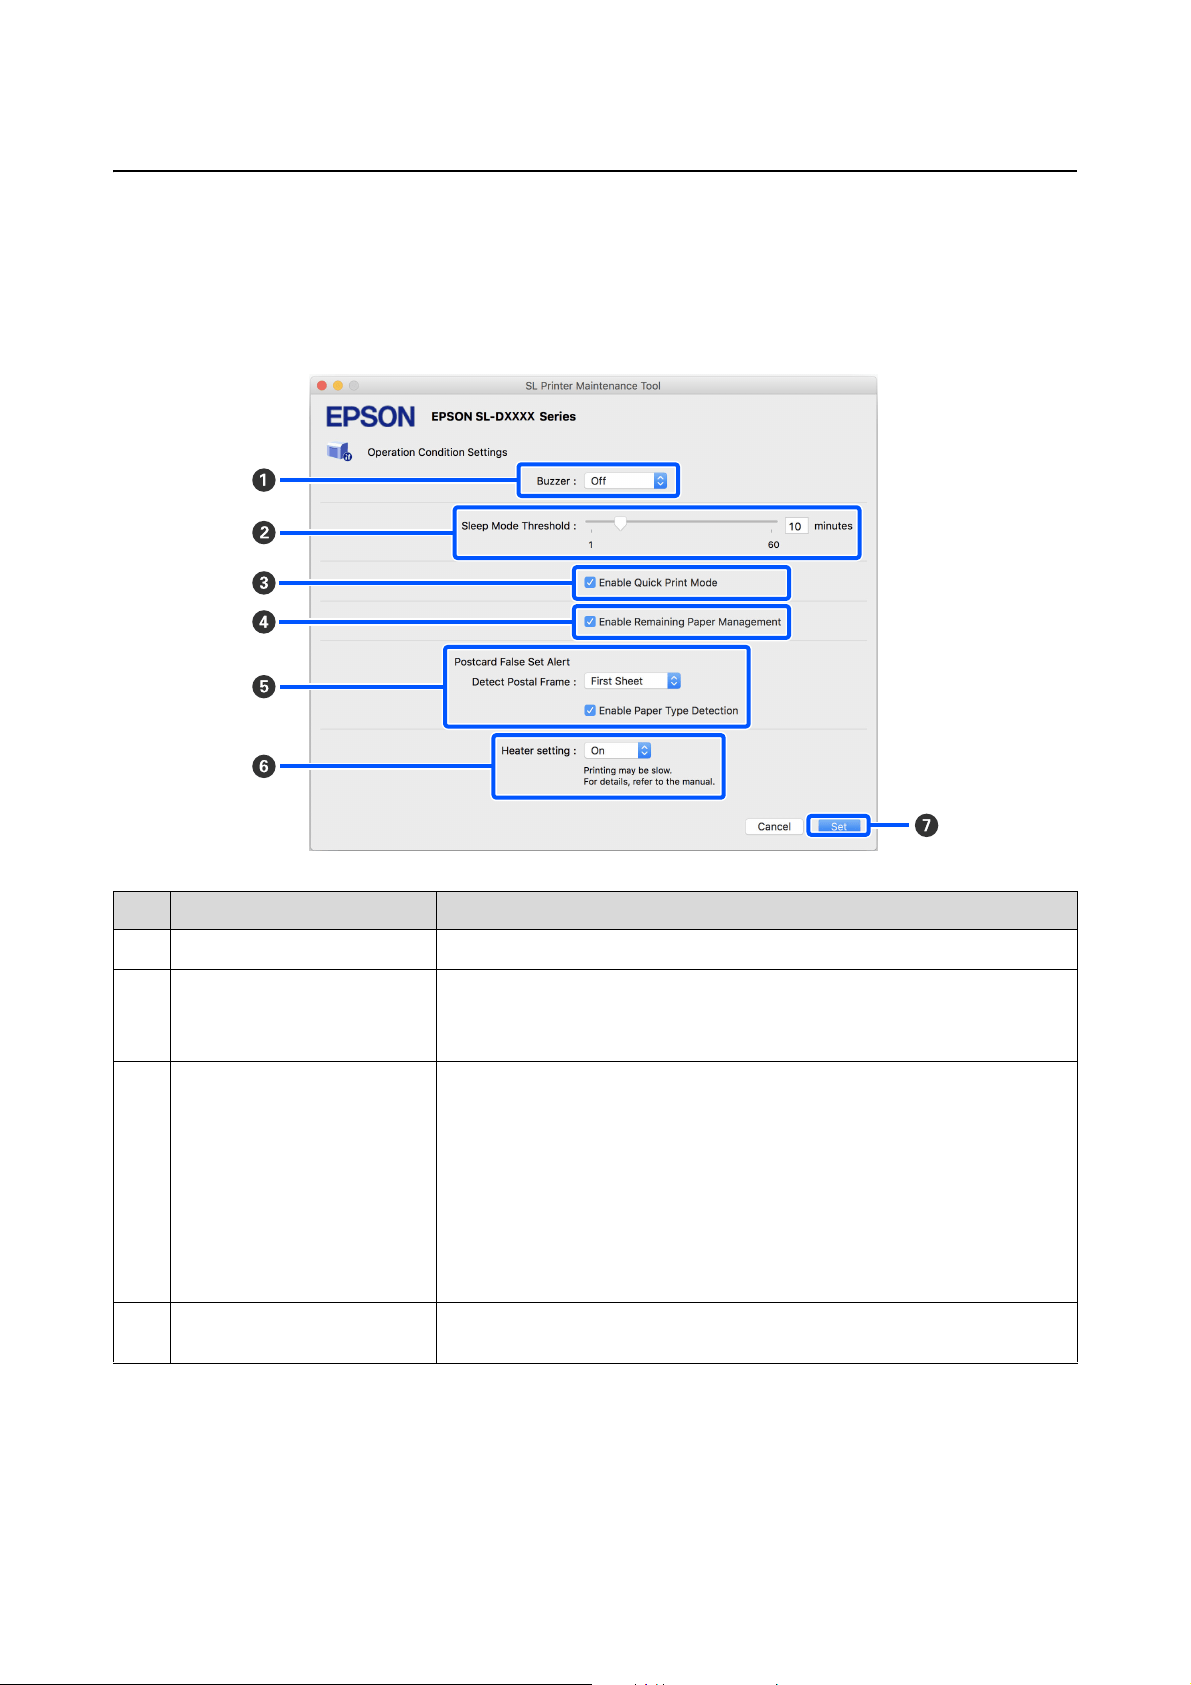
SL-D1000 Series User's Guide
Using the Maintenance Tool (Mac)
99
Explanation of the Operation Condition Settings Screen
Clicking on Operation Condition Settings in the main screen displays the following Operation Condition Settings
screen.
The configuration and functions of the Operation Condition Settings screen are shown below.
Item Functions
A
Buzzer Set volume of and whether to sound the warning buzzer.
B
Sleep Mode Threshold Set the time before switching to Sleep Mode.
If an error has not occurred on the printer and no print jobs have been received for
the specified length of time, the printer automatically switches to Sleep Mode.
C
Enable Quick Print Mode Clicking this enables Quick Print Mode.
Quick Print Mode is a mode that increases print speed by shortening the drying
time when printing one sheet at a time.
We recommend using this when printing one sheet at a time, such as for an event.
Be sure to note the following points.
O Do not stack printouts as the drying time is shorter.
O Depending on the paper type, color may be uneven or ink may be smudged.
In this situation, clear the Enable Quick Print Mode check.
D
Enable Remaining Paper
Management
When this is selected, information, such as the paper type and remaining paper, is
printed as a barcode on the leading edge of the roll paper.

SL-D1000 Series User's Guide
Using the Maintenance Tool (Mac)
100
Explanation of the Auto Nozzle Check Settings Screen
Clicking on Auto Nozzle Check Settings in the main screen displays the following Auto Nozzle Check Settings
screen.
In this section you can do advanced settings for auto nozzle check to confirm the state of the nozzles when the
printer is turned on and at specified times so that the nozzles are automatically cleaned if they clog.
E
Postcard False Set Alert Set whether, when printing postcards, to detect the type and orientation of the
postcard paper loaded on the printer, and to then send a notification.
The following shows the setting items.
Detect Postal Frame Detects the orientation and print side of postcards loaded in the printer and sends
notification if they are judged incorrect according to the postcard paper type set
on the printer’s control panel.
When First Sheet is set, only the orientation of the first postcard loaded on the
printer is detected.
When All Sheets is set, the orientation of all postcards loaded on the printer are
detected.
The print speed is reduced by the amount of time to make these detections when
First Sheet or All Sheets is set. To prioritize print speed, set this to Off.
Enable Paper Type
Detection
When this is selected, notification is sent when the type of postcard paper loaded
in the printer is different from the type of postcard paper set on the printer’s
control panel.
The type of paper used for postcards is different from normal paper or inkjet paper,
so notification is sent in the following situations.
Example: When inkjet paper postcards are set on the printer’s control panel, but
regular paper postcards are loaded on the printer.
F
Heater setting Set whether to turn on the heater that is built-in to the printer.
If it is turned On, then the internal heater is turned on when printing on either roll
paper or cut sheets. The printing time may become longer because of the added
time for drying by the heater.
When printing on both sides of cut sheets of photo paper and stacking them on
paper that has been printed on, if a side with dark colors and a side with light colors
are stacked together, then one side may look uneven, due to the differences in
drying time. Set this to On if this unevenness is an issue.
If you set Auto, then the internal heater turns on when printing on roll paper, but
the internal heater turns off when printing on cut sheets.
Also, if you are using the printer in any of the following environments, then the
internal heater turns off regardless of this setting.
O When the temperature exceeds 27 °C
O When the humidity is below 20%
G
Set button Clicking this reflects the changes to each item A to F.
Item Functions
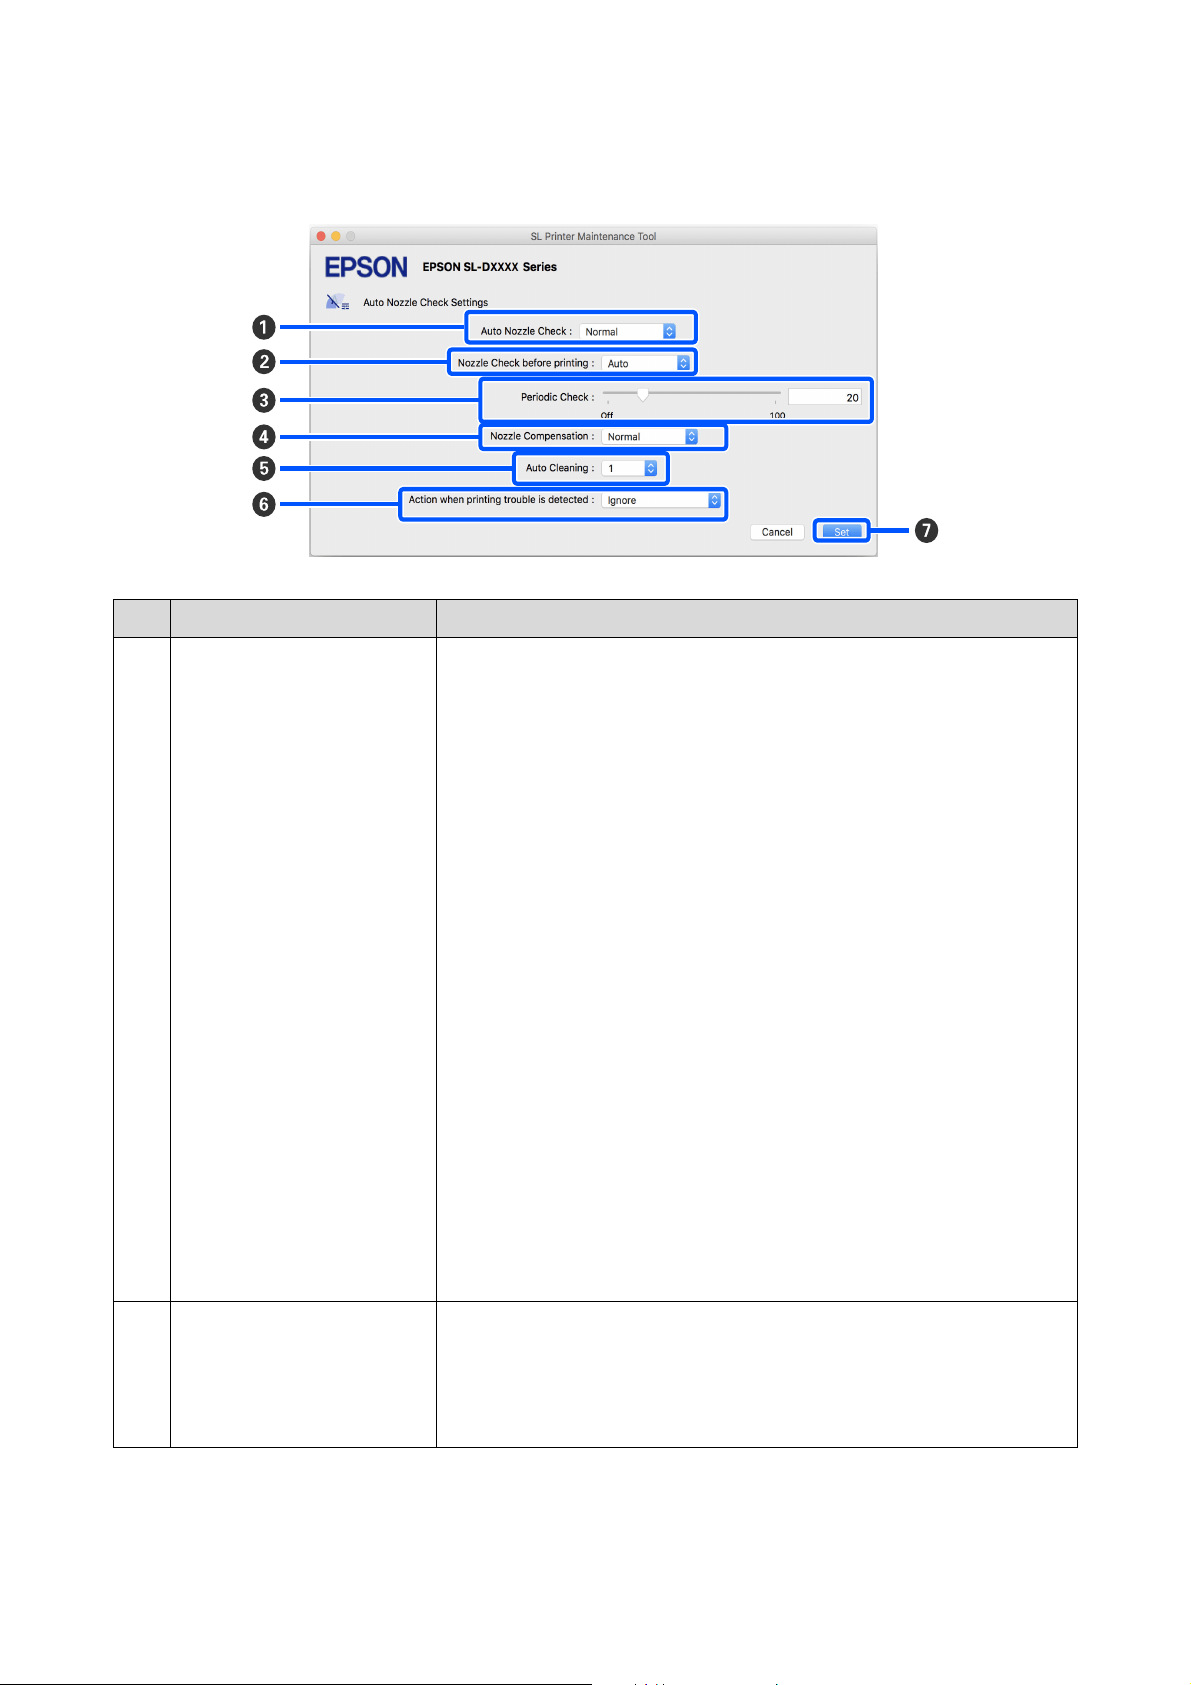
SL-D1000 Series User's Guide
Using the Maintenance Tool (Mac)
101
The configuration and functions of the Auto Nozzle Check Settings screen are shown below.
Item Functions
A
Auto Nozzle Check Set the conditions in which an automatic nozzle check is done. Select one of the
following.
O High quality
Prints a check pattern on roll paper and automatically checks the state of the
nozzles. Nozzles are checked in the same way as when the printer is turned on
too.
Roll paper must always be loaded on the printer.
O Normal
When printing on roll paper, prints a check pattern on roll paper and
automatically checks the state of the nozzles. When printing on cut sheets,
does not print a check pattern and automatically checks the state of the
nozzles.
When roll paper is loaded, nozzles are checked in the same way as when the
printer is turned on too.
O Saving Ink
Does not print a check pattern and automatically checks the state of the
nozzles, whether roll paper or cut sheets are loaded on the printer. Nozzles are
checked in the same way as when the printer is turned on too.
O Off
Nozzles are not checked automatically. Select his when you want to visually
confirm the printed check pattern to confirm the state of the nozzles.
O Default
Returns all the settings (A to F) in the Auto Nozzle Check Settings screen to
the manufacturer’s settings.
B
Nozzle Check before printing Set whether to execute auto nozzle check before printing.
When set to Auto, auto Nozzle Check is executed according to the state of the
printer, such as after changing the auto nozzle check settings, or after executing
nozzle cleaning.
When set to Every time, auto nozzle check is executed for each print job.
SL-D1000 Series User's Guide
Using the Maintenance Tool (Mac)
102
C
Periodic Check Set the time to execute auto nozzle check according to the number of sheets
printed.
If the number of sheets being printed for a single job exceeds the number of
printed sheets set for this item, then the number of sheets for that job is printed,
after which auto nozzle check is executed.
D
Nozzle Compensation Set the print quality for when normal nozzles compensate for the ink that could not
be ejected by clogged nozzles.
E
Auto Cleaning Sets the number of times to do auto cleaning when clogged nozzles are detected.
F
Action when printing trouble is
detected
Sets whether to stop printing when clogged nozzles are detected.
When set to Stop Immediately, printing is stopped when clogged nozzles are
detected.
When set to Ignore, printing is continued even if clogged nozzles are detected.
G
Set button Clicking this reflects the changes to each item A to F.
Item Functions

SL-D1000 Series User's Guide
Using the Maintenance Tool (Mac)
103
Printer Maintenance
You need to perform print head maintenance if there
are problems in the printed results, such as streaks in
the printouts or if printed colors are different from
usual.
Maintenance Operations
Maintenance Tool has the following functions to keep
the print head in good condition and to get the best
print results.
Carry out appropriate maintenance depending on the
print results and situation.
Auto Nozzle Check
By enabling this setting, you can confirm the state of
the nozzles when the printer is turned on and at
specified times so that the nozzles are automatically
cleaned if they clog.
You can change the conditions to execute a nozzle
check and the timing for nozzle checks in Auto Nozzle
Check. You can also disable this setting so nozzles are
not checked automatically.
U
“Explanation of the Auto Nozzle Check Settings
Screen” on page 100
Manual Nozzle Check
Executes a nozzle check to check for clogged nozzles,
such as when auto nozzle check is disabled, if you have
not used the printer for an extended period, or before
printing an important job. The printer automatically
detects clogged nozzles.
U
“Nozzle Check Methods” on page 103
Print Nozzle Check Pattern
Print a nozzle check pattern when you want to confirm
whether clogged nozzles have been cleared after
cleaning the print head or when you want to confirm
the condition of nozzles visually with a printed nozzle
check pattern.
U
“Print Nozzle Check Pattern Method” on page 104
Print Head Cleaning
Do this if there are streaks in the printouts or if printed
colors are different from usual. This function clears
clogged nozzles.
There are two types, Forced Cleaning, which is
cleaning the print head manually, and Diagnostic
Cleaning, which detects clogged nozzles and cleans the
print head automatically.
U
“Print Head Cleaning Method” on page 105
Print Head Alignment
If the print results appear grainy or out of focus,
perform Print Head Alignment. The Print Head
Alignment function corrects print head misalignments
when printing.
U
“Print Head Alignment Method” on page 106
Paper Feed Adjustment
Execute this when streaks and unevenness that occur in
print results are not improved even though print head
cleaning was executed.
U “Paper Feed Adjustment Method” on page 107
Nozzle Check Methods
There are two types of nozzle checks, Normal and
Saving Ink.
Normal prints a check pattern on roll paper and
automatically checks the status of the nozzles. Roll
paper must be loaded on the printer.
Saving Ink does not print a check pattern and
automatically checks the state of the nozzles, whether
roll paper or cut sheets are loaded on the printer.
1
Click Nozzle Check on the main screen.
The Nozzle Check screen is displayed.
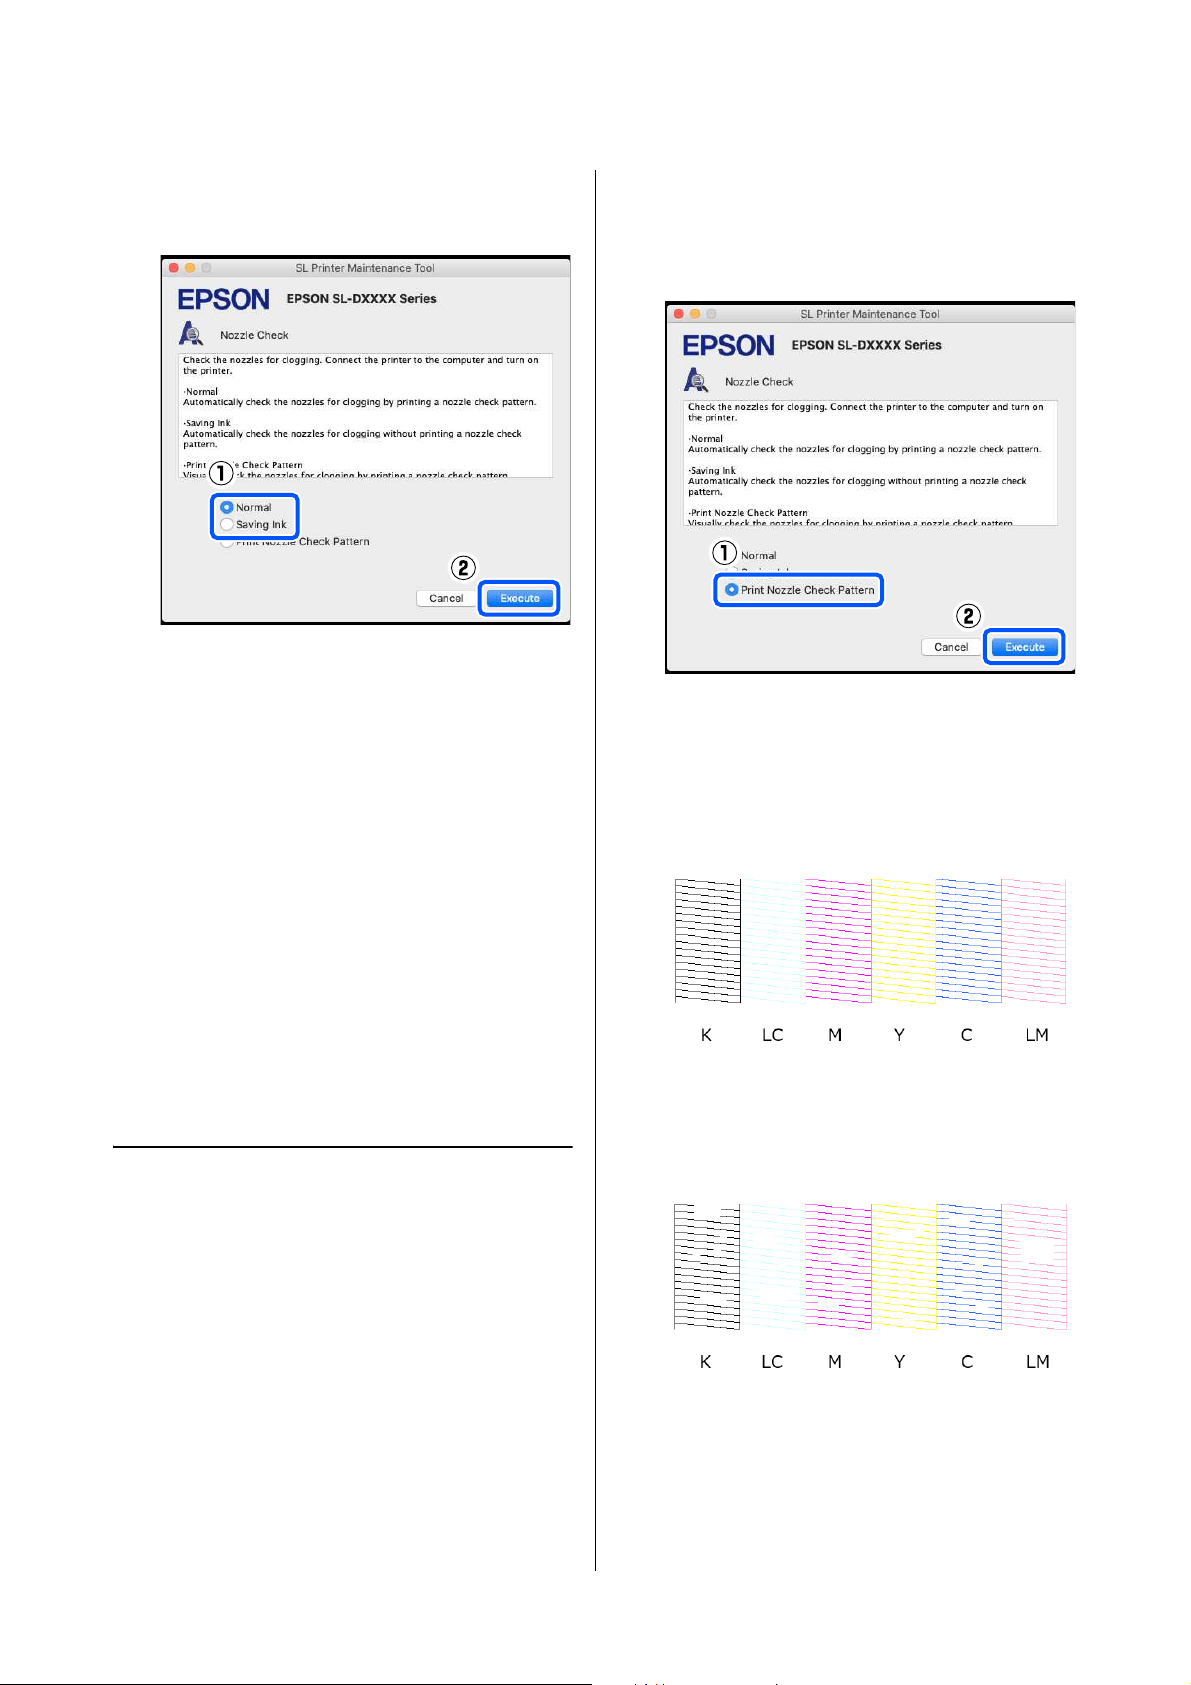
SL-D1000 Series User's Guide
Using the Maintenance Tool (Mac)
104
2
Select Normal or Saving Ink, and then click
Execute.
Nozzle check is executed.
3
Check the results of the nozzle check in the
message displayed on screen.
When “No clogged nozzles were detected.” is
displayed, the work is complete.
When “Clogged nozzles were found.” is
displayed, execute Diagnostic Cleaning.
U
“Diagnostic Cleaning” on page 105
Perform Print Check Pattern to check the
condition of the nozzles.
U
“Print Nozzle Check Pattern Method” on
page 104
Print Nozzle Check Pattern
Method
1
Load paper to print a nozzle check pattern.
U
“Basic Operations” on page 29
2
In the control panel screen, select Printer Setup
- Paper Source Settings - Paper path for
maintenance printing, in this order, and then
set the paper source for the paper loaded in step
1.
3
Click Nozzle Check on the main screen.
The Nozzle Check screen is displayed.
4
Select Print Nozzle Check Pattern, and then
click Execute.
The check pattern is printed.
5
Review the printed check pattern while referring
to the following section.
Example of clean nozzles
If none of the check pattern is missing, then the
print head nozzles are not clogged.
Example of clogged nozzles
If part of the pattern is missing, then the print
head nozzles are clogged. The print head needs
to be cleaned.
U
“Print Head Cleaning Method” on page 105
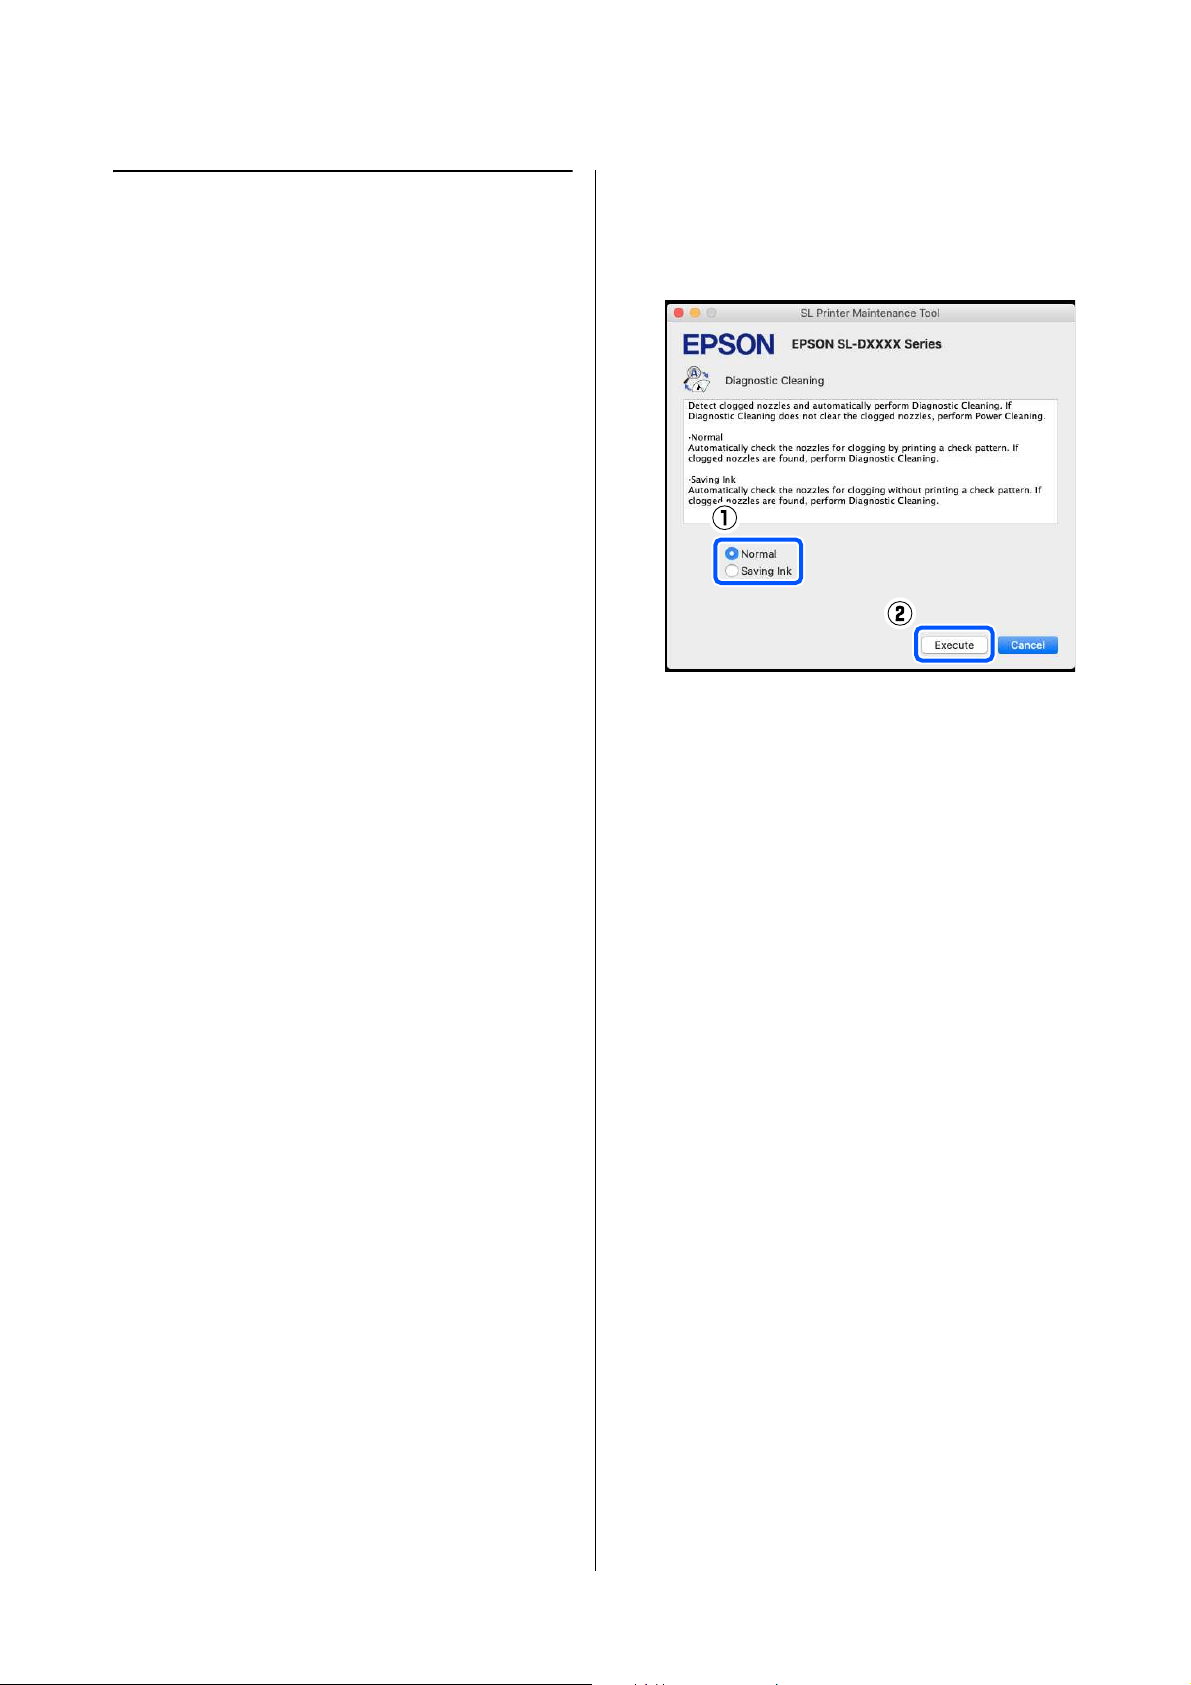
SL-D1000 Series User's Guide
Using the Maintenance Tool (Mac)
105
Print Head Cleaning Method
Types of Cleaning and Order of
Implementation
There are two types of cleaning, Forced Cleaning,
which is cleaning the print head manually, and
Diagnostic Cleaning, which detects clogged nozzles
and cleans the print head automatically.
First, implement Diagnostic Cleaning.
After that, when "Diagnostic cleaning is finished.
Clogged nozzles detected. Perform diagnostic cleaning
again.” is displayed on screen, implement Diagnostic
Cleaning again.
If the clogged nozzles are not cleared after repeating
Diagnostic Cleaning three times, then do Forced
Cleaning set to Power.
Diagnostic Cleaning
1
Click Diagnostic Cleaning on the main screen.
The Diagnostic Cleaning screen is displayed.
2
Select Normal or Saving Ink, and then click
Execute.
Normal prints a check pattern on roll paper and
automatically checks the status of the nozzles.
Roll paper must be loaded on the printer.
Saving Ink does not print a check pattern and
automatically checks the state of the nozzles,
whether roll paper or cut sheets are loaded on
the printer.
The nozzle check starts and cleaning is executed
if necessary.
The time needed for cleaning varies according
to the status of the nozzles.
3
Check the results of Diagnostic Cleaning in the
message displayed on the screen.
When the message "Diagnostic cleaning
completed." is displayed, the work is complete.
When "Diagnostic cleaning is finished. Clogged
nozzles detected. Perform diagnostic cleaning
again.” is displayed, execute Diagnostic
Cleaning again.
If the clogged nozzles are not cleared after
repeating Diagnostic Cleaning three times,
then execute Forced Cleaning set to Power.
U
“Forced Cleaning” on page 105
Forced Cleaning
1
Click Forced Cleaning on the main screen.
The Forced Cleaning screen is displayed.
2
Select Normal or Power, and then click
Execute.
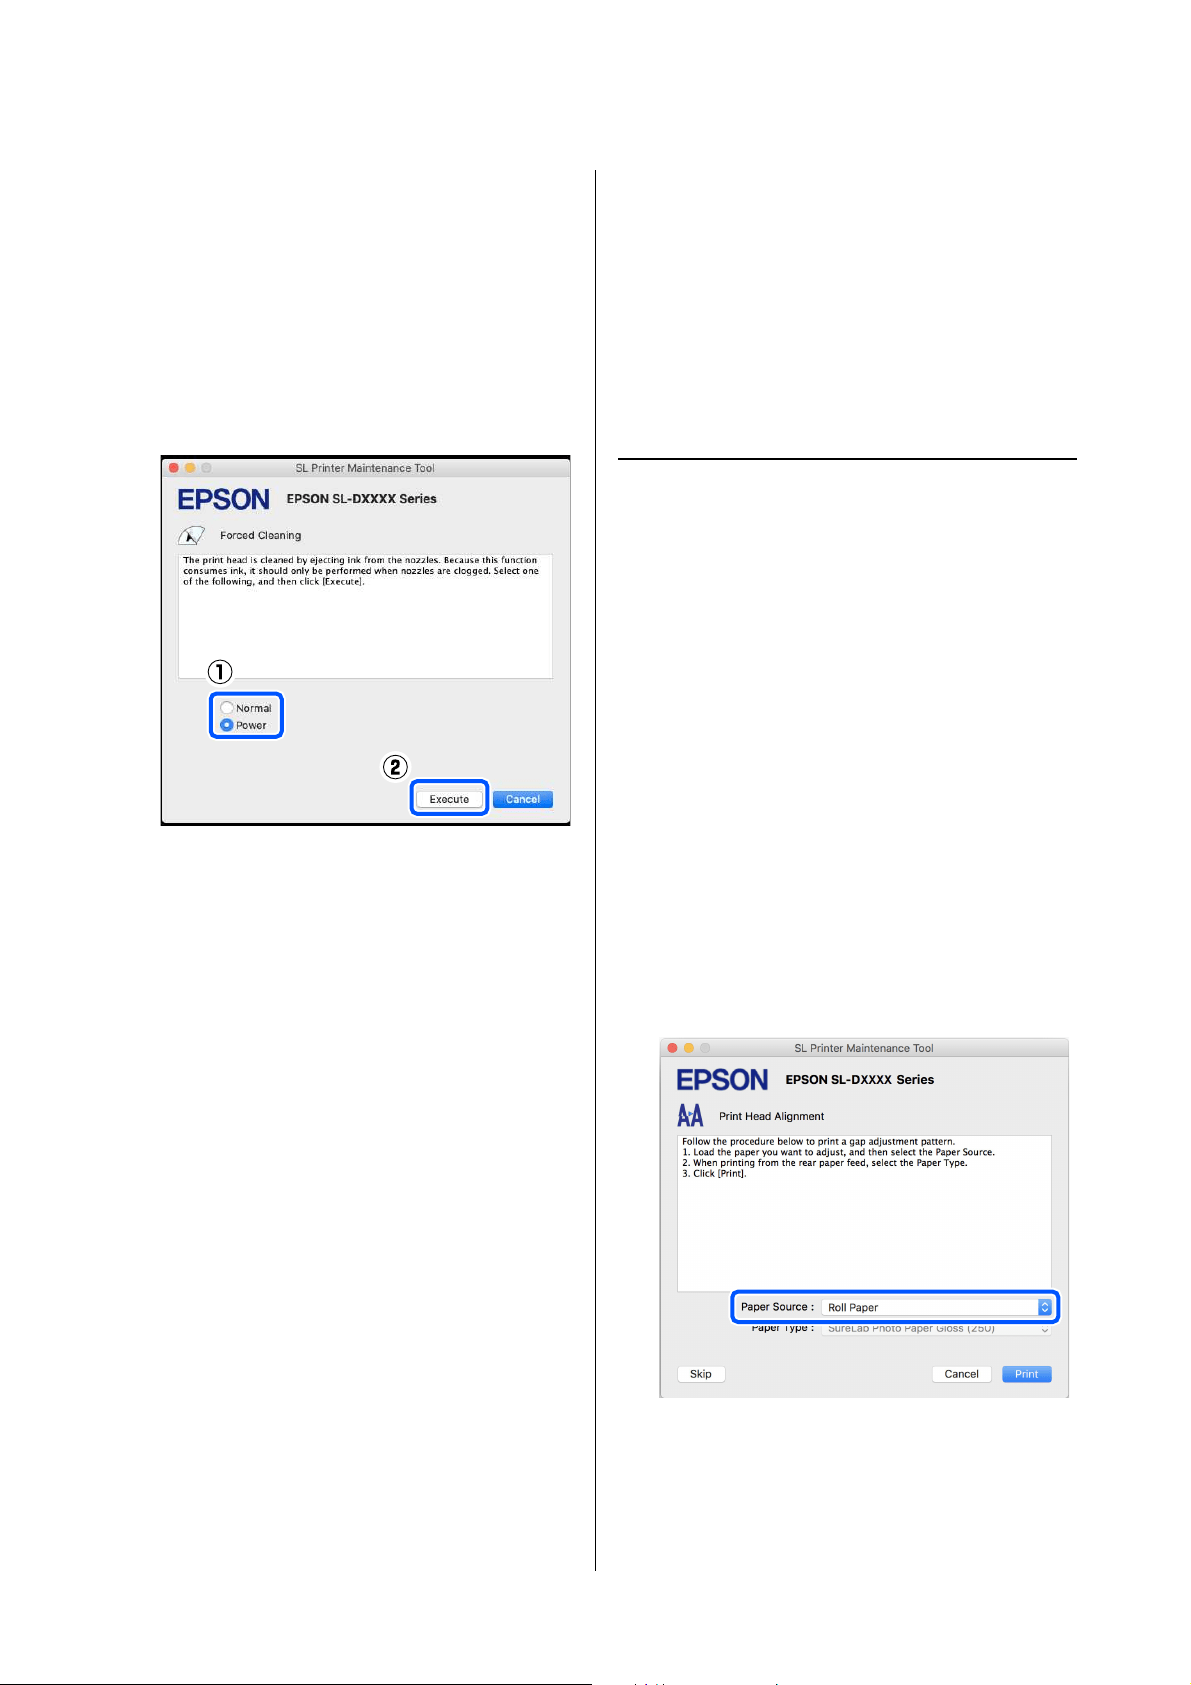
SL-D1000 Series User's Guide
Using the Maintenance Tool (Mac)
106
Select Normal to clean the surface of the print
head and to clear clogged nozzles.
Power cleans more powerfully than Normal.
Use this setting if the nozzles are still clogged
even after repeating Normal cleaning several
times. Power consumes more ink than Normal
cleaning. If a message is displayed informing
you that here is not enough ink remaining,
replace the ink supply unit before continuing.
Cleaning is executed.
Cleaning may take some time depending on the
selected cleaning level.
A message is displayed on screen when cleaning
is complete.
3
Check the results of Forced Cleaning.
There are the following two ways to check the
cleaning results.
O Execute a nozzle check to check for clogged
nozzles.
U
“Nozzle Check Methods” on page 103
O Print a nozzle check pattern to check for
clogged nozzles.
U
“Print Nozzle Check Pattern Method”
on page 104
If the clogged nozzles are not cleared by
executing Normal cleaning, execute Normal
cleaning again. If the clogged nozzles are not
cleared even by repeating this several times,
execute Power cleaning.
If the clogged nozzles are not cleared even by
executing Power cleaning, contact service
support.
Print Head Alignment Method
If the print results appear grainy or out of focus,
perform Print Head Alignment. The Print Head
Alignment function corrects print head misalignments
when printing.
After executing Print Head Alignment, go on to
execute Paper Feed Adjustment.
1
Load paper to print an adjustment pattern.
U
“Basic Operations” on page 29
2
Click Print Head Alignment on the main
screen.
The Print Head Alignment screen is displayed.
3
In Paper Source, select the paper source in
which you loaded paper in step 1.
If you selected Rear Paper Feed Slot for Paper
Source, then go to step 4.
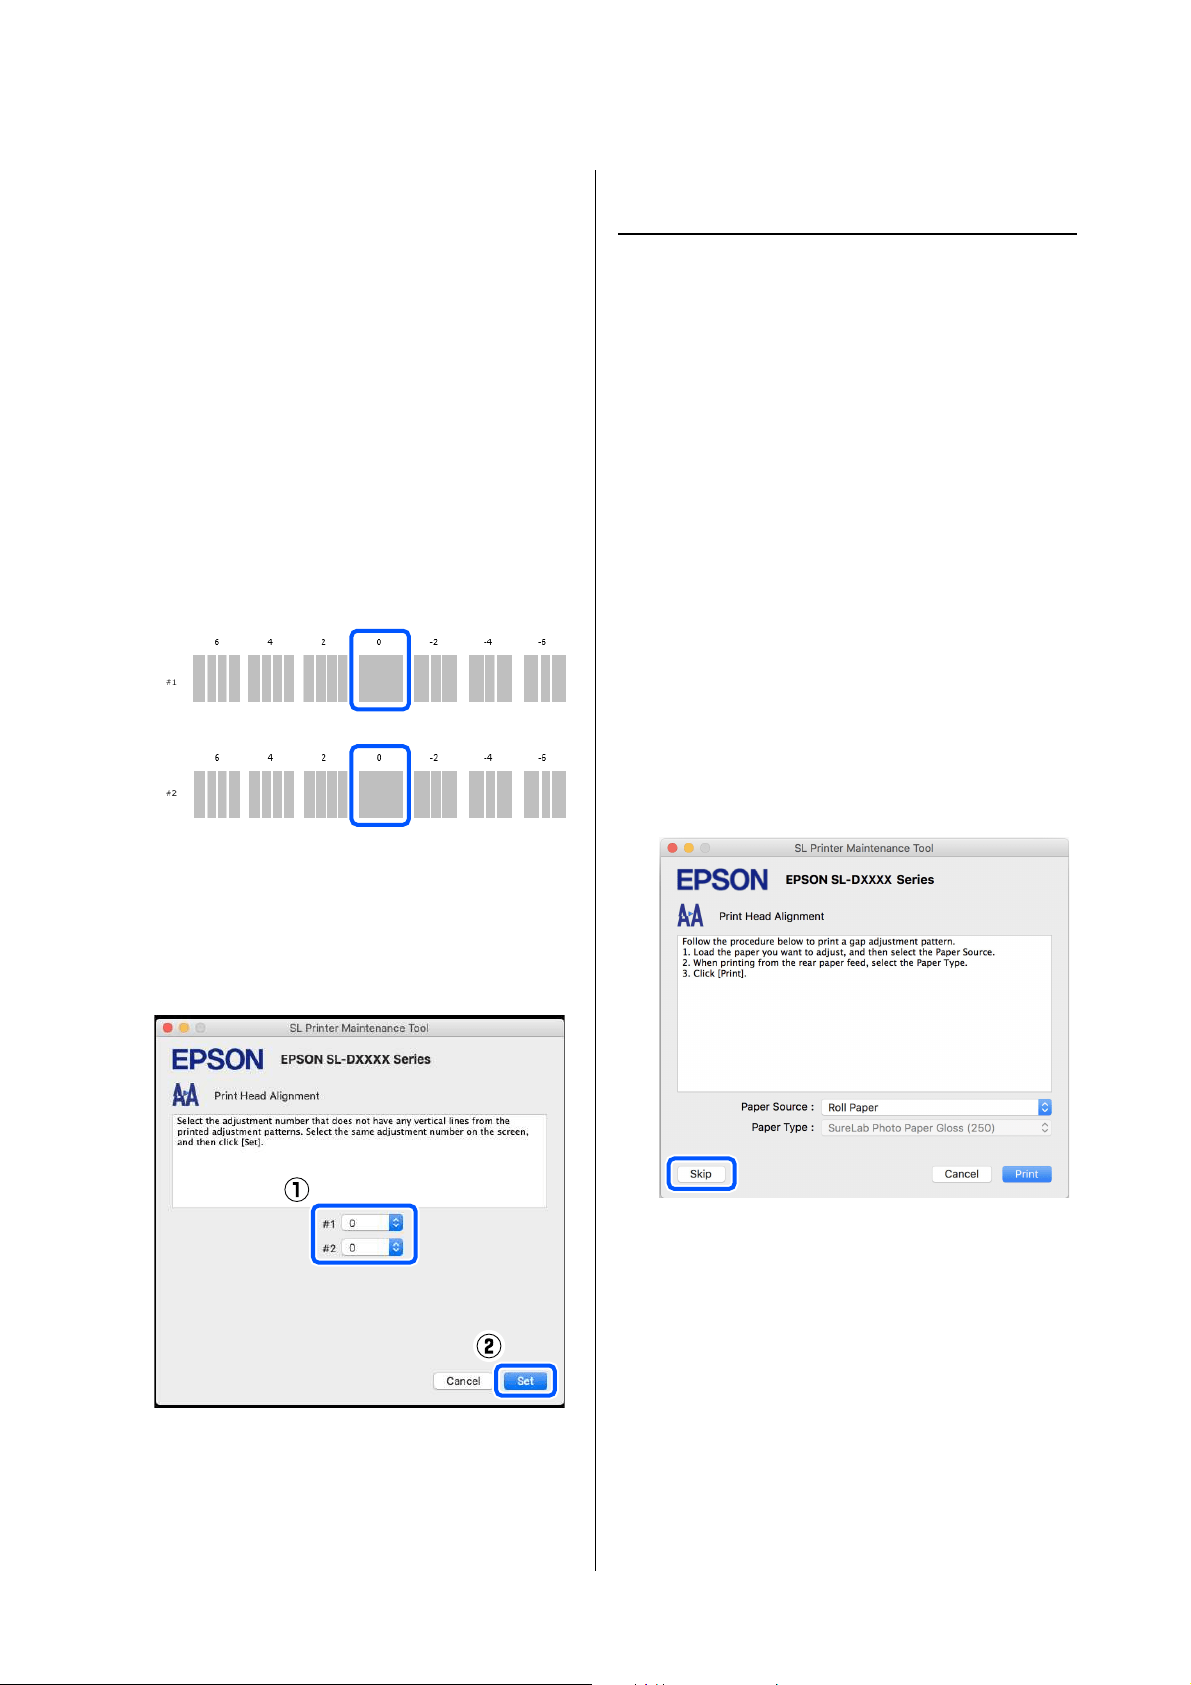
SL-D1000 Series User's Guide
Using the Maintenance Tool (Mac)
107
If you selected something other than Rear
Paper Feed Slot for Paper Source, then go to
step 5.
4
In Paper Type, select the type of paper that is
loaded in the rear paper feed slot.
5
Click Print.
Adjustment patterns are printed.
6
Check the printed adjustment pattern.
Two groups of adjustment patterns, #1 and #2,
are printed. Confirm which of the print pattern
numbers has no gaps between the nozzles in
each group.
7
Select the number of the print pattern you
confirmed, and then click Set.
Select the number of the print pattern you
confirmed individually for both #1 and #2.
The adjustment values are applied.
If you are going to do Paper Feed Adjustment, then go
to step 4 in “Paper Feed Adjustment Method”.
U “Paper Feed Adjustment Method” on page 107
Paper Feed Adjustment Method
Execute this when streaks and unevenness that occur in
print results are not improved even though print head
cleaning was executed.
1
Load paper to print an adjustment pattern.
U
“Basic Operations” on page 29
2
Click Print Head Alignment on the main
screen.
The Print Head Alignment screen is displayed.
3
Click Skip.
If you do not click Skip to do this from Print
Head Alignment, see the following.
U
“Print Head Alignment Method” on page
106
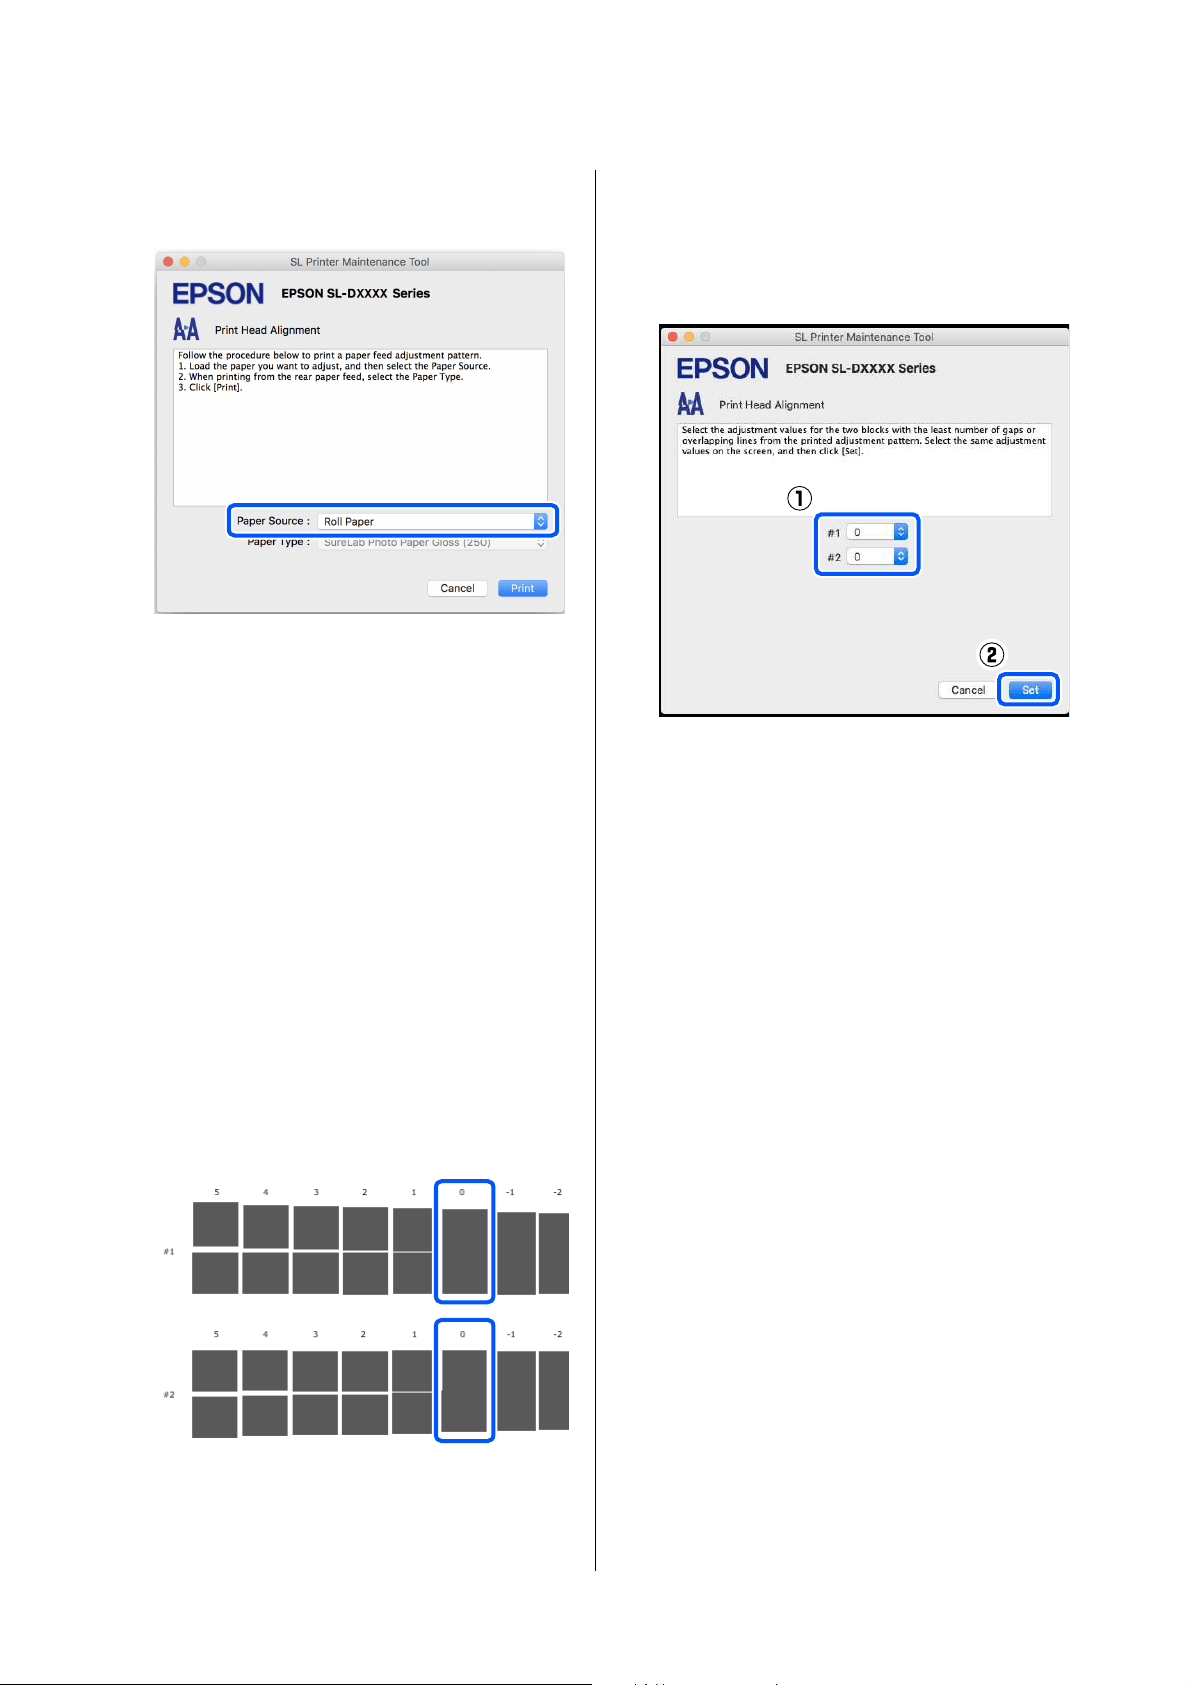
SL-D1000 Series User's Guide
Using the Maintenance Tool (Mac)
108
4
In Paper Source, select the paper source in
which you loaded paper in step 1.
If you selected Rear Paper Feed Slot for Paper
Source, then go to step 5.
If you selected something other than Rear
Paper Feed Slot for Paper Source, then go to
step 6.
5
In Paper Type, select the type of paper that is
loaded in the rear paper feed slot.
6
Click Print.
Adjustment patterns are printed.
7
Check the printed adjustment pattern.
Two groups of adjustment patterns, #1 and #2,
are printed. Confirm the number of the print
pattern with the least amount of overlapping or
gaps for each group.
If all of the adjustment patterns contain overlaps
or gaps, and you cannot narrow it down to one,
select the pattern with the least overlap or gap.
8
Select the number of the print pattern you
confirmed, and then click Set.
Select the number of the print pattern you
confirmed individually for both #1 and #2.
The adjustment values are applied.
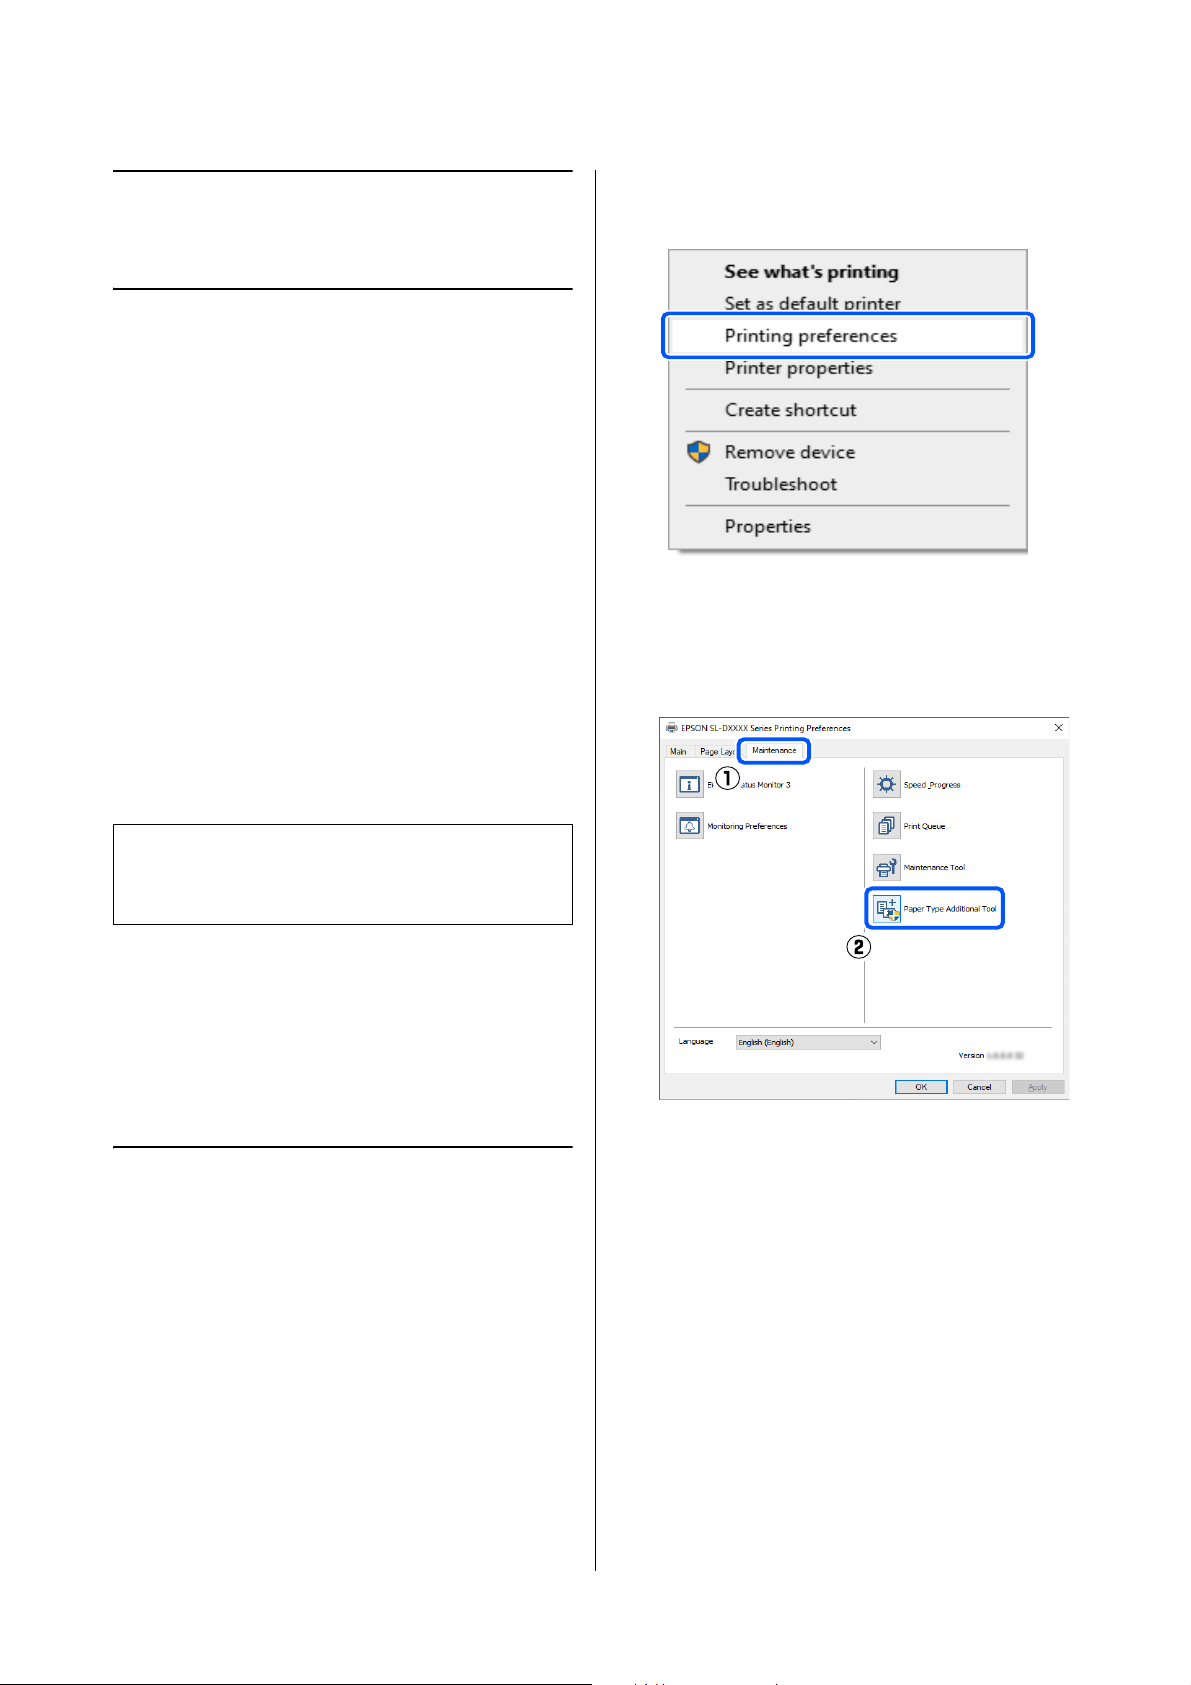
SL-D1000 Series User's Guide
Adding Paper Information
109
Adding Paper
Information
If the paper information for the paper you want to use
is not displayed on the control panel screen or in the
printer driver, you can add paper information. Adding
can be done by the following method.
O When you can acquire the Paper Type File of the
paper you want to use
U
“Adding Paper Information by Using a Paper
Type File” on page 109
O When you cannot acquire the Paper Type File of
the paper you want to use, or when you want to
register color density adjusted to suit the paper
(Windows Only)
U
“Adding Paper Information from Custom
Settings (Windows Only)” on page 111
Adding Paper
Information by Using a
Paper Type File
Settings on Windows
1
Open the Control Panel, and click Hardware
and Sound - Devices and Printers, in this
order.
2
Right-click your printer icon, and select
Printing preferences.
3
Select Maintenance, and click Paper Type
Additional Tool.
Start Paper Type Additional Tool.
Note:
Check with your dealer about how to acquire a Paper
Type File.
SL-D1000 Series User's Guide
Adding Paper Information
110
4
Click Reading Paper Type File, select a Paper
Type File, and then click Open.
5
Select the paper to use, and then click Set.
You can select up to 10 papers.
Follow the on-screen instructions to continue.
When the settings are complete, the paper
information appears in Media Type on the
control panel screen and in the printer driver.
Settings on Mac
1
Click the Apple menu - System Preferences -
Printers & Scanners, in this order.
2
Select the printer and click Options & Supplies
- Utility - Open Printer Utility.
Maintenance Tool starts.
3
Click SL Paper Type Additional Tool.
Start Paper Type Additional Tool.
4
Click Select, select a Paper Type File, and then
click Open.
SL-D1000 Series User's Guide
Adding Paper Information
111
5
Click Next.
6
Select the paper to use, and then click Next.
You can select up to 10 papers.
Follow the on-screen instructions to continue.
When the settings are complete, the paper
information appears in Media Type on the
control panel screen and in the printer driver.
Adding Paper
Information from Custom
Settings (Windows Only)
If you cannot acquire the Paper Type File for the paper
you want to use, or when using commercially available
paper, add paper information by adjusting the color
density of paper information that has already been set.
1
Open the Control Panel, and click Hardware
and Sound - Devices and Printers, in this
order.
2
Right-click your printer icon, and select
Printing preferences.
3
Select Maintenance, and click Paper Type
Additional Tool.
Start Paper Type Additional Tool.
4
Click Custom Settings, and select Media Type.
SL-D1000 Series User's Guide
Adding Paper Information
112
Choose a paper type that is the closest match to
the paper to be used.
5
Input a name in Name, then set the Color
Density to match the paper, and then click Add.
6
Confirm that the paper information you added
in step 5 is selected, and then click Set.
Follow the on-screen instructions to continue.
When the settings are complete, the paper
information appears in Media Type on the
control panel screen and in the printer driver.
Note:
The added paper information appears in Media
Type on the control panel screen and in the
printer driver using the name you input in Name.
SL-D1000 Series User's Guide
Control Panel Menu
113
Control Panel Menu
Menu List
The following items and parameters can be set and executed in the Menu. See the reference pages for more details
on each item.
Settings
For more information on these items, see U “Details of the Menu” on page 117
Item Parameter
Printer Status
Supply Status -
Message List -
Firmware Version -
Paper Setting
Roll Paper
Remove -
Paper information -
Remaining Amount -
Remaining Amount Setting On, Off
Paper Remaining Set numerical values
Remaining Alert Set numerical values
Paper Type Displays the supported paper types
Cassette
Paper Type Displays the supported paper types
Paper Size Displays the supported paper sizes
Maintenance
Print Head Nozzle Check -
Print Head Cleaning -
Powerful Cleaning -
Replace Ink Supply Unit -
Replace Maintenance Box -
Reset Counter -
Printer Setup
SL-D1000 Series User's Guide
Control Panel Menu
114
Paper Source Settings
Paper path for maintenance printing Roll Paper, Cassette, Rear Paper Feed Slot
Error Notice
Paper Size Notice On, Off
Paper Type Notice On, Off
Paper Setup Auto Display On, Off
Sound
Mute Off, On
Button Press Off, Low, Medium, High
Error Tone Off, Low, Medium, High
Thick Paper Off, On
Power Off Timer Off, 30minutes, 1h, 2h, 4h, 8h, 12h
Date/Time Settings
Date/Time
Date Format yyyy.mm.dd, mm.dd.yyyy, dd.mm.yyyy
Time Format 12h, 24h
Time Difference -12:45 to +13:45
Language Arabic, Czech, Danish, Dutch, English, Farsi, Finnish, French,
German, Greek, Hindi, Hungarian, Indonesian, Italian, Japanese,
Korean, Malay, Norwegian, Polish, Portuguese, Romanian,
Russian, Simplified Chinese, Spanish, Swedish, Thai, Traditional
Chinese, Turkish, Vietnamese
Keyboard QWERTY, ABC
Sleep Timer Set numerical values
PC Connection via USB Enable, Disable
Length Unit m, ft / in
Network Settings
Item Parameter
SL-D1000 Series User's Guide
Control Panel Menu
115
Print Status Sheet -
Wi-Fi Setup
Wi-Fi (Recommended)
Wi-Fi Setup Wizard
Other SSIDs -
Push Button (WPS) -
Others
PIN Code (WPS) -
Wi-Fi Auto Connect -
Disable Wi-Fi -
Wi-Fi Direct
iOS -
Other OS Devices -
Change Settings
Change Network Name -
Change Password -
Disable Wi-Fi Direct -
Change Frequency Range 2.4GHz, 5GHz
Restore Default Settings -
Connection Check -
Advanced Setup
Device Name -
TCP/IP Auto, Manual
DNS Server Auto, Manual
Proxy Server Do Not Use, Use
IPv6 Address Enable, Disable
Link Speed & Duplex Auto, 10BASE-T Half Duplex, 10BASE-T Full Duplex, 100BASE-TX
Half Duplex, 100BASE-TX Full Duplex
Redirect HTTP to HTTPS Enable, Disable
Disable IPsec/IP Filtering -
Disable IEEE802.1X -
Epson Connect Services
Register/Delete -
Suspend/Resume -
Email Address -
Status -
Item Parameter
SL-D1000 Series User's Guide
Control Panel Menu
116
Wi-Fi Setup
Displays the same content as Settings - Network Settings - Wi-Fi Setup.
Print Network Status Sheet -
Print Counter -
Reports
Network -
Security Settings
Admin Settings
Admin Password
Change -
Restore Default Settings -
Lock Setting Off, On
Password Encryption Off, On
Restore Default Settings
Network Settings -
Clear All Data and Settings -
Item Parameter
SL-D1000 Series User's Guide
Control Panel Menu
117
Details of the Menu
* indicates default settings.
Item Parameter Explanation
Printer Status
Supply Status - You can confirm an estimate of the amount of ink remaining and the free
space in the maintenance box. The mark indicates that the ink levels
or the free space in the maintenance box are low. The mark indicates
that the ink level is below the minimum value or that there is no free
space in the maintenance box, so the ink supply unit or maintenance box
should be replaced.
You can confirm the model number of the maintenance box and the ink
supply units by selecting Check code..
Message List - The printer's current status and description of unresolved errors are
displayed in a list.
Firmware Version - Displays the firmware version of the printer.
Paper Setting
SL-D1000 Series User's Guide
Control Panel Menu
118
Roll Paper
Remove - Select when removing the roll paper that is loaded. Follow the on-screen
instructions to remove it.
Paper information - Displays paper type that is currently set.
Remaining Amount - When Remaining Amount Setting is On, information about the
remaining amount of paper is printed as a barcode when printing ends,
so that the next time that roll of paper is loaded, the information about
the remaining amount can be scanned. This is useful because the
remaining amounts of roll paper can be managed automatically.
In addition to bar codes, the following information is printed as text that
can be read visually.
O Time and date barcode printed
O Model name
O Paper Type
O Remaining Amount
When loading roll paper for the first time, set the remaining amount from
Paper Remaining.
When the remaining amount reaches the level set in Remaining Alert, a
warning message appears in the control panel screen.
Remaining
Amount Setting
On
Off
*
Paper Remaining Set numerical values
Remaining Alert Set numerical values
Paper Type Displays the
supported paper
types
Set the type of roll paper being loaded.
Cassette Set the type and size of cut sheets loaded in the cassette of the duplex
feeder (option).
Paper Type Displays the
supported paper
types
Paper Size Displays the
supported paper
sizes
Maintenance
Print Head Nozzle
Check
- Print a check pattern to check whether nozzles (holes that eject ink) in
the print head are clogged.
Print Head Cleaning - Clean the print head nozzles to clear the clogs.
Powerful Cleaning - This is powerful cleaning that is executed when clogged nozzles are not
cleared by doing Print Head Cleaning.
Replace Ink Supply
Unit
- Execute this when replacing ink supply units so you can watch the
explanation displayed on the screen.
Replace Maintenance
Box
- Execute this when replacing the maintenance box to watch an
explanation shown on screen while you replace the parts.
Reset Counter - Execute this to reset the amount of paper that has been fed from the
cassette of the duplex feeder. Be sure to execute this when you replace
feed rollers at the end of their service life.
Printer Setup
Item Parameter Explanation
SL-D1000 Series User's Guide
Control Panel Menu
119
Paper Source Settings
Paper path for
maintenance
printing
Roll Paper
*
Set from where to use paper that has been loaded for printing a nozzle
check pattern and network connection check report.
Cassette
Rear Paper Feed Slot
Error Notice When turned On, error messages are displayed when the paper type and
size set in Print Settings does not match the fed Paper Setting.
Paper Size Notice On
*
Off
Paper Type Notice On
*
Off
Paper Setup Auto
Display
On
*
Select On to display the Paper Setting screen when loading paper in the
cassette of Duplex Feeder (Option). If you disable this feature, you cannot
print from an iPhone, iPad, or iPod touch using AirPrint.
Off
Item Parameter Explanation
SL-D1000 Series User's Guide
Control Panel Menu
120
Sound Sets volume of sounds produced by the printer.
When Mute is On, all sounds are muted.
Mute Off
*
On
Button Press Off
Low
Medium
*
High
Error Tone Off
Low
Medium
*
High
Thick Paper Off
*
Normally, leave this Off.
Set this to On to widen the gap between the print head and paper to
reduce rubbing if the print head and paper rub together causing print
results to be dirty.
On
Power Off Timer Off
*
Set the time until the power automatically turns off when the printer has
continuously not been operated.
30minutes
1h
2h
4h
8h
12h
Date/Time Settings
Date/Time Set the current date and time and their display format.
Date Format yyyy.mm.dd
mm.dd.yyyy
dd.mm.yyyy
Time Format 12h
24h
Time Difference -12:45 to +13:45 Set the time difference with coordinated universal time (UTC).
Item Parameter Explanation
SL-D1000 Series User's Guide
Control Panel Menu
121
Language Arabic You can select the language displayed on the screens.
Czech
Danish
Dutch
English
Farsi
Finnish
French
German
Greek
Hindi
Hungarian
Indonesian
Italian
Japanese
Korean
Malay
Norwegian
Polish
Portuguese
Romanian
Russian
Simplified Chinese
Spanish
Swedish
Thai
Traditional Chinese
Turkish
Vietnamese
Item Parameter Explanation
SL-D1000 Series User's Guide
Control Panel Menu
122
Keyboard QWERTY
*
Select the keyboard layout used in the control panel screens.
ABC
Sleep Timer Set numerical values Set the time until the printer automatically goes into sleep (energy
saving) mode when the printer has continuously not been operated.
When the set time is exceeded, the screen becomes dark.
PC Connection via USB Enable
*
When Enable is set, access is allowed from computers connected via
USB. When Disable is set, you can prohibit printing that does not go
through the network.
Disable
Length Unit m Set the units of length to be displayed and input on the control panel.
ft / in
Network Settings
Print Status Sheet - Prints a network status sheet.
Wi-Fi Setup
Wi-Fi (Recommended) Connect the printer to a network through a wireless LAN router.
Select the connection method and follow the on-screen instructions to
do the settings.
Wi-Fi Setup Wizard
Other SSIDs -
Push Button
(WPS)
-
Others
PIN Code (WPS) -
Wi-Fi Auto
Connect
-
Disable Wi-Fi -
Item Parameter Explanation

SL-D1000 Series User's Guide
Control Panel Menu
123
Wi-Fi Direct Directly connect smart devices to the printer using a wireless LAN. Select
the connection method and follow the on-screen instructions to do the
settings.
The following shows details of the setting items.
Change Network Name:
Change the connection name (SSID) of the Wi-Fi Direct (simple AP)
connected to the printer to any value. The connection name (SSID) can
be set using the characters on the keyboard displayed on the control
panel screen. Input up to 22 characters.
If the connection name (SSID) is changed, then all the connected devices
will be cut off. If you change the connection name, then reconnect to
connected devices using the new connection name (SSID).
Change Password:
Change the password of the Wi-Fi Direct (simple AP) connected to the
printer. The password can be set using the ASCII characters on the soft
keyboard displayed on the control panel. Input from 8 to 22 characters.
If the password is changed, then all the connected devices will be cut off.
If you change the password, then reconnect to connected devices using
the new password.
Disable Wi-Fi Direct:
Disable the Wi-Fi Direct (simple AP) connection. If this is disabled, then all
the connected devices will be cut off.
Change Frequency Range:
This setting may not be visible, depending on your region.
Change the frequency band of the Wi-Fi Direct (simple AP) connected to
the printer. This can be set to 2.4 GHz or 5 GHz.
If the frequency band is changed, then all the connected devices will be
cut off. Connect them again.
If the frequency band is set to 5 GHz, then devices that do not support 5
GHz cannot be reconnected.
Restore Default Settings:
Returns all the Wi-Fi Direct (simple AP) settings to the factory defaults.
This also deletes the registered connection information, which is used by
Wi-Fi Direct functions of smart devices, stored on the printer.
iOS -
Other OS Devices -
Change Settings
Change
Network Name
-
Change
Password
-
Disable Wi-Fi
Direct
-
Change
Frequency
Range
2.4GHz
*
5GHz
Restore Default
Settings
-
Connection Check - Checks the status of the printer’s network connection and prints a
network connection diagnosis report. If there is a problem with the
connection, use the results of the diagnosis to resolve it.
Item Parameter Explanation
SL-D1000 Series User's Guide
Control Panel Menu
124
Advanced Setup Set various items related to the network.
Device Name -
TCP/IP Auto
Manual
DNS Server Auto
Manual
Proxy Server Do Not Use
Use
IPv6 Address Enable
*
Disable
Link Speed & Duplex Auto
*
10BASE-T Half
Duplex
10BASE-T Full
Duplex
100BASE-TX Half
Duplex
100BASE-TX Full
Duplex
Redirect HTTP to
HTTPS
Enable
*
Disable
Disable IPsec/IP
Filtering
-
Disable IEEE802.1X -
Epson Connect Services
Register/Delete - Register a printer to Epson Connect or delete a registered printer.
See the following portal site for details on using the Epson Connect
service.
https://www.epsonconnect.com/
Suspend/Resume - Temporarily stop using the Epson Connect service or restart using the
service after it was stopped.
Email Address - Check the email address of the printer that is registered in Epson
Connect.
Status - Confirm that the printer is registered and connected to Epson Connect.
Print Network Status
Sheet
- Prints a network status sheet.
Print Counter - The amount of printing from when the printer was first used until the
present is converted to a number of 102 x 152 mm (4 x 6 inches) size
pages and displayed.
Item Parameter Explanation
SL-D1000 Series User's Guide
Control Panel Menu
125
Reports Checks the status of the printer’s network connection and prints a
network connection diagnosis report. If there is a problem with the
connection, use the results of the diagnosis to resolve it.
Network -
Security Settings
Admin Settings
Admin Password Sets, changes, and initializes the administrator’s password.
The initial value for the administrator’s password is the product’s serial
number. Confirm the product serial number printed on a label on the
printer.
Change -
Restore Default
Settings
-
Lock Setting Off
*
Uses the Admin Password to lock the control panel so it cannot be used.
See the Administrator's Guide for information on the settings that are
locked.
On
Password Encryption Off
*
Select On to encrypt the password, and then restart the printer. If the
power is cut off during a restart, the password data could be damaged
and the printer’s settings initialized. If this happens, reset the password
information.
On
Restore Default Settings
Network Settings - Return network related settings to factory defaults.
Clear All Data and
Settings
- Returns all settings to their defaults.
Item Parameter Explanation
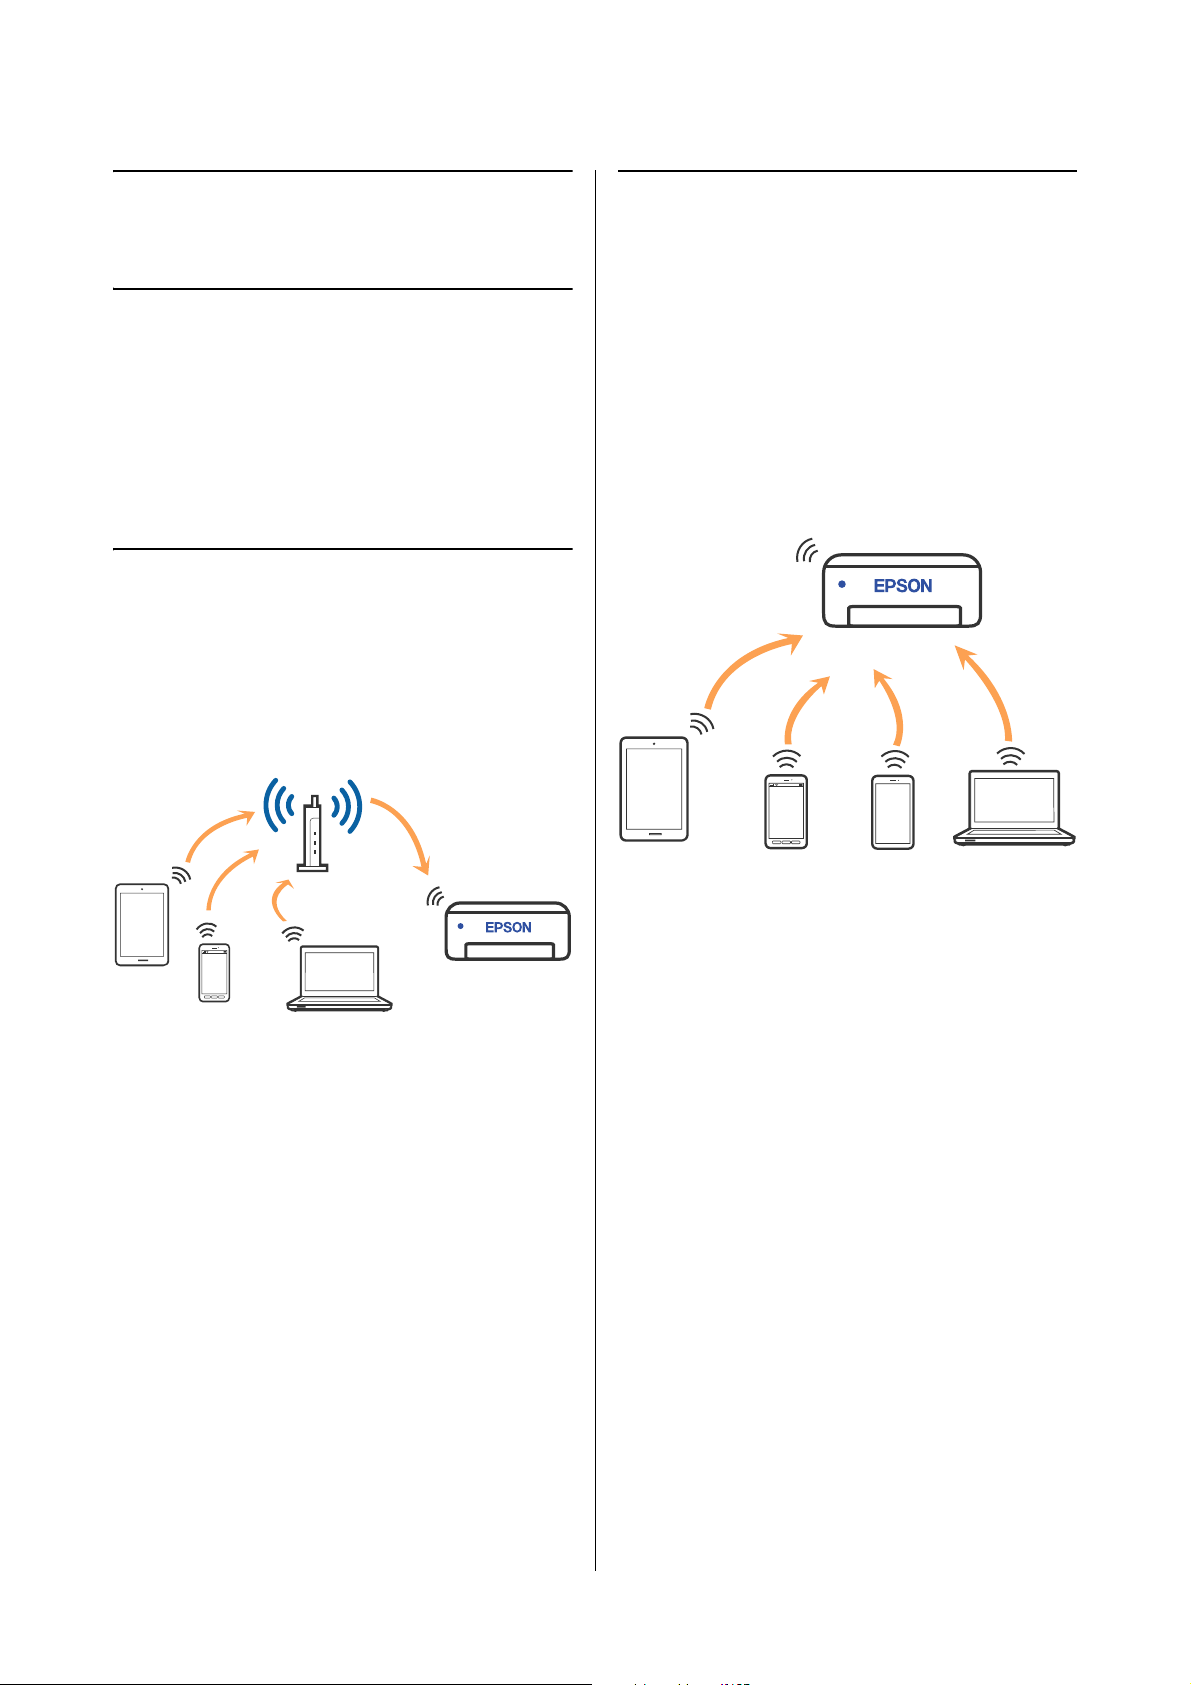
SL-D1000 Series User's Guide
Wireless LAN Connection
126
Wireless LAN
Connection
Types of Wireless LAN
Connection
You can use the following connection methods.
Wi-Fi Connection
Connect the printer and the computer or smart device
to the wireless router. This connection method is for
using smart devices and computers connected via
wireless LAN (Wi-Fi) through a wireless LAN router
(access point).
Related information
U
“Connecting to a Computer” on page 126
U “Connecting to a Smart Device Over a Wireless
Router” on page 127
U “Making Wi-Fi Settings from the Printer” on page
129
Wi-Fi Direct (Simple AP)
Connection
Use this connection method when you want to connect
the printer directly to a computer or smart device
without using wireless LAN (Wi-Fi) and a wireless
LAN router (access point). In this mode, the printer
acts as an wireless router and you can connect the
devices to the printer without having to use a standard
wireless router. However, devices directly connected to
the printer cannot communicate with each other
through the printer.
The printer can be connected by wireless LAN (Wi-Fi)
and Wi-Fi Direct (Simple AP) simultaneously.
However, if you start setting Wi-Fi Direct (Simple AP)
while connected by wireless LAN (Wi-Fi), the wireless
LAN (Wi-Fi) connection is temporarily disconnected.
Related information
U
“Connecting to an iPhone, iPad, iPod touch Using
Wi-Fi Direct” on page 127
U “Connecting to Devices Other Than iOS Using
Wi-Fi Direct” on page 129
Connecting to a
Computer
We recommend using the installer to connect the
printer to a computer. You can run the installer using
one of the following methods.
O Setting up from the website
Access the Epson support website, and then search
for your model. Download the software installer
and run it.
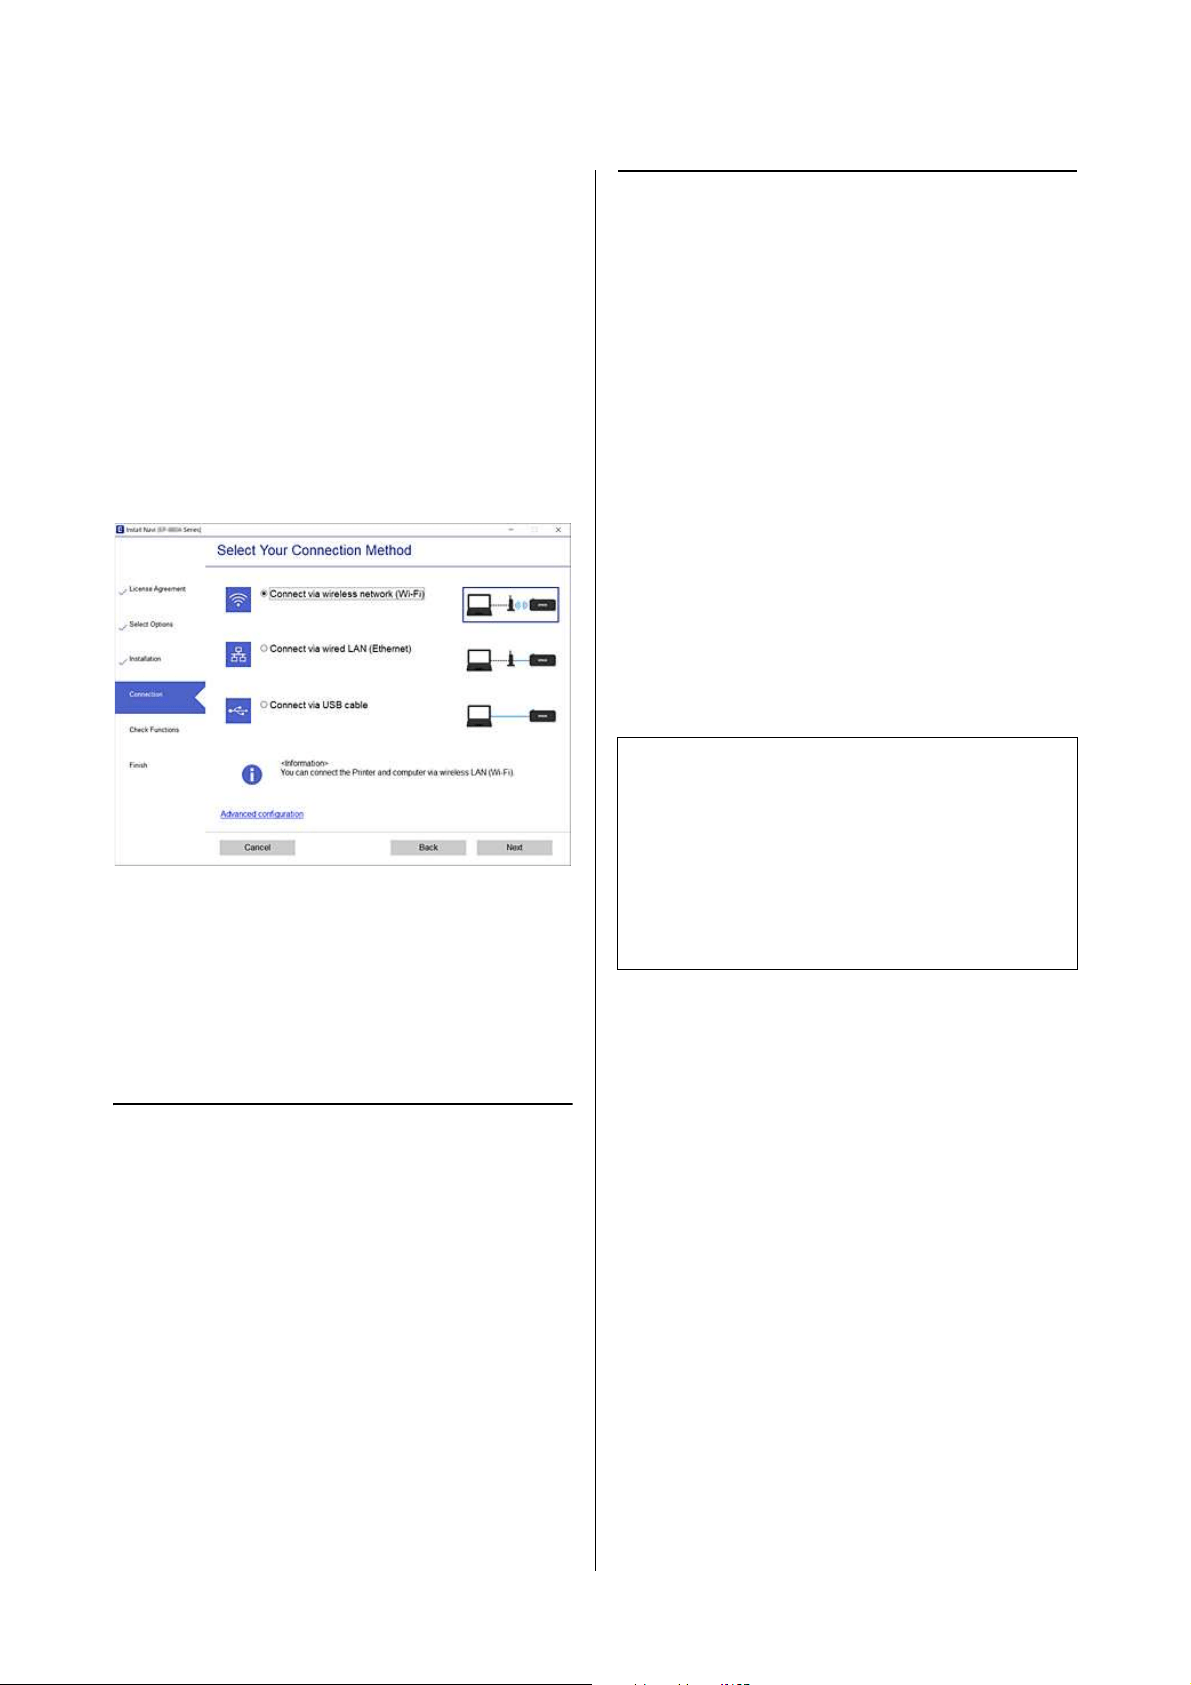
SL-D1000 Series User's Guide
Wireless LAN Connection
127
O Setting up using the software disc (only for the
models that come with a software disc and users
with computers with disc drives)
Insert the software disc into the computer, and
then follow the on-screen instructions.
Selecting the Connection Methods
Follow the on-screen instructions until the following
screen is displayed, and then select the connection
method of the printer to the computer.
Select the connection method for the printer, and then
click Next.
Follow the on-screen instructions.
Connecting to a Smart
Device
Connecting to a Smart Device
Over a Wireless Router
If you are using iOS or Android, you may find it
convenient to do the settings from Epson Smart Panel.
Install and start up the latest version of Epson Smart
Panel. The Wi-Fi setup starts.
Connecting to an iPhone, iPad,
iPod touch Using Wi-Fi Direct
This method allows you to connect the printer directly
to an iPhone, iPad, or iPod touch without a wireless
router. The following conditions are required to
connect using this method. If your environment does
not match these conditions, you can connect by
selecting Other OS Devices. See "Related Information"
below for details on connecting.
O iOS 11 or later
O Using the standard camera application to scan the
QR code
Epson Smart Panel is used to print from a smart device.
Install an Epson printing app, such as Epson Smart
Panel, on the smart device in advance.
1
From the printer’s home screen, press the
u/d/l/r buttons to select Wi-Fi Setup - Wi-Fi
Direct.
2
Check the message, and then press the Z
button to proceed.
3
Check the message, and then press the Z
button to proceed.
Note:
O If you are using iOS, you may find it convenient to
do the settings from Epson Smart Panel.
O You only need to make these settings for the printer
and the smart device that you want to connect to
once. Unless you disable Wi-Fi Direct or restore the
network settings to their defaults, you do not need
to make these settings again.
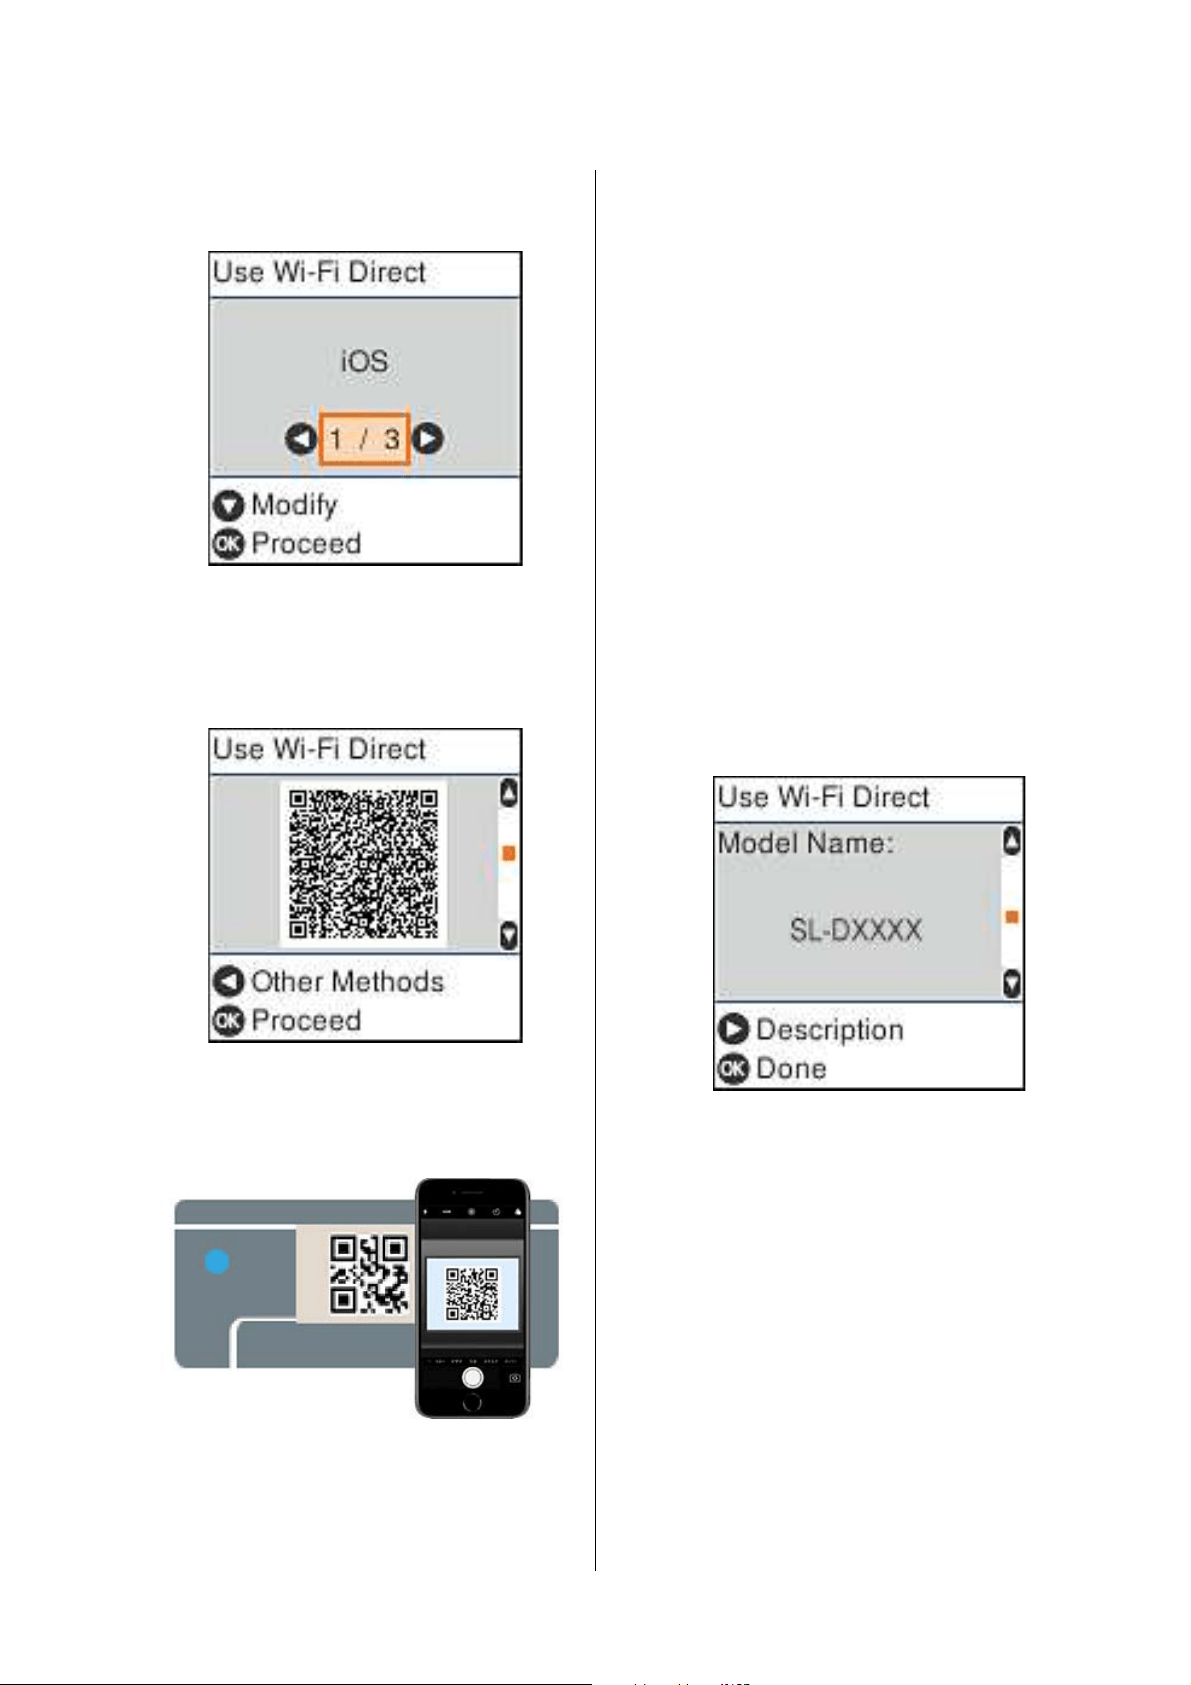
SL-D1000 Series User's Guide
Wireless LAN Connection
128
4
Use the l/r buttons to select iOS, and then
press the Z button.
5
Check the message, and then press the Z
button to proceed.
The QR code is displayed on the printer's screen.
6
Open the standard camera app on iPhone, iPad,
iPod touch, and then use the photo mode to
scan the QR code on the printer’s screen.
Use the Camera app for iOS 11 or later. You
cannot connect to the printer using the standard
camera app for iOS 10 or earlier. Also, you
cannot connect to the printer using an app for
scanning codes. If you cannot connect, press the
l button. See "Related Information" below for
details on connecting.
7
Tap the notification for “DIRECT- XXXXX
Series” network connection displayed in the
iPhone, iPad, or iPod touch screen.
The model number is shown in XXXXX.
8
Check the message, and then tap Join.
9
Press the Z button on the printer.
10
Open the printing app you are using, and then
select the printer.
See the information displayed on the printer's
screen to select the printer.
11
Press the Z button on the printer.
For smart devices that have been connected to the
printer before, select the network name (SSID) on the
smart device's Wi-Fi screen to connect them again.
Related information
U
“Connecting to Devices Other Than iOS Using
Wi-Fi Direct” on page 129
U “Printing from Smart Devices” on page 61
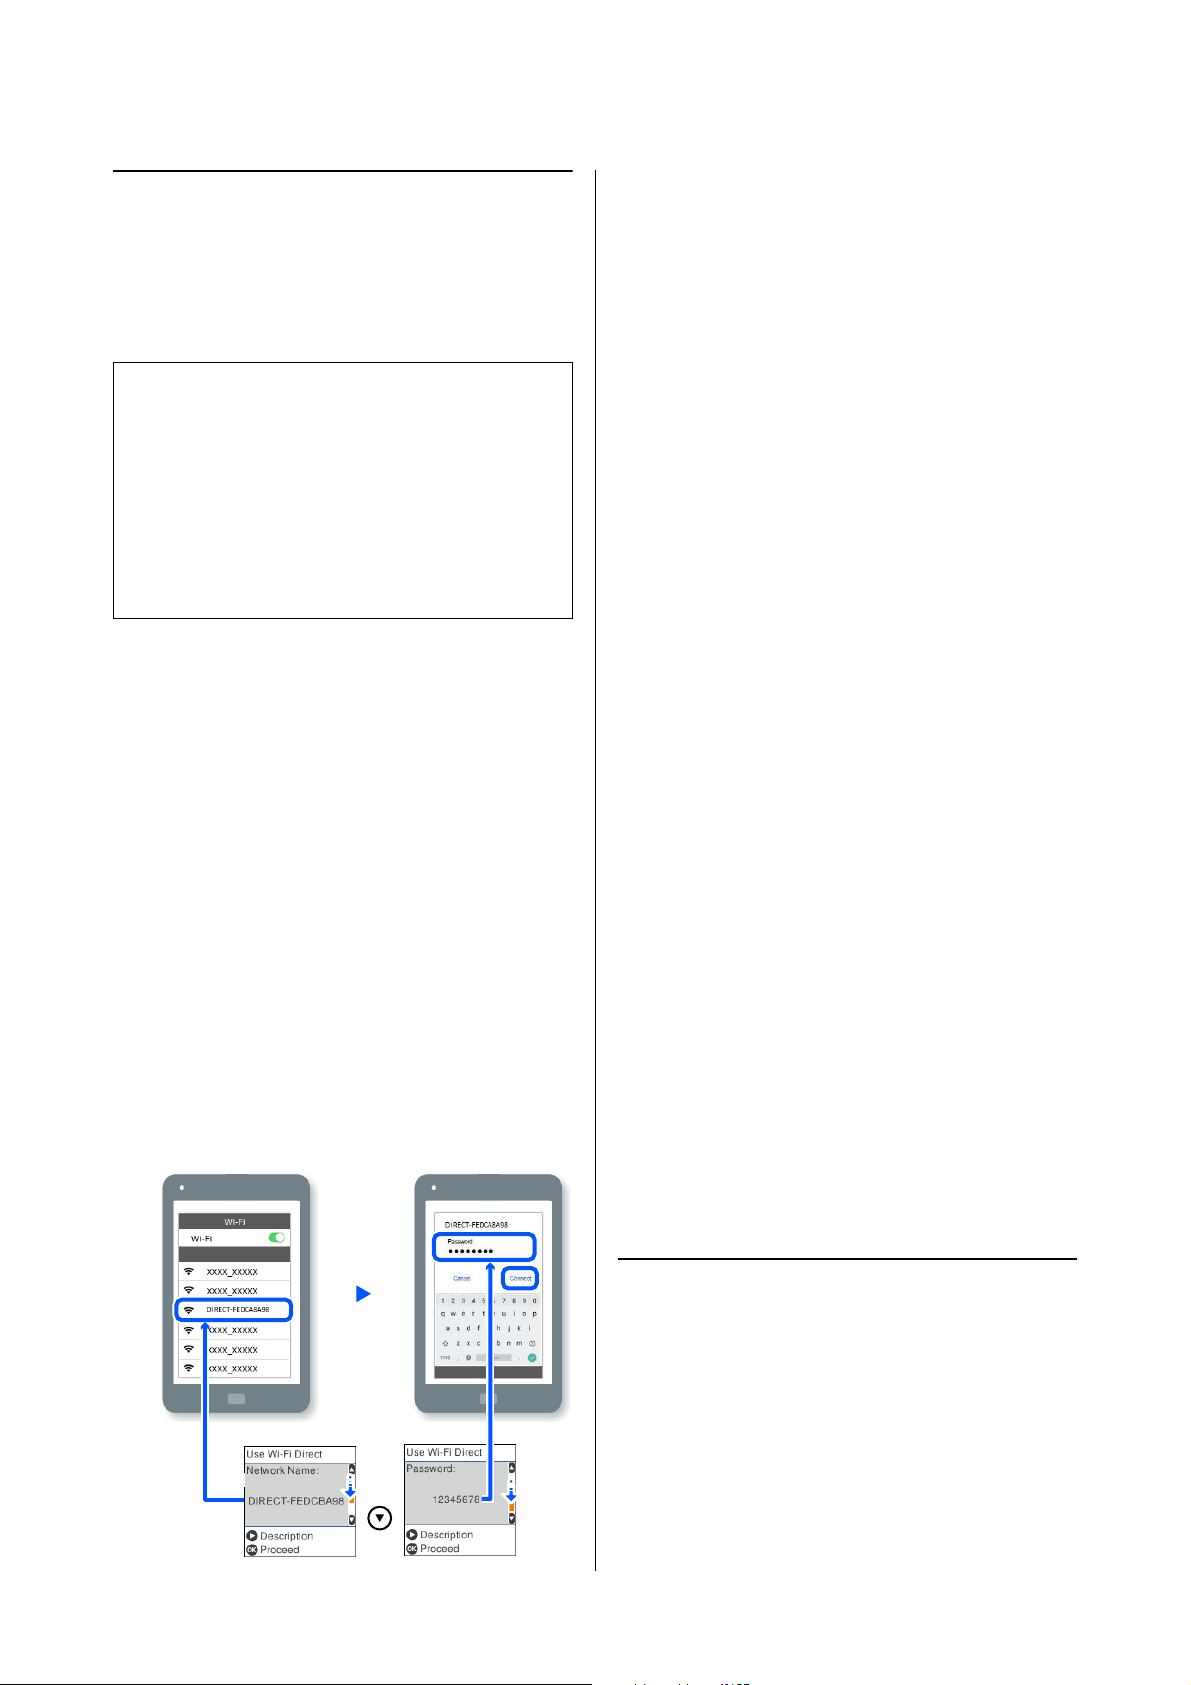
SL-D1000 Series User's Guide
Wireless LAN Connection
129
Connecting to Devices Other
Than iOS Using Wi-Fi Direct
This method allows you to connect the printer directly
to devices without a wireless router.
1
From the home screen, press the u/d/l/r
buttons to select Wi-Fi Setup - Wi-Fi Direct.
2
Check the message, and then press the Z
button.
3
Check the message, and then press the Z
button.
4
Press the l button.
5
Use the l/r buttons to select Other OS Devices,
and then press the Z button.
6
Scroll the screen with the d button, and check
the connection information for Wi-Fi Direct.
7
On the smart device's Wi-Fi screen, select a
connection name shown on the printer's control
panel, and then enter the password.
8
Press the Z button on the printer.
9
Open the printing app you are using, and then
select the printer.
For smart devices that have been connected to
the printer before, select the network name
(SSID) on the smart device's Wi-Fi screen to
connect them again.
Making Wi-Fi Settings
from the Printer
You can make network settings from the printer's
control panel in several ways. Choose the connection
method that matches the environment and conditions
that you are using.
If you know the information for the access point such
as SSID and password, you can make settings
manually.
If you are using a wireless LAN router (access point)
that supports WPS, then you do auto settings by
pressing a button.
After connecting the printer to the network, connect to
the printer from the device that you want to use
(computer, smart device, tablet, and so on).
Related information
U
“Making Wi-Fi Settings by Entering the SSID and
Password” on page 129
U “Making Wi-Fi Settings by Push Button Setup” on
page 130
U “Making Wi-Fi Settings by PIN Code Setup
(WPS)” on page 131
Making Wi-Fi Settings by
Entering the SSID and Password
You can set up a Wi-Fi network by entering the
information necessary to connect to a wireless router
from the printer's control panel. To set up using this
method, you need the SSID and password for a wireless
router.
Note:
O If you are using Android, you may find it
convenient to do the settings from Epson Smart
Panel.
O You only need to make these settings for the printer
and the device that you want to connect to once.
Unless you disable Wi-Fi Direct or restore the
network settings to their defaults, you do not need
to make these settings again.
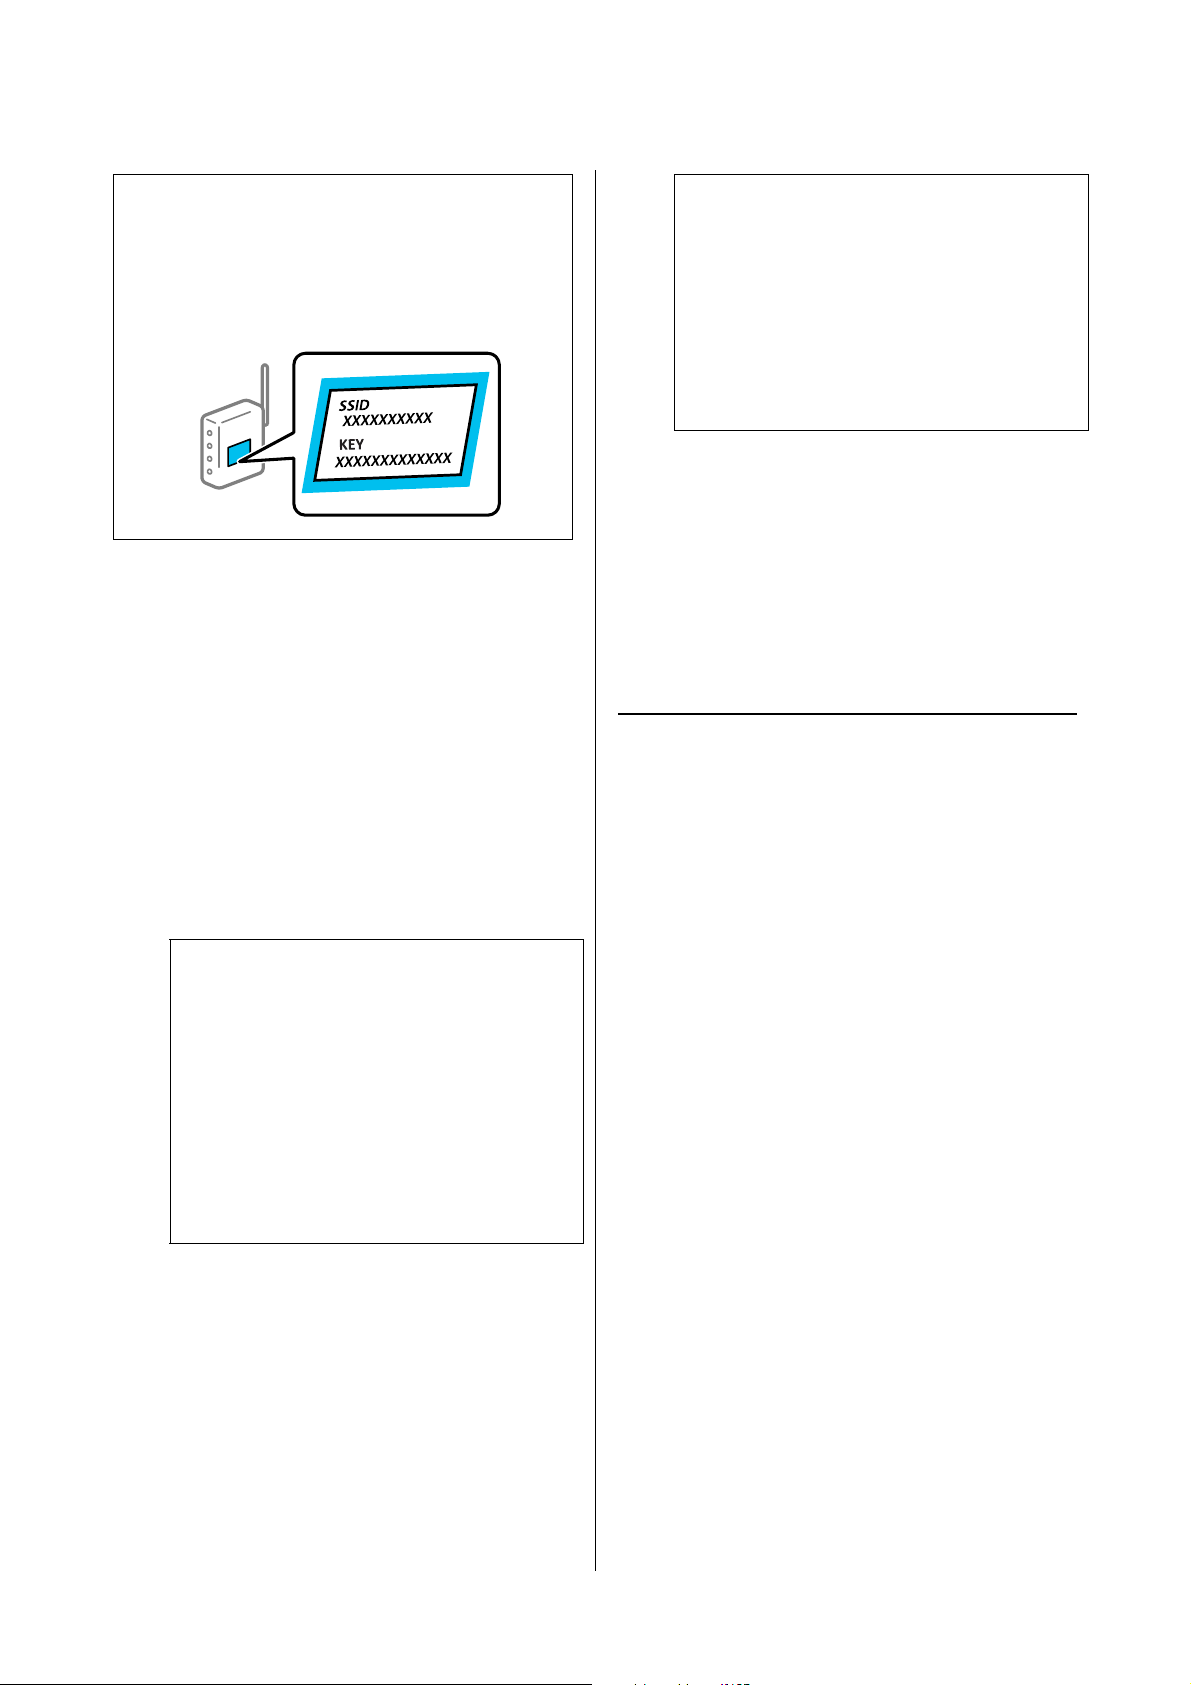
SL-D1000 Series User's Guide
Wireless LAN Connection
130
1
Select Wi-Fi Setup on the home screen.
To select an item, use the u/d/l/r buttons, and
then press the Z button.
2
Select Wi-Fi (Recommended).
3
Press the Z button to proceed.
4
Select Wi-Fi Setup Wizard.
5
Select the SSID for the wireless LAN router
(access point) from the printer's control panel,
and then press the Z button.
6
Enter the password.
Select whether or not you print a network
connection report after finishing the settings.
7
If connection is complete, print a network
connection diagnosis report if needed, and then
finish.
Related information
U
“Text Input Screen” on page 19
U “Printing a Network Connection Report” on page
132
Making Wi-Fi Settings by Push
Button Setup
You can automatically set up a Wi-Fi network by
pressing a button on the wireless router. If the
following conditions are met, you can set up by using
this method.
O The wireless router is compatible with WPS
(Wi-Fi Protected Setup).
O The current Wi-Fi connection was established by
pressing a button on the wireless router.
1
Select Wi-Fi Setup on the home screen.
To select an item, move the focus to the item
using the u/d/l/r buttons, and then press the
Z button.
2
Select Wi-Fi (Recommended).
3
Press the Z button to proceed.
4
Select Push Button (WPS).
Note:
If you are using an wireless router with its default
settings, the SSID and password are on the label. If you
do not know the SSID and password, contact the person
who set up the wireless router, or see the documentation
provided with the wireless router.
Note:
O If the SSID you want to connect to is not
displayed on the printer's control panel, select
Search Again to update the list. If it is still not
displayed, select Other SSIDs, and then enter
the SSID directly.
O If you do not know the SSID, check if it is
written on the label of the wireless router. If
you are using the wireless router with its
default settings, use the SSID written on the
label.
Note:
O The password is case-sensitive.
O If you do not know the network name (SSID)
check if the information is written on the
label of the wireless router. If you are using
the wireless router with its default settings,
use the SSID on the label. If you cannot find
any information, see the documentation
provided with the wireless router.
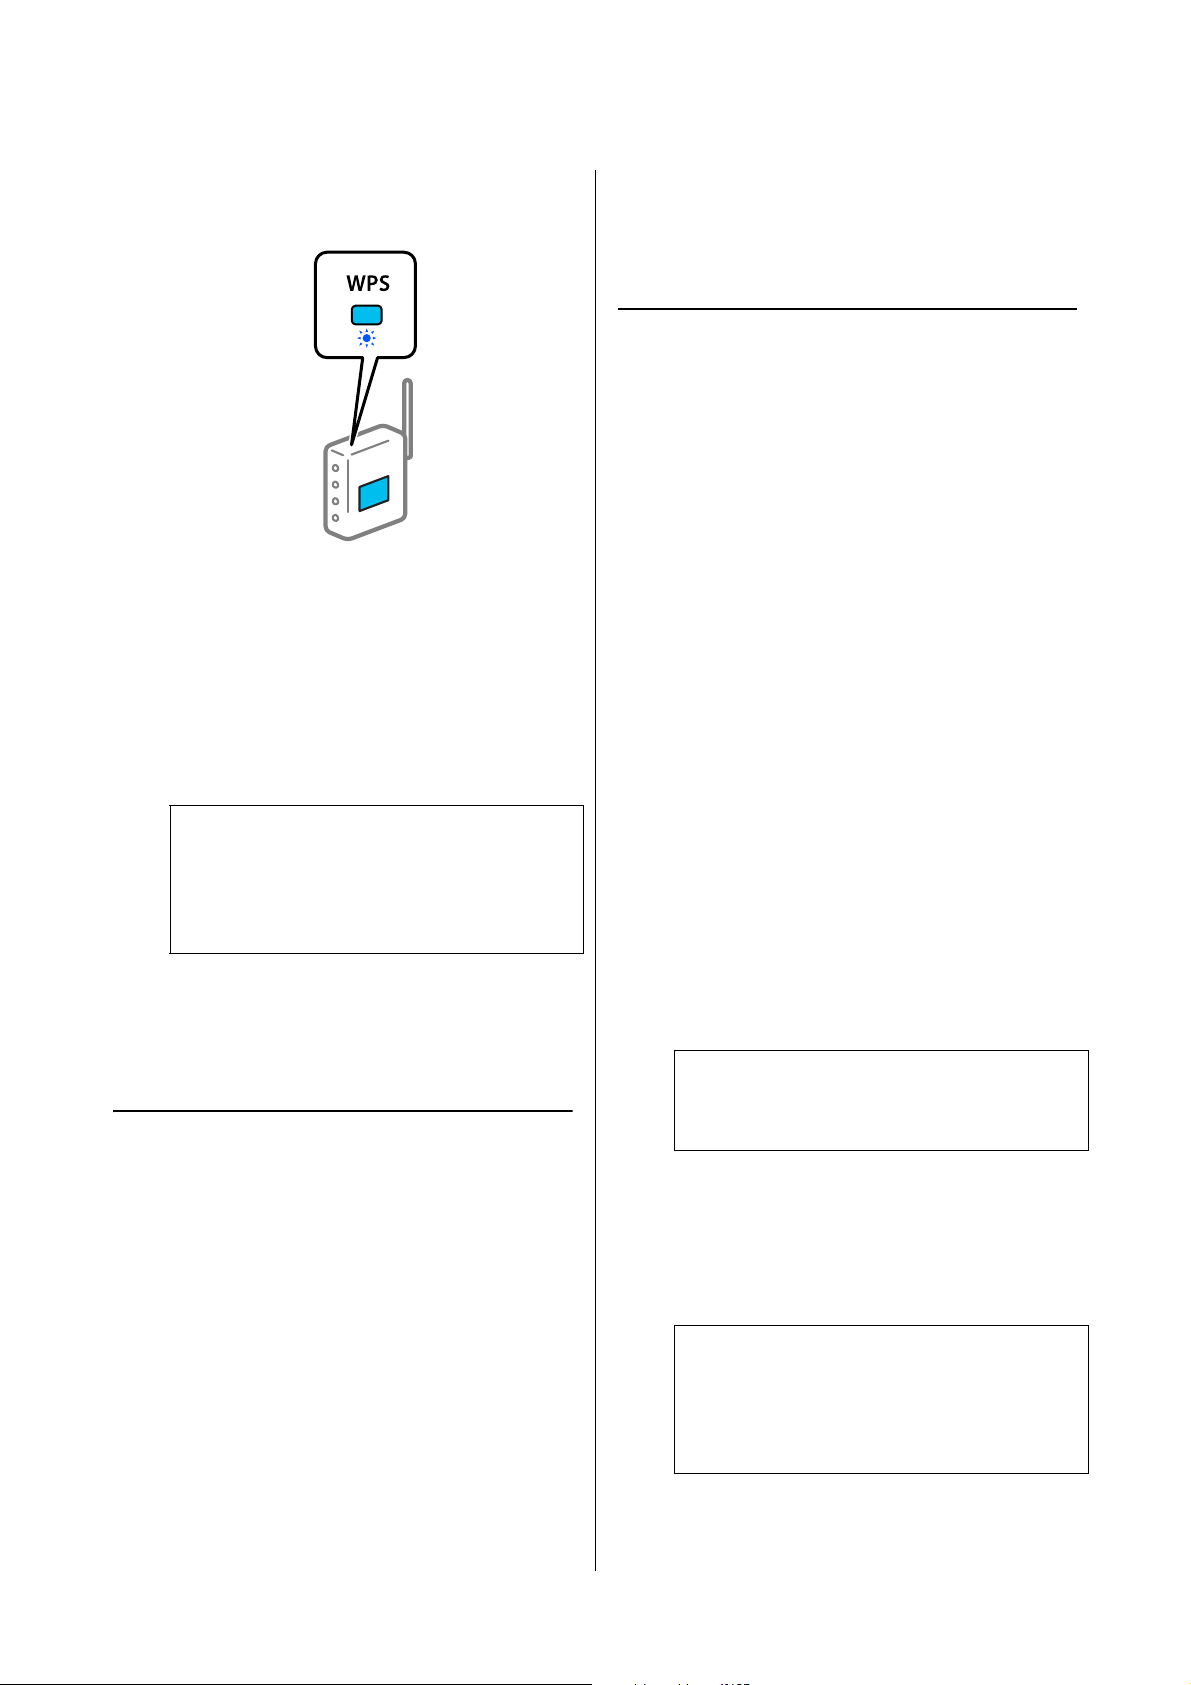
SL-D1000 Series User's Guide
Wireless LAN Connection
131
5
Hold down the [WPS] button on the wireless
router until the security light flashes.
If you do not know where the [WPS] button is,
or there are no buttons on the wireless router,
see the documentation provided with your
wireless router for details.
6
Press the Z button on the printer’s control
panel. Follow the on-screen instruction
hereafter.
Related information
U
“Printing a Network Connection Report” on page
132
Setting Up Using Wi-Fi Auto
Connect
This is a method to set up connections when the
printer software is installed in the computer. Connects
the printer to a wireless (Wi-Fi) network using a
computer that is connected to the access point. Just do
operations according to the screens that appear on
your computer, without the trouble of inputting an
SSID or security key.
Start the installer from the software disc or the website,
and then follow the on-screen instructions to execute
Wi-Fi Auto Connect from the printer’s settings menus.
Access the Epson support website, and then search for
your model. Download the software installer and run
it, then set up the connection according to the
on-screen instructions.
Making Wi-Fi Settings by PIN
Code Setup (WPS)
You can automatically connect to an wireless router by
using a PIN code. You can use this method to set up if
an wireless router is capable of WPS (Wi-Fi Protected
Setup). Use a computer to enter a PIN code into the
wireless router.
1
Select Wi-Fi Setup on the home screen.
To select an item, move the focus to the item
using the u/d/l/r buttons, and then press the
Z button.
2
Select Wi-Fi (Recommended).
3
Press the Z button to proceed.
4
Select Others.
5
Select PIN Code (WPS).
6
Use your computer to enter the PIN code (an
eight digit number) displayed on the printer's
control panel into the wireless router within two
minutes.
7
Press the Z button on the printer’s control
panel.
Setup is complete when the setup completion
message is displayed.
Related information
U
“Printing a Network Connection Report” on page
132
Note:
If connection fails, restart the wireless LAN router
(access point), move it closer to the printer, and do
the settings again. If it still does not work, print a
network connection report and check the solution.
Note:
See the documentation provided with your
wireless router for details on entering a PIN code.
Note:
If connection fails, restart the wireless LAN router
(access point), move it closer to the printer, and do
the settings again. If it still does not work, print a
connection report and check the solution.

SL-D1000 Series User's Guide
Wireless LAN Connection
132
Printing a Network
Connection Report
You can print a network connection report to check
the status between the printer and the wireless router.
1
Load paper in the location set in Printer Setup -
Paper Source Settings - Paper path for
maintenance printing.
U
“Basic Operations” on page 29
2
Select Settings on the home screen, and then
press the Z button.
To select an item, move the focus to the item
using the u/d/l/r buttons, and then press the
Z button.
3
Select Network Settings - Connection Check.
The connection check starts.
4
Press the Z button to print the network
connection report.
If an error has occurred, check the network
connection report, and then follow the printed
solutions.
Related information
U
“Messages and Solutions on the Network
Connection Report” on page 132
Messages and Solutions on the
Network Connection Report
Check the messages and error codes on the network
connection report, and then follow the solutions.
a. Error code
b. Messages on the Network Environment
Related information
U
“E-1” on page 133
U “E-2, E-3, E-7” on page 133
U “E-5” on page 133
U “E-6” on page 134
U “E-8” on page 134
U “E-9” on page 134
U “E-10” on page 134
U “E-11” on page 134
U “E-12” on page 135
U “E-13” on page 135
U “Message on the Network Environment” on page
136

SL-D1000 Series User's Guide
Wireless LAN Connection
133
E-1
Solutions:
O Make sure the Ethernet cable is securely connected
to your printer and to your hub or other network
device.
O Make sure your hub or other network device is
turned on.
O If you want to connect the printer by Wi-Fi, make
Wi-Fi settings for the printer again because it is
disabled.
E-2, E-3, E-7
Solutions:
O Make sure your wireless router is turned on.
O Confirm that your computer or device is
connected correctly to the wireless router.
O Turn off the wireless router. Wait for about 10
seconds, and then turn it on.
O Place the printer closer to your wireless router and
remove any obstacles between them.
O If you have entered the SSID manually, check if it
is correct. Check the SSID from the Network
Status part on the network connection report.
O If an wireless router has multiple SSIDs, select the
SSID that is displayed. When the SSID is using a
noncompliant frequency, the printer does not
display them.
O If you are using push button setup to establish a
network connection, make sure your wireless
router supports WPS. You cannot use push button
setup if your wireless router does not support
WPS.
O Makes sure your SSID uses only ASCII characters
(alphanumeric characters and symbols). The
printer cannot display an SSID that contains
non-ASCII characters.
O Makes sure you know your SSID and password
before connecting to the wireless router. If you are
using a wireless router with its default settings, the
SSID and password are located on a label on the
wireless router. If you do not know your SSID and
password, contact the person who set up the
wireless router, or see the documentation provided
with the wireless router.
O If you are connecting to an SSID generated from a
tethering smart device, check for the SSID and
password in the documentation provided with the
smart device.
O If your Wi-Fi connection suddenly disconnects,
check for the conditions below. If any of these
conditions are applicable, reset your network
settings by downloading and running the software
from the Epson support website for your product.
O Another smart device was added to the
network using push button setup.
O The Wi-Fi network was set up using any
method other than push button setup.
Related information
U
“Connecting to a Computer” on page 126
U “Making Wi-Fi Settings from the Printer” on page
129
E-5
Solutions:
Make sure the wireless router’s security type is set to
one of the following. If it is not, change the security
type on the wireless router, and then reset the printer’s
network settings.
O WEP-64 bit (40 bit)
O WEP-128 bit (104 bit)
O WPA PSK (TKIP/AES)*
O WPA2 PSK (TKIP/AES)*
O WPA (TKIP/AES)
O WPA2 (TKIP/AES)
O WPA3-SAE (AES)

SL-D1000 Series User's Guide
Wireless LAN Connection
134
O WPA2/WPA3-Enterprise
*: WPA PSK is also known as WPA Personal. WPA2
PSK is also known as WPA2 Personal.
E-6
Solutions:
O Check if MAC address filtering is disabled. If it is
enabled, register the printer's MAC address so that
it is not filtered. See the documentation provided
with the wireless router for details. You can check
the printer's MAC address from the Network
Status part on the network connection report.
O If your wireless router is using shared
authentication with WEP security, make sure the
authentication key and index are correct.
O If the number of connectable devices on the
wireless router is less than the number of network
devices that you want to connect, make settings on
the wireless router to increase the number of
connectable devices. See the documentation
provided with the wireless router to make settings.
Related information
U
“Connecting to a Computer” on page 126
E-8
Solutions:
O Enable DHCP on the wireless router if the printer’s
Obtain IP Address setting is set to Auto.
O If the printer’s Obtain IP Address setting is set to
Manual, the IP address you manually set is invalid
due to out of range (for example: 0.0.0.0). Set a
valid IP address from the printer’s control panel or
by using Web Config.
E-9
Solutions:
Check the following.
O Devices are turned on.
O You can access the Internet and other computers
or network devices on the same network from the
devices you want to connect to the printer.
If still does not connect your printer and network
devices after confirming the above, turn off the wireless
router. Wait for about 10 seconds, and then turn it on.
Then reset your network settings by downloading and
running the installer from the Epson support website
for your product.
Related information
U
“Connecting to a Computer” on page 126
E-10
Solutions:
Check the following.
O Other devices on the network are turned on.
O Network addresses (IP address, subnet mask, and
default gateway) are correct if you have set the
printer’s Obtain IP Address to Manual.
Reset the network address if they are incorrect. You
can check the IP address, subnet mask, and default
gateway from the Network Status part on the network
connection report.
If DHCP is enabled, change the printer’s Obtain IP
Address setting to Auto. If you want to set the IP
address manually, check the printer’s IP address from
the Network Status part on the network connection
report, and then select Manual on the network settings
screen. Set the subnet mask to [255.255.255.0].
If still does not connect your printer and network
devices, turn off the wireless router. Wait for about 10
seconds, and then turn it on.
E-11
Solutions:
Check the following.
O The default gateway address is correct if you set the
printer’s TCP/IP Setup setting to Manual.
O The device that is set as the default gateway is
turned on.

SL-D1000 Series User's Guide
Wireless LAN Connection
135
Set the correct default gateway address. You can check
the default gateway address from the Network Status
part on the network connection report.
E-12
Solutions:
Check the following.
O Other devices on the network are turned on.
O The network addresses (IP address, subnet mask,
and default gateway) are correct if you are entering
them manually.
O The network addresses for other devices (subnet
mask and default gateway) are the same.
O The IP address does not conflict with other
devices.
If still does not connect your printer and network
devices after confirming the above, try the following.
O Turn off the wireless router. Wait for about 10
seconds, and then turn it on.
O Make network settings again using the installer.
You can download it from the Epson support
website for your product.
O You can register several passwords on a wireless
router that uses WEP security type. If several
passwords are registered, check if the first
registered password is set on the printer.
Related information
U
“Connecting to a Computer” on page 126
E-13
Solutions:
Check the following.
O Network devices such as a wireless router, hub,
and router are turned on.
O The TCP/IP Setup for network devices has not
been set up manually. (If the printer’s TCP/IP
Setup is set automatically while the TCP/IP Setup
for other network devices is performed manually,
the printer’s network may differ from the network
for other devices.)
If it still does not work after checking the above, try the
following.
O Turn off the wireless router. Wait for about 10
seconds, and then turn it on.
O Make network settings on the computer that is on
the same network as the printer using the installer.
You can download it from the Epson support
website for your product.
O You can register several passwords on a wireless
router that uses the WEP security type. If several
passwords are registered, check if the first
registered password is set on the printer.
Related information
U
“Connecting to a Computer” on page 126
SL-D1000 Series User's Guide
Wireless LAN Connection
136
Message on the Network Environment
Message Solution
The Wi-Fi environment needs to be
improved. Turn the wireless router off and
then turn it on. If the connection does not
improve, see the documentation for the
wireless router.
After moving the printer closer to the wireless router and removing any
obstacles between them, turn off the wireless router. Wait for about 10 seconds,
and then turn it on. If it still does not connect, see the documentation supplied
with the wireless router.
*No more devices can be connected.
Disconnect one of the connected devices
if you want to add another one.
Computer and smart devices that can be connected simultaneously are
connected in full in the Wi-Fi Direct (Simple AP) connection. To add another
computer or smart device, disconnect one of the connected devices or connect
it to the other network first.
You can confirm the number of wireless devices which can be connected
simultaneously and the number of connected devices by checking the network
status sheet or the printer’s control panel.
The same SSID as Wi-Fi Direct exists in the
environment. Change the Wi-Fi Direct
SSID if you cannot connect a smart device
to the printer.
On the printer’s control panel, go to Wi-Fi Direct Setup screen and select the
menu to change the setting. You can change the network name following after
DIRECT-XX-. Enter within 32 characters.

SL-D1000 Series User's Guide
Wireless LAN Connection
137
Replacing or Adding New
Wireless Routers
If the SSID changes due to the replacement of a wireless
router, or a wireless router is added and a new network
environment is established, re-set the Wi-Fi settings.
Related information
U
“Making Settings for Connecting to the
Computer” on page 137
Making Settings for Connecting
to the Computer
We recommend using the installer to connect the
printer to a computer. You can run the installer using
one of the following methods.
O Setting up from the website
Access the Epson support website, and then search
for your model. Download the software installer
and run it, then set up the connection according to
the on-screen instructions.
O Setting up using the software disc (only for the
models that come with a software disc and users
with computers with disc drives)
Insert the software disc into the computer, and
then follow the on-screen instructions.
Making Settings for Connecting
to the Smart Device
You can use the printer from a smart device when you
connect the printer to the same Wi-Fi network (SSID)
as the smart device. To use the printer from a smart
device, see the following.
U
“Connecting to a Smart Device” on page 127
SL-D1000 Series User's Guide
Problem Solver
138
Problem Solver
When a Message Is Displayed
Messages Displayed on the Printer
If one of the following messages is displayed, read and follow the instructions below.
Message What to do
There may be foreign material inside the
printer. Check and remove it.
Some protective tape or protective materials may have been left inside the
printer. Remove all the protective tape and protective materials, and then turn
the power on again.
Paper that is not a standard size has been
loaded. Reload or replace it.
O A size of roll paper that the printer cannot use may have been loaded.
Correctly load a supported standard size of roll paper.
U
“How to Replace Roll Paper” on page 30
U “Supported Media” on page 163
O The ends of the roll paper could have become uneven. Even up the ends of
the roll paper, and then reload it onto the spindle unit. Or, use a new roll of
paper.
U
“Notes when Loading Roll Paper” on page 29
U “How to Replace Roll Paper” on page 30
Print head may require maintenance.
Perform a Print Head Nozzle Check.
Nozzles may be clogged because the print head unit was stopped for a long
period outside the specified position. We recommend doing a nozzle check to
check for clogged nozzles, and then to clean the heads if necessary.
U
“Print Head Nozzle Check and Cleaning” on page 78
Printing may have been done while the
nozzles were clogged. Check the print
results.
The print head’s auto nozzle check function detected clogged nozzles.
Check the print results and clean the print head if needed, and then start printing
again.
U
“Print Head Nozzle Check and Cleaning” on page 78
Parts are nearing the end of their service
life.
XXXXXXX
The part number appears in XXXXXXXXXX.
A part used in the printer is nearing its replacement time. The printer can be used
until the replacement notice appears, but you will need to request repairs to do
the replacement.
It is time to replace a printer part.
XXXXXXX
The part number appears in XXXXXXXXXX.
It is time to replace a part in the printer.
Contact your dealer or Epson Support. Be sure to tell them the part number
when you contact them.
SL-D1000 Series User's Guide
Problem Solver
139
Cannot check nozzle clogging or read
barcodes.
Could not read the barcode of the Remaining Amount Management function or
the check pattern of the Auto Nozzle Check function. Turn the printer’s power off
and then on again to use it.
If you turn the power off and on several times and the same error occurs, then a
sensor may be malfunctioning.
Contact your dealer or Epson Support.
Cannot check nozzle clogging. For details,
see your documentation.
Could not read the check pattern of the Auto Nozzle Check function.
If necessary, stop printing and do a nozzle check.
If you repeat this and the same error occurs, then a sensor may be
malfunctioning.
Contact your dealer or Epson Support.
Could not read the barcode correctly. Set
paper type and remaining paper.
Could not read the barcode of the Remaining Amount Management function on
the loaded roll paper.
Reset the remaining amount, and then use the printer. Remove the printer cover
to check the remaining amount, which is printed in text on the leading edge of
the roll paper.
If you repeat this and the same error occurs, then a sensor may be
malfunctioning.
Contact your dealer or Epson Support.
Printer error. Turn power off and on again.
See documentation.
XXXXXXX
A code number appears in XXXXXXXXXX according to the content of the error.
Turn off the printer, disconnect the power cable from the outlet and from the AC
inlet on the printer, and then reconnect it. Turn on the printer again multiple
times.
If the same code number appears again, contact your dealer or Epson Support.
Be sure to tell them the code number when you contact them.
Adjustment canceled. There is a problem
with the print head nozzles. For details,
see documentation.
Clogs are not cleared even by repeatedly alternating nozzle checks and head
cleaning.
After leaving the printer alone and not printing for more than 12 hours, execute
a nozzle check and head cleaning again. We recommend turning off the power
and leaving the printer alone. If the situation does not improve, try doing power
cleaning.
If the clogs are not cleared even after executing power cleaning, then after not
printing for more than 12 hours, print a nozzle check pattern. Then, depending
on the condition of the printed pattern, execute cleaning or power cleaning
again.
If the situation is still not improved, then repairs are needed.
Contact your dealer or Epson Support.
Ink low. The ink is low. Prepare a new ink supply unit. You can continue printing until the
replacement notice appears.
U
“Consumables and Optional Items” on page 162
Message What to do

SL-D1000 Series User's Guide
Problem Solver
140
Message Codes Displayed on the Screen
Message codes are displayed in the upper right part of the screen when there are notices or errors on the printer.
Message codes are categorized as shown in the following table, and the various message codes appear when the
printer is in the following conditions. When a message is displayed on screen, resolve the problem according to the
message that appears.
Cannot recognize Ink Supply Unit. Try
installing again.
O Reinstall the ink supply unit. If the same error occurs even after reinstalling
the ink supply unit, then replace it with a new one (do not install a faulty ink
supply unit).
U
“Replacing Ink Supply Units” on page 66
O Condensation may have formed. Leave it for more than 3 hours at room
temperature, and then reinstall it.
U “Notes on Handling Ink Supply Units” on page 22
The Maintenance Box is nearing the end
of its service life. You can continue
printing until replacement is required.
There is little available space in the maintenance box. Prepare a new
maintenance box. You can continue printing until the replacement notice
appears.
U
“Consumables and Optional Items” on page 162
Cannot recognize the Maintenance Box. Reinstall the maintenance box. If the same error occurs even after reinstalling the
maintenance box, then replace it with a new one (do not install a faulty
maintenance box).
U
“Replacing Maintenance Box” on page 67
Cannot start cleaning because the
Maintenance Box is near full.
Cleaning cannot be executed because there is not enough available space in the
maintenance box for the waste ink that is ejected during print head cleaning. To
execute cleaning, replace the maintenance box with a new one. The
maintenance box that was removed can be reinstalled and used again after
cleaning is complete.
U
“Replacing Maintenance Box” on page 67
Some features may not be available.
For details, see your documentation.
If Paper Setup Auto Display is disabled, you cannot use AirPrint.
Category Message code Status
Hardware related error at printer E-01 Printer fatal error
W-01 Paper jam error
Ink related error W-11 Ink supply unit not installed error
W-12 Ink supply unit recognition error
Sensor related error W-41 Nozzle detection error
W-42
W-43
W-44 Sensor module error
W-45
Image quality abnormality in sensor
detection results
W-51 Abnormality during analysis
W-52
W-53
Message What to do
SL-D1000 Series User's Guide
Problem Solver
141
Error Messages (Windows)
When an error occurs while printing, you can check error messages on the computer that is connected to the
printer.
To check error messages on the computer, open EPSON Status Monitor 3.
Click the utility icon in the Windows taskbar, and then click the printer’s name - EPSON Status Monitor 3, in this
order, to start EPSON Status Monitor 3.
EPSON Status Monitor 3
Error messages are displayed at the top of the screen. When an error message is displayed, check the solution on the
screen and take the required measures.
Sensor related error W-61 Error at nozzles or circuit board
W-62
W-63
W-64
W-65
Hardware related warning at printer I-01 Temperature warning at nozzle clog detection not
covered by warranty
Network related information I-22 Wi-Fi Setup by Push Button (WPS)
I-23 Wi-Fi Setup by PIN Code (WPS)
I-31 Wi-Fi Setup by Wi-Fi Auto Connect
Sensor related warning I-41 Sensor module warning
Category Message code Status

SL-D1000 Series User's Guide
Problem Solver
142
Check the printer's status, such as the remaining amount of ink, also.
Error Messages (Mac)
When an error occurs while printing, you can check error messages on the computer that is connected to the
printer.
To check error messages on the computer, start Maintenance Tool.
See the following for the procedure to start Maintenance Tool.
1
Click the Apple menu - System Preferences - Printers & Scanners, in this order.
2
Select the printer and click Options & Supplies - Utility - Open Printer Utility.
SL-D1000 Series User's Guide
Problem Solver
143
Error messages are displayed at the top of the screen. When an error message is displayed, check the solution
on the screen and take the required measures.
See the following for more details on Maintenance Tool.
U
“Using the Maintenance Tool (Mac)” on page 95
SL-D1000 Series User's Guide
Problem Solver
144
Troubleshooting
When Paper Jams
This section explains how to clear paper jammed in the
printer.
Screen Display When Paper Jams
When a paper jams, messages and illustrations are
displayed on the screen of the control panel. The
displayed information varies, as shown in the following
table, according to the location of the jam and the type
of paper being printed. Follow the steps described in
the following section to implement the removal
procedure according to the information shown.
The illustrations in the following table are displayed by
pressing the d button in the screen in which the
message is displayed.
When printing on roll paper
!
Caution:
O Do not touch any areas inside the printer
except for those indicated in the manual. An
electric shock or burn could occur.
O When opening and closing the covers, do not
place your hands near the points where the
main unit and the cover join. If your fingers
or hands are trapped, an injury could occur.
O When moving the roll paper unit in or out,
grip the handle. If you place your hands into
any other sections, either side of your hand or
fingers could be injured.
Message Roll paper jammed. Remove it.
Illustration
Removal
procedure
to
implement
U
“Paper is Jammed in the Roll Paper
Unit” on page 145
Message Roll paper jammed. Remove it.
Illustration When duplex
feeder is installed
Removal
procedure
to
implement
U
“Paper is Jammed in the Paper Feed
Unit” on page 148
Message Roll paper jammed. Remove it.
Illustration
Removal
procedure
to
implement
U “Paper Jammed Between the Paper
Feed Unit and Platen” on page 150
SL-D1000 Series User's Guide
Problem Solver
145
When printing on cut paper
If paper is jammed when the power is turned on, the
following message appears.
If this happens, the location in which paper is jammed
is not identified. Implement all of the removal
procedures to remove any paper that is jammed.
Paper is Jammed in the Roll Paper
Unit
Follow the steps below to solve the problem.
Message Paper jammed in Rear Paper Feed Slot.
Remove it.
Illustration When duplex
feeder is installed
Removal
procedure
to
implement
U
“Paper is Jammed in the Paper Feed
Unit” on page 148
Message Paper jammed in Inside. Remove the
jammed paper.
Illustration When duplex
feeder is installed
Removal
procedure
to
implement
U
“Paper Jammed Between the Paper
Feed Unit and Platen” on page 150
Message Paper jammed in Cassette. Remove it.
Illustration When duplex
feeder is installed
Removal
procedure
to
implement
U
“Paper Jammed Between the Rear
Cover and the Paper Feed Unit” on page
155
Message Paper jammed in Inside. Remove the
jammed paper.
Illustration When duplex
feeder is installed
c
Important:
O If a printer system error occurs, turn off the
power for a moment, and then turn it on
again to confirm whether the error persists,
and then check if a paper jam has occurred.
O Do not remove paper forcibly when clearing
paper jams. Otherwise, the printer could be
damaged.
O If paper is jammed inside the printer where
you cannot reach it with your hands, do not
try to forcibly extract it yourself, contact your
dealer or Epson Support.
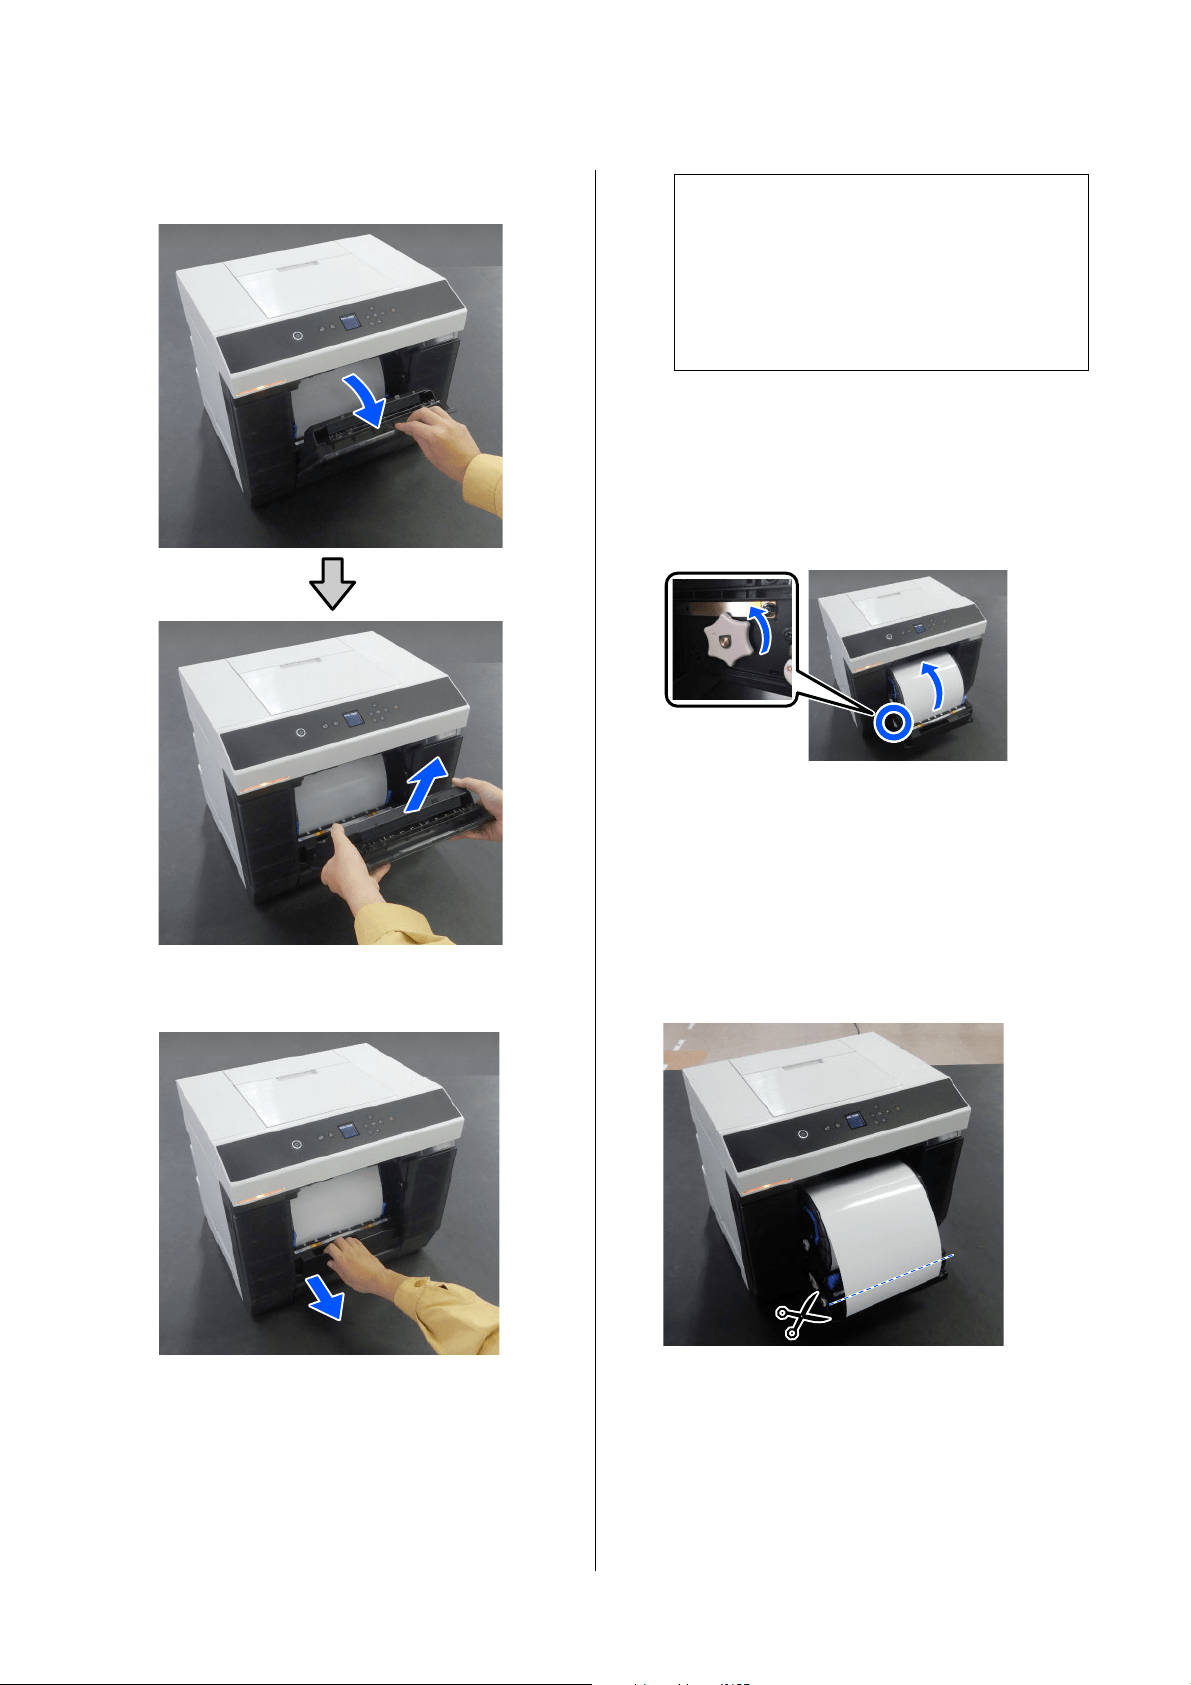
SL-D1000 Series User's Guide
Problem Solver
146
1
Remove the scrap paper box.
2
Pull out the roll paper unit.
3
Turn the handle on the left side of the roll paper
unit in the direction of the arrow to rewind the
roll paper.
Rewind the roll paper until the leading edge
appears at the paper slot.
If it does not rewind, use scissors or something
to cut the roll paper near the paper slot.
4
If the leading edge of the roll paper is ragged, cut
it in a straight line with a pair of scissors or
something.
Cut the paper as straight as possible.
c
Important:
If you cannot pull out the roll paper unit, do
not forcibly pull it out. Paper may be
jammed inside. Refer to the next section to
check for paper jams in the back cover of the
duplex feeder, platen, and paper feed unit,
and remove any jammed paper.
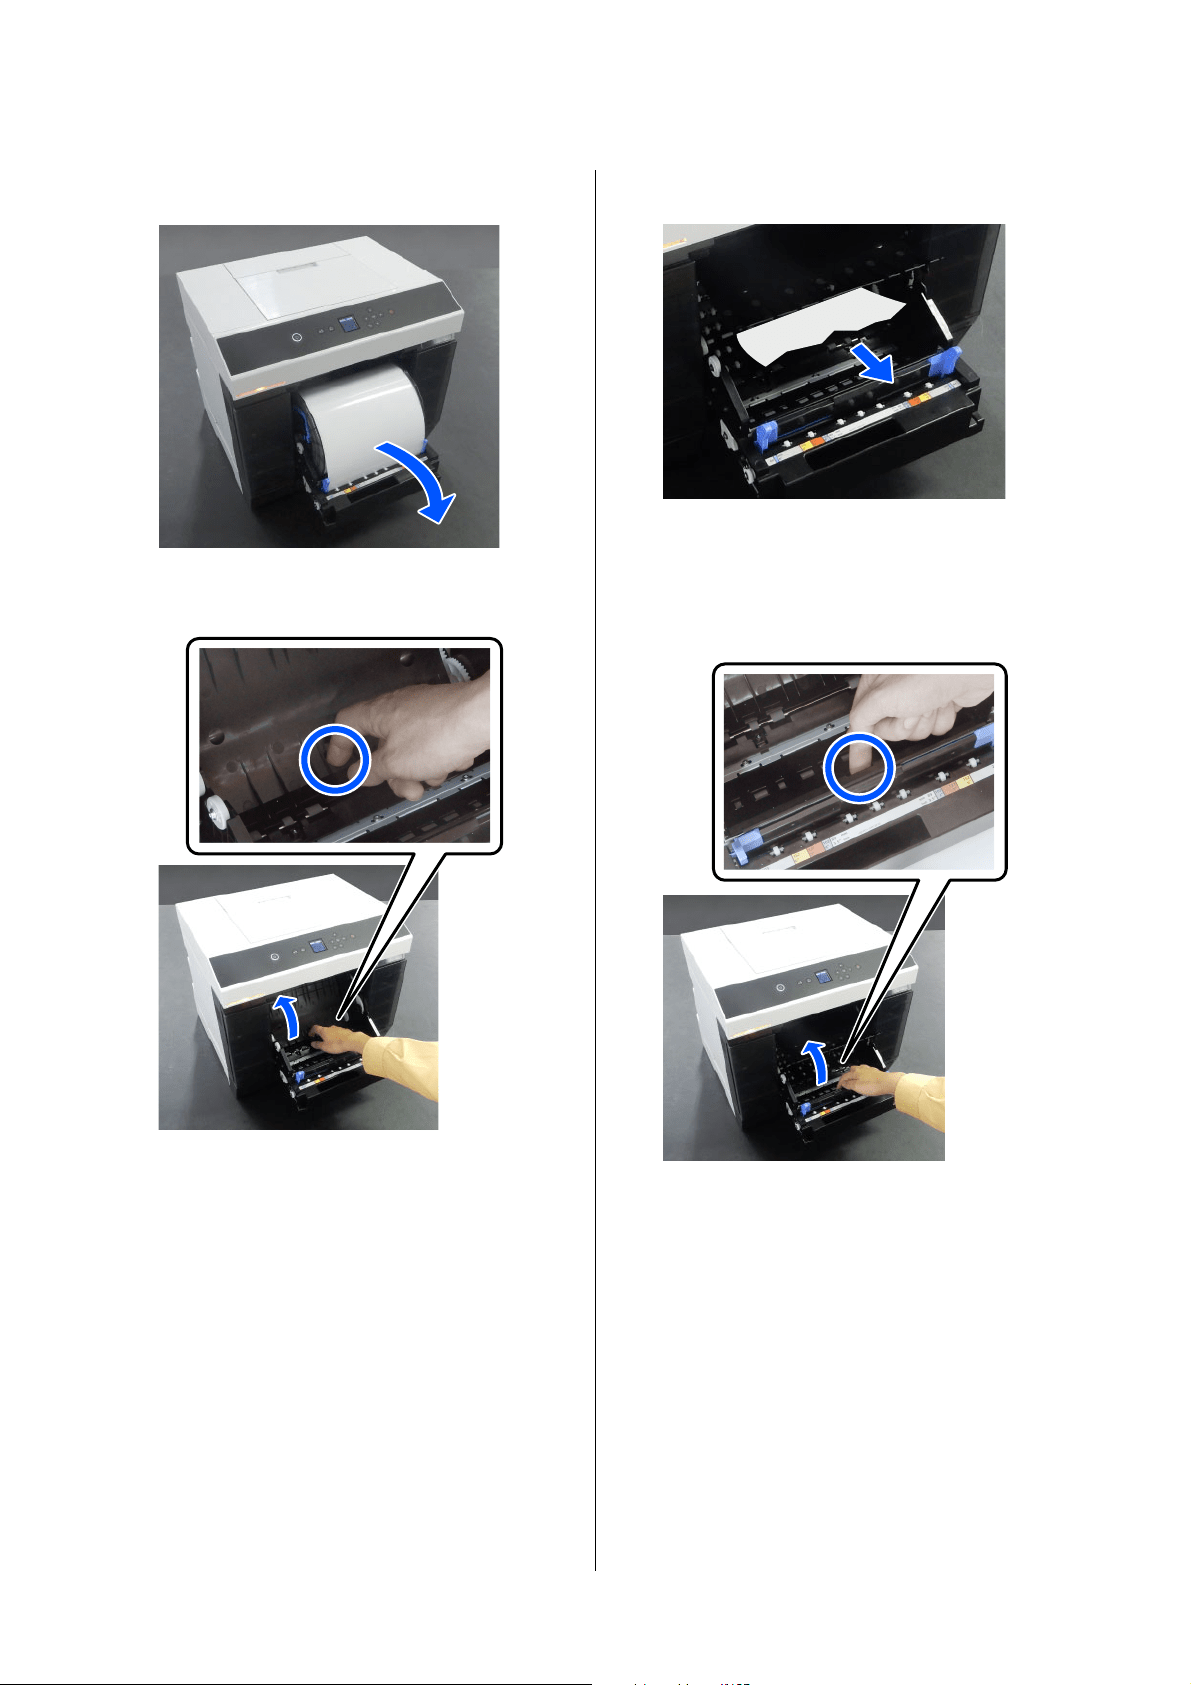
SL-D1000 Series User's Guide
Problem Solver
147
5
Remove the spindle unit.
6
Open the internal rear plate.
7
Check that there is no paper or scraps at the
back of the inside of the printer.
If there is a jam, remove the paper slowly.
8
Open the front plate.
Place your finger in the hole at the bottom and
lift to open.
9
Check that there is no paper or scraps of paper
inside the printer.
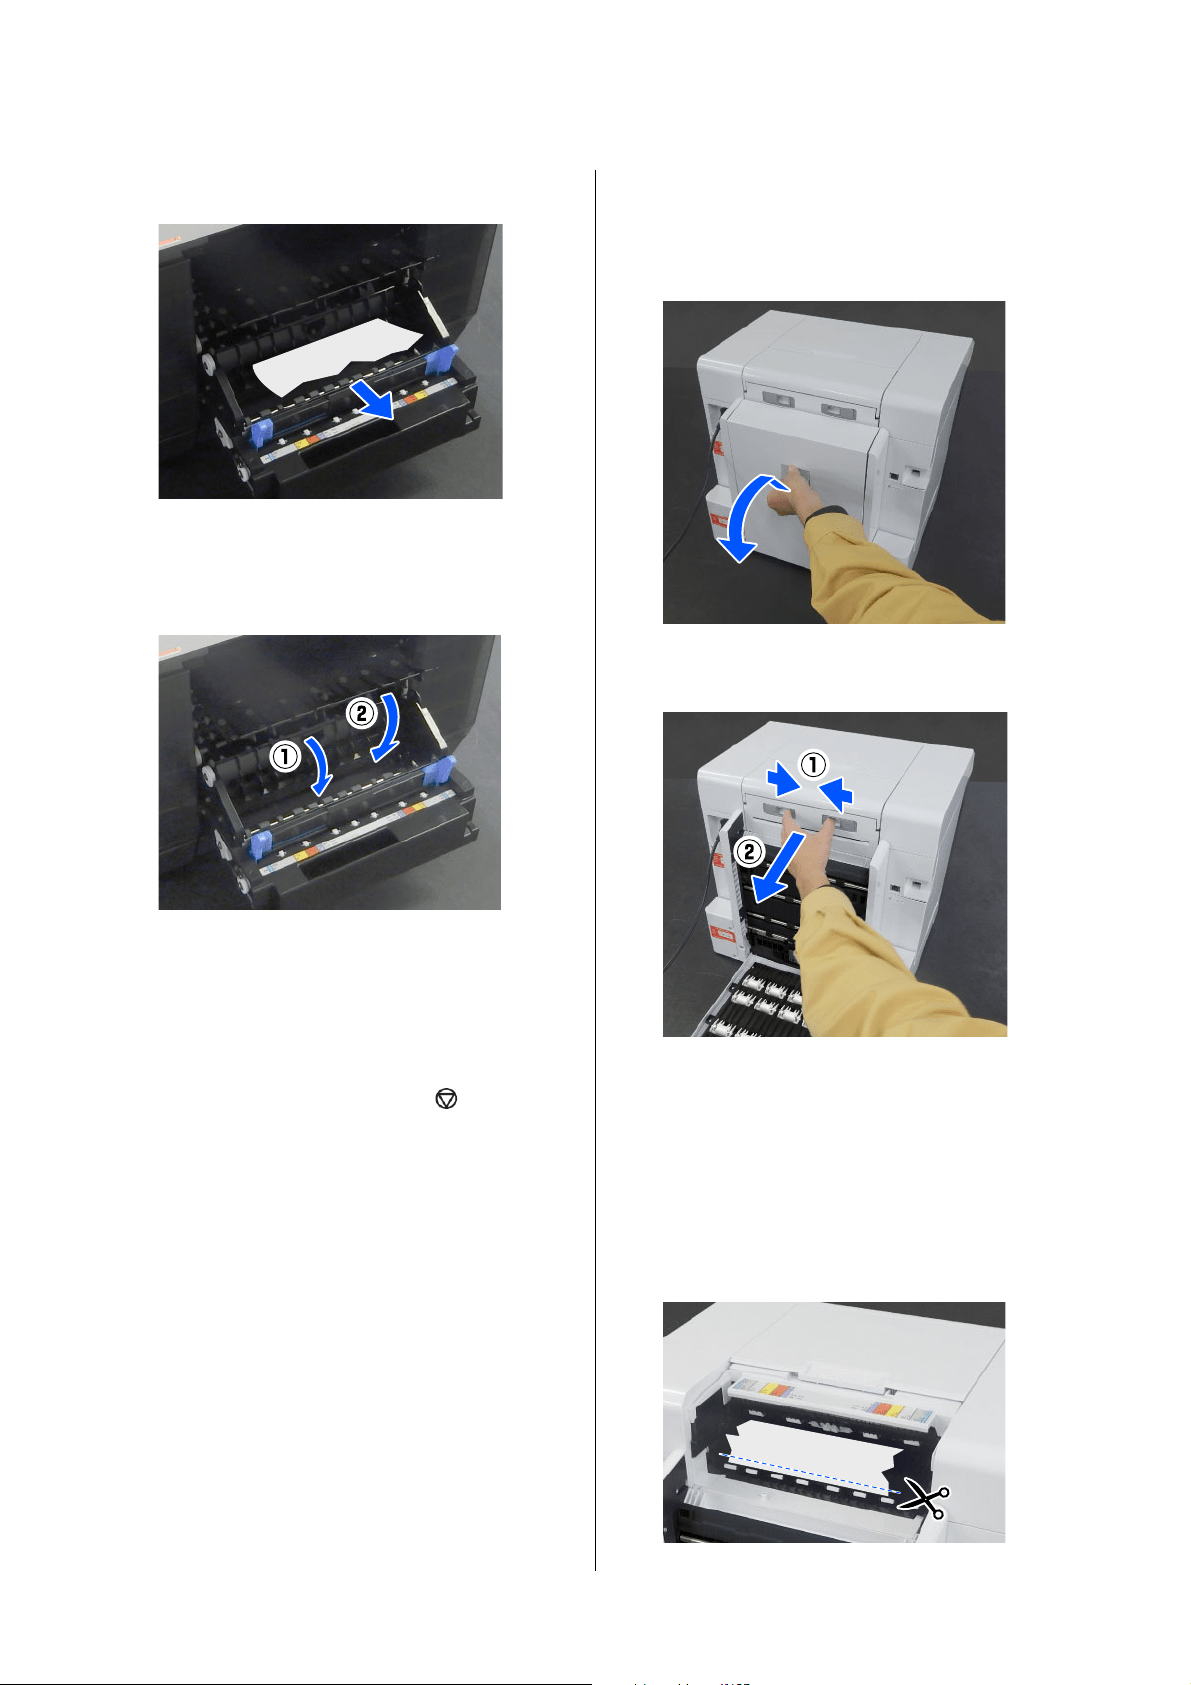
SL-D1000 Series User's Guide
Problem Solver
148
If there is a jam, remove the paper slowly.
10
Replace the front and rear plates.
Press down until you hear it click into place.
11
On the control panel screen, press the Z
button.
The error is canceled and the home screen is
displayed.
12
If there is a print job, press the button to
cancel the job.
13
Reload the roll paper.
See the following for the procedure to load the
roll paper.
U
“How to Replace Roll Paper” on page 30
14
Confirm that the status light is off.
Paper is Jammed in the Paper Feed
Unit
Follow the steps below to solve the problem.
Checking for jammed paper
1
If the duplex feeder is installed, open the rear
cover.
2
Remove the paper feed unit.
3
Check for jammed paper and paper scraps.
Removing jammed paper (roll paper)
1
Cut the jammed paper with scissors or
something.
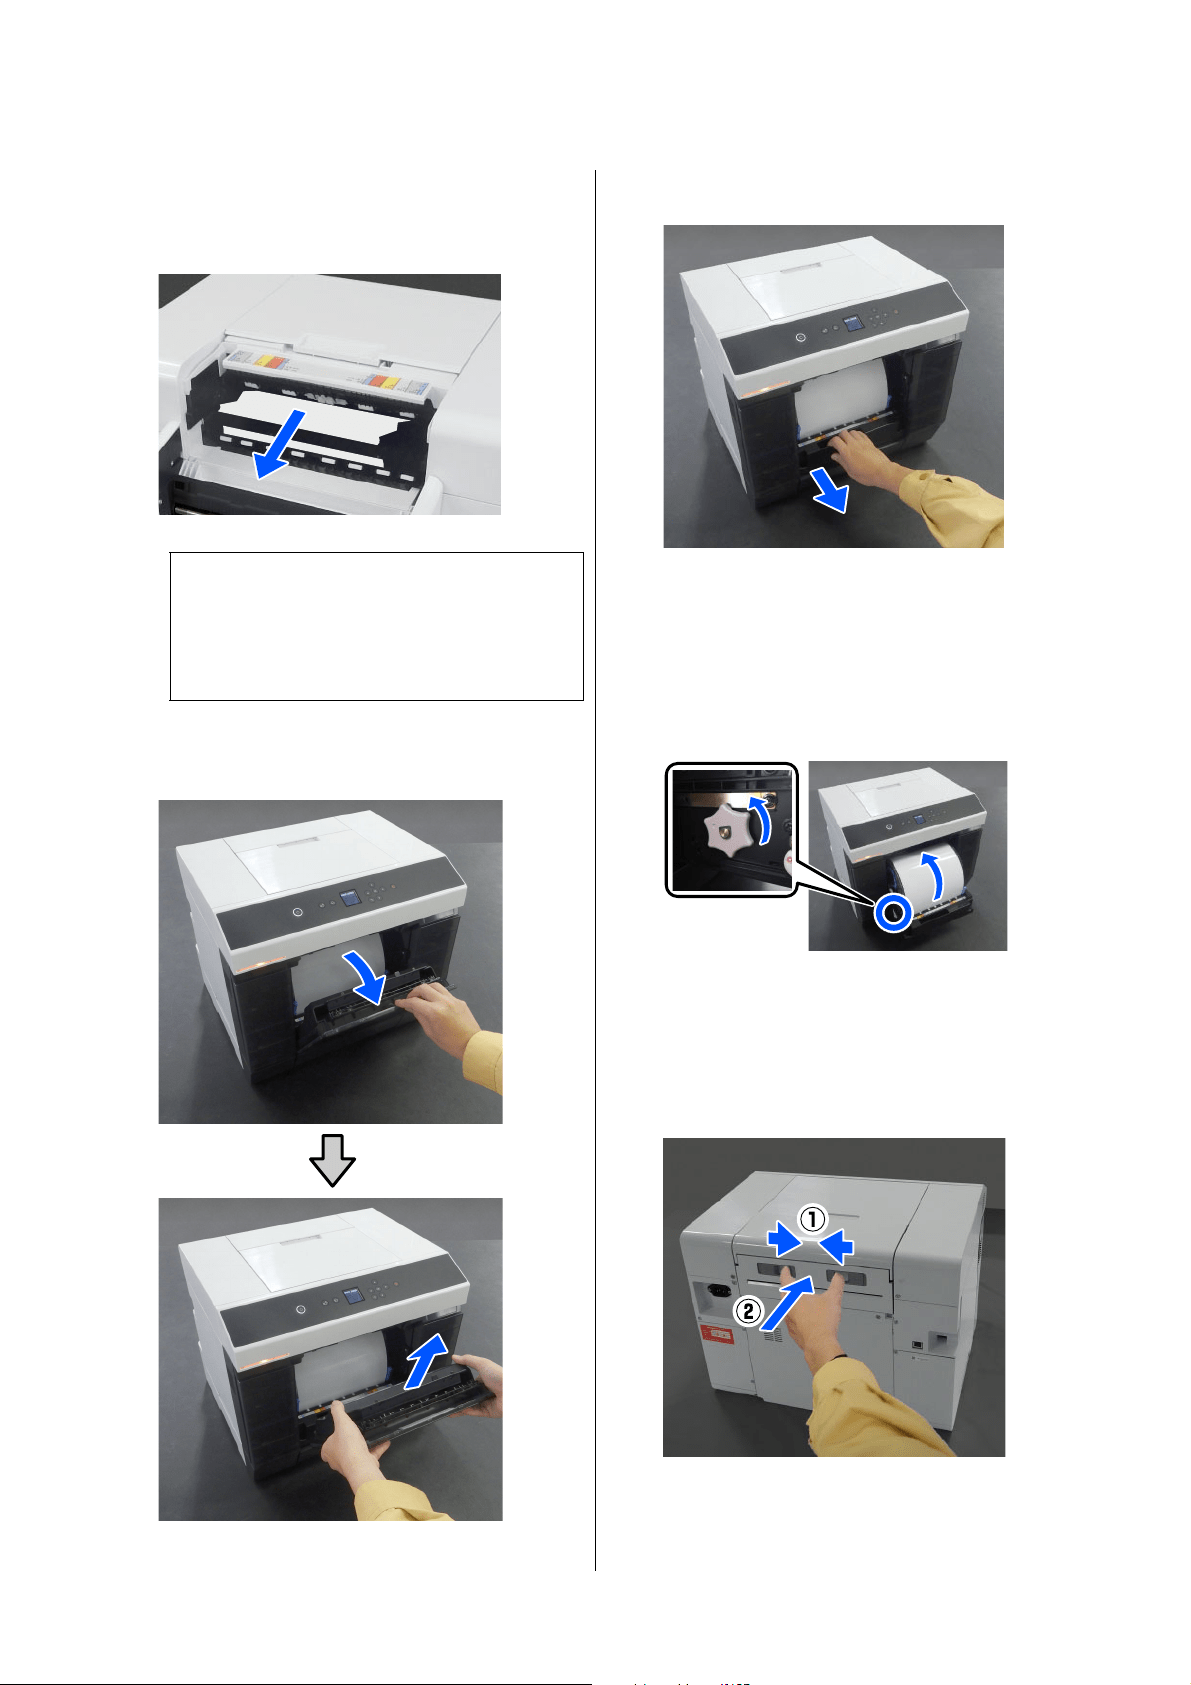
SL-D1000 Series User's Guide
Problem Solver
149
2
Remove paper from the top side.
Remove it slowly.
3
Move to the front, and remove the scrap paper
box.
4
Pull out the roll paper unit.
5
Turn the handle on the left side of the roll paper
unit in the direction of the arrow to rewind the
paper.
Rewind the paper until the leading edge appears
at the paper slot.
If it does not rewind, use scissors or something
to cut the roll paper near the paper slot.
6
Move to the rear side, and install the paper feed
unit.
c
Important:
After cutting the paper, do not pull paper at
the rear side out through the upper side.
Follow the steps below to remove paper from
the rear side.
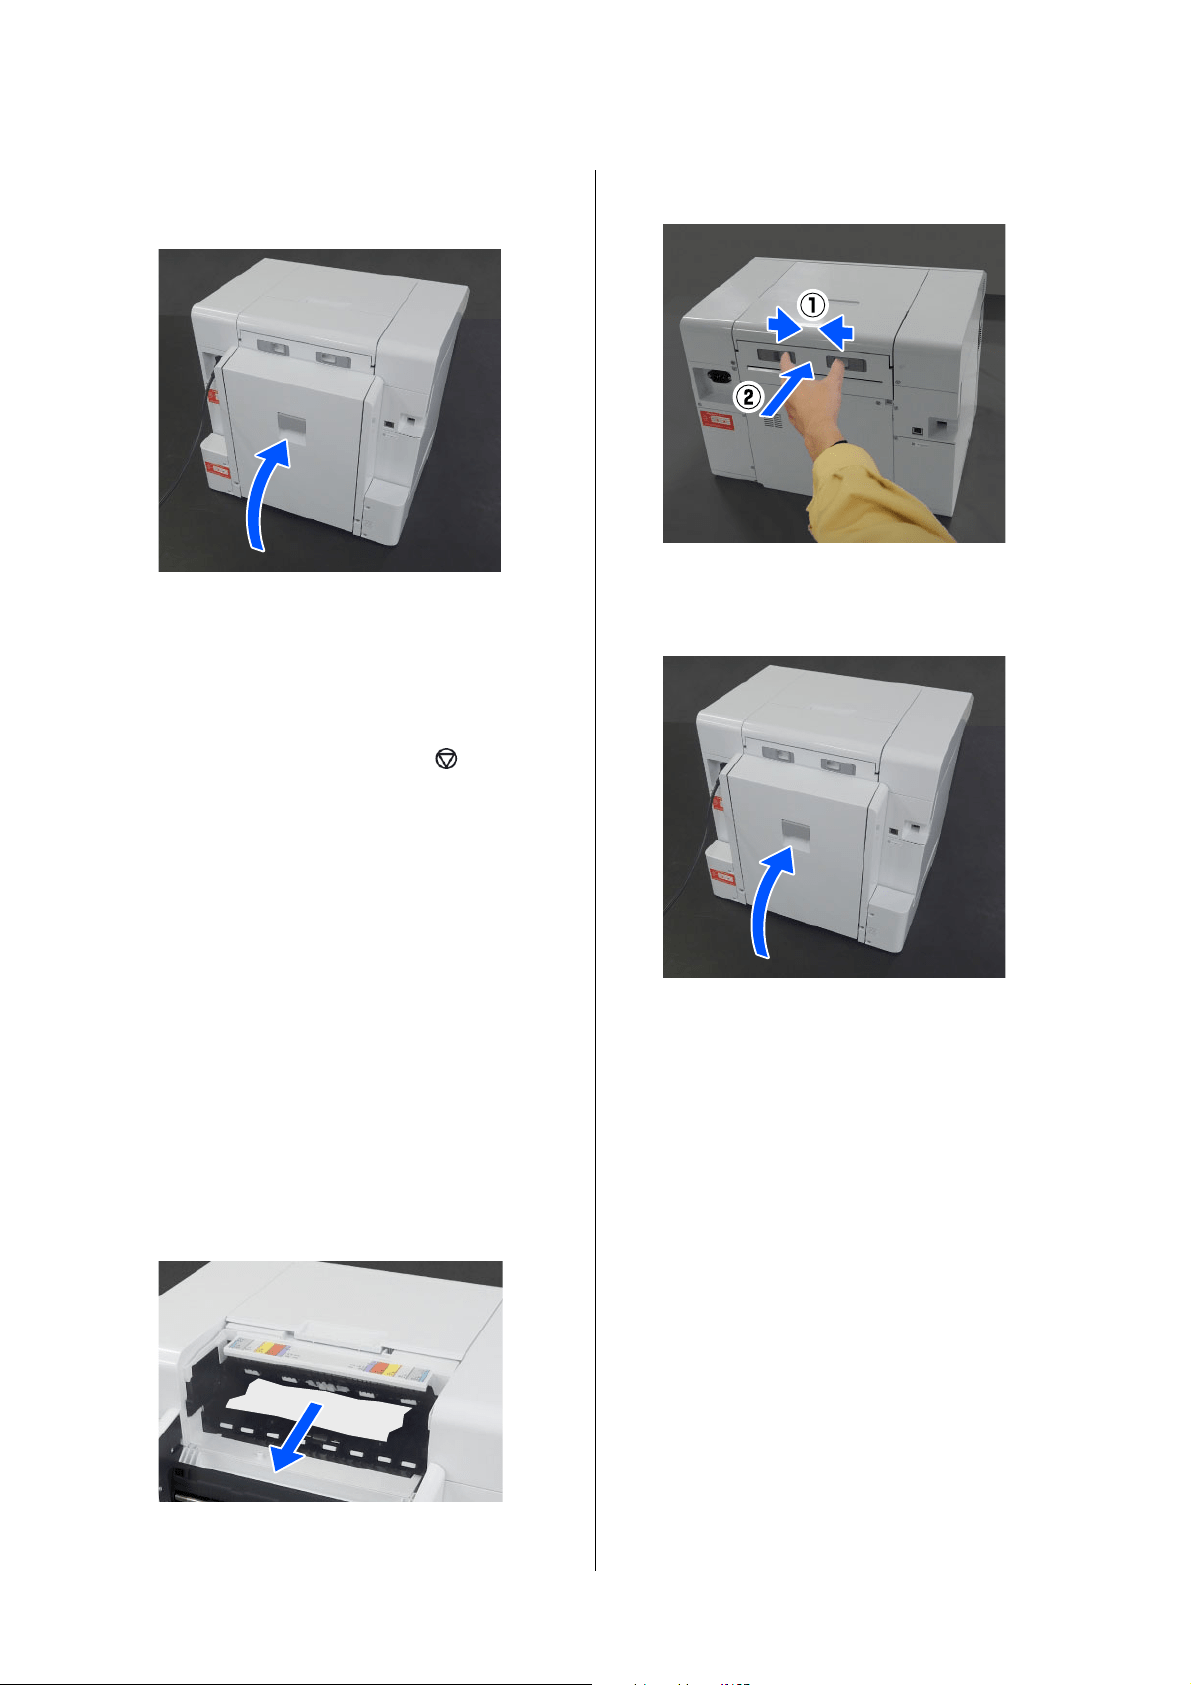
SL-D1000 Series User's Guide
Problem Solver
150
7
If the duplex feeder is installed, close the rear
cover.
8
Move to the front, and on the control panel
screen, press the Z button.
The error is canceled and the home screen is
displayed.
9
If there is a print job, press the button to
cancel the job.
10
Reload the roll paper.
See the following for the procedure to load the
roll paper.
U
“How to Replace Roll Paper” on page 30
11
Confirm that the status light is off.
Removing jammed paper (cut paper)
1
Remove jammed paper.
Remove it slowly.
2
Install the paper feed unit.
3
If the duplex feeder is installed, close the rear
cover.
4
Move to the front, and on the control panel
screen, press the Z button.
The error is canceled and the home screen is
displayed.
5
Reload the cut paper.
See the following for the procedure to load the
cut paper.
U
“How to Load Cut Paper” on page 36
6
Confirm that the status light is off.
Paper Jammed Between the Paper
Feed Unit and Platen
Follow the steps below to solve the problem.
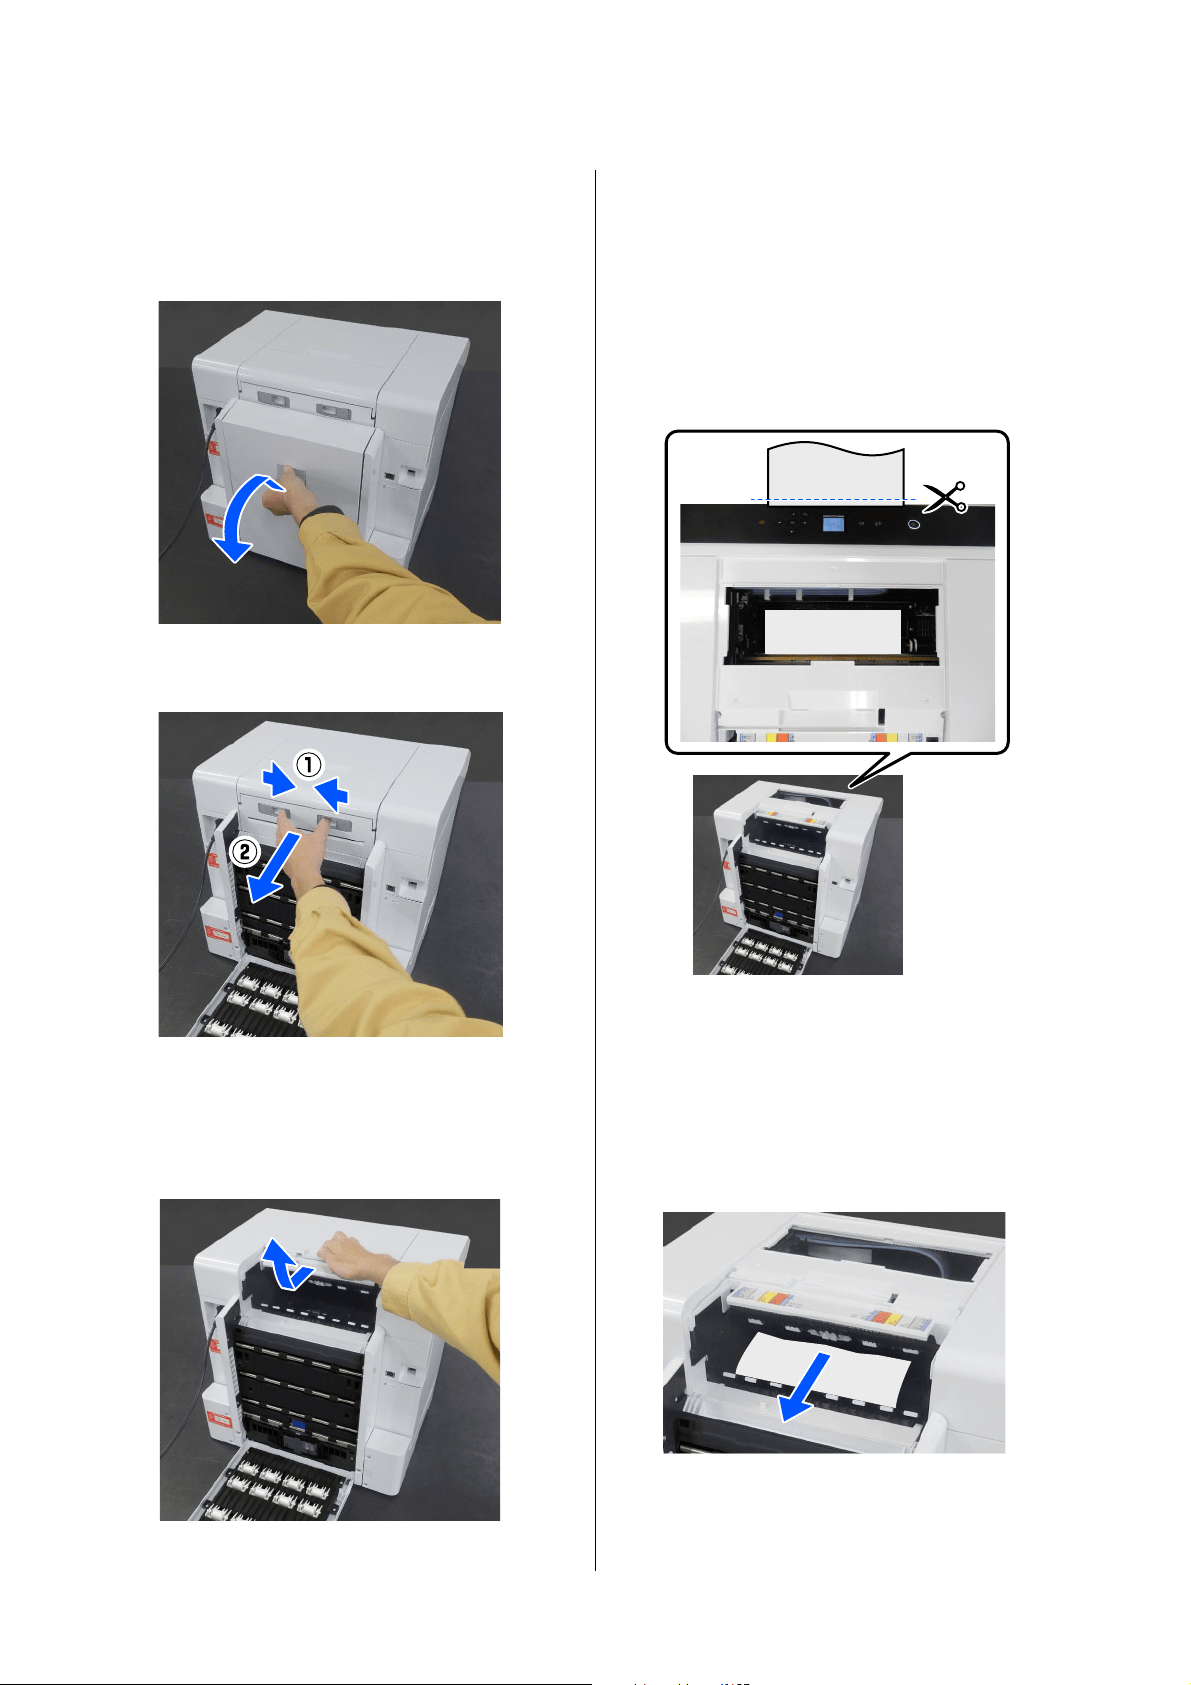
SL-D1000 Series User's Guide
Problem Solver
151
Checking for jammed paper
1
If the duplex feeder is installed, open the rear
cover.
2
Remove the paper feed unit.
3
Remove the printer cover
Slide the printer cover backwards, and then
remove it.
4
Check for jammed paper and paper scraps.
Removing jammed paper (roll paper)
1
If a lot of paper has been ejected from the front
of the printer, cut the paper in front of the jam
with a pair of scissors or something.
2
Slowly pull out, towards the rear, the remaining
paper jammed at the top side.
If you have pulled out the paper, go to step 4.
If the paper is under the print head and cannot
be easily removed, go to the next step.
3
Move the print head unit manually, and remove
the paper towards the rear.

SL-D1000 Series User's Guide
Problem Solver
152
Move the print head unit to the left or right to
the edge of the paper.
4
Cut the paper you have pulled out with scissors
or something.
c
Important:
O If you cannot move the print head unit,
do not try to force it to move, contact
your dealer or Epson Support.
Otherwise, the print head unit could be
damaged.
O When removing the paper, do not
touch the ink absorbing areas.
Otherwise, the platen may get dirty
which could make the back of the paper
dirty.
O Do not touch the parts around the
platen. Otherwise, it may break down
or reduce print quality.
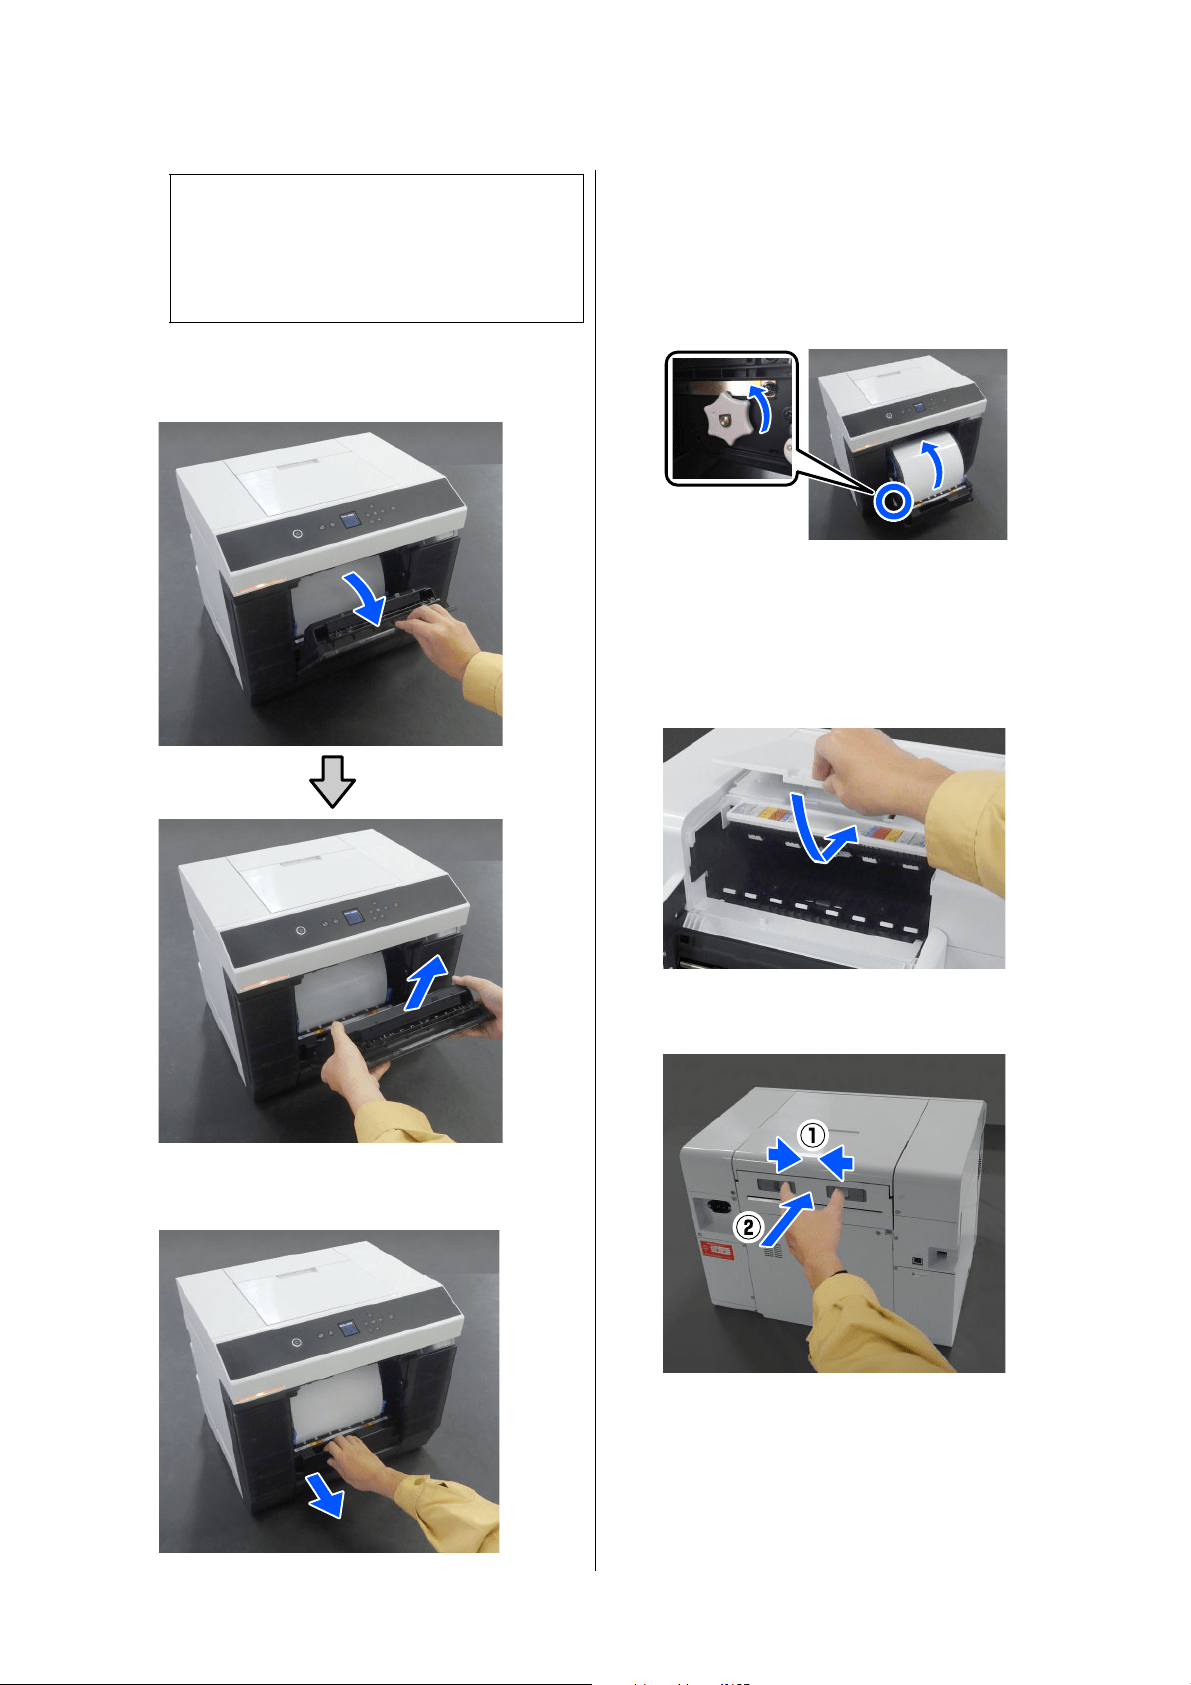
SL-D1000 Series User's Guide
Problem Solver
153
5
Move to the front, and remove the scrap paper
box.
6
Pull out the roll paper unit.
7
Turn the handle on the left side of the roll paper
unit in the direction of the arrow to rewind the
paper.
Rewind the paper until the leading edge appears
at the paper slot.
If it does not rewind, use scissors or something
to cut the roll paper near the paper slot.
8
Move to the rear side, and install the printer
cover.
9
Install the paper feed unit.
c
Important:
After cutting the paper, do not pull paper at
the rear side out through the upper side.
Follow the steps below to remove paper from
the rear side.
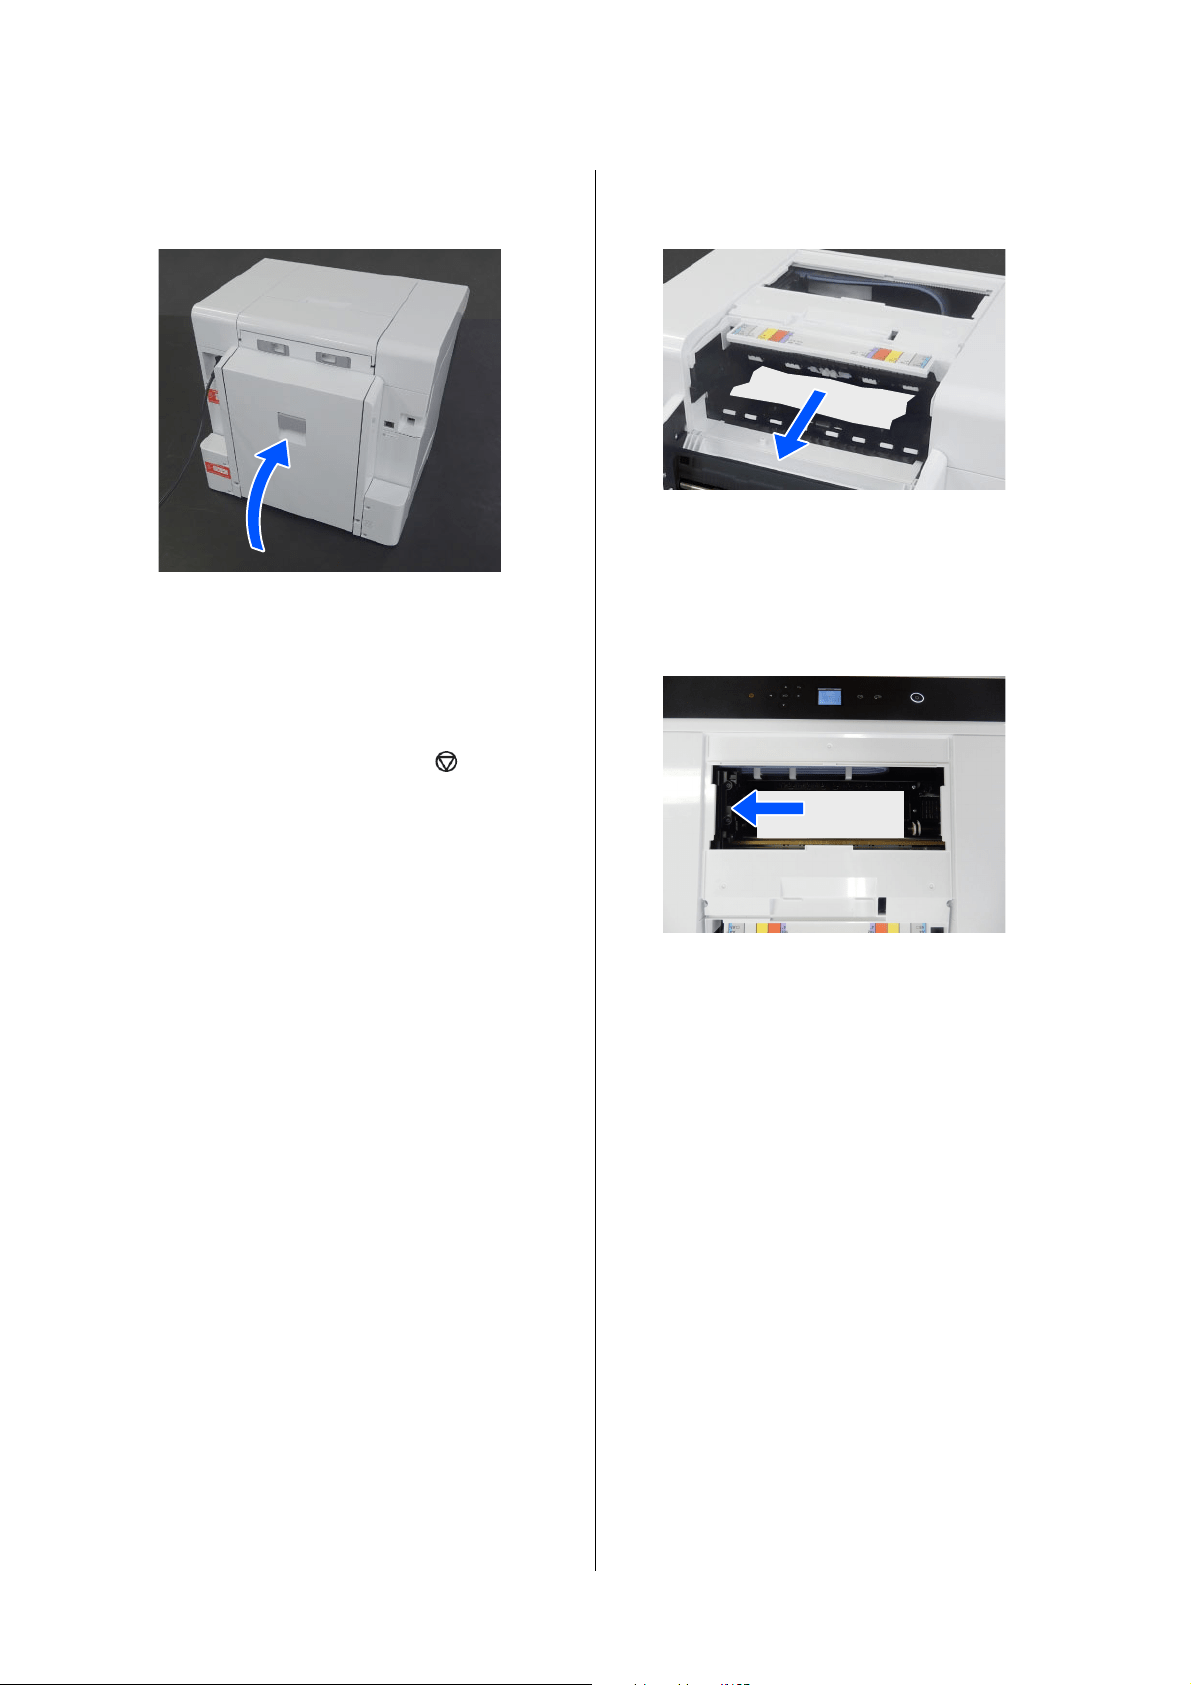
SL-D1000 Series User's Guide
Problem Solver
154
10
If the duplex feeder is installed, close the rear
cover.
11
Move to the front, and on the control panel
screen, press the Z button.
The error is canceled and the home screen is
displayed.
12
If there is a print job, press the button to
cancel the job.
13
Reload the roll paper.
See the following for the procedure to load the
roll paper.
U “How to Replace Roll Paper” on page 30
14
Confirm that the status light is off.
Removing jammed paper (cut paper)
1
Remove jammed paper.
Remove it slowly to the rear.
If you have pulled out the paper, go to step 3.
If the paper is under the print head and cannot
be easily removed, go to the next step.
2
Move the print head unit manually, and remove
the paper towards the rear.
Move the print head unit to the left or right to
the edge of the paper.
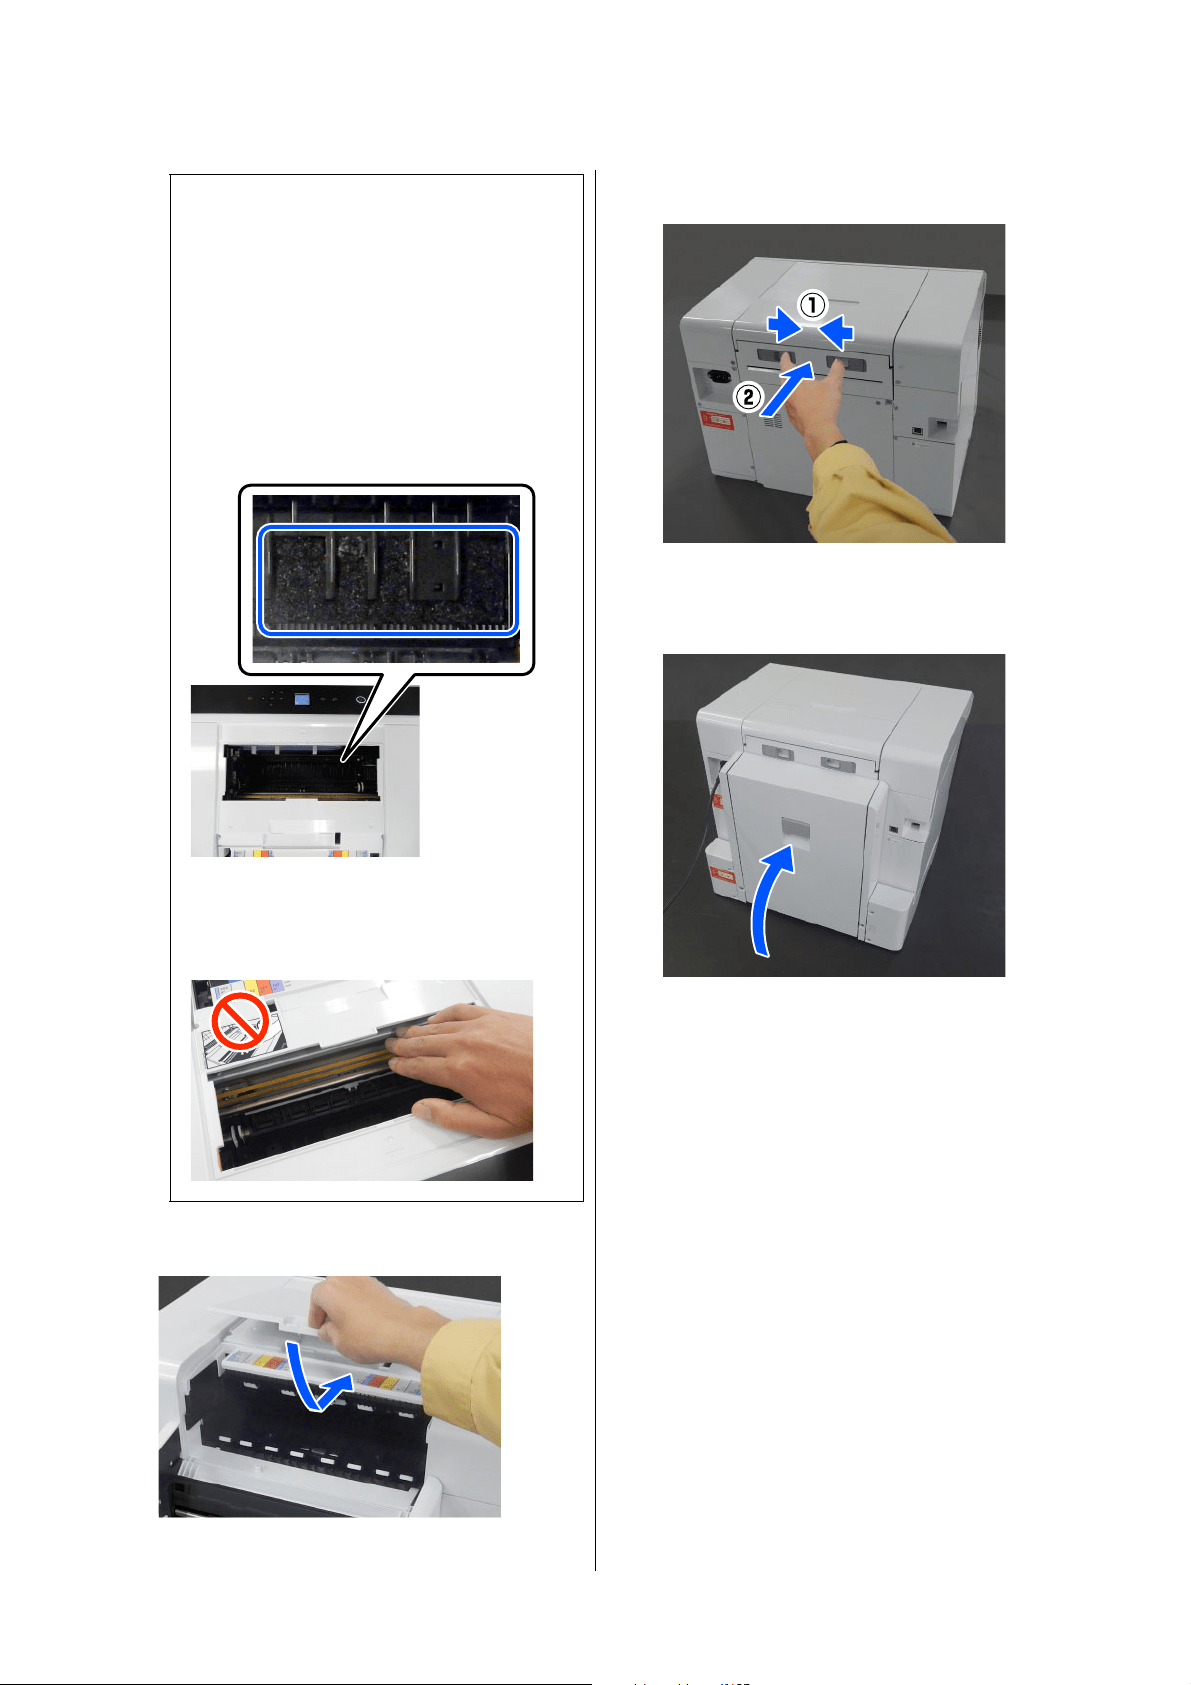
SL-D1000 Series User's Guide
Problem Solver
155
3
Install the printer cover.
4
Install the paper feed unit.
5
If the duplex feeder is installed, close the rear
cover.
6
Move to the front, and on the control panel
screen, press the Z button.
The error is canceled and the home screen is
displayed.
7
Reload the cut paper.
See the following for the procedure to load the
cut paper.
U
“How to Load Cut Paper” on page 36
8
Confirm that the status light is off.
Paper Jammed Between the Rear
Cover and the Paper Feed Unit
Follow the steps below to solve the problem.
c
Important:
O If you cannot move the print head unit,
do not try to force it to move, contact
your dealer or Epson Support.
Otherwise, the print head unit could be
damaged.
O When removing the paper, do not
touch the ink absorbing areas.
Otherwise, the platen may get dirty
which could make the back of the paper
dirty.
O Do not touch the parts around the
platen. Otherwise, it may break down
or reduce print quality.
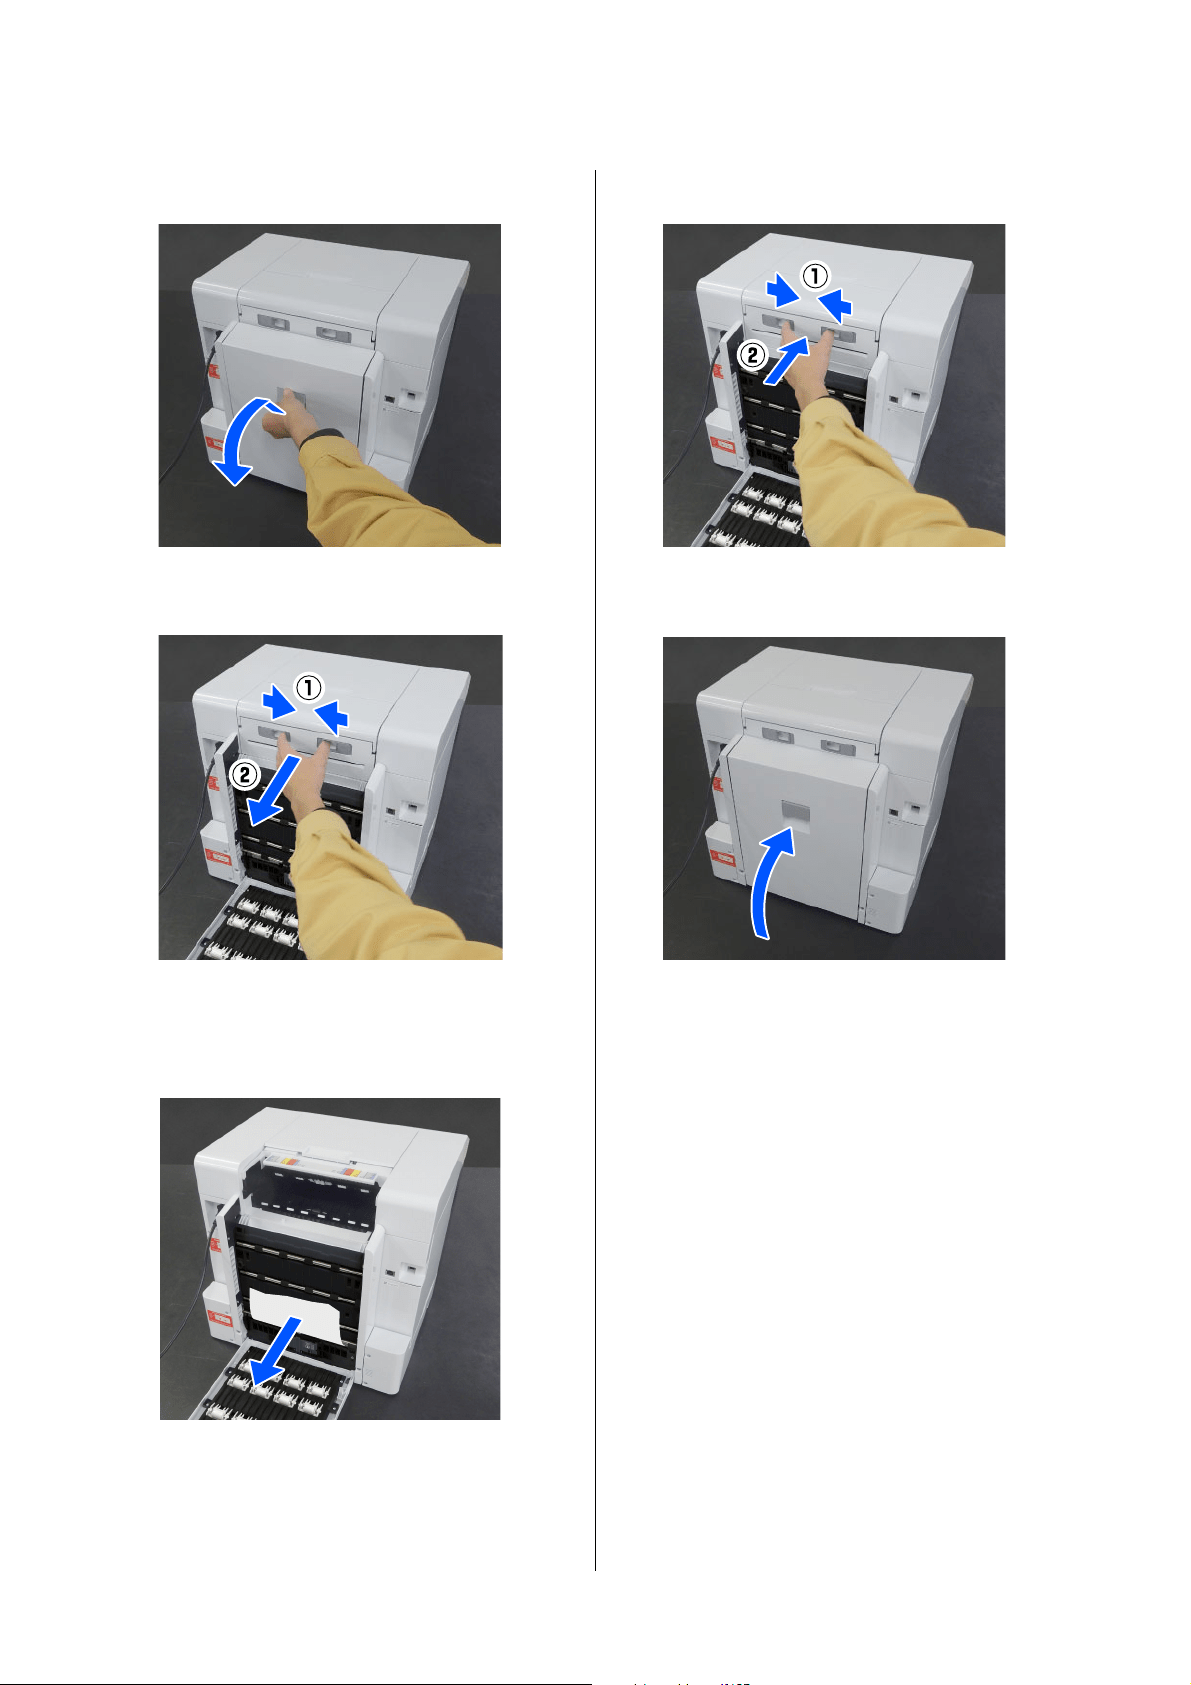
SL-D1000 Series User's Guide
Problem Solver
156
1
Open the rear cover of the duplex feeder.
2
Remove the paper feed unit.
3
Check for jammed paper and paper scraps.
Remove the jammed paper slowly.
4
Install the paper feed unit.
5
Close the rear cover.
6
Move to the front, and on the control panel
screen, press the Z button.
The error is canceled and the home screen is
displayed.
7
Reload the cut paper.
See the following for the procedure to load the
cut paper.
U
“How to Load Cut Paper” on page 36
8
Confirm that the status light is off.
SL-D1000 Series User's Guide
Problem Solver
157
You Cannot Print (Because the
Printer Does Not Work)
The printer driver is not installed
properly (Windows).
The printer driver is not installed
properly (Mac).
The printer is not communicating
with the computer.
The printer has an error.
The printer stops printing.
The printer is offline.
o
Is the icon for this printer displayed in the
Devices and Printers folder?
O Yes
The printer driver is installed. See the following
item, "The printer is not connected correctly to
the computer".
O No (An icon is displayed under "Unspecified")
Do the following:
(1) Open the Control Panel, and click Hardware
and Sound - Device Manager - Other devices,
in this order.
(2) Right-click EPSON SL-D1000 Series, and
then click Update Driver Software.
(3) Click Search automatically for updated
driver software.
(4) After the driver software is updated, click
Close.
If the printer driver is still not installed even after
taking the above measures, install the printer
driver again.
o
Does the printer port setting match the
printer connection port?
Check the printer port.
Click the Port tab on the printer's Properties screen,
and check if the printer name's port is set.
If it is not indicated, the printer driver is not installed
correctly.
Delete and reinstall the printer driver.
U
“Uninstalling Software” on page 27
o
Is the printer added to the printer list?
Click the Apple menu - System Preferences -
Printers & Scanners, in this order.
If the printer name is not displayed, add the printer.
o
Is the cable plugged in properly?
Confirm that the interface cable is securely
connected to both the printer port and the
computer. Also, make sure the cable is not broken
nor bent. If you have a spare cable, try connecting
with the spare cable.
o
View the message displayed in the control
panel.
U
“Control Panel” on page 16
U “When a Message Is Displayed” on page 138
o
Is the status of print queue Pause?
(Windows)
If you stop printing or the printer stops printing
because of an error, the print queue enters a Pause
status. You cannot print in this status.
Double-click the printer icon in the Devices and
Printers folder; if printing is paused, open the
Printer menu and clear the Pause check box.
o
Does the current printer status show
Paused? (Mac)
Open the status dialog for your printer and check
whether printing is paused.
(1) Click the Apple menu - System Preferences -
Printers & Scanners, in this order.
(2) Double-click the icon for any printer that is
Paused.
(3) Click Resume Printer.
o
Has the computer entered sleep mode?
Do not allow the computer to enter sleep mode.
When the computer enters sleep mode, the printer
may go offline.
If the printer goes offline, reboot your computer. If
the printer is still offline even after rebooting your
computer, turn the printer off and then on again.
SL-D1000 Series User's Guide
Problem Solver
158
The Printer Sounds Like It Is
Printing, but Nothing Prints
The print head moves, but nothing
prints.
The nozzle check pattern is not
printed correctly.
Cannot Do Borderless Printing
The Prints Are Not What You
Expected
Print quality is poor, uneven, too
light, or too dark.
o
Confirm the printer operation.
Print a nozzle check pattern, and then check the
printer's operations and print conditions.
O When printing from the printer
U
“Print Head Nozzle Check and Cleaning” on
page 78
O When printing from Maintenance Tool
(Windows)
U “Print Nozzle Check Pattern Method” on
page 90
O When printing from Maintenance Tool (Mac)
U
“Print Nozzle Check Pattern Method” on
page 104
Check the next section if the nozzle check pattern is
not printed correctly.
o
Perform head cleaning.
The nozzles may be clogged. Print a nozzle check
pattern again after performing head cleaning.
O When executing cleaning from the printer
U
“Print Head Nozzle Check and Cleaning” on
page 78
O When executing cleaning from Maintenance
Tool (Windows)
U “Diagnostic Cleaning” on page 91
O When executing cleaning from Maintenance
Tool (Mac)
U “Diagnostic Cleaning” on page 105
o
Is the paper loaded correctly?
Follow the procedures below to load the paper in the
correct position. Borderless printing cannot be done
if paper is loaded in the wrong position.
U
“Attaching the Roll Paper” on page 31
U“Installing the Spindle Unit” on page 33
U“How to Load Cut Paper” on page 36
o
Are you using paper that supports
borderless printing?
Borderless printing can only be done on the printer
with supported paper. See the following and use
paper that supports borderless printing.
U
“Supported Media” on page 163
o
Are the print head nozzles clogged?
If the nozzles are clogged, specific nozzles do not fire
ink and the print quality declines. Try doing a nozzle
check.
O For Windows
U
“Nozzle Check Methods” on page 89
O For Mac
U
“Nozzle Check Methods” on page 103
o
Are the Media Type settings correct?
Print quality can be affected if the media settings in
the printer driver/on the printer and the actual paper
do not match. Be sure to match the media type
setting with the paper that is loaded in the printer.
o
Are you using a recommended (genuine) ink
supply unit?
This printer is developed for use with genuine ink
supply units.
If you use non-genuine products, the prints may
smear, or the color of the printed image may be
changed because the remaining ink level is not
correctly detected. Be sure to use the correct ink
supply units.

SL-D1000 Series User's Guide
Problem Solver
159
The color is not exactly the same as
another printer.
The print is not positioned properly
on the media.
The printed surface is scuffed or
soiled.
The reverse side of the printed paper
is soiled.
The paper is creased.
Margins appear in borderless
printing.
Trouble when Printing from a
Cassette
Scratch-like marks appear on the
back side of two-sided photo paper
during printing.
o
Are you using an old ink supply unit?
The print quality declines when an old ink supply unit
is used. Replace the ink supply unit with a new one.
We recommend using ink supply units before the
expiry date printed on the package.
U
“Replacing Ink Supply Units” on page 66
o
Have you compared the printing result with
the image on the display monitor?
Since monitors and printers produce colors
differently, printed colors will not always match
on-screen colors perfectly.
o
Colors vary depending on the printer type
due to each printer's characteristics.
Because inks, printer drivers, and printer profiles are
developed for each printer model, the colors printed
by different printer models are not exactly the same.
o
Have you specified the print area?
Check the print area in the settings of the application
and the printer.
o
Are the Paper Size settings correct?
If the Paper Size in the printer driver and the paper
size (width) loaded in the printer do not match, the
print position may misalign or some of the data may
not be printed. In this case, check the print settings.
o
Is the paper too thick or too thin?
Check that the paper specifications are compatible
with this printer.
U
“Supported Media” on page 163
o
Has paper dust collected on the platen?
Clean the platen and roll paper unit.
U
“Cleaning the Platen and Roll Paper Unit” on
page 70
o
Are you using the printer at normal room
temperature?
The printer should be used at normal room
temperature (temperature: 15 to 25 °C, humidity: 40
to 60%). For information about paper, such as thin
paper from other manufacturers that requires special
handling, see the documentation supplied with the
paper.
o
Are the settings for the print data in the
application correct?
Make sure that the paper settings in the application
are correct as well as in the printer driver.
U
“Borderless Printing on All Sides” on page 54
o
Are you using the correct feed rollers?
Scratch-like marks may appear on the back side of
two-sided photo paper during printing if you are
using the feed rollers for card stock. Install the feed
rollers for photo paper, and then print.
U
“Cleaning and Replacing the Rollers in the Duplex
Feeder (Option)” on page 72
SL-D1000 Series User's Guide
Problem Solver
160
Paper does not feed.
Troubles when Cutting Roll
Paper
The cut is crooked, the cut edge is
frayed or turned up, or the coating is
cracked.
Cannot print from smart device
even though it is connected
(iOS)
o
Are you using the printer within its
environmental conditions?
High humidity in the printer’s operating
environment is very likely to cause these marks.
Check whether the humidity is within the
environmental conditions, and lower the humidity as
necessary to use the printer.
U
“Specifications Table” on page 169
o
Did you riffle the paper before loading it in
the cassette?
Marks may appear if sheets of paper are stuck to each
other in the stacks of paper loaded in the cassette.
Before loading the paper, riffle it to unstick it.
U
“Loading in the Cassette (Option)” on page 36
o
Increase the number of sheets of paper in the
cassette.
Depending on the type of paper being used, the
marks may appear if there is too little paper in the
cassette. Before printing, increase the number of
sheets of paper in the cassette to about 50 sheets.
U
“Loading in the Cassette (Option)” on page 36
o
Is the paper loaded correctly?
O Load paper that can be used on the printer.
O Follow the notes on handling paper.
O Do not load more than the allowable amount of
paper.
O Match the paper size and paper type settings on
the machine to the paper that is actually loaded.
U
“Supported Media” on page 163
U“Notes on Paper” on page 20
U“How to Load Cut Paper” on page 36
o
Are you using the correct feed rollers?
Card stock may not feed correctly during printing if
you are using the feed rollers for photo paper. Install
the feed rollers for card stock, and then print.
U
“Cleaning and Replacing the Rollers in the Duplex
Feeder (Option)” on page 72
o
Clean the feed rollers and transfer rollers.
The paper feed trouble may occur if the feed rollers
or transfer rollers are dirty, such as with paper dust.
Clean the surfaces of the rollers.
U
“Cleaning the Feed Rollers and Transfer Rollers”
on page 76
o
The feed rollers need to be replaced with
new ones.
If paper does not feed even after doing the following,
then replace the feed rollers with new ones.
O Is the paper loaded correctly in the cassette?
O Are you using the feed roller that is appropriate
for the type of paper?
O Have the feed rollers and transfer rollers been
cleaned?
U
“Consumables and Optional Items” on page 162
U“Replacing Feed Rollers” on page 72
o
The cutter needs to be replaced.
Contact your dealer or Epson Support to replace the
cutter.
o
Paper Setup Auto Display is disabled.
Enable Paper Setup Auto Display in the following
menu on the control panel.
Settings - Printer Setup - Paper Source Settings -
Paper Setup Auto Display
o
AirPrint is disabled.
Enable the AirPrint setting on Web Config.
U Administrator's Guide

SL-D1000 Series User's Guide
Problem Solver
161
Others
The administrator password has
been lost.
If Troubles Are Not Resolved
If you cannot resolve a problem after taking the
measures described in the "Troubleshooting" section,
contact your dealer or Epson Support.
o
Contact your dealer or Epson Support.
The initial value for the administrator’s password is
the product’s serial number. If you forget the
password after it was changed from the product
serial number, contact your dealer or Epson Support.
If the Lock Setting is Off, then you can execute Clear
All Data and Settings without inputting the admin
password. Doing this returns all the settings,
including the admin password, to their initial values.
U“Control Panel Menu” on page 113
SL-D1000 Series User's Guide
Appendix
162
Appendix
Consumables and Optional Items
The following consumable products and optional items are available for use with your printer. (As of August, 2021)
Ink supply unit
This printer is developed for use with genuine ink supply units.
If you use non-genuine ink supply units, the print result may be faint, or the ink remaining may not be detected
normally.
Others
* Model numbers vary depending on the country or region in which you live.
Model name Ink color Product number
SL-D1070
SL-D1070DE
Black T46J120
Cyan T46J220
Magenta T46J320
Yellow T46J420
Light Cyan T46J520
Light Magenta T46J620
Product name Product number Explanation
Maintenance Box C13S400086 Absorbs ink consumed during head cleaning.
U
“Replacing Maintenance Box” on page 67
Spindle Unit C12C935981/
C12C936481
*
The same as the spindle unit supplied with the printer.
Remove the tape before use.
Duplex Feeder C12C936001/
C12C936491/
C12C936011
*
This unit is installed to print on both sides of the paper
automatically.
Roller Assembly Kit C13S210124 This part is for replacing the roller in the feed unit of the
duplex feeder.
Use this part when printing on paper other than card
stock.
Roller Assembly Kit 2 C13S210137 This part is for replacing the roller in the feed unit of the
duplex feeder.
Use this part when printing on card stock.
SL-D1000 Series User's Guide
Appendix
163
Supported Media
We recommend you use the following Epson special media for high-quality printing results.
The following paper can be used with the printer. (As of August, 2021)
Attention: For the most recent information on available media, visit the Epson website.
Epson Special Media
Roll Paper
Note:
If you are using Epson Connect, then printing is possible on only the following sizes of roll paper.
Email Print: 3.5 x 5 in (9 x 13 cm), 4 x 6 in (10 x 15 cm)
Remote Print: A4 210 x 297 mm, 3.5 x 5 in (9 x 13 cm), 4 x 6 in (10 x 15 cm), 5 x 7 in (13 x 18 cm), 8 x 10 in (20 x 25 cm)
Name of paper Size
Borderless
Printing
ICC profile
SureLab Photo Paper Gloss (250) 3.5 in (89 mm) Epson_SL-D1000_PhotoPaperGloss.icc
4 in (102 mm)
5 in (127 mm)
6 in (152 mm)
8 in (203 mm)
A4
SureLab Photo Paper Luster (250) 3.5 in (89 mm) Epson_SL-D1000_PhotoPaperLuster.icc
4 in (102 mm)
5 in (127 mm)
6 in (152 mm)
8 in (203 mm)
A4
SL-D1000 Series User's Guide
Appendix
164
Cut sheet
Name of paper Size
Loading
orientati
on
Number of
sheets that
can be loaded
in the cassette
Two-sided
Printing
Borderl
ess
Printin
g
ICC profile
SureLab Photo
Paper Gloss -
DS(225)
A5 148 x 210
mm
Horizontal 100 Epson_SL-D1000_
PhotoPaperGloss_
DS.icc
A4 210 x 297
mm
Vertical 100
4 x 6 in (10 x 15
cm)
Vertical 100
5 x 7 in (13 x 18
cm)
Vertical 100
8 x 10 in (20 x
25 cm)
Vertical 100
6 x 6 in (152 x
152 mm)
Vertical 100
8.3 x 8.3 in (210
x 210 mm)
Vertical 100
SureLab Photo
Paper Gloss -
DS(190)
A5 148 x 210
mm
Horizontal 100 Epson_SL-D1000_
PhotoPaperGloss_
DS.icc
A4 210 x 297
mm
Vertical 100
4 x 6 in (10 x 15
cm)
Vertical 100
5 x 7 in (13 x 18
cm)
Vertical 100
8 x 10 in (20 x
25 cm)
Vertical 100
6 x 6 in (152 x
152 mm)
Vertical 100
8.3 x 8.3 in (210
x 210 mm)
Vertical 100
SL-D1000 Series User's Guide
Appendix
165
Other Commercially Available Paper
Use other commercially available paper that meets the specifications of the printer.
U
“Specifications Table” on page 169
And, add these paper types before using them.
U
“Adding Paper Information” on page 109
SureLab Photo
Paper Luster -
DS(225)
A5 148 x 210
mm
Horizontal 100 Epson_SL-D1000_
PhotoPaperLuster
_DS.icc
A4 210 x 297
mm
Vertical 100
4 x 6 in (10 x 15
cm)
Vertical 100
5 x 7 in (13 x 18
cm)
Vertical 100
8 x 10 in (20 x
25 cm)
Vertical 100
6 x 6 in (152 x
152 mm)
Vertical 100
8.3 x 8.3 in (210
x 210 mm)
Vertical 100
SureLab Photo
Paper Luster -
DS(190)
A5 148 x 210
mm
Horizontal 100 Epson_SL-D1000_
PhotoPaperLuster
_DS.icc
A4 210 x 297
mm
Vertical 100
4 x 6 in (10 x 15
cm)
Vertical 100
5 x 7 in (13 x 18
cm)
Vertical 100
8 x 10 in (20 x
25 cm)
Vertical 100
6 x 6 in (152 x
152 mm)
Vertical 100
8.3 x 8.3 in (210
x 210 mm)
Vertical 100
c
Important:
O Do not use paper that is wrinkled, scuffed, torn, or dirty.
O Paper types that are within the range of the printer’s specifications can be loaded, but paper feeding and print
quality are not guaranteed.
Name of paper Size
Loading
orientati
on
Number of
sheets that
can be loaded
in the cassette
Two-sided
Printing
Borderl
ess
Printin
g
ICC profile
SL-D1000 Series User's Guide
Appendix
166
Roll Paper
Cut sheet
*1 Name selected in the paper type settings in the menus on the printer and the printer driver.
*2. Supported paper widths: 3.5, 4, 5, 6, 8, and 8.26 in (89, 102, 127, 152, 203, 210 mm)
*3 Not supported in the cassette. Print on it from the rear paper feed slot.
Moving and Transporting the Printer
This section describes how to move and transport the product.
Moving the Printer
This section explains how to move the printer over short distances, such as to a different location within the same
building.
General name of
paper
Name of paper
*1
Borderless Printing ICC profile
Matte photo paper Photo Paper(Matte) Epson_SL-D1000_PhotoPaperMatte.icc
General name of
paper
Name of paper
*1
Two-side
d Printing
Borderles
s
Printing
*
2
ICC profile
Matte photo paper Photo Paper(Matte) Epson_SL-D1000_PhotoPaperMatte.icc
Glossy photo
paper
Photo Paper(Glossy) - Epson_SL-D1000_PhotoPaperGloss.icc
Card stock Card Stock(Plain) Epson_SL-D1000_Standard.icc
Glossy card stock
*3
Card Stock(Coated) - Epson_SL-D1000_Standard.icc
!
Caution:
O When lifting this printer, make sure you use the correct posture.
O When lifting the product, place your hands in from the front of the printer as shown in the manual.
If you hold any other areas, the printer may fall or your fingers could be trapped and damaged when placing
the printer.
O Do not tilt the product more than 10 degrees forward, back, left, or right while moving it. Failure to observe this
precaution could result in the printer falling over, causing accidents.
c
Important:
O Only hold the required area. Otherwise, it may breakdown.
O Move the printer while the ink supply units are installed. If the ink supply units are removed, the nozzles may
clog so printing is not possible or ink may leak.
O Do not tilt the product when moving or transporting it. Ink could leak out.
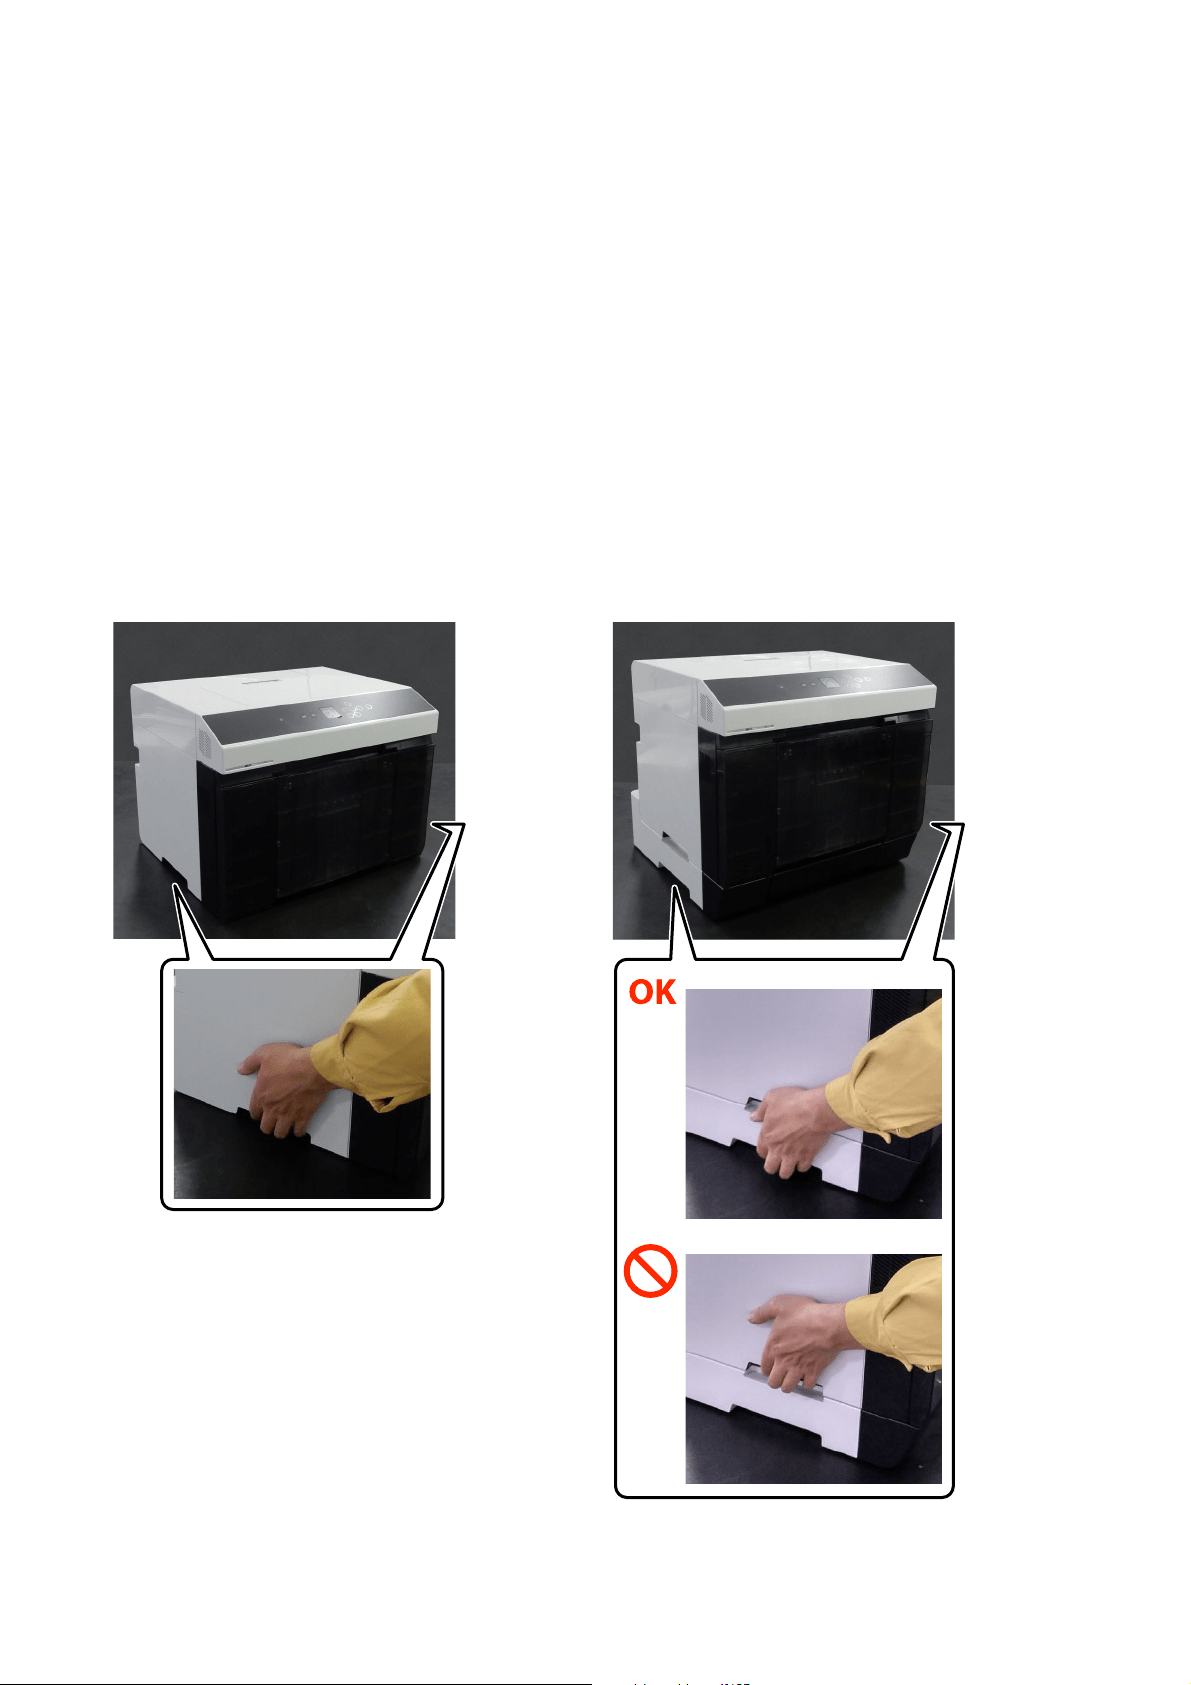
SL-D1000 Series User's Guide
Appendix
167
Preparing to Move
Make the following preparations in advance before moving the printer.
O Remove all paper from the printer.
O Close all the printer’s covers and store the output tray.
O Turn off the printer and remove all cables.
How to carry the printer
When lifting the printer to move it, place your hands at the points indicated in the illustration. Also, place your
hands so the front of the printer is facing your body, so the scrap paper box does not accidently fall out.
When duplex feeder (option) is installed
SL-D1000 Series User's Guide
Appendix
168
Operations after Moving
After moving, make sure that the print head is not clogged before use.
U
“Print Head Nozzle Check and Cleaning” on page 78
Transport
Before transporting the printer, contact your dealer or Epson Support.
System Requirements
Software for this printer can be used in the following environments. (As of August, 2021)
Supported OS and other elements may change.
For the latest information, see the Epson Web site.
Printer Driver
Windows
* For details on the connection methods (interface specifications), see the following.
U “Specifications Table” on page 169
Mac
* For details on the connection methods (interface specifications), see the following.
U
“Specifications Table” on page 169
Operating system Windows 10/Windows 10 x64
Windows 8.1/Windows 8.1 x64
CPU Intel Core2 Duo 3.0 GHz or better
Available memory space 1 GB or more
Hard disk (Available volume to install) 2 GB or more
Display resolution SXGA (1280×1080) or better
Connection method with the printer
*
USB connection, or wired or wireless LAN connection
Operating system OS X 10.9.5 Mavericks or later
CPU Intel Core2 Duo 2.0 GHz or better
Memory 2 GB or more
Hard disk (Available volume to install) 2 GB or more
Display resolution WXGA+ (1440×900) or better
Connection method with the printer
*
USB connection, or wired or wireless LAN connection
SL-D1000 Series User's Guide
Appendix
169
Maintenance Tool
Windows
* For details on the connection methods (interface specifications), see the following.
U
“Specifications Table” on page 169
Mac
* For details on the connection methods (interface specifications), see the following.
U
“Specifications Table” on page 169
Web Config
Use the latest version of browser.
Windows
Mac
Specifications Table
Operating system Windows 10/Windows 10 x64
Windows 8.1/Windows 8.1 x64
CPU Intel Core2 Duo 3.0 GHz or better
Available memory space 1 GB or more
Hard disk (Available volume to install) 2 GB or more
Display resolution SXGA (1280×1080) or better
Connection method with the printer
*
USB connection, or wired or wireless LAN connection
Operating system OS X 10.9.5 Mavericks or later
CPU Intel Core2 Duo 2.0 GHz or better
Memory 2 GB or more
Hard disk (Available volume to install) 2 GB or more
Display resolution WXGA+ (1440×900) or better
Connection method with the printer
*
USB connection, or wired or wireless LAN connection
Browser Internet Explorer 11, Microsoft Edge, Mozilla Firefox, Google Chrome
Browser Safari, Mozilla Firefox, Google Chrome
Basic specifications
Printing method On-demand ink jet
Nozzle configuration 180 nozzles for each color
Highest resolution 1440 x 720 dpi
SL-D1000 Series User's Guide
Appendix
170
Paper feed method Friction feed
c
Important:
Use this printer at an altitude of up to 2000 m.
!
Warning:
This is a class A product. In a domestic environment this product may cause radio interference in which case the
user may be required to take adequate measures.
Electrical Specifications
Rated voltage AC 100 to 240 V
Rated frequency range 50/60 Hz
Rated current 1.4 A
Power consumption Operating: Approximately 80 W
When standing by: Approximately 14 W
Sleep mode: Approximately 1.2 W
Power off: Less than 0.2 W
Basic specifications
SL-D1000 Series User's Guide
Appendix
171
*1 The connected device must comply with IEEE802.3az standards.
*2 IEEE802.11b is not supported.
Interface Specifications
USB port Hi-Speed USB
Wired LAN compliance
standard
10BASE-T (IEEE802.3i)
100BASE-TX (IEEE802.3u)
Energy Efficient Ethernet (IEEE802.3az)
*1
Wireless LAN
Standards SL-D1000, SL-D1030: IEEE802.11b/g/n
SL-D1040, SL-D1060, SL-D1070, SL-D1070DE, SL-D1080, SL-D1090: IEEE802.11b/g/n/a/ac
Frequency band IEEE802.11b/g/n: 2.4GHz
IEEE802.11a/n/ac: 5GHz
Maximum
radio-frequency
power transmitted
2.4GHz:
2400-2483.5 MHz: 20 dBm (EIRP)
5GHz:
5150-5250 MHz: 20 dBm (EIRP)
5250-5350 MHz: 20 dBm (EIRP)
5470-5725 MHz: 20 dBm (EIRP)
Wireless module SL-D1000, SL-D1030: J26H006
SL-D1040, SL-D1060, SL-D1070, SL-D1070DE, SL-D1080, SL-D1090: J26H005
Connection mode Infrastructure
Wi-Fi Direct (simple AP mode)
*2
Wireless security WEP (64/128bit)
WPA-PSK (TKIP)
WPA2-PSK (AES)
WPA3-SAE (AES)
WPA2-Enterprise (AES) (EAP-TLS/PEAPTLS/PEAPMSCHAPv2/EAP-TTLS)
WPA3-Enterprise
Network printing
protocols/functions
*3
EpsonNet Print (Windows)
Standard TCP/IP (Windows)
Bonjour (Mac)
IPP Printing (Windows, Mac)
Mopria Print (Mopria device)
Chromebook native printing
AirPrint (iOS, Mac)
Security
standards/protocols
SSL/TLS:
HTTPS Server/Client
IPPS Server
SMTPS Client
STARTTLS (SMTPS)
IEEE802.1X
IPsec/IP Filtering
SNMPv3

SL-D1000 Series User's Guide
Appendix
172
*3 EpsonNet Print supports IPv4 only. The others support both IPv4 and IPv6.
To prevent radio interference to the licensed service, this device is intended to be operated indoors and away from
windows to provide maximum shielding. Equipment (or its transmit antenna) that is installed outdoors is subject to
licensing.
For European users
Radio Equipment Information:
This product intentionally emit radio wave described as follows.
(a) frequency band in which the radio equipment operates; 2.4 to 2.4835GHz
(b) maximum radio-frequency power transmitted in the frequency band in which the radio equipment operates;
20dBm (eirp power)
Roll paper unit Specifications
Loadable sizes 3-inch roll core
Outside diameter of 6.7 inches (170 mm) or less
One roll can be loaded
Roll paper width 3.5 inches (89 mm), 4 inches (102 mm), 5 inches (127 mm), 6 inches (152 mm), 8 inches (203 mm),
A4 (210 mm)
Roll paper thickness 0.0086 to 0.0098 inches (0.22 to 0.25 mm)
Paper feed unit Specifications
Paper Width 3.5 to 8.26 inches (89 to 210 mm)
Paper Height 5.8 to 39.37 inches (148 to 1000 mm)
Paper Thickness 0.008 to 0.02 inches (0.20 to 0.50 mm)
Output tray Specifications
Capacity Roll Paper:
4 x 6 in (10 × 15 cm) 50 sheets
Length 8 in (203 mm) or less 50 sheets
Length 8.1 in (203.1 mm) to 12 in (305 mm) 20 sheets
Cut sheet:
Length 12 in (305 mm) or less 20 sheets
Paper Size Standard size:
A4 (210×297 mm) or less
Non-standard size:
Width 3.5 in (89 mm) to A4 (210 mm), length: 1.9 in (50 mm) to 12 in (305 mm)
Ink Specifications
Type Ink supply unit
Ink type Six color water-based dye
Use by date Three years after manufacture
SL-D1000 Series User's Guide
Appendix
173
Storage temperature Stored in packaging: −4 to 104 °F (−20 to 40 °C) (4 days or less at 4 °F (−20 °C), 1 month or less at
104 °F [40 °C])
Installed in printer: −4 to 104 °F (-20 to 40 °C) (4 days or less at −4 °F [−20 °C], 1 month or less at
104 °F [40 °C])
Transported in packaging: −4 to 140°F (−20 to 60 °C) (4 days or less at −4 °F [−20 °C], 1 month or
less at 104°F [40 °C], 72 hours or less at 140°F [60 °C])
Capacity 250 ml
Dimensions 3.19 (W) x 10.37 (D) x 1.27 (H) inches (81 (W) x 263.3 (D) x 32.3 [H] mm)
c
Important:
O The ink freezes if left at below 14 °F (-10 °C) for a long time. If it does freeze, leave it at room temperature (77 °F
[25 °C]) for at least three hours until it has defrosted (without condensation).
O Do not disassemble ink supply units or refill them with ink.
General Specifications
Temperature Operating: 50 to 95 °F (10 to 35 °C)
Storage (before unpacking): −4 to 140 °F (−20 to 60 °C) (within 120 hours at 140 °F [60 °C], one
month at 104 °F [40 °C])
Storage (after unpacking): −4 to 104 °F (−20 to 40 °C) (within one month at 104 °F [40 °C])
Humidity Operating: 20 to 80% (without condensation)
Storage (before unpacking): 5 to 85% (without condensation)
Storage (after unpacking): 5 to 85% (without condensation)
Weight Main unit: 38.8 lbs (17.6 kg) (ink not included)
Dimensions Main unit: 18.1 (W) x 14.7 (D) x 13.5 (H) in (460 [W] x 374 [D] x 343 [H] mm)
U
“Necessary Space” on page 174
Installed software version E1.1930.0001
Duplex feeder Specifications
Paper Width 3.5 to 8.3 in (89 to 210 mm)
Paper Height 5.8 to 11.7 in (148 to 297 mm)
Paper Thickness 0.0078 to 0.01 in (0.20 to 0.265 mm)
Weight 10.8 lbs (4.9 kg)
Dimensions 18.1 (W) x 16.9 (D) x 14.4 (H) in (460 [W] x 428 [D] x 365 [H] mm)
!
Warning:
This is a class A product. In a domestic environment this product may cause radio interference in which case the
user may be required to take adequate measures.
Ink Specifications
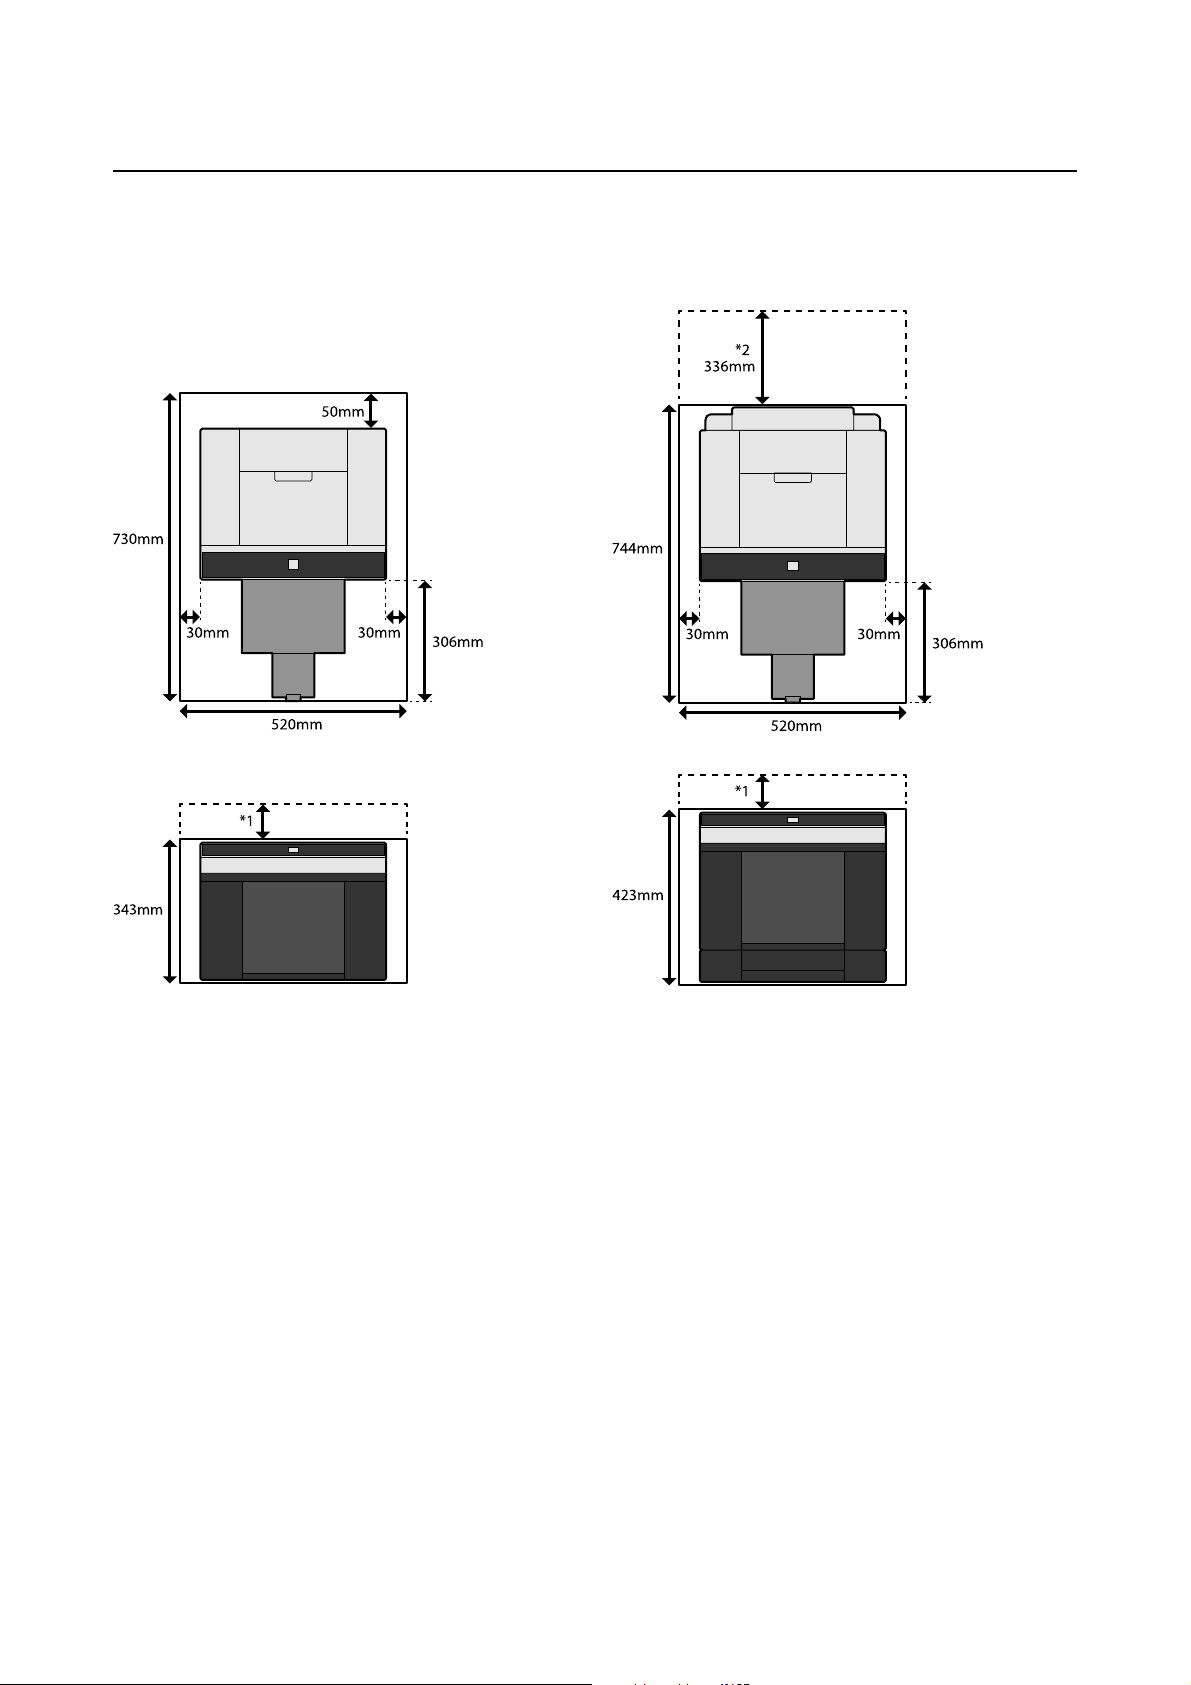
SL-D1000 Series User's Guide
Appendix
174
Necessary Space
*1 2 to 7.1 inches (51 to 180 mm) is needed to load cut sheets in the rear paper feed slot. (7.1 inches [180 mm] for
A4 paper)
*2 Needed to open the rear cover.
OPEN SOURCE SOFTWARE LICENSE TERMS
This product uses open source software as well as software for which Epson owns the rights.
Information related to open source software used by the product is shown below.
When duplex feeder (option) is installed

SL-D1000 Series User's Guide
Appendix
175
Boost Software License - Version 1.0 - August 17th, 2003
Permission is hereby granted, free of charge, to any person or organization obtaining a copy of the software and
accompanying documentation covered by this license (the "Software") to use, reproduce, display, distribute, execute,
and transmit the Software, and to prepare derivative works of the Software, and to permit third-parties to whom the
Software is furnished to do so, all subject to the following:
The copyright notices in the Software and this entire statement, including the above license grant, this restriction
and the following disclaimer, must be included in all copies of the Software, in whole or in part, and all derivative
works of the Software, unless such copies or derivative works are solely in the form of machine-executable object
code generated by a source language processor.
THE SOFTWARE IS PROVIDED "AS IS", WITHOUT WARRANTY OF ANY KIND, EXPRESS OR IMPLIED,
INCLUDING BUT NOT LIMITED TO THE WARRANTIES OF MERCHANTABILITY, FITNESS FOR A
PARTICULAR PURPOSE, TITLE AND NON-INFRINGEMENT. IN NO EVENT SHALL THE COPYRIGHT
HOLDERS OR ANYONE DISTRIBUTING THE SOFTWARE BE LIABLE FOR ANY DAMAGES OR OTHER
LIABILITY, WHETHER IN CONTRACT, TORT OR OTHERWISE, ARISING FROM, OUT OF OR IN
CONNECTION WITH THE SOFTWARE OR THE USE OR OTHER DEALINGS IN THE SOFTWARE.
Inno Setup License
Except where otherwise noted, all of the documentation and software included in the Inno Setup package is
copyrighted by Jordan Russell.
Copyright (C) 1997-2021 Jordan Russell. All rights reserved.
Portions Copyright (C) 2000-2021 Martijn Laan. All rights reserved.
This software is provided "as-is," without any express or implied warranty. In no event shall the author be held liable
for any damages arising from the use of this software.
Permission is granted to anyone to use this software for any purpose, including commercial applications, and to
alter and redistribute it, provided that the following conditions are met:
1. All redistributions of source code files must retain all copyright notices that are currently in place, and this list of
conditions without modification.

SL-D1000 Series User's Guide
Appendix
176
2. All redistributions in binary form must retain all occurrences of the above copyright notice and web site addresses
that are currently in place (for example, in the About boxes).
3. The origin of this software must not be misrepresented; you must not claim that you wrote the original software.
If you use this software to distribute a product, an acknowledgment in the product documentation would be
appreciated but is not required.
4. Modified versions in source or binary form must be plainly marked as such, and must not be misrepresented as
being the original software.
Jordan Russell
jr-2020 AT jrsoftware.org
https://jrsoftware.org/
7-Zip Command line version
License for use and distribution
7-Zip Copyright (C) 1999-2010 Igor Pavlov.
7za.exe is distributed under the GNU LGPL license
Notes:
You can use 7-Zip on any computer, including a computer in a commercial organization. You don't need to register
or pay for 7-Zip.
GNU LGPL information
This library is free software; you can redistribute it and/or modify it under the terms of the GNU Lesser General
Public License as published by the Free Software Foundation; either version 2.1 of the License, or (at your option)
any later version.
This library is distributed in the hope that it will be useful, but WITHOUT ANY WARRANTY; without even the
implied warranty of MERCHANTABILITY or FITNESS FOR A PARTICULAR PURPOSE. See the GNU Lesser
General Public License for more details.

SL-D1000 Series User's Guide
Appendix
177
You can receive a copy of the GNU Lesser General Public License from http://www.gnu.org/
GNU LESSER GENERAL PUBLIC LICENSE Version 2.1, February 1999
Copyright (C) 1991, 1999 Free Software Foundation, Inc.
51 Franklin Street, Fifth Floor, Boston, MA 02110-1301 USA
Everyone is permitted to copy and distribute verbatim copies of this license document, but changing it is not
allowed.
[This is the first released version of the Lesser GPL. It also counts as the successor of the GNU Library Public
License, version 2, hence the version number 2.1.]
Preamble
The licenses for most software are designed to take away your freedom to share and change it. By contrast, the GNU
General Public Licenses are intended to guarantee your freedom to share and change free software--to make sure the
software is free for all its users.
This license, the Lesser General Public License, applies to some specially designated software packages--typically
libraries--of the Free Software Foundation and other authors who decide to use it. You can use it too, but we suggest
you first think carefully about whether this license or the ordinary General Public License is the better strategy to use
in any particular case, based on the explanations below.
When we speak of free software, we are referring to freedom of use, not price. Our General Public Licenses are
designed to make sure that you have the freedom to distribute copies of free software (and charge for this service if
you wish); that you receive source code or can get it if you want it; that you can change the software and use pieces
of it in new free programs; and that you are informed that you can do these things.
To protect your rights, we need to make restrictions that forbid distributors to deny you these rights or to ask you
to surrender these rights. These restrictions translate to certain responsibilities for you if you distribute copies of the
library or if you modify it.
For example, if you distribute copies of the library, whether gratis or for a fee, you must give the recipients all the
rights that we gave you. You must make sure that they, too, receive or can get the source code. If you link other code
with the library, you must provide complete object files to the recipients, so that they can relink them with the
library after making changes to the library and recompiling it. And you must show them these terms so they know
their rights.

SL-D1000 Series User's Guide
Appendix
178
We protect your rights with a two-step method: (1) we copyright the library, and (2) we offer you this license, which
gives you legal permission to copy, distribute and/or modify the library.
To protect each distributor, we want to make it very clear that there is no warranty for the free library. Also, if the
library is modified by someone else and passed on, the recipients should know that what they have is not the original
version, so that the original author's reputation will not be affected by problems that might be introduced by others.
Finally, software patents pose a constant threat to the existence of any free program. We wish to make sure that a
company cannot effectively restrict the users of a free program by obtaining a restrictive license from a patent
holder. Therefore, we insist that any patent license obtained for a version of the library must be consistent with the
full freedom of use specified in this license.
Most GNU software, including some libraries, is covered by the ordinary GNU General Public License. This license,
the GNU Lesser General Public License, applies to certain designated libraries, and is quite different from the
ordinary General Public License. We use this license for certain libraries in order to permit linking those libraries
into non-free programs.
When a program is linked with a library, whether statically or using a shared library, the combination of the two is
legally speaking a combined work, a derivative of the original library. The ordinary General Public License therefore
permits such linking only if the entire combination fits its criteria of freedom. The Lesser General Public License
permits more lax criteria for linking other code with the library.
We call this license the "Lesser" General Public License because it does Less to protect the user's freedom than the
ordinary General Public License. It also provides other free software developers Less of an advantage over
competing non-free programs. These disadvantages are the reason we use the ordinary General Public License for
many libraries. However, the Lesser license provides advantages in certain special circumstances.
For example, on rare occasions, there may be a special need to encourage the widest possible use of a certain library,
so that it becomes a de-facto standard. To achieve this, non-free programs must be allowed to use the library. A
more frequent case is that a free library does the same job as widely used non-free libraries. In this case, there is little
to gain by limiting the free library to free software only, so we use the Lesser General Public License.
In other cases, permission to use a particular library in non-free programs enables a greater number of people to use
a large body of free software. For example, permission to use the GNU C Library in non-free programs enables many
more people to use the whole GNU operating system, as well as its variant, the GNU/Linux operating system.

SL-D1000 Series User's Guide
Appendix
179
Although the Lesser General Public License is Less protective of the users' freedom, it does ensure that the user of a
program that is linked with the Library has the freedom and the wherewithal to run that program using a modified
version of the Library.
The precise terms and conditions for copying, distribution and modification follow. Pay close attention to the
difference between a "work based on the library" and a "work that uses the library". The former contains code
derived from the library, whereas the latter must be combined with the library in order to run.
TERMS AND CONDITIONS FOR COPYING, DISTRIBUTION AND MODIFICATION
0. This License Agreement applies to any software library or other program which contains a notice placed by the
copyright holder or other authorized party saying it may be distributed under the terms of this Lesser General Public
License (also called "this License"). Each licensee is addressed as "you".
A "library" means a collection of software functions and/or data prepared so as to be conveniently linked with
application programs (which use some of those functions and data) to form executables.
The "Library", below, refers to any such software library or work which has been distributed under these terms. A
"work based on the Library" means either the Library or any derivative work under copyright law: that is to say, a
work containing the Library or a portion of it, either verbatim or with modifications and/or translated
straightforwardly into another language. (Hereinafter, translation is included without limitation in the term
"modification".)
"Source code" for a work means the preferred form of the work for making modifications to it. For a library,
complete source code means all the source code for all modules it contains, plus any associated interface definition
files, plus the scripts used to control compilation and installation of the library.
Activities other than copying, distribution and modification are not covered by this License; they are outside its
scope. The act of running a program using the Library is not restricted, and output from such a program is covered
only if its contents constitute a work based on the Library (independent of the use of the Library in a tool for writing
it). Whether that is true depends on what the Library does and what the program that uses the Library does.
1. You may copy and distribute verbatim copies of the Library's complete source code as you receive it, in any
medium, provided that you conspicuously and appropriately publish on each copy an appropriate copyright notice
and disclaimer of warranty; keep intact all the notices that refer to this License and to the absence of any warranty;
and distribute a copy of this License along with the Library.

SL-D1000 Series User's Guide
Appendix
180
You may charge a fee for the physical act of transferring a copy, and you may at your option offer warranty
protection in exchange for a fee.
2. You may modify your copy or copies of the Library or any portion of it, thus forming a work based on the Library,
and copy and distribute such modifications or work under the terms of Section 1 above, provided that you also meet
all of these conditions:
a) The modified work must itself be a software library.
b) You must cause the files modified to carry prominent notices stating that you changed the files and the date of
any change.
c) You must cause the whole of the work to be licensed at no charge to all third parties under the terms of this
License.
d) If a facility in the modified Library refers to a function or a table of data to be supplied by an application program
that uses the facility, other than as an argument passed when the facility is invoked, then you must make a good faith
effort to ensure that, in the event an application does not supply such function or table, the facility still operates, and
performs whatever part of its purpose remains meaningful.
(For example, a function in a library to compute square roots has a purpose that is entirely well-defined independent
of the application. Therefore, Subsection 2d requires that any application-supplied function or table used by this
function must be optional: if the application does not supply it, the square root function must still compute square
roots.)
These requirements apply to the modified work as a whole. If identifiable sections of that work are not derived from
the Library, and can be reasonably considered independent and separate works in themselves, then this License, and
its terms, do not apply to those sections when you distribute them as separate works. But when you distribute the
same sections as part of a whole which is a work based on the Library, the distribution of the whole must be on the
terms of this License, whose permissions for other licensees extend to the entire whole, and thus to each and every
part regardless of who wrote it.
Thus, it is not the intent of this section to claim rights or contest your rights to work written entirely by you; rather,
the intent is to exercise the right to control the distribution of derivative or collective works based on the Library.

SL-D1000 Series User's Guide
Appendix
181
In addition, mere aggregation of another work not based on the Library with the Library (or with a work based on
the Library) on a volume of a storage or distribution medium does not bring the other work under the scope of this
License.
3. You may opt to apply the terms of the ordinary GNU General Public License instead of this License to a given
copy of the Library. To do this, you must alter all the notices that refer to this License, so that they refer to the
ordinary GNU General Public License, version 2, instead of to this License. (If a newer version than version 2 of the
ordinary GNU General Public License has appeared, then you can specify that version instead if you wish.) Do not
make any other change in these notices.
Once this change is made in a given copy, it is irreversible for that copy, so the ordinary GNU General Public License
applies to all subsequent copies and derivative works made from that copy.
This option is useful when you wish to copy part of the code of the Library into a program that is not a library.
4. You may copy and distribute the Library (or a portion or derivative of it, under Section 2) in object code or
executable form under the terms of Sections 1 and 2 above provided that you accompany it with the complete
corresponding machine-readable source code, which must be distributed under the terms of Sections 1 and 2 above
on a medium customarily used for software interchange.
If distribution of object code is made by offering access to copy from a designated place, then offering equivalent
access to copy the source code from the same place satisfies the requirement to distribute the source code, even
though third parties are not compelled to copy the source along with the object code.
5. A program that contains no derivative of any portion of the Library, but is designed to work with the Library by
being compiled or linked with it, is called a "work that uses the Library". Such a work, in isolation, is not a derivative
work of the Library, and therefore falls outside the scope of this License.
However, linking a "work that uses the Library" with the Library creates an executable that is a derivative of the
Library (because it contains portions of the Library), rather than a "work that uses the library". The executable is
therefore covered by this License. Section 6 states terms for distribution of such executables.
When a "work that uses the Library" uses material from a header file that is part of the Library, the object code for
the work may be a derivative work of the Library even though the source code is not. Whether this is true is
especially significant if the work can be linked without the Library, or if the work is itself a library. The threshold for
this to be true is not precisely defined by law.

SL-D1000 Series User's Guide
Appendix
182
If such an object file uses only numerical parameters, data structure layouts and accessors, and small macros and
small inline functions (ten lines or less in length), then the use of the object file is unrestricted, regardless of whether
it is legally a derivative work. (Executables containing this object code plus portions of the Library will still fall under
Section 6.)
Otherwise, if the work is a derivative of the Library, you may distribute the object code for the work under the terms
of Section 6. Any executables containing that work also fall under Section 6, whether or not they are linked directly
with the Library itself.
6. As an exception to the Sections above, you may also combine or link a "work that uses the Library" with the
Library to produce a work containing portions of the Library, and distribute that work under terms of your choice,
provided that the terms permit modification of the work for the customer's own use and reverse engineering for
debugging such modifications.
You must give prominent notice with each copy of the work that the Library is used in it and that the Library and its
use are covered by this License. You must supply a copy of this License. If the work during execution displays
copyright notices, you must include the copyright notice for the Library among them, as well as a reference directing
the user to the copy of this License. Also, you must do one of these things:
a) Accompany the work with the complete corresponding machine-readable source code for the Library including
whatever changes were used in the work (which must be distributed under Sections 1 and 2 above); and, if the work
is an executable linked with the Library, with the complete machine-readable "work that uses the Library", as object
code and/or source code, so that the user can modify the Library and then relink to produce a modified executable
containing the modified Library. (It is understood that the user who changes the contents of definitions files in the
Library will not necessarily be able to recompile the application to use the modified definitions.)
b) Use a suitable shared library mechanism for linking with the Library. A suitable mechanism is one that (1) uses
at run time a copy of the library already present on the user's computer system, rather than copying library functions
into the executable, and (2) will operate properly with a modified version of the library, if the user installs one, as
long as the modified version is interface-compatible with the version that the work was made with.
c) Accompany the work with a written offer, valid for at least three years, to give the same user the materials
specified in Subsection 6a, above, for a charge no more than the cost of performing this distribution.
d) If distribution of the work is made by offering access to copy from a designated place, offer equivalent access to
copy the above specified materials from the same place.
e) Verify that the user has already received a copy of these materials or that you have already sent this user a copy.

SL-D1000 Series User's Guide
Appendix
183
For an executable, the required form of the "work that uses the Library" must include any data and utility programs
needed for reproducing the executable from it. However, as a special exception, the materials to be distributed need
not include anything that is normally distributed (in either source or binary form) with the major components
(compiler, kernel, and so on) of the operating system on which the executable runs, unless that component itself
accompanies the executable.
It may happen that this requirement contradicts the license restrictions of other proprietary libraries that do not
normally accompany the operating system. Such a contradiction means you cannot use both them and the Library
together in an executable that you distribute.
7. You may place library facilities that are a work based on the Library side-by-side in a single library together with
other library facilities not covered by this License, and distribute such a combined library, provided that the separate
distribution of the work based on the Library and of the other library facilities is otherwise permitted, and provided
that you do these two things:
a) Accompany the combined library with a copy of the same work based on the Library, uncombined with any other
library facilities. This must be distributed under the terms of the Sections above.
b) Give prominent notice with the combined library of the fact that part of it is a work based on the Library, and
explaining where to find the accompanying uncombined form of the same work.
8. You may not copy, modify, sublicense, link with, or distribute the Library except as expressly provided under this
License. Any attempt otherwise to copy, modify, sublicense, link with, or distribute the Library is void, and will
automatically terminate your rights under this License. However, parties who have received copies, or rights, from
you under this License will not have their licenses terminated so long as such parties remain in full compliance.
9. You are not required to accept this License, since you have not signed it. However, nothing else grants you
permission to modify or distribute the Library or its derivative works. These actions are prohibited by law if you do
not accept this License. Therefore, by modifying or distributing the Library (or any work based on the Library), you
indicate your acceptance of this License to do so, and all its terms and conditions for copying, distributing or
modifying the Library or works based on it.
10. Each time you redistribute the Library (or any work based on the Library), the recipient automatically receives a
license from the original licensor to copy, distribute, link with or modify the Library subject to these terms and
conditions. You may not impose any further restrictions on the recipients' exercise of the rights granted herein. You
are not responsible for enforcing compliance by third parties with this License.

SL-D1000 Series User's Guide
Appendix
184
11. If, as a consequence of a court judgment or allegation of patent infringement or for any other reason (not limited
to patent issues), conditions are imposed on you (whether by court order, agreement or otherwise) that contradict
the conditions of this License, they do not excuse you from the conditions of this License. If you cannot distribute
so as to satisfy simultaneously your obligations under this License and any other pertinent obligations, then as a
consequence you may not distribute the Library at all. For example, if a patent license would not permit royalty-free
redistribution of the Library by all those who receive copies directly or indirectly through you, then the only way you
could satisfy both it and this License would be to refrain entirely from distribution of the Library.
If any portion of this section is held invalid or unenforceable under any particular circumstance, the balance of the
section is intended to apply, and the section as a whole is intended to apply in other circumstances.
It is not the purpose of this section to induce you to infringe any patents or other property right claims or to contest
validity of any such claims; this section has the sole purpose of protecting the integrity of the free software
distribution system which is implemented by public license practices. Many people have made generous
contributions to the wide range of software distributed through that system in reliance on consistent application of
that system; it is up to the author/donor to decide if he or she is willing to distribute software through any other
system and a licensee cannot impose that choice.
This section is intended to make thoroughly clear what is believed to be a consequence of the rest of this License.
12. If the distribution and/or use of the Library is restricted in certain countries either by patents or by copyrighted
interfaces, the original copyright holder who places the Library under this License may add an explicit geographical
distribution limitation excluding those countries, so that distribution is permitted only in or among countries not
thus excluded. In such case, this License incorporates the limitation as if written in the body of this License.
13. The Free Software Foundation may publish revised and/or new versions of the Lesser General Public License
from time to time. Such new versions will be similar in spirit to the present version, but may differ in detail to
address new problems or concerns.
Each version is given a distinguishing version number. If the Library specifies a version number of this License
which applies to it and "any later version", you have the option of following the terms and conditions either of that
version or of any later version published by the Free Software Foundation. If the Library does not specify a license
version number, you may choose any version ever published by the Free Software Foundation.
14. If you wish to incorporate parts of the Library into other free programs whose distribution conditions are
incompatible with these, write to the author to ask for permission. For software which is copyrighted by the Free
Software Foundation, write to the Free Software Foundation; we sometimes make exceptions for this. Our decision
will be guided by the two goals of preserving the free status of all derivatives of our free software and of promoting
the sharing and reuse of software generally.

SL-D1000 Series User's Guide
Appendix
185
NO WARRANTY
15. BECAUSE THE LIBRARY IS LICENSED FREE OF CHARGE, THERE IS NO WARRANTY FOR THE
LIBRARY, TO THE EXTENT PERMITTED BY APPLICABLE LAW. EXCEPT WHEN OTHERWISE STATED IN
WRITING THE COPYRIGHT HOLDERS AND/OR OTHER PARTIES PROVIDE THE LIBRARY "AS IS"
WITHOUT WARRANTY OF ANY KIND, EITHER EXPRESSED OR IMPLIED, INCLUDING, BUT NOT
LIMITED TO, THE IMPLIED WARRANTIES OF MERCHANTABILITY AND FITNESS FOR A PARTICULAR
PURPOSE. THE ENTIRE RISK AS TO THE QUALITY AND PERFORMANCE OF THE LIBRARY IS WITH
YOU. SHOULD THE LIBRARY PROVE DEFECTIVE, YOU ASSUME THE COST OF ALL NECESSARY
SERVICING, REPAIR OR CORRECTION.
16. IN NO EVENT UNLESS REQUIRED BY APPLICABLE LAW OR AGREED TO IN WRITING WILL ANY
COPYRIGHT HOLDER, OR ANY OTHER PARTY WHO MAY MODIFY AND/OR REDISTRIBUTE THE
LIBRARY AS PERMITTED ABOVE, BE LIABLE TO YOU FOR DAMAGES, INCLUDING ANY GENERAL,
SPECIAL, INCIDENTAL OR CONSEQUENTIAL DAMAGES ARISING OUT OF THE USE OR INABILITY TO
USE THE LIBRARY (INCLUDING BUT NOT LIMITED TO LOSS OF DATA OR DATA BEING RENDERED
INACCURATE OR LOSSES SUSTAINED BY YOU OR THIRD PARTIES OR A FAILURE OF THE LIBRARY TO
OPERATE WITH ANY OTHER SOFTWARE), EVEN IF SUCH HOLDER OR OTHER PARTY HAS BEEN
ADVISED OF THE POSSIBILITY OF SUCH DAMAGES.
END OF TERMS AND CONDITIONS
How to Apply These Terms to Your New Libraries
If you develop a new library, and you want it to be of the greatest possible use to the public, we recommend making
it free software that everyone can redistribute and change. You can do so by permitting redistribution under these
terms (or, alternatively, under the terms of the ordinary General Public License).
To apply these terms, attach the following notices to the library. It is safest to attach them to the start of each source
file to most effectively convey the exclusion of warranty; and each file should have at least the "copyright" line and a
pointer to where the full notice is found.
<one line to give the library's name and an idea of what it does.>
Copyright (C) <year> <name of author>

SL-D1000 Series User's Guide
Appendix
186
This library is free software; you can redistribute it and/or modify it under the terms of the GNU Lesser General
Public License as published by the Free Software Foundation; either version 2.1 of the License, or (at your option)
any later version.
This library is distributed in the hope that it will be useful, but WITHOUT ANY WARRANTY; without even the
implied warranty of MERCHANTABILITY or FITNESS FOR A PARTICULAR PURPOSE. See the GNU Lesser
General Public License for more details.
You should have received a copy of the GNU Lesser General Public License along with this library; if not, write to
the Free Software Foundation, Inc., 51 Franklin Street, Fifth Floor, Boston, MA 02110-1301 USA
Also add information on how to contact you by electronic and paper mail.
You should also get your employer (if you work as a programmer) or your school, if any, to sign a "copyright
disclaimer" for the library, if necessary. Here is a sample; alter the names:
Yoyodyne, Inc., hereby disclaims all copyright interest in the library `Frob' (a library for tweaking knobs) written by
James Random Hacker.
<signature of Ty Coon>, 1 April 1990
Ty Coon, President of Vice
That's all there is to it!
PDFsharp License
PDFsharp is published under the MIT License.
Copyright (c) 2005-2014 empira Software GmbH, Troisdorf (Germany)

SL-D1000 Series User's Guide
Appendix
187
Permission is hereby granted, free of charge, to any person obtaining a copy of this software and associated
documentation files (the "Software"), to deal in the Software without restriction, including without limitation the
rights to use, copy, modify, merge, publish, distribute, sublicense, and/or sell copies of the Software, and to permit
persons to whom the Software is furnished to do so, subject to the following conditions:
The above copyright notice and this permission notice shall be included in all copies or substantial portions of the
Software.
THE SOFTWARE IS PROVIDED "AS IS", WITHOUT WARRANTY OF ANY KIND, EXPRESS OR IMPLIED,
INCLUDING BUT NOT LIMITED TO THE WARRANTIES OF MERCHANTABILITY, FITNESS FOR A
PARTICULAR PURPOSE AND NONINFRINGEMENT. IN NO EVENT SHALL THE AUTHORS OR
COPYRIGHT HOLDERS BE LIABLE FOR ANY CLAIM, DAMAGES OR OTHER LIABILITY, WHETHER IN
AN ACTION OF CONTRACT, TORT OR OTHERWISE, ARISING FROM, OUT OF OR IN CONNECTION
WITH THE SOFTWARE OR THE USE OR OTHER DEALINGS IN THE SOFTWARE.
PDFsharp is Open Source.
You can copy, modify and integrate the source code of PDFsharp in your application without restrictions at all.
This also applies to commercial products (both open source and closed source).
HTML-Renderer / LICENSE
Redistribution and use in source and binary forms, with or without modification, are permitted provided that the
following conditions are met:
Redistributions of source code must retain the above copyright notice, this list of conditions and the following
disclaimer.
Redistributions in binary form must reproduce the above copyright notice, this list of conditions and the following
disclaimer in the documentation and/or other materials provided with the distribution.
Neither the name of the menendezpoo.com, ArthurHub nor the names of its contributors may be used to endorse
or promote products derived from this software without specific prior written permission.

SL-D1000 Series User's Guide
Appendix
188
THIS SOFTWARE IS PROVIDED BY THE COPYRIGHT HOLDERS AND CONTRIBUTORS "AS IS" AND ANY
EXPRESS OR IMPLIED WARRANTIES, INCLUDING, BUT NOT LIMITED TO, THE IMPLIED WARRANTIES
OF MERCHANTABILITY AND FITNESS FOR A PARTICULAR PURPOSE ARE DISCLAIMED. IN NO EVENT
SHALL THE COPYRIGHT HOLDER OR CONTRIBUTORS BE LIABLE FOR ANY DIRECT, INDIRECT,
INCIDENTAL, SPECIAL, EXEMPLARY, OR CONSEQUENTIAL DAMAGES
(INCLUDING, BUT NOT LIMITED TO, PROCUREMENT OF SUBSTITUTE GOODS OR SERVICES; LOSS OF
USE, DATA, OR PROFITS; OR BUSINESS INTERRUPTION) HOWEVER CAUSED AND ON ANY THEORY
OF LIABILITY, WHETHER IN CONTRACT, STRICT LIABILITY, OR TORT (INCLUDING NEGLIGENCE OR
OTHERWISE) ARISING IN ANY WAY OUT OF THE USE OF THIS SOFTWARE, EVEN IF ADVISED OF THE
POSSIBILITY OF SUCH DAMAGE.
EPSON END USER SOFTWARE LICENSE AGREEMENT
NOTICE TO USER: PLEASE READ THIS AGREEMENT CAREFULLY BEFORE INSTALLING OR USING THIS
PRODUCT. IF YOU ARE LOCATED IN THE UNITED STATES, SECTIONS 19-23 OF THIS DOCUMENT
APPLY TO YOU. SECTION 22 CONTAINS A BINDING ARBITRATION PROVISION THAT LIMITS YOUR
ABILITY TO SEEK RELIEF IN A COURT BEFORE A JUDGE OR JURY, AND WAIVES YOUR RIGHT TO
PARTICIPATE IN CLASS ACTIONS OR CLASS ARBITRATIONS FOR CERTAIN DISPUTES. AN “OPT-OUT”
IS AVAILABLE UNDER SECTION 22.7 FOR THOSE WHO WISH TO BE EXCLUDED FROM THE
ARBITRATION AND CLASS WAIVER.
This is a legal agreement (“Agreement”) between you (an individual or entity, referred to hereinafter as “you”) and
Seiko Epson Corporation (including its affiliates, “Epson”) for the enclosed software programs, including any
related documentation, firmware, or updates (collectively referred to hereinafter as the “Software”). The Software is
provided by Epson and its suppliers for use only with the corresponding Epson brand computer peripheral product
(the “Epson Hardware”). BEFORE INSTALLING, COPYING OR OTHERWISE USING THE SOFTWARE, YOU
NEED TO REVIEW AND AGREE TO THE TERMS AND CONDITIONS OF THIS AGREEMENT INCLUDING
THE EPSON PRIVACY POLICY stated in Section 17. If you agree, click on the Agree (“ACCEPT”, “OK” or any
similar representation of agreement) button below. If you do not agree with the terms and conditions of this
Agreement, click on the Disagree (“EXIT”, “Cancel” or any similar representation of disagreement) button and
return the Software, along with the packaging and related materials, to Epson or the place of purchase for a full
refund.
1. Grant of License. Epson grants you a limited, nonexclusive license to (i) download, install and use the Software
for your personal and internal business use on hard disks or other computer storage devices, or in the case of a
software application (also referred to as “Software”), on the smartphone, tablet, or other mobile device (collectively,
“Device”), provided that the Software is used (i) only in a single location (e.g., a home or office or place of business),
or in the case of a mobile device, on a Device owned or otherwise controlled by you, and (ii) only in connection with
Epson Hardware owned by you. You may allow other users of the Epson Hardware connected to your network to
use the Software, provided that you shall ensure that such users use the Software only in accordance with this
Agreement. You agree to be responsible for and indemnify Epson for liabilities incurred as a consequence of use by
such users. You may make backup copies of the Software, as necessary, provided the backup is only used to support
your use of the Epson Hardware.

SL-D1000 Series User's Guide
Appendix
189
2. Upgrades and Updates. If you acquire an upgrade, updated version, modified version, or additions to or for the
Software from Epson, the upgrade, updated version, modified version, or addition, shall be included in the defined
term Software and governed by this Agreement. You acknowledge that Epson has no obligation to provide you with
any Updates (as defined below in this Section 2) to the Software. Epson may, however, from time to time, issue
updated versions of the Software and the Software may automatically connect to Epson or third-party servers via the
Internet to check for available updates to the Software, such as bug fixes, patches, upgrades, additional or enhanced
functions, plug-ins and new versions (collectively, “Updates”) and may either (a) automatically electronically
update the version of the Software that you are using on your personal device or (b) give you the option of manually
downloading applicable Updates. If you installed the EPSON Software Updater and do not wish to allow Epson to
check for available updates to the Software, you may disable this feature by uninstalling EPSON Software Updater.
By installing the Software and not disabling any automated check for Updates, if applicable, you hereby agree and
consent to automatically request and receive Updates from Epson or third-party servers, and that the terms and
conditions of this Agreement shall apply to all of these Updates.
3. Other Rights and Limitations. You agree not to modify, adapt or translate the Software and further agree not to
attempt to reverse engineer, decompile, disassemble or otherwise attempt to discover the source code of the
Software. You may not rent, lease, distribute, lend the Software to third parties or incorporate the Software into a
revenue generating product or service. You may, however, transfer all of your rights to use the Software to another
person or legal entity, provided that the recipient also agrees to the terms of this Agreement and you transfer the
Software, including all copies, updates and prior versions, and the Epson Hardware, to such person or entity. The
Software is licensed as a single unit, and its component programs may not be separated for some other use. Further,
you agree not to place the Software onto or into a shared environment accessible via a public network such as the
Internet or otherwise accessible by others outside the single location referred to in Section 1 above.
4. Ownership. Title, ownership rights, and intellectual property rights in and to the Software shall remain with
Epson or its licensors and suppliers. The Software is protected by United States Copyright Law, copyright laws of
Japan and international copyright treaties, as well as other intellectual property laws and treaties. There is no
transfer to you of any title to or ownership of the Software and this License shall not be construed as a sale of any
rights in the Software. You agree not to remove or alter any copyright, trademark, registered mark and other
proprietary notices on any copies of the Software. Epson and/or its licensors and suppliers reserve all rights not
granted. The Software may also contain images, illustrations, designs and photos (“Materials”), and the copyright
of such material belongs to Epson and/or its licensors and suppliers, protected by national and/or international
intellectual property laws, conventions and treaties. For clarity, (1) the Materials shall be used for non-commercial
purposes only, (2) the Materials shall be edited, adjusted and copied only in the manner designated by the Software,
and (3) you may use the Materials only for lawful personal use, home use or as otherwise legally permitted.
5. Open Source and Other Third-Party Components. Notwithstanding the foregoing license grant, you
acknowledge that certain components of the Software may be covered by third-party licenses, including so-called
“open source” software licenses, which means any software licenses approved as open source licenses by the Open
Source Initiative or any substantially similar licenses, including without limitation any license that, as a condition of
distribution of the software licensed under such license, requires that the distributor make the software available in
source code format (such third-party components, “Third-Party Components”). A list of Third-Party Components,
and associated license terms (as required), for particular versions of the Software is indicated at the end of this
Agreement, relevant user manual/CD, or the license information displayed on your Device/in Software. To the
extent required by the licenses covering Third-Party Components, the terms of such licenses will apply in lieu of the
terms of this Agreement. To the extent the terms of the licenses applicable to Third-Party Components prohibit any
of the restrictions in this Agreement with respect to such Third-Party Components, such restrictions will not apply
to such Third-Party Component.

SL-D1000 Series User's Guide
Appendix
190
6. Multiple Versions of Software. You may receive or obtain the Software in more than one version (e.g. for different
operating environments; two or more language translation versions; downloaded from an Epson server or on a
CD-ROM), however, regardless of the type or number of copies you receive, you still may use only the media or
version appropriate for the license granted in Section 1 above.
7. Disclaimer of Warranty and Remedy. If you obtained the Software by media from Epson or a dealer, Epson
warrants that the media on which the Software is recorded will be free from defects in workmanship and materials
under normal use for a period of 90 days from the date of delivery to you. If the media is returned to Epson or the
dealer from which the media was obtained within 90 days of the date of delivery to you, and if Epson determines the
media to be defective and provided the media was not subject to misuse, abuse, misapplication or use in defective
equipment, Epson will replace the media, upon your return to Epson of the Software, including all copies of any
portions thereof. You acknowledge and agree that the use of the Software is at your sole risk. THE SOFTWARE IS
PROVIDED "AS IS" AND WITHOUT ANY WARRANTY OF ANY KIND. EPSON AND ITS SUPPLIERS DO
NOT AND CANNOT WARRANT THE PERFORMANCE OR RESULTS YOU MAY OBTAIN BY USING THE
SOFTWARE. Epson does not warrant that the operation of the Software will be uninterrupted, error free, free from
viruses or other harmful components or vulnerabilities, or that the functions of the Software will meet your needs
or requirements. Epson’s sole and exclusive liability and your exclusive remedy for breach of warranty shall be
limited to either, at Epson’s option, the replacement of the media for the Software or to refund your money upon
returning the Software and Epson Hardware. Any replacement Software will be warranted for the remainder of the
original warranty period or thirty (30) days, whichever is longer. If the above remedy fails for any reason, Epson’s
entire liability for a breach of warranty shall be limited to a refund of the price paid for the Epson Hardware. Epson
is not liable for performance delays or for nonperformance due to causes beyond its reasonable control. This
Limited Warranty is void if failure of the Software resulted from accident, abuse, or misapplication. THE STATED
LIMITED WARRANTIES AND REMEDY ARE EXCLUSIVE AND IN LIEU OF ALL OTHERS. EPSON
DISCLAIMS ALL OTHER WARRANTIES, EITHER EXPRESS OR IMPLIED, INCLUDING WITHOUT
LIMITATION, ALL WARRANTIES OF NON-INFRINGEMENT, MERCHANTABILITY, AND FITNESS FOR A
PARTICULAR PURPOSE. SOME STATES OR JURISDICTIONS, HOWEVER, DO NOT ALLOW EXCLUSIONS
OR LIMITATIONS OF IMPLIED WARRANTIES, AND IN SUCH STATES, THE ABOVE LIMITATION MAY
NOT APPLY TO YOU.
8. Limitation of Liability. TO THE MAXIMUM EXTENT PERMITTED BY APPLICABLE LAW, IN NO EVENT
WILL EPSON OR ITS SUPPLIERS BE LIABLE FOR ANY DAMAGES, WHATSOEVER, WHETHER DIRECT,
INDIRECT, SPECIAL, INCIDENTAL, OR CONSEQUENTIAL DAMAGES, WHETHER ARISING UNDER
CONTRACT, TORT (INCLUDING NEGLIGENCE), STRICT LIABILITY, BREACH OF WARRANTY,
MISREPRESENTATION, OR OTHERWISE, INCLUDING WITHOUT LIMITATION, DAMAGES FOR LOSS
OF BUSINESS PROFITS, BUSINESS INTERRUPTION, LOSS OF BUSINESS INFORMATION, OR OTHER
PECUNIARY LOSS, ARISING OUT OF THE USE OF OR INABILITY TO USE THE SOFTWARE, OR ARISING
OUT OF THIS AGREEMENT, EVEN IF EPSON OR ITS REPRESENTATIVE HAS BEEN ADVISED OF THE
POSSIBILITY OF SUCH DAMAGES. SOME STATES DO NOT ALLOW THE EXCLUSION OR LIMITATION
OF DAMAGES IN CERTAIN TRANSACTIONS, AND IN SUCH STATES, THE ABOVE LIMITATIONS AND
EXCLUSIONS MAY NOT APPLY.

SL-D1000 Series User's Guide
Appendix
191
9. U.S. Government Acquisition of the Software. This Section applies to all acquisitions of the Software by or for the
U.S. Government (“Government”), or by any prime contractor or subcontractor (at any tier) under any contract,
grant, cooperative agreement, “other transaction” (“OT”), or other activity with the Government. By accepting
delivery of the Software, the Government, any prime contractor, and any subcontractor agree that the Software
qualifies as “commercial” computer software within the meaning of FAR Part 12, paragraph (b) of FAR Subpart
27.405, or DFARS Subpart 227.7202, as applicable, and that no other regulation, or FAR or DFARS data rights
clause, applies to the delivery of this Software to the Government. Accordingly, the terms and conditions of this
Agreement govern the Government’s (and the prime contractor and subcontractor’s) use and disclosure of the
Software, and supersede any conflicting terms and conditions of the contract, grant, cooperative agreement, OT, or
other activity pursuant to which the Software is delivered to the Government. If this Software fails to meet the
Government’s needs, if this Agreement is inconsistent in any respect with Federal law, or if the above cited FAR and
DFARS provisions do not govern, the Government agrees to return the Software, unused, to Epson.
10. Export Restriction. You agree that the Software will not be shipped, transferred or exported into any country or
used in any manner prohibited by the United States Export Administration Act or any other export laws,
restrictions or regulations.
11. Entire Agreement. This Agreement is the entire agreement between the parties related to the Software and
supersedes any purchase order, communication, advertisement, or representation concerning the Software.
12. Binding Agreement; Assignees. This Agreement shall be binding upon, and inure to the benefit of, the parties
hereto and their respective successors, assigns and legal representatives.
13. Severability; Modifications. If any provision herein is found void or unenforceable by a court of competent
jurisdiction (subject to Section 22.8 and 22.9 if you are a located in the U.S.), it will not affect the validity of the
balance of the Agreement, which shall remain valid and enforceable according to its terms. This Agreement may
only be modified in writing signed by an authorized representative of Epson.
14. Indemnification. You agree that you will indemnify and hold harmless, and upon Epson’s request, defend Epson
and its directors, officers, shareholders, employees and agents from and against any and all losses, liabilities,
damages, costs, expenses (including reasonable attorneys’ fees), actions, suits, and claims arising from (i) any breach
of any of your obligations in this Agreement or (ii) any use of the Software or the Epson Hardware. If Epson asks
you to defend any such action, suit or claim, Epson will have the right, at its own expense, to participate in the
defense thereof with counsel of its choice. You will not settle any third-party claims for which Epson is entitled to
indemnification without the prior written approval of Epson.
15. Termination. Without prejudice to any other rights Epson has, your license rights under Section 1 above and
your warranty rights under Section 7 above, shall automatically terminate upon failure by you to comply with this
Agreement. Upon termination of such rights, you agree that the Software, and all copies thereof, will be
immediately destroyed.

SL-D1000 Series User's Guide
Appendix
192
16. Capacity and Authority to Contract. You represent that you are of the legal age of majority in your state or
jurisdiction of residence and have all necessary authority to enter into this Agreement, including, if applicable, due
authorization by your employer to enter into this Agreement.
17. Privacy, Information Processing. The Software may have the ability to connect over the Internet to transmit data
to and from your Device. For example, if you install the Software, the Software may cause your Device to send
information about your Epson Hardware such as model and serial number, country identifier, language code,
operating system information, and Epson Hardware usage information to an Epson Internet site which may return
promotional or service information to your Device for display. Any processing of information provided through
the Software, shall be according to applicable data protection laws and the Epson Privacy Policy located at
https://global.epson.com/privacy/area_select_confirm_eula.html. To the extent permitted by applicable laws, by
agreeing to the terms of this Agreement and by installing the Software, you consent to the processing and storage of
your information in and/or outside your country of residence. If there is a specific privacy policy incorporated into
the Software and/or displayed when you use the Software (for example, in the case of certain software application
software), such specific privacy policy shall prevail over the Epson Privacy Policy stated above.
18. Third Party Websites. You may, through hypertext or other computer links from the Software, gain access to
websites and use certain services that are not under the control of or operated by Epson, but rather are controlled by
third parties. You acknowledge and agree that Epson is not responsible for such third party sites or services,
including their accuracy, completeness, timeliness, validity, copyright compliance, legality, decency, quality, or any
other aspect thereof. These third party websites/services are subject to different terms and conditions and when you
access and use third party websites/services, you will be legally bound by the terms and conditions of those
websites/services. If there is a conflict between this Agreement and terms and conditions of third party
websites/services, the third party websites’/services’ terms and conditions will govern with respect to your access
and use of those websites/services. Although Epson may provide a link to a third party website/service from the
Software, such a link is not an authorization, endorsement, sponsorship or affiliation by Epson with respect to such
website/services, its content, its owners or its providers. Epson provides such links for your reference and
convenience only. Accordingly, Epson makes no representations whatsoever concerning such websites/services and
does not provide any support related to such third party sites or services. Epson has not tested any information,
products or software found on such websites/services and therefore cannot make any representations whatsoever
with respect thereto. You agree that Epson is not responsible for the content or operation of such websites/services,
and it is up to you to take precautions to ensure that whatever you select is free of items such as viruses, worms,
Trojan horses and other items of a destructive nature. You are solely responsible for determining the extent to
which you may use any content at any other websites/services to which you link from this Software.
(IF YOU ARE LOCATED IN THE UNITED STATES, THE FOLLOWING SECTIONS 19 - 23 APPLY TO YOU)
19. Ink Purchases. For certain Epson printer products sold in North America, the Software may also display an
option to buy ink from Epson. If you click on the buy button, the Software will cause your Device to display Epson
Hardware cartridge types and ink levels and provide other information about your cartridges, such as the colors,
available cartridge sizes, and prices for replacement ink cartridges, which you may purchase online from Epson.

SL-D1000 Series User's Guide
Appendix
193
20. Downloadable Updates. You may also be able to download from an Epson Internet site updates or upgrades to
the Software if such updates or upgrades are made available. If you agree to install the Software, any transmissions
to or from the Internet, and data collection and use, will be in accordance with Epson’s then-current Privacy Policy,
and by installing the Software you agree that such then-current Privacy Policy shall govern such activities.
21. Epson Accounts and Promotional Messages. In addition, if you install the Software and register your Epson
Hardware with Epson, and/or you create an account at the Epson Store, and provided your consent to such use, you
agree that Epson may merge the data collected in connection with installation of the Software, registration of your
Epson Hardware and/or creation of your Epson Store account, consisting of personal information and
non-personally identifiable information, and use such merged data to send you Epson promotional or service
information. If you do not wish to send information about your Epson Hardware or receive promotional or service
information, you will be able to disable these features on a Windows system through the Monitoring Preferences
section in the driver. On a Mac operating system, you can disable these features by uninstalling the Epson Customer
Research Participation and Low Ink Reminder software.
22. DISPUTES, BINDING INDIVIDUAL ARBITRATION, AND WAIVER OF CLASS ACTIONS AND CLASS
ARBITRATIONS
22.1 Disputes. The terms of this Section 22 shall apply to all Disputes between you and Epson. The term “Dispute”
is meant to have the broadest meaning permissible under law and includes any dispute, claim, controversy or action
between you and Epson arising out of or relating to this Agreement, the Software, Epson Hardware, or other
transaction involving you and Epson, whether in contract, warranty, misrepresentation, fraud, tort, intentional tort,
statute, regulation, ordinance, or any other legal or equitable basis. “DISPUTE” DOES NOT INCLUDE IP
CLAIMS, or more specifically, a claim or cause of action for (a) trademark infringement or dilution, (b) patent
infringement, (c) copyright infringement or misuse, or (d) trade secret misappropriation (an “IP Claim”). You and
Epson also agree, notwithstanding Section 22.6, that a court, not an arbitrator, may decide if a claim or cause of
action is for an IP Claim.
22.2 Binding Arbitration. You and Epson agree that all Disputes shall be resolved by binding arbitration according
to this Agreement. ARBITRATION MEANS THAT YOU WAIVE YOUR RIGHT TO A JUDGE OR JURY IN A
COURT PROCEEDING AND YOUR GROUNDS FOR APPEAL ARE LIMITED. Pursuant to this Agreement,
binding arbitration shall be administered by JAMS, a nationally recognized arbitration authority, pursuant to its
code of procedures then in effect for consumer related disputes, but excluding any rules that permit joinder or class
actions in arbitration (for more detail on procedure, see Section 22.6 below). You and Epson understand and agree
that (a) the Federal Arbitration Act (9 U.S.C. §1, et seq.) governs the interpretation and enforcement of this Section
22, (b) this Agreement memorializes a transaction in interstate commerce, and (c) this Section 22 shall survive
termination of this Agreement.

SL-D1000 Series User's Guide
Appendix
194
22.3 Pre-Arbitration Steps and Notice. Before submitting a claim for arbitration, you and Epson agree to try, for
sixty (60) days, to resolve any Dispute informally. If Epson and you do not reach an agreement to resolve the
Dispute within the sixty (60) days, you or Epson may commence an arbitration. Notice to Epson must be addressed
to: Epson America, Inc., ATTN: Legal Department, 3840 Kilroy Airport Way, Long Beach, CA 90806 (the “Epson
Address”). The Dispute Notice to you will be sent to the most recent address Epson has in its records for you. For
this reason, it is important to notify us if your address changes by emailing us at [email protected] or writing
us at the Epson Address above. Notice of the Dispute shall include the sender’s name, address and contact
information, the facts giving rise to the Dispute, and the relief requested (the “Dispute Notice”). Following receipt
of the Dispute Notice, Epson and you agree to act in good faith to resolve the Dispute before commencing
arbitration.
22.4 Small Claims Court. Notwithstanding the foregoing, you may bring an individual action in the small claims
court of your state or municipality if the action is within that court’s jurisdiction and is pending only in that court.
22.5 WAIVER OF CLASS ACTIONS AND CLASS ARBITRATIONS. YOU AND EPSON AGREE THAT EACH
PARTY MAY BRING DISPUTES AGAINST THE OTHER PARTY ONLY IN AN INDIVIDUAL CAPACITY,
AND NOT AS A PLAINTIFF OR CLASS MEMBER IN ANY CLASS OR REPRESENTATIVE PROCEEDING,
INCLUDING WITHOUT LIMITATION FEDERAL OR STATE CLASS ACTIONS, OR CLASS ARBITRATIONS.
CLASS ACTION LAWSUITS, CLASS-WIDE ARBITRATIONS, PRIVATE ATTORNEY-GENERAL ACTIONS,
AND ANY OTHER PROCEEDING WHERE SOMEONE ACTS IN A REPRESENTATIVE CAPACITY ARE NOT
ALLOWED. ACCORDINGLY, UNDER THE ARBITRATION PROCEDURES OUTLINED IN THIS SECTION,
AN ARBITRATOR SHALL NOT COMBINE OR CONSOLIDATE MORE THAN ONE PARTY’S CLAIMS
WITHOUT THE WRITTEN CONSENT OF ALL AFFECTED PARTIES TO AN ARBITRATION PROCEEDING.
22.6 Arbitration Procedure. If you or Epson commences arbitration, the arbitration shall be governed by the rules
of JAMS that are in effect when the arbitration is filed, excluding any rules that permit arbitration on a class or
representative basis (the “JAMS Rules”), available at http://www.jamsadr.com or by calling 1-800-352-5267, and
under the rules set forth in this Agreement. All Disputes shall be resolved by a single neutral arbitrator, and both
parties shall have a reasonable opportunity to participate in the selection of the arbitrator. The arbitrator is bound
by the terms of this Agreement. The arbitrator, and not any federal, state or local court or agency, shall have
exclusive authority to resolve all disputes arising out of or relating to the interpretation, applicability, enforceability
or formation of this Agreement, including any claim that all or any part of this Agreement is void or voidable.
Notwithstanding this broad delegation of authority to the arbitrator, a court may determine the limited question of
whether a claim or cause of action is for an IP Claim, which is excluded from the definition of “Disputes” in Section
22.1 above. The arbitrator shall be empowered to grant whatever relief would be available in a court under law or in
equity. The arbitrator may award you the same damages as a court could, and may award declaratory or injunctive
relief only in favor of the individual party seeking relief and only to the extent necessary to provide relief warranted
by that party’s individual claim. In some instances, the costs of arbitration can exceed the costs of litigation and the
right to discovery may be more limited in arbitration than in court. The arbitrator’s award is binding and may be
entered as a judgment in any court of competent jurisdiction.
You may choose to engage in arbitration hearings by telephone. Arbitration hearings not conducted by telephone
shall take place in a location reasonably accessible from your primary residence, or in Orange County, California, at
your option.

SL-D1000 Series User's Guide
Appendix
195
a) Initiation of Arbitration Proceeding. If either you or Epson decides to arbitrate a Dispute, both parties agree to
the following procedure:
(i) Write a Demand for Arbitration. The demand must include a description of the Dispute and the amount of
damages sought to be recovered. You can find a copy of a Demand for Arbitration at http://www.jamsadr.com
(“Demand for Arbitration”).
(ii) Send three copies of the Demand for Arbitration, plus the appropriate filing fee, to: JAMS, 500 North State
College Blvd., Suite 600 Orange, CA 92868, U.S.A.
(iii) Send one copy of the Demand for Arbitration to the other party (same address as the Dispute Notice), or as
otherwise agreed by the parties.
b) Hearing Format. During the arbitration, the amount of any settlement offer made shall not be disclosed to the
arbitrator until after the arbitrator determines the amount, if any, to which you or Epson is entitled. The discovery
or exchange of non-privileged information relevant to the Dispute may be allowed during the arbitration.
c) Arbitration Fees. Epson shall pay, or (if applicable) reimburse you for, all JAMS filings and arbitrator fees for any
arbitration commenced (by you or Epson) pursuant to provisions of this Agreement.
d) Award in Your Favor. For Disputes in which you or Epson seeks $75,000 or less in damages exclusive of
attorney’s fees and costs, if the arbitrator’s decision results in an award to you in an amount greater than Epson’s last
written offer, if any, to settle the Dispute, Epson will: (i) pay you $1,000 or the amount of the award, whichever is
greater; (ii) pay you twice the amount of your reasonable attorney’s fees, if any; and (iii) reimburse you for any
expenses (including expert witness fees and costs) that your attorney reasonably accrues for investigating,
preparing, and pursuing the Dispute in arbitration. Except as agreed upon by you and Epson in writing, the
arbitrator shall determine the amount of fees, costs, and expenses to be paid by Epson pursuant to this Section
22.6d).
e) Attorney’s Fees. Epson will not seek its attorney’s fees and expenses for any arbitration commenced involving a
Dispute under this Agreement. Your right to attorney’s fees and expenses under Section 22.6(d) above does not
limit your rights to attorney’s fees and expenses under applicable law; notwithstanding the foregoing, the arbitrator
may not award duplicative awards of attorney’s fees and expenses.
22.7 Opt-out. You may elect to opt-out (exclude yourself) from the final, binding, individual arbitration procedure
and waiver of class and representative proceedings specified in this Agreement by sending a written letter to the
Epson Address within thirty (30) days of your assent to this Agreement (including without limitation the purchase,
download, installation of the Software or other applicable use of Epson Hardware, products and services) that
specifies (i) your name, (ii) your mailing address, and (iii) your request to be excluded from the final, binding
individual arbitration procedure and waiver of class and representative proceedings specified in this Section 22. In
the event that you opt-out consistent with the procedure set forth above, all other terms shall continue to apply,
including the requirement to provide notice prior to litigation.
22.8 Amendments to Section 22. Notwithstanding any provision in this Agreement to the contrary, you and Epson
agree that if Epson makes any future amendments to the dispute resolution procedure and class action waiver
provisions (other than a change to Epson’s address) in this Agreement, Epson will obtain your affirmative assent to
the applicable amendment. If you do not affirmatively assent to the applicable amendment, you are agreeing that
you will arbitrate any Dispute between the parties in accordance with the language of this Section 22 (or resolve
disputes as provided for in Section 22.7, if you timely elected to opt-out when you first assented to this Agreement).

SL-D1000 Series User's Guide
Appendix
196
22.9 Severability. If any provision in this Section 22 is found to be unenforceable, that provision shall be severed
with the remainder of this Agreement remaining in full force and effect. The foregoing shall not apply to the
prohibition against class or representative actions as provided in Section 22.5. This means that if Section 22.5 is
found to be unenforceable, the entire Section 22 (but only Section 22) shall be null and void.
23. For New Jersey Residents. NOTWITHSTANDING ANY TERMS SET FORTH IN THIS AGREEMENT, IF
ANY OF THE PROVISIONS SET FORTH IN SECTIONS 7 OR 8 ARE HELD UNENFORCEABLE, VOID OR
INAPPLICABLE UNDER NEW JERSEY LAW, THEN ANY SUCH PROVISION SHALL NOT APPLY TO YOU
BUT THE REST OF THE AGREEMENT SHALL REMAIN BINDING ON YOU AND EPSON.
NOTWITHSTANDING ANY PROVISION IN THIS AGREEMENT, NOTHING IN THIS AGREEMENT IS
INTENDED TO, NOR SHALL IT BE DEEMED OR CONSTRUED TO, LIMIT ANY RIGHTS AVAILABLE TO
YOU UNDER THE TRUTH-IN-CONSUMER CONTRACT, WARRANTY AND NOTICE ACT.
Rev. December 2018

SL-D1000 Series User's Guide
Where To Get Help
197
Where To Get Help
New :See comments to select sections you need. Th e word "other" indicates products except fo r inkjet, SPC, Page, and SIDM.
Technical Support Web
Site
New :Only inkjet, SPC, and Scanner products are used in this section.
Epson's Technical Support Web Site provides help with
problems that cannot be solved using the
troubleshooting information in your product
documentation.
If you need the latest drivers, FAQs, manuals, or other
downloadables, access the site at:
https://www.epson.com
Then, select the support section of your local Epson
Web site.
Contacting Epson
Support
New :For All products
Before Contacting Epson
If your Epson product is not operating properly and
you cannot solve the problem using the
troubleshooting information in your product
documentation, contact Epson support services for
assistance. If Epson support for your area is not listed
below, contact the dealer where you purchased your
product.
Epson support will be able to help you much more
quickly if you give them the following information:
O Product serial number
(The serial number label is usually on the back of
the product.)
O Product model
O Product software version
(Click About, Version Info, or similar button in
the product software.)
O Brand and model of your computer
O Your computer operating system name and
version
O Names and versions of the software applications
you normally use with your product

SL-D1000 Series User's Guide
Where To Get Help
198
Help for Users in North America
Epson provides technical support and information on
the installation, configuration, and operation of
professional printing products through the Epson
Preferred Limited Warranty Plan.
Dial (888) 377-6611, 7AM to 4 PM, Pacific Time,
Monday through Friday. Days and hours of support
are subject to change without notice.
Note: If you experience difficulty with the toll-free number,
call (562) 276-1305 (U.S.).
Before you call, make sure you have your printer serial
number and proof of purchase.
Visit
https://epson.com/support (U.S.) or
https://epson.ca/support (Canada) and select your
product for solutions to common problems. You can
download drivers, firmware, and documentation, get
FAQs and troubleshooting advice, or e-mail Epson
with your questions.
Note: For help using any other software on your system, see
the documentation for that software for technical support
information.
Help for Users in Latin America
If you need additional help with your Epson product,
contact Epson.
Epson provides these technical support services:
Internet Support
Visit Epson's support website at
latin.epson.com/support and select your product for
solutions to common problems. You can download
drivers, firmware, and documentation, get FAQs and
troubleshooting advice, or e-mail Epson with your
questions.
Note: For help using any other software on your system, see
the documentation for that software for technical support
information
Speak to a Support Representative
Before you call Epson for support, please have the
following information ready:
O Product name
O Product serial number (located on a label on the
product)
O Proof of purchase (such as a store receipt) and
date of purchase
O Computer configuration
O Description of the problem
Then call:
* Contact your local phone company to call this
toll-free number from a mobile phone.
If your country does not appear in the list, contact the
sales office in the nearest country. Toll or long distance
charges may apply.
Purchase Supplies and Accessories
You can purchase genuine Epson ink, paper, and
accessories from an Epson authorized reseller. To find
the nearest reseller, visit
latin.epson.com or call your
nearest Epson sales office.
Country Telephone
Argentina (54 11) 5167-0300
0800-288-37766
Bolivia* 800-100-116
Brazil 0800-007-5000
Chile (56 2) 2484-3400
Colombia Bogota: (57 1) 592-2200
Other cities: 018000-915235
Costa Rica 800-377-6627
Dominican Republic* 1-888-760-0068
Ecuador* 1-800-000-044
El Salvador* 800-6570
Guatemala* 1-800-835-0358
Mexico Mexico City: (52 55) 1323-2052
Other cities: 01-800-087-1080
Nicaragua* 00-1-800-226-0368
Panama* 00-800-052-1376
Paraguay 009-800-521-0019
Peru Lima: (51 1) 418-0210
Other cities: 0800-10-126
Uruguay 00040-5210067
Venezuela (58 212) 240-1111