INSTRUCTION MANUAL
ICE CREAM MAKER Model: ICE-1032Y
THANK YOU FOR CHOOSING OUR ICE MAKER
PLEASE READ THE MANUAL CAREFULLY BEFORE OPERATING


- 2 -
Thank you for your purchase. To confirm correct operation and your safety,
please read this manual carefully before use and retain it for future use.
IMPORTANT NOTICES
When using an electrical appliance, basic safety precautions should always be
followed to reduce the risk of fire, electric shock, and/or injury, including the
following:
1. Read all instructions before using.
2. Remove all packing material and carefully check your ice maker to ensure
it is in good condition and that there is no damage to the ice maker or
power cord and plug.
3. Before using the ice maker for the first time, please wait 2 hours after
positioning it, and keep the transparent lid open for at least 2 hours.
4. Pure water is not allowed to be used on this unit, spring water is
recommended.
5. Ensure the voltage is compliant with the voltage range stated on the rating
label, and ensure the earthing of the socket is in good condition.
6. If the supply cord is damaged, it must be replaced by the manufacturer or
its service agent or a similarly qualified person in order to avoid a hazard.

- 3 -
7. DO NOT upend this product or incline it over a 45℃ angle.
8. To protect against risk of electric shock, do not pour water on cord, plug
and ventilation, immerse the appliance in water or any other liquid.
9. Unplug the appliance after using or before cleaning.
10. Keep the appliance 8cm from other objects to ensure the good heat
releasing.
11. DO NOT use the accessories which are not recommended by
manufacturer.
12. This appliance can be used by children aged from 8 years and above and
persons with reduced physical, sensory or mental capabilities or lack of
experience and knowledge if they have been given supervision or
instruction concerning use of the appliance in a safe way and understand
the hazards involved. Children shall not play with the appliance. Cleaning
and user maintenance shall not be made by children without supervision.
Children should be supervised to ensure that they do not play with the
appliance.
13. DO NOT use the appliance close by flames, hot plates or stoves.
14. DO NOT switch on the power button frequently (ensure 5 min. interval at
least) to avoid the damage of compressor.
15. DO NOT use outdoors.
16. Never clean with scouring powders or hard implements.

- 4 -
17. Please keep the instruction manual.
18. Warning: DO NOT store explosive substances such as aerosol cans with a
flammable propellant in this appliance.
19. This appliance is intended to be used in household and similar applications
such as
– staff kitchen areas in shops, offices and other working environments;
– farm houses and by clients in hotels, motels and other residential type
environments;
– bed and breakfast type environments;
– catering and similar non-retail applications
20. Caution: Flammable refrigerant used! When handing, moving and use of
the ice maker, make sure to avoid either damaging the refrigerant tubing,
or increasing the risk of a leak.
21. The ice maker is to be installed in a accordance with the Safety Standard
for Refrigeration Systems, ASHRAE 15.
22. The ice maker shall not be installed in corridor or hallways of public
buildings.
23. The refrigerant and insulation blowing gas is flammable, when disposing of
the appliance, do so only at an authorized waste disposal center.
DO NOT expose to flame.

- 5 -
This symbol indicates the refrigerant R134a and the non-metallic
materials of the appliance are flammable. It’s a warning symbol. Warning: Risk
of fire / flammable materials.
Warning; Risk of fire / flammable materials.
WARNING: When positioning the appliance, ensure the supply cord is not
trapped or damaged.
WARNING: Do not locate multiple portable socket-outlets or portable power
supplies at the rear of the appliance.
Children aged from 3 to 8 years old are allowed to load and unload
refrigerating appliances. To avoid contamination of food, please respect the
following instructions:
– Opening the door for long periods can cause a significant increase of the
temperature in the compartments of the appliance.
– Clean regularly surfaces that can come in contact with food and accessible
drainage systems.
– Clean water tanks if they have not been used for 48 hours. Flush the water
system connected to a water supply if water has not been drawn for 5 days.
– If the refrigerating appliance is left empty for long periods, switch off, defrost,
clean, dry, and leave the door open to prevent mould developing within the
appliance.

- 6 -
Regarding the information pertaining to the use of the appliance, thanks to
refer to the below paragraph of the manual.
PRODUCT FEATURE
SPECIFICATIONS
Model: ICE-1032Y
Capacity:1L
Voltage:AC 110-120V/60Hz
Anti-shock protection class:I
Climate type:N/SN
Power consumption:100W
Max overall dimensions:355(L) x 260(W) x 225.8(H)mm
13.98 x 10.24 x 8.89 Inches
NN..W.:7.2kg G.W.:8.0kg
1. Button control, simple and reliable operation
2. LCD display shows the working time.
3. Plastic housing, elegant, fashionable and lighter.
4. Upper mixing and Low noise.
5. With a variety of quick freezing ice cream production methods.
6. The parts are detachable, easy to clean, sanitary and safe.

- 7 -
1. Please read the instruction manual carefully before use.
2. Check if the voltage range used is the same as that marked on the
nameplate, whether the power cord plug and the socket match, and ensure
that the socket is well grounded.
3. When the power cord or socket is damaged, or any other electrical
components are faulty, do not continue to use this product. It should be
immediately sent to the dealer or local special maintenance network for
replacement or repair.
4. DO NOT place the product upside down, or tilt it above 113°F(45 °C).
5. The power cord plug and air outlet should not be drenched. Do not immerse
the machine in water or other liquid to prevent electric shock.
6. When not in use or clean, the power plug must be unplugged.
7. When using, the inlet and outlet should be kept at a certain distance (about
8cm) from other items, so as not to affect the heat dissipation effect of the
machine.
8. Any accessories not recommended by the manufacturer may not be used.
9. DO NOT allow children or the disabled to operate without any guidance or
supervision.
10. This product should not be placed next to a high-temperature gas or
electric stove to avoid accidents.
11. DO NOT start the compressor power switch frequently (at least 5 minutes

- 8 -
each time) to avoid damage to the compressor.
12. Metal foil or other conductive materials are not allowed to be inserted into
the machine to prevent fire or short circuit.
13. When taking out the ice cream, do not knock the surface or edge of the
container to avoid damage to the container.
14. DO NOT start the power switch when the ice cream container barrel is not
installed in place or the mixing fan blade is not placed properly.
15. The initial temperature of making ice cream mixture is 68°F-86°F(25±5℃).
The prepared ice cream material cannot be put into the refrigerator for freezing
and then put into the machine for making. In this way, the ice cream will solidify
ahead of time and the motor will be locked. The motor will be cut off because it
enters the protection circuit ahead of time.
16. After starting the machine freezing, DO NOT remove the motor and
transparent cover during the working process.
17. This product cannot be used outdoors.
18. DO NOT use chemical washing liquids and hard tools to clean the product.
Do not use dishwasher to clean the loading bowl, and do not use water to
directly wash the evaporator.
19. After the operation, please unplug the power plug in time.
20. When the indicator light is on, the red light is in standby state. When the
green light is on, it is in the working state. When the green light is flashing, it is
in the heat preservation state.

- 9 -
21. When the ice cream machine is started without adding ice cream
ingredients, there will be a slight sound of mixing blade scraping to the loading
bowl, which is a normal phenomenon.
22. There are two round copper sheets at the motor assembly of the
transparent cover installed on the upper cover. When using, please wipe the
water stains on the transparent cover and the water stains on the copper
plates. If the machine is in use, the two copper plates will be connected by
water, which will lead to power failure of the motor. Pull out the power line,
wipe the water stains, and restart it.
23. Save the instruction manual for future use.

-10 -
.PRODUCT INSTRUCTION…… ………………… .... .. ......
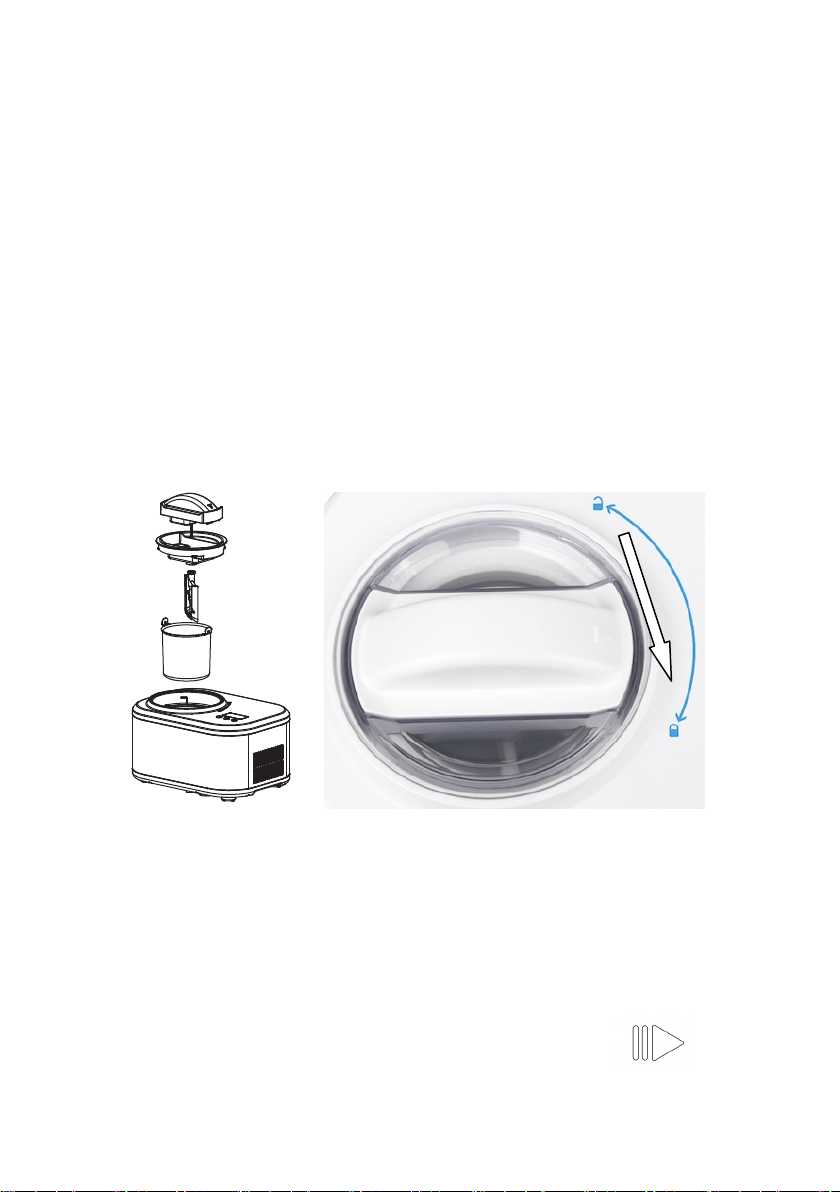
1. Structure
Transparent lid
Mixing blade
Loading bowl
Top lid
Housing
Base

-11 -
2.Control panel
3.MENU
ON/OFF Mode Selection Start/Pause
Single refrigeration mode Single mixing mode

-12 -
OPERATION
1. Connect the power supply and plug the power cord into a suitable socket.
The shape and voltage of the socket shall be the same as those indicated.
2. Button control functions
1). Function description of buttons
①ON/OFF BUTTON
Plug in the power supply, press the power button to turn on the machine,
the indicator light of ice cream mode flashes, and press the power button
again to shut down the machine.
Ice Cream Mode Yogurt mode

-13 -
②START/PAUSE BUTTON
When the machine is in the start-up state, the ice cream mode icon flashes.
Press the START/PAUSE button, the ice cream mode icon will be on for a long
time, the refrigeration icon will flash, the mixing icon will rotate, the display will
start timing, and the machine will start working. Press the button again, the
machine will stop working, the ice cream mode icon will flash, and the icons of
other modes will be on for a long time, and the timing will be suspended. When
the machine is in the normal working state in the ice cream mode, it has not
entered the heat preservation state. At this time, if you press this button, the
ice cream mode icon will flash, the mixing motor of the machine will stop
working, and the refrigeration function will stop working after 1 minute. If you
press this button within one minute, the machine will return to the working
state.
③MODE SELECTION BUTTON
When the machine is in standby mode, press this button, you can select four
modes freely, but in any mode, this button is invalid.
2) DESCRIPTIONS OF MODE
①Single Mixing Mode
When the single mixing mode is selected, the mixing motor starts to realize the
mixing function. The display starts to count down for 30min, the mixing mode
icon rotates, other mode icons do not display. When the time or soft hardness

-14 -
reaches the preset value, there will be 10 beeps to remind that the mixing is
completed. After the completion, he machine will enter the standby mode,
please select other modes or shut down.
② Single Refrigeration Mode
The compressor and cooling fan are started to realize the refrigeration
function. The display starts to count down for 30min. The mixing mode icon
rotates, and other mode icons are not displayed. After completion, there will be
10 beeps to remind that the refrigeration is completed. When the machine is in
standby mode, the icon of each mode will be on for a long time, and the timing
will return to zero. Please select other modes or shut down.
③ Ice Cream Mode
The compressor, mixing motor and cooling fan are started, when the ice cream
is finished, there will be 10 short beeps. At this time, you can enjoy the ice
cream. If there is no operation, it will enter the insulation function
automatically. When the display starts timing, the refrigeration mode icon
flashes, the mixing icon flashes, and the other mode icons do not display. After
the completion of insulation, there will be 10 short beeps, and the machine will
enter the standby mode. The icons of each mode will be on for a long time,
and the timing will return to zero. Please select other modes or turn off the
machine.

-15 -
④ Yogurt Mode
Select yogurt mode, factory setting is 8 hours, display "08H". Press
START/ PAUSE button, compressor, mixing motor and cooling fan start,
yogurt icon on the screen will be on for a long time, other icons will be off. After
the machine completes the yogurt mode, the machine automatically enters the
refrigeration mode, and the time bar shows COOL. The compressor and fan
motor start to work for 15 minutes, then whenever the temperature sensor
detects that the temperature is higher than or equal to 48 °F(9 ℃), the
compressor and fan motor start to work for 4 minutes. If there is no other
operation, the machine will always be in refrigeration mode and will not shut
down automatically.
3. KEEP COOL FUNCTION
When the ice-cream making is completed but no other operates, the
compressor will automatically turn off for 10 minutes and turn on for 7 minutes,
to maintain the fresh taste and taste of the ice-cream texture.
The holding time is 1 hour. During this period, the refrigeration mode icon
flashes, and all other mode icons switch off. When it is finished, there are 10
short beeps, and the machine enters the standby mode.
Remark:This function designed to prevent ice cream to melt, in case of
leaving during the ice-cream making process, or the ice-cream can not be
eaten or stored in time after the completion of the production.

-16 -
4. MOTOR SELF-PROTECTION FUNCTION
When the ice cream becomes harder, the mixing motor might be blocked.
Then the motor protection device makes the mixing motor stop working by
detecting its temperature to ensure the life of the motor.
5. COMPRESSOR SELF-PROTECTION FUNCTION
After the compressor stops from ice cream mode or single refrigeration mode,
if the ice cream mode or single refrigeration mode is selected again, the
compressor will have a protection time of about 3 minutes. However, after the
power cord is plugged in, the machine is restarted by default. At this time,
there is no delay in selecting ice cream mode or single refrigeration mode.
6. CONTROLLING THE VOLUME OF THE INGREDIENTS
To avoid overflow and waste, please make sure that the ingredients do not
exceed 60% of capacity of the removable bowl (Ice cream expands when
being formed).
Yogurt is recommended not to exceed 80% of the inner barrel volume.

-17 -
HOW TO MAKE ICE CREAM
NOTE: Please thoroughly clean all parts that will contact with ice cream before
use, including: cooling bowl, loading bowl, mixing fan blade, transparent lid,
etc.
Before cleaning, you must ensure that the power cord plug is disconnected
from the outlet. When making ice cream, keep the machine flat on a level
surface to ensure that the compressor of the machine is working properly.
Here are the steps to make an ice cream:
Step 1.
Pour the well prepared recipe ingredients and warm water into the removable
bowl, then have a uniform mixing.
Make according to the following formula. After mixing the formula mixture
evenly, it can be made into ice cream within 60 minutes.
Cream: 180g
Powdered Milk: 120g
Water: 200g
-18 -
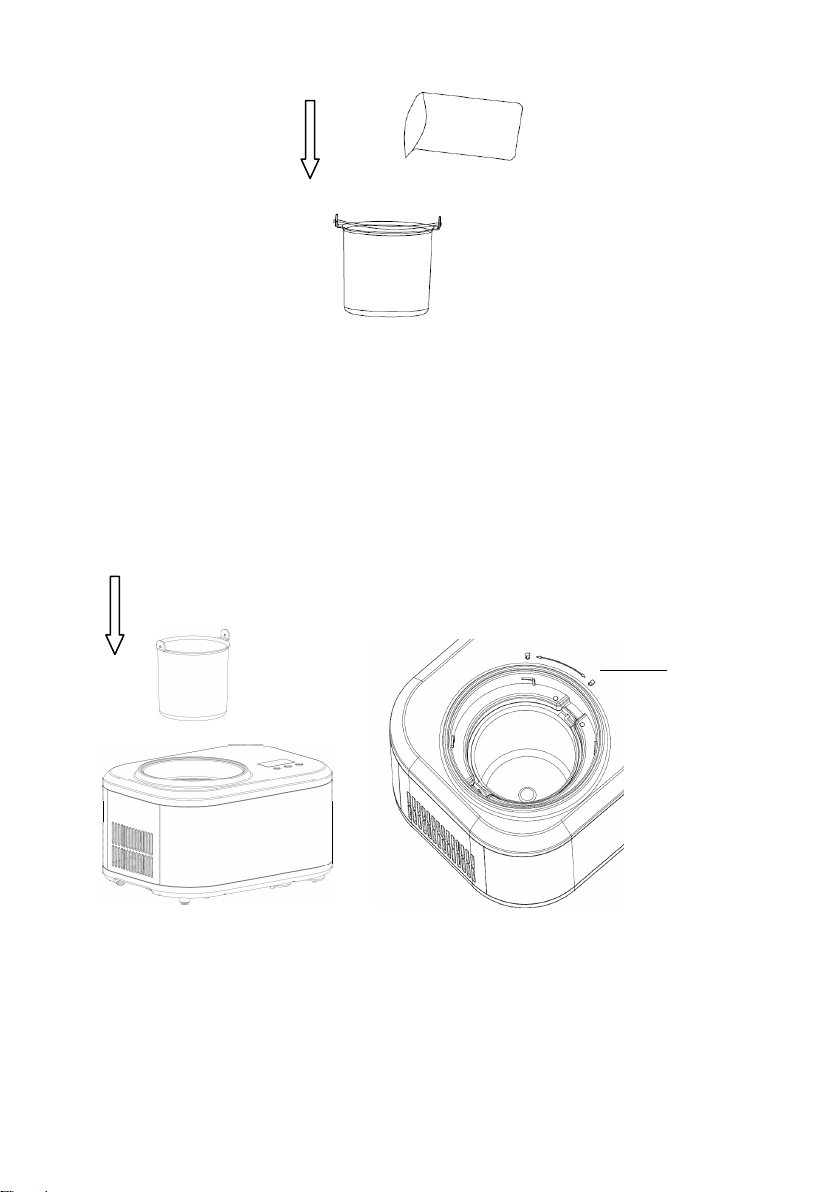
Step 2.
Then put the loading bowl into the ice cream machine, both ends of the loading
bowl handle shall be aligned with the groove of the upper cover.
Installation position
of loading bowl

-19 -
Step 3.
Install the transparent lid and motor components.
Step 4.
Install the mixing fan blade, transparent lid and motor components
-20 -
Step 5.
Put the components installed in step 4 into the ice cream machine, make sure
that the center of the convex hull of the loading bowl and the motor
components of the mixing fan blade are in the same straight line, lock the
components clockwise, and make sure that the triangle mark on the
components rotates to the "LOCK" mark.
Step 6.
Plug in the power supply, press ON/OFF button, the machine starts up, the ice
cream mode indicator light flashes, press the Start/Pause button to
make ice cream.

-21 -
Step 7.
When the ice cream is finished, press the ON/OFF button and the
machine will shut down.
Step 8.
Turn the transparent lid and motor components anticlockwise. In the process
of spinning out, there will be a slight friction sound, which is normal. When the
triangle mark is aligned with the unlocking mark, take out the components and
then take out the loading bowl.

-22 -
HOW TO MAKE YOGURT
Material preparation:
Add the raw materials into the container according to the following proportion
and mix well.
Formula 1: 600 ml cold storage fresh milk + starter or 50 ml cold storage pure
yogurt.
Formula 2: 600 ml sterile pure milk + starter or 50 ml cold storage pure yogurt,
Formula 3: 600 ml milk (which is made from milk powder) + starter or 50 ml
cold storage pure yogurt.
NOTES:
Before adding the above ingredients, please check whether they are
expired or deteriorated.
The addition amount of lactic acid bacteria starter is in accordance with
the instructions of starter.
When filling milk powder, please brew according to the proportion marked
on the market milk powder, or according to the proportion of 150ml milk
powder + 450ml water.
The fermentation time will be affected by the environment temperature
and the initial temperature of raw materials, so the fermentation time
should be extended when the environment temperature is low or the milk
is refrigerated. But the longest time is not more than 14 hours (when pure

-23 -
yogurt is used as fermentation source, the longest time is not more than
10 hours).
Suggestion: the active lactic acid bacteria starter is preferred as the
fermentation source, and the commercially available pure yogurt or the
last self-made pure yogurt can also be used as the fermentation source
when the starter is inconvenient to purchase.
Fermentation steps:
Plug in the power, press the ON/OFF button, the machine starts, the default
ice cream mode icon flashes, press to select the yogurt function, press the
START/STOP button, the yogurt mode icon will be long bright, and start to
make yogurt.
Retain freshness:
Just fermented yogurt can be eaten immediately, but the yogurt has not
reached the best taste at this time. For those who do not accept refrigerated
food, they can be seasoned and eaten at this time. If they do not want to eat
immediately, they can be operated in the following ways to keep yogurt fresh.
1. After acidification, the machine stops working, and automatically enters the
refrigeration mode to keep the yogurt fresh after 2 minutes. The refrigeration
temperature of yogurt is 35.6°F (2 ℃) - 46.4°F( 8℃). After refrigeration, the

-24 -
flavor of yogurt is pure and the taste is excellent (as long as the machine is not
shut down, the machine is always in the refrigeration mode).
2. The fermented yogurt can be directly put into the refrigerator together with
the container for cold storage purification. The flavor and taste are slightly
worse.
Note: yogurt should not be refrigerated for more than 10 days, and it is best to
eat within 3 days, because the activity of lactic acid bacteria in yogurt is the
highest during this period.
Flavour:
Before eating yogurt, you can add fruit juice, fructose and honey according to
your own taste.
Tips:
1. If a large amount of gas and odor are produced after fermentation, it means
that the water source or milk powder is polluted and should be discarded. If the
sour taste appears white yellow luster "jellied beancurd" shape, it means that
the fermentation is good.
2. Too long fermentation time will produce a large number of derivative liquid
(light yellow liquid) with sour taste, which is a normal phenomenon. You can
drink the derivative liquid separately (the derivative liquid contains rich lactic
acid, vitamin B and other nutrients) or stir it for consumption.
-25 -
3. Full fat milk powder or fresh milk is suitable for developing children, and
low-fat or skim milk powder or fresh milk should be used for overweight
children or obese people to maintain their figure (milk added with fructose can
accelerate fermentation, avoid using flavored milk).
4. In case of diarrhea or stomach discomfort, it is recommended to increase
the dosage from 100ml to 200-300ml each time.
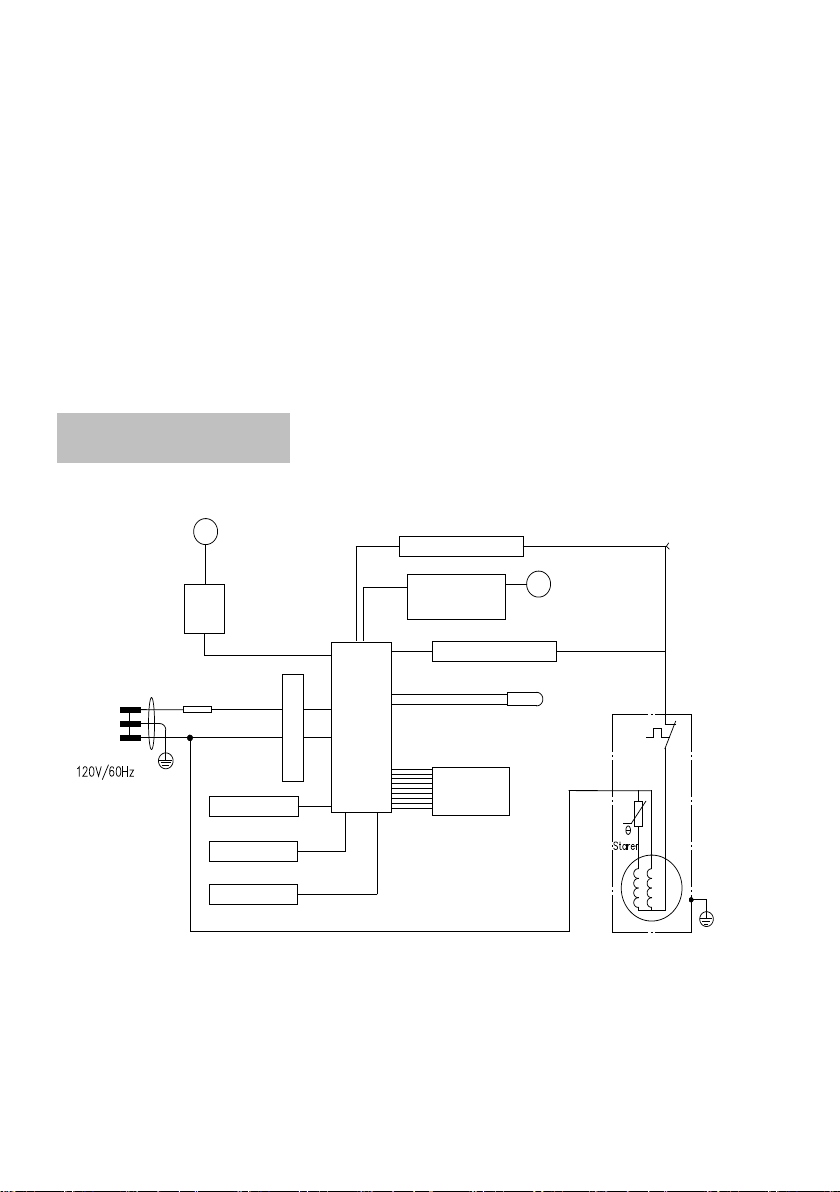
ELECTRICAL DIAGRAM
Power
Plug
N
E
L
Fuse
Fan
control
circuit
Microcomputer controller
Compressor control circuit
Motor control circuit
L
M
power supply circuits
Buzzer circuit
Reset circuit
Oscillating circuit
M
YELLOW/GREEN
Compressor
Protector
DC 12V Fan
DC 12V motor
Heating element
Temperature sensor
LED
control board

-26 -
MAINTENANCE
Caution: The plug must be removed before cleaning to avoid electric shock.
1, Take out the mixing blade, wipe it with a dampened cloth
2, Take out the removable bowl, clean it with a dampened soft cloth
3, Wipe the transparent lid and refill lid with a dampened cloth
4, Remove the dirty on the body or other places with a dampened cloth, and do
not pour water on cord, plug and ventilation, immerse the appliance in
water or any other liquid
5, Allow drying thoroughly with a dry cloth, then return the component to the
home position.
COMMON PROBLEM
No. Exist problem Reason analysis Solutions
1
Not easy to take out
loading bowl after
the ice cream is
finished
There are water drops
between the refrigeration
barrel and the loading
bowl that are not wiped
clean, resulting in freezing.
Wait 3-8 minutes
before taking out
the ice cream
bucket.

-27 -
2
The transparent lid
is lifted to the mixing
fan blade, and it
cannot be stuck in
place
The mixing fan blades not
in place, and pay attention
to the alignment of the
convex hull at the bottom
Put the mixing fan
in place and rotate
the transparent
cover in place
3
The loading bowl
cannot be placed in
the cold bucket
Deformation caused by
improper use of loading
bowl
Buy a new loading
bowl
4
At the beginning of
making ice cream,
the mixing fan
seriously scratched
or jammed.
Deformation caused by
improper use of loading
bowl
Buy a new loading
bowl

-28 -
AFTER SALES SERVICE
One year warranty service is available from the date of purchase. The date of
purchase of the invoice or after-sales service warranty card is subject to the
warranty service. The problems you encounter when using our company's
home automatic ice cream machine can be helped and resolved through the
service email. We provide technical advice free of charge.
Following conditions is not covered by the warranty;
1. Consumers are damaged due to improper use, maintenance and storage
2. Damage caused by NON-ULIT Maintenance personnel or designated
personnel to disassemble the product by themselves
3. No purchase invoice or purchase invoice does not match the product
4. Damage caused by force majeure
5. Exceeding the warranty period
★Any quality problems, please contact the service. DO NOT disassemble it
yourself. The company will not bear any responsibility for quality problems or
accidents caused by self-dis assembly. ULIT reserves the right of final
interpretation of the above commitments.
PARTS
Mixing fan blade B 1 User manual 1

-29 -
Correct Disposal of this product
This marking indicates that this product should not be disposed
with other household wastes throughout the EU. To prevent
possible harm to the environment or human health from
uncontrolled waste disposal, recycle it responsibly to promote
the sustainable reuse of material resources. To return your
used device, please use the return and collection systems or
contact the retailer where the product was purchased. They
can take this product for environmental safe recycling.