PJ_tB_idg_I_,J_D AVCHE_

IdDCamcorder,VIX_ANG21A / VIX_AHG20A systems
Thisdevice complies with Part 15 of the PCCRules. Operation is subject to the following two conditions: (1) This device may'not cause
harmful interference, and (2) this device must accept any interference received, including interference that may cause undesired
operation_
Note: This equipment has been tested and found to comply with the limits for c_assBdigita_device pursuantto Part 15 of the FCC
Ru_esThese limits are designed to pros!de reasonable protection against harmful interference in a residential installation. This
equipment generates usesand can radiate radio frequency energy and, if not installed anduse in accordance with the instructions,
maycause harmful interference to radio communications. However, there is no guarantee that interference win not occur in a
)articular installation. _fthis equipment doescause harmful interference to radio or television reception, which can be determined by
turning the equipment off and on, the user is encouraged to try to correct the interference by one or more of the following measures:
Reorientor relocate the receiving antenn&
Increase the separation between the equipment and receiver
Connect the equipment into an outlet on a circuit different from that to 'which the receiver is connected.
Consult the dealer or art experiencedradio/_! technician for help.
Thecable with the ferrite core provided with the digital video camcorder must be used with this equipment in order to comply 'with
ClassB limits in Subparf B of Part 15 of the FCCrules.
Donot make any changes or modifications to the equipment unless otherwise specified in the manual.
If such changes or modifications should be made you could be required to stopoperation of the equipment.
CanonU.SA. Inc_
OneCanon P_az&Lake Success, NY11042, US.A.
Te_No (516)320-5600
CAUTION:
TO PREVENT ELECTRIC SHOCK, MATCH WIDE BLADE OF PLUG TO WIDE SLOT, FULLY INSERT.
Important Warning
CAUTmON:
TO REDUCE THE RISK OF ELECTRIC
SHOCK, DO NOT REMOVE COVER (OR
BACK). NO USER-SERVICEABLE PARTS
mNSIDE. REFER SEBWCING TO QUALIRED
SERWCE PERSONNEL.
The lightning flash with arrowhead symbol,
within an equilateral triangle, is intended to
s_ert the user to the presence of uninsuIated
"dangerous voltage" within the product's
enclosure, that may be of sufficient
magnitude to constitute s risk of electric
shock to persons.
The exclamation point, withth an equNateral
triangle, is thtended to alert the user to the
presence of important operating and
maintenance (servicing) instructions in the
_iterature accompanying the product.
in these safety instructions the word "product" refers
to the CanonHD CamcorderVlXIAHG21A / VlXlA
HG20A and all its accessories.
1 ReadInstructions-- Atl the safety and operating
instructions should be read before the product is
operated.
2 RetainInstructions-- The safety and operating
instructions should beretained for future
reference.
3 HeedWarnings-- All warnings on the product
and in the operating instructions should be
adhered to.
4 FollowInstructions-- All operating and
maintenanceinstructions should befollowed.
5 Cleaning-- Unplugthis product from the wall
outlet before cleaning. Do not use liquid or
aerosol cleaners.The product should be cleaned
only as recommended in this manual
6 Accessories-- Do not useaccessories not
recommendedin this manualas they may be
hazardous.
7' Avoid magneticor electric fields-- Do not use
the camera close to TV transmitters, portable
communicationdevices or other sourcesof
electdc or magnetic radiation. They may cause
picture interference, or permanently damagethe
camera.
8 Water and Moisture -- Hazardd electric shock
-- Donot use this product near water or in rainy/
moist situations.
9 Placingor Moving-- Donot placeonan unstable
cart, stand, tripod, bracket or table. The product
mayfall, causing seriousinjury to achild or adult,
and serious damageto the product.
A product and cart
combinationshould be moved
with care. Quick stops,
excessiveforce, and uneven
surfaces may cause the
product and cart combination
to overturn.
1 6 Power Sources-- TheCA-570 CompactPower
Adapter shouldbe operated only from the type of
power source indicated on the marking label If
you are not sure of the type d power supply to
your home, consult your product dealer or local
power company'.Regardingother power sources
such as battery power, refer to instructions in this
manual
1 1 Polarization-- TheCA-570 Compact Power
Adapter is equippedwith a polarized2-prong
plug (aplug having one blade wider than the
other).
12
13
The2-prong polarizedplug will fit into the power
outlet only one way'.This is asafety feature. Ifyou
are unable to insert the plug fully into the outlet,
try reversingthe plug. Ifthe plug still fails to fit,
contact your electrician to replaceyour obsolete
outlet. Do not defeat the safety purposeof the
polarizedplug.
Power Cord Protection-- Powercords should be
routed so that theyare not likely to be walked on
or pinched by items placed upon oragainst them.
Payparticular attention to plugs and the point
from which the cords exitthe product.
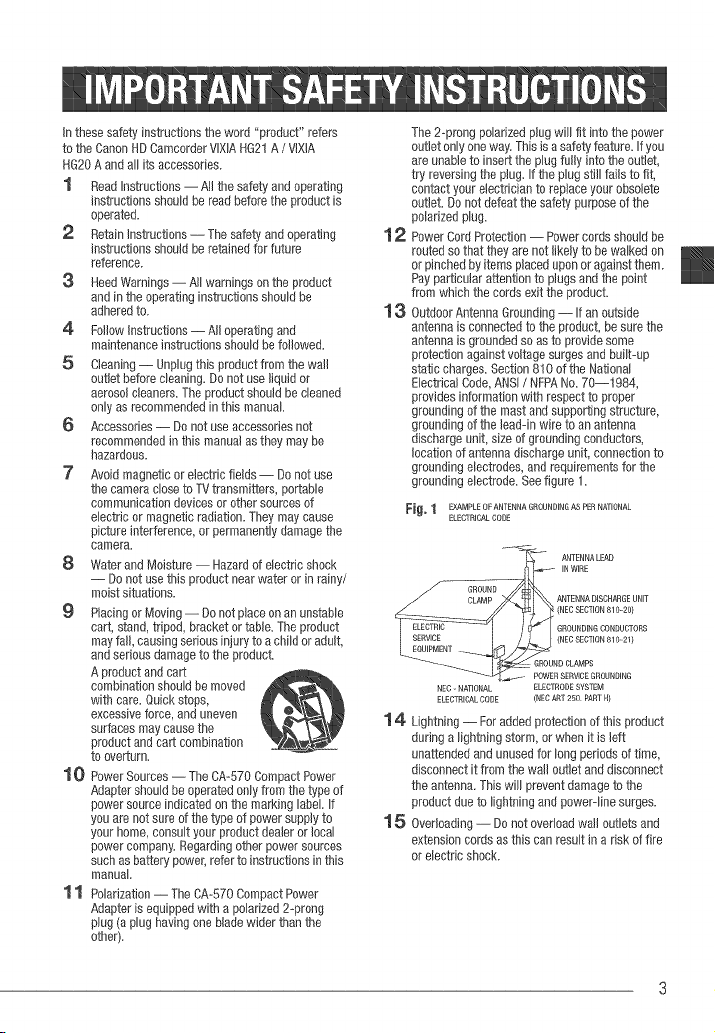
OutdoorAntennaGrounding--If an outside
antenna is connectedto the product, be surethe
antenna is grounded soas to providesome
protection againstvoltage surges and built-up
static charges. Section 810 of the National
ElectricalCode,ANSI / NFPANo. 70--1984,
provides information with respectto proper
grounding of the mast and supporting structure,
grounding of the lead-in wire to an antenna
discharge unit, size of groundingconductors,
location of antennadischarge unit, connection to
grounding electrodes, and requirements for the
grounding electrode. Seefigure t.
Fi_, 1 EXAMPLE OF ANTENNA GROUN DMG AS PER NA'RONAL
ELECTRICAL CORE
"__ ANTENNA LEAD
__ IN WiRE
___ GROUND
CLAMP ANTENNA DISCHARGE UNiT
---_- (NEC SECTION 81020)
ELECTRIC ------ GROUNDINGCONDUCTORS
I ;_c;rREIc -I /I_ I( NEo SECfION ....... )
EQUIPMENT
_._- POWER SERVICE GROUNDING
ELECTRODESYSTEM
NEC- NATIONAL
ELECTRICAL CODE (NEC ART 250 PART N)
14 Lightning -- Foradded protectionof this product
during a lightning storm, or when it is left
unattended and unused for long periods of time,
disconnect it from the wall outlet and disconnect
the antenna.This will prevent damage to the
product due to lightning and poweFline surges.
5 Overloading-- Do not overloadwail outlets and
extension cordsas this can result in a risk of fire
or electric shock.
16 ObjectsandLiquidEntry--Neverpushobjects
ofanykindintothisproductthroughopeningsas
theymaytouchdangerousvoltagepointsorshort
outpartsthatcouldresultinafireorelectric
shock.Becarefulnottospillliquidofanykind
ontotheproduct.
17'Servicing--Donotattempttoservicethis
productyourselfasopeningorremovingcovers
mayexposeyoutodangerousvoltageorother
hazards.Referallservicingtoqualifiedservice
personnel.
18 DamageRequiringService--Disconnectthis
productfromthewal!outletandallpower
sourcesincludingbattery,andreferservicingto
qualifiedservicepersonnelunderthefollowing
conditions:
a.Whenthepower-supplycordorplugis
damaged.
b.Ifanyliquidhasbeenspilledonto,orobiects
havefalleninto,theproduct.
c.Iftheproducthasbeenexposedtorainor
water.
19
2O
d. if the product does notoperate normally even
if you follow the operating instructions. Adjust
only those controls that are coveredby the
operationinstructions. Improperadjustment of
other controls may result in damage and wm
often requireextensivework bya qualified
technician to restore the product to its normal
operation.
e. If the product has beendroppedor thecabinet
has been damaged.
f. Whenthe product exhibits adistinct change in
performance.This indicates a needfor
service.
ReplacementParts-- Whenreplacement parts
are required, be sure the service technician has
used replacement parts that arespecified by
Canonor that have the same characteristics as
the original part. Unauthorizedsubstitutions may
result in fire, electric shock or other hazards.
Safety Check -- Uponcompletion of any service
or repairsto this product, ask the service
technician to perform safety checksto determine
that the product is in safe operating order.
I Whenreplacement of thepower supply is required, pleasereturn it to the responsible nearestCanonServiceCenter
1
and please replaceit with the sametype number CA-570.
H
I The Adapter can be used with apower supply between 100 and 240 V AC. Forareas where 120 V AC power is not ]
used,you will needa special plugadapter. Contactyour nearestCanonService Center for furfher information.
H
I This Class B with CanadianICES-O03. ]
digital apparatus complies
H
Online product registration for U.S.A. Customers on[yo
Register your product online at www, registercano&com
./Protect your product
We will keep the mode[ number and date of purchase of your new Canon
product on file to help you refer to this information in the event of an insurance
claim such as loss or theft.
,/Receive information on new products and promotions
Upon your request, we will send you information on Canon new products and
promotions,
The serial number of this product can be found at the battery attachment unit of
the camcorder. Write down the number and other information here and retain
this book as a permanent record of your purchase to aid identification in case of
theft,
Date of Purchase: Model Name: VlXlA HG21 A/
VIXIA HG20 A
Purchased From: Serial No,:
Dealer Address:
Dealer Phone No.:
Trademark Ackn0wmedgements
The SD 10gois a trademark. The SDHClogo is a trademark.
Microsoft, Windows andWindows Vista are ftademarks or registered trademarks of Microsoft Corporation in the United States and/or
other countries.
Macintosh and Mac OSare trademarks of Apple Inc., registered in the US. and other countries
HDM_,the HDMI bgo and High-Definition Multimedia Interfaceare trademarks or registered
trademarks of HDMILicensing LLC. [_ [_O _BY_,
* "AVOHD"and the AVCHD' logo are trademarks of MatsusMta Electric Industria_Co, Ltd and Sony DiGiTAL ]
Corporation. S'[E RE 0
[
Manufactured under license from Do_byLaboratories. CREATOR
"Do,by" and the boubM-Dsymbol are trademarks of Dolby Laboratories.
Other names and products not mentioned above may be trademarks or registered trademarks of their
respective companies
Thisproduct is licensed under AT&Tpatents for the MPEG-4standard and maybe used for encoding MPEG-4 compliant video and/or
decoding MPEG4 compliant video that was encoded only (1) for a personal and non-commercia_purpose or (2) by a video provider
_icensedunder the AT&Tpatents to provide MPE64 compliant video No _icenseis granted or implied for any other use for MPE64
standard

Enjoying High-DefinitionVideowith your
Preserve your most treasured memories, be it unforgettable scenery or cherished
moments spent with family and friends, with high-definition video recordings of a
quality second only to actually being there.
What is High-Definiti0n Video?
1,080
lines
l Capture the finest detail,
like the movement or shine
of a single strand of hair
Your camcorder features a full high-definition image sensor (Full HD CMOS) that captures
video at a resolution of 1,920 x 1,080 pixels 1, This results in video recordings of
unparalleled high quality, fine detail and lifelike vivid colors.
How does full high definition compare with standard-definition TV broadcasts?
Approximately 6 times the number of pixels.
More than twice the number of scanning lines.
"Full HD 1080" refers to Canon camcorders compliant with high-definition
video composed of 1,080 vertical pixels (scanning lines).
What is Cinema Mode?
Give your recordings a cinematic look by using the [ _L_ Cine Mode] recording program
(Q3 47). Combine this recording program with the 24 fps progressive frame rate
[[]_ PF24] to get the enhanced effect of the 24p Cinema Mode.
1 Video is recorded at this resolution only when the recording mode is set to MXP or FXP mode.
in other recording modes, the picture is resized to 1,440 x 1,080 pixels before being recorded.
Even in that case, the picture captured is detailed enough to render richly detailed recordings.
iiilii0yii_!iI iii!iiiiiili_!_fii_iti0it_J_,...._ ._-,__i_i¸¸C_i_Ic0_t:i_!_i¸
What are the advantages of a hard disk?
Your videos and photos are recorded on the built-in hard disk or commercially available
SD/SDHC memory cards 2 using AVCHD specifications 3, This Double Media recording
system gives you longer recording times for more high-definition videos and photos,
You can shoot approximately 11 hours ([[_[_ 120 GB HDD) or 5,5 hours (_ 60 GB
HDD) of video in MXP mode, which offers the highest video quality under AVCHD
specifications,
The camcorder records video and photos in unused space on the recording media so
you need not worry about accidentally recording over important videos,
You can immediately access the scenes you want to play back from an index menu,
You can easily manage your video and photo collections with the supplied editing
software: lmageMixer 3 (movies) and DIGITAL VIDEO Solution Disk (photos),
Can play back my high-definiti0n video on other
devices?
Needless to say, you can connect your camcorder to an HDTV to enjoy your recordings
with family and friends (L_ 81), You also have the following options:
You can easily play back video recorded on the memory card by inserting the
memory card directly into AVCHD-compatible TV sets and HDD or DVD recorders
that feature an SD/SDHC memory card slot 4. For details, refer to the instruction
manual of your TV or digital video recorder.
You can play back AVCHD discs of your recordings created using the optional
DW-100 DVD Burner (G) 82) on the DVD Burner itself or on AVCHD-compatible
DVD players or Blu-ray Disc players 5.
2 For details about memory cards that can be used with this camcorder refer to Using a Memory
Card (_ 31).
3 AVCHD is the new standard for recording high-definition video, With AVCHD specifications the
video signal is recorded using MPEGo4 AVC/H,264 compression and the audio signal is
recorded in Dolby Digital,
4 Depending on the device used, correct playback may not be possible even if the device is
AVCHD-compatible, In such case, play back the recordings on the memory card using the
camcorden
5 AVCHD discs containing scenes recorded in MXP mode cannot be created with the optional
DW-100 DVD burner, Use the supplied software ImageMixer 3 to back up such scenes,
Impe ant Notes Aboutthe Hard DiskDrive
Your hard disk camcorder allows you to shoot and store many hours of video.
However, there are differences between recording onto a hard disk and recording
onto other media. Make sure to follow the points below when using your camcorder.
For more details, refer to Handfing Precautions (CC]116).
Back up your recordingsperi0dically
Make sure to transfer your movies and photos
to an external device such as a computer or
digital video recorder (CC} 82) and back them
up regularly and especially after making
important recordings. Canon shall not be
liable for any loss or corruption of data.
D0 not subject the camc0rderto
vibrations or strong impacts
The hard disk is a high-precision device,
Vibrations, strong impacts or dropping the
camcorder may result in permanent data loss,
Keepthe drop sensor activated
wheneverpossible
The drop sensor ([Z3 99) detects when the
camcorder is dropped and activates a
protection mechanism to help prevent hard
disk damage, Turning this func:tion off will
disable the mechanism, Even if this function
is set to [_ On] and the camcorder is
dropped, hard disk damage can occur.
D0 not disconnect the power source
while the camc0rderis on
Always turn the camcorder off before
removing the battery or compact power
adapter.
{'? tat',ii:ssAbott_e {a;ig{Skg) Ve
Donot turn off the camcorderwhib the
camcorder is on andthe ACCESS
indicator is on or flashing or while the
camcorder is in standby mode
Doing so may result in hard disk damage or
permanent data loss,
Usethe camcorder within its operating
temperature range
If the camcorder's temperature becomes too
hot or too cold, recording/playback may stop
in order to prevent hard disk damage,
Do not use the camc0rderat high
altitudes
Turning on or using the camcorder in places
with low atmospheric pressure, such as at
altitudes higher than 3,000 m (9,800 ft,), may
result in hard disk damage,
initialize the hard disk when movies
cannot be rec0rded/playedback
n0rmaliy
As movies are recorded and deleted over
time, hard disk fragmentation may occur,
which may reduce performance, initialize the
hard disk should this happen,
Protect personalinformation onthe
harddisk
When the hard disk is initialized or recordings
are deleted, stored data is not physically
erased, Remember this when disposing of the
camcorder or giving it to another person,
Table of contents
[] introduction
6
8
14
1(}
16
17
20
Enjoying High-Definition Video with your Camcorder
Important Notes About the Hard Disk Drive
About this Manual
Getting to Know the Camcorder
Supplied Accessories
Components Guide
Screen Displays
[] Preparatieas
23 Getting Started
23 Charging the Battery Pack
24 Preparing the Wireless Controller and Accessories
26 Adjusting the Position and Brightness of the LCD Screen
27 Basic Operation of the Camcorder
27 The _ Button: _ Mode or Flexible Recording
28 Joystick and Joystick Guide
28 Using the Menus
30 First Time Settings
30 Setting the Date and Time
30 Changing the Language
3! Changing the Time Zone
31 Using a Memory Card
31 Memory Cards Compatible for Use with the Camcorder
32 Inserting and Removing a Memory Card
33 Selecting the Recording Media
33 initializing the Hard Disk or Memory Card
10
[] Videe
i {_i_ oi¸coiito_its
34 Basic Recording
34 Shooting Video
35 Selecting the Video Quality (Recording Mode)
36 Zooming
37 Quick Start Function
37 Reviewing and Deleting the Last Scene Recorded
38 Basic Playback
38 Playing Back the Video
40 Changing the Index Screen Selection
4! Selecting Scenes by Recording Date
42 Selecting the Playback Starting Point from the Movie Timeline
43 Selecting Recordings from the Index Screen
44 Deleting Scenes
45 Advanced Functions
45 Special Scene Recording Programs
46 Changing the Shutter Speed and Aperture
47 Cinema Mode: Giving a Cinematic Look to your Recordings
48 Self Timer
48 Manual Exposure Adjustment and Automatic BackJight Correction
49 Manual Focus Adjustment
50 White Balance
5! image Effects
52 Digital Effects
53 On-Screen Displays and Data Code
53 Audio Recording Level
54 Using Headphones
55 Using the Mini Advanced Shoe
56 Using an External Microphone
57 Using a Video Light
57 Piayiist and Scene Operations
57 Dividing Scenes
58 Editing the Playlist: Adding, Moving and Deleting Playlist Scenes
60 Copying Scenes
11
[] Photos
61 Basic Recording
61 Taking Photos
62 Selecting Photo Size and Quality
63 Deleting a Photo Right After Recording It
63 Basic Playback
63 Viewing Photos
65 Deleting Photos
66 Additional Functions
66 Magnifying Photos during Playback
66 Flash
67 Histogram Display
67 Drive Mode: Continuous Shooting and Exposure Bracketing
68 Taking Photos while Recording Movies
(Simultaneous Recording)
69 Light Metering Mode
69 Capturing a Photo from the Playback Scene
70 Protecting Photos
70 Copying Photos
71 Other Functions You Can Use when Taking Photos
72 Printing Photos
72 Printing Photos (Direct Print)
73 Selecting the Print Settings
75 Trimming Settings
76 Print Orders
[] E×temal ( ennectiens
78 Terminals on the Camcorder
79 Connection Diagrams
81 Playback on a TV Screen
82 Saving and Backing Up Your Recordings
82 Backing Up Your Recordings on a Computer
82 Authoring High-Definition (AVCHD) Discs and Photo DVDs
86 Copying your Recordings to an External Video Recorder
86 Transferring Photos to a Computer (Direct Transfer)
89 Transfer Orders
12
[] Additionalinformation
90 Appendix: Menu Options Lists
90 FUNC. Menu
92 Setup Menus
101 Trouble?
101 Troubleshooting
107 List of Messages
116 Do's and Don'ts
1 !6 Handling Precautions
120 Maintenance!Others
12! Using the Camcorder Abroad
122 General information
122 System Diagram
123 Optional Accessories
127 Product Codes
128 Specifications
130 index
13
i" i!_od_ ct on
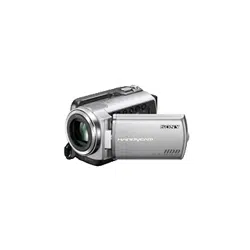
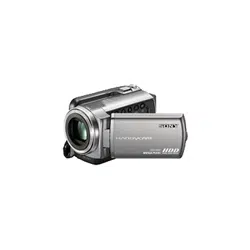
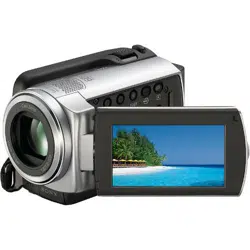
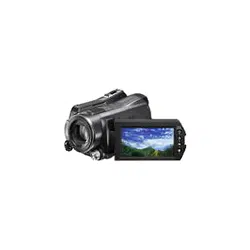
Thank you for purchasing the Canon VIXIA HG21!VlXIA HG2O. Please read this
manual carefully before you use the camcorder and retain it for future reference.
Should your camcorder fail to operate correctly, refer to Troubleshooting (ffl3 101).
ConventionsUsedinthis Manaal
@ IMPORTANT: Precautions related to the camcorder's operation.
(_ NOTES: Additional topics that complement the basic operating procedures.
_ POINTS TO CHECK: Restrictions or requirements regarding the function
described.
ECI: Reference page number within this manual.
To complete some operations you will need to refer also to other instruction
manuals. This will be indicated with the following icons:
Refer to the "Digital Video Software" instruction manual, included as a
PDF file in the supplied DIGITAL VIDEO Solution Disk CD-ROM.
Refer to the instruction manual of the optional DW=I0O DVD Burner.
_ : Text that applies only to the model shown in the icon.
The following terms are used in this manual:
"Screen" refers to the LCD and the viewfinder screen (C[I_ only).
"Hard disk" and "HDD" are used interchangeably to refer to the camcorder's built-
in hard disk drive.
"Media" is used to refer collectively to either the builtqn hard disk or an external
memory card.
The photos included in this manual are simulated pictures taken with a still camera.
Unless indicated otherwise, illustrations and menu icons refer to the _.
14
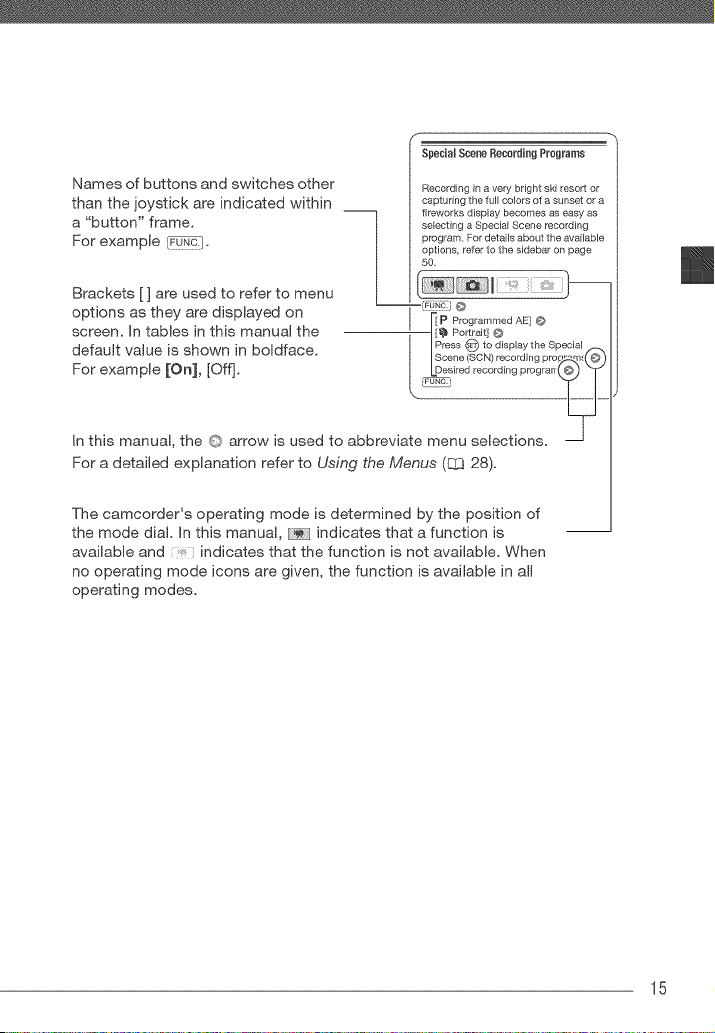
SpecHsBScene Recording Programs
Names of buttons and switches other Recording in a very bright ski resort or
than the joystick are indicated within capturing the full colors of a sunset or a
--] fireworks display becomes as easy as
a "button" frame, selecting a Special Scene recording
For example _F0-N-_:I" / program. For details about the available
options, refer to the sidebar on page
50,
Brackets [ ] are used to refer to menu
options as they are displayed on [_p ProgrammedAE]Q
screen. In tables in this manual the gl_ Portrai[]¢
press #_ to display the Special/._,
default value is shown in boldface. IScene(SCN)recordingpro_24_!(O)
For exam pie [O n], [Oft]. LDesiredrecordingprograrr(©) _T"
In this manual, the © arrow is used to abbreviate menu selections.
For a detailed explanation refer to Using the Menus (EZ] 28).
The camcorder's operating mode is determined by the position of
the mode dial. In this manual, indicates that a function is
available and indicates that the function is not available. When
no operating mode icons are given, the function is available in all
operating modes.
15
_( "; iOR
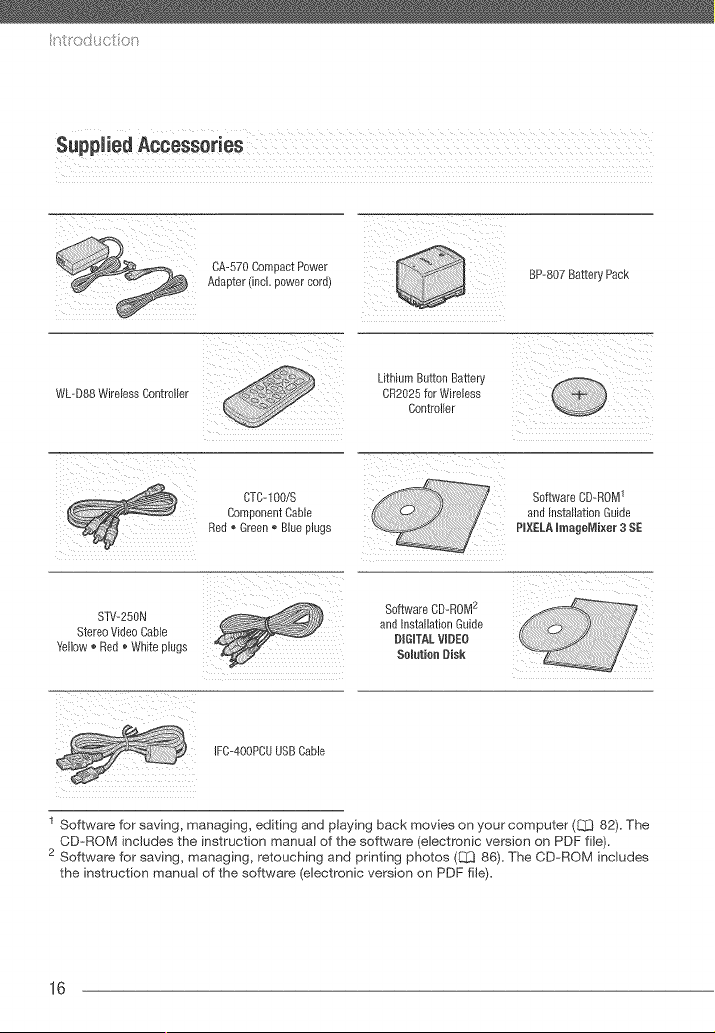
$1pplied Accessories
CA-570 Com-Jact Power
Adapter fincL Dower coro_ _ [tP 807 Battery _ack
WL D88 Wireless Controller
Lithium Button Battery
CR2025 for Wireless
Controller
KC-1OO/S
Corr uonent Cable
Red ,, Green ® Blue plugs
Software CD-ROM1
ana mslalaeon Guide
PIXELA lraage_lixer 3 S£
STV-250N
Stereo Video Cable
Yellow _ Red _ White plugs
SoftwareCD-ROM2
and InstallationGuide
DIIIYALVll£O
Solution lisk
IFC 400PCU USB Cable
1 Software for saving, managing, editing and playing back movies on your computer (_ 82). The
CD-ROM includes the instruction manual of the software (electronic version on PDF file).
2 Software for saving, managing, retouching and printing photos (liZ3 86). The CD-ROM includes
the instruction manual of the software (electronic version on PDF file).
16
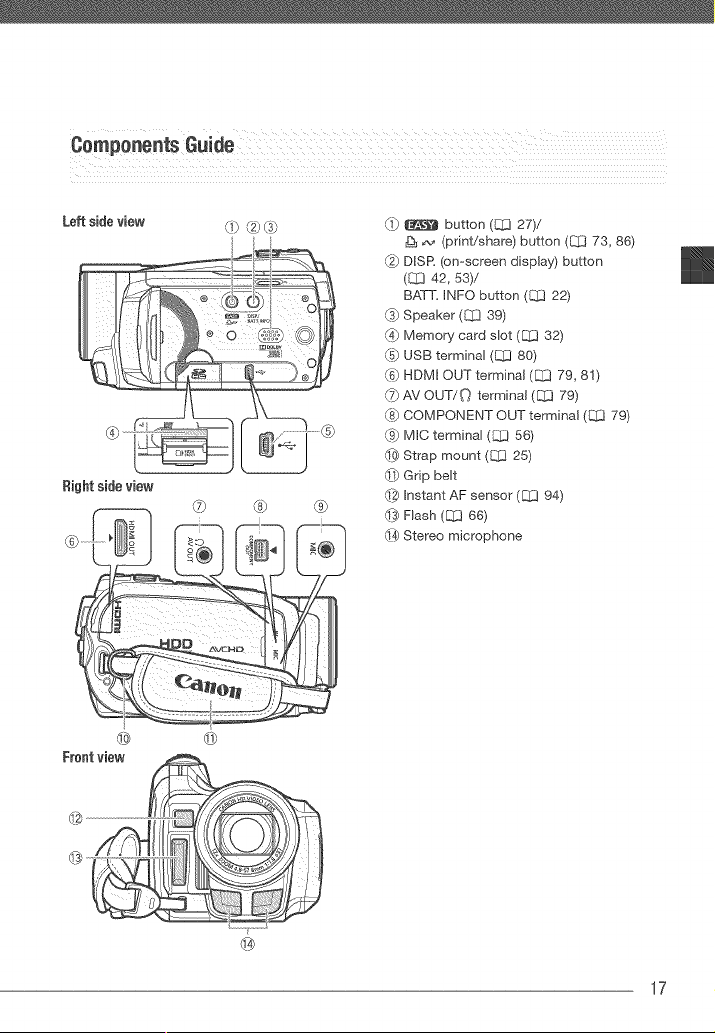
Leftside view
Riohtsideview
® ® ®
/<1}_ button (_ 27)/
A._ (print/share) button (_ 73, 86)
DISR (on-screen display) button
(8[3 42, 53)/
BATT= INFO button (1:]}] 22)
_) Speaker (CJ3 39)
G_ Memory card slot ([_ 32)
C5}USB terminal (Q3 80)
_6)HDMI OUT terminal (EZ3 79, 81)
_ AV OUT/{"_ terminal (8::[379)
(8} COMPONENT OUT terminal (]Z3 79)
_} MIC terminal (C[_ 56)
_3}Strap mount (8_3 25)
_# Grip belt
_ Instant AF sensor ([Z.3 94)
_ Flash ([_ 66)
_-4_Stereo microphone
@
17
r ttodt ot tit
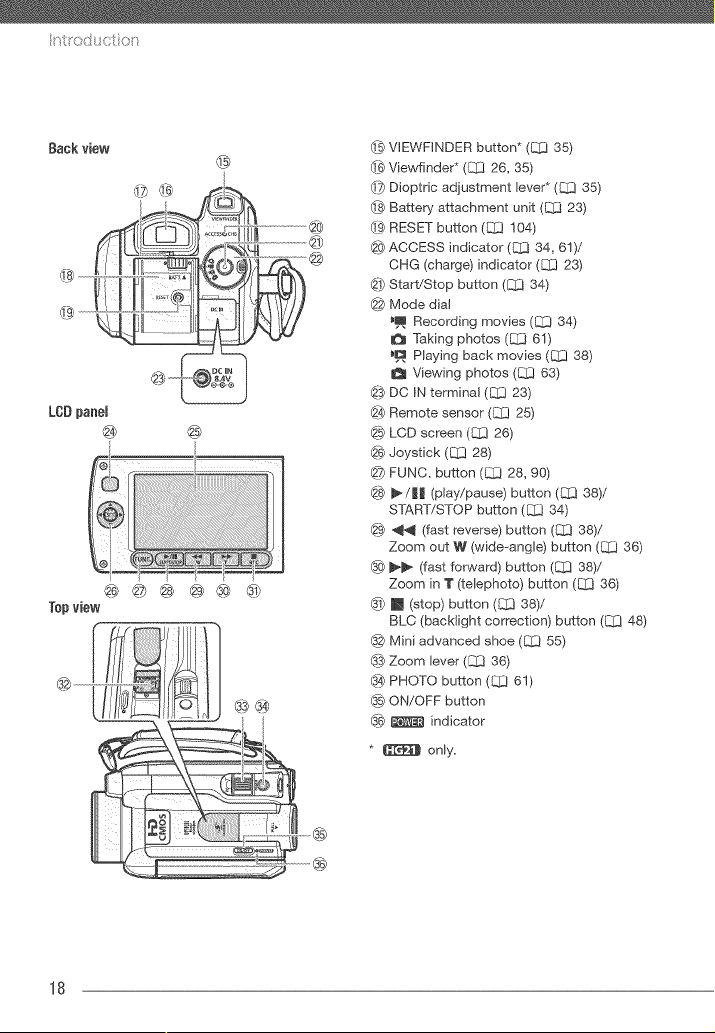
Back view
®
LCDpanel
) )
®@® @® @
Top view
®@
@ VIEWF_NDER button* (£{2 35)
(_ Viewfinder* (_ 26, 35)
(_ Dioptric adiustment lever* ({_1_35)
(_ Battery attachment unit ([_ 23)
_9-}RESET button (_ 104)
(_0}ACCESS indicator (C[3 34, 81)/
OHG (charge) indicator (_ 23)
_1}Start/Stop button ([_ 34)
@ Mode dial
_m Recording movies (Q3 34)
Taking photos ([_ 61)
_D Playing back movies (L_ 38)
Viewing photos (Q3 83)
_3} DC )N termina( ([_ 23)
@ Remote sensor (_ 25)
@ LCD screen (8{[3 26)
@ Joystick (_ 28)
@ FUNC. button (C_ 28, 90)
@ _/|! (play/pause) button (EZ3 38)/
START/STOP button (_ 34)
_ _,_ (fast reverse) button (_ 38)/
Zoom out W (wide_ang)e) button (_ 38)
® _ (fast forward) button (El3 38)/
Zoom in T (telephoto) button (_ 36)
_) [] (stop) button ([_ 38)/
BLC (backlight correction) button (C_ 48)
Mini advanced shoe (_ 55}
_ Zoom lever ([_ 36)
_) PHOTO button ({_[3 61)
ON/OFF button
_6} _ indicator
* _ only.
18
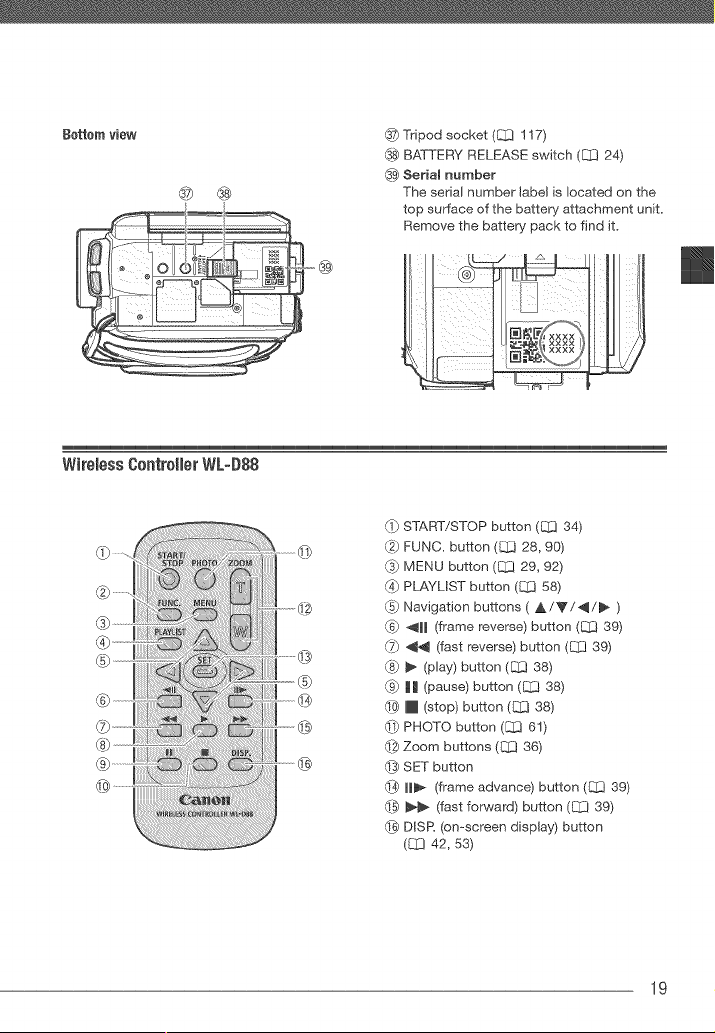
Bottom view @ Tripod socket (_ 117)
@ BATTERY RELEASE switch (_ 24)
_ Serial number
_ @ The serial number label is located on the
top surface of the battery attachment unit.
Remove the battery pack to find it.
I fVI/, '_ L [I _--/ 1 [_ ILl .! ....... t
o
Wiremess00ntr011erWL-D88
©
_ START/STOP button (_ 34)
_2)FUNC. button (_ 28, 90)
_3]MENU button (CI_ 29, 92)
_/_,_P_AYLIST button (C_ 58)
_5)Navigation buttons ( A/'V/4/_ )
{G] 411 (frame reverse) button (_ 39)
_ _ (fast reverse) button (C[_ 39)
(8_ _ (play) button (CCJ38)
@ || (pause) button (_ 38)
_ [] (stop) button (Q_ 38)
_# PHOTO button (CC] 61)
_2_Zoom buttons (Q_] 36)
_ SET button
11_ (frame advance) button (C_.J39)
_ _ (fast forward) button (_ 39)
_ DISR (on-screen display) button
(L_ 42, 53)
19
t i!_od_ ct on
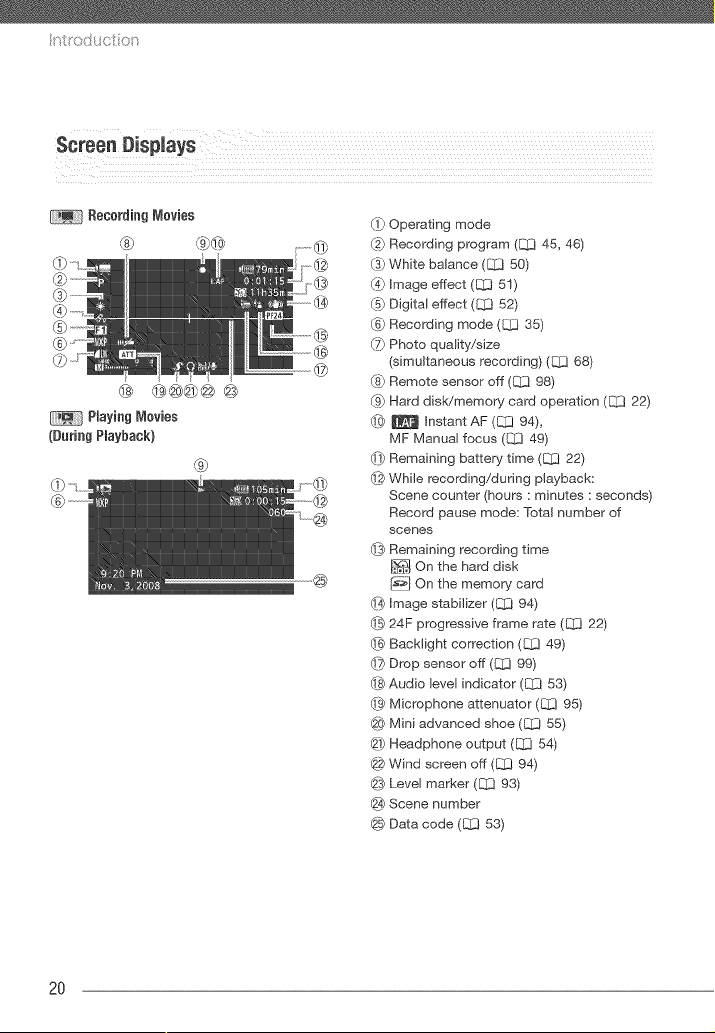
Screen Displays
(During Playback}
@
@
(1_Operating mode
(2} Recording program (l_ 45, 46)
(3} White balance ([_ 50)
(4} Image effect ([_ 51)
(5} Digital effect (L_ 52)
(_) Recording mode (_ 35)
(7} Photo quality/size
(simultaneous recording) (_ 68)
(8} Remote sensor off (_ 98)
(9} Hard disWmemory card operation (_ 22)
(l_ _ Instant AF ([_ 94),
MF Manual focus (L_ 49)
_i} Remaining battery time (_ 22)
(_ While recording/during playback:
Scene counter (hours : minutes : seconds)
Record pause mode: Total number of
scenes
43}Remaining recording time
I_ On the hard disk
@ On the memory card
(_ Image stabilizer (_ 94)
24F progressive frame rate (E_J 22)
(_ Backiight correction (8_1 49)
(_ Drop sensor off (L_ 99}
_}_Audio level indicator (L_ 53)
69}Microphone attenuator (_ 95)
@} Mini advanced shoe ({_[3 55)
_) Headphone output ([_ 54)
Wind screen off ([3J394)
¢_:_Level marker ([_ 93)
_ Scene number
Data code ([_3 53)
2O
®
_@
Vi÷wing Photos
@
@ ®@
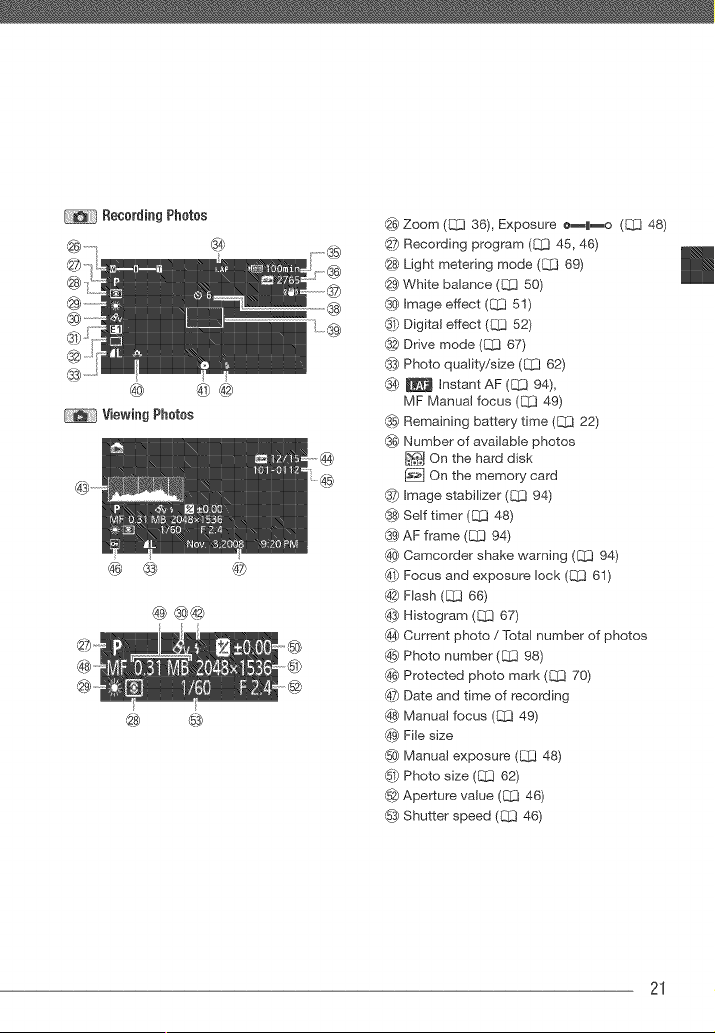
@ Zoom (ECJ 36), Exposure e_H_o (El;] 48)
@ Recording program (L_ 45, 46)
@ Light metering mode (C[3 69)
{_ White balance (C]_! 50)
_0_image effect (C_ 51}
_ Digital effect (_ 52)
{32}Drive mode (C[]] 67}
@} Photo quality/size (_ 62)
@ _ Instant AF (_ 94),
MF Manual focus (1_ 49)
_@Remaining battery time (_ 22)
@ Number of available photos
On the hard disk
@ On the memory card
@7}Image stabilizer (_ 94)
@} Self timer (CCI 48)
@_AF frame (J._] 94)
_0_Camcorder shake warning (_ 94)
d_ Focus and exposure lock (C[_] 61}
@ Flash (C]_] 66)
_} Histogram (__] 67)
_ Current photo / Total r_umber of photos
@@Photo number (E]_) 98)
@ Protected photo mark (C_ 70)
d?PDate and time of recording
@ Manual focus (_ 49}
@ File size
@ Manual exposure (C[_ 48)
6# Photo size (C_] 62)
@ Aperture value (C[_ 46}
_5_Shutter speed (_ 46)
21
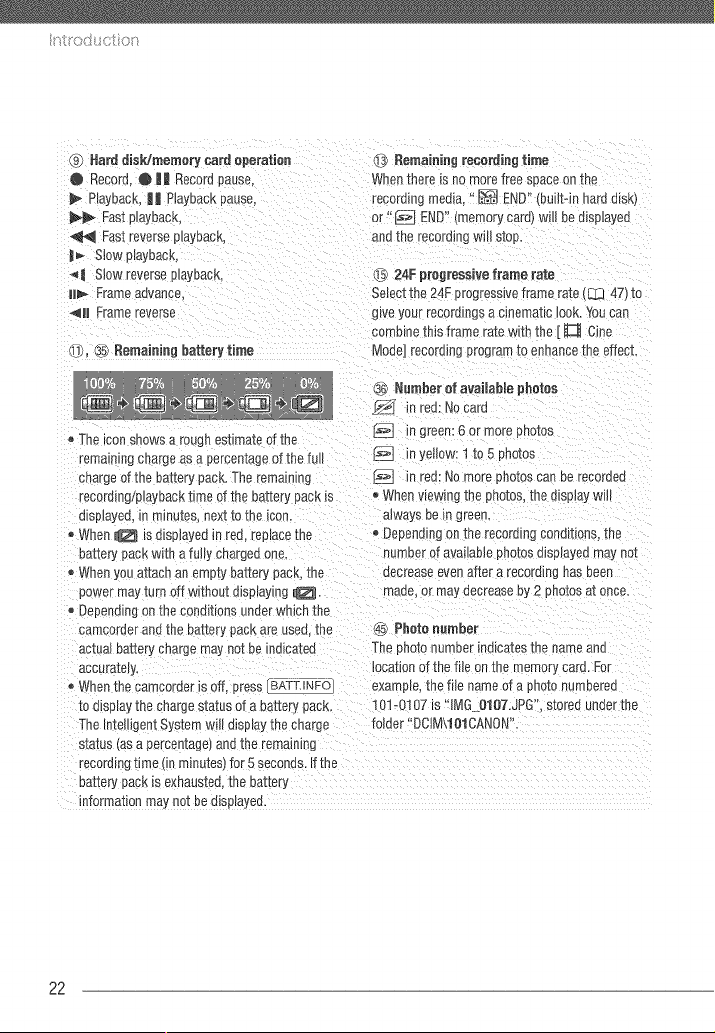
_} Hard disk/memory card operation
@ Recorc • |l Record pause,
PlayDac4, || Playback pause.
Fast playback,
Fast reverse p_ayDack.
|_ Slow playeacK,
| Slow reverse p_ayDacK,
iil_ Frame advance.
411 Frame reverse
d_l_,_5_Remaining battery time
i3) Remaining recording time
Whenthere is no more free space on [ne
recording media, "_ END" (built-in hard dlsk_
or" _ END" (memory caru_will be displayed
one [ne recording will stop.
[_ 24F progressive frame rate
Select tee 24F progressive frame rote (1_]1347) io
g_veyour recorumgs a cinematic look. You can
combine this frame rate with the [ _ Cine
Mode] recording program to ennance tne effect.
t,_ Number ef available photes
n tea: No card
The _consnows a rougn esemate of the _!l in green: 6 or more photos
rema nmg cnarge as a percentage of the full @ iF yetlow: 1 to 5 photos
cnarge of the battery pack, The remaining 12_ in ed: No more _hotos can ee recoroeo
recordmg/p avDaCKr_me of the battery pack is • When viewing the photos, [ne aLsplaywill
o_splayed, in minutes, next to the icon. aJways ue n green.
® When _ is displayeo in red, replace [ne _ Depending on the recordmc conditions, the
battery pack with a fully charged one. number of available photos displayed ma', not
Whet you a_acn an empty battery pacK, [he oecrease even after a recording has been
power may wrn off without displaying _ maoe. Jr may decrease by 2 pnotos at once.
®Depending on the condlbons under which the
camcorder and the battery pack are used. the @5)Photo e_mber
ac_ua_ea_[ery charge may noz oe indicated ]he photo number mmca_es_ne name ano
accurately, location of the fil_ on me memory card. For
When the camcorder is off, press _ example, Lhefile name of a pno_onumeereo
_odisplay the charge statue of a battery pac_ ] 31-0107 is "IMG 0t 07.JPG" s_oreounder _ne
The Intelligent System will display [ne charge folder "DCtM\IO1CANON".
s[a_us _asa percemagef and the remaining
recording _ime dn minutes_ for 5 seconos. #the
Daz_erypack is exhausted, the battery
information may not be dlsplayea.
22
This chapter describes basic operations, such as navigating the
menus, and first time settings to help you learn more about your
camcorder_
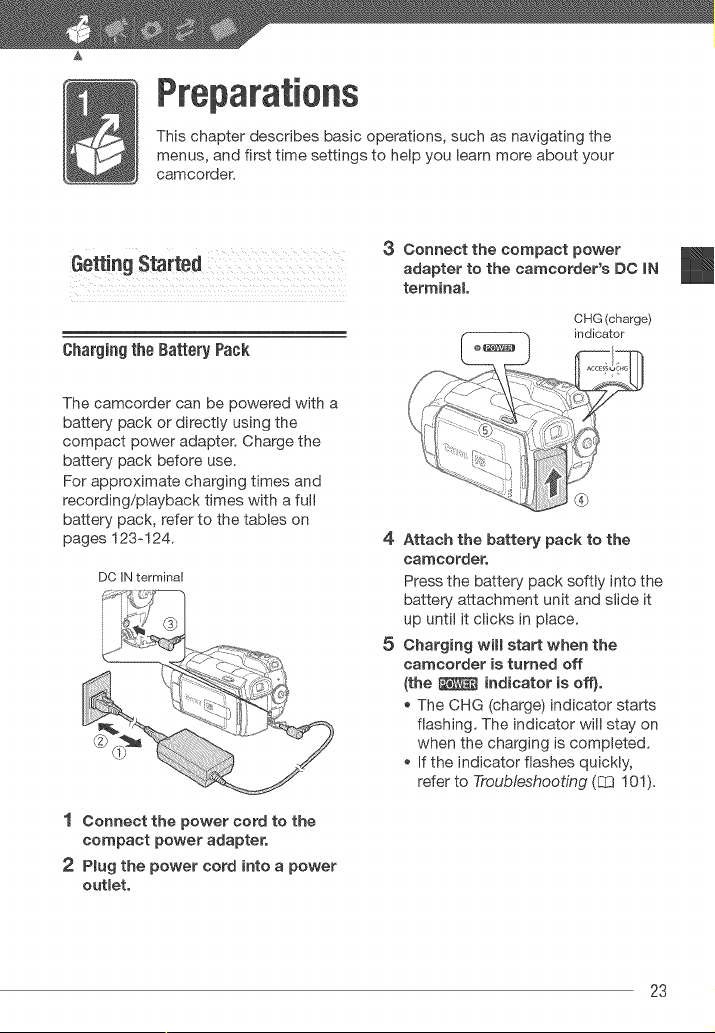
Charging the Battery Pack
The camcorder can be powered with a
battery pack or directly using the
compact power adapter. Charge the
battery pack before use.
For approximate charging times and
recording/playback times with a full
battery pack, refer to the tables on
pages 123-124.
DO IN terminal
®
1 Connect the power cord to the
compact power adapter.
2 Plug the power cord into a power
outlet.
3
4
5
Connect the compact power
adapter to the camcorder'a DC IN
terminal.
CHG (charge)
ir_dicator
, ......;; +7t'i777:_7_
Attach the battery pack to the
camcorder.
Press the battery pack softly into the
battery attachment unit and slide it
up until it clicks in place.
Charging will start when the
camcorder is turned off
(the _ indicator is off}.
The CHG (charge) indicator starts
flashing. The indicator will stay on
when the charging is completed.
If the indicator flashes quickly,
refer to Troubleshooting (C_ 101).
23
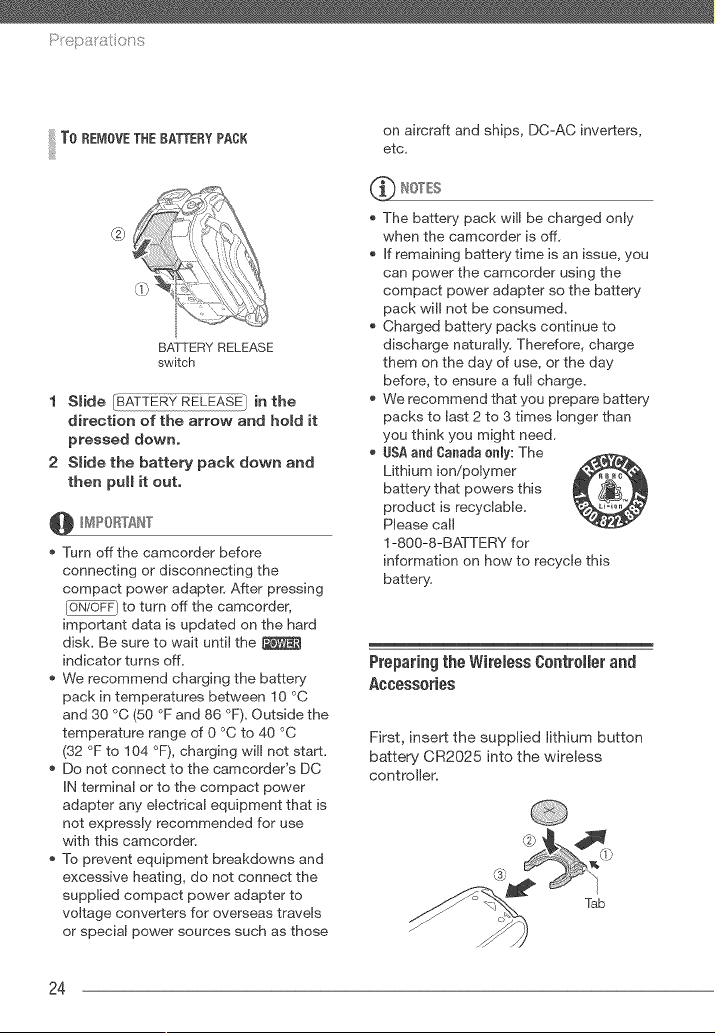
To REd,lOVETHEBATTERYPACK
@
BATTERY RELEASE
switch
1 Slide [BATTERY RELEASE} in the
direction of the arrow and hold it
pressed down,
2 Slide the battery pack down and
then pull it out,
Turn offthe camcorder before
connecting or disconnecting the
compact power adapter= After pressing
iON/OFF] to turn off the camcorder,
important data is updated on the hard
disk. Be sure to wait until the
indicator turns off.
We recommend charging the battery
pack in temperatures between 10 °C
and 30 °C (50 °F and 86 °F). Outside the
temperature range of 0 °C to 40 °C
(32 OFto 104 OF), charging will not start.
Do not connect to the camcorder's DC
IN terminal or to the compact power
adapter any electrical equipment that is
not expressly recommended for use
with this camcorder.
To prevent equipment breakdowns and
excessive heating, do not connect the
supplied compact power adapter to
voltage converters for overseas travels
or special power sources such as those
on aircraft and ships, DC-AC inverters,
etc.
* The battery pack will be charged only
when the camcorder is off.
if remaining battery time is an issue, you
can power the camcorder using the
compact power adapter so the battery
pack will not be consumed.
Charged battery packs continue to
discharge naturally. Therefore, charge
them on the day of use, or the day
before, to ensure a full charge.
We recommend that you prepare battery
packs to last 2 to 3 times longer than
you think you might need.
ISA ant Canada enly: The
Lithium ion/polymer @
battery that powers this
product is recyclable.
Please call
1-800-8-BATTERY for
information on how to recycle this
battery.
Preparingthe WirelessO0ntroler and
Accessories
First, insert the supplied lithium button
battery CR2025 into the wireless
controller.
Tab
24
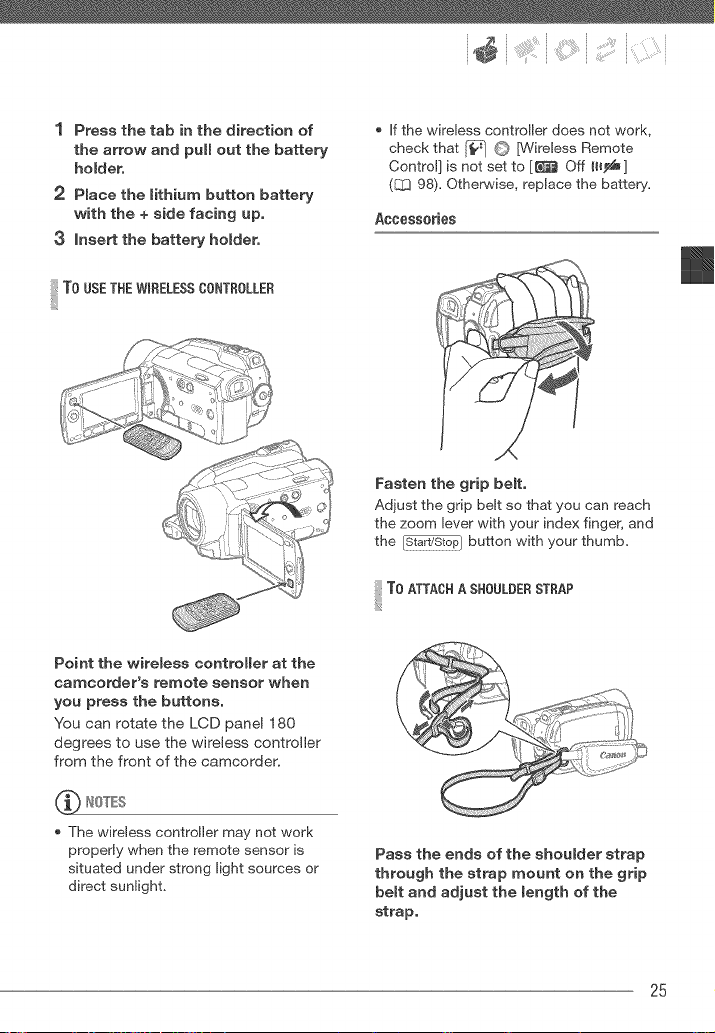
1 Press the tab in the direction of
the arrow and pull out the battery
holdero
2 Place the lithium button battery
with the + side facing up.
3 insert the battery holdero
I To USETHE WmRELESSCONTROLLER
If the wireless controller does not work,
check that [_10 [Wireless Remote
Control] is not set to [_ Off _l_,_d_]
(_ 98). Otherwise, replace the battery.
Accessories
Fasten the grip belt.
Adjust the grip belt so that you can reach
the zoom lever with your index finger, and
the [_,_ar}TS_o_1 button with your thumb.
!iiilT0"TA0°AS"00LOE°ST° P
Point the wireless controller at the
camcorder's remote sensor when
you press the buttons,
You can rotate the LCD panel 180
degrees to use the wireless controller
from the front of the camcorder.
'_ NOTES
The wireless controller may not work
properly when the remote sensor is
situated under strong light sources or
direct sunlight.
Pass the ends of the shoulder strap
through the strap mount on the grip
belt and adjust the length of the
strap.
25

P_@p8 i'8_ iol_ S
Adjustingthe Positionand Brightness
of the LCDScreen
tetating the LCD Panel
Open the LCD panel 90 degrees.
You can rotate the panel 90 degrees
downward.
You can rotate the panel 180 degrees
toward tile lens. Rotating the LCD
panel 180 degrees can be useful in
the following cases:
- _ To allow' the subject to monitor
the LCD screen while you use the
viewfinder.
- To include yourself in the picture when
recording with the self timer.
- To alow the camcorder to be operated
with the wireless controller from the
front.
180 °
90 +
180 °
Subiect can monitor the LCD screen
while you use the viewfinder
Aleut the LOBand viewfinter* screen: The
screens are produced using extremely
high-precision manufacturing techniques.
with more than 99.99% of the pixels
operating to specification. Less than
0.01% of the pixels may occasionaly
misfire or appear as black, red, blue or
green dots. This has no effect on the
recorded image and does not constitute a
malfuncqon,
* _ only.
LCI lacklight
You can set the brightness of the
screen to normal or bright. This
changes the brightness of both the LCD
and viewfinder* screen,
* _ only.
i 'grit " af
;422_...............................(:.:,V
Hold [_15:} pressed down for more
than 2 seconds,
Repeat this action to toggle between
the normal and bright settings,
_ IOTES
This setting does not affect the
brightness of the recording.
Using the bright setting will shorten the
effective usage time of the battery pack.
26

CamcGrder
The _ Butten: _ Mede er
Flexible Recerd[ng
The camcorder offers two basic modes
for recording video or photos:
mode for beginners or if you just prefer
not to bother with detailed camcorder
settings, and flexible recording mode
which lets you change the camcorder's
settings to your preference.
FLEXIBLEREOORDING
Press the _ button again to return
to the flexible recording mode (the
button's light is off). You can access the
menus and change settings to your
preference. Even in flexible recording
mode, the camcorder can help you with
the settings. For example, you can use
the Special Scene recording programs
(C1345) to set at once all the optimal
settings to match special recording
conditions.
_4"_ NOTES
In _ mode you cannot access the
menus but you can change the following
settings in advance, before setting the
camcorder to _ mode,
- Recording mode of movies
- Size/quality of photos
- Auto slow shutter
- All settings under the setup menu's
_, r_ and r_ tabs,
!iiilEAsY°°°E
Press the _ button to enter the
mode (the button's blue light will
be on). You do not need to worry about
any settings and can shoot video using
just the zoom lever (C_336) and
[_ (Crj 34) or take photos using
just the zoom lever and [PFio_rb/(CC;61).
The viewfinder (_ only) and Quick
Start function can also be used in
mode.
27
P_epa_atio__s
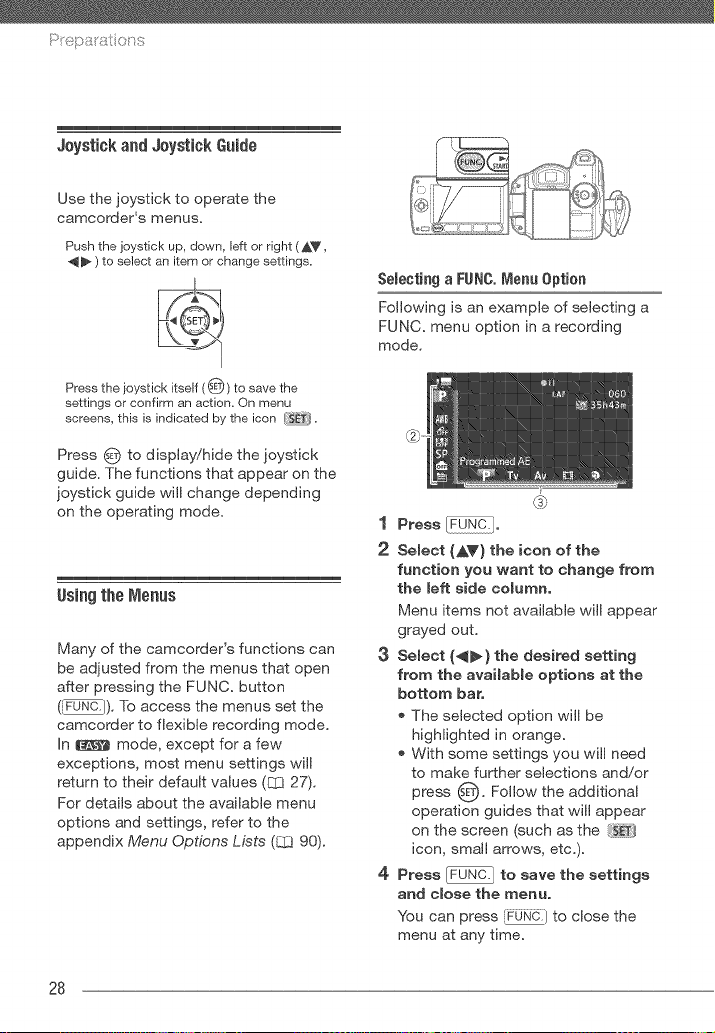
Joystick and JoystickGuide
Use the joystick to operate the
camcorder's menus.
Push the joystick up, down, left or right (_V,
_ ) to select an item or change settings.
Press the joystick itself (@) to save the
settings or confirm an action. On menu
screens, this is indicated by the icon
Press O to display!hide the joystick
guide. The functions that appear on the
joystick guide will change depending
on the operating mode.
Using the Menus
Many of the camcorder's functions can
be adjusted from the menus that open
after pressing the FUNC. button
(_}). To access the menus set the
camcorder to flexible recording mode.
In _ mode, except for a few
exceptions, most menu settings will
return to their default values ([2[327).
For details about the available menu
options and settings, refer to the
appendix Menu Options Lists (_ 90).
Selecting a FUNC.Menu 0ptien
Following is an example of selecting a
FUNC. menu option in a recording
mode.
1 Press o
2 Select (AY) the icon of the
function you want to change from
the left side columno
Menu items not available will appear
grayed out.
3 Select (._} the desired setting
from the available options at the
bottom bar.
The selected option will be
highlighted in orange.
With some settings you will need
to make further selections and!or
O" Follow the additionalpress
operationguides thatwillappear
on the screen (such as the
icon, small arrows, etc.).
4 Press _NCI 1to save the settings
and close the menu°
You can press [FUNgi to close the
menu at any time.
28
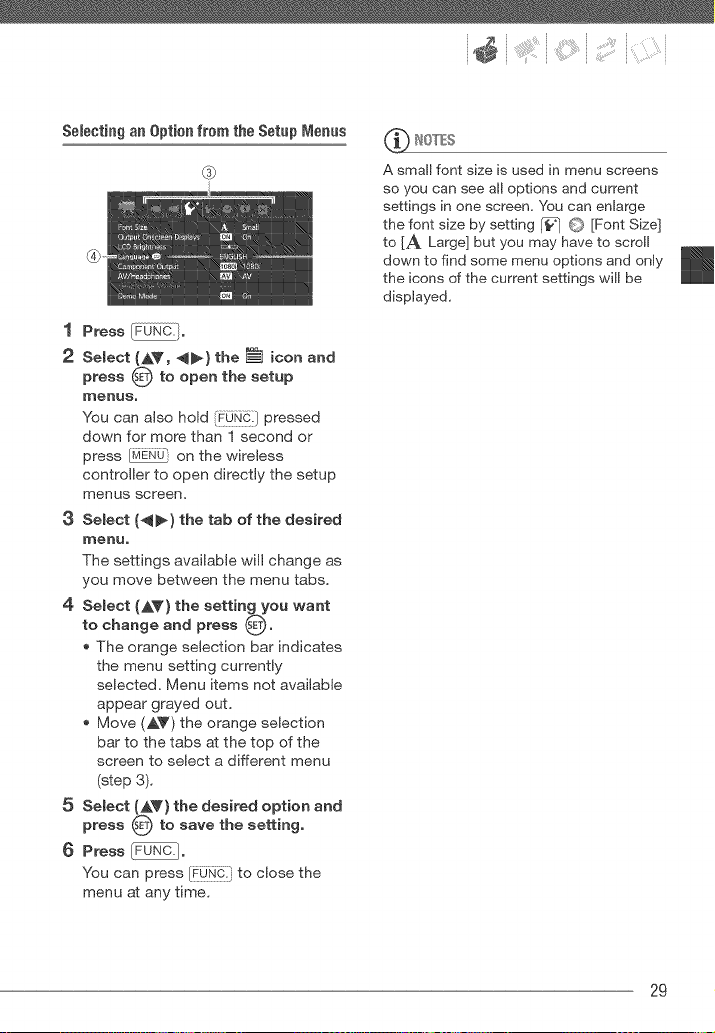
Sebcting an Optionfrom the SetupMenus
@
1 Press_1.
'_ Select (AV, _} the _ icon and
press 0 to open the setup
I'nenuso
You can also hold {€@_ } pressed
down for more than 1 second or
press _ on the wireless
controller to open directly the setup
menus screen.
3 Select (_} the tab of the desired
I'nenuo
The settings available will change as
you move between the menu tabs.
4 Select (AT} the setting you want
to change and press s_._o
The orange selection bar indicates
the menu setting currently
selected. Menu items not available
appear grayed out,
Move (AY) the orange selection
bar to the tabs at the top of the
screen to select a different menu
(step 3).
5 Select (AV} the desired option and
press O to save the setting°
6 Press _o
You can press {P0£d: to close the
menu at any time,
_ NOTES
A small font size _sused in menu screens
so you can see all options and current
settings in one screen, You can enlarge
the font size by setting _r__] G [Font Size]
to [A Large] but you may have to scroll
down to find some menu options and only
the icons of the current settings will be
displayed,
29
'6!p!'i![iO S
Setting the Date and Time
You will need to set the date and time of
the camcorder before you can start
using it. The [Date/Time] screen will
appear automatically when the
camcorder's clock is not set.
The date appears in a year-month-day
format only in the first setup screen. In
subsequent screen displays the date
and time will appear as month-day-year
(for example, [Jan, 1, 2008 12:00 AM]),
You can change the date format (L_3 99),
You can also change the date and time
later on (not during the initial setup),
Open the [Date/Time] screen from the
setup menus:
[_iJi_:} O [_ Menu] 0
[@] O [Date!Time]
Changing the Language
Default value
[_&_a]
When the [Date/Time] screen
appears, the year will be displayed in
orange and indicated with up/'down
arrows.
1 Change (A_') the year and move
(_} to the month.
2 Change the rest of the fields
(month, day, hour and minutes} in
the same way.
3 Select (_} [OK] and press _ to
start the clock and close the setup
screen=
When you do not use the camcorder for
about 3 months, the built-in
rechargeable lithium battery may
discharge completely and the date and
time setting may be lost, In such case,
recharge the built-in lithium battery
(_ 119) and set the time zone, date
and time again,
0pl0ns
[OEST(NA] [MAGYAR]
[DEUTSCH] [MELAYU]
[E,,\AHN(KA] [POLSK(]
[£NGUSH] _ [ROMAN_,]
[ESPANOL] [TORKOE]
[FRANOAIS] [PYCCK_I]
[ITAUANO] [ YKPAi'HCbKA]
r_o.o.]0
[P_h Menu]O _ ©
[Language _] O
Desired language C)
@ IOTES
The displays and that appear
in some menu screens refer to the name of
buttons on the camcorder and will not
change, regardless of the language
selected,
3O
ChangingtheTime Zone
Change the time zone to match your
location. The default setting is New
York.
!i!TOS==E°O=ET'=E=°E
{r0w_:}@
[_ Menu] @ [-07 @
[Time Zone!DS_ @ t_ @
Your local time zone* @
FUNd]
!iiilw=°Y00===
[_ Menu] © [-@q©
[Time Zone!DST] @ :_ @
Local time at your destination* @
FUNC.}
* To adiust for daylight saving time, select the
area name marked w th a -:_-
Usia£ a Mem0ry Oard
Memory Cards Compatibmefor Usewith
the Camcorder
You can use commercially available
s._ SDHC (SD high capacity) memory
cards and _'_ SD memory cards with
this camcorder. However, depending on
its Speed Class, you may not be able to
record movies on the memory card.
Refer to the table on page 32.
As of June 2008, the movie recording
function has been tested using SD!
SDHC memory cards made by
Panasonic, Toshiba and SanDisk.
We recommend using memory cards
with a Speed Class 4 or higher.
About the SD Speed 01ass: The SD Speed
Class is a standard that indicates the
minimum guaranteed data transfer speed
of SDiSDHC memory cards. When you
buy a new memory card, look for the
Speed Class logo on the package.
31
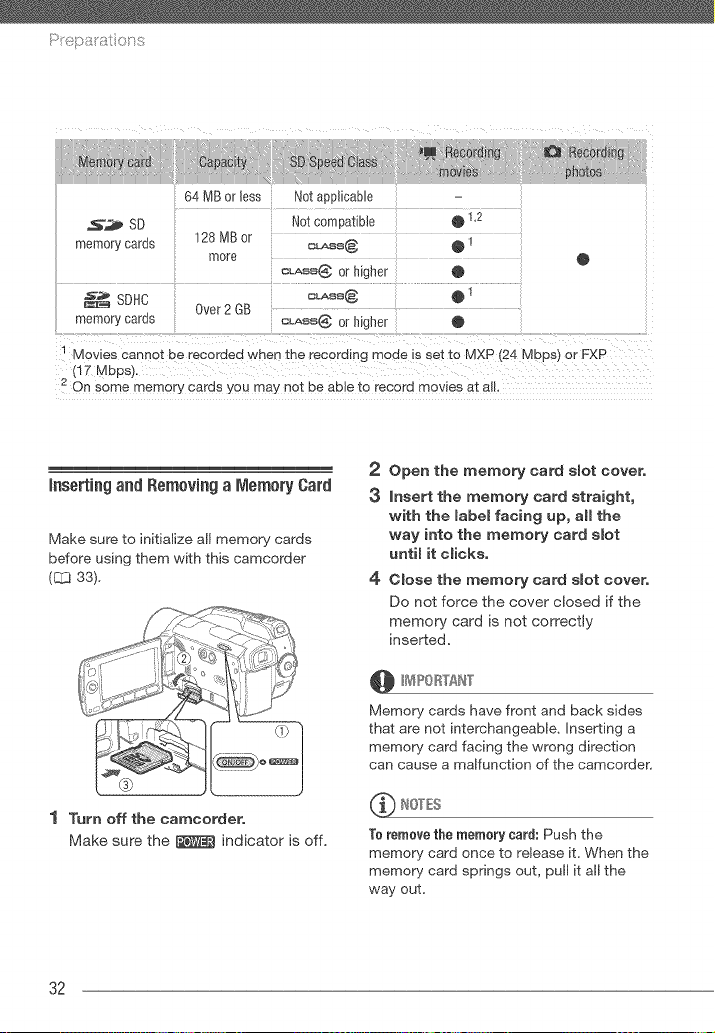
s_emorycares
64 MB or less Not aDD_maDm
Not c0rYDa[IDle @ 1.2
_28 MB 0_
more
CLASS4@ 0[ higher @
0vet 2 GB
eL,ASS@ 0[ nigher @
@
Movies cannot De recorded when _ne recording mode _sset to MXP (24 Mbps) or FXP
(17 Mbps).
2 On some memory cards you may not De auJe to record movies at al.
inserting and Removiag a Memory Card
Make sure to initialize all memory cards
before using them with this camcorder
(121333),
®
1 Turn off the caracorder,
Make sure the _ indicator is off.
2 Open the memory card slot cover,
3 insert the memory card straight,
with the label facing up, all the
way into the memory card slot
until it clicks,
4 Close the memory card slot cover,
Do not force the cover closed if the
memory card is not correctly
inserted,
@ 1t4P0 RTAN"I"
Memory cards have front and back sides
that are not interchangeable, inserting a
memory card facing the wrong direction
can cause a malfunction of the camcorder.
_ NOTES
To remove the memery card: Push the
memory card once to release it, When the
memory card springs out, pull it al the
way out,
32
SelectingtheRecordingMedia
You can select to record your movies
and photos on the built=in hard disk or
on a memory card. The hard disk is the
default media for recording both.
To CHANGETHE _IEDIA FOR RECORDING
iMOV,ES
[_ Menu]© _ or_ ©
[Rec Media for Movies] or
[Rec Media for Photos] © Select
the hard disk or memory card* ©
[_:UNC.J
* For each media, you can check the total,
used and available space. Available space
is estimated based on the recording mode
(movies) or photo size/quality (photos)
currently in use.
Ioitializingthe HardDisk or Memory
Oard
Initialize memory cards when you use
them with this camcorder for the first
time. You can also initialize a memory
card or the hard disk to permanently
delete all the recordings it contains.
Initializing the recording media also
eliminates fragmentation.
Fragmentation becomes more serious
as recordings are repeatedly added and
deleted and can eventually result in
reduced performance.
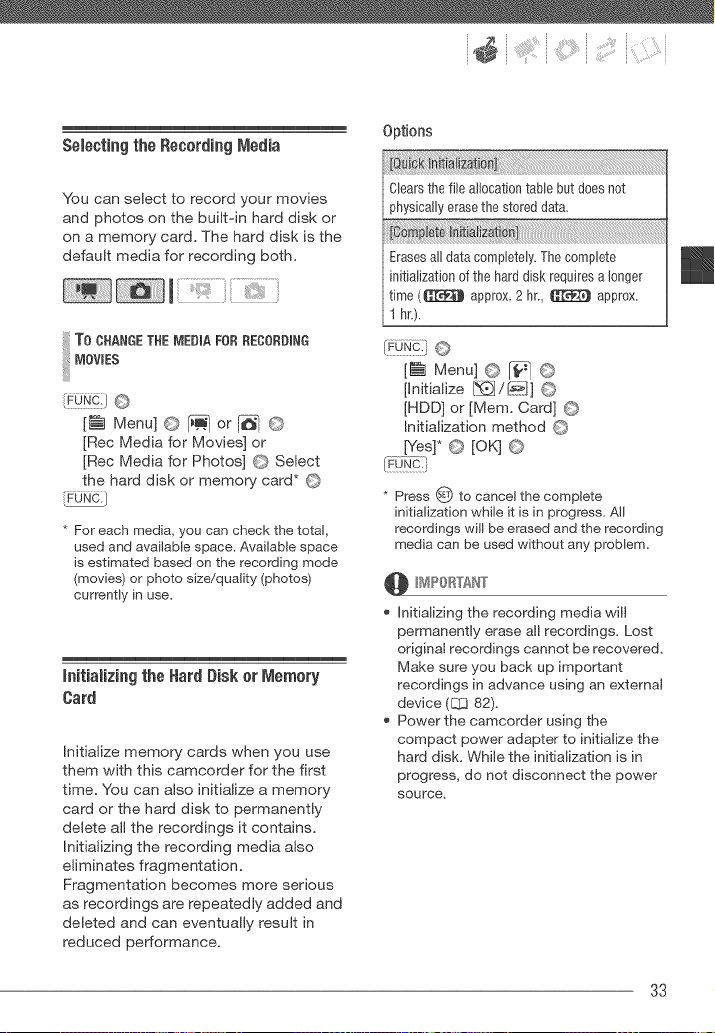
Options
i
Clears the file allocation table but does not
physically erase the stored data.
:!
Erases all data c0mpletely. The c0mpbte
initializationof the hard disk requires a longer
time (_[_ approx. 2 hr., _ approx.
1 hr.).
[P_I Menu] © _ ©
[Initialize [_J![£_]] ©
[HDD] or [Mere. Card] ©
Initialization method O
[Yes]* O [OK] 0
* Press _ to cancel the complete
initialization while it is in progress. All
recordings will be erased and the recording
media can be used without any problem.
initializing the recording media will
permanently erase all recordings. Lost
original recordings cannot be recovered.
Make sure you back up important
recordings in advance using an external
device (813 82).
Power the camcorder using the
compact power adapter to initialize the
hard disk. While the initialization is in
progress, do not disconnect the power
source.
33
This chapter covers functions related to shooting movies, including
recording, playback, menu options and playlist and scene operations.
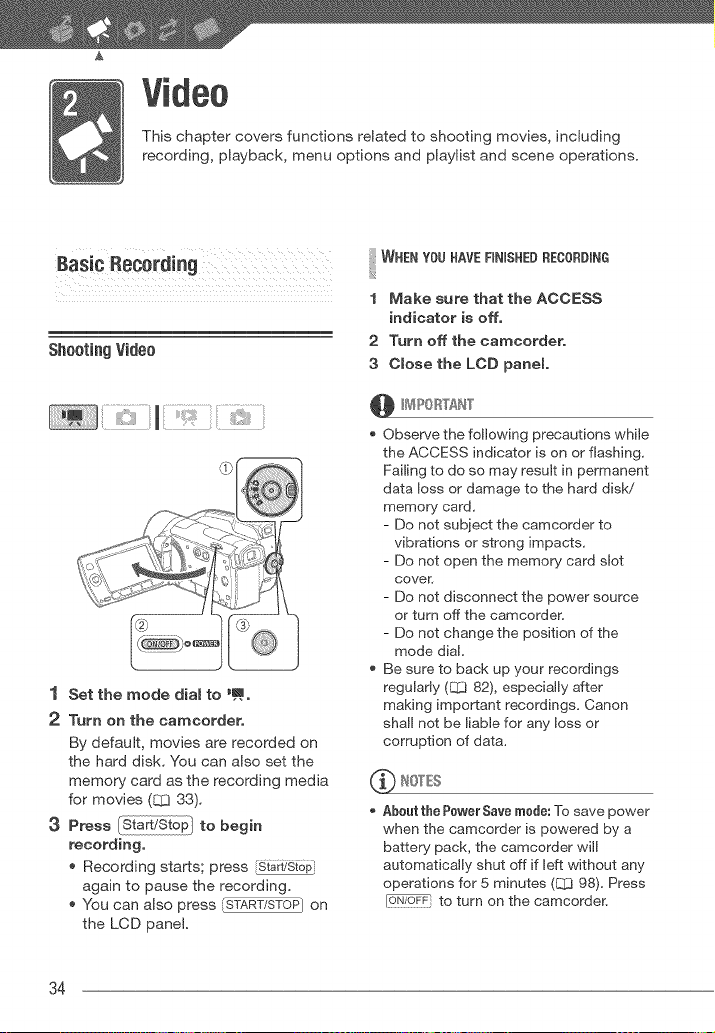
Basic Rec0rdiag
Shooting Video
1 Set the mode dial to _ao
2 Turn on the caracorder.
By default, movies are recorded on
the hard disk. You can also set the
memory card as the recording media
for movies (83 33).
3 Press to begin
recording,
Recording starts; press [Sta?i!sto_
again to pause the recording.
You can also press _) on
the LCD panel.
WHEN YOU HAVERNISHED RECORDING
1 Make sure that the ACCESS
indicator is off.
2 Turn off the camcordero
3 Close the LCD panel
@ _4 ?0 RTAN"['
Observe the following precautions while
the ACCESS indicator is on or flashing.
Failing to do so may result in permanent
data loss or damage to the hard disk/
memory card.
- Do not subject the camcorder to
vibrations or strong impacts.
- Do not open the memory card slot
cover.
- Do not disconnect the power source
or turn off the camcorder`
- Do not change the position of the
mode dial.
Be sure to back up your recordings
regularly (EZ3 82), especially after
making important recordings. Canon
shall not be liable for any loss or
corruption of data.
_ NOTES
Abeut the Pewer Save mude: To save power
when the camcorder is powered by a
battery pack, the camcorder will
automatically shut off if left without any
operations for 5 minutes (Q3 98). Press
[6-_76#7} to turn on the camcorder`
34
When recording in very loud places
(such as fireworks shows or concerts),
sound may become distorted or it may
not be recorded at the actual levels, This
is not a malfunction,
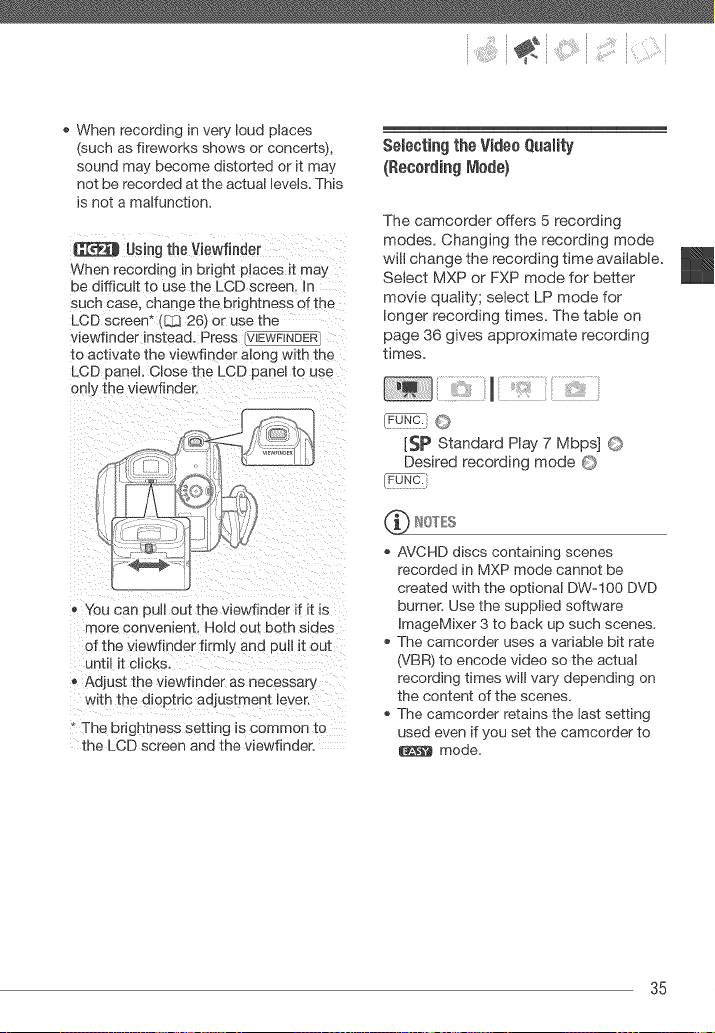
Using the Viewfinder
When recording in bright places Jt may
be difficult to use the LCD screen, In
such case, change the brightness of the
LCD screen _ (B3 26_ or use the
viewtinder instead. Press \/IEWRNDER
to activate the viewfinaer along with the
LCD panel, Close the LCD panel to use
onl',, the viewfinder.
- You can pull out the viewfinder if it is
more convenient, Hold out both sides
of the viewfinder firmly and pul it out
until it clicks,
Adjust the viewfinder as necessary
with the dioptric adjustment lever.
+ The brightness setting is common to
the LCD screen and the viewfinder.
Selecting the VideoQuaity
(Recording l_lode)
The camcorder offers 5 recording
modes. Changing the recording mode
will change the recording time available.
Select MXP or FXP mode for better
movie quality; select LP mode for
longer recording times. The table on
page 36 gives approximate recording
times=
[_p Standard Play 7 Mbps] ©
Desired recording mode ©
IOTEI
AVCHD discs containing scenes
recorded in MXP mode cannot be
created with the optional DW-100 DVD
burner. Use the supplied software
ImageMixer 3 to back up such scenes,
The camcorder uses a variable bit rate
(VBR) to encode video so the actual
recording times will vary depending on
the content of the scenes,
The camcorder retains the last setting
used even if you set the camcorder to
mode,
35
Vid_o
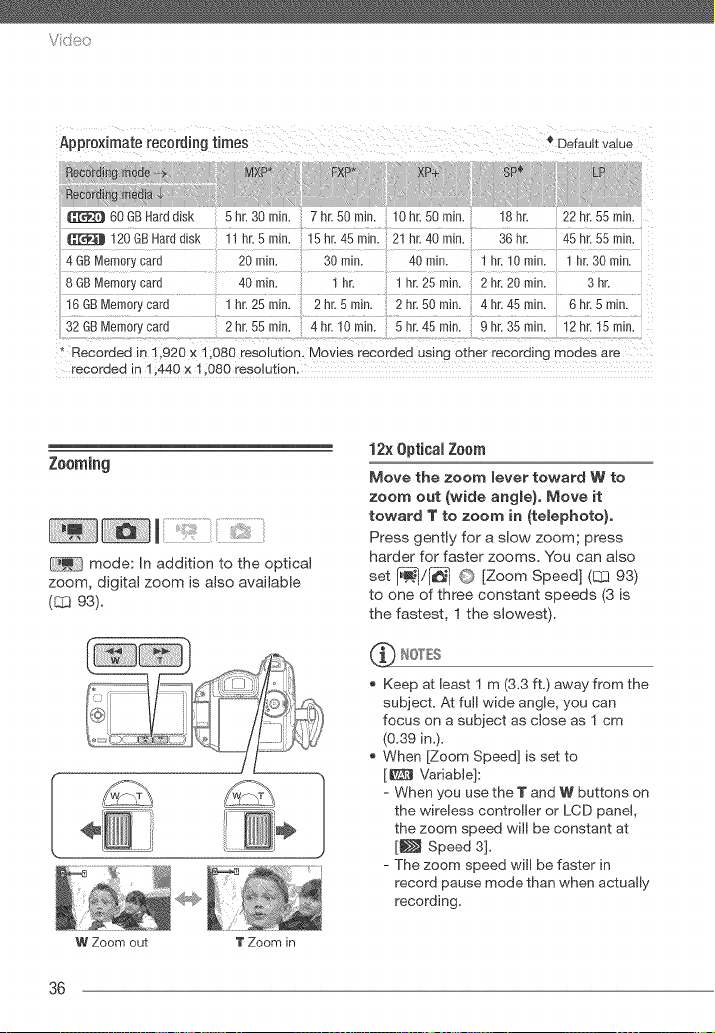
Approximate recording times
FXP_
Default vaue
XP_ _ _SP_ LP
G]:i_t 60 GBHard aJsK 5 hr. 30 rnm. 7 hr. 50 ram. 10 hr. 50 ram. 18hr 22 hr. 55 rain.
120 GB Harddisk "'nr, Smm, 15hr. 45m_n. 21hr. 40mm, 36hr 45hr. 55min,
4 GBMemor_ca[u 20 rain, 30 mir 40 rain. 1 nr, 10 rain. nr, 30 rain,
8 GBMemor_care 40 rain, - nr, " hr. 25 rain, 2 hr. 20 rain. 3 hr.
16 GBMemory cars ] hr. 25 ram. 2 hr. 5 rain. 2 hr. 50 rain. 4 hr. 45 rain. 6 hr. 5 rain.
32 GBMemory ca[s 2 hr, 55 ram, 4 hr. 10 m_n. 5 hr. 45 rain, 9 hr, 35 rain, 12 hr. 15 rain.
* Recorded in 1.920 x 1.080 resolution. Movies recoraea using other recording modes are
recorded in 1.440 x 1.080 resolution,
Zooming
mode: In addition to the optical
zoom, digital zoom is also available
(_ 93).
W Zoom out T Zoom in
12x 0ptieal Zoom
Move the zoom lever toward W to
zoom out (wide angle). Move it
toward T to zoom in (telephoto),
Press gently for a slow zoom; press
harder for faster zooms. You can also
set [i_![_ 1 G [Zoom Speed] (1_393)
to one of three constant speeds (3 is
the fastest, I the slowest).
_ NOTES
Keep at least I m (3.3 ft.) away from the
subject. At full wide angle, you can
focus on a subject as close as I cm
(0.39 in.).
When [Zoom Speed] is set to
[_ Variable]:
- When you use the T and W buttons on
the wireless controller or LCD panel,
the zoom speed will be constant at
[_ Speed 3].
- The zoom speed will be faster in
record pause mode than when actually
recording.
36
; i iiiii iC)i
Quick Start Function
When you close the LCD panel with the
camcorder on, the camcorder enters
the standby mode. In standby mode the
camcorder consumes only about half
the power used when recording, saving
energy when you are using a battery
pack. Additionally, when you open the
LCD panel, the camcorder is ready to
start recording in approximately
I second*, ensuring you do not miss
important shooting opportunities.
* The actual time required varies depending
on the shooting conditions.
1 With the camcorder on and in a
recording mode, close the LOB
panel.
_ If you are using the
viewfinder and the LCD panel is
closed, press [V[LWFiN_R/ to enter
the standby mode.
A beep will sound and the
indicator will change to orange to
indicate the camcorder entered the
standby mode.
2 When you wish to resume
recording, open the LOB panel.
* The _ indicator turns back
green and the camcorder is ready
to record.
* _ You can also press
_SL:_ to resume recording
using the viewfinder with the LCD
panel closed.
Do not disconnect the power source
during standby mode (while the
indicator is lit in orange).
_..!_ IOTES
If you close the LGD panel under some
circumstances (for example, while the
ACCESS indicator is flashing or a menu
is being displayed), the camcorder may
not enter standby mode. Check that the
indicator changes to orange.
The camcorder wiJl shut off if left in
standby mode for 10 minutes,
regardless of the [_'_10 ]Power Saving
Mode] setting (E_ 98). Press [C_/'OFF_to
turn on the camcorder.
You can select the length of time until
shut-off or turn off the Quick Start
function altogether with the [_}] O
[Quick Start] setting (L_ 98).
Changing the position of the mode dial
while the camcorder is in standby mode
will reactivate the camcorder in the
operating mode selected.
teviewing and Deleing the LastScene
tecortel
Even in mode you can play back
the last scene recorded in order to
check it. You can also delete the scene
while reviewing it.
37
Vid_o
1 Press O to display the joystick
guide.
If [] does not appear on the
joystick guide, repeatedly push the
joystick (T) toward [Next] to display
it.
2 Push the joystick (4) toward [_].
The camcorder plays back the last
scene (but without sound) and
returns to record pause mode.
Deletiag a Seeae After Reeordiag It
After recording a scene:
1 Review the scene as described in
the previous section,
2 While reviewing the scene, select
(_) the @ icon and press (_,
3 Select (_) [Yes] and press s_,
Avoid any other operations on the
camcorder while the scene is being
deleted,
You wiff not be able to delete the last
scene this way if after the scene was
recorded you changed the operating
mode or turned the camcorder off,
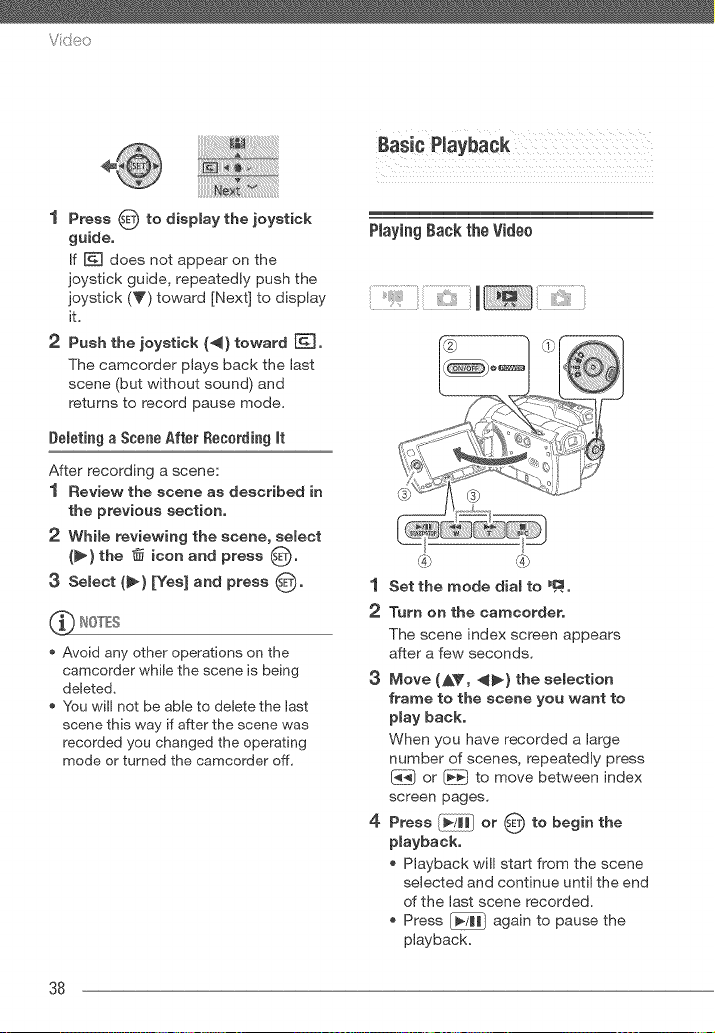
PlayingBack the Video
1 Set the mode dial to _o
2 Turn on the camcorder,
The scene index screen appears
after a few seconds.
3 Move (AV, _) the selection
frame to the scene you want to
play back,
When you have recorded a large
number of scenes, repeatedly press
or _ to move between index
screen pages.
4 Press [_;i_j_ or _ to begin the
playback,
Playback will start from the scene
selected and continue until the end
of the last scene recorded.
Press _ again to pause the
playback.
38
:" (::i
* Press to stop the playback
and return to the scene index
screen,
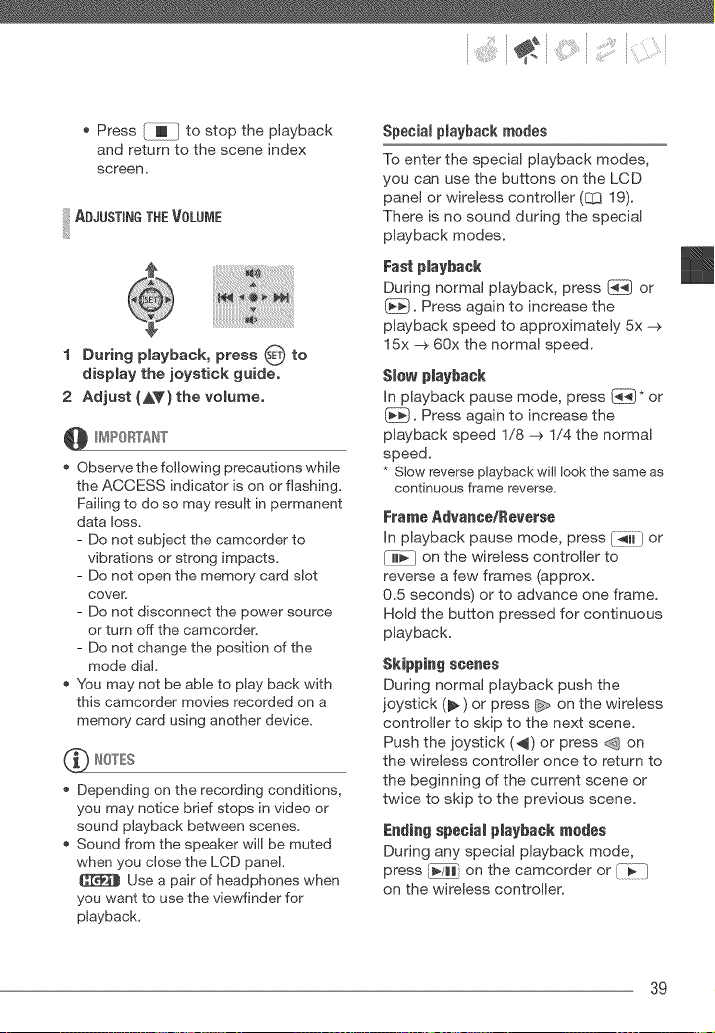
!iiilAOJOST'°OT"EVOLOOE
1 During playback, press O to
display the joystick guide.
2 Adjust (AY) the volurneo
@ _¢_PORTAN"_"
Observe the following precautions while
the ACCESS indicator is on or flashing.
Failing to do so may result in permanent
data loss.
- Do not subject the camcorder to
vibrations or strong impacts.
- Do not open the memory card slot
cover,
- Do not disconnect the power source
or turn off the camcorder`
- Do not change the position of the
mode dial,
You may not be able to play back with
this camcorder movies recorded on a
memory card using another device.
Depending on the recording conditions,
you may notice brief stops in video or
sound playback between scenes,
Sound from the speaker will be muted
when you close the LCD panel.
Use a pair of headphones when
you want to use the viewfinder for
playback,
Special playback modes
To enter the special playback modes,
you can use the buttons on the LCD
panel or wireless controller (E:1319).
There is no sound during the special
playback modes.
Fast pJayback
During normal playback, press [_ or
_. Press again to increase the
playback speed to approximately 5x -_
15x -_ 60x the normal speed.
S_ew p_aybaek
In playback pause mode, press _* or
{_. Press again to increase the
playback speed I/8 -_ I/4 the normal
speed.
* Slow reverseplayback will look the sameas
continuous ffame reverse.
Frame Advance/Reverse
In playback pause mode, press I_ii-/or
on the wireless controller to
reverse a few frames (approx.
0.5 seconds) or to advance one frame.
Hold the button pressed for continuous
playback.
Skipping scenes
During normal playback push the
joystick (_) or press _ on the wireless
controller to skip to the next scene.
Push the joystick (_) or press _ on
the wireless controller once to return to
the beginning of the current scene or
twice to skip to the previous scene.
Ending special playback medes
During any special playback mode,
press _/Hi on the camcorder or [-I_--1
on the wireless controller.
39
Vde:_
During some special playback modes, you
may notice some anomalies (blocky video
artifacts, banding, etc.) in the playback
picture.
Example of changing the index screen in
mode:
(;hanging the index Screen Selecl0n
Use the tabs on top of the index screen
to switch between playback of the
scenes and photos recorded on the
hard disk and those recorded on the
memory card. After creating a playlist
(EL] 58), you can switch between the
original movies and the playlist you
edited to your liking.
Selecting the Media for Playback
1 In the index screen, move (AV} the
orange selection frame to the tabs
on the top of the screen,
2 Select (_} the media or location
from where you want to play back
scenes/photos,
3 Return (AV) to the index screen to
select the scene or photo,
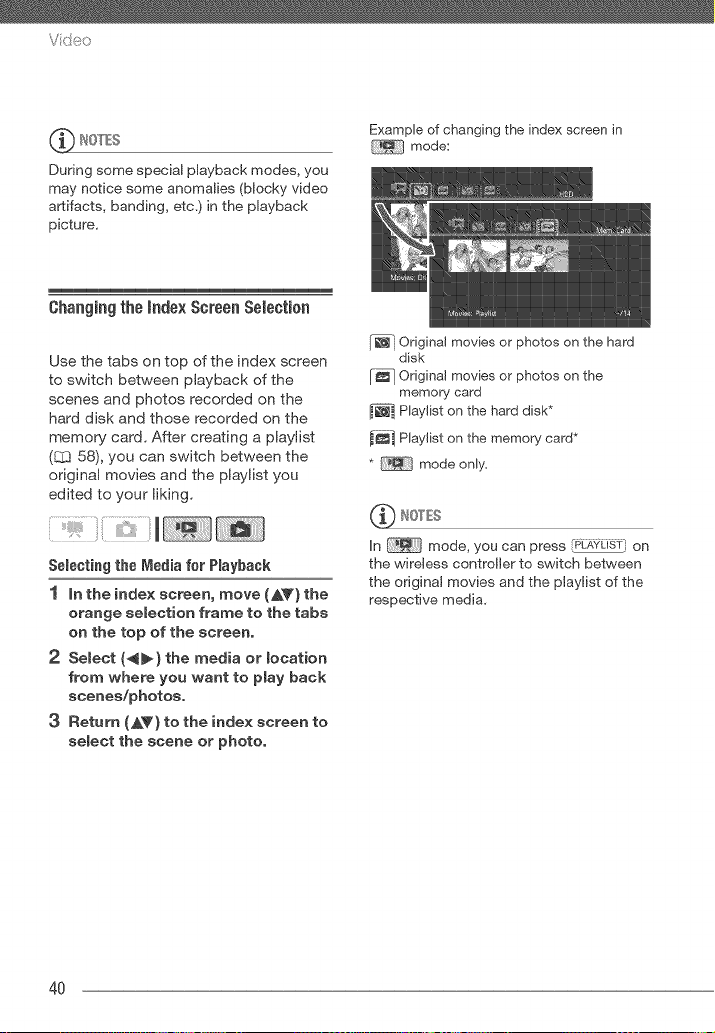
Odginal movies or photos on the hard
disk
[_] Original movies or photos on the
memory card
Playlist on the hard disk*
Play/st on the memory card*
* mode only=
_ IOT£S
In mode, you can press _-IdLAYLiiT',on
the wireless controller to switch between
the original movies and the playtst of the
respective media.
4O
:" ;i iiiii;(:i
Changingthe Numberof itemsin the
indexScreen
By default, the index screen will show
up to 6 items (scenes or photos). Move
the zoom lever toward W to show up to
15 items per screen. Move it toward T
to return to the default index screen
display.
W 6 scenes/photos
÷
T 15 scenes/photos
Selecting Scenes by Recording Date
From the original movies index screen,
you can search for recordings you
made on a particular date (for example,
to find all the movies you shot during a
special event).
!
Selectiag from the List of Recordiags
1 Select the original movies index
screen,
Select the [-_ (hard disk) or _-_
(memory card) tab (_ 40).
2 Open the list of recordings,
_¢0-N_:!O [[_ Scene Search] O
[Date Selection]
3
4
The list of recordings displays all
dates in which recordings were
made. An orange selection frame
appears on the day.
The thumbnail shows a still image
from the first scene recorded on
that day. Below it will appear the
number of scenes recorded (_)
and the total recording time for the
same day.
Select (_) the date, month or
year and move (AV) between
recording dates.
After selecting the desired date,
press O"
The index screen will appear with the
selection frame on the first scene
recorded on the selected date.
(_'_ NOTES
You can press FU[FUN_.)to return to the index
screen at any time.
Selectiag from the Caleadar Screea
1 Select the original movies index
screen,
Select the [_ (hard disk) or [_-_
(memory card) tab (CC]40).
2 Open the calendar screen,
!Fu_qc-:lO [[:_. Scene Search] O
[Calendar Screen]
The calendar screen appears.
Dates that contain scenes (that is,
movies were recorded on that
date) appear in white. Dates
without recordings appear in
black.
41
Vid_o
3 Move _AV, 4_) the cursor to the
desired date,
When you move the cursor to a
date displayed in white, a
thumbnail showing a still image
from the first scene recorded on
that date will be displayed next to
the calendar. Below it will appear
the number of scenes recorded
(_) and the total recording time
for the same day.
You can select (AT) the year or
month field and change (_) the
year or month to move faster
between calendar months.
You can press _ or _ to skip
directly to the previous!next date
that contains scenes.
4 Press O to return to the index
screen,
The orange selection frame will
appear on the first scene recorded
on the selected date.
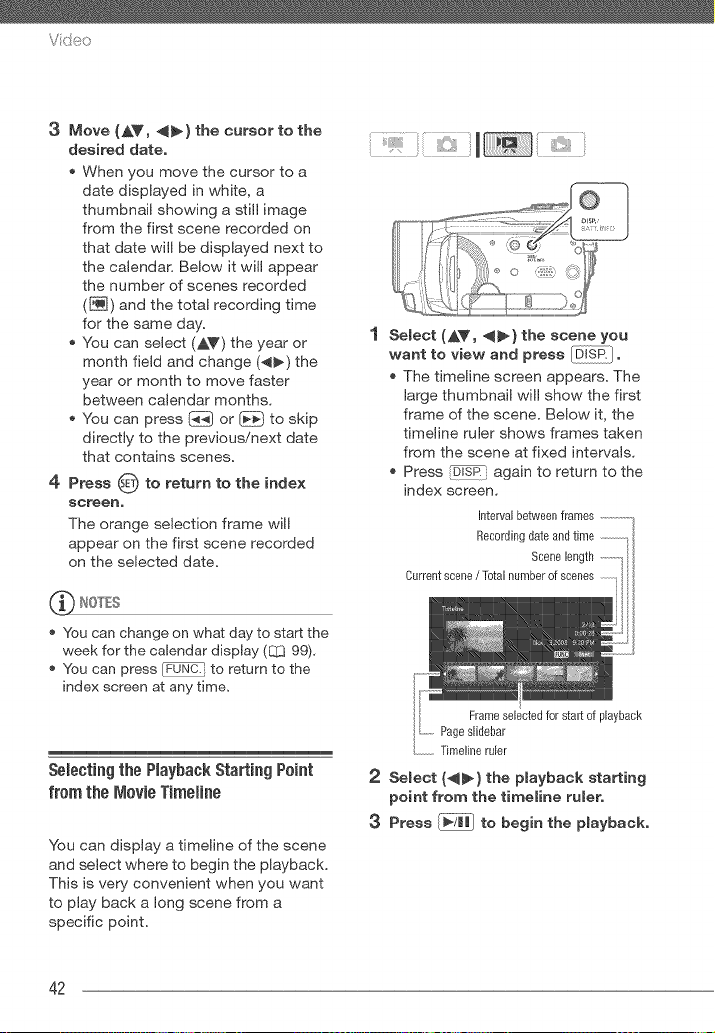
Select {AV, "_") the scene you
want to view and press _Pllo
The timeline screen appears. The
large thumbnail will show the first
frame of the scene. Below it, the
timeline ruler shows frames taken
from the scene at fixed intervals.
Press _ again to return to the
index screen.
Interval between frames ..............
Recording date and time
Scene length ..............
Current scene / Total number of scenes
You can change on what day to start the
week for the calendar display (L_ 99),
You can press FU_UN_.'to return to the
index screen at any time.
Selecting the PlaybackStarting P0int
from the Movie TimeHne
You can display a timeline of the scene
and select where to begin the playback.
This is very convenient when you want
to play back a long scene from a
specific point.
Frameselectedforstartofplayback
Pageslidebar
.............Timelineruler
2 Select (_-) the playback starting
point from the timeline rulero
3 Press _/l_ to begin the playbacko
42
:" _ 5¸:¸i¸i_:'!_¸¸{}}i
To SELECTANOTHERSCENE
Move (AV) the orange selection
frame to the large thumbnail and
change (_) the scene.
!iiilT0o0vE0E EE°T, °OLE°PAOES
Move (AV) the orange selection
frame to the slidebar below the ruler
and display (_) the previous/next 5
frames in the scene.
!iiilT0 T"E'°TEOVALOE EE°F° OES
_/8i_} © Desired interval © [_i3iq_i]
Selecting Recordings from the index
Screen
You can select in advance a number of
original movies or photos from the
index screen in order to perform certain
actions on them collectively, all at once.
mode: Delete (83 44), copy
(83 60) or add the selected scenes to
the playlist (83 58).
mode: Delete (81365), copy
(83 71) or protect (83 70) the selected
photos or mark all of them with print
orders (83 76) or transfer orders
(83 89).
1 Select the original movies or the
photo index screen,
2
3
mode: Select the [-_ (hard
disk) or _ (memory card) tab
(83 40).
mode: Move the zoom lever
toward W to display the index
screen.
Open the selection screen,
_N@-} O [[_ Select] ©
[Individual Scenes] or
[Individual Photos]
The selection screen appears.
Move (AY, _) between the
scenes or photos in the index
screen and press _ to select an
individual scene/photo,
A checkmark _/will appear on the
selected scenes!photos.
Repeat this step to add all the
scenes/photos you want to include
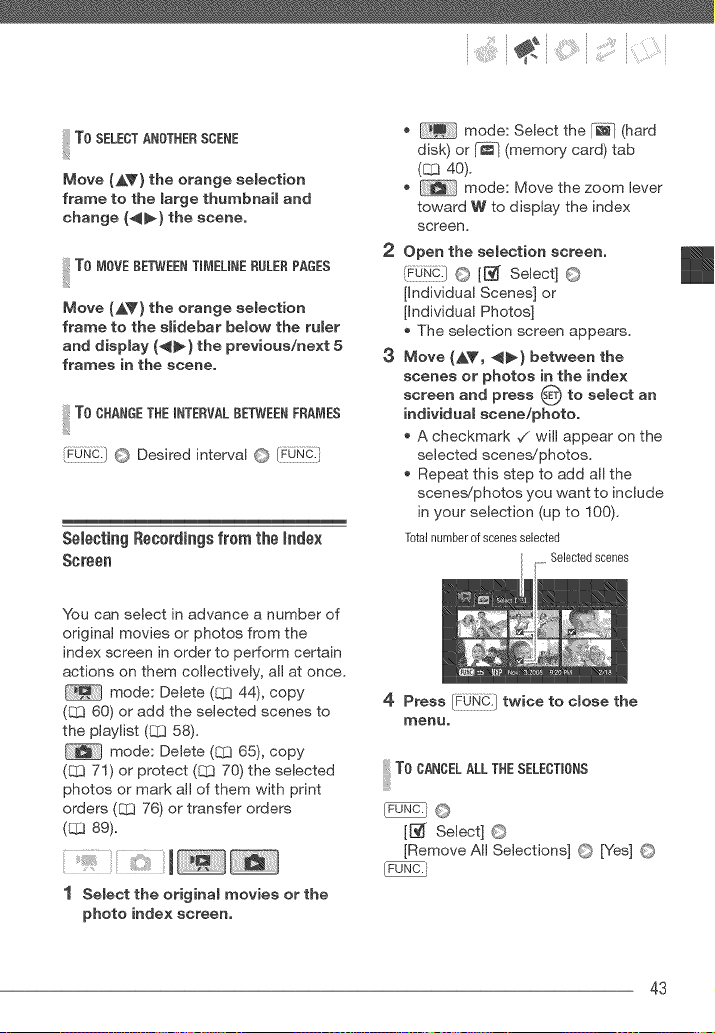
in your selection (up to I00).
Total number of scenes selected
Selected scenes
4 Press [FONC} twice to close the
menuo
!iiilT00A°0ELALLT°ESELEOT,0°S
@_3 ©
[[_ Select] ©
[Remove All Selections] O [Yes] ©
43

Vid_o
The selection of scenes/photos will be
canceled if you turn off the camcorder
or change the operating mode,
Scenes in the playlist cannot be
included in the selection,
Ddeting Scenes
You can delete those scenes that you
are not interested in keeping, Deleting
scenes allows you also to free up space
on the recording media,
Options
Deletes a/the scenes.
Deletes a/the scenes recorded 0nthe same day
as the selected scene.
Deletes 0nly the scene marked with the orange
selection frame.
Deletes a/the scenes selected in advance
marked with a ¢ checkmark). Refer to
Selecting Recordings from tire Index Screen
(C[_ 43).
Select (&V, 4_} the scene you
want to delete, or a scene
recorded on the date you want to
delete,
This step is not necessary to delete
all scenes or previously selected
scenes.
2 Delete the scene(s),
[FUNC.' O [_ Delete] O
Desired option © [Yes]* © [OK] O
FuLFu_}
* If you selected any option other than
[This Scene], you can press _) to interrupt
the operation while it is in progress. Some
scenes wi/be deleted nevertheless.
@ //PORTAN'}"
Be careful when deleting original
recordings, Once deleted, original
scenes cannot be recovered,
Back up important scenes before
deleting them ([_ 82),
Observe the following precautions while
the ACCESS indicator is on or flashing
(while scenes are being deleted),
- Do not subject the camcorder to
vibrations or strong impacts,
- Do not open the memory card slot
cover,
- Do not disconnect the power source
or turn off the camcorder`
- Do not change the position of the
mode dial,
'_ IOT£S
* Deleting a scene from the original index
screen also deletes that scene from the
playtst,
To delete all movies and make al
recordable space available again you
may prefer to initiatze the recording
media (C1:333),
You may not be able to delete scenes
recorded or edited using another
device,
44
,;i!i:')¸ ii) i
Advanced Functions
_ i _ x x x x x x x x x x x x x x x x x x x_ _
Special Scene Recording Programs
Recording in a very bright ski resort or
capturing the full colors of a sunset or a
fireworks display becomes as easy as
selecting a Special Scene recording
program. For details about the available
options, refer to the sidebar below=
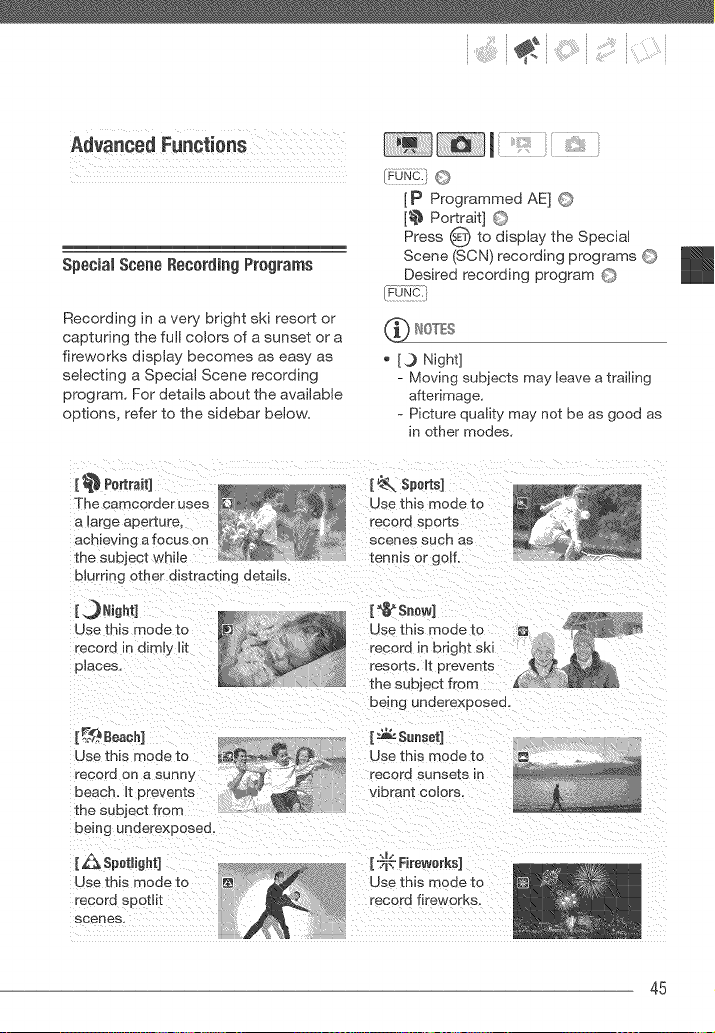
[P Programmed AE] @
[_ Portrait] ©
Press O to display the Special
Scene (SCN) recording programs O
Desired recording program O
'_ NOTES
* [3 Night]
- Moving subjects may leave a trailing
afterimage,
- Picture quality may not be as good as
in other modes,
[ _ Portrait]
The camcorder uses
a large aperture,
achieving a focus on
the subject whte
blurring other distracting details.
Use this mode to
record in dimly lit
places,
Use this mode to
record sports
scenes such as
tennis or golf.
{=_¢Snow}
{_4_. Beach]
Use this mode to
record on a sunBy
beach. It prevents
the subiect trom
being underexposed.
being underexpose&
[ _ Sunset]
Use this mode to
record sunsets in
vibrant colors.
[_ Sp0tlight] .m.- .
[';F: Fireworks]
Use this mode to !! Use this mode to
record spotlil record fireworks,
scenes.
45
Vi<:_eo
- White points may appear on the
screen,
- Autofocus may not work as well as in
other modes, In such case, adjust the
focus manually,
[_I_ Fireworks]
- To avoid camcorder shake, we
recommend using a tripod, Make sure
to use a tripod especially in
mode, as the shutter speed slows
down,
[_'_ Portrait]/[_. Sports]/[_9 Beach]/
[t_ Snow]
- The picture may not appear smooth
during playback,
[_ Portrait]
- The blur effect of the background
increases the more you zoom in (T),
[_¢ Snow]/[B_:._ Beach]
- The subject may become
overexposed on cloudy days or in
shaded places, Check the image on
the screen.
Changingthe Shutter Speed and
Aperture
Use the automatic exposure (AE)
program to use functions like the white
balance or image effects, or give
priority to the exposure value or the
shutter speed.
Use faster shutter speeds to record
subjects moving quickly; use slower
shutter speeds to add motion blur,
emphasizing the feel of movement.
Use low aperture values (larger lens
opening) to softly blur the background
in a portrait; use high aperture values
(smaller lens opening) to get a wider
depth of field, giving a sharp focus all
throughout a landscape.
Options _ Default value
The camc0rder automatically adiusts the
aperture and shutter speed to obtain the optimal
exposure for the subiect.
iTv !
Set the shutter speed value. The camc0rder
automatically sets the appropriate aperture
value.
Set the aperture value, The camc0rder
aut0matically sets the appropriate shutter speed,
{_u.c.}0
[P Programmed AE] 0 Desired
recording program 0
{_u.c:)
ToSET THE SHUTTERSPEEB OR APERTURE
VALUE
When you select [Tv ShuttePPriority
AE] or [AV Aperture_Priority AE], a
numeric value will appear next to the
recording program icon.
1 if the joystick guide appears on
the screen, press _E_to hide it,
2 Adjust (_) the shutter speed or
aperture value to the desired
value,
Shutter speed guidelines
Note that on screen only the denominator
is displayed = [Tv 250] indicates a
shutter speed of 1/250 second, etc.
46
:" i(:i:i
To record in dimly lit places.
u6
To record under most ordinary conditions.
To record indoor sports scenes.
Torecordfrom within a movingcarortrain or to
shootfast-m0vingsubjectssuchasmiler
coasters.
Torecordoutdoorsportssceneson sunnydays.
* mode only. ** mode only.
In mode, when the frame rate is set to
[_ PF24], the shutter speeds available will
be the following: 1/6, 1/12, 1/24, 1/48, 1/60,
1/100, 1/250, 1/500, 1/1000 and 1/2000.
Available Aperture Values
[F1.8], [F2.0], [F2.4], [F2.8], [F3.4],
[F4.0], [F4.8], [F5.6], [F6.7], [F8.O]
[Tv Shutter-Priority AE]
- if you use a sJow shutter speed in dark
places, you can obtain a brighter
image, but image quality may be
lower, and autofocus may not work
well.
- The image may flicker when recording
with fast shutter speeds.
- Recording movies _der fl_oresne_t lights:
if the screen starts to flicker, select
[iv Shutter-Priority AE] and set the
shutter speed to 1/100.
[ AV Aperture-Priority AE]
The actual range of values available for
selection will vary depending on the
initial zoom position.
When setting a numeric value (aperture
or shutter speed), the number displayed
will flash if the aperture or shutter speed
is not appropriate for the recording
conditions, in such case, select a
different value.
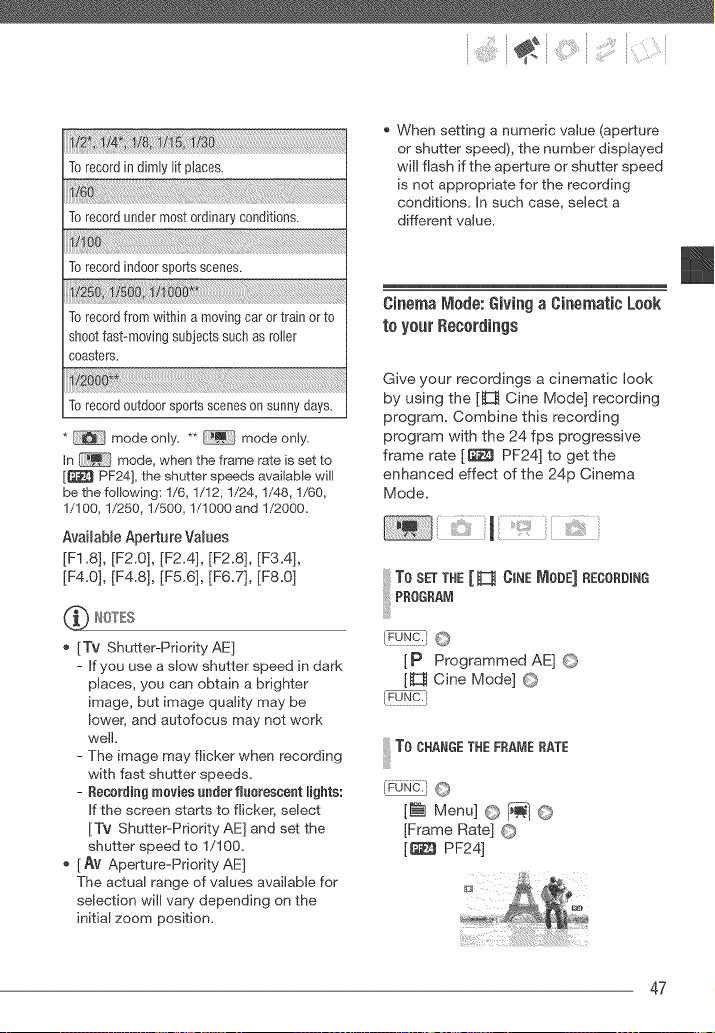
Cinema m_ode:Givinga Cinematic Look
to yourRecordings
Give your recordings a cinematic look
by using the [_ Cine Mode] recording
program. Combine this recording
program with the 24 fps progressive
frame rate [_ PF24] to get the
enhanced effect of the 24p Cinema
Mode.
To SETTHE[_ OINEm_oBE]RECORDING
PROGRA,,_
FPow_:}@
[P Programmed AE] ©
[_ Cine Mode] ©
!iiilTOO"A°OET"EFO OEO TE
_©
[r_ Menu] © [_ ©
[Frame Rate] ©
[_ PF24]
47

Vde:_
SelfTimer
iVianualExposureAdjustmentand
Automatic8acklightCorrection
[_ Menu] @ [i_ lor_ @
[Self Timer] © [On @] ©
IFo]_-¢:i
@ appears.
mode:
in record pause mode, press
The camcorder starts recording after a
I 0-second countdown*. The
countdown appears on the screen.
mode:
Press , first halfway to
activate the autofoeus and then fully,
The camcorder will record the photo
after a 10-second countdown*. The
countdown appears on the screen.
* 2 seconds when using the wireless
controller=
Once the countdown has begun, you can
press _ (when recording movies),
press PHL#HOTOj fully (when recording
photos) or turn off the camcorder to
cancel the self timer.
At times, backlit subjects may appear
too dark (underexposed) or subjects
under very strong lights may appear too
bright or glaring (overexposed). To
correct this, you can manually adjust
the exposure or use the automatic
backlight correction.
_ PO_Ir_TSTO O_ECK
Select a recording mode other than
[I" Fireworks].
Manual Exposure Adjustment
1 Press O to display the joystick
guide.
If [Exposure] does not appear on the
joystick guide, repeatedly push the
joystick (V) toward [Next] to display
it.
2 Push the joystick (_.} toward
[Exposure].
The exposure adjustment indicator
_=._o and the neutral value "+_0"
appear on the screen.
The adjustment range and the
length of the exposure adjustment
indicator will vary depending on
the initial brightness of the picture.
48
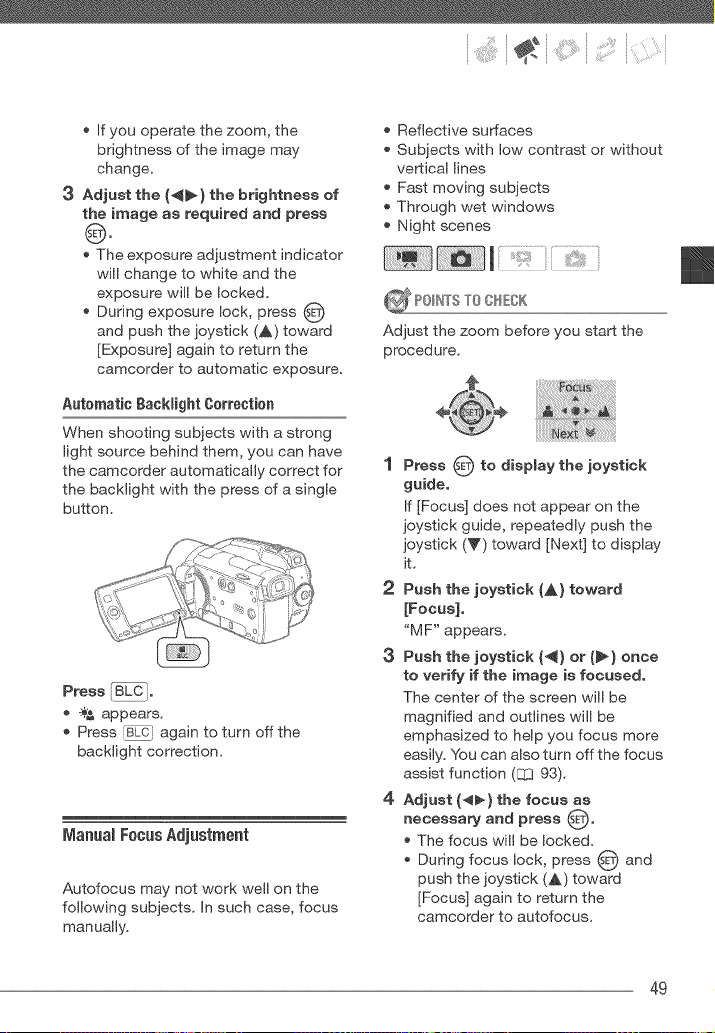
:" (:;i
If you operate the zoom, the
brightness of the image may
change.
3 Adjust the (_) the brightness of
the image as required and press
@.
The exposure adjustment indicator
will change to white and the
exposure will be locked.
During exposure lock, press O
and push the joystick (A) toward
[Exposure] again to return the
camcorder to automatic exposure.
Automatic gaeklight Correction
When shooting subjects with a strong
light source behind them, you can have
the camcorder automatically correct for
the backlight with the press of a single
button.
Press _C_.
-_ appears.
Press _i again to turn off the
backlight correction.
ManuamFocusAdjustment
Autofocus may not work well on the
following subjects. In such case, focus
manually.
Reflective surfaces
Subjects with low contrast or without
vertical lines
Fast moving subjects
Through wet windows
Night scenes
_ P01_"_°STO 0HEOK
Adjust the zoom before you start the
procedure.
1 Press O to display the joystick
guide.
If [Focus] does not appear on the
joystick guide, repeatedly push the
joystick (Y) toward [Next] to display
it.
2 Push the joystick (,_} toward
[Focus].
"M F" appears.
3 Push the joystick (_) or (_) once
to verify if the image is focused,
The center of the screen will be
magnified and outlines will be
emphasized to help you focus more
easily. You can also turn off the focus
assist function (_ 93).
4 Adjust (_) the focus as
necessary and press sE_.
* The focus will be locked.
* During focus lock, press _ and
push the joystick (A) toward
[Focus] again to return the
camcorder to autofocus.
49

Video
[nfin[_ Focus
Use this function when you wish to
focus on faraway subjects such as
mountains or fireworks.
instead of step 2 in the previous
procedure:
Push the joystick (A) toward [Focus]
and hold it for more than 2 seconds.
OO appears.
Push the joystick (A) toward [Focus]
again to return the camcorder to
autofocus.
If you operate the zoom or joystick
(_'), OO changes to "MF" and the
camcorder returns to manual focus.
White BaRance
The white balance function helps you to
accurately reproduce colors under
different lighting conditions so that
white objects will always look truly
white in your recordings.
_ P0_NTSTOO_%K
Select a recording mode other than the
Special Scene recording programs.
Options _ Default value
Forrecordinginshadedplaces.
Forrecordingon a cloudy'day.
Forrecordingundertungstenandtungstentype
(3-wavelength)fluorescentlighting.
!:@ :
For recording under warm white, cool white or
warm white type (3-wavebngth) fluorescent
lighting.
Forrecordingunderdaylightordaylighttype
(3-wavelength)fluorescentlighting.
Usethe customwhitebalancesettingto make
whitesubiectsappearwhiteundercolored
lighting.
i
i_u_:} @
[AW_Automatic] ©
Desired option* O
* When you select [=_ Custom WB], do not
press _O_:} and continue instead with the
following procedure.
I TOSETTHECHST0_,IWHITEBALANCE
1 Point the camcorder at a white
object, zoom in until it fills the
whole
screen and press (_E_o
When the adjustment is completed,
._ stops flashing and stays on. The
camcorder retains the custom
setting even if you turn off the
camcorder.
2 Press _ to save the setting
and close the menu,
5O
:" i i ii;;i( i
When you seBectthe custom white bamance:
- Set the custom white balance in a
sufficiently ifluminated place.
- Turn off the digital zoom (8]3 93).
- Reset the white balance when the
lighting conditions change.
- Depending on the light source, _
may keep flashing. The result will still
be better than with [AWBAutomatic].
Custom white balance may provide
better results in the following cases:
- Changing lighting conditions
- Close-ups
- Subiects in a single color (sky, sea or
forest)
- Under mercury lamps and certain
types of fluorescent lights
Depending on the type of fluorescent
light, optimal color balance may not be
obtained with [_ Fluorescent] or
[_ Fluorescent HI. If the color looks
unnatural, adjust it using [AWBAutomatic]
or [_% Custom WB].
imageEffects
You can use the image effects to
change the color saturation and
contrast to record movies and photos
with special color effects.
Select a recording mode other than the
Special Scene recording programs.
0 1Jtions _ Default value
Records with no image enhancing effects.
Emphasizes the contrast and color saturation.
i:N_ ut
Tones down the contrast and color saturation.
Records subjects with softened outlines.
Softens the details in the skin tone area for a
more complimentary appearance. To obtain the
best effect, use this setting when recording a
}erson in close-up. Note that areas similar to the
skin color may lack in detail.
NJows you to adiust the color depth, brightness,
contrast, and sharpness of the image.
[Color Depth]: (-) Shallower colors,
(+) Richer color tonality
[Brightness]: (-) Darker picture,
(+) Brighter picture
[Contrast]: (-) Flatter picture,
(+) More defined Jight and shade
[Sharpness]: (-) Vaguer outlines,
(+) Sharper outlines
[_F Image Effect Offj ©
Desired option* ©
* When you seJeet [ <_c Oustom Effect], do
not press FOf_] and continue instead with
the following procedure.
51

Vid_o
ToSET THE CUSTO_I m_IAGEEFFECT
1 Press _) and select _&V) the
custom setting options.
2 Adjust {_} each setting as
desired.
3 When you finish aimthe
adjustments, press 0 then
to save the setting and
close the menu.
Setting
[_ Digital Effect off] 0
Desired fader!effect* O
* Youcan preview the digital effect on the
screen.
**The icon of the selected digital effect
appears.
Applying
Digital Effects
Options _ Default value
Select this setting when you do not intend to use
the digital effects.
Select one of the faders to begin or end a scene
with a fade from or to a black screen.
Records movies and photos in black and white_
Recordsmoviesand photosinsepiatonesfor an
"old" look.
Select this effect to add "flavor" to your
recordings.
* Only these digital effects are available in
mode.
1 Press O to display the joystick
guide.
if _ does not appear on the
joystick guide, repeatedly push the
joystick (V) toward [Next] to display
it.
®
2 Push the joystick (A} toward _l_o
_, The icon of the selected effect
turns green.
_, Push the joystick (A) again to
deactivate the digital effect (its
icon will turn white again).
I To FADE iN
Activate the selected fader in record
pause mode (@||), then press
to start recording with a fade in.
To FADE OUT
Activate the selected fader while
recording (@), then press Is!ar_'stop/to
fade out and pause the recording.
52
:" ; i ii;I;:':(ii
To ACTIVATEAN EFFECT
mode: Activate the selected
effect while recording or in record
pause mode.
mode: Activate the selected effect
and then press to record the
photo.
When you apply a fader, not only the
pic:ture but also the sound will fade in or
out. When you apply an effect, the
sound will be recorded normally.
The camcorder retains the last setting
used even if you turn off the digital
effects or change the recording
program.
On-Screen Displays and Data Code
You can turn most on=screen displays
on or off.
mode:
All displays on
Data code only
All displays off
C_[} mode:
All displays on
Regular displays only (removes the
histogram and information icons)
All displays off
* The following icons will appear even when
all other on-screen displays are turned off:
Theicons @ and @|| (in _ mode), the
@ icon and AF frames when the autofocus
is locked (in _ model, screen markers
(both recording modes).
About the Data Cede
With every scene or photo recorded.
the camcorder Keeps a data code
|date/time of recording, information
about the camera setu s, etc.). In F_'_
mode. this information is displayed on
the bottom bar and as information
icons; in _ mode, you can select
the information to be displayed with the
_1 [Data Code] setting (E.1LI95).
Repeatedly press [U.s_51]to turn the
on-screen displays on/off in the
following sequence:
, mode:
All displays on
Most displays off*
AudioRecordingLeveJ
You can adjust the audio recording level
of the built-in or an external
microphone. You can display the audio
level indicator while recording.
53
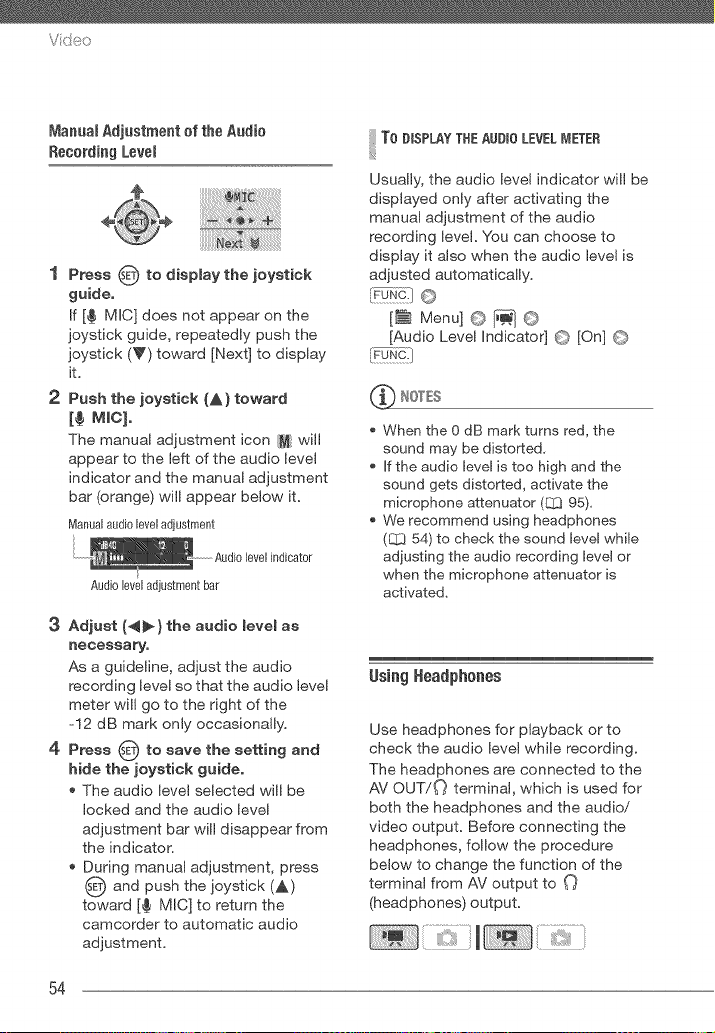
Vid_o
ManualAdjustmentofthe Audio
RecordingLevel
1 Press O to display the joystick
guide.
If [¢ MIC] does not appear on the
joystick guide, repeatedly push the
joystick (_') toward [Next] to display
it.
2 Push the joystick (A) toward
[¢ MIC}.
The manual adjustment icon M will
appear to the left of the audio level
indicator and the manual adjustment
bar (orange) will appear below it.
Manual audio level adiustment
Audioleveladjustmentbar
3 Adjust {_) the audio level as
necessary,
As a guideline, adjust the audio
recording level so that the audio level
meter will go to the right of the
-12 dB mark only occasionally.
4 Press 0 to save the setting and
hide the joystick guide.
The audio level selected will be
locked and the audio level
adjustment bar will disappear from
the indicator.
During manual adjustment, press
and push the joystick (,&)
toward [€ MIC] to return the
camcorder to automatic audio
adjustment.
To DISPLAYTHEAUDIOL£V£L_,IETER
Usually, the audio level indicator will be
displayed only after activating the
manual adjustment of the audio
recording level. You can choose to
display it also when the audio level is
adjusted automatically.
[_ Menu] O _ ©
[Audio Level indicator] O [On] (_}
When the 0 dB mark turns red, the
sound may be distorted,
If the audio level is too high and the
sound gets distorted, activate the
microphone attenuator (QI3 95),
We recommend using headphones
(_ 54) to check the sound level while
adjusting the audio recording level or
when the microphone attenuator is
activated,
lsing Headphones
Use headphones for playback or to
check the audio level while recording.
The headphones are connected to the
AV OUT!O terminal, which is used for
both the headphones and the audio!
video output. Before connecting the
headphones, follow the procedure
below to change the function of the
terminal from AV output to
(headphones) output.
54
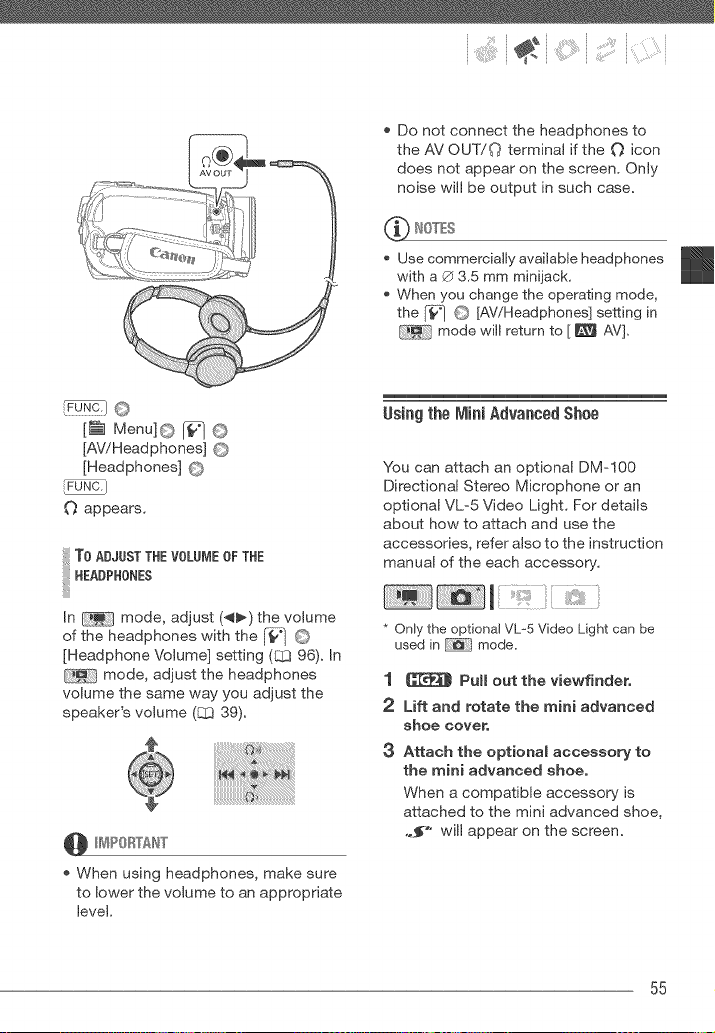
:" ilia:i(i:i
[_ Menu[@ J_ @
[AWHeadphones] @
[Headphones] @
O appears.
ToADJUST THE VOLUB,IE OF THE
HEADPHONES
In mode, adjust (_l_) the volume
of the headphones with the [_w] @
[Headphone Volume] setting (q3 96). In
mode, adjust the headphones
volume the same way you adjust the
speaker's volume (B3 39).
@ H_4POBTAN"['
When using headphones, make sure
to lower the volume to an appropriate
level.
Do not connect the headphones to
the AV OUT!O terminal if the O icon
does not appear on the screen. Only
noise will be output in such case.
NOTES
Use commercially available headphones
with a ® 3.5 mm minijack.
When you change the operating mode,
the _] @ [AViHeadphones] setting in
mode will return to [ _ AV].
UsiagthelViJniAdvancedShee
You can attach an optional DM-100
Directional Stereo Microphone or an
optional VL=5 Video Light. For details
about how to attach and use the
accessories, refer also to the instruction
manual of the each accessory.
* Only the optional VL% Video Light can be
used in mode.
1 J[_ Pall oat the viewfinder,
2 Lift and rotate the mini advanced
shoe cover,
3 Attach the optional accessory to
the mini advanced shoe,
When a compatible accessory is
attached to the mini advanced shoe,
,._-" will appear on the screen.
55
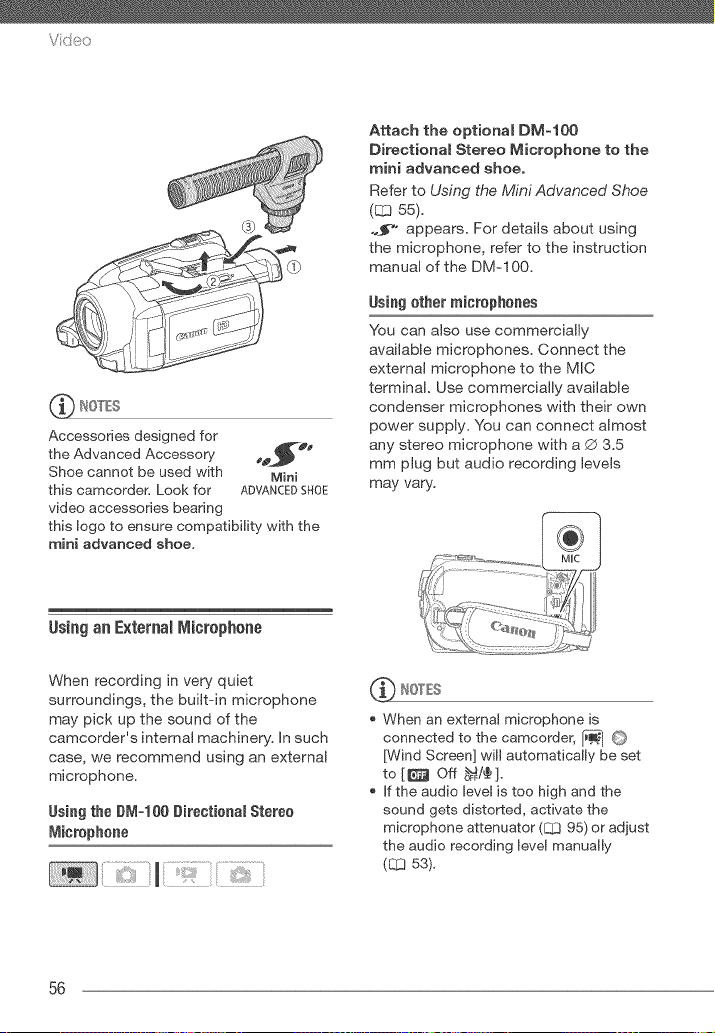
Vde:_
Accessories designed for
the Advanced Accessory eo__"_
Shoe cannot be used with Mini
this camcorder. Look for ADVANCEDSHOE
video accessories bearing
this logo to ensure compatibility with the
mini advanced shoe,
Attach the optional DM-100
Directional Stereo Microphone to the
mini advanced shoe,
Refer to Using the Mini Advanced Shoe
(_ 55).
.._'o appears. For details about using
the microphone, refer to the instruction
manual of the DM=100.
Using ether mierophenes
You can also use commercially
available microphones. Connect the
external microphone to the MIC
terminal. Use commercially available
condenser microphones with their own
power supply. You can connect almost
any stereo microphone with a Q 3.5
mm plug but audio recording levels
may vary.
Using an External Microphone
When recording in very quiet
surroundings, the built=in microphone
may pick up the sound of the
camcorder's internal machinery. In such
case, we recommend using an external
microphone.
Using the BM=100 Directional Stereo
Micrephene
'_ NOTES
When an external microphone is
connected to the camcorder, _ O
[Wind Screen] will automatically be set
to [ [_ Off _/¢ ].
If the audio level is too high and the
sound gets distorted, activate the
microphone attenuator (E:D 95) or adjust
the audio recording level manually
(L_ 5g).
56
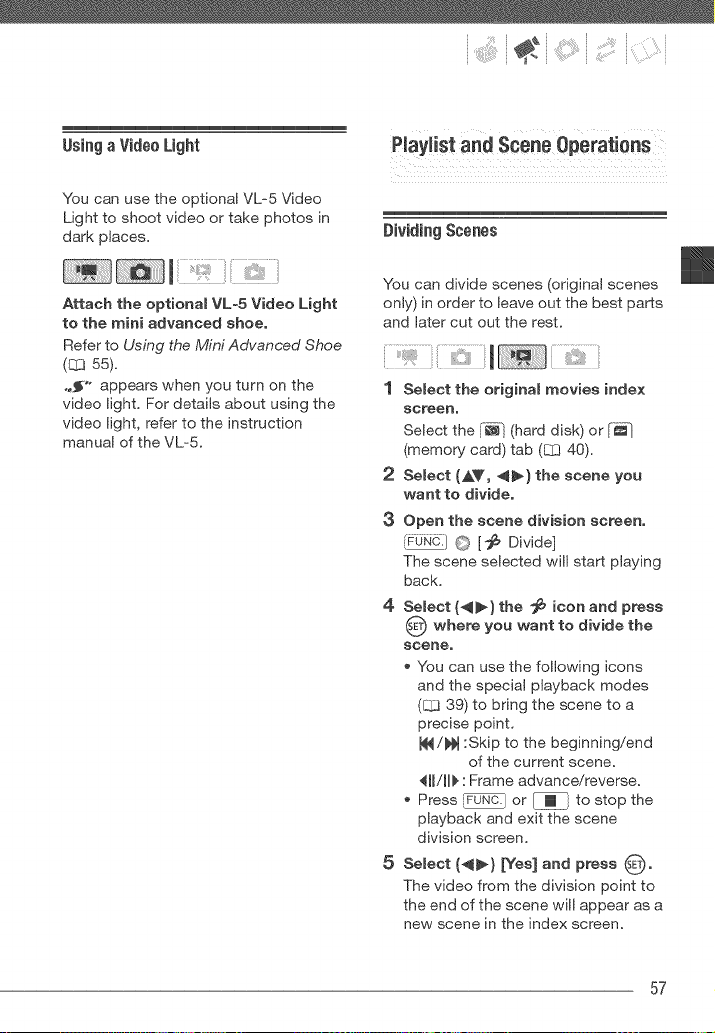
UsingaVideo Light
You can use the optional VL-5 Video
Light to shoot video or take photos in
dark places.
Attach the optional VL-5 Video Light
to the mini advanced shoe,
Refer to Using the Mini Advanced Shoe
(_ 55).
,,_'° appears when you turn on the
video light. For details about using the
video light, refer to the instruction
manual of the VL-5.
DividingScenes
You can divide scenes (original scenes
only) in order to leave out the best parts
and later cut out the rest.
1 Select the original movies index
screen,
Select the I-_l (hard disk) or [_
(memory card) tab ([Z3 40).
2 Select (AV, 4_} the scene you
want to divide,
3 Open the scene division screen,
{FUN0.J0 ['_ Divide]
The scene selected will start playing
back.
4 Select (_) the _ icon and press
@ where you want to divide the
scene,
* You can use the following icons
and the special playback modes
([:Z339) to bring the scene to a
precise point.
_/_ :Skip to the beginning!end
of the current scene.
411/11_ : Frame advance!reverse.
* Press _ or _ to stop the
playback and exit the scene
division screen.
5 Select (4_) _es] and press _.
The video from the division point to
the end of the scene will appear as a
new scene in the index screen.
57
Video
In this mode, the scene playback will
pause only at points where the scene
can be divided. Advancing/reversing
frames will skip only between such
points as well, so the interval will be
longer than in regular frame advance/
reverse,
The following scenes cannot be divided:
- Scenes incJuded in the scene
selection (marked with a ,/
checkmark), Remove the seJection
mark in advance,
- Scenes too short (3 seconds or
shorter).
- Scenes that were not recorded with
this camcorder.
Scenes cannot be divided within 0.5
seconds from the beginning or the end
of the scene.
During the playback of a scene that was
divided you may notice some anomalies
in the picture/sound at the point where
the scene was cuL To avoid this, you
can use the supplied software
ImageMixer 3 to divide and edit scenes.
Editingthe PlayHst:Adding, Moving and
DeJetJngPJaymistScenes
Create a playlist to play back only the
scenes you prefer and in the order of
your choice. Moving or deleting scenes
in the playlist will not affect the original
recordings,
Adding Scenes to the Piayiist
Options
Adds to the piayJist all the scenes that were
recorded on the same day as the selected scene.
Adds to the playiist 0nly the scene marked with
the orange selection frame.
Adds to the playlist all the scenes selected in
advance (marked with a ./checkmark). Refer to
Selecting Recordings from fire Index Screen
([Z3 43).
SeJect the original movies index
screen,
Select the [-_ (hard disk) or [_]
(memory card) tab (q3 40).
Select (,&V, _) the scene yon
want to add to the playlist, or a
scene recorded on the date you
want to add to the playlisto
Add the scene(s} to the playlist.
[_ Add to Playlist] ©
Desired option @ [Yes]
When the operation is completed
[Scene(@ added to the playlist] will
be displayed.
Scenes are added to the playlist on
the same media they are recorded
on.
To check the playlist, select the
(hard disk playlist) or
(memory card playlist) tab (L._340).
58
:" ¸i¸i':'!:i(i:i
You can copy scenes from the hard disk
to the memory card (Q3 60) to include in
the memory card's playlist also scenes
that were originally recorded on the hard
disk,
You may not be able to add scenes to
the playlist if they were recorded or
edited using another device or if there is
not enough space available on the hard
disk or memory card.
Debting Scenes from the Playlist
Deleting scenes from the playlist will
not affect your original recordings,
Options
1 Select the playlist index screen,
Select the _ (hard disk playlist) or
i_.."] (memory card playlist) tab
(CY340),
2 Select (AV, _) the scene you
want to delete,
This step is not necessary to delete
all scenes,
3 Demete the scene,
_} 0[_ Delete] 0
Desired option © [Yes]* © [OK] ©
[FUNC.i
* If you selected [All Scenes], you can press
_'_ to interrupt the operation while it is in
progress. Some scenes will be deleted
nevertheless.
M0viag Sceaes ia the Playlist
Move the scenes in the playlist to play
them back in the order of your choice,
1 Select the playlist index screen,
Select the _]1 (hard disk playlist) or
_--_..."(memory card pbylist) tab
(_ 40),
2 Select (_&V, 4_) the scene you
want to move,
3 Open the scene moving screen,
',%!)£} 0 [}1{ Move]
4 Move (A_', 4_} the orange
marker to the desired position of
the scene and press @,
The original position of the scene
and the current position of the
marker are displayed at the bottom
of the screen,
5 Select (_} [Yes] and press @ to
move the scene,
_ NOTES
You may not be able to move scenes in
the playlist if there is not enough space
available on the hard disk or memory card,
59
CopyingScenes
You can copy od@nal movies or the entire
playlist only from the hard disk to the
corresponding location on the memory
card,
1
CopyingOriginal Movies
Options
Copies all the scenes to the memory card.
Copies to the memory card all the scenes that
were recorded on the same day as the selected
scene.
Copies only' the scene marked with the orange
selection frame to the memory' card.
Copies to the memory card all the scenes
selected in advance (marked with a ,/
checkmark). Refer to Selecting Recordings from
tire Index Screen (CL] 43).
Select the index screen of original
movies recorded on the hard disk.
Select the [_ tab (83 40),
2 Select fAY, _l_) the scene you
want to copy to the memory card,
or a scene recorded on the date
you want to copy.
This step is not necessary to copy all
scenes or previously selected
scenes,
3 Copy the scene(s}.
IF@@} © [_ Copy ( [_ _ _)] ©
Desired option @ [Yes]* @
[OK] O rFuNO-J
* Press _ to interrupt the operation while it
is in progress.
Copying the Entire Playlist
1 Select the index screen of the hard
disk's playlist.
Select the _ tab (_ 40).
2 Copy the pJaylist.
[FdN-_:}O [_! Copy ( [_ ,,__)] ©
[Yes]* O [OK] O Fu_.]
* Press _ to interrupt the operation while it
is inprogress.
Observe the following precautions while
the ACCESS indicator is on or flashing.
Failing to do so may result in permanent
data loss,
- Do not subject the camcorder to
vibrations or strong impacts,
- Do not open the memory card slot
cover,
- Do not disconnect the power source
or turn off the camcorder`
- Do not change the position of the
mode dial,
_f_ NOTES
* if the memory card slot cover is open, or
the LOCK switch on the memory, card is
set to prevent writing, you will not be
able to copy movies to the memory card,
Scenes that were edited using the
supplied software ImageMixer 3 and
written back to the camcorder cannot
be copied to the memory card, You may
also not be able to copy scenes that
were not recorded with this camcorder`
6O
Refer to this chapter for details on shooting photos = taking photos and
playing them back, capturing photos from video and printing photos.
TakingPhotos
1 Set the mode dial to O o
2 Turn on the camcorder.
By default, photos are recorded on
the hard disk. You can also set the
memory card as the recording media
for photos ([Z_ 33).
3 Press PH@HOTOihalfwayo
Once the focus is automatically
adjusted, _t_ will turn green and
one or more AF frames will appear.
, When you press [_t_ on the
wireless controller, the photo is
recorded after the autofocus is
activated and locked.
4 Press P_I fullyo
The ACCESS indicator will flash as
the photo is being recorded.
Observe the following precautions while
the ACCESS indicator is on or flashing.
Failing to do so may result in permanent
data loss,
- Do not subject the camcorder to
vibrations or strong impacts,
- Do not open the memory card slot cover.
- Do not disconnect the power source or
turn off the camcorder=
- Do not change the position of the mode
dial,
_ It0TES
If the subject is not suitable for
autofocus, (_) turns yellow, Adjust the
focus manually (CC] 49).
When the subiect is too bright,
[Overexp,] starts flashing. In such case,
use the optional FS-H37U ND filter,
61
Pi_ot os
Seleclng PhotoSize and Quaity
Photos are recorded as JPG files. As a
general rule, select a larger photo size
for higher quality. Select the
[LW 1920x1080] size for photos with an
aspect ratio of 16:9.
1
Options
Photo size options and the approximate
number of photos that can be recorded
on memory cards of various sizes are
given in the table below.
{F_:I O
[ _L 2048x1536] O
Desired photo size* O
Desired photo quality* O
[FuNc.]
* Press (SET)to move back and forth between
size and qualty selection= The number
displayed on the right corner indicates the
approximate number of photos that can be
recorded with the current qualty/size
setting=
_ IOTES
The actual number of photos that can
be recorded will vary depending on the
subject and shooting conditions.
The camcorder retains the last setting
used even if you set the camcorder to
mode,
LW1920x1080 50 75 150 315 470 925 670 1.000 1.970
L 2048x1536 e 30 50 100 205 310 625 445 660 ].325
M 1440x1080 65 _o0 200 420 625 ].225 890 1.325 2.595
SW848x4802 260 370 740 1.585 2245 4.495 3.360 4.760 9.325
$640x480 340 490 890 2.070 2.995 5.390 4.395 6.350 11.430 s
1 _ [Super Fine], _ : [Fine], ,a_ : [Normal:
2 This size is only avalable for recording it- _ mode (simultaneous recoralng) ([._ 68}.
B Approximate number of pnotos tnat can actually De recoraea on tne memory cara.
:The maximum number of remaining photos d_splayed on tne screen is 9999,
62
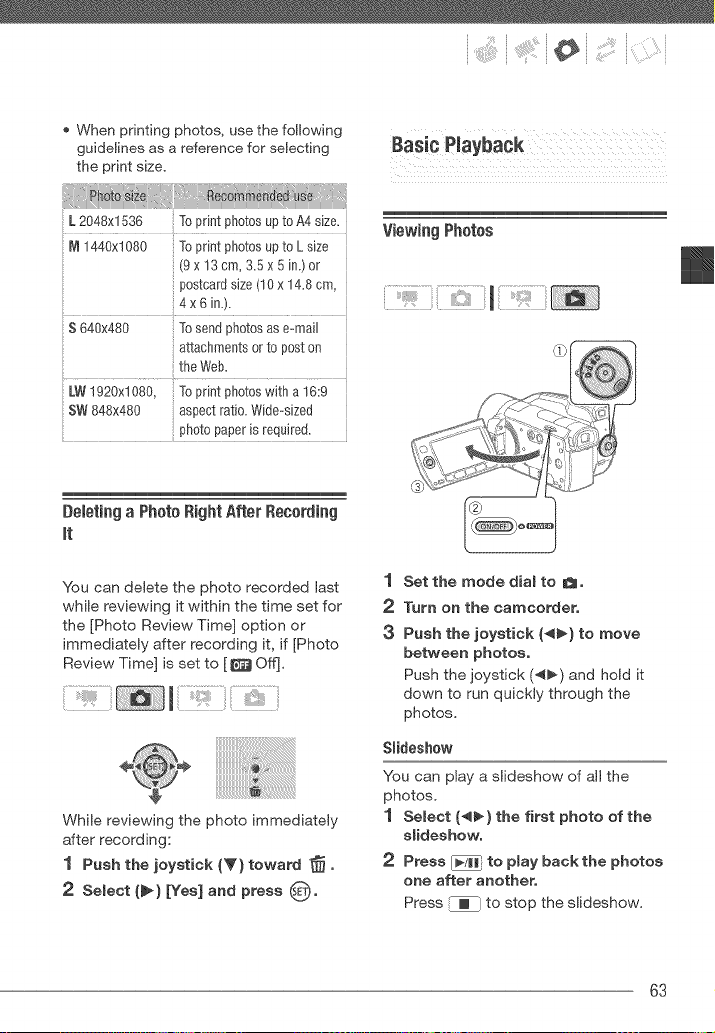
When printing photos, use the following
guidelines as a reference for selecting
the print size.
M 1440xl 080 To print photos up to L size
_(9 x 13 cm, 3.5x5 in.) 0r
_postcard size (lOx 14.8 cm,
',4x 6 in.).
.... i
S 640x480 To send photos as e-mail
attachments or to post on
the Web.
LW 1920xl 080, To print photos with a 16:9
Deletinga PhotoRightAfterRecording
it
You can delete the photo recorded last
while reviewing it within the time set for
the [Photo Review Time] option or
immediately after recording it, if [Photo
Review Time] is set to [_ Off].
While reviewing the photo immediately
after recording:
1 Push the joystick (_} toward _.
2 Select (_) [Yes] and press 8"
ViewingPhotos
1 Set the mode dial to _,
2 Turn on the camcorder,
3 Push the joystick (_) to move
between photos,
Push the joystick (4_-) and hold it
down to run quickly through the
photos,
Slideshow
You can play a slideshow of all the
photos.
1 Select (*q_} the first photo of the
slideshow.
2 Press [3 to play back the photos
one after another,
Press _ to stop the slideshow.
63
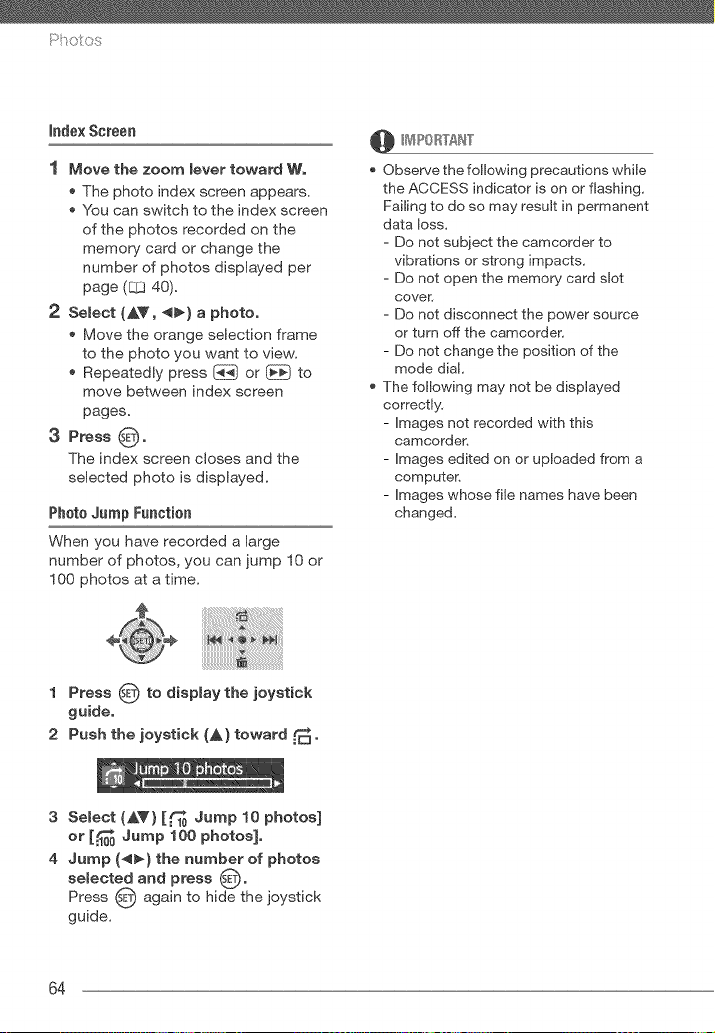
indexScreen
1 Move the zoom lever toward W.
* The photo index screen appears,
You can switch to the index screen
of the photos recorded on the
memory card or change the
number of photos displayed per
page (C_340).
2 Select (AV, *_} a photo,
Move the orange selection frame
to the photo you want to view,
Repeatedly press [_} or _ to
move between index screen
pages,
3 Press @,
The index screen closes and the
selected photo is displayed,
Photo Jump Function
When you have recorded a large
number of photos, you can jump 10 or
100 photos at a time.
@ _4PORTAN"['
Observe the following precautions while
the ACCESS indicator is on or flashing,
Failing to do so may result in permanent
data loss,
- Do not subject the camcorder to
vibrations or strong impacts,
- Do not open the memory card slot
cover
- Do not disconnect the power source
or turn off the camcordeR
- Do not change the position of the
mode dial,
The following may not be displayed
correctly,
- Images not recorded with this
camcordeR
- Images edited on or uploaded from a
computer.
- Images whose file names have been
changed,
1 Press O to display the joystick
guide,
2 Push the joystick (A) toward _,
3 Select (AV} [..f_10Jump 10 photos]
or [_ Jump 100 photos],
4 Jump (4_) the number of photos
selected and press 0"
Press 0 again to hide the joystick
guide.
64
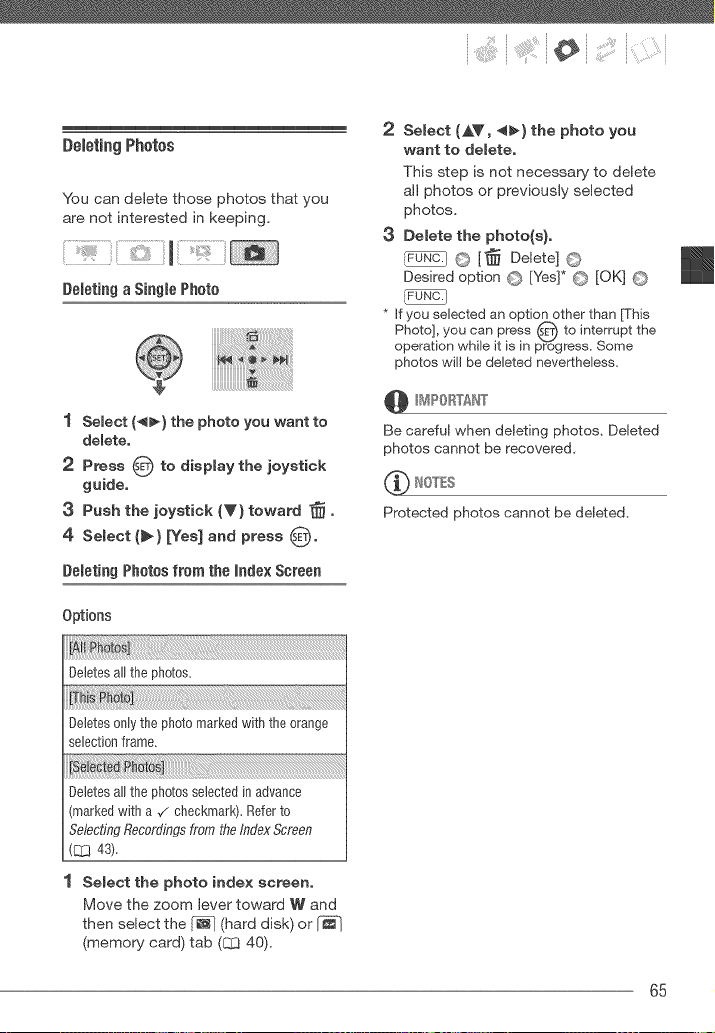
:" _ ;i_iiiii;i_ili_:'!_¸¸i(] i
Deleting Photos
you can delete those photos that you
are not interested in keeping.
Deleting a Single Photo
1 Semect (_} the photo you want to
demote.
2 Press O to display the joystick
guide.
3 Push the joystick iV) toward ]_.
4 Select (_} [Yes] and press 0"
Deleting Photos from the Index Screen
Options
Deletes all the photo&
Deletes 0nly the photo marked with the orange
selecti0n frame.
2 Select (A_', 4_) the photo you
want to delete.
This step is not necessary to delete
all photos or previously selected
photos.
3 Delete the photo(s).
_) O [_ Delete] ©
Desired option C_ [Yes]* O [OK] C)
[FUNC. )
* If yOU selected an option other than Fhis
Photo], you can press O to interrupt the
operation while it is in progress. Some
photos will be deleted nevertheless=
@ H_4PORTAN"['
Be careful when deleting photos, Deleted
photos cannot be recovered,
_ It0TES
Protected photos cannot be deleted,
Deletes all the photos selected in advance
marked with a ,/checkmark). Refer to
Selecting Recordings from tire Index Screen
(C[_ 43).
1 Select the photo index screen,
Move the zoom lever toward W' and
then select the [_ (hard disk) or
(memory card) tab (CCI40).
65
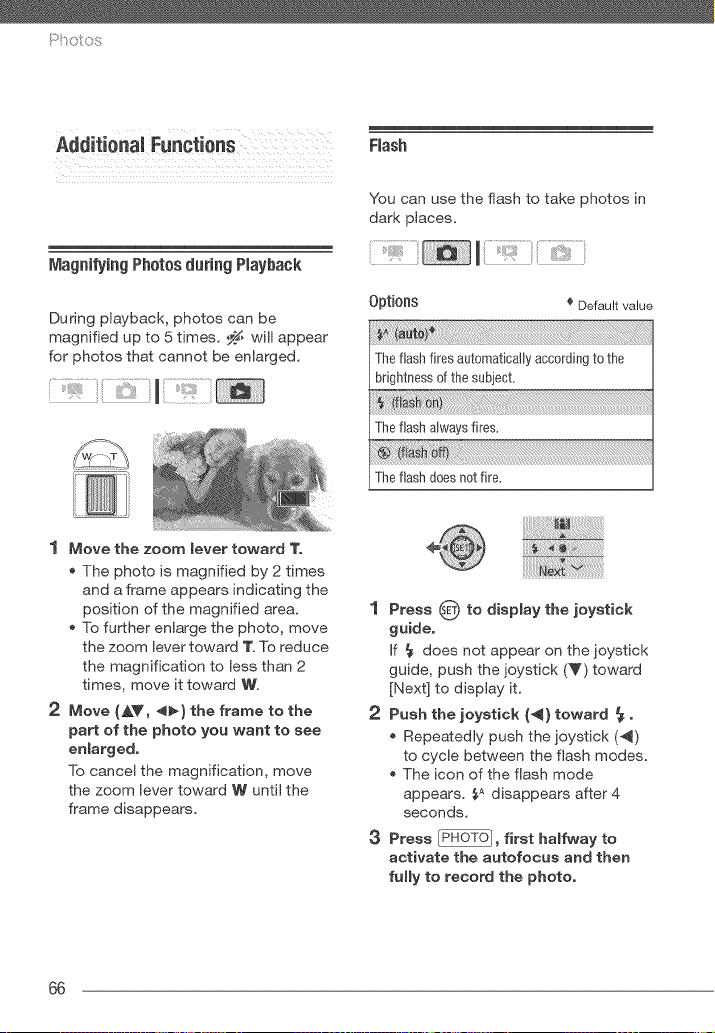
Magni_ingPhotosduring Playback
During playback, photos can be
magnified up to 5 times. _ will appear
for photos that cannot be enlarged.
1 Move the zoom lever toward 1".
The photo is magnified by 2 times
and a frame appears indicating the
position of the magnified area.
To further enlarge the photo, move
the zoom lever toward 1".To reduce
the magnification to less than 2
times, move it toward W'.
2 Move (AY, _} the frame to the
part of the photo you want to see
enmarged,
To cancel the magnification, move
the zoom lever toward W until the
frame disappears.
Flash
You can use the flash to take photos in
dark places.
Options _ Default value
Theflashfires automaticallyaccordingto the
brightnessof thesubject.
Thefleshalwaysfires.
Theflashdoesnotfire.
1 Press 0 to display the joystick
guide,
If _ does not appear on the joystick
guide, push the joystick (V) toward
[Next] to display it.
2 Push the joystick (41} toward 4.
Repeatedly push the joystick (4)
to cycle between the flash modes.
The icon of the flash mode
appears. _A disappears after 4
seconds.
3 Press [P_}, first halfway to
activate the autofocus and then
fully to record the photo,
66
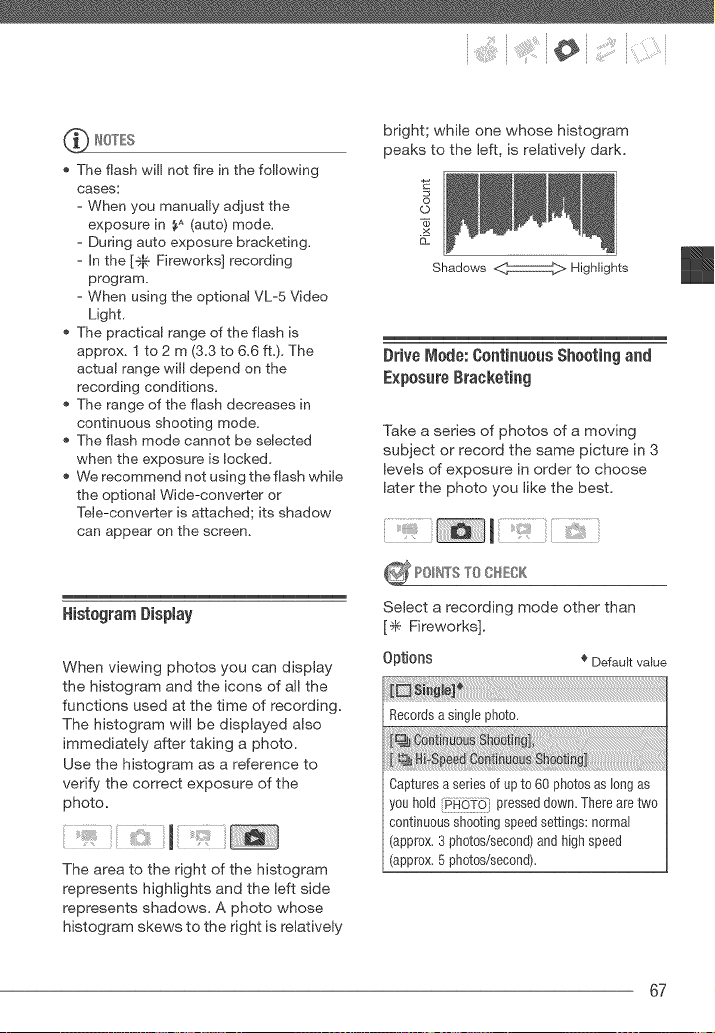
:" _ ;_i_i/_¸¸i¸i¸i_:'!_¸¸{}}i
The flash will not fire in the following
cases:
- When you manually adjust the
exposure in SA (auto) mode.
- During auto exposure bracketing.
- in the [÷_. Fireworks] recording
program.
- When using the optional VL-5 Video
Light,
The practical range of the flash is
approx. 1 to 2 m (3,3 to 6.6 ft.), The
actual range will depend on the
recording conditions.
The range of the flash decreases in
continuous shooting mode.
The flash mode cannot be selected
when the exposure is locked,
We recommend not using the flash while
the optional Wide-converter or
Tele-converter is attached; its shadow
can appear on the screen.
HistogramDisplay
When viewing photos you can display
the histogram and the icons of all the
functions used at the time of recording.
The histogram will be displayed also
immediately after taking a photo.
Use the histogram as a reference to
verify the correct exposure of the
photo.
The area to the right of the histogram
represents highlights and the left side
represents shadows. A photo whose
histogram skews to the right is relatively
bright; while one whose histogram
peaks to the left, is relatively dark.
©
.x
Shadows _ Highlights
Drive Mode: Continuous Shooting and
Exposure Bracketing
Take a series of photos of a moving
subject or record the same picture in 3
levels of exposure in order to choose
later the photo you like the best.
_ POItWSTO OHEOK
SeJect a recording mode other than
[_ Fireworks].
Options _ Default value
Records a single ph0t0.
Captures a series of up to 60 photos as long as
you hold i#F[611% pressed down. There are two
continuous shooting speed settings: normal
(approx. 3 photos/second) and high speed
(approx, 5 photos/second),
67
The camcorder records 3 photos using 3
different exposures (dark, normal, light in 1/2 EV
steps), allowing you to choose the photo you like
the best,
[E3 Single] © Desired option ©
Taking PhotoswhJJeRecordhg lVlov[es
(SimumtaneousRecording)
?bu can record photos even while the
camcorder is set to mode.
Moreover, you can capture the photo at
the same time you are recording video.
Photos recorded with simultaneous
recording will have the same aspect
ratio of movies (16:9).
1 Press halfway to activate
the autofocue,
2 Press _ fully and hold it
pressed down.
!iiilAoT0ExP0s0°E0°AOKET'°0
Press _, first halfway to
activate the autofocus and then fully
to record the photos,
Continuous shooting speeds are
approximate and vary depending on
recording conditions and subjects.
When using the flash, continuous
shooting speed will decrease to approx.
2,1 photos/second, Continuous
shooting speed wiJJ decrease also when
using slow shutter speeds (1,/30 or
slower),
_?u_._©
[_ Simultaneous Recording Off] ©
Desired photo size* O
Desired photo quality* O
{_UNc:]
Press _ET)to move back and forth between
size and quality selection, The number
displayed on the right corner indicates the
approximate number of photos that can be
recorded with the current quality/size
setting.
Whib recording, or in record pause
mode, press _ to capture the
photo.
NOTB
* Photos cannot be recorded
simultaneously while the digital zoom or
a digital effect is activated.
* To take photos we recommend using
the _-/ mode, which offers the best
quality for photos.
* Photos will be recorded on the media
selected for recording photos (L_ 33),
68
:" _ ;_i_i/_i¸i¸i_:'!_¸¸i(}i
LightMetering iViode
The camcorder measures the light
reflected from the subject in order to
calculate the optimal exposure settings.
Depending on the subject, you may
want to change the way the light is
measured and evaluated.
.......
0prioRs € Default value
Appropriate for standard shooting conditions,
includingbacklit scenes. The camcorder divides
the picture into several areas and the light is
measured in all of them to achieve the optimal
exposure for the subiect.
iN
Averages the light metered from the entire
screen, giving more weight to the subiect in the
center.
Meters only the area within the spot AE point
frame, Use this setting to adjust the exposure to
match the subject in the center of the screen,
[m Evaluative] ©
Desired option ©
Capturiag a Photofrom the PJayback
Scene
You can capture frames from a scene
as photos. The size of the captured
photo will be [LW 1920x1080] and it
cannot be changed, but you can select
the photo quality.
_ ?9_r_TSTO O_%K
Set [_;_]© [TV Type] to [l[_ Wide TV]
before using this function (C::397).
[FUNC_ ©
[_ Menu] © [;_ ©
[Photo Capture Quality] ©
Desired photo quality* ©
* The number displayed at the bottom
indicates the approximate number of
photos that can be recorded with the
current quality setting.
!iiilT000PT00ET°EP"OTO
1 Play back the scene containing
the picture you want to capture,
2 Pause the playback at the point
you want to capture,
3 Press [_6T6 / fully,
NOTES
The data code of the photo will reflect
the date and time of recording of the
original scene.
A photo captured from a scene with lots
of fast movement may be blurred.
69
• Photos will be recorded on the media
selected for recording photos (L_ 33),
ProtectingPhotos
You can protect photos from accidental
erasure.
Protectiag Siagle Photos
1 Open the photo selection screen,
[PuN0.] O [o_ Protect]
[_ Protect] appears on the screen.
2 Select (_) the photo you want to
protect,
3 Press O to protect the photo.
[_ appears on the bottom bar and
the photo cannot be deleted. Press
again to remove the protection.
4 Repeat steps 2-3 to protect
additional photos or press ,_FbN0.)
twice to close the menu.
Protectiag Photos from the mndexScreen
Options
Opensthe samescreendescribedin Protecting
SinglePhotos(C_J70).Continuefrom step 3 of
that procedureto protectthe photo.
B:
Protectsall the photosselectedin advance
markedwith a ,/checkmark). Referto
SelectingRecordingsfrom tireindexScreen
([_] 43).
[FON0-/ O [o_ Protect] O
Desired option O [Yes] O [OK] O
Initializing the recording media (_ 33) will
permanently erase all recordings,
including protected photos.
CopyingPhotos
You can copy photos only from the hard
disk to the memory card.
(}opying a Single Photo
1 Select to view the photos
recorded on the hard disk.
Select the _ tab (_3 40) and move
the zoom lever toward T to return to
single photo view.
2 Select (_!_) the photo you want to
copy,
3 Copy the photo to the memory
card.
O [_i Copy (_,_ _)] O
[Yes] © _€_J_:]
7O
:" _ ;i_iii:;¸¸:i¸i_:'!:(:i
Copying Photos from the rondo×Screen
Options
h to s] .....
Copies alJthe photos.
,,h hN:
Copies 0nly the photo marked with the orange
selection frame.
_iote Ph
Copies all the photos selected in advance
marked with a 7 checkmark), Refer to
Selecting Recordings from tire Index Screen
([11343),
1 Select the index screen of the
photos recorded on the hard disk.
Move the zoom lever toward W and
then select the [_@_(hard disk) tab
(C:1340).
2 if you want to copy only one
photo, select (&Y, _} the photo
you want to copy.
3 Copy the photo(s),
LFUNC__ O [HI Copy ([_J _, _)] O
Desired option O [Yes]* O [OK]** O
* If you selected [Selected Photos] or [All
Photos], you can press O to interrupt the
operation while it is in progress.
**This step is not required when copying a
single photo.
Observe the following precautions while
the ACCESS indicator is on or flashing,
Failing to do so may result in permanent
data loss,
- Do not subject the camcorder to
vibrations or strong impacts.
- Do not open the memory card dot cover.
- Do not disconnect the power source or
turn off the camcorder.
- Do not change the position of the mode
dial,
_ It0TES
If there is not enough space on the
memory card, as many photos as
possible will be copied before stopping
the operation,
If the memory card slot cover is open, or
the LOCK switch on the memory card is
set to prevent writing, you will not be
able to copy photos to the memory
card,
You may not be able to copy photos that
were not recorded with this camcorder.
You can als0 use the f0H0wing
functions,,
The following functions and features of
the camcorder can be used either for
shooting video or for taking photos,
The way to set and use them was
already explained in detail so we refer
you to the relevant page in the "Video"
section.
Zoom ([Z3 36)
QuickStart _ 37
® Recording programs (813 45, 46)
Self timer (LlZt 48)
o Manua exposure a0jus_men_ana automatic
backllght correctJ0n (LZ&I48)
Manual focus _ajustment (83 49t
White balance [Z2_50)
Image effects (LT3 51)
Digital effects (rZ,l 52t
71
PrintingPhotos(DirectPrint)
The camcorder can be connected to
any PictBridge-compatible printer. You
can mark in advance the photos you
want to print and set the desired
number of copies as a print order
(E:gl76).
PictBridge
Caffon printers: SELPHY printers of the
CP, DS and ES series and PIXMA
printers marked with the PictBridge
logo,
Connecting the Camcorder to the Printer
1 Select the media that contains the
photos you want to print.
Select the [_-] (hard disk) or
(memory card) tab (12[340) and move
the zoom lever toward T to return to
single photo view.
2 Turn on the printer.
3 Connect the camcorder to the
printer using the supplied USB
cable,
Connection _. Refer to
Connection Diagrams (Q3 79).
If the device type selection screen
appears, select [Computer!Printer]
and press O"
_1._appears and changes to f_#.
The & _ (print!share) button lights
up and the current print settings
will be displayed for approx.
6 seconds.
If _ continues to flash (for more than I
minute) or if /_¢ does not appear, the
camcorder is not correctly connected to
the printer. In such case, disconnect the
USB cable and turn off the camcorder
and the printer. After a short while, turn
them on again, set the camcorder to
mode and restore the connection,
During the following operations, even if
you connect a printer to the camcorder
it will not be recognized,
- Deleting all photos
- Removing all transfer orders
- Removing all print orders
_ will appear for photos that cannot be
printed,
We recommend powering the
camcorder using the compact power
adapter.
Refer also to the printer's instruction
manual,
If you have no intention to use the
optional DW-100 DVD Burner, you can
set or O [USB Connection
Type] to [J2:1 Computer/Printer] (E::I398)
so the device type selection screen
does not appear every time you connect
the camcorder to a printer.
Connection to a PictBridge-compatible
printer will not work when the hard disk
or memory card contains 1,800 photos
or more, For best performance, we
recommend keeping the number of
photos under 100,
72
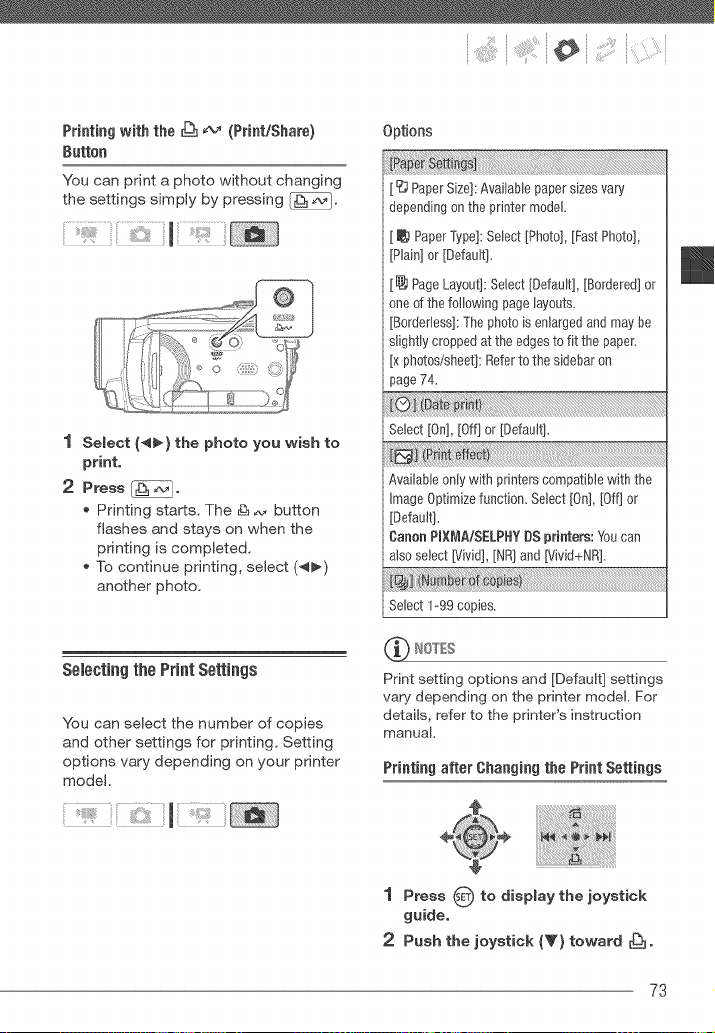
:" _ ;_i_iiiii:i_il¸i_:'!_¸¸i( i
Printing with the _ _ (PrinL/Share)
Button
You can print a photo without changing
the settings simply by pressing _.
1 Select (_) the photo you wish to
print,
2 Press _,
, Printing starts. The _ _,, button
flashes and stays on when the
printing is completed.
, To continue printing, select (4_)
another photo.
Selecting the PrintSettings
You can select the number of copies
and other settings for printing. Setting
options vary depending on your printer
model.
Options
[ _ Paper Size]: Available paper sizes vary
depending on the printer model.
[ _ Paper Type]: Select ]Photo], [Fast Photo],
[Plain] or [Default].
[_ Page Layout]: Select [Default], [Bordered] or
one of the following page layouts.
[Bordefless]: The photo is enlarged and may be
slightly cropped at the edges to fit the paper.
[x photos/sheet]: Refer to the sidebar on
page 74.
Select[On],[Off]or [Default].
Available only with printers compatible with the
Image Optimize function. Select [On], [Off] or
[Default].
Canon PIXL_,_A/SELPHYDS printers: You can
als0 select [Vivid], [NR] and [Vivid+NR].
Select 1-99 copies.
_ WtOTES
Print setting options and [Default] settings
vary depending on the printer model. For
details, refer to the printer's instruc:tion
manual.
Printing after Changing the Print Settings
1 Press _ to display the joystick
guide,
2 Push the joystick (V) toward _.
73
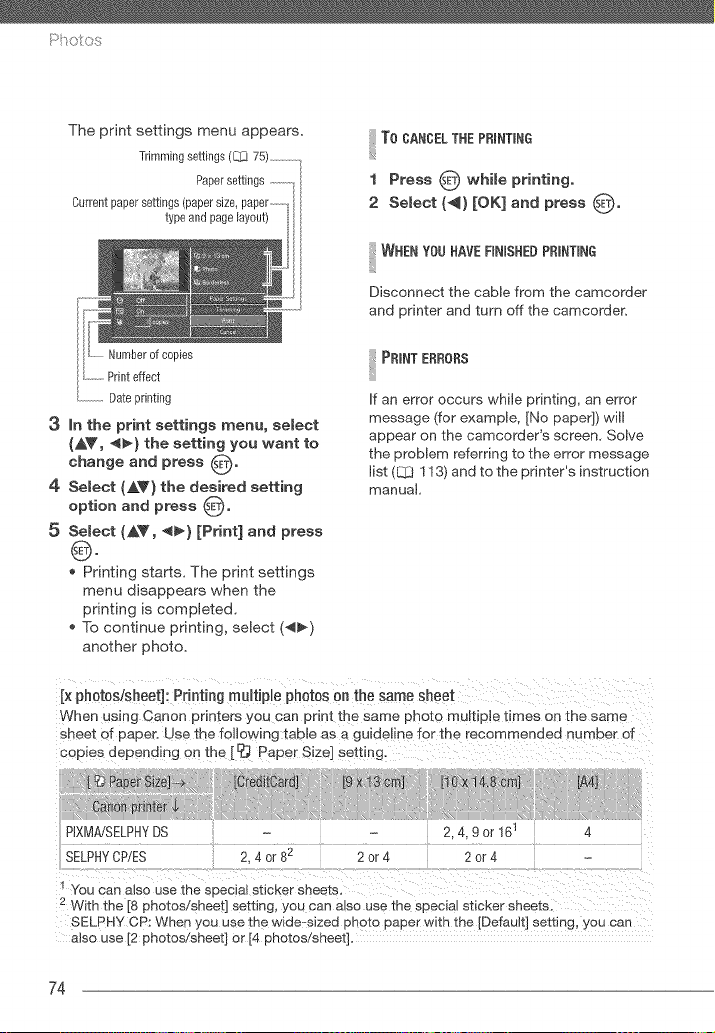
The print settings menu appears.
Trimming settings (L_ 75) ...............
Paper settings ...............I
Current paper settings (paper size, paper ..........
type and page layout)
Numberof copies
Printeffect
.................Dateprinting
3 in the print settings menu, select
(AV, _I_) the setting you want to
change and press 0.
4 Select (AY) the desired setting
option and press 0.
5 Select (AV, 4_) [Print] and press
0.
* Printing starts. The print settings
menu disappears when the
printing is completed.
* To continue printing, select (_)
another photo.
To CANCELTHE PRINTING
1 Press 0 while printing,
2 Select (_) [OK] and press 0"
I WHEN YOU NAVE RNISHEB PRINTING
Disconnect the cable from the camcorder
and printer and turn off the camcorder.
I PRINT ERRORS
If an error occurs while printing, an error
message (for example, [No paper]) will
appear on the camcorder's screen. Solve
the proMem referring to the error message
list (Q:I 113) and to the printer's instruction
manual.
Ix ph0t0sisheet]: Printing multiple photos on the same sheet
When using Canon orinters you can print the same photo multiple times on the same
sheet of paper. Use the following table as a guideline for the recommended number d
copies depending on the [ _ Paper Size] setting.
PIXMA/SELPHYDS 2.4= 9 or 161 4
SELPHYCP/ES 2, 4 or 82 2 or 4 2 or 4
You can also use the special sticker sheets.
2 With the [8 pr_otos/sneet] setting, you can a_so use me special sticker sheets.
SELPHY CP: When you use "[ne wide-sized pn _to paper with the [Default] setting, you can
also use [2 photos!sheet] or [4 photos/sheet].
74
:" _ i_i+iiiii¸¸:i_¸¸i¸i¸i+:'!_¸¸(i
+ Oanon's Pictgridge=cempatible printers: If
printing does not resume automatically
after you solved the problem, select
[Continue] and press O to resume
printing. If that option is not available,
select [Stop] and press _) and then
restart printing from the beginning.
+ 0therprintersoriftheerrerstiff persists with
a Canon printer: If printing does not
resume automatically, disconnect the
USB cable and turn off the camcorder.
After a short while, turn on the
camcorder and restore the USB
connection.
+ You may not be able to print correctly
with a PictBddge-compatible printer
photos whose file names have been
changed or that were recorded, created,
edited or changed with any device other
than this camcorder.
+ If [Busy] does not disappear, disconnect
the USB cable and restore the
connection after a short while.
2
3
Refer to steps I +2 in Printing after
Changing the Print Settings (q3 73).
Select (_,T, _) [Trimming] and
press O o
The trimming frame appears.
Change the size of the trimming
frame,
+ Move the zoom lever toward T to
shrink the frame, and move it
toward W to enlarge it. Press
to change the orientation of the
frame (portrait/landscape).
+ To cancel the trimming settings,
move the zoom lever toward W
until the trimming frame
disappears.
Trimming Settings
Set the paper size and page layout
before changing the trimming settings.
Trimming settings apply to one photo
only.
1 Open the print settings menu,
4
5
Move (AY, _) the trimming
frame to the area you want to
print,
Press to return to the print
settings menu,
+ The print area selected will be
indicated by a green frame within
the thumbnail,
+ To change other print settings and
print the area you selected refer to
steps 3+5 in Printl;_g after
Changing the Print Settl;_gs
(_ 73).
75
The trimming settings are canceled in
the following cases:
- When you turn off the camcorder.
- When you disconnect the USB cable.
- When you expand the trimming frame
beyond its maximum size.
- When you change the [Paper Size]
setting,
You may not be able to set the trimming
settings for photos that were not
recorded with this camcorden
PrintOrders
You can mark in advance the photos
you want to print and set the desired
number of copies as a print order. Later,
you can easily print out the print orders
by connecting the camcorder to a
PictBridge-compatible printer (CCI72).
You can set print orders for up to 998
photos.
ii i iHiii¸¸ii
Selecting Photos for Printing (Print Order)
Set the print orders before connecting
the supplied USB cable to the
camcorder.
Marking Single Photos with Print Orders
1 Open the photo seJection screen,
_F_N_-I O [_ Print Orders]
_[pj appears on the screen.
2 SeLect (4_} the photo you want to
mark with a print order,
3 Press O to set the print order,
The number of copies appears in
orange.
4 Set (A_'} the number of copies
desired and press O"
To cancel the print order, set the
number of copies to 0.
5 Repeat steps 2-4 to mark
additional photos with print orders
or press twice to close the
nlenu.
Setting Print Orders from the index Screen
Options
Opens the same screen described in Mark,@g
Single Photos with Pr,_qtOrders (L_ 76).
Continue from step 3 of that procedure to set the
print 0rder.
oto
Sets a print order of 1copy of each of the photos
selected in advance (marked with a v"
checkmark). Refer to SelectL*tgRecordings from
the Index Screen (L_ 43).
Removes all the print orders.
[_ Print Orders] ©
Desired option © [Yes] © [OK] ©
Printing Photos Marked with Print Orders
1 Connect the camcorder to the
printer using the supplied USB
cable,
Connection _D_. Refer to Connection
Diagrams (Q3 79).
76
:" _ ;_i_iiiii¸¸:i_¸¸i¸i¸i_:'!_¸¸(i
'_ Open the print menu.
O [_ Menu] O [_ O
[,_ _ Print]
The print menu appears.
If there are no photos marked with
print orders, [No _ print orders
have been set] appears.
Depending on the connected
printer, you may be able to change
some print settings (_ 73).
3 Select (AV, _) [Print] and press
0.
Printing starts. The print menu
disappears when the printing is
completed.
To cancel the printing, refer to page 74.
Restarting printing: Open the print menu
as explained in step 2. In the print
settings menu, select [Print]* or
[Resume] and press 0" The remaining
photos will be printed.
Printing cannot be restarted when the
print order settings have been changed
or if you deleted a photo with print order
settings.
* in case the print order was interrupted
after the first photo.
77
External Oennectiens
This chapter explains how to connect your camcorder to an external
device such as a TV, VCR, or computer,
®
<>=D
o®
(i} NDI_ItOUT Terminam*
Access: Open the rear terminal cover.
The HDMI OUTterminaJ offers a high-quality digital
connection that combines audio and video in a single
convenient cable.
COi_IPONENTOUTTerminal*
Access: Open the front terminal cover.
The component video terminal is for video only. When
you use connection _ do not forget the audio
connections using the AV OUT/(_ terminal.
{_)AV OUTI(_ Terminal
Access: Open the front terminal cover.
Sound from the buJJt-inspeaker will be muted while the
STV-250N Stereo Video CaNe is connected to the
camcorder.
_} US£ Terminal
Access: Open the LCD panel.
* When connecting a cable to the camcorder, make sure to align the triangle marks on the cable's
connector and on the camcorder's terminal (_ *_).
78
Connection Diagrams
Connections that can be used to connect the camcorder to a TV are listed in falling
order of picture quality.
HDMIIN
HTC-tO0HDMIgable
HDMImini-connect0r) (optional) (standardHDMI
connector)
(supplied) Green
_@ White_____
AV OUT
(supplied) Red
79
Yellow
O@ White
AV OUT (supplied) Red
USB Cable
(supplied)
8O
Connect the camcorder to a TV to enjoy
your recordings with family and friends.
Playback on an HDTV using one of the
high-definition connections will ensure
the best playback quality.
1 Turn off the camcorder and the TV.
2 Connect the earneorder to the TV.
Refer to Connection Diagrams
(1:_ 79) and select the most
appropriate connection for your TV.
3 Turn on the connected TVo
On the TV, select as the video input
the same terminal to which you
connected the camcorder. Refer to
the instruction manual of the
connected TV.
4 Turn on the camcorder and set it
to mode (E:Z338} or
mode (1_ 63}.
Start the playback of movies or
photos.
_ IOTES
We recommend powering the
camcorder using the compact power
adapter.
Connection _: When you play back
your 16:9 movies on standard TV sets
with a 4:3 aspect ratio, the TV set will
switch automatically to widescreen
mode if it is compatible with the Video
ID-1 system. Otherwise, change the
aspect ratio of the TV manualy.
About the HDMI TM connection
The HD_ H(High-Definkion Multimedia hterface_ connection (_A_) is a convenienl al-
digital connection using a single cable for both video and audio. When you connect the
camcorder to an HDTV equipped with an HDM[ terminal, you can enjoy video and audio
playback at the highest quaIty.
- The HDMI OUT terminal on the camcorder is for output only. Do not connect it to an
HDMI output terminal on an external device, as this may damage the camcorder.
- Correct ooeration cannot be guaranteed when connecting the camcorder to DVI
monitors.
- Depenalng on the HDTV. correct playback of personal video content may not be possible
using connection A. Try one of the o[ner connecuons.
- While the camcoroer _s connected to an HDTV using connection _. there wll be no
video output from other terminals.
81

i]ilx_e _a ©o _ect o__s
Saving and Backing Up
YourRecordings
Backing UpYour Recordings on a
Computer
Movies recorded with this camcorder
are saved on the hard disk or memory
card. Because space is limited, make
sure to back up your movies onto a
computer on a regular basis.
Pm×ELAmmageMi×er3 SE
With the software supplied on the
PIXELA lraageMi×er 3 SE CD-ROM
you can select scenes and back them
up on your computer's hard disk. If
necessary, backup video files
previously saved on a computer can be
restored back to the camcorder.
ImageMixer 3 offers also many options
for organizing your video library, editing
video and more.
For details about installing the software
refer to PIXELA lraageMixer 3 SE
Installation Guide.
Saving your Recordings without a
Computer
The following options are also available:
Use the optional DW=100 DVD Burner
to create high-definition (AVCHD)
discs of your movies and Photo DVDs
of your photos (Q3 82).
Connect the camcorder to an external
recording device (DVD or HDD
recorder, VCR, etc.) to save standard-
definition copies of your movies
(Ca 86).
When the camcerder is connected tea
computer: Do not access, change or delete
any of the camcorder's folders or flies
directly from the computer as this may
result in permanent data loss. Always
back up your recordings to the computer
and restore the backup files to the
camcorder using only the supplied
software, ImageMixer 3.
AuthoringHigh-Definiti0n(AVCHD)
Discs and PhotoDVDs
You can connect the camcorder to the
optional DW=I00 DVD Burner to create
high-definition DVD discs (AVCHD
specifications). This way, you can
preserve your video recordings in the
highest video quality available. You can
also create Photo DVDs from your
photos that you can play back with
most standard DVD players.
Refer to this section along with the
relevant sections in the instruction
manual of the DW=IO0.
....... !
82
Options for creating AVCHDdiscs
( mode)
Addall the scenesto the disc(s).
Add0nlythose scenesthat have notbeen
previ0uslyaddedto a disc.
i iayisti
Add0nlythe scenesincludedinthe playlist
(_ 58).
Options for creating Photo DVDs
( mode)
(E:_ 89).
Preparations ca the Cameorder
1 Turn on the camcorder and set it
to mode to create high-
definition discs of your movies or
mode to create Photo DVDs
of your photos,
Power the camcorder using the
compact power adapter.
Select in advance the media that
contains the recordings you want
to add to the disc (CO 40).
2 Select the scenes or photos you
want to add to the disc.
F[F[F[FUNC._O [_ Menu] O
[Add Recordings to Disc] O
Desired option O
Connecting to the DW-le0 DVD Burner
and Creating a Disc
1 Turn on the DVD Burner.
[D_#:t00_ Refer to Creating DVDs.
2 Connect the camcorder to the
DVB Burner using the supplied
USB cable.
Connection @. Refer to
Connection Dbgrams (_ 79) and
Connections.
If the device type selection screen
appears, select [DVD Burner] and
press _.
When the connection is
completed, [No disc] will be
displayed.
3 insert a brand new disc into the
DVD Burner.
Use the OPEN!CLOSE button on
the DVD Burner to open and close
the disc tray.
After the disc is recognized, an
information screen will display the
type of DVD you are creating and
the estimated time and number of
discs it will require (based on the
disc you inserted).
If you inserted a DVD_RW disc that
already contains data, [The disc
already contains data.] will be
displayed. To overwrite the data
(erasing the previous content of
the disc), press _, select [Yes]
and press _ again.
83
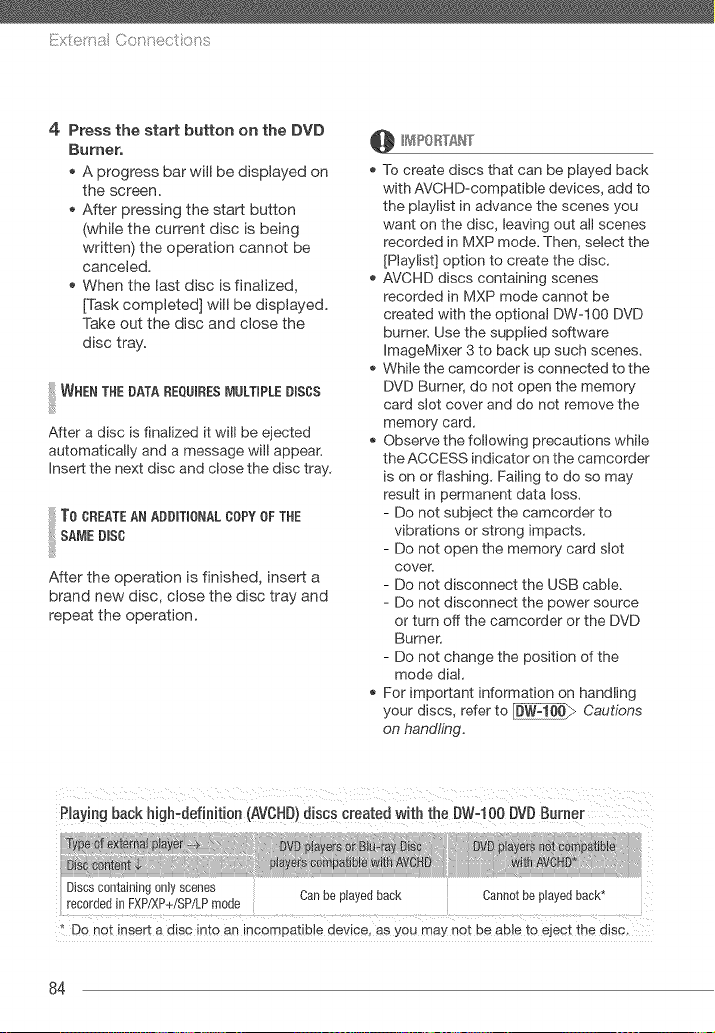
iiilxte!'na Co nec ons
4 Press the start button on the DVD
Burner,
A progress bar will be displayed on
the screen.
After pressing the start button
(while the current disc is being
written) the operation cannot be
canceled.
When the last disc is finalized,
[TAsk completed] will be dispbyed.
Take out the disc and close the
disc tray.
!iiilw°E°T.E °E00,°ESOOLT' LE0'S0S
After a disc is finalized it will be ejected
automatically and a message will appear,
insert the next disc and close the disc tray,
To CREATEAN ADDITIONALCOPY OF THE
ii SA,,'IEDiSC
After the operation is finished, insert a
brand new disc, close the disc tray and
repeat the operation.
@ _IPORTANT
To create discs that can be played back
with AVCHD-compatible devices, add to
the playlist in advance the scenes you
want on the disc, leaving out all scenes
recorded in MXP mode, Then, select the
[Playlist] option to create the disc,
AVCHD discs containing scenes
recorded in MXP mode cannot be
created with the optional DW-100 DVD
burner. Use the supplied software
ImageMixer 3 to back up such scenes,
While the camcorder is connected to the
DVD Burner, do not open the memory
card slot cover and do not remove the
memory card.
Observe the following precautions while
the ACCESS indicator on the camcorder
is on or flashing, Failing to do so may
result in permanent data loss,
- Do not subject the camcorder to
vibrations or strong impacts,
- Do not open the memory card slot
cover.
- Do not disconnect the USB cable,
- Do not disconnect the power source
or turn off the camcorder or the DVD
Burner.
- Do not change the position of the
mode dial,
For important information on handling
your discs, refer to _ Cautions
on handling.
Playing back high-definition (AVCHD) discs created with the DWq 00 DVD Burner
Typ_ _:p_r @ , ISayersar B_ray !0sc DVD_0_ayer_;net _patiSb
4 t
Discscontaining only scenes
recordedin FXP/XP+/SF/LPmode Canbe played back Cannotbe playedback
* Do not insert a disc into an incompatible aewee, as you may no_ De able to eject the disc,
84
If a scene does not fit entirely in one disc,
it may be divided and continue on the next
disc,
Playing Back AVCHDDiscs Using the
DW-100 DVD Burner
You can use the optional DW-100 DVD
Burner and the camcorder also to play
back high-definition (AVCHD) discs on a
TV. This is very convenient, for example to
play back your discs even in a location
where an AVCHD-compatble DVD player
is not available.
!
1 Connect the camcorder to the TV.
Refer to Connection Diagrams
(ZO 79). Select connection _ or
to enjoy high-definition playback.
2 Turn on the DVD Burner and set it
to Disc Playback mode,
Refer to Playing DVDs,
3 Connect the cameorder to the
DVD Burner using the suppled
USB cable,
, Connection _}, Refer to
Connection Diagrams (EL3 79) and
Connections,
, If the device type selection screen
appears, select [DVD Burner] and
press @.
4 insert the disc you want to play
back into the DVD Burner,
Use the OPEN!CLOSE button on
the DVD Burner to open and close
the disc tray.
After the disc is recognized, the
disc's content will be displayed in
an index screen.
5 Select (AV, 4_) the scene you
want to play back and press O to
begin the playback,
While the camcorder is connected to the
DVD Burner, do not open the memory card
slot cover and do not remove the memory
card,
/0T£S
Only AVCHD discs created with the
DW-100 DVD Burner can be played
back using the DVD Burner.
The FUNC, menu and setup menus
cannot be accessed while the
camcorder is connected to the DVD
Burner,
With the exception of fast playback at
60x speed, special playback modes
(iZ[ZJ39) can be used also for disc
playback,
!iiilT0, Y°A0=P.0T00v0=
Photo DVDs are created using DVD-Video
specifications (standard definition), Play
back your Photo DVDs using standard
DVD players,
If your computer has a DVD drive, you can
play back the sideshow as a DVD and you
can also access individual photos as JPG
files,
Photo DVDs cannot be played back using
the DW-100 DVD Burner,
85
Copyingyour Recordingsto an Extemam
VideoRecorder
TransferringPhotosto a Computer
(DirectTransfer)
You can copy your recordings by
connecting the camcorder to a VCR or
a digital video device. Video output will
be in standard definition, although the
original scenes are in high definition.
Connecting
Connect the camcorder to the VCR
using Connection _. Refer to
Connection Diagrams (eLI 79).
Recording
1 External device: Load a blank
cassette or disc and set the device
to record pause mode.
:2 Cameorder: Locate the scene you
wish to copy and pause playback
shortly before the scene,
3 Cameorder: Resume playback.
4 External device: Beg_n recording
when the scene you wish to copy
appears. Stop recording when
copying is complete,
5 Camcorder: Stop playback.
We recommend powering the
camcorder using the compact power
adapter.
By default, on-screen displays will be
embedded in the output video signal.
You can change the displays by
repeatedly pressing (D_SP.I (_ 53).
With the software supplied on the
DIGITAL VIDEO Solution Disk
CD=ROM you can transfer photos to a
computer simply by pressing [-_.
Refer also to the relevant sections in the
"Digital Video Software" instruction
manual (PDF file).
Preparatiens
Install the software before you connect
the camcorder to the computer for the
first time. (Windows users only: you
also need to select CameraWindow's
autoqaunch setting.) After that, just
connect the camcorder to the computer
(steps 2 and 3) and proceed directly to
transfer the photos (q3 88).
1 Install the supplied Digital Video
Software,
Refer to the installation guide
(separate leaflet included with the
CD-ROM).
2 Set the camcorder to mode.
3 Select the media that contains the
photos you want to transfer,
Select the [_ (hard disk) or [_
(memory card) tab ([_3 40) and
move the zoom lever toward T to
return to single photo view.
4 Connect the eameorder to the
computer using the supplied USB
cable,
Connection _. Refer to
Connection Diagrams (C_J 79).
86
If the device type selection screen
appears, select [Computer/'Printer]
and press @.
The direct transfer menu appears
on the camcorder screen and the
_ button lights up.
RRST-Tt_IE CONNECTIONTO A COP,IPUTER
RUNNINGWINDOWS
Windows users only: The first time you
connect the camcorder to the
computer, you also need to select the
CameraWindow autoqaunch setting.
Refer to Starting
Camera Window.
While the camcorder is connected to the
computer, do not open the memory card
slot cover and do not remove the
memory card.
Observe the following precautions while
the ACCESS indicator is on or flashing.
Failing to do so may result in permanent
data loss.
- Do not subject the camcorder to
vibrations or strong impacts,
- Do not open the memory card slot
cover,
- Do not disconnect the USB cable.
- Do not turn off the camcorder or the
computer.
- Do not change the position of the
mode dial,
Operation may not work correctly
depending on the software and the
specifications/settings of your
computer.
if you wish to use the image files on your
computer, make copies of them first,
Use the copied files, retaining the
originals.
During the following operations, even if
you connect the camcorder to the
computer it will not be recognized,
- Deleting all photos
- Removing all transfer orders
- Removing all print orders
_ ItOTES
We recommend powering the
camcorder using the compact power
adapter.
Refer also to the computer's instruction
manual,
Users of Wied0ws Vista, Windows XP and
Mac 0S ×: Your camcorder is equipped
with the standard Pic:ture Transfer
Protocol (PTP) allowing you to transfer
photos (JPEG only) simply by
connecting the camcorder to a
computer using the supplied USB cable,
without having to install the supplied
software,
If you have no intention to use the
optional DW-100 DVD Burner, you can
set or O [USB Connection
Type] to [_ Computer/Printer] (L_ 95)
so the selection screen does not appear
every time you connect the camcorder
to a computer.
Depending on the number of photos on
the memory card (Windows: 1,800
photos or more; Macintosh: 1,000
photos or more), you may not be able to
transfer photos to a computer. Try using
a card reader.
87
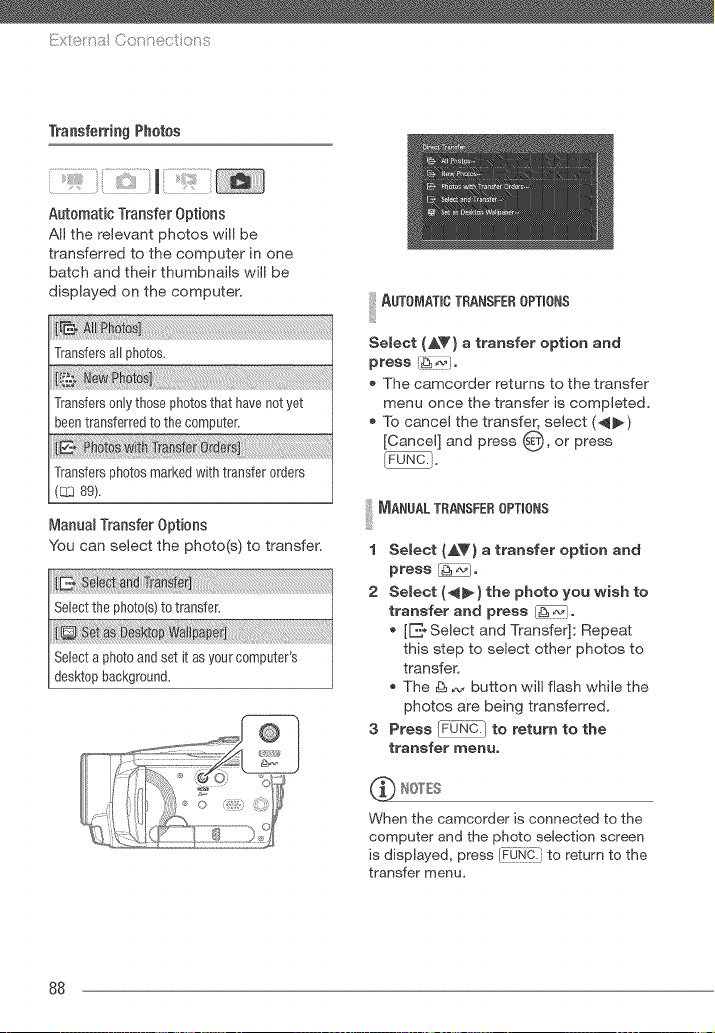
ilX_ )t u
Transferring Photos
Automatic Transfer Options
All the relevant photos will be
transferred to the computer in one
batch and their thumbnails will be
displayed on the computer.
Transfersall photos.
N h
Transfersonlythosephotosthat havenot yet
beentransferredto the computer.
Transfersphotosmarkedwith transferorders
(_ 89).
Manual Transfer Options
You can select the photo(s) to transfer.
i=E.:
Selectthe ph0t0(s)to transfer.
ktoW
Selecta photoandsetit asyourcomputer's
desktopbackground.
I AUT0_,IATBOTRANSFEROPTIONS
Select (_T} a transfer option and
press {_]o
The camcorder returns to the transfer
menu once the transfer is completed.
To cancel the transfer, select (4_)
[Cancel] and press 0, or press
I MANOALTRANSFEROPTIONS
1 Select {AV) a transfer option and
press _o
2 Select (4_} the photo you wish to
transfer and press [-_i_]o
[E-Select and Transfer]: Repeat
this step to select other photos to
transfer.
The & _ button will flash while the
photos are being transferred,
3 Press _ to return to the
transfer menu.
_ NOTES
When the camcorder is connected to the
computer and the photo selection screen
is displayed, press _,¢t_-! to return to the
transfer menu,
88
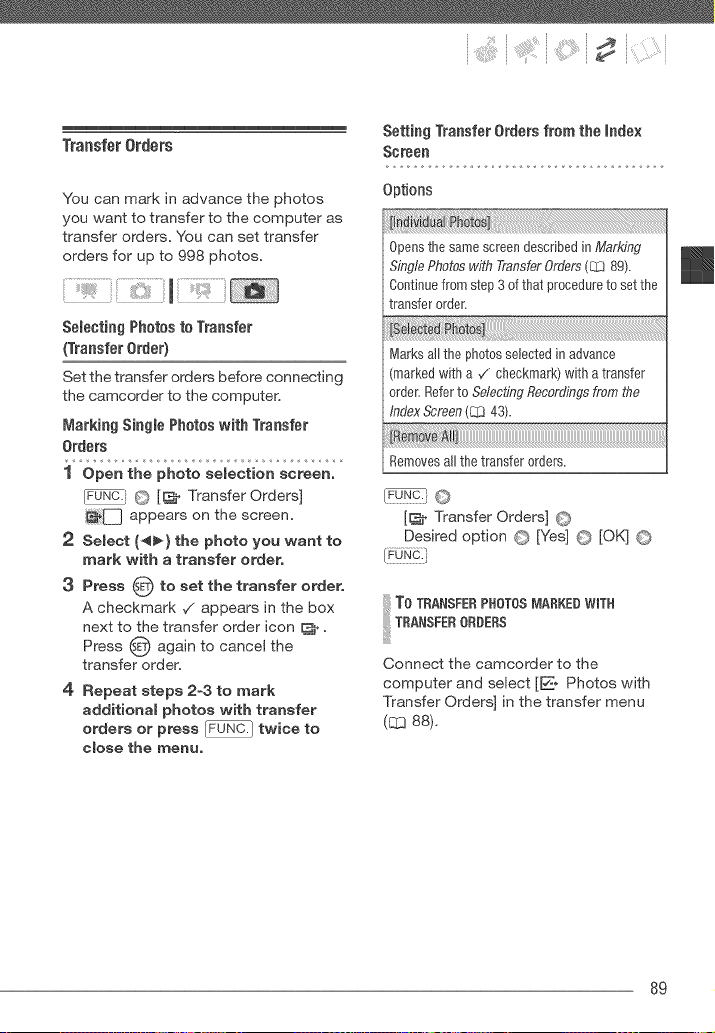
TransferOrders
You can mark in advance the photos
you want to transfer to the computer as
transfer orders. You can set transfer
orders for up to 998 photos.
Selecting Photos to Traasfer
(Traasfer Order)
Set the transfer orders before connecting
the camcorder to the computer.
Markiag Siagb Photos with Traasfer
Orders
_FUNC__ 0 [_ Transfer Orders]
_Q appears on the screen.
2 Select (4_} the photo you want to
mark with a transfer order,
3 Press 0 to set the transfer order,
A checkmark ./appears in the box
next to the transfer order icon _.
Press _) again to cancel the
transfer order.
4 Repeat steps 2-3 to mark
additional photos with transfer
orders or press _ twice to
close the menu.
Settiag Traasfer Orders from the mndex
Screen
Options
Opens the same screen described in Marking
S_qg/ePhotos with Transfer Orders (_ 89).
Continue from step 3 of that procedure to set the
transfer order.
Marks all the photos selected in advance
marked with a ,/checkmark) with a transfer
order. Refer to Seiectfl_g Recordings from the
Index Screen (_ 43).
Removes all the transfer orders.
1_ Transfer Orders I @
Desired option @ [Yes] © [OK] @
To TRANSFERPHOTOSMARKED WiTH
TRANSFERORDERS
Connect the camcorder to the
computer and select [E * Photos with
Transfer Orders] in the transfer menu
(On88).
89
A
Additional Information
This chapter contains troubleshooting advice, screen messages,
handling and maintenance tips, and other information.
Menu items not available appear grayed out. For details about how to select an item,
refer to Using the Menus ([33 28). For details about each function, see the reference
page. Menu options without a reference page are explained below the tables.
FUNC. Menu - Recording Modes
Recording programs [ p Programmed AE], o
[ TM Shutter-Priority AE], [ AVAperture-Priority AE]
[ _ Cine Mode] o
[_ Portrait], [_ Sports], [J_ Night], [_ Snow], o
[._._Beach], [_ Sunset], [_ Spotlight], ['_.I_"Fireworks]
Light metering mode [mEvaloative],
[E]Center-Weighted Average], [E] Spot]
White balance [A_/BAotomatie], [_ Daylight], [-_ Shade], [4 Cloudy], ÷
[_Tungsten], [_ Fluorescent], [_Fluorescent HI,
[_ Custom WB]
Image effects [ _ mmageEffect Off], [ 4_v Vivid], [ _N Neutral], ®
[ 4_s _ow Sharpening], [ _o Soft Skil Detail],
[ _c Custom Effect]
Digital effects [_d_ Digital Effect Off], [ [_) Fade Trigger], [1_ Wipe[ ®
[_ B&W], [_ Sepia], [[_] Art]
[_€_ Digital Effect Off], [D[l B&W], [_ Sepia]
Drive mode [E3 Single], [_ Continuous Shooting],
: [ _ Hi-Speeo Continuous Shooting],
[_ Auto Exsosure Bracketing]
- 47
® 45
o 69
e 5o
e 51
52
o
o 67
9O
Recording mode [_lXP High Quality 24 Mbps], o 35
[FAP High Quality 17 Mbps],
[XP+ High Quality 12 Mbps],
[SP Standard Ptay 7 Mbps],
[LP Long May 5 Mbps]
', Simultaneous recording [_t Simuffaneous Recording Off], [LW 1920x!08% e - 68
[SW 848x480]
[_ Super Fine], [_ Fine], [_ Normal]
Photo size/quality [LW 1920xt080], [L 2048×1536], [M !440x1080], ÷ 62
.....iS 640x480] .....................................................................
[_ Super Fine], [A Fine], [_ Normal]
FUNC.Menu - Playback Modes
[Select] [Individual Scenes], [Remove All Selections} • - 43
From the index screen: - o
[Individual Photos], [Remove All Selections}
[Copy ( _ _ I_:I)] Odginal movies: e - 60
JAIlScenes], JAIl Scenes (this date)], [This Scene],
P!ayIist: [No}, [Yes]......... ..............
From the index screen: - ® 70
JAil Photos], [This Photo], [Selected Photos]
From single photo view: [No], [Yes]
1
[DMde] I - o - 57
[Move}2 - • - 59
[Protect] From single photo view: - - o 70
From the index screen:
[Individual Photos], [Selected Photos], [Remove All}
[Print Orders] From single photo view: 0-99 copies
91
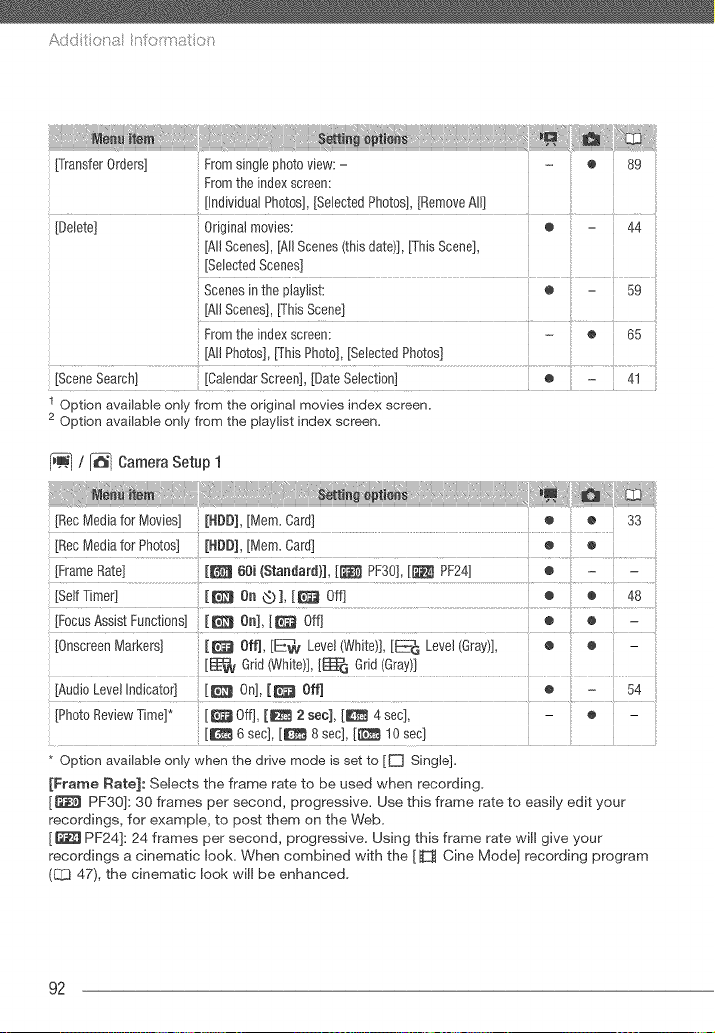
A
[Transfer Orders] From single photo view: - - e 89
From the index screen:
[individual photos[, [Selected Photos[, [Remove All] ....
[Delete] Original movies: ® 44
[All Scenes], [All Scenes (this date]], [This Scene],
[Selected Scenes]
Scenes in the playlist: • 59
[AI] Scenes], [This Scene]
From the index screen: - • 65
[All Photos], [This Photo], [Selected Photos]
[Scene Search] [Calendar Screen], [Date Selection] e 41
1 Option available only from the original movies index screen.
2 Option available only from the playlist index screen.
/ _ Camera Setup 1
[Rec Media for Movies] [HDD], [Mem. Card] ÷ o 33
[Rec Media for Photos] [NDD], [Mem. Card] ® o
[%!!T!mer! .....[_ O.®1_[_ O_f! * .............._..................
[Focus Assist Functions] [_ Oa],[_ Off]
[Audio Level Indicator] [_ On], [_ Off]
[Photo Review Time]* [_ Off], [_ 2 see], [_ 4 sec], - o
[_ 6 sec], [_ 8 sec], [_ 10 sec]
• Option available only when the drive mode is set to [D Single].
[Frame Rate]: Selects the frame rate to be used when recording.
[_ PF30]: 30 frames per second, progressive. Use this frame rate to easily edit your
recordings, for example, to post them on the Web.
[_ PF24]: 24 frames per second, progressive. Using this frame rate will give your
recordings a cinematic look. When combined with the [ _ Cine Mode] recording program
(Q3 47), the cinematic look will be enhanced.
92
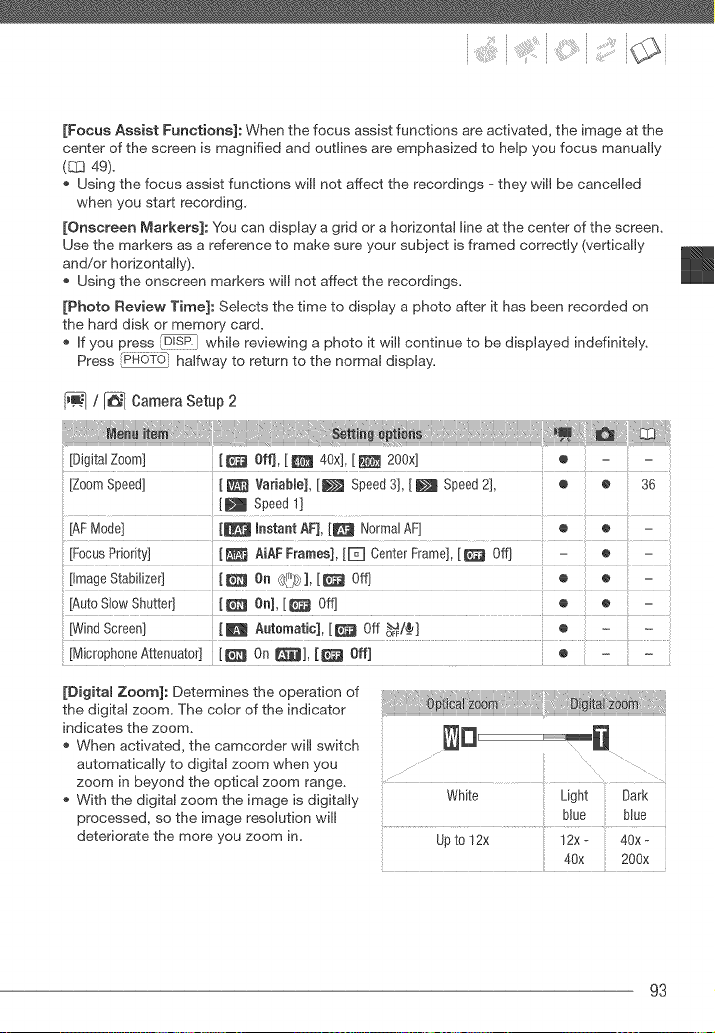
[Focus Assist Functions]: When the focus assist functions are activated, the image at the
center of the screen is magnified and outlines are emphasized to help you focus manually
(CCJ49).
Using the focus assist functions will not affect the recordings - they will be cancelled
when you start recording,
[Onscreen Markers]: You can display a grid or a horizontal line at the center of the screen,
Use the markers as a reference to make sure your subject is framed correctly (vertically
and/or horizontally).
Using the onscreen markers will not affect the recordings,
[Photo Review Time]: Selects the time to display a photo after it has been recorded on
the hard disk or memory card.
If you press _LB]sPIIwhile reviewing a photo it will continue to be displayed indefinitely,
Press [PHo?O_ halfway to return to the normal display,
/ _ Camera Setup 2
[Digital Zoom] [ _ Off], [ _ 40x], [ _ 200x]
[Z00m Speed] _ VariabBe], [_ Speed 3], [ _ Speed 2], o o 36
[AutoSlowShutter] [_ On],[_ Off] ® o : -
[DigitaU Zoom]: Determines the operation of
the digital zoom, The color of the indicator
indicates the zoom,
When activated, the camcorder will switch
automatically to digital zoom when you
zoom in beyond the optical zoom range,
With the digital zoom the image is digitally
processed, so the image resolution will
deteriorate the more you zoom in,
White Light Dark
blue blue
Upto 12x 12x- 40x-
40x 200×
93

Add t t:t a n oitrat t:_
[AF Mode]: Select how fast the autofocus will operate,
With [ _ instant AF] the autofocus adjusts quickly to a new subject, This is convenient
for example when changing the focus from a near subject to a far subject in the
background, or when recording fast-moving subjects,
When the opdonal Wide-converter or Tele-converter is attached to the camcorder, it may
partially obstruct the instant AF sensor. Set the AF mode to [_ Normal AF],
[Focus Priority]: When the focus priority is activated, the camcorder records a photo only
after the focus has been adjusted automatically, You can also select which AF frames to
use.
[_ AiAF Frames]: One or more AF frames out of the nine frames available are
automatically selected and the focus is fixed on them.
[r_ Center Frame]: A single focusing frame appears in the center of the screen and the
focus is automatically fixed on it,
[_ Off]: No AF frame will appear and the photo will be recorded immediately after you
press [PRO_d},
When the recording mode is set to [.'_ Fireworks], focus priority is automatically set to
[_ Off],
[Image Stabilizer]: The image stabilizer compensates for camcorder shake even at full
telephoto,
The image stabilizer is designed to compensate for a normal degree of camcorder
shake,
* We recommend setting the image stabilizer to [ _ Off] when using a tripod,
[Auto Smow Shutter]: The camcorder
automatically uses slow shutter speeds to
obtain brighter recordings in places with
insufficient lighting.
The setting will not change even if with [_ PF24] frame rate
you set the camcorder to
mode, ....... :: Asi0wa iii
. in mode, set the flash modeto @
(flash off),
If a trailing afterimage appears, set the slow shutter to [ _ Off],
If _ (camcorder shake warning) appears, we recommend stabilizing the camcorder, for
example, by mounting it on a tripod,
[Wind Screen]: The camcorder automatically reduces the background sound of wind
when recording outdoors.
Some low-frequency sounds will be suppressed along with the sound of wind, When
recording in surroundings unaffected by wind or if you want to record low-frequency
sounds, we recommend setting the wind screen to [_ Off OF_/_],
94
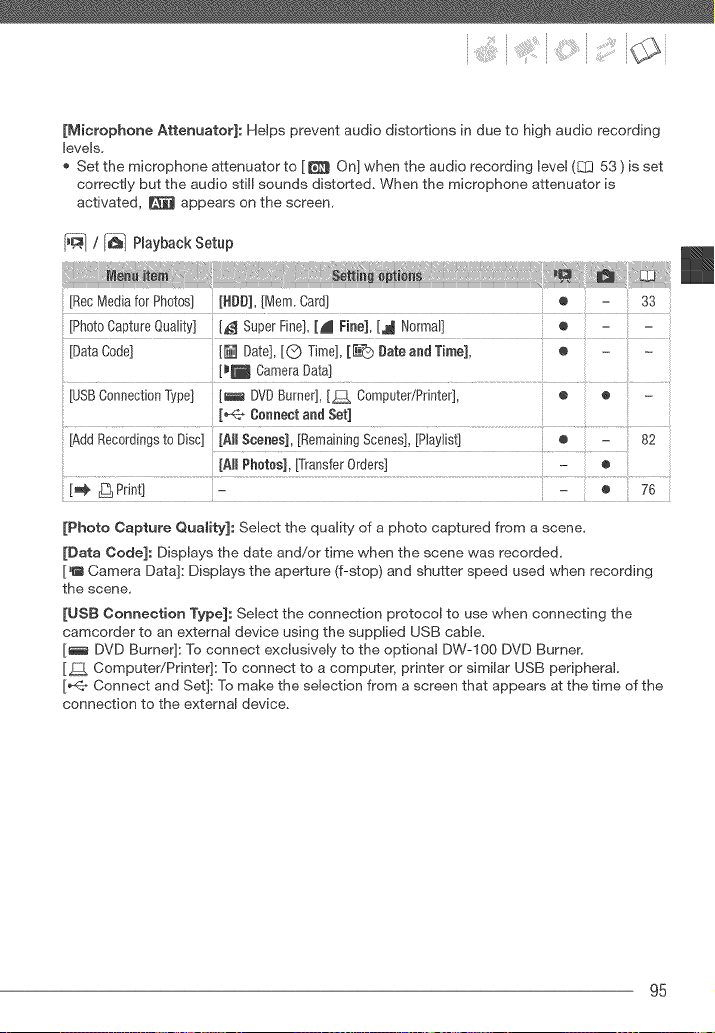
[Microphone Attenuator]: Helps prevent audio distortions in due to high audio recording
levels,
Set the microphone attenuator to [ _ On] when the audio recording level (E]_353 ) is set
correctly but the audio still sounds distorted, When the microphone attenuator is
activated, _ appears on the screen,
[__,_/ [_q Playback Setup
[Photo Capture Quality] [_ Super Fine], [_ Fine], [_ Normal] o
[Data Code] [_ Date], [Q Time], [_ #ate and Time], e .........
[_ Camera Data]
USBConnection Type] [_ DVDBurner], [_ Computer/Printer], • ® -
[_ Cennent and Set]
[Add Recordings to Disc] [Al_ Scenes], [Remaining Scenes], [Playlist] • - 82
....... }................
[AJl Phetee], [Transfer Orders] - ®
[_ _ Print] - - • 76
[Photo Capture Quality]: Select the quality of a photo captured from a scene,
[Data Code]: Displays the date and/or time when the scene was recorded,
['B Camera Data]: Displays the aperture (f-stop] and shutter speed used when recording
the scene,
[USB Connection Type]: Select the connection protocol to use when connecting the
camcorder to an external device using the supplied USB cable,
[_ DVD Burner]: To connect exclusively to the optional DW-IO0 DVD Burner,
[_ Computer/Printer]: To connect to a computer, printer or similar USB peripheral,
[_<_ Connect and Set]: To make the selection from a screen that appears at the time of the
connection to the external device,
95
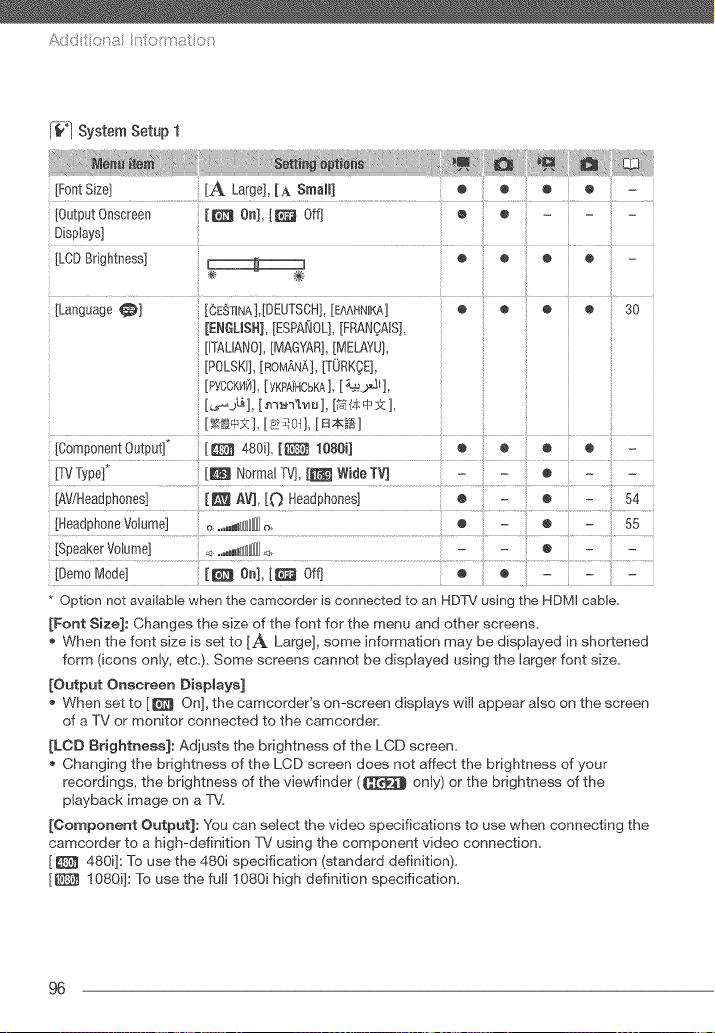
A
_-fr'l System Setup 1
[Font Size] [A Large], [A Small]
[LCD Brightness] _ o • o • -
[Language _] [_E_]INA],[DEUTSCH], [E&AHNIKA] @ O @ O 30
[ENGUS%[ESPA_Oq,[FRANOAIS],
[ITALIANO],[MAGYAR],[MELAYU],
[POLSKI], [ROMANA],[TORKOE],
[PYCCK_4_],[YKPA]HCBKA],[_._],
[Component Output]* [ [[_ 480i], [ _ 1080i]
[Speaker V01ume] <, ....mN_HHHHHH_<0
* Option not available when the camcorder is connected to an HDTV using the HDMI cable.
[Font Size]: Changes the size of the font for the menu and other screens,
When the font size is set to [_t_ Large], some information may be displayed in shortened
form (icons only, etc,), Some screens cannot be displayed using the larger font size,
[Output Onscreen Displays]
When set to [_ On], the camcorder's on-screen displays will appear also on the screen
of a TV or monitor connected to the camcorder.
[LOD Brightness]: Adjusts the brightness of the LCD screen,
Changing the brightness of the LCD screen does not affect the brightness of your
recordings, the brightness of the view'finder (C[_ only) or the brightness of the
playback image on a T_,L
[Oomponent Output]: You can select the video specifications to use when connecting the
camcorder to a high-definition TV using the component video connection,
[ _ 480i]: To use the 480i specification (standard definition),
[_ I080i]: To use the full I080i high definition specification,
96
[TV Type]: In order to display the picture in full and in the correct aspect ratio, select the
setting according to the type of television to which you will connect the camcorder.
[_ Normal TV]: TV sets with 4:3 aspect ratio.
[_ Wide TV]: TV sets with 16:9 aspect ratio.
When the TV type is set to [_ Normal TV], during the playback of video originally
recorded with an aspect ratio of 16:9, the picture will not be displayed full screen.
When the TV type is set to [_ Normal TV], photos cannot be captured from the
playback scene (C_ 69). Set it to [_ Wide TV] before capturing the photos.
[Speaker Volume]: Adjust (._) the volume of the playback. You can also adjust the
volume using the joystick guide (_ 39).
[Demo Mode]: The demonstration mode displays the camcorder's main features. It starts
automatically when the camcorder is powered with the compact power adapter if you
leave it turned on for more than 5 minutes.
To cancel the demo mode once it has started, press any button or turn off the
camcorder.
System Setup 2
NotificationSounds] p_))) High Volume],
i ¢ o
ii
® • - ii
[Quick Star[] [_ Off], [_ 10 rain], @ @
[_ 20 mini, [_ 30 mini
[Control for HDMI]_ [_ On], [_il_ Off] @ @ @ @ -
[Initialize [_]!r_7] [HDD], [Mem. Card], [Cancel] @ @ @2 @ 33
[Quick Initialization],
[Complete Initialization], [Cancel]
i _ ! ii
[Photo Numbering] [_ Reset], [_ Continuous] @ @ @ :: @ -
[Drop Sensor] [ _ On], [ [¢7J Off _ ] @ @ @ @ 8,
i
116
i
[Firmware] - - - - @ -
Option not available when the camcorder is connected to an HDTV using the HDMI cable.
Option available only from the original movies index screen.
97
Add t t:t a n oitrat t:_
[Wiremess Remote Oontrom]: Allows the camcorder to be operated with the wireless
controller.
[Notification Sounds]: A beep will accompany some operations like turning on the
camcorder, the self-timer countdown, etc.
[Power Saving Mode]: in order to save power when the camcorder is powered by a
battery pack, it will automatically shut off if left without any operation for 5 minutes.
Approximately 30 seconds before the camcorder shuts off, ]Auto power off'] will appear.
In standby mode, the camcorder will shut off after the time selected for the
[Quick Start] setting,
[Quick Start]: Select whether to activate the Quick Start function when you close the LCD
panel in a recording mode (E:]3 37) and the bngth of time after which the camcorder will
end the standby mode and shut off automatically.
[ControJ for RDMI]: Activates the HDMI-CEC (Consumer Electronics Control) function,
When you connect the camcorder to an HDTV compatible with HDMI-CEC using an HDMI
cable, you can control the camcorder's playback using the TV's remote control. Also,
turning on the camcorder will automatically turn on the TV and select the camcorder's
video input and turning off the TV will automatically turn off the camcorder.
Use the up/downileffirigM buttons and the OK or SET button on the T1i's remote control
to play back your recordings.
Depending on the TV set, additional settings may be required on the T1i itself to activate
the HDMI-CEC function. Refer to the T1i's instruction manual.
Correct operation of the HDMI-CEC function cannot be guaranteed even when
connecting the camcorder to compatible T1i sets, if you cannot use the T1i's remote
control, operate the camcorder directly or use the camcorder's wireless controller.
The remote control of the TV can only be used to play back movies or photos ( or
mode only), if the camcorder is connected to the TV while it is set to mode,
depending on the T1i used, turning off the T1i will automatically turn off the camcorder
even if it is recording at the time.
[Photo Numbering]: Select the photo numbering method to be used on a new memory
card. Photos are automatically assigned consecutive numbers from 0101 to 9900, and
stored in folders containing up to 100 photos, Folders are numbered from 101 to 998,
[_ Reset]: Photo numbers will restart from 101-0101 every time you insert a new memory
card.
[_Continuous]: Photo numbers will continue from the number following that of the last
photo recorded with the camcorder.
if the memory card you insert already contains a photo with a larger number, a new
photo will be assigned a number one higher than that of the last photo on the memory
card,
We recommend using the [_ Continuous] setting,
98
[Drop Sensor]: Detects when the camcorder is dropped and activates a protection
mechanism to help prevent hard disk damage. While the mechanism is active, _ appears
in red on the screen and playback/recording may stop.
Keep the drop sensor set to [_ On] in most situations. Deactivating this function can
increase the likelihood of hard disk damage should the camcorder be dropped.
When the drop sensor is set to [_[_ On], recording/playback may stop when the
camcorder approaches a weightless state, which the sensor can detect as a fall or drop.
To record under such situations, set the drop sensor to [_ Off l'_ ].
[Firmware]: You can verify the current version of the camcorder's firmware. This menu
option is usually unavailable.
[-@1 Date/Time Setup
Time Z0ne/DST] List of world time zones. ® • ® ® 31
[Date/Time) o e ® • 30
[Date Format) [Y.M.D (2008.t.1 AM 12:00)], • e ® o -
[M.D,Y (Jan. 1,2008 12:00 A_)],
Calendar Start Day] [Saturday), [Sunday), [Menday] - - • - -
[Date Format]: Select the date format to be used for most on-screen displays, and (if
selected) for the date printed on photos.
[Calendar Start Day]: Select the day on which the week starts for the calendar display
(L02! 41).
[_ Information Screens
[HDDInfo] - o e o • -
............................................................................................................................ ................
[HOD InfoJ/[Memory Card lnfo]: Displays a screen where you can verify how much of the
hard disk or the memory card is currently in use (_ total recording time and _ total
number of photos) and how much space remains available for recording.
Estimated figures about available movie recording time and available number of photos
are approximate and based on the recording mode and photo quality/size settings
currently in use.
In the [Memory Card Info] screen you can verify also the Speed Class of the memory
card.
99

Add t t:t a n oitrat t:_
[Battery Info]: Displays s screen where you can verify the battery charge (as a percentage}
and the remaining recording time ( , mode) or playback time ( ,
mode).
[HDMI Status]: Displays a screen where you can verify the standard of the video output
signal from the klDMI OUT terminal,
100
If you have a problem with your camcorder, refer to this section. Sometimes what you
think is a malfunction of the camcorder may have the simplest of solutions - please
read the "CHECK THIS FIRST" box before going on to the more detailed problems
and solutions. Consult your dealer or a Canon Service Center if the problem persists.
CHECK THIS FIRST
Power supply
Is the battery charged? Is the compact power adapter correctly connected to the
camcorder? (_ 23)
Recording
Did you turn the camcorder on and set the mode dial to %m or _ ? If you are recording
on a memory card, is one correctly inserted into the camcorder? ([_ 32)
Playback
Did you turn the camcorder on and set the mode dial to _ or a? If you are playing
back recordings from a memory card, is one correctly inserted into the camcorder?
(_ 32} Does it contain any recordings?
Power source
The camcorder will notturn on or it turns off by itself.
- The battery pack is exhausted.Replaceor chargethe battery pack ([_[_ 23).
- Removethe battery pack and reattach it correctly.
Cannot charge the battery pack.
- Make surethe camcorder is off so charging can start.
- The battery pack is too hot. Charging will start once the battery packtemperature is below 40 °C (104 °F}.
- Chargethe battery pack in temperaturesbetween O°C and 40 °C (32 °F and 104 °F).
- The battery pack is damaged.Use adifferent battery pack.
A noise can be heardfrom the compact power adapter,
- A faint soundcan be heard while the compact power adapter is connectedto a power outlet.This is not a
malfunction.
After using the camcorder for a long time, it becomes hot.
- This is not a malfunction.Turn off the camcorder and let it cool down before resuming use.
The battery pack is exhausted extremely quickly even at normal temperatures.
- The battery may havereached the end of its battery life. Buya new battery pack.
101
Add t t:t a n oitrat t:_
Recording
Pressing {_}_] will not start recording.
- Youcannot record while the camcorderis writing previousrecordings on the hard disk/memory card (while
the ACCESSindicator is on or flashing).
- The recording media isfutl or it alreadycontains the maximum number of scenes. Delete some recordings
([:Z344, 65) or initialize the recording media (CI3 33) to free somespace.
- Recording maynot be possibb whib the drop protection mechanism(_ 99)is active (_ appears).
- The camcorder has exceededits operationaltemperature ([_] appears). Turn off the camcorderand bt it cool
down before resuminguse.
- The camcorder has fallen below its operationaltemperature ( _ appears).Turn it off and use it in awarmer
location.Make sure to avoid rapid temperaturechanges.
The point where _?__} was pressed does not match the beginning/end of the recording.
- There is a slight interval between pressing [_a_Zd}_p]and the actual start of recording. Thisis not a
malfunction.
The recording suddenly stops shortly after starting recording.
- If recording near loud soundsor strong vibrations, move to another location.
- The camcorder has exceededits operationaltemperature (_ appears}. Turn off the camcorderand bt it cool
down before resuminguse.
The camcorder will not focus.
- Autofocus does not work on the subiect. Focusmanually (C[_ 49).
- _ Adiusttheviewfinderwiththedioptricadiustmentlever(E:D 35).
- The lens or InstantAF sensoris dirty. Cleanthe lens or sensorwith a soft lens-cleaning cloth (_ 120). Never
usetissue paper to clean the bns.
When a subject firs across in front of the lens, the image appears slightly bent.
- This is a phenomenonbjpical of CMOSimage sensors. Whena subject crossesvery quickly in front of the
camcorder,the image mayseem slightly warped. Thisis not a malfunction.
Changing the operating mode between recording (0)/record pause (0 | |}/playback (_,_)takes longer than
usual.
- When the mediacontains a large number of scenes, some operations may take longerthan usual Backup
your recordings(E:_382) and initialize the recording media(QZJ33).
Reviewing the last scene recorded takes longer than usual.
- When the mediacontains a large number of scenes, some operations may take longerthan usual Backup
your record{ngs(E:_} 82) and initialize the recording media(_ 33).
Cannot record a photo.
- In mode:Youcannot take photos in this mode if the simultaneous recordingoption in the FUNC.menu
isset to [SimultaneousRecording Off] (_ 68), or if either the digital zoom ((.._:193) or a digital effect
(C1:352) is activated.
102
PLayback
Pressingthe p{ayback button does not start playback.
- The camcorderhas exceededits operational temperature (_ appears).Turn off the camcorderand let it cool
down before resuming use.
- The camcorderhas fallen below its operationaltemperature ( [] appears).Turn it off and use it in a warmer
location. Makesure to avoid rapid temperature changes.
Cannot add scenes to the playlist,
- Youcannot add more than 999 scenesto the playlist. If the playlist includes scenes recordedin NIXPor F×P
mode,the maximum numberof scenes in the playlist may beless than ggg_
- Youmaynot be ableto add scenes to the playlist if they were recorded or editedusing another device.
Cannot delete a scene.
- Youmaynot be ableto deletescenes recorded or edited using anotherdevice.
Deleting scenes takes longer than usual,
- Whenthe mediacontains a large number of scenes, some operations may take longer than usual. Back up
your recordings (LZ3 82) and initializethe recording media (C[_ 33).
Cannot delete a photo,
- The photo is protected. Removethe protection (l_ 70).
indicatorsand Onscreen DispLays
lights up in red.
- Batten/pack is exhausted.Replaceor chargethe battery pack (_ 23).
appears on the screen.
- The camcordercannot communicate with the battery pack attached so the remaining batterytime cannot be
displayed.
lights up in red.
- A memory card error occurred. Turnoff the camcorder. Removeand reinsert the memory card. Initializethe
memory card (1_ 33} if the display does not changeback to normal.
- The memorycard is full Replacethe memorycard or deletesome recordings([_[_ 44, 65)to free somespace
on the memorycard.
[:_] lights up in red.
- The camcorderhas exceeded its operational temperature. This is not a malfunction. Turnoff the camcorder
and let it cool down before resuming use.
'_ flashes in red on the screen.
- The camcorderhas malfuncfloned. Consulta CanonService Center.
Evenafter stopping recording, the ACCESSindicator does not go off.
- The scene is being recordedon the hard disk/memory card. This is not a malfunction.
The camcorder ison and the ACCESSindictor has been on or flashing longer than usual.
- This is not a malfunction.The camcorder may be recovering data onthe hard disk. Do notdisconnect the
powersource orturn oft the camcorder.
103

Add t t:t a n oitrat t:_
The CHG(charge) indicator flashes rapidly;
- _ (one flash at 0.5-second intervals)
Charginghasstopped becausethe compact poweradapter or the battery pack isfaulty. Consult aCanon
Service Center.
The CHG(charge) indicator flashes very slowly.
- [ ;< ;< I (one flash at 2-second intewals)
The battery pack is too hot. Charging will start once the battery packtemperature is below 40 °C(104 °F).
- Chargethe batterypack in temperaturesbetween 0 °C and 40 °C (32 °F and 104 °F).
- The battery pack is damaged.Usea different batten/pack.
The CHG(charge) indicator does not turn on even though a battery pack isattached,
- The camcorder cannot communicate with the battery pack attached.Such battery packs cannot be charged
usingthis camcorder.
I_cture and Seund
Screen displays turn on and off repeatadly.
- The battery pack is exhausted.Replaceor charge the battery pack ([]_] 23).
- Removethe battery pack and reattach it correctly.
Abnormal characters appear on the screen and the camcorder does net operate properly,
- Disconnectthe power sourceand reconnect it after ashort time. If the problemstill persists, disconnectthe
powersource and pressthe RESETbutton with a pointed item. Pressingthe RESETbutton resetsall settings.
Video noise appears on screen,
- Keepa distance betweenthe camcorderand devices that emit strong electromagneticfields (plasma TVs,
cellular phones, etc.).
Horizontal bands appear on the screen,
- This is a phenomenontypical of CMOSimage sensors when recording under sametypes of fluorescent,
mercury or sodium lamps. To reduce the symptomsset the camcorderto _ mode. This is not a
malfunction.
No picture appears on the viewfinder.
- Press to activate the viewfinder (E_ 35).
Viewfinder picture is blurre&
- Adjust the viewfinder with the dioptric adjustment lever (L.q_35).
Sound is distorted or is recorded at lower bvets.
- When recording near loud sounds (such asfireworks, shows or concerts),sound may becomedistorted or it
maynot be recorded at the actual levels.Activate the microphoneattenuator (C[3 95) or adjust the audio
recording level manually(C[_ 53).
Noise can be heard.
- if the camcorder is moved suddenly while recording, sound from the hard disk may be recorded.
The hard disk's rotation can be heard faintty.
Occasionally, the camcorder's operation sound can be heard.
- When recording onto the hard disk or playing back recordingsfrom it, the hard disk is activated from time to
time. This is not a malfunction.
104
The picture is displayed correctly but there is no sound from the built-in speaker.
- Openthe LCOpanel
- Speakervolume is turned off. Adjust the volume(_ 39).
- If the STV-250NStereo VideoCableis connectedto the camcorder, disconnect it.
A rattling can be heard from the camcorder.
- The internal lens fixture can movewhen the camcorder is turned off. This is not a malfunction.
The camcorder vibrates.
- Whenrecording onto the hard disk or playing back recordingsfrom it, the camcordermayvibrate
occasionally.This is not a malfunction.
Memory Card and Accessories
Cannot insert the memory card.
- The memory card was not facing the correct direction.Turn the memory card overand insert it (E_ 32).
Cannot record on the memory card.
- The memory card is full Deletesome recordings (_ 44, 65) to free some space or replacethe memory
card.
- Initializethe memorycard (E_[_33) when you useit with the camcerderfor the first time.
- The LOCKswitch on an SDor SDHCmemory card is set to prevent accidental erasure. Changethe positionof
the LOCKswitch (E_[_119).
- The folder and file numbers have reachedtheir maximum value. Set _ _) [PhotoNumbering] to [Reset)
(E_[_98) and insert a new memory card.
- The simultaneousrecording option in the FUNC.menu is set to [SimultaneousRecording Off]. Changethe
setting to take photos while recording video (_ 68).
- Photoscannot be capturedfrom the playback scenewhen [_ C) [TV Type)is set to [Normal TVJ.In such
case,_ appears. Set it to [WideTVJ(_ 97).
The wireless controller will not work.
- Set _ C_ [WirelessRemoteContrsl] to IOn].
- Replacethe battery of the wireless controller.
Connections with E×ternal Devices
Video noise appears on the TVscreen,
- Whenusing thecamcorder in a room where aTV is located, keep a distance between the compact power
adapterand the power or antennacables of the TV.
Playback looks fine on the camcorder but there is no image on the TVscreen.
- The video input on the TVis not set to thevideo terminal to which you connected the camcorder.Select the
correctvideo input.
There is no sound from the TV.
- Whenconnecting the camcorder to an HDTVusing the CTC-tO0/SComponentCable,make sure to connect
also the audio connectionsusing the white and red plugsof the STV-250NStereoVideo Cable.
105
Add t tit a n oitrat tt_
The camcorder is connected using the optional BTCqO0 HDMICable, but there is no picture or soundfrom the
HDTV.
- Disconnectthe BTCdO0 HDMICableand then restorethe connection or turn the camcorder off and then on
again.
The camcorder is connected using the optional BTC-IO0 HDMICable,but HDIVlI-CECdoes not work (cannot
play back using the TV's remote control),
- Disconnectthe BTCqO0 SDMIcable and turn off the camcorderand the TV.After a shod while turn them on
again and restorethe connection.
- If_i (_) [Control for SDMI]is set to [Oft]. Set it to [On](_ 98}.
- HDMPCECis not activated on the connectedTV.Activate this function on the TV.
- Evenwith TVsets compatible with SDMPCECthe range of functions availabb differs dependingon the typeof
TV.Referto the instruction manualof the connectedXI.
The computer doesn't recognize the camcorder even though the camcorder is connected correctly,.
- r_l or _ (}?_[uss connection Type] is set to [DVDBurner]. Set it to [Computer/Printer]or to [Connect and
Set](_ 95).
- Disconnectthe USBcable and torn off the camcorder.Affer asho_twhile, torn it on again and restore the
connection.
- Connectthe camcorderto a different USSport onthe computer.
The printer is not working even though the camcorder and printer ate connected correctly,
- r_ or E1 C) [uss connection Type] is set to [DVDBurner].Set it to [Computer/Printer]or to [Connect and
Set](_ 9S).
- Disconnectthe USBcable and turn off the printer. After a shortwhile turn it on again and restore the
connection.
The camcorder doesn't recognize the DW-IO0 DVDBurner even though it is connected correctly;
- r_ or [_ (_ [uss connection Type] is set to [Computer/Printer].Set it to [DVDBurner] orto [Connect and
Set](_ 95).
106
ListofMessages(inalphabeticalorder)
Following the list of messages for the camcorder you can find separate lists for print-
related messages (_ 113) and for messages that appear only when using the
optional DW-IO0 DVD Burner (L[3 1 12).
AcceSS error
- Therewas an error when reading the hard disk orattempting to write onto it.
- This messagecan also appear if condensationhas formed ({--[3 t 2t}. Wait until the camcorder dries
completely before resuming use.
Accessing the memory card. Do not remove the memory card,
- Youopened the memory card slot cover while the camcorder was accessing the memory cardor the
camcorderstarted accessing the memorycard as you openedthe memory card slot cover.Do notremove the
memory card until this message disappears.
Avoid moving the camcorder
- Trynot to movethe camcorder while the image is being recorded.
Backup recordings regularly
- This messagemay appearwhen youturn onthe camcorder, in the eventof a malfunction, recordings may be
lostso back up your recordings regularly.
Buffer overflow, Recording was stopped.
- While recordingon the hard disk, drops were detected repeatedlyand the buffer becamefull. Move to a more
stable location and allow data to be written ontothe hard disk. Ifyou are using the camcorder in such a
situationthat vibrations or drop-like conditions (for example,weightlessness)are likely to occur, set
[-_1 0 [DropSensor]to [Off _F] (_ 99).
- The data transfer ratewas too highfor the memory card in use and the recording was stopped. Replacethe
memory card with one rated Speed Class2 or higher.
Cannot access the HDD
= Thereis a problem with the hard disk.
Cannot communicate with the battery pack. Continue using this battery pack?
= Youattached a battery pack that is not recommendedby Canonfor use with this camcorder.
Cannot copy
= Thetotal size of the scenes you selectedto copy exceedsthe available space onthe memorycard. Delete
somerecordings onthe memorycard (_ 44, 65} or reducethe number of scenes to copy (_ 60}.
Cannot divide the scene. Initialize only using the camcorder.
- The scene could not be divided becausethe camcorder'sinternal scene managementdata log is full. Back up
your recordings (IZ_I 82} and initializethe recording media ([]_ 33}. Write backthe backup flies and try
dividingthe scene again.
Cannot edit
- Cannotdivide original scenesand cannot move/deleteoriginal scenesor scenes in the playlistof the selected
media.
107
Add t tit a n oitrat tt_
Cannot edit Check the memory card
- The memory card in the camcorderwas initialized usinga computer.Initialize the memory card with this
csmcorder (L_ 33).
Cannot enter standby mode now
- The camcorder cannot enter standby mode if the remaining battery charge is too low.
Cannot play back
- There is a problem with the hard disk/memory card,
Cannot play back due to high temperature
- The camcorder has exceededits operationaltemperature (_ appears), Turn off the camcorderand bt it cool
down before resuminguse,
Cannot play back Cannotaccess the HDD
- There is a problem with the hard disk.
Cannot play back Check the memory card
- There is a problem with the memory card,
Cannot play the movies on the HDD Initialize only using the camcorder
- The camcorder's hard disk was initialized using a computer,Initialize the hard disk with this camcorder
(E_ 33),
Cannot play the roovbs on this memory card
- Movies cannot be playedback from a 64 MB or smaller memory card,
Cannot play the movies on this memory card Initialize only using the carocorder
- The memory card in the camcorderwas initialized usinga computer.Initialize the memory card with this
csmcorder (_ 33).
Cannot read the HDD
- The hard disk could not be read.
- This message can also appear it condensationhasformed ([:[3 121).Wait until the csmcorder dries
completelybefore resuming use,
- This message can abe appear if the camcorder hasexceeded its operationaltemperature (_ appears), Turn
off the csmcorder and let it cool down before resuming use,
Cannot record
- There is a problem with the recording media,
- This message can also appear it condensationhasformed (E_ 121).Wait until the csmcorder dries
completelybefore resuming use,
Cannot record due to high temperature
- The camcorder has exceededits operationaltemperature. Disconnectthe compact power adapterand
removethe battery pack.Let the camcorder cool down before resuming use.
Cannot record roovies in MXP/FXPmode on this meroory card
- Movies cannot be recordedin MXPor FXPmode on a memory card if it is rated SpeedClass2. Selects
different recording mode (E_ 35) or replacethe memory card with one rated SpeedClass 4 or higher.
Cannot record roovies on the HDD (Initialize only usingthe carocorder)
- The camcorder's hard disk was initialized using a computer,Initialize the hard disk with this camcorder
(_ 33),
108
Cannot record movies on this memory card
- Movies cannot be recordedon a 64 MB or smallermemory card.
Cannot record movies on this memory card Initialize only using the camcorder
- The memory card in the camcorder was initialized usinga computer. Initializethe memory card with this
camcorder(_ 33).
Cannot record Cannotaccess the HDD
- Thereis a problem with the hard disk.
Cannot record Check the memory card
- Thereis a problem with the memorycard.
Change the battery pack
- Battery pack is exhausted.Replaceor charge the battery pack (_ 23).
Check the memory card
- Caneot accessthe memory card. Checkthe memory card and makesure it is inserted correctly ([1_ 32).
- A memory card error occurred. The camcordercannot record or display the image.
- Youinserted a MultiMedia Card (MMC)into the camcorder. Replaceit with an SD/SDHCmemorycard
compatible for usewith this camcorder ([1_331).
- If after the message disappears, [_/appears in red, perform the following: Turn oft the camcorderand
remove and reinsert the memory card. If [_i turns backto green youcan resume recording/playback.
- Initializethe memorycard ([_ 33). (Doingso will erase all the recordingson the memorycard.)
Connect the compact power adapter
- Whenthe camcorderis in mode and is connectedto a computer, this message will appear if the
camcorderis being powered by the battery pack. Connect the compact power adapter to the camcorder.
Coutd not add the scene(s/to the playlist
- One or morescenes could notbe added to the playlist (l_ 58). Youcannot add more than 999 scenesto the
playlist. If the playlist includes scenes recordedin MXPor FXPmode, the maximum number of scenes in the
playlist maybe less than 999. Deletesomerecordings (_ 44, 65}.
Data iecludes scenes in MXP/F×Pmode. Cannot copy to this memory card.
- Movies recordedin M×Por F×Pmode cannot be copied onto a memory card if it is rated SpeedClass2.
Replacethe memory card with one rated SpeedClass4 or higher.
Data is protected
- Scenesedited or protected using another device cannot be deleted with this camcorder.
Donot disconnect the USBcable or the power source while the camcorder is connected to a computer.
Cannot turn off the camcorder or change the operating mode.
- Whenthe camcorderis in mode and is connectedto the computer with the supplied USBcable, the
camcordercannot be operated. Disconnectingthe USDcable or power source while this messageappears
mayresult in permanent lossof the recordings in the camcorder. Usethecomputer's Safely Remove
Hardwarefunction to end the connection and disconnectthe USB cable before using the camcorder.
Drop detected. Power was turned off.
- Whenthe camcorderis dropped while it is on, the camcorder automatically turns oft to protect the hard disk.
Thismessage appearsthe next time the camcorderis turned on. This is nota malfunction.
109
Add t tit a n oitrat tt_
Error writing on the memory card. Data may be recovered if the memory card has not been removed.
Atiempt recovering the data?
- This message wil! appear the next time youturn onthe camcorder if power supplywas accidentally
interruptedwhile the camcorderwas writing on the memorycard. Select [Yes]to try to recover therecordings.
if you removedthe memorycard and used it with another deviceafter this happened,we recommendyou
select [No].
File name error
- The folder and file numbers have reachedtheir maximum value. Set [-__,]C} [Photo Numbering]to [Reset]
([_ 98) and delete all the photoson the memory card ([_] 65[ or initialize it ([_3 33).
Function not available in _ mode
- Youpressed a button that cannot be used in _ mode (while the _ button's bluelight is on[. Press
the ! button to set the camcorderto flexible recording mode.
HDD error
- There is a problem with the hard disk. Initializethe hard disk (_ 33).
HDD is full
- The hard disk is full ("/_ END" appearson the screen[.Deletesome recordings (_ 44, 65) to free some
space.
Initialize only using the camcorder
- There is a problem with the fib system that preventsaccessing theselected media, initialize the recording
mediawith this camcorder(_ 33).
May not be possible to record movies on this memory card
- Youmay not be ableto record movies on a memory card without a Speed Class rating. Replacethe memory
card with one rated SpeedClass2 or higher.
Memory card cover is open
- After inserting a memorycard, close the memory card slot cover (@ 32).
Memory card is fuii
- The memory card is full. Deletesome recordings (8].3 44, 65) to free some space or replacethe memory
card.
Memory card is writeoprotected
- The LOCKswitch on an SD orSOHCmemory card is set to prevent accidental erasure.Changethe position of
the LOCKswitch (I]_I[]119).
Memory card Number of scenes already at maximum
- The memory cardalready containsthe maximum numberof scenes;no furtherscenes can be copiedonto the
memory card. Deletesome recordings (_ 44, 65) to free some space.
Memory card Unabb to recognize the data
- The memory card containsscenes recorded in a different television system (PALor SECAM).
Need to recover fibs from the memory card. Change the position of the LOCKswitch on the memory card.
- This message will appear the nexttime youturn onthe camcorder if power supplywas accidentally
interruptedwhile the camcorder was writing on the memory card and later the position of the card's LOCK
switch was changed to prevent erasure. Changethe position of the LOCKswitch (81]3119}.
110
Nomemory card
Thereis no memory card in the camcorder.
Nophotos
Thereare no photos to play back.
Noscenes
Thereare no scenes in the recording media selected.
Numberof scenes already at maximum
Themaximum numberof scenes hasbeen reached. Deletesome scenes([_[_ 44) to free some space.
Operation canceled
Theoperation was canceled following user intervention.
Haylist is fuR. Cannot divide the scene.
Scenescannot be divided when the playlist already contains999 scenes.Delete some scenesfrom the
playlist (L_[_59}.
Readingthe RDD
Readingdata from the hard disk.
Readingthe memory card
Readingdata from the memory card.
Scene recorded using another device. Cannotdivide the scene.
Scenesrecorded using another devicecannot be divided with this camcorder.
Some O_ photos could not be deleted
Protectedphotos ( 011 ) cannot be deleted.Remove the protection (_ 70).
Some scenes could not be deleted
Movies that were protected/edited with other devices cannot be deletedwith this camcorder.
Task in progress. Do not disconnect the power source.
Thecamcorder is updating the hard disk/memory card. Do notdisconnect the compact power adapteror
remove the battery pack.
Temperature too high. Turn off the camcorder and wait.
- The camcorderhas exceeded its operational temperature. Disconnectthe compact power adapter and
remove the battery pack. Let the camcordercool down before resuming use.
Temperaturetoo low. Keep the camcorder on and wait.
- The camcorder's temperatureis too low. Keep the power on until the [] icon disappears.
Temperaturetoo low. Usethe camcorder in a warmer location.
- Theoutsidetemperature is too low and the camcorder will not operate. Moveto a location between0 °C and
40 °C (32 °F and 104 °F).
The camcorder is set to photo mode
- Youpressed _r_J_:_ while recording photos ( mode).
The drop sensor isturned off
- The camcorderwas turned on while [-_i C} [Drop Sensor]is set to [Off t"_F],in such case, dropping the
camcordercan increasethe likelihood of hard disk damage.
111
Add t t:t a n oitrat t:_
The lees cover is not fully closed, Turn the camcorder off, thee on again.
- The bes cover did not closecompbtely when you set the csmcorder to a playback mode.Turn thecamcorder
off and then on again. If the problem persists, contact a CanonService Center.
The lees cover is not fully open. Turn the camcorder off, then on again.
= The lens coverdid not opencompletaly when youset the camcorderto a recording mode.Turn thecamcorder
off and then on again. If the problem persists, contact a CanonService Center.
This O_ photo could not be deleted
= Protectedphotos ( O_ ) cannot be deleted.Remove the protection([_.j 70).
This photo cannot be displayed
= Youmay not beable to display photostaken with other devicesor image flies created or edited ona computer.
Toomany photos. Disconnect the USBcable.
= Disconnectthe USBcable. Tryusing a memorycard readerordecreasethe number of photos on the memory
card (Windows:fewer than 1,800 photos,Macintosh: fewer than 1,000 photos), if a dialog box appearedon
the computer screen,close it and then reconnectthe USBcable.
_- Transfer order error
- Youattempted to set morethan 998 transfer orders. Reducethe eumber of photos marked with transfer
orders.
Ueabb to recognize the data
= Youtransferred data to the camcorder recorded in a different television system (PALor SECAM).
Unable to recover data
= Couldnot recover a corrupted file.
= This messagecae also appear if condensationhasformed ([_ 121).Wait until the camcorder dries
completelybefore resuming use.
Messages Related to the Optional DW=100 DVD Burner
If an error message appears while the camcorder is connected to the optional
DW=I OO DVD Burner, refer to the following section and also to the instruction manual
of the DVD Burner.
Caeeot read the disc. Check the disc.
- Duringdisc recording mode,this message can appearwhen a commercially available DVDdisc (a DVDdisc
containingmovies, software, etc.)or an 8 cm mini DVDdisc is inserted.
- Duringdisc playbackmode, this messagecan appear whena commercially available DVDdisc or abrand
eew DVDdisc is inserted.
Closethe memory card slot cover
- The memory card slot cover is open. Closethe cover after correctly inserting the memory card([_1_332).
Coeeect the compact power adapter
= The camcorderis being powered by the battery pack. Connectthe compact power adapter to the camcorder.
Disc access failure. Check the disc.
= There was an error whmr reading the disc or attemptieg to write onto it.
= This messagecae appear also if condensationhasformed ([_1 121).Wait until the DVDburnerdries
completelybefore resuming use.
112
- The disc may not be loaded correctly. Tryremoving the disc and reinserting it.
Errorreading the data
- Error while reading the recordings from the camcorder.
- Checkthat the USBcable was not accidentallydisconnected.
Nodisc
- Insert a disc into the DVDBurner.
- This messagecan appear also if condensationhas formed (83 t 21).Wait until the DVDburner dries
completely before resuming use.
Nophotos
- Thereare no photos to add to the disc.
Noscenes
Thereare no movies to add to the disc.
Noscenes left to add
Thereare no scenes that have not already beenadded to discs created previously.
Notransfer orders
No photoshave been marked with transfer orders ([:Z3 89).
Operation canceled
TheUSBcable was disconnectedand the operation was canceled. Checkthe USBconnection.
Readingthe disc
Readingdata from the disc.
Unable to recover data
Couldnot recover a corrupted file.
Direct Print Related Messages
Cannot print this photo
- Youattempted to print a photo that was recordedwith another camcorder, hasa different compression, or
was edited on a computer.
Cannot trim this photo
- Youattempted to trim a photo that was recordedwith another camcorder.
Check print settings
- Current print settings cannot be used for printing with the _ _ button.
Datatransfer error
- The printer is experiencinga data transfer error.Cancelprinting, disconnectthe USBcable and turn off the
printer.After a while, turn the printer back on and reconnect the USBcable. Whenyou are printing usingthe
_,, button, check the print settings.
- Youattempted to print from a memory card that contains a large numberof photos. Reducethe number of
photos.
File error
- Youattempted to print a photo that was recordedwith another camcorder, hasa different compression, or
was edited on a computer.
113
Add t t:t a n oitrat t:_
Hardware error
- Cancelprinting.Turn off the printer and turn it back on.Check the printer status. Ifthe printer is equippedwith
abattery, it might be exhausted.In such case,turn off the printer, replacethe battery and turn it back on.
incompatible paper size
- The paper settings of the camcorder conflict with the printer's settings.
ink absorber full
- Select[Continue]to resume printing. Consult a CanonService Center(refer to the list included with the
printer) to replacethe ink absorber.
Ink error
- There is a problem with the ink. Replace the ink cartridge.
Low ink level
- The ink cartridge needsto be replaced soon.Select [Continue]to restart printing.
No _ print orders have been set
- Nophotos havebeen marked with a print order.
No ink
- The ink cartridge is not insertedor is out of ink.
No paper
- Paperis not correctly insertedor there is no paper.
Paper error
- There is a problem with the paper. The paper is not correctly loadedor the paper size is wrong. Alternatively,
if the paper output tray is closed, open it to print.
Paper jam
- The paper jammed during printing. Select [Stop)to cancelprinting. After removing the paper,set somepaper
again and retry printing.
Paper lever error
- Paperlever error occurred.Adjust the paper sebction lever to the proper position.
X photos could not be printed
- Youattempted to use the print order settings to print X photosthat were recordedwith anothercamcorder,
with a different compression or were edited on a computer.
Print bead not installed
- Noprint head is installed in the printer or the print head is defective.
6$Print order error
- Youattempted to set morethan gg8 photos in the print order.
Printer cover open
- Closethe printer cover securely.
Printer error
- A malfunction has occurredthat may require repairs. (CanonPIXMAprinters: the printer's greenpower lamp
and orangeerror lamp flash alternately.)
- Disconnectthe USBcane and turn off the printer. Unplug the printer's power cord from the power outlet and
contactthe appropriate customersupport center or service center.
114
Printer in use
- The printer is in use. Checkthe printer status.
Printing error
- Cancelprinting, disconnectthe USBcable and turn off the printer.After awhile, turn the printer back on and
reconnectthe USBcable. Checkthe printer status.
- Whenyou are printing using the _ _ button, check the print settings.
Readjusttrim settings
- The trimming settings for this photo were lost as a result of changes in the paper-related settings.
About Canon PI×MA/SELPNY DSPrinters: if the printer's error indicator flashes or an error
message appears on the printer's operation panel, refer to the printer's instruction manual,
if you cannot solve the problem even after consulting this list and the printer's instruction
manual, contact the closest Canon Service Center (refer to the list included with the
printer),
115
Camcorder
Make sure to observe the following
precautions to ensure maximum
pedormance. Make sure to also observe
the precautions pertaining to the hard
disk, as hard disk damage may result in
permanent data loss.
Back up your recordings
periodically. Make sure to transfer
your recordings to an external device
such as a computer or digital video
recorder (_ 82) and back them up
on a regular basis and especially after
making important recordings. This will
protect your important recordings in
case of damage and create more free
space on the hard disk or memory
card. Canon shall not be liable for any
data loss.
Do not subject the camcorder to
vibrations or strong impacts. The
hard disk is a high-precision device.
Vibrations, strong impacts or
dropping the camcorder may result in
the hard disk not being recognized or
may cause recording!playback to
stop unexpectedly. Be especially
careful while the ACCESS indicator is
on or flashing. Avoid recording in very
loud places. When using a shoulder
strap, do not allow the camcorder to
swing and hit an object.
Keep the drop sensor activated
whenever possibleo This camcorder
is equipped with a sensor that
detects acceleration. Should the
camcorder be dropped or subject to a
similar condition, a mechanism
designed to help prevent hard disk
damage will activate and recording!
playback may stop or the camcorder
may turn off. Deactivating this
function ([_ 99) can increase the
likelihood of hard disk damage should
the camcorder be subject to such
conditions. Even if this function is set
to [_ On], hard disk damage can
occur if the camcorder is dropped.
Do not use the camcorder in very
loud placeso When using the
camcorder in extremely loud
surroundings, recording!playback
may stop unexpectedly. In such case,
you can continue recording on the
memory card.
Do not disconnect the power
source while the camcorder is on.
Always turn the camcorder off before
removing the battery pack or
compact power adapter.
Do not turn off the camcorder while
the ACCESS indicator is on or
flashing or while the camcorder is
in standby mode. While data is being
written onto the hard disk,
disconnecting the power source or
turning off the camcorder may result
in hard disk damage or permanent
data loss.
116
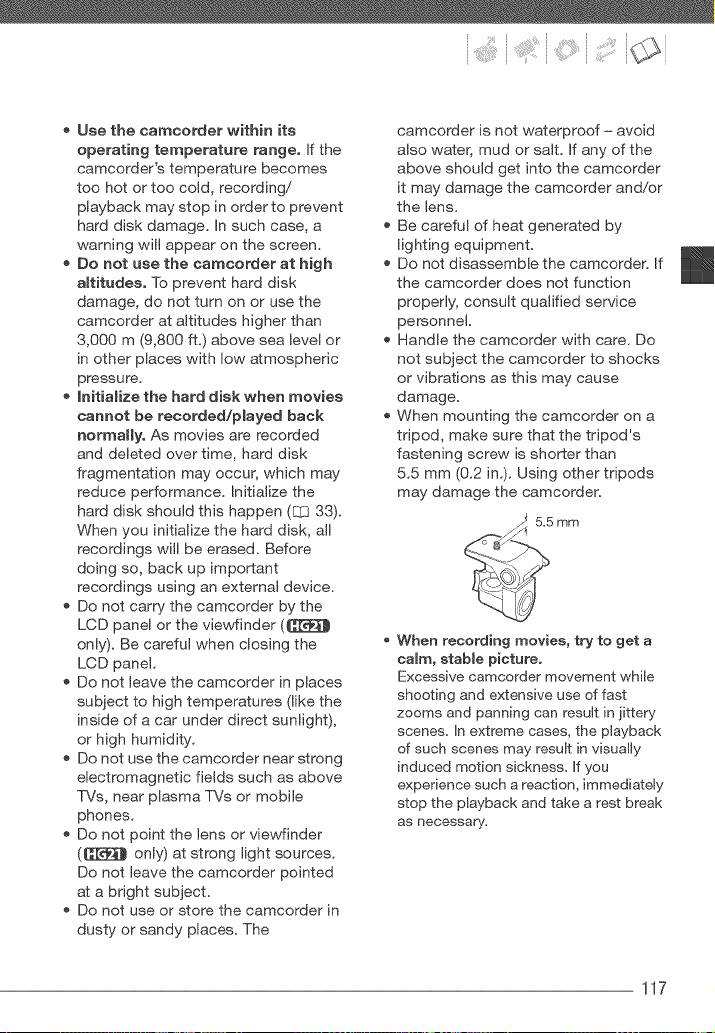
Use the camcorder within its
operating temperature range. If the
camcorder's temperature becomes
too hot or too cold, recording!
playback may stop in order to prevent
hard disk damage. In such case, a
warning will appear on the screen.
Do not use the camcorder at high
altitudes. To prevent hard disk
damage, do not turn on or use the
camcorder at altitudes higher than
3,000 m (9,800 ft.) above sea level or
in other places with low atmospheric
pressure.
Initialize the hard disk when movies
cannot be recorded/played back
normaHyo As movies are recorded
and deleted over time, hard disk
fragmentation may occur, which may
reduce performance. Initialize the
hard disk should this happen (_ 33).
When you initialize the hard disk, all
recordings will be erased. Before
doing so, back up important
recordings using an external device.
Do not carry the camcorder by the
LCD panel or the viewfinder (C[_
only/). Be careful when closing the
LCD panel.
Do not leave the camcorder in places
subject to high temperatures (like the
inside of a car under direct sunlight),
or high humidity.
Do not use the camcorder near strong
electromagnetic fields such as above
TVs, near plasma TVs or mobile
phones.
Do not point the lens or viewfinder
(_ only) at strong light sources.
Do not leave the camcorder pointed
at a bright subject.
Do not use or store the camcorder in
dusty or sandy places. The
camcorder is not waterproof - avoid
also water, mud or salt. If any of the
above should get into the camcorder
it may damage the camcorder and!or
the lens.
Be careful of heat generated by
lighting equipment.
Do not disassemble the camcorder. If
the camcorder does not function
properly, consult qualified service
personnel.
Handle the camcorder with care. Do
not subject the camcorder to shocks
or vibrations as this may cause
damage.
When mounting the camcorder on a
tripod, make sure that the tripod's
fastening screw is shorter than
5.5 mm (0.2 in.). Using other tripods
may damage the camcorder.
5.5 mm
When recording movies, try to get a
calm, stable picture.
Excessive camcorder movement while
shooting and extensive use of fast
zooms and panning can result in jittery
scenes. In extreme cases, the playback
of such scenes may result in visually
induced motion sickness. If you
experience such a reaction, immediately
stop the playback and take a rest break
as necessary.
117
Add t t:t a n oitrat t:_
Long-term storage
If you do not intend to use the
camcorder for a long time, store it in a
place free of dust, in low humidity, and
at temperatures not higher than 30 °C
(86 °F).
Battery Pack
DANGER!
Treat the battery pack with care.
• Keep it away from fire (or it might
explode).
Do not expose the battery pack to
temperature higher than 60 °C
(140 °F), Do not leave it near a heater
or inside a car in hot weather.
Do not try to disassemble or modify it,
Do not drop it or subject it to shocks,
Do not get it wet,
Dirty terminals may cause a poor
contact between the battery pack
and the camcorder. Wipe the
terminals with a soft cloth.
Leng-term storage
Store battery packs in a dry place at
temperatures no higher than 30 °C
(86 °F).
To extend the battery life of the
battery pack, discharge it completely
before storing it.
Charge and discharge all your battery
packs fully at least once a year.
Remaining battery time
If the remaining battery time displayed
is not correct, charge the battery pack
fully. However, the correct time may not
be displayed if a fully charged battery
pack is used continuously in high
temperatures or it is left unused for long
periods of time. Additionally, depending
on the battery life, the correct time may
not be displayed. Use the time shown
on the screen as an approximation.
Regarding the use of non=Canon battery
packs
For your safety, battery packs that are
not genuine Canon battery packs will
not be charged even if you attach
them to this camcorder or to the
optional CG-800 Battery Charger.
We recommend using genuine Canon
battery packs bearing the
I_telligent Li-ion Batte_'y mark.
If you attach to the camcorder battery
packs that are not genuine Canon
battery packs, _ will appear and
the remaining battery time will not be
displayed.
Memory Card
We recommend backing up the
recordings on the memory card onto
your computer. Data may be
corrupted or lost due to memory card
defects or exposure to static
electricity. Canon shall not be liable
for lost or corrupted data.
Do not touch or expose the terminals
to dust or dirt.
118
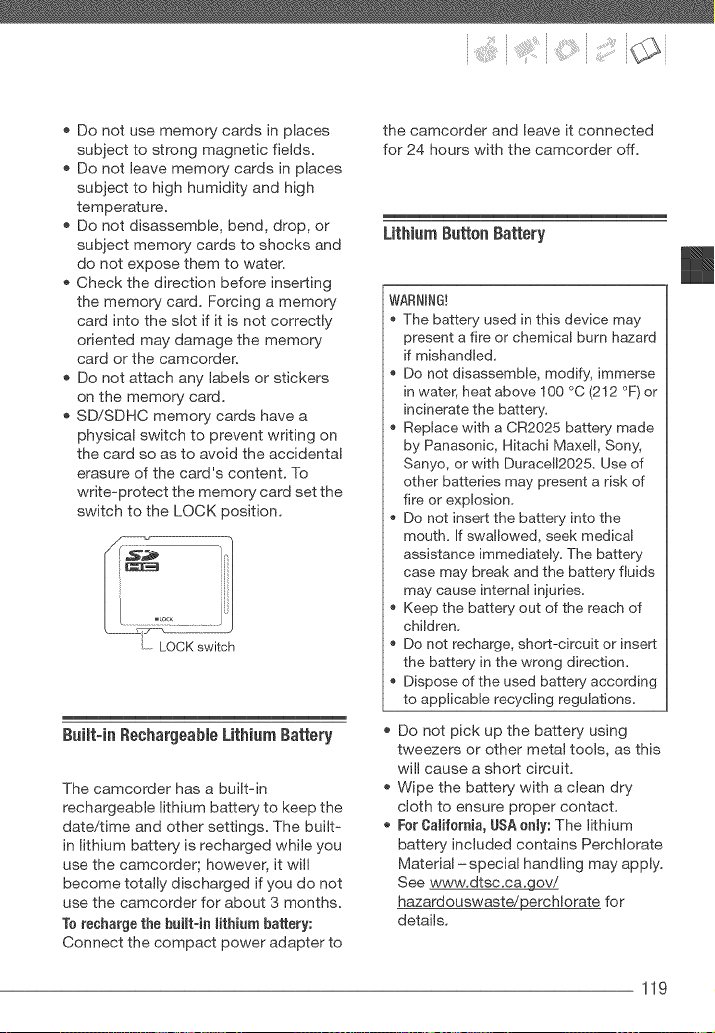
Do not use memory cards in places
subject to strong magnetic fields.
Do not leave memory cards in places
subject to high humidity and high
temperature.
Do not disassemble, bend, drop, or
subject memory cards to shocks and
do not expose them to water.
Check the direction before inserting
the memory card. Forcing a memory
card into the slot if it is not correctly
oriented may damage the memory
card or the camcorder.
Do not attach any labels or stickers
on the memory card.
SD!SDHC memory cards have a
physical switch to prevent writing on
the card so as to avoid the accidental
erasure of the card's content. To
write-protect the memory card set the
switch to the LOCK position.
L LOCK switch
Builtqa Beehargeable LithiumBattery
The camcorder has a built=in
rechargeable lithium battery to keep the
date!time and other settings. The built=
in lithium battery is recharged while you
use the camcorder; however, it will
become totally discharged if you do not
use the camcorder for about 3 months.
Torecharge the bui_t-in lithium battery:
Connect the compact power adapter to
the camcorder and leave it connected
for 24 hours with the camcorder off.
Lithium Button Battery
WARNBNG!
The battery used in this device may
present a fire or chemical burn hazard
if mishandled.
Do not disassemble, modify, immerse
in water, heat above 100 °C (212 °F) or
incinerate the battery.
Replace with a CR2025 battery made
by Panasonic, Hitachi Maxell, Sony,
Sanyo, or with Duracel12025. Use of
other batteries may present a risk of
fire or explosion.
Do not insert the battery into the
mouth. If swallowed, seek medical
assistance immediately. The battery
case may break and the battery fluids
may cause internal injuries.
Keep the battery out of the reach of
children.
Do not recharge, short-circuit or insert
the battery in the wrong direction.
Dispose of the used battery according
to applicable recycling regulations.
o
o
Do not pick up the battery using
tweezers or other metal tools, as this
will cause a short circuit.
Wipe the battery with a clean dry
cloth to ensure proper contact.
ForOaHf0rnia, USAnnty: The lithium
battery included contains Perchlorate
Material -special handling may apply.
See www.dtsc.ca.gpv!
hazardouswaste!perchlorate for
details.
119
A
Disposam
When you delete movies or initialize the
hard disk or memory card, only the file
allocation table is altered and stored
data is not physically erased. Take the
necessary precautions when you
dispose of the camcorder or memory
card, for example by physically
damaging it to prevent the leakage of
private data.
If giving the camcorder to another
person, initialize the builtqn hard disk or
memory card using the [Complete
Ktialization] option (_ 33). Fill it up
with unimportant recordings, and then
initialize it again using the same option.
This makes recovering the original
recordings very difficult.
0leaning
0arneorderBody
Use a soft, dry cloth to clean the
camcorder body. Never use
chemically treated cloths or volatile
solvents such as paint thinner.
Lens,Viewfinder(_ nnmy)and instant AF
Sensor
* If the lens surface or Instant AF
sensor is dirty, autofocus may not
work properly.
Remove any dust or dirt particles
using a non-aerosol type blower
brush.
Use a clean, soft lens-cleaning cloth
to gently wipe the lens or viewfinder.
Never use tissue paper.
LCDScreen
Clean the LCD screen using a clean,
soft lens-cleaning cloth.
Condensation may form on the
surface of the screen when the
temperature changes suddenly. Wipe
it with a soft dry cloth.
120
Condensation
Using the CamcorderAbroad
Moving the camcorder rapidly between
hot and cold temperatures may cause
condensation (water droplets) to form
on its internal surfaces. Stop using the
camcorder if condensation is detected.
Continued use may damage the
camcordeR
Oendensatienmay ferra in the faBtewingcases:
When the camcorder is moved
quickly from cold to warm places
When the camcorder is left in a humid
room
When a cold room is heated rapidly
!iiilT0 0,00000E0s ,00
Do not expose the camcorder to
sudden or extreme changes in
temperature.
Place the camcorder in an airtight
plastic bag and let it adjust gradually
to temperature changes before
removing it from the bag.
!iiilw.E00000Eos T,00,s0ETEOTE0
The camcorder automatically shuts off.
The precise time required for water
droplets to evaporate will vary
depending on the location and weather
conditions. As a general rule, wait for 2
hours before resuming use of the
camcorder.
Power Sources
You can use the compact power
adapter to operate the camcorder and
to charge battery packs in any country
with power supply between I00 and
240 V AC, 50/'60 Hz. Consult a Canon
Service Center for information on plug
adapters for overseas use.
Playback on a TV Screen
You can only play back your recordings
on TVs compatible with the NTSC
system. NTSC is used in the following
regions!countries:
Americas: All of North America and
Central America; most Caribbean
islands (except in French territories like
Guadeloupe and Martinique); most of
South America (except in Argentina,
Brazil and Uruguay). Asia: Only in
Japan, the Philippines, South Korea,
Taiwan and Myanmar. Oceania: US
territories (Guam, American Samoa,
etc.) and some Pacific islands like
Micronesia, Samoa and Tonga.
121
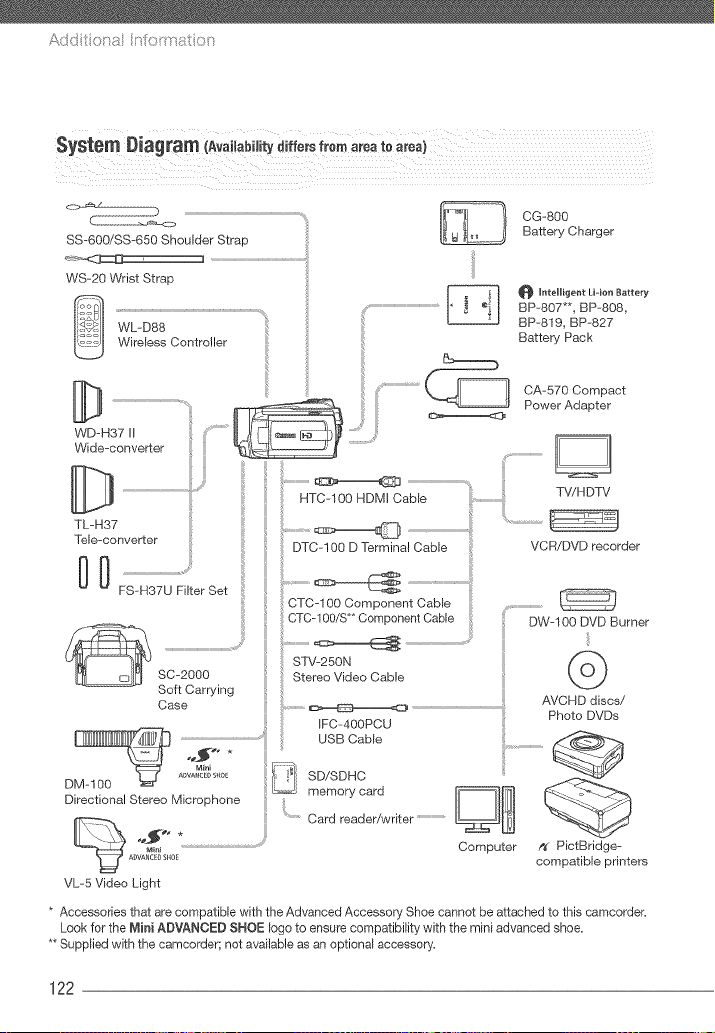
SS-600/SS-650 Shoulder Strap
WS-20 Wrist Strop
WL-D88
Wireless Controller
WD-H37 II
Wide-converter
TL-H37
Tele-converter
00
FS-H37U Filter Set :{
SC-2000
Soft Carrying
Case .................
IFC-40OPCU
BSOCoblo
.... SO,SOBC
D
cord
memory
Directional Stereo Microphone
Card reader/writer ..............................
CG-800
Battery Charger
VL-5 Video Light
_ UnteHigentLidon Battery
BP-807**, BP-808,
BP-819, BP-827
Battery Pack
0A-570 Compact
Power Adapter
........................................................TV/HDTV
HTC-100 HDMI Cable ...............................
DTC-100 D Terminal Cable VCR/DVD recorder
CTC-100 Component Cable , ...............................
CTC-100/S** Component Cable DW-100 DVD Burner
STV-250N @Stereo Video Cable
AVCHD discs/
! Photo DVDs
...........................
Computer f_" PictBridge-
compatible printers
* Accessories that are compatible with the Advanced Accessory Shoe cannot be attached to this camcorder.
Look for the Mini ADVANCED SNOE logo to ensure compatibility with the mini advanced shoe.
** Supplied with the camcorder; not available as an optional accessory.
122
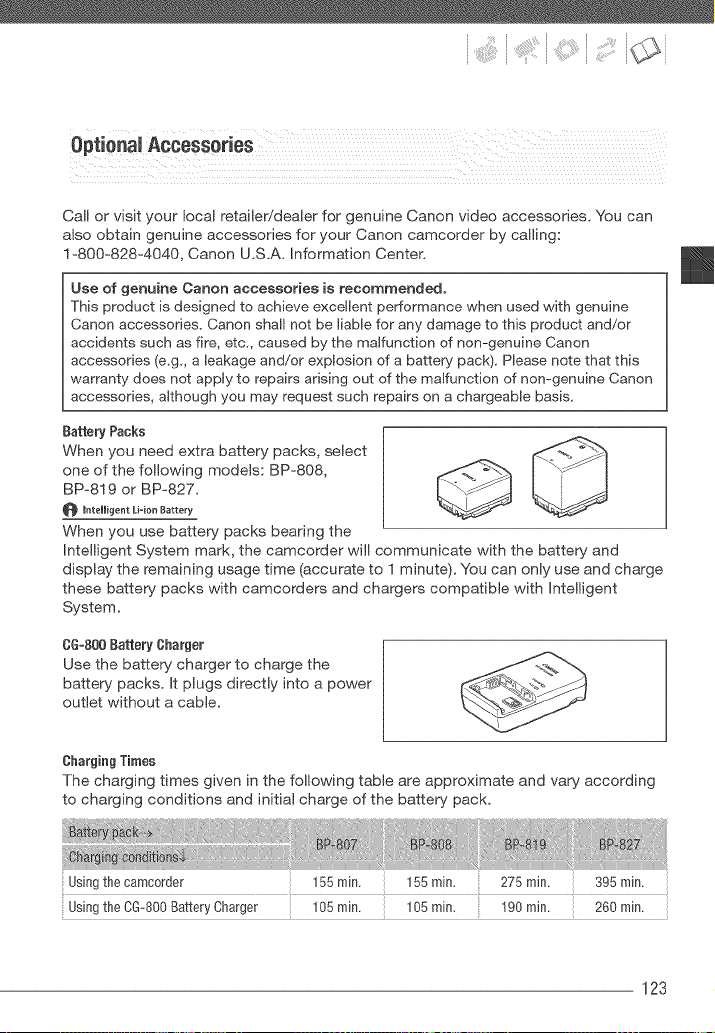
Call or visit your local retailer!dealer for genuine Canon video accessories. You can
also obtain genuine accessories for your Canon camcorder by calling:
I=800-828=4040, Canon U.S.A. Information Center.
Use of genuine Canon accessories is recommended.
This product is designed to achieve excellent performance when used with genuine
Canon accessories. Canon shall not be liable for any damage to this product and/or
accidents such as fire, etc,, caused by the malfunc:[ion of non-genuine Canon
accessories (e,g,, a leakage and/or explosion of a battery pack), Please note that this
warranty does not apply to repairs arising out of the malfunction of non-genuine Canon
accessories, although you may request such repairs on a chargeable basis,
BatteryPacks
When you need extra battery packs, select _---_
one of the following models: BP=808,
BP=819 or BP=827.
RnteHigent Li=ion Battery
When you use battery packs bearing the
Intelligent System mark, the camcorder will communicate with the battery and
display the remaining usage time (accurate to I minute). You can only use and charge
these battery packs with camcorders and chargers compatible with Intelligent
System.
OG=800Battery Charger
Use the battery charger to charge the
battery packs. It plugs directly into a power
outlet without a cable.
ChargingTimes
The charging times given in the following table are approximate and vary according
to charging conditions and initial charge of the battery pack.
Usingthe camcorder 155rain. 155rain. 275 rain. 395 rain.
Usingthe CG-800BatteryCharger 105rain. 105rain. 190 rain. 260 rain.
123
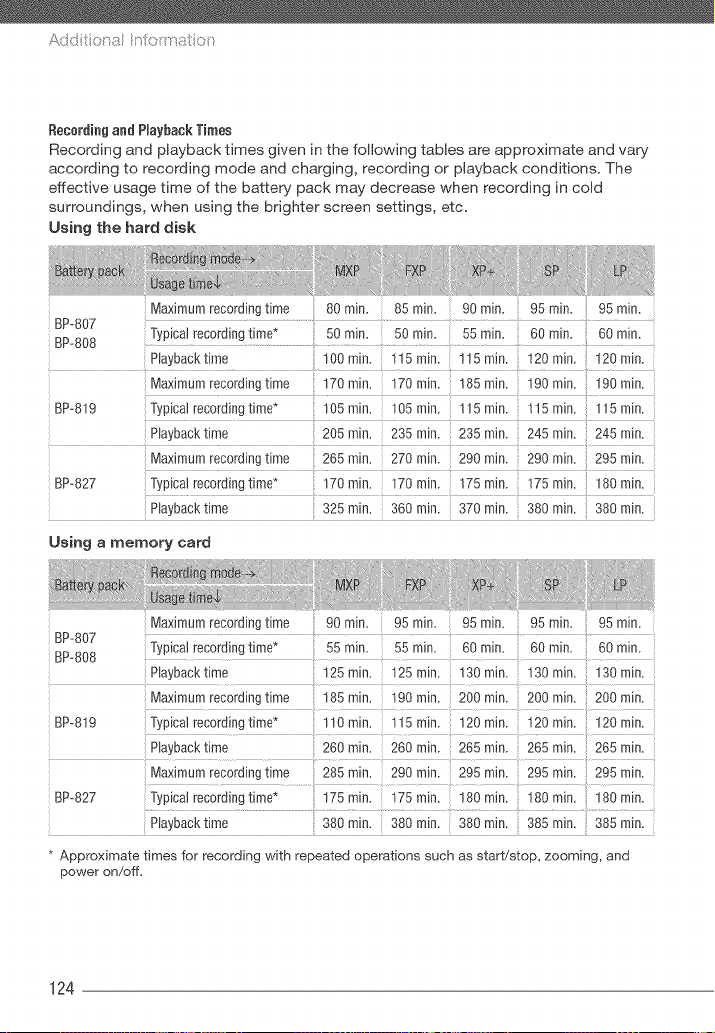
A
Recerdingand P(aybackTimes
Recording and playback times given in the following tab(es are approximate and vary
according to recording mode and charging, recording or playback conditions. The
effective usage time of the battery pack may decrease when recording in cold
surroundings, when using the brighter screen settings, etc.
Using the hard disk
Maximum recording time 80 min. 85 min. 90 min. 95 rain. 95 min.
BP-807 ...................................................................................................
BP-808 Typica] record(ng time* 50 rain. 50 rain. 55 rain. 60 mira. 60 rain.
............................................................... ..................................................... >.............
Piaybacktime 100rain. 115mira. 115 rain. 120 rain. 120rain.
Max(mum recording time 170 rain. 170 rain. 185 m(n. 190 m(n. 190 rain.
BP-819 Typical record(ngtime* 105 rain. 105 rain. 115 m(n. 115 m(n. 115 rain.
Playback time 205rain. 235rain. 235 m(n. 245 m(n. 245rain.
i
Max(mum recording time 265 rain. 270 rain. 290 m(n. 290 m(n. 295 rain.
BP-827 Typical recording time* 170 rain. 170 rain. 175 m(n. 175 re(n. 180 rain.
Playback time 325min. 360rain. 370 m(n. 380 re(n. 380rain.
Using a memory card
Maximum recording time 90 rain. 95 min. 95 rain. 95 rain. 95 rain.
BP-807 ..........................
BP-808 Typical record(ng time* 55 m(n. 55 rain. 60 rain, 60 rain. 60 rain.
Playback time 125rain. 125min. 130 m(n. 130 m(n. 130rain.
Max(mum recording time 185 rain. 190 min. 200 m(n. 200 m(n. 200 rain.
BP-819 Typical recording time* 110 rain. 115 rain. 120 m(n. 120 m(n. 120 rain.
Playback time 260 rain. 260 rain. 265 m(n. 265 re(n. 265 rain.
Max(mum recording time 285 rain. 290 rain. 295 m(n. 295 rain. 295 rain.
BP-827
P(aybacktime 380rain. 380rain. 380min. 385min. 385rain. ,
* Approximate times for recording with repeated operations such as start!stop, zooming, and
power on/off.
124
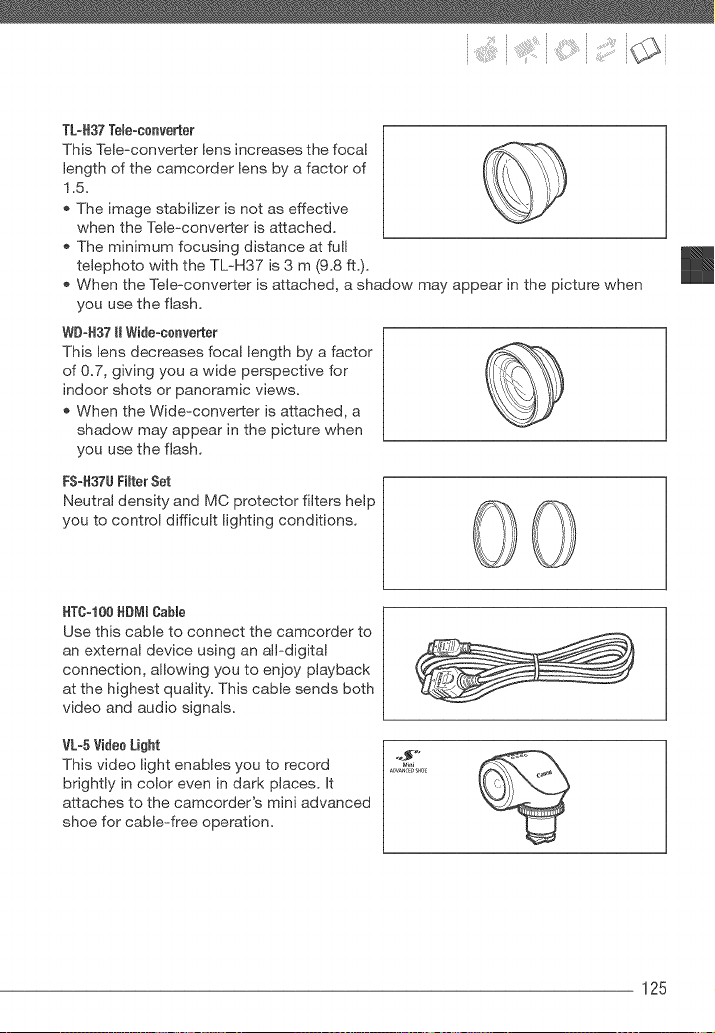
TL_H37Tele°converter
This Teie=converter lens increases the focal
length of the camcorder lens by a factor of
1.5.
The image stabilizer is not as effective
when the Tele-converter is attached.
The minimum focusing distance at full
telephoto with the TL=H37 is 3 m (9.8 ft.).
When the Tele-converter is attached, a shadow may appear in the picture when
you use the flash.
WD°H37I_Wide=converter
This lens decreases focal length by a factor
of 0.7, giving you a wide perspective for
indoor shots or panoramic views.
When the Wide-converter is attached, a
shadow may appear in the picture when
you use the flash.
FS°H37UFimterSet
Neutral density and MC protector filters help
you to control difficult lighting conditions.
HTC-t00HDMmCable
Use this cable to connect the camcorder to
an external device using an all-digital
connection, allowing you to enjoy playback
at the highest quality. This cable sends both
video and audio signals.
VL-5VideeLight
This video light enables you to record
brightly in color even in dark places. It
attaches to the camcorder's mini advanced
shoe for cable-free operation.
125
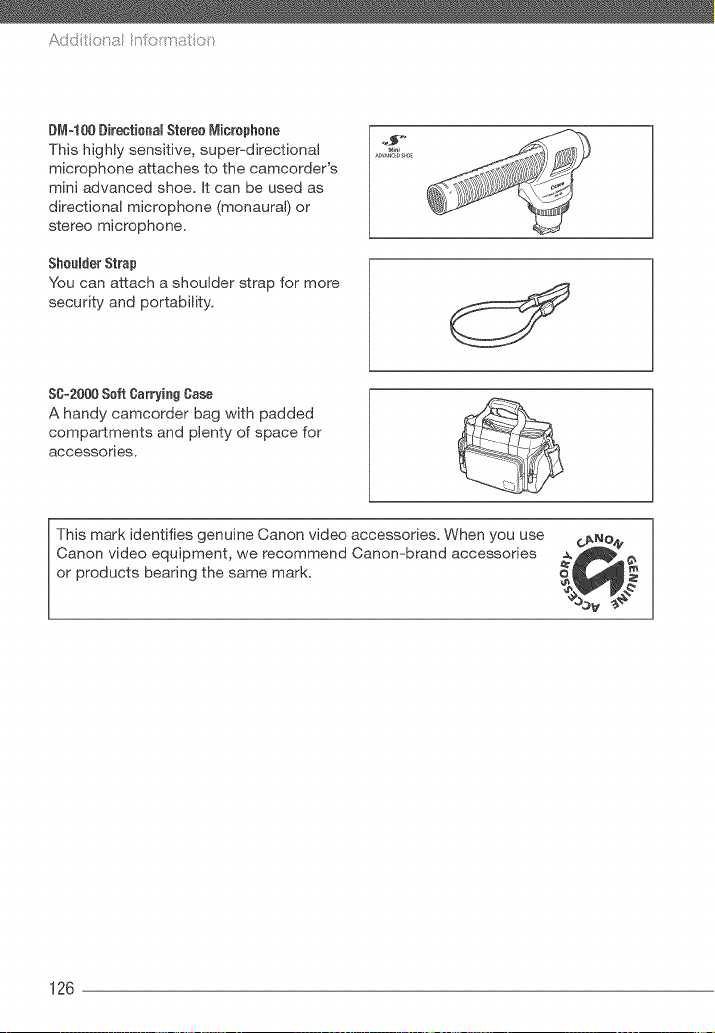
Add t t:t a n oitrat t:_
D_%t00[}irectionamStereoMicrophone
This highly sensitive, super-directional
microphone attaches to the camcorder's
mini advanced shoe. It can be used as
directional microphone (monaural) or
stereo microphone.
SheomderStrap
You can attach a shoulder strap for more
security and portability.
S0=2000S0ft CarryingCase
A handy camcorder bag with padded
compartments and plenty of space for
accessories.
This mark identifies genuine Canon video accessories. When you use
Canon video equipment, we recommend Canon=brand accessories
or products bearing the same mark.
126
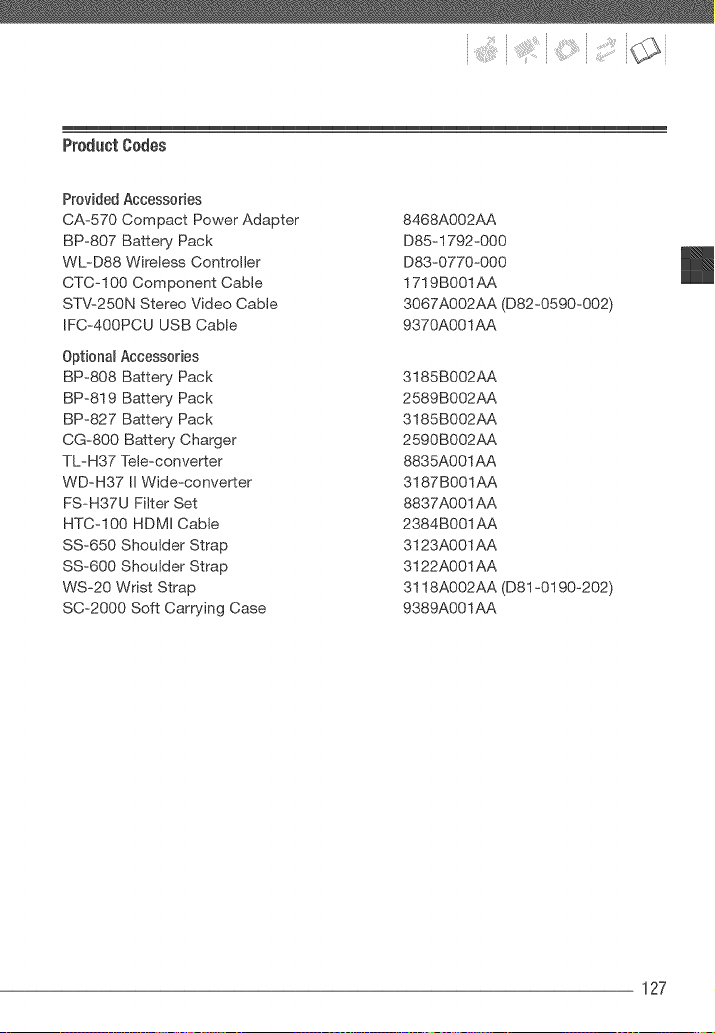
ProductCodes
Provided Accessories
CA=570 Compact Power Adapter
BP=8O7 Battery Pack
WL=D88 Wireless Controller
CTC-100 Component Cable
STV-25ON Stereo Video Cable
IFC=400PCU USB Cable
Optional Accessories
BP-808 Battery Pack
BP-819 Battery Pack
BP=827 Battery Pack
CG=800 Battery Charger
TL=H37 Tele_converter
WD_H37 II Wide=converter
FS_H37U Filter Set
HTC=I00 HDMI Cable
SS_650 Shoulder Strap
SS-600 Shoulder Strap
WS_20 Wrist Strap
SC=20O0 Soft Carrying Case
8468A002AA
D85_1792=000
D83=0770=000
1719B001AA
3067A002AA (D82=0590=002)
9370A001AA
3185B002AA
2589B002AA
3185B002AA
2590B002AA
8835A001AA
3187B001AA
8837A001 AA
2384B001AA
3123A001AA
3122A001AA
3118A002AA (D81 =0190=202)
9389A001AA
127

/ ' _ _0 '_ !OK
NG21/NG2G
Movies: AVCRD
Video compression: MPEG-4 AVC/R264 Audio compression: DelbyDigita_2@
Photos: DCP(Design rule for camera system),compatible with Exit1
Yer 22 and with DPOP
image compression: JPEG(Super Pine, Pine Normal)
MXP, FXPmode: 1920 x 1080 pixeb
Other recording modes: 1440 x 1080 pixels
mode: 2048 x 1536, 1920 x 1080, 1440 x 1080, 640 x 480 pixels
Simultaneous recording: 1920 x 1080, 848 x 480 pixels
1080/60i 7
Bui_t-in hard disk: _ 120 SB, _ 60 GB
SD or SDRCmemory card (not included)
Bui_t-in hard disk:
MXPmode: 11 hr. 5 min_ PXPmode: 15 hr. 45 min_ XP+ mode: 2! hr. 40 min_
SP mode: 36 hr. LP mode: 45 hr. 55 min_
Bui_t-inhard disk:
MXPmode:5hr3Omin_ PXPmode:7hr. 5Omin. XP+mode:lOhr. 5Omin_
SP mode: 18 hr LP mode: 22 hr. 55 min_
32 GB memory card:
MXPmode: 2 hr. 55 min_ PXPmode: 4 hr. 10 min. XP+ mode: 5 hr. 45 min_
SP mode: 9 hr. 35 min_ LP mode: 12 hr 15 min_
Image Sensor 1/3.2dnch CMOS, approx. 3,3!0,000 pixMs
Effective pixels: Movies: approx. 2,070,000
Photos(LW): approx. 2,070,000
Photos(L, of, S): approx. 2,760,000
LC# Screen 2.7 in., wide, TFT cobb approx. 211,000 dots
Viewfioder 0.27 in., wide, TFT cobr, approx. 123,000 dots
ofis_pheoe Stereo e_ectretcondenser microphone
Lees 1=4_8-5X6 mm F/18-3.0, 12x optical zoom
35 mm oguivabnt: Movies: 42.9 - 514.8 mm
Photos(LW): 42.9- 514.8 mm
Photos(L, of, S): 393 - 471.6 mm
Lees CordiOuratioo 11 elements in 0 groups (2aspheRc ebments)
AP System Autofocus (TTL+ externa_distance sensor when set to [instant AP)) or Manualfocus
Peter Diameter 37 mm
ofioimum PesusinO Distanoe 1 m (3.3 ft.); 1 cm (039 in) at fulJwide sngJe
White l}aofnoe Auto white balance, custom white balance andpreset white balance settings:
Daylight, Shade, C_oudy,Tungsten, Fluorescent,Fluorescent H
ofioimum Illomioation 0.2 Ix ([Night] recording program, Shutter speed at 1/2}
3 Ix ([Programmed AE],Auto sbw shutter [On], Shutter speed at 1/30)
Recommeoded Oluminatieo More than lOg Ix
Image Stohilioatien Optical-Shift Image Stabilizer
1 This camcorder supports Exit 2.2 (also caibd 'Exit Print"). Exit Print isa standard for enhancing the communication between
camoorders and printers. By connecting to an Exit Print-compliant printer,the cameorders imagedata at the time of shooting is used
and optimized, yielding extremely high quaMy prints.
2 Recordings madewith the [PF24], [PF30] frame rate are converted and recorded on the hard disk/memory card as 60i.
128
Sioe of Video Resordings
Sioe of Photos
TemevisieoSystem
Recording ofedia
ofosimum Recording Time
(approximate flgores)
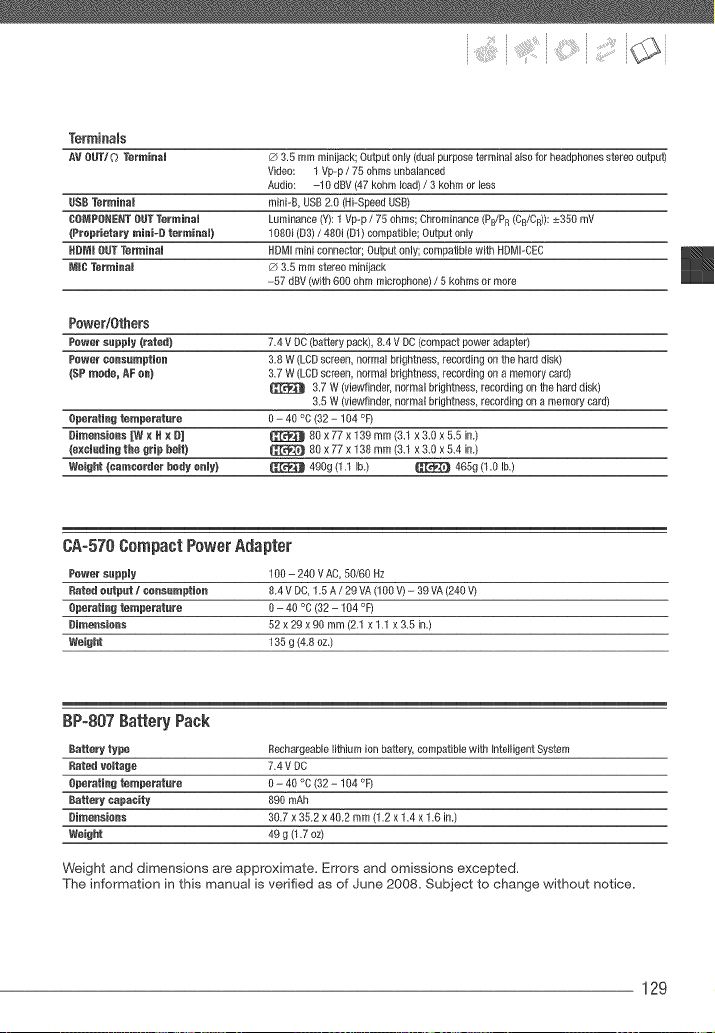
Term[nares
AV RUT/O Terminal _') 3.5 mm minijack; Outputonly (dual purpose terminal a_sofor headphones stereo output)
Video: 1 Vp-p / 75 ohms unbalanced
Audio: -!0 dBV (47 kohm _oad)/ 3 kohm or _ess
USBTerminal mini-& USB 20 (Hi-SpeedUSB)
COMPONENTOUT Termioal Luminance (Y):1 Vp-p / 75 ohms; Chromthonce(PB/PR(CB/CR)):_+350mV
{Proprietary miai-B termiool) 1080i (D3)/ 480i (D1)compotiNe Output only
HBM188T Termiaol HDNImini connector; Output only; compatible with HDMI-CEC
MIC Termiaol _) 3,5 mm stereo re[hijack
-57 dBV(with 600 ohm microphone)/ 5 kohms or more
PowedOthers
Power sapply Crated) 74 V DC (battery pack) 84 V DC (compact power adapter)
Power ooasamptioa 3.8 W (LCDscreen, norma_brightness recording on the hard disk)
{SP node, AF ca) 37 W (LCDscreen, norma_brightness, recording on a memory card)
3.7 W (aiewfthder, normal bdghtness recording on the hard disk)
35 W (viewfthder, normal brightness recording on a memory cwd)
Operatiag temperotore O- 40 °C(32 - 104 °F)
Bimeosioas [W a 6 a B] _ 80 x 77 x 139 m m (3.1x 3.0 x 5.5 in.)
{eaomadio6the grip 6ett) _ 80 x 77 x 138 mm (3,1 x3,0 x 5,4 in,)
Wei6ht {oamoorder 6ody ooly) _ 490g (1.1 Ib) _ 4656 (1.0 Ib)
0Ao570Compact PowerAdapter
Power sapp[y 100 - 240 VAC, 50/60 Hz
Rated oatpat / ooosamptioo 84 V DC, 1_5A / 29 VA(lOg V)- 39 VA(240 V)
Operatiag temperotore O- 40 °C (32 - 104 °F)
Oimeosioas 52 x 29 x 90 mm (2.1 x 1.1 x 3.5 in.)
Weight 135 g (4,8 oz,)
BP-807 Battery Pack
Battery type Rechwgeob_elithium ion battery, compatible with Inte_HgentSystem
Rated vottage 74 V DC
8perotia6 temperotore 0- 40 % (32 - 104 °F)
Battery capacity 890 mAh
Oimeosioas 307 x 352 x 402 mm (1.2 x 1.4 x1.6 in,)
Weight 49 g (1.7 oz)
Weight and dimensions are approximate. Errors and omissions excepted.
The information in this manual is verified as of June 2008. Subject to change without notice.
129
24F progressive frame rate ....... 22, 92
24p Cinema Mode ................ 47
Abroad, using the camcorder ....... 121
Aperture (f number) ................ 46
Aspect ratio of a connected TV
(TV type) ....................... 97
Audio recording level .............. 53
Auto exposure bracketing ........... 67
Auto slow shutter ................. 94
Autofocus (AF)
AF frame
@-point AiAF/Center point) ..... 94
Instant AF/Normal AF ........... 94
Av (recording program) ............. 46
AV OUT/O terminal ............ 54, 78
AVCHD specifications ............... 6
Backing up recordings ............. 82
Backlight correction ............... 49
Battery pack
Battery information ............ 22
Charging ..................... 23
Remaining charge indicator ...... 22
Beach (recording program) .......... 45
Built-in backup batter}, ............ 119
Calendar display .................. 41
Capturing photos from video ........ 69
Cine Mode (recording program) ...... 47
COMPONENT OUT terminal ......... 79
Condensation ................... 121
Connections to external devices ..... 79
Continuous shooting ............... 67
Copying
Movies ...................... 60
Photos ...................... 70
Data code ................... 53, 95
Date and time .................... 30
Date format .................. 99
Daylight saving time ........... 31
Time zone ................... 31
Deleting
Movies ................ 37, 44, 59
Photos ................... 63, 65
Digital effects .................... 52
Direct print ...................... 72
Direct transfer ................... 86
Dividing scenes .................. 57
Drive mode ...................... 67
Drop sensor ..................... 99
DVD authoring ................... 82
EASY mode ..................... 27
Error messages ................. 107
Exposure ....................... 48
Fireworks (recording program) ....... 45
Flash .......................... 66
Flexible recording ................. 27
Focus
Assist functions ............... 49
Focus priority ................ 94
Manual ..................... 49
Frame rate ................... 47, 92
FUNC, menu ................. 28, 90
Hard disk precautions .............. 8
HDMI OUT terminal ............ 79, 81
HDMI-CEC ...................... 98
Headphones ..................... 54
130
Histogram ....................... 67
image effects ..................... 51
image stabilizer ................... 94
index screen ............... 38, 39, 64
Initialization (hard disWmemory card) , .33
Joystick ......................... 28
Joystick guide .................... 28
Language ........................ 30
LCD screen ...................... 26
Light metering mode ............... 69
Magnifying photos ................. 65
Maintenance .................... 120
Manual exposure adjustment ........ 48
Markers ......................... 93
Memory card .................... 118
MIC terminal ..................... 56
Microphone ...................... 56
Microphone attenuator ............. 95
Mini advanced shoe ............... 55
Night (recording program) ........... 45
Notification sounds ................ 98
Onscreen display selection .......... 53
Odginal recordings ................ 58
P (recording program) .............. 46
Photo numbers ................... 98
Photo quality ..................... 62
Photo size ....................... 62
Playback
Movies ...................... 38
Photos ...................... 63
Playlist ......................... 58
Portrait (recording program) ......... 45
Power save ...................... 34
Print order ....................... 76
Print/share button .............. 73, 87
Printing photos ................... 72
Protecting photos ................. 70
Quick Start func:tion ............... 37
Recording
Movies ...................... 34
Photos ...................... 61
Recording mode .................. 35
Recording programs ............ 45, 46
Recording time ................... 36
Remote sensor ................... 25
RESET ........................ 104
Reviewing
Movies (Record review) ......... 37
Photos ...................... 93
Screen icons ..................... 20
SDiSDHC memory card ............ 31
Searching scenes by date .......... 41
Selecting recordings ............... 43
Selecting the media
for playback .................. 40
for recording ................. 33
Self timer ....................... 48
Serial number .................... 18
Setup menus ................. 29, 92
Shutter speed .................... 46
Simultaneous recording ............ 68
Slideshow ....................... 63
Snow (recording program) .......... 45
131
Addt :t a n oitrat t:_
Special Scene
(recording programs) ............. 45
Sports (recording program) .......... 45
Spotlight (recording program) ........ 45
Sunset (recording program) ......... 45
Telephoto ....................... 36
Timeline ......................... 42
Transfer order .................... 89
Transferring to a computer
Movies ...................... 82
Photos ...................... 86
Tripod ......................... 117
Troubleshooting ................. 101
Tv (recording program) ............. 46
USB terminal .................... 78
Viewfinder* . ..................... 35
Volume ...................... 39, 97
White balance ................... 50
Wide angle ...................... 36
Wind screen .................. 94, 95
Wireless controller ................ 24
Zoom .......................... 36
Digitalzoom ................. 93
Zoom speed .............. 36,93
132
* _ only.
[ U.S.A. 1
CANON CONSUMER DiGiTAL VIDEO EQUIPMENT UMmTED WARRANTY FOR
THE UNITED STATES
The limited warranty set forth below isgiven by CanonU.S.A.,Inc. ("Canon USA")with respect to Canon Consumer Digital Video
Equipment (the "Equipment') purchased in the UnitedStates This Hmited'warranty is only effective upon presentation of your Bill of Sale
or other proofof purchase.
The Equipment is warranted under normal, non-commercial, personal use, against defective materials or workmanship as follows:
Parts: Defective parts will be exchangedfor new parts or comparable rebuilt parts for o period of ONEYEARfrom the date of original
purchase, except for a defective Video Reed,which will be exchangedfor o period of three months from the date oHpurchase.
Labor: Fora period of ONEYEARfrom the date of original purchase labor will be provided free of charge by our factory service centers or
designated service facilities located in the United States.
When returning Equipment under this warranty, you must pro-pay the shipping charges, and you must enclose the Bill of Sale or other
proof of purchase with o complete explanatton of the proMem. During the ONE-YEARwarranty period repairs wil_be madeand the
Equipment wil_be return-shipped to you free of charge. For repogs after the warranty period is over, you will be given an estimate of the
cost of repair and onopportunity to approve or disapprove of the repair expensebefore it is incurred If you approve, repairs will be made
and the Equipment will be return-shipped to you. (shipping charges apply). If you disapprove we wi_ returmship the equipment at no
charge to yoo.
Non-Caaon brand peripheraB eqoipment and sof_z,_arewhich may be distriboted with, or factory mnadedon, the Eqoipment, are
sold "AS IS" without warranty of any kind by Canon USA,inclodthg any impged warranty regarding merchantability or fitness
for a partieotar porpose. The sofa warranty with respect to soeh non=Canon brand items is given by the manufacturer nr
prndoser thereof, if the Eqoipment cnntaios a hard disk drive, Canon USA recommends that data atemd nn that drive be
dopgcated nr backed op to prevent its less in the event nf faiBore or other malthnetion of soeb drive.
CanonUSA shall have no responsibility under this limited warranty for use ofthe Equipment in conjunction with incompatiMe peripheral
equipment and inoompatibb software.
Inorder to obtain warranty service, contact the aothedzed Canonretail dealer from whom you purchased the Equipment or call the
CANONINFORMATIONCENTERAT 1-Ben-oK-CANON). Youwill be directed to the nearestservice toMMy for your Equipment.
This Limited Warranty coversall defects encountered in normal use of the Equipment and does not apply in the following cases:
A) Loss or damage to the Equipment due to abuse, mishandling, accident, improper maintenance, or tai_oreto fedow operoBng
instructions;
B) It the Equipment is defective as a result of leaking batteries, sand, dirt or water damage;
C) If defects or damages are caused by' the use of unauthorized parts or by service other than by CanonUSA's factory service
centers or oothoNzed service taeiMies;
D) _fthe Equipment is used for commercia_or industrial use.
This Limited Warranty does not cover cabinet (exterior finish), video cassette tape, head cbonings, nor does it apply to Equipment
purchased outside the United States. Thiswarranty does not cmmr units sold to rental firms, military operations, hota_s,schools,
hospitals or for other commercial, industrial, or institottooo_applications. These usesere covered only by such specific warranty as
Canon mayissue with such sales.
This Limited Wananty does not apply to accessoriesor consumables for the Equipment, 'which ere sold "AS IS", without wmrmdy of any
kind by Canon USA.
Please retain this warranty card and your Bi_ of Sale as a permanent record of your purchase This card is most important in order to be
sure you are contacted right away shooedthere be o safety inspection, modification or product recall under appHcaMe taws or
regulations.
NOIMPLIEDWARRANTY,_NCLUDg_GMERCHANTABIUTYANDE_TNESSFORA PARTICULARPURPOSEAPPLIESTO THiS EQUIPMENT
AFTERTHE APPLICABLEPERIODOFEXPRESSWARRANTYORGUARANTY,EXCEPTAS MENTIONEDABOVE,GIVENBYANY PERSON,FIRM
ORCORPORATIONWiTHRESPECTTO THISEQUIPMENTSHALLBINDTHE UNDERSIGNED(SOMESTATESDONOTALLOWLIMITATIONSON
ROWLONGAN IMPUEDWARRANTYLASTS,SOTHE ABOVELIMITATIONOREXCLUSIONMAYNOTAPPLYTO YOU),CANONUSA SHALL
NOTBELIABLEFORLOSSOFREVENUESOR PROFITS,EXPENSEFORSUBSTITUTEEQUIPMENTOR SERVICE,STORAGECHARGES,LOSS
ORCORRUPTIONOFDA_:A,INCLUDINGWITHOUTUMITATION,LOSSORCORRUPTIONOFDATASTOREDONTHEEQUIPMENT'SHARD
DRIVE,ORANY OTHERSPECIAL,iNCiDENTALORCONSEQUENTIALDAMAGESCAUSEDBYTHE USE,MISUSEOR INABIUTYTO USETHE
EQUIPMENT,REGARDLESSOFTHE LEGALTHEORYONWHICHTHE CLAIMIS BASED,ANDEVENIF CANONUSA HAS BEENADVISEDOF
THEPOSSIBILITYOFSUCHDAMAGES.NORSHALLRECOVERYOFANY KINDAGAINSTCANONUSABEGREATERTHANTHEPURCHASE
PRICEOF THEEQUIPMENTSOLDBYCANONUSAANDCAUSINGTHE ALLEGEDDAMAGEW_TROUTMMITINGTHE FOREGOING,YOU
ASSUMEALL RISKAND MAB_UTYFORLOSS,DAMAGEORINJURYTOYOUAND YOURPROPERTYAND TO OTHERSAND THEIRPROPERTY
ARBINGOUTOFUSE,MISUSEORINAB_UTYTO USETHE EQUIPMENTNOT CAUSEDDIRECTLYBYTHE NEGLIGENCEOF CANONUSA,
(SOMESTATESDONOTALLOWTHE EXCLUSIONORLIMITATIONOF INCIDENTALORCONSEQUENTIALDAMAGES,SO THEABOVE
UM_TATIONMAYNOTAPPLYTO YOU).TRISWARRANTYSHALLNOTEXTENDTO ANYONEOTHERTHANTHEORIGINALPURCHASEROF
THiS EQUIPMENTORTHE PERSONFORWHOM _TWASPURCHASEDAS A GIFT
Thiswarranty gives you specific legal rights, endyou mayalso hmm other rights which vary from state to state
CANONU,S A,, INS,
133
ICANADA1
CANON CONSUMER DmGmTALVmDEO EQUmPMENT UMmTED WARRANTY
The limiWd warranty set forth below is given by Canon Canada Inc, (" Canon Canada") with respect to Canon Consumer Digital Video Equipment (lhe
"Equipment") purchased in Canada, This limited warranty is only effective upon presentation of a bill or sale or other proof or purchase for this
Equipment to a Canon Ser_,ice Facilgy when repairs are required,
The Equipment is warranted under normal, non-commercial, personal use, against ddecRve materials or workmanship as follows:
PaCts: Defective parts will be exchanged for new parts or, at Canon Canada's option, comparable rebuilt parts for a period of one year from the date or
original purchase, except Video Heads which will be exchanged for a period of 3 months from the date of purchase,
Labour: For a period of one year from the date of original purchase, labour will be pro_,ided free d charge by our Canon Service FaciMies in Canada,
This limited warranty covers all defects except where:
(a) The loss or damage to the producl results from:
i) accident, natural disasLer, mishandling, abuse, neglect, unauthorized product modification or failure to follow instructions contained in the
instruction manual;
ii) the use of accessories, attechments, producte, supplies, parts or devices with the Equipment that do not conform to Canon specifications
or that cause abnormally frequent service problems;
iii) repairs or ser_,ices performed by any party other than a Canon Service Facility;
N) ddectNe batteries or any exposure to water, sand or dirt;
v) shipping (claim must be presen[ed to the shipper);
(b) Any serial number on the _,ideo equipment is altered or removed,
(c) The Equipment is used for commercial, professional or industrial purposes,
This limited warranty does no_cover the cabinet (exterior finish) d the Equipment, media, nor does it apply to Equipment purchased outside Canada,
if the Equipment contains a hard disk drive, Canon Canada recommends that date stored on that drNe be duplicated or backed up to prevent its loss
in the event or a failure or other magunction of such Wive,
TO OBTNN WARRANTY SERWRE
Ship your Equipment in its original carton, box or equivalent, properly packed, fully insured with shipping charges prepaid, together with a copy of
your bill of sale or olher proof ol purchase and a description ol the problem to any of the Canon Service Facilities in Canada,
LiMiTATiONS
Except as otherwise required by applicable legislation, this warranty is in lieu d all other warranties, conditions, guarantees or representations,
express or implied, statutory or otherwise, relative to the Equipment, induding implied warranties or conditions of merchantebility or fitness for a
particular purpose,
Canon Canada assumes no liability for special, consequential or incidental damages, loss or corruption of data including, without limitation, data
stored on the hard disk drive of the Equipment or loss that may arise, whether on account of negligence or _herwise, from the use, misuse or inability
to use the Equipment (including loss of profit, revenue, media or enjoyment) or from failure to conform to any express or implied warranties,
conditions, guarantees or representations, Any recovery under this limited warranty shall not exceed the purchase price of the equipment, Canon
Canada does not assume or authorize any other person to assume for Canon Canada any other liability with respec_ to this equipment,
This warranty does not extend to any person other than the original purchaser of the Equipment or the person for whom it was purchased as a gift and
states your exclusNe remedy
NOTHCETO CONSUMER
if you plan to take important videos or if the product has not been used for some time, please check all functions with the instruction book before
using it,
134
Cal_@H
USA
CANON U.S.A., iNC. NEW JERSEY OFFmCE
100 Jamesuur 9 Road. Jamesbur 9, NJ 08831 US_
CANON U.S.A, INC. CHICAGO OFFICE
100 Park Blvd, ntasca. IL 60143 USA
CANON U.S.A., INC. LOS ANGELES OFFICE
15955 AJton Parkway, Irvine. CA 92618 USA
CANON U.S.A., INC, HONOLULU OFFICE
210 Ward Avenue. Suite 200. Honolulu. Hi 96814 USA
*_,-If you nave any questions, cal_ the Canon U.S.A. Information
Center toiFfree at 1-800-828-4040 U.S.A. only).
CANADA CANON CANADA INC.
6390 Dixie Road. MissJssauga, ON L5T 1P7
CANON CANADA INC. CALGARY
2828 16th Street NE, Calgary, AB T2E 7KT
CANON CANADA INC. MONTREAL
8801 Route Transcanadienne. Saint-Laurent_ QC H4S 1Z6
,:* if you nave any questions, cat_[ne Canon Canada information Center
toll free n Canada only) at 1-800-OK-CANON 1-800-652-2666_.
-t._ S vous avez aes uuestlons, veuJllezt_16Dhoner 1-830-OK-CANON
1-800-652-2666. sans fraJs au Canada seulement.
MEXICO
CANON MEXICANA, S DE RL DE CV
Blvd. Manuel Avila Camacho No. 138, Piso 17
Col. Lomas de Chapu_zepec
C.R 11000 M6xlco. D.F M6xico
CANON U,SoA. iNC. NEW JERSEY OFFICE
100 Jamesburg Road, Jamesburg, NJ 08831 USA
CENTRO Y CANON LATIN AMERICA. INC,
SURAMER_CA 703 Waterford Way, Suite 400, Miami, FL 33126 USA
ASIA CANON HONGKONG COMPANY LTD.
19/F, The Metropolis Tower, 13 Me[roDolJs Drive.
Hunghom, Kowloon, Hong Kong
For support concerning Pixela ImageMixer 3 SE. p_ease call Pixela customer
support {details in the PIXELA mageMixer 3 SE nstailation Guide.
Pour le support tecnnlque concemant P xela ImageMixer 3 SE. veuilbz appeler _e
service clientele de Pixela {les d#tails se trouvent darts le Guide d'_nstaHat_on
PIXELA ImageMixer 3 SE).
Para sopor-[e relacionado con Pixela ImageMixer 3 SE. Hame a_ cemro de
atenc_on al cliente de Pixela [vea los aetaHes en la Guia oe _nstalaci6n PIXELA
ImageMixer 3 SEL
PUB. DtM-879B © CANON INC. 2008