Loading ...
Loading ...
Loading ...
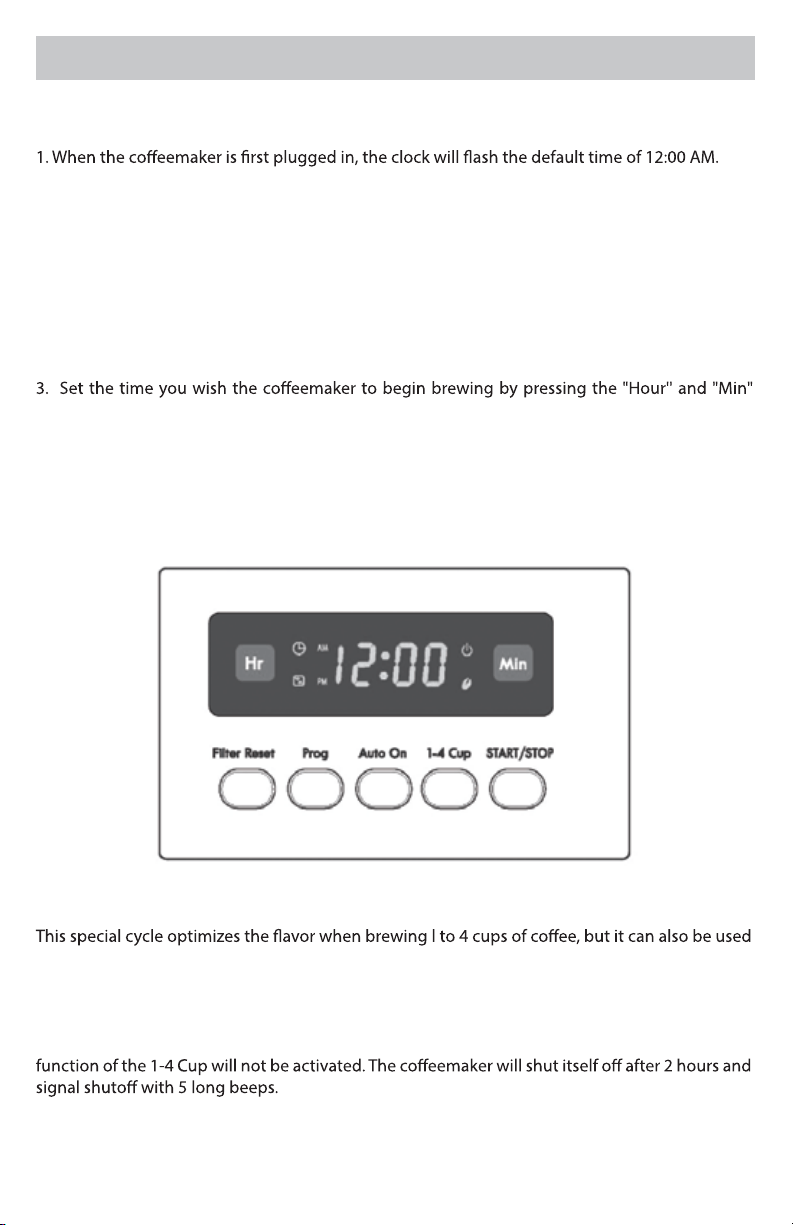
6 7
OPERATING YOUR COFFEEMAKER OPERATING THE CONTROL PANEL
automatically switches to the warming mode. For delayed brewing, see SETTING THE CLOCK,
TIMER AND AUTO-BREWING.
PAUSE AND POUR FEATURE
brew basket.
SETTING THE CLOCK, TIMER AND AUTO-BREWING
Use the Hour and Min Buttons to Set the Clock:
2. Press the Hour button to change the setting to any hour number between 12:00 am to 11:00
pm.
3. Press the Min button to change the setting to any minute number between 1 and 59
4. You can make the hours and minutes move more quickly in the clock display by holding the
buttons down.
5. The clock will begin keeping time at the moment the Hour and Min buttons are released.
Use the Prog, Hour and Min Buttons to Program an Automatic Brew Time:
1. First set the clock. See directions above.
2. Press the Prog button; the indicator will illuminate.
buttons. Be sure to set the correct designation of AM or PM.
4. Once you have set the correct time to begin the automatic brewing and the clock has returned
to the time of day, press the Auto On button.
5. The Auto Brew can be cancelled at any time by pressing the Auto On button a second time. The
Auto On light goes out. To check what time the Auto Brew is set for, push in the Set Auto button
and the time will be displayed.
There is a gauge marked from 4 to 12 cups
water tank and on the sides of carafe (see Fig. 4).
These marks the show the amount of cold water
some water.
(see Fig. 5).
is a matter of personalof taste (we recommend
one heaping tablespoon for every two cups).
5. Close the cover. Place carafe on the warming
plate and plug in appliance. The display
-
maker beeps for about 1 second if the clock is not
set. The clock does not have to be set to brew
CLOCK, TIMER AND AUTO-BREWING.
1-4 CUP BUTTON
to increase the brew strength of any number of cups you are brewing. Push the START /STOP
button to start the appliance, and then push the 1-4 CUP button once and both the START/STOP
and 1-4 CUP indicators will illuminate, showing that the strong brewing option is activated.
NOTE: The 1-4 Cup button must be pushed after the START /STOP button is pressed. If not, the
Fig. 6
Loading ...
Loading ...
Loading ...