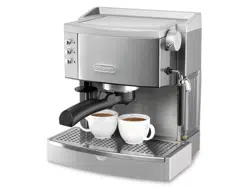
EC933X
COFFEE MAKER
Instructions for use
2
C3
C2
C4
C1
C6*
C9
C5
C7 C8
B2 B3 B4 B5 B6 B7 B8
B9
B10
B11
B12
B14
B13
B1 B16
B15
B17
3
A1
A23
A6
A21
A22
A10
A11
A12
A14
A13
A5
A2 A3
A7
A8
A9
A4
A15
A16
A17
A18
A19
A20

4
1 2 3 4
5 6 7 8
9
10 11 12
13 15 16
14
0,5 L
MAX
5
17 20
21 23
27 28
29 30 31 32
18
✓
19
MAX
✗ ✗
22
24
25 26

6
Before using the appliance, always read the safety warnings.
This appliance shall not be used by children.
Keep the appliance and its cord out of reach
of children.
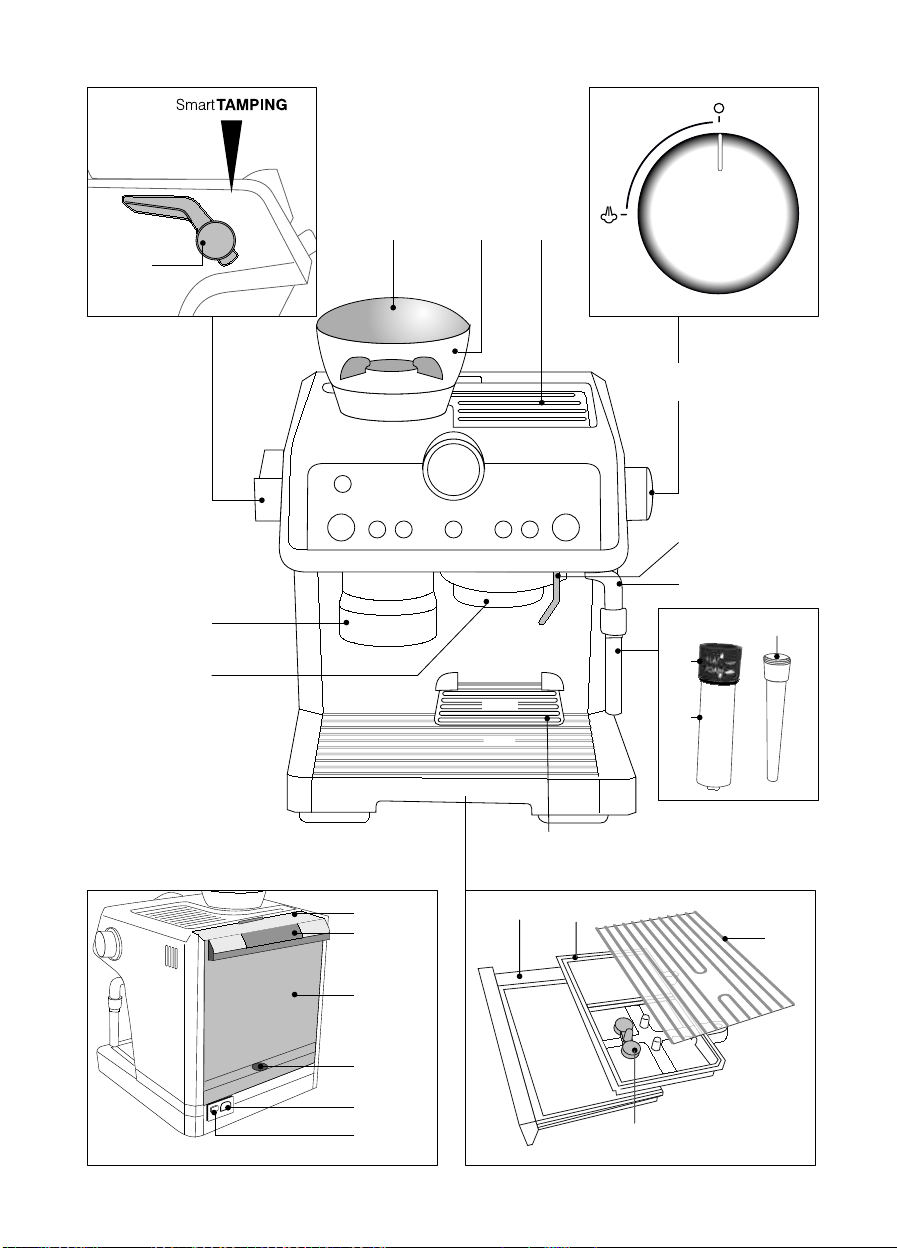
1. DESCRIPTION
1.1 Description of the appliance
(page 3 - A )
A1. Beans container lid
A2. Beans container
A3. Cup tray
A4. Steam dial
A5. Hot water spout
A6. Steam spout
A7. Cappuccino maker selection ring
A8. Cappuccino maker
A9. Cappuccino maker connection nozzle
A10. Cup grille for espresso
A11. Cup grille for glasses or mugs
A12. Drip tray grille
A13. Drip tray
A14. Drip tray water level indicator
A15. Water tank lid
A16. Water tank extraction handle
A17. Water tank
A18. Water softener lter housing
A19. Power cord connector socket
A20. Main switch (ON/OFF)
A21. Boiler outlet
A22. Coee mill outlet (tamper station)
A23. Presser lever
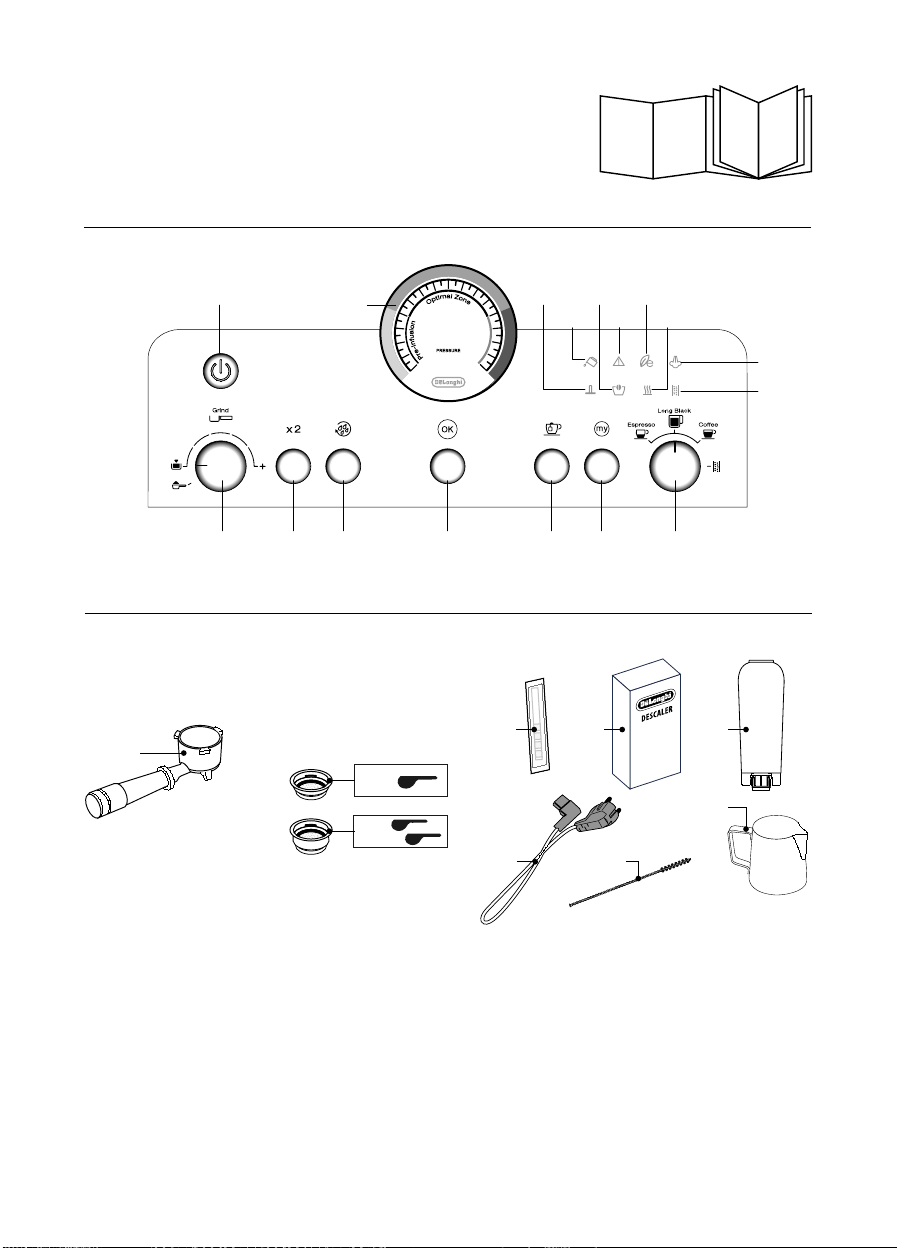
1.2 Description of control panel
(page 3 - B )
B1. ON/Standby button
B2. Ground coee quantity dial
B3. "X2" button: to use the 2 coees Easy Clean lter
B4. Rinse button
B5. "OK" button: to deliver the beverage/conrm
B6. Hot water button
B7. "My" button: to customise beverage quantity
B8. Mode selector dial:
• Espresso
• Long Black
• Coee
• Descaling
B9. Descale light
B10. Steam ready light
B11. Overtemperature light
B12. Energy saving light
B13. General alarm light
B14. Beans container empty/no beans container light
B15. No water light
B16. Pressing light
B17. Pressure gauge
1.3 Description of the accessories
(page 2 - C )
C1. Filter holder
C2. Easy Clean lter 1 coee
C3. Easy Clean lter 2 coee
C4. "Total Hardness Test" indicator paper
C5. Descaler
C6. Water softener lter (*if present)
C7. Power cord
C8. Tube brush
C9. Milk jug
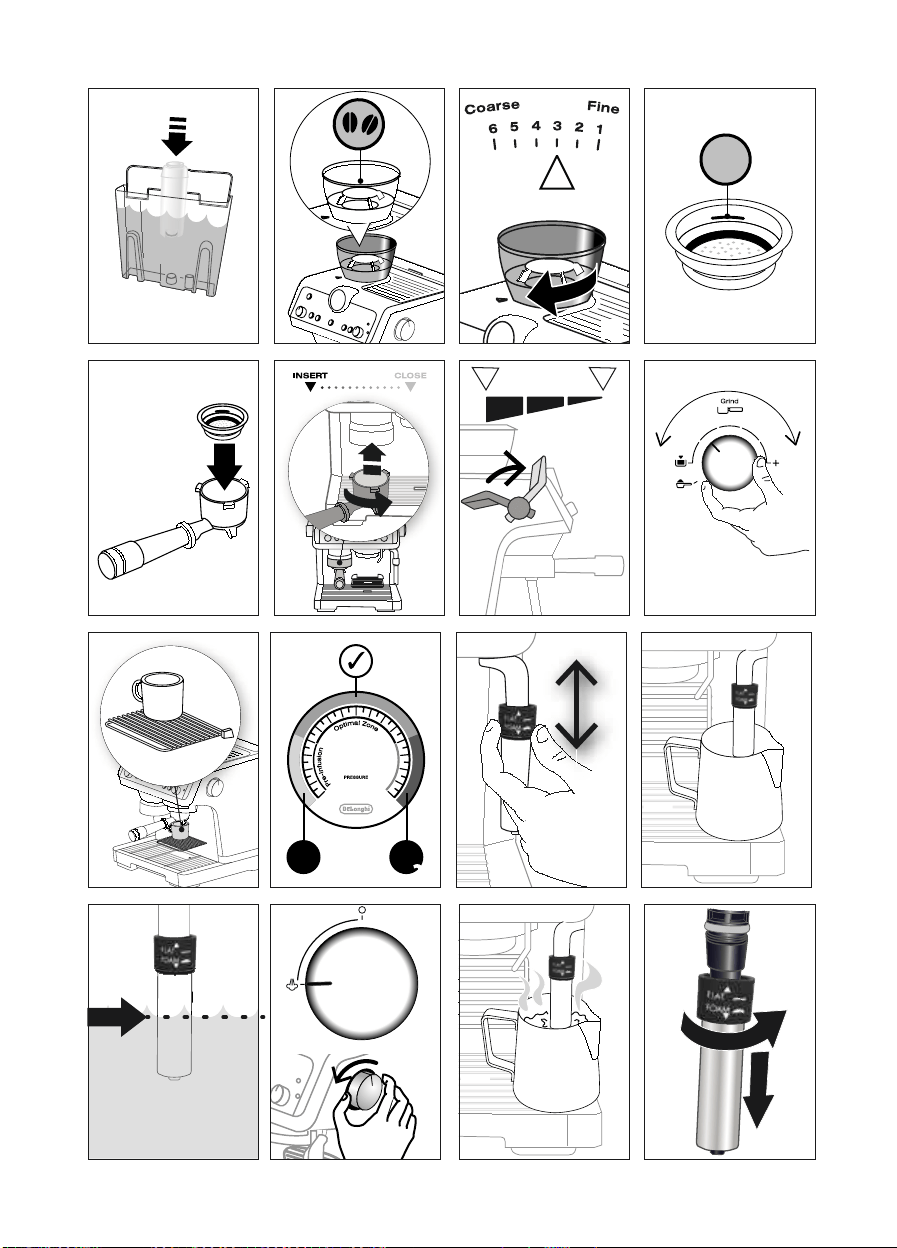
2. PREPARING THE APPLIANCE
Wash all accessories with warm water and washing-up liquid,
then proceed as follows:
1. Insert the beans container (A2) in the coee mill (g. 1);
2. Insert the drip tray (A13) complete with cup grill (A11) and
drip tray grille (A12) (g. 2);
3. Extract the water tank (A17) (g. 3) and ll with fresh clean
water, taking care not to exceed the MAX level (g. 4).
4. Put the tank back in the appliance.
Important Never operate the appliance without water in the tank or without the
tank.
3. SETTING UP THE APPLIANCE
1. Plug the power cord connector (C7) into the socket (A19) at
the back of the appliance (g. 5), then plug the plug into
the mains socket. Make sure the main switch (A20) at the
back of the appliance is pressed and in the I position (g.
6);
2. The
light (B6)
corresponding to the button comes on
and the
light (B15) ashes to indicate that you need
to deliver water to ll the circuit (g. 7);
3. Place a container with a minimum capacity of 100 ml under
the hot water spout (A5) and cappuccino maker (A8) (g.
8);
4. Press the button (B6) corresponding to the
light (g.
9). Delivery begins and stops automatically. Empty the
container.
Before using the machine, you must rinse the internal circuits.
Proceed as follows:
5. Attach the lter holder (C1) complete with lter to the
appliance. To attach correctly, align the lter holder handle
7
with "INSERT" (g. 10), then turn the handle to the right
until it is aligned in the "CLOSE" position;
6. Place a recipient under the lter holder and cappuccino
maker (A8) (g. 11);
7. Press the button (B4) corresponding to the
light (g.
12). Delivery begins;
8. When delivery is complete, turn the steam dial (A4) (g.
13) and deliver steam for 10 seconds to rinse the steam
circuit;
9. Repeat points 7 and 8 until you have delivered at least 1
litre of water (about half the tank);
10. Extract the water tank (A17) (g. 3), rinse and ll with fresh
clean water, taking care not to exceed the MAX level (g. 4)
The appliance is ready for use.
Please note: We also recommend rinsing the internal circuits if the appliance is not
used for a long period.
4. ACTIVATING THE WATER SOFTENER FILTER
Certain models are tted with a water softener lter (C6). If this
is not the case with your model, you are recommended to pur-
chase one from De’Longhi Customer Services.
To use the lter correctly, follow the instructions below.
1. Remove the lter from the packaging;
2. Turn the date indicator disk (g. 14) until the next 2 months
of use are displayed;
Please note: The lter lasts about two months if the appliance is used normally. If
the coee machine is left unused with the lter installed, it will last a maximum of 3
weeks.
3. To activate the lter, run tap water through the hole in the
lter (g. 15) until water comes out of the openings at the
side for more than a minute;
4. Extract the tank (A17) (if necessary ll with water);
5. Insert the lter in the water tank and immerse it complete-
ly for about ten seconds, sloping it and pressing it lightly to
enable the air bubbles to escape (g. 16);
6. Place the lter in the lter housing (A18) (g. 17) and press
as far as it will go. Close the tank, then put the tank back
in the machine;
The lter is now active and the coee machine can be used.
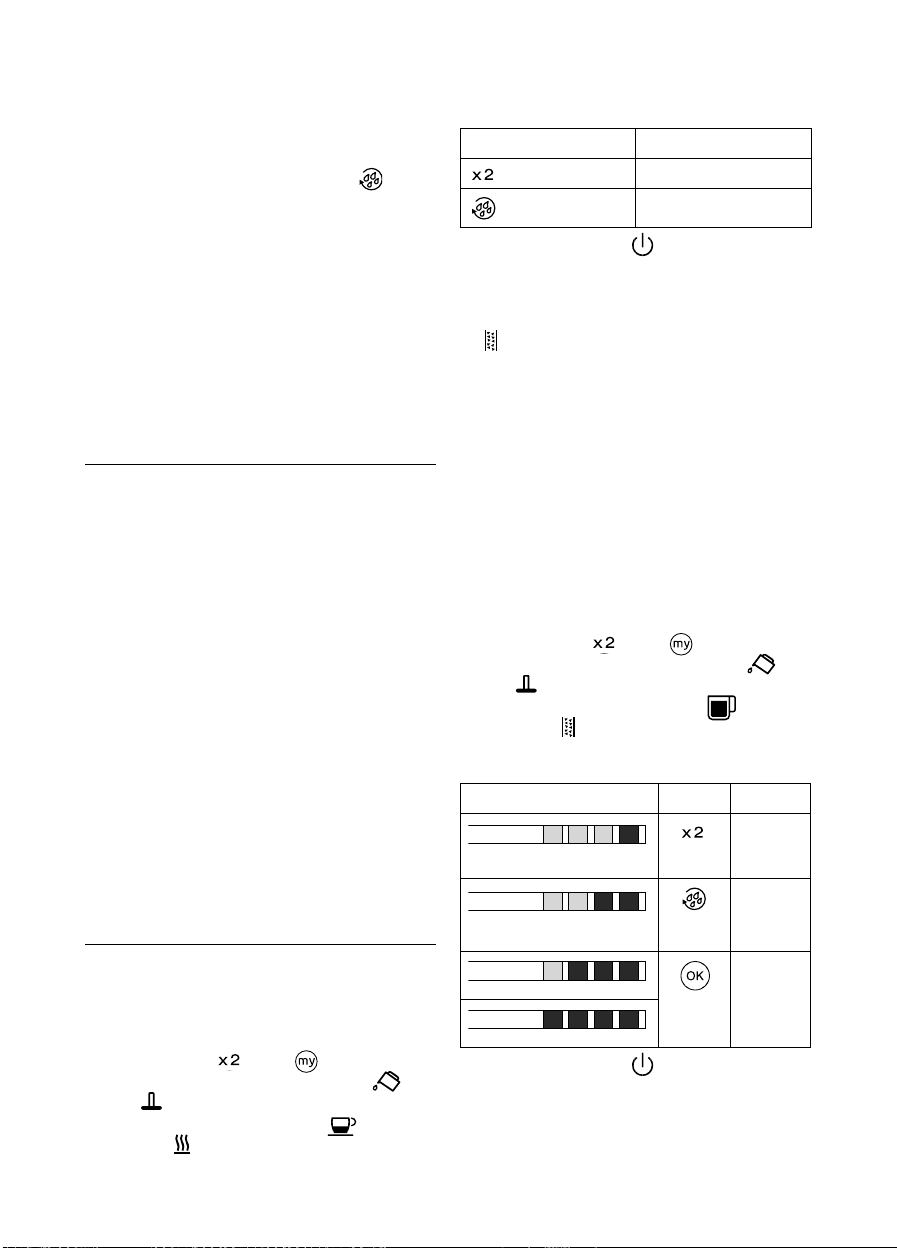
5. MENU SETTINGS
Please note: Once in the menu, you can modify all the menu functions as described
in the previous sections.
5.1 Coee temperature
To change the temperature of the water used to make the coee,
proceed as follows:
1. Press and hold the
(B3) and
(B7) buttons together
for at least 3 seconds to access the menu. The
(B15)
and
(B16) lights alternate;
2. Turn the mode selection dial (B8) to the
ESPRESSO po-
sition. The light (B11) remains on steadily;
3. Press the button corresponding to the desired selection as
shown in the following table:
Tasto Temperatura
Normale
Alta
4. To exit the menù, press the (B1) button. (If the appliance
is left idle for
about 1 minute, it exits automatically from
the settings menu and is ready for use again).
5.2 Water hardness
The descale light (B9) comes on after a period of time es-
tablished according to water hardness. The machine can also
be programmed according to the actual hardness of the water
supply in the various regions, in which case descaling may be
required less frequently.
Proceed as follows:
1. Remove the "TOTAL HARDNESS TEST" indicator paper (C4)
from its pack.
2. Immerse the paper completely in a glass of water for one
second.
3. Remove the paper from the water and shake lightly. After
about a minute, 1, 2, 3, or 4 red squares form, depending
on the hardness of the water. Each square corresponds to
one level.
4. Press and hold the
(B3) and
(B7) buttons together
for at least 3 seconds to access the menu. The
(B15)
and
(B16) lights alternate;
5. Turn the mode selector dial (B8) to the
LONG BLACK
position. The
(B9) remains on steadily;
6. Press the button corresponding to the desired selection as
shown in the following table:
Total Hardness Test result Button Level
1
soft water
2
medium
water
3
hard or
very hard
water
7. To exit the menù, press the (B1) button. (If the appliance
is left idle for
about 1 minute, it exits automatically from
the settings menu and is ready for use again).
8
5.3 Auto-o
Auto-o can be set so that the appliance goes o after 15 min-
utes, one and a half hours, or three hours. Proceed as follows:
1. Press and hold the
(B3) and
(B7) buttons together
for at least 3 seconds to access the menu. The
(B15)
and
(B16) lights alternate;
2. Turn the mode selection dial (B8) to the
COFFEE posi-
tion. The (B13) remains on steadily;
3. Press the button corresponding to the desired selection as
shown in the following table:
Button Time
15 minutes
1.5 hours
3 hours
4. To exit the menù, press the (B1) button. (If the appliance
is left idle for
about 1 minute, it exits automatically from
the settings menu and is ready for use again).
5.4 Default values
The appliance can be reset to the default values. Proceed as
follows:
1. Press and hold the
(B3) and
(B7) buttonstogether
for at least 3 seconds to access the menu. The
(B15)
and
(B16) lights alternate;
2. Press and hold the
button for a few seconds until the
corresponding light starts ashing;
3. To exit the menù, press the
(B1) button. (If the appliance
is left idle for
about 1 minute, it exits automatically from
the settings menu and is ready for use again).
5.5 Energy saving
Use this function to enable or disable energy saving. When en-
abled, the function reduces energy consumption in compliance
with European regulations.
Proceed as follows:
1. Press and hold the
(B3) and
(B7) buttonstogether
for at least 3 seconds to access the menu. The
(B15)
and
(B16) lights alternate;
2. Press the
(B6) button. The light (B12) comes on;
3. To exit the menù, press the
(B1) button. (If the appliance
is left idle for
about 1 minute, it exits automatically from
the settings menu and is ready for use again).
Please note:
• If energy saving is active, you may have to wait a few seconds
before delivery.
• When energy saving is disabled, steam is delivered
immediately.
6. MAKING COFFEE
6.1 Preparing the coee mill
1. Insert the beans container (A2), line up the printed marks
and screw on by turning clockwise (g. 1) until it is aligned
with position "3" (factory setting);
2. Remove the beans container lid (A1);
3. Place the required quantity of coee beans in the container
(g. 18);
4. Close the lid, pressing rmly.
5. Check that the ground coee quantity dial (B2) is on
position (factory setting).
Important: Do not remove the beans container while it contains beans.
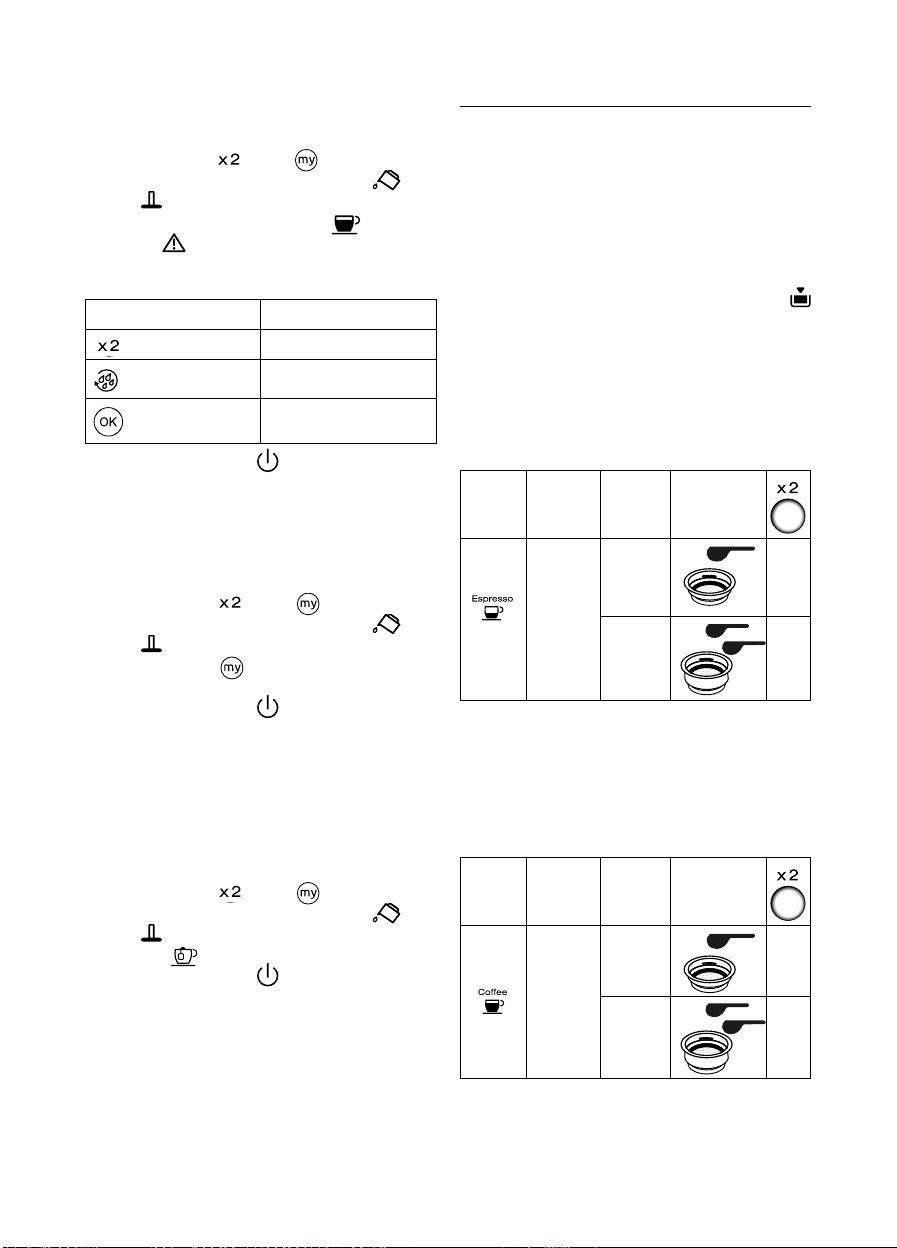
6.2 Coee beverages
• ESPRESSO
Beverage of Italian origin, a short coee with an intense
aroma.
Coee Pre-
infusion
Quantity Filter
✓
1 cup
35 ml
C2
✗
2 cups
70 ml
C3
✓
Always check that the coee quantity in the lter is correct (see
paragraph "6.8 Adjusting the quantity of ground coee in the
lter").
• COFFEE
Beverage of European origin, a long coee with a delicate
aroma.
Coee Pre-
infusion
Quantity Filter
✗
1 cup
70 ml
C2
✗
2 cups
140 ml
C3
✓
9
Always check that the coee quantity in the lter is correct (see
paragraph "6.8 Adjusting the quantity of ground coee in the
lter").
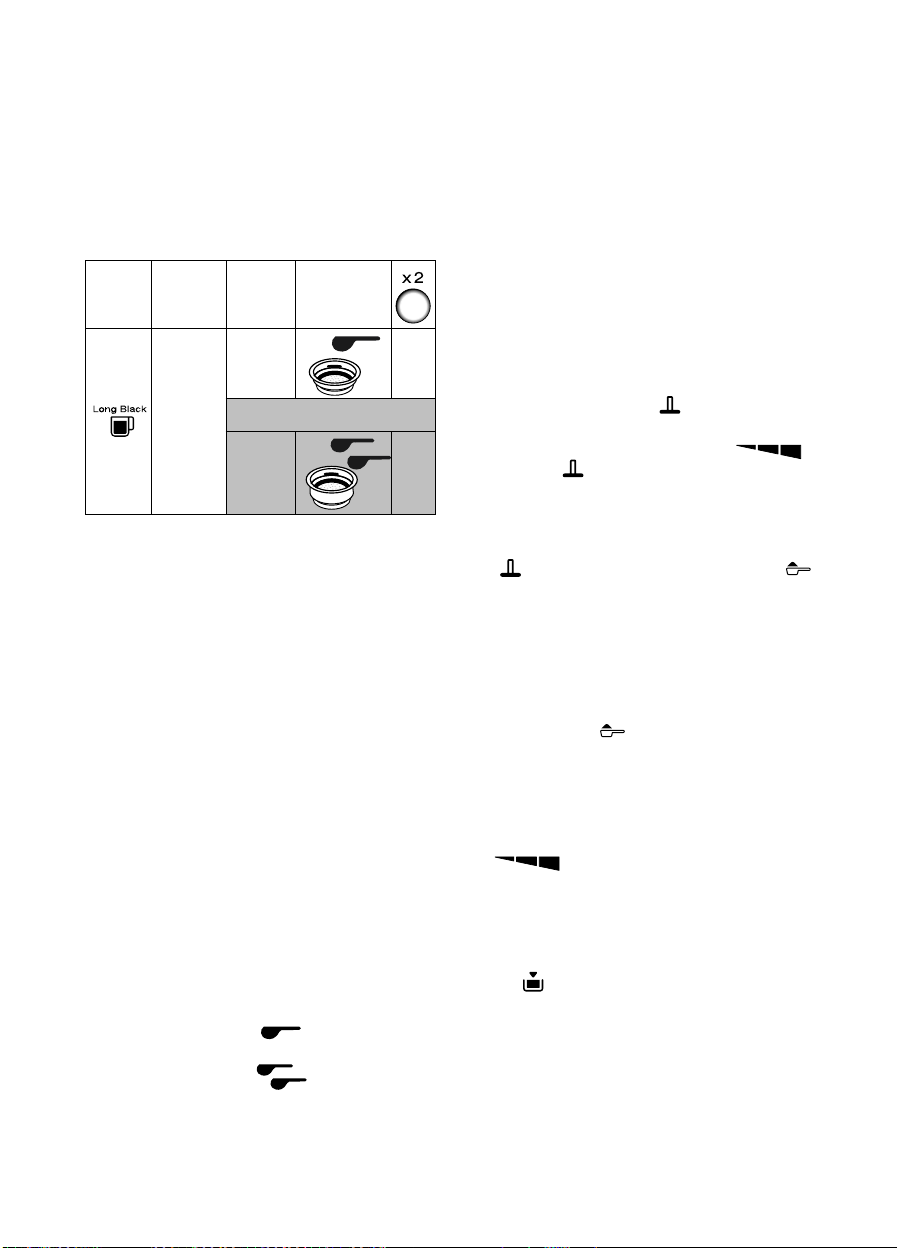
• LONG BLACK
This long coee is a favourite in Australia and New Zealand.
Hot water is delivered rst, followed by the espresso directly
into the cup. Only one cup can be made at a time.
Coee Pre-
infusion
Quantity Filter
✓
1 cup
120 ml
C2
✗
RECOMMENDED
1 cup
240 ml
C3
✓
Always check that the coee quantity in the lter is correct (see
paragraph "6.8 Adjusting the quantity of ground coee in the
lter").
6.3 Beverage selection
1. Turn the mode selector dial (B8) to select the desired coee
(see section "6.2 Coee beverages").
2. If you use the 2 cup lter (C3), press the "2X" button (B3) .
6.4 Select the grinding level
The grinding level aects delivery speed and therefore the qual-
ity of the extract.
The rst time you use the appliance, we recommend using the
factory setting (medium grinding) (g. 19), then if you are not
satised with the result, adjust the level according to your per-
sonal taste and the type of coee by setting a ner or coarser
grinding level, referring to the tips in section "6.8 Adjusting the
quantity of ground coee in the lter".
Important:
• Always adjust the coee mill while in operation.
• Adjust one grinding level at a time and make at least 5 coees
before adjusting again.
6.5 The coee lters
The appliance is provided with two coee lters.
The 1 coee lter (C2), has the
symbol marked on the
bottom.
The 2 coee lter (C3), has the
symbol marked on the
bottom.
The ideal level of pressed coee is marked inside both lters
(g. 20). If the quantity is above or below the level indicated,
the result may not be satisfactory. The next times you use the
coee mill, you can adjust the grinding level using the dial (B2)
(see section "6.8 Adjusting the quantity of ground coee in the
lter").
6.6 Grind the coee directly into the lter
1. Place the ground coee lter (C2) or (C3) in the lter holder
(C1) (g. 21);
2. Press the "X2" button if you are using the 2 coee lter;
3. Attach the lter holder to the outlet of the coee mill
(A22), aligning it with "INSERT", then turning it to the right
(g. 22). Grinding begins when the lter holder reaches the
CLOSE position and stops automatically;
Important: while the appliance is grinding coee, you can per-
form a rinse, or produce hot water or steam at the same time.
4. Once grinding is complete, the
(B16) light ashes: pull
the presser lever (A23) as far as it will go. The force exerted
on the coee is indicated on the lever itself ( )
(g. 23). The
light remains on steady.
5. Remove the lter holder by turning it towards the left.
Important: to adjust the correct quantity ground automatically into the lter hold-
er, see section "6.8 Adjusting the quantity of ground coee in the lter".
If the lter holder is removed without pressing the coee, ash-
es the (B16) light. To press it, turn the knob (B2) to
position to disable the grinding and pull the lever (A23) : then
re-attach the lter holder.
6.7 Using pre-ground coee
1. Place the ground coee lter (C2) or (C3) in the lter holder
(C1) (g. 21);
2. Place the quantity of ground coee in the lter;
3. Turn the dial (B2) to position to disable the coee mill;
4. Attach the lter holder to the outlet of the coee mill (A22)
aligning it with "INSERT", then turning it to the right (g.
10).
5. Pull the presser lever (A23) as far as it will go. The print-
ing on the lever indicates the pressing force exerted
( ) (g. 23).
6. Remove the lter holder by turning it towards the left.
6.8 Adjusting the quantity of ground coee in
the lter
Important: When using the coee mill for the rst time, leave
the knob to position (min). At the beginning, it is normal for a
few attempts to be needed before nding the correct grinding level
and quantity. We recommend starting by using the default values,
then if necessary changing them according to the tips in section
"14. How to make perfect coee".
A mark on the inside of the (C2) and (C3) lters shows the ideal
quantity of pressed coee (g. 20). Adjust the (B2) dial to in-
crease of decrease the quantity of ground coee (g. 24), in
order to achieve the ideal quantity indicated by the mark.
10
6.9 Delivering the coee
1. Attach the lter holder (C1) to the appliance. To attach cor-
rectly, align the lter holder handle with "INSERT" (g. 10)
then turn the handle to the right until it is aligned in the
"CLOSE" position;
2. Place the cup or cups under the lter holder spouts;
3. If you are using small cups, lower the cup grille (A10) to
bring the lter holder spouts nearer the cup. This makes a
better froth (g. 25);
4. Using the dial (B8), select the desired beverage;
5. Press the "OK" button. The appliance makes the coee then
stops automatically.
Please note: While the machine is making coee, delivery can
be interrupted at any moment by pressing the "OK" button. To re-
move the lter holder, turn the handle from right to left.
Danger of burns
• To avoid splashes, never remove the lter holder while the
appliance is delivering coee. Wait for a few seconds after
delivery.
• If no coee is delivered, wait for about 1 minute before remov-
ing the lter holder. There could be a pu of steam caused by
the residual pressure inside the appliance.
6.10 Pressure gauge
The pressure gauge enables you to check that pressure is correct
while the coee is being delivered (g. 26).
While making ESPRESSO coee, the indicator will initially be in
the "pre-infusion" sector and will then rotate to the "optimal
zone" during delivery.
For more information, see section "14. How to make perfect
coee".
Important: the pressure gauge only operates while coee bev-
erages are being made. If you are preparing hot water "
" or
using the steam function, the pressure gauge indicator does not
move.
7. HOW TO MAKE MILKBASED BEVERAGES
1. Fill the milk jug (C9) with the milk you want to heat/froth,
bearing in mind that the milk doubles or triples in vol-
ume. For a denser more even froth, you should ideally use
skimmed or partially skimmed cow's milk at refrigerator
temperature (about 5°C).
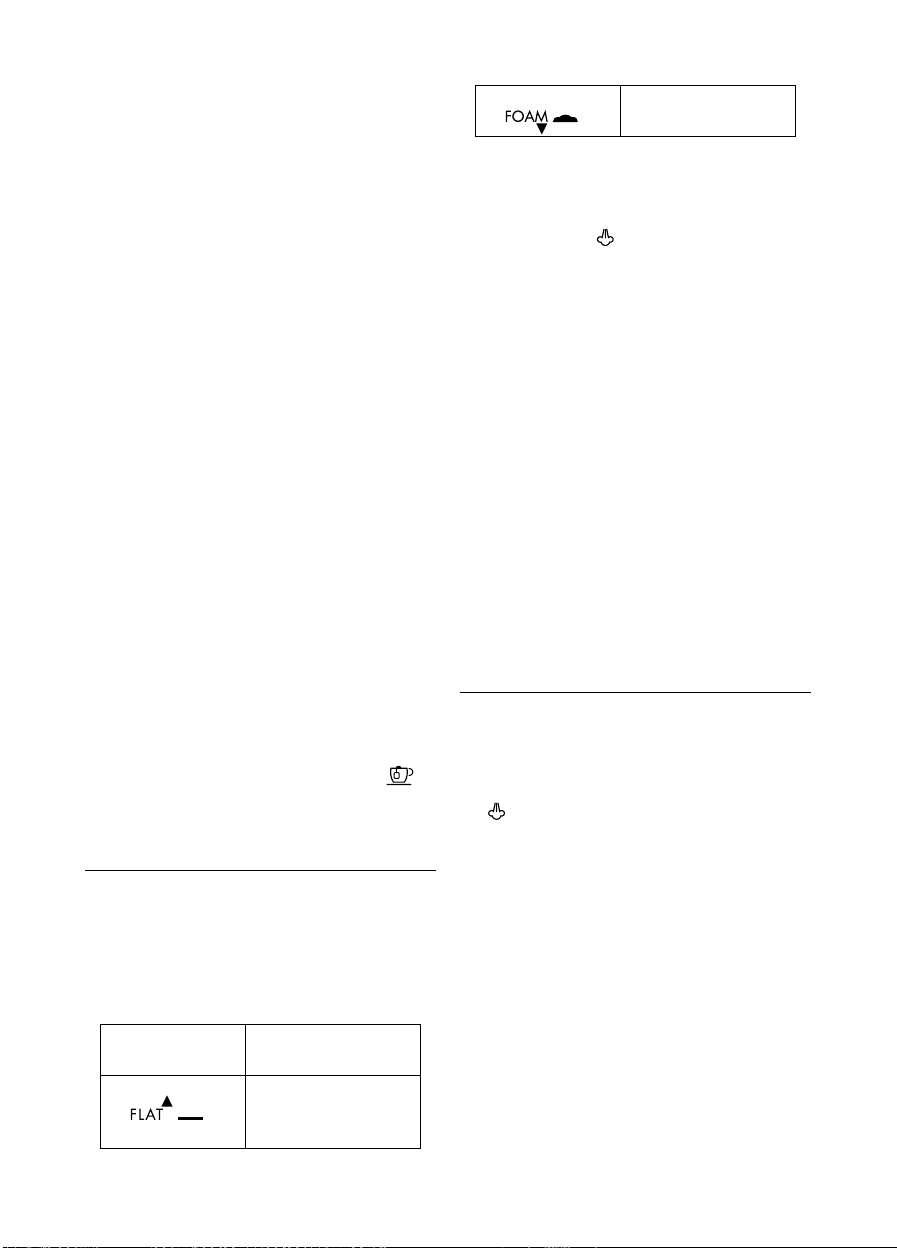
2. Choose the position of the ring (A7) (g. 27) according to
the beverage to be prepared (see following table):
Recommended
position
Milk beverage to be
prepared
Hot milk (not frothed) /
Caelatte / Macchiato / Flat
White
Cappuccino, Espresso Mac-
chiato, Hot Milk (frothed)
3. Place the jug (C9) containing the milk under the cappuccino
maker (A8) (g. 28).
4. Immerse the cappuccino maker in the milk container. Never
immerse the black ring (g. 29).
5. Turn the dial to the
position (g. 30). Steam to heat the
milk is delivered from the cappuccino maker. If the ring is
in the FOAM position, the steam gives the milk a creamy
frothy appearance (g. 31). To obtain a creamier froth,
immerse the cappuccino maker in the milk and rotate the
container with slow upward movements
6. When the required temperature (the ideal is 60°C) and
froth density is reached, interrupt steam delivery by turn-
ing the dial to the ◯ position.
7. For beverages requiring it, prepare the coee (see section
"6. Making coee"). Choose suciently large cups and
place them on the espresso cup grille (A10). To use tall
glasses, close the espresso cup grille (A10) and rest the
glass on the cup grille for glasses or mugs (A11).
8. Pour the frothed milk into the cups. Sweeten to taste and if
desired, sprinkle the froth with a little cocoa powder.
Please note:
Preparing cappuccino: consider about 100 g of milk for each cup.
You should not deliver steam for more than
60 seconds.
8. CLEANING THE CAPPUCCINO MAKER
AFTER
USE
For hygiene reasons, the cappuccino maker should always be
cleaned after use.
Proceed as follows:
1. Deliver a little steam for a few seconds (points 2, 5 and 6
of the previous section) by turning the steam deal to the
position. This causes the cappuccino maker to discharge
any milk left inside.
2. Press the (B1) ON/Standby button to turn the appliance o.
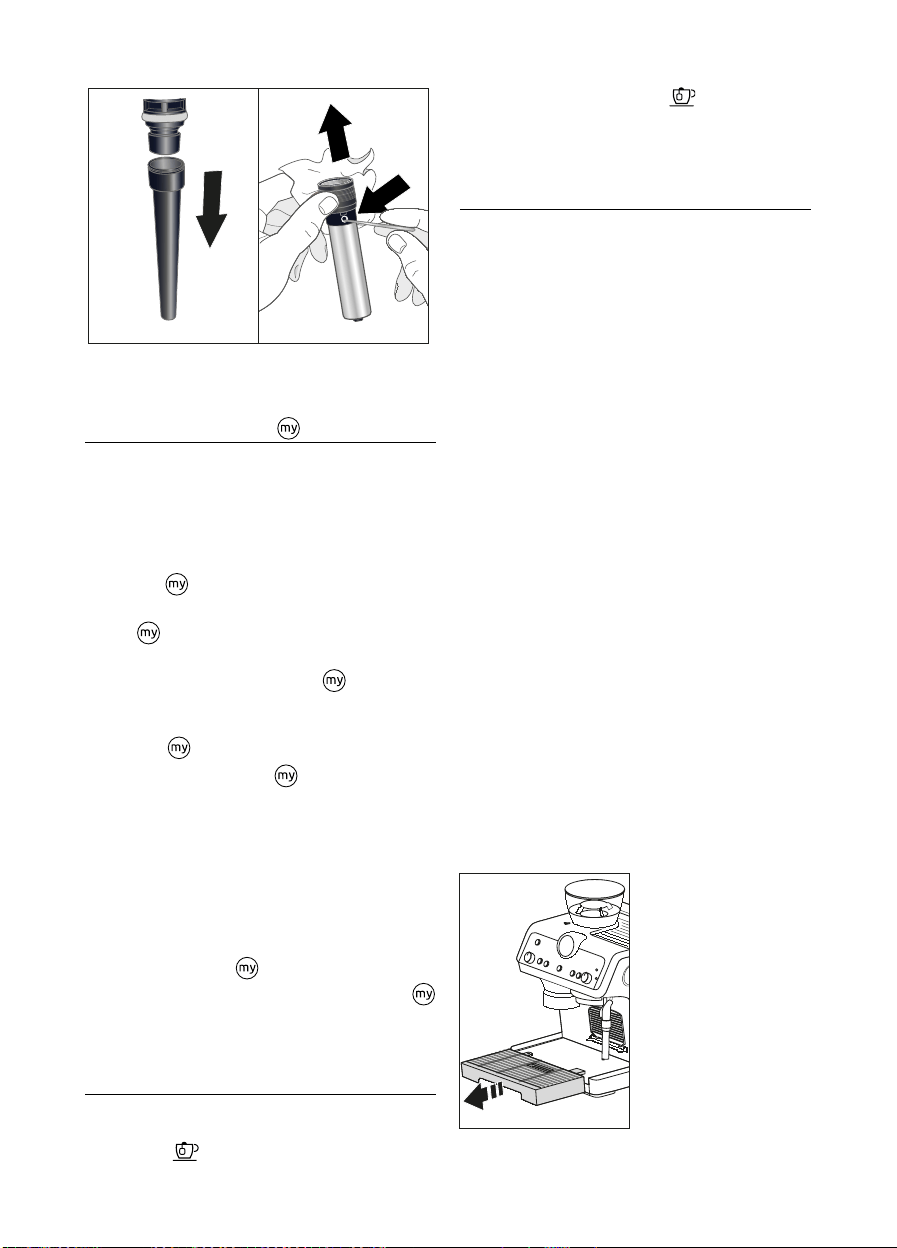
3. Wait a few minutes for the cappuccino maker to cool down.
With one hand, hold the cappuccino maker tube rmly,
with the other, release the cappuccino maker by turning it
anticlockwise, then pull o downwards (g. 32).
4. Remove the rubber steam connection nozzle from the
spout by pulling it downwards (g. 33).
5. Push the ring upwards and make sure the two holes shown
by the arrows in g. 34 are not blocked. If necessary, clean
with a pin.
6. Replace the connection nozzle, move the ring downwards
and put the cappuccino maker back on the nozzle, turning
it and pushing it upwards until it is attached.
11
3433
For thoroughly cleaning, use De'Longhi cleaner.
9. CUSTOMISING THE QUANTITY OF COFFEE
BEVERAGES WITH THE
BUTTON B7
1. Prepare the appliance to deliver 1 or 2 cups of the coee
beverage you want to make, as far as attaching the lter
holder (C1) complete with the (C2) or (C3) lter and ground
coee.
2. Select the coee beverage to program, by turning the (B8)
dial.
3. Press the
button: the light corresponding to "OK" but-
ton (B5) comes on steadily and the light corresponding to
the
button ashes.
4. Press the "OK" button to start delivering the beverage. The
lights corresponding to the "OK" and
buttons ash.
5. When you have reached the desired quantity of the bever-
age, press the "OK" button again.
6. Press the button to save the new setting. The appliance
is ready for use again and the
button remains on.
If you do not want to save the new setting, press any other
button.
Programming Long Black coee: follow the procedure described
above for the quantities of both coee and hot water.
Please note:
• The coee beverages can be programmed: you can not program steam and hot
water quantity.
• "X2" drinks can be programmed separately.
9.1 Beverage reset
To reset the default beverage quantities, press and hold the
button (B7) until it goes o.
The selected beverage is reset to the default values.
10. DELIVERING HOT WATER
1. Choose the cup and place it on the correct cup grille ((A10)
or (A11));
2. Press the
button (B6): the appliance delivers hot
water from the spout (A5) then goes o automatically.
3. To stop delivery, press again the button.
You should not deliver hot water for more
than 60 seconds.
11. CLEANING
11.1 Cleaning the machine
The following parts of the machine must be cleaned regularly:
- drip tray (A13) complete with cup grille (A11) and drip tray
grille (A12);
- espresso cup grille (A10);
- coee lters (C2) and (C3);
- beans container (A2);
- coee burrs;
- coee mill outlet (A22) (smart tamping station);
- boiler outlet (A21);
- water tank (A17);
- cappuccino maker (A8) as described in section "8. Cleaning
the cappuccino maker after use".
Important!
• Do not use solvents, abrasive detergents or alcohol to clean
the coee machine.
• Do not use metal objects to remove encrustations or coee
deposits as they could scratch metal or plastic surfaces.
• None of the components of the appliance can be washed in
a dishwasher with the exception of the drip tray (A13) and
cup grilles (A10) and (A11).
• If the appliance is not used for more than a week, before
using it again, we recommend you perform a rinse cycle as
described in section "3. Setting up the appliance".
Danger!
• While cleaning, never immerse the coee maker in water. It
is an electrical appliance.
• Before cleaning the outside of the appliance, turn it o,
unplug from the mains socket and allow to cool.
11.2 Cleaning the drip tray
The drip tray is tted with a level
indicator (A14) showing the
amount of water it contains. Be-
fore the indicator protrudes from
the cup tray, the drip tray must
be emptied and cleaned, other-
wise the water may overow the
edge and damage the appliance,
the surface it rests on or the sur-
rounding area.
35
12
1. Remove the drip tray (g. 35).
2. Remove the cup grille (A7), the drip tray grille (A12) and
the drip tray water level indicator (A14), empty the water
and clean the tray with a cloth, then reassemble the drip
tray.
3. Put the drip tray back in place.
11.3 Cleaning the small cup grille
1. Extract the grille (A10) by pulling it from the left, then re-
moving it from the support (g. 36).
2. Clean the support with a cloth and wash the grille (dish-
washer safe).
3. Put the grille back on the support from the right side, then
push until it is correctly attached (g. 37).
37
36
1
2
1
22
2
1
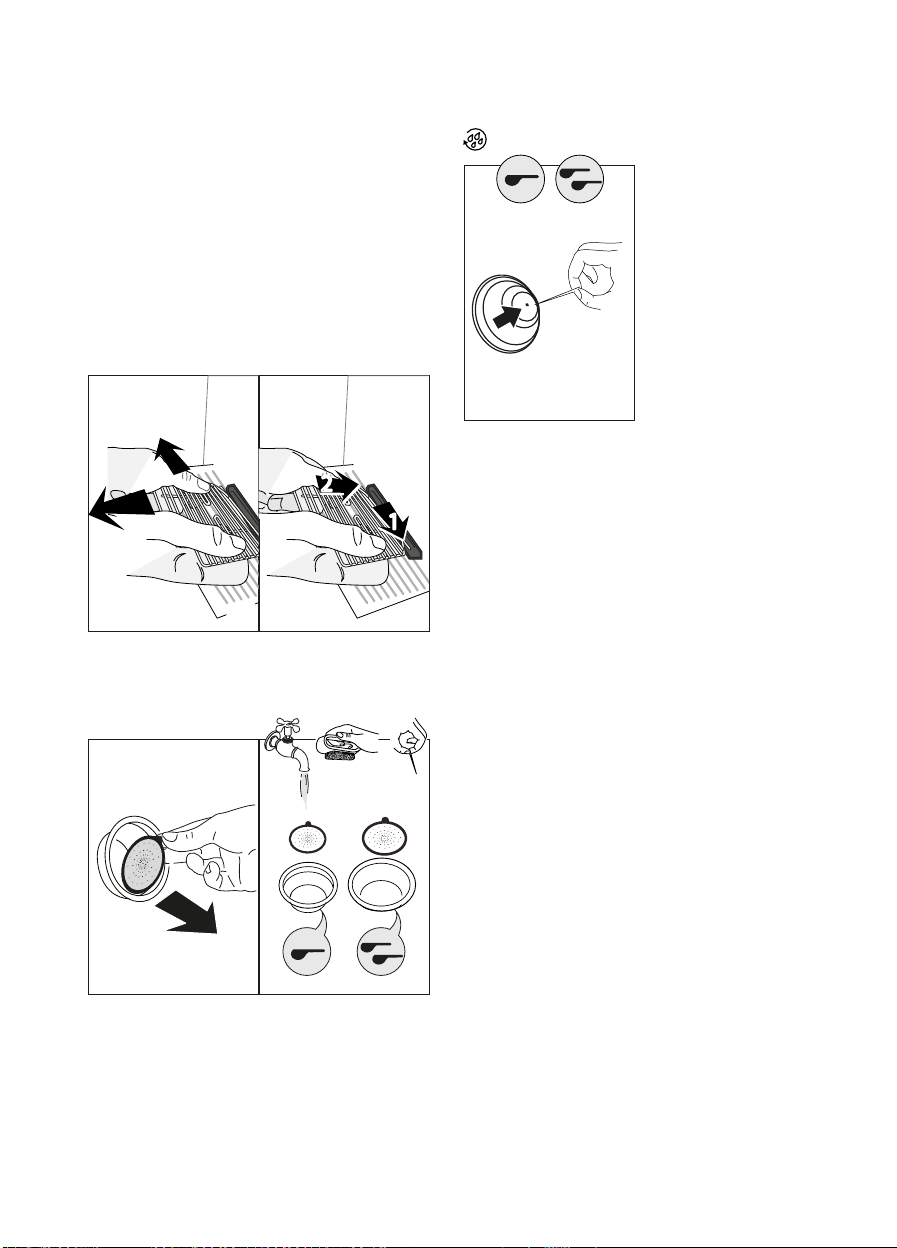
11.4 Cleaning the coee lters
Clean the coee lters weekly:
1. Extract the perforated lter by pulling the tab (g. 38).
38 39
2. Rinse the lters under running water (g. 39).
3. Make sure the holes are not blocked. If necessary, clean
with a pin (g. 40).
4. Place the perforated lter back in the lter housing and
press as far as it will go.
11.5 Cleaning the boiler outlet
After every 200 coees, rinse the boiler outlet:
Press the rinsing
button (B4) until around 500 ml of water is delivered.
11.6 Cleaning the water tank
1. Clean the water tank regularly (about once a month) and when-
ever you replace the water softener lter (C6) (*if present) with
a damp cloth and a little mild washing up liquid.
2. Remove the lter (*if present) and rinse with running
water.
3. Replace the lter (*if present), ll the tank with fresh water
and replace the tank.
4. (Models with water softener lter only) Deliver about 100
ml of water.
Danger!
While cleaning, never immerse the coee maker in water. It is an
electrical appliance.
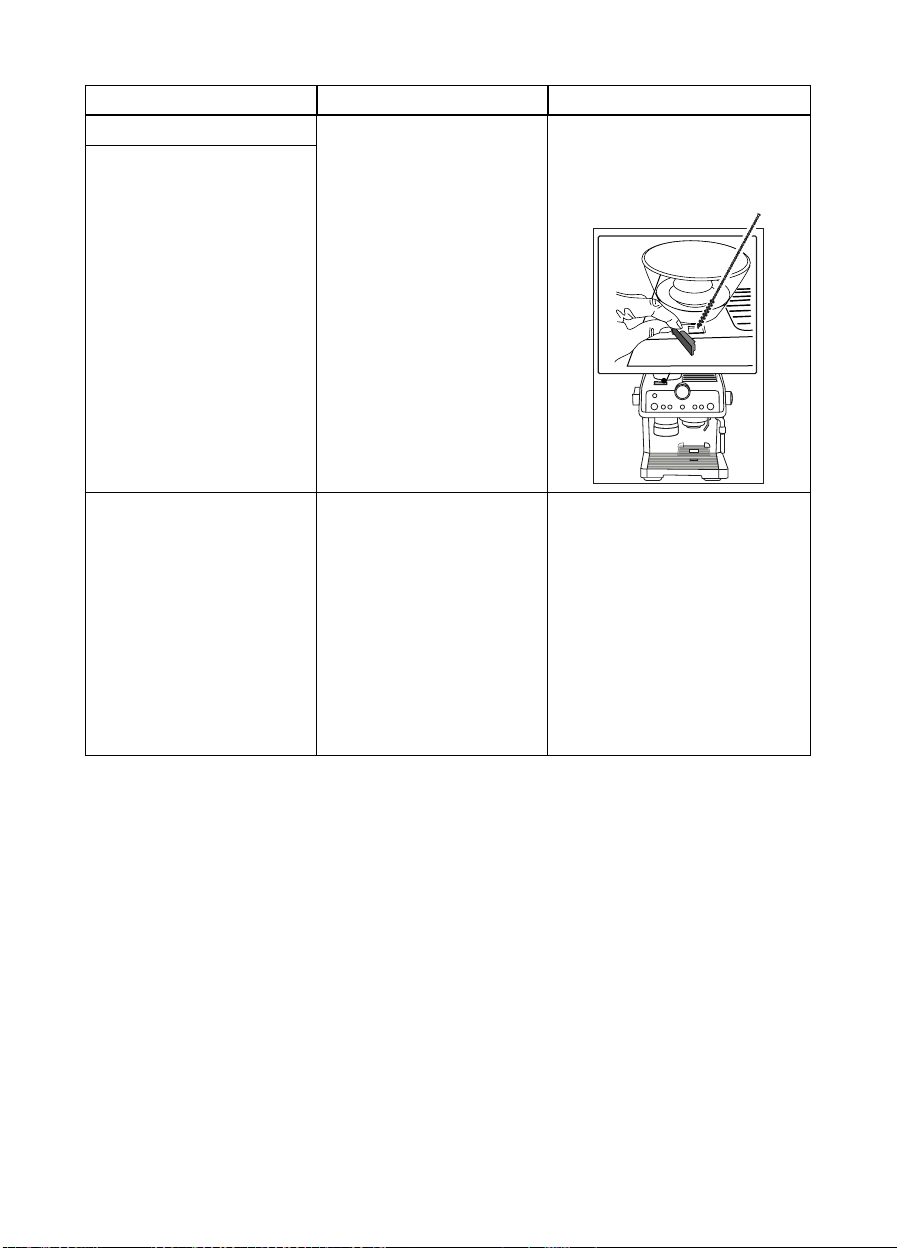
11.7 Cleaning the beans container
1. Make sure the beans container (A2) is empty, then release
by turning it anticlockwise and extract from the appliance.
2. Wash the container and lid (A1) with warm water. Do not
wash the components in a dishwater or use washing up
liquid! Dry all accessories thoroughly before using again.
3. Remove coee residues (g. 44).
4. Put the container back as described in section "3. Setting
up the appliance".
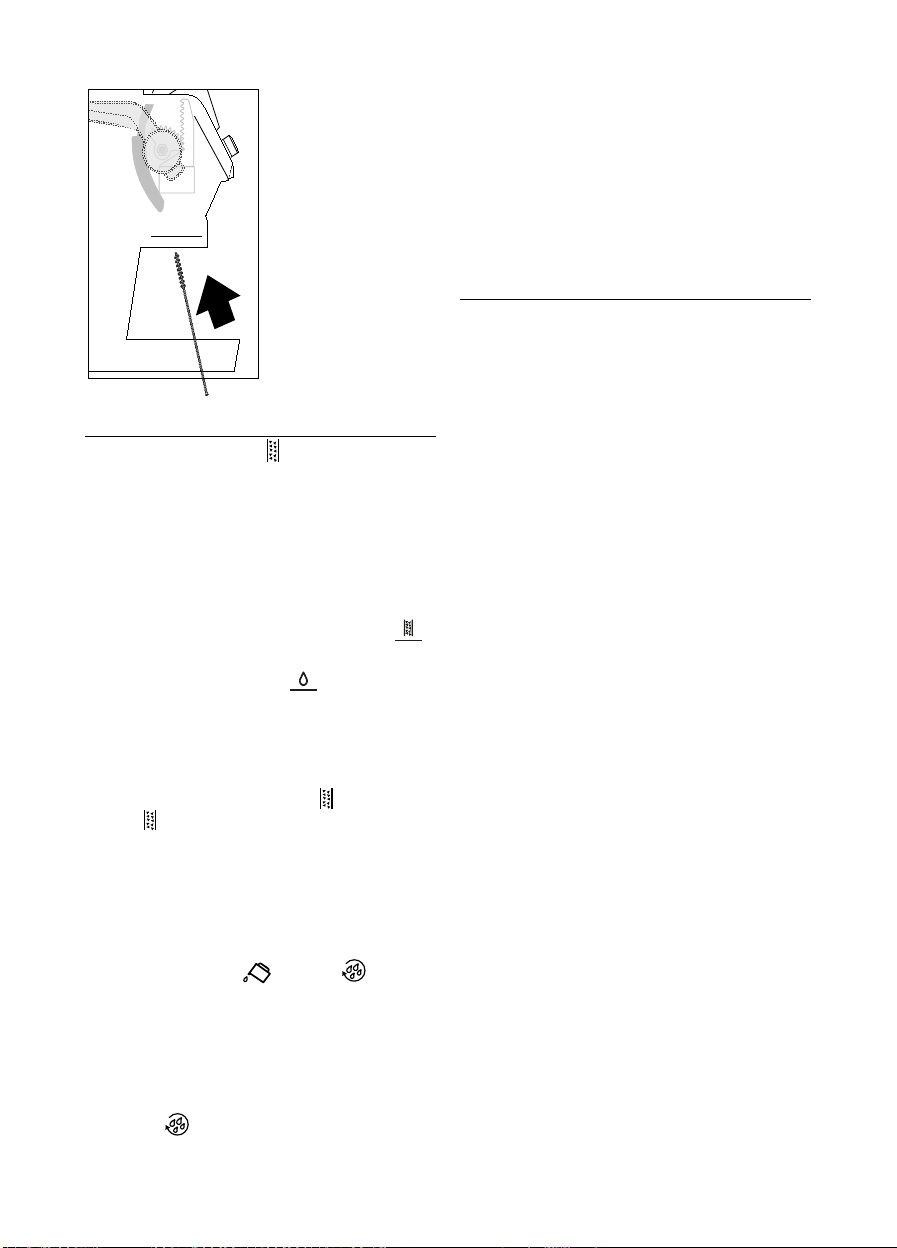
11.8 Cleaning the burrs
1. Empty the beans container (if necessary, using a vacuum
cleaner to remove any remaining beans).
2. Attach the lter holder and operate the mill without beans
to free the coee guide: attach the lter holder to the outlet
of the coee mill (A22) aligning it with "INSERT", then turn-
ing it to the right (g. 22). Grinding begins when the lter
holder reaches the CLOSE position and stops automatically.
3. Remove the beans container as described in the previous
section "11.7 Cleaning the beans container".
40
13
4. Turn the neness selector anticlockwise as far as it will go
to the "REMOVE" position
(g. 41).
42
41
5. Lift and extract the upper burr
, taking it by the special han-
dle (g 42).
6. Clean the inside of the appliance with the tube brush
(C8)-
g. 43)
and use a vacuum cleaner to remove coee residues
(g. 44).
43 44
7. Put the upper burr back in the appliance
:
45
46
• Insert the brash in its housing (g. 45);
• Turn the neness selector to the desired grinding position
(g. 46);
• verify that the burr is well inserted by pulling it by the han-
dle: the burr is correctly inserted if it does not move;
8. Use a brush to remove any coee residues from the outlet
of the coee mill
(A22).
11.9 Extra grinding adjustment
Over time, the burrs will wear down and the quantity of ground
coee will diminish. When the grinding adjustment illustrated
on the "6.4 Select the grinding level" is not sucient, you can
select a new grinding range. Proceed as follows:
1. Press and hold the
(B3) and
(B7) buttons together
for at least 3 seconds to access the menu. The
(B15)
and (B16) lights alternate;
2. turn the mode selector dial
(B8) to the position: the
(B14) light
remains on steady.
3. Select the new grinding range by pressing the
(B4)
button;
4. Press the
(B1)button to exit the menù. (
If the appliance
is left idle for
about 1 minute, it exits automatically from
the settings menu and is ready for use again);
5. Turn the dial (B2) to position ("min"), then proceed as
illustrated for the rst use ("6.4 Select the grinding level").
Over time, the burrs will wear down and the quantity of ground
coee will diminish. If this occurs, replace with new burrs pur-
chased from an authorised Customer Services centre.
Then turn the knob (B2) to (min) position and proceed as
illustrated at the rst use ("6.4 Select the grinding level").
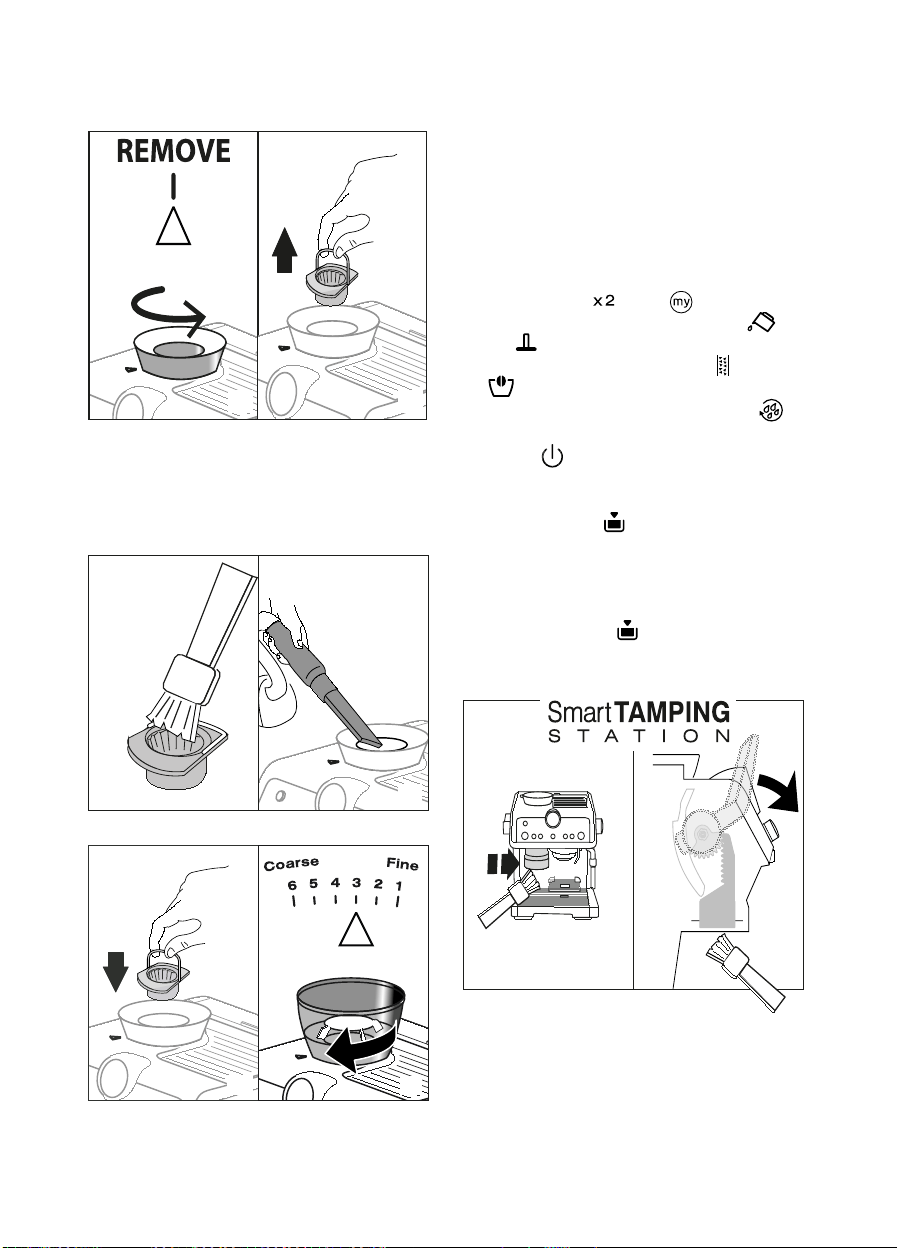
11.10 Cleaning the "tamping station"
47 48
1. Clean the attachment area with a brush (g. 47).
2. Pull the lever
(A23)as far as it will go and clean the presser
cylinder with a brush (g. 48). Then release the lever;
3. Use the tube brush
(C8)
to clean the coee guide
(g. 49).
14
11.11 Other cleaning
operations
1. Do not use solvents or
abrasive detergents to
clean the coee maker.
Use a soft damp cloth only.
2. Clean the lter holder cup.
For thoroughly cleaning, use
De'Longhi cleaner.
12. DESCALING
Descale the appliance when the
light
(B9)
comes on.
• Before use, read the instructions and the labelling on the
descaler pack.
• It is important to use De’Longhi descaler only. Using unsuitable
descaler and/or performing descaling incorrectly may result in
faults not covered by the manufacturer's guarantee.
Proceed as follows:
1. IF PRESENT, REMOVE THE WATER SOFTENER FILTER
.
Pour the descaler into the tank up to the level
A
marked inside the tank (equal to one 100ml packet), then
add water (litre) up to the level
B.
2. If the appliance is o, press the ON/Standby button
(B1).
3. Make sure the lter holder is not attached and position a
recipient under the spouts
(A5), (A6)
and the boiler outlet
(A21) (g. 8).
4. Turn the mode selector dial (B8) to the (B8) position.
The light ashes and the "OK" light comes on.
5. Press "OK" (B5) to start descaling.
6. The descale programme starts and the descaler liquid comes
out of the spouts and boiler outlet. The descale programme
removes limescale deposits from inside the appliance by au-
tomatically performing a series of rinses and pauses until the
tank is empty.
7. Delivery stops and the (B15) and lights corre-
sponding to the rinse button (B4) come on.
8. Empty the recipient used to collect the descaler solution
and replace it empty under the spouts.
9. Remove the water tank, empty any residues of descaler
solution, rinse with running water and ll with fresh water
up to the MAX level. Put the tank back in its housing.
10. Press the
button. The appliance rinses the internal cir-
cuits and delivers water from all three spouts.
11. When rinsing is complete, delivery stops. All the LEDs ash
briey and the appliance prepares to be used again.
12. Empty the recipient used to collect the rinse water.
13. Extract and empty the drip tray, then put back in the
appliance.
14. Extract the tank, ll with fresh water, then put back in the
appliance.
15. Turn the mode selector dial to one of the coee positions.
13. TECHNICAL DATA
Voltage:
220-240V
˜
50/60Hz
Power:
1450W
Size LxDxH:
375x368x445 mm
Pressure:
19 bar
Water tank capacity:
2 L
Cord length:
1200 mm
Weight:
12 kg
49
15
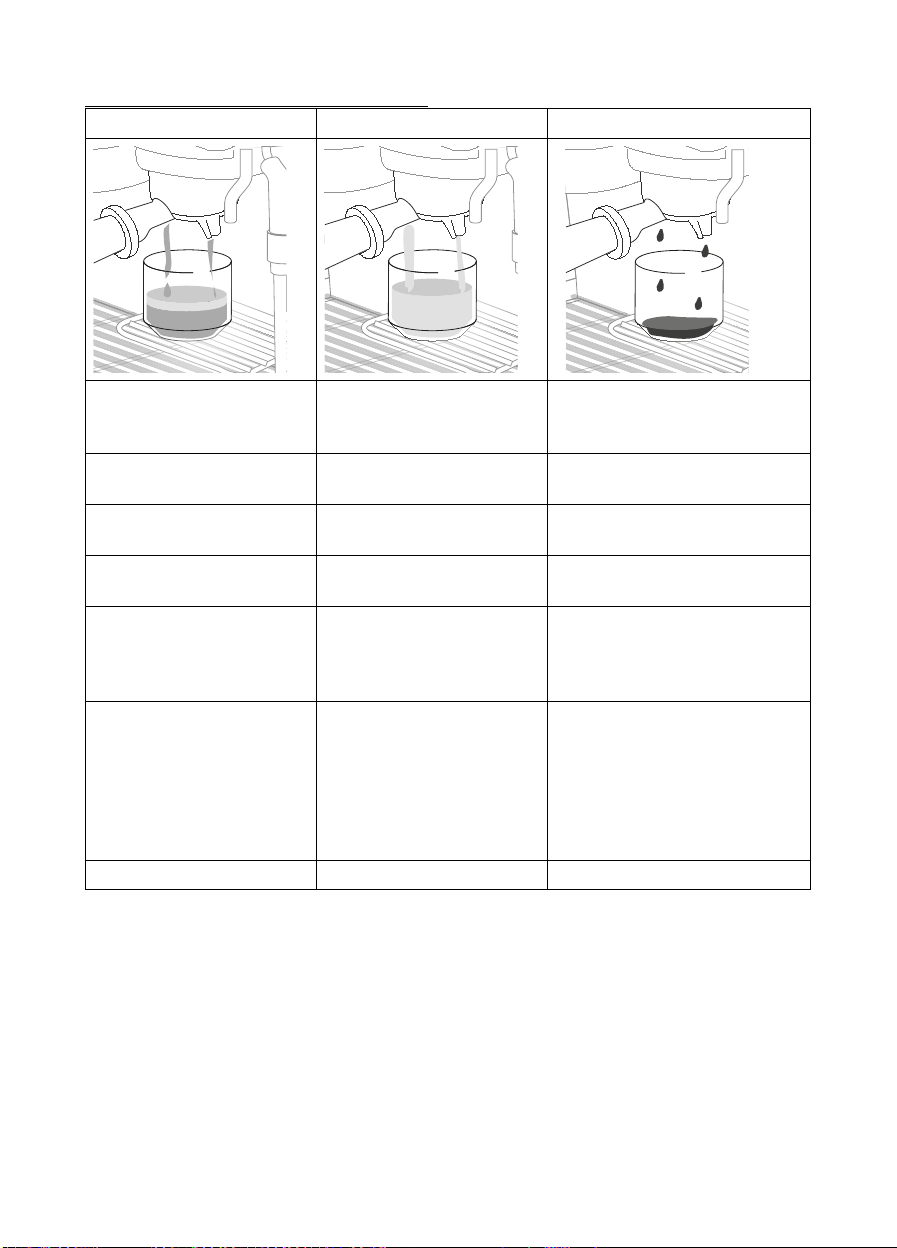
14. HOW TO MAKE PERFECT COFFEE
PERFECT ESPRESSO UNDEREXTRACTED COFFEE OVEREXTRACTED COFFEE
FROTH: nut-brown coloured
with reddish lights and light coloured
streaks, 3-4 mm thick
FROTH: clear and thin with large
bubbles
FROTH: dark and thin, only at the edges
BODY: dense, full-avoured and
smooth
BODY: thin, watery BODY: excessive
TASTE: well-balanced and
lingering
TASTE: weak and short-lived TASTE: strong, astringent, lingering
and bitter on the palate
AROMA: intense AROMA: not pronounced AROMA: weak, with a hint of burnt
coee
GRINDING LEVEL: Correct GRINDING LEVEL: too coarse. Adjust the
mill to a lower position, follow-
ing the instructions in section
"6.4 Select the grinding level"
GRINDING LEVEL: too ne. Adjust the mill
to a higher position, following the
instructions in section "6.4 Select the
grinding level"
QUANTITY COFFEE IN FILTER:
Correct
QUANTITY COFFEE IN FILTER:
Not enough. Increase the quan-
tity by turning the dial "B2.
Ground coee quantity dial" as
described in section "6.8 Ad-
justing the quantity of ground
coee in the lter"
QUANTITY COFFEE IN FILTER:
Too much: reduce the quantity by
turning the dial "B2. Ground coee
quantity dial" as described in section
"6.8 Adjusting the quantity of ground
coee in the lter"
PRESSING: Correct PRESSING: Too light PRESSING: Too heavy
16
15. EXPLANATION OF LIGHTS
LIGHTS EXPLANATION OF LIGHTS OPERATION
All the lights ash briey Turning the machine on Self-diagnosis
on
Insucient water in tank or water tank
not inserted correctly
Fill the tank or extract the tank and put it
back correctly
Energy saving is enabled See section "5.5 Energy saving" to disable
the function
on
The appliance is on and ready for use The appliance is at the right temperature
to deliver steam. To deliver steam, turn the
steam dial (A4)
ashing
The appliance is on and energy saving
is enabled. The steam dial (A4) is in the
steam delivery position
The light ashes to indicate that the ap-
pliance is preparing to deliver steam. De-
livery begins as soon as the appliance is at
temperature
The appliance is heating up to be ready
for use
The appliance is at temperature when the
light remains on steadily
Steam delivery has ended and the
steam dial (A4) is in the steam position
Turn the dial
to the ◯ position.
ashing
The lter holder has been detached
from the coee mill without pressing
Detach the lter holder and press the cof-
fee as described in section "6.7 Using pre-
ground coee"
Coee have to be pressed Coee has been grinded and the lter holder
is attached to the coee mill
on
Coee has been correctly pressed
on
The beans container is empty Fill the beans container
ashing
No beans present or the beans contain-
er is missing or has not been screwed
correctly in place
Fill the beans container or put it back
correctly
ashing
The temperature is too high to deliver
coee
Wait for the temperature to drop
ashing
Descaling is underway Complete the operation as described in sec-
tion"12. Descaling"
Descaling has ended and the dial (B8) is
in the "descaling" position
Turn the mode selector dial to one of the
"coee positions"
17
16. ALARMS
LIGHTS ALARM SOLUTION
on
General alarm Contact Customer Services
+ on steadily
The drip tray (A13) is missing or has not
been inserted correctly
Extract the drip tray then put back cor-
rectly in the appliance
on
Descaling must be performed Proceed as described in section "12.
Descaling"
ashes quickly
The knob (B8) is in descaling position Turn the knob to one of the coee bever-
age position
on +
+ ashing
The lter holder has been detached from
the coee mill before grinding has ended
Repeat grinding
+ ashing
The appliance is being turned on for the
rst time and the water circuit must be
lled.
Proceed as described in section "3. Set-
ting up the appliance"
If the water softener lter (C6) is present,
an air bubble may have been released in-
side the circuit, obstructing delivery
Press the button (B4) corresponding to
the
light (g. 9). Delivery begins
and stops automatically.
The grinding is too ne and the coee is
delivered too slowly or not at all
Extract the lter holder and repeat the
operations to make the coee, bearing in
mind the indications in section "6.4 Se-
lect the grinding level" and the "14. How
to make perfect coee" table.
+ ashing
If the water softener lter (C6) is present,
an air bubble may have been released in-
side the circuit, obstructing delivery
Press the button (B4) corresponding to
the
light (g. 9). Delivery begins
and stops automatically.
The grinding is too ne and the coee is
delivered too slowly or not at all
Extract the lter holder and repeat the
operations to make the coee, bearing in
mind the indications in section "6.4 Se-
lect the grinding level" and the "14. How
to make perfect coee" table.
The lter is blocked, or the perforated
lter is missing
Clean as described in section "11.4 Clean-
ing the coee lters" and check that the
perforated lter is correctly inserted
The tank has been inserted incorrectly
and the valves on the bottom are not
open
Press the tank down lightly to open the
valves on the bottom
Scale in the water circuit Descale as described in section "12.
Descaling"
18
18. TROUBLESHOOTING
PROBLEM CAUSE SOLUTION
Espresso coee is not delivered any
more
No water in the tank (A17) Fill the tank
The
light is on and the
light is ashing to indicate that the cof-
fee or steam circuit is empty.
Press the button corresponding to the
light
.
The lter is blocked, or the perforated
lter is missing
Clean as described in section "11.4 Cleaning
the coee lters" and check that the perfo-
rated lter is correctly inserted
The tank has been inserted incorrectly
and the valves on the bottom are not
open
Press the tank down lightly to open the
valves on the bottom
Scale in the water circuit Descale as described in section "12.
Descaling"
The espresso coee drips from the
edges of the lter holder rather than
the holes
The lter holder has been inserted in-
correctly or is dirty
Attach the lter holder correctly and rotate
rmly as far as it will go
The espresso boiler gasket has lost elas-
ticity or is dirty
Have the espresso boiler gasket replaced by
Customer Services
The lter is blocked, or the perforated
lter is missing
Clean as described in section "11.4 Cleaning
the coee lters"
The lter holder cannot be attached to
the appliance
The ground coee has not been pressed
or is too much
Clean as described in section "6.6 Grind the
coee directly into the lter"
The coee froth is too light (delivered
from the spout too fast)
The appliance settings need reviewing See section "14. How to make perfect coee"
The coee froth is too dark (delivered
from the spout too slowly)
The appliance settings need reviewing See section "14. How to make perfect coee"
No milk froth is formed when making
cappuccino
The ring (A7) is in the "FLAT" (NO
FROTH) position
Push the ring into the "FOAM" position
Milk not cold enough Always use milk at refrigerator temperature
The cappuccino maker (A8) is dirty Clean the cappuccino maker as described in
section "8. Cleaning the cappuccino maker
after use"
Scale in the water circuit Descale as described in section "12.
Descaling"
At the end of descaling, the appliance
requests a further rinse
During the rinse cycle, the water tank
has not been lled to the MAX level
Repeat the rinse cycle from point (8) of section
"12. Descaling"
The coee mill doesn't work Inside the coee mill there is a
non-millable foreign body
Clean the mill as indicated in par."11.2 Clean-
ing the drip tray", making sure you have re-
moved all the grains from the bean container
(A2) before removing it.
Before reinserting the burr, carefully vacuum
any residue from its seat (g. 44).
19
PROBLEM CAUSE SOLUTION
After grinding, the coee lter is empty
The coee mill coee guide is clogged
Clean as described in section "11.10 Cleaning
the "tamping station"". If the problem per-
sists, access the guide by opening the hatch
and free it using the brush(g. 50).
After grinding, there is too much coee
in the lter
If you want to change coee quality
All the coee beans in the machine
must be removed
• Empty the bean container (if necessary,
vacuum the remaining beans).
• Attach the lter holder and operate the
mill without beans to free the coee
guide: attach the lter holder to the
coee mill outlet (A22) aligning it to
"INSERT" and turning it towards right
(g. 22). Grinding starts when the lter
holder reaches CLOSE position and au-
tomatically ends. Repeat until the lter
stays empty.
• Insert new coee beans in the container.