1
AIR CONDITIONER
INSTRUCTIONS

2
• Usethisapplianceonlyasdescribedinthis
instructionmanual.
As with all electrical equipment, whilst the
instructionsaimtocoverasmanyeventuali-
tiesaspossible,cautionandcommonsense
shouldbeappliedwhenoperatingandinstal-
lingthisappliance.
• Thisapplianceisdesignedforhomeaircon-
ditioningandmustnotbeusedforotherpur-
poses.
• Itisdangeroustomodifyoralterthecharac-
teristicsoftheapplianceinanyway.
• Theappliancemustbeinstalledinconformi-
tywithnationallegislationregulatingelectri-
calequipmentandinstallations.
• If the appliance requires repair, contact a
ServiceCentreauthorisedbythemanufactu-
reronly.
Repairscarriedoutbyunauthorisedperson-
nelmaybedangerous.
• Thisappliancemustbeusedexclusivelyby
adults.
Theapplianceisnotintendedforusebyper-
sons(includingchildren)withreducedphy-
sical,sensoryormentalcapabilities,orlack
of experience and knowledge, unless they
have been given supervision or instruction
concerninguseoftheappliancebyaperson
responsiblefortheirsafety.
Childrenshouldbesupervisedtoensurethat
theydonotplaywiththeappliance.
• Theappliancemustbeconnectedtoanef-
cientearthsystem.
Haveyourelectricalcircuitcheckedbyaqua-
liedelectrician.
• Donotuseextensioncables.
• Beforecleaningormaintenance,alwaysun-
plugtheappliancefromthemainssocket.
• Neverunplugtheappliancebypullingonthe
powercable.
• Donotinstalltheapplianceinroomscontai-
ninggas,oilorsulphur.Donotinstallnear
sourcesofheat..
• Keeptheapplianceatleast50cmawayfrom
ammablesubstances(alcoholetc)orpres-
surisedcontainers(egaerosolcans).
• Donotrestheavyorhotobjectsontopofthe
appliance.
• Cleantheairlteratleastonceaweek.
• Avoidusingheatingappliancesnearthe air
conditioner.
• Alwaystransporttheapplianceuprightorre-
stingononeside.
Beforemovingtheappliance,emptythein-
ternalcircuitcompletelyofwater.
After moving the appliance, wait at least 1
hourbeforestartingit
• Whenputtingtheapplianceaway,donotco-
verwithplasticbags.
• Thematerialsusedforpackagingcanbere-
cycled.
Youarethereforerecommendedtodispose
of themin specialdifferentiated waste col-
lectioncontainers.
• Attheendofitsworkinglife,consigntheap-
pliancetoaspecialistcollectioncentre.
• Ifthepowercableisdamaged,itmustbere-
placedbythemanufactureroranauthorised
technicalservicecentreinordertoavoidall
risk.
Check the type of refrigerant gas used by your
appliance on the rating plate.
Specific warnings for appliances with
R410A refrigerant gas
R410A refrigerant gas conforms to EC regula-
tionsontheenvironment.
Avoid perforating the refrigerant circuit of the
appliance.
ENVIRONMENTALINFORMATION:
Thisunitcontainsuorinatedgreenhousegases
coveredbytheKyotoProtocol.
Maintenanceanddisposalmustbecarriedoutby
qualiedpersonnelonly(R410A,GWP=1975).
Specific warnings for appliances with
R290 refrigerant gas
• Readthewarningscarefully.
• When defrosting or cleaning, use only
the implements recommended by the
manufacturer.
• The appliance must be placed in a room
without continuously operating sources
of ignition (for example: open ames, an
operating gas appliance or an operating
electricheater).
• Donotpierceorburn.
IMPORTANT SAFEGUARDS

3
• Refrigerantgasmaybeodourless.
• The appliance must be installed, used and
storedinaroomwithasurfaceareagreater
than15m².
• Thisappliancecontainsabout300gofR290
refrigerantgas.
• R290refrigerantgascomplieswithEuropean
environmentaldirectives.
Donot perforate any of thecomponents in
therefrigerantcircuit.
• Ifthe applianceisinstalled, used orstored
inanunventilatedroom,theroommustbe
such as to prevent stagnation of possible
leaksofrefrigerantgasastherecouldbea
dangerofreorexplosionhazardshouldthe
refrigerant come into contact with electric
heaters,stovesorothersourcesofignition.
• Theappliancemustbestoredinsuchaway
astopreventmechanicalfaults.
• Personsworkingonarefrigerantcircuitmust
havetherelativeauthorisationissuedbyan
accreditedbodycertifyingtheircompetence
tohandle refrigerants incompliancewith a
standard assessment recognised by sector
associations.
• Allrepairsmustbecarriedoutinaccordance
withthemanufacturer’srecommendations.
Maintenance and repairs requiring the
assistance of other qualied personnel
must be carried out under the supervision
of specialists in the use of inammable
refrigerants.
ELECTRICAL CONNECTIONS
Before plugging the appliance into the mains
socket,checkthat:
• themainspowersupplycorrespondstothe
value indicated on the rating plate on the
backoftheappliance;
• the power socket and electrical circuit are
adequatefortheappliance.
• themainssocketmatchestheplug.Ifthisis
notthecase,havetheplugreplaced;
• themainssocketisadequatelyearthed.
Failure to follow these important safety
instructionsabsolvesthemanufacturerofall
liability.
WHAT IS THE WATER-AIR PINGUINO
During the summer, you feel comfortable at a
temperatureofbetween24and27°Cwitharela-
tivehumidityofabout50%.
Anairconditionerremovesexcessmoistureand
heatfromtheroomwhereitislocated.
Compared with wall mounted models, portable
airconditionershavetheadvantagethattheycan
bemovedfromoneroomtoanotherinthehome
orbetransportedfromonebuildingtoanother.
Hotairfromtheroomispassedthroughacoil
cooledbyrefrigerantgas.Excessheatandmoi-
sture are removed before the air is re-emitted
intotheroom.
Insingleunitmodels,asmallpartofthisairis
usedtocooltherefrigerantgasandthen,when
hotanddamp,isdischargedoutside.
In exclusive De’Longhi water-air models, the
heatisremovedfromtheroomthroughthecoo-
lingeffectofthewaterwhichisobviouslymuch
greaterthanair.
Thisgivesthisairconditionerunbeatablecooling
efciency.
4
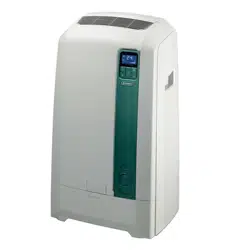
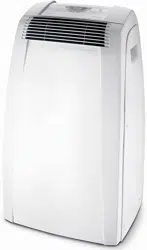
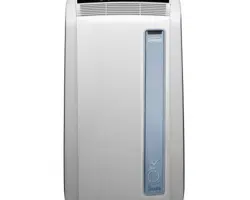
DESCRIPTION
A Airoutletgrille
B ControlpanelwithadvancedLCDdisplay
C Handle
D Grille
E Castors
F Airintakegrillewithdustlter
G Condensatedrainconnector
H Powercable
I Pullouttank/tankdrawer
J Tankopeningdoor
K Airexhausthose
L Remotecontrol
M Airexhausthosehousing
N Windowoutlet
O Silverionlter(certainmodelsonly)
P Electrostaticlter(certainmodelsonly)
Q Sucker
R Castorlocks(certainmodelsonly)
S Flangewithcap
T Adjustablebar
U Waterdrainhose+cap
V Indicatorpaper
A
A
B
F
C
CC
D
E
J
I
G
H
K
L
M
N
O
P
Q
R
S
T
U
V
5
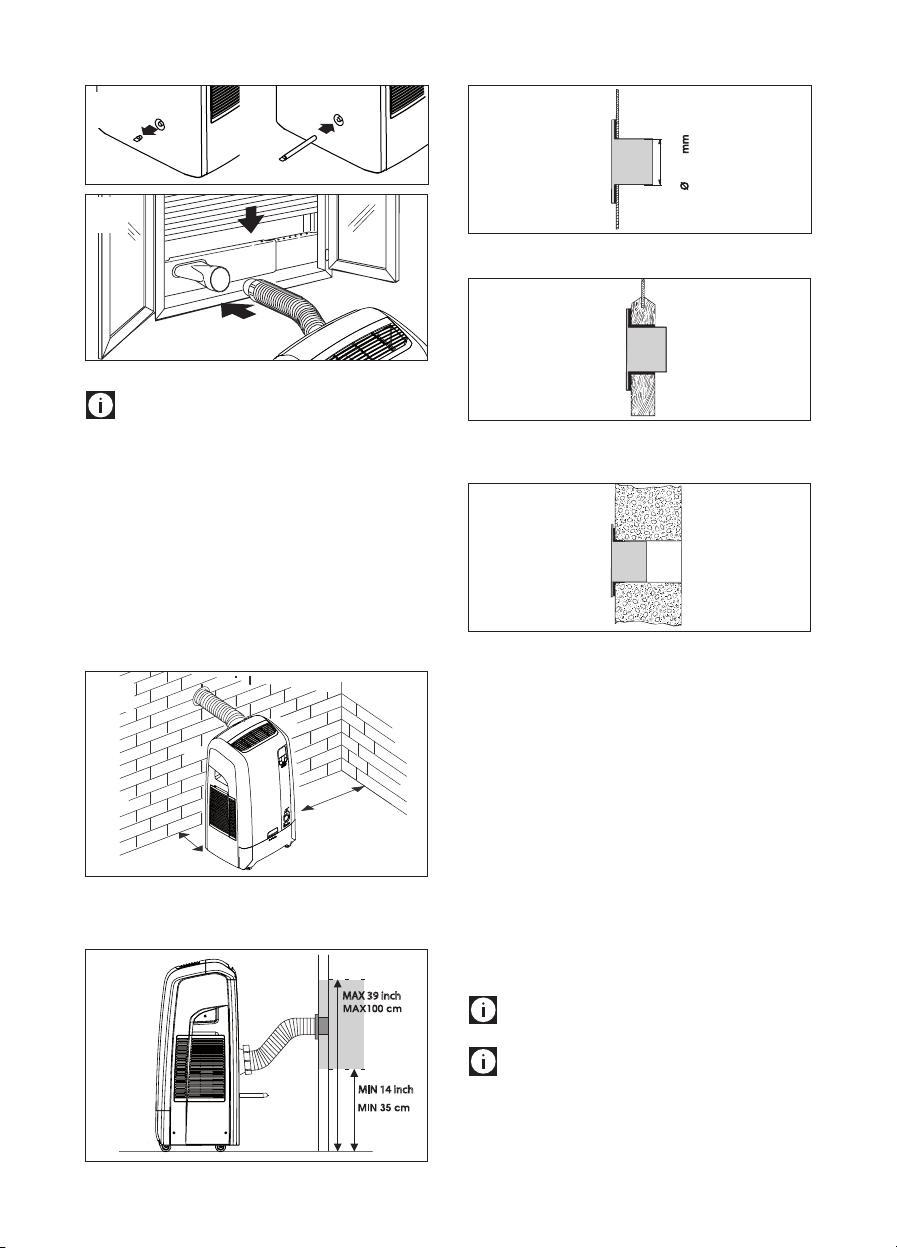
Youcanalsousethe“adjustablebar”accessory
(T).
• Fit thewindowoutlet inthehousing inthe
bar(g.4)
• Position the bar on the window sill and
adjustuntilit tsintheguidesof theblind
(thelengthcanbeblockedwiththepinpro-
vided),thenlowertheblind(g.5).
• Fittheairhosetotheendofthewindowout-
let.
• Place theair conditionernear awindow or
Frenchwindow and connect theend ofthe
hose(g.7).
• Removethecapatthebackoftheappliance
(G)andreplacewiththedrainhosepluscap
(U)asshowningure6.
This enables the condensate to be drained
moreeasilyattheendoftheseason.
Seethesection:“ENDOFSEASONOPERA-
TIONS”.
PREPARING FOR USE
Theinstructionsbelowwillenableyoutoprepare
your airconditioner for operation as efciently
aspossible.
Beforeuse,make suretheairintakeand outlet
grillesareunobstructed.
Air-conditioning without installation
Justafewsimplestepsandyourcomfortisen-
suredwithyourappliance:
• Fittheairexhausthoseinthehousingatthe
backoftheappliance(g.1).
• Fitthe windowoutlet(N) to theendof the
hose(K).
• Placethe airconditioner near a window or
Frenchwindow.
• Adjust the length of the hose to reach the
window.
• Makesuretheairexhausthoseisunobstruc-
ted.
• OpenthewindoworFrenchwindowslightly
andpositiontheoutlet(g.2).
• Ifyouhaveadoublewindow,usethesucker
(Q)providedtoholdthetwopartsofthewin-
dowtogether(g.3).
1
2
1
2
1
2
2
3
4
5
1
6
Keep the air hose as short and free of cur-
ves as possible to avoid bottlenecks.
Air-conditioning with installation
Ifrequired,yourappliancecanbeinstalledsemi-
permanently(Fig.8).
Proceedasfollows:
• Drilla134mmdia.holeinanoutside wall
or through a window pane, respecting the
heightsshowning.9.
• Fittheangeaccessory(S)providedinthe
holefollowingtheindicationsings.10,11
and12.
12 inch
30 cm
30 cm
12 inch
MAX 39 inch
MIN 14 inch
inthewindowpane
inthewoodenkickboardofaFrenchwindow
inthewall:youarerecommendedtoinsulate
thesectionofwallusingsuitableinsulation.
• Fittheairexhausthose(K)inthehou-
sing at the back of the appliance (g.
1).
• Fittheendofthehosetotheange(S).
Whenthehoseisnottted,theholecan
beclosedwiththeangecap.
• Removethecapat thebackofthe ap-
pliance (G) and replace with the drain
hosepluscap(U)asshowningure6.
Thisenablesthecondensatetobedrai-
nedmoreeasilyattheendoftheseason.
Seethesection:“ENDOFSEASONOPE-
RATIONS”.
Keep the air hose as short and free of cur-
ves as possible to avoid bottlenecks.
When installing the air conditioner semi-
permanently, you should leave a door slightly
open, as little as 1 cm, to guarantee correct
ventilation.
1
2
8
10
11
12
9
134
5 inch
6
7
7
PREPARING FOR OPERATION IN
WATER MODE
Oncetheappliancehasbeeninstalled,itisready
foruse.
However,itsefciencycanbeenhancedbyope-
ratingitintheexclusiveDe’longhiwatermode.
Thewaterinthetankincreasesthecoolingpo-
werofyourPinguinoandatthesametimeredu-
cesnoiselevelsandelectricalconsumption.
Comparedtoair,waterreducesthetemperature
ofthecoolingcircuitmuchmoreefciently,be-
forebeinggivenofffromtheairexhausthosein
theformofvapour.
Rememberthat:
• You mustalways usesalt-free cleanmains
water.
• Thelengthoftimethewaterinthetanklasts
depends greatly on environmental condi-
tionssuchastemperature,humidity,insula-
tion,theexposureoftheroom,thenumber
ofpeoplepresent,etc.
Indicativelyitlastsaboutsixhours.
TheBOOSTfunction(seepage30)shortens
theoperatingtimetoabout4hours,butthe
coolingpowerandefciencyareincreased.
• When the water in the tank runs out, the
light comesonandoperationofthe
applianceswitchesautomaticallytoair-air.At
thesametime,thequantityofairgivenout
fromtherearhoseincreases.
The appliance is fitted with a resin lime-
scale filter enabling normal tap water to be
used.
The impregnated resins reduce water hardness
and therefore prolong the working life of the
appliance.
“CF” is displayed when the limescale fil-
ter needs replacing. The efficacy of the filter
depends on water hardness. It should, howe-
ver, be replaced every five years.
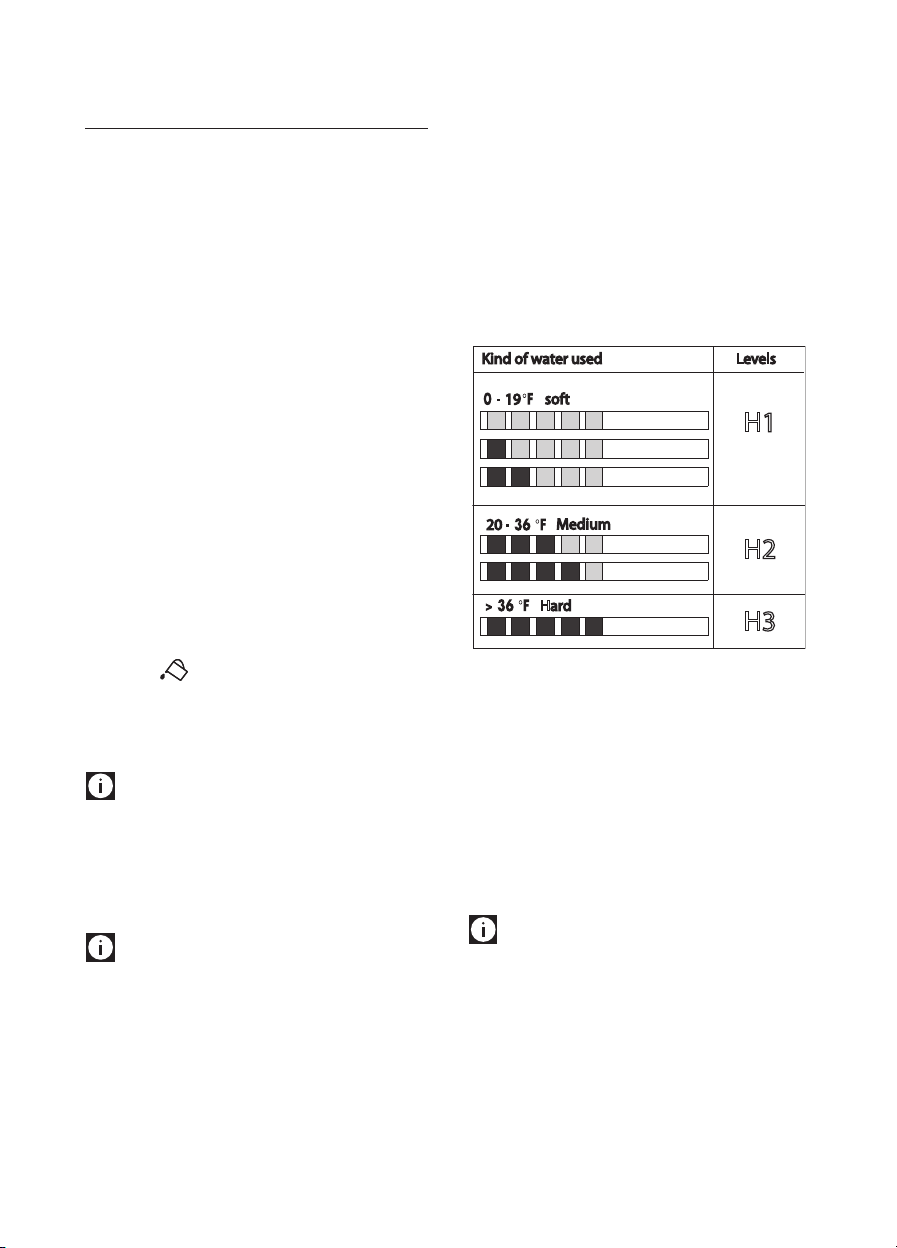
Setting water hardness
Measurewaterhardnessusingtheindicatorpa-
perprovided.
• Remove the indicator paper from its pack
(V).
• Immersethepapercompletelyinaglassof
waterforonesecond.
• Removethepaperfromthewaterandsha-
ke lightly. After about a minute, 1, 2, 3, 4
or 5 redsquaresappear,depending onthe
hardnessofthewater.Theappliancecanbe
set to three different waterhardness levels
soft(H1),medium(H2)andhard(H3).De-
terminethehardnessofthewateryouwillbe
usingbycomparingtheredsquaresonthe
indicatorpaperwiththetablebelow.
Tosetwaterhardness,proceedasfollows:
1. Settheappliancetostand-by.
2. Hold the FAN button on the control panel
downfor10seconds.Theapplianceemitsa
beepandH1, H2 orH3isdisplayed.
3. Use the+or - buttonstoset the hardness
levelaccordingtothetablebelow.Waitafew
seconds for the setting to be memorised.
Theapplianceemitsanotherbeepandgoes
backtostand-by.
The machine is set by default for medium
hardness (H2).
Filling the tank
The watertank is located at thebottom of the
appliance.Removethetankbyinsertingthehand
through the door above the word “PULL” (g.
13)andpullingthetankoutasfarasitwillgo.
Removethecapanduseacontainer(bottle,jug,
wateringcan)topourinthewater(g.14/15).
Youcanseewhenthetankisfullthroughthel-
20
19
soft
Kind of water used Levels
H1
H2
H3
Medium
Hard
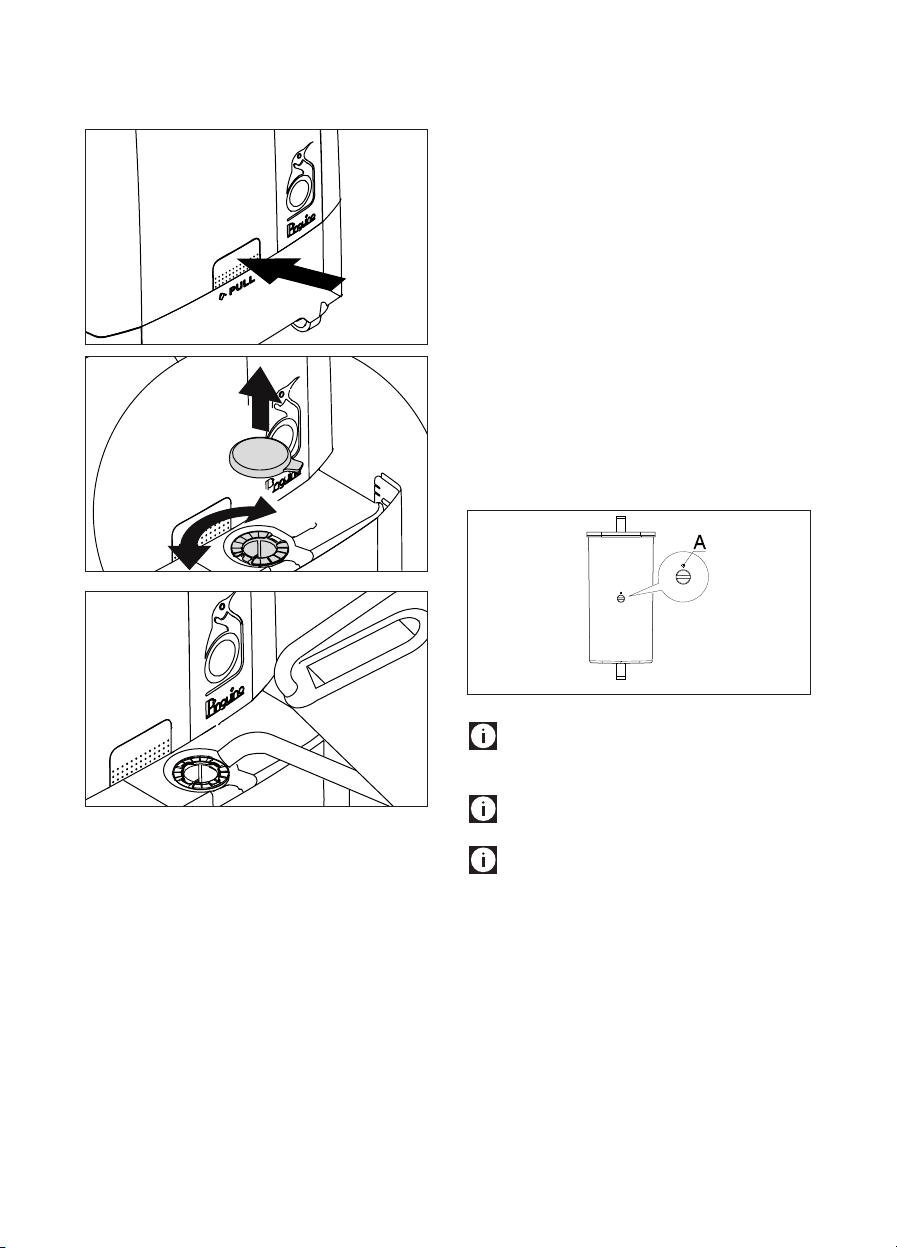
8
linghole.Itholdsamaximumof10litres.
Replacethecapcorrectlyandclosethetank,pu-
shingitinasfarasitwillgo.Thetankholehasa
meshltertopreventtheintroductionofforeign
matter.Ifnecessary,thisltercanbeunscrewed
andremovedforcleaningunderrunningwater.
• Thetankdoesnothavetobefulltousethe
water function, but the length of time the
appliancewilloperateinwatermodewillbe
shorter.
• Donotllabovetheleveloftheholetoavoid
thewateroverowing.Thetankhasnoover-
owpreventionsystem.
Replacing the limescale filter
Turn the appliance off and unplug from the
mains.
Makesurethereisnowaterintheapplianceby
emptyingthetankandinternaltrayasdescribed
inthesection:“Endofseasonoperations”.
Laytheapplianceonitsbackasshowningure
17.Restit onatowelorpieceofcardboard to
avoidscratchesordamage.Removethelterco-
verbyunscrewingthefourscrews(g.17).
Removethe lterdelicatelyandloosenthetwo
ties,makingsurethetwohosesconnectingthe
lterdonotslipinsidetheappliance.Fitthenew
lter, following the same procedure in reverse
(g. 16/15). The pawl on the lter (see gure)
indicatesthecorrectdirection.Thepawlmustal-
waysbetowardstheinsideoftheapplianceand
point“A”mustbefacingupwards.
Water may leak out while replacing the
limescale filter. You should therefore perform
the operation in a suitable location.
After replacing the filter, wait at least an hour
before starting the machine again.
When the filter has been replaced, turn the
alarm off by pressing the ON/STAND-BY
button (15) for 10 seconds.
The appliance emits a beep.
1
2
13
14
15
16
9
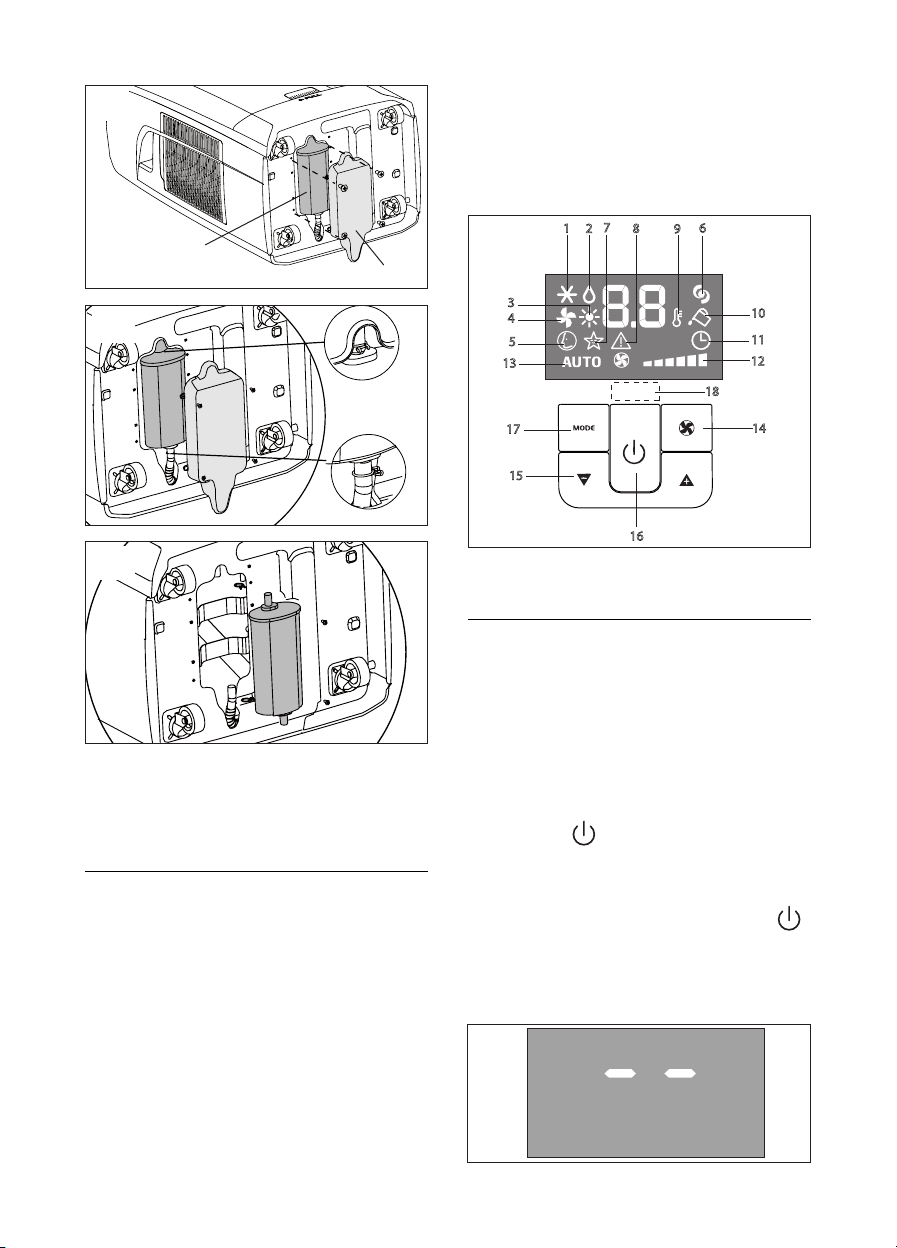
DESCRIPTION OF THE CONTROL
PANEL WITH ADVANCED LCD
DISPLAY
1 Air conditioning symbol
2 Dehumidifying symbol
3 Heating symbol
4 Fan symbol
5 SMART symbol
6 BOOST symbol
7 SLEEP symbol
8 Alarm symbol
9 Temperature indicator
10 “No water” symbol
11 Timer symbol
12 Speed indicator
13 AUTOFAN indicator
14 FAN button
15 Increase (+) and decrease (-) temperature
button
16 ON/Standby button
17 MODE button (selects the modes)
18 Signal receiver
OPERATING FROM THE CONTROL
PANEL
Thecontrolpanelenablesyoutomanageallthe
mainfunctionsoftheappliance.Tofullyexploit
its potential, you must use the remote control
unit.
Turning the appliance on
• Plugintothemainssocket.
Two lines appear on the display indicating
thattheapplianceisinstandby(g.20).
• Pressthebuttonuntiltheapplianceco-
meson.Thelastfunctionactivewhenitwas
turnedoffwillappear.
• Neverturntheairconditioneroffbyunplug-
gingfromthemains.Alwayspressthe
button,thenwaitforafewminutesbefore
unplugging.Thisallowstheappliancetoper-
formacycleofcheckstoverifyoperation.
1
2
7
8
9
6
10
11
12
4
3
5
13
17
15
14
18
16
17
18
19
20
Resin filter
Cover
10
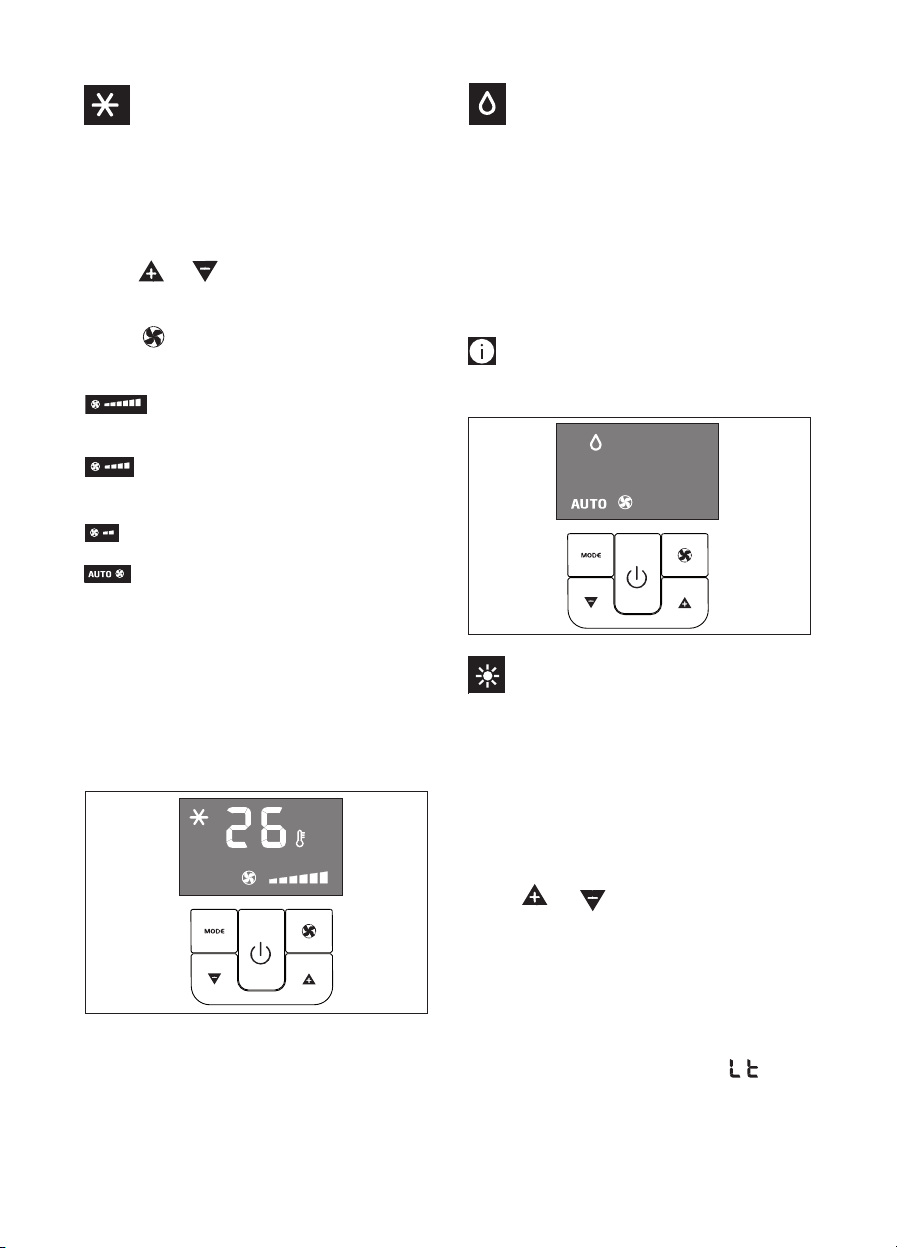
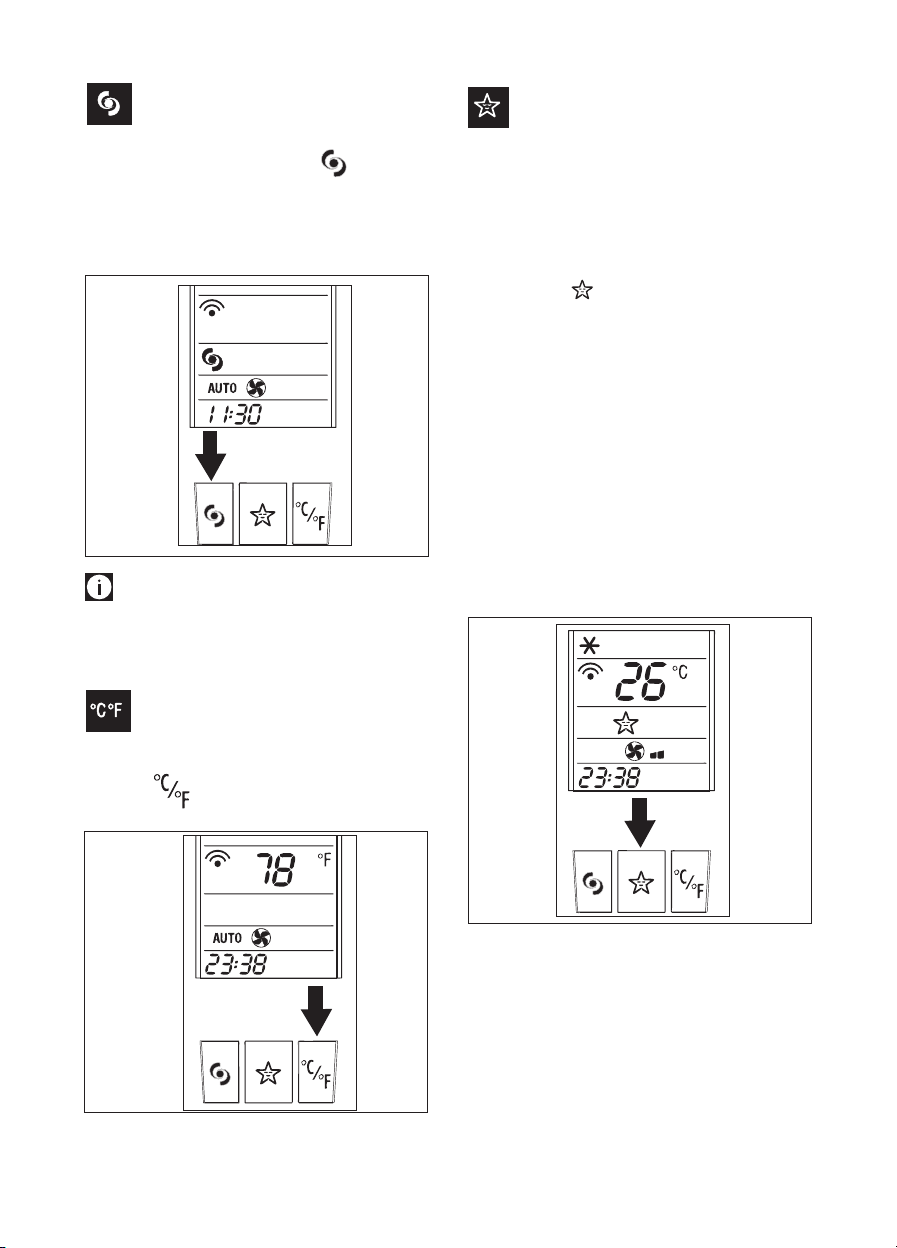
AIR CONDITIONING mode (fig. 21)
Idealforhotmuggyweatherwhenyouneedto
coolanddehumidifytheroom.
Tosetthismodecorrectly:
• Pressthe MODEbutton a numberof times
untiltheair-conditioningsymbolappears.
• Select the target temperature by pressing
the orbuttonuntilthecorrespon-
dingvalueisdisplayed.
• Select the required fan speed by pressing
the button.
Fourspeedsareavailable:
Maximum speed: toachievethetarget
temperatureasrapidlyaspossible
Medium speed: reduces noise levels
butstillmaintainsagoodlevelofcomfort
Low speed:forsilentoperation
AUTOFAN: the appliance automatically
selectsthemostsuitablefanspeedinrelationto
thetemperaturesetonthedigitaldisplay.
The most suitable temperature for the room du-
ring the summer varies from 24 to 27°C.
You are recommended, however, not to set a
temperature much below the outdoor tempera-
ture.
DEHUMIDIFYING mode (fig. 22)
Ideal to reduce room humidity (spring and au-
tumn,damprooms,rainyperiods,etc).
Indehumidifyingmode,theapplianceshouldbe
preparedinthesamewayasforairconditioning,
withtheairexhausthoseattachedtoenablethe
moisturetobedischargedoutside.
Tosetthismodecorrectly:
• Pressthe MODEbutton a numberof times
untilthedehumidifyingsymbolappears.
In this mode, fan speed is selected automa-
tically by the appliance and cannot be set ma-
nually.
HEATING mode (fig. 23)
Thisisidealinspringandautumnwhenoutdoor
temperaturesarenotparticularlysevere.
Whenusingtheapplianceinthismode,theap-
pliance must be set as in the air conditioning
mode(seethesection:“Preparingforuse”).
Tosetthismodecorrectly:
• Pressthe MODEbutton a numberof times
untiltheheatingsymbolappears.
• Select the target temperature by pressing
the orbuttonuntilthecorrespon-
dingvalueisdisplayed.
In this mode, fan speed is selected automatically
by the appliance and cannot be set manually.
N.B.
- When operating in very cold rooms, the ap-
pliance defreezes automatically, momentarily
interrupting normal operation. “ “ appe-
ars on the display. During this operation, it is
normal for the noise made by the appliance
to change.
- In this mode, you may have to wait a few mi-
21
22
1
2
7
8
9
6
10
11
12
4
3
5
13
17
15
14
18
16
1
2
7
8
9
6
10
11
12
4
3
5
13
17
15
14
18
16
1
2
7
8
9
6
10
11
12
4
3
5
13
17
15
14
18
16
1
2
7
8
9
6
10
11
12
4
3
5
13
17
15
14
18
16
1
2
3
54
6
9
11
13
12
16
17
20
21
22
23
24
25
19
18
15
14
10
8
7
11
23
1
2
3
54
6
9
11
13
12
16
17
20
21
22
23
24
25
19
18
15
14
10
8
7
nutes before the appliance starts giving out
hot air.
- In this mode, the fan may operate for short
periods, even though the set temperature
has already been reached.
- In this mode, if the alarm “hl” is displayed,
empty the internal tray (as indicated in fig.
43).
- With particular weather conditions it is pos-
sible that some wet built up in the air exhaust
hose (K).
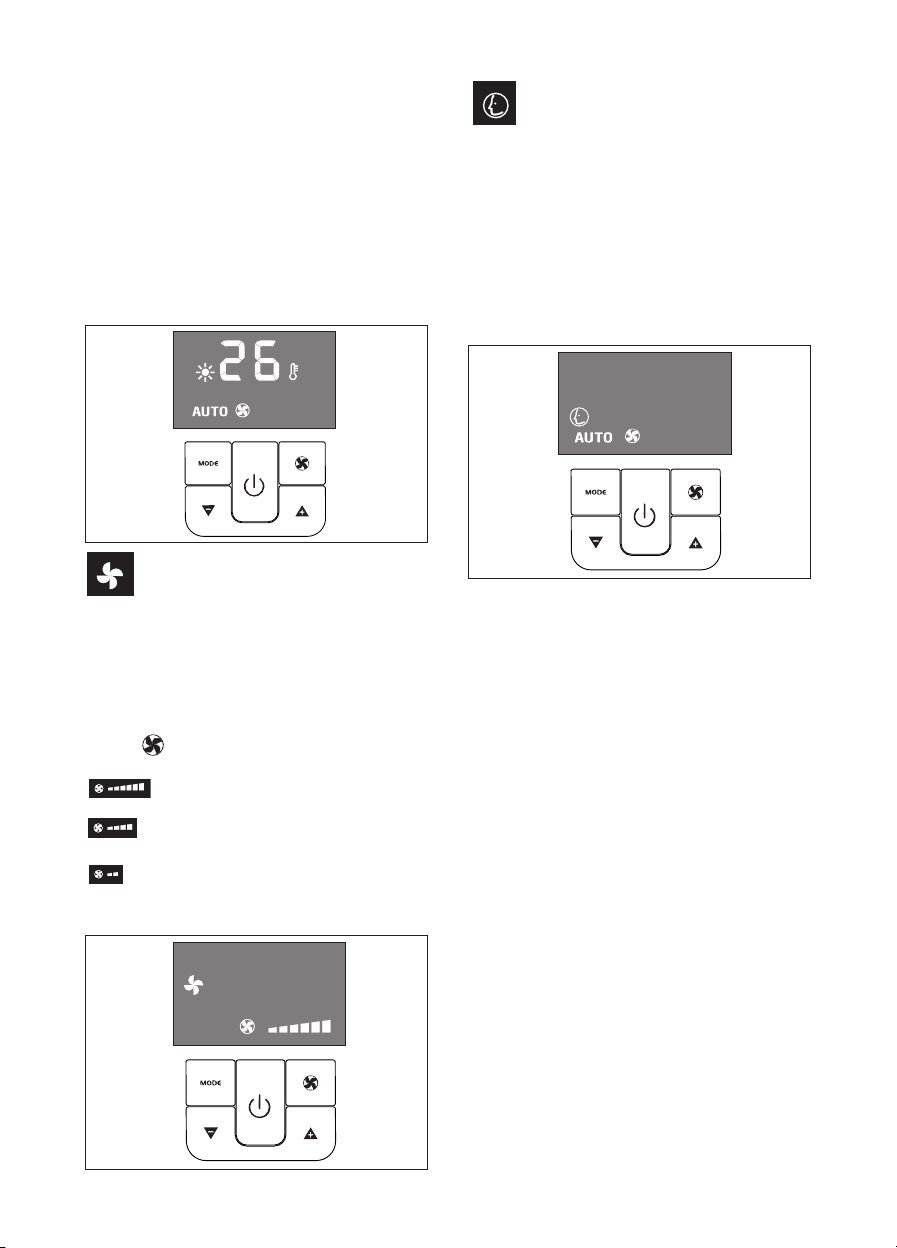
FAN mode (fig. 24)
Whenusing theapplianceinthismode, theair
hosedoesnotneedtobeattached.
Tosetthismodecorrectly:
• Pressthe MODEbutton a numberof times
untilthefansymbolappears.
• Select the required fan speed by pressing
the button.
Threespeedsareavailable:
High speed: formaximumfanpower
Medium speed: reduces noise levels
butstillmaintainsagoodlevelofcomfort.
Minimum speed: forsilentoperation
In this mode, AUTO speed cannot be selected.
SMART mode (fig. 25)
SMARTmodetriestorecreateidealcomfortcon-
ditionsintheroom.Theapplianceautomatically
establishes whether to operate in air conditio-
ning,heating,fanorstandstillmodedepending
ontheenvironmentalconditionsdetected.
Tosetthismode:
• Pressthe MODEbutton a numberof times
untiltheSMARTsymbolappears.
• Choosetherequiredfanspeed.
24
25
12
DESCRIPTION OF THE REMOTE
CONTROL
1 Airconditioningsymbol
2 Dehumidifyingsymbol
3 Fansymbol
4 Heatingsymbol
5 SMARTsymbol
6 Selectedtemperaturescaleindicator
7 Signaltransmission
8 BOOSTsymbol
9 SLEEPsymbol
10 AUTOFANindicator
11 Fanspeedindicator
12TIMERONsymbol
13TimerOFFsymbol
14Clock
15ON/Standbybutton
16FANbutton
17 Increase (+) and decrease (-) temperature
button
18MODEbutton(selectsthemodes)
19Resetbutton(resetstheappliancetotheori-
ginalsettings)
20OKbutton
21TimerOFFbutton
22 °Cor°Fselectionbutton
23SLEEPbutton
24BOOSTbutton
25TimerONbutton
If the remote control unit is replaced or discar-
ded, the batteries must be removed and dispo-
sed of in accordance with current legislation
as they are harmful to the environment. Do not
mix old and new batteries. Do not mix alka-
line, standard (carbon-zinc) or rechargeable
(nickel-cadmium) batteries.
Do not dispose of batteries in fire. Batteries
may explode or leak.
1
2
3
54
6
9
11
13
12
16
17
20
21
22
23
24
25
19
18
15
14
10
8
7
13
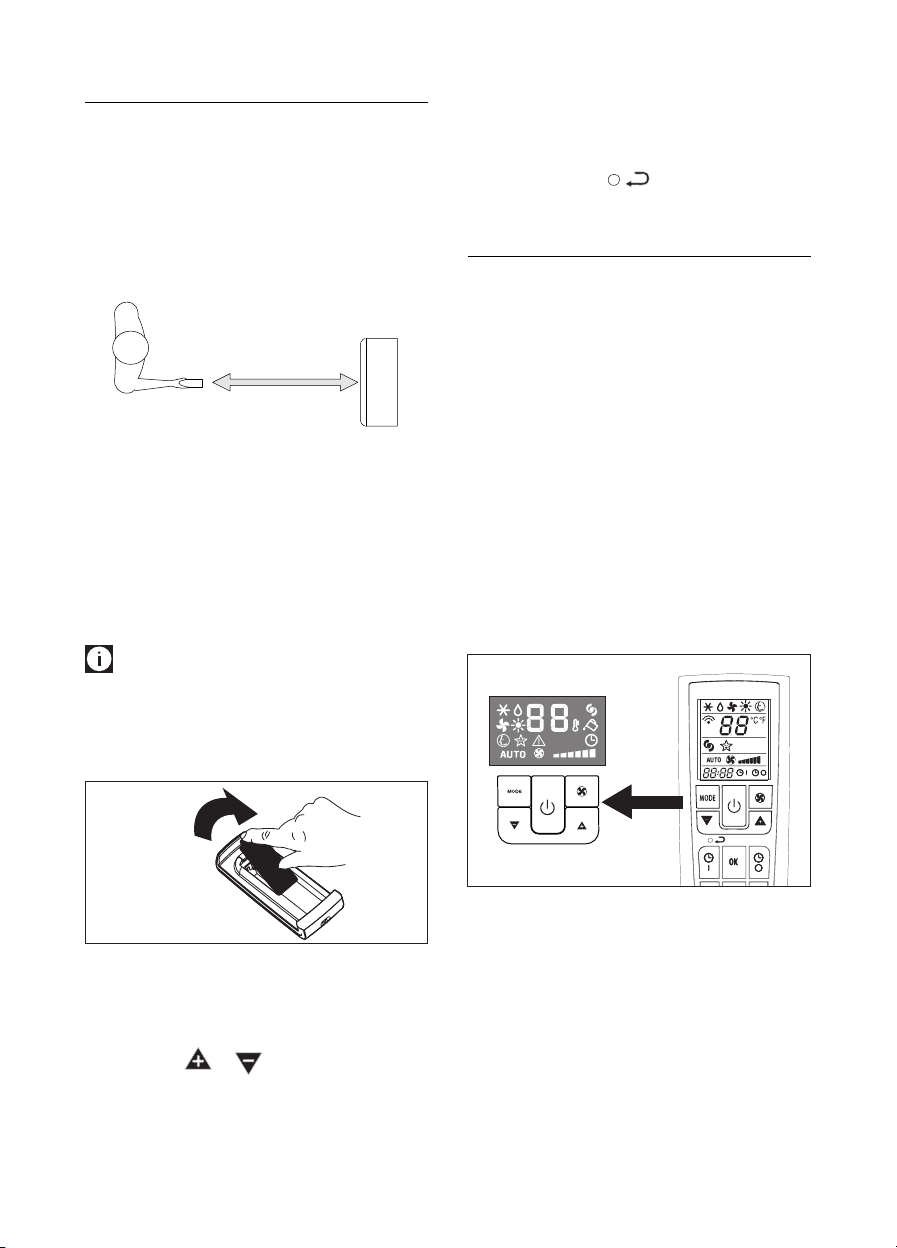
USING THE REMOTE CONTROL
• Pointtheremote controlat thereceiver on
the appliance. The remote control must be
no morethan 7 metres away fromthe ap-
pliance (without obstacles between the re-
motecontrolandthereceiver).
• The remote control must be handled with
extremecare.Donotdropitorexposeitto
directsunlightorsourcesofheat.
Inserting or replacing the batteries
• Removethecoverontherearoftheremote
control(g.26);
• Inserttwo R03“AAA”1.5V batteries inthe
correctposition(seeinstructionsinsidethe
batterycompartment);
• Replacethecover.
Iftheremotecontrolunitisreplacedordi-
sposed of, the batteries must be removed
and discarded in accordance with current
legislation asthey are harmful to the envi-
ronment.
Setting the time
Afterhavinginsertedthebatteries,theclockon
thedisplayashesuntilthetimeisset.
Proceedasfollows.
• Presstheorbuttonuntilthecorrect
timeisreached.
Holdthebuttondowntorunrapidlythrough
rsttheminutes,thenthetensofminutes.
• Oncethecorrecttimehasbeenreached,re-
leasethebuttonandpresstheOKbuttonto
conrm.
• To cancel the settings programmed on the
remotecontrolandrestoretheoriginalset-
tings,pressthebuttonlightlywiththe
pointofapencilorpen.
USING THE REMOTE CONTROL UNIT
Therstpartofthecontrolsontheremotecon-
trolarethesameasthoseonthecontrolpanelof
theappliance(g.27).
Youshouldthereforerefertotheinstructionsin
the chapter OPERATING FROM THE CONTROL
PANELto
• turntheapplianceonoroffand
• selecttheoperatingmode(airconditioning,
dehumidifying, heating, fan or Smart) and
thefanspeed.
• settherequiredtemperature.
The following section describes the additional
functionscorresponding to thecontrolson the
bottompartoftheremotecontrol.
26
27
MAX. 7 metres
14
BOOST function (fig. 28)
Idealforthesummertocoolroomsrapidly.
Activatebysimplypressingthebutton.
Theapplianceoperatesinairconditioningmode
at maximum fan speed and maximum power.
Whilethisfunctionisselected,itisnotpossible
tosetthetemperatureorchangefanspeed.
When the BOOST function is active, the
water lasts less time than in air conditioning
mode. On the other hand, the cooling power
and efficiency of the appliance are higher.
SELECTING THE TEMPERATURE
SCALE (fig. 29)
Pressthebuttontoswitchthetemperature
displayfrom°Cto°Fandviceversa.
SLEEP function (fig. 30)
Thisfunctionisusefulforthenightasitgradual-
lyreducesoperationoftheappliance,turningit
offafter8hours.
Tosetthisfunctioncorrectly:
• Selecttheoperatingmode(airconditioning,
dehumidifying,smartorheating)asdescri-
bedabove.
• Pressthebutton.
The appliance operates in the previously
selectedmodewith thelowestpossiblefan
speed.
Fan speed is always at minimum, while room
temperatureandhumidityvarygraduallytoen-
surethemostcomfortableconditions.
During air conditioning, the temperature incre-
asesby1°Cafter60minutesandafurther1°C
after2hours.
In dehumidifying mode, the dehumidifying po-
wer of the appliance is partially reduced every
hourforthersttwohours.
Inheatingmode,thetemperaturedropsby1°C
everyhour,threetimes.
28
29
30
15
If you needto disablethe timer onor off pro-
grammeinadvance,presstheorbut-
tonrespectivelytwice.
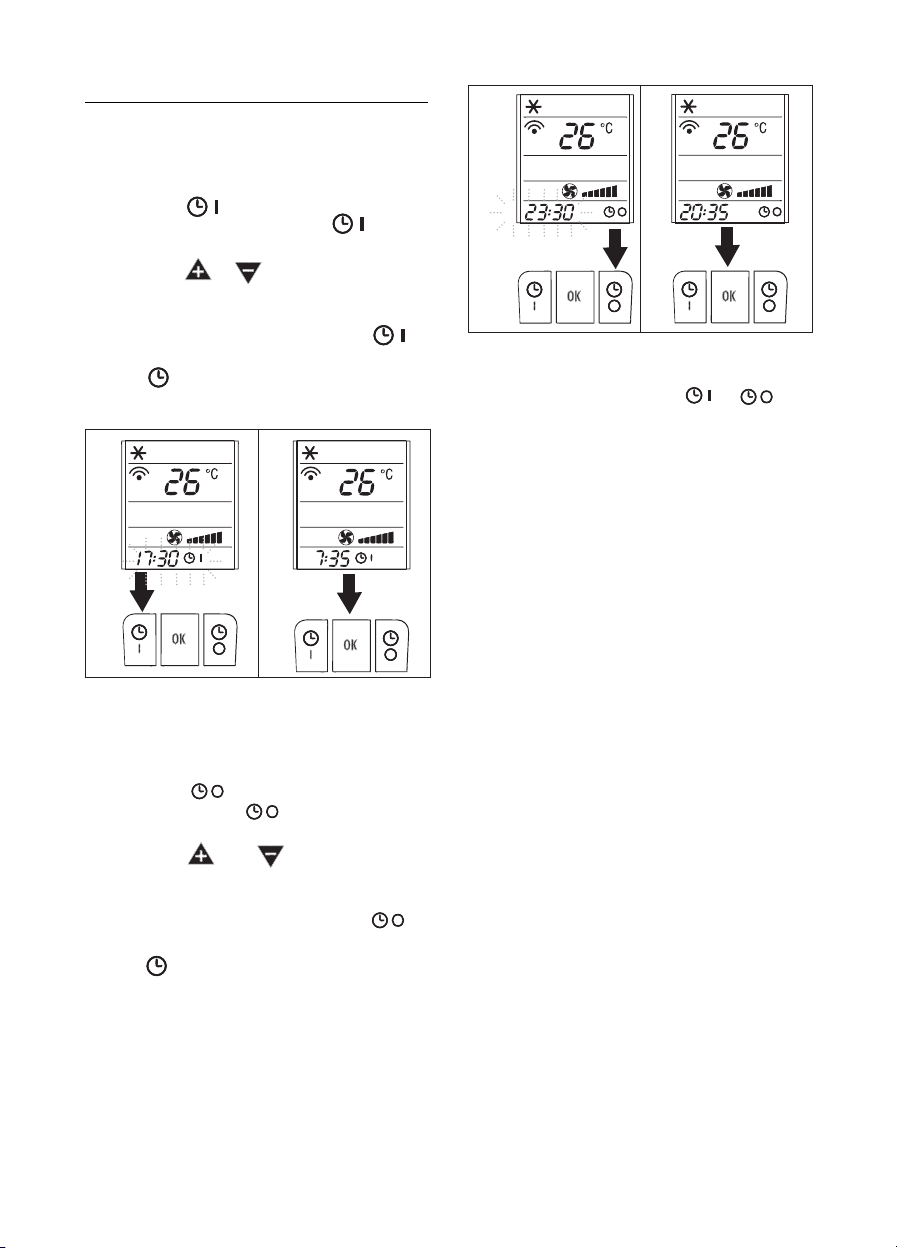
PROGRAMMING THE TIMER
Thetimercanbeprogrammedtostartandstop
theappliancewhenrequired.
Programming start up
• Pressthebutton.
Thestart-uptimeandsymbolashon
theremotecontroldisplay(g.31).
• Presstheorbuttonstosetthetime
youwanttheappliancetostartup.
• Whenthattimeisreached,presstheOKbut-
tontoconrm(g.32).Thesymbolre-
mainsdisplayedonthe remote control and
thesymbolisdisplayedontheapplian-
cetoindicatethatthetimerisactive.
Programming shutdown
• Pressthe OFFbutton.The shutdown
timeandsymbolashontheremote
controldisplay(g.33).
• Presstheorbuttonstosetthe
timeyouwanttheappliancetoshutdown.
• Whenthattimeisreached,presstheOKbut-
tontoconrm(g.34).Thesymbolre-
mainsdisplayedonthe remote control and
thesymbolisdisplayedontheapplian-
cetoindicatethatthetimerisactive.
31
33
32
34
16
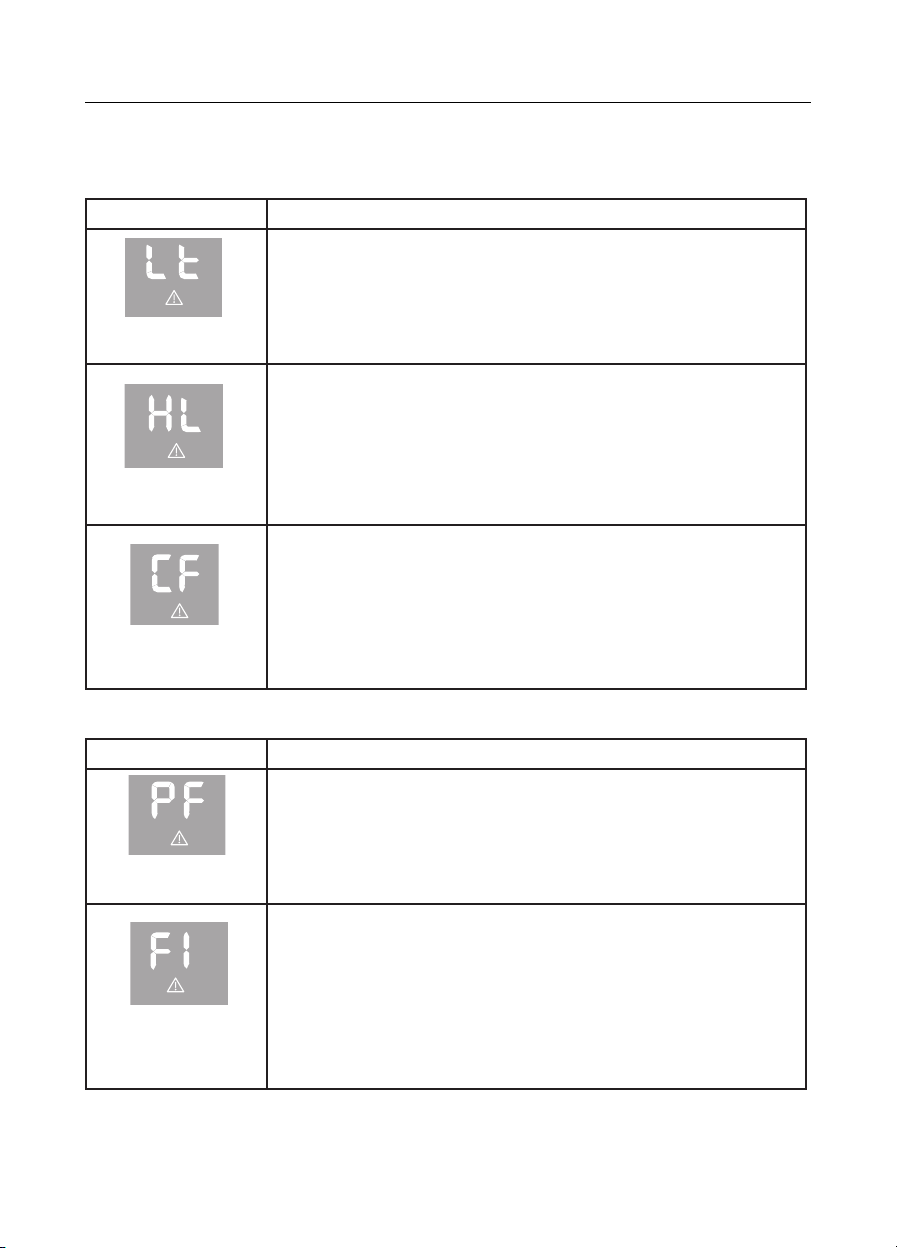
SELF-DIAGNOSIS
Theappliancehasaselfdiagnosissystemtoidentifyanumberofmalfunctions.
Errormessagesaredisplayedontheappliancedisplay.
IF ... IS DISPLAYED, ...WHAT SHOULD I DO?
Low Temperature
(frostprevention)
Theappliance isttedwithafrostprotection deviceto avoidexcessive formation
ofice.Theappliancestartsupagainautomaticallywhenthedefrostingprocessis
completed.
High Level
(internaltrayfull)
Emptytheinternalsafetytrayfollowingtheinstructionsinthesection“Endofseason
operations”.Ifitreoccursincoolingmode,contactyourlocalauthorisedcustomer
services.
Inheatingmode:emptytheinternaltray.
Change filter
Whenthismessageisdisplayed,thewaterlterneedsreplacingasdescribedinthe
section:“Replacingthelimescalelter”.
IF ... IS DISPLAYED, ...WHAT SHOULD I DO?
Probe Failure
(sensordamaged)
Ifthisisdisplayed,contactyourlocalauthorisedservicecentre.
Failure1
Thismessagecouldappearifthewaterlterisparticularlyclogged.Seesection:“Re-
placingthelimescalelter”.
Ifthelterhasbeenreplacedrecently,contactyourlocalauthorisedservicecentre.
17
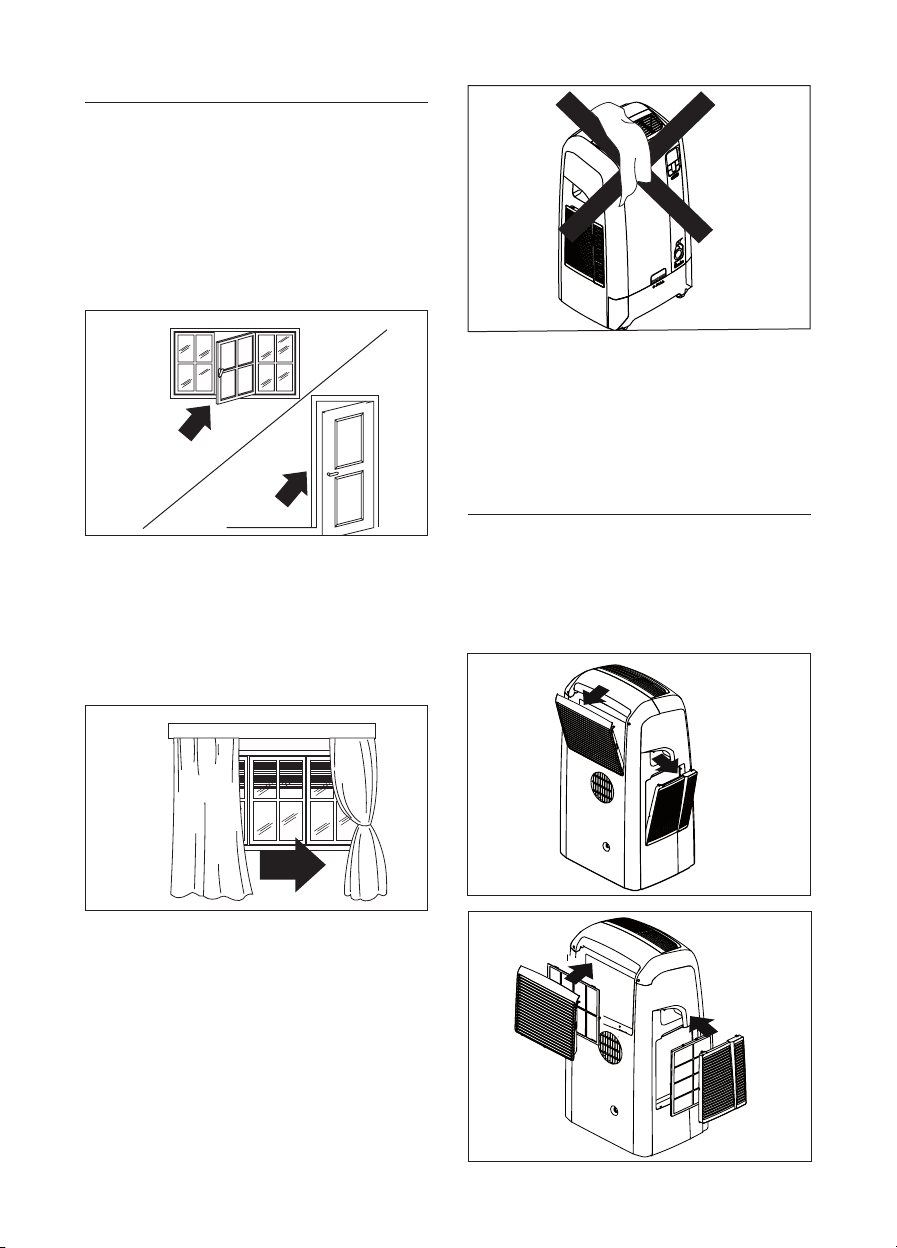
TIPS FOR CORRECT USE
Togetthebestfromyourairconditioner,follow
theserecommendations:
• closethewindowsanddoorsintheroomto
beairconditioned(g.35).
Wheninstallingtheairconditionersemi-per-
manently, you should leave a door slightly
open(aslittleas1cm)toguaranteecorrect
ventilation.
• Protecttheroomfromdirectexposuretothe
sunbypartiallyclosingcurtainsand/orblin-
dstomaketheappliancemuchmoreecono-
micaltorun(g.36);
• neverrestobjectsofanykindontheaircon-
ditioner;
• donotobstructtheairintakeandoutlet(g.
37).Leavebothgrillesfree;
• makesuretherearenoheatsourcesinthe
room;
• neverusetheapplianceinverydamprooms
(laundriesforexample);
• neverusetheapplianceoutdoors;
• makesuretheairconditionerisstandingon
alevelsurface.
Ifnecessary,placethecastorlocksunderthe
frontwheels.
AIR PURIFYING FILTERS
This appliance is tted with two dust lters to
maintainefciency.
Oneisatthebackneartheintakegrille,theother
isattheside(g.38-39).
closedoorsandwindows
closecurtains
donotcover
theappliance
35
36
37
38
39
18
Certainmodelshavea silver ion dustlterand
anadditionalelectrostaticlterinthegrillatthe
back
Silver ion filter
Thisdustlteristreatedwithsilverionswhich
not just retain dust particles, but also have an
efcientantibacterialaction.Italsogreatlyredu-
cesconcentrationsofirritantssuchaspollenand
spores.
Electrostatic filter
Theelectrostaticlterretainsthenestdustpar-
ticles,thusenhancingthelteringcapacityofthe
appliance.
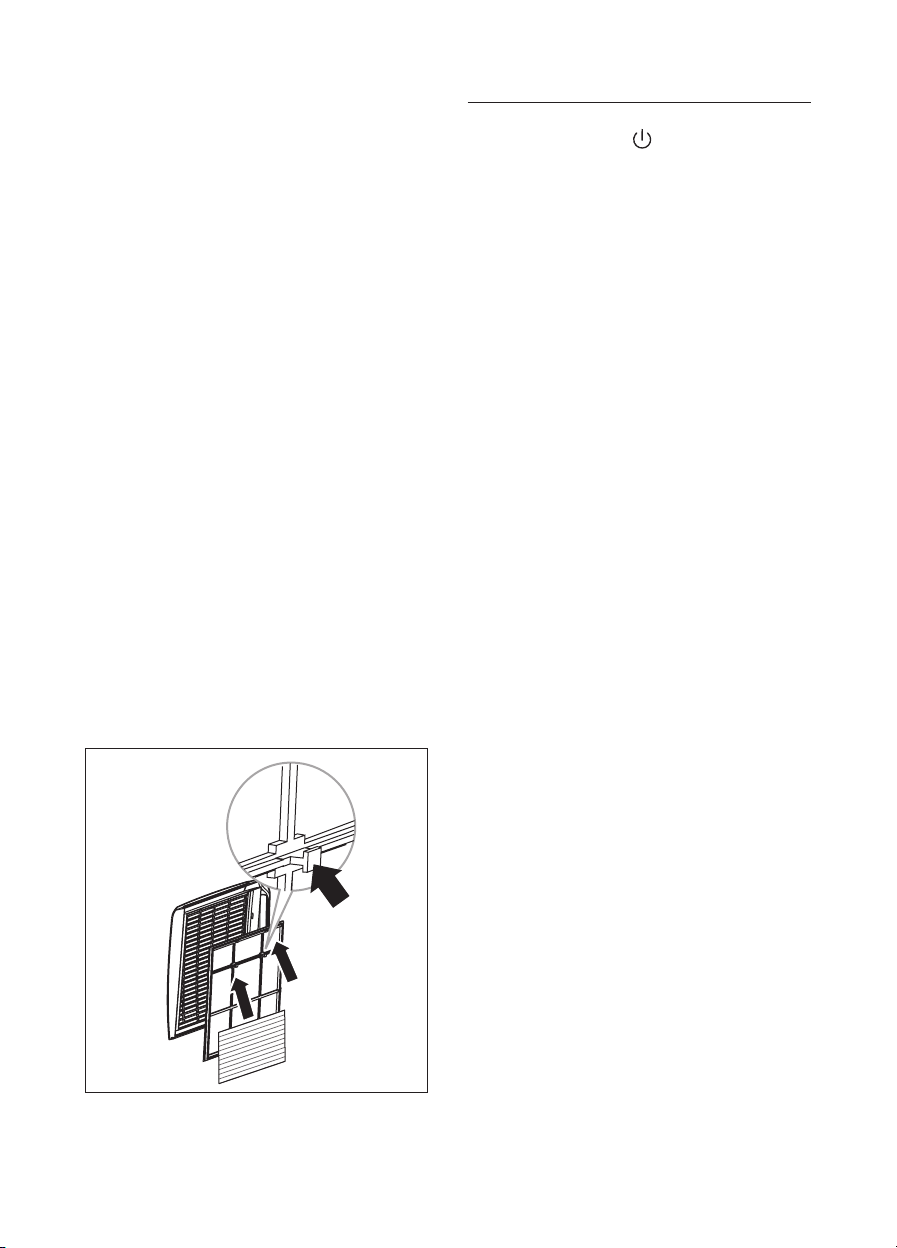
Fitting the filters to the grille
Theappliancecanbeusedwithjustthedustl-
tersalreadyinsertedinthegrille.
Tousethetwosupplementarylters(ifprovided
withyourmodel),removethemfromthepacka-
gingandattachthemtothedustlter,inserting
themunderthespecialclips(g.40).
Ifyoudecidenottouseit,keepitsealedinthe
packaging.
CLEANING
Beforecleaningormaintenance,turntheapplian-
ceoffbypressingthebuttononthecontrol
panelorremotecontrol,waitforafewseconds
thenunplugfromthemainssocket.
Cleaning the cabinet
You should clean the appliance with a slightly
dampcloththendrywithadrycloth.
• Donotwashtheairconditionerwithwater.It
couldbedangerous.
• Donotusepetrol,alcoholorsolventstocle-
antheappliance.
Donotsprayinsecticideliquidsorsimilar.
Cleaning the air filters
Tokeepyourairconditionerworkingefciently,
youshouldclean thedustltersevery weekof
operation.
Cleaning the dust filters supplied with all
models
Eachlterishousedintheintakegrille.
Tocleanthelters,proceedasfollows
• Remove the intake grille by pulling it ou-
twards(g.38).
• Removethedustlterbydetachingitfrom
thegrille(Fig.39).
• Use a vacuum cleaner to remove the dust
collectedonthelter.
Ifitisverydirty,immerseinwarmwaterand
rinseanumberoftimes.
• Afterwashing,leavetheltertodrycomple-
tely.
• Toreplace,puttheltersbackintheintake
grillethenattachtheintakegrilletotheap-
pliance.
Silverion
lter
Electrostaticlter
40
19
Cleaning of the silver ion filter and of the
electrostatic filter (certainmodelsonly)
Tocleanthesilveriondustlter,theelectrostatic
ltermustbetemporarilyremoved.
Tocleanthelters,useavacuumcleaneratme-
diumpower.
Thesilverionltercanbewashedwithlukewarm
water.Leavetodrycompletelyandreplace.
The electrostatic lter is not washable but it
shouldbereplacedatleastonceeverytwose-
asons.
Theelectrostaticltercanbeboughtfromshops
sellingDe’longhiaccessoriesorauthorisedser-
vicecentres.
START OF SEASON OPERATIONS
Makesurethepowercableandplugareundama-
gedandtheearthsystemisefcient.Followthe
installationinstructionsprecisely.
END OF SEASON OPERATIONS
Beforeputtingtheapplianceawayormovingit
toanotherlocation,emptyanywaterleftinthe
tanks.
Emptying the tank
Pull out the tank as described in the section:
“FILLINGTHETANK”.Unhookthedrainhoseon
theleftofthetank(g.41-42)andplacetheend
inarecipient.Removethecapanddrainoffthe
waterleftinthetank.
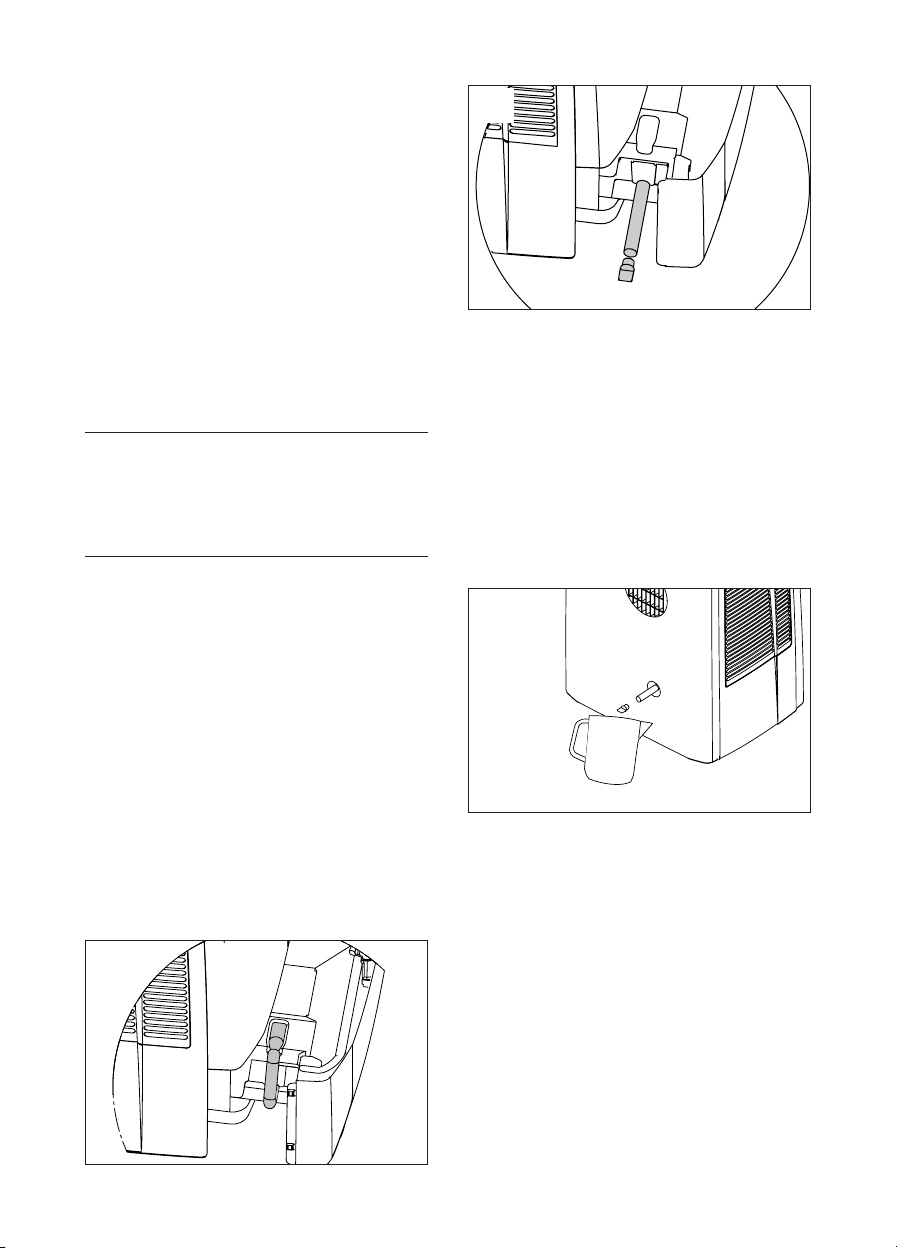
Emptying the internal tray
Tofacilitatethisoperation,atthestartofthese-
ason, replacethe spoutcap (G) with the drain
hose+cap(U).
Placearecipient(suchasajugorbottle)near
thespoutonthebackoftheappliance(g.43).
Removethecapandrunoffanywaterleft.
Whencompletelyempty,replacethecap.
IMPORTANT:thetraycouldcontainasmuchas
2litresofwater.
• After performing the 2 operations descri-
bedabove,operatetheapplianceinfanonly
modeforabouthalfanhour.Thisdriesany
waterremaininginsidetheappliance.
• Turntheappliance offandunplugfromthe
mains.
• Removetheairexhausthoseandcondensa-
tedrainhose.
• Cleanthedustlters.
• Covertheappliancetoavoiddust.
41
42
43

20
TECHNICAL CHARACTERISTICS:
Powersupplyvoltage
Maximumabsorbedpower
inairconditioning
Refrigerant
Coolingcapacity
Limit conditions
Roomtemperatureforairconditioning21÷35°C
Roomtemperatureforheating10÷27°C
GUARANTEE
The terms oftheguarantee andtechnicalassi-
stance are given in the documentation accom-
panyingyourappliance.
seeratingplate
“
“
“
21
PROBLEM CAUSE SOLUTION
Theairconditioner
doesnotcomeon
• thereisnocurrent
• itisnotpluggedintothemains
• theinternalsafetydevicehastripped
• wait
• plugintothemains
• calltheServiceCentre
Theairconditioner
worksforashorttime
only
• therearebendsorkinksintheair
exhausthose
• somethingispreventingtheairfrom
beingdischarged
• positiontheairhosecorrectly,keeping
itasshortandfreeofcurvesaspossible
toavoidbottlenecks.
• checkandremoveanyobstacles
obstructingairdischarge
Theairconditioner
works,butdoesnot
cooltheroom
• windows,doorsand/orcurtainsopen
• thereareheatsourcesintheroom
(oven,hairdryer,etc)
• theairexhausthoseisdetachedfrom
theappliance
• dustltersclogged
•thetechnicalspecicationofthe
applianceisnotadequatefortheroom
inwhichitislocated.
• closedoors,windowsandcurtains,
bearinginmindthe“TIPSFOR
CORRECTUSE”givenabove
• eliminatetheheatsources
• ttheairexhausthoseinthehousingat
thebackoftheappliance(g.1).
• cleanorreplacetheltersasdescribed
above
Duringoperation,there
isanunpleasantsmell
intheroom
•dustlterand(whenpresent)
electrostaticlterclogged
• cleantheltersasdescribedabove
Theairconditioner
doesnotoperatefor
aboutthreeminutes
afterrestartingit
• theinternalcompressorsafetydevice
preventstheappliancefrombeing
restarteduntilthreeminuteshave
elapsedsinceitwaslastturnedoff.
• wait.Thisdelayispartofnormal
operation.
Thesymboland
oneofthefollowing
messages
LT / HL/Cf/PF / FI
appearsonthe
appliancedisplay:
• Theappliancehasaselfdiagnosis
systemtoidentifyanumberof
malfunctions.
• SeetheSELF-DIAGNOSISchapter.
TROUBLESHOOTING

22
5715110581/06.10