Loading ...
Loading ...
Loading ...
instructions nuwavenow.com
28 29
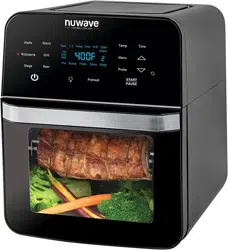
ENGLISH
nuwavenow.com
INSTRUCTIONS
28 29
Slow-Cook
Slow-cook roasts, chicken, or
any other food items.
1. Press and hold PROBE for
1 second. The display will
show “165F” (“74C”). Press
the Up or Down arrows
to set the target internal
temperature.
2. Press PROGRAM and
PROBE at the same time.
This will start the slow-
cooking process. “01:00” (1
hour) will be displayed. This
is the default cooking time.
3. Press the Up or Down
arrows to adjust the time.
4. Place the Probe in the food
and place the food in the
Brio.
5. Press START/PAUSE.
The Brio will begin
cooking and the current
Probe temperature will be
displayed.
1800
1 6 5F
1800
0 1 00
:
ROTISSERIE
1. Press ROTISSERIE.
The light next to
ROTISSERIE will illuminate.
2. Press TIME and adjust the
cooking time.
3. Press START/PAUSE
to begin cooking. The
Rotisserie Skewer (spit),
Basket, or Drum will begin
to turn.
4. When the Brio is nished
cooking your food, “End” will
be displayed and the Brio will
beep three times.
• See Rotisserie Skewer
Assembly, and Rotisserie
Basket Assembly under
“Assembly Guide” for
more information.
Notes:
• Always check that there
is sufcient space above
and below your food, so
it can rotate freely without
obstruction.
• When using the Rotisserie
Skewer, Basket, or Drum,
place the Drip Tray on the
bottom.
1800
35 0F
CAUTION
Accessories will be hot during
and after use. Use oven mitts.
• The Brio will cook for the
amount of time you set for
slow cooking.
• When the time runs out, the
display will show “End”.
Carryover Cooking
If you would like to do a high sear
at the end of cooking while using
the Probe, you can set the Brio to
begin the Sear function up to 30
degrees before the target probe
temperature is reached.
1. Set your cooking
temperature, and then
press and hold PROBE for
1 second to set the target
probe temperature.
2. Press SEAR and PROGRAM
at the same time. The
Display will show 10F (-12C).
• At this time you can press
the Up or Down arrows to
set the number of degrees
below the target probe
temperature you would like
the Probe to reach before
the Brio begins the nal
Sear function.
Example: The cooking
temperature is 375F (191C). The
target probe temperature is 135F
(57C). Begin the Sear function.
Cook at 15F (-9C) before target
probe temperature:
1. Press the Up or Down
arrows to set the cooking
temperature to 375F
(191C).
2. Press and hold PROBE for
1 second. The display will
show “160F” (“71C”). Press
the Up or Down arrows to set
the target probe temperature
to 135F (57C).
3. Press PROBE and
PROGRAM at the same
time. The display will show
“10F” (“-12C”). Press the Up
or Down arrows to set the
temperature to 15F (-9C).
4. Press START/PAUSE. The
Brio will begin cooking at
375F (191C) and the display
will show the current internal
temperature of the food.
• When the internal
temperature reaches
120F (49C), the Brio will
begin the Sear function
until the target probe
temperature is reached.
Once 135F (57C) is
reached, the Brio will
nish cooking and “End”
will be displayed.
LOCK
Lock is used to stop the function
of the Brio. While in Lock mode,
your Brio’s buttons will not
respond to any action until the
Brio is unlocked.
1. Press ON/OFF. Set the
cooking temperature.
2. To lock the Brio functions,
press PROGRAM and
STAGE at the same time.
The remaining cooking time
will be displayed.
• NO buttons will function
while the Brio is locked
except for LIGHT and
ON/OFF.
3. To unlock your Brio’s
functions, press PROGRAM
and STAGE at the same
time once again. The Brio
will unlock and “LOC” be
displayed.
• The ON/OFF button will
work during Lock function
if the Brio needs to be
turned off.
Loading ...
Loading ...
Loading ...