Loading ...
Loading ...
Loading ...
ENGLISH
www.stiebel-eltron-usa.com PSH Plus | 9
INSTALLATION
Installation
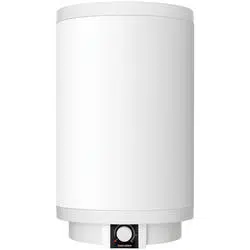
11. Installation
11.1 Water connection
!
Material losses
Carry out all water connection and installation work in
accordance with regulations.
Operate the appliance only with pressure-tested taps.
Connect the hydraulic connections with fl at gaskets or with
PTFE tape and pipe thread sealant. The connecting nipples
are bare steel. Use only brass or stainless steel unions or
adapters to connect directly to the tank.
11.1.1 Permissible materials
!
Material losses
When using plastic piping, observe the manufacturer's
data and use piping with very low oxygen permeability..
Cold water line
Only dielectric unions, brass or stainless steel connections can be
made directly to the cold and hot water line.
11.1.2 Fitting the T&P relief valve
Note
The supplied T&P relief valve must be used.
Note
If the water pressure is greater than 87 psi (0.6MPa),
install a pressure reducing valve in the "cold water inlet".
The maximum permissible pressure must not be exceeded (see
chapter 16.4, “Data table”, pg. 13).
Please note that, depending on the static pressure, you may
need a pressure reducing valve.
Size the drain so that water can drain off unimpeded when
the T&P relief valve is fully opened.
Fit the discharge pipe of the T&P relief valve with a constant
downward slope and in a room free from the risk of frost.
The safety valve discharge opening must remain open to the
atmosphere. Do not immerse in water.
11.2 Power supply
WARNING Electrocution
Carry out all electrical connection and installation work
in accordance with relevant regulations.
Only use a permanent connection to the power supply.
The appliance must be able to be separated from the
power supply by a circuit breaker that disconnects all
poles. Before any work on the appliance, disconnect all
poles from the power supply. Ensure that the appliance
is grounded.
!
Material losses
Observe the type plate. The specifi ed voltage must match
the mains voltage.
12. Commissioning
12.1 Commissioning
Note
Fill the appliance with water prior to electrical connec-
tion. If you switch on the appliance while empty, the high
limit safety cut-out will activate and need to be reset.
Thoroughly fl ush out the cold water line before connecting
the appliance, so that no foreign material gets into the water
heater or T&P relief valve.
Open the shut-off valve in the cold water feed line.
Open a draw-off point until the appliance has fi lled up and
the piping is free of air.
Turn the temperature knob to maximum.
Switch the on the circuit breaker connected to the appliance.
Check the function of the appliance. Turn the temperature
knob down to the minimum setting. Ensure that the thermo-
stat switches off.
Turn the temperature knob back to the energy saving setting.
Check that the T&P relief valve is working correctly.
12.1.1 Appliance handover
Explain the function of the appliance and T&P relief valve to
users and familiarize them with their operation.
Make users aware of potential dangers, especially the risk of
scalding.
Hand over these instructions.
12.2 Recommissioning
See chapter 12.1, “Commissioning”, pg. 9.
13. Shutting down
Disconnect the appliance from the mains at the circuit break-
er/fuse. If possible, lock out the breaker so that it cannot be
accidentally activated.
Drain the appliance. See chapter 15.1, “Draining the appli-
ance”, pg. 10.
14. Troubleshooting
Note
The high limit safety cut-out can activate at temperatures
below 5°F (–15°C). The appliance may be subjected to
these temperatures during storage or transport. If the
appliance does not heat during the initial commissioning,
the high limit safety cut-out switch may need to be reset.
Loading ...
Loading ...
Loading ...