Pedestal
Installation
Instructions
Instructions
d'installation
du
socle
Instrucciones
de
instalacion
del
pedestal
=e
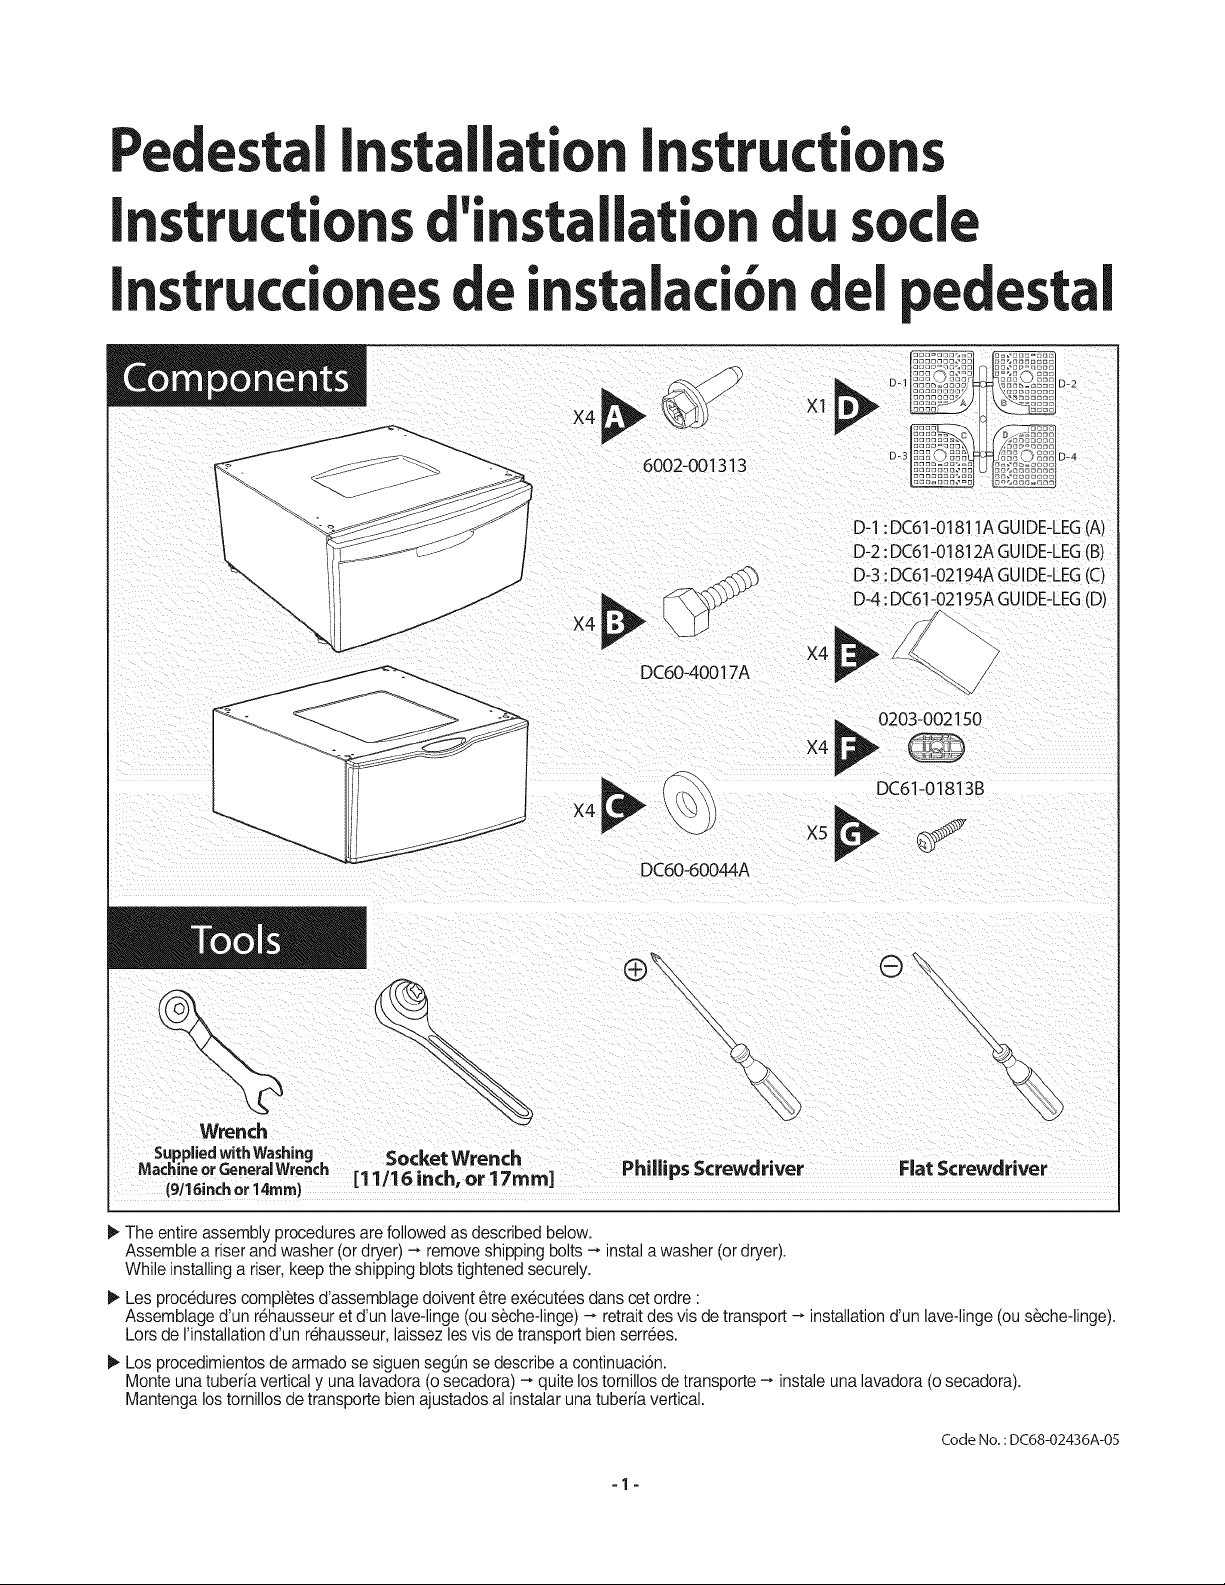
6002-001313
D-1:DC61-01811A
GUIDE-LEG
D-2:DC61-01812A
GUIDE-LEG
D-3:DC61-02194A
GUIDE-LEG
D-4:DC61-02195A
GUIDE-LEG
x4
7
x4
DC60-40017A
0203-002150
x4
>
Cie
DC61-01813B
X5
[>
oe
CO’
—
A)
B)
C)
D)
fea
pein
po
DC60-60044A
iN
Wrench
Supplied
with
Washing
a
: .
Machine
or
General
Wrench
(11
Aocket
Wrench
ml
Phillips
Screwdriver
Flat
Screwdriver
(9/16inch
or
14mm)
,
»
The
entire
assembly
procedures
are
followed
as
described
below.
Assemble
a
riser
and
washer
(or
dryer)
~
remove
shipping
bolts
~
instal
a
washer
(or
dryer).
While
installing
a
riser,
keep
the
shipping
blots
tightened
securely.
»
Les
procédures
complétes
d’assemblage
doivent
étre
exécutées
dans
cet
ordre
:
Assemblage
d’un
réhausseur
et
d’un
lave-linge
(ou
séche-linge)
—
retrait
des
vis
de
transport
>
installation
d'un
lave-linge
(ou
séche-linge).
Lors
de
installation
d’un
réhausseur,
laissez
les vis
de
transport
bien
serrées.
»
Los
procedimientos
de
armado
se
siguen
segtin
se
describe
a
continuacién.
Monte
una
tuberia
vertical
y
una
lavadora
(0
secadora)
>
quite
los
tornillos
de
transporte
~
instale
una
lavadora
(o
secacora).
Mantenga
los
tornillos
de
transporte
bien
ajustacos
al
instalar
una
tuberia
vertical.
Code
No.
:
DC68-02436A-05
«
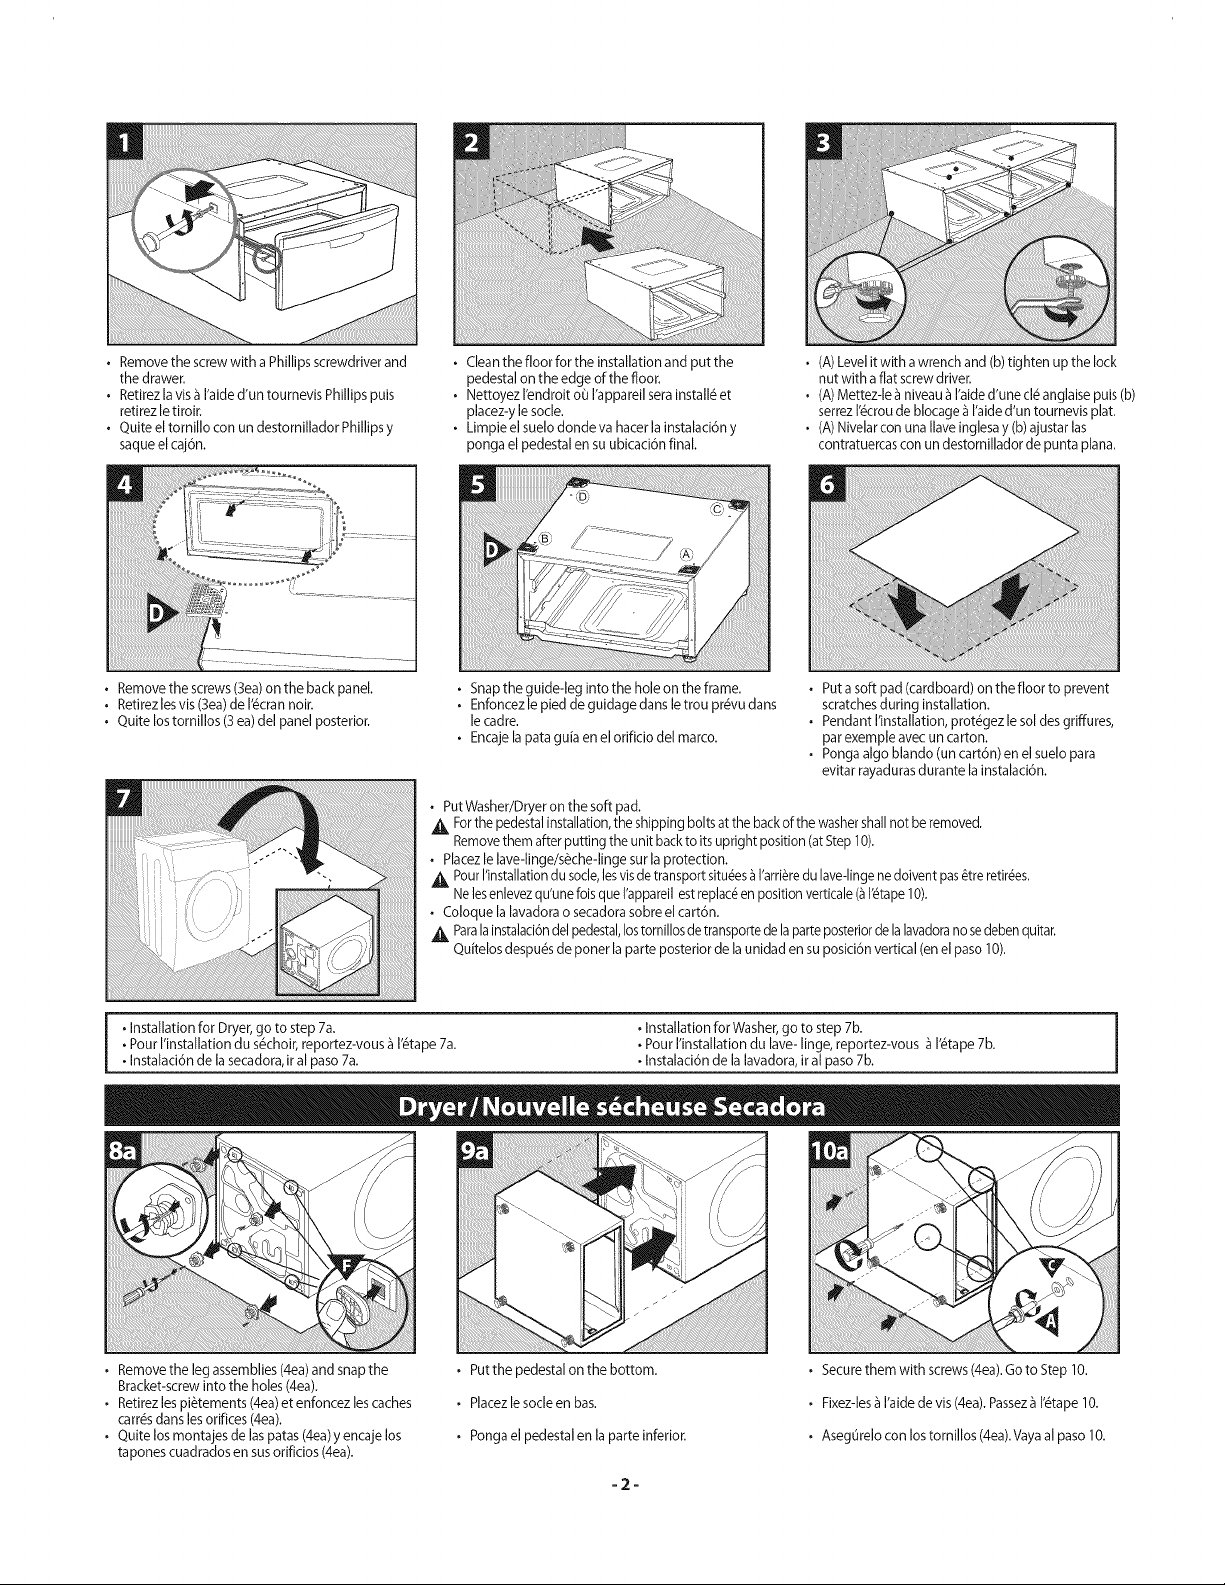
Remove
the
screw
with
a
Phillips
screwdriver
and
+
Clean
the
floor
for
the
installation
and
put
the
+
(A)
Level
it
with
a
wrench
and
(b)
tighten
up
the
lock
the
drawer.
pedestal
on the
edge
of
the
floor.
nut
with
a
flat
screw
driver.
+
Retirezla
vis
4
l'aide
d’un
tournevis
Phillips
puis
+
Nettoyez
l'endroit
ot
l'appareil
sera
installé
et
+
(A)
Mettez-le
a
niveau
a
l'aide
d’une
clé
anglaise
puis
(b)
retirez
le
tiroir.
placez-y
le
socle.
serrez
lécrou
de
blocage
a
l'aide
d'un
tournevis
plat.
«
Quite
el
tornillo
con
un
destornillador
Phillips
y
+
Limpie
el
suelo
donde
va
hacer
la
instalacion
y
+
(A)
Nivelar
con
una
llave
inglesa
y
(b)
ajustar
las
saque
el
cajén.
ponga
el
pedestal
en
su
ubicacién
final.
contratuercas
con
un
destornillador
de
punta
plana.
«
Remove
the
screws
(3ea)
on the
back
panel.
+
Snap
the
guide-leg
into
the
hole
on
the
frame.
«
Puta
soft
pad
(cardboard)
on the
floor
to
prevent
+
Retirezles
vis
(3ea)
de
lécran
noir.
+
Enfoncez
le
pied
de
guidage
dans
le
trou
prévu
dans
scratches
during
installation.
«
Quite
los
tornillos
(3
ea)
del
panel
posterior.
le
cadre.
«
Pendant
Installation,
protégez
le
sol
des
griffures,
+
Encaje
la
pata guia
en
el
orificio
del
marco.
par
exemple
avec
un
carton.
«
Ponga
algo
blanco
(un
cartén)
en
el
suelo
para
evitar
rayaduras
durante
la
instalacion.
+
Put
Washer/Dryer
on the
soft
pad.
For
the
pedestal
installation,
the
shipping
bolts
at
the
back
of
the
washer
shall
not
be
removed.
Remove
them
after
putting
the
unit
back
to
its
upright
position
(at
Step
10).
+
Placez
le
lave-linge/séche-linge
sur
la
protection.
Ay
Pour
linstallation
du
socle,
tes vis
de
transport
situées
a
Parriére
du
lave-linge
ne
doivent
pas
étre retirées.
Ne
les
enlevez
qu'une
fois
que
l'appareil
est
replacé
en
position
verticale
(a
/étape
10).
«
Coloque
la
lavadora
o
secadora
sobre
el
carton.
dy
Patalainstalacion
del
pedestal,
los
tomnillos
de
transporte
de
la
parte
posterior
de
la
lavadora
no
se
deben
quitar.
Quitelos
después
de
poner
la
parte
posterior
de
la
unidad
en
su
posicién
vertical
(en
el
paso
10).
+
Installation
for
Dryer,
go
to
step
7a.
+
Installation
for
Washer,
go
to
step
7b.
+
Pour
l’installation
du
séchoir,
reportez-vous
a
|'étape
7a.
+
Pour
l’installation
du
lave-
linge,
reportez-vous
a|'étape
7b.
+
Instalacion
de
la
secadora,
ir
al
paso
7a.
+
Instalacion
de
la
lavadora,
ir
al
paso
7b.
Dryer
/Nouvelle
sécheuse
Secadora
+
Remove
the
leg
assemblies
(4ea)
and
snap
the
+
Put
the
pedestal
on the
bottom.
+
Secure
them
with
screws
(4ea).
Go
to
Step
10.
Bracket-screw
into
the
holes
(4ea).
+
Retirez
les
piétements
(4ea)
et
enfoncez
les
caches
»
Placezle
socle
en
bas.
+
Fixez-les
a
l'aide
de
vis
(4ea).
Passez
a
létape
10.
carrés
dans
les
orifices
(4ea).
+
Quite
los
montajes
de
las
patas
(4ea)
y
encaje
los
+
Ponga
el
pedestal
en
la
parte
inferior.
+
Asegtrelo
con
los
tornillos
(4ea).
Vaya
al
paso
10.
tapones
cuadrados
en
sus
orificios
(ea).
-2-

Washer
/Laveuse/
Lavadora
+
Remove
the
leg
assemblies
(4ea).
+
Put
the
pedestal
on
the
bottom.
4
Caution
/
Attention
/
Precauién
os
»
Make
sure
to
tighten
up
all
the
bolts
between
the
+
Otez
les
piétements
(4ea).
«
Placez
le
socle
en
bas.
washer
and the
pedestal
until
you
cannot
be
. .
ek
tightened
up
anymore.
+
Quite
los
montajes
de
las
patas
(4ea).
«
Ponga
el
pedestal
en
la
parte
inferior.
—~
Use
a
socket
wrench.
Veillez
a
serrer
a
fond
tous
les
boutons
entre
le
lave-linge
et
le
support.
—
Utilisez
une
clé
a
douille.
Asegtirese
de
ajustar
bien
todos
los
pernos
entre
la
lavadora
y
el
pedestal
hasta
que
no
se
los
pueda
ajustar
mas.
~~
Use
una
llave
de
cubo.
+
Put
the
assembled
unit
back
to
upright
position.
«
Screw
up
(8ea)
the
back
panel.
«
Remove
the
Shipping
bolts
of
washing
machine
Make
sure
all
the
screws
are
completely
fastened
+
Replacez
l'appareil
en
position
verticale.
to
prevent
buzzing
noise
during
unit
operation.
+
Retirezles
vis
de
transport
du
lave-linge.
«
Fixez
le
panneau
arriére
a
l'aide
de
vis
(8ea).
+
Ponga
la
parte
posterior
de
la
unidad
ensamblada
Assurez-vous
que
toutes
les vis
sont
correctement
«
Quite
los
tornillos
de
transporte
de
la
lavadora.
en
posicién
vertical.
serrées
afin
d'éviter
tout
bourdonnement
pendant
lefonctionnement.
«
Atornille
(8ea)
el
panel
posterior.
Asegurese
de
que
todos
los
tornillos
estén
bien
apretacos
para
evitar
ruidos
de
zumbidos
durante
el
funcionamiento.
Tips
for
Wooden
Panel
Floor
and
Vibration
Test
/
Conseils
pour
les
sols
en
bois
et
Test
de
vibration
/
Consejos
para
los
suelos
de
paneles
de
madera
y
test
de
vibraciones
Test-1.
+
Putit
into
the
Spin
cycle
and
check
its
vibration.
«
Mettez-le
en
cycle
Essorage
et
contrélez
ses
@
vibrations.
bd
«
Seleccione
el
ciclo
Spin
(Centrifugado)
y
verifique
si
hay
vibraciones.
Test-2.
+
If
there
is
too
much
vibration,
repeat
the
above.
«
Sily
a
trop de
vibrations,
répétez
les
opérations
ci-
8 @
dessus.
«
Si
hay
demasiadas
vibraciones,
repita
los
pasos
anteriores.
+
Put
the
assembled
units
to
the
installation
sites.
«
Put
the
legs
on the
same
floor
panels
and
+
Posez
les
appareils
assemblés
a
leur
place
keep
them
away
from
the
floor
lines.
définitive.
«
Placez
les
pieds
sur
les
mémes
panneaux
+
Ponga
las
unidades
ensambladas
en
el
lugar
de de
parquet,
entre
les
rainures.
instalacion.
«
Ponga
las
patas
sobre
los
mismos
paneles
del
suelo
y
apartelas
de
las
lineas
del
suelo.
-3-
in
@
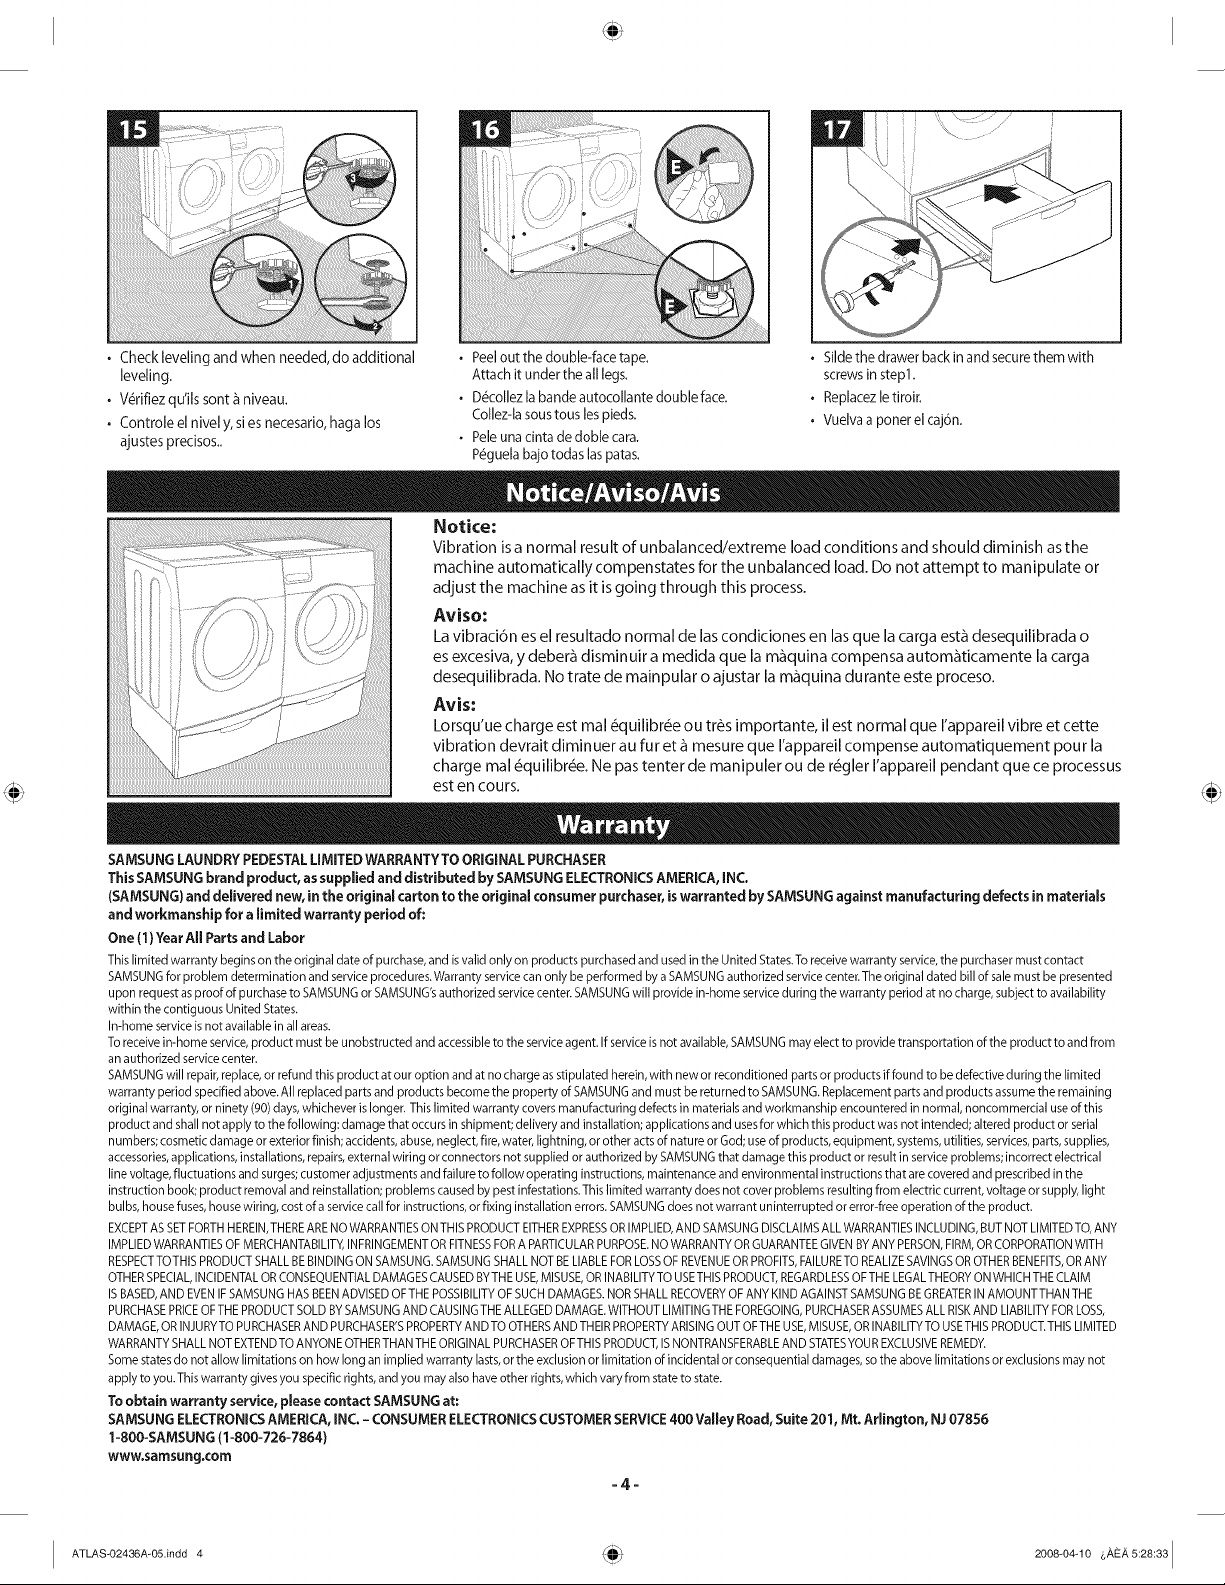
*
Check
leveling
and
when
needed,
do
additional
+
Peel
out
the
double-face
tape.
+
Silde
the
drawer
back
in
and
secure
them
with
leveling.
Attach
it
under
the
all
legs.
screws
in
step1.
+
Vérifiez
quills
sont
a
niveau.
+
Décollez
la
bande
autocollante
double
face.
«+
Replacez
le
tiroir.
: : :
Collez-la
sous
tous
les
pieds.
ib
+
Controle
el
nivel
y,
si
es
necesario,
haga
los
,
p
+
Vuelva
a
poner
el
cajon.
ajustes
precisos..
«
Pele
una
cinta
de
doble
cara.
Péguela
bajo
todas
las
patas.
Notice/Aviso/Avis
Notice:
Vibration
is
a
normal
result
of
unbalanced/extreme
load
conditions
and
should
diminish
as
the
machine
automatically
compenstates
for
the
unbalanced
load.
Do
not
attempt
to
manipulate
or
adjust
the
machine
as
it
is
going
through
this
process.
Aviso:
La
vibracion
es
el
resultado
normal
de
las
condiciones
en
las
que
la
carga
esta
desequilibrada
o
es
excesiva,
y
debera
disminuir
a
medica
que
la
maquina
compensa
automaticamente
la
carga
desequilibrada.
No
trate
de
mainpular
o
ajustar
la
maquina
durante
este
proceso.
Avis:
Lorsqu’ue
charge
est
mal
équilibrée
ou
trés
importante,
il
est
normal
que
l'appareil
vibre
et
cette
vibration
devrait
diminuer
au
fur
et
a
mesure
que
l'appareil
compense
automatiquement
pour
la
charge
mal
équilibrée.
Ne
pas
tenter
de
manipuler
ou
de
régler
l'appareil
pendant
que
ce
processus
est
en
cours.
(au)
ww
SAMSUNG
LAUNDRY
PEDESTAL
LIMITED
WARRANTY
TO
ORIGINAL
PURCHASER
This
SAMSUNG
brand
product,
as
supplied
and
distributed
by
SAMSUNG
ELECTRONICS
AMERICA,
INC.
(SAMSUNG)
and
delivered
new,
in
the
original
carton
to
the
original
consumer
purchaser,
is
warranted
by
SAMSUNG
against
manufacturing
defects
in
materials
and
workmanship
for
a
limited
warranty
period
of:
One
(1)
Year
All
Parts
and
Labor
This
limited
warranty
begins
on
the
original
date
of
purchase,
and
is
valid
only
on
products
purchased
and
used
in
the
United
States.
To
receive
warranty
service,
the
purchaser
must
contact
SAMSUNG
for
problem
determination
and
service
procedures.
Warranty
service
can
only
be
performed
by
a
SAMSUNG
authorized
service
center.
The
original
dated
bill
of
sale
must
be
presented
upon
request
as
proof
of
purchase
to
SAMSUNG
or
SAMSUNG'S
authorized
service
center.
SAMSUNG
will
provide
in-home
service
during
the
warranty
period
at
no
charge,
subject
to
availability
within
the
contiguous
United
States.
In-home
service
is
not
available
in
all
areas.
To
receive
in-home
service,
product
must
be
unobstructed
and
accessible
to
the
service
agent.
If
service
is
not available,
SAMSUNG
may
elect
to
provide
transportation
of
the
product
to
and from
an
authorized
service
center.
SAMSUNG
will
repair,
replace,
or
refund
this
product
at
our
option and
at
no
charge
as
stipulated
herein,
with
new
or
reconditioned
parts
or
products
if
found
to
be
defective
during
the
limited
warranty
period
specified
above.
All
replaced
parts
and
products
become
the
property
of
SAMSUNG
and
must
be
returned
to
SAMSUNG.
Replacement
parts
and
products
assume
the
remaining
original
warranty,
or
ninety
(90)
days,
whichever
is
longer.
This
limited
warranty
covers
manufacturing
defects
in
materials
and
workmanship
encountered
in
normal,
noncommercial
use
of
this
product
and
shall
not
apply
to
the
following:
damage
that
occurs
in
shipment;
clelivery
and
installation;
applications
and
uses
for
which
this
product
was
not
intended;
altered
product
or
serial
numbers;
cosmetic
damage
or
exterior
finish;
accidents,
abuse,
neglect,
fire,
water,
lightning,
or
other
acts
of
nature
or
God;
use
of
products,
equipment,
systems,
utilities,
services,
parts,
supplies,
accessories,
applications,
installations,
repairs,
external
wiring
or
connectors
not
supplied
or
authorized
by
SAMSUNG
that
damage
this
product
or
result
in
service
problems;
incorrect
electrical
line
voltage,
fluctuations
and
surges;
customer
adjustments
and
failure
to
follow
operating
instructions,
maintenance
and
environmental
instructions
that
are
covered
and
prescribed
in
the
instruction
book;
product
removal
and
reinstallation;
problems
caused
by
pest
infestations.
This
limited
warranty
does
not
cover
problems
resulting
from
electric
current,
voltage
or
supply,
light
bulbs,
house
fuses,
house
wiring,
cost
of
a
service
call
for
instructions,
or
fixing
installation
errors.
SAMSUNG
does
not
warrant
uninterrupted
or
error-free
operation
of
the
product.
EXCEPT
AS
SET
FORTH HEREIN,
THERE
ARE
NO
WARRANTIES
ON
THIS
PRODUCT
EITHER
EXPRESS
OR
IMPLIED,
AND
SAMSUNG
DISCLAIMS
ALL
WARRANTIES
INCLUDING,
BUT
NOT
LIMITED
TO,
ANY
IMPLIED
WARRANTIES
OF
MERCHANTABILITY,
INFRINGEMENT
OR
FITNESS FOR
A
PARTICULAR
PURPOSE.
NO
WARRANTY
OR
GUARANTEE
GIVEN
BY
ANY
PERSON,
FIRM,
OR
CORPORATION
WITH
RESPECT
TO
THIS
PRODUCT
SHALL
BE
BINDING
ON
SAMSUNG.
SAMSUNG
SHALL
NOT
BE
LIABLE
FOR
LOSS
OF
REVENUE
OR
PROFITS,
FAILURE
TO
REALIZE
SAVINGS
OR
OTHER
BENEFITS,
OR
ANY
OTHER
SPECIAL,
INCIDENTAL
OR
CONSEQUENTIAL
DAMAGES
CAUSED
BY
THE
USE,
MISUSE,
OR
INABILITY
TO USE
THIS
PRODUCT,
REGARDLESS
OF
THE
LEGAL
THEORY
ON
WHICH
THE
CLAIM
IS
BASED,
AND
EVEN
IF
SAMSUNG
HAS
BEEN
ADVISED
OF
THE
POSSIBILITY
OF
SUCH
DAMAGES.
NOR
SHALL
RECOVERY
OF
ANY
KIND
AGAINST
SAMSUNG
BE
GREATER
IN
AMOUNT
THAN
THE
PURCHASE
PRICE
OF
THE
PRODUCT
SOLD
BY
SAMSUNG
AND
CAUSING
THE
ALLEGED
DAMAGE.
WITHOUT
LIMITING
THE
FOREGOING,
PURCHASER
ASSUMES
ALL
RISK
AND
LIABILITY
FOR
LOSS,
DAMAGE,
OR
INJURY
TO
PURCHASER
AND PURCHASER’S
PROPERTY
AND
TO
OTHERS
AND
THEIR
PROPERTY
ARISING
OUT
OF
THE
USE,
MISUSE,
OR
INABILITY
TO USE
THIS
PRODUCT.
THIS
LIMITED
WARRANTY
SHALL
NOT
EXTEND
TO
ANYONE
OTHER
THAN
THE
ORIGINAL
PURCHASER
OF
THIS
PRODUCT,
IS
NONTRANSFERABLE
AND
STATES
YOUR
EXCLUSIVE
REMEDY.
Some
states
clo
not
allow
limitations
on
how
long
an
implied
warranty
lasts,
or
the
exclusion
or
limitation
of
incidental
or
consequential
damages,
so
the
above
limitations
or
exclusions
may
not
apply
to
you.
This
warranty
gives
you
specific
rights,
and you
may
also
have
other
rights,
which
vary
from
state
to
state.
To
obtain
warranty
service,
please
contact
SAMSUNG
at:
SAMSUNG
ELECTRONICS
AMERICA,
INC.
-
CONSUMER
ELECTRONICS
CUSTOMER
SERVICE
400
Valley
Road,
Suite
201,
Mt.
Arlington,
NJ
07856
1-800-SAMSUNG
(1-800-726-7864)
WWW.samsung.com
ATLAS-02436A-05.indd
4
(@)
2008-04-10
AEA
5:28:33
o)