

10
10
11
13
13
14
15
Packing list ------------------------------------------------
Remote button installation
---------------------------
Wiring diagram -----------------------------------------
About the TPMS sensor -----------------------------
Sensor installation -------------------------------------
Sensor battery replacement ------------------------
Trouble shooting ---------------------------------------
User Manual Installation Manual
Contents
2
2
2
3
3
4
5
7
8
Important notice --------------------------------
About the product ------------------------------
Technical specification ------------------------
Key features -------------------------------------
Remote button & installation -----------------
Interface of the TPMS -------------------------
How does the system work -------------------
Upgrade function --------------------------------------
TPMS sensor programming -------------------

01 02
User Manual
This unit is only for vehicles with 12V DC and
its tire pressure is within 3.5 Bar/50 Psi
This unit should be installed by a professional
technician according to the installation manual
TPMS (tire pressure monitoring system) is
designed to help the driver to monitor the tire
irregularities. It is the driver's responsibility to
react promptly to alerts. Abnormal tire pressure
should be corrected ASAP.
This is a wireless RF product, therefore, the
signal may be affected by the poor environment,
RF interference, low sensor battery or a damaged
sensor.
We do not guarantee or assume liability for the
loss of the TPMS sensors.
Important notice
Technical specification
Sensor:
Operating frequency: 433.92MHz
Battery voltage: 3V
Operating temperature: -20
o
C~+60
o
C/
-4
o
F~140
o
F
Pressure range: 0~3.5 Bar/0~50Psi
Control unit:
Working frequency: 433.92 MHz
Working voltage: 9~16V
Working temperature: -40
o
C~+85
o
C
-40
o
F~185
o
F
Air pressure unit
1 Bar = 14.5 Psi = 100K Pa = 1.02 Kgf/cm
2
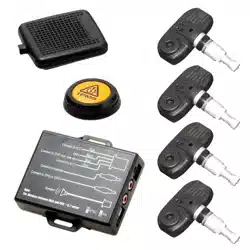
About the product
This TPMS matches with the original car A/V
monitor. It can work with PAL or NTSC monitor.
The external wireless sensor measures the tire
pressure and temperature,and easy for
installation. Once installed in your vehicle, the
system will automatically monitor tires in real-
time for pressure and temperature. When there
is any abnormal tire pressure and/or temperature
happened, the system will, in real-time, transmit
signals to activate an alarm and warning the
driver about tire problem.
Our TPMS can help you to avoid tire accidents
due to tire failure, to reduce the fuel consumption
and to extend the tire life.

01 02
User Manual
This unit is only for vehicles with 12V DC and
its tire pressure is within 3.5 Bar/50 Psi
This unit should be installed by a professional
technician according to the installation manual
TPMS (tire pressure monitoring system) is
designed to help the driver to monitor the tire
irregularities. It is the driver's responsibility to
react promptly to alerts. Abnormal tire pressure
should be corrected ASAP.
This is a wireless RF product, therefore, the
signal may be affected by the poor environment,
RF interference, low sensor battery or a damaged
sensor.
We do not guarantee or assume liability for the
loss of the TPMS sensors.
Important notice
Technical specification
Sensor:
Operating frequency: 433.92MHz
Battery voltage: 3V
Operating temperature: -20
o
C~+60
o
C/
-4
o
F~140
o
F
Pressure range: 0~3.5 Bar/0~50Psi
Control unit:
Working frequency: 433.92 MHz
Working voltage: 9~16V
Working temperature: -40
o
C~+85
o
C
-40
o
F~185
o
F
Air pressure unit
1 Bar = 14.5 Psi = 100K Pa = 1.02 Kgf/cm
2
About the product
This TPMS matches with the original car A/V
monitor. It can work with PAL or NTSC monitor.
The external wireless sensor measures the tire
pressure and temperature,and easy for
installation. Once installed in your vehicle, the
system will automatically monitor tires in real-
time for pressure and temperature. When there
is any abnormal tire pressure and/or temperature
happened, the system will, in real-time, transmit
signals to activate an alarm and warning the
driver about tire problem.
Our TPMS can help you to avoid tire accidents
due to tire failure, to reduce the fuel consumption
and to extend the tire life.
03 04
Press the remote button to control the TPMS
TPMS
Abnormal tire
Abnormal tire position
Tire alarm message
Temperature unit
Key features
Remote button & Installation
Interface of the TPMS
1. Main Interface
2. Alarm Interface
3. Setting Interface
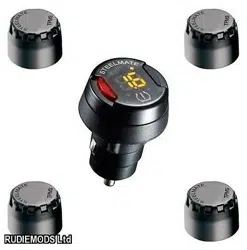
Match with original car A/V monitor
Easy-to-install external sensor with locking design
Visual and audible warning for abnormal tire pressure and temperature
Remote button to turn on TPMS on monitor
Stable wireless signal transmission
The monitoring pressure range can be set manually
TPMS
Press and hold the remote button 4 seconds to enter
the setting mode.
Short press the button to increase / change
parameter. If the parameter in excess of maximum,
the parameter will down to minimum.
Press and hold the button 2 seconds to save and
enter next parameter setting.
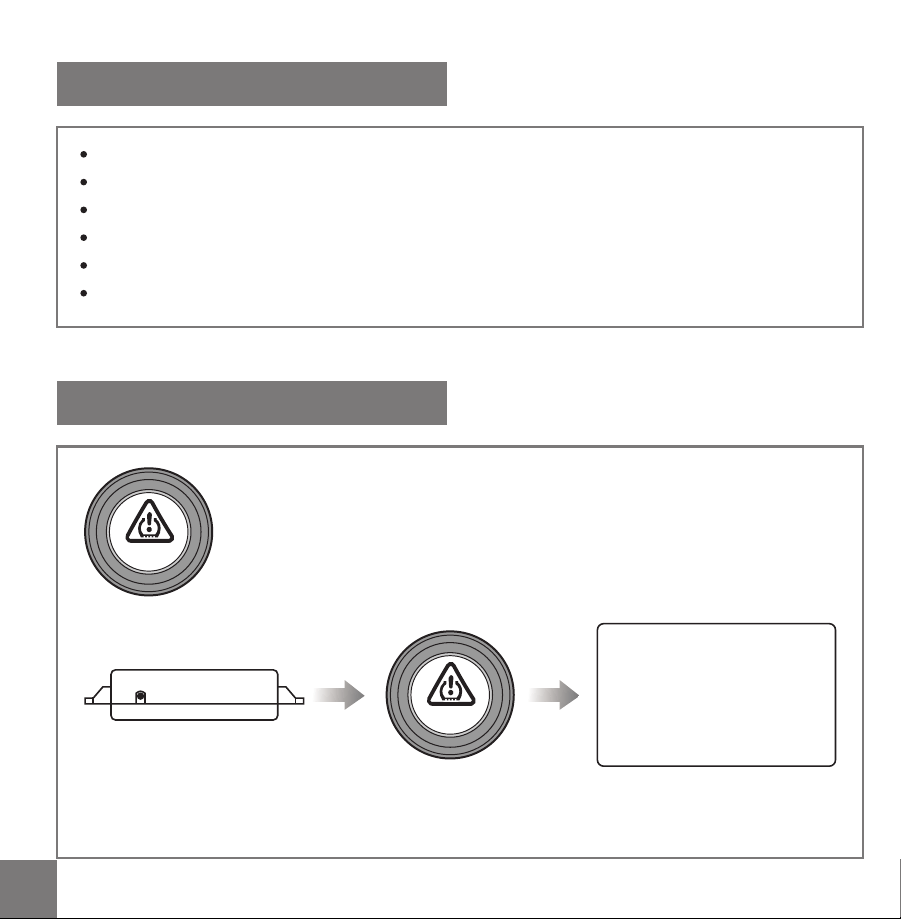
Pairing
Press and hold the Set button
on the ECU
Press the remote button
once
The tire monitoring interface will
show on the display automatically
to indicate the paring successful
Status
Tire symbol
Tire pressure
Pressure unit
Tire temperature
Interface
03 04
Press the remote button to control the TPMS
TPMS
Abnormal tire
Abnormal tire position
Tire alarm message
Temperature unit
Key features
Remote button & Installation
Interface of the TPMS
1. Main Interface
2. Alarm Interface
3. Setting Interface
Match with original car A/V monitor
Easy-to-install external sensor with locking design
Visual and audible warning for abnormal tire pressure and temperature
Remote button to turn on TPMS on monitor
Stable wireless signal transmission
The monitoring pressure range can be set manually
TPMS
Press and hold the remote button 4 seconds to enter
the setting mode.
Short press the button to increase / change
parameter. If the parameter in excess of maximum,
the parameter will down to minimum.
Press and hold the button 2 seconds to save and
enter next parameter setting.
Pairing
Press and hold the Set button
on the ECU
Press the remote button
once
The tire monitoring interface will
show on the display automatically
to indicate the paring successful
Status
Tire symbol
Tire pressure
Pressure unit
Tire temperature
Interface

05 06
Once the ACC is turned on, after 25 seconds the speaker will chirp once and A/V monitor will perform
self-test. The latest tire information will be showed while no tire data updating (Picture 1), Once receive
the new tire data signal, the updated tire data will be showed on the display. (Picture 2)
The system will exit the TPMS monitor interface without pressing the remote button 4 seconds.
Tire measure data is updating (Picture 1)
Tire monitoring (Picture 2)
Press the remote button once
Tire information interface
1. F.R (Front Right) tire high pressure 2. R.R (Rear Right) tire low pressure
How does the system work
Alarm warning for abnormal tire conditions
When the tire is abnormal (high pressure, low pressure, high temperature, fast leak, slow leak, low sensor
battery or abnormal sensor), the speaker will chirp 5 times and enter the alarm interface. The corresponding
abnormal tire symbol and information box will turn to red, the abnormal tpressure value or abnormal
temperature value will turn to yellow, the speaker will chirp every 5 seconds. Press the remote button
once, the system will alarm every 1 minute.
Tire status Indication
Press the remote button once, the speaker will chirp once and the system will enter the tire information
interface. The system will exit the information interface automatically after 8 seconds.
3. F.L (Front Left) tire fast leak 4. R.L (Rear Left) tire slow leak
Default settings:
Maximum Pressure: 3.5 bar (Adjustable range: 2.8~3.5 bar)
Pressure Unit: bar (Psi and Kgf/cm
2
are optional)
Minimum Pressure: 1.8 bar (Adjustable range: 1.7~2.4 bar)
Temperature Unit:
o
C (
o
F is optional)
Maximum Temperature: 75
o
C (Can not be changed)

07 08
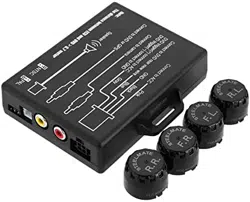
All sensors in this unit have been pre-set individually for each tire in the factory. Once the labeled sensors
are installed in the corresponding tires, there will be no need to program the sensors.
Whenever a tire position is changed, the sensor must be changed correspondingly.
TPMS sensor programming
Rearview camera (optional)
When ACC is on and the reverse gear is engaged, the A/V monitor will show the rear view image
automatically.
Rear view image priority: When ACC is on, as long as the reverse gear is engaged, the A/V monitor will
only show the rear view image.
Upgrade function
25 seconds after ACC on, press
the remote button 5 times to
enter the sensor programming
interface
Press the remote button to
choose the tire which you want
to program
Screw the new sensor to the
corresponding tire
The system will receive the
sensor signal and the
corresponding tire pressure
value will be showed on the
monitor. Press the remote
button once to confirm the
programming.
After all sensors are
programmed successfully,
press and hold the remote
button to save and exit the
programming interface.
The system will show the new
tires information on the monitor
after programming successfully
5. R.L (Rear Left) tire high
temperature
6. R.L (Rear Left) tire sensor
low battery
7. R.R (Rear Right) tire sensor
failure
07 08
All sensors in this unit have been pre-set individually for each tire in the factory. Once the labeled sensors
are installed in the corresponding tires, there will be no need to program the sensors.
Whenever a tire position is changed, the sensor must be changed correspondingly.
TPMS sensor programming
Rearview camera (optional)
When ACC is on and the reverse gear is engaged, the A/V monitor will show the rear view image
automatically.
Rear view image priority: When ACC is on, as long as the reverse gear is engaged, the A/V monitor will
only show the rear view image.
Upgrade function
25 seconds after ACC on, press
the remote button 5 times to
enter the sensor programming
interface
Press the remote button to
choose the tire which you want
to program
Screw the new sensor to the
corresponding tire
The system will receive the
sensor signal and the
corresponding tire pressure
value will be showed on the
monitor. Press the remote
button once to confirm the
programming.
After all sensors are
programmed successfully,
press and hold the remote
button to save and exit the
programming interface.
The system will show the new
tires information on the monitor
after programming successfully
5. R.L (Rear Left) tire high
temperature
6. R.L (Rear Left) tire sensor
low battery
7. R.R (Rear Right) tire sensor
failure

09 10
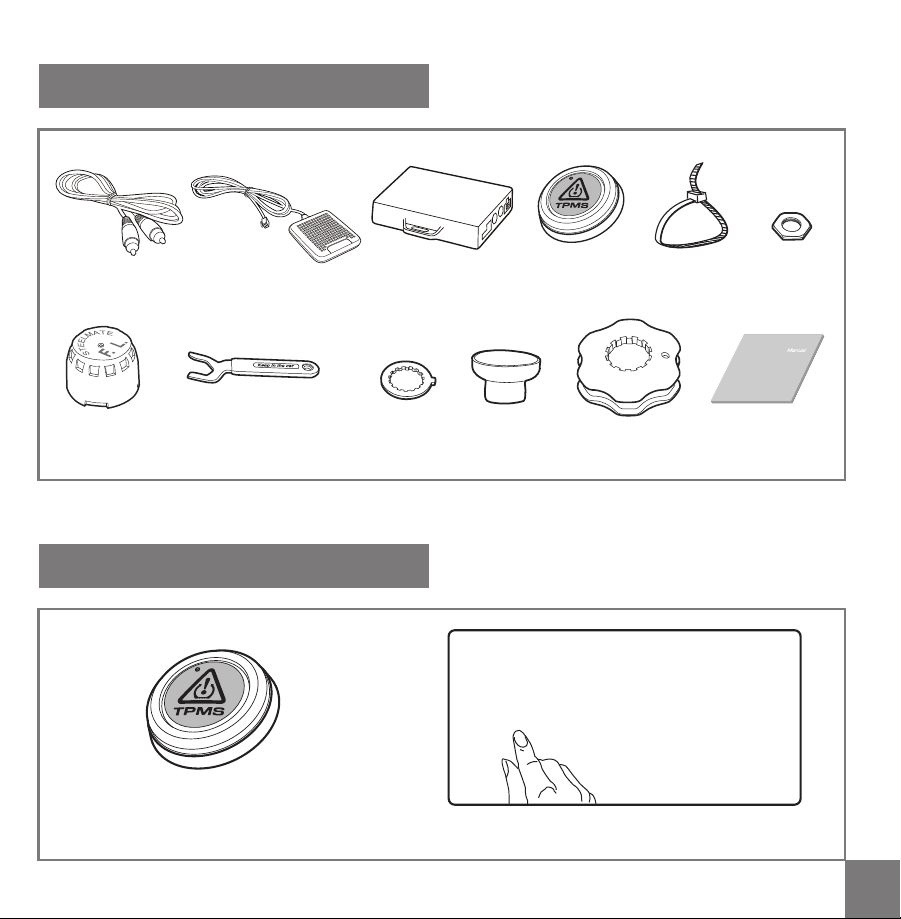
Glue the remote button on the dashboard for
the driver easy to reach (refer to picture at right)
Installation Manual
Spanner
Sensor toolWasher
Nut
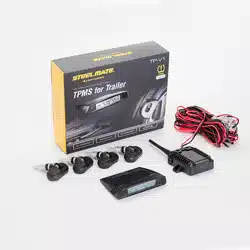
Packing list
TPMS
Wire tie
Sensor
ECU Remote buttonSpeaker
Manual
Video Cable
Dustproof
cover
Remote button installation
Press the remote button to enter the tire information
interface
(Please keep it in car
for in case)
09 10
Glue the remote button on the dashboard for
the driver easy to reach (refer to picture at right)
Installation Manual
Spanner
Sensor toolWasher
Nut
Packing list
TPMS
Wire tie
Sensor
ECU Remote buttonSpeaker
Manual
Video Cable
Dustproof
cover
Remote button installation
Press the remote button to enter the tire information
interface
(Please keep it in car
for in case)
11 12
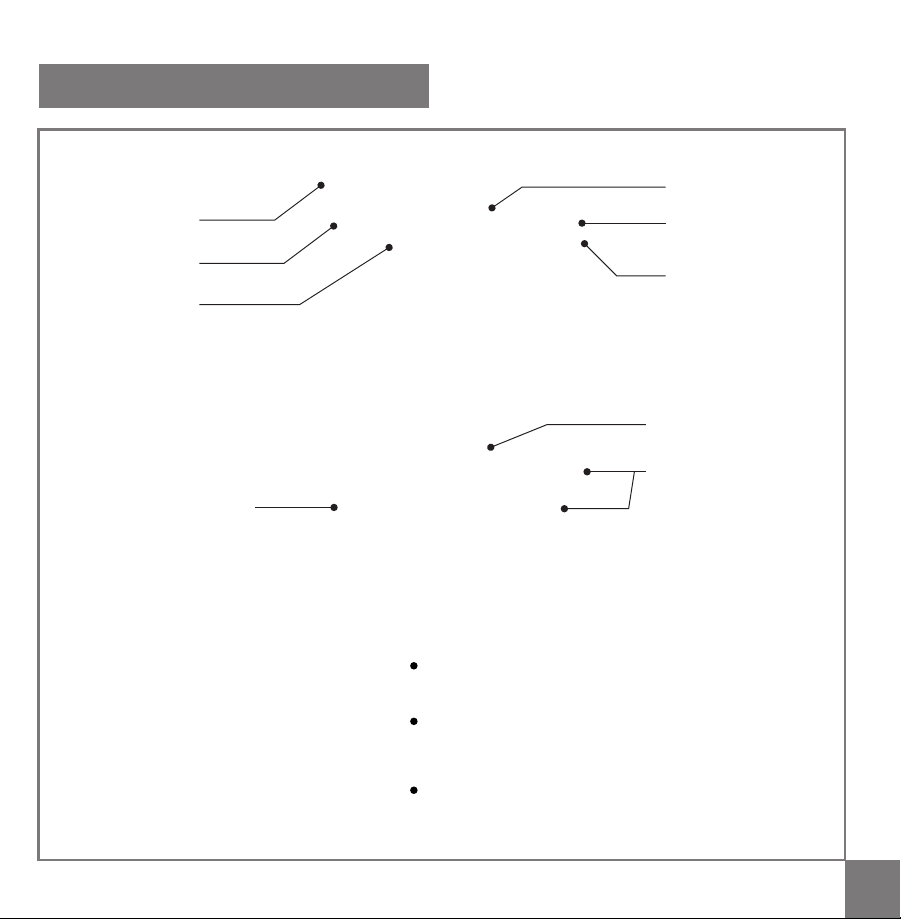
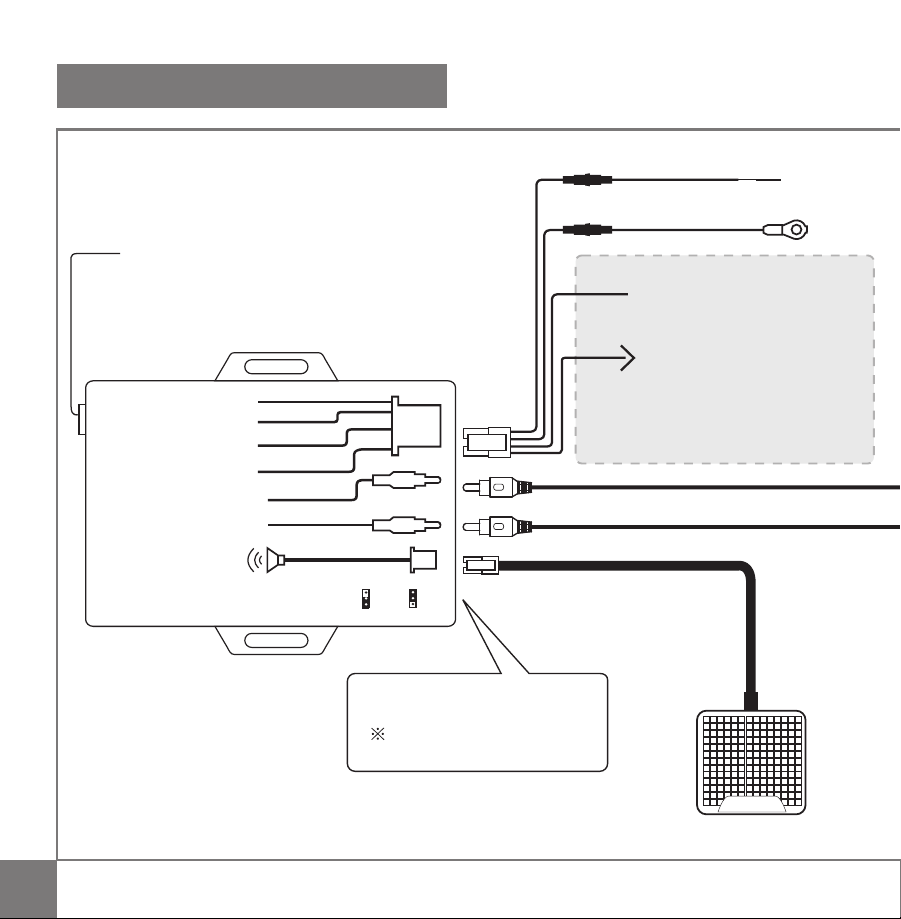
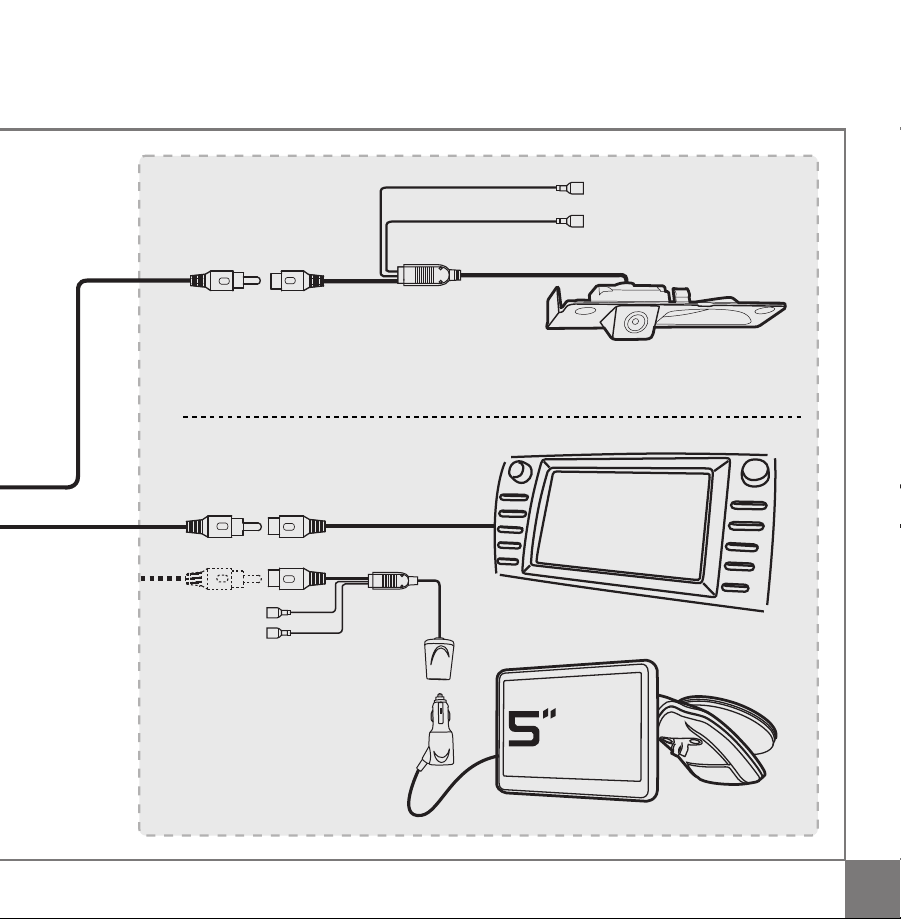
Wiring diagram
Connect to Camera
Connect to A/V or GPS
GND
Connect to A/V rear
view wire
Connect to ACC
Pink
PAL
Speaker
Gray
Blue
Black
NTSC
Note:
The distance between ECU and A/V >0.7 meter
Connect to ACC
Rear view video output
A/V monitor
Speaker
Parking light(+12V)
GND
Red
Blue
OE car rear view camera
Upgrade optional
Rear view video input
GND
ACC(+12V)
2A Fuse
ACC(+12V)
GPS
navigation
2A Fuse
Red
Black
Pink
Black
Blue
Gray
PAL or NTSC
Factory setting: PAL
GNG
If connect to steelmate 5" GPS navigation,
do not need to connect these two wires.
Connect to A/V rear view wire
If A/V is positive trigger, connect
to ACC(+12V)
If A/V is nagative trigger, connect
to GND
Set button
11 12
Wiring diagram
Connect to Camera
Connect to A/V or GPS
GND
Connect to A/V rear
view wire
Connect to ACC
Pink
PAL
Speaker
Gray
Blue
Black
NTSC
Note:
The distance between ECU and A/V >0.7 meter
Connect to ACC
Rear view video output
A/V monitor
Speaker
Parking light(+12V)
GND
Red
Blue
OE car rear view camera
Upgrade optional
Rear view video input
GND
ACC(+12V)
2A Fuse
ACC(+12V)
GPS
navigation
2A Fuse
Red
Black
Pink
Black
Blue
Gray
PAL or NTSC
Factory setting: PAL
GNG
If connect to steelmate 5" GPS navigation,
do not need to connect these two wires.
Connect to A/V rear view wire
If A/V is positive trigger, connect
to ACC(+12V)
If A/V is nagative trigger, connect
to GND
Set button
13 14
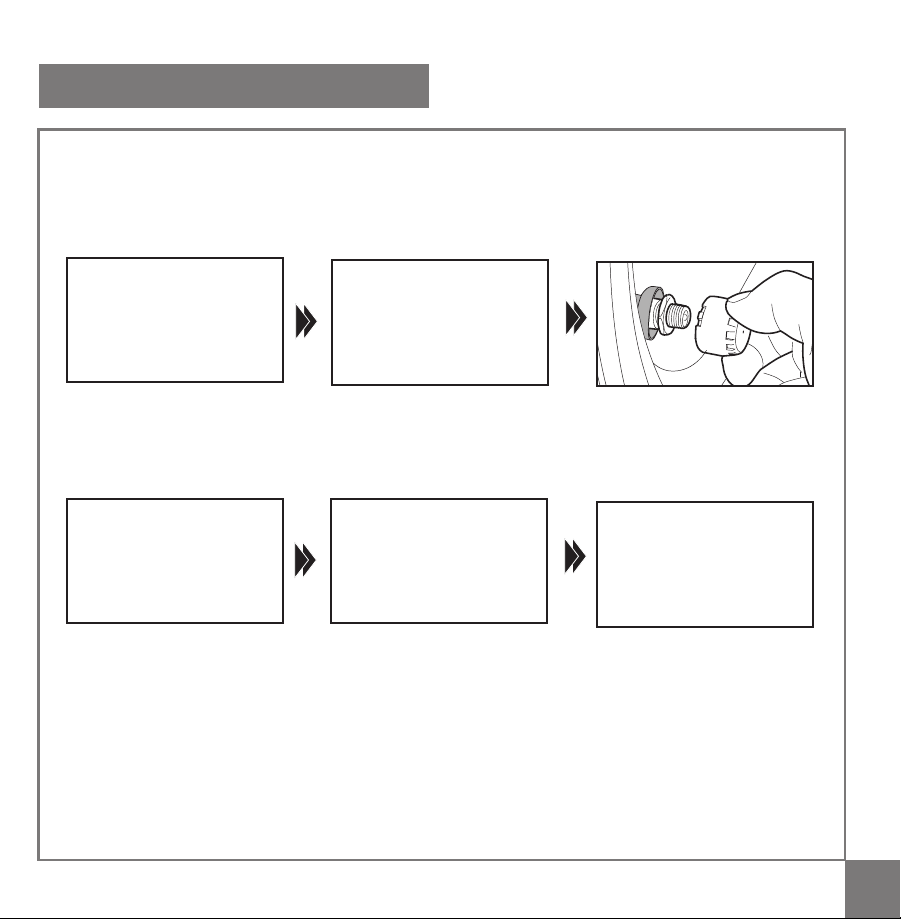
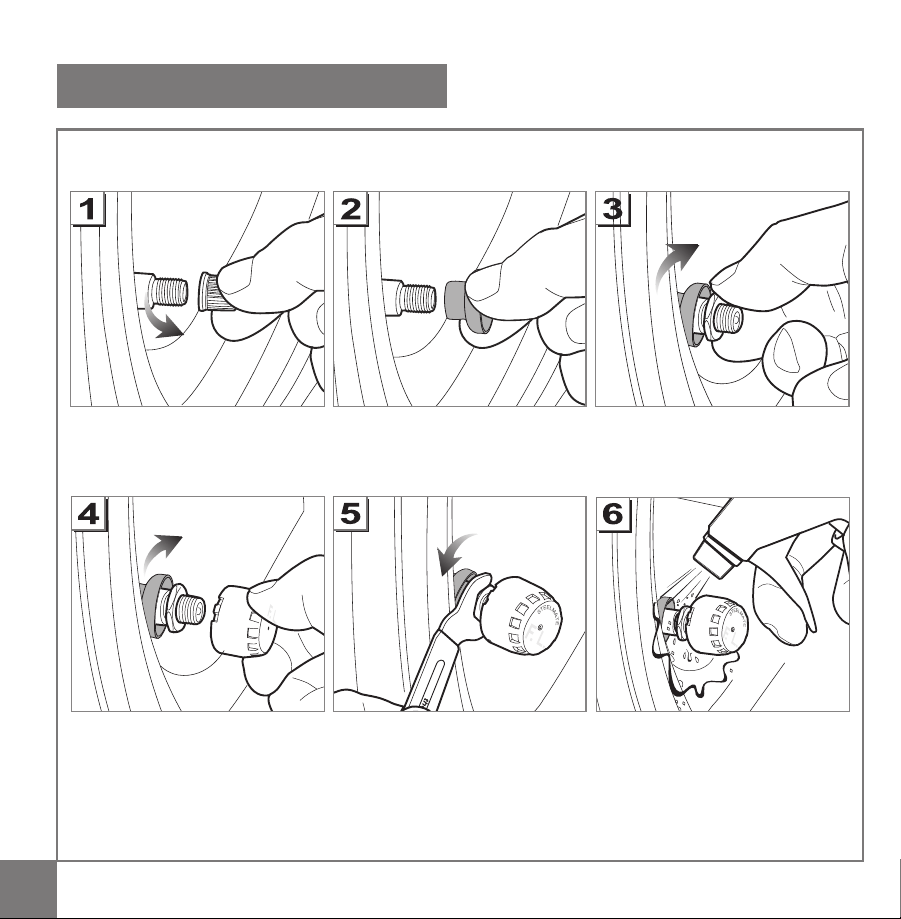
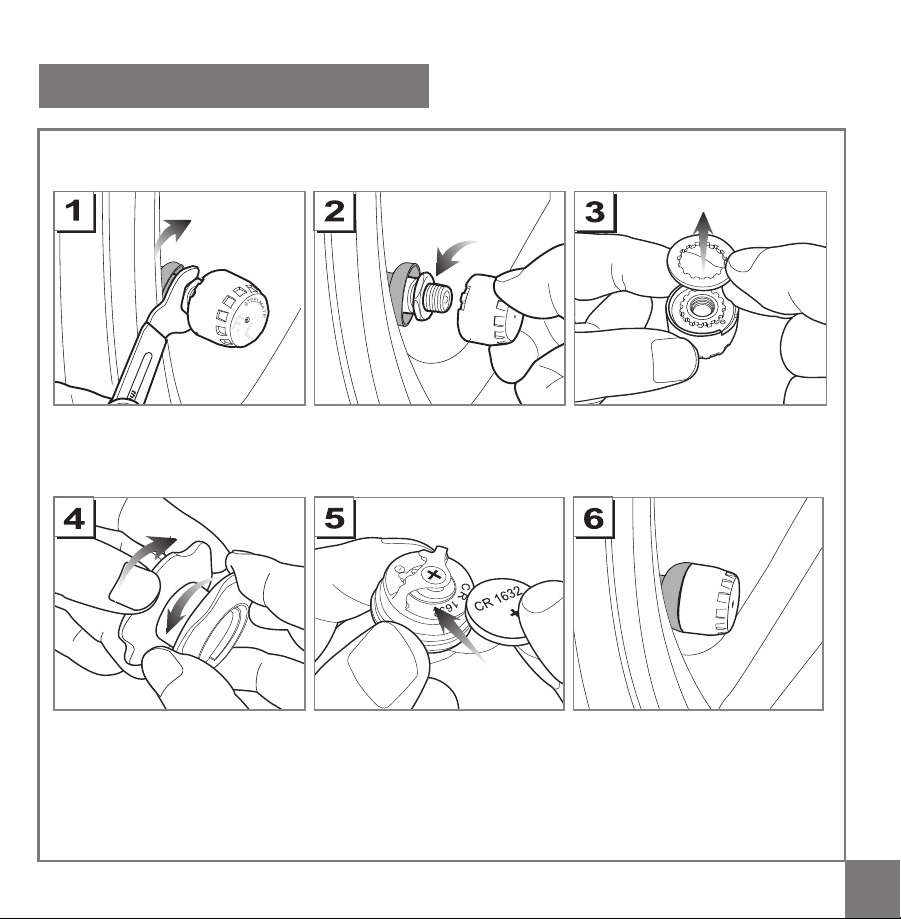
Sensor installation Sensor battery replacement
Unscrew the sensor
Follow the "Sensor Installation"
steps above
Unscrew the valve cap Screw in the nut
Insert the dustproof cover into
the valve stem
Screw on the sensor Check air leakage by spraying
soapy water
Tighten up the nut to the sensor
by using the spanner
Replace the batteryUnscrew the sensor cover by
using the sensor tool
Take out the washer
F. L.
Unscrew the nut
13 14
Sensor installation Sensor battery replacement
Unscrew the sensor
Follow the "Sensor Installation"
steps above
Unscrew the valve cap Screw in the nut
Insert the dustproof cover into
the valve stem
Screw on the sensor Check air leakage by spraying
soapy water
Tighten up the nut to the sensor
by using the spanner
Replace the batteryUnscrew the sensor cover by
using the sensor tool
Take out the washer
F. L.
Unscrew the nut

15
Trouble shooting
1. After the installation, there is no tire information on the display?
1) The sensors are not programmed to the display, please reprogramm the sensors.
2) The display is not turned on.
3) The video cable is not connected
2. When ACC is turned on, there is tire information on the display but the tire symbol is flashing
slowly.
The display shows the previous tire information. Once the new tire information is received, the tire symbol
will stop flashing.
3.There is no tire information for a specific tire.
1) There is a problem with the sensor.
2) The sensor is not programmed to the display.
reprogram the sensor.
4. After installation, leakage is found.
The tire valves are not the standard type, please replace the standard one.
5.Sensor is lost.
Please buy a new sensor from your local distributor.
6.Sensor battery is low.
Please replace the battery of CR1632.
7.Tire locations are changed.
Whenever a tire position is changed, the sensors must be changed correspondingly.