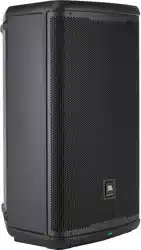
User Manual JBL EON715 Loudspeaker
OVERVIEW
SETTING UP
How to set up
- Insert input into desired channel
- Slowly turn the Main knob to increase your main volume.
- Adjust the Channel Gain knobs until your desired volume is achieved.
How to turn on/off
Press the Power Button for .5 of a second to engage power.

P.A. BASICS
A mixing board is actually a very simple device that takes the audio input signals (from the input channels) and “mixes” them to the outputs. The mixing board controls will typically enable the user to blend the input channel signal levels, affect their tone, and adjust each channel’s reverb level. The signal is then fed from the mixing board to the amplifiers and onto the speakers. The EON700 is a self-contained PA system, which includes a mixing board, amplifiers, and speakers.
GETTING ACQUAINTED WITH EON700

APPLICATION EXAMPLES

USING TWO SYSTEMS AS MAINS (EON700 Left and EON700 Right)

MIXER PANEL

MIXER PANEL FUNCTIONS
A. LCD Panel
The LCD is used to display basic diagnostic information and allow access to more advanced features through a menu system. See the LCD GUI specification for more details on the LCD menu system, features, and navigation. The LCD will refresh at approximately 4Hz and is not suitable for meters or any other fast motion items.
B. Power Button
The Power Button is a momentary push button. It is used to toggle the unit between the On and Off states. When in the Off state, a short press and release of the Power Button will put the unit into the On state.
C. Main Volume / Menu Navigation
Controls LCD Display
- Rotary encoder: In Menu - Clockwise down menu/Anti-clockwise up menu
- Press to select menu item
- On Home screen, Main Volume increase by rotating the knob clockwise.
- On Home screen, Main Volume decrease by rotating the knob counterclockwise.
D. Limit LED
Amplifier is reaching clip.
E. Back Button
Press to return to previous menu item
F. Power Inlet
Inlet adapter for A/C power cable
G. XLR Male Loop Thru
This XLR output connector provides a method of sending audio out to an external source. If signal is present on all inputs, the inputs will be summed and sent out as a mix: Can be adjusted in the pass through menu section..
H. CH2 XLR-1/4” Combo Input
XLR – 1⁄4” combination connector (1 for each input) are used for the analog audio inputs.
Knobs and Functions
The EON700 comes equipped with push button rotaries to make for easy navigation and hardware usage.
- A single press of the MAIN/MENU knob will open up the main menu.
- Pressing and holding the MAIN/MENU knob for 2s will mute the SPEAKER.
- Pressing and holding a CHANNEL KNOB for 2s will mute the CHANNEL.
Buttons and Functions
- The POWER button turns on/off the speaker. Hold for .5s to turn on the speaker and .5s to turn off the speaker.
- The BACK button will back you out of the current screen you are in without saving changes. This can be thought of as a “CANCEL” button.
LEDs and Functions
- Signal detection - LED below channel knobs will periodically flash yellow to indicate signal is present.
- LED function when Muting Channels/Speaker : LED Below Channel knobs will slowly flash RED when a channel is muted.
SSM

EASYNAV LCD
Intro to the EasyNav LCD
Main Menu
Pressing the Main/Menu rotary at any time will take you to the EON700’s main menu. Here, users can access the main menu functions of the EON700.
Gain adds preamp gain to the system to support microphone usage. EON700’s fader runs standard in LINE LEVEL, but accessing the GAIN menu can allow users to plug a microphone in directly.
- Press MAIN/MENU to access the GAIN menu.
- Select which channel you want to add GAIN to by rotating and pressing the MAIN/MENU knob.
- Turn your gain up to desired levels.
Ducking by Soundcraft® is a type of side-chain compressor most often used to lower the level of music playback while a person is talking into a microphone. This feature allows the user to choose which mic channels the use as sensors, the sensitivity of each channel, and if they want a little or a lot of music reduction while a person is speaking. This menu engages the ducking feature, allows users to select which channel(s) will act as the trigger for ducking, and set individual thresholds of each channel.
- To access this menu, navigate to ducking and press the Main/Menu button.
- To turn on ducking, navigate to Ducking and press the Main/Menu button
- Turn the knob CLOCKWISE to activate ducking
- Turn the knob COUNTER-CLOCKWISE to disable ducking
- "Channel Sensors” give the user the option to select which mic inputs can be used to trigger the
- Bluetooth playback music ducking. The user can select any combination of the mic inputs to turn on as sensors for Bluetooth music ducking.
- To adjust the Channel Sensor, navigate to the Channel Sensor field and press the MAIN/MENU button
- Navigate to the respective channel(s) you wish to set as a sensor and press the MAIN/MENU button
- Turn the knob CLOCKWISE to activate that channel as a SENSOR for ducking. When this is selected, the respective channel will detect signal and activate the ducking feature on the Bluetooth signal.
- Turn the knob COUNTER-CLOCKWISE to disable that channel as a SENSOR for ducking. When this is disabled, signal detection on this channel will NOT trigger the ducking feature on the Bluetooth signal.
" Sensitivity Parameters” give the user the option to select at what volume level each mic input channel will trigger the ducker threshold. Stronger voices may want a higher sensor level. Weaker voices may want a lower sensor level to trigger the music reduction. A lower value represents a less sensitive signal detection
- Select and edit these values by pressing the MAIN/MENU knob while Sensitivity Parameters is highlighted.
- Navigate to the respective channel you wish to edit and press the MAIN/MENU knob to select.
- Adjust the parameter.
- Press the MAIN/MENU knob to save the adjustment
- Press the BACK button to cancel this adjustment.
- Range is a parameter than tells the Bluetooth signal how much volume should be reduced when signal detection meets the desired level.
- To adjust this, navigate to RANGE and press the MAIN/MENU knob.
- Adjust the parameter
- Press the MAIN/MENU knob to save the adjustment
- Press the BACK button to cancel this adjustment.
Release Time is a parameter that tells Bluetooth signal when it should return to normal volume after signal is no longer detected. This value is represented in ms (milliseconds).
- To adjust this, navigate to RELEASE RETURN TIME field and press the MAIN/MENU knob.
- Adjust the parameter
- Press the MAIN/MENU knob to save the adjustment
- Press the BACK button to cancel this adjustment.
dbx DriveRack Output - DriveRack is a line of hardware products produced by Harman’s dbx brand. These rack mount signal processors provide detailed control for final processing and crossovers before feeding the mix to one or more speakers. This DriveRack functionality embedded into EON700 is designed to optimize the combination of speaker and Pass Thru outputs built into this JBL speaker.
AFS by dbx, or automatic feedback suppression, is a combination of processing that can enable the user to add up to 3 dB more total gain to their output before getting audio feedback back in through the mix inputs. AFS does this using a combination of auto sensing and very tight width parametric EQs before the output master EQ.
- Stage setup best practices are always recommended for best results to avoid feedback, in combination with the AFS processing system. Microphones have less chance of contributing feedback if they follow the following position standards on stage:
- Microphones should be behind the front plane of the speakers.
- Microphones should be least two meters to the left or right of the speakers.
- AFS by dbx” On/Off selection toggles the AFS processor on or off.
- Reset Filters” will reset all filters, prompting the filters to reset and start over in their discovery of potential feedback frequency risks.
The Output EQ is a package of filter adjustments on the main mix before the audio feeds to the amp and speaker. It includes a collection of easy to select preset curves for common speech and music styles. Each preset can also be loaded into the Custom preset for detailed user adjustable of output parametric EQ’s. The user has adjustments for individual band level, frequency, and width (“Q”).
- " Output EQ” On/Off enables or bypasses the current settings in the output EQ processor.
- " Presets” enables rotation of the Main/Menu knob to view and select from the Output EQ presets.
- Scroll the menu to “Presets” and press the MAIN/MENU knob.
- Rotate the MAIN/MENU knob to view the available presets.
- Click the MAIN/MENU knob to load the currently listed preset.
- Users can load the Custom preset, then double click the MAIN/MENU knob to open the Master
- EQ editing page. Inside this graph display page you may rotate the MAIN/MENU knob to a specific parametric EQ number and click the MAIN/MENU knob again to select to edit the gain (plus or minus in dB), filter frequency, or “Q” (i.e. adjust the filter width.)
- Users can load any preset as a starting point, then scroll down and adjust any setting to load the current curve as the Custom preset for further editing. A confirmation dialog will appear, warning the user that doing this will remove the current Custom preset settings and load it with the currently viewed settings.
Bass Boost – The Bass Boost functionality adds 2db of bass to the system.
- Bass Boost On/Off enables or disables bass boost functionality.
Pass Thru XLR output can be set to assist in feeding the mix to additional speakers. This section includes presets and settings based on the type of speaker the Pass Thru will be feeding and how it is positioned in comparison to this speaker and the audience.
- " Pass Thru” On/Off” enables or disables the Pass Thru XLR output feed.
- Presets” enables selection of three types of speakers combinations using the Pass Thru XLR output:
- " Full Range” is designed for feeding another full range speaker. This feeds both this and the Pass Thru XLR out to another speaker the same full frequency range mix.
- " Sub” preset automatically configures the below settings for isolating low frequencies and only feeding them to Pass Thru XLR out for a subwoofer speaker. Selecting “Sub” automatically sets the internal amp/speaker feed to HPF (“high pass filter”) only signal at above 80Hz and the Pass Thru XLR output to only pass the mix signal below 80Hz.
- " Custom” allows the user to set the lower settings manually.
- HPF on this Speaker” can be used to remove signal below a selected frequency to the built-in amp/speaker and tweeter bar.
- "LFP on Pass Thru Out” can be used to set the low pass filter on the Thru Out XLR output feed.
Time Align
- Signal delays are used when multiple speakers are in use but speakers are at different distances from the audience.
- Examples:
- A subwoofer is front of the stage, while this full range speaker in on the stage. In this configuration, the Pass Thru XLR to subwoofer will need to be slightly delayed to make up for its closer position to the audience.
- The Pass Thru XLR out is feeding an additional full range speaker placed half way back in the audience, to give additional listening distance. In this case, delay the back fill speaker in the audience to compensate correct time alignment.
- To compensate for different distances’, determine the speaker farthest from the audience and delay other speakers with the same signal to “time align” with the speaker farthest away from the audience.
- Sound travels through air at average humidity and room temperature at about 1.1 feet per ms. Measure the difference in distance of each speaker feeding the audience. Feed the speaker farthest from the audience with no time alignment delay. Set delays for the other closer speakers based on their distance ahead of the farthest back speaker. Measure the distance difference and enter 1 ms per 1.1 feet that each speaker is ahead of the farthest back speaker in your configuration. Time alignment is not perfect as not all audience positions measure the same speaker distance differences.
- Delay Pass Thru Out” Enter in ms.
- Delay This Speaker” Enter in ms.
Settings
- " BT Audio Pairing” enables Bluetooth audio pairing for up to 30 seconds. This setting turns off when a pairing has been made, or after 30 seconds.
- " BT Control Pairing” enables Bluetooth control pairing for up to 30 seconds with the JBL Pro Control app. This turns off when a pairing has been made, or after 30 seconds.
- The EON700 loudspeaker will confirm a secure pin with the app. Please ensure you confirm this to secure BLE control pairing.
- LCD Contrast” allows the user to adjust the LCD contrast between 0 and 100%.
- " Firmware Version” shows the current firmware version loaded onto the speaker.
- " Factory Reset” resets all settings in the speaker to factory default, including Bluetooth communication pairing.
The JBL Limited Warranty on professional loudspeaker products (except for enclosures) remains in effect for five years from the date of the first consumer purchase. JBL amplifiers are warranted for three years from the date of original purchase. Enclosures and all other JBL products are warranted for two years from the date of original purchase.
Who Is Protected By This Warranty?
Your JBL Warranty protects the original owner and all subsequent owners so long as: A.) Your JBL product has been purchased in the Continental United States, Hawaii or Alaska. (This Warranty does not apply to JBL products purchased elsewhere except for purchases by military outlets. Other purchasers should contact the local JBL distributor for warranty information.); and B.) The original dated bill of sale is presented whenever warranty service is required.
What Does The JBL Warranty Cover?
Except as specified below, your JBL Warranty covers all defects in material and workmanship. The following are not covered: Damage caused by accident, misuse, abuse, product modification or neglect; damage occurring during shipment; damage resulting from failure to follow instructions contained in your Instruction Manual; damage resulting from the performance of repairs by someone not authorized by JBL; claims based upon any misrepresentations by the seller; any JBL product on which the serial number has been defaced, modified or removed.
Who Pays For What?
JBL will pay all labor and material expenses for all repairs covered by this warranty. Please be sure to save the original shipping cartons because a charge will be made if replacement cartons are requested. Payment of shipping charges is discussed in the next section of this warranty.
How To Obtain Warranty Performance
If your JBL product ever needs service, write or telephone us at JBL Incorporated (Attn: Customer Service Department), 8500 Balboa Boulevard, PO. Box 2200, Northridge, California 91329 (818/893-8411). We may direct you to an authorized JBL Service Agency or ask you to send your unit to the factory for repair. Either way, you’ll need to present the original bill of sale to establish the date of purchase. Please do not ship your JBL product to the factory without prior authorization. If transportation of your JBL product presents any unusual difficulties, please advise us and we may make special arrangements with you. Otherwise, you are responsible for transporting your product for repair or arranging for its transportation and for payment of any initial shipping charges. However, we will pay the return shipping charges if repairs are covered by the warranty.
Limitation of Implied Warranties
ALL IMPLIED WARRANTIES, INCLUDING WARRANTIES OF MERCHANTABILITY AND FITNESS FOR PARTICULAR PURPOSE, ARE LIMITED IN DURATION TO THE LENGTH OF THIS WARRANTY.
EXCLUSION OF CERTAIN DAMAGES
JBL’S LIABILITY IS LIMITED TO THE REPAIR OR REPLACEMENT, AT OUR OPTION, OF ANY DEFECTIVE PRODUCT AND SHALL NOT INCLUDE INCIDENTAL OR CONSEQUENTIAL DAMAGES OF ANY KIND. SOME STATES DO NOT ALLOW LIMITATIONS ON HOW LONG AN IMPLIED WARRANTY LASTS AND/OR DO NOT ALLOW THE EXCLUSION OF INCIDENTAL OR CONSEQUENTIAL DAMAGES, SO THE ABOVE LIMITATIONS AND EXCLUSIONS MAY NOT APPLY TO YOU. THIS WARRANTY GIVES YOU SPECIFIC LEGAL RIGHTS, AND YOU MAY ALSO HAVE OTHER RIGHTS, WHICH VARY, FROM STATE TO STATE.
JBL Professional
Balboa Blvd. Northridge, CA 91329 USA