RVM1435
RVM1635
Counter Saver Plus Microwave Oven
Owner'sManual
Important SafetyInformation
?
J
OperatingInstructions
Helpful Information
J_
H
m
If SomethingGoes Wrong
' J_ xa,¢
h's,Ot* ;'¢au vtx? _&ou_:_:s ?,,?
For a Spanish version of this manual, visit our Websiteat Hotpoint.com.
Para consultar una version enespafiol de este manual de instrucciones,
visite nuestro sitio de internet Hotpoint.com.
Ho_omtcom
DE68-O2954A
39-40427-1
10-04 JR
READ ALL SAA_2TY
INFORMATION BEFORE USING
For yoHl" sal(q },; l]le ill[_)rlll>lliOll ] 11 l]lib 111_ll/till]
musl be ]ollowed It, minimize _lle lJsk of lirc
DD_[-T/I T yr/y/'-_._/'-'1 _ or explosion or lo prmcnt property damage,
TO AVOID OoNo,a,e,._, OoNo,Ooe,_,e,,,_o,_.,,
POSSIBI_2
EXPOSUt_
7"0 EXCESSIVE
lo operaw this oven i['il is damaged. 11 is
wilh die door open parlicularlv importanl
since open-door thai lhe OVell door
o_)erallOll (}tll resull c]osc properly alld
in hannfld exposure tltat flmre is no
_o lllicrowave ellerg), danlage _o the:
MICRO WAVE _, is impormn, not to
,leleat or Kllllper with
ENER GY ,h(_ satb 1,/interlocks.
Be Not Place any object
b(q\veell /he OVOll [i'OllI
la(e and II:w dool" or
allo\v _oil or clea,,_cr
residtl(' lo _l('('tlllltll_ttt-
O/1 scaling surJ[hces
properly quMilied
s(_Y_l('c persolllle].
1 (lt_or (bell|).
2 hinges and lalches
broken or loosenedL
3 (loo_ seals and scaling
StlIJ _tceb
The Oven Should Not
be adjusted o1"repaired
b\ allVOlle cxccp/
WelcometotheGEtiunily.
We'reproudotourqu_dity
productsandwebelieve
indepe;`;`dableservice.
"_i)u'llseeitintiffs
eas_-lo-nsemmmaland
you'llhearitintheliJendly
voicesofourconsmner
servicedepm:tmem.
Bestof_dl,you'llexperience
thesevaluese_,.htl;`i;`eyell
(lse }o(lr (//icr()w_l_,_ '. That's
important, because your new
n/icro(_m e will be part ot
yore: limlily/or a long time.
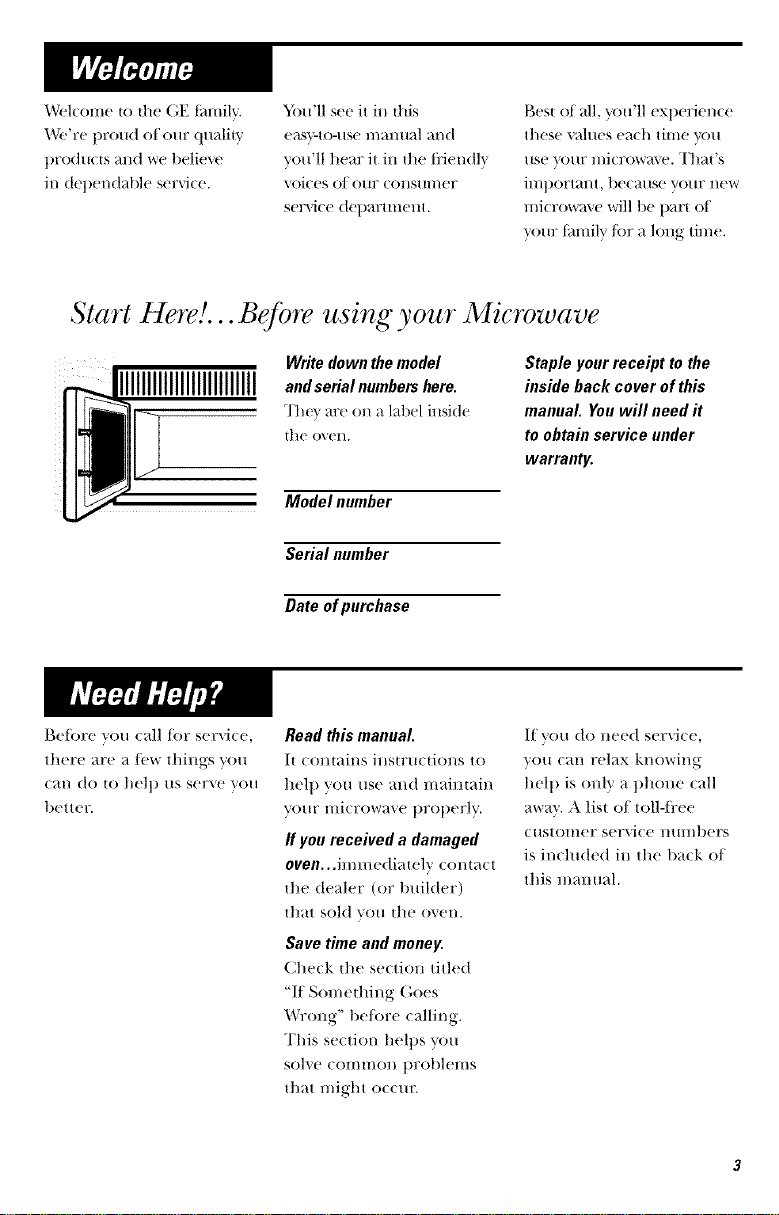
Start Here!... Before using your Microwave
Write down the model
and serial nmnbers hem.
The_ ;u'e (m a label inside
tile o\eD.
Model number
Serial number
Date of purchase
Staple your receipt to the
inside back cover of this
manual. You will need it
to obtain service under
warranty,
Betore you call tor service,
there are a/ew things you
cv_n do to help ;`;`sserve 'veil
better.
Read this manual.
It (OlltlZil;`S illStrtlcliOl;`S to
help you rise al;`d lnaimain
VO(lr ;`;`lierowave properly.
If you received a damaged
oven,.,imme(liately (oma(-t
the deah'r (or t)uiMer)
tl;`at sold you the oven.
Save time and money.
Check the section titled
"lI Something (',oes
Wrong" be/ore calling.
This section helps you
solve cOiiliilO;`l problellls
tl;`at might ()cell;':
If you do need service,
you can relax knowing
help is only a phone call
away. A list of toll-fl:ee
customer service mlmbers
is inchtded h;` the back ot
this mamml.
READ ALL SAA 2TY
INFORMATION BEFORE USING
This microwave oven is
UL listed for installation
over electric and gas
ranges.
This microwave oven is
not approved or tested
for marine use,
• Reud and tollow tile
speciiit "PreCUtltiot/s It)
\_oid Possible Expo.mre
to l_xcessixe Microwu_c
Energy" on puge 2.
• This uppliauce mttst be
_l'Ottllde(|. (',ol/nect Ol/|V
to properly grounded
ottllet. N('( + (;rounding
IlStFttctioI/S Sc('liOI Oil
page 10.
• l)o//ol l/lOtlllt lhis
app|im)( e over a sink.
• [ustM| or It)cute this
al)l)lim)( e only in
u(cordul)(e x*,'it]l the
proxided In_tMlulion
11 ISIFIICIiOI/S.
• This ovet-lhe-rung-e t)VCI/
_raS designed ]or /15c over
Y;tI/_CS 110 wideF t]/all 21()_'
/t may be iu_tulled over
both gas uud electric
cookiug equipment.
• I)o not operate this
appliance if it has a
damaged power cord or
plug, if it is not working
properly or if it has been
damaged or dropped.
I/the power (ord is
damaged, it must be
replaced bv General
Ele( trie Servi(e or an
m_thorized service agent
using a power cord/i'om
(;enerul Ele( u:ic.
• Do not cover or block
any openings on the
appliance.
• Else this appliunce only
/or its intended use us
described in this mmmal.
Do llOt IISe corrosive
chemicals or vapors in
this appliance. This
microwave o_en is
spe(ifi(ally designed to
heat, (lilyror cook/ood,
and is not intended
/or laboratory or
industrial use.
I!1
• l)o not store this appliance
outdoors.
• Do not use this product
11('_117 W;-It(T ]()17 UX_ll//pl(',
in _ wet basement,
nero: _ swimming pool,
nero: _1sink or in similm:
locations.
• Keep power cord :_wm
It'om heated surIilces.
• Do not immerse power
cord or ph N in water.
• To reduce the risk of fire
in the oven cavity:
-- Do not overtook/ood.
Carcflfl]v attend appliance
when pal)e_; plastk or
other ( ombustiMe
materials are placed
inside the oven while
cooking.
-- Remove wire twist-ties
m_d metal hml(tles
ti'om t)_q)er or plastic
cont_dners bet6re placing
tl/('IIl ill th(' ox('ll,
-- Do I/or tlS(' th(' ov(ql
t6r storage t)m])oses.
Do not le_\ e t)aper
t)_x)(hwts, cooking
utensils or t6od in the
o\'cn when not in use.
--//materials inside oven
ignite, keep the oxen
door closed, mrn the
OV('II ()1t and disconnect
the power cord, or shut
off t)ower _t the fi_se or
(ir(uit breaker f)anel.
//the door is opened,
the fit',.+lm_y spread.
• See door sttrIilce cleaning
instructions in the (_at'e
and Clemfing section (s)
of this mmmal.
• This appliance must only
be serviced by qualified
ser\'i( e t)ers(mnel+ Conta( t
nearest authorized service
/i_cility I6r exmninafion,
I'(+p_liF Or _t(!j/IStl//('I/t+
• +\s with any appliance,
close sut)elMsion is
necessary when used
1)v children.
• I)o not store m_ything
directly on top of the
mi(rowa\'c o_en sur/i_ce
when the mi(rowa\'c o\'cn
is in operation.
SA THESE INS TR UC TIONS
SPECIAL N07 2S ABOUF MICRO WAVING
Ar(ing is file l//J( Fo_r_l+'_e
term t_>r sparks in the
oxen. Ardng is (aused by:
• Metal or foil tou(hing
ttl+e side of ttl+e oxell+.
• Foil not molded to ti)od
(upturned edges a(t like
amemlas).
• Metal, such as twist-ties,
poultry pins or gold-
rimmed dishes, in the
mi(rowa_e.
• Recycled paper towels
comaining small metal
pieces being used in
the l+l+licl+owt-ive+
• Do not pop popcorn in
your microwave oven
mfless in a special
microwave t )Ot)COlTll+
_ICCeSSOI'y 017 till+less VO/l+
use 1)ot)corn labeled tor
use in microwave ovens.
• Some t)roducts such as
whole eggs and sealed
(omainers tor example,
closed jars--are able to
explode and shotfid not
be heated in this
microwave o_en. Such use
of the microw_we oven
could result in i_jury.
• 1)o not boil eggs in a
mi(rowave oven. Pressure
will build up inside egg
yolk and will (ause it to
burst, possibly resuhing
• Operating tll+e microwave
with no tood inside/or
more than a mimne or
tWO l+l+l_l_' C_l[lSe (t_l+I//Hge
to the oven and could
St_I+Ft _1 tire. It i]lcre;4ses
the he+_t +u:otmd the
magnetron and (_m
shorten ttl+e lilt' of
flit. _ OVell.
• Foods with mlbroken
outer "skill" S/loll+ _l+s
potatoes, hot dogs,
sail+sages, [()Ill,l+[()es,
apples, chicken livers
and other giblets, and
egg yolks should be
pierced to allow steam
to escape dm:ing
cooking.
I!1
SAFETYFACT
SUPERHEATED WATER
Liquids, such as water,
coffee or tea, are able to
he overheated beyond
the boiling point without
appearing to he boiling.
Visible bubbling or boiling
when the container is
removed from the microwave
oven is not always present.
THIS COULD RESULT
IN VERY HOT LIQUIDS
SUDDENLY BOILING OVER
WHEN THE CONTAINER IS
DISTURBED OR A SPOON
OR OTHER UTENSIL IS
INSERTED INTO THE LIQUID.
To 1"('(Ime tilt" risk o/inj/IFV
to persons:
-- Do not overheat tile
liquid.
-- Stir the liquid both
bell)re and hall\ray
through heating it.
-- Do not use straight-sided
containers with narrow
necks.
-- ,\lter heating, allow
the comainer to stm/d
in the microwa\e oven
/or a short time belore
rel//O\'illg the containeE
-- Use extrelile care when
inserting a st)oon or
other utensil imo the
containec
• A_oid heating baby/ood
ill glass jars, even with tile
lid o/E Make sure all
in/iu/t/ood is thoroughly
looked. Stir/ood to
distribute the heat e_vnlv.
Be carefld to prevem
scalding when warming
tormula or breast milk.
The container may teel
cooler than the milk really
is. Always test the milk
betore tceding tile baby.
• Don't detrost trozen
beverages ill narrow-
necked bottles (especially
carbonated beverages).
Even if the container is
opened, t)ress/lre Call
build up. This can cause
tile container to burst,
possibly resulting in
i,/juv}.
• t lot foods and steanl
call cause burns. Be
careflll when opening
am' containers of hot
tood, inchlding pop(orn
bags, cooking pouches
and boxes. To prevem
possible il_jm:}, direct
stean/ away/i'om hands
and/hce.
• Do not overcook
potatoes. They could
dehydrate and catth
fire, causing damage
to your men.
• Cook nleat and poultv}
thoroughl}--meat to
at least an INTERNAI_
temperature of 160°F
and poultry to at least all
INTERNAI, Wmperature
of 180°E Cooking to
these tenlperat ures
usually protects against
/oodborne ilh/ess.
SPECIAL N07 2S ABOU£ MICRO WAVING
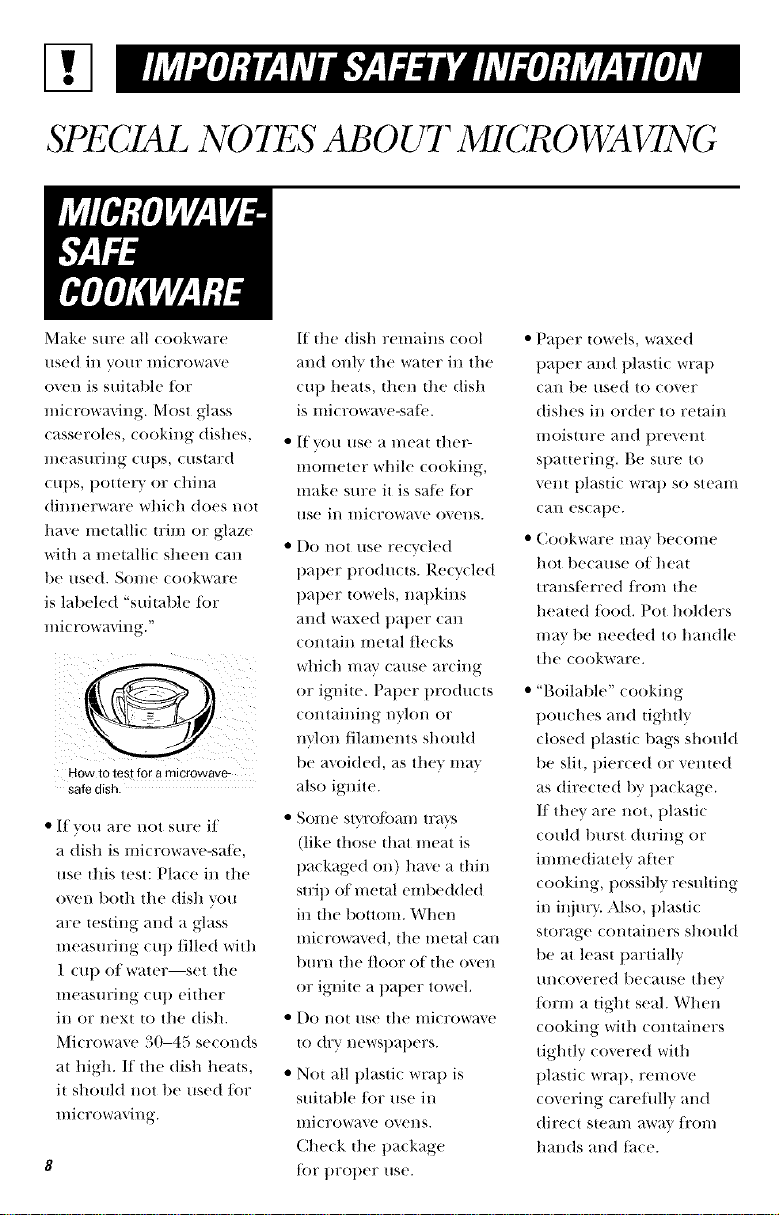
Make sure all cookware
used in your microwave
oven is suitable tor
n/icrowaving. Most glass
casseroles, cooking dishes,
l//easllring Cilt)S , Cllstar(t
Gillie , t)otter} or china
dinnerware which does not
have metallic u:im or glaze
with a n/emllic sheen Call
be/lsed. Sol//e cook'_,are
is labeled "suitaMe [ilr
nlicrowm'ing."
HOW tO tesl for a microwave
safe dish
• [J _,ou m'e not sure Jl
a dish is ulicrowa,e-sa/c,
use thia test: Pl;_ce ill the
ovcu both the dish you
are testing aud ;1 glass
ule;_suriug CUll filled with
1 Clip ofw;ttor--s('t the
l/le;tMIrJl/g C/I l) eit]ler
ill or next to the dish.
Microwave 30-45 seconds
at high. /f the dish heats.
it sh(mld not t)e used/or
l/licrowavillg.
If the dish remains cool
and only the water ill the
CUll heats, then the dish
is micr()wa_ e-sati'.
• If VO/l /ISe a l//eat tllel_
nlonleter while cooking,
nlake sure it is sa/i' tbr
use in microwave o_ens.
• I)o not use re(vcled
l)_llier prod/l_ is. Re(vcled
likelier towels, nal/kins
_ln(t waxi'(t tlaller (_111
contain metal flecks
which n/av cause arcing
or ignite. Pal/er products
containing nylon or
nylon filaments should
be avoided, as they mm
also ignite.
• SOl//e stvro/();4n/ tr;-_2.;
(like those that meat is
tiackaged on) time a thin
strill of n/etal embedded
ill the bottom. When
llliCI'()'_,_.ed, the IIletal can
l)tlrn the floor of tile ()Veil
or ignite a tialier towel.
• Do no|/lee the lllicr()w_l_e
to dry newstlal/ers.
• Not all tllastic wrap is
suitable/or use in
microwave ovens.
Che(k the tla(bge
tor tlrol/er use.
• Paller towels, waxed
tlal/er and ]/lastic wrap
Call tie used to cover
dishes ill order to retain
l//oistllre and lirevellt
spattering. Be sure to
vent plastic wrat) so stealll
Call escape.
• Cookware lilav becolile
hot because of l/eat
transti'rred /i'oln the
heated/ood. Pot holders
n/m be needed to handle
the (ookware.
• "Boilable" cooking
tloucl/es and tightly
closed plastic bags should
be slit, tlierced or vented
as directed by tlackage.
If tl/ev are not, t)lastic
could burst during or
immediately _dter
(ooking, l/ossibly resulting
in il_i/lr }. Also, tllasti(
storage (omainers should
be at le_lst pm:tially
uncovered because they
/orn/ a tight seal. When
cooking with containers
tightly covered with
tllastic wrap, ren/ove
co_ering carefllllv and
direct steal// aW_lV /i'Ol//
hands and tilce.

• Use/kill only as dire(ted in
d/is mmmal. TV dinners
may be mi(r()w_'d in ti)il
trays less thin/ 3/4" high;
remo_e tile top toil (over
_ll/(I ret/lrl/ the tr_l} to t]le
box. When using toil in
the l//i('r()w_\ e ovell, kee t)
tile/kill +_tle+_st 1" away
ti'om the sides ot the oven.
• Plastic cookware--Plastic
c()()kw_we designed tot
micro_l_ e cooking is very'
usetill, but should be used
( _wetillh. E_en n/icr()wa_x'-
s_d_' plastic may n()t be _s
t()leram of (_ erc()()king
COllditi()llS _ls _lre glass or
ceralIliC l//k_terials k_l/(|
may s()/ten or char iI
subjected to short periods
of o_ er(()()king, hi longer
ex1)osHres tO over(ooking,
die to()d and cookware
could ignite.
Foll()_, dlese guidelines:
I Use n/icrowme-sa/k'
plasti(s only mid use
them in stri(t (()n/plim/(e
with tile co()kw_we
l//_ll//lt_l( | liter's
re( Ol//lllel/d atiol/s+
2 [)o I/or II/icr()w_ve eli/lily'
COl/tail lets.
3 I)o no| penni| children
to use plastic cookware
wid/()ut (()replete
sutievvision.
The/ml will ot)erate
automatically under
certain conditions (see
Am()matic Fan ti'ature).
"I_ke care to prevent the
starting and spreading of
accidental cooking fires
while the vent tml is in use.
• Clean the mlderside of
the n/icrowa_e ()/]ell.
Do not allow grease
to build till on the
microwave or the
thn tihers.
• hi the event of a grease
fire on the surthce milts
below the n/icrowa_e
oven, smother a fl+mling
t)_lll 011 the s/lrl_l(e tlllit
by c()_ering the t)an
c()n/pletely with a lid, a
(ookie sheet or a {+tattray.
• Use care when cleaning
the vetlt/hn filters.
Corrosive cleaning
agents, such as lye-based
()Veil cleal/ers, i//_l}'
damage the tihers.
• When preparing
flaming toods raider the
n/icr()wa_e, turn the vent
/_tl/ Oil+
• Never leave surthce units
beneadl your microwave
oven unattended at high
l/eat settings. Boilovers
cause smoking and
greasy' sl)illo_ers that may
ignite and spread if the
l//i(?r()w_ive vellt ]_tl/ is
operating. "ll) minin/ize
a/ltOlIlati€ t_lll operatiol/,
use adequate sized
cookware and use high
heat Oil surl_€e tlllfiS
OlllV whell I/ecessaFv.
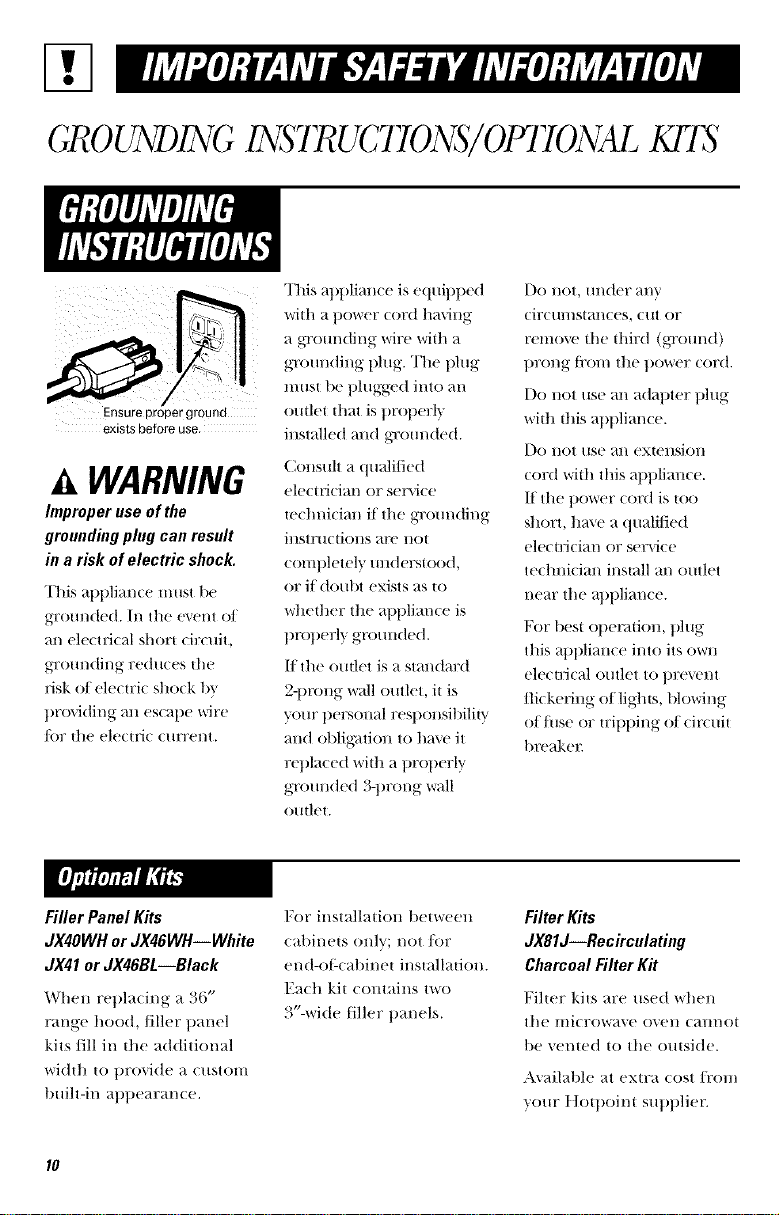
GR0 UNDING INSTR{_7(;770NS/ OfflTONALKI'IS
Ensure proper ground
exists before use.
WARNING
hnproper use of the
grounding plug can result
in a risk of electric shock.
This appliance must be
g-rom/ded. Ill tile m_'nt of
an electrical short circuit,
gTounding reduces tile
risk of electric shock 1_
tin,riding an escape wire
/_)r the electric current.
This appliance is equiplled
with a power cord having
a g-c(mnding wire with a
gromlding plug. The plug
must be t>lugged into an
omlet that is prot/erl }
installed and gTom_(ted.
Consuh a qualified
electrician or service
technician if the grom_ding
instructions are not
eoml>letely understood,
or if doubt exists as to
whether the appliance is
t/rot>efly grounded.
If the outlet is a standard
2-1)rong wall outlet, it is
your personal resllonsibilit _
and oblig_don to hm_' it
repla(ed with a properly
gromlded 3-prong wall
outlet.
[)O not, tin(let ;-ll/V
('ir('/li//st_l+n( es, ell[ or
remove tile third (g-c(mnd)
t>rong ti'om the t>ower cord.
Do not use an adat>ter plug
wifll fills atltllian(e.
Do not use an extension
(ord _sith this al/pliance.
If tile power (otx/is too
short, ha\ e a qualilied
electrician or service
technician install an outlet
near the apt/lian(e.
For best ol/emdon, plug
this al>l/limwe into its ()_r_
electrical outlet to t>revent
flickering of lights, blowing
offllse or trillping of circuit
breaker.
Filler Panel Kits
JX4OWH or JX46WH--White
JX41 or JX46BL--Black
When repladng a 36"
range hood,/iller panel
kits fill in the additional
width to provide a custom
built-in al>l>earance.
For installation between
(abinets only; not/or
end-otk abinet installation.
Ea(h kit contains t_o
._4"-wi(te filler panels.
Filter Kits
JX81J--Recirculating
Charcoal Filter Kit
Filter kits are used when
tile microwave oven cam_ot
be vented to tile outside.
Axailallle at extra ((>st /i'()m
your t]ottloint sut>pliet_
-0
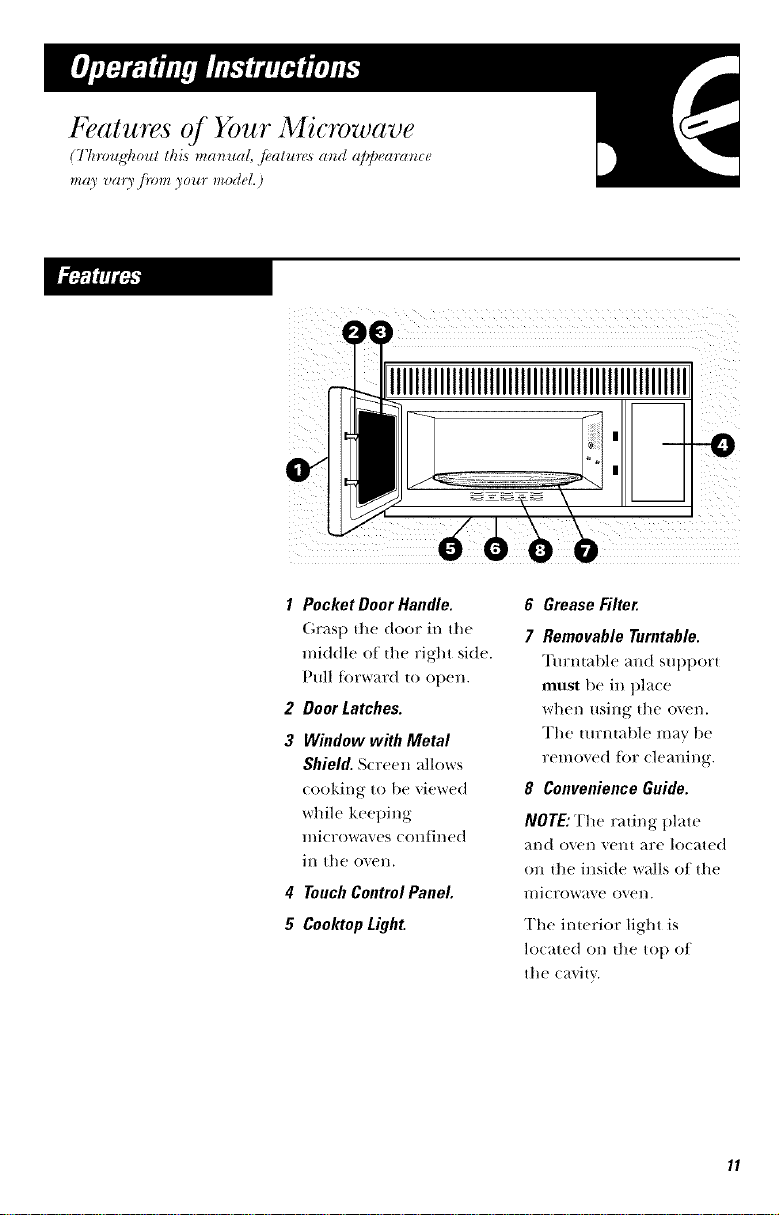
2
3
4
5
Pocket Door Handle.
(',rasp th(' door in the
middle of the right side.
Ptfll tbrward to open.
Door Latches.
Window with Metal
Shield. Screen alh)ws
cooking to be viewed
while keeping
microwaves confined
in the o_en.
Touch Control Panel
CooktopLight
6 Grease Filter.
7 Removable Turntable.
Turntable and SUl)pOrt
must bc in pla(c
when using tl't+.' ov(,n.
The tm:ntable may be
removed tor cleaning.
8 Convenience Guide.
NOTE:The rating plate
and oven vent are located
on the inside w_+.lls of the
l//i( r()w_,_, e oven.
The imerior light is
located on tlle to I) of
the (a_itv.
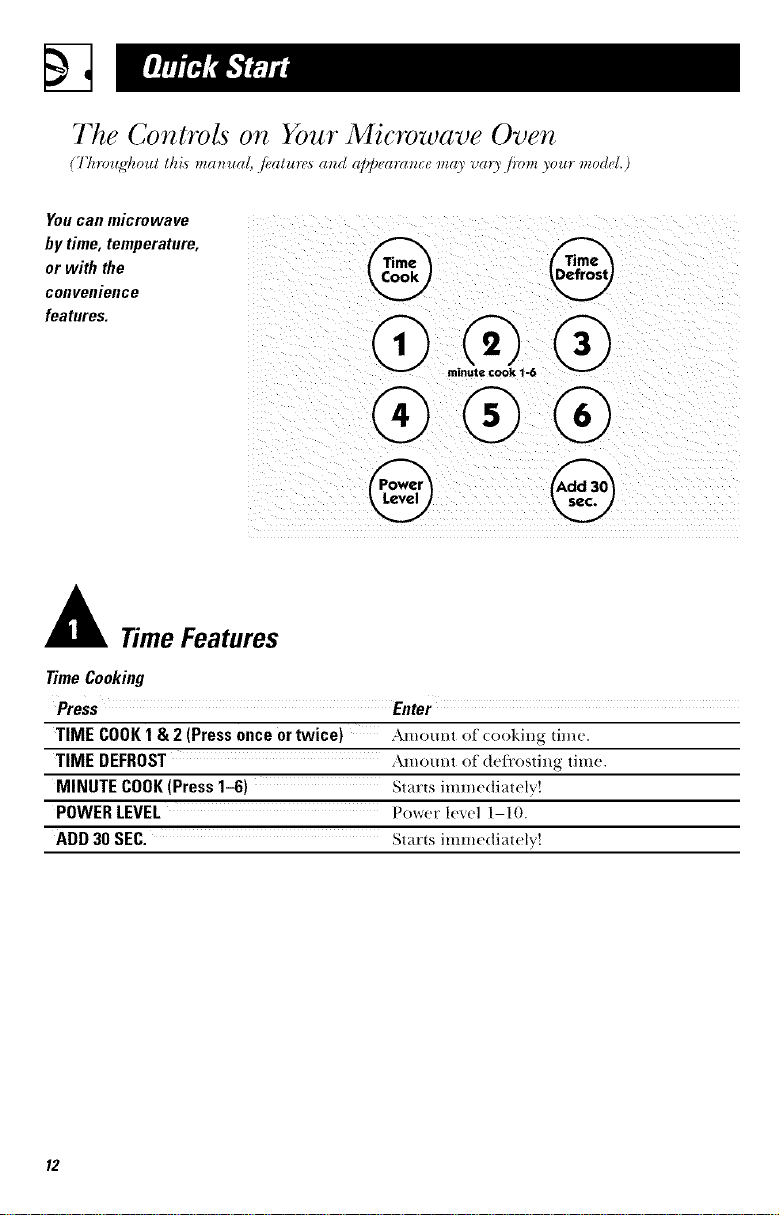
The Controls on Your Microwave Oven
(Tlnvugq_oul this ma_ua[, fi_alur(_5 m_d a])])ectranc_ ma) vm 3 ./iota )our modeL)
You calf microwave
by time, temperature,
or with the
convenience
features.
@
TimeFeatures
TimeCooking
Press Enter
TIME COOK1 & 2 (Pressonceortwice) Amount of (ookillg time.
TIME DEFROST Amount of defi'osting time.
MINUTE COOK(Press1-6) Starts immediately!
POWERLEVEL Power lexel 1-I O.
ADD 30 SEC. Starts Jli_,li_,e(lJat(_lv!
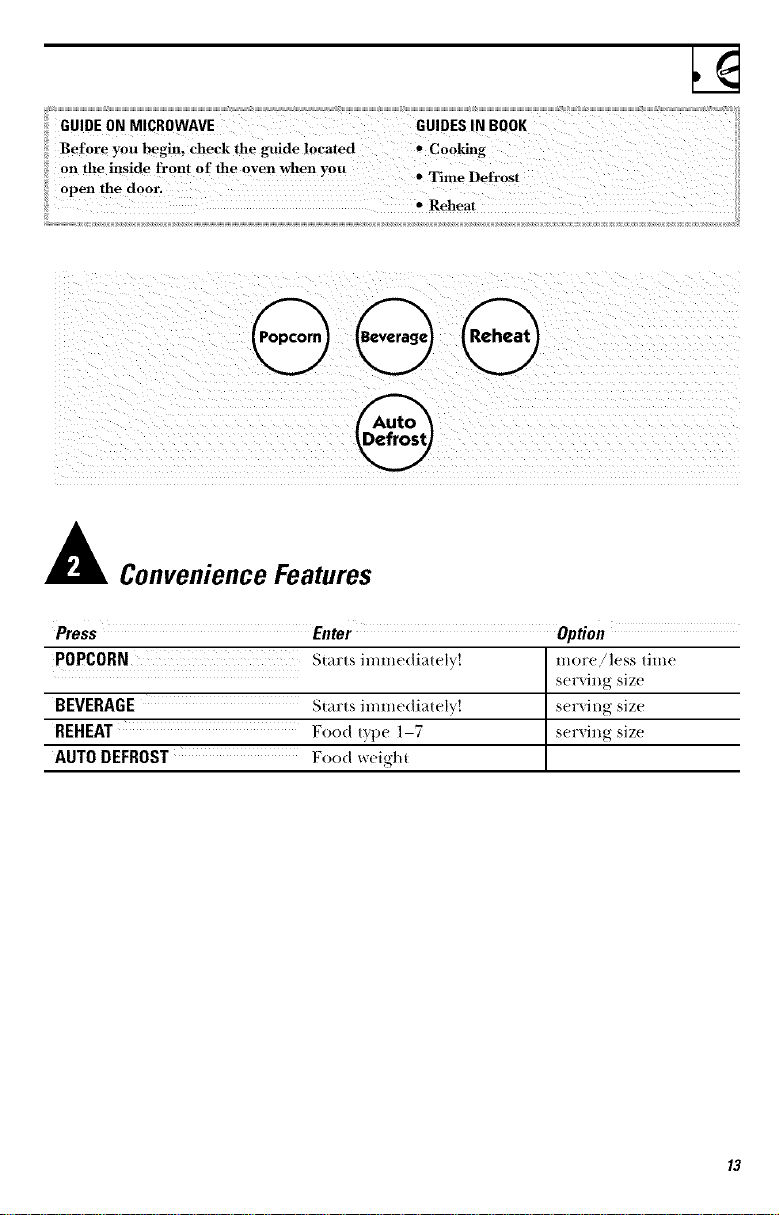
ConvenienceFeatures
Press Enter Option
POPCORN Starts immediately! more!less time
ser',ing size
BEVERAGE Starts immediately! serxing size
REHEAT Food type 1-7 serving size
AUTO DEFROST Food weight
i¸@ i
::e,::eredore!:>mg:'d
::enW:ing the fk'aturetrine
::lor TIME C()OI_ TIME ::::
::DEFROST (,rM!NU:
iiiC OOIL The P°"vr le'_v'!
:::may also be cl:anged
::dm_::gti,,eeo,_::tdown.:
defrosting time.
::3P,essPOWERLEVEL.
:i4 Select desired power
:: 5 Press START
14
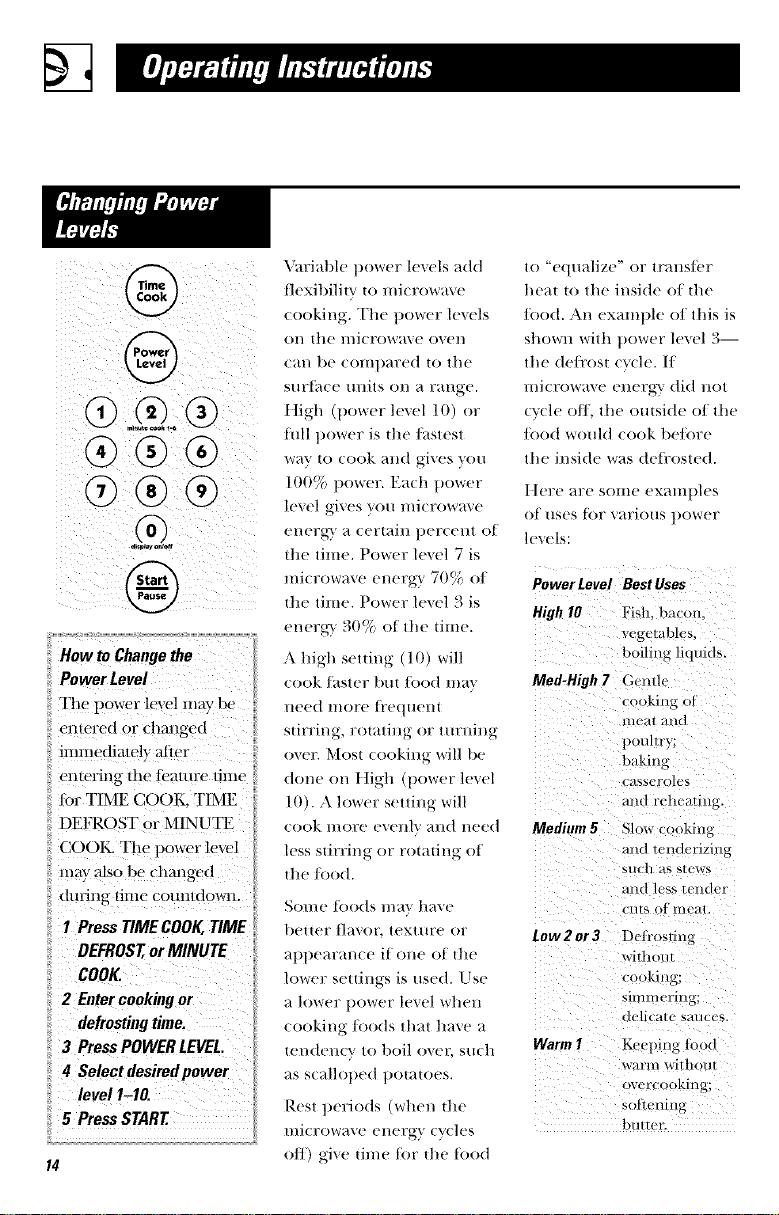
Variat)le t)ower lexels add
tlexit)ility to nil( rowaxe
cooking. The t)ower lexels
on the l/It( FOWa_,e oven
can be COml)ared to the
surl_me milts on a range.
High (1lower level 10) or
hill t)ower is the ]_t_stest
way to cook and gives you
100% 1lower. Each t)ower
level gives you microwave
energ-} a certain t)ercent of
the time. Power level 7 is
microwave energ-y 70% of
the time. Power level 3 is
energ-y 30% of the time.
A high setting (10) will
cook/i_ster but/ood ma',
need more [i'eqtlellt
stirring, rotating or turning
over. Most cooking will 1)e
done on t ]igh (1lower level
10). A lower setting will
cook more evenly and need
less stirring or rotating of
the/ood.
Soi//e t()ods ill,iV have
better tlavor texttlre or
al)l)earance if one of the
lower settings is used. Use
a lower 1)ower level when
(ooking foods that haxe a
[endell(y to boil o'_er, s/tch
as scallot)ed potatoes.
Rest t)eriods (when lt'te
ll}i(ro'¢vr_zx, e energ_ (v(10s
o/1") giw.' lime lot t]'..' toed
to 'e(lttalize" or lrmisti_'r
heat _<)the inside el the
|ood. An example o/this is
bho\'vu, \_ilh power level B--
the de/t'ost ( • (le. 11
i//icrow_we eller_-'v did 1101
('v(-]e 011. lhe otttside el lhe
Iood would cook belbre
the inside \,,as det]'osled.
/lere _lre Nellie exal/ll)b-_
O[ liNeS t()r variotls power
le\els:
PowerLevel BestUses
High 10 FM:. bacon.
vegetables,
boilin_ liquids.
Med-High 7 Gentle
cooking or
llleal lind
pouhry:
baking
casseroles
and rehcaling.
Medium 5 Slowcookillg
and lenderizing
S[/( h _ls SteW_
alld less tellder
CllLS el llllq41
tow2or3 Deli'oslin _,
withoIIl
cooking:
simmering:
delicate smites.
Warm I Kceping lood
W_I Fin Ivi tllol/1
overcookiil _
so/]enill_
buttm:

Time Features
®
®®®
0)(9(9
@
1 Press TIME COOK.
2 Enter cookiug time.
3 Change power level
if you don't want full
power. (Press POWER
LEVEL.Select a
desired power level
1-10.}
4 Press START.
Time Cook 1
Jk]lows VO/I tO lIli(row;tve
tor rely time up to 99
mimnes and 99 seconds.
Power level 10 (t[igh) is
automatically set, but you
may change it/or more
flexibilitv.
You may ot)en the door
d m:ing Time Cook to
che(k the/oo(t. Close tll('
door and t)ress START to
res/ll//e (ookil lg.
Time Cook 2
I _ets you change power
levels ;mtomatically dm:ing
cooking. Here's how to
(t1) it:
1 Press TIME C()()K.
2 Emer the first cook time.
3 Change die t)ower level
if you don't warn full
power. (Press P()WER
I J-;VH, Select a desired
power level 1-10.)
4 Press TIME COOK
again.
5 Enter the se(ond cook
time.
6 Change the power level
if you don't walH full
t)owe_: (Press P()WER
I,EVEI, Sele(t a power
level 1-10.)
7 Press ST\R'E
:M the end oI Time Cook 1,
Time Cook 2 (omns do_'l/.

Cooking Guide for 7 me Cook 1 &
2
NOTE:Usepowerlevel High(10)unlessotherwise noted.
Vegetable Amount Time Comments
Asparagus
(liest! spears)
(ti'ozen spears)
Beans
(ii'esh green)
(Ii-ozen green)
(ti'ozen lima)
Beets
(ti'esh, _ hole)
Broccoli
(fi-est! cut)
(fiest! spears)
(ii'ozen,
chopped)
(li-ozen spears)
Cabbage
(n-es!_)
(wedges)
I lb.
1O-oz. package
I lb. cut in half
1 O-oz. package
1O-oz. package
1 1)reich
I t)tmch
(lV_ to 1_2 lbs.)
1 trench
(lY_ to 1__,lbs.)
1 O-oz. package
1 O-oz. package
I medimn head
(about 2 lbs.)
6 to 9 n}i_}.,
Med-Iligh (7)
5 to 7 min.
9 to 11 min.
6 to 8 min.
6 to 8 min.
17 to 21 min.
7 to 10 min.
9 to 13 min.
5 to 7 min.
5 to 7 n}i_,.
8 to l 1 n}i_,.
7 to 10 min.
In 1V.)-(It. oblong glass baking dish,
])]_'t(e ]/4 (Ill) +v+r21teF.
In t-(It. (asserole.
In 1t/_(tt. (asserole, place 1/2 {up water.
S •
hi 1-qt. (as._erole, t)la(e .2 tablespoons
W;-I t er.
In 1-qt. ( asserole, t)la( e 1/4 (u t) _ater.
Carrots
(Ii'esl L sliced) 1 lb.
(li'ozen) 1 O-oz. package
Cauliflower
(tto_erets) I medimn head
(Ii'esh, :'.t!ole) l me(tium head
(fi'ozen) 1 O-oz. pa( kage
7 to 9 min.
5 to 7 min.
9 to 14 min.
10 to 17 min.
5 to 7 mi,].
In 2-qt. (asserole, pla(e 1/2 (tq) water.
In 2-qt. casserole, place 1/2 cup water.
In 2-qt. oblong glass baking dish, place
1/4 cup water.
In 1-qt. casserole.
In 1-qt. casserole, place 3 tablespoons
water.
In 1V_)-or 2-qt. (asserole, pla(e 1/4 (u t)
W;-I t er.
In 2- or 3-qt. (asserole, t)la(e 1/4 (u t)
W;-I t er.
In 2-qt. (asserole, 1)la(e 1/2 (tq) water.
In 2-qL ( asserole, pla(e 1/2 {u l) water.
In 1-(V. (asserole, pla(e 2 tablespoons
W;-I t er.
In l V2-qt. (asserole, pla(e 1/4 {up water.
In 1-qt. (asserole, pla(e 2 tablespoons
water.
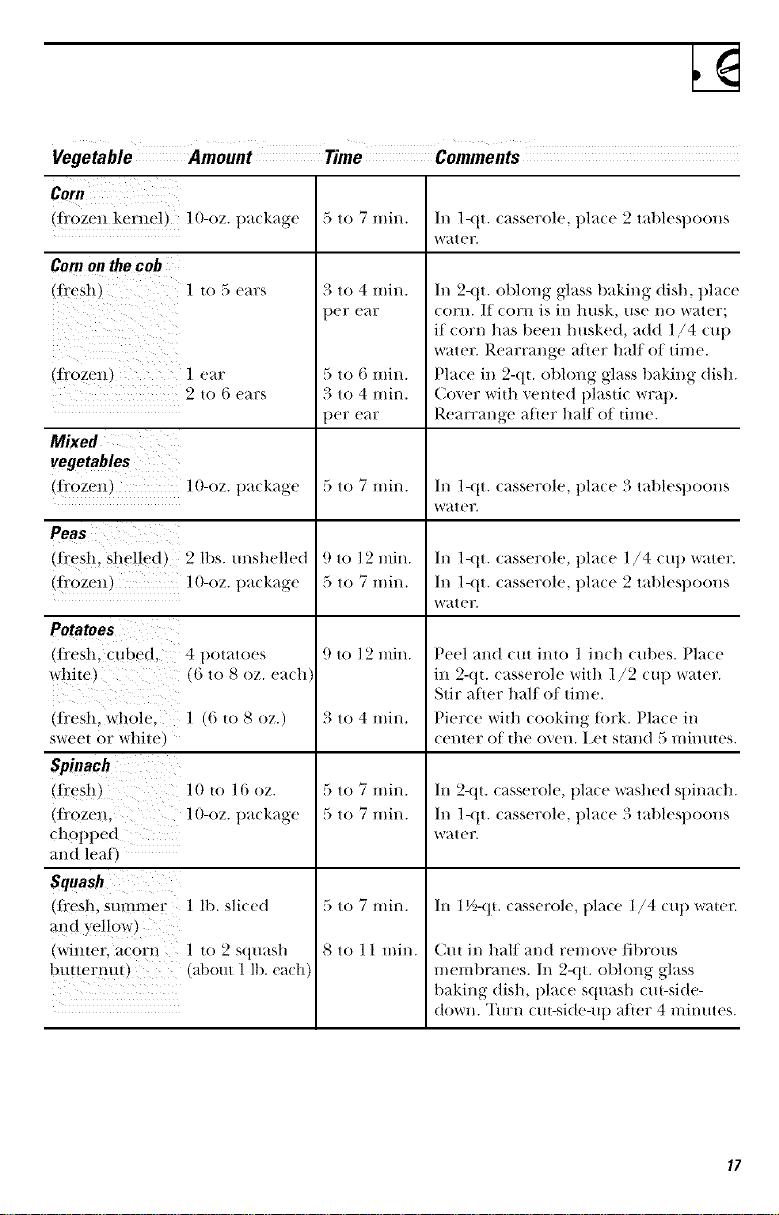
Curb
,fi'ozen kernel, ] 0-oz. t);,(kage 5 to 7 rain. /n l-qt. (asseroh'. t)la(e 2 tab|esl)oons
W;Her.
Cam on the cob
(li'esh 1 to ", ('m_s
( ] rozeIl }
Mixed
vegetables
( lrozell )
1 eHr
] O-oz. package
Peas
(lresh. shelled_ 2 lt)s. mlshelh'd
(fi'ozeI:) ] 0-oz. package
Potatoes
_J resh. (i/bed, 4 t)Ol;llOeS
_llile, G to _ oz. t'_,th
di'esll, whole. ] tl m _ oz.)
sweet or white,
Spinach
(li'esh) 10 u) 16 oz.
:rozen. l 0-oz. t);'ckage
chopl)ed
mid leal,
Squash
_i'esll. smlnner 1 1t1. sliced
>llld _ellow,
iWilllef, acorr ] u) 2 squash
butternut J N)oul 1 1|). each)
3 to 4 rain.
)er e_lr
5 to 6 rain.
3 to 4 rain.
)er e_lr
5 to 7 lnin.
9 to 12 rain.
5 to 7 ulin.
9 to 12 rain.
3 to 4 nlin.
5 to 7 nlin.
5 to 7 lnin.
5 to 7 nlin.
8to 11 nlin.
h/ 2-qt. oblong glass baking dish, t)lace
corn. If corn is in tmsk, use no water;
if corn tlas been husked, add 1/4 cu 11
water. Rearrange a/ler half of time.
Place in 2-qt. ot/long glass baking distl.
Cover widl vetoed t)lastic wrap.
Rearrange after tlalf of dine.
h/ 1-qt. casserole, t)lace 3 tal/lesl)oons
water.
h/ l-qt. casserole, t)lace 1/4 cup water.
h/ l-qt. casserole, place 2 tablest)oons
water.
Peel and cut into 1 inch cubes. Place
in 2-qt. casserole with 1/,2 cup water.
Stir after tlalf of tin/e.
Pierce with cooking tork. [)lace in
cei/tt'r of tile ()veil. I el staild D l//ill/l|es,
hi 2-qt. casserole, t/lace washed sl)inacll.
h/ 1-(it. casserole, t)lace 3 tal)lest)oons
water.
hi 1½-qt. casserole, place 1/4 CUll water.
Cut in tlalf and ren/ove fibrous
n/elnbranes. In 2-qt. obh)ng glass
baking disll, l)lace squash cut-side-
down. "Ihrn cut-side-u l) after 4 n/inutes.

7 me Features
®
®®®
05®®
@
1 Press TIMEDEFROST
2 Enter defrosting time°
3 Press START
(Auto Defrost explained
in the section on
Convenience Features.)
Allows you to deflx)st tor the
length of tin/e roll select.
See tile l)e/i'osting Guide
tor suggested times.
Power level 3 is auton/aticall_
set, but you may change this
[or n/ore tlexibilitv.
_i)tl ln_l_ deti'ost small itenls
nlore quickly by raising the
power level alier entedng
the time. Howevel; th(w
will need more/i'equem
attent]oll thai//is/lal+
Power le_vl 7 CtltS the total
deti'osting time in about
halP, power lexel 10 cuts the
total time to at)t/roximately
1/3. Rotate or stir/ood
ti:equentl}.
At one hall of selected
deti'osting time, turn/ood
()_'r all(t break at)art or
rearrange pieces for more
even deti'osting. Shield any
_l'_ll areas with small pieces
of toil.
A dull thumt/ing noise may
be heard during (te/i'osting.
This sound is normal _l/en
the o_,ell is I/or otler_tillg at
t ]igh power.
Defrosting Tips
• Foods fir)zen in t)atler or
t)lasti( can be de/ir)sted ill
the package. Tightly closed
packages shotfld tie slit,
t)ierced or vented AKI'ER
/ood has partially
de/i:osted. Plastic storage
containers shotfld be at
least partially unco_vred.
• Fmnil}_size, tn:epackaged
/i'ozell (lil/l/ers Call be
(tefi_osted and mi(ro_ved.
If tile/ood is in _1toil
(ontainel; mms/_+r it
to a IlIiCI'OVQI\ e-s_l/( + dish.
• Foods that st/oil easily, such
as milk, egg_, fish, stuffings,
t)ouhry and l)ork, should
not be Mlowed to sit out
/or nlore than one hour
alter deti'osting. Room
telnt)erature tm)n/otes
the gTowth of hannflll
bacteria+
• For nlore e\ en (te/i'osting
of larger/oods, such as
beet; lmnb and vend roasts,
use Auto De/i'ost.
• t_e sure large lIleals are
COml/letely de/i'osted
betore cooking.
• When de/ix)sted,/ood
should be cool but
so/tened in all areas. If still
slightly icy, return to the
_//icrow_\'e very bdetly, or
let it stand a/[+w minutes.
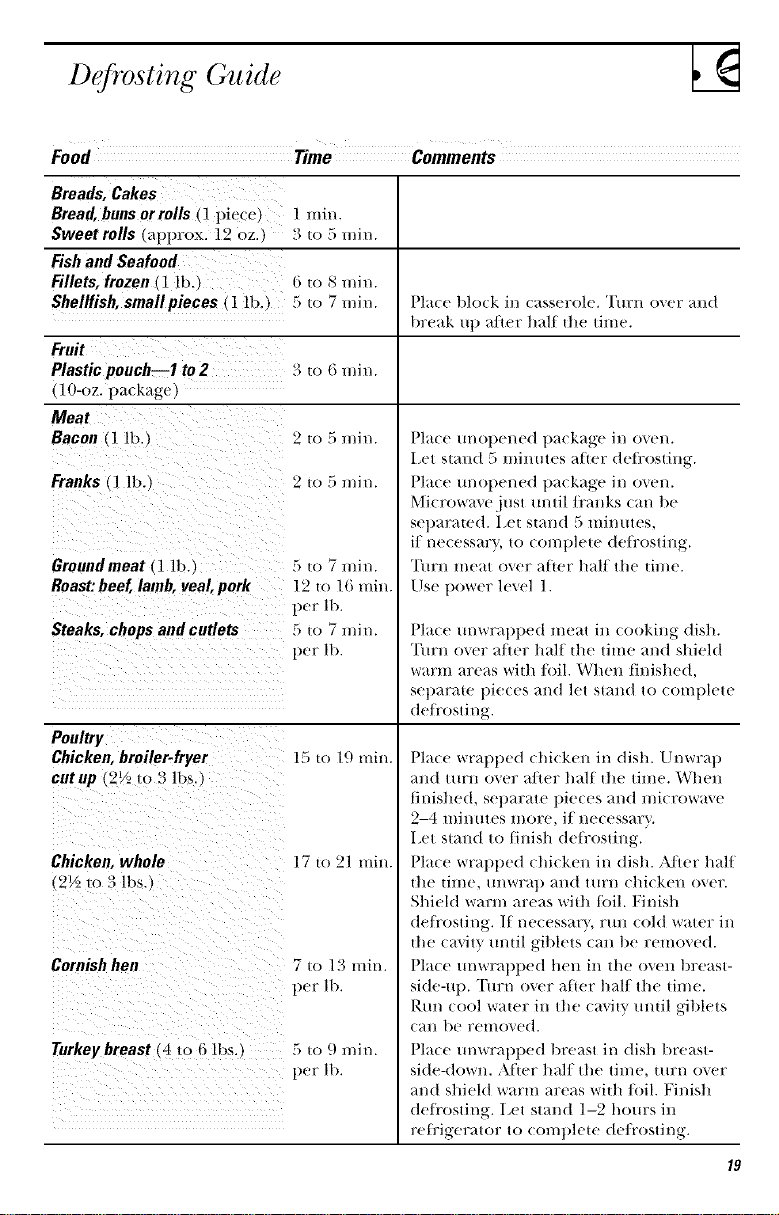
DCrosting Guide
Food Time Comments
1 ufin.
Breads,Cakes
Bread,bunsor rolls _l piece)
Sweetrolls approx. 12 oz..
Fishand Seafood
Fillets, frozen_1 lb..
Shellfish,small pieces (1 lb.)
Fruit
Plastic pouch--1 to 2
(lO-oz, package J
Meat
Bacon 1 lb.)
Franks (] lb.
Groundmeat ] lb.,
Roast:beef, lamb, veal, pork
Steaks, chops and cutlets
Poultry
Chicken, broiler-fryer
cutup (2_2/() 3 lbs.
Chicken, whole
(2½ to 3 lbs. )
Cornish hen
Turkey breast (4 +o 6 lbs,,
5 I0 7 l/lJlÂ.
12 t() 16 min.
per lb
5 to 7 min.
per 11)
15 u) 19 rain.
17 t() 21 min.
I)la(e t)lo(k ill (asserole, THrI/ oxer alld
break u l) after half lfte time.
Place mmt)ened package in oven.
Iet stand 5 minutes after deflx)sting.
Place mmpened package in o_en.
Microwave just m_til/i'anks can be
set)aramd. I,et stand 5 minutes,
if necessary, to comt)lew (tefl:osting.
Turn meat over after half the time.
Use power level 1.
Place m_wral)l)ed meat in cooking dish.
"Ihrn o_er a/ler half llle time and shield
warm areas wiitl/oil. When tinished,
set)araw pieces and let stand to coml)lete
de/i'osting.
Place wrapt)ed chi(ken in dish. Unwra t)
and turn o_er a/ler half die time. When
thfisfte(t, set)arate pieces and microwaxe
2-4 minutes more, if necessary.
I,et stand to tinish del_'osdng.
Place wrapped chicken in (lish. AJler half
tiletime, /lnwra t) and turn ellicken over.
Shield warm areas wiill loll. Nnisft
de/i'osting. If necessat), rim cold water in
tl_e cavity mull giblets can be removed.
Place m_wrat)ped hen in the oven breast-
side-up. "I'm:n over after half the lime.
Rm_ cool wawr in the cavity muil giblets
(an be removed.
Place m_wrapped breast in (lisft breast-
side-down. After half the time, turn o_er
and shield warm areas widl/oil. Finish
deli'osting. I,et stand 1-2 hom:s in
rel]'igerator to (omt)leie (te/i'osting.
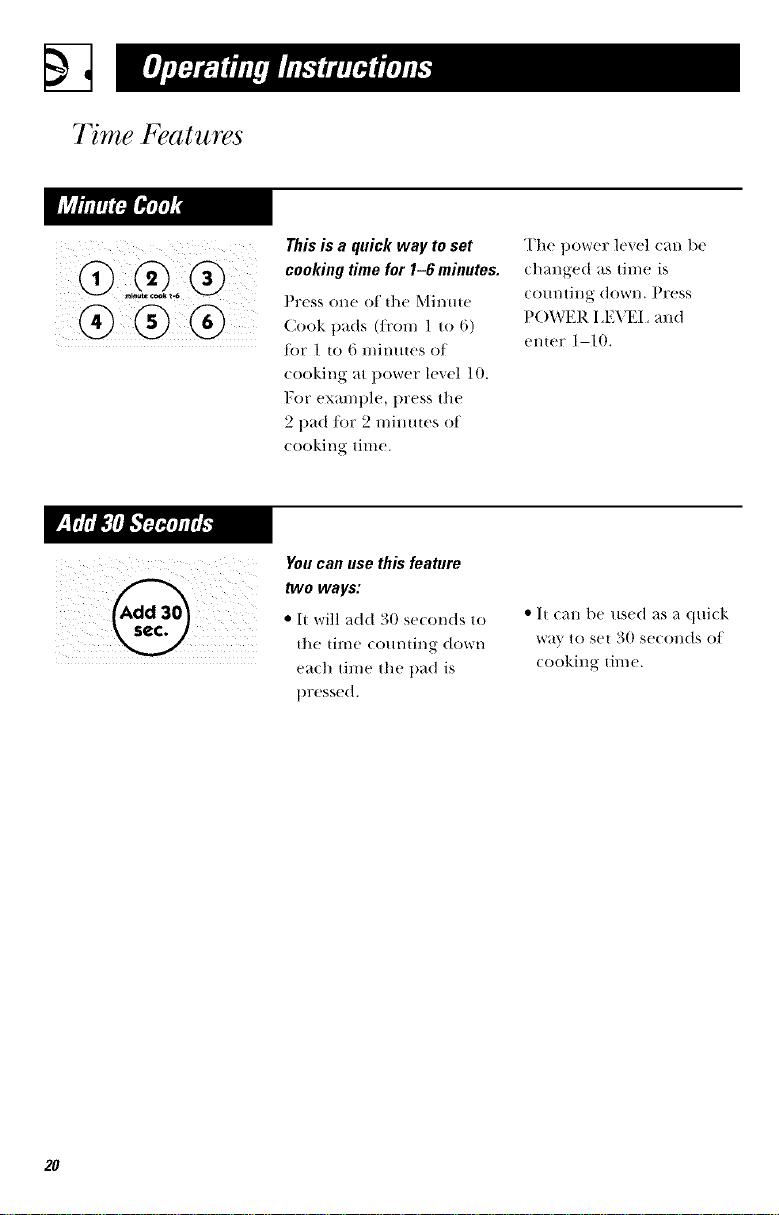
Time Features
This is a quick way to set
) cooking time for 1-6minutes.
@ ol e.f,t,eMin,.e
Cook pads (ti'om 1 to 6)
for 1 to (5minutes ot
( ooking at t)oweF lexel 10.
For example, press the
_) • • " S "
_ 1)ad tor 2 mmme,_ ot
( ooking time.
The t)ower level can be
changed as time is
CO/ll/{Jllg dOWl/. PFUSS
POWER I ,E'_2I _and
enter 1-10.
You can use this feature
two ways:
• It will add )0 s_(o _(Is to
the tilIle COtll/til/g dowI/
each time the t)ad is
t)ressed.
• h (an be used as a (lui(k
(ooking time.
2O

Convenience Features
0
(lesstime) tmoretimej
Use oR¥with prepackagee
nicrowave popcorn weighing
3,0to 3,5ounces.
How to Use the Popcorn
Feature
I Follow package
instructions, using Time
Cook if the tlackage is
less than _).00tlll(es or
larger than 3.5 ounces.
Place the package of
t)Ot)corn ill the center
of tfte microwave.
2 Press P()PC()RN. Tile
oven starts in/illediatelv.
Tap P()PC()RN to select
tfte bag size you are
cooking.
Haw to Adjust the Popcorn
Program to Provide a Shorter
or Longer Cook Time
Iivou find that the brand oI
t)ot)corn _'()ll [Ise [lllderl)ot)s
or overeooks consistentl},
you can add or subtract
20-30 se(onds to the
automatic t_Ol/ping time.
To add tlnle:
M_ler pressing P()PC()RN,
press 9 immediately after
the oven starts t_)r an extra
20 seconds.
To subtract thne:
M'ter pressing P()PC()RN,
press 1 immediately after
the o_en starts t_)r 20
seconds less cooking time.
21
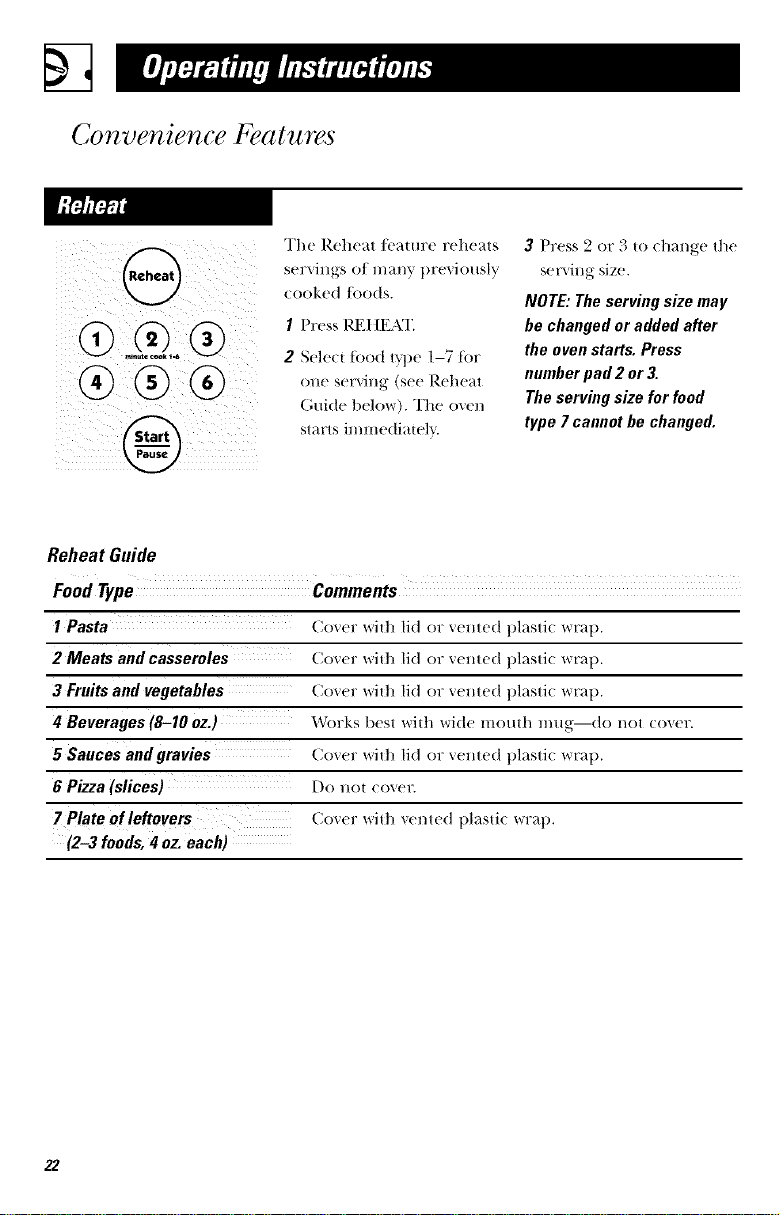
Convenience Features
G ®
®®®
The Reheat feature reheats
s_ 1",rags ot many pre'_iously
cooked foods.
I Press l@[IIEAT.
2 Select ti)od type 1-7 ti)r
one sewing (see Reheat
Guide below). The oven
starts immediatelx.
3 Press 2 or 3 to change the
set\ ing size.
NOTE: The serving size may
be changed or added after
the oven starts. Press
nmnber pad 2 or 3.
The serving size for food
type 7 cannot be changed.
Reheat Guide
1 Pasta
2 Meats and casseroles
3 Fruits and vegetables
4 Beverages (8-I0 oz.)
5 Sauces and gravies
6 Pizza (slices)
7 Plate of leftovers
(2-3 foods, 4 oz. each)
Cover with lid or vented plastic wrap.
Cover with lid or vented plasti( wrap.
Cover with lid or vented plasti( wrap.
Works best with wide mouth mug--do not cover.
Cover with lid or vented plastic wrap.
1)O 110[ cover.
Cover with vented plastic wrap.
22
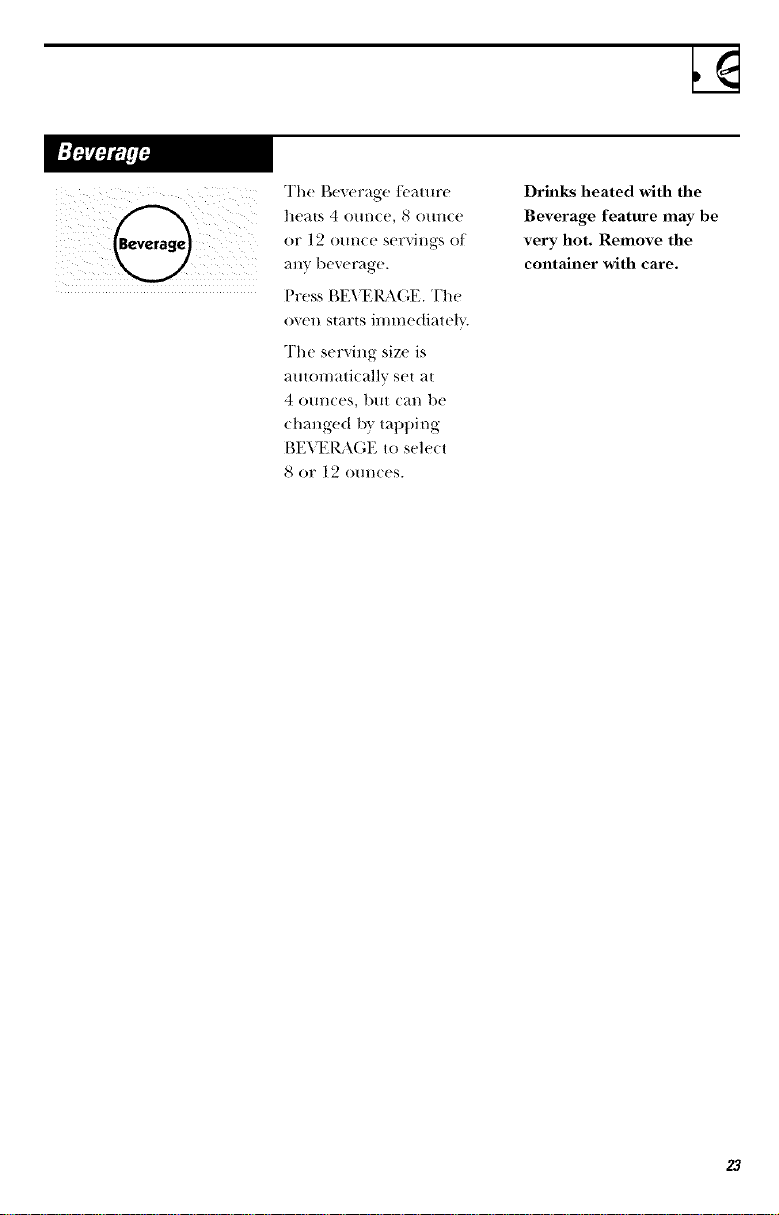
The Beverage/cature
heats 4 olin((?, _ O[lll(e
OF ] _ o/|n( (! selT"_illgS 0][
;_111_be_, e Fa_,e.
Press t_I_I_.\(',E. The
o_en starts immediateh.
The serving size is
alltomatieallv set at
40/lllCeS, B/H can be
changed b} tapping
BEVI_2RAGE to select
8 or 12 omlces.
Drhlks heated with the
Beverage feature lllay be
very hot. Remove the
container with care.
23
Convenience Features
@
®®®
@
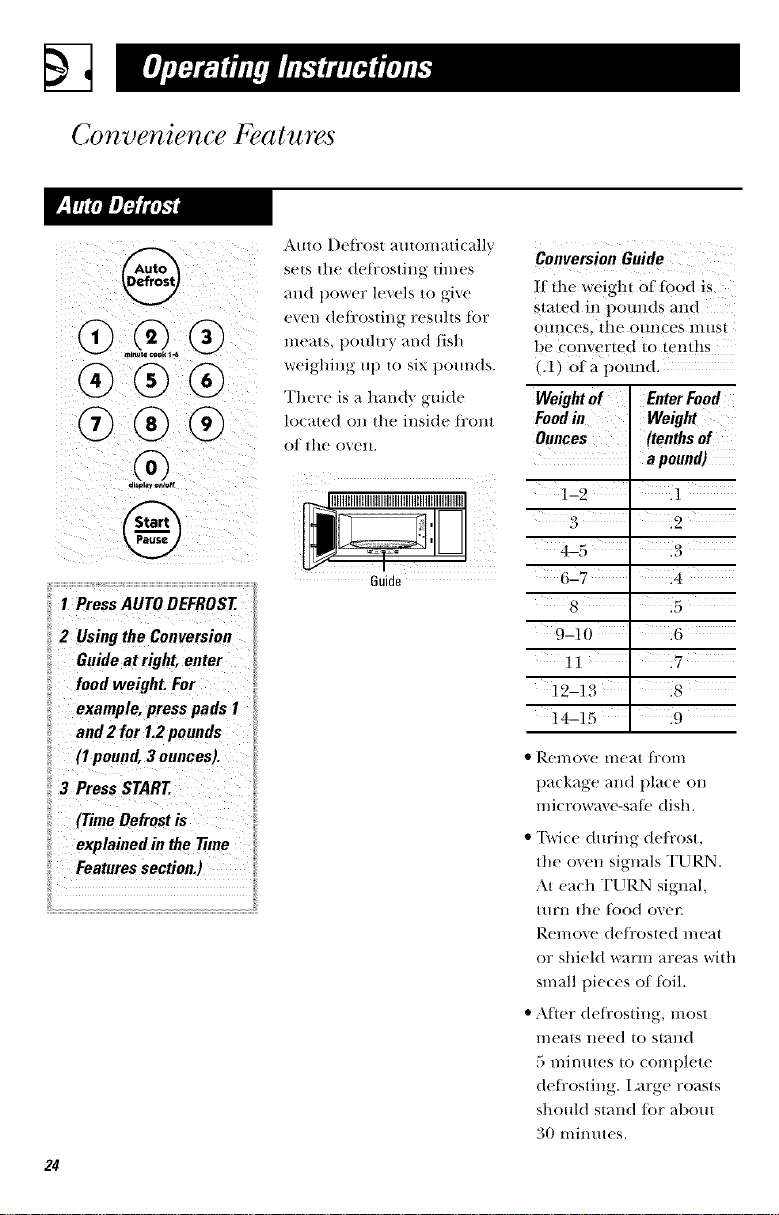
I Press AUTO DEFROST
2 Using the Conversion
Guide at right, enter
food weight. For
example, press pads 1
and 2 for 1.2 pounds
(I pound, 3 ounces).
3 Press START
(Time Defrost is
explained in the 77me
Features section.)
24
Auto Defl:ost automatically
sets the detrosting times
;rod t/ower levels to give
even defl:osting results tot
meats, poultry and tish
weighing ut/ to six pom/ds.
There is tl handy guide
located on tile inside fi'ont
()_ tlle OVell.
__llllillllillllillllillllillllillll_i!i_._I_ _!_iiii
Guide
Conversion Guide
II"the _eight of iood is
stated in 1)otmds and
OUllCeS, tile ot!ilces llltlSt
be converted to tenths
(.1) of a pound.
Weight of Enter Food
Foodin Weight
Ounces (tenths of
a pom_d)
1-2 :1
627 :4
8 :5
9-10 :6
11 :7
12-13 :8
14-15 :9
• Rel//(}_e hie}it tl?Olll
t}a(kage and pla{e (m
llli{ rowa'_, e-saI_! dish.
• "I\vice (turillg de/i'ost,
the oven signals TURN.
At each TURN signal,
turn tile tood over.
Remove de/i'osted me_t
or shield warm _re_s _vitll
sn/all tlie{es of loll.
• Alt{'l" {lellPosiill_,-, IIlOSt
meres ]le{'d to stml(t
5 minutes to {Omlllete
(h'lkosting. I_arge ro_lsts
should stmld lot _ff>out
30 lnin_ut{'s.
Other Features Your Model May Have ___
To remind you that you
ha_e/ood in the oven, the
oven will display "END"
_lll(t b('(' t) onc(' _1 lnin[l[('
until you either open the
oven doo_: or press
CI EAR! () FF.
®®®
®®®
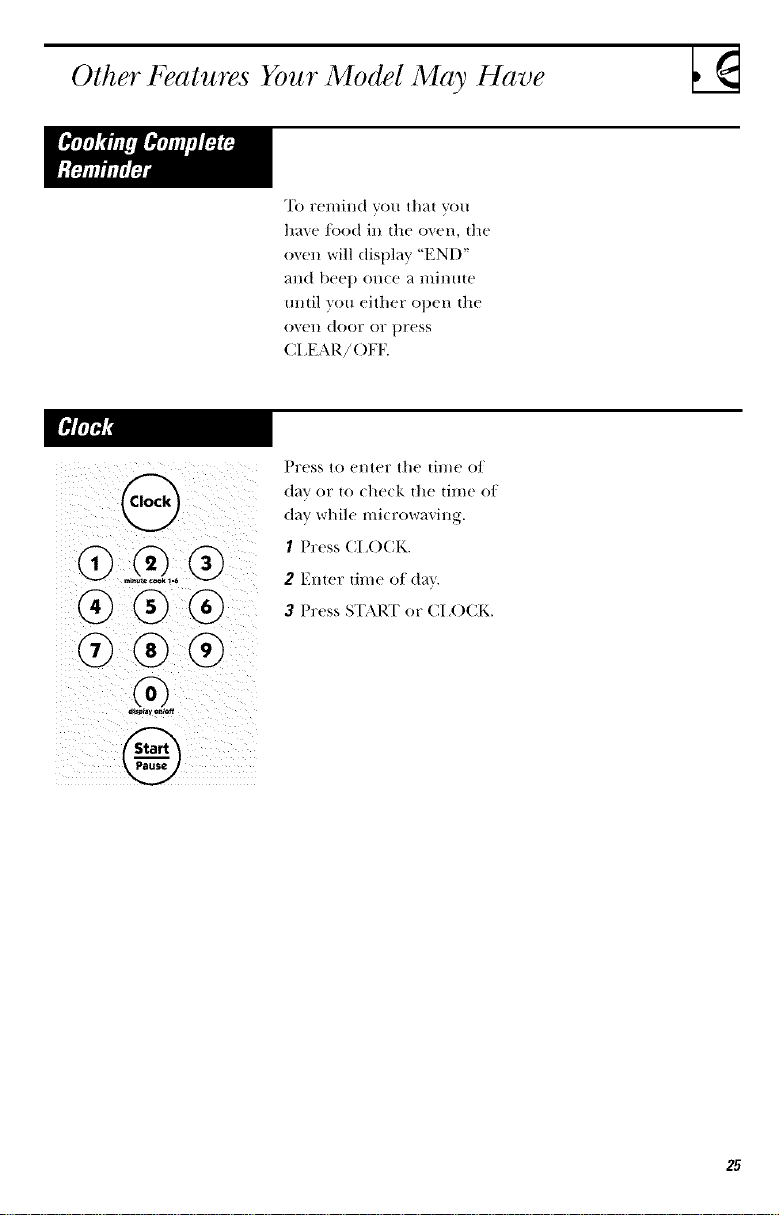
_fny ooto,/t
PIX'SS to entel7 th(' till/(' of
day or to check the time of
(-lay while microwaving.
I th:ess CI_()CK.
2 Enter time of da_.
3 Pl:ess START or CI,()CK.
25

Other Features Your Model May Have
i ¸
display on/off
To turn the (lo(k display
off, press and hold 0 tor
abO[l{ |hl?ee se(ollds.
"[b redisplay the do(k,
repe_tt.
®
Delay Start allows _x)u to
set |lie lilicrow_e 1o delta'
cooking up to 24 hours.
I Press DEI._\Y S%\RT
2 Enter the time you
want the o',en to start.
(Be sure file microwave
clock shows the correct
tilIle Of d_t_r.)
3 Select any comt)iHation
of Auto or Time I)e/i'os|
or Time Cook 1 8-: 2.
4 Press S'EM_I'.
The Delay Start time will
be displayed. The oven will
automati(Mlv start _t the
(tela_ ed time.
The time of day mm be
(tispl_l}ed by pressing
CI ()CK.
26

G
®®®
®®®
Tinier ()n!Off operaws as
;_ lIli///Ite {il//er al/(t C_lll be
used at ally tin/e, even
when tile o_+en is ot)erating.
To use tile timer as a
lllinute timer when tile
OVell is 110{ OlleYatJl/_:
I Press TIMER ()N!()FF.
2 E1Her tile {ilIle VOll Wall{
to court{ down.
3 Press START!t{\USE {o
s{art.
_'tlel/ time is Ull, tile ovetl
will signal.
NO]E: The tinier indi€ator
will be lit while tile timer
is ollerating.
To use tile tinier while tile
oven is operating:
I Press TIMER ()N/()FK
2 Enter tile time you want
tO CO/lilt (towII.
3 Wai{ 5 set onds. The
tilner will star{ (Omlting
dOWll auton/mi( ally.
Whell {ime is Ul), {lie oven
will signal. To turn off tile
timer signal, press TIMER
()N!()FF.
In addition to starting Illan x,
hmcfions, S'I;\RT!t_\USE
allov, s you to stop looking
wi{hom ot)ening the door
or fleming ill( dl @av.
27

Other Features Your Model May Have
Y()tl IIlaV lo(k ttl(_ (OlltlTol
t)allel [o t)FeVel/t the
mi(rowaxe ti'()m being
a((idenmll_ started oF used
by (hildren.
To lock or mflock the
controls, press and hold
CI EAR!OFF/i)r M)out
three seconds. When the
control panel is locked,
"I ()C" will be dist)layed.
28
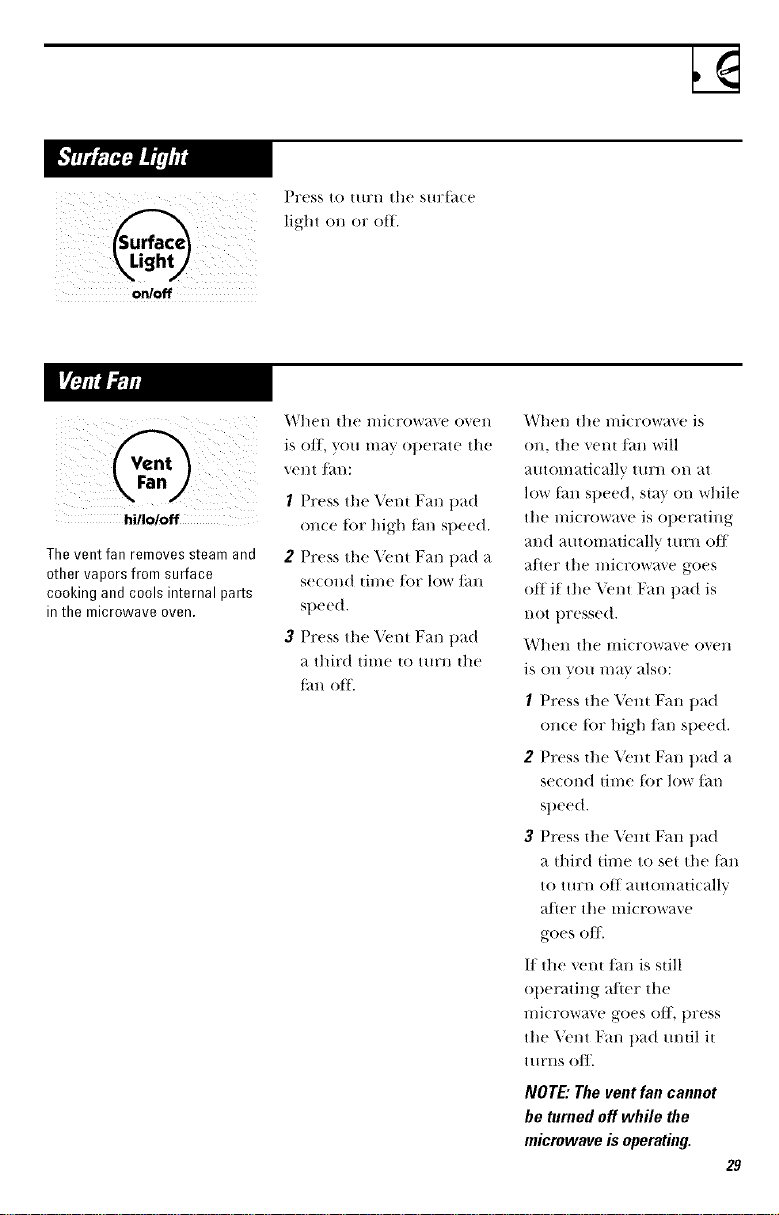
Press to illrl/the allr_J(e
light rm or off.
on/off
h|llo/off
The vent fan removes steam and
other vapors from surface
cooking and cools internal parts
in the microwave oven.
When tlle microwave oven
is of/, "_rm rIla_' operate the
xent fan:
I Press the Vent Fro/pad
on(e tot high tbn speed.
2 Press tile Vent Fan pad a
se(rmd time/or low/ira
st)eed.
3 Press tile Veto Fan pad
a third time to turn the
tim off.
When the microw_we is
rm, the vent fall will
muomati_ ally turn on at
low tml speed, smx on whih'
tile n/i(row_l\e is operating
and mUomati_ ally turH off
after the mi(rowa\e goes
off if the Veto Fan pad is
not pressed.
_Vhell [tie Illi(row_we ()veil
is rm you mm' also:
I Press die \'cm Fml pad
rm(e tot high/m_ speed.
2 Press the Vent Fan pad a
second time tot low tm_
speed.
3 Press the \'cm Fan pad
a third trine to set tile tml
tO ttll?l/ OH automatic;-dlv
_t/I('r" Ill(' llliCrow_v('
goes o/ll
If the vent/ira is still
ol)erating after tile
microwave goes oil press
tile _'nt Fan t)ad until it
t tlrllS o/l_
NOTE: The vent fan cannot
be turned off while the
microwave is operating.
29

Microwave Terms
Arcing
Arcing is the llliCrowa_,e term tor sparks in the oxen. Arcing is
(aused b_:
• metal or toil touching the side off the o,,en.
• ti>il that is l/Or molded to tood (/Ipttlrl/(!d (!dg+(!s a(t like
al lt(_lll/_tS).
• lll(!tal sll(h as twist ties, po/lltr} pins, gold-rimmed dislles.
• rc(y(led paper towels (Olltainillg small metal pie(es.
Covering Coxers hold ill II/OiSHI17(!, }tl]ow t()l" H/OI'(! (!'_(_11 heating alld rc(lu(e
( ooking til//e. _'lltillg, })lastic _*4rl'_tt) or ('o",eril 1_, _rit]l WaX paper
allows excess sI(!_t]//1o escat)c.
Shielding In a regl:Llar ovel_,, ym shield chicken breasts or baked foods to
t)reV(!llt ov(!r-|)rownillg. YVh(!n n/icrovvraxillg, yo/l USe small strips of
foil to shield thin parts, such as the tips of wings and legs on
poultv}, which would cook before larger parts.
Standing Time When you (ook with regular oxens, foods su(h as roasts or (akes are
allowed to stand to finish (ooking or to set. Standing time is
especiMly important in l//i(l_()_*(_lx(!(ooking. Note that _1microwaxed
cake is not placed on a (ooling rack.
Venting After (oxering a dish with plastic w177tp,VOH '_(!111the plastic wra t) by
HI1711il/g |)_l(k ()1/(' ( Ol'll(_l" so (_x((?ss st(_l]// (_tl/ (_s( _tp(L
30

Care and Cleaning
An occasional thorough
wiping with a solution of
baking soda _md _mter
keeps the inside/i'esh.
NOTE:Be certain thepower
is offbeforecleaning any
part ofthis oven.
Walls, Floor, Inside Window,
Metal and Plastic Parts on
the Door
_oH/e spatters Call be
relilove(t '¢,q[h a paper
towel; others may r('quire
_1(l_ml I) (h)th. Remove
greasy sl)_mers wi[h a sIIdsv
ch)th, then rinse with a
damp cloth. Do not use
abrasive cleaners or sharp
tltensils Oll ovell walls.
Never use a eOlllnlereial
oven cleaner on rely part
of your microwave.
Removable Turntable and
Turntable Support
To prevent breakage,
do not place die turntable
into water just atter
cooking. W_lsh it carefully
in warm, sudsy water or
in die dishwasher. The
turntable and support
can be broken if drol)l)ed.
ReII/el//bel', do llO[ operate
the oven withollt the
turntable _md support
in place.
31
%
Care and Cleaning
We recommend against
using cleaners with
ammonia or alcohol, as
they can damage the
appearance of the
microwave oven. If you
choose to use a comlnofl
household cleaner, first
apply the cleaner
directly to a clean cloth,
then wipe the soiled
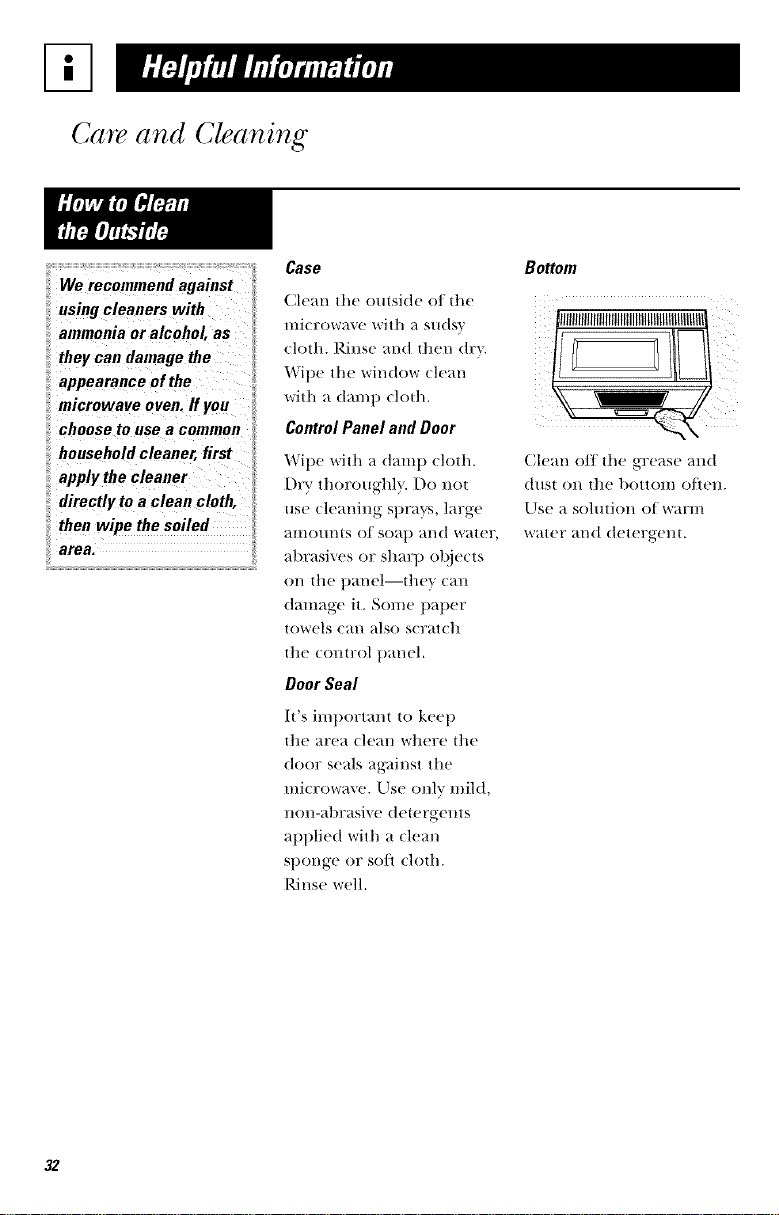
Case
Clean the outside of the
microwave with a su(tsv
ch)th. Rillse and then (/r_.
Wil)e the window clean
with a dam t) cloth.
Control Panel and Door
Wipe with a dam 1) ch)th.
Dry thoroughl}. [)o not
use cleaning sl)ra?_'% lm:ge
am(rants of soap and water,
area. abrasixes or sharp ol!je(ts
OI/ the t)al/el--the}' (all
damage it. Some 1)al)er
|owels (all also s(ratch
[he (OllH;Ol t)al/el.
Door Seal
It's important to kee t)
the area clean where the
door seals against the
mi(row_ve. Else OI/l_ r mild,
non-abrasive detergents
_ll)l)lie(t with a (lean
St)Doge or sol1 cloth.
Rinse well.
Bottom
;
Clean off the grease and
(ttlSi OI/ the bottolll o/lell.
Llse a solution of warm
water and (h'tergeHt.
32
Light Bulb Replacement
incandescent bulb !
(WB36XIO003), available
froth your Hotpoin t
supplier.
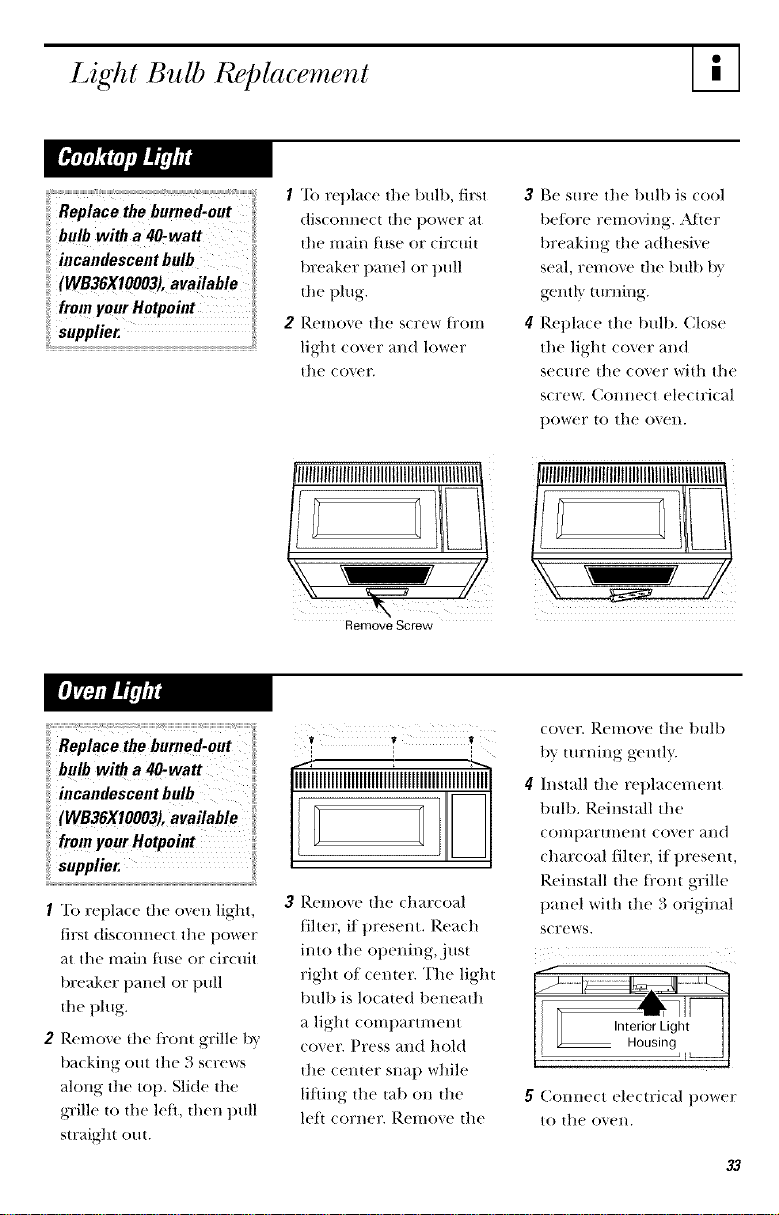
1 "Ib replace tile bulb, first
discom/ect the power at
the main fl_se or cir( uit
breaker panel or pull
the t)lug.
2 Remove tile s(rew tl'()lll
light cover and lower
tile eoveE
Remove Screw
3 Be sure tile bulb is cool
be/ore removing. Afer
breakil_,g the adhesive
seal, remove tile bulb 1)',
g-entl} turning.
4 Replace the bull). Close
tile light cover and
secm:e tile (over witll the
screw. Colmect electrical
power to the ovelL
NIIIIIIIIIIItlIIItlIIIIIIIIIIlilIIIIIIIIIIII/
Replace the burned-out
bulb with a 40-watt
incandescent bulb
(WB36X10003), available
from your Hotpoint
supplier.
1 "Ib repla(e dw oxen ligllt,
first dislOlll/ect tile t)ower
at tile main ttlse or (Jr( uit
breaker llanel or tlull
the t)lug.
2 Remove the fi:om grille by
balking out tile 3 screws
ahmg tile toll. Sli(te tile
grille to the lef, then pull
straigtlt out.
V I' V
l l :
3 Remove tile charcoal
filter, if present. Reacll
into tile opening, just
right of ceme_: Tile light
bulb is locawd beneath
a light comllarm_eln
c()_e_: Press and hold
tile (enter sl_ap wllile
li/ling tile tab on tile
lef corneg Remove tile
cover. Remove tile bulb
tU tm:ning geHtl}.
4+h/stall tile repla(emeln
bulb. Reinstall tile
(Omtlartmem (over and
(har(oal/iltet; i/present,
Reinstall tile I_'oIJ,t grille
panel with tile 3 original
screws.
5 COllllelt ele/trital ])()_r(?r
t() tile OVel/.
33
%
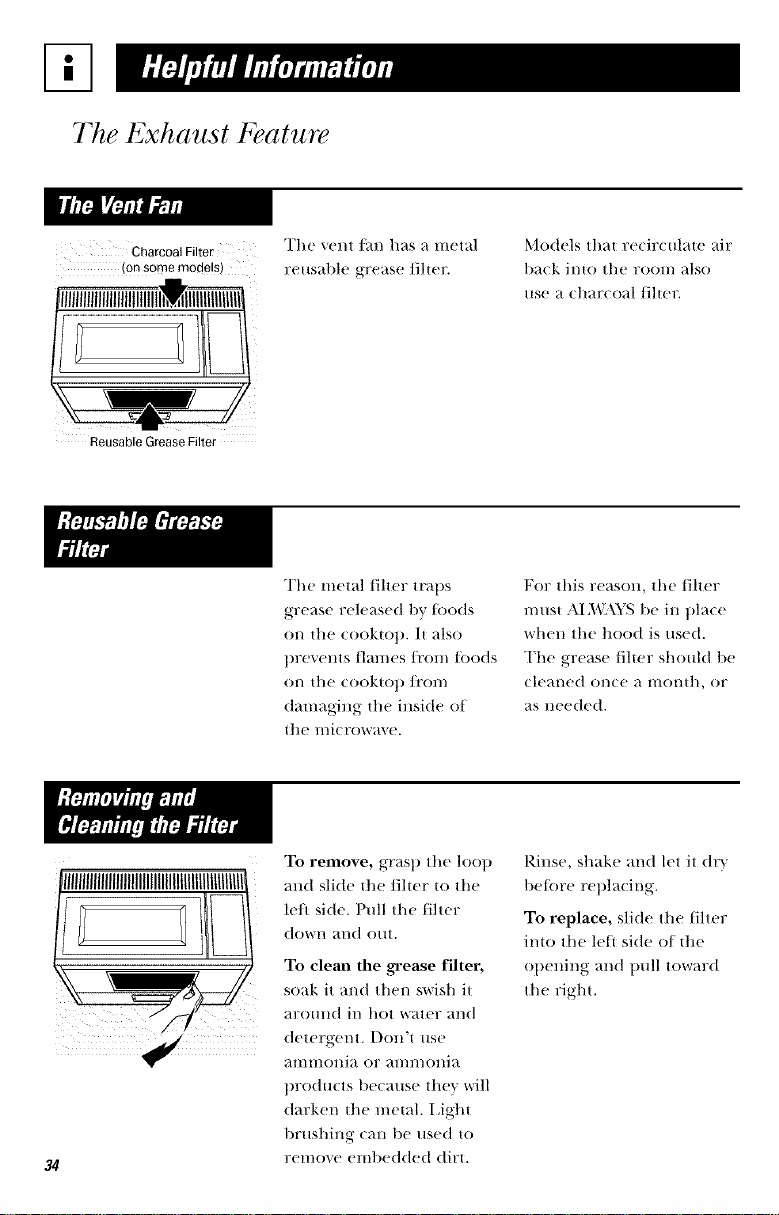
The Exhaust Feature
Charcoal Filter
(on some models)
The _ent fan has a metal
r_ usable grease filter.
Models that re/irculate air
balk into the ]?ool//also
use a (har/oal fiher.
Reusable Grease Filter
The nletaI fiher trails
grease released by toods
on tile cooktop. It also
tlrevents _]al//es ii'Ol// fi)O(Is
on tile cookto]) ]l'Ol//
damaging tile insid(' of
tilt' l//icrow_lve.
For this reason, tile filter
must AI/_X_\YS be in place
when tile hood is used.
The grease fiher should be
cleaned once a ulonth, or
as needed.
_llllllllllllllllllllllllllllllllllllllllllllllll_
// t2
34
To remove, grasp tile loop
and slide tile filter to tile
le/1 side. Pull tile filter
dow]/ and o/It.
To cleat] the gTease filter,
soak it and then swish it
aromld in hot water and
detergent. Don't use
alillllonia or ai//i//ollia
tlrod ucts because they will
darken tile n/etal. I,ight
brushing can be used to
renlo_e enlbedded dirt.
Rinse, shake and let it drx
betore replacing.
To replace, slide tile filter
into tile lett side of tile
oi/ening and pull toward
the right.
AJ
i__a,,otb_o/oa,od.,
: '.,_tbe,_p/_oed.order
Part No. WBO2X11124
froln your Hotpoint _
supplier.
If the model is not vented
to the outside, the air will
be recirculated through a
disposable charcoal filter
that helps remove smoke
;41 l(t o(tors.
The charcoal filter
should be replaced when
it is noticeabh' dirty or
discolored (usllally atter
6-12 months, depending
on hood usage).
.4 .4 *4
1 1 1
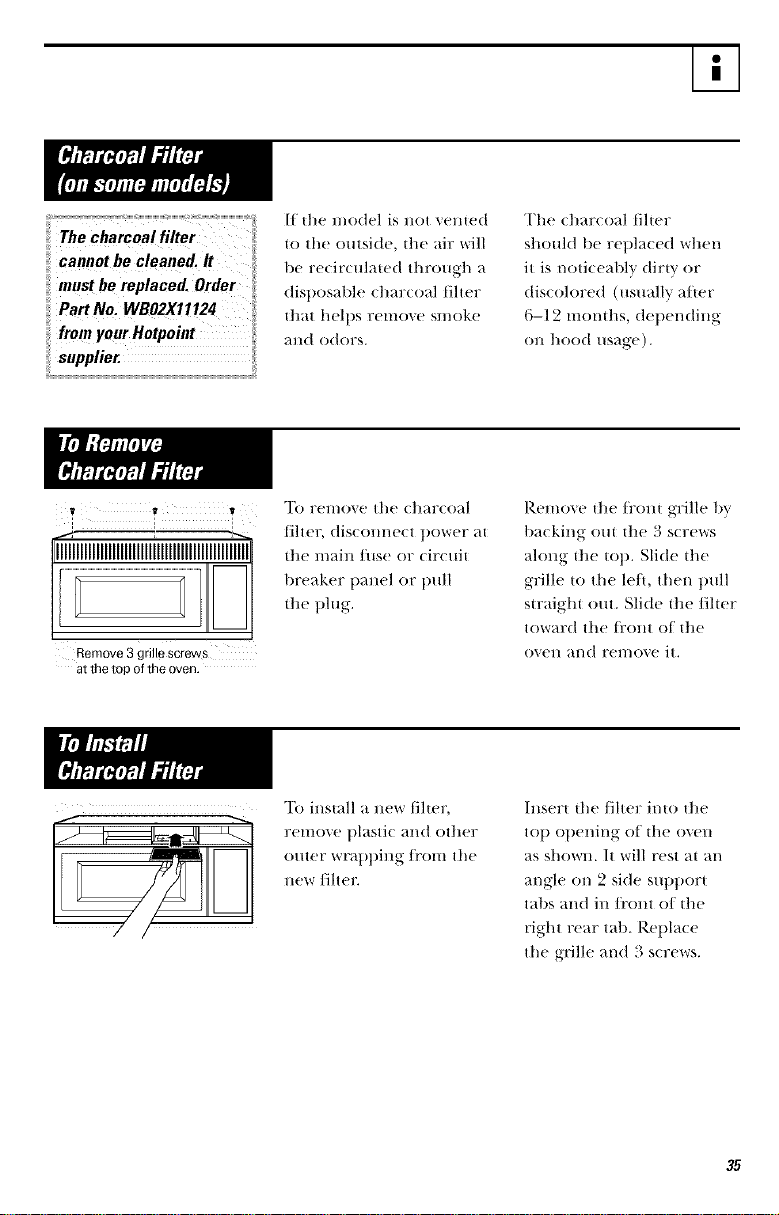
Remove 3 grille screws
at the top of the oven.
To remove the charcoal
filter, (lisc(mnect power at
the main fi_se or circuit
breaker panel or pull
the plug.
Remove the fl:ont grille by
backing out the 3 screws
along the top. Slide the
grille to the left, then pull
su:aight out. Slide the/ilter
toward the t_:ont of the
oven and remove it.
To install a new filter,
remove t)lastic and other
outer wrapping/i'om the
new/iltel:
hJ,sert the fiher into the
to I) ol)ening of the oven
_tSshowll. It will rest at an
angle on 2 side support
tabs and in/i'ont of the
right rear tab. Rel)lace
the grille and 3 screws.
35
Before You Call For Service
Problem
Oven will not
start
A fuse in your home
may be blown or the
circuit breaker tripped.
Power surge.
Plug not fully inserted
into wall outlet.
Floor of the oven is
warm, even when
the oven has not
been used
The cooktop light is
located below the oven
floor. When the light
is on. the heat it
produces may make the
oven floor get warm.
• Rel)lace tuse or reset circuit breaker.
• Unl)lug the lilJcrowa_,e o'_ell, then t)lug
it 1)a(k in.
• Make sm:e die 3-t)rong plug on the
oven is tully inserted into w_tll outlet.
• This is normal.
"LOC"appears The control has been • Press ;rod hold C[,EAR/()/:F ti)r
on display locked, ;d)om 3 se(on(ts lo mflo(-k lhe (-onlrol.
Vent fan will not The vent fro1 • ['he '_em tml cmmot l)e turned oil
turn off
automatically turns on
to cool hlternal parts
wlfile the microwave
while the microwave is operating.
This is normal. Wait ii)r the microwave'
to turn off and the tim will el{her go
off mltomati(allv or you will need to
turn it off 1)} pressing tlle Vent Fan
pad atier the microwave is o/li
36
I.'l
• Steam or vapor escaping
li'()l/l arot)IId tile (lo0)'.
• I,ight reflection ar(mnd
door or outer case.
• [)immil)g oven light and
change in tile blower
so/n)d at power levels
()tiler than high.
• Dull thumping sound
while ()vet) is operating.
• The vent/_m operating
while the microwave is
operating. The vent/_m
will not go off nor ca1) it
be turned off m/til tile
H/)crow?t\ e is o[].
• TV-radio ilHerlhrence
might be noticed while
/lSillg the u/iCFOW?|\ e.
Similar to tile il)terfi:rence
caused 1)_ other small
apl)limmes, it does not
indicate a problem with
the microw_ve. Plug the
microwave into a different
electrical circuit, move the
radio or TV as tsr m\ _'>r
/FOI/I _he lllic17o\vilx, e Hs
possible or check die
position mid sigmd of
tile' TV/'r_dio antenm_.
37

We'll Be Therd
Hotpointcom
Hotpointcom
Have a ques6on or need
assistance with VO/l17
appliance? "Dv the
Itotpoint Wel)site 24 hours
a da}, any day of tile year!
}i)u can also shop/or
more great t]otpoint
prod/lctS and take
a(hantage ot all of our
Oil-line S111)1)()171 seFvi(es
designed tbr your
convenience.
800.GE.CARES
(800.432.2737)
GEAppliances.com
Expert t ]otpoint repair
seFvice is OIlIV Olle step
awm/i'om your door.
(;el on-line and s(hedule
vour servile at yore"
convenience 24 hours
any (tin of the year!
()r ( all 8()O.(,L.(,AM+S
(800.4.,2.2/a/) during
normal business hours.
800.TDD.GEAC
(800.833.4322)
GE sut)t)orts tile Universal
Design concept--products,
services and enviromnents
that can be used by people
of all ages, sizes and
capabilities. We recognize
the need to design tbr a
wide range o/t)hysi( al and
mental abilities and
impairments. For details
of GE's Llniversal Design
al)l)lications, including
kitchen design ideas tbr
people wittl disabilities,
che(k out our Website
today. For the hearing
impaired, 1)lease (all
800.TDD.(;IL\C
"800.8._43.4322).
Purchase a I [otl)oint
www. GEAppliances.com extended _r_']:'_']_[V_1_(_
800.626.2224 learn about spelial
dis( ounts that are a',ailabk_
whil( your warrant'_ is s611
in ett_xt. 51)u (an ptlr(hase
38
it on-line anytime, or call
800.626.2224 during
normal 1)usiness hours.
Itotpoint Consumer ttome
Servi(es will still be there
after your warranty exl)ires.
Hotpoint.com
I,.I
800.626.2002
Hotpoint.com
In(livid uals qualified
to service their own
_q)l)liam es ('_m have
t)m:ts or a(cessories sent
dire(tlv to their home.
(VISA, MasterC_uxt and
Discover (ards are
accepted.) ()rder on-line
to(t_}, 24 hours every day or
by phone _t 800.626.2002
during normal business
ho/lrs.
Instructions contained
in this manual cover
procedures to be
performed by rely user.
Other servichlg generally
should be referred
to qualified service
personnel. Caution
must be exercised, since
improper servichlg may
cause tmsafe operation.
Register your new
appliance on-lhle--
at your conve_tience!
Timely t)rod mt reg-istration
will allow/or enhan_ ed
(ommmfication mid
prompt service m_der the
terms of your warranty.
should the need arise.
him ma,, also mail in the
pre-l)rint ed registration
card included in die
packing material.
39
Stap/e.,a/e_,@ o,.,,.'e/led et,eJ_I,e,_../',,,ddo,-id,,d
purchase date is _a'ed_'dto obtai_t set, dee u_tder warra_tly.
FULL ONb_ YFAR WARRANTY
For one year fi'om (late of original
tmrchase, x+e will provide,/i'ee of (barge,
t)arts +llld service lal)or in VOtlr holIle to
rel)air or rel)la( e a_O' part q/ the miami,wave
ove_ that tails because of a manu/_(turing
del('ct.
LIMITED ADDITIONAL
I_DUR-IT_2AR WARRANTY
For tlte second tltrougtt the fiflh year
/i'om ttte date of origimd tmr(hase, _e
will provide,/i'ee of cttarge, a repla(emen|
_?zag)telro)t [gtDe if tlle l//agnetroll tilbe
/_fils because of a mamd_cmring det_'ci.
_,_)u pa}/i)r the service trip to your home
and service labor (harges.
This warranty is extended to the original
t)m:(ltaser and any su((eeding owner lot
t)rodtt(ts t)m:(ltased lot ordinary home use
in the 48 mainland states, t]awaii and
Wasttington, D.C. ht Alaska |tte warranty
is |tte same except tltat it is IIMITED
be(ause you must pay to strip the product
to the service stto 1) or tor ttte service
teclll/ieiall'S travel costs to VO/lr tlOl//e,
All warranty service will be provided bv
our Factory Service Centers or by ore:
autltorized Customer Care °' servicers
dm:ing normal working hom:s.
Sttould your appliance need service,
during warranty period or beyond, call
800.GE.CARES (800.432.2737).
• Service trips to your home to teach you
how to use the product.
• Improper installation, delivery or
lllalntenallce.
If you have an installation problem,
contact your dealer or hlstaller. You are
responsible for providing adequate
electrical, exhausting and other
connecting facilities.
• Replacement of house fuses or resetting
of circuit breakers.
• Replacement of the cooktop light bulbs.
• Failure of the product if it is nfisused, or
used for other than the intended purpose
or used commercially.
• Dmnage to product caused by accident,
fire, floods or acts of God.
• Incidental or consequential dmnage
caused by possible defects with this
appliance.
• Dmnage caused after delivery.
Some itatcs do not allow the cxdusi0n 0,7lin_itation Of incidental or Consequential dmnages, I
S° the !!bore limitation 0r cxc!uskm may not app!} to you. T!_is wm ranty gixes you speci!]c lega! I
rights, and you may alsOhave other riglats whict I vary ti-0,n state to state. _ik_knoyv what your I
legal rights arc in _om" state, consult _ou r local or state consumer _fffairs o_]cc or your state's I
lYarrantor:General Eledric Company. Louisville, KY 40225 J
Printed in Malaysia