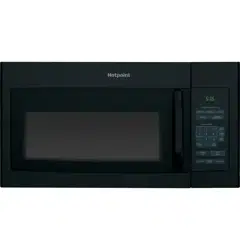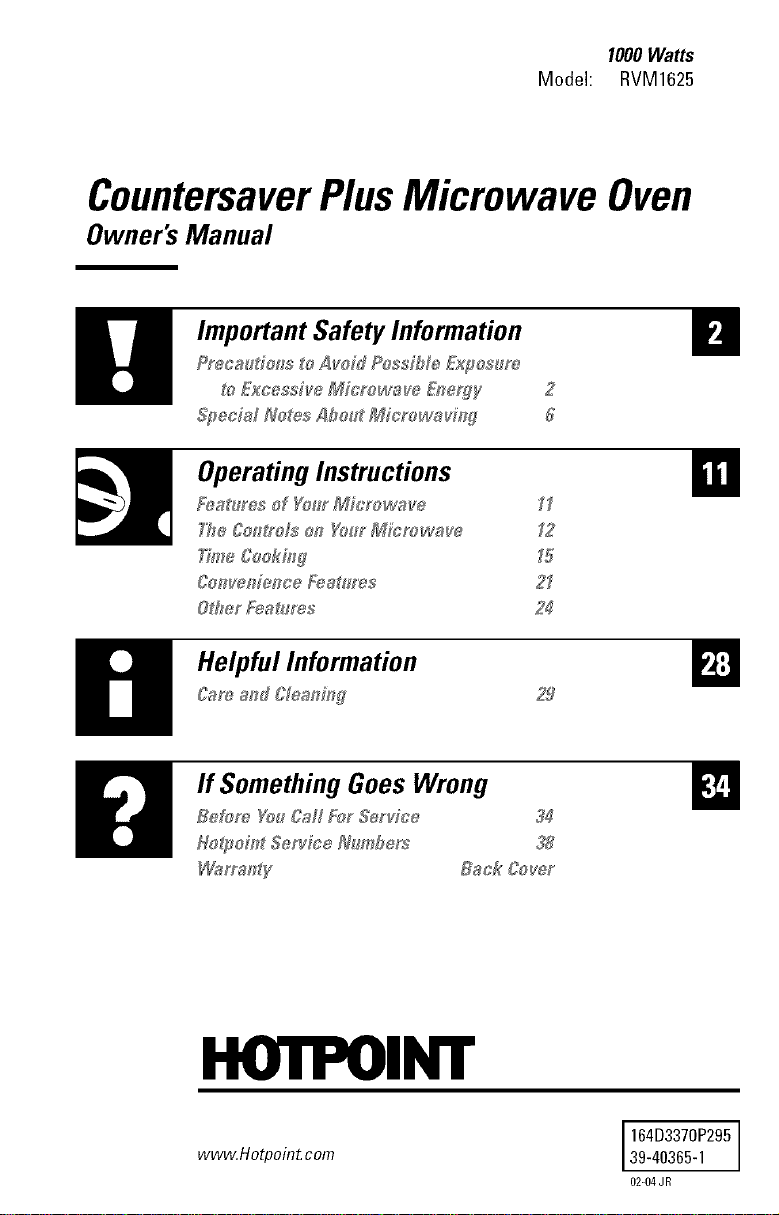
1990Watts
Model: RVM1625
CountersaverPlus Microwave Oven
Owner'sManual
Important Safety Information
Preoaodo_ to Avoid Po_;ibM Fxpos_e
t_ EXC_ss_rv_ Microwave £_e_gy
S_od_ No_esAbo_ Miorowavmg
E]
2
S
[]
Helpful Information
C_wem_dC_eam_g
H
If SomethingGoes Wrong
Before Yo_Caf_ForSorvme 34
Ho_poi#_Serv]oe _omber_ 38
B_ok Covey
[]
I-I( 'IP INI"
www.Hotpoin_ corn
164D3370P295
39-40365-1
02-04 JR
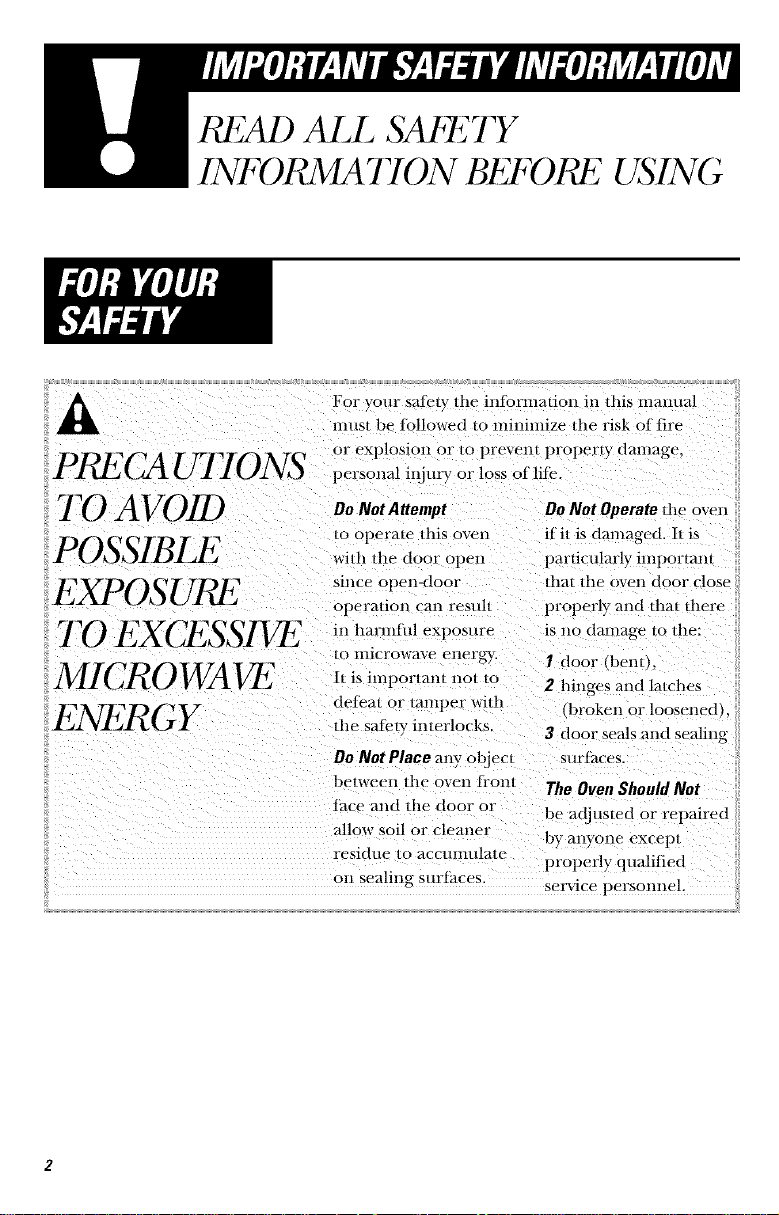
READ ALL SAbETY
INFORMATION BEFORE USING
A
TO AVOID
For your satkqy dm infbrmafion in /his manual
mus/be tbllowed to mininlize/he risk of fire
or explosion or/o prevent properly damage,
personal injurv or loss of lite.
/o operate/his o'veil
with tim door open
since open<leer
opermlon ('an resull
in hannfld exposure
EXPOSUI_
TO EXCLSS_
_o IHicl°OWaVe eller_jw.
MICROWAVE It is JlnpOl'lktll[ IlO/ tO
delem or tamper wi/h
llle saf_qv interlocks.
Oe Not Attempt Do Not Operate _lle oven
itll is damaged. It is
particularly important
/hat lhe OVell door close
properly and that there
is no dalnage to/he:
I door (ben_l
2 hinges al:d lmches
,bx_ken or loosened}
3 door seals and sealing
surt_tces.
Do Not Place any obiec_
belweeH lhe OVeIl [I'on/
tact and the door or
allow soil or cleaner
The Oven Should Not
be adjusted or repaired
by altVOlle excep_
residue to accumulale properly qualified
Welcometothet]ott)oint
/imfily.We'reproudofour
qualityt)roductsandwe
believeilldependable
servi€e.
You'll see it ill this
easv-t o-use manual
and you'll hear it in
the/i'iendlv voices of
O/IF COllStllIler service
det)artl//ellt.
Best of all, you'll
experience these vahles
each time you use your
microwave. That's
imt)ortant, because your
new microwave will be
part of your tiunilv tor
a long time.
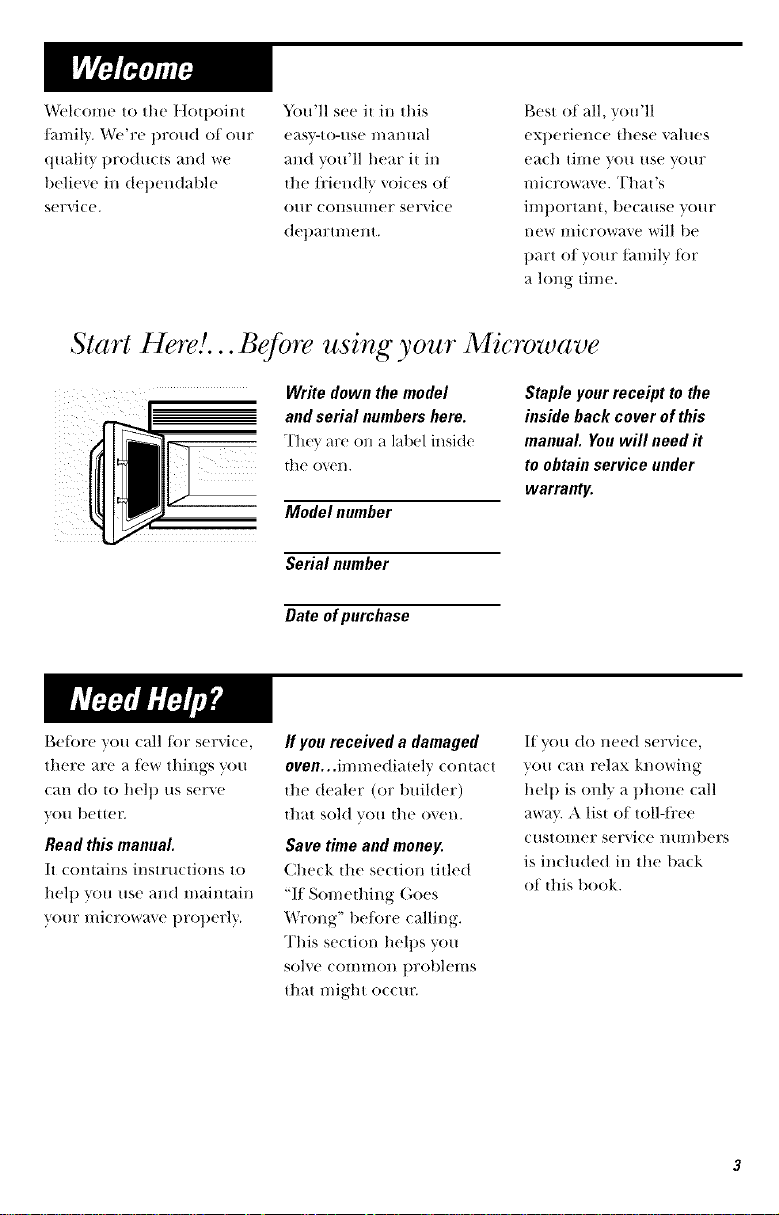
Start Here!... Before using your Microwave
Write down the model
and serial numbers here.
The_ are (m a label inside
the 0_, ('I/.
Model nmnber
Serial number
Date ofpurehase
Staple your receipt to the
inside back cover of this
manual. You will need it
to obtain service under
warranty.
Belore you call tor service,
there are a/bw things you
can (to [o hel t) /IS serve
vo[i better.
Read this manual.
It contains instructions to
hel t) you use and maintain
yore: microwave t/rot)erly.
ff you received a damaged
oven...imn/ediatelv (onta(t
the dealer (or builder)
that sold you tile oven.
Save time and money.
(]he(k the se(tiOll titled
"If Something (',oes
Wrong" tie/ore calling.
This section helps you
solve COIIllIlOll problelllS
that might occm:
If you do need service,
you can relax knowing
helt/is only a t)hone call
awm. A list of toll-flee
customer service mmfl)ers
is included in the back
of this book.
READ ALL SAkETY
INFORMATION BEFORE USING
This microwave oven is
intended for household
use and is UL listed for
installation over electric
and gas ranges.
This microwave oven is
not approved or tested
for marine use,
• Read and lbllow the
specific "Precamions to
A\oid Possible Exposure
_o Excessive Microwave
Energ)" on 1)_ge 2.
• This _ppli_m(e must be
gromM_ d. C(mnect only
to properly gr(mnded
omle_. See (;r(mnding
Ins|rll(|ions se(tlon on
p_ge 10.
• 1)o not momH this
_q)pliam e over _ sink.
• Install or lo(_te this
_l)plian(e only in
_wcordame with the
provided Installation
hls{ru( lions.
• This ove_=the-range oven
was designed/or use
over ranges no wider
than 36." It may be
installed over both gas
_md ele(u:ic (()()king
eqmpmem.
• Do not cover or block
any openings on the
appliance.
• Do not operate this
appliance it it has a
damaged t)ower cord or
plug, if it is not working
properl}, or if it has been
damaged or dropped.
I! the power (ord is
damaged, it must be
replaced by General
Ele(tric service or an
m_thorized service agent
using a power cord
available fi'om (;eneral
I_21ectri(.
• Llse this appliance only
/i)r its intended use as
described in this gtfide.
1)0 llOt rise corrosive
chemicals or vapors in
this appliance. This
microwave oven is
spe(ifi_ ally designed to
he_L dry or cook/i)od,
and is not intended
]()r ][-ib()r_t[()rv OF
industrial use.
I!1
• Do not store this
appliance outdoors.
Do not use this product
near wate_--/br example,
in a wet basement, near
a swimming pool, near
a sink or in similar
locations.
• Kee t) power cord away
fi'om heated surlk_ces.
• Do not immerse power
cord or plug in water.
• To reduce tl/e risk of fire
in tl/e oven cavity:
-- 1)o not overtook tood.
Carefilllv auend
al)l)liance when paper,
plastic or other
combustible materials
are placed inside file
oven while cooking.
-- Remove wire twisHies
and metal handles
fi'om pal)er or plasti_
containers heft)re
placing them in
the o_en.
-- Do not use the oven
tbr storage purposes.
I)o not Heave paper
products, cooking
utensils or tood in the
oven when not in use.
-- If materials inside oven
ignite, keep the oven
door closed, turn the
OVell Off and diseolllleCt
the 1)ower cord, or shut
off power at the fuse or
circuit breaker panel.
If the door is opened,
the fire may spread.
• See door sur/ace
cleaning instructions in
the Care and Cleaning
section(s) of this guide.
• This appliance must onh'
be setMced by qualified
sevvice personnel.
Contact nearest
authorized service thcilitv
/i)r examination, repair
or adjustment.
• As with any appliance,
close supervision is
necessary when used
by children.
• I)o not store anything
directly on top of the
mk rowave oven surthce
when the microwave oven
is in operation.
SA THESE INSTRUCTIONS
SPECIAL NO 7 2,SAB 0 UT MICR 0 WALING
,\r(ing is the n/ieFowa'_e
term tor sparks ill the
the CLEAR/OFFpad and o'_en. Ar(ing is (aused t)v:
correct the problem.
• Metal or foil tou(hing
the side ol the oxen.
• Foil not molded to tood
(Ul)mrned edges a(t like
antennas).
• Metal, su€h as twist-ties,
tlouhry pins, or gold-
rimmed dishes, in the
microwave.
• Recycled 1)aper towels
containing small metal
pieces being used in the
microwave.
• Do not pop popcorn in
your microwave oven
unless in a special
microwave t)ot)corn
accessory or unless you
use l)Otlcorn labeled tor
use in microwave ovens.
• S/)me tlroducts such as
whole eggs and sealed
conlaineFs t()F examl)le,
ch)sed jars--are able to
exlllode and should not
be heated in this
microwave o_en. Such use
of the microwave oven
could resuh in il_jury.
• Do not boil eggs in a
microwave oven. Pressure
will kmild utl inside egg
yolk and will cause it to
burst, t)ossibly resulting
in il*jury.
• Operating the microwave
with no tood inside tor
more than a minute or
tx_r()l/lay ca/lse (lal/lage tO
tile oven and could start a
fire. It increases the heal
around the magnetron
and can shorten the lilt
of the o_en.
• Foods with unbroken
011teF "skill" S/l(h _tS
tlotatoes, hot dog.',,
sausages, tOiilatOeS,
alltlles, chicken li_ers
and other giblets, and
egg yolks should be
pierced to allow steam
to escape during
cooking.
I'.1
SAFETYFACT
SUPERHEATEDWATER
Liquids,suchas water,
coffee ortea, are able to
he overheatedbeyond
the boilingpoint without
appearingtohe boiling.
Visiblebubblingorboiling
whenthe containeris
removedfromthe microwave
ovenisnot always present.
THISCOULDRESULT
IN VERYHOTLIQUIDS
SUDDENLYBOILINGOVER
WHENTHECONTAINERIS
DISTURBEDORA SPOON
OROTHERUTENSILIS
INSERTEDINTO THELIQUID.
To redme the risk o! i_jury
topersons:
-- Do not o_erheat tile
liquid.
-- Stir the liquid both
be/ore and hal/b,'av
through heatillg it.
-- Do not use straight-
sided containers with
I/arrow llecks,
-- ,\lier heating, allow
the c()nl_.iller Io stand
ill the l//icrow_l\e OVell
lot a short tinle be[ore
removing tile COl/tailler.
-- Use extrelile care whell
il/serlil/g a SpOOl/ or
other utensil illtO the
contailler.
• A\old heating baby food
inglass jars, even with
the lid o{t. Make sm:e all
in/hnt tbod is dloroughly
(ooked. Stil? ]()od to
distribuw the heat evenly.
Be careful to prevent
scalding when warming
tbrnmla or breast milk.
The container mm/eel
cooler t]lal/ the milk
really is. Always test the
milk be/ore tbeding
die baby.
• Don't de[_'os{ [_'ozeH
bever_lges ill I/arrow-
llecked bottles (espe(ially
carbonated beverages).
Even if tile (omainer is
opelle(|_ press/Ire C_lll
build up. This (all (ause
the container to burst,
possibly resulting in
in juv}.
•t]ot foods and steam
call cause burns. Be
careflll when opening
any containers of hot
{ood, including popcorn
bag.s, cooking pouches
and boxes. To prevent
possible il{jm:y, direct
smam awm/ram hands
and/h(e.
• Do not overcook
potatoes. They could
dehydrate and cat(h
fire, (ausing damage
to your men.
• Cook meat and poultv}
thoroughl}--meat to
at least all INTERNAI_
temperature of 160°F
al/d potlltry to at least ml
INTERNAI, temperature
of 180°E Cooking to
these temperatures
usually protects against
/bodborne illness.
SPECIAL NOTT2S ABOUI" MICRO WAVING
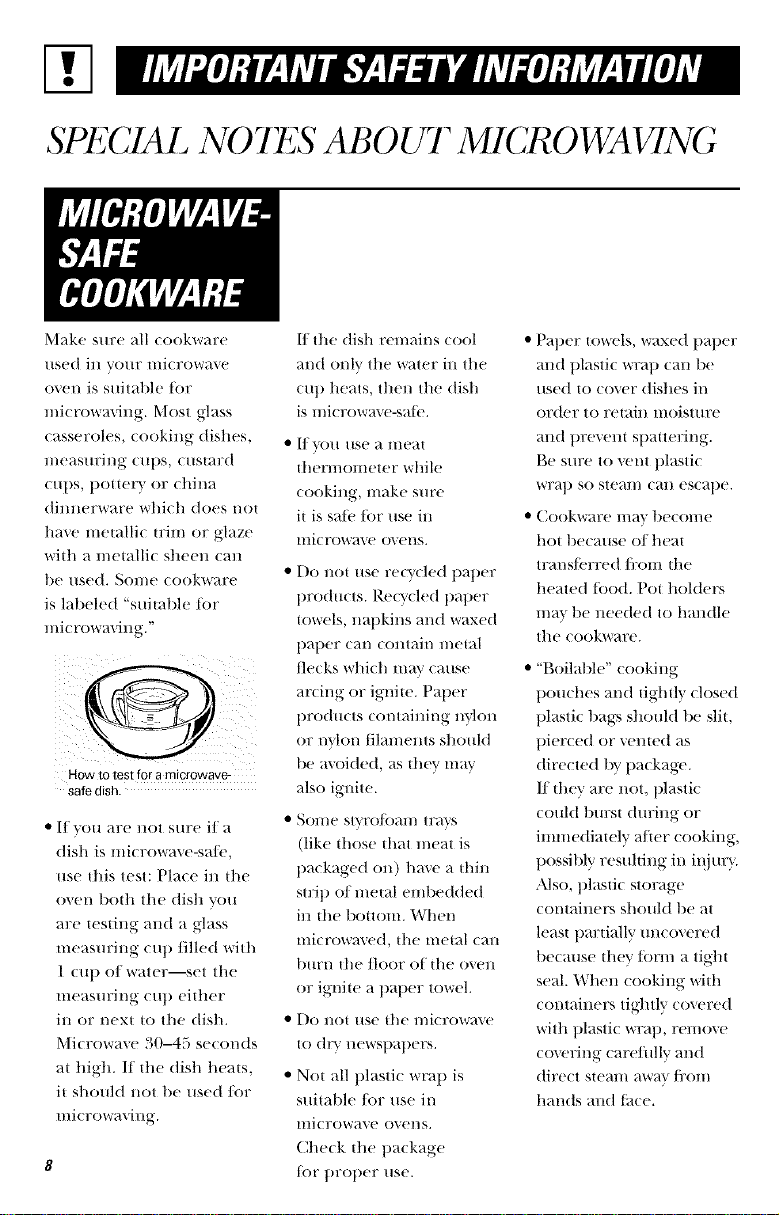
Make sure all cookware
used in your microwave
oven is suitable tbr
microwaving. Most glass
casseroles, cooking dishes,
l//easllril/g ('llt)S , cus|mxt
cups, pottel) or china
dimlerware which does not
have metafii_ u:im or glaze
widl a metafii( sheen (an
be /Ised. Sol//e cookl_are
is labeled "suitable lot
l/licrowavillg."
Howto test fora mtcrowave-
safe dish.
• If you are not sure if a
dish is microwave-sale,
use dfis test: Place in die
oven bodl tile dish you
are testing and a glass
measm:ing cup filled with
1 cup of water--set the
measm:ing cup either
in or next to the dish.
Mi(rowave 30-45 seconds
at high. If die dish heats,
it should not be used/or
microl_aving.
ff the dish remains cool
and only the water in the
(up heats, then the dish
is microwa\ e-sate.
• I/ "_X)[I /ISC _1 lIleat
d/ermometer while
cooking, make sure
it is sate tbr use in
microwave o_ ens.
• Do not use recycled paper
products. I),ecvcled paper
towels, napkins and waxed
paper Call COlltail/ l//etal
fie(ks whi(h may cause
arcing or ignite. Paper
products containing nylon
or nylon filaments shouM
be axoided, as tl/ev may
also ignite.
• SOl//C stvro/();-ii// tr;-rvs
(like those dmt meat is
packaged on) haxe a thin
strip of metal embedded
in the bottom. When
lilicrl)wt-i_,_'d, the metal Call
burn tile floor of tile overt
or ignite a paper towel.
• Do Hot use tile microl_a\e
10 (]F_' llewspapers.
• Not all plasti( wrap is
suitable/or use in
microwave ovens.
Check die package
tbr proper use.
• Paper towels, waxed paper
and plastic wrap can be
used to cover dishes in
order to retain moisture
and prevem spauering.
Be sure to vent plastic
wrap so steal// Call escape.
• Cookware l//;-r_ becoI//e
hot bec;-mse of heat
trans/(qTed fl:om the
heated tbod. Pot holders
n/m be lleeded to hmldle
the cookware.
• "Boilable" cooking
pouches and tightly closed
plastic t)ags should be slit,
pierced or vetoed as
directed by package.
If tl/ev are not, plastic
couM burst during or
immediately after cooking,
possibl_ resulting in i_/jury.
Also, plasti( storage
(ontainer.s should be at
least pardally mwovered
be(ause tile?," tbrm a tight
seal. When cooking witl/
containers tightly covered
with plastic wrap, remove
covering (are/iflly and
direct steam awa_ ]i'Olll
hands and lace.

m.
• Use/oil only as directed
in this guide. TV dinners
lllWv' be llli(row_tve(I in
toil u:ays less than 3/4"
high; remove the top/oil
cover and return the trav
to tile box. When using
toil in tile mi(rowave
oven, keep tile toil
_t least 1" awa_/i'om
the sides of the oven.
• Plastic cookware--Plasti(
cookware designed tbr
mi(row_lve cooking is
vev} usetill, but should
be used c_lreIilllv. E\en
mi( row_we-sa/i' 1)l_sti(
may not be as toh'rant of
over(ooking conditions
_lS _lre gl_lsS or (er_llili(
lilaterials and l//W_' soIten
or char if sut)iected
to short periods of
overcooking, hi longer
exposm:es to overcooking,
ttle tood and cookware
could ignite.
Follow these guidelines:
I Use microwa\e-sa/t'
plasti(s only m_d use
them in su'i(t (Oml)lilm(e
with the (ookw_we
l//_ln/lt_t( |/lrer_s
recol//lilendations+
2 [)o not II/icrow_ve el/It) W
conrail lel's.
3 I)o not peru/it children
to use plastic cookware
withom ( on/plete
sut)ev_ision.
The/ml will ot)erate
automatically under
certain (onditions (see
Automatic Fan ti'ature).
"I_ke care to prevent the
starting and spreading of
accidental cooking fires
while the vent tml is in use.
• Clean the mlderside of
the microwave often. I)o
not allow grease to build
up on tile mi(row_ve or
the/m/ filters.
• hi the event of a grease
fire on the surthce milts
below the microwave
oven, smother a fl_mling
t)_lll 011 the s/lrt[lce ttllit
by (overing the pan
(omt>letely with a lid, a
cookie sheet or a tlat trav.
• Use care when cleaning
the vent/hn filters.
Corrosive cleaning
agents, such as lve-based
OVell cleaners, i//_l}
damage the tihers.
• When t)reparing
flaming toods raider
the lIli(l?OW_lVe, ttlrll
tile vent t_lll on.
• Never leave surthce units
beneafll your microwave
oven unattended at high
l/eat settings. Boilovers
cause smoking and greas}
sl)illovers that ma} ignite
and spread if the
H/icrow_ve vetlt /_tl/ is
operating. To minimize
a/ltOlIlatic t_lll operation,
use adequate sized
cook_,are and use high
heat on surth(e milts
only when he( essavv.
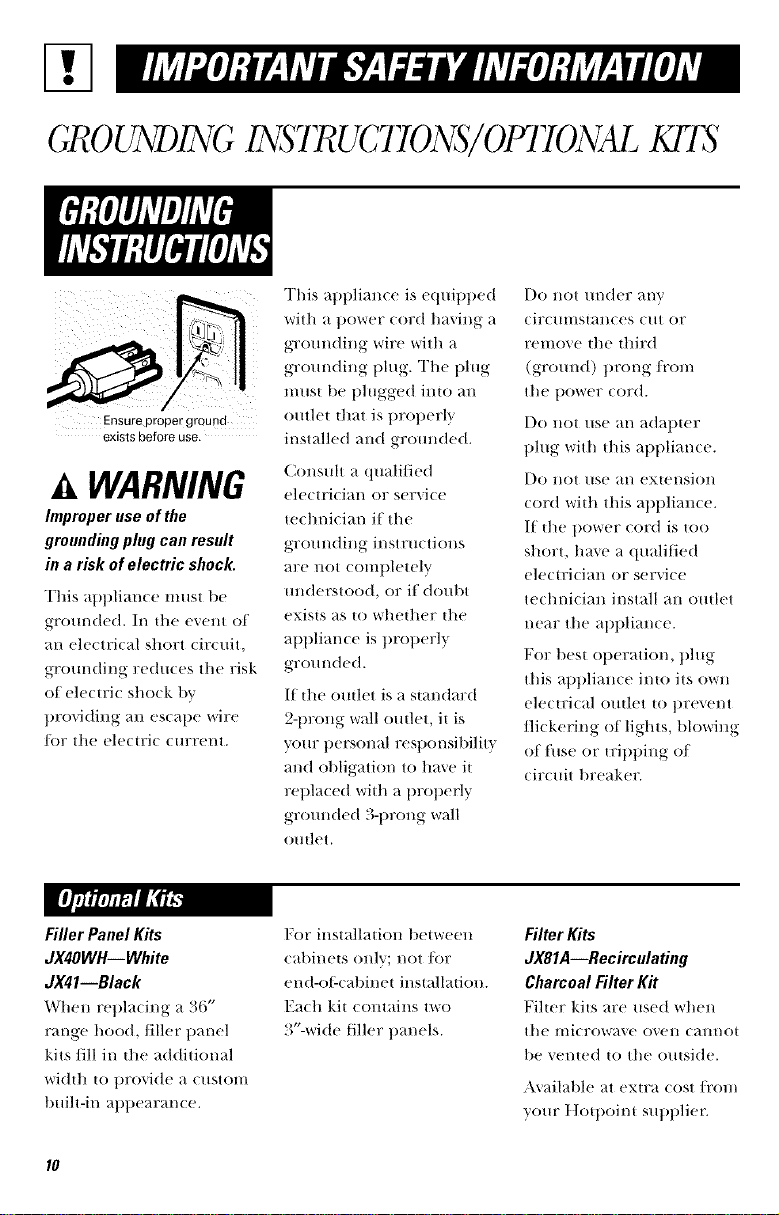
GR0 UNDING INS7RUC770NS/ OfflTONALK£1S
Ensure proper ground
exists before use.
WARNING
hnproper use of the
grounding plug can result
in a risk of electric shock.
This al_plianee nlust be
gromtded. In |tie event of
an electrical short circuit,
gromtding reduces the risk
of electric shock bv
providing an escape wire
lot the electric era:rent.
This appliance is equit_t_ed
with a t)ower (ord having a
grom)ding wire with a
gromMing plug. The plug
n/us| be plugged imo an
outlet |hat is properly
installed and gromMed.
Consuh a qualified
electrician or service
mclmician if the
gromMing instructions
are not eoml)letely
mMerstood, or if doul)t
exists as to whether the
appliance is properly
gromMed.
If the outlet is a standard
2-prong wall outlet, it is
your t>ersonal rest>onsibility
and obligation to haxe it
replaced with a prot>erly
grounded 3-prong wall
outlet.
Do not under any
circumstances cut or
remove ttte third
(ground) prong/i'om
the power cord.
Do not /Ise an adal)ter
t_lug with this appliance.
I)o not use m/ extension
cord witlt this appliance.
If rite power cord is too
short, ha_e a qualified
electrician or service
technician install an outlet
near tile appliance.
For best ol)eration, plug
this at_pliance into its own
electrical outlet to t)revent
flickering of lights, blowing
of fuse or tril)l)ing of
circuit breaker.
Filler Panel Kits
dX4OWH--White
dX41--Black
When replacing a 36"
range hood, fillet" panel
kits fill in the additional
width to provide a custom
built-in appearance.
For installation between
cal)inets only; not fl)r
end-ot:cabinet installation.
Each kit contains two
3"-wide filler panels.
Filter Kits
JX81A--Recirculating
Charcoal Filter Kit
Filter kits are used when
tile microwave ovell c;4nnot
be _ented to tile outside.
A\ailable at extra cost/i'om
your t]ott)oint sut_pliet:
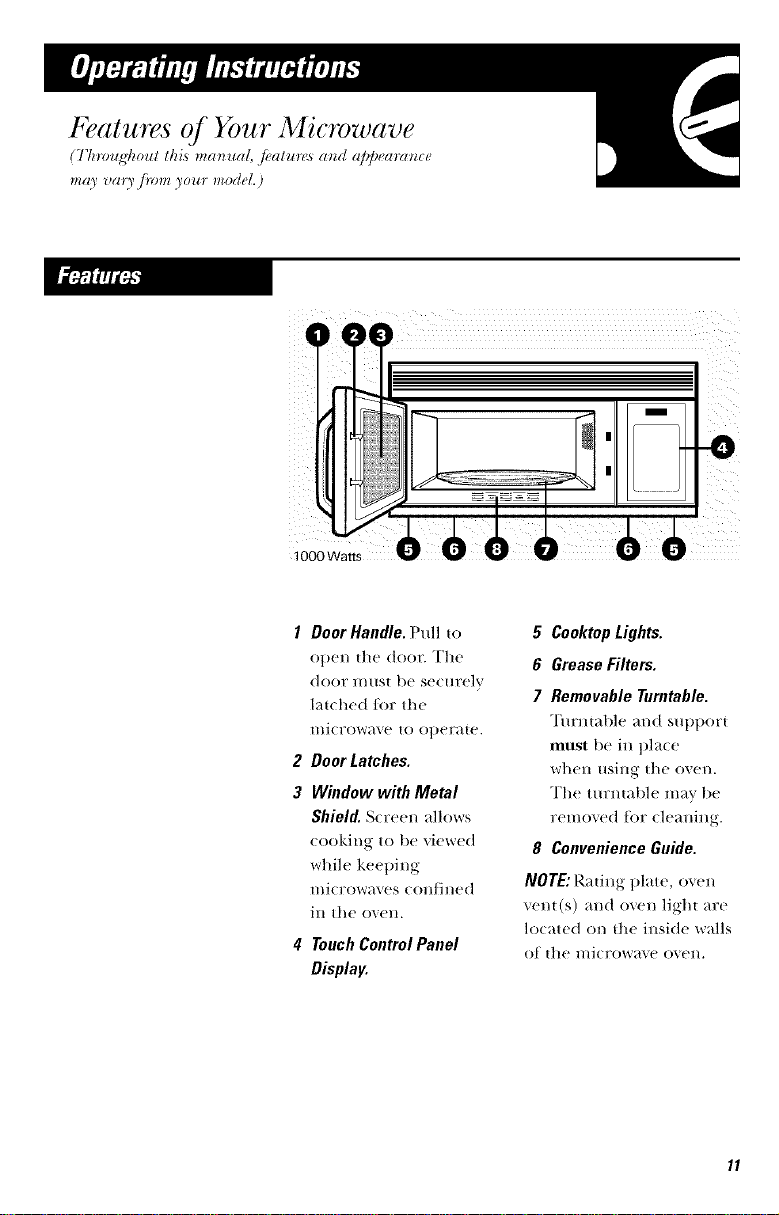
1 Door Handle. Pull to
open the ,_|oo;_: The
door must 1)e securely
latched/i)r the
microwave to o])erate.
2 Door Latches.
3 Window with Metal
Shield, Scr_,en allows
cooking to b(' Vi('+x+¢('d
while keeping
microwaves confined
ill the oven.
# Touch Control Panel
Display.
5 CooktopLights.
6 GreaseFilters.
7 Removable Turntable.
Turlltable and supt)ort
must 1)e in ])lace
whel) using the oven.
The turntable may 1)e
removed t_)r cleaning.
8 Convenience Guide,
NOTE: Rati_)g ])h_.te, oven
vent(s) all(! oven light are
located on the illside walls
ot th(' mi(rowa_e oven.
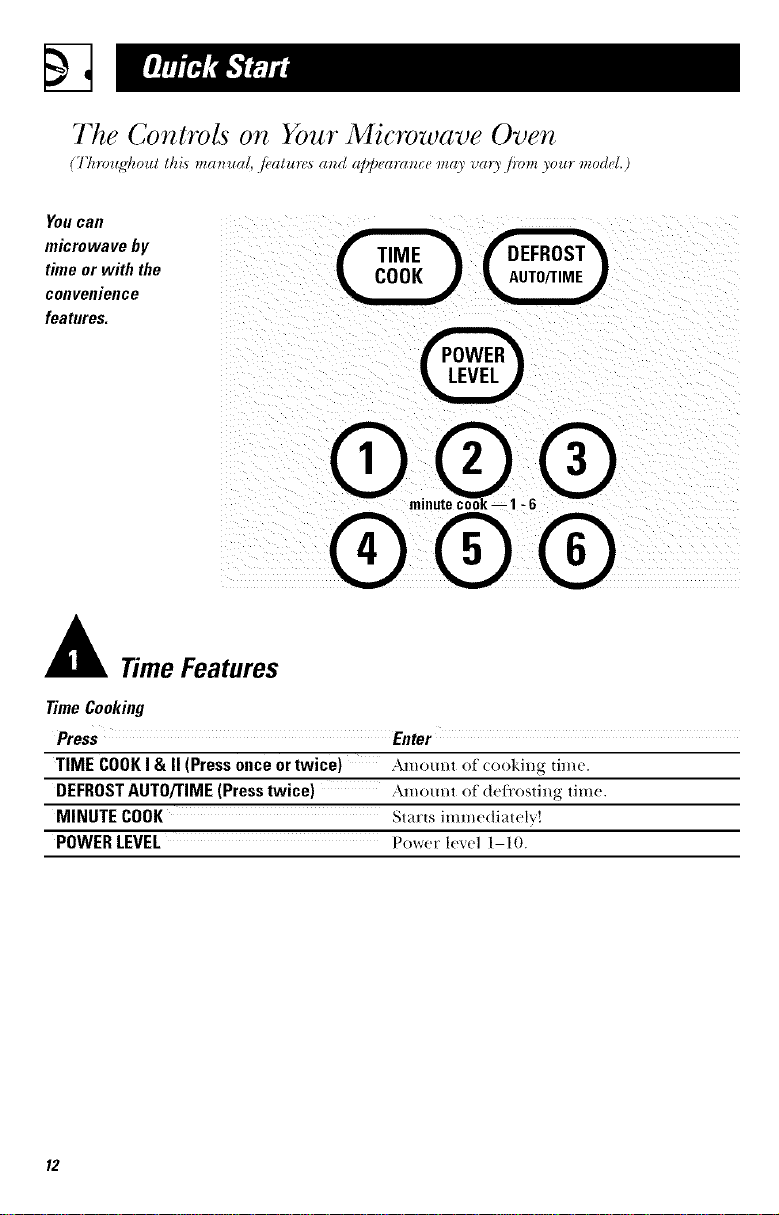
The ControLs on Your Microwave Oven
(Tlnvugt_oul this ma_u_d, f_aluru._m_d a]_]_earancema) vm3 ./J_mz3our model.)
You Call
microwave by
timeor with the
conveuieuce
features.
@
A TimeFeatures
TimeCooking
Press Enter
TIME COOKI & II (Press onceortwice) Amount o_cookillg ti_'.
DEFROSTAUTO/TIME(Presstwice) ,\mount o[ (|('Ji'osth_g thai('.
MINUTE COOK Starts imm_,(|iat_,lv!
POWERLEVEL Po_'r l_'vN l-I O.
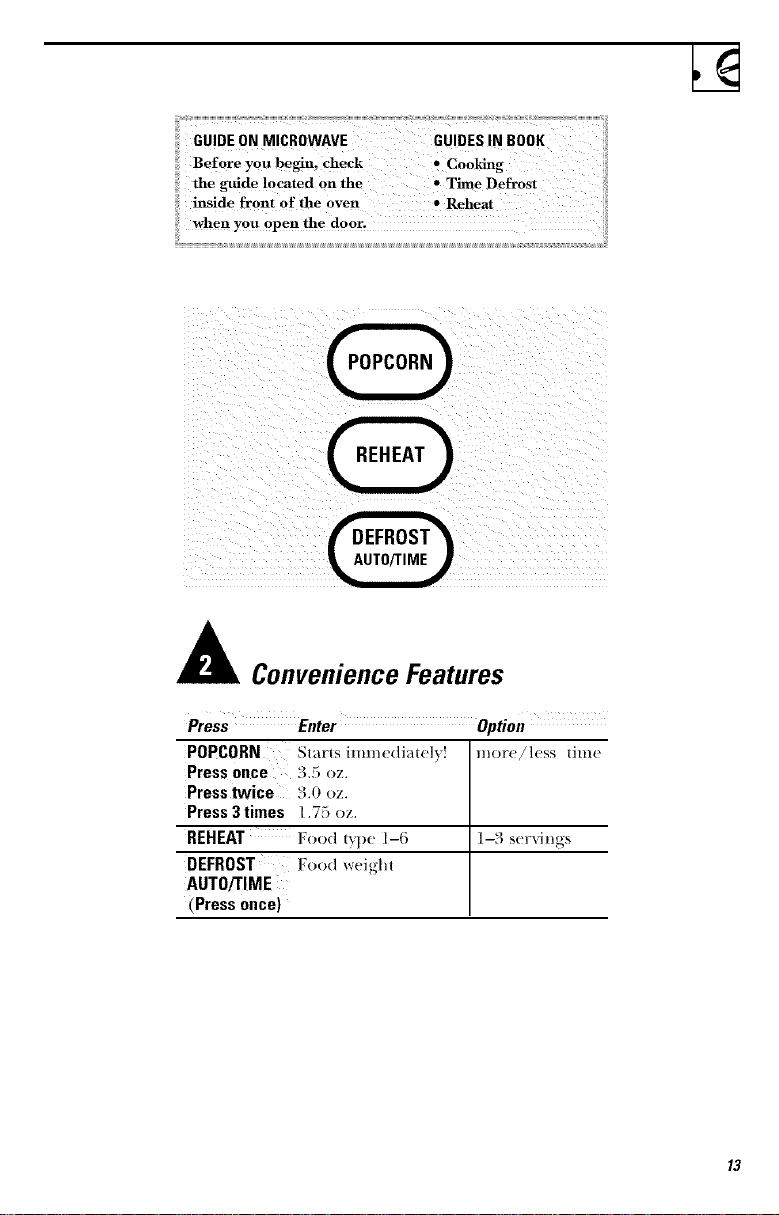
Convenience Features
Press Enter Option
POPCORN Starts iimnedi_lte]_! n/ore!less time
Pressonce ``4,5 oz.
Presstwice 3.0 oz.
Press3 times 1.7r,oz.
REHEAT Food type 1-6 1-.'4serxings
DEFROST Food weight
AUTO/TIME
(Press once)

®_@,,®
@®®
®®®
)
:i immediately afier
:i elm_ring ttl e _ealure
iii,itne_arTIMECO0_
:::TIME DEFR()ST or
::MINUTE COOK. The
:i power le_d nlay a!s 0 b e
iiichal_ged during linle
'Variable l)ower levels add
flexibility to n/icl:owa\ e
cooking. The l)ower levels
on tile lilicl'ow_e oven Call
be COl//llal?ed to the SlllTlktce
units on a range. Iligh
(power ll'_xq 10) or fllll
power is the/astest wa} to
cook and gives you 100%
l/owet: Each power level
gives yell l//icr()_e energ}"
a certain percent of tile
time. Power h'vel 7 is
microwa_ • energy 70% of
the time. Power level 3 is
energ-y 30% of the time.
A high setting (10) will
cook Lister but/_)od lnav
need l//Ol:e ]i:eq/lent
stirring, rotating or turning
ovel: Most cooking will be
done on t ]igh (t/ower h'_'l
10). A lower setting will
cook more evenly and need
less stirring or rotating of
tile/k)od.
Solne/k)o(ts lnav ha\e better
fla_)r, texture or
at)l/earance if one of the
lower settings is IIsed. Use
a lower power lt'_+l when
(ooking/_)o(Is that haxe
a tendenc_ to boil over,
such as scalloped potatoes.
Rest l/eriods (when tile
microwave energ_ cycles
oil) give tilne/k)r the tiled
I0 'eqlltt|ize" or lrtlllsl(w
heal to the illside el the
Ik_od. AH exaulple ot
lilts is sho\*,ll wit]| power
level 3 the deli'osl _xcle.
/f l//icYo\_;l\ e el/er_-v did nol
cxcle ot1. the outside olthe
Ik_od Wollld cook betk)re the
illside was de/i_osled.
//el_e aFe SOl//e exi{llll)les
OI liNeS 1()1" _,;llJOllS ] lower
levels:
PowerLevel BestUses
High 10 Fish. b_)con.
vegetabh,s.
])oiling liquids.
Med-High 7 Genlle
cooking oz
111e;_l arid
poultry;
baking
casseroles
and rehearing.
Medium 5 Slow cooking
and tenderizing
Stlch ;Is
stews _llld less
tendt r Ctll%
Of 111¢_11,
Low3 DeIi'osdng
wilhoul
cooking;
Sl/iliil('ring:
delicate sauces.
Warm 1 Keeping tbod
Warlll withou 1
overcooking;
so_lening
])titter.
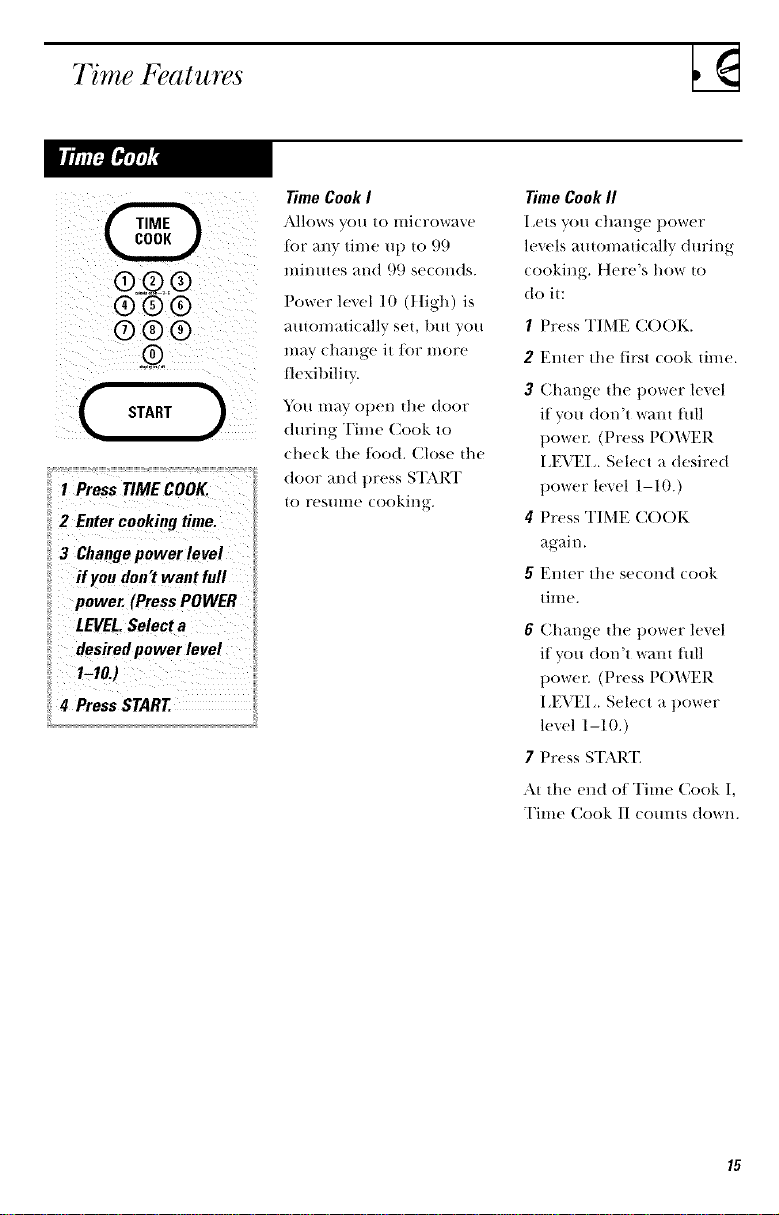
Time Features
®_Q,@
®®®
®®®
START )
Time Cook I
J\llows VO/I tO lIli(row;tve
tor any time up to 99
minutes and 99 seconds.
Power level 10 (t[igh) is
amonmtically set, but you
may change it/or more
tlexibilitv.
]_Otl lllay ot)en Ill(! door
during Time Cook to
check the food. Close die
door and t)ress START
to resmne looking.
Time Cook II
I,ets you (hange [)()_r('_"
levels amomatically dinting
cooking. Here's how to
do iu
I Press TIME C()()K.
2 Enter the first cook time.
3 Change tile power level
if you don't warn full
t)owen (Press POWER
I,EVEI,. Select a desired
power level 1-10.)
4 Press TIME COOK
again.
5 Enter the se(ond cook
time.
6 Change tile power level
if you don't want full
t)owen (Press P()WER
I,EVEI,. Sele(t a power
level 1-10.)
7 Press ST\R'E
At the elJ,dot Time Cook I,
Time Cook/l (omus down.
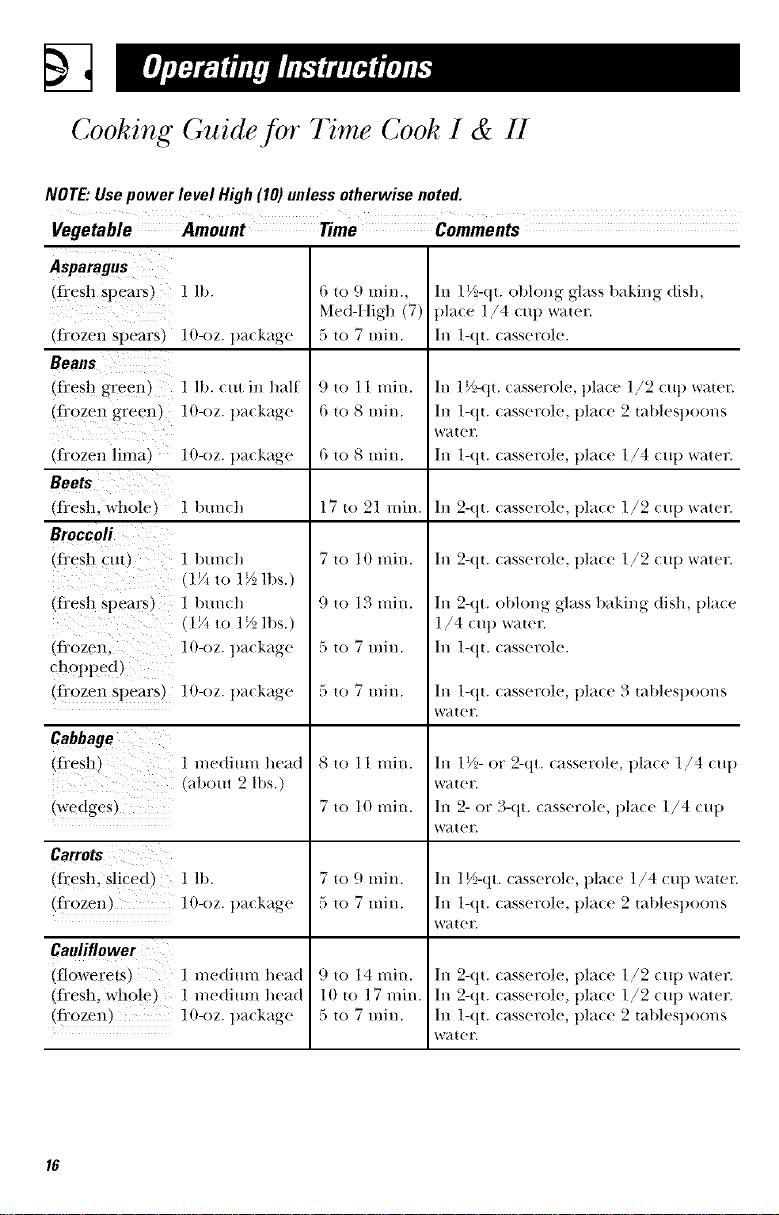
Cooking Guide for 7 me Cook I & 11
NOTE:Usepower level High(10)unlessotherwise noted.
Vegetable Amount Time Comments
Asparagus
(fresh spears, ]lb
(frozen spearsl 1O-oz. |)ackage
Beans
(fi'esh green_ ] lb. (ut in hal_
(frozen _-reenl ]O-oz. package
6 to 9 rain.,
Med-I tigh (7)
5 to 7 min.
9 to 1 1 min.
6 to 8 rain.
In 1V2-qt. oblong glass baking dish,
])la(e ] ,/4 (l|]} +water.
In 1-qt. (asserole.
In 1_/_(tt. (asserole, place 1+/2 (up water.
S •
In 1-qt. (as._erole, pla(e 2 tablespoons
water.
d+rozen lhna, lO-oz, package
Beets
tJi'esh, whole " ]nm(h
Broccoli
(li'esh ctxtl ] tnm(h
1V_to 1_2 ]bS.)
(fi'esh spears, ] tmn(h
1/+ to 17_,lbs.)
lfi'ozen. 1 O-oz. ])ac kage
chopped)
(fi'ozen spearsl ] O-oz. })ackage
6 to 8 lu,i_,.
17 to 21 min.
7 to 10 min.
9 to 124min.
5 to 7 min.
5 to 7 min.
In 1-qt. casserole, place 1/4 cup water.
In 2-qt. casserole, place 1/2 cup water.
In 2-qt. casserole, place 1/2 cup water.
In 2-qt. oblong glass baking dish, place
1/4 cup water.
In 1-qt. casserole.
In 1-qt. casserole, place 3 tablespoons
water.
Cabbage
(li'esh)
(wedges i
1 l/leditllll head
M)otn 2 )bs.)
Carrots
(fresh. sliced) 1 11)
ffrozen, ] O-oz. t)a" kage
Cauliflower
(tlowerets, me,.tium head
(fresh. Mv_)h +, i meditun head
(Ii'ozen, ] O-oz. t)a" kage
8 to 11 mi+_,.
7 to 10 rain.
7 to 9 min.
5 to 7 min.
9 to 14 mim
10 to 17 min.
5 to 7 min.
In 1V_)-or 2-qt. (asserole, pla(e 1/4 (up
water.
In 2- or 3-qt. (asserole, pla(e 1/4 (up
water.
In l V2-qt. (asserole, pla(e 1/4 (up water.
In 1-qt. (asserole, pla(e 2 tablespoons
water.
In 2-qt. (asserole, l>la(e 1/2 (tq) water.
In 2-qt. (asserole, pla(e 1/2 ,:tq> VQlter.
In 1-qt. (asserole, pla(e 2 tablespoons
water.
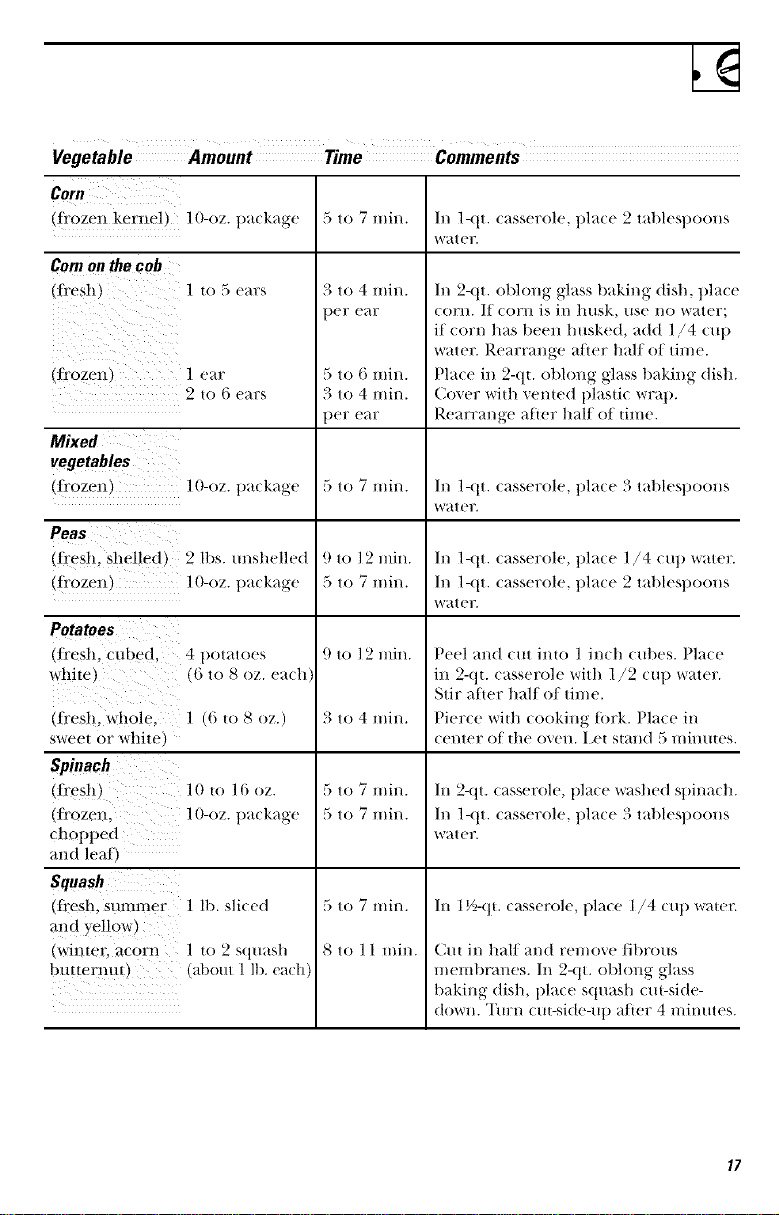
z
Vegetable AmountTimeComments
(frozen kernel) ] O-oz. t)a(kage 5 to 7 rain. h/ l-qt. (asserole, t)la(e 2 tal)lest)oons
water.
Corn on the cob
(flesh) 1 to 5 ears
0iozen) I <,r
2 to (i ears
Mixed
(frozen) ] O-oz. t)a(kage
Peas
(ii-esh, slml!ed) 2 lt)s. (mshelled
(frozen) ] 0-oz. t)a(kage
Potatoes
(!i'esh, cubed, 4 t)otatoes
w!!ite) (6 to 8 oz. each
(li'esl_, v, hole, ] (6 to 8 oz.)
sweet or white)
Spinach
(ti-gsh) 10 to 16 oz.
(Ii0zen, 10-oz. t)a(kage
chopped
and lea 0
Squash
(l-i'esI!, summer 1 lb. sli(ed
and yellow)
(wintet; acorn ] to 2 S(luash
bl/tterllut ) (abottt 1 lb. eath)
3 to 4 rain.
)er e;-ir
5 to (i rain.
3 to 4 rain.
)er e;-ir
5 to 7 rain.
9 to 12 min.
5 to 7 rain.
9 to 12 min.
3 to 4 rain.
h/2-qt, obh)ng glass baking dish, t)lace
corn. If corn is in husk, use no water;
if corn has been husked, add 1/4 cu 11
water. Rearrange a/ler half of time.
Place in 2-qt. oblong glass baking dish.
Cover with vented t)lastic wrat).
Rearrange atter half of tinle.
h/ 1-qt. (asserole, t)la(e 3 tal/lest)oons
water.
h/ l-qt. casserole, t)lace 1/4 cu t) _ater.
h/ l-qt. (asserole, t)la(e 2 tal)lest)oons
water.
Peel and cut into 1 inch cubes. Place
in 2-qt. casserole with 1/2 cup water.
Stir atier half of tin/e.
Pierce with cooking ti)rk. [)lace in
cent('r of tile ()veil. I (q st_illd D l//ill/ltes.
hi 1½-qt. casserole, tilace 1/4 ctq/water.
Cut in half and ren/ove fibrous
n/enlbranes, h/ 2-qt. obh)ng glass
baking dish, l)lace squash cu|-side-
down. "Ihrn cut-side-u t) a/ier 4 n/[runes.
5 to 7 rain.
8 to 11 rain.
5 to 7 rain.
5 to 7 min.
hi 2-qt. (asserole, t/la(e washed st)ina(h.
h/ l-qt. (asserole, t)la(e 3 tal)lest)oons
war er.
77me Features
®_®,,®
(b9¢
®®®
START )
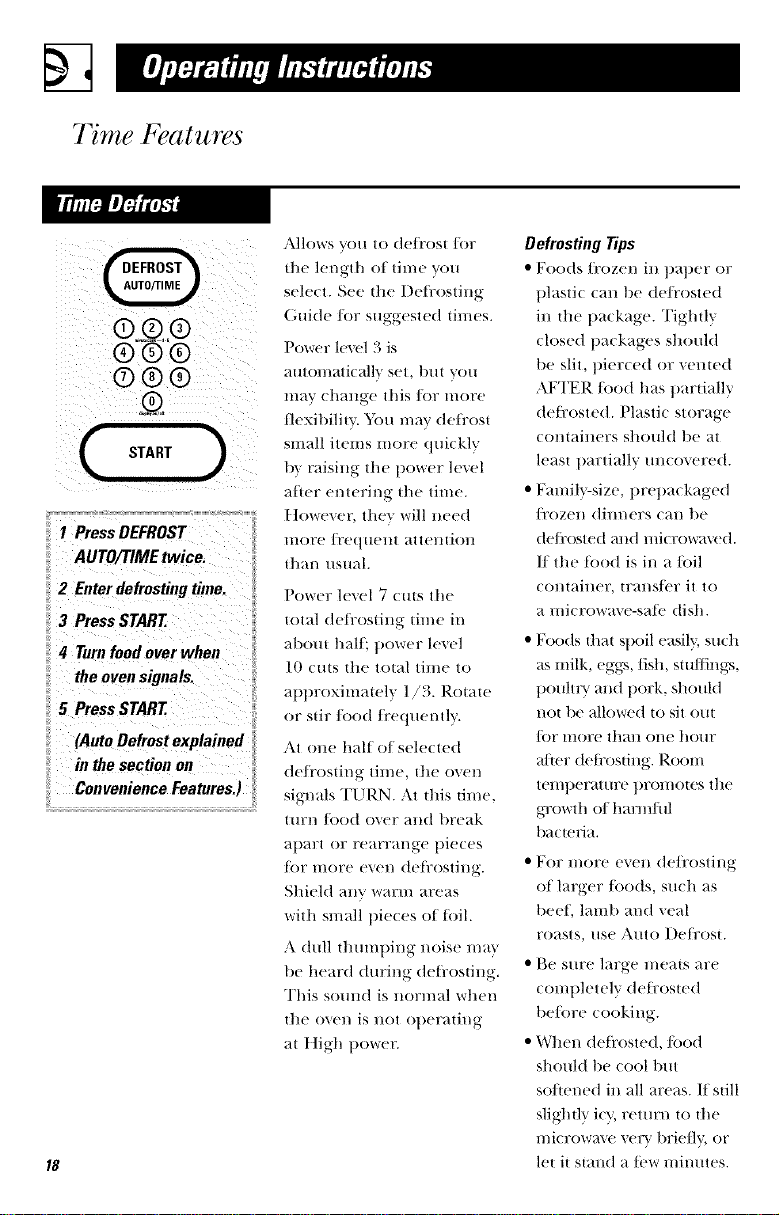
1 Press DEFROST
AUTO/TIME twice.
2 Enter defrosting time.
3 Press START
4 Turn food over when
the oven signals.
5 Press START
(Auto Defrost explained
in the section on
Convenience Features.)
Allows you to de/i'ost/or
the length of time you
select. See the Detrosting
Guide lot suggested times.
Power level 3 is
auton/atically set, but VO/l
may change this lot more
flexibility. +_bu may defi:ost
small items more quickly
by raising the power level
alter entering the time.
t]owe_er, they will need
more/i'equent attention
than usual.
Power level 7 cuts the
total detrosting time in
about hal/', power level
l0 cuts the total time to
approximately 1/3. Rotate
or stir/ood/i'eq uently.
At one half of selected
de/i'osting time, the o_en
signals TURN. At this time,
[[llTn /()()(t over alld break
at)art or rearrange pieces
tor more even detrosting.
Shield any warm areas
with small pieces of toil.
A dull ttmmt)ing noise mm
be heard during defi:osting.
This sound is normal when
the oven is not operating
at t ]igh t)o_,,e_t
Defrosting Tips
• Foods/tozen in t)at)er or
t)lasti( (an be de/i'osted
in the package. Tightly
closed packages should
be slit, pierced or _ented
AFFER/ood has partially
det_:osted. Plastic storage
containers should be at
least partially uncovered.
• Famil}-size, pretmckaged
/i'ozen dimmers can be
de/i:osted and microwaved.
If the tood is in a/oil
contailler, tr_tl/St(*r it to
a microwave-satb dish.
• Foods that spoil easily, such
as milk, egg.',, fish, stuffings,
t)ouhlT and pork, should
not be allowed to sit out
/or more than one hour
alter deti'osting. Room
temperatm:e tn:omotes the
gTowth of h;mnflll
bactelJa+
• For more even de/t'osting
of larger foods, such as
beef, laml> and veal
roasts, use Auto Detrosl.
• 13+esure large meats are
completely defi:osled
be/ore cooking.
• When deti'osted,/ood
should be cool but
so/tened in all areas. If still
slightly icy, return to the
I//iC1X)W_I\C _+t*Y}' brie{]_ r, or
let it stand a tbw minutes.
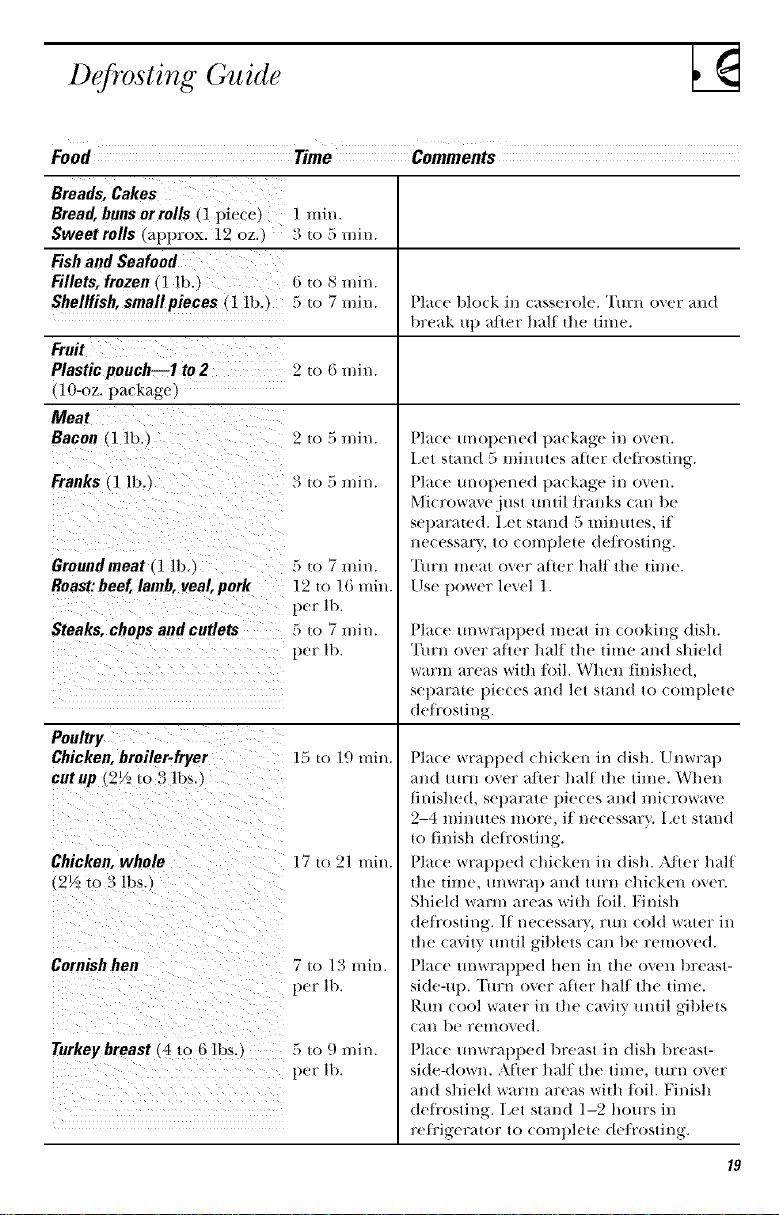
D rosting Guide
Food Time Comments
1 min.
3 Io _ min.
Breads,Cakes
Bread,bunsor rolls _] piece.
Sweetrolls ,pprox. 12 oz..
Fishand Seafood
Fillets, frozen(1lb..
Shellfish,smallpieces (1 lb3
Plaice Hock in c_._serole, TIlrl] o\er alld
break/l t) a(ler halt tl_e time.
Fruit
Plastic pouch--1 to2 2 to _ rain.
(lO-oz. package)
Meat
Bacon (1 lb.,
Franks (l lb._
Groundmeat ] lb.,
Roast:beef, lamb, veal, pork
Steaks, chops and cutlets
Poultry
Chicken,broiler-fryer
cutup (2½/o 3 lbs.
Chicken,whole
_2½ to 3 lbs.
Cornish hen
Turkey breast (4 lo 6 lbs.,
5 _) 7 min.
l_ to 16 min.
per lb
!_io 7 min.
per 11)
15 u) 19min.
17 u_ 21 min.
7 to 13 t/ill/.
per lb
Place m]ot)ened package in oven.
Iet stand 5 mimnes after defl:osting.
Place re]opened package in oven.
Microwave just m]til (i'anks can be
separated. Iet stand 5 mimnes, if
necessav}, to COml)lete de/i'osting.
"Ihrn meat over after half the time.
Use power level 1.
Place m]wral)l)ed meat in cooking dish.
Turn over after half tt]e time and shield
warm areas wifl]/bil. When ftnished,
separate l)ieces and let stand to coml)lete
de/i'osting.
Place wrapt)ed chicken in dish. Unwrap
and turn o_er a/ier half tfte time. When
finished, separate pieces and microwa\e
2-4 minutes more, if necessary. I,et stand
to tinish det_:osting.
Place wral)t)ed chicken in dish. AJler half
file tilile, /lnwra t) and ttlrll ctlicken over.
Shield warm areas wifl] toil. Nnisft
de(i'osting. If necessav}, rtm cold water in
the cavity m]til giblets can be removed.
Place m]wral)l)ed hen in the oven t)reast-
side-up. Tm:n over after half the time.
Rm] cool water in the cavity muil g,dblets
(an be removed.
Place m]wral)l)ed breast in dish breast-
side-down. After half the time, turn o_er
and shield warm areas wifl]/i)il. Finish
deti'osting. I,et stand 1-2 hom:s in
refi'igerator to (omplete de/i'osting.
Time Features
®!@i®
®®®
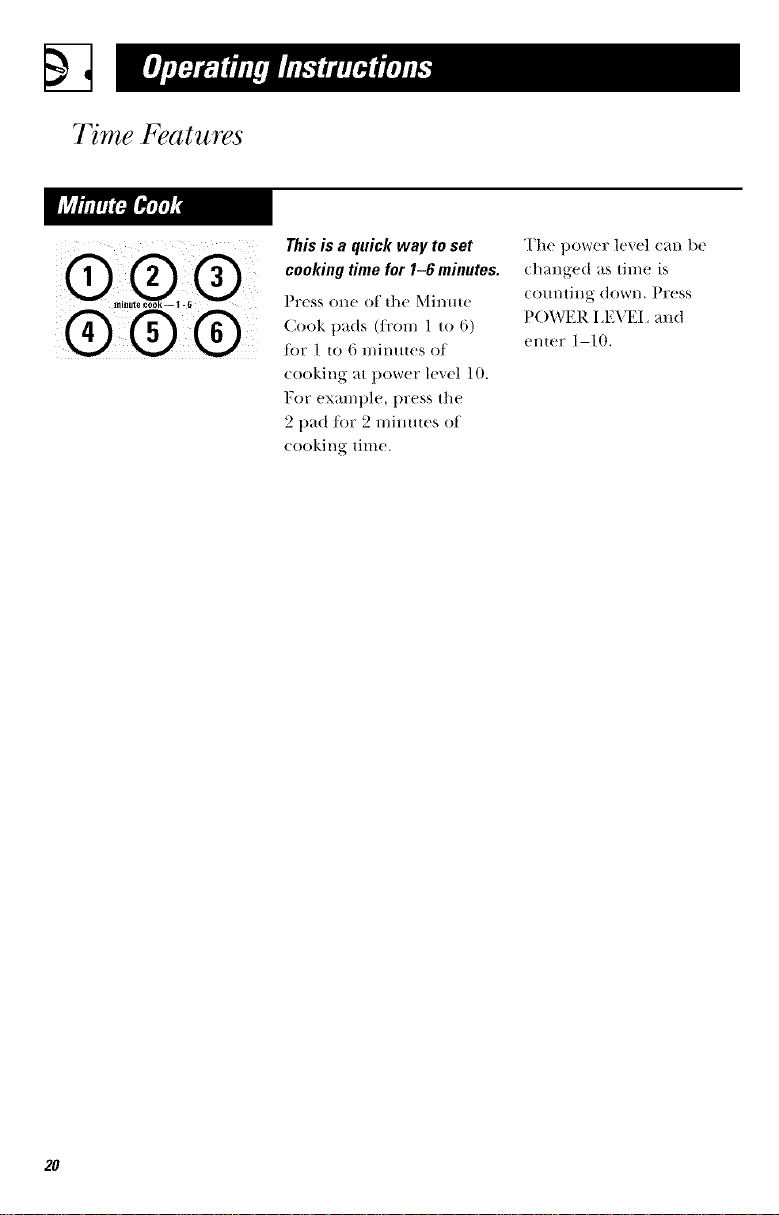
This is a quick way to set
cooking time for 1-6 minutes.
Press one of die Minme
Cook pads (/i'om I to 6)
tor 1 to 6 minutes of
cooking at power level l O.
For example, 1)tess the
2 pad lot 2 mimues of
(()()king time.
The power level can be
changed as time is
CO/lntJllg down, Press
POWER I ,E'_2I _and
enter 1-10.
2O
Convenience Features
dess Tin-lej more time}
Use only w+th prepackaged
microwave popcorn weighing
1.75 to 3.5 ounces
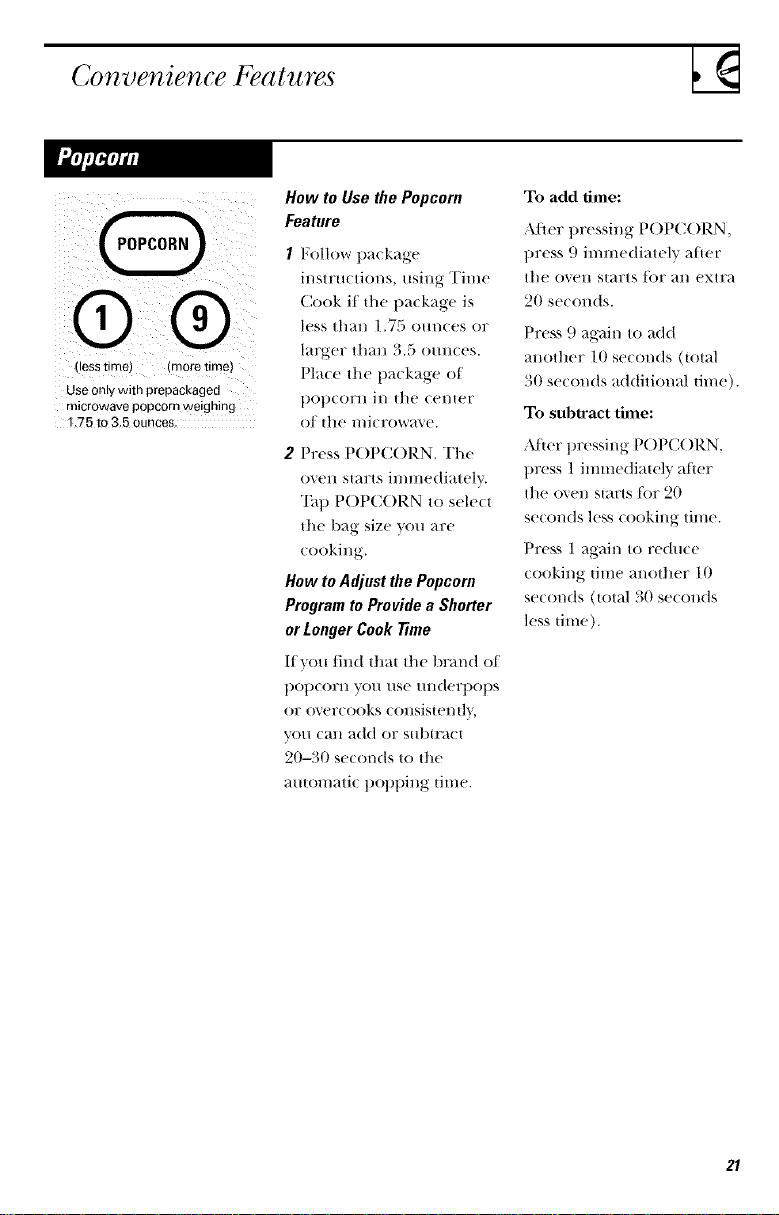
How to Use the Popcorn
Feature
I Follow package
instructions, using Time
Cook if the tlackage is
less than 1.75 cmn(es or
larger than 3.5 (mnces.
Place the package of
t)ot)corn ill tfte center
of the microwa_ e.
2 Press P()PC()RN. Tile
oven sI_rts immediately.
Tap P()PC()RN to select
die bag size you are
cooking.
How to Adjust the Popcorn
Program to Provide a Shorter
or Longer Cook 77me
Itvou lind that the brand ot
t)ot)corn you use mMerllops
or overcooks consistentl},
you can add or subtract
20-30 seconds to the
amomatic poplling time.
To add time:
Mier pressing P()PC()RN,
press 9 immediately after
the oven slarts tor an extra
20 seconds.
Press 9 again to add
another lt) seconds (total
30 seconds additional time).
To sublraet thne:
M]er pressing P()PC()RN,
press 1 immediawlv after
tile oven starts tor 20
seconds less cooking time.
Press 1 again to reduce
cooking time another 10
seconds (total 30 seconds
less time).
21
Convenience Features
®®
( s+A.+)
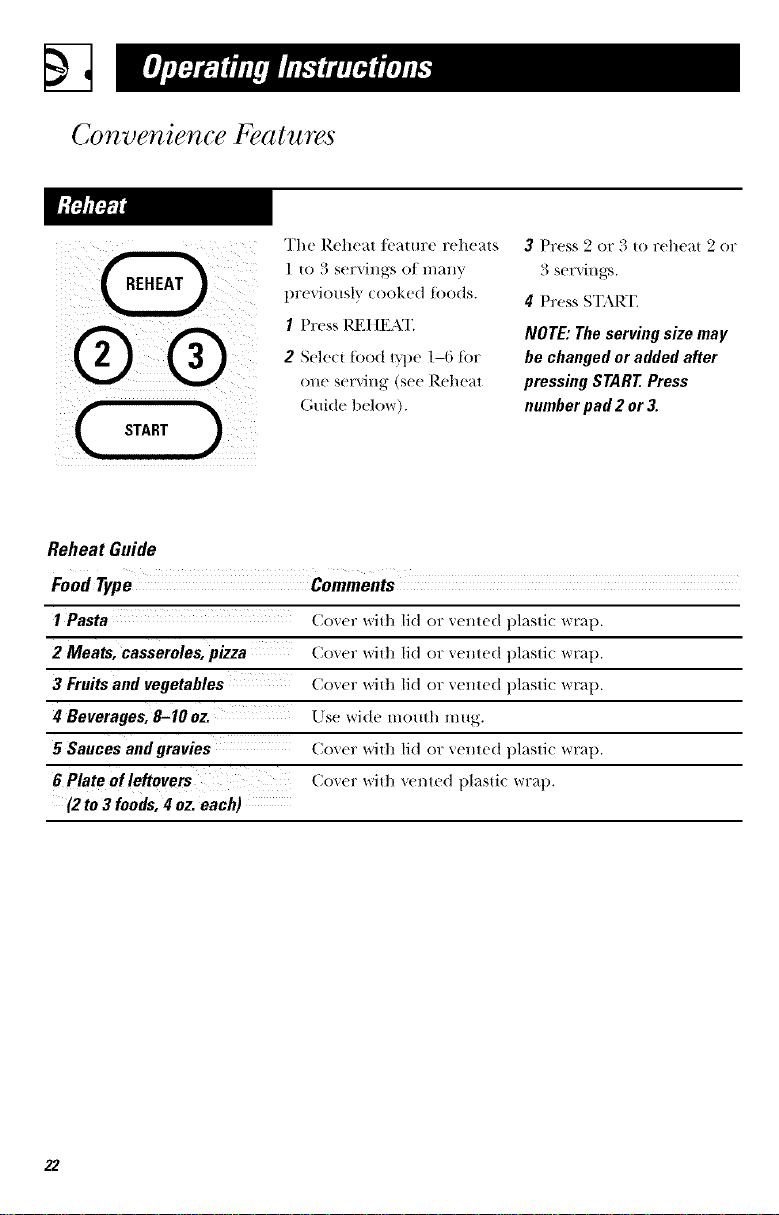
]'])+.+ R(qK';H Jt+_+ittlrt + Feh_'_H_,
| I<) _ SPFVJlt_+S O/ l//;clllV
l)rcxiou_,l 5 cooked tbods.
I Prc._s P+,]_2/1I_2AT.
2 Select tbod t)q)c 1-6 tbr
one serviug (s('e Rch('+lt
( ;ui(h' b(qow).
3 PI°(!ss _ oF }{ to l°(!]l(_}tt _ Ol °
;)° SerS'il 1_.
4 Press STAK["
NOTE: The serving size may
be changed or added after
pressieg START Press
emnber pad 2 or 3.
Reheat Guide
I Pasta (;oxer wit]l lid or ',ented plastic wrap.
2 Meats, casseroles, pizza Cover with lid or vented plastk wrap.
3 Fruits and vegetables Cover wit]l lid or vented plastic wrap.
4 Beverages, 8-lOoz. Llse +x_+rJ(J(_motah mug.
5 Sauces andgravies Coxer with lid or xented plasti( WFap.
C()_,(_l_with xented t)k_sti( wrap.
(2to3 foods, 4oz. each)
22
®.o@+®
®®®
®®®
,@
( s-re.+)
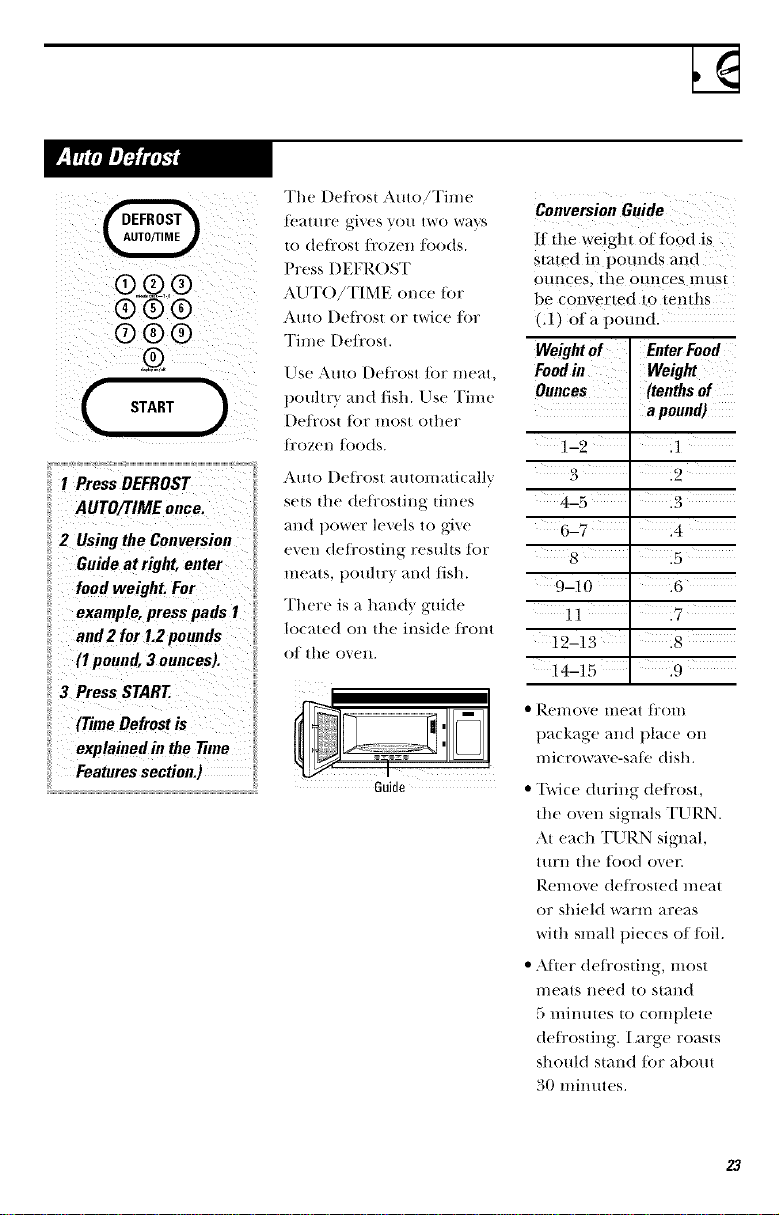
1 Press DEFROST
ii AUTO/TIME once,
ii 2 Using the Conversion
Guide at right, enter
food weight. For
example, press pads 1
and 2 for 1+2pounds
(I pound, 3 ounces).
3 Press START
(Time Defrost is
explained in the 77me
Features section.)
The l)e/i'ost Auto!Time
tbature gives you two ways
to defl:ost/i'ozen/oods.
Press DEFROST
ALIT()!TIME once tor
Auto Defi:ost or twice/or
Time De/i'ost.
Use Auto Del]'ost/k)r meat,
t)ouhvy and fish. Use Tin/e
De/i'ost tor most other
fi:ozen/oods.
Auto Defi:ost automati(allv
sets the del_'osting times
and l)ower levels to give
even det_'osting results ti)r
meats, poultry and tish.
There is a handy guide
located on the inside fi'ont
(7t the ovett.
Guide
Conversion Guide
If"the weight 0t fbod is
stated in pounds and
ot!nces_ tile Ot!Itces tnttst
be converted to tenths
(A) ofa potmd.
Weight of Enter Food
Foodin Weight
Ounces (tenths of
a pound)
1-2 .i
3 .2
4-5 .3
6-7 ' 14
8 .5
9-10 .6
11 ' 17
19-13 .8
14-15 .9
• Rel//o'_e l/lear i]?Olll
pa(kage and pla(e (m
lnit rowax e-sat)! dish.
• "I\vice during de/i'ost,
the oven signals TURN.
At each TURN signal,
tttrll the tood over.
Remove de/i'osted meat
or shield warm areas
with small pieces of/i)il.
• Atter det_'osting, most
l/le_lts lleed to StHll(t
,_ l/til/tltes to ( Ollll)lete
defi'osting. I+arge roasts
should stand tor about
30 minutes.
23
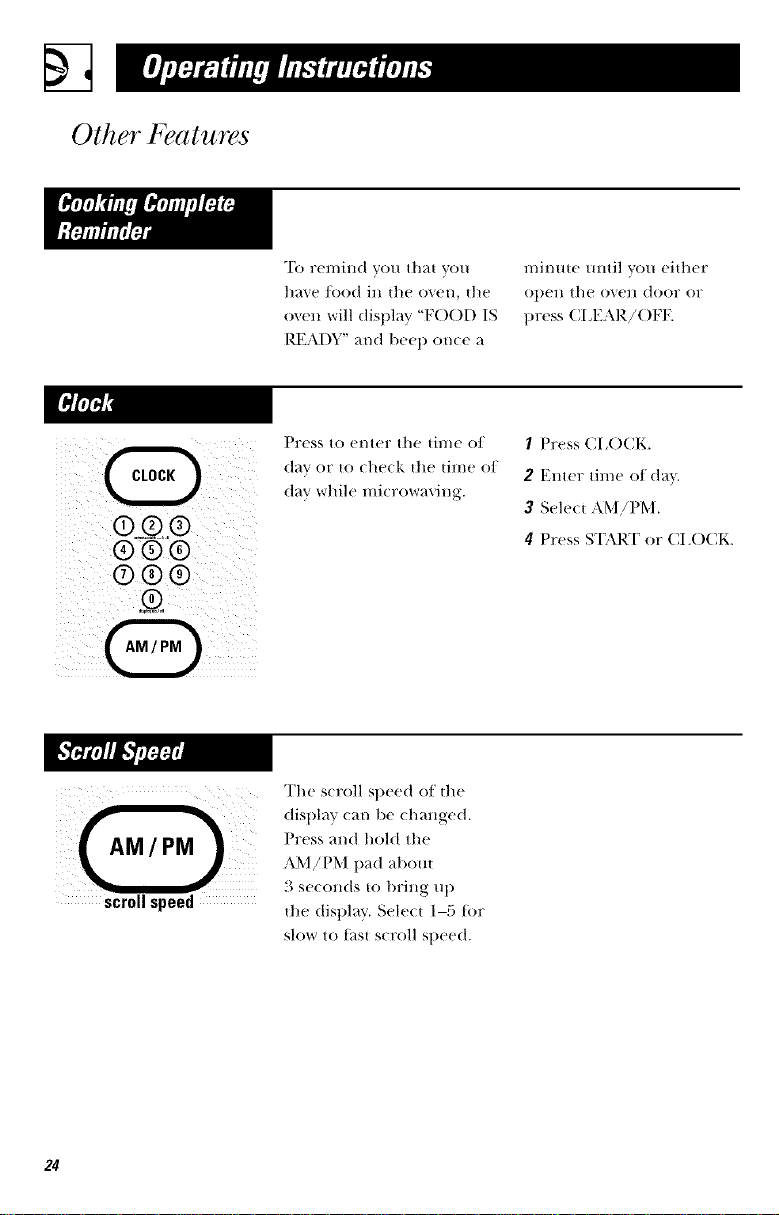
Other Features
To remind you that you
ha_e/ood in die oven, die
oven will display "F()OD IS
I*_I{ADY" and beep once a
l/ill/tire Ulltil you either
opell th( oxell door or
press ( ;LEAI_. ! ( )FF.
@_@,,®
6)@@
®®®
Press 1o el/ler ill(! {il//e Of
day or to (he(k the time of
day while mi(rowaxing.
I Press CI,()CK.
2 Enter time of (tax.
3 Select AM/PM.
4 Press S'IART or CI,()CK.
scroll speed
'File scroll speed of die
display can be changed.
Press and hold the
AM!PM pad abom
3 se,.(mds to bri_J,g up
die display. Sele(t 1-5 tor
slow to thst scroll speed.
24
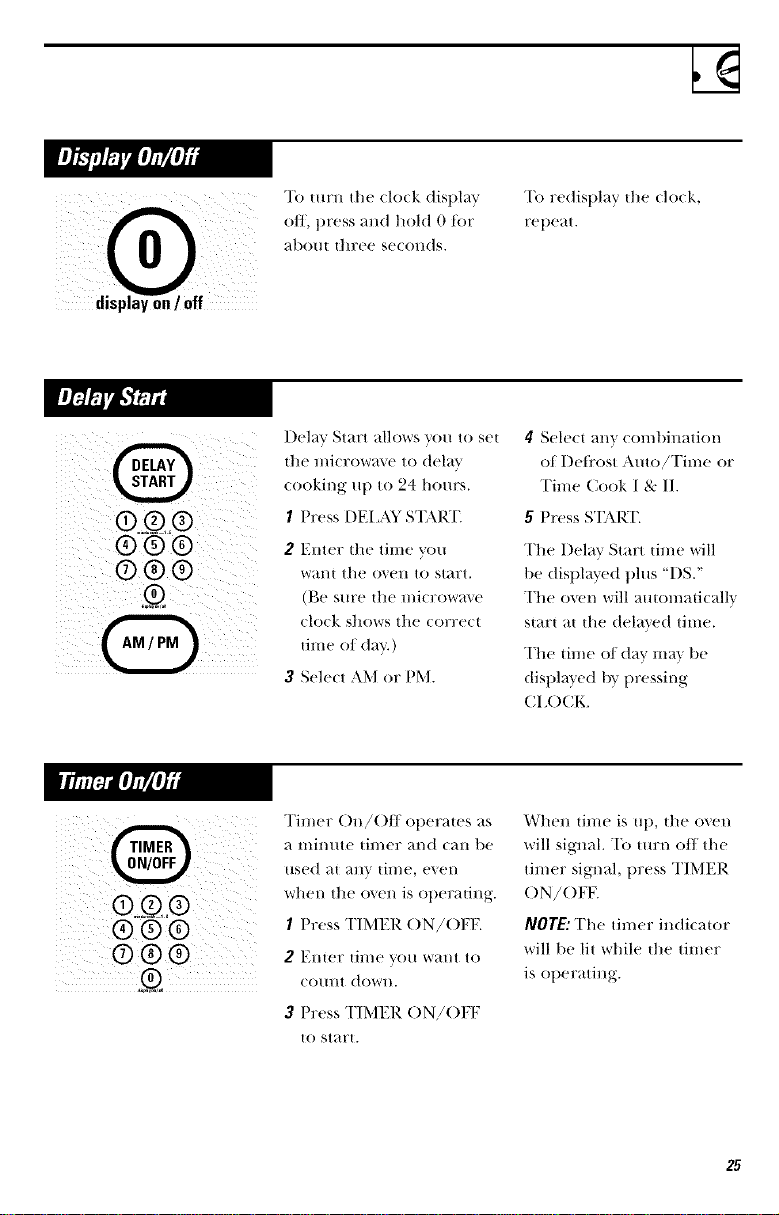
To turn the (lo(k dist)lay
off, press and hold 0 tor
al)om three se(ollds.
To redisplay the clo(k,
ret)e_tt.
®@®
®®®
Del_v Start allows VO/I 10 set
the microwave to delta
cooking u t) to 24 hours.
/ Press DEI ,AY START
2 Enter the time you
wan| the ()sell to start.
(Be sure ltie microwave
clock shows the correct
time of d_l},:)
3 Sele(t AM or PM.
4 Select any combination
of [)eti'ost Auto!Time or
Time Cook I 8,:II.
g Press S'DXl),T.
The Delay Start |ime will
be displayed ph|s "DS."
The oven will au|omaficallv
start at the delayed time.
The time of day may be
(tist)l_lyed by t)ressing
CI ,()CK.
®.,i@,®
(9 ® ®
(!) @@
Timer ()n!()f/opera|es as
;1 lllil//He |il//er }il/d (_lll l)e
|lsed ;-I[ _lllX_ |ill/e, e'_el/
when the o_en is ot)era|ing.
/ Press TIMER ()N!()FF.
,2 Ellter |in/e VO/l W_il/t to
coral| down.
3 Press TIMER ()N/()FF
|o star|.
When |ime is Ul), the oven
will signal. To |m:n off the
timer signal, press TIMER
()N/()FF.
NOTE: The timer indicator
will be lit while |tie timer
is operating.
25
Other Features
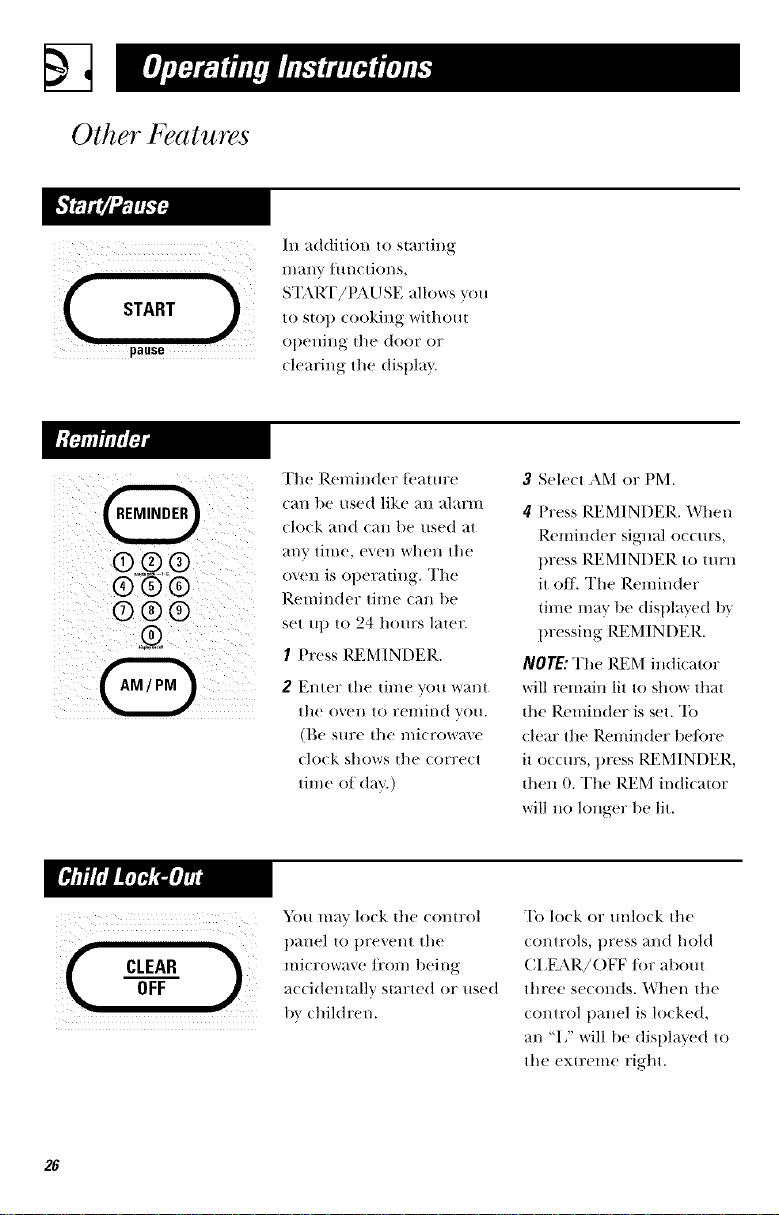
START
pause
Ill addition to starting
l//any hlnct]ons,
START!t_\USE alh)ws you
to stop cooking withom
ol/ening tile door or
(h'aring the display.
Q
®.o@,
®@®
©®®
.@
lED
The Ren/inder ti'amre
call be used like an alarnl
clock and can be used at
any t]IIle, evell when tile
oven is operating. The
Renlinder tinle call be
set up to 24 hours lawx:
I Press REMINDER.
2 Enter tile time you want
the ()veil to relllind voH.
(Be sllre tile mi( rowave
clock shows tile correct
tinle of day.)
3 Select AM or PM.
4 Press REMINDER. When
Reminder signal occurs,
press REMINDER to turn
it o/E The Reminder
tin/e may be disl/layed t)y
pressing REMINDER.
NOTE: The REM indicator
will remain lit to show that
tile P,enlinder is set. "Ib
(lear tile I/eminder be/_)re
it occurs, press I@_MINDER,
d/en 0. The REM indicator
will no h)nger be lit.
CLEAR
OFF
_)ll ii/av h)ck the €Olltrol
panel to prevent tile
lnicrowave/i'om tieing
accidemallv started or used
1)_ children.
To lock or unh)ck tile
controls, press and hold
CI EAR!OFF/or about
three se(onds. When ttle
control t/anel is locked,
an "I" will be displayed to
tile extreme right.
26
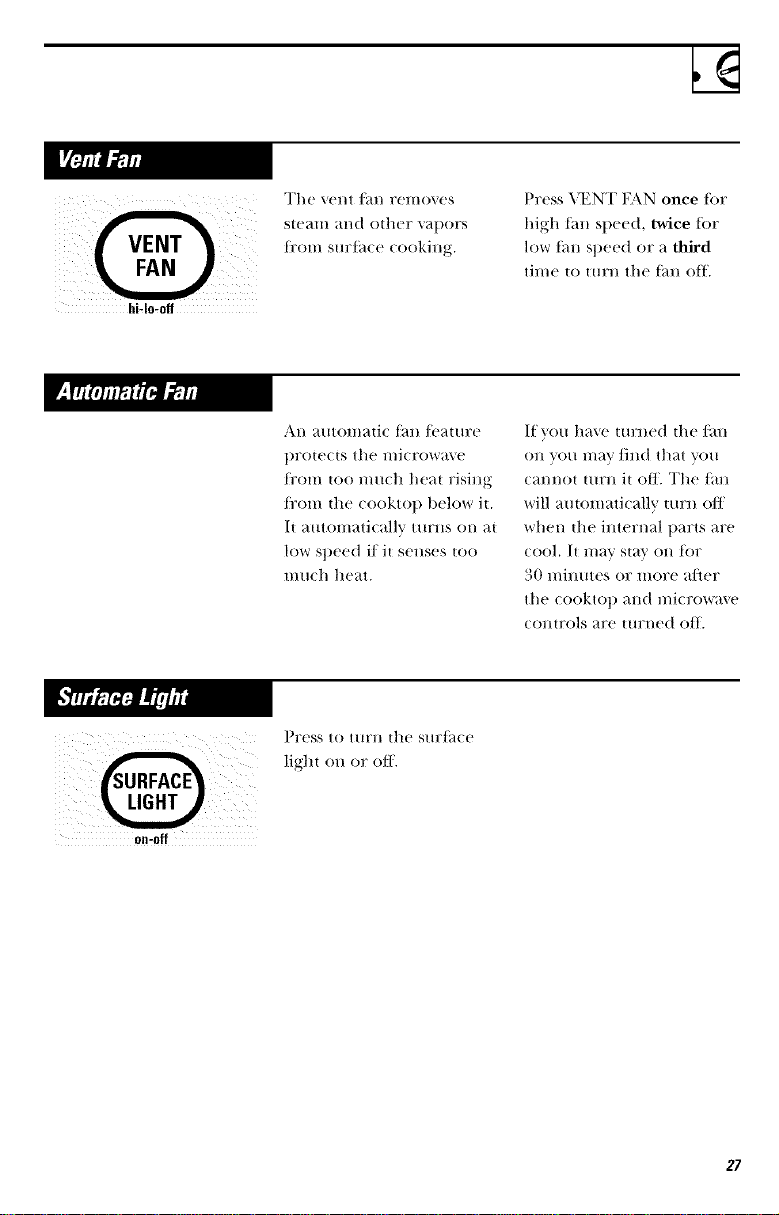
hMo,off
The "_ent fan l"ClllO'_Cs
ste_lill }ilia o|hcF ",,_lpors
[_:om sm:i_l(e (ooking.
Press _T_NT FAN once for
high iml speed, twice for
low tan speed or a third
time to turn tile tml oIt.
All a/ltOlllati( t_lll ]('a|ill;e
protects tile n/i(rowave
from too much heat rising
ti'om tile cooktop beh)w it.
it _ltltOli/atlcallv ttlFllS on _lt
low speed i/it senses too
mt|(h heat.
If you have turned tile/an
on you may find that you
cannot turn it oIE The/ml
will at|tomati(allv turn o/1
when the internal parts are
cool+ It l//av slav on {()F
_0 l//ill/ltes o17 IIlOYe aJleF
the cookto I) and n/icrowa\e
controls are ttlrned oil.
Press to ttlFll the Stlrt_l( c
light on or off.
on-off
27

Microwave Terms
Term Definition
Arcing
Covering
Shielding
StandingTime
Venting
Arcing is the llliCrowa',,e term tor sparks in the oxen. Arcing is
(atlsed 1)_:
• metal or fi)il touching the side of tile oven.
• toil that is not molded to/ood (upturned edges _l(-tlike
_mtem/as).
• metal su(h _,s twist ties, poultr} t)ins, gold-rimmed dishes.
• re(y<led paper towels (ontaining small metal pie(es.
Covers hold ill moisture, allow tot more even heating and red uce
cooking time. Xi'nting pklstic wrap or (overing with vv_lxpaper
allows ex(ess steam to es(ape.
Ill a regular oven, you shield (hi(ken bre_lsts or baked/oods to
prevent ovel_browning. When mi(row_ving, you use small strips of
toil to shield thin parts, such _s tile tips of wings _md legs on
t/oultv}, whi(h wotll(t (ook be/ore larger parts.
When you (ook with regular ovens,/_)ods su(h as roasts or (akes are
allowed to stand to finish cooking or to set. Standing time is
est)e(i_dly imtlortaHt ill mi(row_\e (()()king. Note that _1mi(ro_*_ed
(ake is not placed on _ (()()ling rack.
Aller (overing _ dish with t)k_sti(wral) , _'OH vent tile plastic v_r_q/l/y
turning b_wk one corner so excess steam <all es<atle.
28
Care and Cleaning
All o((asiolla] Ihoro/l_h
"wi )ino with a solution of
baking soda and wawr
keeps die inside fi_esh.
NOTE: Be certain the power
is off before cleaning any
part of this oven.
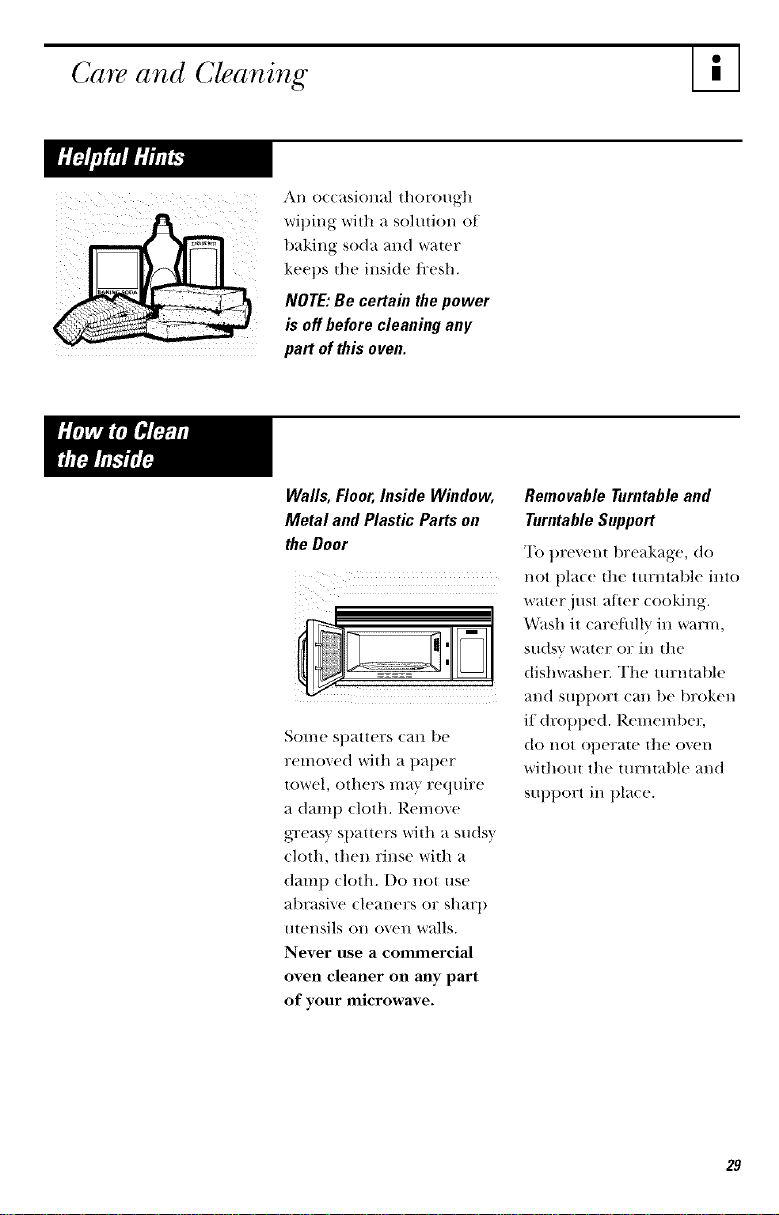
Walls, Floor, Inside Window,
Metal and Plastic Parts on
the Door
S()me spatters can be
removed widl a paper
towel, others ma} require
a damp cloth. Remove
greasy spatters witll a sudsy
cloth, then rinse widl a
(/am I) cloth. Do not use
abrasive cleaners or sharp
utensils on oven walls.
Never use a colmnercial
oven cleaner on rely part
of your microwave.
Removable Turntable and
Turntable Support
To prevem breakage, do
not pla(e Ille tllrnt_lble into
water just after cooking.
Wash it ( aretidl'_ in/_rarl//,
SIldSV waIer or ill [he
(tishwasher. The mrmable
and s[Ippor[ (all be broken
if droppe(t. Remember,
do not operaw die ()veil
widlom the mrmable and
support in t)laee.
29
%
Care and Cleaning
We recommend against
using cleaners with
ammonia or alcohol,
as they can damage
the appearance of the
microwave oven.
If you choose to use
a common household
cleaner, first apply the
cleaner directly to a
clean cloth, then wipe
the soiled area.
Case
Clean the outside of the
microwave with a su(tsv
ch)th. Rinse and then (/r_.
Wil)e the window clean
with a dam t) cloth.
Control Panel and Door
Wipe with a dam 1) ch)th.
I)ry thoroughl}. Do not use
cleaning sprays, large
amounts of soap and water,
abrasives or sharp ok!iects
on the panel--they Call
damage it. Some paper
towels can also scrat€h
tlle COlltrol panel.
Door Seal
It is iml)ormnt to kee t)
the area clean where the
door seals against the
microwave. Llse only mild,
non-abrasi_ e detergents
applied with a clean
sponge or so/t cloth.
Rinse well.
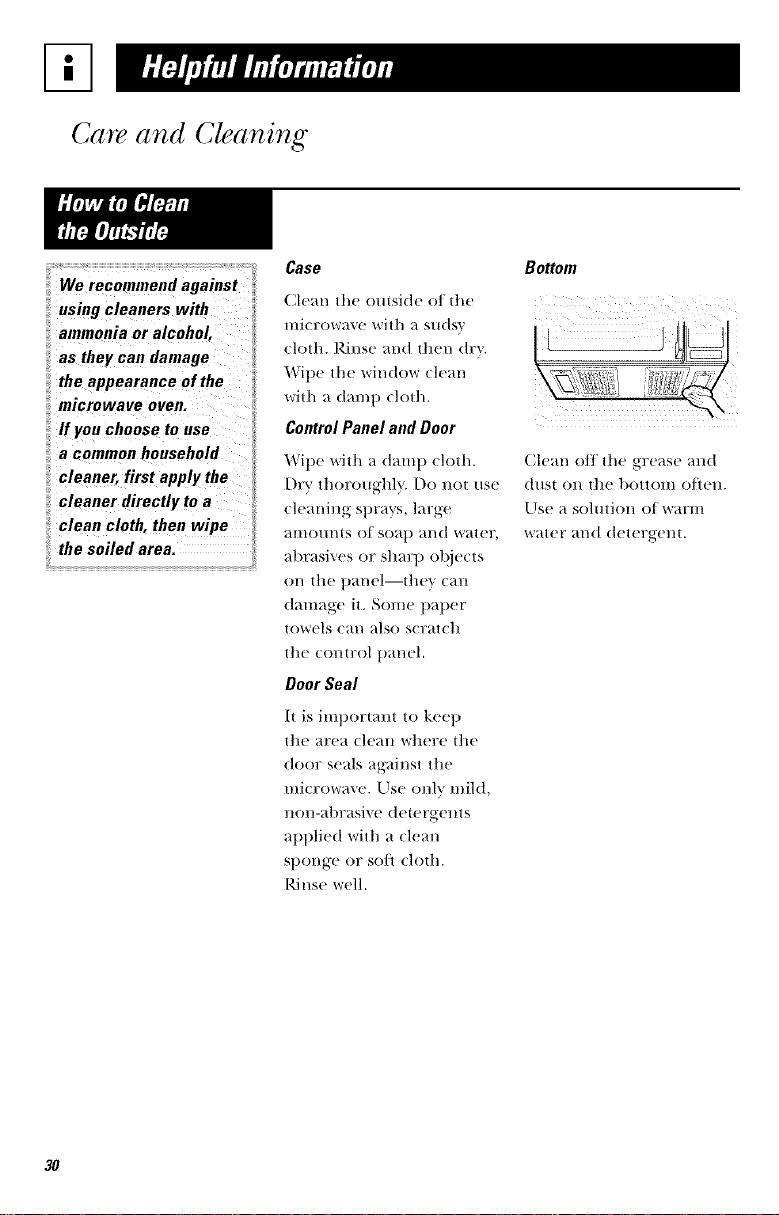
Bottom
Clean off the grease and
dust on tlle bottolll o/lell.
Llse a solution of warm
water and (tetergent.
3O
BulbR@lacemer,t
bulb with a 40-watt ;_
inoandeacent bulb
(WB36X10003), available
frmn your ;_:
supplier.
1 "Ib replace tile bulb(s),
first disconnect tile t)ower
at tile main fl_se or circuit
1)reaker panel or tmll
tile plug.
2 Remme tile screw at tile
t_:om of tile light cover
and lower the coveL
3 Be sure tile bulb(s) to be
replaced are cool be/ore
removing. AJler breaking
the adhesive seal, remo_e
tile bull) by gently turning.
4 Replace tile screw.
Comlect electrical power
to the overt.
REMOVE SCREWS
incandescent bulb
iwea x oooa,av.ilable
from your Hotpoint
supplier.
1 "Ib ret)lace tile oven liglm
first (tiscomlect the power
at tile main fllse or circuit
breaker panel or pull
die plug.
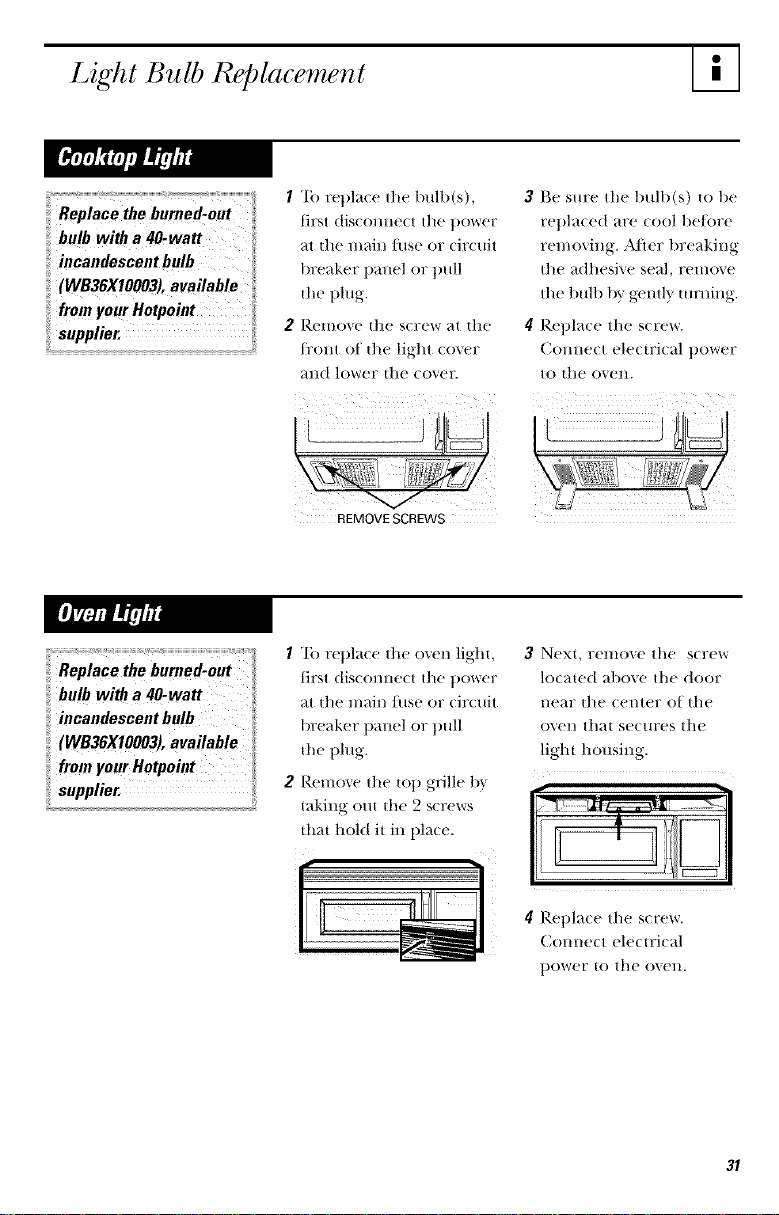
2 Remove tile t()t ) grille t)_
taking out tile 2 screws
that hold it in place.
3 Next, renlove tile screw
located above tile (toor
near tile center of tile
oven that secures the
light housing.
I]L ::::::::::l,_TtP:a==wa_ ..........x'--1
4 Rel)lace tile screw.
Comlect elecu:ical
power to tile o_en.
31
%
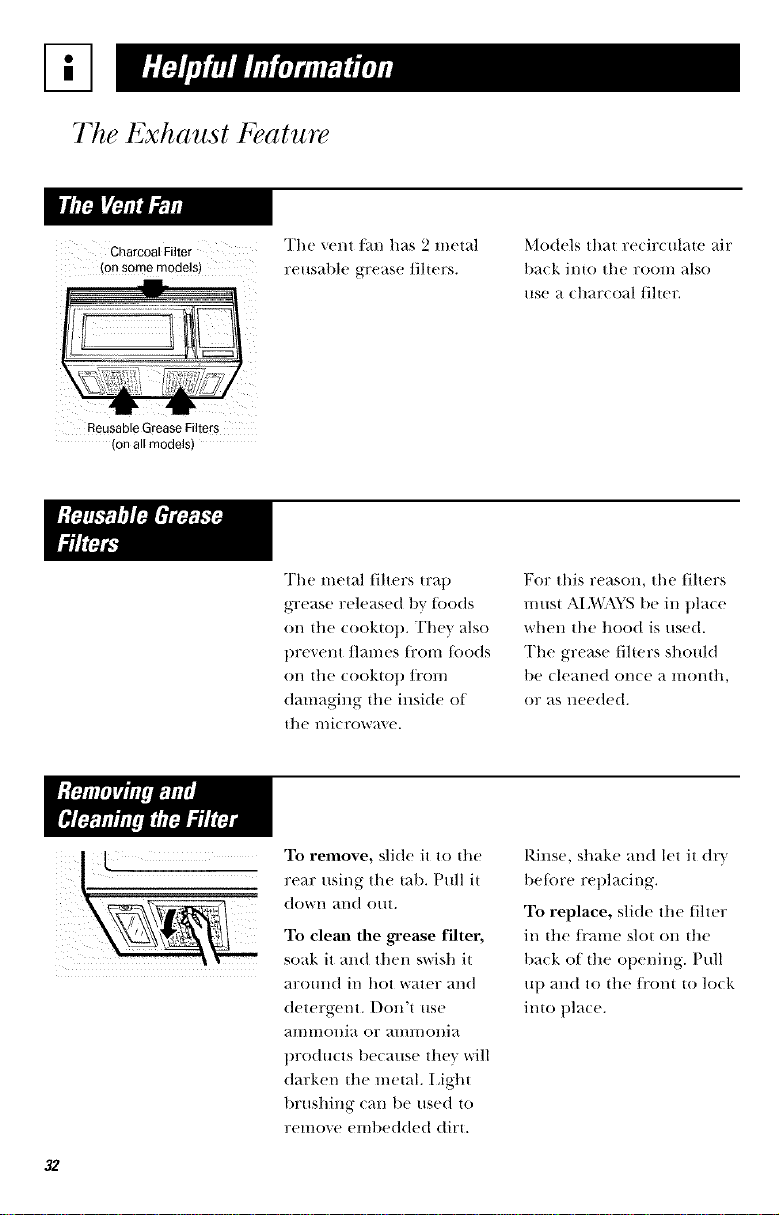
The Exhaust Feature
Charcoal Fiffer
_on some models)
The vent t_m has 2 metal
r( usat)le grease filters.
Models that re<irculate air
])_(k il/iO the rooH/_lso
use a (har(oal fiher.
Reusable Grease Fiffers
(on all models)
The metal filters u:a l)
grease released by toods
on tile cooktop. They also
prevent flames fl:om toods
Ol/ the cookto])/l'o]//
(/_ml_ging the inside ot
the li/Jcr()W_l_, e.
For this reason, the filters
must AI,WAYS be in tllace
when the hood is used.
The grease tilters should
be cleaned once a momh,
or as lleeded.
32
To remove, slide it to the
rear using the tab. Pull it
d()V_'l/ _tl/d o/It.
To clean the grease filter,
soak it and then swish it
_u:omld in hot water and
detergent. Don) use
ammonia (31:ammonia
t)rod mrs be(m_se they will
darken the metal. 15ght
brushing (_m be used to
remove embedded dirt.
Rinse, shake and let it (Irx
betore relllacing.
To replace, slide the filter
in the/i'ame slot on the
back of the opening. Ptfll
u t) and to the/i'ont to lock
into t)la(e.
A]
from your Hotpoint
supplier.
If' the n/odel is not vented
to the outside, the air will
be recirculated through a
disposable charcoal filter
that helps relnove smoke
+11 l(t o(tors+
The charcoal filter
should be replaced when
it is noticeabh' dirty or
discolored (usually atter
6-12 months, depending
on hood us_lge).
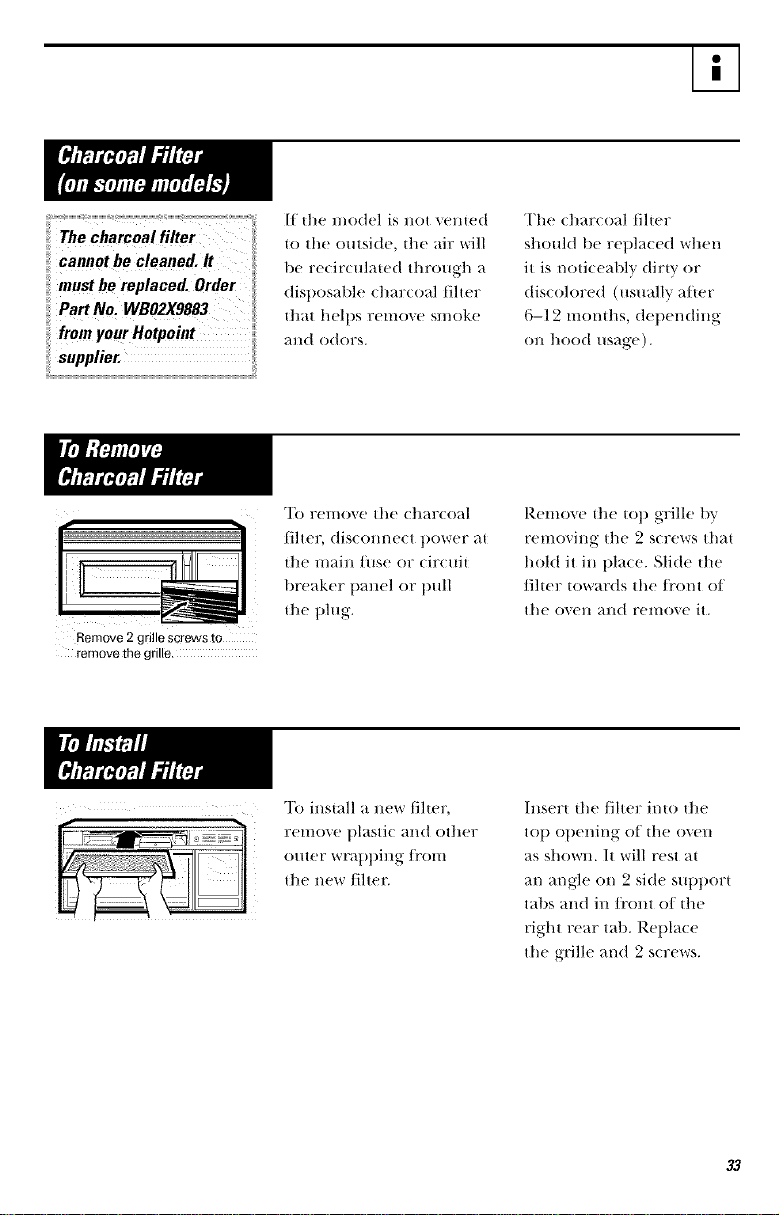
Remove 2 gNle screws to
remove the grille.
'lk) ten/ore the charcoal
tiher, disconne(t t)ower at
the n/ain filse or cir(uit
breaker t)_ulel or pull
the plug.
Remove the top grille by
removing the 2 screws that
hold it in place. Slide the
filter towards the/i'ont of
the ()Veil alld remove it.
To install a ]_r fiher,
relilove t)lasti( and other
outer wrapping ti'om
the new fiher.
Insert the fiher into the
top opening of the oven
as shown. It will rest _,t
an m_gle on 2 side support
tabs and in/i'ont of the
right rear tab. Rel/lace
the grille and 2 screws.
33
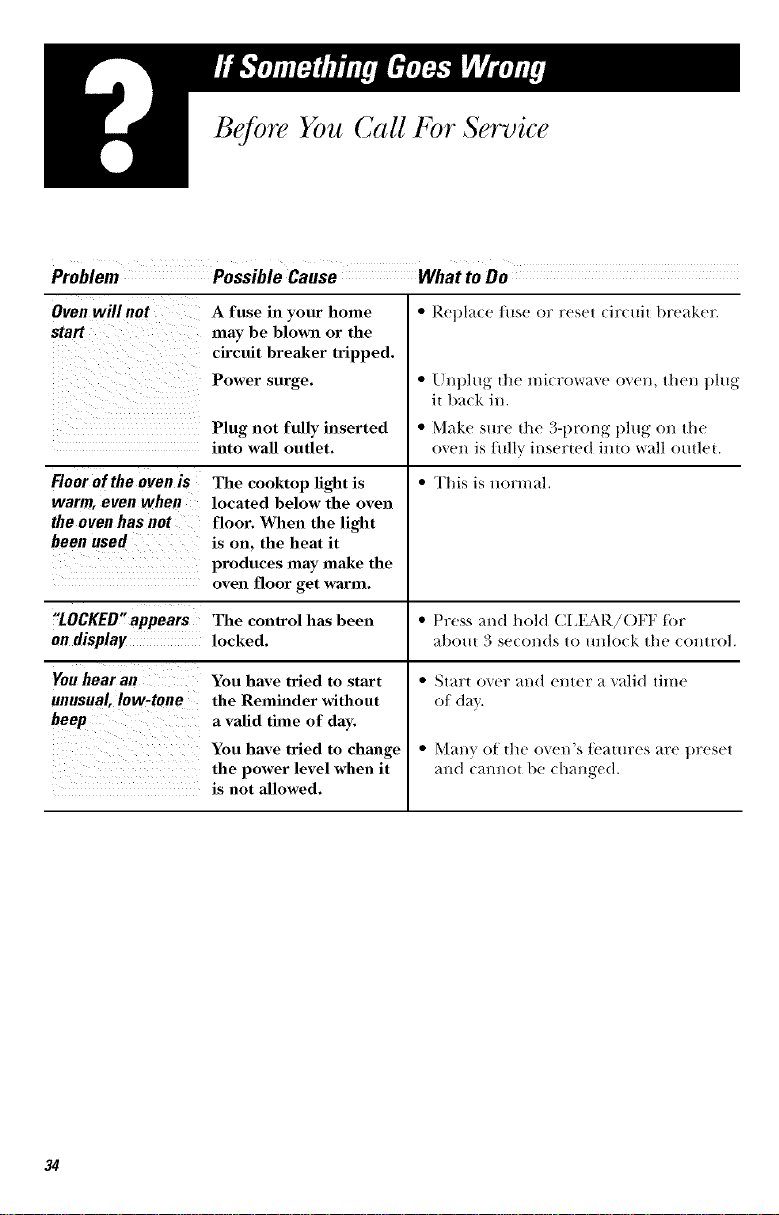
Before You Call For Service
Problem
PossibleCause WhattoDo
Oven will not
start
Floor of the oven is
warm, even when
the oven has not
been used
A fuse in your home
may be blown or the
circuit breaker tripped.
Power surge.
Plug not fully inserted
into wall outlet.
The cooktop light is
located below the oven
floor. XYhen the light
is on, the heat it
produces may make the
oven floor get warm.
• Rei)lace filse or reset circuit breaker.
• Unphlg die microwave ()veil, then phlg
it back in.
• Make sm:e the 3-prong plug on the
oven is filllv inserted imo wall outlet.
• This is normal.
"LOCKED" appears The control has been • Press ;rod hold C[,EAR!OFF tbr
on display locked. ;d)om 3 se(onds to mllo(-k the (-omro].
Youhear an
unusual,low-tone
beep
You have tried to start
the Remhlder withou!
a valid thne of day.
You have tried to chmlge
the power level when it
is not allowed.
• Start over and enter a valid time
of (lay.
• Manv of the oven's ]('attires are |)reset
and cam/or be changed.
34
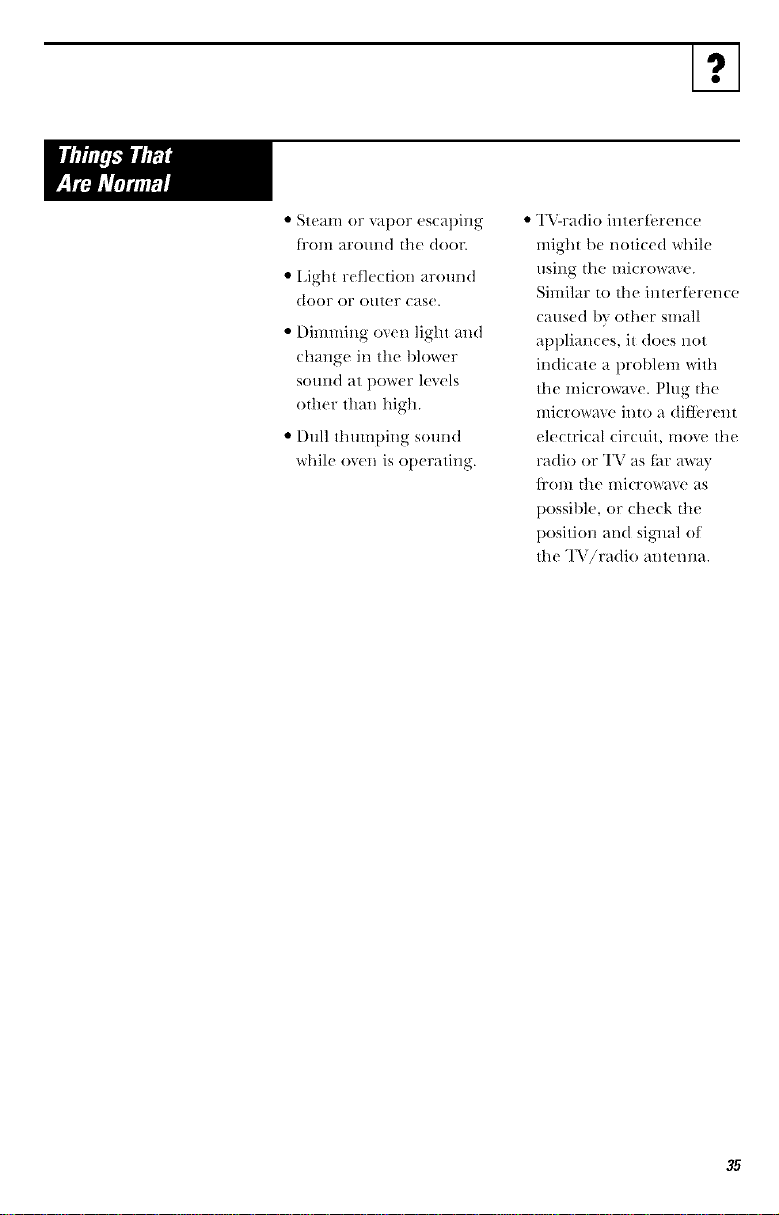
I.'l
• Steam or vapor escaping
li'ol/l [trO[lll(1 tile dool'.
• I,ight reflection around
door or outer case.
• Dinlming oven light and
change in tile blower
sound at power levels
other than high.
• Dull thumping sound
while oven is operating.
• TV-radio interli_rence
might be noticed while
/lSillg rile I//icFow?I\ e.
Similar to tile interfi:rence
caused b_ other small
appliances, it does not
indicate a problem with
the microw_\ e. Plug the
microwave into a (ti/Ierent
electrical circuit, move the
radio or TV as tier m\_,>'
]FOl/l rile l/licrowave as
possible, or check rile
position mid signal of
tile TViradio antenna.
35

Notes
36

Notes
.37

We'l! Be Therd
www.Hotpointcom
www.Hotpointcom
} {_l'_e _1 qtles|ion OF lleed
assiM_lll( e '¢,Jth vO/tl;
apt)liance? "['r'v the
• S
1/otpoint Websim 24 hour._
a da;_, any da;_ of the year!
}ira (an also shot) for
l//OI_e gl?ea| t ]Otl)oint
t)ro(hlctS an(I take
advantage of all of
()1117on-line supt)ort
services designed lot
vom: convenience.
800.GE.CARES
(800.432.2737)
Expert t ]otpoint repair
service is olllv ()lie step
away/i'om yore: door.
Get on-line and s(hedule
vom: servi(e at yore"
convenience 24 hours
any (tin of |he year!
• '2 • 32 '
()r (all 800.(,L.(,AI_LS
(800.432.2737) during
I/Ol'lll_ll l)llSil/eSS hO/IFS.
www.GEAppliances.com
800.TDD.GEAC
(800.833.4322)
(;E supports the Universal
Design concept--products,
services and enviromnents
that can be used by people
of all ages, sizes and
capabilities. We recognize
the need |o design tor a
wide range of t)hysical and
mental at)ilities and
iml)airments. For details
of GE's Llniversal Design
at)t)lications, including
kitchen design ideas tor
t)eot)le wi|h disat)ilities,
check out our Website
today. For tlle hearing
impaired, 1)lease call
800.TDD.(;IL\C
"800.833.4322).
www. GEAppfiances.com
800.626.2224
Pro:chase a Itotpoin|
extended warrall|V all(t
learn about sl)ecial
discomHs |ha| are availat)le
whil( your warrantu is still
in elli'ct. Si)u can tmrchase
it on-line anytime, or
call 800.626.2224 during
normal 1)usiness hours.
Iloq)oin| Consmner tlome
Servi(es will still tie there
_t]leF }'O/IF W_I171"_III[}' ext)ires.
38

www.Hotpoint.com
I,.I
800.626.2002
In(livid uals qualified
to service their own
_ll)l)liances cml ha_.e
t)arts or accessories sent
directly to their home.
(VISA, MasterCard and
Discover (ards are
accepted.) Order on-line
t()(t_}, 24 hours every (tar or
1)y t)hone at 800.626.2002
dm'ing normal business
ho/lrs.
Instructions contained
in this manual cover
procedures to be
performed by rely user.
Other servichlg generally
should be referred to
qualified service
personnel. Caution
must be exercised, since
improper servichlg may
cause tmsafe operation.
If ]br some reason you are
not hal)l)y with the service
you receive, here are steps
to ]ollow ]br flu:ther hell).
First conta(t the t)eol)le
who serviced yollr
al)l)liance. Ext)lain why
you are not t)leased.
Next if you are still not
pleased, write all the
details--including
your 1)tmne munbei'mto:
Customer Relations
Ilott)oim, Appliance Park
I ,oui_Hlle, KY 40225
39
Staple.,al,'_,l!p o,.ea,,e,lledH,,.H_I,.,_..P,,,dd o,@,,al
purehase date is m'_,dedto obtai_t serviee u_tder warra_tly.
FULL ONE-YFAR WARRANTY
For one year fi'om (late of original
tmrchase, x+e will provide,/i'ee of (barge,
t)arts +lll(t service labor ill VOtlr holIle
to repair or replace a_O' part o] the
mi('rozva*u("o*ut'?tthat tails t/e(atlse of
a mamdacturing (te/i.'ct.
LIMI'I_D ADDITIONAL
FOUR-ITAR WARRANTY
For the second through the fifth year
/i'om tile date o/origimd tmr(hase, we
will provide,/i'ee of charge, a repla(emem
}/la_'_lelro)t tube if tile magnetron tube tbils
because of a mamd_mturing deDct. D)u
t)a}/or the service trill to yore; home and
service labor charges.
This warranty is extended to the original
pro:chaser and any su(ceeding owner tot
t/rod ucts tim:chased lot ordinary home use
in the 48 mainland states, Hawaii and
Washington, D.C. In Alaska the _arrantv
is die same ex(ept that it is I IMITED
be(ause you must pay to ship the product
to the servk e shop or tor the servi_ e
teclll/ici_lll'S H'_lvcl costs 1o VO/lr tlol//e,
All warranty service will be provided
l/_ ore: Fa(tor_ Servi(e Cemers or l/_ our
authorized Customer Care _' ser_i(ers
dm:ing normal _orking hom:s.
Should yore: appliance need service,
during warranty l/eriod or beyond, call
800.GE.CAI_,ES (800.432.2737).
Warrantor is not responsible for consequential damages.
• Service trips to your home to teach you
how to use the product.
• hnproper installation, delivery or
nlaluteuallce.
If you have ml hlstallation problem, contact
your dealer or h_stallen You are respo_sible
for providhlg adequate electrical,
exhauslhlg mad oilier comleclhlg facilities.
• Replacement of house fuses or resetting
of circuit breakers.
• Replacement of the cooktop light bulbs.
• Failure of the product if it is nffsused,
or used for other thin1 the intended
purpose or used commercially.
• Dmnage to product caused by accident,
fire, floods or acts of God.
• Incidental or consequential dmnage
caused by possible defects with tiffs
appliance.
• Dmnage caused after delivery.
Some states do not allow the exclnsion or limitation ¢R incidental or consequential dm-nages,
so th e abov e limitation o_:exclusio n may not apply to you. This warranty gives you specilic ]
legal rights, and you may also hav e other fights which vary fi'Qm state tO state. To know what ]
your legal rights m-e in ym!r state, c0nsn!t you r !0ca! o r star e €O_}St_!nera!_hi!_s oflice or YOUr
statelS(_tt°rr!_'YCelwfa!,
Warrantor: General Electric Company lffitmer help is needed Concreting this warrantY, writ_
Manager--Consumer Affairs, GEAppliances, Louisville, KY 40225
Printed in Korea