Loading ...
Loading ...
Loading ...
6 7
® ®
CUSTOMER CARE - AU: 1800 890 840CUSTOMER CARE - NZ: 0800 002 999
* Extract a nutritious drink containing vitamins and nutrients from fruits and vegetables.
FEATURES:
• Nutrient & Vitamin Extraction*
• 1100 Watt Motor
• User Interface:
START/STOP
START/STOP is a manual setting that runs at High speed for 60 seconds. This button can be pressed at any time if you wish to stop a program.
SMOOTH BOOST
™
SMOOTH BOOST YES/NO is a special feature available when using the Auto-iQ
™
EXTRACT and Auto-iQ BLEND. This setting can be used to control the consistency of your beverage
recipes. Select SMOOTH BOOST YES when smoother, creamier results are desired. This is the default program for both Auto-iQ EXTRACT and Auto-iQ BLEND programs. Select
SMOOTH BOOST NO when more of a textured consistency is desired.
PULSE
Offers greater control to help prevent over-processing or over-blending. Simply hold down the button and our blades will run at a high speed for a quick burst of power to break through
ice or chop vegetables.
AUTO-IQ EXTRACT
*
EXTRACT should be used when blending hard, leafy, or fibrous whole fruits and vegetables, including apples, kale, and celery. This optimized program allows you to blend fresh items
with their skins, seeds, and stems into nutrient extractions. Before using EXTRACT, select SMOOTH BOOST YES or NO depending on your desired consistency.
AUTO-IQ BLEND
BLEND can be used to make a range of beverages that do not include hard or fibrous fresh ingredients, such as milkshakes, protein smoothies, soft fresh-fruit smoothies, and frozen
cocktails. Before using BLEND, select SMOOTH BOOST YES or NO depending on your desired consistency.
• Sip & Seal
™
lids for drinks on the go.
• Nutri Ninja
®
Cups and Sip & Seal lids, BPA Free, and dishwashersafe.
NOTE: The Stainless Steel Ninja
®
Cup is NOT dishwasher safe.
• Cord Wrap located on back of the motor base.
Ice to Snow
Crushing Ice to Snow is easy – take ice cubes directly from your freezer, and put in a dry Ninja
®
Cup – use the pulse feature in short quick bursts until it’s a snow like consistency.
NOTE: Ninja
®
Auto-iQ
™
Technology can sense
which jar is on the motor
base. The function lights
will illuminate depending
on which container is
placed on the motor base.
IMPORTANT: When processing soft
dry ingredients such as day-old
bread or cheese use quick, short 1
second pulses. Do not overfill to avoid
overheating the appliance. Allow the
appliance to cool after each use.
1 Review warning and caution statements
above before proceeding to number 2.
2
Place the motor base on a clean, dry, level
surface such as a counter or tabletop. Press
down on the motor base to make sure that the
suction cups adhere to the counter or tabletop.
3 Add ingredients to the Nutri Ninja cup.
NOTE: Do not overfill! To avoid spilling, do
not add ingredients past the “MAX” fill line.
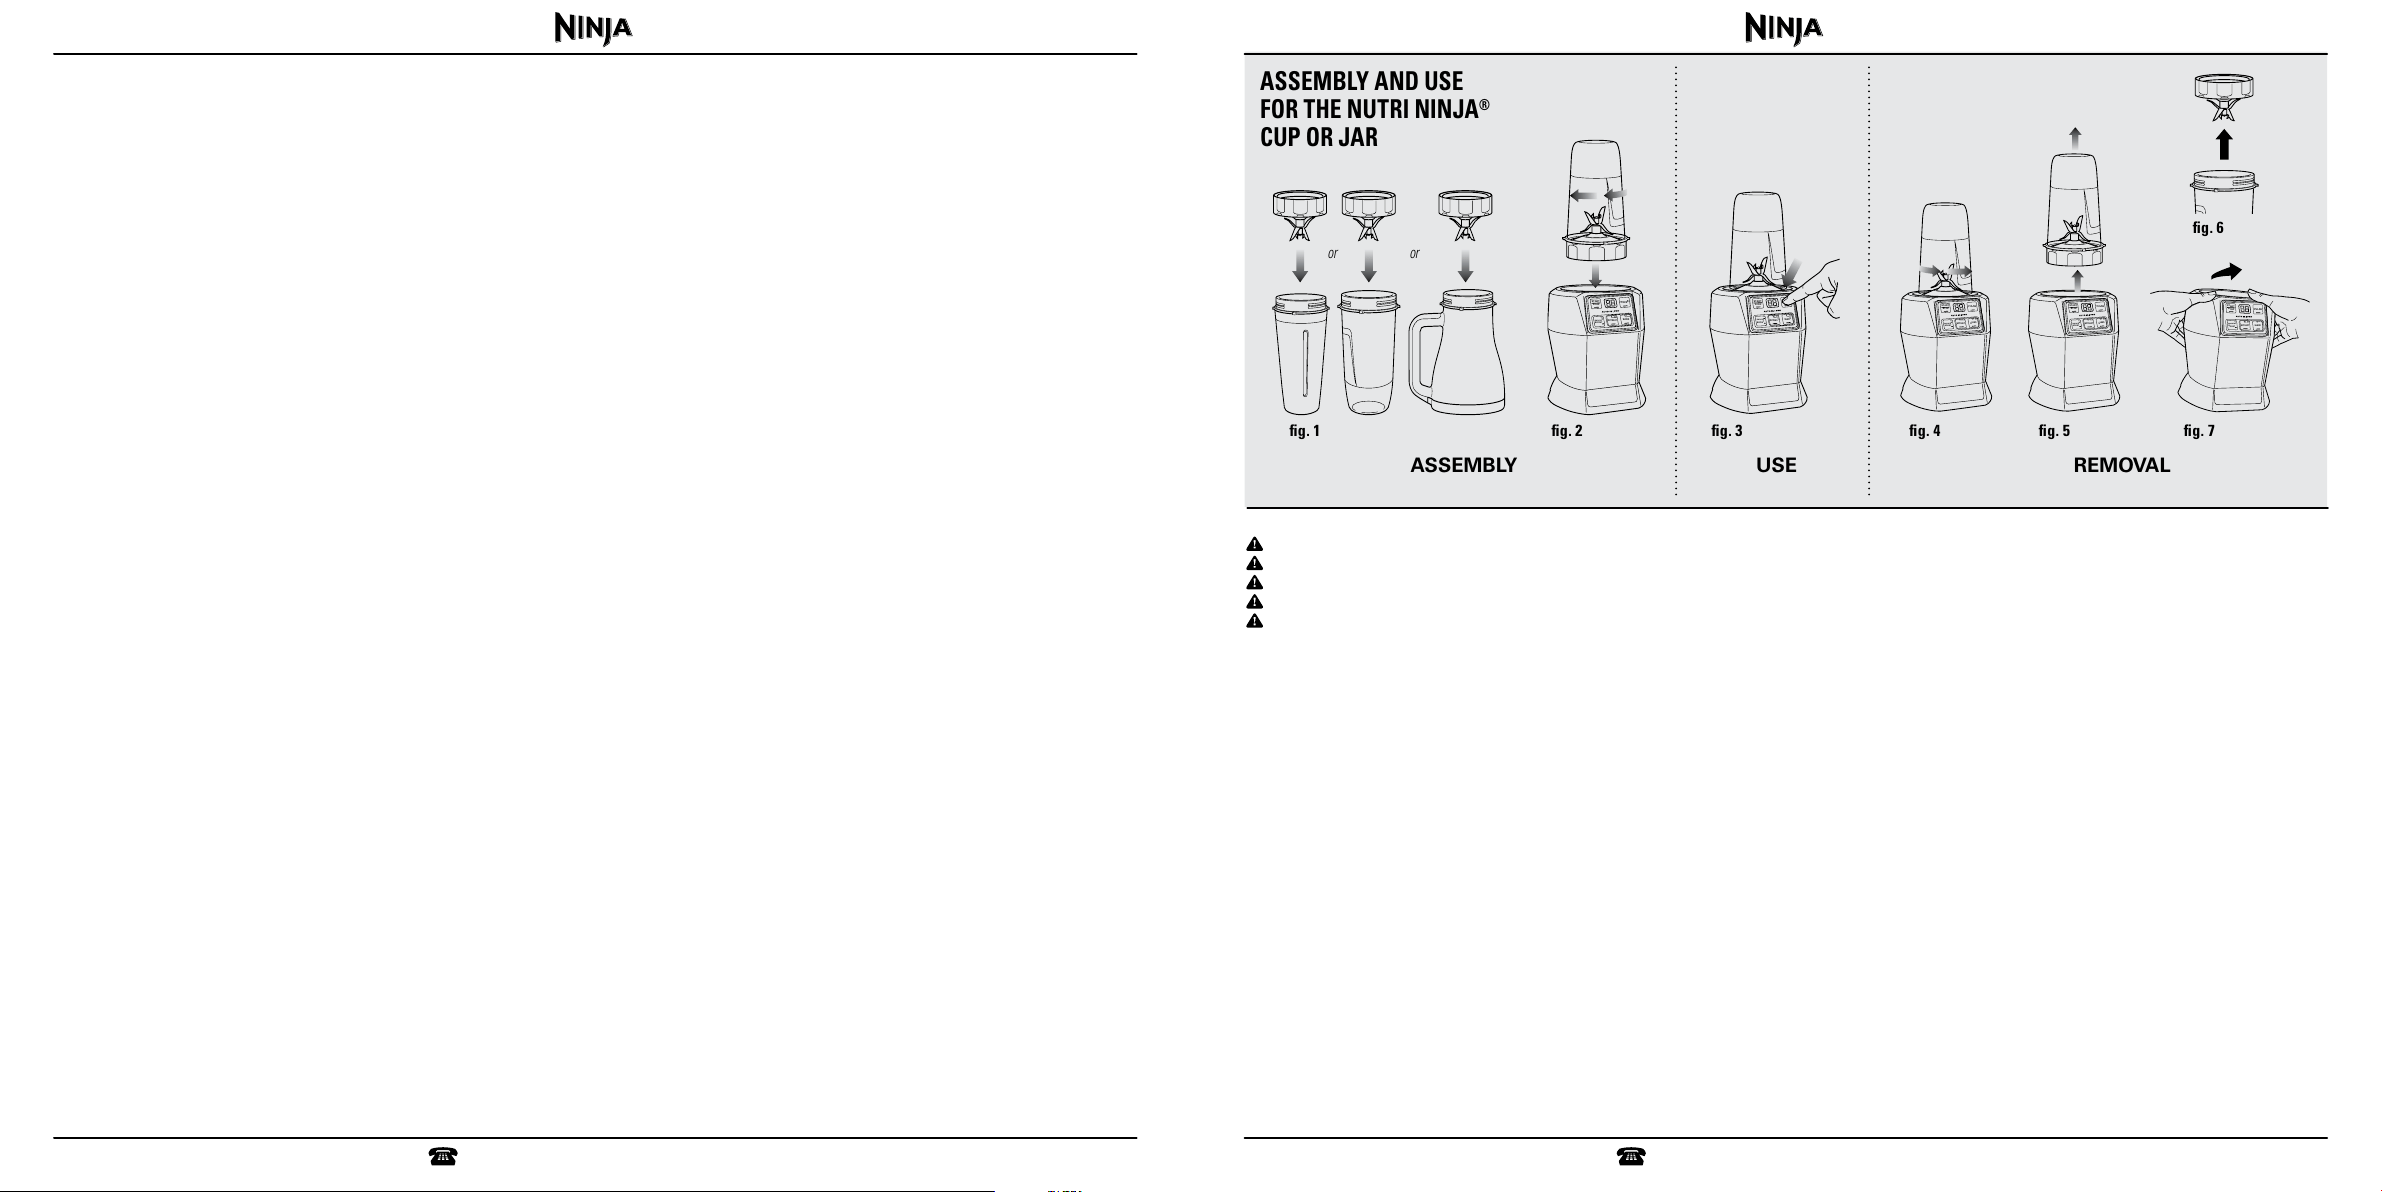
4 Place the Pro Extractor Blades Assembly
onto the cup and tightly screw it on
clockwise until you have a good seal. (Fig. 1)
5
Turn the Nutri Ninja cup upside down and place
it onto the motor base, aligning the tabs on the
cup with the motor base. Rotate the Nutri Ninja
cup clockwise until it locks in place, you will
hear a click when the lock is engaged. (Fig. 2)
6 Once the cup is engaged, the programs
available for that attachment will illuminate.
Select the program desired based on your
recipe. (Fig. 3)
7 To pause the appliance, press the selected
speed or Auto-iQ program a second time.
When the program is paused, the light on the
program button will flash until you press it
again to resume the rest of the program.
8 Once you have reached your desired
consistency, press the START/STOP button
to turn the program off. Turn the Nutri Ninja
cup anticlockwise (Fig. 4) and pull straight
up to remove. (Fig. 5)
9 Turn the cup upright and remove the Pro
Extractor Blades Assembly by twisting the
Pro Extractor Blades Assembly anticlockwise.
10 Do not store blended contents in the Nutri
Ninja cup or Nutri Ninja XL Multi-Serve Jar
with the Pro Extractor Blades Assembly
attached. (Fig. 6)
11 Place the Sip & Seal
™
lid onto the Nutri
Ninja
®
cup, twist to seal and enjoy!
NOTE: Sip & Seal lid not intended for use
with the Nutri Ninja XL Multi-Serve Jar.
12 For storage in the cup, use Sip & Seal lid to
cover.
13 Make sure that the motor base is unplugged
when not in use.
14
To remove the motor base unit, tip the unit
forward from the rear to easily disengage the
suction cups.
(Fig. 7)
15
Be sure to store the Pro Extractor Blades
Assembly attached to an empty cup when
not in use.
USE REMOVALASSEMBLY
fig. 2 fig. 3 fig. 4 fig. 5
START
STOP
PULSE
SMOOTH
BOOST
YES
NO
EXTRACT
BLEND
fig. 7fig. 1
or or
For best results, follow the recipe/ingredient loading instructions found in your Inspiration Guide.
WARNING: Handle the Pro Extractor Blades
™
Assembly with care, as the blades are sharp.
WARNING: Remove utensils prior to processing. Failure to remove may cause the Nutri Ninja cup to be damaged or to shatter, which may cause personal injury.
WARNING: Never leave the appliance unattended while in use.
CAUTION: Do not blend hot liquids, doing so may cause excessive pressure buildup, resulting in risk of the user being burned.
CAUTION: Remove the Pro Extractor Blades
™
Assembly from the Nutri Ninja cup or Nutri Ninja XL Multi-Serve Jar upon completion of blending. Do not store
ingredients before or after blending them in the cup or jar with the blade assembly attached. Some foods may contain active ingredients or release gases that
will expand if left in a sealed container, resulting in excessive pressure buildup that can pose a risk of injury. For ingredient storage in the cup or jar, use Sip &
Seal Lid
®
to cover.
ASSEMBLY AND USE
FOR THE NUTRI NINJA
®
CUP OR JAR
fig. 6
START
STOP
PULSE
SMOOTH
BOOST
YES
NO
EXTRACT
BLEND
START
STOP
PULSE
SMOOTH
BOOST
YES
NO
EXTRACT
BLEND
START
STOP
PULSE
SMOOTH
BOOST
YES
NO
EXTRACT
BLEND
START
STOP
PULSE
SMOOTH
BOOST
YES
NO
EXTRACT
BLEND
START
STOP
PULSE
SMOOTH
BOOST
YES
NO
EXTRACT
BLEND
START
STOP
PULSE
SMOOTH
BOOST
YES
NO
EXTRACT
BLEND
Loading ...
Loading ...
Loading ...