Loading ...
www.PyleUSA.com2 www.PyleUSA.com 3
Safety Precautions
A. Avoid opening the cover or back panel. Do not open the
cover, x or touch the inner parts. No user-serviceable
parts inside, refer servicing to qualied service personnel.
B. Protect voltage line. Avoid high pressure and to be
stomped on, do not pull, push excessively.
C. Please put on this unit in the windy place, avoid direct
sunshine and nearing heater. Place the unit in a location
with adequate air circulation.
D. Do not interfere with its proper ventilation; this will cause
the internal temperature to rise and may result in a failure.
E. Avoid metals dropping in, like needle, hairpin, coin,
otherwise the unit will get short and out of work.
F. Be sure to set the line voltage AC230V/50Hz if you are not
sure of the type of power supply, consult your appliance
dealer or local power company.
For MAINS powered apparatus and for apparatus producing
internal voltages greater than 35V (peak) a.c. or d.c., having
no protection against splashing water according to annex A,
the instructions for use shall state that the apparatus shall not be exposed to
dripping or splashing and that no objects lled with liquids, such as vases, shall be
placed on the apparatus.
HOW TO REPLACE THE PRESET RADIO STATIONS?
Use the remote control to set the radio stations.
NOTE: The preset stations can’t be deleted, BUT CAN BE REPLACED.
Operations Steps
1. Press TUNER on the remote. Then press AM or FM button. Select AM or FM tuner.
2. Press / the button to adjust to your favorite station number, then press
tuner+/tuner- button to adjust your favorite station, wait a few seconds the tuner
automatically store and replace the station. After adjusting your favorite station,
press MEMORY on remote, MEMxx ashes on the screen, press / and select
your favorite station number, then press MEMORY, MEM OK ashes on the screen,
the tuner successfully stored this station number. In this way, you can replace the
preset radio stations.
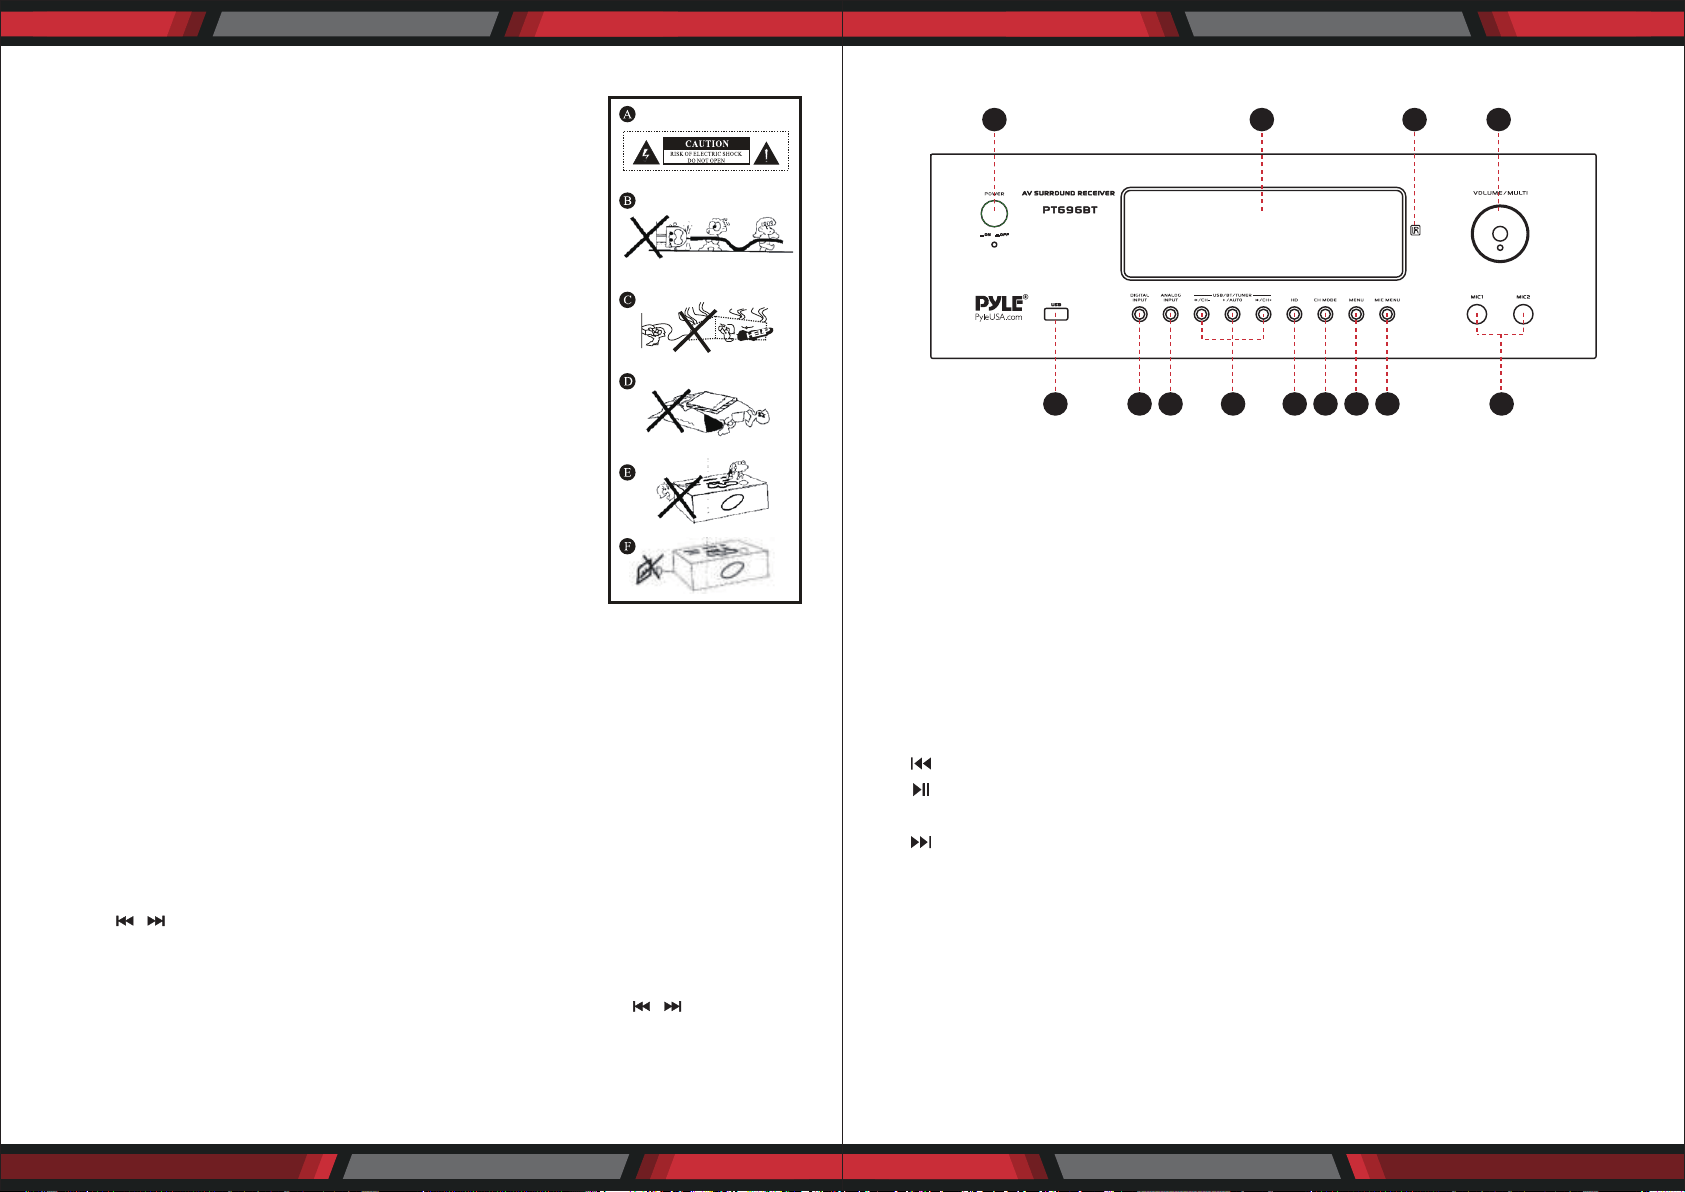
FRONT PANEL
1. POWER SWITCH: Press to switch the power unit ON or OFF
2. DISPLAY: Function displayed uorescent window
3. REMOTE: Infrared remote receiver
4. MASTER VOLUME/MULTI:
• Adjust the volume level.
• Select Multi or MIC function, adjust the corresponding function by this knob.
5. USB INPUT JACK: Connect USB ash disk to this jack.
6. DIGITAL INPUT KNOB: This is used to select the input sources such as HDMI1,
HDMI2, HDMI3, coaxiaI, optical.
7. ANALOG INPUT BUTTON: This is used to select the input sources such as DVD/CD,
AUX, USB, BT.
8. USB/BT and AM/FM programs adjust button:
This button is used to select the previous station is USB/BT/AM/FM.
This button is for USB/Wireless BT pause or play, or press and hold this button
to automatically scan AM/FM programs
This button is used to select the next station is USB/BT/ AM/FM.
9. HD (ARC) ON/OFF button: This function must be in HDMI state. When ARC is ON,
the sound of a TV program is output through the power amplier to the speakers.
10. CHANNEL MODE button: Select 2.1channeI or 5.1channeI output mode by knob
11. MENU button: This music menu function includes treble, bass, balance, display,
DSP. Select these function and adjust the corresponding function by volume/
muIti knob.
12. MIC MENU button: This microphone menu function includes MIC volume, treble,
bass, echo and delay. Before, selecting these function adjust the corresponding
function by volume/muIti knob.
13. MIC INPUT JACK: Connect KARAOKE Microphone to these jacks.
1 2
3
4
13
1211
109876
5
Loading ...
Loading ...
Loading ...