

5 SPEED DIGITAL
JUICE EXTRACTOR
Instruction Manual

Thank You for your purchase
Register & sign up for special
announcements and trendy recipes!
Tell us what you think!
Rate, review or ask us a question.
@bellahousewares.com
#getinspired
BellaLife BellaLifestyle

Important Safeguards ......................................................................................................1-2
Additional Important Safeguards ...................................................................................... 3
Notes On The Plug ...............................................................................................................4
Notes On The Cord .............................................................................................................. 4
Plasticizer Warning ..............................................................................................................5
Electric Power .......................................................................................................................5
Getting to know your 5 Speed Digital Juice Station .......................................................6
Before Using For The First Time ......................................................................................7
Assembly instructions .................................................................................................... 8-9
Preparing fruits and vegetables for your 5 speed digital juice extractor .............10 -11
Operating instructions ................................................................................................. 11-12
Manual thermal protection ............................................................................................... 13
Disassembly instructions .................................................................................................13
User maintenance instructions ........................................................................................ 13
Care & cleaning instructions .......................................................................................13-14
Storing instructions ........................................................................................................... 15
Troubleshooting ............................................................................................................ 15-16
Recipes ........................................................................................................................... 17-19
Warranty ....................................................................................................................... 20-21
TABLE OF CONTENTS

1
IMPORTANT SAFEGUARDS
When using electrical appliances, basic safety precautions should always
be followed including the following:
1. Read all instructions.
2. To protect against risk of electrical shock do not put cord, plugs,
orappliance in water or other liquid.
3. This appliance is not intended for use by persons (including children)
with reduced physical, sensory or mental capabilities, or lack of
experience and knowledge, unless they have been given supervision
or instruction concerning use of the appliance by a person responsible
for their safety.
4. Close supervision is necessary when any appliance is used by or near
children. Children should be supervised to ensure that they do not
play with the appliance.
5. Turn the appliance OFF. Unplug from outlet when not in use, before
putting on or taking off parts, and before cleaning. To unplug, grasp
the plug and pull from the outlet. Never pull from the power cord.
6. Avoid contacting moving parts.
7. Do not operate any appliance with a damaged cord or plug or after
the appliance malfunctions, or is dropped or damaged in any manner.
Contact the manufacturer at their customer service telephone number
for information on examination, repair, or adjustment.
8. The use of attachments, including canning jars, not recommended
bythe manufacturer may cause re, electric shock, or injury.
9. Do not use outdoors.
10. Do not let cord hang over edge of table or counter.
Do not touch sharp blade in the base of the juicing disc.

2
11. Do not let cord contact any hot surface, including the stove.
Make sure the juicer is properly assembled before operating.
12. Always make sure the juice extractor cover is locked securely inplace
before the extractor is turned on. Do not unfasten locking bar while
the juice extractor is in operation. Vibration can occur during normal
operation.
13. Turn the speed dial to Power (OFF) and unplug from electrical
outlet after each use of your juice extractor. Make sure the motor
iscompletely stopped before disassembling. Do not use any frozen
fruit/vegetables in this machine. This juicer is designed to juice fresh
fruits and vegetables only.
14. Do not put your ngers or other objects into the juice extractor
opening while it is in operation. If food becomes lodged in the feed
tube, use the food pusher or another piece of fruit or vegetable
topush it down. When this method is not possible, turn the speed
dial to Power (OFF), unplug the juice extractor from the electrical
outlet, and disassemble the juice extractor to remove remaining
food. When juicing hard fruits or vegetables, always juice on the high
speed settings (settings 4 or 5). Failure to do so will cause damage
tothejuicer motor. Do not juice harder fruits on any of the lower
speed settings which is meant for juicing softer fruits and vegetables.
15. Do not use the appliance if the rotating juicing blades and basket
aredamaged.
16. Use care when handling the stainless steel blade basket.
Holdthebasket’s rim only. Do not touch the cutter blades
onthebottom ofthe basket. The cutter blades are very sharp!
17. Do not operate without the pulp container in place.
Please see assembly instructions for proper placement.

3
FOR HOUSEHOLD USE ONLY
ADDITIONAL IMPORTANT
SAFEGUARDS
1. All users of this appliance must read and understand this instruction
manual before operating or cleaning this appliance.
2. The cord to this appliance should be plugged into a 120V AC electrical
outlet only.
3. Do not leave this appliance unattended during use.
4. If this appliance begins to malfunction during use, immediately turn
the speed dial to Power (OFF) and unplug the cord.
Do not use orattempt to repair the malfunctioning appliance.
5. If this appliance falls or accidentally becomes immersed in water,
unplug it immediately. Do not reach into the water! Do not use this
appliance after it has fallen into or becomes immersed in water.
6. To reduce the risk of injury to persons or property, never use this
appliance in an unstable position.
7. Do not use this appliance for other than its intended use.
8. Pay special attention to the amount of pulp and residue produced
while juicing. Always empty a full pulp container before continuing
tojuice.
9. Always ensure that the anti-drip spout is in the OPEN position when
juicing. The anti-drip spout should only be used to prevent dripping
when the juice jar is removed.

4
SAVE THESE INSTRUCTIONS
NOTES ON THE PLUG
This appliance has a polarized plug (one blade is wider than the other).
Toreduce the risk of electric shock, this plug will t in a polarized outlet
only one way. If the plug does not t fully into the outlet, reverse theplug.
If it still does not t, contact a qualied electrician. Do not modify the plug
in any way.
NOTES ON THE CORD
The provided short power-supply cord (or detachable power-supply cord)
should be used ato reduce the risk resulting from becoming entangled in
or tripping over a longer cord. If an extension cord is used:
1. The marked electrical rating of the cord or extension cord should be
at least as great as the electrical rating of the appliance;
2. If the appliance is of the grounded type, the extension cord should be
a grounding-type 3-wire cord; and
3. The longer cord should be arranged so that it does not drape over
the countertop or table top where it can be pulled on by children or
tripped over unintentionally.

5
PLASTICIZER WARNING
CAUTION: To prevent Plasticizers from migrating from the nish of the
counter top or table top or other furniture, place NON-PLASTIC coasters
or place mats between the appliance and the nish of the counter top
or table top. Failure to do so may cause the nish to darken; permanent
blemishes may occur or stains can appear.
ELECTRIC POWER
If the electrical circuit is overloaded with other appliances, your appliance
may not operate properly. It should be operated on a separate electrical
circuit from other appliances.
6
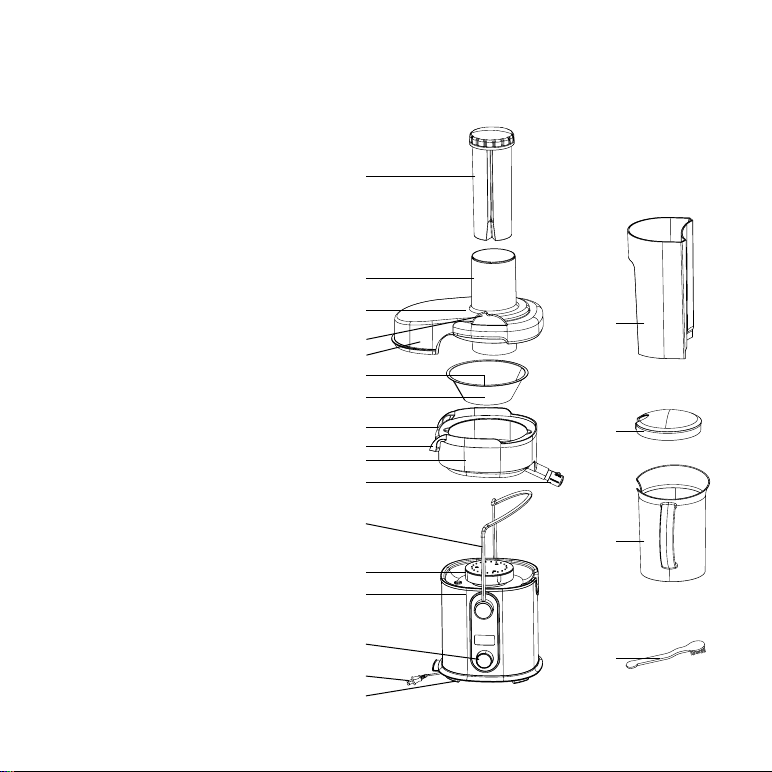
GETTING TO KNOW YOUR 5 SPEED DIGITAL JUICE STATION
Product may vary slightly from illustration
1. Food Pusher
2. Extra Wide Feed Tube
3. Clear Juicer Cover
4. Locking Bar Slots
5. Pulp Spout Cover
6. Cutter Blades
7. Stainless Steel Blade Basket
8. Pulp Spout
9. Juice Bowl Lip
10. Juice Bowl
11. Anti-drip Spout
12. Safety locking bar
13. Motor Hub
14. Motor Base
15. Speed Selector Knob
16. Polarized Plug
17. Rubber Feet
18. Pulp Container
19. Juice Jug Lid
20. Juice Jug
21. Cleaning Brush
1
2
18
19
20
21
3
4
5
6
7
8
9
10
11
13
14
12
15
16
17

7
BEFORE USING FOR THE FIRST TIME
The juice extractor comes almost completely assembled in the box.
1. Your extractor may be shipped with a protective cardboard insert between the clear cover
and the blade basket. Remove this and any other protective packaging before using your
juice extractor. Also included in the box is a cleaning brush.
2. Following the disassembly instructions, remove the food pusher from the feed tube, then
the cover, juice bowl with stainless steel blade basket.
3. Wash all removable parts (food pusher, clear cover, juice bowl, pulp basket, and juice jug
with lid) in warm water with a biodegradable, non-abrasive liquid detergent. Rinse well and
air-dry. This will eliminate any traces of dust or residue from manufacturing or shipping.
Caution: Use care when handling the blade basket. Hold the basket’s rim only.
Do not touch thecutter blades on the bottom of the basket. The cutter blades are very sharp!
Caution: Never rinse or immerse the motor base in water or any other liquid.
8
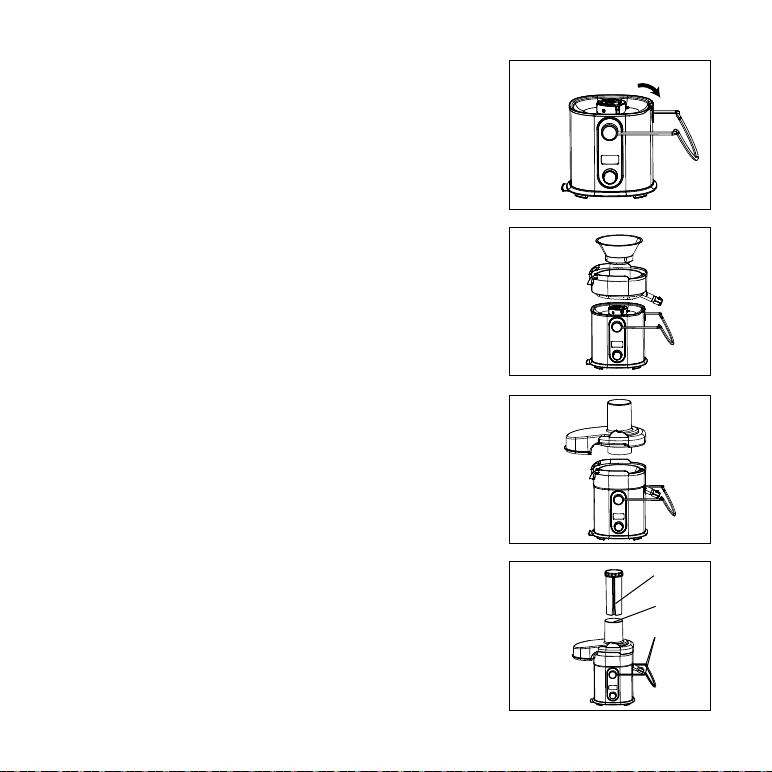
Assembly instructions
Warning: Always make sure the juice extractor is unplugged
before starting assembly.
Important: The juice extractor is equipped with a safety system
that prevents the extractor from being turned on unless the unit
is completely and properly assembled.
1. Rotate the locking bar so that it sits at the front ofthe base
(see gure 2).
2. Place the juice bowl on top of the motor base so that
the juice spout ts into the cut out at the front of the base
(see gure 3).
Caution: Use care when handling the stainless steel blade
basket. Hold the basket’s rim only. Do not touch thecutter blades
onthebottom of the basket. The cutter blades are very sharp!
3. Set the stainless steel blade basket onto the motor hub
in the center of the juice bowl (see gure 3). Press down
ontheblade basket’s outer rim until it drops into place
andis securely seated. Gently rotate the blade basket
toensure that it turns freely. If initially it fails to seat,
thisshould slip it into place. Double check by pressing down
on the rim andspinning it again.
4. Align the cover so that the pulp cover ts over the back
ofthe base. (see gure 4).
5. Turn the food pusher so that the groove in the side lines
up with the tab in the feed tube. Insert the food pusher
into thefeed tube (see gure 5). Store the food pusher
inthefeed tube of the lid until the produce is ready to juice.
Figure 2
Figure 3
Figure 4
Locking
bar
Tab
Groove
Figure 5
9
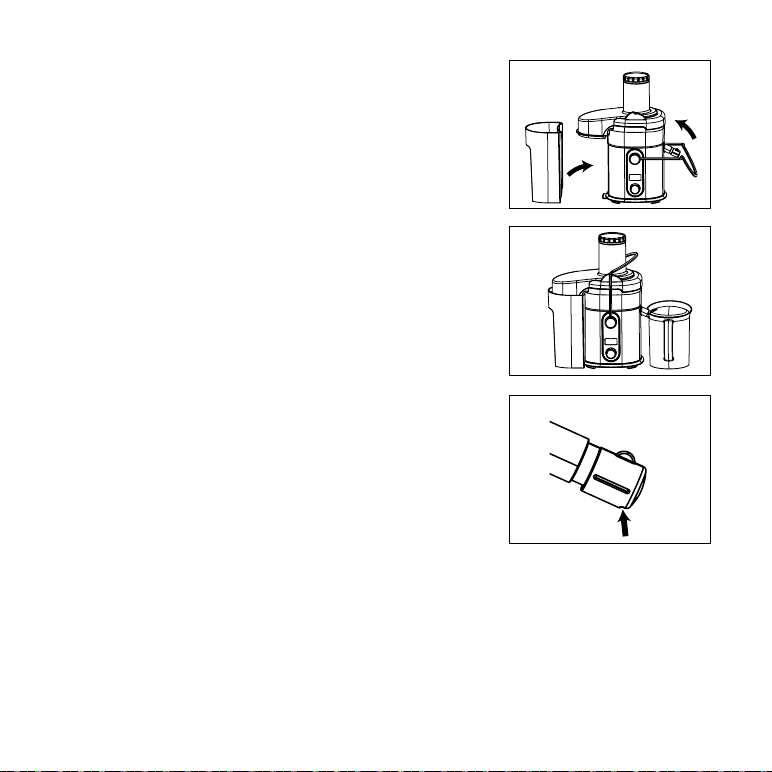
6. Push the safety locking bar up and over the lid. Make sure
the lid is locked securely into place (see gure 6).
7. Add the pulp basket (see gure 7). Tilt the pulp basket
slightly so that the lip of the juice bowl ts snugly over
the inside of the pulp basket. Push the bottom of the pulp
basket so that it rests securely on its platform.
Important: To avoid spillage, make sure the pulp basket sits ush
up against the base.
Note: To save cleaning time, line the pulp basket with a plastic
grocery store produce bag.
8. Make sure the anti-drip spout is properly open
(seegure8).
9. Add the juice jug lid to the juice jug so that the lid’s cut out
ts over the pitcher’s pouring spout. Tilt the juice jug slightly
so that the extractor’s juice spout ts into the top ofthe
pitcher lid (see gure 7). This will prevent juicespillage.
Figure 6
Figure 7
23(1
Figure 8

10
Preparing fruits and vegetables for your 5 speed digital juice
extractor
• Clean all produce thoroughly, using a natural bristle brush. If you are not using organic
produce, we recommend using a biodegradable cleaner to help remove pesticide residue.
• Remove and discard the outer leaves of non-organic produce and peel any waxed fruit
orvegetable.
• Trim away any discolored or bruised sections.
• The skin may be left on all produce (including pineapple and melons) except oranges,
grapefruit, and tangerines. The oil found in these skins tastes bitter and is difcult to digest.
• Remove melon seeds when possible, as they may escape through the top of the feed tube
while juicing. The pits of fruits such as cherries, pears, and peaches should also beremoved.
• Cut produce into pieces small enough to t into the feed tube. Use the food pusher to gently
direct produce through the tube. Never push produce into the feed tube with your ngers.
• It may be necessary to cut hard produce (carrots, beets, pineapple, etc.) into smaller pieces
to facilitate juicing.
• Leafy greens, parsley, wheat grass, and sprouts should be bunched up into a small, tight
ball and pushed through with either a carrot or the food pusher.
• Juicing herbs and leafy greens will yield a lower juice level due to the nature
ofthevegetable or greens. It is recommended to juice them in combination with other fruits
andvegetables.
• Bananas are not suitable for juicing; a clear juice cannot be obtained from them and residue
left in the machine can clog the micro-mesh screen.
• For best results when juicing apricots, plums, pears, peaches, and tomatoes, produce should
be rm.
• When juicing apples, add a small amount of fresh lemon or lime to help slow down
thebrowning process.

11
• Fruits that contain starch, such as bananas, papayas, avocados, gs and mangoes are not
suitable for the juice extractor. Use a food processor, blender or bar blender to process
these fruits.
• The juice extractor is not suitable for processing very hard and/or brous/starchy fruits
orvegetables such as sugar cane.
Important: Always juice hard fruits (see detailed chart below) in the higher speed settings
(settings 4 & 5). Failure to do so may result in a damaged motor and will cause the juicer
tobreak.
Operating instructions
5 speed Dial control
Your juice extractor offers 5 speed options that ensure optimal rpm to provide maximum juicing
efciency.
Note: Efciency describes the amount of juice extracted from your produce.
Speed Description Example
5 Hard Fruits /
Vegetables
Beets, Carrots, Fennel, Brussel Sprouts
4 Celery / Leafy Greens Pear, Celery, Cabbage, Cauliower, Broccoli,
Cucumber (with skin)
3 Apples Peach, Apricots, Plums, Tomato, Apples, Pineapples
2 Citrus Orange, Lime, Grapefruit, Lemon
1 Soft Fruits Mango, Watermelon, grapes,
Cucumbers (peel removed), Raspberries, Blueberries
0 Power (OFF) Turn Off the machine; Ready to use
Important: The juice extractor is equipped with a safety system that prevents the Extractor from
being turned on unless the unit is completely and properly assembled.
1. Assemble the juice extractor following the assembly instructions described in this manual.
2. Have all fruits and vegetables prepared for juicing.

12
3. To begin, plug the unit into a 120v ac electrical outlet. The LCD display will illuminate once
you turn on the unit by selecting one of the 5 speed settings.
4. Once plugged in, the juicer will verify if the safety locking bar is properly fastened and
securely locked in place. If the safety locking bar is not properly assembled, and the unit is
turned on, the LCD will display “L” to inform the user that the unit is not properly secured
and locked in place. However, if the unit is in the OFF position, and the safety locking bar is
not properly locked into place, the unit will not power on. It is important to always ensure
that the safety locking bar is properly secured and locked in place prior to juicing.
5. Remove the food pusher from the feed tube.
6. Turn the speed control dial to 5 to juice harder produce.
7. Turn the speed control dial to 1 to juice softer produce.
Note: When juicing a combination of hard and soft produce, such as beets, carrots
andstrawberry, you will want to use the highest speed setting (5) for beets and carrots
andthe lowest speed setting (1) for the strawberry. You do not have to turn the machine
off to change speeds. Simply turn the dial to change to the appropriate speed for each type
ofproduce being juiced.
Tip: To ensure maximum efciency, alternate types of produce.
8. Once you have selected the desired speed setting for juicing and you are ready to begin
juicing, place produce into the feed tube. Use the food pusher to gently direct through the
feed tube and blade basket with the food pusher. When juicing is completed, turn the speed
dial to Power (OFF).
9. Slide the juice jug out from the juice spout. Serve juice immediately for the freshest avor
and highest nutritional value.
10. Remove the pulp container and save or discard pulp.
Note: The pulp from your juice extractor can be used in many different applications such as
breads, mufns, cakes, soup stocks, compressed facial packs and garden compost material.
11. Unplug the juice extractor from the outlet after use.
12. Follow disassembly instructions described in this manual; all removable parts should
be rinsed and cleaned after each use. Clean the juice extractor following the procedures
described in the care & cleaning instructions.

13
Manual Thermal Protector
This product is equipped with a Manual Resettable Thermal Protector to protect the motor. If the
motor shuts down and LCD shows “E” and “1” ashing alternatively, turn the Speed Selector
Knob to Off position, and then unplug the juice extractor. Let the unit rest for approximately half
an hour. Once the resetting period has elapsed, plug the power cord back into the outlet and turn
the Speed Selector Knob to the desired setting to continue.
Disassembly instructions
Warning: Always make sure juice extractor is unplugged before starting disassembly.
1. Remove the pulp basket and juice jug.
2. Lift the safety locking bar up and off the bar locking slots on the cover.
Rest the locking bar at the front of the unit.
3. Lift juice extractor cover up and off the juice extractor.
4. Grasping the pulp spout in one hand and the back of the juice bowl in the other, loosen
andlift the juice bowl and blade basket off as one piece. These 2 parts will then easily
separate for easy cleaning.
Caution: Use care when handling the blade basket. Hold the basket’s rim only. Do not touch
the cutter blades on the bottom of the basket. The cutter blades are very sharp!
5. Please follow the procedures outlined in the care & cleaning instructions for specic
cleaning instructions.
User maintenance instructions
This appliance requires little maintenance. It contains no user serviceable parts. Do not
try torepair it yourself. Any servicing that requires disassembly other than cleaning must
beperformed by a qualied appliance repair technician.
Care & cleaning instructions
1. Unplug from outlet. Please follow the procedures outlined in the disassembly instructions
toremove parts before cleaning.
2. Clean unit and parts after each use.

14
3. Do not immerse the motor base in water or spray it with water. Clean only by wiping with
a damp sponge, cloth, or paper towel. Use any liquid dishwashing detergent but do not
use products containing ammonia or scouring powders. These products will dull, scratch
ormark the surface.
4. If any juice has spilled under the juice extractor, clean legs and area with a lightly soaped
sponge, then dry. Use a damp toothbrush or cloth to clean juice from inside the motor hub
on top of the motor base.
5. All parts (except the blade basket and motor base) are washable in warm, soapy water
orinthe dishwasher.
6. When cleaning the blade basket, make sure the tiny holes in the basket are not clogged.
This can be accomplished by holding the blade basket under running water faucet. Use
thecleaning brush included in a circular motion to clean the basket holes from both inside
and outside of the blade basket.
Caution: Use care when handling the blade basket. Hold the basket’s rim only. Do not touch
thecutter blades on the bottom of the basket. The cutter blades are very sharp!
Note: If necessary, allow the blade basket to soak in hot water with 10% lemon juice added.
7. The juice extractor clear cover, juice bowl, pulp jug, juice jug and juice jug lid may
bewashed in the top rack of a dishwasher. However, washing with warm (not hot) tap water
on a daily basis should be sufcient.
8. Due to the powerful staining properties of the carotenoids that are found in many
vegetables, especially carrots, we suggest soaking stained parts overnight in any of these
4cleaning solutions:
• Biodegradable soap in enough warm water to cover juice extractor parts
• 1 part warm water to 1 part cider vinegar
• 1/2 small box baking soda in enough warm water to cover parts.
• Warm water with 10% lemon juice solution.
Caution: Never use ammonia or abrasives.
• Lightly clean with a sponge or kitchen rag and liquid detergent after soaking.
Warning: Never submerge the motor base in water or other liquid!

15
Storing instructions
1. Unplug unit, assemble clean, dry parts before storing.
2. Store the juice extractor in its box in a clean, dry place. Never store it while it is hot or still
plugged in.
3. Store the food pusher in the feed tube of the lid.
4. Never wrap cord tightly around the appliance. Do not put any stress on the cord where
itenters the unit; while holding the cord perpendicular to the unit, push inwards slowly
tostore it inside the base of the unit.
Troubleshooting
Symptom Possible correction
The juice extractor will not
turn on
• The juice extractor is equipped with a safety system that
prevents the extractor from being turned on unless the unit
iscompletely and properly assembled.
• Turn the speed dial to Power (OFF). Check to make sure
theblade basket is properly seated.
• Make sure the safety locking bar is securely locked into place
on the top of the lid. (see gure 6.) The lid must be bared
securely into place or the juice extractor will not turn on.
Excessive noise or vibrations
occur after juice extractor is
turned on.
• Check to make sure the blade basket is properly seated.
• Pulp may have built up on the blade basket. Clean the blade
basket.
• Try alternating different types of produce while juicing.
Note: Because of the juice extractor’s powerful motor, a small
amount of noise and/or vibration is normal when the extractor
is turned on and as it comes to a complete stop. All juicers will
sound slightly different.

16
Symptom Possible correction
Excessive noise or vibrations,
unpleasant odor, appliance is
hot to the touch, or the juice
extractor smokes after it is
turned on.
• Unplug the unit immediately. Take the juice extractor
toaqualied appliance repair technician for servicing.
The blade basket is blocked.
Food Is jammed in the base
of the feed tube; the juice
extractor has stopped during
juicing.
• Turn the speed selector dial to Power (OFF). Remove cover
and clear feed tube. Chop fruits and vegetables into smaller
pieces to facilitate juicing.
“E” Error on the LCD screen • There was an error when turning on the juice extractor.
• This product is equipped with a Manual Resettable Thermal
Protector to protect the motor. If the motor shuts down and
LCD shows “E” and “1” ashing alternatively, turn the Speed
Selector Knob to Off position, and then unplug the juice
extractor. Let the unit rest for approximately half an hour.
Once the resetting period has elapsed, plug the power cord
back into the outlet and turn the Speed Selector Knob to the
desired setting to continue.
“L” on the LCD screen • The locking bar is not securely locked into place.
• The LCD will display “L” when the locking bar is down for
safety measures to ensure that the locking bar is always
properly secured and locked in place prior to juicing.

17
RECIPES
POMEGRANATES
Pomegranates are healthy, avorful, delicious, and perfect to juice in the Juice Extractor.
They are worth the trouble of de-skinning and removing the membranes.
Cut off the 2 pole ends. Scoop out the center core without disturbing the seeds. Using
asharp knife, score the outer skin and separate the pomegranate into sections. Place
the sections in a bowl of water. With your ngers, working in the water, roll the juice
sacs out of the papery inner membranes.
NOTE: The seeds will sink to the bottom, the membranes will oat to the top.
Discard membranes and outer skin. Strain water and seeds are ready for extraction.
IMPORTANT: Juice pomegranates rst at LOW speed into the clean pulp basket.
Then throw the pulp basket remains back into the Juice Extractor. Extract a second time.
POMEGRANATE HEAVEN
• 4 pomegranates, seeded (2 cups of
seeds)
• 4 tangelos (or tangerines), skinned
• 2 pears, stems removed
JICAMA
Jicamas are traditionally used to relieve an upset stomach. They are a very good source
of calcium and phosphorus.
JICAMA WATERMELON COCKTAIL
• 1/2 watermelon (seeds and rind
included)
• 3 jicamas (peeled)
• Kosher salt
Add to chilled glasses with a pinch of kosher salt.

18
RECIPES
PINEAPPLES
The juice of the pineapple is rich in potassium, calcium, phosphorus and organic
sulphur, moderate amounts of iron and Vitamins C and A. The beauty of juicing
pineapples, is that the pulp is absolutely delicious when used in a varieties of recipes,
from appetizers to desserts! Prepare sauces, jams, jelly, preserves, toppings, marinades,
and salsas with fresh pineapple pulp. Juice the pineapple rst. Empty the pulp basket
into a storage container for use in any recipe. Pineapple pulp can be stored in zipper-
lock freezer bags or ice cube trays and frozen for later use.
HOT MULLED SUNSHINE WITH PINEAPPLE STUFFED FRENCH TOAST
Enjoy a mug of Hot Mulled Sunshine with Pineapple Stuffed French Toast
forasweet and exotic breakfast on a cold winter day.
• 1 ripe pineapple, outer skin and top
crown removed
• 1 navel orange, peeled
• 2 apples
• 1 cinnamon stick
• 8 whole cloves
• 2 tablespoons honey
Juice pineapple, orange and apples. Combine juice, cinnamon, cloves and honey
inamedium sauce pan. Bring to a boil, then cover and reduce to a slow simmer for
15minutes. Strain to remove the cinnamon stick and cloves.

19
RECIPES
PINEAPPLE STUFFED FRENCH TOAST
Serves 2
• 4 slices day-old brioche (egg bread)
• 1 jumbo egg, beaten
• 1 teaspoon milk or cream
• 6 teaspoons whipped cream cheese
• 3 teaspoons pineapple pulp
• 1 tablespoon honey
• 2 tablespoons melted butter
• 2 tablespoons vegetable oil
• 1/2 cup pineapple pulp for topping
• brown sugar for topping
Add 1 tablespoon butter plus 1 tablespoon vegetable to a medium skillet. Heat on
medium-high. While the skillet is preheating, in a medium bowl, whisk the egg and milk
together. In a small bowl, combine cream cheese, pineapple pulp and honey. Mix well.
Lay 4 slices of bread out and spread 1/2 of the pineapple cream cheese on one slice
ofbrioche. Spread the remaining 1/2 on another. Cover with 2 remaining dry pieces
ofbread to form 2 sandwiches. Working 1 at a time, dip each sandwich in the egg
mixture for about 1-1/2 minutes per side. When the skillet is hot, add the dipped French
Toasts and fry in butter for 3 to 4 minutes until golden brown. Remove from skillet. Add
1 tablespoon butter plus 1 tablespoon vegetable to the skillet. Fry the second side for
3 to 4 minutes until golden brown. Remove to serving plates. Top each stuffed French
toast with pineapple pulpand sprinkle with brown sugar.
VIRGIN EXTRACTOR MOJITO
Here’s a healthy non-alcoholic version of a cocktail favorite.
• 2 cucumbers
• 2 large Anjou pears
• 1 large handfuls fresh mint
• 1 lime
EXTRACTOR APPLE PIE
• 1 tsp cinnamon
• 1 tsp nutmeg
• 8 large grany smith apples

Limited Two-Year Warranty
SENSIO Inc. hereby warrants that for
a period of TWO YEARS from the date
of purchase, this product will be free
from mechanical defects in material
and workmanship, and for 90 days in
respect to non-mechanical parts. At its
sole discretion, SENSIO Inc. will either
repair or replace the product found to
be defective, or issue a refund on the
product during the warranty period.
The warranty is only valid for the
original retail purchaser from the date
of initial retail purchase and is not
transferable. Keep the original sales
receipt, as proof of purchase isrequired
to obtain warranty validation. Retail
stores selling this product do not have
the right to alter, modify, or in any way
revise the terms and conditions of the
warranty.
Exclusions:
The warranty does not cover normal
wear of parts or damage resulting
from any of thefollowing: negligent
use of the product, use of improper
voltage or current, improper routine
maintenance, use contrary to the
operating instructions, disassembly,
repair, or alteration by anyone other than
qualied SENSIO Inc. personnel. Also,
the warranty does not cover
Acts of God such as re, oods,
hurricanes, or tornadoes.
SENSIO Inc. shall not be liable for any
incidental or consequential damages
caused by the breach of any express
or implied warranty. Apart from the
extent prohibited by applicable law, any
implied warranty of merchantability or
tness for a particular purpose is limited
in time to the duration of the warranty.
Some states, provinces or jurisdictions
do not allow the exclusion or limitation
of incidental or consequential damages,
or limitations on how long an implied
warranty lasts, and therefore, the above
exclusions or limitations may not apply
to you. The warranty covers specic
legal rights which may vary by state,
province and/or jurisdiction.
20

21
How To Obtain Warranty Service:
You must contact Customer Service at
our toll-free number: 1-866-832-4843.
A Customer Service Representative
will attempt to resolve warranty issues
over thephone. If the Customer Service
Representative is unable to resolve the
problem, you will be provided with a
case number and asked to return the
product to SENSIOInc. Attach a tag to
the product that includes: your name,
address, daytime contact telephone
number, case number, and description of
the problem.
Also, include a copy of the original sales
receipt. Carefully package the tagged
product with the sales receipt, and send
it (with shipping and insurance prepaid)
to SENSIO Inc.’s address. SENSIO Inc.
shall bear no responsibility or liability
for the returned product while in transit
to SENSIO Inc.’s Customer Service
Center.


For customer service questions or comments
1-866-832-4843
bellahousewares.com
Sensio Inc.
New York, NY 10016/USA
90094_R14