Loading ...
Loading ...
Loading ...
2.Makesurethatthereis
agroundingstrap.
3.Fixthestrainreliefclamptothe
anglebracket.Tightenthenut.
4.Loosenthe2 screwslabeledLand
thescrewlabeledNintheterminal
block.
5.Threadthe3-wirecablethrough
theU.Lstrainreliefclamp.
6.Tightenthescrews(2.5Nm)onthe
U.Lstrainreliefclampsothatthe
powercordcannotbemoved.
7.Attachthe2 powercordouter
conductors(redandblack)tothe2
terminalslabeledLandthe
remainingpowercordconductor
(white)totheterminallabeledN.
8.Tightenall3 screws(3Nm)sothat
thepowerconductorsareheldin
placesecurely.
9.ChecktheU.L strainreliefclamp
tomakesurethatitistightand
cannotbeturned.
10.Replacethecoverontheterminal
blockandfasteninplace.
[_ MakesurethattheU.L strainrelief
clampisoutsidethecover!
Additionalgrounding procedure
- Somelocalregulationsmay
requireaseparateground.Insuch
cases,therequiredaccessory
groundwire,clampandscrew
mustbepurchasedseparately.
- Nevergroundthedryerto plastic
plumbinglines,gaslinesorwater
pipes.
Groundinginstruction
Thisappliancemustbegrounded.In
theeventofamalfunctionor
breakdown,groundingwillreducethe
riskofelectricshockbyprovidinga
pathofleastresistancefortheelectric
current.
ForCanadathedryercomeswitha
cordwhichhasanequipment
groundingconductorandagrounding
plug.Theplugmustbepluggedintoan
appropriateoutletwhichhasbeen
properlyinstalledandgroundedin
accordancewithalllocalregulations
andordinances.
Improper connection of the
equipment grounding conductor
may result in electric shock.
Have the appliance checked by
a qualified electrician or service
technician if you are in doubt as
to whether the dryer has been
properly grounded.
Exhaust air connection
1. To reduce the risk of fire, this dryer
MUST BE EXHAUSTED
OUTDOORS.
2. To reduce the risk of fire, do not
use the ductwork longer than
recommended.
3. DO NOT use a plastic or
non-metal duct with this dryer.
4. DO NOT use a duct smaller than 4
inches in diameter.
5. DO NOT use exhaust hoods with
magnetic latches.
6. DO NOT exhaust the dryer into a
chimney, furnace cold air duct,
attic, crawl space, or any other
ductwork used for venting.
7. DO NOT install a flexible duct in an
enclosed wall, ceiling or floor.
8. DO NOT crush or kink the duct.
9. Do clean and inspect the exhaust
system on a regular basis; at least
once a year.
10. The exhaust duct must terminate
in a manner to prevent back drafts
or entry of birds or other wildlife.
The Bosch dryers are intended to be
vented outdoors. To prevent build-up
of moisture and accumulation of lint
indoors, as well as to maintain
maximum drying efficiency, it is
recommended that the dryer is vented
outdoors.
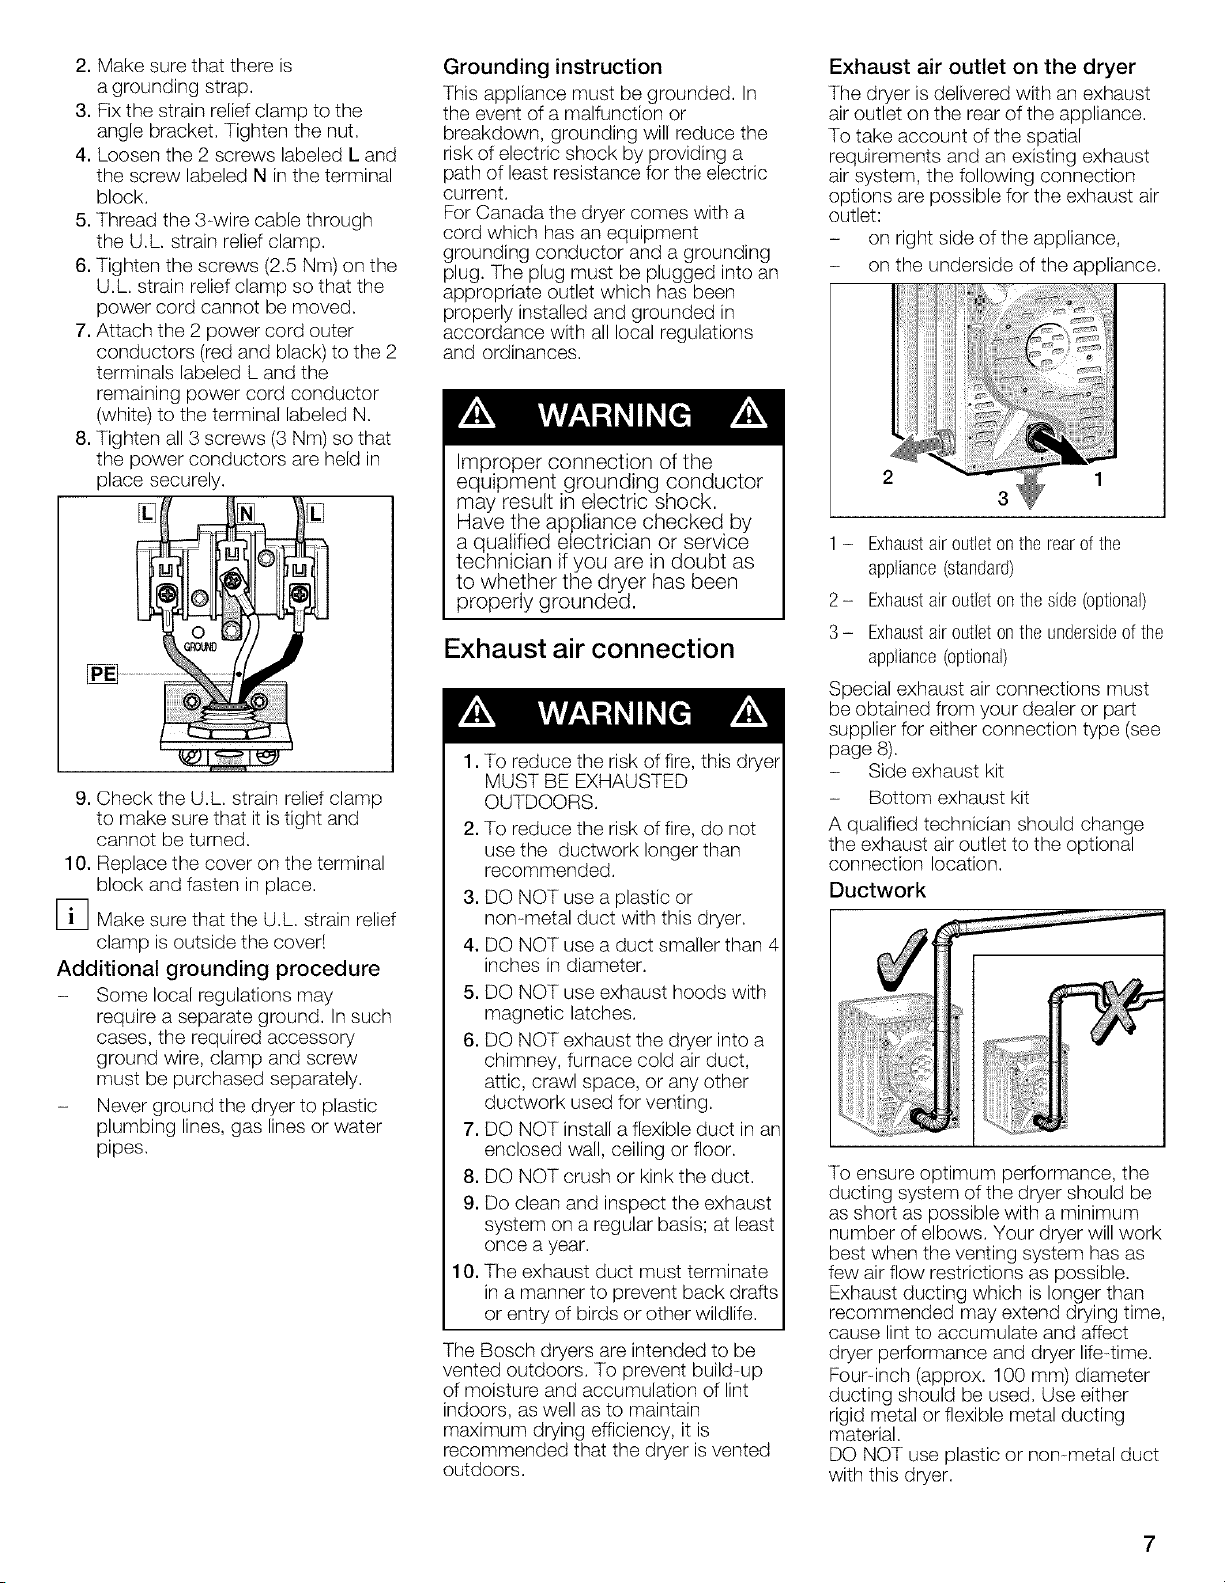
Exhaust air outlet on the dryer
The dryer is delivered with an exhaust
air outlet on the rear of the appliance.
To take account of the spatial
requirements and an existing exhaust
air system, the following connection
options are possible for the exhaust air
outlet:
- on right side of the appliance,
- on the underside of the appliance.
2 1
3
1 - Exhaustairoutletonthe rearof the
appliance(standard)
2- Exhaustairoutleton the side (optional)
3 - Exhaustairoutleton the undersideof the
appliance(optional)
Special exhaust air connections must
be obtained from your dealer or part
supplier for either connection type (see
page 8).
- Side exhaust kit
- Bottom exhaust kit
A qualified technician should change
the exhaust air outlet to the optional
connection location.
Ductwork
To ensure optimum performance, the
ducting system of the dryer should be
as short as possible with a minimum
number of elbows. Your dryer will work
best when the venting system has as
few air flow restrictions as possible.
Exhaust ducting which is longer than
recommended may extend drying time,
cause lint to accumulate and affect
dryer performance and dryer life-time.
Four-inch (approx. 100 mm) diameter
ducting should be used. Use either
rigid metal or flexible metal ducting
material.
DO NOT use plastic or non-metal duct
with this dryer.
Loading ...
Loading ...
Loading ...