Loading ...
Loading ...
Loading ...
Introduction
This Wet/Dry Vac is intended for house-
hold use.
IMPORTANT NOTE
Please Read Carefully
Static Shocks Are Common - In dry
areas or when the relative humidity of the
air is low. To reduce the frequency of
static shocks in your home the best rem-
edy is to add moisture to the air with a
console humidifier.
Owner's Manual Contents
Item Page
Warranty Information ............................. 2
Safety Instructions ................................. 2
Introduction ............................................ 4
Unpacking and Checking
Carton Contents ............................. 4
Assembly ............................................... 4
Operation ............................................... 7
Maintenance .......................................... 9
Repair Parts ........................................ 12
Unpacking and Checking Carton Contents m
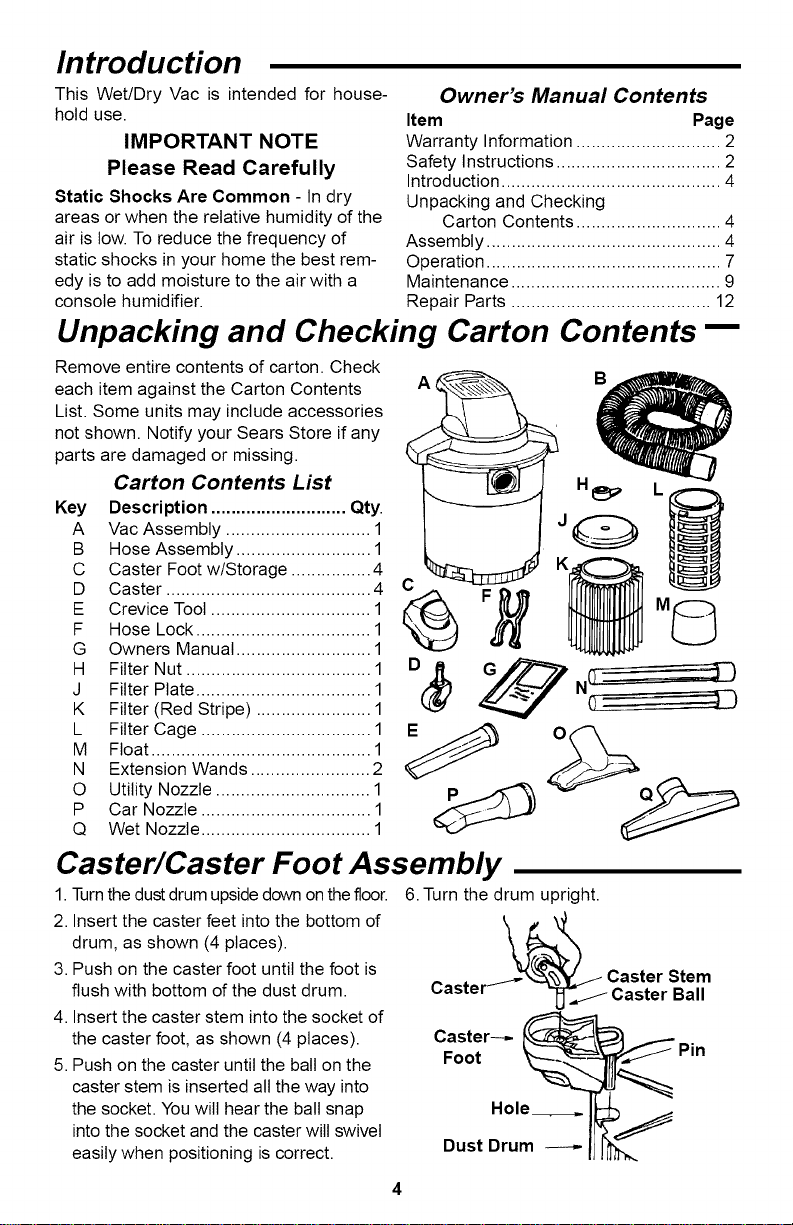
Remove entire contents of carton. Check
each item against the Carton Contents
List. Some units may include accessories
not shown. Notify your Sears Store if any
parts are damaged or missing.
Carton Contents List
Key Description ........................... Qty.
A Vac Assembly ............................. 1
B Hose Assembly ........................... 1
C Caster Foot w/Storage ................ 4
D Caster ......................................... 4
E Crevice Tool ................................ 1
F Hose Lock................................... 1
G Owners Manual ........................... 1
H Filter Nut ..................................... 1
J Filter Plate ................................... 1
K Filter (Red Stripe) ....................... 1
L Filter Cage .................................. 1
M Float ............................................ 1
N Extension Wands ........................ 2
O Utility Nozzle ............................... 1
P Car Nozzle .................................. 1
Q Wet Nozzle .................................. 1
Caster/Caster Foot Assembly
1. Turnthe dust drum upside down on the floor.
2. Insert the caster feet into the bottom of
drum, as shown (4 places).
3. Push on the caster foot until the foot is
flush with bottom of the dust drum.
4. Insert the caster stem into the socket of
the caster foot, as shown (4 places).
5. Push on the caster until the ball on the
caster stem is inserted all the way into
the socket. You wilt hear the ball snap
into the socket and the caster wilt swivel
easily when positioning is correct.
6. Turn the drum upright.
_J Caster Stem
Caster_ _Caster Ball
Caster_
Foot Pin
Hole__..
Dust Drum_ _
Loading ...
Loading ...
Loading ...