Ai ITI NE
Please read the operating instru,ctions and safety precautions
carefully and th,oroughly before installing and operating your room
air conditioner,
AI ICIONA
Por favor lea las instrucciones de operaci6n y las precauciones de
seguridad cuidadosa y totalmente ,antes de instalar y operar su
acondicionado, r de aire de ventana,
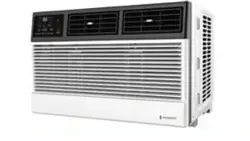
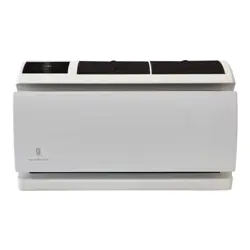
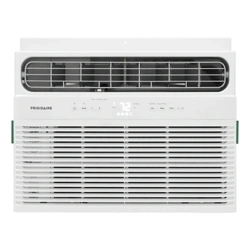
MODELS, MODELOS: HIBLG1,803R
Manufactu red by LG Elle_ro,nics
FOR YOUR RECORDS
Wr_e the m,od_ and _ria] nur_rs here:
Mode| #
_rial #
You can find them on a label on the side of each unit.
_aler's Name
Date Purc_sed
[] Stap,_eyou_ _eceipt to this pa_ i_°_the e_e_t you need
it to prove date of purcha_ or for waffan|y issue.
READ THIS MANUAL
_nside 'you wilJ fir_ many helipfui hints on how to use
and maintain your air coi_t_oi_r Ip,rof_r[y. Just a Ifflie
preventive care on your part can save you a great dea_
of tim and money over the lile of your air oo,nditioner,
You'H find many answers to common prob]e_ in the
cha_ of troub,lest_ling tips. if you review our chart ,of
Troub_esh_tJng Tips first, you may not need to calil
for _rv_e at al_
• Contact the a_hori_d _vice technician _or repair o_
_|nt_,an_ .ofth|s unit,
.,Contact the insta|_r for instal_tion of this unit.
• _e al_ cond|tio.ner is not inten_d for u_ by young
chi_ren or invalids w_hout su_rv_m
=Young children should be su_rvi_d to ensure that
t_y _ _ot p|ay with the _i_ conditioner,
• When t_ power cord is to. i_ r_laoe_,, replacement
wo_ sh_ll _ _rfot_ by _thorized _tsonne_ on_
_ng only _nuir_, mp,la_nt part&
• _ns_l_tion work mu_ _ perto_d in a_ordance with
• e Na|io_l El_ric C:o_ b,y qua_it_d _d _thori_
_onne_ o_|y_
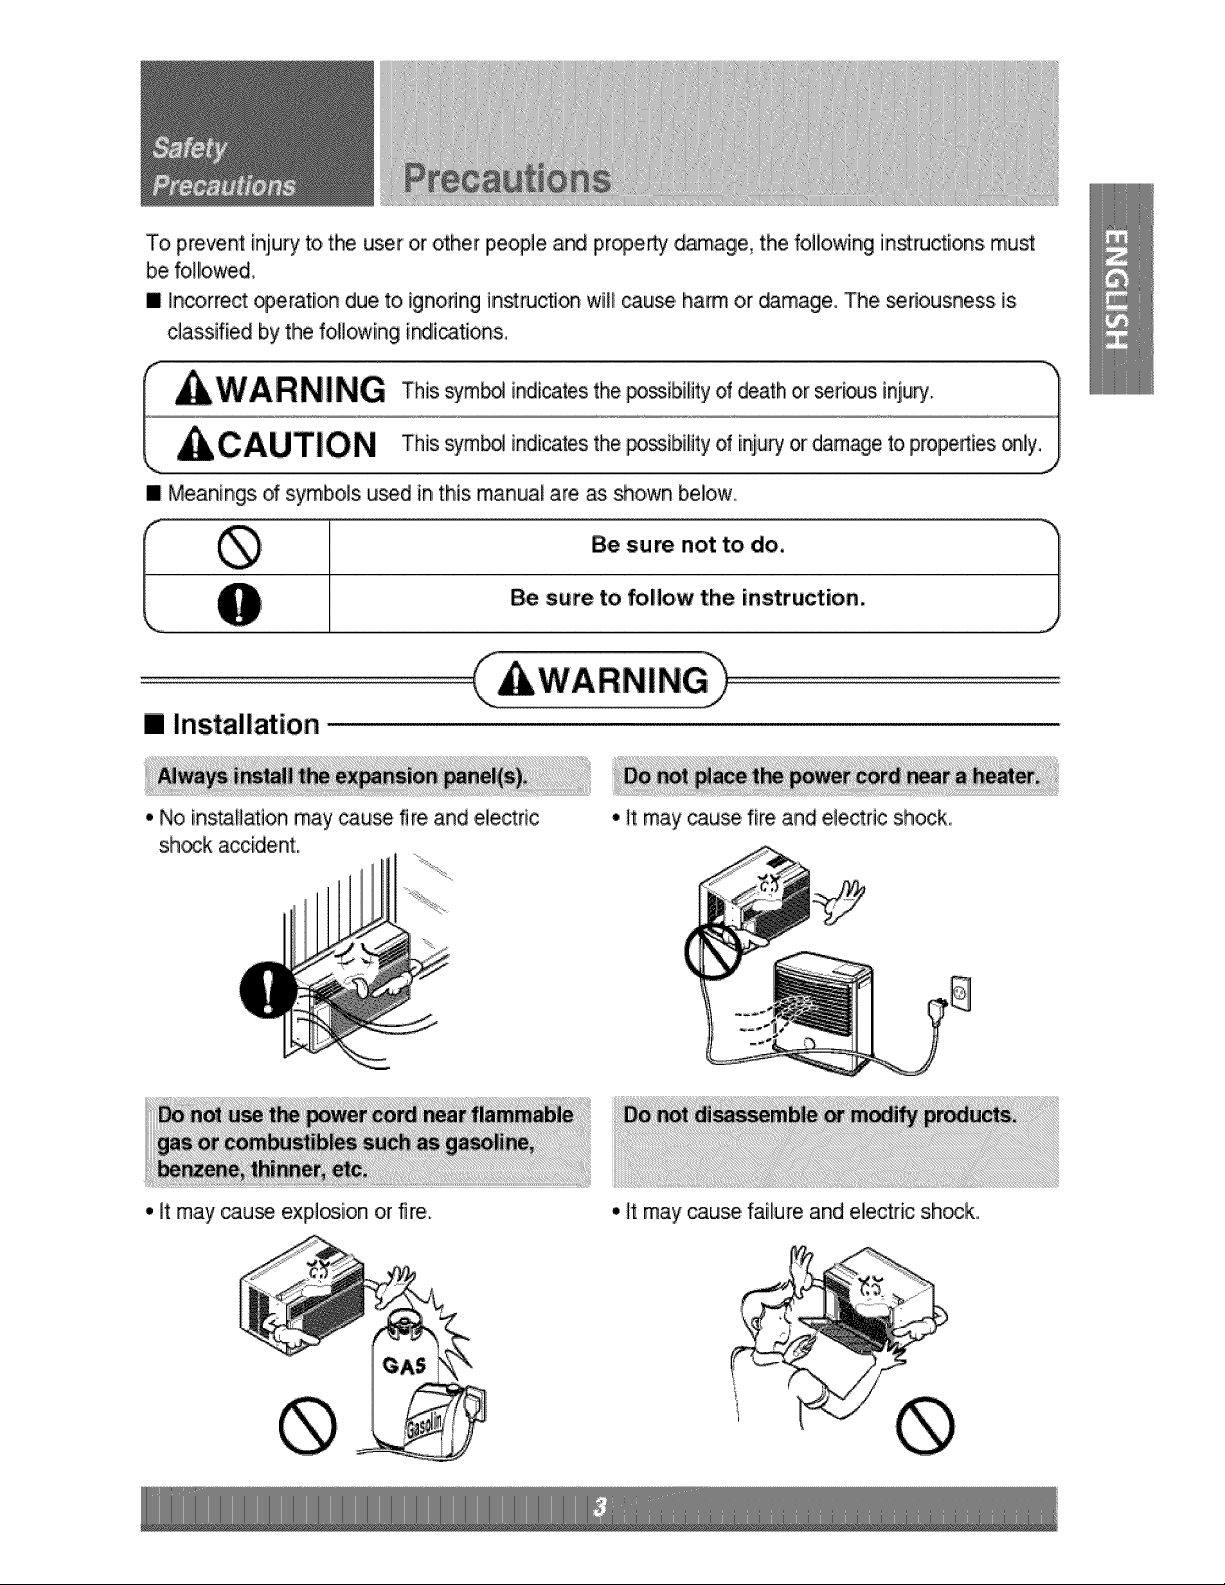
To prevent iniu _ to tihe user or other people ar_ pr_erty damage, the following inst_ctions, must
be fo,l!owe&
i incorrect c_,erati,on due to ignoring instruction wi_ cause harm or _mage. The senousness, is,
classified by the fo!lowing i_iications,
[] Meanings d symbols u_d in this manual are, as shown below.
I ..o oot,ooo. rl!
Be sure to follow' the instruction.,
[] Installation
° No installation may cause fire and electric
sh_k accident:,
• _t may cau_ fire and electric shock
° It may _u_ explos, ion or fire, ° it may cau_, failure and electric s,h_k,.
m Operation
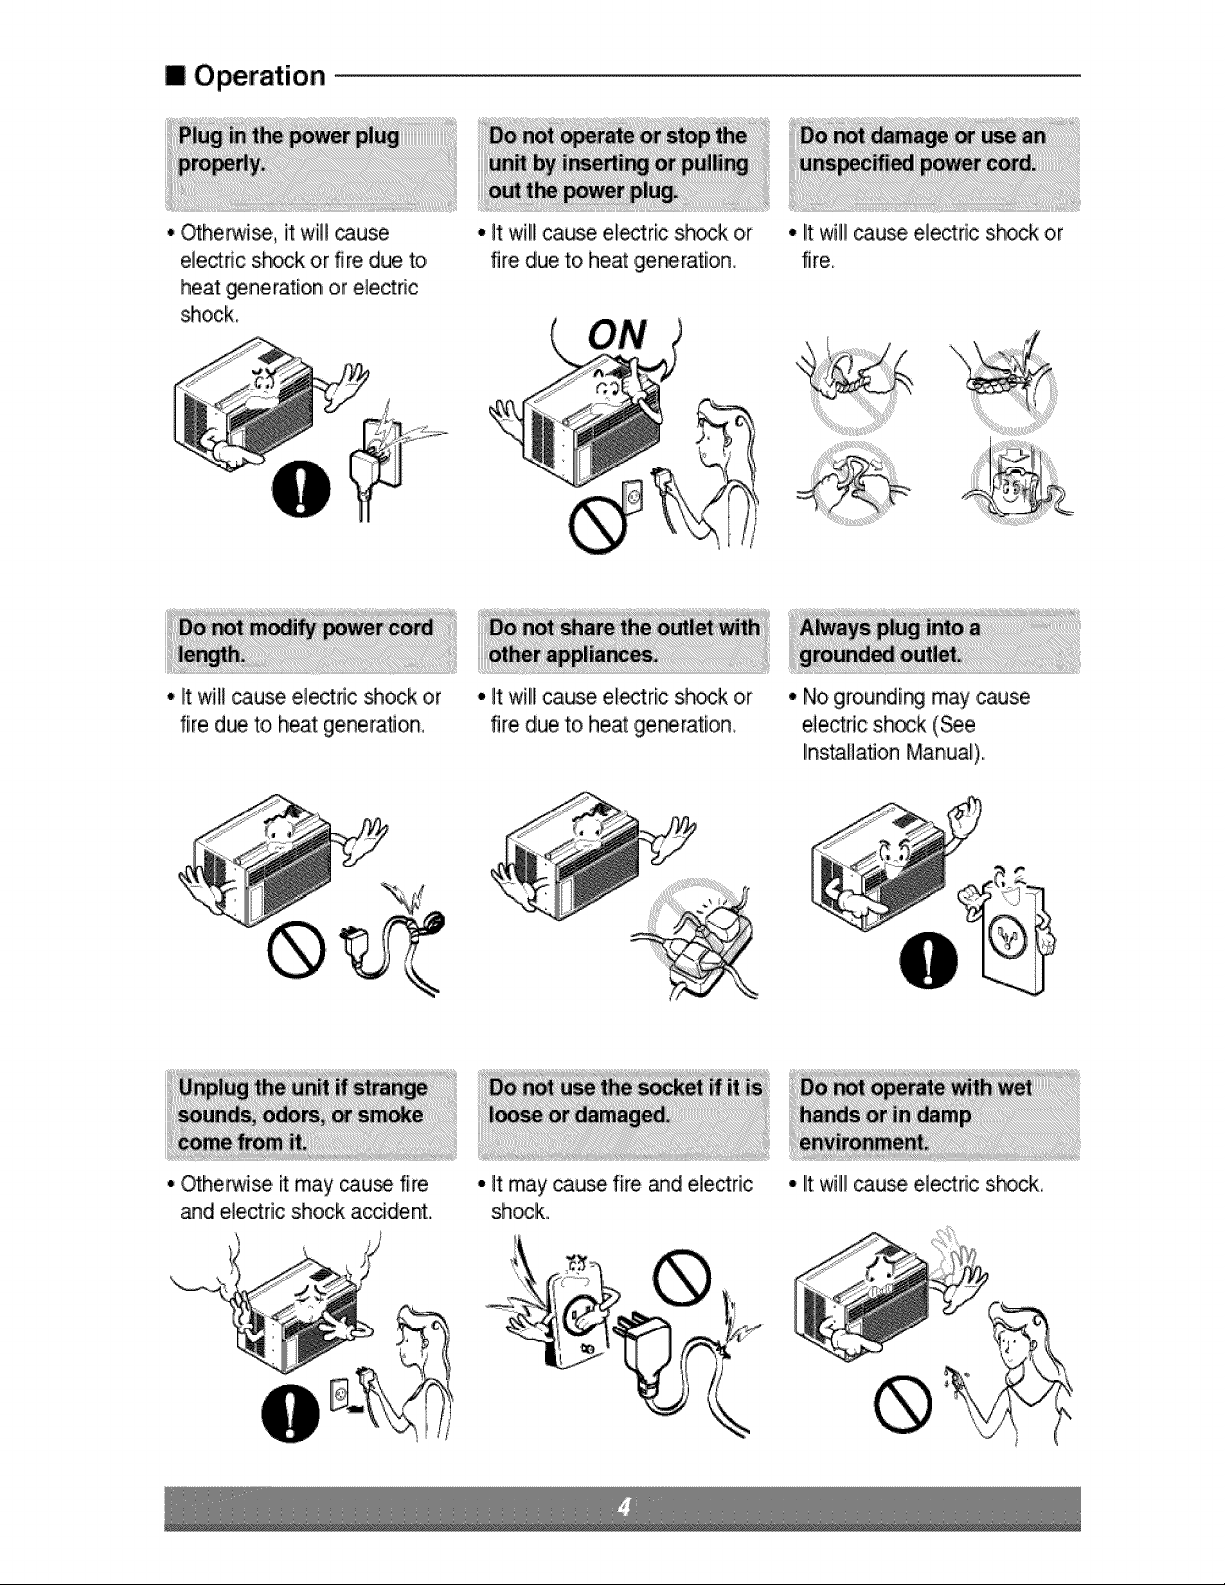
° _herwi_, it wi]] muse
ele_fic shock or fire due to,
heat _nerat[,on or electric
_ock_
• It will cause electdc shock or
fire due to heat generation,
° Otherwise it may cau_ fire
_d e]e_ric shock a_ident,.
• It wil!lcause el_ric shock or
fire due to heat ,germration.
• It will cause e!_ric shock or
fire due to heat gereration,
° It may _u_ fire and ,electric
sheik..
° I!twill! cau_ electric shock or
fire.
° No groundi_ may cause
e]e_ric sh_k (_e
installation Manual).
° lit will cause electric s_ck,
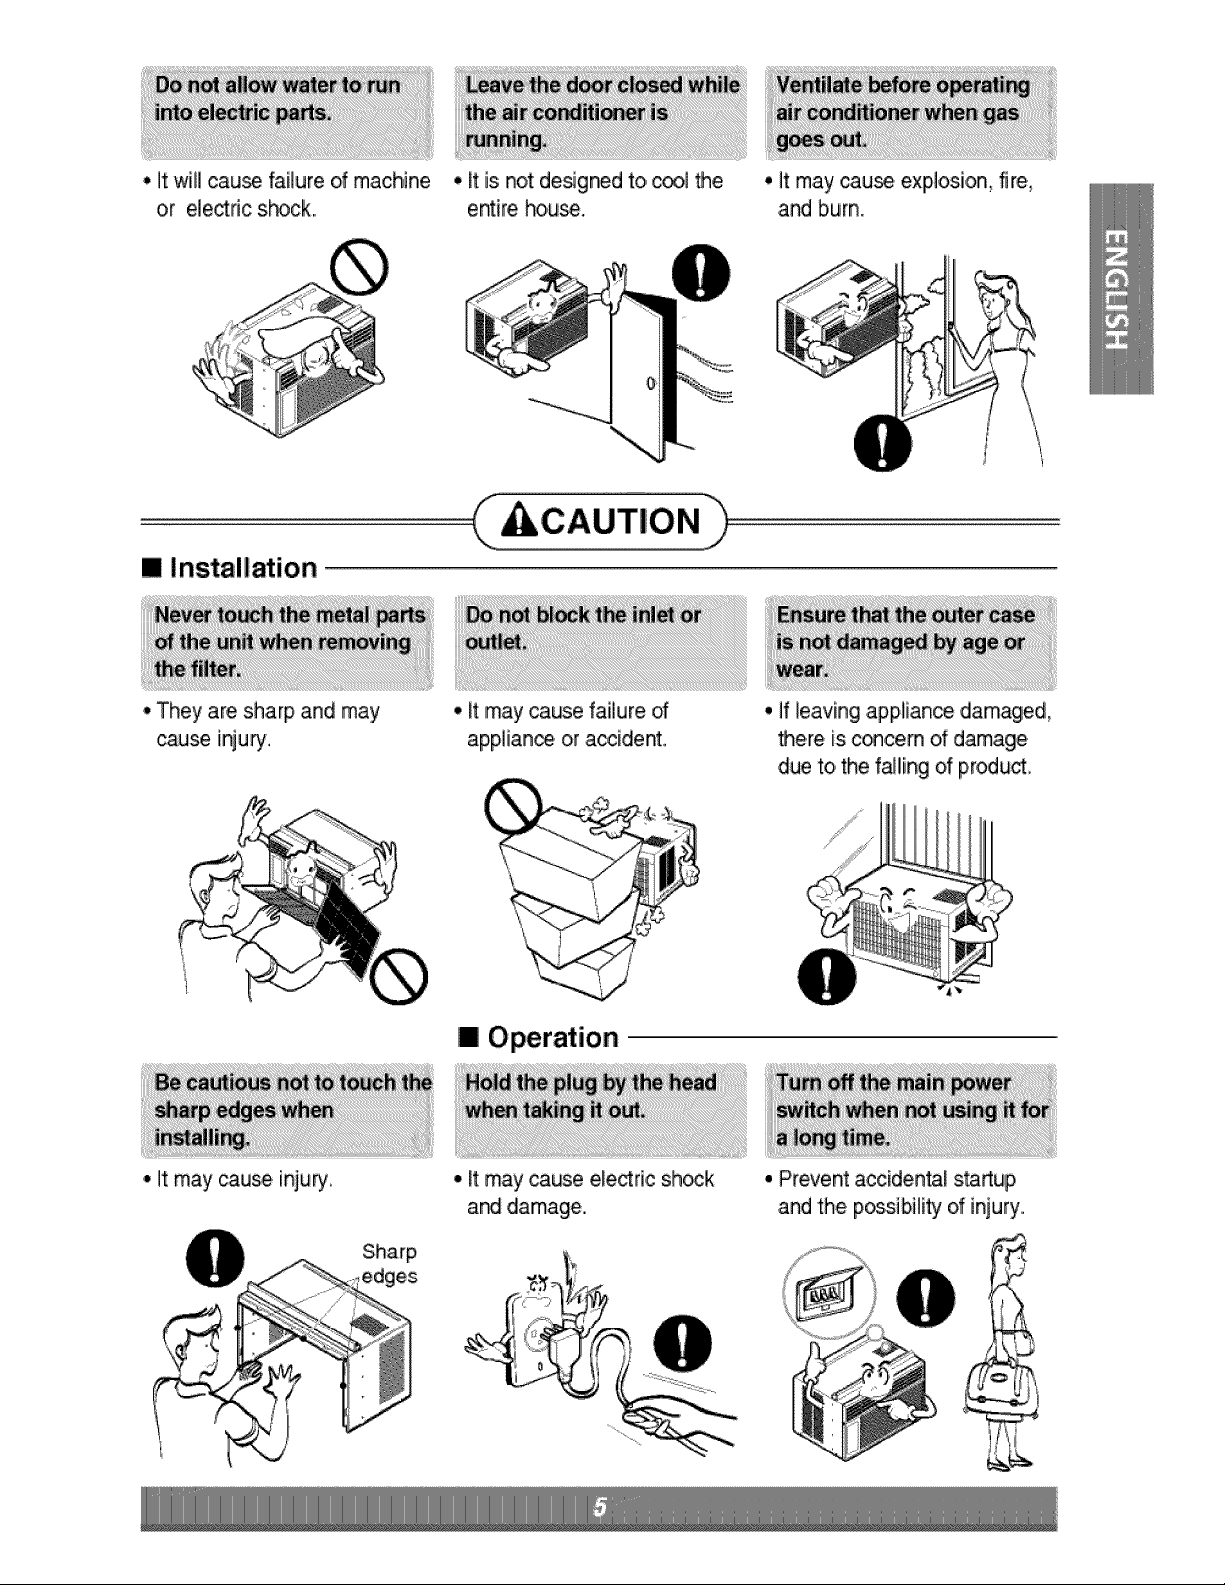
• It will cau_ failure of machine
or elect_ficsP#ck.,
I Installation
• They are sharp ,andmay
cause iinju_.
• It may _use inju%
• It is not deigned to, _l Me
entire ho,u_.
i'i'iiiiiiiiii¸
_iiii,i_iillii ii!ii!ii!ii!ii!ii!ii_ii!iiiiiiiii!!_:
° it may cause failure of
applian_, or a_ident,,
i
> /
/
° It may cau_. explosi,on, fire,
.andburn.
• ff _eaving appliance damaged,
there is concern of damage
due to,the f_ling of product,
I Operation
Sharp
es
° it may cause ele_ric shock
a_ diamage.
° Prevent acciden_l sta_up
,andthe, pos,sibili_ of injury,.
iiii_:;:i!i!iii!i!!!!!_!iiiii;_i_!;iilf!l_Jii_!?ii!!_!i_!_!!iiii!¸iiiii;;;ii!i!iiiiii!;!i!i!;iiiiiiilliiiiiiii;iii iiii;iiii!iiiiiiiii;;iiii:iilli!!!!iiiiiiiii;iiiiiilliiilliiililiiiiiiiiiiiii!?i!ii!iiiiliilliiiliiiiii!iliiiii!i:i!i!iiliiii!i!i;i
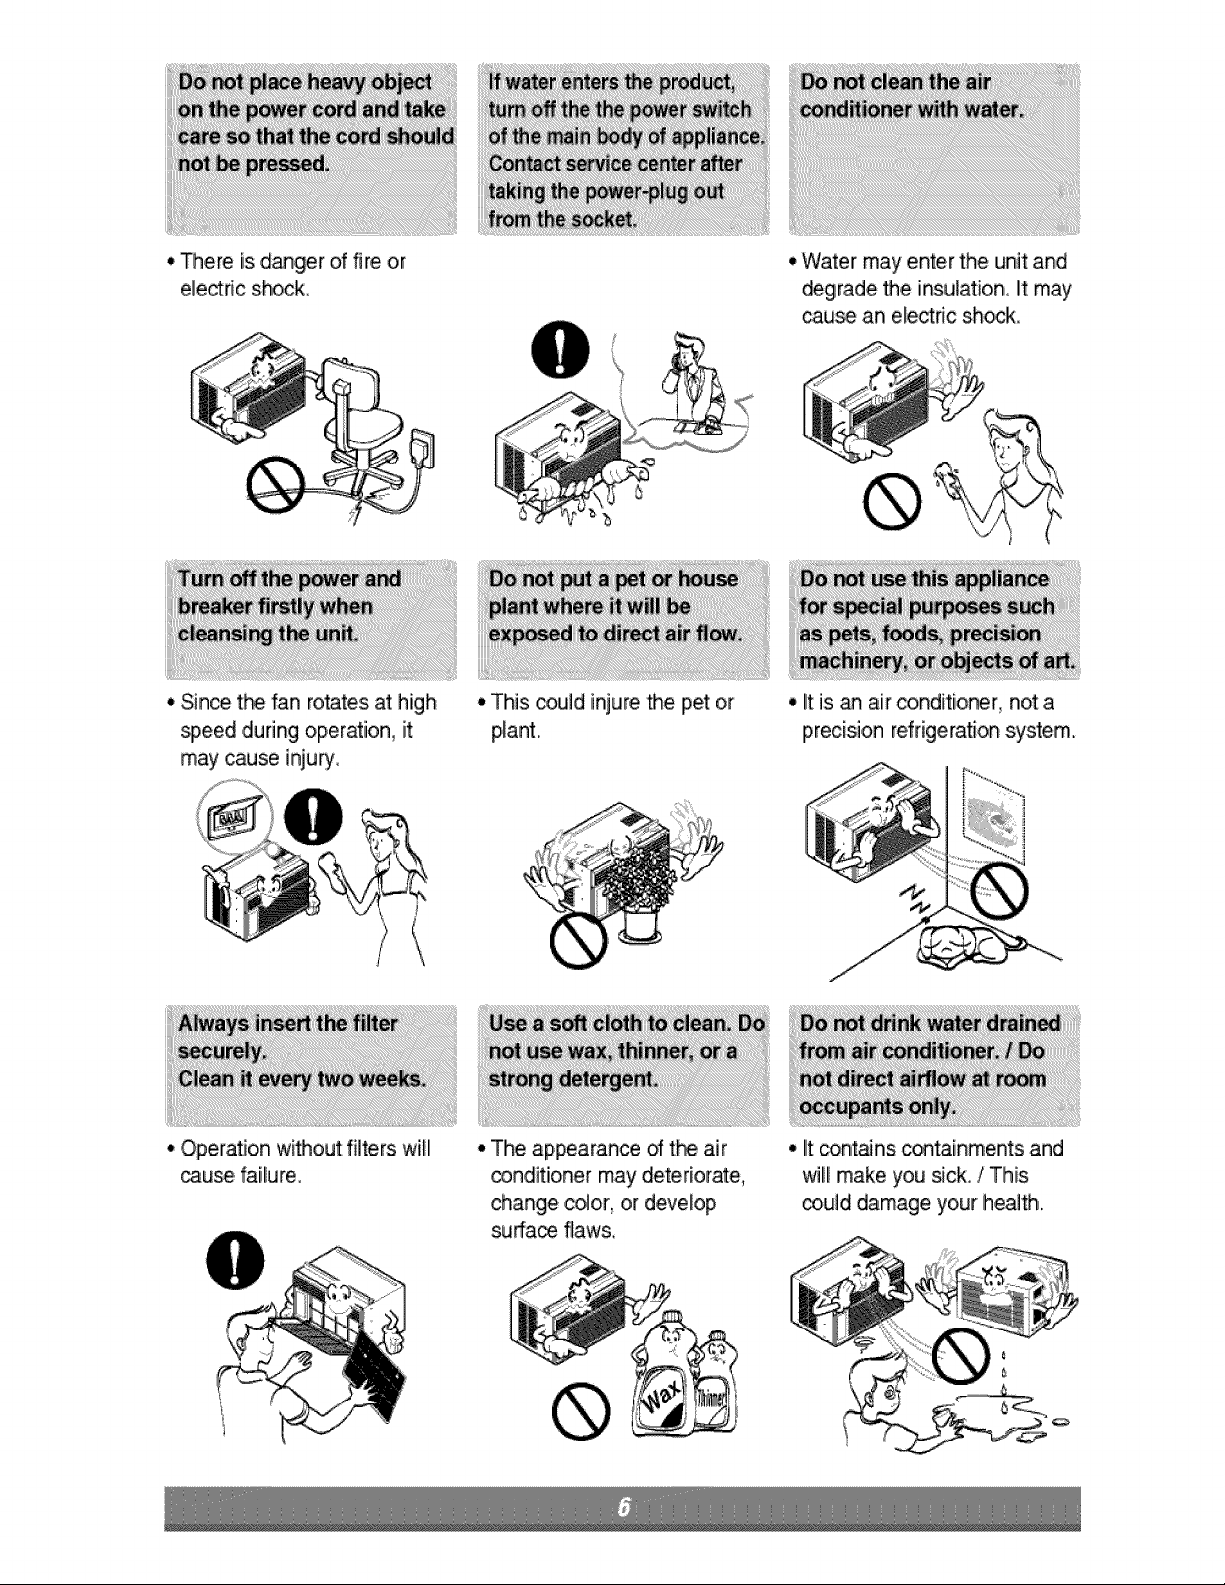
• _ere is danger of fire or
ele_ic shock,
• Water may enter the unit and
degrade the insulation, _t may
cau_ an electric shock
• Sin_ tb_ fan rotates at high
speed ,during operation, it:
may cause injuri,
i!!!!!!!t_iiii!i!!_i!i!_!iii__!iliiiiiii!_!i!iiii_!i !_!ii!iiiiii_!_!!!!ii!ii!ii!!i!i!i!i!i!i!i!i!i!i!i!iiiiiil¸_il;;_i!_iiii!i!iii!_iiiiii!!iiii!iill!_!ii_iiii_!iiiii!iili_iii_!ili!if!i_ii!ii_ii!!ii!!_!ii_!i!ii_iii__i:iii!i_iiiii:i:!_i:_!_i_!ii_!ii_!_i_ii;_:_iii!i_i_i:_i_iii?i_iiii_ii!i!:!iiiiiiiiiiiiii!_ii?;i;_!;ii!_i_!i!i!iilD_i!iiii!i!i!iiiiii!iiiii!iliiiiii_i!iiiiiiiiiiii!iiiii_iiiii_:ili;_i_iii!ili_jli_iiiii!!iiiiiiiiiiiiiiiiiiiiiiiiii!iii!iii!!ii_i_!ii_;__ __: _ _:__' :_ _:_ _ iiiii!ii_!!!!!!!i_
:_i_iii!!!i ii:iii:ii¸_i¸!!!!!!:i ii!illii ! :! !!iiiiiiii!ii!!iiiiiii!iiiiiiiilliiii i!i!i_i!i:i!:!ii!i:!ii!i:!¸ iii!iii!i: i_!!;_i;: i!i!ii:!!i!ii!_i_i!
• This could injure the pet o_ ° it is _ air conditioner not a
plant precision refrigeration system.
•Operation without filte,rs will
_use failure,
• The appearance d t_ air
_ndi :loner
t_ may deteriorate,
change c_or, or develop
suda_ flaws,
• _tcontorts containments and
wilil make you sick. / This
could damage, your health.
_ C_ct an instalillati_ s_cialist for installation.
PI_ in the p_ser piug pretty.
_Do not share the same outlierwith other applianc_
_Do not we an extension _rd.
Do net staWstop operation _ _uggin_unpluggin,g the pow_ cad.
_ cord/_ug is ,_mag_, replace only with an authorized _rt.
Being ex_sed to direct _fflow for an exter_i_ _ri_ of time could _ hazardous 'to your health, IDo no€
expose,occupant, _ts, or plan_ to di_t aiff!_ fo_" ext:end,_ _d_s of time,,
Due to the _ssibil_y of oxygen defic_ncy,, ventJlia_ethe room when usi_ t_ether with st_Jes or other
heating devices°
Do not:_e this air conditioner for non-specked Sl_Cial purpo_ (e,g, prese_ing precision de.vice,
food, pets_pla_s., .andart objects), Usage in such a manner _uld harm such pro_y,
Do not we water to cle.aninsMe the .airco_itioner, Exp_ure to water can des.troy_e insu_flon, leading
possible _ectric sh_k,
When cleaning the unit, fir_ make sure that the power and b_eaker are turned off. The fan rotates at a
ve_ high sp_ during o_ration. There is a p_siibili_ _ injury if t:l_ un_°s_w_ is accidentally
#iggered on while clleaning inner [pa_sof the unit.
F_ repair _d maintenance, con_ct your authorized _tvice dealer
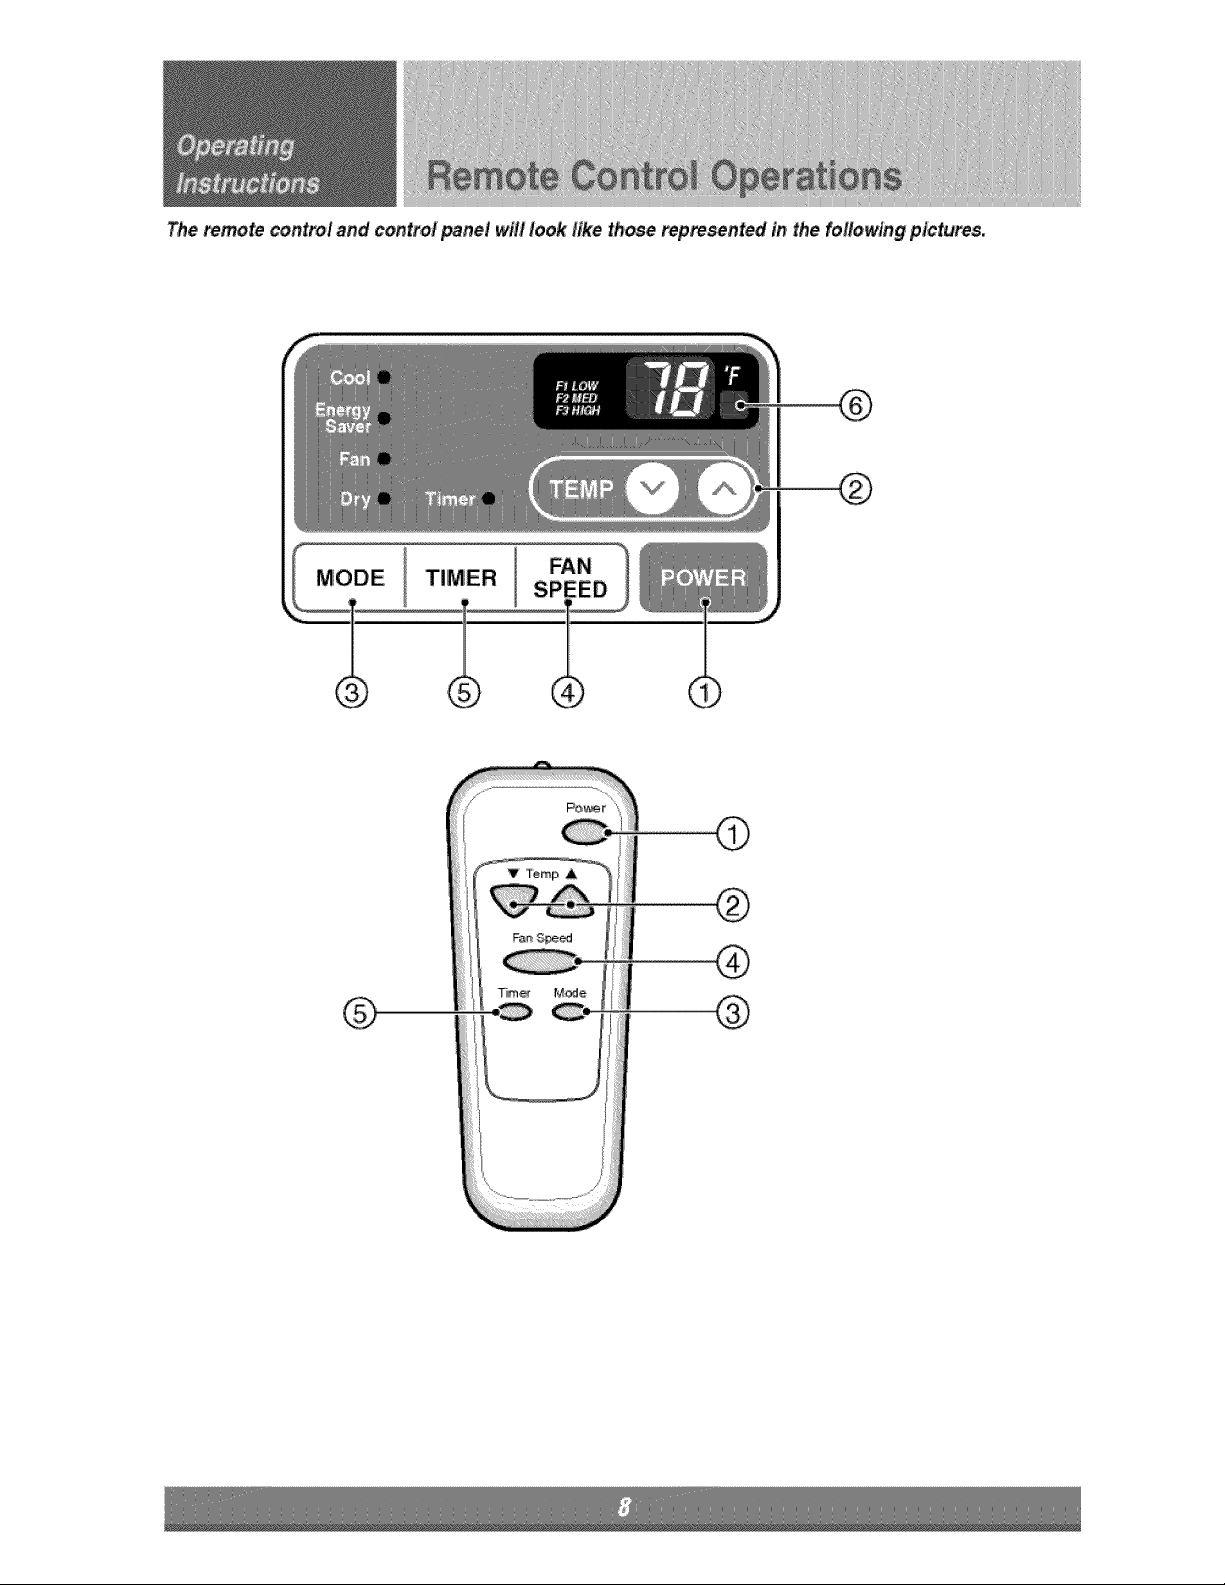
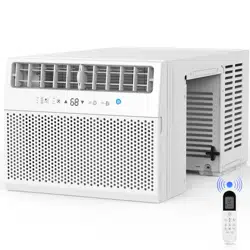
The _mote control and control _nel will look like those rep_sented in the following plctur"es.
®
®
POWER
,O_ration s_rts when this button is pre_ a_ sto_ when you pll3_ssthe b_on again
TEMPERATURE CON_OL
The thermostat m_ors room temperature to maintain _e desir_ tem_ratureo
The rheostat: c_ be set be._een 60_"F~_°F (16'_C~_°C).
The unit t_es an average _ 30 minutes to adjust the r_m tem_rature by i_'F.
OPERATION MODE SELECTOR
Select coo,llingm_e to _o_ _e _im..
Sei_t energy _ver mode f_ energy saving o_r_bn.
Select _anmode fo.rb_.ic ventilating fan operation_
Sei_: dry mode for d_ o_ration
FAN SPEED SELECTOR
For inc_ea_ _wer whilec_l!i_, s_ect a higher fan sp_.d_
3 ste_: High -) Lcw 4, M_
_ O_OFF T|MER
The timer _n _ _t to _tart and _top _e un_ in houdy i_rements, (up to 12 hours,),
REMOTE CON_OL SENSOR
Push ,o_ the cov_ on t_ back of tlhe remo_ co,ntro]with your _Ulmb
Pay attention to polarity a_ ir_serttwo new AA.Ai .5V batter,s.
'_ R_tLach the cm_er.
"_ not use rechargeable batlefes. Make sure that both batteries are new.
• In order to prevent _harge, remove the batteries fromthe remote control ff the air
conditioner is not going to.be used for an extended period of time
Ke_, _e remote control away from extm,mely hot or humid p¢aces,
To maintain optimal operation of _e remote control, the remote sensor should not be
exposed to direct sur_igh't.
° The remote co,ntro_can be mounted on a watl using the moun_ble holder.
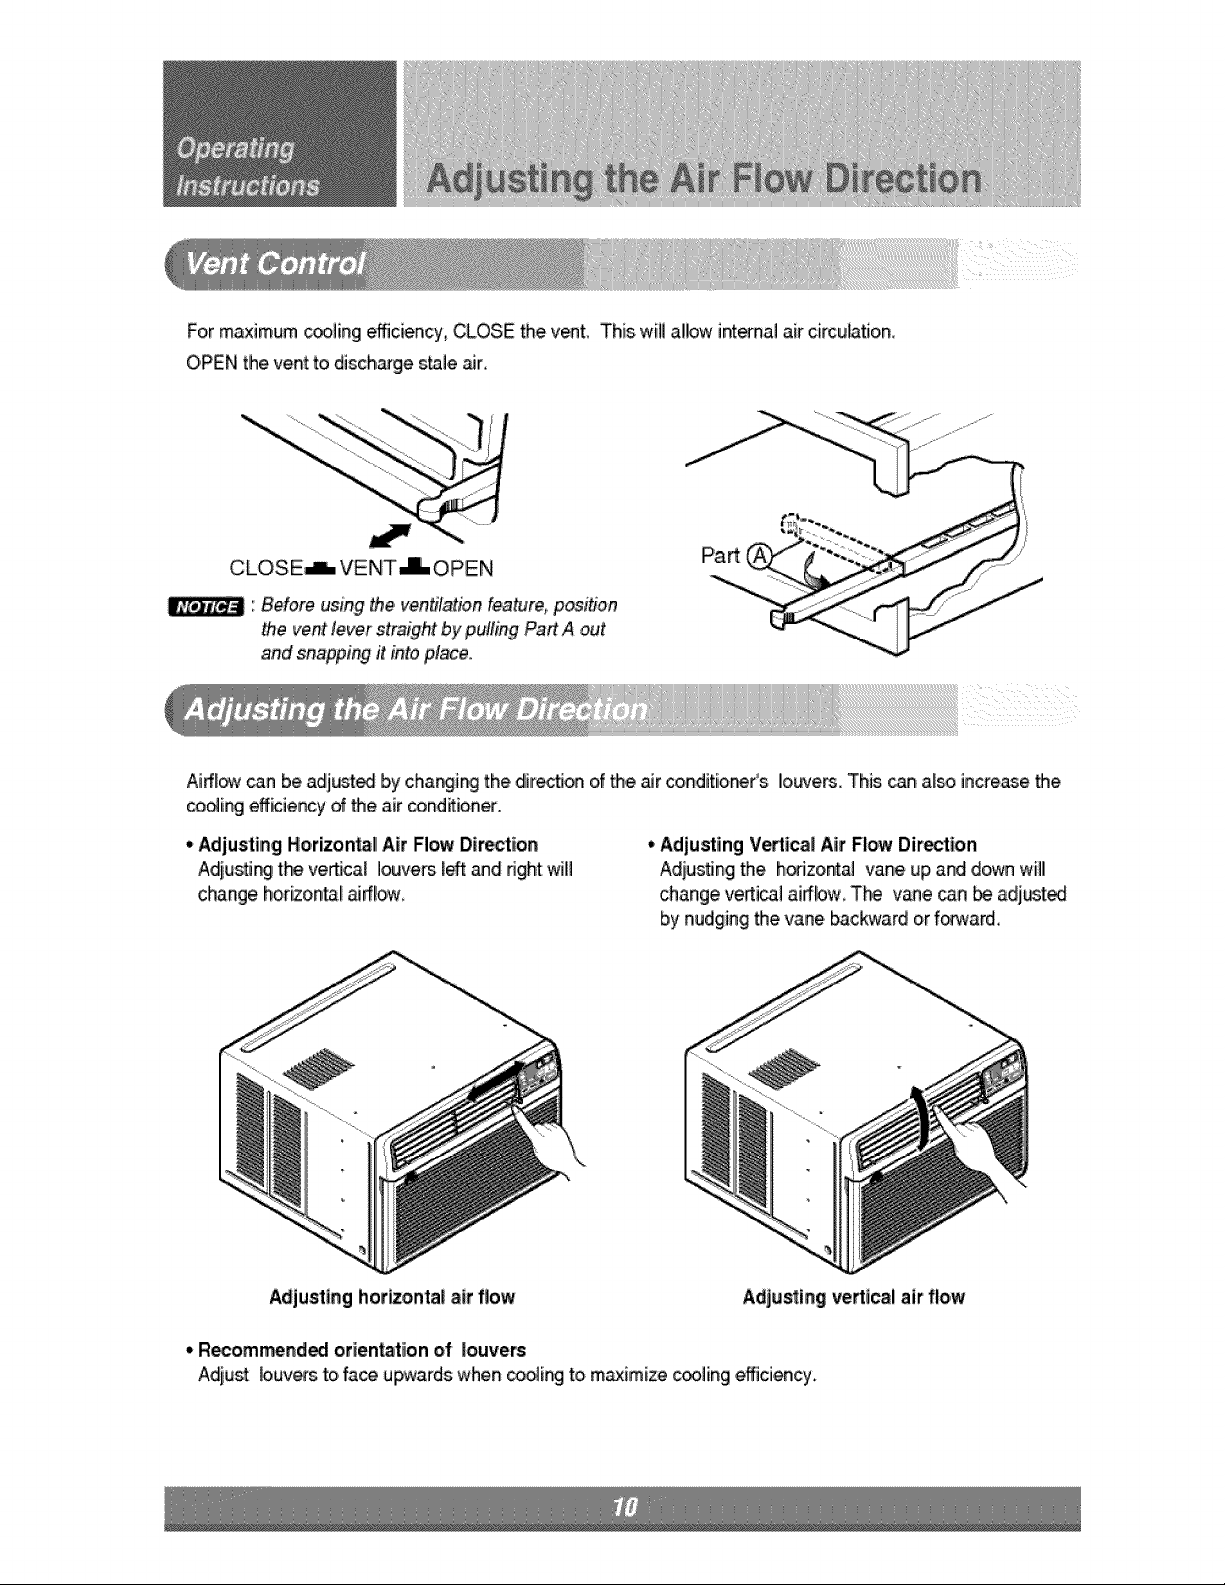
Formaximum_ling efficiency,CLOSEthev_t,,Thiswillallowinternalaircirculatio,n_
OPENtheventtodisch_gestale_r
CLOSE,L VENT.-LOPEN
Before using _e ventfla#on fea_'re, posifon
_e vent tever straight by pulling Pa_ A _'t
and snapping it into p,lace.
Aiff[_ _n be adjust_ by char_ing the diiirectionof the air conditiioneCs IIo_m_. This can also increase the
_o_ing eff_iency of the air cond_ion_.
• Adjusting Horizon_ll Air Flow Diction
Aejus_tJ_th_ v'erticallouvers I_ _d right will
change hori_on_[ aifflo,w,
• Adjusting Vetica| Air Flow Direction
Adjusting the h_zont_ vane up and d_m wiU
change ve_i_l airflow The vane _n _ adj_ted
by nudging the vane backward or forward,
Adjusting hotlzonta_air flow Adjuring 'vertical air flow
• Recomm=endl_ otien_tiion of louvers
Adiu_ louvers to,face upwards when _oling to m_imize _ling e_ciency.
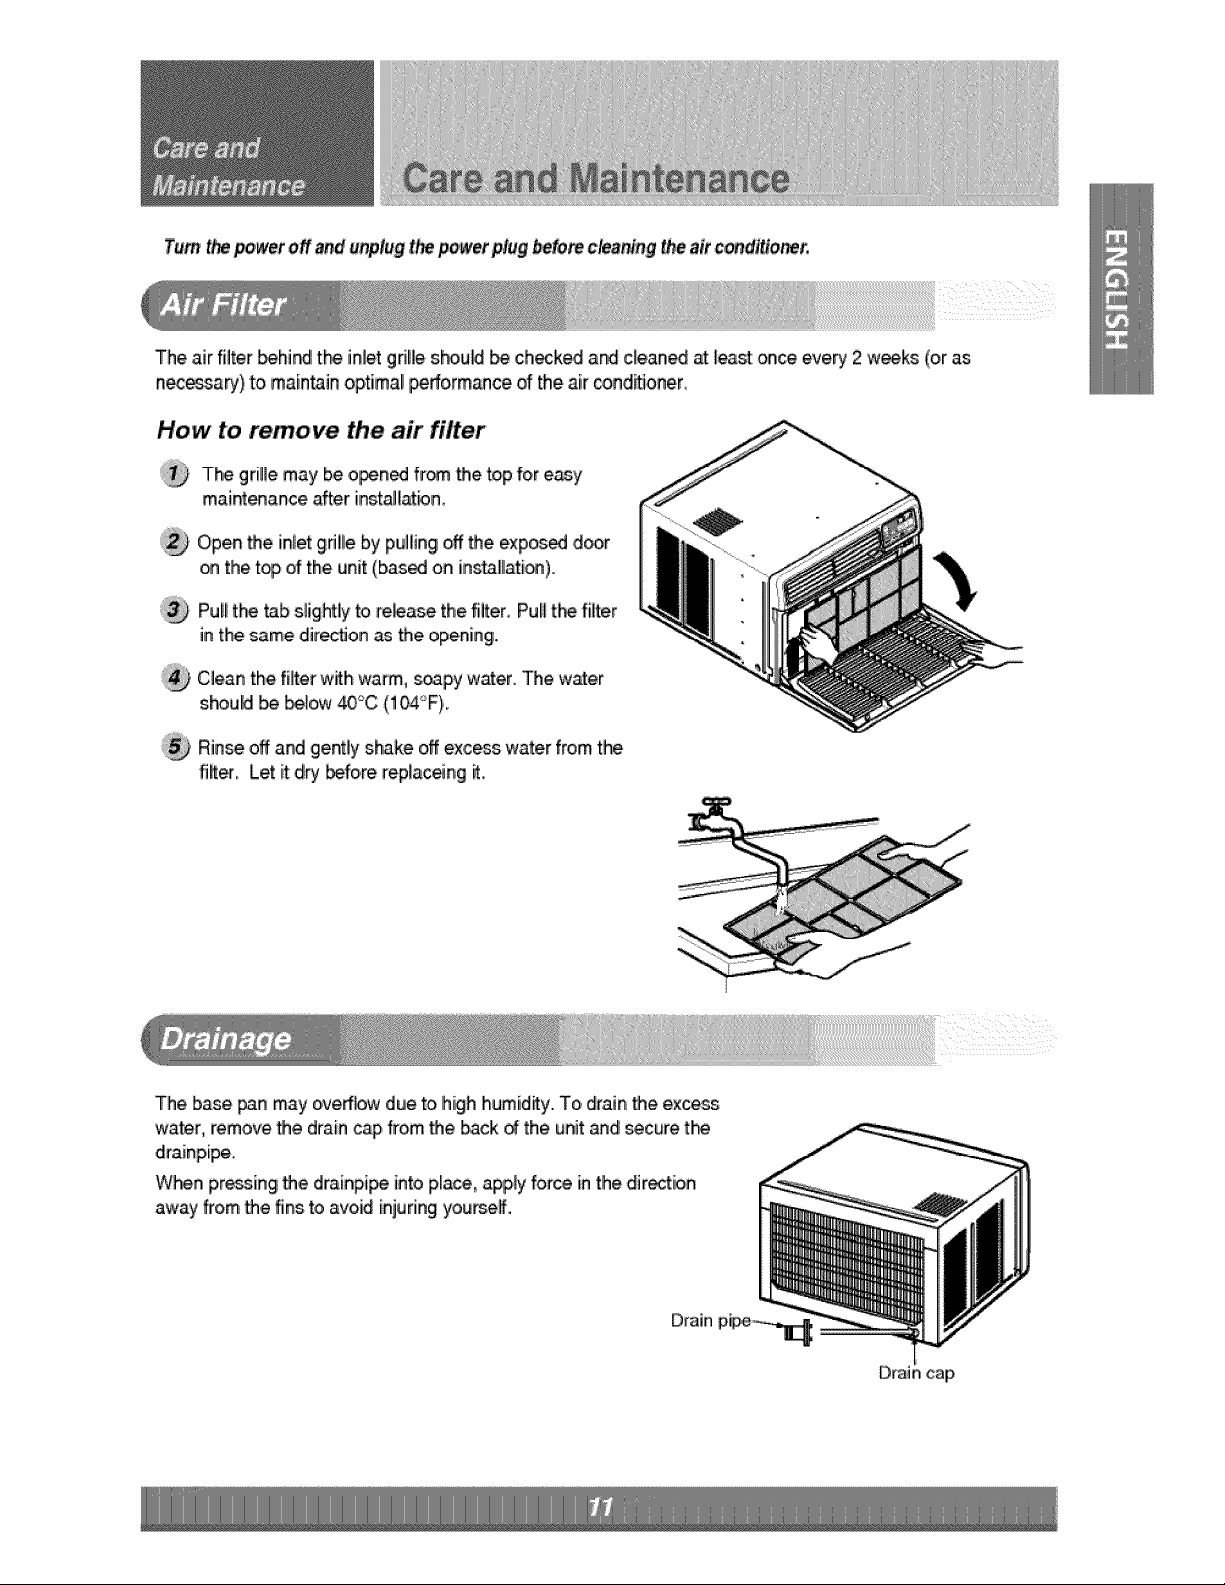
Turn t_ power of and unplugt_ po,wetplug _,_m c,_antngthe air condmone_
The air f[ff,er_hind t_ iNet grille sL_,u_ _ checked a_ c_ean,ed _ [east on_ eve_ 2 w_ks (oras
nece_a_) to ma[n_in optimal peffoirm_ce _ the air _n_i_oner.
How to remove the air filter
The gri!]e may be o_ned fr_ _e top for easy
maint_ance after instail_bn.
Open the inlietgdlle by pu]Uingoff _e exposed d_r
on the t_ of the unit (b_ed on ins_lllati_).
PuI_the tab s]igbt!y to re_ase the filter, Pul_tl_ filler
inthe same direction as the opening.
Clean the filter with wa_, sc_3pyw_er. The w_er
should _ _ _°C (I_°F}.
Rinse off and gently shake off excess water fromthe
fi_. Let it dry before rep_aceng it.
The base _n may o,veffbw due to high humidly. To, drain _e excess
water, remove _e drain cap from _,e back _ the unit and _cure t_
When p,ress.[ngthe drainpipe intoplace, apply force inthe.direction
away from _,e fins to avoid injuring yourse_.
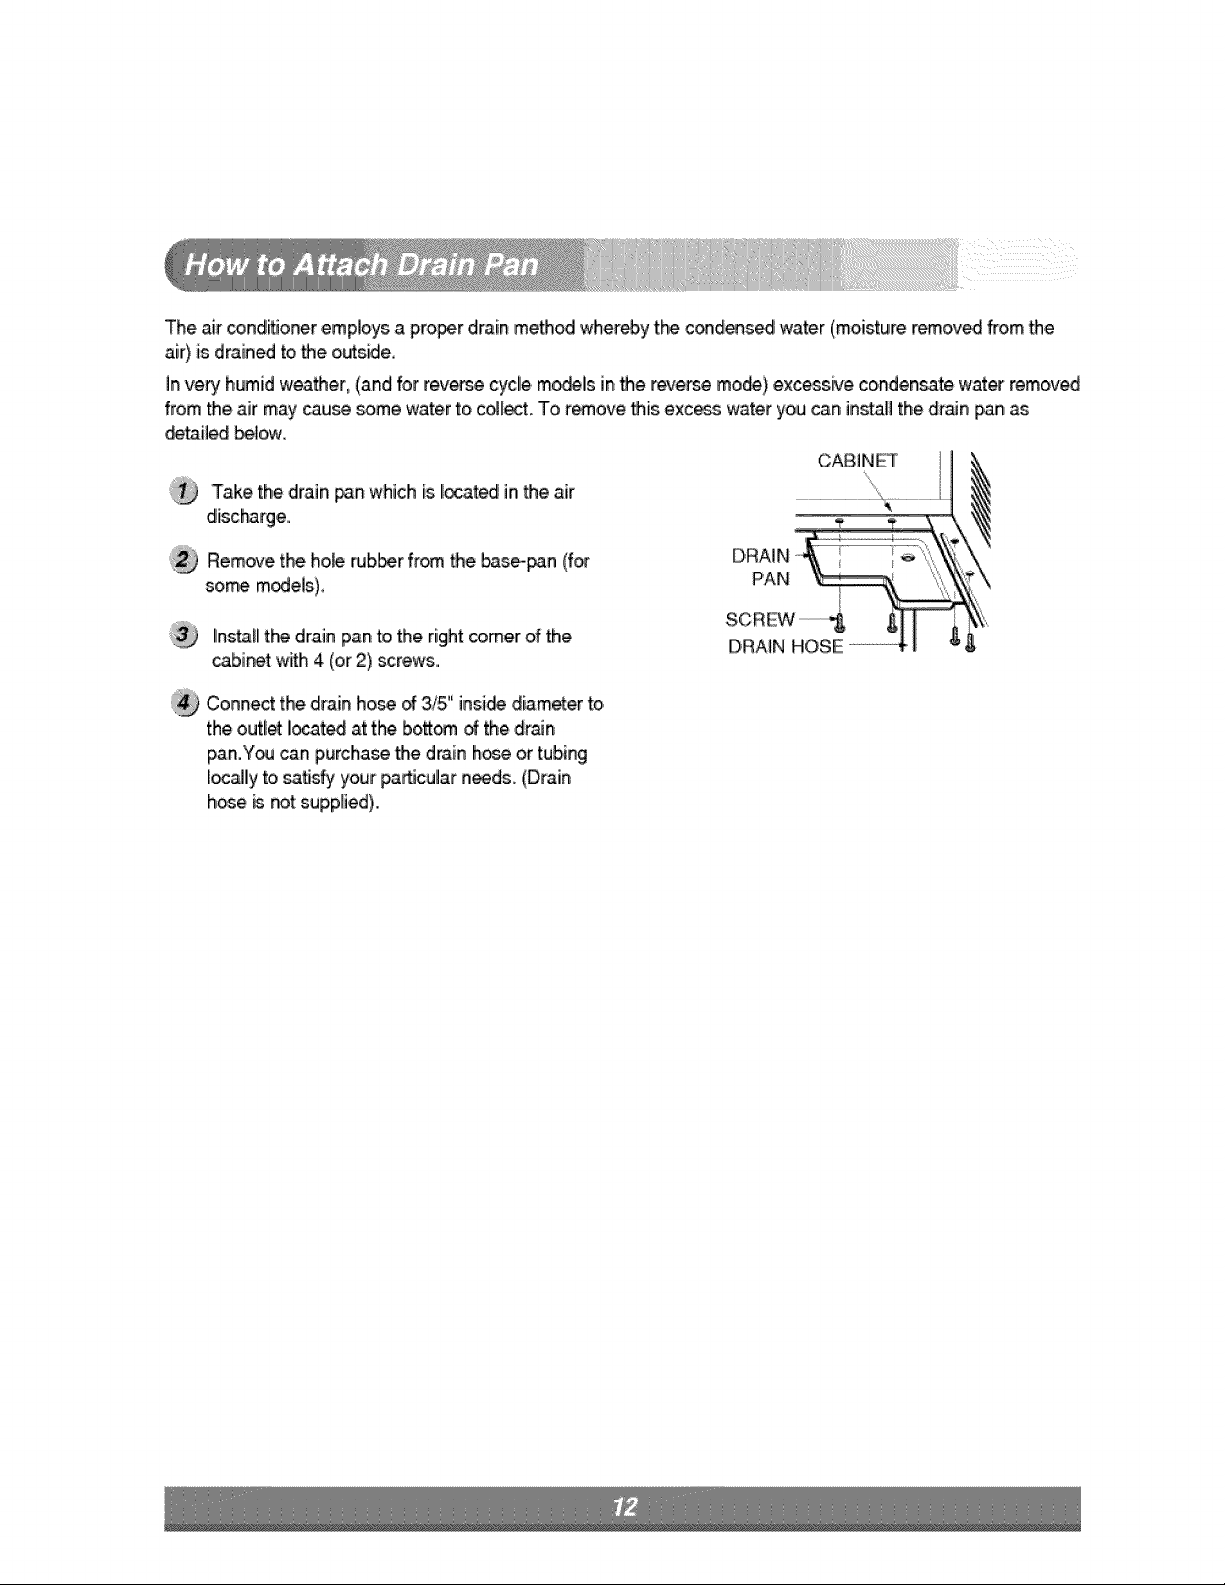
Theairconditioneremploysa proper drain method whereby t_ cond_s_ water (moisture remov_ from the
air) is drained to the o_s_e,
in very humid weather, (and for rev_ cycle m_ls in the reverse mode) excess_e condensate water removed
from the air may _use some water to co4_, To remove this exc_s water you can insta!l the drain pan as
CASIN£T
Take the drain _n which is lior_ted in the air
disc_rge..
Rem_e the hoi_ rubber from the _se-_n (fo_
some models),
_ns'_ the drain parttothe right corner of the
cabi_t with 4 (or 2) screws..
Connect the drain hose _ 3/5" inside diam_er to,
the outl'_ Ilocatedat the bottom _ the ,drain
pan.You can purchase the drain h_ or tubing
_y to satisfy your pa_cu_ar n_ds. (Drain
h_e _ n_t supplied).
PAN
DRAIN HOSE
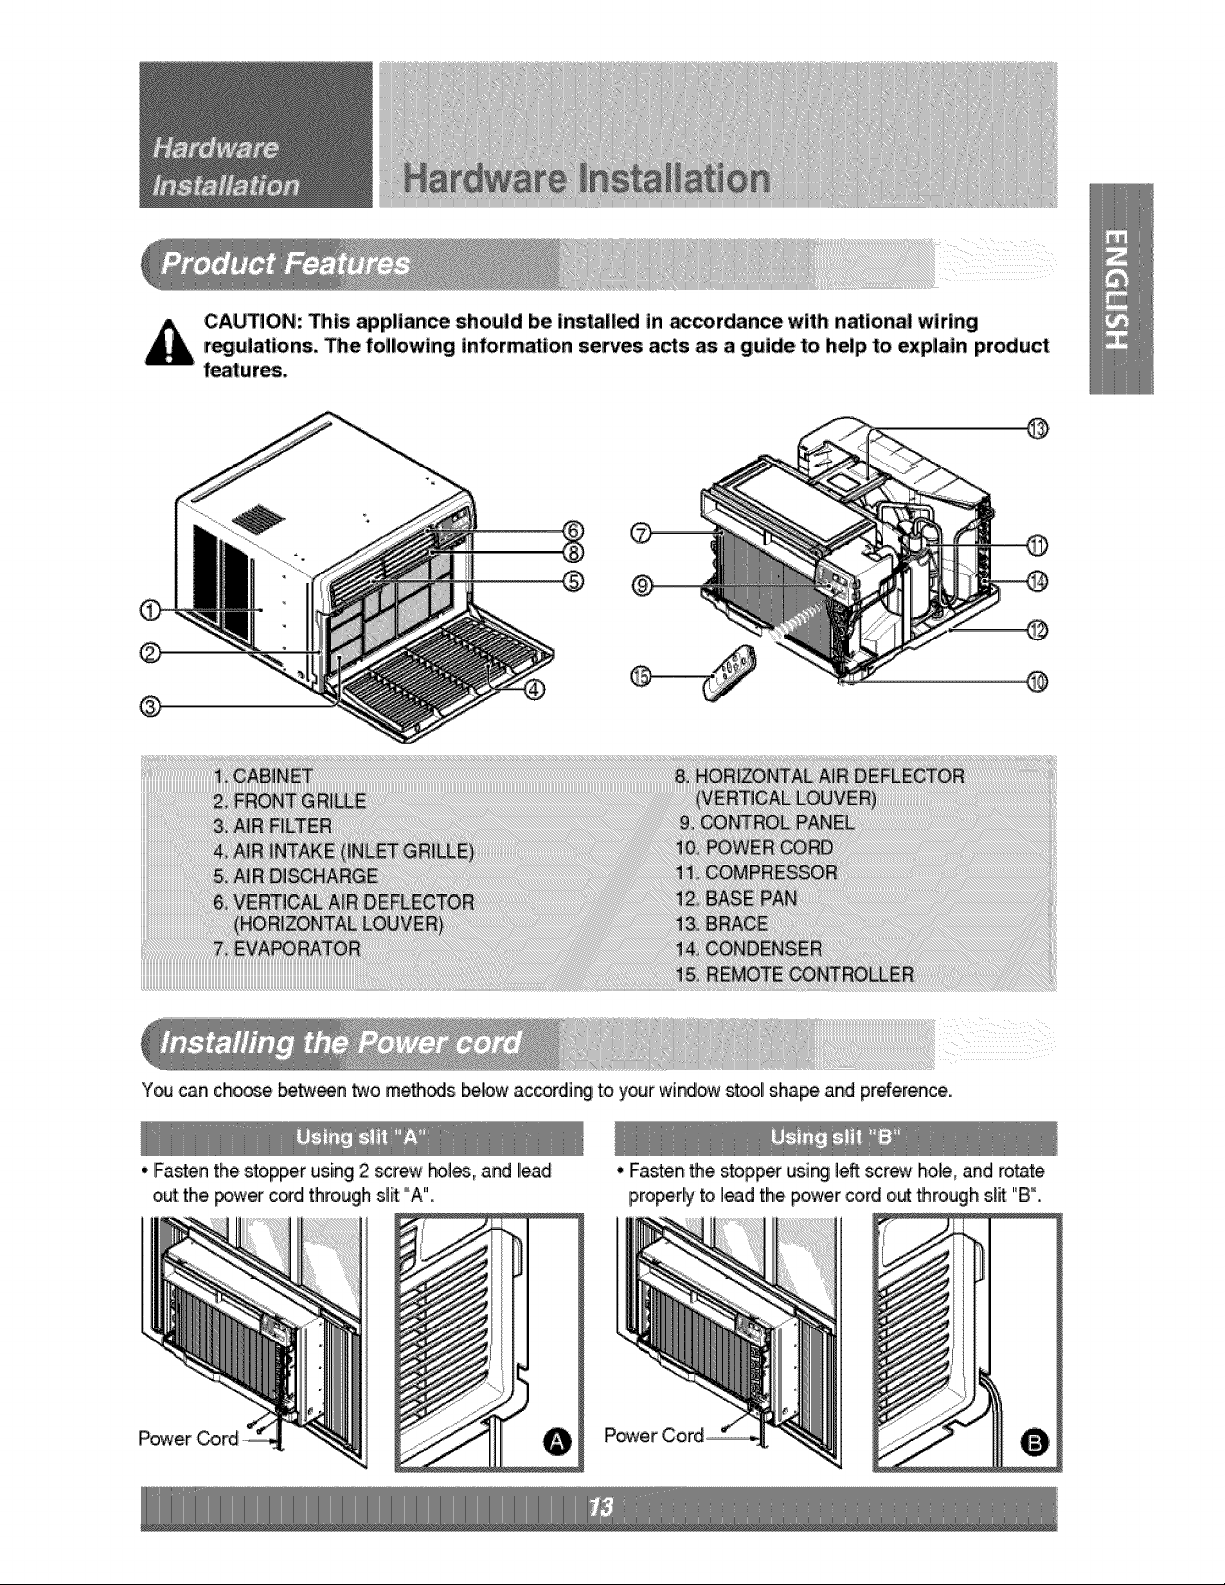
CA_ON: Dis appliance should be ins_|_ in accordance with national wiring
r_ulations. The followlng information serves acts as a guide to help to explain product
feature;.
@
®
®
Y_ can cho_e be._n two meth_s below a,ccordli_ to your wi_o,w stool shape and preference.
• Fastenthe stopper using 2 screw _les, and I!ead
o_ the _wer cord through slit °A".
•Fasten the stopper using left scr_ holie,and route
properliyto lead the power cord o,_ thr,oughs_ "8 °.
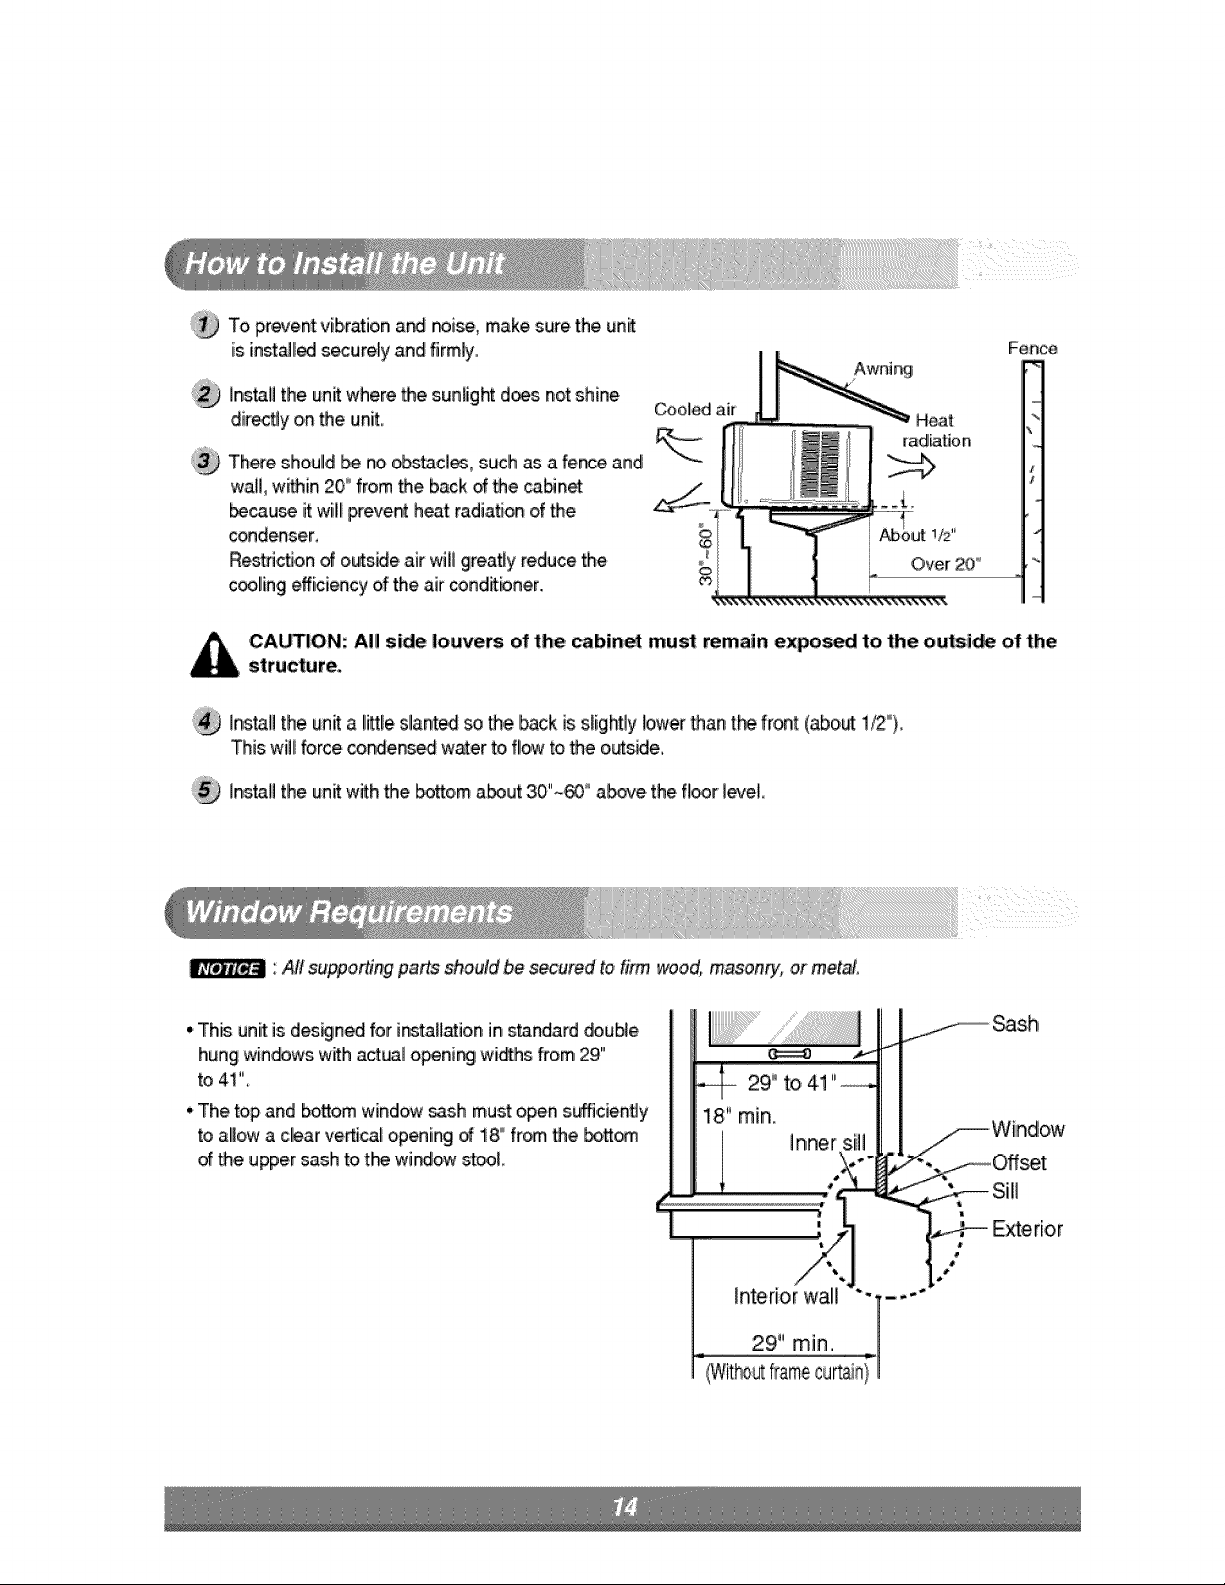
To prevent vibration a_ r_ise, make sure the unit
is [nst_l_ s_urely and firmly.
hstatl the unit where the sunlig_ d_s not shine
dkecUy o,nthe unit,
There should _ no _acl_, such as a fete and
wall, w_hin 20'_'from the back of the _n_
be_u_ it wil! prevent heat radiation of the
cond_ser,
Res_ictJ,onof outs_e air will greatfy reduce the
cooling effici_cy of the air conditbner.
Fence
CAIL_|ON; All side Iouvers ofthecabine_must remain expo_d totheoutsi_oifthe
structure.
In,s,ta_lthe unit a little slanted _ the _ck is slightly locaterthan t_ front (about 1/2°)_
This will force cond -e_ water toi fl!o_vto the outs_e,,
InstaU the.unit w_h the i_o,m a_ut 30"~_ ° ab,_e the ft_r leve!
Ai! supporting parts should be s_u'md to firm wood, masons, oil met&_,
• This unit is desoned for ins'_llatio,n instandard _ub_e
hung win_ws with act_l o_nir_ wiOhs from 29"
to 41"
• The top and bosom window sash must open sufficiently
to alllowa clear vertica_opting _ 18° fr_ the _om
the upper sash to t_ widow stoo_
Y
29,° to 41
18" rain.
l
2
3
4
5
6
7
8
9
10
11
_oJ,,,,_.......
13
14
15
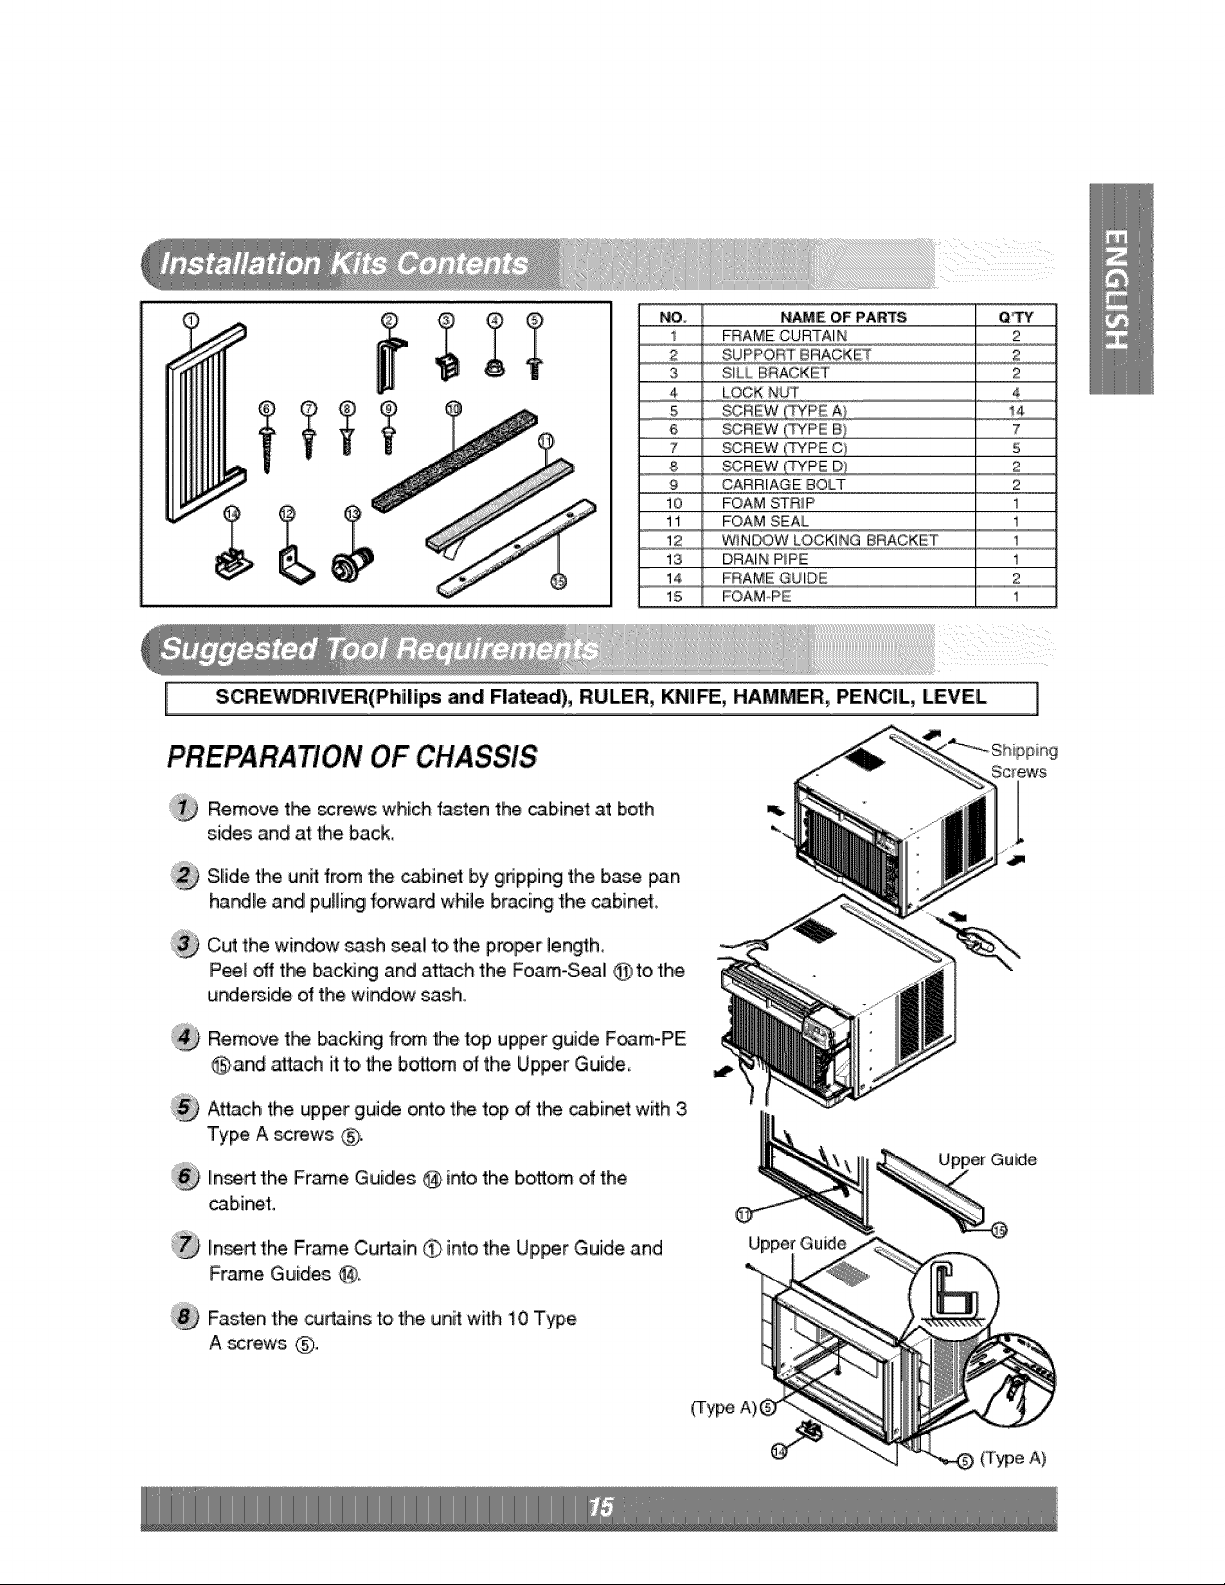
FRAME CURTAIN 2
SUPPORT BRACKET ,............2 ....................
SILL BRACKET 2
LOCK NUT 4
...... 7Z,PF_A} ,, _4
_REW ('TYPE B} 7
_REW (TYPE C) 5
SOREW _£_ D) 2
CARRIAGE BOLT 2
FOAM STR_P 1
FOAM SEAL 1
WIN_W LOCKING BRACKET 1
DRAIN P_PE 1
FRAME GUIDE ......................................2...................................
FOAM PE 1
SCRE,WDRIVER(Philips and F'liat_,d), RULER, KNIt, HAMMER, P'E,NC|L,, LEVEL I
PREPARATION OF CHASSIS
Remove tee _rews which fasten the cabinet at both
sides ,and af the back,,
Sliide the unit from the cabinel by gdpping the base pan
ha_le and pulling fo,_¢ard while bracing _he cabineL
Cut the window _sh seal to the piro_r len_h,
Peel off the bacNng and atlach the Foam-Seal @to the
u_e_ide of the wir_,ow sash,
Remove t_ _c_r_ fr_ the top upper guide F_m-PE
Oand _ach it to,_e bosom of the Upper Guide,,
Attach the upper gui_ onto the top of t_ _bi_t with 3
Type A screws {_},
Inert the Fr_e Guides @ into the bottom of the
cabinet.
Inert the Frame Cudain O into the Up_r Guide and
Frame Guides, @,
Fasten the oJ_ins to the unit: with 10 Type
A _rews @.
(Type
U
(Type A)
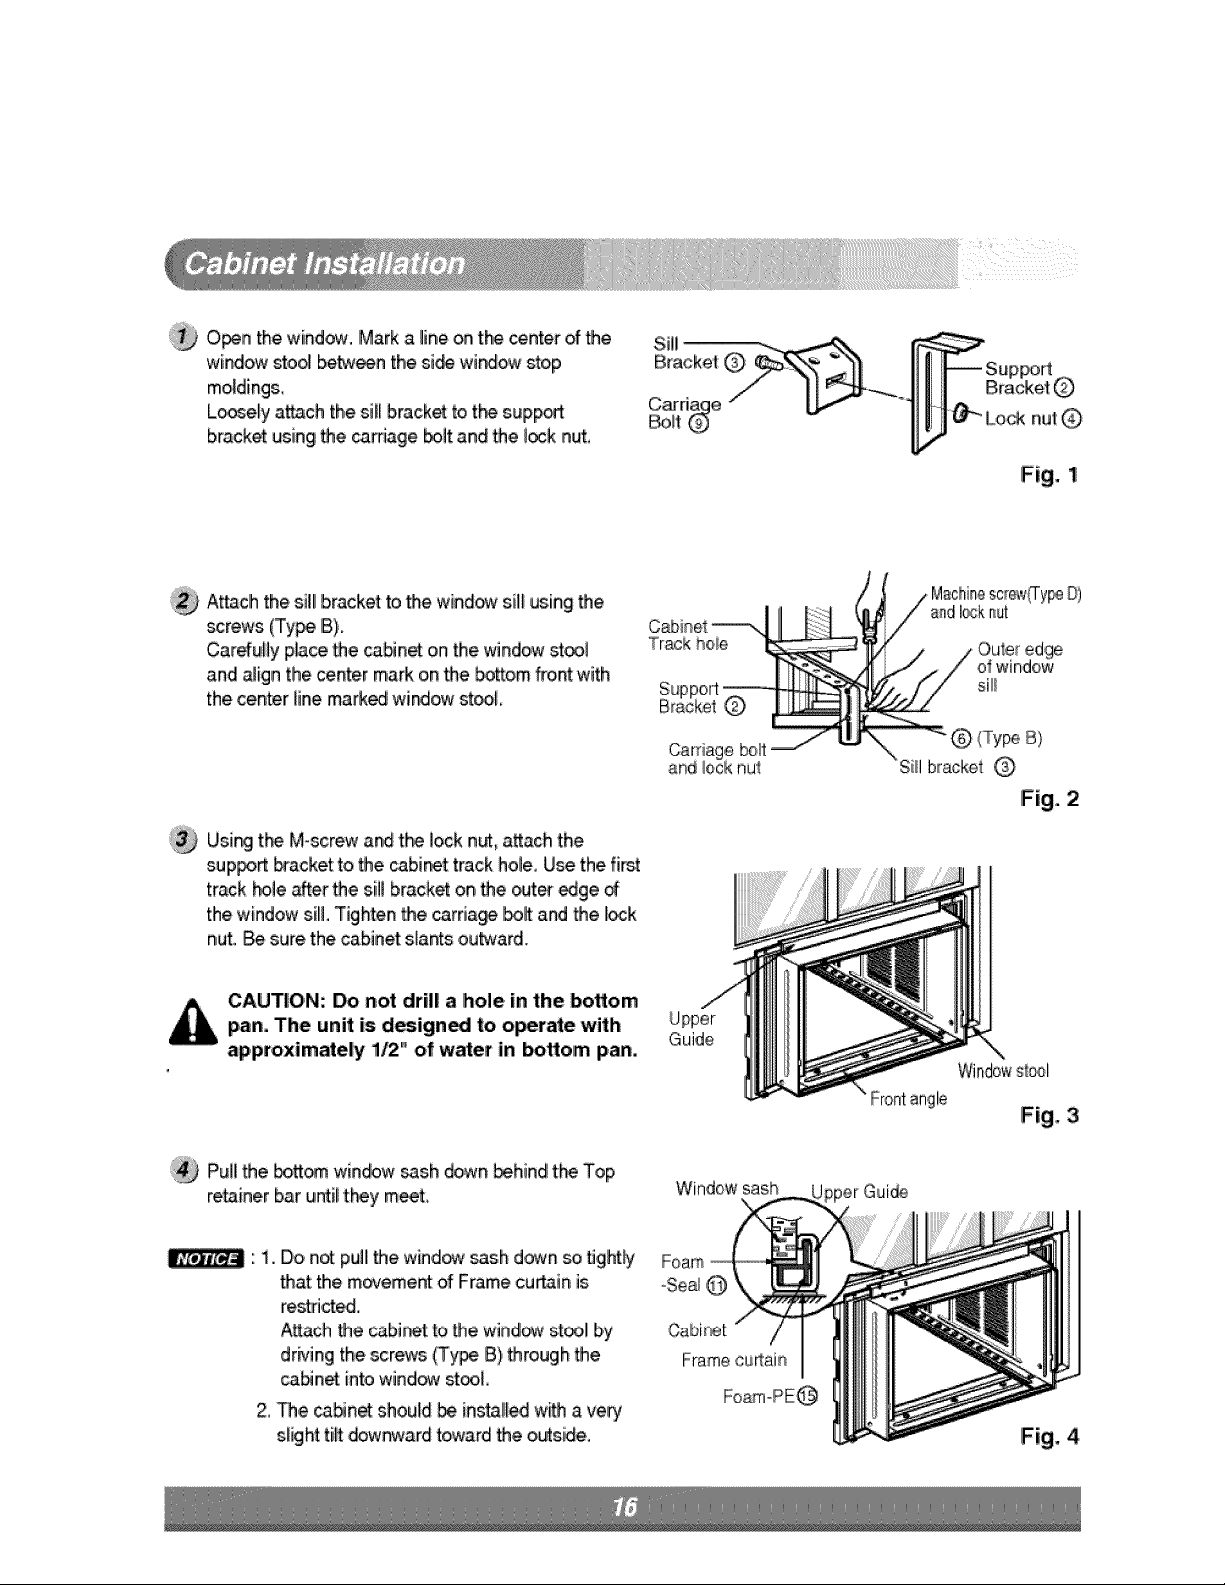
{/_ Open the wind_. Mark a line on,t_ center of the
window s_o_ betw_n the si_ widow stop
mo,Mings,,
Lor_ely attach the sill biracketto t_ s,upp_
bracket using the carnage _lt and the I_k nut,
Bracket _)
nut Q
Fig. li
A_clh the sil bracket to the window sill using the
screws (my_ IB).
CaretuHyplace the _Nnet on the window stool
and _ign the center mark on the bottom front with
the center line marked widow stoo_
Using tb_ M-screw a_ t_ lock n_, a_ach the
sup_rt bracket to the cabinet track hole, Use the fi_.t
tr_:k hole after _,e sil! bracket on the _ter _ge
the window sillLTighten the _rria_ _lt and the I_k
nut. Be sure the cabinet sla_s ou_ard.
Cabinet
'Track ho_e
aadI_k nut
o_window
si_/
(TypeB}
Sill b_acket _3
Fig. 2
CAUTION: Do not drill a hole in the bottom
pan. 'The unit is d_igned to,o_ra_e witlh
approximately 1/2" of w_er in bottom pan.
'_ P'uHthe bott_ win_w _sh down _h, indit_ Top
retainer bar u_il t_y m_t.
Guide
Window sash
Windowstool
Fig,. 3
: 1. Do n_ pull the wind_ sash down _ flglhtly
that the movement of Frame curtain is
re_icted..
A'_ch the _bir_t to the window stool!by
drMng the screws _ype B),through the
_Nnet into wind_ Stooil,
2, The _Nnet should _ in_!_ wi_ a very
slight tiff downward t_ard the o_sMe_
Fig. 4
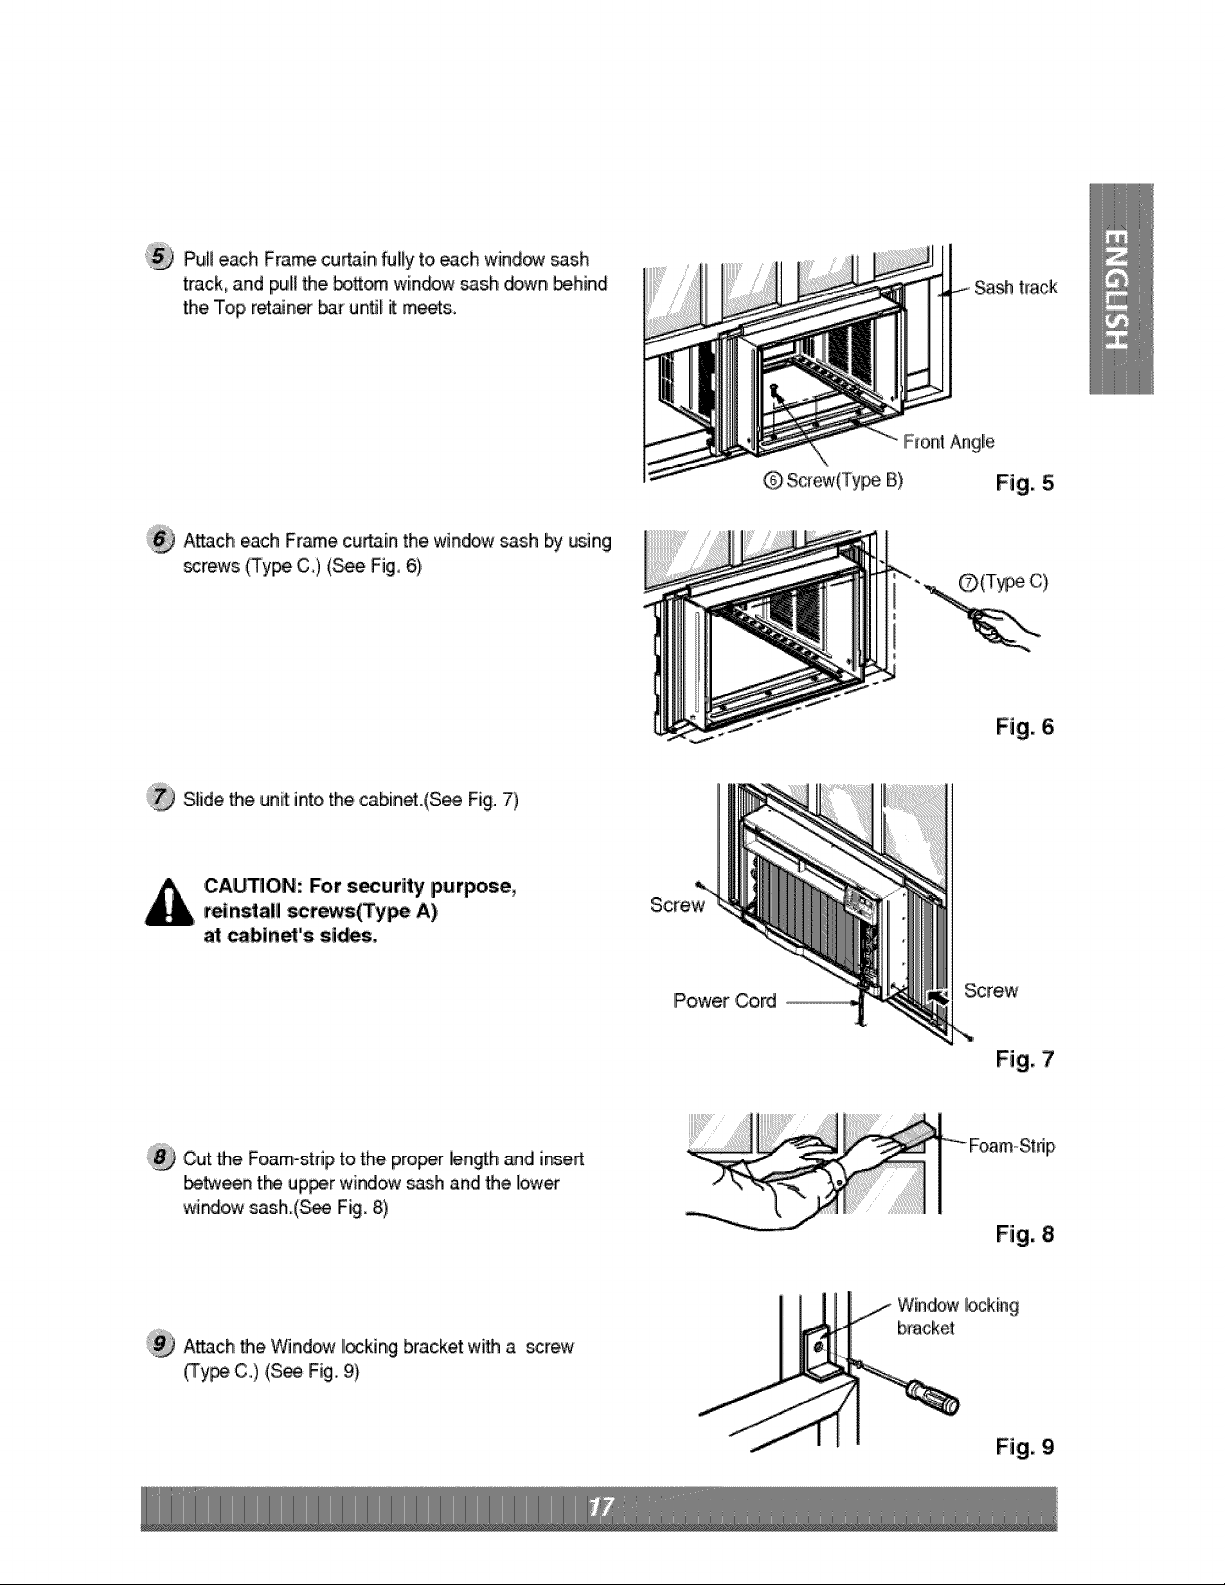
Pull each Frame cu_in, fully to._ch window _sh
track_and pull Me _ttom win_w _sh d_n, _hind
the Top,r_aine_ _r until it m_s.
track
A_ch each Frame curtain the.window sash by wing
Brews (Type C.) (_e Fig. 6)
F_ontAngle
Fig, 5,
SliideMe unit into the cabiinet.(See Fig. 7)
,CA_ON: For s_urity purpose_
reinstall sct_s(Type A)
at cabin_'s sides.
Power ,Cord
screw
Fig. 7
'Ca[ the Fo,am-stdpto the proof length and W_er[
_tw_n the up_r window _sh and Me I_er
window sash.(_ F_. 8)
Fig. 8
Attach 'the Win,dewII_kin,g bracket with a screw
_y_ C.) (S_ Fig. 9)
i
t/.1 Win_# Ilocking
bracket
Fig. 9,
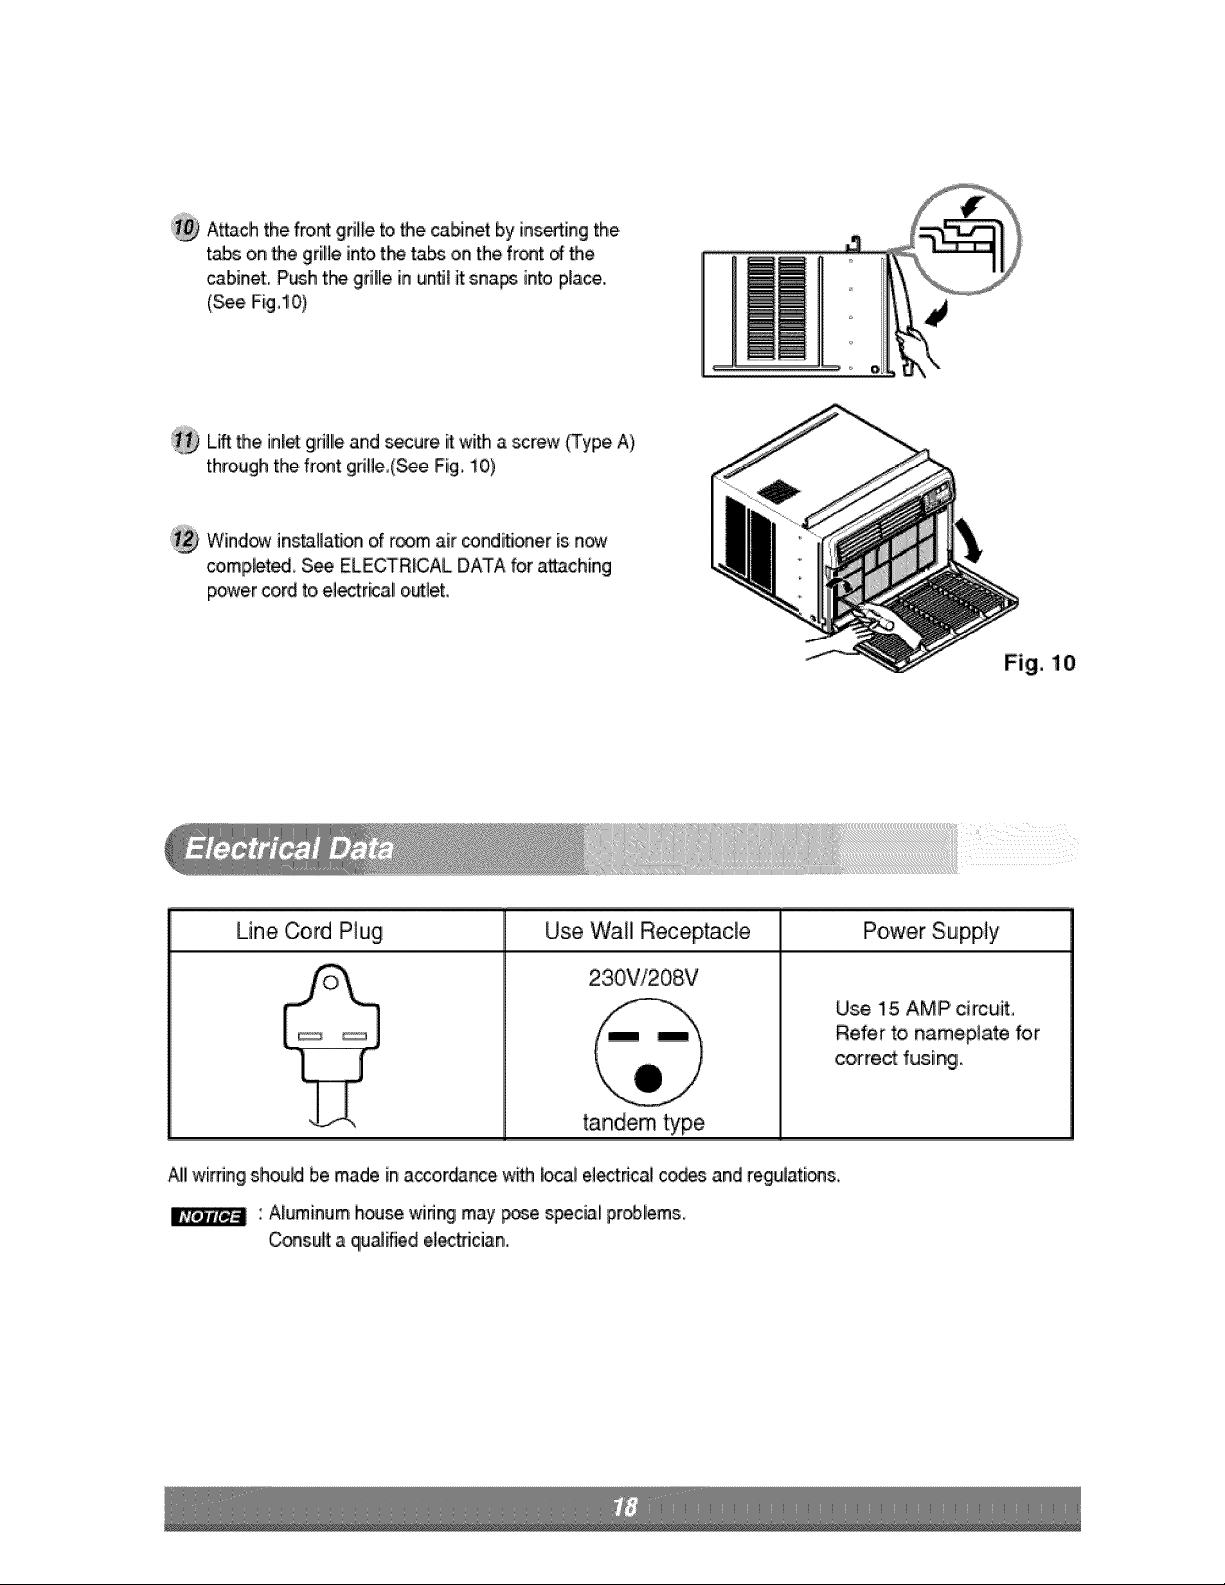
@ Attach the front gdl_eto Me ca_net by ins_ing the
tabs on 'the grille into t_ tabs on the front _ the
cabinet. P_lh the gd[le in until it sna_ into p_ace.
(,SeeFig,lO}
!1_ Lift the inl_ girdllleand s_ure it with a screw (Type A}
through the front gd_le,(SeeFig_i0)
':_ WJndi_ installation o,fr_m air _nditJoner is now
co,repUte& S_ ELECTRICAL DATA for a_ching
power cord to el_tr_all o_leL
Fig. 10
Line Cord Plug Power SupplyUse Wall Receptacle
230V/208V
tandem type
Ui_ 15 AMP circuit,
Refer to nameplate for
corre_ fus,ir'_l.
AJlwir_ng should be made in acco,r_nce with boa! el_dcal c_ and regulations,
: Aluminum h_se _4nnglmay _e special problems,
Consult a q!uaI_iedeI_ician.
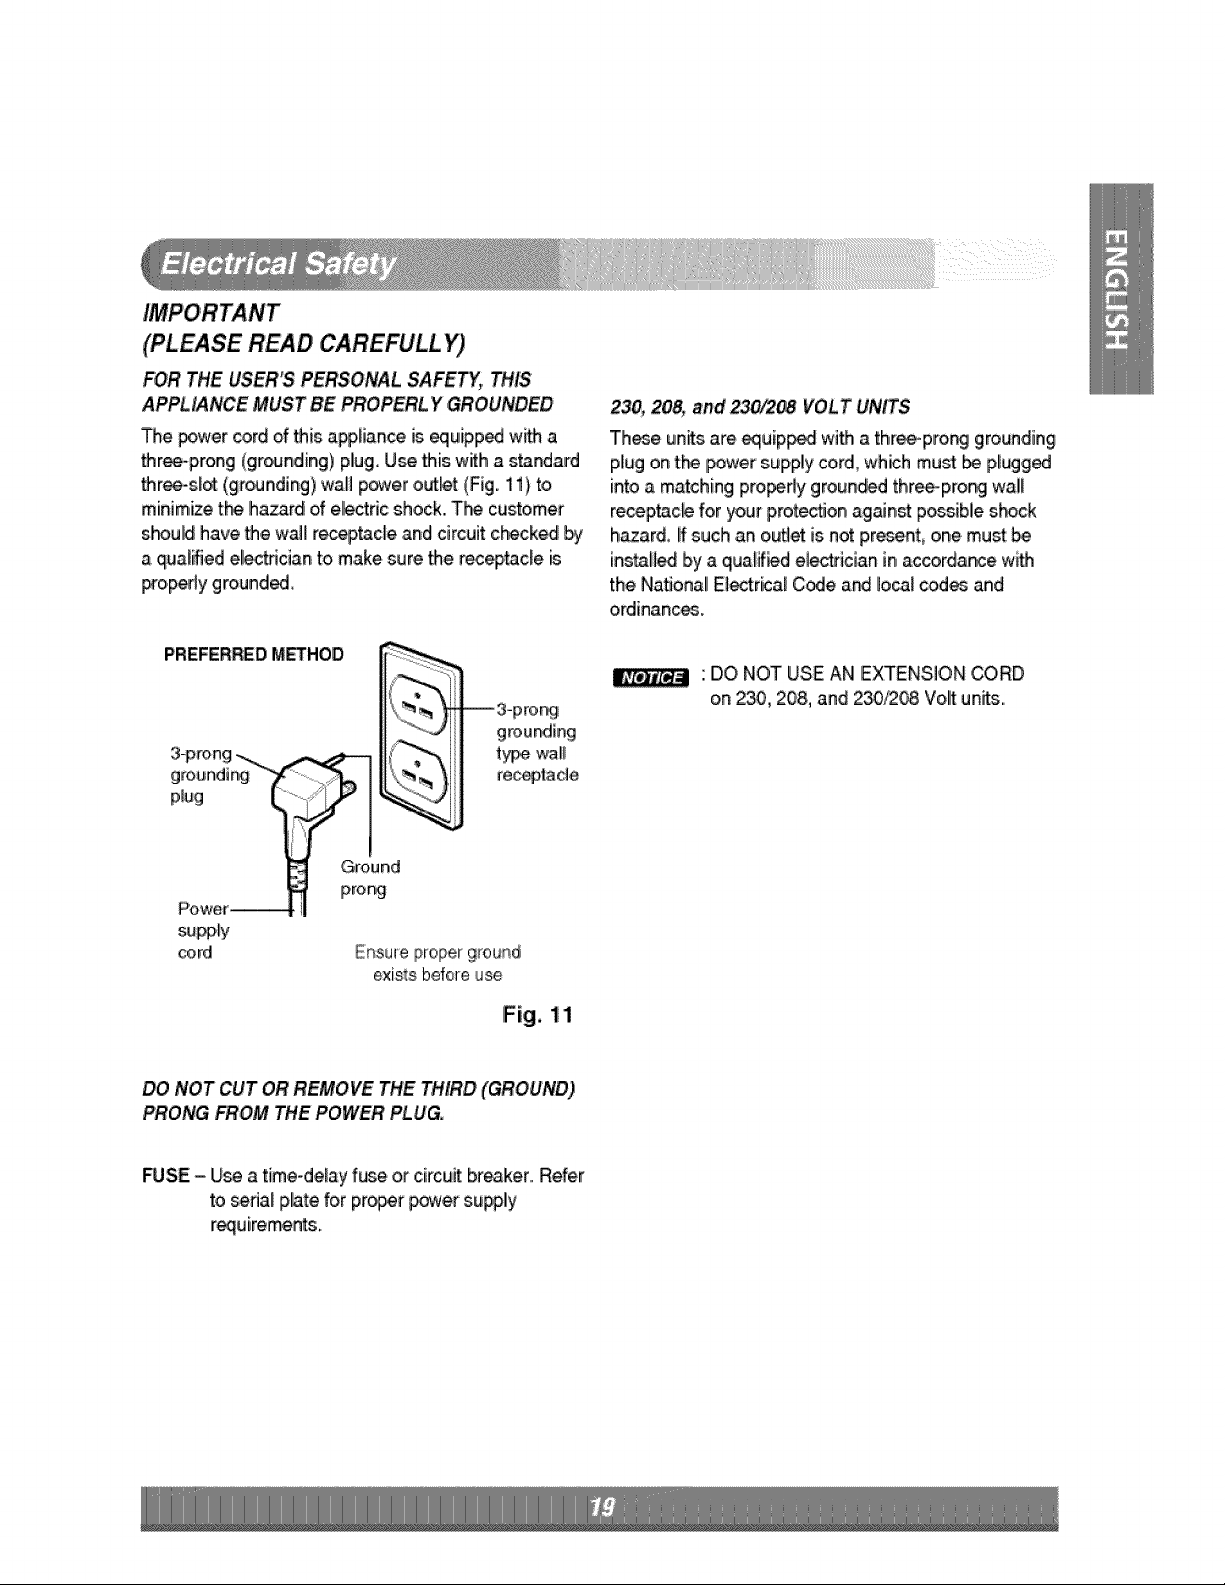
(PLEASE READ CAREFULL Y)
FOR THE USER'S PERSONAL SAFETY, THiS
APPLIANCE MUST BE PROPERL Y GROUNDED
The _er cord of this .a_,liance is.equipped w_ a
three-prong (gr_ndin,g) plug..U_ his. with a standard
_ree-sl_ (grounding) wall p_wer o_bt (Fig. 11) to
minimize tk_ hazard of ellectricshock..The customer
sh_uH have _,e waJIreceptacle and circuit c_ck_ by
a qualified elec_cian to make sure the rec_cle i_
propedy grounded,
230, 208, and 236"2_ VOLT UNITS
Thee un_s am _uip_ with a th,reepmr_ grounding
plug on t_ po_t supply cord, wh_h mu_ _ plugg_
into a matching pro_dy groun_d thr_pro_ wall
recep_c_ for your protection against possible s_ck
hazard if such an o_et is n_ present_ one mu_
ins_H_ by a qua_if_d elec_ician inaccordance with
the NaflonallEl_trical C_e ar_ localcod_ and
ordinances,
_3-pro_
grour_:Jing
t_e wa_
_ecep_ade
: DO NOT USE AN EXTENSION CORD
on 2_, 208, and 2_/2_ Volltunits..
existsbefore use
Fig, 11
DO NOT CUT OR REMOVE THE THIRD (GROUND)
PRONG FROM THE POWER PLUG,
FUSE= U_ a time-delay fuse or circuit breaker..Refer
to serial pilatefor prier _er su_ly
r_uirements.
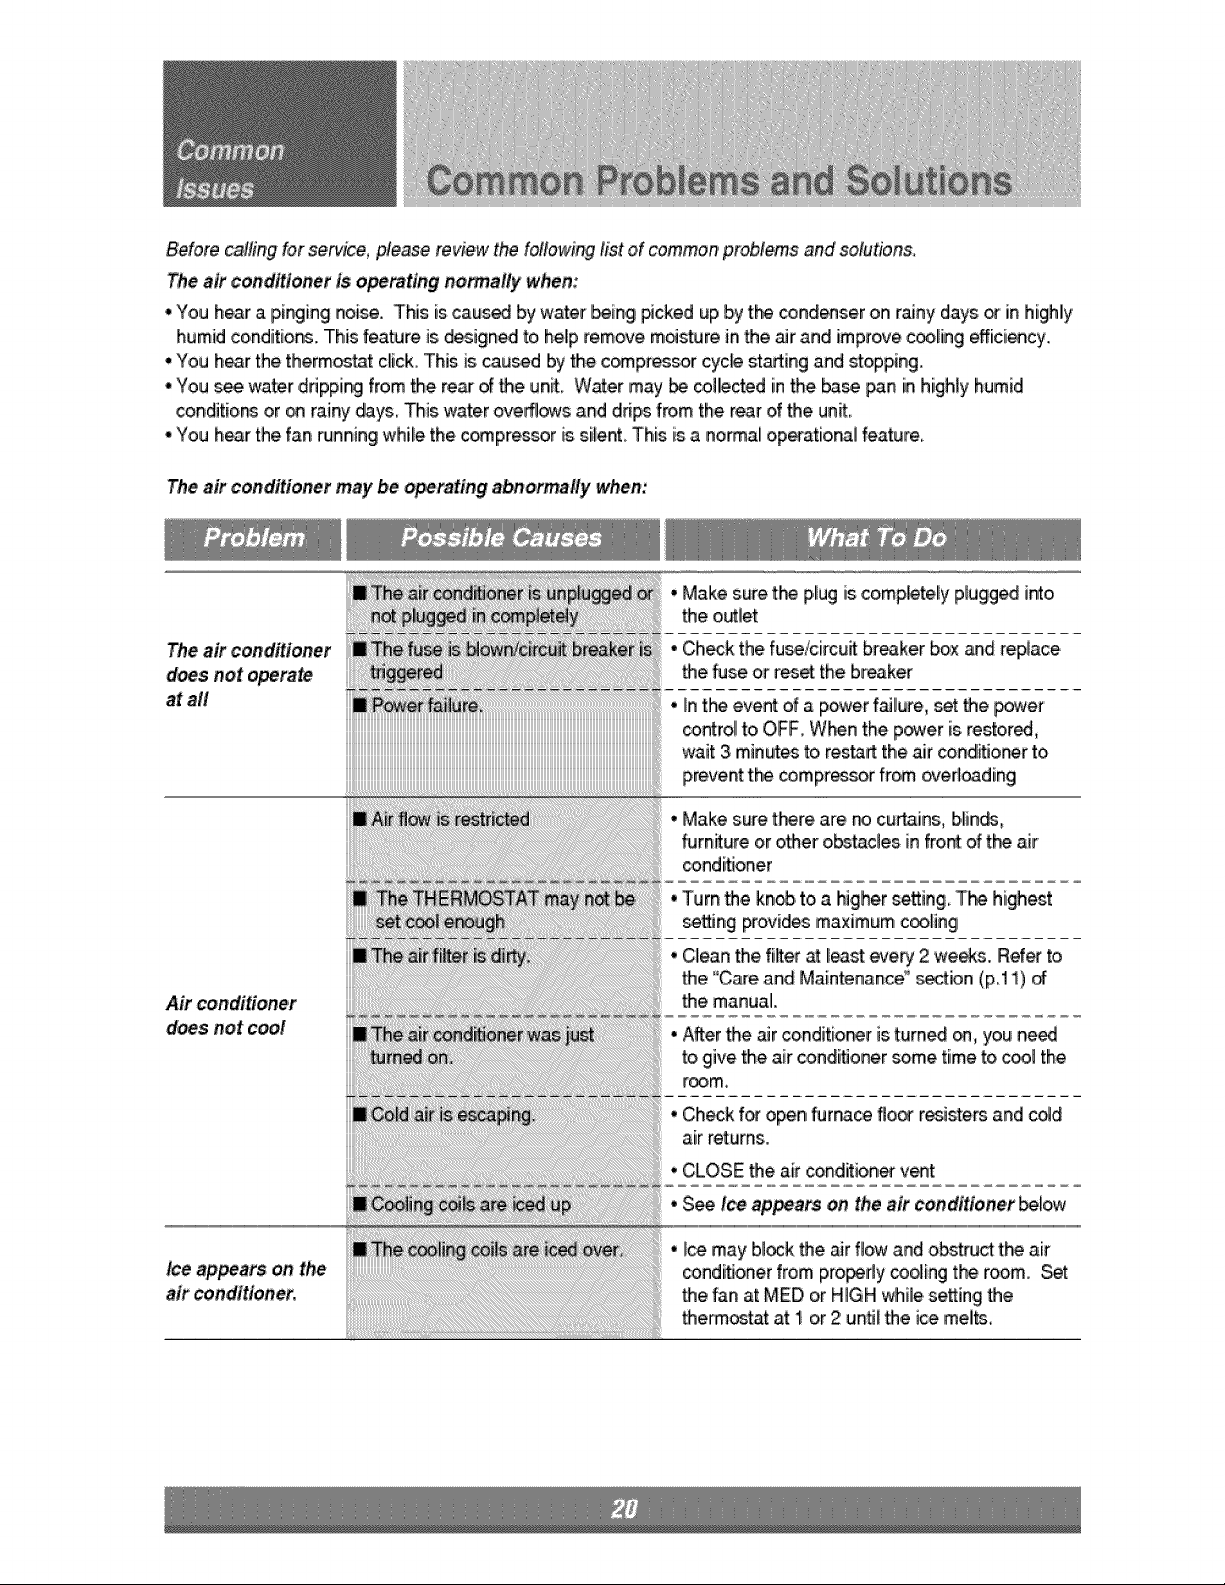
Before calh_ngfor service, please review the following list of common'problems and solutions.
The air ,conditioner is operating normally when:
• You hear a pinging noise. This is caus_ by water _ing Dcked up by the condenser on rainy days _ in highly
humid conditions. This feature is design_l to,help remove moisture in the _r and improve c_[in,g efficiency.
• You h_r the thermostat dick. This is caused by the c_pres_r cyc# st_ing and stopping.
° You s_ water ddppi_ from the rear d the un&, Water may _ co!l!ectedin the _ pan in highly humid
conditior_ or on rainy days. This water ovedl_,ws and drip_ from the rear of the un_.
• You hear the fan _nning while the c_pres_r is silent. This is a normal operational feature.
The air conditioner may be operating abnormally when:
The air conditioner
d_s not operate
at aft
Air conditioner
does not coot
Ice appears on the
air conditioner.
• Make sure t_ p,liugis comp_tel[y plugged into,
the o_let
• Check the fuse!circu_ breaker box _d replace
the fuse or res_ the breaker
• _nthe event of a power f_[ure, set _e p_er
control!to OFF W_n the power is restored,
wait 3 minutes to, resta_ the air cond[itJonerto
prevent the compressor fr_ _ed_ding
• Make sure t_re are r# curtains, b,[in_,
fum_ure or other obstacles in front of t_ air
condi_oner
• Turn the kn_, to a higher setting The highest
setting provid_ maximum c_ling
• Clieanthe fi_ter_ I_st _ery 2 weeks. Ref_ to
• e °Care and Maintenance"' _n (pl 1)
• e manual.
• After the _r conditio_r isturned _, you need
to give the air conditioner some time to c_l the
room.
• Ch_k for open fumase floor resiste_ and c_d
air returns.
• CLOSE _e air _nd_ion_ vent
• See ice appears o# the air ¢onditioner _[_
• Ice may block the air flow and obstruct the air
conditioner from pro_dy co_ing the room. S_
• e fan at MED or HIGH while setting the
thereat at 1 or 2 un_l the ice melts.