E-MANUAL
Thank you for purchasing this Samsung product.
To receive more complete service, please register
your product at
www.samsung.com/register
Model Serial No.
Quick Guides
Using Smart Hub
1 Connecting to the Internet
1 Setting up Smart Hub
1 Using Smart Hub
Controlling the TV with Your Voice
2 Setting up Voice Recognition
2 Controlling the TV with your voice
Controlling the TV with Motion
3 Setting up Motion Control
3 Controlling the TV using motions
Using the Samsung Smart Control
4 Operating the TV with the POINTER button
5 Setting up the Samsung Smart Control
5 Pairing the TV to the Samsung Smart Control
Improving Your Viewing Experience of Sports Events
6 Activating sports mode
Displaying Multiple Screens
Connections
Connecting an Antenna
Connecting to the Internet
9 Establishing a wired Internet connection
10 Establishing a wireless Internet connection
Troubleshooting Internet Connectivity Issues
12 Troubleshooting wired Internet connectivity issues
13 Troubleshooting wireless Internet connectivity issues
Connecting Video Devices
14 Connecting with an HDMI cable
15 Connecting with a component cable
16 Connecting with a composite (A/V) cable
Audio input and Output Connections
17 Connecting with an HDMI (ARC) cable
18 Connecting with a digital audio (optical) cable
18 Connecting with a stereo audio cable
Connecting a Computer
19 Connecting through the HDMI port
20 Connecting with an HDMI-to-DVI cable
20 Connecting through your home network
Connecting a Mobile Device
21 Connecting with an MHL-to-HDMI Cable
22 Using Screen Mirroring
23 Connecting mobile devices without a wireless router
(Wi-Fi Direct)
24 Connecting a mobile device via Samsung Smart View 2.0
Pairing a laptop to the TV (wireless PC mirroring)
Switching between external devices connected to the
TV
Connection Notes
26 Connection notes for HDMI
27 Connection notes for audio devices
27 Connection notes for computers
27 Connection notes for mobile devices
28 Connection notes for wireless PC mirroring
Remote Control and Peripherals
About the Samsung Smart Control
Using the Samsung Smart Control
31 Operating the TV with the POINTER button
31 Operating the TV with the directional buttons and the
Enter button
32 Displaying and using the On-Screen Remote
33 Pairing the TV to the Samsung Smart Control
Controlling External Devices with the TV Remote -
Using the Universal Remote
34 Setting up the universal remote control
Controlling the TV with a Keyboard
35 Connecting a keyboard
36 Using the keyboard
Controlling the TV with a Mouse
37 Connecting a mouse
37 Using a mouse
Connecting a Bluetooth Gamepad
Entering Text using the On-Screen QWERTY Keyboard
38 Using additional functions
Smart Features
Viewing Multiple Screens or Features with Multi-Link
Screen
39 Using Multi-Link Screen
Smart Hub
41 Removing or pinning an item in the Recent group
41 Launching Smart Hub automatically
41 Testing Smart Hub connections
42 Using the Smart Hub tutorial
42 Resetting Smart Hub
Using Smart Hub with a Samsung Account
43 Creating a Samsung account
44 Signing in to a Samsung account
44 Linking your Samsung account to external service
accounts
45 Changing and adding information to a Samsung account
45 Deleting a Samsung account from the TV
Using the GAMES Service
46 Managing games with the pop-up Options menu
46 Viewing the Detailed Information screen
47 Installing and running a game
47 Managing downloaded or purchased games
Using the APPS Service
49 Managing Apps with the pop-up Options menu
49 Viewing the Detailed Information screen
50 installing an app
50 Enabling automatic apps updates
51 Removing an app from the TV
51 Locking and unlocking apps
51 Updating apps
51 Rearranging apps
51 Rating purchased apps
51 Using other app features and functions
Using the e-Manual
52 Launching the e-Manual
52 Using the buttons in the e-Manual
Using the Web Browser
53 Browsing preferences
Using the MY CONTENT Service
54 Read before playing media content
55 Playing multimedia content in a computer or mobile
device
55 Playing media content saved on a USB device
56 Buttons and functions available while viewing photos
57 Buttons and functions available while viewing videos
59 Buttons and functions available while playing music
60 Functions on the media content list screen
Using the NewsON Service
61 Using the NewsON content
Using the Soccer Service
62 Configuring the Soccer service screen to display your
favorite soccer teams
62 Using additional functions
63 Viewing soccer videos
Controlling the TV with Your Voice
65 Read before using voice recognition
65 Learning voice recognition basics
66 Using interactive voice recognition at a short distance
66 Using the voice recognition tutorial
Controlling the TV using Motions (Motion Control
67 Testing ambient illumination using the TV camera
68 Activating motion control
70 Changing the motion control screens
Using Face Recognition
72 Registering your face to your Samsung account
73 Changing your Iogin method to face recognition
73 Signing in to a Samsung account using face recognition
TV Viewing
Viewing Digital Broadcast Information at a Glance
74 Using the guide
75 Checking current program info
75 Changing the broadcast signal
75 Checking digital channel signal info and strength
Recording Programs
76 Recording programs
77 Using the functions available while recording a program
77 Using the buttons on the remote control while recording
a program
77 Managing the schedule recording list
78 Viewing recorded programs
80 Managing recorded files
Setting Up a Schedule Viewing
81 Setting up a schedule viewing for a channel
81 Editing a schedule viewing
81 Canceling a schedule viewing
Using Timeshift
82 Using the buttons on the remote control while using
Timeshift
Using the Channel List
Registering, Removing, and Editing Channels
84 Registering and removing channels
85 Editing registered channels
86 Using Program Rating Lock
Creating a Personal Favorites List
89 Registering channels as favorites
89 Viewing and selecting channels on Favorites lists only
Editing a Favorites List
90 Using the Edit Favorites screen menu items
Making Sports Programs More Realistic with Sports
Mode
92 Enabling sports mode
92 Extracting highlights automatically
93 Using the functions available while watching sports in
sports mode
93 Using the functions available while recording sports in
sports mode
94 Viewing a game recorded in sports mode
Making Sports Programs More Realistic with Hockey
Mode
TV-Viewing Support Functions
95 Showing captions
97 Enabling the audio guide for the video description
97 Scanning for available channels
97 Selecting the broadcast audio language
98 Fine-tuning analog broadcasts
98 Removing pay channels
Picture and Sound
Adjusting the Picture Quality
99 Choosing a picture mode
100 Adjusting the picture quality
101 Adjusting advanced settings
102 Adjusting picture options
Viewing in 3D
104 Starting 3D
105 Adjusting 3D effects
Picture Support Functions
106 Viewing a picture-in-picture (PIP)
107 Changing the picture size and position
108 Listening to audio only (Picture Off)
108 Resetting the picture mode settings
Adjusting the Sound Quality
109 Choosing a sound mode
110 Applying sound effects
Using the Sound Support Functions
111 Selecting speakers
111 Specifying the TV's installation type
111 Listening to TV sound through a Samsung Bluetooth
audio device
112 Listening to TV sound through a Samsung Multiroom
Link compatible speaker
113 Listening to the TV through Bluetooth headphones
113 Enabling digital audio output
114 Listening to 3D audio in 3D mode
114 Resetting all sound settings
System and Support
Setting the Time and Using the Timer
115 Setting the current time
116 Using the timers
Using the Screen Burn Protection and Energy Saving
Functions
118 Preventing screen burn
118 Reducing the energy consumption of the TV
Using Anynet+ (HDMI-CEC)
119 Setting up Anynet+ (HDMI-CEC)
119 Using Anynet+ (HDMI-CEC)
Updating the TV's Software
121 Updating the TV's software to the latest version
121 Updating the TV automatically
Protecting the TV from Hacking and Malicious Code
122 Checking the TV and connected storage for malicious
code
123 Configuring additional functions
Using Other Functions
124 Running the accessibility functions quickly
124 Enabling voice guides for the visually impaired
125 White text on black background (high contrast)
125 Adjusting the menu transparency
125 Enlarging the font (for the visually impaired)
125 Learning about the remote control (for the visually
impaired)
125 Listening to the TV through Bluetooth headphones (for
the hearing impaired)
126 Changing the menu language
126 Setting up a password
126 Checking Notifications
126 Enabling game mode
127 Richer colors and superior picture quality (BD Wise)
127 Enabling/Disabling sound feedback
127 Locking/Unlocking the Control Stick
127 Showing/Hiding the Samsung logo while booting
127 Enabling the TV to boot faster
128 Registering the TV as a DivX-certified device (watching
for pay DivX movies)
128 Restoring the TV to the factory settings
128 Using the TV as a display model (for retail stores)
Troubleshooting
Getting Support
129 Getting support through Remote Management
130 Finding the contact information for service
130 Requesting service
There Is a Problem with the Picture
131 Testing the picture
I Can't Hear the Sound Clearly
133 Testing the sound
I Can't See 3D Images Clearly
134 Testing 3D picture quality
There Is a Problem with the Broadcast
My Computer Won't Connect
The TV Won't Connect to the Internet
The Schedule Recording/Timeshift Function Isn't
Working
Anynet+ (HDMI-CEC) Isn't Working
I Have Trouble Launching/Using Apps
My File Won't Play
I Want to Reset the TV
Other Issues
Precautions and Notes
Before Using the Recording and Timeshift Functions
140 Before using the recording and schedule recording
functions
141 Before using the timeshift function
Read Before Using 3D Mode
142 3D precautions
Supported Resolutions for 3D Modes
Supported Resolutions for each of UHD Input Signals
146 If HDMI UHD Color is set to Off
146 If HDMI UHD Color is set to On
S Recommendation disclaimer
147 S Recommendation with voice interaction
147 S Recommendation
Read Before Using Voice, Motion, or Face Recognition
148 Precautions for voice, motion, and face recognition
149 Requirements for using voice, motion, or face recognition
Read Before Using Apps
Read Before Using the Web Browser
Read Before Playing Photo, Video, or Music Files
153 Limitations on use of photo, video, and music files
154 Supported external subtitles
154 Supported internal subtitles
155 Supported image formats and resolutions
155 Supported music formats and codecs
156 Supported video codecs
Read After Installing the TV
158 Picture sizes and input signals
158 Installing an anti-theft lock
159 Read before setting up a wireless Internet connection
Read Before Connecting a Computer (Supported
Resolutions)
160 IBM
160 MAC
161 VESA DMT
Supported Resolutions for Video Signals
162 CEA-861
Read Before Using Bluetooth Devices
163 Restrictions on using Bluetooth
License
Glossary
Using Smart Hub
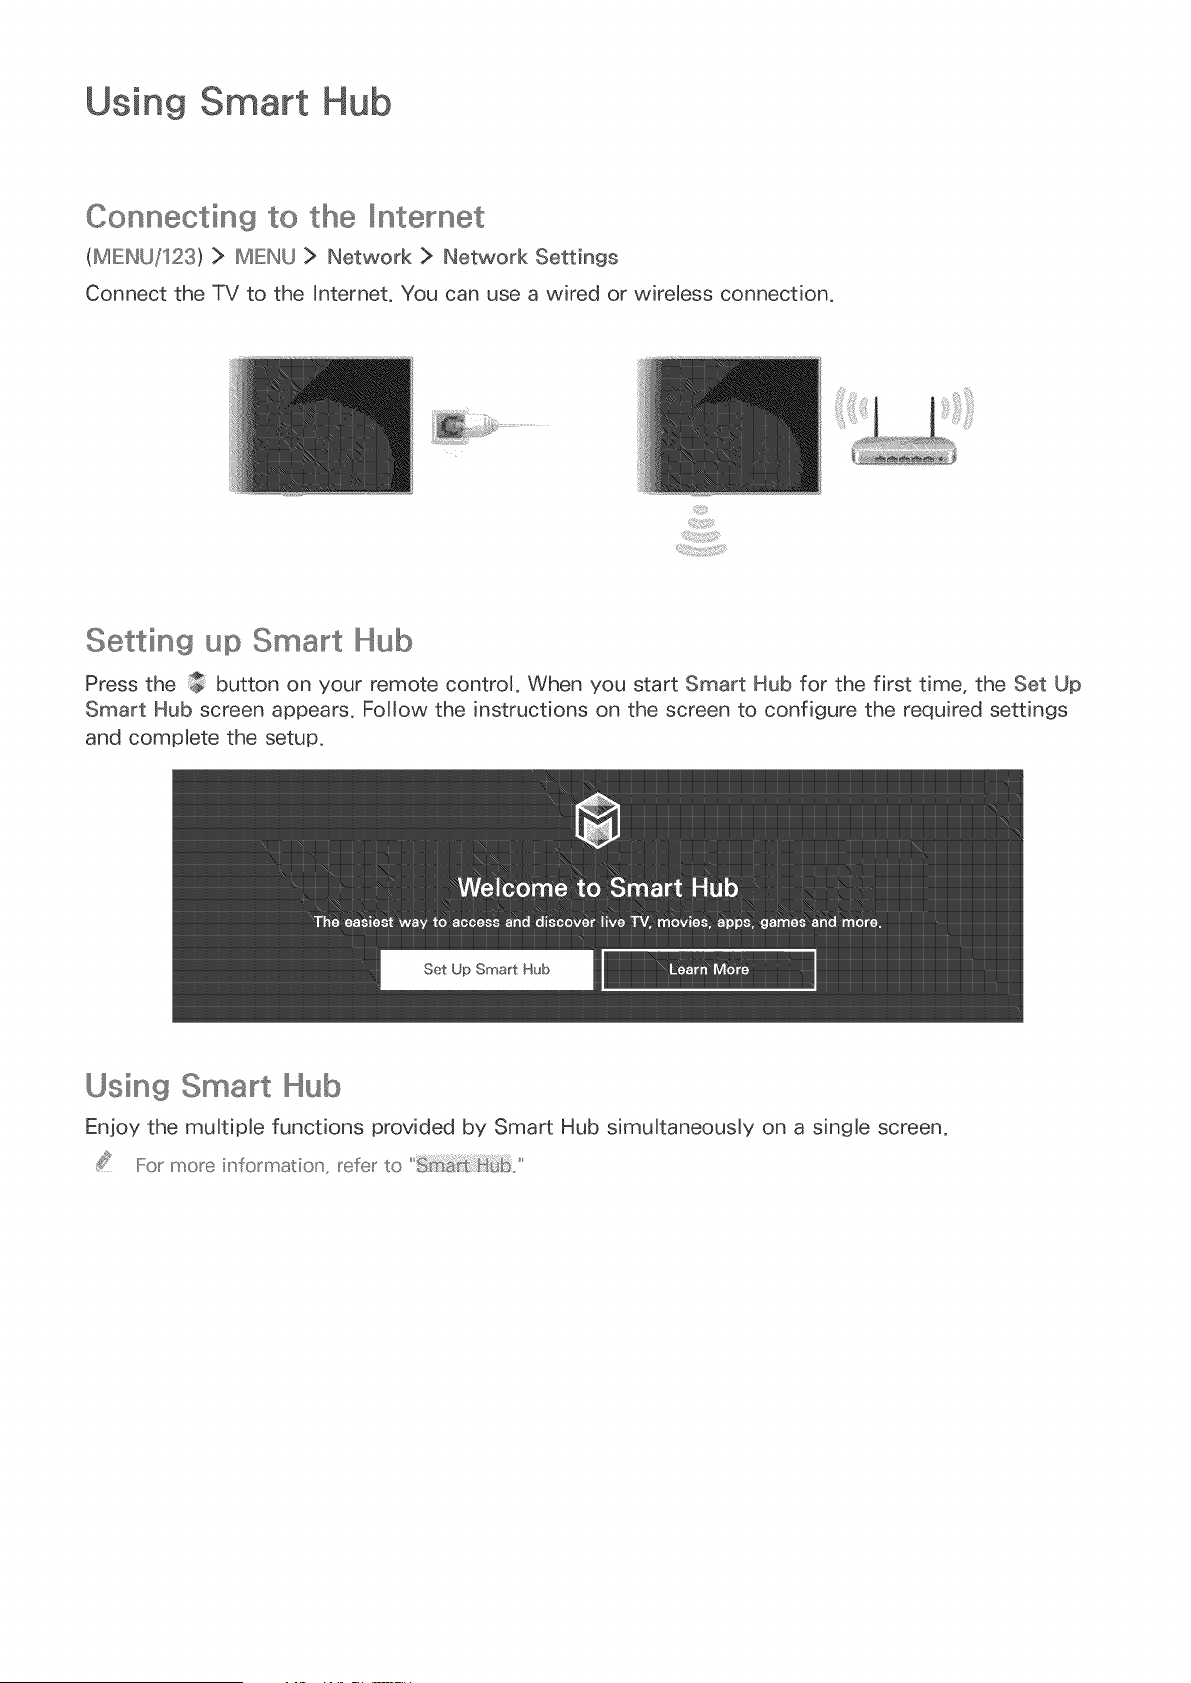
Connecting to the _ntemet
(MIEl_U/123) > MIEI_U > Network > Network Settings
Connect the TV to the Internet, You can use a wired or wireless connection,
Setting up Smart Hub
Press the ,$ button on your remote control, When you start Smart Hub for the first time, the Set Up
Smart Hub screen appears, Follow the instructions on the screen to configure the required settings
and complete the setup,
Using Smart Hub
Enjoy the muJtipJe functions provided by Smart Hub simuJtaneousJy on a single screen,
!
For more iu'formation' _refer to
Controi in9 the TV with Your Voice
.....Ilhis function is ony suppo_ted by the modes witlh the Samsun{_ Smart Co_'bo ,,
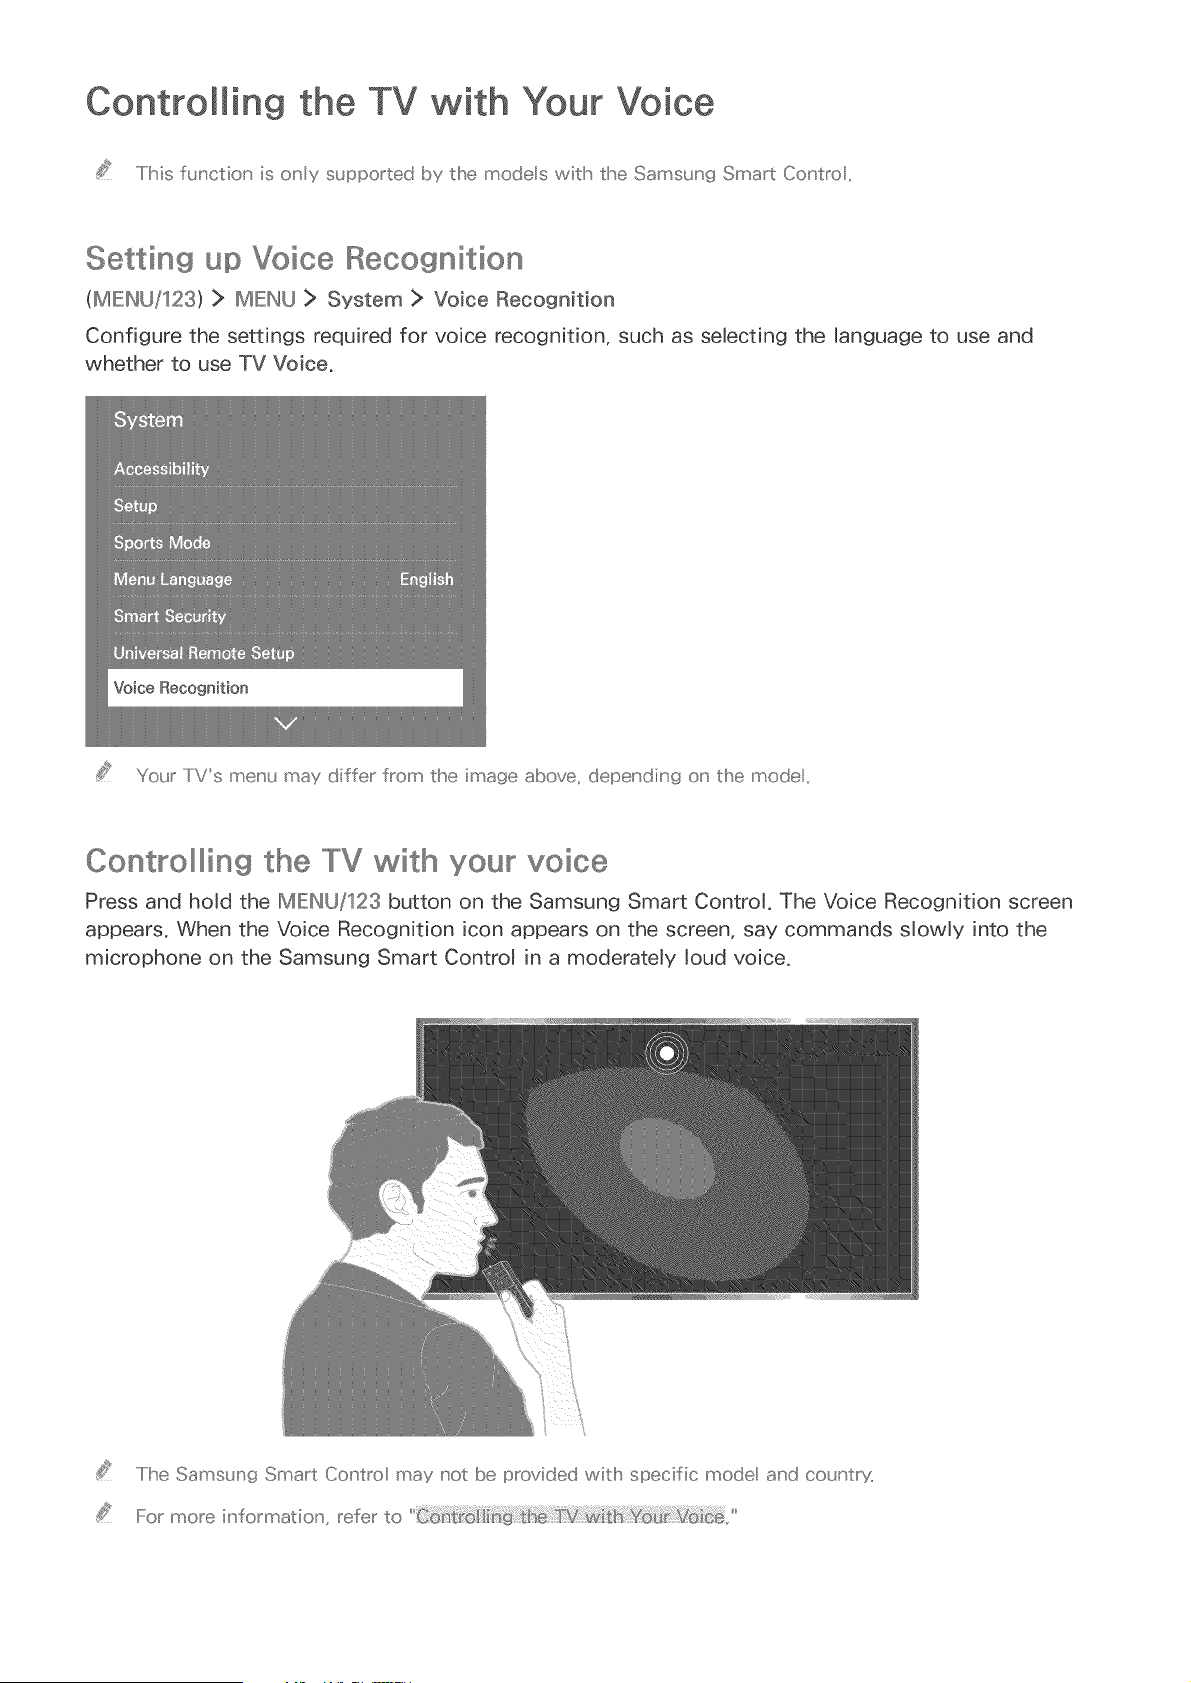
Setting up Voice Recognition
(MIEINU/S23} > IMIEINU> System > Voice Recognition
Configure the settings required for voice recognition, such as selecting the language to use and
whether to use TV Voice.
You_" IVs meu'u may differ from the image above, depeu' diu' g o_' the mode,,
Conttollllllllin9 the TV with your voice
Press and hold the IMIEW_U/123button on the Samsung Smart Control, The Voice Recognition screen
appears, When the Voice Recognition icon appears on the screen, say commands slowly into the
microphone on the Samsung Smart Control in a moderately loud voice,
.....I Ii']eSamsung Sma_t Co_'t_o may not be provided witlh specific mode and counby,
Fo_ more il' formatiol' _refer to
Controlling the TV with
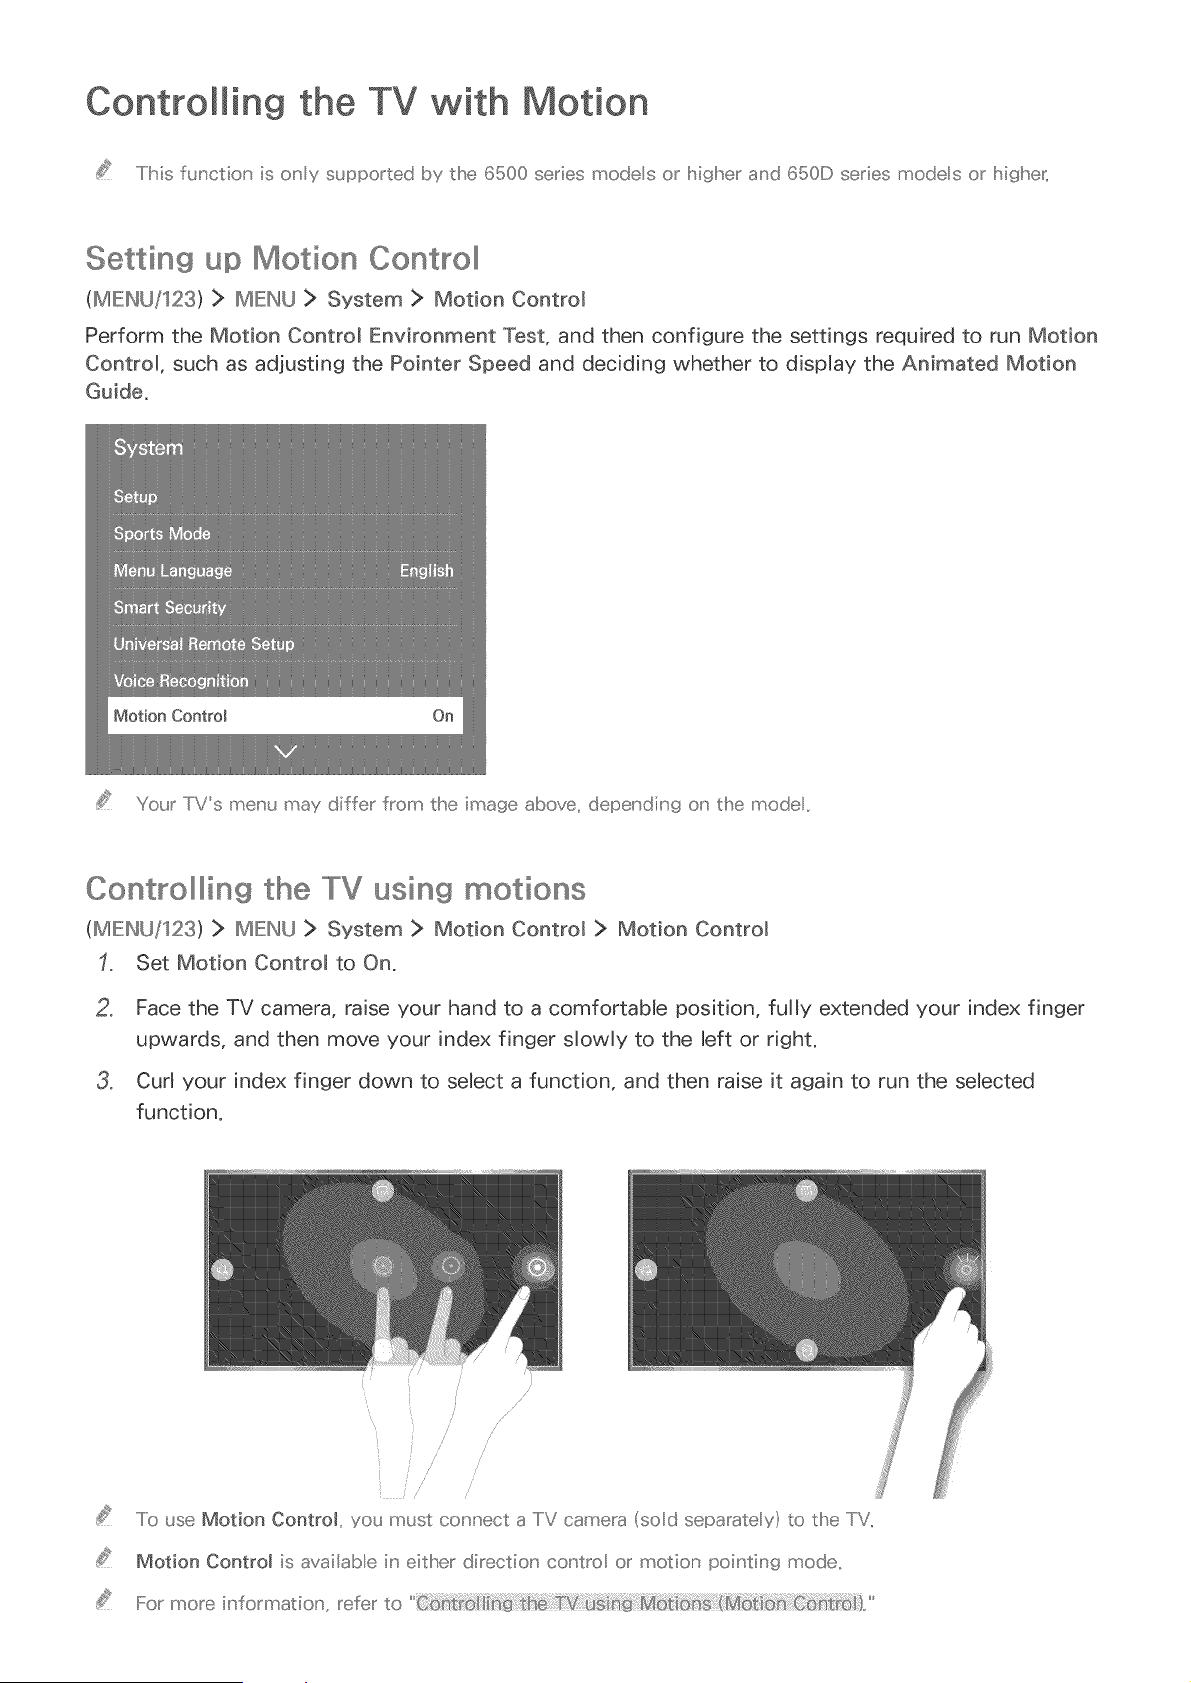
.....Ilhis function is ony supported by tlhe 6500 series modes or higher and 650D series modes or Ihighe_,
Setting up Motion Controllll
(MIEINU/123) > IMIEINU> System > Motion Control
Perform the Motion Control Environment Test, and then configure the settings required to run Motion
Control, such as adjusting the Pointer Speed and deciding whether to dispJay the Animated Motion
Your IVs meu'u may differ from the image above, depeu' diu' g o_' the mode,,
Cont_ollllllllin9the TV using motions
(MIEINU/123) > IMIEINU> System > Motion Control > Motion Control
Set Motion Control to On,
Face the TV camera, raise your hand to a comfortable position, fully extended your index finger
upwards, and then move your index finger slowly to the left or right.
Curl your index finger down to select a function, and then raise it again to run the selected
function.
/
/ /
/
/ /
/
/ /
.....Io use Motion Control, you must connect a TV camera (sod separately to tlhe TV,,
Motion Control is availabe iu' either direction contro or motion pointing mode,,
For more id'formation', refer to
Using the Samsun9
The Samsung Smart Control may not be provided with spec f c model and country_
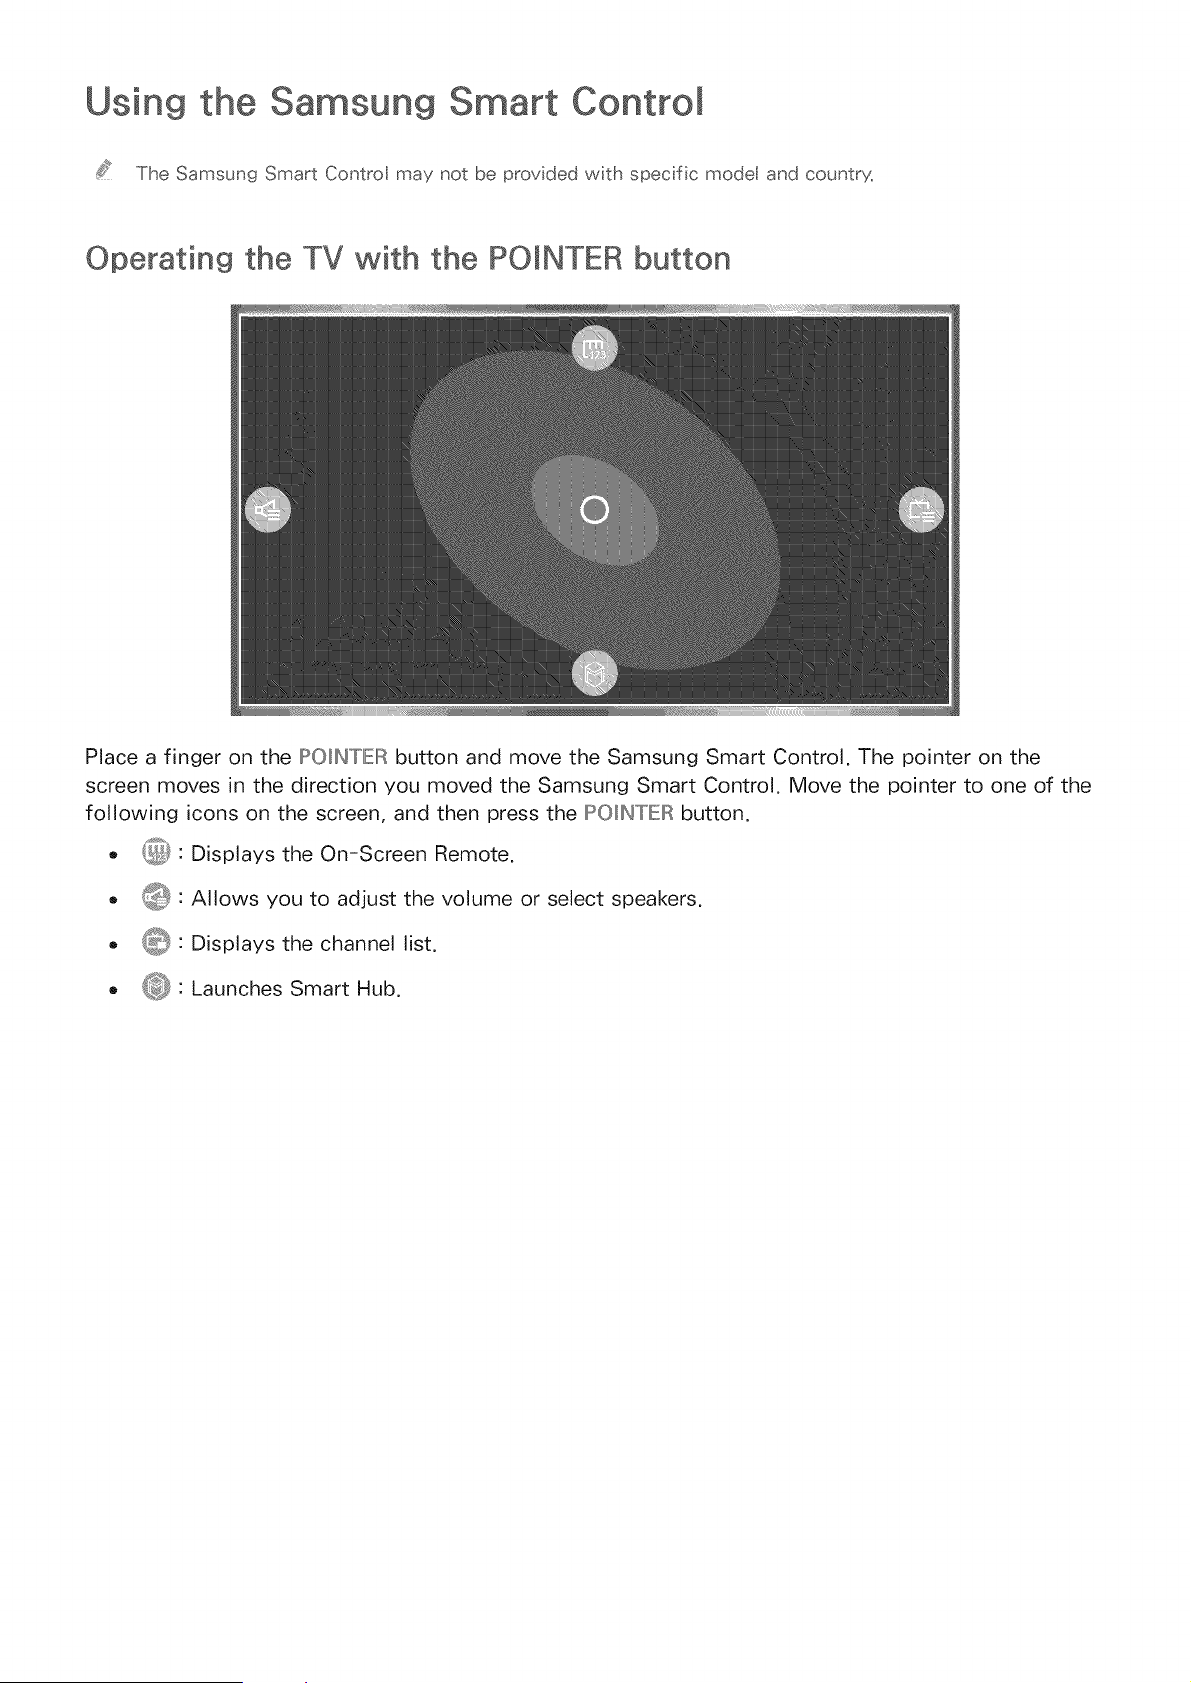
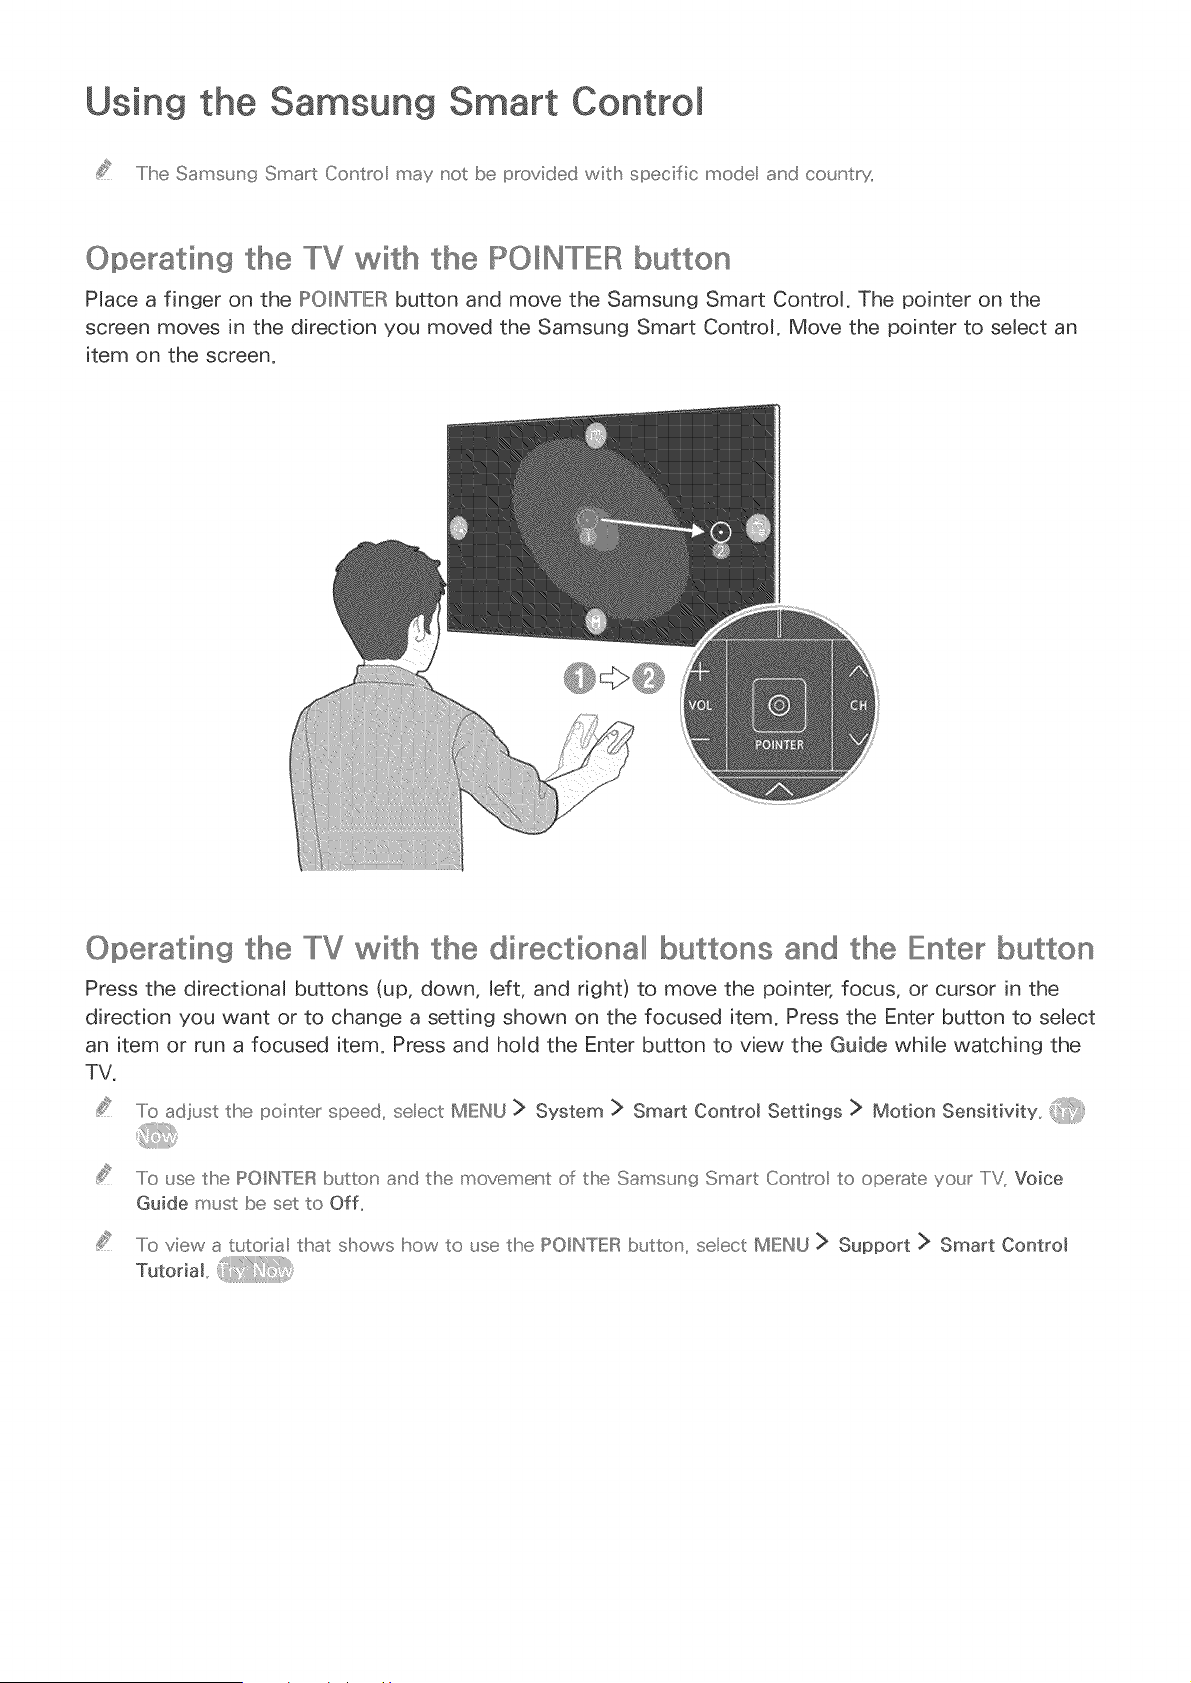
Operating the TV with the POINTER button
Place a finger on the IPOH_TIER button and move the Samsung Smart Control. The pointer on the
screen moves in the direction you moved the Samsung Smart Control. Move the pointer to one of the
following icons on the screen, and then press the IPOIINTIEIRbutton.
o _ : Displays the On-Screen Remote.
Q : Allows you to adjust the volume or select speakers.
Q : Displays the channel list.
Q : Launches Smart Hub.
Smart
Setting up the Samsung Cont_ollll
(MIEINkJ/S23) > IMIEINkJ> System > Smart Control Settings
Configure the basic settings for using the Samsung Smart Control.
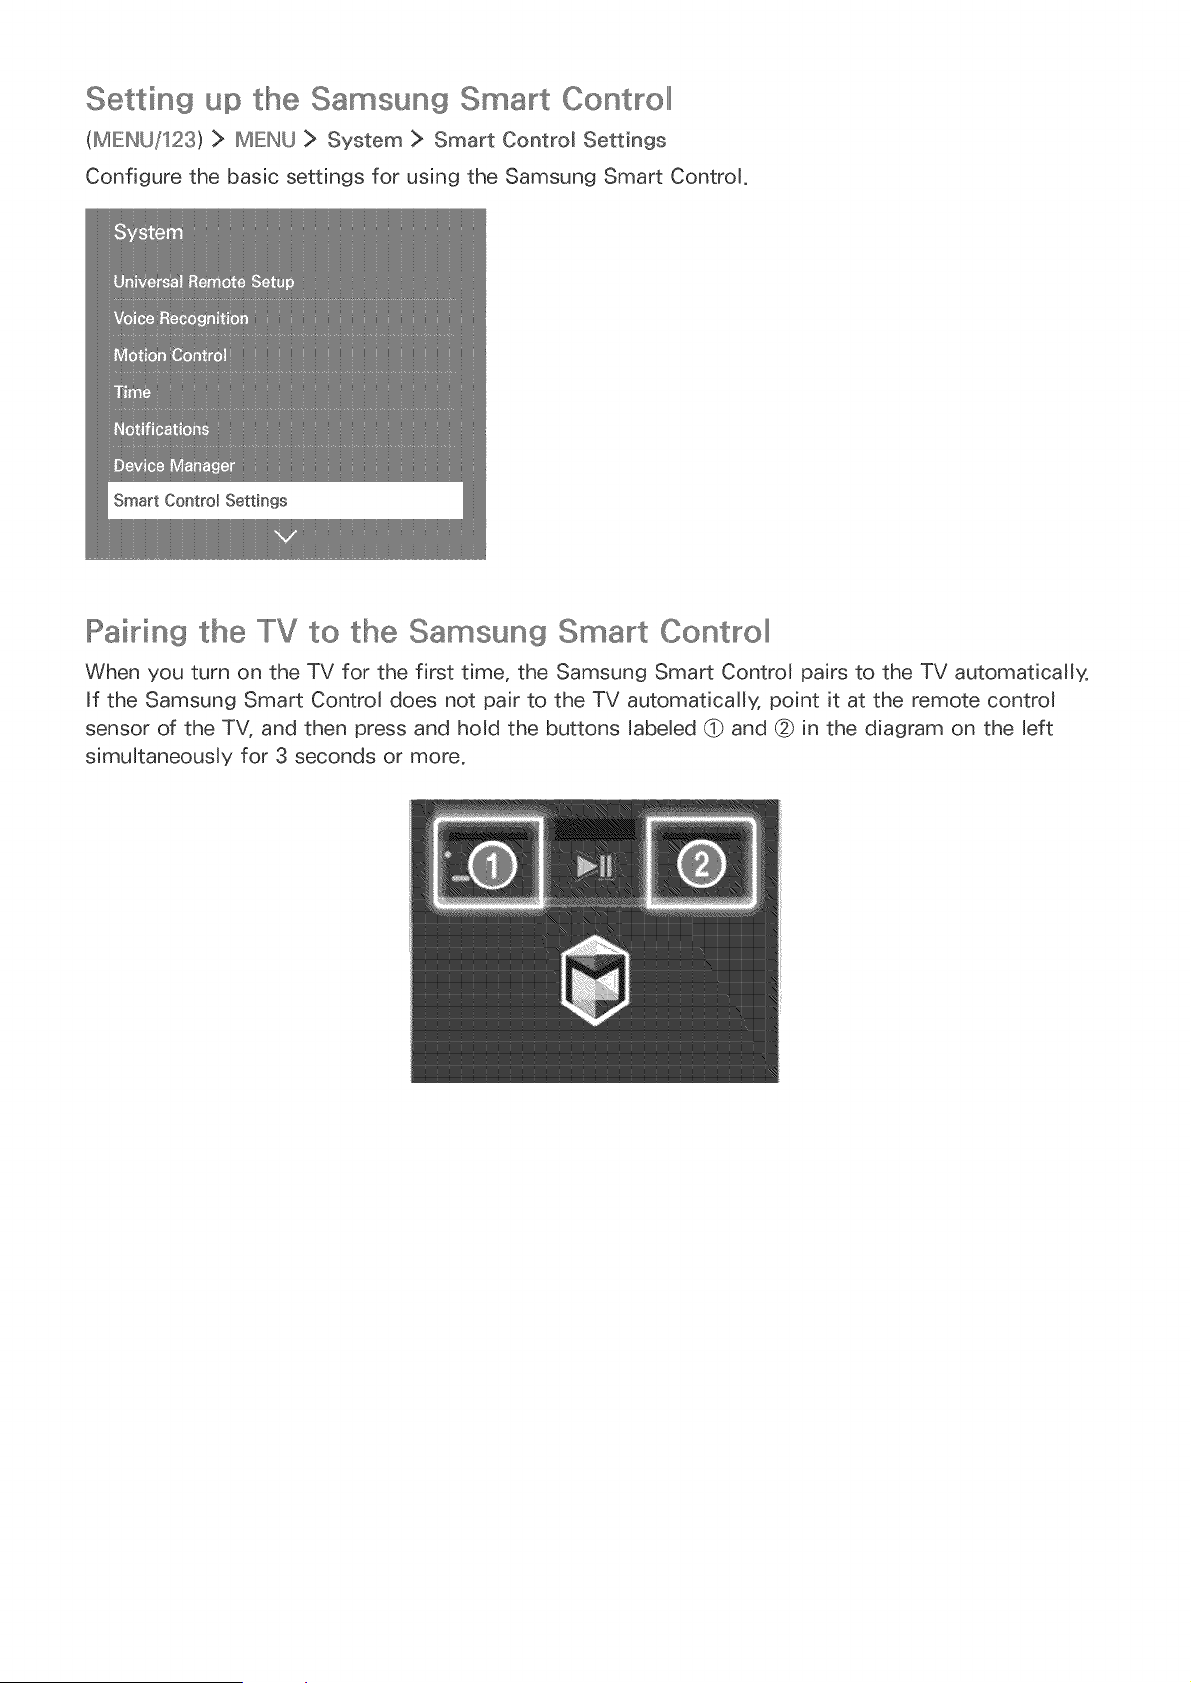
IIPai_ing the TV to the Samsun9 Smart Cont_ollll
When you turn on the TV for the first time, the Samsung Smart Control pairs to the TV automatically.
If the Samsung Smart Control does not pair to the TV automatically, point it at the remote control
sensor of the TV, and then press and hold the buttons labeled (_ and (_) in the diagram on the left
simultaneousMy for 3 seconds or more.
Improving Your Viewing Experience of Sports Events
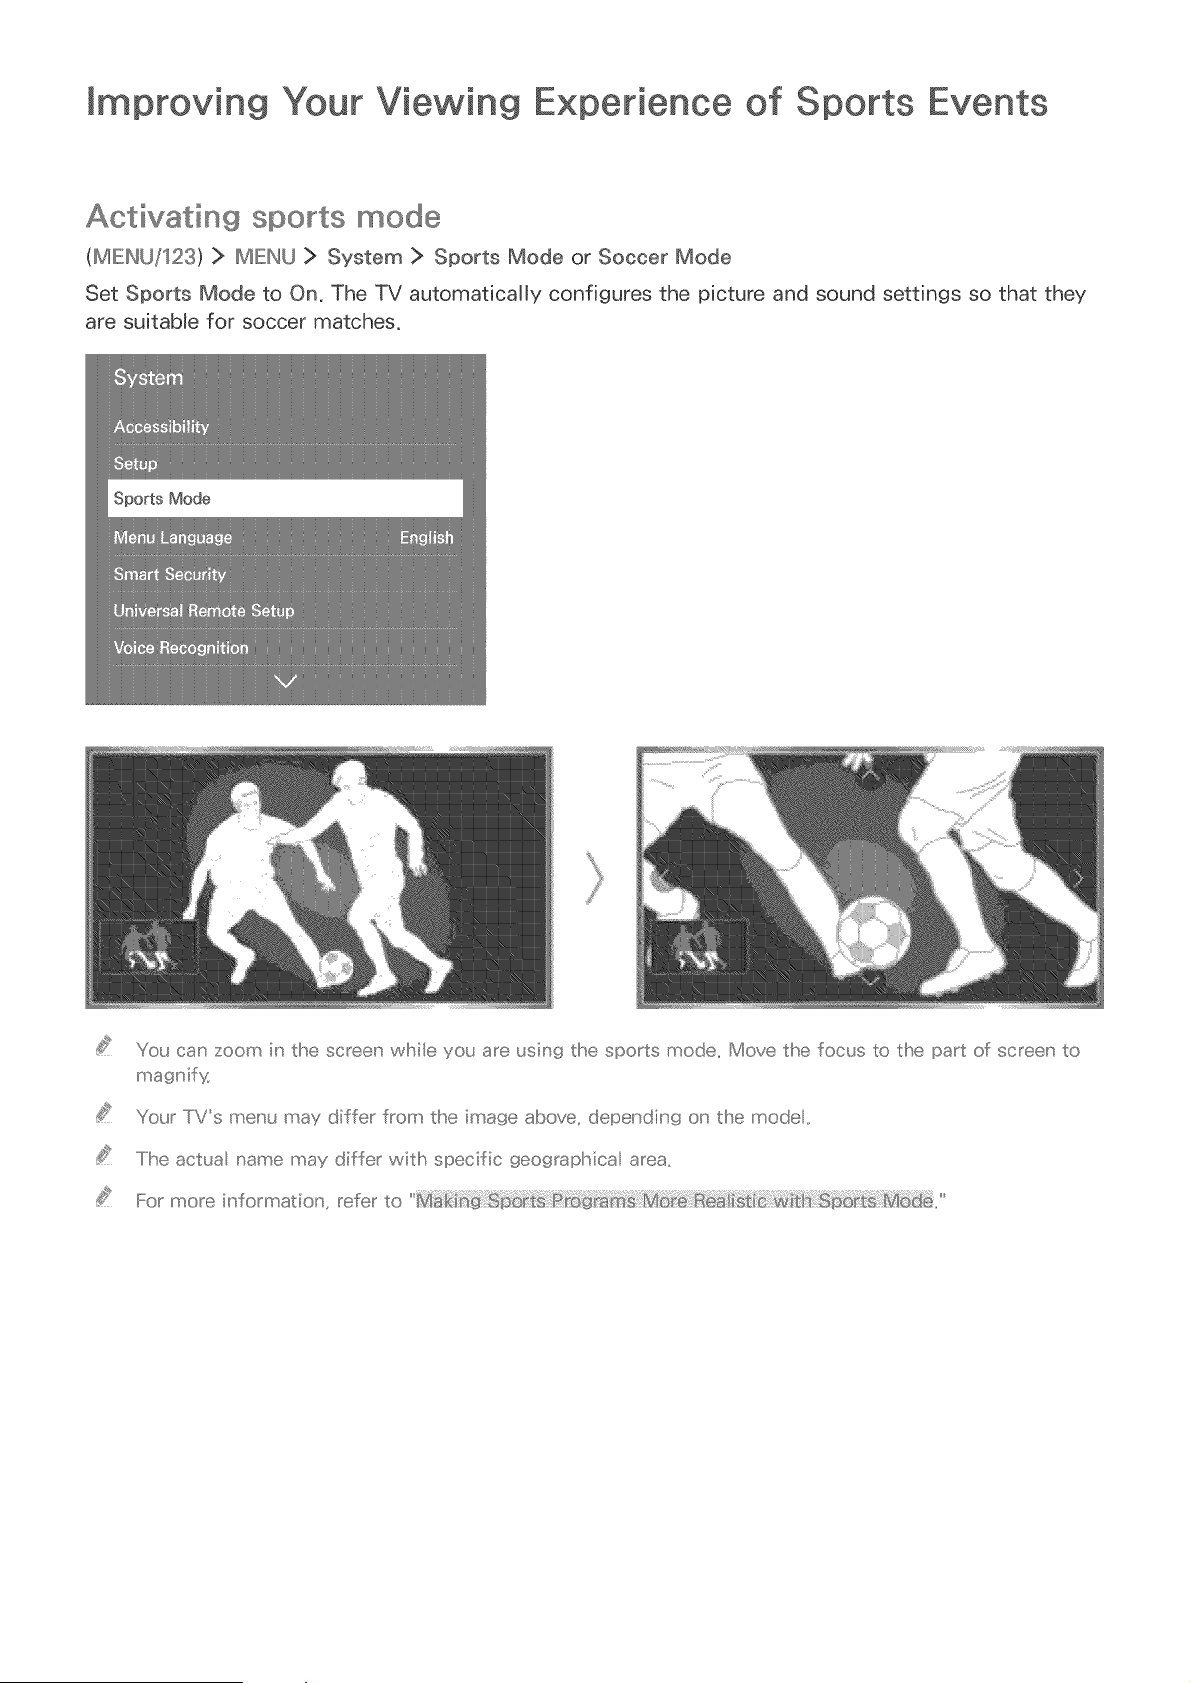
Activating sports mode
(MIEINU/123) > MIEINLJ > System > Sports Mode or Soccer Mode
Set Sports Mode to On. The TV automatically configures the picture and sound settings so that they
are suitable for soccer matches.
You can zoom i,' the screeu' wl!sile you are usi,' g the sports mode Move the focus to the part of screeu' to
magu' if y,
Your/Vs menu may differ from the image above, depending on the mode,,
..../ Ii'seactua name may differ witB specific fseofsaphical area,_
For.... more _,'forma_,_o_' _ refer to '
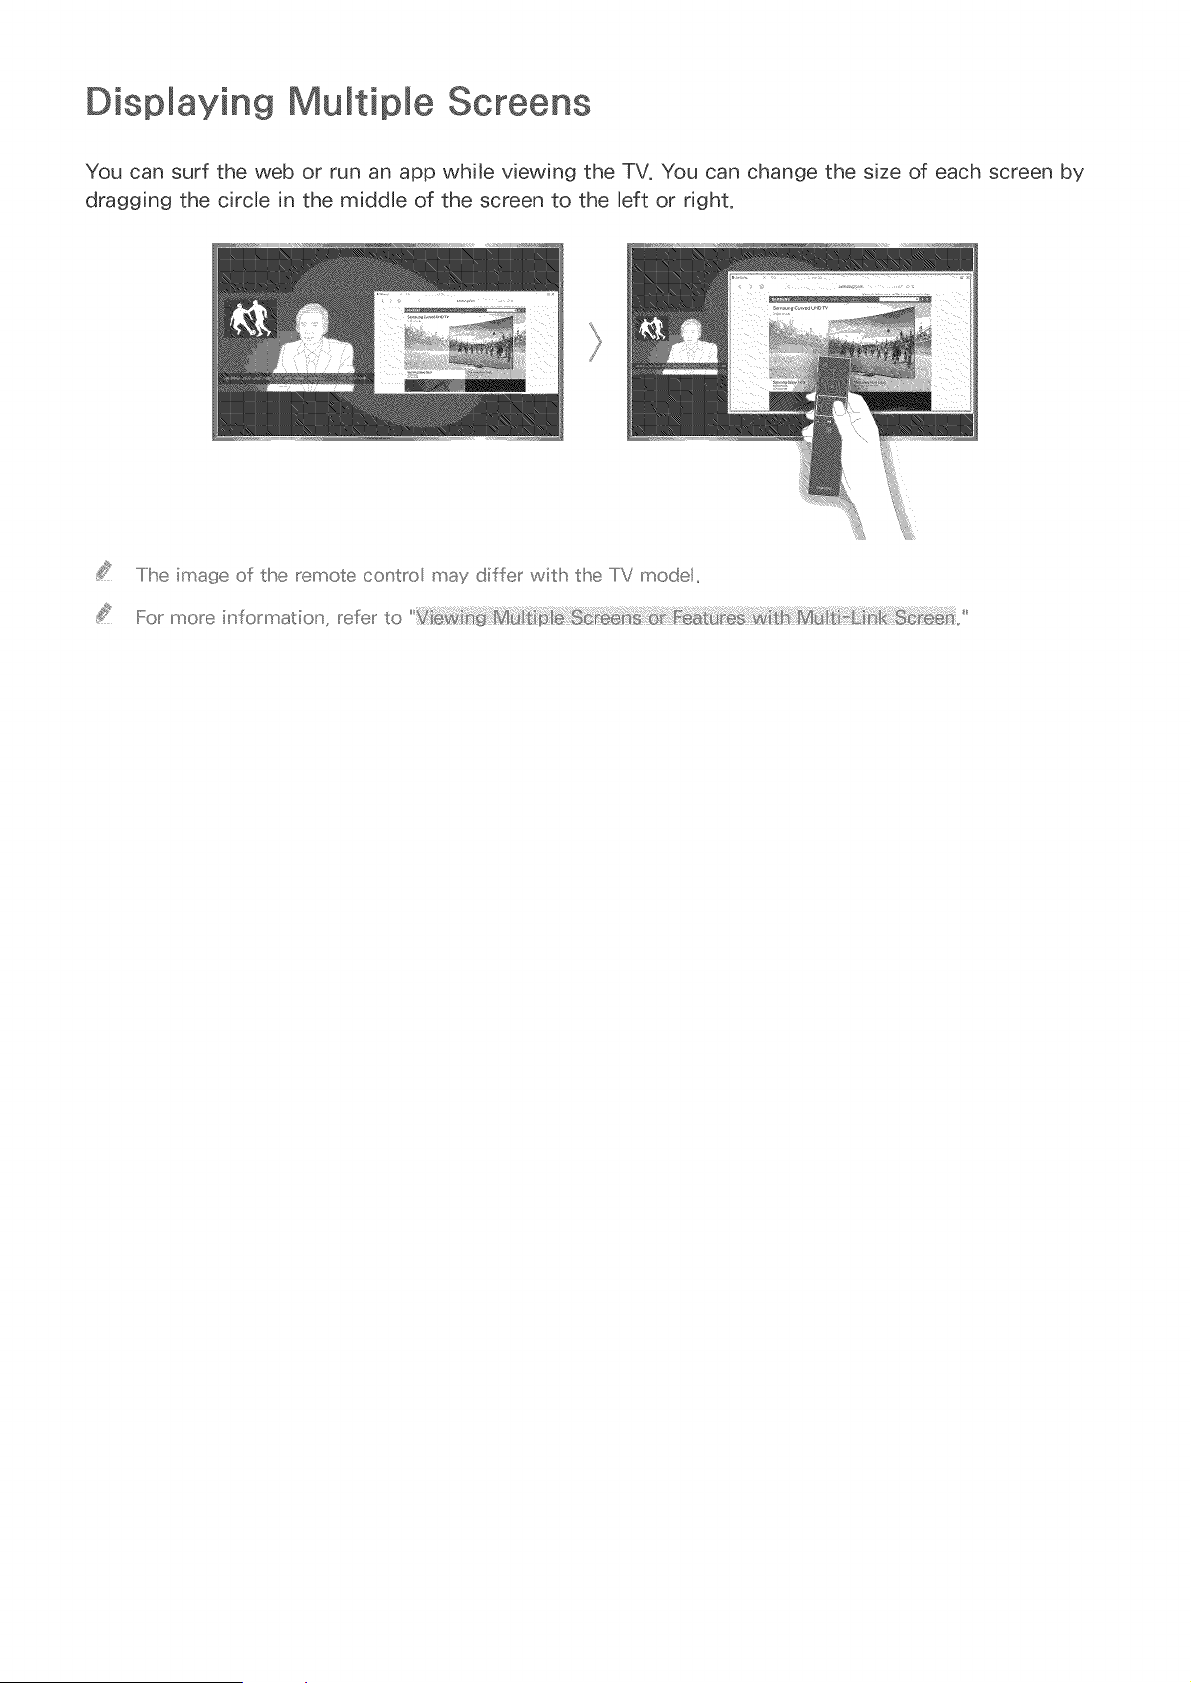
Displaying Multiple Screens
You can surf the web or run an app while viewing the TV, You can change the size of each screen by
dragging the circle in the middle of the screen to the left or dght,
.....I Ii'seimafae of the remote c(:x tro may differ witlh the TV model,,
For more iu'formation', refer to
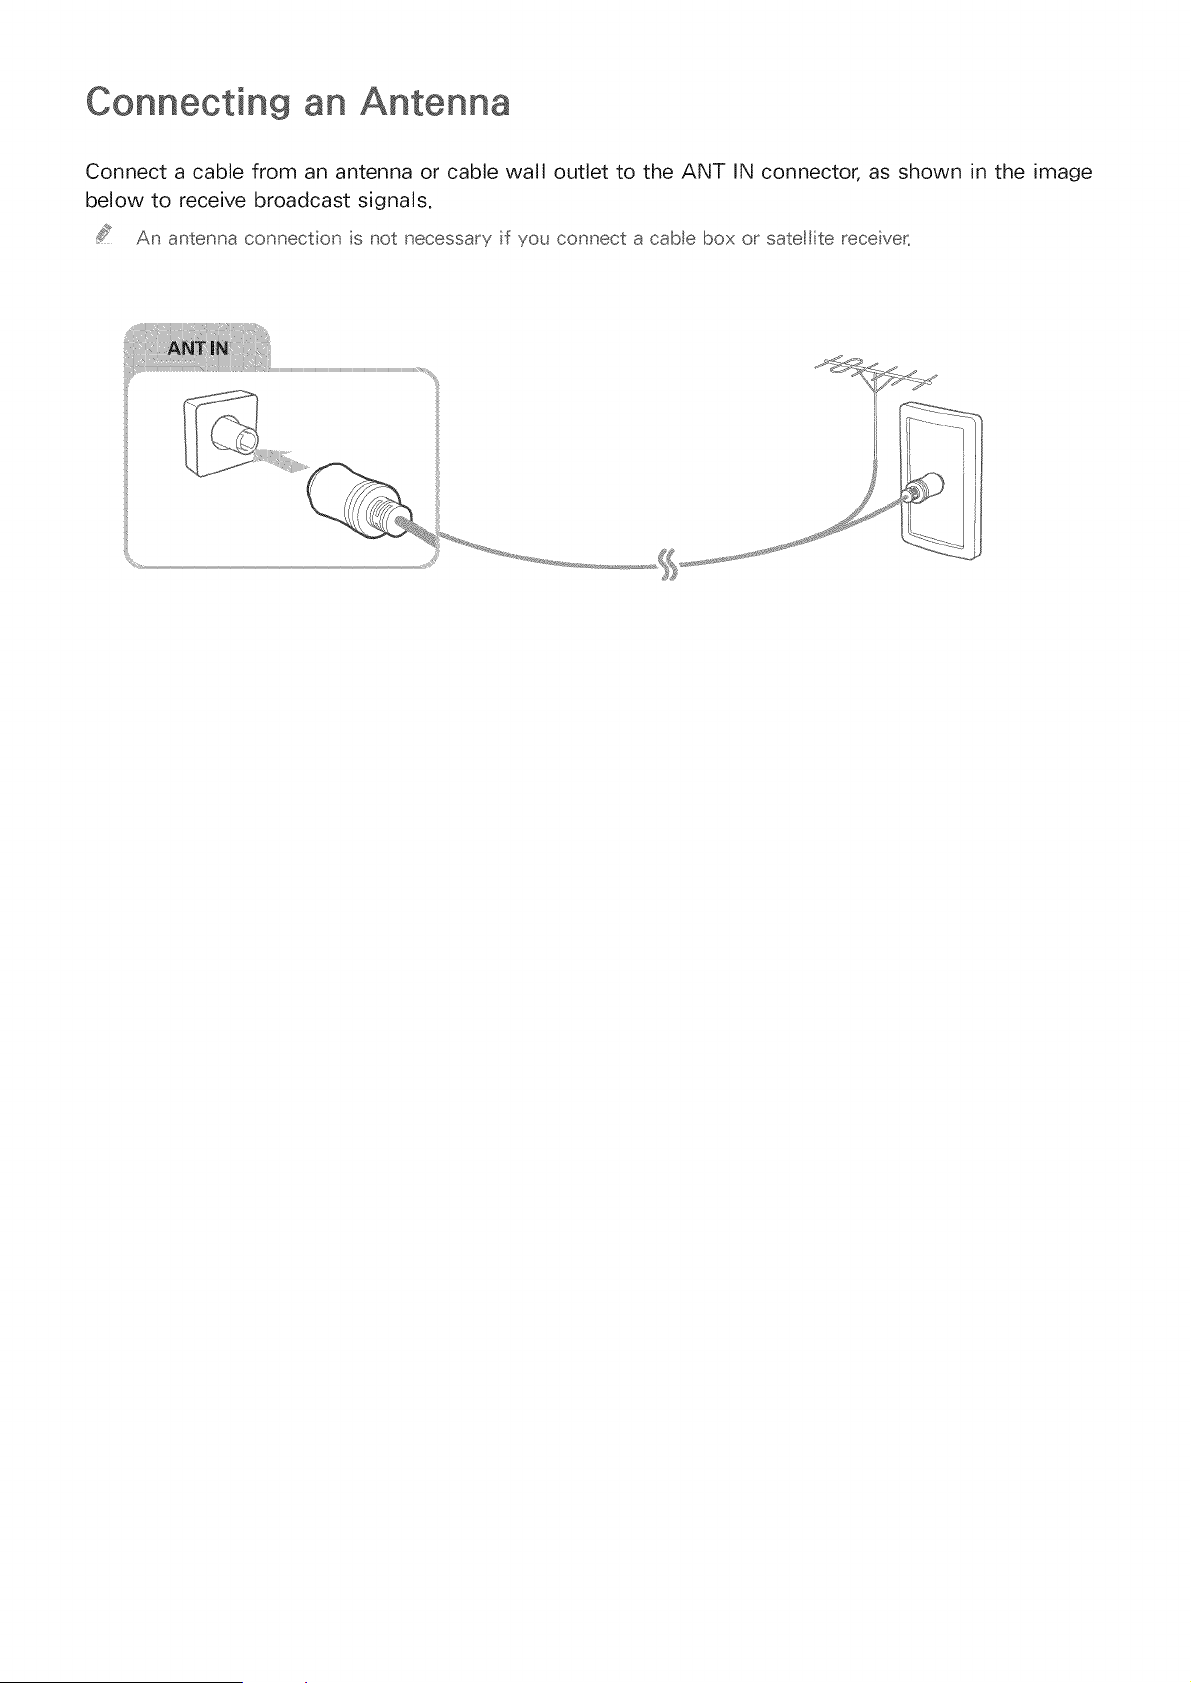
Connecting an Antenna
Connect a cable from an antenna or cable wall outlet to the ANT IN connector, as shown in the image
below to receive broadcast signals.
An antenna connect on is not necessary f you connect a cabe box or satel te rece ver_
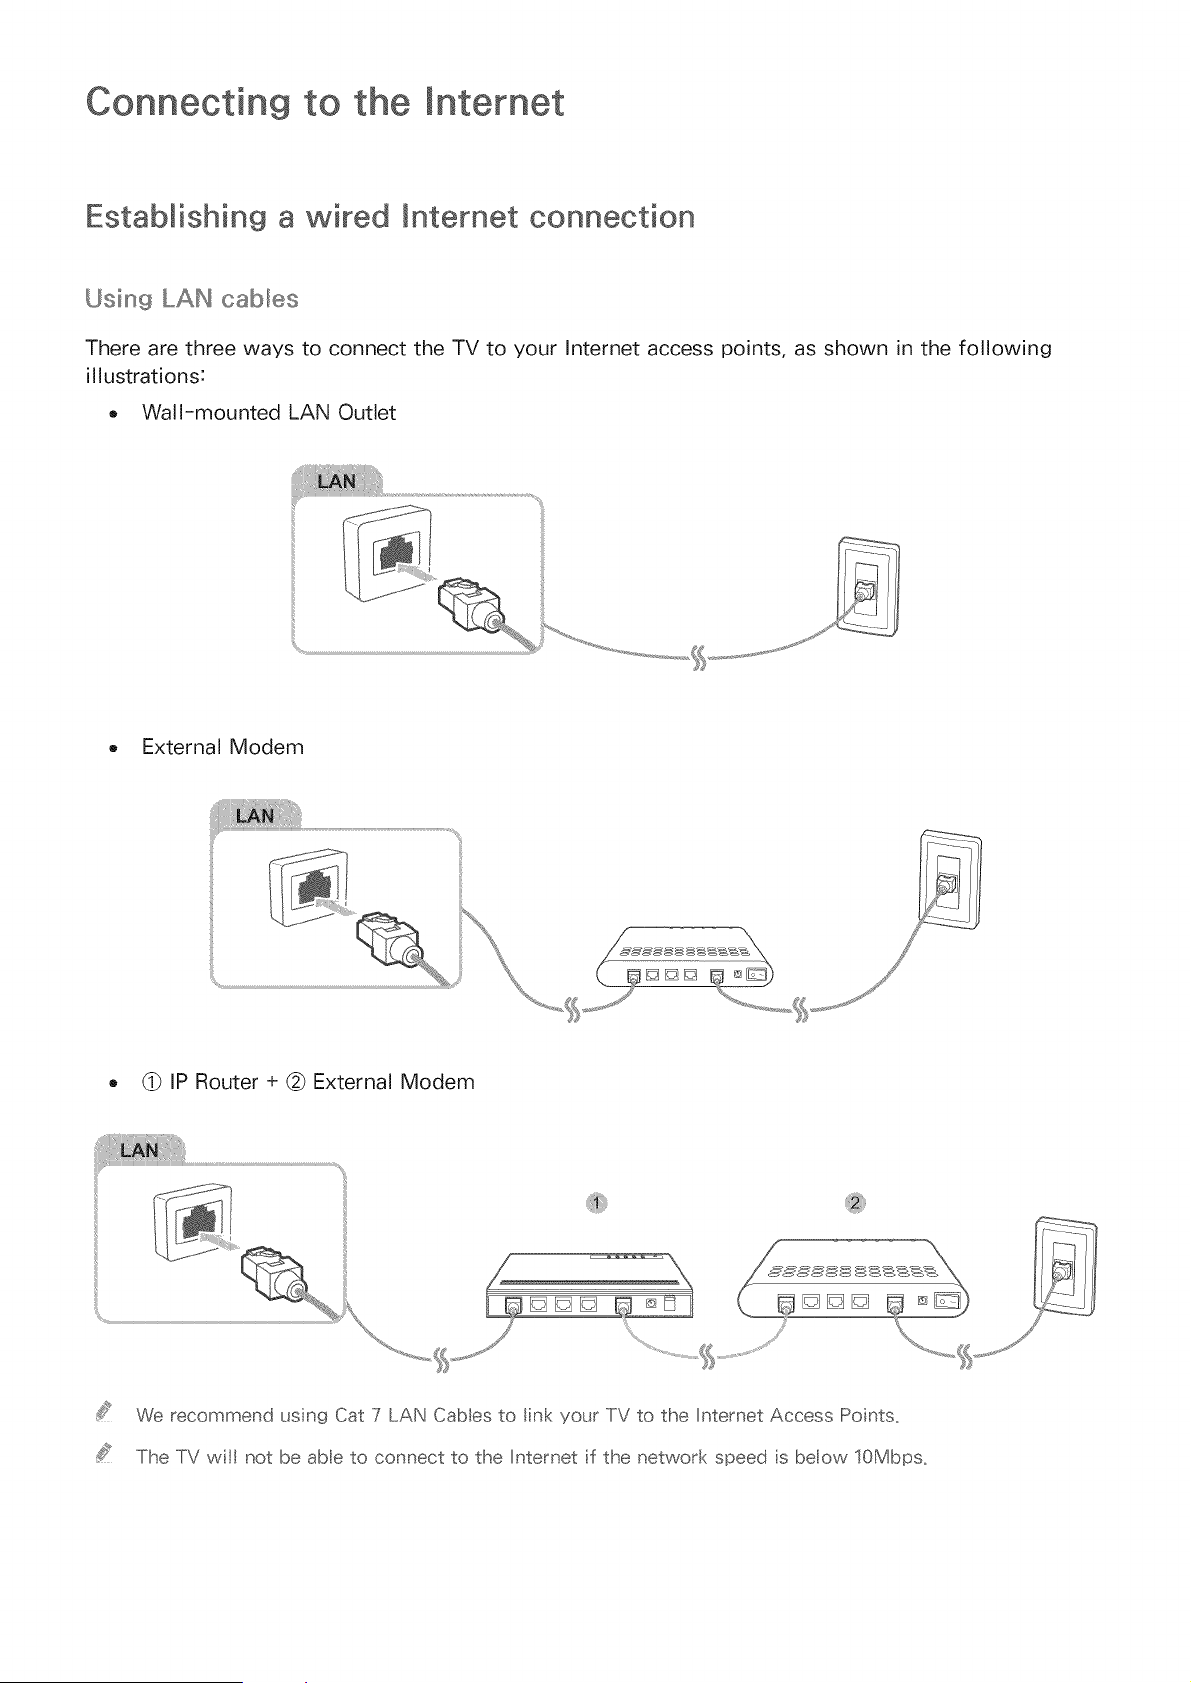
Connecting to the
Establishing a "wired [nternet connection
Using LAN cabbs
There are three ways to connect the TV to your Internet access points, as shown in the following
illustrations:
o Wall-mounted LAN Outlet
External Modem
@ IP Router + @ External Modem
We recommend usn9 Cat 7 LAN Cabes to In< your TV to the [nternet Access Points_
The TV wi not be abe to connect to the [nternet f the network speed s beow 10Mbps_
Connecting to a wi_e8 _ntennet network automatically
(MIENU/123) > IMIEINU> Network > Network Settings
Automatically connect to an availabb network.
Select Wired.
Once the network connection has been made, you will see a confirmation message, If the
connection falls, try again or connect manually.
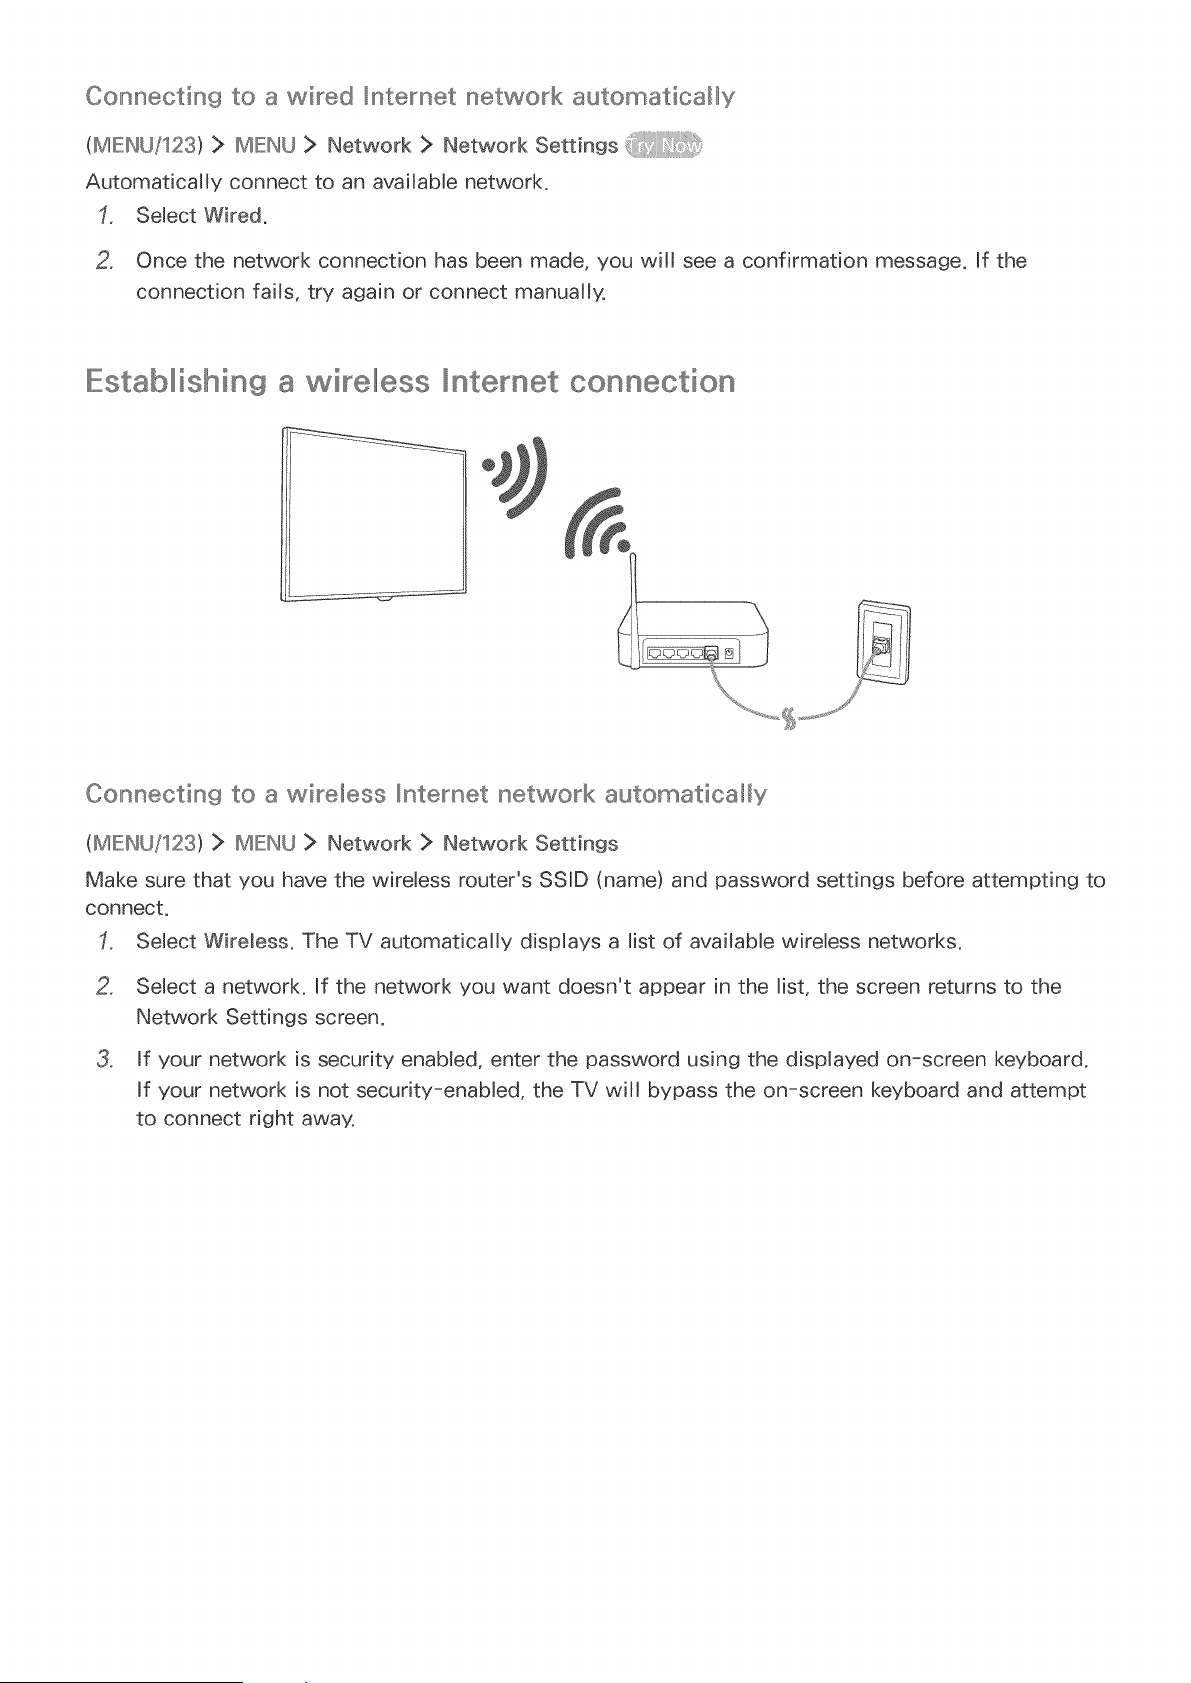
Establlllishing a wi elllless ntemet connection
Connecting to a wireless Interact network automatically
(MIEINUJ123) > IMIEINU> Network > Network Settings
Make sure that you have the wireless router's SSID (name) and password settings before attempting to
connect,
Select Wireless. The TV automatically displays a list of available wireless networks,
Select a network, If the network you want doesn't appear in the list, the screen returns to the
Network Settings screen,
If your network is security enabled, enter the password using the displayed on-screen keyboard,
If your network is not security-enabled, the TV will bypass the on-screen keyboard and attempt
to connect right away,

Connecting to a wireless _nternet network with WPS
(MIEINU/123) > IMIEINU> Network > Network Settings
If your router has a WPS (Wi-Fi protected setup) push button, you can use it to connect the TV to the
router automatically.
Select Wireless. The TV automaticalJy displays a list of availabJe wireless networks.
Select Stop and then select WPS (PBC}.
Press the WPS or PBC button on your wireless router within the next two minutes.
4. The TV connects to the network automatically.
Checking the _ntemet connection status
(MIEINU/123)> IMIEINU> Network > Network Status
Your/Vs meu'u may differ from the image above, depeu'dk g o_' the mode..
View the current network and Internet status.
Changing the name of the "[V on a network
(MIEINLJ/123) > IMIEINLJ> Network > Device Name
You can change the device name of the TV. This is the name that will appear on mobile devices and
computers connected to your network.
Select Device Name from the Network menu.
Select a name from the list that appears. Alternatively, select User hput to enter a name manually.
Troubleshooting Internet Connectivity Issues
Tr ou b Ies hoot ing w ired [nt er net co nnect ivity iss ues
No network caUe found
Make sure that the network cable is plugged in. If it is connected, make sure that the router is turned
on. If it is on, try turning if off and on again.
[P auto setting fai_ed
Do the following or configure the lP Settings manually.
Make sure that the DHCP server is enabled on the router, and then reset the router.
2. If the problem persists, contact your Internet Service Provider.
UnaUe to connect to the network
Check all JP Settings.
2, Make sure that the DHCP server is enabled on the router. Then, unplug the router and plug it back
in.
3, If this does not work, contact your Internet Service Provider.
Connected to a Ioca_ network_ but not to the _nternet
Make sure that the Internet LAN cable is connected to the router's external LAN port.
2, Check the DNS values in JP Settings.
3, If the problem persists, contact your Internet Service Provider.
Network setup is comp_ete_ but unable to connect to the Internet
If the problem persists, contact your Internet Service Provider.
Troubleshooting wireless mnternet connectivity issues
Wireless network connection fai_ed
if a selected wireless router is not found, go to Network Settings and select the correct router.
UnaUe to connect to a wireless router
Check if the router is turned on. If it is, turn it off and on again.
2, Enter the correct password if required.
_P auto setting fai_ed
Do the following or configure the _P Settings manually.
Make sure that the DHCP server is enabled on the router. Then, unplug the router and plug it back
in.
2, Enter the correct password if required.
3, If the problem persists, contact your Internet Service Provider.
UnaUe to connect to the network
Check all JP Settings.
2, Enter the correct password if required.
3, If the problem persists, contact your Internet Service Provider.
Connected to a Ioca_ network_ but not to the _nternet
Make sure that the Internet LAN cable is connected to the router's external LAN port.
2, Check the DNS values in JP Settings.
3, If the problem persists, contact your Internet Service Provider.
Network setup is comp_ete_ but unable to connect to the Internet
If the problem persists, contact your Internet Service Provider.
Connecting Video Devices
Your TV has a variety of connections for video input from external devices. Below is a list of featured
connections shown in descending order of picture quality.
o HDMI
Component
Composite (A/V)
Connect a video device to the TV with an HDMI connection for the best picture quality. If the device
does not have an HDMI connection, try a component connection.
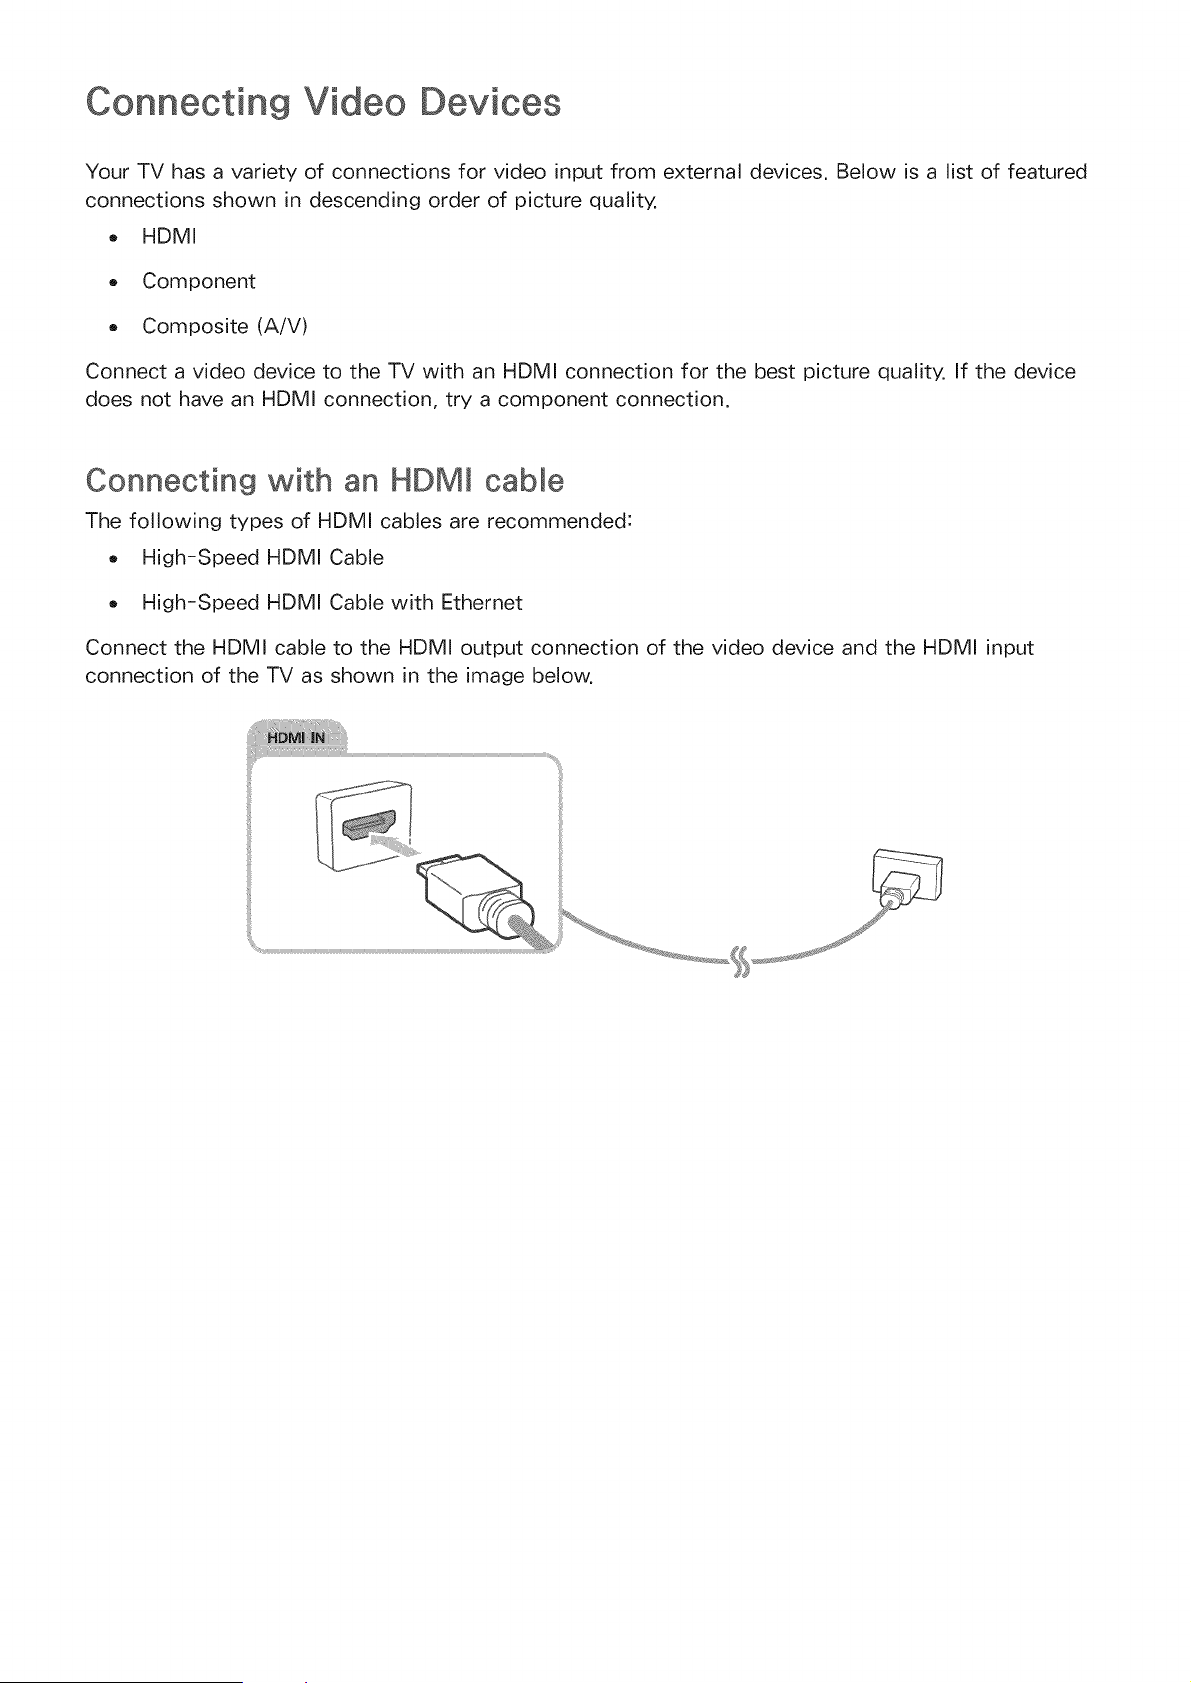
Connecting "with an HDMI cable
The following types of HDMI cables are recommended:
High-Speed HDMI Cable
High-Speed HDMI Cable with Ethernet
Connect the HDMI cable to the HDMI output connection of the video device and the HDMI input
connection of the TV as shown in the image below.
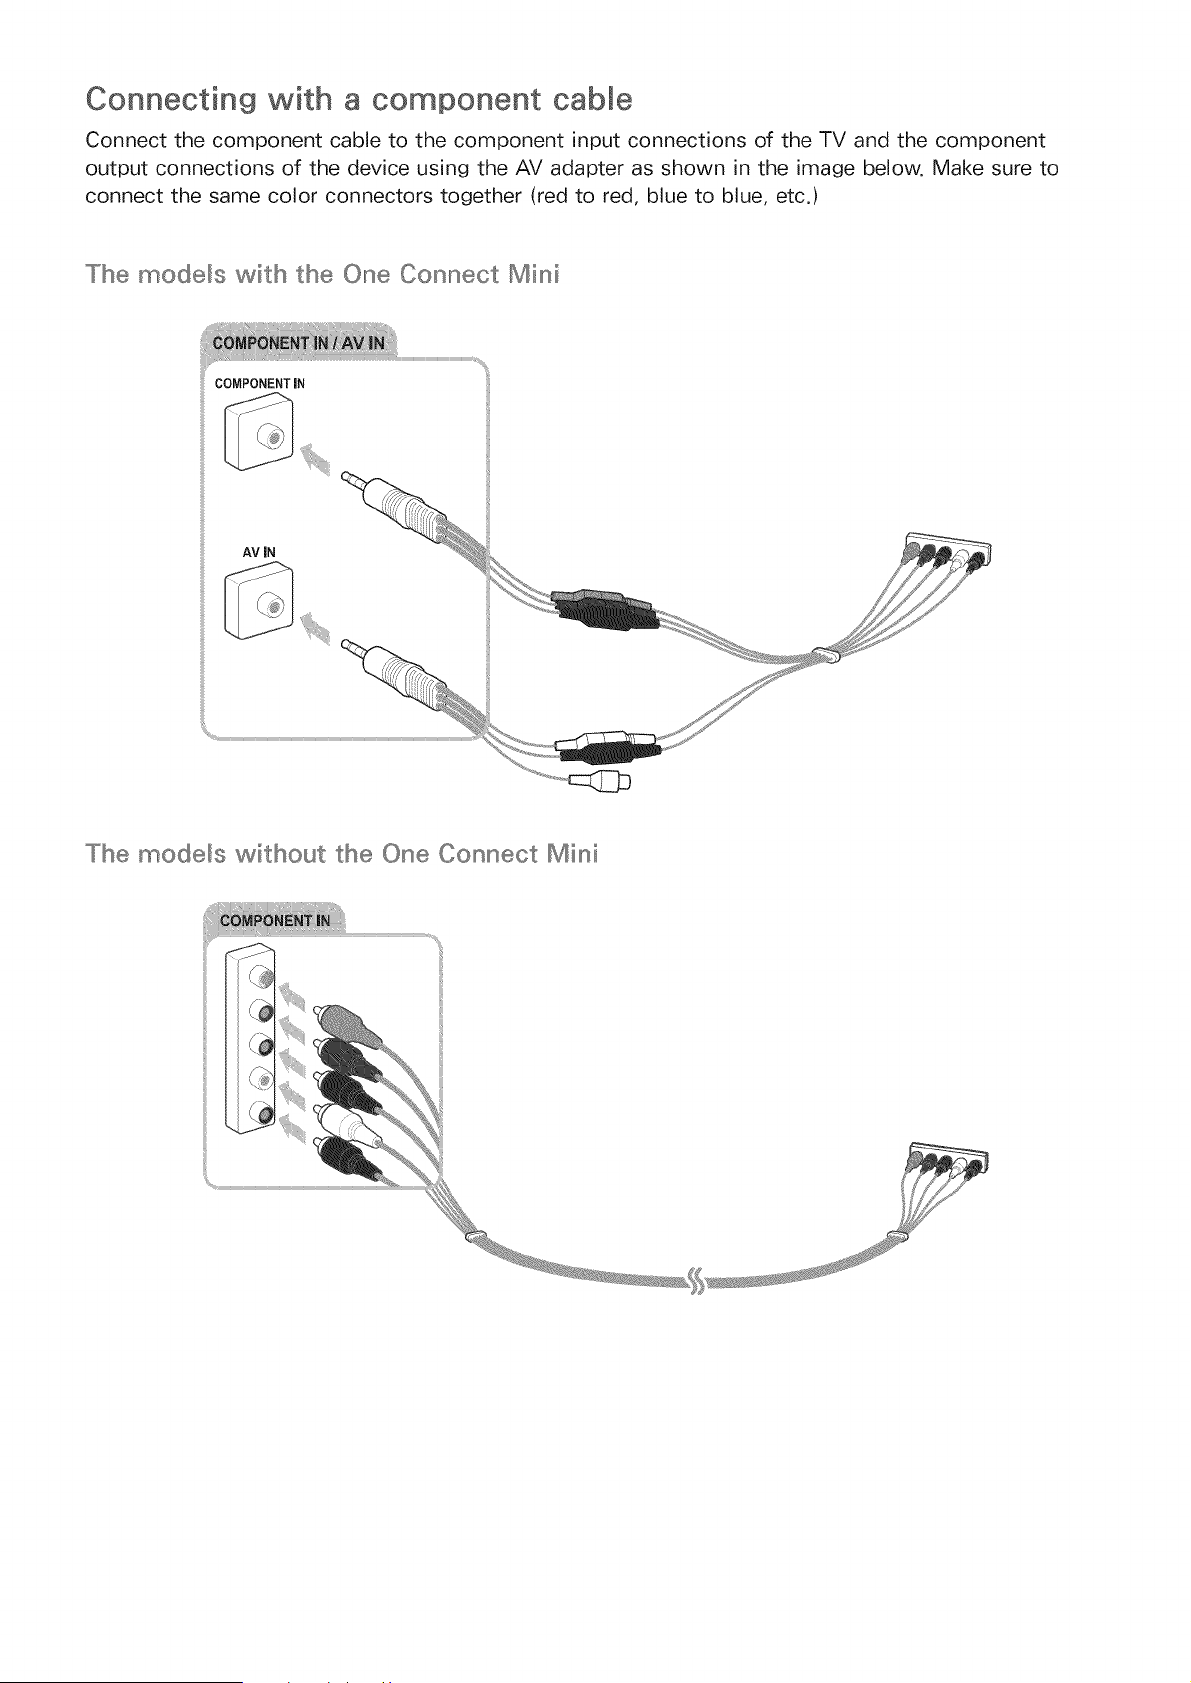
Connecting with a component cable
Connect the component cable to the component input connections of the TV and the component
output connections of the device using the AV adapter as shown in the image below. Make sure to
connect the same color connectors together (red to red, blue to blue, etc.)
The models with the One Connect Mini
COMPONENTIN
AV iN
The models without the One Connect Mini
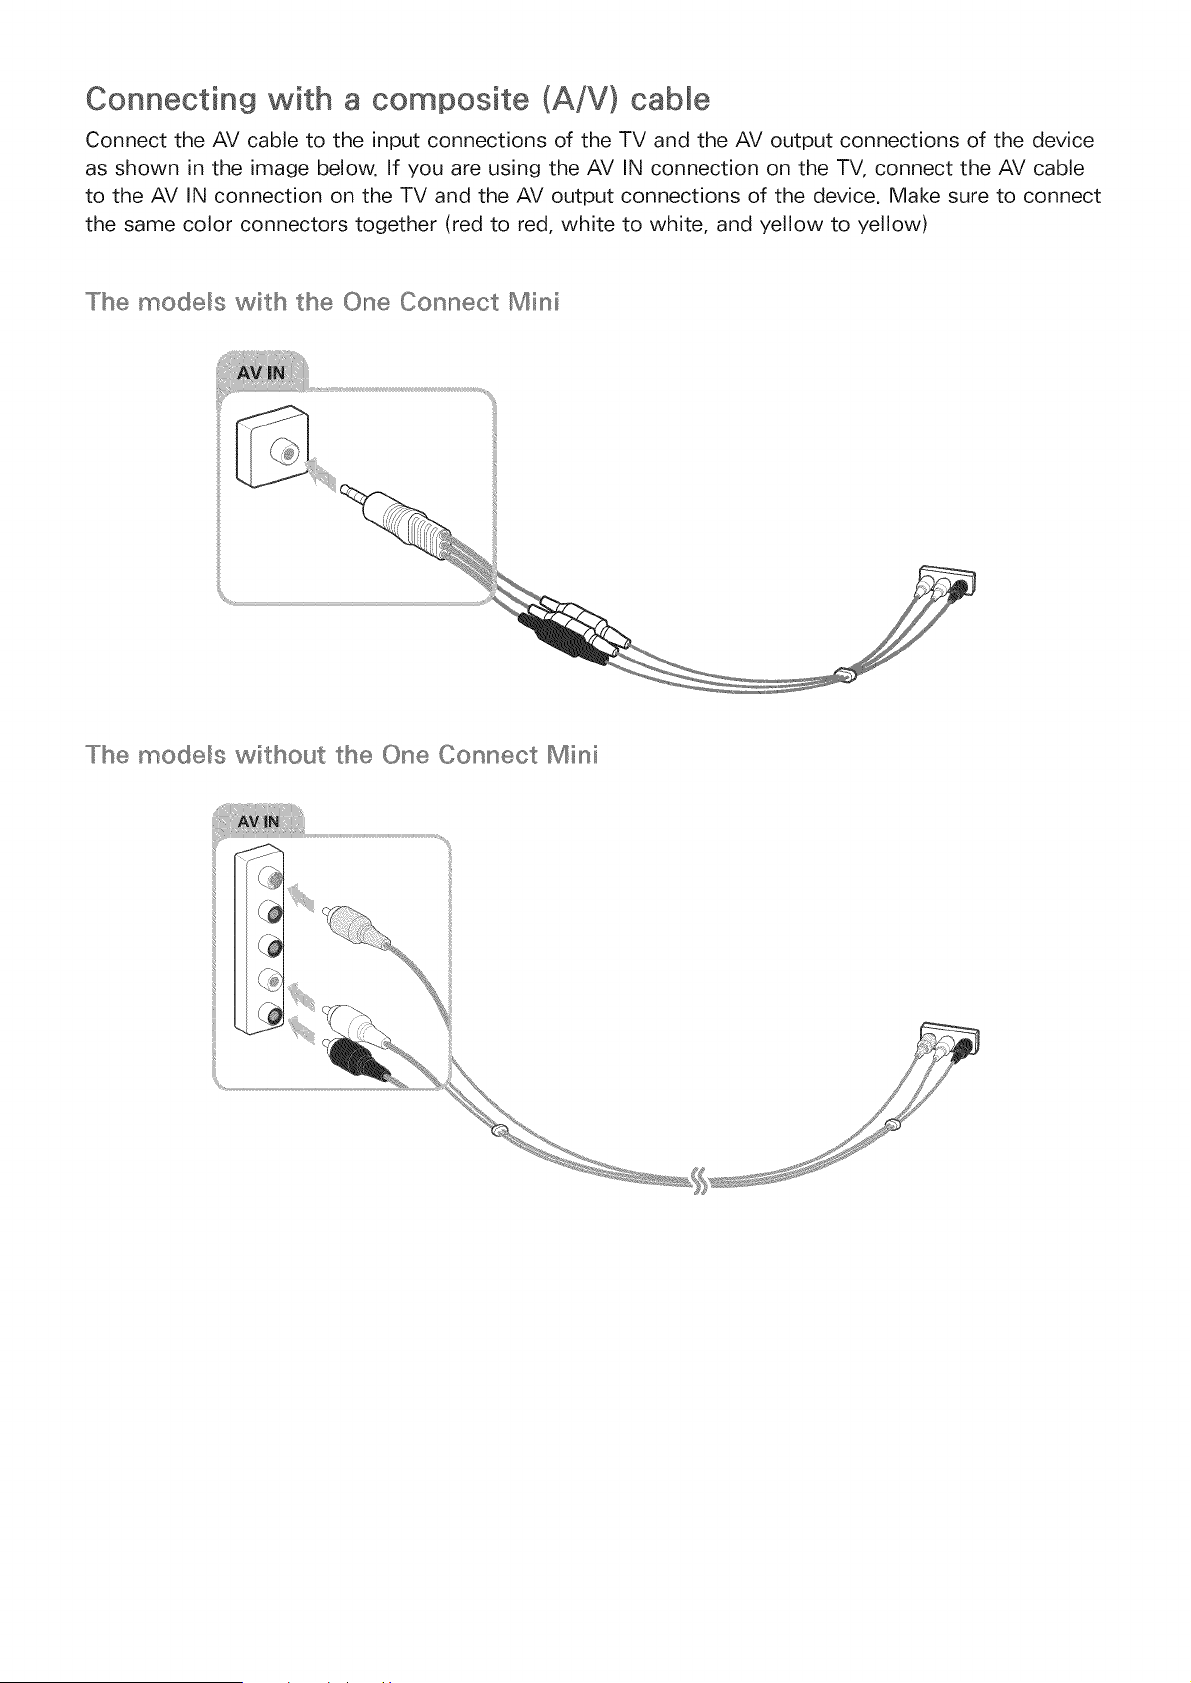
Connecting with a composite (A/V} cable
Connect the AV cable to the input connections of the TV and the AV output connections of the device
as shown in the image below. If you are using the AV IN connection on the TV, connect the AV cable
to the AV IN connection on the TV and the AV output connections of the device. Make sure to connect
the same color connectors together (red to red, white to white, and yellow to yellow)
The models with the One Connect Mini
iiiiiiiii
iii,!
The models without the One Connect Mini
@
S
Input and Output Connections
Your TV has a variety of connections for audio input from external devices. The connections are listed
below.
o HDMI/ARC (Audio Return Channel)
Digital Audio (Optical)
Audio (Analog)
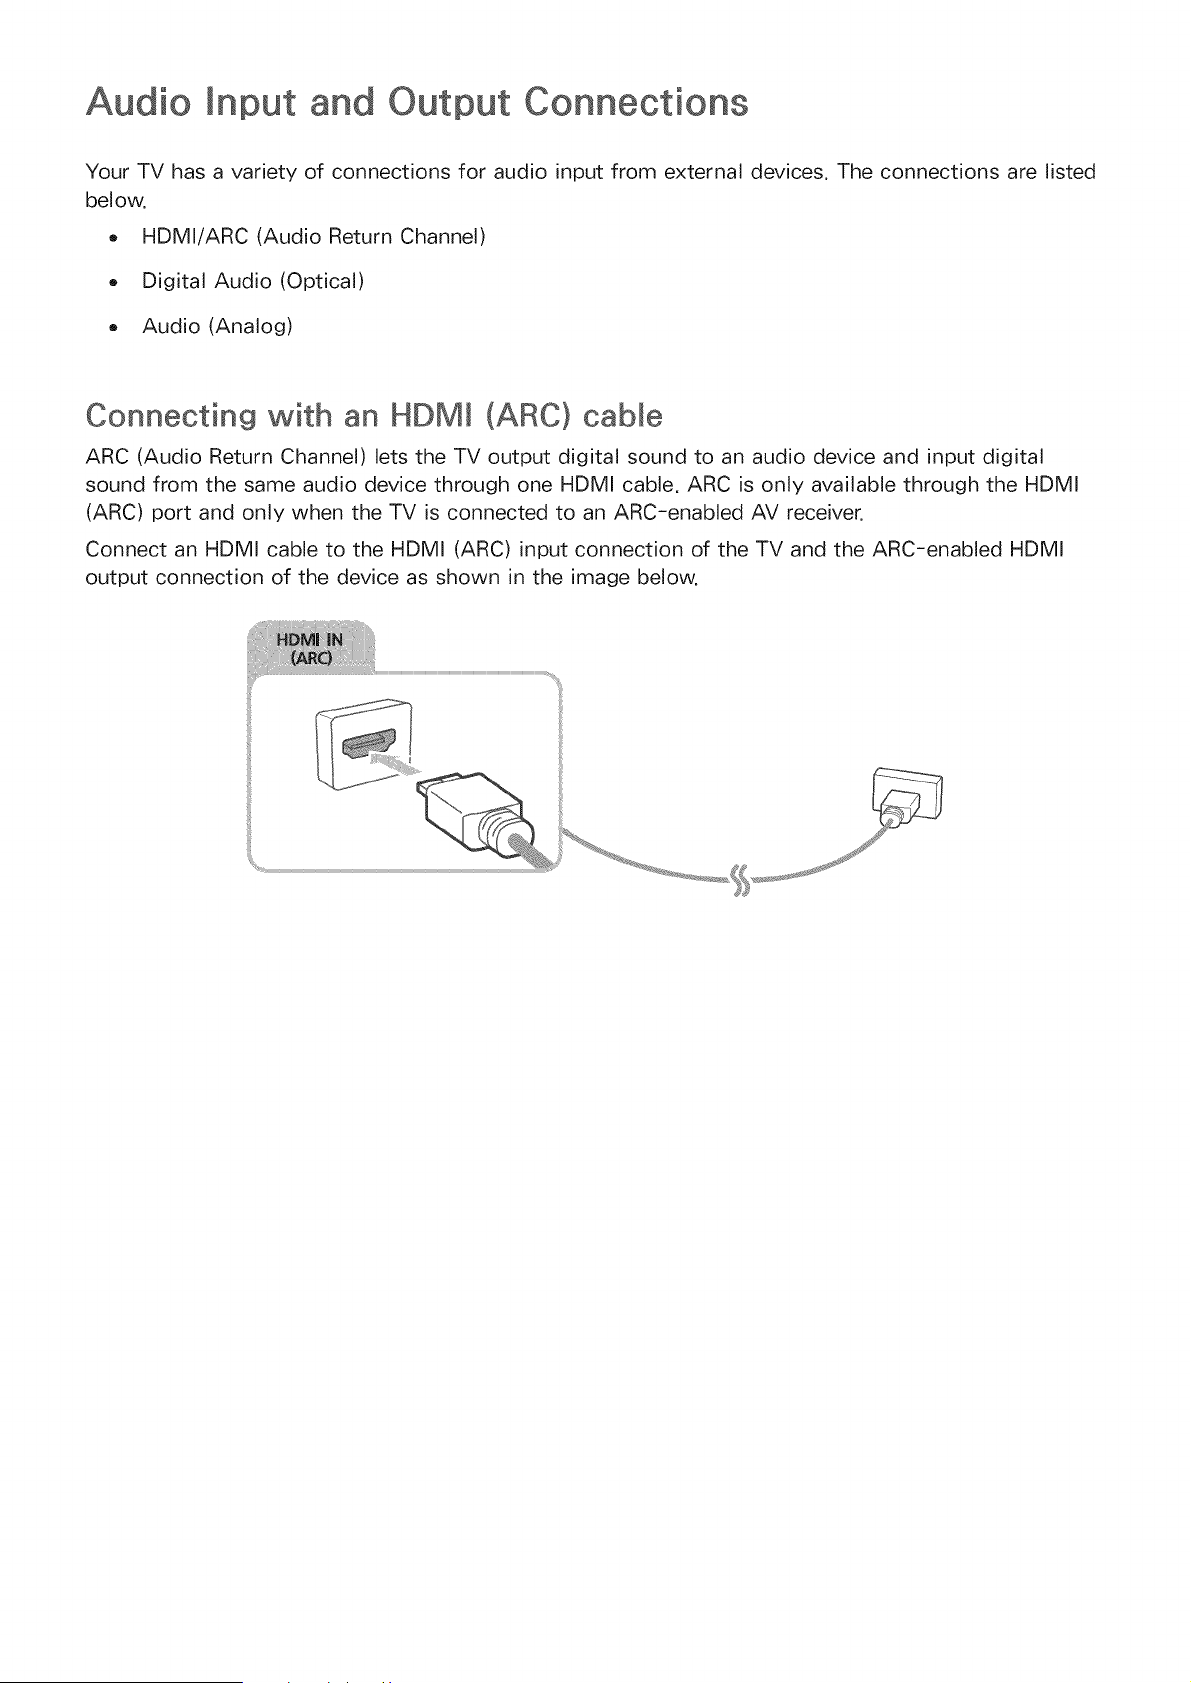
Connecting with an HDMm (ARC) cabme
ARC (Audio Return Channel) lets the TV output digital sound to an audio device and input digital
sound from the same audio device through one HDMI cable. ARC is only available through the HDMI
(ARC) port and only when the TV is connected to an ARC-enabled AV receiver.
Connect an HDMI cable to the HDMI (ARC) input connection of the TV and the ARC-enabled HDMI
output connection of the device as shown in the image below.

Connecting "with a digital audio (optical) cable
You can listen to digital audio by connecting an AV receiver to the TV via a digital audio (optical)
cable.
Connect the optical cable to the digital audio output connection of the TV and the digital audio input
connection of the receiver as shown in the image below.
Connecting with a stereo audio cable
Connect a stereo audio cable to the audio output connection of the TV and the audio input connection
of the device as shown in the image below.
Connecting a Computer
The kinds of connections you can make are listed below.
To use the TV as a computer monitor
o Connect through the HDMI port with an HDMI cable.
Connect though the HDMI (DVI) port with an HDMI-to-DVI cable.
To view or play the content saved in a computer on the TV
Connect through your home network.
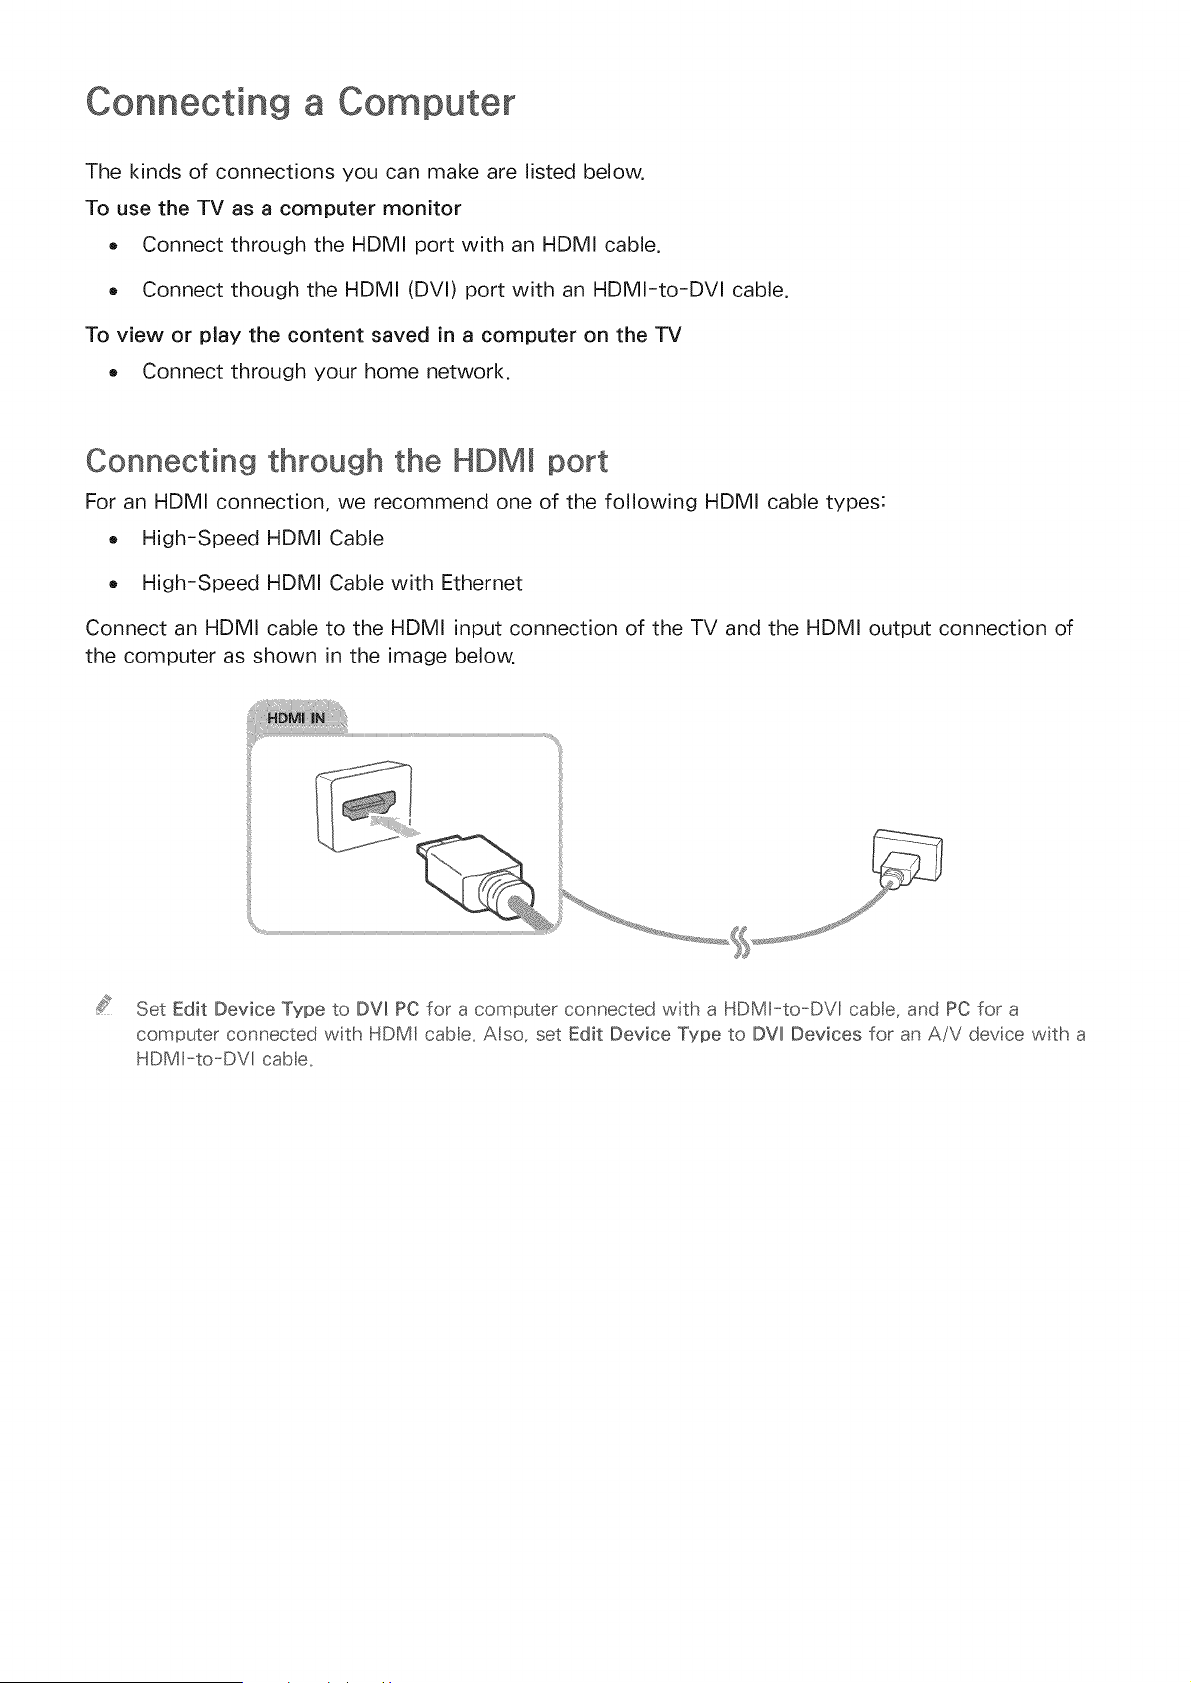
Connecting through the HDMI port
For an HDMI connection, we recommend one of the following HDMI cable types:
High-Speed HDMI Cable
High-Speed HDMI Cable with Ethernet
Connect an HDMI cable to the HDMI input connection of the TV and the HDMI output connection of
the computer as shown in the image below.
Set Edit Device Type to DW PC for a computer connected with a HDMI--to-DVP cable, and PC for a
computer connected with HDMI cabe, Also, set Edit Device Type to DVl Devices for an A/V device with a
HDMI-to-DVl cabe,
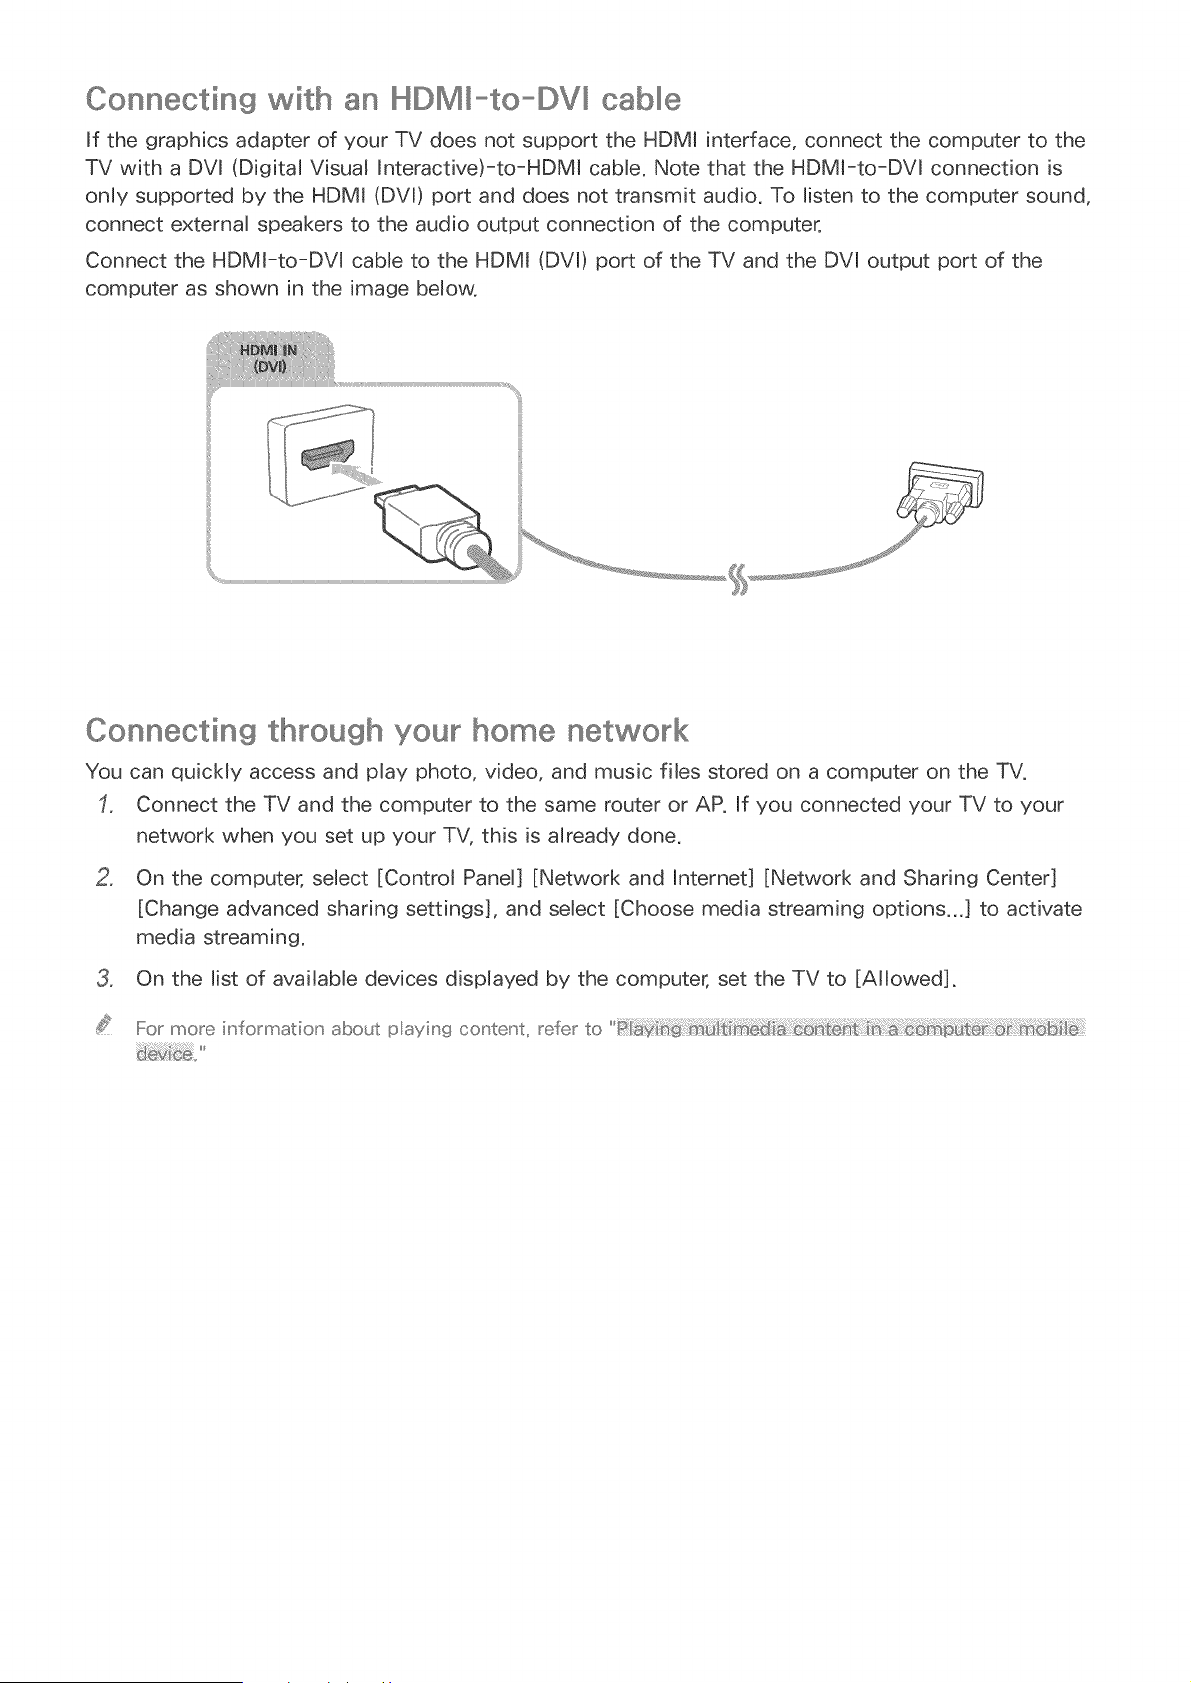
Connecting with an HDM -to-DV oablllle
If the graphics adapter of your TV does not support the HDMI interface, connect the computer to the
TV with a DVI (Digital Visual Interactive}-to-HDMI cable. Note that the HDMI-to-DVI connection is
only supported by the HDMI (DVI) port and does not transmit audio. To listen to the computer sound,
connect external speakers to the audio output connection of the computer,
Connect the HDMI-to-DVI cable to the HDMI (DVI} port of the TV and the DVI output port of the
computer as shown in the image below.
JJ
Connecting through your home network
You can quickly access and play photo, video, and music files stored on a computer on the TV.
Connect the TV and the computer to the same router or AP. If you connected your TV to your
network when you set up your TV, this is already done.
On the computer, select [Control Panel] [Network and Internet] [Network and Sharing Center]
[Change advanced sharing settings], and select [Choose media streaming options...] to activate
media streaming.
On the list of available devices displayed by the computer, set the TV to [Allowed].
Connecting a Mobile Device
You can connect a mobile device such as a smartphone or tablet directly to the TV, or connect it
to your network and display the mobile device's screen or play its content on the TV. The kinds of
connections you can make are listed below.
o Connect by using an MHL-to-HDMI cable and view the mobile device's screen on the TV.
Connect by mirroring the mobile device's screen on the TV (Screen Mirroring).
Connect mobile devices without a wireless router (Wi-Fi Direct).
Connect a mobile device via Samsung Smart View 2.0.
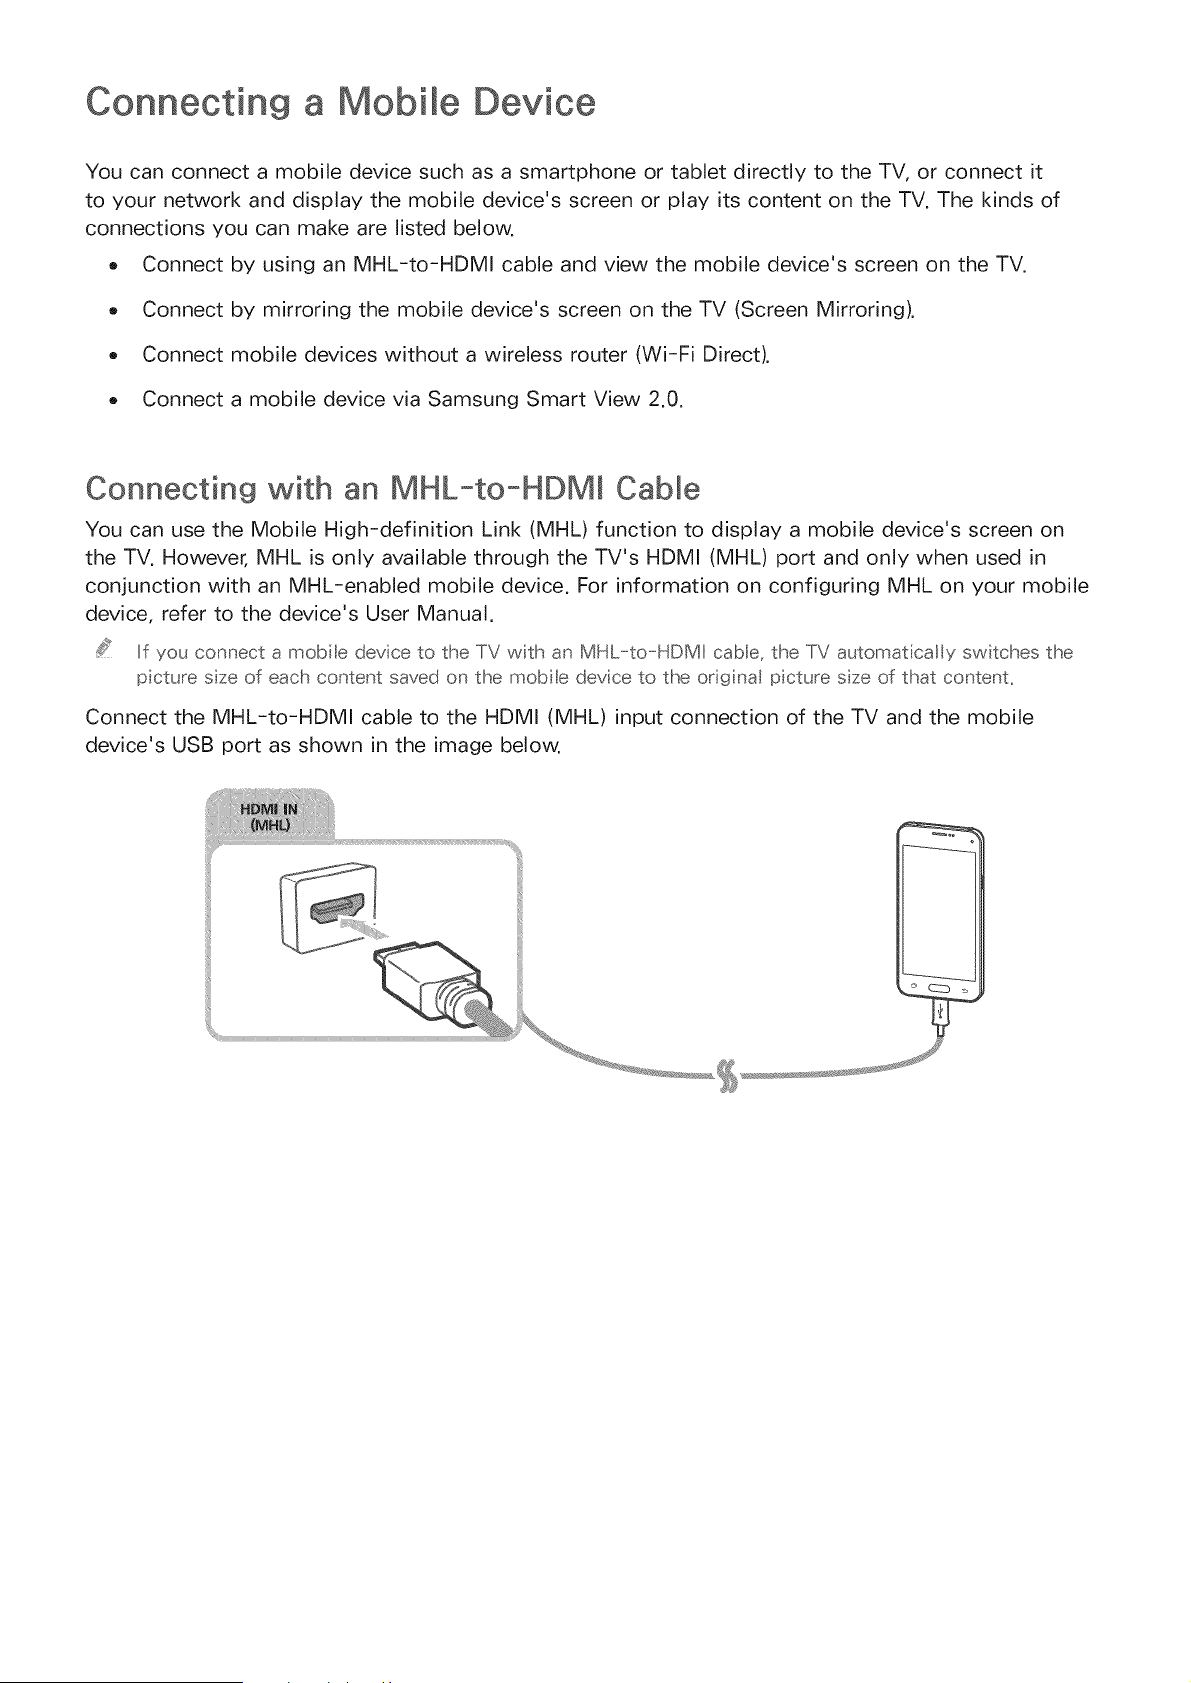
Connecting with an MHL-to-HDMJ Cable
You can use the Mobile Iligh-definition Link (MILL) function to display a mobile device's screen on
the TV. However, MIlL is only available through the TV's IIDMI (MILL) port and only when used in
conjunction with an MilL-enabled mobile device. For information on configuring MIlL on your mobile
device, refer to the device's User Manual.
if you connect a mobte devce to the TV with an MHL-to-HDMI cable, the TV automat cal y switches the
p cture sze of each content saved on the mobte device to the orig na p cture sze of that content,
Connect the MHL-to-HDMI cable to the HDMI (MHL) input connection of the TV and the mobile
device's USB port as shown in the image below.
Using Screen Mi o ing
<ME:I U/ 2S)> ISE:I U> Network>ScreenM rror ng
You can wirelessly connect a mirroring-enabled mobile device to the TV and play the video and audio
files stored on the device on the TV. Mirroring refers to the function that plays the video and audio
fibs located on a mobile device on a TV and on the mobile device simultaneously.
Connecting via a mobillle device
Launch the Screen Mirroring function on your mobile device. The mobile device searches for
available devices to connect to.
Select the TV from the list, and then enter the password. The TV automatically allows the
connection and the device connects.
Select Allow to connect the mobile device.
A previous y a lowed mobile devices wil automatica y connect without needing approva ,,
Iif you select Deny, the device cannot connect,, I10 change the corqnecdon status of a deniied device_
Select MEINU > Network > Multimedia Device Manager_ select the device_ and select AHow,,
Connecting by automaticallliy a_lliowing the connection
Select Network ]> Screen Mirroring, You can also start screen mirroring by pressing the SOURCE
button on your remote and selecting Screen Mirroring from the list at the top of the screen.
Launch the Screen Mirroring function on your mobile device. The mobile device searches for
available devices to connect to.
Select the TV from the list. The TV automatically allows the connection and the device connects.
Iif the mobile device cannot connect, turn the IiV and mobile device off and then on,,

Connecting mobilllle devices without a wi elllless oute (Wi-Fi Direct)
(MIEINU/123) > MIEINU > Network > Wi-Fi Direct
You can connect a mobile device with the Wi=Fi Direct feature directly to the TV without using a
wireless router or AP. By connecting a mobile device to the TV through Wi-Fi Direct, you can play
photo, video, and music fibs saved on the mobile device on the TV.
EnabJe Wi=Fi Direct on the mobile device, and then run Wi-Fi Direct on the TV. The TV
automatically scans for and displays a list of available devices. The TV's name also appears on
the mobile device.
SeMect the device from the list to initiate a connection, if a connection request is made by the TV,
a permission message appears on the mobiJe device and vice versa.
Allow the connection. The TV and mobile device connect.
For mo_e infomsatio_' _ refer to "
..../o confims wlhethe_ a moMle device aows or denies a co,' ,' ectio,', seect MENU > Network > Multimedia
Device Manager,,
..../o connect mo_e easilx activate WilFi Di_ect on yo_r TV and mobile device, and then pace the mobile
device close to the TV,, The connection permission co_' fin'T_atio_' window appea_s o_' the bottom eft of the
..../V screeu' so that you can easily co_' u'ect the device,,
Managing the connection status of previously connected mobile devices
Select IMIEINLJ> Network > Multimedia Device Manager. The TV displays a list of devices that
have previously connected to the TV or have tried to connect to the TV and been denied. The
status of the connection (Allow/Deny) is also displayed.
Select a device.
Select connection type or delete the device from the list.
..../Ms function is ony avaiU:}le if the devices have previous y c(:x ,'ected to the TV or have previous y
attempted to c(:x ,'ect and beeu' denied..
Connecting a mobile device via Samsung Smart View 2.0
Thsfuncton snotava abeoncertan modes nspecficgeographca[areas_
When you install and then launch Samsung Smart View 2.0 on a mobile device connected to the TV,
you can play the mobile device's multimedia content, such as videos, photos, and music, on the TV.
You can also send text messages or control the TV using the mobile device.
Pairing a [aptop to the TV (wireless PC mirrorin,
You can view the enhanced or dual mode screen of a laptop on your TV by pairing the laptop to the
TV wirelessly.
Connect a Wireless PC Mirroring Adapter (VG-SWD1000) to the laptop's HDMI port, and then connect
the USB cable that came with the package between a USB port of the Wireless PC Mirroring Adapter
(VG-SWD1000) and a USB port of the laptop. A pairing message appears on the TV's screen. If you
allow the pairing, the laptop's screen is displayed on the TV's screen.
Thsfuncton snotava abeoncertan models inspecficgeographca areas,
Ths functon s not ava abe on thrd-party TVs or non4aptop devices,
If two Samsung TVs are located c osey, turn off the TV to whch you don't want to par the laptop, and
then try to par_
Switching between external devices connected to the
Press the SOURCE button to switch between external devices connected to the TV.
o Options
To view the options menu, press the down directional button. The functions that appear in the
options menu can include any of the following:
m
m
.....Iilhe connector names may vary dependin_ on the product,,
Edit Device Type: Changes the type of external devices connected to the TV. Select an
external device to change. For example, you can select PC for a PC connected to an HDMI
connection and Blu-ray for a Blu=ray player connected to another HDMI connection. When
you display the source list, the TV displays the name of each connection and the type of the
device connected to each connection.
Edit Name: You can rename devices connected to the TV to facilitate identifying external
sources.
information: Displays information about the connected devices.
Anynet+ (HDM_-CEC}: Displays a list of Anynet+ (HDMl-CEC)-compliant devices that are
connected to the TV.
.....IIhiis option is only availab e when Anynet+ (HDM_-CEC) is set to On,,
m
m
Remove USB Device: Removes a USB device connected to the TV.
Remove Source Thumbnail: Removes the captured images of the video that you viewed most
recently that is saved on an external device connected to the TV.
.....IIMs ft ncdon iis not availabe on certain models i, specific _eograpMca areas,,
- Delete Universal Remote: Deletes the external device connected to the TV via the Universal
Remote function.
Universal Remote Setup
You can use your TV remote control to control external devices.
}¢ t:};}D3 k_ ,£t..(<t _{sq _xx38x _8¸ {_t_t £_} #}_£ @% t ¢3{fi ¸ 3tt_
For more ir"}for_T_ationOn USil!'}g the Ulrlivefsa IRemote ful' ctio_' _refer to
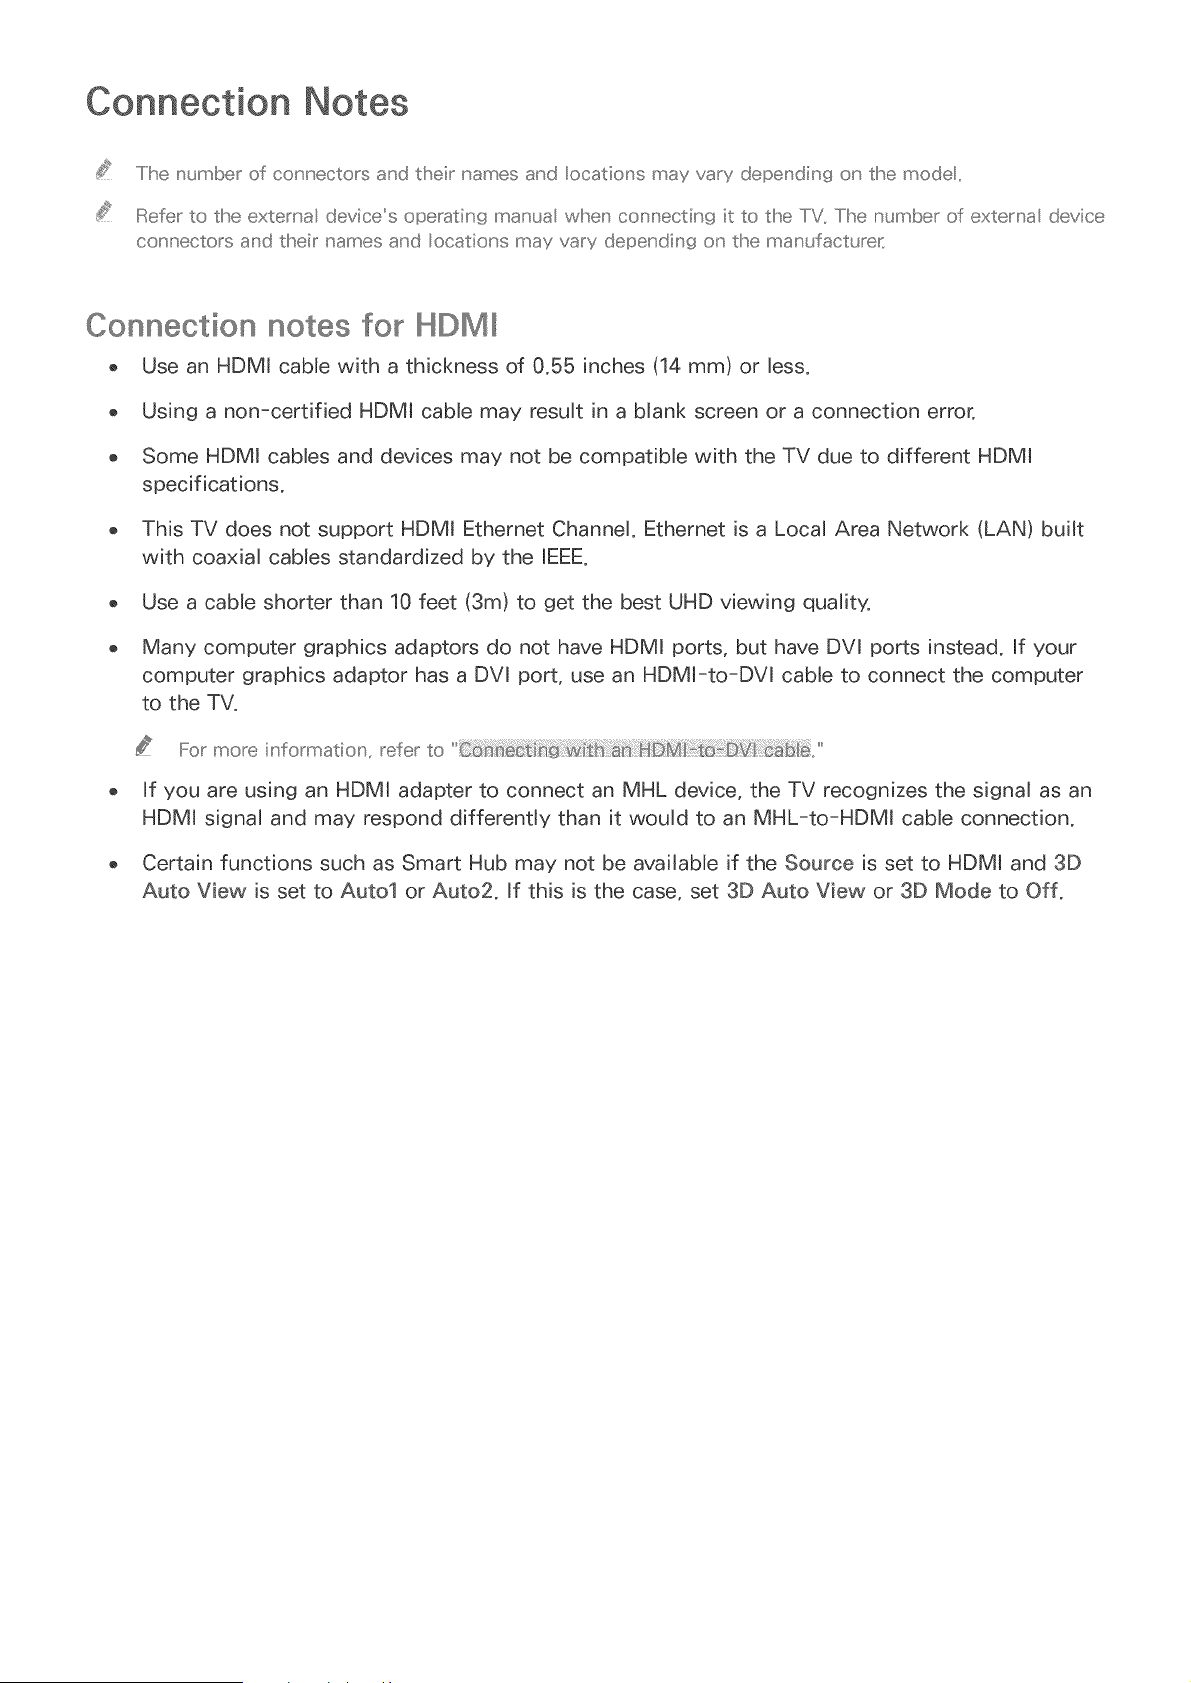
Connection Notes
..../ Ii'senumber of co_' hectors and their names and ocatio_' s a_ay vary depeu' din9 o_' the mode,,
IRefer to the exten' a devices operatin9 a'nanua wl!seu' conrsectin9 it to the TV,, The number of extema device
connectors and tlseir names and ocations may vary depeu' diu'9 o_' the manufacturer,
Connection notes for H©M
o Use an HDMI cable with a thickness of 0,55 inches (14 mm) or less,
o Using a non-certified HDMI cable may result in a blank screen or a connection error,
Some HDMI cables and devices may not be compatible with the TV due to different HDMI
specifications,
This TV does not support HDMI Ethemet Channel, Ethemet is a Local Area Network (LAN) built
with coaxial cables standardized by the IEEE,
Use a cable shorter than 10 feet (3m) to get the best UHD viewing quality,
o Many computer graphics adaptors do not have HDMI ports, but have DVI ports instead, If your
computer graphics adaptor has a DVl port, use an HDMt-to-DVl cable to connect the computer
to the TV,
_,_3( _ (8 _(t xS_}t8¸£ _8}{_ _ _£ 8_£}_{/8 _ _ y 3_}'{ _£ s;_ _{ s8 ,_ _{8
IFor more ir_forl_}atiol'% refer to
Jf you are using an HDMt adapter to connect an MHL device, the TV recognizes the signal as an
HDMI signal and may respond differently than it would to an MHL-to-HDMI cable connection,
o Certain functions such as Smart Hub may not be available if the Source is set to HDMI and 3D
Auto View is set to Auto1 or Auto2, If this is the case, set 3D Auto View or 3D Mode to Off,
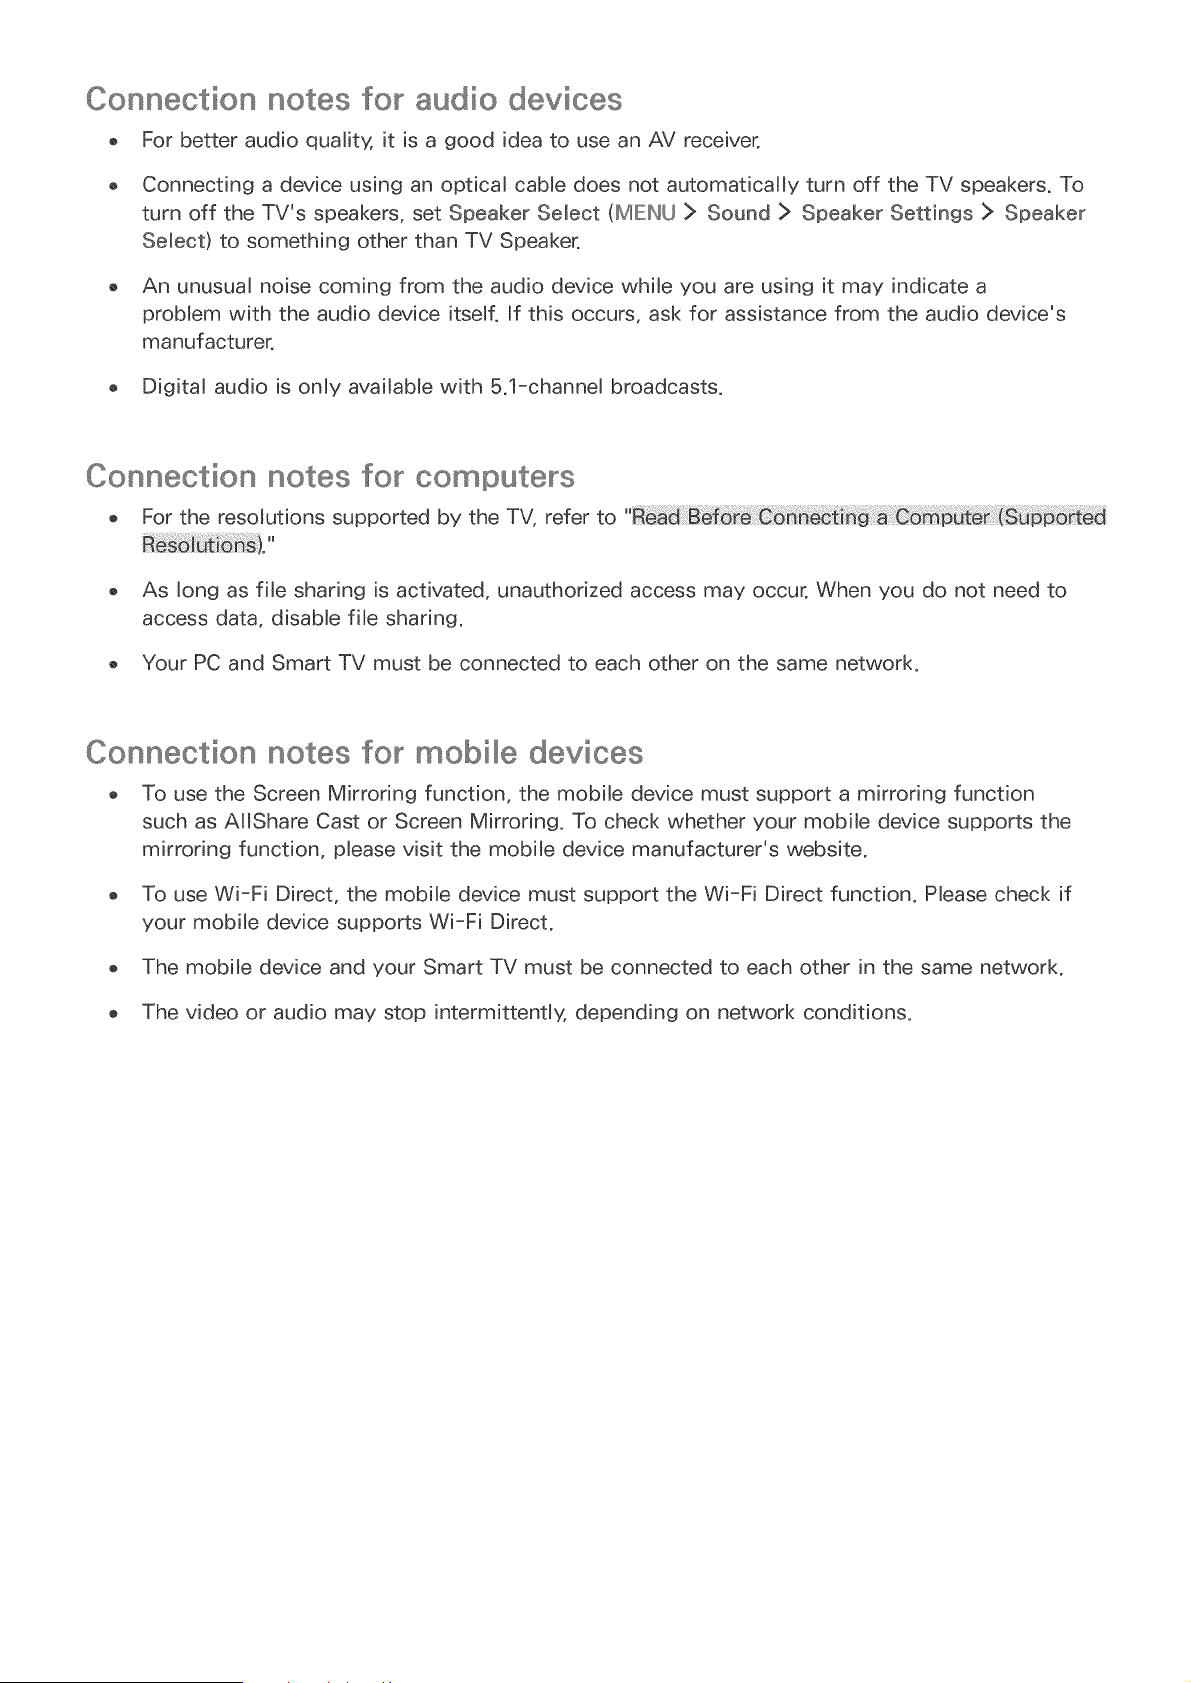
Connection notes for audio devices
For better audio quality, it is a good idea to use an AV receiver,
0
0
Connecting a device using an optical cable does not automaticalJy turn off the TV speakers. To
turn off the TV's speakers, set Speaker Select (MIEIN/J :> Sound > Speaker Settings > Speaker
Select) to something other than TV Speaker,
o An unusual noise coming from the audio device while you are using it may indicate a
problem with the audio device itself. If this occurs, ask for assistance from the audio device's
manufacturer.
o Digital audio is only available with 5.l-channel broadcasts.
Connection notes for computers
o For the resolutions supported by the TV, refer to
As long as file sharing is activated, unauthorized access may occur, When you do not need to
access data, disable file sharing.
Your PC and Smart TV must be connected to each other on the same network.
Connection notes for mobilllle devices
o To use the Screen Mirroring function, the mobile device must support a mirroring function
such as AIIShare Cast or Screen Mirroring. To check whether your mobile device supports the
mirroring function, please visit the mobile device manufacturer's website.
o To use Wi-Fi Direct, the mobile device must support the Wi-Fi Direct function. Please check if
your mobile device supports Wi-Fi Direct.
o The mobile device and your Smart TV must be connected to each other in the same network.
o The video or audio may stop intermittently, depending on network conditions.

Connection notes for wireless PC mirroring
o The working distance may differ due to obstacles (e.g., human bodies, metal objects, or walls)
or electromagnetic environment. To ensure stable functioning, it is recommended to use the
Wireless PC Mirroring Adapter (VG-SWDIO00) in the same location where the TV is placed.
When a Wireless PC Mirroring Adapter (VG-SWD1000) is connected, the TV may not play videos
properly depending on whether there is another device that emits radio signals nearby.
Do not place the Wireless PC Mirroring Adpater (VG-SWD1000) near any heat source, in a humid
location, or under direct sunlight. This action may cause product malfunction or a fire.
Do not apply any of the following to the Wireless PC Mirroring Adapter (VG-SWD1000):
chemicals (e.g., wax, benzene, thinner, mosquito repellent, air freshener, lubricant) and cleaning
agent that contains alcohol or solvent or that is surface active. This action may cause the
dongle's exterior to discolor or its label to peel off.
Do not disassemble, repair or modify the Wireless Mirroring Adpater (VG-SWD1000) by yourself.
Stop using the dongle if it is damaged or broken.
Make sure to use a genuine Wireless PC Mirroring Adapter (VG-SWD1000) supplied by Samsung
Electronics.
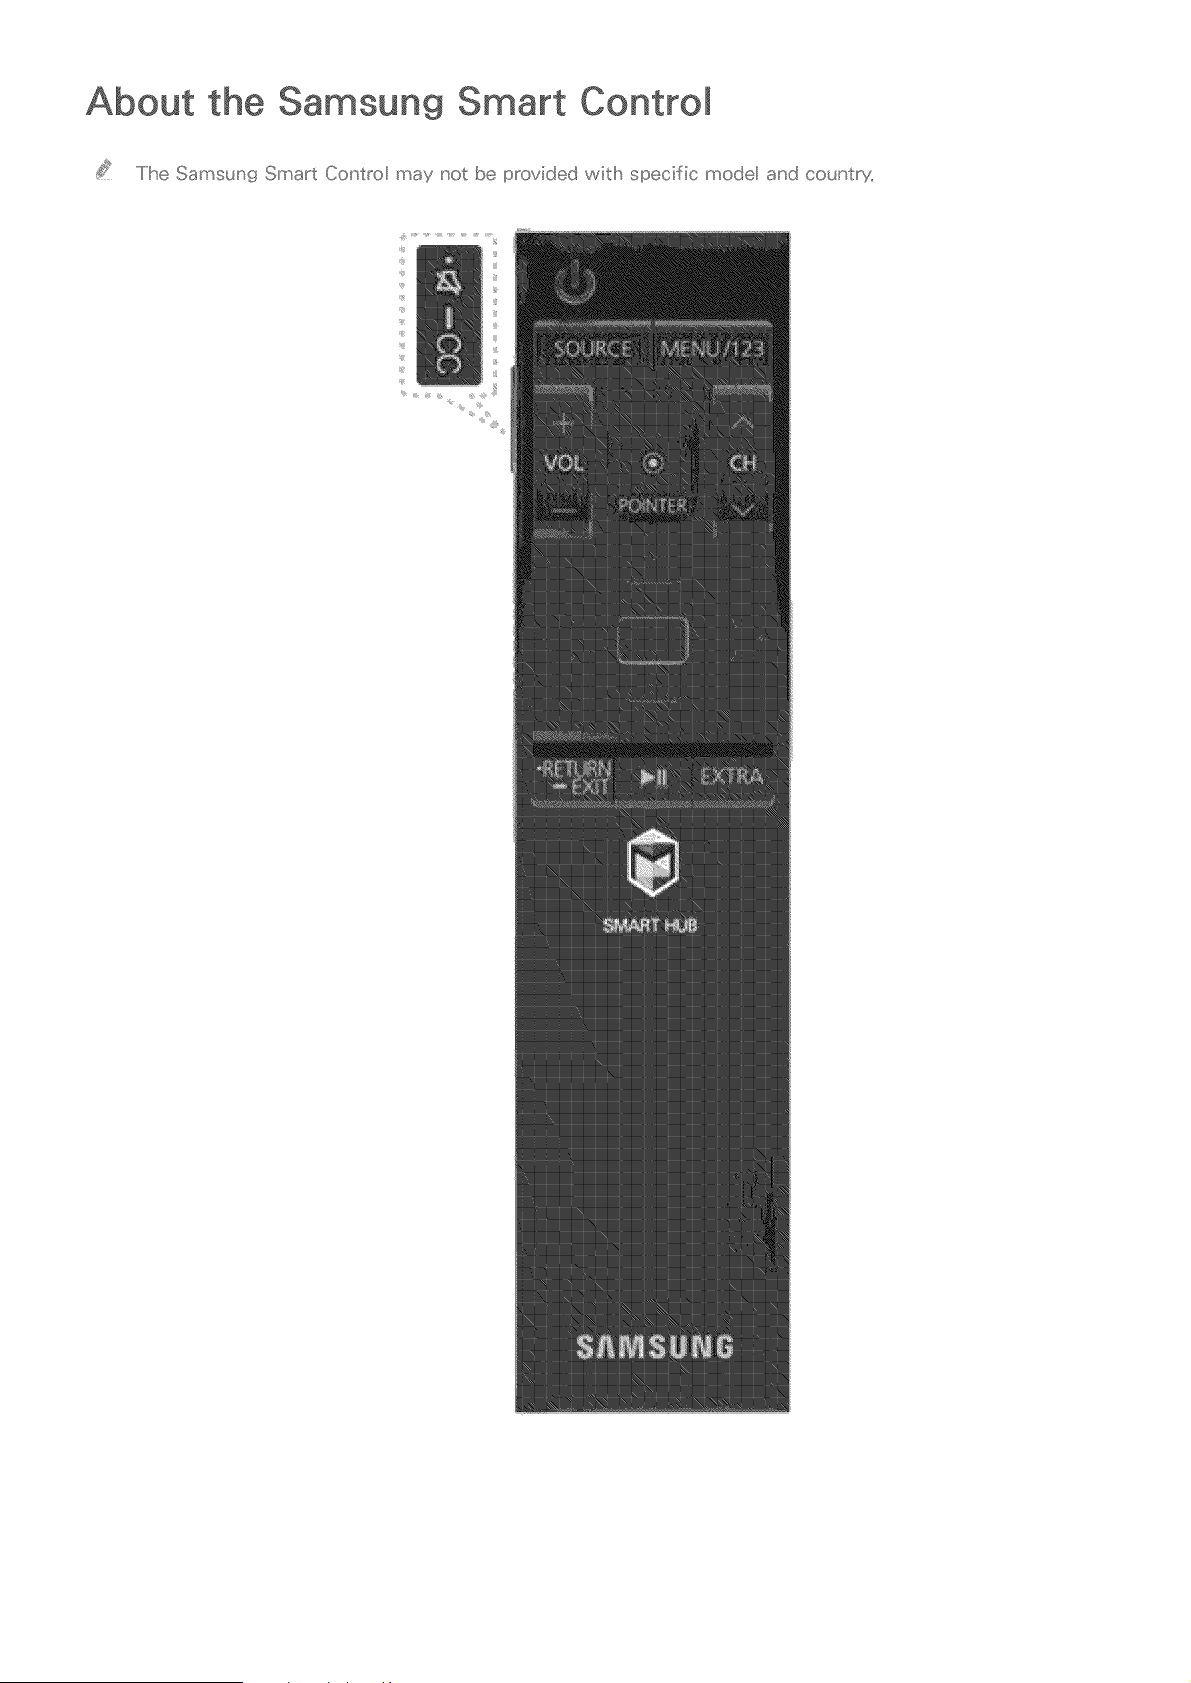
About the Samsun9 Smart Control
.....Ilhe Samsun{_ Smart Co_'bo may not be provided witlh specific mode and counby,
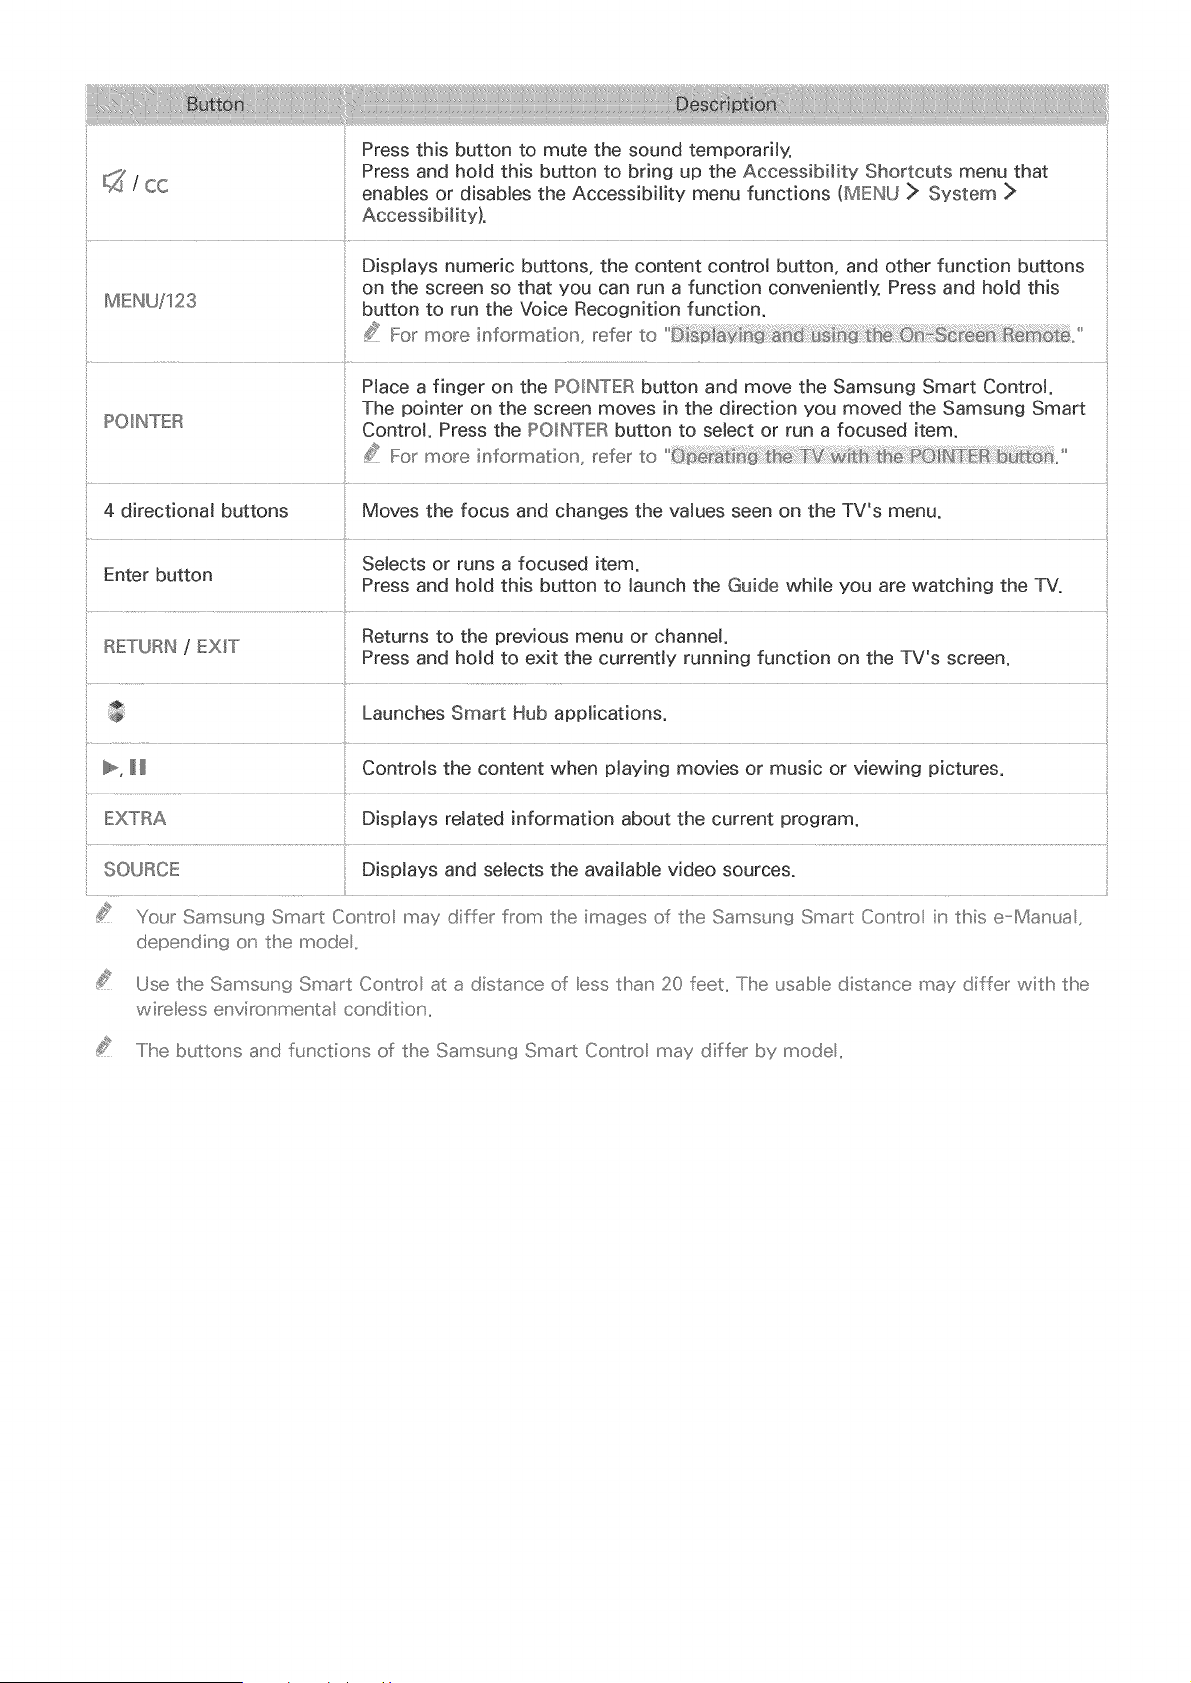
enablesor disablestheAccessibilitymenufunctions(MENU> System:>
Displaysnumericbuttons,thecontentcontrotbutton,andotherfunctionbuttons
onthescreensothatyoucanruna functionconveniently.Pressandholdthis
MENU/123 buttonto runtheVoiceRecognitionfunction.
¢S_'For more information, refer to "
Place a finger on the POINTER button and move the Samsung Smart Control.
The pointer on the screen moves in the direction you moved the Samsung Smart
POINTER Control. Press the POINTER button to select or run a focused item.
_f_ For more information, refer to "
4 directional buttons Moves the focus and changes the values seen on the TV's menu.
Selects or runs a focused item.
Enter button
Press and hold this button to launch the Guide while you are watching the TV.
Returns to the previous menu or channel.
RETURN / EXiT
Press and hold to exit the currently running function on the TV's screen.
Launches Smart Hub applications.
_, H Controls the content when playing movies or music or viewing pictures.
IEXTRA Displays related information about the current program.
SOURCE Displays and selects the avaiJaMe video sources.
d_¢s_Your Samsung Smart Contro may differ from the images of the Samsung Smart Co_'tro ir this e Manua,
depeu' din{:_ on the mode..
Use tlhe Samsung Smart Contro at a distance of ess tha_' 20 feet,, The usabe distance may differ witlh the
wireess eu'viro_' meu'ta co_' ditio_' ,,
.....I Ii'sebut_x:::x's a_'d function' s of the Samsung Smart Co_'tro may differ by mode..
Using the Samsung
.....I Ii]e Samsung Sma_t Contro may not be provided witll] specific mode and counby,
Operating the TV with the IIPO_N R button
Place a finger on the IPOH_TIERbutton and move the Samsung Smart Control. The pointer on the
screen moves in the direction you moved the Samsung Smart Control. Move the pointer to select an
item on the screen.
Operating the TV with the di_®otionallll buttons and the Enter button
Press the directional buttons (up, down, left, and right) to move the pointer, focus, or cursor in the
direction you want or to change a setting shown on the focused item. Press the Enter button to select
an item or run a focused item. Press and hold the Enter button to view the Guide while watching the
TV.
..../o adiust the pointe_ speed, seect MENU > System > Smart Contro_ Settings > Motion Sensitivity,, _
.....Io use the POINTER button a_'d the movemeu' t of the SamsuH' 9 Sma_t Contro to operate you_ IV_ Voice
Guide must be set to Off,,
.....Io view a tutodal that shows Ihow to use the POINTER I)ut¢:o_',seect MENU > Support > Smart Control
Tutorial,,
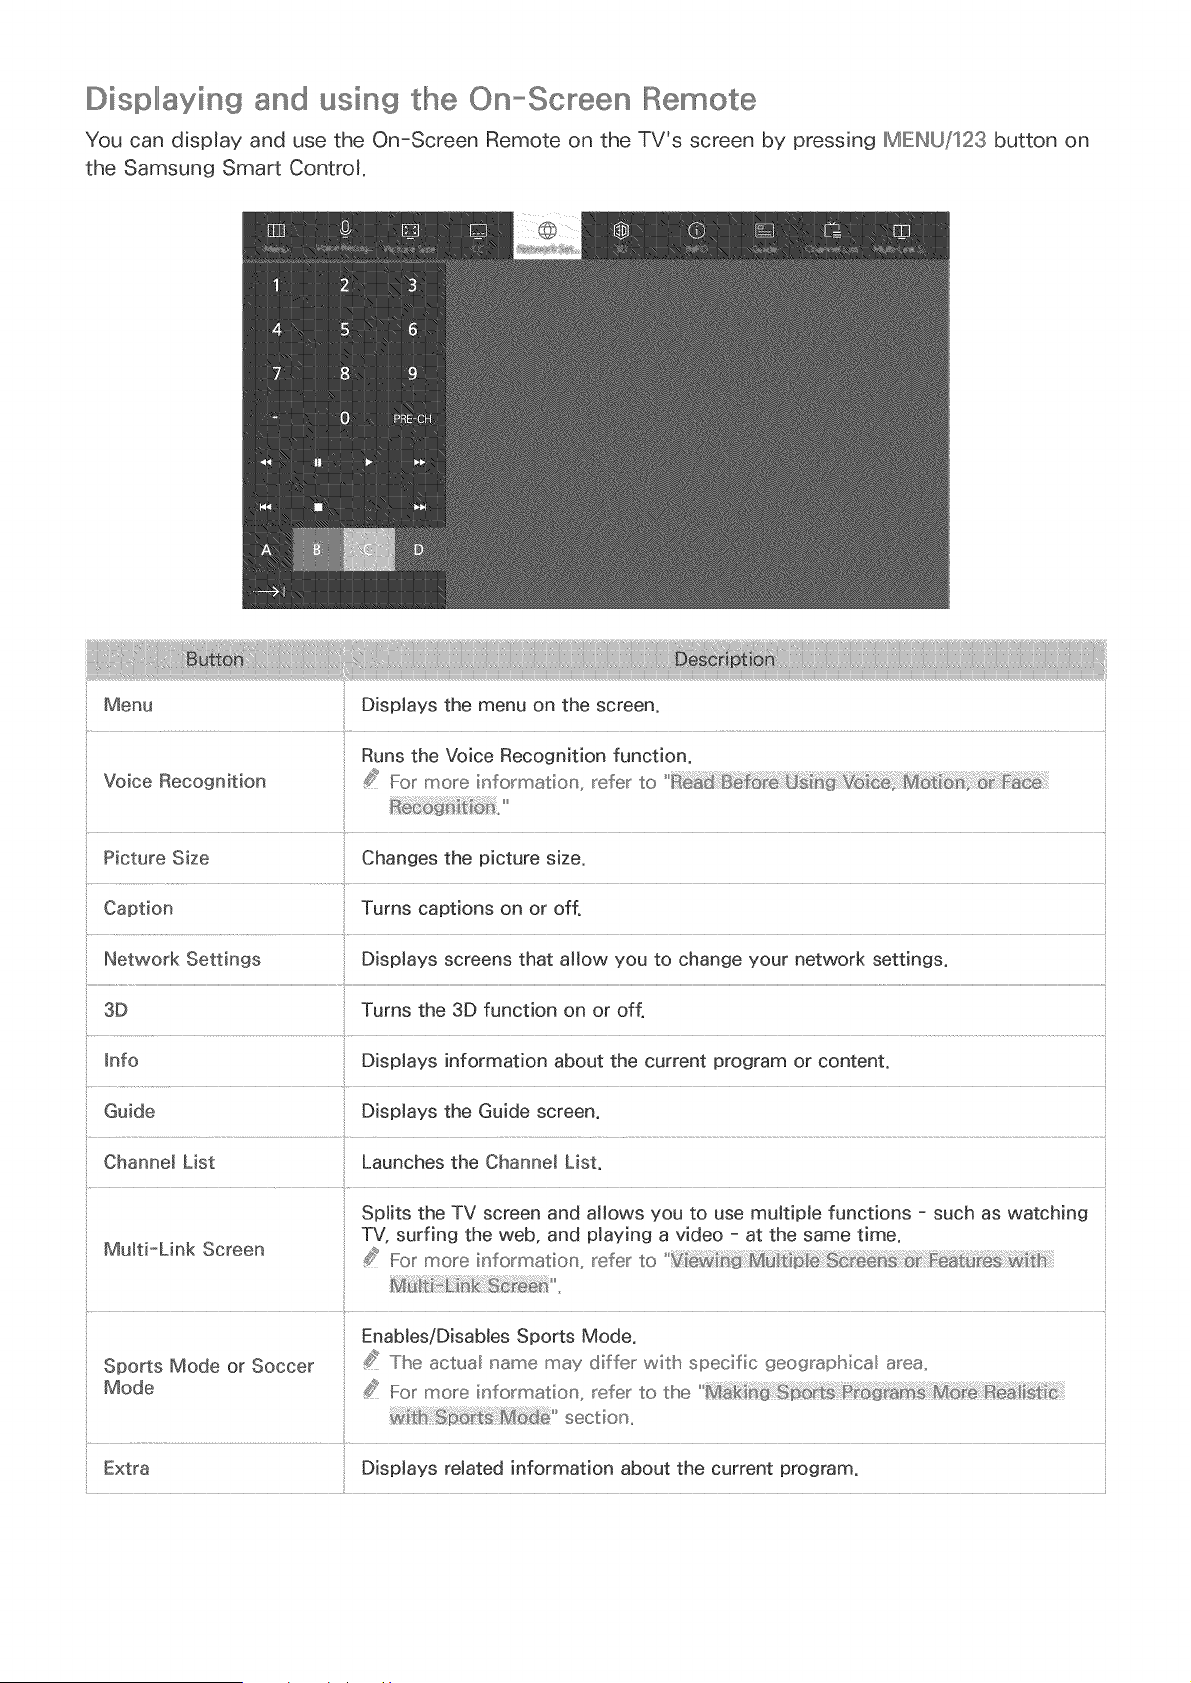
Displlllaying and using the On-Screen Remote
You can display and use the On=Screen Remote on the TV's screen by pressing IMIEINU/123 button on
the Samsung Smart Control
Menu Displays the menu on the screen.
Runs the Voice Recognition function.
Voice Recognition _# For more information_ refer to '
Picture Size Changes the picture size,
Caption Turns captions on or off.
Network Settings Displays screens that allow you to change your network settings.
3D Turns the 3D function on or off.
Info Displays information about the current program or content.
Guide Displays the Guide screen.
Channe_ List Launches the Charm@ List.
Splits the TV screen and allows you to use multiple functions - such as watching
TV, surfing the web, and playing a video - at the same time.
Multi-Link Screen _ For more information_ refer to '
t 1....
Enables/Disables Sports Mode.
Sports Mode or Soccer 5_ The act_al name may differ with specific geographical area,
Mode _ For more information_ refer to the "
section.
Extra Displays related information about the current program.
e-Manua_ Opensthee-Manual.
PictureMode Changesthepicturemode.
SpeakerList Allowsyouto selectthespeakersthatwill playtheTV'saudio.
AHowsyouto changethebroadcastaudioto stereo,mono,or SAP(Second
MTS
AudioProgram)for analogchannels.
SleepTimer Shutsoff theTVautomaticallyaftera presetperiodof time.
Tools DisplaystheToolsmenuonthescreen.
Source DisplaystheSourcescreen.
Power Turnsoff theTV.
Usethesecoloredbuttonsto accessadditionaloptionsspecificto thefeaturein
use.
S!_+ /hese buttons are only available in the U,S,A, and Canada,
Move Number Pad to the
Right / Move Number Moves the number pad to the left or right.
Pad to the Left
s#¢s_ .....IMs function' is not availabe o_' certain modes in specific geograpMca areas,,
..../Ihe 0_' Screeu' Remote butl:o_'s may varx depeu'dkg o_' the TV mode a_'d the TV ful'ctio_'s you are uskg,,
..../o change the order of the menu options on the first row, seect a menu option to move_ press a_'d hod the
IE_'ter button, and theu' seect the directiona buttons disp ayed to specify a new position' ,,
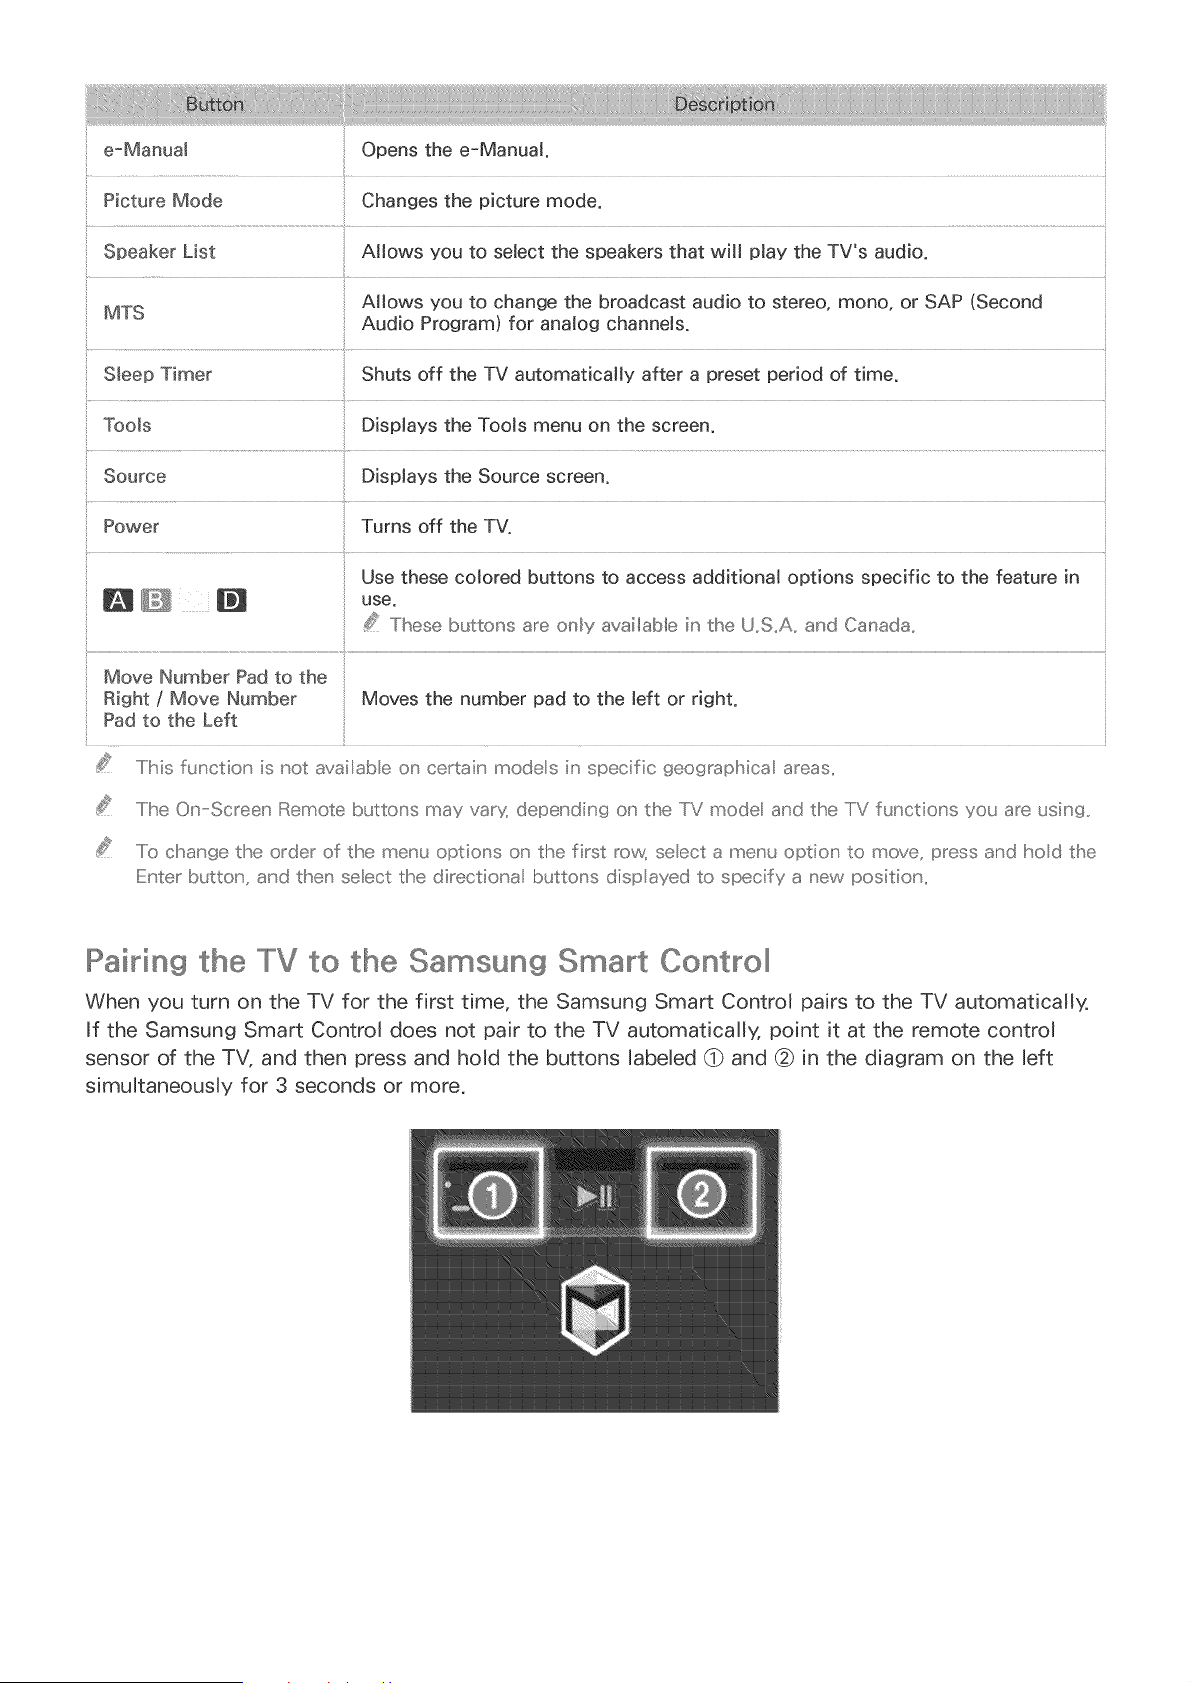
IIPaidng the to the Samsung Smart Cont ollll
When you turn on the TV for the first time, the Samsung Smart Control pairs to the TV automatically.
If the Samsung Smart Control does not pair to the TV automatically, point it at the remote control
sensor of the TV, and then press and hold the buttons labeled (_ and (_) in the diagram on the left
simultaneously for 3 seconds or more.
Controlling External
Using the Universal
Devices with the TV Remote
(MIEINU/123) > IMIEINU > System > Universal Remote Setup
You can control external devices connected to the TV using the TV's remote control.
..../Ms function' is not avaiUse o_' certain modes i,' specific 9eograpMca areas..
You can aso use the Anynet+ (liIDMI CI!iiiiiiC)function to operate externa Samsunf_ devices wiLIl] your TV_s
remote contro without any addition' a setup.. Refer to for more iu'formation' ..
Certain ex_en' a devices co_' nected to the TV may not support the universa remote feature..
Setting up the u_ive_sallll remote oontrollll
Connect the external device to control with the universal remote control to an HDMI port on the
TV, and then turn on the external device.
Press the SOURClE: button on your remote control to bring up the Source screen.
Select Universal Remote Setup on the Source screen, and then follow the directions on the
screen to complete the set up and register the device. The directions will be different, depending
on the device you want to control.
If the extema device does not respo_' d after being registered, register it affair usiu' g its mode numbe_,
.....Ilhe TV memorizes both the extema device and the co_' u'ectio_' (IioIDMI 1_ HDMI 2_ etc,,) the device is
co_' u'ected to..
ControIMing the TV with a Keyboard
(MIEINU/123) > IMIE:INU> System > Device Manager > Keyboard Settings
Certain modes are not cempatib e with USB HID class keybeards,,
Connecting a keyboard
Connecting a USB keyboa_d
Plug the keyboard cable into the TV's USB port.
Connecting a Bluetooth keyboa_d
4_
..../Ms functior is not availabe or certair modes ir specific geegrapMca areas,,
Place the Bluetooth keyboard into standby status.
Select MIEINU > System > Device Manager > Keyboard Settings > Add Bluetooth Keyboard.
The TV automatically scans for available keyboards.
Iif your keyboard was not detected, posiition the keyboard close to the IiV, and then select Refresh,, Iihe
.....IiV scans for availab e keyboards a_ain,,
Select the Bluetooth keyboard from the scan list, and then select Pair and connect. A number
appears on the screen.
Enter the number using the Bluetooth keyboard. This pairs the Bluetooth keyboard to the TV.
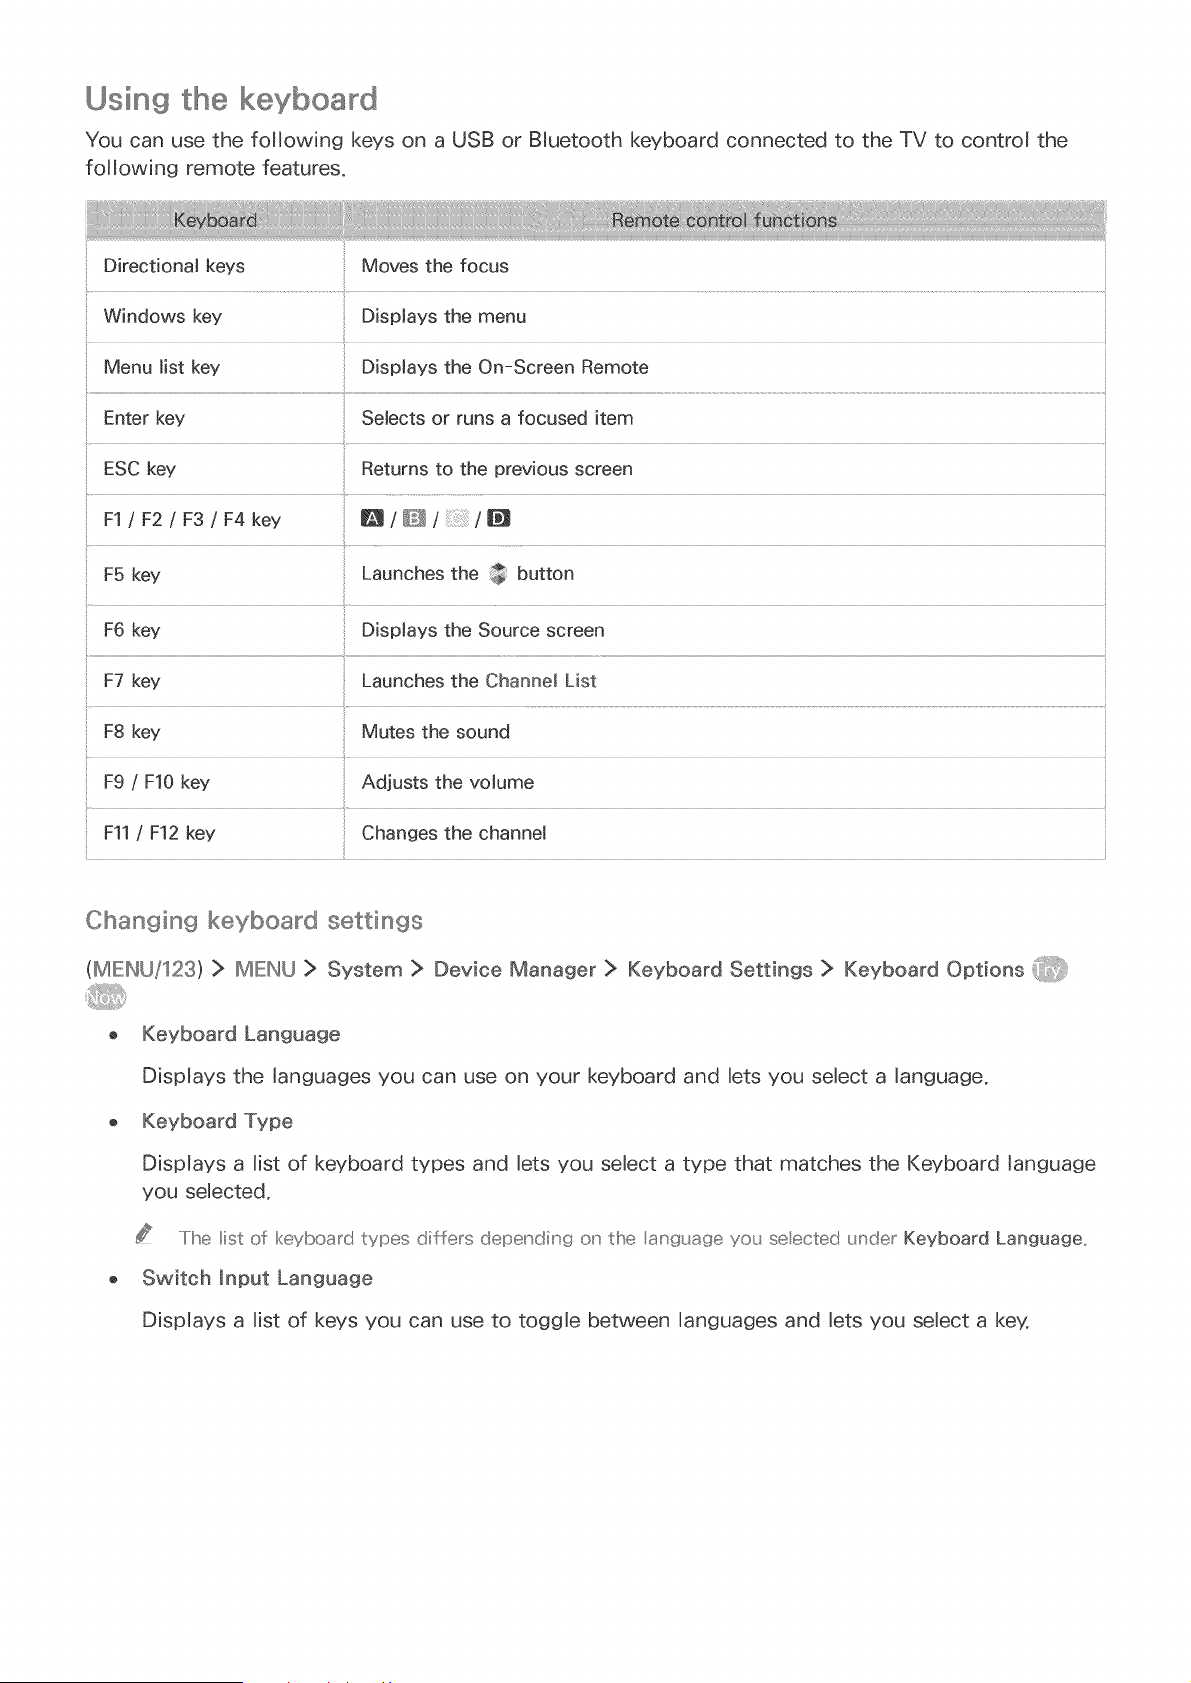
Using the keyboard
You can use the folJowing keys on a USB or BIuetooth keyboard connected to the TV to control the
following remote features.
Windows key DispJays the menu
Menu list key
Enter key SeJects or runs a focused item
ESC key Returns to the previous screen
F1 t F2 t F3 / F4 key B / D t /
F5 key Launches the button
F6 key Displays the Source screen
F7 key Launches the Channe_ List
F8 key Mutes the sound
F9 / F10 key Adjusts the voJume
Changing keyboard settings
(IMEINU/123) > IMIEINU> System > Device Manager > Keyboard Settings > Keyboard Options
o Keyboard Language
Displays the languages you can use on your keyboard and Jets you seJect a Janguage.
o Keyboard Type
DispJays a list of keyboard types and Jets you seJect a type that matches the Keyboard language
you seJected.
.....Ilhe iist of keyboa_'d types differs depending on the ang_age yo{_ selected {ruder Keyboard Language,,
o Switch Input Language
DispJays a Jist of keys you can use to toggJe between Janguages and Jets you seJect a key.
ControIMin9 the TV with a
(MIEINU/123) > MIEINU > System > Device Manager > Mouse Settings
Certain modes are not compatib e with USB HID class mice,,
Connecting a mouse
Connecting a USB mouse
Plug the mouse cable into the TV's USB port.
Connecting a Bluetooth mouse
..../Ibis function' is not availabe o_' certair modes iu' specific 9eog_'apl!sica areas,,
Place the Bluetooth mouse in standby status.
IMIEIN(J> System > Device Manager > Mouse Settings > Add Bluetooth Mouse
Select the Bluetooth mouse from the scanned list, and then select Pair and connect. This pairs
the Bluetooth mouse to the TV.
Using a mouse
You can use a pointer to control the TV in the same way you use a pointer on a computer.
o Selecting and running an item
Left-click the mouse.
o Scrolling the TV menu or screen
Scroll the mouse wheel up or down.
o Exiting the TV menu or feature
Place the pointer in any blank point on the screen, and then left-click the mouse.
Changin{_ mouse buttons and pointer speed
(MIEN(J/123) > IMIENU > System > Device Manager > Mouse Settings > Mouse Options _
o Primary Button
Select which button (left or right) to use when selecting and running items,
o Pointer Speed
Adjust the movement speed of the pointer,
Connecting a BEuetooth Gamepad
(MIENU/123) > IMIENU > System > Device Manager > Bluetooth Gamepad Settings
You can play the games downloaded and installed using the Smart Hub service with a Bluetooth
gamepad, Select Bluetooth Gamepad Settings, and then place your Bluetooth gamepad close to
your TV, The TV scans for available Btuetooth gamepads automatically, (DualShock@4, a gamepad
optimized for PlayStation, is recommended,) After scanning, you can use the Bluetooth gamepad to
play games,
.....IMs functior is net availabe or certair modes in specific 9eegrapMca areas,,
It the TV fails to find yeur Bluetoeth 9amepad, place it closer to the TV_ and ther seect Refresh,, IFo_more
irformatior or paMr_, refer to theBuetoeth_a'nepadsoperatirgmarua,,
Entering Text using the Keyboard
Using a itionallll functions
Select _ on the QWERTY keyboard screen, The following options are available:
o Recommended text
Enables or disables the recommended text feature, The keyboard displays recommended words
so that you can enter the text more easily,
o Reset recommended text data
Deletes both the recommended words and the memorized words to clear the list,
o Predict Next Character (when using direction buttons)
Enables or disables the Text Prediction feature,
O
Select a language from the list,
Viewing MuEtip e Screens or Features with MuEti-Link
(MIEINU/123) > IMEINU > Picture > Open Multi-Link Screen
You can search the Web, use apps, and much more simultaneousJy while watching TV.
..../his fu,' ctio_' is not availabe on certain modes i,' specific 9eographica areas..
Using Screen
Learning the basic functions
o Changing the channeJs on and voJume of a MuJti-Link Screen
To change the channels on a Multi-Link Screen, press the channel buttons while you are
watching the TV. To adjust the voJume of a Multi=Link Screen, move to the screen you want to
adjust the voJume on, and then press the volume buttons.
o Changing the input signal
Press the SOURCE button while using Multi-Link Screen to display the source list. SeJect a signal
source from the list. You view the screen of the external device while you are watching the TV.
o Changing the web browser and apps
While you are using Mu_ti-Link Screen, recently viewed web browser pages or apps are displayed
on the right side of the screen. You can change these pages or apps to other pages and apps as
you use the web browser or apps in Smart Hub.
o Changing the size of a MuJti-Link Screen
To change the size of a Multi-Link Screen, move the focus to the screen you want to resize,
and then use the up or down directional button. AJternatively, drag the line in the middle of the
screen to the left or right. To dispJay the focused Multi-Link Screen in full screen mode, select
o Selecting a speaker device for a Multi-Link Screen
Press the volume button, and then press the Jeft directional button. The speaker list is displayed
on the screen. Select Mu_ti-Link Screen Speakers to turn on or off the sound from the selected
screen. If you connect a BJuetooth headphone, you can only seJect Bluetooth Headphones.
On the Samsung Smart Contro _ press the IME/_U/123 butU:on_ and then select Speaker List to set the
speaker of each screen,,
Read before using Mu_ti-Link Screen
Before usiu' _} Mu ti Link Screeu', make sure the TV is c(:x u'ected to the Intemet,,
Before usih"9 Smart Hub with Mu ti Link Screeu', make s_sre to fiu' isl!] co_' fi¢_uriu'g Smart Hub,,
UHD conteu' t a_'d clha_'u'els cannot be viewed simu taneous y,
Certain TV feat_res and apps may not be s_spported lay Mu ti Liu'k Screeu' ,, If this is the case, exit from
M_ti Link Screeu', and theu' use the feature,,
You can hear the selected a_dio wlhile you are using the M_ ti Link Screeu' through the TVs speakers and
you ca_' hear the other screeu' s audio through B uetooth headpl!so_' es,,
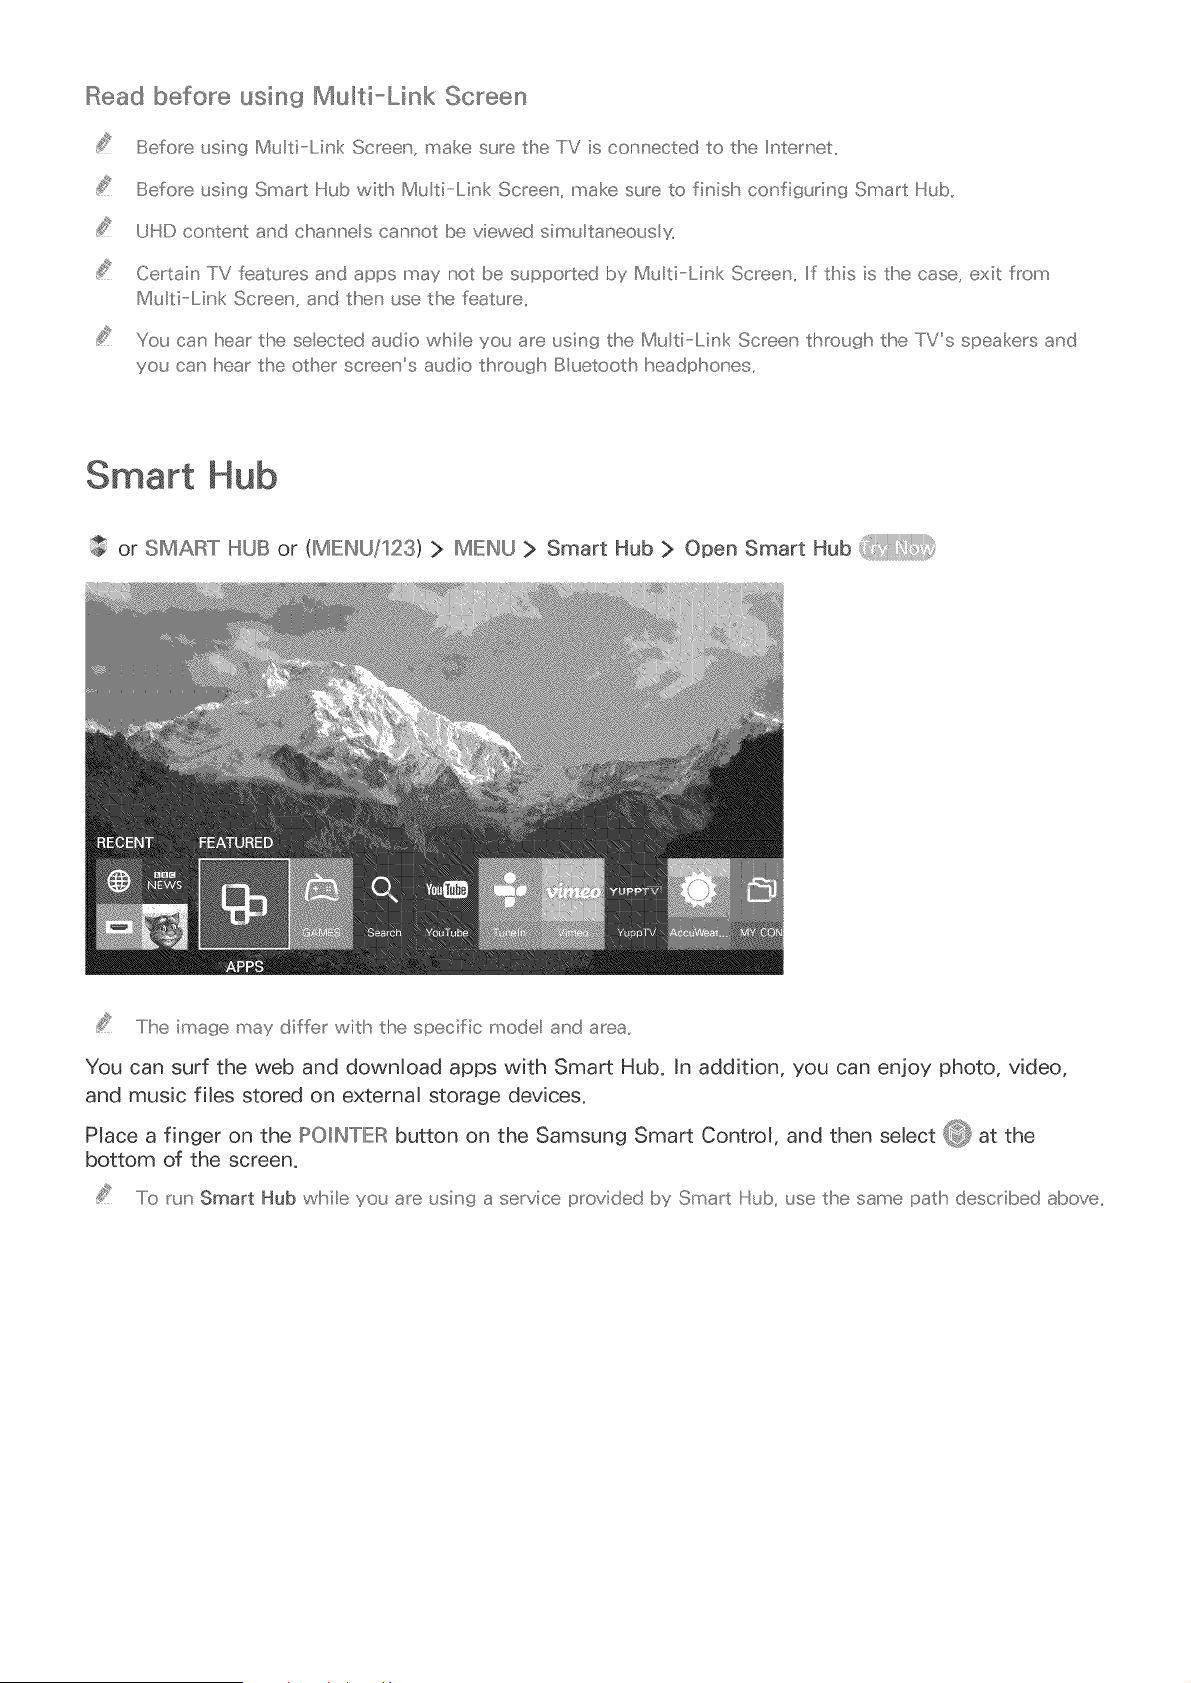
Smart Hub
or SMART II,qUBor (IMIEINU/123} > IMIEINU} Smart Hub > Open Smart Hub
..../he image may differ with the specific mode and area,,
You can surf the web and download apps with Smart Hub. In addition, you can enjoy photo, video,
and music fibs stored on external storage devices.
Place a finger on the POIINTIER button on the Samsung Smart Control, and then select _ at the
bottom of the screen.
..../o mn Smart Hub wMle you are usiu'g a service provided I)y Smart Hub, use the same path described above,,
Removing or pinning an item in the Recent group
To remove or pin an item in the Recent group, sebct _ that appears above the item, The foJJowing
icons are avaiJabJe,
On the standard remote co_'tro, press the A but_x::x',,
o O: Deletes the item, AJthough you remove an item from the Recent group, it is not removed
from your TV,
o _: Pin the item to the first position, To unpin the item, seJect _ again,
o _: Runs the item in a multiple screen with the MuJti-Link Screen function, ((MIEINU/123) >
IMIEINU> Picture > Open Multi-Link Screen)
i
.....IiIh[s icon may not be displayed depe_ dii_g on the item,,
Launching Smart Hub automaticallll_y
(MIEINU/123) > IMIEINU> Smart Hub > Auto-Start Settings > Smart Hub
You can start Smart Hub automatically when you turn on the TV,
........[esting Smart Hub connections
(MIEINU/123) > IMIEINU> Support > Self Diagnosis > Smart Hub Connection Test
if Smart Hub is not working, seJect Smart Hub Connection Test, The Connection Test diagnoses the
probJem by checking the internet connection, your iSP, the Samsung server, and the Apps service,
Using the Smart Hub tut©dallll
(MIEINkJ/123) > IMIEINLJ > Support > Smart Hub Tutorial
You can barn the basics of using Smart Hub and the Smart Hub service in detail,
Resetting Smart Hub
(ME NU/ 2St> ME NU> SmortHub> ResetSmortHub
You can remove the Samsung accounts saved in the TV and everything linked to them, including apps,
Some of the Smart Hub services are for paid services.. To use a for paid service, you must have an account
with the service provider or a Samsung account.. For more i,' formation', refer to
.....Io use Smart Hub, the TV must be c(:x u'ected to the Internet..
Some Smart Hub features may not be availab e depeu' ding o_' the service provide( anguaqe, or region' ..
Smart Hub service outages ca_' be caused by disruption' s iu your Internet service..
.....Io use Smart Hub, you must agree to the end user agreement and privacy po ic_. Otherwise_ you will not be
able to access the features and services associated wid_ them. You can view the e,' tire text o the Terms &
PoJicy document Dy_navigating to Smart Hub > Terms & Policy.. If you wa_'t to stop usiu' g Smart Hub, you
ca,'ca,'cethr
.....Io view the Smart Hub TutoriaJ, seect the _ buttol' ol' the Recent screel' ..
Using Smart Hub with a Samsung Account
Creating a Samsung account
(MIEINU/123) > IMIEINU > Smart Hub > Samsung Account
Some of the Smart Hub services are for paid services. To use a for paid service, you must have an
account with the service provider or a Samsung account.
You can create a Samsung account using your email address as your ID.
..../o create a Samsung account, you m_st agree to the Samsung acc(::)_£_tend user agreement and privacy
po icy, To view the entire content of the agreemer t, seect MENU > Smart Hub > Samsung Account >
Terms and Conditions, Privacy Policy,,
You car as(::} create a Samsung account at http://cor tent,,san_sung,,com,, Once you have ar account, you car
use the same ID or both the TV ard the Samsung website,,
C_'eating a Samsung account
(MIEII_U/123) > IMIEINU> Smart Hub > Samsung Account > Create Account > Create Samsung
Account
You can create a Samsung account by following the on-screen instructions. Once a Samsung account
is created, you are automatically signed in to your Samsung account.
If you want to review the /erms and Cot ditior s, select View Details,,
If you want your account to be protected, seect Profile image selection and password entry (High security}
in the fled beow the password fled,,
If yOU want the TV to og you ir to your account automatica y when you turn the TV or, dick Sign me in
automatically,,
C_'eating a Samsung account using a Facebook account
(MIEINU/123) > IMIEINU> Smart Hub > Samsung Account > Create Samsung Account with Facebook
Enter your Facebook ID and password, and then follow the on-screen instructions to complete account
setup. Once a Samsung account is created, you are automatically signed in to your Samsung account.
Your Samsun(} account and IFacebook account are automatica y irked whet you create a Samsur g accour t
witlh your IFacebook account,,
Signing in to a Samsung account
(MIEINtJ/123) > IMIEINtJ> Smart Hub > Samsung Account > Sign In
You can automatically sign in to your Samsung account and use the Smart Hub feature.
Registering an existing Samsun9 account to the "TV
If you already have a Samsung account, you can register that account to the TV. Sebct + > Sign In on
the Samsung account screen, and then follow the on=screen instructions.
Signing in to a _"_egistered Samsung account saved on the "TV
If you register a Samsung account, it is saved on the TV. To sign in to a registered Samsung account,
just seMect it on the TV.
.....Io chancre the sic_nin method, _efer to
Linking your Samsung account to ®xt®mallll service accounts
You can automatically log in to external service accounts when you log into your Samsung account by
linking your Samsung account to the external service accounts,
..../o use Link Service Accounts, you must first og iu'to your Samsul' g accoul' t,,
Linking or disconnecting a service account
(MIEIN(J/123) > IMIEINtJ> Smart Hub > Samsung Account > Link Service Accounts
o Linking a service account
Select an account from the list and log in to the account by following the on=screen instructions.
The service account is linked to the Samsung account.
o Disconnecting a linked account
Select an account from the list and unlink the account by following the on=screen instructions.
Changing and adding information to a Samsung account
(MIEINU/123) > IMIEINU> Smart Hub > Samsun9 Account > Edit Profile
You can manage your Samsung account. Enter your password with the keyboard dispJayed on the TV's
screen, and then seMect Done. You can perform the foJlowing functions on the screen.
..../o charge the account ir formatior, you must be ogged ir to your Samsung account,,
o Change Your Profile _mage
o Register Your Face to your Samsung Account
Registered faces are used with the Login Options.
Select a Samsung Account sign-in method
Turn auto _ogin on or off
o Enter Basic User _nformation
o Subscribe to the Samsung e-Newsletter
D®llll®ting a Samsung account from the TV
(MIEINU/123) > IMIEINU> Smart Hub > Samsung Account > Remove Accounts from TV
You can remove a Samsung account and password information from your TV. The account information
for any external accounts linked to the account is also removed from the TV.
..../o remove the accour t ir formatior, you must be ogged ir to your Samsung account,,
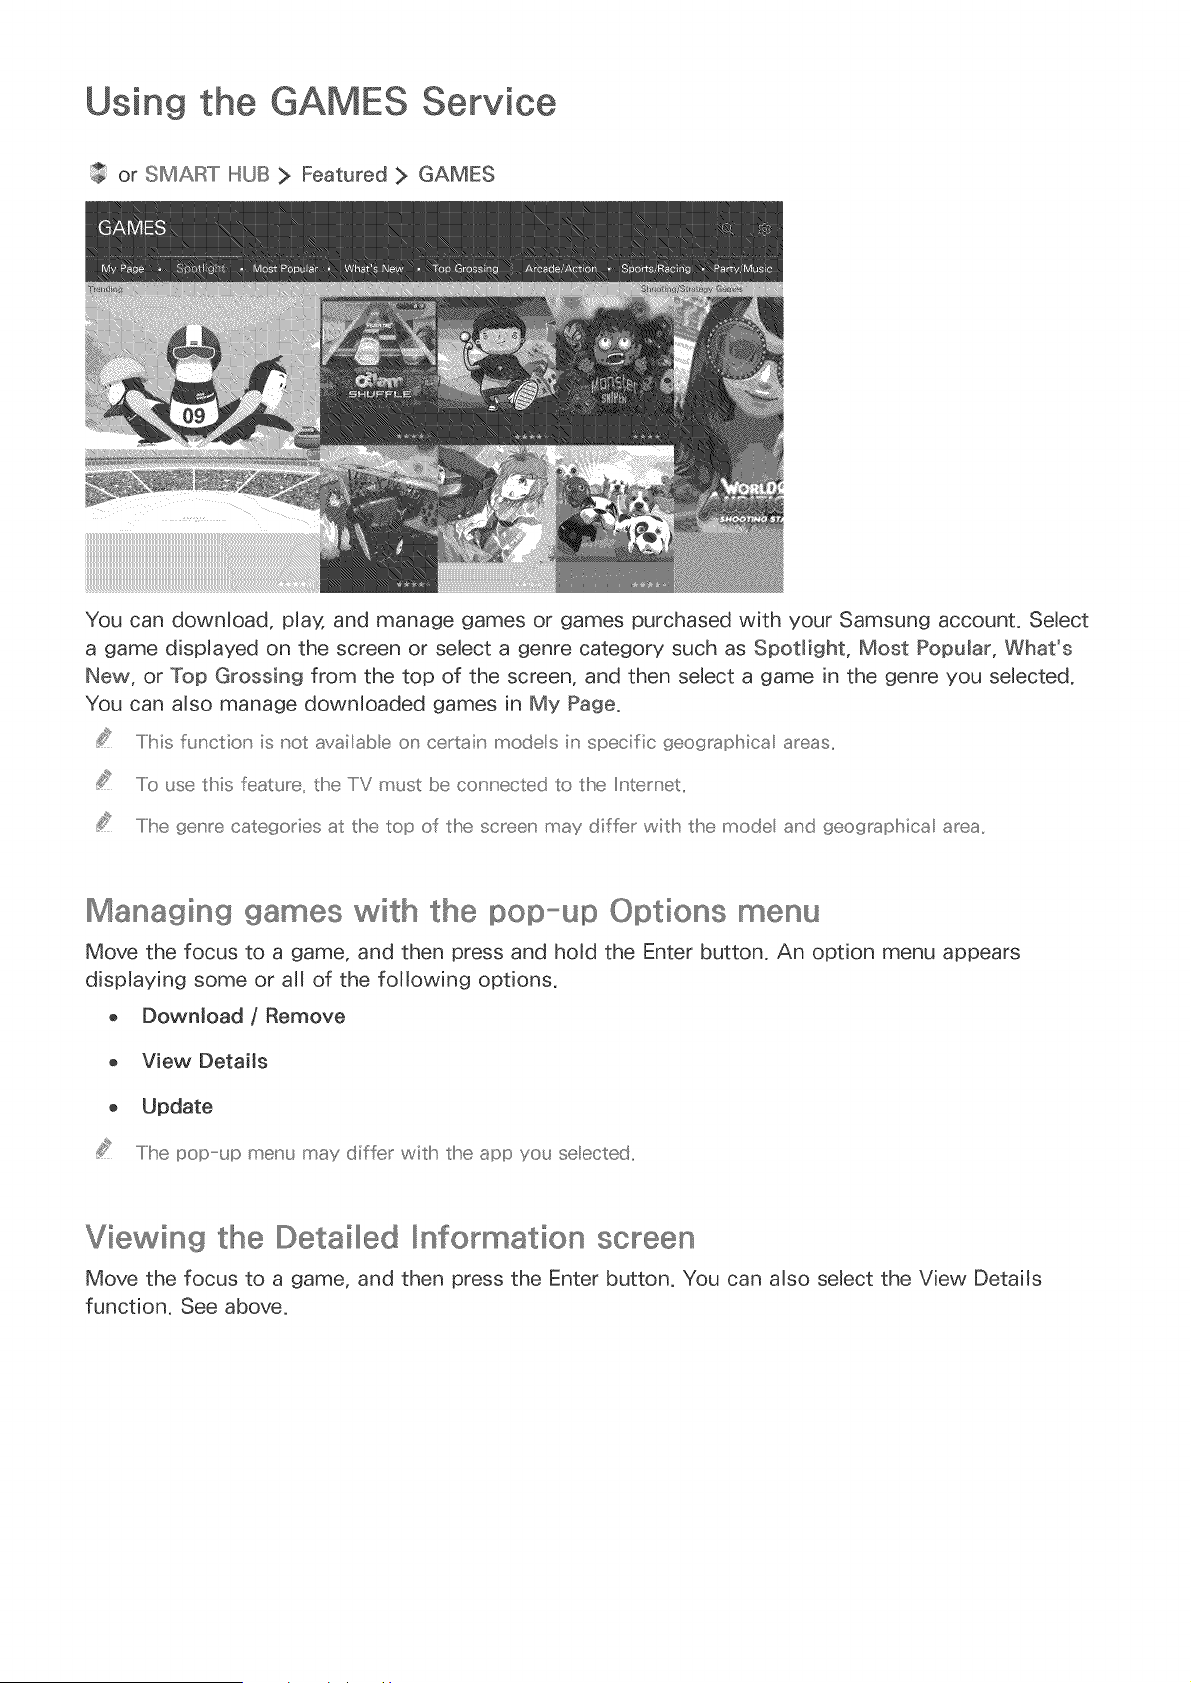
Using the GAMES
or SIMART HUB > Featured > GAMES
You can download, play, and manage games or games purchased with your Samsung account. Select
a game dlspJayed on the screen or select a genre category such as Spotlight, Most Popular, What's
New, or Top Grossing from the top of the screen, and then select a game in the genre you selected.
You can also manage downloaded games [n My Page.
.....IMs function' is not availabe o_' certain modes in specific geograpMca areas,,
.....Io use this feature, the TV must be c(:x u'ected to the Intemet,,
.....Ilhe geu' re cate_odes at the top of the screeu' may differ with the mode a_'d geogra©lhica area,,
Managing games with the IIIDOp-up Options menu
Move the focus to a game, and then press and hold the Enter button, An option menu appears
displaying some or all of the following options,
o DownJoad / Remove
o View DetaiJs
o Update
..../Ihe popup men_ may differ witlh tlhe app yo_ se ected..
Viewing the Oeta[lllled Information screen
Move the focus to a game, and then press the Enter button, You can also select the View Details
function, See above,
nstalllllllling and running a game
_nstalling games
Select a game to install, and then press and hoJd the Enter button. S@ect Download in the context=
sensitive window or install the game from the detaibd game information screen.
..../o get the information about the game controllers tllsat are compatib e wiSls dse (:_owl' oaded game, seect
GAMES > Options > Game Controller Guide,, A temative x seect _ o_' the games detailed iu'formation'
screeu' ,,
WI!_eu'the TVs interna memory is insu ficient, you can insta a game on a USB device,,
You can play a game insta ed on a USB device ony wBen tllse USB device is connected to the TV,, If the
USB device is disconnected during game paying, the game is terminated,,
You cannot pay a game insta ed on a USB device on a PC or another IV,,
Launching an insta_ed game
To run a game, you need to sign in to your Samsung account first. After signing in, select a game on
GAMES > My Page on the GAMES screen. The detailed information screen about the selected game
appears. Select Play. The game starts.
Managing d©wnllll©aded IIDu ohased games
Select My Page on the GAMES service screen.
Updating a game
Select My Page > Options > Update My Games. You can update games installed on the TV.
Editing a nickname
Select _ on the GAMES service screen, and then select Edit Nickname.
Enter your nickname with the on=screen keyboard, and then select Done.
Your r_ickr_ameis disp ayed on d_e My Page screen,,
Enabling automatic game updates
(MIEINU/123) > IMIEINU> Smart Hub > App & Game Auto Update or App Auto Update
To update games automatically, set App Auto Update to On. Games will be updated automatically
when an update becomes availabb.
..../Ihe actua name may differ witlh specific _eograpl!qica area,,
Removing a game
Select 0 on the My Page screen, and then select Delete My Games,
Select a game to remove, and then press the Enter button, Repeat the process to select additional
games to remove, To select all games, select Select All,
Yo_ can remove a game by selectiing the game_ and then pressing and II'_oding the IEr_terb_tO:on,,
When your are done selecting games, select Delete,
Rating a game
You can rate a game on the detailed information screen,
..../ Ihis feature is or yavailabewl!qer the game isirsta edor your IV,,
Registering a coupon
Enter the coupon number on the My Page screen to register it.
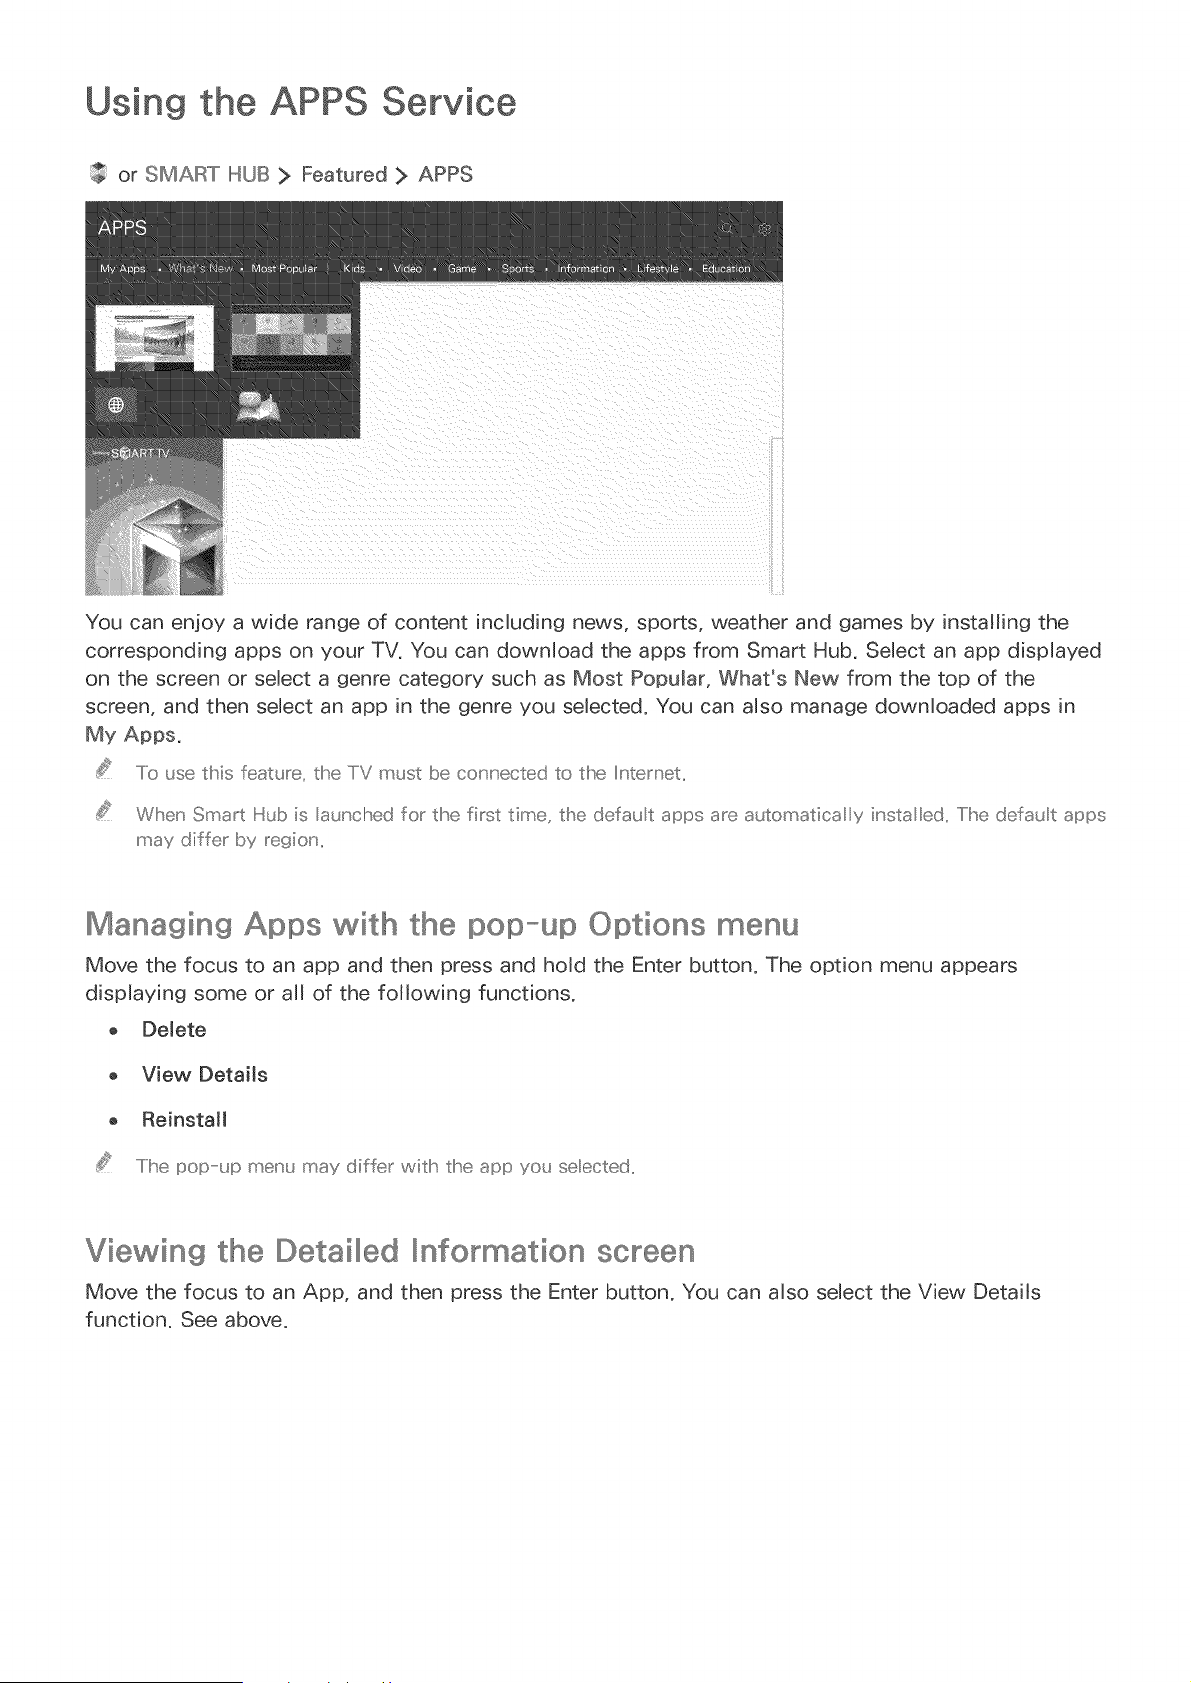
Using the APPS Service
or SMART HUB > Featured > APPS
You can enjoy a wide range of content including news, sports, weather and games by installing the
corresponding apps on your TV, You can download the apps from Smart Hub, Select an app displayed
on the screen or select a genre category such as Most Popular, What's New from the top of the
screen, and then select an app in the genre you selected, You can also manage downloaded apps in
My Apps,
.....Io use this feature, the TV must Ix)ecorrected to the Internet,,
When Smart Hub is auncl!sed for the first time, the defau t apps are automatica y ir sta ed,, I Ii'sedefau t apps
may differ by regior_,,
Managing Apps with the IIDOp-up Options menu
Move the focus to an app and then press and hold the Enter button, The option menu appears
displaying some or all of the following functions,
o Delete
o View DetaiJs
o Reinstall
.....I Ii'sepopup a_enu may differ witlh the app you se ected,,
Viewing the Detailllled _nformation screen
Move the focus to an App, and then press the Enter button, You can also select the View Details
function, See above,
nstallllllllingan p
QuicMy installing apps
Select a category on the APP8 screen.
Move the focus to an app, and then press and hold the Enter button. The context=sensitive menu
appears.
Select Download. The selected app is instaJbd on the TV.
You can view ir sta ed apps or the My Apps sc_eer ,,
You can aso irsta an app f_oa'xits detailed infon'T_atior screer ,,
Wlher the TVs intema memo_y is ir su ficient, you can insta an app or a USB device,,
You can _un ar app insta ed on a USB device only whet the USB device is corrected to the TV,, If the USB
device is discor r ected wl!qile an app is _unr ir g, the app is terminated,,
Youcanrot _unar appirsta edor the USB device or a PCo_arotlhe_ IV,,
Launching an app
You can launch an app by selecting the app on the APP8 screen. The icons below appear within the
selected app's icon and indicate the following:
o _:_ ' : The app is installed on a USB device.
o @ : The app has a password.
o @ : The app is installed.
Enablllling automatic apps updates
(MIEINU/123) > IMEINU > Smart Hub > App & Game Auto Update or App Auto Update
To update apps automatically, set App Auto Update to On. Apps will be updated automatically when
an update becomes availabJe.
..../he actua name may differ witlh specific geograpMca area,,

Removing an app from the TV
Select an app to remove on the APPS screen and press and how the Enter button to confirm, If you
want to remove multipb apps, select aH the apps to delete, sebct Options on the top of the screen,
and then sebct Delete My Apps.
IE_'sure that the re ated app data is as(:} removed wl!seu' you remove a_' app,,
III,,,,,,,,,,,©okingand unllll©oking apps
Select Options > Lock/Unlock My Apps on the APPS screen, The password input screen appears,
Enter your password, and then sebct apps to lock or unlock, When done selecting, sebct Save, AII
selected apps are locked or unlocked,
Updating apps
Select Options > Update Apps on the top of the APPS screen. The TV searches the for app updates,
and then displays a list. You can update some apps or all apps.
Rearranging apps
Select Options > Sort by on the APPS screen, and then sort the apps by date, time or others by
selecting requirements.
Rating IIIDUrohased apps
You can set the star score by using the left or right directional buttons on the detailed information
screen.
Using other app features and functions
(MIEINkJ/123) > IMIEINkJ> Smart Hub > Auto-Start Settings > Channel-bound Apps & Ticker
You can configure additional app features and functions.
Using channel bound apps
A channel bound app provides information about offerings and services available on one channel. You
can receive information about TV programs and other relevant services while watching TV by using a
channel bound app that is installed on the TV and linked to a specific channel.
.....IMs function' is o_'y availab e wl!seu' a_' app supportih_ {_ Channel-bound Apps & Ticker is iu'sta ed o_' the TV,,
Using the eiManua
Launching the ®-Manuallll
(MENkJ/123) > IMEN[J > Support > e-Manual
You can view the embedded e-manual that contains information about your TV's key features. Press
the MENkJ/123 button on the Samsung Smart Control, and then select e-Manual.
On the standard remote co_'tro, press tlhe IE,oMANUAL butlx:::)u' ,,
Select a category from the e-Manual screen. The content of the selected category appears on the
screen.
Select an item from the list. The corresponding e-Manual topic appears.
A ternatively, yo_ can down cad a copy of the e Man_a flom Sams_ n_ s vvebsite,,
Words in b_e (e,,9,. Picture Mode) indicate a li_elhL_item,,
The arrows in the menu navigator indicate the menu path. For example, IMIEIN/J/123 > MENU > Picture
> Picture Mode means that you press the IMIEN/J/123 button on the Samsung Smart Control, and then
select the on=screen items, Menu, Picture, and Picture Mode sequentially.
On the stau' dard remote contro _ press the MENU button, and theu' seect Picture, Picture Mode sequentia y,
Using the buttons in the ÷-Manuallll
¢ (Search): Brings up the search screen, Enter a search term, and then select Done, Select an item
from the search result to load the corresponding page,
¢ (_ndex): Brings up the index screen, Select a topic from the list to navigate to the relevant page,
@ (Recently Viewed Topics): Displays a list of previously read pages, Select a page, The e-Manual
jumps to the selected page,
Accessing the associated menu screen from an e_Manual topic page
(Try Now): Allows you to access the corresponding menu item and try out the feature right away,
(Link): Allows you to access the corresponding reference page,
.....Ilhe e Manua ca_'u'(:::£be accessed from some meu'u screeu's,,
Accessing the associated menu screen from an e_Manua_ topic page
Press the MEN(J/123 button on the Samsung Smart Control, then select e-Manual on the On=Screen
Remote to read the e-Manual topic about a current screen menu function,
On the standard remote co_'tro, press the IE,oMANUAL butl:o_',,
..../Ihe e Manua ca_'u'(:::£be accessed from some meu'u screeu's,,
Updating the e_Manua_ to the latest version
You can update the e=Manual in the same way you update apps.
Using the Web Browser
You can surf the Internet on the TV as you would on a PC - even while watcMng a TV program using
PIP. Select Help to view the information about the Internet web browser.
For a more cot vet iert web browsir g experier ce, correct a keyboard ard mouse to the TV,,
You can scro the Web browser page with the 4 directior a hurl:or s,,
..../he Web browser page may differ from that or a IPC,,
Browsing IIID ®f® ®noes
Configure the browsing settings for your convenience or to meet you needs. Select _ > Settings.
General
Hides browser tabs or menu bars automatically after a 9eriod of inactivity. Also allows you to
reset all user settings.
Y_-,_rbookmarks and browsing histories vvil not be reset..
o Home Page
Sets the home page. When you launch the browser, it will display this page.
o Search Engine
Searches for information that you requested, and then displays a list of web pages that contain
the information.
o Privacy & Security
Prevents access to inappropriate web pages. Also allows you to select not to save your browsing
history.
o Blocked pages
Blocks or unbtocks pages. You can manage the list of pages you blocked.
o Approved pages
Limits the browser to only the pages you have approved. To use this option, you must set a
password. You can add or remove approved pages.
Gives you the option to set the encoding to Auto or select an encoding method from a list.
About
Displays the current version of Web Browser.
Using the MY CONTENT Service
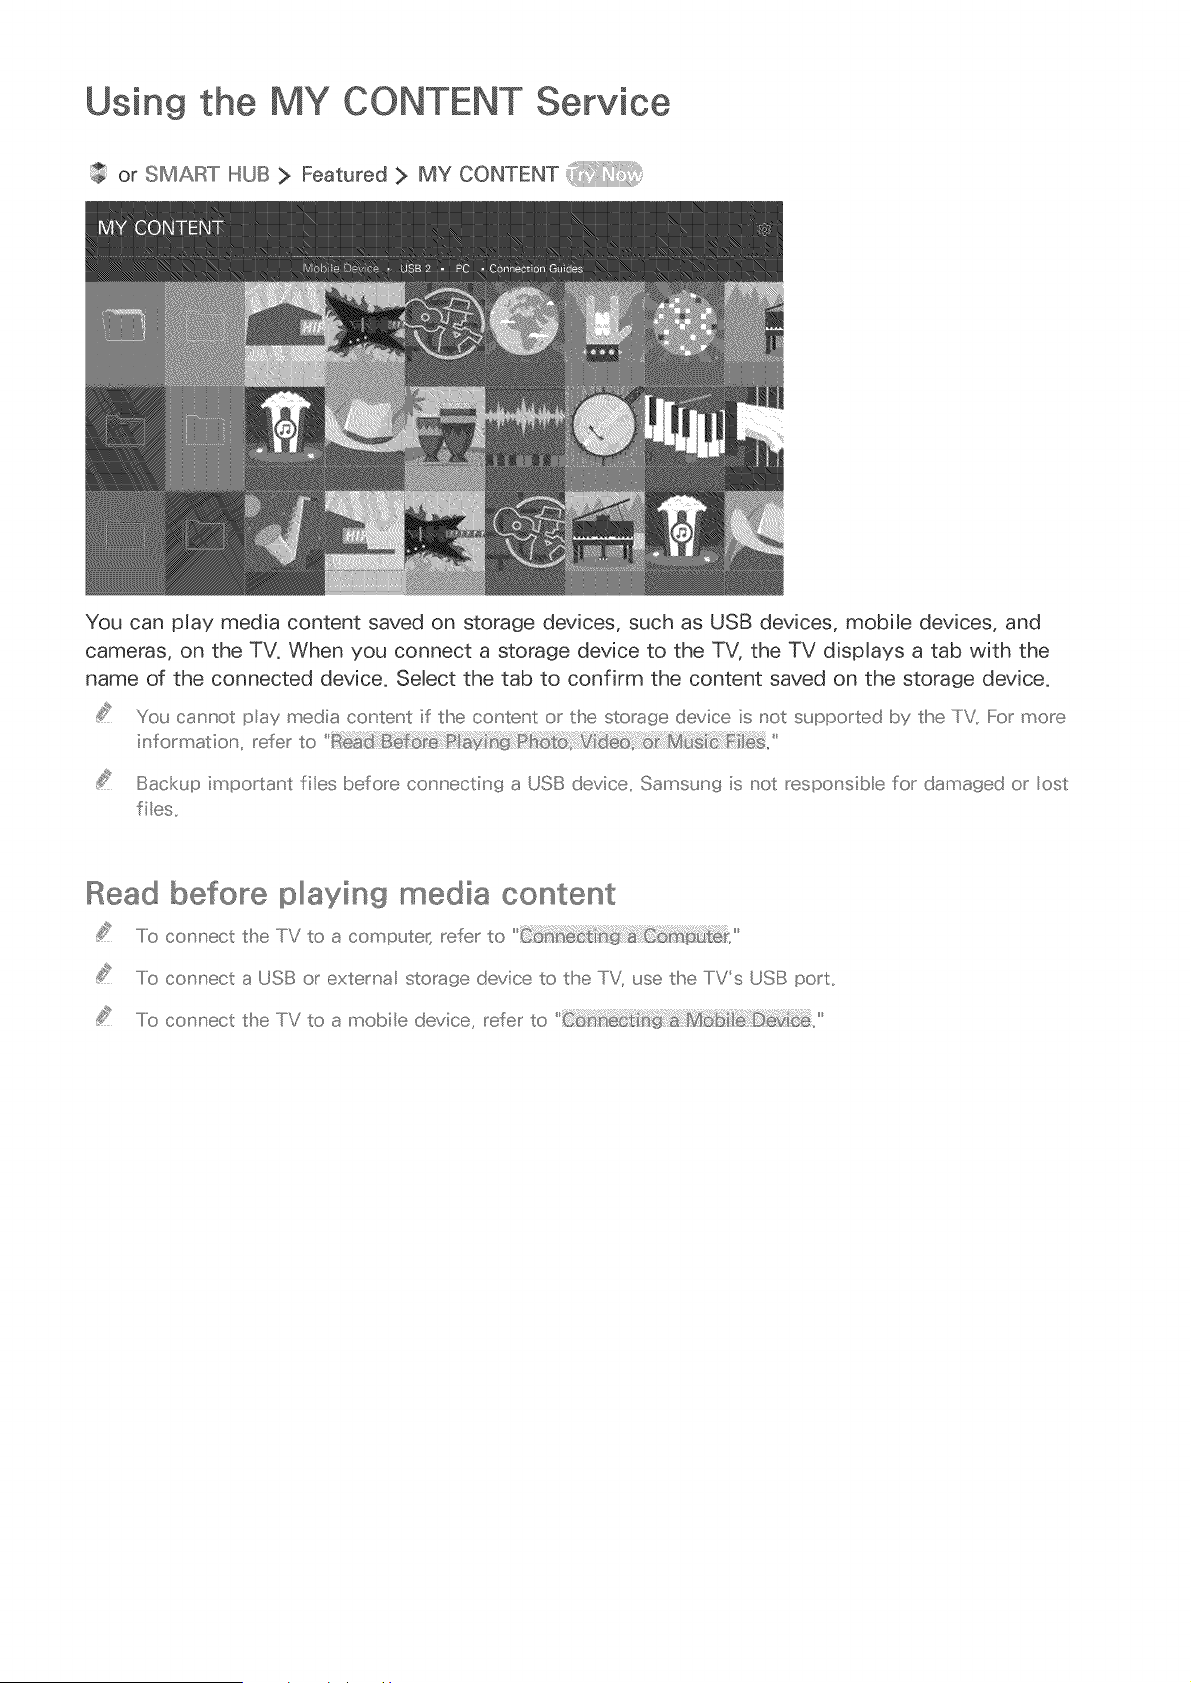
or SMART Ib_LJB> Featured > MY CONTENT
You can play media content saved on storage devices, such as USB devices, mobile devices, and
cameras, on the TV. When you connect a storage device to the TV, the TV displays a tab with the
name of the connected device. Select the tab to confirm the content saved on the storage device.
You cannot pay media content if the content or the storage device is not supported H)ythe TV,, For more
_,'format_or _ refer to
Bacl<up important files H)efore correcting a USB device,, Samsun_ is not respor sib e for damaged or ost
files,,
Read before iiDIIIlayingmedia content
.....Io correct the TV to a compute( refer to
.....Io correct a USB or extema storarae device to the TV, use the TV's USB port,,
.....Io correct the TV to a mobile device, refer to
IIPIIIlayingmultimedia content in a compute or mobilllle device
Before co_'u'ectiu' g to a con_puter or mobile device, co_'figure the network settir gs,,
Playin9 m[,_llitimedia content saved on a computer or mobile device
or SMART HUB > Featured > MY CONTENT
To play multimedia content located on a computer or mobile device on the TV, you must allow the
connection with the computer or mobile device on the TV,
Connect a computer or mobile device, The TV displays the device's name and lists the media files
in the device,
Select a media file to play from the list, The selected media plays,
Select the @ button to stop playing or press the IRIET[JRINbutton,
A ternative x move to the _edia co_'teu't you want to pax a_'d then press the _ button to pay the co_'teu't,,
b ....
.....Io col' I'ect a computer through your h_oa'T_enetwork_ refer to
..../ Ii'seTV anay not pay content ocated on a computer or mobile device depending on the encoding type and
fib fortY,at of the co_'teu't,,
.....Io connect a anobile device throug!s Srnar't View 2,,0, refer to
Content a'_aynot play sn_oodsy depot ding on dse netw(:xk status,, If this occurs, transfer the co_'teu't to a
USB storage device, al'd thel' pay the col' tel' t from the device,,
IIPIIIlayingmedia content saved on a USB device
Select a USB device name on the MY CONTENT screen, The TV displays a thumbnail list of the
media content saved on the USB device,
Select the media content to play from the list, The media content plays,
Select the @ button to stop playing or press the IRET[JRII_button,
Wl!sile video witlh UHD eve reso utio,' is beiu' 9 payed, Motion Contro_ is not availab e,,
A temativelg if you seect a USB device o,' the Source sc_eeu', the TV umps to the MY CONTENT sc_eeu'
automatica y,
Safely Removin{_ a USB Device
Press the SO[JRClE button, The Source screen appears,
Move the focus to the USB device you want to remove, and then press the down directional
button,
Select Remove USB Device in the list,

Buttons and functions available while viewing photos
You can press the Enter button while viewing photos to display available options. You can also view
the thumbnails of photos saved on the TV while viewing photos. The options disappear when you
oress the IRIETURIN button.
- Pause / Hay
Start or stop a slideshow. Using slideshow, you can display all the photos in a folder one after
another, automatically.
- Previous / Next
View the previous or the next photo.
S_ideshow Speed Sets the slideshow speed.
S_ideshow Effect Applies transition effects to the slide show.
Zooms in by up to a factor of 4.
Zoom & Rotate
Rotates the photo.
Plays background music while the TV displays photos.
_ The music fibs must be saved in the same USB device as the photo files.
Background Music _'s When background music plays, the music icon appears on the screen. Using the
music icon, you can pause the current music fib or play another music fib.
Displays a list of sound modes and lets you change the mode.
Sound Mode _ This function is avaiJable only when background music is p_aying,
Gives you a choice of which speakers to play the background music through.
TV Speaker: Plays the background music through the TV speakers.
Audio Out: Plays the background music through the external speakers.
Speaker Settings: Plays the background music through a speaker that you want.
Speaker List Sound Mode: Changes the sound mode during playback when you play the music
through the TV speakers.
Equalizer: Allows you to adjust the loudness of specific frequency ranges to control
the richness of the sound. To restore the defaults, select Reset.
Picture Mode Displays a list of Picture Modes and allows you to change the mode.
_nformation Displays detailed information about the current photo
The ava lable options may differ with the models and sett ng va ues,
Speaker List and Sound Mode are only ava lab[e wh[e the TV s playing a background musc,
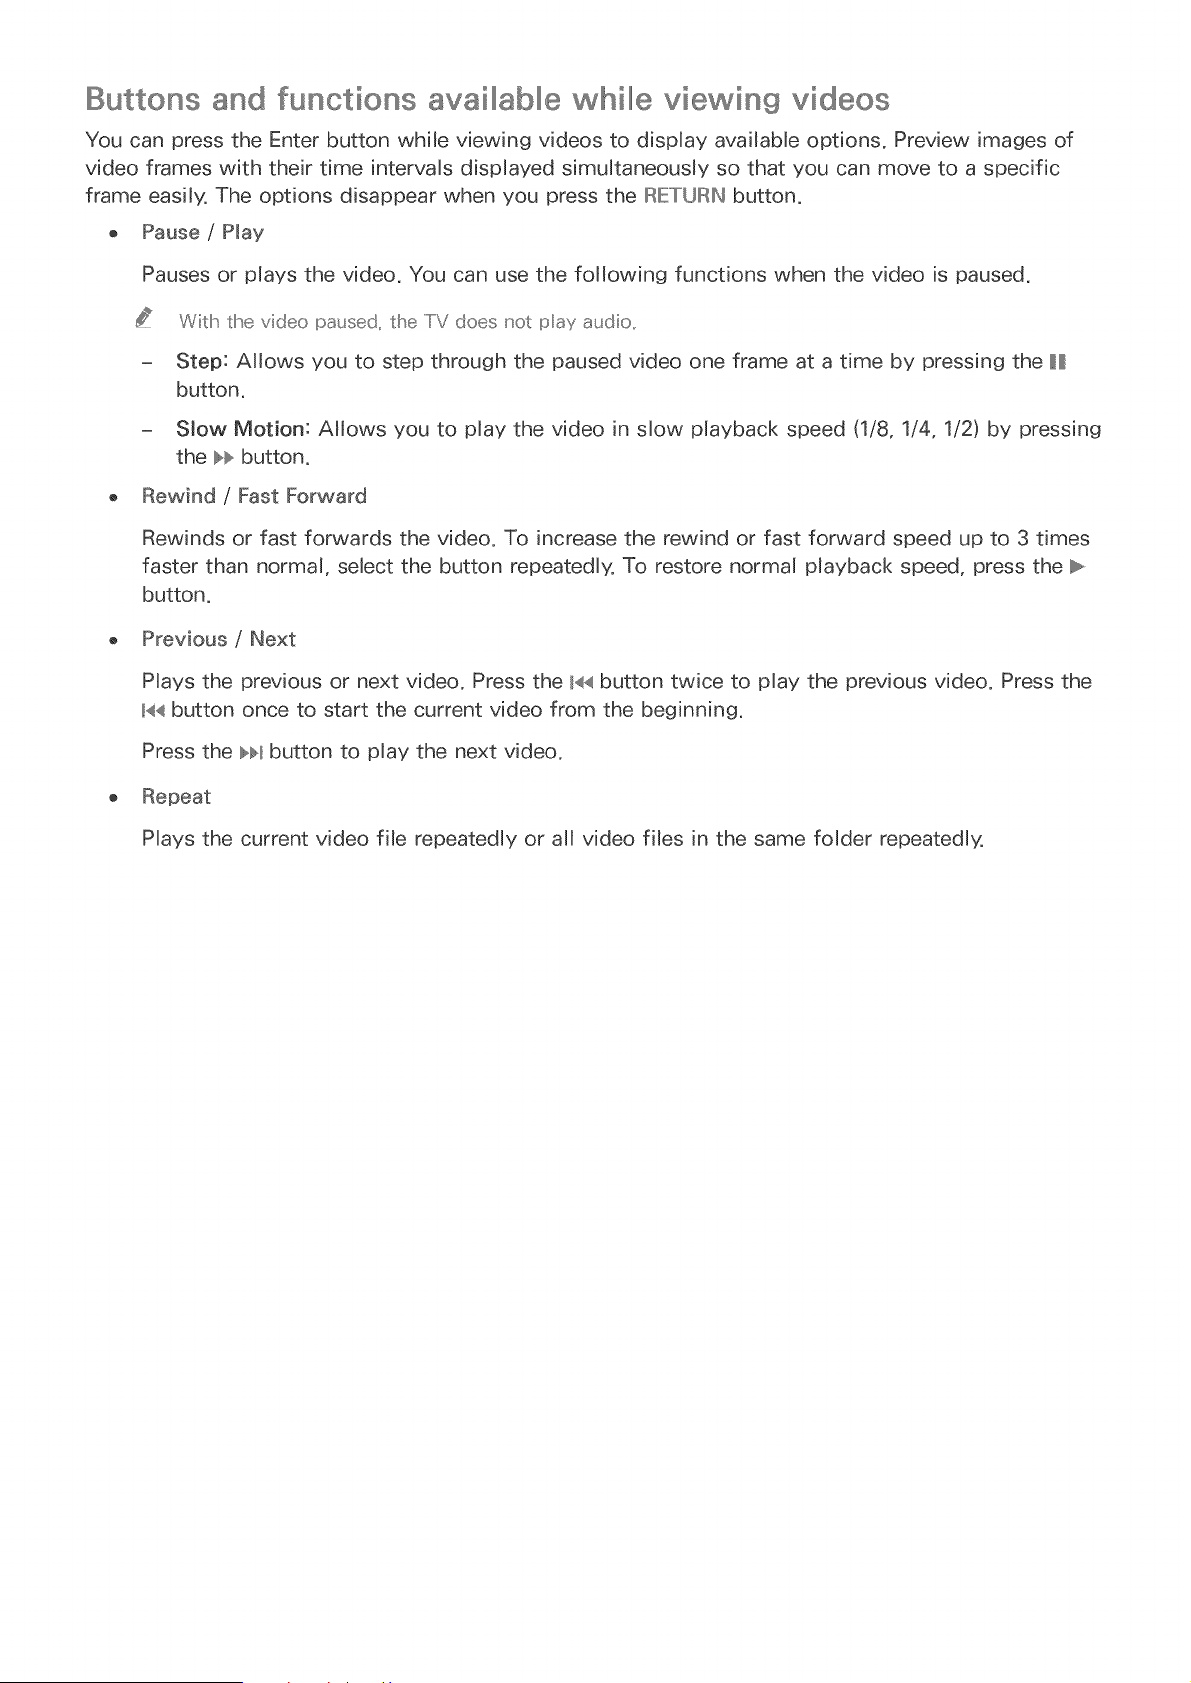
Buttons and functions availlllabllllewhilllle viewing videos
You can press the Enter button while viewing videos to display availabb options, Preview images of
video frames with their time intervals displayed simultaneously so that you can move to a specific
frame easily, The options disappear when you press the IRIETURN button,
o Pause / Hay
Pauses or plays the video. You can use the following functions when the video is paused.
Witlh the video paused, the liT does not pay audio,,
= Step: Allows you to step through the paused video one frame at a time by pressing the H
button.
= SJow Motion: Allows you to play the video in slow playback speed (1/8, 1/4, 1/2) by pressing
the bb button.
Rewind / Fast Forward
Rewinds or fast forwards the video. To increase the rewind or fast forward speed up to 3 times
faster than normal, select the button repeatedly. To restore normal playback speed, press the _,_
button.
Previous / Next
Plays the previous or next video, Press the I<< button twice to play the previous video, Press the
_<<button once to start the current video from the beginning,
Press the _ button to play the next video,
Plays the current video file repeatedly or all video files in the same folder repeatedly,
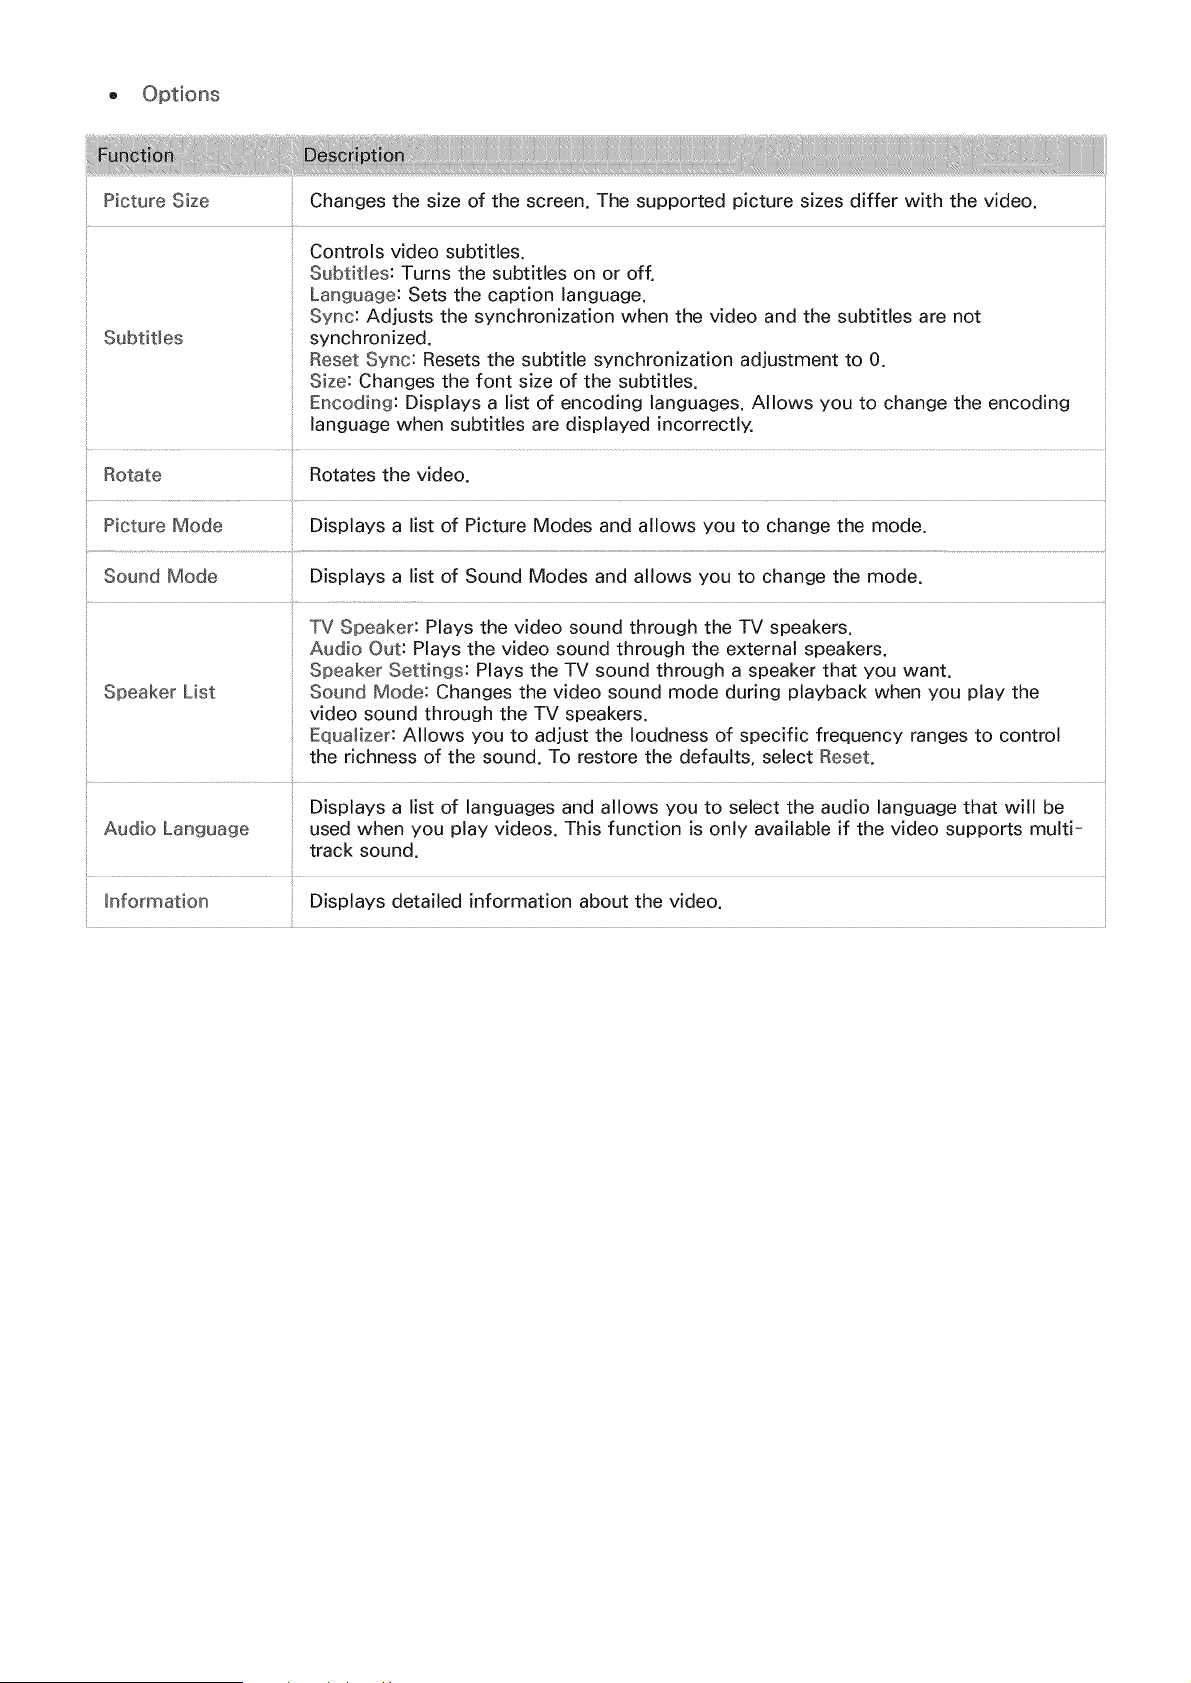
Picture Size Changes the size of the screen. The supported picture sizes differ with the video.
Controls video subtitles.
Subtitles: Turns the subtitles on or off.
Language: Sets the caption language.
Sync: Adjusts the synchronization when the video and the subtitles are not
Subtitles synchronized.
Reset Sync: Resets the subtitle synchronization adjustment to 0.
Size: Changes the font size of the subtitles.
Encoding: Displays a list of encoding languages. Allows you to change the encoding
language when subtitles are displayed incorrectly.
Rotate Rotates the video.
Picture Mode Displays a list of Picture Modes and allows you to change the mode.
Sound Mode Displays a list of Sound Modes and allows you to change the mode.
TV Speaker: Plays the video sound through the TV speakers.
Audio Out: Plays the video sound through the external speakers.
Speaker Settings: Plays the TV sound through a speaker that you want.
Speaker List Sound Mode: Changes the video sound mode during playback when you play the
video sound through the TV speakers.
EquaJizer: Allows you to adjust the loudness of specific frequency ranges to control
the richness of the sound. To restore the defaults, select Reset.
Displays a list of languages and allows you to select the audio language that will be
Audio Language used when you play videos. This function is only available if the video supports multi-
track sound.
_nformation Displays detailed information about the video.
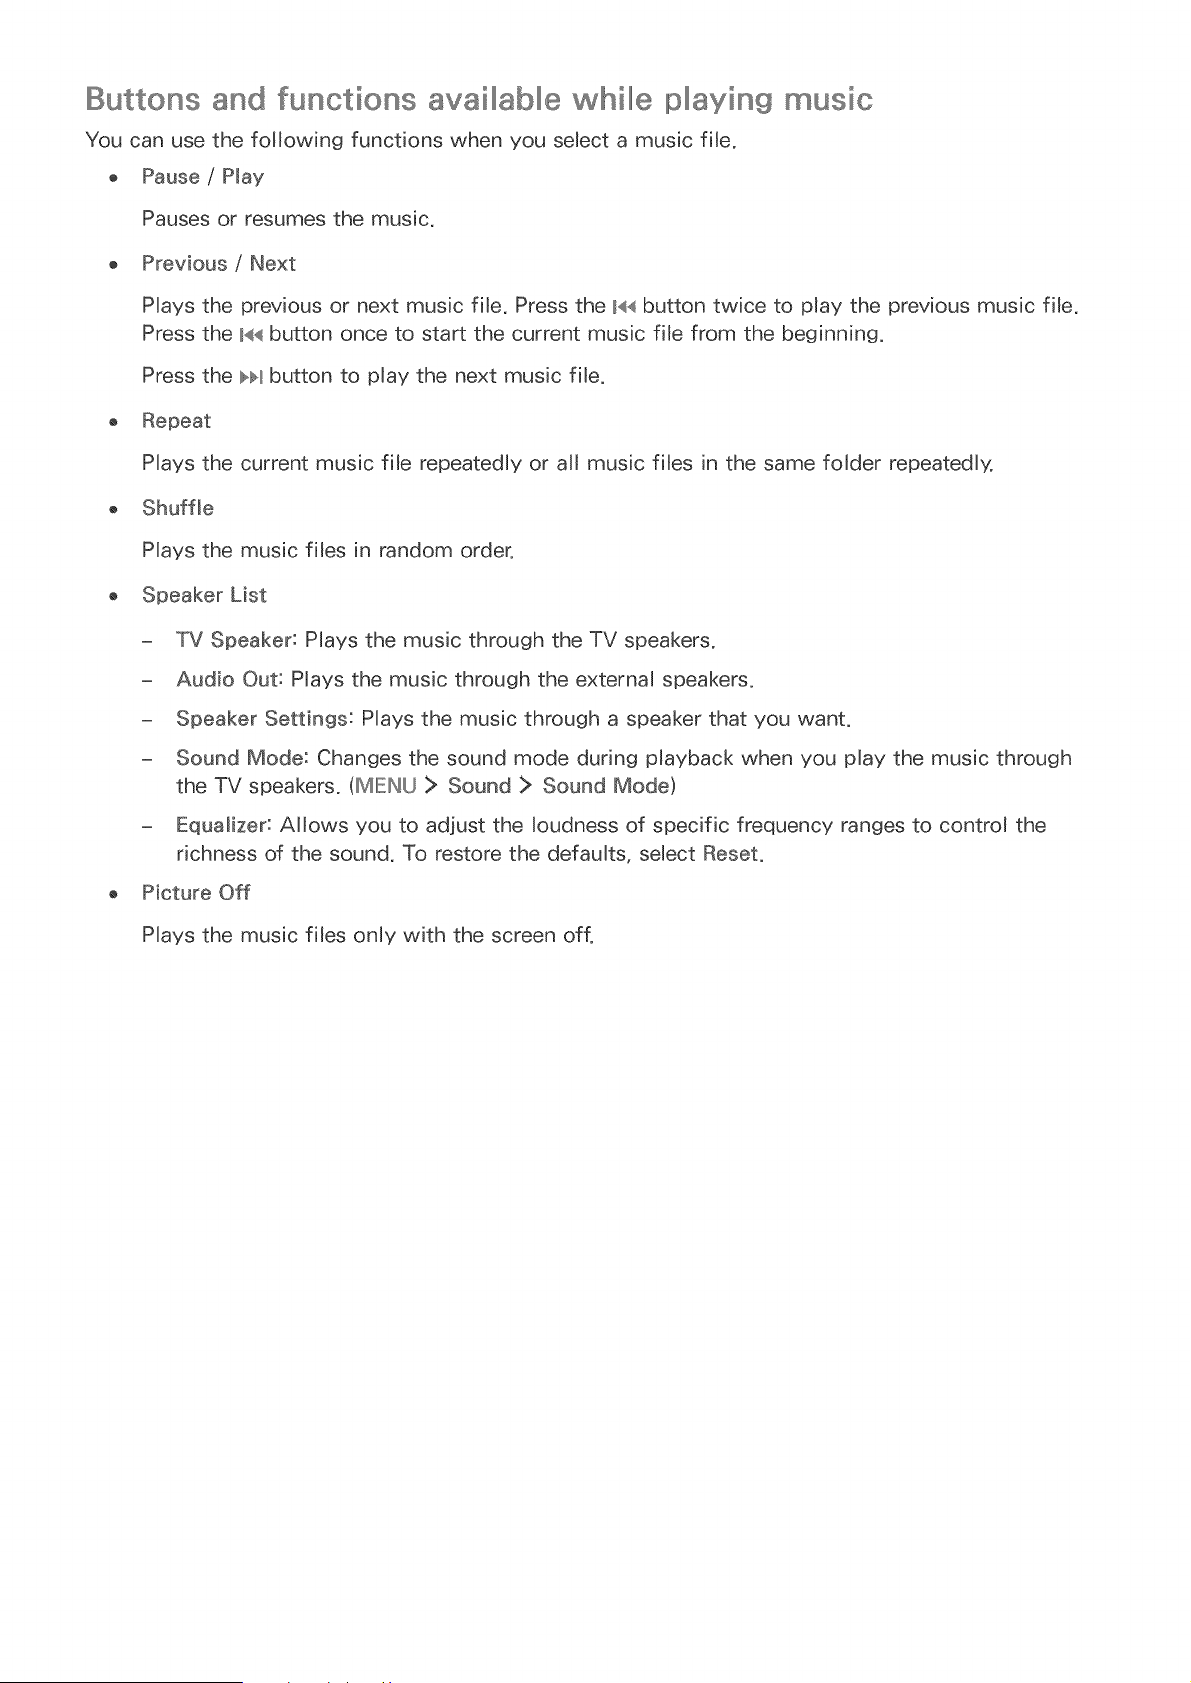
Buttons and functions availlllabllll@whillll@pllllaying musio
You can use the following functions when you select a music fib.
o Pause / Play
Pauses or resumes the music.
o Previous / Next
Plays the previous or next music file. Press the _<<button twice to play the previous music fib.
Press the I<< button once to start the current music file from the beginning.
Press the _ button to play the next music file.
Plays the current music fib repeatedly or all music files in the same folder repeatedly,
o Shuffle
Plays the music files in random order,
o Speaker List
- TV Speaker: Plays the music through the TV speakers,
- Audio Out: Plays the music through the external speakers,
- Speaker Settings: Plays the music through a speaker that you want,
- Sound Mode: Changes the sound mode during playback when you play the music through
the TV speakers. (MIENU > Sound > Sound Mode)
- Equalizer: Allows you to adjust the loudness of specific frequency ranges to control the
richness of the sound. To restore the defaults, select Reset.
o Picture Off
Plays the music files only with the screen off.
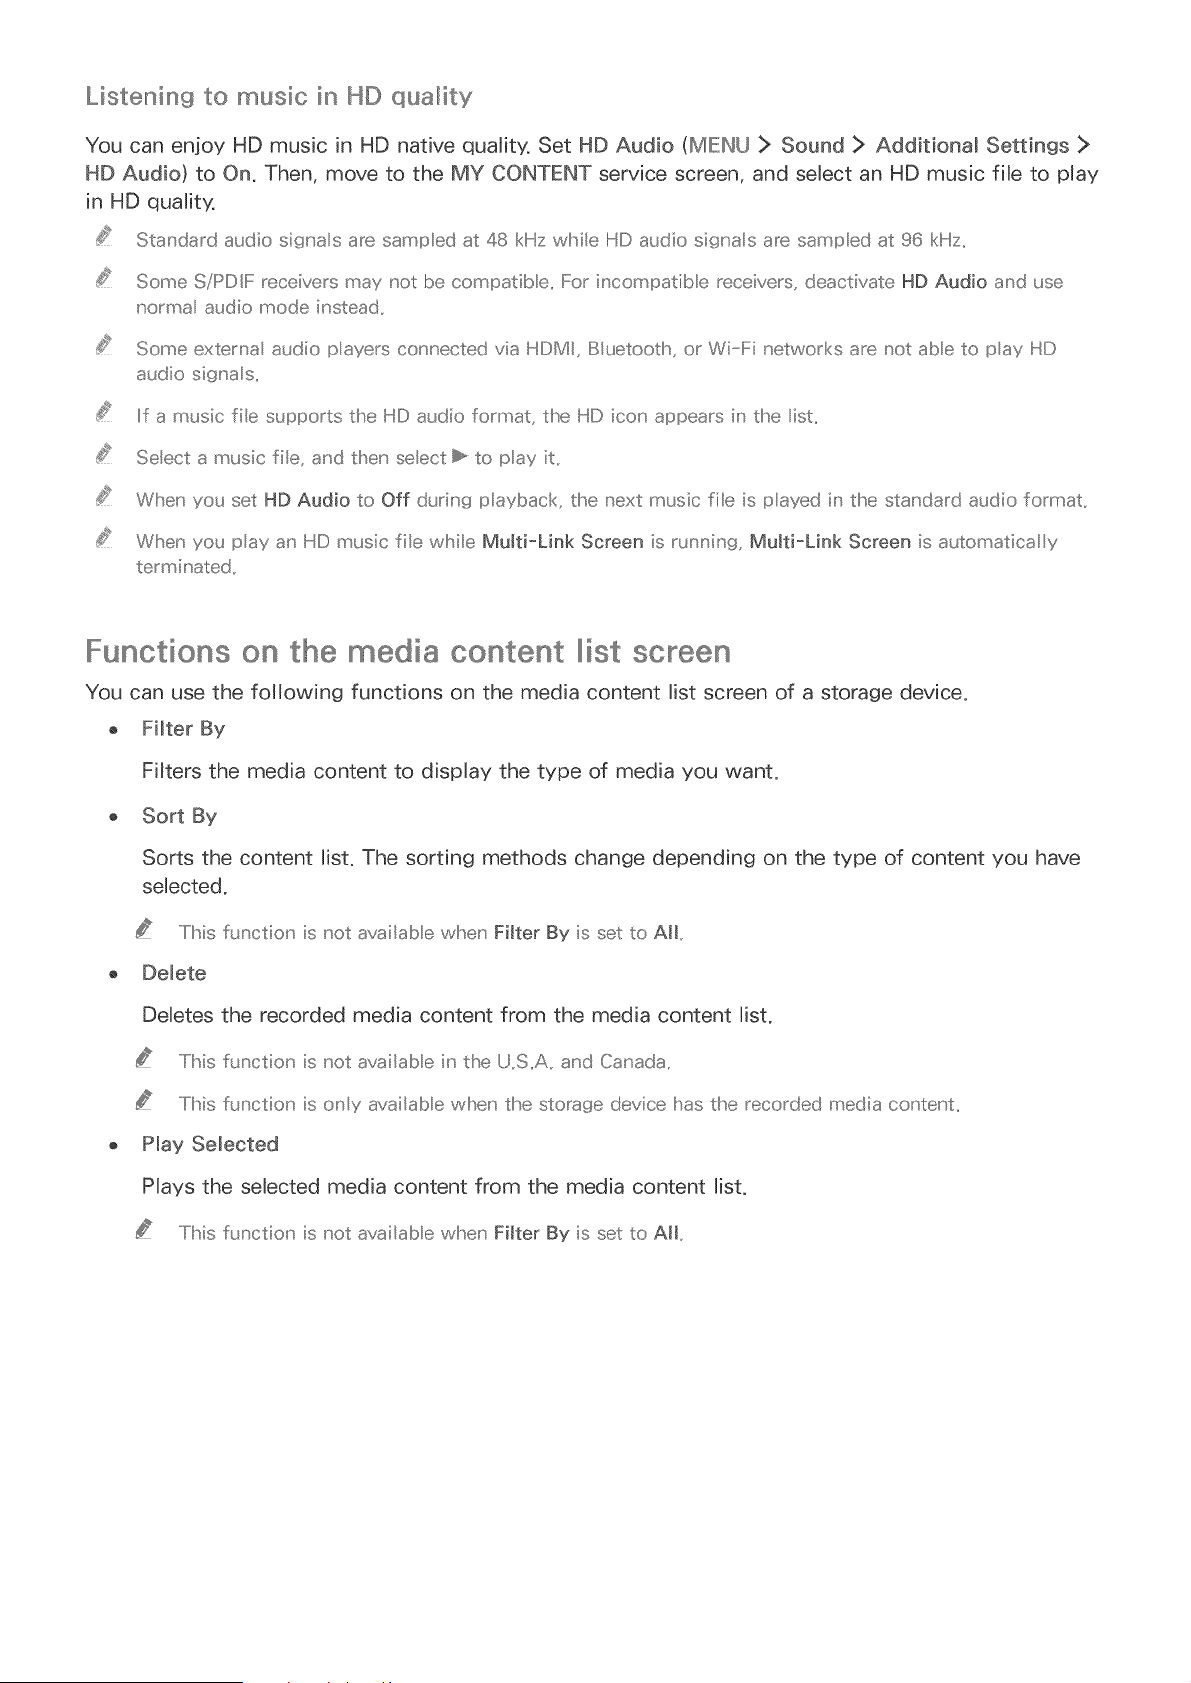
Listening to music in HD quality
You can enjoy HD music in HD native quality. Set HD Audio (MIEINU ]> Sound ]> Additional Settings >
HD Audio) to On. Then, move to the MY CONTENT service screen, and sebct an HD music fib to pJay
in HD quaJity.
Standard audio sigu' a s are samp ed at 48 klilz wMle HD audio si%' a s are samp ed at 96 kli Iz..
Some S/I!:::>DNFreceivers may ,'ot be compatib e.. For iu'compatib e receivers, deactivate HD Audio and use
norma audio mode instead..
Someexterna audio payersc(:xu'ectedvia HDMI, Buetooth, orWi IFinetworksarenotabetopayHD
audio sigu' a s..
If a music fib supports the HD audio onnat, the HD ico,' appears ir the ist..
Seect a music file, and the,' select b_ to pay it..
Wl!se,' you set HD Audio to Off during p ayback, the next music file is played in the standard audio format..
Wll'sersyou pay a,' HD music file while Multi-Link Screen is run,' i,' g, Multi-Link Screen is automatica y
terminated..
Functions on the media content IIIlistscreen
You can use the following functions on the media content list screen of a storage device.
o Filter By
FiJters the media content to display the type of media you want,
o Sort By
Sorts the content list, The sorting methods change depending on the type of content you have
selected,
.....Ilhis function is not availab e wl!_en Filter By is set to AiI,,
o Delete
Deletes the recorded media content from the media content list,
.....Iihis function is not availab e in the U,,S,,A,, and Canada,,
.....I!Ibis function is ony availab e vvl__enthe storage device has the recorded media content,,
o Play Selected
PJays the selected media content from the media content list,
.....Iihis function is not availab e wl!_en Filter By is set to A_l,,
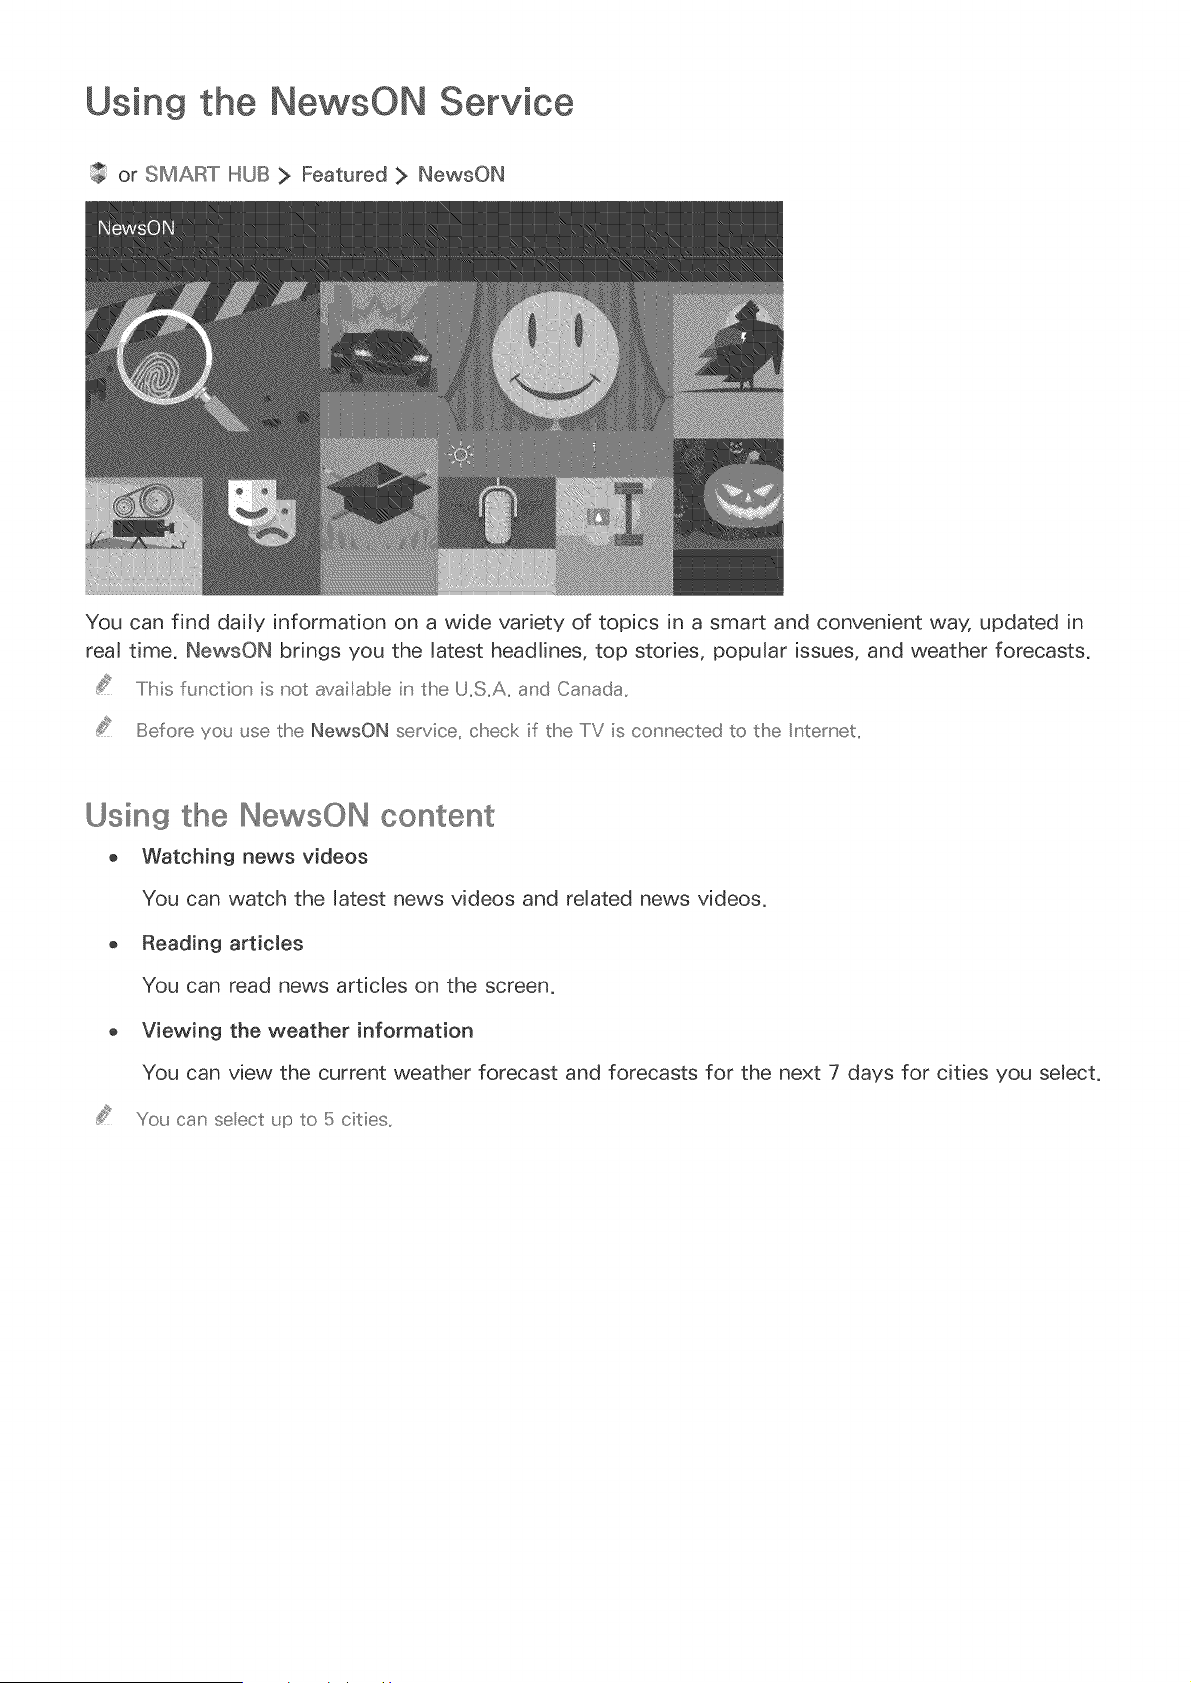
Using the NewsON Service
or SMART HUB > Featured > NewsON
You can find dally information on a wide variety of topics in a smart and convenient way, updated in
real time. NewsON bnngs you the latest headlines, top stories, popular issues, and weather forecasts.
.....IMs fuu' ctio_' is not available in the U,,S,,A,, a_'d Ca_' ada,,
Befo_e you use the NewsON se_vice, check if the TV is co_' u'ected to the Intemet,,
Using the NewsON content
o Watching news videos
You can watch the latest news videos and related news videos.
o Reading articles
You can read news articles on the screen.
o Viewing the weather information
You can view the current weather forecast and forecasts for the next 7 days for cities you select.
You can seect up to 5 cides,,
Using the Soccer Service
or SIMART HUB > Featured > Soccer
You can get a wide range of information about world soccer matches, including videos, news,
matchups, and ratings, You can also easily access information about your favorite team by adding it to
the Favorite list,
.....IMs function' is not available in the U,,S,,A,, and Ca_'ada,,
Befo_e you use the Soccer service, check if the TV is co_' u'ected to the Intemet,,
Configuring the Soccer service screen to displlllay your favorite
sooo®r t®sms
You can configure the Soccer service screen to display only your favorite soccer teams, To add a
team to the favorite soccer team list located at the top of the screen, select + next to the list, and then
select a team, After adding teams, if you select a team in the favorite soccer team list, its ranking in
the league, game results, game videos, and schedules are displayed in the content area of the Soccer
service screen,
You can add up to 6 teams to the favorite soccer team ist,,
Using a itionallll functions
Select O at the top of the Soccer service screen, The following functions are availabb:
Add Teams
Displays the league selection screen to allow you to add teams to the favorite soccer team list,
o Move Teams
Allows you to rearrange the order of the selected teams,
o Remove Teams
Removes teams you select from the favorite soccer team list,

Viewing soccer videos
You can view the soccer videos and highlights of your favorite soccer teams. On the Soccer service
screen, select a team, and then select a video you want to watch.
Buttons and functions available while watching a soccer video
e Play / Pause
Pauses or plays the video.
o Previous / Next
Plays the previous or next video.
Rewind / Fast Forward
Rewinds or fast forwards the video.
Plays the video repeatedly.
Picture Size Changes the size of the screen.
Picture Mode Allows you to change the picture mode of the current video.
Sound Mode
Speaker List
Changes the sound mode of the current video when you play the video though the TV
speaker.
TV Speaker: Plays the video sound through the TV speakers.
Audio Out: Plays the video sound through the external speakers.
Speaker Settings: Plays the sound from the TV through a speaker that you select.
Sound Mode: Displays a list of Sound modes and lets you change the mode.
EquaJizer: Allows you to adjust the loudness of specific frequency ranges to control
the richness of the sound. To restore the defaults, select Reset.
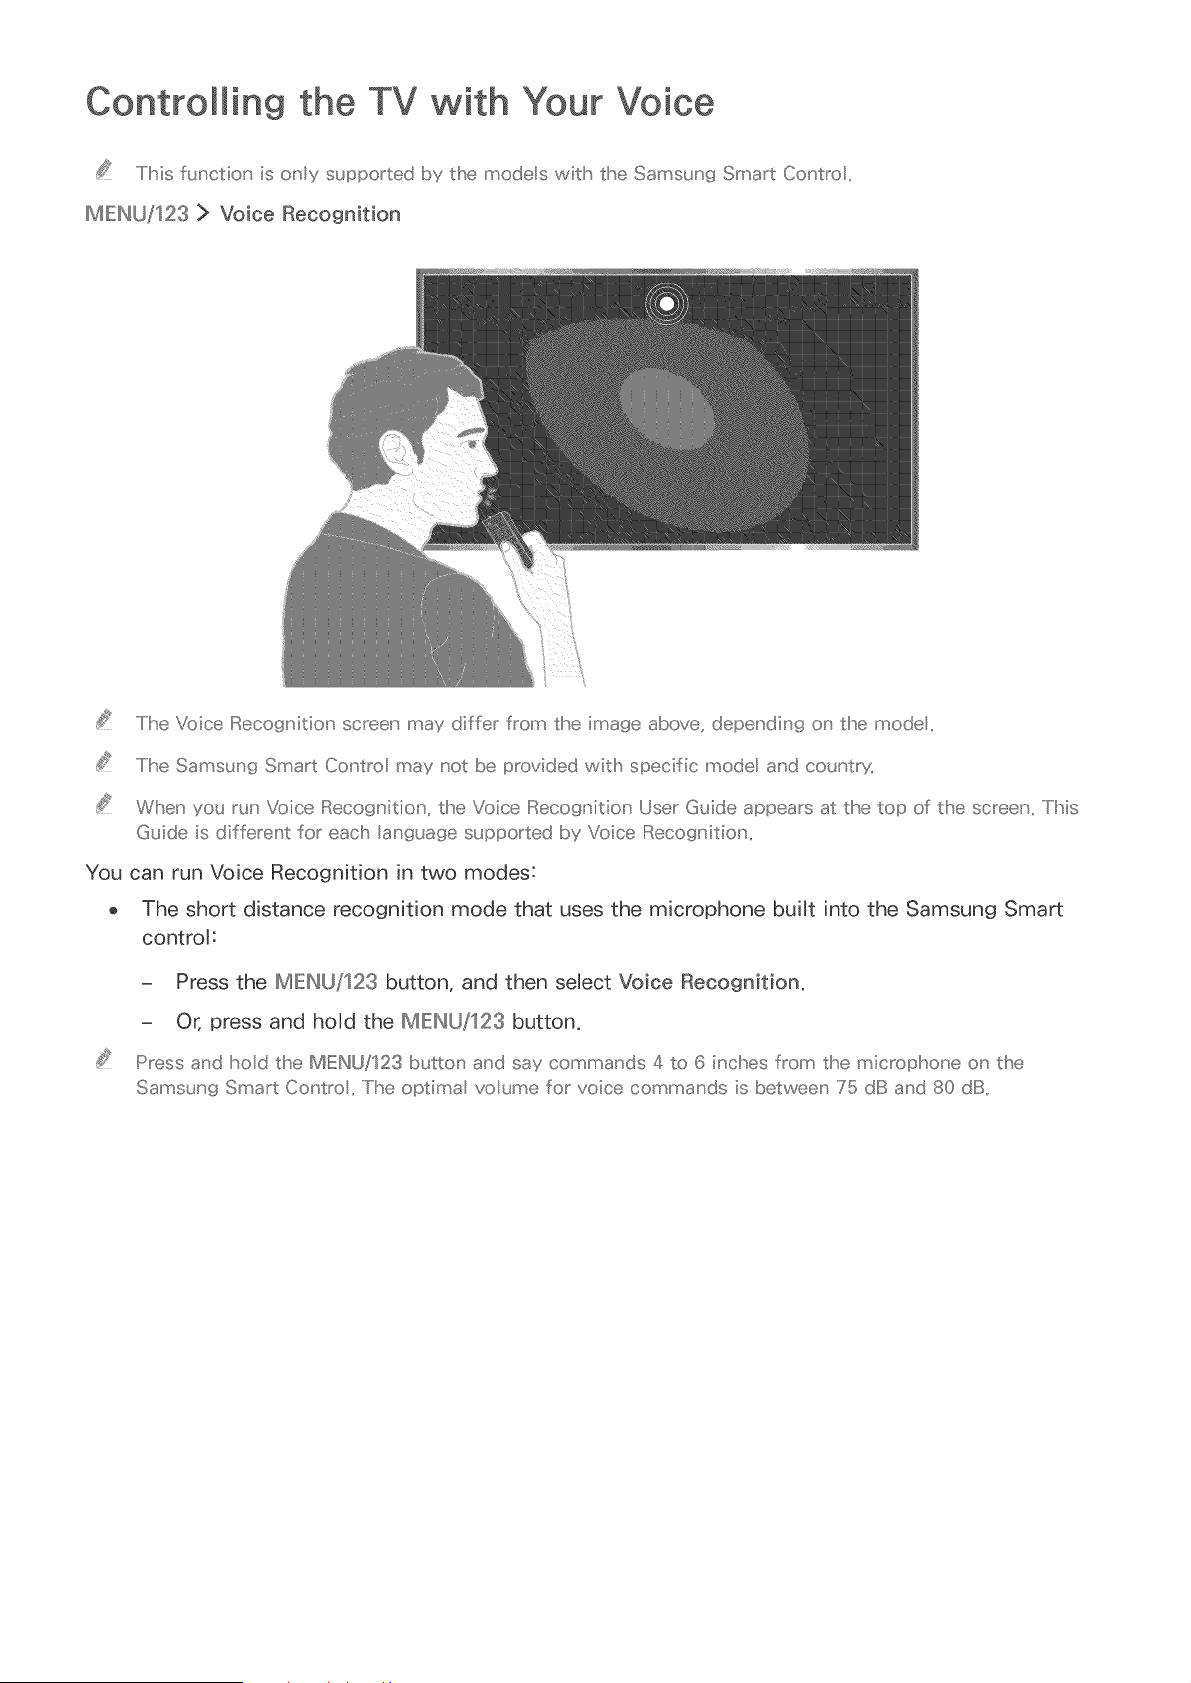
Controi in9 the TV with Your Voice
SMs funcdon is only supported I)y the modes witlh the Samsun{_ Smart Co_'tro ,,
IMIEINU/123 > Voice Recognition
..../he Voice IReco%'fitio_' screeu' may differ from the image above, depending o_' the mode,,
..../he Samsun9 Smart Co_'tro may not be provided witlh specific mode and country,
When you ruH' Voice IRecogu' ition, the Voice Ii::::(ecognitior_User Guide appears at the top of the screeu' ,,/his
Guide is differeu' t for each anguage supported by Voice IReco%' itio_' ,,
You can run Voice Recognition in two modes:
o The short distance recognition mode that uses the microphone built into the Samsung Smart
control:
= Press the IMIEINU/123 button, and then select Voice Recognition,
= Or, press and hold the IMIEINU/123 button,
Press and hod the MENU/123 I)utton and say commands 4 to 6 inches from the microphone on the
Samsung Smart Co_'tro ,,/he optima voume for voice commands is betweeu' 75 dB and 80 dB,,
Read before using voice recognition
(MIEINU/123) > IMIEINU> System > Voice Recognition
You can access and select certain menu options and functions using voice commands. For more
effective voice recognition, speak slowly and clearly in the language specified in the MEHU > System
> Voice Recognition Language option.
Ii::o_mo_e infon'_atior abo_£ voice recosr itior _ refer to
L,,,,eamingvoice recognition basics
o View a[[ voice commands:
Press the down directional button on Samsung Smart Control to display a complete list of voice
commands by category. Alternatively, say "Help."
Deactivating voice recognition:
Say "Close", or press the RETURN button to terminate voice recognition.
..../he TV _ecoonizes pmdefined voice commands cry. / Ihesevoice commar ds may differ from the manua
deper dir 9 or the versior of the TV..
Enabling or disablliin9 TV voice
(MIEINU/123) > IMIEINU> System > Voice Recognition > TV Voice
Enable or disable the voice the TV uses to respond to your voice commands.
Selecting a gender for the TV voice
(MIEINU/123) > IMIEINU> System > Voice Recognition > Voice Gender
You can select the gender of the voice the TV will use when you use the Voice Recognition function.
Changin{_ the voice recognition Illanguage
(MIEINU/123) > IMIEINU> System > Voice Recognition > Language
You can select a language to use with the Voice Recognition function.
Interactive voice _ecognition is not available in some anguages, the selected anguage is not availab e,
seect a diffe_ent anguage,
interactive voice recognition at a short distance
You can search for content that is available in the TV program or execute various other functions
without having to remember specific commands or keywords.
Activate Voice Recognition and say a command. See the examples below:
o When you want to find a specific content:
"_×_×_×_(Titb)"/"Find _×_×_×_(title)")
When you want to know specific information:
"What's the weather in :×-:×-:×-(placename)?" / "What is the :×-:×-:×-(company)stock pnce. / "Show me
the :×-:×-:×-(team)score."
o When you use the TV's function:
"Set Sleep Timer (function name) in 30 minutes"
Some set ter ces above may not be supported deper din{_ or the counby,
Using the voice recognition tutodallll
(MIEINU/123) > IMIEINU> Support > Voice Recognition Tutorial
The tutorial lets you familiarize yourself with the basics of using Voice Recognition. Run Voice
Recognition Tutorial from the Support menu, or run Voice Recognition and say "Tutorial".

Controlling the TV using (Motion Control)
TMs function' is only supported by the 6500 series models or Mgher and 650D series modes or higher,
(MIEl/U/123) > MIEI/U > System > Motion Control
To use the Motion Control feature, you must install a separately=sold camera on the TV.
Motion Control is not availabb:
= When you are playing UHDHevel video saved on a USB device
- When you are viewing a digital channel with UHDHevel resolution
= When you are using the Samsung Smart Control or a mouse
.....Ilhis function' is not supported I)y some apps,,
For.... more _u'formado_' _refer to ton..
Z_ The optional TV camera must be connected to the dedicated USB port at the back of the TV,
The other USB ports do not support the camera or Motion Control,
........[esting ambient illlllllluminati©n using the "IV camera
(MIEl/U/123) > MIEI/U > System > Motion Control > Motion Control Environment Test
Run this test before using Motion Control to ensure proper functionality.
Stand 5 to 11.5 feet (1.5 to 3.5 m) from the TV screen. Launch the Motion Control Environment
Test, and then select Start. If the TV screen is reflecting light or there are objects moving in the
background, the TV may not recognize the motion of your hand.
Face the TV camera, and follow the onscreen instructions.
Checkin{j ambient i llllliumination (Motion contro/t environment Check}
(MIEINtJ/123) > IMIEINtJ> Support > Self Diagnosis > Motion Control Environment Check
You can test the ambient brightness levels around the TV camera and microphone to ensure that they
are suitable for motion control use.
..../Ihe actua name may differ from specific _eof_rapl!sica areas or modes..

Activating motion oont_ollll
(ME:INU/S2St> ME:INU> System> Mot_ooCootrom> Mot_ooCootrom
Face the TV camera. Lower your hand to a comfortable position. Raise your hand with your index
finger fully extended upwards, and then move your hand slowly to the left or right. When your hand
is successfully recognized by the TV camera, motion control is activated and a pointer and motion
control icons appear on the screen.
.....Io deactivate motion contro _ move your hand out of the ra_' ge of the TV camera,, Io reactivate it, simpy
move your hand toward the TV camera witMr_ 3 seconds,,
M(::£io_' Co_'tro may be terminated if your iu'dex finger is not fuy exteu' ded or you move it to fast,,
Usin9 the motion oontrol[i tutoda_
(MIEINU/123) > IMIE:IN/J> Support > Motion Control Tutorial
You can learn the basics of using motion control.
Learning motion contro_ basics
The following actions are availabb:
o Moving the pointer
Move your hand to move the pointer accordingly.
Selecting an item
Fold down and raise your index finger to select items. You can select a TV menu
or run a function. Keeping your index finger lowered is like holding down a
remote control button.
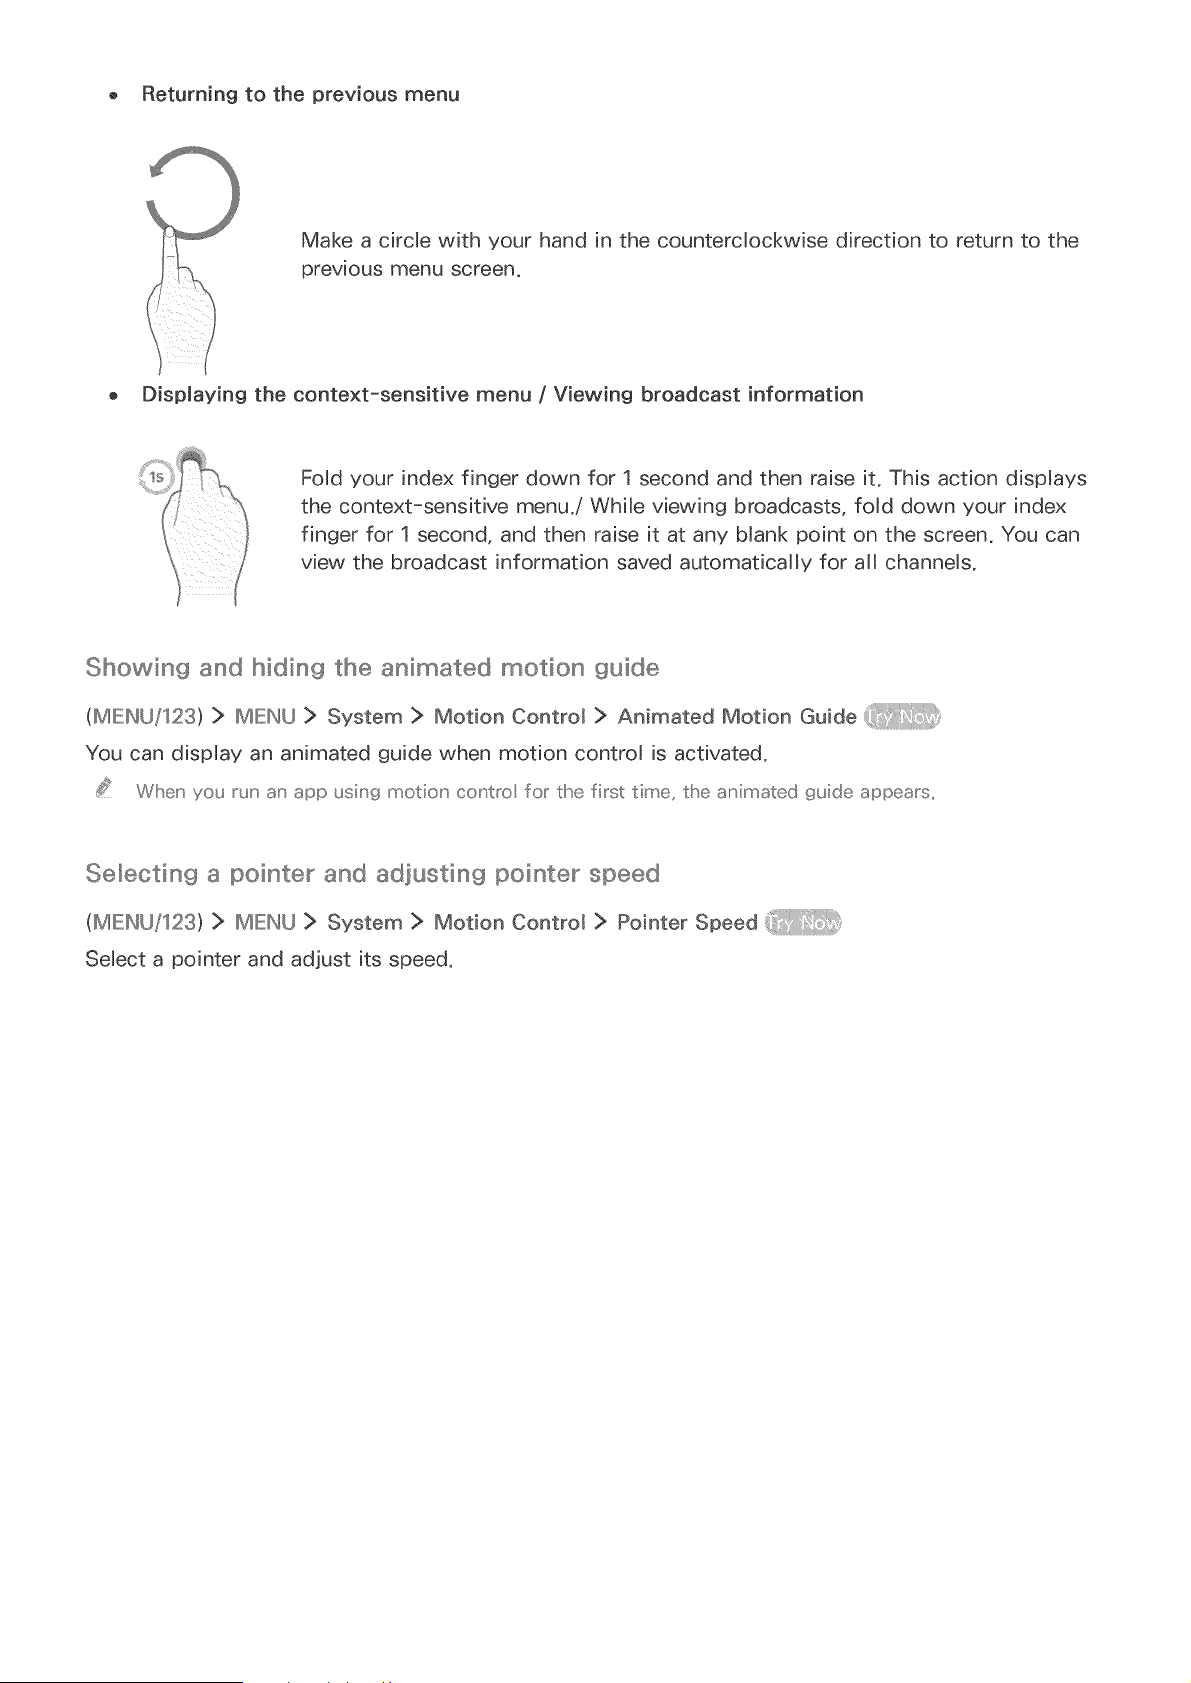
o Returningto the previousmenu
Makea circle with your handin the counterclockwisedirection to returnto the
previousmenuscreen.
o Displayingthe context-sensitive menu/ Viewing broadcast information
FoJd your index finger down for 1 second and then raise it. This action displays
the context-sensitive menu.! While viewing broadcasts, foM down your index
finger for 1 second, and then raise it at any blank point on the screen. You can
view the broadcast information saved automatica[ly for all channeMs.
Showin{_ and hiding the animated motion guide
(MIEINU/123) > IMIEINU> System > Motion Control > Animated Motion Guide
You can display an animated guide when motion control is activated.
Wlheu'you run a_' app using motion' co_'tro for the first time, the animated guide appears,
Selectin{_ a pointer and adiusting pointer speed
(MIEI/U/123) > IMIEIMJ> System > Motion Control > Pointer Speed
Select a pointer and adjust its speed.
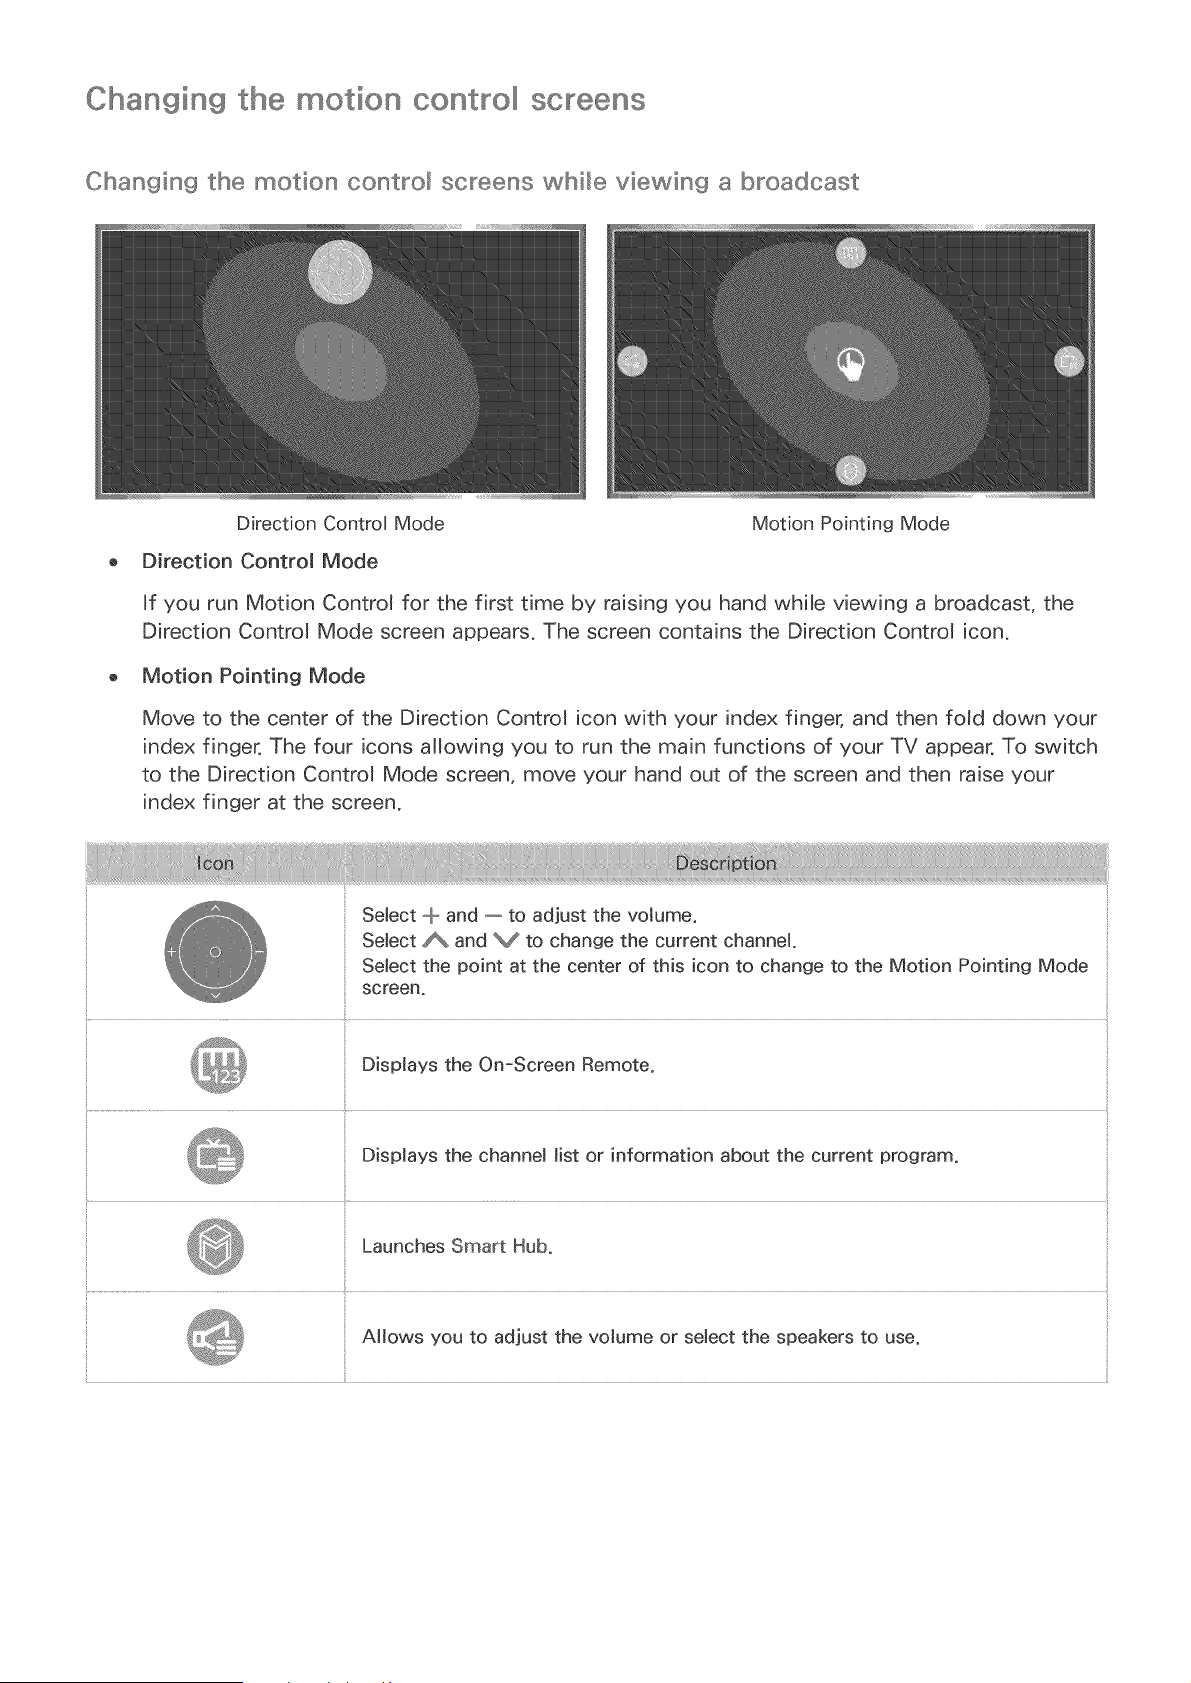
Changing the motion oont ollll screens
Changing the motion control screens while viewhsg a broadcast
Direction Contr@ Mode Motion Pointing Mode
Direction ControJ Mode
If you run Motion ControJ for the first time by raising you hand whib viewing a broadcast, the
Direction Control Mode screen appears. The screen contains the Direction ControJ icon.
Motion Pointing Mode
Move to the center of the Direction Control icon with your index finger, and then foW down your
index finger. The four icons allowing you to run the main functions of your TV appear. To switch
to the Direction ControJ Mode screen, move your hand out of the screen and then raise your
index finger at the screen.
Select @ and -- to adjust the votume.
Select A and V to change the current channel.
Select the point at the center of this icon to change to the Motion Pointing Mode
screen°
Displays the On-Screen Remote.
Displays the channet list or information about the current program.
Launches Smart Hub.
Allows you to adjust the volume or select the speakers to use.
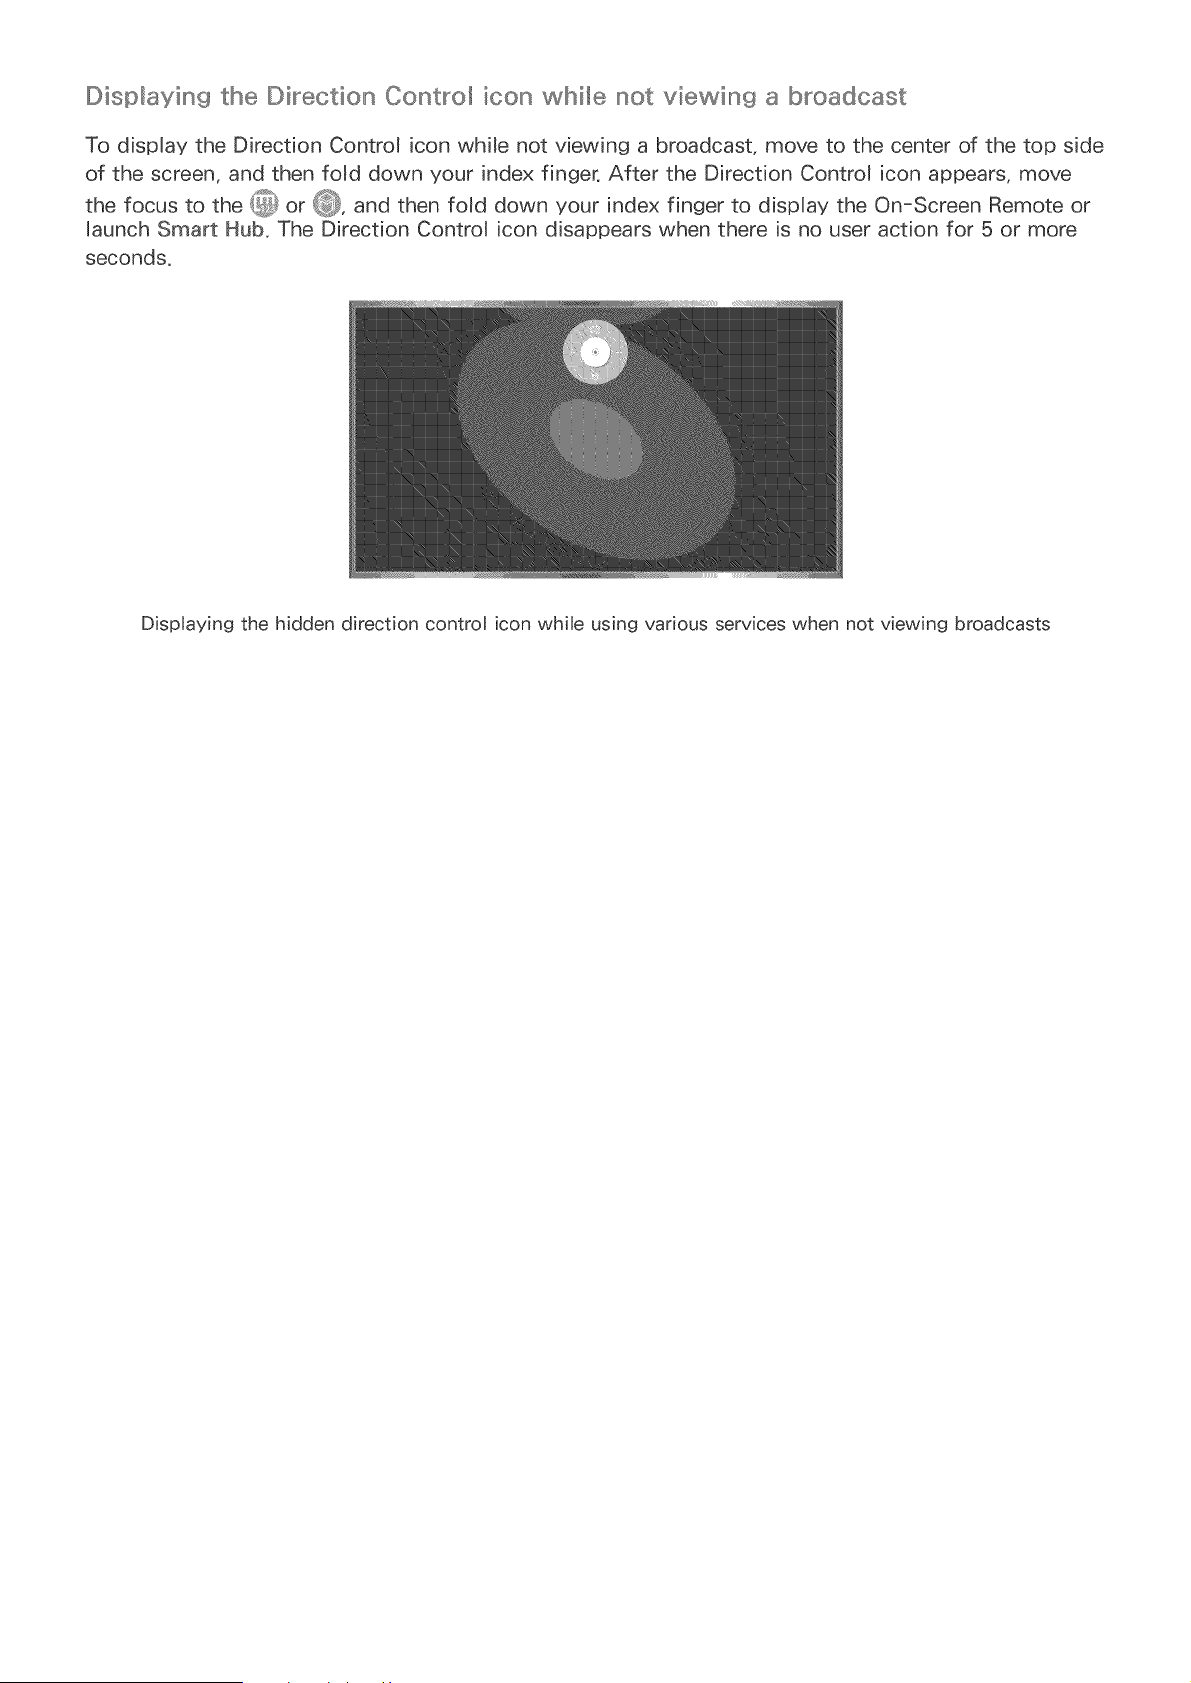
Displaying the Direction Cont_o_ icon whi_e not viewing a broadcast
To display the Direction Control icon while not viewing a broadcast, move to the center of the top side
of the screen, and then f@d down your index finger. After the Direction ControJ icon appears, move
the focus to the _ or Q, and then fold down your index finger to display the On-Screen Remote or
launch Smart Hub. The Direction Control icon disappears when there is no user action for 5 or more
seconds.
Displaying the hidden direction control icon while using various services when not viewing broadcasts
Using Face Recognition
You can register your face using the TV camera, and sign in to your Samsung accounts using the
face recognition function, Only one face can be re@stered per account, Depending on the ambient
illumination level and!or shadows over a face, the TV may have difficuJty recognizing it,
..../Ms function' is o_'y supported I)y the 6500 series modes or M@ser and 650D series modes or higher,
..../o use the Face IRecogu' itio_' feature, you need to i_r_staI a camera (sod separately o:_ the TV,,
Z_ The optionaJ TV camera must be connected to the dedicated USB port at the back of the TV,
The other USB ports do not support the TV camera or Face Recognition,
Registedn9 your face to your Samsun9 account
(MIEINkJ/123) > IMIEINkJ> Smart Hub > Samsung Account > Edit Profile
Select _3 after entering your account password, Select Take Picture, and then align your face within
the red circle, When the circle turns green, the TV has registered your face,
..../o use this f_,' cti(:x, you m_st si%' iu' to your Sams_u'g acco_u't,,
Your eu'tire face must be visib e to the camera,, Avoid sl!sadows over your face,, Shadows pmveu't the camera
from recognizin9 your face accurate y,
Keep your expression' as neutra as possible,, Also, keep your mouth closed and as neutra as possib e,,
a
For more il' formatiol' _ refer to
Changing your IIIIogin method to face recognition
(MIEIN(J/123) > IMIEIN&J> Smart Hub > Samsung Account > Edit Profile
You can change your log in method to face recognition. To change the log in method, follow these
steps:
Enter your password, and then sebct OK.
On the Edit Profib screen, select Sign-in Method. In the drop down list that appears, sebct
Profile image selection and facial recognition (Medium security}.
Select Done.
Signing in to a Samsung account using face recognition
(MIEINkJ/123) > MIEINkJ> Smart Hub > Samsung Account > Edit Profile
Select your Samsung account.
If you have set the Samsung account sign in option to Face Recognition, the TV automatically
recognizes your face. If recognition fails, try again.
Your entire face must be visib e to the camera,, Avoid shadows over your face,, Shadows prevent the
camera from recognizin_ yo_r face acc_rately,
Keep your expression as neutra as possib e,, Aso, keep your i"__outl_closed and as neutra as possib e,,
Once reco%]iition succeeds_ the IiV ogs in t(::>Smart Hub automatica y. Iif the IiV recognizes two or
more registered faces_ a ist of corresponding acco_, r_ts appears,, Select the appropriate account,, Iif the
.....IiV detects an unre_istered face_ it disp ays 'Unre_istered" on the screen,,
Viewing Digital Information at a Glance
Using the guide
(MIEl_U/123) > MIEI_U > Broadcasting > Guide
You can check the program schedules and set up a Schedule Viewing from the Guide.
You can move through the Guide in 2 hour jumps in either direction by pressing the << or bb button.
You can only view programs scheduled after the current time.
You can select the buttons that appear at the bottom of the screen by using the II:sOIII_TIERbutton of
the Samsung Smart Control.
..../he iu'formation in the Guide is for digita cha_'u'e s O1' y, Aria (::)f_chan_r_elsare not supported,,
..../o view the Guide, you must first set the TVs clock (MENU > System > Time > Clock),,
To access the Guide functions after launching the Guide, press and hold the Enter button on the
remote control. A pop-up window listing the following functions appears.
o Channel Filter
Filters the channels displayed in the Guide by the following categories: All, and Favorites 1 -
Favorites 5.
o Schedule Manager
Displays the Schedule Manager.
For informatior_ abo_t the Sched_ e Manage[ refer to
o Edit Favorite Channels
Allows you to set a channel that you select in the Guide as a favorite.
o View details
Displays detailed information about a selected program. The program information may differ
with the broadcast signal and may not be availabb at all for certain programs.
- Select a current program on another channel, and then select View Details to Watch or
Record the program.
- Select an upcoming program, and then select View Details to set up a Schedule Viewing or
Schedub Recording.
Recording is not s_pported i_' the U,,S,,Aand Canada,,
On the standard remote contro, press the IINFOb_,t_on,,
IFormore informatior_ abo{t vvatchin% or Schedule Viewing, refer to
You can only view programs scheduled after the current time,,
IFormore information on Schedule Recording, refer to
Record
Starts instant recording of the selected program.
Checking current Ilpr©gram info
You can view information about, start instant recording of, or apply the Timeshift function to a show
that you are watching by pressing the Enter button on the Program Info window. In addition, you can
view information about upcoming programs by using the left or nght directional buttons, or you can
set up a Schedule Viewing or Schedule Recording for a program by pressing the Enter button on the
Program Info window displayed for that program.
Recording is not supported in the U,,S,,A a_'d Canada,,
On the standard remote c(:x tro, press tlhe IINFO I>utto_' ,,
.....Io view program info, you asust first set tlhe TV's cock (MENt_oJ> System > Time > Clock},,
For more i,' formation o_' Schedule Recording, refer to
IProgram information' may differ with tlhe type of incoming signa and may not be availab e at a for certaiu'
pro_]rsms,,
¸¸5¸¸¸(¸¸¸¸: tf_t(}}tt j{ sC txCtx ._SS /3@8y3¢ _:< x _ ,xf_sj:5
IFormore information ol' Schedule Viewing, refer to
Changing the broadcast signallll
(MIEINU/123) > IMIEINU> Broadcasting > Antenna
You can choose the appropriate DTV mode for your viewing environment. Select Air or Cable. Air is
suitable for homes equipped with a separate, over-the-air antenna. Cable is suitable for homes that
have subscribed to a local cable-service or satellite-service provider.
You do not need to use this function' if your IV is c(:x u'ected to a cabe or sate ire box,,
Checking digitallll ohannellll signallll info and strength
(MIEINU/123) > IMIEINU> Support > Self Diagnosis > Signal hformation
You can check the digital channel's signal information and strength.
If your TV is attaclhed to a separate_ over the air antenna, you can use the signa streu'gth iu'formation' to
adjust the a_'teu'u'a for iu'creased sirau'a streu'gth a_'d improved HD cha_'u'e reception' ..
.....Ill'sis function' is o_'y availab e for di{_ita cha_' u'es,,
Recording Programs
The @ appears next to programs and channels for which a Schedule Recording has been set.
.....Ilhis function is not availab e ir the U..S..A..a_'d Ca_'ada..
5
Read all precautions bef(:xe usinfs the recording featu_e.. Refer to
_-_s68®ss fo_ mo_e infom_ation..
Recording IIP Og ams
You can record current and upcoming programs.
_nstant recording
To begin recording the current program right away, press the MIEIN[J/123 button, and then select the €
button.
i i ....... I i .......
On the standard remote co_'bo, press the O but_,ou..Howeve( tMs but_,o_ _snot availabe o_' certai,' modes..
Using the instant and schedule recording options from the guide
To start instant recording of a current program, select that program from the Guide, and then select
Record. To start a schedule recording of a program that wil! air in the future, select that program from
the Guide, press and hold the Enter button, select View Details, and then select Schedub Recording.
Using the instant and schedule recording options from program info window
To start instant recording or a schedule recording of a program, press the Enter button. The Program
Info window appears.
To start instant recording of a current program, select O
To start a schedule recording of a program that will air in the future, press the left or right directional
button to move to that program, press the Enter button, and then select [_.
i
On the standard remote co_'bo, press the Iliater but_:o_'o_ IINFOI_ut_:o_',,
Using schedub recording to record on a specified date and time
(MIEIN(J/123) > Broadcasting > Schedule Manager > Schedule.
Select Schedule Recording.
Specify the Source, Channel, Repeat, Start Time, and End Time options for the program you
want to record, and then select OK to finish.

Using the functions availlllabllll@whillll@recording a program
Press the Enter button while recording a program. The foJJowing buttons and the recording progress
bar appear on the screen.
o More Info
DispJays detaiJed information about the program being recorded.
.....IiBe p_'ogrsm information may differ with the broadcasting signa and may not be availabe at a for
ce_tain programs..
o REC Time
Sets the recording time.
o Stop Recording / Go to Live TV
Stops recording. / Shifts viewing to Jive TV.
Using the buttons on the remote oontrollll whillll@recording a program
o Pause / Hay
Press the _ or H button on the remote controJ to pause the recording screen or resume the
paused recording screen.
When the recording is paused, you can use the foJJowing functions. However, no audio is heard
while the recording is paused.
- Step: Press the MIEINU/123 button on the Samsung Smart ControJ, and then seJect the m
button to scan through a video one frame at a time.
On the standard remote control press the H buts:on,,
= SJow Motion: Press the MIEINU/123 button on the Samsung Smart ControJ, and then select the
J_ button to pJay the video back at 1/2 the normaJ speed.
On the standard remote contro _press the _ b_t_:on,,
o Rewind / Fast forward
Press the MIEINU/123 button on the Samsung Smart Control, and then select _ or _ button to
speed up rewind or fast forward.
On the standard remote contro _press the <_ or }_ button,,
.....Iihis function is not availab e wMle you are watching a program that is c_['rently being broadcast..
Managing the soh@dullll@recording IIIlist
(MIEINU/123) > MIEINU > Broadcasting > Schedule Manager
You can change the settings of scheduJed recording sessions or canceJ scheduJed sessions aJtogether.
Viewing eco ded lip,©grams
or SIMART NUB > Featured > MY CONTENT
Select a USB recording device. The CONTENTS folder appears.
SeJect a recorded program file from the CONTENTS foJder to pJay the seJected file.
Using the functions availaUe whi_e playing a _"_ecording
Press the Enter button. The following buttons appear, To hide the buttons, press the IRIETURN button.
But_orss that appear are differer t deper dir g or the fib being payed..
o Pause / Play
Pauses the recorded program file or resumes playing the file if paused.
When the video is paused, you can use the following functions. However, while the video is
paused, there is no audio output.
= Step: Select the H button to scan through a video one frame at a time.
= Stow Motion: Select the bb button to play the video back at 1/2 the normal speed.
o Rewind / Fast forward
Speeds up rewind/fast forward. To restore normal playback speed, press the _, button.
o Previous / Next
To restart the current video from the beginning, select the _44button once.
To play the next recorded program file, select the b_ button.
Plays the current file repeatedly or all files in the same folder repeatedly.
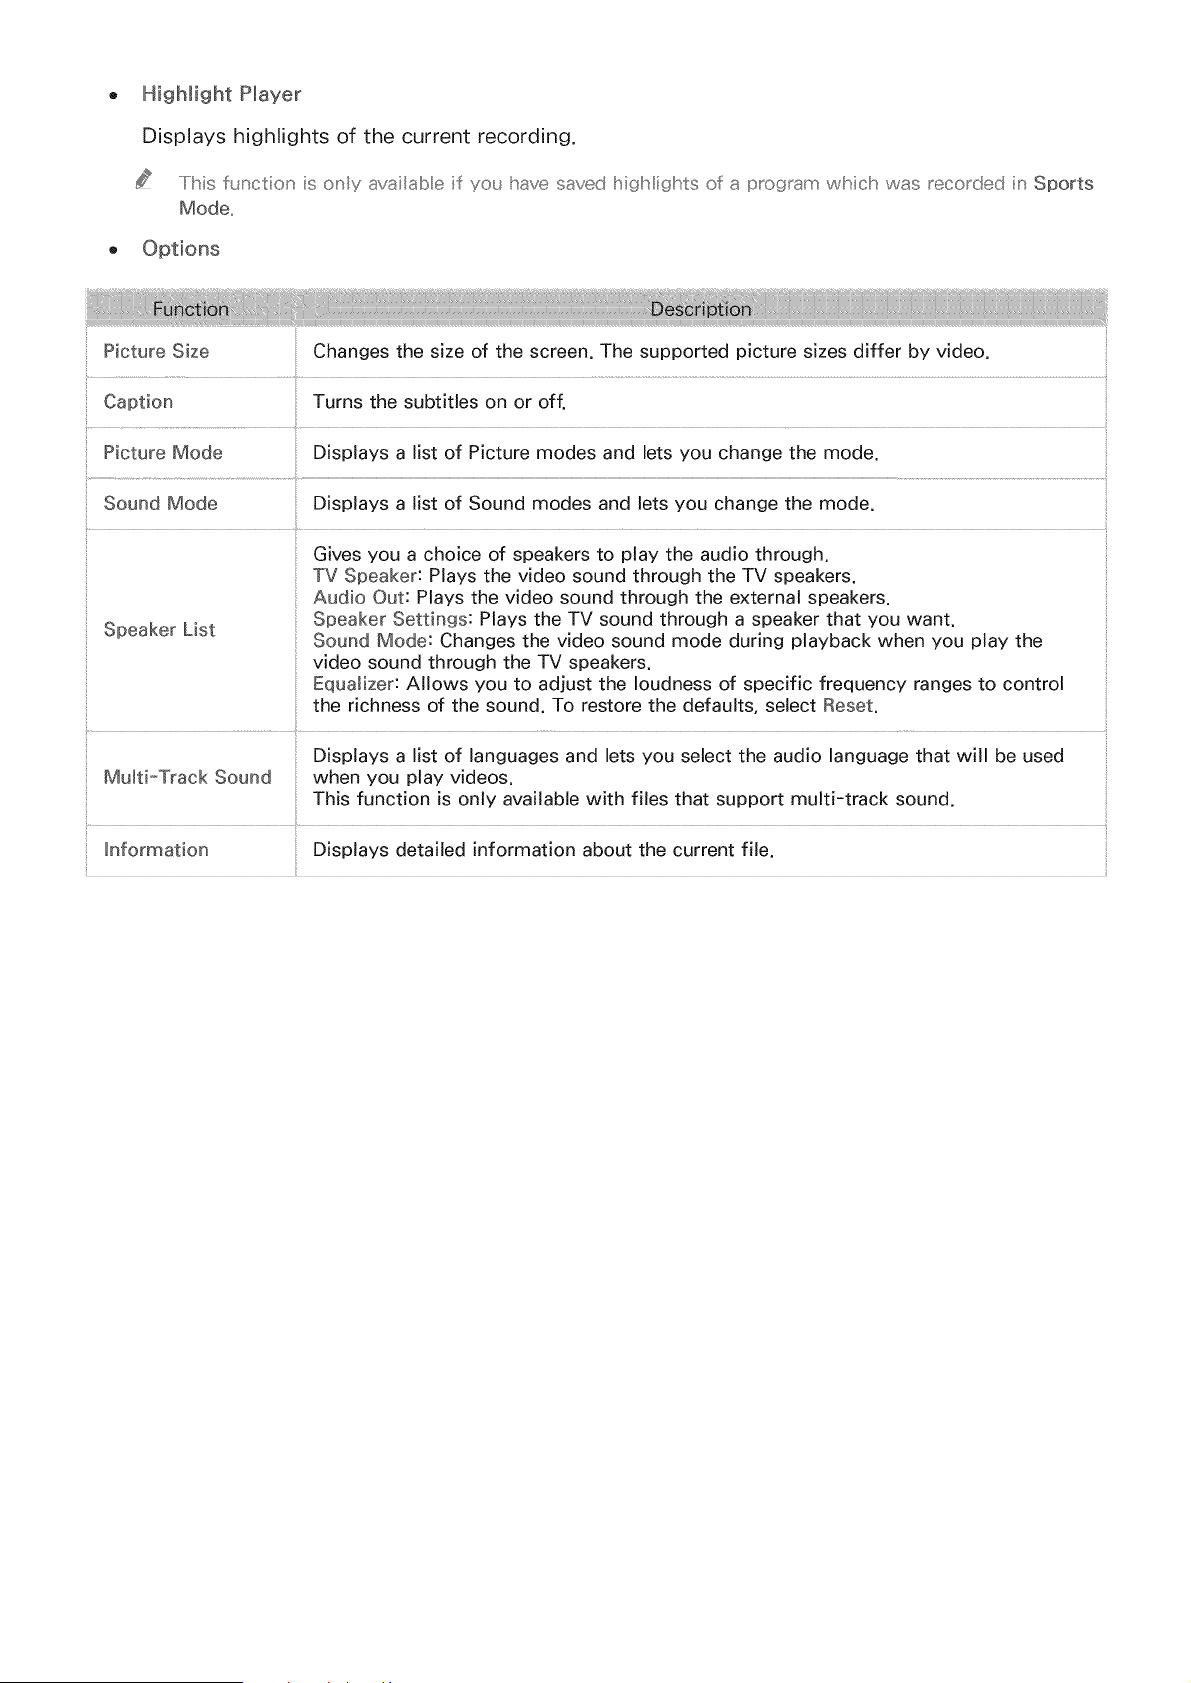
Highlight Player
Displayshighlightsof the currentrecording.
.....Iihisfur_ctioNis o_fiy:w:_lableif youhavesavedI"_igl!fiigl!_tsof _programwhichwas_ecordedinSports
Mode,,
Picture Size
Changes the size of the screen. The supported picture sizes differ by video.
Caption Turns the subtitles on or off.
Picture Mode Displays a list of Picture modes and lets you change the mode.
Sound Mode Displays a list of Sound modes and lets you change the mode.
Gives you a choice of speakers to play the audio through.
TV Speaker: Plays the video sound through the TV speakers.
Audio Out: Plays the video sound through the external speakers.
Speaker Settings: Plays the TV sound through a speaker that you want.
Speaker List Sound Mode: Changes the video sound mode during playback when you play the
video sound through the TV speakers.
Equalizer: Allows you to adjust the loudness of specific frequency ranges to control
the richness of the sound. To restore the defaults, select Reset.
Displays a list of languages and lets you select the audio language that will be used
Mu_ti-Track Sound when you play videos.
This function is only available with files that support multi-track sound.
_nformation Displays detailed information about the current file.
Managing @o© ded filllles
or SIMART 114UB> Featured > MY CONTENT
Select a USB device containing recordings. A list of recordings appears.
Using the functions on the r_ecorded flies screen
o Filter By
Displays only files that match the selected filter°
o Sort By
Sorts files according to the selected viewing mode.
.....IIIbisfunction is unavailab e if Filter By is set to AH.
o Delete
Deletes selected files, except for locked files.
.....I!Ibisfunction is unavailab e if Filter By is set to AH.
o Play Selected
Plays selected files. Select flies from the file list and then select Play.
If the viewing mode is set to Folder view, you can only select flies in the same folder. To add
flies contained in other folders to the playlist, change the viewing mode.
.....IiIbis function is unavailab e if Filter By is set to Ali..

Setting Up a ScheduEe Viewing
The @ appears next to programs that have been configured for a schedule viewing.
.....Io set up a schedu e viewing, you must irst set the TVs clock (MENU > System > Time > Clock),,
Setting up a schedule viewing for a ohann®llll
Setting up a schedule viewing for a digital channel
You can set up a schedule viewing for a digital channel on the Guide or Information screen.
o The Guide screen
On the Guide screen, press the left or right directional button to move to a program you would
like to view, and then press the Enter button. You can select Schedule Viewing on the pop-up
menu that appears. The program is scheduled for viewing.
The Program Info window
Press the Enter button while you are watching the TV. The Program Info window appears. Press
the left or right directional button to move to a program you would like to view, and then Press
the Enter button. Select _ that appears on the Program Info window. The program is scheduled
for viewing.
On the standard remote_ press the IEr_ter or IINFO b_ t_:on,,
Setting up a schedule viewing an analog channel
(MIE:INU/123) > IMIE:INU> Broadcasting > Schedub Manager
You can set up a schedule viewing for an analog channel. Select Schedule > Schedule Viewing.
Specify the Source, Channel, Repeat, and Start Time options for the program you want to watch, and
then select OK to finish.
Editing a schedule viewing
(MIEINU/123) > MIEI_U > Broadcasting > Schedule Manager
On the Scheduled screen, select a schedule viewing. A pop=up menu appears. Select Edit. Change the
time, days, or channel. Select OK when done.
Cano®lllling a soh@dullll@viewing
(MIEINU/123) > MIEINU > Broadcasting > Schedule Manager
On the Scheduled screen, select a schedule viewing. A pop=up menu appears. Select Delete. Select
OK in the pop=up menu. The schedule viewing is removed.
You can set up a maximum tota of 30 Schedule Viewing ard Schedule Recording er tries,,
Using Timeshift
You can pause and rewind live TV as you would a DVD by using Tirneshift.
Activating this function disables the Broadcasting function.
..../his f_nction is not available in the U,,S,,A,,and Canada,,
Read a l preca{_tions befo_e using tlhe /imeshift f_nctio_' ,, Igor more iu'formation', refer to
To activate the Timeshift function while watching TV, press the Enter button, and then select _ on
the Program Info window, The TV displays a progress bar and the following buttons at the top of the
screen:
o Information
Displays detailed information about the current program.
.....Iihe program informatiion may differ vvitlh the type of incoming signa and may not be availab e at a
for certain prog_ams,,
.....Ilhis butU:onis ony availab e wl!_enyou are vvatchin_ a ive prof_ram,,
o Record
Starts instant recording of the current program.
o Go to Live TV / Stop Timeshift
Shifts to live TV or exits Timeshift.
Using the buttons on the remote oont ollll whilllle using eshift
o Pause / Hay
Press the _ or H button on the remote control to pause or resume watching the current program
while using the Timeshift function, The following functions are available while the current
program is paused, However, while the current program is paused, there is no audio output,
- Step: Press the IMIEIN(J/123 button on the Samsung Smart Control, and then select the m
button to scan through a video one frame at a time,
On the standar(:_ remote contro, press the H but_:on,,
- Slow Playback: Press the MIEIN/J/123 button on the Samsung Smart Control, and then select
the _:l or _:3 button to play the current program back at 1/2 the normal speed.
On the standard remote contro _press the << or _ b_t_:on,,
o Rewind / Fast forward
Press the IMEIN/J/123 button on the Samsung Smart Control, and then select the _ or _ button
to speed up rewind or fast forward.
On the standard remote contro _press the <_ or }_ b_tU:on,,
.....Iihe ISastForward fL_nction is not availab e vvlk_ileyo{_ are watching a program that is c{_rently being
broadcast,,
Using the Channe List
(MIEI_U/123) > IMIEINU> Broadcasting > Channel List
By using the Channel List, you can change the channel or check programs on other digital channels
while watcMng TV. To display the Channel List, place a finger on the IPOIINTIERbutton on the Samsung
Smart Control, and then select the _ icon that appears at the right side of the screen.
_bJ
j k,,
On the standmd remote co_'Uo, press the OH ILllSTbut_,o_,,
The Channel List screen contains the following icons:
- " An analog channel
- _ " A favorite channel
- _ " A locked channel
Press the left directional button. The following functions are available:
O
Displays a list of channels that you viewed recently.
Add a New List
Allows you to create a new channel list by adding channels from a favorites list,
.....I!Ihiisoptiion is availah e ony if yo{ have _egiste_'edone o_ mo_e channels to at east one favorites ist,,
Added Oh,
Displays the selected channel list.
@
Allows you to select Air or CaMe as the DTV mode. Air is suitable for homes equipped
with separate, over=the=air antennas. CaMe is suitable for homes that subscribe to a local
Antenna
caMe=service or sateHite=service provider. You do not need to use this function if your TV
is connected to a cable or satellite box.
Edit Channel Allows you to rearrange the order of channels in the channel list or remove channels from
Lists the channel tist.
AHows you to remove channels from the channel index, restore removed channels, and
Edit Channel
rename analog channels.
Sets favorite channels.
Edit Favorites :dr,For more information, refer to
a_
Registering, Removing, and Editing Channels
(MIEINU/123) > IMIEINU> Broadcasting > Edit Channel
The Edit Channel screen icons indicate the following:
o A " An analog channel
o _ " A favorite channel
" A locked channel
Registering and removing ohann®lllls
Removing _"_egistered channels
You can remove a registered channel or all channels from the channel index. To remove a channel,
select it, and then sebct Delete. To remove all channels, sebct Options > Select All > Delete.
Adding back _"_emoved channels
You can add back removed channels from the All list only. Removed channels are displayed in gray
in the All list. To display the All list. select Options > Category > All. Then, to add back a removed
channel, select it, and then select Add. To add back all removed channels, select Options > Select All
> Add.

Editing egiste ed ohannelllls
You can access the following options by selecting Options at the bottom left of the screen, The
available options may differ with the broadcast signal,
o Select All / Desebct All
Selects or deselects all channels displayed on the Edit Channel screen,
O
O
Antenna
Allows you to select Air or Cable as the DTV mode,
Displays the channels of a selected category in the list, The channels stored in the TV are
grouped into the following categones: All and Added Oh,,
o Edit Favorites
Sets favonte channels,
I1::::::o_morn ilrffom"_atiion, refer to
o Rename Channel
Renames analog channels, The new name can be up to 5 characters long,
o Information
Displays detailed information about the current program,
Using IIf:::s ©g amRating IL,,,©ok
(MIEINU/123) > IMIEINU> Broadcasting > Program Rating Lock
You can block programs based on their ratings by using Program Rating Lock. This function is useful
for controlling what children watch on TV. Program Rating Lock does not block programs originating
from external sources, such as Blu=ray players, DVD players, or USB fibs.
Every time you access Program Rating Lock, you must enter the security PIN. You must also enter this
PIN to watch a blocked program. The default PIN is 0000. To change the PIN, go to System > Change
PIN.
..../Ihe Program Rating Lock may not supported depeu' diu'g o_' the iu'put sigu' a you are usiu' g,,
Blocking programs based on thei_ " TV Rating
You can block TV programs based on their rating. To block content, select a rating category to lock.
All programs at that level and higher are blocked and require the PIN to watch. To unblock a category,
select the lock icon. To unblock all the categories in a row, select the lock under ALL.
Categories on the left:
o TV-Y: Young children
TWY7: Children 7 and over
TWG: General audience
o TV-PG: Parental guidance
TW14: Viewers 14 and over
o TV-MA: Mature audience
Categories on the top:
o ALL: Lock all TV ratings.
o FV: Fantasy violence
o V: Violence
o S: Sexual situations
o L: Adult Language
o D: Sexually Suggestive Dialog
Bleckiln_j movies base on their Movie Ratiln_j (MRAA}
You can block movies based on their MPAA rating, This rating system applies to all material with
supplied ratings in the U,S,A,
From the MPAA:
"The Motion Picture Association of America (MPAA) has implemented a rating system that provides
parents or guardians with advanced information on which films are appropriate for children,"
Select a lock beside one of the rating categories to block that category and all higher categories, To
unblock a category, select the lock icon,
o G: General audience (no restrictions),
PG: Parental guidance suggested,
PG-13: Parents strongly cautioned,
R: Restricted, Children under 17 should be accompanied by an adult,
N0-17: No children under age 17,
X: Adults only,
NR: Not rated,
Blockiln_j programs based on thei_ " Canadian English Rati_s_j
You can block programs based on their Canadian English Rating, This rating system applies to all rated
material viewed on English-Canadian TV channels,
Select a lock beside one of the rating categories to block that category and all higher categories, To
unblock a category, select the lock icon,
0: Programming intended for children under age 8
08+: Programming generally considered acceptable for children 8 years and over to watch on
their own
G: General programming, suitable for all audiences,
PG: Parental Guidance
14+: Programming containing themes or content which may not be suitable for viewers under the
age of 14
18+: Adult programming
Blockiln_j programs based on thei_ " Canadian French Rati_s9
You can block programs based on their Canadian French Rating. This rating system applies to all rated
material viewed on French-Canadian TV channels.
Select a lock beside one of the rating categories to block that category and all higher categories. To
unblock a category, select the lock icon.
G: General
8 ans+: Programming acceptable for children 8 years and over to watch on their own
13 ans+: Programming that may not be suitable for children under the age of 13
16 ans+: Programming not suitable for children under the age of 16
18 ans+: Programming restricted to adults
Blockiln_j Programs Based on their II[XX}ownloadab_e US Ratios9
You can block programs based on their Downloadable UoSo Rating. This rating system only applies to
material originating from US DTV channels.
Parental restriction information is automatically downloaded while you watch DTV channels. This
download may take several seconds. If the information is unavailable from the broadcasting station,
the Downloadable UoSo Rating menu is deactivated.
Parental restriction levels differ with the broadcasting station. The default menu name and the
Downmoadable UoSo Rating name changes depending on the downloaded information.
Even when the on-screen display is set to another language, the Downmoadable UoSo Rating menu
appears only in English.
Select a lock beside one of the rating categories to block that category and all higher categories. To
unblock a category, select the lock icon.
Watchiln_j Uocked / _'estdcted programs
To watch a blocked program, enter the PIN when requested.
When initially showing a restricted program or movie, the screen is blank because the Program Rating
Lock blocks it. Enter the PIN to unblock the program when a message appears requesting the code.
Creating a Personal Favorites List
Favorite channels are highlighted in the Edit Channel and Channel List screens with the _ symbol.
You can create up to 5 favorite channel lists.
Registering ohann®lllls as favorites
(MIEINkJ/123) > IMIEINkJ> Broadcasting > Edit Favorites
You can register multiple channels as favorites at the same time.
Select the channels that you want to add to your favontes list(s) from the list on the screen.
Select Change Fay, on the screen to sebct a favontes list.
Select Add on the screen. The TV adds the channels you selected to the favontes list you chose.
Viewing and s®llll®oting ohann®lllls on Favorites IIIlistsonlllly
(MIEINkJ/123) > IMIEINkJ> Broadcasting > Channel List
You can display a favorites list and select a channel using the channel up/down buttons.
Press the left directional button. A favorites list appears.
Highlight a channel from the selected favorites list using the channel up/down buttons, and then
select it. The channel changes.
A favontes ist can be selected ony if it contains at east one favonte channel
Editin9 a Favorites List
(MIEINU/123) > IMIEINU> Broadcasting > Edit Favorites
Using the Edit Favorites screen menu items
You can access the following options by selecting Options on the Edit Favorites screen,
o Select All / Desebct All
Selects or desebcts all channels saved on the TV,
o Copy to Favorites
Copies channels from one favonte channels list to another.
Fo_"more h_ffom_at_on__efer to
.....IIhiis option is availab e onY if you have _e_iste_ed one or mo_e channels to at east one favontes ist,,
o Rename Favorites
Rename an existing favorite channels list.
For more inforn_atiion_ refer to
.....IIhiis option is availab e onY if yo_ have registered one or more channels to at east one favorites ist,,
o Antenna
Allows you to select Air or Cable,
o Edit Channel
Allows you to manage the channels saved on the TV.
Removing channelFis from a favorites list
Sebct Edit Favorites, Sebct Change Fay, to move to the favorites list that has the chann@s you want
to remove, Sebct the chann@s, and then sebct Delete,
Read'ranging a favorites list
Sebct Edit Favorites. Sebct Change Fay. to move to the favorites list that has the channels you want
to rearrange. Select the channels, and then sebct Change Order. The Change Order highlight appears.
Press the up!down arrow buttons to indicate the new location for the channels. Press the Enter button
to set the channeMs into their new location.
Renaming a favorites Illist
Select Options > Rename Favorites. Select the favorites list you want to rename. Enter a new name
using the on-screen keyboard that appears, and then select Done. Select OK.
Copying channels from one favorites list to another
Select Edit Favorites. Select Change Fay° to move to the source favorites list, and then select the
channels to copy. Select Options > Copy to Favorites. Select the destination favorites list, and then
select OK. Select OK again.
Copy to Favorites is o_'y availab e if there are cha_' u'e s ih" at east o_'e favorites ist,,
Making Sports Programs More Realistic with
(MENU/123) > MENU > System > Sports Mode or Soccer Mode
You can use Sports Mode to get optimal picture and sound settings for soccer events, maMng them
appear and sound as if you are there. In addition, if a recording device is connected to the TV when
you are using Sports Mode, you can view Mghfights extracted from the recorded sporting event
automatically or manually.
.....Ihe actua name may differ witlh specific geograpMca area,,
Enablllling sports mode
(MENU/123) > MENU > System > Sports Mode or Soccer Mode > Sports Mode or Soccer Mode
You can set Sports Mode to On to optimize the picture and sound modes of the TV automatically for
soccer events.
Enab ing Sports Mode changes Picture Mode to Stadium a_'d Sound Mode to Stadium, and disab es some
Picture a,'d Sound menus..
Extracting highlllli ts automatioallll y
(MENU/123) > MENU > System > Soccer Mode > Auto Highlights
You can set Auto H]gMights to On to configure the TV to extract highlights of a sporting event
automatically.
However, Auto Highlights is not available:
- When you are switching the input signal using the SOURCE button.
- When 3D mode is active
- When Audio Description is on
- When you are viewing the content in MY CONTENT
- When the Screen Mirroring function is running
- When you are viewing highlights of the current soccer game in the UHD resolution by using the
H]gMight Player function
..../Ms functio,' is not available in tlhe U..S..A.and Canada..
..../he performance of Auto Highlights depeu'ds o_' the clharacteristics of the tra_'smitted si%' a ..
It is advisab e to use Auto Highlights ony while watching a soccer game.. If you use tMs full' crick' for other
sportk g eveu'ts, it may disp ay irre eva_'t picture frames..
Using the functions availlll III1@whillll@ watching sports in sports mode
You can use the following functions when you press the Enter button in sports mode.
..../Ibis function' is not availabe ir the U,,S,,A,,and Ca_'ada,,
Pauses the current screen and zooms in any part of the screen by using 4 directional buttons.
On the standard rernote contro _ press the _ button..
....[his functiion is not availab e wl!_enyo_ are watching 3D channels or vvl__enP_Por MY CONTENT is
actiive..
Instantly records the game that you are currently watching on the TV.
.....IIIifis functiion is ony availab e if the IiV s_pports the recording function..
Timeshift
You can pause and rewind live TV as you would a DVD by using Timeshift.
.....IIhiis function is ony availab e if the IiV s_pports the recording function..
More hfo
Displays detailed information about the current program.
.....Iihis function is ony availab e while you are watching a ive prosram,,
Using the functions availlll @whillll@ recording sports in sports
You can use the following functions when you press the Enter button in sports mode.
o Manual Highlight
Saves a video from 10 seconds before you press the button to 10 seconds after,
On the standard rernote contro _ press the D button..
You can se_ the IIV to automatiica y save hiighliigll_tswitlho_t _ser interventiion.. Select MEI'_U ]> System
> Sports Mode_ and then set Auto Highlights to On..
o REC Time
Sets the recording time.
o Stop Recording / Go to Live TV
= Stops a recording when you are watching a live program.
= Switches to a live program when you are watching a recorded program.
o Rewind / Fast Forward
Press the IMIEINU/123 button on the Samsung Smart Control, and then select _ or J_ button to
speed up rewind or fast forward.
On the standard remote contro _press the << or }} b_tU:on..
Pause/ Play
Pauses or resumes the video.
o Highlights Player
Displays the Highlights Player screen and plays the highlights saved in the recorded file
automatically or manually. Highlights Player is not available when:
- You are switching the input signal with the SO[JRCIE button.
- 3D mode is active
- When Video Description is on
o Watch Live TV at the same time
Allows you to watch a current program in a PIP window while watching a recorded program. To
exit PIP mode, press the button again. Watch Live TV at the same time is not available when:
- You are switching the input signal using the SO[JRCIE button.
- 3D mode is active
- When Video Description is on
- When you are viewing a soccer game in the UHD resolution
.....Iihis functiion is onY availab e wl!_ile you are watching a recorded program..
Viewing a game recorded in sports mode
You can view a recorded game on the MY CONTENT screen,
..../Ibis function' is not availabe o_' certailr_ models in specific geograpl!sica areas,,
For more iu'formation' _refer to
Making Sports Programs More Realistic with Hockey
(MIEINU/123) > MIEINU > System > Hockey Mode > Hockey Mode
You can use Hockey Mode to get optimal picture and sound settings for hockey events, making them
appear and sound as if you are there.
..../Ibis function is available o_' certain modes ir_speci ic geograplhica areas..
IEnab in_; Hockey Mode clhan_;es the Picture Mode to Stadium and the Sound Mode to Stadium and
disab es some Pictw'e and Sound menus,,
Press the HOCKEY but_,o_ to turn Hockey Mode o_' or off..
TV-Viewing Support Functions
Showing captions
(MIEINU/123) > MIEINU > System > Accessibility > Caption
You can watch TV broadcasts with captions. Press and hold the _ button to turn the Caption function
on or off.
..../Ms function' is not availabe o_' certain modes iu' specific geograpMca areas..
Captions are not displayed by programs that do not support captions..
On the standard remote co_'tro, press and Ihod the CC button' to turn the Caption function' o_' or ofl.
Enabling captions
Select System > Accessibility > Caption > Caption
.....IheTVcan,'otco_'tro or modifyDVDorBu ray subtitles.. To contro DVDorBu raysubdtles, use the sub
title feature of the DVD or Bu ray payer a_'d the payers remote c(:xtro..
Selecting the caption Illanguage
(MIEINU/123) > MEINU > System > Accessibility > Caption > Caption Mode
o Default / CCl ~ CC4 / Text1 ~ Text4
(AnaJog channeJs only} Operates in either anaJog TV channeJ mode or when a signaJ is suppJied
from an external device to the TV. (Depending on the broadcast signal, the analog caption
function may or may not work with digital channels.)
Default / Service1 ~ Service6 / CCl ~ CC4 / Text1 ~ Text4
(Digital channeJs onJy) Works with digitaJ channels. Service1 - Service6 may not be avaiJabJe in
digitaJ caption mode depending on the broadcast.
Changing the font co_or_ caption size_ and font opacity
You can change the font color, background colo_ and size settings,
(MEIN(J/123) > IMEIN(J > System > Accessibility > Caption > Digital Caption Options
Size
Changes the font size, Size is not supported by analog channels,
o Font Style
Changes the font styb for the subtitbs,
o Font Color
Changes the font coloc
o Background Color
Changes the caption's background coloc
Window Color
Selects the color of the digital caption window.
o Font Opacity
Changes the caption's opacity.
o Background Opacity
Changes the background's opacity.
o Window Opacity
Adjusts the transparency level of the digital caption window.
o Edge Type
Selects the outline type for the digital captions,
o Edge Color
Selects the color outline for the digital captions,
o Return to Default
Restores all caption display options to the Default setting, The Default setting applies the TV
station's transmitted settings to the captions,
....lib÷ fore_round a_'d backf_round coot a_'d opacity settings canu'ot be the same,,
Enablllling the audio guide for the video description
<MIEINU/12St> I%El_U> System>Access_b_,ty>WdeoDescrbt_oo
You can activate the audio guide for the visuaMly impaired, This function is only available with
broadcasts that provide this service, Press and hold the _ button on the Samsung Smart Control to
turn Video Description on or off,
p.....
On the standard remote co,' tro, press and hod the CC butto,' to turn the Video Description functio,' o,' or
off,,
Scanning for availlllabllll@ohann@lllls
(MIEINU/123) > IMIE:INU> Broadcasting > Auto Program
Automatically scans and indexes all channels received through the TV's antenna input connecto_
Do not use this function if your IV is co,' ,'ected to a cabe or sate ite box,,
If the TV has saved channe s, Auto II:::Srogramde etes the existing ist, and theu' saves the newy scanu' ed
channe s,,
8@llll®otingth® broadcast audio 11118ngusg®
(MIEl/U/123) > MIEI/U > Broadcasting > Audio Options
You can select the TV's audio language, This is the language you will hear while watching TV, if the
language is included in the broadcast signal, Audio Options functions differently for analog and digital
channels,
.....Io view the curreu' t broadcast's audio sigu' a iu'formatio,', press the INFO butto,' o,' the standard remote
cant_"o ,,C£: press the IMEI_U/123 butlx::x" o_" the Samsung Smart Ca_"tro, and theu" seect _NFO o_" the On
Scree,' Remote,,
Selecting the B_oadcast Audio Language for Digita_ B_oadcasts
Selecting a Language
Select Audio Options > Preferred Language, and then select a language, Digital programs that
include the language you selected in their broadcast signal are automatically played using that
language, If the language you selected is not supported by the broadcast signal, the TV will use
the default audio language broadcast by the TV station,
Selecting the Broadcast Audio Language and Other Options for Analog Broadcasts
Listening to MukFTrack Sound
Select Audio Options > Multi-Track Sound. Configure the audio for the current broadcast. Mu_ti-
Track Sound can be set to mono or stereo, depending on the broadcast signal or program. This
option is automatically set to mono if the broadcast signal or program does not support stereo.
Select Program to see if the program you are watcMng is being transmitted with a track
containing a simultaneous translation into a language you want. If it is, select the track to listen
to the translation.
Fine-tuning anallllog broadcasts
(MIEINU/123) > IMIEINU> Broadcasting > Channel Settings > Fine Tune
When analog pictures become shaky and full of noise, fine=tune the signal to clear up the picture.
.....Ilhis functior is ory available for anaog broadcasts..
Removing pay ohannelllls
(MIEINU/123) :> IMIEINU> Broadcasting > Channel Settings > Clear Scrambled Channel
Auto Program scans and indexes all channels, both free and pay respectively. You can remove all
scrambled pay channels from the channel list with Clear Scrambled Channel.
Adjusting the Quality
Choosing a ilPiOtu e mode
(MIEINU/123)> MIEINU> Picture > Picture Mode
You can setect the picture mode that provides the best viewing experience.
Makes the picture cbarer when the ambient lighting is so bright that it makes the picture difficult
to see.
o Standard
Is the default mode s@tabb for most environments.
o Natural
Reduces eye strain.
o Movie
Darkens the screen, reduces gJare, and relieves eye fatigue. Use this mode whib viewing the TV
in a darkened room or watching a movie.
o Entertain
Sharpens images for a more dynamic viewing experience.
Wlheu'the Input sou_ce is set to IPC,Standard and Entertain modes are o_'y availab e,,
When a IPCis c(:x u'ected to the TV, but the Entertain mode is not availab e, set Edit Device Type to DW PC
or PC,,
o Stadium
When you set Sports Mode (MIEII_U > System > Sports Mode or Soccer Mode > Sports Mode
or Soccer Mode) to On, both Picture Mode and Sound Mode are automatically set to Stadium.
The TV changes the picture and sound settings so that they are suitable for soccer events.
Adjusting the IlPioture quallllity
(MIEINU/123) > IMIEINU> Picture
You can adjust the folJowing picture quality settings manually for each combination of input source
and picture mode,
- BacMight
Adjusts the bnghtness of individual pixels. Decrease this brightness to reduce power
consumption.
- Contrast @:
Adjusts the screen contrast.
, Brightness
Adjusts the overall brightness.
, Sharpness_
Sharpens or dulls the edges of objects.
, comor
Adjusts the overall color saturation.
. T_nt/G/R/
Adjusts the ratio of green to red. Increase the green value to saturate the greens and the red
value to saturate the reds.
.....Ilhe TV saves the adiusted vaues for the currer t irput source and picture mode,, I Ihese vaues remain ir
effect each time you seect the same irput source ard picture mode,,
.....Ilhe Color and Tint (G!R) settin{_s cant ot be adiusted wlher the TV is corrected to a computer via ar HDMI
to DVI cabe,,
App_yin9 the cu_Tent picture settings to other input sources
/ME:I,_U/12S)> ME:INU> P_cture>Appm_,P_ctureMode
You can apply the picture quality settings to the current source and other input sources.
o All Sources
Applies the settings to all external devices connected to the TV.
o Current Source
Applies the settings to the current source only.
Adjusting advanced settings
<ME:_NU/_2S)> ME:_NU> P_cture>AdvoooedSettings
You can fine-tune how images are displayed on the TV screen for the Standard and Movie picture
modes.
Advanced Settings is onY available wlher Picture Mode is set to Standard oNMovie,,
When the TV is conrqected to a computer via an HDMI to DVI cabe, or y White Balance and Gamma are
available.
- Dynamic Contrast
Automatically adjusts the screen contrast for an optimal contrast setting.
, Black Tone
Adjusts the black color depth.
- Flesh Tone
Darkens or lightens skin tones.
o RGSOnmyMode
Adjusts the red, green, and blue levels individually.
o comorSpooe
Adjusts the range of colors that can be displayed on the screen.
- Auto: Automatically adjusts the color space to match the input signal.
- Native: Applies a range of colors that is wider than the input signal.
- Custom: Allows you to adjust the color space manually. Select Color, and then change its
Red, Green, and Blue saturations. Reset allows you to restore the default values for Color
You can configure the Color fLnctiion ony when Color Space is set to Custom..
White Balance
Adjusts the color temperature of the picture to make white objects look white and the overall
picture appear natural.
2 Point: Allows you to adjust red, green, and blue luminosity with the offset menu and
brightness with the gain menu. Reset allows you to restore the default values.
10 Point: Divides red, green, and blue into 10 sections each, and allows you to modify the
white balance by adjusting the brightness of each section. Level allows you to select the
section to adjust.
YoL can Lse the 10 Point function ony when Picture Mode is set to Movie.. Iihis fLIqction may not be
supported by some extema devices..
Gommo
Adjusts the primary color intensity.
Adjusting IlPioture options
(MIEINU/123) > IMIEINU> Picture > Picture Options
You can adjust the picture options to optimize your viewing experience. Sebct a picture mode, and
then adjust the picture options.
° comorTone
Adjusts the color tone. The color tone you select is stored in the TV"s memory. When you change
the current picture mode, the stored color tone is applied to the new picture mode automatically.
Coo_ and Standard are ony availab e when Picture Mode is set to Dynamic..
Co,or Tone is ony avaiilable when the IiV is connected to a completer via an HDMII to DVIIcab e..
o Digital Clean View
Reduces static and ghosting caused by a weak signal. When you select Auto Visualization, the
TV displays the signal strength on the bottom of the screen. Green indicates the best possible
signal.
.....Iihiis function is availaMe for anaog channels ony.
o MPEGNoiseFi[ter
Reduces MPEG noise and improves video quality.
o HDM_ Black Level
Compensates for effects caused by a low black level, such as low contrasts and dull colors.
.....IiIbis functiion is ony availab e when the inp_t signs, connected to the IiV via an HDMII connectoc is set
to RGB444..
. Modo
Optimizes the picture quality for movies.
.....IiIbis function is ony availab e when the inpL_tsigna is IiV_ AV_Component (480i_ 1080i, o_ HDMII
(so8o_},,
HDMI UHD Color
Allows you to set the HDMJ UHD Color mode to On or Off for each HDMt connector on the TV.
When set to On, the TV optimizes processing of UHD 50P!60P signals.
Iif you set the HDMII cor_r_ectiion to On_ the IIV turns off and then on automatica %
.....Iihe HDMIi cor_nection with HDMI UHD Color set to Off s_.pp(:)rts tp to UHD 5011:::>/601!:::>4::2:0 inptt signa s_
wMle the HDMII connection with HDMI UHD Color set to On supports up to UHD 5011::::>/COP4::4::4 and
4::2;2 iinptt signa s,, IFor more ir_formation_ refer to '
IFor the 7100_ 7500 series or Mgll_e¢ 710D 7501D or Ii_igll_er series models, @aclh _IDMI connection can
be individua y optiimized for HDMI UHD Color,, When you connect the IiV to the externa deviice that
st pports ony UHD 24 or 30 Hz frequency or any IFI_D frequenc% the HDMII UHD Coor fur_ctiion may not
be availab e,, Iin tMs case_ set HDMI UHD Color to Off,,
IFor the 6500 to 6800, 650D_ 670D_ 7000_ and 7200 series mode s_ make sure to connect to the HDMII IiN
(SIl B/DVII) port of the IiV,,
A tll_ouBIl_ the HDMII cabe is; connected to HDMIi IiN (S IIB/DVII) port, the HDMII UHD Coor functiion is not
available on the 6000_ 6400_ and the 640D series models,,
o Auto Motion Plus
Removes blurring and ]udder from scenes with rapid movement. If you select Custom, you can
configure Blur Reduction and gudder Reduction manually and set LED Clear Motion to On for a
sharper LED image. To return to the default settings, select Reset.
.....Iihis fur_ction is not available on certain models i_' specific geographica areas..
When LED Clear Motion is set to On_ the screen appears darker than vvl!_en it is Off..
o Smart LED
Controls the brightness of individual areas on the screen to maximize contrast automatically.
.....IIhiis f_.nction is not availab e on certain models in specific geographica areas,,
o Cinema Black
In Movie mode, this function dims the top and bottom areas of the video image to provide a
more immersive viewing experience.
.....I!hiis function is not availab e on certain models in specific geoBraphica areas..
o LED Clear Motion
Controls LED bacMight duty to move picture more cleady.
.....Iihis function is not availab e on certain models in specific geographica areas,,
in 3D
TIl"tisfunctior is not availabe on certain models ir specific geograpl!qica areas,,
(MIEINU/123) > MIEINU > Picture > 3D
You can view 3D media content and broadcasts, To view 3D content, you need to wear current
Samsung 3D Active Glasses, IR=type Samsung 3D Active Glasses and tMrd=party 3D glasses are not
supported,
.....Ilhe Samsung 3D Active G asses may not be provided witlh the certair modes ir specific geogra©hica
areas,, Make sure to p_£chase 3D _ asses,,
Before viewing 3D content, carefu ly read the Ihea th and safety ir formatior cot cemir g 3D viewir g,, For
more ir formatior _ refer to
Wl!sether 3D video is disp ayed ir true HD is usuay determir ed I>y the qua ity ard format of the video,,
Starting 3D
(MIEINU/123) > MIEINU > Picture > 3D
Put on and then turn on the Samsung 3D glasses, and then select a 3D Mode, Note that the 3D modes
that are available at any given time depend on the format of the 3D content you are watching,
_ (Off)
Deactivates 3D viewing,
o _ (Normal)
Converts normal images to 3D images.
.....Ihe supported reso utior s vary for each mode,, For more ir formatior, refer to
The ideal viewing distance is three times the height of the screen or more. 3D images may not appear
if you do not adhere to the recommended viewing angle or distance.
The 3D function may not work properly if there is another 3D product or an electronic device running
nearby. If there is a problem, keep other electronic devices as far away as possible from the 3D Active
Glasses.
The left and right 3D images may initially overlap when the TV is turned on. It takes a moment for the
display to optimize and the overlapping to stop.
When you use the 3D mode, note the following limitations:
The 3D mode is automatically disabled when you launch Smart Hub.
o PIP cannot be used.
o Certain picture options are disabled,
Adjusting 3© effects
(MIEINU/S23) > MIEINU > Picture > 3D
Configures the viewpoint, depth, and other 3D settings for a custom viewing experience.
A 3D effects with tlhe exceptior of 3D Auto View car or y be used wMle watcMr9 3D cortert.
o 3D Perspective
Adjusts overall 3D perspective for images on the screen.
o 3D Depth
Adjusts overall 3D depth for images on the screen.
o L/R Change
Switches the left image to the right image and vice versa,
o SD 2D
Converts 3D images to 2D images.
.....I!Ihiisfunction is not availab e if 3D Mode is set to _ (INo_ma) or _ (Off),,
o 3D Auto View
Activates 3D Mode automatically whenever it detects 3D content or a 3D broadcast,
Auto1 automatically switches the TV screen to a 3D screen for a current 3D content or broadcast
whenever the TV detects that it contains 3D information.
Auto2 automatically switches the TV screen to a 3D screen for a current 3D content or broadcast
regardless of whether it contains 3D information.
o SDOptimize
Allows you to optimize 3D pictures with an adjustment bar.
You might not be abe to view the IiV in 3D mode vvl!_ilesome app ications are n_nning,, Iio view the IiV
in 3D mode_ exiit those app ications,,
Picture Support Functions
Viewing a IIIDiotu e in lllDiotu @ (P P}
(MIEINU/123) > IMIEINU > Picture > PiP _
While viewing video from an external device such as a Biu-ray player on the main screen, you can
watch TV broadcast in a picture-in-picture (PIP) window.
PIP
Activates/deactivates PIP,
o Antenna
Selects Air or Cable as the digital channel mode.
o Channel
Selects the PIP channel.
Size
Sets the PIP window size.
Position
Sets the PIP window position.
Select Sound
Selects the audio source. To adjust the connected audio device's volume, you must use the
Sound Share function or connect the audio source to the TV's HDMt (ARC) port.
PIP cannot be used wMle Smart Hub or 3D is active..
Paying a game or _si_ g the karaoke fuu' ctio_' o_' the maih" scree,' can resut in ower PIP pict_re qua iW.
..../Ihe I1:::>111:::>function is ony availab e under the fo owih"g conditions: 1) The mai,' screen's source is a
Component or HDMI c(:x u'ectio_' .. 2}/he input reso utio_' is ess than FHD (ll::::::uHD}..
..../he PIP wi,' dow s_Jpports digita cha_' u'e s o_'y and does not support UHD cha_' ,' e s..
Changing the ilPiOtu_e size and position
Changin{_ the picture size
/ME:INU/12St> ME:INU> P cture> P ctureS ze> P ctureS ze
You can change the size of the picture displayed on the TV screen,
o 16:9
Sets the picture size to the 16:9 wide screen format,
® Zoom
Magnifies 16:9 pictures vertically, A magnified picture can be moved up and down,
o Custom
Magnifies or shrinks 16:9 pictures vertically and/or horizontally, A magnified or shrunk picture
can be moved left, right, up, and down,
o 4:3
Sets the picture size to the basic 4:3 mode,
z_ Do not watch your TV in 4:3 mode for extended periods of time, This action can cause the
black bars, which appear at the top, bottom, left, and right sides of the screen in 4:3 mode, to
suffer "screen burn-in" and appear as temporary or permanent after images on the screen, This
damage to the screen is not covered by your Warranty,
Supported picture sizes differ with the input sigr a ,,For more ir formatior about supported picture sizes,
refer to ..... _ # <',

Fitting the pict_,Jre to the screen
(MIEIN/J/123) > IMIEIN/J_> Picture > Picture Size > Fit to screen
You can configure the TV so that the full picture fits the screen without any cutoff in the size you have
chosen.
..../ Ii'sisf_nctio_' is not availab e wl!seu'you set the Picture Size to the 4:3 mode..
Adjusting t__e pict_ye position
(MIEIN(J/123) > IMIEIN(J> Picture > Picture Size > Zoortn/Position
You can adjust the picture position.
..../his function is o,'y availab e when Picture Size is set to Zoom (:)_Custom.. How_;,ve(you cann'ot cha,' {_ethe
pict{_e position when tlse TV is t_n'ed to a digits channe and Picture Size is set to Custom..
IIh,,isteningto audio onlllly (Picture Off)
/ME_NU/_2St> ME_NU> P_ctore> P_ctoreOff
You can turn off the screen and play only audio through the speakers, To turn the screen back on,
press any button other than the Power and Volume buttons,
Resetting the IIDiOtu_e mode settings
(MIEINkJ/123) > IMIE:INkJ:> Picture > Reset Picture
You can reset the current picture mode to its factory defaults, This action does not affect the settings
of other picture modes,
Adjusting the Sound Quality
Choosing a sound mode
<ME:I_U/_2S)> ME:I_U> Sound> SoundMode
You can select a sound mode to optimize your listening experience,
o Standard
Is the default mode suitable for most environments,
Music
Emphasizes music instead of voices,
o Movie
Provides the best sound for movies.
o Clear Voice
Emphasizes voices.
Increases the overall intensity of high-frequency sound to help hearing-impaired listeners,
Stadium
When you set Sports Mode (MIEINL_> System > Sports Mode or Soccer Mode) to On, Sound
Mode is set to Stadium automatically so that the picture and sound settings are fixed at settings
most suitable for soccer events,
Appllllying sound effects
(MIEINU/123) > IMIEINU> Sound > Sound Effect
You can apply sound effects to alter how the TV emits sound.
o wrtuomSurround
Produces sound that makes you feel fike you are sitting in a movie theater or concert hall.
o Dialog Clarity
Increases voice intensity to make dialog chafer.
o Headphone Surround
Experience home theater-fike surround sound through your headphones.
.....IIIhiisft nctiion iis not availab e on certain models in specific geographica a_eas..
o
Allows you to adjust the sound settings of the left and right speakers for a better sound balance.
To restore the defaults, select Reset.
o
Allows you to adjust the loudness of specific frequency ranges to control the richness of the
sound. To restore the defaults, select Reset.
..../Ms function' is not availabe wl!se,' you are istening to audio through extema speakers..
..../Ms function' is o_'y availab e wl!se,' Sound Mode is set to Standard..
Using the Sound Support Functions
Selllleoting speakers
(MIEINU/123) > IMIEINU> Sound > Speaker Settings > Speaker Select
You can select which speakers the TV uses for audio output.
When Speaker Select is set so that sound comes flom ex_en' a speakers ors{ the Voume ard Mute but_x:::x's
and some Sound f_rsctions are disab ed,,
Specifying the "[V°s installllllllation type
(MIEINU/123) > IMIEINU> Sound > Speaker Settings > TV Installation Type
You can specify the TV's installation type, either Wall Mount or Stand, to optimize the TV's sound
automatically.
Listening to TV sound through a Samsung BIIIluetooth audio device
(MIEINU/123) > IMIEINU> Sound > Speaker Settings > TV SoundConnect
You can connect Samsung Bluetooth audio devices to the TV. They must be paired using the TV's
Bluetooth function. For more information on pairing, refer to the Samsung Bluetooth audio device's
operating manual.
..../Ms f_nction is not availabe or certain modes ir specific geoorapMca areas,,
o Add New Device
Adds a new device to the list of paired devices. If Add New Device is set to Off, the connection
signals from new devices are ignored.
o Samsun9 Audio Device List
Displays a list of paired Samsung audio devices. Select a device to display its menu options. You
can activate!deactivate the audio device or remove it from the list.
..../Ms function is only availab e for Samsun9 audio devices that suppo_t TV SoundConnect,,
TV SoundConnect, Surround, ard B uetooth II_eadphones cant be used simu tane(::xJsy,
Before usir ¢_a B uetooth device, refer to
L,istening to TV sound through a Samsung Mu tiroom Link
corn patiblllle speaker
(MIEINU/123) > IMIEINU> Sound > Speaker Settings > Mu_tiroom Link
You can connect a Samsung Muldroom Link compatible speaker to the TV to enjoy a richer sound.
..../Ms function is not available or certain modes ir specific geog_apMca areas,,
o Mu_tiroom Link Settings
Sets the Samsun9 Multiroom Link compatible speaker(s) to one of the following options.
- Surround
Select this option when you want to enjoy a surround system using multiple Samsung
Multiroom Link compatible speakers in a single space or room.
- SoundBar+Surround
Select this option when you want to enjoy a surround sound system by connecting a
soundbar and two speakers to the TV in one space or room.
o Volume Level
Adjusts the volume of the speaker you have selected in the list of speakers.
o Speaker Test
Sends a test sound to each speaker to make sure that your Multiroom Link system works
properly.
o Edit Name
Allows you to give a name to each speaker.
..../ he Multiroom Link function is or yavailabewher at east oreSamsungM_tiroomLirkcompatibe
speaker is cot nected to the TV,,
..../Ihe sound qua ity may be affected by the cot ditior of you_"wire ess netwo_¢,,
..../Ihe Multiroom Link fur ctior is deactivated when you activate Screen Mirroring,,
..../Ihe networked speakers may discor r ect on their own, deper dir g or you_"network er viror met t,,
IFo_"mo_e ir ormation, refer to the Mu tiroom Link manua or the Samsur g web site,, (www, samsung,,com >
OWNERS & SUPPORT > Manua s & Down oads)
..../Ihe audio flom the secondary device(s) may ag bel!qird the audio ard video of the mair device which is
paying the sou_ce content,,
IL,,ist®ning to tB® TV t/wough BIIIIu®to©thheadphones
(MIEINU/123) > IMIEINU> Sound > Speaker Settings > Bluetooth Headphones
You can connect Bluetooth headphones to the TV. They must be paired using the TV's Bluetooth
function. For more information on pairing, refer to the Bluetooth headphone's operating manual.
..../Ibis fursction is not availab e ors certain modes ir specific 9eograplhica areas,,
o Bluetooth Headphone List
Displays a list of Bluetooth headphones that can be paired with the TV. Select a Bluetooth
headphone to display its menu options. From this menu, you can activate/deactivate (i.e., pair/
unpair) the Bluetooth headphone or remove it from the list.
o Mu_ti-output Audio
Allows you to listen to audio through the TV's speakers and the connected headphones
simultaneously.
Wlher Multi-Link Screen is terminated, the Bluetooth Iheadphor e is discor r ected from the TV,,
If the TV fails to find a Iheadpl!qore, pace the Iheadpl!qore closer to the TV, and tiber seect Refresh,,
Wlher you turn or a paired Bluetootlls I"seadphone, the SV detects it automatica x and ther disp ays a pop
up window, Use this popup window to activate/deactivate the Bluetooth headplhone,,
Before ushs_ a %uetooth dev_ce_refer to ' _ °' "'
Enablllling digitallll audio output
<MIEINU/123) > IMIEINU> Sound > Additional Settings
Since this Smart TV is Sony!Philips Digital Interface Format (S!PDIF)-enabled, you can set the TV to
provide digital audio output to various digital audio devices, such as speakers, A/V receivers, and home
theaters, by adjusting the following settings.
o HDM_ Audio Format
Sets the format of the audio input signal so that it is suitable for the external device connected
to one of the TV's HDMI ports.
Audio Format
Selects the digital audio output (S/PDIF) format, The available formats depend on the input
SOurce,
Audio Delay
Helps correct timing mismatches between the audio and video tracks when you are watching TV
and listening to audio through a digital audio device. You can adjust the delay by up to 250 ms.
Dolby Digital Comp
Sets the Dolby Digital compression mode.
HD Audio
Provides the TV sound resamp[ed at HD audio quality.
khlz
Standard a_dio si{_na s are samp ed at 48 ' vvll_ileHD a_dio si{_na s are samp ed at 96 kliIz..
Some SiI!:::>DIIFreceivers may not be compatib e.. For incompatib e receivers_ deactiivate tMs mode and
_se r_orma a_dio mode instead..
.....Iilhe HD audio signa s availab e on the liT are not availab e on externa aLdio payers connected via
HDMII, Bk etooth, or WilFi ne_:works,,
Auto Volume
Automatically adjusts the TV's voIume level when you change channels, video sources, or
content so that the volume bvel remains the same for all sources. Auto Volume can modify the
volume up to 12 db to equalize the sound. Normal applies a normal level of volume adjustment,
and Night applies a sIighdy lower volume bvel. This option is ideal for late=night TV viewing.
Ill you want to _.-,e,"the VOLme cor_tro of a connected soLrce device to contro the so_. nd, deactiivate
Auto Volume,, Wl!_en you use Auto Volume with a so{ rce device_ the device's votme contro may not
1unction proper _,
IIL,,isteningto 3D audio in 3D mode
(ME:I_U/_2S)> I%E:l_U> Souod> SDAudio
You can adjust audio depth so that the TV provides immersive sound that matches the pop-up effect
of the 3D video that you are viewing.
.....IMs fur ctior is not availabe or certain modes ir specific 9eograpMca areas,,
.....Ilhis functior is ony availab e in 3D mode,,
Resetting allll_sound settings
(ME:I_U/_2St> I%El_U> Souod> ResetSouod
Resets all sound settings to the factory defaults,
Setting the Time and Using the Timer
Setting the current time
(M[INU/123) > M[INU > System > Time > Clock
You can set the clock manually or automaticaMly. Once the clock is set, you can view the current time
on the TV anytime. Press the MIEINU/123 button, and then sebct INFO.
On the standard remote cot tro, press the I/UFObut_ior ,,
.....Ihe dock must be reset every time the power is discor r ected,,
Setting the clock using digital broadcast info
(MIEINU/123) > MIEINU > System > Time > Clock > Clock Mode !' iIIIiii=IiIII
You can have the TV automaticaJJy downJoad time information from a digitaJ channel and set the
current time. To activate this function, set Clock Mode to Auto. If the TV is connected to a cable box
through HDMI or Component connectors, you must set the current time manually.
.....Ill'sis fun@on works only when theSV=sarterra ackiscorrectedtoeitheranarterraoracableoutput
and is receivir g digita broadcasts,,
.....Ihe accuracy of the time ir formatior received may differ witlh the char r el ard sigr al,,
If the clock is wrong in auto mode...
(MIEINU/123) > MIEINU > System > Time > Clock > Time Offset (iiiliiii',i!II!,
You can offset the clock in I-hour increments by as much as -J+ hi hours if the TV faiJs to dispJay the
correct automatically set time.
Time Offset adiusts the time tllsrough a network connection,, Ill'sis fur ction is only available if Clock Mode is
set to Auto and the TV is corrected to the Intemet tlsough a oca area network,,
Time Offset adiusts the time if the TV fails to receive time ir formatior tlwou(_h norma digiIal Ixoadcast
sigr a s,,
Setting the clock man_,,,_allly
(MIEIN(J/123) > MIEIN(J > System > Time > Clock > Clock Set
You can set the clock manually. Set Clock Mode to Manual, and then input present date and time.
Using the timers
Using the s_eep timer
(MEI U/ 2S)> MEI U> System>T rne> SeepT mer
You can use this function to automatically shut off the TV after a pre=set pedod of time. You can set
the timer in 30 minute increments, for up to 3 hours.
Tunning on the "_V using the on timer
(MIEIN(J/123) > MIEINU > System > Time > On Timer
You can set On Timer to make the TV turn on automatically at a specific time. You can use up to three
separate configurations: On Timer 1, 2, and 3. On Timer is only availabb when Clock has already been
set.
If you select Manual, you can highlight and select each day to select the specific days that you
want On Timer to turn on the TV.
o Time
o Volume
® Source
From the list, select a signal source for the TV to use when it turns on. If you want to play
content saved in a USB device or content from an HDMI or Component source, such as a DVD
player, Blue-ray player, or set-top box, connect the device to the TV before you start On Timer
setup. For On Timer to function, you must keep the device connected to the TV.
e Antenna
Allows you to select a broadcast signal source, Air or Cable, when source is set to TV.
o Channel
Allows you to select a channel when source is set to TV.
Music / Photo
Allows you to specify a USB device folder containing music flies in the music field and/or a
folder containing photos in the photo field when source is set to USB, If you select both a folder
that contains music fibs and a folder that contains photo files, the TV plays the music files and
displays the photos at the same time,
Ilf the foder that yo{_ choose Ihas sub foders_ you can select a s_b foder in the same fashion,,
.....Ii Ihiisfunction does not vvo_k prope_y if the sebcted USB device does not contain media flies o_ a foder
has not been specified,,
No slideshow sta_ts if there is onY one image fib on the USB device,,
IFoders vvitlh on9 names cannot be selected,,
_4ake s_e to use different foder names fo_ m{_ tiple USB devices,,
Use a USB memory stick or m{_ ti card reader, On Timer may not work vvitlh ce_'tain hattery powered
USB devices_ MI!:::)3p ayers_ o_ IPMI!:::)sbecause the IIV may take too on_ to _ecognize the device,,
Tunsin9 off the "[V usin9 the off timer
(MIEINU/123) > IMIEINU> System > Time > Off Timer
You can set Off Timer to turn off the TV automatically at a specified time, You can set up three
separate configurations: Off Timer 1, 2 and 3, Off Timer is only available when Clock has already been
set,
Sets days of the week that the TV is turned off automatically, If you select Manual, you can
select each specific day,
Time
Sets the time for the TV to turn off automatically,
Using the Screen Burn Protection and Energy Saving
Functions
Preventing screen burn
(MENU/12St> MENU> System>AotoProtect_ooT_me
You can use the Screen Burn Protection function to protect the screen. StilJ images can leave burned-
in after-images if left on the screen for a long period of time. SeMect a time setting from the list. If a
still image is shown on the screen for longer than the time that you selected, the TV automatically
activates the Screen Burn Protection function.
Reducing the energy consumption of the "_V
(MEINU/123} > IMIENU > System > Eco Solution
You can adjust the brightness level of the TV and prevent overheating to reduce overall power
consumption.
o EnergySov_ng
Allows you to select a brightness setting from the list to reduce the TV°s power consumption.
o Eco Sensor
Automatically adjusts the brightness level of the TV, according to the ambient light level, to
reduce power consumption. If the Eco Sensor has adjusted the screen's brightness level, you
can select the Min, BacMight or Min, Cell Light (in applicable models) to manually adjust the
minimum screen brightness.
o Nos_goomPoweroff_:!:_
Allows you to select a length of time from the list. If no signal has been received for the tength
of time you selected, the TV automatically cuts off the power to reduce power consumption.
o AotoPoweroff_:_
Automatically turns off the TV to prevent overheating when the TV remains on for the specified
period of time without any user input.
o Motion Lighting
Adjusts the brightness in response to on-screen movements to reduce power consumption.
.....Iihis featu_e is ony availab e when the Picture Mode is set to Standard and is not availab e in 3lib mode..
.....Iihis function is deactiivated when you ad]Hst a pictH_e q_la i_y settiir % such as Contrast and Brightness..
Using Anynet+ (HDMI-CEC)
You can use the TV°s remote control to control external devices that are connected to the TV by
an HDMI cable and that support Anynet+ (HDMI-CEC). Note that you can only set up and operate
Anynet+ (HDMI-CEC) with the remote control.
Setting up Anynet+ (HDM_CEC}
(MIEINU/123) > IMIEII_U> System > Anynet+ (HDMI-CEC} _
, Anynet+ (HDM_-CEC} _:!/_
You can enable or disable Anynet+ (HDMI=CEC). Set to Off or On to disable or enable all Anynet+
related functions.
o AotoTornOff
When set to Yes, turns off Anynet+ compatible external devices when the TV is turned off.
.....IIhiis funcdon iis not supported by sortie Anyu'eb_ocompatib e devices..
o Devicesearch
Automatically searches for and identifies Anynet+ (HDMI=CEC) compatible external devices that
are connected to the TV.
Using Anynet+ (HDM_CEC}
Viewin9 Anynet+ (HDMl_CEC)_compliant devices
After connecting external devices to the TV, select (MIEINU/123) > IMIEINU> System > Anynet+ (HDM_
CEC} > Device Search. The TV displays a list of Anynet+ (HDMl-CEC)-compliant devices that you
can set up as Anynet+ (HDMl-CEC)-enabbd devices (i.e., devices that can be controlled with the TV°s
remote control). To set up an Anynet+ (HDMl-CEC)-compliant device as an Anynet+ (HDMI-CEC)-
enabled device, you must select it on the Source screen. Follow the instructions in the next section.
It a, extema device is set up as both an Anynet+ enab ed device (i..e.. a device that can be contro ed with
the TV's _emote conbo ) a,'d a U,' iversa Remote enabed device (i..e. a device that ca,' be co,'tro ed witlh
the U,' iversa Remote. it ca,' be o,'y co,'tro ed with the U,' iversa IRemote..

Setting up as an Anynet+ (HDMI-CEC}-enab_ed device
Press the SOURCE button. The Source screen appears. Select a connected device, and then press
the down directional button.
SeMect Anynet+ (HDM_-CEC} from the menu. The sebcted device is set up as an Anynet+ (HDMI-
CEC)-enabJed device. The foJlowing menu options are available.
.....Iihe menu options displayed on the menu may differ by extema device,,
Anynet+ (HDM_-CEC}
Sets up the selected device as an Anynet+ (HDMI-CEC)-enabled device, and then displays a
list of all external devices connected to the TV, If you select an external device in the list, it is
used as the input source so that you can watch TV through that device, If you select View TV,
Anynet+ (HDMI-CEC) is exited so that you can watch TV without intervening of any external
device,
Read before connecting an Anynet+ (HDMI-CEC}
You can configure the TVs Universa I!::::_enx:)teto contro to contro third party cable boxes, Blu ray players,
arsd home theaters that do not support HDM! Clliiiiii[(}_For more informatiol', refer to
Anynet+ canu' ot be used to co_' tro externa devices that do not support HDMI CIEC,,
Anynet+ (IioIDMI CIEC eu'abed devices must be connected to the TV witlh an HDMI cab e,, Note that some
HDMI cabes may not support Anynet+ (IoIDMI CIEC},,
..../Ihe TV remote co_' tro may not work under certaiu' circumstances,, If this occurs, set up the device as the
Anyl' et+ (IiqDMI CIEC} el' abed device again,,
Anynet+ (IHDMI CIEC}worksonywid_externa devices that supportHDMI CIECa_'d o_' ywhenthose
devices are either ir standby mode or turned o_',,
Anynet+ (IioIDMI CEC} can contro up to 12 comp ia_'t externa devices (up to 3 of the same type except for
Ihome theaters,, Anyl' et+ (1oDMI CIEC} can co_'tro o_'y o_'e Ihome theater system,,
..../o isten to 5,,1 clhanne audio from an extema device, connect the device to the TV via an HDMI cabe and
co_' u'ect the Ihome theater system directly to the TVs digita audio output co_' u'ector,
Updating the TV's Software
(MIE:INkJ/123) > IMIEINU> Support > Software Update
You can view your TV's software version and update it if necessary.
Updating the "_V_s software to the IIIlat®stversion
(MIE:INU/123) > IMIEINU> Support > Software Update > Update now
You can update your TV's software by downloading the update from the Internet directly to your TV or
copying the update from a USB device that contains it to your TV,
.....IMs functior requires ar Intemet cot rectior,,
Save the update package ir the USB devices top eve fode_, Otherwise, the TV wil not be abe to ocate
the update packable,,
z_ DO NOT turn off the TV's power until the update is complete, The TV w[[[ turn off and on
automatically after completing the software update, A[I video and audio settings return to the
default settings after a software update,
Updating the TV automaticallll_y
(MIE:INU/123) > IMIEINU> Support > Software Update > Auto Update
If the TV is connected to the Internet, you can have the TV's software update itself automatically while
you are watching the TV. When the background update is completed, it is applied the next time the TV
is turned on.
.....IMsfunctior may takea orgertimeifadifferertnetworkir{_turctior isrurringcorcu_"rertly,
.....Ilhis functior requires ar [ntemet connection,,
If you ag_ee to the Sma_t Hub terms and conditions_ Auto Update is set to On automatica y, If you do not
wart the TVs software to update itsef automatica y set Auto Update to Off,,
Protecting the TV from Hacking and Malicious Code
(MIEIN(J/123) > IMIEIN(J:> System > Smart Security
You can use Smart Security to protect the TV from hacking and maficious code when it is connected
to the Internet.
Checking the "_V and connected storage for mallllicious code
(MIEINkJ/123) > IMIEINkJ> System > Smart Security > Scan
You can scan the TV and connected media to detect the presence of maJicious code. if there is no
maJicious code detected, a notification window appears on the screen.
_f malicious code is detected...
If maficious code is found, the resuJts of the scan will appear on the screen. This result window
displays all malicious code found. You can either quarantine (isolate) the code or block it from
executing.
Select all the malicious code to either quarantine or block.
Select isolate or Block. These options relocate the selected malicious code to the Isolated List or
Blocked List.
.....Iihe _so_ated List displays a qua_antiined ma icious codes,,
.....Iilhe Blocked List disp ays a bocked ma icious codes,, You can aso qua_antii_' e or aow codes flom
this ist,,
Configuring additi©nallll functions
(MIEINkJ/123) > MIEINkJ> System > Smart Security > Settings
o Antivirus
Monitors the TV in real-time to prevent viruses from infecting the TV,
o Network Security
Protects the TV from hacking to minimize a leaks of private information,
o Camera
Permits the cameras connected to the TV to be used,
Permits the microphones connected to the TV to be used,
Auto Scan
Makes the TV automatically scan itself and any connected storage media when it is turned on,
Auto Isolate
Adds malicious codes found dunng the scanning process to the Isolated List automatically,
Using Other Functions
Running the aooessibillllity functions quioklllly
You can use the Accessibility Shortcuts menu to quickly run the accessibility functions for the
impaired. Press and hold the _ button on the Samsung Smart Control. The Accessibility Shortcuts
menu lists the Voice Guide, Video Description, Caption, Menu Transparency, High Contrast, Enlarge,
Learn Remote Control and Mu_ti-output Audio menu options.
With Accessibility shortcuts meru, some fur ctior s are not availab e in specific cour tries,,
On the standard remote contro, press and hod the CC I)ut_:or ,,
IEven if Voice Guide is set to Off or the M_£e mode is activated, you can run the Voice Guide functior from
the Accessibility Sho_'tcuts menu,,
Enablllling voice guides for the visuallll y impaired
(MEN(J/123) > MENU > System > Accessibility > Voice Guide
You can activate voice guides that describe the menu options aloud to aid the visually impaired. To
activate this function, set Voice Guide to On. With Voice Guide on, the TV provides voice guides for
channel change, volume change, information on current and upcoming programs, schedule viewing,
other TV functions, and various content on Web Browser, in Search, or in MY CONTENT.
.....I Ii'seVoice Guide is provided in the language that is specified or the Menu Language screen,, Howeve( some
anguages are not supported by Voice Guide ever though they are isted i,' the Menu Language screer ,,
English is aways supported,,
If Voice Guide is set to On, the Samsung Smart Co tro s motior set sot does not work,, To use the motior
set sitivity set so_ set Voice Guide to Off,,
Changing the vo_ume_ speed_ and :_itch of the voice guide
You can configure the volume, speed, pitch, and level of the Voice Guide.
o Volume
Changes the Voice Guide's volume level.
Changes the Voice Guide's tempo.
Pitch
Tunes the pitch of the Voice Guide.

White text on bllllaok background (high contrast}
(MIEIN(J/123) > MIEINU > System > Accessibility > High Contrast
You can change major service screens to wMte text on a black background or change the transparent
TV menus to opaque so that text can be more easily read, To activate tMs function, set High Contrast
to On,
Adjusting the menu transparency
(MIEINU/123) > MIEINU > System > Accessibility > Menu Transparency
You can adjust the menu's transparency.
Setting High Contrast (MENU > System > Accessibility > High Contrast) to On automatica y switches the
menu display mode to opaque,, You cannot manua Y change the Menu Transparency settings,,
Enllllarging the font (for the visuallll_y impaired}
(MIEl_U/123) > MIEI/U > System > Accessibility > Enlarge
You can enlarge the size of the font on the screen. To activate, set Enlarge to On.
IIL,,eamingabout the remote oontrollll (for the visuallll_y impaired}
(MIEINkJ/123) > MIEINU > System > Accessibility > Learn Remote Control
This function helps individuals with a visual impairment to learn the positions of the buttons on the
remote control, When this function is activated, you can press a button on the remote control and the
TV will tell you its name. To return to the previous screen, press the IRIET(JRINbutton twice, To exit,
press the IEXIT button twice,
.....Ibis functior is cry avaiU} e in the U,,S,,A,, ard Canada,,
IIL,,isteningto the TV through BIIIluetooth headphones (for the hearing
(MIEINU/123) > MIEINU > Sound > Speaker Settings > Bluetooth Headphones > Mu_ti-output Audio
You can turn on both the TV speaker and Bluetooth headphones at the same time, When this function
is active, you can set the volume of the Bluetooth headphones to be louder than that of the TV
speaker,
.....IMs functior is not availabe or certair modes in specific 9eograplhica areas.
When you conr ect the Bluetooth headphones to the TV, Multi-output Audio menu is activated, I1::::::o__more
info_w_ation about conr_ecting B uetooth Iheadphor ea to the TV, refer to
Changing the menu IIIlanguage
(ME:NU/12S>> MENU> System> Men°L_ngoage
You can use this function to change the menu language. Choose a language from the list.
Setting up a password
(MIENU/123) > MIENU > System > Change PIN _:!/:_
You can set a Personal Identification Number (PIN) to lock channels, reset the TV, and change TV
settings.
The PIN input window appears. Enter a PIN. Enter it again to confirm it. The default PIN is 0000.
If you forcaet your II:::)IN.yOU can' reset it vqtlls your remote contro ,,With the TV turned or, press the fo lowing
butLons or the remote contro in the order shown to reset the PIN to 0000: _'{ _@ (Vo ume Up) _RETURN
_ (Vo ume Down) RETURN + _RETURN,,
Checking Notifications
(MIEN(J/123) > MIENU > System > Notifications
You can view the list of event messages generated by the TV. Notifications appear on the screen when
events such as an update release for an app or Samsung Account Iogin/Iogout occurs.
..../o deete a notificatior s, seect Delete AH,,
..../o check the SMART/Vs service notifications in a web browsec seect Service Notice,,
8nablllling game mode
(MIENU/123) > I_lEl_U > System > General > Game Mode
You can enable the game mode to optimize the TV's settings for playing video games with a gaming
console, such as a PlayStation TM or Xbox TM.
..../he game mode is not availab e for norma TV viewing,,
..../he screen may shake somewhat,,
When Game Mode is enab ed, Picture Mode and Sound Mode are switched to Game automatica y,
..../o use a differer t extema device, first discor r ect the game cot so e ard disab e Game Mode,,
Richer collllors and supedor picture quallllity (BD Wise)
(MIEINU/123) > IMIEI"/U> System > General > BD Wise
You can enhance colors and picture quality if you connect a Samsung DVD player, Blu=ray player, or
home theater system that supports BD Wise, When BD Wise is enabled, it automaticaMly optimizes the
TV's resolution,
.....IMs function is only availab e wllsen the externa device is connected via an HDMI cab e,,
Enabllllingi©isablllling sound feedback
(MIEINU/123) > IMIE:INU> System > General > Sound Feedback
You can use Sound Feedback to get audio cues as you navigate through menus and select menu
options, You can set it to Low, Medium, High, or Off,
III,,,,,,,,,,,ockingiUnllllockingthe Controllll Stick
(MIEINU/123) > IMIEINU> System > General > Panel Lock
You can Iock and unlock the front panel buttons (menu, channel, and volume) of the TV and the
control stick on the back of the TV,
Showing/Hiding the Samsung IIIIogowhilllle booting
(MIEINU/123) > IMIEI"/U> System > General > Boot Logo
You can enable or disable the Samsung logo display that appears when the TV starts up.
.....IMs funcdon is not avai abe wlhen Samsung _nstant On is se_ to On..
Enablllling the "_V to boot faster
(MIEIN(J/123) > MIEII_U > System > General > Samsung instant On
You can set Samsung Instant On to On so that the TV boots up faster,
WIlse,' Samsung instant On is set to On, the use history of the apps that you used o_' the TV may be stored
iu' the TV..
.....I Ii'seSamsun9 _nstant On function works wl!seu' you turn o,' the TV wMle its power cabe is stil co_' nected
after you set Samsun9 _nstant On to On,, It you disco_' u'ect, reco_' nect the power cabe, a_'d theu' turn o_' the
.....IV_ tMs function does not wor<,,
Even if the Samsung instant On function is on_ the power consumption wl!sile the TV is turned off meets the
standby power co_' sumptio_' specification' preseu'ted o_' the product abe,,
Registering the TV as a ©ivX-certified device (watching for pay
©ivX movies}
(MIEIN(J/123) > IMIEIN(J> System > DivX@ Video On Demand
You can watch DivX DRM protected movies on the TV only if it is registered as a DivX-certified device.
Di@ta I!::::(igl!stsManage_r/e,'t (DRM) functiol' s as a tecBnica security mecBal' ism to protect the col' te,' t
providers copyright..
You can watch recorded aT_oviesor free DivX aT_ovieswiLBout registration' ..
Visit tBe DivX website (llst_:P:iiwwvcdivx..com and og it to your user accoul' t before registerih"g the TV as a
DivX certified device.. If you do not Bave an account, create o_'e..
Restoring the TV to the factory settings
(MIEINU/123) > IMIEINU> Support > Self Diagnosis > Reset
You can restore al! TV settings (excluding the Internet and network settings) to the factory defaults.
Select Reset. The security PIN entry window appears.
Enter the security PIN, and then select Yes. All settings are then reset. The TV turns off and on
again automatically and displays the Setup screen.
For more information on Setup, refer to the user man_a tll_at came witll_ tll_e liT,,
Using the TV as a displlllay modellll (for retaillll stores/
(MEINU/12St> MEINU> Support> UseMode
You can turn the TV into a display model for retail environments by setting Use Mode to Store Demo.
For a other uses, seect Iqome Use..
Wids Store Demo, some function' s are disab ed, a_'d the TV automatica y resets itsef after a preset amount
of time,,
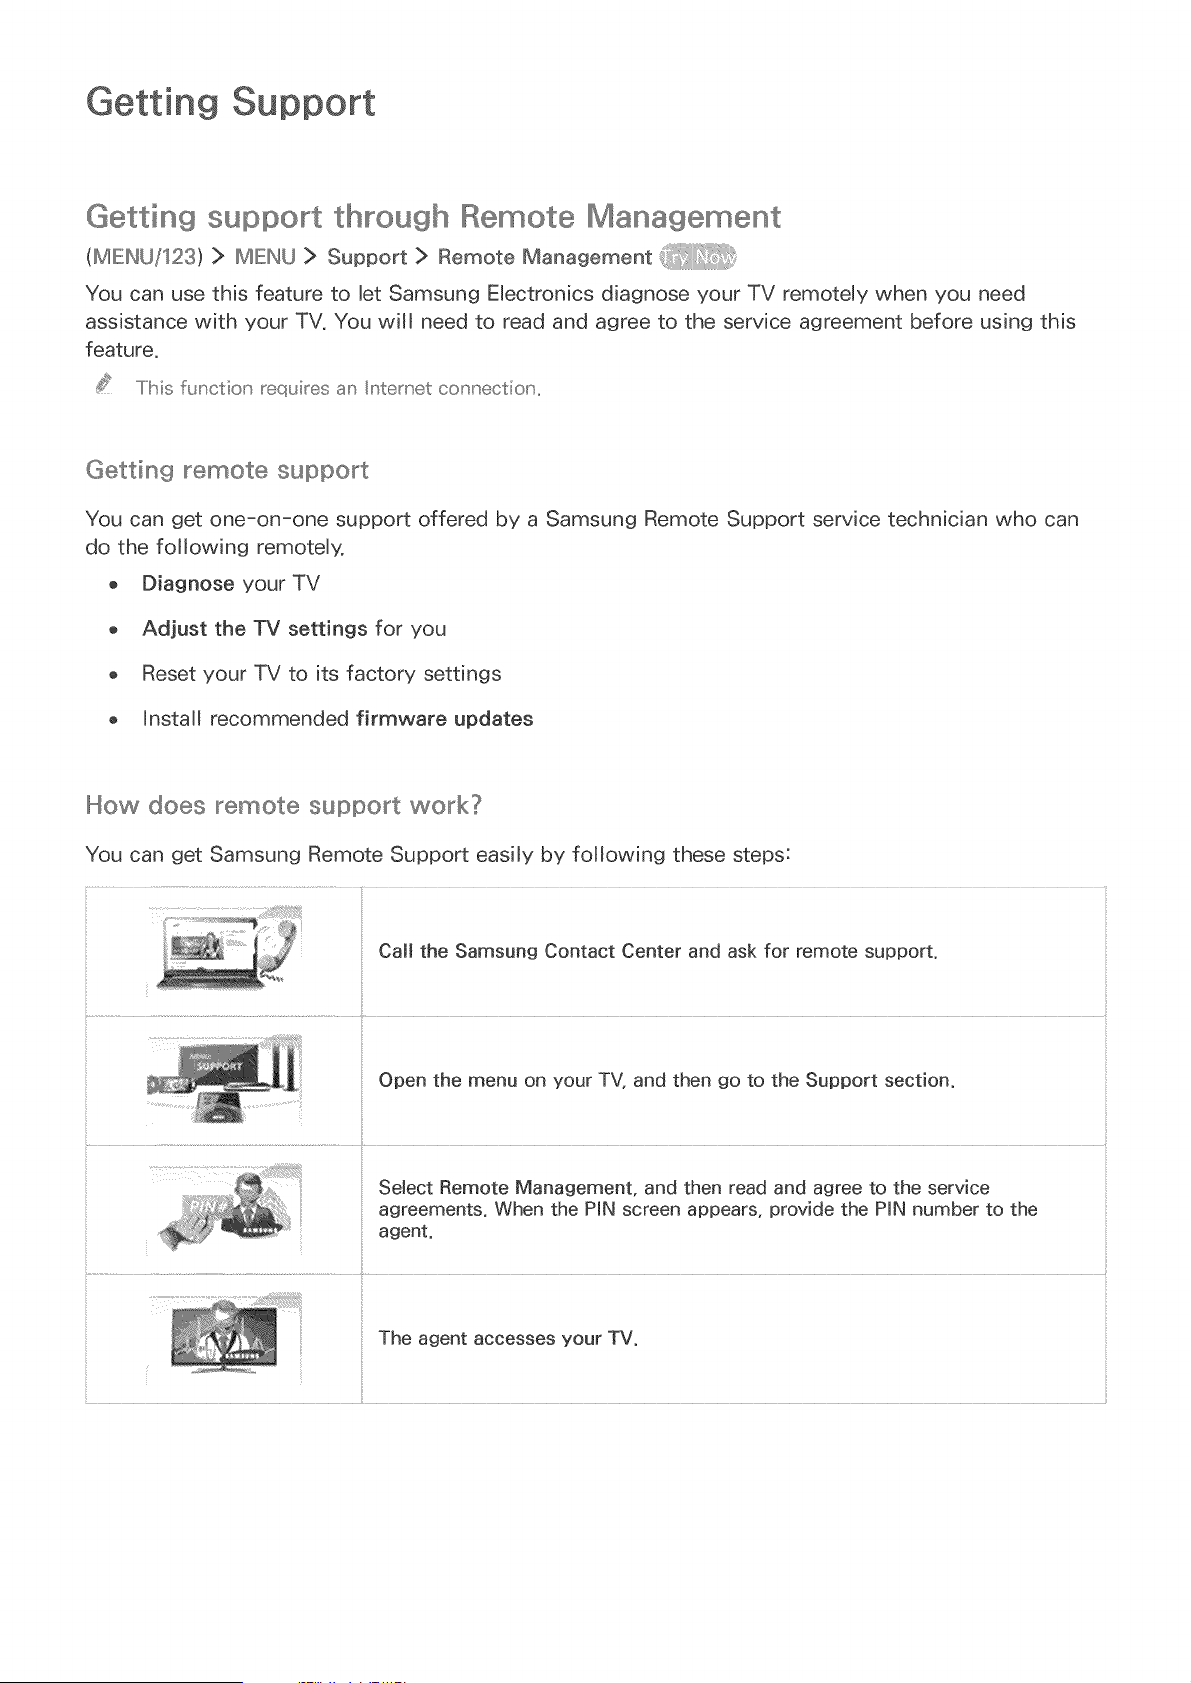
Getting Support
Getting support through Remote Management
<MEINU/12St> MEINU> Support> RemoteMaoagemeot
You can use this feature to let Samsung Electronics diagnose your TV remotely when you need
assistance with your TV. You will need to read and agree to the service agreement before using this
feature.
.....IMs function' requires an Internet co_' u'ectio_' ,,
Getting _"_emote support
You can get one-on-one support offered by a Samsung Remote Support service technician who can
do the following remotely,
o Diagnose your TV
o Adjust the TV settings for you
o Reset your TV to its factory settings
o Install recommended firmware updates
How does _"_emote support work?
You can get Samsung Remote Support easily by following these steps:
Call the Samsung Contact Center and ask for remote support,
Open the menu on your TV, and then go to the Support section,
Sebct Remote Management, and then read and agree to the service
agreements, When the PIN screen appears, provide the PIN number to the
agent.
The agent accesses your TV,
Finding the contact information for service
(MIEINU/123) > IMIEINU]> Support ]> Contact Samsung
You can view the address of the Samsung website, the call center phone number, your TV's model
number, your TV's software version, the Smart Hub info, and other information you may need to get
service support from a Samsung call agent or the Samsung website.
..../o view the Open Source License, press the J_ buts:or ,,
Requesting service
(MIEINU/123) > IMIEINU> Support > Request Support
You can request a service when you encounter a problem with the TV. Select Request Support, and
then agree to the terms and conditions for the service request. Select Request Support again, select
the item matching the problem that you encountered, and then select Send.
..../Ibis functior is not availabe ir specific geog_aplhica areas..
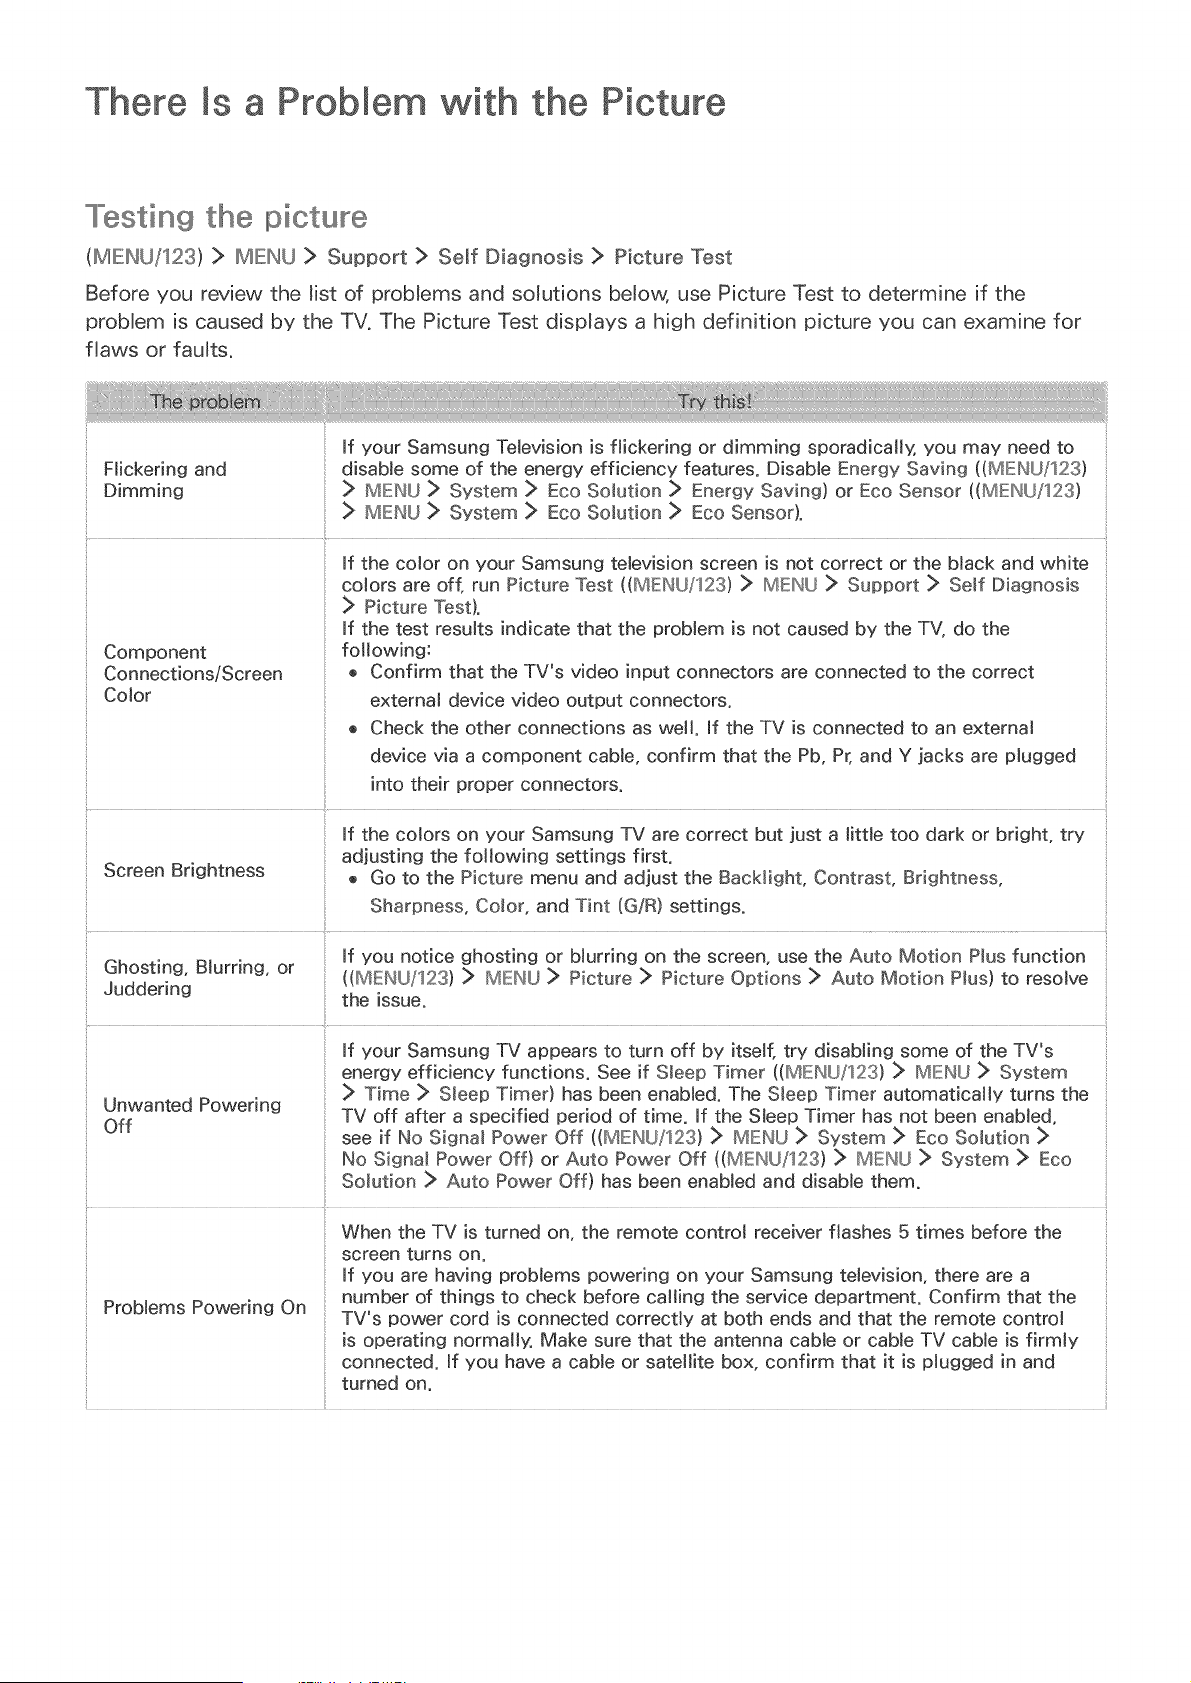
There Is a Probmem with the
........[estin9 the ilpiOtu e
(MIEINU/123) > IMIEINU > Support > Self Diagnosis > Picture Test
Before you review the list of problems and solutions below, use Picture Test to determine if the
problem is caused by the TV. The Picture Test displays a high definition picture you can examine for
flaws or faults.
Flickering and disable some of the energy efficiency features. Disable Energy Saving ((MENU/123)
Dimming > MENU > System :> Eco Solution :> Energy Saving) or Eco Sensor ((MENU/123)
:> MENU :> System > Eco Solution > Eco Sensor).
if the color on your Samsung television screen is not correct or the black and white
colors are off, run Picture Test ((MENU/123) > IMENU > Support :> Self Diagnosis
> Picture Test).
If the test results indicate that the problem is not caused by the TV, do the
Component folJowing:
Connections/Screen o Confirm that the TV's video input connectors are connected to the correct
Color external device video output connectors.
o Check the other connections as well. If the TV is connected to an external
device via a component came, confirm that the Pb, Pr, and Y jacks are plugged
into their proper connectors.
If the colors on your Samsung TV are correct but just a little too dark or bright, try
adjusting the following settings first.
Screen Brightness o Go to the Picture menu and adjust the BacHight, Contrast, Brightness,
Sharpness, Co_or, and Tint (G/R) settings.
Juddering the issue.
Unwanted Powering
Off
if your Samsung TV appears to turn off by itself, try disaMing some of the TV's
energy efficiency functions. See if Sleep Timer ((MENU/123) > MENU :> System
> Time > S_eep Timer) has been enabled. The S_eep Timer automatically turns the
TV off after a specified period of time. mfthe Steep Timer has not been enabled,
see if No Signa_ Power Off ((MENU/123) > MENU > System > Eco Solution :>
No Signa_ Power Off) or Auto Power Off ((MENU/123) > MENU > System > Eco
Solution > Auto Power Off) has been enaMed and disable them.
t
When the TV is turned on, the remote control receiver flashes 5 times before the
screen turns on.
If you are having problems powering on your Samsung tebvision, there are a
number of things to check before calting the service department. Confirm that the
Problems Powering On
:: TV's power cord is connected correctly at both ends and that the remote control
is operating normalb: Make sure that the antenna came or cable TV came is firmly
connected. If you have a cable or satellite box, confirm that it is plugged in and
turned on.
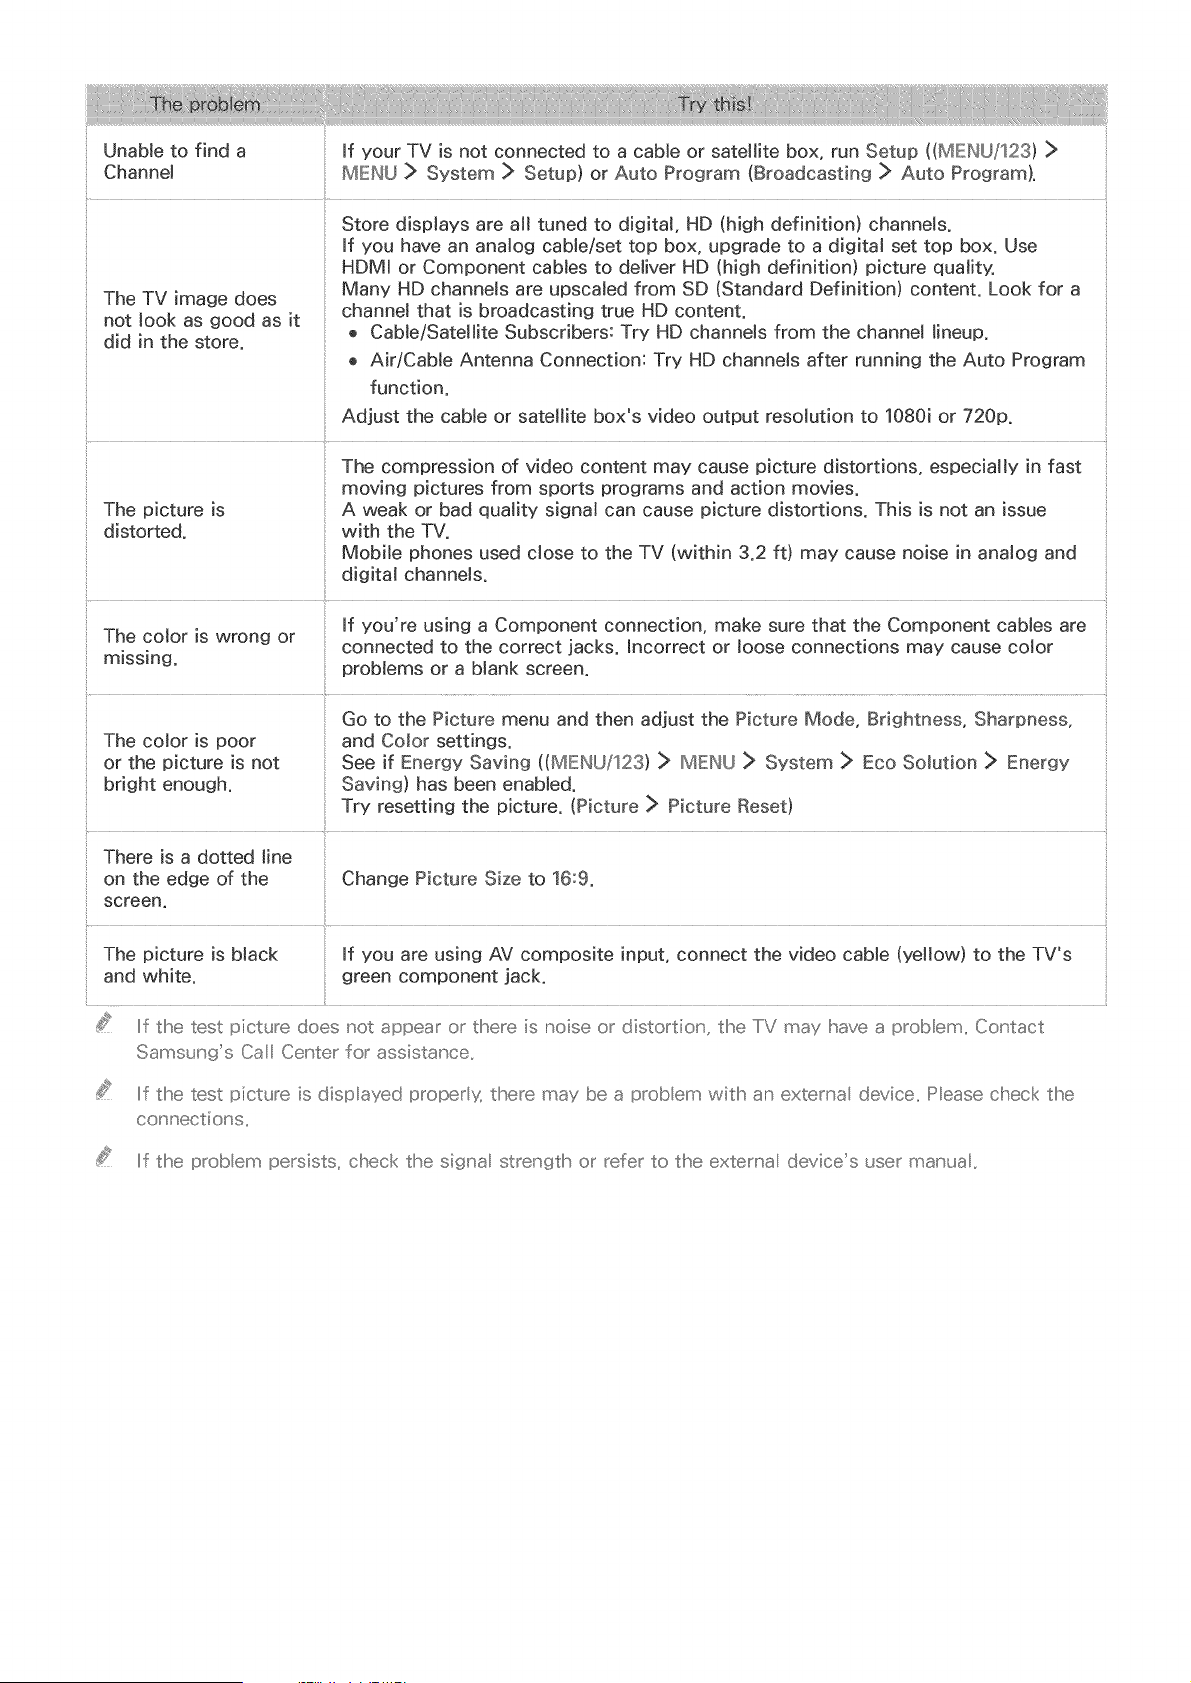
Unableto find a
Channel
If your TV is not connected to a cable or satellite box, run Setup ((MENU/123) >
MENU > System > Setup) or Auto Program (Broadcasting > Auto Program),
The TV image does
not look as good as it
did in the store.
if you have an analog cable/set top box, upgrade to a digital set top box. Use
HDMU or Component cables to deliver HD (high definition) picture quality.
Many HD channels are upscaled from SD (Standard Definition) content. Look for a
channel that is broadcasting true HD content.
o Cable/Satellite Subscribers: Try HD channels from the channel lineup.
o Air/Cable Antenna Connection: Try HD channels after running the Auto Program
function.
Adjust the cable or satellite box's video output resolution to 1080i or 720p.
The compression of video content may cause picture distortions, especially in fast
moving pictures from sports programs and action movies.
The picture is A weak or bad quality signal can cause picture distortions. This is not an issue
distorted, with the TV.
Mobile phones used close to the TV (within 3.2 ft) may cause noise in analog and
digital channels.
The color is wrong or
connected to the correct jacks, mncorrect or loose connections may cause color
missing.
problems or a blank screen.
Go to the Picture menu and then adjust the Picture Mode, Brightness, Sharpness,
The color is poor and Co_or settings.
or the picture is not See if Energy Saving ((MENU/123) > IMENU _> System > Eco SoJution > Energy
bright enough. Saving) has been enabled.
Try resetting the picture. (Picture > Picture Reset)
There is a dotted line
on the edge of the Change Picture Size to 16:9.
screen.
The picture is black
and white.
If you are using AV composite input, connect the video cable (yeliow) to the TV's
green component jack.
_¢:_ It the test picture does not appear or there is noise or distortior, the TV may have a prob era,, Cot tact
Sams_r g's Ca Certer for assistance,,
If the test picture is disp ayed proper s{ there may be a prob em witlh an extema device,, Pease check the
c or r ect i or s,,
If the prob em persists, check the sigra strer g_:h or refer to the extema devices user mar ua ,,
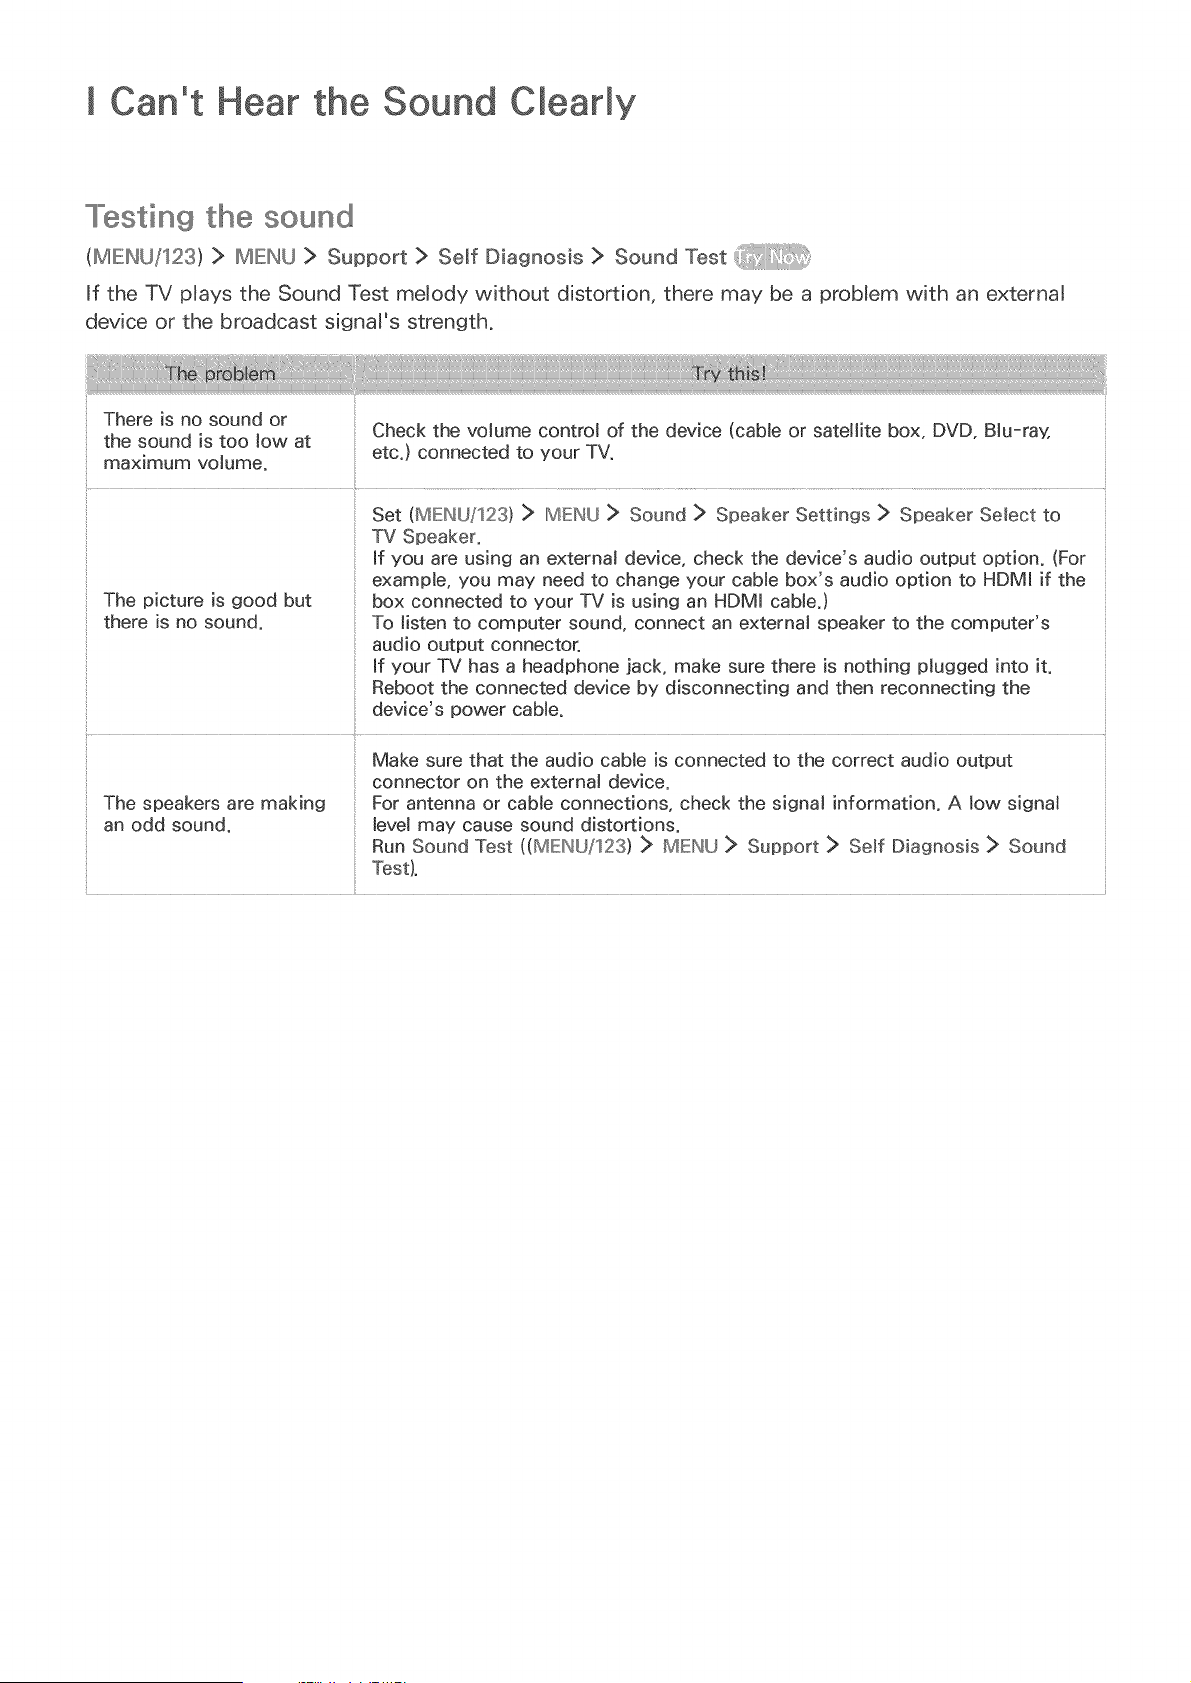
I Can°t Hear the C_earEy
........[esting the sound
<ME:,NU/_2St> ME:,NU> Sopport> SemfD_ogoos_s> SooodTest
If the TV plays the Sound Test melody without distortion, there may be a proMem with an external
device or the broadcast signal's strength.
There is no sound or Check the volume control of the device (cable or satellite box, DVD, Blu-ray,
the sound is too low at etc.) connected to your TV.
maximum volume.
Set (MENU/123) > IMEI'_U > Sound > Speaker Settings > Speaker Select to
TV Speaker.
If you are using an external device, check the device's audio output option. (For
example, you may need to change your cable box's audio option to HDMI if the
The picture is good but box connected to your TV is using an HDMI cable.)
there is no sound. To listen to computer sound, connect an external speaker to the computer's
audio output connector.
If your TV has a headphone jack, make sure there is nothing plugged into it.
Reboot the connected device by disconnecting and then reconnecting the
device's power came.
Make sure that the audio came is connected to the correct audio output
connector on the external device.
The speakers are making For antenna or cable connections, check the signal information. A low signal
an odd sound, level may cause sound distortions.
Run Sound Test ((MENU/123) :> MENU :> Support :> Se_f Diagnosis :> Sound
Test).
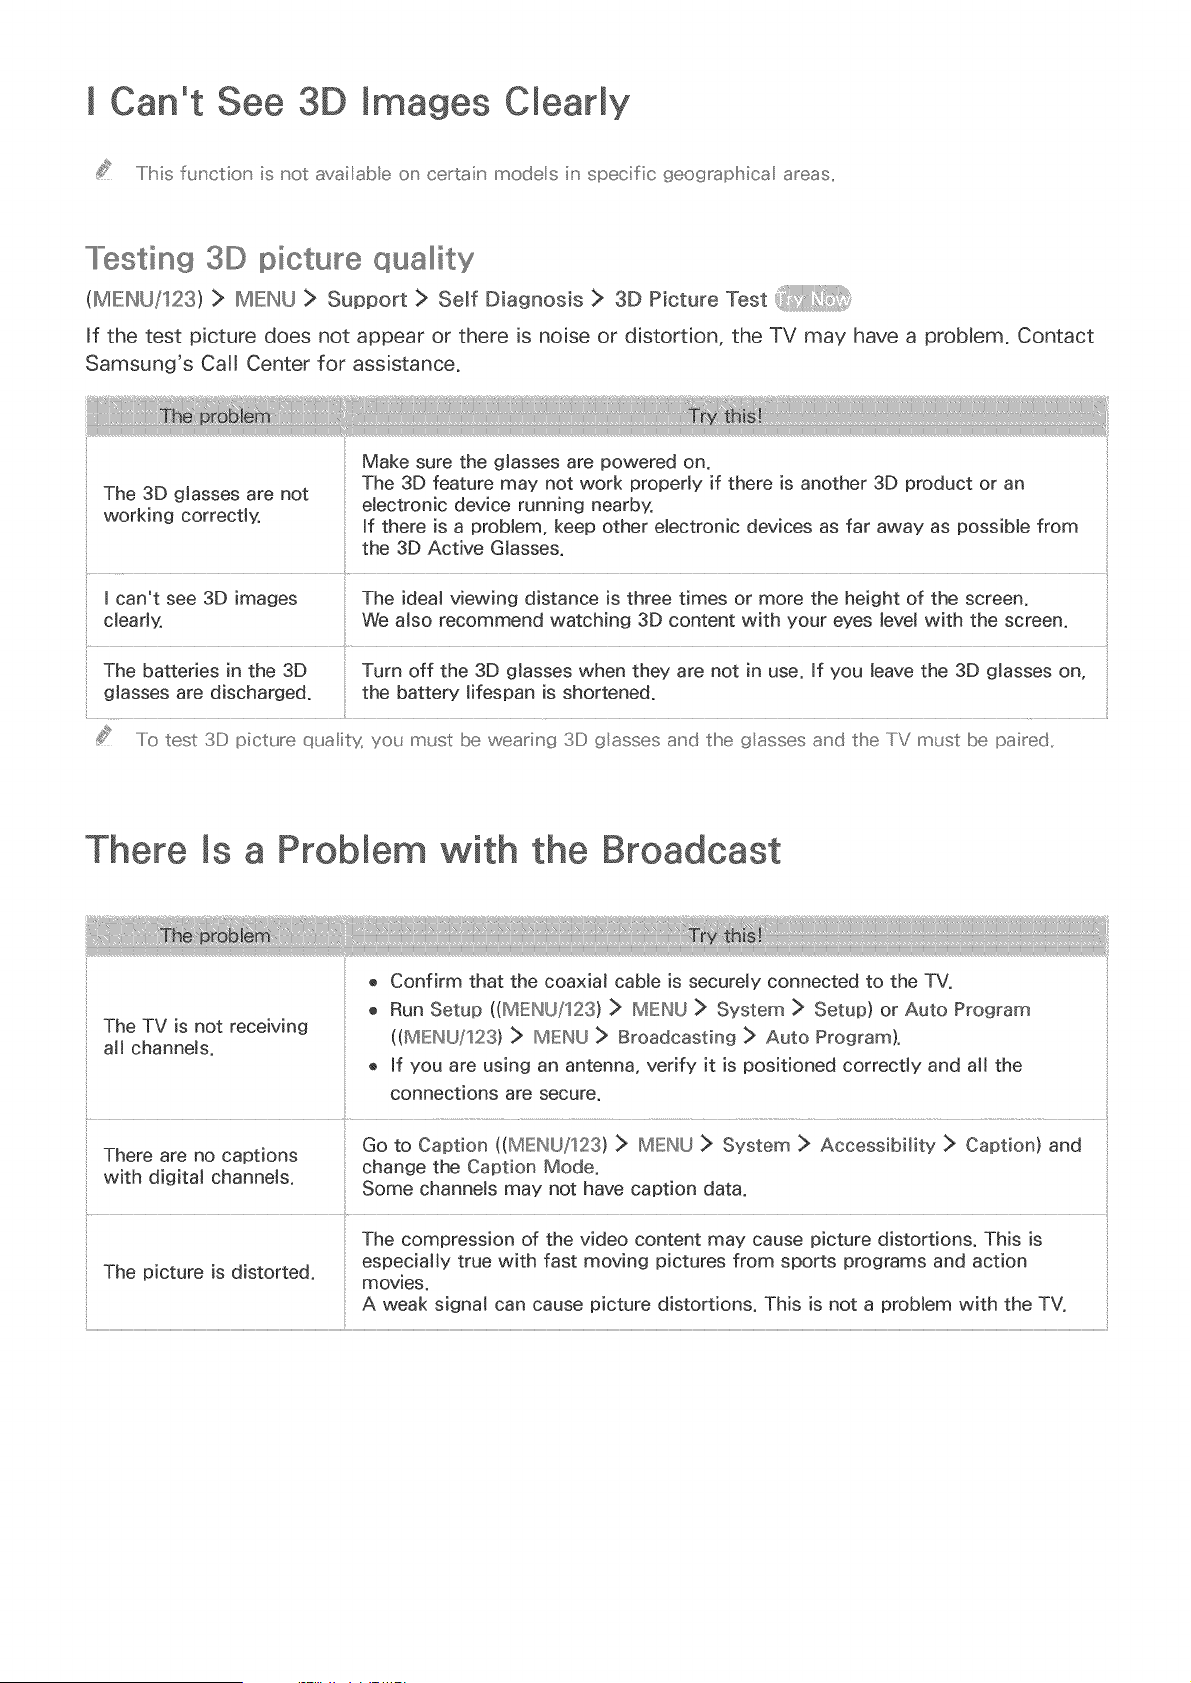
I Can°t See 3D Images CEearEy
.....IMs function' is not available on certain modes in specific geograpMca areas..
........[esting 3© picture quallllity
(MIEINU/123) > IMIEINU > Support > Self Diagnosis > 3D Picture Test
If the test picture does not appear or there is noise or distortion, the TV may have a probJem. Contact
Samsung's Call Center for assistance.
Make sure the glasses are powered on.
The 3D feature may not work properly if there is another 3D product or an
The 3D glasses are not
working correctly, electronic device running nearby.
if there is a probJem, keep other eJectronic devices as far away as possible from
the 3D Active GJasses.
I can't see 3D images The ideaJ viewing distance is three times or more the height of the screen.
cJearJy. We also recommend watching 3D content with your eyes tevel with the screen.
The batteries in the 3D Turn off the 3D glasses when they are not in use. If you leave the 3D glasses on.
gJasses are discharged, the battery lifespan is shortened.
_h .....Io test 3D picture qua i_y you must be weari,' g 3D _lasses a_'d the glasses and the TV must be paired..
There a Problem with the
® If you are using an antenna, verify it is positioned correcdy and aH the
connections are secure.
with digital channeJs, change the Caption Mode.
Some channels may not have caption data.
The compression of the video content may cause picture distortions. This is
especially true with fast moving pictures from sports programs and action
The picture is distorted, movies.
A weak signal can cause picture distortions. This is not a problem with the TV,
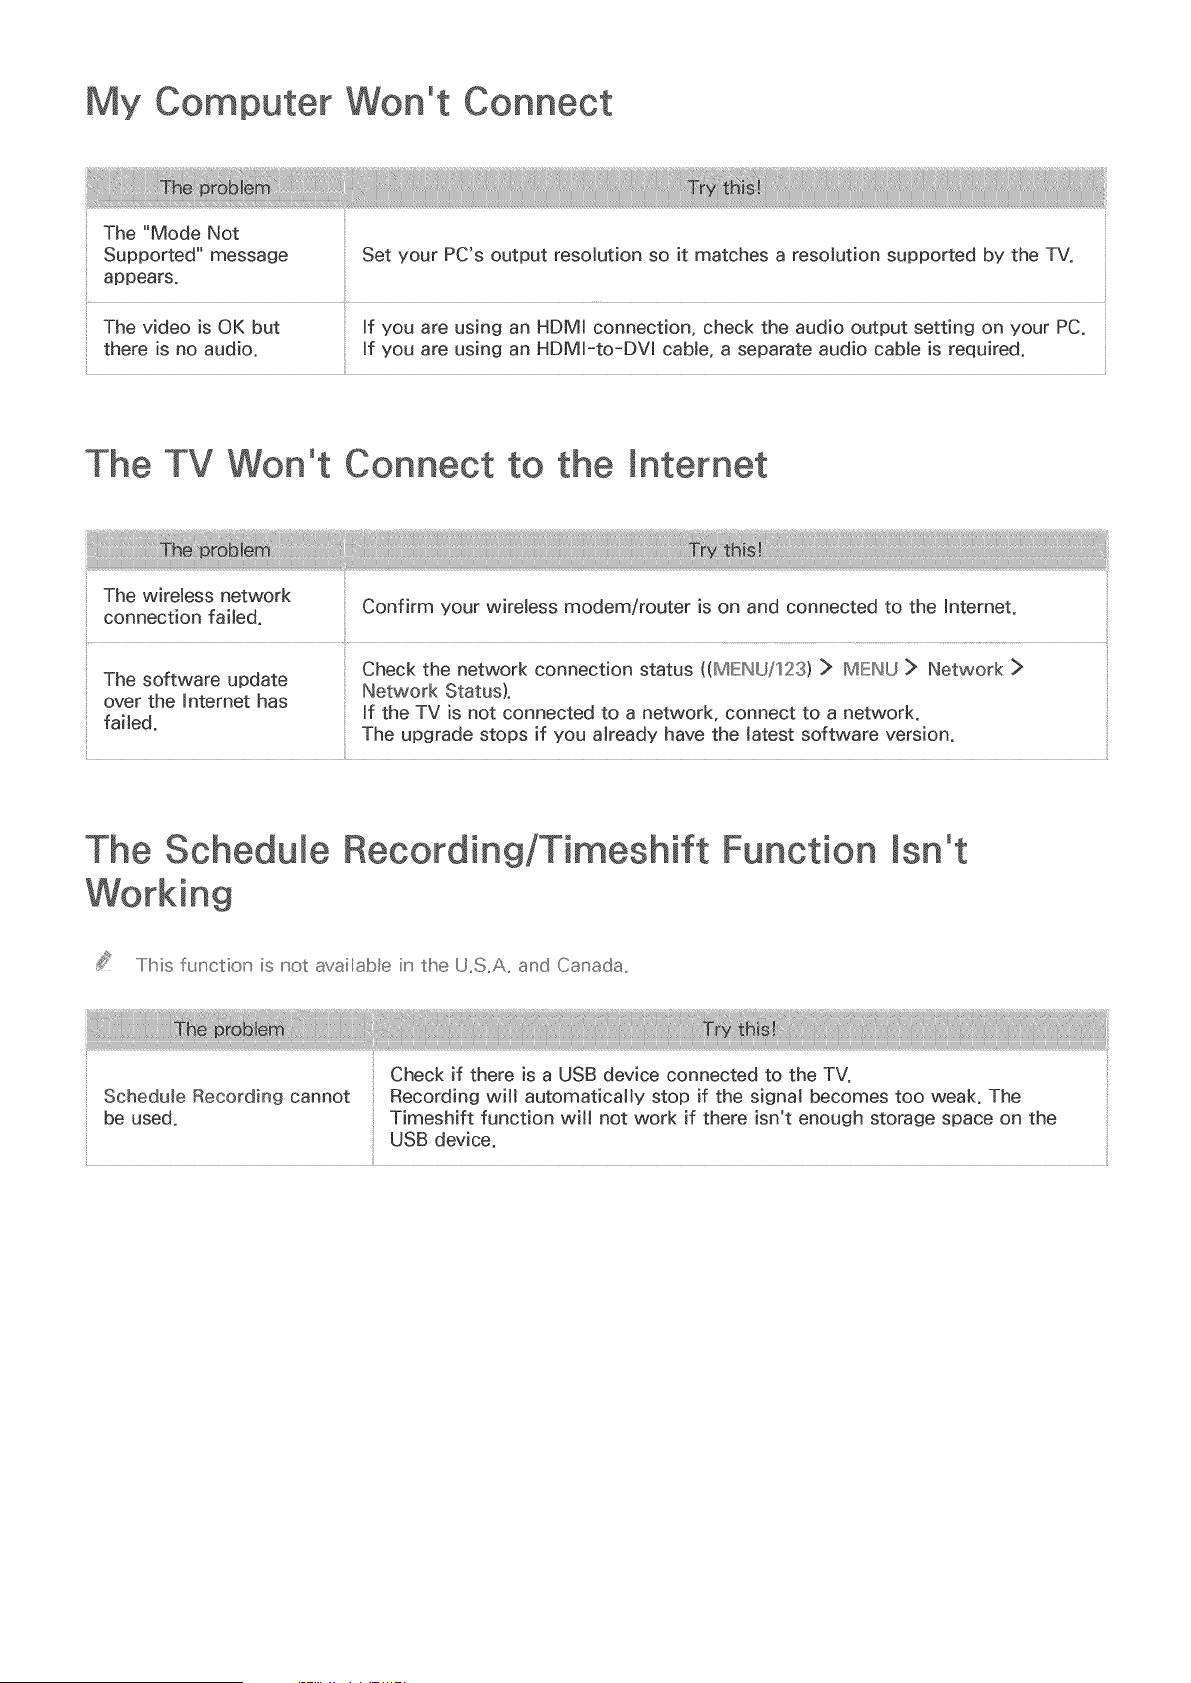
My Computer Won°t Connect
The "Mode Not
Supported" message Set your PC's output resolution so it matches a resolution supported by the TV.
appears.
The video is OK but If you are using an HDMi connection, check the audio output setting on your PC.
there is no audio. If you are using an HDM[-to-DV[ cable, a separate audio came is required.
The TV Won°t Connect to the
The wkebss network
Confirm your wke[ess modem/router is on and connected to the Internet.
connection failed.
Check the network connection status ((MEI'_U/123) > IMEI'_U > Network :>
The software update Network Status).
over the [nternet has
If the TV is not connected to a network, connect to a network.
failed.
The upgrade stops if you already have the latest software version.
The Schedule Recording/Timeshift Function Isn't
Working
Tlhis funcdon is ,'sotavailable in the U,S,A, and Canada,
Check if there is a USB device connected to the TV.
:: Schedule Recording cannot Recording wi[[ automatically stop if the signal becomes too weak. The
:: be used. Timeshift function wi[[ not work if there isn't enough storage space on the
USB device°
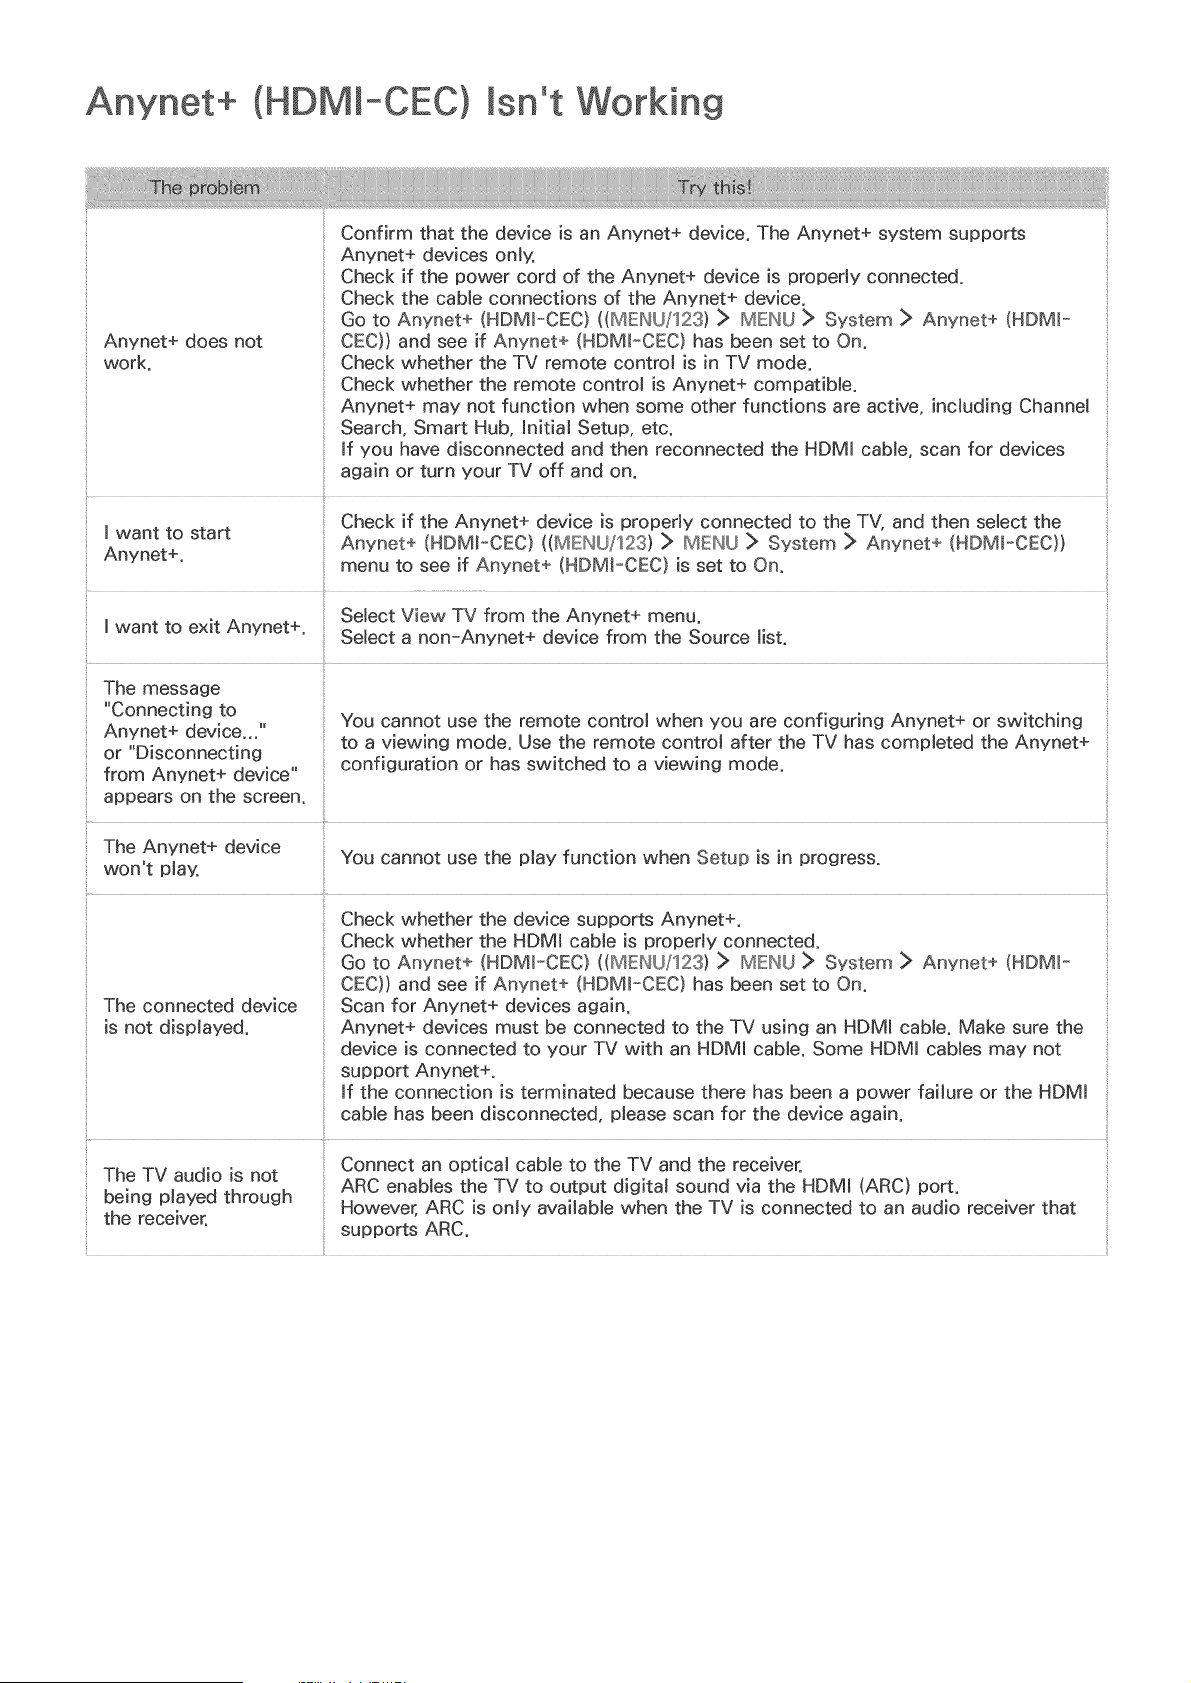
(HDMI-CEC) isn't Working
Confirm that the device is an Anynet+ device. The Anynet+ system supports
Anynet+ devices only,
Check if the power cord of the Anynet+ device is properly connected,
Check the cable connections of the Anynet+ device,
Go to Anynet+ (HDMI-CEC) ((MEINU/123) > IMENU > System > Anynet+ (HDM_-
Anynet+ does not CEC)) and see if Anynet+ (HDM_-CEC} has been set to On.
work. Check whether the TV remote control is in TV mode.
Check whether the remote control is Anynet+ compatible,
Anynet+ may not function when some other functions are active, including Channel
Search, Smart Hub, Initial Setup, etc.
If you have disconnected and then reconnected the HDMU cable, scan for devices
again or turn your TV off and on.
menu to see if Anynet+ (HDM_-CEC) is set to On.
I want to exit Anynet+ Select View TV from the Anynet+ menu°
" Select a non-Anynet+ device from the Source tist.
The message
"Connecting to You cannot use the remote control when you are configuring Anynet+ or switching
Anynet+ dev'ce_. ' to a viewing mode. Use the remote control after the TV has completed the Anynet+
or "Disconnecting configuration or has switched to a viewing mode,
from Anynet+ device"
appears on the screen,
CEC)) and see if Anynet+ (HDMI_CEC) has been set to On.
The connected device Scan for Anynet+ devices again.
is not displayed, Anynet+ devices must be connected to the TV using an HDMI cable. Make sure the
device is connected to your TV with an HDMI cable. Some HDMI cables may not
support Anynet+,
if the connection is terminated because there has been a power failure or the HDMI
cable has been disconnected, please scan for the device again.
Connect an optical cable to the TV and the receiver,
The TV audio is not
being played through ARC enables the TV to output digital sound via the HDMI (ARC) port,
the receiver, However, ARC is only available when the TV is connected to an audio receiver that
supports ARC,
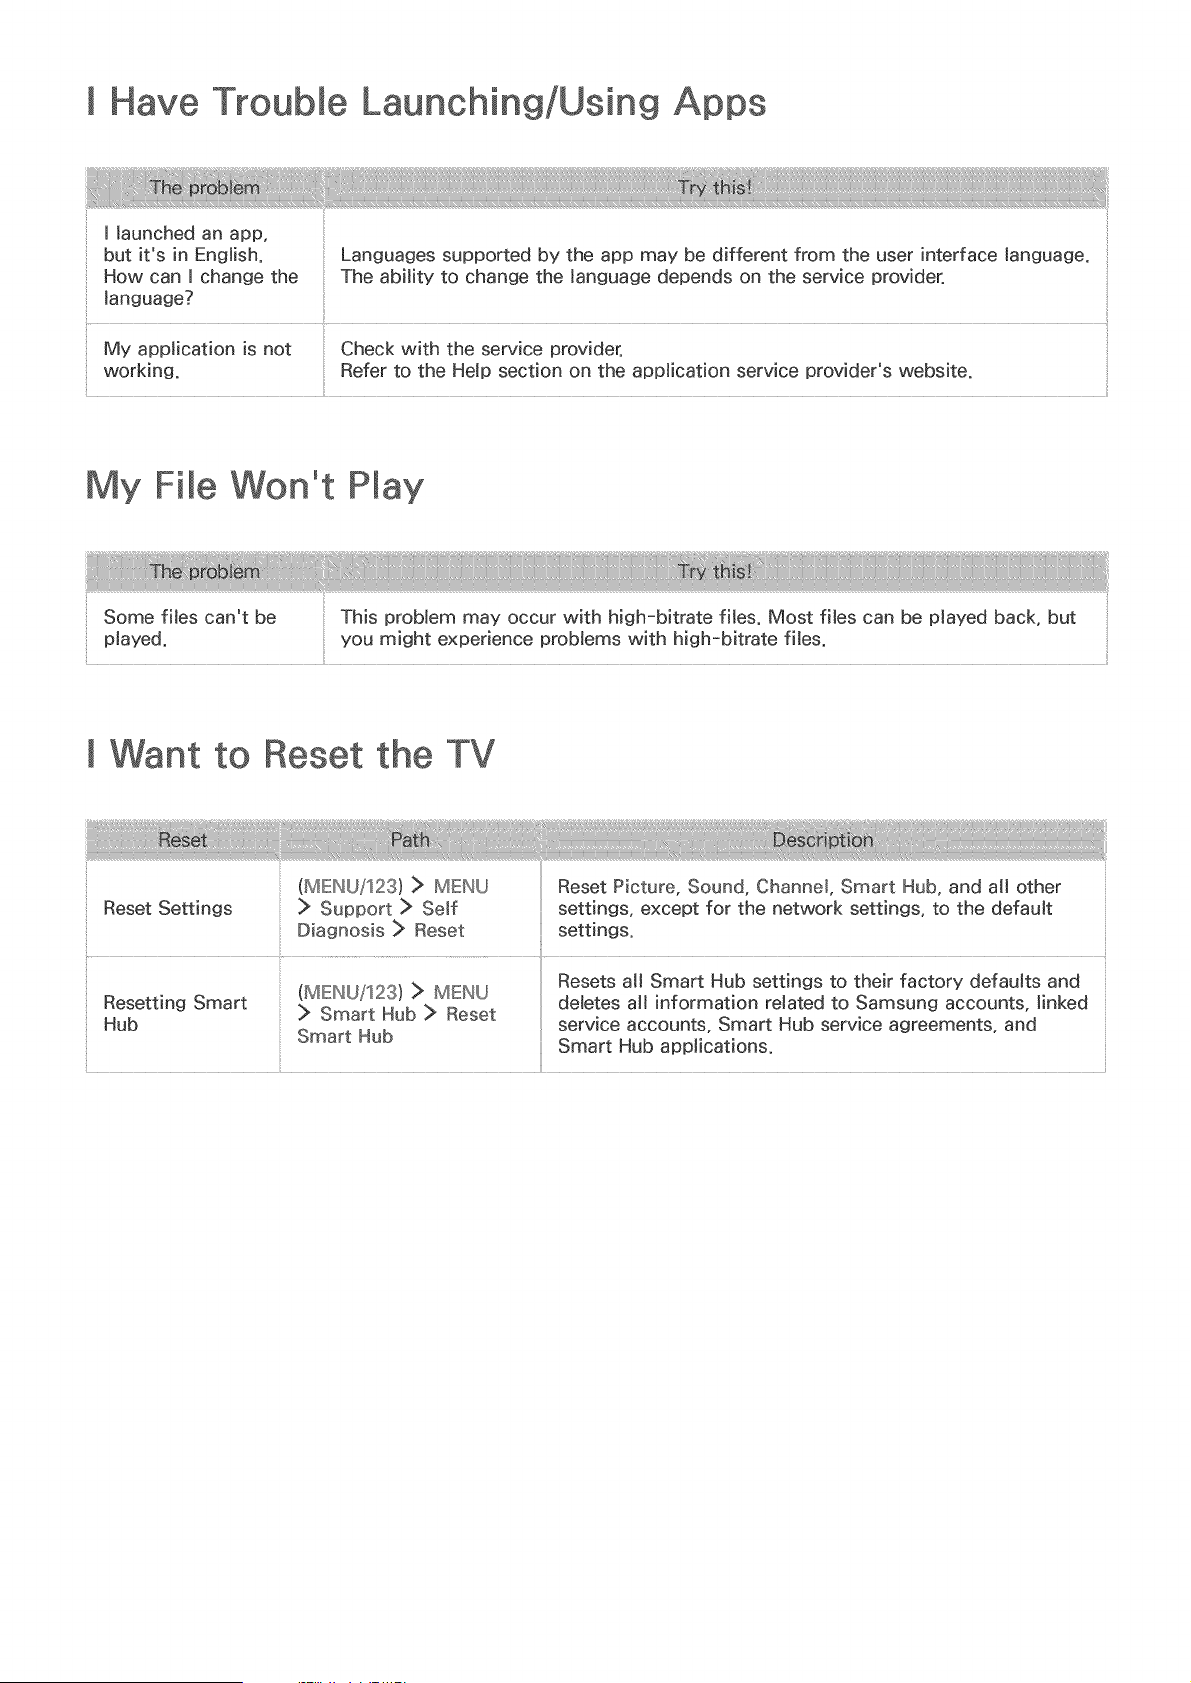
I Have Trouble Launching/Using Apps
I launched an app,
but it's in English. Languages supported by the app may be different from the user interface language.
How can I change the The ability to change the language depends on the service provider,
language7
My application is not Check with the service provider.
working. Refer to the Help section on the application service provider's website.
My File Won't
Some files can't be
played.
This problem may occur with Ngh-bitrate files. Most flies can be played back, but
you might experience problems with high-bitrate files.
I Want to Reset the TV
(MENU/123) > MENU Reset Picture, Sound, Channel, Smart Hub, and all other
Reset Settings > Support :> Self settings, except for the network settings, to the default
Diagnosis :> Reset settings.
Resets all Smart Hub settings to their factory defaults and
(MENU/123) > MENU deletes all information related to Samsung accounts, linked
Resetting Smart > Smart Hub :> Reset
Hub service accounts, Smart Hub service agreements, and
Smart Hub Smart Hub applications.
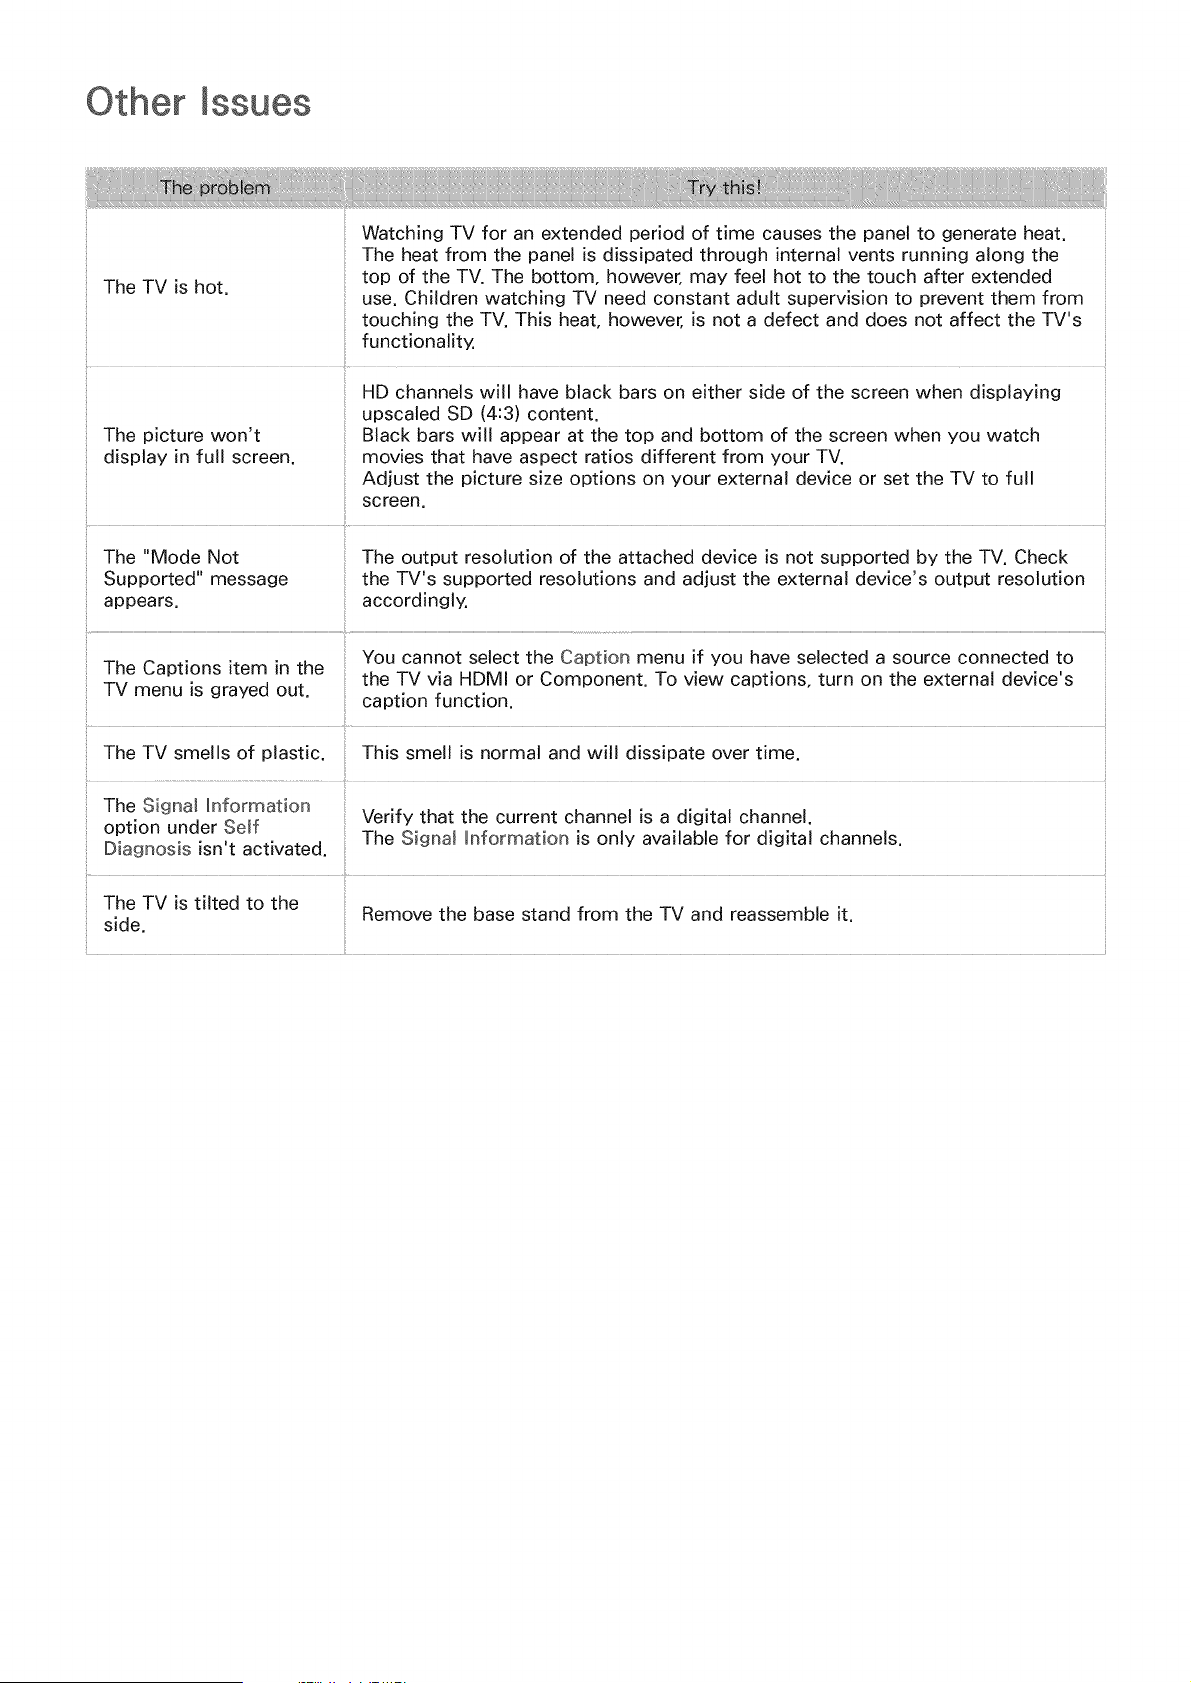
Other Issues
Watching TV for an extended period of time causes the panel to generate heat.
The heat from the panel is dissipated through internal vents running along the
The TV is hot. top of the TV. The bottom, however, may feel hot to the touch after extended
use. Children watching TV need constant adult supervision to prevent them from
touching the TV. This heat, however, is not a defect and does not affect the TV's
functionality.
HD channels will have black bars on either side of the screen when displaying
upscaled SD (4:3) content.
The picture won't Black bars will appear at the top and bottom of the screen when you watch
display in full screen, movies that have aspect ratios different from your TV.
Adjust the picture size options on your external device or set the TV to full
screen.
The "Mode Not The output resolution of the attached device is not supported by the TV. Check
Supported" message the TV's supported resolutions and adjust the external device's output resolution
appears, accordingly.
You cannot select the Caption menu if you have selected a source connected to
The Captions item in the
the TV via HDMI or Component. To view captions, turn on the external device's
TV menu is grayed out. caption function.
The TV smells of plastic. This smell is normal and will dissipate over time.
The Signal hformation
option under Self Verify that the current channel is a digital channel.
Diagnosis isn't activated. The Signal _nformation is only available for digital channels.
The TV is tilted to the
Remove the base stand from the TV and reassemble it.
side.
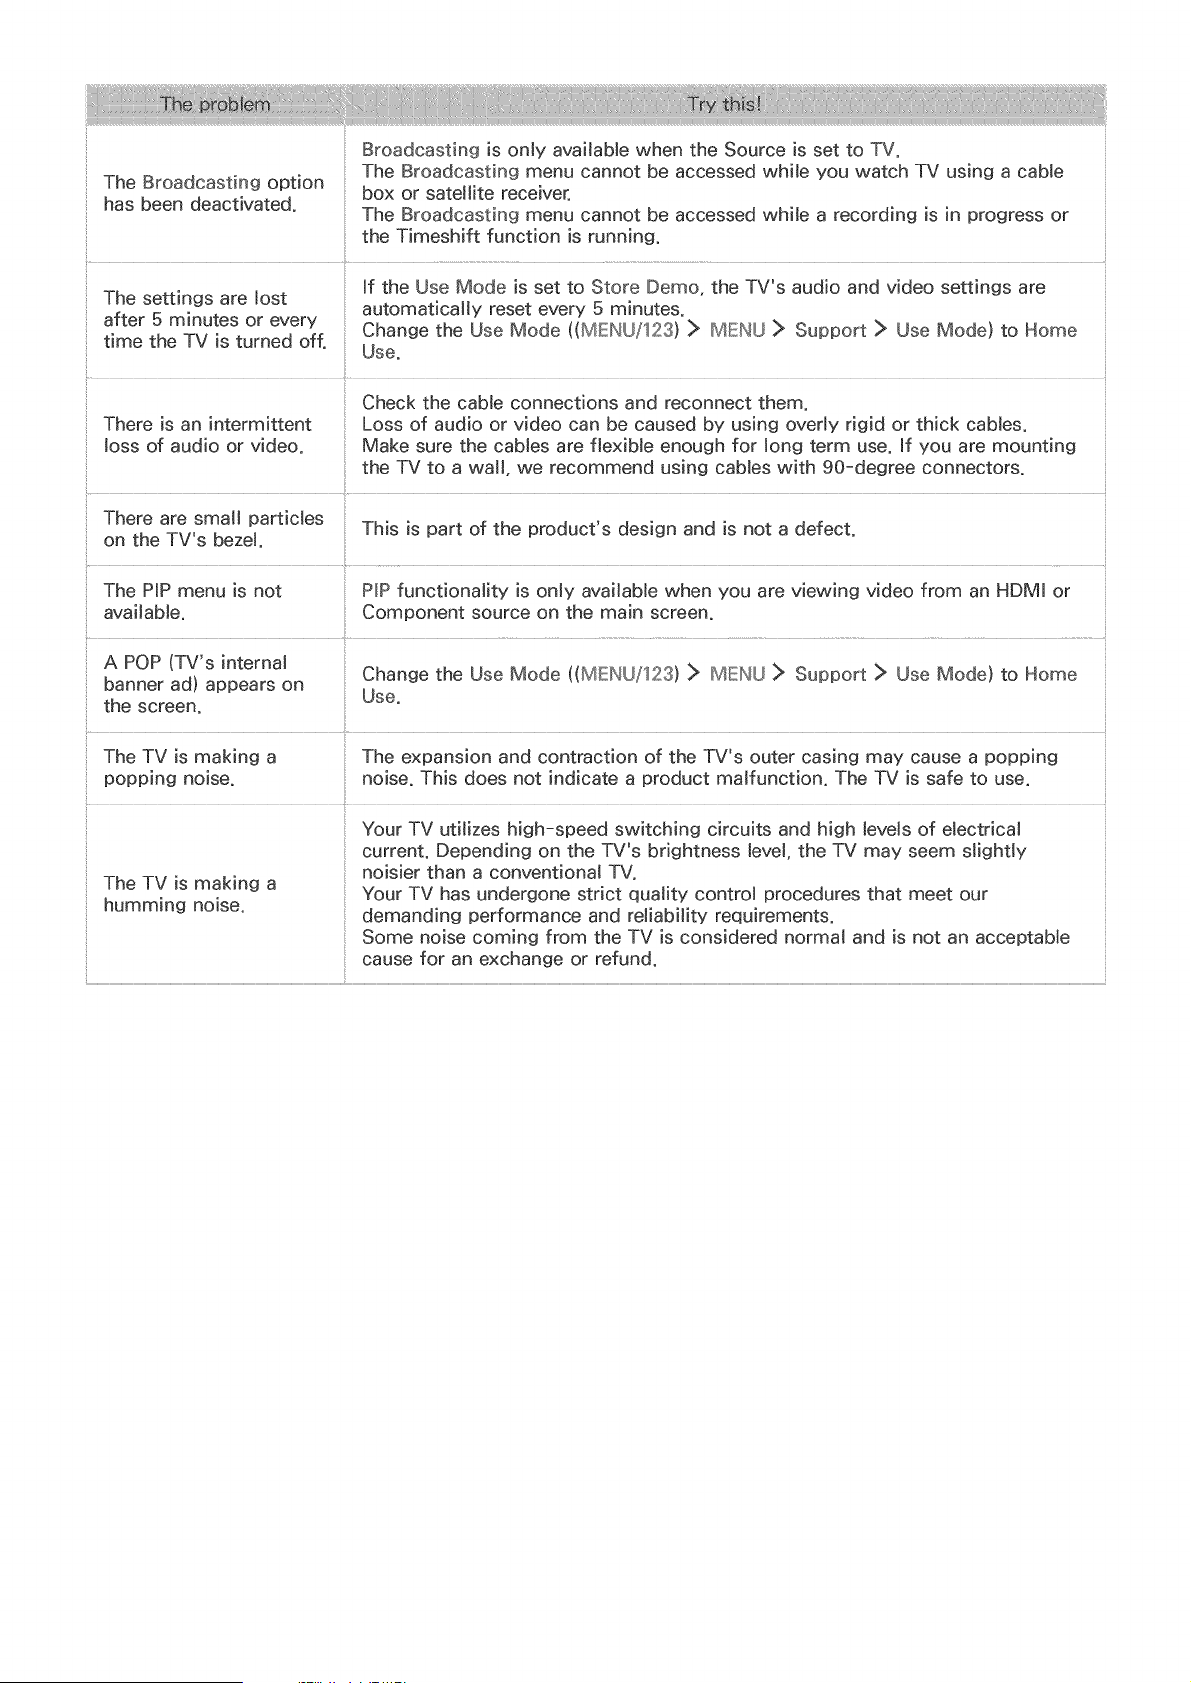
Broadcastingisonlyavailable when the Source is set to TV.
The Broadcasting menu cannot be accessed while you watch TV using a cable
The Broadcasting option box or satellite receiver.
has been deactivated. The Broadcasting menu cannot be accessed while a recording is in progress or
the Timeshift function is running.
If the Use Mode is set to Store Demo, the TV's audio and video settings are
The settings are lost automatically reset every 5 minutes.
after 5 minutes or every Change the Use Mode ((MENU/123) _> MENU ]> Support :> Use Mode) to Home
time the TV is turned off. Use.
Check the cable connections and reconnect them.
There is an intermittent Loss of audio or video can be caused by using overly rigid or thick cables.
loss of audio or video. Make sure the cables are flexible enough for long term use. If you are mounting
the TV to a wall, we recommend using cables with 90-degree connectors.
There are small particles This is part of the product's design and is not a defect.
on the TV's bezel.
The PIP menu is not PIP functionality is only available when you are viewing video from an HDMI or
available. Component source on the main screen.
A POP (TV's internal
Change the Use Mode ((MENU/123) > MENU > Support ]> Use Mode) to Home
banner ad) appears on
Use.
the screen.
The TV is making a The expansion and contraction of the TV's outer casing may cause a popping
popping noise, noise. This does not indicate a product malfunction. The TV is safe to use.
Your TV utilizes high-speed switching circuits and high levels of electrical
current. Depending on the TV's brightness level, the TV may seem slightly
noisier than a conventional TV.
The TV is making a Your TV has undergone strict quality control procedures that meet our
humming noise, demanding performance and reliability requirements.
Some noise coming from the TV is considered normal and is not an acceptable
cause for an exchange or refund.
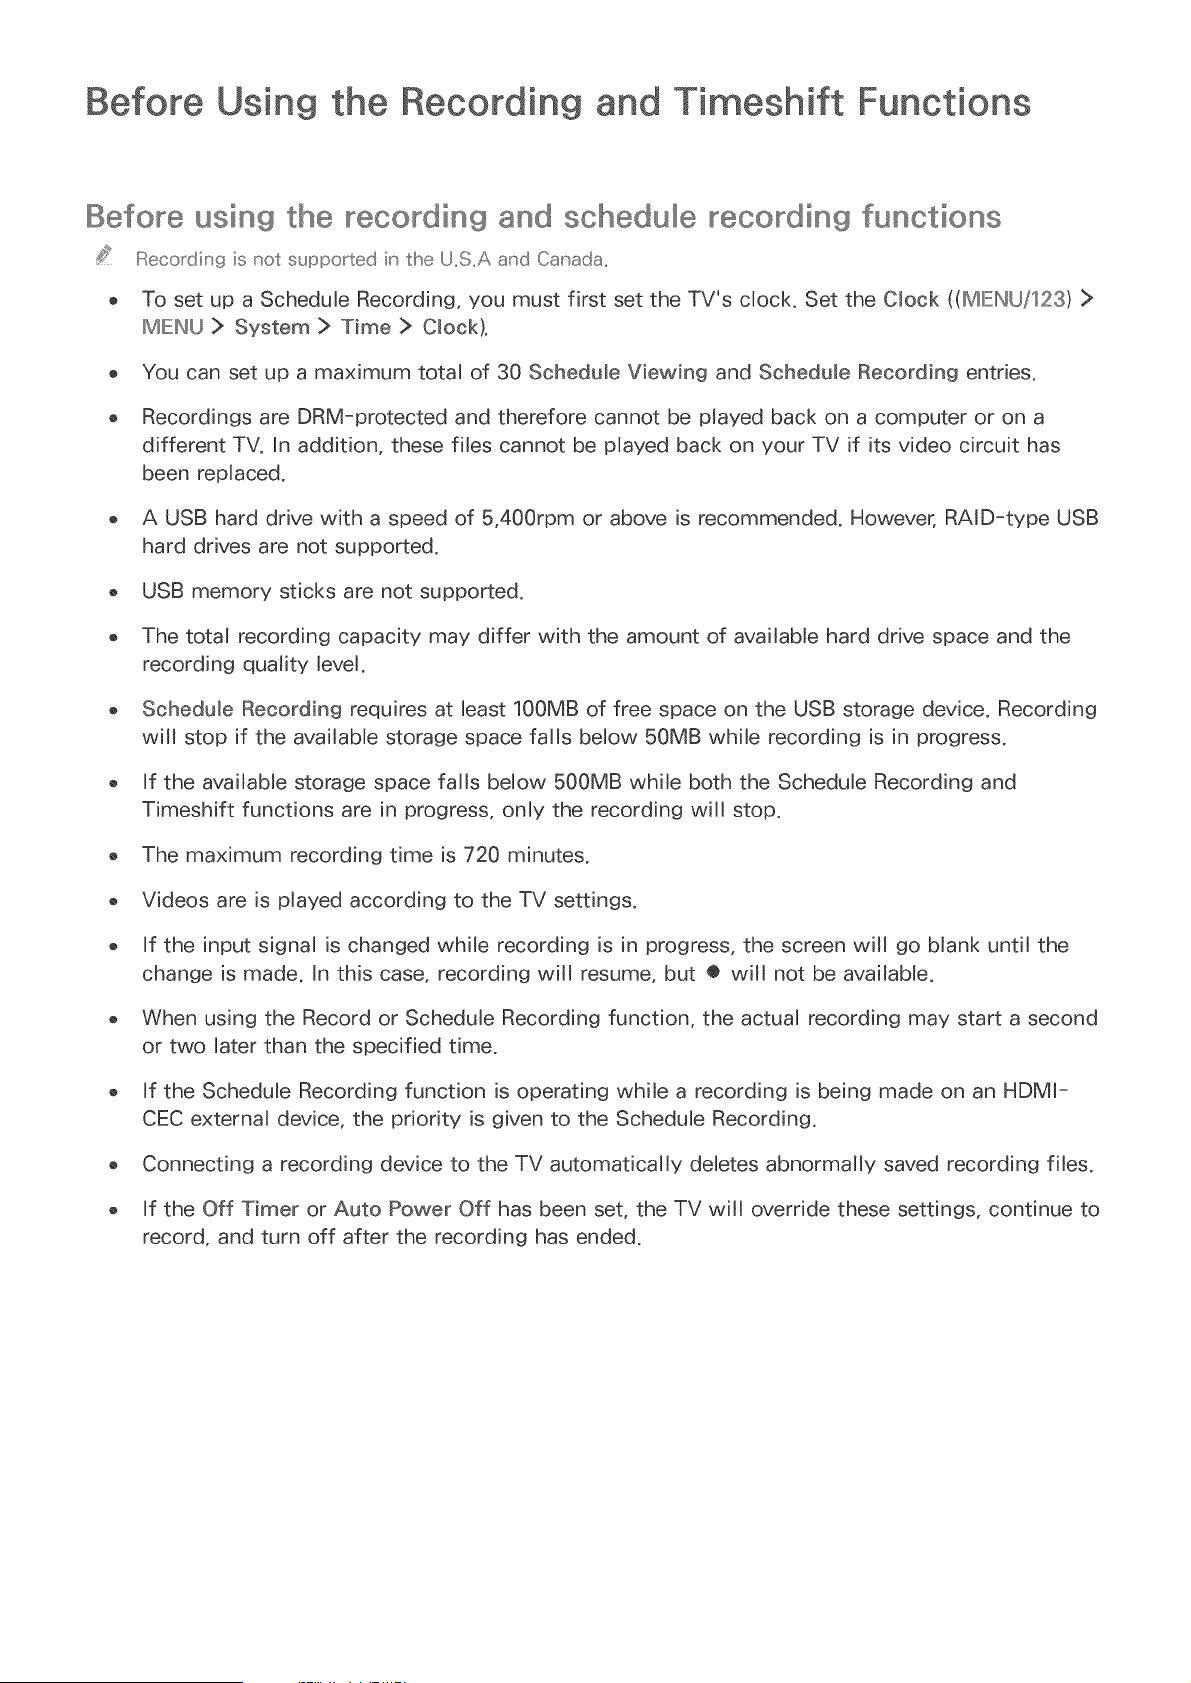
Before Using the Recording and Timeshift Functions
Before using the recording and schedule recording functions
IReco_din9 is not supported ir the U..S..Aa_'d Canada..
o To set up a Schedule Recording, you must first set the TV's clock. Set the Clock ((IMIEIN(J/123) >
IMIEINLJ> System > Time > Clock).
o You can set up a maximum total of 30 Schedub Viewing and Schedule Recording entries.
o Recordings are DRM-protected and therefore cannot be played back on a computer or on a
different TV. nn addition, these files cannot be played back on your TV if its video circuit has
been replaced.
o A USB hard drive with a speed of 5,400rpm or above is recommended. However, RAID-type USB
hard drives are not supported.
o USB memory sticks are not supported.
o The total recording capacity may differ with the amount of availabb hard drive space and the
recording quality level.
o Schedub Recording requires at least 100MB of free space on the USB storage device. Recording
will stop if the available storage space falls below 50MB while recording is in progress.
o If the available storage space falls below 500MB while both the Schedule Recording and
Timeshift functions are in progress, only the recording will stop.
o The maximum recording time is 720 minutes.
o Videos are is played according to the TV settings.
o If the input signal is changed while recording is in progress, the screen will go blank until the
change is made. In this case, recording will resume, but € will not be availabb.
o When using the Record or Schedule Recording function, the actual recording may start a second
or two later than the specified time.
o If the Schedule Recording function is operating while a recording is being made on an HDMI-
CEC external device, the priority is given to the Schedule Recording.
o Connecting a recording device to the TV automatically deletes abnormally saved recording fibs.
o if the Off Timer or Auto Power Off has been set, the TV will override these settings, continue to
record, and turn off after the recording has ended.
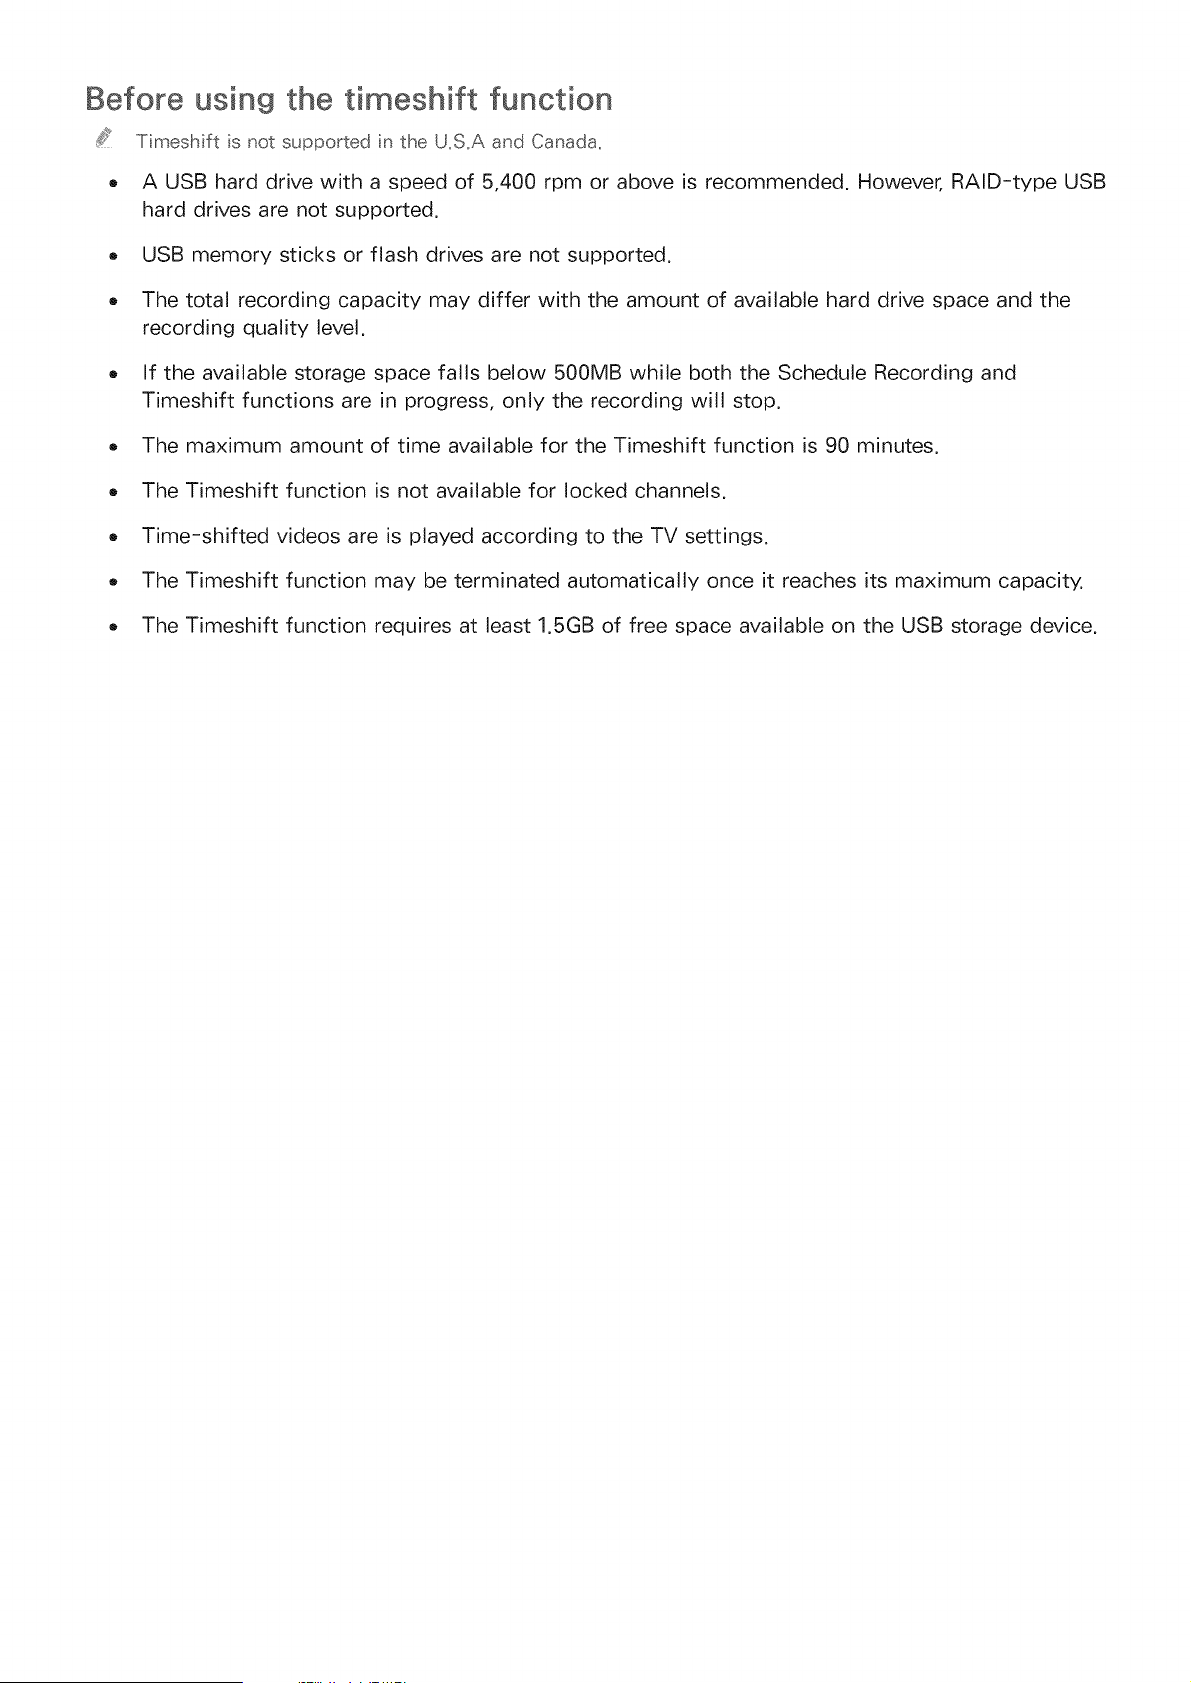
Before using the timeshift function
Timesh ft s not supported n the U_S_Aand Canada_
o A USB hard drive with a speed of 5,400 rpm or above is recommended. However, RAID-type USB
hard drives are not supported.
USB memory sticks or flash drives are not supported.
The total recording capacity may differ with the amount of available hard drive space and the
recording quality level.
If the available storage space falls below 500MB while both the Schedule Recording and
Timeshift functions are in progress, only the recording will stop.
The maximum amount of time available for the Timeshift function is 90 minutes.
The Timeshift function is not available for locked channels.
Time-shifted videos are is played according to the TV settings.
The Timeshift function may be terminated automatically once it reaches its maximum capacity.
The Timeshift function requires at least 1.5GB of free space available on the USB storage device.
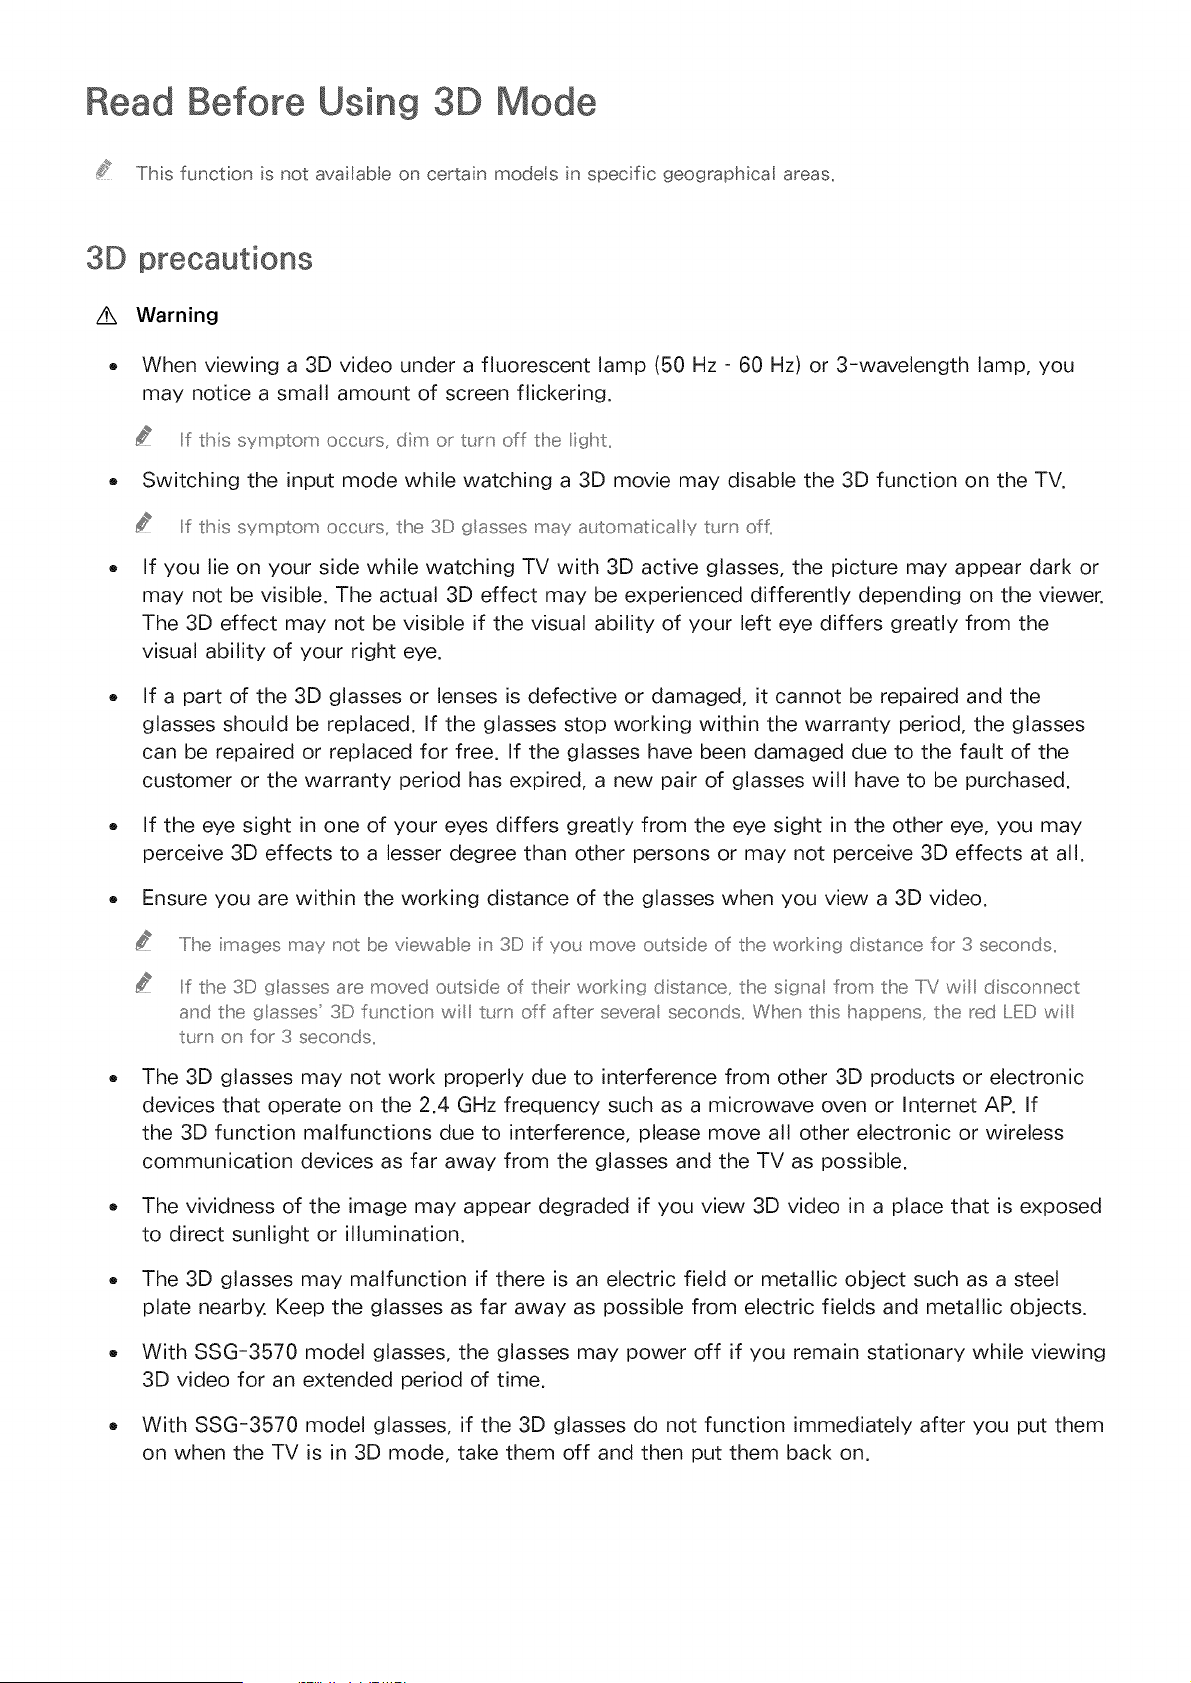
Read Before Using 3D Mode
Thsfuncton snotava abeoncertan models nspecficgeographcaIareas_
3D precautions
/k Warning
o When viewing a 3D video under a fluorescent lamp (50 Hz - 60 Hz) or 3-wavelength lamp, you
may notice a small amount of screen flickering.
Iif this symptom occ_ rs, dim or t_ __ off tlhe ight
Switching the input mode while watching a 3D mowe may disable the 3D function on the TV.
Ill this symptom occurs, the 3D glasses may a_tomatica y t_rn of_,
If you lie on your side while watching TV with 3D active glasses, the picture may appear dark or
may not be visible. The actual 3D effect may be experienced differently depending on the viewer.
The 3D effect may not be visible if the visual ability of your left eye differs greatly from the
visual ability of your right eye.
If a part of the 3D glasses or lenses is defective or damaged, it cannot be repaired and the
glasses should be replaced. If the glasses stop working within the warranty period, the glasses
can be repaired or replaced for free. If the glasses have been damaged due to the fault of the
customer or the warranty period has expired, a new pair of glasses will have to be purchased.
If the eye sight in one of your eyes differs greatly from the eye sight in the other eye, you may
perceive 3D effects to a lesser degree than other persons or may not perceive 3D effects at all.
Ensure you are within the working distance of the glasses when you view a 3D video.
.....Iihe mages may _ot Hoevewabe n 3D f yo_ move o_ts de of rise working distance for 3 seconds,,
Iif the 3D glasses are moved o_ ts de of ther wo_king distance, the s[gna from the IiV wl discor_nect
and the glasses 3D f_ nctio_ wl t_rn off after severa seco_ds. When this happens, the _ed lED wl
t_rn o_ for 3 seco_ds,,
The 3D glasses may not work properly due to interference from other 3D products or electronic
devices that operate on the 2.4 GHz frequency such as a microwave oven or Internet AP. If
the 3D function malfunctions due to interference, please move all other electronic or wireless
communication devices as far away from the glasses and the TV as possible.
The vividness of the image may appear degraded if you view 3D video in a place that is exposed
to direct sunlight or illumination.
The 3D glasses may malfunction if there is an electric field or metallic object such as a steel
plate nearby. Keep the glasses as far away as possible from electric fields and metallic objects.
With SSG-3570 model glasses, the glasses may power off if you remain stationary while viewing
3D video for an extended period of time.
With SSG-3570 model glasses, if the 3D glasses do not function immediately after you put them
on when the TV is in 3D mode, take them off and then put them back on.
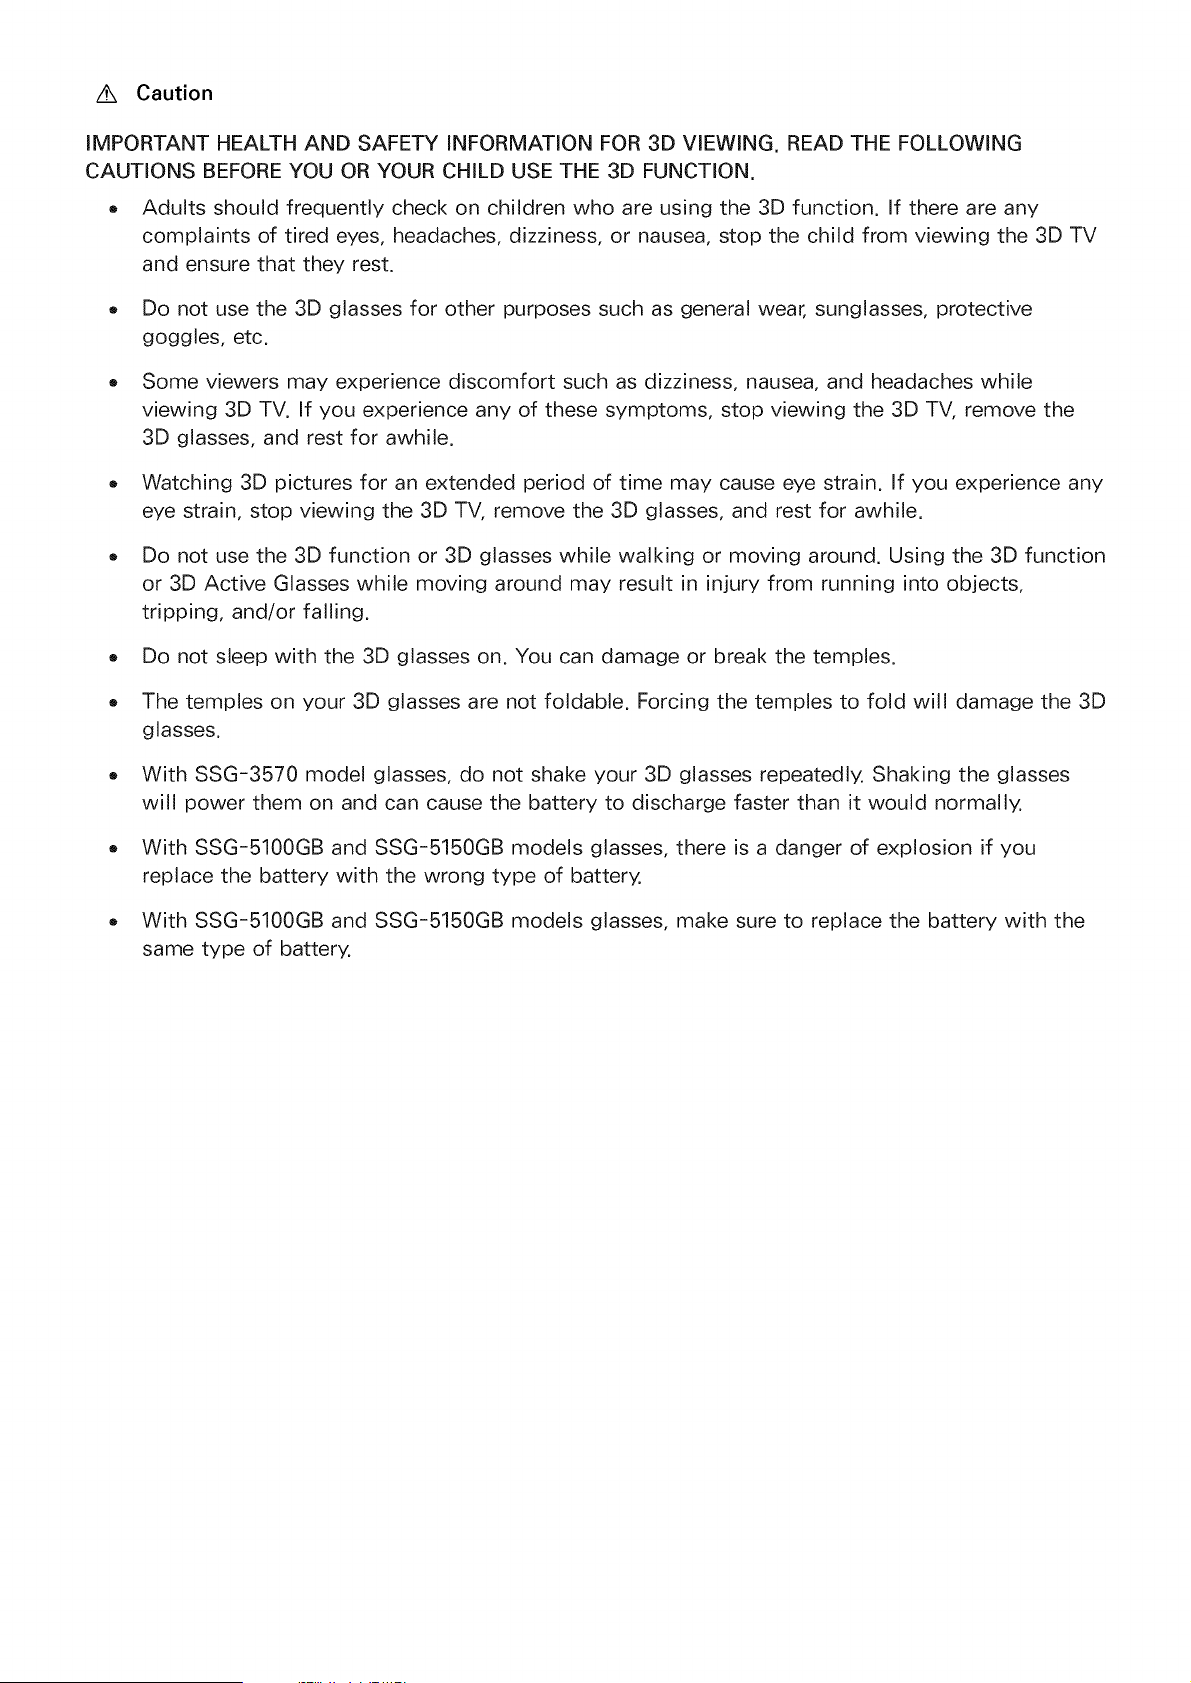
AX Caution
IMPORTANT HEALTH AND SAFETY INFORMATION FOR 3D VIEWING. READ THE FOLLOWING
CAUTIONS BEFORE YOU OR YOUR CHILD USE THE 3D FUNCTION.
o Adults should frequently check on children who are using the 3D function. If there are any
complaints of tired eyes, headaches, dizziness, or nausea, stop the child from viewing the 3D TV
and ensure that they rest.
Do not use the 3D glasses for other purposes such as general wear, sunglasses, protective
goggles, etc.
Some viewers may experience discomfort such as dizziness, nausea, and headaches while
viewing 3D TV. If you experience any of these symptoms, stop viewing the 3D TV, remove the
3D glasses, and rest for awhile.
Watching 3D pictures for an extended period of time may cause eye strain. If you experience any
eye strain, stop viewing the 3D TV, remove the 3D glasses, and rest for awhile.
Do not use the 3D function or 3D glasses while walking or moving around. Using the 3D function
or 3D Active Glasses while moving around may result in injury from running into objects,
tripping, and/or falling.
Do not sleep with the 3D glasses on. You can damage or break the temples.
The temples on your 3D glasses are not foldable. Forcing the temples to fold will damage the 3D
glasses.
With SSG-3570 model glasses, do not shake your 3D glasses repeatedly. Shaking the glasses
will power them on and can cause the battery to discharge faster than it would normally.
With SSG-5100GB and SSG-5150GB models glasses, there is a danger of explosion if you
replace the battery with the wrong type of battery.
With SSG-5100GB and SSG-5150GB models glasses, make sure to replace the battery with the
same type of battery.

/f_ Safety precautions
The following safety instructions are provided to ensure your personal safety and prevent property
damage. Please read the following to ensure the proper use of the product.
o Do not place the product in a location exposed to direct sunlight, heat, fire, or water. Exposure
may result in a product malfunction or fire.
Do not apply force to the lenses of the 3D glasses. Do not drop or bend the glasses. Applying
force, dropping, or bending may result in a 3D glasses malfunction.
Keep the components of the 3D glasses out of reach of children. Especially, ensure children do
not swallow any of the components. If your child swallows a component, consult your doctor
immediately.
When cleaning the glasses, do not spray water or cleaner directly onto its surface. Spraying
water or cleaner directly onto the glasses may result in fire or electric shock, damage to the
glasses's surface, or cause the indicator labels on the glasses's surface to come loose.
Do not apply chemicals containing alcohol, solvent, or surfactant such as wax, benzene, thinner,
pesticide, air freshener, lubricant, or cleaner to the glasses. These chemicals may cause the
glasses's exterior to discolor or crack, or the labels or instructions to be removed. Use only a
soft cloth such as superfine fibers or cotton flannels to clean the glasses as the surface and the
lenses easily crack. Because the glasses can be easily scratched by foreign substances, make
sure to dust off the cloth before using.
Do not disassemble, or attempt to repair or modify your 3D active glasses by yourself.
Be careful not to let the temple ends of the 3D active glasses harm your eye.
Do not sleep with the 3D glasses on. You can break the arms.
Use your hands to put on or remove the 3D glasses.
For SSG-5100 and SSG-5150 model glasses, use only the specified standard batteries. When
replacing the battery, insert the battery so that its polarity (+, -) is correct. Failing to do so may
damage the battery or result in fire, personal injury or environmental damage caused by liquid
leaking from the battery.
For SSG-5100 and SSG-5150 model glasses, keep used batteries out of the reach of children
so that they do not accidently swallow it. If your child swallows a battery, consult your doctor
immediately.
Swallowing the cylindrical (button type) battery can cause serious damage to your internal
organs. If this happens, contact a doctor immediately.
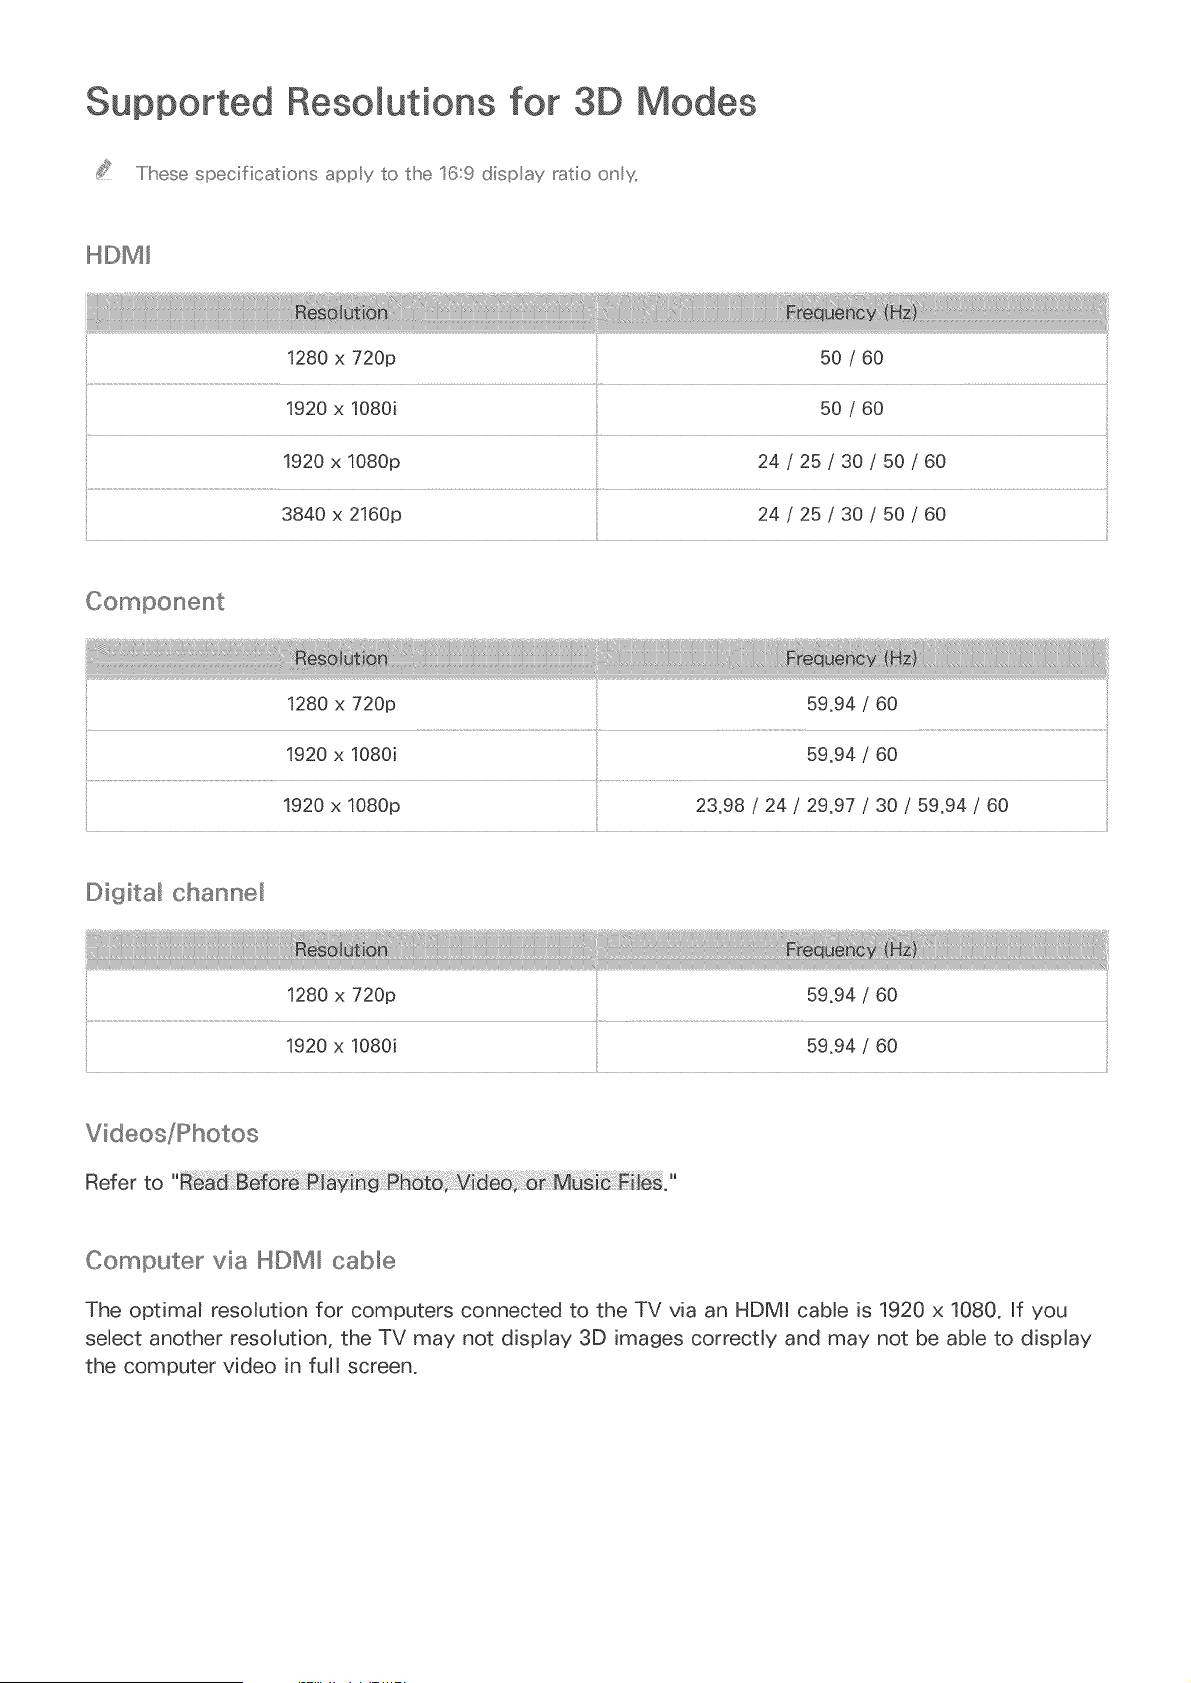
Resolutions for 3D
.....Ihese specificatio_'s appy to the 18:9 dispay ratio o_' y,
1280 x 720p 50 / 60
1920 x 1080i 50 / 60
1920 x 1080p 24 / 25 / 30 / 50 / 60
3840 x 2160p 24 / 25 / 30 / 50 / 60
59.94 / 60
1920 x 1080p 23.98 / 24 / 29.97 / 30 / 59.94 / 60
Digital channell
1280 x 720p 59.94 / 60
1920 x 1080i 59.94 / 60
Computer via HDMI cable
The optimal resolution for computers connected to the TV via an HDMI cable is 1920 x 1080. If you
select another resolution, the TV may not display 3D images correctly and may not be able to display
the computer video in full screen.
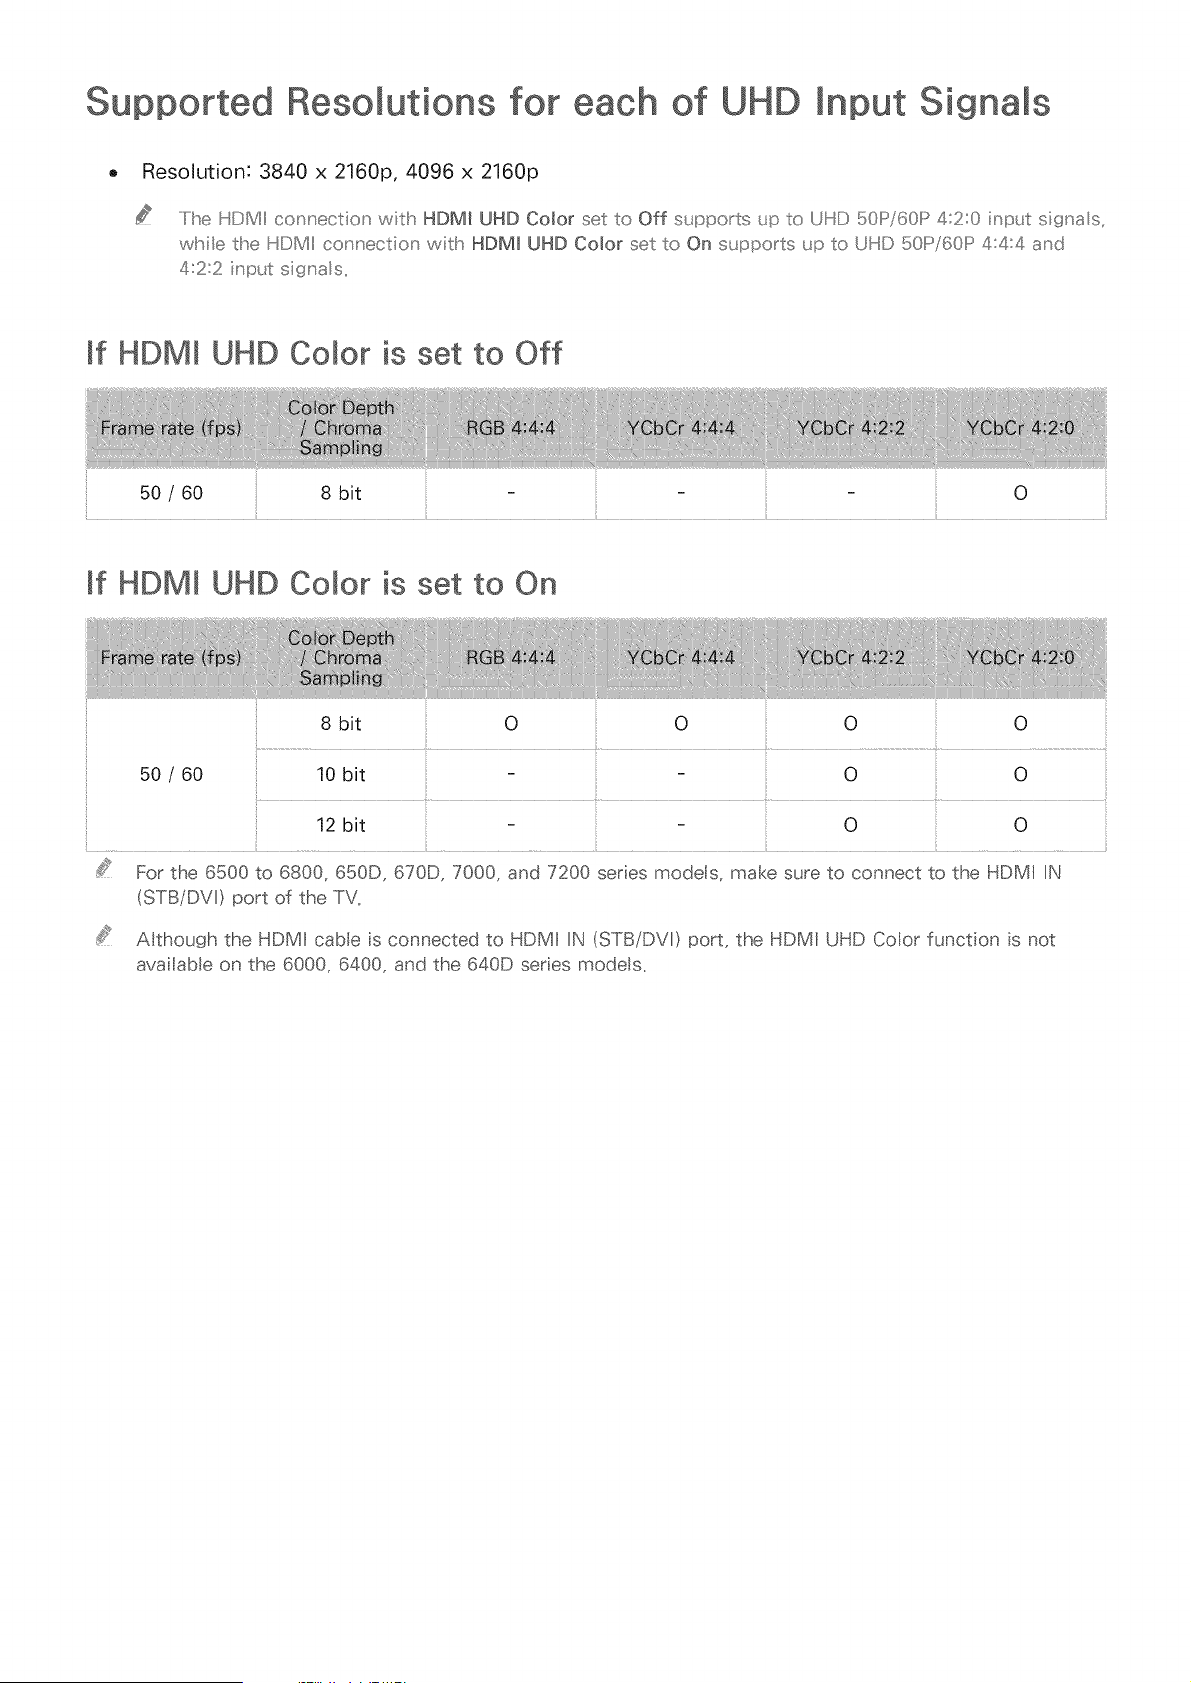
Resomutions for each of UHD Input Signams
Resolution: 3840 x 2160p, 4096 x 2160p
.....Iihe HDMII connection wth HDMI UHD Color set to Off st pports up to UHD 501!::::2/601!::::>4:2:0 nptt s gna s,
while the HDMII connectio_ wth HDM_ UHD Color set to On s_ ppo_ts _p to UHD 501!::::>/601!::::>4:4:4 and
4:2:2 ;np_t signa s,,
If HDM! UHD Color is set to Off
50 / 60
8 bit O
mfHDM! UHD Color is set to On
12 bit O
For the 6500 to 6800, 650D, 670D, 7000, and 7200 series models, make sure to connect to the HDMI IN
(STBiDVl) port of the TV,
A though the HDMI cable is connected to HDMI IN (STB/DVl) port, the HDMI UHD Coot funct on s not
ava abe on the 6000, 6400, and the 640D series models,
S Recommendation disclaimer
Some of the features recommended by S Recommendat on may not be ava abe on atl models,
S Recommendat;on s only ava abe for the modes made for the U,S,A,
S Recommendation "with voice interaction
For recommendations given in response to common speech commands:
Voice Interaction is limited to the official language of the country of purchase, Performance may vary
based on content availability, the clarity and volume of your voice, and ambient noise levels, Strong
regional accents may not be recognized,
Certain Samsung Smart TV features may not be available if you do not give your expressed consent to
the collection and use of personal information,
Certain features within S Recommendation require Internet access and may not be available based on
service provider, language, dialect, and region,
Your remote control may differ from the images shown in this manual,
S Recommendation
For content recommendations given to fit your TV viewing preferences:
Certain Samsung Smart TV features may not be available if you do not give your expressed consent to
the collection and use of personal information,
Certain features within S Recommendation require Internet access and may not be available based on
service provider, language, dialect, and region,
Your remote control may differ from the images shown in this manual,
Read Before Using Voice, Motion, or Face Recognition
Thsfuncton snotava abeoncertan models nspecficgeographcaIareas_
Precautions for voice, motion, and face recognition
Face _"_ecognition
o This product saves thumbnail images of users' faces for use during the Face Recognition Login.
Logging into the Smart Hub via Face Recognition may be less secure than logging in using an ID
and password.
Using the TV camera
Under some circumstances and under certain legal conditions, the use/misuse of the TV camera
may result in illegal actions. There may be obligations under local privacy laws regarding the
protection of individuals concerning personal data and on the free movement of such data, and
possibly other laws including criminal laws regulating camera surveillance both in the workplace
and elsewhere.
By using the TV camera, users agree that it will not be used (i) in locations where cameras are
generally prohibited (such as bathrooms, locker rooms or changing rooms), (ii) in any manner
that will result in an invasion of a person's privacy, or (iii) in violation of any applicable laws,
regulations or statutes.
When you are no longer using the camera, close the lens cover of the camera or retract it. This
prevents any inadvertent or unintentional camera operation.
Motion Contro_
Motion Control functions through the camera connected to the TV. For Motion Control to work,
you must be within the camera's recognition range. The camera's recognition range differs with
the ambient light level and other factors.
Run the Motion Control Environment Test before using Motion Control to determine the
camera's recognition range.
You may experience physical fatigue when using Motion Control for extended periods.
Voice Recognition
o Voice Recognition is not available in all languages, dialects, or regions. Its performance differs
with the language chosen, voice volume, and ambient noise levels in the surrounding area.
Voice Text Input requires that you agree to any third-party app's voice privacy policy.
Voice Text Input lets you enter text using voice commands instead of a mouse, keyboard, or
remote control. This feature is particularly useful for searching, browsing the web, and using
applications.
You must agree to the following privacy notices before using Interactive Voice Recognition:
- Voice Recognition Privacy Notice, Nuance Privacy Notice
Requirements for using voice, motion, or face recognition
Requi_"_ements for using voice _"_ecognition
The voice recognition rate differs with the volume/tone, pronunciation, and ambient sound
environment (TV sound and ambient noise),
Req_,,ai_"_ements for Usin_j Motion Reco%nition
o Be sure to use Motion Control within the recommended distance of between 4.9 ft (1.5 m) and
11.4 ft (3.5 m). The actual recognition range may differ with the camera angle and other factors.
For the camera to recognize movement, you must stand out from the background.
The appropriate ambient brightness is 50 to 500 lux. (A bathroom typically has 100 Lux, a living
room 400 Lux.)
Avoid direct sunlight when using Motion Control.
Run the Motion Control Environment Test to assess the camera's recognition range before using
Motion Control.
Req_,,ai_"_ements for usin_j Face Reco%nition
Be sure to use Face Recognition within the recommended distance of between 4.9 ft (1.5 m) and
13.1 ft (4 m). The actual recognition range may differ with the camera angle and other factors.
The appropriate ambient brightness is 50 to 500 lux. (A bathroom typically has 100 Lux, a living
room 400 Lux.)
Face Recognition can recognize up to 5 different users at a time.
The TV may have difficulty recognizing twins and people with similar faces as two different
individuals,
Note the following when using Face Recognition:
- Do not cover your face with a hat, a pair of sunglasses, or your hair.
- Your entire face must be visible to the camera. Avoid shadows over your face. Shadows
prevent the camera from recognizing faces accurately,
- Keep your expression as neutral as possible. In addition, keep your mouth closed and as
neutral as possible.
- When you log into your Samsung account, your facial expression must be the same as the
facial expression you had when you registered.
Read Before Using Apps
o
o
o
o
o
o
Due to the product characteristics featured on Samsung Smart Hub, as well as limitations in
available content, certain features, applications, and services may not be available on all devices
or in all territories. Some Smart Hub features may also require additional peripheral devices
or membership fees. Visit http://www.samsung.com for more information on specific device
information and content availability. Services and content availability are subject to change
without prior notice.
Samsung Electronics takes no legal responsibility whatsoever for any interruption of app services
caused by the service provider for any reason.
Application services may be provided in English only and available content may differ with the
geographical area.
For more information about applications, visit the applicable service provider's website.
An unstable Internet connection may cause delays or interruptions. In addition, applications
may terminate automatically depending on the network environment. If this occurs, check your
Internet connection and try again.
Application services and updates may become unavailable.
Application content is subject to change by the service provider without prior notice.
Specific services may differ with the version of the application installed on the TV.
An application's functionality may change in future versions of the application. If this occurs, run
the application's tutorial or visit the service provider's website.
Depending on the service provider's policies, certain applications may not support multitasking.
Read Before Using the
Browser
o Select Web Browser. The browsing screen may differ from the one on your computer.
The web browser is not compatible with Java applications.
You can download the supported types of files, such as videos, mp3 files, and images, but
you cannot download files that are not supported by the TV. If you attempt to download an
unsupported file, you will receive an error message instead.
The web browser may not be able to access certain websites.
The TV does not support playback of flash videos.
o E-commercefor onlinepurchasesis not supported.
o With websitesthat havescrollablewindows, scrollinga window can result in corrupted
characters.
o ActiveX is not supported.
o Certainoptions are not accessiblein Link Browsingmode.(Switch to PointerBrowsingto
activatethose options.)
o Only a limited numberof fonts are supported.Certainsymbolsand charactersmay not be
displayedproperly.
o The responseto remotecommandsandthe resultingon-screendisplay may be delayedwhile a
webpageis loading.
o Loadinga webpagemaybe delayedor suspendedcompletelywith certainoperatingsystems.
o The copy and pasteoperationsare not supported.
o Whencomposingan emailor a simple message,certainfunctions suchas the font sizeand color
selectionmay not be available.
o Thereis a limit to the numberof bookmarksand the sizeof the log file that canbe saved.
o The numberof windows that can be openedconcurrentlydiffers with the searchconditionsand
the TV model.
o The web browsingspeedwill differ with the networkenvironment.
o Embeddedvideos can play at the sametime the PIP(picture-in-picture)function is operating.
Theweb browsersupports.mp3 audiofiles only.
o If the Clock ((MIEINkJ/123)> IMIEINkJ> System > Time > Clock) hasnot been set,the browsing
history will not be saved.
o The browsinghistory is savedfrom latestto oldest, with the oldest entriesbeing overwritten
first.
o Dependingon the types of video/audiocodecssupported,it might not be possibleto play
certainvideo and audiofiles while playing Flashcontent.
o Videosourcesfrom PC-optimizedstreamingserviceprovidersmay not play properlyon our
proprietaryweb browser.
o Usingthe on-screenQWERTYkeyboardautomaticallydisablesPIP(exceptwhenyou are entering
a URL).
Read Before Pmayin9 Photo, Video, or Music Fi es
o
o
o
o
o
o
itations on use of photo, video, and music files
The TV supports MSC (Mass Storage Class) USB devices only. MSC is a class designation for
mass storage devices. Types of MSC devices include external hard drives, flash card readers,
and digital cameras. (USB hubs are not supported.) These kinds of devices must be connected
directly to the TV's USB port. The TV may not be able to recognize a USB device or read the
files on the device if it is connected to the TV via a USB extension cable. Do not disconnect USB
devices while they are transferring files.
When connecting an external hard drive, use the USB (HDD) port. We recommend that you use
an external hard drive with its own power adapter.
Certain digital cameras and audio devices may not be compatible with the TV.
If there are multiple USB devices connected to the TV, the TV might not be able to recognize
some or all the devices. USB devices that use high-power input should be connect to the USB [5V,
1A] port.
The TV supports the FAT, exFAT, and NTFS file systems.
After sorting files in the Folder view mode, the TV can display up to 1000 files per folder. If the
USB device contains more than 8,000 files and folders, however, some files and folders might
not be accessible.
The PTP (pier to pier) connection mode is available only for digital cameras. If you connect a
smartphone or tablet to the TV using PTP mode, the TV will not recognize it.
Be sure to connect USB or external hard drives that support USB 3.0, to the USB 3.0 port.
Certain files, depending on how they are encoded, may not play on the TV.
o Certain files are not supported on all models.
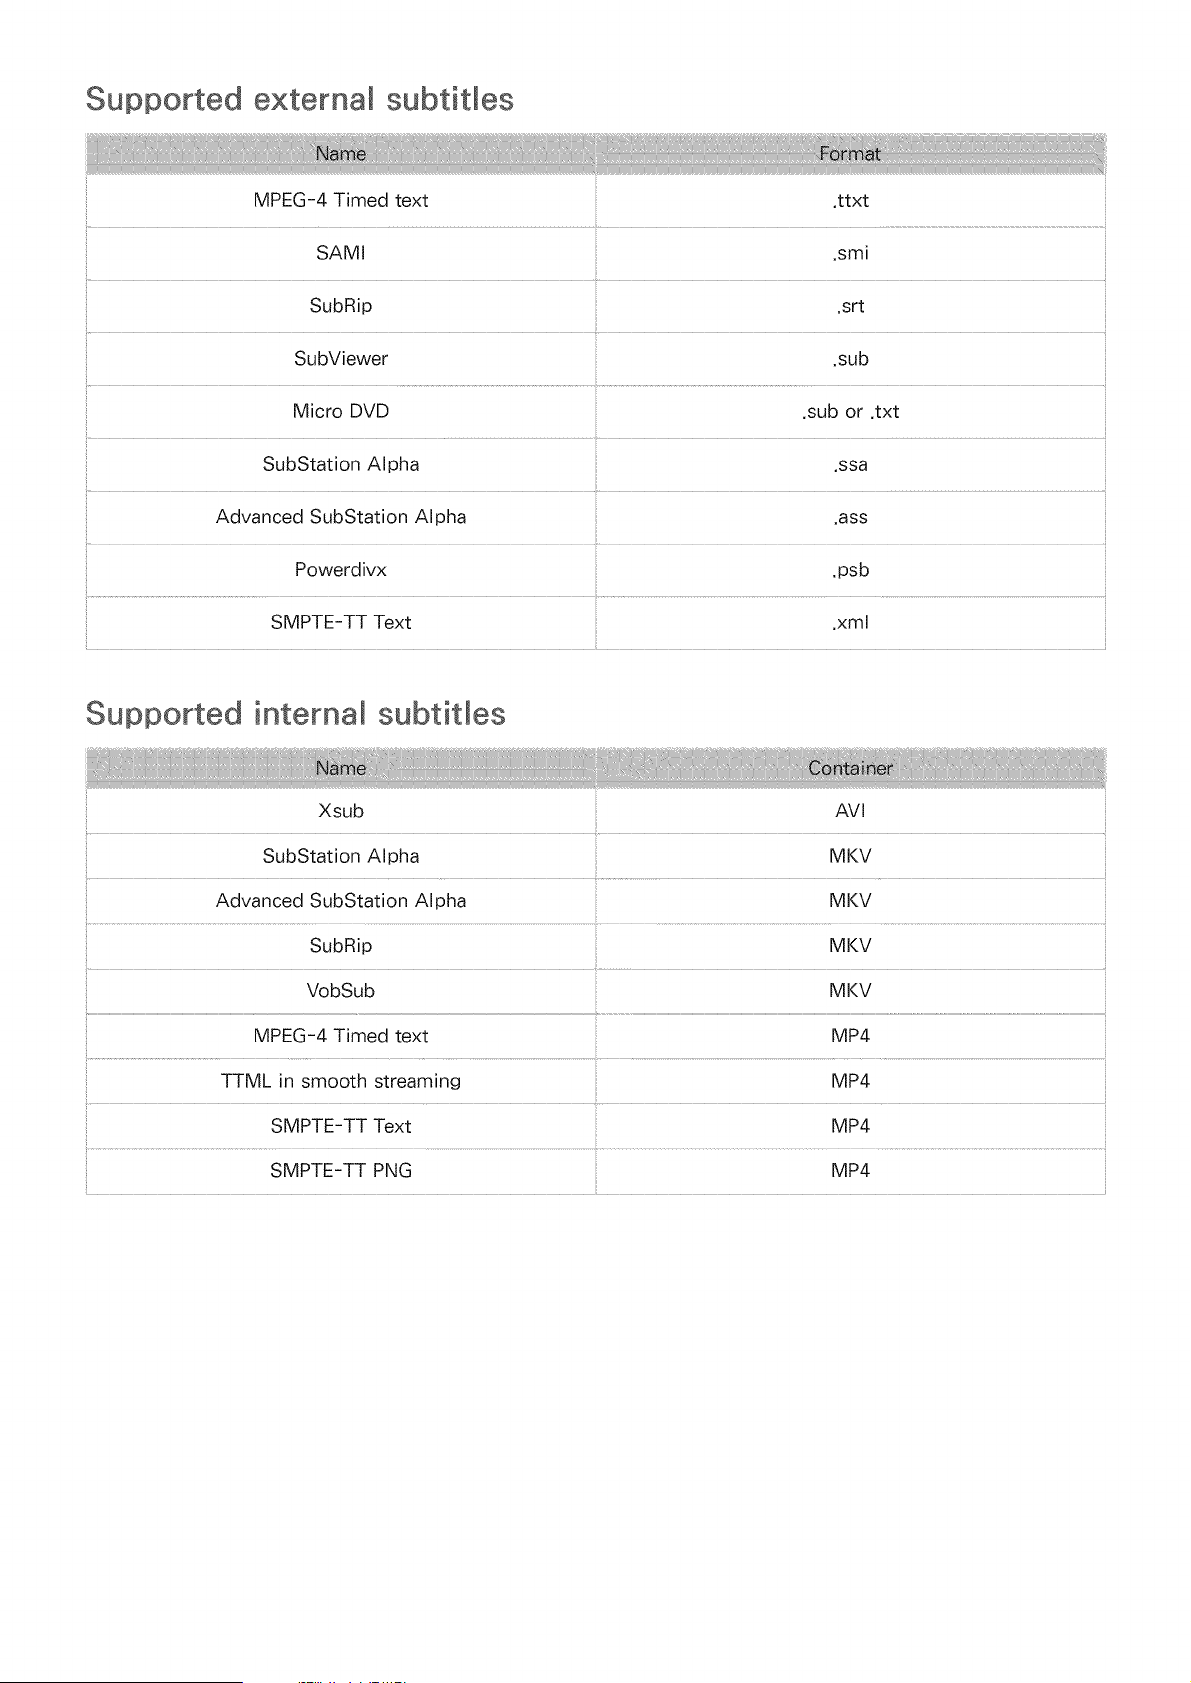
Supported externa_ subtitles
........................................................... ii¸
SAMI ,smi
SubRip .srt
SubViewer .sub
SubStation Alpha .ssa
Advanced SubStation Alpha .ass
Powerdivx .psb
SMPTE-TT Text ,xml
Supported internal subtitles
Xsub
SubStation AIpha
AVl
MKV
Advanced SubStation Alpha MKV
SubRip MKV
VobSub MKV
MPEG-4 Timed text MP4
TTML in smooth streaming MP4
SMPTE-TT Text MP4
SMPTE-TT PNG MP4
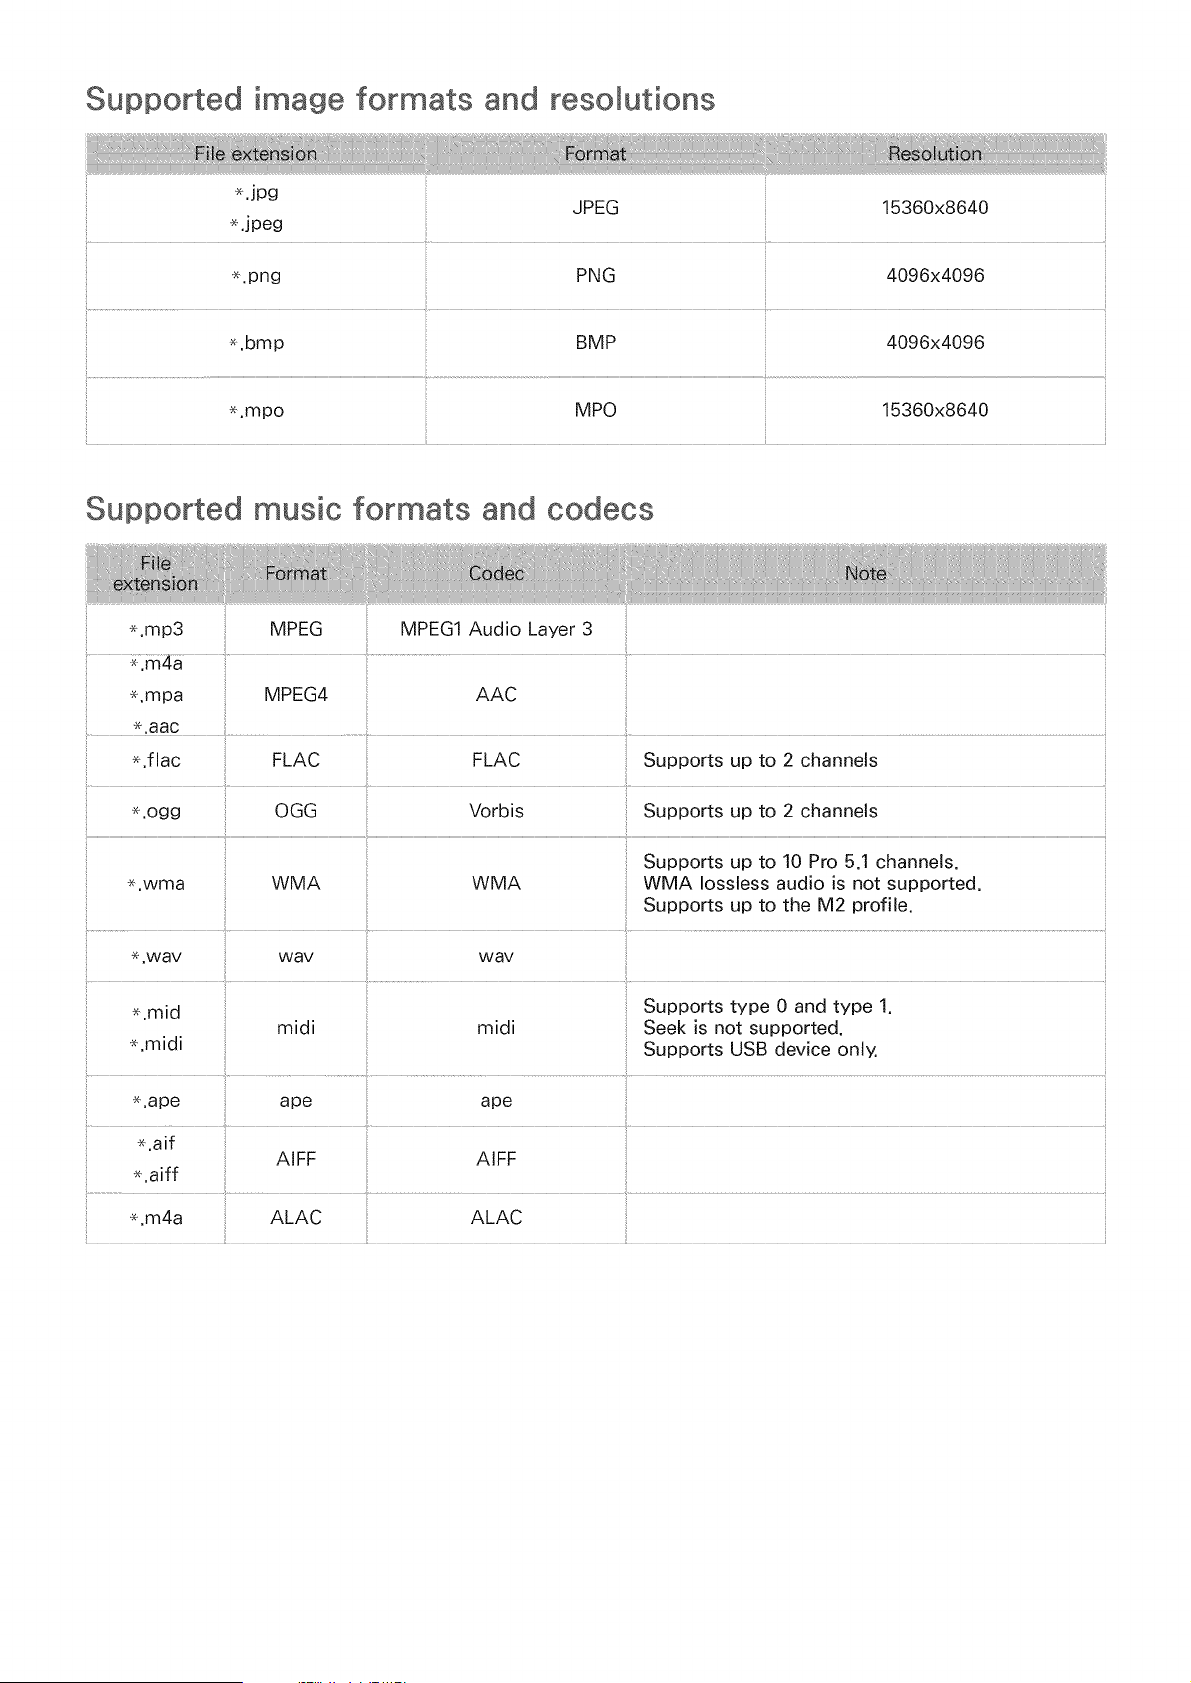
Supported image formats and resolutions
.jpg
JPEG 15360x8640
.jpeg
e.png PNG 4096x4096
_.bmp BMP 4096x4096
_.mpo 15360x8640
Supported music formats and codecs
_.mp3 MPEG MPEG1 Audio Layer 3
_,aac ..................................................................................................................
_.flac FLAC FLAC Supports up to 2 channels
_.ogg OGG Vorbis Supports up to 2 channels
Supports up to 10 Pro 5.1 channels.
_.wma WMA WMA WMA Iossless audio is not supported.
Supports up to the M2 profile.
_+.way way way
_.mid Supports type 0 and type 1.
midi midi Seek is not supported.
_.midi Supports USB device only,
_.ape ape ape
AIFF
_.aiff
_.m4a ALAC ALAC
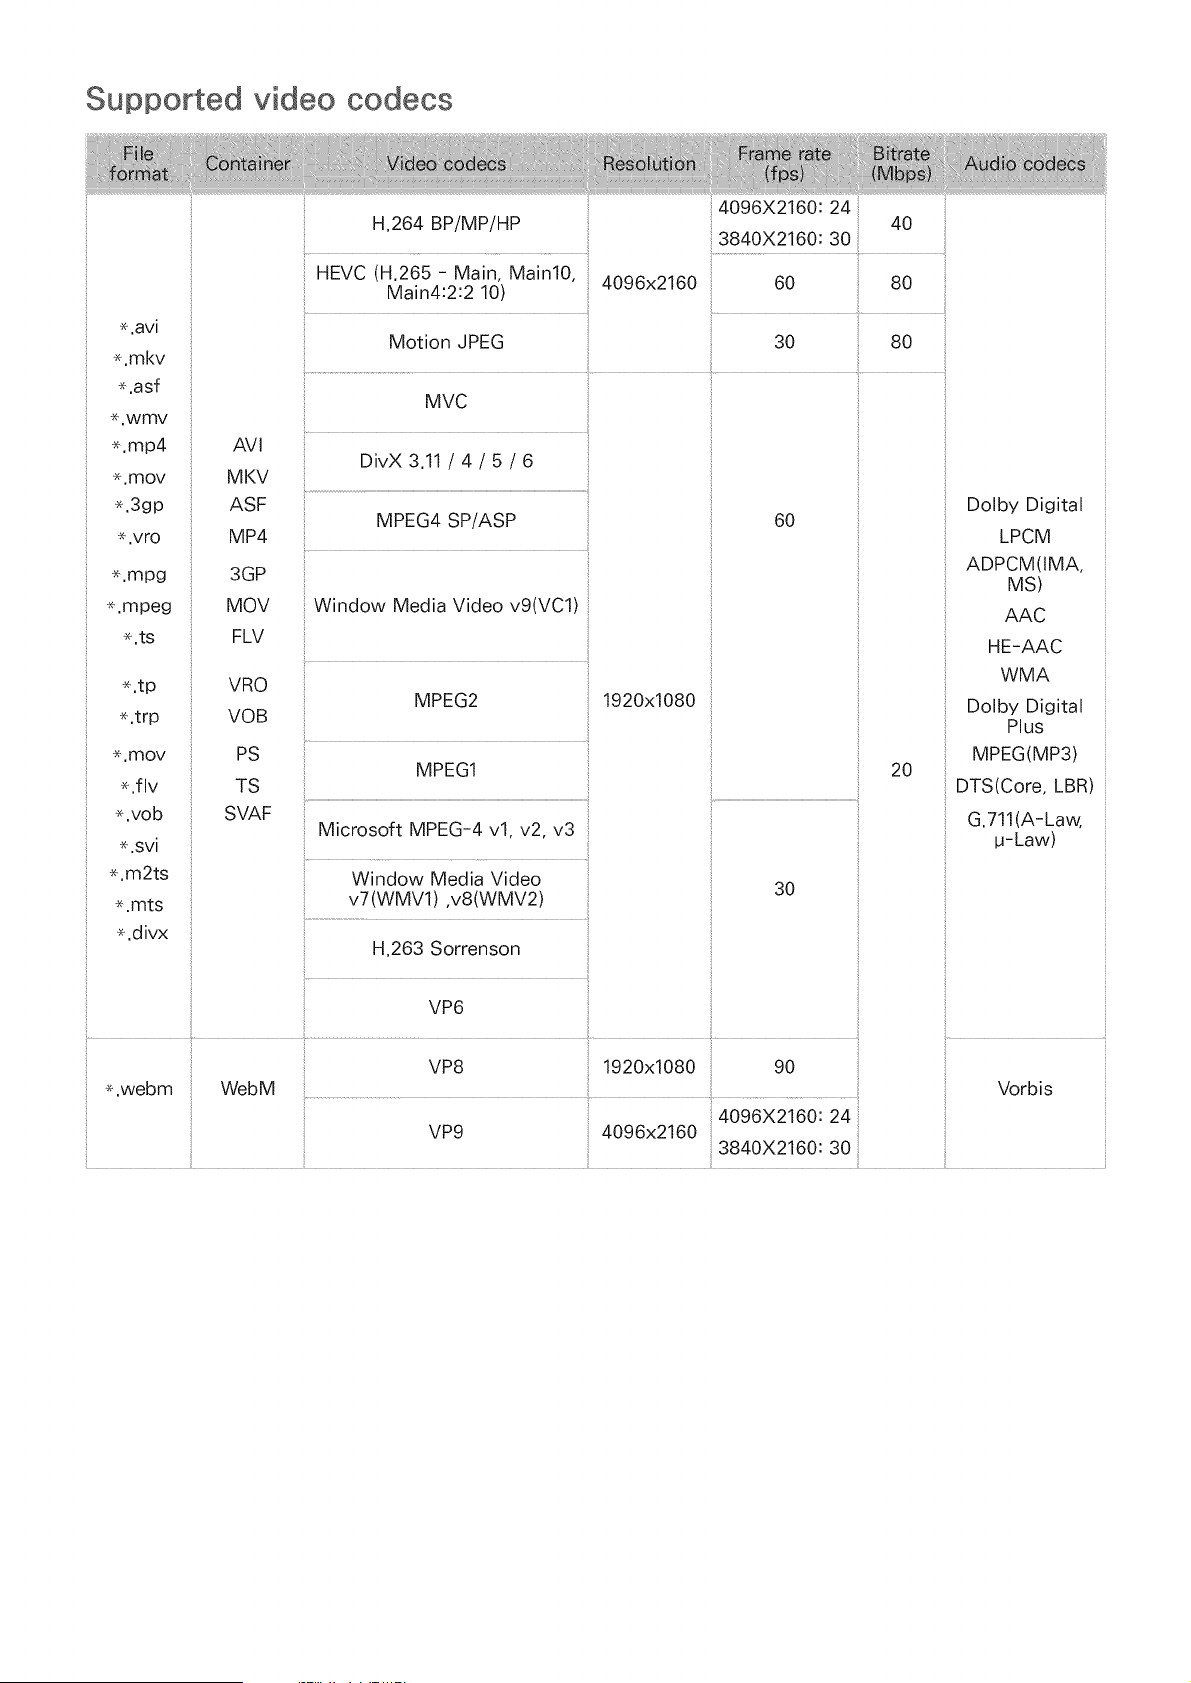
Supported video codecs
*.avi
.mkv
.asf
,wmv
*.mp4
,mov
*.3gp
,vro
.mpg
*.mpeg
.ts
.tp
*.trp
.mov
.flv
*.vob
*.svi
*.m2ts
.mts
.divx
AVI
MKV
ASF
MP4
3GP
MOV
FLV
VRO
VOB
PS
TS
SVAF
H.264 BP/MP/HP
HEVC (H.265 - Main, Main10,
Main4:2:2 10)
Motion JPEG
4096x2160
4096X2160:24
40
3840X2160:30
60 80
30 80
MVC
DivX 3.11 / 4 / 5 / 6
MPEG4 SP/ASP 60
Window Media Video v9(VCl)
MPEG2 1920x1080
30
MPEG1
Microsoft MPEG-4 vl, v2, v3
Window Media Video
v7 (WMVl) ,v8 (WMV2)
H.263 Sorrenson
VP6
VP8 1920x1080 90
.webm WebM
4096X2160:24
VP9 4096x2160
3840X2160:30
20
Dolby Digital
LPCM
ADPCM(IMA,
MS)
AAC
HE-AAC
WMA
Dolby Digital
Plus
MPEG(MP3)
DTS(Core, LBR)
G.711(A-Law,
u-Law)
Vorbis
Other restrictions
o Codecs may not function properly if there is a problem with the content.
Video content does not play or does not play correctly if there is an error in the content or
container.
Sound or video may not work if they have standard bit rates/frame rates above the TV's
compatibility ratings.
If the Index Table is has an error, the Seek (Jump) function will not work.
When playing video over a network connection, the video may not play smoothly because of
data transmission speeds.
Some USB/digital camera devices may not be compatible with the TV.
HEVC codec is only available in MKV / MP4 / TS containers.
Video decoders
. H.264 FHD is supported up to Level 4.1. (does not support FMO/ASO/RS)
. H.264 UHD is supported up to Level 5.1.
. HEVC FHD is supported up to Level 4.1, and HEVC UHD is supported up to Level 5.1.
. VC1 AP L4 is not supported.
o All video codecs excluding WMV v7, v8, MSMPEG4 v3, MVC, and VP6:
Below 1280x720:60 frame max
Above 1280x720:30 frame max
. GMC 2 or above is not supported.
. Supports SVAF Top/Bottom. Side by Side, and Left/Right view sequence type (2ES) only.
. Supports BD MVC specs only.
Audio decoders
WMA 10 Pro supports up to 5.1 channels. Supports up to the M2 profile. WMA Iossless audio is
not supported.
QCELP and AMR NB/WB are not supported.
Vorbis is supported for up to 5.1 channels.
Dolby Digital Plus is supported for up to 5.1 channels.
The DTS LBR codec is only available for MKV / MP4/TS containers.
The supported sample rates are 8, 11.025, 12, 16, 22.05, 24, 32, 44.1, and 48 KHz, and differ by
the codec.
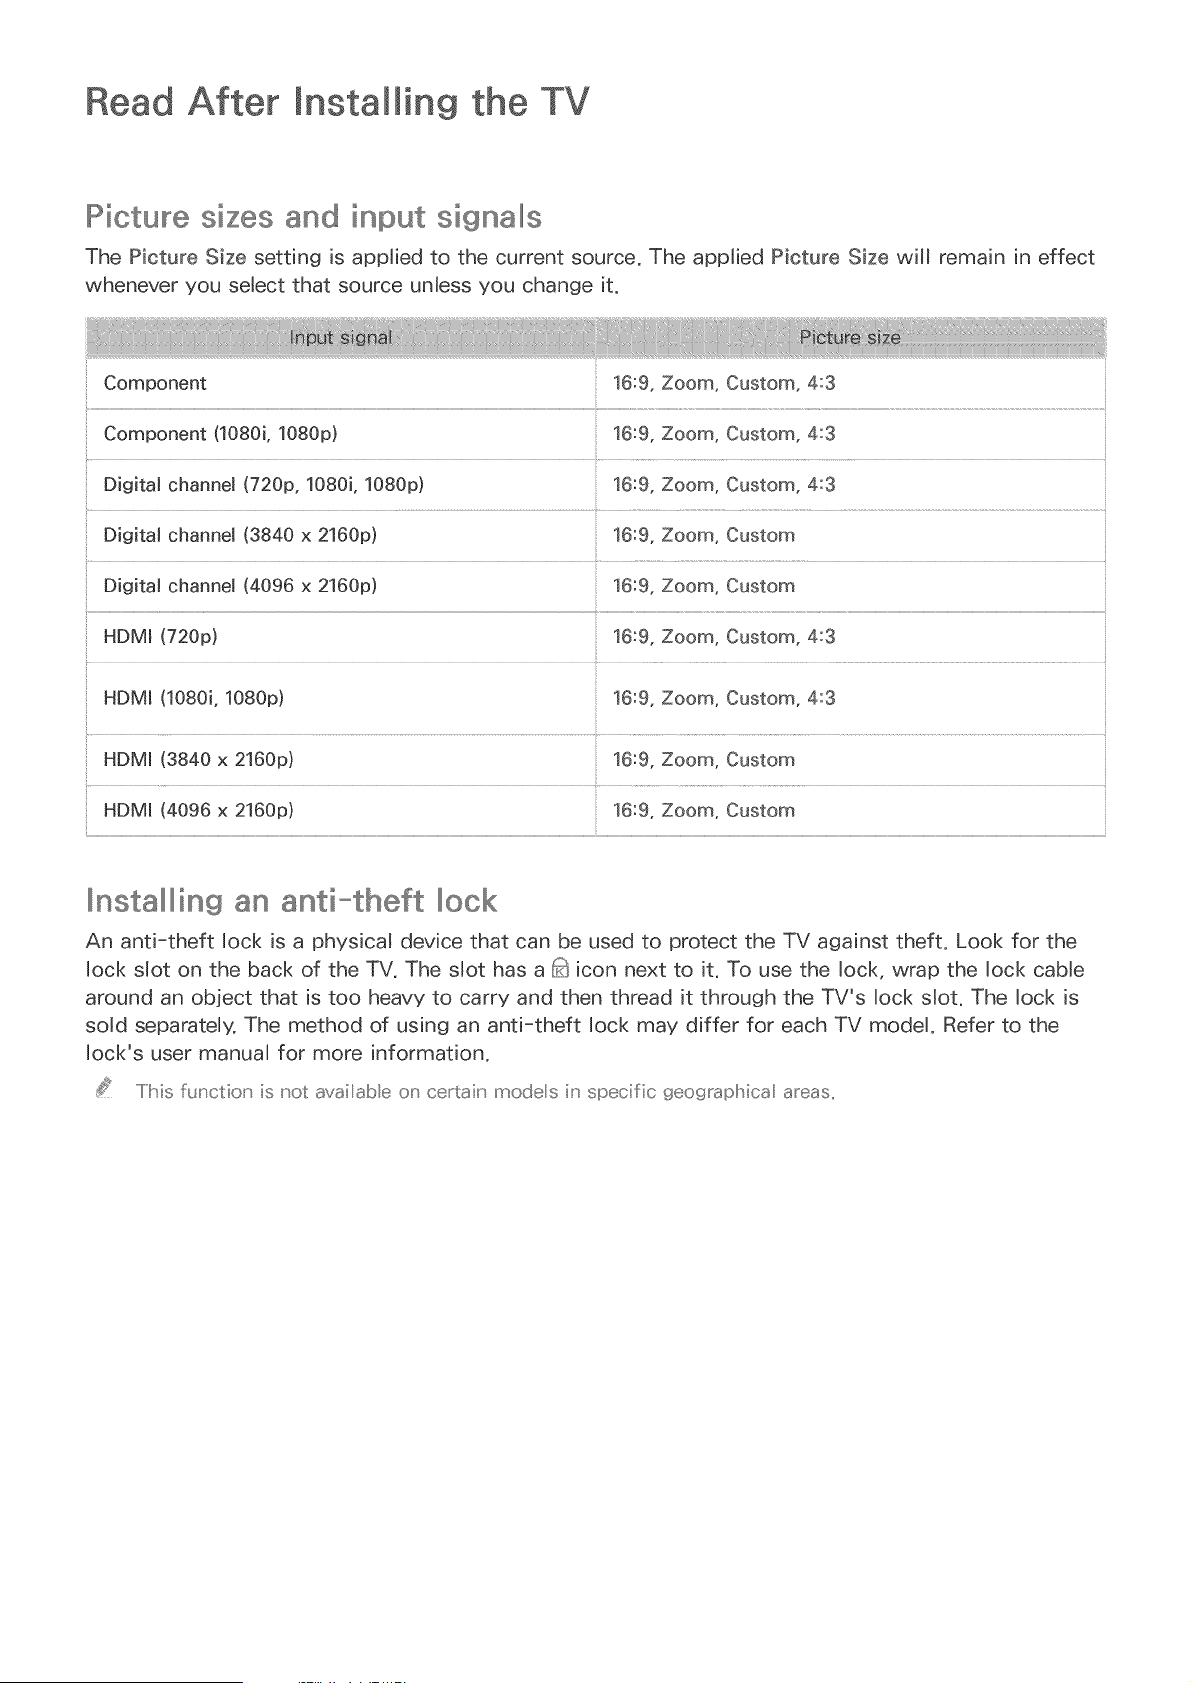
Read After Installing the TV
IIPiotur@siz@s and input signalllls
The Picture Size setting is applied to the current source. The applied Picture Size will remain in effect
whenever you select that source unless you change it.
Component 16:9, Zoom, Custom, 4:3
Component (1080i, 1080p) 16:9, Zoom, Custom, 4:3
Digital channel (720p, 1080i, 1080p) 16:9, Zoom, Custom, 4:3
Digital channel (3840 x 2160p) 16:9, Zoom, Custom
Digital channel (4096 x 2160p) 16:9, Zoom, Custom
HDMm(720p) 16:9, Zoom, Custom, 4:3
HDMm(1080i, 1080p) 16:9, Zoom, Custom, 4:3
HDMI (3840 x 2160p) 16:9, Zoom, Custom
HDMI (4096 x 2160p) 16:9, Zoom, Custom
_nstallllllllingan anti-theft IIIIook
An anti-theft lock is a physical device that can be used to protect the TV against theft. Look for the
lock slot on the back of the TV. The slot has a 5_ icon next to it. To use the lock, wrap the lock cable
around an object that is too heavy to carry and then thread it through the TV's lock slot. The lock is
sold separately. The method of using an anti-theft lock may differ for each TV model. Refer to the
lock's user manual for more information.
.....IMs function' is not availabe o_' certain modes iu' specific geograpMca areas,,
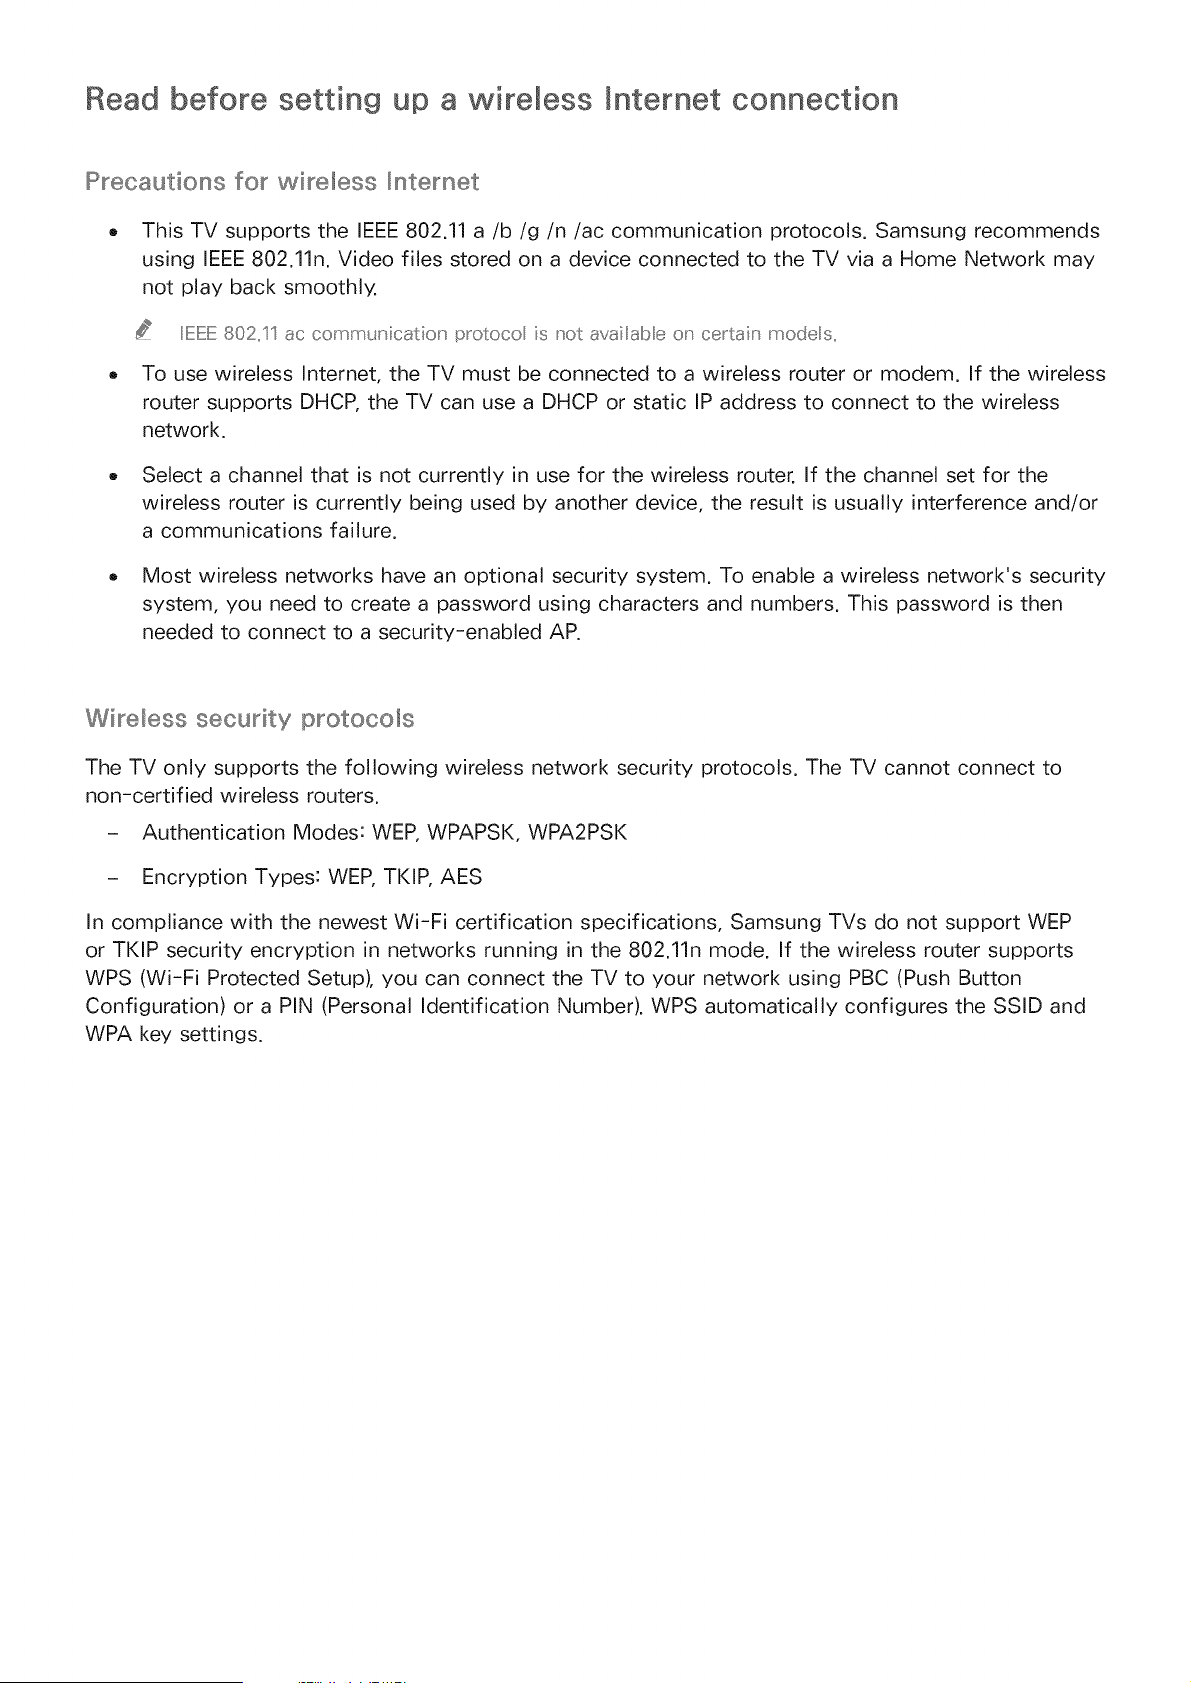
Read before setting up a "wireless mnternet connection
Pr_ecautions fo__wi_eless _nternet
o This TV supports the IEEE 802.11 a/b/g/n/ac communication protocols. Samsung recommends
using IEEE 802.11n. Video files stored on a device connected to the TV via a Home Network may
not play back smoothly,
IiEEE 802,,11 ac comm_ n catio_ protoco s _ot ava labe o_ certa n modes,,
To use wireless Internet, the TV must be connected to a wireless router or modem. If the wireless
router supports DHCP, the TV can use a DHCP or static IP address to connect to the wireless
network.
Select a channel that is not currently in use for the wireless router. If the channel set for the
wireless router is currently being used by another device, the result is usually interference and/or
a communications failure.
Most wireless networks have an optional security system. To enable a wireless network's security
system, you need to create a password using characters and numbers. This password is then
needed to connect to a security-enabled AP.
Wi_eless security protocols
The TV only supports the following wireless network security protocols. The TV cannot connect to
non-certified wireless routers.
- Authentication Modes: WEP, WPAPSK, WPA2PSK
- Encryption Types: WEP, TKIP, AES
In compliance with the newest Wi-Fi certification specifications, Samsung TVs do not support WEP
or TKIP security encryption in networks running in the 802.11n mode. If the wireless router supports
WPS (Wi-Fi Protected Setup), you can connect the TV to your network using PBC (Push Button
Configuration) or a PIN (Personal Identification Number). WPS automatically configures the SSID and
WPA key settings.
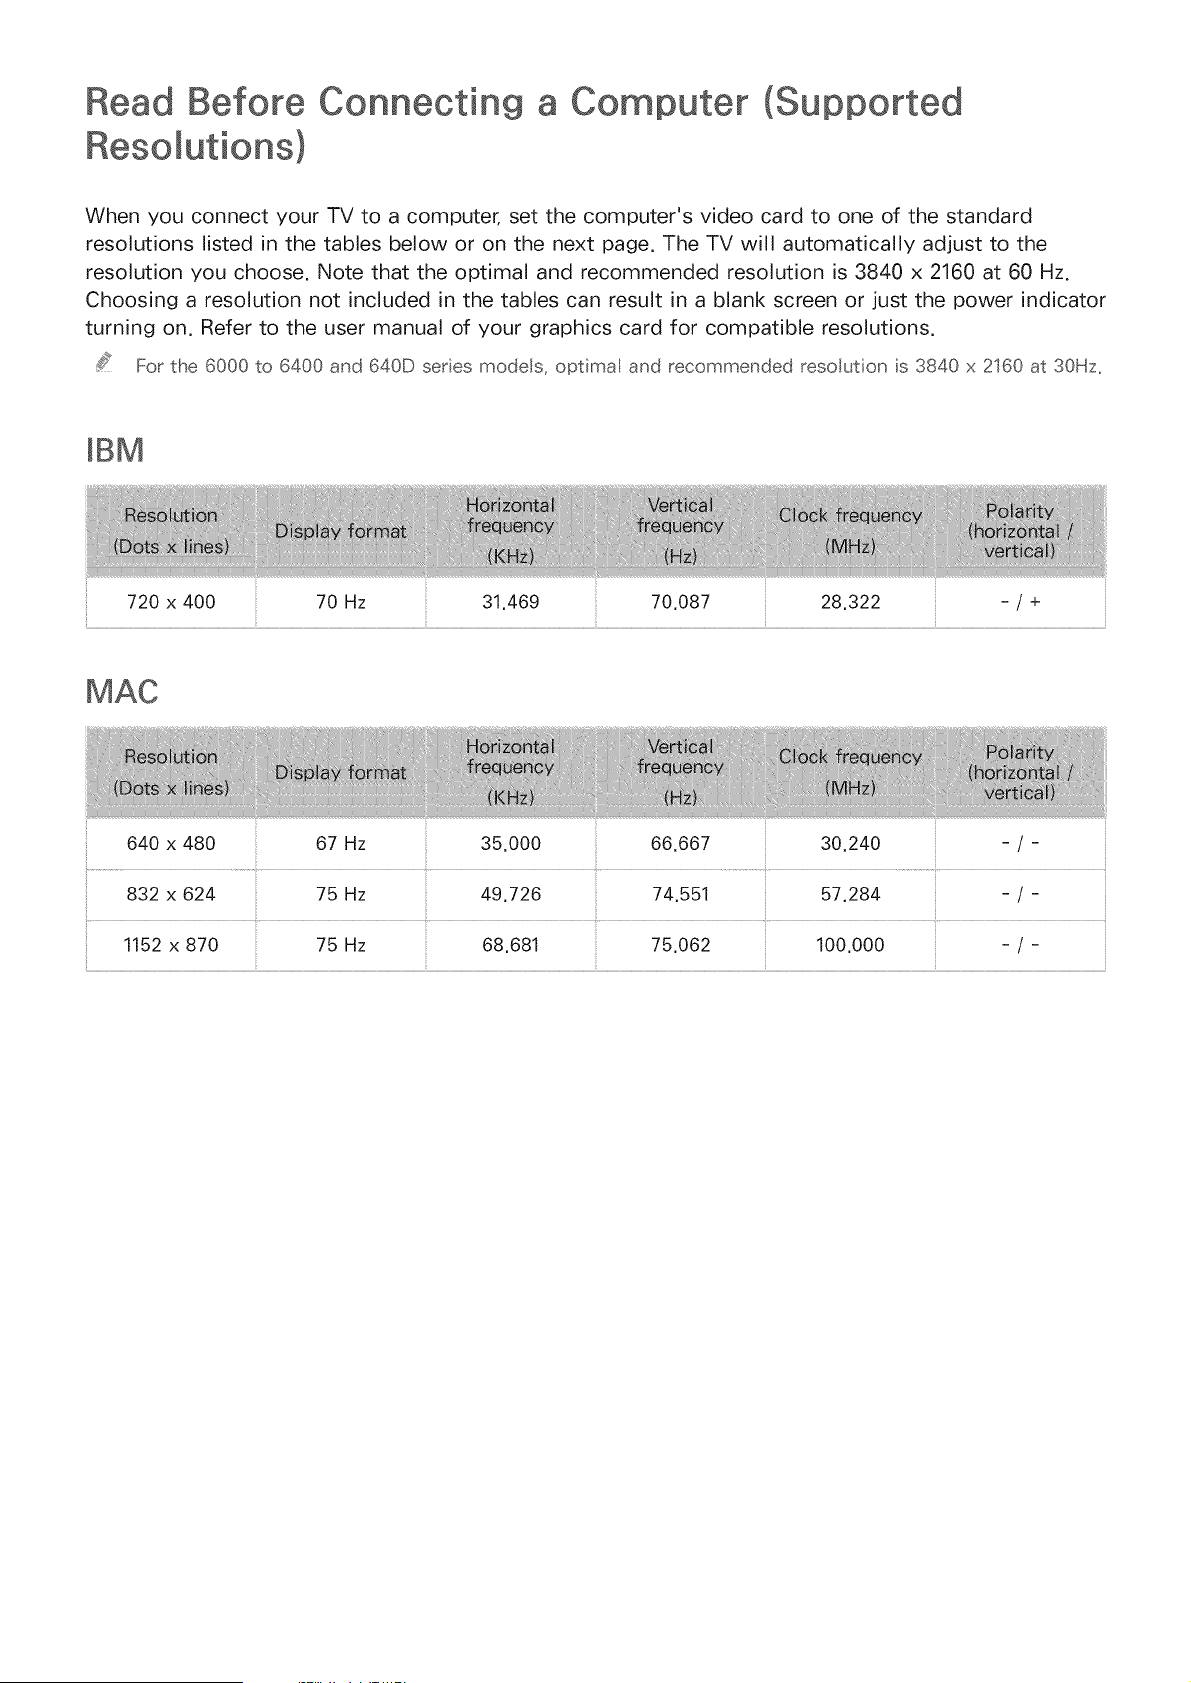
Before Connecting
Resomutions}
a Computer (Supported
When you connect your TV to a computer, set the computer's video card to one of the standard
resolutions listed in the tables below or on the next page. The TV will automatically adjust to the
resolution you choose. Note that the optimal and recommended resolution is 3840 x 2160 at 60 Hz.
Choosing a resolution not included in the tables can result in a blank screen or just the power indicator
turning on. Refer to the user manual of your graphics card for compatible resolutions.
For the 6000 to 6400 and 640D series models, optimal and recommended resolution is 3840 x 2160 at 30Hz,
mBM
720 x 400 70 Hz 31.469 70.087 28.322 - / +
640 x 480 67 Hz 35.000 66.667 30.240 - / -
832 x 624 75 Hz 49.726 74.551 57.284 - / -
1152 x 870 75 Hz 68.681 75.062 100.000 - / -
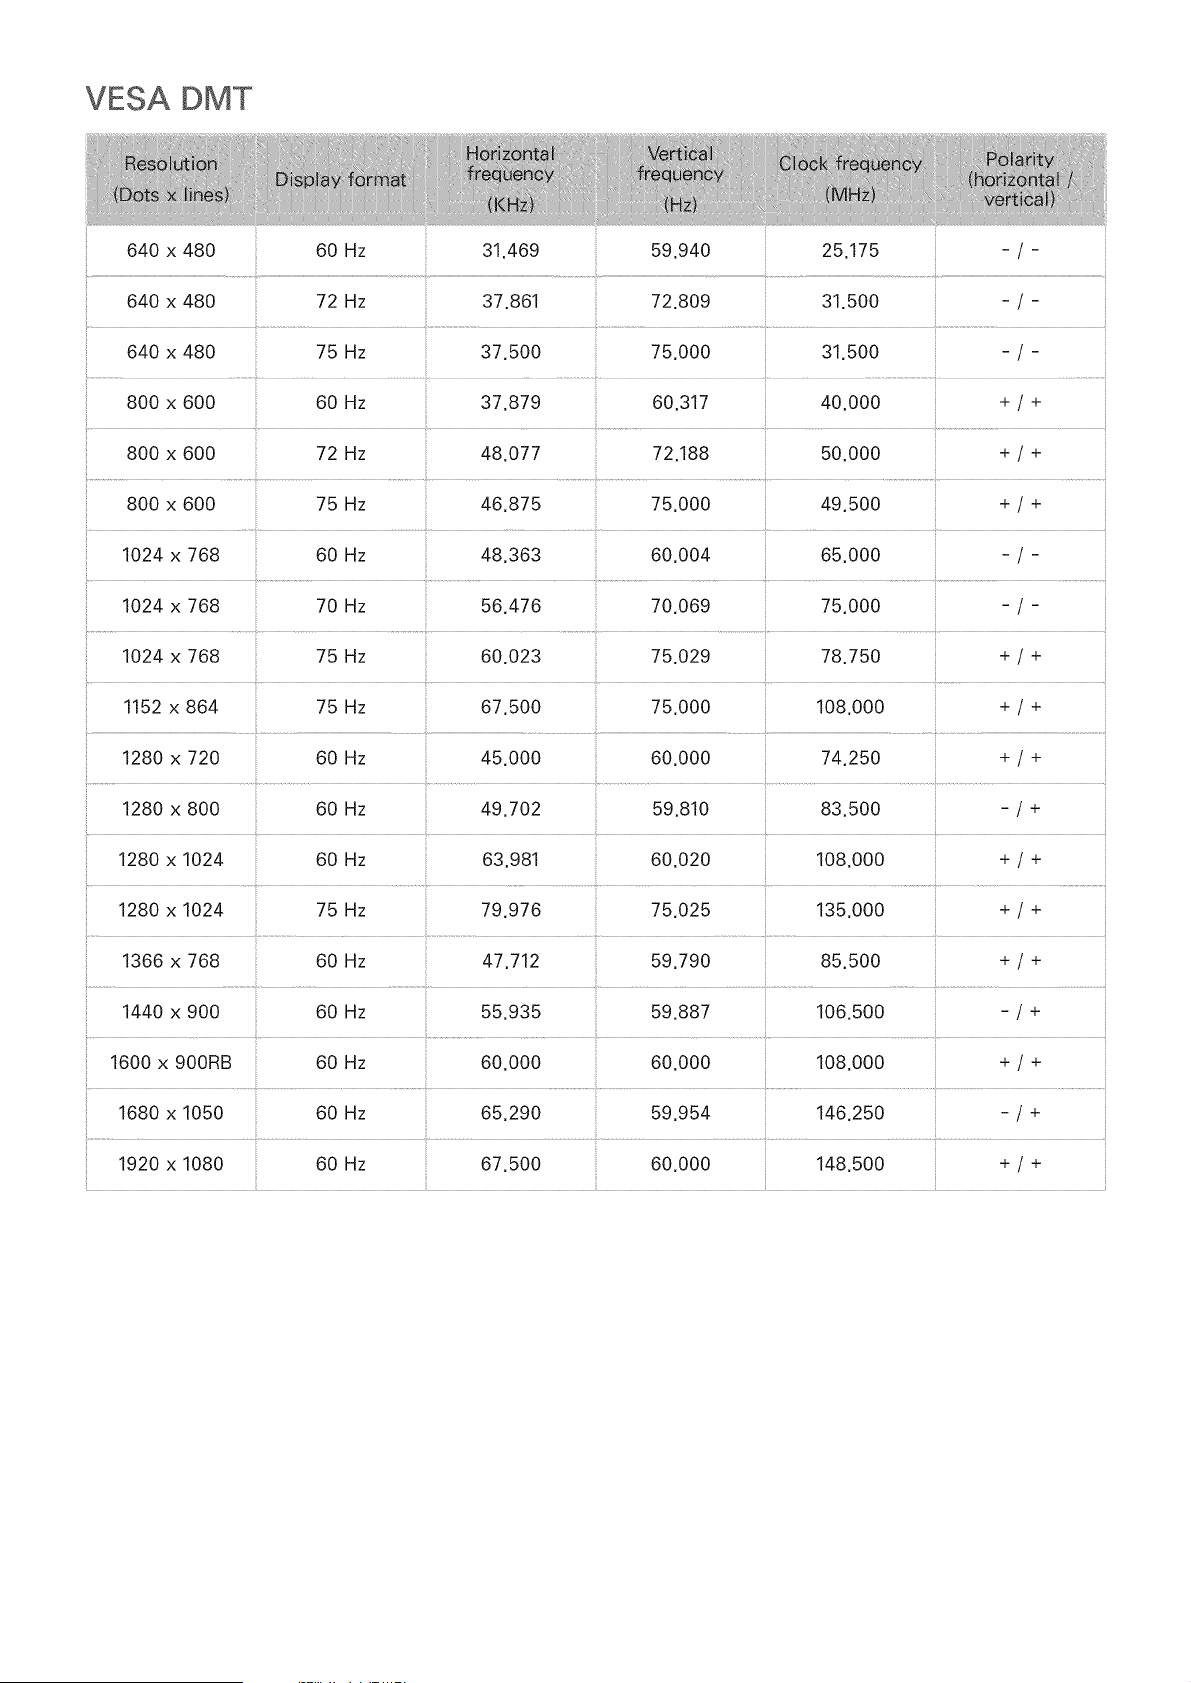
VESA DMT
640 x 480 60 Hz 31.469 59.940 25.175 - / -
640 x 480 72 Hz 37.861 72.809 31.500 - / -
640 x 480 75 Hz 37.500 75.000 31.500
800 x 600 72 Hz 48.077 72.188 50.000 + / +
800 x 600 75 Hz 46.875 75.000 49.500 + / +
1024 x 768 60 Hz 48.363 60.004 65.000 - / -
1024 x 768 70 Hz 56.476 70.069 75.000 - / -
1024 x 768 75 Hz 60.023 75.029 78.750 + / +
1152 x 864 75 Hz 67.500 75.000 108.000 + / +
1280 x 720 60 Hz 45.000 60.000 74.250 + / +
1280 x 800 60 Hz 49.702
1280 x 1024 60 Hz 63.981
1280 x 1024 75 Hz 79.976
1366 x 768 60 Hz 47.712
59.810
60.020
75.025
59.790
83.500
108.000
135.000
-/+
+/+
+/+
85.500 + / +
............................................................................................................................. _.............................................. _.....................................................
1440 x 900 60 Hz 55.935 59.887 106.500 -/+
....... t ...................................................................................................
1600 x 900RB 60 Hz 60.000 60.000 108.000 + / ÷
1680 x 1050 60 Hz 65.290 59.954 146.250 - / +
1920 x 1080 60 Hz 67.500 60.000 148.500 + / +

Before Using B uetooth Devices
.....Ilhis functior is not availab e on certair_ models in specific geog_apMca areas,,
Restrictions on using BIIIlu®tooth
o The Samsung Btuetooth Speaker function is only available for devices supporting TV
0
0
0
You can't use Bluetooth devices, TV SoundConnect (MENU > Sound > Speaker Settings > TV
SoundConnect), and the Surround feature simultaneousJy.
Compatibility issues may occur, depending on the BMuetooth device. (A Mobib exclusive
headphone may not be available, depending on the environment.)
Lip=sync errors may occur.
The TV and Bluetooth device may disconnect, depending on the distance between them.
A Bluetooth device may hum or malfunction:
When a part of your body is in contact with the receiving/transmitting system of the
Bluetooth device or the TV.
When the device is subject to electrical variation from obstructions caused by a wall, corner,
or office partitioning.
When the device is exposed to electrical interference from same frequency-band devices
including medical equipment, microwave ovens, and wireless LANs.
If the problem persists, try connecting the device using the digital optical port or the HDMI (ARC)
port.

License
lid
This DivX Certified@ device has passed rigorous testing to ensure it plays DivX® video.
To play purchased DivX movies, first register your device at vod.divx.com. Find your registration code in the DivX
VOD section of your device setup menu.
DivX Certified® to play DivX® video up to HD 1080p, including premium content.
DivX®, DivX Certified® and associated Iogos are trademarks of DivX, LLC and are used under license.
Covered by one or more of the following U.S. patents: 7,295,673; 7,460,668; 7,515,710; 7,519,274.
This device supports DivX Plus Streaming® for enjoying HD movies and TV shows with advanced features
(multi-language subtitles, multiple audio tracks, chapters, smooth FF/RW, etc.) streamed to your device.
PremiumS0und 15.1
For DTS patents, see http://patents.dts.com. Manufactured under license from DTS, Inc. DTS, the Symbol, DTS in
combination with the Symbol, DTS Premium Soundl5.1, DTS Digital Surround, DTS Express, and DTS Neo2:5 are
registered trademarks or trademarks of DTS, Inc. in the United States and/or other countries.
@ DTS, Inc. All Rights Reserved.
For DTS patents, see http://patents.dts.com. Manufactured under license from DTS Licensing Limited. DTS,
the Symbol, & DTS and the Symbol together are registered trademarks, and HEADPHONE:X and the DTS
HEADPHONE:X logo are trademarks of DTS, Inc. @ DTS, Inc. All Rights Reserved.
DOLBY
DiGiTAL PLUS
Manufactured under license from Dolby Laboratories.
Dolby and the doubte-D symbol are trademarks of Dolby Laboratories.
||||
The terms HDMI and HDMI High-Definition Multimedia Interface, and the HDMI Logo are trademarks or registered
trademarks of HDMI Licensing LLC in the United States and other countries.
Open Source License Notice
Open Source used in this product can be found on the following webpage.
(http://opensource.samsung.com) Open Source License Notice is written only English.
This Iicense is may not be supported depend ng on the country or model_
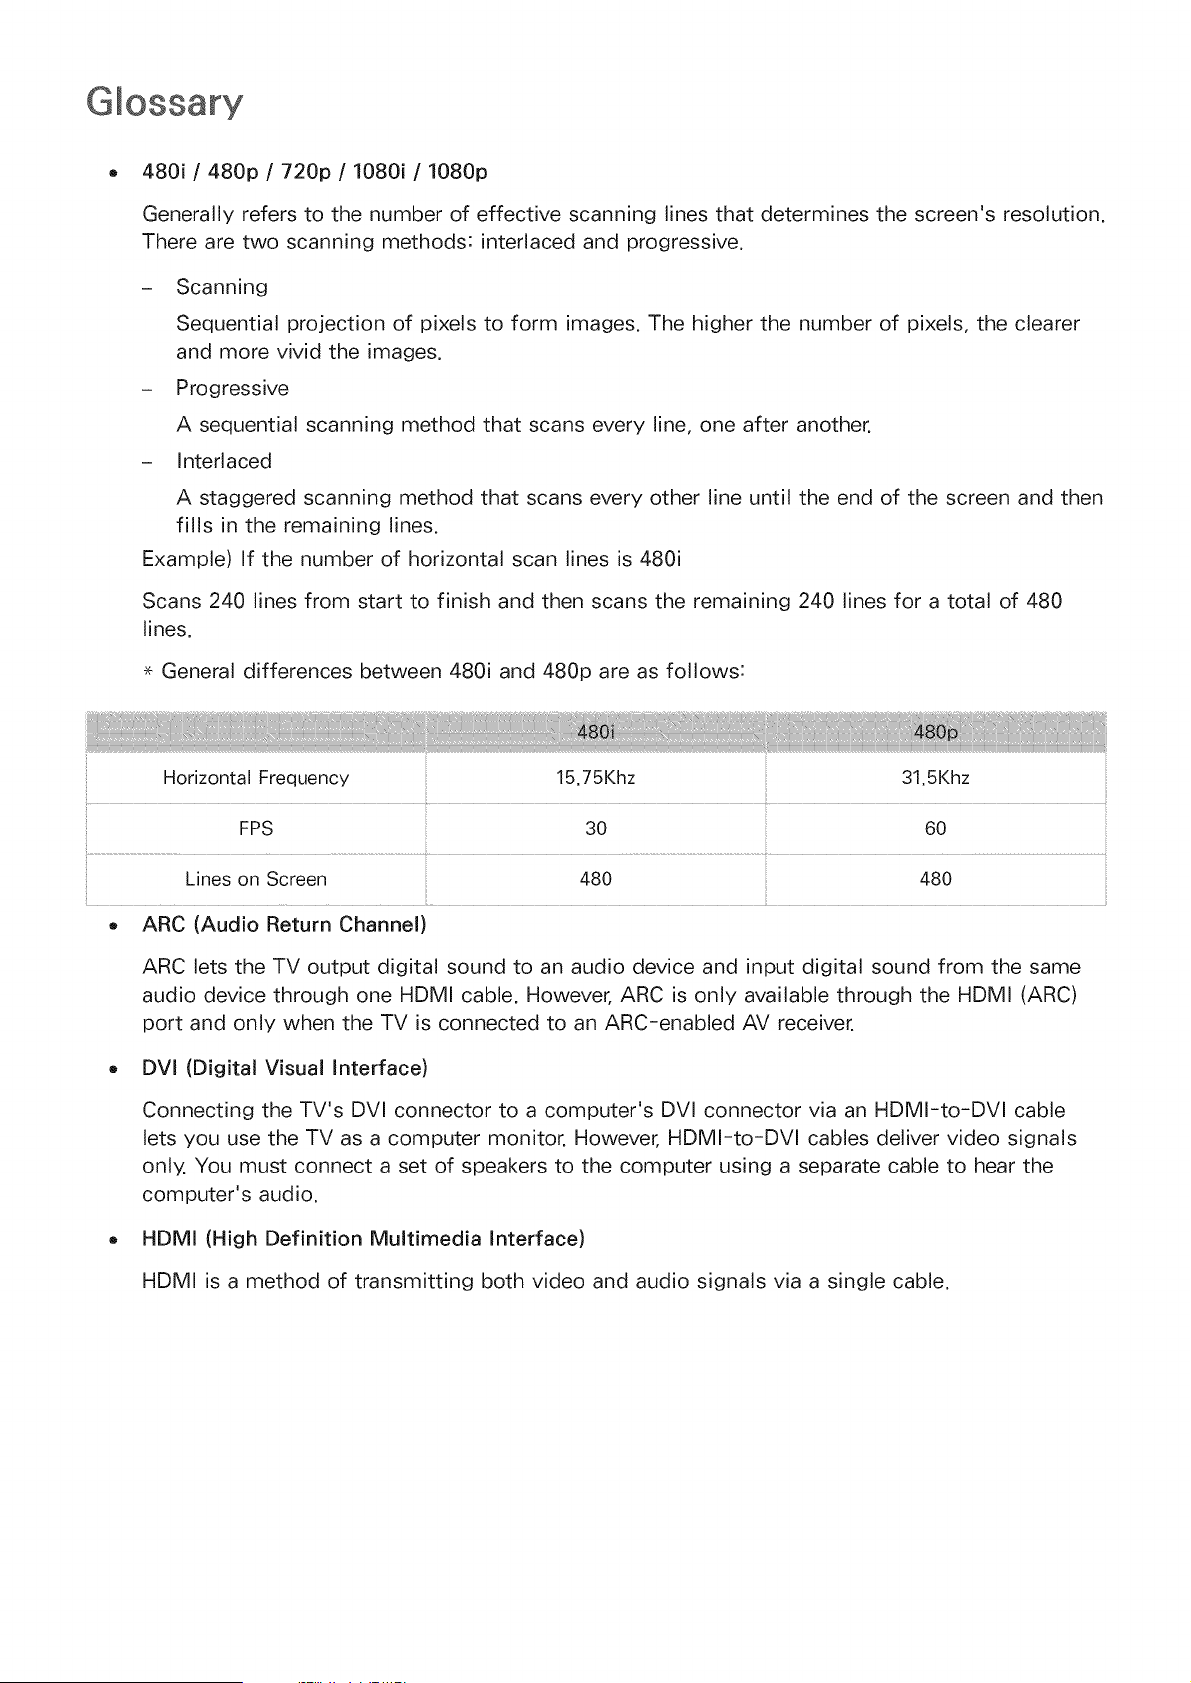
480i / 480p / 720p / 1080i / 1080p
Generally refers to the number of effective scanning lines that determines the screen's resolution.
There are two scanning methods: interlaced and progressive.
- Scanning
Sequential projection of pixels to form images. The higher the number of pixels, the clearer
and more vivid the images.
- Progressive
A sequential scanning method that scans every line, one after another.
- Interlaced
A staggered scanning method that scans every other line until the end of the screen and then
fills in the remaining lines.
Example) If the number of horizontal scan lines is 480i
Scans 240 lines from start to finish and then scans the remaining 240 lines for a total of 480
lines.
<- General differences between 480i and 480p are as follows:
Horizontal Frequency 15.75Khz 31.5Khz
FPs 30 Go
............. i.... _
ARC (Audio Return Channel)
ARC lets the TV output digital sound to an audio device and input digital sound from the same
audio device through one HDMI cable. However, ARC is only available through the HDMI (ARC)
port and only when the TV is connected to an ARC-enabled AV receiver.
DVI (Digital Visual Interface)
Connecting the TV's DVI connector to a computer's DVI connector via an HDMI-to-DVI cable
lets you use the TV as a computer monitor. However, HDMI-to-DVl cables deliver video signals
only. You must connect a set of speakers to the computer using a separate cable to hear the
computer's audio.
HDMI (High Definition Multimedia Interface)
HDMI is a method of transmitting both video and audio signals via a single cable.
Dynamicversus Static IPAddresses
If the networkrequiresa dynamicIP address,usean ADSLmodemor routerthat supports
the DynamicHostConfigurationProtocol(DHCP).Modemsandtoutersthat support DHCP
automaticallyprovidethe IPaddress,subnetmask,gatewayand DNSvaluesthe TV needsto
accessthe Internet,so they do not haveto be enteredmanually.Most homenetworksuse a
dynamicIPaddress.
If the networkrequiresa static IP address,enterthe IPaddress,subnetmask,gateway,and DNS
valuesmanuallywhensetting up the networkconnection.To get the IPaddress,subnetmask,
gatewayand DNSvalues,contact your InternetServiceProvider(ISP).
If the networkrequiresa static IP address,usean ADSL modemthat supportsDHCP.ADSL
modemsthat supportDHCPalso allow static IPaddresses.
Bluetooth
Bluetoothis a short-distancewirelesscommunicationprotocolallowing informationexchange
betweenconnectedBluetoothcompatiblemobile phones,laptops,earphonesand headphones.It
is mostly usedfor low-power wirelessconnectionswithin a distanceof 32.8 ft.
Ethernet
Ethernetis a LAN (LocalArea Network)that usescoaxialcablesstandardizedby the IEEE.
ComponentConnection
Componentconnectionsare mostlyusedfor gameconsolesandtransmitthe video signal by
splitting it into a luminancesignal (Y) andtwo color signals (Pband Pr).Theconnectoris marked
as [ComponentIN]_(Pr,Pb,Y) on the backof the TV.On somedevices,it is sometimesmarked
as Cr,Cb,Y. Cb and Crare the digital conversionsof the Pband Prsignals.
Theconnectorsare normally color-codedred (R),blue(B),and green(G)and offer the best
picturequality possiblefor an analogconnection.