Orrneds
Manûal
LI
L3
L5
K
I
t
I
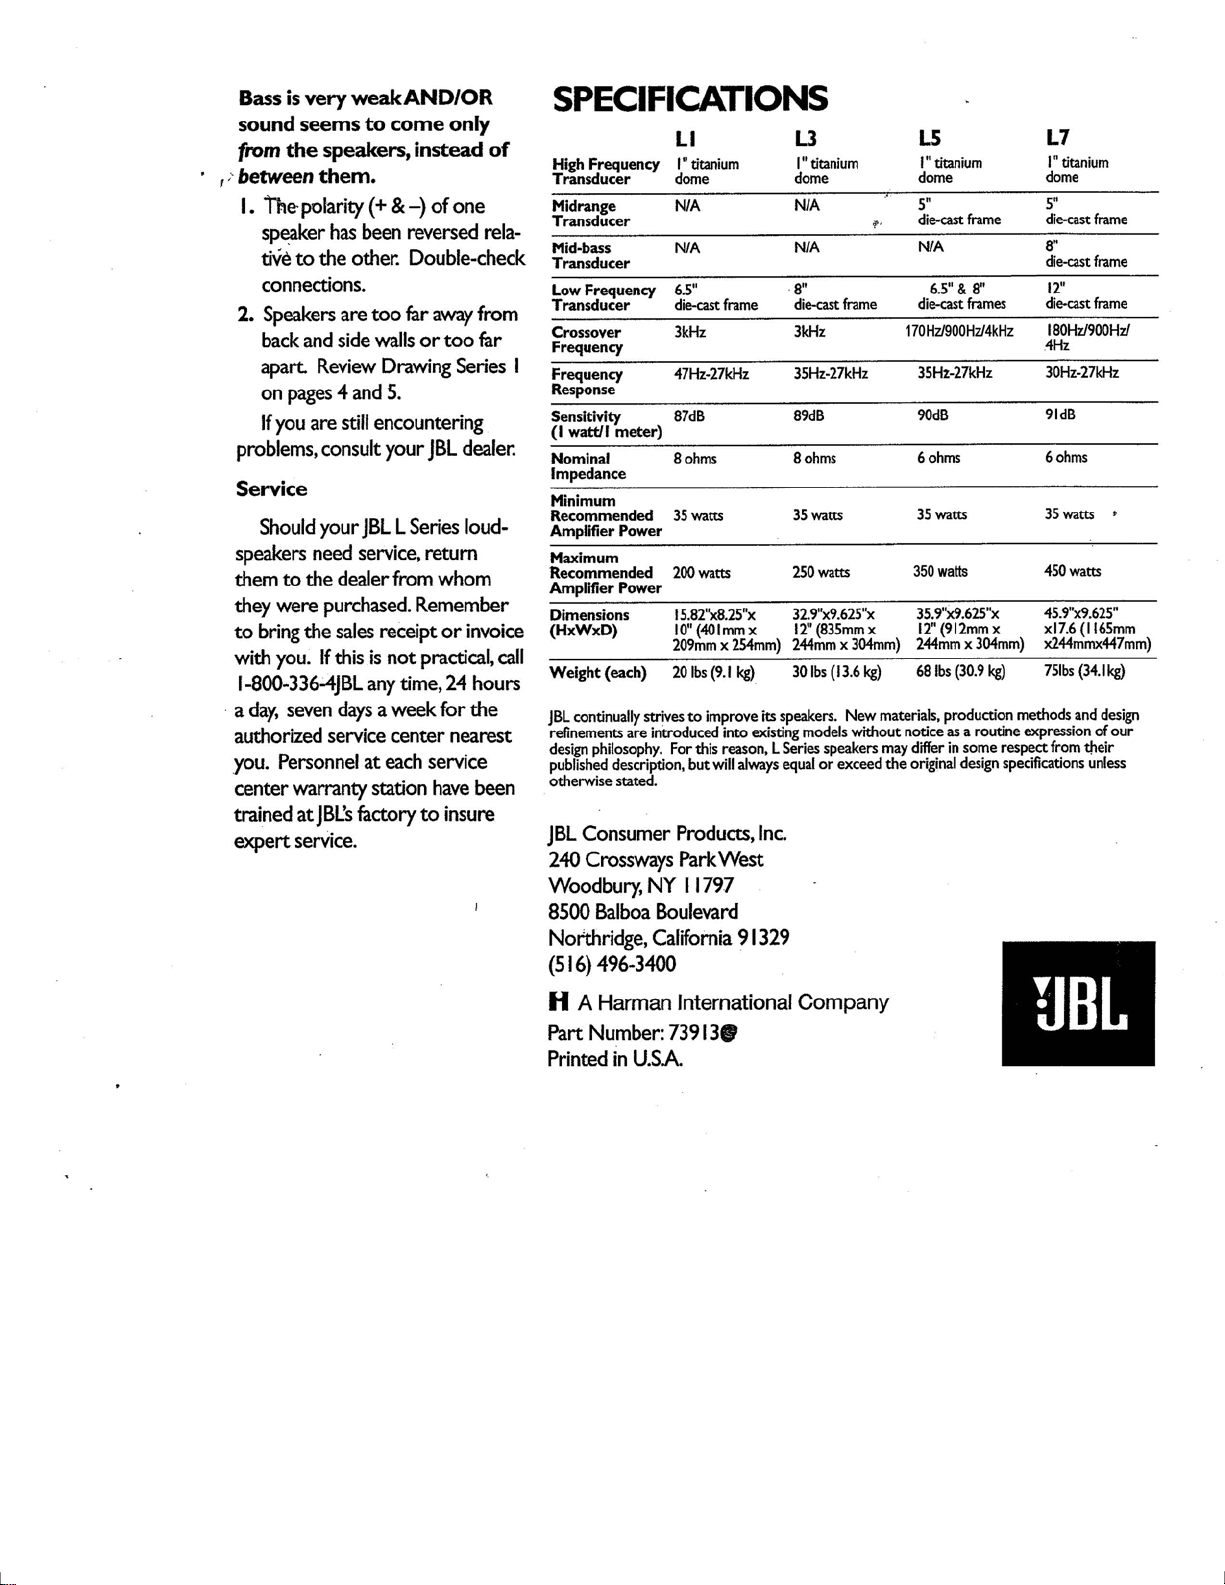
IMPORTANT:
L3, Ls,AND L7
MODELS REQUTRE
SOMEASSEMBLY.
For proper stabil¡ty, it is
strongly
recommended thatyou use the
molded base
provided
with each
L3,
L5, and
L7 speaker:
lnstructions begin on the next
page,
third
column.
The Rigl.rt Choice
All of us atJBL would like
to
congratulate
)rou
on choosingJBL
l- Series Loudspeakers. There
are a
bewildering array of
speakers
on
l'the
market today and we know
that
the choice
to purchase
ours
was
probably not
an
eaÐ/
one.
We're confident
that the
new
speakers
youVe
just
unpacked
will
exceed
your
expectations.
Your state-of-the-art Ll, L3,
L5
or
L7
speakers
continue in
the long
tradition of
precise studio
monitor
sound for whíchJBL
is
famous.
Each model incorporates consider-
able advanced technology.
ì6u will
enjoythe benefits of
purdtitanium
dome hþh frequency transducers,
die cast low frequency transducers
witlr vented
pole pieces
and
proprietary
Symmetrical
Field
Geometry
magnet
desþn,as
well
as
hþh-definition dividing
networks with
quality
electronic
comPonents
The narrow
front profile
of
your
new L Series speakers is designed
to maximíze dispersion and thus
contribute to better stereo
imaging
and a
more open;spacious
sound. The slanted
front
surface
of the speaker not only alþns
each transducers'voice coil
for
proper phase
and better sound
stage
depth,
but
also eliminates
parallel
internal surÍaces to
eliminate associated sanding
wave
resonances.

Finall¡ all L Series
cabínets are
constructed with
lock-mitre
¡oin-
ery
hþh
density
fìberboard
baffles
and
internal
bracing
to
reduce
colorations whích can.occur
in an
ordinary enclosure.
.'
The
Right Company
We're
able to appb/ technology
and materials such as
these be-
cause of our
preeminent
position
in
the
demanding
world
of
profes-
sional sound reproduction.
JBL
loudspeakers
are a key
part
of
more large superstar
touring
sound systems,
surÈound
sound
stereo theaters
and ttre
actual
recording studios
where
your
favorite music is
created
than any
other single company.
No other
audio
company
in the
world can
make
that claim.
The same
U.S.-based engineer-
ing
and-production f'acility
that
earnedJBl this top position
in
professional
sound reproduction
has also designed
and created
your
new L Series home loudspeaker
Ð/stem.
Maxim izing Performance
As with any
well-engineered
product
-
be it
a cír6 a computer
or a loudspeaker
-
your
L
Series
monitors will benefit
from careful
set-up and installation.
Follow the
directions
in this manual
as closely
3
as
possible
to insure
that
your
new
JBL
speaker
systems will produce
tJreir
best sound
performance.
An important (often
overlooked)
step
Your
sales receipt
should
be
stored in a safe
place.lt
establishes
wfien
you
bought
the loudspeakers
(for
warranty validation)
and how
muchyou paid
for
them
(for
ínsur-
ance
purposes).
Also
please
ake
a
minute to fill out
the enclosed
cus-
tomer
profìle
card and mail
it back
to us.
lfyou have
purchased
Ll
speakers,
skip the next
sect¡on and
begin
on
page4,
PLACEMENT.
,/
ATTACHING
SCRE\ryS AND
BASE
(L¡,
L5,
&L7
ONLp
The molded
base
provided
with
the
L3,
L5 and L7 are not
only
intended
to enhance the speaker's
appearance,
but to sablíze tlre
speaker as well.
Attaching
the base
l. After
rcmovingthem from
the
carcons, lay
your
L3, L5
or L7
speakers on
their back on
a
soft surhce such as carpeting.
2. Locate
the speaker base and
eþht Phillips-head screws
packed
in each
speaker cafron.
3. Slipthe base onto
each speaker.
4. Secure the
base with the eight
screws.
Do
not over-tighten.
5.
After
returning both
speakers
to upright positions,they
are
ready
for placement
in your
listening
room.

PTACEMENT
The
best
positioning
produces
the best sound
Where'you putyourJBL
L
Series Loudspeakers can actually
acceÍrtuate tlreir already impressive
music reproduction
capabilities.
Because different
speaker
brands and models have dífferent
placement
requirements,
simply
placing your L
Series speakers
where
a
previous pair
were may
not represent the
best choice
for
your
newJBL
speaker system.
WhileJBL L
Series loudspeakers
sound good
anywhere, some
posi-
tions in the average listening room
will
maximize the technology in-
corporated into
these
designs.
lncluded
on the following
pages
are
drawings
showing the ideal
placementfor
each
L Series model.
The closèr
to
our drawings you
can come within
your own particu-
lar room, the betten
Howeven
evBn if
you
cannot fully
follow
Çyery
dimension and deail due
to
room
size and
furniture layouq
you
will still be able
to enjoy
excellent fidelity.
Many factors
affect
speaker per-
formance.
Some may
be important
to
you
and others may not Thus
3'-_rff
_.
T_
3'
Ear level when
seated in lisæning
POS|1lOn
Drawing lB
-
Ll
position
front
view
3' 3'
Drawing lD
-
L3
position
front view
4
Drawing
lA- Ll
position
top view
Drawing lC
-
L3
position
top
view
the ultimate decision
on where
you
put your
L Series
speaker
system depends
as much on your
musical priorities'as
it does
on
room
layouL
Where you put your
new
speakers
can affect:
lmaging
-When
the per.formers
seem
to appear
between
the loud-
speakers, creating
a spacious,
three-dimensional
sound
stage
that
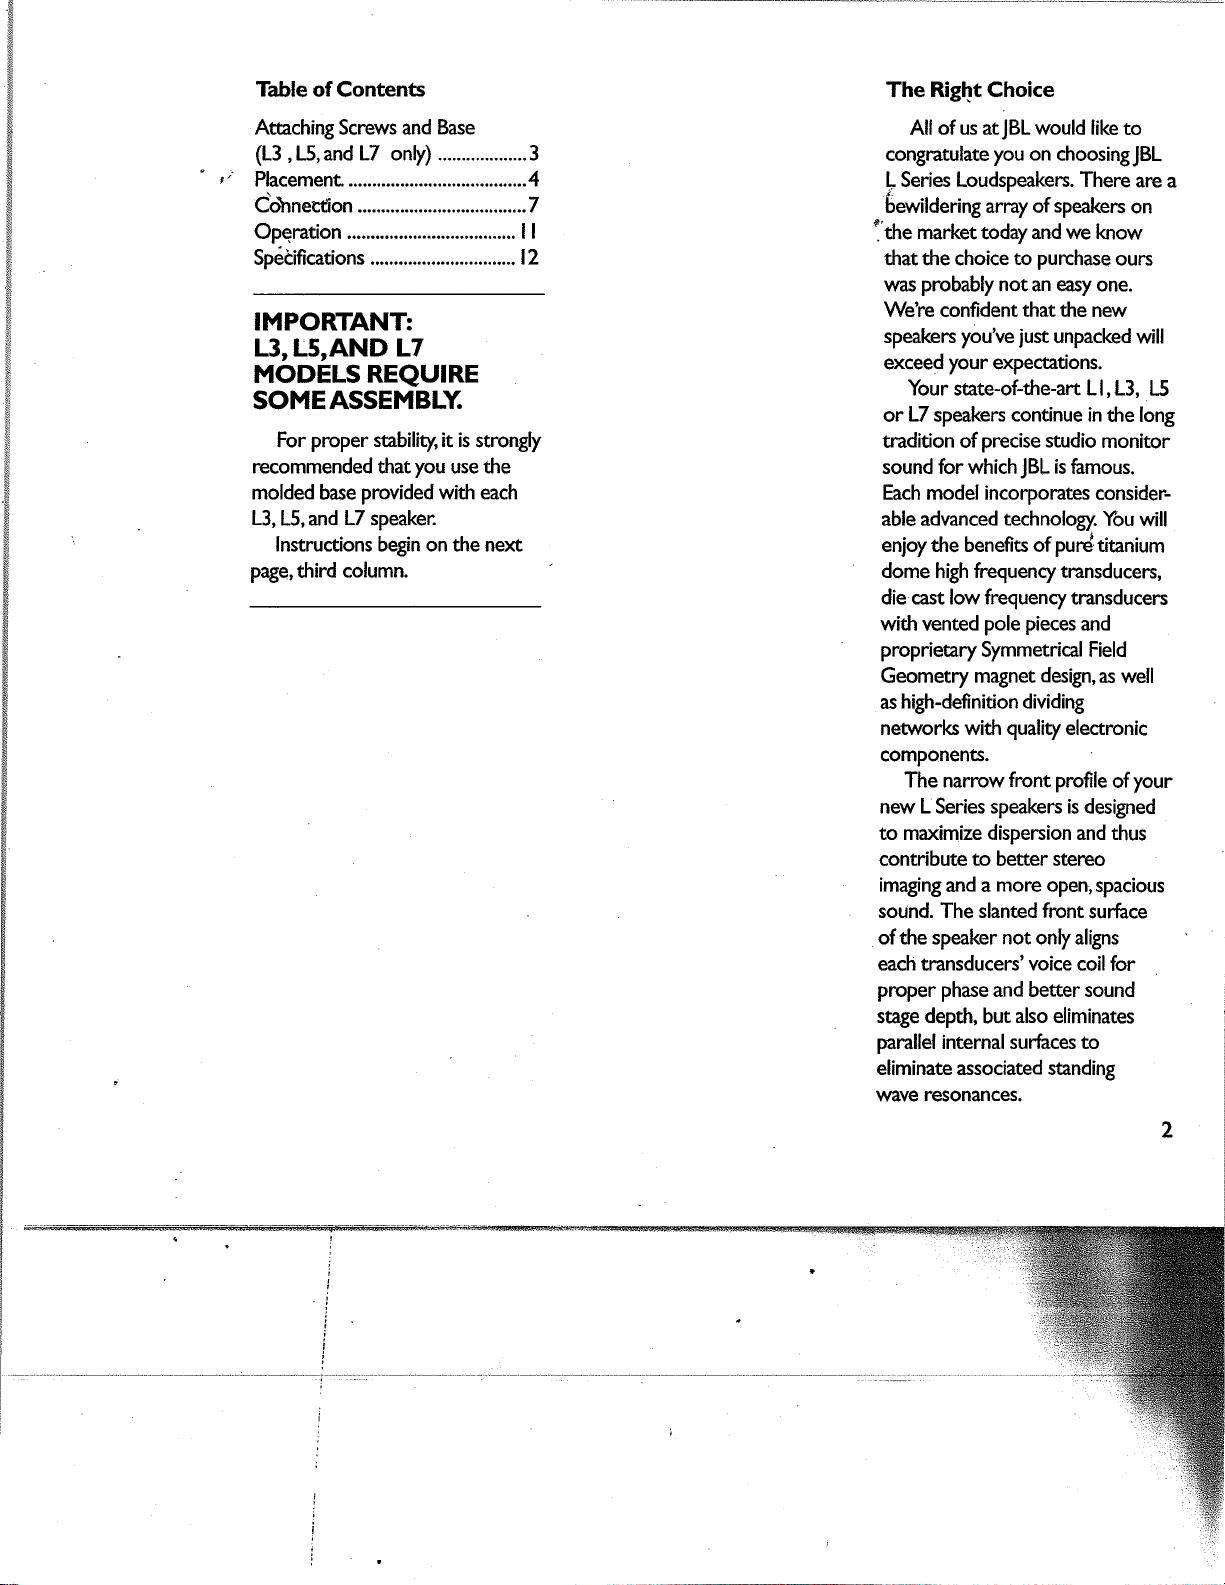
Drawing
lF
-
L5
position
fronr
view.
5
seems
to fill your
room.
ln fact,
under
ideal
conditions,
the image
can
actually
extend
beyond
the
boundaries
of
your
room!
Bass
-The
visceral
impact
of
music
created
by bass drums,
string
bass, electric
bass
guitar
or
synthesizer:
Tteble
-
High-frequency
detail
such
as
the
sheen
ofa cymbal
stroked
with a
brush, the
Placementfor
best
stereo
imaging
TheJBL
engineers
who created
your
L Series
speaker's desþned
a
system
so accurate
that virtually
eveÐ/th¡ng you
hear
on a tâpe,
record
or
CD can appear
on a
"sound
stage"
centered between
and extending
well
beyond the two
loudspeakers.
To
achieve this
excit-
ing
effect requires
careful
speaker
positioning.
Most important
are the dimen-
sions which determine
the
angles
of an imaginary
triangle formed
be-
tween
both speakers
and
your
main listening position
as shown
in
Fþure lA, lC
and lE.
NotqLZ
owners
see L7 Supplementfor
Þloce
ment drowing$
Try to
achieve an
angle between
the
speakers and
the main listening
breathiness
of
a
singer
or the
te)cure
of
a vio-
lin
bow drawn
across
a string.
Drawing
2A
*
Ll
bookshelf
placement,
front
view. lf Ll's
are
placed
ón their
sides,
make öure that
the tops
åce inward.
Drawinq
28
-
Ll bookshelf
placement
roo
view.
Speaker-should
be at least
tivo inches
îroin back
of the
bookshelf.
Drawing
lE
-
L5 position
top view.
3'
3'
t
.tt,l
posítion of about
60
degrees
(see
Drawings
lA,
IC,and
lE). Notice
that
in each
case,the
speakers
n"
should
be angled
inward
l0 to
15
dègreeS.
Note that we recommend
the
use of speaker
stands with
Ll
speakers.
Many styles and
brands
are
available; consult
yourJBL
dealer for more
information.
Al-
least two
inches of
room between
the back
ofthe
speakers
and the
back wall
of the
bookcase.
V/hat
if you
cant
position
the
s¡ieakers
as
shown
in
Drawing
l?
Drawing
38 shows
the
result of a
narrow
angle
between
the speak-
ers
and
your main
listening
position.
The L Series
speakers
image
well in
this configuration,
but
will have
a slighdy
narrower sound
stâge.
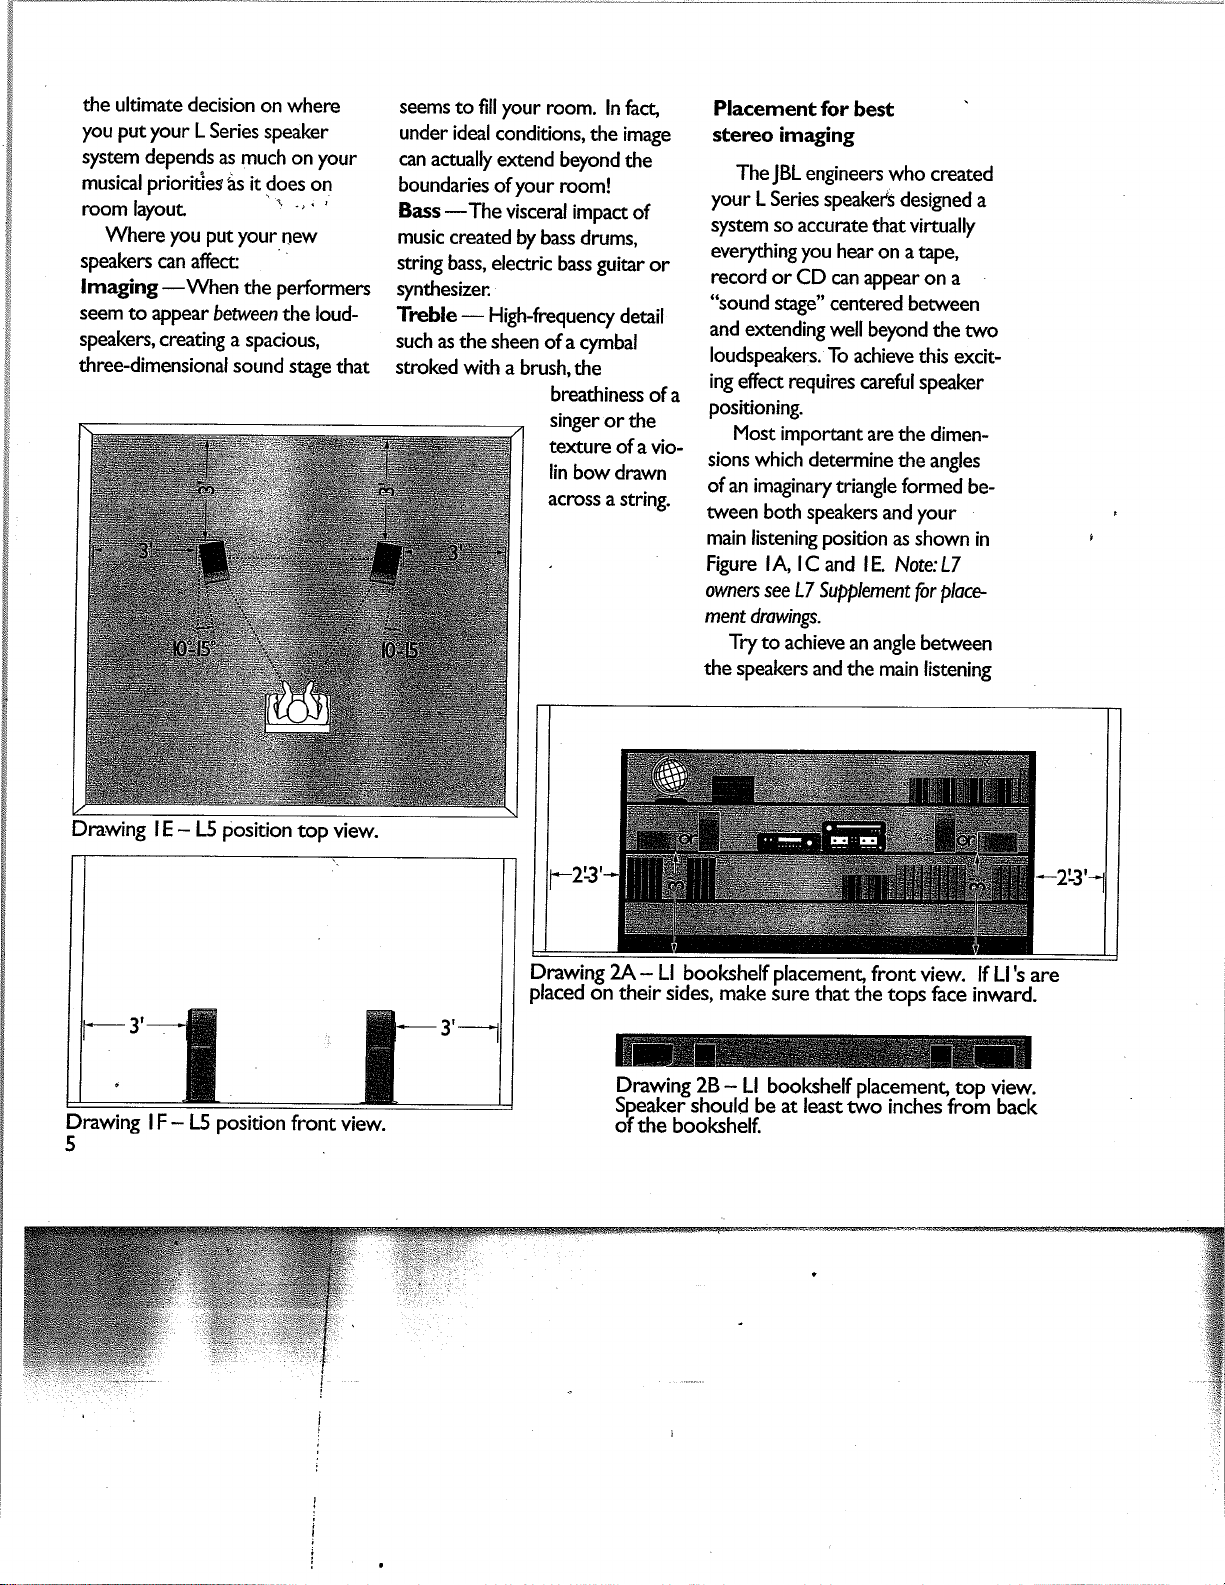
The
placement
in
Drawing 4
should
be
avoided
unless
you want
only
bacþround
music with little
stereo
imaging
effeèc
!
Placement
for best
,
bass
response
No
matter what
kind of
music
you enjo¡
bass ís an
important
part
of
the
tonal spectrum.
L
Series
ternativel¡
you
can
place Ll's
on a
bookhelf
as shown
in
Drawing
2 on
the
previous
page. Note
that
tlre
hþh
frequency
transducers
should
be
to-
wards
the
inside
when
the
Ll's are
placed on their
sides.
Make
sure
to
leave at
Drawing
38
-
Reduceð
stereo
image if speakers
are
close together
speakers
can
reproduce surpr¡s-
ingly
hþh
quality
bass under any
condition
and o<ceptionally
low
bass when
positipned optimally.
Two
modifiable rootn factors af-
fect
L Series bass:
l) proximity
to
room corners and
2) disønce from
the rear wall.
How close
your
L Series
speaker
systems are
to the
back
wall
determines how they will
"couple"
to that
surface, resulting
in increased
bass at certa¡n
fre-
quencies. The optimal
distances
from a backwall
(as shown in Fþ-
ures
lA, lC,
lE
and
the L7
Supplement)
will
produce
well-
balancêd bass
in a normal-sized
room.
NOTE:
You can increase or
decrease this
distance by about
one
foot
witlrout
seriously affecting
low frequency
balance.
The closer
tlre
speakers
are
placed
tö
room corners, the more
mid-bass
(boomy bass) they will
produce. lf
your listening room is
extremely
naffowyou may not be
able
to
place your L
Series speak-
ers at
least three feet from side
walls
as shown
in Drawings lA" lC
and I E.
lf this is the case,
decrease
the disønce between
the two
speakers
to allow at
least
some
disønce from side
walls.
Placement for best treble
dispersion
High musical sounds create the
fine deails of a musical experience.
High-frequency sounds such as fe-
male
vocals,
violins, lead guitars,
upper
piano octaves
and cymbals
are more
directional
tjran bass and
midrange. In other words, these
treble
sounds are best heard
when
they can
pro¡ect directly in
an
unencumbered
path
from the
speaker to
your
ean
Thanks
to their
tianium
dome
high frequency transducers,
L
Series speakerc
are less
sensitive
to
placement for
best treble than
almost any other speaker model..
Howeveçyou will ênjoy
your
best'
musical o<perience when ttre
L Series'tweeters are at or near
"ear
level"
as shown in Drawings
lB, lD lF and L7 Supplement
(an-
other
reason why we recommend
placing L |
's
on speaker
stands).
CONNECTION.
You will
need...
3
Speaker wire
i
3
A tape measure
É'
3 One of
the following depending
on wire type and
thickness:
Wire strippers, diagonal
pliers,
a
knife
or a
pair
of scissors
What
kind of wirc to
use
For best results,we
recommend
the use
of specially desþed
heavy-
Bauge,
ultralow
resistance
speaker
wire.
Available from
yourJBL
dealen it
ís able to conduct
the
maximum
power and frequency
bandwidth
of
your
amplifier
or receiver.
Howeve[ any
insulated, multi-
stranded
copper wire
may be used,
provided it is of the
proper
gauge
(thickness).The
easiest
to obtain
is
ordinary
lamp cord
(also
called
"zipcord'),
available at hardware
and home
improvement
stores.
The
minimum size of wire
to
use depends on the
length ofthe
wire between
the amptifier and
your
L Series
Speakers.
I
;
¡
I
Y
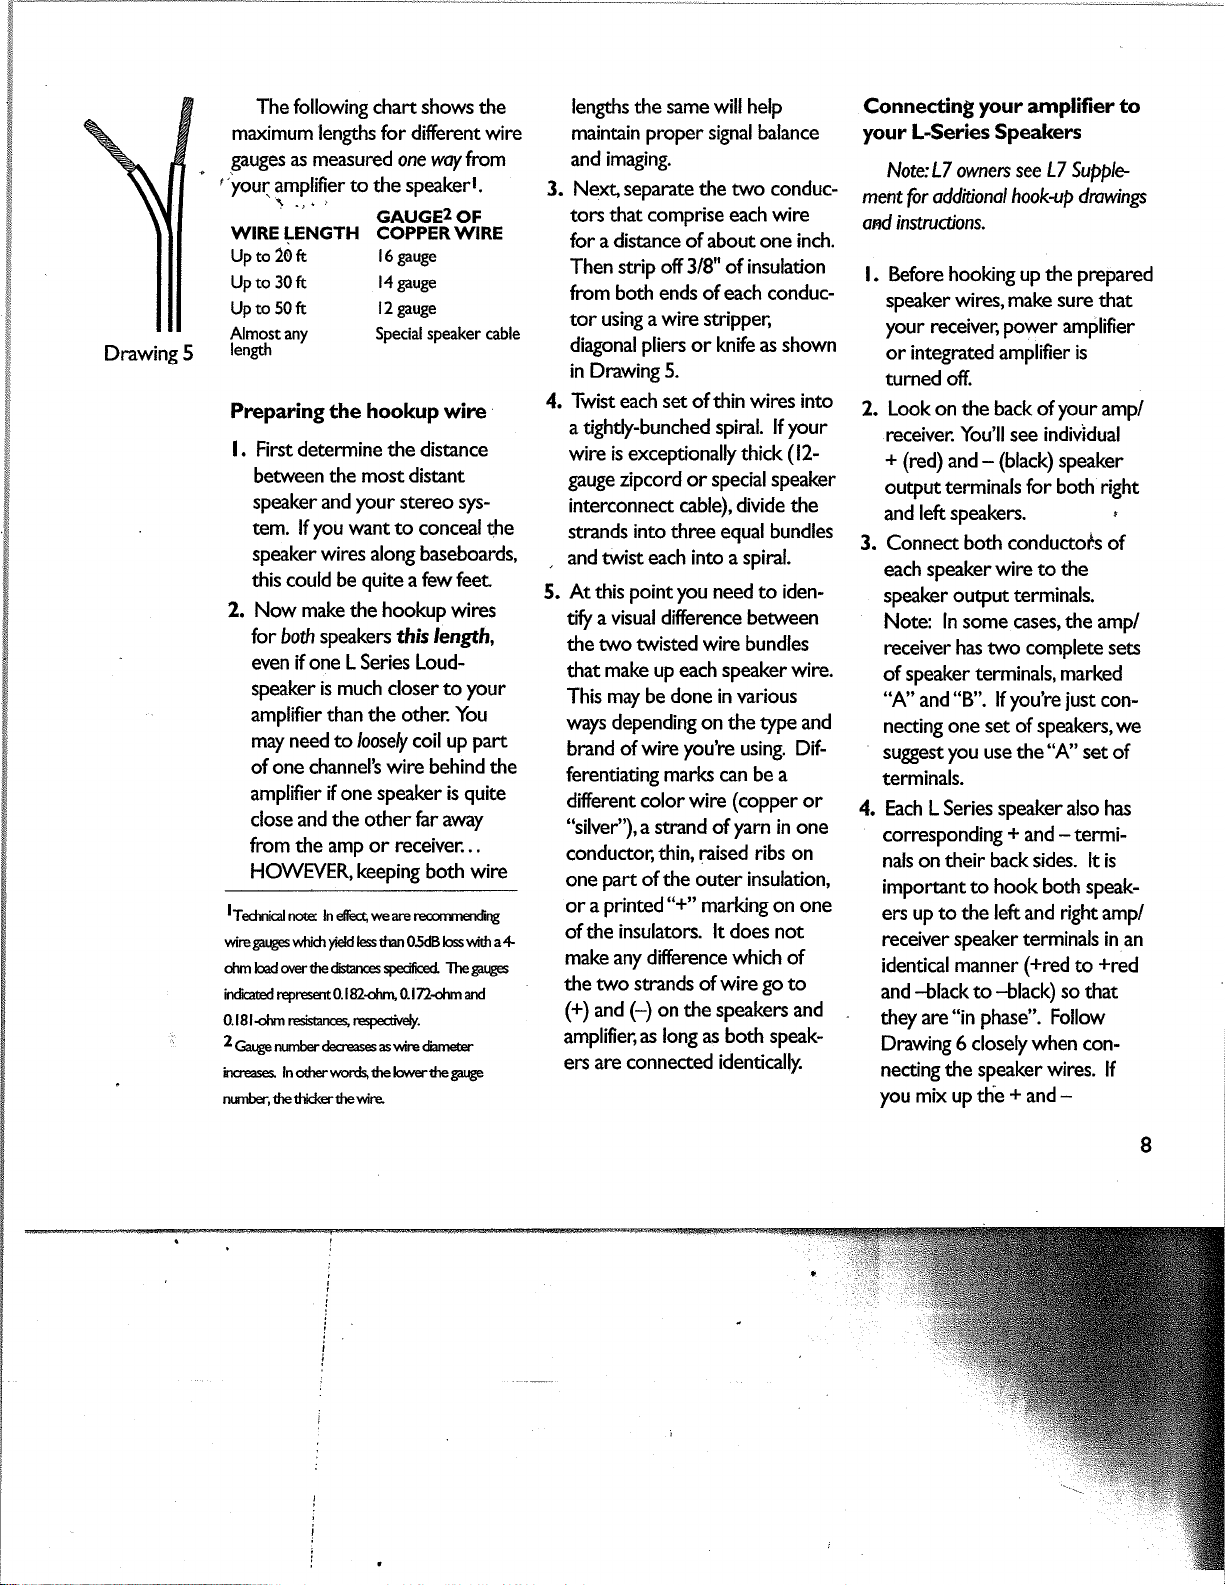
Drawing 5
The
following
chart shows the
maxÍmum lengths for different wire
gauges
as
measured
onewoyfrom
|youq
amplífier
to
the speakerl.
lengths the same will help
maintain
proper sþnal balance
and imaging.
3.
NexC separate the two conduc-
tors
that comprise
each wire
for
a
distance of
about
one inch.
Then strip
off
3/8"
of insulation
from both ends of each conduc-
tor using a wire strippen
diagonal
pliers
or knife as shown
in Drawing 5.
4.
Twist
each
set of thin wires into
a tightly-bunched
spiral. lf your
wire is except¡onall), thick
(
12-
gauge zipcord or special speaker
interconnect cable), divide the
strands
into
three equal bundles
.
and twist each into a spiral.
5.
At this point
you
need to iden-
tifr a
visual difference between
the two twisted wire bundles
that
make up each speaker
wire.
This may be
done in
various
ways
depending on the type and
brand
of wire
you're
using. Dif-
ferentiating marks can be a
different color wire (copper or
"silYer"),
a strand of
yarn
in one
conductoG
thin, raised ribs on
one
paft of the
outer
insulation,
or a
printed
"+"
marking on one
of the
insulators. lt does not
make any difference which of
the two strands of
wire
go
to
(+)
and
(-) on
the speakers and
amplifieri
as long as both speak-
ers are
connected identically.
Connectint
your
amplifier to
your
L-Series
Speakers
NotsfT owners see
L7
Suþple
ment
for
additionol
hook-up drowinç
ond inst¡uoions.
l.
Before hooking up the
prepared
speaker
wires, make sure that
your receive[
power
amplifier
or integrated amplifier
is
turned off.
2.
Look on the back of
your
amp/
receiver. You'll see
individual
+
(red)
and
-
(black)
speaker
output terminals for both rþht
and
leftspeakers.
!
3. Connect both conductoÊs of
each speaker
wire to the
speaker output
terminals.
Note: ln some cases, the amp/
receiver has two complete sets
of speaker
terminals, marked
'4"
and
"B".
lf you're
just
con-
necting one
set of speakers,
we
suggest
you
use
the
"A"
set of
terminals.
4. Each L Series speaker also has
corresPonding
+
¿¡¿
-termi-
nals on their back sides. lt is
important to hook botJr speak-
ers up to the
left
and
right
amp/
receiver speaker terminals in
an
identical manner
(+red
to
+red
and
-black
to
-black)
so that
they are
"in
phase".
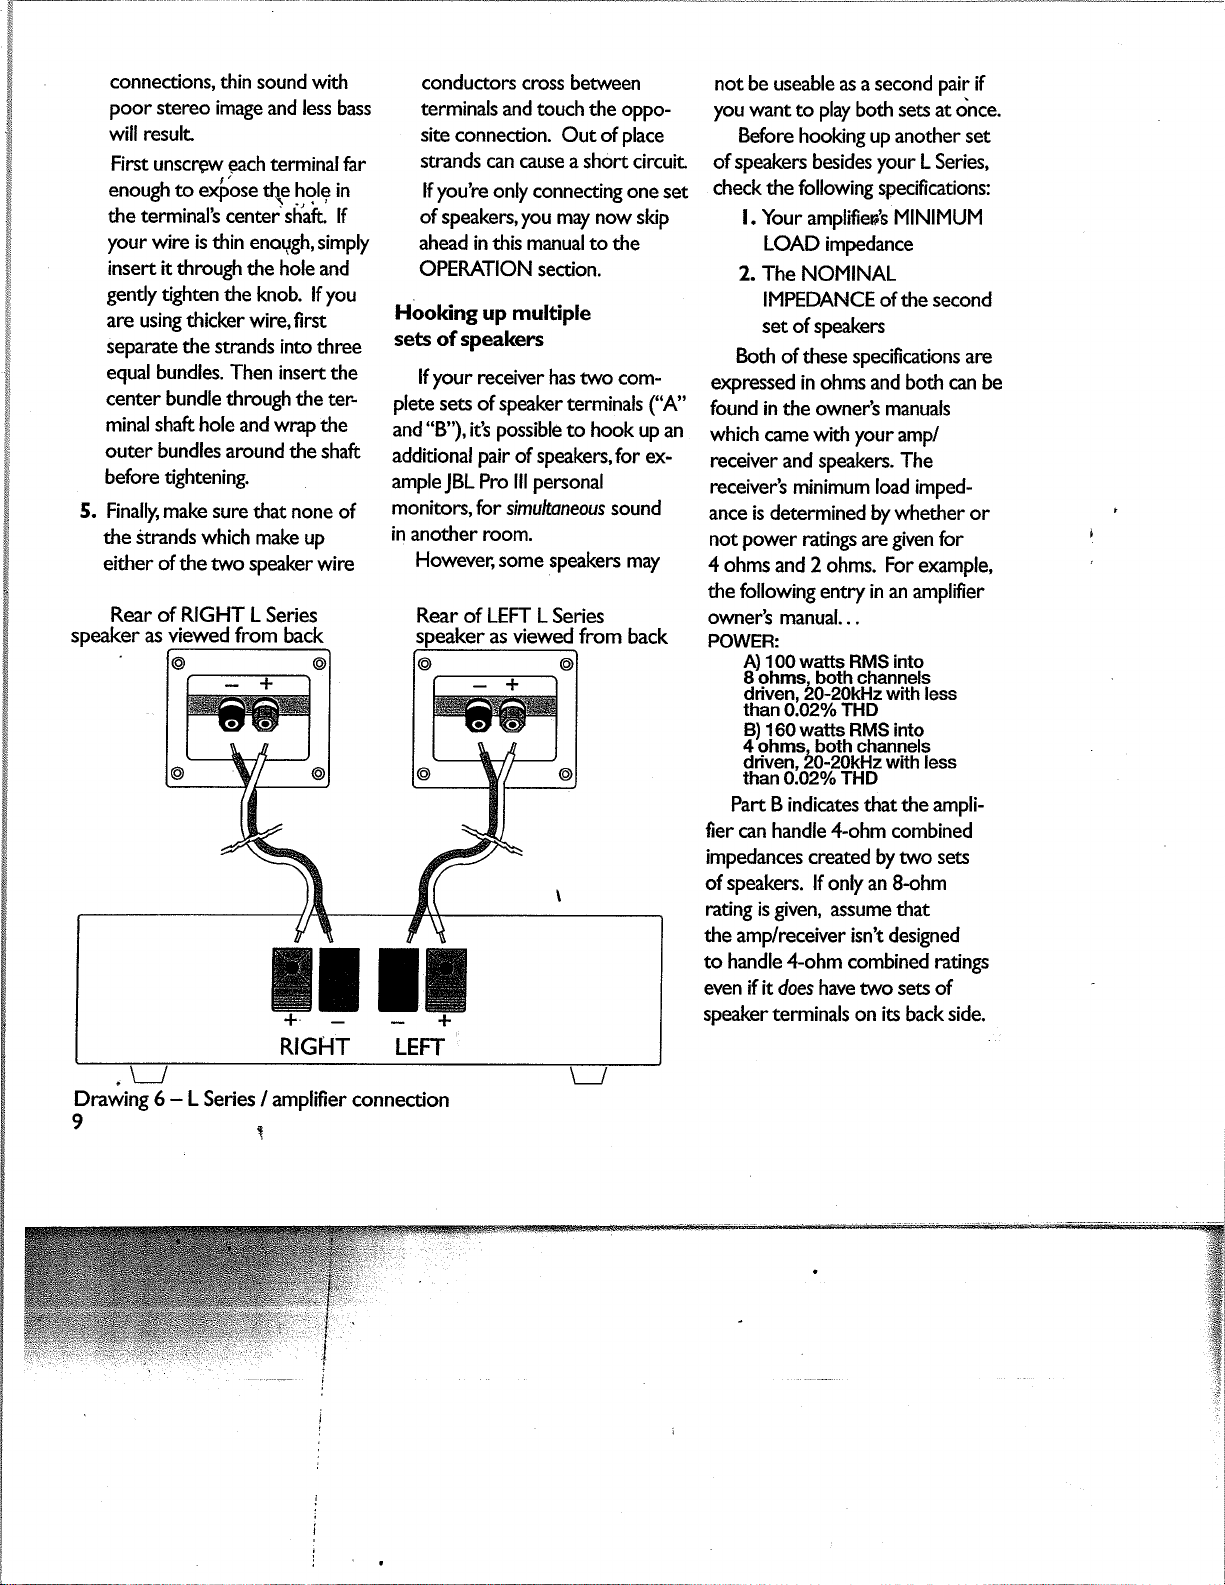
Follow
Drawing 6 closely when con-
necting the speaker
wires.
lf
you mix up thb
+
and
-
1
.,.
,
WIRE LENGTH
Upto20ft
Upto30ft
Upto50ft
Almost any
length
GAUGEz OF
COPPERWIRE
l6
gauge
l4 gauge
l2 gauge
Special speaker cable
Pr.eparing
the
hookup
wire
l. First determine the disønce
between
the most distant
speaker and
your
stereo sys-
tem. lf
you
want to conceal the
speaker
wires along
baseboards,
this could be
quite
a
few fee¿
2. Now make the hookup
wires
for both speakers thìs
lenglh,
even if one L Series Loud-
speaker
is much closer to
your
amplifier than the othen You
may need to loosely
coil
up
part
of one channel's wire behind the
amplifier
if
one
speaker is quite
close and the other far away
from the amp or receiver...
HOWEVER,
keeping
both wire
IT"d"rlcal
n"to In effecq we are reconrnerdirg
wire
garges which
yidd
l€ss úEn O-ftB bss
wiú
a4
otm læd o¡erthe dsar¡ces
+ecificed
Ttre
galges
indræd represent
0. I 82€[rm 0. | 72€tùn and
0. I I I <frn resisanceq r€sp€cdr/dy.
2
C"ra" *nnæ. aucroto as wire &mger
iîcr€âses In
odrc¡'words,
the lowerthe
garye
ntrrùer, the thirj<er tlp wire.
*
B
conneccions, thin
sound witlr
''U
poor stereo image
and less b
â
willresult
''ç
first unscrgw
each
terminall
f
enough
to exöose tlç hole in
I the
terminal's
centenshaft" lf
I
your
wire is thin enoqgh,sim¡
t
insert it through
the hole and
poor stereo image
and less bass
First unscrgw
each
terminalf'ar
. t'
enough
to exÞose tlç hole in
conductors cross
between
terminals
and touch the oppo-
site
connectjon. Out of place
strands can cause
a short circuit
lf you're
only connecting one
set
of
speakers,
you
may now
skip
ahead in this manual to the
OPERATION
section.
Hooking
up multiple
sets ofspeakers
lf your
receiver has two
com-
plete
sets of speaker
terminals
('.A"
and
"B'),
it's possible
to hook up
an
additional pair
of speakers, for
o<-
ampleJBL Pro lll personal
monitors, for
simultøneous sound
in
another room.
Howeveq some
speakers may
Rear
of
LEFT
L Series
as viewed from
back
not be useable as
a
second pair if
you
want to
play
both
sets
at
oìce.
Before
hooking up another set
ofspeakers besides
your
L Series,
check the following specífications:
l. Your
amplifien's MINIMUM
LOAD
impedance
2. The
NOMINAL
IMPEDANCE
of the second
set of speakers
BotJr
of these specifìcations are
expressed in ohms and both can be
found in
the owner's manuals
which
came with
your
amp/
receiver
and speakers.
The
receiver's
minimum load imped-
ance is determined by whetlrer or
not
Power
ratings are
given
for
4 ohms
and 2 ohms. For example,
the following
entry
in an
amplifier
owner's
manual...
POWER:
A) 100watts RMS into
I ohms. both channels
driven, 20-20kHz with less
than 0.02% THD
B)
160watts RMS into
4'ohms. both channels
driven, 20-20kHz with less
than 0.02% THD
Part B indicates
that
the ampli-
fìer
can handle 4-ohm combined
impedances created
by
two sets
of speakers. lf
only an 8-ohm
rating is given,
assume
that
the
amp/receiver isnt designed
to handle 4-ohm combined ratings
even
if
it does have two sets of
speaker terminals
on
its
back
side.
your
wire is thin enoqgh,simply
insert it through
the hole and
gently tighten the
knob. lf you
are using thicker wire, first
seParate the strands
into three
equal
bundles.
Then insert the
center bundle through
the ter-
minal shaft hole
and wrap the
outer bundles around
the shaft
before tþhtening.
5. Finall¡ make sure
that none of
the strands
which make up
either
of
the two speaker
wire
Rear of
RIGHT
L
Series
speaker as viewed from
back
ffit rffi
++
RIGHT LEFT
I
:
I
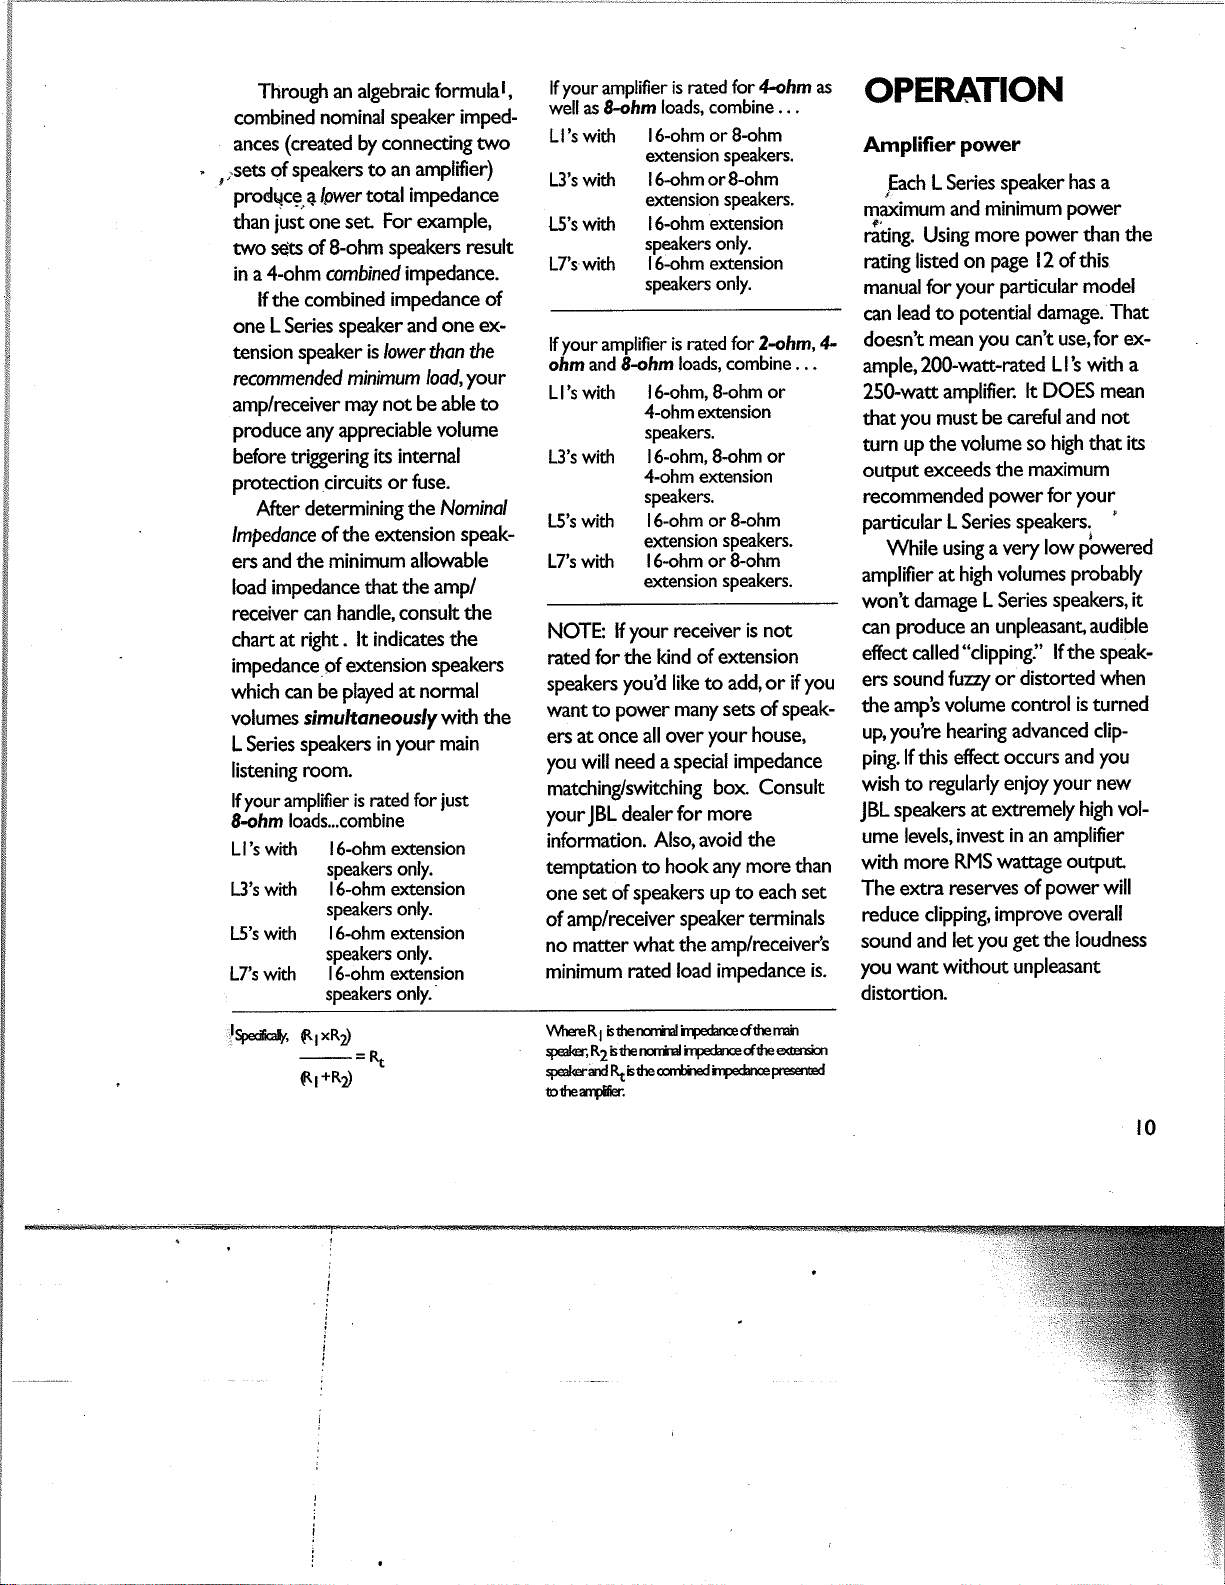
Through an
algebraic
formulal,
combined
nominal speaker imped-
ances
(created
by
connecting two
,;-sêts
of speakers
to an
amplifier)
prodqcg,
a
lpwer total
impedance
than
just
one set
For
example,
two sets of 8-ohm
speakers
result
in
a
4-ohm combined
impedance.
lf the combined
impedance of
one L Series speaker
and one
o<-
tension speaker
is lower thon the
recommended
minimum
load,
your
amp/receiver
may not be able
to
produce any appreciable
volume
before triggering
its internal
protection
circuits
or fuse.
After
determining
the Nominol
lmpedonce of
the extension
speak-
ers and
tlre minimum allowable
load impedance
tlrat the amp/
receiver can
handle, consult the
chart at rþht.
lt indicates the
impedance
of
extension
speakers
which
can be
played
at
normal
volumes
sìmultaneously
with
the
L Series
speakers
in
your
main
listening
room.
lf
your amplifìer is r¿ted
for
iust
&-ohm
loads...combine
Ll's with
l6-ohm extension
speakers
only.
L3's with
l6-ohm octension
speakers only.
L5's witJr
l6-ohm extension
speakers
only.
L7's with
l6-ohm octension
speakers
only.
lf
your
amplifier
is rated
for 4-ohrn as
well as 8æhm
loads, combine...
Ll's with
l6-ohm or 8-ohm
extension
speakers.
L3's with
l6-ohm
or8-ohm
e><tension
speakers.
L5's with
l6-ohm
octension
speakers only.
L7's with
f 6-ohm extension
speakers
only.
lf
your
amplifier
is
rated for 2+hm,4-
ohrn and
S<,hm
loads, combine..
.
L |
's
with
| 6-ohm,
8-ohm or
4-ohm extension
speakers.
L3's with
l6-ohm,8-ohm
or
4-ohm extension
speakers.
L5's with
l6-ohm or
8-ohm
octension
speakers.
L7's with
l6-ohm or 8-ohm
octension
speakers.
NOTE:
lf
your receiver is not
raæd for
the kind of exænsion
speakers
you'd like to add,or
if
you
want to
power many
sets of speak-
ers at
once all over
your house,
you
will
need a special
impedance
matching/switching
box Consult
yourJBL dealer
for more
information. Also,
avoid
the
temptation
to hook any
more than
one
set ofspeakers
up to each
set
of amp/receiver
speaker
terminals
no matter what
the amp/receiver's
minimum
rated
load impedance
is.
OPERATION
Amplifier
power
Each L Series
speaker
has a
maximum and
minimum
power
råting. Using
more
power
than the
rating listed
on
page 12 of this
manual for
your
particular model
can
lead to
potential
damage. That
doesnt
mean
you
cant
use,for ex-
ample,
20O-watt-rated
L |
's
with a
250-watt
amplifier:
lt DOES mean
that
you
must
be careful
and not
turn
up the volume
so
high that its
output o<ceeds
the
maximum
recommended
power
for
your
particular L Series
speakers.
È
While
using a very
low
pbwered
amplifìer
at high
volumes
probably
wont
damage L Series
speakerc,
it
can
produce an unpleasant audible
effect called
"clipping."
lf the speak-
ers
sound
fu:zy or
distorted
when
the
amp's volume
control
is turned
up,
you're
hearing
advanced
clip-
ping.lf this effect
occurs and
you
wish
to
regularly enjoy
your
new
JBL
speakers
at
extremely
high
vol-
ume levels,
invest
in an amplifier
witlr
more
RMS wattage
output
The extra
reseryes
of
power
will
reduce clipping,
improve overall
sound and
let
you
get
the loudness
you
want
without
unpleasant
distortion.
lgeøay,6¡xRz)
-=q
ßl*Rz)
Wrere R
¡
bdrerurind
içedmcecfÛE
ñalt
+€dcr,
R2búersrid
hpeúnæcfûeeærr*n
+€dcrmd
q
b úe orùird
inpedmæ
æsened
oúeardfier.
t0
A
shortt'test
drivet'
At this poing it's
time to
make
sure
you
made the amplifìer-to-
speaker connêGions correctly
-
and then st¿rc enioyinlkheml
l. With the amp/receiver still
turned off, confìrm ttrat its vol-
ume control is turned allthe
way DOWN. NexÇsetthe
BALANCE
controlto
its
center
position. Alsq
if the amp/
receiver hasA/B
speaker switch,
set ¡t to correspond to the set
of speaker output term¡nals
connected
to the L
Series
speakers.
2. Now turn on
your
amp/
receiver and a music source
such as CD
player;
cassette deck
or FM station.
3.
Select that source
on the amp/
receiver
front panel
and
press
PLAY on the music source
comPonent
4. GENTLY turn up the volume
control until
you
hear sound
from both L Series
speakers.
(lf
one or both channels
do
not
produce
sound, consult
"Troubleshooting"
).
5.
Rotate the amp/receiver
BALANCE control allthe way
to the LEFI. Sound
should only
come from
the left
speaker:
lf the sound comes from the
RIGHT speaker with the
bal-
ance control
LEFI,the
speaker
wires
have been reversed during
il
hook-up. Turn the amp/receiver
off and switch both
sets of
speaker wires.
ó.
lf sound moves to the appro-
priate
speaker when the
BALANCE
control
is
rot¿ted in
the corresponding direction,
you're ready
to enjoy
your
new
L
Series speakers. lf not,
consult
"Troubleshooting'.
Caring for
your
L Series
speakers
In
general,
a light dusting should
be all the c¿re necessary
since
the
L Series' cabinet fìnish does
not
need
waxing or oiling. However; if
the enclosure surhces
become
dirty,they may
be cleaned with a
damp
cloth or a
cleaner
suiøble
for a sealed
wood
fìnish.
Never
use
a
pump
or spmy cleaner di-
recdy
on the speakers since
the
over-spnry
could be harmfulto the
L Series' speaker cones. lnstead,
apply cleaner to
a
soft rag
and then
wipe it onto the cabine¿
To remove dust from
the
grille
cloth, use a vacuum with a brush
attachmen¿ Spots may
be
removed with
a commercial
sPot
remover.
Trnoubleshooting
The vast majorÇ
of
new
speaker
"malfunctions"
end up
being traced
to connections or
switch settlngs.
To avoid
packing
up correctly functioning
speakgrs
and sending them off,
only to find
that they're not really at
fault" check
tlre following tips fìrst, before
requesting service.
'
No sound at all from
either speaker
l.
Amp/receiver tape
monitor but-
ton
pushed in
while
using CQ
FM or
phono
inputs.
2. Wrong speaker switch
is
pressed
if the amp/receiver
has
both
"A"
and
"B"
sets of speaker
outPuts.
3. Sound source
(CD
cassette
deck turnable) not turned
on,
not activated or not
selected on
amp/receiver front,
panel.
No sound
fiom one speaker
l. Balance
control
turned all the
way left or
righr
2.
Speaker
wire to that speaker
has become
disconnected at
either the speaker or the
amp/receiven
3. One of the
connections
between sound source and amp/
receiver is faulty or has become
disconnected.
Both speakers
play
at lowvol-
umes but shut offas volume
is
incrcased OR sound turns on
and offintermittently
l. A
few
strands of speaker
wire
may be
shorting
out at either
the
speakers or amp/receiven
Re-check connections.