atorlS Manual_
CRRFTSMRN°
1.46 cu. in./24cc 2-Cycle
17 Inch Cutting Path /.080 In. Line
GASOLINE WEEDWACKER _
Model No.
358.798540
358.798570
&
II
WARNING:
Read and follow all Safety Rules and Operating
Instructions before first use of this product.
For answers to your questions about this product:
Call 7 am-7 pm, Mon-Sat; Sun, 10 am-7 pm
1-800-235-5878
Sears, Roebuck and Co., Hoffman Estates, IL 60179 USA
530-084027 03/22/96
Warranty Statement 2 Storage
Safety Rules 2 TrOUbleshooting Chart
Assembly 4 : Repair Parts List
Operation 5
Maintenance 9 Spanish
Service & Adjustments 10 Parts and Ordering
11
12
13
16
Back Cover
FULL ONE YEAR "WARRANTY ON CRAFTSMAN GAS POWERED
WEEDWACKER ® LINE TRIMMER
For one year from the date of purchase, when this Craftsman Gas Powered
Weedwacker® Line Trimmer is maintained, lubricated, and tuned Up according to
the operating and maintenance instructions in the operator's manual, Sears will
repair, free of charge, any defect in material or workmanship.
This warranty excludes nyton line, spark plug, and air filter, which are expendable
parts and become worn during normal use.
If this Weedwacker® Line Trimmer is used for commercial purposes, this warranty
applies for only 90 days from the date of purchase. If this Weedwacker® Line Trim-
mer is used for rental purposes, th s warranty applies for or_!y30 days from the date
of purchase. This warranty applies only while this pr0duct is in use in the United
States.
WARRANTY SERVICE IS AVAILABLEBY RETURNINGTHE WEEDWACKER® LINE
TRIMMER TO THE NEAREST SEARS SERVICE CENTER INTHE UNITEDSTATES.
This warranty gives you specific legal rights, and you may atso have other rights
which vary from state to state.
Sears, Roebuck and Co. Dept. D/817WA Hoffman Estates, IL 60179
WARNING: When using gardening
appliances, basic safety precautions
must always be followed to reduce the
risk of fire and serious injury. Read and
follow all instructions. Safetyinformationonthe unit
This power unit can be dangerous!
Operator is responsible for following _ DANGER: Never use blades or flailing
instructions and.warnings on unit and devices. This unit is designed for line.i
in manual. Read entire Operator's trimmer use only. Use of any other ac-
Manual before using unit! Be thorough- cessories or attachments will increase
ly familiar wi{h the controls and the ' the risk of injury.
proper use of the unit. Restrict the use
of this unit to persons who have read,
understand, and will follow the instruc-
tions and warnings on the unit and in WARNING: Trimmer line throws ob-
the manual. Never allow children to jects violently. You and others can be
operate this unit. - :.... blinded/injured. Wear eye and leg
protection. Keep body parts clear of
rotating line. Keep children, bystand-
2
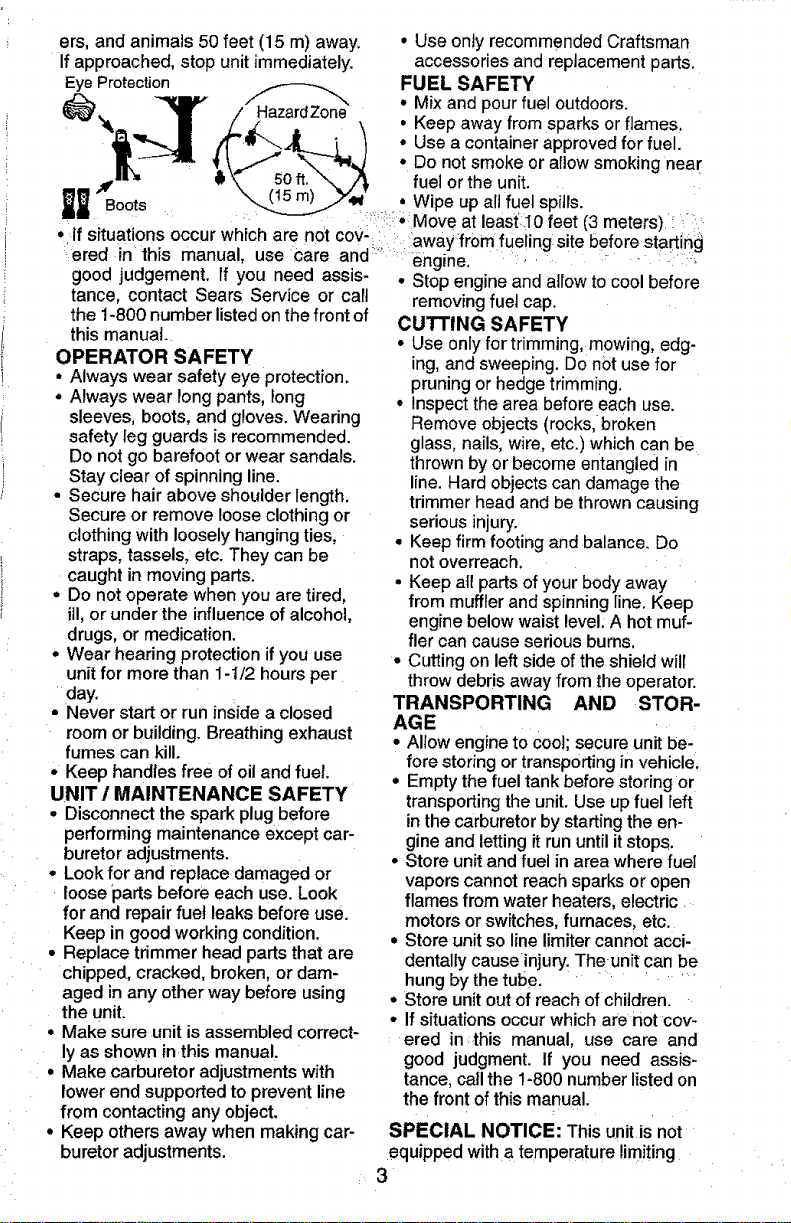
ers,andanimals50feet(15m)away. • UseonlyrecommendedCraftsman
Ifapproached,stopunitimmediately, accessoriesandreplacement parts.
Eye Protection FUEL SAFETY
_---'_- * Mix and pour fuel outdoors.
/ /Hazard/one \ • Keep away from sparks or flames.
il_-.._j.. _ • Use a container approved for fuel:
_._/"_. _'_4 • Do not smoke or allow smoking near
_ doots"B & \'_ 50 ft. \, /71, fuel or the unit. .i
"__'_i , Wipe up all fuel spitls.
:/:_:_* :Move at least:_10feet (3 meters) '._:
• If situations occur which are not cov-i: : :awayfrom fue ing site before starting
ered in this manual, use Care and ........engine. :_ _-:i _'.
good judgement. If you need assis- • Stop engine and allow to cool before
lance, contact Sears Service or call
the !-800 number listed on the front of
this manual.
OPERATOR SAFETY
• Always wear safety eye protection.
• Always wear long pants, long
sleeves, boots, and gloves. Wearing
safety leg guards is recommended.
Do not go barefoot or wear sandals.
Stay clear of spinning line.
• Secure hair above shoulder length.
Secure or remove loose clothing or
clothing with loosely hanging ties,
straps, tassels, etc. They can be
caught in moving parts.
• Do not operate when you are tired,
ill, or under the influence of alcohol,
drugs, or medication.
• Wear hearing protection if you use
unit for more than 1-1/2 hours per
day.
• Never start or run inside a closed
room or building. Breathing exhaust
fumes can kill.
• Keep handles free of oil and fuel.
UNIT / MAINTENANCE SAFETY
• Disconnect the spark plug before
performing maintenance except car-
buretor adjustments.
• Look for and replace damaged or
loose parts before each use. Look
for and repair fuet leaks before use.
Keep in good working condition.
• Replace trimmer head parts that are
chipped, cracked, broken, or dam-
aged in any other way before using
the unit.
• Make sure unit is assembled correct-
ly as shown in this manual.
• Make carburetor adjustments with
lower end supported to prevent line
from contacting any object.
• Keep others away when making car-
buretor adjustments.
removing fuel cap.
CUTTING SAFETY
• Use only for trimming, mowing, edg-
ing, and sweeping. Do not use for
pruning or hedge trimming.
• inspect the area before.each use.
Remove objects (rocks, broken
g_ass, nails, wire, etc.) which can be
thrown by or become entangled in
line. Hard objects can damage the
trimmer head and be thrown causing
serious injury.
• Keep firm footing and balance. Do
not overreach.
• Keep all parts of your body away
from muffler and spinning line. Keep
engine below waist level: A hot muf-
fler can cause serious burns.
• Cutting on left side of the shield will
throw debris away from the operator.
TRANSPORTING AND STOR-
AGE
• Allow engine to Cool; secure unit be-
fore storing or transporting in vehicle.
• Empty the fuel tank before storing or
transporting the unit. Use up fuel left
in the carburetor by starting the en-
gine and letting it run until it stops.
• Store unit and fuel in area where fuel
vapors cannot reach sparks or open
flames from water heaters, electric
motors or switches, furnaces, etc.
• Store unit so line limiter cannot acci-
dentally cause injury. The unit can be
hung by the tube.
• Store unit out of reach of children.
° If situations occur which are r,ot cow
ered in:this manual, use care and
good judgment. If you need assis-
tance, call the 1-800 number listed on
the front of this manual.
SPECIAL NOTICE: This unit is not
equipped with a temperature limiting
• 3

muffler and spark arresting screen
which meets the requirements of Cali-
fornia Codes 4442 and 4443. All U.S.
forest land and the states of California,
Idaho, Maine, Minnesota, New JerSey,
Oregon, and WashingtOn require by
law that many internal combustion en-
gines be equipped with a spark arres-
tor screen. If you operate in a locale
where such regulations exist, you are
legally responsible for installing and
maintaining the operating condition of:.
these parts. Failure to do so is a viola_
tion of the law: Refer tothe MAINTE-
NANCE section in this manual. :
CARTON CONTENTS
Check carton contents against the fol-
lowing list.
Model 358,798540
° Trimmer
° Shield
• Assist Handle
• Wing Nut (attached to shield)
, Container of Oil
Model 358.798570
• Trimmer
- Shield
- Assist Handle
° Wing Nut (attached to shield)
. Container of Oil
• Spool with 20 ft. of line
. One gallon gasoline container
° Pair of gloves
° Bulk line - 200 feet
Examine parts for damage. Do not use
damaged parts.
NOTE: If you need assistance or find
parts missing or damaged, call the
1-800 number listed on the front of this
manual.
It is normal for the fuel filter to rattle in
the empty fuel tank.
Finding fuel or oil residue on muffler is
normal due to carburetor adjustments
and testing done by the manufacturer.
ASSEMBLY
:WARNING: If received assembled,
repeat all steps to ensure your unit is
properly assembled and all fasteners
are secure.
Ber sure to assemble the handle to the
unit before you assemble the shield.
ATTACHING THE HANDLE
(some units are already assembled)
WARNING: Make sure unit is properly
assembled and all fasteners are secure.
j.7-6
Make sure knob isassembled on this side.
• Assemble handle to the unit asshown;
make sure bottom of handle is seated
in the groove inthe trigger housing.
NOTE,: Adjustment knob must be as-
sembled on the side of the unit oppo-
site the operator's position.
• Pivot handle to acomfortable position.
Tighten handle securely.
ATTACHING SHIELD
WARNING: The shield must be prop-
erly installed. The shield provides partial
protection from the riskofthrownobjects
to the operatorand others and is
equippedwith a line ]imiter which cuts
excess line to the properlength.The line
limiter(on undersideof shield) is sharp
and can cut you. For proper orientation,
see illustratio_in Operation section.
° Remove wing nut from shield.
• Insert bracket into s!ot as shown.
• Pivot shield until bolt passes through
hole in bracket.
° Securely tighten wing nut onto bolt,
_'_ Slot
Shield J
_ __"_ Bracket
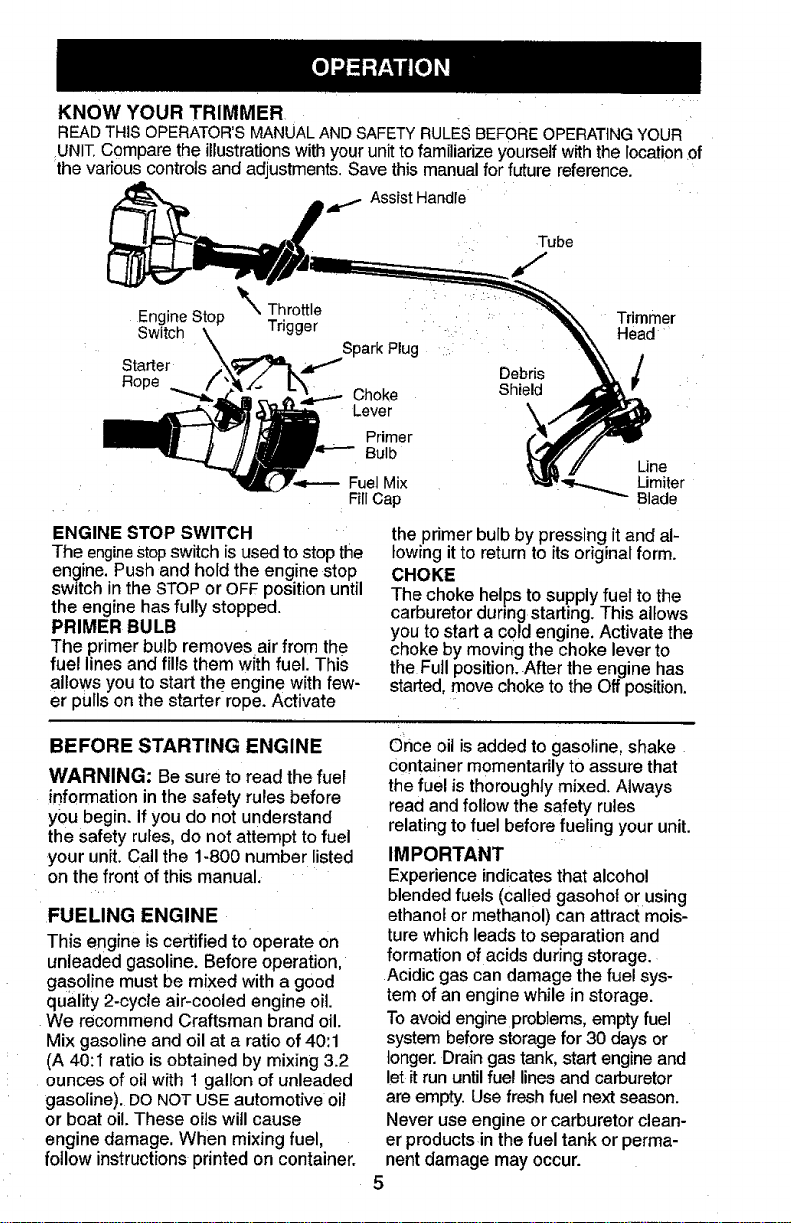
KNOWYOURTRIMMER
READTHIS OPERATOR'SMANUALAND SAFETYRULESBEFOREOPERATINGYOUR
UNIT.Compare the illustrations with your unit to familiarize yourself with the location of
the various controls and adjustments. Save this manual for future reference.
i,,dr,._ AssistHandle
Tube
Engine Stop _' Throttle Trimmer
Switch Trigger Head
Spark Plug
Starter _ Debris
Rope Shield
Choke
Lever
Primer
Bulb
Fuel Mix
Fill Cap
Line
Limiter
Blade
ENGINE STOP SWITCH
The engineStopswitch is used to stop the
engine. Push and hold the engine stop
switch in the STOP or OFF position until
the engine has fully stopped.
PRIMER BULB
The primer bulb removes air from the
fuel lines and fills them wlth fuel. This
allows you to start the engine with few-
er pulls on the starter rope. Activate
BEFORE STARTING ENGINE
WARNING: Be sure to read the fuel
information in the safety rules before
you begin. If you do not understand
the safety rules, do not attempt to fuel
your unit. Call the 1-800 number listed
on the front ofthis manual.
FUELING ENGINE
This engine is certified to0perate on
unleaded gasoline. Before operation,
gasoline must be mixed with a good
quality 2-cycle air-cooled engine oil.
We recommend Craftsman brand oil.
Mix gasoline and oil at a ratio of 40:1
(A 40:I ratio is obtained by mixing 3.2
ounces of oil with 1 gallon of unleaded
gasoline). DO NOT USE automotive oil
or boat oi!.These oilswill cause
engine damage. When mixing fuel,
follow instructions printed on container.
the primer bulb by pressing it and al-
lowing it to return to its original form.
CHOKE
The choke helps to supply fuel to the
carburetor during starting. This allows
you to start a c0ld engine. Activate the
choke by moving the choke lever to
the Full position. After the engine has
started, move choke to the Off position.
Once oil is added to gasoline, shake
Container momentarily to assure that
the fuel is thoroughly mixed. Always
read and follow the safety rules
relating to fuel before fueling your unit.
IMPORTANT
Experience indicates that alcohol
blended fuels (called gasohol or using
ethanol or methanol) can attract mois-
ture which leads to separation and
formation ofacids during storage.
Acidic gas can damage the fuel sys-
tem of an engine while in storage.
Toavoid engine problems, empty fuel
system before storage for 30 days or
longer. Drain gas tank, start engine and
let it run until fuel lines and carburetor
are empty. Use fresh fuel next season.
Never use engine or carburetor clean-
er products in the fuel tank or perma-
nent damage may occur.
5
See:theSTORAGEsectionforaddition-:_
alinformation.
HOWTOSTOP YOUR UNIT
Push and hold the engine stop switch
in the STOPor OFF position until the
unit has fully stopped.
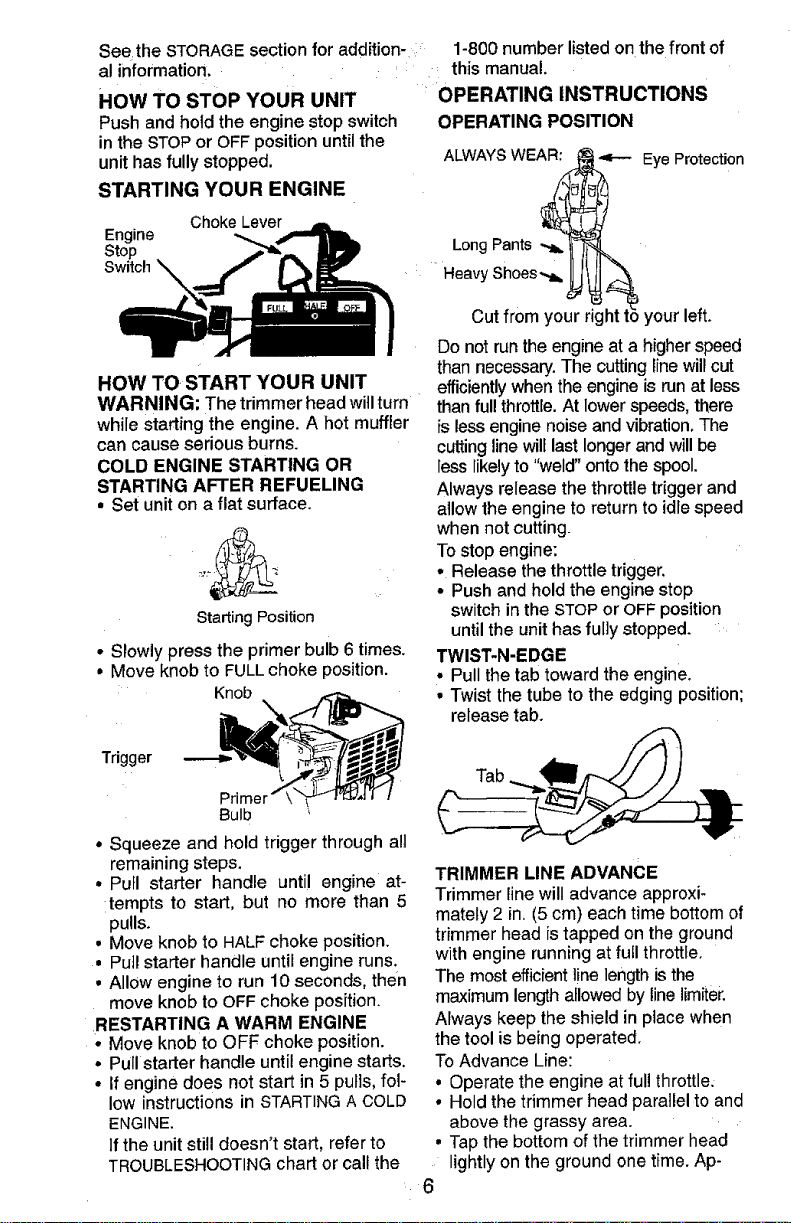
STARTING YOUR ENGINE
1-800 number listed onthe front of
this manual,
• OPERATING INSTRUCTIONS
OPERATING POSITION
ALWAYS WEAR: '4-'- Eye Protection
Choke Lever
Engine
Stop
Switch
Long Pants -._
Heavy Shoes-t=
HOW TO START YOUR UNIT
WARNING: Thetrimmerhead willturn
whilestarting the engine.A hot muffler
cancauseserious burns.
COLD ENGINE STARTING OR
STARTING AFTER REFUELING
• Set uniton a flat surface.
Starting Position
• Slowly press the primer bulb 6 times.
• Move knob to FULL choke position.
Knob
Cut from your right I left.
Do not run the engine at a higher speed
than necessary. The cutting line will cut
efficiently when the engine is run at less
than full throttle. At lower speeds, there
is lessengine noiseand vibration, The
cutting line will last longer and will be
less likely to "weld" onto the spool.
Always release the throttle trigger and
allow the engine to return to idle speed
when not cutting.
To stop engine:
• Release the throttle trigger.
• Push and hold the engine stop
switch in the STOP or OFF position
until the unit has fully stopped.
TWIST-N-EDGE
• Pull the tab toward the engine.
• Twist the tube to the edging position;
release tab.
Trigger
Bulb
• Squeeze and hold trigger through all
remaining steps.
• Pull starter handle until engine at-
tempts to start, but no more than 5
pulls.
• Move knob to HALF choke position.
• Pull starter handle until engine runs,
• Allow engine to run 10 seconds, then
move knob to OFF choke position.
RESTARTING A WARM ENGINE
• Move knob to OFF choke position.
• Pull starter handle until engine starts,
° If engine does not start in 5 puI]s, fol-
low instructions in STARTING A COLD
ENGINE.
If the unit still doesn't start, refer to
TROUBLESHOOTING chart or call the
Tab
TRIMMER LINE ADVANCE
Trimmer line will advanceapproxi-
mately 2 in.(5 cm)eachtimebottomof
trimmerhead istappedontheground
withenginerunningatfull throttle.
Themostefficientlinelengthisthe
maximumlengthallowedbyline limiter.
Always keep theshield in placewhen
thetoolisbeing operated.
ToAdvance Line:
• Operate theengineatfull throttle.
• Holdthetrimmerhead parallelto and
abovethe grassy area.
• Tapthe bottom of the trimmer head
lightly on the ground one time. Ap-
6
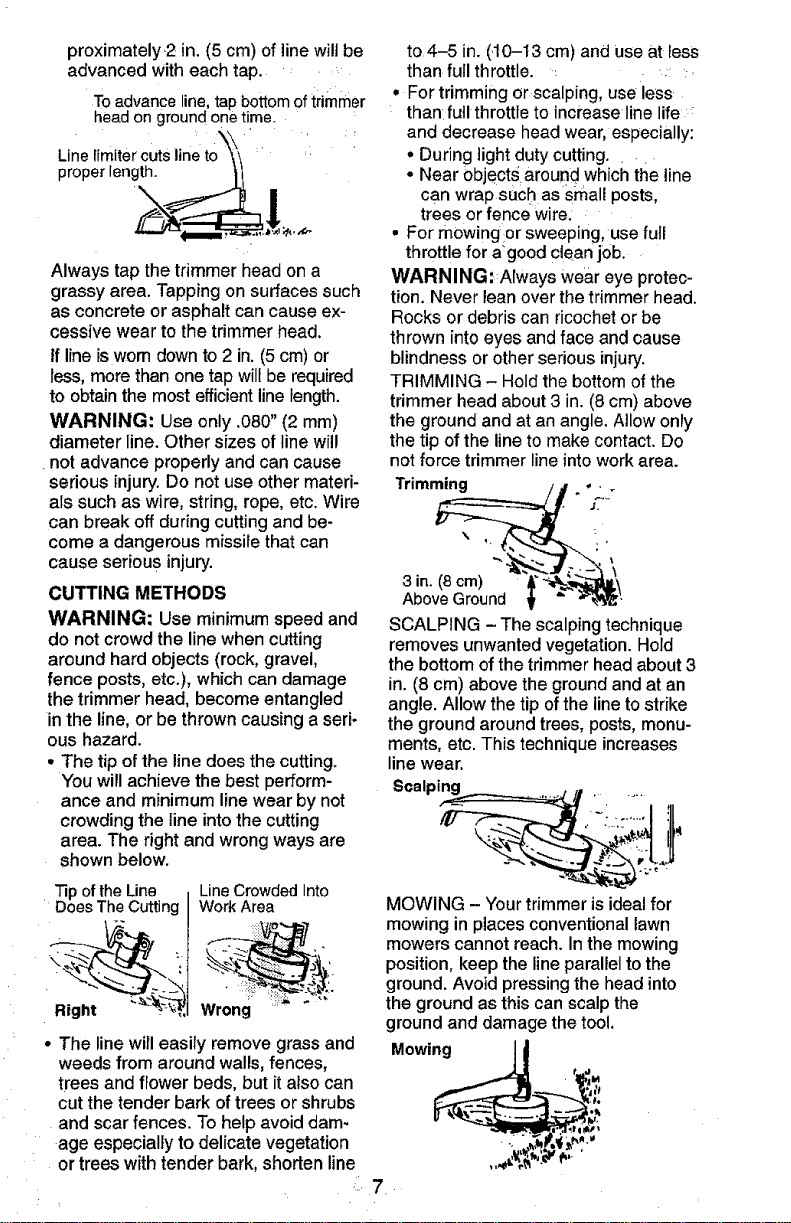
proximately.2 in. (5 cm) of line will be
advanced with each tap.
To advance line, tap bottomof trimmer
headon ground onetime.
Line limiter cuts line :
proper length.
Always tap the trimmer head on a
grassy area. Tapping on surfaces such
as concrete or asphalt can cause ex-
cessive wear to the trimmer head,
If line iswom down to 2 in. (5 cm) or
less, more than one tap will be required
to obtain the most efficient line length.
WARNING: Use only .080" (2 mm)
diameter line. Other sizes of line wil!
not advance properly and can cause
serious injury. Do not use other materi-
als such as wire, string, rope, etc. Wire
can break off during cutting and be-
come a dangerous missile that can
cause seriou s injury.
CUTTING METHODS
WARNING: Use minimum speed and
do notcrowdthe linewhencutting
aroundhardobjects(rock,gravel,
fence posts,etc.), whichcan damage
thetrimmerhead,becomeentangled
intheline,or be throwncausinga seri-
ous hazard.
• The tip ofthe linedoes thecutting.
You willachievethebest perform-
anceand minimumlinewearby not
crowdingtheline intothecutting
area. The right andwrongwaysare
shownbelow.
to4-5 in. (.10-13 cm) and Use at less
than fuIIthrottle. _ ::
• For trimming or scalping, use less
than full throttle to increase line life ;
and decrease head wear, especially:
• During light duty cutting.
• Near 0bjectsaround which the line
can wrap such as small posts,
trees or fence wire.
• For mowingor sweeping,use full
throttle for a"good clean job.
WARNING::AIways wear eye protec-
tion. Never lean over the trimmer head.
Rocks or debris can ricochet or be
thrown into eyes and face and cause
blindness or other serious injury.
TRIMMING - Hold the bottom of the
trimmer head about 3 in. (8 cm) above
the ground and at an angle. Allow only
the tip of the line to make contact. Do
not force trimmer line into work area.
Trimming
SCALPING - The scalping technique
removes unwanted vegetation. Hold
the bottom of the trimmer head about 3
in. (8 cm) above the ground and at an
angle. Allow the tip of the line to strike
the ground around trees, posts, monu-
ments, etc. This technique increases
line wear.
Tip ofthe Line I
Right ___I
_--_-,_j_.,
LineCrowded Into
Work Area
Wrong
• The line will easily remove grass and
weeds from around walls, fences,
trees and flower beds, but it also can
cut the tender bark of trees or shrubs
and scar fences. To help avoid dam-
age especially to delicate vegetation
or trees with tender bark, shorten line
MOWING - Your trimmer is ideal for
mowing in places conventional lawn
mowers cannot reach. In the mowing
position, keep the line parallel to the
ground. Avoid pressing the head into
the ground as this can scalp the
ground and damage the too!.
Mowing J_
,,,4¢V,_i#' t',

SWEEPING-Thefanningactionof
rotatinglinecanbeusedforaquick
andeasycleanup.Keep.lineparallel
toandabovethesurfacesbeingswept
andmovethetoolfromsidetoside.
EDGING- TheTwist-N-Edgefeature
allowsforeasyedgingofsidewalks,
patios,driveways,etc.Adjusttrimmer
totheedgingposition.Allowonlythe
tipof the line to make contact. Do not
force trimmer line into work area.
Edging __
/
8
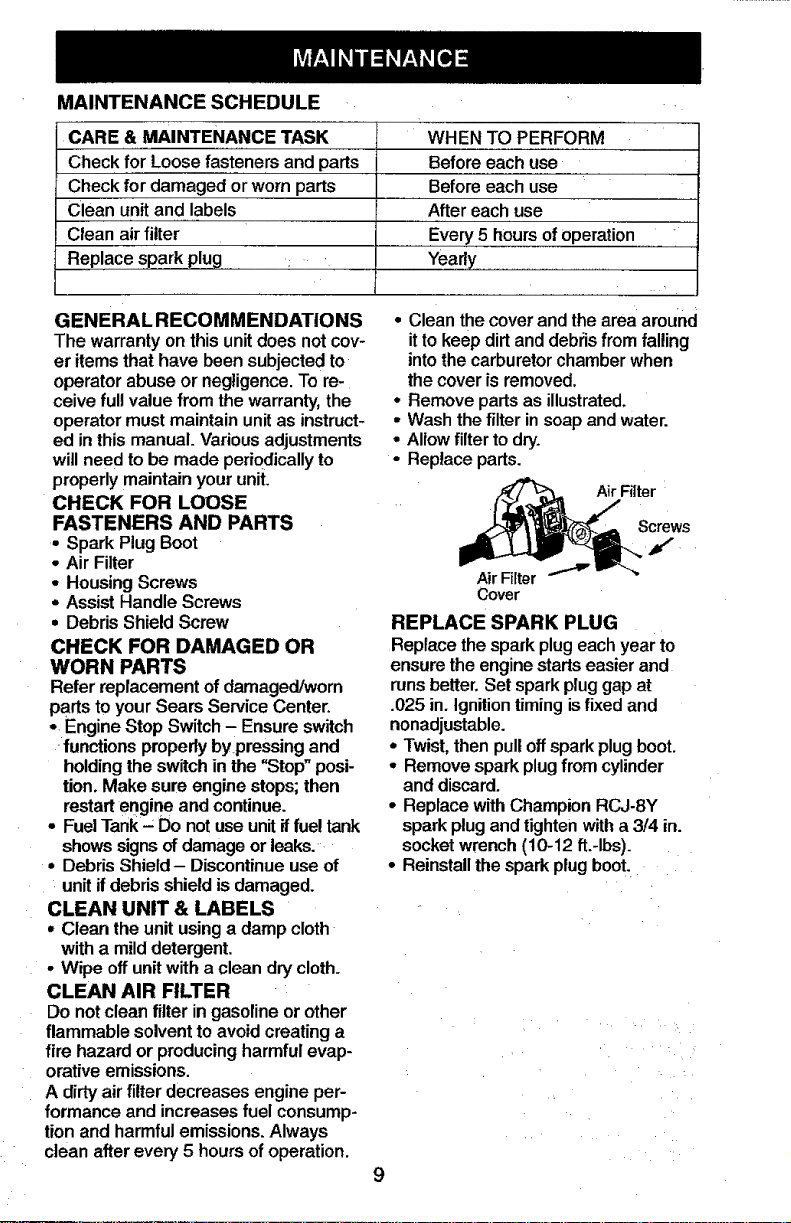
MAINTENANCE SCHEDULE
CARE & MAINTENANCE TASK
Check for Loose fasteners and parts
Check for damaged or worn parts
Clean unit and labels
Clean air filter
Replace spark plug
GENERAL RECOMMENDATIONS
The warranty on this unit does not cov-
er items that have been subjected to
operator abuse or negligence. To re-
ceive full value from the warranty, the
operator must maintain unit as instruct-
ed in this manual. Various adjustments
will need to be made periodically to
WHEN TO PERFORM
Before each use
Before each use
After each use
Every 5 hours of Operation
Yeaffy
• Clean the cover and the area around
it to keep dirt and debris from falling
into the carburetor chamber when
the cover is removed,
• Remove parts as illustrated.
o Wash the filter in soap and water.
° Allow filter to dry.
• Replace parts.
properly maintain your unit.
CHECK FOR LOOSE
FASTENERS AND PARTS
• SparkPlugBoot
- AirFilter
- HousingScrews
= Assist HandleScrews
• DebrisShieldScrew
CHECK FOR DAMAGED OR
WORN PARTS
,_Fi|ter
Cover
REPLACE SPARK PLUG
Replace the spark plug each year to
ensure the engine starts easier and
Refer replacement of damaged/worn
parts to your Sears Service Center.
=Engine Stop Switch - Ensure switch
functions propedy bypressing and
holding the switch in the "Stop" posi-
tion, Make sure engine stops; then
restart engine and continue.
• Fuel Tank - Do not use unit iffuel tank
shows signs of damage or leaks.
• Debris Shield- Discontinue use of
unit if debds shield is damaged.
CLEAN UNIT & LABELS
• Clean the unit using a damp cloth
with a mild detergent.
° Wipe off unitwith a clean dry cloth.
CLEAN AIR FILTER
Do not clean filter in gasoline or other
flammable solvent to avoid creating a
fire hazard or producing harmful evap-
orative emissions.
A dirty air filter decreases engine per-
formance and increases fuel consump-
tion and harmful emissions. Always
clean after every 5 hours of operation.
runs better. Set spark plug gap at
.025 in. Ignition timing is fixed and
nonadjustable.
= Twist, then pull off spark plug boot.
= Remove spark plug from cylinder
and discard.
- Replace with Champion RCJ-8Y
spark plug and tighten with a 3/4 in.
socket wrench (10-12 ft.-Ibs).
* Reinstall the spark plug boot.
< •

AD_/ANCING THE CUTTING LINE
Advance line by tapping bottom of cut-
ting head lightlyon the ground while en-
gine is running at full_speed. A metal
blade attached to the shield wilt cut the
line to the proper length.
REPLACING THE LINE
, Remove the spool by firmly pulling on
the tap button.
• Clean entire surface of hub and spool.
• Replace with a pre-wound spool, or
cut a length of20 feet of .080" (2 ram)
diameter Craftsman® Pro Trimmer
line. Never use wire, rope, string, etc.,
which can break off and become a
dangerous missile.
• Insert one end of the line about 1/2
inch (1 cm) into the small hole inside
the spool.
• Wind the line evenly and tightly onto
the spool. Wind in the direction of the
arrow found on thespool.
• Push=theline int0 the notch, leaving 3
to 5 inches (7 - 12 cm) unwound.
° Insert the line into the exit hole in the
hub as shown in the illustration.
• Align the notch with the line exit hole.
• Push the spoolinto the hub until it
snaps into place.
• Pullthe lineextending outside the hub
to release itfrom the notch:
Small
Line in
Notch"i"a_
Hub
Line exithole
CARBURETOR ADJUSTMENT
WARNING: The trimmer head will be
spinning during most of this procedure.
Wear your protective equipment and
observe all safety precautions. After
making mixture adjustments, recheck
idle speed.
Carburetor adjustment is criticaland !f
done improperly can permanently
damage the engine as well as the car-
buretor, if you require further assis-
tance or are unsure about performing
this procedure; call the 1-800:number
listed on the front of this manual.
Old fuel, a dirty air filter, a dirty fuel fil-
ter, or flooding may give the impres:
sion of an improperly adjusted carbu-
retor. Check these conditions before
adjusting the carburetor. : _
The carburetor has been carefully set
atthe factory. Adjustments may be
necessary ff you notice any of the foli
lowing conditions:
° Engine will not idle. See "Idle Speed"
under adjusting procedure.
- Engine dies or hesitates instead of
accelerating: See "Acceleration
Check" under adjusting procedure.
• Loss of cutting power.See "Mixture=.
Adjustment" under adjusting
procedure.
There are two adjustment screws on
the carburetor. They are located in the
area just above the primer bu!b.
MixtureScrew (with _
LimiterCap)
Idle
Speed
Screw
Air Fitter
Cover
CARBURETOR PRESETS
When making carburetor preset adjust-
ments, do not force plastic limiter caps
beyond stops or damage will occur,.
tf carburetor presets are not needed,
proceed to "Adjusting Procedure, Idle
Speed."
To adjust presets:
° Turn mixture screw counterclockwise
until it stops.
• Turn the idle speed screw clockwis_
until it stops. Now tumcounterc!ock
wise 4-1/2 turns.
• Start motor, cut grass for 3 minutes;
and proceed to the adjustment , •
section. If engine does not start, =
10
refertotroubleshootingchartorcall
the 1-800 numberlisted onthefront
ofthismanual.
• Ifengineperformanceisacceptable
at thepresetpositions,nofurther
adjustmentisnecessary.
ADJUSTING PROCEDURE
Idle Speed
Allow enginetoidle.Adjust speed until
enginerunswithoutstalling.
• Turnclockwiseto increaseengine
speed ifenginestallsor dies.
• Turncounterclockwiseto decrease
speed.
No furtheradjustmentsare necessary
ifperformanceissatisfactory.
Mixture Adjustment "H"
DONOToperateengine atfullthrottle
for prolongedperiodswhilemakingad-
justments.Damage totheenginecan
occur.Extend lineto thelength al-
lowed by the line timiter and cut some
grass. Based on performance while
cutting, turn themixture adjustment in
1/16-turn increments as follows:
• Clockwise until the engine has good i
power while cutting with no hesita-
tion.
Do not adjust by sound or speed, but
judge by how well the engine per-
forms while cutting.
• Counterclockwise if the engine has
speed but dies or lacks power while
cutting.
After completing adjustments, check
for acceleration. Reset if necessary.
Acceleration Check
if engine dies or hesitates instead of
accelerating, turn mixture adjustment
counterclockwise until you have
smooth acceleration. Recheck and ad-
just as necessary for acceptable per-
formance.
Prepare unit for storage at end of sea-
son or if it wilt not be used for 30 days
or more.
WARNING:
• Allow engine to cool, and secure the
unitbefore storing or transporting.
• Store unit and fuel in a well venti-
lated area where fuel vapors cannot
reach sparks or open flames from
water heaters, electric motors or
switches, furnaces, etc.
• Store unitwith all guards in place.
Position unit so that any sharp object
cannot accidentally cause injury.
• Store unitand fuel well out of the
reach of children.
EXTERNAL SURFACES
If your unit isto be stored for a pedod
of time, clean it thoroughly before stor-
age. Store in a clean dry area.
• Lightly oil external metal surfaces.
FUEL SYSTEM
Under Fueling Engine in the Operating
Section of this manual, see message
labeled IMPORTANT regarding the use
of gasohol in your engine.
Fuel stabilizer is an acceptable alter-
native in minimizing the formation of
fuel gum deposits during storage. Add
i :1
stabilizer to the gasoline in the fuel
tank or fuel storage container. Follow
the mix instructions found on stabilizer
container. Run engine at least 5 min-
utes after adding stabilizer.
CRAFTSMAN40:1, 2-cycle engine oil
(air cooled) is already blended with
fuel stabilizer. If you do not use this
Sears oil,you can add a fuel stabilizer
to your fuel tank.
INTERNAL ENGINE
• Removespark plugandpour1tea-
spoonof40:1,2-cycle engineoil(air
cooled)throughthesparkplugopen-
ing.Slowly pullthestarterrope8 to
10timestodistributeoil.
• Replacesparkplugwithnewoneof
recommendedtypeandheatrange.
• Cleanair filter.
• Checkentireunitfor loosescrews,
nuts,and bolts.Replace anydam-
aged,broken,orwornparts.
• Atthebeginning ofthenextseason,
useonlyfresh fuel havingtheproper
gasolinetooilratio.
OTHER
• Donotstoregasolinefromonesea-
sontoanother.
° Replacegasolinecanifitstartstorust.
1
Engine will not
start.
Engine wilt not
idle propedy.
Engine will not
accelerate,
lacks power,
or dies under
a load.
• Carbon build up.
Engine Smokes
excessively.
Engine runs hot;
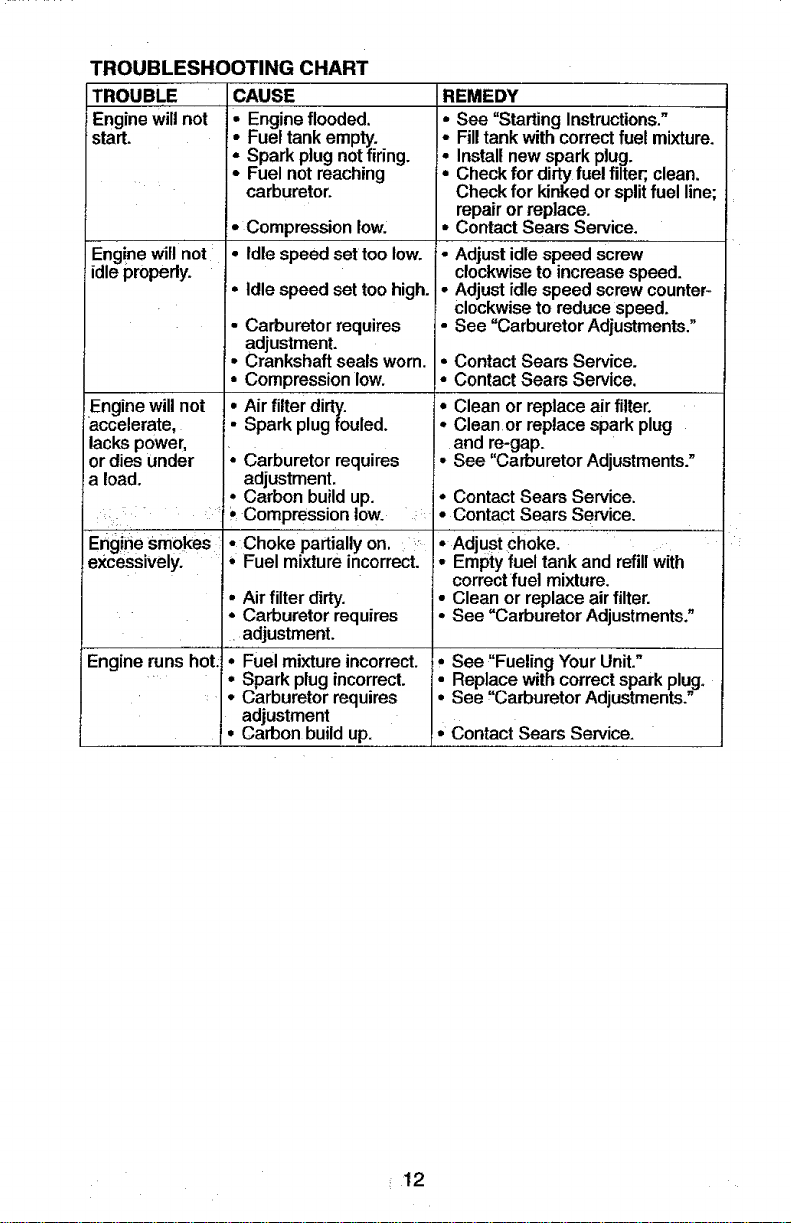
TROUBLESHOOTING CHART
TROUBLE CAUSE
• Engine flooded.
r• Fuel tank empty.
- Spark plug not firing.
• Fuel not reaching
carburetor.
° Compression low.
• Idle speed set too low.
• idle speed set too high.
• Carburetor requires
adjustment.
• Crankshaft seals worn.
• Compression low.
Air filter dirty.
Spark plug fouled.
"- Carburetor requires
adjustment,
Compression low. _
• Choke partially on, z_
• Fuel mixture incorrect.
• Air filter dirty.
° Carburetor requires
adjustment.
• Fuel mixture incorrect.
• Spark plug incorrect.
Carburetor requires
adjustment
• Carbon build up.
REMEDY
• See "Starting Instructionsi"
• Filltank with correct fuel mixture.
Install new spark plug.
Check for dirty fuel filter;,clean.
Check for kinked or splitfuel line;
repair or replace.
• Contact Sears Service.
• Adjust idle speed screw
clockwise to increase speed.
• Adjust idle speed screw counter-
Clockwiseto reduce speed.
• See "Carburetor Adjustments."
• Contact SearsService.
_- Contact Sears Service.
• Cleanor replaceairfilter.
° Clean or replacespark plug
and re-gap.
• See "CarburetorAdjustments."
• Contact Sears Service.
• Contact Sears Service.
• Adjust choke. ...........
Empty fuel tank and refill with
correct fuel mixture.
• Clean or replace air filter.
• See =Carburetor Adjustments."
, See "Fueling YourUnit."
• Replacewithcorrect sparkplug.
• See "Carburetor Adjustments."
-Contact Sears Service.
12
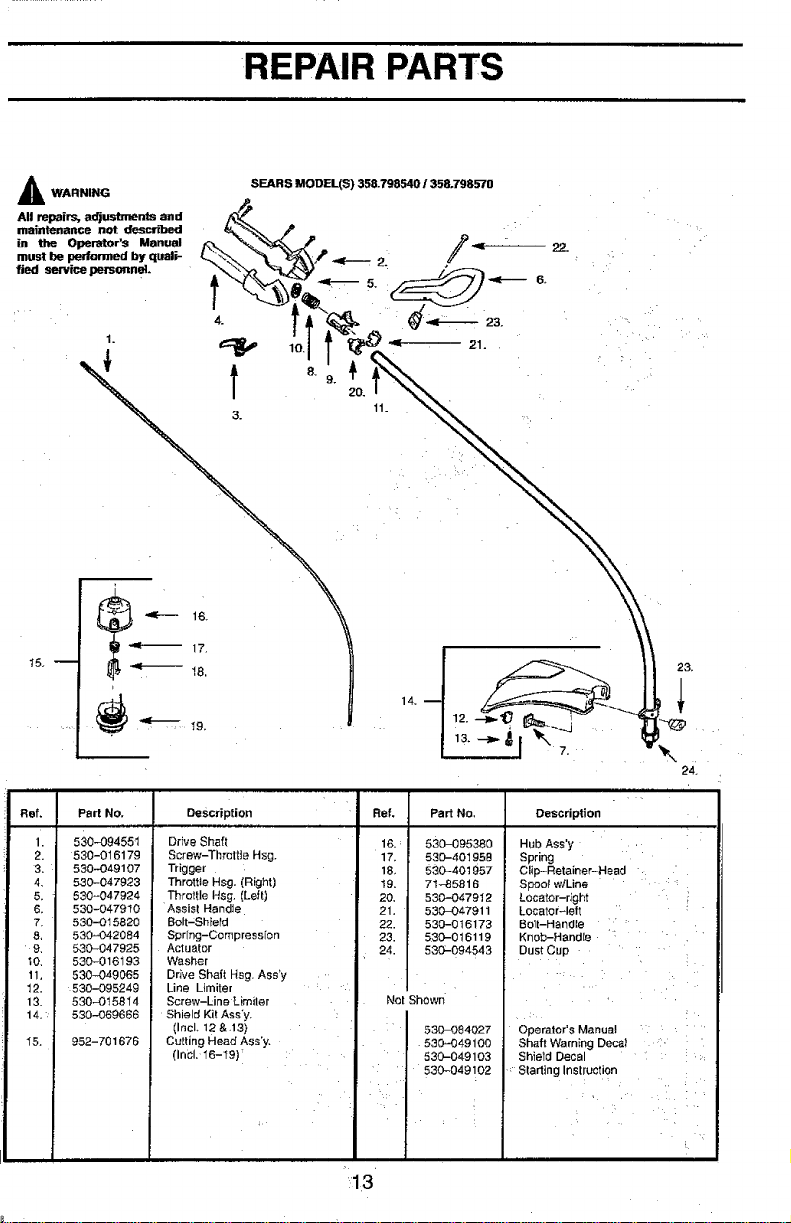
REPAIR PARTS
24.
Ref, PaH No.
1. 530-094551
2. 530-016179
3. 530-049107
4, 53O-047923
5, 530-047924
6, 530-047910
7. 530-015820
8, 530,4342084
9. 530-047925
_0. 530--016193
11, 530-049065
12. 530-095249
13. 530-015814
14. 530--069666
I5, 952-701676
Description
Drfve Shaft
Screw-Throttle Hsg.
Trigger
Throttle Hag, (Right)
Throttle HSg. (Left)
Assist Handle
Bolt-Shield
Spring-Compression
Actuator
Washer
Drive Shaft Hag, Ass'y
Line Limiter
Screw-Line Limiter
Shield Kit Ass'y.
(IncL 12 &.13)
Culling Head Ass'y.
(Incl. 16-t9)'
Ref.
16.:
17,
18+
19.
20.
Part No.
53O-09538O
530-401958
530-401957
71-85816
530-047912
21. 530-047911
22. 530-016173
23. 530-016119
24. 530-094543
Net Show#
530-084027
530-049100
530-0491O3
530-049102
Description
Hub Ass'y
Spring
Clip-Retainer-Head
Spoof w;Line
Locator-r;ght
Locatorqeft
BoltHandle ....
Knob-Handte ' '
Dust Cup ....
Operator's Manual
Shaft Warning Decal '
Shield Decal
, Starting Instruction
•:¸•¸1•3

u
REPAIR PARTS
i
32.
52.
,,i u,
Ref. Part No.
1.
••2,
3,
4.
5,
6,
7.
8+
9.
10,
t1.',
12.
13,
14.
15,
t7,
l&
18.1
t9J
20,1
21
22.
23,
24.
25,
26.
27,
530-016164
530=015892;
530=01616_
530-01588¢
530-02756g
53(3-01581 ¢
530-019232
Champion
530-019194
530_015945
53O-049390
530-049389
530-039149
530-039163
530-036145
530-015954
530-015828
530-027953
530-014532
530=069615
530_047737
530-014861
530-032125
530-032124
530-019179
530_01594t
530-036578
5&
63,
Description
Starter Spring
Screw
Reteiner-Pu}ley
Screw '
Starter Handle
Screw
Gasket-CyiindedCarb. i
Spa_'k Ptug (RCJ-SY)
Gasket-Carb,
Retainer Ring--.C'case
Lead Wire
Ground Wire
FlywheeI
Ignition Module
Spacar-ignit, Module
Screw-Ignit. Module
Washer-Thrust
Drive Coup!log
Crankshaft Ass'y.
Connecting Rod Assy.
Piston Ring
Crankcase Assy.
(tncLl0 & 23-26)
Inner Bearing
Outer Bearing
C'case Seal
ReL Ring!O'shaft
k4uffler Body
Ref,
28,
29.
30.
31.
32,
3&
34.
35,
,36+
37+:
38.
39+
40.
41.
42.
43.
44.
45.
46,
47.i
48.
49.
50.
51.
52.
53.
Part No,
530-036577
530--038602
530-036579
53O-029930
530-049377
530-,019181
530-069757
530-069758
530-016014
530-019223 1
530-069754
,530-015882
530-047914
530-015557
530-049298
530-015254
530-015852 :,
530-049089
580"-047932 '
530-049095 1
530-015966
530-049066
530-049299
530-015953
530-036793
530-069247
3. 62.
Description Ref,
Muffler Cover 54.
Muffter BaSle-Exit
Muffler Baffle-First 55.
Muffler Spring 56,
Rear Shroud 57,
Gasket-O'case
Cylinder Kit 58,
Carb. Adaptor Kit
Screw=Garb Adptr. 59.
Gasket-Cytinder - 60.
Carburetor ASsy Kit 61.
(tact. Limiter Cap) 62,
Screw-Flywheel
Choke Plate 63.
Screw 64.
Choke Lever Ass'y. 65.
Wave Washer 66,
Choke Spacer 67.
Air Box 68,
Air Filter Foam 69.
Air Filter Cover
Screw-Air Box 70.
Throttle Cable Assy
Fuel Tank Ass'y.
Screw-Cylinder
Shroud Isdator
Fuel Une-CaCefrank
.... , ,,_,,,,
57,
Part No.
530-069660
_a0-o_;a47
530-014362
530.-069625
530-014729
530-038114
530-069762
530-069232
530--069400
530-069599
530=016080
530-036792
:530--049284
53O-.O69380
530-015162
530-069756
53O-O16191
Description
Muffler K_t
(!ncL 27-3!)
Fuel Cap Assy.
Fuel Pickup Assy
Engine Gasket Kit
(Incl. 7.9,33, 37)
C'case/C'shaft Assy,
(lncL !0,19_22-26)
On/Off Switch
Fan Housing Assy.
Rope }(it
Starter PulIey Kit
'(IncL 64)
Fuel Line-Carbfi_ank
Screw
Isotater-C'case
Starter Dog
Spark Arrestor Kit
Piston Pin Retainer
Piston Kit
(lacL 21,69 & Pin)
Spring Starter Dog
..... ii ii• " •
i DI DAID DADT_-- . . lr_.._
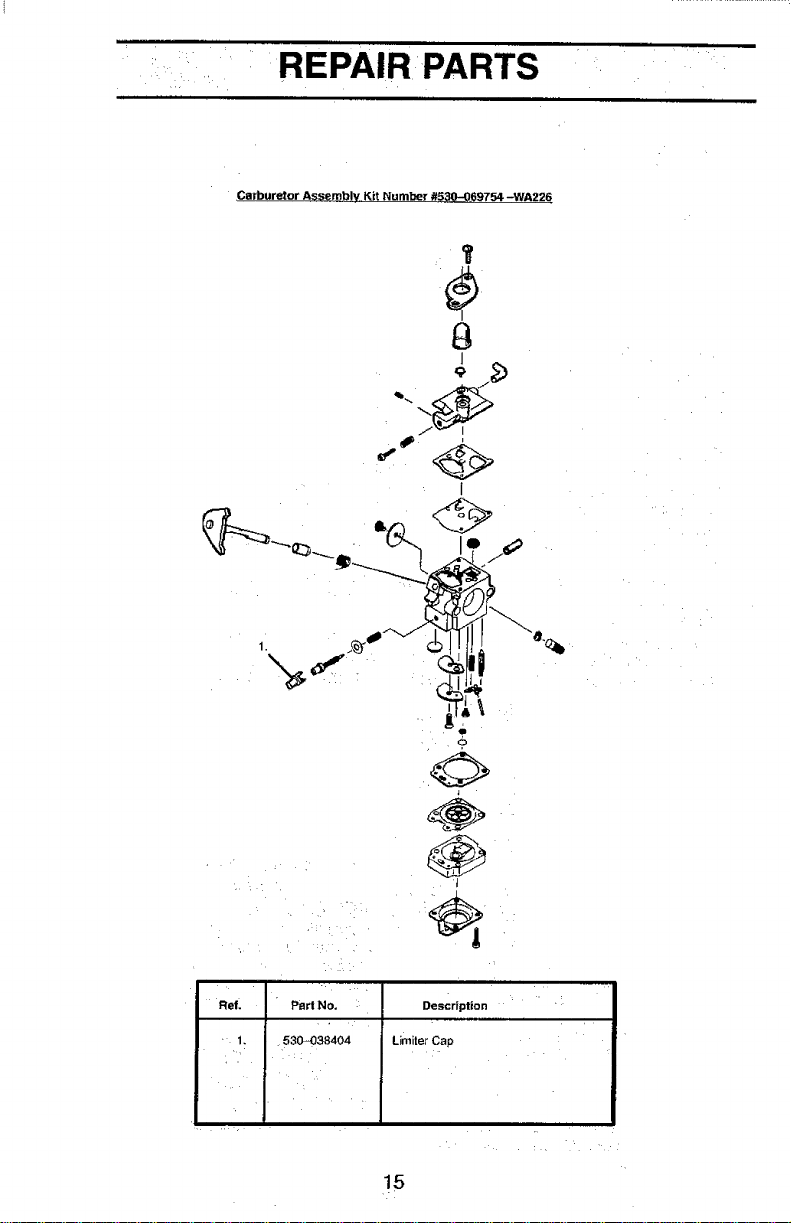
Carburetor Assembly Kit Number/#53.0-069754-WA226
1
I
Ref.
" 1.
Part No,
530_038404
•i
Description
Limiter Cap
•!5
Declaraci6ndeGarantfaUmitada 16 Servicio yAjuste 24
Reglas de Seguridad 16 Almacenamiento 26
Montaje 18 TablaDiagn6stica 27
Uso 19 RepuestosyEncargos Contratapa
Mantenimiento 23
GARANTIA DE UN AN PAPA I.A COFITADOFIADE HIERBAS A GASOUNA
CRAFTSMAN WEEDWACKER ®
Porun afio desdela fechadecompmcuandoesta unidada gasolinaCraftsman
Weedwacker_ es mantenida,lubdcaday puestaa purdodeacuerdoconlas
instruccionesde operaci6ny mantenimientoen elmanualdeloperado,Sears
reparardlibredecostocualquierdefectodematedalodemanode obra.
Esta garantiaexcluyela cuerdade nylon,bujfay filtmdeaire,lescualesson
partesdescartablesque se desgastanduranteelusonormal.
Si este Weedwacker® se usapara finescomerciales,estagarantiase aplicadu-
rants90 dias solamentea partirde lafechadecompra.SiesteWeedwacker®se
-usaparafinesdealquiter,estagamntfaseaplicadurante30 diassolamentea partir
de lafecha decompra.Estagarantfase aplicas61omientrasesteproductose use
en losEstadosUnidos.
EL SERVICtO DE GARANT1A ESTA DISPONIBLE DEVOLVIENDO EL WEEDWACKER®
AL CENTRO O DEPARTAMENTO DE SERVICIO DE SEARS MAS CERCANO EN LOS
ESTADOSUNIDOS.
Estagarantia leotorgaderechoslegalesespecfficosy ustedpuedetambi_nten-
er otrosderechosquevariande Estadoa Estado.
Sears, Roebuck and Co. Dept. DI817WA HoffmanEstates,IL 60179
ADVERTENCMu AI usaraparatos
deja.,dinerfa,es nec_,ario siempre
ooservarprecaucionesbdsicasde
.seguridedpata reducirel riesgode
Ir_'er_ioy .asgravesheddas. Lea.y
=ga toaas Bs mstmcciones,p_te
apata_ de fuetzapuedeset _petigroso!
= usuadotiere la responsabilidadde
cumplircon iasadvertenciase
instmcciones de_seguddadque se
encuentranenel aparaIo yen el
manual.iLeael Manual del IJsuario en
surotated antesde hacer uso €tel
aparato!Est6totalmentafamiliadzado
con loscontrlesyes usocorrectodet
aparato,r Limi_ el uso deeste apam_
a aqueuas.personasque hay'ank_idoy
comprendiaolas aQ'vertenc'Bse
insttu_ores enel ape.intoyen el
_U u_l y que lasv'4_yana curnplir.
ncapen'nitaque losni_osusen
esteaparato.
Informaci6ndeSeguddad en
elaparato
PELIGRO: Nunca use cuchiltas ni
dLspositivos=des_ran_adores. Este
apar"alofue _ado ex¢lusivamente
paraserusado¢omocortadoraline=.F.t
uso." de cuaJqu'Brotroaccesodoo pieza
aaicionaJincrementar_el peligm de
heridas.
000
ADVERTENCIA: Laiineade corte
.arro.ja.objetos_o_err_rtte, puQ_=nde
rent"a=usuarioo a terceros.Usegalas
deseguddady protecci6ndepiernas.
16
_Mantengatodoelcuerpoaiejadodela
Ifneagirante.
Mant_ga a losniEos,espectadomsy
animalesa una _ minimade
15 metros(50 pies) Pare elaparato
inmediatamentesiaJguiense le
acerca.
protecci_ sirnila_de losojos
8i acontecensituacionesno previstas
en estemanual,tenga cuidadoy use
buencritedo.$i necesi_ ayuda,entre
encontactoconel Concesionariode
8ervicio Sears oilameal
t-800.235-5878
SEGURIDAD DEL USUARiO
• Usesiempreprotecci6nde ojos.
usesiemprepantaloneslargos,
mangaslargas,botasy guantes.Se
recomiendaeluso de_rdlleras
ddad.No use elaparam
, niconsandalias.
Man_ngase aIejadode laiinea
girante.
• Mantengael cabelloper encimade
loshombros,atdndotoparatalefecto
es neces_,io.No use ropasuelta
ni ropaCOncorbatas,tiras,borlas,
e_ quecuelganlibmmente.Pueden
enredameenlaspiezas en
movimiento.
• NOhaga usodelapma_ estando
cansado,enfermoo bajola
i_uenda del alcohol,de drogaso
:de remedios.
combustibleantesde usarel
bua_a_. _ga el aparatoen
enascondidonesdeu_o.
- Camb_ todas _s pk_s del cabe_
queest6ndesca_11adas,
msquebrajadas,quebradaso
de cualquierottomodo,
antesde usar el apamIo.
o_e que el apamtoes_
correclamentearmadocomose
muestraen el manual
• Haga los ajustesal carbumdorcon
elcabezalapoyado demodoque la
ffnea nopueda tocar nada.
• Mantenga alejadasalas demds
pemonasslempm que hagaajustes
aJca,-burador.
• Use e0_us'wamentelosaccesodosy
mp_ Seam recomendados.
SEGURIDAD CON EL
COMBUSTIB_
• Mezcley vierta el combustibleal aim
libre.
• M_gase alejadode laschispasy
de las llamas.
• Use recipienteaprobadopara el
combustible.
• No fumeni permitaquese fume
cercadel combustiblenidelapamto
nimientms6ste estdenuso.
• Umpietodoel combust_le
derramado.
• AI6jesea porIo menos3 metros(10
pies)del iugar de abastecimiento
antesde porteren marchael motor.
• F_areel motory permitaquese enfn'e
elapamto antes de retirarlatapa del
S_iDAD AL CORTAR
• Use el aparato exclusivamente para
recortar, para cortar cdsped, para
corlar bordes y para barren No Io :
- usepro =en deofdossi.sa. . .usepar .pod=r. r padre..mr
:aDarato_'_rrndsde una.hold" ' ::;, mspecaoneel area antestie caaa
_'-clfa. " uso. Retirelos objetos(piecL_s,
' Nuncar'-'naa el amuat_ en marcha viddointo, clavo_._a!a_..m,etc.)-que
ni Ioo_'_°engnn_-_-rd_ deun _ pueaa._,en .m.m.m.m.m.mc_en I_linea o que
redntoo _ cerrado _irar eszapueaa._. Losobjetos
los_n,',res del comb,_ L, aurospueaon aanar alcaoezaly
. " - 1-ayes erlcla_
las mamlasfibresde . . .
a___ v __rl__..--_..._mh"_-N_ • eaantengael equ_iibno,,conlos pros
SEGU_II)tt[_ DEL APARATO Y enuna super_=e eslable.No se
EN EL MANTENIMIENI:(_ .... exaenda aemasiaoo.
• Mantengatodas laspartesdel
• Desconectela bujia antesdehacer _o a_adas de ta l[neagirantey
cual_Jiermantenimientomenoslos del sil_ador. Mantengael motor
ajustesalcarburado_
• tnspecdoneelapamto y cambielas pordebajode! nivelde[a ci_Jra. El
.....silencia.dorpuede causargraves
pi.e__as_das o flojasantesde quemaourascuando esldca_ente.
caoauso.Reparetoda fuga de
17
* Sise cortaconla tinea del lado
izquierdodel protector,los
escombrosvo_ en sentido
opuastoal usuario.
TRANSPORTE Y
ALMACENAMIENTO
i Espereque el motorse enfde y fije
bienelapartoantesde guardadoo
detransportadoen unvehfculo.
Vacieeltanquedecombustible
antesdeguardarelaparato ode
transportado.Consumato.doel
combustible restanteenel
carburadorponiendoelmotor en
marchay dejdndoloenmarcha
hastaque elmotorse pare solo.
* Guardeelaparatoy el combustible
enun lugardonclelosvaporesdel
combustible no puedanaJcanzar
chispasnillamasprovenientesde
lostermotanques,losmotores o
interruptoresel_=ctricos,los
celefactorescentrales,etc.
• Guardeet aparatode modoqueel
timitadorde Ifneanopueda causar
heddasaccidentales.Se puede
colgarelaparatopereltubo.
. Guardeel aparatofueradel alcance
delosnifios.
Si acontece alguna situaci6n no
previstaeneste manual,tengacuidado
y usebuencritedo.Si necesitaayuda,
gameal 1-800-235-5878
AVISO ESPECIAL: F_.__eaparato no
viene equipado con sflenciador
limitadorde temperatura.ni con rejilla
._j_i ,spaquecumpla I.osrequisit_ de
ms_zgos ae t.;_nomla444zy 444_.
Todaslastierrasforestadas federales,
rn_ los estados de California, idaho,
Maine, Minnesota, Nueva Jersey,
Oreg6nyWashington,requierenper ley
que muchos motoras de combusti6n
intema astdn equipados con re_lla
antichispa.Si usted utilizael aparato
donde existen tales _lamenteos,
ustedtiene la rasponsabitidadjuddica
deinstalary mantenerestasplezasen
correctoestado defuncionamiento.De
Io contrado,estarden infracci6nde la
lay. Vea la secci6n de SERVICIO en
estemanual.
AVlSOESPECIAL: Elestarexpuestoa
las vibraciones a travds del uso
prolongadodeherramientasdefuerzaa
gasolina puede causar dafios a los
vasossanguineosoa losnerviosdelos
dedos,las manos y ]ascoyunturasen
aquellas personas que tienen
pmpensidad a los trastomos de ta
circulaci6n o alas hinchazones
anormales. E! uso prolongado en
tiempofdo ha sideasociadocondaJ_os
a los vasos sanguineosde personas
que por otra parte se encuentranen
perfectoestado de salud. Si ocurren.
sfntomas tales como ez
entumecimiento,el dolor, la falta de
fuerza, los cambios en el color o la
texturadelapielofaltadesentidoenlos
dedos,lasmanosolascoyunturas,deje
de usares*_ m6quinainmediatamente
y procure atenci6n m_dica. Los
sistemas de anti-vibraci6n no
garantizan que se eviten tales
problemas.Losusuariosquehacenuso
continuo y prolongando de las
herramientasdefuerzadebenfiscalizar
atentamentesuestadoffsicoy elestado
del aparato.
CONTENIDO DE LA CAJA
Verifique que est6n incluidas todas las
piezas que figuran en la Usta a
continuaci6n.
Modelo 358.798540 y 358.798570
° Cortadora
• Protector
- Tuerca Madposa
• Polvera
. Cabezal
• Mango Auxiliar
Modeio 358.798570 solamente
° Bobina con 6 m (20 pies) de linea
• Recipientepara gasolina de 3,8 1(1 gaidn)
• Un para de guantes
, Lfnea a granel--60 m. (200 pies)
Examinelaspiezasparaverfficarqueno
est_nda_ades.Nousepiez_ d_adas.
Sinecesitaayuda,f_an piezasot'_y
piezasda_adas,lk_ae_ 1-800235-5878.
AVlSO:E.xnormalescucharquegolpetee
elfiltrode_ eneltanquevado.
Esnom_ encontrarresiduosdecombus-
libleoaceiteen e!silenciadordebidoa
losajustesatcarburadoryalas pmebas
efectuadaspote_fabrican_.
MONTAJE
ADVlERTENClA: Sirecibi5elapa._o
ya montado,repitatodoslospasospara
aswgurarclueest_ _r_e_
y quetodoslosfladoreses_ r_osy se-
gums.
• 18
COMOINSTARLARELMANGO
(A_gunasunidadesvienenconelmango
ya instalado)
• Monteel_go ene[apatatocomose_s-
Ira; asegurese que la parte inferior _ mango
se encuentre en la ranura en la cubiertadel
gat_lo.
AVISO: La perillade ajuste deber_ set _da
en el lado opuesto al tado de la posicion de
del-usuario: • :,::,.
• Gire_ _go_hasta|legara laposiciSn rr_
_rt_e::,,,_ de ajus_ _en eJ
INSTALAGION DEL CABEZAL Y
DEL PROTECTOR
ADVERTENCIA: _ imp_e
queel protectorestedebi_ insta-
lado:!Proveeprolz_d_nparcialcontrael
peligrode objetosarrohadoshacia el
usuarioo haciatercerosy vieneequipa-
do de un limitadordelinea quecortael.
excesodel/neaparaquequedede]largo
que corresponde.E[ limitadorde linea:
(debajodel protector)esfl!osoy coda..
• introduzca la mensula por taranura
comose ilustra. -
• Gireet protectorhastaqueel perno
pase porel orificioenla mensula.
• Er_msquelatuercamariposa al peru0
y aj_stelabien-:_ ....
Ranura.
Mdnsule
Tuerca -
f_,rilx_a .....
LEA ESTE MANUAL DEL USUARIO Y.LAS REGLAS DE SERGURADAD ANTES DE PONER .-
ENMAROHAELAPj_P_TO.Corr_ lasilustracionesasu aparatoparafamiliafizame
coi_-IaubicaciSnde losdiversoscontrolesy ajustes.Guardeeste manualpara uso
fUtLlrO.
lntermptor Man Aux r
Tubo
Interruptor
Sogade
Arranque
GatilloAcelmador., ,...
J Protector
Pedlta -
Bombeador
TapadetTanquelJmitador
deCombustible
de I.Jnea
IINFrERRUPTOR
Se uUlizaelinterruptorparapararel
motor. Empuje y sujeteel interruptor
enla posicibnde STOPo OFF hasta
quela unidadse hayadetenidocom-
ptetamente.
o
BOMBEADOR
Elbombeadorretireaim de laslineas
de combus_ey iasItena de
combus_b"le. Estolepermiteque
pongae_motorenfuncionamientocon
menos_rones a lasoga de armnque.
,A_'one el bombeadorapmt_dolo y
dejanooque retomesuf0rmaodginaL
19
PERILLA:
[] pedllaayudaa proveercombustible
atcarburador_duranteelarranque.Esto
le permitealusuarioponerunmotor
frioenfuncionamiento.Accione:elce-
badorcolocando la palancaen laposi-
ci6nSTAR'_.Despu_sdequ_:elm0tQ_
sehayapuestoen marcha,€oloque__11.
ceb_dorenr|a,posicibnRUN.
ANTES DE PONER EL MOTOR
EN MARCHA
_h_berVERTENCIA:Ase_rese de
let'dola informaci6nsobmel
co_ en _s reglasde
seguddadantes de €omenzar.Si no
compmnde desegurided,
nointenteabasle_r elapara_ de
cornhusk-Die.Uarne
1-800-_8.
ABASTECIMIENTO DEL MOTOR
F._--temotorest_ hab_tadopara
funcionarcon gasormasin plomo.
Antesde usar, se deber_ _la
g.a._dinacon un aceltede buena
calk:ladpara motomsde 2 _empos
er_iaa_ a aim. _ et
aceitemama Craftsman.Mezc_ la
dgasolinacon el aceiteen lapropon::i6n
e 40:.I. (Se obtk,_ u-hapropon:_n
de40:.1mezcl,_do 3,2 onzasde
PAPA PARAR EL MOTOR
• Coloq_ eJintemJptorenla posici6n
STOP.
• Si el motornose detiene,tire la
perilladelcebadora sumdxima
extensi6n.
PaJancadel Cebador
lntemJpt_r
abastecerel aparato.
IMPOFrrANTE
L_expefienc_ bc_ que los
combustiblesmezx_dos con alcohol
(losIlamados _gasol"mlo losclue
contienenetark_lometanol)pueden
a_aer humedad, io que _ causar
la separate"n y lafo_ de _dos
duranteelalmacenan_nto.
gaso_ ecfdica _ defiar el
Sis_emade combiJslibledel
dtman1_el elmacenammnto.
€._.raeVitarproblemascon el motor,
_ el sistemade
combusb-Dleantesde almacenarel ::
_ pot 30 d_s ornds.
We elumquede ponga
el motoren marcna y d6jelo en
marcl_ basraque iaslfneasde
consumabley el omburadorqueden
vacfos._Jande vaya a usarel apare_
nuevamerr_e,use combustiblefmco.
Vea lasinstmcdonosde
ALMACENAMIENTO para obtener
rn_sinfonnacionos.
Nuncauseproductosde limpiezade
motoro_h'burador en el tanquede
'_O_d_que hacerlopuede
DE SU UNIDAD
ADVERTENCIA: Elcabez_decortese
moverdcuandocomienzeaencenderelmotor
de su unidad.Cuandoel silenciadorse
encuentracalientepuedecausar graves
quemaduras.
COMO ARRANCAR EL MOTOR
FRIO O DESPUES DE
REABASTECER CON GASOMNA
• Pongalaunidadenunasuperlicieplana.
• Lentamenteaprietelabombillaprincipel12
races.
• Muevalacebadoralaposici6nFULL
Apneteysuieteelgatil_odurantetodeslos
pasossiguientes. "
Hale lamanigueta dearranquehastaque_l-
motortratedearracar,peronorn_sde5
intentos.
• Muevae!cebadorala posicibnHALF.
. Halelamaniguetadearranquehastaqueel
motorenc_e_nda.
• Permitaque el motormarchefor 10
segundos,entoncesmuevala cebadora la
posici6ndeOFF.
COMO ARRACAR EL MOTOR YA
CALIEER'E
• Muevalacebadora laposici6nOFF.
• Halelamaniguetadearranquehastaqueel
motorencienda.
• Sielmotornoarranqueen5intentos,sigalas
instnJcionesdeCOMOARRACARELMOTOR
CUANDO ESTA FRiO.
aceitecon cada gal6n degaso,nasin PAPA PONER EL MOTOR EN
plomo).NO USE aceite para MARCHA
autorn6vitesni pard bamos.Estos
aceitP.,S _ el motor. AI mez_ Posici6n de Arranque Bombillarc,.=u._
impresasen el mcipiente.Una vez ' :::: Gati,o
quehayaafiadidoel aceitea la
g;a=;ofip.a,agite el recipiente Cebador _JYI
brevementepara asegurarque el COMO DETENER SU UNIDAD
combi._e est_ completameftte Empuje y sujete etinterruptor enla posici6n de
mezclado. Lea siempm y siga las STOP o OFF hast_ que la unidad se haya
regl_sdeseguridad que lienenque detenidocompletarnente.
vet con elcombustible antes de COMO ARRACAR EL MOTOR
INSTRUCCIONESDEUSO
Nohagamarchar
el motora velocidadesmdsaltasque
la necesaria.Lal_neade cortecoda
eficientementeconel motor
marchando a unavelocidadmenor
qua la mdxima, produciendoasf
menos ruidoy vibraci6n,LaIfneade
cortedurardporm_s tiempoy tendrd
menosprobabilidadde =fundirse"a la
bobina.
Siempresueiteelaceleradory deje
que elmotorbajea marcha lenta
cuandonoestdcortando.
Parapararelmotor:.
• Sueiteelgatilloace[erador.
° Apretey mantenga apretadoel
interruptormomentdneo hastaqueel
motorse hayadetenidopot
¢ompleto.
TWIST-N-EDGE
: Hale lalengOetahacia el motor.
Tuerza el tubo en la posici6n de corta;
entonces,sueltelalengQeta.
LengOeta
unos5 crn(2 pulgadas)con cads
toque.
Pata h_cersvanzar |al(naa,toqueel
¢abezalcontm elsuelo una vez.
Bl dor de.naa ,
oortalalineaaJlargo _
quacorresponde. -_J.J, o
AVlSO:Toqueet¢abezal siempre
contm elsuelodonde haysc_ped. El
coco ¢ontralassuperficiestaJes
como elcementoo asfaltocausa_
desgasteexcesivode| cabezaL
AVI$O: S!no quedan m_ qua dos o
trespulgadasde Ifnea,habr_ qua
hater m_sde untoque pare obtenerel
de [{nearn_ eflciento.
ADVERTENCIA: Use
_Jusivamente I_neacondidmetrode
2 mrn(.080"depulgada).I.asIineas .
concualquierotto didmetrono
avanz=_ debidamentey podrdn ,
¢ausargrovesheddas. No useningun
ottomateriaJ,¢omo aJambre,hilo,
sog_ etc.El _re se puede
quebrardurar_ elcot"m,
convirti6naoseen proyectiipeligtoso
quepuede=t_r graves heddas.
_AVANCE DE LA LINEA DE
CORTE
LaIfneade corteavanza
aproximadamente5 cm (2 pulgadas)
.cada vezquese toc,a el cabeza!
contrael sueloconet motoracelerado
a rondo.
El largomdseficientede Ifneaes el
largomdximopermitidoporel limitador
de]l'nea.
,Siempre mantengael protector
debidamenteinstaladoat util|zarel
aparato.
• Parahaceravancarla lfnea:
° Acelereelmotor a fondo.
• Sostengael cabezaJencimade un
espaciode tierracon c6spedy
paraleloal mismo.
• Toque elcabezallevemente unavez
contraelsuelo.Lalfnea avanzard
21
METODOSDECOmE
ADVERTENCIA:Use|ave!o_d_u:J
mfnimaynoaproximeelapa__toa los
objetosdurosCoiedras,pedregu,o,
postes de cercas,e_) que el cabezat
puedaaJ'rojaroclue pu_an _ el
mismoo enredarseconla lfnea,
creandosedope!igm.
• Es lapuntade la linea ia que corta.
Se conseguirdel mayor rendimiento
y el mfnimodesgastede la Ifneasi
nose mete 1_Ifrieadentrode!
materialquese estdcortando.La
forrnacorrectae incorrec_ de cortar
iJus_mna _:mtinuad6n.
_Es laPunta Lfnea Metida Den-
dela Unea la t_odel Material
queCpr_
COR EC% ,NCORRECTO
• L.alfnearetiref_citmenteet pasto y
lasmalezasde a] lack)de ias
paredes,lascemas, los d,'bolesy!as
erasdeflores, perotambidnpuede
corlarlacorteza delicadade los
con cortezadelicada,saque 10 a 13
crn(4-5"_ al largode ia tfnse y no
haga mamhar elmotor a fondo.
• PaParecortaroesca]par,torte a
menos que tas mvoluciones n_ximas
pare incrementar lavide Qtilde la linea
y disrninuirel desgastede| cabezal,
_ente:
--Pard trabajoslivianos.
- Cersa de los objetosen los que la
linea se puedaenredar,tales como
los postesy _='bolespequefioso el
._ambm de lascersas.
• Pare cotterc_ped o barter, use el
acelerador a fondopare conseguir
una buenalimpieza.
ADVERTENCIA: Use siempre
. .pmtecci6nde ojos. Nuncase incline
sobreel saber. Elaparato puede
arrojaro hacer rebotarpiedmsy
:escombrosque pueden der enlos
ojosy la cam det usuadoy causar
¢eguerauotms graves heddas.
' PARARECORTAR - Sostengael
aparatooe mode que el.
qu_le a unos8 cm(3 pulgadas)del
sue_oyen angum,verm_ que
Qnicamentela puntade ialfnsa haga
contacto.No mete la Ifnea dentro dei
drea quese est_ trabajando.
PAPA ESCALPAR- La tdc.ica de
escalparse usa pare quitarvegetaci6n
nodeseada. Sostengael cab=.._la
unos8 ='n (3 pulgadas)del sue!oyen
dngulo.Deje que la punta de la lfriea
toquee! sueloalrededorde los
dzboles,los postes,losmonumentos,
etc.Esta tdc_ica incmmenta el
desgastede la tinea.
PAPA ESCALPAR
cotterc_sped,mantenga laiinea
parate[aelsuelo.Eviteapretarel
cabezalcontmelsuelo,ya qua tel
procedimientopuedeescalparelsuelo
y darer elaparato.
PAPACORTAR
CESPED
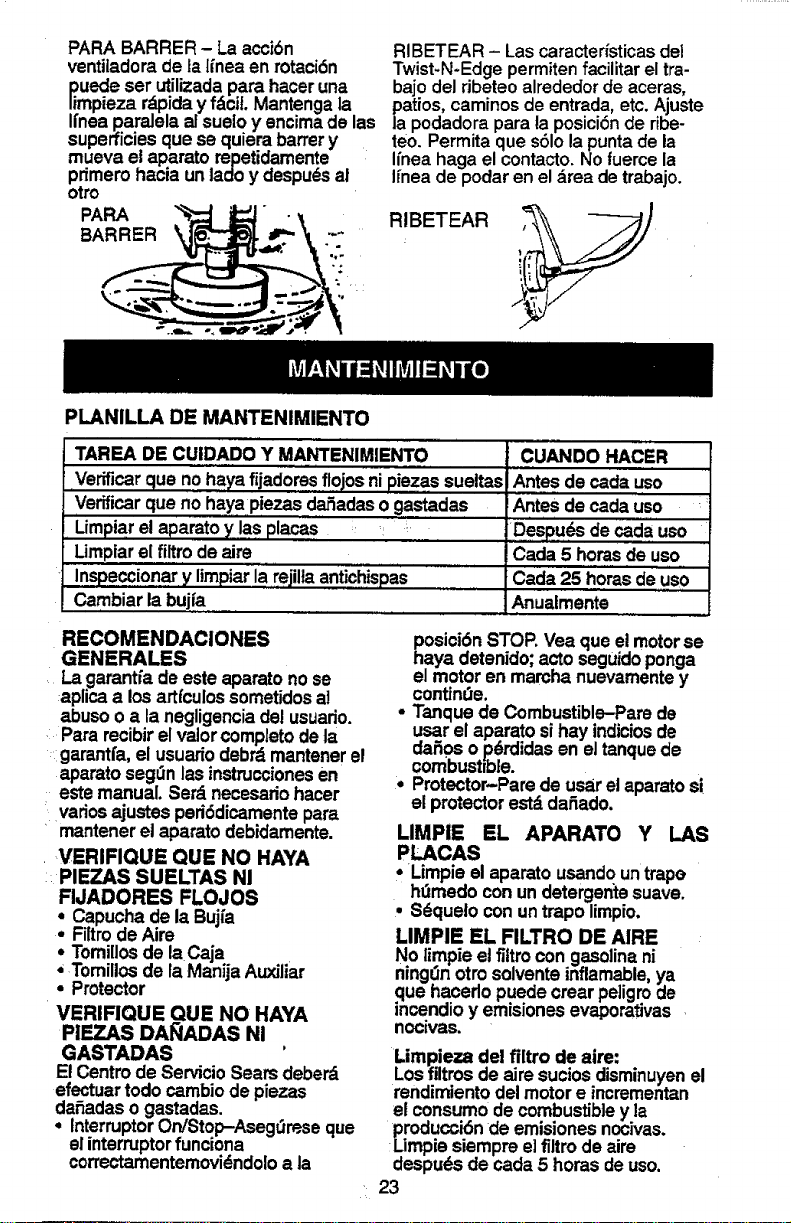
PARABARRER- Laacci6n
ventiladorade lal_neaen rotaci6n
_imUedeset utilizadapara haceruna
piezardpiday fdciL Mantengala
Ifneaparalela alsueloy encima de las
superficiesque se quiera bartery
mueva elaparatorepetidamente
pdmerohacia untad<)y despu_sal
otto
PAPA
BARRER
PLANILLA DE MANTENIMIENTO
RIBETEAR - Las caracteristicas del
Twist-N-Edgepermitenfacilitar eltra-
bajodelribeteoalrededordeaceras,
patios,caminosdeentrada,etc.Ajuste
lapodadorapara laposici6nderibe-
teo. Permitaque s61olapuntade la
Ifneahagael contacto.Nofuercela
Ifneade podarenel dreade trabajo.
RIBETEAR
!.
TAREA DE CUIDADO Y MANTENIMIENTO
Verificar que nohayafijadores f!ojos nipiezassueltas
Verificarque nohay.apiezasda_adasogastadas
Limpiarel aparatoy la.splacas _ =
Umpiarel filtrodeaim
Inspeccio.a y,mpiarlareji,aa.tic,! pas ......iii
Cambiarla bujia...................
CUANDO HACER
IAntesdecada uso
=,
_Antes decadauso
Cada 5 horas de uso
Anualmente
RECOMENDACIONES
GENERALES
Lagaranffade esteaparatonose
aplica a losarffculossometidosal
abusooa la negligenciadel usuario.
Pararecibirel valorcompletodeta
_igamntfa,el usuariodebrdmantenerel
aparatoseg0n lasinstruccionesen
estemanual. Serdnecesafiohacer
variosajustesped6dicarnentepara
mantenerel aparatodebidamente.
,VERIFIQUE QUE NO HAYA
_PIEZAS SUELTAS NI
FIJADORES FLOJOS
, Capuchade la Bujia
FiltrodeAiro
• Tomillosde laCaja
, Tomiliosde laManijaAuxiliar
• Protector
VERIRQUE QUE NO HAYA
PIEZAS DA_IADAS NI
GASTADAS
E!Centrode ServicioSearsdeberd
efectuartodocambiodepiezas
da5adaso gastadas.
• InterruptorOn!Stop-Aseg_roseque
elinterruptorfunciona
correctamentemovidndoloa la
posici6nSTOR Vea que elmotorse
haya detenido;actoseguidoponga
el motoren marchanuevamentey
continue.
• Tanque de Combustible-Parede
usarel aparatosihay indiciosde
dafiosop6rdidasen eltanquede
combustible.
Protector-Parede usarel aparatosi
el protectorestddafiado.
LIMPIE EL APARATO Y I.AS
PLACAS
• Limpie el aparatousandountrape
hLlmedoconundetergen'tesuave.
• Sdqueloconuntrapolimpio.
LIMPIE EL FILTRO DE AIRE
No limpieelfittro con gasolinani
ningL1notrosolventeinflarnable,ya
que hacerlopuedecrear peligrode
incendioy emisionesevaporativas
nocivas.
Limpieza del filtro de aire:
Losfiltrosdeairesuciosdisminuyenel
rendimientodel motore incrementan
et consumodecombustibley la
producci6nde emisionesnocivas.
Limpie siemproelfiltrode aire
despu_sde cada5 horasdeuso.
23
deAim
miltos
J
¢ad_nizando. La carbonizacidn
debe_ set retiradaparaevitm"peligro
de incendioo bajade rend'mnientodel
motor.
Retire larejilladelsilenciadory
Ifmpiela.Cambie la r_lla poruna
nueva sise producealguna rotura.
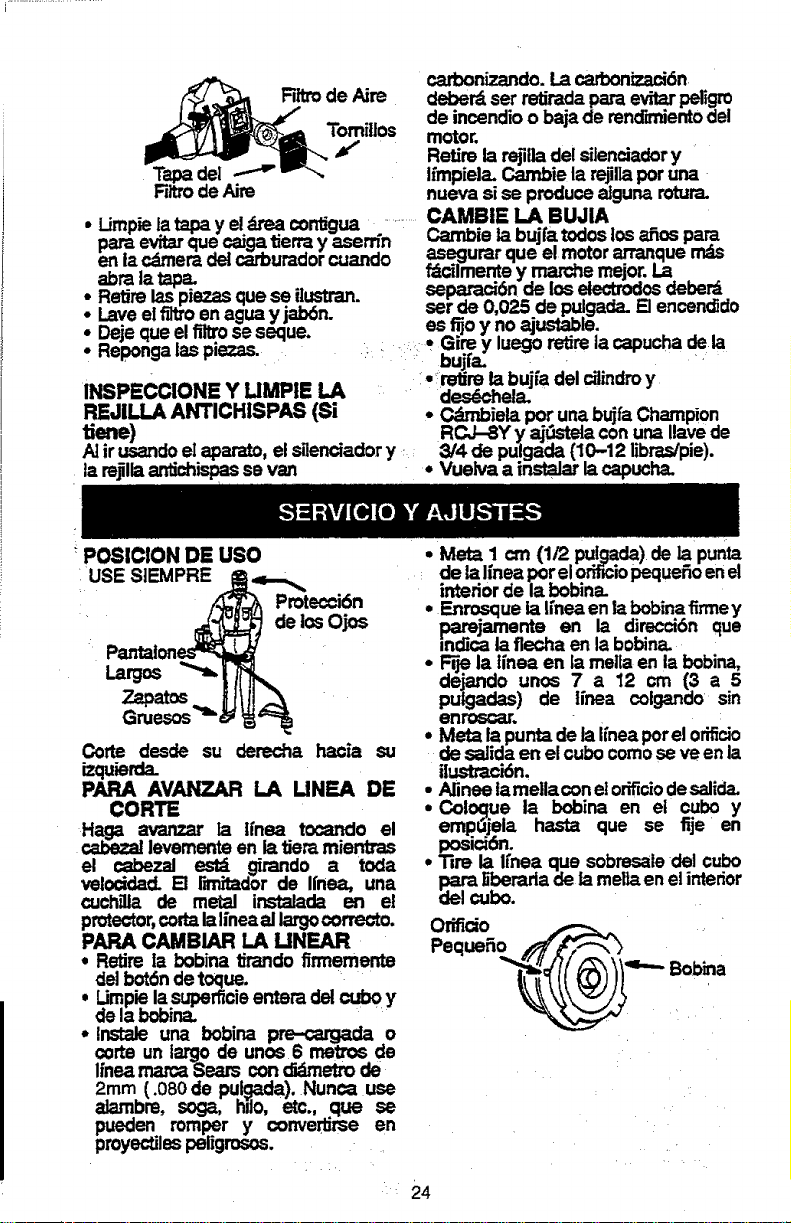
• Limpielatapay eldrea contigua ....... CAMBIE _ BUJIA .
,_ =v_r r.,_ _n_ tie_--_v asem'n Cambleta bujfa todoslosanospare
enr"i-_ - -.--era-_-€_l-_--c_urad---_cuandocdrn . asegurar,que el motorarranque,rr_
=h_ t=_n_ f_lmente y mardle mejor.La
• _'':'Retire"/_=_r.ni"--ezas.,_uese ......q,_h.=n separaci'Onde losetectmdosdeberd
. .....iav====1filt_en a=ua,jab6_v i n. set de 0,025.de puigada.Elencendido
. =z,_r_,m_=las niezas _ _='= Y ,u,=,.ju,==_=,=,.._.,u_,_ .,=m
bujfa_ r
"; reUrelabujfadel cilindmy
INSPECCIONE Y LIMPIE LA des6_ela.
REJILLA ANTICHISPAS (Si • CdrnbielaporunabujfaCham_on
tiene) RCJ-SY y aj!3stelaconuna Ilavede
AIir usandoel aparato,el._lenciadory =_ 3/4 de pulgada(10-12 libms/pie).
la mjlla antichispasse van • Vuelva a instalarlacapucha.
PO$1CION DE USO
IUSE SIEMPRE ._L_...._
_T='_ Protecci6n
• _ de losOjos
Pantalon_
Zapatos
Corte desde su derecha hac_a su
_u_rd_
PAPA AVANZAR LA LINEA DE
CORTE
Haga avanzar la ffnea tocando el
¢aSe=_ levementeen i_tiem mientras
el cabezal esld girando a toda
velodda_ [] r_d0r de Ifnea. una
cuchiUa de metal instal_da en e!
protector,codalaIfne_allargocorrecto.
PAPACAMBIAR LA UNEAR
• Retirela bobinatirandofirmememe
delbotchdetoque.
• Umpielasuperficieentera delcuboy
dela bobina.
,, lnstaJe una bobina p_da o
corte un largo de unos 6 metros de
Iine_mat_ Seam condi_netro de
2rnm (.080 de pul._da). Nunca use
alambm, sog_ hilo, etc., que se
pueden romper y conve_rse en
pmyectJlespeligrosos.
• Meta I cm (1/2 pulgada)de la punta
de 1,1Iineaporelorificiopeque_oenel
intedorde la bobina.
• Enrosqueia ffneaen labobinafirmey
pamjamente en la direcci6n que
indica laflecha en I_bobina.
• FFjela ffnea en ia mellaen ta bobina,
dejando un_s 7 a 12 crn (3 a 5
putgadas) de linea colgando sin
ell_.
• Meta la puntade laffneapotelorificio
de salidaen etcubocomose ve enia
il_n.
• Alineetamellaconetorificiodesalida.
• Col_ue la bobina en el cubo y
emp_jela, hasta que se fije en
posici6n.
• Tim la Ifnea que sobmsaledel cubo
Pare_3oeradadela melt_enelintedor
del cubo.
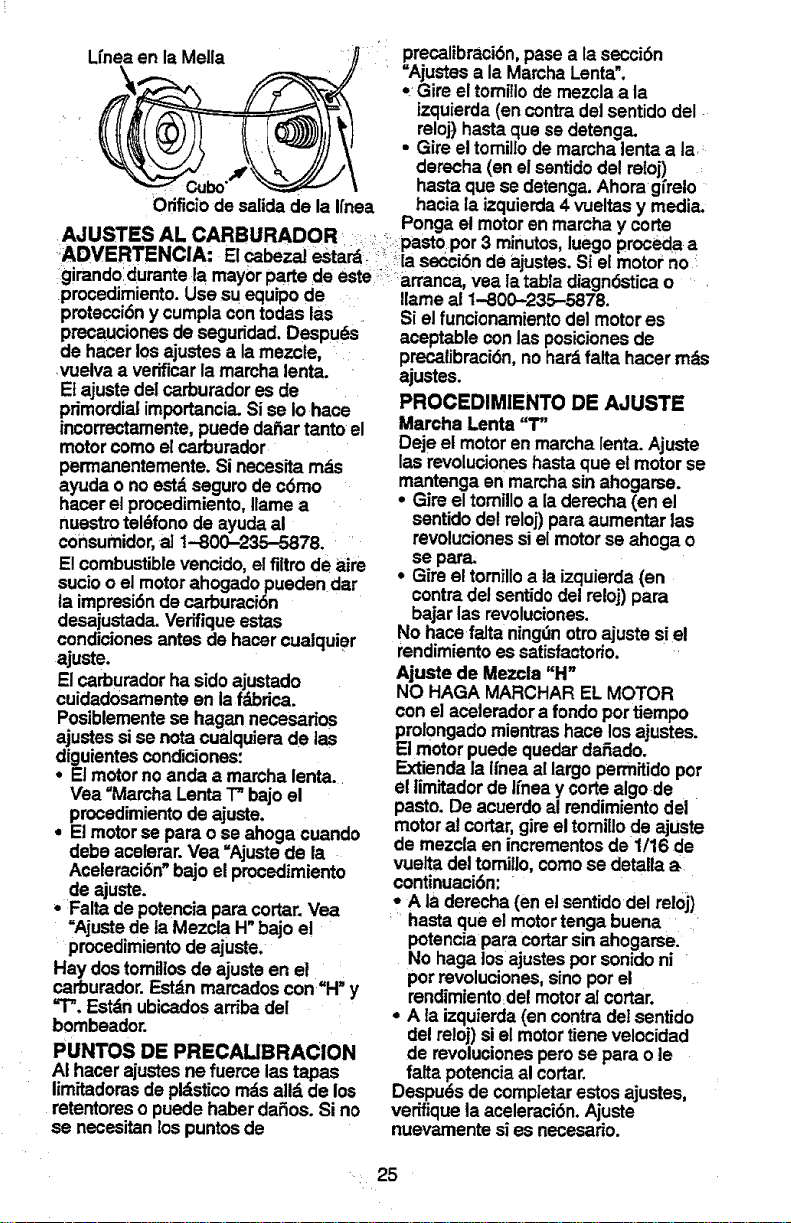
UnealenlaMeUa
OrificiodesalidadelaIfnea
precalibraci6n,paseala secci6n
=Ajustesa la Marcha Lenta'.
- Gire el tomillodemezclaa la
izquierda (encontradelsentidodel -
reloj)hastaque sedetenga.
• Gireeltomil[ode marcha lenta a la.
derecha(enelsentidodel reloj)
hastaquese detenga.Ahoragfrelo
hacia[aizquierda4 vueltasy media.
Pongael motoren marcha y corte
AJUSTES AL CARBURADOR _ pastopor3 minutos, luegoprocedaa
ADVERTENCIA: Elcabezalestard__i_i:lasecci6nde ajustes.Siel motor no
girando,durante!amayor parlede este; _i-arranca,vea iatabladiagn6sticao _
procedimiento.Usesueq_Jipode Ilameal 1-800-235-5878.
protecci6ny cumplacontodaslas Sielfuncionamientodel motores
precaucionesdeseguridad.De,spuds
de hacerlosajustesa lamezcle,
vuelva a verificarlamamha lenta.
Etajustedel carbumdores de
primordialimportancia.Sise iohace
incorrectamente,puededaSartantoel
motorcomoelcarburador
permanentemente.Sinecesitamds
ayudao noestdsegurodec6mo
hacerel procedimiento,Ilamea
nuestrotel_fonodeayudaal
consumidor,a] !-800-235-5878.
Elcombustiblevencido,elfittrodeaire
suoioo elmotorahogadopuedendar
taimpresi6nde carburaci6n
desajustada.Verifiqueestas
condioionesantesdehacercualquier
ajuste.
Elcarburadorha sidoajustado
cuidad0samenteen laf_rica.
Posiblementese hagannecesados
ajustessise notacualquierade las
diguientescondiciones:
° Etmotorno andaa marcha lenta._
Vea '_MamhaLentaT_bajoel
procedimientodeajuste.
= Elmotor se parao se ahogacuando
debe acelerar.Vea =Ajustede la
Aceleraci6n"bajoelproosdimiento
de ajuste.
° Falta de potenciaparacortar.Vea
=Ajustede laMezclaH"bajoel
procedimientode ajuste.
Hay dostomitlosde ajusteenel
carburador.Estdnmarcadoscon=H' y
=T".Estdnubicadosardbadel
bombeador.
PUNTOS DE PRECALIBRACION
A!hacerajustesnefuercelastapas
limitadorasdepldsticorodsalld de los
retentoreso puedehaberda_os. Sino
se necesitanlos puntosde
aceptableconlasposicionesde
precalibraci6n,nohardfaltahacerrods
ajustes.
PROCEDIMIENTO DE AJUSTE
Marcha Lenta "1"
Deje elmotorenmarcha[enta.Ajuste
lasrevolucioneshastaque el motorse
mantenga en mamhasinahogarse.
° Gireeltomilloa laderecha(enel
sentidodel reloj)paraaumentarlas
revolucionessiel motorse ahogao
se para.
° Gire eltomilloa la izquierda(en
contra,delsentidodel reloj)para
bajarlasrevoluciones.
No hacefalta ningdnotroajustesiel
rendimientoes satisfactorio.
Ajuste de Mezcla "H"
NO HAGAMARCHARELMOTOR
conel aceleradora rondoportiempo
prol0ngadomientrashacelosajustes.
Elmotorpuedequedardafiado.
Extiendala Ifneaallargopermitidopot
ellimitadordelfneaycortealgode
pasto.De acuerdoal rendimientodel
motoral cortar,gireeltomillode ajuste
de mezcla enincrementosde 1116de
vueltadeltomiIlo,comose detallaal
continuaci6n:"
° A la derecha(enelsentidodel rel0j)
hastaqueel motortengabuena
potenciaparaco_'.arsinahogarse. '
No hagalosajustesporsonidoni "
pot revoluciones,sinoporel
rendimientodelmotoral cortar.
° A taizquierda(encontradelsentido
del re!oj)sielmotortienevelocidad
de revolucionesperose para o le
faltapotenciaal cortar.
Despu6sdecomptetarestosajustes,
verffiquelaaceleraci6n.Ajuste
nuevamentesies necesado.
25
Verificaci6ndelaAceleracl6n
Sielmotorsa parao hesitaen vez de
acelerar,gireeltomillode ajustede la
mezcla a la izquierda(encontradel
sentidodel reloj)hastaconsaguiruna
aceleraci6n pareja,Verifique
nuevamentey haga los_ustes
necesariosparaconsegu_run
funcionamiento aceptable:
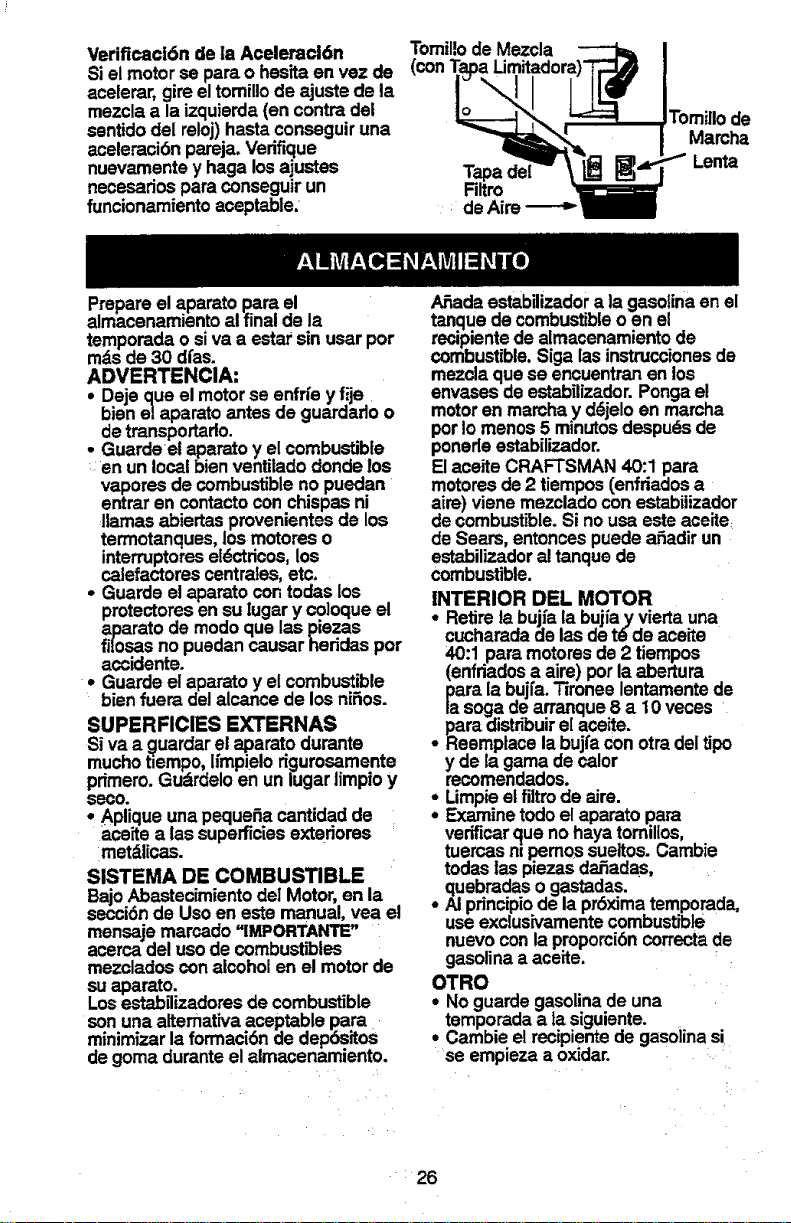
Tomillo de Mezcla
Tapadel
RRro
deAirs
Tomillode
Marcha
Lenta
Prepareelaparatopara el
almacenamiento al finaldela
temporadao siva a estarsinusar por
rodsde 30 dfas.
ADVERTENCIA:
* Dajequa el motorse enfriey fije
bienelaparatoantesde guardadoo
detransportado.
oGuardeel aparatoy elcombustible
:an unlocalbienventiladodondelos
vaporesde combustibleno puedan
entrarencontactoconchispasni
:llamasabiertasprovenientesde los
termotanques,losmotoreso
interruptoresel6ctdcos,los
calefactorescentrafes,etc.
• Guardsel aparatocontodaslos
protectoresen suiugary co]oqueel
aparato de modoqua lasplazas
filosasnopuedancausarheddaspor
accidents.
• Guardselaparatoy elcombustible
bienfuera del alcance de losnifios.
SUPERFICIES EXTERNAS
Siva a _uardar elaparatodurante
mucho t_empo,Ifmpielodgurosamente
primero.Gudrdeloen un lugarlimpioy
seco.
• Apliqueunapeque_acantidadde
aceitea lessuperficiesexteriores
metdlicas.
SlSTEMA DE COMBUSTIBLE
BajoAbastecimientodel Motor,en la
secci6nde Usoen este manual,vea el
mensajemarcado"IMPORTANTE"
acercadel usode combustibles
mezclados con alcohol en el motorde
suaparato.
Losestabilizadoresde combustible
sonuna altemativaaceptablepara
minimizarla formaci6nde dep6sitos
de gomaduranteelaimacenamiento.
A_adaestabilizadora lagasolinaenel
tanquedecombustibleoen el
recipientede almacenamientode
combustible.Sigalasinstruccionesde
mezcla quese encuentranenlos
envasesdeestabilizador.Pongae!
motoren marcha y d6jeloenmamha
pottomenos 5 minutosdespu_sde
ponedeestabilizador.
ElaceiteCRAFTSMAN40:1 para
motores de2 tiempos(enfdadosa
airs)vienemezcladoconestabitizador
decombustible. Sinousa esteaceite
deSears, entoncespuedeafiadirun
estabilizadoraltanquede
combustible.
INTERIOR DEL MOTOR
• Retiretabuj/ala bujiay viertauna
cucharadadelasdet6 deaceite
40:1 para motores de2 tiempos
(enfdadosa aire) porlaabertura
para labujra.Tironeelentamentede
tasoga dearranque8 a 10 veces
para(fistribuirelaceite.
• Reemplacelabujfaconotradel tipo
y de tagamadecalor
recomendados.
,*Limpieelfittrode aim.
Examinetodoe!aparatopara
verificarclueno hayatomillos,
tuemasntpemossueltos.Cambie
todaslaspiezasdafiadas,
quebmdaso gastadas.
• AIpdncipiode lapr6)dma,temporada,
useexclusivamentecombustible
nuevoconla proporcibncorrectade
gasolinaa aceite. : .
OTRO
• Noguardsgasolinadeuna
temporadaa tasiguiente.
• Cambieelrecipientede gasolinasi
se empiezaa oxidar. :.
: 26
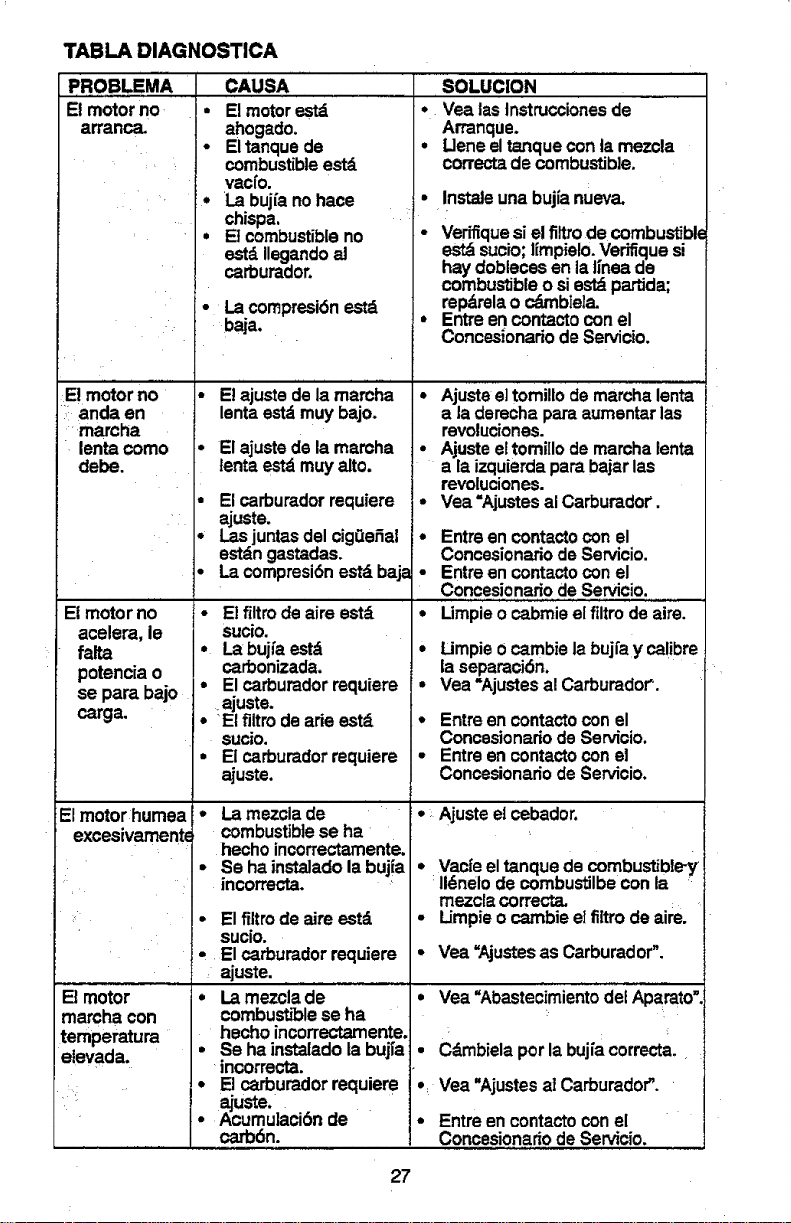
TABLADIAGNOSTICA
Etmotorno •
arranca_
e
e
,,,,,,.........,,,,
E! motorno
: anda en
• marcha
lentacomo
debe.
Elmotorno •
acelera, le
faRa
potenciao
se pare bajo.
carga.
El motorhumea
excesivament_
Elmotor
marcha con
temperatura
etevada.
CAUSA
Elmotorestd
ahogado.
Eltanquede
combustibleestd
vas[o.
La bujfanohace
chispa.
Elcombustibleno
estdIlegandoal
carburador.
• Lacompresi6nestd
baja.
Elajuste de'lamarcha
lentaestdmuy bajo.
El ajustedela mamha
tentaestdmuyalto.
• Elcarburadorrequiere
ajuste.
• LasjuntasdelcigOeRat
astdn gastadas.
• Lacompresi6nestdbaj_
El firm de aire estd
sucio,
• La bujfa estd
carbonizada,
• El carburador requiere
ajuste.
• •Elfiltro de ade estd
sucio.
• El carbumdor requiere
ajuste.
• La mezclade
combustiblese ha
hechoincorrectamente.
° Se hainstaiadolabujfa
incorrecta.
• Elfirm deaireestd
sucio.
Elcarburadorrequiere
: ajuste.
• Lamezclade
combustiblese ha
hechoincorrectamente.
• Se hainstaladolabuj[a
_incorrecta.
° E!carburadorrequiere
ajuste.
• Acumulaci6nde
carbdn.
.SOLUCION
........° Vea lasInstruccionesde
Arranque.
• Lleneeltanqueconlamezcla
correctade combustible.
• Instaieunabuj[anueva.
• Verifiquesielflltrode combustible
astdsucio;tfmpielo.Veriflquesi
haydoblecesenlat[neade
combustibleo siestdpattida;
rep_relao c_uTtbiela.
° Entreencontactoconel
ConcesionadodeServic|o.
° Ajustee]tomillodemarchalenta
a laderechaparaaumentarlas
revoluciones.
• Ajusteeltomi[Iodemarchaienta
a laizquierdaparabajarlas
revoluciones.
- Vea"AjustesalCarburador'.
• Entreencontactocon el
ConcesionadodeServicio.
• Entreencontactocon el
ConcesionadodeServicio.
• Limpieocabmieelfiltrodeaire.
• Umpieoca.mbielabujfaycalibre
lasepamoi6n.
• Vea =AjustesalCarburador.
° Entreencontactoconel
ConcesionadodeSeP,'icio.
• Entreencontactoconel
ConcesionadodeServicio.
• Ajusteel_bador.
° Vacfeeltanquedecombu_ble-y
:II_nelodecombustilbe con ta
mezclacorrec1_
° LJmpieo cambieeIfltrodeaim.
• Vea =Ajustesas Carburador".
° Vea "AbastecimientodeiApamto'.
• Cdmbielaporlabuj_acorrecta.•
°: Vea "Ajustesa] Carburador".
° Entreencontactoconel
ConcesionariodeServicio.
27

For the repair or replacement parts you need
delivered directly to your home
Call 7 am - 7 pm, 7 days a week
1-800-366-PART -
(1-800-366-7278)
Para ordenar piezas con entrega a
domicilio- 1-800,659-7084
For in-house major brand repair service
Call 24 hours a day, 7 days a week
1-800-4-REPAIR
(1-800-473-7247)
Para pedir servicio de reparaci6n a
domicilio - 1-800-676-5811
For the location of a Sears Parts and
Repair Center in your area
Call 24 hours a day, 7 days a week
1-800-488-1222
mmmlm
|mmmmmm
For information on purchasing a Sears
Maintenance Agreement or to inquire
about an existing Agreement ....
Call 9 am - 5 pm, Monday-Saturday
1-800-827-6655
When requesting service or ordering
parts, always provide the following '
information:
Product Type • Part Number
Model Number • Part Description
America's Repair Specialists