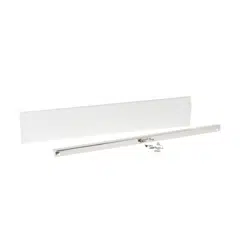
UX12BS36PSS, UX12BS48PSS
12” High Backsplash
WARNING
To prevent ignition of combustible
materials, the entire back wall above the range
must be protected by a backsplash constructed of
non-combustible material.
This stainless steel backsplash accessory must be
installed in combination with a custom, non-combustible
backsplash built beyond the 12” height of the backsplash.
BEFORE YOU BEGIN
Read these instructions completely and carefully.
Ŷ IMPORTANT — Save these instructions
for local inspector’s use.
Ŷ IMPORTANT — Observe all governing
codes and ordinances.
Ŷ Note to Installer — Be sure to leave these
instructions with the consumer.
Ŷ Note to Consumer — Keep these instructions with
your Owner’s Manual for future reference.
Ŷ This kit provides for the installation of a 12” high
backsplash for 36” and 48” Professional Ranges and
Rangetops.
Installation
Instructions
31-2000883 Rev. 1 03-22 GEA
TOOLS AND MATERIALS REQUIRED
Ŷ*ORYHVWRSURWHFWDJDLQVWVKDUSHGJHV
Ŷ7DQG3KLOOLSV
screwdrivers
Ŷ'ULOOZLWK´DQG
´ELWV
Ŷ6DIHW\JODVVHV
Ŷ/HYHO
Ŷ3HQFLO
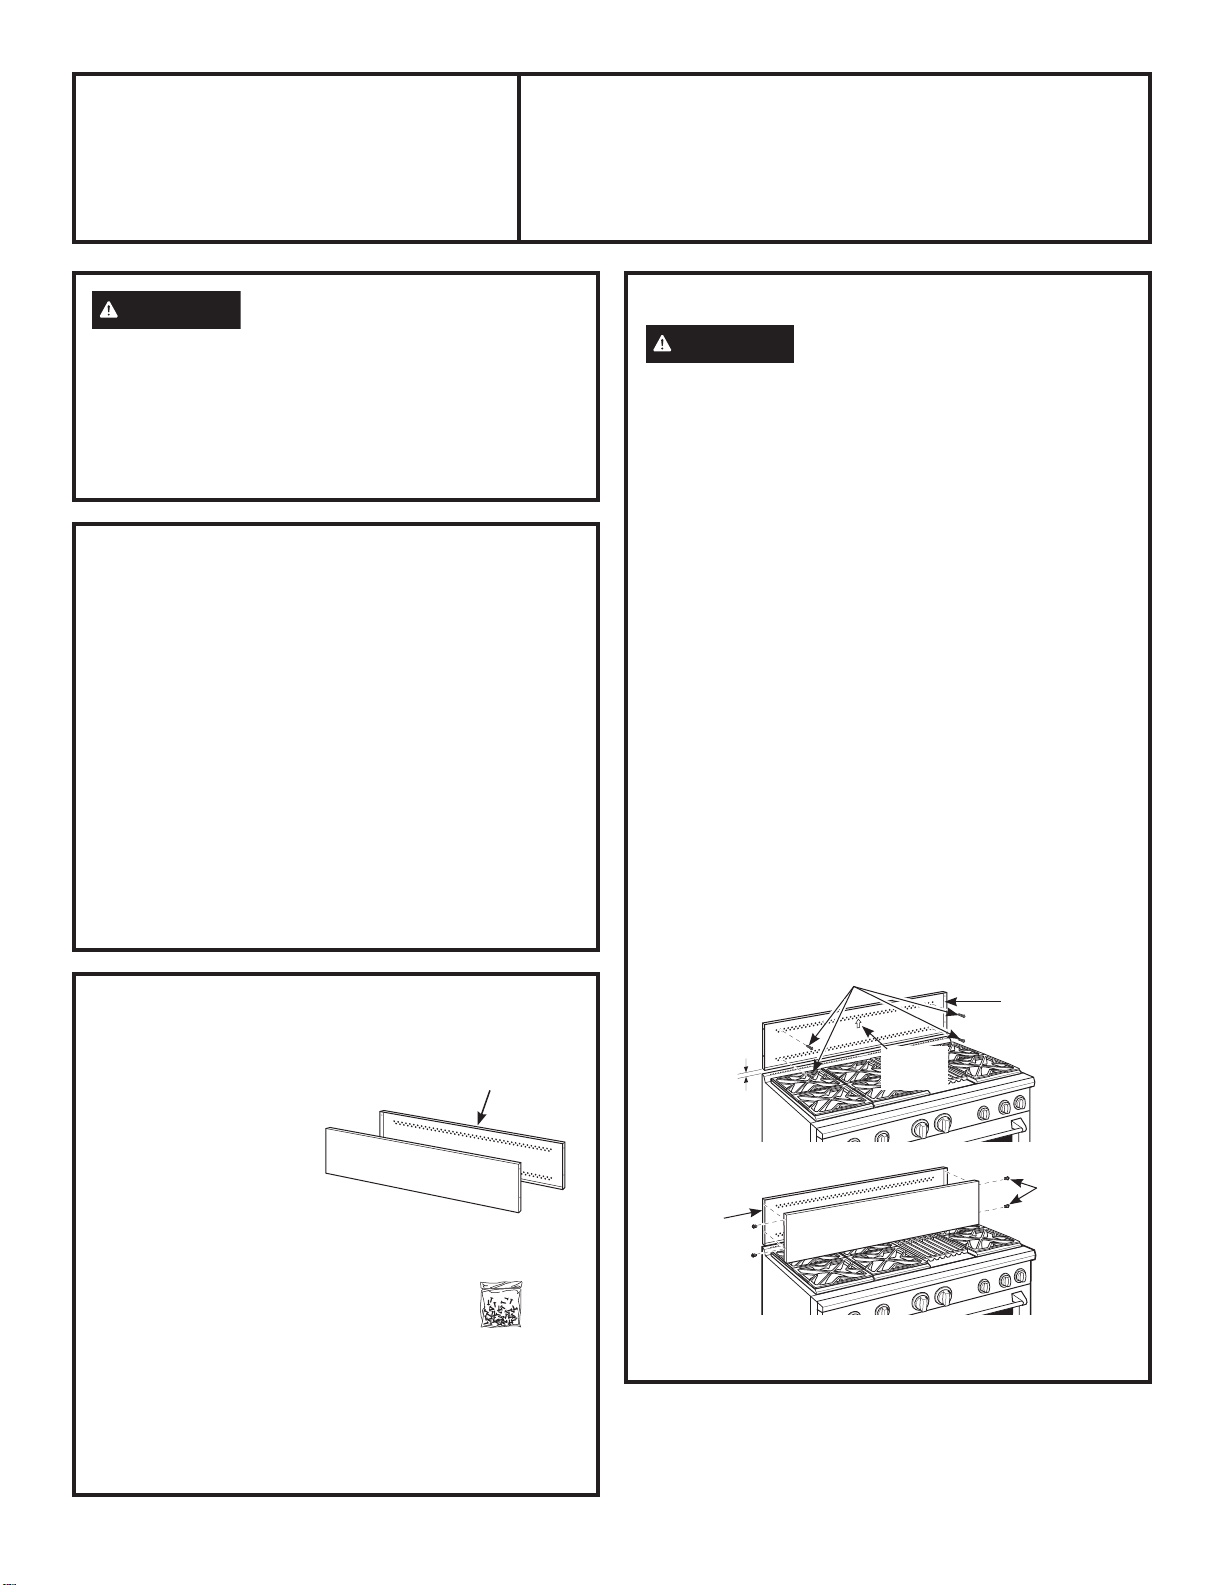
This Kit Includes
Ŷ:DOOVXSSRUWSDQHO
Ŷ&RYHUSDQHO
Ŷ+DUGZDUHSDFNDJHZLWK
±6WDLQOHVV6WHHO7RU[
VHOIWDSSLQJVFUHZV
±3KLOOLSVSDQKHDGZRRG
VFUHZV
INSTALL 12” BACKSPLASH
WARNING
This backsplash must be securely
fastened to the wall. Failure to do so could result in
damage or personal injury.
Ŷ,QVWDOODQGOHYHOWKHUDQJHRUUDQJHWRSDQGWKH
range hood according to the installation instructions.
Ŷ5HPRYHWKHEDFNVSODVKSDFNDJLQJDQGSURWHFWLYH
film.
Ŷ8VHDOHYHOWRSHQFLODKRUL]RQWDOOLQHRQWKHZDOO´
DERYHWKHUDQJHRUUDQJHWRS7KH´JDSDOORZVWKH
cover panel to overlap the wall support panel.
Ŷ/RFDWHZDOOVWXGVRQHDFKVLGH:KHUHVWXGVDUHQRW
available, plan to use wall anchors (not provided).
&KHFNWRPDNHVXUHZDOODQFKRUVZLOOQRWLQWHUIHUH
with any electrical lines or plumbing.
Ŷ$OLJQWKHZDOOVXSSRUWSDQHORQWKHPDUNHG
KRUL]RQWDOOLQHDQGFHQWHUHGOHIWWRULJKW
Ŷ7KHZDOOVXSSRUWSDQHOPXVWEHVHFXUHGWRWKHZDOO
QHDUDOOFRUQHUV8VHZRRGVFUHZVSURYLGHGRU
wall anchors (not provided) to secure the support
panel to the wall.
Ŷ3ODFHWKHFRYHUSDQHORYHUWKHZDOOVXSSRUWSDQHO
DQGVHFXUHZLWK7RU[VFUHZVSURYLGHG,QVWDOO
screws on each side.
:DOO6XSSRUW3DQHO
&RYHU3DQHO
+DUGZDUH
Package
,QVWDOO:RRG6FUHZV
,QVWDOO7
Screws
:DOO
Support
Panel
:DOO6XSSRUW
Panel
&RYHU3DQHO
&HQWHU
Arrow
´
2 31-2000883 Rev. 1
UX12BS36PSS, UX12BS48PSS
Le Dosseret 30 cm (12”)
AVERTISSEMENT
Afin d’éviter que les matériaux
inflammables ne prennent feu, le mur arrière au-dessus de la
cuisinière doit être protégé par un dosseret en matériau ignifuge.
Ce dosseret en acier inoxydable doit être installé avec un
dosseret ignifuge fabriqué au-dessus de la hauteur de 30
cm (12”) du dosseret.
AVANT DE COMMENCER
Lisez attentivement l’ensemble des consignes.
Ŷ IMPORTANT — Conservez ces instructions
pour l’inspecteur local.
Ŷ IMPORTANT — Respectez toutes les normes
ainsi que les recommandations préconisées par les
autorités compétentes.
Ŷ Remarque à l’attention de l’installateur — Assurez-
vous de laisser ces instructions au consommateur.
Ŷ Note au consommateur — Gardez ces instructions avec
votre manuel d’utilisation pour référence ultérieure.
Ŷ &HNLWHVWFRQoXSRXUO¶LQVWDOODWLRQGXGRVVHUHWGHFP
(12») pour les cuisinières et les tables de cuisson
professionnelles 91 cm (36») et 122 cm (48»).
Instructions
d’installation
OUTILS ET MATÉRIEL NÉCESSAIRES
Ŷ *DQWVSRXUYRXVSURWpJHUGHVSDUWLHVWUDQFKDQWHV
Ŷ 7RXUQHYLVFUXFLIRUPHHW
7
Ŷ 3HUFH]DYHFGHVIRUHWV
PP´HWPP
(9/64”)
Ŷ /XQHWWHVSURWHFWULFHV
Ŷ 1LYHDX
Ŷ &UD\RQ
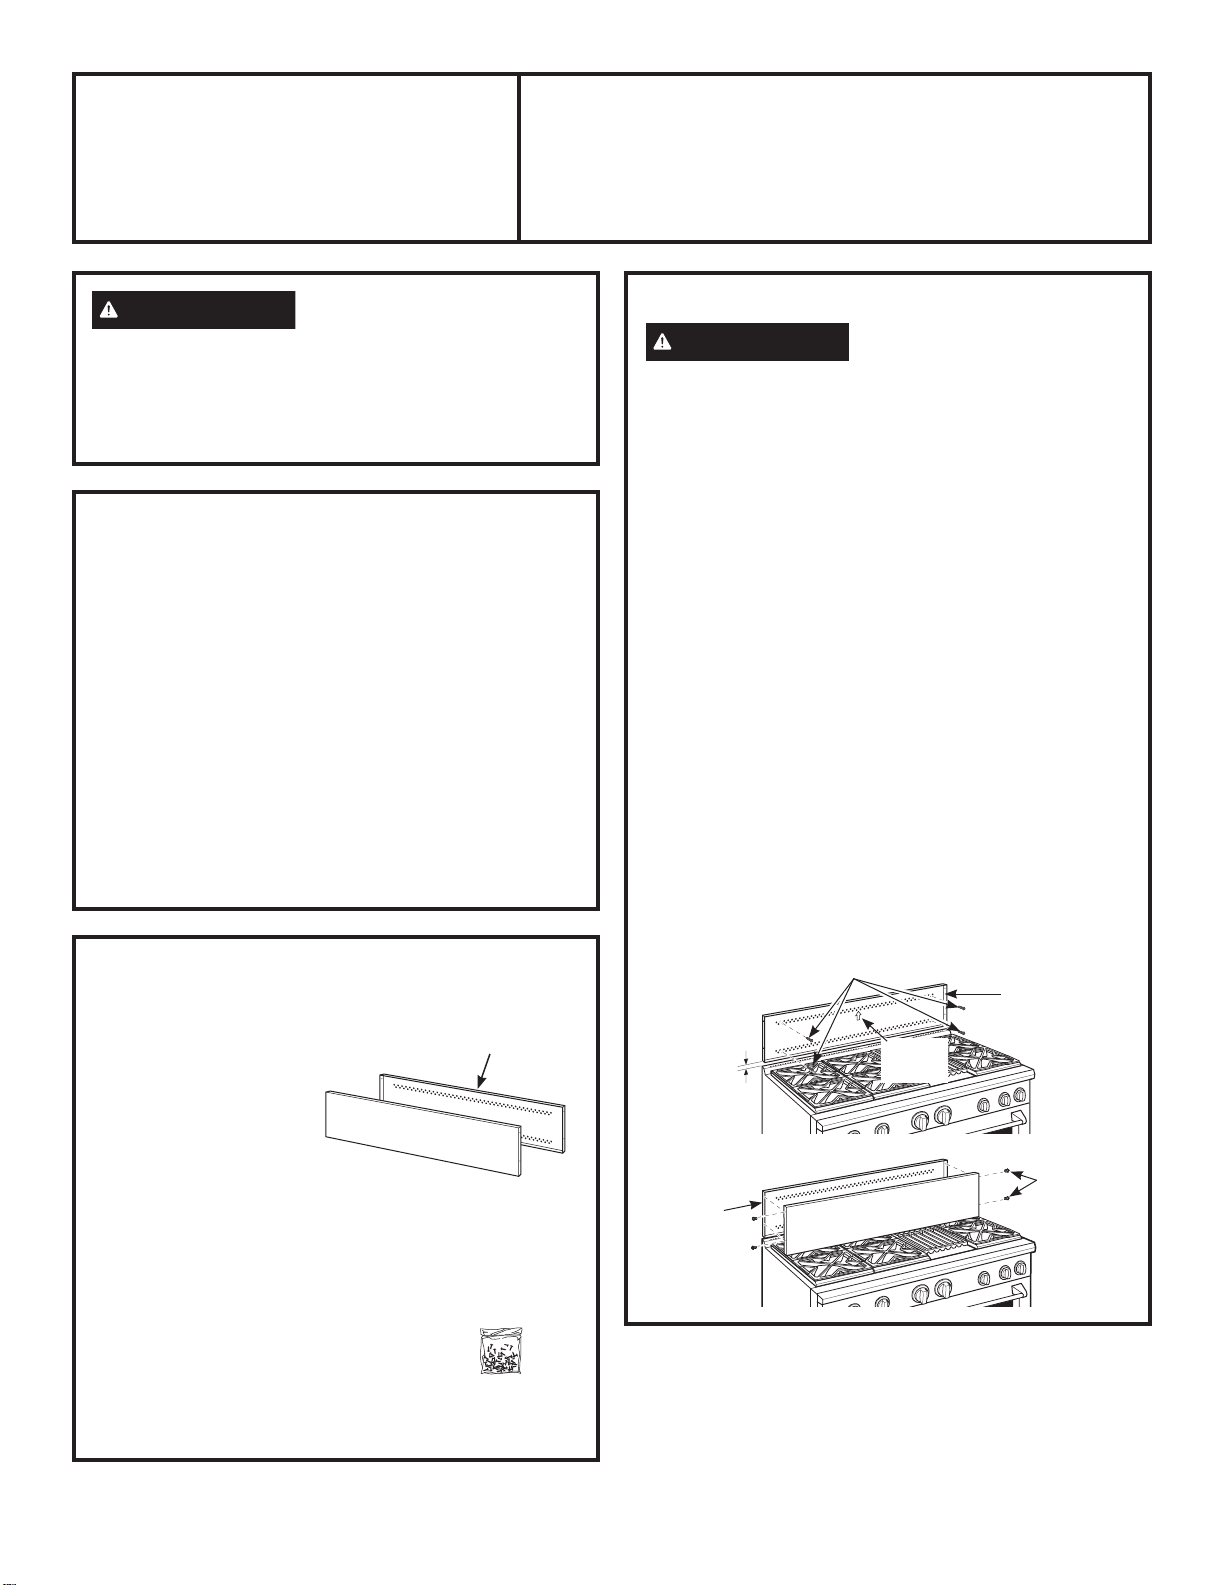
Ce Kit comprend
Ŷ 3DQQHDXGHVXSSRUWPXUDO
Ŷ 3DQQHDXUHFRXYUDQW
Ŷ 6DFKHWGHPDWpULHOFRQWHQDQW
±YLVHQDFLHULQR[\GDEOH
7RU[DXWRWDUDXGHXVHV
±YLVjERLVjWrWHF\OLQGULTXH
3KLOOLSV
INSTALLEZ LE DOSSERET 30 CM (12”)
AVERTISSEMENT
Ce dosseret doit être
correctement fixé au mur afin d’éviter toute blessure ou
dommage matériel.
Ŷ ,QVWDOOH]HWDMXVWH]ODSRVLWLRQGHODFXLVLQqUHRXGH
la table de caisson et de la hotte de la cuisinière,
conformément aux consignes d’installation.
Ŷ 6RUWH]OHGRVVHUHWGHVRQHPEDOODJHHWOHILOPSURWHFWHXU
Ŷ 8WLOLVH]XQQLYHDXSRXUGHVVLQHUDXFUD\RQXQHOLJQH
horizontale sur le mur, 1/8” au-dessus de la cuisinière ou
GHODWDEOHGHFXLVVRQ/¶HVSDFHGH´IDLWTXHOHSDQQHDX
recouvrant se superpose au panneau de support mural.
Ŷ /RFDOLVH]OHVSRWHDX[PXUDX[VXUFKDTXHF{Wp(Q
O¶DEVHQFHGHSRWHDX[XWLOLVH]SOXW{WGHVFKHYLOOHV
murales (non fournies). Assurez-vous que les chevilles
murales ne gêneront pas le câblage électrique ou la
plomberie.
Ŷ $OLJQH]OHSDQQHDXGHVXSSRUWPXUDOVXUODOLJQH
KRUL]RQWDOHGHVVLQpHHWFHQWUpHGHJDXFKHjGURLWH
Ŷ/HSDQQHDXGHVXSSRUWPXUDOGRLWrWUHIL[pDXPXUSUqV
des 4 coins.8WLOLVH]GHVYLVjERLVIRXUQLHVRXGHV
chevilles murales (non fournies) pour fixer le panneau
de support au mur.
Ŷ 3ODFH]OHSDQQHDXGHUHFRXYUHPHQWVXUOHSDQQHDXGX
VXSSRUWPXUDOHWIL[H]jO¶DLGHGHYLV7RU[IRXUQLHV
,QVWDOOH]YLVGHFKDTXHF{Wp
3DQQHDXGHVXSSRUWPXUDO
3DQQHDX
de recouvrement
6DFKHW
de matériel
,QVWDOOH]OHVYLVjERLV
,QVWDOOH]OHV
YLV7RU[
3DQQHDX
du support
mural
3DQQHDX
du support
mural
3DQQHDX
de recouvrement
Flèche
centrale
31 mm
31-2000883 Rev. 1 3
ANTES DE COMENZAR
Lea estas instrucciones por completo y con detenimiento.
Ŷ IMPORTANTE — Conserve estas
instrucciones para uso del inspector de electricidad local.
Ŷ IMPORTANTE — Cumpla con todos los
códigos y ordenanzas gubernamentales.
Ŷ Nota para el Instalador — Asegúrese de que estas
instrucciones queden en manos del comprador.
Ŷ Nota para el Consumidor — Guarde estas instrucciones
para referencia futura.
Ŷ Este kit provee los materiales necesarios para la
instalación de salpicaderos de 12” de altura para cocinas
y estufas profesionales de 36” y 48”.
UX12BS36PSS, UX12BS48PSS
Salpicadero Alto 12”
ADVERTENCIA
Para prevenir el encendido de
materiales combustibles, debe protegerse toda la pared
trasera de la cocina mediante un salpicadero construido con
un material no combustible.
El accesorio para salpicadero de acero inoxidable debe
instalarse en combinación con un salpicadero no combustible a
medida construido más allá de la altura de 12” del salpicadero.
Instrucciones
de instalación
HERRAMIENTAS Y MATERIALES
REQUERIDOS
Ŷ *XDQWHVSDUDSURWHJHUVHGHORVERUGHVILORVRV
Ŷ 'HVWRUQLOODGRUHV7\GH
estrella #2
Ŷ 3HUIRUDGRUDHOpFWULFD
con mechas de 3/32” y
9/64” bits
Ŷ *DIDVGHVHJXULGDG
Ŷ 1LYHO
Ŷ /iSL]
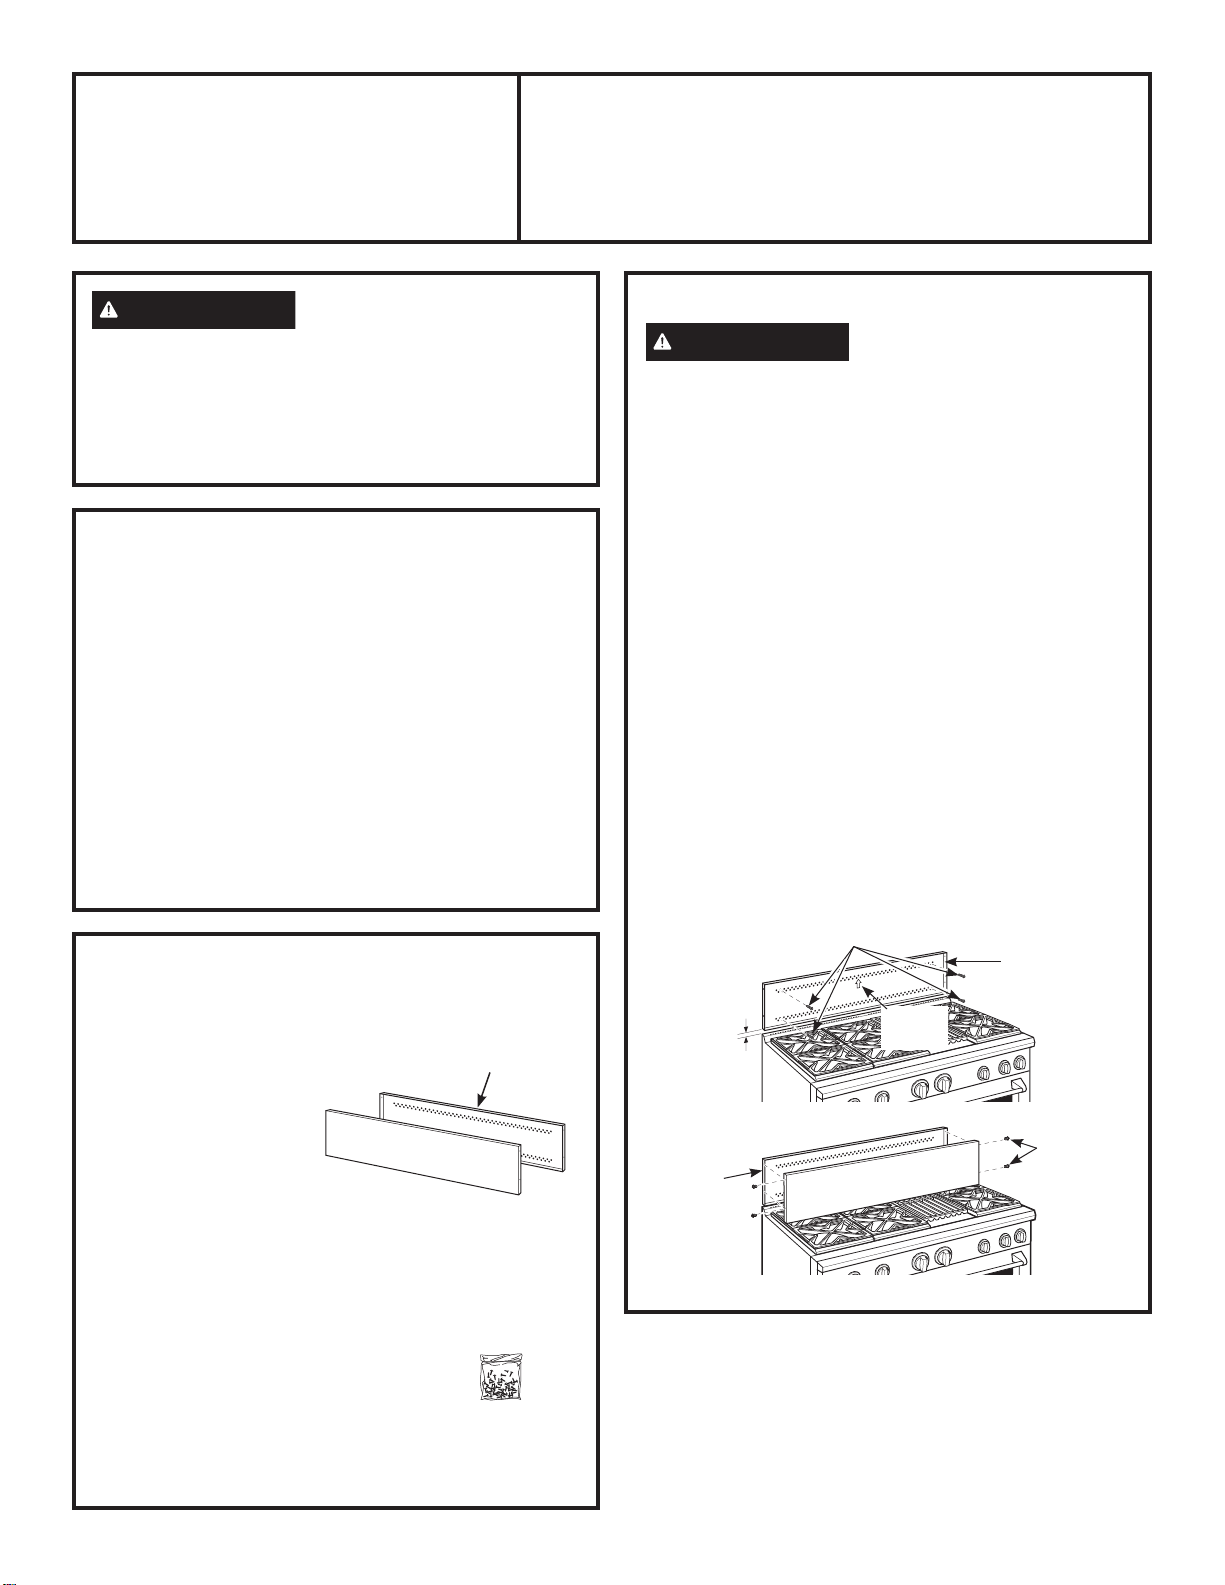
Este kit incluye
Ŷ 3DQHOGHVRSRUWHGHSDUHG
Ŷ 3DQHOGHFXELHUWD
Ŷ 3DTXHWHGHIHUUHWHUtDFRQ
±WRUQLOORVDXWRURVFDQWHV
7RU[GHDFHURLQR[LGDEOH
±WRUQLOORVGHHVWUHOOD
para madera de cabeza
troncocónica #10
INSTALE EL SALPICADERO DE 12”
ADVERTENCIA
Este salpicadero debe estar bien
VXMHWRDODSDUHG1RKDFHUORSXHGHSURYRFDUGDxRVR
lesiones personales.
Ŷ ,QVWDOH\QLYHOHODFRFLQDRHVWXID\ODFDSXFKDGHOD
cocina de acuerdo con las instrucciones de instalación.
Ŷ 4XLWHHOHPSDTXH\ODSHOtFXODSURWHFWRUDGHOVDOSLFDGHUR
Ŷ 8WLOLFHXQQLYHOSDUDPDUFDUFRQOiSL]XQDOtQHDKRUL]RQWDO
sobre la pared, 1/8” sobre la cocina o estufa. El espacio
de 1/8” permite que el panel de cubierta se superponga
con el panel de soporte de pared.
Ŷ 8ELTXHORVSDUDQWHVHQDPERVODGRV'RQGHQRKD\D
parantes disponibles, utilice anclajes de pared (no
provistos). Asegúrese de que los anclajes de pared no
LQWHUILHUDQFRQWXEHUtDVHOpFWULFDVRGHSORPHUtD
Ŷ $OLQHHHOSDQHOGHVRSRUWHGHSDUHGVREUHODOtQHD
horizontal marcada y centrada de izquierda a derecha.
Ŷ El panel de soporte de pared se deberá asegurar a la
pared cerca de las 4 esquinas. 8WLOLFHWRUQLOORVSDUD
madera (provistos) o anclajes de pared (no provistos)
para fijar el panel de soporte a la pared.
Ŷ &RORTXHHOSDQHOGHSURWHFFLyQVREUHHOSDQHOGHVRSRUWH
GHSDUHG\ILMHFRQWRUQLOORV7RU[SURYLVWRV,QVWDOH
tornillos en cada lado.
Panel de soporte de pared
Panel de cubierta
Paquete de
IHUUHWHUtD
,QVWDOHWRUQLOORVSDUDPDGHUD
,QVWDOHORV
WRUQLOORV7
Panel de
soporte de
pared
Panel de
soporte de
pared
Panel de cubierta
Flecha
Central
1/8”

4 31-2000883 Rev. 1
Printed in Mexico • ,PSULPpDX0H[LTXH • ,PSUHVRHQ0p[LFR