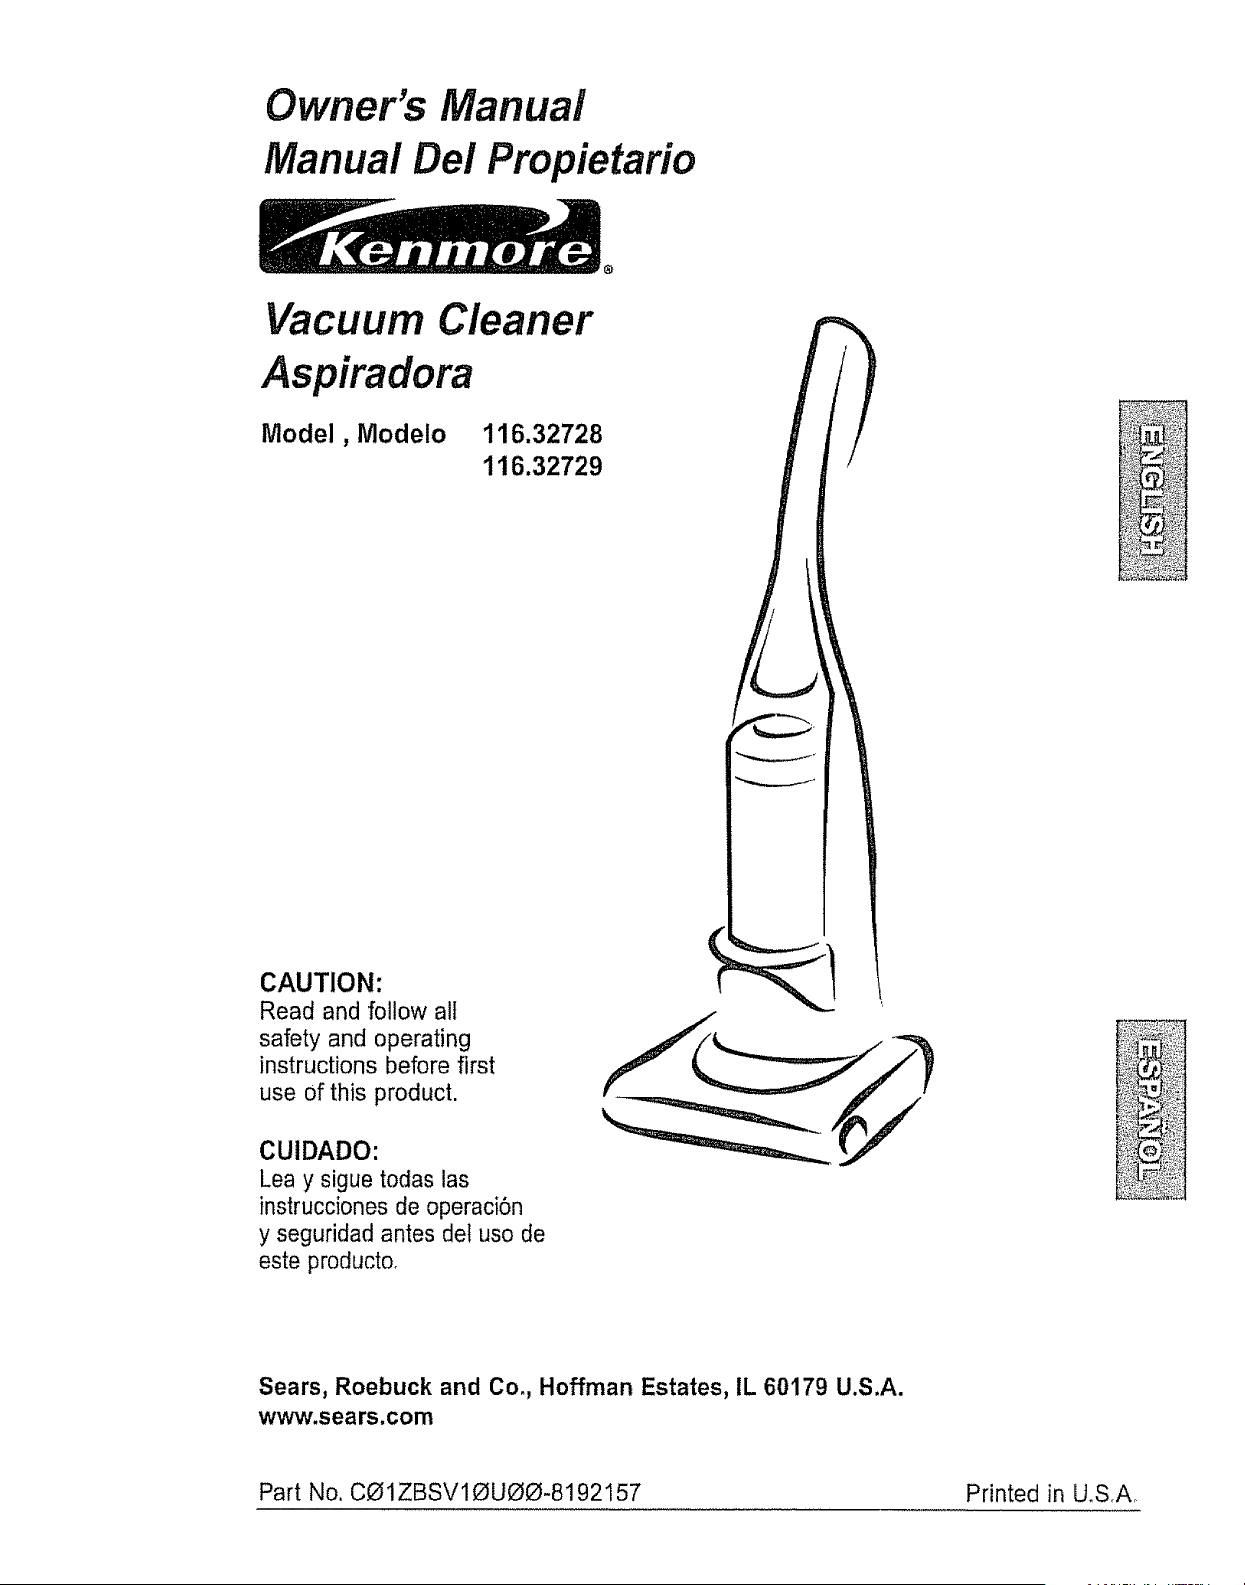
Owner's Manual
Manual Del Propietario
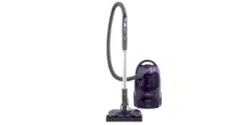
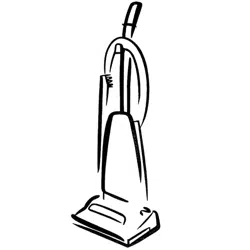
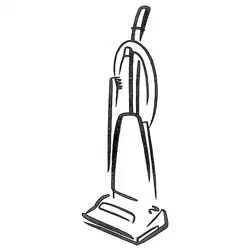
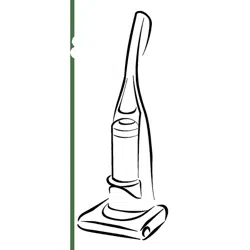
Vacuum Cleaner
Aspiradora
Model, Modelo
116.32728
116.32729
CAUTION:
Read and follow all
safety and operating
instructionsbefore first
use of this product.
CUIDADO:
Lea y sigue todas las
instrucciones de operaci6n
y seguridad antes del uso de
este producto,
t !
li l<:=_kl='l!
Sears, Roebuck and Co., Hoffman Estates, IL 60179 U.S.A.
wv,_v.sears.com
Part No. CO1ZBSV10U00-8192157 Printed in UoSA
Before Using Your New Vacuum ........ 2
Kenmore Vacuum Cleaner Warranty 2
Important Safety Instructions ........... 3
Parts and Features .................. 4
Assembly Instructions .............. 5-6
Operating Instructions ............... 6
Pile Height Selection and Setting ...... 7
Carpet/Bare Floor Selector .......... 7
Releasing the Handle ................... 8
ONIOFF Switch ........................... 8
Attachments .......................... 8-10
Attachment Use Chart ................ 1I
Vacuuming Tips ................ 11
Performance Features ................. I2-t3
Vacuum Cleaner Care ................ 14
Vacuum Storage .................... 14
Cleaning Exterior and Attachments ...... t4
Dust Bin Cleaning ................ 15-16
Secondary Filter Cleaning ............ t6
Filter ChangingtCleaning ............. 17
Belt Changing and Agitator Cleaning ., !8-20
Clog Removal ................... 21
Light Bulb Changing ..................... 22
Agitator Servicing .................... 23
Agitator Assembly .................. 23
Troubleshooting ........................ 24
Requesting Assistance
Or Service ................... Back Page
Please read this guide. It will help you assemble and operate your new Kenmore vacuum in
the safest and most effective way.
For more information about vacuum cleaner care and operation, call your nearest Sears store,
You will need the complete model and serial numbers when requesting information Your vacu-
um's model and serial numbers are located on the Model and Serial Number Plate.
Use the space below to record the model number and serial number of your new Kenmore
vacuum.
Model No.
Serial Noo
Date of Purchase
Keep this book and your sales check (receipt) in a safe place for future reference.
LIMITED ONE YEAR WARRANTY ON KENMORE VACUUM CLEANER
This warranty is for one year from the date of purchase, and includes only private household
vacuum cleaner user During the warranty year, when this vacuum cleaner is operated and
maintained according to the owner's manual instructions, Sears will repair any defects in
material or workmanship free of charge.
This warranty excludes vacuum bags, belts, light bulbs, and filters, which are expendable parts
and become worn during normal use.
For warranty service, return this vacuum cleaner to the nearest Sears Service Center in
the United States.
This warranty applies only while this product is in use in the United States° This warranty gives
you specific legal rights, and you may also have other rights which vary from state to state.
Sears, Roebuck and Co., D/817 WA, Hoffman Estates, IL 60179
2
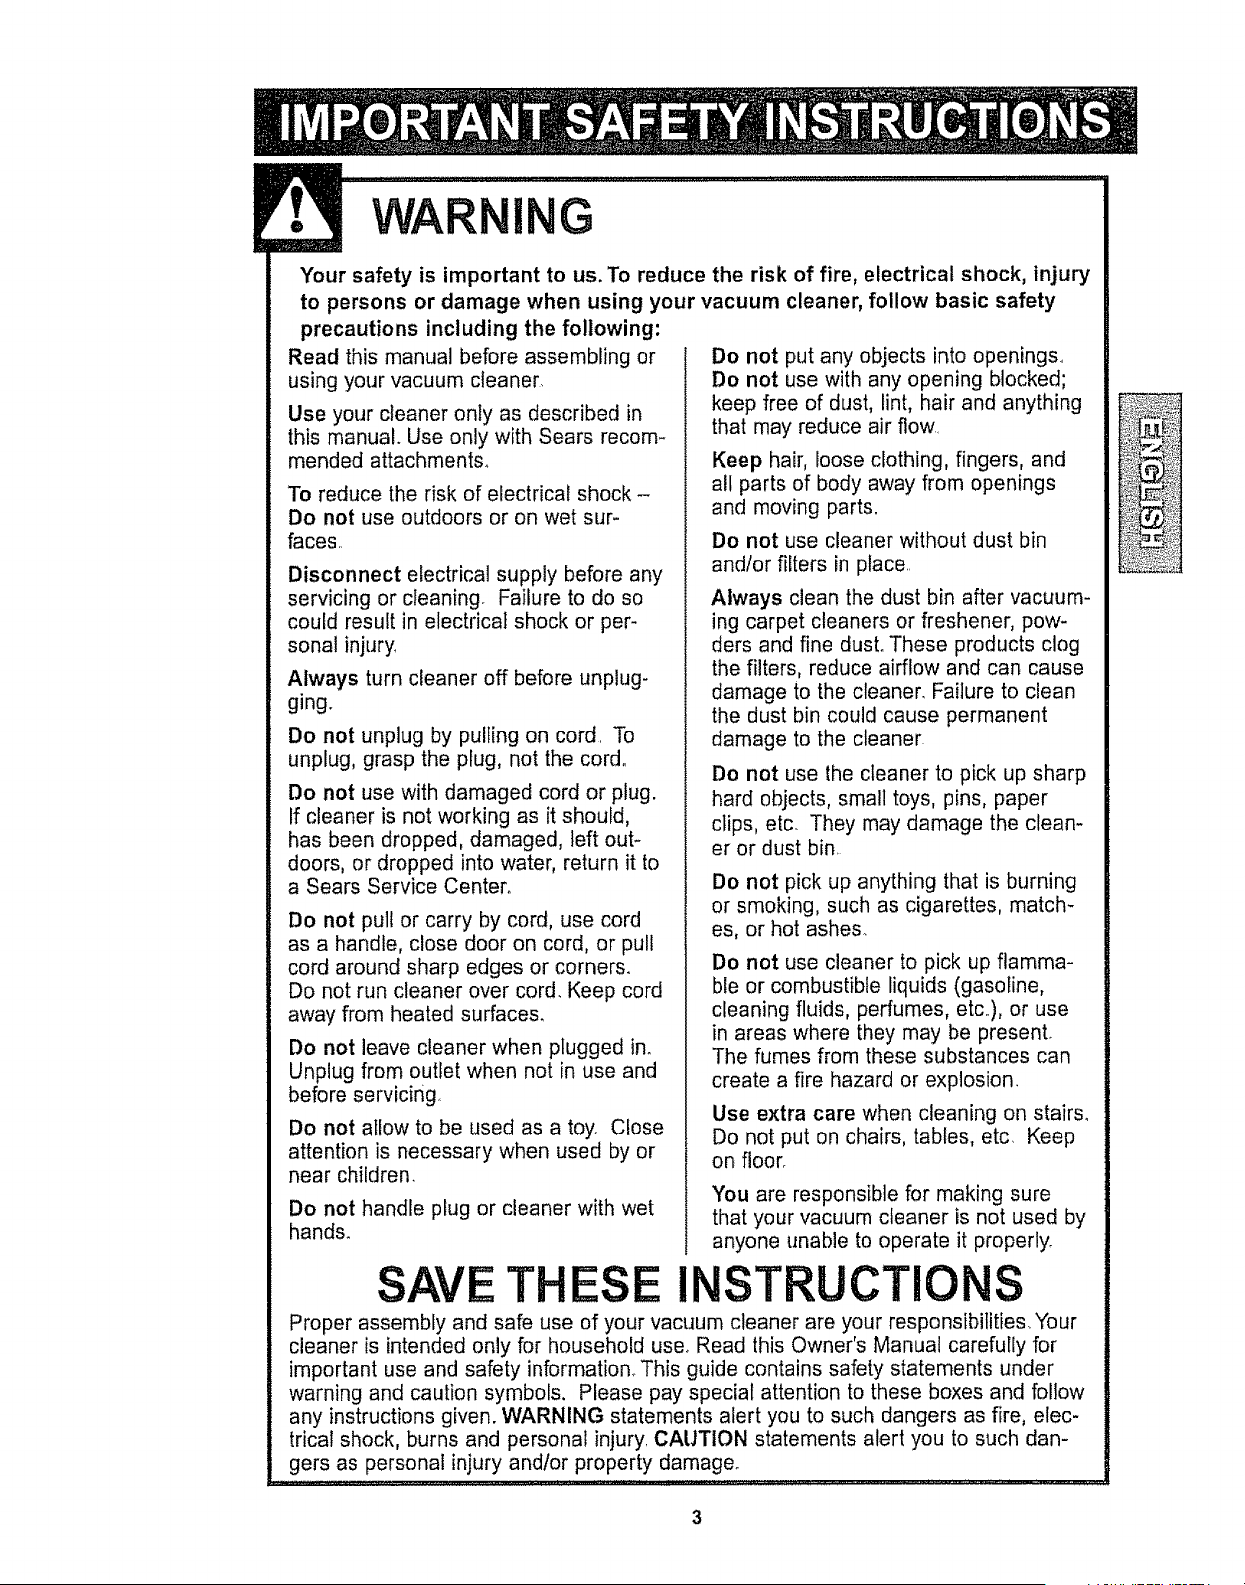
WAR
Your safety is important to us. To reduce the risk of fire, electrical shock, injury
to persons or damage when using your vacuum cleaner, follow basic safety
precautions including the following:
Read this manual before assembling or
using your vacuum cleaner
Use your cleaner only as described in
this manual. Use only with Sears recom-
mended attachments.
To reduce the risk of electrical shock -
Do not use outdoors or on wet sur-
faces.
Disconnect electrical supply before any
servicing or cleaning. Failure to do so
could result in electrical shock or per-
sonal injury.
Always turn cleaner off before unplug-
ging.
Do not unplug by pulling on cord To
unplug, grasp the plug, not the cord°
Do not use with damaged cord or plug.
If cleaner is not working as it should,
has been dropped, damaged, left out-
doors, or dropped into water, return it to
a Sears Service Center.
Do not pull or carry by cord, use cord
as a handle, close door on cord, or pull
cord around sharp edges or corners.
Do not run cleaner over cord. Keep cord
away from heated surfaces.
Do not leave cleaner when plugged in.
Unplug from outlet when not in use and
before servicing
Do not allow to be used as a toy. Close
attention is necessary when used by or
near children.
Do not handle plug or cleaner with wet
hands.
Do not put any objects into openings.
Do not use with any opening blocked;
keep free of dust, lint, hair and anything
that may reduce air flow
Keep hair, loose clothing, fingers, and
all parts of body away from openings
and moving parts.
Do not use cleaner without dust bin
and/or filters in place
Always clean the dust bin after vacuum-
ing carpet cleaners or freshener, pow-
ders and fine dust. These products clog
the filters, reduce airflow and can cause
damage to the cleaner. Failure to clean
the dust bin could cause permanent
damage to the cleaner
Do not use the cleaner to pick up sharp
hard objects, small toys, pins, paper
clips, etc. They may damage the clean-
er or dust bin.
Do not pick up anything that is burning
or smoking, such as cigarettes, match-
es, or hot ashes.
Do not use cleaner to pick up flamma-
ble or combustible liquids (gasoline,
cleaning fluids, perfumes, etc.), or use
in areas where they may be present.
The fumes from these substances can
create a fire hazard or explosion.
Use extra care when cleaning on stairs.
Do not put on chairs, tables, etc Keep
on floor.
You are responsible for making sure
that your vacuum cleaner is not used by
anyone unable to operate it properly.
T ESE INSTRUCTION
Proper assembly and safe use of your vacuum cleaner are your responsibilities Your
cleaner is intended only for household use. Read this Owner's Manual carefully for
important use and safety information° This guide contains safety statements under
warning and caution symbols. Please pay special attention to these boxes and follow
any instructions given. WARNING statements alert you to such dangers as fire, elec-
trical shock, burns and personal injury. CAUTION statements alert you to such dan-
gers as personal injury and!or property damage_
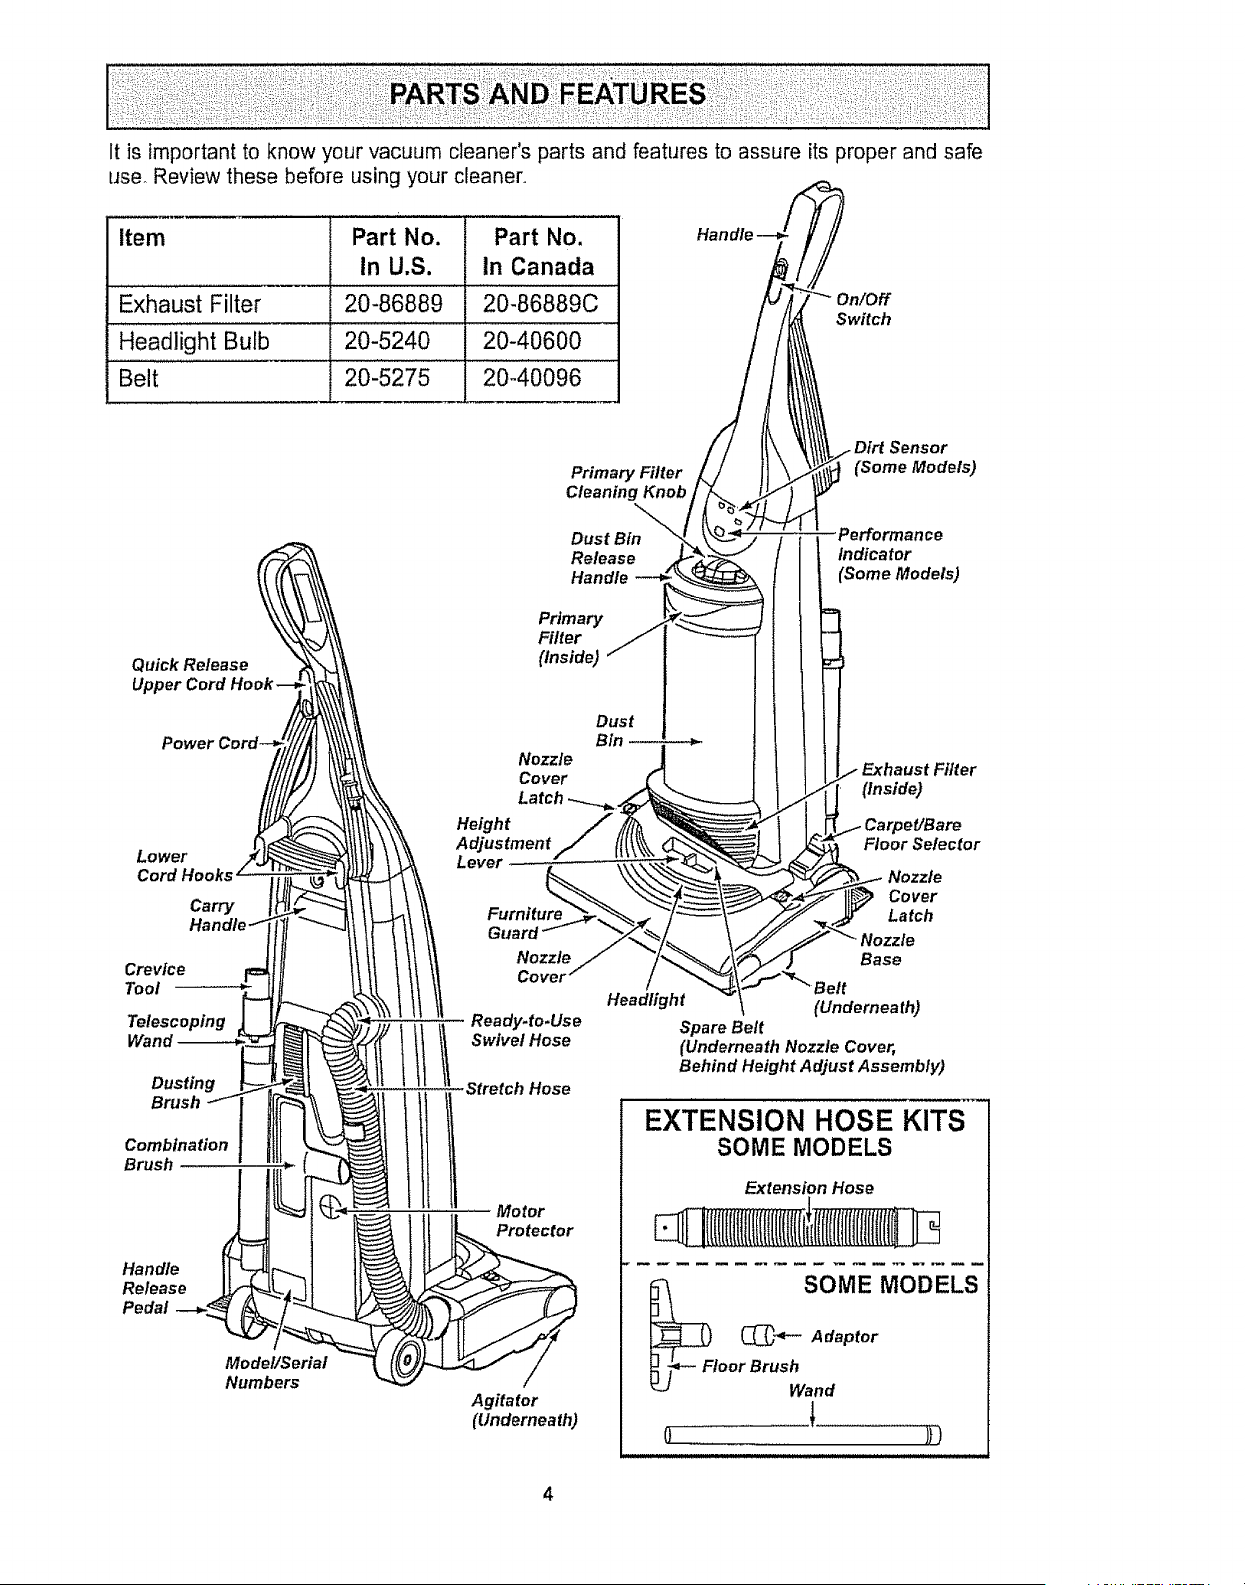
It is importantto knowyourvacuumcleaner'spartsandfeaturesto assureitsproperandsafe
use.Reviewthesebeforeusingyourcleaner.
Item Part No. Part No,
In U,S. In Canada
Exhaust Filter 20-86889 20-86889C
......... = .
Headlight Bulb 20-5240 20-40600
Belt 20-5275 20-40096
Primary Filter
Cleaning Knob
Switch
t Dirt Sensor
_ (Some Models)
Quick Release
Upper Cord
Power
Lower
Cord Hooks
Carry
Crevice
Tool
Telescoping
Wand
Dusting
Brush
Combination
Brush
Handle
Release
Pedal
Model/Serial
Numbers
Dust Bin
Release
Handle --_
Primary /
Filter /
(Inside) ""
Nozzle
Cover
Height
Adjustment
Lever -
Dust
Bln_
Furniture
Guard
Nozzle
Cover
Ready.to.Use
Stretch Hose
Motor
Protector
HeadHght
Agitator
(Underneath)
Performance
Indicator
(Some Models)
Filter
(Inside)
CarpeYBare
Floor Selector
Nozzle
Cover
Latch
Nozzle
Base
(Underneath)
Spare Belt
(Underneath Nozzle Cover,
Behind Height Adjust Assembly)
EXTENSION HOSE KITS
SOME MODELS
Extension Hose
SOME MODELS
(_"_"- Adaptor
_j_- Fl°°r BrUShwand
J.
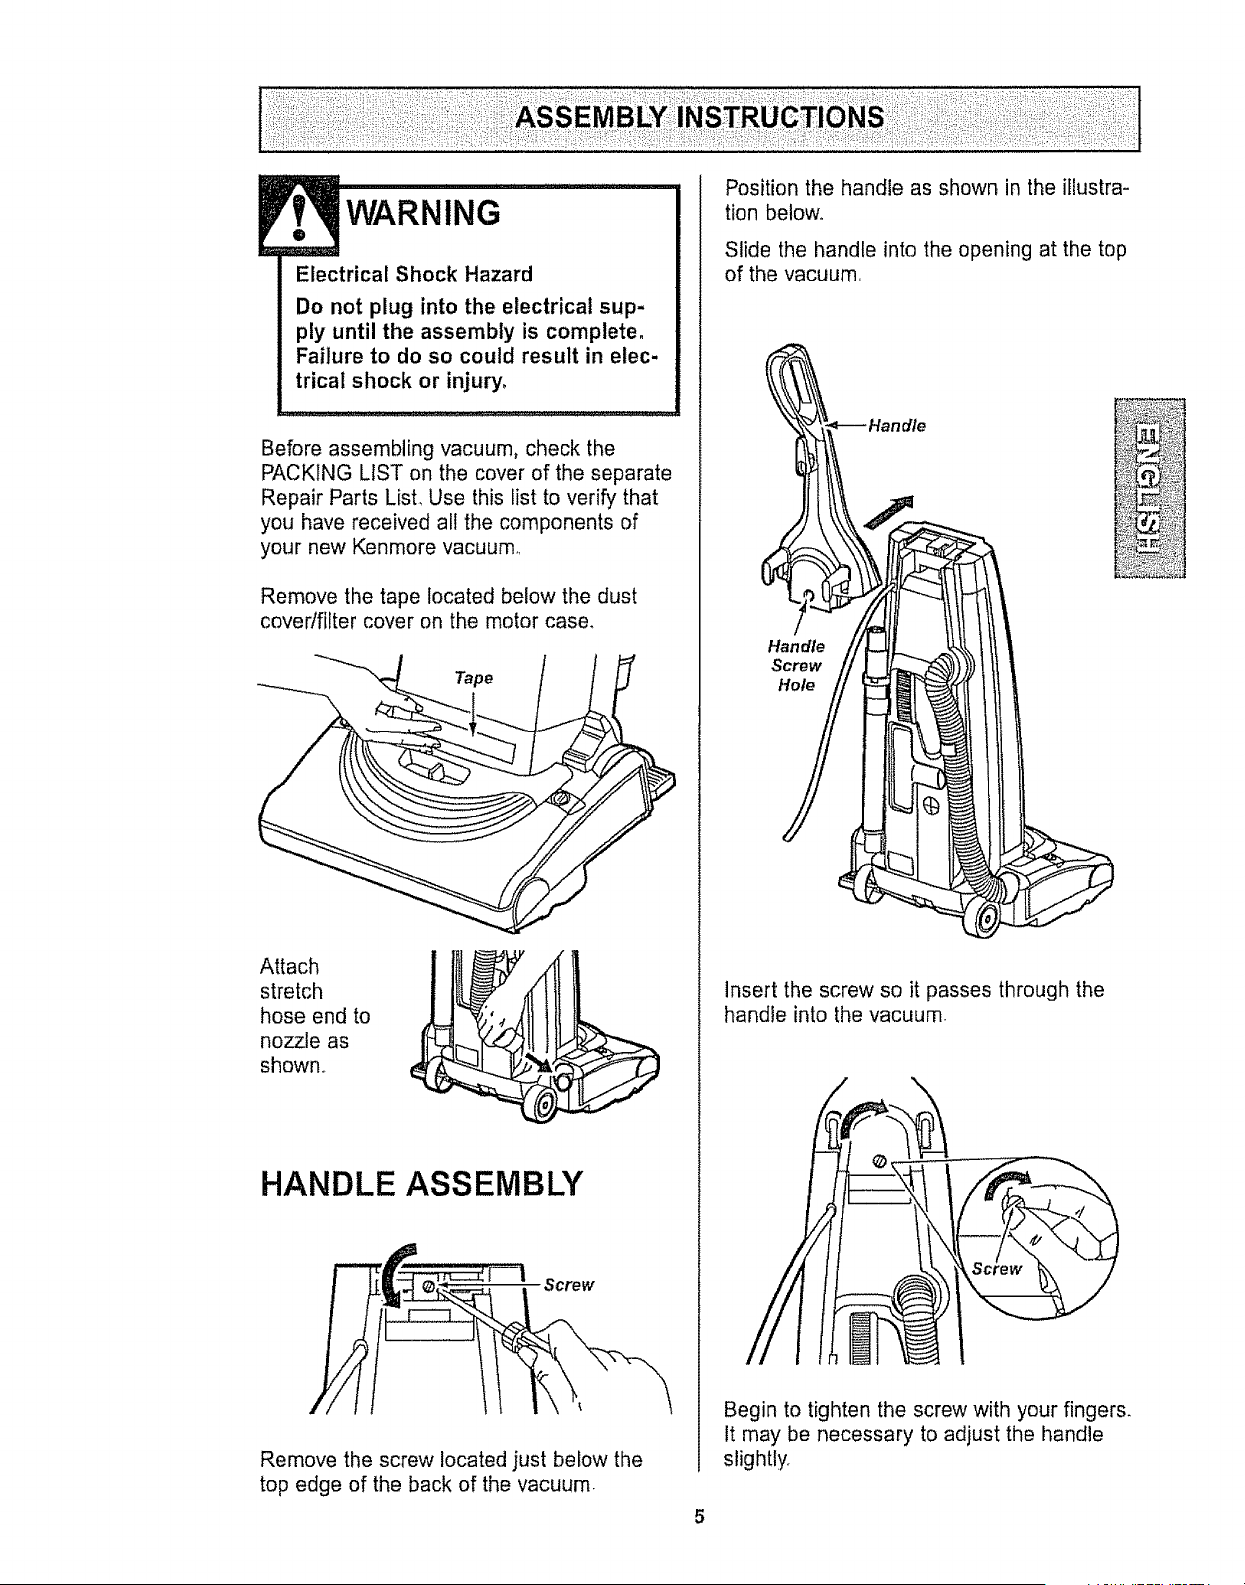
WARNING ....................I
Electrical Shock Hazard
Do not plug into the electrical sup-
ply until the assembly is complete.
Failure to do so could result in elec-
trical shock or injury,
Before assembling vacuum, check the
PACKING LIST on the cover of the separate
Repair Parts LisL Use this list to verify that
you have received all the components of
your new Kenmore vacuum.
Remove the tape located below the dust
cover/filter cover on the motor case.
Tape
Attach
stretch !
hose end to "
,/
nozzle as
shown,.
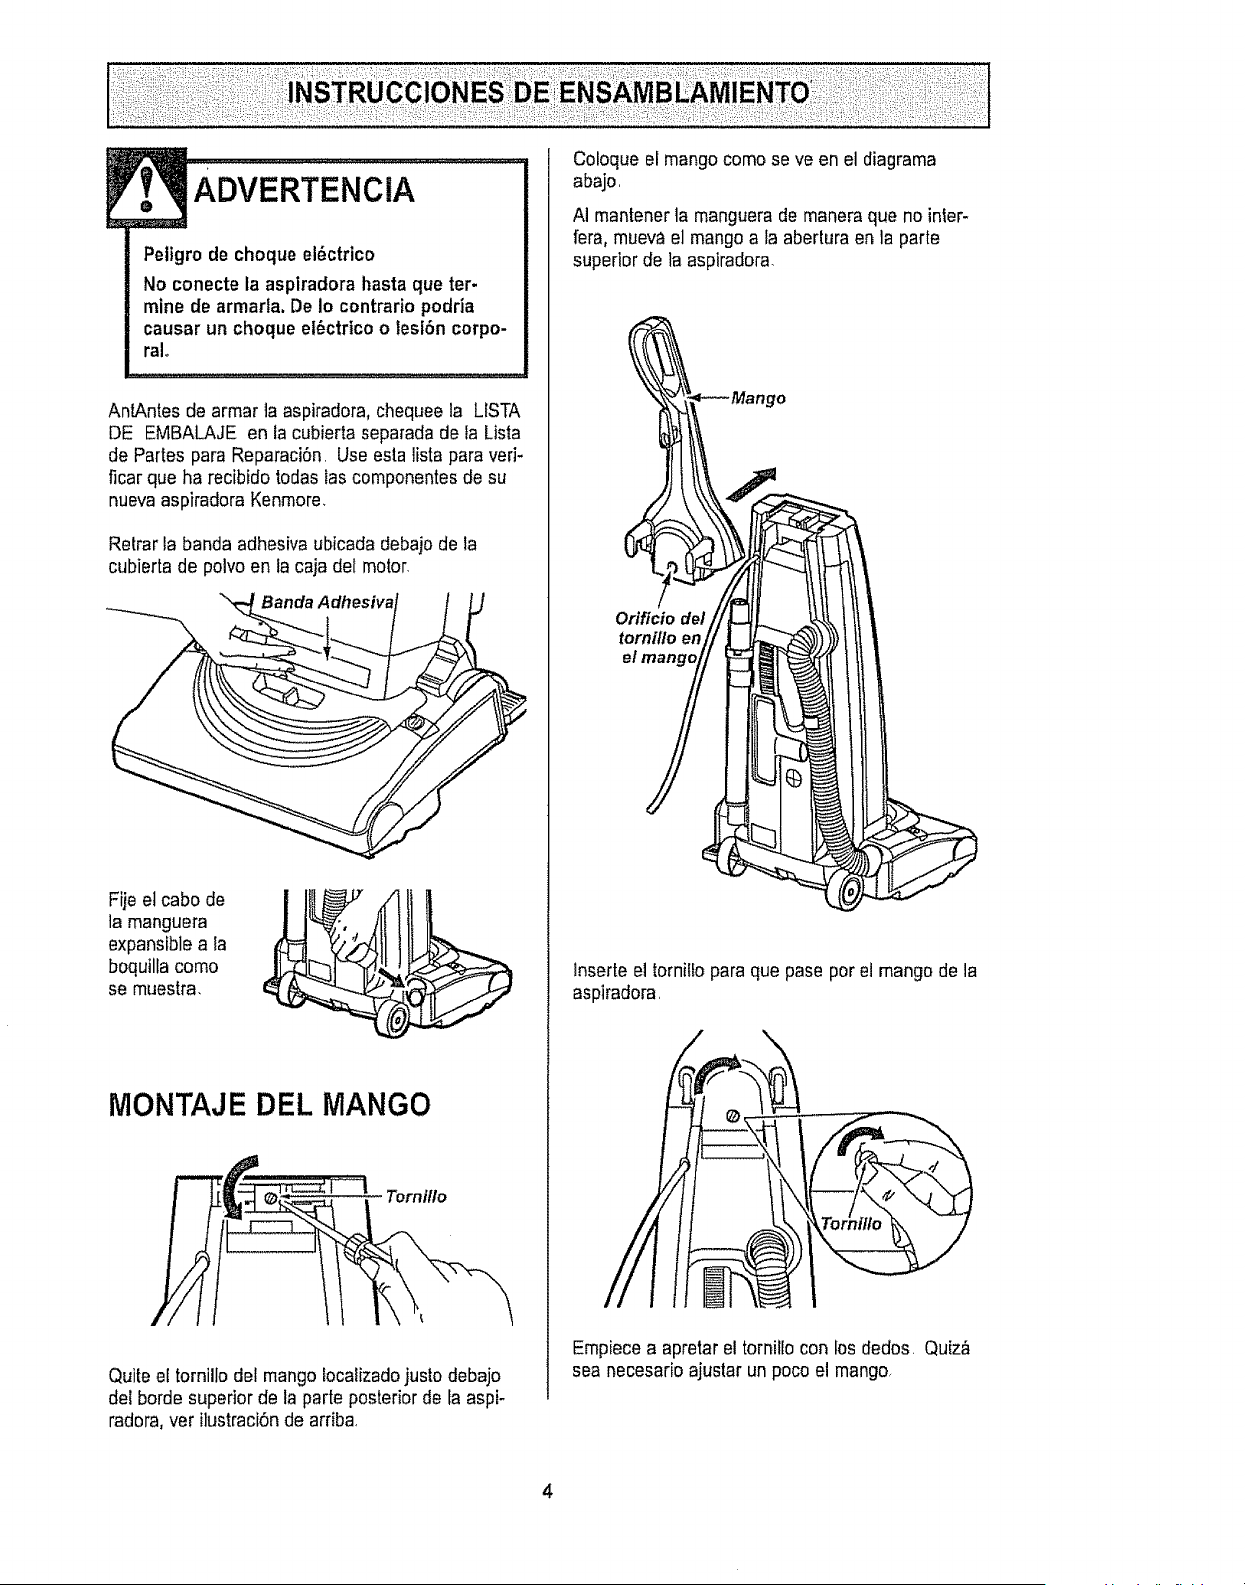
HANDLE ASSEMBLY
Remove the screw located just below the
top edge of the back of the vacuum.
Position the handle as shown in the illustra-
tion below°
Slide the handle into the opening at the top
of the vacuum.
Handle
Handle t
Insert the screw so it passes through the
handle into the vacuum.
Begin to tighten the screw with your fingers.
It may be necessary to adjust the handle
slightly.
5
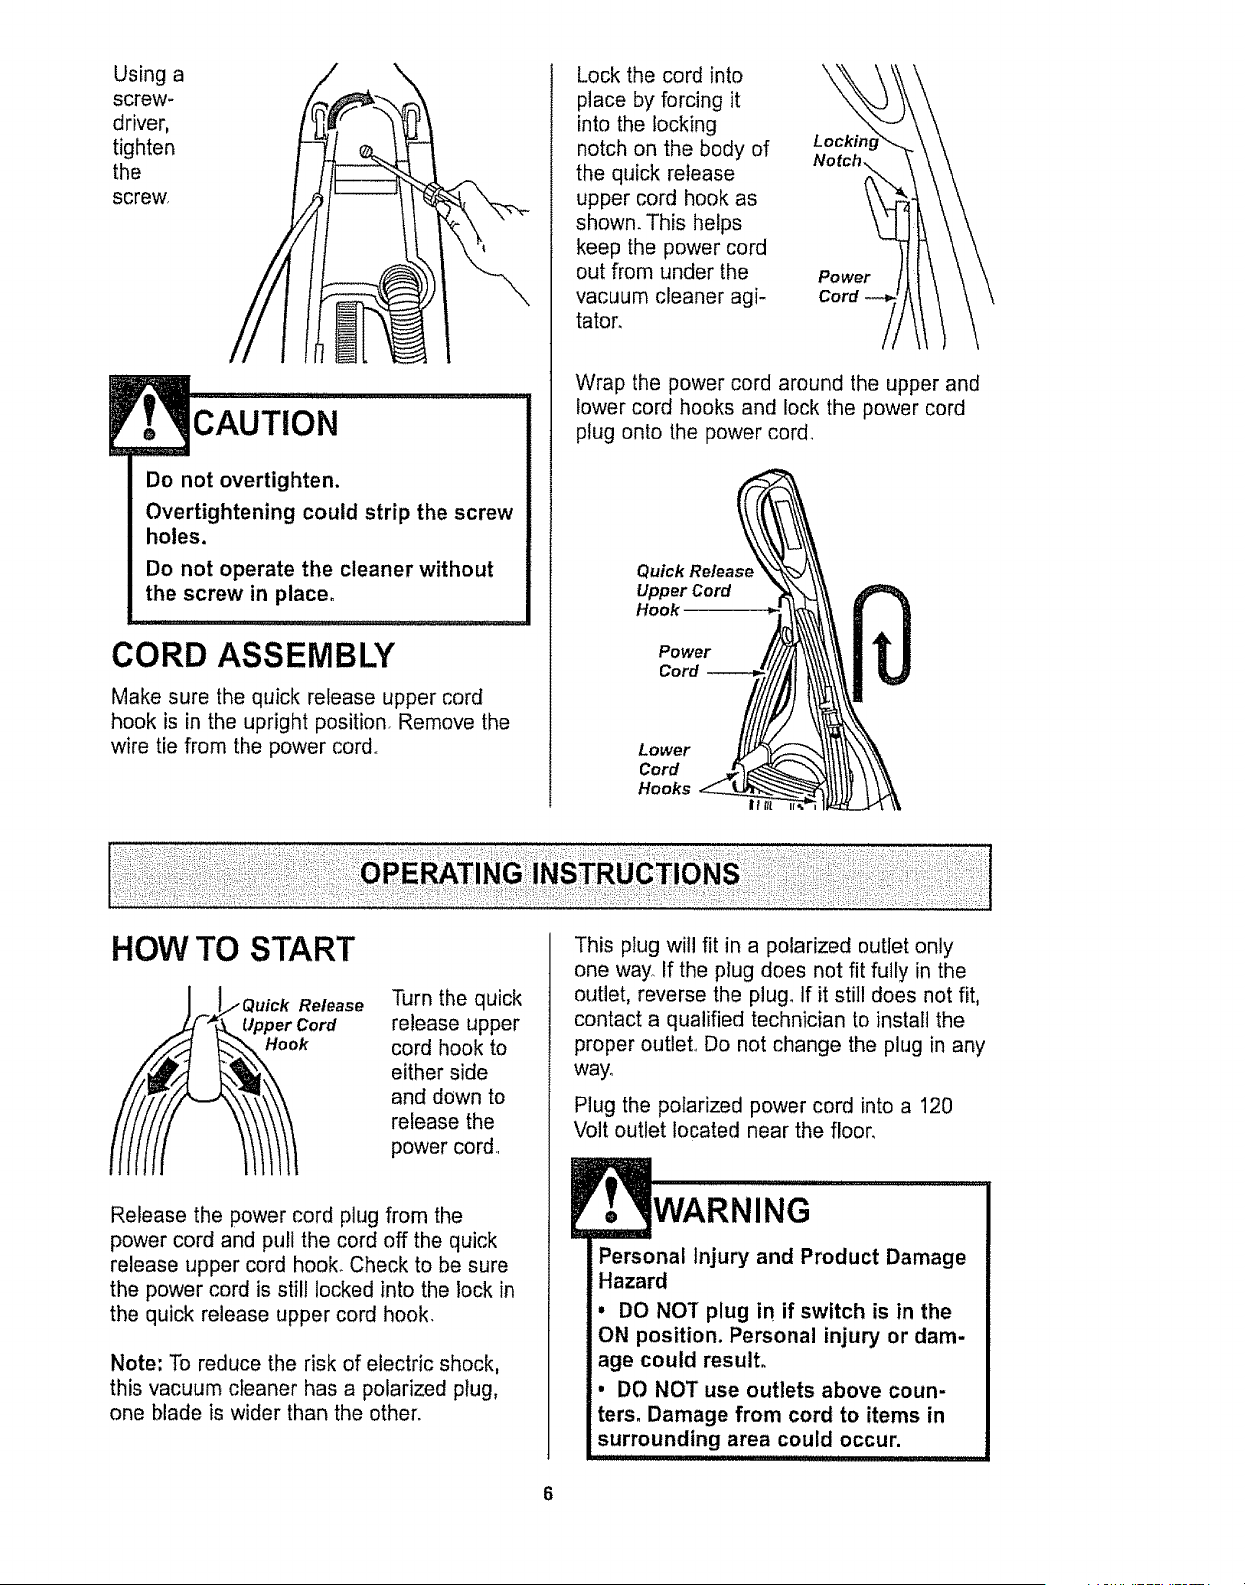
Using a
screw-
driver,
tighten
the
screw,
CAUTION
Do not overtighten.
Overtightening could strip the screw
holes.
Do not operate the cleaner without
the screw in place.
CORD ASSEMBLY
Make sure the quick release upper cord
hook is in the upright position. Remove the
wire tie from the power cord,,
Lock the cord into \
place by forcing it
into the locking
notch on the body of Locking
Notch,
the quick release
upper cord hook as
shown. This helps
keep the power cord
out from under the Power
vacuum cleaner agi- Cord
tator.
Wrap the power cord around the upper and
lower cord hooks and lock the power cord
plug onto the power cord.
Quick Release
Upper Cord
Hook
Power
Cord
Lower
Cord
Hooks
If
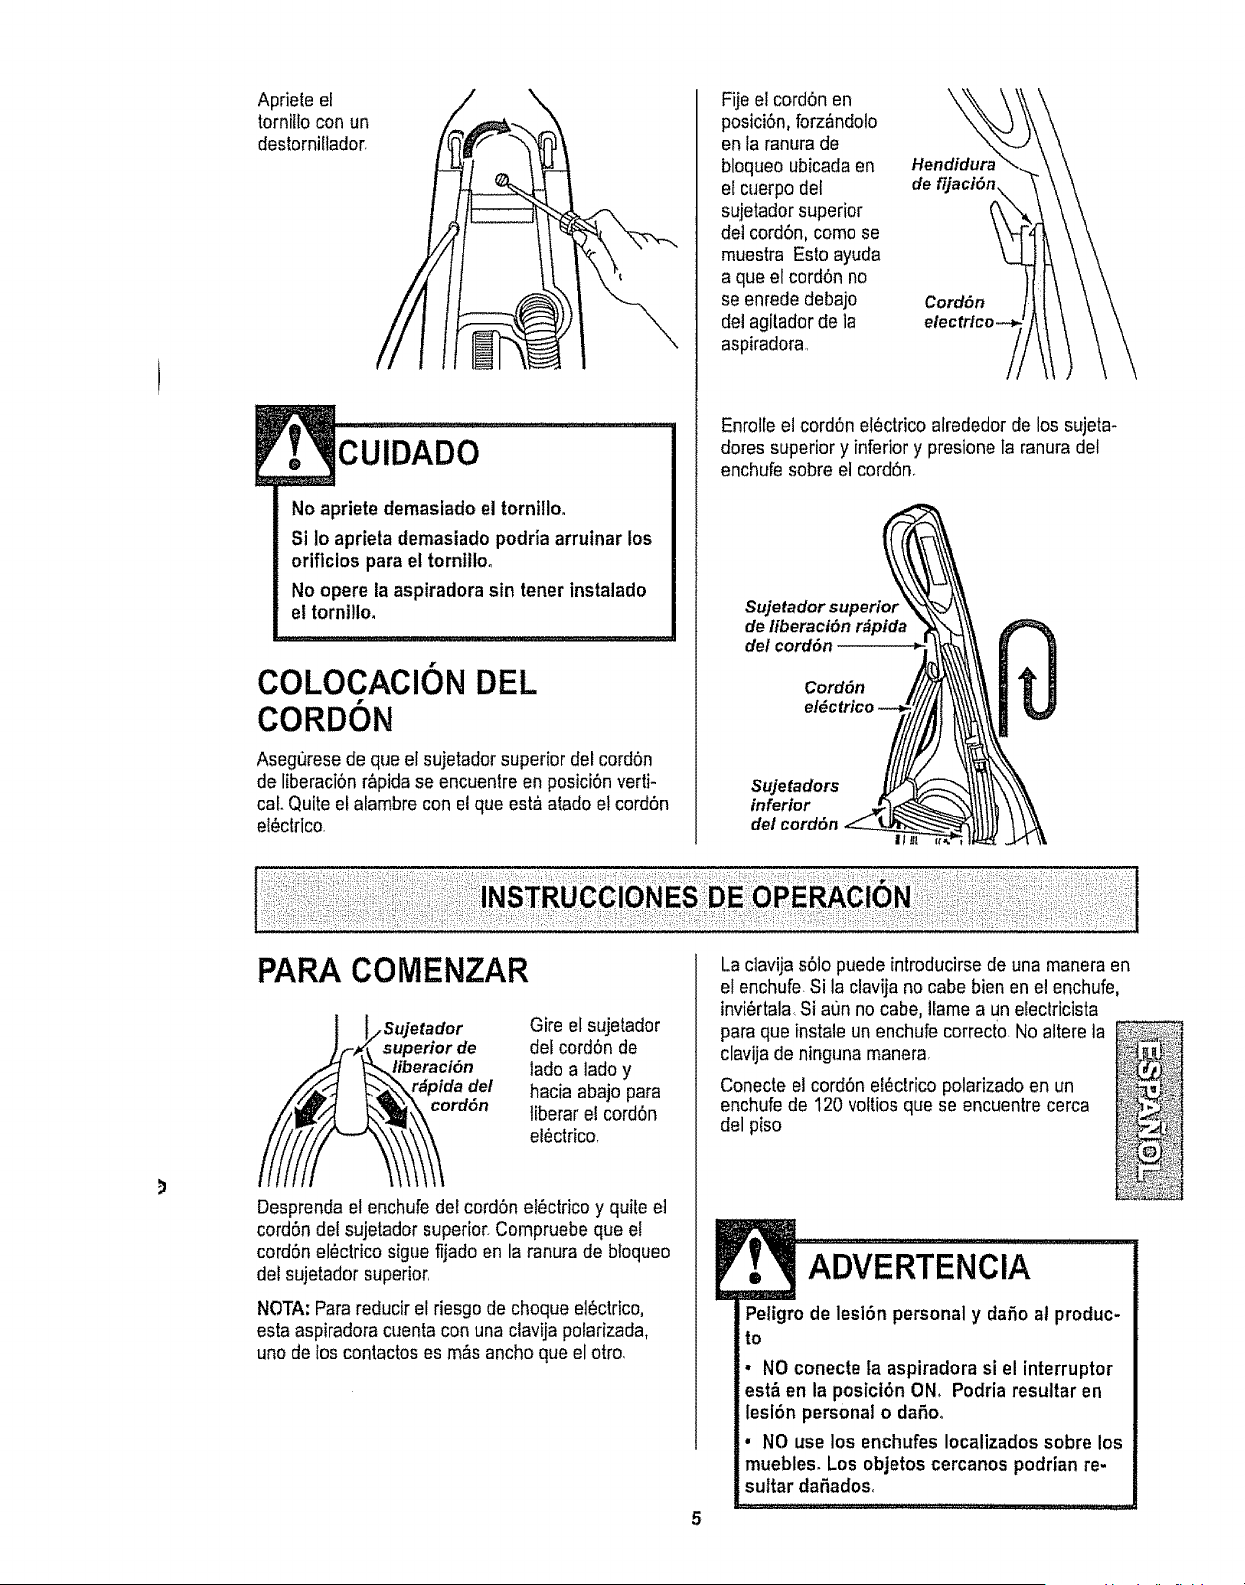
HOW TO START
Release
Cord
Turn the quick
release upper
cord hook to
either side
and down to
release the
power cord..
Release the power cord plug from the
power cord and pull the cord off the quick
release upper cord hooL Check to be sure
the power cord is still locked into the lock in
the quick release upper cord hook.
Note: To reduce the risk of electric shock,
this vacuum cleaner has a polarized plug,
one blade is wider than the other.
................ ::_i;
This plug will fit in a polarized outlet only
one way. If the plug does not fit fully in the
outlet, reverse the plug. If it still does not fit,
contact a qualified technician to install the
proper outleL Do not change the plug in any
way°
Plug the polarized power cord into a 120
Volt outlet located near the floor.
WARNING ...........
Personal Injury and Product Damage
Hazard
• DO NOT plug in if switch is in the
ON position. Personal injury or dam-
age could result.
, DO NOT use outlets above coun-
ters. Damage from cord to items in
surrounding area could occur.
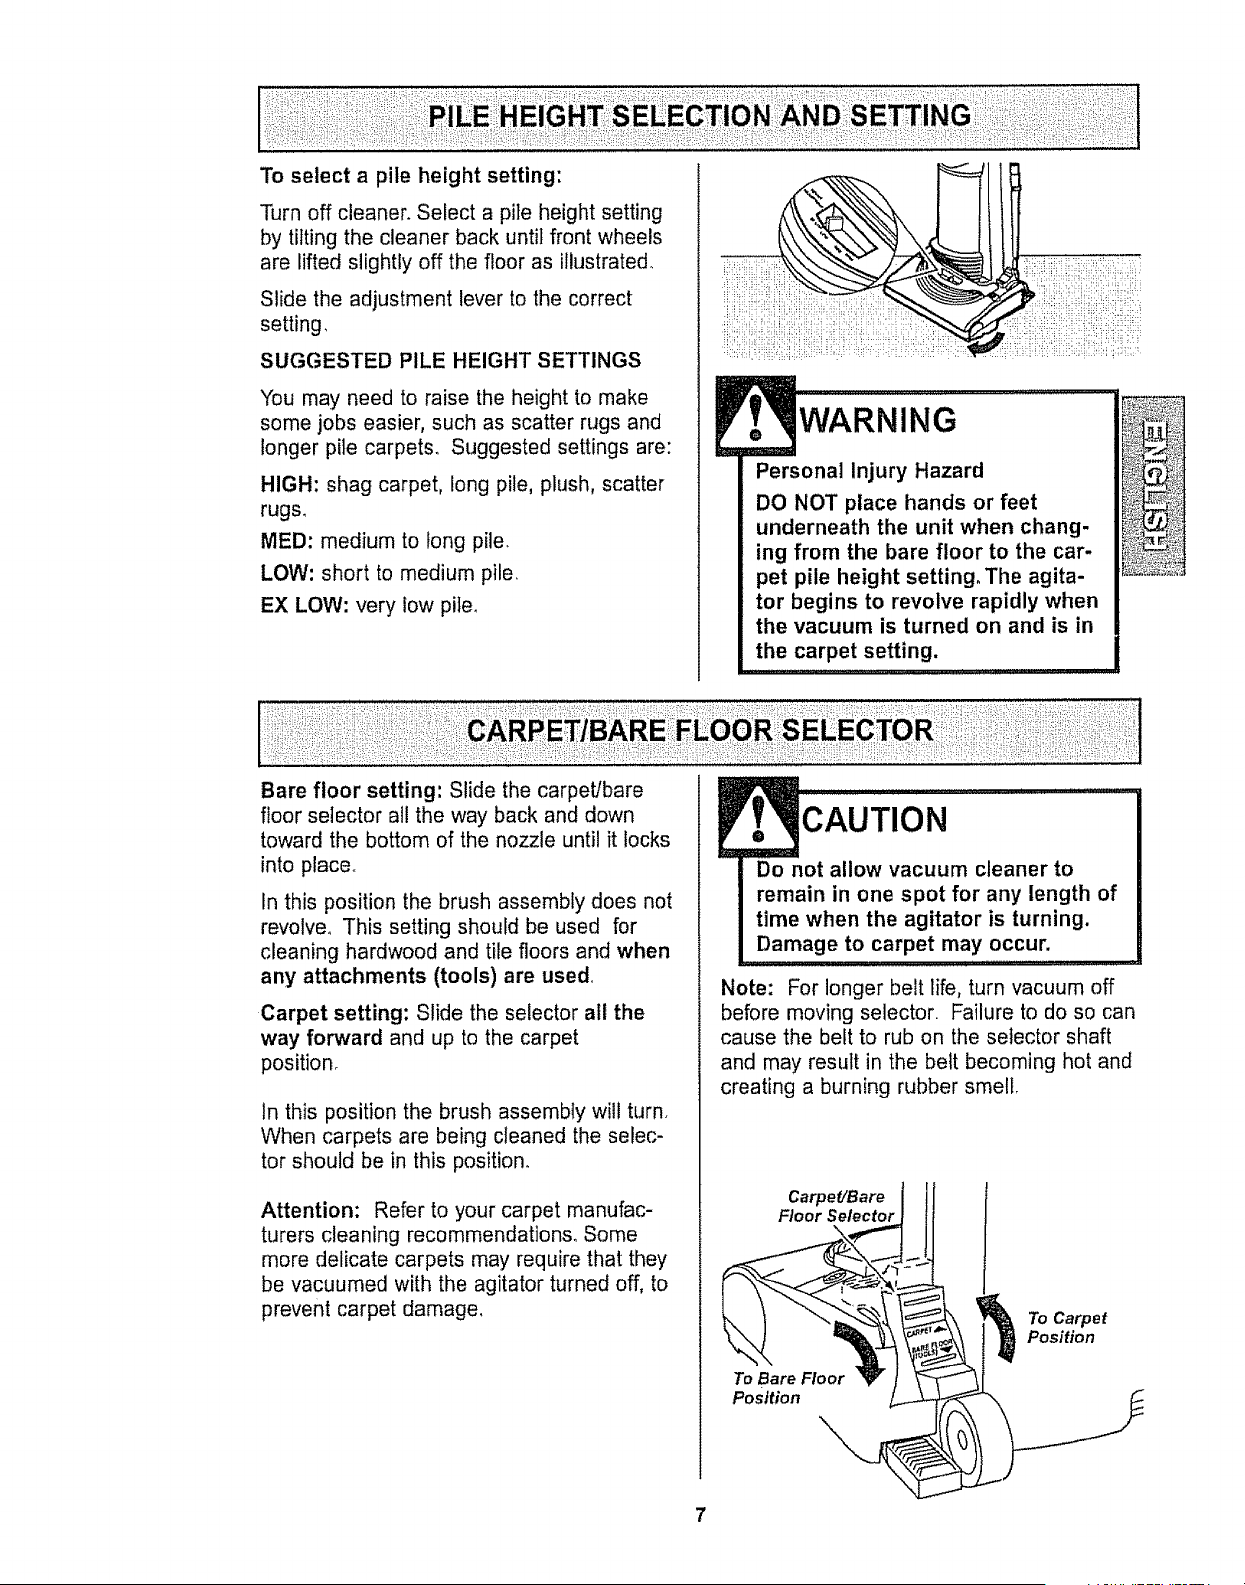
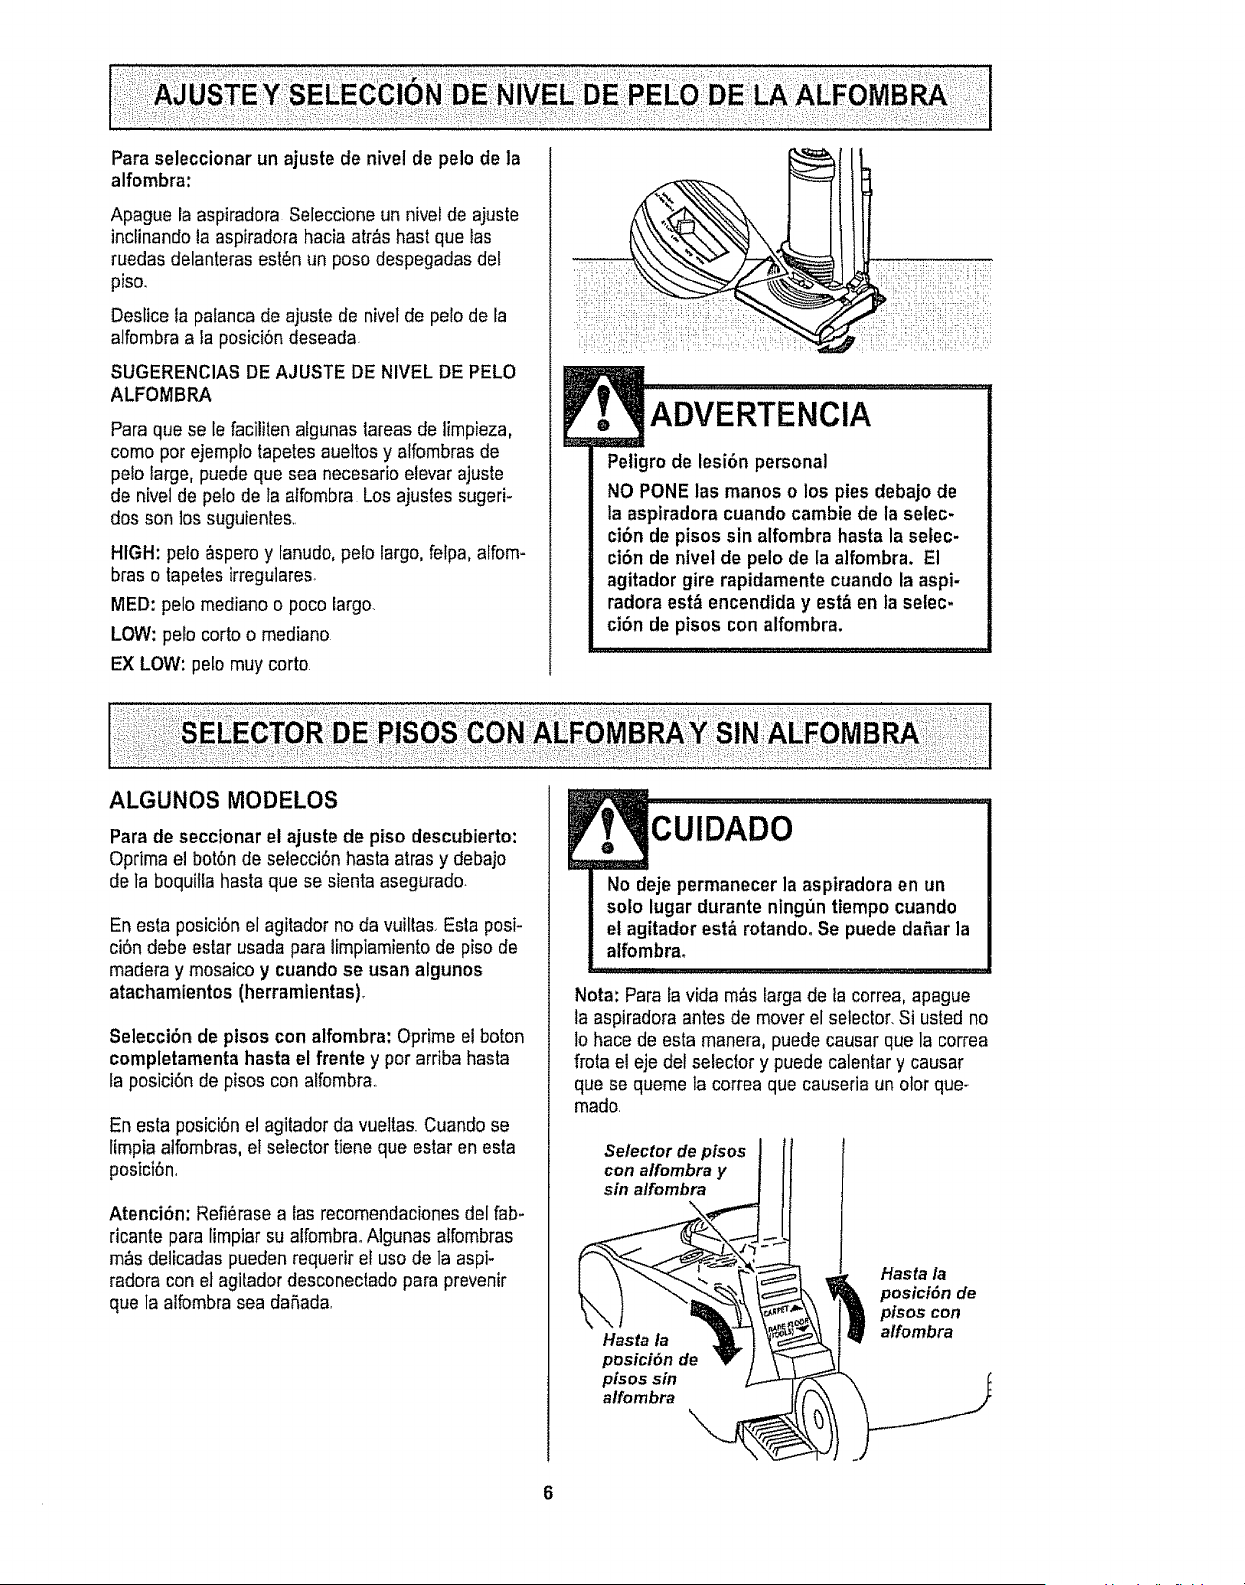
To select a pile height setting:
Turn off cleaner_ Select a pile height setting
by tilting the cleaner back until front wheels
are lifted slightly off the floor as illustrated.
Slide the adjustment lever to the correct
setting,
SUGGESTED PILE HEIGHT SETTINGS
"You may need to raise the height to make
some jobs easier, such as scatter rugs and
longer pile carpets. Suggested settings are:
HIGH: shag carpet, long pile, plush, scatter
rugs.
MED: medium to tong pile.
LOW: short to medium pile,
EX LOW: very low pite.
WARNING
Personal Injury Hazard
DO NOT place hands or feet
underneath the unit when chang-
ing from the bare floor to the car-
pet pile height setting. The agita-
tor begins to revolve rapidly when
the vacuum is turned on and is in
the carpet setting.
Bare floor setting: Slide the carpet/bare
floor selector all the way back and down
toward the bottom of the nozzle until it locks
into place°
In this position the brush assembly does not
revolve. This setting should be used for
cleaning hardwood and tile floors and when
any attachments (tools) are used,
Carpet setting: Slide the selector all the
way forward and up to the carpet
position.
In this position the brush assembly will turn.
When carpets are being cleaned the selec-
tor should be in this position.
Attention: Refer to your carpet manufac-
turers cleaning recommendations. Some
more delicate carpets may require that they
be vacuumed with the agitator turned off, to
prevent carpet damage,
CAUTION
Do not allow vacuum cleaner to [
remain in one spot for any length of [
time when the agitator is turning.
Damage to carpet may,,,Occ,u,r. ,,I
Note: For longer belt life, turn vacuum off
before moving selector Failure to do so can
cause the belt to rub on the selector shaft
and may result in the belt becoming hot and
creating a burning rubber smell.
Carpet/Bare
Floor Selector
To Bare Floor _"
Position
To Carpet
Position
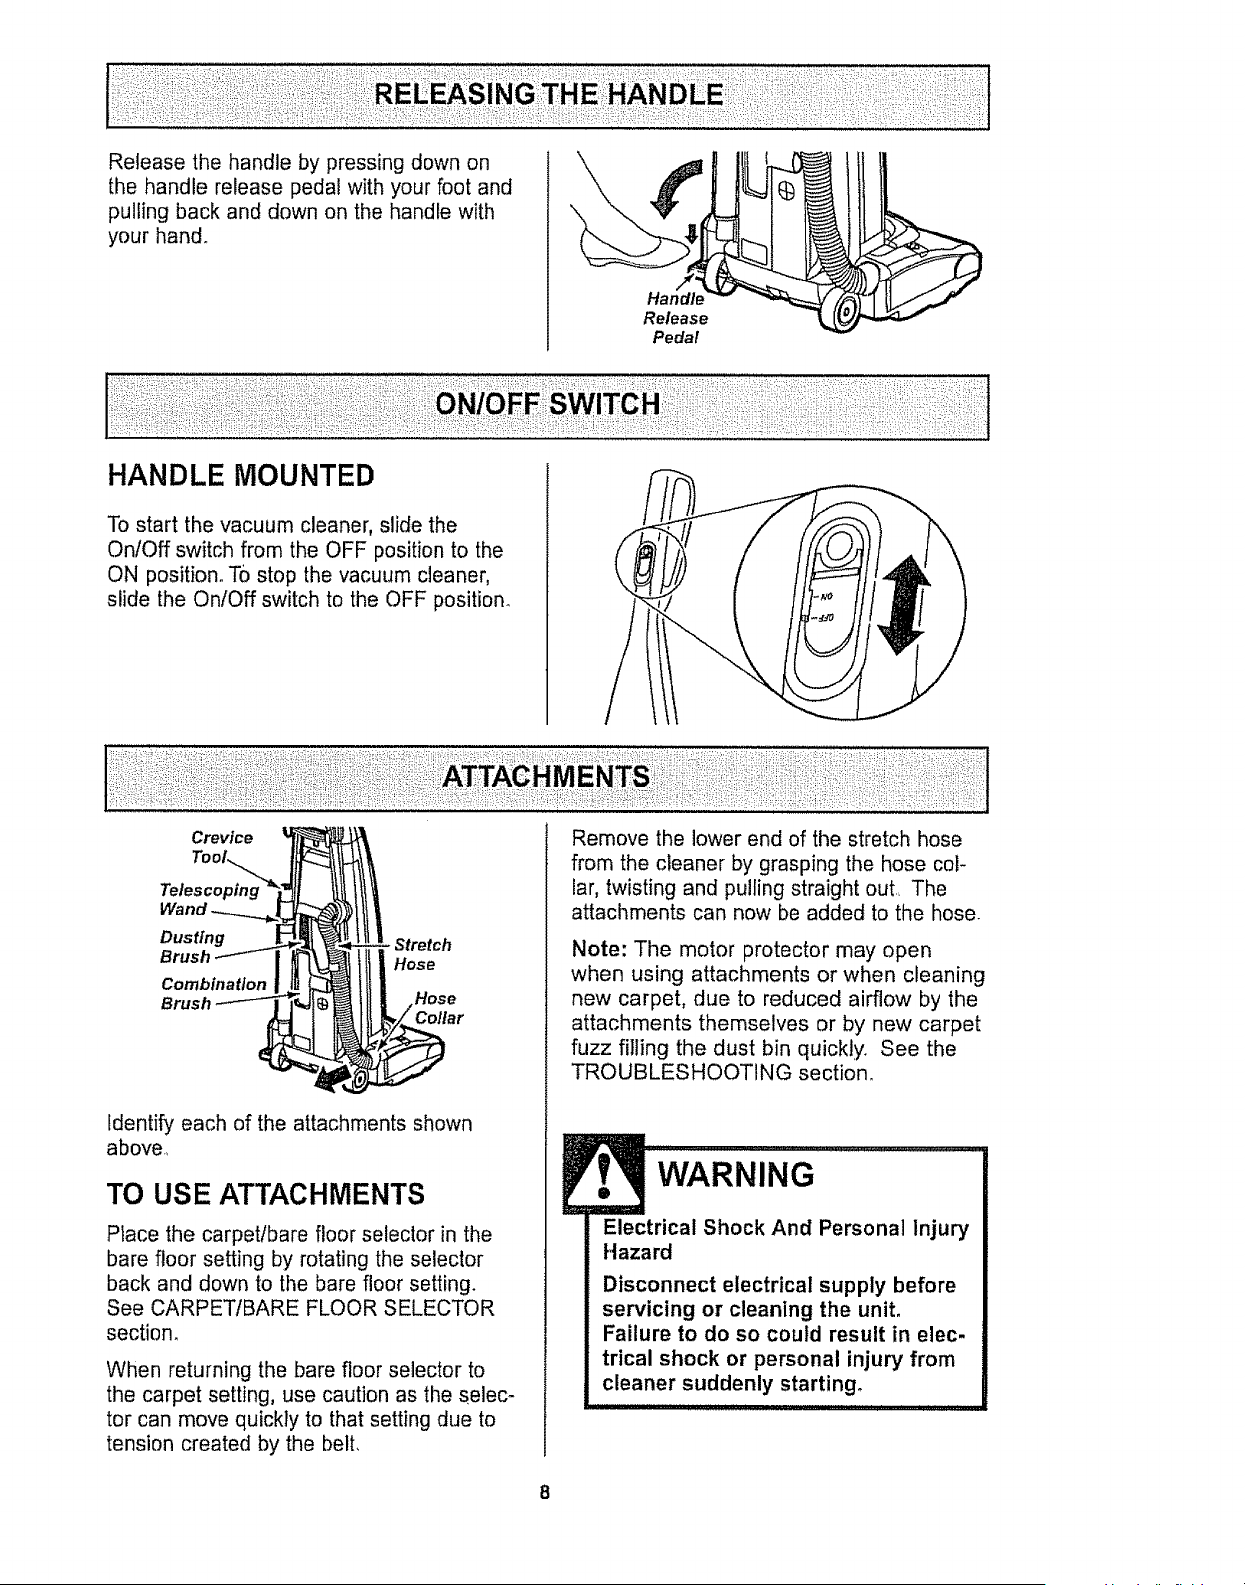
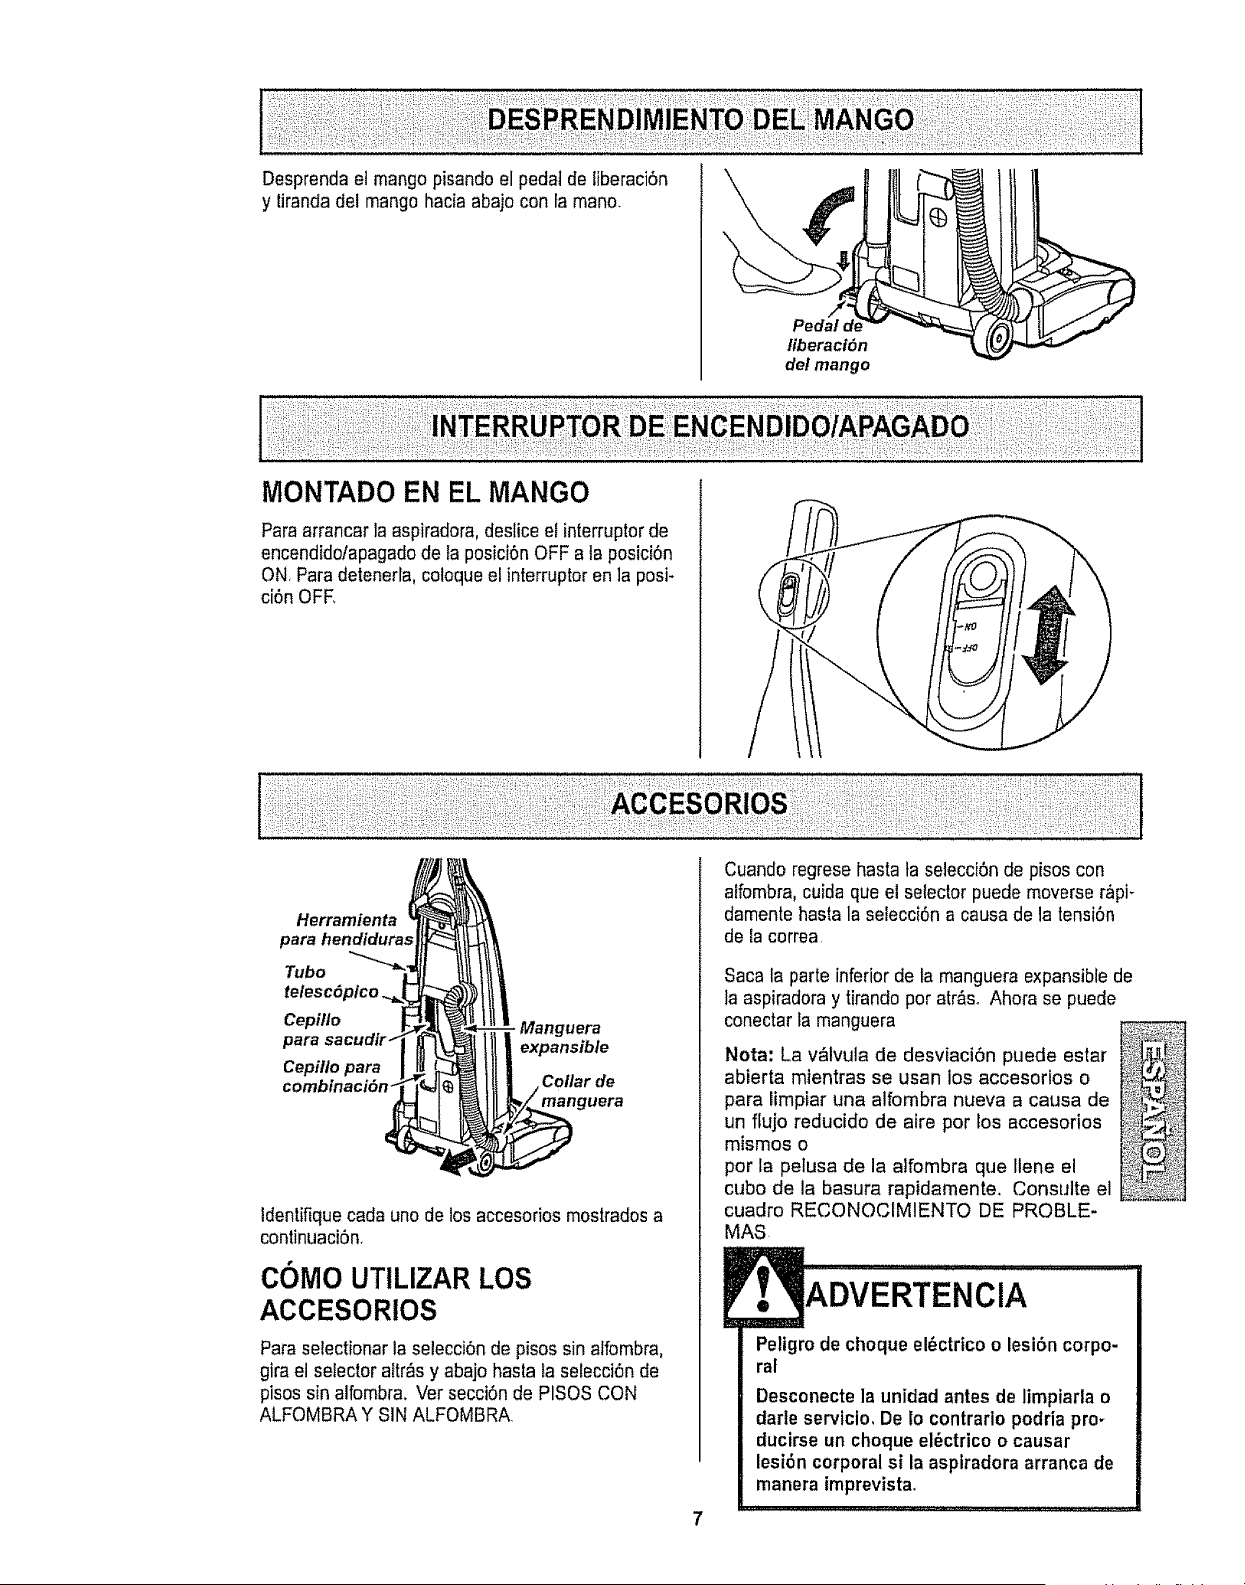
Release the handle by pressing down on
the handle release pedal with your foot and
pulling back and down on the handle with
your hand_
Handle
Release
Pedal
HANDLE MOUNTED
To start the vacuum cleaner, slide the
On/Off switch from the OFF position to the
ON position_ TO stop the vacuum cleaner,
slide the On/Off switch to the OFF position_
Crevice
Dusting
Brush _
Combinat/on| rg
Brush-__
- Stretch
Hose
Identify each of the attachments shown
above.,
TO USE ATTACHMENTS
Place the carpet/bare floor selector in the
bare floor setting by rotating the selector
back and down to the bare floor setting.
See CARPETIBARE FLOOR SELECTOR
section.
When returning the bare floor selector to
the carpet setting, use caution as the selec-
tor can move quickly to that setting due to
tension created by the belt,
Remove the lower end of the stretch hose
from the cleaner by grasping the hose col-
lar, twisting and pulling straight out. The
attachments can now be added to the hose.
Note: The motor protector may open
when using attachments or when cleaning
new carpet, due to reduced airflow by the
attachments themselves or by new carpet
fuzz filling the dust bin quickly. See the
TROUBLESHOOTING section.
WARNING
Electrical Shock And Personal Injury
Hazard
Disconnect electrical supply before
servicing or cleaning the unit,
Failure to do so could result in elec-
trical shock or personal injury from
cleaner suddenly starting.
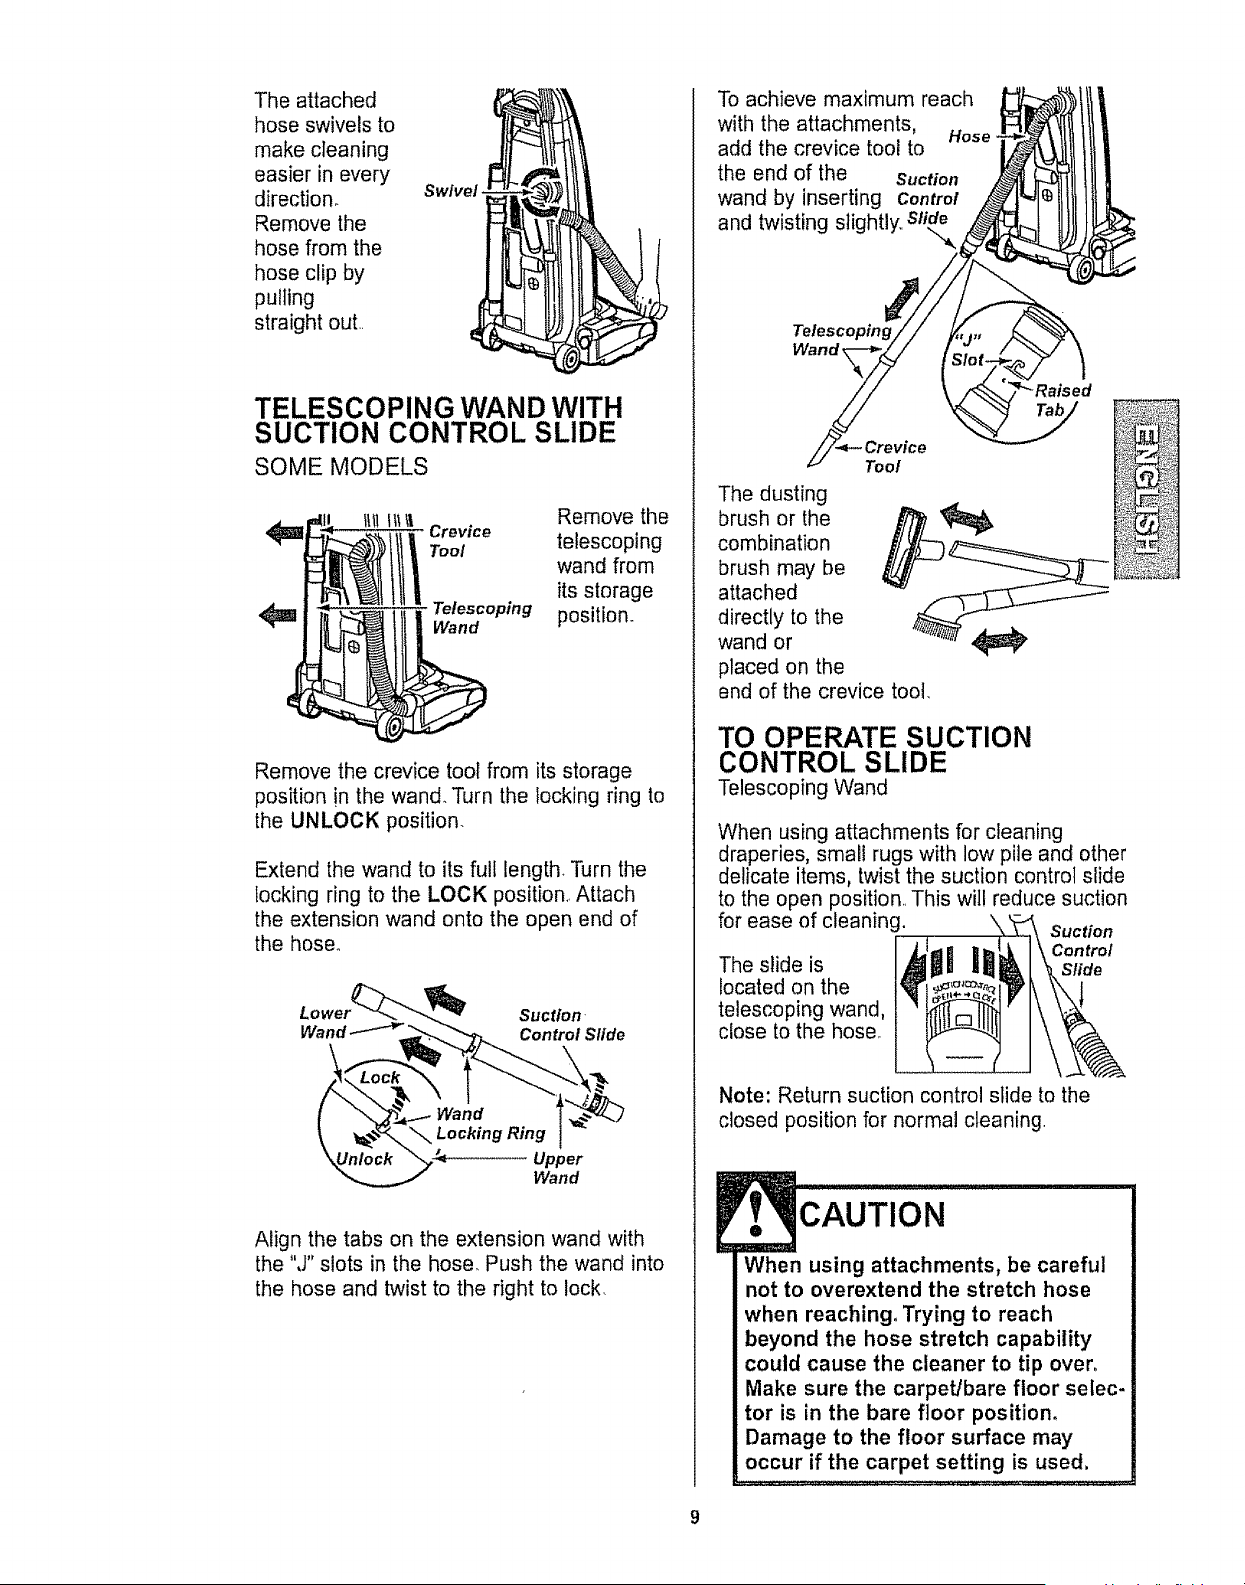
Theattached
hoseswivelsto
makecleaning
easierinevery
direction, swivel.
Remove the
hose from the
hose clip by
pulling
straight out
TELESCOPING WAND WITH
SUCTION CONTROL SLIDE
SOME MODELS
t_tl_1li Remove the
i Crevice telescoping
Tool wand from
its storage
Telescoping position.
Wand
Remove the crevice tool from its storage
position !n the wand. Turn the locking ring to
the UNLOCK position.
Extend the wand to its full length Turn the
locking ring to the LOCK position_ Attach
the extension wand onto the open end of
the hose°
Suction-
Wand Control Slide
Upper
Wand
Align the tabs on the extension wand with
the "J" slots in the hose. Push the wand into
the hose and twist to the right to lock.
To achieve maximum reach
with the attachments, Hose
add the crevice tool to
the end of the Suction
wand by inserting Control
and twisting slightly,,
Telescoping
Wand _
Tool
The dusting
brush or the
combination
brush may be
attached
directly to the
wand or
placed on the
end of the crevice tool_
TO OPERATE SUCTION
CONTROL SLIDE
Telescoping Wand
When using attachments for cleaning
draperies, small rugs with low pile and other
delicate items, twist the suction control slide
to the open position. This wil! reduce suction
for ease of cleaning. \
Suction
Control
The slide is Slide
located on the
telescoping wand,
close to the hose,
Note: Return suction control slide to the
closed position for normal cleaning.
CAUTION
When using attachments, be careful
not to overextend the stretch hose
when reaching, Trying to reach
beyond the hose stretch capability
could cause the cleaner to tip over.
Make sure the carpet/bare floor selec-
tor is in the bare floor position.
Damage to the floor surface may
occur if the carpet setting is used.
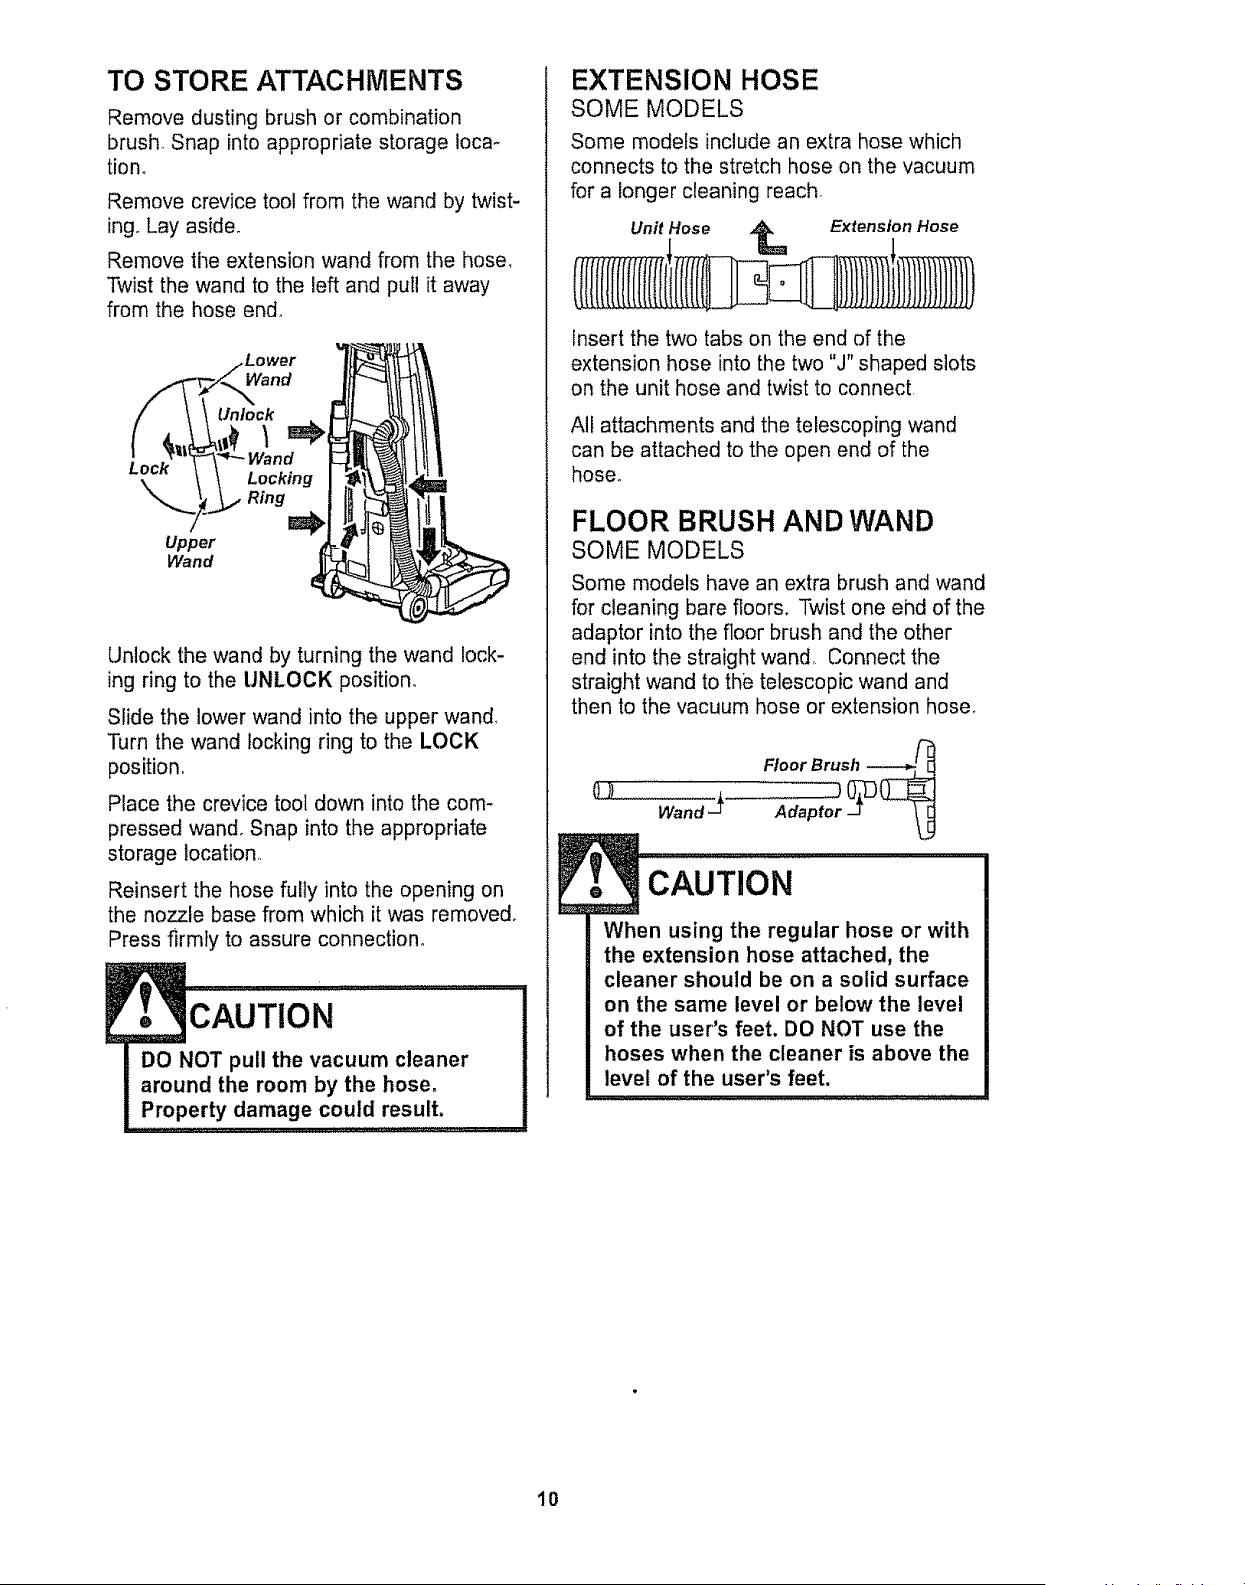
TO STORE ATTACHMENTS
Remove dusting brush or combination
brush. Snap into appropriate storage Ioca-
tion,
Remove crevice tool from the wand by twist-
ing. Lay aside.
Remove the extension wand from the hose,
Twist the wand to the left and pull it away
from the hose end°
Lock
Upper
Wand
Lower
Wand
Unlock
Locking
Ring
Unlock the wand by turning the wand lock-
ing ring to the UNLOCK position
Slide the lower wand into the upper wand.
Turn the wand locking ring to the LOCK
position.
Place the crevice tool down into the com-
pressed wand. Snap into the appropriate
storage location
Reinsert the hose fully into the opening on
the nozzle base from which it was removed,
Press firmly to assure connection°
DO NOT pull the vacuum cleaner
around the room by the hose.
Property damage could result.
EXTENSION HOSE
SOME MODELS
Some models include an extra hose which
connects to the stretch hose on the vacuum
for a longer cleaning reach.
Unit Hose _ Extension Hose
Insert the two tabs on the end of the
extension hose into the two "J" shaped slots
on the unit hose and twist to connect
All attachments and the telescoping wand
can be attached to the open end of the
hose.
FLOOR BRUSH AND WAND
SOME MODELS
Some models have an extra brush and wand
for cleaning bare floors. Twist one ehd of the
adaptor into the floor brush and the other
end into the straight wand,, Connect the
straight wand to the telescopic wand and
then to the vacuum hose or extension hose,
Floor Brush ------___
CAUTION
When using the regular hose or with
the extension hose attached, the
cleaner should be on a solid surface
on the same level or below the level
of the user's feet, DO NOT use the
hoses when the cleaner is above the
level of the user's feet,
10
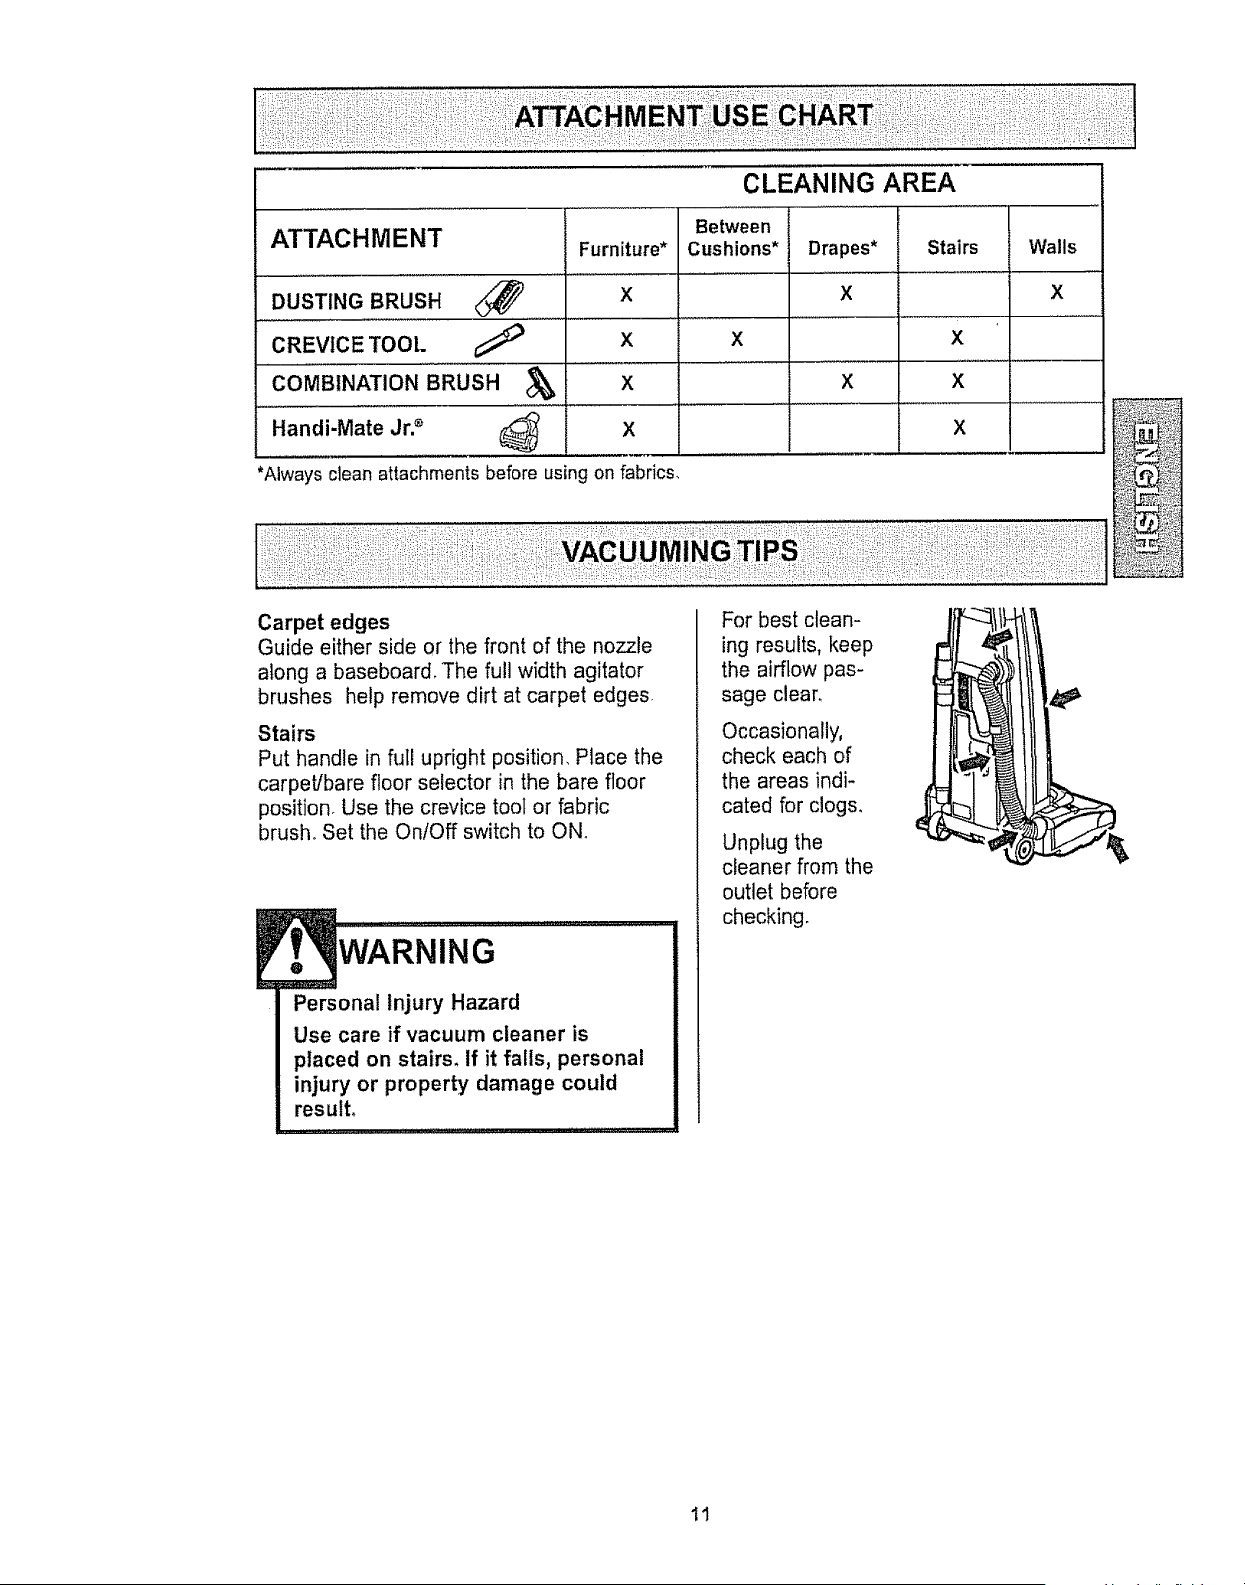
CLEANING AREA
Between
Cushions* Drapes* Stairs Walls
X X
X X
X X
ATTACHMENT Furniture*
DUSTING BRUSH X
CREVICE TOOL
X
COMBINATION BRUSH d_ X
Handi-Mate Jr2 _ X
*Always clean attachments before using on fabrics.
Carpet edges
Guide either side or the front of the nozzle
along a baseboard. The full width agitator
brushes help remove dirt at carpet edges
Stairs
Put handle in ful! upright position, Place the
carpet/bare floor selector in the bare floor
position Use the crevice tool or fabric
brush° Set the On/Off switch to ON.
...........,....
Personae Injury Hazard
Use care if vacuum cleaner is
ptaced on stairs, If it falls, personae
injury or property damage could
result.
For best clean-
ing results, keep
the airflow pas-
sage clear,
Occasionally,
check each of
the areas indi-
cated for clogs,
Unplug the
cleaner from the
outlet before
checking.
11
MOTOR PROTECTION
SYSTEM
Thermal Protector
This vacuum has a thermal protector which
automatically trips to protect the vacuum
from overheating, If a clog prevents the
normal flow of air to the motor, the thermal
protector turns the motor off automatically to
allow the motor to cool in order to prevent
possible damage to the vacuum. During this
time the headlight remains on
To correct problem: If this occurs, turn the
vacuum off and unplug the power cord from
the outlet to allow the vacuum to cool and
the thermal protector to reseL Check for
and remove clogs, if necessary. Also
check and clean/replace any clogged
filters.Wait approximately thirty (30)
minutes and plug the vacuum in and turn
back on to see if the motor protector has
reset. The motor protector will not reset if
the vacuum is not turned off even if the
vacuum has cooled down,
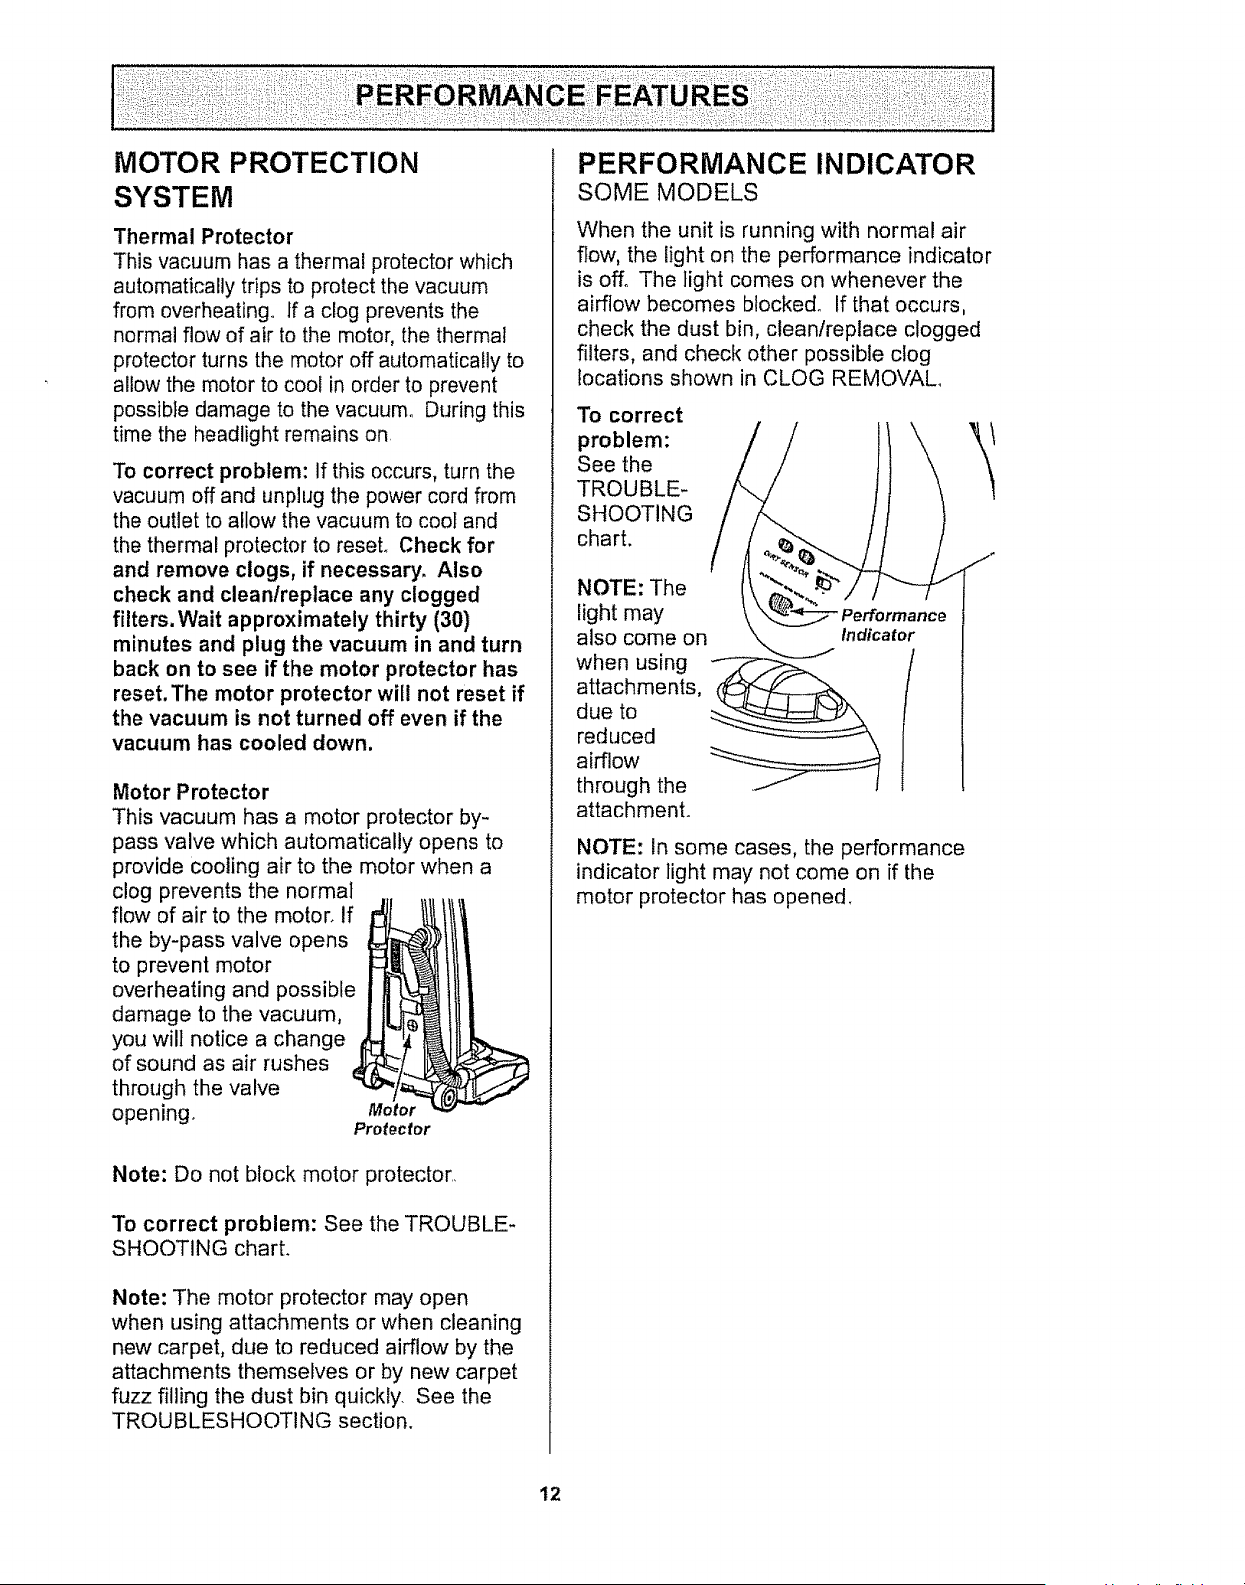
Motor Protector
This vacuum has a motor protector by-
pass valve which automatically opens to
provide cooling air to the motor when a
clog prevents the normal
flow of air to the motor, if
the by-pass valve opens
to prevent motor
I
overheating and possible
damage to the vacuum,
you will notice a change
i
of sound as air rushes J
through the valve
opening. Motor
Protector
Note: Do not block motor protector,
To correct problem: See the TROUBLE-
SHOOTING charL
Note: The motor protector may open
when using attachments or when cleaning
new carpet, due to reduced airflow by the
attachments themselves or by new carpet
fuzz filling the dust bin quickly. See the
TROUBLESHOOTING section.
PERFORMANCE INDICATOR
SOME MODELS
When the unit is running with normal air
flow, the light on the performance indicator
is off. The light comes on whenever the
airflow becomes blocked° If that occurs,
check the dust bin, clean/replace clogged
filters, and check other possible clog
locations shown in CLOG REMOVAL
To correct
problem:
See the
TROUBLE-
SHOOTING
chart.
NOTE: The
light may
also come on
when using
attachments,
due to
reduced
airflow
through the
attachment.
/
NOTE: In some cases, the performance
indicator light may not come on if the
motor protector has opened_
12
DIRT SENSOR
SOME MODELS
The electronic dirt sensor is a feature which
will detect particles as they pass through the
vacuum cleaner,
The dirt sensor indicators and sensor
sensitivity switch are located on the front of
the switch cover.
A red light indicates dirt is being picked up
by the cleaner. A green light indicates most
of the dirt has been picked up by the
cleaner_
OPERATION
As you vacuum, the red indicator light will
come on and stay on as long as the sensor
detects a high concentration of particles
passing through the cleaner.
The green light indicates that most of the
cleaning is complete.
The sensor switch allows you to select the
sensitivity of the dirt sensor. The switch can
be set to HI (+) or LO (-) sensitivity°
Set the sensor switch to the HI (+) position
when:
• Cleaning bare floor&
• Cleaning carpet with low pile heighL
Set the sensor switch to the LO (-) position
when:
• Cleaning heavily soiled areas.
• Cleaning carpet with deep pile_
• Cleaning new carpet&
Even with the sensor switch in the LO (-)
position, the dirt sensor will detect carpet
fuzz, especially on new carpet, which may
cause the red light to remain on longer than
expected..
Sensor
Sensitivity
Switch
f
WARNING
Electrical Shock And Personal Injury
Hazard
Disconnect electrical supply before
servicing or cleaning the unit.
Failure to do so could result in elec-
trical shock or personal injury from
TO CLEAN DIRT SENSOR OPTICS
The dirt sensor optics consist of two optic ..............
cells located inside the dust bin port. _!L_#_
Occasionally, it may become necessary to ,,,_'_._i_!,_r_,,,_.Z,.
clean the two optic cells to assure ,_:_.
maximum performance, It is :_i_i!!i_ii_!
recommended the optic cells be cleaned: _...,,_,:_s:
• When the red light stays on
continuously.
• When the green light stays on
continuously,
• When dirt or dust adheres to the
optic ceils.
, Whenever the dust bin is cleaned,
To clean the sensor, wipe the optic ceils with
a soft, dry cloth,. Never use cleaners or
liquids as they can help speed the recoating
of the optic cells and make it necessary to
clean them much sooner than normal. The
dirt sensor area can be reached by
removing the dust bin.
Optic
13
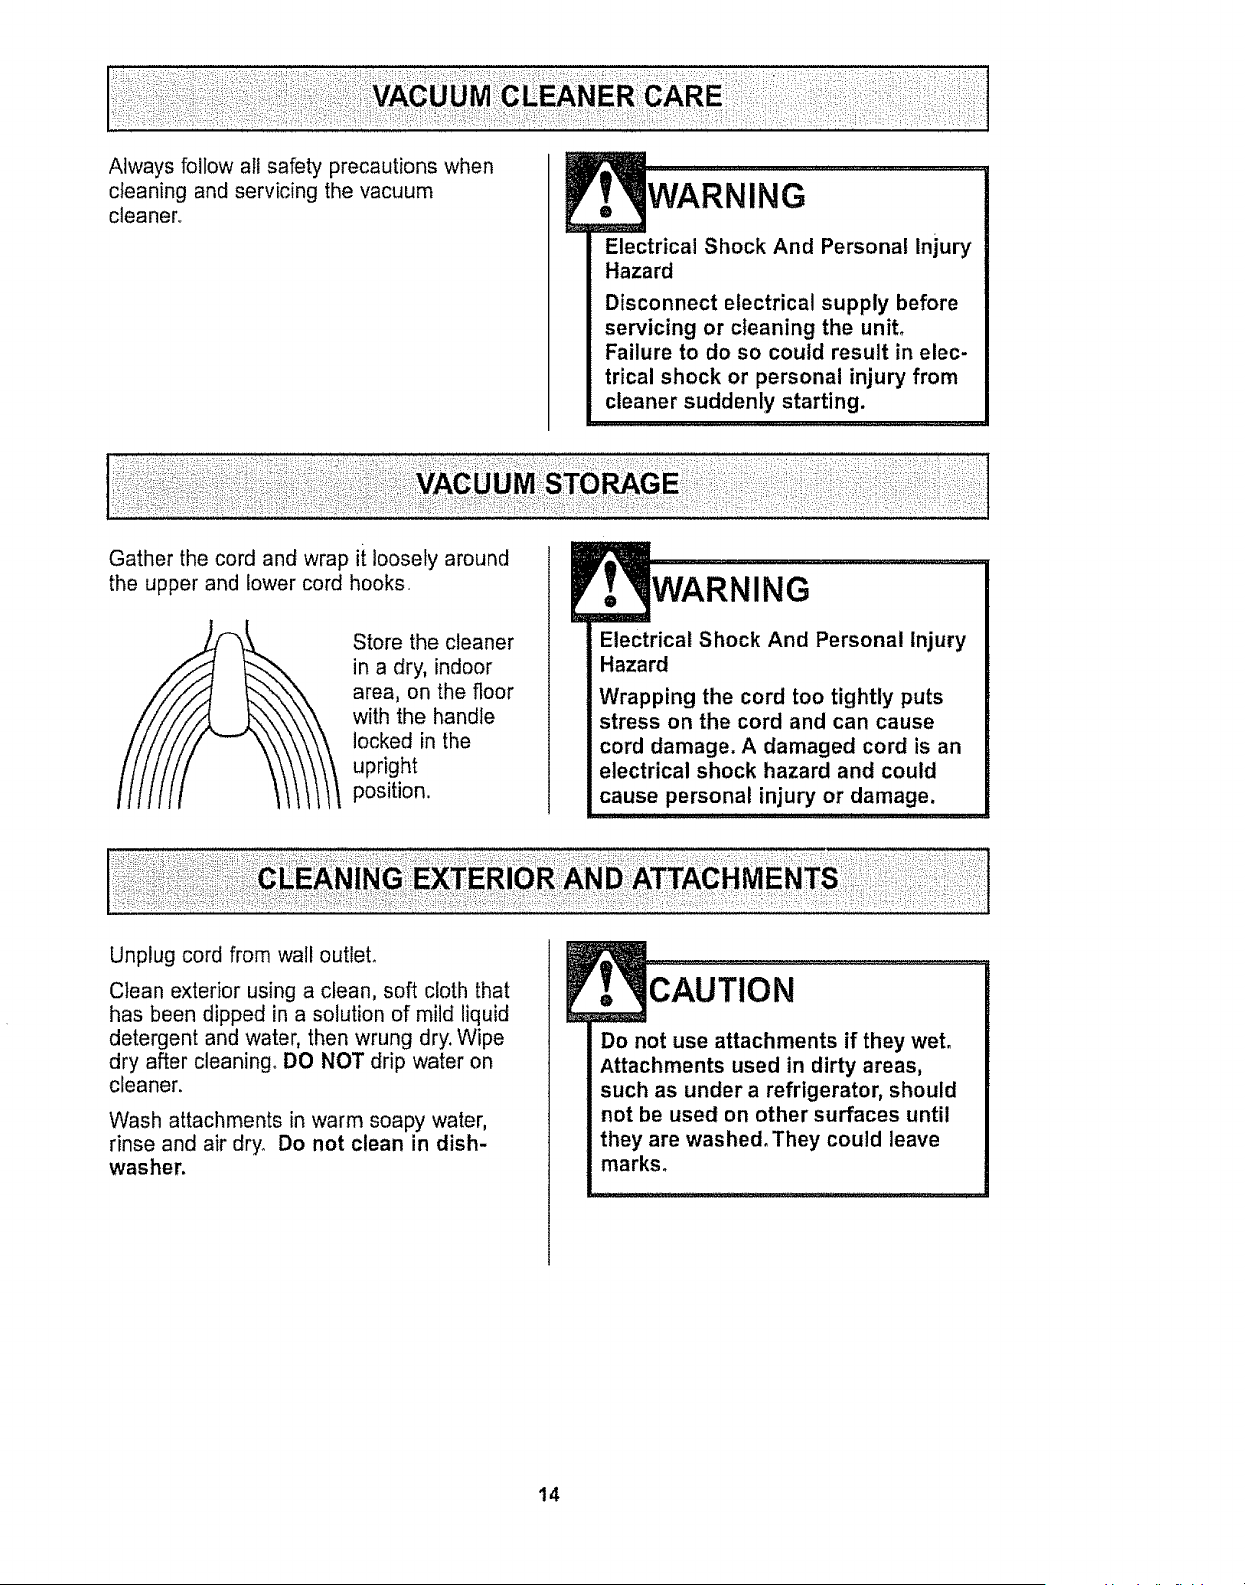
Always follow all safety precautions when
cleaning and servicing the vacuum
cleaner..
Gather the cord and wrap ii loosely around
WARNING
Electrical Shock And Personal Injury
Hazard
Disconnect electrical supply before
servicing or cleaning the unit°
Failure to do so could result in elec-
trical shock or personal injury from
cleaner suddenly starting.
;!:L : :,: !:!:
the upper and lower cord hooks.
Store the cleaner
in a dry, indoor
area, on the floor
with the handle
locked in the
upright
position.
ING
Electrical Shock And Personal Injury
Hazard
Wrapping the cord too tightly puts
stress on the cord and can cause
cord damage. A damaged cord is an
electrical shock hazard and could
cause personal injury or damage,
,11 i ii i I I I , I,,11 I , i,[_ _1 _ ' L
Unplug cord from wall outlet,
Clean exterior using a clean, soft cloth that
has been dipped in a solution of mild liquid
detergent and water, then wrung dry. Wipe
dry after cleaning, DO NOT drip water on
cleaner.
Wash attachments in warm soapy water,
rinse and air dry. Do not clean in dish-
washer.
cAuTIoN ............................................
Do not use attachments if they wet.
Attachments used in dirty areas,
such as under a refrigerator, should
not be used on other surfaces until
they are washed. They could leave
marks.
14
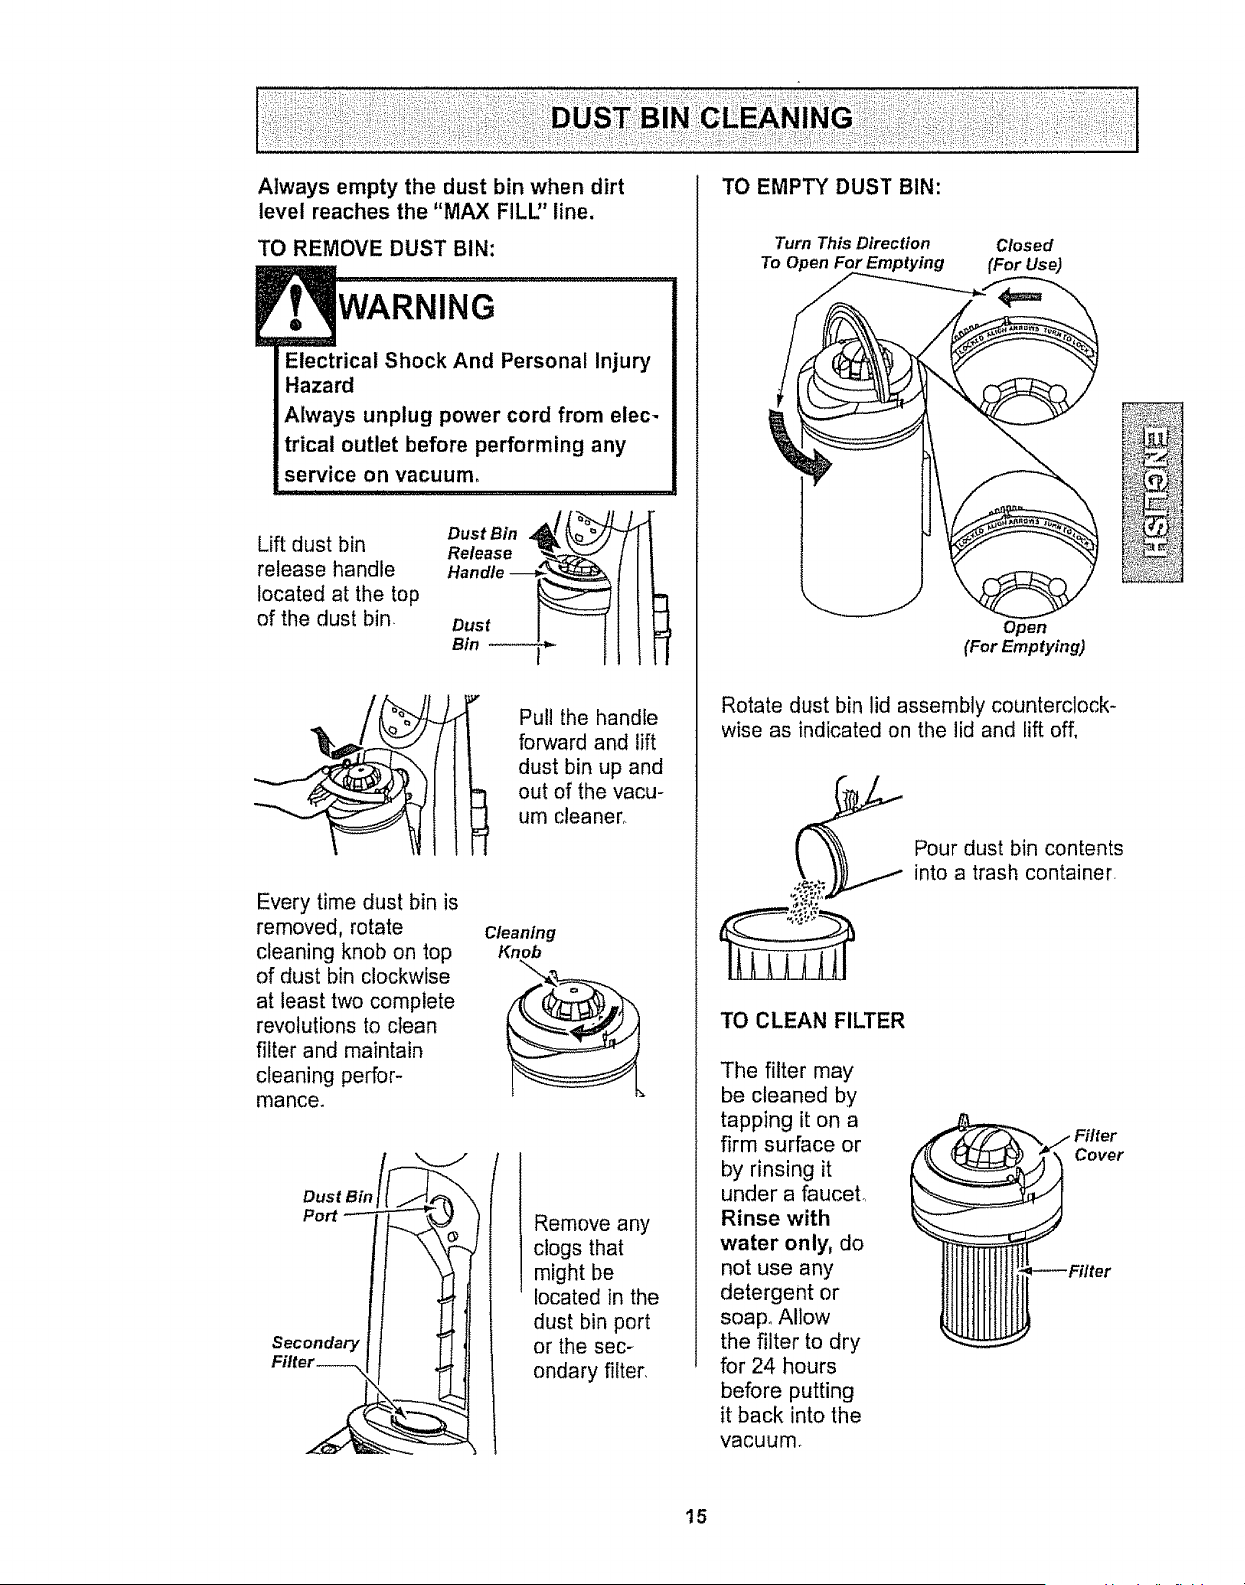
Always empty the dust bin when dirt
level reaches the "MAX FILU' line.
TO REMOVE DUST BIN:
WARNING
Electrical Shock And Personal Injury
Hazard
Always unplug power cord from elec-
trical outlet before performing any
service on vacuum,
Lift dust bin
release handle
located at the top
of the dust bin
Release _-E "_-j
Handle -_,_
Bin
Pull the handle
forward and lift
dust bin up and
out of the vacu-
um cleaner_
Every time dust bin is
removed, rotate
cleaning knob on top
of dust bin clockwise
at least two complete
revolutions to clean
filter and maintain
cleaning perfor-
mance.
Cleaning
Knob
Dust Bin
Port
Secondary
Remove any
clogs that
might be
located in the
dust bin port
or the sec-
ondary filter.
TO EMPTY DUST BIN:
Turn This Direction
To Open For Emptying
Closed
(For Use)
Operl
(For Emptying)
Rotate dust bin lid assembly counterclock-
wise as indicated on the lid and lift off,
TO CLEAN FILTER
The filter may
be cleaned by
tapping it on a
firm surface or
by rinsing it
under a fauceL
Rinse with
water only, do
not use any
detergent or
soap° Allow
the filter to dry
for 24 hours
before putting
it back into the
vacuum.
Pour dust bin contents
into a trash container.
Cover
15
TO REPLACE DUST BIN
Turn This Direction Open
To Close For Use (For Emptying)
Closed
(For Use)
Replace dust bin lid assembly by placing
back on dust bin with the marks on the lid
aligned as shown under Open (For
Emptying) on the back of the dust bin°
Rotate lid clockwise while pressing down-
ward so marks align as shown above Close
(For Use) as above°
Place dust bin
back into vacuum
cleaner by insert-
ing the bottom first
and tilt back with
the dust bin han-
dle raised.
Handle
Dust
Bin *-
Lower the dust
bin handle to lock
dust bin in place,
Check secondary filter frequently and clean
when dirty°
WARNING
Electrical Shock Hazard
Do not operate the cleaner without
the motor safety filter. Be sure the
filter is properly installed to prevent
motor failure and/or electrical
shock.
Always unplug power cord from
electrical outlet before performing
any service on vacuum.
SECONDARY FILTER
FOAM
Remove the dust bin as outlined in the
DUST BIN CLEANING section,,
Remove secondary filter from vacuum
cleaner,.
Secondar/
Filter---_
(
Wash the secondary filter in warm soapy
water, rinse and dry thoroughly by squeez-
ing the filter in your hand and letting it air
dry,
DO NOT wash in the dishwasher.
DO NOT install damp.
Replace dry secondary filter, Ensure filter is
properly installed over filter opening
Replace the dust bin as outined in the
DUST BIN CLEANING section.
16

EXHAUST FILTER
WARNING
Electrical Shock Hazard
Unplug power cord from electrical
outlet. Do not operate the cleaner
without the primary or exhaust fil-
ters. Be sure the filters are properly
installed to prevent motor failure
and/or electrical shock,
PRIMARY FILTER
Check primary filter frequently and clean
when dirty_
TO REMOVE PRIMARY FILTER
Remove the dust bin and dust bin lid
assembly as outlined in the DUST BIN
CLEANING section,
Grasp filter, rotate and fift
off,
Cleaning Cam
Slot
g
Cover Tab
Clean primary filter by gently tapping over a
trash container, Tap on several sides to
ensure best cleaning Rinse with water
only as needed (see page 13)
When cleaning the filter no longer restores
vacuum suction to full power you need to
replace the filter_
TO REPLACE PRIMARY FILTER
Replace filter and rotate filter until
slots lock onto tabs in
covert
Cleaning Cam
Slot
Cover Tab
Note: Under normal use and care, your fit-
ter can be expected to last up to 5 years,
HEPA
The exhaust filter must be reptaced when
dirty, it should be replaced regularly
depending on use conditions.
The filter CANNOT be washed as it will
lose its dust trapping ability,
NOTE: See PARTS AND FEATURES
for the exhaust filter number,
Press inward on each side of ]_
exhaust filter cover and pull
/
Press
out to remove from vacuum
Inward
cleaner,
Exhaust
Remove the
exhaust filter
cartridge,
Push only on filter car-
tridge frame, not on filter
material itself°
The grey edge of the filter should be fac-
ing away from the operator,
Replace the exhaust filter cover by placing.
tabs in slots and pushing in until cover
snaps into place,
17
WARNING
Electrical Shock Or Personal Injury
Hazard
Disconnect electrical supply before
servicing or cleaning the unit,
Failure to do so could result in elec-
trical shock or personal injury from
cleaner suddenly starting,
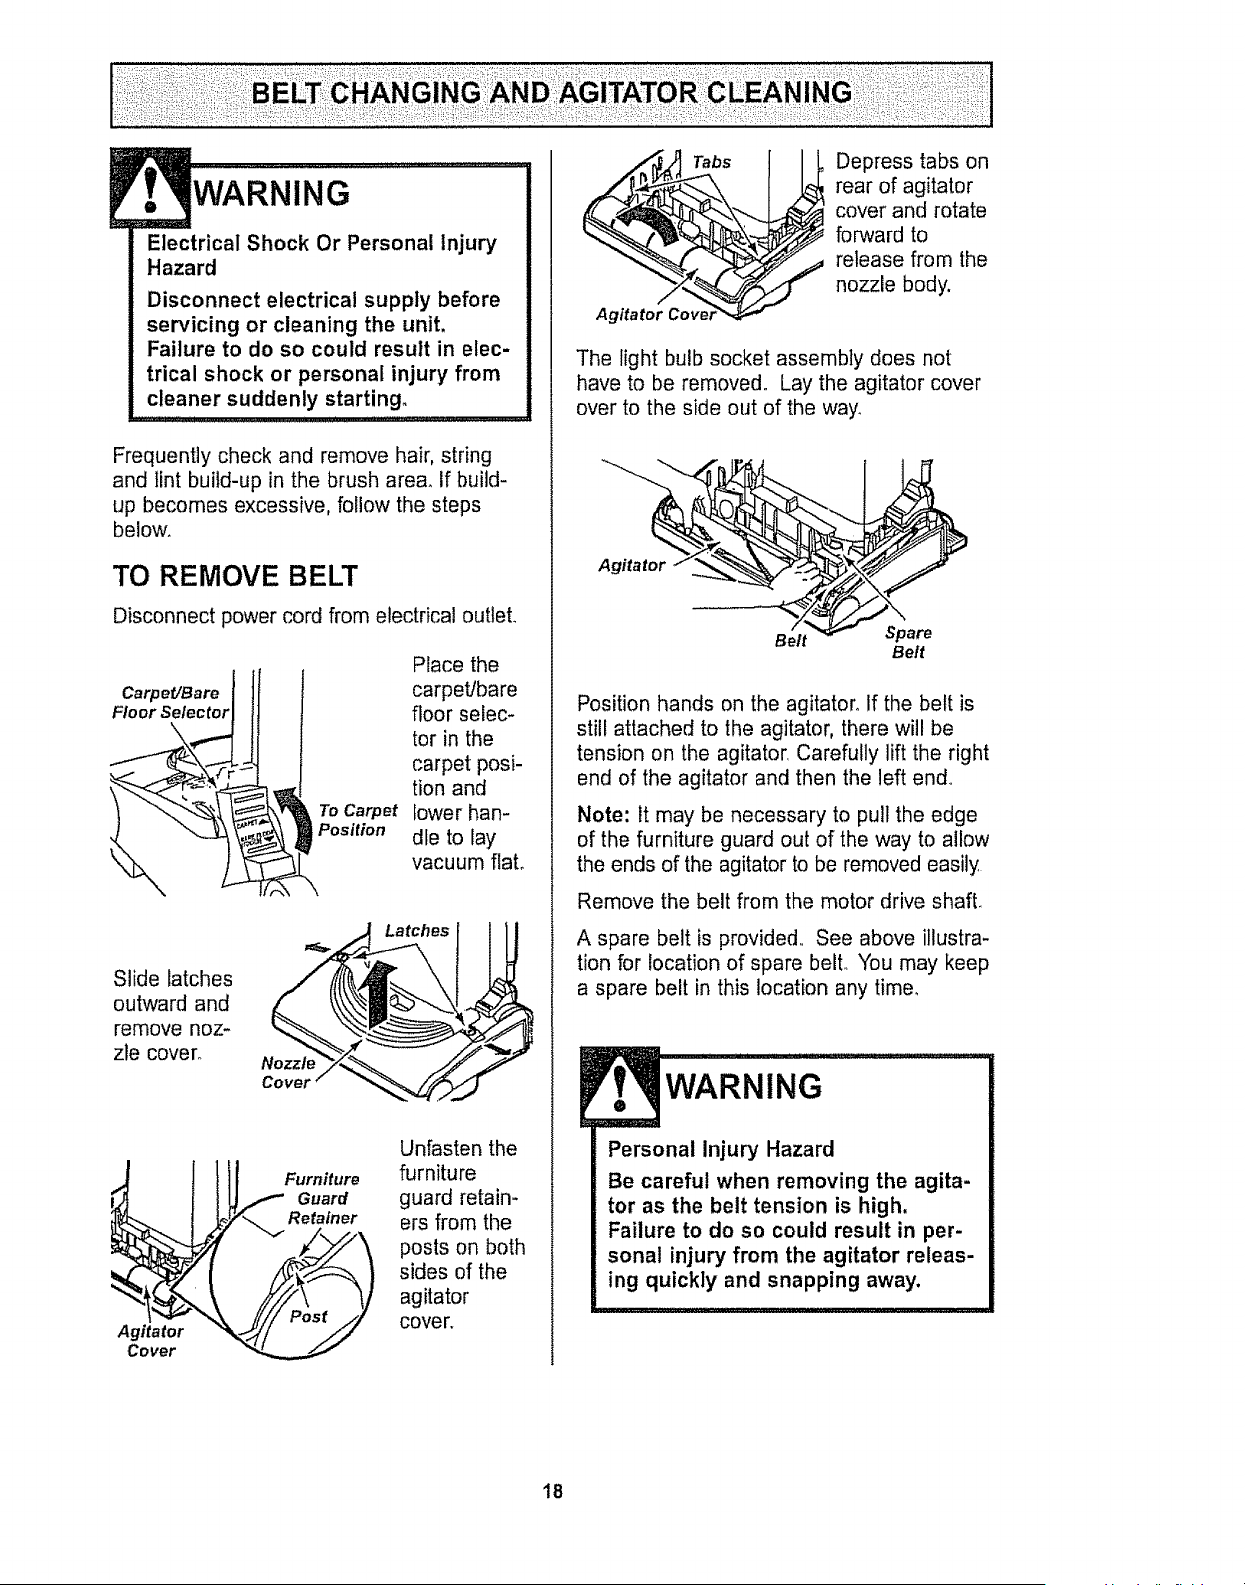
Frequently check and remove hair, string
and lint build-up in the brush area. If build-
up becomes excessive, follow the steps
below.
TO REMOVE BELT
Disconnect power cord from electrical outlet.
Carpet/Bare
Floor Selector
To Carpet
Position
Place the
carpet/bare
floor selec-
tor in the
carpet posi-
tion and
lower han-
dle to lay
vacuum flato
Slide latches
outward and
remove noz-
zle cover.
Nozzle
Latches
Agitator
Cover
Furniture
Guard
Retainer
Unfasten the
furniture
guard retain-
ers from the
posts on both
sides of the
agitator
cover.
_ Tabs
Agttatol Cover'_ ._
Depress tabs on
rear of agitator
cover and rotate
forward to
release from the
nozzle body.
The light bulb socket assembly does not
have to be removed. Lay the agitator cover
over to the side out of the way.
Agitator
Belt Spare
Bett
Position hands on the agitator° If the belt is
still attached to the agitator, there will be
tension on the agitator, Carefully lift the right
end of the agitator and then the left end.
Note: it may be necessary to pull the edge
of the furniture guard out of the way to allow
the ends of the agitator to be removed easily
Remove the belt from the motor drive shaft.
A spare belt is provided,, See above illustra-
tion for location of spare belt,, You may keep
a spare belt in this location any time,
WARNING
Personal Injury Hazard
Be careful when removing the agita-
tor as the belt tension is high,
Failure to do so could result in per-
sonal injury from the agitator releas-
ing quickly and snapping away.
18
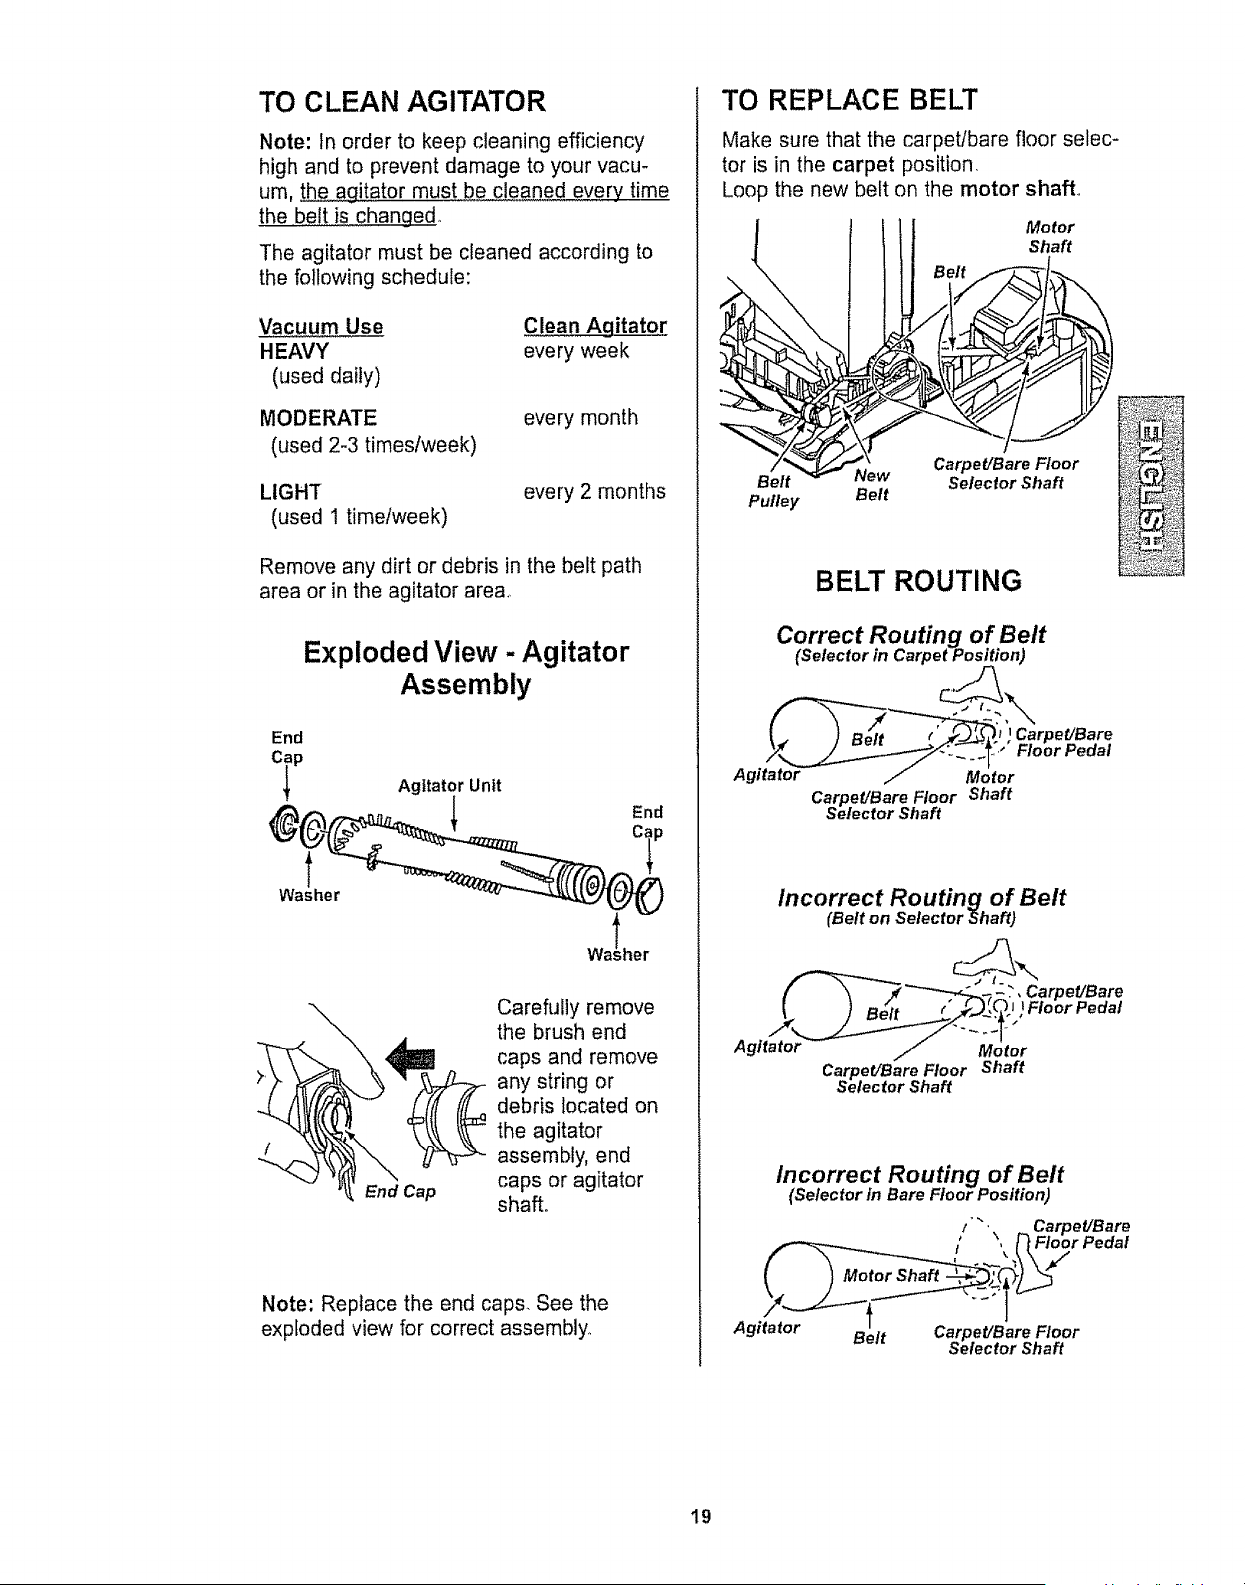
TO CLEAN AGITATOR
Note: In order to keep cleaning efficiency
high and to prevent damage to your vacu-
um, the agitator must be cleaned every time
the belt is changed,.
The agitator must be cleaned according to
the following schedule:
Vacuum Use Clean Agitator
HEAVY every week
(used daily)
MODERATE
(used 2-3 times/week)
every month
LIGHT
(used t timetweek)
every 2 months
Remove any dirt or debris in the belt path
area or in the agitator area..
Exploded View - Agitator
Assembly
End
Agitator Unit
End
Washer
\
End Cap
Carefully remove
the brush end
caps and remove
any string or
debris located on
the agitator
assembly, end
caps or agitator
shall
Note: Replace the end caps. See the
exploded view for correct assembly.,
TO REPLACE BELT
Make sure that the carpet/bare floor selec-
tor is in the carpet position.
Loop the new belt on the motor shaft°
Motor
Shaft
Belt New
Pulley Belt
Carpet/Bare Floor
Selector Shaft
BELT ROUTING
Correct Routing of Belt
(Selector in Carpet Position)
Carpet/Bare Floor Shaft
Selector Shaft
Incorrect Routing of Belt
(Belt on Selector Shaft)
__l f'_?!}:': _Fl°°r Pedal
Carpet/Bare Floor Shaft
Selector Shaft
Incorrect Routing of Belt
(Selector in Bare Floor Position)
Agitator Bett Carpet/Bare Floor
Selector Shaft
19
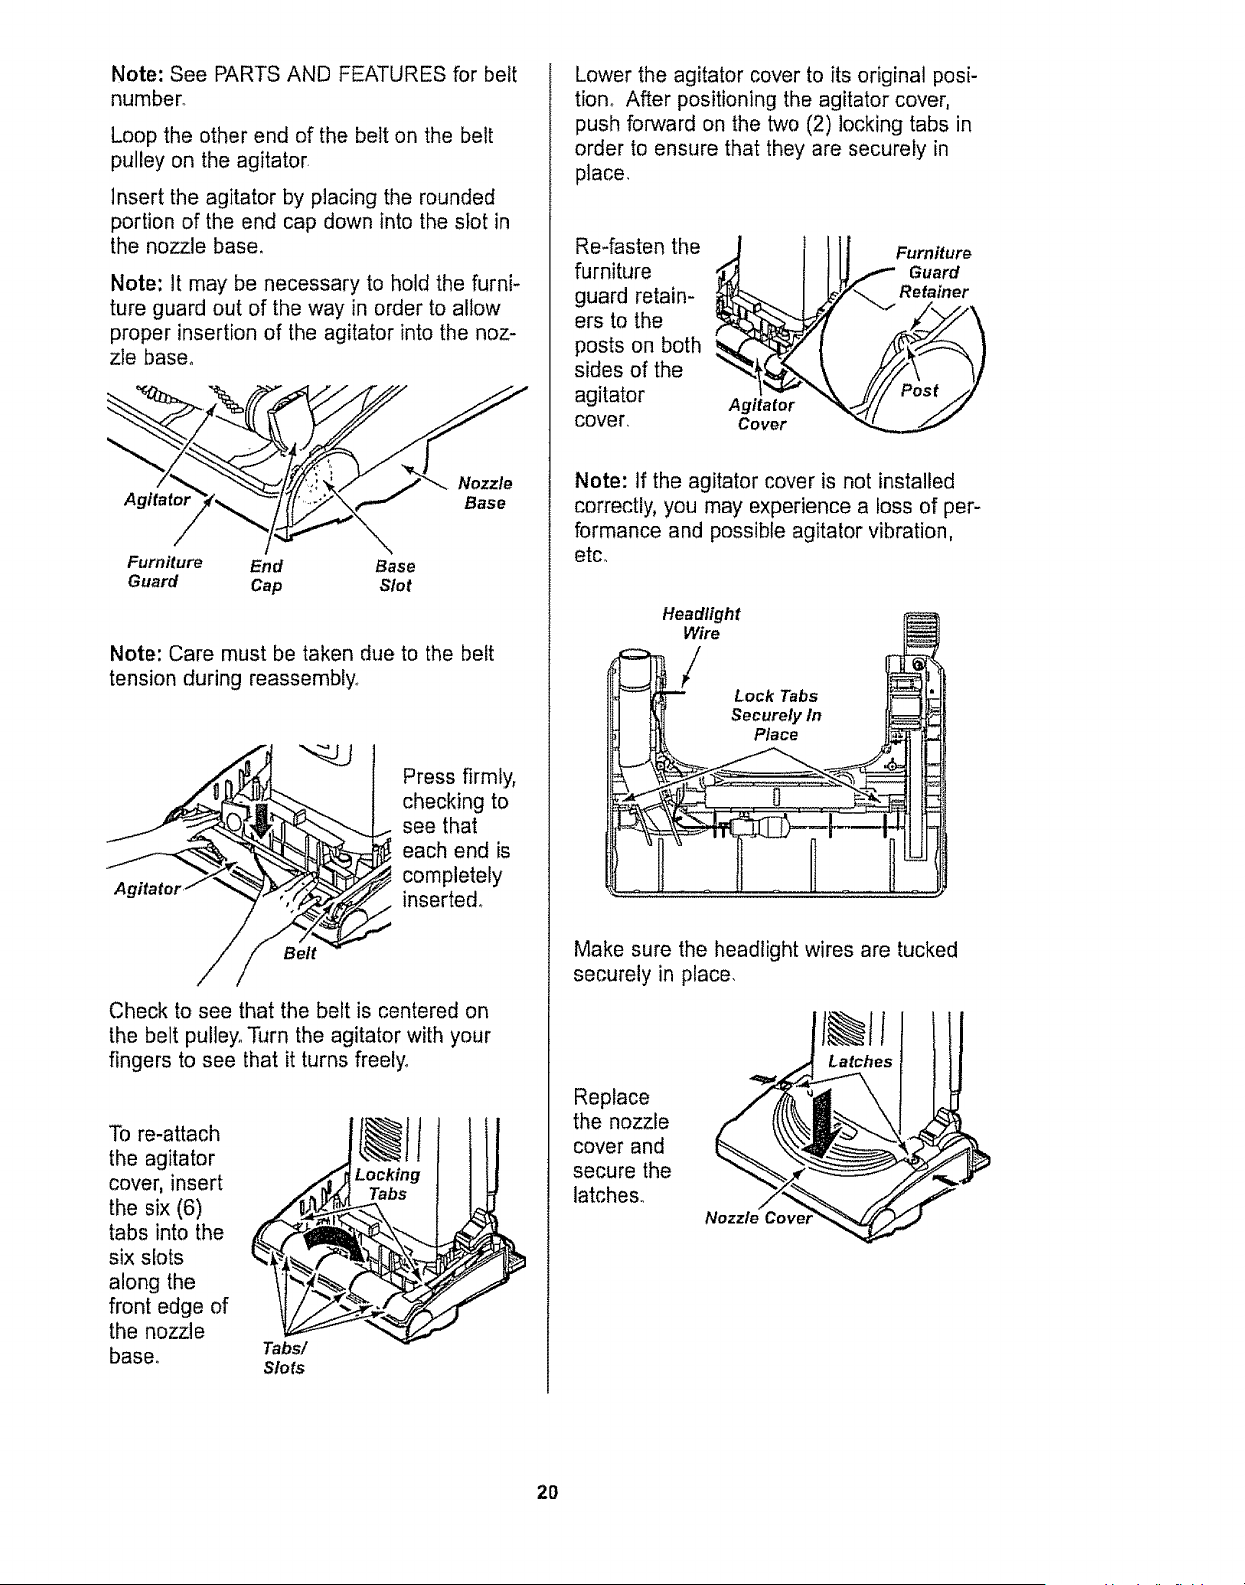
Note: See PARTS AND FEATURES for belt
number.
Loop the other end of the belt on the belt
pulley on the agitator
Insert the agitator by p{acing the rounded
portion of the end cap down into the slot in
the nozzle base,
Note: It may be necessary to hold the furni-
ture guard out of the way in order to allow
proper insertion of the agitator into the noz-
zle base_
Nozzle
Agitator Base
Furniture End Base
Guard Cap Slot
Note: Care must be taken due to the belt
tension during reassembly_
A
Press firmly,
checking to
see that
each end is
completely
inserted°
Check to see that the belt is centered on
the belt pulley_ Turn the agitator with your
fingers to see that it turns freely°
To re-attach
the agitator
cover, insert
the six (6)
tabs into the
six slots
along the
front edge of
the nozzle
base.
Tabs!
Slots
@It
Locking
Tabs
Lower the agitator cover to its original posi-
tion,, After positioning the agitator cover,
push forward on the two (2) locking tabs in
order to ensure that they are securely in
place,
Re-fasten the
furniture
guard retain-
ers to the
posts on both
sides of the
agitator
cover,
Agitator
Cover
Furniture
Guard
Retainer
Note: If the agitator cover is not installed
correctly, you may experience a loss of per-
formance and possible agitator vibration,
etc.
Place jj_.,
Make sure the headlight wires are tucked
securely in place.
Latches
Replace
the nozzle
cover and
secure the
latches..
Nozzle Co'
2O
Always follow all safety precautions when
cleaning and servicing the vacuum cleaner.
WARNING
Electrical Shock Or Personal injury
Hazard
Disconnect electrical supply before
servicing or cleaning the unit.
Failure to do so could result in elec-
trical shock or personal injury from
cleaner suddenly starting.
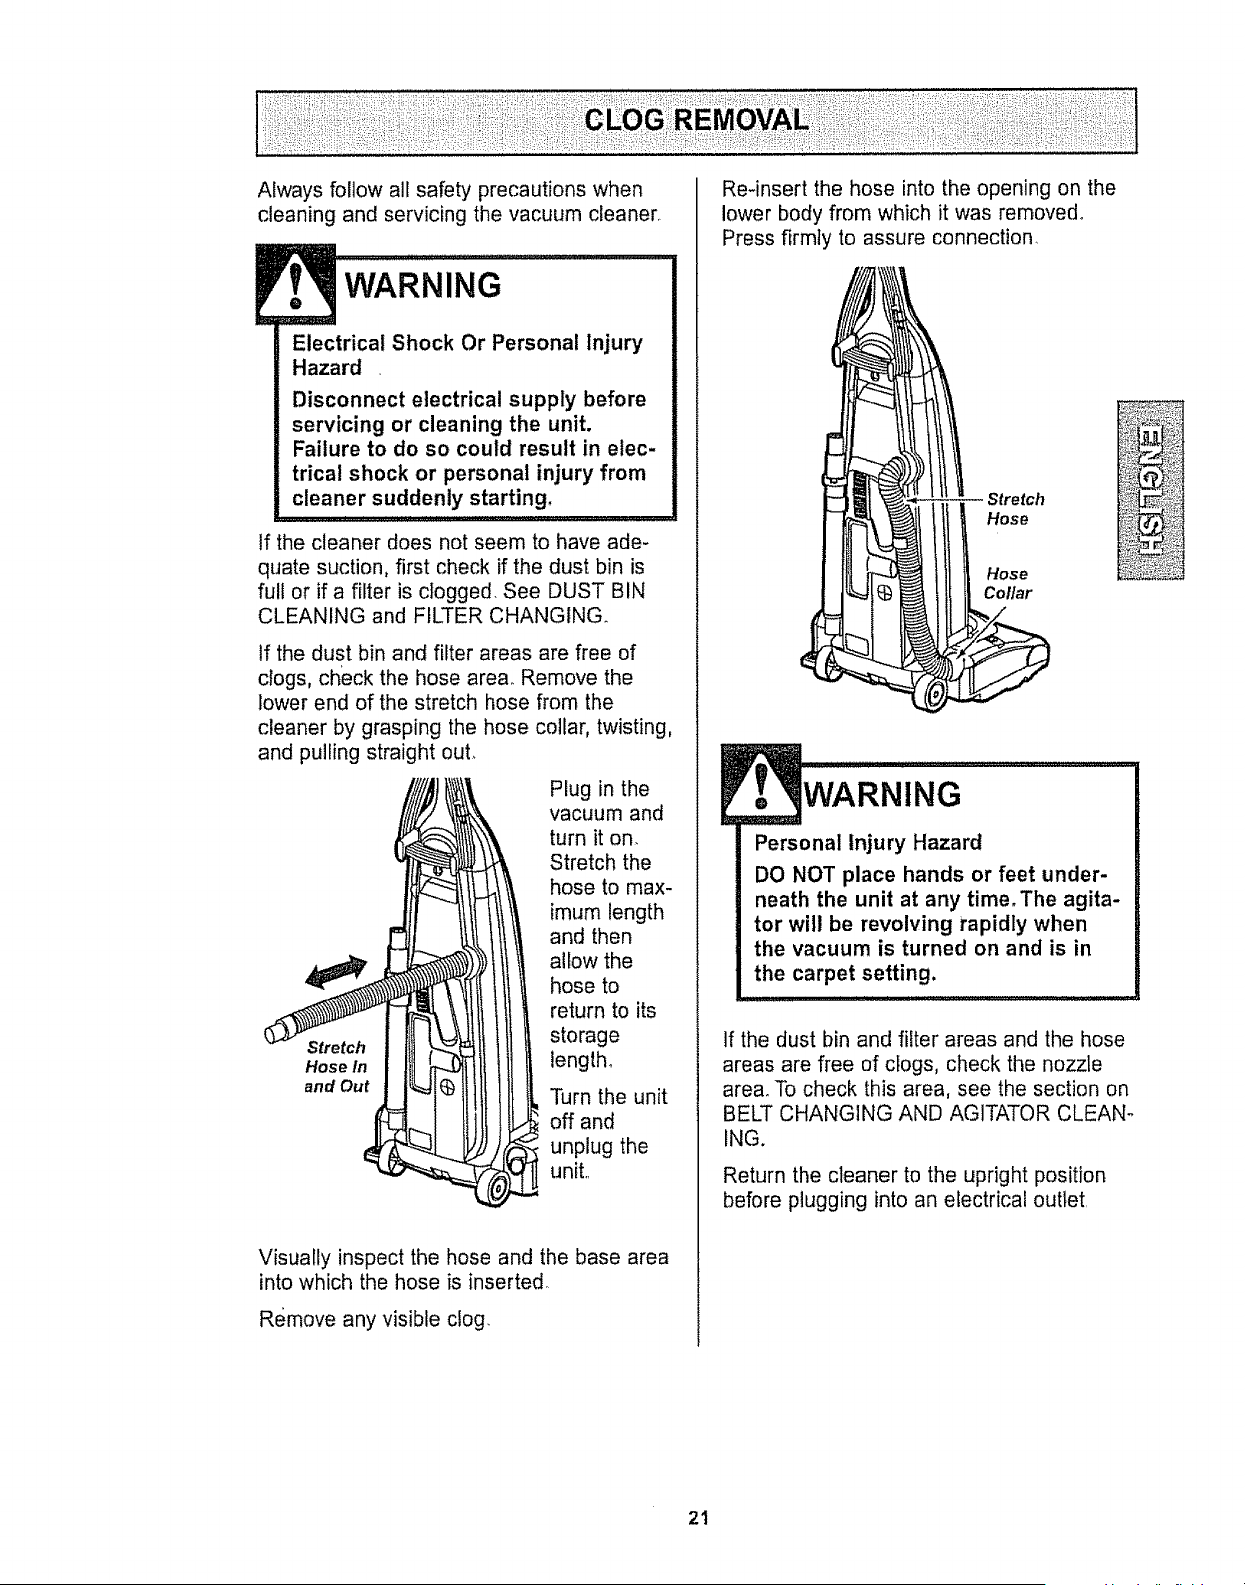
If the cleaner does not seem to have ade-
quate suction, first check if the dust bin is
full or if a filter is clogged. See DUST BIN
CLEANING and FILTER CHANGING.
tf the dust bin and filter areas are free of
clogs, check the hose area. Remove the
lower end of the stretch hose from the
cleaner by grasping the hose collar, twisting,
and pulling straight out_
Plug in the
vacuum and
turn it on.
Stretch the
hose to max-
imum length
and then
allow the
hose to
return to its
Stretch storage
Hose tn length.
and Out Turn the unit
off and
unplug the
unit..
Visually inspect the hose and the base area
into which the hose is inserted
Remove any visible clog.
Re-insert the hose into the opening on the
lower body from which it was removed_
Press firmly to assure connection.
Stretch
Hose
Hose
Col/ar
WARNING.....
Personal injury Hazard
DO NOT place hands or feet under-
neath the unit at any time.The agita-
tor will be revolving rapidly when
the vacuum is turned on and is in
the carpet setting,
If the dust bin and filter areas and the hose
areas are free of clogs, check the nozzle
area_ To check this area, see the section on
BELT CHANGING AND AGITATOR CLEAN-
ING.
Return the cleaner to the upright position
before plugging into an electrical outlet.
21
WARNING
Electrical Shock Or Personal Injury
Hazard
Disconnect electrical supply before
servicing or cleaning the unit.
Failure to do so could result in elec-
trical shock or personal injury from
cleaner suddenly starting.
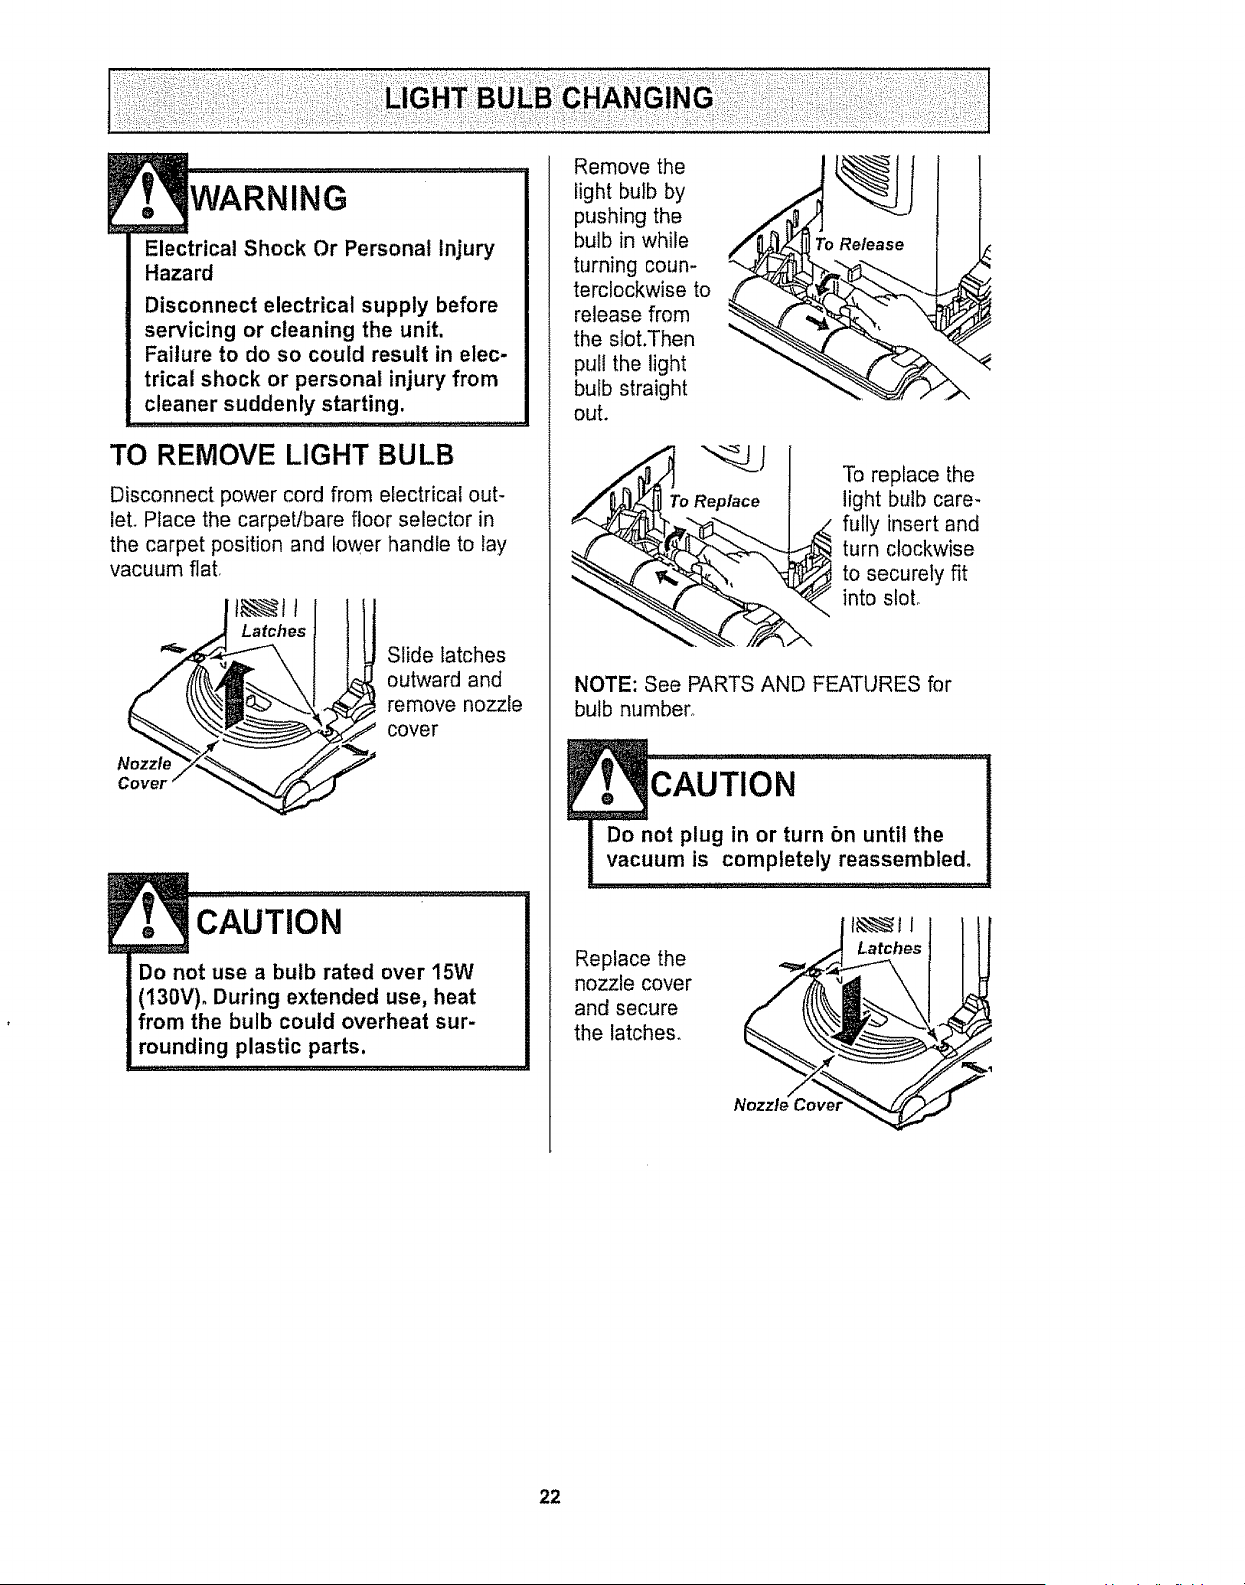
TO REMOVE LIGHT BULB
Disconnect power cord from electrical out-
let. Place the carpetlbare floor selector in
the carpet position and lower handle to lay
vacuum flat,
Latches
t
Slide latches
outward and
remove nozzle
cover
, CAUTiON..................................................................
Do not use a bulb rated over 15W
(130V)° During extended use, heat
from the bulb could overheat sur-
rounding plastic parts.
Remove the
light bulb by
pushing the
bulb in while
turning coun-
terclockwise to
release from
the slot.Then
pull the light
bulb straight
out.
To Replace
To replace the
light bulb care-
fully insert and
turn clockwise
to securely fit
into sloL
NOTE: See PARTS AND FEATURES for
bulb number°
cAuTION ......................................
Do not plug in or turn bn until the
vacuum is completely reassembled°
Replace the
nozzle cover
and secure
the latches.
Latches
22
Electrical Shock Or Personal Injury
Hazard
Disconnect electrical supply before
servicing or cleaning the unit.
Failure to do so could result in elec-
trical shock or personal injury from
cleaner suddenly starting.
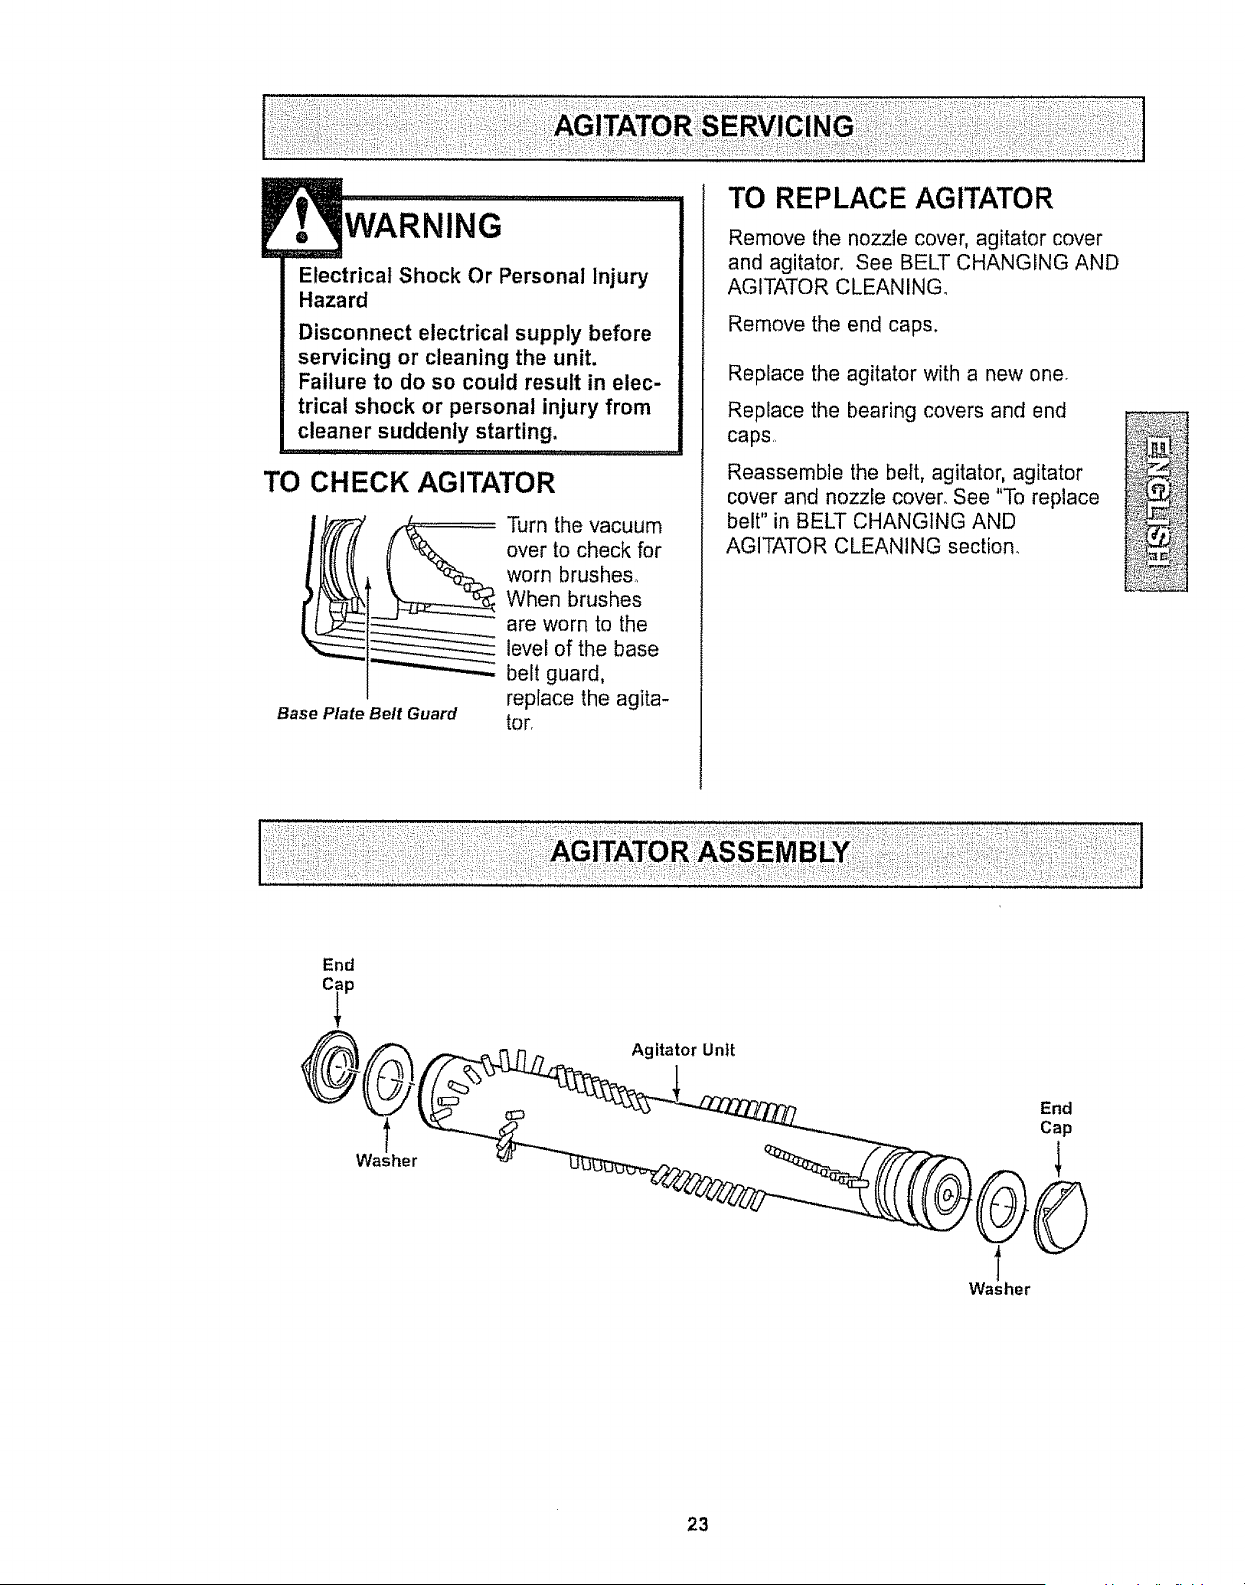
TO CHECK AGITATOR
Base Plate Belt Guard
Turn the vacuum
over to check for
worn brushes_
When brushes
are worn to the
level of the base
belt guard,
replace the agita-
tor,
TO REPLACE AGITATOR
Remove the nozzle cover, agitator cover
and agitator. See BELT CHANGING AND
AGITATOR CLEANING.
Remove the end caps.
Replace the agitator with a new one
Replace the bearing covers and end
caps,
Reassemble the belt, agitator, agitator
cover and nozzle cover. See "To replace
belt" in BELT CHANGING AND
AGITATOR CLEANING section.
End
23
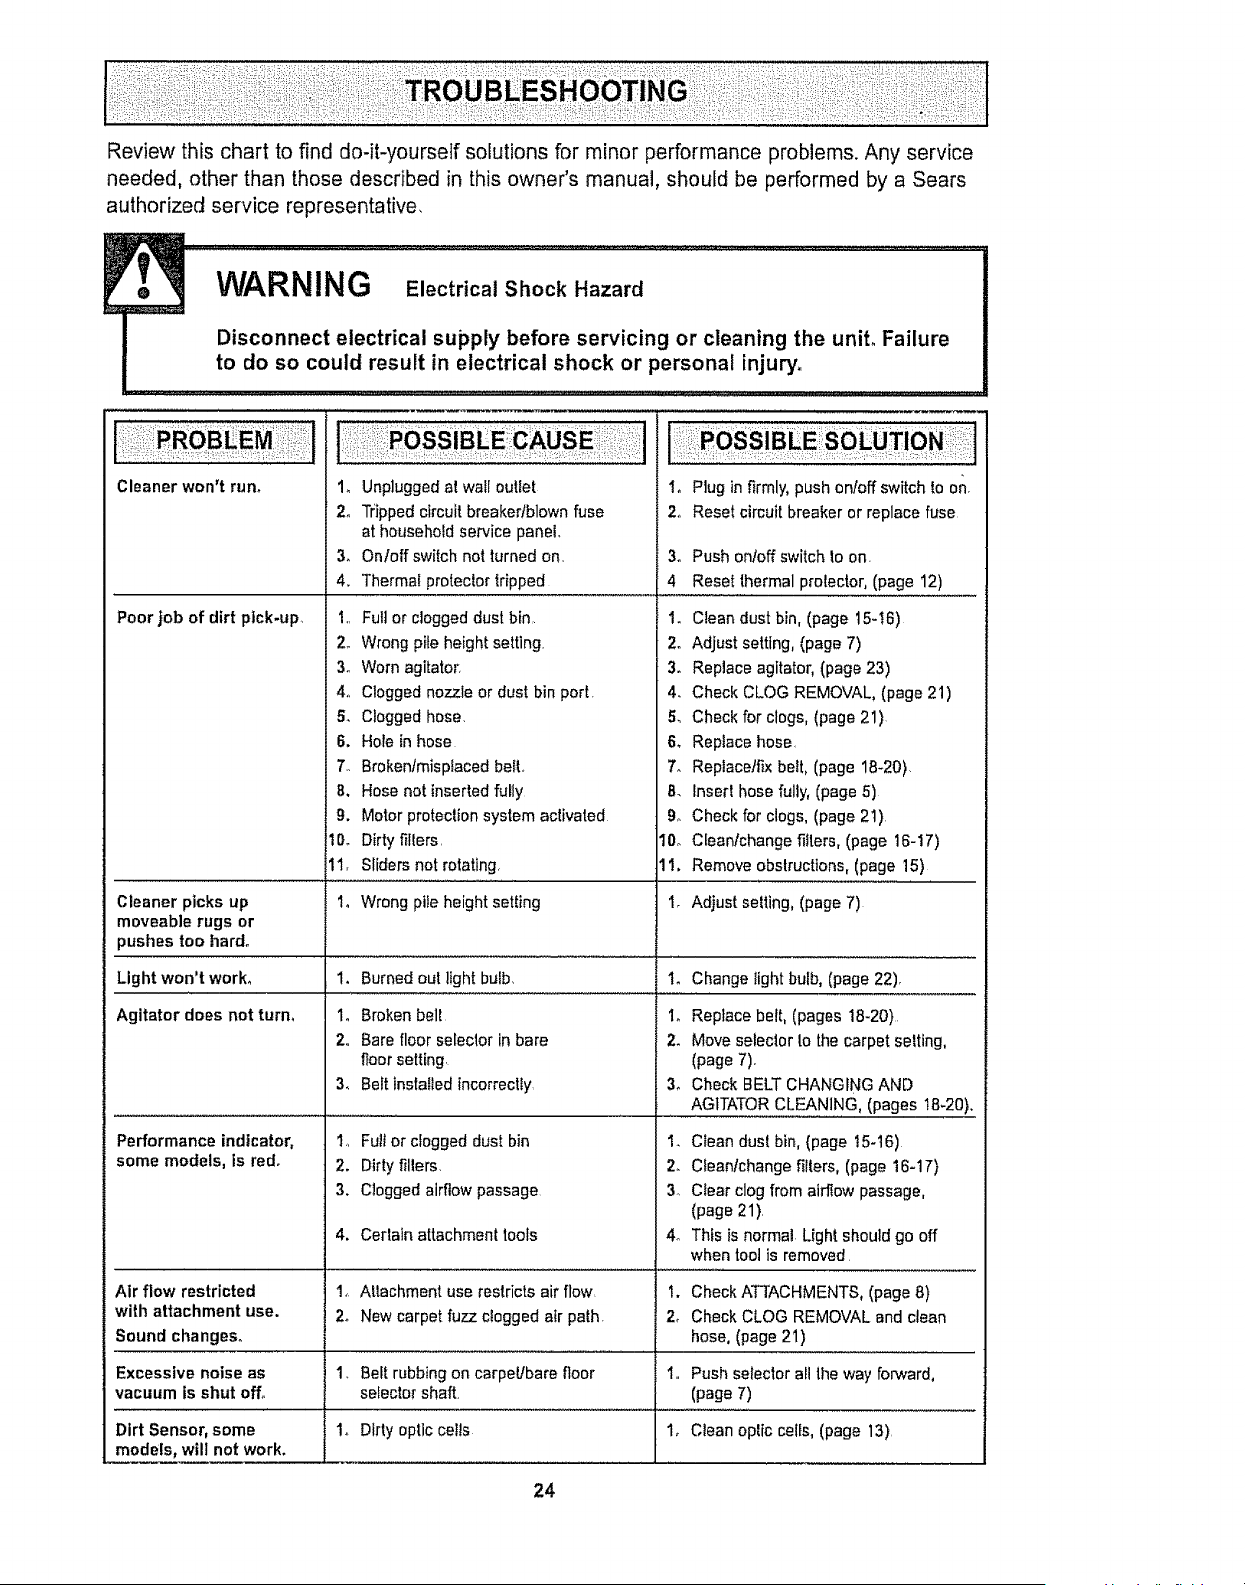
Review this chart to find do-it-yourself solutions for minor performance problems. Any service
needed, other than those described in this owner's manual, should be performed by a Sears
authorized service representative,
Cleaner wol3_t rurL
Poor job of dirt pick-up.
Cleaner picks up
moveable rugs or
pushes too hard.
Light won't work°
Agitator does not turn.
Performance indicator,
some models, is red.
1, Unplugged at wall outlet
2. Tripped circuit breaker/blown fuse
at household service panel.
3. Onloff switch not turnedon,
4. Thermal protector tripped
1,, Full or clogged dust bin,
2. Wrong pile height setting
3. Worn agitator,
4. Clogged nozzle or dust bin port.
& Clogged hose.
6. Hole in hose
7.. Brokentmispiaced heir,
8. Hose not inserted fully
g. Motor protection system activated
10. Dirty filters,
11, Sliders not rotating,
1. Wrong pile height setting
1. Burned out light bulb,
1, Broken belt
2,, Bare floor selector in bare
floor setting.
3. Belt installed incorrectly.
1., Full or clogged dust bin
2. Dirty filters,
3. Clogged airflow passage
1. Plug in firmly, push onfoff switch to on.
2o Reset circuit breaker or replace fuse
3o Push onloff switch to on.
4 Reset thermal protector, (page 12)
1. Clean dust bin, (page 15-t6)
2. Adjust setting, (page 7)
3. Replace agitator, (page 23)
4. Check CLOG REMOVAL, (page 21)
& Check for clogs, (page 21)
6. Replace hose,
7. Replacetfix belt, (page 18-20).
8. Insert hose fully, (page 5)
9o Check for clogs, (page 21)
10o Cleanlchange filters, (page 16-17)
11. Remove obstructions, (page 15)
1_ Adjust selling, (page 7)
Io Change light bulb, (page 22).
i_ Replace belt, (pages 18_20)
2_ Move selector to the carpet setting,
(page 7).
3_ Check BELT CHANGING AND
AGITATOR CLEANING, (pages 18-20).
2_
3_
Clean dust bin, (page I5-t6)
Cleantchange filters, (page 16-17)
Clear clog from airflow passage,
(page 21).
This is normal Light should go off
when tool is removed
4. Cerlaln attachment tools 4o
Air flow restricted t_ Attachment use restricts air flow, t. Check ATTACHMENTS, (page 8)
with attachment use. 2. New carpet fuzz clogged air path. 2, Check CLOG REMOVAL and clean
Sound changes, hose, (page 21)
Excessive noise as 1_ Belt rubbing on carpet/barefloor I. Push selector all the way forward,
vacuum is shut off° selector shaft, (page 7)
Dirt Sensor, some 1. Dirty optic cells 1, Clean oplic cells, (page 13).
models, will not work.
24
Antes de usar su aspiradora nueva ..... I
Garantia de la aspiradora de Kenmore .... I
instrucciones importantes de
seguridad ........................ 2
Piezas y caracteristicas ............ 3
lnstrucciones de ensamblamiento ....... 4-5
lnstrucciones de operaci6n ............ 5
Ajuste y selecci6n de nivel de peto de la
alfombra ............................ 6
Seleclor de pisos con atfombray .......... 6
sin alfombra
Desprendimientodel mango ............... 7
]nterruptor de encendidolapagado ......... 7
Accesorios .......................... 7-9
Cuadro de uso de los accesorios ....... 10
Sugerencias para aspirar ............. 10
Caracteristicas de rendimiento ........ t 1-!2
Cuidado de la aspiradora ............... 13
Almacenamiento de la aspiradora ......... t3
Limpiezadel exterior y de los accesorios .... !3
Limpiando el cubo de la basura ........ 14-15
Limpiezadel fittro secundario .......... t5
Cambiotlimpie det ffltros ............... t6
Cambio de la correa y limpieza del
agitador ............................ 17-19
C6mo eliminar los residuos de basura
en los conductos ..................... 20
Cambio de la bombilla ................. 21
Cuidado del agitador ................... 22
Ensambfe del agitador .................. 22
Reconocimiento de problemas ......... 23
Informaci6n de assistancia
o servicio ................... Posterior Cubierta
Por favor lea esta guia que le ayudara a assemb]ary operar su aspiradora nueva de Kenmore en una manera
m&ssegura y effectiva,
Para mas informaci6n acerca del cuidado y operaci6n de esta aspirador,llame a su tienda Sears mas cercana.
Cuando prequnte pot informaci6n usted necisitar&el numero completo de serie y modelo de Eaaspiradora que
est&locado en la placa de los numerosde modetoy serie.
Use et espacio de abajo para registrar el nQmerode modelo y serie para su nueva aspiradora de Kenmore.
Numero de Modeto
Numero de Serie
Fechade Compra
Matenga este libro y su recibo en u lugar seguro para referenciasfuturas
GARANTiA LIMITADA DE UN ANO DE LA ASPIRADORA KENMORE
Esta garantia es por tin ap.odesde la fecha de compra, e incluyesolamente el uso de la aspiradora en
hogares privados Durante e! aSode garantia, cuando la aspiradora es operada y manlenida de acuerdo al
manual de instrucciones del duefio, Sears reparar&cualquier defecto en matedales o fabricaci6n fibrede cargo
Esta garantia exciuye las bolsas de colecci6n, correas, lamparillas, y filtros, las cuales son partes gastables que
se deterioran con el uso normal
Para el servicio de garantia, retorne esta aspiradora al Centro de Servicio Sears m_s cercano en los
Estados Unidos.
Esta garantia se aplica solamente mientras este producto est&en uso en los Estados Unidos Estagarantia le
da a usted derechos legales especificos, y usted puede tenet tambi_n otros derechos los cuales varian de
estado a estado
Sears, Roebuck and Co., D1817WA, Hoffman Estates, IL 60179
ADVERTE CiA
Su seguridad es muy importante para nosotros_Para reductr el riesgode incendio, choque
el6ctrico, lesi6n corporal o dafios al utilizar su aspiradora, actue de acuerdo con precauciones
b_sicas de seguridad, entre ellas:
Lea este manual antes de armar o utilizar su
aspiradora.
Use su aspiradora unicamenteen ta forma
descrita en este manual Use [_nicamentecon
accesorios recomendados por Sears..
Para reducir et riesgo de choque el_ctrico, no use
su aspiradora al aire libre ni sobre superficies
mojadas
Desconecte la fuente de electricdad antes de
dar servicio o limpiar. De Io contrario podria
causar un choque et6ctdcoo lesi6n corporal.
Siempre debe apagarsu aspiradoraantes de
desconectarla.
No desconecte la aspiradora tirando detcord6n
el_ctrico..Para desconectarfa, hale el enchufe, no
el cord6n.
No use ia aspiradora si el cord6n o el enchufe
est& daRado.Si la aspiradora no est_
funcionando adecuadamente o si se ha dejado
caer, esta daSada, se ha dejado expuesta a ta
intemperie o se ha dejado caer en agua, devu61-
vala a un Centro! Departamento de servicio de
Sears°
No hale ni transporte la aspiradora por el cord6n;
no use efcord6n como mango; no cierre puertas
sobre el cord6n; no hale el cord6n sobre rebor-
des agudos ni esquinas. No pase la aspiradora
sobre el cord6n. Mantenga et cord6n alejado de
superficies calientes
No abandonela aspiradora cuando est6conec-
tada. Descon_ctela cuando no la este usando y
antes dedarle servicio.
No permitaque sea utifizadacomo juguete.Se
requiere tener mayorcuidado cuando sea
utilizada en la proximidadde niSoso por niSos_
No toque la aspiradora ni el enchufe con las
manos mojadas.
GUARDE
No coloque objetos en las aberturas
No utiliceta aspiradora si alguna abertura est&
bloqueada;mant6ngaia Iibre de polvo,pelusa,
cabellosy cualquiera cosa que podria disminuir
el flujo de aire_
Mantengael cabello,ropa suelta, dedos y todas
las partes del cuerpo alejados de las aberturas y
piezas mec&nicas.
No use la aspiradora sin tenet instatada la cubo
de la basura y/o los filtros
Limpte siempre el cube de la basura despu6s
de aspirar de la alfombra limpiadores o refres-
cantes, polvos y dep6sitos finos. Estos productos
tapan los filtros, reducen el flujo de aire y pueden
causar daSoa la limpiadora
No use la aspiradora para levantar objetos agu-
dos,juguetes pequefios, alfileres, sujetapapeles,
etcrPodrlandafiar la aspiradora o la cubo de ia
basura,
No levanteninguna cosa quese est_ quemando
o emitiendo humo,como cigarritlos, ceritloso
cenizas catientes..
No use la aspiradora para aspirar tiquidos
inflamableso combustibles (gasolina,liquidos
para limpieza, perfumes, elc.) ni la use en
iugares donde estos podrian estar presentes. Los
vapores de estas sustancias pueden crear un
pe!igrode incendio o explosi6n.
Tenga cuidado especial al utilizar la aspiradora
en escalones.No la coloque sobre sillas, mesas,
etc. Mant_ngalaen el piso.
Usted es responsablede asegurar que su aspira-
dora no sea utilizada pot ninguna persona que no
pueda manejarla correctamente.
INSTRUCCIONES
El armado y uso seguro de su aspiradora son su responsabilidad.Esta aspiradora ha sido diseSada
exclusivamentepara uso dom6stico. La aspiradora deber,_almacenarse en un lugar seco yen el inte-
rior. Lea este Manual del propietario delenidamente, pues contieneinformaci6n importante sobre segu-
ridad y uso. Estaquia contieneinformaci6n sobre seguridad debajo de simbolos de advertiencia
cuidado. Pot favor ponga atenci6n especiat a estas instrucciones dadas. Advertencfa: Este
informaci6n le alertar& con el po!igrode fuego,choques electricos, quemadasy lesiones. Cuidado:
Este informaci6n le atertara a peligros como lesionesy daSos de propiedad.
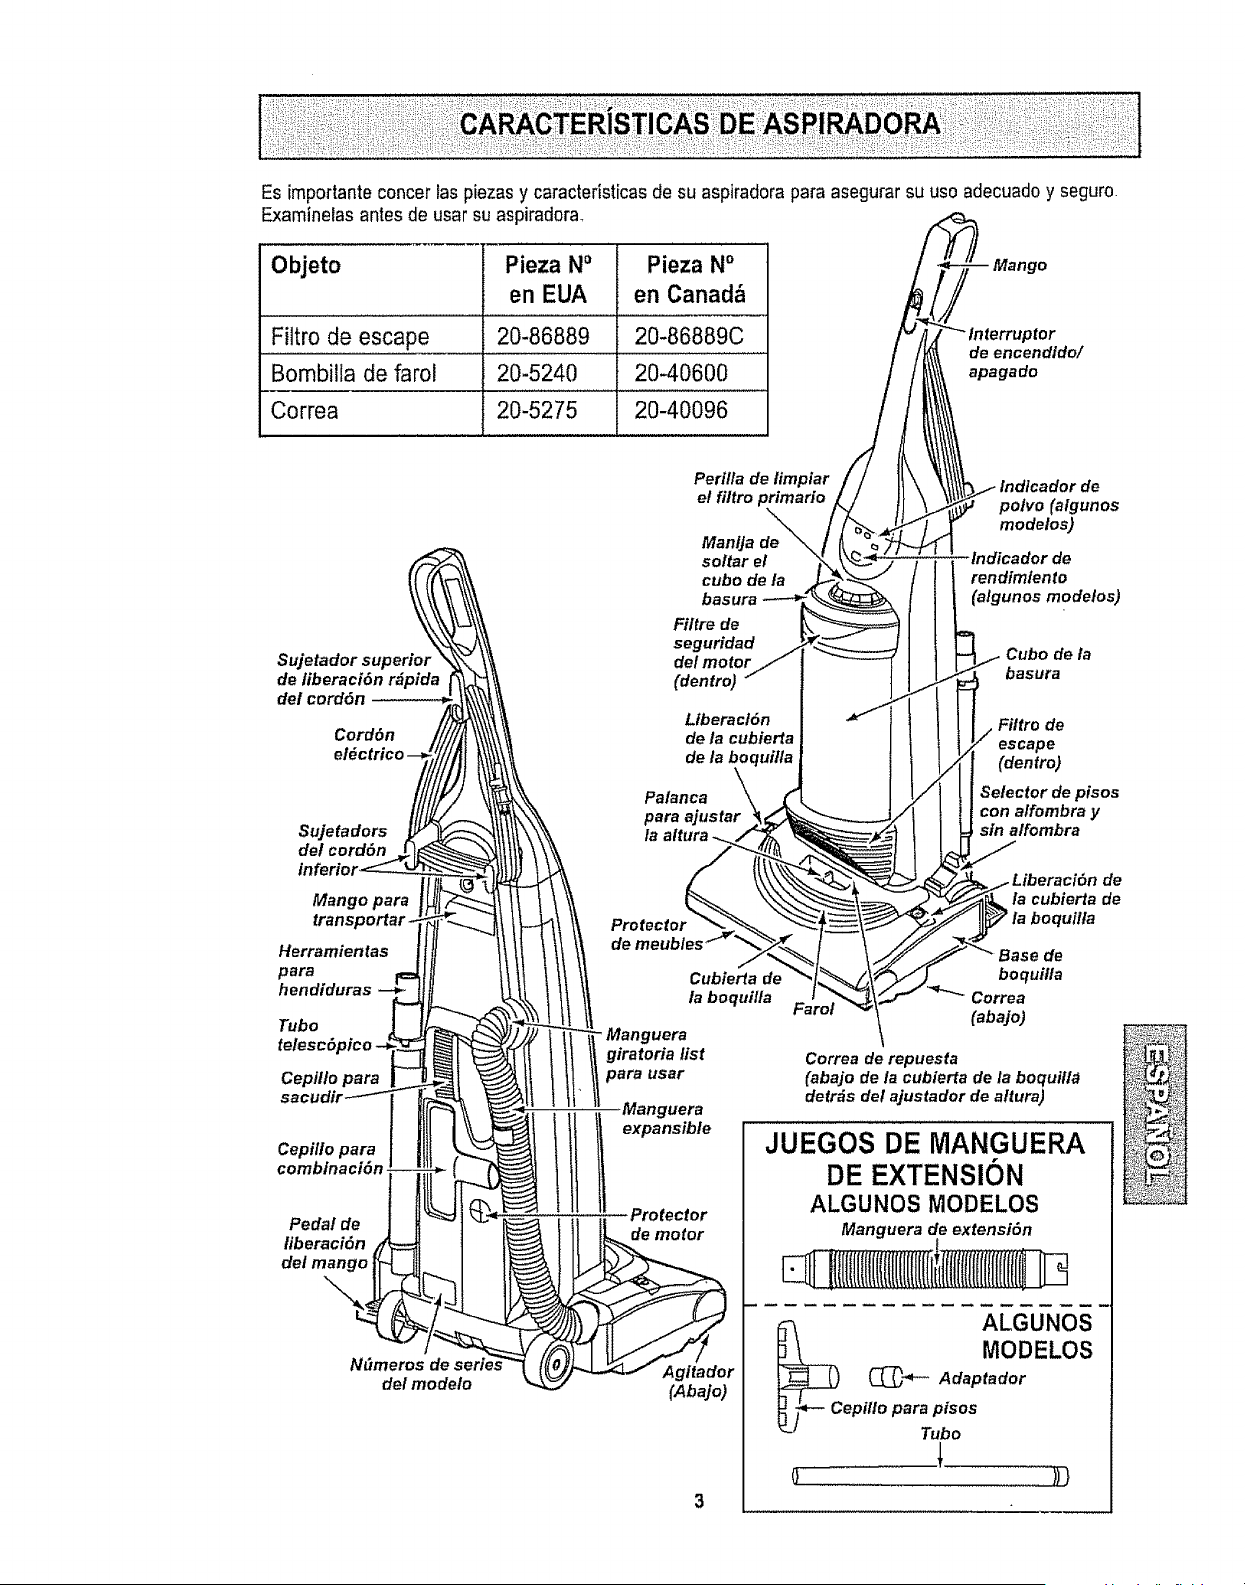
Es[mportanteconcer tas piezasy caracteristicas de su aspiradora para asegurar su uso adecuado y seguro.
Examinelas antes de usar su aspiradora_
Objeto Pieza NO Pieza No
en EUA en Canad&
Filtro de escape 20-86889 20-86889C
Bombilla de farol 20-5240 20-40600
Correa 20-5275 20-40096
_tor
de encendido/
apagado
Sujetador superior
de liberaci6n rdpida
del cord6n
Cord6n
detcord6n
Mango para
transporlar
Herramientas
para
hendiduras --_
Tubo _-
telesc6pico -_"_'_
Cepil/o para _
sacudir_
Pedal de t
N_meros d_
de/modeto
Perilla de limpiar
e! filtro primario
ManUa de
soltar el
cube de/a
basura
Fi/tre de
seguridad j
del motor/
(dentro) _"
Llberact6n
de la cubierta
de la be( rui/la
Palanca \\ _
para ajustar _,._
la altura ,/
\\ Protector _'_ .
il de meubles_ _
tt Cubier_a de
1 la boquilla
T" - Manguera
1| giratoria list
t
''
(Abajo)
3
polvo (algunos
modelos)
indicador de
rendimiento
(algunos modelos)
Cubo de la
basura
de
escape
(dentro)
Selector de pisos
con alfombra y
sin a/fombra
de
la cubierta de
boquit/a
boquilla
Correa
(abajo)
Correa de repuesta
(abajo de/a cubierfa de la boquilla
detrds del ajustador de a/tura)
JUEGOS DE MANGUERA
DE EXTENSION
ALGUNOS MODELOS
Manguera de extensi6n
E:LiItI{llllIl(({tIIIIlI(t(I{ifi
ALGUNOS
MODELOS
(_"_- Adaptador
ept/Io para pisos
_'J Tubo
l
o
ADVERTENCIA
Peligro de choque el_ctrico
No conecte la aspiradora hasta que ter-
mine de armada. De io contrario podria
causar un choque el_ctrico o lesi6n corpo-
ralo
AnlAntes de armar la aspiradora, chequee la LISTA
DE EMBALAJE en la cubierta separada de Ia Lista
de Partes para Reparaci6n. Use esta lista para veri-
ficar que ha recibido todas Gascomponentes de su
nueva aspiradora Kenmore,
Retrar ta banda adhesiva ubicada debajo de la
cubierta de polvo en la caja del motor_
Banda A dhesiva
Fije el cabo de
la manguera
expansiblea ta
boquilta como
se muestra,
MONTAJE DEL MANGO
Torni/Io
Quite el tornillo del mango focalizadojustodebajo
del borde superior de la parte posterior de [a aspi-
radora, ver itustraci6nde ardba
Coloque el mango como se ve en el diagrama
abajo,
AI mantener la manguera de manera que no inleF
fera, mueva el mango a la abertura en la parle
superior de la aspiradora.
Mango
-p-q
Orificio de/
lnserteel tornilfo para que pase por el mango de la
aspiradora,
Empiece a aprelar el torniflo con los dedos, Quiz#,
sea necesario ajustar un poco el mango,
i
Apriete el
tornillo con un
destornillador,
No apriete demasiado el tornillo.
Si Io aprieta demasiado podria arrutnar los
oriflcios para el torntltoo
No opere la aspiradora sin toner instalado
et tornillo.
COLOCACION DEL
CORDON
Asegt]resedo que el sujetador superior del cord6n
de liberaci6nr_pida se encuentre en posici6n verti-
cal. Quite el alambre con el que est_ atado et cord6n
el_ctdco.
Fije el cord6n en
posici6n, forz_ndolo
en la ranurade
bloqueo ubicada en
el cuerpo del
sujetador superior
del cord6n, corno se
muestra Esto ayuda
a que el cord6n no
se enrede debajo
del agitador de la
aspiradora,,
Hendidur_
CordOn
Enrolle el cord6n elOctricoalrededor de los sujeta-
dotes superior y inferior y presione la ranuradel
enchufe sobre el cord6no
Sujetador superior
de liberaci6n r_pida
dot cord6n
Cord6n
Sujetadors
inferior
del cord6n
PARA COiVtENZAR
__i sujetad°r
uperior de
eraci6n
ida del
rdon
Desprenda el enchufe del cord6n elbctdco y quite el
cord6n det sujetador superior. Compruebe que el
cord6n el_ctrico sigue fijado en la ranura de bloqueo
del sujetador superior,
Gire el sujetador
del cordSn de
lade a lade y
hacia abajo para
liberar el cord6n
el_ctrico,
NOTA: Para reducir et riesgo de choque el6ctrico,
esta aspiradora cuenta con una clavija polarizada,
uno de los contactos es m&s ancho que el otro,
La clavija s61opuede introducirse de una manera en
el enchufe.Si la clavija no cabe bien en el enchufe,
invi6rtala Si aun no cabe, llame a un eleclricista
para que instale un enchufe correcto.No altere la
clavijade ninguna manera,
Conecte el cord6n el_ctrico polarizado en un
enchufede 120 vottiosque se encuentrecerca
del piso
ADvERTENCiA
Peligro de lesi6n personal y dafie at produc-
to
• NO conecte ta aspiradora si el interruptor
est& en la posicl6n ON, Podria resuttar en
lesl6n personal o daSoo
• NO use los enchufes Iocalizadossobre los
muebles, Los objetos cercanos podrian re-
sultar da£=ados,
Para seleccionar un ajuste de nivel de pelo de la
alfombra:
Apague la aspiradora Seleccione un nivel de ajuste
inclinando la aspiradorahacia atr_s hast que Ias
ruedas delanteras est_n un peso despegadas def
piso.
Deslice la patancade ajuste de nivel de pelo de la
alfombra a la posici6n deseada.
SUGERENClAS DE AJUSTE DE NIVEL DE PELO
ALFOMBRA
Para que se le faciliten afgunas tareas de limpieza,
come per ejemplo tapetes aueltos y alfombras de
pe!o large, puedeque sea necesario elevar ajuste
de nivel de pelo de la affombra Los ajusles sugeri-
dos son los suguienles,.
HIGH: pelo _spero y tanudo,pelo largo, felpa, alfom-
bras e tapeles irregulares.
tilED: pelo mediano o poco largo..
LOW: pele corto o mediano
EX LOW: pelo muy corto
ADVERTENCIA
Peligro de lesi6n personal
NO PONE las manes o los pies debajo de
la aspiradora cuando cambie de la selec-
cibn de pisos sin alfombra haste la sefec-
ci6n de nlvel de pelo de la aifombra. E1
agitador gire rapidamente cuando la aspi-
radora est& encendlda y est&en la setec-
ci6n de pisos con alfombra.
ALGUNOS MODELOS
Pare de seccionar el ajuste de piso descubierto:
Oprima el bot6n de selecci6n hasta arras y debajo
de ta boquitla hasta que se sienta asegurado.
En esta posici6n el agitador no da vuiltas. Esta posi-
ci6n debe ester usada para limpiamiento de piso de
madera y mosaico y cuando se usan algunos
atachamientos (herramientas).
Selecci6n de ptsos con alfombra: Oprime el boton
completamenta hasta el frente y per arriba hasta
la posici6n de pisos con alfombra..
En esta posici6n el agitador da vuellas. Cuando se
limpia atfombras,el selector tiene que ester en esta
posici6n,
Atenci6n; Refi_rase alas recomendacionesdel fab-
ricante pare limpiar su alfombraoNgunas alfombras
m_s delicadas pueden requerir el use de la aspi-
fedora con et agilador desconectado para prevenir
que la alfombra sea dafiada,
CUIDADO
No deje permanecer la aspiradora en un
solo lugar durante ning0n tiempo cuando
et agitador est_ rotandoo Se puede dafter la
alfombra.
,,,,,,,,,,,,,,,
Nota: Pare la vida m_s large de fa correa, apague
la aspiradora antes de moverel selector. Si usted no
1ohace de esta manera, puede causer que la correa
frota el eje del selector y puede calentary causer
que se queme la correa que causerie un olor que-
made.
....,.r...o.tl
con alfombra y
sin alfombra
Hasta la
posici6n de
pisos sin
alfombra
Hasta /a
posicidn de
pfsos con
alfombra
Desprenda el mango pisando el pedal de tiberaciSn
y tirandadel mango hacia abajo con ta mano.
liberact6n
del mango
Paraarrancar la aspiradora,deslice el interruptor de
encendidolapagado de la posici6n OFF a ta posici6n
ON, Paradetenerla, co!oque el interruptor en ]a posi-
ci6n OFE
1
Herramienta
para hendldura,,
Tubo
telesc6plco.
Cepillo
para
Cepitlo para
- Manguera
expansible
Collar de
manguera
ldentifiquecada uno de los accesorios mostrados a
continuacbn,
COMO UTILIZAR LOS
ACCESORIOS
Paraselectionar la selecci6n de pisossin alfombra,
gira el selector altr_s y abajo hasta fa selecci6n de
pisos sin alfombra. Ver secciSnde PISOS CON
ALFOMBRA Y SIN ALFOMBRA
Cuando regrese hasta ta selecciSnde pisos con
atfombra,cuida que el selectorpuede moverse r_pF
damente hasta la sefecciSna causa de la tensiSn
de ia correa
Saca la parte inferior de la manguera expansible de
la aspiradora y tirando por art&soAhora se puede
conectar la manguera
Nota: La v_Ivula de desviaci6n puede estar
abierta mientras se usan los accesorios o
para Iimpiar una alfombra nueva a causa de
un flujo reducido de aire por los accesorios
mismos o
pot la pelusa de la alfombra que Ilene el
cubo de la basura rapidamente. Consulte el
cuadro RECONOCIMIENTO DE PROBLE-
MAS
ADVERTENCIA
Peligro de choque el_ctrico o lesibn corpo-
ral
Desconecte la unidad antes de limpiarla o
darle servicio, De lo contrarlo podria pro-
ducirse un choque el6ctrico o causar
lesi6n corporalsi la aspiradora arranca de
manera imprevist&
..... •...::.::::::.
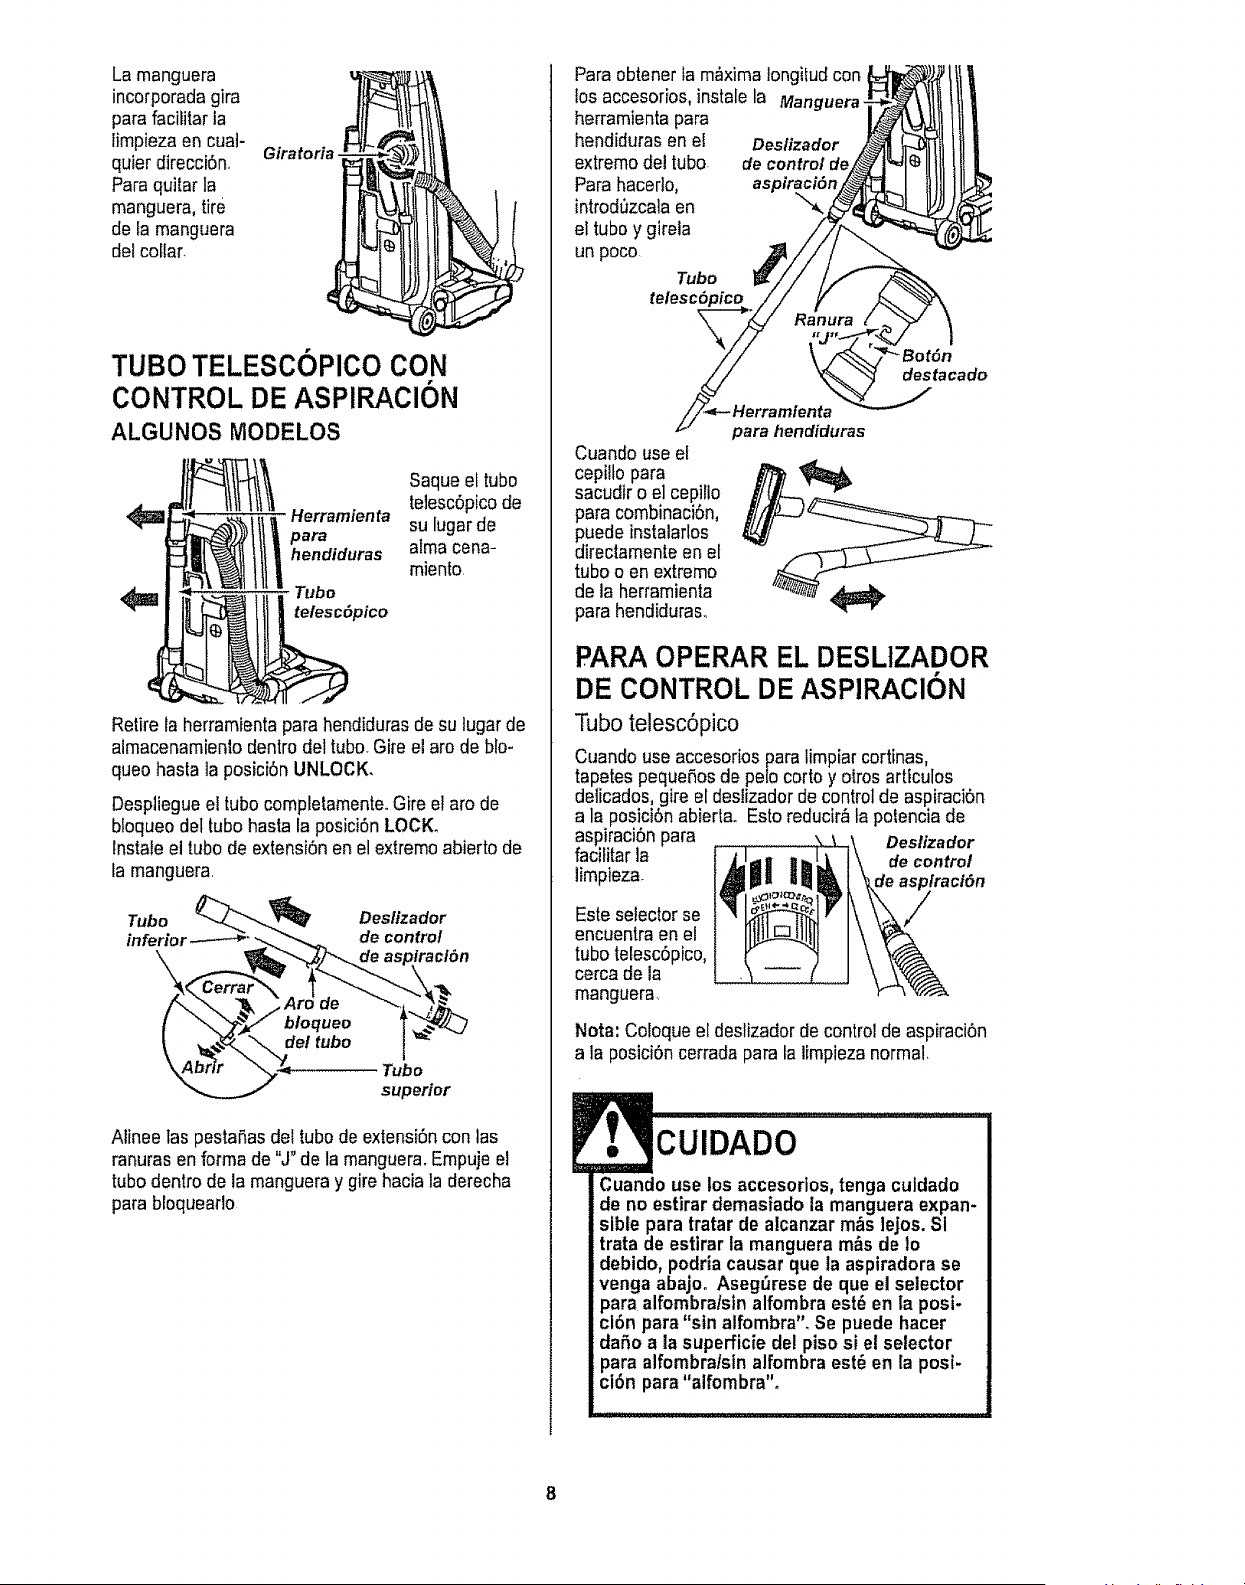
La manguera
incorporada gira
parafacititar la
limpiezaen cual-
quier direcci6n,
Paraquitar la
manguera,tire
de fa manguera
del collar.
Giratoria
TUBO TELESCOPICO CON
CONTROL DE ASPIRAClON
ALGUNOS MODELOS
Saque el tubo
4_ Herramienta telesc6picode
para su lugar de
hendtduras alma cena-
miento,
<_ Tubo
telesc(_pico
Retire la herramienta para hendidurasde su lugarde
almacenamienlo dentro del tubo. Gire el aro de blo-
queo hasta la posici6n UNLOCK.
Despliegueel tubo completamenteoGire el aro de
bloqueo del tubohasta la posici6n LOCK.
lnstale el tubode extensi6n en el extremo abierto de
[a manguera
Tubo Deslizador
inferior de control
Tubo
superior
Alinee tas pestaSasdel tubode extensi6n con las
ranuras en forma de "J" de la manguer& Empujeel
tubo dentro de la manguera y gire hacia la derecha
parabloqueaflo
Para obtener fa m_xima longilud con
los accesorios, instalela Manguera,
herramienta para
hendiduras en el Deslizador
extremo del tubo. de control de
Para hacerlo,
introd_zcataen
et tubo y gfreta
un poco
Tubo
telesc6
destacado
Cuando use el
cepi!to para
sacudir o e] cepillo
para combinaci6n,
dPuedeinstalaflos
irectamenteen et
tubo o en extremo
de la herramienta
para hendiduras_
para hendiduras
PARA OPERAR EL DESLIZADOR
DE CONTROL DE ASPIRACI6N
Tubo telesc6pico
Cuando useaccesorios para limpiar cortinas,
tapetes pequeSosde polo corto y otros artfculos
delicados, gire el deslizadorde control de aspiraciSn
a la posiciSnabiertao Esto reducir_ la polencia de
aspiraci6n para Deslizador
facititarla
limpieza, de control
Esteselector se
encuentra en e!
tubo telesc6pico,
cerca de la
manguera.
Nora: Coloque el deslizadorde control de aspiraci6n
a la posici6n cerrada para la Iimpieza normal,
CUIDADO
Cuando use los accesorlos, tonga culdado
de no estirar demasiado la manguera expan-
sible para tratar de alcanzar m&s ]ejos. Si
trata de estirar la manguera m&sde 1o
debido, podria causar que la aspiradora se
venga abajo. Aseg_rese de que el selector
para alfombra!stnalfombraest6 en la posi-
cl6n para "sin alfombra". Se puede hacer
daSo a la superficie del piso si el selector
para alfombra/sin alfombra est_ en la posf-
ci6n para"alfombra".
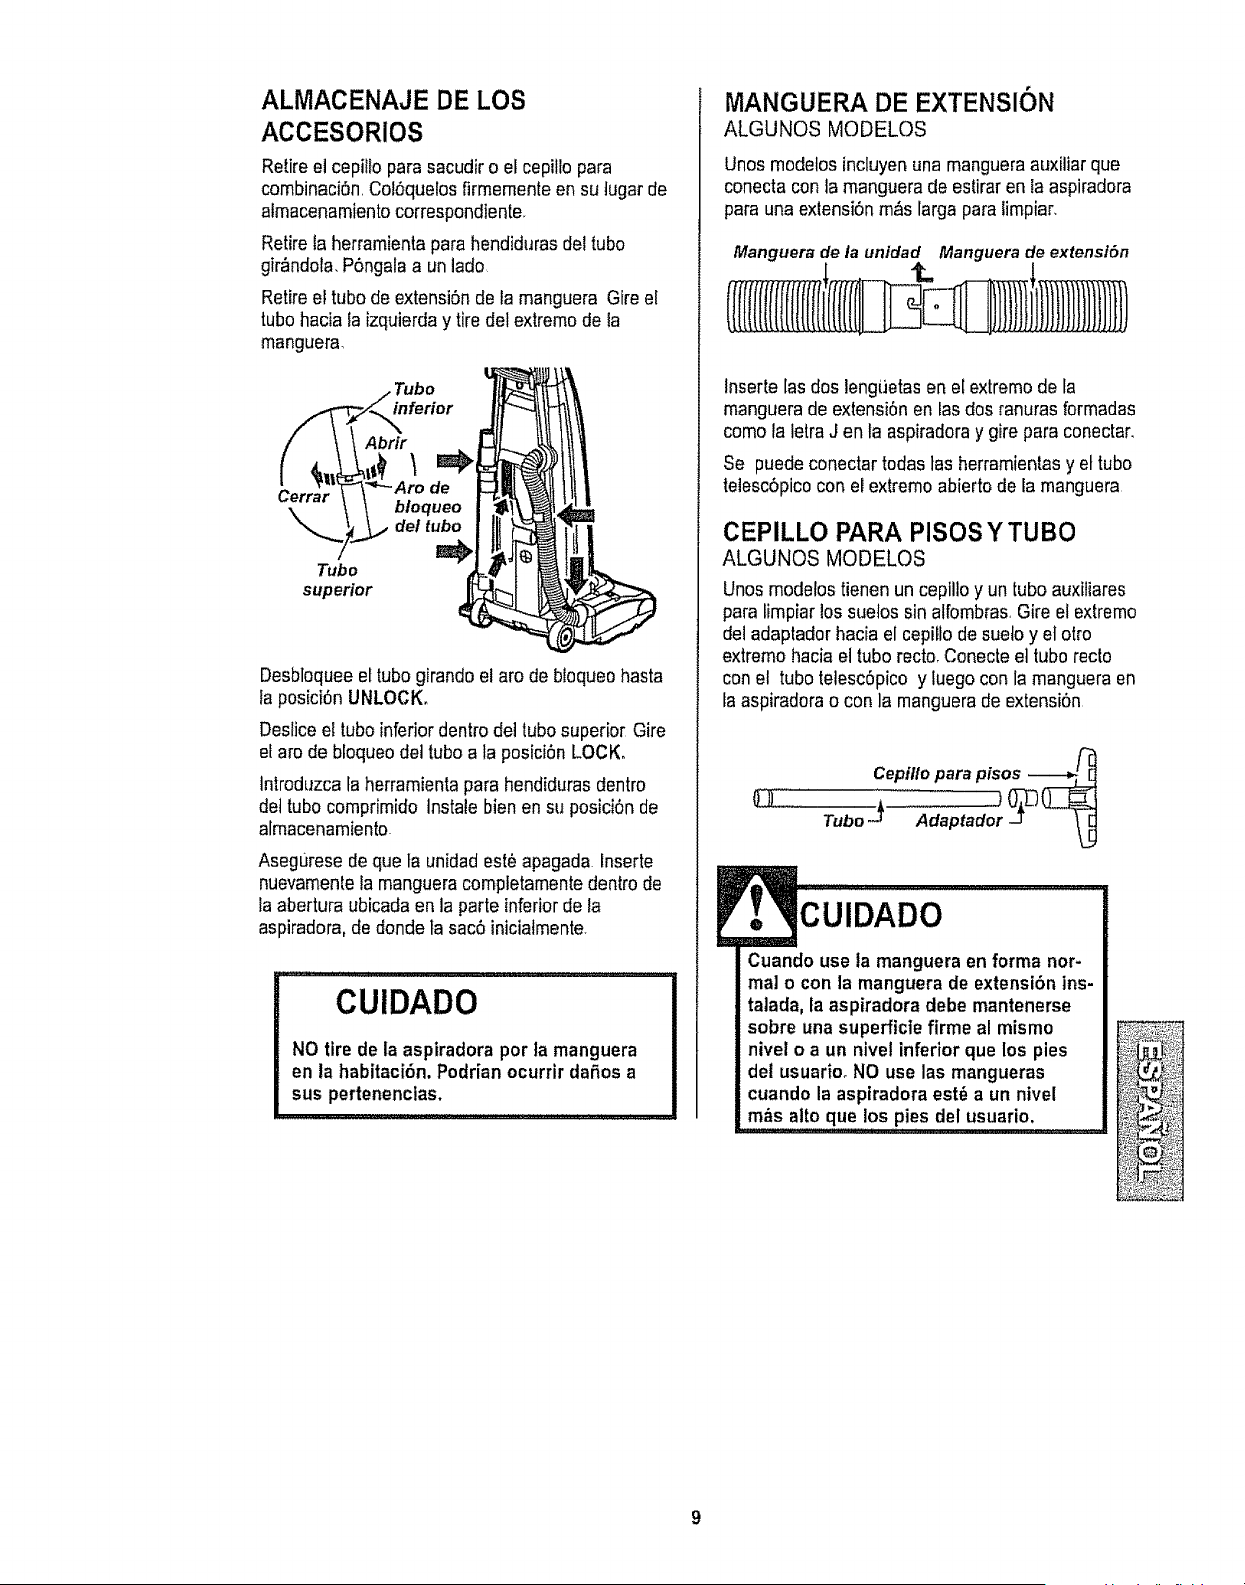
ALMACENAJE DE LOS
ACCESORIOS
Retireel cepillo para sacudir o el cepilio para
combinaci6n,Cot6quelos firmemente en su tugar de
almacenamientocorrespondiente.
Retirela herramienta para hendiduras del tube
gir_ndola. P6ngala a un lade
Retireel tubede extensi6n de la manguera Gire el
tube hacia la izquierda y tire del extremede la
manguera.
inferior
Tubo
superior
Abrir
bloqueo
del tubo
J
Desbloqueeel tube girandoel are de bloqueo hasta
la posici6n UNLOCK.
Deslice el tube inferior dentro del tube superior Gire
el are de bloqueodel tube a la posiciSnLOCK.
tntroduzca la herramientapara hendiduras dentro
det tube comprimido Instale bien en su posici6n de
almacenamiento
Asegurese de que ta unidadest# apagada Inserte
nuevamente la manguera compietamente dentro de
la abertura ubicada en la parteinferiorde la
aspiradora,de donde ta sac6 iniciatmente
,,,,, ""',"',"L'"'L,'L'," '_'_.......
CUIDADO
NO tire de la aspiradora per la manguera
en la habitaci6n. Podrian ocurrir dafios a
sus pertenenclas.
MANGUERA DE EXTENSION
ALGUNOS MODELOS
Unos modetos incluyenuna mangueraauxiUarque
conecta con la manguera de estiraren la aspiradora
para una exlensi6n m_s larga para limpiar.
Manguerade la unidad Manguerade extenst6n
Inserte [as dos lengt_etasen el extremo de la
manguera de extensi6n en las dos ranuras formadas
como la letra J en la aspiradora y gire para conectar,
Se puede conectar todas tas herramientasy et tube
telescbpicocon el extreme abierto de la manguera
CEPILLO PARA PISOSYTUBO
ALGUNOS MODELOS
Unos modelos tienenun cepillo y un tube auxitiares
para limpiar los suetos sin atfornbras,Gire et extreme
del adaptador hacia el cepiUode sueto y el otro
extreme hacia el tube recto,Conecte et tube recto
con el tube telesc6pico y luego con la manguera en
ta aspiradora o con la manguera de extensi6n
CUIDADO
Cuando use la manguera en forma nor-
mal o con la manguera de extensi6n ins-
talada, la aspiradora debe mantenerse
sobre una superficte firme al mismo
nivel o a un nivel inferior que los pies
del usuario. NO use las mangueras
cuando la aspiradora est_ a un nivel
m&s alto que los pies del usuario,
;; ] ] ] J I'IU']_L'I}_ L_L_"L'
i
AREA A LIMPIAR
ACCESORIO
' CEPILLO PARA'
SACUDIR
HERRAM1ENTA PARA _
HENDIDURAS
CEPILLO PApA
COMBINAClON
Handi-Mate Jr2 (_ X
Siemprelimpie!osaccesoriosantesde usarsobretelas
Entre
Muebles* coijines*
X
X X
X
Cortinas* Escalones Paredes
X X
X
X X
X
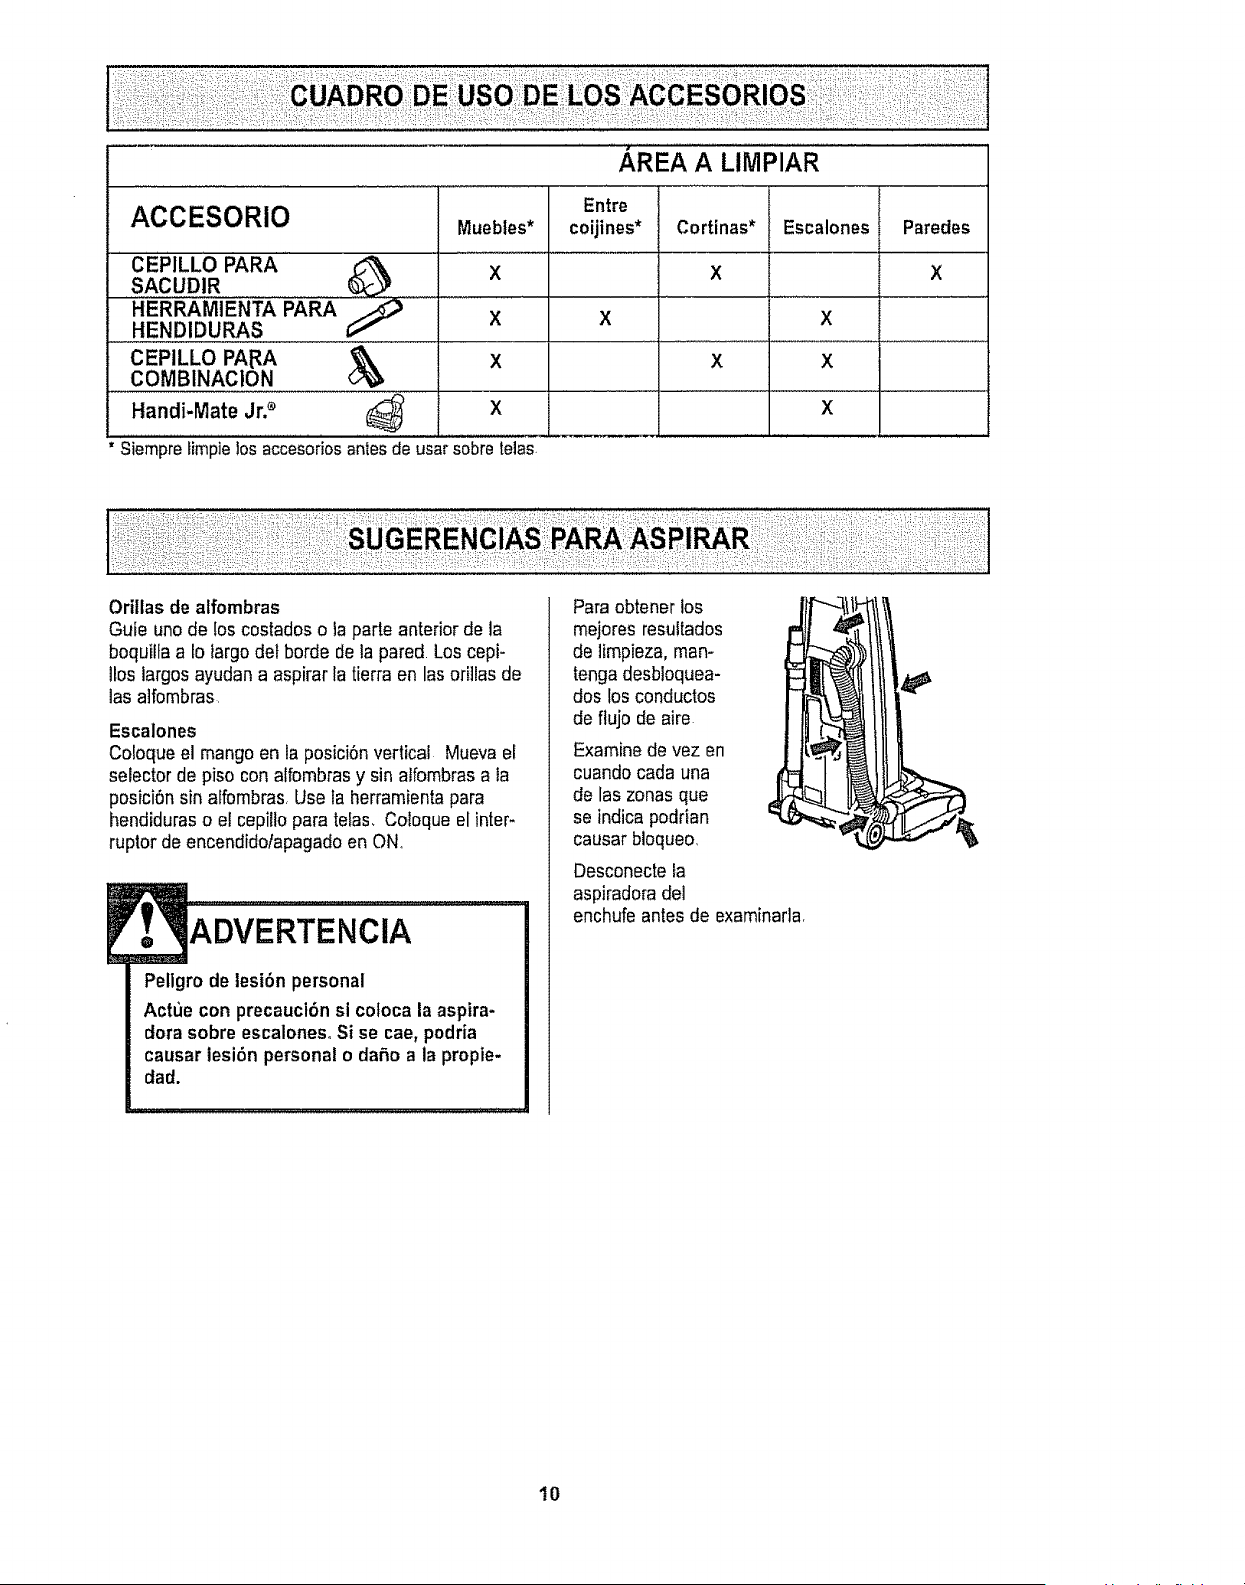
Orillas de atfombras
Guie unode los costados o ta parte anterior de la
boquilla a 1olargo def horde de la pared. Los cepi-
llos largos ayudan a aspirar la tierraen las ori]las de
las alfombras
Escalones
Coloque el mango en la posici6n vertical Mueva el
selector de piso con alfombrasy sin atfombrasa la
posici6n sin alfombras Use la herramientapara
hendiduras o el cepillo para telas, Coloque el inter-
ruptor de encendidolapagado en ON,
ADVERTENClA
Peligro de lesi6n personal
Actue con precaucibn si cofoca la aspira-
dora sobre escaloneso Si se cae, podria
causar lesi6n personal o daSo a la propie-
dad.
Para obtener los
mejores resuttados
de limpieza, man-
tenga desbloquea-
dos los conductos
de flujo de aire
Examine de vez en
cuando cada una
de las zonas que
,t
se indicapodrian
causar bioqueo,
Desconecte ta
aspiradora de]
enchufe antes de examinarla
10
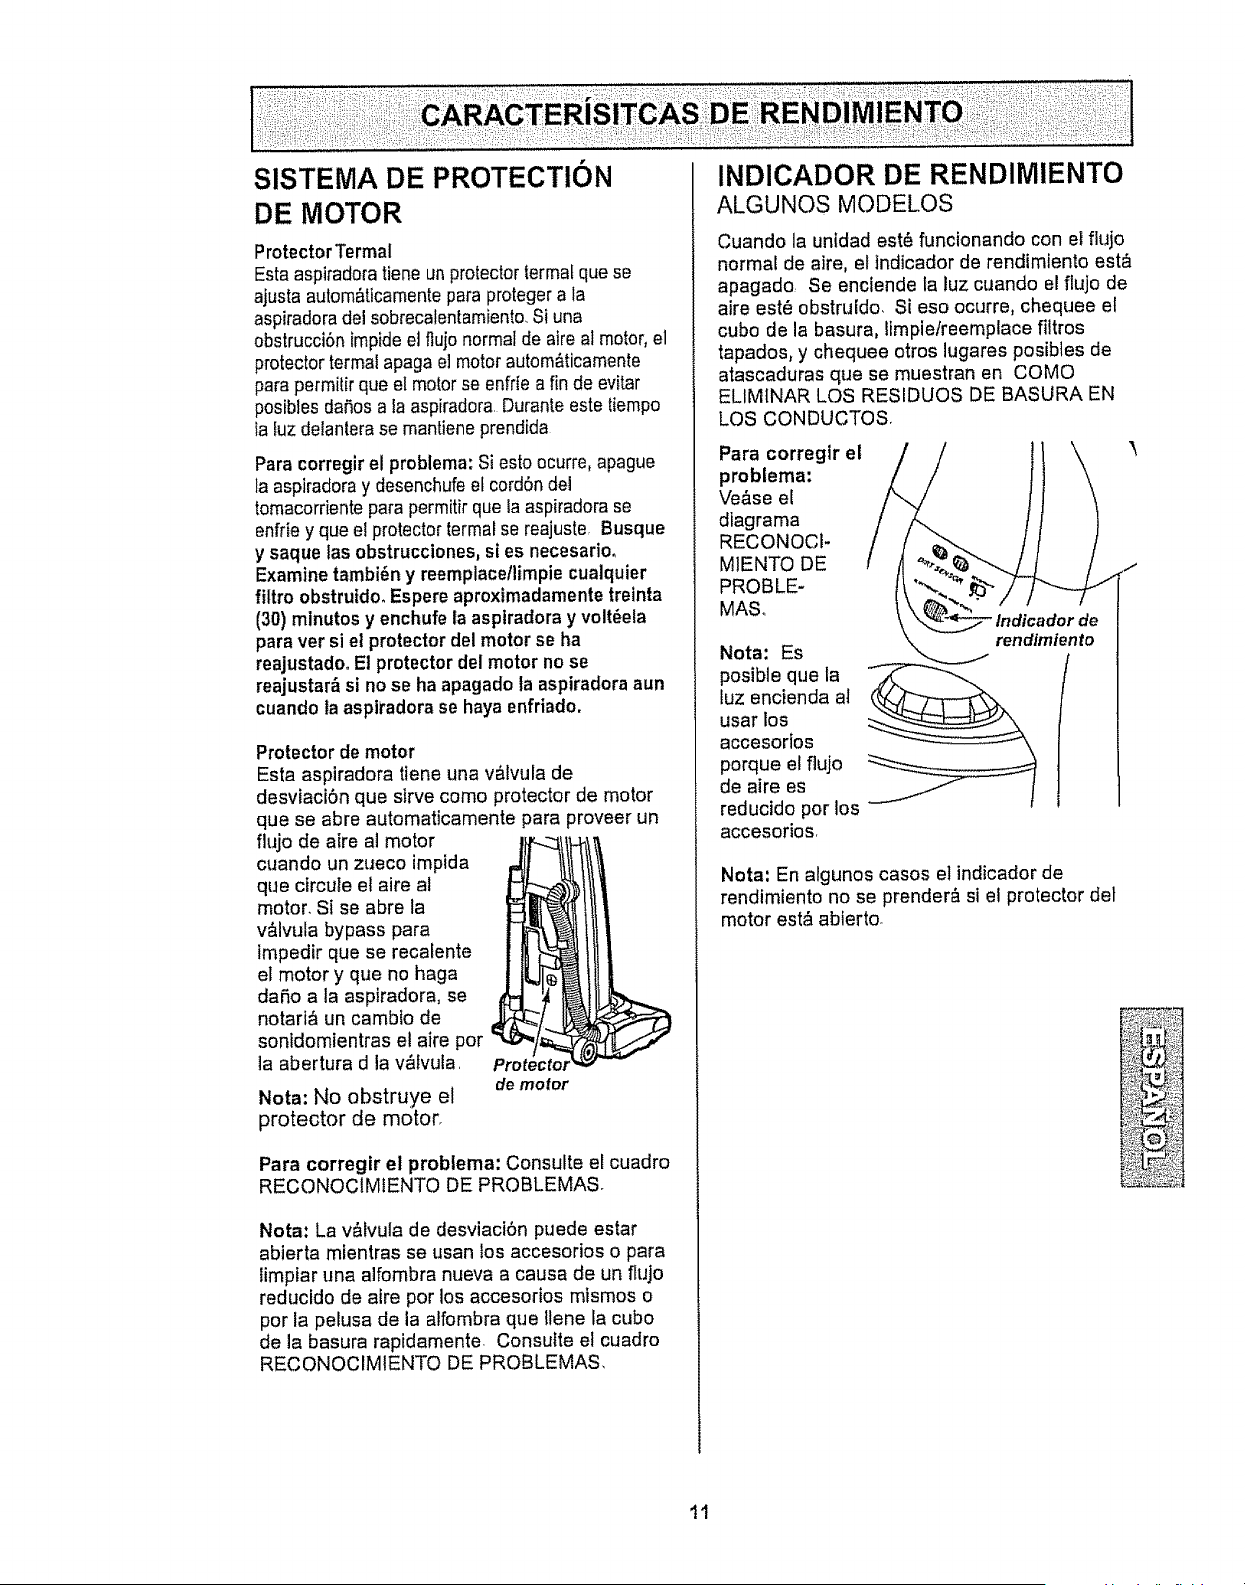
SISTEMA DE PROTECTION
DE MOTOR
ProtectorTermal
Esta aspiradora tiene un protectortermafque se
ajusta autom_ticamentepara proteger a la
aspiradora del sobrecalentamiento.Si una
obstrucciSn impide el flujo normal de aire al motor, el
protector termai apaga el motorautom&ticamente
para permitir que el motor se enfrle a fin de evitar
posibles daSosa la aspiradora Durante este tiempo
la fuz delantera se mantiene prendida
Para corregir el problema: Si estoocurre, apague
la aspiradora y desenchufe et cord6n del
tomacorriente para permitir que la aspiradora se
enfrie y que el protector terrnal se reajuste. Busque
y saque las obstrucctones,si es necesario,
Examine tambi_n y reemplace/limpie cualquier
filtro obstrufdo. Espere aproximadamente treinta
(30) minutos y enchufe la aspiradora y volt_ela
para ver si el protector del motor se ha
reajustadoo El protectordel motor no se
reajustar_ si no se ha apagado ta aspiradoraaun
cuando la aspiradora se haya enfriado,
Protector de motor
Esta aspiradora tiene una v&lvula de
desviaci6n que slrve como protector de motor
que se abre automaticamente para proveer un
flujo de aire al motor
cuando un zueco impida
que circule el aire al
motor. Si se abre la
v&lvula bypass para
tmpedir que se recalente
el motor y que no haga
da5o a la aspiradora, se 4
notari& un camblo de
sonidomientras el aire por
la abertura d ia v&lvuta.
de motor
Nota: No obstruye el
protector de moton
Para corregtr el problema: Consulte el cuadro
RECONOCtMIENTO DE PROBLEMAS
Nota,* La v&Ivula de desviaciSn puede estar
abierta mlentras se usan los accesorios o para
limpiar una alfombra nueva a causa de un flujo
reducido de atre por los accesorios mismos o
por la pelusa de la alfombra que tlene la cubo
de la basura rapidamente Consutte el cuadro
RECONOCIMIENTO DE PROBLEMAS,
INDICADOR DE RENDIMIENTO
ALGUNOS MODELOS
Cuando la unidad estOfuncionando con el flujo
normal de aire, el tndicador de rendimiento est_
apagado. Se enciende la luz ctJando el flujo de
aire est_ obstrufdo. Si eso ocurre, chequee et
cubo de la basura, limpie!reemplace filtros
tapados, y chequee otros lugares posibles de
atascaduras que se muestran en COMO
ELIMINAR LOS RESIDUOS DE BASURA EN
LOS CONDUCTOS
Para corregtr el
problema:
Ve&se el
diagrama
RECONOCt-
MIENTO DE
PROBLE-
MAS.
Nota: Es
posible que la
tuz encienda at
usar los
accesorlos
porque el flujo
de aire es
reducido por los
accesorioSr
Nota: En algunos casos et indicador de
rendimiento no se prender_, si el protector det
motor est_ abierto.
11
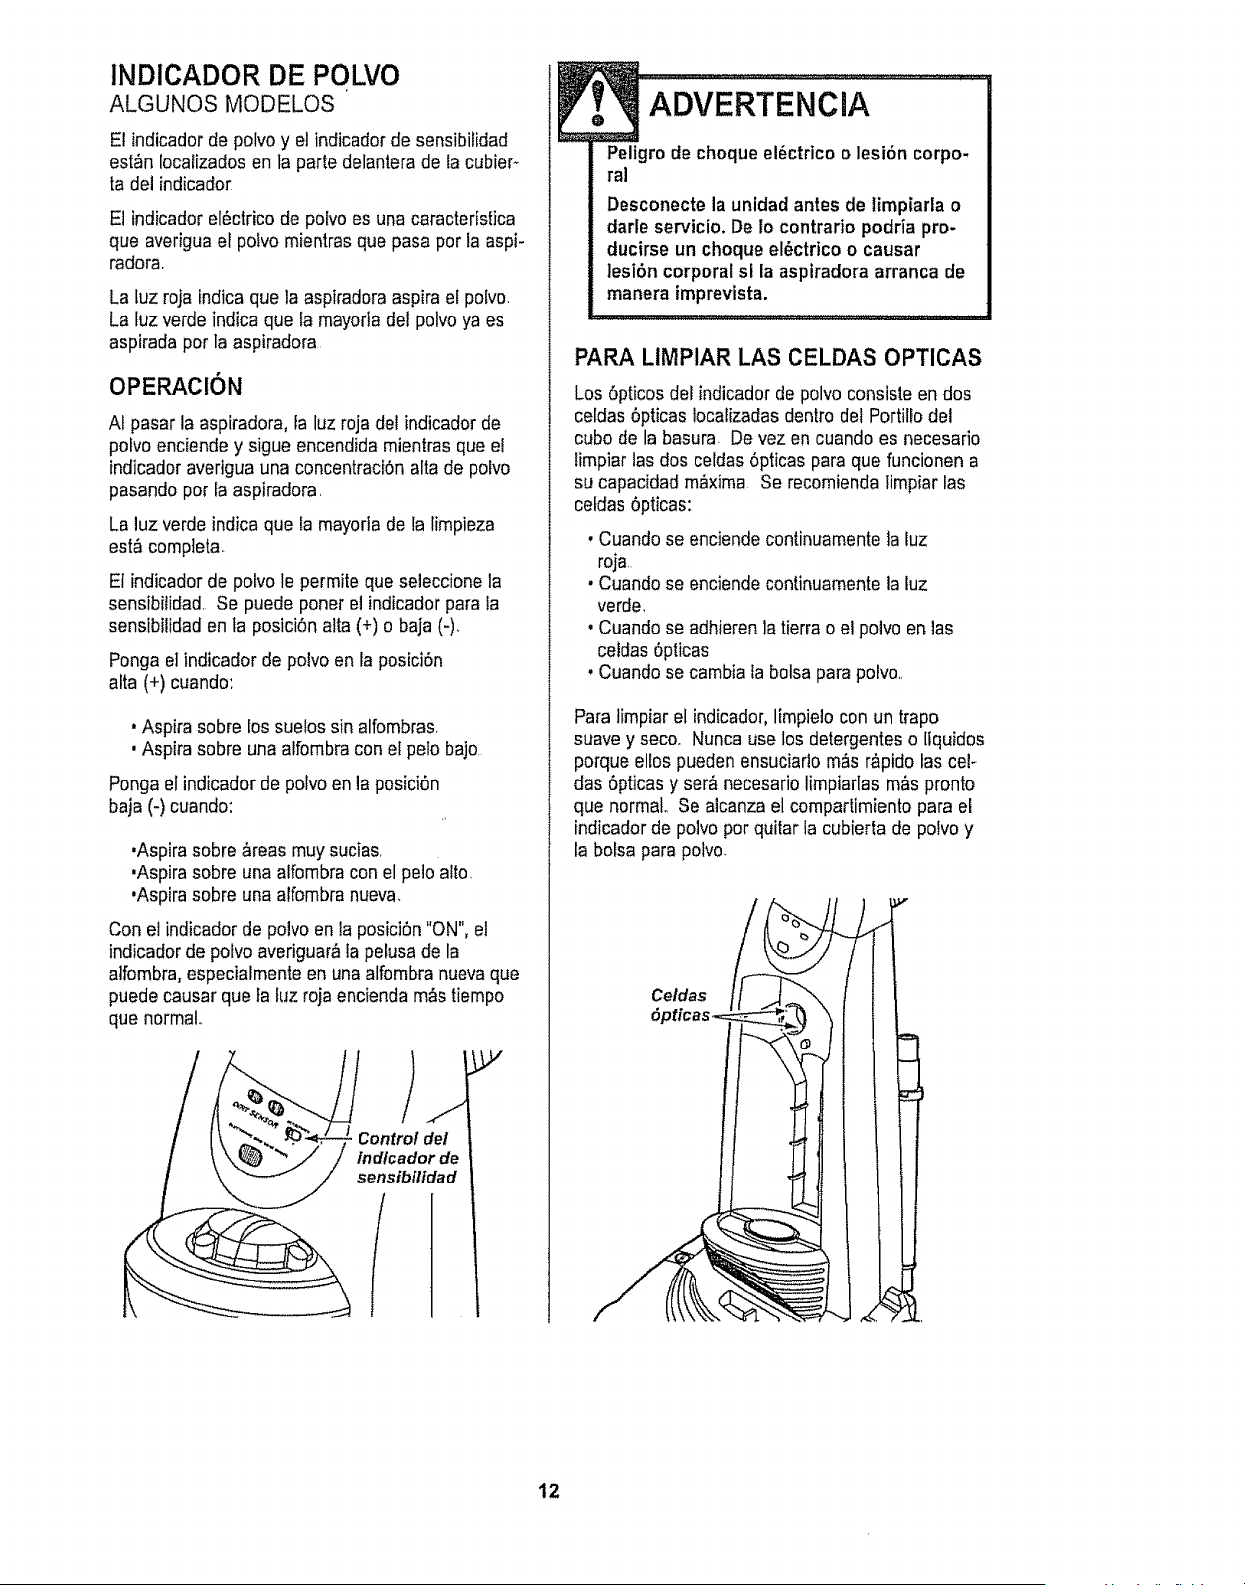
INDICADOR DE POLMO
ALGUNOS MODELOS
El indicador de polvo y el indicador de sensibilidad
est_n localizados en ta parle delantera de la cubier-
ta del indicador
El indicador el_ctrico de polvo es una caracteristica
que averigua el polvo mientras que pasa por la aspi-
radora.
La luz roja indica que la aspiradora aspira el polvo
La tuz verde indica que la mayortadel polvo ya es
aspirada por la aspiradora
OPERACION
At pasar la aspiradora, la luz roja del indicador de
potvo enciende y sigue encendida mientras que el
indicador averigua una concentraci6n alta de polvo
pasando por la aspiradora,
La luz verde indica que la mayoria de la limpieza
est_ compteta.
Et indicador de pofvo le permite que seleccione la
sensibilidad. Se puede poner el indicador para la
sensibilidad en ta posici6n alta (+) o baja (-)_
Ponga el indicador de polvo en la posici6n
afta (+) cuando:
• Aspira sobre los suetos sin alfombras.
, Aspira sobre una alfombracon et pelo bajo
Ponga el indicador de polvo en la posici6n
baja (-) cuando:
•Aspira sobre &reas muysucias,
,Aspirasobre una alfombra con el peto alto
,Aspira sobre una alfombranueva.
Con el indicador de polvo en la posici6n "ON", el
indicador de polvo averiguar_ la pelusa de la
alfombra, especialmente en una alfombra nueva que
puede causar que ta fuz roja encienda m&stiempo
que normal
p,,
Controldel
lndlcadorde
sensibflidad
f
ADVERTENCIA
Peltgro de choque el_ctrico o lesi6n corpo-
ral
Desconecte la unidad antes de limpiarla o
darle servicio. De Io contrario podria pro-
ducirse un choque el_ctrico o causar
lesibn corporal sl la aspiradora arranca de
manera imprevista.
PARA LIMPIAR LAS CELDAS OPTICAS
Los6pticos del indicador de polvo consiste en dos
celdas 6pticas localizadas dent.todet Portillo del
cubo de la basura De vez en cuando es necesario
limpiar las dos celdas6pticas para que funcionen a
su capacidad m,_xima Se recomienda limpiar las
celdas 6pticas:
, Cuando se enciende continuamente la luz
roja
, Cuando se enciende continuamente la luz
verde,
, Cuando se adhieren ]a tierra o el polvo en las
celdas 6pticas
, Cuando se cambia fa botsa parapolvo,,
Para limpiar el indicador, limpielo con un trapo
suave y seco. Nunca use los detergentes o lfquidos
porque ellos pueden ensuciarlo m_s r&pidolas cel-
das 6pticas y ser_,necesario limpiarlas m&spronto
que normal Se alcanza el comparlimiento para el
indicador de polvo por quitar la cubierta de polvo y
la botsa para polvo.
Celdas
12
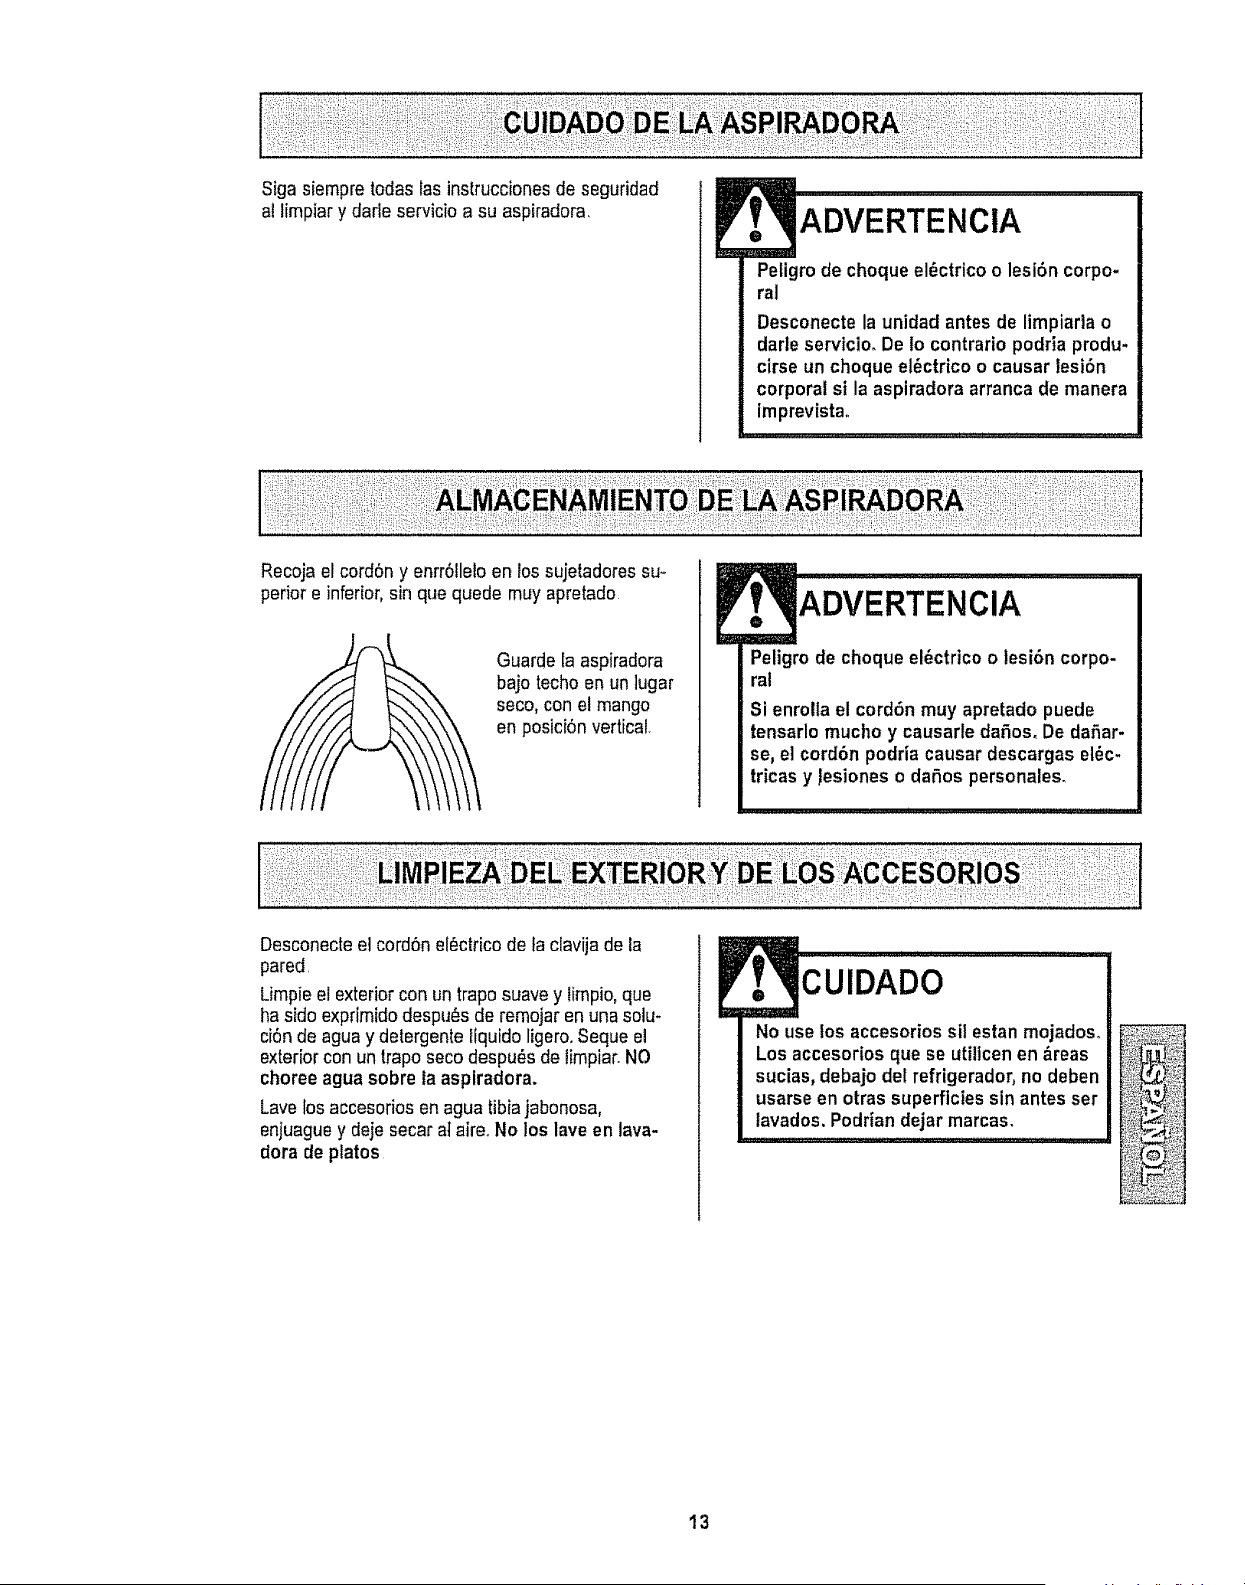
Siga siempre todas las instrucciones de seguridad
a! limpiar y dade servicio a su aspiradora,
ADVERTENCIA
Peligro de choqueel_ctrico o lesi6n corpo-
ral
Desconecte la unidad antes de limpiarla o
darle servicio. De Io contrario podria produ-
cirse un choque el_ctrico o causar lesi6n
corporal si la aspiradora arranca de manera
imprevista_
Recoja el cordSn y enrrSIleloen los sujetadores su-
perior e inferior,sin que quede muy apretado
Guarde la aspiradora
bajo techo en un lugar
seco, con el mango
en posiciSnvertical,
ADVERTENClA
Peligro de choque el_ctrico o lesi6n corpo-
ral
Si enrolla el cord6n muy apretado puede
tensarlo mucho y causarle dafos_ De daSar-
se, el cordbn podria causar descargas el_c-
tricas y lesiones o daSos personales.
Desconecteel cordSnel_ctrico de la clavija de la
pared.
Limpie et exterior con un trapo suave y timpio, que
ha sido exprimido despu_s de remojar en una solu-
ciSnde agua y detergente Ifquido ligero.Seque el
exteriorcon un trapo seco despu_s de limpiar.NO
choree agua sobre la asplradora.
Lave los accesorios en agua tibiajabonosa,
enjuaguey deje secar at aire. No los lave en lava-
dora de platos
CUIDADO
No use los accesorios sil estan mojados_
Los accesorios que se utiltcen en &reas
sucias, debajo del refrigerador, no deben
usarse en otras superficies sin antes ser
lavados, Podrian dejar marcas.
13
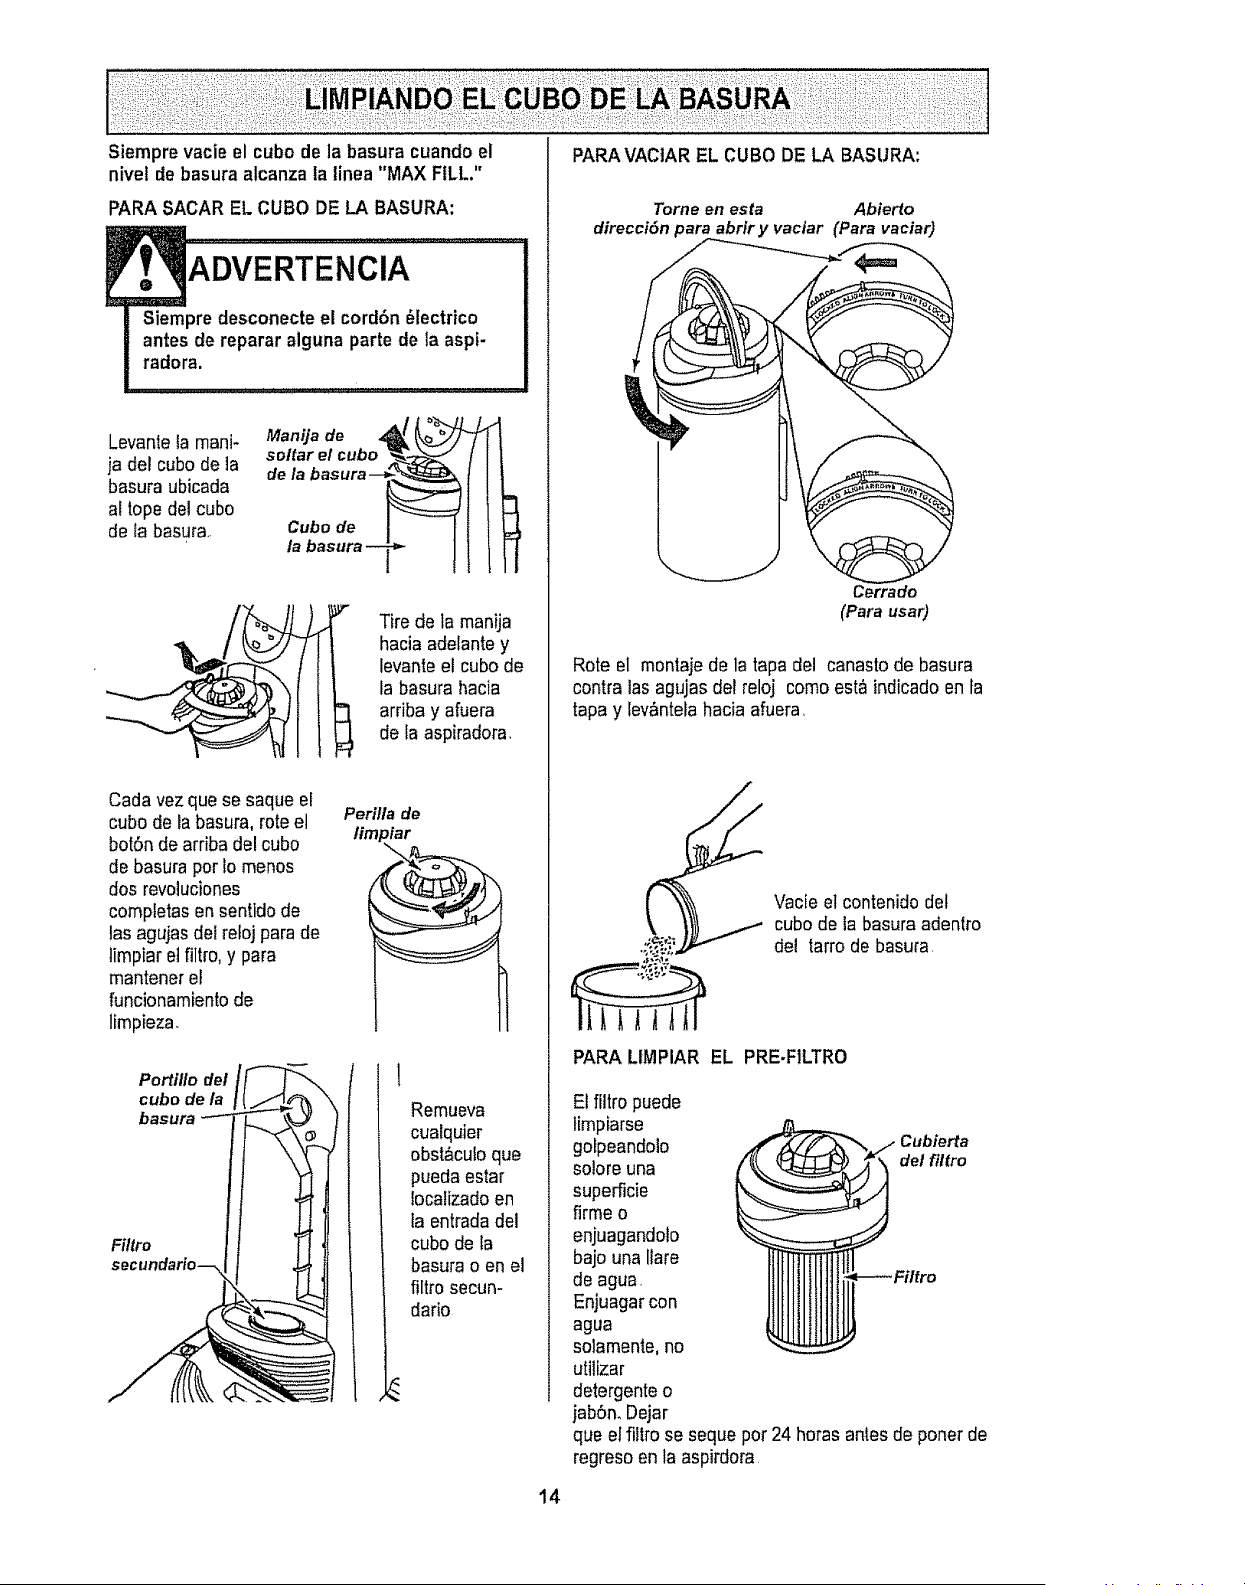
PARA VACIAR EL CUBO DE LA BASURA:
Siempre vacie el cubo de la basura cuando el
nivet de basura alcanza la linea "MAX FILL."
PARA SACAR EL CUBO DE LA BASURA:
Siempre desconecte el corrldn _lectrico
antes de reparar alguna parte de la aspt-
radora.
Levante la mani-
ja del cube de la
basura ubicada
al topedel cube
de fa basura.
Manija de 4_ _
sottar el cubo _..__._
de la basura--_._
Cubo de
la basura--_
I Tire de la manija
hacia adelante y
levanteel cube de
la basura hacia
arriba y afuera
de la aspiradora
Cada vezque se saque el
cube de la basura, rote el
bot6n de arriba del cube
de basura per fo menos
dosrevolucienes
completas en sentldo de
tas agujas del re!oj para de
limpiar el filtro, y para
mantener el
funcionamientode
limpieza.
Perilla de
limp iar
Portillo del
cubo de la
basura
Filtro
secundario--
Remueva
cualquier
obst&culoque
pueda estar
locatizado en
la entrada del
cubode la
basura o en el
filtro secun-
dario
14
Tome en esta Abierto
direccidn para abrir y vaciar (Para vaciar)
Rote el montaje de la tapa del canasto de basura
contra las agujas det reloj como est_ indicado en la
tapa y tev,Sntelahacia afuera,
Vacie el contenido det
cubo de ia basura adentro
del tarrode basura,
PARA LIMPIAR EL PRE.FILTRO
El filtro puede
limpiarse
gofpeandolo Cubierta
so!ore una del filfro
superficie
firme o
enjuagandolo
bajo una Ilare
de agua.
Enjuagar con
agua
solamente, no
utilizar
detergente o
jab6n. Dejar
que el fittro se seque per 24 horas antes de poner de
regreso en la aspirdora
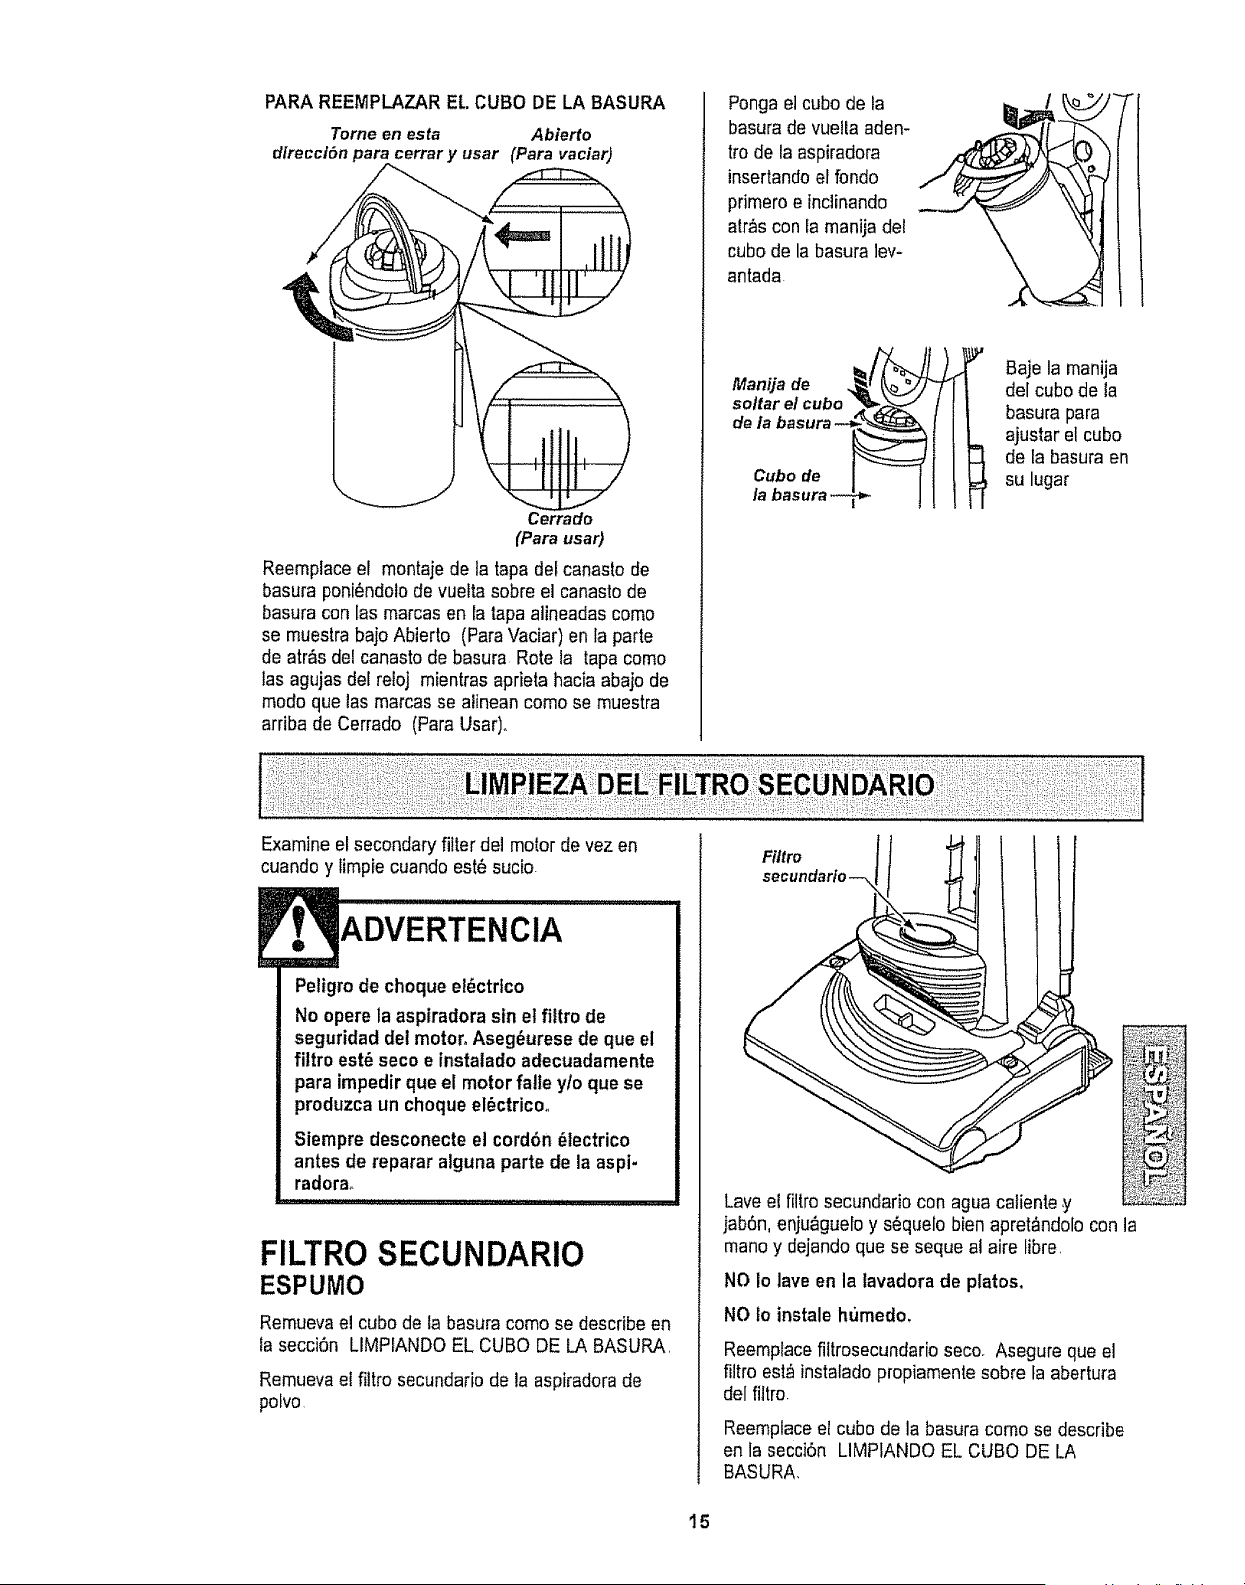
PARA REEMPLAZAR EL CUBO DE LA BASURA
Tome en esta Abierto
direcct6n para cerrar y usar (Para vaciar)
Cerrado
(Para usar}
Reemplace el montajede la tapa det canasto de
basura poni6ndolode vuefta sobre el canasto de
basura con las marcas en la tapa alineadas como
se muestra bajo Abierto (ParaVaciar) en la parte
de atr&sdel canasto de basura Rote la tapa como
tasagujas del reioj mientras aprieta hacia abajo de
modo que las marcas se alinean como se muestra
arriba de Cerrado (Para Usar)°
Pongael cubo de la
basura de vuelia aden-
trode la aspiradora
insertandoel fondo
pdmero e inclinando
atr,%con ia manija de!
cubo de la basura lev-
antada
Manija de
soltar e/ cubo --
de/a basura --_
Cubo de
/a basura
Baje la manija
del cubo de la
basura para
ajustar el cubo
I e la basura en
su lugar
Examineel secondary fitter del motor de vez en
cuando y limpie cuando este sucio
ADVERTENCIA
Peligro de choque el6ctrtco
No opere la aspiradorasin et filtro de
seguridad det motor, Aseg6urese de que el
filtro est6 seco e instalado adecuadamente
para impedir que el motor falle yfo que se
produzca un choqueel_ctricoo
Siempre desconecte el cord6n 61ectrico
antes de reparar alguna parte de la aspi-
radorao
FILTRO SECUNDARIO
ESPUMO
Remueva el cubo de {a basura como se describe en
ta secci6n LIMPIANDO EL CUBO DE LA BASURA
Remueva ei fittro secundario de la aspiradora de
polvo
Filtro
secundarfo--,
Lave e{ filtro secundario con agua catiente y
jab6n, enju_guelo y s6quelo bien apret_ndolo con
mano y dejando que se seque al aire libre,
NO Io lave en la lavadora de platos,
NO io instale humedo,
Reemptacefiltrosecundario seco. Asegure que el
filtro est_ instaladopropiamente sobre fa abertura
del filtro.
Reemplaceel cube de la basura como se describe
en la secci6n LIMPIANDO EL CUBO DE LA
BASURA,
la
15
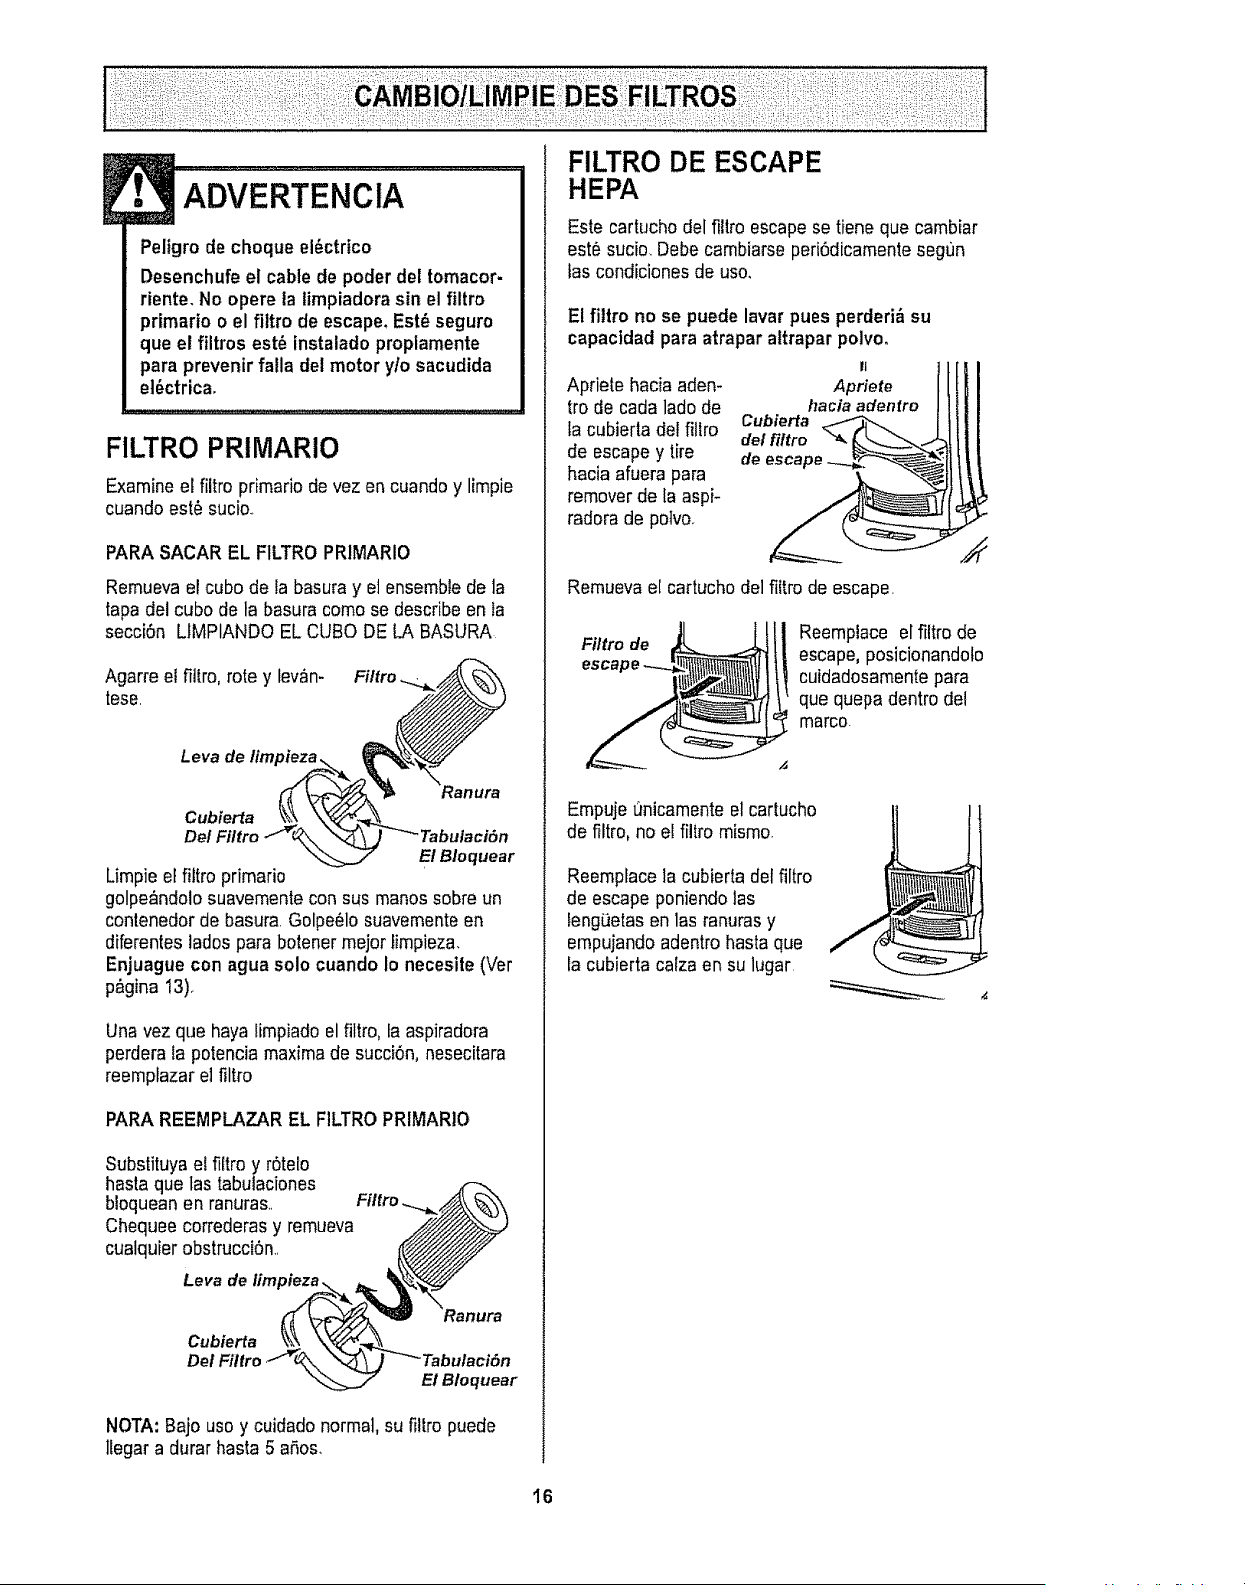
ADVERTENCIA
Peligro de cheque el_ctrico
Desenchufe el cable de poder del tomacor-
riente, No opere la limpiadorasin el filtro
primario o el filtro de escape,Est_ seguro
que el filtros est_ instalado propiamente
para prevenir falla del motor y/o sacudida
el6ctrica,
FILTRO PRIMARIO
Examine el filtro primario de vez en cuando y limpie
cuando est6 suci&
PARASACAR EL FILTRO PRIMARIO
Remueva el cube de la basurayet ensemble de la
tapa del cube de la basura come se describe en la
secci6n LfMPIANDO EL CUBe DE LA BASURA
Agarre el fillro, rote y lev_n- Filtro
tese.
Leva de
Cubierta
De/
E! Bloquear
Limpie el filtro primario
golpe&ndolosuavemente con sus manes sobre un
contenedor de basura. Golpe61osuavementeen
diferentes lades para botener mejor limpieza.
Enjuague con agua solo cuando Io necesite (Vet
p&gina I3).
Una vez que haya limpiado el filtro, ta aspiradora
perdera Ia potencia maxima de succi6n, nesecitara
reemplazar el filtro
PARA REEMPLAZAR EL FILTROPRIMARIO
Substituya el filtro y r6telo
hasta que tas tabulaciones
bloquean en ranura& Filtro.....__
Chequee correderas y remueva _'_
cualquier obstrucci0n. __
_/__Ranura
Cubierta \_ \Y_/_\
Del Filtro_\.\ \_-_'_ Tabulacifm
_j" EI B/oquear
NOTA: Bajo use y cuidado normal, su fillro puede
ltegar a durar hasta 5 aSos.
HEPA
Este cartucho del filtroescape se tiene que cambiar
est6 sucio. Debe cambiarse peri6dicamente segt)n
fas condiciones de use.
El filtro no se puede lavar pues perderid=su
capactdad para atrapar altrapar polvo.
II
Apriete hacia aden- Apriete
fro de cada lade de haciaadenlre
ta cubierla del fillro Cubierta
del fittro
de escape y tire de escape
hacia afuera para
remover de la aspi-
radora de potvo.
Remueva el cartucho del filtro de escape.
Filtro de
Reemplace el filtro de
escape, posicionandoto
cuidadosamentepara
que quepa dentro del
marco.
Empuje t_nicamenteel carlucho
de filtro, no el filtro mismo.
Reemplace la cubierta del filtro
de escape peniendo las
tengiJetasen 1asranuras y
empujando adentro hasta que
fa cubierta calza en su lugar.
16

ADVERTENCIA
Peligro de choque el_ctrico o lesi6n corpo-
ral
Desconecte la unidad antes de limpiarla o
darle servicio. De Io contrario podria produ-
cirse un choque ei_ctrico o causar lesi6n
corporal si la aspiradora arranca de manera
imprevtsta.
Frecuentemente revise el area del cepillo y quite
todo peto,cord6n o pelusa que se haya acumufado
Si la acumufaci6nes excesiva, siga las instrucciones
a continuaci6n
PARA QUITAR LA CORREA
Desconecle el cord6n electrico del enchufe.
Selector de pisos I
con alfombra y Hasta la
sin alfombra posici6n de
\ pisos con
a/fombra
Deslice tas
liberaciones
hacia afuera y
quite la
cubierla de {a
boquitla.
Cubierta
/a boquilla
Muevael
selector de
pisos con
alfombra y sin
alfombra a la
posici6na la
posici6n con
affombra y
baje la manija
para que la
aspiradora
descanse
plana.
Pestlllos
II!I s.,°,o,o,
I I _ delprotector
! _J,Y'_ de meubles
del agitador -_...__,._
Suette los
sujetadores
del protector
de muebfes
de tas pes-
tafias en
ambos lados
de la cubier-
ta del agita-
dot.
___f_Lengfietas_
del agitador
Tire hacia abajo de
las ieng6etas en la
parle atrasera de!
agitator y ruede
hacia adelante para
liberarde la unidad
de boquilla
No es necesario quitar et ensamble de portal,_m-
paras. Coloque al lado ta cubierta del agitador
A Co_e_ Correa de"
repuesta
Coloque las manos en et agitator° Si la correa ya
est_ instalada en el agitador, habra tensi6nen e!
agitator. Tenga cuidado cuando levanla etagitator
de la boqui]la..
Nora: puede ser necesario tirar det borde del pro-
tector de muebles para que los extremos def rotor
se puedan sacar con facitidad
Quite la correa o rota del eje de transmisi6ndel
motor.
Una correa de repuesta est_ disponible, V_a a la
ilustraciSnpara la locaci6n de la correa de repuesta.
La correa de repuesta se puede guardar en el
mismo sitio.
ADVERTENCIA
Peligro de lesibn personal
Tenga cuidado al quitar el cepillo cilin-
drico, la tensi6n de la correa es grande.
Si no tiene precaucibn podria sufrir una
lesi6n personal si e! cepilto se libera r_-
pidamente y sale dtsparado,
17
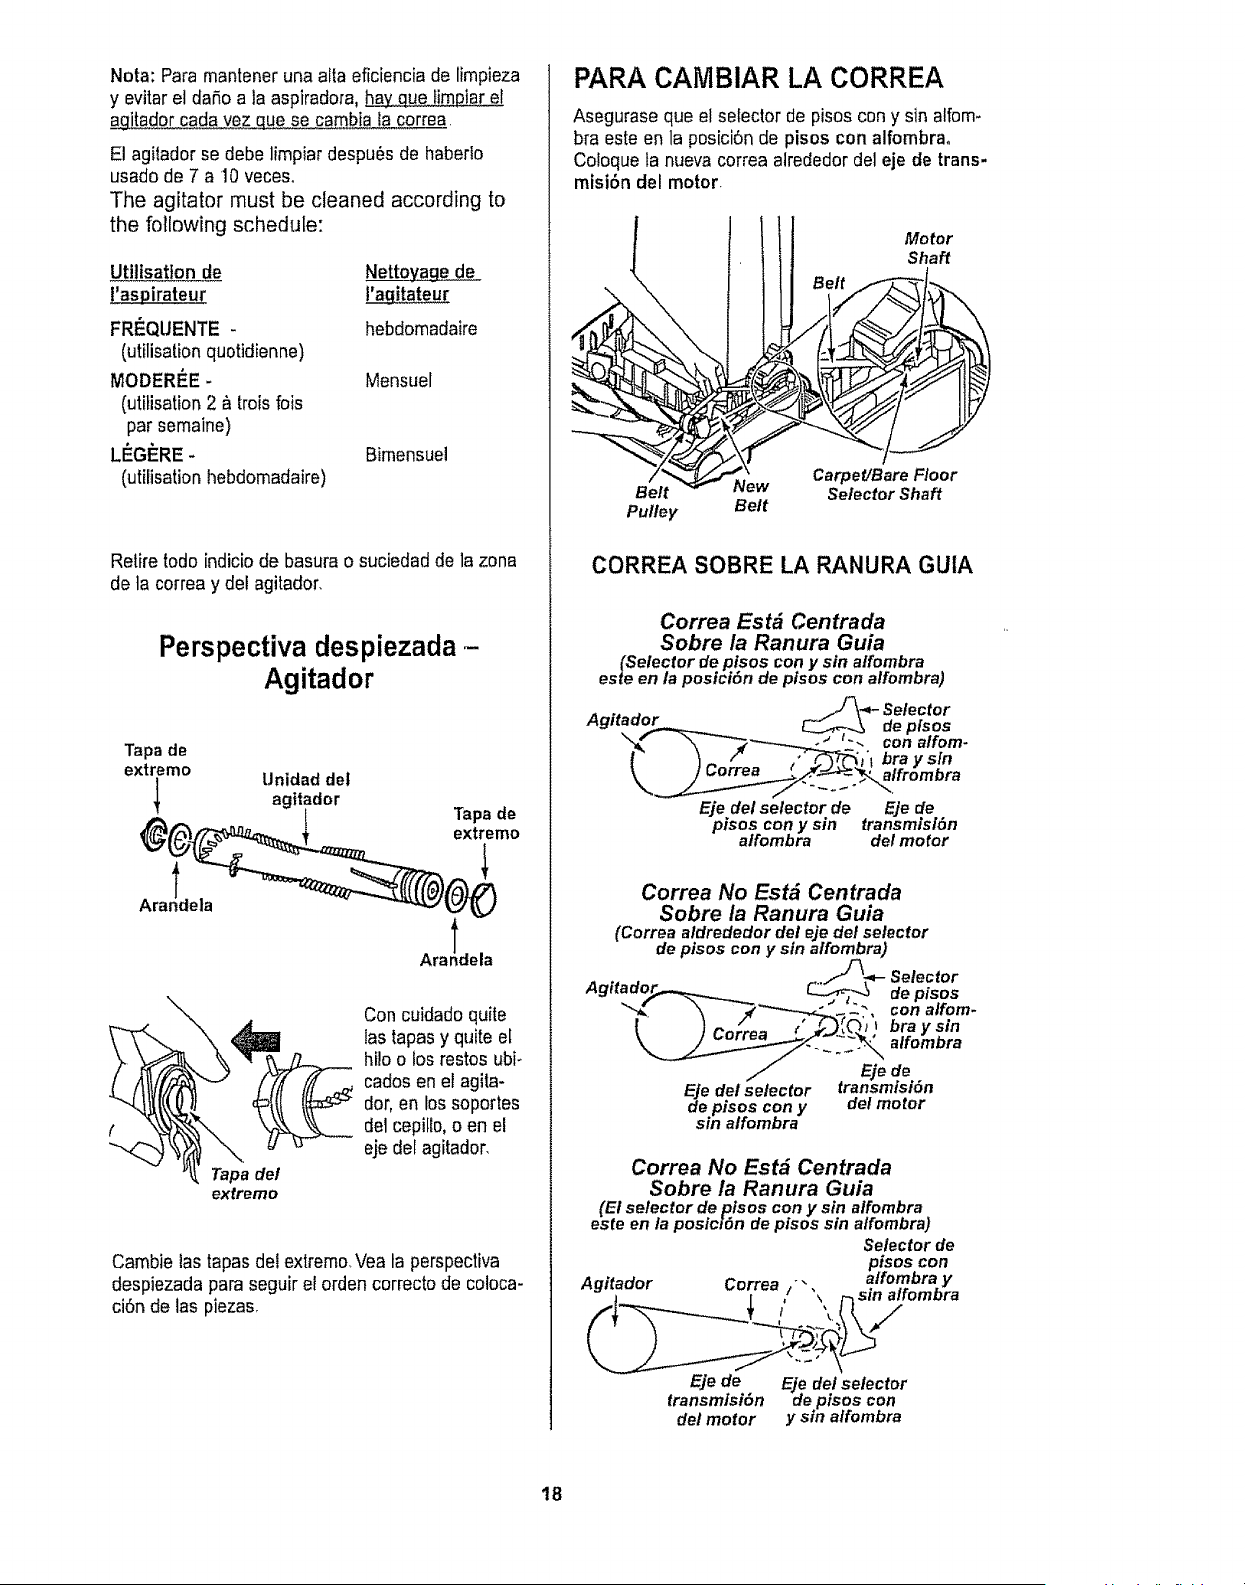
Nora: Para mantener una alta eficiencia de limpieza
y evitar el daSoa la aspiradora, _iar el
agitador cada vez que se cambia la correa.
El agitador se debe limpiar despu_s de habedo
usado de 7 a 10 veceso
The agitator must be cleaned according to
the following schedule:
Utiiisatton de Nettova_e de
I'agitateur
FRF.QUENTE -
(utilisation quotidienne)
MODERI_E-
(utitisation 2 &trois fois
par semaine)
LI_GF_RE-
(utilisation hebdomadaire)
hebdomadaire
Mensuel
Bimensuel
Retire rode indicio de basura o suciedad de la zona
de la correa y del agitador.
Perspectiva despiezada-
Agitador
Tapa de
extreme
Unidad det
agitador
Ara!dela
\
Tapade
extreme
Ara!dela
Con cuidado quite
tastapas y quite el
hi!o o los restos ubi-
carlos en el agita-
dot, en los soportes
del cepilto, o en el
. eje det agitador,
Tapa del
extreme
Cambie las tapasdei extremo_Vea la perspectiva
despiezada para seguir el orden correcto de coloca-
ci6n de las piezas.
PARA CAIVIBIAR LA CORREA
Asegurase que el selector de pisos con y sin alfom-
bra este en la posici6n de pisos con alfombra.
Coloque la nueva correa alrededor del eje de trans-
misi6n del motor.
Motor
Shaft
Belt New
Pulley Belt
Carpet/Bare Floor
Selector Shaft
CORREA SOBRE LA RANURA GUIA
Correa Estd Centrada
Sobre la Ranura Guia
(Selector depisos con y sin a/fombra
esteen la posiciSn de pfsos conalfombra)
Eje del selector de Eje de
pisos con y sin transmtsl6n
affombra del motor
Correa No Estd Centrada
Sobre la Ranura Guia
(Correa aldrededor del eje del selector
de pisos con y sin alfombra)
de.pisos con del motor
sm alfombra y
Correa No Est# Centrada
Sobre la Ranura Guia
(El selector de _tsos con y sin alfombra
este en la posic_Sn de ptsos sin alfombra)
Selectorde
pisos con
Agitador Correa /'" atfombra y
]_ I , ",, r_ Sllf alromora
Eje de Eje de/selector
transmlsi6n depisos con
delmotor y sin alfombra
t8

Nora: Consulte las PIEZASAND
CARACTERISTICASpara determinar et N°. de cor-
rea
Ensarte la correa nueva sobre el agitador,
lnserte el agilador por insertar fa parte redonda de
la tapa en la ranura de la base de la boquilla,
Nota: Puede set necesario sacar o arrimar et pro-
tector de mueblespara poder insertar con facilidad
et agitador en la base de ta boquilla,
Agitador _._w-_._ Base
/ Ranura de la
Protector Tape del base de boquifla
de meubles extremo
Nota: Debido a la tensi6n de la correa, debe actuar
con cuidado al instalarla
A£
Empuje firme-
rnente para
revisarque
cada exlremo
est_ instalado
bien
Revise que la correa est6 en el centro de ta polea
Gire el agitador con sus dedos hasta que gire fibre-
mente el agitador
Para colocar la
cubierta del
agitador,
inserte las seis
(6) ieng_etas
en las ranuras
en la parte
adelante de la
base de la
boquilla
Leng_etas/
Ranuras
Baje ]a cubierta del agitador a la posici6noriginal
Despu_s de cotocar la cubierta del agitador,
Empuje hacia adelante en las dos (2) tengQetasde
cierre para asegurar que est6n en su colocaci6n
apropiada.
Abroche los
sujetadores
del protector
de muebles a
tas pestafias
en ambos
ladosde la
cubierta del
agitador,
Cubierta
del agitador
Sujetador
del protector
J_z'_ de meubles
Nora: Si la cubierta del agilador, empuje hacia ade-
lante en las dos (2) teng_etasde cierre para asegu-
rar que est6n en su colocaci6n apropiada
Asegt_reseque los cables de la iuz estObien instal-
ada,
El cable
de la luz
_ / Asegurar las ,=p '
]_L. _ apropiada _-_
Reemplazca la cubierta
de ,s _ii_: _
boquilla y asegure _i_'_+__I_
rta
la b_quflla
19
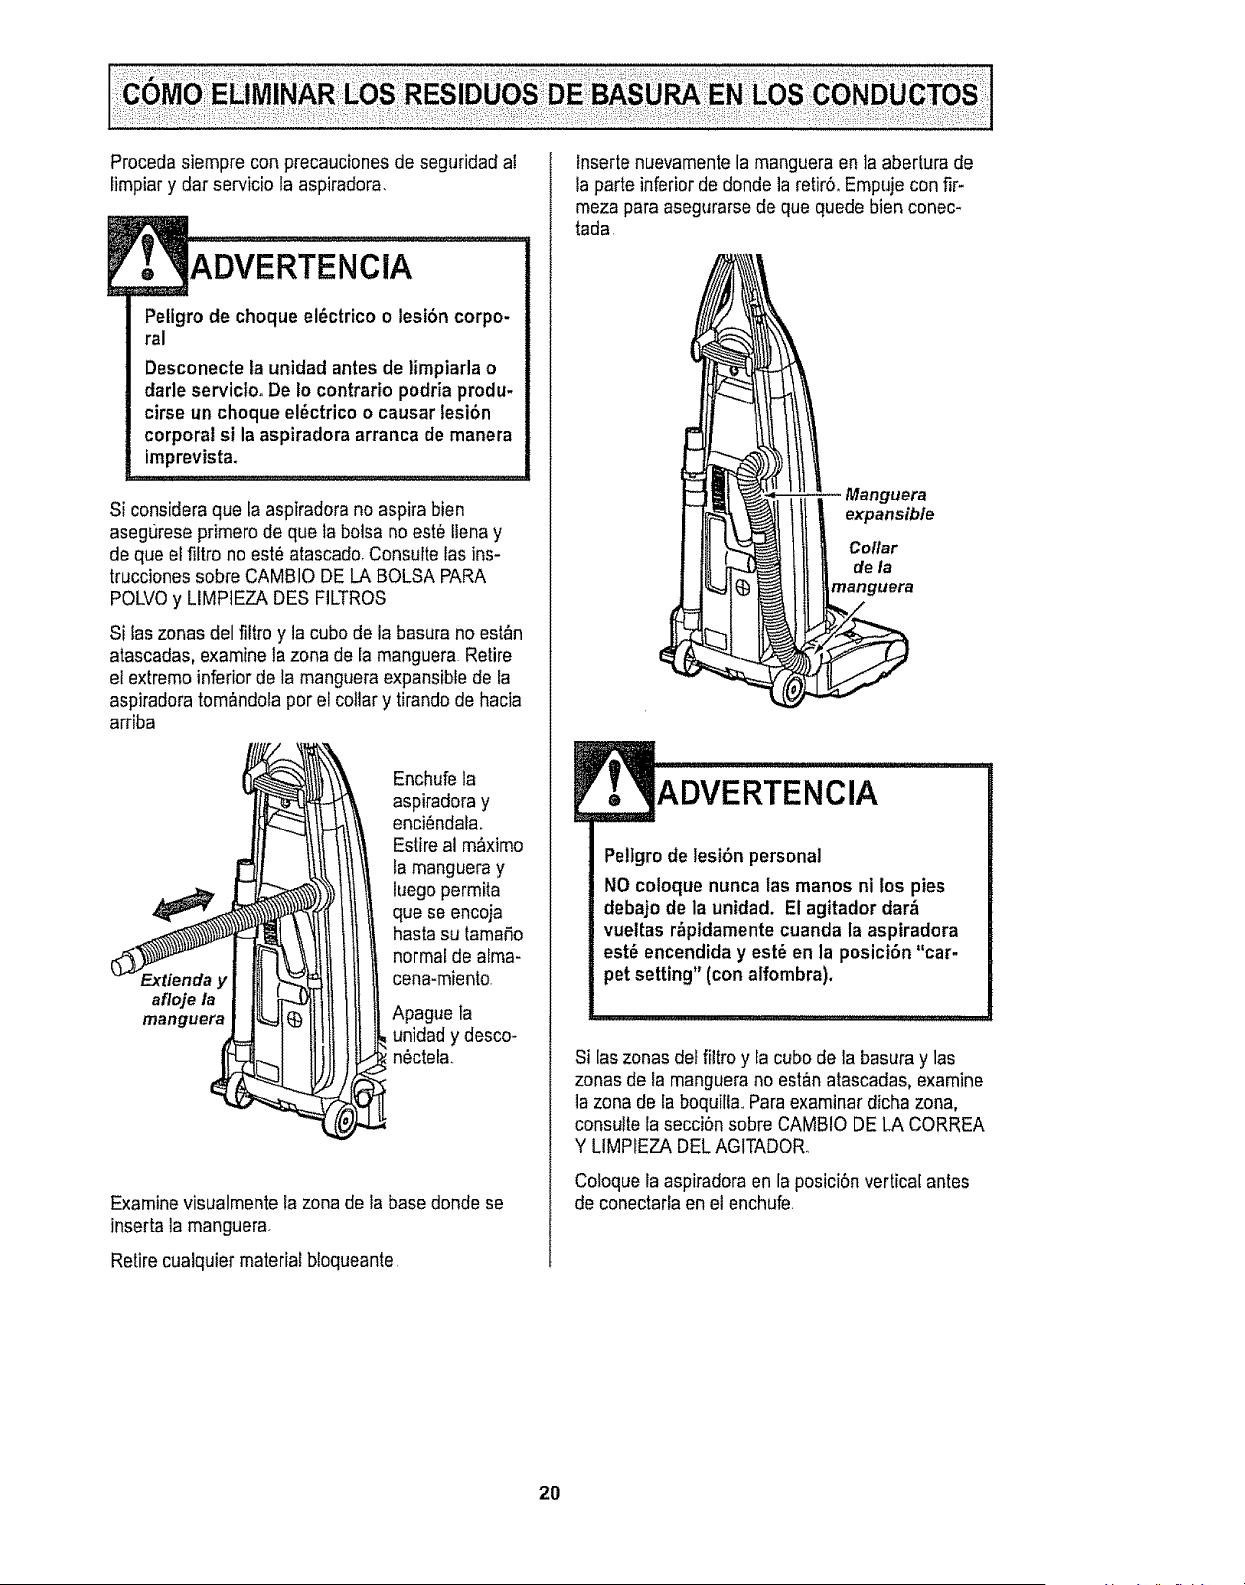
Procedasiempreconprecaucionesdeseguridadal
limpiarydarserviciolaaspiradora.
ADVERTENclA
Petigro de choque el_ctrico o lesi6n corpo-
ral
Desconecte ta unidad antes de limpiarla o
darle servicloo De to contrario podria produ.
cirse un choque el6ctrico o causar lesi6n
corporal si la aspiradora arranca de manera
imprevista.
Si considera que la aspiradora no aspira bien
asegurese primero de que la botsa no este !lena y
de que el fiftro no est_ atascado,Consutte las ins-
trucciones sobre CAMBIO DE LA BOLSA PARA
POLVOy LIMPIEZA DES FILTROS
Si Easzonas del filtro y la cubo de ia basura no est_n
atascadas, examine tazona de la manguera Retire
et extremo inferior de la mangueraexpansible de la
aspiradora tom&ndolapor el collar y tirando de hacia
arriba
afloje la
manguera
Enchufe la
aspiradora y
enci_ndala.
Estire al m_ximo
la manguera y
luego permita
que se encoja
hasta su tamat%
normal de alma-
cena-miento.
Apague la
unidady desco-
n6ctela.
Examinevisualmente ta zona de _abase donde se
inserta la manguera.
Retire cualquier material b{oqueante
lnserte nuevamentela manguera en ]a abertura de
Iaparte inferior de donde la retirS, Empuje con fir-
meza paraasegurarse de que quede bien conec-
tada
Manguera
i lltl l li I co. r
de la
ADVERTENCIA
Peltgrode lesibn personal
NO coloque nunca las manos ni los pies
debajo de la unidad. El agitador dar&
vueltas r_pidamentecuanda la aspiradora
est_ encendida y est_ en la posici6n "car-
pet setting" (conalfombra).
Si [aszonasdel filtro y la cubo de la basura y las
zonas de la manguerano est&natascadas, examine
la zona de la boquilia.,Paraexaminar dicha zona,
consuttela seccibn sobre CAMBIO DE LA CORREA
Y LIMPIEZA DEL AGITADOR.
Coloque la aspiradora en la posicibn vertical antes
de conectarla en el enchufe
2O
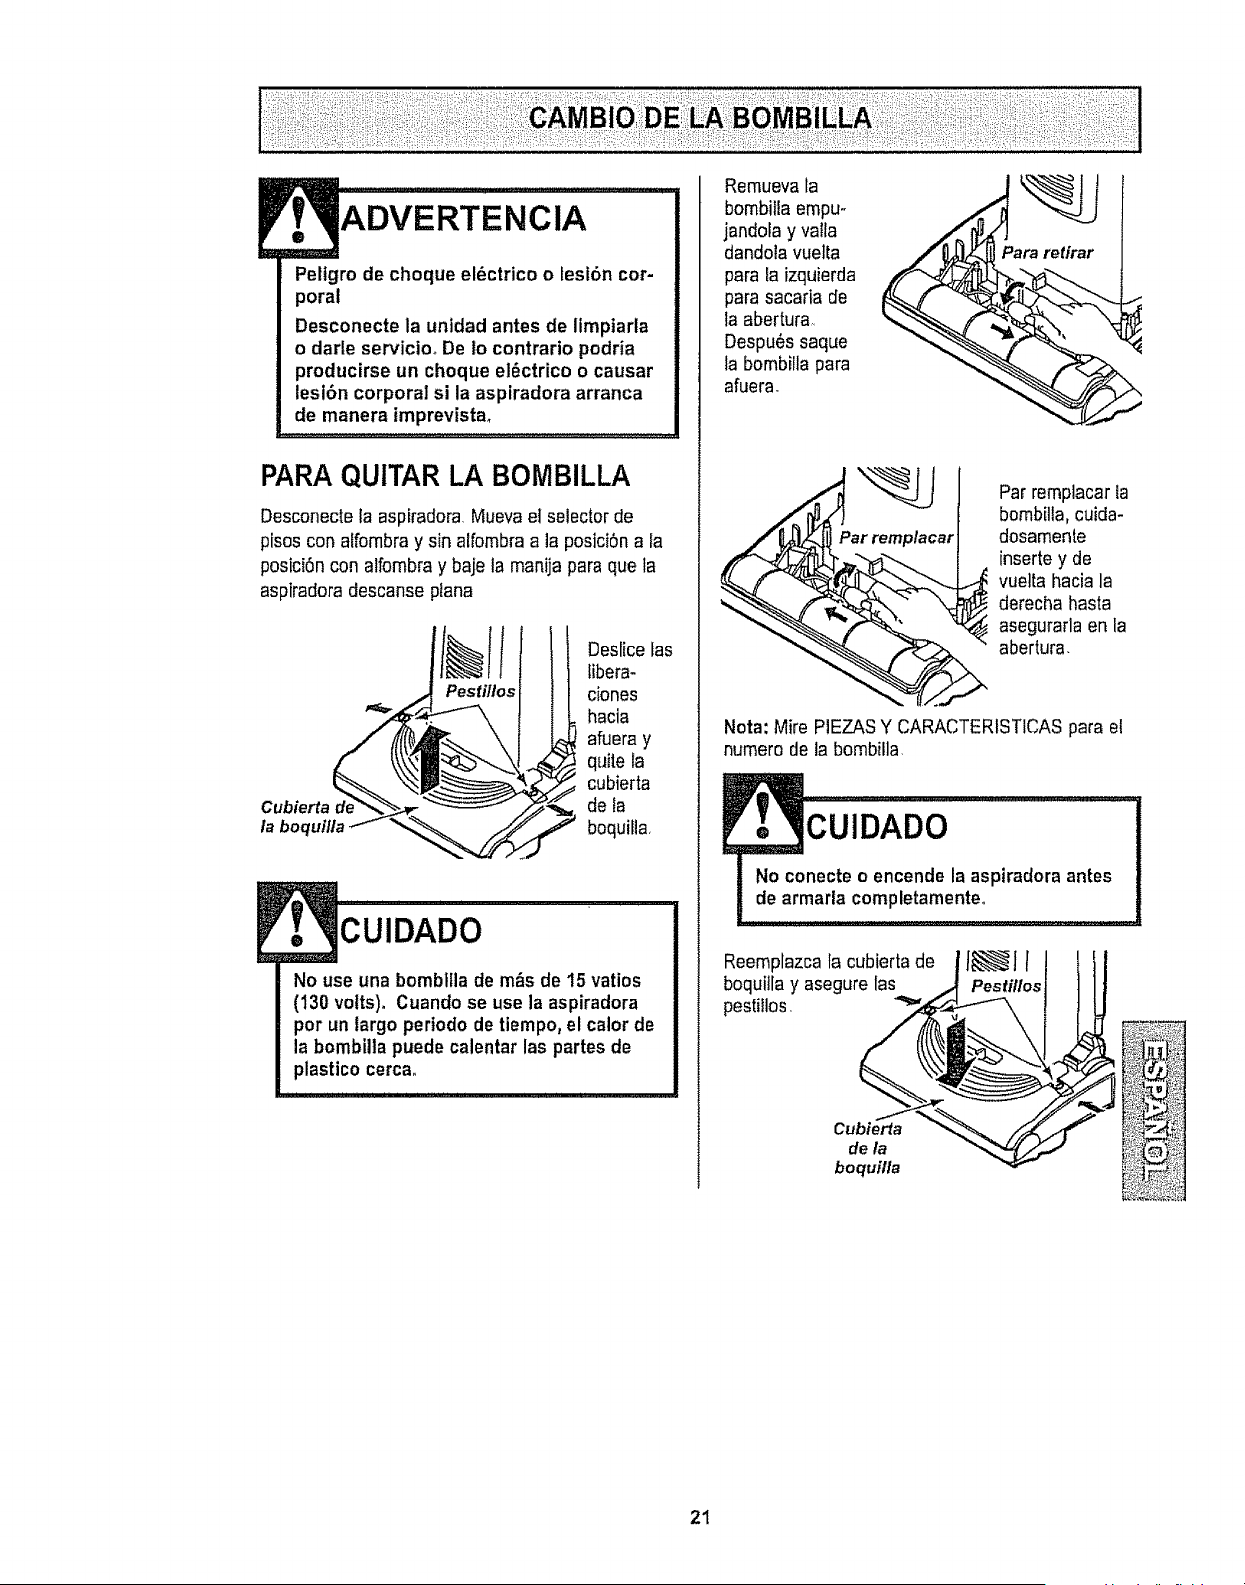
Peltgrodechoqueel_ctricoo lesf6n cor-
poral
Desconecte la unidad antes de limpiarla
o darle servicto_ De to contrario podria
producirse un choque el_ctrico o causar
lesi6n corporal si la asplradora arranca
de manera imprevista.
PARA QUITAR LA BOMBILLA
Desconecte la aspiradora Mueva el selector de
pisos con alfombray sin alfombraa la posici6n a la
posici6n con alfombray baje la manija para que la
aspiradora descanse ptana
Cubierta d__
la boquilla _ "<
Pestillos
Deslice fas
libera-
ciones
hacia
afuera y
quite la
cubierta
de la
boquilla,
i, i i i i
CUIDADO
No use una bombltlade m_s de 15 vatios
(130 volts). Cuando se use la aspiradora
por un largo periodo de tiempo, el calor de
la bombilla puede calentar las partes de
plastico cerca.
Remueva la
bombilla empu-
jandora y valla
dandola vuelta
para la izquierda
para sacaria de
la abertura.
Despu6s saque
la bombiila para
afuera_
Par remplacar
Par remplacar la
bombilla, cuida-
dosamente
inserte y de
_ uelta hacia la
derecha hasta
asegurarla en la
abertura.
Nota: Mire PIEZASY CARACTERISTICAS para el
numero de la bombilla.
CUIDADO
No conecte o encende la aspiradora antes
de armada completamenteo
Reemplazcala cubierta de
boquitla y asegure las
pestiilos.
Cubierta
de la
boquilla
Pestillos
21
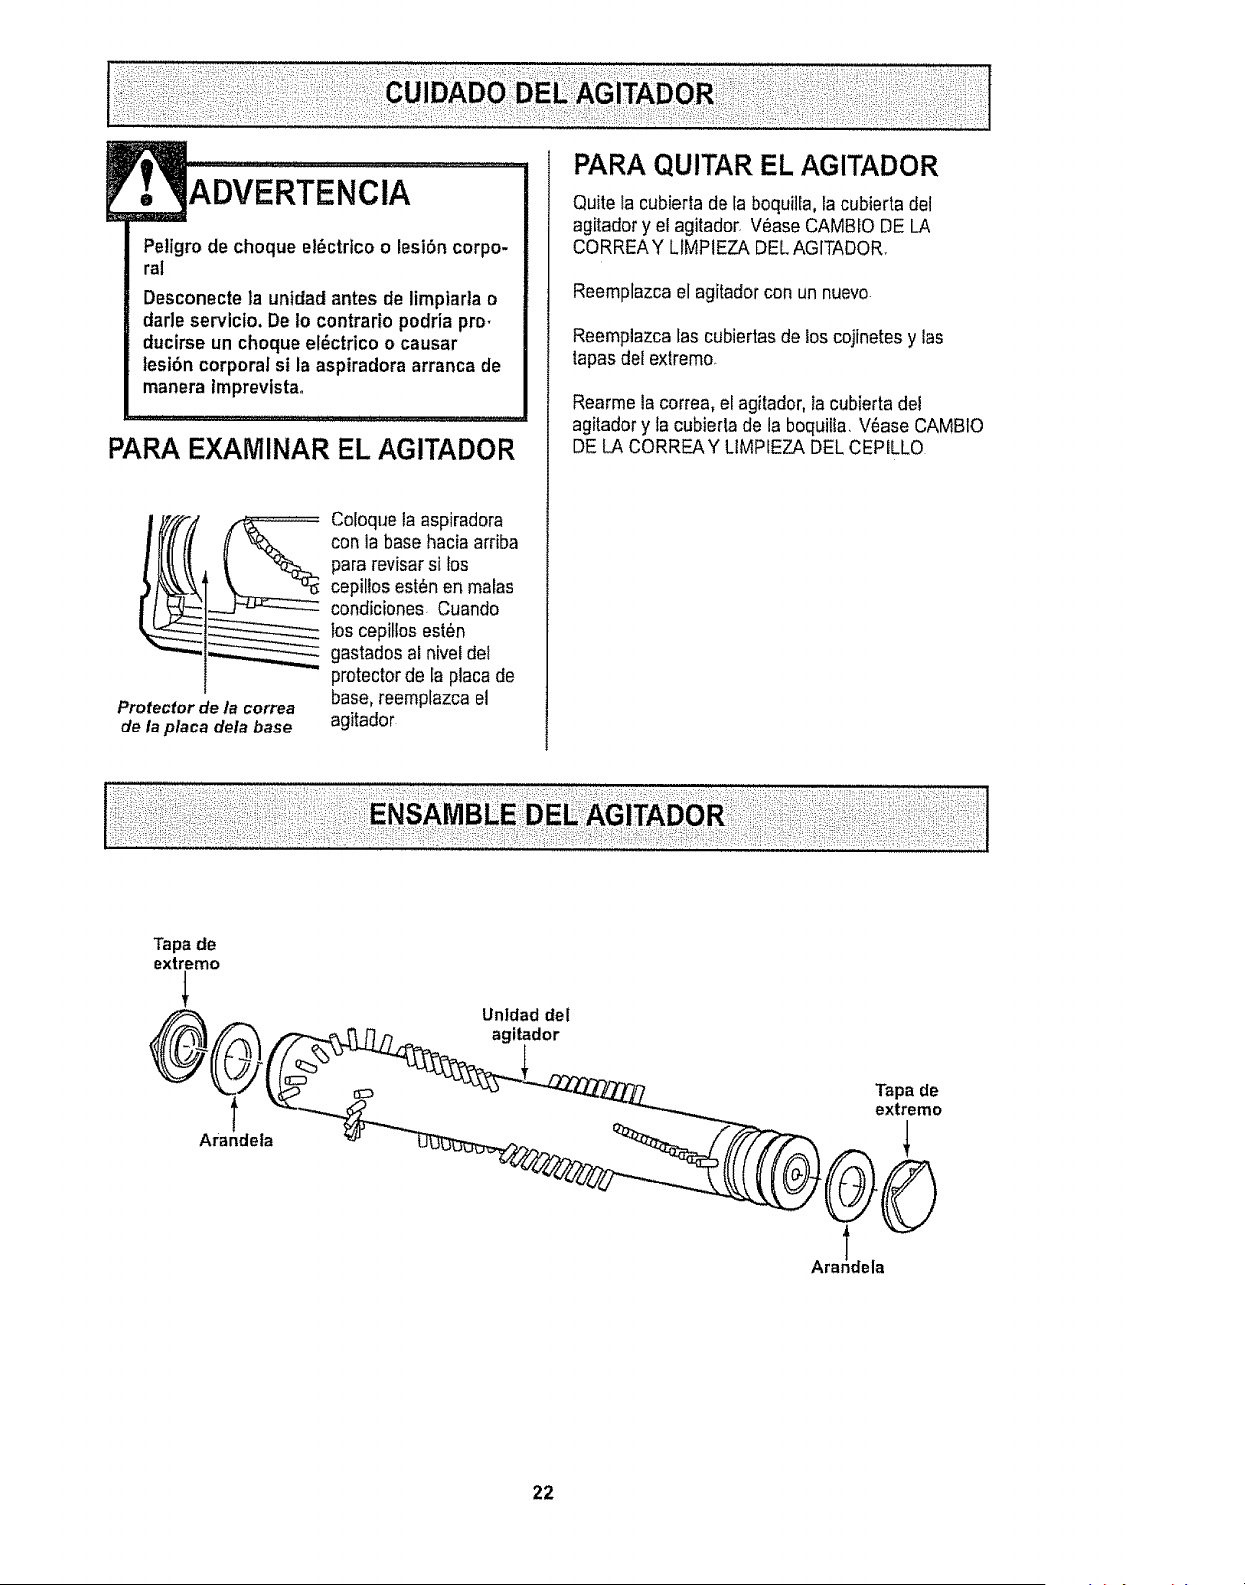
ADVERTENCIA
Petigro de choque el_ctrtco o lesi6n corpo-
ral
Desconecte la unidad antes de limptarta o
darle servicio, De 1ocontrario podria pro.
ducirse un choqueel_ctrico o causar
tesi6n corporal si la aspiradora arranca de
manera Imprevistao
PARA EXAMINAR EL AGITADOR
Protector d_ la correa
de la placa dela base
Coloque la aspiradora
con la base hacia arfiba
para revisar si los
cepillos est_n en malas
condiciones Cuando
los cepitlos est_n
gastados al nivel del
protector de la placa de
base, reemplazca el
agitador
Quite la cubierta de la boquiiEa,la cubiertadel
agitador y el agitador_V_ase CAMBLODE LA
CORREAY LIMPIEZA DEL AGITADOR.
Reemplazca el agitador con un nuevo
Reemplazca las cubiertas de los cojinetes y las
tapas del extremo.
Rearme la correa, el agitador, la cubierta dei
agitador y la cubierta de la boquilta, V6ase CAMBIO
DE LA CORREAY LIMPIEZA DEL CEPILLO
Tapa de
extremo
®,
Arandela
Untdad del
agitador
Tapade
extremo
Ara!dela
22
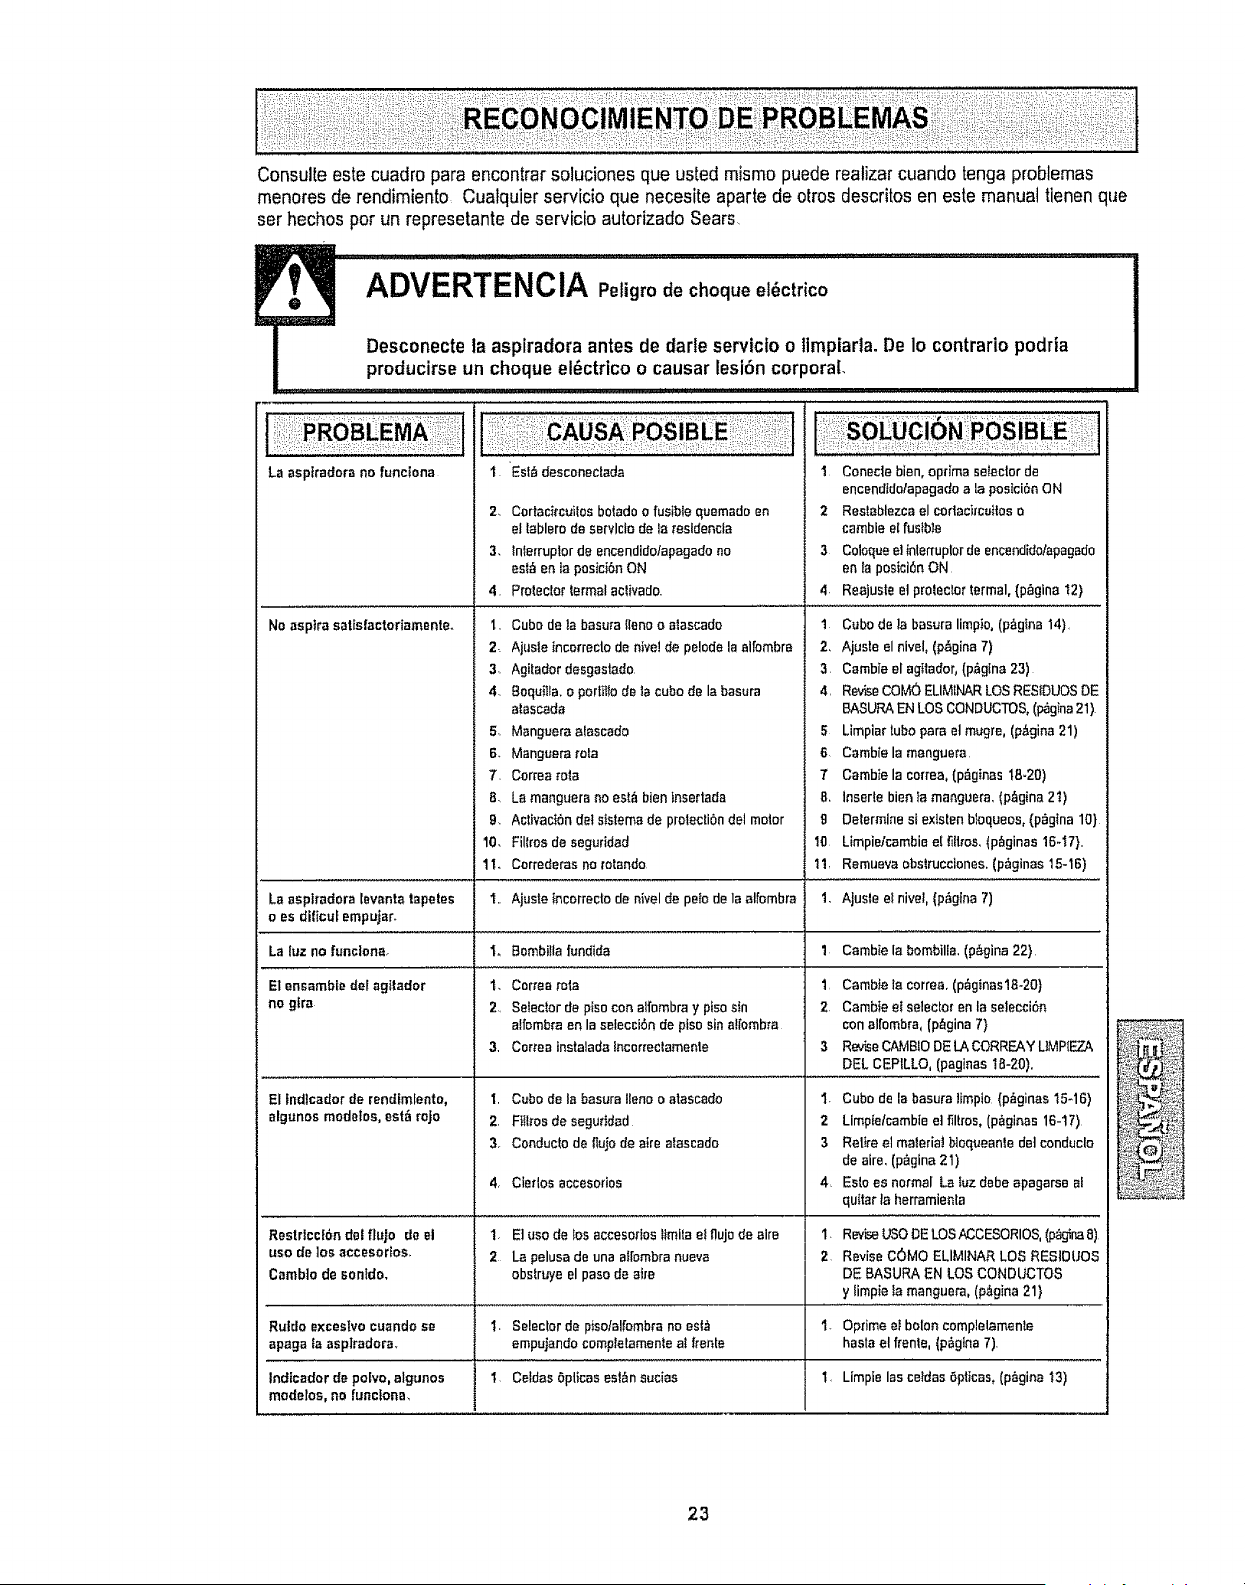
Consulte este cuadro para encontrar soluciones que usted mismo puede realizar cuando tonga problemas
menores de rendimiento Cualquier servicio que necesite aparte de arras descritos en este manual tienen que
ser hechos per un repress|ante de servicio autorizado Sears,
La aspfradora no funciona
I. EsW,desconectada
2. Cortacitcuitos boWdo o fusibIe quemado en
el lablero de servlcio de Ia resldencla
3. lnlerruplor de encendido/apegado no
est_ en la pesici6n ON
4. Pro|eclat formal sclivado.
I Console bien, optima selector de
ancendido/apagado ala pesici_n ON
2 Restablezca el cortacircuitos o
cambie el fuWbla
3 Coloque e] inlerruplor de encendido/epagado
en la pesici6e ON
4. Reajusle el prolector termal, (p_gina t2)
Ne aspire safisfactodamenteo
1. Cube de ]a basura{lenao alascado
2. Ajusle tncorreclode hive! de pelodela elfombre
3. Agitador desgastado.
4, 8oquiila.oportiIIode]ecubede labasura
atasceda
5. Mangueraafascado
6. Manguerarata
7. Conea rata
8_ La manguerano est_ bieninset|ads
Q_ ActivaciSndotsistemade prolectibndel meter
10, Fillrosde eeguridad
1t. Correderas ne re|ands
1 Cube de la basura limpio, (p_gina 14).
2, Ajuste el nivel, (p&gina 7)
3 Cambie el agitador, (p,_gina 23)
4. RevUeCOM(_ ELIMINAR LOS RESIDUes DE
BASURA EN LOS CONDUCTOS, (_gina 21)
5 Lirnpiar tube pare el mugm, (p&gina 21)
B. Cambie la manguera
T Cambie la cortes, (p_ginas 18-20)
B. Insefle bien Ia manguera, (pAgina 2'_)
g Delermine si existen btequeos0 (p_gina 10)
10 Limpieicambie el fiilres, (p_ginas 16-'_7}..
11, Rsmueva obs_ruccienes, (p_ginas 15-16)
La aspfradora lsvanta tape|as
o es dificuf empujar.
La luz no funciena.
E1ensambfe del agitador
no gtra
I.. Ajuste incorrecte de nivel de pe_ode la al[embra 1_ Ajuste e! nivel, (p_gina 7)
Io Bembi!la fundida 1 Cambie la bomb|lie, (p_,gina 22)
El tndicador de rendimlento,
elgunos modetos, est_ roJo
t,
2,
I,
2.
3_
Cortes rata 1.
SWeclor de piso con alfombra y piso Wn 2.
a!rombm en la seleccibn de pfso sin el[ombra
Certes instalada lncorrectamenle 3
Cube de la basura liana o alascedo I.
FIil_rosde segurided 2
Conducto de fiujo de aim alascado 3
4
4, Cter|os accesofios
Restrlcc}bn del fluje de el 1, E| use de los accesodos _imi[a e! flujo de elm
use de |as accesodos, 2 La pelusa de una a_[ombra nueve
Camb]o de sonido, obstruye el paso de sire
Ruldo exceslvo cuando se I_ Seleclor de piso/alfombra no esf,_
apaga fa aspiradora, empujando completamente a_ fronts
Indicador de polvo, algunos 1_ Celdes 5pticas esl,_n sucias 1. Limpie las ceidas Opiicas, (p_gina !3)
modetos, no functonm
CamWe la correa, (p_ginas18-20}
Cambte eI selector en la se]ecci6n
con al[ombra, (p_gina 7}
RevUeCAMBIO DE LA CORRF..AYUMPIF..Z_
DEL CEPILLO, (paginas 18-20),
Cube de la basura limpio {p_ginas 15-16)
Limptelcambie e] filtros, (peg|has 16-t7)
Rel}re el meier|at biaqueanle del conduclo
de sire, (p_gina 21)
Esto es normal La Iuz debe apagarse al
quitar la herramie_la
I. ReviseUSODELOSN;CESORIOS, (p_g_naS)
2 Revise COMe ELIMINAR LOS RESIDUES
DE BASURA EN LOS CONDUCTOS
y limpie Ia manguera, (p_gina 21}
1. Optima el bolon complelamen|e
haste el frenle, (p6gtna 7).
23
your homeor
ours!
:i
:: 12_
: :?:!i
:!
? ;
: :L
; :
• 7_ •:7!clr
i ¸ : _ :_;i
!:i?i!ili :,
•:i,:Mi:;:i
;ii!:_!!
Your Home
For repair- tn yo_r :t'_m_- ot'a!l m_im" brand ,Bpp,!imqce_,
lawr_ and garden aCluiPmant,or hea.ting arid cc,ali:ngsystems,
no m_r Who m_de il_,no m_tte_ whe sold tt!
Ft_t 1Ji_ _epl_m,8_ pa_, _C_$sorie$ ,ar_di
e_wner's mammals lhBt yg_U neb%! _< d.o4t-yourselL
FOr Se_r.s _'ol_e_jo_ ins_ll_1_ar_ el home app[_a_cas
_nd _oms I_ke@ara_ •door _pener_ and water heaters,
1,=800=_MY,,HO,ME g_ ._,_airr_, dai ar ni_ht
Out H_
For repair or _r_-ir_ ptodvc_t, iike vacuums, lawr_ er._Jipm_nl.
arid el_cl_onI;e,, ml! or g_ o_.!ine fo_ l,h_ ne_re,_t
_, .s4111!_i,_l;ttr!
To 'pumh'._-,_,apr_gc.'asl _mement {15,S,A.)
or'ma_onm_.e.a_o_m_t (_"04_a_.') cv_a f_oduct =_r_J by S_ _at_:
L,!i:ili_II_::_17
i
ad_mldl_ y pamom_nar p1,_.._:
Au ¢_ _r _erd_ en '_is: