W11408557A
W11408565-SP
French Door Bottom Quick Start Guide
OPERATING INSTRUCTIONS
IMPORTANT: Before operating this appliance, make sure it has been properly installed according to the
appliance’s Owner’s Manual.
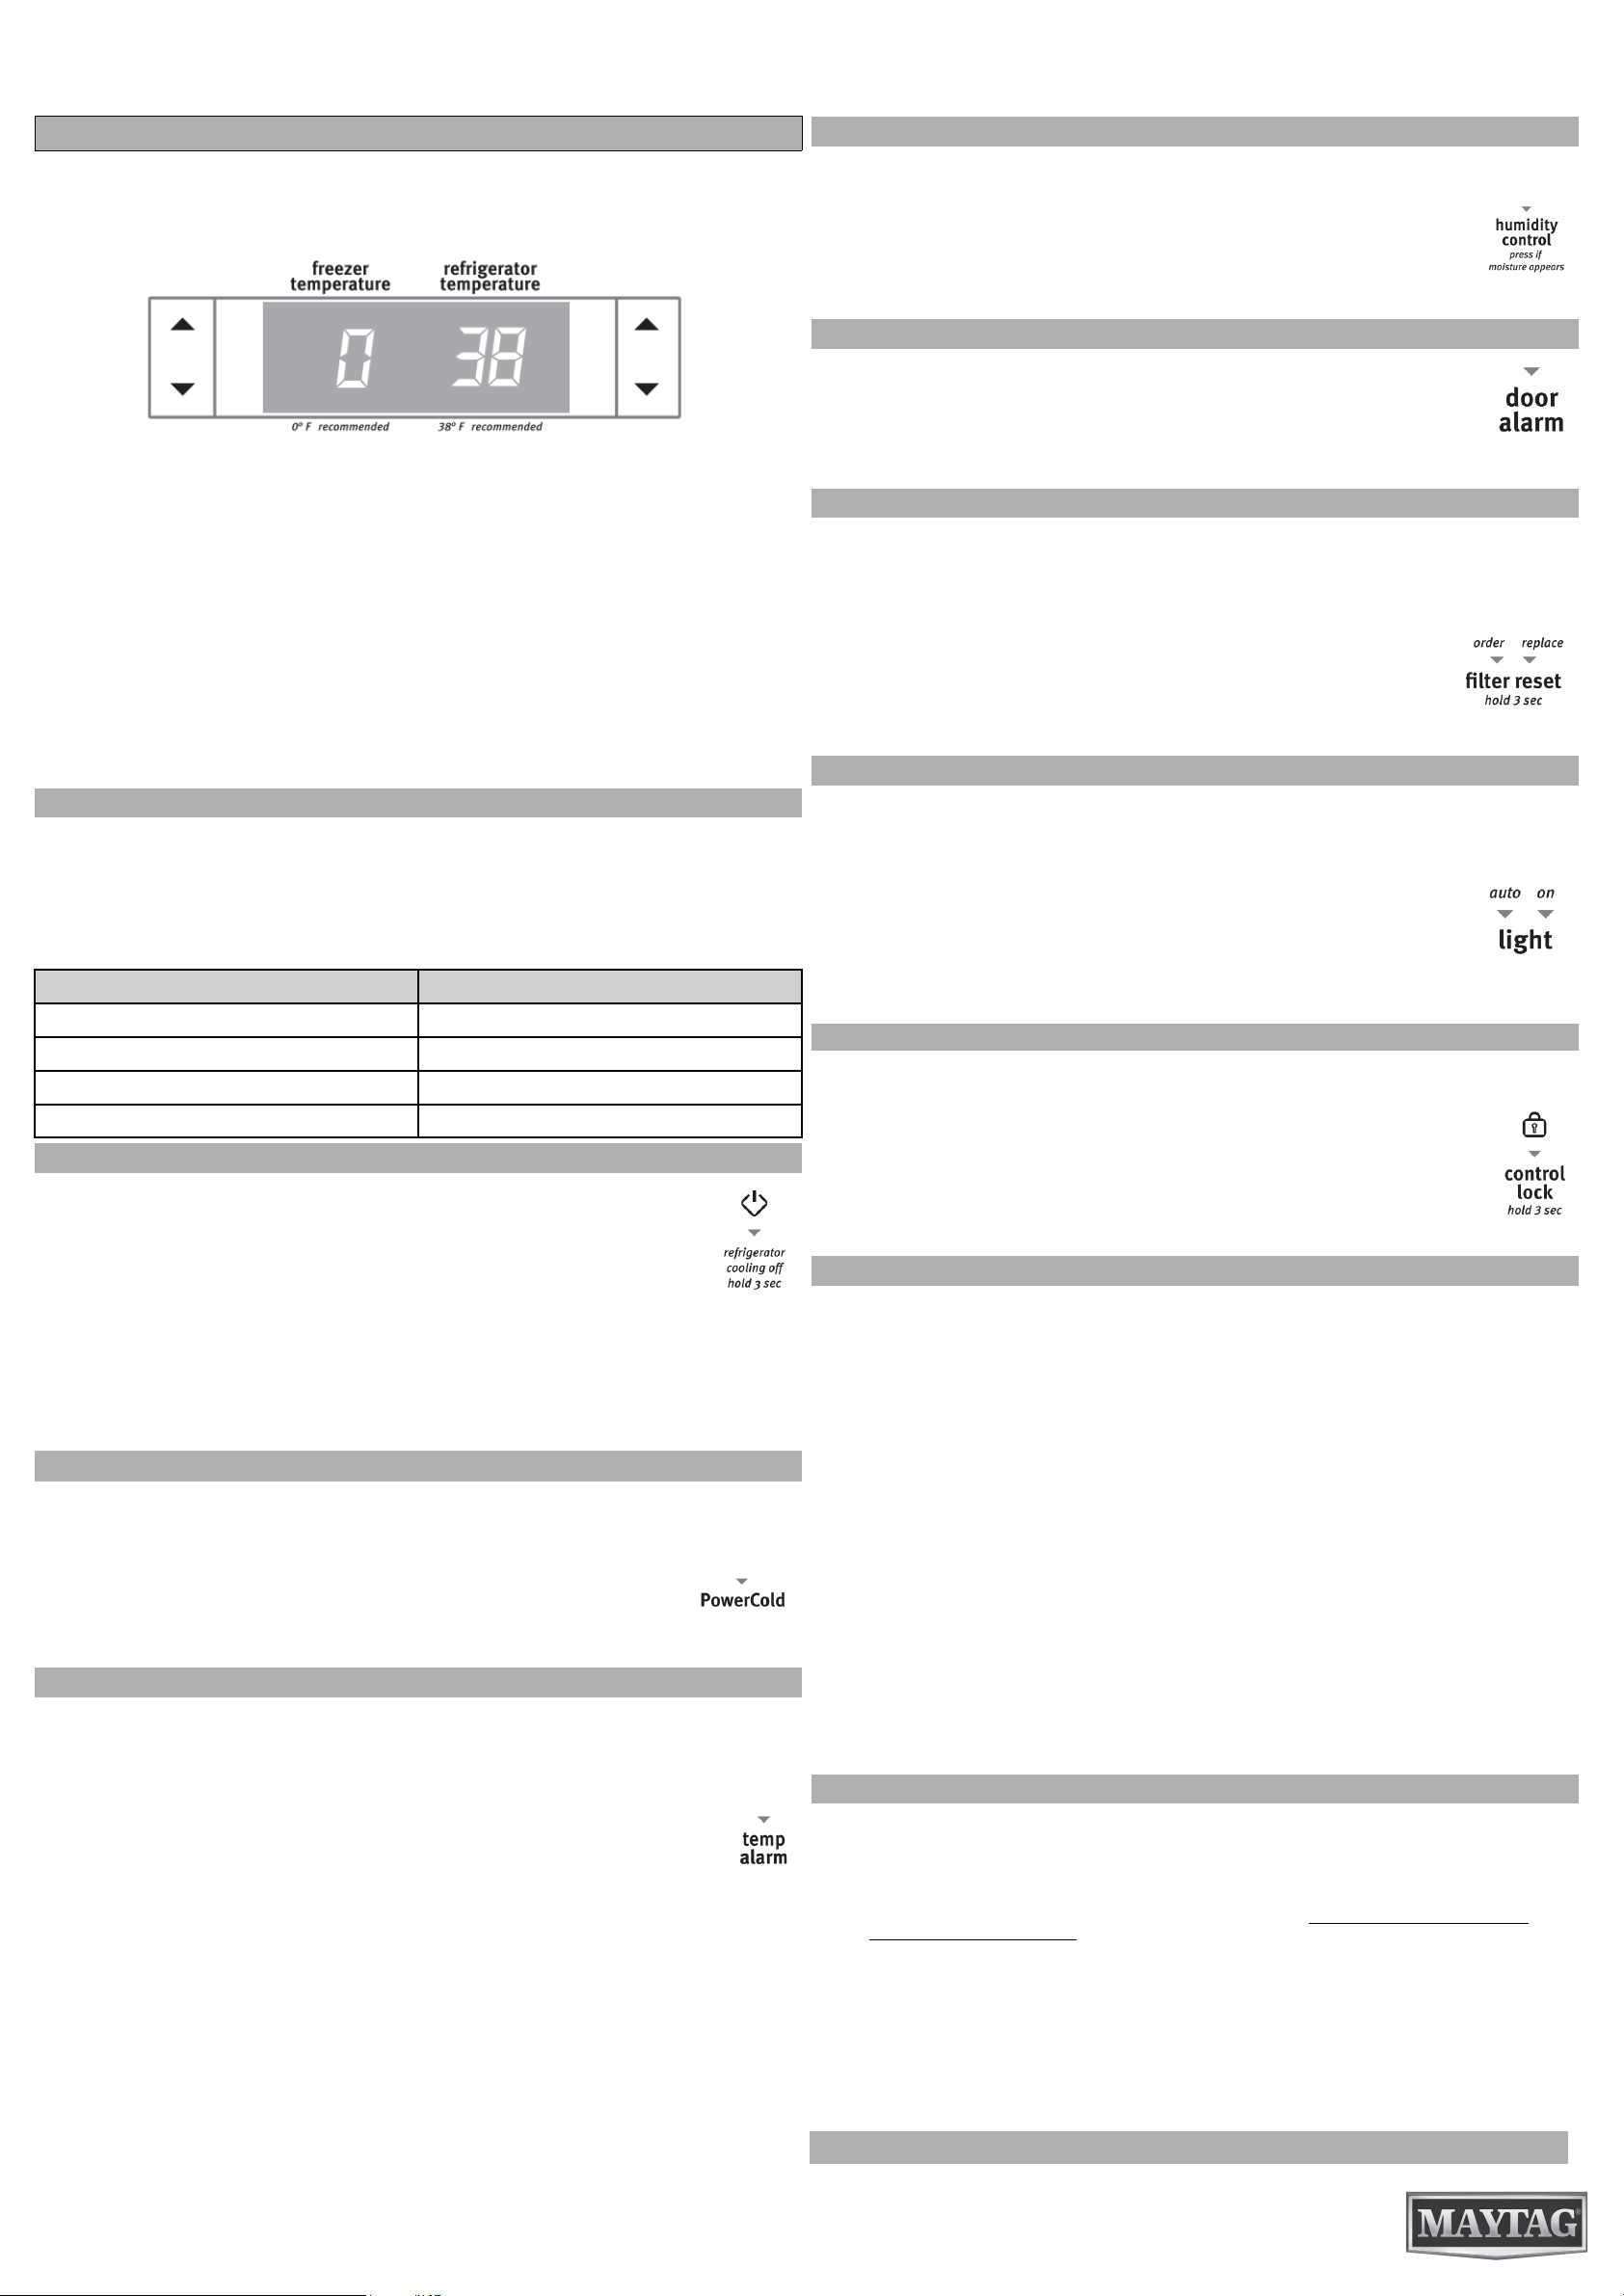
For your convenience, your temperature controls are preset at the factory. When you first install your refrigerator,
make sure the controls are still set to the recommended set points as shown.
IMPORTANT:
� The recommended settings should be correct for normal household refrigerator use. The controls are set
correctly when milk or juice is as cold as you like and when ice cream is firm.
NOTE: Areas such as a garage, basement, or porch may have higher humidity or extreme temperatures. You
may need to adjust the temperature away from the recommended settings to accommodate for these
conditions.
� When the power is on, the temperature display shows the set point temperature of the compartment.
� Wait 24 hours for your refrigerator to cool completely before adding food. If you add food before the
refrigerator has cooled completely, your food may spoil.
NOTE: Adjusting the refrigerator and freezer controls to a colder than recommended setting will not cool the
compartments any faster.
� If the temperature is too warm or too cold in the refrigerator or freezer, first check the air vents to be sure they
are not blocked before adjusting the controls.
� Wait at least 24 hours between adjustments. Recheck the temperatures before other adjustments are made.
TEMPERATURE SET POINTS
The Refrigerator control adjusts the refrigerator compartment temperature. The Freezer control adjusts the
freezer compartment temperature.
Press the up or down arrow touch pads until the desired temperature set point is displayed.
NOTE: Except when starting the refrigerator, do not adjust the control more than one setting at a time. Wait 24
hours between adjustments for the temperature to stabilize.
When adjusting temperature set points, use the following chart as a guide.
CONDITION: TEMPERATURE ADJUSTMENT:
Refrigerator too cold Refrigerator setting 1° higher
Refrigerator too warm Refrigerator setting 1° lower
Freezer too cold Freezer setting 1° higher
Freezer too warm / too little ice Freezer setting 1° lower
COOLING ON/OFF
Depending on your model you may have a control center with an On/Off button, or you may
have a control center without an On/Off button.
The On/Off control turns off cooling for both compartments and turns off the dispenser. It does
not disconnect power to the refrigerator.
Style 1–With an On/Off button
Press and hold the On/Off button for 3 seconds. The red LED will light up to indicate that cooling
is Off. Press On/Off again to turn cooling back on. The LED will turn off.
Style 2–Without an On/Off button
Press the Freezer up arrow touch pad until off appears in the display. Neither compartment will cool. Press the
Freezer or Refrigerator down arrow touch pad to turn cooling back on.
PowerCold
®®
FEATURE
The PowerCold
®
feature assists with periods of high refrigerator use, full grocery loads, or temporarily warm room
temperatures. Once selected, Fast Cool will remain on for 24 hours unless manually turned off.
Press the PowerCold
®
touch pad to set the freezer and refrigerator to the lowest temperature
settings. Press the PowerCold
®
touch pad again to return to the normal refrigerator set point.
NOTE: The PowerCold
®
feature will automatically shut off in approximately 2 hours. When
PowerCold
®
feature is on, the temperature cannot be adjusted.
TEMP ALARM
The Temp Alarm feature provides temperature information in the event of a power outage.
Temperature alarm: An alarm will sound repeatedly if the freezer or refrigerator compartment temperatures
exceed normal operating temperatures for an hour or more.
The temperature displays will alternately show the current temperatures and the highest
temperatures the compartments reached.
Press the Temp Alarm touch pad once to stop the audible alarm and alternating temperature
displays. The Temp Alarm light will continue to flash until the refrigerator returns to the set
temperature.
Power outage: During a power outage, if the temperatures in the refrigerator and freezer compartments exceed
normal operating temperatures, the highest temperature reached will be displayed.
Press the Temp Alarm touch pad until the indicator light is lit, to turn on this feature. Press and hold Temp Alarm
for 3 seconds until the indicator light goes off to turn off this feature.
HUMIDITY CONTROL (on some models)
The Humidity Control feature turns on a heater to help reduce moisture on the door hinge seal.
Use in humid environments or when you notice moisture on the door hinge seal. The
refrigerator uses more energy when Humidity Control is on.
Press Humidity Control to turn on the door heater. Press Humidity Control again to turn off
the heater. The LED will be illuminated when Humidity Control is on.
DOOR ALARM
The Door Alarm feature sounds a chime every few seconds when the refrigerator door has
been left open for 5 continuous minutes. The chime will sound until the door is closed or
Door Alarm is turned off.
Press the Door Alarm touch pad to turn this feature on or off. The indicator light will be lit
when the Door Alarm feature is on.
WATER FILTER STATUS
When a water filter has been installed in the refrigerator, the water filter status lights help you know when to
change your water filter. See “Water Filtration System” in the Owner’s Manual.
The disposable water filter should be replaced at least every 6 months. If the water flow to the water dispenser or
ice maker decreases noticeably before 6 months have passed, replace the water filter more often.
� Yellow: ORDER—The Order light will illuminate when 90% of the volume of water for
which the filter is rated has passed through the filter or 5 months have passed since the
filter was installed.
� Red: REPLACE—The Replace light will illuminate when the rated volume of water has
passed through the filter or 6 months have passed since the filter was installed. A new
water filter should be installed immediately when the Replace light is illuminated.
DISPENSER LIGHT
The dispenser lights are LEDs that cannot be changed. If it appears that your dispenser lights are not working,
see online “Troubleshooting” for more information.
When you use the dispenser, the lever will automatically turn the light on. If you want the light to be on
continuously, you may choose either On or Auto.
Auto: The light sensor monitors the light level in the room. The dispenser light will illuminate at
half-power when the light level is low. To activate the Auto option, press the Light button. The
Auto indicator light will illuminate.
On: For continuous light, press the Light button a second time. The On indicator light will
illuminate.
Off: To turn the dispenser light off, press the Light button a third time.
DISPENSER LOCK
The dispenser can be locked for easy cleaning or to avoid unintentional dispensing by small children and pets.
NOTE: The dispenser lock does not shut off power to the product, to the ice maker, or to
the dispenser light. It just deactivates the dispenser lever.
Press and hold the Control Lock touch pad for 3 seconds to lock the dispenser. The
indicator light will illuminate when Lock is on.
Press and hold the Control Lock touch pad again for 3 seconds to unlock dispenser. The
indicator light will turn off.
USER PREFERENCES
The control center allows you to set user preferences, if desired.
Temperature Display (F_C)
This preference allows you to change the
temperature display.
F - Temperature in degrees Fahrenheit
C - Temperature in degrees Celsius
Alarm (AL)
This preference allows you to turn off the sound of all
alarms.
On – You will hear the alarm sound.
Off – You will not hear the alarm sound.
Auto Light Level Selection (LL)
This preference allows you to adjust the dispenser
light level from dimmest to brightest (settings 1
through 9).
NOTE: The Auto Light feature on the control
center must be selected to activate this
preference.
Sabbath Mode (SAB)
On - All control center lights, interior lights and alarm tones
will be disabled.
Off - All control center lights, interior lights and alarm tones
will be enabled.
NOTE: Press and hold the Door Alarm touch pad for 3
seconds to restore all lights.
To Access the User Preferences Menu:
1. Press and hold the Door Alarm touch pad for 3 seconds. The preference name will appear in the freezer
display and the preference status (F or C) or (On or Off) will appear in the refrigerator display.
2. Use the freezer (+) or (-) touch pads to scroll through the preference names. When the desired preference
name is displayed, press the refrigerator (+) or (-) touch pads to change the preference status.
3. Set your preferences by pressing and holding the Door Alarm touch pad for 3 seconds, or by closing the
refrigerator compartment door.
Online Ordering Information
For detailed installation instruction and maintenance information, winter storage, and transportation tips, please
see the Owner’s Manual included with your appliance.
For information on any of the following items, the full cycle guide, detailed product dimensions, or for complete
instructions for use and installation, please visit https://www.maytag.com/owners, or in Canada
https://www.maytag.ca/owners. This may save you the cost of a service call.
However, if you need to contact us, use the information listed below for the appropriate region.
United States:
1–800–344–1274
Maytag Brand Appliances
Customer eXperience Center
553 Benson Road
Benton Harbor, MI 49022–2692
Canada:
1–800–688–2002
Maytag Brand Appliances
Customer eXperience Centre
200–6750 Century Ave.
Mississauga, Ontario L5N 0B7
SAVE THESE INSTRUCTIONS
Guide de démarrage rapide du réfrigérateur à porte à double battant et congélateur
au bas
INSTRUCTIONS D’UTILISATION
IMPORTANT: Avant d’utiliser cet appareil, s’assurer qu’il a été bien installé selon le manuel d’utilisation de
l’appareil.
À titre de commodité, les commandes de température sont préréglées à l’usine. Lors de l’installation initiale du
réfrigérateur, s’assurer que les commandes sont encore préréglées aux points de réglage recommandés comme
illustré.
IMPORTANT:
� Les réglages recommandés devraient être corrects pour une utilisation domestique normale du réfrigérateur.
Les réglages sont faits correctement lorsque le lait ou le jus sont aussi froids que désiré et lorsque la crème
glacée est ferme.
REMARQUE: Dans des zones comme un garage, un sous-sol ou un porche, la température peut être extrême
ou le taux d’humidité supérieur à celui de votre domicile. Il peut s’avérer nécessaire de modifier la température
à d’autres réglages que les réglages recommandés afin de s’adapter à ces conditions.
� Lorsque l’appareil est sous tension, l’afficheur de température indique la température réglée du compartiment.
� Attendre 24 heures pour que le réfrigérateur refroidisse complètement avant d’y placer des aliments. Si on
ajoute des aliments avant que le réfrigérateur ne soit complètement refroidi, les aliments risquent de se
gaspiller.
REMARQUE: Le fait de placer les commandes du réfrigérateur et du congélateur à un réglage plus froid que
le réglage recommandé ne refroidira pas les compartiments plus rapidement.
� Si la température est trop tiède ou trop froide dans le réfrigérateur ou le congélateur, vérifier d’abord les évents
pour s’assurer qu’ils ne sont pas bloqués, avant de régler les commandes.
� Attendre au moins 24 heures entre chaque modification. Vérifier à nouveau les températures avant de
procéder à d’autres modifications.
POINTS DE RÉGLAGES DE LA TEMPÉRATURE
La commande du réfrigérateur règle la température du compartiment de réfrigération. La commande du
congélateur règle la température du compartiment de congélateur.
Appuyer sur les touches tactiles à flèche vers le haut ou le bas jusqu’à ce que le point de réglage désiré de la
température s’affiche.
REMARQUE: Ne pas régler les commandes de plus d’un réglage à la fois, sauf lors de la mise en marche du
réfrigérateur. Attendre 24 heures entre chaque réglage pour que la température puisse se stabiliser.
Pour modifier les points de réglage de température, utiliser le tableau suivant comme guide.
ÉTAT : RÉGLAGE DE LA TEMPÉRATURE :
Réfrigérateur trop froid Réfrigérateur réglage 1° plus élevé
Réfrigérateur trop tiède Réfrigérateur réglage 1° plus bas
Congélateur trop froid Congélateur réglage 1° plus élevé
Congélateur trop tiède/trop peu de glaçons Congélateur réglage 1° plus bas
MARCHE/ARRÊT DU REFROIDISSEMENT
Selon le modèle, le centre de commande peut être muni d’un bouton On/Off (marche/arrêt) ou
ne pas avoir un tel bouton.
La commande On/Off (marche/arrêt) arrête le refroidissement des deux compartiments, ainsi
que le distributeur. La commande ne déconnecte pas le réfrigérateur de l’alimentation
électrique.
Style 1 – avec bouton marche/arrêt
Appuyer sur le bouton On/Off (marche/arrêt) pendant 3 secondes. La DEL rouge s’allume pour
indiquer que le refroidissement est désactivé. Appuyer à nouveau sur On/Off (marche/arrêt)
pour remettre en marche le refroidissement. La DEL s’éteint.
Style 2 – sans bouton marche/arrêt
Appuyer sur la commande à flèche vers le haut du congélateur jusqu’à ce que Off (arrêt) apparaisse sur
l’affichage. Aucun compartiment ne refroidira. Appuyer sur la commande à flèche vers le bas du réfrigérateur ou
du congélateur pour réactiver le refroidissement.
PowerCold
®®
CARACTÉRISTIQUE
La fonction PowerCold
®
est utile lors de périodes d’utilisation intense du réfrigérateur, de l’ajout d’un grand
nombre d’aliments ou d’une élévation temporaire de la température ambiante. Une fois sélectionnée, la
caractéristique Fast Cool (refroidissement rapide) reste activée pendant 24 heures à moins d’être annulée
manuellement.
Appuyer sur le bouton PowerCold
®
pour placer le congélateur et le réfrigérateur aux réglages
de température les plus bas. Appuyer sur le bouton PowerCold
®
de nouveau pour revenir au
point de réglage normal du réfrigérateur.
REMARQUE: La fonction PowerCold
®
s’éteint automatiquement au bout de 2 heures environ.
Lorsque la fonction PowerCold
®
est en marche, la température ne peut pas être réglée.
TEMP ALARM (alarme de température)
La caractéristique Temp Alarm (alarme de dépassement de température) fournit des renseignements sur la
température en cas de panne de courant.
Alarme de température : Un signal d’alarme sera émis à plusieurs reprises si les températures des
compartiments de réfrigération ou de congélation excèdent les températures de fonctionnement normales
pendant une heure ou plus.
L’affichage indique alternativement les températures actuelles et les températures les plus
élevées atteintes dans les compartiments.
Appuyer une fois sur la touche Temp Alarm (alarme de dépassement de température) pour
arrêter le signal sonore et l’alternance d’affichage des températures. Le témoin Temp Alarm
continue de clignoter jusqu’à ce que le réfrigérateur revienne à la température réglée.
Panne de courant : Au cours d’une panne de courant, si les températures dans les compartiments de
réfrigération et de congélation excèdent les températures de fonctionnement normales, la plus haute température
atteinte sera affichée.
Pour activer cette caractéristique, appuyer sur la touche Temp Alarm (alarme de dépassement de température)
jusqu’à ce que le témoin lumineux s’allume. Pour désactiver cette caractéristique, appuyer sur Temp Alarm
(alarme de dépassement de température) pendant 3 secondes jusqu’à ce que le témoin lumineux s’éteigne.
HUMIDITY CONTROL (contrôle de l’humidité) (sur certains modèles)
La caractéristique Humidity Control (contrôle de l’humidité) met en marche un dispositif de chauffage pour aider à
réduire l’humidité sur le joint de la charnière de porte.
À utiliser dans des environnements humides ou en cas d’observation d’humidité sur le joint
de la charnière de porte. Le réfrigérateur consomme plus d’énergie lorsque la commande
d’humidité est activée.
Appuyer sur Humidity Control (réglage de l’humidité) pour activer l’avertisseur. Appuyer de
nouveau sur le bouton Humidity Control (réglage de l’humidité) pour éteindre le radiateur
portatif. La DEL est allumée lorsque la commande d’humidité est activée.
DOOR ALARM (alarme de porte)
La caractéristique Door Alarm (alarme de porte ouverte) fait retentir une sonnerie toutes les
quelques secondes lorsque la porte du réfrigérateur a été laissée ouverte continuellement
pendant 5 minutes. La sonnerie retentira jusqu’à ce que la porte soit fermée ou que la
caractéristique Door Alarm (alarme de porte ouverte) soit désactivée.
Appuyer sur la touche Door Alarm (alarme de porte ouverte) pour activer ou désactiver cette
caractéristique. Le témoin lumineux est allumé lorsque la caractéristique Door Alarm est
activée.
ÉTAT DU FILTRE À EAU
Lorsque le filtre à eau est installé dans le réfrigérateur, les témoins lumineux du filtre à eau indiqueront quand
changer le filtre à eau. Consulter la section « Système de filtration de l’eau » du manuel de l’utilisateur.
Le filtre à eau jetable doit être remplacé au moins tous les 6 mois. Si le débit d’eau au distributeur d’eau ou à la
machine à glaçons diminue de façon marquée avant que 6 mois ne se soient écoulés, remplacer le filtre à eau
plus souvent.
� Jaune : ORDER (commander) – Le témoin lumineux « Order Filter » (commander un
filtre) s’allume lorsque 90 % du volume d’eau pour lequel le filtre est paramétré est
passé par le filtre ou lorsque 5 mois se sont écoulés depuis l’installation du filtre.
� Rouge : REPLACE (remplacer) – Le témoin lumineux rouge Replace (remplacer)
s’allume lorsque le volume d’eau paramétré est passé par le filtre OU lorsque 6 mois se
sont écoulés depuis l’installation du filtre. Un nouveau filtre doit être installé
immédiatement lorsque le témoin lumineux Replace (remplacer) s’allume.
LUMIÈRE DU DISTRIBUTEUR
Les lampes du distributeur sont des DEL qui ne peuvent pas être remplacées. Si l’éclairage du distributeur ne
semble pas fonctionner, voir la section « Dépannage » pour plus d’information.
Lorsqu’on utilise le distributeur, la plaque allume automatiquement la lumière. Si l’on souhaite que les lampes
restent allumées en permanence, sélectionner On (marche) ou Auto (automatique).
Auto (automatique) : Le capteur d’éclairage contrôle le degré de luminosité dans la pièce. La
lampe du distributeur s’allume à la moitié de sa puissance lorsque la luminosité est faible. Pour
activer l’option Auto (automatique), appuyer sur le bouton Light (lampe). Le témoin lumineux
Auto s’allumera.
On (marche) : Pour un éclairage en continu, appuyer sur le bouton Light (lampe) une
deuxième fois. Le témoin lumineux On (marche) s’allumera.
Off (arrêt) : Pour fermer l’éclairage du distributeur, appuyer une troisième fois sur le bouton
Light (lampe).
VERROUILLAGE DU DISTRIBUTEUR
Le distributeur peut être verrouillé pour faciliter le nettoyage ou pour éviter la distribution involontaire par de
jeunes enfants ou par des animaux de compagnie.
REMARQUE: Le verrouillage du distributeur n’interrompt pas l’alimentation électrique à
l’appareil, la machine à glaçons ou la lampe du distributeur. Elle ne sert qu’à désactiver
la plaque du distributeur.
Appuyer et maintenir enfoncée la touche Control Lock (verrouillage) pendant 3 secondes
pour verrouiller le distributeur. Le témoin lumineux s’allume lorsque le distributeur est
verrouillé.
Appuyer et maintenir enfoncée la touche Control Lock (verrouillage) pendant 3 secondes
pour déverrouiller le distributeur. Le témoin lumineux s’éteint.
USER PREFERENCES (préférences utilisateur)
Le centre de commandes permet à l’utilisateur de régler ses préférences, au besoin.
Affichage de la température (F_C)
Cette préférence permet à l’utilisateur de modifier
l’affichage de la température.
F – Température en degrés Fahrenheit
C – Température en degrés Celsius
Alarme (AL)
Cette préférence permet à l’utilisateur de désactiver le son
de toutes les alarmes.
On (marche) – Le son de l’alarme sera audible.
Off (arrêt) – Le son de l’alarme ne sera pas audible.
Sélection du niveau de luminosité automatique
(LL)
Cette préférence permet à l’utilisateur de régler le
niveau d’éclairage du distributeur du plus faible au
plus lumineux (réglages 1 à 9).
REMARQUE: La caractéristique Auto Light
(éclairage automatique) du centre de commande
doit être sélectionnée pour activer cette
préférence.
Mode Sabbath (SAB)
On (marche) – Toutes les lumières du centre de
commande, l’éclairage intérieur et tous les signaux sonores
sont désactivés.
OFF (arrêt) – Toutes les lumières du centre de commande,
l’éclairage intérieur et tous les signaux sonores sont
activés.
REMARQUE: Appuyer et maintenir enfoncé la touche Door
Alarm (alarme de porte) pendant 3 secondes pour rétablir
toutes les lumières.
Pour accéder au menu User Preferences (préférences de l’utilisateur) :
1. Appuyer sur la touche Door Alarm (alarme de porte ouverte) pendant 3 secondes. Le nom de la préférence
apparaît sur l’affichage du congélateur et le statut de la préférence (F ou C) ou (On ou Off) (marche/arrêt)
apparaît sur l’affichage du réfrigérateur.
2. Utiliser les touches (+) ou (-) du congélateur pour faire défiler les noms de préférence. Lorsque le nom de la
préférence désirée s’affiche, appuyer sur la touche (+) ou (-) du réfrigérateur pour modifier le statut de la
préférence.
3. Enregistrer les préférences en appuyant sur la touche Door Alarm (alarme de porte ouverte) pendant 3
secondes ou en fermant la porte du compartiment de réfrigération.
Information de commande en ligne
Pour obtenir des instructions détaillées pour l’installation l’entretien, l’hivernisation, ainsi que des conseils de
transport, consulter le manuel de l’utilisateur inclus avec votre appareil.
Pour obtenir des informations sur l’un des points suivants guide complet des programmes, dimensions détaillées
du produit ou instructions complètes d’utilisation et d’installation, visiter le https://www.maytag.com/owners, au
Canada https://www.maytag.ca/owners. Cette vérification peut vous faire économiser le coût d’une intervention
de dépannage.
Cependant, si vous devez nous contacter, utiliser les coordonnées suivantes selon la bonne région.
États-Unis :
1–800–344–1274
Maytag Brand Appliances
Customer eXperience Center
553 Benson Road
Benton Harbor, MI 49022–2692
Canada:
1–800–688–2002
Maytag Brand Appliances
Centre d’eXpérience pour la clientèle
200–6750 Century Ave.
Mississauga, Ontario L5N 0B7
W11408557A
W11408565-SP
®/™ ©2020 Maytag. All rights reserved. Used under license in Canada.
Tous droits réservés. Utilisé sous licence au Canada.
CONSERVER CES INSTRUCTIONS