
THIS RANGE IS FOR RESIDENTIAL USE ONLY
Some models are supplied with a protective lm on steel and aluminium
parts. This lm must be removed before installing/using the appliance.
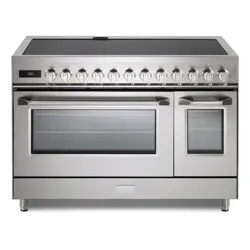
INDUCTION RANGE
for residential use only
Models: VDFSIE365..
INSTALLATION INSTRUCTIONS
IMPORTANT - PLEASE READ AND FOLLOW
• Beforebeginning,pleasereadtheseinstructionscompletelyandcarefully.
• Donotremovepermanentlyafxedlabels,warnings,orplatesfromtheproduct.Thismay
voidthewarranty.
• Pleaseobservealllocalandnationalcodesandordinances.
• Pleaseensurethatthisproductisproperlygrounded.
• The installer should leave these instructions with the consumer who should retain
for local inspector’s use and for future reference.
• INCANADA:Theelectricalplugshouldalwaysbeaccessible.
ElectricalinstallationmustbeinaccordancewiththeNationalElectricalCode,ANSI/NFPA70
-latesteditionand/orlocalcodes.
IN CANADA: Electrical installation must be in accordance with the current CSA C22.1
CanadianElectricalCodesPart1and/orlocalcodes.
R
2
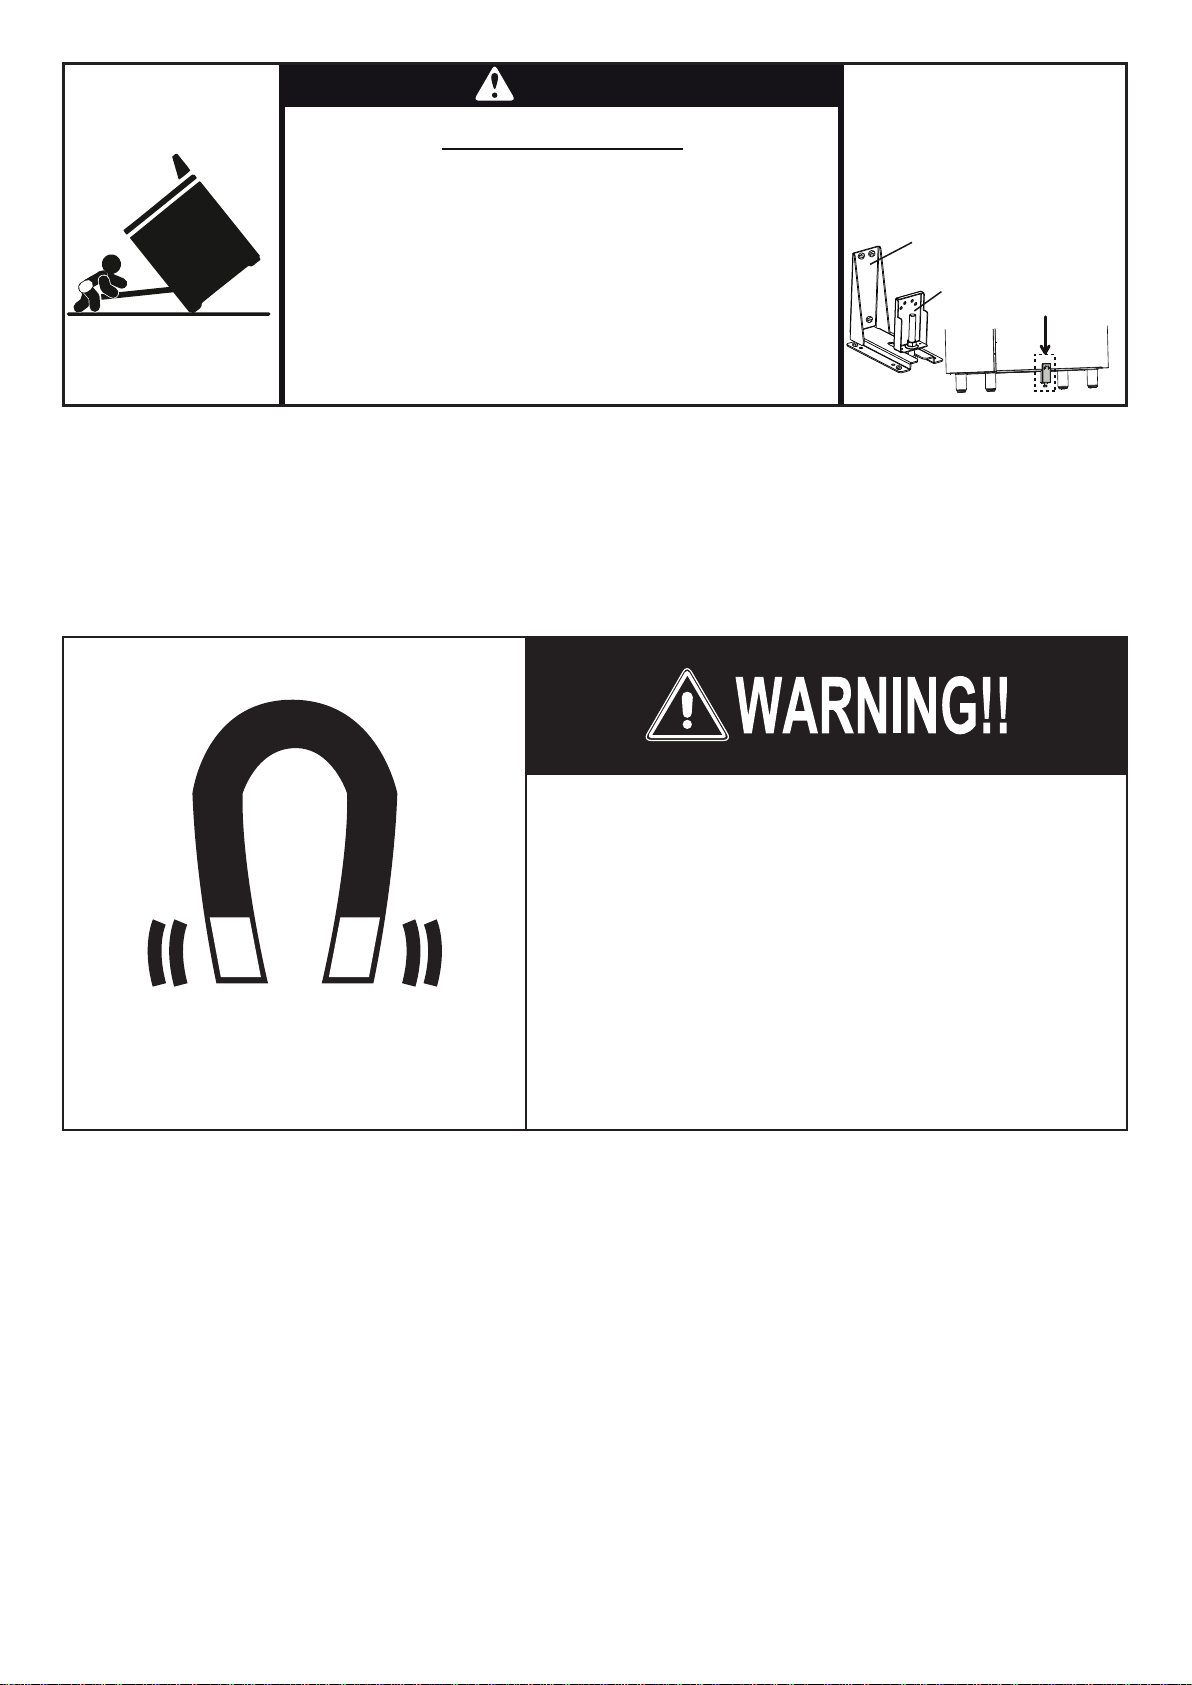
WARNING
See installation
instructions for details.
Tip-Over Hazard
Anti-tip bracket
Adjustable bracket
assembly to be xed to
the back of the range
A child or adult can tip the range and be killed.
Check installation of anti-tip device per installation
instructions.
Check engagement of anti-tip device if range
is moved per installation.
Failure to follow these instructions can result in
death or serious burns to children and adults.
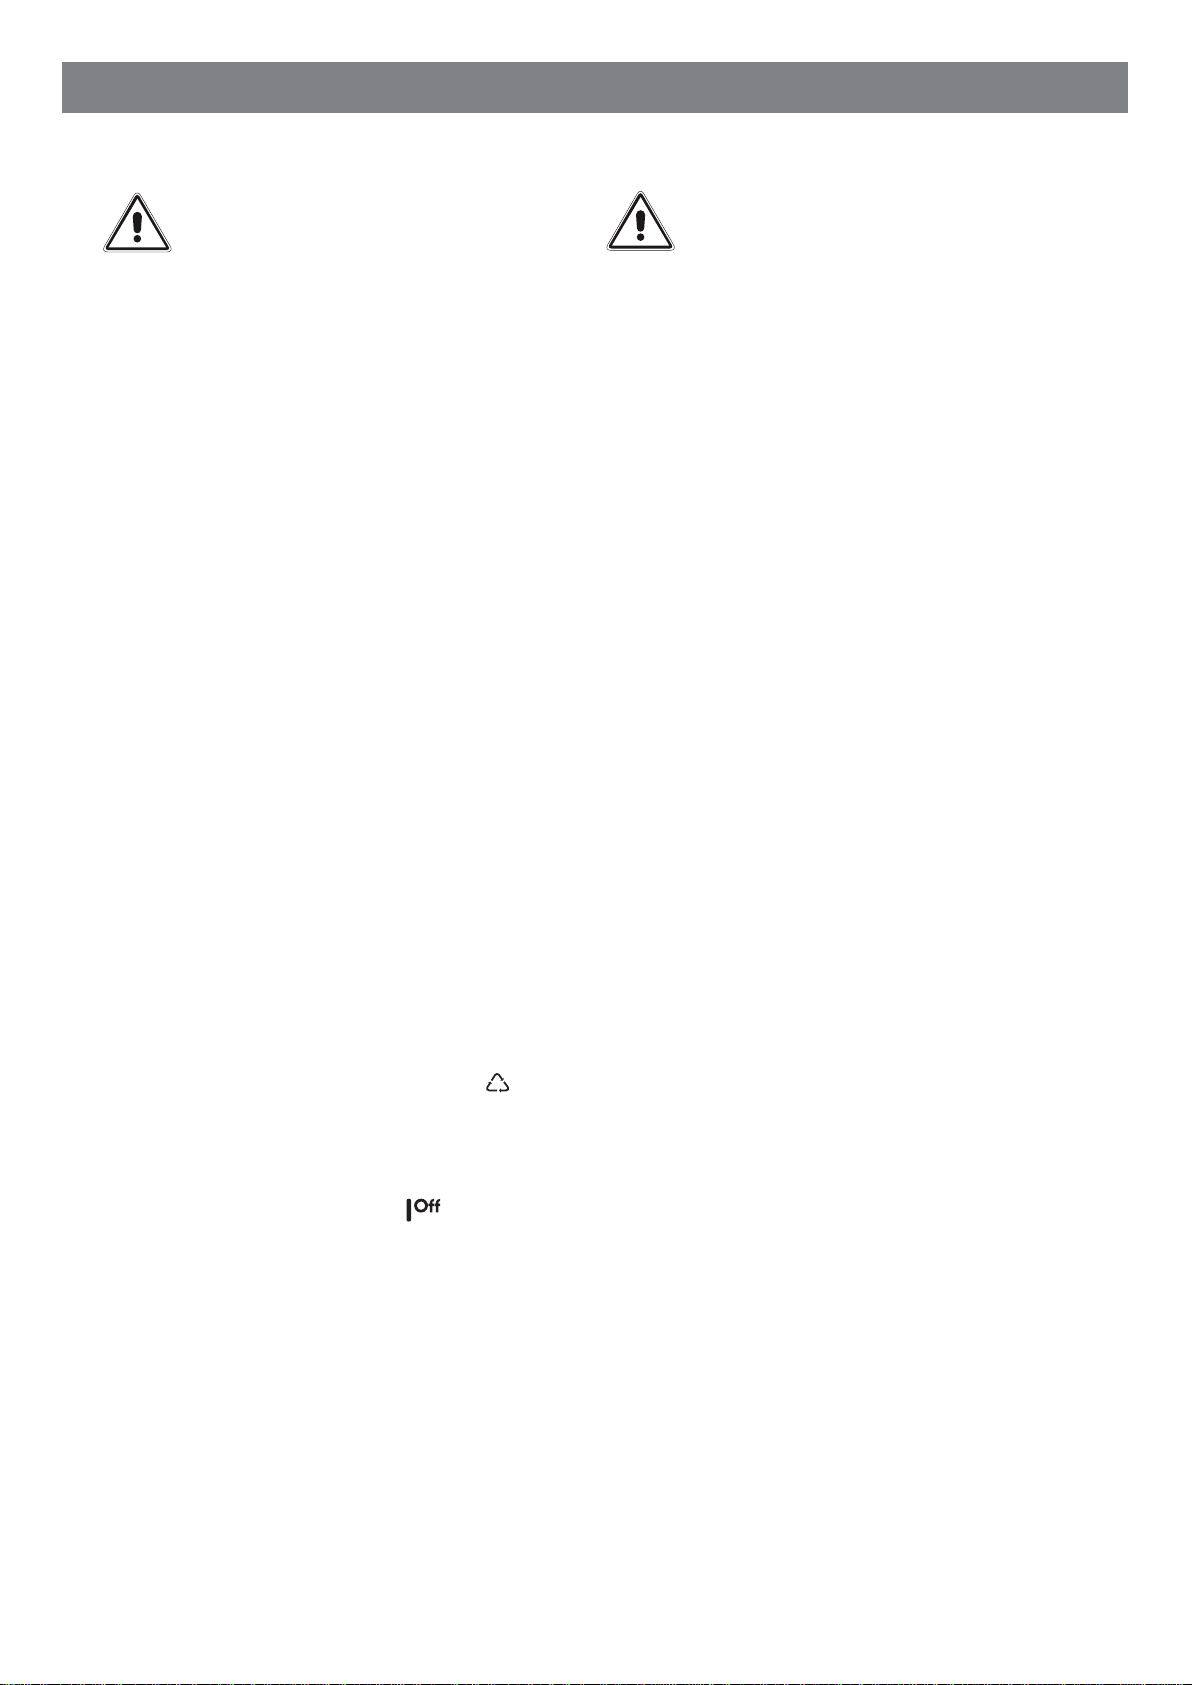
Health Hazard
This appliance complies with electromagnetic
safety standards.
However, persons with cardiac pacemakers
or other electrical implants (such as insulin
pumps) must consult with their doctor or
implant manufacturer before using this
appliance to make sure that their implants will
not be affected by the electromagnetic eld.
Failure to follow this advice may result in death.

3
Dear Customer,
Thank you for having purchased and given your preference to our
product.
The safety precautions and recommendations reported below are
for your own safety and that of others. They will also provide a means
by which to make full use of the features offered by your appliance.
Please preserve this booklet carefully. It may be useful in future,
either to yourself or to others in the event that doubts should arise
relating to its operation.
This appliance must be used only for the task it has explicitly been
designed for, that is for cooking foodstuffs. Any other form of usage
is to be considered as inappropriate and therefore dangerous.
The manufacturer declines all responsibility in the event of damage
caused by improper, incorrect or illogical use of the appliance.
This appliance is designed and manufactured solely for the cooking of domestic (household)
foodandinnotsuitableforanynonedomesticapplicationandthereforeshouldnotbeusedina
commercialenvironment.
Theappliancewarrantywillbevoidiftheapplianceisusedwithinanonedomesticenvironmenti.e.
asemicommercial,commercialorcommunalenvironment.
WARNING: This product can expose you to chemicals including
formaldehyde, which is known to the State of California to cause cancer,
and lead, which is known to the State of California to cause birth defects or other
reproductive harm. For more information go to www. P65Warnings.ca.gov.
4
USER INSTRUCTIONS
GENERAL INFORMATION
1. WARNING!!
This appliance shall not be used for space heating. This
information is based on safety considerations.
2. AlIopeningsinthewallbehindtheapplianceandintheoor
undertheapplianceshallbesealed.
3. Keep appliance area clear and free from combustible
materials,gasoline,andotherammablevapors.
4. Donotobstructtheowofventilationair.
5. Disconnect the electrical supply to the appliance before
servicing.
6. Whenremovingapplianceforcleaningand/orservice;
A. DisconnectACpowersupply.
B. Carefullyremovetherangebypullingoutward.
CAUTION:Rangeisheavy;usecareinhandling.
3. Electrical Requirement
Electrical installation should comply with national and local
codes.
4. Themisuseofovendoor(e.g.stepping,sitting,orleaningon
them)canresultinpotentialhazardsand/orinjuries.
5. Wheninstallingorremovingtherangeforservice,arollinglift
jackshouldbeused.Donotpushagainstanyoftheedgesof
therangeinanattempttoslideitintooroutoftheinstallation.
Pushingorpullingarange(ratherthanusingaliftjack)also
increases the possibility of bending the leg spindles or the
internalcouplingconnectors.
WARNING!!
ELECTRICAL GROUNDING INSTRUCTIONS
The range must be electrically grounded in accordance with
local codes or, in the absence of local codes, with the National
Electrical Code, ANSI/NFPA No. 70-latest edition, in Canada
Canadian Electrical Code.
Installation should be made by a Iicensed electrician.
FOR PERSONAL SAFETY, THIS APPLIANCE MUST BE
PROPERLY GROUNDED.
If an external electrical source is utilized, the installation must
be electrically grounded in accordance with local codes or, in
the absence of local codes, with the national Electrical Code,
ANSI/NFPA70.
IN CANADA: This appliance is equipped with a four-prong
groundingplug(NEMA14-50P)foryourprotectionagainstshock
hazardandshouldbepluggeddirectlyintoaproperlygrounded
socket.
Do not under any circumstances cut or remove the fourth
(ground) prong from the power plug.
REPLACEMENT PARTS
Only authorized replacement parts may be used in performing
serviceontherange.Replacementpartsareavailablefromfactory
authorizedpartsdistributors.Contactthenearestpartsdistributor
inyourarea.
IMPORTANT PRECAUTIONS AND RECOMMENDATIONS
Afterhavingunpackedtheappliance,checktoensurethatitisnotdamaged.
Incaseofdoubt,donotuseitandconsultyoursupplieroraprofessionallyqualiedtechnician.
Packingelements(i.e.plasticbags,polystyrenefoam,nails,packingstraps,etc.)shouldnotbeleft
aroundwithineasyreachofchildren,asthesemaycauseseriousinjuries.Thepackagingmaterial
isrecyclableandismarkedwiththerecyclingsymbol
.
• Donotattempttomodifythetechnicalcharacteristicsoftheapplianceasthismaybecome
dangeroustouse.
• Do not carry out cleaning or maintenance operations on the appliance without having
previouslydisconnecteditfromtheelectricpowersupply.
• Afteruse,ensurethattheknobsarein
position.
• Donotallowchildrenorotherincapablepeopletousetheappliancewithoutsupervision.
• Duringandafteruseoftherange,certainpartswillbecomeveryhot.Donottouchhotparts.
• Keepchildrenawayfromtherangewhenitisinuse.
• Somemodelsaresuppliedwithaprotectivelmonsteelandaluminiumparts.Thislmmust
beremovedbeforeinstalling/usingtheappliance.
• Fire risk!Donotstoreammablematerialintheovenandinthestoragecompartment.
• Make surethatelectrical cables connecting otherappliancesin the proximity oftherange
cannotcomeintocontactwiththehoborbecomeentrappedintheovendoor.
• Donotlinetheovenwallswithaluminiumfoil.Donotplaceshelves,broilerpan,pansorother
cookingutensilsonthebaseoftheovenchamber.
• Themanufacturerdeclinesallliabilityforinjurytopersonsordamagetopropertycausedby
incorrectorimproperuseoftheappliance.
• Toavoidanypossiblehazard,theappliancemustbeinstalledbyqualiedpersonnelonly.Any
repairsbyunqualiedpersonsmayresultinelectricshockorshortcircuit.Inordertoavoid
possibleinjuriestoyourbodyortotheappliance,donotattemptanyrepairsbyyourself.Such
workshouldbecarriedoutbyqualiedservicepersonnelonly.

5
• Danger of burns!Theovenandcookingaccessoriesmaybecomeveryhotduringoperation.
Make sure children are kept out ofreachandwarnthemaccordingly. To avoid burns use
kitchenclothesandgloveswhenhandlinghotpartsorutensils.
• Standawayfromtherangewhenopeningovendoor.Hotairorsteamwhichescapescan
causeburnstohands,face,and/oreyes.
• Nevercleantherange,ovenandstoragecompartmentwithahigh-pressuresteamcleaning
device,asitmayprovokeashortcircuit.
• Thisapplianceisintendedforuseinyourhousehold.Neverusetheapplianceforanyother
purpose!
• Ifyoushoulddecidenot touse thisappliance anylonger(or decideto substitutean older
model),beforedisposingofit,itisrecommendedthatitbemadeinoperativeinanappropriate
manner in accordance to health and environmental protection regulations, ensuring in
particular that all potentially hazardous parts be made harmless, especially in relation to
childrenwhocouldplaywitholdappliances.Removethedoorandthestoragedrawerbefore
disposaltoprevententrapment.
IMPORTANT PRECAUTIONS AND RECOMMENDATIONS FOR USE
OF ELECTRICAL APPLIANCES
Useofanyelectricalapplianceimpliesthenecessitytofollowaseriesoffundamentalrules.
Inparticular:
• Nevertouchtheappliancewithwethandsorfeet.
• Donotoperatetheappliancebarefooted.
• Donotallowchildrenordisabledpeopletousetheappliancewithoutyoursupervision.
Themanufacturercannotbeheldresponsibleforanydamagescausedbyimproper,incorrector
unreasonableuseoftheappliance.
IMPORTANT PRECAUTIONS AND RECOMMENDATIONS FOR
INDUCTION HOBS:
• Metallicobjectssuchasknives,forks,spoonsandlidsshouldnotbeplacedonthehobsurface
sincetheycangethot.
• Donotusemetallickitchenutensils(e.g.ladles).Itispreferabletouseplasticorwoodkitchen
utensils.
• Pleaseusepansofrecommendedsize(seeminimumpandiameterrecommended).Itisnot
advisabletousepanssmallerthanthecookingzone.Thepanshavetobeplacedinthecentre
ofthecookingzone.
• Donotusedefectivepansorpanswithacurvedbottom.
• Pleaseusesuitablepansmarkedforinductioncooking.
• Please keep your distance from the electromagnetic elds by standing 5-10 cm from the
cookingzones.Whenpossibleusetherearcookingzones.
• Magnetic objects(e.g. creditcards, oppydisks, memorycards) andelectronic instruments
(e.g.computers)shouldnotbeplacedneartheinductionhob.
• Theheatingofmagnetictinsisforbidden!Closetinsmayexplodebyexceedingpressurewhile
heating.There isa burningrisk withopentinsaswell, becausethe integratedtemperature
protectioncan’tworkwell.
Loading page 6...

7
CONTROLS DESCRIPTION
1. Electronicprogrammer
2. Multifunctionovenswitchknob
3. Multifunctionoventhermostatknob
4. Frontleftzonecontrolknob
5. Rearleftzonecontrolknob
6. Centralzonecontrolknob
7. Rearrightzonecontrolknob
8. Frontrightzonecontrolknob
9. Ovenfunctionindicatorlight
10. Oventhermostatindicatorlight
Fig.1.2
1
5
6
7
4
8321
A
U
T
O
109
Please note: This appliance incorporates a safety cooling fan which you will
hear operating whenever the oven or grill or induction hob are in use.
This fan may continue to run for several minutes after the appliance has been
switched off.
This fan is to reduce the external temperature of the appliance and cool the
internal components.
8
how to use the induction hob
2
Theceramiccooktopisttedwithinductioncookingzones.
Thesezones,shownbymarkedareasontheceramicsurface,arecontrolledbyseparate
knobspositionedonthecontrolpanel.
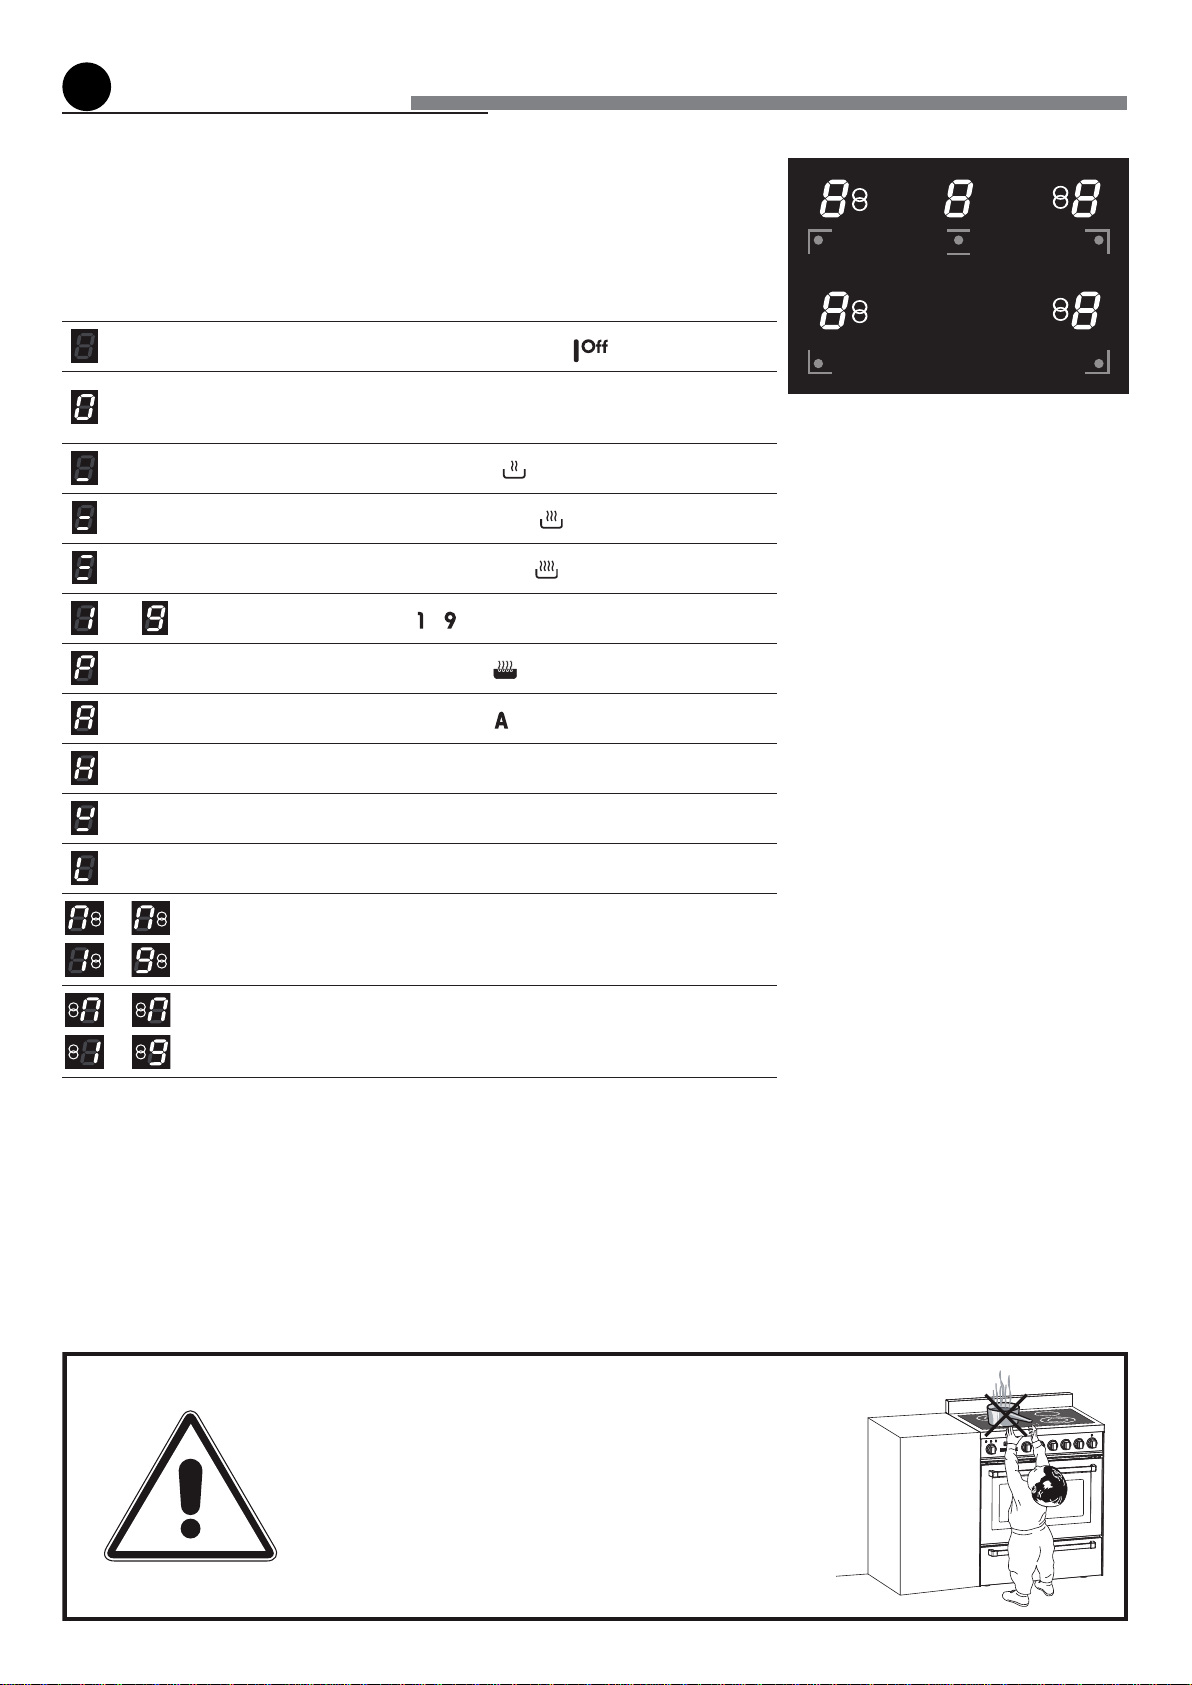
Inthefrontcentralareaofthecooktop,thecookingzonesdisplay(g.2.1)(composedbyno.
5luminousgures-oneforeachzone)indicates:
INDUCTION COOKING SYSTEM
When your induction hob is switched on and a cooking zone has been selected, the
electroniccircuitsproduce induced currentsthat instantaneously heatthebottom of the
panwhichthentransfersthisheattothefood.
Cookingtakesplacewithhardlyanyenergylossbetweentheinductionhobandthefood.
Your induction hob operates onlyifa correct pan with the rightfeaturesis placed on a
cookingzone.PleaserefertoCOOKWAREFORINDUCTIONCOOKING.
=CookingzoneOff(notactivated)(knobsetting )
=CookingzoneOn(activatedbutnotoperating).
Ifazoneisinzerosetting,thedisplayswitchesoffautomatically(cooking
zoneOff)afterabout10seconds.
=GentleHeatlowsetting(knobsetting )
=GentleHeatmediumsetting(knobsetting )
=GentleHeatsimmersetting(knobsetting )
÷
=Powerlevels(knobsetting ÷ )
=“PowerBoost”function(knobsetting )
=“Fastheating”function(knobsetting )
=HotSurfaceindicator
=Pandetectionindicator
=Childlocksafety
÷
=Bridgedzoneindicators(leftzones)
÷
=Bridgedzoneindicators(rightzones)
Note:eachlitgurereferstotherelevantcookingzone
Fig.2.1
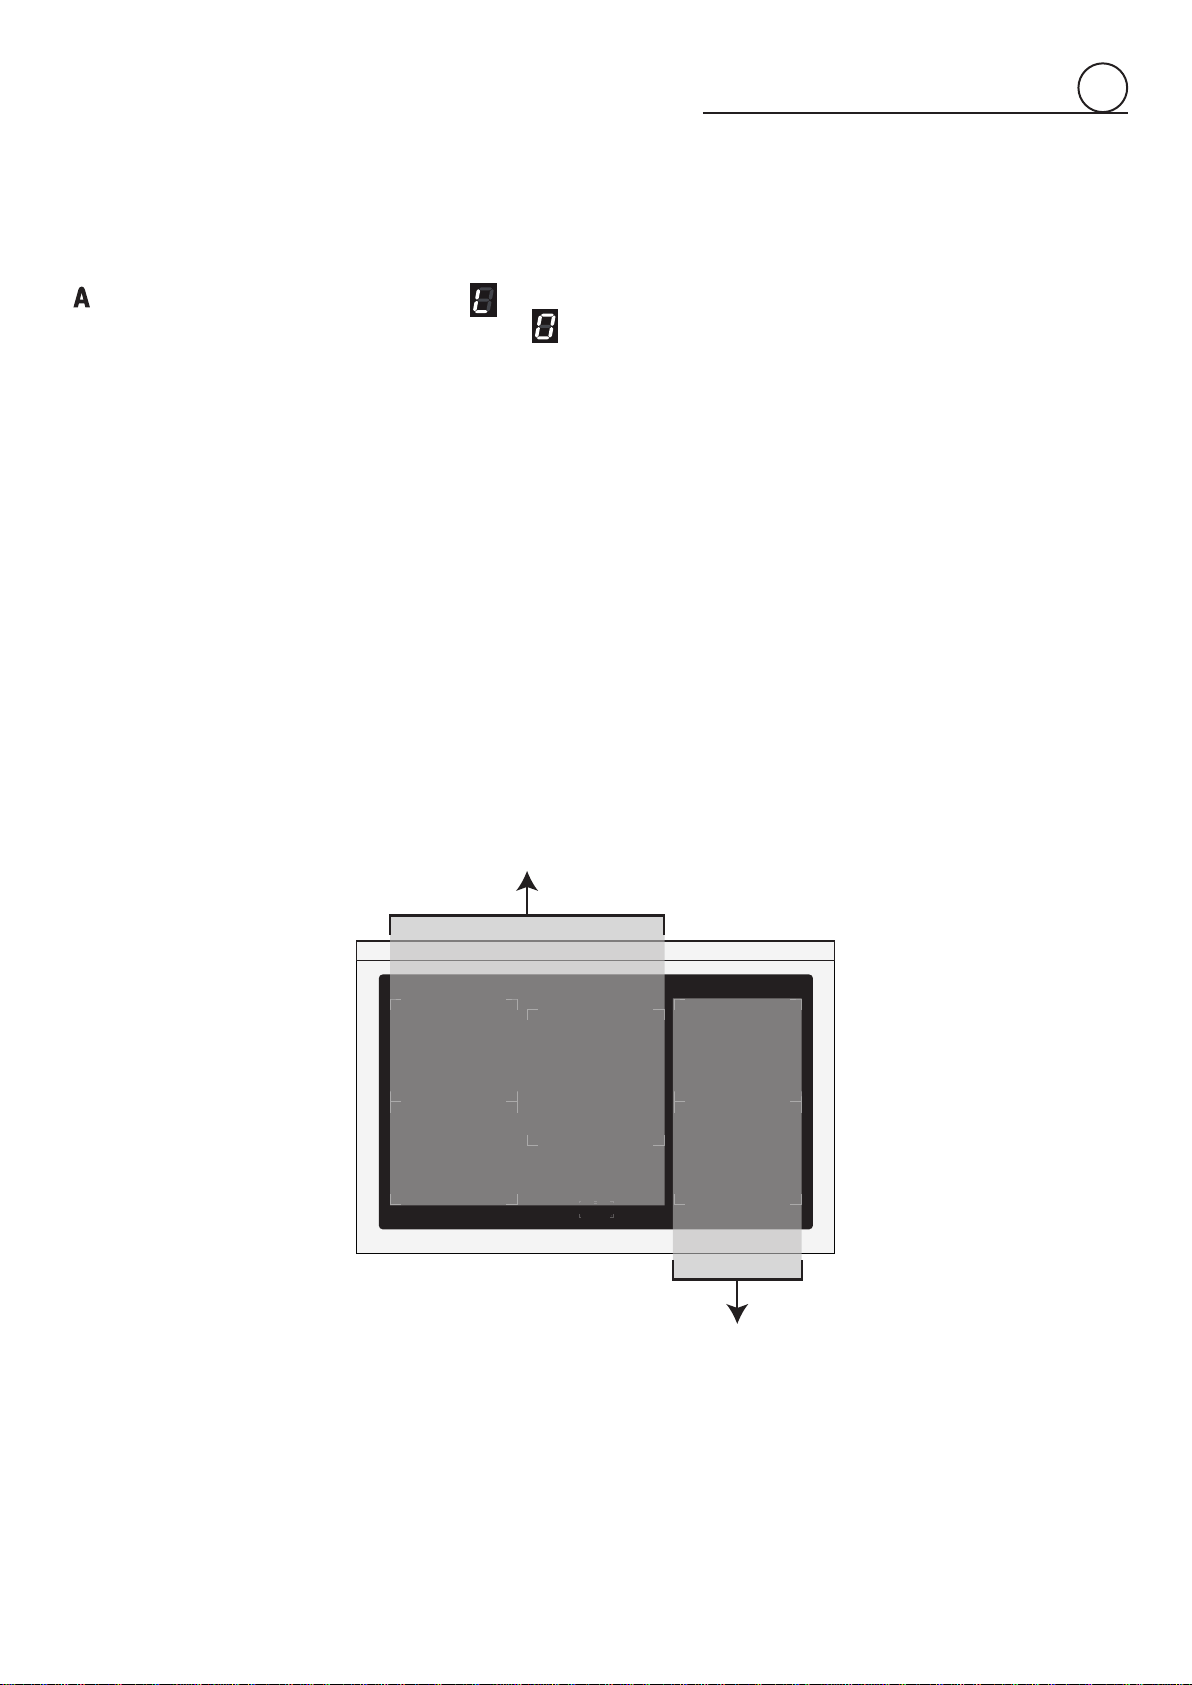
Ensure that the handles of
cookware do not stick out over
the edge of the range, to avoid
them being knocked over by
accident. This also makes it more
difficult for children to reach the
cooking vessels.
9
2
PAN DETECTION INDICATOR
Ifadisplayashes alternatelywiththeheatsetting,thismeansthat:
• youhavenotplacedapanonthecorrectcookingzoneor
• thepanyou’reusingisnotsuitableforinductioncookingor
• thepanistoosmallornotproperlycentredonthecookingzone.
No heating takes place unless there is a suitable pan on the cooking zone.
The cooktop will automatically turn off after 10 minutes if no suitable pan is placed on it.
Dual Zone:Whenusingasmallpotonthedualcookingzone,besuretocentreitsothat
theinnerzonewilldetectthepan.Ifthepancoverstheouterzone,thentheouterzonewill
automaticallyswitchon.
Smart Zones:TheSmartZonesarelarge.YoumayplaceseveralsmallpotsontheSmart
Zoneandtheywillbedetectedasiftheywereonelargepot.
IMPORTANT! The whole of the Smart Zone is activated when a pot is detected. This
means that other magnetizable items (such as cutlery) sitting in the cooking zone
will heat up. Never leave cutlery or other magnetizable items on your cooktop.
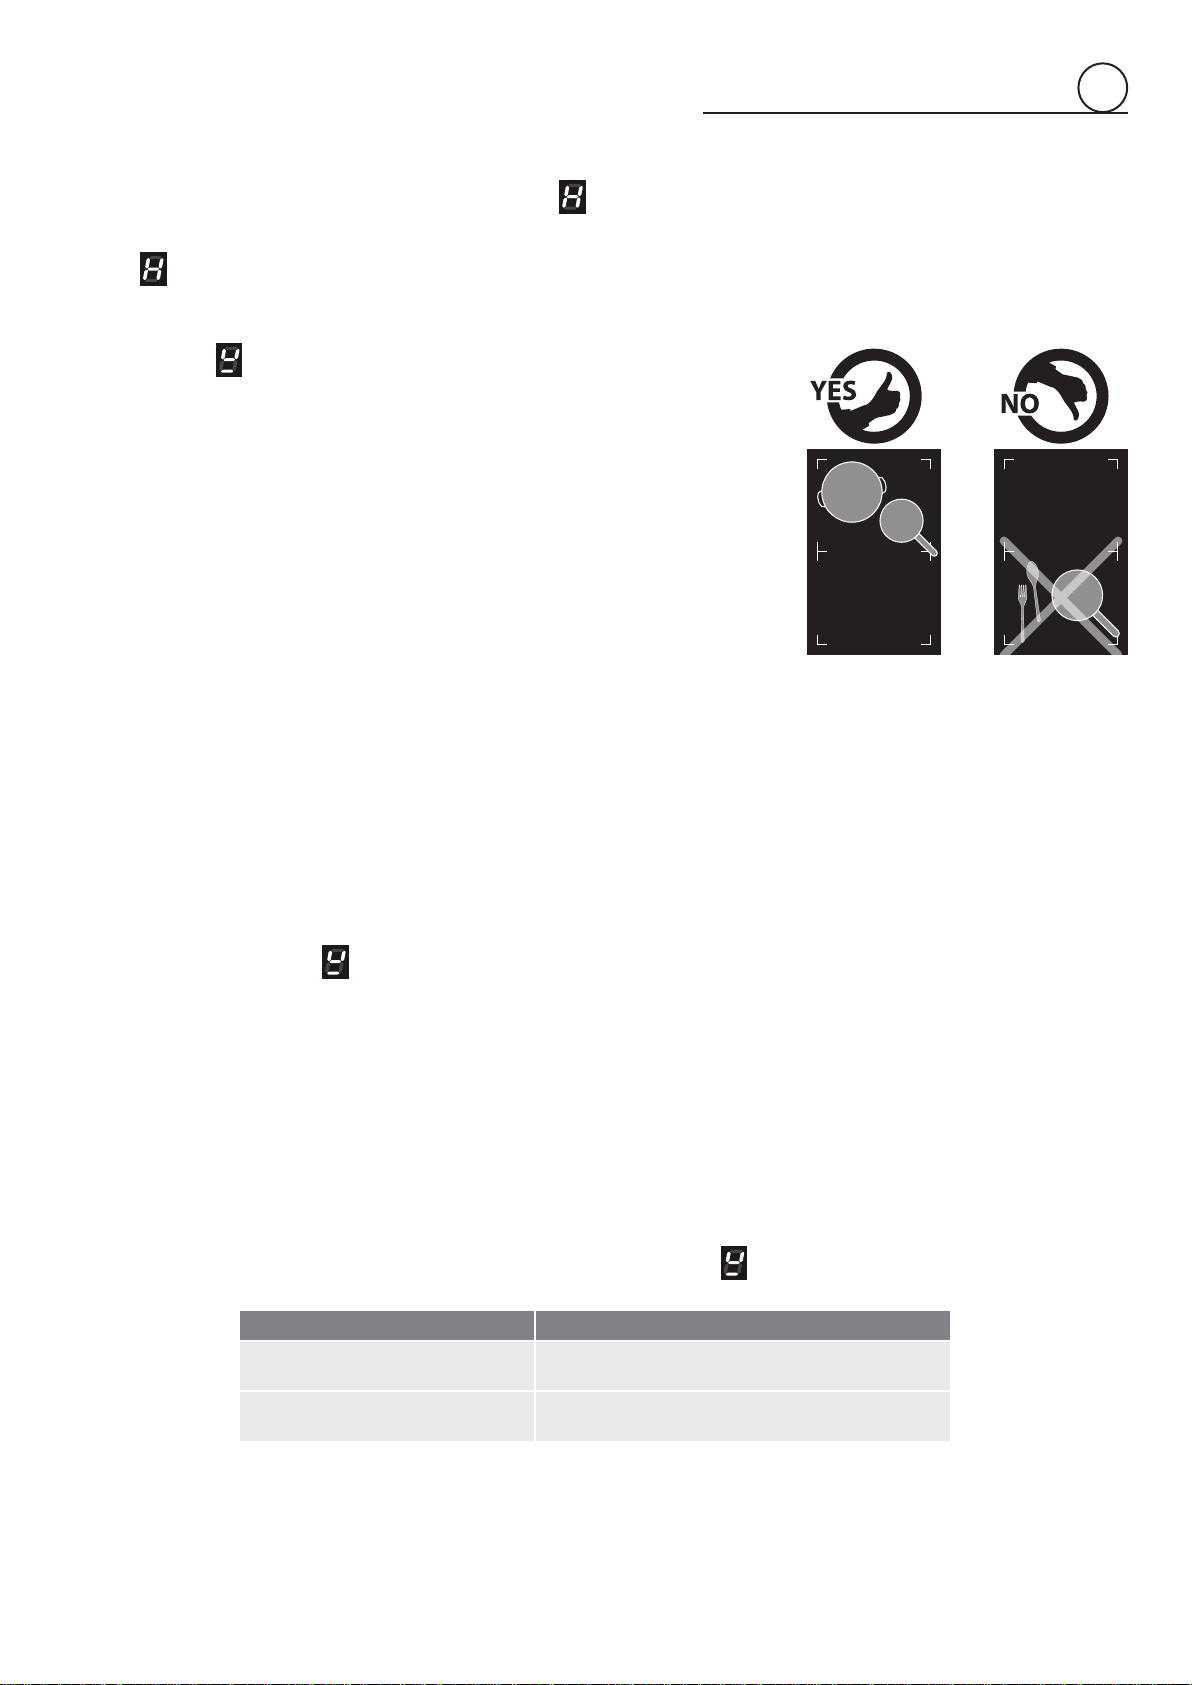
COOKWARE FOR INDUCTION COOKING
TheinductioncookingsystemOPERATESONLYifusingcorrectcookwaresuitableforinductioncooking.
Thebottomofthepanhastobeferromagnetictogeneratetheelectromagneticeldnecessaryfortheheatingprocess(meaninga
magnethastosticktothebottomofthepan).
Pansmadefromthefollowingmaterialsarenotsuitable:
• glass,wood,porcelain,ceramic,stoneware;
• purestainlesssteel,aluminiumorcopperwithoutmagneticbottom.
Tocheckifapanissuitableornot:
• testthebottomofthepanwithamagnet:ifthemagnetsticks,thepanissuitable.
• ifamagnetis notavailablepourasmall amountofwaterinsidethepanand placethepanona cookingzone.Switchonthe
cookingzone:ifthesymbol
(pandetection)appearsonthecookingzonedisplay(alternatelywiththeheatsetting),thepanis
notsuitable.
Quality of cookware - IMPORTANT!
• Thequalityofyourcookwarecanaffectcookingperformance.Onlyuseinduction-compatiblecookwarethathasbeenspecically
designedforinductioncooking.Lookfortheinductionsymbolonthepackagingorthebottomofthepan.
• Cookwarethathasahighcontentofferromagneticmaterialthatcontinuesupfromthebaseintothesidesofthepanwillgivethe
bestcookingperformance.
Quickest heating performance:Highcontentofferromagneticmaterial.Heatingareaisconsistentacrossthebaseandcontinuesup
thesidesofpan.
Average heating performance:Reducedareaofferromagneticmaterial.Reducedzoneofheating,resultsinpoorcookingperformance
andslowerheating.
Slow heating performance:Verylimitedareaofferromagneticmaterial.Resultsinveryslowheatingperformance.Note:thistypeof
potisgoodforverydelicatetaskssuchasmeltingchocolate,asheatingisveryslow.
Important note:thecookingzoneswillnotoperateifthepandiameteristoosmall(
pandetectionsymbolwillappearonthecooking
zonedisplay,alternatelywiththeheatsetting).Tocorrectlyusethecookingzonesfollowtheindicationsgiveninthefollowingtable.
Induction cooking zone Minimum pan diameter recommended
DoubleZone
5”(125mm)(innerzone)
9
7/8”(250mm)(dualzone)
SmartZones
5
11/16”(145mm)(un-bridged)
95/8”(245mm)(bridged)
Alwaysusepanswiththick,completelyatbottom.
Donotusepanswithconcaveorconvexbottom;thesecouldcauseoverheatingofthecookingzone.
Notes:
• Sometypesofpanscouldcausenoisewhenusedonaninductioncookingzone.Thenoisedoesnotmeananyfailureonthe
applianceanddoesnotinuencethecookingoperation.
• Itisnormalifthecooktopmakesalowhummingnoisewhenusedonahighheatsetting(especially“PowerBoost”),thisiscausedby
thetechnologyofinductioncooking,butthenoiseshouldquietendownordisappearcompletelywhenyoudecreasetheheatsetting.
HOT SURFACE INDICATORS
Whenthetemperatureofacookingzoneisstillhot,therelevant remainingheatindicatorlightsuponthedisplaytoalertyouofthehot
surface.
Avoidtouchingthehobsurfaceoverthecookingarea.Pleasepayspecialattentiontochildren.
Whenthe
islitonthedisplay,itisstillpossibletostartcookingagain;justturnthecontrolknobtotherequiredpowerlevel.
Fig.2.2
10
2
OPERATION TIME LIMIT OF COOKING ZONES
EachcookingzoneisautomaticallyswitchedOffafteramaximumpresettime
ifnooperationisperformed.
Themaximumpresettimelimitdependsonthesetpowerlevel,asillustrated
inthisschedule.
Eachoperationonthecookinghobbyusingtheknobwillresetthemaximum
operationtimeatitsinitialvalue.
Power level of
Cooking zones
Operation
time limit
, or
2hours
6hours
6hours
5hours
5hours
4hours
1.5hours
1.5hours
1.5hours
1.5hours
10minutes
Seethe
“FASTHEATING”FUNCTION
section
CONTROL KNOBS
Eachcookingzoneisadjustedbyaseparatecontrolknobpositionedonthecontrolpanel
andtheoperationiscontrolledbytheelectronicsystem.
IfacookingzoneisnotturnedOfftheelectronicsystemautomaticallyswitchesitOffafter
apre-settimewhichdependsonthepowersetting.
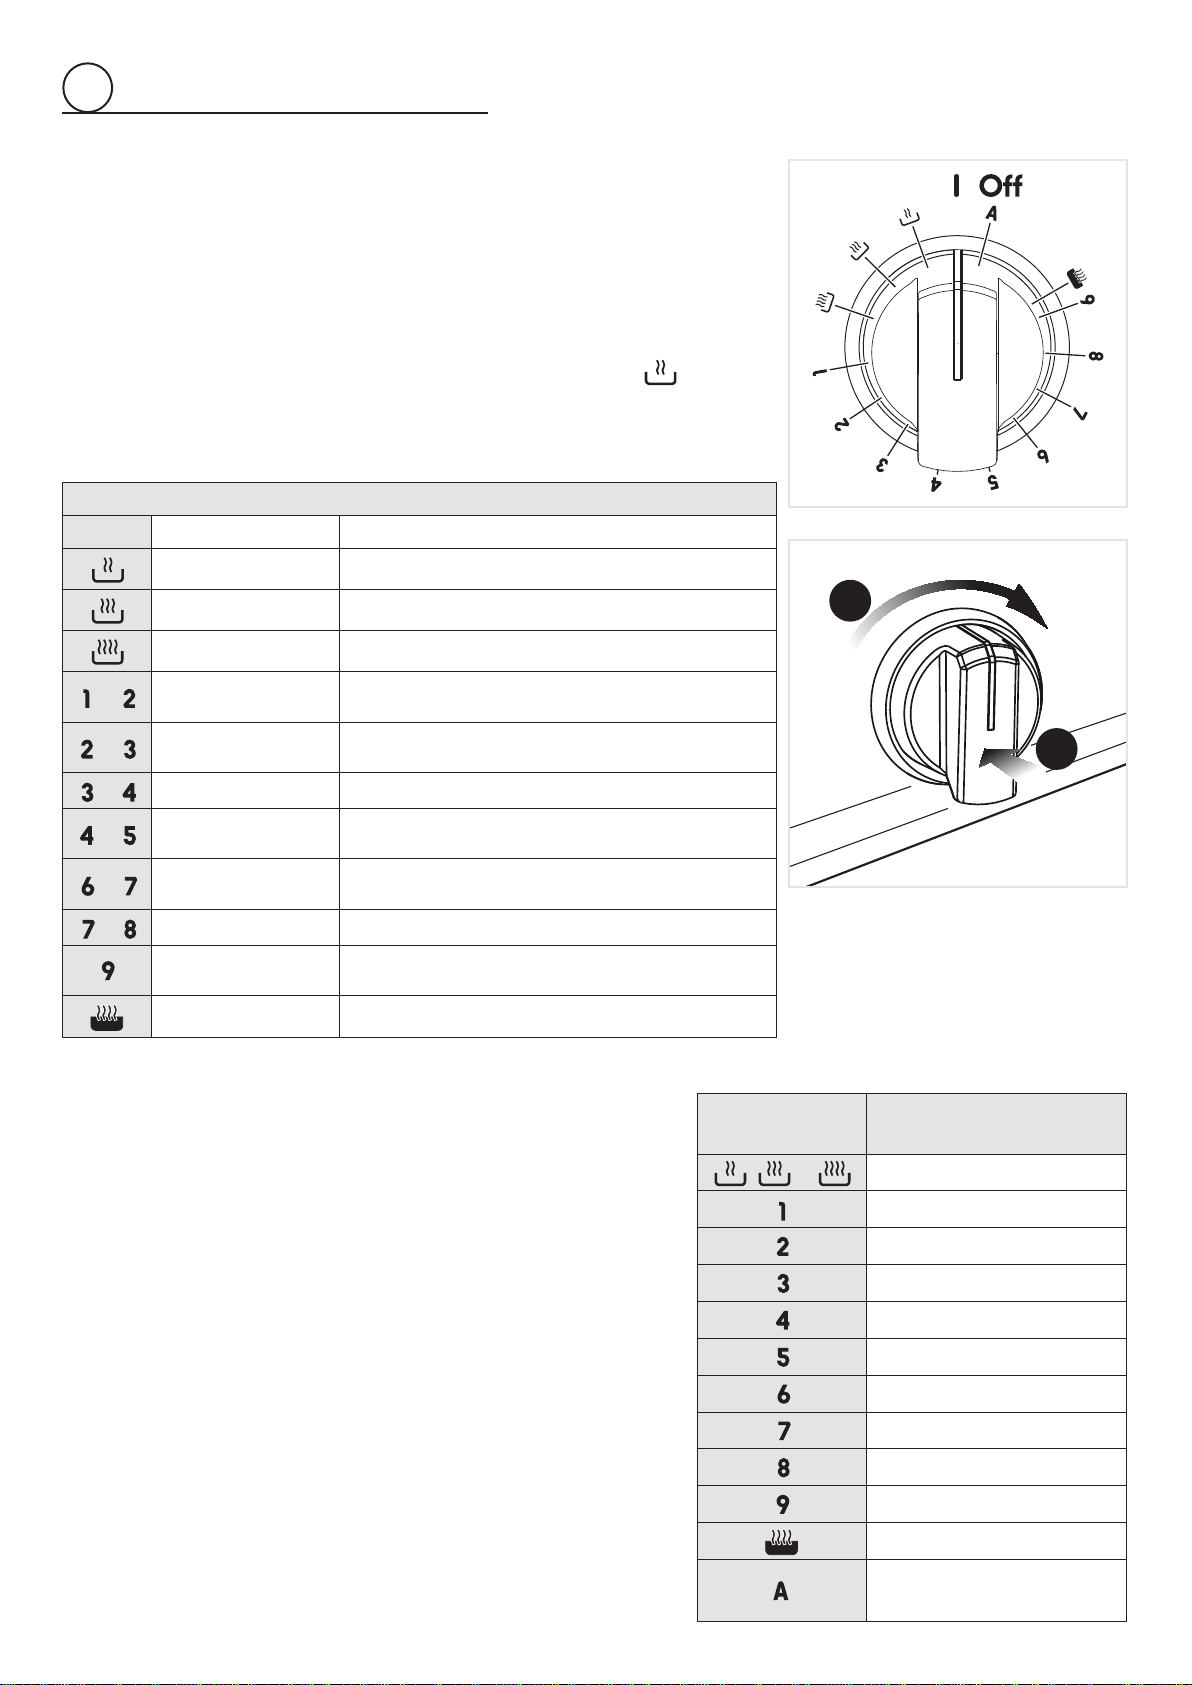
EXAMPLES OF COOKING POWER SETTING
OFF ZoneOff Cookingzonenotoperating
GentleHeatlow Meltingchocolate,butter,andfoodsthatburnquickly
GentleHeatmedium Delicatewarmingforsmallamountsoffood
GentleHeatsimmer Simmeringsoups,stocksandsauces
to
Melting
Reheating
Sauces,butter,chocolate,gelatine
Dishespreparedbeforehand
to
Simmering
Defrosting
Rice,pudding,sugarsyrup
Driedvegetables,sh,frozenproducts
to
Steam Vegetables,sh,meat
to
Water
Steamedpotatoes,soups,pasta,
freshvegetables
to
Mediumcooking
Simmering
Meat,lever,eggs,sausages
Goulash,roulade,tripe
to
Cooking Potatoes,fritters,wafers
Frying,roasting
Boilingwater
Steaks,omelettes,frieddishes
Water
Boilingwater -
POWER LEVEL
Pushandturntheknobclockwisetosetthedesiredpowerlevelbetween GentleHeat
lowsetting(minimum)and“9”(maximum).
Thepowerlevelcanbemodiedatanytimebyturningtheknobclockwiseoranti-clockwise
toadifferentsetting.
Thecookingzonedisplayshowstheselectedlevel.
Fig. 2.3
1
2
Fig. 2.4
11
2
“FAST HEATING” FUNCTION
Thisfunctionallowsthecookingzonetooperateatthemaximumpower(100%)foratimeproportionaltotheselectedpowerlevel
(“1”÷“8”only);afterthistimethecookingzonewilloperateattheselectedlevel.
Thisfunctionisavailableonallthecookingzones.
Thisfeatureletsyourapidlyheatupfoodorliquidthenautomaticallyreducethetemperaturetoapre-selectedheatsetting.
Tosetacookingzoneforthe“FastHeating”function:
1. Pressinandturnthecontroldialcounterclockwiseto
.Holdthedialat until appearsinthecookingzonedisplay.
2. Turnthecontroldial(within5seconds)tothedesiredheatsetting(“1”÷“8”).Theheat
settingand
willalternateinthedisplay.The“FastHeating”functionisnowset.
Duringrapidheat
willashalternatelywiththeheatsettingyouhaveselected.
Whenrapidheat isnished
willstop ashingandthetemperature willautomatically
reducetotheheatsettingyouhaveselected.
Theamountoftimethecookingzonewillrapidlyheatfordependsontheheatsettingyou
haveselected.Seebelowchartforrapidheattimes.
Tocancelthe“FastHeating”function(while
isstillashing):
• Turnthecontroldialtoalowerheatsettingorbackto“OFF”.
• Increasingtheheatsettingto“9”willalsocancelthe“FastHeating”.
Note:The“FastHeating”and“PowerBoost”featurescannotbeusedtogether.Ifyouturn
“PowerBoost”onwhen“FastHeating”isalready set,the “FastHeating” functionwill be
cancelled.
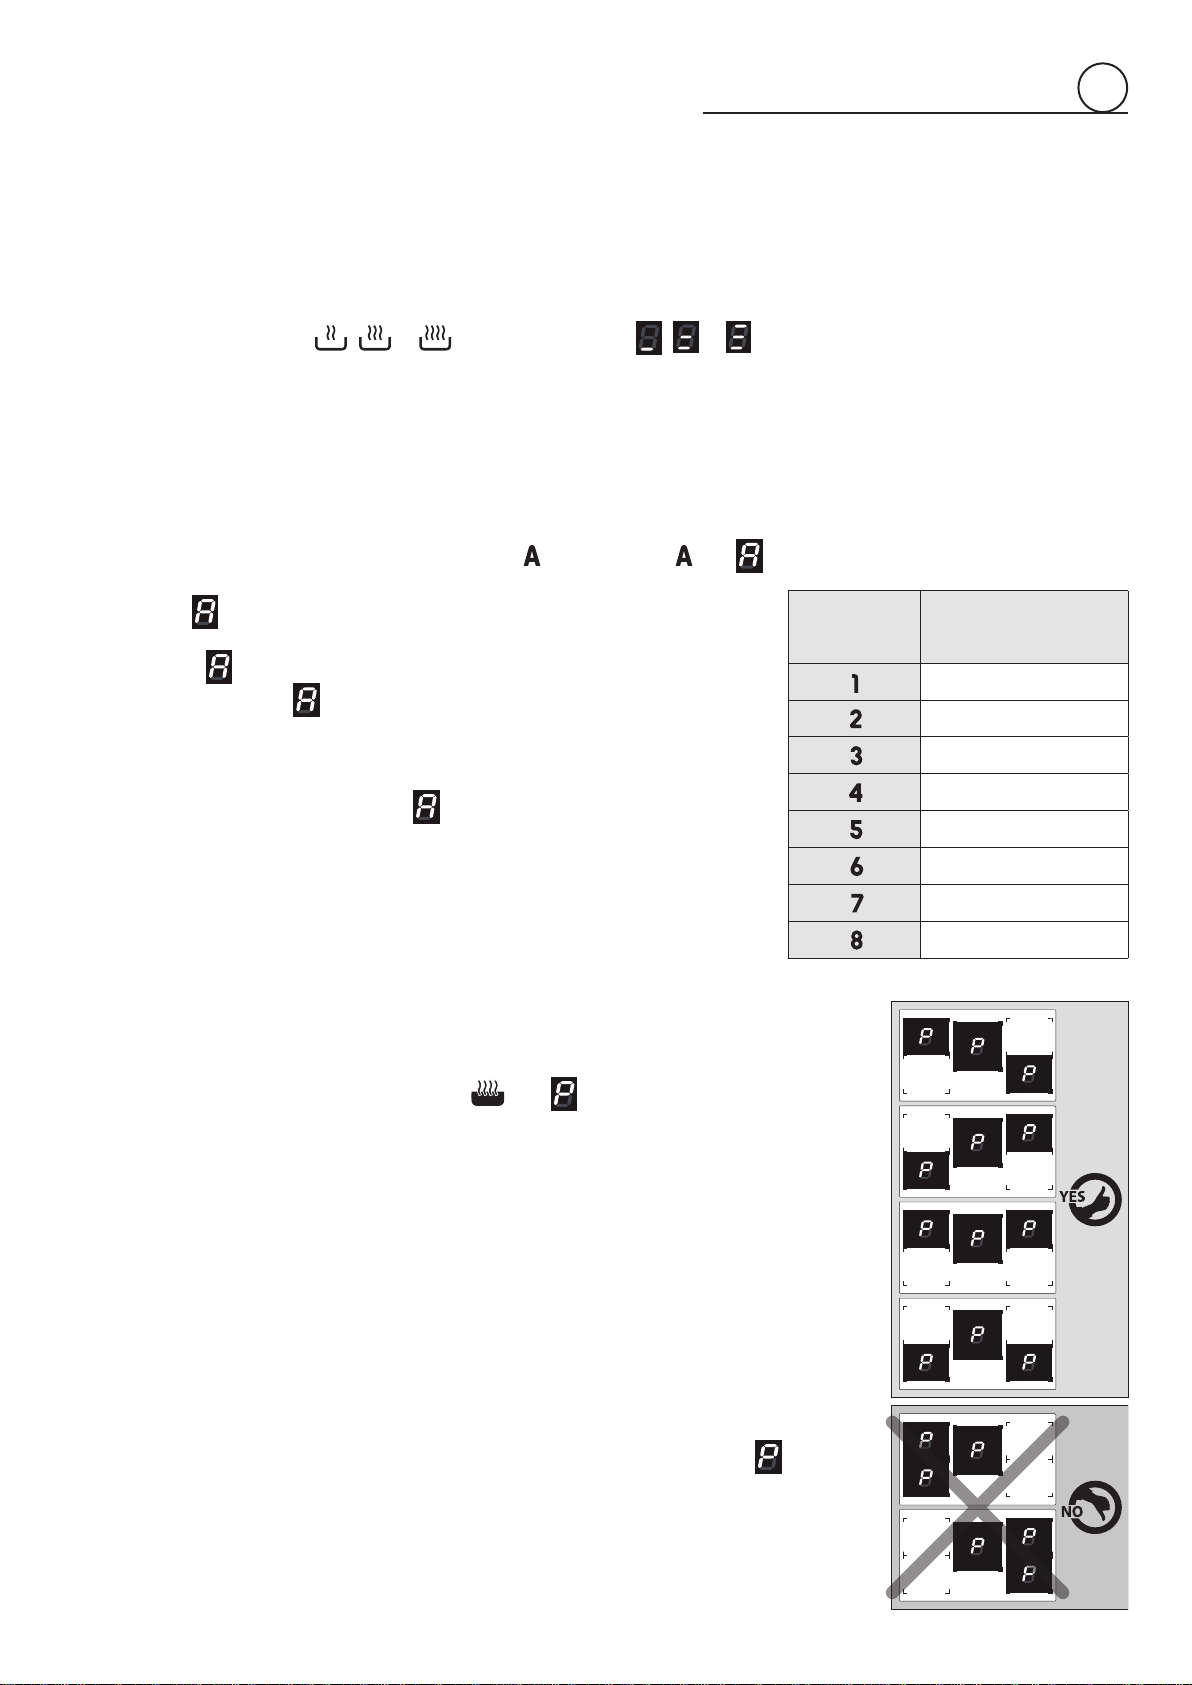
“POWERBOOST” FUNCTION
Tosetacookingzonefor“PowerBoost”:
1. Pressandturnthecookingzoneontoitshighestheatsetting(“9”).
2. Fromheatsetting“9”,turnandholdthedialto
until appearsinthedisplay.
The“PowerBoost”programisnowoperative.
This functionallowsthe cooking zone tooperateatthe “PowerBoost” maximum power(abovethe
nominal power) for maximum 10 minutes; it could be used, for example, to rapidly heat up large
amountofwater.
Todisablethisfunctionturntheknobanti-clockwisetoalowerpowerlevelortothe“OFF”.
IMPORTANT:
• Youcansetthreecookingzonesfor“PowerBoost”atthesametimeaslongasoneisnotbehind
theother.
• Itisnotpossibletosetallthecookingzonesfor“PowerBoost”atthesametime.
• Ifonecookingzoneissetto“PowerBoost”andyouaccidentallyalsosetasecondcookingzone
immediately in front or behind to “PowerBoost”, the rst cooking zone will warn you that the
congurationisnotpossible,ashandthenautomaticallyreduceitspowerlevel.
• Whenacookingzoneissetfor“PowerBoost”,thecookingzoneimmediatelyinfrontoforbehind
mayautomaticallyreduceitspowerlevel.
• “PowerBoost”isnotavailableifcookingzonesarebridged.
• Ifacookingzoneisstillhot,itisnotpossibletousethe“PowerBoost”functionand willashif
youtrytoactivate.Allowthecooktoptocooldown.
IMPORTANT NOTES:
• The “PowerBoost” function is not suitable for use with non water based cooking. Do not
use this function for heating oil (e.g. deep fat frying).
• “PowerBoost” heats food and liquids very quickly. Do not leave the cooktop unattended
when using this feature.
GENTLE HEAT
GentleHeatsettings:
• TheLowsettingisidealforthemostdelicatecookingtasks(suchasmeltingchocolate),asthecookingzonewillprovideavery
lowcontinuousgentleheat.
• TheMediumsettingisidealforkeepingcookedfoodwarmandthegentlewarmingofdelicatefoods.
• TheSimmersettingisidealforextendedcookingofsoups,stocksandsauces.
TosetacookingzoneforGentleHeat:
Pushandturnthedialtoeither
, or .Thedisplaywillshow , or .
SELECTED
HEAT
SETTING
APPROXIMATE TIME
AT “FAST HEATING”
48seconds
144seconds
230seconds
312seconds
408seconds
120seconds
168seconds
216seconds
Fig. 2.5
Loading page 12...
13
CHILDLOCK SAFETY (LOCKING THE COOKTOP)
Whennotusingtheinductioncooktop,setthechildlocksafetytopreventchildrenfromaccidentallyswitchingonthecookingzones(or
forcleaningandtopreventunintendeduse).
When the cooktop is locked the controls and cooktop display will remain unresponsive.
Ensureallcookingzonesareswitched“OFF”,thenturncounterclockwiseatthesametimethecontrolknobsofthetwoleftcookingzones
(
setting)andholdtheknobsinthispositionuntil lightsuponthecookingzonesdisplay;thenreleasetheknobs.
Todeactivatethechildlockrepeatthesameprocedureuntil
lightsuponthecookingzonesdisplay;thenreleasetheknobs.
2
THERMAL PROTECTIONS
Theinductioncooktopisttedwithsafetydevicestoprotecttheelectronicsystemandtoprotecteachcookingzonefromoverheating.
Incaseofoverheating,oneofthefollowingautomaticfunctionscouldbestartedbytheelectronicsystem:
• “PowerBoost”programdeletedandpowerreduced;
• powerreduced;
• oneormorecookingzonesswitchedOff;
• coolingfanmotoroftheinductionunitswitchedon(itmaycontinuetorunevenafteryou’veturnedthecooktopoff.Donotswitch
thepowertotherangeoffatthewallwhilethefanisrunning).
MAXIMUM USABLE POWER FOR THE COOKING ZONES
Theleft/centralandrightcookingzonesarecontrolledbytwoseparatepowerboards(seegurebelow)withthefollowingmaximum
totalpower:
• 1
st
powerboard(left/centralzones):7400W;
• 2
nd
powerboard(rightzones):3700W.
Controlledby
2
nd
powerboard
Controlledby
1
st
powerboard
Shouldthecookingzonesofonepowerboardrequiremorethanthemaximumtotalpower,thelastselectedpowerlevelhaspriorityand
thepoweroftheothercookingzone(s)isautomaticallyreducedtotheremainingpoweravailable(orswitchedoffifthereisnotenough
poweravailable).
Ifthisoccurs,thecookingzone(s)willdisplayaashinggureforabout3secondsbeforeautomaticallydisplayingthenewpowerlevel.
Thismeansforexamplethat:
• Whensettinga“PowerBoost”programmeforthesecond(orthird)zone,thesettingfortheotherzone(s)couldbereducedtothe
remainingpoweravailable.
• Whensettinga“PowerBoost”programmeforazoneandthenanothersettingonthesecondzone(andonthirdzone),ifthetotal
powerexceedthemaximumtotalpower,the“PowerBoost”programmeisdeletedandthepowerreducedtothemaximumpower
available.
Fig. 2.7
14
2
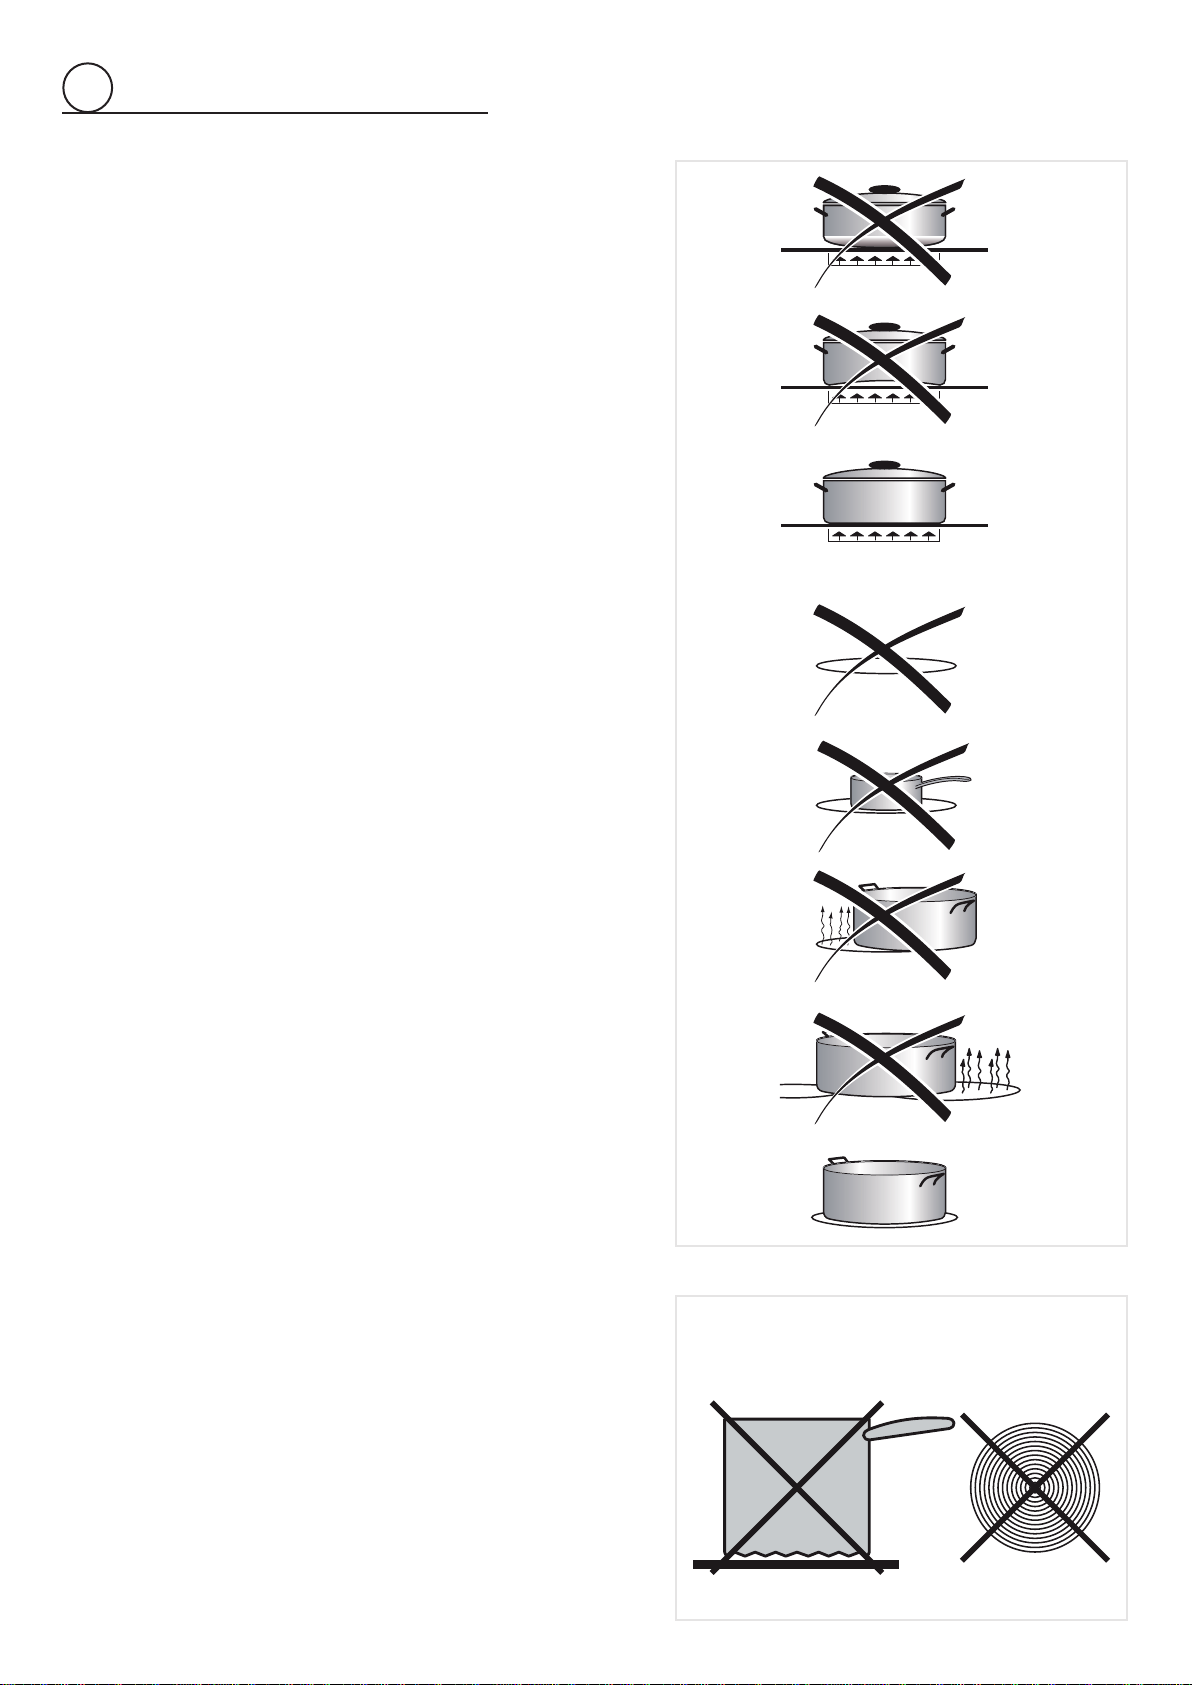
ADVICE FOR SAFE USE OF THE HOB
• Beforeswitchingonmakesurethatyouhavethecorrectknobforthehotplate
chosen.Itisadvisabletoputthepanonthehotplatebeforeswitchingonand
totakeitawayafterswitchingoff.
• Usecookwarewithatandevenbottoms.Unevenbottomscanscratchthe
glassceramicsurfaces.Becarefulthatthebottomiscleananddry.
• Alwaysliftpansoffthecooktop–donotslide,ortheymayscratchtheglass.
• Donotleavewetordamplidsonthebob.
• The glass-ceramic surface and pans must be clean. Carefully eliminate
any foodremains(especially containing sugar), dirtetc.with the aid ofa
cleansingagent.
• Makesurethatthehandlesofcookwaredonotstickoutovertheedgeofthe
cooker,toavoidthembeingknockedoverbyaccident.This also makes it
more difcult for children to reach the cooking vessels.
• Donotleanoverthecookingzoneswhentheyareswitchedon.
• Donotdropheavyorsharpobjects ontheglass ceramiccooktop.If the
glass surface is broken or damaged, disconnect the appliance from
the electrical mains supply and contact the after-sales service.
• Donotputaluminiumfoilorplasticobjectsonthecookingzoneswhenthey
arehot.
• Followthecleaninginstructionscarefully.
DO NOT USEPANSWITHROUGH
CIRCULARMACHINEDBASE.
Fig.2.9
Fig.2.8
Loading page 15...
16
OPERATING PRINCIPLES
Heatingandcookinginthemultifunctionoventakesplaceasfollows:
• by normal convection -
Theheatisproducedbytheupperandlowerheatingelements.
• by forced convection -
Theheatproducedbythecircularelementisdistributedthroughouttheovenbythe
fan.
• by semi-forced convection -
Theheatproducedbytheupperandlowerheatingelementsisdistributedthroughout
theovenbythefan.
• by radiation -
Theheatisradiatedbytheinfraredbroilelement.
• by radiation and fan -
Theradiatedheatfromtheinfraredbroilelementisdistributedthroughouttheoven
bythefan.
• by semi-forced convection from the top -
Theheatproducedbytheupperheatingelementisdistributedthroughouttheoven
bythefan.
• by ventilation -
Thefoodisdefrostedbyusingthefanonlyfunctionwithoutheat.
USING THE OVEN FOR THE FIRST TIME
• Putintheshelfandthetray.
• Switchtheovenonempty(onacookingfunction)atmaximumpowerforabout2
hourstoremovetracesofgreaseandsmellsfromthecomponents.
There will be a distinctive smell and a small amount of smoke during the
conditioning process as manufacturing residue is burnt off. This is normal,
but make sure the kitchen is well ventilated during the conditioning.
• Whentheovenhascooleddownandunpluggingtherange,cleantheinsideofthe
ovenwithaclothsoakedinwaterandneutraldetergentanddryitperfectly.
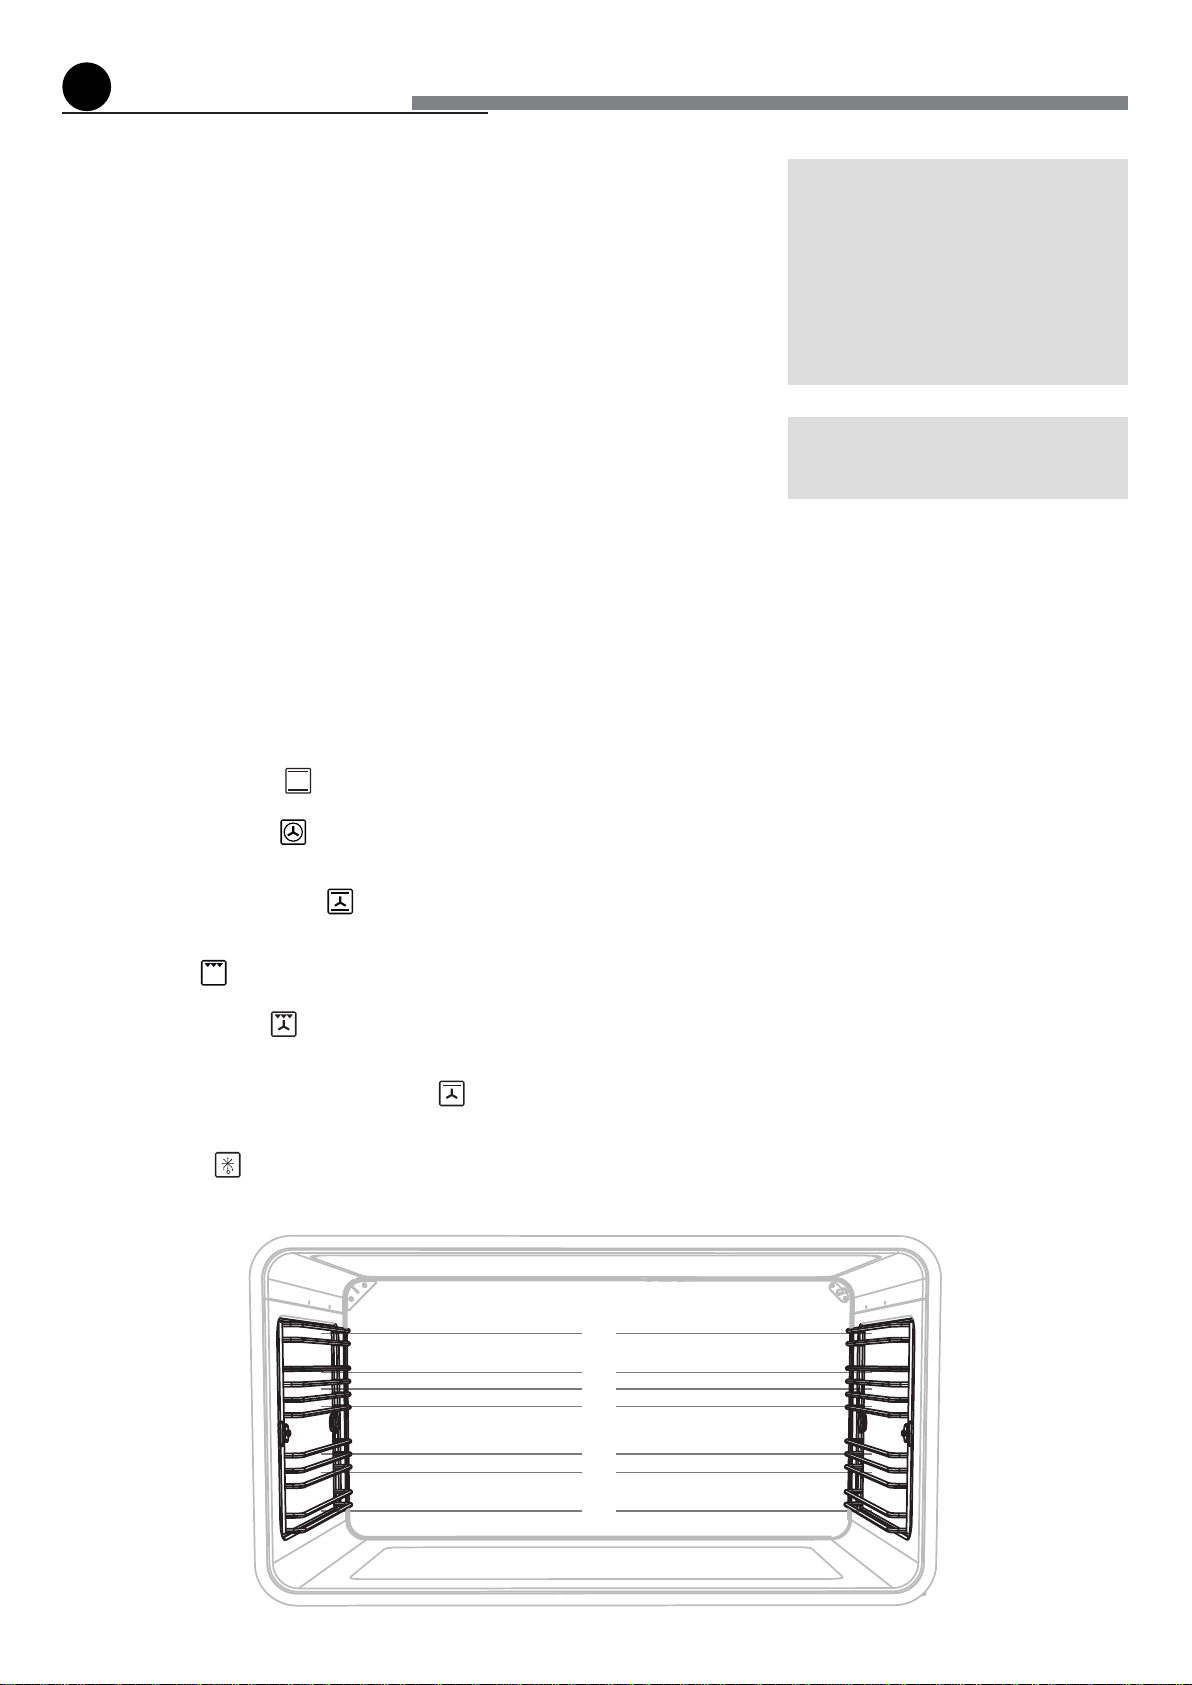
GENERAL FEATURES
Asitsnameindicates,thisisanoventhatpresentsparticularfeaturesfromanoperational
pointofview.
Infact,itispossibletoinsert7differentprogramstosatisfyeverycookingneed.
The7positions,thermostaticallycontrolled,areobtainedby4heatingelementswhich
are:
• Lowerheatingelement
• Upperheatingelement
• Broilheatingelement
• Circularheatingelement
VERY IMPORTANT
The oven shall be used always with
the door closed.
ATTENTION: the range becomes very
hot during operation.
ATTENTION: the oven door becomes
very hot during operation.
KEEP CHILDREN AWAY.
WARNING:
The door is hot, use the handle.
Fig.3.1
how to use the multifunction electric oven
3
1
5
4
3
2
6
7
17
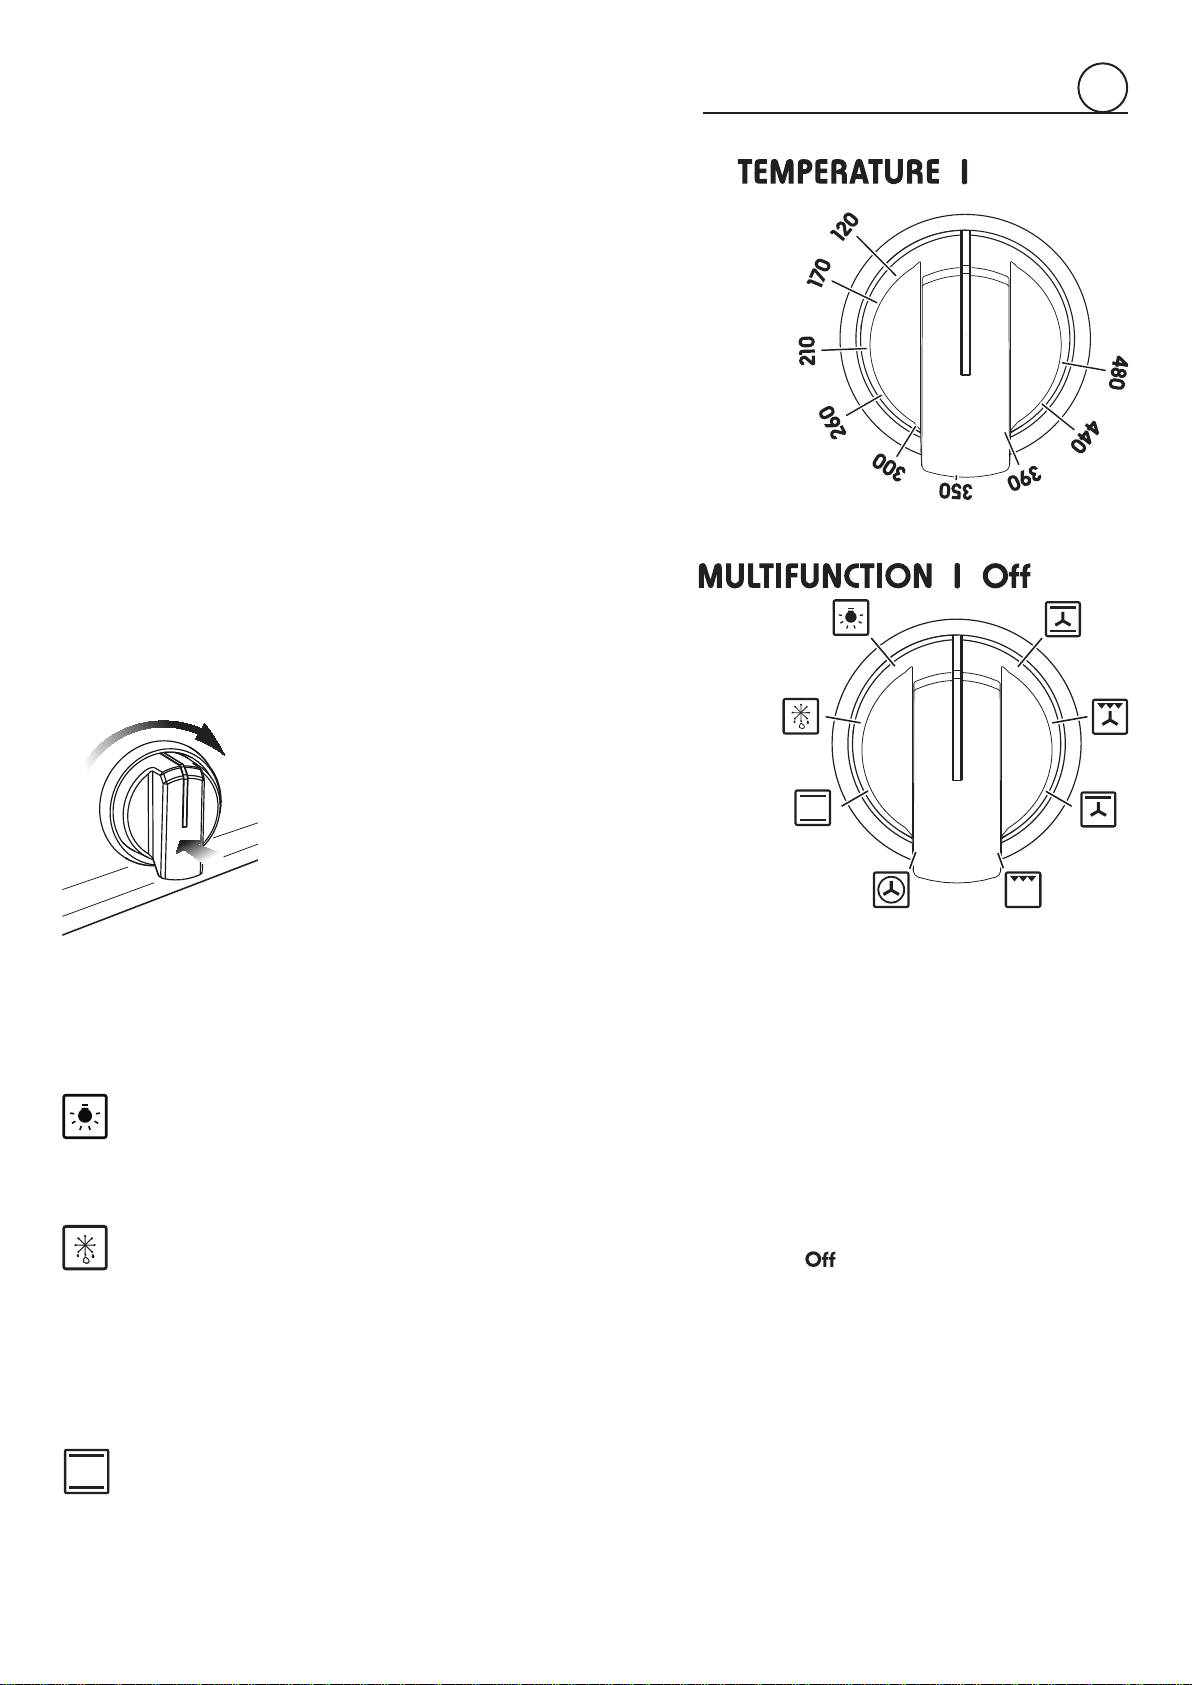
OVEN LIGHT (this is not a cooking function)
Turningtheknobtothisposition,onlytheovenlamplightsup.
Thelampisalwaysoninallthecookingfunctions.
FUNCTION SELECTOR KNOB(g.3.3)
VERY IMPORTANT: ALWAYS LIGHTLY PRESS THE CONTROL KNOB
WHEN TURNING THE FUNCTION KNOB FROM THE OFF POSITION(g.
3.4).
Rotatetheknobclockwisetosettheoventooneofthefollowingfunctions:
DEFROSTING FROZEN FOODS (thisisnotacookingfunction)
Onlythefanandtheovenlampswitchon.Tobeusedwiththethermostatknobon
becausetheotherpositionshavenoeffect.
Defrostingtakesplacebyfan,withoutheating.
Recommended for:
Torapidlydefrostfrozenfoods;2.2lbs(1kg)requiresaboutonehour.
Thedefrostingtimesvaryaccordingtothequantityandtypeoffoodstobedefrosted.
TRADITIONAL CONVECTION COOKING
Theupperandlowerheatingelementsswitchon.
The heatis diffusedbynatural convection andthetemperature must beset between
120°F(50°C)and480°F(250°C)viathethermostatknob.
Recommended for:
Forfoodswhichrequirethesamecookingtemperaturebothinternallyandexternally,i.
e.roasts,spareribs,etc.
THERMOSTAT KNOB(g.3.2)
To turn on the heating elements of the oven, set the switch knob on the
desiredprogramandthethermostatknobontothedesiredtemperature.
Tosetthetemperature,itisnecessarytomakethechosennumber,printed
ontheknob,tomatchwiththecontrolpanelindicator.
The elements will turn ON or OFF automatically according to the energy
needwhichisdeterminedbythethermostat.
Theindicatorlightwillcycleonandoffduringcooking.
3
Fig.
3.4
Fig.3.3
Fig.3.2

18
MAINTAINING TEMPERATURE AFTER COOKING OR SLOWLY
HEATING FOODS
Theupperelementandthefanareon.Theheatisdiffusedbyforcedconvectionwith
themostheatbeingproducedbytheupperelement.Thetemperaturemustberegulated
between120°F(50°C)and480°F(250°C)viathethermostatknob.
Recommended for:
Tokeepfoodshotaftercooking.Toslowlyheatalreadycookedfoods.
VENTILATED BROILING
The infrared heating element and the fan switch on. The heat is mainly diffused by
radiationandthefandistributesitinthewholeoven.
The temperature can be set between 120 °F (50 °C) and 480 °F (250 °C) via the
thermostatknob.
Forcorrectuseseethe“VENTILATEDBROILING”section.
Recommended for:
Forgrillcookingwhenafastoutsidebrowningisnecessarytokeepthejuicesin,i.e.veal
steak,steak,hamburger,
etc.
CONVECTION COOKING WITH VENTILATION
Theupperandlowerheatingelementsandthefanturnon.
The heat is dispersed by forced convection and the temperature can be regulated to
between120°F(50°C)and480°F(250°C)viathethermostatknob.
Recommended for:
For foods of large volume and quantity which require the same internal and external
degreeofcooking;forie:rolledroasts,turkey,legs,cakes,etc.
VENTILATED COOKING
Thecircularelementandfancomeon.
The heat is dispersed by forced convection and the temperature can be regulated to
between120°F(50°C)and480°F(250°C)viathethermostatknob.Theovendoesnot
requirepreheating.
Recommended for:
Foodwhichhastobewell-cookedoutsideandsoftorrosyinside,forexamplelasagne,
lamb,roastbeef,wholeshetc.
BROILING
Theinfraredheatingelementswitcheson.
Theheatisdiffusedbyradiation.Thetemperaturecanbesetbetween120°F(50°C)and
480°F(250°C)viathethermostatknob.
Forcorrectuseseethe“BROILING”section.
Recommended for:
Intensebroilingactionforcookingwiththebroiler;browning,crisping,toasting,etc.
3
19
COOKING DIFFERENT DISHES AT THE SAME TIME
TheMULTIFUNCTIONovenatpositions
or ofthefunctionselectorcancook
variousdifferentfoodsatthesametime.Fish,cakesandmeatcanbecookedtogether
withoutthesmellsandavoursmixing.
Theonlyprecautionsrequiredarethefollowing:
• Thecookingtemperaturesmustbeascloseaspossiblewithamaximumdifference
of70-80°F(20-25°C)betweenthedifferentfoods.
• Differentdishesmustbeplacedintheovenatdifferenttimesaccordingtothecooking
timerequiredforeachone.Thistypeofcookingobviouslyprovidesaconsiderable
savingontimeandenergy.
COOKING ADVICE
STERILIZATION
Sterilizationoffoodstobeconserved,infullandhermeticallysealedjars,isdoneinthe
followingway:
a. Turntheswitchtoposition
or .
b. Setthethermostatknobtoposition350°F(175°C)andpreheattheoven.
c. Fillthegrillpanwithhotwater.
d. Setthejarsintothegrillpanmakingsuretheydonottoucheachotherandthedoor
andsetthethermostatknobtoposition260°F(130°C).
Whensterilizationhasbegun,thatis,whenthecontentsofthejarsstarttobubble,turn
offtheovenandletcool.
VENTILATED BROILING
Ventilatedbroilingmaybedonebyselecting withthefunctionselectorknob;thehot
aircompletelyenvelopsthefoodthatistobecooked.
Introducethefoodtobecooked,positioningthegrillpanasclosetotheinfra-redelement
aspossible.
Closethedoorandlettheovenoperateuntilbroilingisdone.
Adding afewdabsof butter before the endofthe cooking time gives the golden“au
gratin”effect.
Broiling with the oven door closed.
Important: Use always suitable protective gloves when inserting/removing the
broiling pan from the oven (see next page).
It is advisable to handle
the oven accessories
using oven gloves.
WARNING
VERY IMPORTANT
WARNING!!
REGENERATION
Turntheswitchtoposition
or andsetthetemperatureto300°F(150°C).
Breadbecomesfragrantagainifwetwithafewdropsofwaterandputintotheovenfor
about10minutes.
ROASTING
Toobtainclassicalroasting,itisnecessarytoremember:
• thepre-settemperatureshouldbemaintained.
• thatthecookingtimedependsonthequantityandthetypeoffoods.
3
Loading page 20...

21
Description of the illuminated symbols:
AUTO flashing-Programmerinautomaticpositionbutnotprogrammed
AUTO alwayslighted-Programmerinautomaticpositionwithprogrammeinserted.
Automaticcookingtakingplaceoroveninmanualmode.
Timer in operation
and AUTO - flashing - Programme error.
(Thetimeofdayliesbetweenthecalculatedcookingstartandendtime).
Note:Selectafunctionbytherespectivebuttonand,in5seconds,settherequiredtime
withthe
/ buttons(“one-hand”operation).
Apowercutzeroestheclockandcancelsthesetprogrammes.
Theelectronicprogrammerisadevicewhichgroupstogetherthefollowingfunctions:
• 12hoursclockwithilluminateddisplay
• Timer(upto23hoursand59minutes)
• Programforautomaticovencooking
• Programforsemi-automaticovencooking
Description of the buttons:
Timer
Cookingtime
Endofcookingtime
Manualpositionandcancellationoftheinsertedcookingprogram
Toincreasethenumbersonthedigitaldisplay
Todecreasethenumbersonthedigitaldisplay.
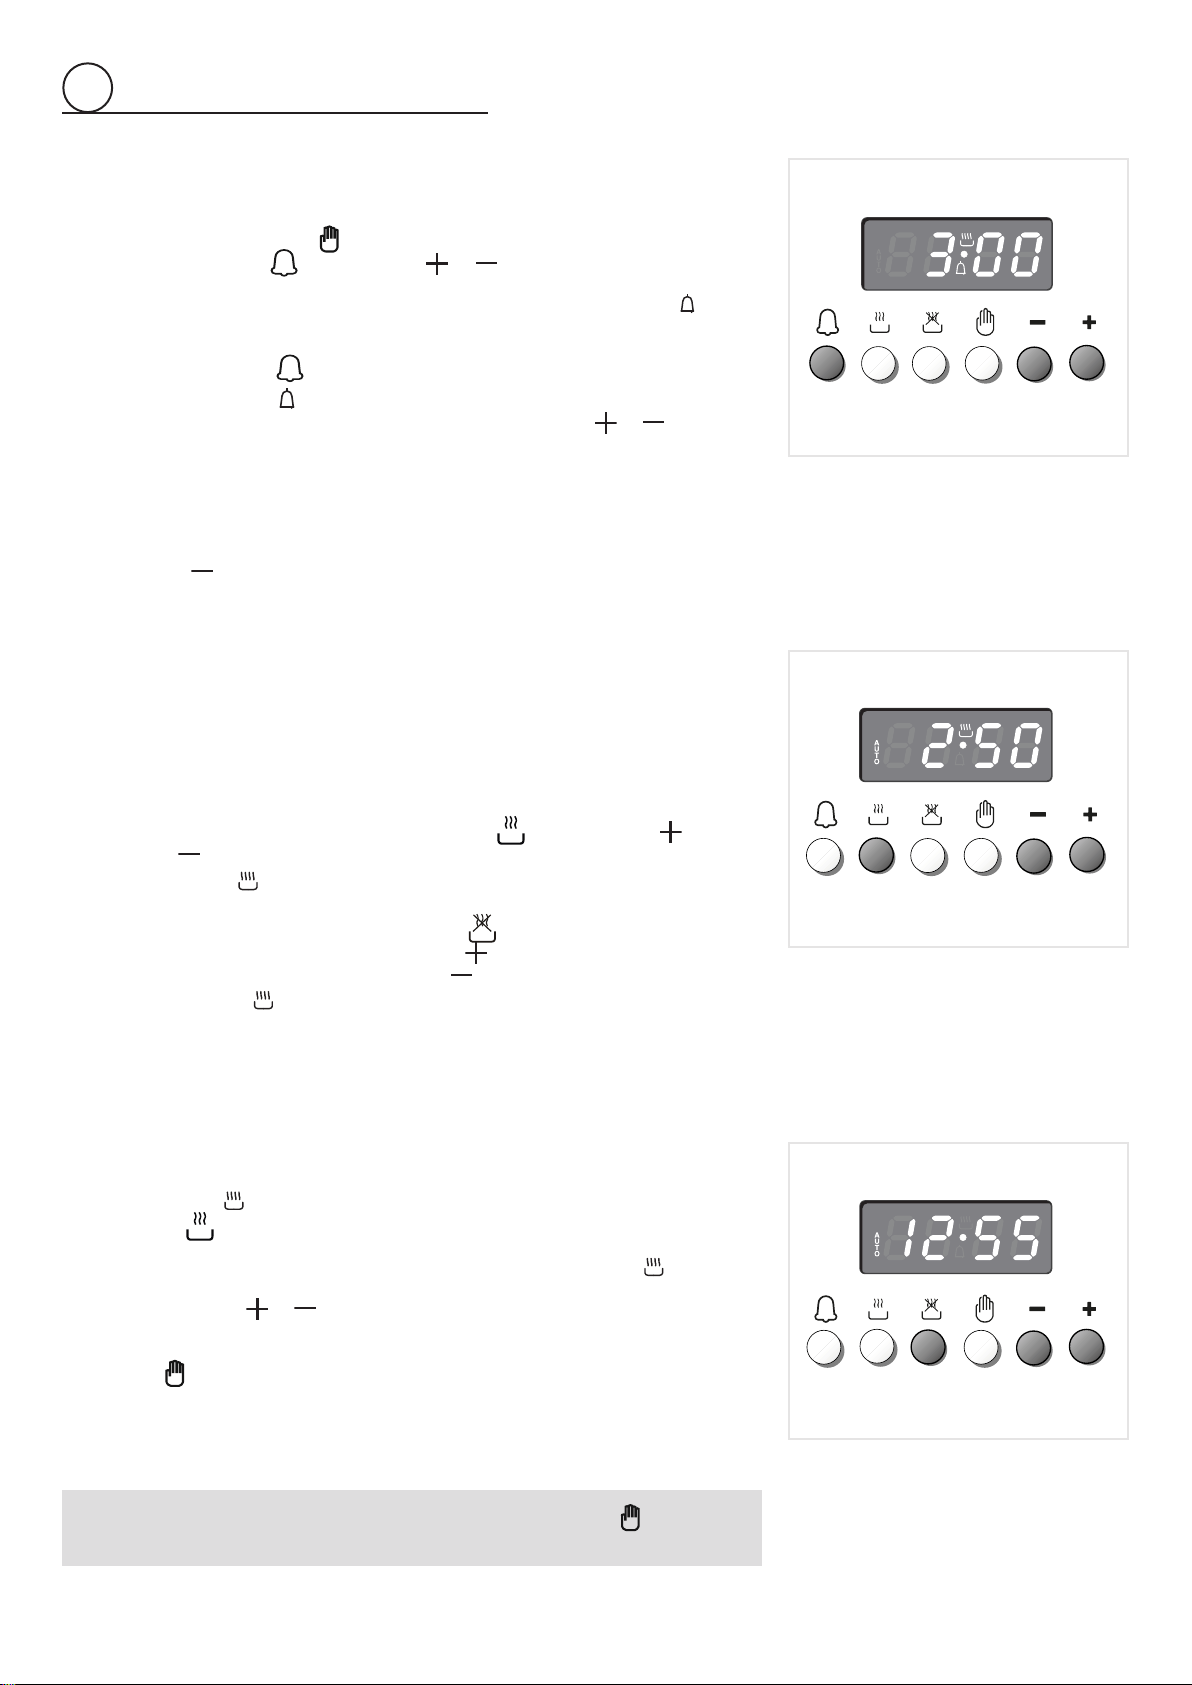
ELECTRONIC CLOCK(fig.4.2)
The programmer is equipped with an electronic clock with lighted numbers which
indicatehoursandminutes.
Upon immediate connection of the oven or after a blackout, “12:00” will flash on the
programmerpanel.
Tosetthehouritisnecessarytopushthe
buttonandthenthe or
buttonuntil
youhavesettheexacthour(fig.4.2).
Alternatively,simultaneouslypushthe
twobuttonsandthenthe or
button.
Note:Settingtheclockdeletesanyprogramme.
NORMAL COOKING WITHOUT THE USE OF THE
PROGRAMMER
Tomanuallyusetheoven,thatis,withouttheaidoftheprogrammer,itisnecessaryto
canceltheflashingAUTObypushingthebutton
(AUTOwillbeswitchedoffandthe
symbol
willgoon-fig.4.3).
Attention:IftheAUTOisnotflashing(whichmeansacookingprogrammehasalready
been inserted), by pushing the button
you have cancelled the programme and
switchedtomanual.
Theovenshallbeswitchedoffmanually.
4
Fig.4.2
Fig.4.1
Fig.4.3
During a semi-automatic or
automatic oven cooking program,
once completed the programming
procedure the oven lamp/s will be lit
until the end of the cooking program.
This means that, in case of delayed
cooking start, the oven lamp/s will
remain always lit.
In addition, if a fan assisted semi-
automatic or automatic oven cooking
program is set, further to the oven
lamp/s also the oven fan motor (the
motor inside the oven cavity) may be
operating (together with the cooling
fan motor) before the start of the
cooking program; this is possible if
the oven or cooktop has been used
previously and the range is still hot/
warm.
how to use the electronic programmer
22
ELECTRONIC TIMER
Thetimerprogrammeconsistsonlyofabuzzerwhichmaybesetforamaximumperiod
of23hoursand59minutes.
Ifthe
AUTO
isflashingpushthe button.
Tosetthetime,pushthe
buttonandthe or
untilyouobtainthedesiredtime
(fig.4.4).
Havingfinishedthesetting,thenormaltimewillappearonthepanelandthe
symbol
willappear.
Thecountdownwillstartimmediatelyandmaybeseenatanymomentonthepanelby
simplypressingthebutton
.
Attheendofthetime,the symbolwillbeswitchedoffandanintermittentbuzzerwill
gooff;thiscanbestoppedbypressinganyoneofthebuttons(not
or
).
If the oven is switched on, you must switch off manually.
SETTING THE FREQUENCY OF THE AUDIBLE SIGNAL
Bypressingthe buttonyoucanchoosefromthreevariations.
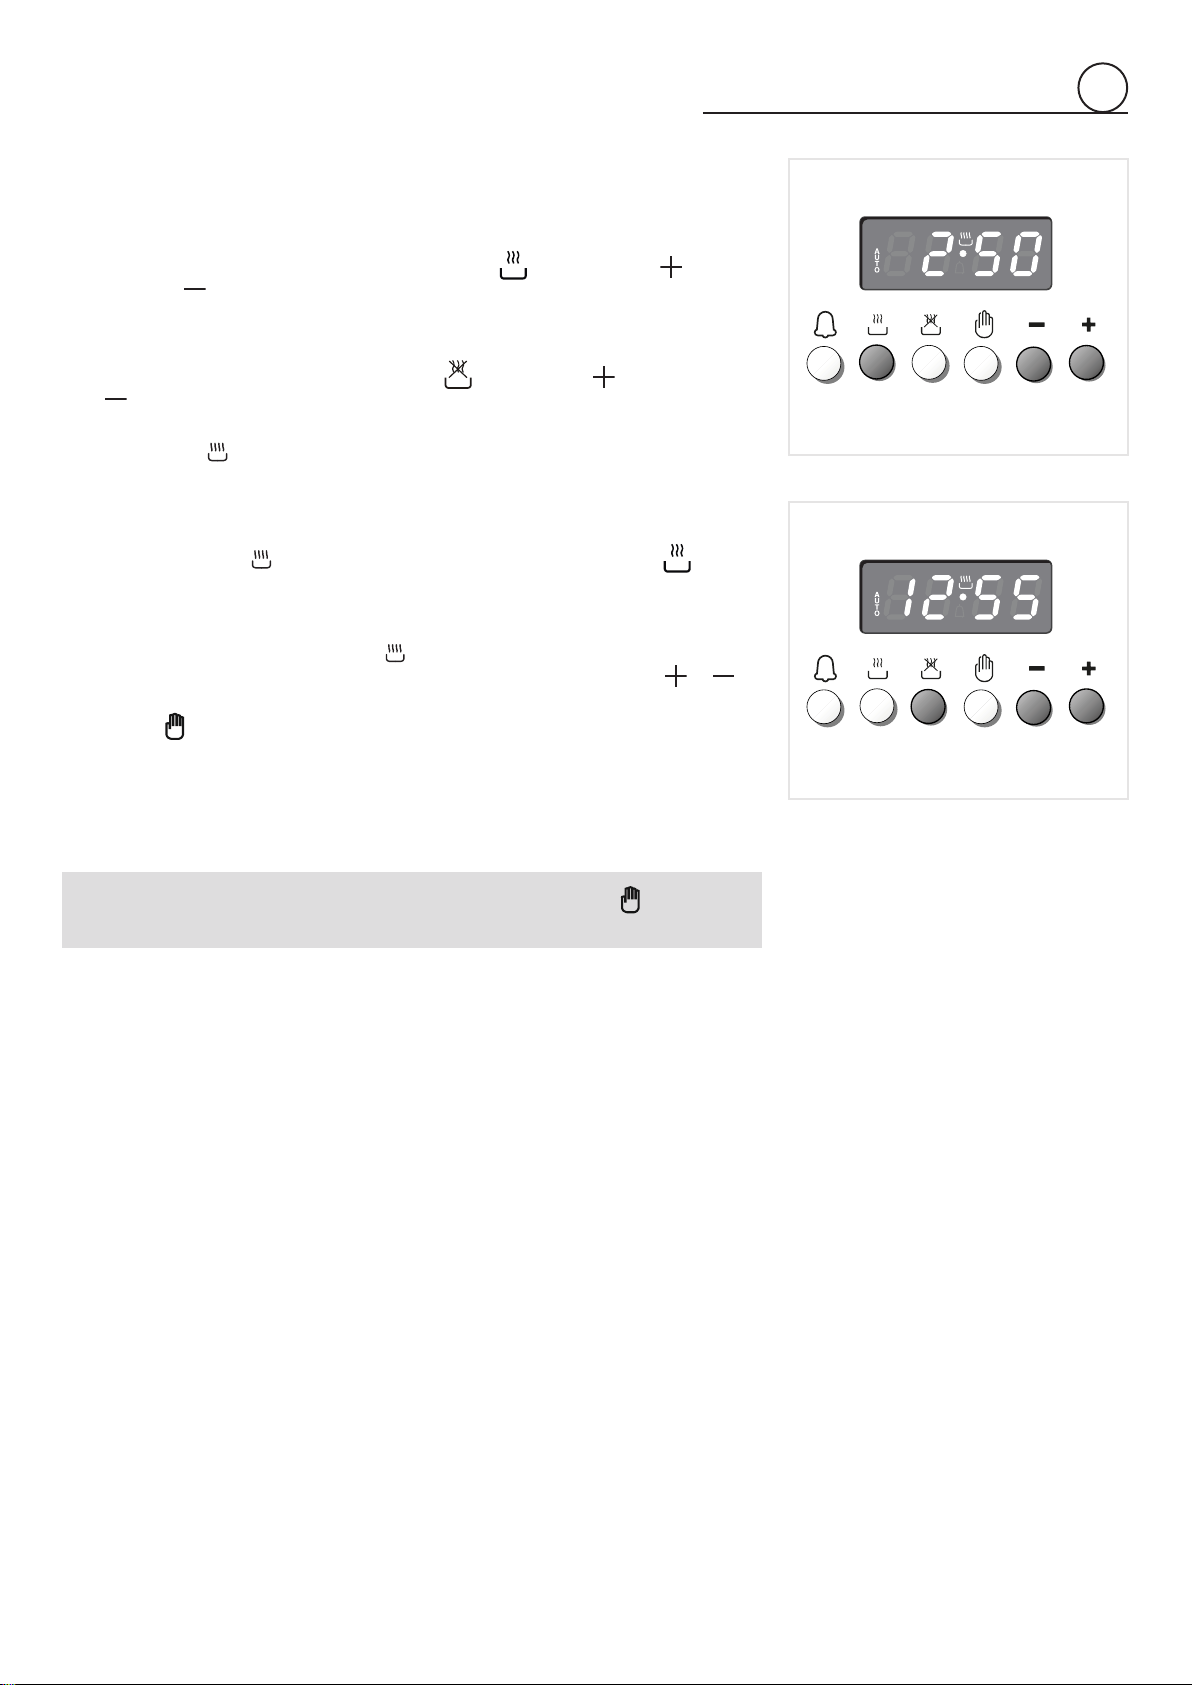
AUTOMATIC OVEN COOKING
Tocookfoodautomaticallyintheoven,itisnecessaryto:
1. Setthelengthofthecookingtime
2. Settheendofthecookingtime
3. Setthetemperatureandtheovencookingprogramme.
Theseoperationsaredoneinthefollowingway:
1.Set the length of the cooking time by pushing the button and the
button to
advance,or
togobackifyouhavepassedthedesiredtime(fig.4.5).
TheAUTOandthe
symbolwillbeon.
2.Settheendofthecookingtimebypressingthe
button(thecookingtimealready
added to the clock time will appear), and the
button (fig. 4.6); if you pass the
desiredtimeyoumaygetbackbypushingthe
button.
Afterthissetting,the
symbolwillgooff.Ifafterthissetting,theAUTOflasheson
thepanelandabuzzergoesoff,itmeanstherewasanerrorintheprogramming.
Inthiscase,modifytheendofcookingtimeorthecookingtimeitselfbyfollowingthe
aboveinstructionsagain.
3.Setthetemperatureandthecookingprogrammebyusingtheswitchandthermostat
knobsoftheoven(seespecificchapters).
Nowtheoven isprogrammed andeverythingwill workautomatically, thatisthe oven
willturnonattherightmomenttoendthecookingattheestablishedtime.
Duringcooking,the
symbolremainson.
Bypushingthe
buttonyoucanseethetimethatremainsuntiltheendofcooking.
Attheend ofthe cookingtimethe ovenwill turnoff automatically, the
symbolwill
turnoff,AUTOwillflashandabuzzerwillsound,whichcanbeturnedoffbypushing
anyofthebuttons(not
or
).
Turntheswitchandthermostatknobstozeroandputtheprogrammeronto“manual”by
pressingthe
button.
Attention:Apowercutmakestheclockgotozeroandcancelsthesetprogrammes.
Afterapowercut,“12:00”willflashonthepanel.
The cooking program may be cancelled at any time by pushing .
In this case the oven shall be switched off manually.
4
Fig.4.4
Fig.4.5
Fig.4.6
23
SEMI-AUTOMATIC COOKING
This is used to automatically switch off the oven after the desired cooking time has
elapsed.
Therearetwowaystosetyouroven:
1.Setthe length ofthecooking time bypushing the
buttonand the button to
advance,or
togobackwardsifyouhavepassedthedesiredtime(fig.4.7).
or
2.
Settheendofthecookingtimebypushingthe buttonandthe buttontoadvance,
or
togobackwardsifyouhavepassedthedesiredtime(fig.4.8).
AUTOandthe symbolwillbeon.
Then set the temperature and the cooking programme using the oven switch and
thermostatknobs(seespecificchapters).
Theovenis switched onandit will beswitchedoff automatically attheend of the
desiredtime.
Duringcooking,the
symbolremainsonandbypressingthebutton youcan
seethetimethatremainstilltheendofthecooking.
Attheendofcooking,theovenandthe
symbolwillturnoff,theAUTOwillflashand
abuzzerwillsound;thatcanbestoppedbypushinganyofthebuttons(not
or
).
Turntheswitchandthermostatknobstozeroandputtheprogrammeronto“manual”by
pressingthe
button.
Attention:Apowercutmakestheclockgotozeroandcancelsthesetprogrammes.
Afterapowercut,“12:00”willflashonthepanel.
The cooking program may be cancelled at any time by pushing .
In this case the oven shall be switched off manually.
4
Fig.4.8
Fig.4.7
Loading page 24...

25
5
VITROCERAMIC SURFACE
Before cleaning the cooktop, make sure that it is switched off.
Removeanyencrustation usingaspecial scraperwhichcan bebought(g.
5.1).
Removedustusingadampcloth.
Detergentscanbeusedaslongastheyarenotabrasiveorcorrosive.
Allresiduesofdetergentmustbeeliminatedwithadampcloth.
Keepallobjectsthatcouldbemeltedby theheatawayfromthe top:plastic
objects,aluminiumfoil,sugarorsugaryproducts.
If an objectmeltson the top, remove immediately (whilethetopis still hot)
usingaspecialscrapertoavoidpermanentdamagetothepyroceramsurface.
Avoidusingknivesandpointedobjectsastheycoulddamagethesurfaceof
thetop.
Alsoavoidusingabrasivespongesorwirewoolwhichcanpermanentlyscratch
thepyroceramsurface.
ATTENTION: MOST IMPORTANT!
If cleaning the glass ceramic hob using a special scraper tool take extra
care to avoid damaging to the seal at the edges of the glass ceramic
surface.
Fig. 5.1
OVEN FITTING OUT
• Assemblethewirerackstotheovenwallsusingthe2screws(g.5.2a).
• Slidetherackintotherunners(g.5.2b).
Therackmustbettedsothatthesafetynotch,whichstopsitslidingout,facestheinsideoftheoven;theguardrailshallbeat
theback.
• Todismantle,operateinreverseorder.
Guardrail Stopnotch
Fig.5.2bFig.5.2a
Loading page 26...
27
5
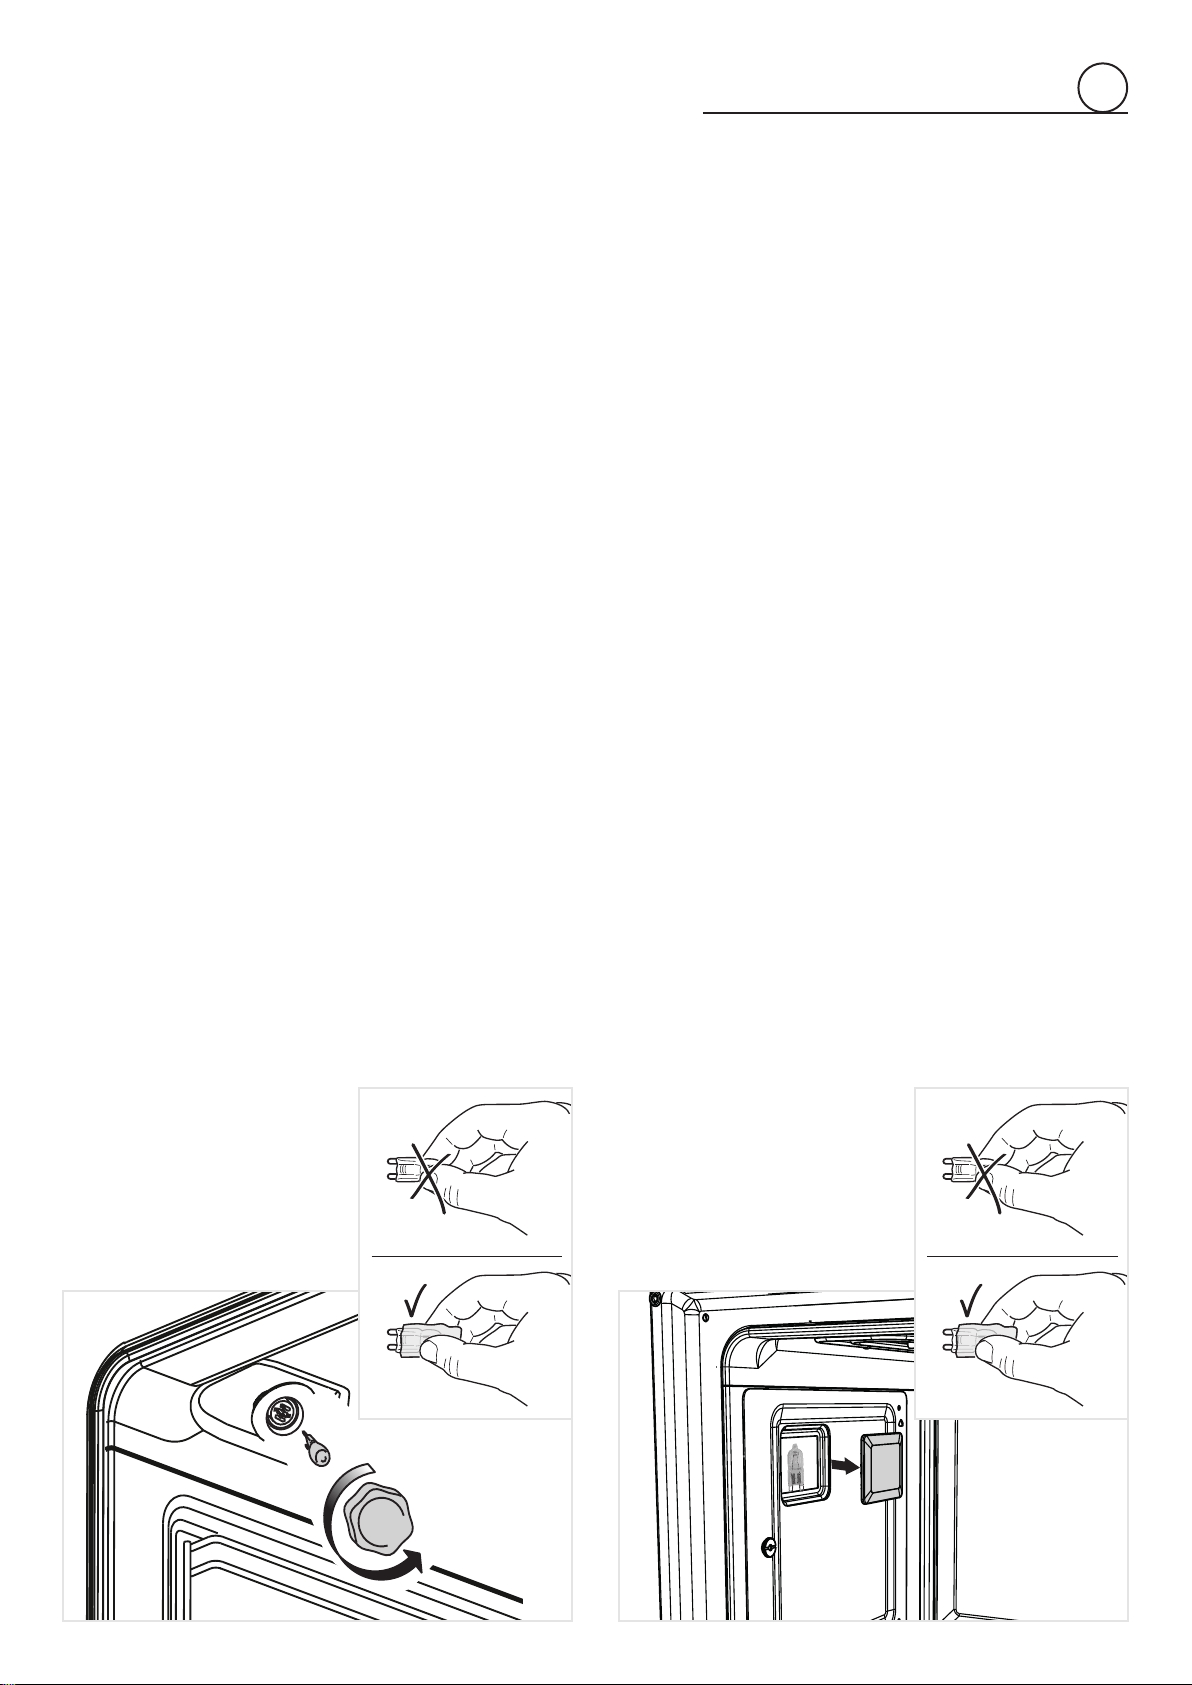
REPLACING THE OVEN LIGHTS
(NOTE: DEPENDING ON YOUR MODEL, YOUR OVEN MAY ONLY HAVE SOME OF THESE LIGHTS)
WARNING: Ensure the appliance is switched off before replacing the lamp to avoid the possibility of electric shock.
• Lettheovencavityandtheheatingelementstocooldown.
• Switchofftheelectricalsupply.
• Removetheprotectivecover(gs.5.5a-5.5b).
• Replacethehalogenlampwithanewonesuitableforhightemperatureshavingthefollowingspecications:120Vacandsame
power(checkwattpowerasstampedinthebulbitself)ofthereplacedlamp.
IMPORTANT WARNING: Never replace the lamp with bare hands; contamination from your ngers can cause premature
failure. Always use a clean cloth or gloves.
• Rettheprotectivecover.
NOTE:Ovenbulbreplacementisnotcoveredbyyourguarantee.
WRONG
CORRECT
WRONG
CORRECT
Fig.5.5b
Fig.5.5a
28
5
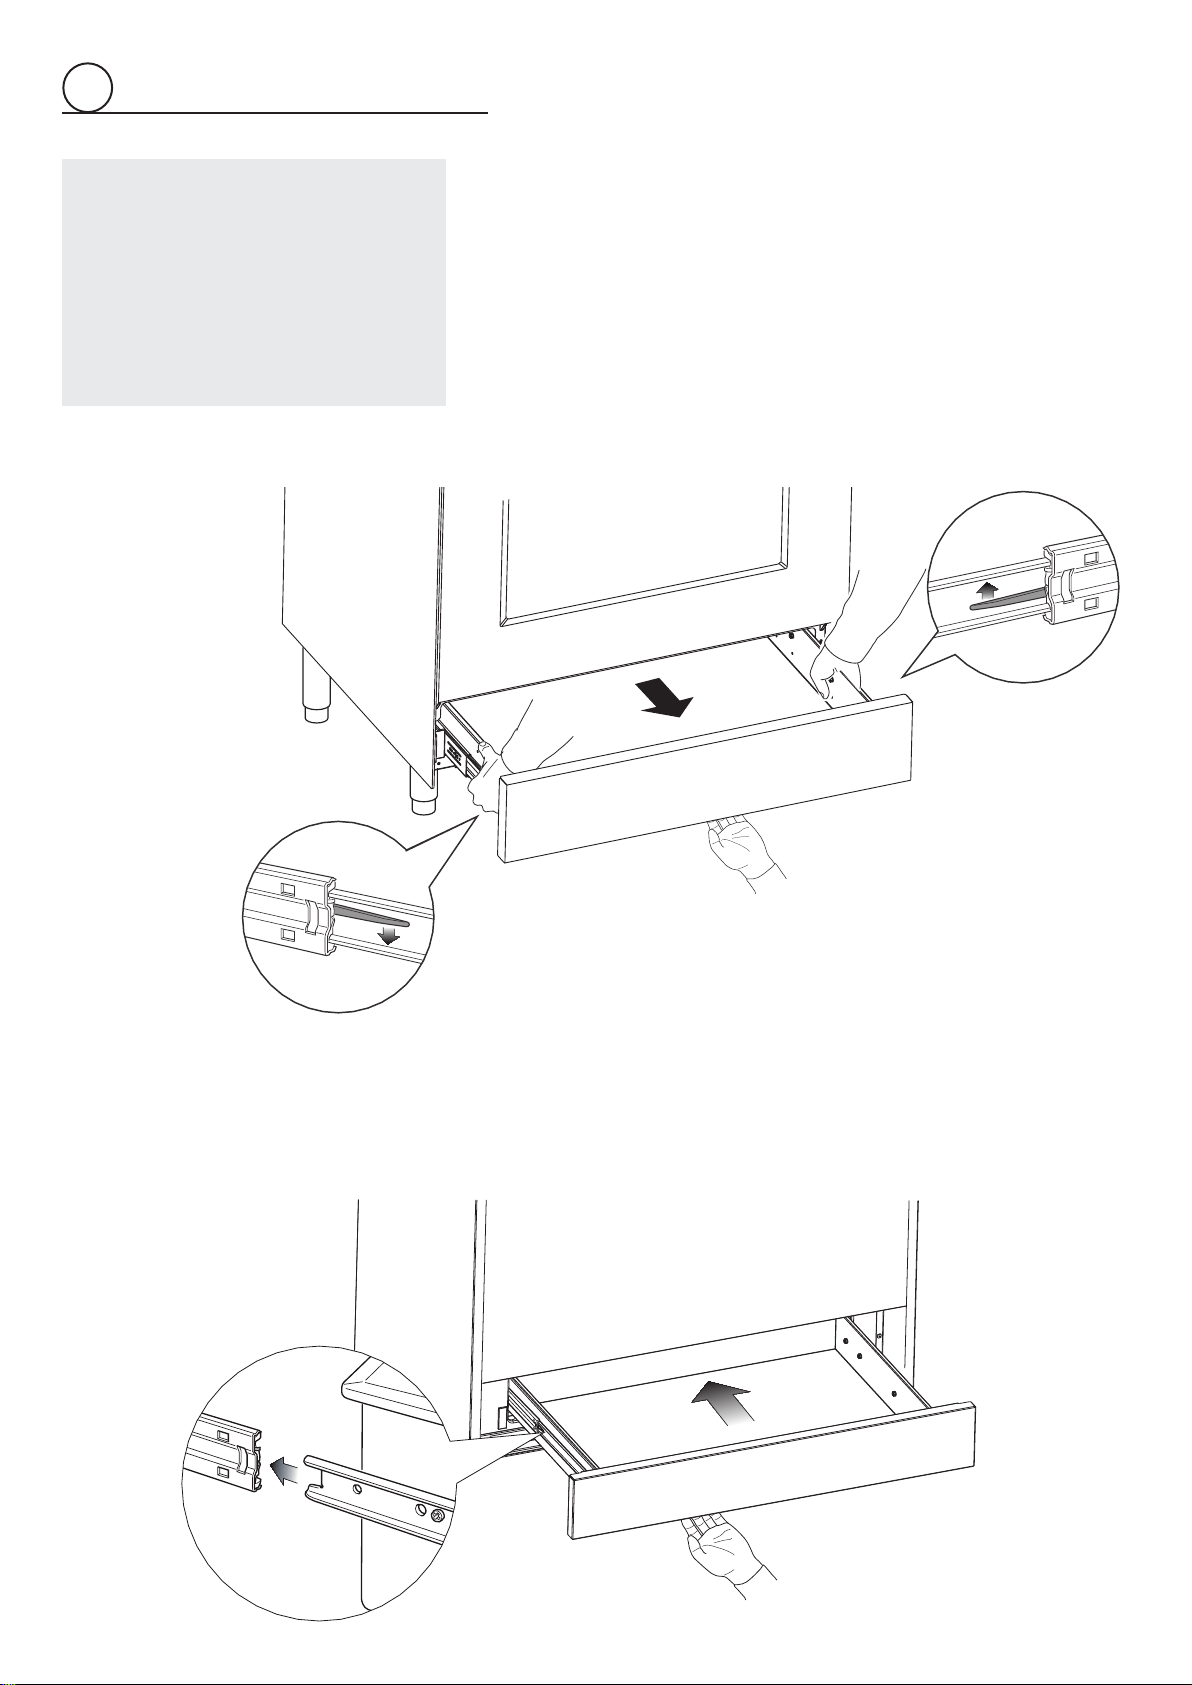
WARNING:
• Do not remove drawer while hot.
• Do not remove drawer during
• operation.
• Be sure drawer is empty before
removing.
REMOVING THE STORAGE DRAWER
1. Openthedrawercompletely(g.5.6)
2. Movedowntheleverof leftguide(g. 5.7)andup theleverofrightguide
(g.5.8).
3. Removethedrawer;thelevershavetobekeptmoved(g.5.6).
REFIT THE STORAGE DRAWER
1. Insertthedrawerguidesintotherangeguides(g.5.9)
2. Gentlyclosethedrawercompletely;thesafetycatchswillbeautomatically
hooked.
Fig. 5.9
Fig. 5.6
Fig. 5.8
Fig. 5.7
29
5
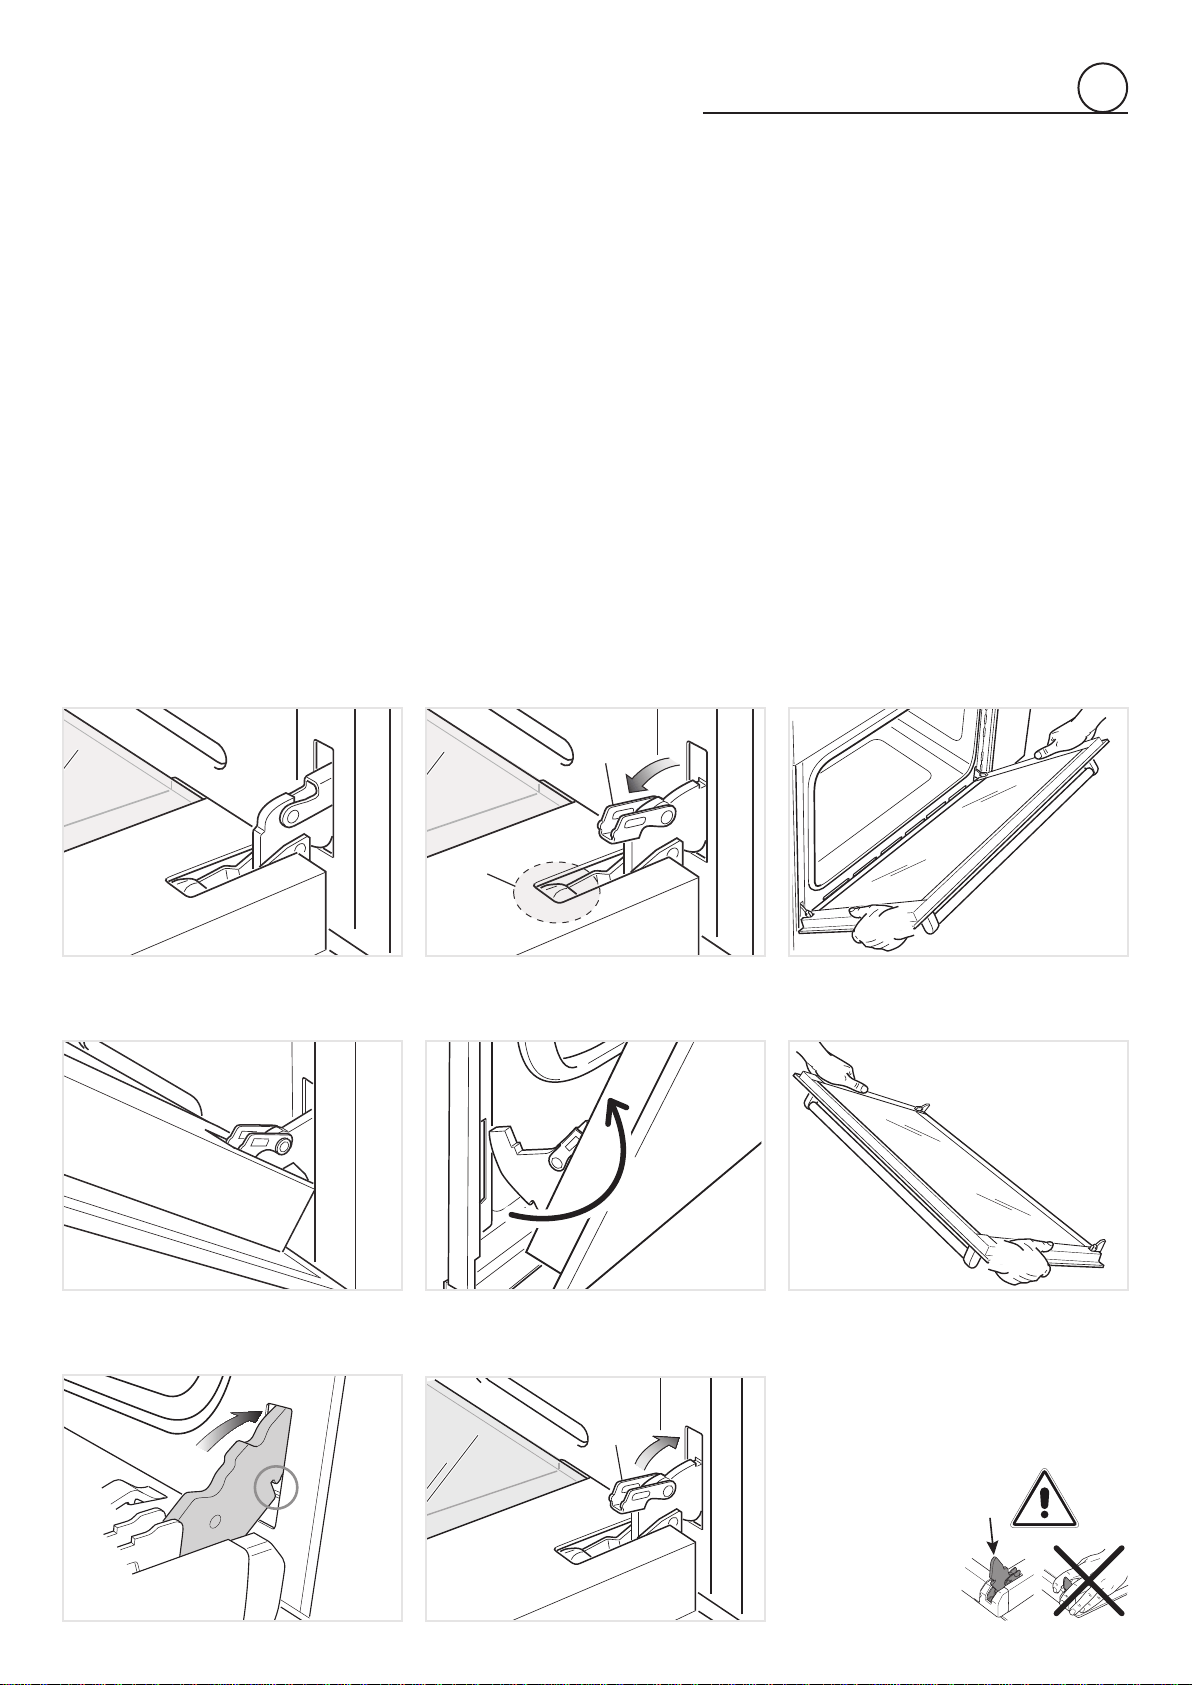
REMOVING THE OVEN DOOR
Theovendoorcaneasilyberemovedasfollows:
• Openthedoortothefullextent(g.5.10).
• Openthelever“A”completelyontheleftandrighthinges(g.5.11).
• Holdthedoorasshowning.5.12.
• Gentlyclosethedoor(g.5.12)untilleftandrighthingelevers“A”arehookedtopart“B”ofthedoor(g.5.13).
• Withdrawthehingehooksfromtheirlocationfollowingarrow“C”(g.5.14).
• Restthedooronasoftsurface.
B
A
C
Fig.5.14
Fig.5.12
Fig.5.13
Fig.5.11
Fig.5.10
Important!
Alwayskeepasafedistancefromthedoor
hinges,payingspecialattentiontoposition
ofyourhands.
Ifthedoorhingesare
notcorrectlyhooked,
they could unhook
and close suddenly
and unexpectedly
withriskofinjury.
REFIT THE DOOR
1. Holdthedoorrmly(g.5.15).
2. Insertthehingetonguesintotheslots,makingsurethatthegroovedropsintoplaceasshowninthegure5.16.
3. Openthedoortoitsfullextent.
4. Fullyclosethelevers“A”ontheleftandrighthinges,asshowninthegure5.17.
5. Closethedoorandcheckthatitisproperlyinplace.
Fig.5.15
Fig.5.16
A
Fig.5.17

30
5
DO’S AND DO NOT’S
• Doalwaysusetheovenwiththedoorclosed.
• Doalwaysbroilwiththedoorclosed.
• Doreadtheuserinstructionscarefullybeforeusingtherangeforfirsttime.
• Do allow the oven to heat for about two hours, before using for the first time, in
ordertoexpelanysmell fromthenew oveninsulation,withouttheintroductionof
food.Makesurethekitcheniswellventilatedduringtheconditioning.
• Docleanyourovenregularly.
• Doremovespillsassoonastheyoccur.
• Doalwaysuseovengloveswhenremovingfoodshelvesandtraysfromtheoven.
• Donotallowchildrenneartherangewheninuse.
• Donotallowfatoroilstobuildupintheovenbase,orovenaccessories.
• Donotplacecookingutensilsorplatesdirectlyontotheovenbase.
• Donotplacehotenamelpartsinwater.Leavethemtocoolfirst.
• Do not allow vinegar, coffee,milk, saltwater, lemon or tomato juice to remain in
contactwithenamelparts(i.e.insidetheoven).
• Do not use abrasive cleaners or powders that will scratch the surface of the
stainlesssteelandtheenamel.
• Donotattempttorepairtheinternalworkingsofyourrange.
• Doremovetheprotectivefilmbeforethefirstuse.
• Fire risk! Do not store flammable material in the oven and in the storage
compartment.
• Donotusetheovenwiththeovendooropen.
• Donotusetheoventowarmorheataroom.
• Do not use the appliance if the ceramic glass surface is broken or damaged. If
you note a crack onthecooktop,disconnecttheappliance immediately from the
electricalmainssupplyandcalltheAfter-SalesService.
• Donotleavealuminiumfoil,greaseproofpaperetc.orplasticonthehobwhenitis
hot.
• Donotdropheavyorsharpobjectsontheglassceramiccooktop.
FOR YOUR SAFETY
Under no circumstances should any external covers be removed for servicing or
maintenanceexceptbysuitablyqualifiedpersonnel

31
5

Ref.L0338-ß0
The manufacturer cannot be held responsible for possible inaccuracies due to
printingortranscriptionerrorsinthepresentbooklet.
Themanufacturerreservestherighttomakeallmodicationstoitsproductsdeemed
necessaryformanufactureorcommercialreasonsatanymomentandwithoutprior
notice,withoutjeopardisingtheessentialfunctionalandsafetycharacteristicsofthe
appliances.