L T
®
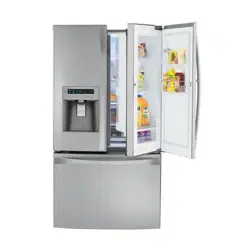
Bottom Freezer Refrigerator
Use & Care Guide
Refrigerador con montaje inferior
Manual de uso y cuidado
R_frig_rateur _ compartiment inf_rieur
Guide d'utilisation et d'entretien
I'll
m
Models:
596.73502201, 596.73503201, 596.73504201, 596.73509201
r
I11
O
mmt.rio o
==
m
\
PartNo.12642733 Sears, Roebuck and Co., Hoffman Estates, IL 60179 U.S.A. www.sears.com
FormA/05/03 Sears Canada, Inc.,Toronto, Ontario, Canada M5B 2B8 Au Canada, www.sears.ca
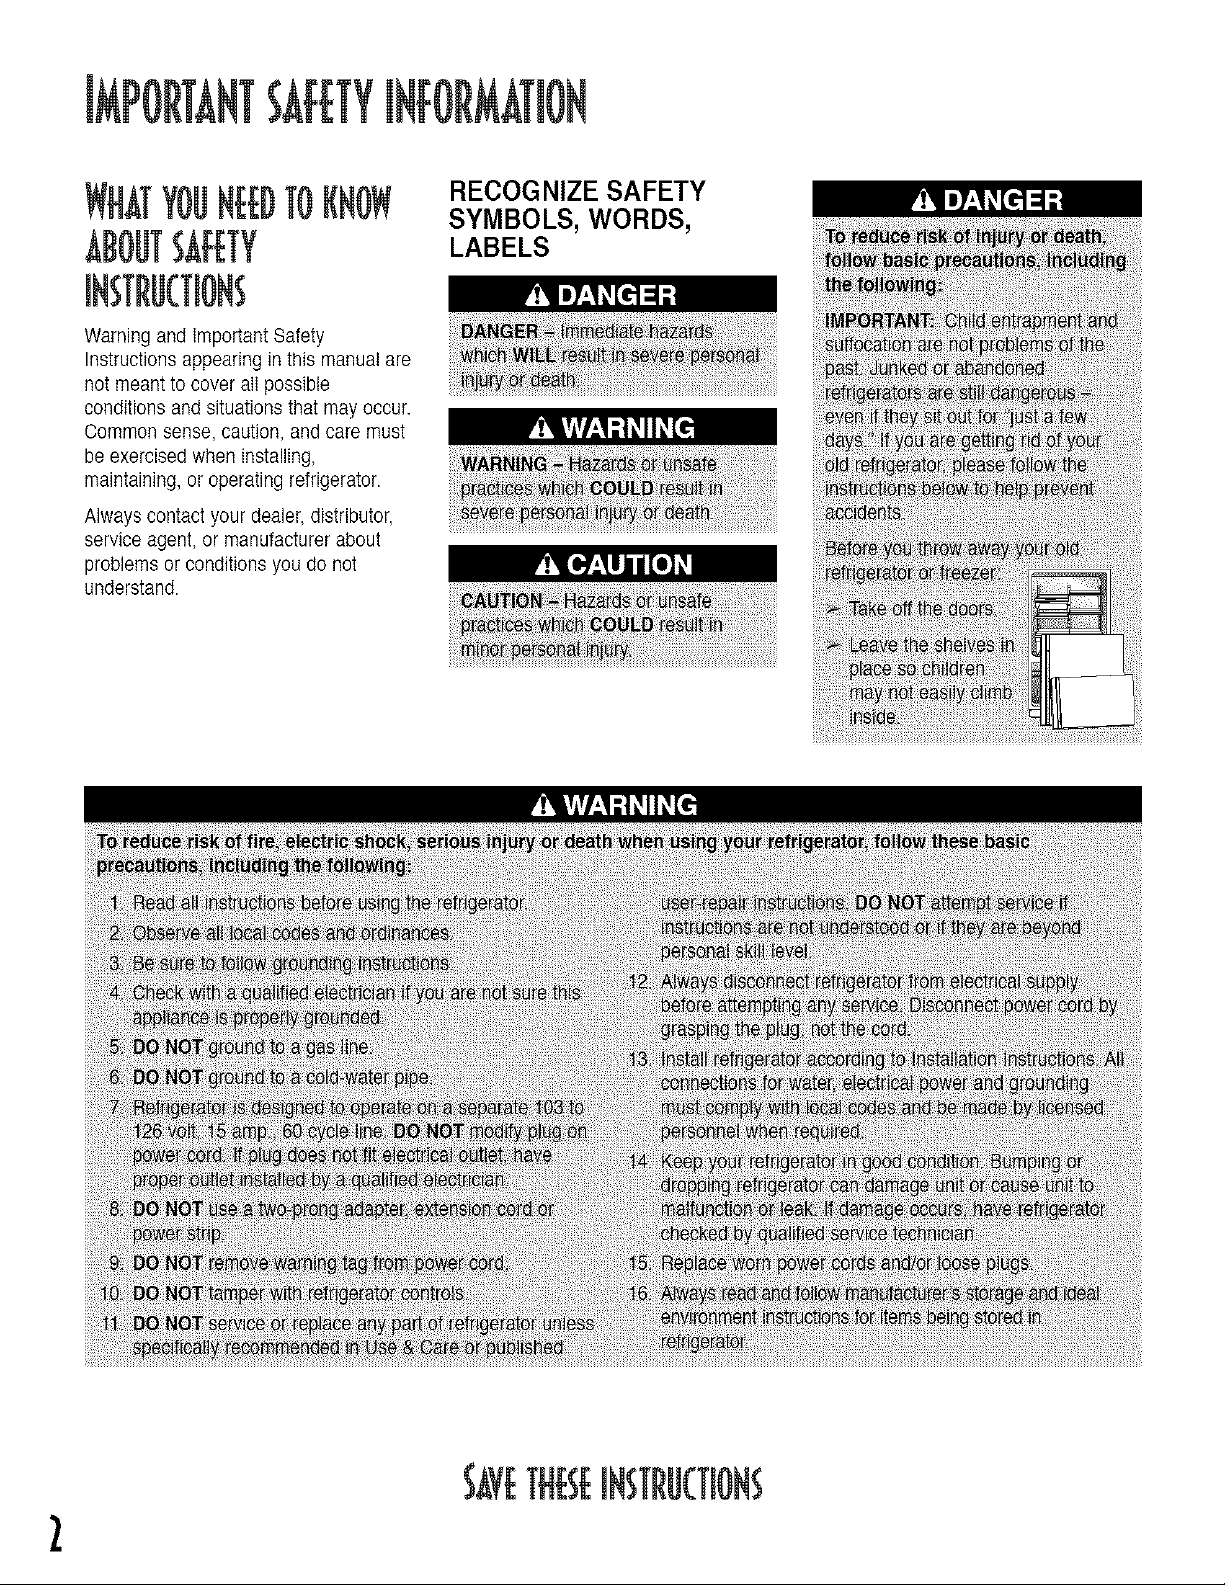
WHATYOUNEEDTOKNOW
ABOUTSAFETY
RECOGNIZE SAFETY
SYMBOLS, WORDS,
LABELS
Warning and important Safety
Instructions appearing in this manual are
not meant to cover all possible
conditions and situations that may occur.
Common sense, caution, and care must
be exercised when installing,
maintaining, or operating refrigerator.
Always contact your dealer, distributor,
service agent, or manufacturer about
problems or conditions you do not
understand.
2
SAVETHESE
MkSTERPROTECTION
IN THE U.S.A.
Congratulations on making a smart
purchase. Your new Kenmore®
appliance is designed and manufactured
for years of dependable operation. But
like all products, it may require
preventive maintenance or repair from
time to time. That is when having a
Master Protection Agreement can save
you money and aggravation.
Purchase a Master Protection
Agreement now and protect yourself
from unexpected hassle and expense.
The Master Protection Agreement also
helps extend the life of your new
appliance. Here is what is included in
the agreement:
Expert service by our 12,000
professional repair specialists.
Unlimited service and no charge for
parts and labor on all covered
repairs.
>- "No-lemon" guarantee - replacement
of your covered product if more than
three product failures occur within
twelve months.
:_ Product replacement if your covered
product cannot be fixed.
Annual Preventive Maintenance
Check at your request - no extra
charge.
>- Fast help by phone - non-technical
and instructional assistance on
products repaired in your home, plus
convenient repair scheduling.
>- Power surge protection against
electrical damage due to power
fluctuations.
Rental reimbursement if repair of
your covered product takes longer
than promised.
Once you purchase the Agreement, a
simple phone call is all that it takes for
you to schedule service. You can call
anytime day or night, or schedule a
service appointment online.
Sears has over 12,000 professional
repair specialists, who have access to
over 4.5 million quality parts and
accessories. That is the kind of
professionalism you can count on to
help prolong the life of your new
purchase for years to come. Purchase
your Master Protection Agreement
today!
Some limitations and exclusions apply.
For prices and additional information,
call 1-800-827-6655.
Sears Installation Service
For Sears guaranteed professional
installation of home appliances and
items like garage door openers and
water heaters, in the U.S.A. call
1-800-MY-HOME®.
IN CANADA
Your purchase has added value because
you can depend on Sears HomeCentrat®
for service. With over 2,400 service
technicians and access to over 900,000
parts and accessories, we have the
tools, parts, knowledge and skills to I[i_!
ensure our pledge: We Service What
We Sell. m
Your Kenmore®appliance is designed
manufactured and tested to provide
years of dependable operation. Yet any
major appliance may require service
from time to time. The Sears
Maintenance Agreement offers you an
outstanding service program, affordably
priced.
Sears Maintenance Agreement
Is your way to buy tomorrow's service
at today's price.
:,--Eliminates repair bitls resulting from
normal wear and tear.
> Provides for non-technical and
instructional assistance.
Even if you don't need repairs,
provides an annual Preventive
Maintenance Check, at your request,
to ensure that your appliance is in
proper running condition.
Some limitations apply. For information
concerning Sears Canada Maintenance
Agreements, call 1-800-361-6665.
Full One Year Warranty on
Refrigerator
For one year from the date of purchase,
when this refrigerator is operated and
maintained according to instructions
attached to or furnished with it, Sears
will repair it, free of charge, if defective
in material or workmanship.
Full Five Year Warranty on Sealed
Refrigeration System
For five years from the date of purchase,
when this refrigerator is operated and
maintained according to instructions
attached to or furnished with it, Sears
will repair the sealed system (consisting
of refrigerant, connecting tubing and
compressor motor) free of charge, if
defective in material or workmanship.
The above warranty coverage applies
only to refrigerators which are used for
storage of food for private household
purposes. It excludes original and
replacement Kenmore ice & water filter
cartridges. Original and replacement
cartridges are warranted for 30 days,
parts only, against defects in material or
workmanship.
Warranty service is available by
contacting 1-800-4-MY-HOME®
(1-800-469-4663).
This warranty applies only while this
product is in use in the United States
and Canada.
This warranty gives you specific legal
rights, and you may also have other
rights, which vary from state to state.
Sears, Roebuck and Co., Dept. 817WA,
Hoffman Estates, IL 60179
NOTE: Some Reverse Osmosis home
water systems cause low water
pressure. Low water pressure can affect
the water and ice dispensing system by
causing small or hollow ice cubes and
slow water flow from the dispenser.
Service problems related to the home's
Reverse Osmosis water system are not
covered by the warranty.
In the space below record the model
and serial numbers and purchase date
of your refrigerator. You will find the
model and serial number sticker inside
the refrigerator section on the left wall.
Model Number: 596.
Serial Number:
Purchase Date:
Keep this booklet and your Sears
sales receipt in a safe place for future
reference.
4
Important Safety Information ......................................................................................2
What You Need to Know About Safety Instructions...................................................2
Electrical Requirements .............................................................................................2
Protection Agreements ................................................................................................3
Master Protection Agreements - USA .....................................................................3
Maintenance Agreements - Canada .........................................................................3
Warranty ........................................................................................................................4
Product Record .............................................................................................................4
Installing Your Refrigerator ....................................................................................6-11
Measuring the Opening .............................................................................................6
Transporting Your Refrigerator...................................................................................6
Selecting the Best Location .......................................................................................6
Opening and Closing Your Fresh Food Doors ...........................................................6
Removing and Replacing Handles ............................................................................7
How to Remove the Hinges, Doors and Drawer .......................................................7
How to Replace the Hinges, Doors and Drawer........................................................9
How to Connect the Water Supply...........................................................................10
How to Level Your Refrigerator ................................................................................11
Setting and Maintaining Proper Temperatures ........................................................12
Initial Control Settings ..............................................................................................12
Adjusting the Controls..............................................................................................12
Fresh Food Storage .................................................................................................12
Frozen Food Storage ...............................................................................................12
About Your Water Filter ........................................................................................13-14
Water Filter Installation and Removal......................................................................13
Water Filter Data......................................................................................................14
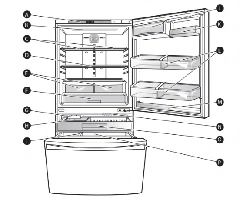
Fresh Food Features .............................................................................................15-16
Water Dispenser ......................................................................................................15
Interior Shelves........................................................................................................15
Door Storage............................................................................................................15
Climate-Controlled Drawers .....................................................................................16
Freezer Features .........................................................................................................17
Automatic Ice Maker ................................................................................................17
Drawers....................................................................................................................17
Hints and Care .......................................................................................................18-19
How to Clean Your Refrigerator ...............................................................................18
How to Remove Odors from Refrigerator ................................................................19
Energy Saving Ideas................................................................................................19
How to Remove and Replace Light Bulbs ...............................................................19
Normal Operating Sounds .........................................................................................20
Troubleshooting ....................................................................................................21-22
Operation ............................................................................................................21-22
Ice and Water...........................................................................................................22
EspaSol ........................................................................................................................23
Frangais .......................................................................................................................45
Service ..........................................................................................................Back Cover
I'll
m
These instructions were provided to aid
you in the installation of your refrigerator.
MB URINGTHEoPENiNG
A one-half inch (v;') of air space must be
provided for the back of the refrigerator.
When installing your refrigerator,
measure carefully.
Subflooring or floor coverings (i.e.
carpet, tile, wood floors, rugs) may make
your opening smaller than anticipated.
Some clearance may be gained by
using the leveling procedure under
How to Level Your Refrigerator.
IMPORTANT: If refrigerator is to be
installed into a recess where top of
refrigerator is completely covered, use
dimensions from floor to top of hinge
cap to verify proper clearance.
SELECTINGTHEBEST
Observe these points when choosing the
final location for your refrigerator:
DO NOT install refrigerator near
oven, radiator or other heat source. If
not possible, shield refrigerator with
cabinet material.
DO NOT install where temperature
falls below 55° F (13° C). Malfunction
may occur at this temperature.
To assure proper door closure, follow
the leveling instructions in the
section, How to Level Your
Refrigerator.
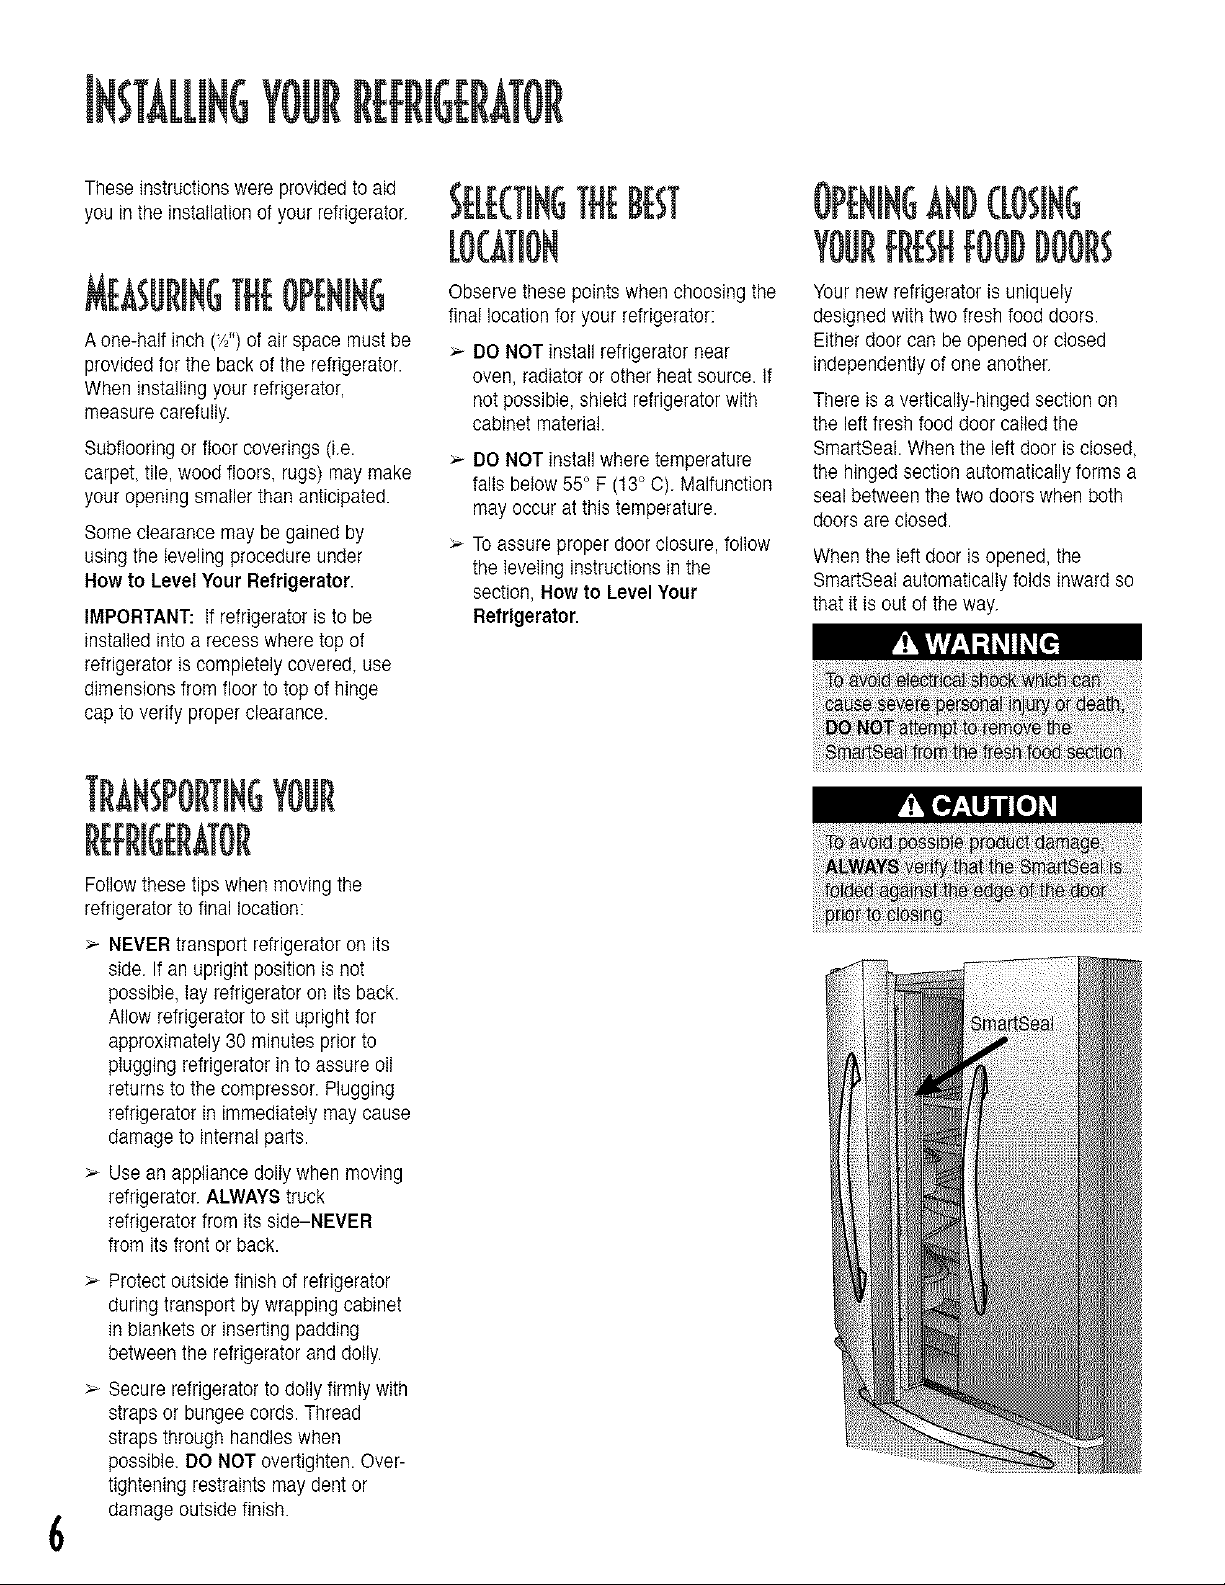
Your new refrigerator is uniquely
designed with two fresh food doors.
Either door can be opened or closed
independently of one another.
There is a vertically-hinged section on
the left fresh food door called the
SmartSeal. When the left door is closed,
the hinged section automatically forms a
seal between the two doors when both
doors are closed.
When the left door is opened, the
SmartSeal automatically folds inward so
that it is out of the way.
TRANSPORTINGYOUR
6
Follow these tips when moving the
refrigerator to final location:
NEVER transport refrigerator on its
side. If an upright position is not
possible, lay refrigerator on its back.
Allow refrigerator to sit upright for
approximately 30 minutes prior to
plugging refrigerator in to assure oil
returns to the compressor. Plugging
refrigerator in immediately may cause
damage to internal parts.
Use an appliance doily when moving
refrigerator. ALWAYS truck
refrigerator from its side-NEVER
from its front or back.
Protect outside finish of refrigerator
during transport by wrapping cabinet
in blankets or inserting padding
between the refrigerator and dolly.
Secure refrigerator to dolly firmly with
straps or bungee cords. Thread
straps through handles when
possible. DO NOT overtighten. Over-
tightening restraints may dent or
damage outside finish.
ANDREPL, (iNG
Removing Fresh Food Handles
1. Locate either the plastic II
tool packaged with the
literature pack or a plastic
putty knife• Pulling the
handle slightly outward, _._'7_
insert the tool, as illustrated• Tool
should slide in about :Y_".
2. With tool still in place,
grab portion of handle
closest to the tool area,
and firmly slide handle
upward to remove from
door.
3. Repeat to remove opposite fresh food
handle•
Removing Freezer Handle
1.Locateeitherthep,ast,c
tool packaged with the
•
literature pack or a plastic
putty knife• Pulling the i_
handle slightly outward, ,_
insert the tool, as illustrated• Tool
should slide in about _".
2. With tool still in place, grab portion of
handle closest to the toot area, and
firmly slide handle right to remove
from door•
Replacing Fresh Food Handles
1. Making sure the outer curve of the
handle is facing the hinge side of
door, align handle on door face just
above clips on door.
2. Push handle firmly
against door while sliding
handle downward until it
locks into place•
3. Repeat to install opposite
fresh food handle•
Replacing Freezer Handle
1. Making sure the outer curve of the
handle is pointed toward the floor,
align handle on door face just to the
right of the clips on door.
2. Push handle firmly
against door while sliding
handle to the left until it
locks into place.
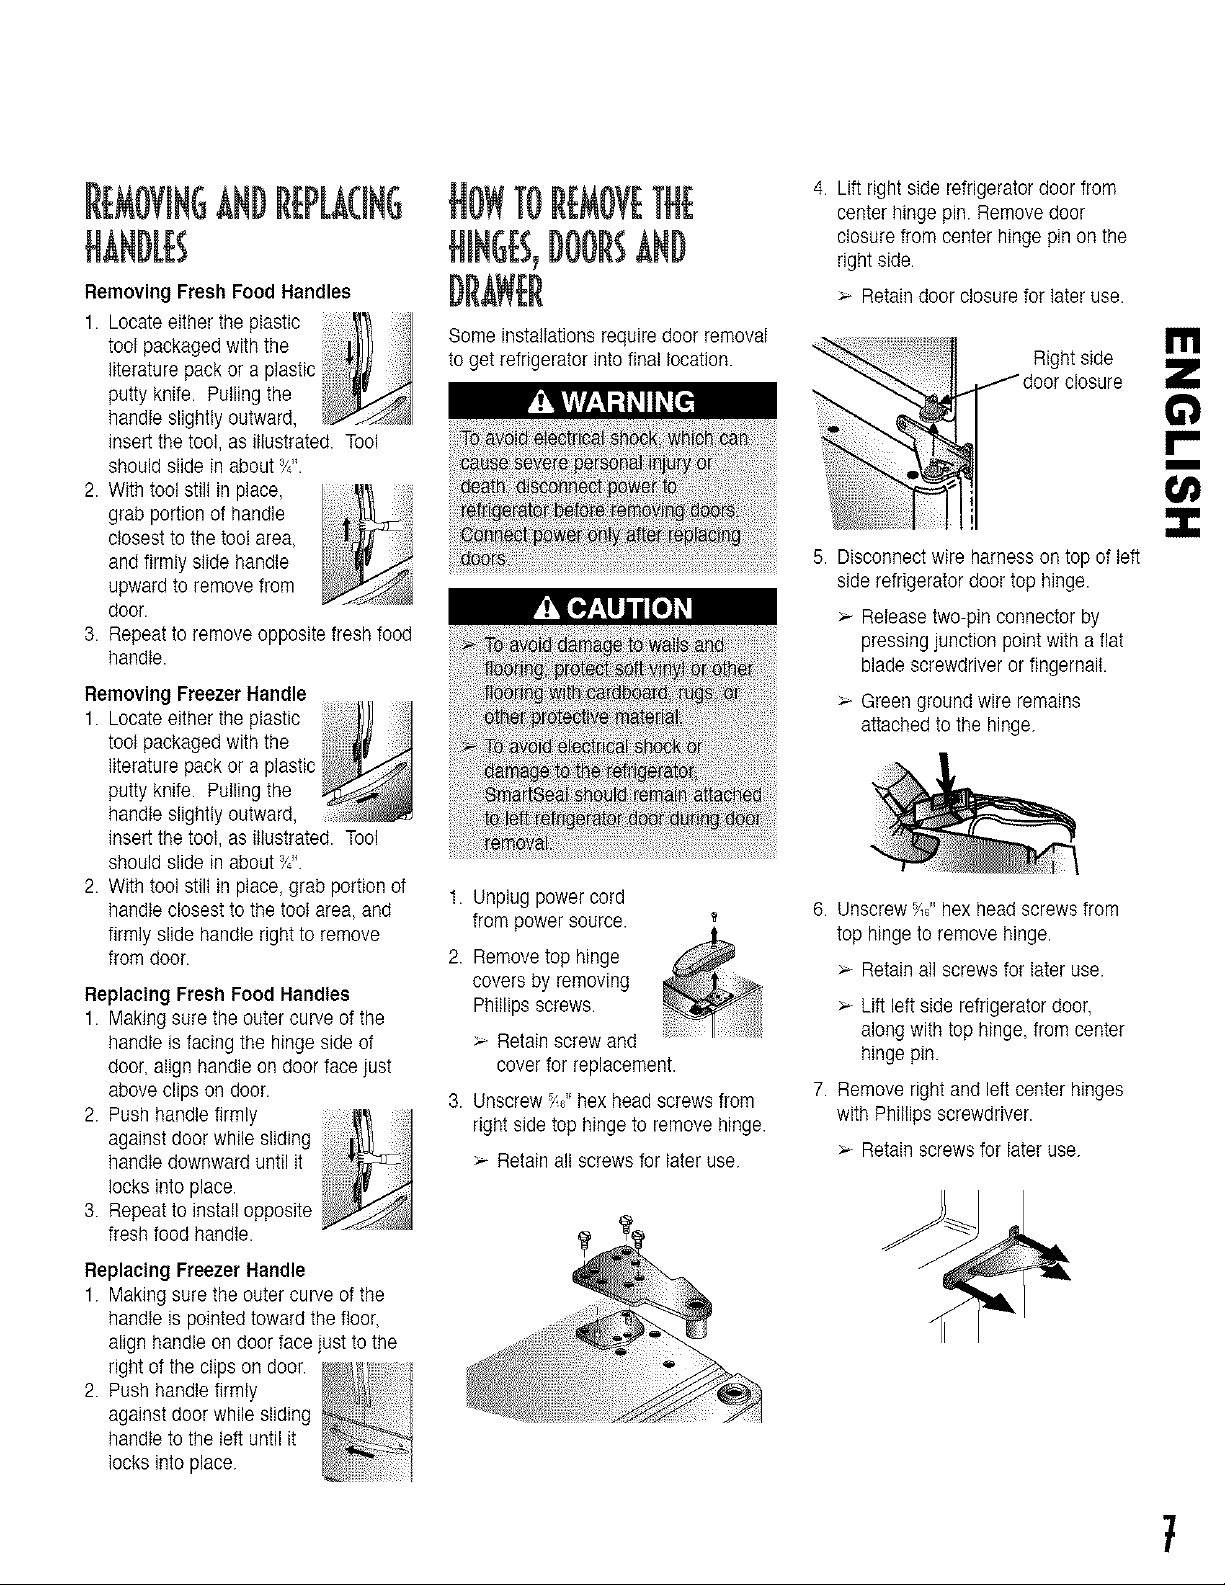
Some installations require door removal
to get refrigerator into final location•
1. Unplug power cord
from power source•
2. Remove top hinge
covers by removing
Phillips screws•
>- Retain screw and
cover for replacement•
3. Unscrew _" hex head screws from
right side top hinge to remove hinge•
>- Retain all screws for later use.
4. Lift right side refrigerator door from
center hinge pin. Remove door
closure from center hinge pin on the
right side.
Retain door closure for later use.
Right side
/ door closure
5. Disconnect wire harness on top of left
side refrigerator door top hinge•
:,--Release two-pin connector by
pressing junction point with a fiat
blade screwdriver or fingernail•
Green ground wire remains
attached to the hinge.
6. Unscrew _',_"hex head screws from
top hinge to remove hinge•
>- Retain all screws for later use.
:,--Lift left side refrigerator door,
along with top hinge from center
hinge pin.
7. Remove right and left center hinges
with Phillips screwdriver•
:,--Retain screws for later use.
m
m
7
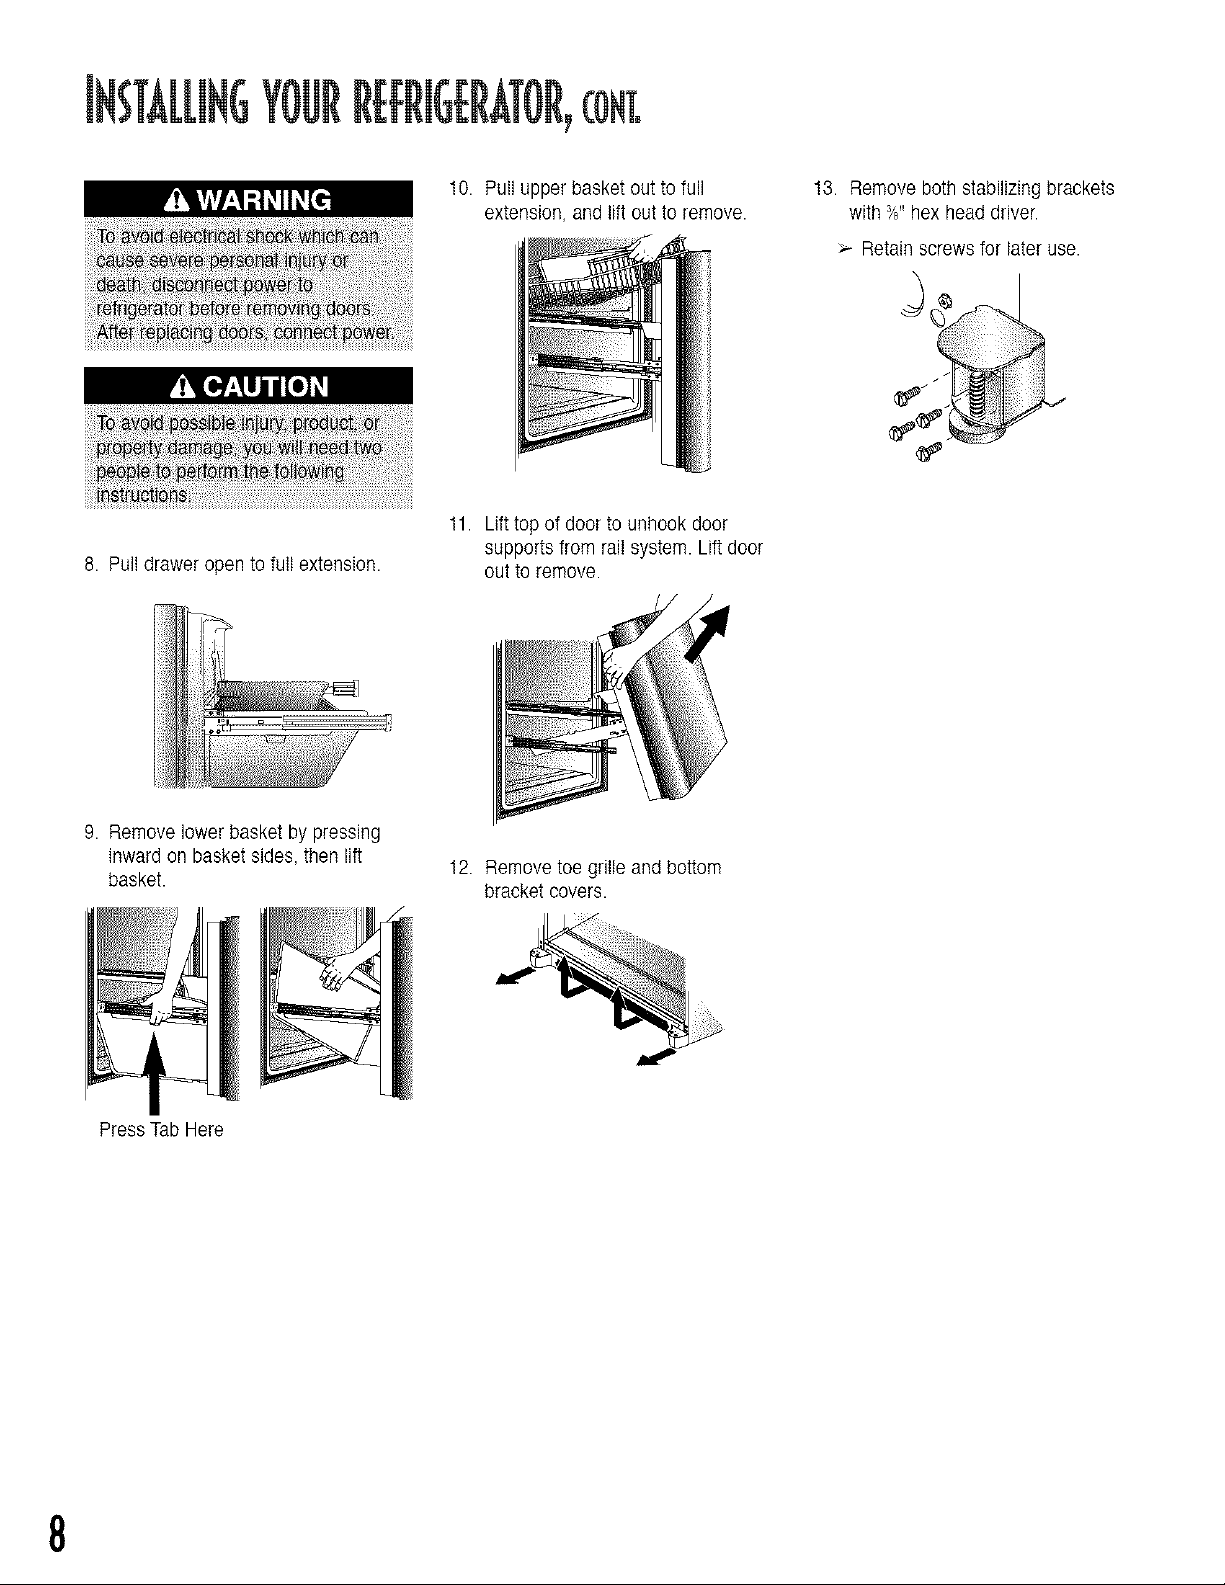
10. Pull upper basket out to full 13. Remove both stabilizing brackets
extension, and lift out to remove, with _/8"hex head driver.
_.- Retain screws for later use.
8. Pull drawer open to fult extension.
11. Lift top of door to unhook door
supports from rail system. Lift door
out to remove.
9. Remove lower basket by pressing
inward on basket sides, then lift
basket.
12. Remove toe grille and bottom
bracket covers.
PressTab Here
8
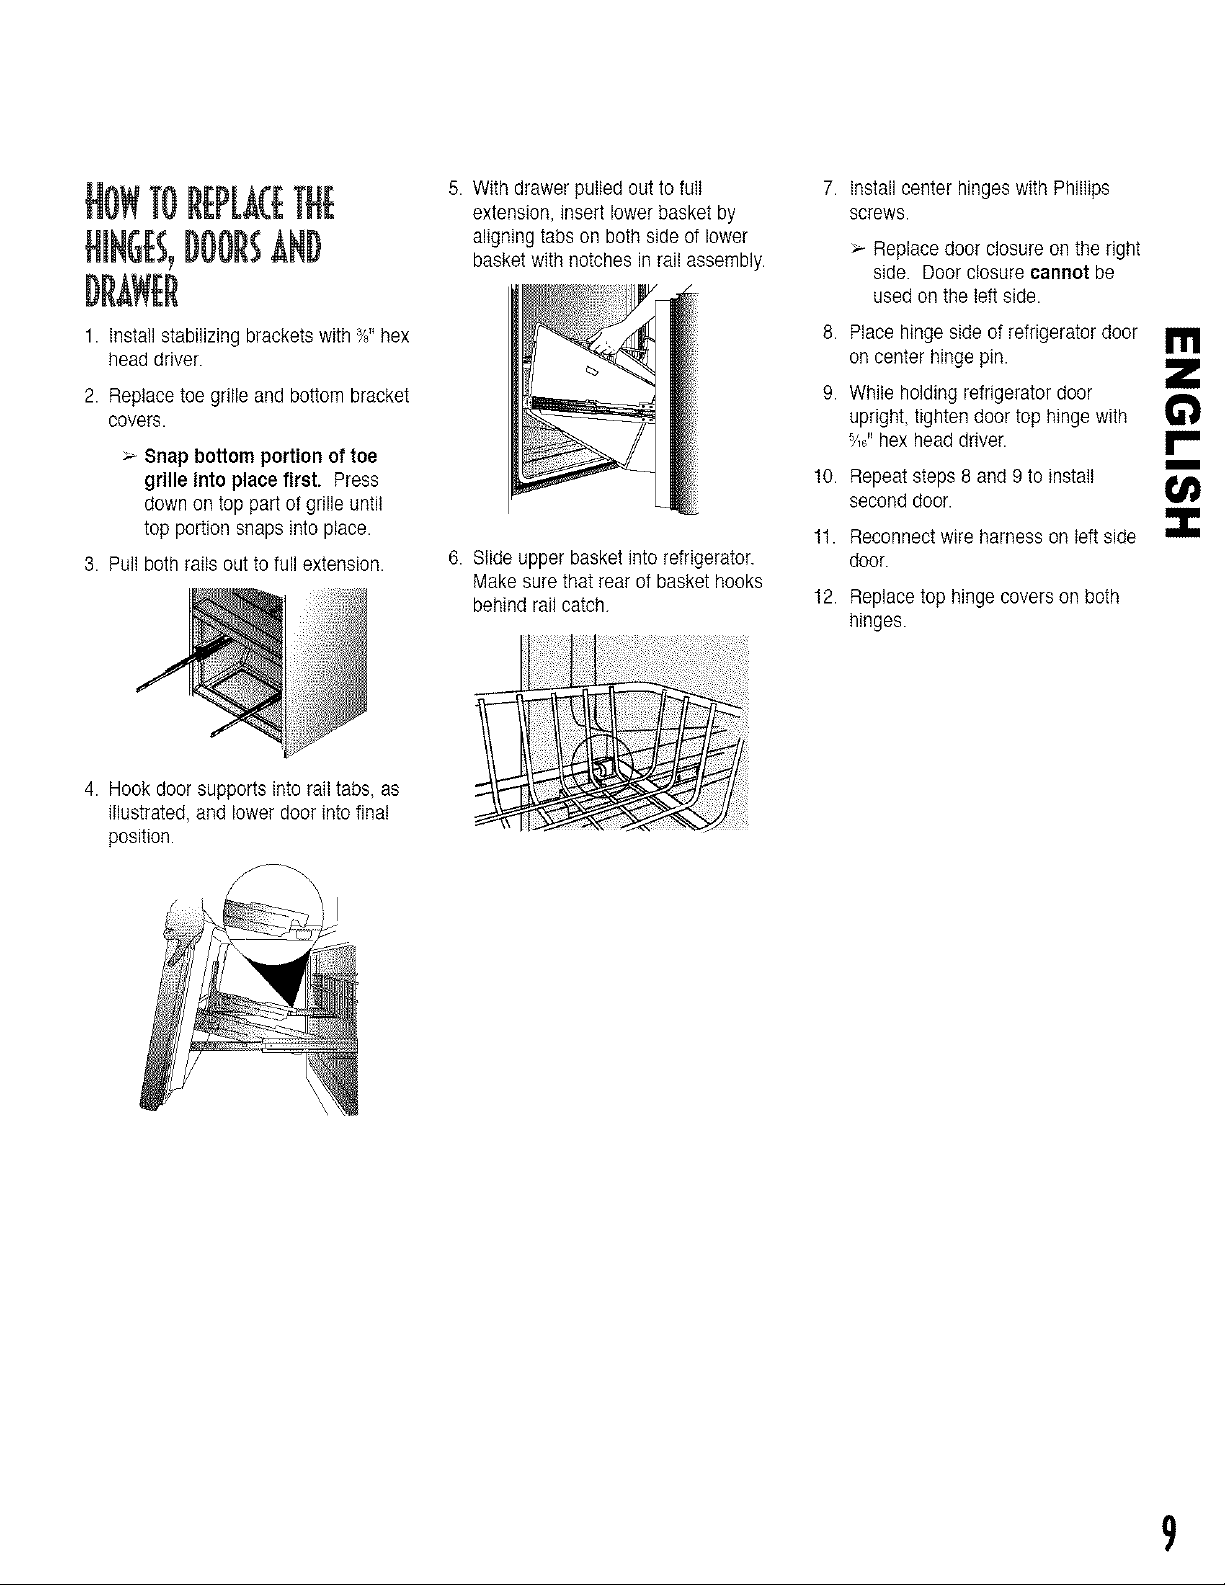
1. Install stabilizing brackets with %"hex
head driver.
2. Replace toe grille and bottom bracket
covers.
_--Snap bottom portion of toe
grille into place first. Press
down on top part of grille until
top portion snaps into place.
3. Pull both rails out to full extension.
5. With drawer pulled out to full
extension, insert lower basket by
aligning tabs on both side of lower
basket with notches in rail assembly.
6. Stide upper basket into refrigerator.
Make sure that rear of basket hooks
behind rail catch.
7. Install center hinges with Phillips
screws.
_.-Replace door closure on the right
side. Door closure cannot be
used on the left side.
8. Place hinge side of refrigerator door
on center hinge pin.
9. While holding refrigerator door
upright, tighten door top hinge with
_z,_"hex head driver.
10. Repeat steps 8 and 9 to install
second door.
11. Reconnect wire harness on left side
door.
12. Replace top hinge covers on both
hinges.
m
m
4. Hook door supports into rail tabs, as
illustrated, and lower door into final
position.
9

HOWTOCONNECTTHE
MATERIALS NEEDED
7Z outer diameter flexible copper
tubing
:.--Brass compression nut and sleeve for
7_"outer diameter copper tubing.
Shut-off valve (requires a '/4"hole to
be drilled into water supply before
valve attachment)
:.--Adjustable wrench
Y_"hex nut driver
NOTE: Add 8' to tubing length needed to
reach water supply for creation of
service loop.
1. Create service loop with tubing using
care to avoid kinks in tubing.
4. Place end of copper tubing into water
valve inlet port. Shape tubing slightly -
DO NOT KINK - so that tubing feeds
straight into inlet port.
5. Slide brass nut over sleeve and
screw nut into inlet port. Tighten nut
with wrench.
2. Remove plastic cap from water valve
inlet port.
IMPORTANT: DO NOT overtighten.
Cross threading may occur.
6. Pull on tubing to confirm connection
is secure. Connect tubing to frame
with water tubing clamp (C) and turn
on water supply. Check for leaks and
correct, if present.
C
3. Place brass nut (A) and sleeve (B) on
copper tube end as illustrated.
A
7. Monitor water connection for 24
hours. Correct leaks if necessary.
l0
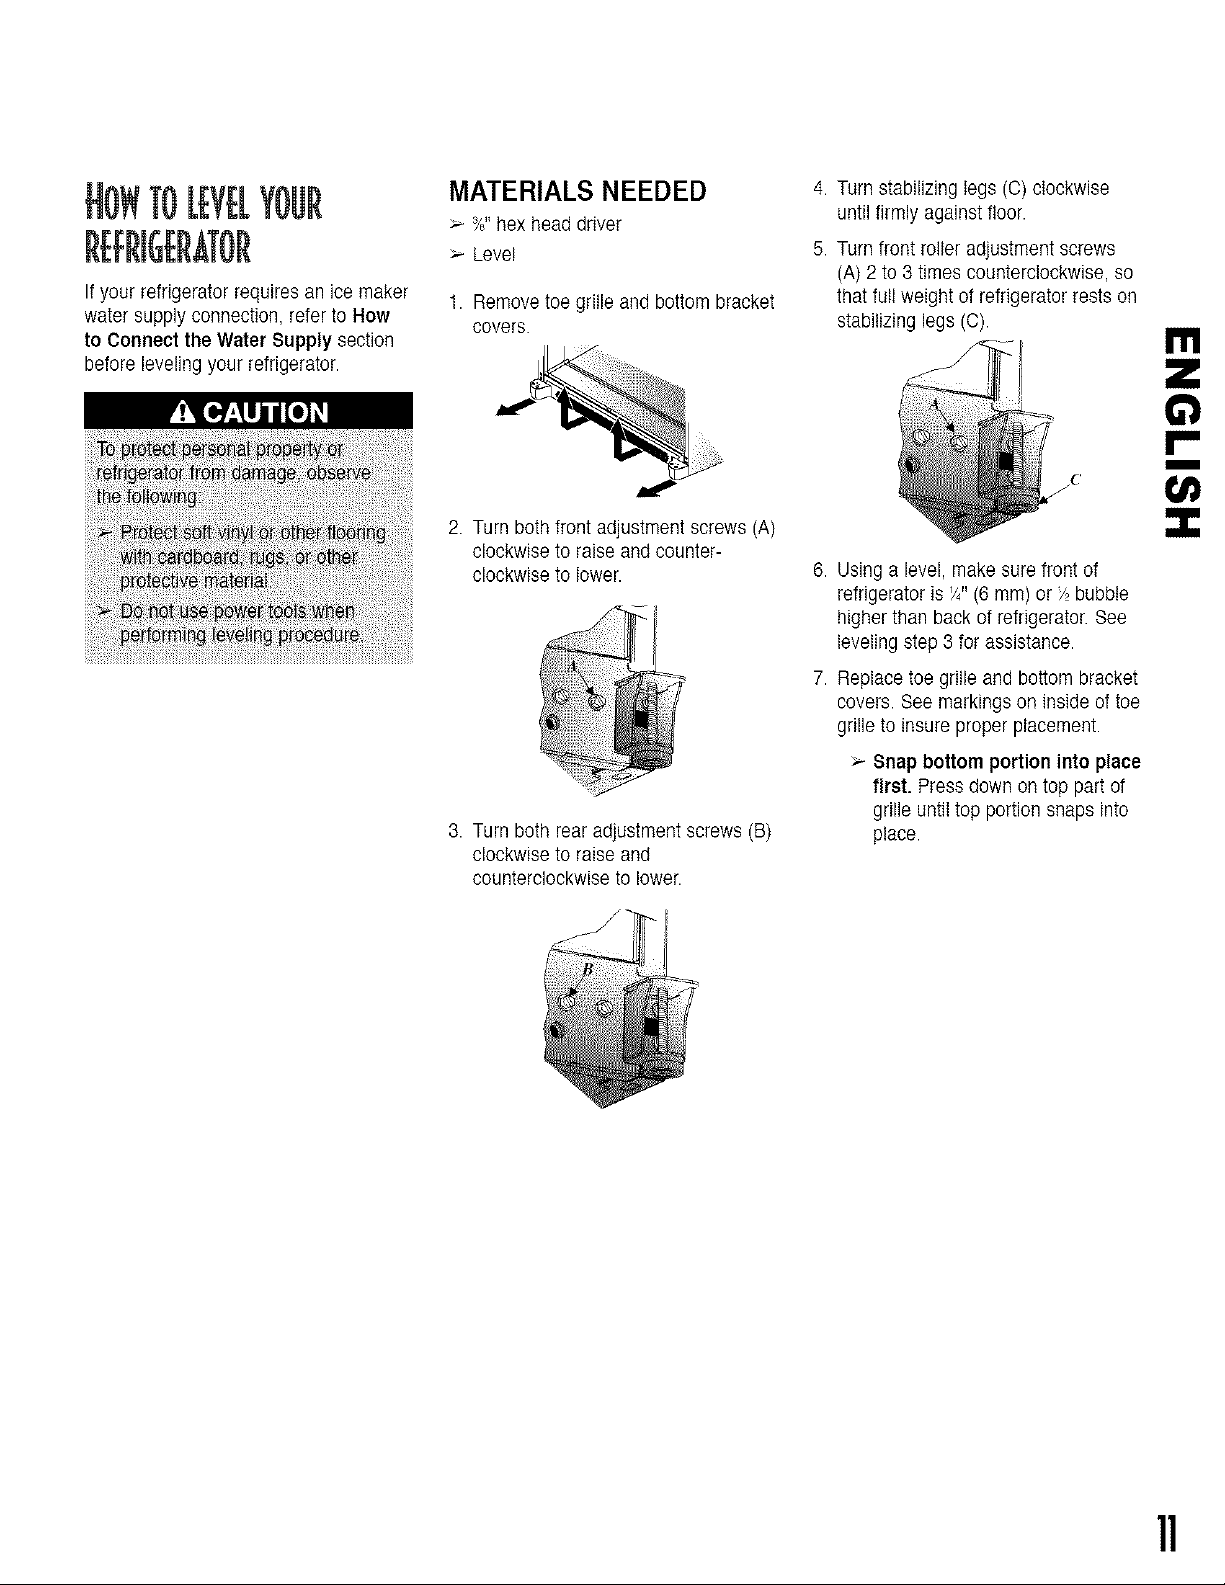
HOWTOkEYEkYOUR
If your refrigerator requires an ice maker
water supply connection, refer to How
to Connect the Water Supply section
before leveling your refrigerator.
MATERIALS NEEDED
:Y_"hex head driver
_- Level
1. Remove toe grille and bottom bracket
covers.
2. Turn both front adjustment screws (A)
clockwise to raise and counter-
clockwise to lower.
3. Turn both rear adjustment screws (B)
clockwise to raise and
counterclockwise to lower.
4. Turn stabilizing legs (C) clockwise
until firmly against floor.
5. Turn front roller adjustment screws
(A) 2 to 3 times counterclockwise, so
that full weight of refrigerator rests on
stabilizing legs (C).
6. Using a level, make sure front of
refrigerator is Y_"(6 ram) or '/, bubble
higher than back of refrigerator. See
leveling step 3 for assistance.
7. Replace toe grille and bottom bracket
covers. See markings on inside of toe
grille to insure proper placement.
_- Snap bottom portion into place
first. Press down on top part of
grille until top portion snaps into
place.
!'!1
m
11
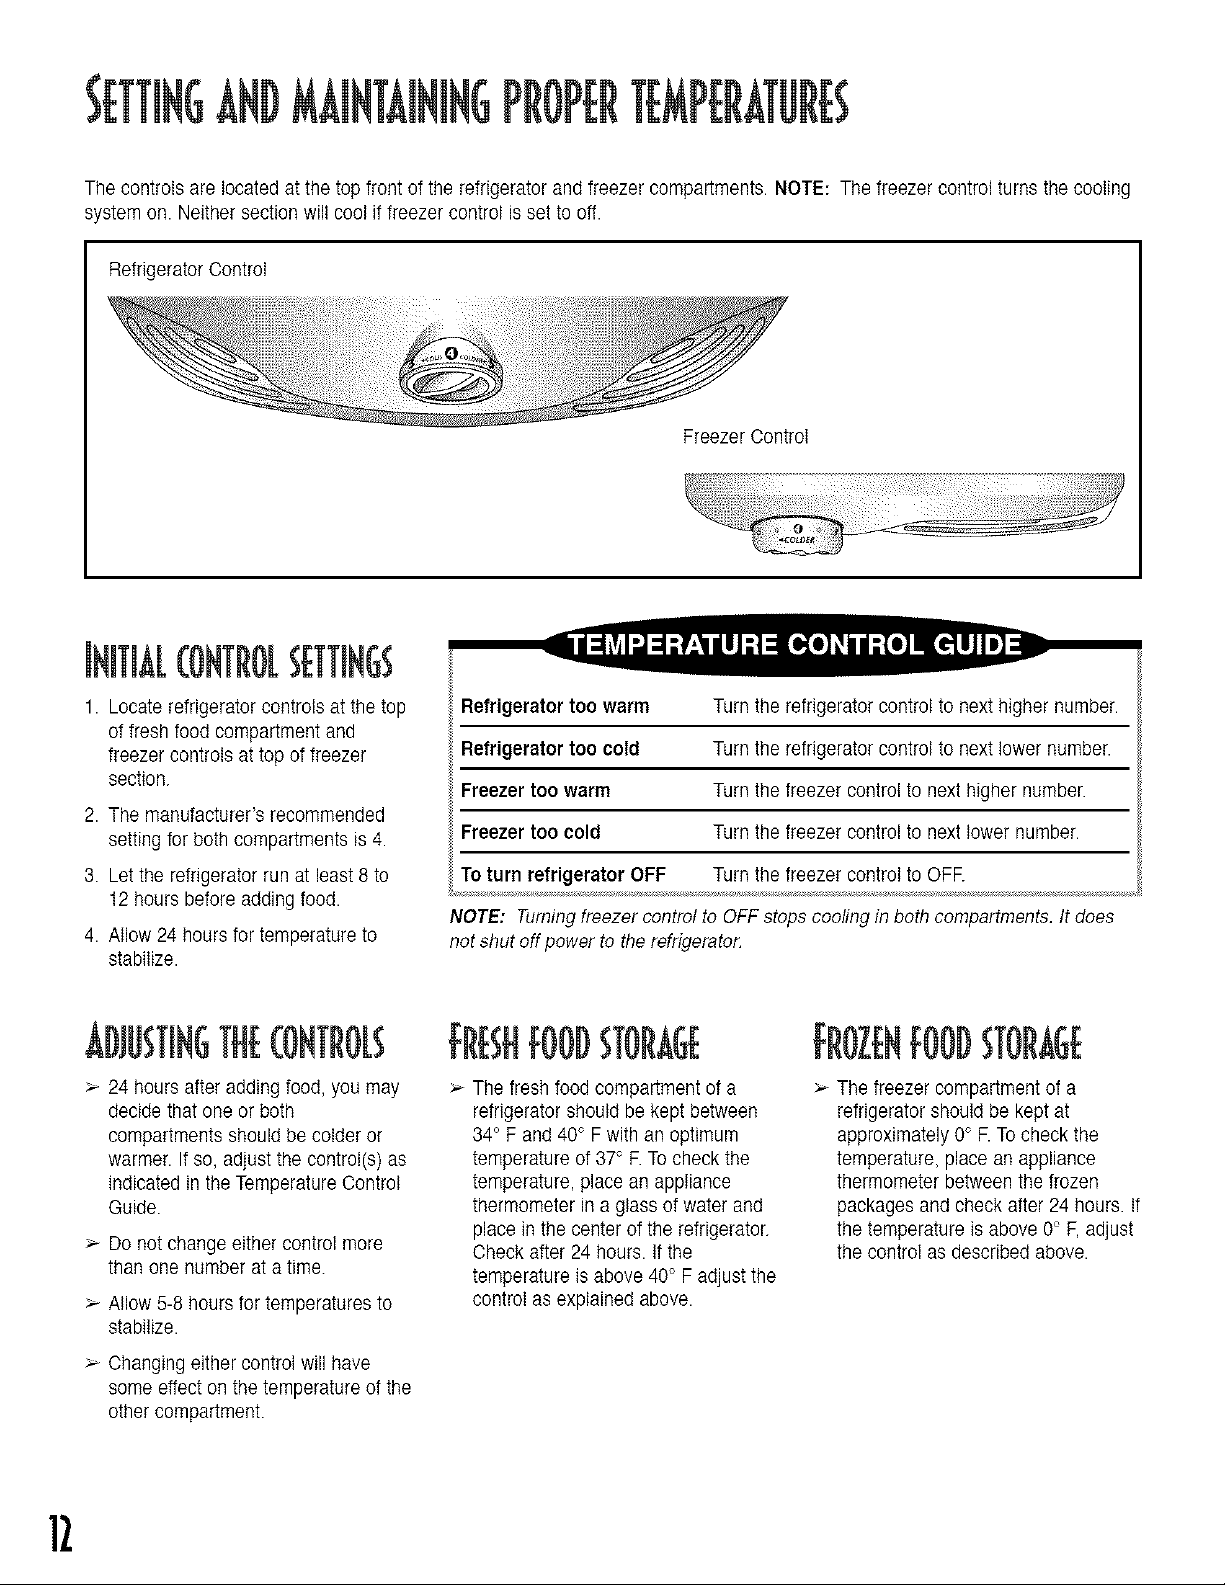
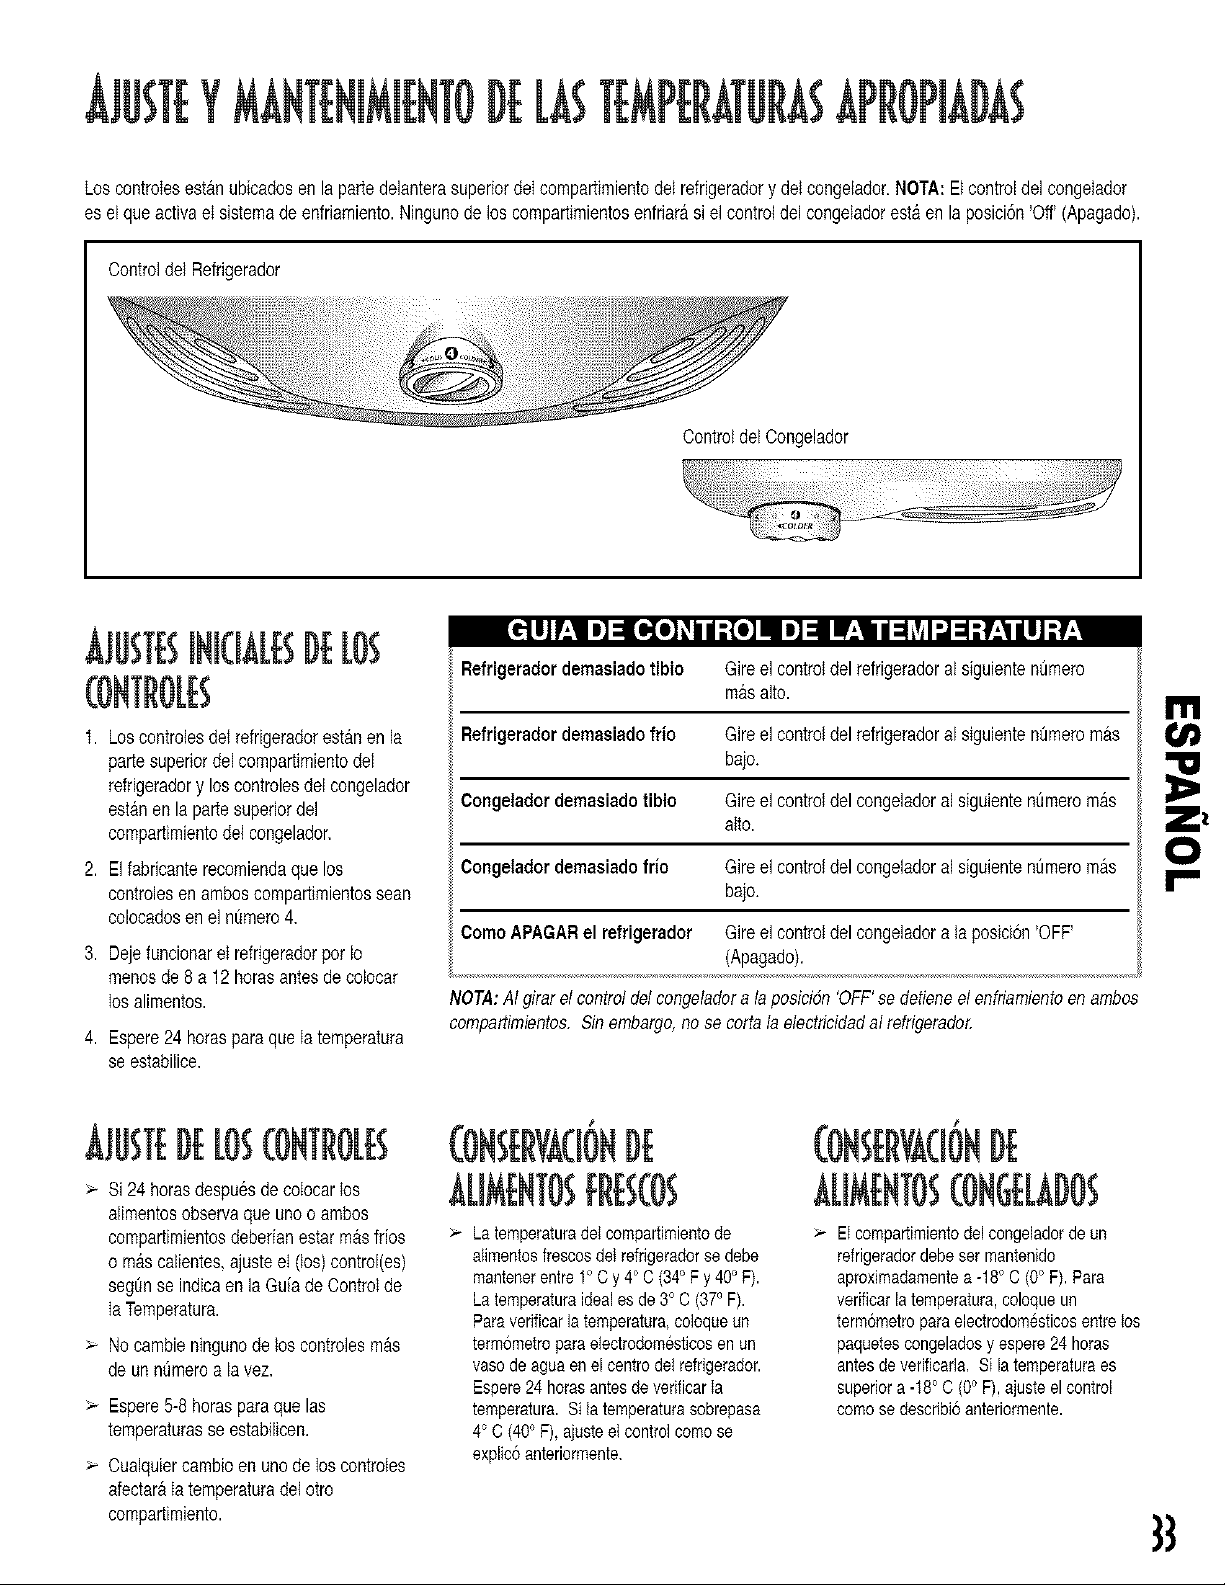
The controls are located at the top front of the refrigerator and freezer compartments. NOTE: The freezer control turns the cooling
system on. Neither section will cool it freezer control is set to off.
Refrigerator Control
Freezer Control
CONTROLSETTINGS
1. Locate refrigerator controls at the top
of fresh food compartment and
freezer controls at top of freezer
section.
2. The manufacturer's recommended
setting for both compartments is 4.
3. Let the refrigerator run at least 8 to
12 hours before adding food.
4. Allow 24 hours for temperature to
stabilize.
Refrigerator too warm
Refrigerator too cold
Freezer too warm
Freezer too cold
To turn refrigerator OFF
Turn the refrigerator control to next higher number.
Turn the refrigerator control to next lower number.
Turn the freezer control to next higher number.
Turn the freezer control to next lower number.
Turn the freezer control to OFE
NOTE: "Fumingfreezer control to OFF stops cooling in both compartments. It does
not shut off power to the refrigerator.
ADJ[JSTINGTHE(ONTROB
>- 24 hours after adding food, you may
decide that one or both
compartments should be colder or
warmer. It so, adjust the control(s) as
indicated in the Temperature Control
Guide.
Do not change either control more
than one number at a time.
>- Allow 5-8 hours for temperatures to
stabilize.
Changing either control will have
some effect on the temperature of the
other compartment.
:RBNFOOD TORA E
The fresh food compartment of a
refrigerator should be kept between
34° F and 40° F with an optimum
temperature of 37° F. To check the
temperature, place an appliance
thermometer in a glass of water and
place in the center of the refrigerator.
Check after 24 hours. If the
temperature is above 40° F adjust the
control as explained above.
ROZ R OOD TOR GE
The freezer compartment of a
refrigerator should be kept at
approximately 0° R To check the
temperature, place an appliance
thermometer between the frozen
packages and check after 24 hours. If
the temperature is above 0° F, adjust
the control as described above.
12
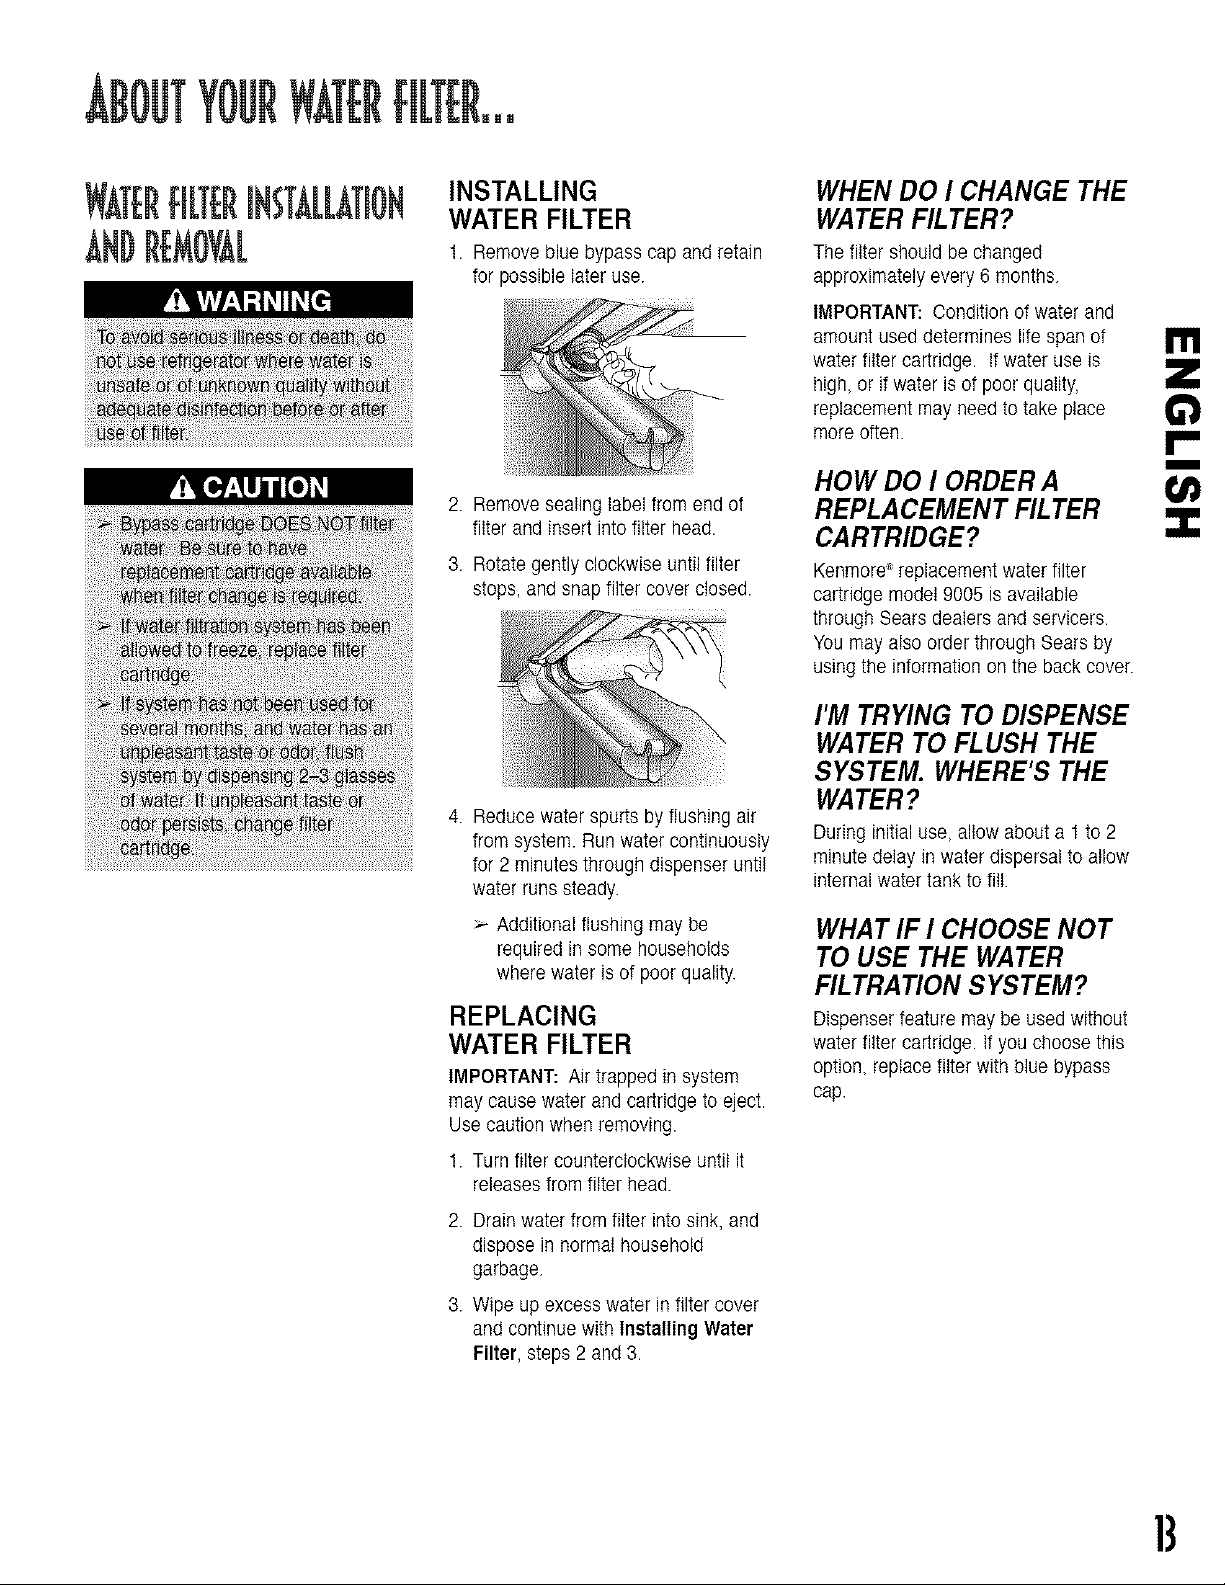
INSTALLING
WATER FILTER
1. Remove blue bypass cap and retain
for possible later use.
2. Remove sealing label from end of
filter and insert into filter head.
3. Rotate gently clockwise until tilter
stops, and snap tilter cover closed.
4. Reduce water spurts by flushing air
from system. Run water continuously
for 2 minutes through dispenser until
water runs steady.
Additional flushing may be
required in some households
where water is of poor quality.
REPLACING
WATER FILTER
IMPORTANT: Air trapped in system
may cause water and cartridge to eject.
Use caution when removing.
1. Turn filter counterclockwise until it
releases from tilter head.
2. Drain water from tilter into sink, and
dispose in normal household
garbage.
3. Wipe up excess water in tilter cover
and continue with Installing Water
Filter, steps 2 and 3.
WHEN DO I CHANGE THE
WATER FILTER?
The filter should be changed
approximately every 6 months.
IMPORTANT: Condition of water and
amount used determines life span ot
water filter cartridge, tf water use is
high, or it water is ot poor quality,
replacement may need to take place
more often.
HOW DO I ORDER A
REPLACEMENT FILTEtl
CARTRIDGE?
Kenmore®replacement water filter
cartridge model 9005 is available
through Sears dealers and servicers.
You may also order through Sears by
using the information on the back cover.
I'M TRYING TO DISPENSE
WATERTO FLUSH THE
SYSTEM. WHERE'S THE
WATER?
During initial use, allow about a 1 to 2
minute delay in water dispersal to allow
internal water tank to fill.
WHATIF I CHOOSE NOT
TO USE THE WATER
FILTRATIONSYSTEM?
Dispenser feature may be used without
water filter cartridge, it you choose this
option, replace filter with blue bypass
cap.
!'11
m
13
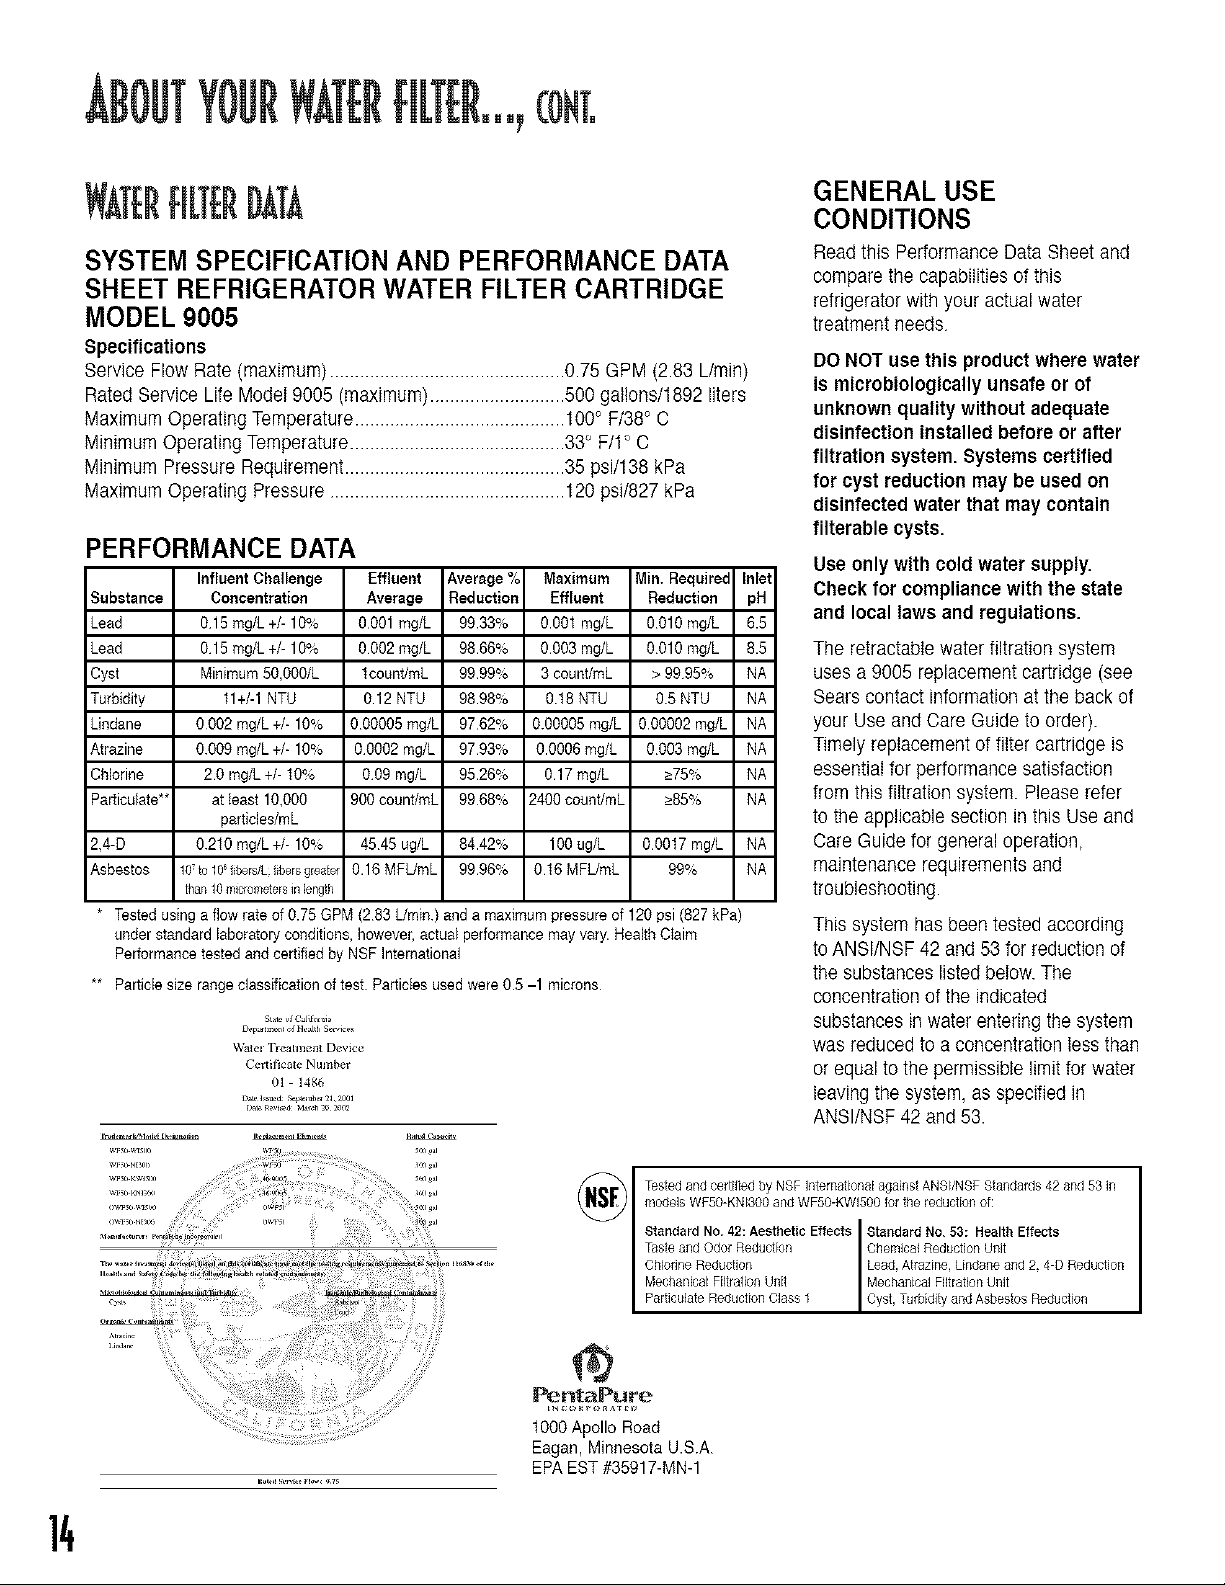
H[TER[NA
SYSTEM SPECIFICATION AND PERFORMANCE DATA
SHEET REFRIGERATOR WATER FILTER CARTRIDGE
MODEL 9005
Specifications
Service Flow Rate (maximum) ...............................................0.75 GPM (2.83 L/min)
Rated Service LifeModei 9005 (maximum) ...........................500 gallons/1892 liters
Maximum Operating Temperature..........................................100° F/38° C
Minimum Operating Temperature...........................................33° F/1_ C
Minimum Pressure Requirement............................................35 psi/138 kPa
Maximum Operating Pressure ...............................................120 psi/827 kPa
PERFORMANCE DATA
Substance
Lead
Lead
Cyst
Turbidity
Undane
Atrazine
Chlorine
Particulate *'
2,4-D
Asbestos
Influent Challenge
Concentration
015 mg/L +/- 10%
015 mg/L +/- 10%
Minimum 50,000/L
I1+/-1 NTU
0002 mg/L +/- 10%
0.009 mg/L +/- 10%
20 mg/L +/- t0%
at least 10,000
particles/mL
0.210 mg/L +/- 10%
107to108fibers/Lfibers9ieater
than10micrometersinlength
Effluent Average % Maximum
Average Reduction Effluent
0001 mg/L 99.33% 0001 mg/L
0002 mg/L 98.66% 0003 mg/L
t count/mL 99.99% 3 count/mL
0.12 NTU 98.98% 0t8 NTU
000005 mg/L 9762% 0.00005 mg/L
00002 mg/L 9793% 0.0006 mg/L
009 mg/L 95.26% 0.17 mg/L
900 count/mL 9968% 2400 count/mL
4545 ug/L 84.42% 100ug/L
0.16 MFUmL 99.96",,, 0t6 MFUmL
Min. Required
Reduction
0010 mg/L
0010 mg/L
> 9995%
0.5 NTU
000002 mg/L
0003 mg/L
_>75%
_>85%
00017 mg/L
99%
* Tested using a flow rate of 0.75 GPM (283 L/rain ) and a maximum pressure of !20 psi (827 kPa)
under standard laboratory conditions, however, actual performance may vary. Health Ctaim
Performance tested and certified by NSF International
** Particle size range classification of test Particles used were 05 -1 microns
State of Ca[_f_111_
D_-p_ tmen_of Hea[_ S_4c_
WaI¢'] TlCalmellt Device
Cellificate Numbel
01 1486
Inlet
pH
6.5
8.5
NA
NA
NA
NA
NA
NA
NA
NA
GENERAL USE
CONDITIONS
Read this Performance Data Sheet and
compare the capabilities of this
refrigerator with your actual water
treatment needs.
DO NOT use this product where water
is microbiologically unsafe or of
unknown quality without adequate
disinfection installed before or after
filtration system. Systems certified
for cyst reduction may be used on
disinfected water that may contain
filterable cysts.
Use only with cold water supply.
Check for compliance with the state
and local laws and regulations.
The retractable water filtration system
uses a 9005 replacement cartridge (see
Sears contact information at the back of
your Use and Care Guide to order).
Timely replacement of filter cartridge is
essential for performance satisfaction
from this filtration system. Please refer
to the applicable section in this Use and
Care Guide for general operation,
maintenance requirements and
troubleshooting.
This system has been tested according
to ANSI/NSF 42 and 53 for reduction of
the substances listed below. The
concentration of the indicated
substances in water entering the system
was reduced to a concentration less than
or equal to the permissible limit for water
leaving the system, as specified in
ANSI/NSF 42 and 53.
Tested and certified by NSF International against ANSI/NSF Standards 42 and 53 in
models WF50-KNI300 and WF50-KWlS00 tot the reduction or:
Standard No. 42: Aesthetic Effects Standard No. 53: Health Effects
Taste and Odor Reduction Chemical Reduction Unit
CNodne Reduction Lead. Atrazine Lindane and 2. 4-D Reduction
Particulate Reduction Class t Cyst, Turbidity and Asbestos Reduction
Mechanical Filtration Unit Mechanical Filiration Unit
@
PentaPure
1000 Apollo Road
Eagan, Minnesota U.S.A.
EPA EST #35917-MN-1
14
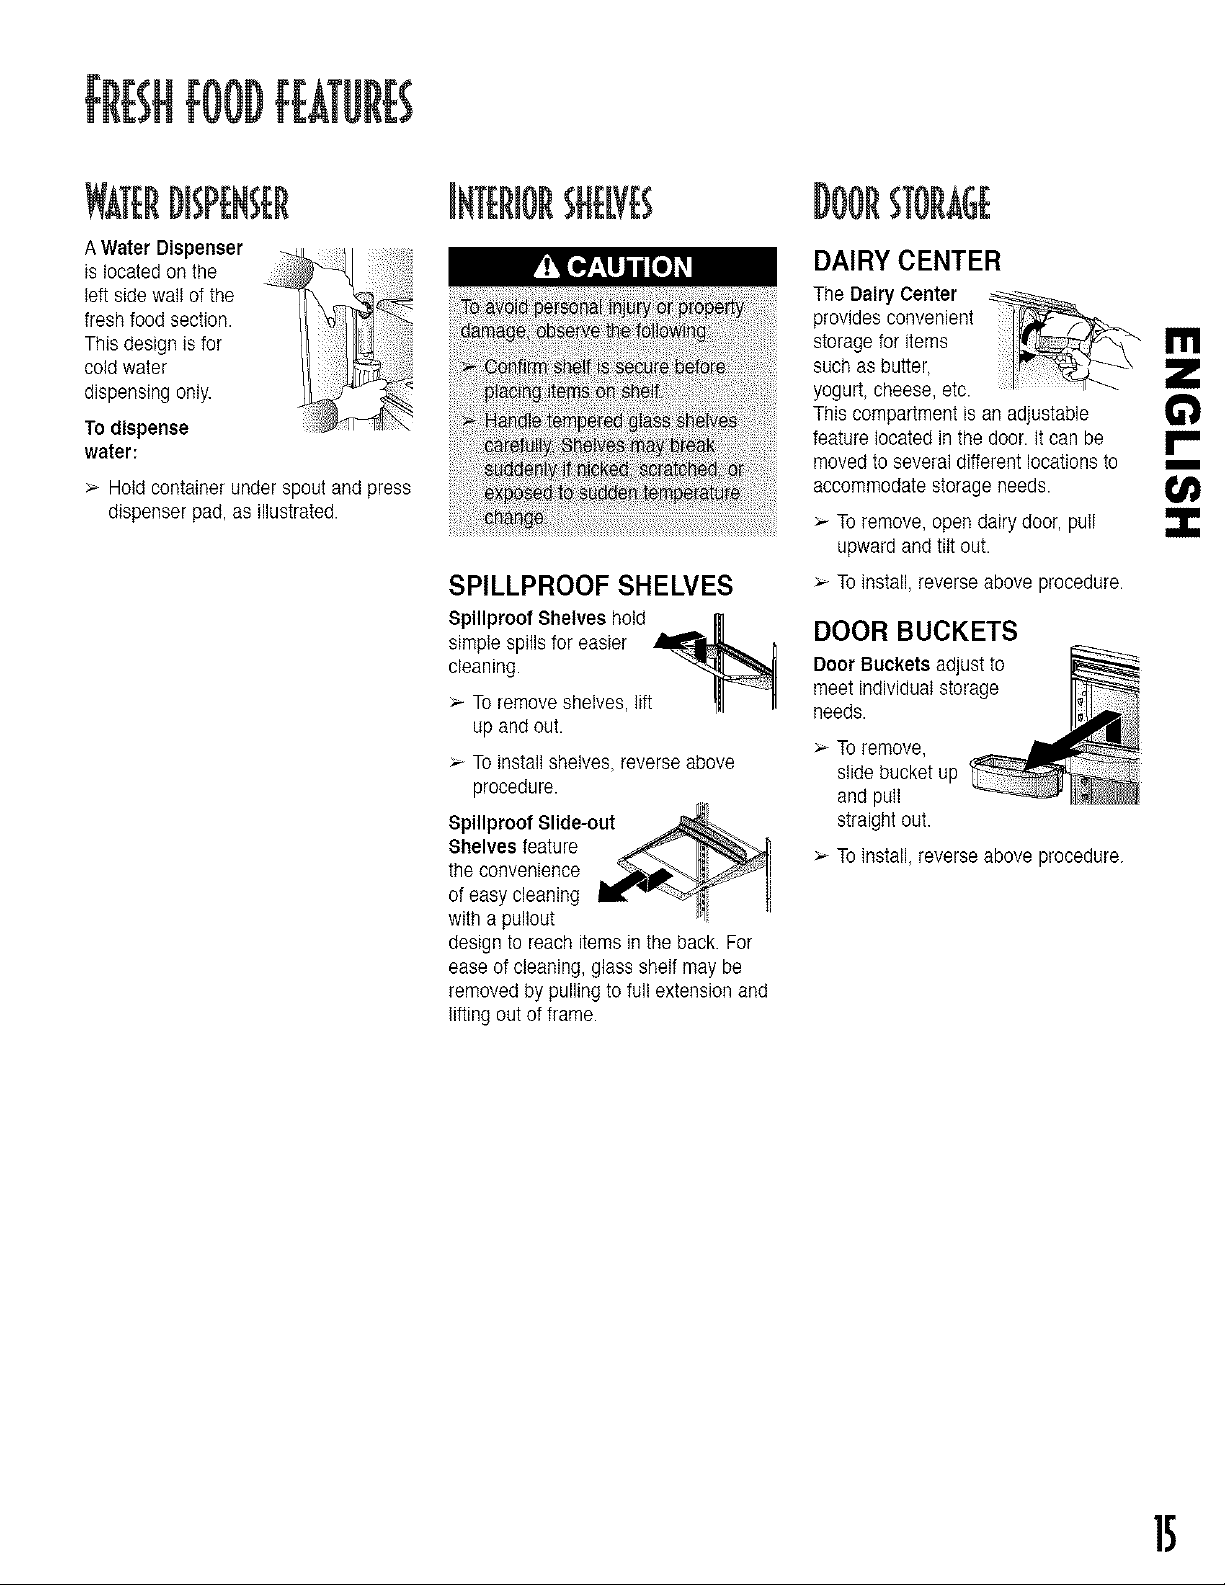
A Water Dispenser
is located on the
left side wall of the
fresh food section.
This design is for
cold water
dispensing only.
To dispense
water:
>- Hold container under spout and press
dispenser pad, as illustrated.
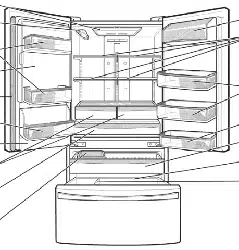
SHE B
SPILLPROOF SHELVES
Spillproof Shelves hold _ _
simple spills for easier
cleaning.
_--To remove shelves, lift
up and out.
>- To install shelves, reverse above
procedure.
Spillproof Slide-out _ .
Shelves feature _ ]_
the convenience __>]
of easy cleaning I_
with a pullout _ '
design to reach items in the back. For
ease of cleaning, glass shelf may be
removed by pulling to full extension and
lifting out of frame.
STORAGE
DAIRY CENTER
The Dairy Center
provides convenient
storage for items
such as butter,
yogurt, cheese, etc.
This compartment is an adjustable
feature located in the door. It can be
moved to several different locations to
accommodate storage needs.
To remove, open dairy door, pull
upward and tilt out.
_Toinstall, reverse above procedure.
DOOR BUCKETS
Door Buckets adjust to
meet individual storage
needs.
To remove,
slide bucket up
and pull
straight out.
>To install, reverse above procedure.
I'!1
m
15
]6
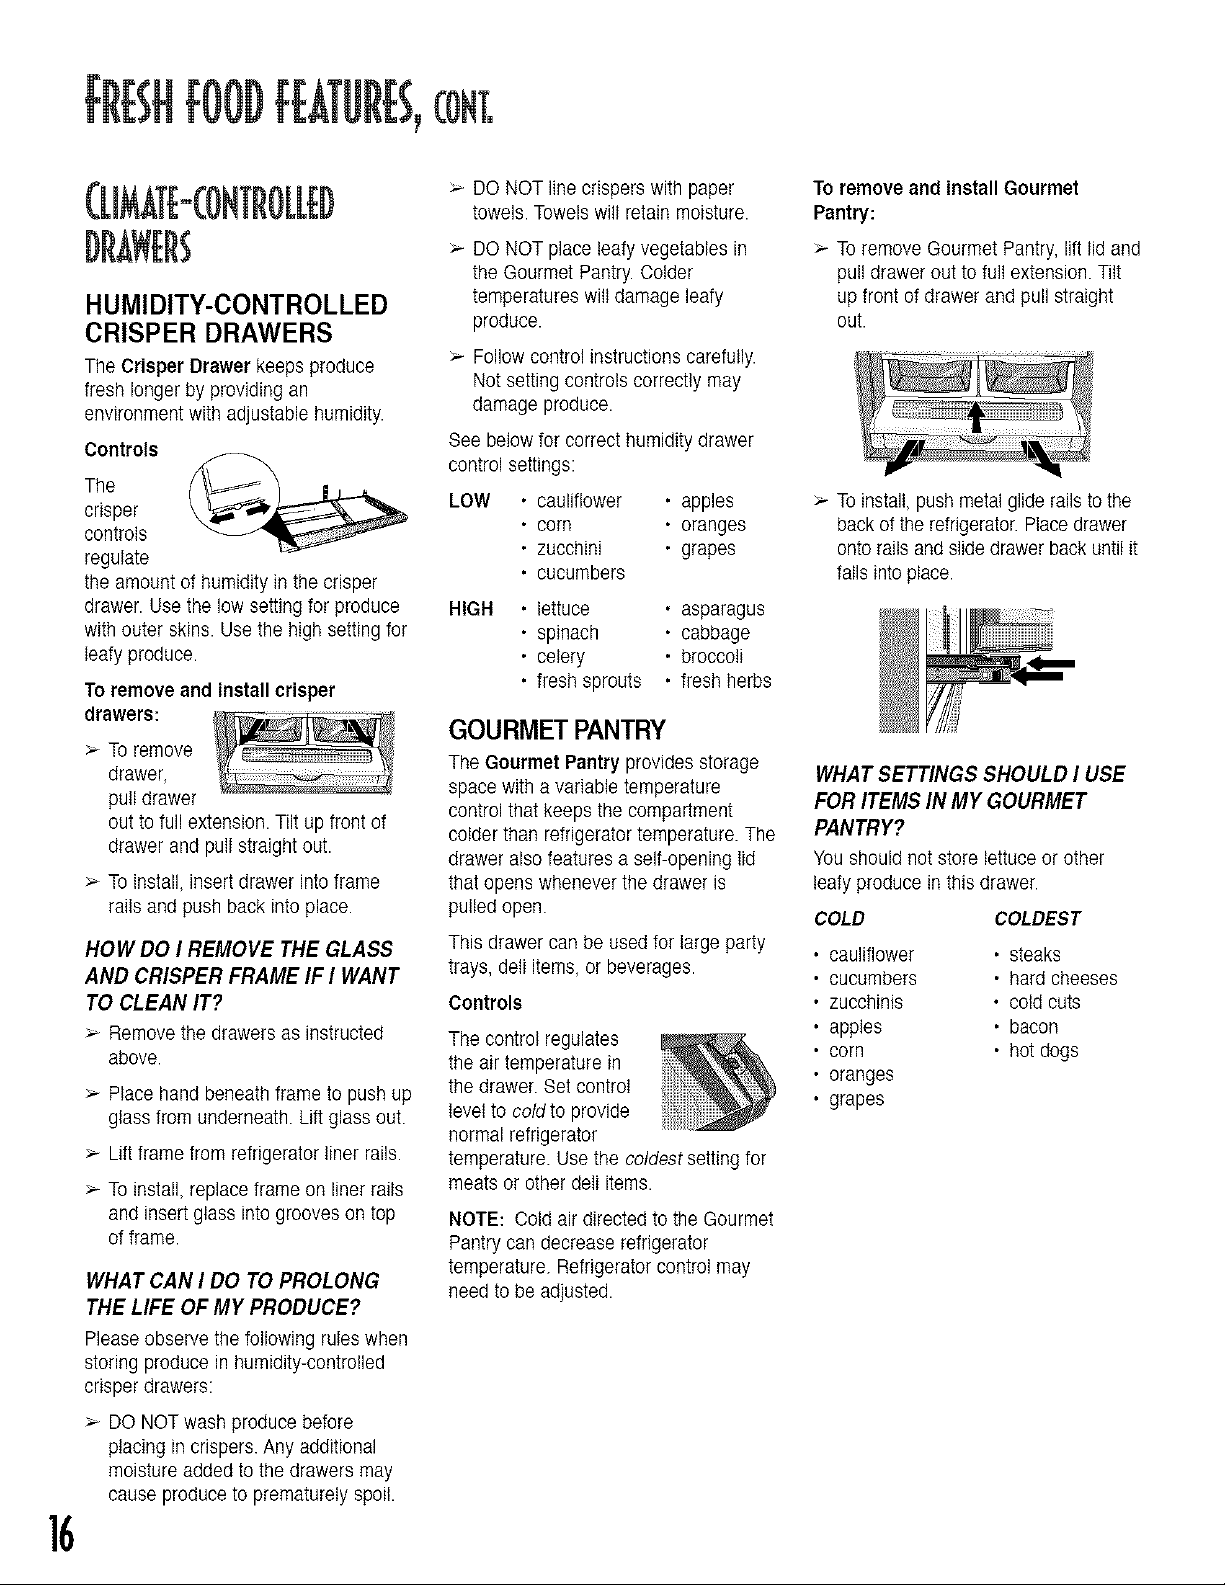
HUMIDITY-CONTROLLED
CRISPER DRAWERS
The Crisper Drawer keeps produce
fresh longer by providing an
environment with adjustable humidity.
Controls
The
crisper
controls
regulate
the amount of humidity in the crisper
drawer. Use the low setting for produce
with outer skins. Use the high setting for
leafy produce.
To remove and install crisper
drawers:
>- To remove
drawer,
pull drawer
out to full extension. Tilt up front of
drawer and pull straight out.
To install, insert drawer into frame
rails and push back into place.
HOW DO I REMOVE THE GLASS
AND CRISPER FRAME IF I WANT
TO CLEAN IT?
Remove the drawers as instructed
above.
>- Place hand beneath frame to push up
glass from underneath. Lift glass out.
>- Lift frame from refrigerator liner rails.
To install, replace frame on liner rails
and insert glass into grooves on top
of frame.
WHAT CAN I DO TO PROLONG
THE LIFE OF MY PRODUCE?
Please observe the following rules when
storing produce in humidity-controlled
crisper drawers:
>- DO NOT wash produce before
placing in crispers. Any additional
moisture added to the drawers may
cause produce to prematurely spoil.
> DO NOT line crispers with paper
towels. Towels wilt retain moisture.
_.- DO NOT place leafy vegetables in
the Gourmet Pantry. Colder
temperatures wilt damage leafy
produce.
> Follow control instructions carefully.
Not setting controls correctly may
damage produce.
See below for correct humidity drawer
control settings:
LOW • cauliflower • apples
• corn • oranges
• zucchini • grapes
• cucumbers
HIGH • lettuce • asparagus
• spinach • cabbage
• celery • broccoli
• fresh sprouts • fresh herbs
GOURMET PANTRY
The Gourmet Pantry provides storage
space with a variable temperature
control that keeps the compartment
colder than refrigerator temperature. The
drawer also features a self-opening lid
that opens whenever the drawer is
pulled open.
This drawer can be used for large party
trays, deli items, or beverages.
Controls
The control regulates
the air temperature in
the drawer. Set control
level to cold to provide
normal refrigerator
temperature. Use the coldest setting for
meats or other deli items.
NOTE: Cold air directed to the Gourmet
Pantry can decrease refrigerator
temperature. Refrigerator control may
need to be adjusted.
To remove and install Gourmet
Pantry:
_.-To remove Gourmet Pantry, lift tid and
pull drawer out to full extension. Tilt
up front of drawer and pull straight
out.
_--To install, push metal glide rails to the
back of the refrigerator. Place drawer
onto rails and slide drawer back until it
falls into place.
WHAT SETTINGS SHOULD I USE
FOR ITEMS IN MY GOURMET
PANTRY?
You should not store lettuce or other
leafy produce in this drawer.
COLD COLDEST
cauliflower • steaks
cucumbers • hard cheeses
zucchinis • cold cuts
apples • bacon
corn • hot dogs
oranges
grapes
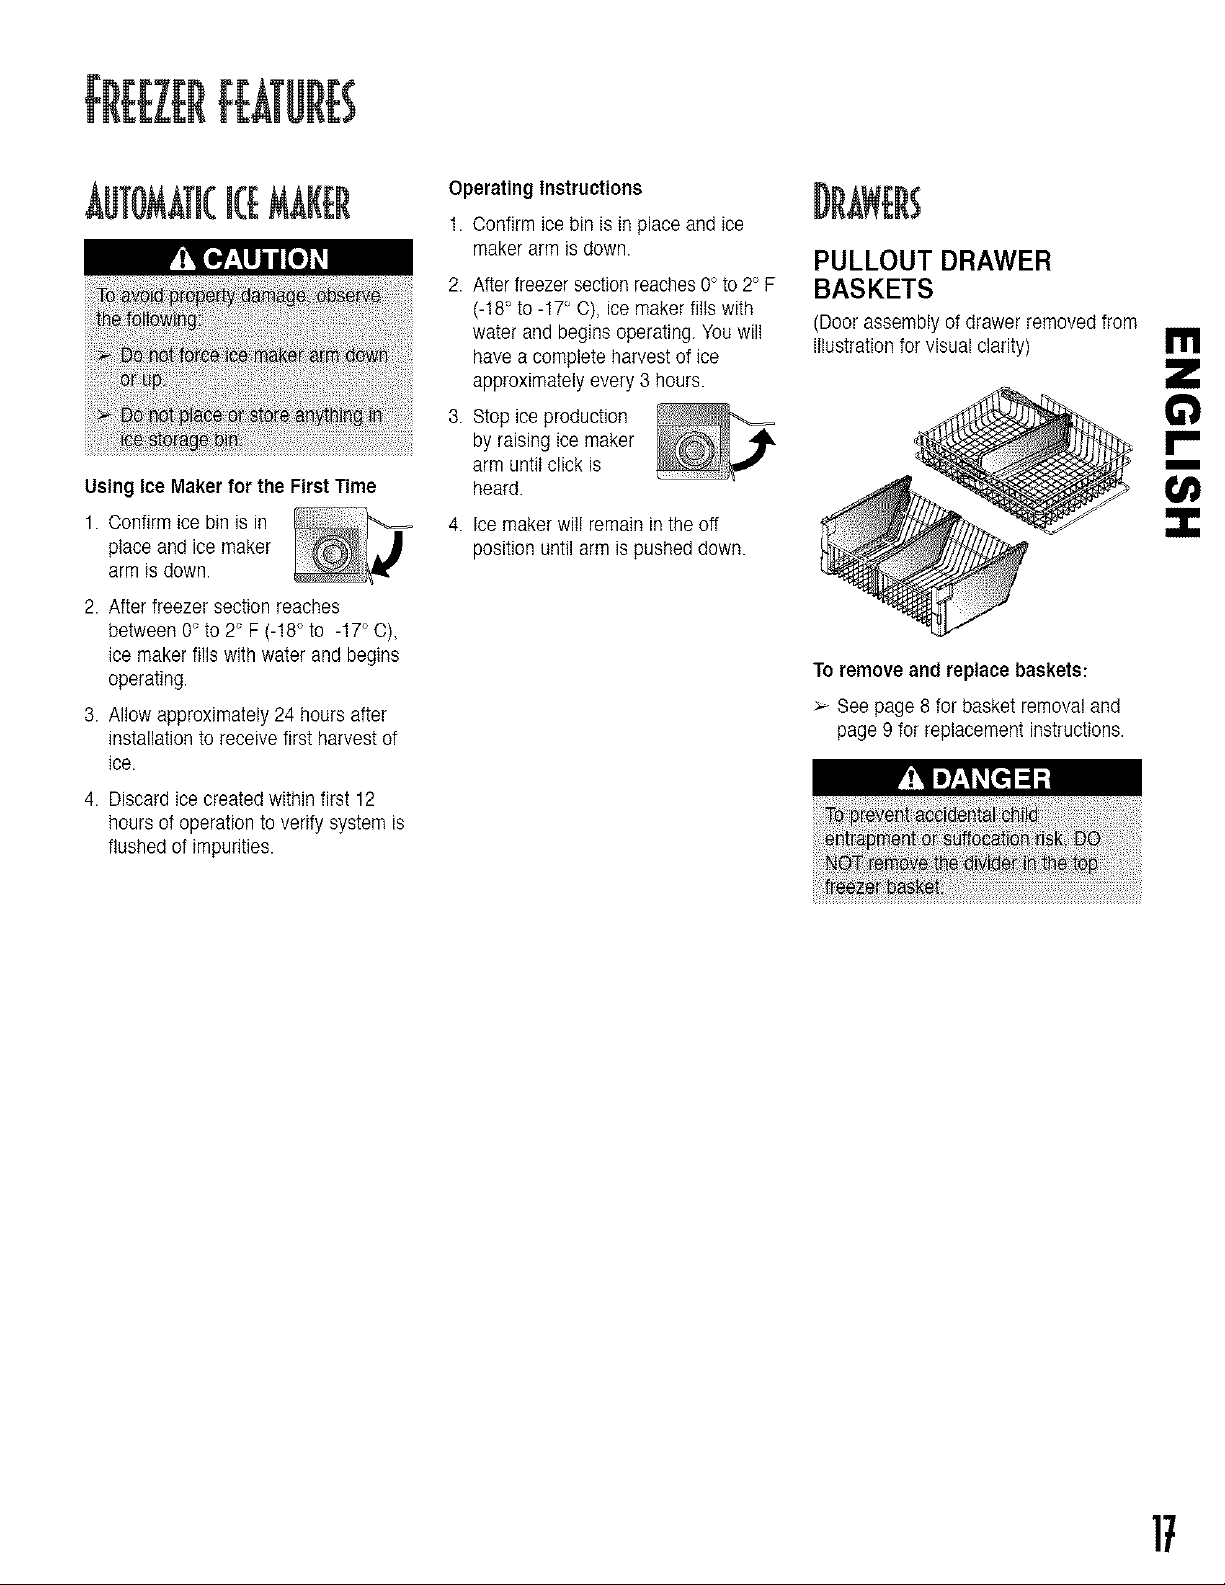
AUTOMATICiCEMAKER
Using Ice Maker for the First Time
1. Confirm ice bin is in
place and ice maker
arm is down.
2. After freezer section reaches
between 0° to 2° F (-18° to -17° C),
ice maker fills with water and begins
operating.
3. Allow approximately 24 hours after
installation to receive first harvest of
ice.
4. Discard ice created within first 12
hours of operation to verify system is
flushed o1impurities.
Operating Instructions
1. Confirm ice bin is in place and ice
maker arm is down.
2. After freezersection reaches0° to 2° F
(-18° to -17° O), ice maker fills with
water and begins operating. You will
have a complete harvest of ice
approximately every 3 hours.
3. Stop ice production
by raising ice maker
arm until click is
heard.
4. Ice maker will remain in the off
position until arm is pushed down.
PULLOUT DRAWER
BASKETS
(Door assembly o1drawer removed from
illustration for visual clarity)
To remove and replace baskets:
:,--See page 8 for basket removal and
page 9 for replacement instructions.
rll
6"1
m
]7
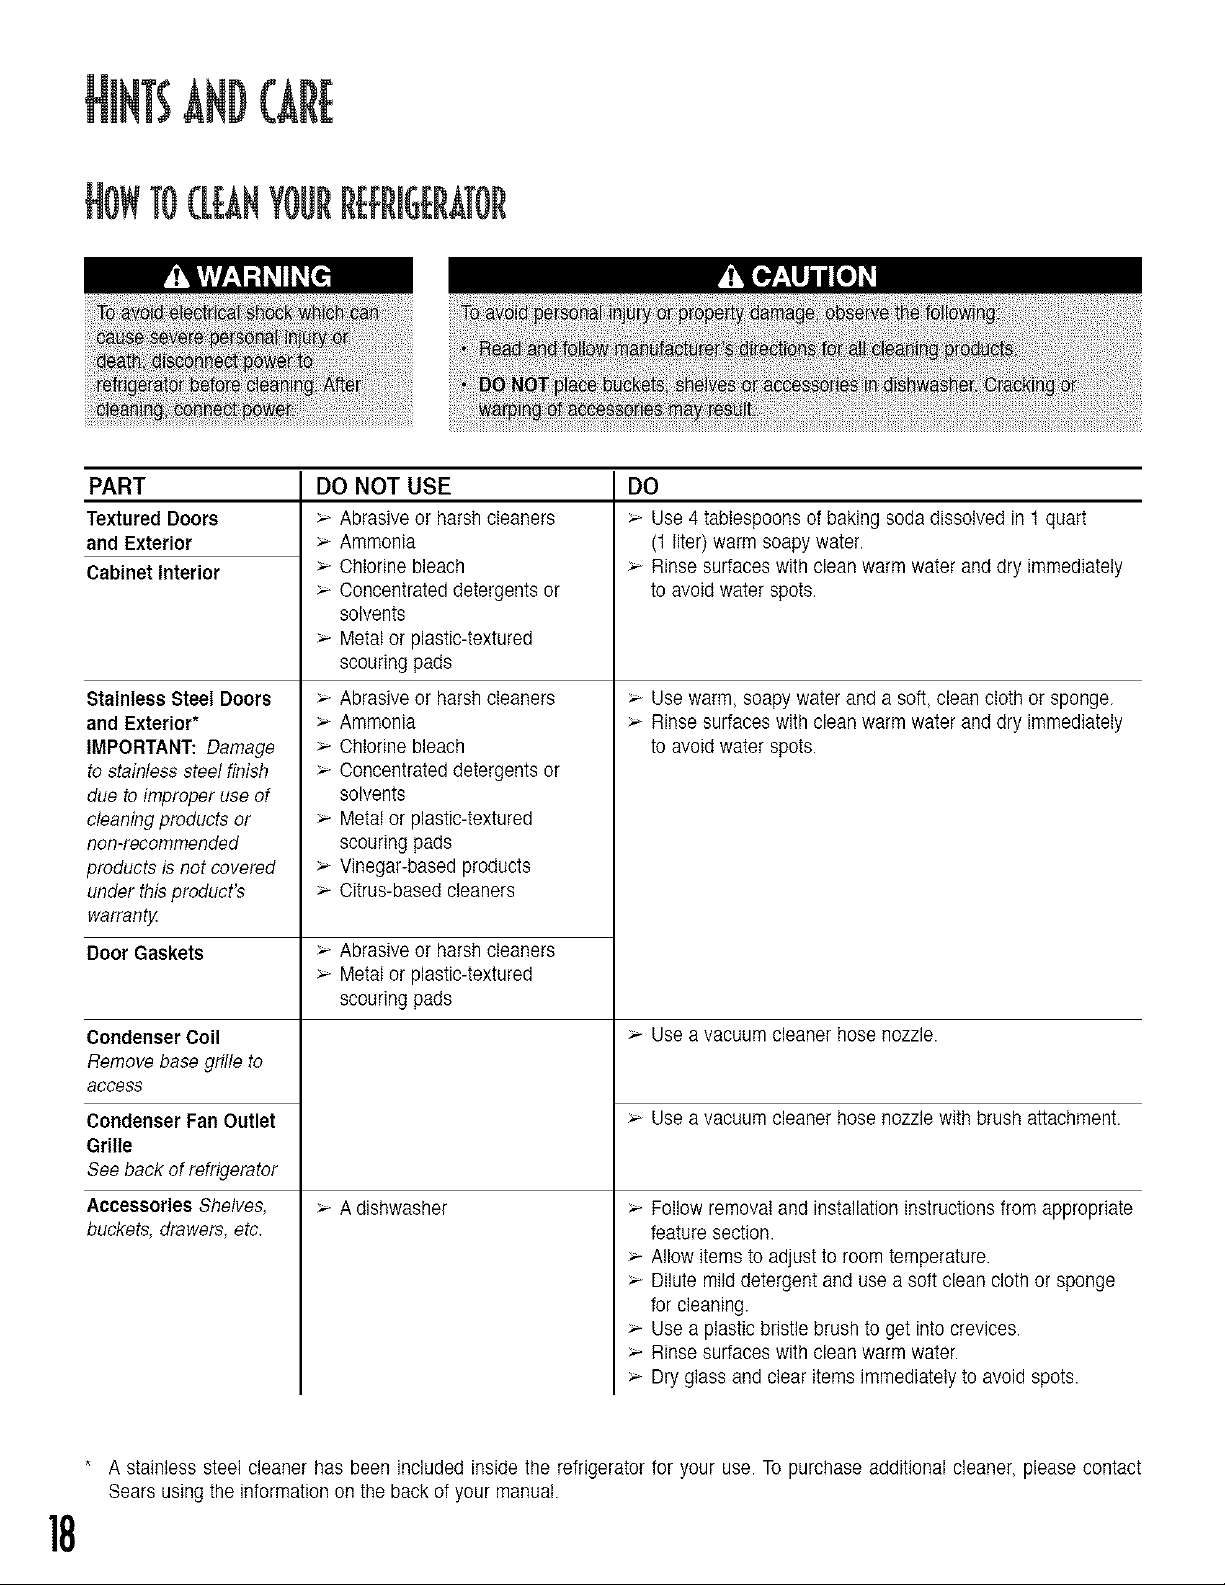
TOCLEANYOURREI:RIGERATOR
PART
Textured Doors
and Exterior
Cabinet Interior
Stainless Steel Doors
and Exterior*
IMPORTANT: Damage
to stainless steel finish
due to improper use of
cleaning products or
non-recommended
products is not covered
under this product's
warrant_
Door Gaskets
Condenser Coil
Remove base grille to
aCCeSS
Condenser Fan Outlet
Grille
See back of refrigerator
Accessories Shelves,
buckets, drawers, etc.
DO NOT USE
Abrasive or harsh cleaners
Ammonia
Chlorine bleach
Concentrated detergents or
solvents
>- Metal or plastic-textured
scouring pads
>- Abrasive or harsh cleaners
Ammonia
Chlorine bleach
>- Concentrated detergents or
solvents
Metal or plastic-textured
scouring pads
Vinegar-based products
Citrus-based cleaners
Abrasive or harsh cleaners
Metal or plastic-textured
scouring pads
>- A dishwasher
DO
use 4 tablespoons of baking soda dissolved in 1 quart
(1 liter) warm soapy water.
Rinse surfaces with clean warm water and dry immediately
to avoid water spots.
>- Use warm, soapy water and a soft, clean cloth or sponge.
Rinse surfaces with clean warm water and dry immediately
to avoid water spots.
Use a vacuum cleaner hose nozzle.
Use a vacuum cleaner hose nozzle with brush attachment.
>- Follow removal and installation instructions from appropriate
feature section.
Allow items to adjust to room temperature.
>- Dilute mild detergent and use a soft clean cloth or sponge
for cleaning.
Use a plastic bristle brush to get into crevices.
>- Rinse surfaces with clean warm water.
Dry glass and clear items immediately to avoid spots.
* A stainless steel cleaner has been included inside the refrigerator for your use. To purchase additional cleaner please contact
Sears using the information on the back of your manual.
18
TO
1. Remove all food.
2. Disconnect refrigerator.
3. Clean the following items-paying
special attention to crevices-using
the appropriate instructions in How to
Clean Your Refrigerator:
Walls, floor and ceiling of cabinet
interior.
Drawers, shelves and gaskets.
4. Wash and dry all bottles, containers
and jars. Discard spoiled or expired
items.
5. Wrap or store odor-causing foods in
tightly-sealed containers to prevent
reoccurring odors.
6. Connect power to refrigerator and
return food.
7. After 24 hours, check if odor has
been eliminated.
If odor is still present...
1. Remove drawers and place on top
shelf of refrigerator.
2. Pack refrigerator and freezer
sections-including doors-with
crumpled sheets of black and white
newspaper.
3. Place charcoal briquettes randomly
on crumpled newspaper in both
freezer and refrigerator
compartments.
4. Close doors and let stand24-48 hours.
5. Repeat steps 5 through 7 above.
If odor was not eliminated, contact
Sears Service Center. Refer to back of
manual for phone number.
ENERGY+A++NGt+EAS
> Avoid overcrowding refrigerator
shelves. This reduces effectivity of air
circulation around food and causes
refrigerator to run longer.
> Avoid adding too much warm food to
refrigerator at one time. This
overloads compartments and slows
rate of cooling.
> Do not use aluminum foil, wax paper,
or paper toweling as shelf liners. This
decreases air flow and causes
refrigerator to run tess efficiently.
> A freezer that is _+full runs most
efficiently.
> Locate refrigerator in coolest part of
room. Avoid areas of direct sunlight,
or near heating ducts, registers, or
other heat producing appliances, if
this is not possible, isolate exterior by
using a section of cabinet or an
added layer of insulation.
> Refer to section in Use and Care
Guide on temperature controls for
recommended control settings.
:,--Clean door gaskets every three
months according to Use and Care
Guide instructions. This wilt assure
that door seals properly and
refrigerator runs efficiently.
Taketime to organize items in
refrigerator to reduce time that door
is open.
> Be sure your doors are closing
securely by leveling refrigerator as
instructed in your Use and Care
Guide.
Clean condenser coils off as
indicated in the Use and Care Guide
every 3 months. This will increase
energy efficiency and cooling
performance.
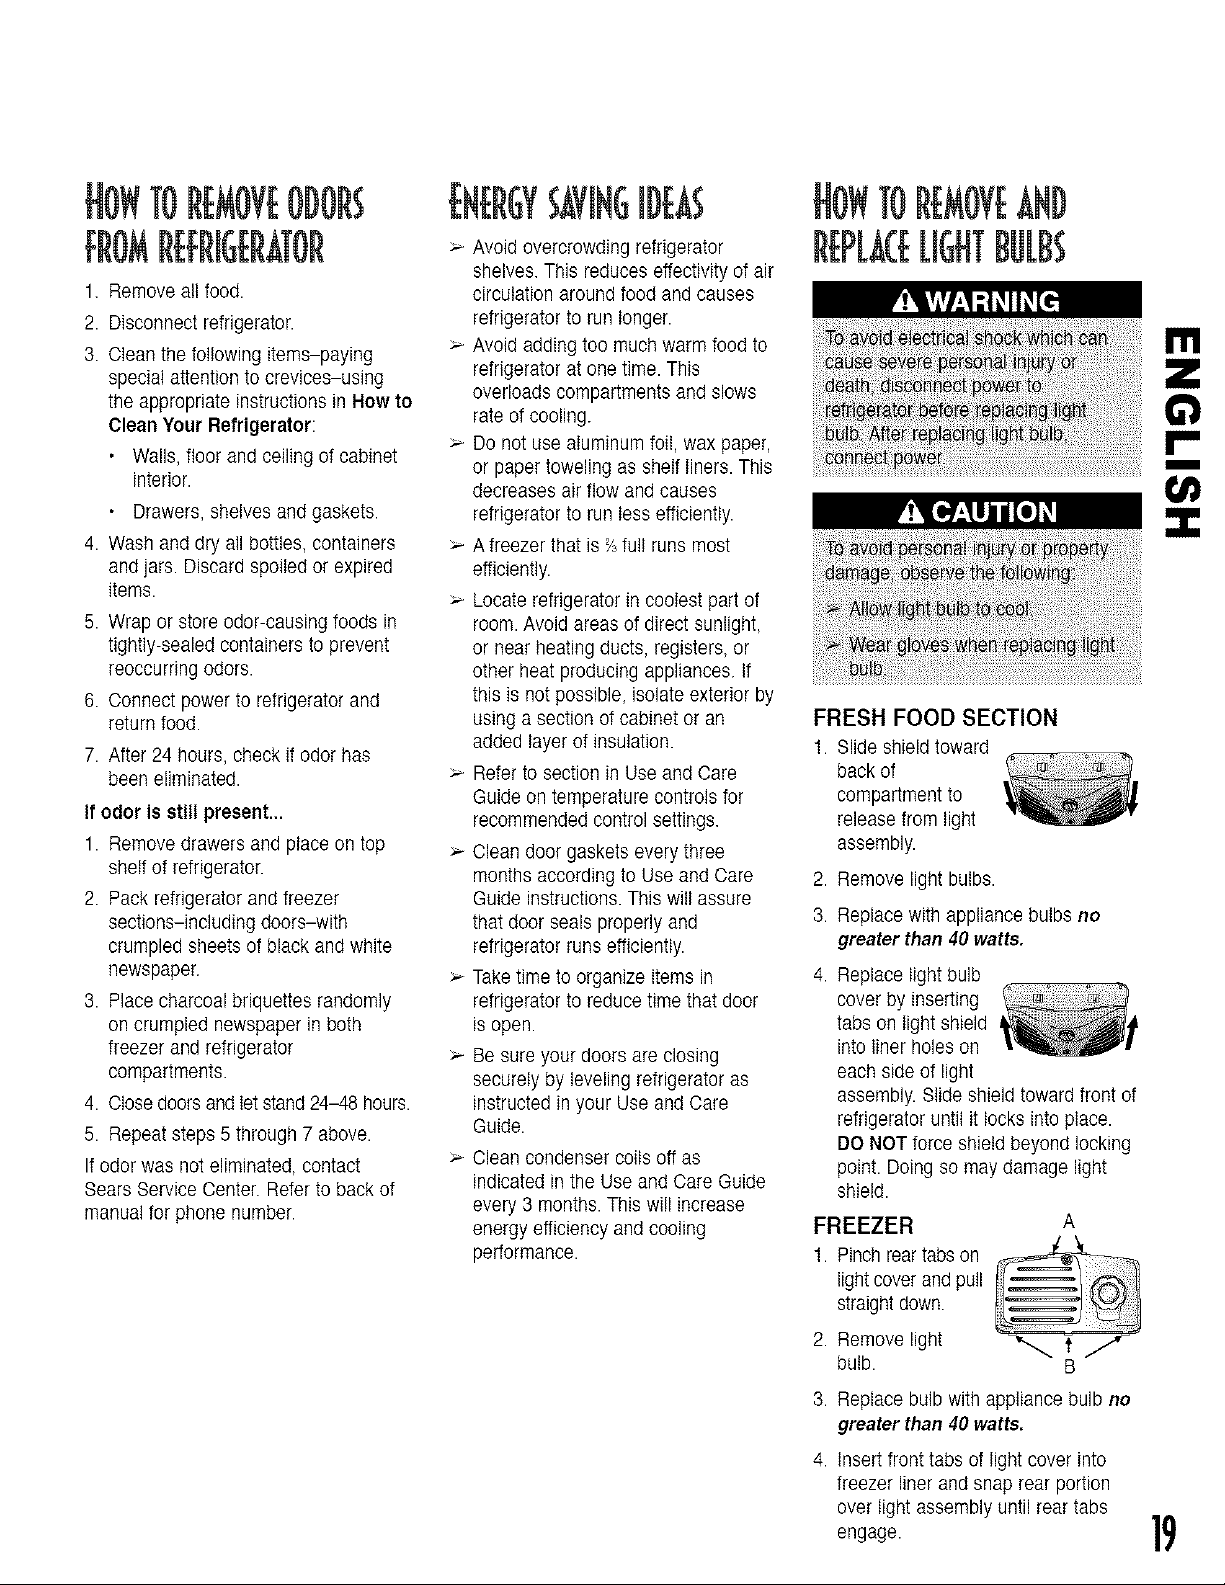
FRESH FOOD SECTION
1. Slide shield toward
back of
compartment to
release from light
assembly.
2. Remove light bulbs.
3. Replace with appliance bulbs no
greater than 40 watts.
4.
FREEZER
1 Pinch reartabs on
light cover and pull
straight down.
Replace fight bulb
cover by inserting
tabs on fight shield
into liner holes on
each side of light
assembly. Slide shield toward front of
refrigerator until it locks into place.
DO NOT force shield beyond locking
point. Doing so may damage light
shield.
A
2. Remove light _ f /7
bulb. B
3. Replace bulb with appliance bulb no
greater than 40 watts.
4.
Insert front tabs of fight cover into
freezer liner and snap rear portion
over light assembly until rear tabs
engage.
!'11
¢1
m
19

Today's refrigerators use foam insulation and are more energy efficient than refrigerators of the past. However, foam insulation is
not as sound absorbent as former insulated models. As a result, certain sounds may be unfamiliar. In time, these sounds will
become familiar. Please refer to this information before calling service.
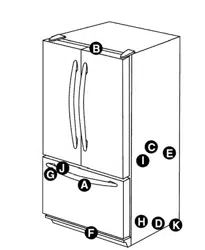
I I[O]"-,t[o.] I ;,[o].$']I;] ! ;1[I.7:'!1[."]= [-."[o]ILI]Ii [o]ZI
Clicking > Freezer control (A) clicks when > Normal operation
starting or stopping compressor.
Defrost timer (B) sounds like an > Normal operation
electric clock and snaps in and
out of defrost cycle.
Air rushing or whirring > Freezer fan (C} and condenser > Normal operation
fan (D} make this noise while
operating.
Gurgling or boiling > Evaporator (E) and heat _ Normal operation
sound exchanger (F) refrigerant makes
this noise when flowing.
Thumping >- ice cubes from ice maker (select >- Normal operation
models) drop into ice bucket (G).
Vibrating noise > Compressor (H) makes a _ Normal operation
pulsating sound while running.
Refrigerator is not level. > See installation Instructions for details on how to level your
refrigerator.
Buzzing _ ice maker water valve (I) _ Normal operation
hookup (select models) buzzes
when ice maker fills with water.
Humming > ice maker (J) is in the 'on' > Stop sound by raising ice maker arm to 'off' position. See
position without water Automatic Ice Maker section in your Use and Care Guide
connection, for details.
Normal operationCompressor(H) can makea high-
pitched hum while operating.
Hissing or > Defrostheater (K) hisses,sizzles > Normal operation
popping or pops when operational.
2O
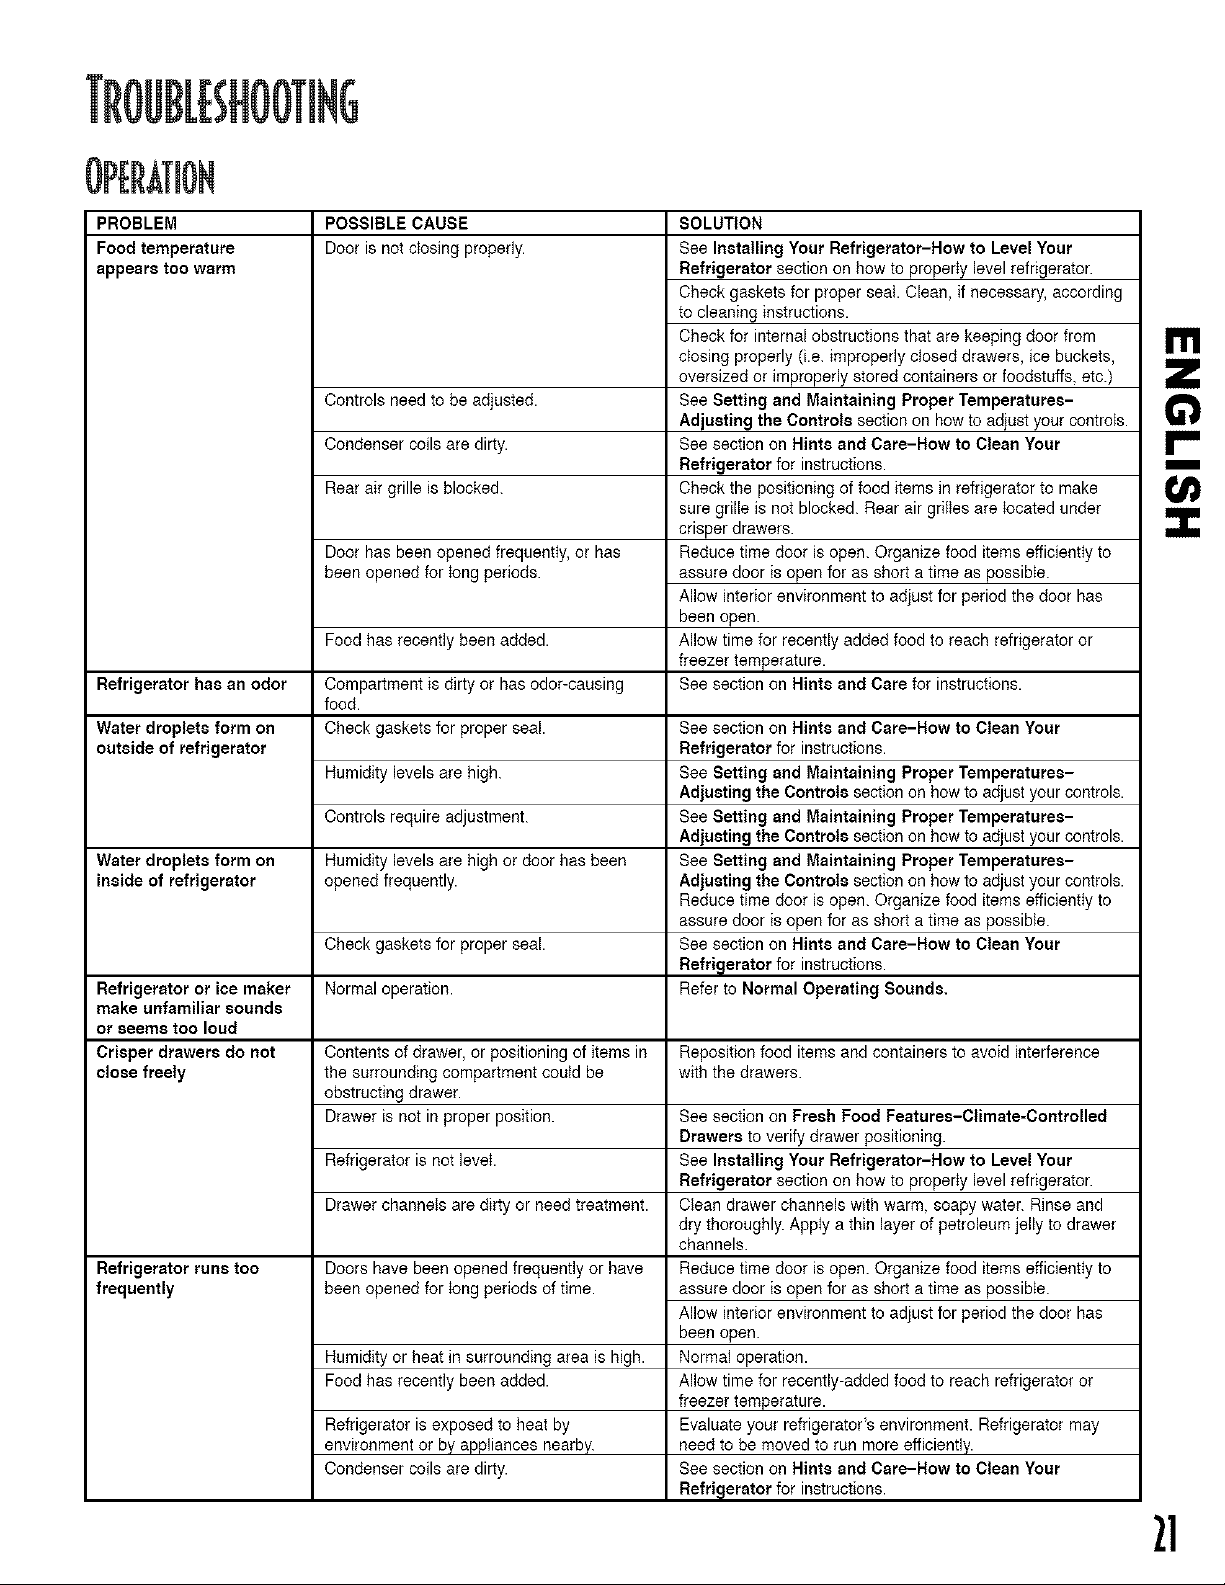
PROBLEM
Food temperature
appears too warm
Refrigerator has an odor
Water droplets form on
outside of refrigerator
Water droplets form on
inside of refrigerator
Refrigerator or ice maker
make unfamiliar sounds
or seems too loud
POSSIBLE CAUSE
Door is not ctosing properly.
Controls need to be adjusted.
Condenser coils are dirty.
Rear air grille is blocked.
Door has been opened frequently, or has
been opened for bng periods.
Food has recently been added.
Compartment is dirty or has odor-causing
food.
Check gaskets for proper seal.
Humidity levels are high.
Controls require adjustment.
Humidity levels are high or door has been
opened frequently.
Check gaskets for proper seal.
Normal operation.
SOLUTION
See Installing Your Refrigerator-How to Level Your
Refrigerator section on how to proper_ylevel refrigerator.
Check gaskets for proper seat. Clean, if necessary, according
to cleaning instructions.
Check far internal obstructions that are keeping door from
cbsing properly (i.e. improperly closed drawers, ice buckets,
oversized or improperly stored containers or foodstuffs, etc.)
See Setting and Maintaining Proper Temperatures-
Adjusting the Controls section on how to adiust your controls.
See section on Hints and Care-How to Clean Your
Refrigerator for instructions.
Check the positioning of food items in refrigerator to make
sure grille is not blocked. Rear air gbltes are Iocated under
crisper drawers.
Reduce time door is open. Organize food itemsefficientiy to
assure door is open for as short a time as passibie.
Allow interior environment to adjust for period the door has
been open.
Allow time for recently added food to reach refrigerator or
freezer temperature.
See section on Hints and Care for instructions.
See section on Hints and Care-How to Clean Your
Refrigerator for instructions.
See Setting and Maintaining Proper Temperatures-
Adjusting the Controls section on how to adjust your controls.
See Setting and Maintaining Proper Temperatures-
Adjusting the Controls section on how to adjust your controls.
See Setting and Maintaining Proper Temperatures-
Adjusting the Controls section an how to adjust your controls.
Reduce time door is open. Organize food items efficiently to
assure door is open for as short a time as possible.
See section on Hints and Care-How to Clean Your
Refrigerator for instructions.
Refer to Normal Operating Sounds.
Crisper drawers do not Contents of drawer, or positioning of items in Reposition food items and containers to avoid interference
close freely the surrounding compartment coutd be with the drawers.
obstructing drawer.
Drawer is not in proper position.
Refrigerator is not level
Drawer channels are dirty or need treatment.
Doors have been opened frequently or have
been opened for tong periods of time.
Refrigerator runs too
frequently
Humidity or heat in surrounding area is high.
Food has recently been added.
Refrigerator is exposed to heat by
environment or by appliances nearby.
Condenser coils are dirty.
See section on Fresh Food Features-Climate-Controlled
Drawers to verify drawer positioning.
See Installing Your Refrigerator-How to Level Your
Refrigerator section an how to property level refrigerator.
Clean drawer channels with warm soapy water. Rinse and
dry thoroughly. AppIy a thin layer of petroleum jelly to drawer
channels.
Reduce time door is open. Organize food itemsefficientty to
assure door is open for as short a time as possibte.
Allow interior environment to adjust for period the door has
been open.
Normal operation.
Allow time for recently-added food to reach refrigerator or
freezer temperature.
Evaluate your refrigerator's environment. Refrigerator may
need to be moved to run more efficiently.
See section on Hints and Care-How to Clean Your
Refrigerator for instructions.
I'!1
m
2]
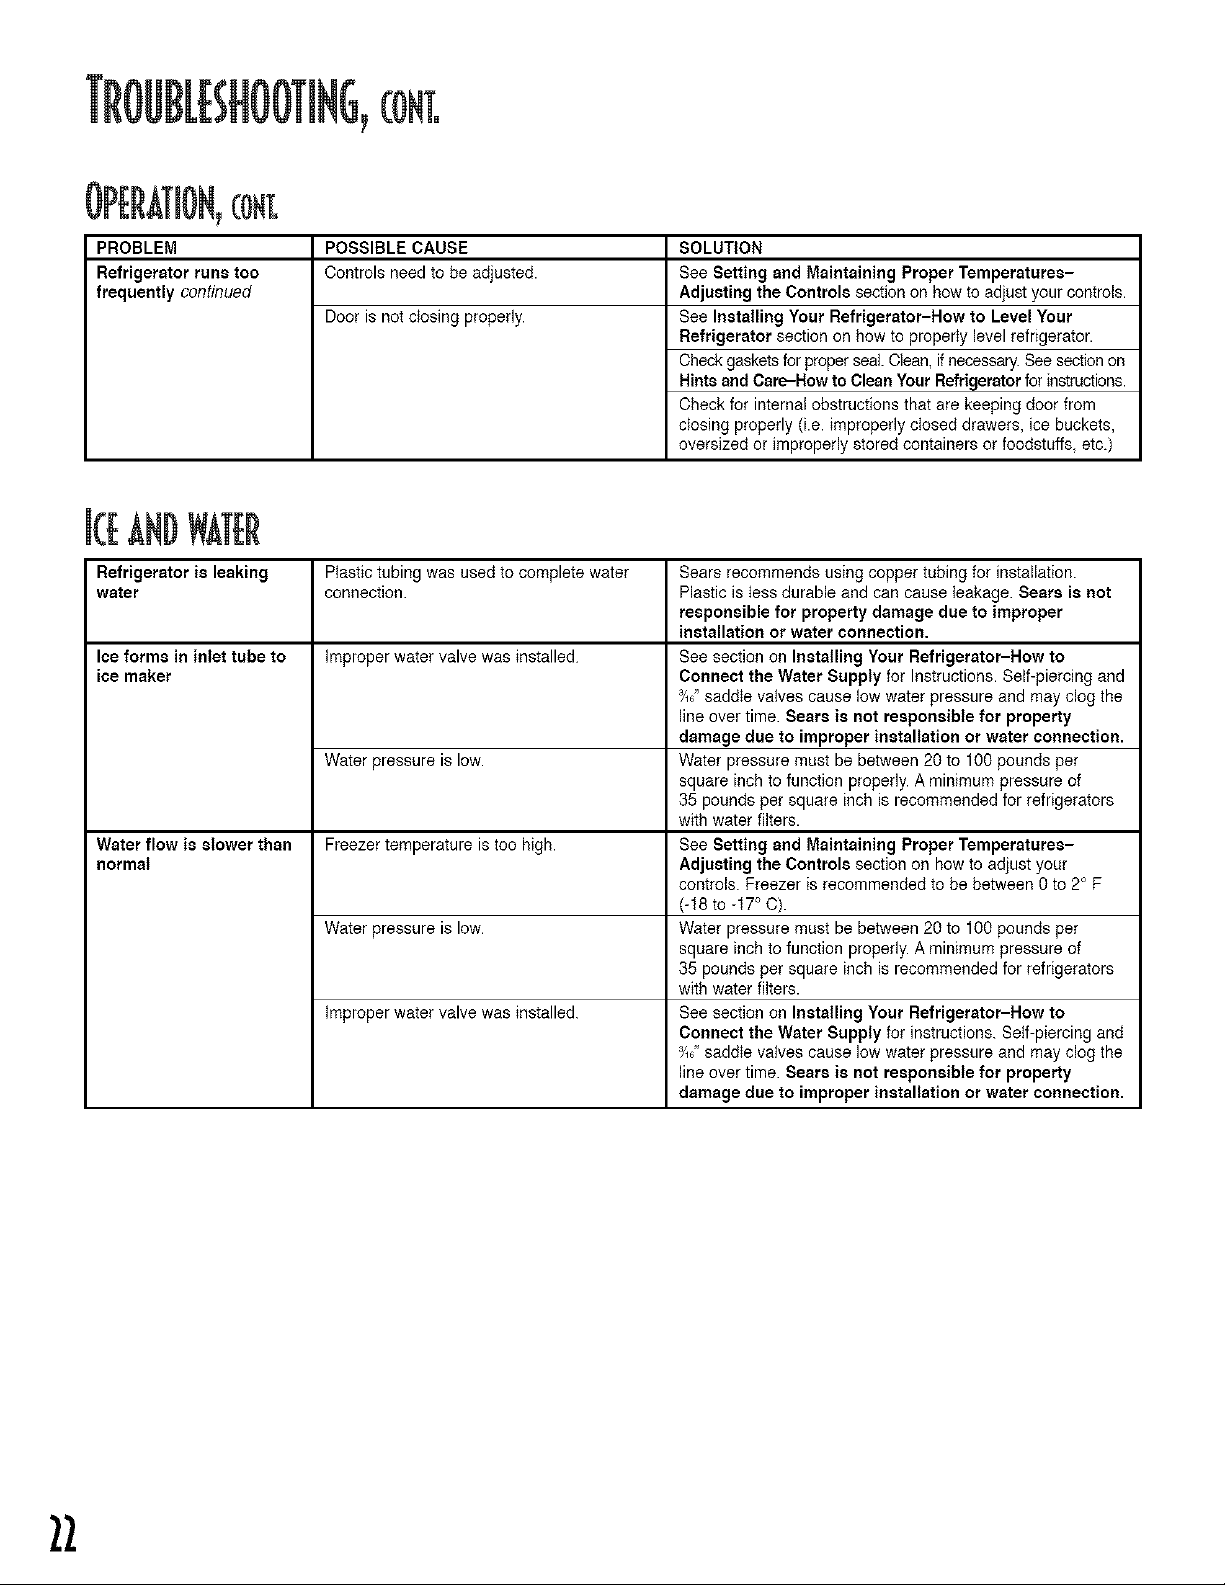
(ONT,
PROBLEM
Refrigerator runs too
frequently continued
POSSIBLE CAUSE SOLUTION
Controls need to be adjusted.
Door is not closing properly.
See Setting and Maintaining Proper Temperatures-
Adjusting the Controls section on how to adjust your controls.
See Installing Your Refrigerator-How to Level Your
Refrigerator section on how to property level refrigerator.
Checkgaskets for proper seal Clean,if necessary.See sectionon
Hinte and Care-How to Clean Your Refrigerator for instructions.
Check for internal obstructions that are keeping door from
closing properly (i.e. improperly cIesed drawers, ice buckets,
oversized or improperlystored containers or foodstuffs, etc.)
Refrigerator is leaking PIastic tubing was used to complete water Sears recommends using copper tubing for installation.
water connection. Plastic is tess durable and can cause Ieakage. Sears is not
responsible for property damage due to improper
installation or water connection.
Ice forms in inlet tube to improper water valve was installed. See section on Installing Your Refrigerator-How to
ice maker Connect the Water Supply for Instructions. Self-piercing and
¾0"saddte valves cause low water pressure and may clog the
line over time. Sears is not responsible for property
damage due to improper installation or water connection.
Water pressureis low. Water pressure must be between 20 to 100 pounds per
square inchto function properly.A minimum pressure of
35 pounds per square inch is recommended for refrigerators
with water filters.
Water flow is slower than Freezer temperature is too high. See Setting and Maintaining Proper Temperatures-
normal Adjusting the Controls section on how to adjust your
controls. Freezer is recommended to be between 0 to 2° F
(-18 to -17° C).
Water pressure is low. Water pressure must be between 20 to 100 pounds per
square inchto function properly.A minimum pressure of
35 pounds per square inchis recommended for refrigerators
with water filters.
improper water valve was installed. See section on Installing Your Refrigerator-How to
Connect the Water Supply for instructions.Self-piercing and
¾o"saddte valves cause low water pressure and may clog the
line over time. Sears i8 not responsible for property
damage due to improper installation or water connection.
22
Lasadvertendasy tas instrucdones
importantesdeseguridadqueaparecenen
estemanualnotienenel propdsitodecubrir
todaslas condicionesposiblesquepodrian
ocurrir. DebeusarsesentidocomQn,
precaud6ny cuidadocuandose instale,se
realicemantenimientoose opereel
refrigerador.
$iemprecomuniquesecon eldistribuidor,
concesionario,agentedeservicioo fabricante
paraIosasuntosrelacionadoscon problemas
ocondicionesqueno entienda.
RECONOZCALOSSJMBOLOS,
LAS PALABRASY LAS
ETIQUETASDE SEGURIDAD
m
0
CONSERVEBTA iNSTRUCCIONB
2}
cONTRATOSDEPI OT[cCi6N
EN LOS EE.UU.
Lofelicitamosporsu sabiadecisidnde
compra.Su nuevoelectrodomestico
Kenmore hasidodisefiadoy fabricadopara
ofreceflemuchosafios de rendimiento
seguro.Pero,al igualquetodoslos
productos,de vezen cuandopuedenecesitar
mantenimientopreventivoo reparaci6n.En
tatmomentoes cuandoun Contratode
Protecci6nle puedeahorrarpreocupaciones
y gastos.
Adquieraun Contratode ProteccionPrincipal
ahoray protejasecontraincertidumbresy
gastosinesperados.
ElContratode Protecci6nPrincipalademas
leayudaa prolongarlavida _tilde sunuevo
etectrodomestico.El Contratoincluye1o
siguiente:
> Servicioposventapot nuestros12000
profesionalesespecializadosen
reparaciones.
> Servidoposventailimitadoy gratisde
piezasy manodeobra paratodaslas
reparacionescubiertaspor el contrato.
> Garantiade rendimiento- reemplazodet
productobajo contratosi ocurrenm&sde
tresfatlasdel productodentrode doce
meses.
_- Reemplazode su productosi elproducto
bajocontratono puedeser reparado.
> Revisi6nAnualde Mantenimiento
PreventivocuandoIosolicite- sin costo
adicionai,
> AyudarSpidaportel6fono- ayudae
informaci6nno t6cnicaparalos productos
reparadosen su hogar,ademasde
fijaciondefechasconvenientespara las
reparaciones.
> Protecci6ncontraarremetidasel6ctricas
debidoa fiuctuacionesde lacorriente
el6ctrica.
>. ReemboIsodecostosde arriendosi las
reparacionesde su productobajocontrato
demoranmgstiempoqueIoprometido.
Unavezque ustedhacompradoel Contrato,
solamentenecesitauna ilamadapor tei6fono
parafijar lafechadel servicio.Puedellamara
cualquierhora,duranteeIdia o enla nocheo
puedefijar lafecha paraeI servicioa traves
dela computadora.
Searstienemasde 12000profesionales
especializadosen reparaciones,quetienen
accesoamas de4,5 mitlonesde repuestosy
accesoriosde calidad.Estees el tipode
profesionatismoat queustedpuederecurrir
paraprolongarIavidat_tildesu nuevo
electrodomesticodurantemuchosafios.
iComprehoymismosuContratode
ProteccionPrincipal!
Existenciertastimitacionesy exclusiones.
Parapreciosy mayorinformaci6n,Ilameal
1-800-827-6655.
Serviciode instataci6nSears
Parainstaiaci6nprofesionalgarantizadade
electrodomesticosSearsy articulostales
comosistemadeaperturade puertasde
cocherasy calefactoresde agua,en Ios
EE.UU.Ilameal 1-888-SU-HOGARs_'_
(1-888-784-6427).
EN CANADA
Sucompratienemayorvalorpuesusted
puededependerde SearsHomeCentral
paraservicio.Conmas de 2400tecnicosde
servicioy accesoamas de900.000
repuestosy accesofios,tenemoslas
herramientas,los repuestos,tos
conocimientosy lasdestrezasparacumplir
nuestrapromesa:ReparamosIoque
Vendemos.
SuetectrodomesticoKenmore_ha sido
disefiado,fabricadoy probadoparaofrecerle
muchosafiosdefuncionamientoseguro.Sin
embargo,cualquierelectrodomesticopuede
requerirserviciode vez encuando.El
Oontratode MantenimientoSearsleofrece
unprogramade serviciosobresaiientey
econ6mico.
El contratode mantenimientoSears
> Significagueustedestacomprandoel
serviciode boya los preciosdemarian&
> Eliminalosgastosen reparaciones
resultantesde usoy desgastenormal.
> Leofreceayudaeducacionate
informaci6nno t_cnica.
At]nsi ustednonecesitareparaciones,le
ofreceunarevisi6nanuatde
mantenimientopreventivo,cuandoIo
solicita,afin deasegurarde quesu
electrodomesticoest6 siempreen buenas
condicionesde uso.
Existenciertaslimitaciones.Parainformaci6n
sobretos Oontratosde Mantenimientode
SearsCanada,Ilameal 1-800-361-6665.
14
Garantiacompletede an a_o pareel
refrigerador
Duranteunafio desdelafechade compra,
cuandoesterefrigeradores usadoy
mantenidode acuerdocon las instrucdones
adjuntaso entregadasconel producte,Sears
Io reparar&gratuitamente,si tienedefectos
de matefiato defabricacion.
Garantiacompletede cincoaSos pareel
sietemade refrigeraci6nsellado
Durantecincoafiosdesdelafechade
cempra,cuandoesterefrigeradores usadoy
mantenidode acuerdocon las instrucciones
adjuntaso entregadasconel producto,Sears
repararagratuitamenteel sistemasellado
(compuestoporel refrigerante,tuberiade
cenexi6ny motordel cempresor),si tiene
defectosde materiatode fabricaci6n.
Lasgarantiasdescfitasanteriormente
soIamentesonv&Iidasparalos refrigeradores
queseenusadospareconservaci6nde
alimentosdestinadosalconsumodel hogar.
No incluyeloscartuchosfiltrantesoriginalesy
derepuestodeJsistemaautom&ticode aguay
hieloKenmore.Loscartuchesoriginalesy de
repuestosongarantizadosdurante30dias,
encuantoalas piezasmismassolamente,
contradefectosde materialo de fabricacion.
Elserviciobajolagarantiaestadisponible
Ilamandeal 1-800-4-MY-HOME®
(1-800-469-4663).
Estagarantiaes v&Iidasolamentecuandoel
productoest&siendousadoen los Estados
Unidosy Canada.
Estagarantiale otorgaderechoslegales
especificesy ustedadem&spuedetenerotros
derechesquevariandeun estadoa otro.
Sears,Roebuckand Co._Dept.8t7WA,
HoffmanEstates,IL60179
NOTA:AIgunossistemasdetratamientode
aguapot osmosisinversacausanunabaia
de lapresi6ndel agua.Lapresi6nbajadel
aguapuedeafectarelsistemadel distribuidor
deaguey hieloproduciendocubesde hielo
pequefioso huecosy fluiode agualentodel
distribuider.LosprobIemasdeservicio
relacionadosconel sistemadetratamiento
deaguaperosmosisinversadel hogarno
est&ncubiertosporlagarantia.
[)E[£RODU(TO
Enel espacioprovistoacontinuaci6n,anote
elnt_merodemodeloy el nt_merodeseriey
lafechade compradesu refrigerador.El
n_merode modeloy deseriese encuentran
dentrodel refrigeradoren la paredizquierda.
NQmerode Modelo:596.
N_merodeSefie:
Fechade Compra:
Conserveestefolleto y surecibode
comprade Searsen untugar seguro para
refereneiafuture.
m
tee
O
25
Informaei6nimportantesobreseguddad..................................................................................23
tnformaci6nsobrelasinstruccionesde seguridad...................................................................23
Requerimientosel@tricos........................................................................................................23
Contratosde Protecci6n.............................................................................................................24
Contratosde Protecci6nPrincipaies-en los EE.UU..............................................................24
Contratosde Mantenimiento- en Canada..............................................................................24
GarantJa.........................................................................................................................................25
Registrodel produeto..................................................................................................................25
Instalaei6ndel refrigerador...................................................................................................27-32
Medici6nde lacavidad.............................................................................................................27
Transportedel refrigerador.......................................................................................................27
Setecci6nde la mejorubicaci6n...............................................................................................27
Aperturay cierrede las puertasdelrefrigerador.....................................................................27
Desmontajey reinstataci6ndelas manijas..............................................................................28
Desmontajedelas bisagras,de las puertasy delcaj6n..........................................................28
Reinstalaci6nde lasbisagras,de laspuertasy deIcaj6n.......................................................30
Conexi6ndel suministrode agua.............................................................................................31
Nivelaci6ndeIrefrigerador........................................................................................................32
Ajustey mantenimientode tastemperaturasapropiadas.......................................................33
Ajustesinicialesde Ioscentroles..............................................................................................33
Ajustede toscontroIes.............................................................................................................33
Oonservaci6nde alimentosfrescos.........................................................................................33
Conservaci6nde alimentoscongelados...................................................................................33
Informaci6nsobre el filtro deagua ......................................................................................34-35
tnstalaci6ny desmontajedelfittrode agua..............................................................................34
Datesdel filtrodeagua............................................................................................................35
CaraeterJsticasdel compartimientodel refrigerador..........................................................36-36
Dispensa@rde agua...............................................................................................................3G
Bandejasinteriores...................................................................................................................36
AImacenamientoenla puerta...................................................................................................36
Caj6ncontroladodelclima.......................................................................................................37
CaracterJsticasdel congetador...................................................................................................38
Maquinaautomaticade hacerhieto.........................................................................................38
Cajones.....................................................................................................................................38
Consejosy euidado................................................................................................................39-40
Limpiezade su refrigerador......................................................................................................39
Eliminaci6nde losoloresdel refrigerador................................................................................40
8ugerenciasparaahorrode energia........................................................................................40
Desmontajey reemplazode losfocos.....................................................................................40
$onidoenormatesde funcionamiento.......................................................................................4t
Localizaci6ny soluci6n deaverias.......................................................................................42-43
Funcionamiento...................................................................................................................42-43
Hieloy agua..............................................................................................................................43
Fran_ais........................................................................................................................................45
$ervicio.....................................................................................................................Contrapertada
26

Estasinstruccionesson proporcionadaspara
ayudarlea instalarsu refrigerador.
:iONDEB (AVIDAD
Sedebedejarun espaciode1,25cm(t_")en
la partetraseradel refdgerador.Cuando
instalesu refrigerador,hagatodaslas
medicionescon cuidado.
Losrevestimientosdelsubsueloodel piso
(esdecir,alfombras,baldosas,pisosde
madera,tapetes)puedendisminuirel tamaSo
de lacavidad.
Sepuedeobtenermasespaciolibreusando
el procedimientode nivelacionincluidoen la
secci6nNivetaci6ndel refrigerador.
IMPORTANTE:Si et refrigeradorva a set
instaladoen unacavidaden que la parte
superiordelrefrigeradorquedar&
completamentecubierta,useIas dimensiones
desdeel pisohastala partesuperiorde la
tapade labisagraparaverificarel espacio
libreapropiado.
Sigaestosconsejoscuandomuevael
refrigeradora su lugardefinitivo.
> NUNCAtransporteel refrigeradorde
costado.Sinoes posibietransportarloen
posici6nvertical,transp6rtelohaciendolo
descansaren lapartetrasera.Dejeel
refrigeradoren posici6nverticaldurante
aproximadamente30 minutosantesde
enchufarloa fin de asegurarde queel
aceitevuelvaal compresor.Si el
refrigeradorse enchufainmediatamente,
se puedecausarda_oalas piezas
internas.
Siempreuse unacarretiliademano
cuandomuevaeI refrigerador.$1EMPRE
inserteIa carretillade manopotel
costadoo por la partetraseradet
refrigerador- NUNCAporel frente.
Protejael acabadoexteriordel
refdgeradorduranteel transporte
envolviendoel gabineteenfrazadaso
insertandoacolchadoentreel refrigerador
y lacarretilla.
Asegureelrefrigeradorfirmementeenla
carretillade mano,conflejeso cuerdas
elasticas.Paselosflejesa trav6sde las
maniascuandoseaposible.NOapriete
demasiadobs materialesdesujecionpues
puedenhendiroda_arelacabadoexterior.
ELECCi6NDELA
Tomeencuentalos puntosindicadosa
continuaci6ncuandoseleccioneel lugar
definitiveparasu refrigerador:
NOinstaleel refrigeradorcercadelhomo,
radiadoruotrafuentede calor.Si estono
es posibIe,protejaet refrigeradorcon
materialdelos armarios.
NOinstaleel refrigeradoren un lugar
dondetatemperaturadescenderaa
menosde 13° C (550F).Aesta
temperaturapuedeocurrirmal
funcionamiento.
> Paraasegurarunbuen cierrede la
puerta,sigaIasinstruccionesde
nivelaciondescritasen la seccion
Nivelaci6ndel refrigerador.
APERTURAYCIERREDE
PgERTASD{].
Sunuevorefrigeradorest#tdotadode un
diseSot_nicocon 2 puertas.Oadaunade tas
puertasse puedenabriro cerrar
independientementede la otra.
Existeuna secci6nabisagradaverticatmente
enla puertaizquierdadel refrigerador
denominada'SmartSeal'.Ouandola puerta
izguierdaestacerrada,la secci6nabisagrada
formaautomaticamenteun selloentreIasdos
puertascuandoambasestancerradas.
Cuandose abrela puertaizquierda,et cierre
'SmartSeal'se pliegaautom&ticamentehacia
adentroparaevitarinterferencia.
m
27
Desmontajedetas Manijasdet ;I
Reffigerador I
t, Ubiqueyasea{aherramienta 4rJ)_
depi&sticoinctuidacon el
paquetede la documentaciSn
0 unaesp&tua para _
enmasillar.Tirandode la
manijaI[geramentehaciausted,insertela
herramienta,comose muestraen la
ilustraci6n.La herramientadebe
deslizarset .27cm (3/4")haciaadentro.
2. Teniendolaherramienta I _'_
todaviainsertadasuete la
porcidnde la manijaque est&l: _ _
m&scercadel&readeta
herramientay destice
hrmementeta manijahacla F_y_
arribapararetiraflade la _"-J'J<'_
puerta.
3. Repitapara retirarla manijaopuestadel
refrigerador.
Desmontajedeta ManijadelCongelador
t. Ubiqueya sea la herramienta ;11
deplasticoincluidaconel
paquetede ladocumentacionil i[,_:_
o unaespatulapara _,_
enmasillar.Tirandode la _
manijaligeramentehacia _
afuera,insertela
herramienta,comose muestraen la
ilustraciSn.La herramientadebedeslizarse
aproximadamente1.27cm (_/,")hacia
adentro.
2. Teniendo{aherramientatodavia
insertada,sujetela porci6nde la manija
queestamascercadel areade la
herramientay deslicefirmementela
manijahaciaIa derechapararetirarlade
la puerta.
Reinstalaci6nde las Manijasdel
Refrigerador
I. Asegur&ndosede quela curvaexteriorde
Ia manijaestadirigidahaciael ladode la
bisagrade tapuerta,alineela manijaen
Ia superficiede la puertajusto arribade
IosclipsdeIa puerta.
2. Optimala manijafirmemente
contralapuertaa la vezque
deslizala manijahaciaabajo
hastaque sebloqueeen su i;:i_
Iugar.
3. Repitapara instalarla manija_f_
opuestadel refrigerador.
Reinstataoionde Is Manijadel Congelador
t. Asegur&ndosede quela curvaexteriorde
Ia manijaestadirigidahaciael piso,alinee
Ia manijaen la superficiede la puerta
justoa laderechade losclipsde la
puerta.
28
2. Optimala manijafirmemente
contratapuertaa lavez que
destizala manijahaciala
izquierdahastaquese
bloqueeensu Iugar.
Enalgunoscasoses necesafioretirarlas
puertasdelrefrigeradorparacolocarIoen su
lugardefinitivo.
1. Desenchufeel cord6neI_ctrico.
2. Retirela tapade la bisagra
superiorsacandolos
tornillosPhillips.
> Conserveel tornilloy la
tapaparasu instalaci6n
posterior.
3. Destornillelos tornillosde cabeza
hexagonalde Y_"de la bisagrasuperior
deltadoderecho
paradesmontar
la bisagra.
Conservelos
tornitIospara
usoposterior.
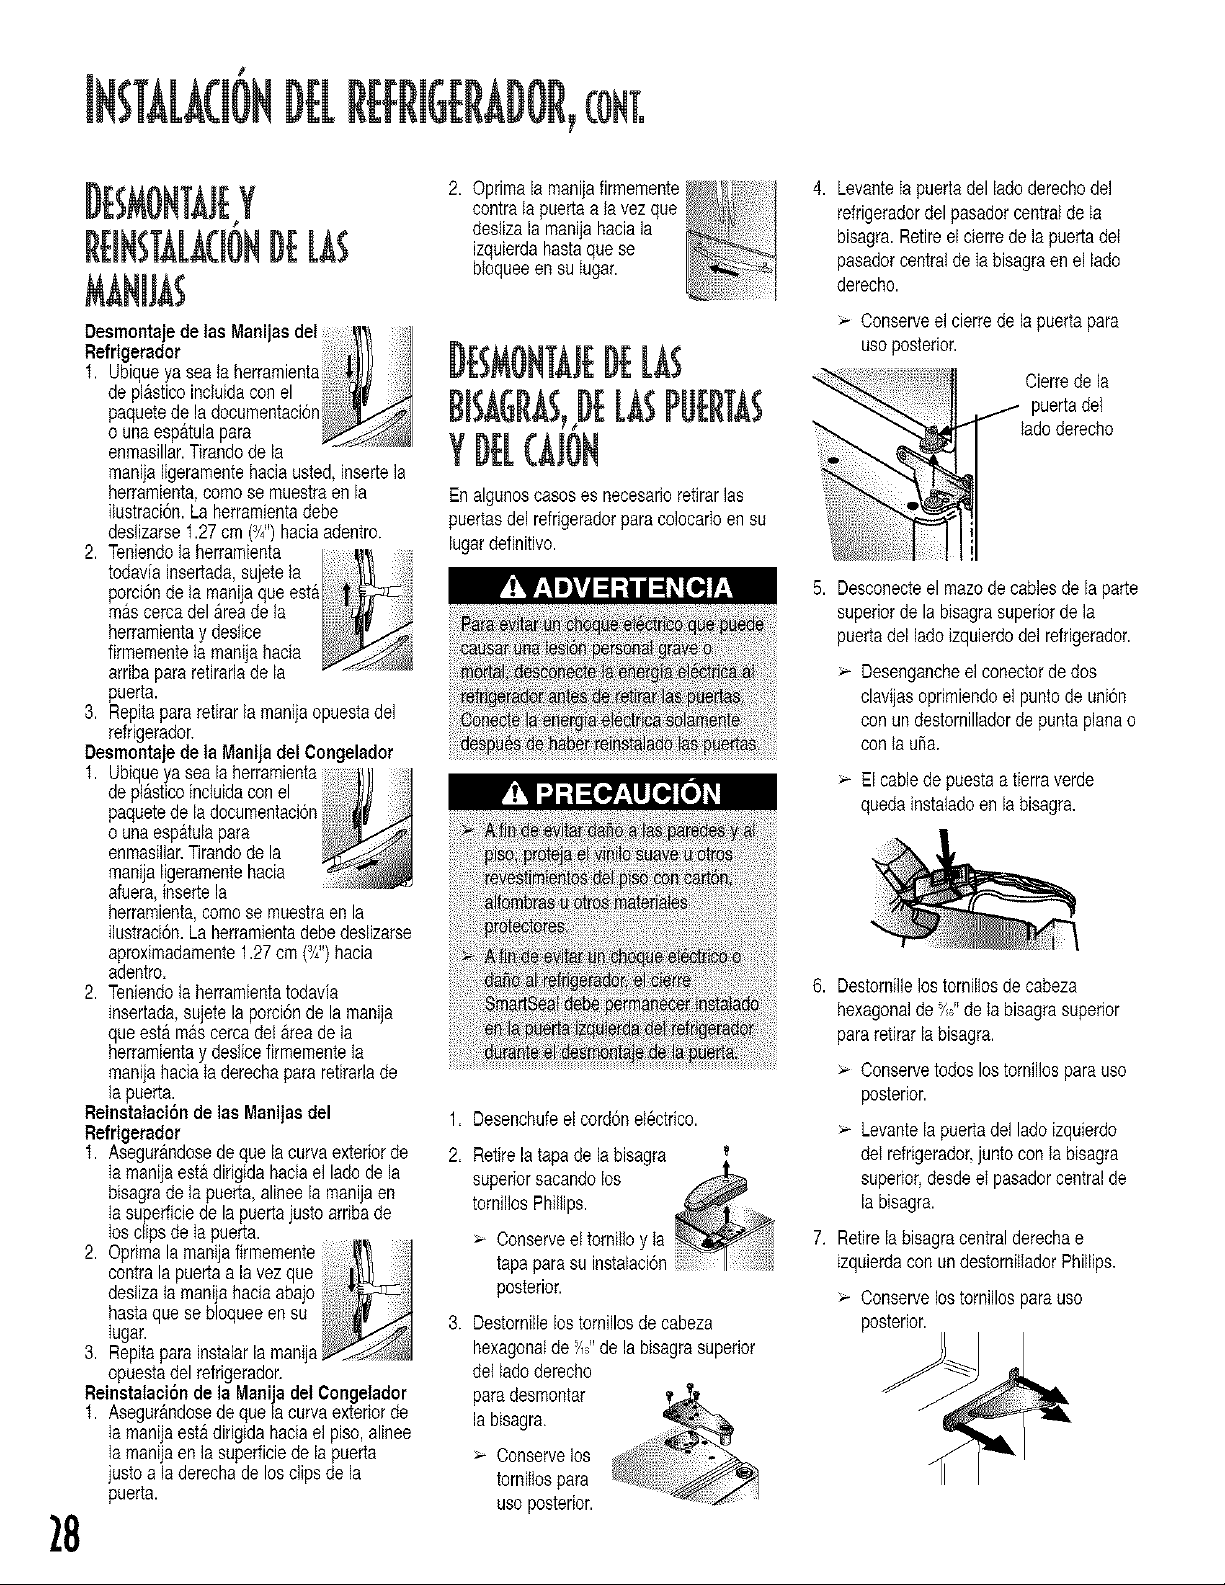
4. LevanteIapuertadel ladoderechodel
refrigeradordel pasadorcentralde Ia
bisagra.Retireelcierrede la puertadel
pasadorcentralde Ia bisagraen el lado
derecho.
> Conserveel cierrede la puertapara
usoposterior.
Cierrede la
puertadet
ladoderecho
5. Desconecteel mazodecablesde laparte
superiorde labisagrasuperiorde la
puertadel ladoizquierdodel refrigerador.
> Desengancheelconectordedos
clavijasoprimiendoel puntodeuni6n
conun destornilladordepuntaplanao
conta u_a.
Elcabledepuestaatierraverde
quedainstaladoen labisagra.
6. DestorniHelostornillosdecabeza
hexagonalde Y,_de tabisagrasuperior
pararetirarla bisagra.
> Conservetodos lostornillosparauso
posterior.
> Levantelapuertadel ladoizquierdo
detrefrigerador,juntocon tabisagra
superior,desdeeI pasadorcentralde
la bisagra.
7. Retirela bisagracentralderechae
izquierdaconun destornitIadorPhillips.
>. Conservelostornillospara uso
posterior.
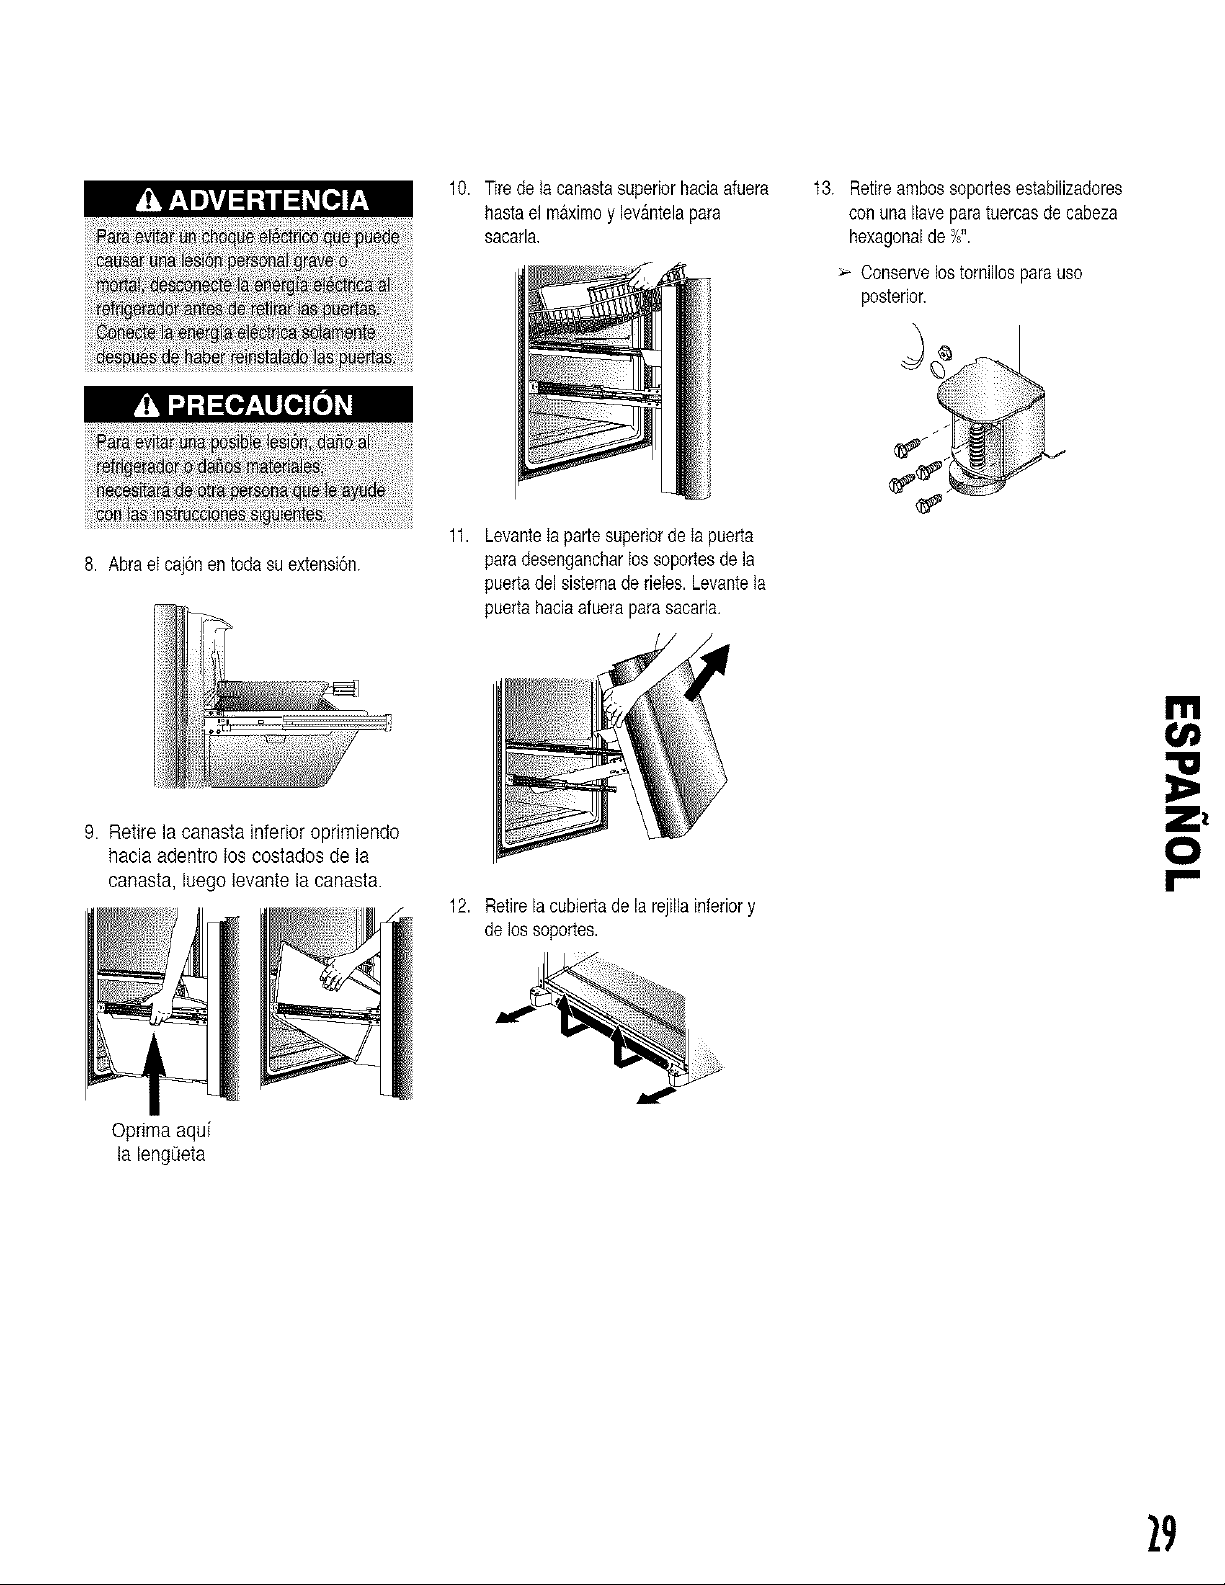
10.Tiredetacanastasuperiorhaciaafuera
hastaelmaximoylev&ntelapara
sacarla,
t3. Retireambossoportesestabilizadores
conunaIlaveparatuercasdecabeza
hexagonalde_".
> Conservelostornillosparauso
posterior.
8. AbraeIcaj6nentodasuextensi6n.
11.LevanteIapartesuperiordeIapuerta
paradesengancharlossoportesdela
puertadelsistemaderieIes.Levanteta
puertahaciaafueraparasacarla.
9. Retirelacanastainferioroprimiendo
haciaadentroioscostadosdela
canasta,luegolevantelacanasta.
12.Retirelacubiertadelarejillainferiory
delossoportes.
I'tl
¢e
O
Optima aqui
la lengOeta
29
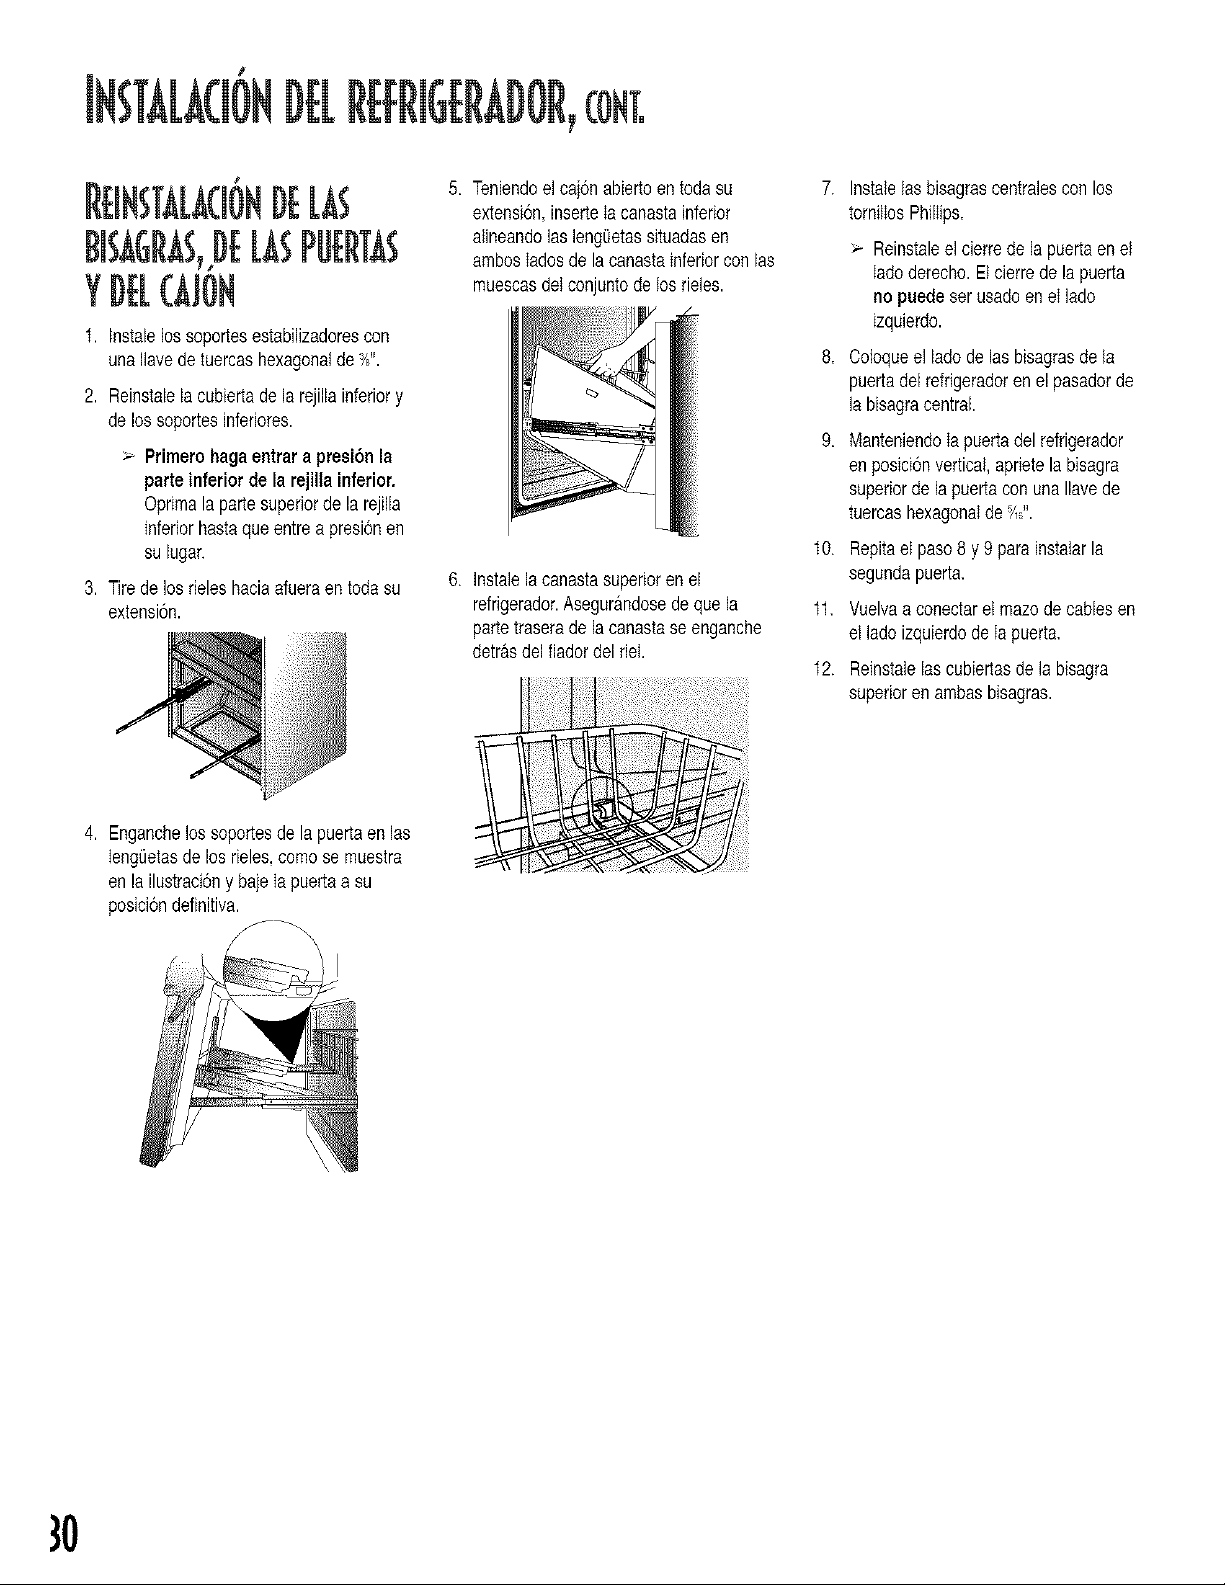
Rt iNsTA[ACi6NDELAs
BISAGRA$,DEW PUERTAS
¥ #EL(AJON
t. tnstalelossoportesestabilizadorescon
unallavede tuercashexagonalde 3/8".
2. Reinstalela cubiertade ]arejilia inferiory
delos soportesinfefiores.
> Primerohagaentrara presi6nla
parte inferiorde la rejillainferior.
Optimalapartesuperiorde larejilla
inferiorhastaqueentrea presi6nen
su lugar.
3. Tirede los rieleshaciaafueraen todasu
extensi6n.
4. Enganchelos soportesde la puertaen las
Iengt]etasde los rieles,comose muestra
enla ilustraci6ny bajeIa puertaa su
posici6ndefinitiva.
5. Teniendoelcai6nabiertoentodasu
extensi6n,inserteIa canastainferior
atineandolas lengOetassituadasen
ambosIadosde la canastainferiorcon las
muescasdetconjuntodetos rieles.
6. lnstalela canastasuperioren el
reffigerador.Asegur&ndosedeque la
partetraserade la canastase enganche
detr&sdel fiadordel riel.
7. Instalelasbisagrascentralescon los
tornilIosPhilIips.
> Reinstaleel cierrede [apuertaen el
Iadoderecho.Etcierrede lapuerta
no puedeser usadoen eI lado
izquierdo.
8. Cobqueel ladode lasbisagrasdela
puertadel refrigeradoren el pasadorde
la bisagracentral
9=
ManteniendoIapuertadelrefrigerador
enposicionvertical,aprietela bisagra
superiorde lapuertacon una Ilavede
tuercashexagonalde5/,,.
10. Repitael paso8 y 9 parainstatarla
segundapuerta.
tl. Vuelvaa conectaret mazedecablesen
el ladeizquierdodeIa puerta.
t2. Reinstalelascubiertasde labisagra
superiorenambasbisagras.
}0
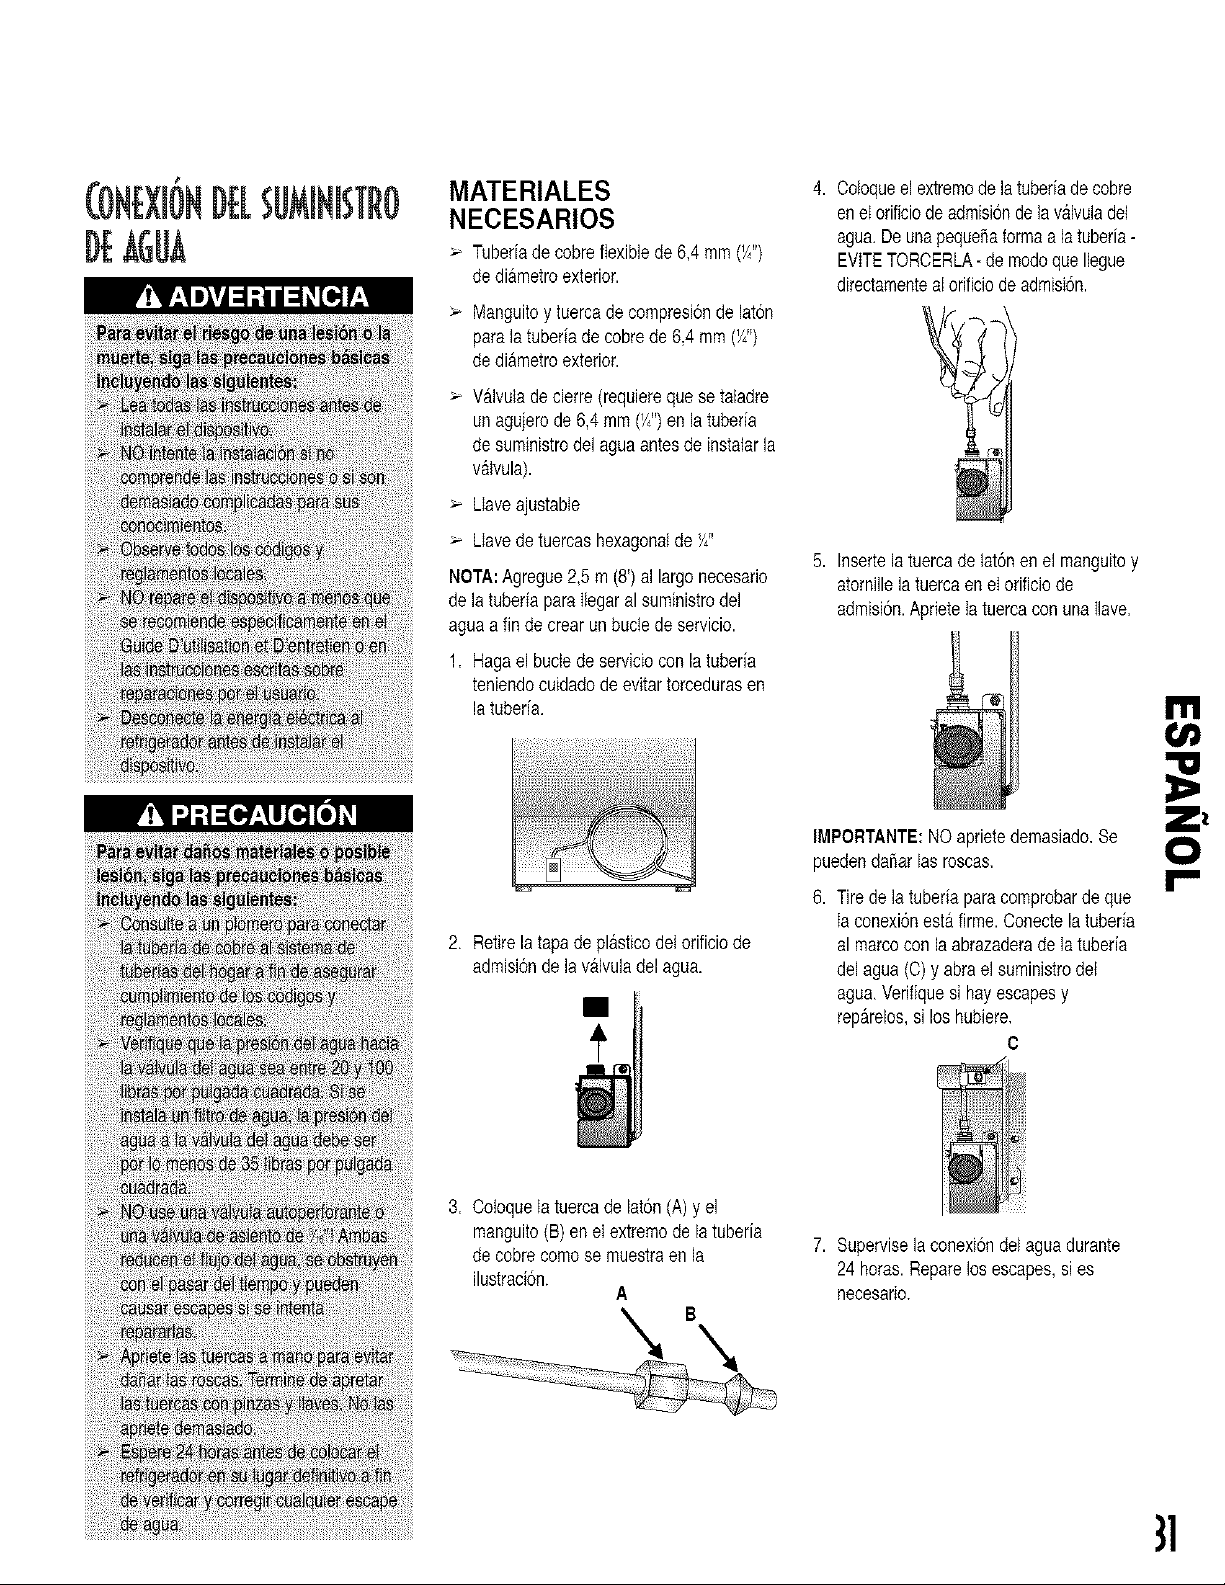
DEAGUA
DE[
MATERIALES
NECESARIOS
> Tubedade cobreflexiblede 6,4 mm(_/z")
dediametroexterior.
_. Manguitoy tuercade compresi6nde laton
parala tuberiade cobrede6,4 mm(YL")
dediametroexterior.
Valvulade cierre(requierequese tatadre
unaguierode 6,4mm (Yz")en la tuberia
desuministrodelaguaantesde instatarla
v&ivula).
> LIaveajustable
>" LIavedetuercashexagonalde Y_"
NOTA:Agregue2,5 m (8') al largonecesario
dela tuberiapara Ilegaral suministrodel
aguaa fin de crearunbuctede servicio.
1. Hagael buclede servicioconlatuberia
teniendocuidadode evitartorcedurasen
latuberia.
2. Retirela tapade pl&sticodelorificiode
admisi6nde lavalvuladel agua.
4. Coioqueel extremede latuberiadecobre
eneIorificiode admisi6ndela valvuladel
agua.DeunapequeSaformaa la tuberia-
EVITETORCERLA- de modoque Ilegue
directamenteal orificiode admisi6n.
5. Insertela tuercade lat6nen el manguitoy
atornillela tuercaeneIorificiode
admision.Aprietetatuercacon unaIlave.
IMPORTANTE:NOaprietedemasiado.Se
puedendaSarlas roscas.
6. Tire dela tuberiapara comprobardeque
Iaconexi6nest&firme.Conectela tuberia
al marcocon la abrazaderade te tuberia
del agua(O)y abrael suministrodet
agua.Verifiquesi hayescapesy
reparelos,si los hubiere.
C
m
¢e
O
3. CotoqueIatuercade lat6n(A)y el
manguito(B) enet extremode latuberia
decobrecomese muestraen la
ilustraci6n.
A
7. Supervisela conexi6ndel aguadurante
24horas.Reparelosescapes,si es
necesario.
}1
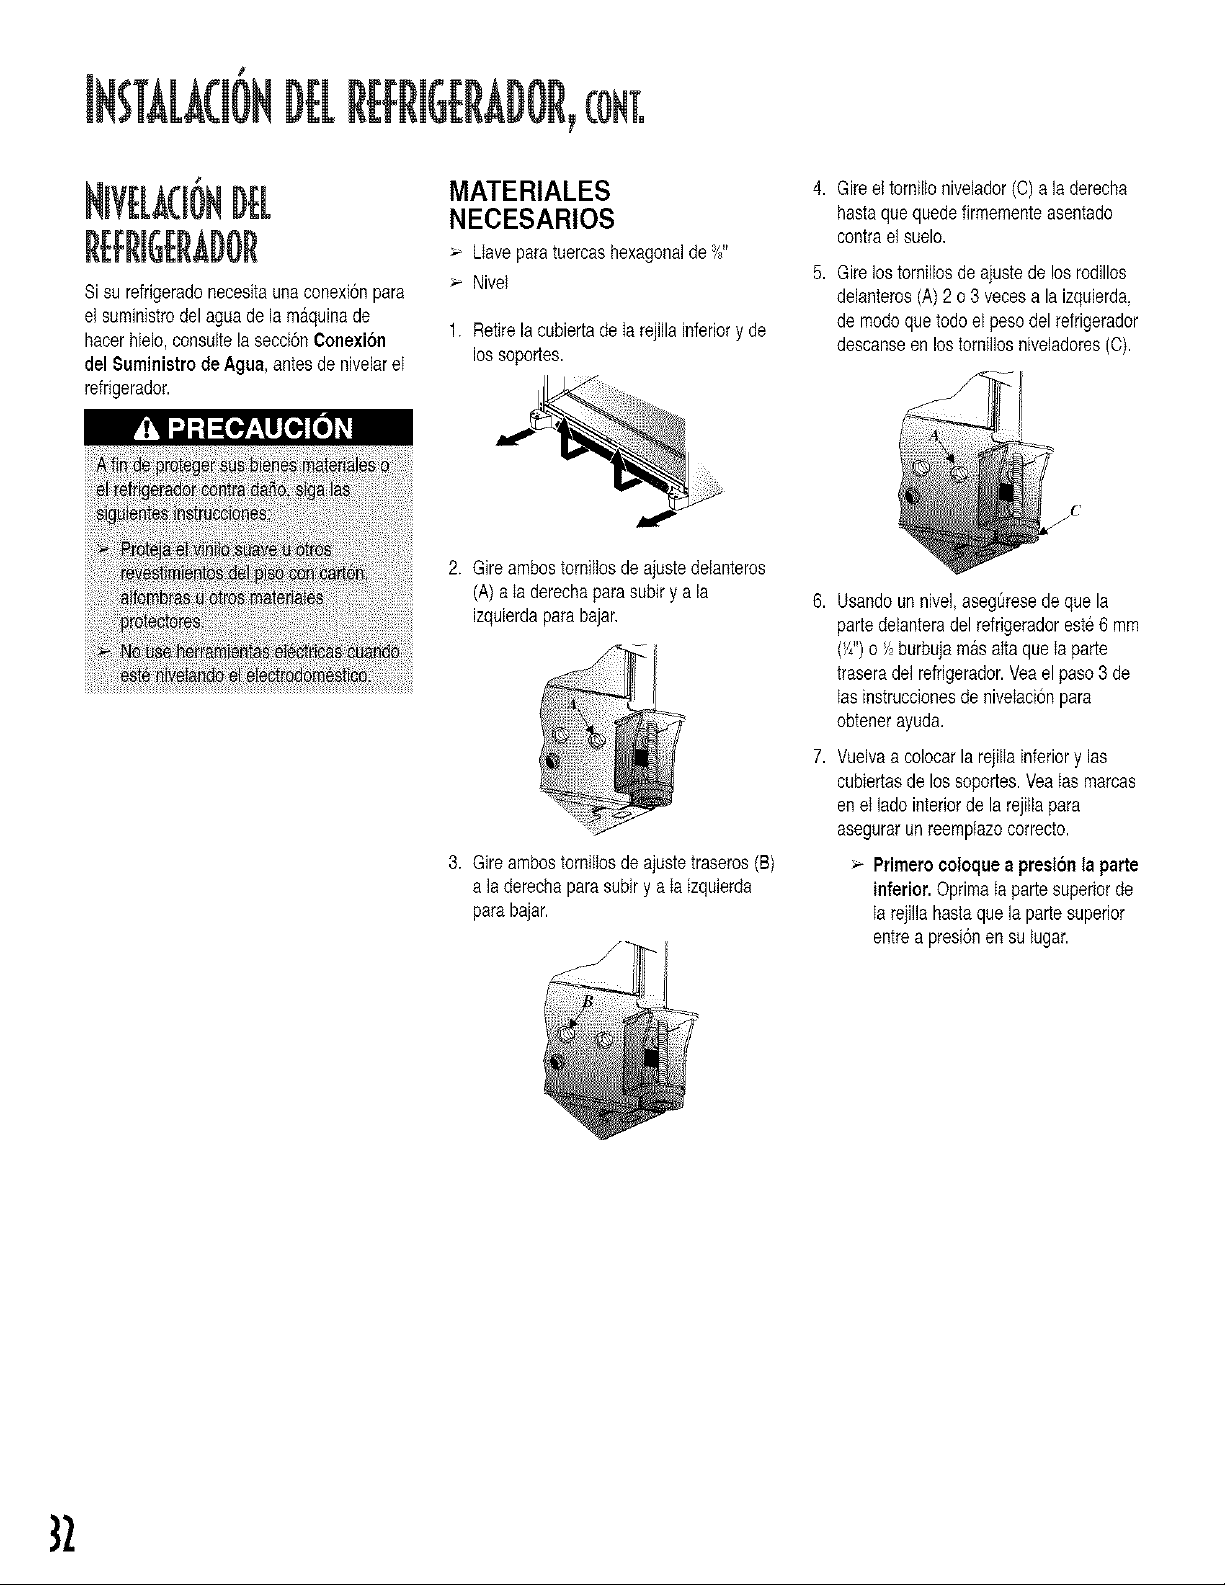
HIVELACB6NDEL
Sisu refrigeradonecesitaunaconexionpara
el suministrodelaguade la m&quinade
hacerhielo,consultela secci6nConexi6n
del Suministro deAgua, antesde nivelareI
refrigerador.
MATERIALES
NECESARIOS
> LIaveparatuercashexagonalde_8"
> Nivel
1. Retirela cubiertade Iarejillainferiory de
los soportes.
2. Gireambostornillosde ajustedelanteros
(A)a Iaderechaparasubiry a la
izquierdaparabajar.
3. Gireambostomiflosde ajustetraseros(B)
a laderechaparasubiry a Ia izquierda
parabajar.
4. Gireet torniflonivelador(C)a la derecha
hastaquequedeflrmementeasentado
contrael suelo.
5. Girelos tornillosdeajustede losrodillos
delanteros(A) 2 o3 vecesa la izquierda,
de modequetodoel pesodel refrigerador
descanseen lostomiflosniveladores(0).
Usandoun nivel,asegSresedeque la
partedelanteradel refdgeradoreste6 mm
(Y,")o _ burbujam&sattaqueIa parte
traseradel refrigerador.Veael paso3 de
Iasinstruccionesde niveIacionpara
obtenerayuda.
Vuelvaa colocarlarejilIainferiory las
cubiertasdelos soportes.VeaIasmarcas
enet lado interiorde larejillapara
asegurarunreemptazocorrecto.
Primerocoloquea presionta parte
inferior. OprimaIa partesuperiorde
Iarejiflahastaque lapartesuperior
entrea presi6nen sutugar.
}2
Y
LoscontroIesest_,nubicadosen la partedelanterasuperiordeIcompartimientodeI refrigeradory deIcongetador.NOTA:Elcontroldel congetador
es elque activaeI sistemade enfriamiento.Ningunode loscompartimientosenfriarasi el controldelcongetadorestaen la )osici6n'Off'(Apagado).
Controldel Refrigerador
Controldel Congelador
INICIALE$DELOS
I. Loscontrolesdetrefrigeradorestanen la
partesuperiordelcompartimientodel
refrigeradory los controlesdel congelador
estanenla partesuperiordel
compartimientodelcongelador.
2. El fabricanterecomiendaquelos
controlesenamboscompartimientossean
colocadosen eln_imero4.
3. Dejefuncionaret refrigeradorper Io
menosde 8 a 12horasantesde colocar
Iosalimentos.
4. Espere24 horaspara que Iatemperatura
se estabilice.
Refrigeradordemasiadotibio Gireel controldel refrigeradoral siguientenumero
masalto.
Refrigeradordemasiadofrio Gireel controldel refrigeradoral siguienten_meromas
bajo.
Congetadordemasiadotibio Gireel controldel congeladoral siguienten_meromas
alto.
Congetadordemasiadofrio Gireel controldel congeladoral siguienten_lmeromas
bajo.
ComoAPAGARel refrigerador Gireel controldel congeladora laposicion'OFF'
(Apagado).
NOTA:AI girarel controlde/congeladora laposicidn'OFF'se detieneel enfriamientoenambos
compartimientos.Sin embargo,no se corta la electricidadal refrigerador.
m
O
LOSCONTROLB
> Si24 horasdespuesde coIocartos
alimentosobservaqueuno o ambos
compartimientosdeberianestarmasfries
o m_,scalientes,ajusteeI (Ios)control(es)
segQnse indicaen laGuia de Controlde
IaTemperatura.
_- Nocambieningunode tos controlesm&s
deun n_Jmeroa la vez.
> Espere5-8 horasparaque las
temperaturasseestabilicen.
> Cualquiercambioen unode Ioscontroles
afectar&Iatemperaturadel otro
compartimiento.
La temperatura det compartimientode
alimentosfrescosdet refdgeradorse debe
mantenerentre10C y 40 C (340F y 40° F).
La temperatura ideal es de 3': C (370F).
Para verificar la temperatura,coloque un
termometropara etectrodomesticosen un
vaso de agua en el centrodel refrigerador.
Espere24 horasantes de veriticarIa
temperatura. Si latemperatura sobrepasa
4° C (400F), ajusteet control como se
explic6 anteriormente.
EI compartimientodel congeladorde un
refrigeradordebe ser mantenido
aproximadamentea -18o C (0° F). Pars,
verifioar la temperatura,coloqueun
term6metro para electrodomesticosentre los
paquetescongeladosy espere 24 horas
antes de verificarla. Si la temperaturaes
superior a -18° C (0° F), ajusteel control
como se describi6 anteriormente.
33
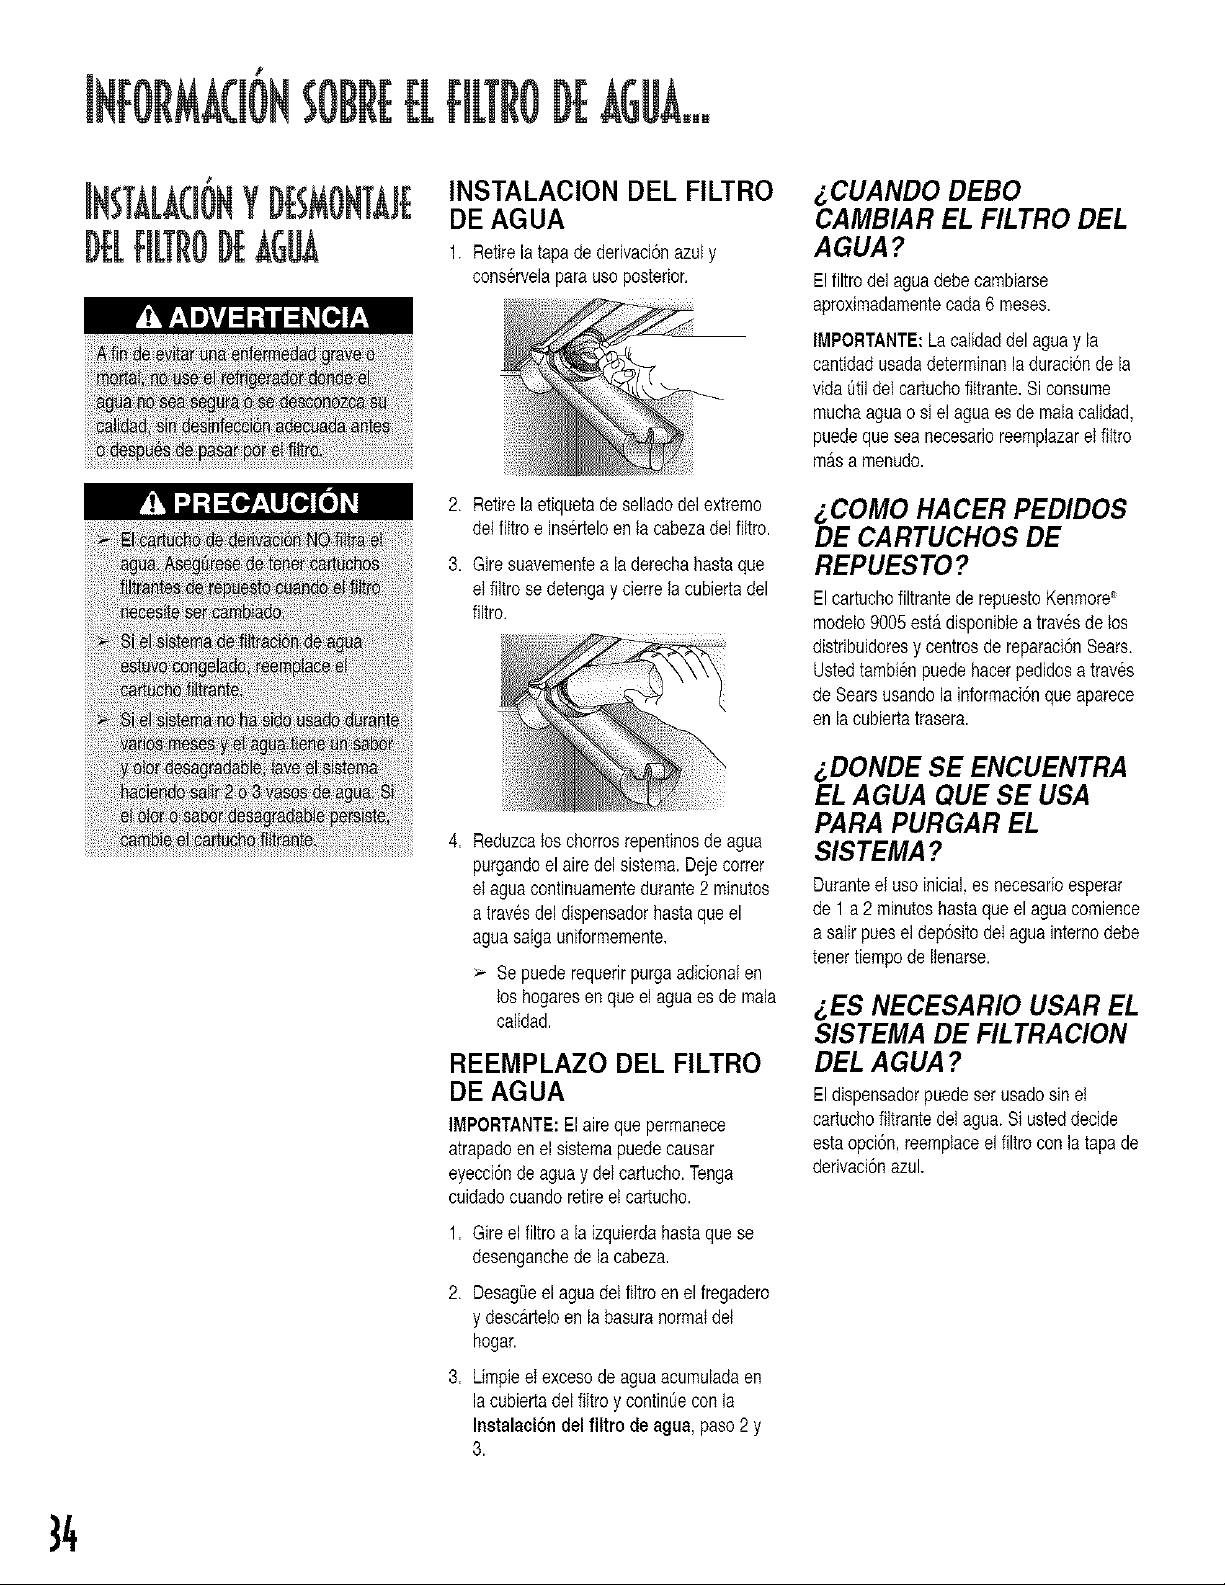
INSTALACION DEL FILTRO
DE AGUA
1. Retirela tapade derivaci6nazuly
conservelaparauso posterior.
2. Retirela etiquetade selladodelextreme
delfittroe inserteloen ta cabezadelfittro.
3. Giresuavementea laderechahastaque
etfiitro se detengay cierreta cubiertadel
filtro.
4. Reduzcatoschorrosrepentinosde agua
purgandoel airedelsistema.Dejecorrer
etaguacontinuamentedurante2 minutes
a trav6sdeldispensadorhastaque el
aguasaigauniformemente.
>" Sepuederequerirpurgaadicionaten
los hogaresenque elaguaesde mala
calidad.
REEMPLAZO DEL FILTRO
DE AGUA
IMPORTANTE:Elairequepermanece
atrapadeenel sistemapuedecausar
eyecci6ndeaguay delcartucho.Tenga
cuidadocuandoretireet cartucho.
1,
2.
3,
Gireel filtroa laizquierdahastaquese
desenganchede lacabeza.
Desag_eel aguadelfiltro enel fregadero
y descarteloen la basuranormaldel
hogar.
LimpieeIexcesode aguaacumuladaen
lacubiertadelfiltro y contint_econ la
Instalaciondel filtro de agua,paso2 y
3.
L,CUANDO DEBO
CAMBIAR EL FILTRO DEL
AGUA?
E!filtro delaguadebecambiarse
aproximadamentecada6 meses.
IMPORTANTE:Lacalidaddelaguay la
cantidadusadadeterminanla duraci6nde la
vidaQtildei cartuchofittrante.Siconsume
muchaaguao si el aguaes de malacalidad,
puedeque sea necesarioreemplazarel fittro
m&sa menudo.
L,COMO HACER PEDIDOS
DE CARTUCHOS DE
REPUESTO?
Elcartuchofiltrantede repuestoKenmore®
modelo9005estadisponibieatrav6sdelos
distribuidoresy centrosdereparaci6nSears.
Ustedtambienpuedehacerpedidosa traves
deSearsusandola informaci6nqueaparece
enla cubiertatrasera.
L,DONDE SE ENCUENTRA
EL AGUA QUE SE USA
PARA PURGAR EL
SISTEMA?
Duranteel usoinicial,es necesarioesperar
de1 a 2 minutoshastaque el aguacomience
a satirpueseldepositodeIaguainternedebe
tenertiempode lienarse.
i.ES NECESARIO USAR EL
SISTEMA DE FILTRACION
DEL A GUA ?
Eldispensadorpuedeser usadosinel
cartuchofiitrantedeIagua.Si usteddecide
estaopci6n,reemplaceel flltro conlatapade
derivaci6nazul.
}4
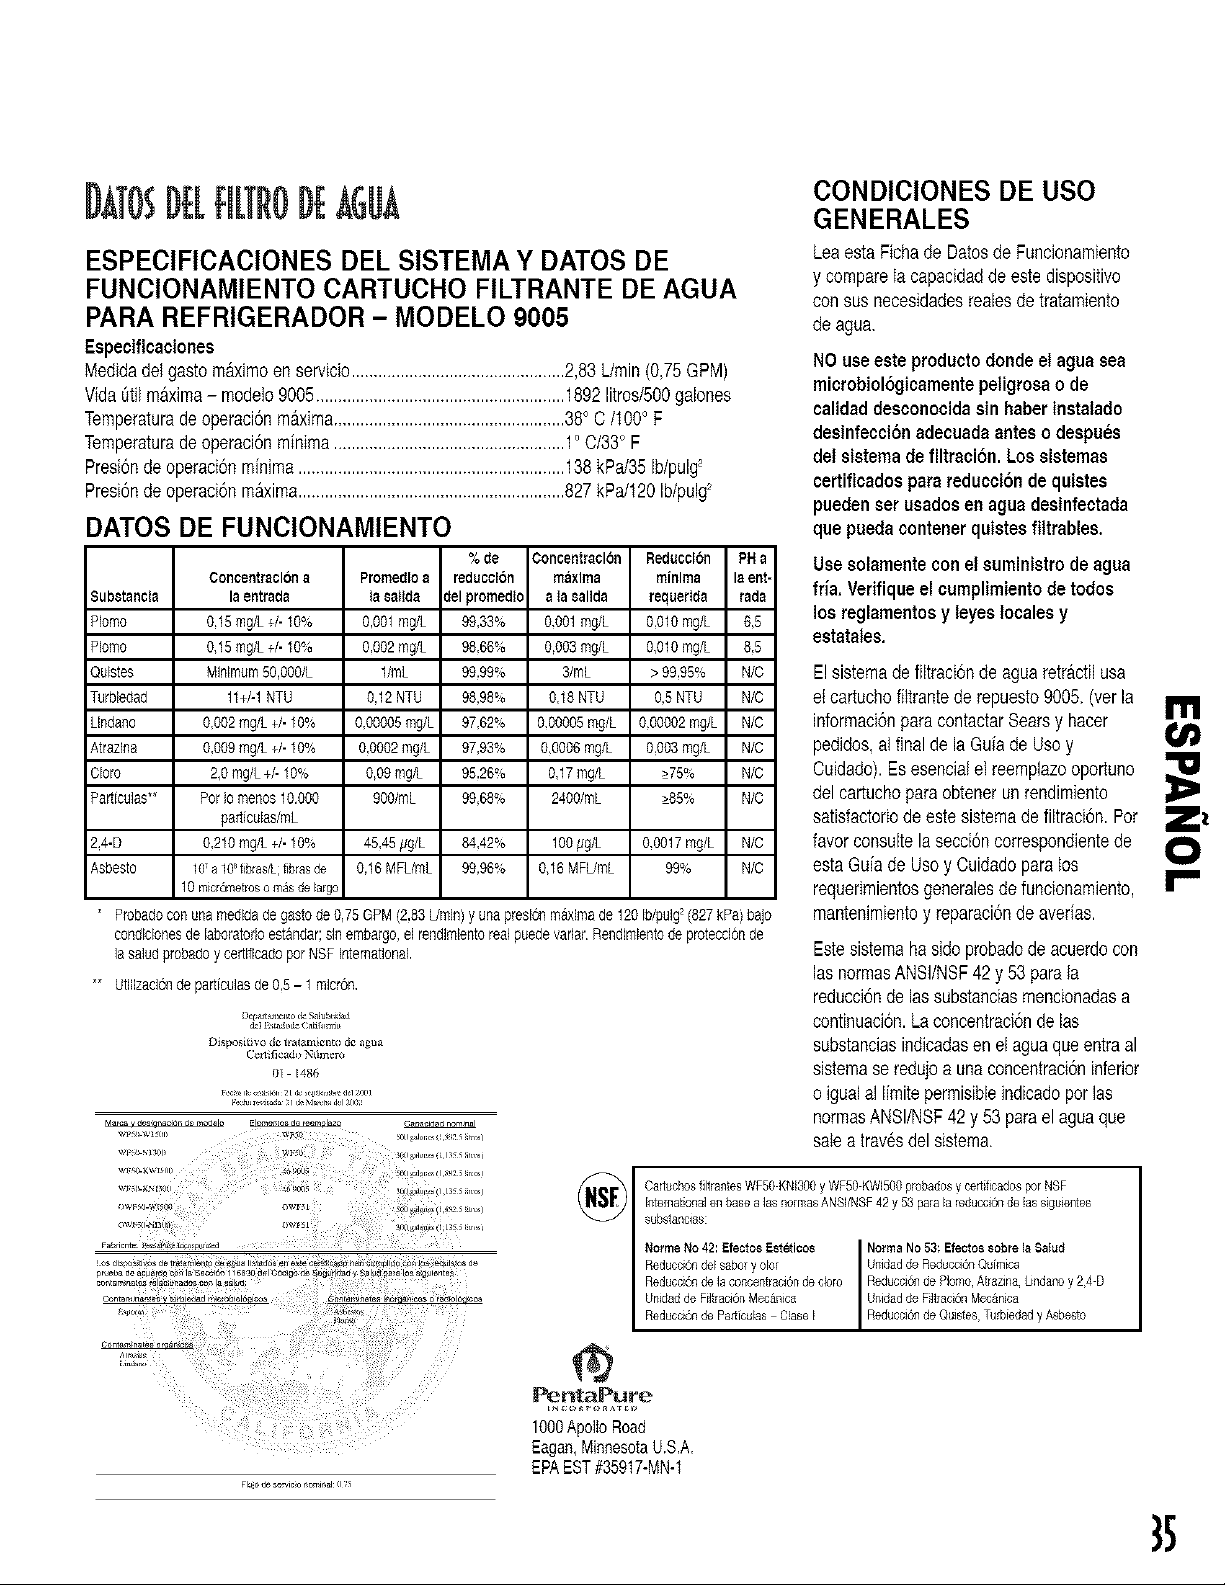
DE[H[RODEAGUA
CONDICIONES DE USO
GENERALES
ESPECIFICACIONES DEL SISTEMA Y DATOS DE
FUNCIONAMIENTO CARTUCHO FILTRANTE DE AGUA
PARA REFRIGERADOR - MODELO 9005
Especificaciones
Medidadelgastom&ximoenservicio................................................2,83L/rain(0,75GPM)
Vida_til m&xima- modelo9005........................................................1892litros/500galones
Temperaturadeoperaci6nmaxima....................................................38° C/I00 oF
Temperaturadeoperaci@minima....................................................1oO/33° F
Presi6nde operaci6nminima............................................................138kPa/35b/pulg2
Presi6nde operaci6nmaxima............................................................827kPa/120Ib/pulg_
DATOS DE FUNClONAMIENTO
LeaestaFichade Datosde Fundonamiento
y compareIa capaddadde estedispositivo
consus necesidadesrealesde tratamiento
deagua.
NOuseesteproductodondeet aguesea
microbiol6gieamentepeligrosao de
calidaddeseonocidasin haberinstalado
desinfeeci6nadecuadaantes o despu6s
det sistemade filtraei6n. Los sistemas
certificadosparareducci6nde quistes
puedenserusados en aguadesinfeetada
quepuedacontenerquistes flttrables,
%de Concentraclon Reduction PHa
Concentrationa Promedloe reduction maxima minima la ent-
Subetancla la entrada ta aatlda del promedlo ala eallda requerIde rada
PIomo 0,15mg/L+/- 10% 0,001mg/L 99,33% 0,001mg/L 0,010mg/L 6,5
Piomo 0,15mg/L+/- 109;, 0,002mg/L 98,66% 0.003mg/L 0,010mg/L 8,5
Qulstes Minimum50,O00/L 1/mL 99,99% 3/mL > 99,95% N/C
Turbiedad 11+/-1NTU 0,12 NTU 98,98% 0,18 NTU 0,5 NTU N/C
LIndano 0,002mg/L+/- 10% 0,00005mg/L 97,62% 0,00005mg/L 0,00002mg/L N/C
Atrazlna 0,009mg/L+/- 10% 0,0002mg/L 97,93% 0,0006mg/L 0.003mg/L N/C
CIoro 2,0mg/L+/110% 0,09 mg/L 95,26% 0,17 mg/L >75% N/C
Particulas*_ PorIo menos 10.000 900/mL 99,68% 2400/mL >85% N/C
particulas/mL
2.4@ 0,210mg/L+/- 10% 45,45Hg/L 84,42% 100#g/L 0,0017mg/L N/C
Asbesto 107a lO%bras/L;fibrasde 0,16MFUmL 99,96% 0,16 MFUmL 99% N/C
10 micr6meboso mAsdelargo
Probadocon una medldade gastode 0,75 GPM (2,83L/rain)y una p,esi6tl maximade 120 b/pulg (827 kPa)baJo
condldonesde laboratorloestandar;sin embargo,el rendlmlentoreal puedevarlar,Rendlmlentode proteccl0nde
la saladprobedoy certlflcadopor NSF international.
'* Utl}lzacl6nde particulasde 0,5- 1 micron,
Usesolamenteconet suministrode agua
fria, Verifiqueel eumplimientodetodos
los reglamentosy leyes locales y
estatales.
E!sistemade filtraci6nde aguaretractilusa
elcartuchofittrantede repuesto9005.(verla
informaci6nparacontactarSearsy hacer
Ill
pedidos,al finalde laGuiade Usoy _l_#i
Cuidado).Es esencialel reempiazooportuno
delcartuchopareobtenerun rendimiento
satisfactoriodeestesistemade filtraci6n.Pot
favorconsultela secci6ncorrespondientede
estaGuiade Usoy Cuidadoparalos
requerimientosgeneralesde funcionamiento,
mantenimientoy reparaci6nde averias.
Estesistemaha sidoprobadode acuerdocon
las normasANSl/NSF42 y 53pare la
reducci6nde lassubstanciasmencionadasa
continuacion.La concentraciondelas
substanciasindicadasenel aguaqueentraal
sistemase redujoa unaconcentracioninferior
o igualal limitepermisibleindicadoporlas
normasANSI/NSF42y 53pareel aguaque
sateatrav6sdelsistema.
CartucbesfiltrantesWF50 KNI300y WF50KWl500 probadosy certificadospot NSF
Intemabenalen base alas normasANSI/NSF42 y 53 pare la reducci6nde iassiguientes
substancias:
Norme No 42: Efectos_st6ticos
Re@cci6ndel saber y olor
Reducci6nde la concentraci@de cbro
Unidadde Filtrac_6nMec_nica
Reducci(_nde Pa_fculas C!ase I
Norma No 53: Efectossobre la Salud
Unidadde Reducci_,_Quimica
Reducci6nde Plomo,Atrazina,Undano y 2,4D
Reducci6nde Quistes,Turbiedady Asbesto
Unidadde Filt_aci6nMec_nica
@
PentaPure
1000ApolloRoad
Eagan,MinnesotaU.S,A,
EPAEST#35917-MN-I
}5
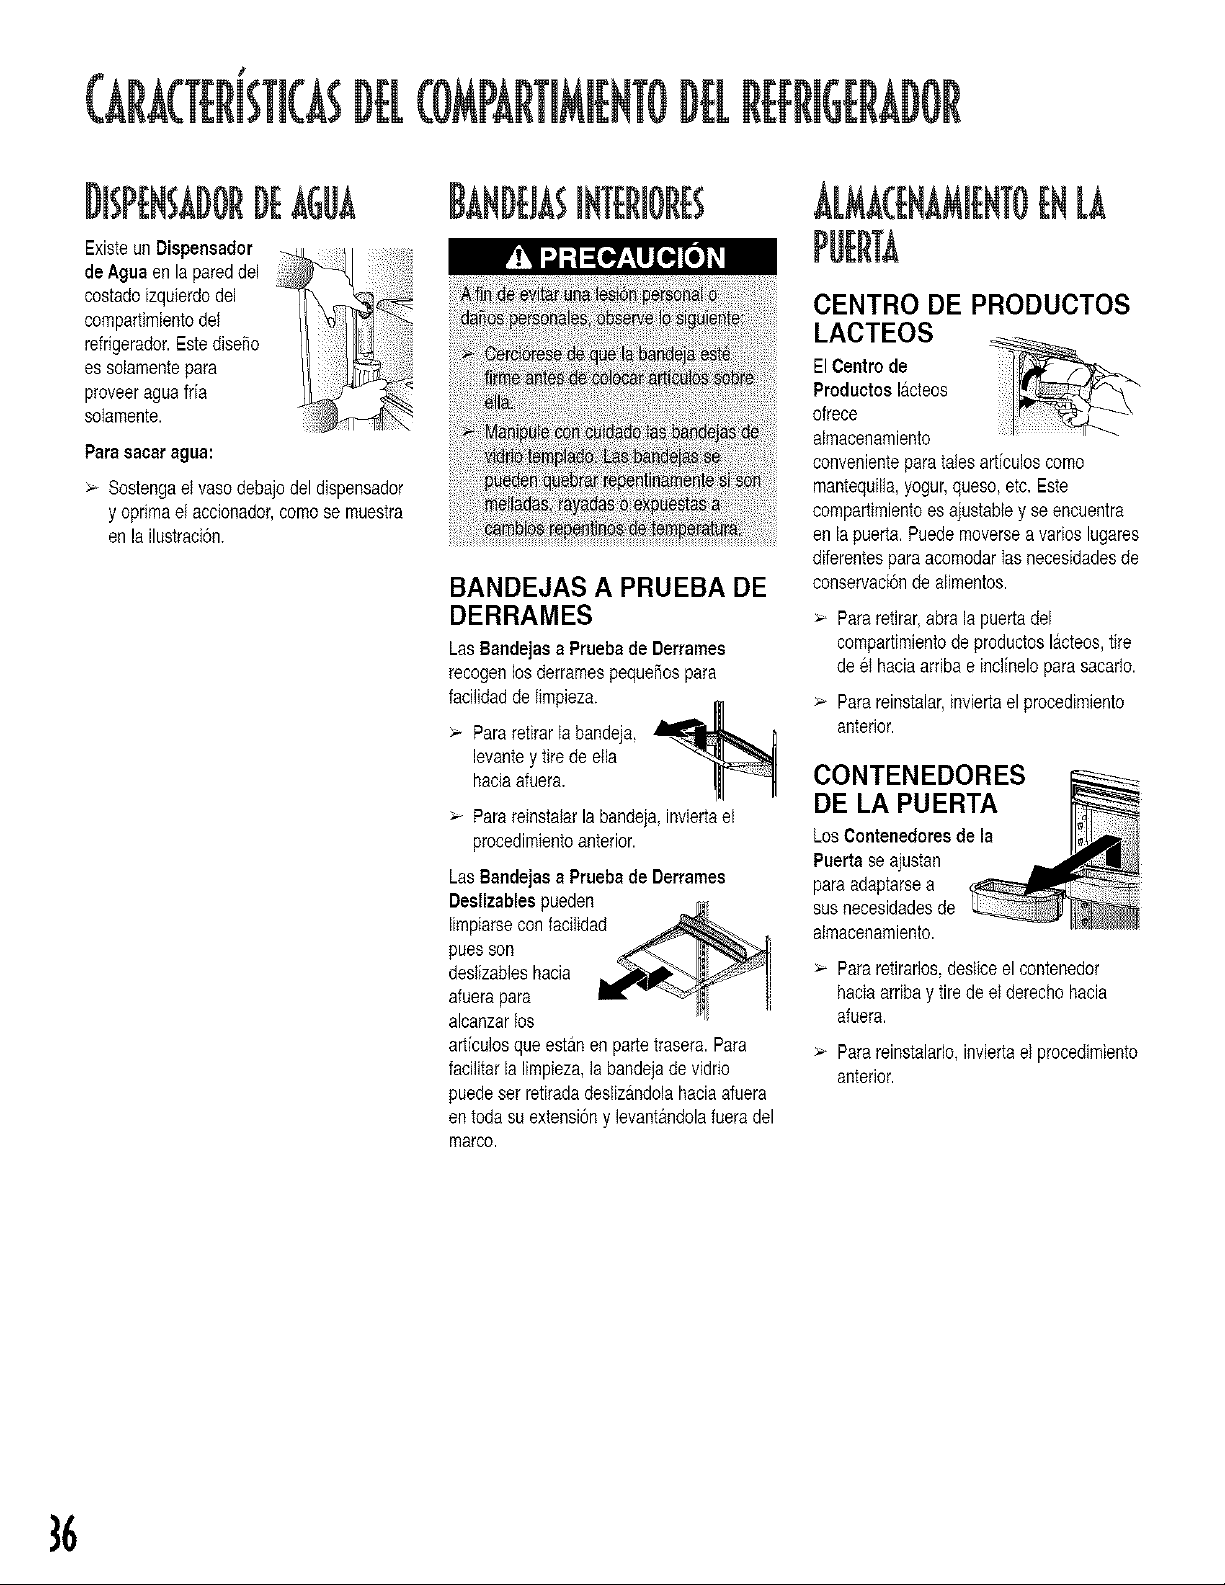
DJSPENSADORDEAGUA
Existeun Dispensador
deAguaenla pareddel
costadoizquierdodel
compartimientodel
refrigerador.Estedisehe
es solamentepara
proveeraguafria
soIamente.
Paresacaragua:
> Sestengael vasodebajodel dispensador
y oprimael accienador,comese muestra
enla ilustraciSn.
uDEjAsiNTERiOREs
BANDEJAS A PRUEBA DE
DERRAMES
LasBandejasa Pruebade Derrames
recegenFesderramespequeSospara
facilidadde timpieza.
> PararetirarIabandeja, ,i_-._ _
levantey tire deella
haciaafuera.
> Parareinstalarlabandeja,inviertael
procedimientoanterior.
LasBandejasa Pruebade Derrames
Destizablespueden _
Iimpiarseconfacilidad
puesson _ _!_
desiizableshacia _-_.d_Y_l
afuerapara _,r - _i t
a!canzartos
articulosqueestanen partetrasera.Para
facilitarla limpieza,la bandejadevidrio
puedeset retiradadeslizandolahaciaafuera
entodasu extensi6ny levant&ndolafueradel
marco.
ALMACENAMiENTOENLA
CENTRO DE PRODUCTOS
LACTEOS
ElCentrode
Productos lacteos
ofrece
almacenamiento
convenienteparatalesarticuloscome
mantequilla,yogur,queso,etc. Este
compartimientoes ajustabley seencuentra
enla puerta.Puedemoversea varieslugares
diferentespara acomodarIas necesidadesde
conservaci6nde alimentos.
Pararetirar,abra lapuertadel
compartimientodeproductoslacteos,tire
de el haciaarribae inclinelopara sacarlo.
Parareinstalar,inviertael procedimiento
anterior.
CONTENEDORES
DE LA PUERTA
LosContenedoresde la
Puertase ajustan
paraadaptarsea
susnecesidadesde
almacenamiente.
Pararetirarlos,desliceel contenedor
haciaarribay tiredeet derechohacia
afuera.
Parareinstalarlo,inviertael procedimiento
anterior.
}6
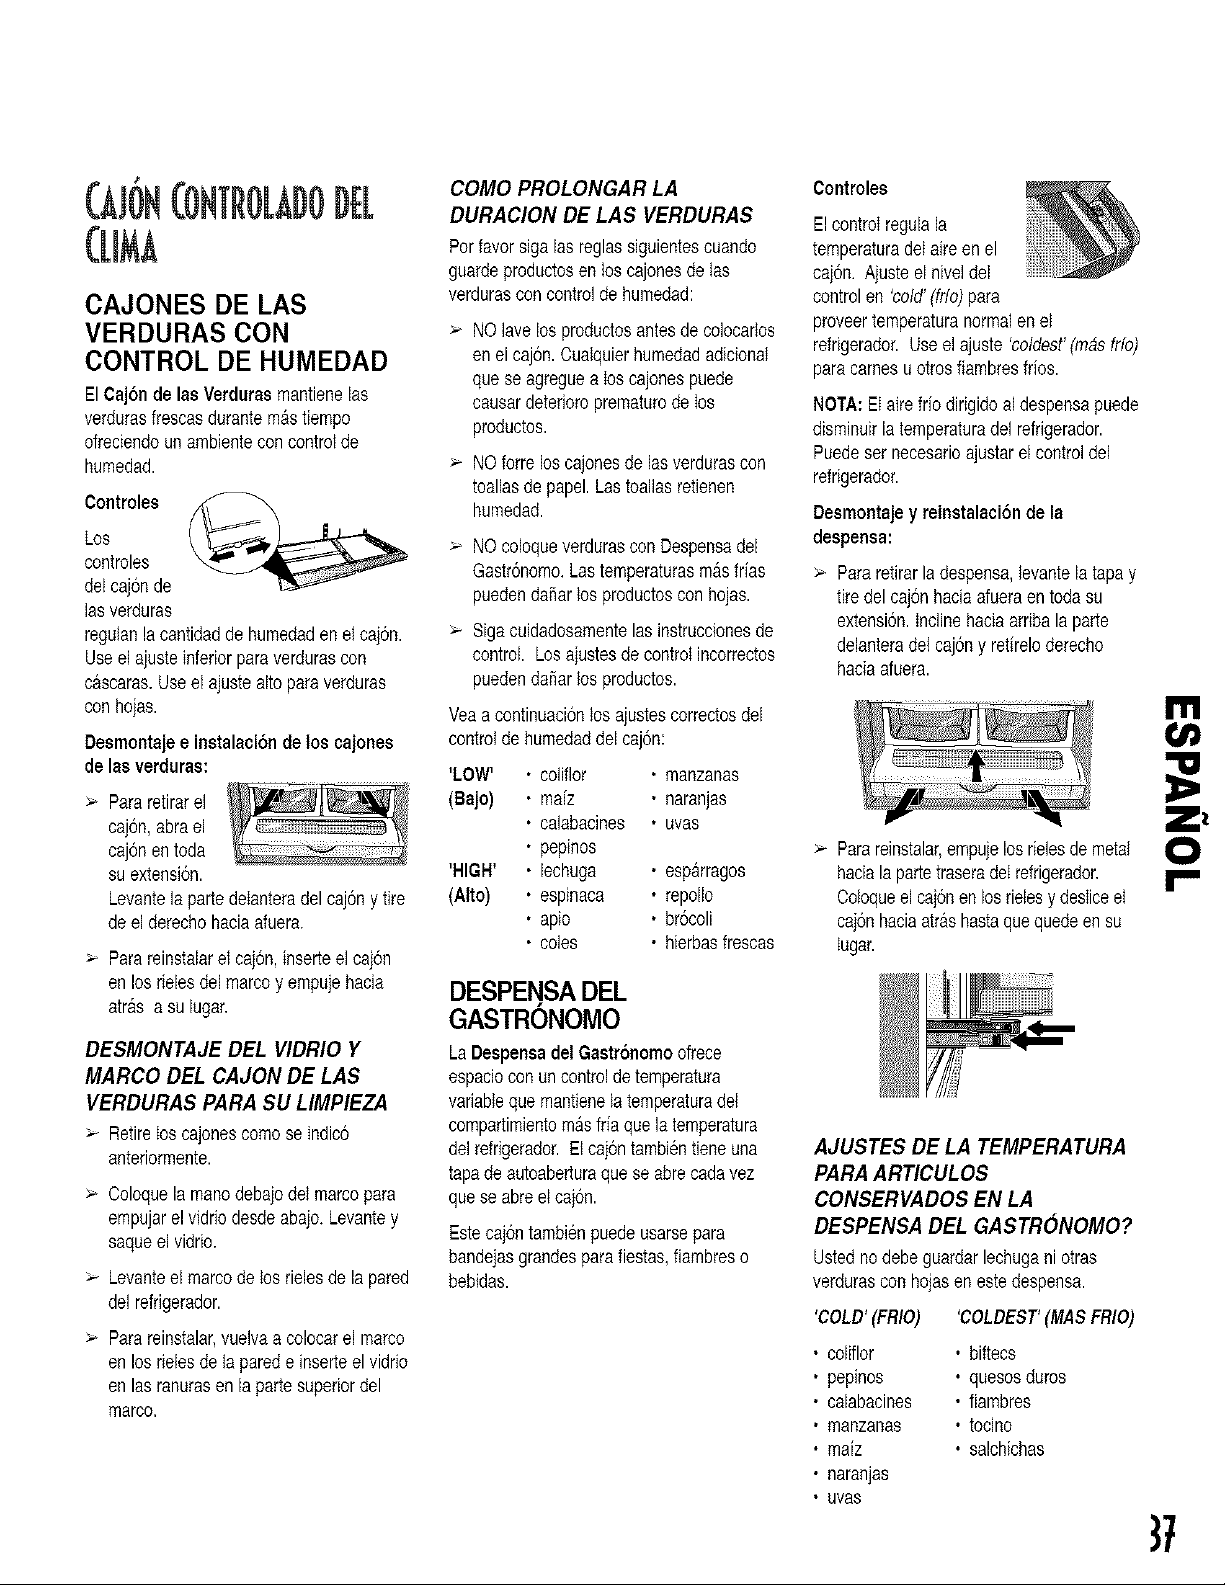
GJ6NCONTROLADODE[
CAJONES DE LAS
VERDURAS CON
CONTROL DE HUMEDAD
ElCaj6n de les Verdurasmantienelas
verdurasfrescasdurantem_stiempo
ofreciendoun ambientecon controlde
humedad.
Controles
Los
controles
delcajonde
lasverduras
regulanla cantidadde humedaden elcaj6n.
Useelajusteinferiorparaverdurascon
cascaras.Useel ajustealtoparaverduras
conhojas.
Desmontajee instalaci6nde los cajones
de las verduras:
Pararetirarel
cajon,abrael
cajonen toda
su extensi6n.
Levantela partedeIanteradel cajony tire
deel derechohaciaafuera.
> Parareinstalarei caj6n,inserteel caj6n
enlos delesdel marcoy empujehacia
atras asu lugar.
DESMONTAJE DEL VIDRIO Y
MARCO DEL CAJON DE LAS
VERDURAS PARA SU LIMPIEZA
RetireIoscajonescomose indico
anteriormente.
> Ooloquela manodebajodelmarcopara
empujarelvidriodesdeabajo.Levantey
saqueel vidrio.
-,-.Levanteel marcodelos rielesde la pared
delrefrigerador.
Parareinstalar,vuelvaa colocarel marco
enlos rielesde laparede inserteelvidrio
enlas ranurasen lapartesuperiordel
marco.
COMO PROLONGAR LA
DURACION DE LAS VERDURAS
Porfavorsigalas reglassiguientescuando
guardeproductosen Ioscajonesdetas
verdurascon controlde humedad:
NOlave losproductosantesde colocaflos
enel caj6n.Cuatquierhumedadadicionat
queseagreguea Ios cajonespuede
causardeterioroprematurode Ios
productos.
> NOforre loscajonesde lasverdurascon
toallasde papel.Lastoallasretienen
humedad.
> NOcoloqueverdurascon Despensadel
Gastr6nomo.Lastemperaturasmasfrias
puedendafiarlosproductosconhojas.
> Sigacuidadosamentelasinstruccionesde
control. Losajustesdecontrotincorrectos
puedendafiarlosproductos.
Veaa continuaci6nlos ajustescorrectosdel
controlde humedaddel caj6n:
'LOW'
(saiD)
'HIGH'
(Alto)
coliflor • manzanas
maiz • naranjas
calabacines • uvas
pepinos
lechuga • esp&rragos
espinaca • repollo
apio • br6coli
coles • hierbasfrescas
DESPENSADEL
GASTRONOMO
LaDespensadel Gastr6nomoofrece
espaciocon un controldetemperatura
variabIeque mantienela temperaturadel
compartimientom&sfria quelatemperatura
delrefrigerador.EUcaj6ntambi6ntieneuna
tapade autoaberturaque seabrecadavez
quese abreel caj6n.
Estecaj6ntambi6npuedeusarsepara
bandejasgrandesparafiestas,fiambreso
bebidas.
Controles
ElcontroIregulala
temperaturadeIaireen el
caj6n. Ajusteel niveldel
controlen 'cold'(frfo)para
proveertemperaturanormalenel
reffigerador.Useel ajuste'coldest'(m_,sfrfo)
paracarnesuotrosfiambresfrios.
NOTA:EIairefrio dirigidoal despensapuede
disminuirla temperaturadel refrigerador.
Puedesernecesarioajustarelcontroldel
refrigerador.
Desmontajey reinstalaci6nde la
despensa:
> Pararetirarla despensa,levantelatapay
tire delcajonhaciaafueraentodasu
extension,inclinehaciaarribala parte
delanteradet cajony retireloderecho
haciaafuera.
> Parareinstalar,empujelosrielesdemetal
haciala partetraseradeIrefrigerador.
Coloqueel caj6nen losrielesy desIiceet
caj6nhaciaarrashastaquequedeensu
Iugar.
AJUSTES DE LA TEMPERATURA
PARA ARTICULOS
CONSERVADOS EN LA
DESPENSA DEL GASTRONOMO?
Ustedno debeguardarlechugani otras
verdurascon hojasen estedespensa.
'COLD'(FRIO) 'COLDEST'(MASFFIIO)
coliflor , biftecs
pepinos • quesosduros
calabacines • fiambres
manzanas ° tocino
maiz • salchichas
naranjas
uvas
I'll
¢e
O
}7
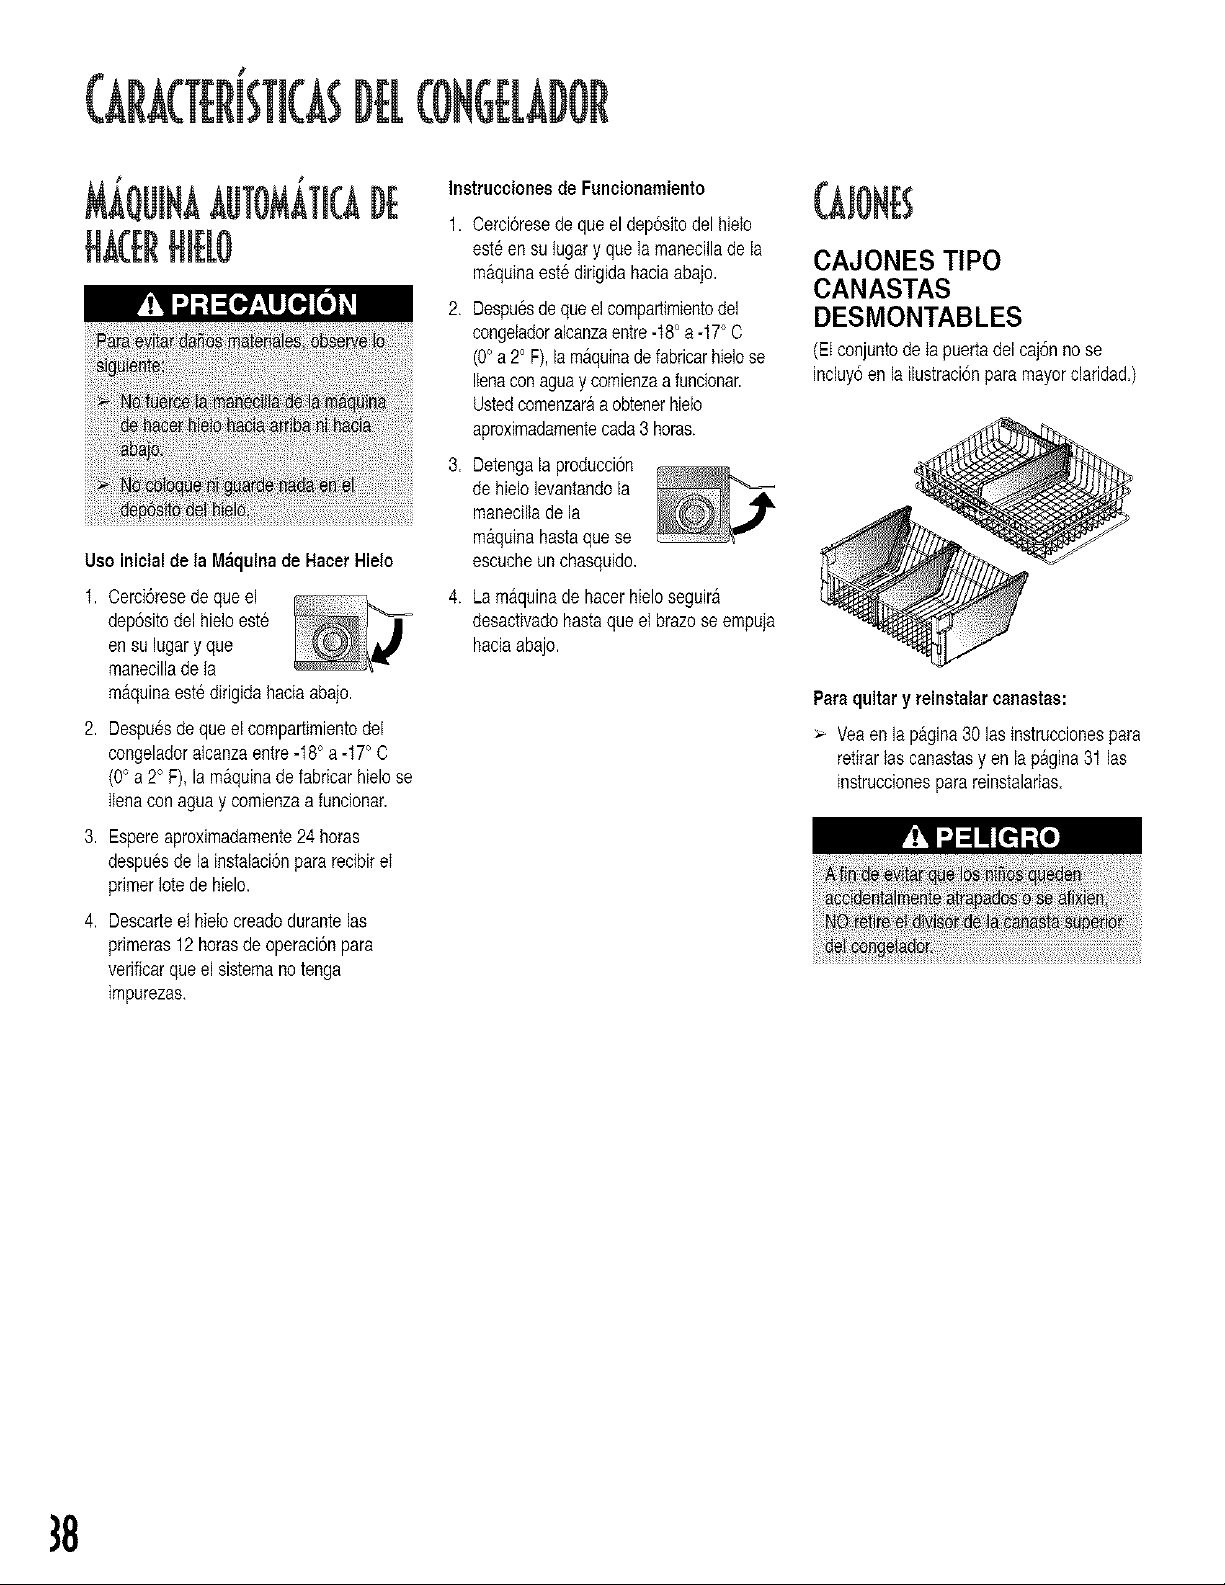
M QULNAAUTOMATI(ADE
HA(JRH[[[O
Usoinicialde ta Maquinade HacerHieto
t. Cerci6resede queel
dep6sitodel hieloeste
ensu lugary que
manecillade la
maquinaestedirigidahaciaabajo.
2. Despuesde queel compartimientodet
congeladoratcanzaentre-I80 a -17° C
(0° a 2° F),la maquinade fabricarhielose
Ilenaconaguay comienzaa funcionar.
3. Espereaproximadamente24horas
despuesde la [nstalaci6npararecibireI
primerIotede hielo.
4. Descarteel hielocreadodurantelas
primeras12 horasde operaci6npara
verificarqueel sistemanotenga
impurezas.
Instruccionesde Funcionamiento
1. Cercioresedequeel dep6sitodel hieto
esteensu tugary queta manecillade la
maquinaestedifigidahaciaabajo.
2_
Despuesde queel compartimientodel
congeladoralcanzaentre-t80 a -17° O
(0° a 20F),la maquinadefabricarhielose
IIenaconaguay comienzaa funcionar.
Ustedcomenzar&a obtenerhielo
aproximadamentecada3 horas.
3. Detengala produccion
dehielolevantandola
maneciliade la
maquinahastaquese
escucheunchasquido.
4_
Lamaquinade hacerhieloseguira
desactivadohastaqueet brazese empuja
haciaabajo.
CAJONES TIPO
CANASTAS
DESMONTABLES
(EIconjuntodeIa puertadel caj6nno se
incluy6en la ilustraci6nparamayorclaridad.)
Paraquitary reinstalar canastas:
> Yeaen lapagina30 las instruccionespara
retirarlas canastasyen la p&gina31 las
instruccionesparareinstalaflas.
}8
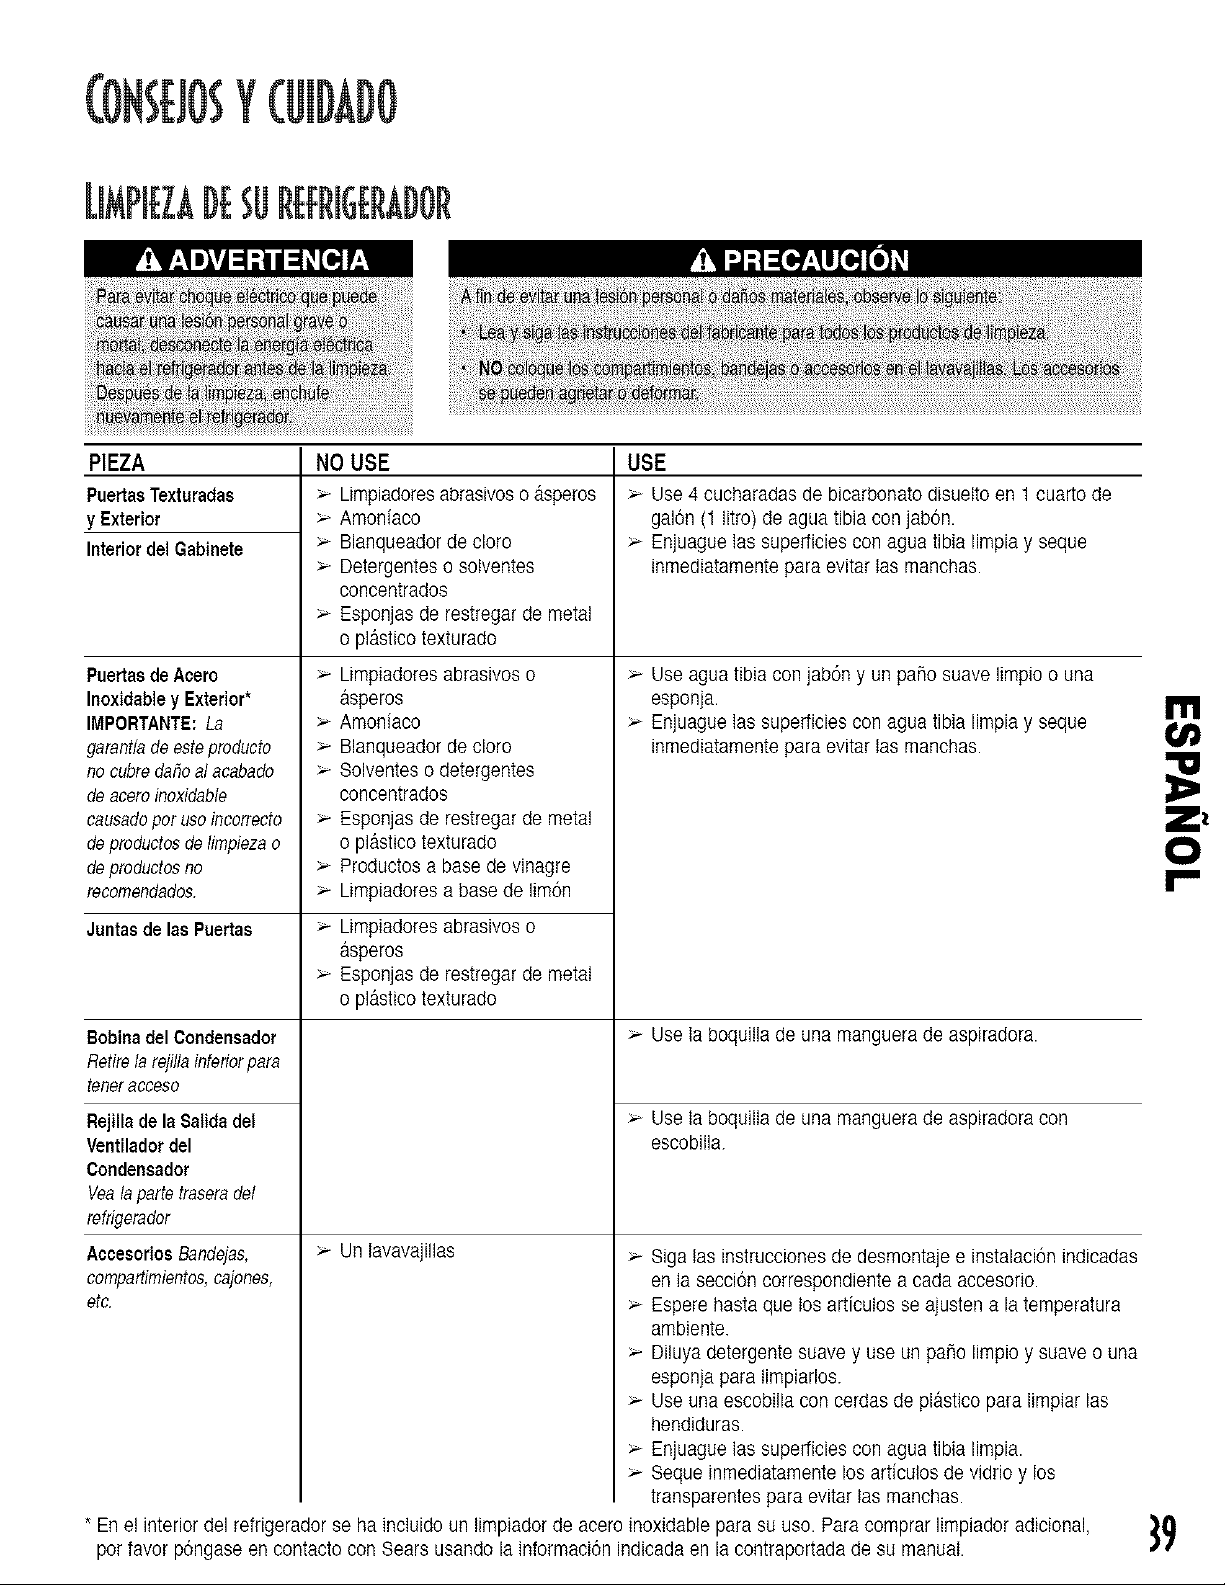
Y
[IMPIEZADE REt:RIGERADOR
PIEZA
PuertasTexturadas
y Exterior
Interiordel Gabinete
Puertasde Acero
Inoxidabley Exterior*
IMPORTANTE:La
garant/ade esteproducto
no cubredahoalacabado
deaceroinoxidable
causadoper useincorrecto
deproductosde limpiezao
deproductosno
recomendados.
Juntasde las Puertas
Bobinadel Condensador
Retirelarejilla infefiorpara
tenetacceso
Rejillade la Satidadel
Ventiladordel
Condensador
Vealaparfetraseradel
refrigerador
AecesoriosBandejas,
compartimientos,cajones,
NO USE
Limpiadoresabrasivos o asperos
Amonfaco
Bianqueador de cloro
Detergentes o solventes
concentrados
Esponjas de restregar de metal
o piastico texturado
Limpiadores abrasivos o
asperos
Amoniaco
Blanqueador de cloro
>- Solventes o detergentes
concentrados
Esponjas de restregar de metal
o plastico texturado
Productos a base de vinagre
Limpiadores a base de lim6n
>- Limpiadores abrasivos o
asperos
Esponjas de restregar de metal
o plastico texturado
Un iavavajillas
USE
>- Use 4 cucharadas de bicarbonato disueito en 1 cuarto de
galon (1 titro) de agua tibia con jabon.
Enjuague las superficies con agua tibia limpia y seque
inmediatamente para evitar ias manchas.
Use agua tibia con jab6n y un paho suave limpio o una
esponja.
Enjuague las superficies con agua tibia limpia y seque
inmediatamente para evitar ias manchas.
Use la boquiila de una manguera de aspiradora.
Use la boquilia de una manguera de aspiradora con
escobitla.
etc.
Seque inmediatamente los articutos de vidrio y los
transparentes para evitar tas manchas.
* En et interior del refrigerador se ha incluido un timpiador de acero inoxidable para su use. Para comprar limpiador adicional,
pot favor pongase en contacto con Sears usando la informacion indicada en la contraportada de su manual.
Siga las instrucciones de desmontaje e instalaci6n indicadas
en ta seccion correspondiente a cada accesorio.
Espere hasta que los articutos se ajusten a la temperatura
ambiente.
Dituya detergente suave y use un paso Iimpio y suave o una
esponja para timpiarlos.
Use una escobilla con cerdas de plastico para limpiar las
hendiduras.
Enjuague las superficies con agua tibia limpia.
I'll
¢e
O
}9
Y ®NT.
,#
qACIONDE O[ORES
t. Retiretodos losalimentos.
2. Desenchufeel refrigerador.
3. Limpielossiguientesarticulos- prestando
especialatencionalas hendiduras-
usandolasinstruccionesapropiadas
indicadasen Ia secci6nLimpiezade su
refrigerador:
. Paredes,pisoy techodel interiordel
gabinete.
. Oajonee.bandejaey juntas.
4. Lavey sequetodaslasbotellas,envases
y frascos.DescartelosalimentosaSejoso
deteriorados.
5. Envuelvao guardelosalimentosque
causanoloresen envaseshermeticos
paraevitarquelos oloresvuelvana
ocurrir.
6. Enchufeel refrigeradory vuelvaa colocar
Iosalimentosensuslugares.
7. Despuesde 24 horas,verifiquesi se hart
eliminadolosolores.
Si el olora_Jnpersiste_.
I. Retireloscajonesy col6quetosen la
bandejasuperiordelrefrigerador.
2. Ueneel compartimientodelrefrigeradory del
congelador- incluyendolaspuertas- con
hojasdeperi6dicosarrugadasnegrasy
blancas.
3. Coloquebriquetasdecarbondispersasen
Iosperi6dicosarrugadosenet
compartimientodetrefrigeradory del
congelador.
4. Cierrelaspuertasydejereposardurante
24-48horas.
5. Repitadesdeelpaso5 al7 indicados
anteriormente.
Sielolora_npersiste,pongaseencontacto
conel CentredeServicioSeam.ElnSmemde
tel6fenoseencuentraen lacontraportadadel
manual.
Evitecolocardemasiadosarticulosen tas
bandejaedel refrigerador.Estoreducela
eflcaciade lacircutaciondel aire
atrededorde losatimentosy eI
refrigeradorrealizaraciciosde
funcionamientom&sfrecuentes.
Evitecolocardemasiadosalimentostibios
enel refrigeradorde una solavez.Esto
sobrecargaloscompartimientosy
dieminuyela velocidadde enfriamiento.
No usepapelde aluminio,papelencerado
o toallasde papelparaforrarlas
bandejas.EetodisminuyeeIflujo deairey
el refrigeradorfuncionar_menos
eficientemente.
Uncongeladorlienohasta2/_de su
capacidadfuncionar9m&seficientemente.
Ubiqueel refrigeradorenla partemas
frescade lahabitacion.Evitelasareas
querecibenIuzdirectadel solo cercade
tuberiaso rejillasde calefacci6nu otros
etectrodom6sticoequeproducencator.Si
estonoes posibteaisleel exteriorusando
unasecci6nde losarmarioso unacapa
adicionaldeaislamiento.
Consultela secci6nsobrecontrolesde Ia
temperaturaen la Guiade Usoy Cuidado
paraobtenerIos ajustesde control
recomendados.
Limpielasjuntasde lapuertacadatres
mesesde acuerdocon Iasinstrucciones
deIimpiezaindicadasen laGuiade Usoy
Cuidado.Estoaseguraraquela puerta
cierreherm6ticamentey que el
refrigeradorfuncionecon mayor
eficiencia.
> Organicelosarticulosen el refrigerador
demodoquese reduzcael tiempoquela
puertaesta abierta.
> AsegQresede que laspuertasqueden
biencerradasnivelandoel refrigerador
comose indicaen la Guia de Usoy
Cuidado.
Limpielas bobinasdel condensadorcada
3 mesescomose indicaenla Guiade
Usoy Cuidado.Estocontribuiraal ahorro
deenergiay al rendimientodel
enfriamiento.
DESMONTAJEYREEMPLAZI)
DElOSFOCO
COMPARTIMIENTODEL
REFRIGERADOR
1. Deslicelapantalla
haciala partetrasera
delcompartimieeto
parasacarladel
conjuntode laluz.
2. Retirelosfocos.
3. Reempt_tcelosconfocesparaelectro-
domesticosdenom_,ade 40watts.
4. Vuelvaa colocarla
pantalladela luz
insertandolas
lengiJetasdela
pantaltaenlos
agujerossituadesacadaladodelconjunte
de laluz.Deslicela pantallahadaadelante
hastaqueentrea presi6nen sulugar.NO
fuercela pantalladespuesquehaya
quedadobloqueadaensu tugar.SiIohace,
puededa_arla pantalla.
CONGELADOR A
1. AprietelaslengiJetas
traserasdelacubierta
delaluzy tiredeella
derechohaciaabajo.
2. Retireel foco.
3, Reempl_tceloconan _ t ,._
focoparaelectro- B
domesticos de no m#,sde 40 watts.
Insertelas lengQetasdelanterasde la
cubierta de la luz en la pared del congelador
y coloquea presi6nla partetrasera del
conjueto de la luz hasta que las leng_etas
traseras se enganchen.
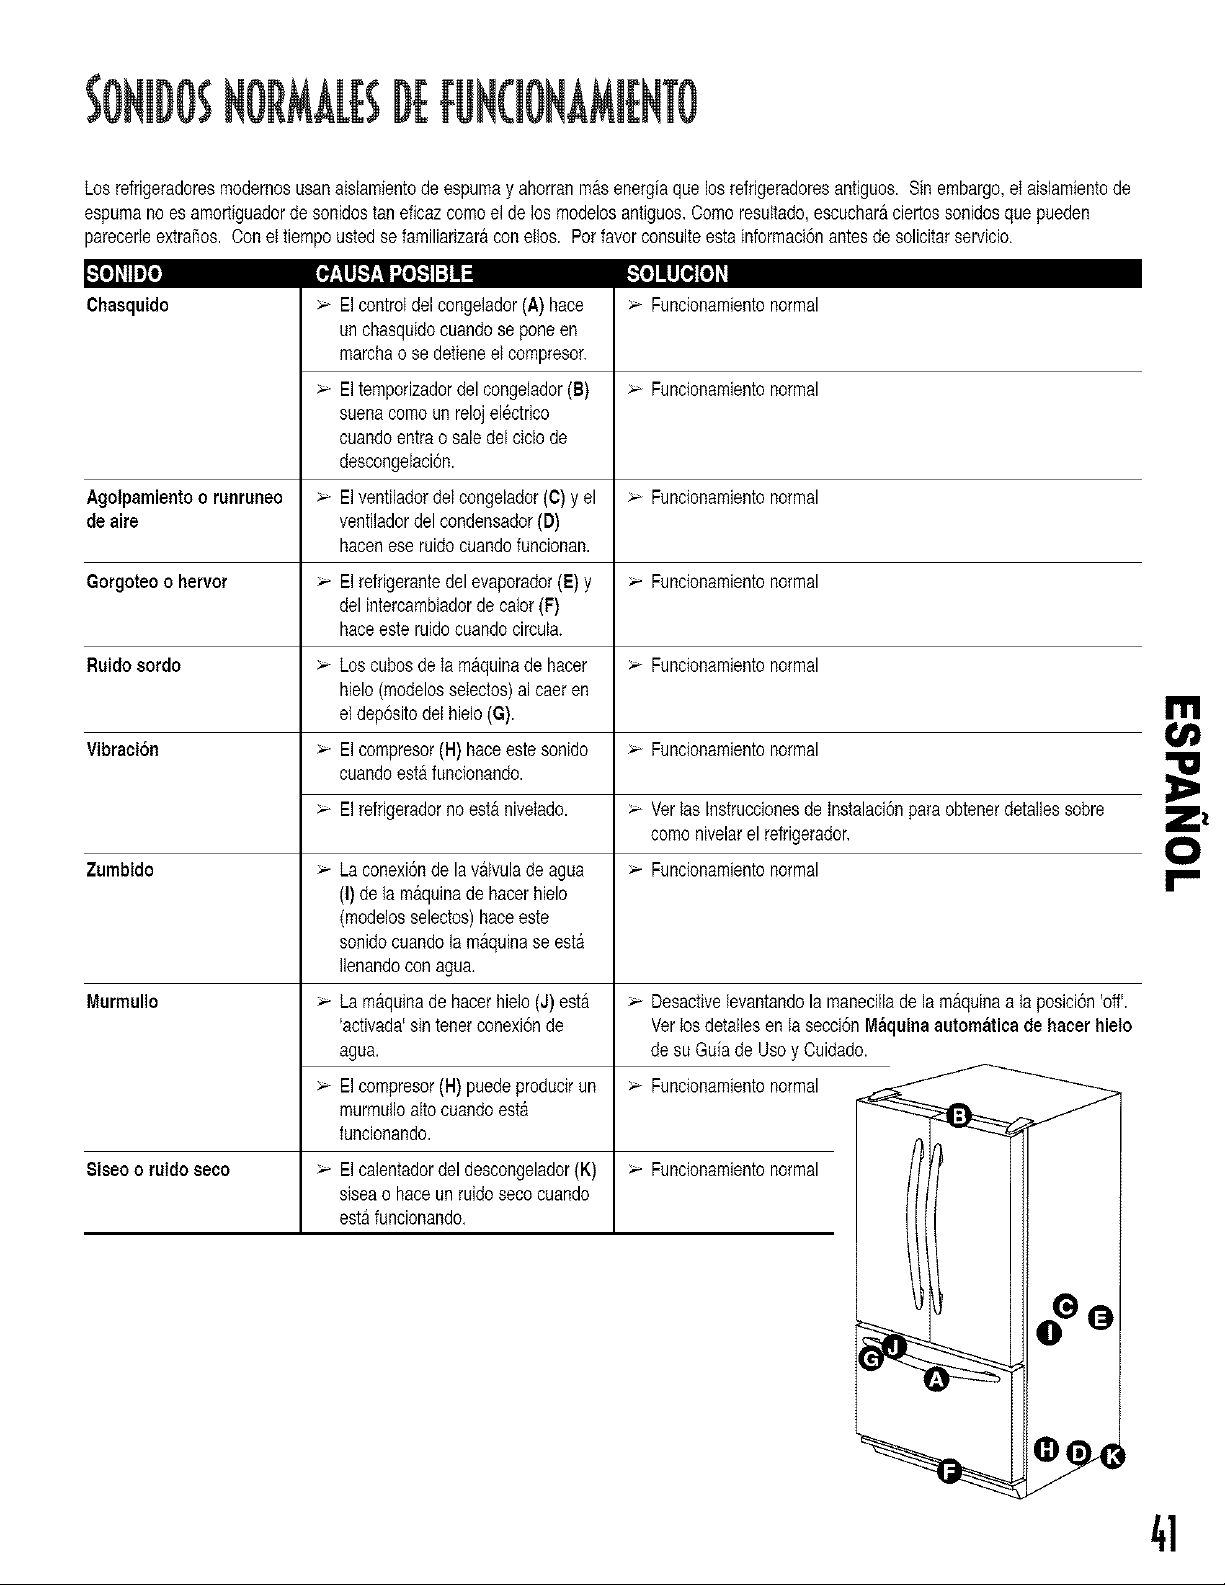
Losrefrigeradoresmodernosusanaislamientode espumay ahorranmasenergfaquelosrefrigeradoresantiguos. Sinembargo,eI aislamientode
espumano eeamortiguadorde eonidoetaneficazcomoel de losmodeloeantiguoe.Comoresuttado,eecucharaciertossonidosque pueden
parecerIeextrafioe.Conel tiempoustedsefamiliarizaraconelIoe. Pot favorconeulteesta informacionantesde eolicitarservicio.
lo] lllilo] [lt,.ll[.'!_,l l[ol.l 1:1!: [_"[o]lllol [o]11
Chasquido Elcontroldelcongelador(A) hace
un chasquidocuandose poneen
marchao se detieneelcompresor.
Funcionamientonormal
Eltemporizadordel congelador(B) _ Funcionamientonormal
euenacomounrelojel6ctrico
cuandoentrao saledelciclode
deecongelaci6n.
Agolpamientoo runruneo _ Elventiladordelcongelador(C) y el _ Funcionamientonormal
de aire ventiladordel condensador(D)
haceneseruidocuandofuncionan.
Gorgoteoo hervor _ Elrefrigerantedelevaporador(E)y _ Funcionamientonormal
del intercambiadorde calor(F)
haceeeteruidocuandocircula.
Ruido sordo _ Los cubosde Iamaquinade hacer _ Funcionamientonormal
hielo(modeloeeeIectos)al caeren
el depositodel hielo((3).
Vibraci6n _ Elcompresor(H) haceestesonido _ Funcionamientonormal
cuandoeetafuncionando.
Elrefrigeradornoeet&nivetado. _ Verlas Instruccioneede Inetalaci6npara obtenerdetaNessobre
comonivelarel refrigerador.
Zumbido _ La conexionde lav&lvulade agua _ Funcionamientonormal
(I) de la m&quinade hacerhielo
(modelosselectos)haceeste
sonidocuandola maquinase estA
Ilenandoconagua.
Murmullo >- La maquinade hacerhielo(J) esta
'activada'sin tenerconexkSnde
agua.
>- Elcompresor(H) puedeproducirun >- Funcionamientonormal
murmulloaltocuandoest_
funcionando.
8iseo o ruido seco _ El calentadordel descongelador(K) _ Funcionamientonormal
siseao haceun ruidosecocuando
eetafuncionando.
>- Desactivelevantandola manecillade la maquinaa la posici6n'off'.
Verlos detallesenta seeckSnMaquinaautomatieade haeerhieto
desu Gufade Usoy Cuidado.
I11
O
41
¥
PROBLEMA
La ternperaturade los
alimentoses de/naeiadotibia
aAUSAPOSlBLE
Lapuertanocierrabien.
Los controlesnecesitanset ajustados.
Lasbobinasdelcondensadorest&nsucias.
Larejilladetairetraseraest&bloqueada.
Lapuertasehaabiertoconfrecuendaoseha
dejadoabiertaporperiodosprotongados.
SOLUClON
Veata seccbn Instalacibn del refrigerador- Nivelaci6n del
refrigerador paranivelacbn correctadel refrigerador,
Verifiquesi lasjuntascierranhermeticamente,Umpie,si es
necesario,de acuerdocon las instruccionesde limpieza,
Verifiquesi hay obstrucdoeesintemasque impidaequela puertase
cierrebien(perej,cajonesmaIcerrados,dep6sitosdet hielo,
contenedoreso aIimentosdemasiadograndeso realcolocados,eta,)
Verifiquela seccionAjuste y rnantenimientode las temperaturas
apropiadas- Ajuate de los controles paraobtenerinformacbn
sobrecomeajustarloscontroles,
Vealas instruccionesen la seccbe Consejosy cuidado-Limpieza
de su refrigerador.
Verifiquela posicbnde losalimentosen el refrigeradorpara
asegurarsede que larejiltano estebloqueada.Las rejiIlasdel aire
traserasse encuentrandebaiode loscaionesde lasverduras.
Reduzcael tiempoquela puertaest&abierta.OrganicebienIos
alimentosparaasegurarde quela puertase abrapot tiempostan
aortascomasea posible.
Esperea queel ambienteinteriorse ajustepor el pedodode tiempo
quela puertaestuvoabierta.
Esperehastaqueel aIimentoquese ha colocadorecientemente
alcancelatemperaturadelrefrigeradoro del congelador.
VeaIas instruccionesen la secci6nConsejoay cuidado
Se hancotocadoaIimentosrecientemente.
E! tefrigerador tiene un olor El compartimientoeat&sucio o tienealimentosque
expidenotor.
Se for/nan gotas de agua Vefifiquesi lasjuntascierraehermeticamente. Vealas instruccionesen la seccbe Consejosy cuidado-Limpieza
en el exterior de1refrigerador de su refrigerador.
Los nivelesde humedadsonaltos. Verifiquela seccionAjuate y rnantenimientode las temperaturaa
apropiadaa- Ajuate de los aontroles paraobtenerinformacbe
sobrecomoaiustarloscontroles.
Los controlesdebenset ajustados. Verifiquela secci6nAjuate y/nantenimiento de las temperaturaa
apropiadas- Ajuste de los eontroles paraobtenerinformacbn
sobrecomoajustarloscontroles.
Se for/nan gotas de agua Los nivelesde humedadsonaltos o la puertase Verifiquela seccbnAjuate y rnantenimientode las temperaturas
en el interior del reftigeradot ha abiertocon demasiadafrecuencia, apropiadaa- Ajuate de los aontroles paraobtenerinformacbn
sobrecomeajustarloscontroles.Reduzcael tiempoque la puerta
esterabierta.Organicebienlosalimentosparaasegurarde quela
puertase abra partiempostancortescomasea posible.
Verifiquesi lasjuntascierranhermeticamente. VeaIas instruccionesen la seccionConsejoay cuidado- Limpieza
de su refrigeradot.
El refrigerador o la m_quina Funcionamientonormal Consultelasecci6nSonidos nermales defuncionamiento.
de hater hielohacen ruidos
extraSos o de/nasiadoaltos
Los cajonesde laa frutas y El contenidodel cat6no la posicionde los Cambiede lugarlos aIimentesy centenedoresparaevitar
verduraa no cierran bien articulosen el compartimientovecinopuedenestar interferenciacon los cajenes
obstruyendoelcaj6n.
EtcajSeestamalcotocado. Veala seccbn Caractedaticasdel refrigerador - Cajonescon
controlde temperaturaparaverificarlaposicbn de los cajones,
El refrigeradorno esta nivetado. VeaIa seccbn Instalaci6n del refrigerador- Nivelacibn del
refrigerador paranivelaci6ncorrectadel refrigerador.
Las canaletasde loscajonesestanst._ciaso Limpielas canaletascon aguatibia y jabon. Enjuaguey sequebien,
necesitantratamiento. Aptiqueunacapadelgadadevasetinaen lascanaletasde los
cajones.
42
FUNCIONAMIENTO,CONT
PROBLEMA
El refrigerador funciona con
demasiadafrecuencia
(;AUSAPOSIBLE
Lapuertasehaabiertoconfrecuenciao seha
dejadoabiertaporperiodosprotongados.
La humedado caIoren el &reavecinaesalta.
Recientementese hancolocadoalimentos.
Et refrigeradorest&expuestoalcalordebidoal
medioambienteo a otroselectrodomesticosa su
alrededor.
Las bobinasdel condensadorestan sucias,
Los controlesnecesitanserajustados.
La puertano cierrabien.
SOLUCION
Reduzcael tiempoquela puertaest&abierta.OrganicebienIos
alimentosparaasegurarde queIa puertase abrapot tiempostan
cortoscomasea posible.
Esperea queel ambienteinteriorse ajustepot el periodode tiempo
quela puertaestuvoabierta.
Funcionamientonormal.
Esperehastaque el alimentoquese ha colocadorecientemente
alcancelatemperaturadelrefrigeradoro del congelador.
Eval_eel medioambientede su refrigerador.Posiblementesea
necesariocambiarlode lugarparamejorarsu rendimiento.
VeaIas instruccionesen la secciSnConsejosy cuidado- Limpieza
de su refrigerador.
Verifiquela secciSnAjuste y mantenimientode las temperaturas
apropiadas- Ajuatede los controlesparsobtenerinformaciSn
sobrecomeajustarloscontroles.
YeaIa secciSnInstalacibn del refrigerador- Nivelacibn del
refrigerador paranivelaci6ncorrectadel refrigerador.
Verifiquesi lasjuntascierranhermeticamente.Limpie,si es
necesario.Vealasinstruccionesen lasecci6nConsejosy cuidado-
Limpiezs de sa refrigerador.
Verifiquesi hay obstruccionesinternasque impidanquela puertase
cierrebien(perej.cajonesmatcerrados,dep6sitosdel hielo,
contenedoreso aIimentosdemasiadograndeso realcolocados,etc.)
YAGUA
E!refrigeradortieneescape
deagua
Se forms hieloen el tubo
de admisi6n de la mSquins
de hscer hielo
Elflujo del aguaesmas
lentoqueIo normal
Seus6tuberiapl&sticaparacompIetarla
conexi6n.
Se instalsunav&lvutade aguaincorrecta.
La presi6ndetagua esbaja.
La temperaturadel congeladores demasiadoatta.
La presiondetagua esbaja.
Se instalsunavalvutadeagua;ncorrecta.
Searsrecomiendael use de tuberiade cobre parala instalaciSn.La
tubedade pl&sticoes menosdurabley puedecausarescapes.Sears
no se responsabilizapot dai_osmaterialesdebido a inatalasion o
conexiondel a._uaincorrecta.
Vealas instruccionesen la secciSnInstalaci6ndel refrigerador -
Conexi6n del suministro de agua.Las valvulasautoperforantesy
lasv_tlvulasde asientode _¢ causanbaja presiondel aguaypueden
obstruirlatuberiacon el pasardel tiempo.Searsno se
responsabilizapot dai_osmateriales debido a instalasi6n o
eonexiondel agusincorrecta.
La presiSndel aguadebeserentre20 y 100librasparpuigada
cuadradapara queel funcionamientoseaapropiado.Se recomienda
unapresiSnminimade 35 libraspot pulgadacuadradapara los
refrigeradoresquetienenfiItrosde agua.
VeaIa secciSnAjuste y mantenimientode las temperaturas
apropiadas- Ajustede los controlesparaobtenerinformaciSn
sobrecomeajustarloscontroles.Se recomiendaqua latemperatura
del conqeladorseaentre-18a -17° C (0 a 2° F).
La presiondel aguadebeser entre 20 y 100librasperpulgada
cuadradapara queel funcionamientoseaapropiado.Se recomienda
unapresionminimade 35 libraspot puIgadacuadradapara los
refrigeradoresquetienenfiItrosde agua.
Vealas instruccionesen la secciSnInstalaciondel refrigerador -
Conexi6n del suministro de agua.Lasv_tlvulasautoperforantesy
lasvalvulasde asientode !,,_"causanbaja presiSndel aguay pueden
obstruirlatubedacon el pasardel tiempo.Sears no se
responsabilizapot dai_osmaterisles debido a instalaei6n o
conexiondel aguaincorrecta,
I11
O
43

NOTg
44
J J
CEQU'llWT_AVOIRSUR
8 _
iB CONflGNBDESECURITE
Lesmisesengardeet lesconsignesde
s6curiteindiqueesdansce manuelne visent
pas& couvrirtouteslessituationset
conditionssusceptiblesdese presenter.It est
indispensablede faire preuvede bonsens,
deprudenceet d'attentiondansla miseen
service,I'entretienou !'utilisationdu
refrig6rateur.
Oontacteztoujoursle magasino_I'appareila
6t_achete,le distributeur,leserviceapres-
venteoulefabricantencas de probI6mesou
desituationsguevousne comprenezpas.
APPRENEZA RECONN_TRE
CESSYMBOLES,MOTSET
ETIQUETTESRELATIFSA LA
SECURITE
m
CONSERVERCBCONflGNB
45
D[PRGT[CTIGN
AUX I TATS-U NIS
Nousvousfelicitonspourvotreachat.Depar
sa conceptionet sa fabrication,votrenouvel
appareilKenmore_vousfournirade
nombreusesann6esdeserviceliable.Mais,
commetoutautreproduit,il pourrait
necessiterdesr6parationsou travaux
d'entretiendetemps& autre.C'estdansces
circonstancesqu'uncontratde protection
principalvouspermettrad'6vitersouciset
depenses.
Souscfivezmaintenantun contratde
protectionprincipalpourvousprot6gercontre
les problemeset depensesinattendues.
Lecontratdeprotectionprincipalvous
permettra6galementde maximiserla
Iong6vitede votrenouvelappareikVoid ce
qu'il inclut:
> Serviceapres-ventedispens6par 12000
professionnels,sp6cialistesdes
reparationsdesappareilsm_nagers.
> Serviceapres-venteillimit&et gratuite
(pieceset main-d'ceuvre)detoutesles
r6parationscouvertes.
> Garantiede performance- remplacement
duproduitcouverts'il subitplusde trois
d6failIancespendantunep6riodede
douzemois.
>* Remplacementdu produitcouverts'ii ne
peut_trerepar&
Contr61eannueld'entretienpreventifsur
demandedeI'utilisateur- sansfrais
additionnel.
> Accesinstantanea un serviced'aidepar
t616phone- fournitured'instructionet
d'informationnontechniquesur les
produitsrepar6sa domicile,et fixationde
rendez-vouspourtouteintervention.
> Protectioncontreles surtensionset les
dommagesimputabtesauxfluctuationsde
I'atimentationelectrique.
>" Remboursementdes fraisde locationd'un
appareildansle cas o_]le produitrepar6
n'estpasdisponible&Iadatepromise.
Lorsquevous_tesprot_g6par lecontratde
protection,il suffitd'unappeltel@honique
pourdemanderuneintervention.Vous
pouvezt61@honer&tout momentdujour ou
dela nuit,oufixer un rendez-vousen ligne.
Searsdisposed'uneequipede t2 000
professionnelssp6cialistesdes reparations
quiontacc_sa plusde 4,5 millions
d'accessoireset de piecesde qualit&C'estle
genrede professionnalismesur lequeIvous
pouvezcompter,et qui vousaidera
maximiserla Iongevit6devotre nouvel
appareilpendantdesann6es.Souscrivez
sansattendrevotrecontratde protection.
CertainesIimitationset exclusionssont
applicables.Pourles Fix et de I'information
additionnelle,composezIe 1-800-827-6655.
Serviced'instatlationSears
PourHnstalIationgarantiepar les
professionnelsSearsdetout appareil
m6nageroude produitcommesyst_me
d'ouverturedeportede garageou
chauffe-eau,auxE.-U.composezle
1-800-4-MY-HOME_.
AU CANADA
Votreachata unevaleursupplementaire
parceque vouspouvezcomptersur le
HomeOentraPde Searspourun service
apr_s-vente.Avec plusde 2400 sp6ciatistes
formes& rentretienet unacc_s& plusde
900000 pieceset d'accessoires,nousavons
lesoutils,les pieces,lesavoiret le talent
pourrepondre&votre demande:nous
r_paronsce quenousvendons.
VotreappareilKenmore®est congu,fabrique
et essayepourvousassurerdes anneesd'un
fonctionnementfiabte.Cependant,comme
toutappareilmenager,il peutnecessiterun
entretiende temps& autre.Lecontrat
d'entretienSearsvousoffreun remarquable
programmedeservice&un prixabordable.
Contratd'entretien Sears
Estvotremani_red'acheterunservice
pourdemainau prixd'aujourd'hui.
Eliminefacturesde reparationr6sultant
d'usurenormale.
> Fournituneassistancenontechniqueet
informative.
> M_mesi vousn'avezpasbesoinde
reparation,vousfournitun contr61e
d'entretienpr6ventifannuela votre
demande,pourvousassurerquevotre
appareilest enbon etatdemarche.
Oertaineslimitess'appliquent.Pourde plus
amptesinformationssur lescontrats
d'EntretienSearsCanada,composezle
t -800-361-6665.
46

Garantiecompleted'uneanneesur le
refrigerateur
Durantune p6rioded'un an & compterdela
datede I'achatinitial,Searsr@arera
gratuitementce r6frig@ateurencas device
de mati@eou de fabrication,quandcet
appareilest utilis6et entretenuselonles
directivesappos@ssur cetappareilou
fourniesavec.
Garantiecompletede cinqanssurle
systemede refrigerationscelle
Durantune p@iodede cinq ans& compterde
ladatede Fachatinitial,Searsr@arera
gratuitementlesystemescelie(quicomprend
le r@ig@ant,latuyauterieet le moteurdu
compresseur)en casde vicede matiereou
defabrication,quandcetappareilest utilis6
et entretenuselonlesdirectivesappos@s
surcet appareilou fourniesavec.
Lagarantieci-dessuscouvreseutementles
refrig6rateursquisontutilisespour
I'entreposaged'aliments&desfins
domestiquesseulement.Lescartouchesde
filtration(poureauet glacons)Kenmore,de
rechangeet d'origine,nesontpascouvertes
parcettegarantie.Lescartouchesd'origineet
derechangesontgarantiespendant30jours,
piecesseulement,contrelesvicesdemati@e
oudefabrication.
Leserviceapres-venteen vertude la
garantieestdisponibleencomposantle
1-800-4-MY-HOME_(1-800-469-4663).
Oettegarantienes'appliqueque si ce produit
estutiliseauxEtats-Uniset Canada.
CettegarantievousconDredesdroits
juridiquesspecifiqueset vous pouvez
6galementjouird'autresdroitsvariablesd'un
6tat& unautre.
Sears,Roebuckand Co., Dept.8t7WA,
HoffmanEstates,IL60179
REMARQUE:Certainssyst_mesd'eau
domestiques&osmoseinverseprovoquent
unebaissede Iapressiond'eau.Une
pressiond'eau bassepeutaffecterte systeme
dedistributiond'eauet de gla;onsen
produisantdesgla;onspetitsou creuxet
ralentitte d6bitd'eauaudistributeur.Les
problemesde fonctionnementli6sau systeme
d'eau&osmoseinversene sontpascouverts
parlagarantie.
[NREGiSTR[M[NTDU
VeuillezinscriredansI'espaceci-dessousle
num6rode mo@leet le numerode s6rie
ainsique ladated'achatdu r6frig6rateur.
VoustrouverezI'etiquettecomportantle
num6rode mo@leet le numerode s6rie
I'int@ieurdu r@igerateursur laparoigauche.
Num@ode modele: 596.
Numerode serie:
Dated'achat:
Conservezce guideet le reguSeersdarts
unendroitsir pourvousy reporter
ulterieurement.
m
4t
instructionsde securit6importantes.........................................................................................45
Ceque vousdevezsavoirsur les instructionsde securit6......................................................45
Alimentationelectrique.............................................................................................................45
Contratsde protection................................................................................................................46
Contratsde protectionprincipaux- E.-U.................................................................................46
Contratsd'entretien- Canada..................................................................................................46
Garantie.........................................................................................................................................47
Enregistrementdu produit..........................................................................................................47
installationdu refrig6rateur...................................................................................................49-54
Mesurede !'ouverture...............................................................................................................49
Transportdu refrig@ateur.........................................................................................................49
Choixdumeilleuremplacement...............................................................................................49
Ouvertureet fermeturedes portesdu r6frig@ateur.................................................................49
D@oseet posedespoignees..................................................................................................50
D@osedescharni_res,desporteset du tiroir........................................................................50
Posedes chami@es,desporteset dutiroir............................................................................52
Raccordementde I'alimentationen eau...................................................................................53
Mised'apiombdur6frig@ateur.................................................................................................54
RL=glageet maintien des bonnestemperatures........................................................................55
Reglageinitial...........................................................................................................................55
Reglagedescommandes.........................................................................................................55
Conservationde produitsfrais..................................................................................................55
Conservationdes alimentssurgel6s........................................................................................55
Filtre aeau...............................................................................................................................56-57
D@oseet installationdufiRre& eau........................................................................................56
Caracteristiquesdesfiitresa eau.............................................................................................57
Caracteristiques- compartimentr6frigerateur ...................................................................58-59
Distributeurd'eau......................................................................................................................58
Etageresint@ieures.................................................................................................................58
Rangementdans la contre-porte..............................................................................................58
Tiroirset bacsa reglagehygrom6trique...................................................................................59
Caractedstiques- compartimentcong61ateur.........................................................................60
Machine_,glagonsautomatique...............................................................................................60
Tiroirs........................................................................................................................................60
Conseilset entretien..............................................................................................................6t-6t
Nettoyagedu refrig@ateur........................................................................................................61
D6sodorisationdu r6frig@ateur................................................................................................62
Conseilspour1'6conomied'energie..........................................................................................62
D@oseet remplacementdesampoules..................................................................................62
Bruitsnormaux............................................................................................................................63
Diagnostic................................................................................................................................64-65
Fenctionnement...................................................................................................................64-65
Glagonset eau.........................................................................................................................65
Service.........................................................................................................Derni@ede couverture
48
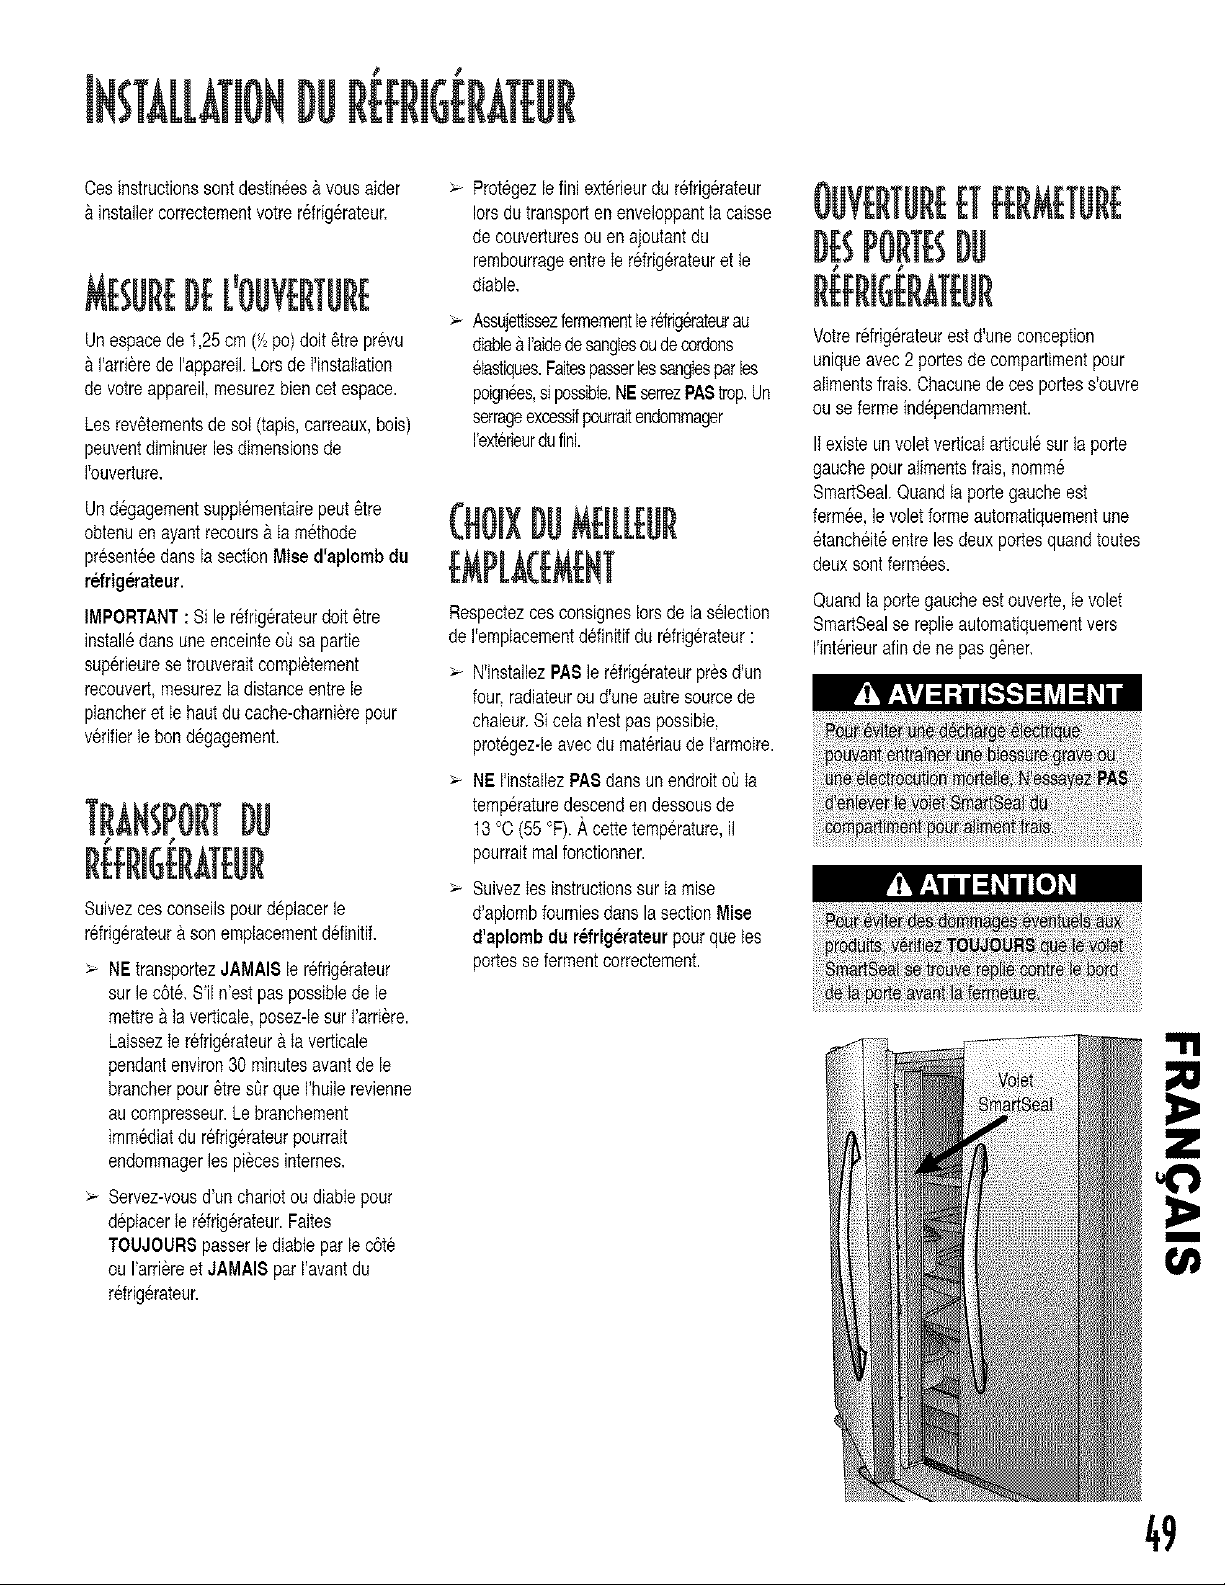
,# I
Cesinstructionssontdestin6es& vousaider
&installercorrectementvotrerefrig@ateur.
URE
Unespacede 1,25cm (Y_po)doit 6treprevu
&Far@rede I'appareikLorsde I'installation
devotreappareil,mesurezbiencet espace.
Lesrev6tementsdesol (tapis,carreaux,bois)
peuventdiminuerlesdimensionsde
I'ouverture.
Und_gagementsupplementairepeut_tre
obtenuen ayantrecours& Ia methode
present6edartsla sectionMieed'aplomb du
refrigerateur.
IMPORTANT:Si le r@ig@ateurdoit _tre
installedansuneenceinteo_ sa pattie
superieurese trouveraitcompl_tement
recouvert,mesurezla distanceentrele
plancheret Ie hautdu cache-charni@epour
v@ifierte bond6gagement.
TRANSPORTDU
P
Suivezces conseilspourd@lacerle
refrig@ateura sonemplacementd6finitif.
> NEtransportezJAMAISle r@igerateur
sur lec6te.S'il n'estpas possiblede le
mettre& laverticale,posezdesurFar@re.
LaissezIe refrig@ateura ta verticale
pendantenviron30 minutesavantde le
brancherpour_tres@que I'huilerevienne
aucompresseur.Lebranchement
immediatdu r6frig@ateurpourrait
endommagerlespiecesinternes.
> Servez-vousd'unchariotoudiabIepour
d@tacerte r@ig@ateur.FaRes
TOUJOUR8passerle diabteparle c6te
ouI'arri_reet JAMAI8 parI'avantdu
refrig@ateur.
Protegezle finiext@ieurdur6frig#rateur
Iorsdutransporten enveloppantlacaisse
decouverturesou enajoutantdu
rembourrageentreIerefrig@ateuret te
diable.
Assujettissezfermementler6ffig6rateurau
diable&I'aidedesanglesoudecordons
etastiques.FaitespasserlessangIesparles
poign_es,si possible.NEserrezPA$trop.Un
serrageexcessifpourraitendommager
I'exterieurdu rink
(}lOIxDUM{ I[[EUR
Respectezces consignesIorsdela selection
deI'empIacementd6finitifdurefrig@ateur:
N'installezPA$ le r@igerateurpresd'un
four.radiateuroud'uneautresourcede
chaleur.Si celan'estpaspossible,
prot6gez-leavecdumat@iaude I'armoire.
NE I'installezPA$dansunendroito_ Ia
temp@aturedescenden dessousde
13°O (55°F).A cettetemperature,il
pourraitmalfonctionner.
SuivezIes instructionssurIa mise
d'aplombfourniesdansla sectionMise
d'aplombdu refrigerateurpourquetes
portessefermentcorrectement.
DBPORTBDU
Votrerefrigerateurest d'uneconception
uniqueavec 2 portesde compartimentpour
alimentsfrais.Chacunede cesportess'ouvre
ouse fermeind@endamment.
li existeunvoletverticalarticulesur la porte
gauchepouralimentsfrais,nomme
SmartSeal.QuandIa portegaucheest
fermee,le voletformeautomatiquementune
6tanch6it_entrelesdeuxportesquandtoutes
deuxsontfermees.
Quandlaportegaucheestouverte,tevolet
$martSealse replieautomatiquementvers
I'int@ieurafindene pasg6ner.
m
49
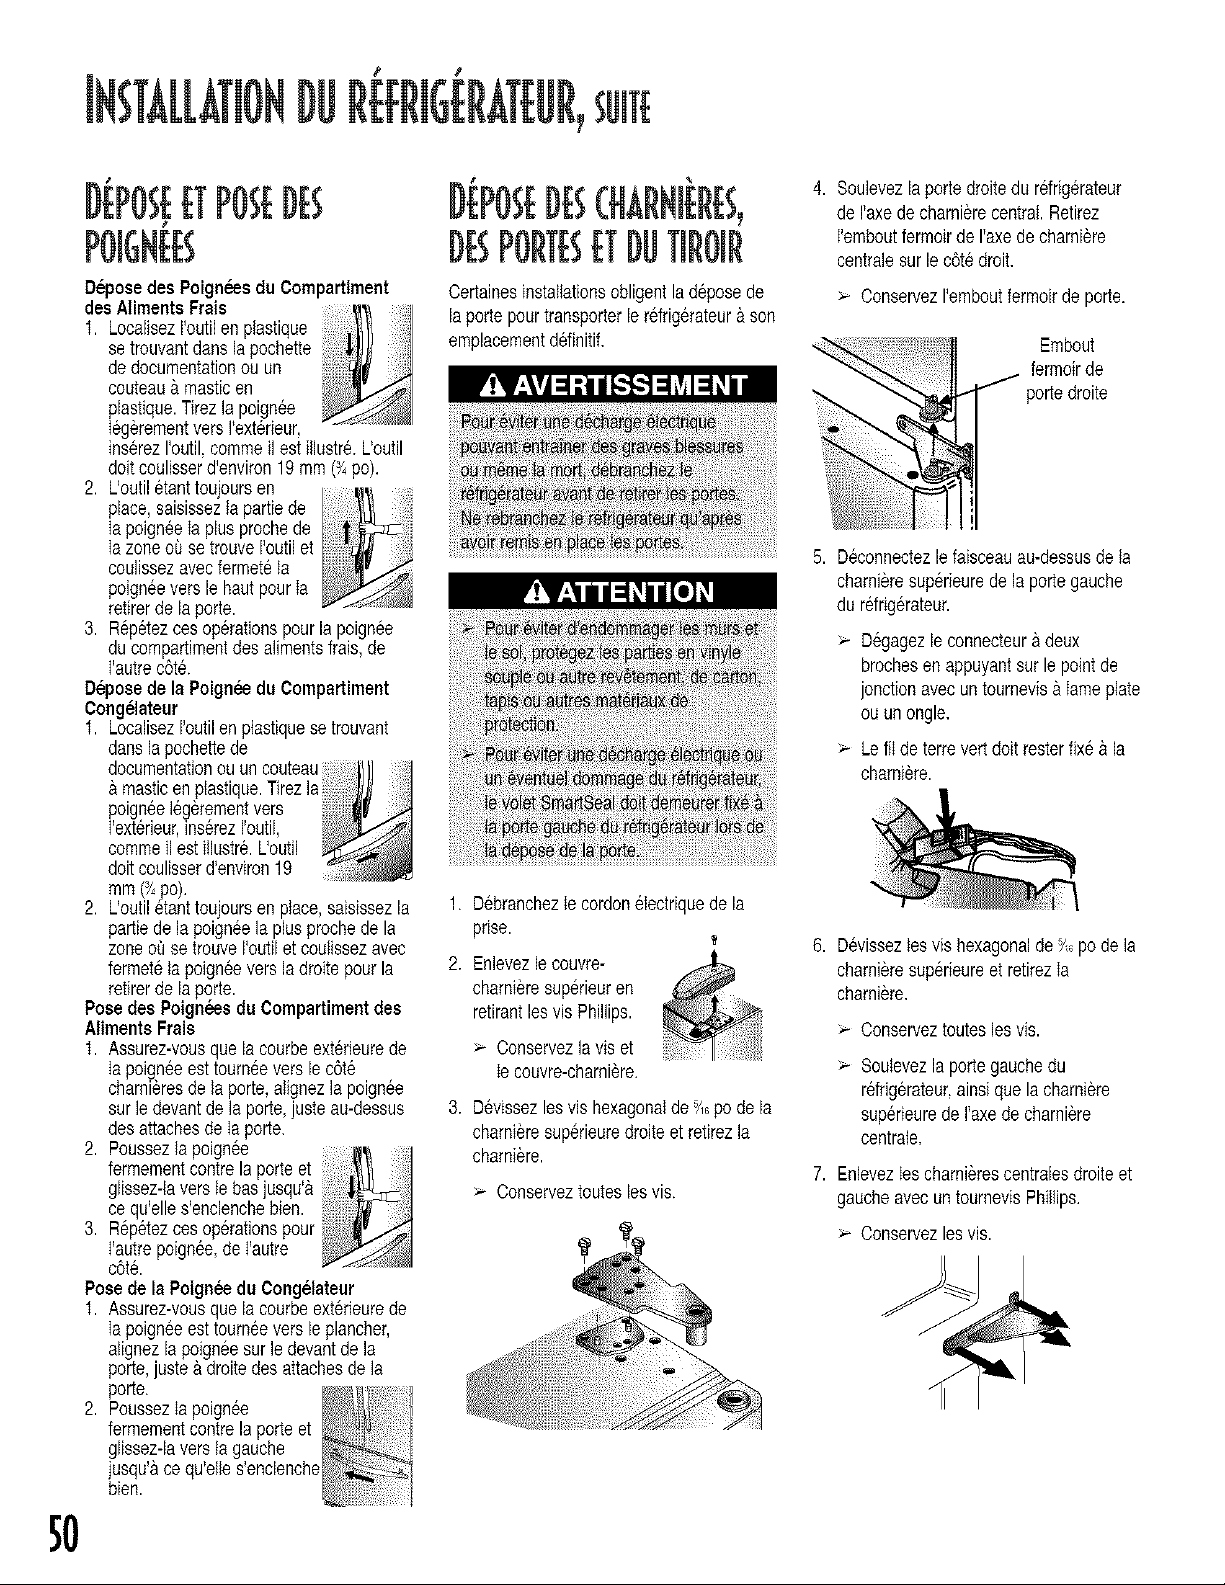
DEPOSEETPOSEDES
P
Deposedes Poigneesdu Compartiment
desAilmentsFrais
I. LocalisezI'outilen plastique
setrouvantdansla pochette
dedocumentationou un
couteau& masticen
plastique.Tirezla poign_e
IegerementversI'ext6rieur,
inserezI'outil,commeil est illustr& L'outil
doitcoulisserd'environ19 mm(Y_po).
2. Uoutiletanttoujoursen _,_
place,saisisseztapartiede
Ia poigneeIa plusprochede
IazoneoQse trouveIoutil et _ _w_
cou ssezavecferme6 a _l_j_,_"/'_
pognee
vers e hautpour a _
retirerde laporte.
3. R@etezcesoperationspourla poignee
ducompartimentdesalimentsfrais,de
I'autrec6t&
Deposede la Poignee du Compartiment
Congelateur
t. LocalisezFoutilenptastiquese trouvant
dansla pochettede
D i%EDBCHARi@B,
DBPORTBETDUTIROiR
Certainesinstallationsobligentla d@osede
laportepourtransporterierefrig@ateur&son
emplacementd6finitif.
4. Souievezla portedroitedu refrig6rateur
de I'axede charni@ecentral.Retirez
I'emboutfermoirde I'axede chami@e
centralesurle c6tedroit.
> ConservezI'emboutfermoirde porte.
Embout
fermoirde
/
portedroite
5. D@onnectezlefaisceauau-dessusde ta
charni_resuperieurede ia portegauche
du refrig@ateur.
> Degagezleconnecteur&deux
brochesen appuyantsur le pointde
jonctionavecuntournevisa Iameplate
ouunongle.
> LefiI deterrevertdolt resterfix_ &la
chamiere.
mm('Y_po).
2. Loutil etanttoujoursen place,saisissezla
partiede iapoign6eia plusprochedela
zoneoQse trouvei'outilet coulissezavec
fermetela poigneevers iadroitepourla
retirerde iaporte.
Posedes Poigneesdu Compartimentdes
AlimentsFrais
I. Assurez-vousquelacourbeext@ieurede
Ia poigneeest tourneevers lec6t6
charni_resde ta porte,atignezla poignee
sur ledevantde la porte,juste au-dessus
desattachesdeIa porte.
2. Poussezla poignee :11
fermementcentrela porteet //
glissez-laverste basjusqu
ce quelles enclenchebien.
3.
R@6tezcesop@ationspour_i_[_ii_v_
Fautrepoignee,de Fautre _
c6t&
Posede la Poigneedu Congelateur
t. Assurez-vousquelacourbeext@ieurede
Ia poigneeest tourneevers leplancher,
alignezla poigneesur ledevantdela
porte,juste a droitedes attachesde la
porte.
2. PoussezIa poignee
fermementcontrela porteet
glissez-laversta gauche
jusqu'ace qu'elles'enclenche
bien.
50
1. Debranchezle cordon61ectriquede la
prise, t
2. Enlevezle couvre-
charnieresup@ieuren
retirantles visPhillips.
>" Conserveziavis et
Ie couvre-charni_re.
3. D@issezlesvis hexagonalde"_ pode la
charni@esup@ieuredroiteet retirezia
charni@e.
>" Conservezrouteslesvis.
6. Devissezlesvis hexagonalde Y-_po dela
charni_resup@ieureet retirezIa
charniere.
> Conserveztouteslesvis.
> Soutevezla portegauchedu
r_frig@ateur,ainsique lacharniere
sup@ieurede I'axedecharni_re
centrate.
7. EnlevezIescharni@escentralesdroiteet
gaucheavecun tournevisPhillips.
Conservezlesvis.

10.Tirezlepaniersuperieuraumaximumet
soutevez-lepourI'enlever.
t3. Retireztesdeuxpiedsstabilisateurs&
I'aided'untourne-6crouhexagonalde_.
po.
> ConservezlesvispourlesreutiIiser
plustard.
8. Tirezletiroiraumaximum.
1I. Soulevezlaporteparlehautpourla
decrocherdessupportsdusystemede
glissiere.Soulevezlaportepour
I'enlever.
9. Enlevezlepanierinterieuren
appuyantversI'interieur,surlesc6tes
dupartier.Puissouteveztepanier.
12.Retirezlagrilteinferieureetlescaches
inf6rieurs.
Appuyezici
m
51
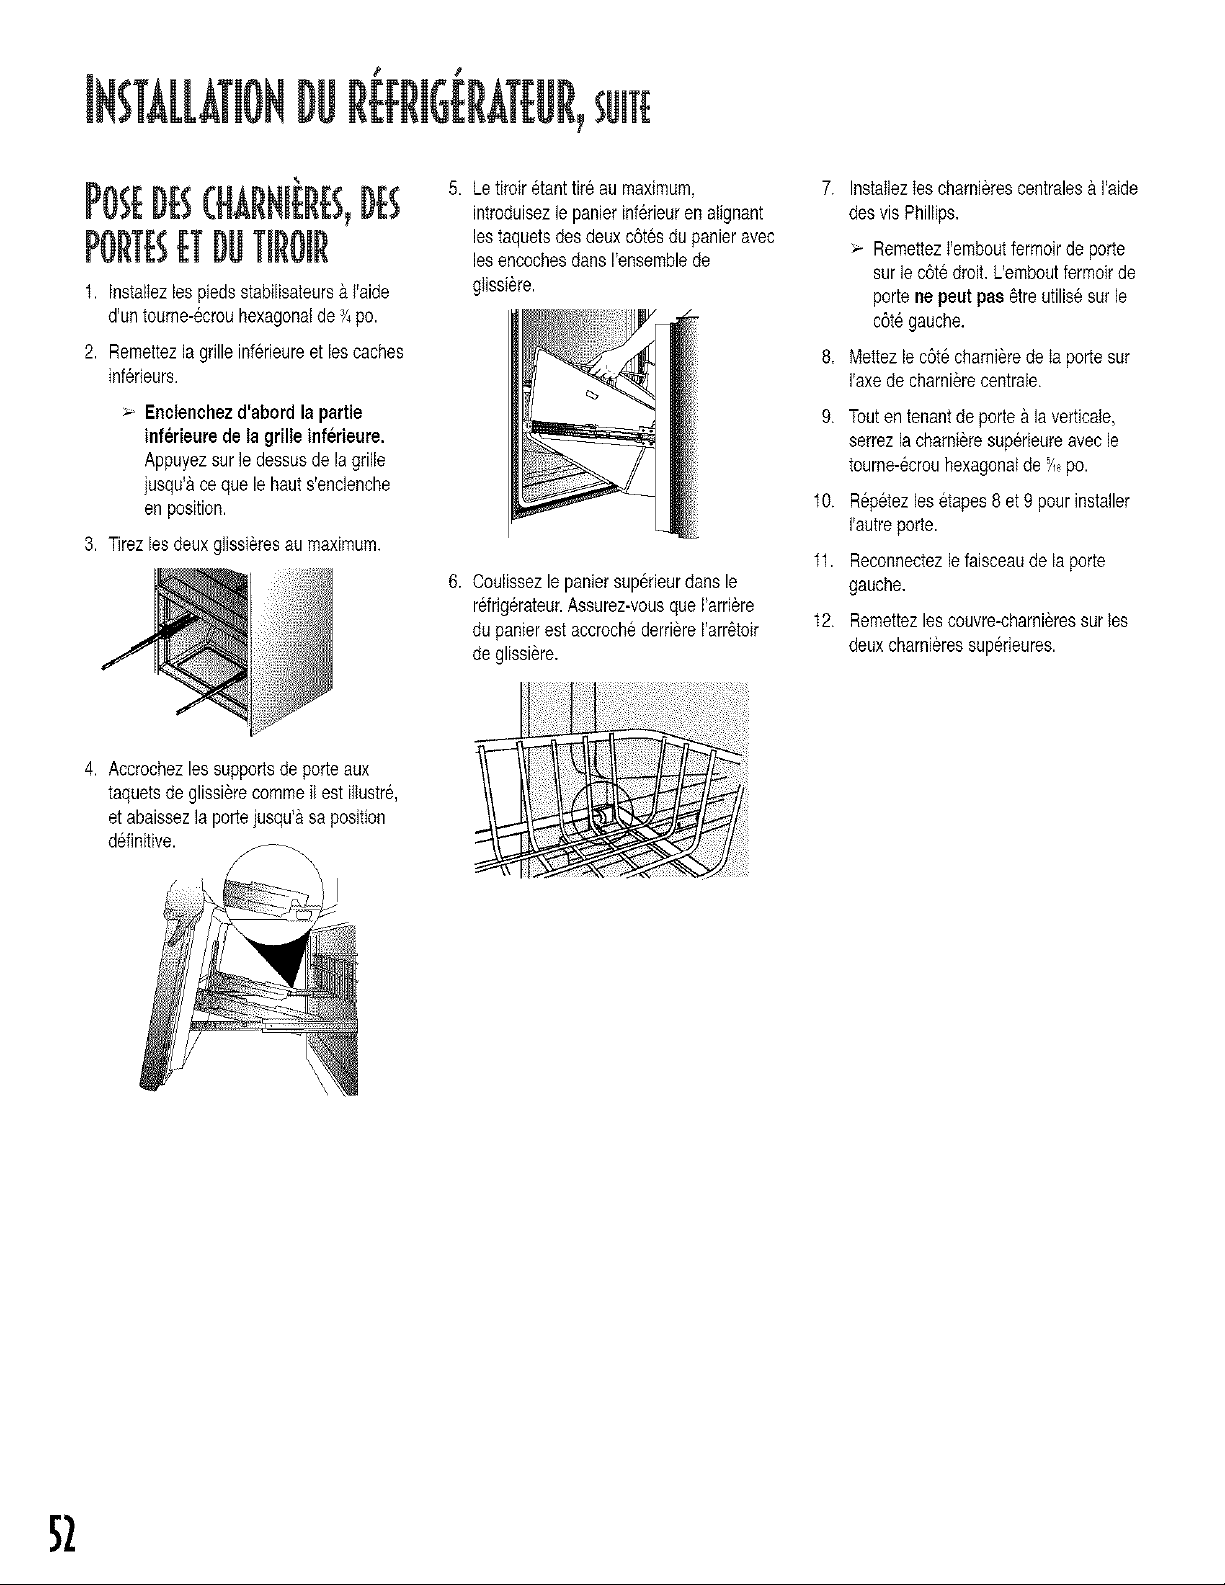
ROSEDBCHARNI[RB,DES
PORTBETDUTIR@iR
t. tnstalIezles piedsstabilisateurs&I'aide
d'untourne-6crouhexagonalde:/4po.
2. Remettezla grilleinferieureet lescaches
inf6rieurs.
Enelenchezd'abordla partie
inf6rieure de ta grilleinferieure.
Appuyezsur le dessusde la grille
jusqu'&ce quele hauts'enclenche
enposition.
3. Tirezlesdeuxglissi_resaumaximum.
5. Le tiroir_tanttir6 au maximum,
introduisezle panierinf6rieurenalignant
lestaquetsdesdeuxc6tesdupanieravec
lesencochesdans!'ensemblede
glissi_re.
6. Coulissezle paniersup_rieurdansle
refrig6rateur.Assurez-vousqueI'arri_re
dupanierestaccrochederriereI'arr_toir
deglissiere.
7. InstallezIescharni_rescentrales&I'aide
desvis Phillips.
> RemettezI'emboutfermoJrde porte
sur lec6tedroit. Uemboutfermoirde
portene peut pas _treutilisesur le
c6tegauche.
8. Mettezle c6t_charnierede Iaportesur
I'axede charni_recentrale.
9. Touten tenantde porte&la verticale,
serrezlacharnieresuperieureavecle
tourne-ecrouhexagonalde_ po.
I0. Rep6tezles 6tapes8 et 9 pour installer
I'autreporte.
tl. ReconnectezlefaJsceaudela porte
gauche.
t2. Remettezlescouvre-charnieressurtes
deuxcharnieressup_rieures.
4. Accrochezlessupportsde porteaux
taquetsde glissi_recommeElest illustre,
et abaissezla portejusqu'&sa position
definitive.
52

MATI RIEL NI CESSAIRE
> Tubeen cuivreflexiblede 6,4 mm(Y4po)
dediametreexterieur.
> Bagueet ecrou& compressionenlaiton
pourtubeen cuivrede6,4 mm(74po) du
diam_treexterieur.
Robinetd'arr_t(necessiteun troude 6,4
mm[Y,po]& percerdansle tuyau
d'aiimentationen eauavantde fixerte
robinet),
> Cle&molette
> Tourne-6crou&t_tehexagonaledeYLpo
REMARQUE: Ajoutez2,50m (8 pi)a Ia
Iongueurde tube n6cessairepouratteindre
I'alimentationen eau afind'obtenirune
Iongueursuffisanteen cas der6paratien.
1. Creezcette Iongueursupptementaireen
prenantsoind'6viterd'entortillerIe tube.
4. PlacezI'extremit6du tubede cuivredans
I'orificed'arriveedu robinetd'eau.
Fagonnez16g_rementletube- SANS
L'ENTORTILLER- pourqu'itp6n6tredans
I'orificed'arriv6e.
5. OoulissezI'ecrouen laitonpar-dessusla
bagueet vissez1'6croudansI'orifice
d'arrivee.SerrezI'ecrou&la cI&
2. Retirezle capuchonen plastiquede
I'orificed'arriveedu robinetd'eau.
3. PlacezIa bague(B)et l'6crouenIaiton(A)
sur I'extremit6du tubede cuivrecommeil
estillustr&
A
IMPORTANT: NEserrezPAStrop. II y risque
sinonde fausserle flIetage.
6. Tirezsurte tubepourconfirmerquele
raccordementest bien fait.Raccordezle
tube auch&ssisa I'aided'uncollier(C) et
ouvrezI'eau.V6rifiezI'absencede fuite et
corrigezla situation,lecas ecbeant.
C
7. Surveiitezle raccordementde I'eau
pendant 24 heures. Oorrigez les fuites, le _
cas 6cheant,
$3
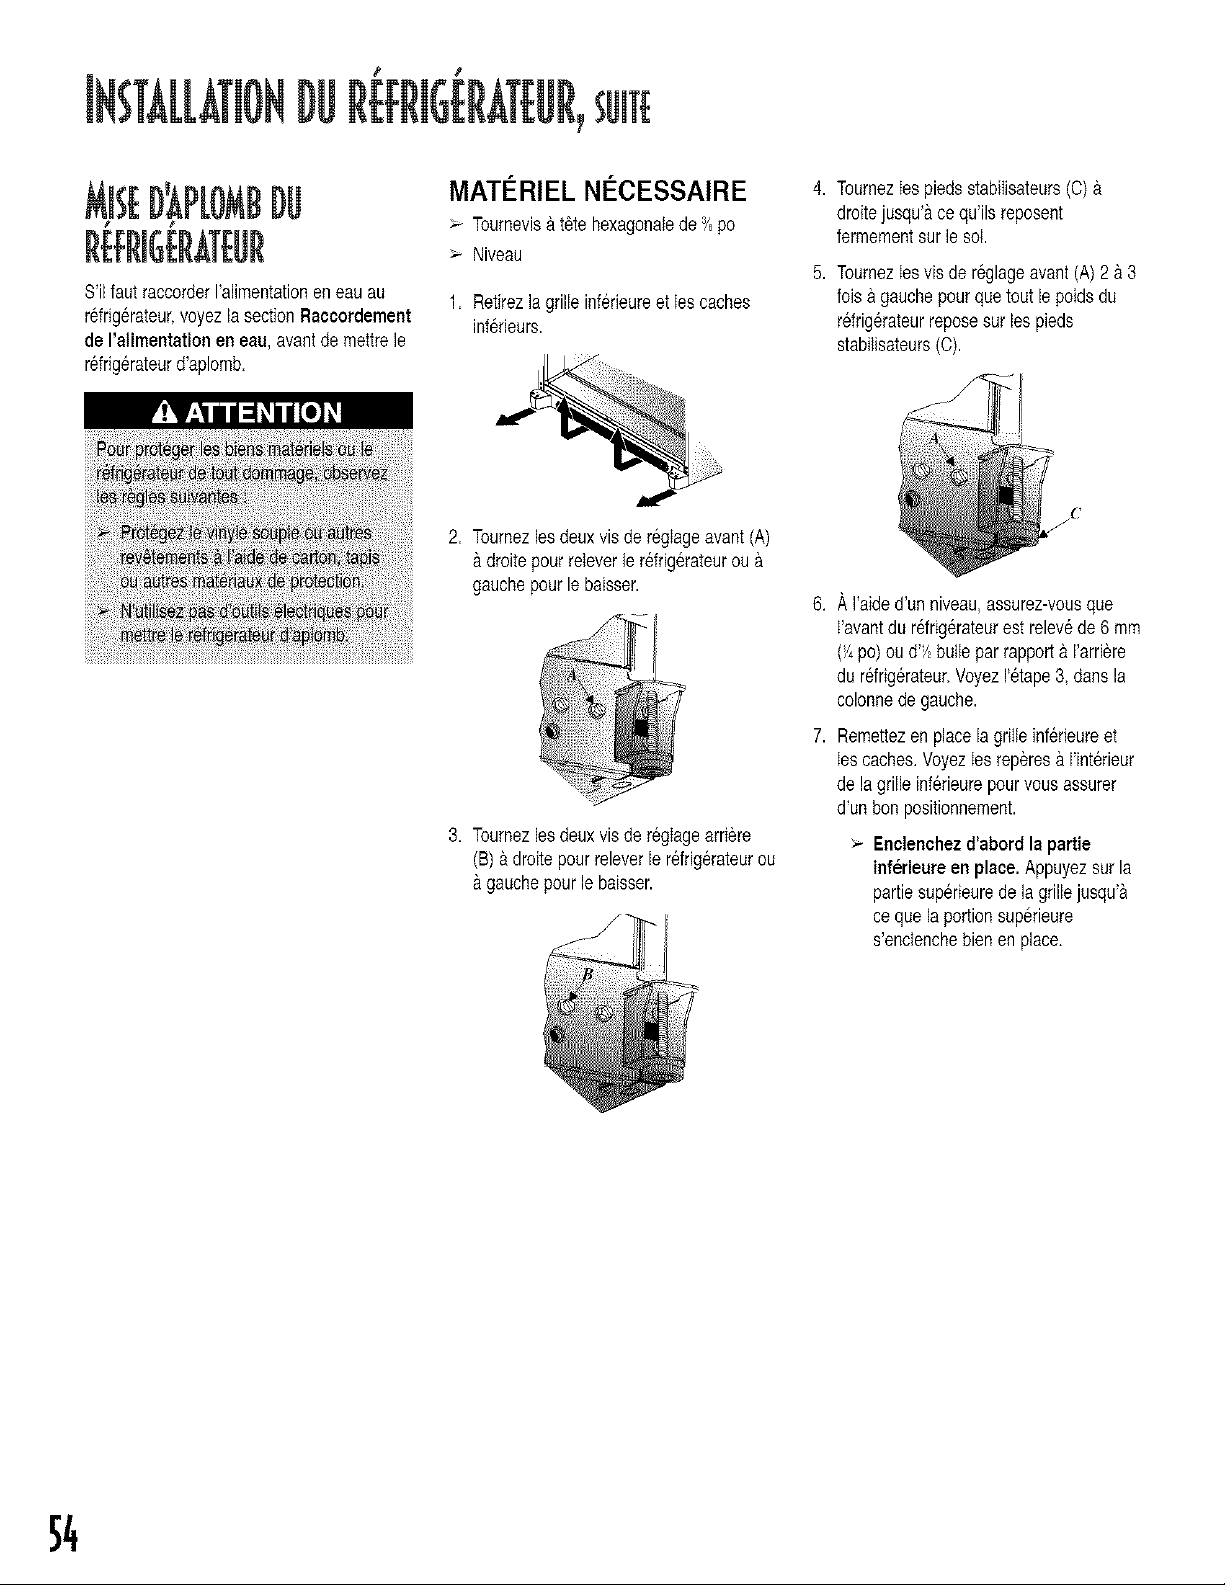
SE
S'il faut raccorderI'alJmentationen eau au
refrig@ateur,voyezla sectionRaccordement
de I'alimentation eneau, avantde mettrele
r6frigerateurd'aplemb.
MATI RIEL NI CESSAIRE
> Tournevis&t6tehexagonalede_8po
> Niveau
1. Retirezlagrilleinferieureet Ies caches
inf@ieurs.
4. TournezIespiedsstabiIisateurs(C) &
droitejusqu'&ce qu'ilsreposent
fermementsurle sol.
5. TeurnezIesvisde reglageavant(A) 2 &3
fois &gauchepourquetout lepoidsdu
refrig@ateurreposesur lespieds
stabilisateurs(C).
2. Toumezlesdeuxvisde regIageavant(A)
&droitepourreleverler6frigerateurou&
gauchepourle baisser.
3. Toumezlesdeuxvisde r6gIagearri@e
(B)& droitepourreleverle r@ig@ateurou
&gauchepourle baisser.
jC
,&,I'aided'unniveau_assurez-vousque
I'avantdu r_frig@ateurestrelevede 6 mm
(Y,po)oud'Y_bullepar rapport& I'arri@e
du refrig@ateur.Voyez1'6tape3, dartsla
colonnede gauche.
RemettezenplacelagriIleinf6rieureet
Iescaches.VoyezIesrep@es&I'int@ieur
de la grilleinf@ieurepourvous assurer
d'un bonpositionnement.
> Enetenchezd'abord la partie
inferieure en place.Appuyezsur la
partiesuperieurede lagrillejusqu&
ce quela portionsup@ieure
s'enctenchebien en place.
54

I I
Lescommandessontsitueesenhaut,sur le devantdes compartimentsde refrig@ationet de congelation.REMARQUE: Lacommandedu
cong6lateurmetenmarchele systemede refroidissement.Aucundes compartimentsnese refroidirasi Ia commandedu congelateurest& I'arr_t.
Commandedu r6frig6rateur
Commandedu cong61ateur
I. Rep@ezlescommandesdu refrig@ateur
lapattiesupedeureducompartiment
desailmentsfrais et les commandesdu
cong61ateur& la partiesup@ieuredu
compartimentcongelateur.
2. Le reglagerecommand6par lefabdcant,
pourlesdeuxcompartiments,est 4.
3. LaissezIe refrig@ateurfonctionner
pendantau moins8 & 12heuresavantd'y
placerdesaliments.
4. Attendez24 heurespourque la
temp@aturese stabilise.
DES
>. Vingt-quatreheuresapresI'addition
d'aliments,il est possiblede deciders'il
convientd'ajusterla temp@aturedansFun
ouI'autreou lesdeuxcompartiments.
Dansce cas,modifiezIa positiondu ou
desboutonsdecommande,selonles
indicationsdu guidepourle reglagede Ia
temperature.
> Nechangezpas lapositionde Funou
I'autredesboutonsdecommandede plus
d'uneunite_ lafois Iorsdu reglagedes
commandes.
> LaissezIestemp@aturessestabiIiser
pendant5 &8 heures.
-_ Unemodificationdu reglagede Funou
I'autredesboutonsde commande
entraTneune modificationde la
temp6raturedansI'autrecompartiment.
Compartimentde refrigeration Tournezlacommandedu refrig@ateurvers le chiffre
tropchaud sup@ieur.
Compartimentde rLffrigeration Tournezla commandedu refrig@ateurvers le chiffre
trop froid inferieur.
Compartimentde congelation Tournezla commandedu cong61ateurversle chiflre
trop chaud sup@ieur.
Compartimentde congelation Tournezlacommandedu congelateurversle chiffre
trop froid inferieur.
ARRETdurefrigerateur Tournezla commandedu congelateursurARRET(OFF).
REMARQUE: Si la commandeducongelateurest surARRET(OFF),le refroidissementcesse
dansles deuxcompartiments.L'alimentationdu rdrig_rateurn'estcependantpasinterrompue.
[Rkl
Ondevraitmaintenirlatemperaturedans
lecompartimentr@ig@ateurentre1 °Cet
4 °C(34 °F et 40°F)(la vateuroptimale
est3 °0 [37 °F]).Pourcontr61erla
temperature,placezun thermom@edans
unverred'eau,aucentredu
compartimentr@igerateur.Notez
I'indicationdu thermometreapres24
heures.Si la temperatureest sup@ieure&
4 °0 (40°F), ajustezlacommande,selon
les instructionsci-dessus.
Latemp@aturedanslecompartiment
congelateurd'un refrig@ateurdoit _tre
maintenue& 18°C(0 °F). Pourcontr61er
Iatemperature,placezun tbermom6tre
pourappareilsm6nagersentreles
paquetsd'alimentssurgel_s.Notez
I'indicationdu thermom@eapres24
heures.Si la temperatureest sup@ieure&
18°O (0°F),ajustezla commande,selon
Iesinstructionsci-dessus.
m
55
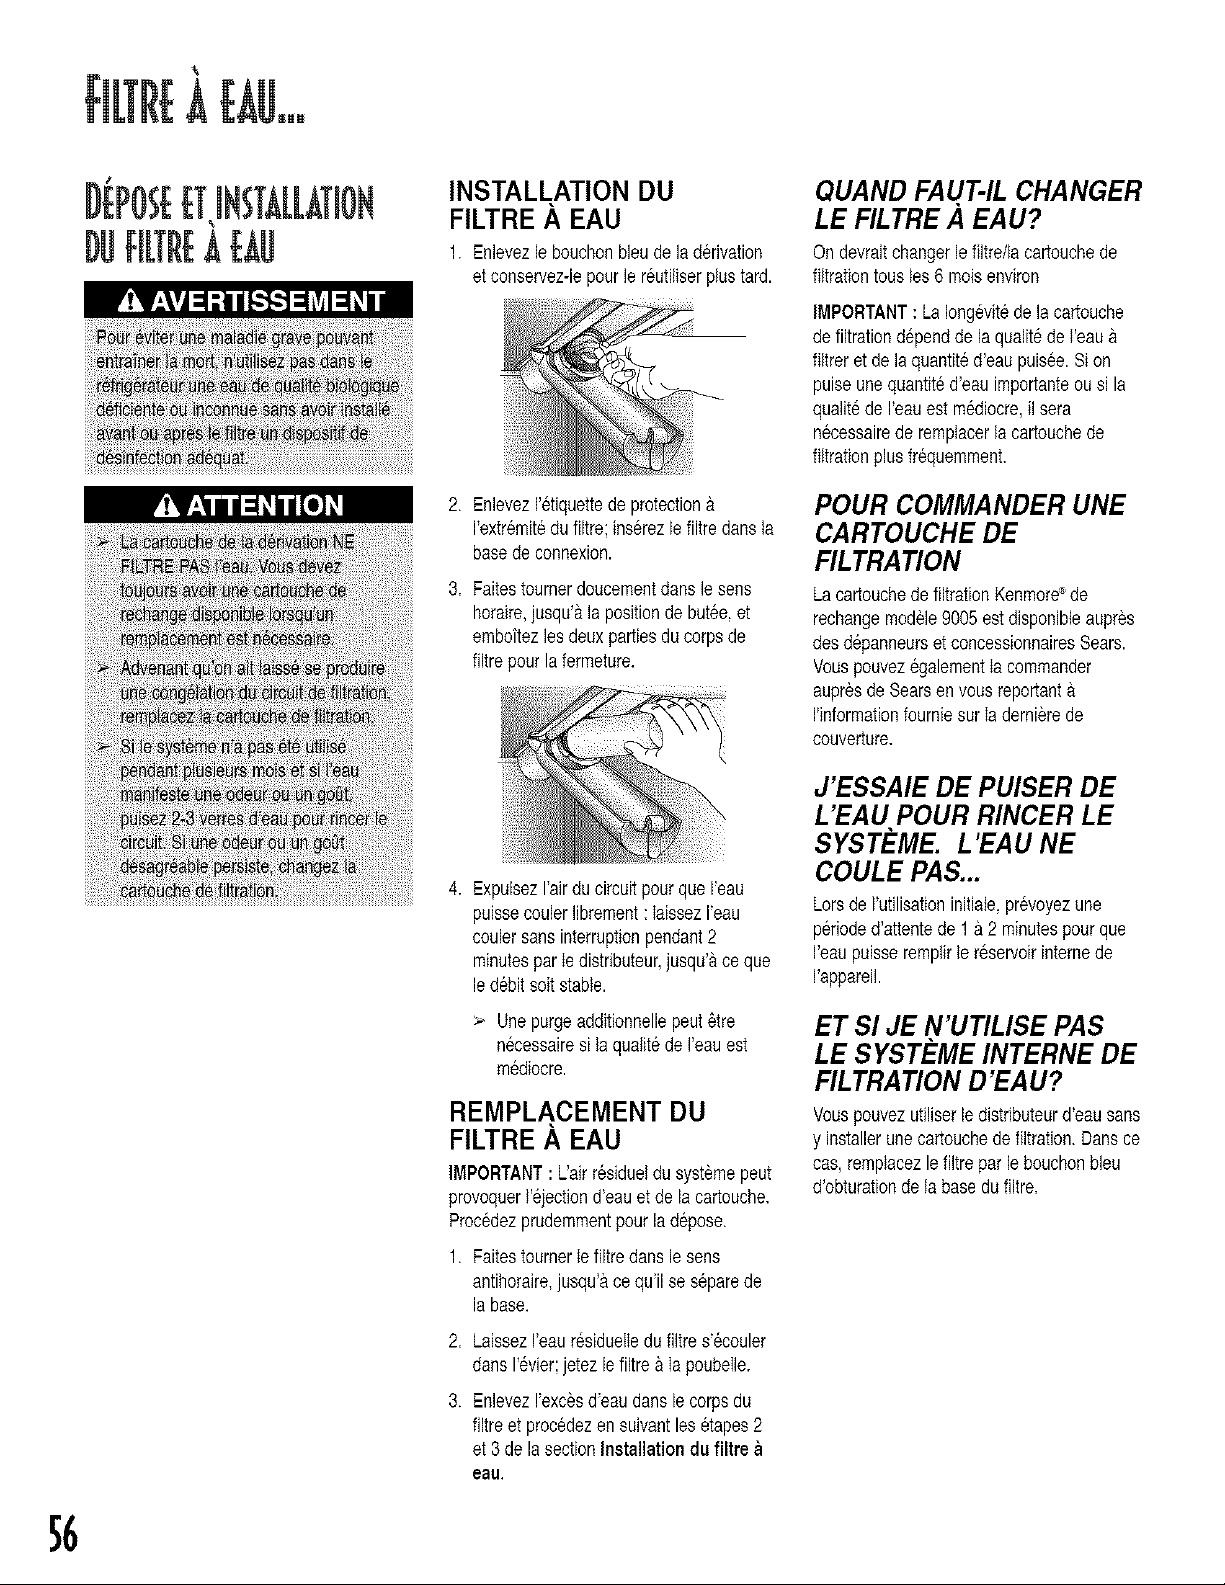
DEPOSEETiNSTALLATiON
DUflgR[ABU
INSTALLATION DU
FILTRE ._ EAU
1. Enievezle bouchonbleude lad@ivation
et conservez-lepourle reutitiserplustard.
2. EnlevezI'etiquettede protection&
I'extremit6dufiltre:ins@ezle filtredansta
basede connexion.
3. FaRestournerdoucementdansle seas
horaire,jusqu'&la positionde but6e,et
emboftezles deuxpartiesducorpsde
filtrepourlafermeture.
4. ExpulsezFairdu circuitpourque I'eau
puissecoulerlibrement: laissezI'eau
coulersans interruptionpendant2
minutesparIe distributeur,jusqu'&ce que
ledebitsoitstabte.
> Unepurgeadditionnellepeut6tre
necessairesi la quatitedeI'eauest
mediocre.
REMPLACEMENT DU
FILTRE A EAU
IMPORTANT: L'airr6sidueldusystemepeut
provoquert'6jectiond'eauet de lacartouche.
Procedezprudemmentpourlad@ose.
1. Faitestournerlefiltre dansle sens
antihoraire,jusqu'&ce qu'il ses@arede
la base.
2=
3.
LaissezI'eaur6siduetIedu filtres'@ouler
dans1'6vier;jetezle filtrea IapoubeIle.
Enlevez!'ex@sd'eau danslecorpsdu
filtreet procedezen suivantles6tapes2
et 3 dela sectionInstallation du filtre
eau.
QUAND FAUT-IL CHANGER
LE FILTRE,4 EAU?
Ondevraitchangerle filtre/lacartouchede
flRrationtoustes6 moisenviron
IMPORTANT: LaIongevit6de lacartouche
defiltrationd@enddela qualit6de t'eau&
filtreret de laquantit6d'eaupuisee.Sion
pulseunequantit6d'eauimportanteou si la
qualit6de I'eauest mediocre,il sera
n@essairede remplacerla cartouchede
filtrationplusfrequemment.
POUR COMMANDER UNE
CARTOUCHE DE
FILTRATION
LacartouchedefiltrationKenmore®de
rechangemodele9005estdispoeibteaupr_s
desd@anneurset concessionnairesSears.
VouspouvezegalementIa commander
aupr6sde Searsen vousreportant&
I'informationfourniesur Iaderni_rede
couverture.
J'ESSAIE DE PULSER DE
L'EAU POUR RINCER LE
SYSTEME. L'EAU NE
COULE PAS...
Lorsde I'utilisationinitiate,pr@oyezune
p@ioded'attentede 1a 2 minutespourque
I'eaupuisseremplirtereservoirinternede
I'appareil.
ET SI JE N'UTILISE PAS
LE SYSTEME INTERNE DE
FILTRATION D'EAU?
Vouspouvezutiliserledistributeurd'eausans
y installerunecartouchedefiltration.Dansce
cas,remplacezle filtrepar lebouchonbleu
d'obturationdeta basedufiltre.
$6
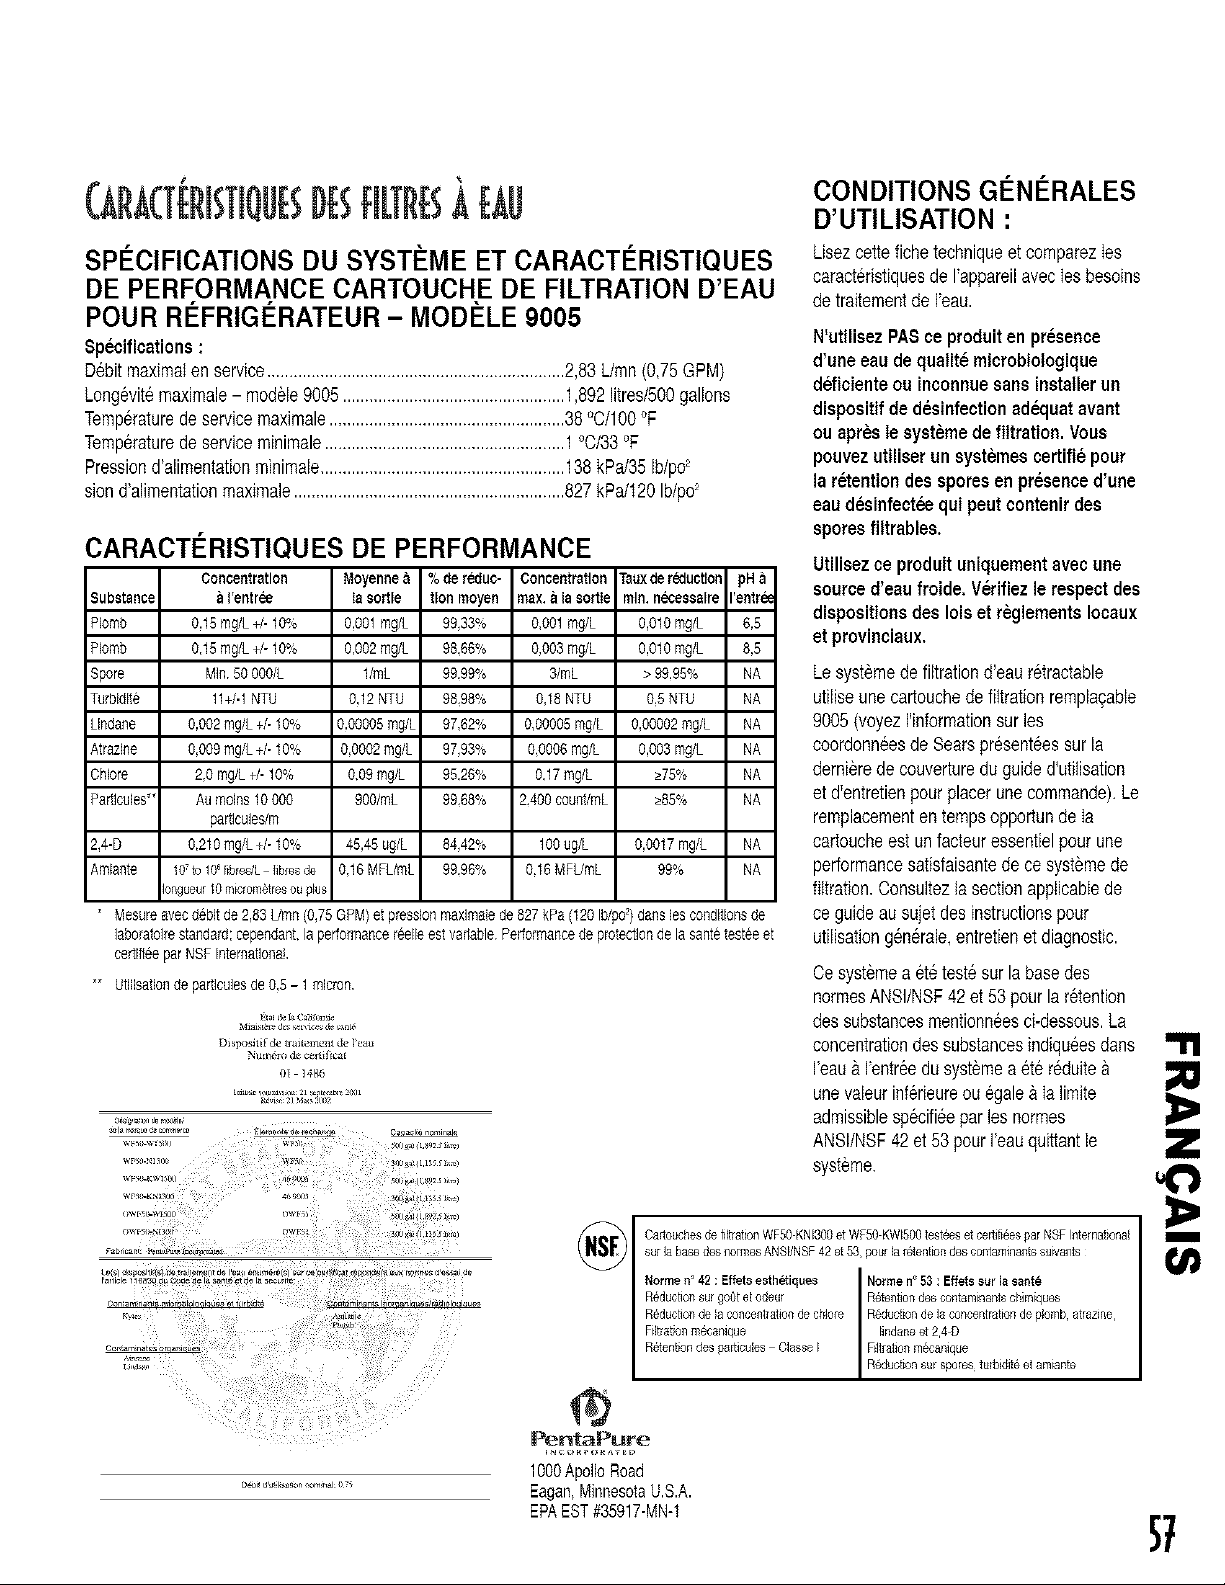
(ii i( T l iSTiQUBl)BFii TRBi BU
CONDITIONS GI NI RALES
D'UTILISATION :
SPI CIFICATIONS DU SYSTt ME ET CARACTI RISTIQUES
DE PERFORMANCE CARTOUCHE DE FILTRATION D'EAU
POUR RI FRIGI RATEUR - MODI LE 9005
Specifications:
D6bitmaximaten service...................................................................2,83Umn (0,75GPM)
Longevit6maximale- modele9005..................................................1,892fltres/500gallons
Temperaturedeservicemaximale.....................................................38°C/100°F
Temperaturede serviceminimale......................................................1 °C/33°F
Pressiond'alimentationminimale.......................................................138kPa/35Ib/po2
siond'alimentationmaximale.............................................................827kPa/120Ib/po_
CARACTI RISTIQUES DE PERFORMANCE
Concentration Moyenne_ %dar_luc- Concentration Tauxdereductlon pHa
Subatance a_'antree tasottle tlonmoyen max. alaaortIe mln. necesaalre 'entr_
Plomb 0,15 mg/L+/- 10% 0,001mg/L 99,33% 0.001mg/L 0,010 mg/L 6,5
Plomb 0,15 mg/L+/- 10% 0,002mg/L 98.66% 0,003mg/L 0,010 mg/L 8,5
Spore MIn.50 000/L 1/mL 99.99% 3/mL > 99.95% NA
Turbldit¢ 11+/-1NTU 0,12 NTU 98,98% 0,18 NTU 05 NTU NA
Llndane 0,002mg/L +/-10% 0,00005mg/L 97.62% 0,00005mg/L 0,00002mg/L NA
Atrazlne 0,009mg/L+/- 10% 0,0002mg/L 9793% 0.0006mg/L 0,003 mg/L NA
Chiore 2,0 mg/LW- 10% 0,09 mg/L 95.26% 0.17mg/L >75% NA
Partlcules"_ Au molns 10000 900/mL 99,68% 2,400count/mL >85% NA
partlcules/m
2,4-D 0,210mg/L+/- 10% 45,45 ug/L 84,42% 100ug/L 0,0017mg/L NA
Amtante 107tol06fibredL fib_esde 0,16MFL/mL 99.96% 0,16MFL/mL 99% NA
Iongueur10microm_tresou plus
Mesureavecdebitde 2,83 Umn (0,75 GPM)et presslonmaxlmaiede 827 kPa (120 Ib/po)dans les conditionsde
laboratolrestandard;cependant,la performancereelleest vaSable.Performancede protectionde la santetestee et
certl_eepar NSF IntematlonaL
'* Utlilsatlonde partlculesde 0,5 - 1 micron,
MialsLel_ des s_ _i_s de sa_L6
N_I_t_rO d_ c_rt_nc_
O1 - 148_
Lisezcettefichetechniqueet comparezIes
caractefistiquesde I'appareilavecIes besoins
detraitementde I'eau.
N'utilisez PA$ce produit en presence
d'une eau de qualite microbiologique
deficiente ou inconnuesans installer un
dispositif de desinfectionadequatavant
ou apres le systemede filtration. Vous
pouvezutiliser un systemes certifiepour
la retention des spores en presenced'une
eaudesinfecteequi peut contenirdes
sporesflltrables.
Utilisezce produit uniquementavec une
sourced'eau froide. Verifiezle respect des
dispositions des lois et reglements Iocaux
et provinciaux.
Lesystemedefiltrationd'eauretractable
utiliseunecartouchedefiltrationremplagable
9005(voyezi'informationsur les
coordonneesde Searspresenteessur la
dernierede couvertureduguided'utiiisation
et d'entretienpourplacerunecommande).Le
remplacementen tempsopportunde Ia
cartoucheest unfacteuressentielpourune
performancesatisfaisantede ce systemede
flItration.ConsultezlasectionapplicabIede
ce guideausuietdes instructionspour
utilisationg_nerale,entretienet diagnostic.
Oesystemea et_test_sur labasedes
normesANSI/NSF42et 53 pourlaretention
dessubstancesmentionneesci-dessous.La
concentrationdessubstancesindiqu_esdans
i'eau&i'entreedusystemea _ter_duite
unevaleurinf_rieureou _gale&Ia iimite
admissiblespecifi_eparles normes
ANSl/NSF42 et 53pour I'eauquittantle
syst_me.
Oadouchesde fiilrationWFS0KNB00 et WF50 KWI500testeeset certifiTespar NSF International
su_la ba_e desnormesANSE/NSF42 et 53, pou_la _tent_on_Jesoontaminant_su_vants
Notmen° 42 : Effetsesth_iques No,me n_ 53 : Effetss_r I_ sante
F{_ductio_su_go_t el odeur R_tentio__Jescontamina_t_chimiques
F{6rentionFiltrationF{6ductiO_m_caniquedesde lagarticulesconcenearionOlassede choreE FiltrationR_ducrionR_ducrionlindanem_canigueetsurde2,4lasporesconcentratione tu_bidir6deet plomb,amianreatrazine'
@
PentaPure
1000ApolloRoad
Eagan,MinnesotaU.S.A.
EPAEST#35917-MN-1
m
57
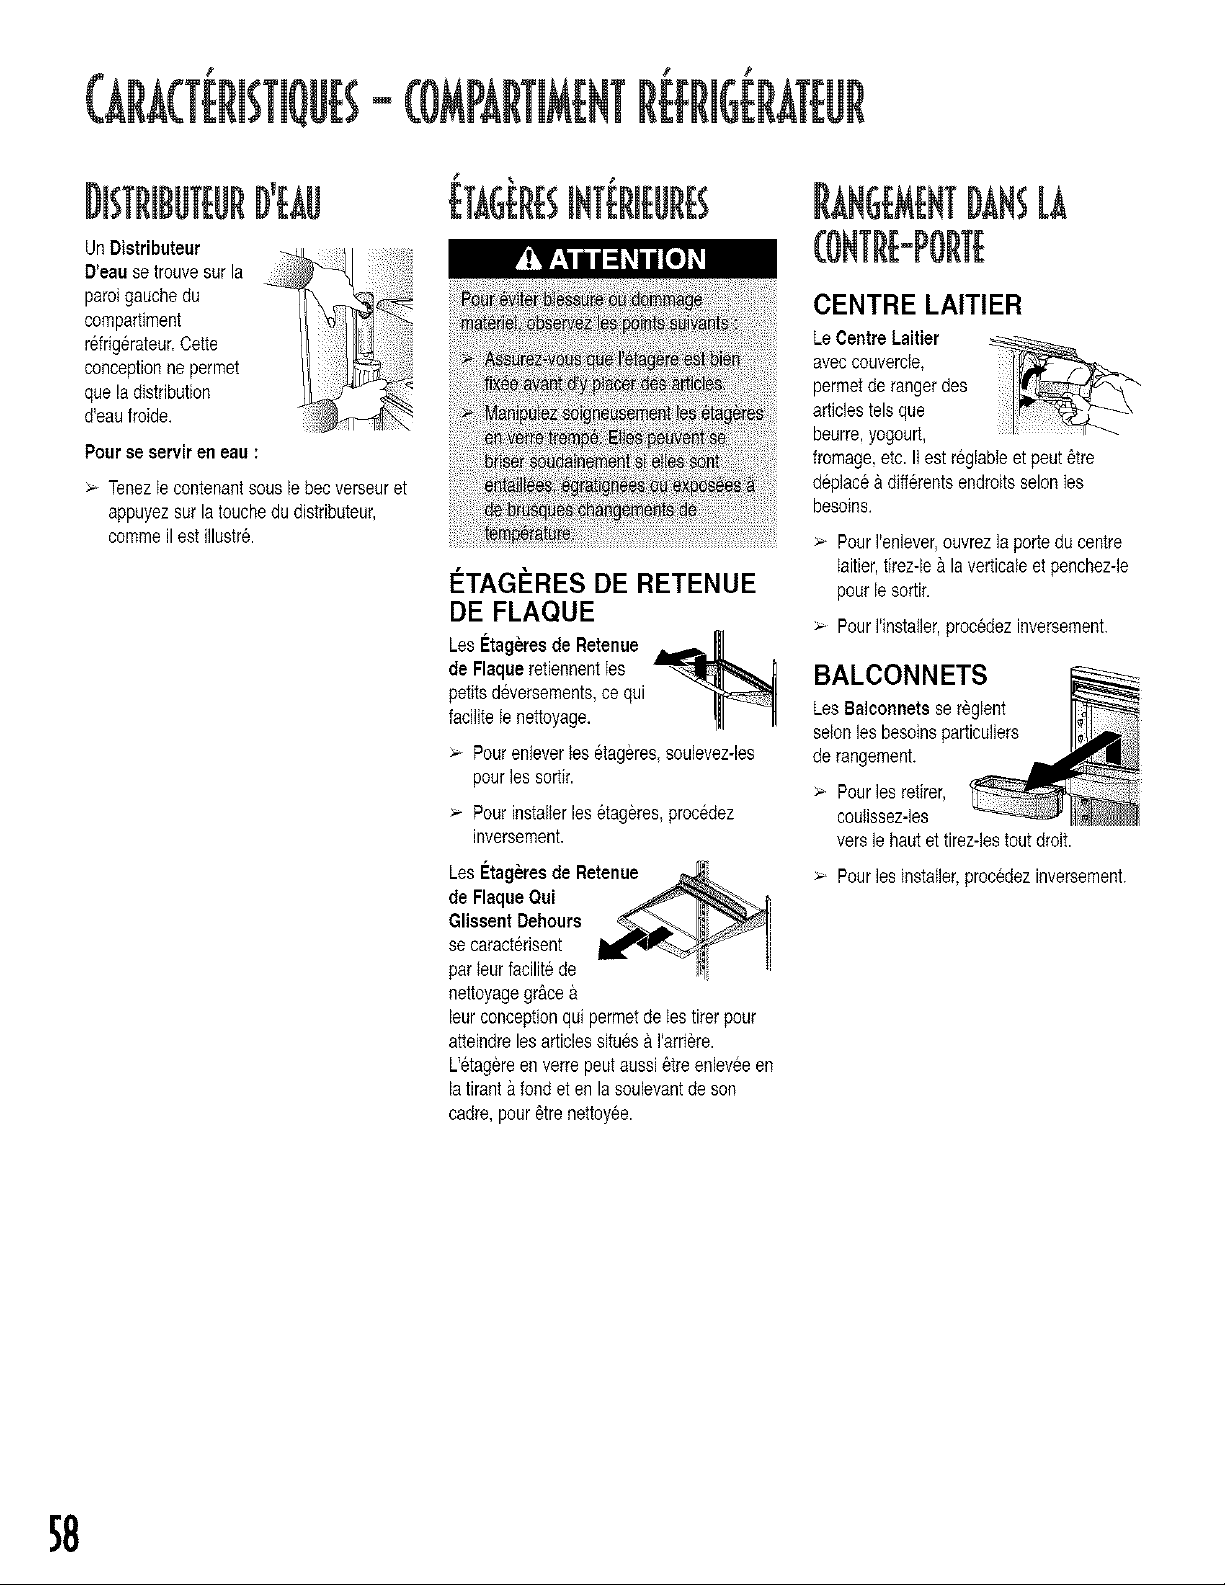
IIBU URD'BU
Un Distributeur
D'eausetrouvesur la
paroigauchedu
compartiment
refrigerateur.Cette
conceptionne permet
queladistribution
d'eaufroide.
Pourse serviren eau :
> TenezIecontenantsous iebecverseuret
appuyezsurla touchedudistributeur,
commeil est illustr&
ETAGERBiNTERIEURB
I_TAGI_RES DE RETENUE
DE FLAQUE
Les Etag_resde Retenue A=.,,,=_-_
de FlequeretiennentIes
petitsdeversements,ce qui
facilitete nettoyage.
> Pourenleveries _tageres.soulevez-les
pourles sortir.
> Pourinstallerles 6tag_res,procedez
inversement.
Les Etag_resde Retenue
de FlaqueOai _._j,
Glissent Dehours _-._L_ ItL_4
se caracterisent _ll_"_ l
parteurfacilitede lti t
nettoyagegr&ce
leurconceptionquipermetde Iestirerpour
atteindrelesarticlessitues& I'arriere.
L'etagereen verrepeutaussi_tre enleveeen
latirant&fondet enla soulevantde son
cadre,pouretrenettoy6e.
[ ANSB
CENTRE LAMER
LeCentreLaitier
aveccouvercle,
permetde rangerdes
articlestelsque
beurre,yogourt,
fromage,etc. Itest reglabIeet peut_tre
deplace&diff6rentsendroitsselonIes
besoins.
PourI'enlever,ouvrezta portedu centre
Iaitier,tirez-le&laverticaleet penchez-le
pourlesortir.
> PourI'installer,procedezinversement.
BALCONNETS
LesBalconnetsse reglent
selenlesbesoinsparticuliers
derangement.
> Pourles retirer,
couIissez-les
versle hautet tirez-lestoutdroit.
> Pourles installer,procedezinversement.
$8
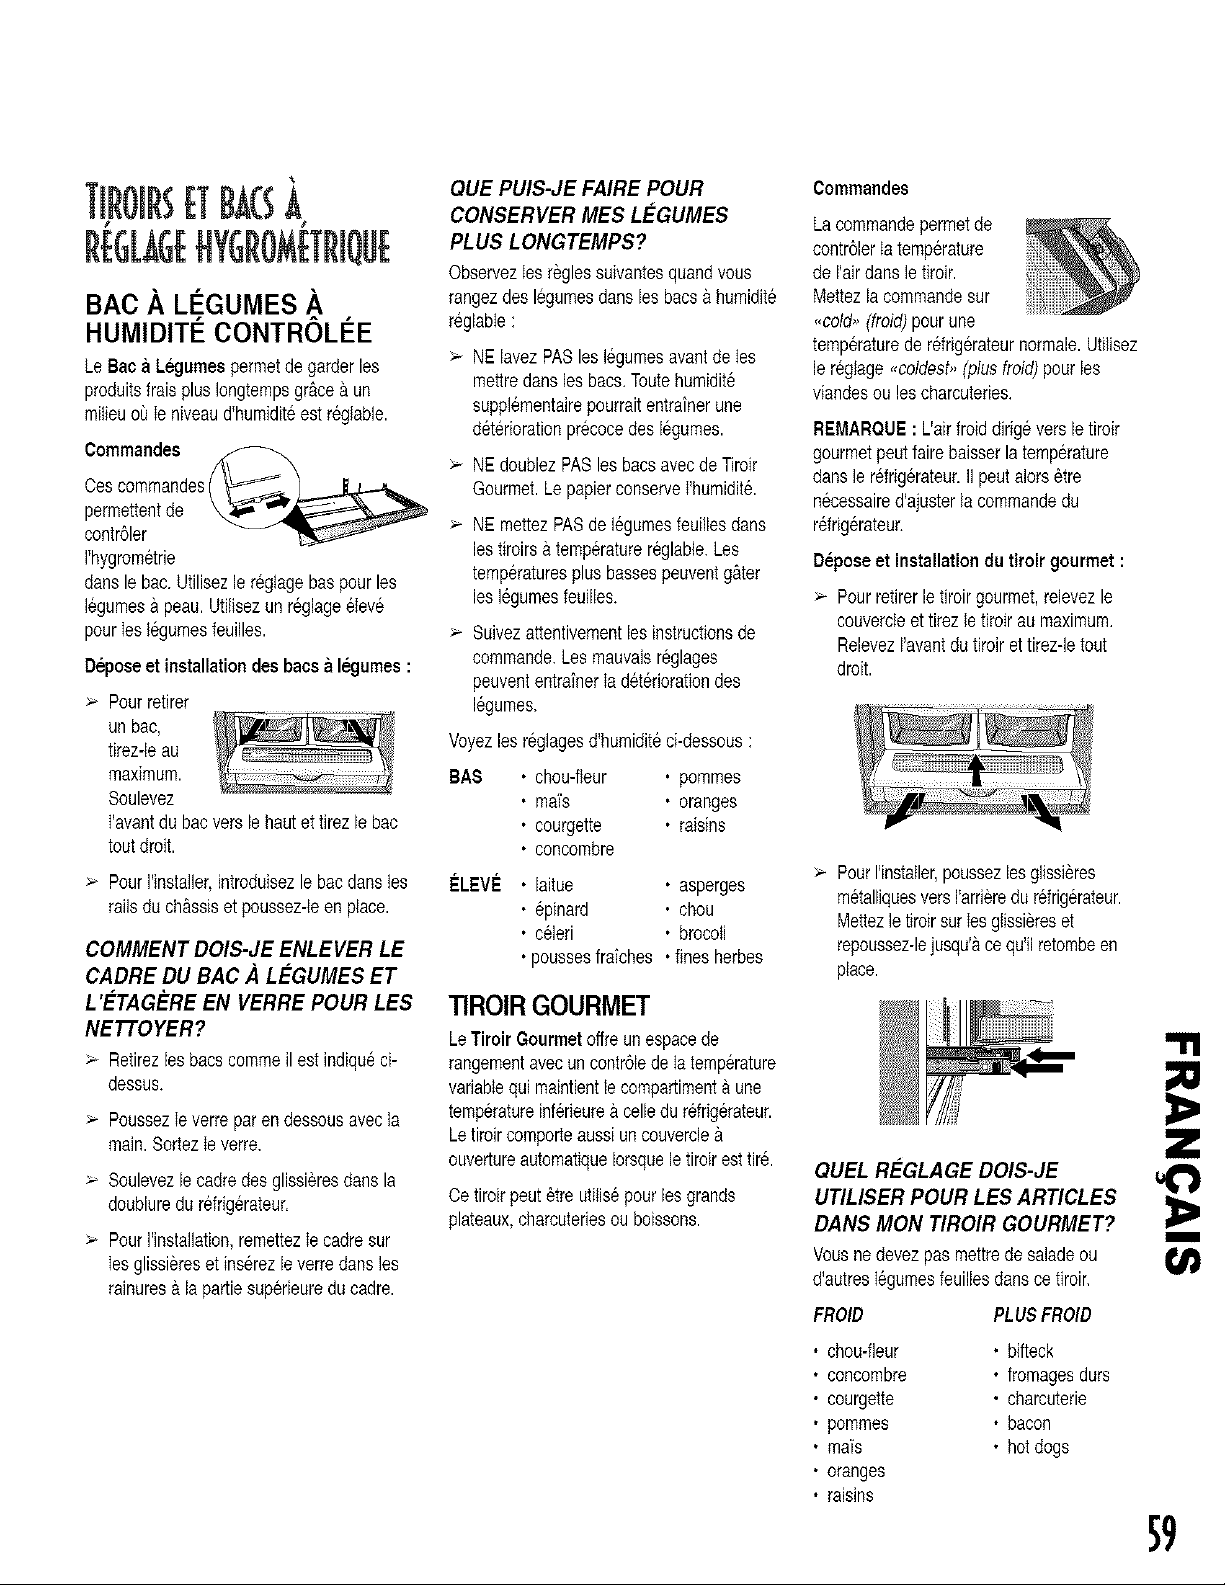
TIROiBETBACSA
BAC A LEGUMES A
HUMIDITI CONTROLEE
Le Baea Legumespermetde garderles
produitsfraisplus Iongtempsgr&ce&un
milieuo_ Ieniveaud'humiditeestr6glable.
Commandes
Oescommandes/_
permettentde _:;_a, ._
contr61er -- _-
I'hygrometrie
dansle bac.Utilisezle r6glagebaspourles
legumes& peau.Utitisezun r6glage6Iev6
pourIeslegumesfeuilles.
Deposeet installationdesbaesaIL=gumes:
> Pourretirer
unbac,
tirez-leau
maximum.
Soulevez
I'avantdu bacversle hautet tirezle bac
toutdroit.
PourI'installer,introduisezlebacdansles
railsdu ch&ssiset poussez-leenplace.
COMMENT DOIS-JE ENLEVER LE
CADRE DU BAC A L_-GUMES ET
L'_-TAG_-RE EN VERRE POUR LES
NETTOYER?
> Retirezlesbacs commeil est indiqu_ci-
dessus.
>" PoussezIeverre parendessousavecla
main.SortezIe verre,
> Soulevezlecadredes glissi6resdansla
doubluredu refrig6rateur.
>. PourI'installation,remettezIecadresur
Iesglissiereset inserezleverredartsles
rainuresa la pattiesuperieureducadre.
QUE PUIS-JE FAIRE POUR
CONSERVER IVIES L_-GUMES
PLUS LONGTEMPS?
ObservezIesreglessuivantesquandvous
rangezdes legumesdanslesbacs&humidite
reglabIe:
> NE lavezPASleslegumesavantdeIes
mettredansles bacs.Toutehumidite
suppl6mentairepourraitentrainerune
deteriorationpr6cocedes I_gumes.
> NEdoublezPASles bacsavecde Tiroir
Gourmet.LepapierconserveI'humidit&
> NE mettezPASdelegumesfeuillesdans
lestiroirs &temp6raturereglable.Les
temperaturesplus bassespeuventg&ter
les legumesfeuilles.
Suivezattentivementles instructionsde
commande.Lesmauvaisreglages
peuvententrainerIa d6t_riorationdes
16gumes.
Voyezles reglagesd'humidit6cbdessous:
BAS • chou-fleur . pommes
• m_'s • oranges
• courgette • raisins
• concombre
ELEVE • laitue • asperges
• @inard . chou
• celeri • brocoti
• poussesfraiches • finesherbes
TIROIRGOURMET
LeTiroirGourmetoffreunespacede
rangementavecuncontr61ede Iatemperature
variablequimaintientle cempartiment&une
temperatureinf6rieure&celledu r_frigerateur.
Letiroircomperteaussiun couvercle&
ouvertureautematiquelersquele tiroirest tit&
Oetiroirpeut_tre utitis6pourles grands
plateaux,charcuteriesou boissons.
Commandes
Lacommandepermetde
contr61erIa temperature
deI'airdansle tiroir.
Mettezlacommandesur
,cold,,(froid)pourune
temp6raturede r6frig6rateurnormale.Utilisez
le r_glage,,coldest,,(plusfroid)pour les
viandesou les charcuteries.
REMARQUE: L'airfmiddirig6versle tiroir
gourmetpeutfaire baisserla temperature
dansle r6frig6rateur.II peutalors6tre
necessaired'ajusterta commandedu
r6frigerateur.
Deposeet installationdu tiroirgourmet:
Pourretirerle tiroirgourmet,relevezle
couvemleettirez tetiroir au maximum.
RelevezI'avantdu tiroiret tirez-letout
droit.
> PourI'instatler,poussezlesglissieres
m_talliquesversI'arrieredur_frigerateur.
Mettezle tiroirsur Iesglissiereset
repoussez-lejusqu'acequ'ilretombeen
place.
QUEL R_-GLAGE DOIS-JE
UTILISER POUR LES ARTICLES
DANS MON TIROIR GOURMET?
Vousne devezpas mettrede saladeou
d'autresI_gumesfeuillesdansce tiroir.
FROID PLUSFROID
• chou-fleur • bifteck
• concombre • fromagesdurs
• courgette • charcuterie
• pommes • bacon
• ma'[s • hotdogs
• oranges
• raisins
59

MACHINEGLA(ON
Utilisationde la machinea glaqonsta
premierefois :
t. Assurez-vousquele
bac& gla£onsesten
placeet que tebrasde
detectionestversle
has.
2. Apresque le cempartimentcongelateur
atteintunetemperaturesitu_eentre
-18°Cet -17 °C (0 °F et 2 °F),la
machine&gla£onsse rempfitd'eau et se
meten marche.
3. Attendez24 heuresenvironapr_s
I'instaflationpourrecueillirlepremierlot
degla_ons.
4. JetezIes gla_onsobtenusles 12
premieresheuresdefonctionnementpour
verifierque le systemenecomportepas
d'impuretes.
Instructionsde fonctionnement
1. Assurez-vousque le bac& glaconsest en
ptaceet quele brasde detectionesten
bas.
2.
Unefoisque le compartimentcong61ateur
atteintunetemperaturesitu&eentre-18°C
et-I7 °O(0°Fet 2 °F),Ia machine&
gla_onsseremplitdeau et semeten
marche.IIestpossiblederecueiIlirun lot
completde gla_onsenvirontouteslee3
heures.
3. Arr_tezla production
deglaconsen relevant
le brasjusqu'&ce
qu'undeclicsefasse
entendre.
4. La machine&glagonsreste& I'arr_ttant
quele braen'estpaspouss_versIebas.
PANIERS-TIROIRS
COULISSANTS
(Ensemblede portedu tiroir,retir6sur
I'illustration,pourune meilleure
compr6hension)
Pourenleveretremplacer des paniers :
> Voyezpage52 commentenleverlepanier
et page53 commentle remettreen place.
60

Nm'O EDUR , RIG R UR
COMPOSANTS
Exterieuret portes
texturees
Interieurde tacaisse
Extedeuret portesen
acierinoxydable*
NE PAS UTILISER
> Nettoyantsabrasifsou energiques
> Ammoeiaque
>. Javellisant
Sotvantsou detergentsconcentrGs
> Tamponsde rGcurageee metalou
ptastique
> Nettoyantsabrasifsou 6eergiques
> Ammoeiaque
UTILISER
> Utiiiser4 cuilleres&soupede bicarbonatedesodiumparlitre
(1pinte)d'eautiedesavonneuse.
>. Rincerlessurfaces& I'eautiedeet propreet secherimmediatement
pourevitertesmarquesdues& I'eau.
> UtiIiserune@ongeouun lingepropreet soupleavecde I'eautiede
et savoeneuse.
IMPORTANT: Les >
dommagesdu fini enacier >
inoxydabledus#,une
utilisationincorrectedes
produitsdenettoyageou
deproduitsnon >
recommandesne sentpas
couvertspar la garantiede
ceproduit.
Joints de porte
Serpentinsde
eondenseurRetirerla grille
inf#rfeurepouraccederaux
serpentins.
Grillede sortiedu
ventilateurde
eondenseur
Voirartiste durdrigerateur.
Aecessoires: Clayettes,
etageres,bacs,tiroirs,etc.
Javellisant
SoIvantsou detergentsconcentres
Tamponsde recurageen metalou
ptastique
Produitsa basedevinaigre
Nettoyants& based'agrumes
> Nettoyantsabrasifsou eeergiques
> Tamponsde recurageen metalou
plastique
> Lave-vaisselle
> Rincerlessurfaces& I'eautiedeet propreet secherimmediatement
pour_vitertesmarquesdues& I'eau.
UtiIiserunebused'aspirateur.
UtiIiserunebused'aspirateuravecbrosse.
> Suivreles instructionsde deposeet d'installationdansla section
appropriee.
Laisserles articless'ajuster&la temperatureambiante.
> Diluerdu detergentdouxet utiliserune epongeou un lingesouple
et proprepourle nettoyage.
> Utiliserunebrossea filamentsen plastiquepour allerdaesles
interstices,
Rincerlessurfacesa I'eautiedeet propre.
Secherimmediatementlesarticlestransparentset en verrepour
eviterroutesmarques,
Un nettoyant pour acier inoxydable a 6te ajoute pour votre usage, & I'interieur du refrig6rateur. Si vous voulez acheter d'autres
produits de nettoyage veuillez prendre contact avec Sears en utitisant les renseJgnementsdonnes au dos de couverture de ce _1
guide.
UI
m
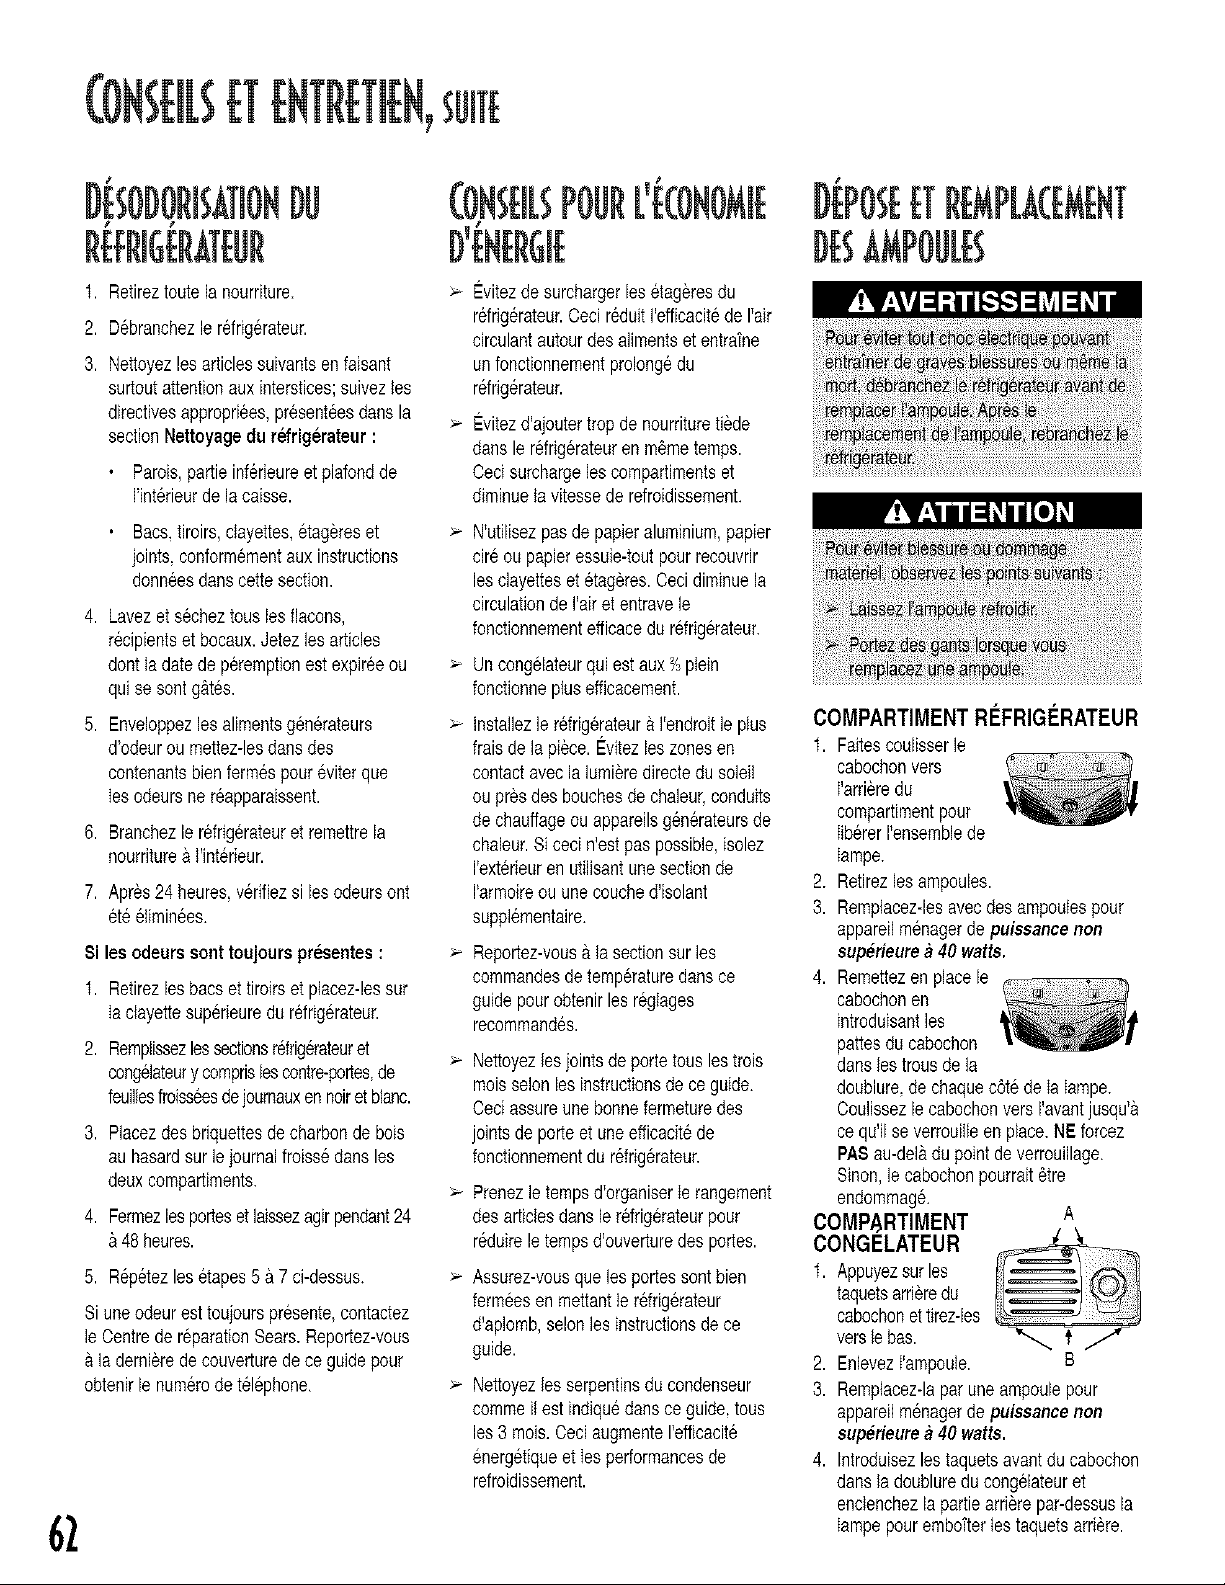
ODORISkIIONDU
_ P
t. Retireztoutela nourriture.
2. D6branchezlerefrig@ateur.
3. Nettoyezlesarticlessuivantsenfaisant
surtoutattentionauxinterstices;suivezles
directivesappropriees,present6esdansla
sectionNettoyagedu r6frigerateur :
Patois,pattie inf@ieureet plafondde
I'int@ieurde lacaisse.
Bacs,tiroirs,clayettes,etagereset >
joints,conform6mentauxinstructions
donn6esdanscettesection.
4. Lavezet secheztousles flacons,
r6cipientset bocaux.Jetezlesarticles
dontla datede p@emptionestexpireeou
quise sentg&tes.
5. Enveloppezles alimentsgen@ateurs >
d'odeurou mettez-lesdansdes
contenantsbienferm6spour@iterque
Iesodeursne r@pparaissent.
6. Branchezle refrig@ateuret remettrela
nourriture& l'interieur.
7. Apres24 heures,v@ifiezsi lesodeursont
et66timinees.
8i lesodearssonttoujours presentes:
t. Retirezlesbacset tiroirset ptacez-lessur
Ia dayettesup@ieuredu refrig@ateur.
2. Remptissezlessectionsr@igerateuret
congelateury comprislescontre-pottes,de
feuillesfroisseesdejoumauxen noiretblanc.
3. Placezdes briquettesde charbondebois
auhasardsur lejournalfroissedansles
deuxcompartiments.
4. Fermezlesportesetlaissezagirpendant24
48heures.
5. R@etezles etapes5 a 7 ci-dessus.
Siuneodeurest teujourspresente,contactez
le Oentreder@arationSears.Repottez-vous
&lademi@edecouverturede ce guidepour
obtenirle numerodet61@hone. >
62
( ONfl iBPOURiJ CONOMI[
> Evitezde surchargerles etag@esdu
refrig@ateur.CecireduitI'efficacitede I'air
circulantautourdesalimentset entrafne
unfonctionnementprolong6du
refrig@ateur.
Evitezd'ajoutertropde nourrituretiede
dartslerefrigerateuren m6metemps.
Oecisurchargelescompartimentset
diminueta vitessede refroidissement.
N'utilisezpasde papieraluminium,papier
cireou papieressuie-toutpourrecouvrir
lesclayetteset etag@es.Oecidiminuela
circulationde Hairet entravele
fonctionnementefficacedu reffig@ateur.
> Uncongelateurqui estaux_ plein
fonctionneplusefficacement.
Installezle r@igerateur&I'endroitleplus
fraisde lapi@e. Evitezleszonesen
contactavec lalumi6redirectedusoleii
ouprosdes bouchesde chaleur,conduits
dechauffageouappareilsgen6rateursde
chaleur.Si cecin'estpaspossible,isolez
I'ext@ieurenutilisantunesectionde
I'armoireou une couched'isolant
suppl6mentaire.
Repottez-vous& la sectionsurles
commandesdetemp@aturedansce
guidepourobtenirles regtages
recommand6s.
> Nettoyezlesjointsde portetousles trois
moisselonles instructionsde ceguide.
Ceciassureunebonnefermeturedes
jointsdeporteet une efficacit6de
fonctionnementdur@ig6rateur.
> Prenezle tempsd'organiserIe rangement
desarticlesdansle r6frigerateurpour
reduirele tempsd'ouverturedes pottes.
Assurez-vousque lesportessentbien
fermeesen mettantter6frig@ateur
d'aplomb,selonles instructionsdece
guide.
Nettoyezlesserpentinsdu condenseur
commeitest indiquedansce guide,tous
les3 mois.OeciaugmenteI'eflicacit6
energ6tiqueet Iesperformancesde
refroidissement.
COMPARTIMENTRI_FRIGI_RATEUR
t. Faitescoulisserle
cabochonvers
I'arrieredu
compartimentpour
IibererI'ensemblede
Iampe.
2. Retirezlesampoules.
3. Remplacez-lesavecdes ampoutespour
appareilmenagerde puissance non
sup#,rieure_ 40 watts.
4. Remettezen placele
cabochonen
introduisantles
pattesdu cabochon
dans lestrousde la
doublure,de chaquec6tede IaIampe.
Coulissezle cabochonversI'avantjusqu'a
ce qu'ilse verreuilteenplace.NE fercez
PA$au-del&du pointdeverrouillage.
Sinon,le cabochonpourrait@e
endommag&
COMPARTIMENT A
CONGELATEUR
t. Appuyezsur les
taquetsarrieredu
cabochonettirez-les
verslebas. _ t
2. EnlevezI'ampoule. B
3. Remplacez-laparune ampoulepour
appareilmenagerde puissance non
sup#rieure_ 40 watts.
4. Introduisezlestaquetsavantdu cabochon
dans ladoublureducongelateuret
encIenchezlapattiearri@epar-dessusla
Iampepourembottertestaquetsat@re.

Lesr6frig6rateursd'aujourd'huicomportentuneisolationenmousseetsontpIusefficacesdu pointde vue6nerg6tiquequeles anciensmodeIes.
Cependant,cetteisolationen moussen'estpasaussi efficacepourI'absorptiondessons.tl en resulteque certainebruitspeuventvoussembler
inhabituels.,_ la Iongue,cesbruitsdeviendrontfamiliers.Veuillezvousre _orterautableauci-dessousavantdefaireappelau serviceapres-vente.
I:].'{IJill [0.}',.1.11.1_11_oI.$!1:] nl_1 [€,,[o]ILIii [o]_1
Cliquetis La commandedu cong6Iateur(A)
6metund6ctica I'arr_touau d6part
du compresseur.
Fonctionnementnormal
:_ La minuteriede d6givrage(B) faitle :_ Fonctionnementnormal
bruitd'unehortoge61ectriqueet
fonctionneparintermittence.
Grandmouvementd'air _ Le ventilateurducongelateur(C)et _ Fonctionnementnormal
le ventilateurducondenseur(D)
fontce bruitencoursde
fonctionnement.
Bruit d'ebullition ou de _ Le r6frig_rantde 1'6changeurde _ Fonctionnementnormal
gargouillis chaleur(F)et de 1'6vaporateur(E)
faitce bruitIorsqu'ilcircule.
Bruit sourd >Les glaconstombentde la machine > Fonctionnementnormal
gla_onsdanslebaca gta_ons((3).
Bruit devibration > Le compresseur(H) fairce bruiten > Fonctionnementnormal
fonctionnant.
Le refrig6rateurn'estpasd'aplomb. _ Voirlosd6tailssur la mised'aplombdur6frig6rateurdartsles
instructionsd'instaIIation.
Bourdonnernent >- La soupaped'eaude Ia machine& >- Fonctionnementnormal
glacons(I) (certainsmodeles)
bourdonneIorsquela machine
glaconeeeremplitd'eau.
Ronronnement > La machinea glagons(J) est aIa > Arr6terle bruiten relevantle brasd_tecteura la positiond'arr_t.
positionde marchesans Voirlesdetailsdansia sectionourla Machinea glagons
raccordementd'eau, automatique,dartsce guide.
Lecompresseur(H)peut6mettreun _ Fonctionnementnormal
ronronnementaiguenfonctionnant.
Bifflementou >- U616mentchauffantdusystemede >- Fonctionnementnormal
olaquement d6givrage(K)faitunsifflement,
greeitleou claqueencoursde
fonctionnement.
m
63
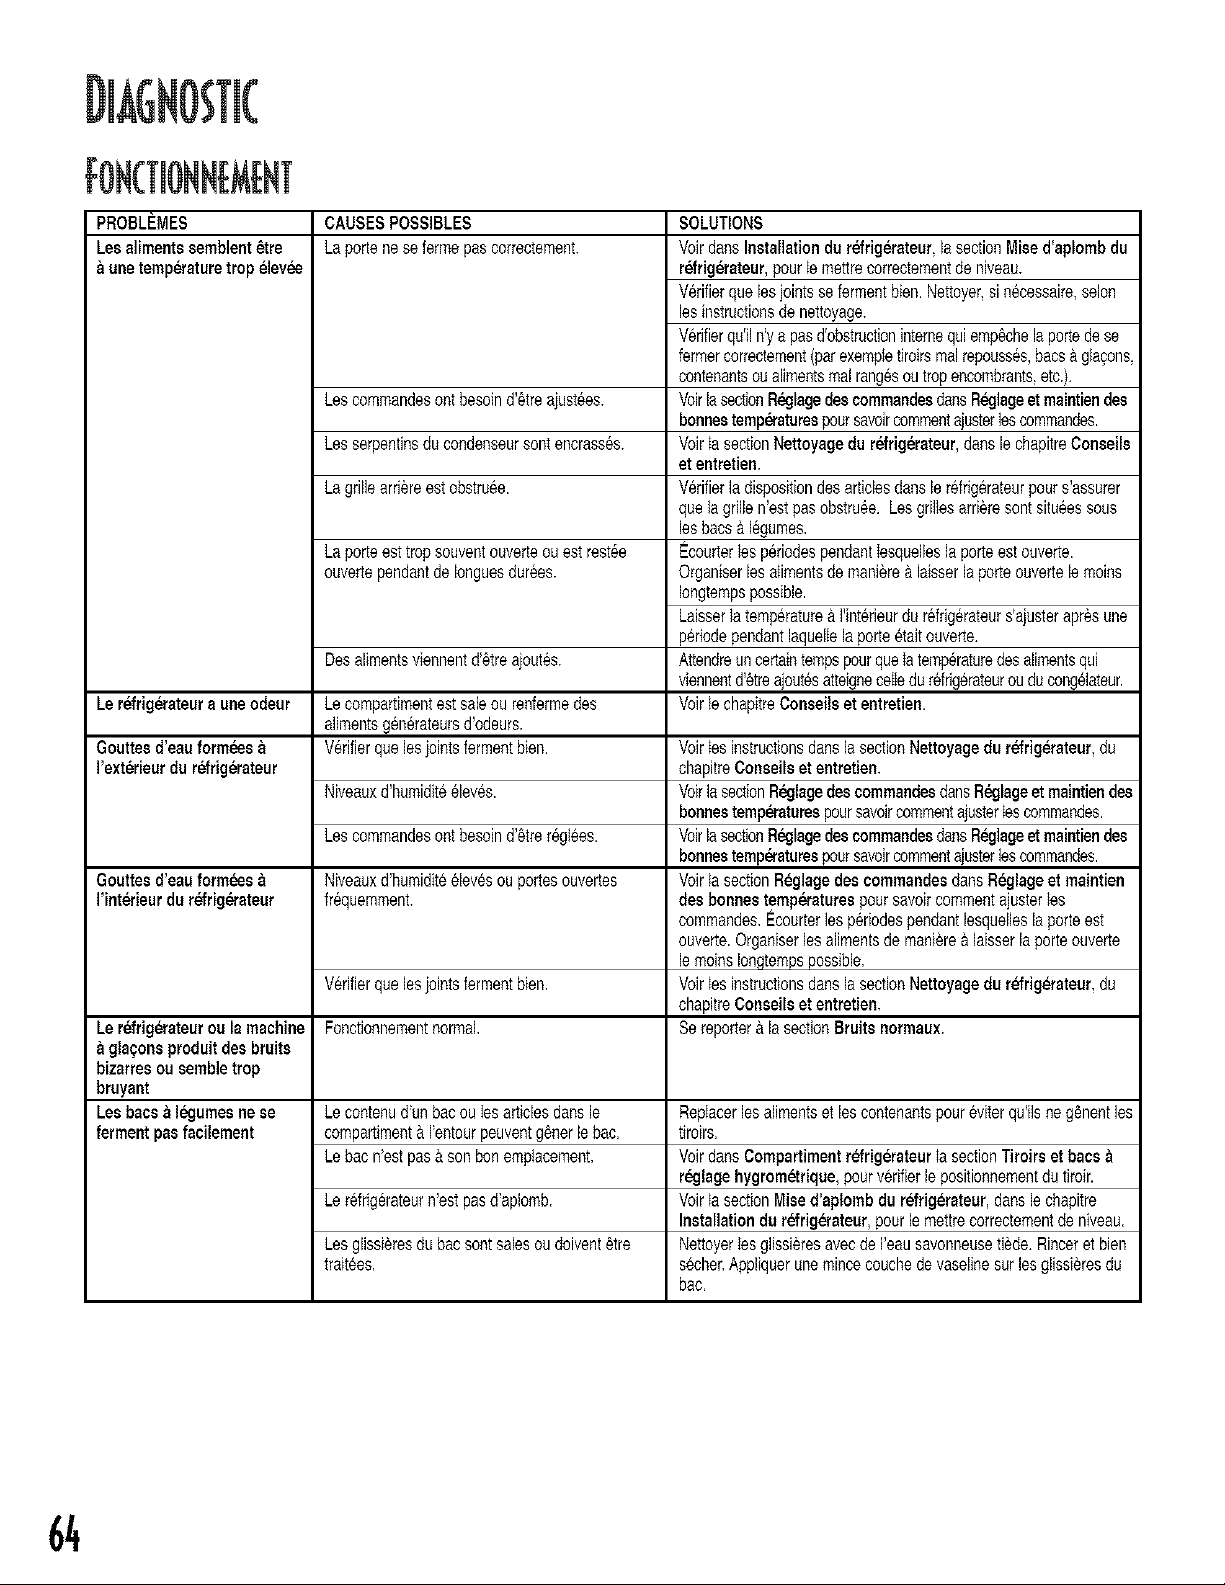
PROBLEMES
Leaaliments semblent_tre
unetemperature trop _levee
Le refrig_ateura uneodeur
Gouttesd'eau form.s
I'exterieur du r_frig_rateur
Gouttesd'esu form.s
I'interieur du r_rig_rateut
CAUSESPOSSIBLES
Laportene se fermepascorrectement,
Les comrqandesont besoind'6treajustees.
Les serpentinsducondenseursent encrasses.
La grillearriereest obstruee,
La porteest trop souventouverteou est restee
ouvertependantde Ionguesdurees.
Desalimentsviennentd'6trea)outes.
Le compartimentest saleou renfermedes
alimentsgenerateursd'odeurs,
Verifierquelesjointsfermentbien,
Niveauxd'humiditeeleves.
Les commandesontbesoind'6trereglees,
Niveauxd'humiditeeieuesou portesouvertes
frequemment.
SOLUTIONS
VoirdansInstallationdu rLffrigerateur_lasectionMise d'aplombdu
r6frig_.rateur,pourte mettrecerrectementde nJveau.
Verifierque lesjointsse fermentbien,Nettoyer.si necessaire,selon
lesinstructionsde nettoyage.
V6rifierqu'il n'yapas d'obstructioninternequiemp6chela portedese
fermercorrectement(parexemptetiroirsmalrepousses,bacs&glacons.
contenantsoualimentsrealrangesoutrop encombrants,etc,).
VoirlasectionR_glagedesoornmandesdartsR_lage et msintiendes
bonneatemperaturespoursavoircommentajusterlescommandes.
Voirta sectionNettoyagedu r6frig6rateur, dartsle chapitreConseils
et entretien,
Verifierladispositiondesarticlesdans ler6frigerateurpours'assurer
quela grillen'est pasobstruee. Lesgri]Iesarrieresontsitueessous
lesbacs &16gumes.
Ecourterles periodespendantIesquellesla porteest ouverte,
Organiserlesalimentsde maniere& laisserlaporteouvertele moios
Iongtempspossible.
Laisserla temperature&I'interieurdu refrigerateurs'ajusterapresune
pebodependantlaquelIela porteetaiteuverte.
Attendreun certaintempspourquaIatemperaturedes alimentsqui
vienneotd'etreajoutesatteigneceItedu refrigerateurou du congelateur.
Voirle chapitreConaeilset entretien.
Voirtes instructionsdansla sectionNettoyagedu r6frigerateur, du
chapitreConaeilset entretien,
VoirlasectionR_lage des commandeadansRL=,glageet maintiendes
bonnestemperaturespoursavoircommentajustertescommandes.
VoirlasectionR_glagedescornmandesdartsR_lage et maintiendes
bonneatempeaturespoursavoircommentajusterlescommandes.
Voirla sectionR_glagedes commandesdartsR_lage et maintien
des bonnea t.emp_ratureapour savoircommentajusterles
commandes.Ecourterlesper[odespendantlesquellesla porteest
euverte.Organiserlesalimentsde maniere&laisserlaporteouverte
le moinsIoncttempspossible.
Voirtes instructionsdansla sectionNettoyagedu r6frigerateur, du
chapitreConaeilset entretien,
Se reporter& lasectionBruits normaux.
Verifierqualesjointsfermentbien.
Le refrig_ateur ou la machine Fonctionnementnormal,
glagonaproduitdes bruits
bizarrea ou aembletrop
bruyant
Lea bace_ I_umea ne ae Le contenud'un bacou Iesarticlesdartsle RepIacerlesalimentsetles contenantspour eviterqu'ilsoe g_nentles
ferment pas facilement compartiment_tI_entourpeuventg_nerle bac, tiroirs,
Le bac n'estpas &son bonemplacement. VoirdartsCompartirnentrLffrigerateurta sectionTiroira et baoa
r_glage hygrom_trique,pour verifierlepositionnementdu tiroir.
Le refrigerateurn'est pasd'aplomb. Voirta sectionMised'aplomb du refrig_rateur,dartsle chapitre
Installation du r6frigerateur_pour lemettrecorrectementde niveau.
Les glissieresdu bac sontsalesou doivent_tre Nettoyerlesglissieresavecde I'eau savonneusetiede. Rinceret bien
traitees, sachet,Appliquerunemincecouohede vaselinesur les glissieresdu
bac.
64
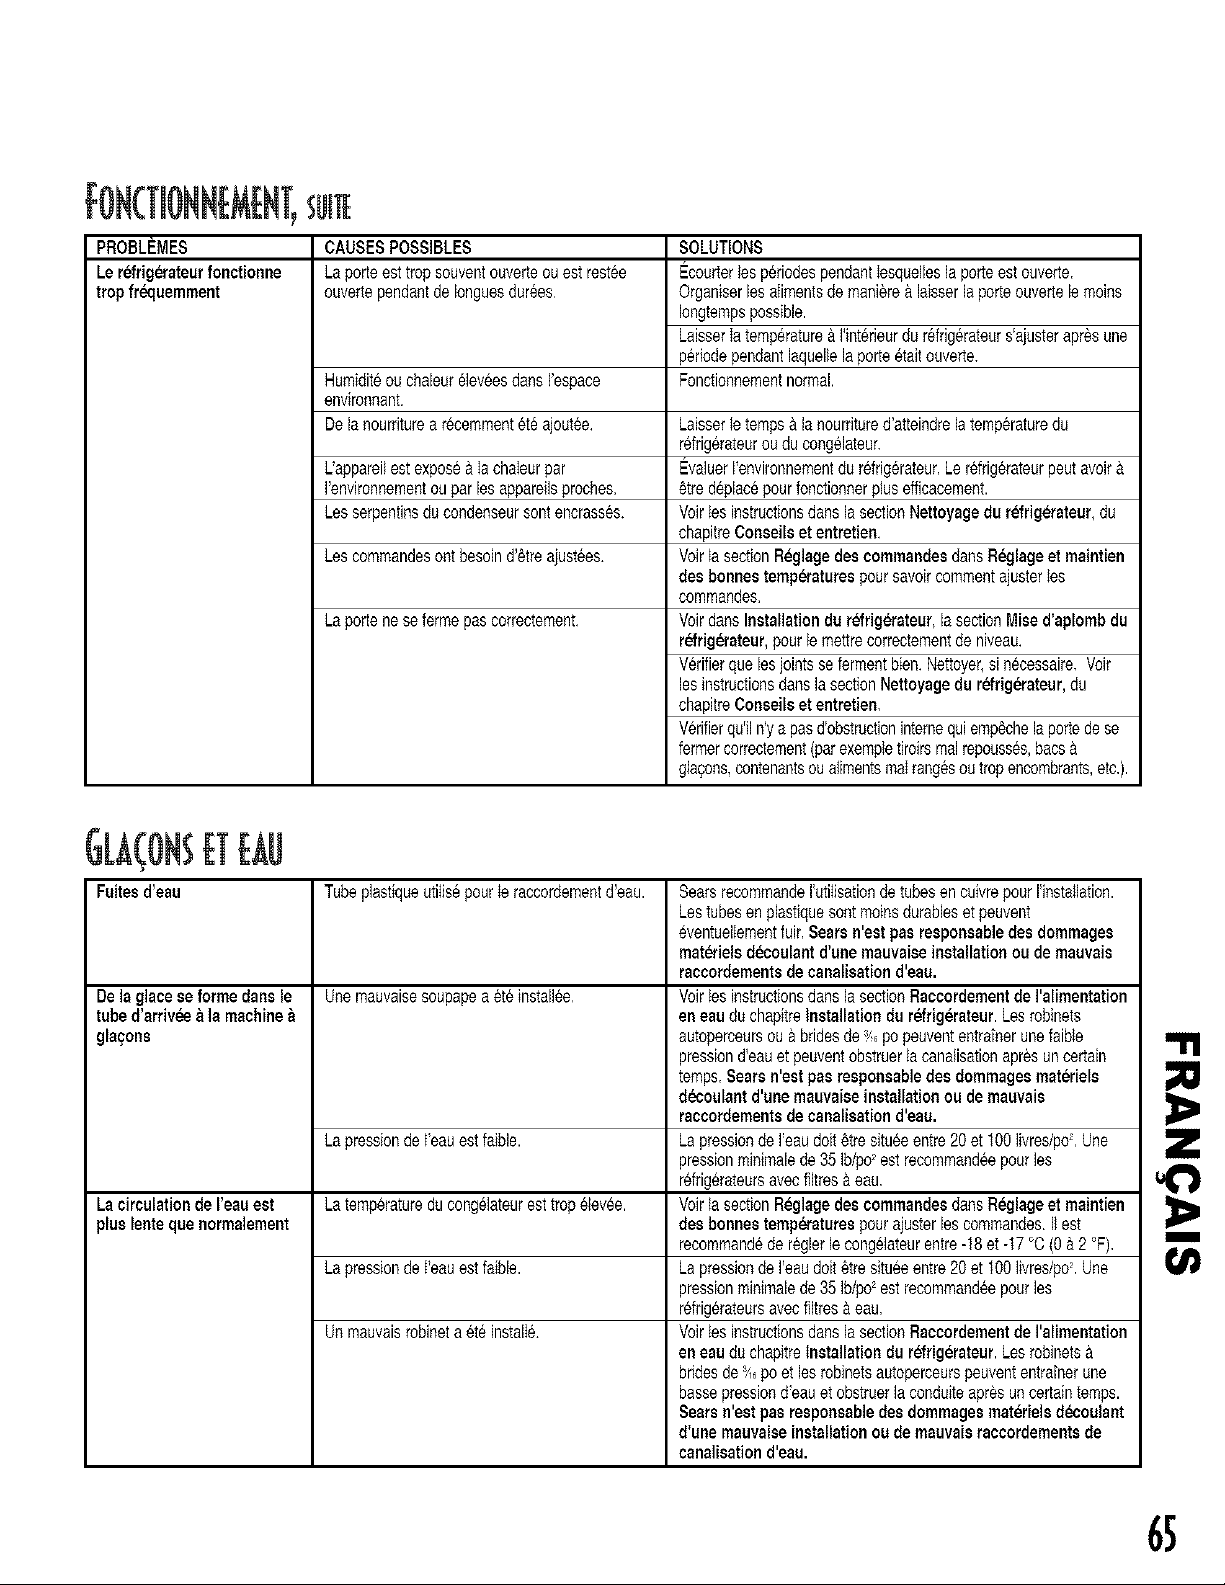
PROBLEMES
Le refrig_rateurfonctionne
trop frL,quemment
[ONCTIONNEM[NT, UtTE
CAUSESPOSSIBLES
La porteest trop souventouverteou est restee
ouvertependantde Ionguesdurees
Humiditeou chaleureleveesdansI'espace
environnant.
Dela nourriturea recemmentete ajoutee.
L'appareilest exposea Ia chaIeurpar
I'environnementou par lesappareilsproches.
Les serpentinsducondenseursont encrasses.
Los commandosoct besoind'etreajustees.
La portene sefermepas correctement.
SOLUTIONS
Ecourterles periodespendantIesqueliesla porteest ouverte.
Organiserlesailmentsde maniereA laisserlaporteouvertele moles
Iongtempspossible.
LaisserIa temperature&I'interieurdu refdgerateurs'ajusterapresLine
pebodependantlaquellela porteetaitouverte.
Fonctionnementnormal.
Laisserte temps&la nourdtured'atteindrela temperaturedu
refrigerateurou du congeiateun
EvaluerI'environnementdu refrigerateunLerefrigerateurpeut avoir&
6tredeplacepourfonctionnerplus efficacement.
Voirles instructionsdansla sectionNettoyagedu r_frig_,rateur,du
chapitreConseilset entretien.
Voirta sectionR6glagedes commandosdartsR_lage et maintien
des bonnes temperaturespour savoircommentajustertes
commandes.
VoirdartsInstallation du r_rig_rateur, lasectionMise d'aplomb du
rLffrigerateur,pourle mettrecorrectementde niveau.
Verifierque lesjointsse fermentbien.Nettoyer,si necessaire.Voir
lesinstructionsdanslasectionNettoyagedu r_frigerateur,du
chapitreConseilset entretien.
Verifierqu'il n'yapas d'obstructioninternequiemp_chela portedese
formercorrectement(parexempletiroirsmalrepousses,bacs&
glapons,contenantsou alimentsmaIrangesou tropencombrants,etc.).
ETE,&g
Fuites d'eau Tubeplastiqueutitisepourteraccordementd'eau. SearsrecommandeI'utitisationde tubesen cuivrepour I'instaIlation.
Lestubesen plastiquesontmoinsdurableset peuvent
eventuelIementfuin Searsn'est pas responsabledes dommages
materielsd_ooulant d'une mauvaiseinstallation ou de mauvais
raeoordementsde eanalisation d'eau.
Dela glaee se forme dana le Unemauvaisesoupapea ete installee Voirles instructionsdansla sectionRacoordementde I'alimentation
tube d'arrivL,e a la machine_ en eau du chapitreInstallation du r_frigerateur. Los robinets
glsqons autoperceursou a bridesde _/,_po peuvententrafnerunefaible
pressiond'eauet peuventobstruerla canalisationapres un certain
temps,Searsn'est pas responaabledes dommagesmateriels
d_coulsnt d'une mauvaiseinstallation ou de mauvais
raeoordementsde eanalisation d'eau.
La pressionde t'eauest faible. La pressionde I'eaudolt_tresitueeentre20et 100livres/poLUne
pressionminimalede 35 Ib/po2est recommandeepourlos
refrigerateursavecfiltres aeau,
La circulation de reau eat La temperaturedu congelateurest tropelevee. Voirla sectionR_glagedes eommandesdartsR_lage et maintien
plus lento que normalement des bonnes temperaturespour ajusterlescommandos.IIest
recommandede reglerlecongelateurentre -18et -17 °C (0 &2 °F).
La pressionde I'eauest faible. La pressionde I'eaudoit_tresitueeentre20et t00 livres/po2,Une
pressionminimalede 35 Ib/po2est recommandeepourlos
refrigerateursavecfiltres _eau,
Unmauvaisrobineta ete instalIe. Voirlos instructionsdansla sectionRaooordementde I'alimentation
eneau du chapitreInstallation du r_frigerateur. Los robinets
bridesde _'_poet les robinetsautoperceurspeuvententrafnerune
bassepressiond'eauet obstructla conduiteapres un certaintemps.
Sears n'est pas reaponsabledes dommageamateriels d_oulant
d'une mauvaise installation ou de mauvais raeeordementsde
eanslisation d'eau.
m
65

66

67

68

I
69

70

_0
:/1
Your Home
For repair-in your home-of all major brand appliances,
lawn and garden equipment, or heating and cooling systems,
no matter who made it, no matter who sold it!
For the replacement parts, accessories and
owner's manuals that you need to do-it-yourself.
For Sears professional installation of home appliances
and items like garage door openers and water heaters.
1-800-4-MY-HOME ® (1-800-469-4663)
Call anytime, day or night (U.S.A. and Canada)
www.sears.com www.sears.ca
Our Home
For repair of carry-in items like vacuums, lawn equipment,
and electronics, call or go on-line for the location of your nearest
Sears Parts & Repair Center.
1-800-488-1222
Call anytime, day or night (U.S.A. only)
www,sears,com
To purchase a protection agreement (U.S.A.) or
maintenance agreement (Canada) on a product serviced by Sears:
1-800-827-6655 (U.S.A.) 1-800-361-6665 (Canada)
Para pedir servicio de reparaci6n
a domicilio, y para ordenar piezas:
1-888-SU-HOGAR sM
(1-888-784-6427)
Au Canada pour service en fran(_ais:
1-800-LE-FOYER _c
(1-800-533-6937)
www.sears.ca
6E/A/ S
® TM SM
Registered Trademark / Trademark / Service Mark of Sears, Roebuck and Co.
® TM SM
Marca Registrada / Marca de Fabrica / Marca de Servicio de Sears, Roebuck and Co.
MC MD
Marque de commerce / Marque d_pos_e de Sears, Roebuck and Co.
Part No. 12642733
Form A/05/03
© Sears, Roebuck and Co.