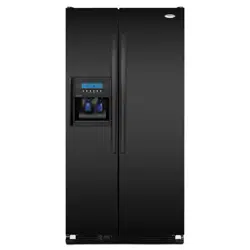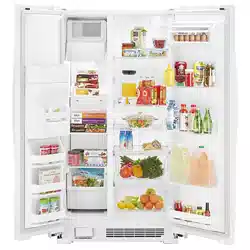
REFRIGERATORUSE&CAREGUIDE
MANUALDEUSOYCUIDADODELREFRIGERADOR
p p
GUIDED'UTILISATIONETD'ENTRETIENDUREFRIGERATEUR
Tableof Contents/ Indice/ Tabledes matibres
ASSISTANCE OR SERVICE ............................ 1
REFRIGERATOR SAFETY ............................... 2
INSTALLATION INSTRUCTIONS ................... 3
REFRIGERATOR USE ..................................... 5
REFRIGERATOR CARE ................................... 7
TROUBLESHOOTING ...................................... 8
WATER FILTER CERTIFICATIONS .............. 10
PRODUCT DATA SHEETS ............................ 11
WARRANTY .................................................... 13
AYUDA O SERVIClO TECNICO .................... 14
SEGURIDAD DEL REFRIGERADOR ............ 14
INSTRUCCIONES DE INSTALACI(3N .......... 15
USO DE SU REFRIGERADOR ...................... 18
CUIDADO DE SU REFRIGERADOR ............. 21
SOLUCION DE PROBLEMAS ....................... 22
HOJA DE DATOS DEL PRODUCTO ............ 24
GARANTiA ...................................................... 26
ASSISTANCE OU SERVICE .......................... 27
S¢CURITF = DU RCFRIGCRATEUR ................ 27
INSTRUCTIONS D'INSTALLATION .............. 28
UTILISATION DU RleFRIGleRATEUR ........... 31
ENTRETIEN DU RleFRIGleRATEUR ............. 34
DlePANNAGE .................................................. 35
FEUILLES DE DONNleES
SUR LE PRODUIT .......................................... 37
GARANTIE ...................................................... 39
Assistance or Service
If you need assistance or service, first see the "Troubleshooting"
section. Additional help is available by calling our Customer
Interaction Center at 1-800-253-1301 from anywhere in the
U.S.A., or write:
Whirlpool Corporation
Customer Interaction Center
553 Benson Road
Benton Harbor, MI 49022-2692
In Canada, for installation and service call, 1-800-807-6777.
For assistance call 1-800-461-5681 Monday to Friday 8:00 a.m. -
6:00 p.m. (EST), Saturday 8:30 - 4:30 p.m. (EST), or write:
Whirlpool Canada Inc.
Customer Interaction Center
1901 Minnesota Court
Mississauga, Ontario L5N 3A7
Information may also be obtained by visiting our website at
www.whirlpool.com.
In Canada, visit www.whirlpool.com/canada.
Please include a daytime phone number in your correspondence.
Keep this book and your sales slip together for future
reference. You must provide proof of purchase or installation
date for in-warranty service.
Write down the following information about your appliance to help
you obtain assistance or service if you ever need it. You will need
to know your complete model number and serial number. You can
find this information on the model and serial number label, located
on the inside wall of the refrigerator compartment.
Dealer name
Serial number
Address
Phone number
Model number
Purchase date
To order replacement filters, call 1-800-442-9991 and ask for the
part number listed below or contact your authorized Whirlpool
dealer. In Canada, call 1-800-461-5681.
Stainless Steel Cleaner and Polish: Order Part #4396095
Standard Base Filter Cartridges: Order Part #4396508 (NL240/
L400); #4396509 (NL240V and L400V)
2261717
"__q;'- _ _Whi, l_ol o
_- !:r .....el °
TOD0 LO QUE _AGINA_ _'
REFRIGERATORSAFETY
Your safety and the safety of others are very important.
We have provided many important safety messages in this manual and on your appliance. Always read and obey all safety
messages.
This is the safety alert symbol.
This symbol alerts you to potential hazards that can kill or hurt you and others.
All safety messages will follow the safety alert symbol and either the word "DANGER" or "WARNING."
These words mean:
You can be killed or seriously injured if you don't immediately
follow instructions.
You can be killed or seriously injured if you don't follow
instructions.
All safety messages will tell you what the potential hazard is, tell you how to reduce the chance of injury, and tell you what can
happen if the instructions are not followed.
IMPORTANT SAFETY INSTRUCTIONS
WARNING: To reduce the risk of fire, electric shock, or injury when using your refrigerator, follow these basic precautions:
m Plug into a grounded 3 prong outlet.
m Do not remove ground prong.
m Do not use an adapter.
m Do not use an extension cord.
m Disconnect power before servicing.
m Replace all panels before operating.
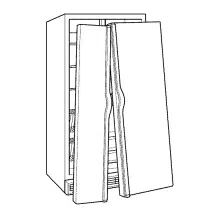
m Remove doors from your old refrigerator.
• Use nonflammable cleaner.
• Keep flammable materials and vapors, such as gasoline,
away from refrigerator.
• Use two or more people to move and install refrigerator.
• Disconnect power before installing ice maker (on ice maker
kit ready models only).
• Use a sturdy glass when dispensing ice or water (on some
models).
SAVE THESE INSTRUCTIONS
Proper Disposal ofYour OldRefrigerator
Before you throw away your old refrigerator or freezer:
• Take off the doors.
• Leave the shelves in place so that children may not easily
climb inside.
IMPORTANT: Child entrapment and suffocation are not problems
of the past. Junked or abandoned refrigerators are still dangerous
- even if they will sit for "just a few days." If you are getting rid of
your old refrigerator, please follow these instructions to help
prevent accidents.
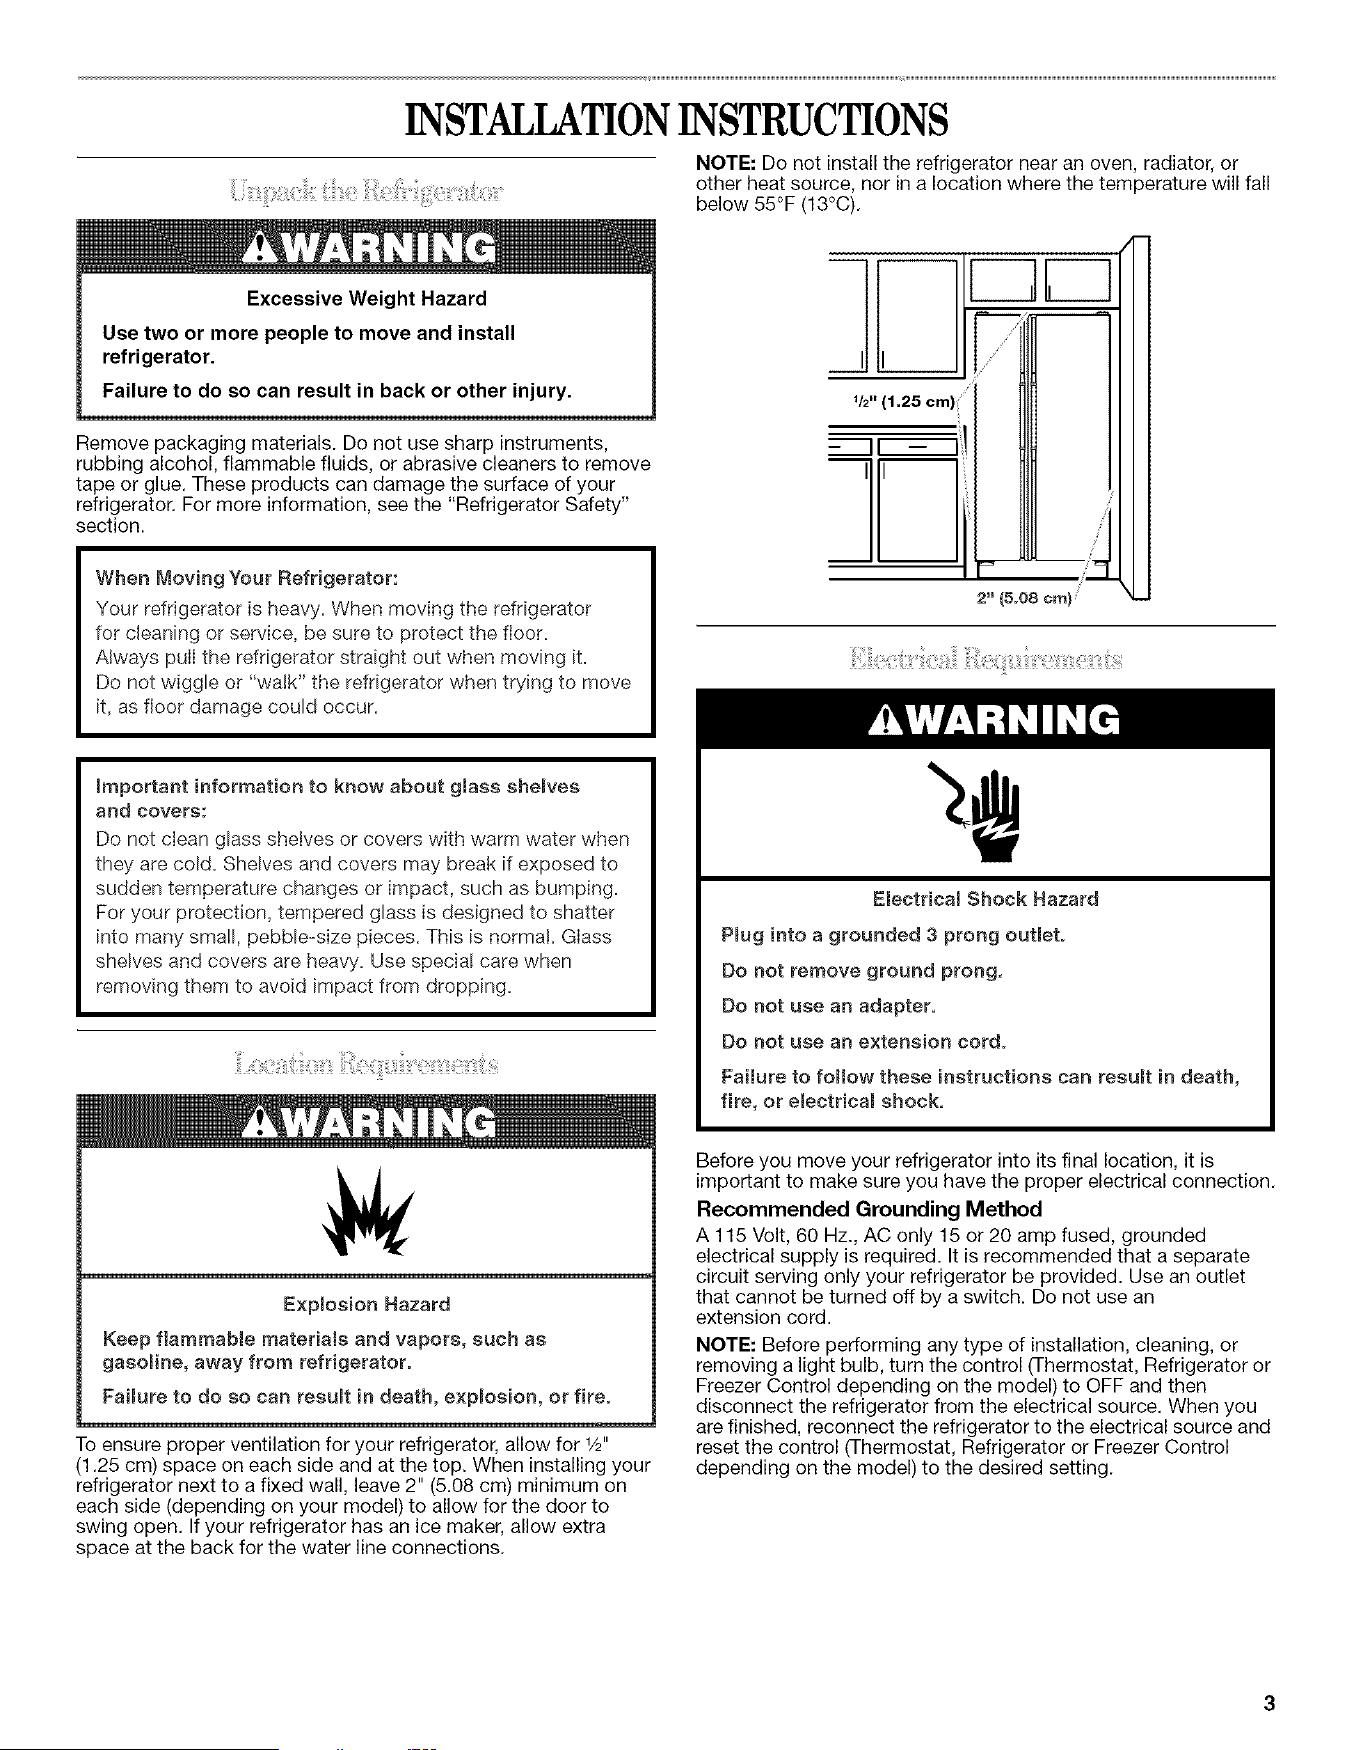
INSTALLATIONINSTRUCTIONS
NOTE: Do not install the refrigerator near an oven, radiator, or
other heat source, nor in a location where the temperature will fall
below 55°F (13°C).
Excessive Weight Hazard
Use two or more people to move and install
refrigerator.
Failure to do so can result in back or other injury.
Remove packaging materials. Do not use sharp instruments,
rubbing alcohol, flammable fluids, or abrasive cleaners to remove
tape or glue. These products can damage the surface of your
refrigerator. For more information, see the "Refrigerator Safety"
section.
When Moving Your Refrigerator:
Your refrigerator is heavy. When moving the refrigerator
for cleaning or service, be sure to protect the floor.
Always pull the refrigerator straight out when moving it.
Do not wiggle or "walk" the refrigerator when trying to move
it, as floor damage could occur.
important information to know about glass shemves
and covers:
Do not cIean glass shelves or covers with warm water when
they are cold= Shelves and covers may break if exposed to
sudden temperature changes or impact, such as bumping=
For your protection, tempered glass is designed to shatter
into many sma!I, pebble-size pieces. This is normal= GIass
shelves and covers are heavy= Use special care when
removing them to avoid impact from dropping=
Explosion Hazard
Keep flammable matedais and vapors, such as
gasoJine, away from refrigerator.
Faimure to do so can resumt in death, expmosion, or fire.
To ensure proper ventilation for your refrigerator, allow for 1/2"
(1.25 cm) space on each side and at the top. When installing your
refrigerator next to a fixed wall, leave 2" (5.08 cm) minimum on
each side (depending on your model) to allow for the door to
swing open. If your refrigerator has an ice maker, allow extra
space at the back for the water line connections.
/
r ..... 2.
2" (5.08 era)
Electricam Shock Hazard
Pmug into a grounded 3 prong outlet.
Do not remove ground prong.
Do not use an adapter.
Do not use an extension cord.
Failure to follow these instructions can resumt in death,
fire, or eiectricam shock.
Before you move your refrigerator into its final location, it is
important to make sure you have the proper electrical connection.
Recommended Grounding Method
A 115 Volt, 60 Hz., AC only 15 or 20 amp fused, grounded
electrical supply is required. It is recommended that a separate
circuit serving only your refrigerator be provided. Use an outlet
that cannot be turned off by a switch. Do not use an
extension cord.
NOTE: Before performing any type of installation, cleaning, or
removing a light bulb, turn the control (Thermostat, Refrigerator or
Freezer Control depending on the model) to OFF and then
disconnect the refrigerator from the electrical source. When you
are finished, reconnect the refrigerator to the electrical source and
reset the control (Thermostat, Refrigerator or Freezer Control
depending on the model) to the desired setting.
Readalldirectionscarefullybeforeyoubegin.
IMPORTANT:
• Ifyouturntherefrigeratoronbeforethewaterlineis
connected,turntheicemakerOFE
• Allinstallationsmustmeetlocalplumbingcoderequirements.
• Usecoppertubingandcheckforleaks.Installcoppertubing
onlyinareaswherethehouseholdtemperatureswillremain
abovefreezing.
TOOLSNEEDED:Flat-bladescrewdriver,7A6"and1/2"open-end
wrenchesortwoadjustablewrenches,1/4"nutdriveranddrillbit,
handdrillorelectricdrill(properlygrounded).
NOTE:Yourrefrigeratordealerhasakitavailablewitha1/4"
(6.35mm)saddle-typeshutoffvalve,aunion,andcoppertubing.
Beforepurchasing,makesureasaddle-typevalvecomplieswith
yourlocalplumbingcodes.Donotuseapiercing-typeor3/16"
(4.76mm)saddlevalvewhichreduceswaterflowandclogsmore
easily.
WaterPressure
Acoldwatersupplywithwaterpressureofbetween30and
120psi(207- 827kPa)isrequiredtooperatethewaterdispenser
andicemaker.Ifyouhavequestionsaboutyourwaterpressure,
callalicensed,qualifiedplumber.
ReverseOsmosisWaterSupply
IMPORTANT:Thepressureofthewatersupplycomingoutofa
reverseosmosissystemgoingtothewaterinletvalveofthe
refrigeratorneedstobebetween30and120psi(207- 827kPa)
Ifareverseosmosiswaterfiltrationsystemisconnectedtoyour
coldwatersupply,thewaterpressuretothereverseosmosis
systemneedstobea minimumof40to60psi(276-414kPa).
Ifthewaterpressuretothereverseosmosissystemislessthan
40to60psi(276-414kPa):
• Checktoseewhetherthesedimentfilterinthereverse
osmosissystemisblocked.Replacethefilterifnecessary.
• Allowthestoragetankonthereverseosmosissystemtorefill
afterheavyusage.
• Ifyourrefrigeratorhasawaterfiltercartridge,it mayfurther
reducethewaterpressurewhenusedinconjunctionwitha
reverseosmosissystem.Removethewaterfiltercartridge.
See"WaterFiltrationSystem."
Ifyouhavequestionsaboutyourwaterpressure,callalicensed,
qualifiedplumber.
Readalldirectionsbeforeyoubegin.
IMPORTANT:Ifyouturntherefrigeratoronbeforethewaterlineis
connected,turntheicemakerOFE
Connect to Water Line
1. Unplug refrigerator or disconnect power.
2. Turn OFF main water supply. Turn ON nearest faucet long
enough to clear line of water.
3. Locate a 1/2"(12.70 mm) to 11/4'' (3.18 cm) vertical cold water
pipe near the refrigerator.
IMPORTANT:
• Make sure it is a cold water pipe.
• Horizontal pipe will work, but drill on the top side of the
pipe, not the bottom. This will help keep water away from
the drill and normal sediment from collecting in the valve.
4. Determine the length of copper tubing you need. Measure
from the connection on the lower rear corner of the refrigerator
to the water pipe. Add 7 ft (2.1 m) to allow for cleaning. Use
1/4"(6.35 mm) O.D. (outside diameter) copper tubing. Be sure
both ends of copper tubing are cut square.
5. Using a grounded drill, drill a 1/4"(6.35 mm) hole in the cold
water pipe you have selected.
G_
F E D
A. Cold water pipe E. Compression sleeve
B. Pipe clamp F. Shutoff valve
C. Copper tubing G. Packing nut
D. Compression nut
6. Fasten shutoff valve to cold water pipe with pipe clamp. Be
sure outlet end is solidly in the 1/4"(6.35 mm) drilled hole in the
water pipe and that washer is under the pipe clamp. Tighten
packing nut. Tighten the pipe clamp screws carefully and
evenly so washer makes a watertight seal. Do not overtighten
or you may crush the copper tubing.
7. Slip the compression sleeve and compression nut on the
copper tubing as shown. Insert the end of the tubing into the
outlet end squarely as far as it will go. Screw the compression
nut onto the outlet end with an adjustable wrench. Do not
overtighten.
8. Place the free end of the tubing into a container or sink, and
turn ON main water supply and flush out the tubing until water
is clear. Turn OFF the shutoff valve on the water pipe. Coil the
copper tubing.
Connect to Refrigerator
Style 1
1. Unplug refrigerator or disconnect power.
2. Remove the shipping tape from the gray, coiled water tubing
on the rear of the refrigerator.
3. A 1/4"x 1/4"coupling is needed to order to connect the water
tubing to an existing household water supply line. Thread the
provided nut onto the coupling on the end of the copper
tubing.
NOTE: Tighten the nut by hand. Then tighten it with a wrench
two more turns. Do not overtighten.
B c
A. Refrigerator water tubing
B. Nut (provided)
C. Bulb
4. Turn shutoff valve ON.
5. Check for leaks. Tighten any nuts or connections (including
connections at the valve) that leak.
6. Plug in refrigerator or reconnect power.
7. Flush the water system see "Water and Ice Dispensers."
NOTE: It may take up to 24 hours for your ice maker to begin
producing ice.
D E F
D. Coupling (provided)
E. Ferrule (purchased)
F Nut (purchased)
Style 2
1. Unplug refrigerator or disconnect power.
2. Remove the shipping tape from the gray, coiled water tubing
on the rear of the refrigerator.
3. Thread the provided nut onto the water valve as shown.
NOTE: Tighten the nut by hand. Then tighten it with a wrench
two more turns. Do not overtighten.
A
Ill
B
A. Bulb
B. Nut (provided)
4. Turn shutoff valve ON.
5. Check for leaks. Tighten any nuts or connections (including
connections at the valve) that leak.
6. Plug in refrigerator or reconnect power.
7. Flush the water system. See "Water and Ice Dispensers."
NOTE: It may take up to 24 hours for your ice maker to begin
producing ice.
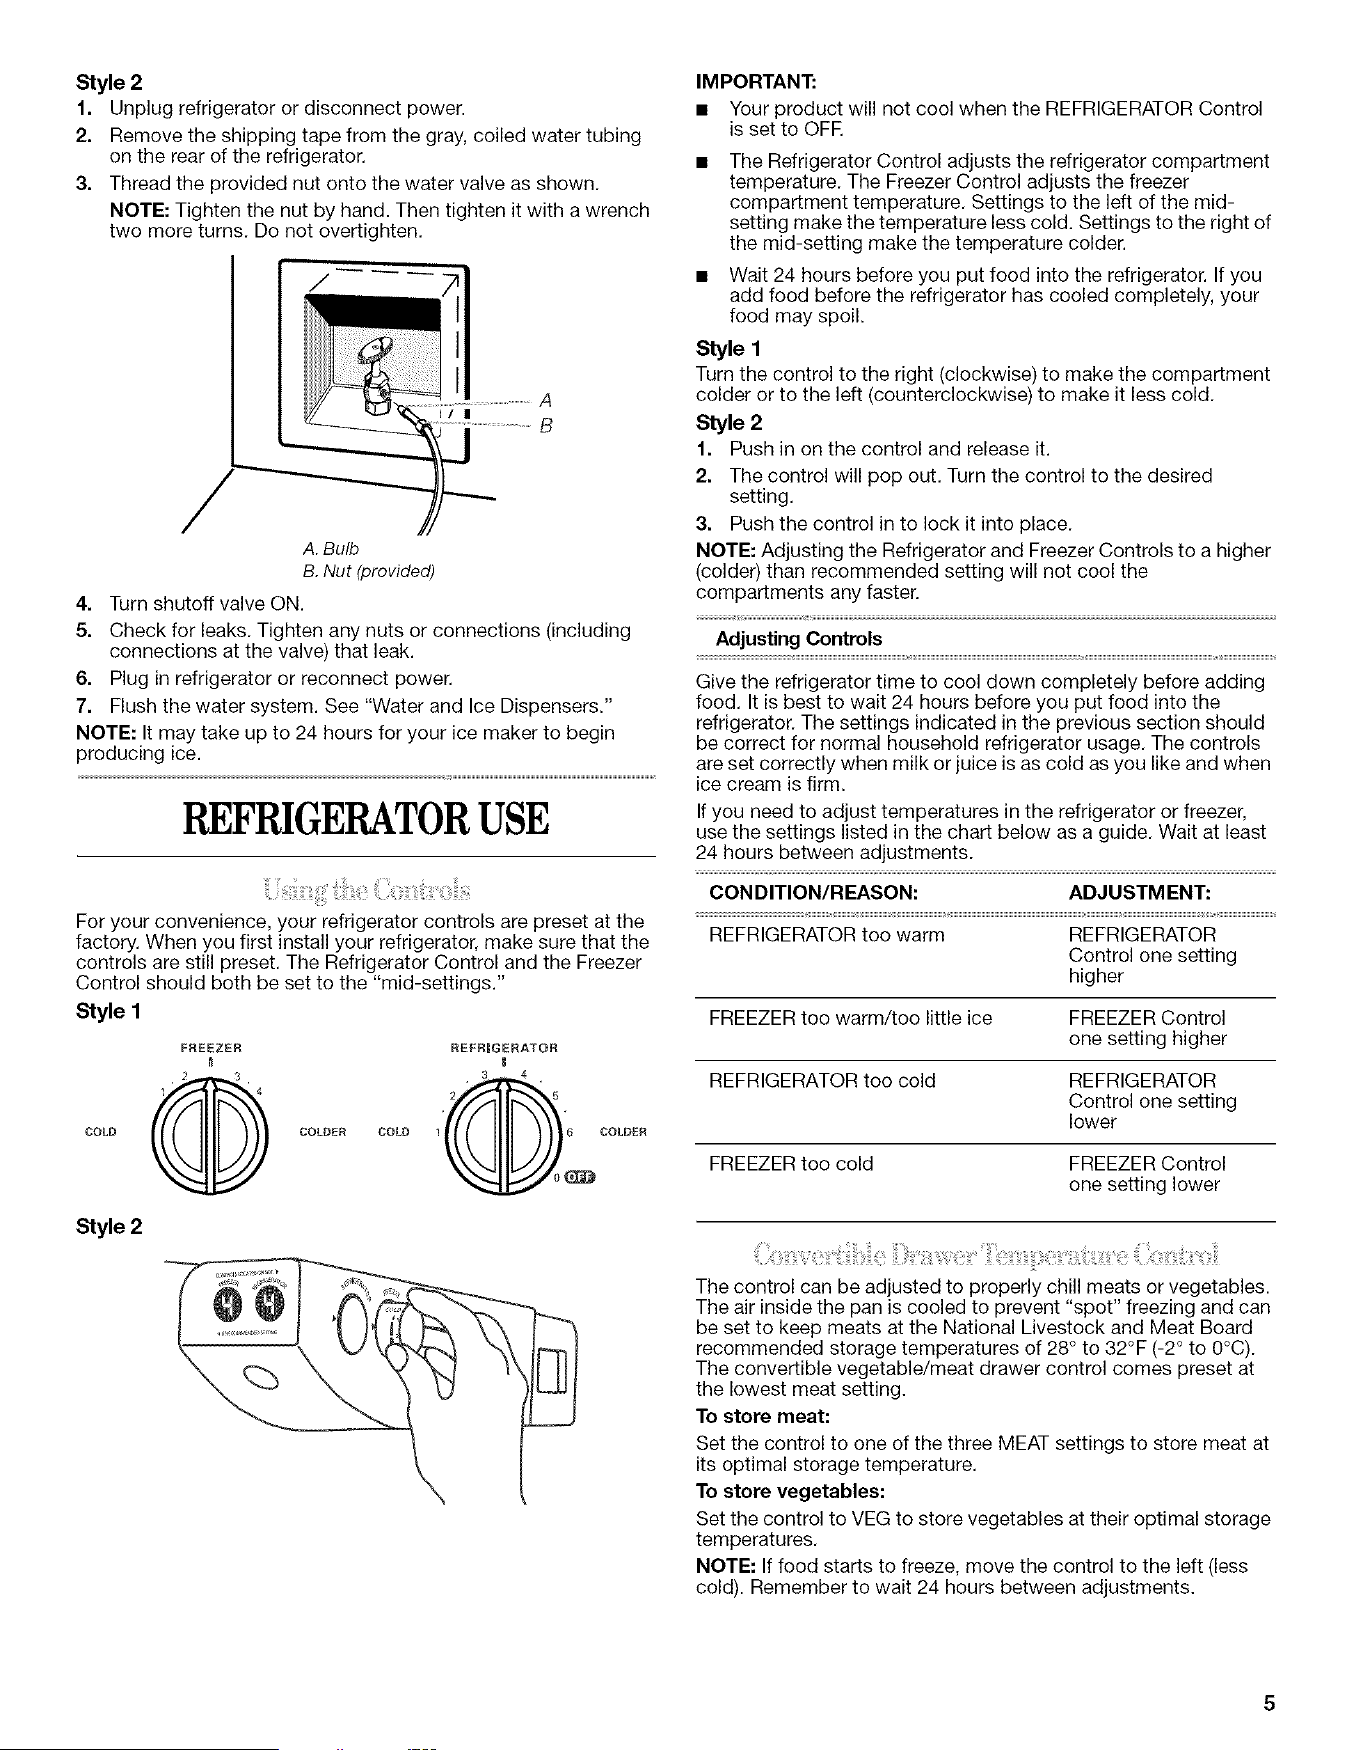
REFRIGERATORUSE
:: il
For your convenience, your refrigerator controls are preset at the
factory. When you first install your refrigerator, make sure that the
controls are still preset. The Refrigerator Control and the Freezer
Control should both be set to the "mid-settings."
Style I
COLD
FREEZER
. 2
COLDER COLD
REFRRGERATOR
l
Style 2
IMPORTANT:
• Your product will not cool when the REFRIGERATOR Control
is set to OFR
• The Refrigerator Control adjusts the refrigerator compartment
temperature. The Freezer Control adjusts the freezer
compartment temperature. Settings to the left of the mid-
setting make the temperature less cold. Settings to the right of
the mid-setting make the temperature colder.
• Wait 24 hours before you put food into the refrigerator. If you
add food before the refrigerator has cooled completely, your
food may spoil.
Style 1
Turn the control to the right (clockwise) to make the compartment
colder or to the left (counterclockwise) to make it less cold.
Style 2
1. Push in on the control and release it.
2. The control will pop out. Turn the control to the desired
setting.
3. Push the control in to lock it into place.
NOTE: Adjusting the Refrigerator and Freezer Controls to a higher
(colder) than recommended setting will not cool the
compartments any faster.
Adjusting Controls
Give the refrigerator time to cool down completely before adding
food. It is best to wait 24 hours before you put food into the
refrigerator. The settings indicated in the previous section should
be correct for normal household refrigerator usage. The controls
are set correctly when milk or juice is as cold as you like and when
ice cream is firm.
If you need to adjust temperatures in the refrigerator or freezer,
use the settings listed in the chart below as a guide. Wait at least
24 hours between adjustments.
CONDITION/REASON: ADJUSTMENT:
REFRIGERATOR too warm REFRIGERATOR
Control one setting
higher
FREEZER too warm/too little ice FREEZER Control
one setting higher
REFRIGERATOR too cold REFRIGERATOR
Control one setting
lower
FREEZER too cold FREEZER Control
one setting lower
The control can be adjusted to properly chill meats or vegetables.
The air inside the pan is cooled to prevent "spot" freezing and can
be set to keep meats at the National Livestock and Meat Board
recommended storage temperatures of 28 ° to 32°F (-2 ° to 0°C).
The convertible vegetable/meat drawer control comes preset at
the lowest meat setting.
To store meat:
Set the control to one of the three MEAT settings to store meat at
its optimal storage temperature.
To store vegetables:
Set the control to VEG to store vegetables at their optimal storage
temperatures.
NOTE: If food starts to freeze, move the control to the left (less
cold). Remember to wait 24 hours between adjustments.
i#_ii_ _ii_!_ _. i_
You can control the amount of humidity in the moisture-sealed
crisper. Adjust the control to any setting between LOW and HIGH.
LOW (open) for best storage of fruits and vegetables with skins.
HIGH (closed) for best storage of fresh, leafy vegetables.
ii;iii!ii!!ii i:ii/iiii ¸!li!i ili
: :
Cool air from the freezer is directed to the refrigerator door bin
directly beneath the vents.
NOTE: The dairy compartment and can rack are not chilled.
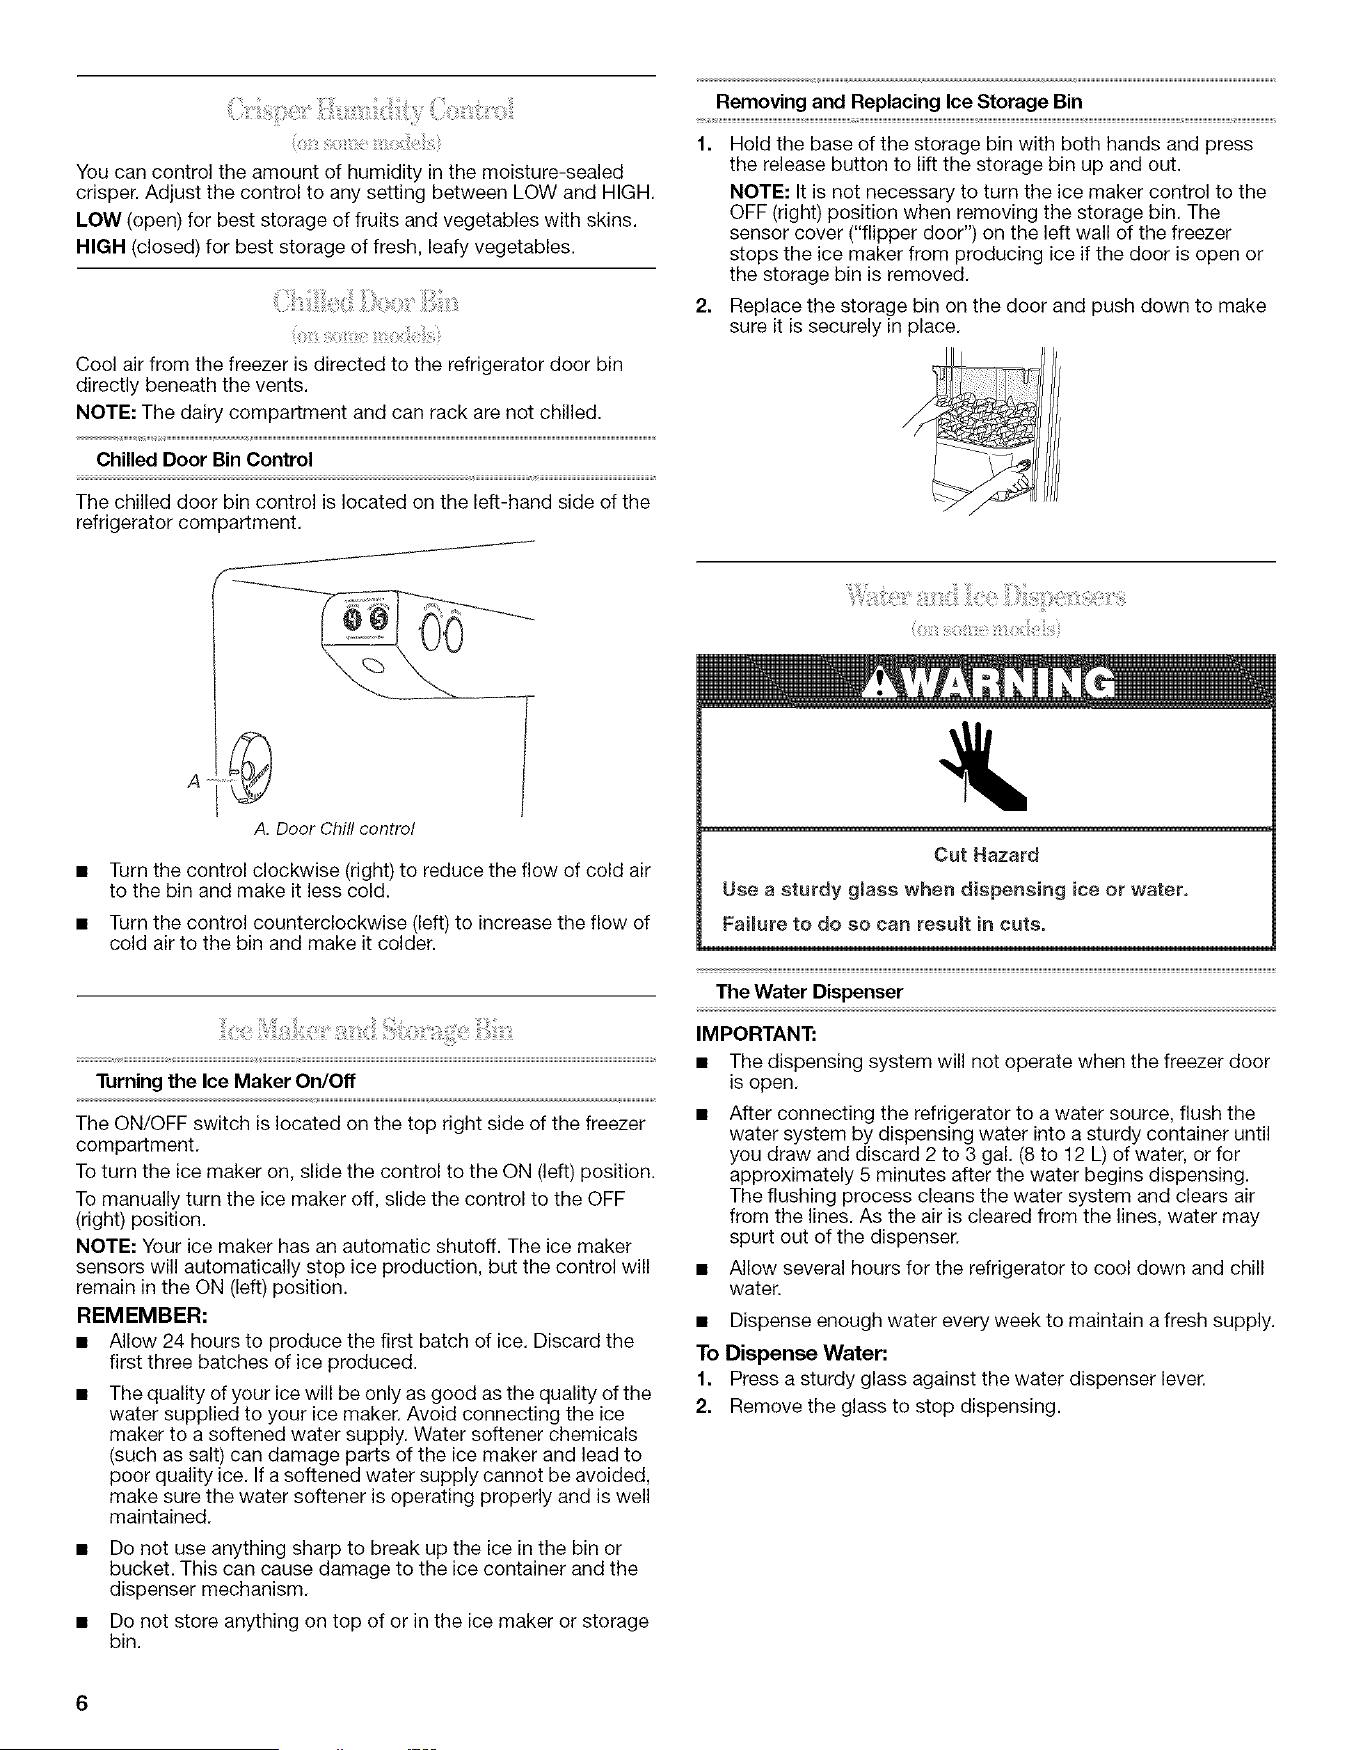
Chilled Door Bin Control
The chilled door bin control is located on the left-hand side of the
refrigerator compartment.
A. Door Chill control
Turn the control clockwise (right) to reduce the flow of cold air
to the bin and make it less cold.
Turn the control counterclockwise (left) to increase the flow of
cold air to the bin and make it colder.
Turning the Ice Maker On/Off
The ON/OFF switch is located on the top right side of the freezer
compartment.
To turn the ice maker on, slide the control to the ON (left) position.
To manually turn the ice maker off, slide the control to the OFF
(right) position.
NOTE: Your ice maker has an automatic shutoff. The ice maker
sensors will automatically stop ice production, but the control will
remain in the ON (left) position.
REMEMBER:
• Allow 24 hours to produce the first batch of ice. Discard the
first three batches of ice produced.
• The quality of your ice will be only as good as the quality of the
water supplied to your ice maker. Avoid connecting the ice
maker to a softened water supply. Water softener chemicals
(such as salt) can damage parts of the ice maker and lead to
poor quality ice. If a softened water supply cannot be avoided,
make sure the water softener is operating properly and is well
maintained.
• Do not use anything sharp to break up the ice in the bin or
bucket. This can cause damage to the ice container and the
dispenser mechanism.
• Do not store anything on top of or in the ice maker or storage
bin.
Removing and Replacing Ice Storage Bin
1. Hold the base of the storage bin with both hands and press
the release button to lift the storage bin up and out.
NOTE: It is not necessary to turn the ice maker control to the
OFF (right) position when removing the storage bin. The
sensor cover ("flipper door") on the left wall of the freezer
stops the ice maker from producing ice if the door is open or
the storage bin is removed.
2. Replace the storage bin on the door and push down to make
sure it is securely in place.
Cut Hazard
Use a sturdy glass when dispensing ice or water.
Failure to do so can result in cuts.
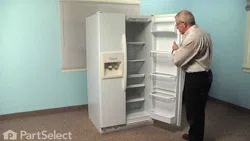
The Water Dispenser
IMPORTANT:
• The dispensing system will not operate when the freezer door
is open.
• After connecting the refrigerator to a water source, flush the
water system by dispensing water into a sturdy container until
you draw and discard 2 to 3 gal. (8 to 12 L) of water, or for
approximately 5 minutes after the water begins dispensing.
The flushing process cleans the water system and clears air
from the lines. As the air is cleared from the lines, water may
spurt out of the dispenser.
• Allow several hours for the refrigerator to cool down and chill
water.
• Dispense enough water every week to maintain a fresh supply.
To Dispense Water:
1. Press a sturdy glass against the water dispenser lever.
2. Remove the glass to stop dispensing.
The Ice Dispenser
The dispensing system will not operate when the freezer door is
open. Ice dispenses from the ice maker storage bin in the freezer
when the dispenser lever is pressed.
Depending on your model, you may have one or more of the
following options: the ability to select either crushed or cubed ice,
a special light that turns on when you use the dispenser, or a lock
option to avoid unintentional dispensing.
NOTE: Some models dispense both cubed and crushed ice.
Before dispensing ice, select which type of ice you prefer.
For crushed ice, cubes are crushed before being dispensed. This
may cause a slight delay when dispensing crushed ice. Noise
from the ice crusher is normal, and pieces of ice may vary in size.
When changing from crush to cube, a few ounces of crushed ice
will be dispensed along with the first cubes.
To Dispense Ice:
1. Press the button to select the desired type of ice.
2. Press a sturdy glass against the ice dispenser lever. Hold the
glass close to the dispenser opening so ice does not fall
outside of the glass.
IMPORTANT: You do not need to apply a lot of pressure to the
lever in order to activate the ice dispenser. Pressing hard will
not make the ice dispense faster or in greater quantities.
3. Remove the glass to stop dispensing.
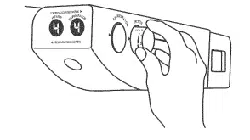
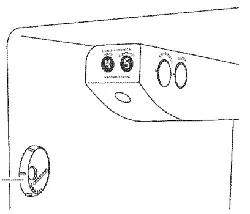
The Dispenser Light
Style 1: The dispenser light can be turned on by pressing the ON
button.
Style 2: When you use the dispenser, the lever will automatically
turn the light on. If you want the light to be on continuously, you
may choose either ON or NIGHT LIGHT.
ON: Press the LIGHT button to turn the dispenser light on.
NIGHT LIGHT: Press the LIGHT button a second time to select
the Night Light. The dispenser light will automatically adjust to
become brighter as the room brightens, dimmer as the room
darkens.
OFF: Press the LIGHT button a third time to turn the dispenser
light off.
The dispenser lights are LEDs which should not need to be
changed. If it appears that your dispenser lights are not working,
check to be sure that the light sensor is not blocked (in Night Light
mode). See "Troubleshooting" for more information.
The Dispenser Lock (on some models)
Your dispenser can be turned off for easy cleaning or to prevent
unintentional dispensing by small children and pets.
NOTE: The lock feature does not shut off power to the product, to
the ice maker, or to the dispenser light. It simply deactivates the
dispenser levers. The ice and water dispensers will not work.
Style 1: Press the LOCK BuTroN to lock the dispenser. Press the
UNLOCK button to unlock the dispenser.
Style 2: Press and hold the LOCK OUT button to lock the
dispenser. Press and hold the LOCK OUT button a second time to
unlock the dispenser.
NOTE: Do not use with water that is microbiologically unsafe
or of unknown quality without adequate disinfection before or
after the system. Systems certified for cyst reduction may be
used on disinfected waters that may contain filterable cysts.
Water Filter Status Light (on some models)
The water filter status light will help you know when to change
your water filter. The light will change from green to yellow. This
tells you that it is almost time to change the filter. It is
recommended that you replace the water filter when the status
light changes to red OR water flow to your water dispenser or ice
maker decreases noticeably.
After changing the water filter, reset the water filter status light.
The status light will change from red to green when the system is
reset.
Non-indicator Water Filter (on some models)
If your refrigerator does not have the status light, you should
change the water filter every 6 to 9 months depending upon your
usage. If the water flow to the water dispenser or ice maker
decreases noticeably before 6 months have passed, replace the
water filter more often.
Using the Dispenser Without the Water Filter
You can run the dispenser without a water filter. Your water will not
be filtered.
1. Remove the water filter.
2. Slide the cap off the end of the filter and replace it in the base
grille.
IMPORTANT: Do not discard the cap. It is part of your
refrigerator. Keep the cap to use with the replacement filter.
3. Rotate the cap until it is securely in position.
REFRIGERATORCARE
Explosion Hazard
Use nonflammable c_eaner.
Failure to do so can result in death, explosion, or fire.
Both the refrigerator and freezer sections defrost automatically.
However, clean both sections about once a month to prevent
odors from building up. Wipe up spills immediately.
IMPORTANT: Because air circulates between both sections, any
odors formed in one section will transfer to the other. You must
thoroughly clean both sections to eliminate odors. To prevent
odor transfer and drying out of food, wrap or cover foods tightly.

ToCleanYour Refrigerator:
NOTE: Do not use abrasive or harsh cleaners such as window
sprays, scouring cleansers, flammable fluids, cleaning waxes,
concentrated detergents, bleaches or cleansers containing
petroleum products on plastic parts, interior and door liners or
gaskets. Do not use paper towels, scouring pads, or other harsh
cleaning tools.
1. Unplug refrigerator or disconnect power.
2. Hand wash, rinse, and dry removable parts and interior
surfaces thoroughly. Use a clean sponge or soft cloth and a
mild detergent in warm water.
3. Wash stainless steel and painted metal exteriors with a clean
sponge or soft cloth and a mild detergent in warm water.
4. There is no need for routine condenser cleaning in normal
home operating environments. If the environment is
particularly greasy or dusty, or there is significant pet traffic in
the home, the condenser should be cleaned every 2 to
3 months to ensure maximum efficiency.
If you need to clean the condenser:
• Removethe base grille.
• Use a vacuum cleaner with a soft brush to clean the grille,
the open areas behind the grille and the front surface area
of the condenser.
• Replace the base grille when finished.
Plug in refrigerator or reconnect power.
NOTE: Not all bulbs will fit your refrigerator. Be sure to replace the
bulb with one of the same size, shape and wattage. The dispenser
light requires a heavy duty 10-watt bulb. All other lights require a
40-watt bulb. Replacement bulbs are available from your dealer.
1. Unplug refrigerator or disconnect power.
2. Remove light shield when applicable.
NOTE: To clean the light shield, wash it with warm water and
liquid detergent. Rinse and dry the shield well.
3. Remove light bulb and replace with one of the same size,
shape and wattage.
4. Replace light shield when applicable.
5. Plug in refrigerator or reconnect power.
TROUBLESHOOTING
Try the solutions suggested here first in order to avoid the cost of an unnecessary service call.
The refrigerator isn't cooling The motor seems to run too much
• Are the temperature controls set at the mid-settings? The
controls are preset at the factory to the correct mid-setting.
After connecting power, wait 1 hour before checking
temperature.
NOTE: Adjusting the controls to coldest setting will not cool either
compartment more quickly.
The lights do not work
• Is the power supply cord unplugged? Plug into a grounded
3 prong outlet.
• Is a light bulb loose in the socket or burned out? See
"Changing the Light Bulbs."
• Is the dispenser light set to ON? The dispenser light will
operate only when the levers are pressed. If you want the
dispenser light to stay on continuously, set the dispenser light
to ON, or NIGHT LIGHT. See "Water and Ice Dispensers."
• Is the dispenser light set to NIGHT LIGHT? If the dispenser
is set to the NIGHT LIGHT mode, be sure the dispenser light
sensor is not blocked. See "Water and Ice Dispensers."
Temperature is too warm
Check the following:
• Are the air vents blocked in either compartment?
• Are the door(s) opened often?
• Has a large amount of food just been added to the refrigerator
or freezer?
• Are the controls set correctly for the surrounding conditions?
Check the following:
• Is the room temperature hotter than normal?
• Has a large amount of food just been added to the
refrigerator?
• Are the doors opened often?
• Are the doors not closed completely?
• Are the condenser coils dirty?
NOTE: Your new refrigerator will run longer than your old one due
to its high-efficiency motor.
There is interior moisture buildup
Check the following:
• Are the air vents blocked in the refrigerator?
• Are the door(s) opened often?
• Isthe room humid?
• Are the controls set correctly for the surrounding conditions?
• Was a self-defrost cycle completed?
The doors will not close completely
Check the following:
• Are food packages blocking the door open?
• Is the ice storage bin out of position?
• Were the doors removed during product installation and not
properly replaced?
The doors are difficult to open
• Are the gaskets dirty or sticky? Clean gaskets with mild
soap and warm water.
The ice maker is not producing ice or not enough ice
Check the following:
• Is the ice maker wire shutoff arm or switch (depending on
models) in the OFF position?
• Is the water line shutoff valve to the refrigerator turned on?
• Is the freezer temperature cold enough to produce ice?
Wait 24 hours after ice maker hookup for ice production.
• Has the ice maker just been installed? Wait 72 hours for full
ice production to begin.
• Does the ice maker mold have water in it or has no ice
been produced? Make sure your refrigerator has been
connected to a water supply and the supply shutoff valve is
turned on.
Has a large amount of ice just been removed? Allow
24 hours for ice maker to produce more ice.
Is there a water filter installed on the refrigerator? The filter
may be clogged or installed incorrectly.
Is an ice cube jammed in the ice maker ejector arm?
For models with an interior ice bin, remove the ice from the
ejector arm with a plastic utensil. For models with an ice
storage bin located on the freezer door, access the ice maker
by depressing the ice sensor door on the upper left side of the
freezer interior. While depressing the sensor door, lift the ice
maker service door and remove the ice from the ejector with a
plastic utensil.
Off-taste, odor or gray color in the ice
Check the following:
• Are the plumbing connections new, causing discolored or off-
flavored ice?
• Have the ice cubes been stored too long?
• Does the freezer and ice bin or bucket need to be cleaned?
• Has food in the freezer or refrigerator been wrapped properly?
• Does the water contain minerals (such as sulfur)? A filter
may need to be installed to remove the minerals.
• Is there a water filter installed on the refrigerator? Gray or
dark discoloration in ice indicates that the water filtration
system needs additional flushing.
The ice dispenser will not operate properly
Check the following:
• Is the freezer door closed completely?
• Is the ice storage bin installed correctly?
• Is there ice in the storage bin?
• Has the ice frozen in the storage bin?
• Is ice stuck in the delivery chute?
• Has the wrong ice been added to the storage bin? Use only
cubes produced by the current ice maker.
• Has the ice melted around the auger (metal spiral} in the
ice bucket? Dump the ice cubes and clean the ice storage
bin.
• Is the ice dispenser stalling while dispensing "crushed"
ice? Change the ice button from "crushed" to "cubed." If
cubed ice dispenses correctly, depress the button for
"crushed" ice and begin dispensing again.
• Has the dispenser arm been held in too long? Ice will stop
dispensing when the arm is held in too long. Wait 3 minutes
for dispenser motor to reset before using again.
The water dispenser will not operate properly
Check the following:
• Is the water shutoff valve not turned on, incorrectly installed or
clogged?
• Is the water line connected at the source?
• Is there a kink in the home water source line?
• Has the water system not filled? The water system needs to
be filled the first time it is used.
• Is the refrigerator connected to a cold water line with
water pressure of at least 30 psi? The water pressure to the
home determines the flow from the dispenser.
• Is there a water filter installed on the refrigerator? The filter
may be clogged or incorrectly installed.
Water or ice is leaking from the dispenser
Check the following:
• Is the glass not being held under the dispenser long enough?
• Is an ice cube stuck in the chute and holding the trap door
open?
The dispenser water is not cool enough
NOTE: Water from the dispenser is chilled to only 50°F (10°C).
• Has the refrigerator been newly installed or a large
amount of water recently dispensed? Allow 24 hours for the
refrigerator to cool completely.
• Has water not been recently dispensed? The first glass of
water may not be cool. Discard the first glass of water.
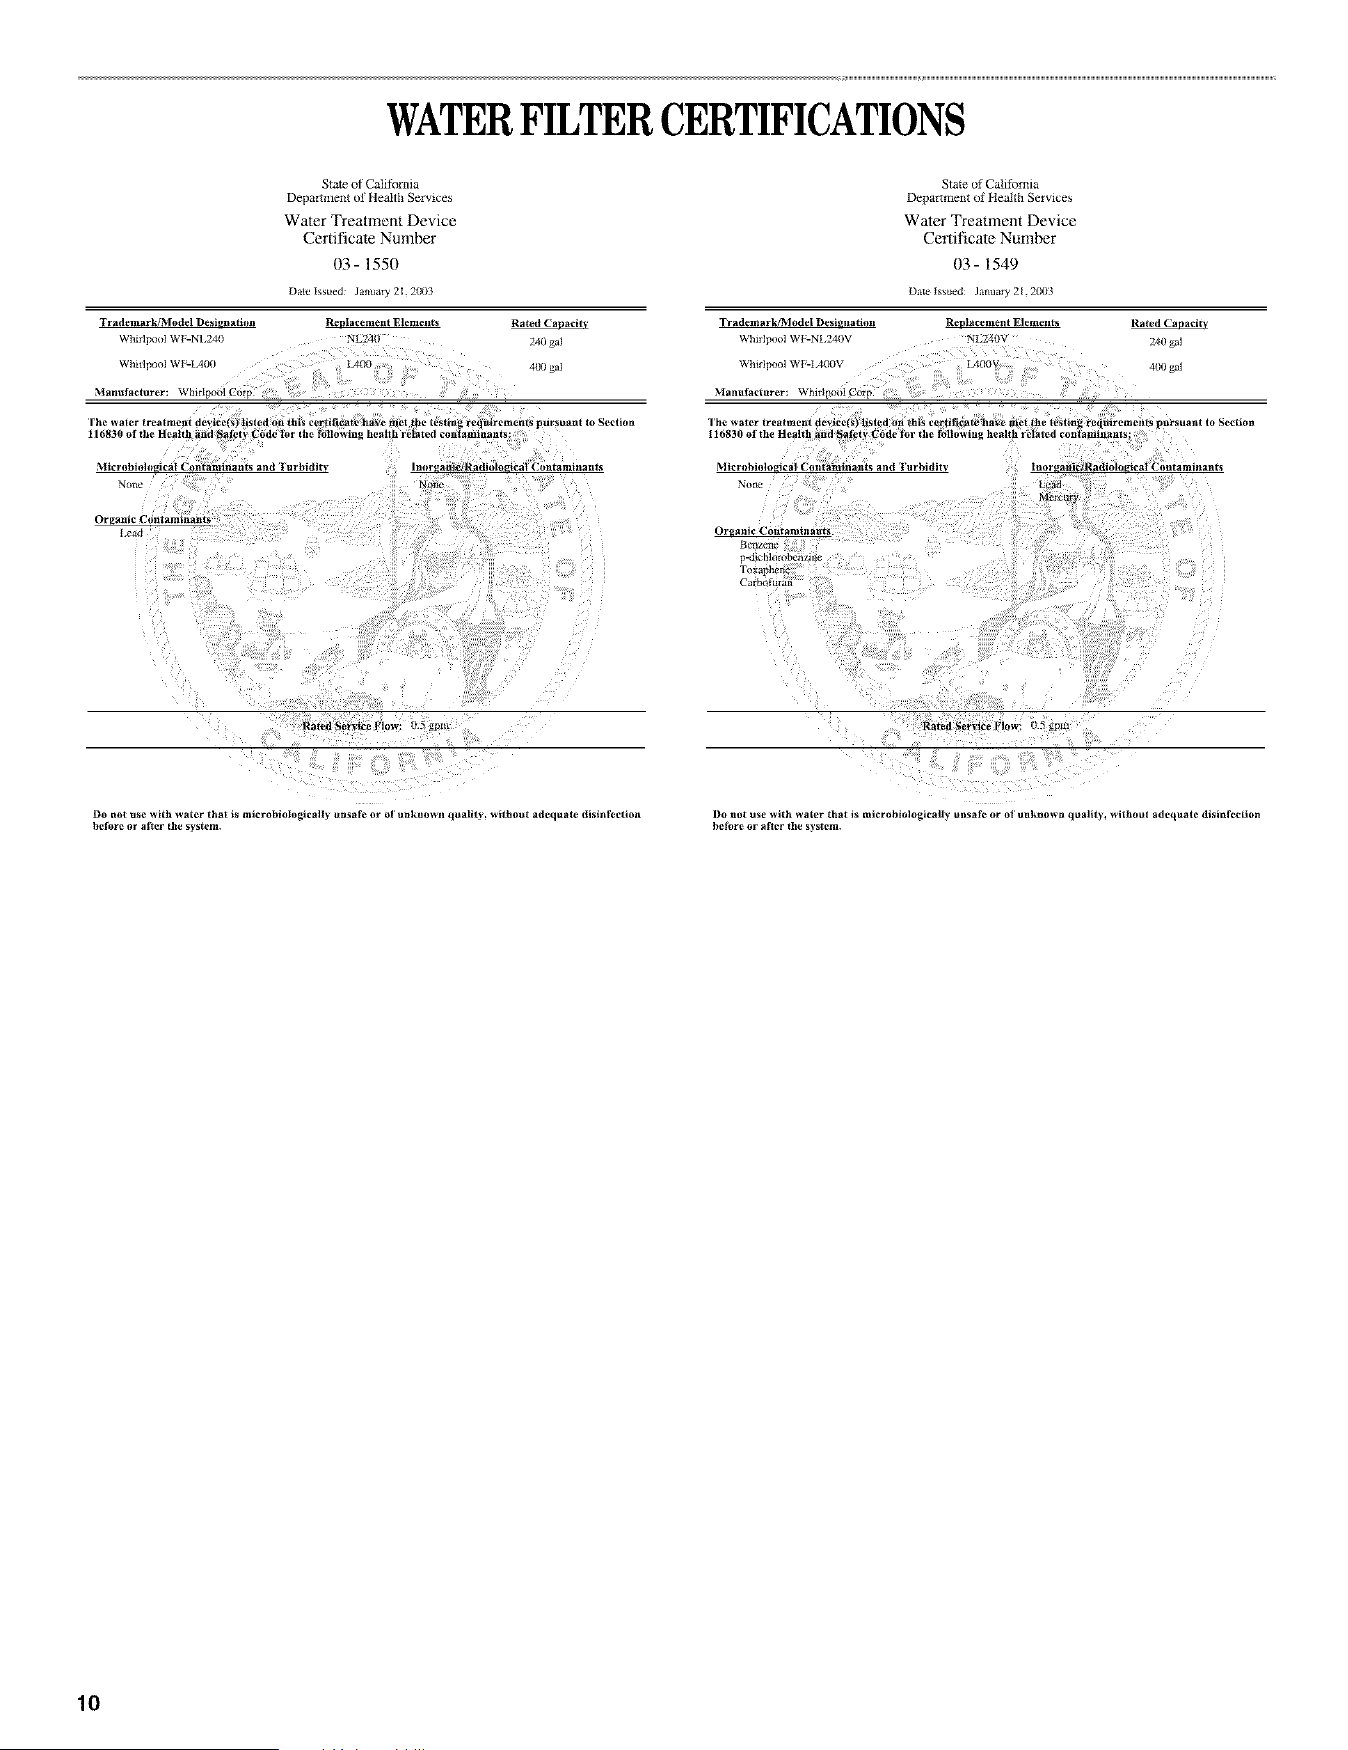
WATERFILTERCERTIFICATIONS
State ot CaIifl)_nia
Depamnem of Heaifl_ Services
Water Treatment Device
Certificate Number
03- 1550
DaW lss_ed: Jal/uary 21. 200_
Trademark/Model Desivnatioa Replacement Eleme_lts Rated _'a_
Whlflpo_I WI--NL241 Nt_4 240 gal
........ _ol WF-IA00 /lfX 400 gaI
Manufacturer: W_I,_II_O01Cow
I lie water treatment dct'ice(_) lisIed Oll Ibis c¢tnfi_at¢ |laye met tilt- testing reqtt_relllcnls purs_lant to Seciion
116830 of Ihe Heallh and Sal¢ly f'ode |_r the fotlowin_ heallh related colltaminanls:
Microbiological Cuntaminants and Turbidity Ino r ga_i_iRad J ologlca t Contamlnanls
N_me NOh_
Organic Colltaminallts
-al
Trademark/Model Desi_tiation
Whirlpool WF-NL240V
Whirlpool WF-I/IOOV
Manufactarer: wkali×/6i C0} p ::
Stare of Caliibrnia
Departnmnt of Health Services
Water Treatment Device
Certificate Number
03 - 1549
t)atc Iss_'d: Ja_luary 21.?003
Ret_lacenlent Elerilents Rated t"a_
240 gal
L4(K)_ 4 ga
Rated Service Flow: 05 gpm
Do not use with ssater that is microbiologicMIy ansafe or oI unknown q_ality_ without adequate disinfection
before or a_er the system.
'',,:!iiiiiii,ii!!'_!':!_:_:_!_!)_i!iiiii'i_i:i::i!!!:i!:!i_!!ii!_ii'ii_:!iii!!i_'!!!:ITIF¸¸
no not use with water that is microbiologically unsafe or oI unknown quality, without adequate disinfection
before or after the s3 stern.
10
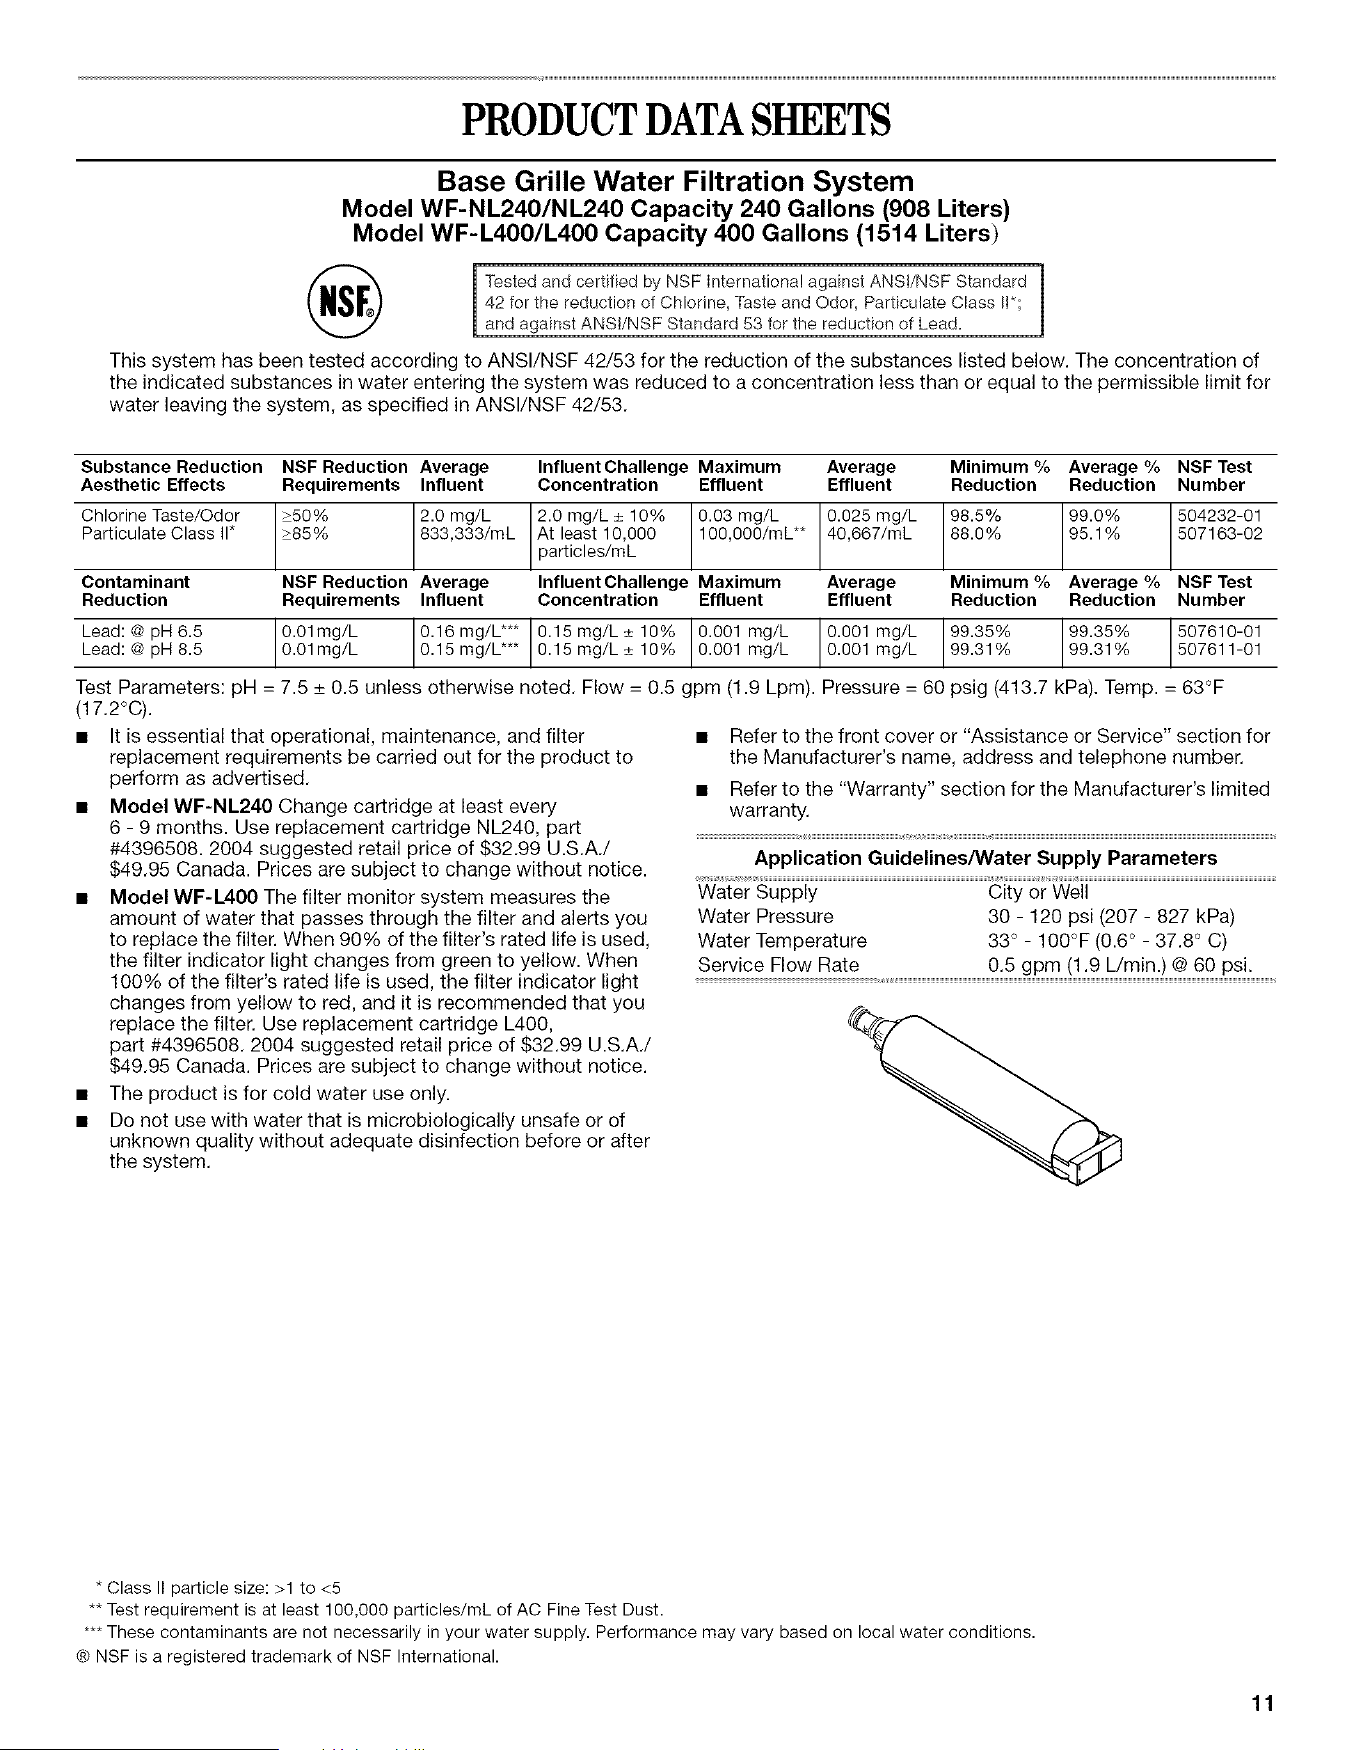
PRODUCTDATASHEETS
Base Grille Water Filtration System
Model WF-NL240/NL240 Capacity 240 Gallons (908 Liters)
Model WF-L400/L400 Capacity 400 Gallons (1514 Liters)
Testedand certified by NSF international against ANS!/NSF Standard
42 for the reduction of Chlorine, Taste and Odor, Particulate Class ll*;
and against ANSt/NSF Standard 53 for the reduction of Lead.
This system has been tested according to ANSl/NSF 42/53 for the reduction of the substances listed below. The concentration of
the indicated substances in water entering the system was reduced to a concentration less than or equal to the permissible limit for
water leaving the system, as specified in ANSI/NSF 42/53.
Substance Reduction NSF Reduction Average InfluentChallenge Maximum Average Minimum % Average % NSF Test
Aesthetic Effects Requirements Influent Concentration Effluent Effluent Reduction Reduction Number
Chlorine Taste/Odor _50% 2.0 mg/L 2.0 mg/L ± 10% 0.03 mg/L 0.025 mg/L 98.5% 99.0% 504232-01
Particulate Class I1" _85% 833,333/mL Atparticles/mLleast10,000 100,000/mL** 40,667/mL 88.0% 95.1% 507163-02
Contaminant NSF Reduction Average InfluentChallenge Maximum Average Minimum % Average % NSF Test
Reduction Requirements Influent Concentration Effluent Effluent Reduction Reduction Number
Lead: @ pH 6.5 0.01mg/L 0.16 mg/L*** 0.15 mg/L ± 10% 0.001 mg/L 0.001 mg/L 99.35% 99.35% 507610-01
Lead: @ pH 8.5 0.01 mg/L 0.15 mg/L*** 0.15 mg/L ± 10% 0.001 mg/L 0.001 mg/L 99.31% 99.31% 507611-01
Test Parameters: pH = 7.5 + 0.5 unless otherwise noted. Flow = 0.5 gpm (1.9 Lpm). Pressure = 60 psig (413.7 kPa). Temp. = 63°F
(17.2°C).
• It is essential that operational, maintenance, and filter
replacement requirements be carried out for the product to
perform as advertised.
• Model WF-NL240 Change cartridge at least every
6 - 9 months. Use replacement cartridge NL240, part
#4396508. 2004 suggested retail price of $32.99 U.S.A./
$49,95 Canada. Prices are subject to change without notice.
• Model WF-L400 The filter monitor system measures the
amount of water that passes through the filter and alerts you
to replace the filter. When 90% of the filter's rated life is used,
the filter indicator light changes from green to yellow. When
100% of the filter's rated life is used, the filter indicator light
changes from yellow to red, and it is recommended that you
replace the filter. Use replacement cartridge L400,
part #4396508. 2004 suggested retail price of $32.99 U.S.A./
$49.95 Canada. Prices are subject to change without notice.
• The product is for cold water use only.
• Do not use with water that is microbiologically unsafe or of
unknown quality without adequate disinfection before or after
the system.
• Refer to the front cover or "Assistance or Service" section for
the Manufacturer's name, address and telephone number.
• Refer to the "Warranty" section for the Manufacturer's limited
warranty.
Application Guidelines/Water Supply Parameters
Water Supply City or Well
Water Pressure 30 - 120 psi (207 - 827 kPa)
Water Temperature 33 ° - 100°F (0.6 ° -37.8 ° C)
Service Flow Rate 0.5 gpm (1.9 L/min.) @ 60 psi.
* Class II paCdcle size: >1 to <5
** Test requirement is at least 100,000 particles/mL of AC Fine Test Dust.
*** These contaminants are not necessarily in your water supply. Performance may vary based on local water conditions.
® NSF is a registered trademark of NSF International.
11
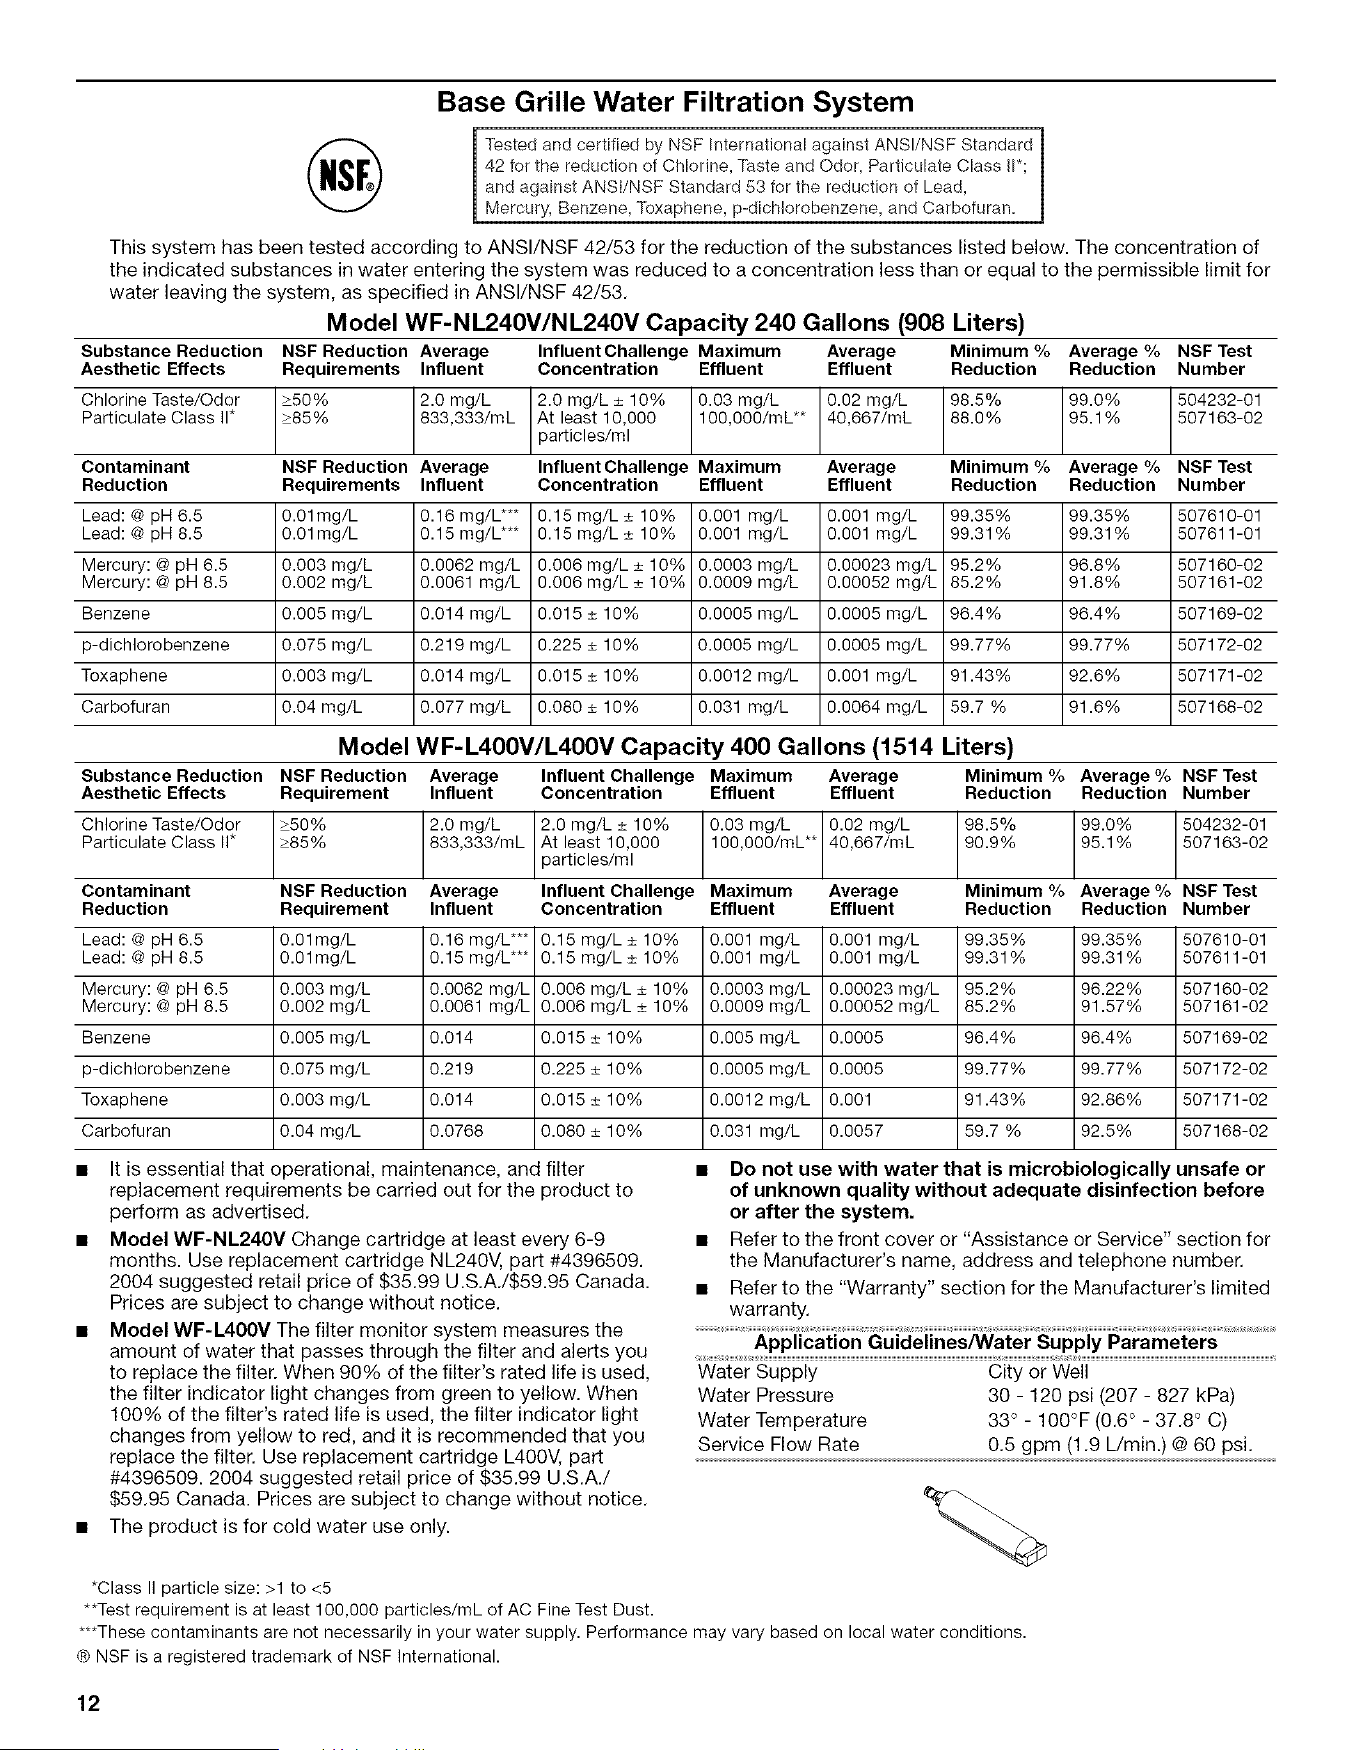
Base Grille Water Filtration System
Tested and certified by NBF International against ANSI/NSF Standard
42 for the reduction of Chlorine, Taste and Odor, Particulate Class {1";
and against ANB{/NSF Standard 53 for the reduction of Lead,
Mercury, Benzene, Toxaphene, p-dichlorobenzene, and Carbofuran=
This system has been tested according to ANSl/NSF 42/53 for the reduction of the substances listed below. The concentration of
the indicated substances in water entering the system was reduced to a concentration less than or equal to the permissible limit for
water leaving the system, as specified in ANSI/NSF 42/53,
Model WF-NL240V/NL240V Capacity 240 Gallons (908 Liters)
Substance Reduction NSF Reduction Average InfluentChallenge Maximum Average Minimum % Average % NSF Test
Aesthetic Effects Requirements Influent Concentration Effluent Effluent Reduction Reduction Number
Chlorine Taste/Odor _50% 2.0 mg/L 2.0 mg/L _+10% 0.03 mg/L 0.02 mg/L 98.5% 99.0% 504232-01
Particulate Class II* _85% 833,333/mL Atparticles/mlleast10,000 100,000/mL** 40,667/mL 88.0% 95.1% 507163-02
Contaminant NSF Reduction Average InfluentChallenge Maximum Average Minimum % Average % NSF Test
Reduction Requirements Influent Concentration Effluent Effluent Reduction Reduction Number
Lead: @ pH 6.5 0.01mg/L 0.16 mg/L*** 0.15 mg/L_+ 10% 0.001 mg/L 0.001 mg/L 99.35% 99.35% 507610-01
Lead: @ pH 8.5 0.01 mg/L 0.15 mg/L*** 0.15 mg/L _+10% 0.001 mg/L 0.001 mg/L 99.31% 99.31% 507611-01
Mercury: @ pH 6.5 0.003 mg/L 0.0062 mg/L 0.006 mg/L _+10% 0.0003 mg/L 0.00023 mg/L 95.2% 96.8% 507160-02
Mercury: @ pH 8.5 0.002 mg/L 0.0061 mg/L 0.006 mg/L _+10% 0.0009 mg/L 0.00052 mg/L 85.2% 91.8% 507161-02
Benzene 0.005 mg/L 0.014 mg/L 0.015 _+10% 0.0005 mg/L 0.0005 mg/L 96.4% 96.4% 507169-02
p-dichlorobenzene 0.075 mg/L 0.219 mg/L 0.225 _+10% 0.0005 mg/L 0.0005 mg/L 99.77% 99.77% 507172-02
Toxaphene 0.003 mg/L 0.014 mg/L 0.015 _+10% 0.0012 mg/L 0.001 mg/L 91.43% 92.6% 507171-02
Carbofuran 0.04 mg/L 0.077 mg/L 0.080 _+10% 0.031 mg/L 0.0064 mg/L 59.7 % 91.6% 507168-02
Model WF-L400V/L400V Capacity 400 Gallons (1514 Liters)
Substance Reduction NSF Reduction Average Influent Challenge Maximum Average Minimum % Average % NSF Test
Aesthetic Effects Requirement Influent Concentration Effluent Effluent Reduction Reduction Number
Chlorine Taste/Odor _50% 2.0 mg/L 2.0 mg/L _+10% 0.03 mg/L 0.02 mg/L 98.5% 99.0% 504232-01
Particulate Class II* _85% 833,333/mL Atparticles/mlleast10,000 100,000/mL** 40,667/mL 90.9% 95.1% 507163-02
Contaminant NSF Reduction Average Influent Challenge Maximum Average Minimum % Average % NSF Test
Reduction Requirement Influent Concentration Effluent Effluent Reduction Reduction Number
Lead: @ pH 6.5 0.01mg/L 0.16 mg/L*** 0.15 mg/L _+10% 0.001 mg/L 0.001 mg/L 99.35% 99.35% 507610-01
Lead: @ pH 8.5 0.01mg/L 0.15 mg/L*** 0.15 mg/L _+10% 0.001 mg/L 0.001 mg/L 99.31% 99.31% 507611-01
Mercury: @ pH 6.5 0.003 mg/L 0.0062 mg/L 0.006 mg/L _+10% 0.0003 mg/L 0.00023 mg/L 95.2% 96.22% 507160-02
Mercury: @ pH 8.5 0.002 mg/L 0.0061 mg/L 0.006 mg/L _+10% 0.0009 mg/L 0.00052 mg/L 85.2% 91.57% 507161-02
Benzene 0.005 mg/L 0.014 0.015 _+10% 0.005 mg/L 0.0005 96.4% 96.4% 507169-02
p-dichlorobenzene 0.075 mg/L 0.219 0.225_+ 10% 0.0005 mg/L 0.0005 99.77% 99.77% 507172-02
Toxaphene 0.003 mg/L 0.014 0.015_+ 10% 0.0012 mg/L 0.001 91.43% 92.86% 507171-02
Carbofuran 0.04 mg/L 0.0768 0.080 _+10% 0.031 mg/L 0.0057 59.7 % 92.5% 507168-02
• It is essential that operational, maintenance, and filter • Do not use with water that is microbiologically unsafe or
replacement requirements be carried out for the product to of unknown quality without adequate disinfection before
perform as advertised, or after the system.
Model WF-NL240V Change cartridge at least every 6-9 • Refer to the front cover or "Assistance or Service" section for
months. Use replacement cartridge NL240V, part #4396509. the Manufacturer's name, address and telephone number.
2004 suggested retail price of $35.99 U.S.A./S59.95 Canada. • Refer to the "Warranty" section for the Manufacturer's limited
Prices are subject to change without notice, warranty.
Model WF-L400V The filter monitor system measures the
amount of water that passes through the filter and alerts you Application Guidelines/Water Supply Parameters
to replace the filter. When 90% of the filter's rated life is used, Water Supply City or Well
the filter indicator light changes from green to yellow. When Water Pressure 30 - 120 psi (207 - 827 kPa)
100% of the filter's rated life is used, the filter indicator light Water Temperature 33 ° - 100°F (0.6 ° - 37.8 ° C)
changes from yellow to red, and it is recommended that you Service Flow Rate 0.5 gpm (1.9 L/rain.) @ 60 psi.
replace the filter. Use replacement cartridge L400V, part
#4396509. 2004 suggested retail price of $35.99 U.S.A./
$59.95 Canada. Prices are subject to change without notice.
The product is for cold water use only.
*Class II particle size: >1 to <5
**Test requirement is at least 100,000 particles/mL of AC Fine Test Dust.
***These contaminants are not necessarily in your water supply. Performance may vary based on local water conditions.
(¢ NSF is a registered trademark of NSF International.
12
WHIRLPOOL®REFRIGERATORWARRANTY
ONE-YEAR FULL WARRANTY ON REFRIGERATOR
For one year from the date of purchase, when this refrigerator (excluding the water filter) is operated and maintained according to
instructions attached to or furnished with the product, Whirlpool Corporation will pay for FSP® replacement parts and repair labor costs
to correct defects in materials or workmanship. Service must be provided by a Whirlpool designated service company.
On models with a water filter: 30 day limited warranty on water filter. For 30 days from the date of purchase, when this filter is operated
and maintained according to instructions attached to or furnished with the product, Whirlpool Corporation will pay for replacement
parts to correct defects in materials and workmanship.
SECOND THROUGH FIFTH YEAR FULL WARRANTY ON SEALED REFRIGERATION SYSTEM PARTS AS LISTED
In the second through fifth years from the date of purchase, when this refrigerator is operated and maintained according to instructions
attached to or furnished with the product, Whirlpool Corporation will pay for FSP® replacement parts and repair labor costs to correct
defects in materials or workmanship in the sealed refrigeration system. These parts are: compressor, evaporator, condenser, dryer, and
connecting tubing. Service must be provided by a Whirlpool designated service company.
Whirlpool Corporation will not pay for:
1. Service calls to correct the installation of your refrigerator, to instruct you how to use your refrigerator, to replace house fuses or
correct house wiring or plumbing, to replace light bulbs, or replacement water filters other than as noted above.
2. Repairs when your refrigerator is used in other than normal, single-family household use.
3. Pickup and delivery. Your refrigerator is designed to be repaired in the home.
4. Damage resulting from accident, alteration, misuse, abuse, fire, flood, improper installation, acts of God, or use of products not
approved by Whirlpool Corporation or Whirlpool Canada Inc.
5. Any food loss due to product failure.
6. Repairs to parts or systems resulting from unauthorized modifications made to the appliance.
7. Replacement parts or repair labor costs for units operated outside the United States or Canada.
8. In Canada, travel or transportation expenses for customers who reside in remote areas,
WHIRLPOOL CORPORATION AND WHIRLPOOL CANADA INC. SHALL NOT BE LIABLE
FOR INCIDENTAL OR CONSEQUENTIAL DAMAGES
Some states or provinces do not allow the exclusion or limitation of incidental or consequential damages, so this exclusion or limitation
may not apply to you. This warranty gives you specific legal rights, and you may also have other rights which vary from state to state or
province to province.
Outside the 50 United States and Canada, this warranty does not apply. Contact your authorized Whirlpool dealer to determine
if another warranty applies.
If you need service, first see the "Troubleshooting" section of this book. After checking "Troubleshooting," additional help can be found
by checking the "Assistance or Service" section or by calling the Whirlpool Customer Interaction Center, 1-800-253-1301 (toll-free),
from anywhere in the U.S.A. In Canada, contact your Whirlpool Canada Inc. designated service company or
call 1-800-807-6777. 8/01
13
MANUALDE USOY CUIDADODELREFRIGERADOR
Ayuda o Servicio T(!cnico
Si necesita ayuda o servicio tecnico, vea primero la secci6n
"SoluciSn de Problemas". Puede obtener asistencia adicional
Ilamando a nuestro Centro de InteracciSn del Cliente al
1-800-253-1301 desde cualquier lugar de los EE.UU., o escriba a:
Whirlpool Corporation
Customer Interaction Center
553 Benson Road
Benton Harbor, MI 49022-2692
En CanadA, para instalaci6n y servicio, Ilame al 1-800-807-6777.
Para recibir asistencia Ilame al 1-800-461-5681, de lunes a
viernes de 8:00 a.m. a 6:00 p.m. (hora estandar del este); sabados
de 8:30 a 4:30 p.m. (hora estandar del este), o escriba a:
Whirlpool Canada Inc.
Customer Interaction Center
1901 Minnesota Court
Mississauga, Ontario L5N 3A7
Tambien puede obtener informaci6n visitando nuestro sitio web
en www.whirlpool.com.
En CanadA, visite www.whirlpool.com/canada.
Favor de incluir un n0mero telef6nico de dia en su
correspondencia.
Guarde este libro y su comprobante de compra juntos para
referencia futura. Usted debera proporcionar evidencia de la
compra o una fecha de instalaci6n para obtener servicio bajo
la garantia.
Escriba la siguiente informaci6n acerca de su electrodomestico
para ayudarle a obtener asistencia o servicio tecnico si alguna vez
Ilegara a necesitarlo. Debera tenet a mano el n0mero completo
del modelo y de la serie. Puede encontrar esta informaci6n en la
etiqueta con el nOmero de modelo y de serie que esta ubicada en
la pared interior del compartimiento del refrigerador.
Nombre del distribuidor
Nt_mero de serie
Direcci6n
Nt_mero de tel6fono
Nt_mero del modelo
Fecha de compra
Para pedir filtros de repuesto, Ilame al 1-800-442-9991 y solicite
el n0mero de pieza que se detalla a continuaci6n o p6ngase en
contacto con su distribuidor autorizado de Whirlpool. En CanadA,
Ilame al 1-800-461-5681.
Limpiador de Acero Inoxidable: Pida la pieza No. 4396095
Cartucho del filtro de la base estandar: Pida la pieza
No. 4396508 (NL240/L400), No. 4396509 (NL240V y L400V)
SEGURIDADDELREFRIGERADOR
Su seguridad y la seguridad de los demas es muy importante.
Hemos incluido muchos mensajes importantes de seguridad en este manual yen su electrodomestico. Lea y obedezca siempre
todos los mensaies de seguridad.
Este es el simbolo de advertencia de seguridad.
Este simbolo le llama la atencion sobre peligros potenciales que pueden ocasionar la muerte o una lesi6n a
usted y a los demas.
Todos los mensajes de seguridad iran a continuaci6n del simbolo de advertencia de seguridad y de la palabra
"PELIGRO" o "ADVERTENCIA". Estas palabras significan:
Si no sigue las instrucciones de inmediato, usted puede
morir o sufrir una lesion grave.
Si no sigue las instrucciones, usted puede morir o sufrir
una lesion grave.
Todos los mensajes de seguridad le diran el peligro potencial, le diran como reducir las posibilidades de sufrir una lesi6n y Io que
puede suceder si no se siguen las instrucciones.
14
mNSTRUCCmONES mMPORTANTES DE SEGURmDAD
ADVERTENCmA: Para reducir el riesgo de incendio, choque electrico, o lesiones personales al usar su refrigerador siga
estas precauciones basicas:
• No quite la terminal de conexi6n a tierra.
• No use un cable electrico de extensiSn.
• Desconecte el suministro de energfa antes de darle servicio.
• Vuelva a colocar todos los paneles antes de ponedo a
funcionar.
• Remueva Ias puertas de su refrigerador viejo.
• Use un Iimpiador no inflamabIe.
• No use un adaptador.
• Mantenga los materiales y vapores infiamabtes, tales como
gasolina, alejados del refrigerador.
• Use dos o mas personas para mover e instalar el
refrigerador.
• Desconecte el suministro de energfa antes de instalar Ia
fabrica de hieto (en aquellos modelos que incluyen el juego
de instalaciSn de Ia fabrica de hielo).
• Use un vase resistente para recibir hielo o agua deI
despachador (en algunos modelos).
• Conecte a un contacto de pared de conexi6n a tierra de
3 terminales.
CONSERVAR ESTAS mNSTRUCCmONES
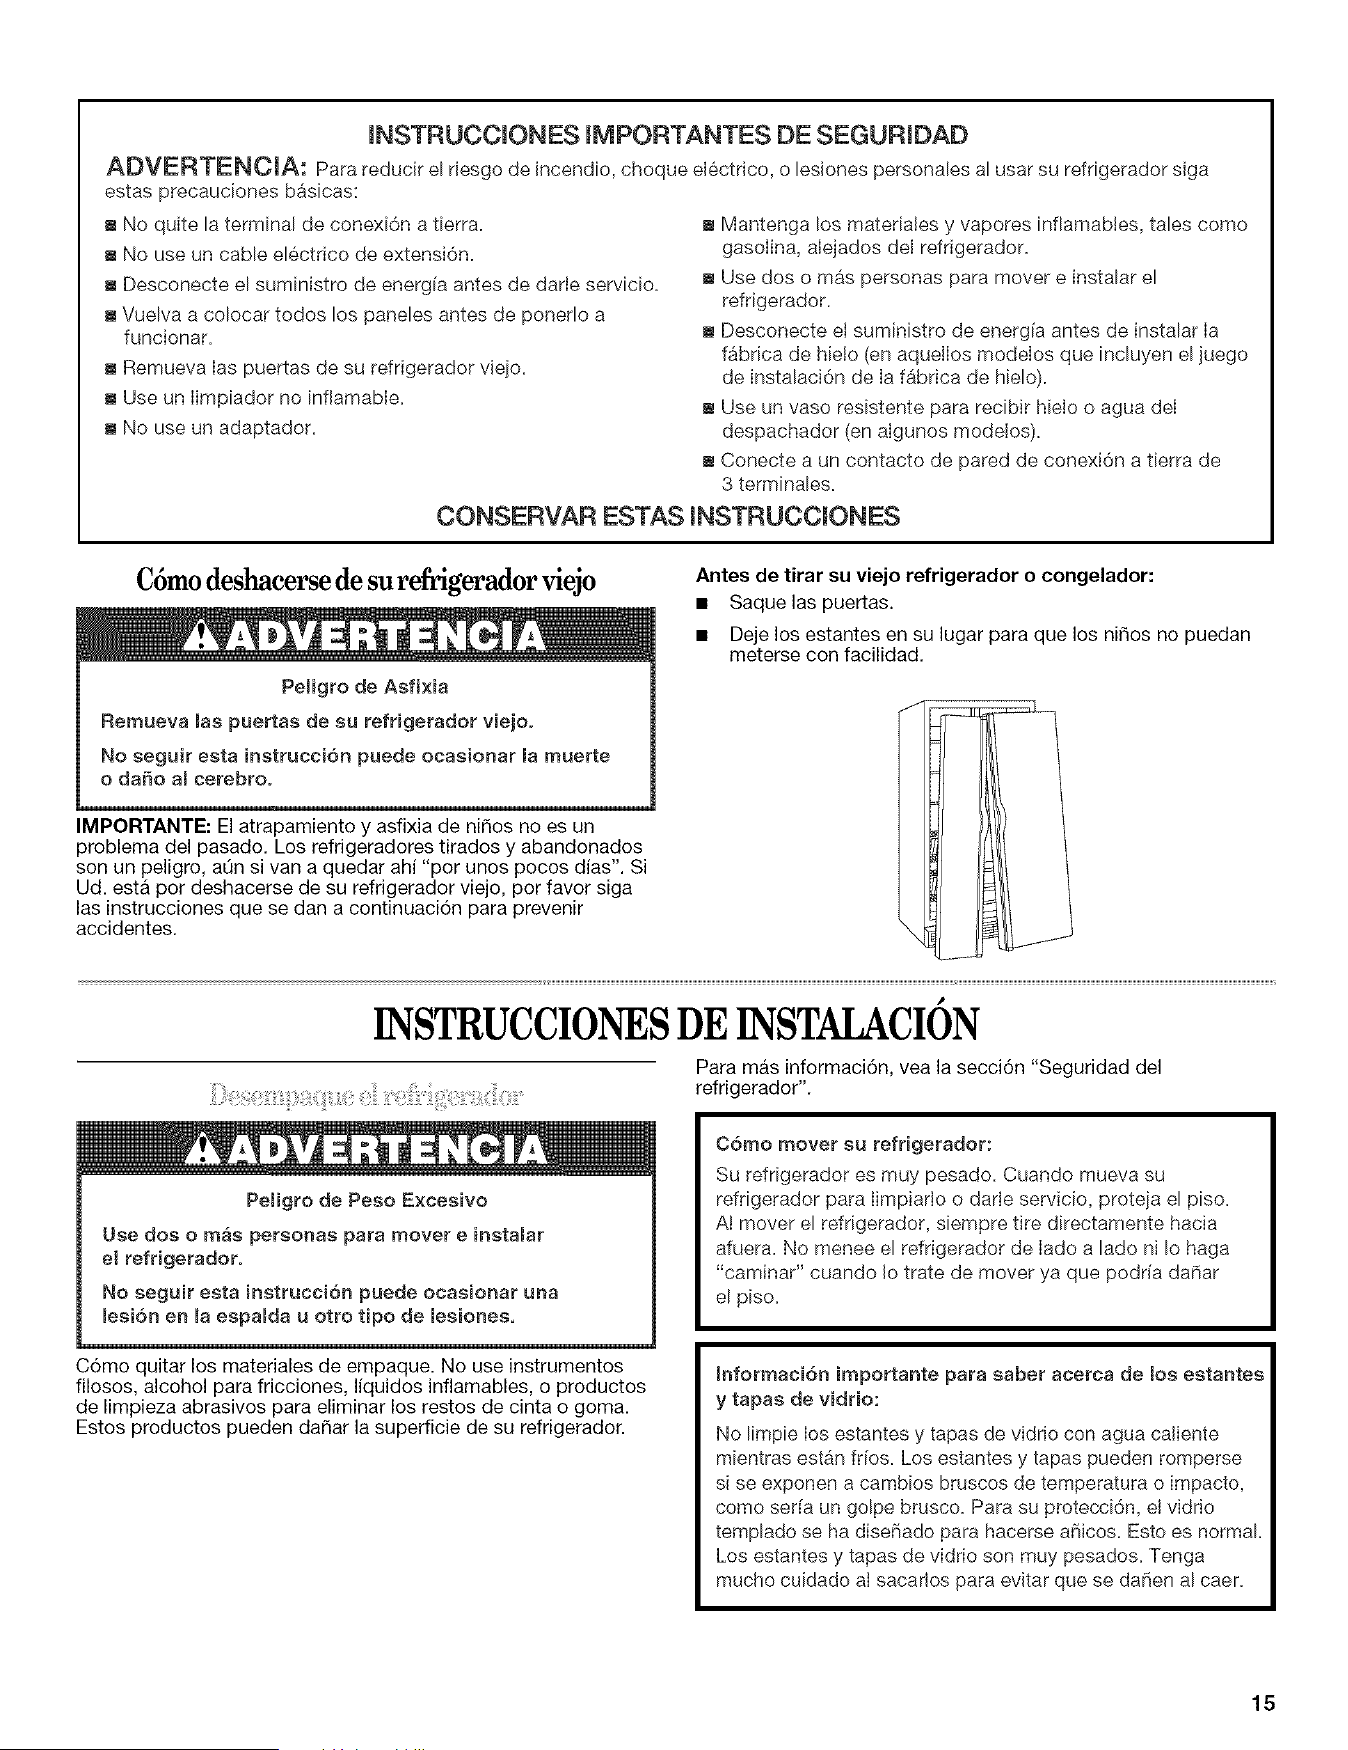
C6mo deshacerse de su refrigerador viejo
Peligro de Asfi×ia
Remueva maspuertas de su refrigerador viejoo
No seguir esta instrucci6n puede ocasionar la muerte
o dafio amcerebroo
IMPORTANTE: El atrapamiento y asfixia de niSos no es un
problema del pasado. Los refrigeradores tirados y abandonados
son un peligro, ann si van a quedar ahi "por unos pocos dias". Si
Ud. esta por deshacerse de su refrigerador viejo, por favor siga
las instrucciones que se dan a continuaci6n para prevenir
accidentes.
Antes de tirar su viejo refrigerador o congelador:
• Saquelas puertas.
• Deje los estantes en su lugar para que los nitros no puedan
meterse con facilidad.
#
INSTRUCCIONESDEINSTAIACION
Para mas informaci6n, vea la secci6n "Seguridad del
refrigerador".
PeHgro de Peso E×cesivo
Use dos o mas personas para mover e insta_ar
el refrigeradoro
No seguir esta instrucci6n puede ocasionar una
_esi6n en _a espalda u otto tipo de lesiones.
C6mo quitar los materiales de empaque. No use instrumentos
filosos, alcohol para fricciones, liquidos inflamables, o productos
de limpieza abrasives para eliminar los restos de cinta o goma.
Estos productos pueden daSar la superficie de su refrigerador.
C6mo mover su refrigerador:
Su refrigerador es muy pesado. Cuando mueva su
refrigerador para Iimpiarlo o darle servicio, proteia el piso.
At mover el refrigerador, siempre tire directamente hacia
afuera. No menee el refrigerador de Iado a lade ni Io haga
"caminar" cuando Io trate de mover ya que podria daSar
el piso.
Informaci6n importante para saber acerca de los estantes
y tapas de vidrio:
No limpie Ios estantes y tapas de vidrio con agua caliente
mientras est&n fr[os. Los estantes y tapas pueden romperse
si se exponen a cambios bruscos de temperatura o impacto,
como ser[a un golpe brusco. Para su protecci6n, el vidrio
templado se ha diseSado para hacerse aSicos. Esto es normal.
Los estantes y tapas de vidrio son muy pesados. Tenga
mucho cuidado aI sacarlos para evitar que se daSen al caer.
15
PeHgre de E×ptesion
Mantenga Bee materialee y vapores inflamabmee,
ta_es come gasolina, amejadoe del refdgerador°
Me seguir esta instrucci6n puede ocasionar la muerte,
e×p_oei6n, e incendio.
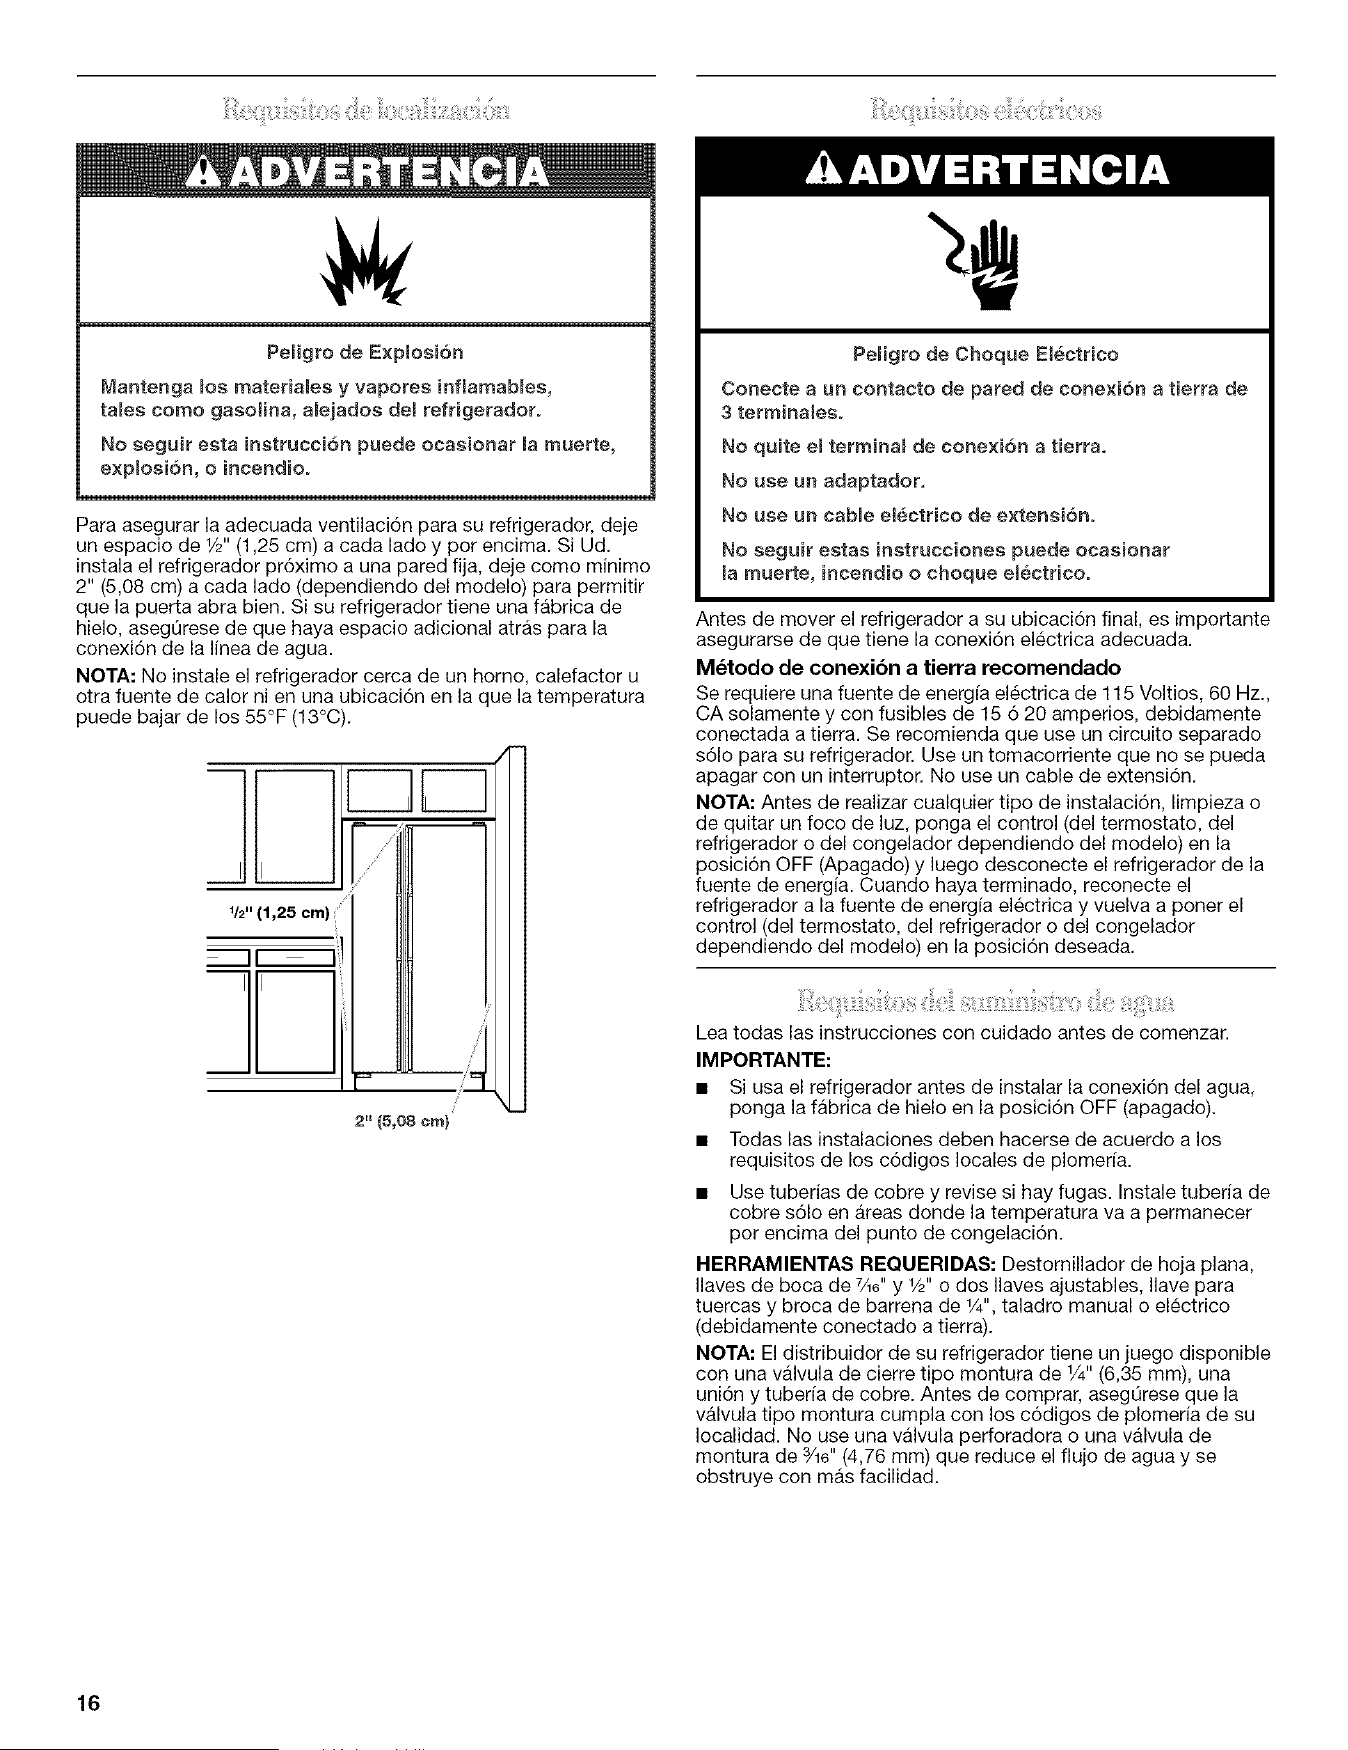
Para asegurar la adecuada ventilaci6n para su refrigerador, deje
un espacio de 1/2"(1,25 cm) a cada lado y pot encima. Si Ud.
instala el refrigerador pr6ximo a una pared fija, deje come minimo
2" (5,08 cm) a cada lade (dependiendo del modelo) para permitir
que la puerta abra bien. Si su refrigerador tiene una fabrica de
hielo, aseg0rese de que haya espacio adicional atras para la
conexi6n de la linea de agua.
NOTA: No instale el refrigerador cerca de un homo, calefactor u
otra fuente de calor ni en una ubicaci6n en la que la temperatura
puede bajar de los 55°F (13°C).
I IL_
J
/
1/2" (1,25 cm)
II I_!
/
2" (5,08 ore)
Pemigro de Choque Electrico
Conecte a un contaeto de pared de cone×i6n a tierra de
3 terminates.
No quite el terminam de cone×i6n a tierra.
No use un adaptador.
No use un cabme etectrico de e×tensi6n.
No eeguir eetae instrucciones puede ocaeionar
la muerte, ineendio o choque emectricoo
Antes de mover el refrigerador a su ubicaci6n final, es importante
asegurarse de que tiene la conexi6n electrica adecuada.
M_todo de conexibn a tierra recomendado
Se requiere una fuente de energfa electrica de 115 Voltios, 60 Hz.,
CA solamente y con fusibles de 15 6 20 amperios, debidamente
conectada a tierra. Se recomienda que use un circuito separado
s61o para su refrigerador. Use un tomacorriente que no se pueda
apagar con un interruptor. No use un cable de extensi6n.
NOTA: Antes de realizar cualquier tipo de instalaci6n, limpieza o
de quitar un foco de luz, ponga el control (del termostato, del
refrigerador o del congelador dependiendo del modelo) en la
posici6n OFF (Apagado) y luego desconecte el refrigerador de la
fuente de energia. Cuando haya terminado, reconecte el
refrigerador a la fuente de energia electrica y vuelva a poner el
control (del termostato, del refrigerador o del congelador
dependiendo del modelo) en la posici6n deseada.
Lea todas las instrucciones con cuidado antes de comenzar.
IMPORTANTE:
• Si usa el refrigerador antes de instalar la conexi6n del agua,
ponga la fabrica de hielo en la posici6n OFF (apagado).
• Todas las instalaciones deben hacerse de acuerdo a los
requisites de los c6digos locales de plomerfa.
• Use tuberias de cobre y revise si hay fugas. Instale tuberia de
cobre s61o en areas donde la temperatura va a permanecer
per encima del punto de congelaci6n.
HERRAMIENTAS REQUERIDAS: Destornillador de hoja plana,
Ilaves de boca de 7_6"y 1/2"o dos Ilaves ajustables, Ilave para
tuercas y broca de barrena de 1/4",taladro manual o electrico
(debidamente conectado a tierra).
NOTA: El distribuidor de su refrigerador tiene un juego disponible
con una valvula de cierre tipo montura de 1/4"(6,35 mm), una
uni6n y tuberfa de cobre. Antes de comprar, aseg0rese que la
valvula tipo montura cumpla con los c6digos de plomeria de su
Iocalidad. No use una valvula perforadora o una valvula de
montura de 3/16"(4,76 mm) que reduce el flujo de agua y se
obstruye con mas facilidad.
16
Presibn del agua
Se necesita un suministro de agua fria con presi6n de agua entre
30 y 120 Ibs/pulg _ (207 a 827 kPa) para hacer funcionar el
despachador de agua y la fabrica de hielo. Si usted tiene
preguntas acerca de la presi6n de agua, Ilame a un plomero
competente autorizado.
Suministro de agua de bsmosis inversa
IMPORTANTE: La presi6n del suministro de agua que sale de un
sistema de 6smosis inversa y va a la valvula de entrada de agua
del refrigerador necesitara set entre 30 y 120 Ib/pulg _ (207 a
827 kPa).
Si se conecta un sistema de filtraci6n de agua de 6smosis inversa
al suministro de agua fria, la presi6n de agua al sistema de
6smosis inversa necesitara set de un minimo de 40 a 60 Ibs/pulg _
(276 a 414 kPa).
Si la presi6n del agua del sistema de 6smosis inversa es menor de
40 a 60 Ibs/pulg 2 (276 a 414 kPa):
• Fijese si el filtro de sedimentos en el sistema de 6smosis
inversa esta bloqueado y reemplacelo si fuera necesario.
• Deje que se vuelva a Ilenar el tanque de almacenaje del
sistema de 6smosis inversa despues del uso intense.
• Si su refrigerador tiene un cartucho del filtro de agua, se podra
reducir la presi6n aQn mas si se usa en conjunto con un
sistema de 6smosis inversa. Quite el cartucho del filtro de
agua; vea "Sistema de filtraci6n de agua".
Si tiene preguntas acerca de la presi6n del agua, Ilame a un
plomero competente autorizado.
Lea todas las instrucciones antes de comenzar.
IMPORTANTE: Si usa el refrigerador antes de instalar la conexi6n
del agua, ponga la fabrica de hielo en la posici6n apagado (OFF).
Conexi_n a la linea de agua
1. Desenchufe el refrigerador o desconecte el suministro de
energia.
2. CIERRE el suministro principal de agua. ABRA la Ilave de agua
mas cercana el tiempo suficiente para que la tuberia de agua
se vacie totalmente.
3. Busque una tuberia vertical de agua fr[a de 1/2"a 11A''
(12,70 mm a 3,18 cm) cercana al refrigerador.
IMPORTANTE:
4.
5=
• AsegQrese de que sea una tuberia de agua fr[a.
• Una tuberia horizontal funcionar& pete taladre per el lade
superior de la tuberia, no por debajo. Esto ayudara a
mantener el agua alejada del taladro. Esto tambien evita
que se junte sedimento normal en la valvula.
Para determinar la Iongitud de la tuberfa de cobre que va a
necesitar, mida desde la conexi6n en la esquina inferior
trasera del refrigerador hasta la tuberfa de agua. Agregue
7 pies (2,1 m) para la limpieza. Use tuberia de cobre de W'
(6,35 mm) de diametro externo. AsegOrese que ambos
extremes de la tuberia de cobre esten cortados rectos.
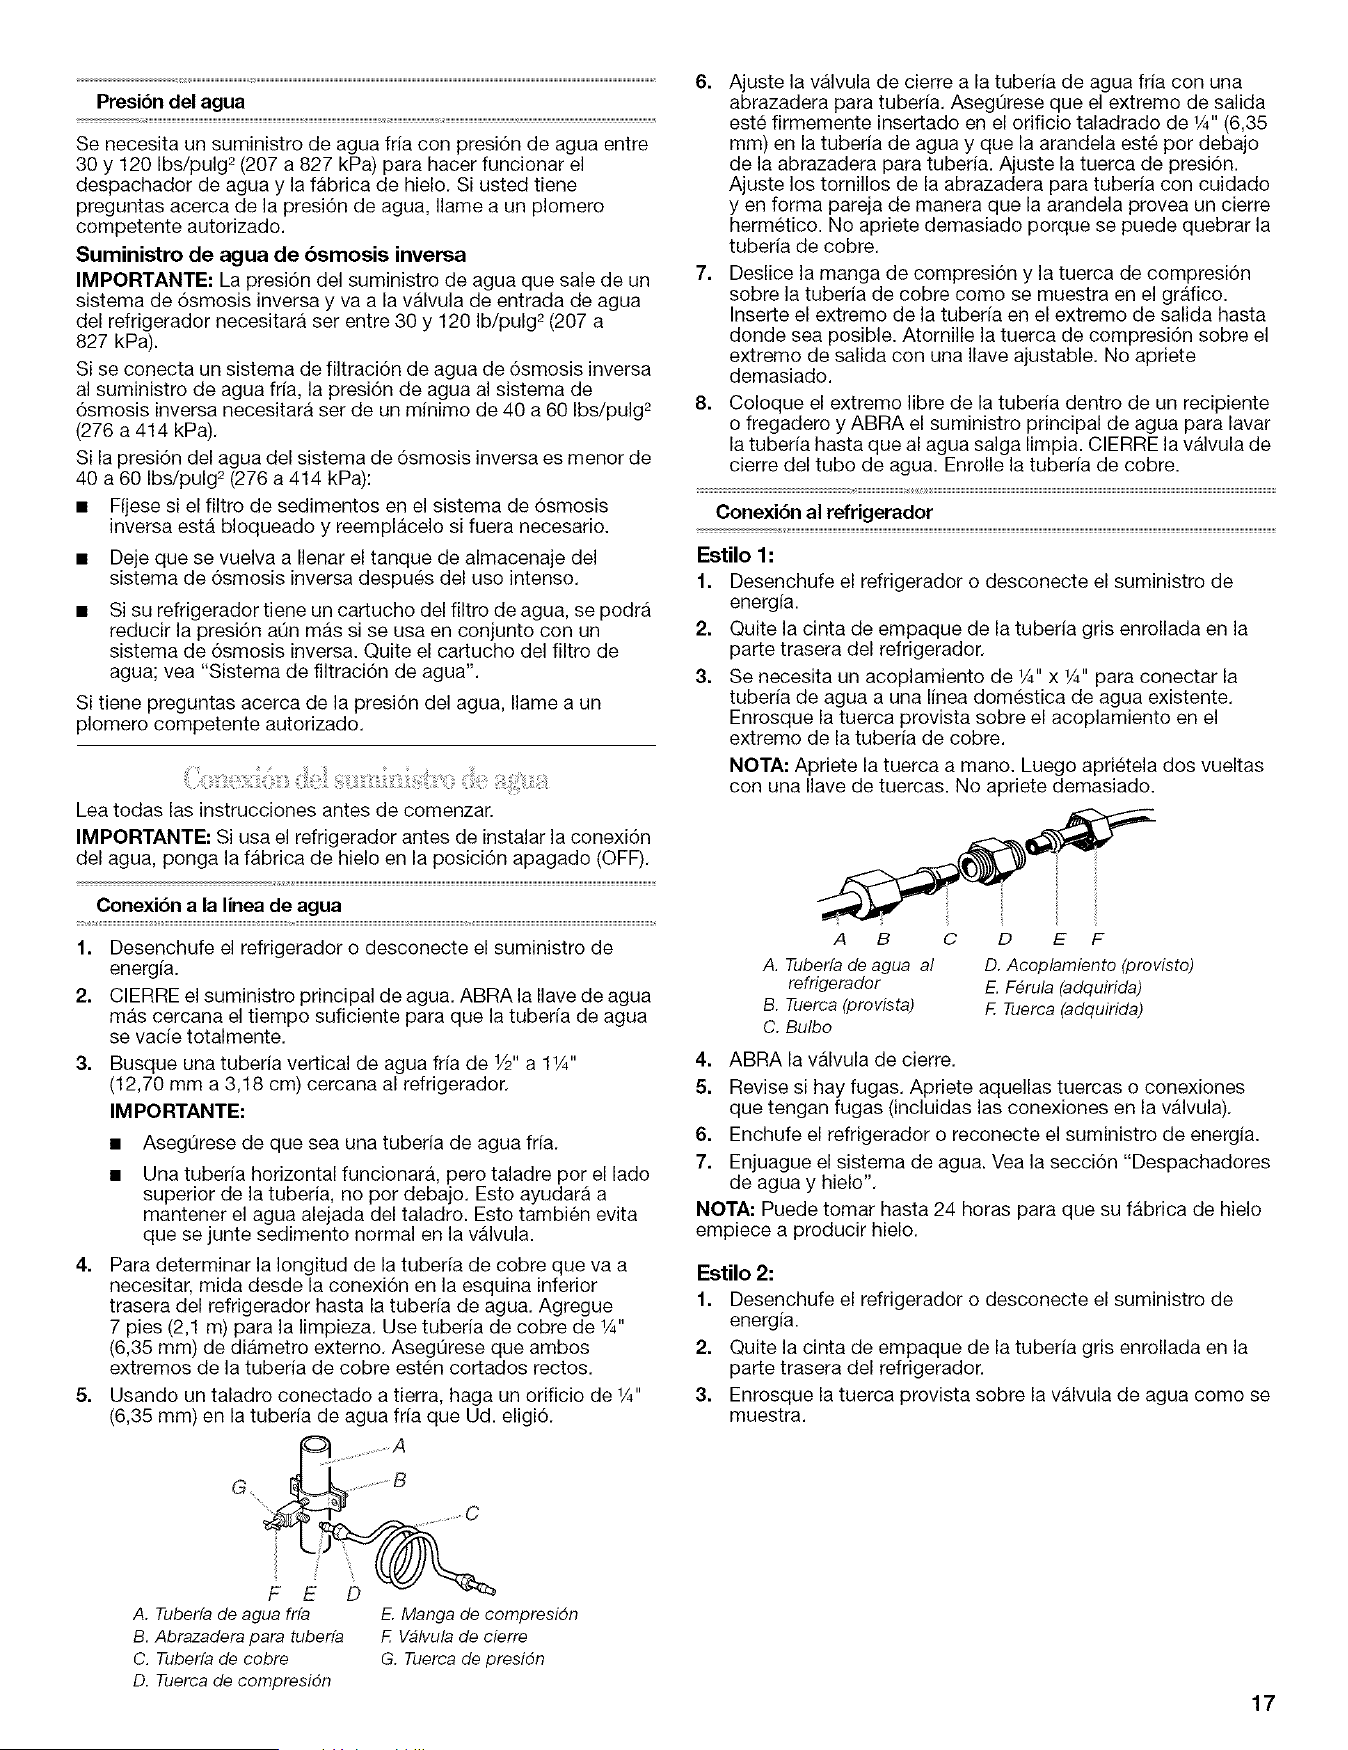
Usando un taladro conectado a tierra, haga un orificio de 1_,,
(6,35 mm) en la tuberia de agua fria que Ud. eligi6.
........ A
G ...................B
..... C
A. Tuberfade agua frfa E. Manga de compresidn
B. Abrazadera para tuberfa F. V#lvulade cierre
C. Tuberfade cobre G. Tuercade presidn
D. Tuercade compresidn
6. Ajuste la valvula de cierre a la tuberia de agua fria con una
abrazadera para tuber[a. AsegQrese que el extremo de salida
este firmemente insertado en el orificio taladrado de 1A"(6,35
mm) en la tuberia de agua y que la arandela este por debajo
de la abrazadera para tuberia. Ajuste la tuerca de presi6n.
Ajuste los tornillos de la abrazadera para tuberia con cuidado
yen forma pareja de manera que la arandela provea un cierre
hermetico. No apriete demasiado porque se puede quebrar la
tuberia de cobre.
7. Deslice la manga de compresi6n y la tuerca de compresi6n
sobre la tuberia de cobre como se muestra en el grafico.
Inserte el extremo de la tuber[a en el extremo de salida hasta
donde sea posible. Atornille la tuerca de compresi6n sobre el
extreme de salida con una Ilave ajustable. No apriete
demasiado.
8. Coloque el extremo libre de la tuberia dentro de un recipiente
o fregadero y ABRA el suministro principal de agua para lavar
la tuber[a hasta que al agua salga limpia. CIERRE la valvula de
cierre del tube de agua. Enrolle la tuberfa de cobre.
Conexi6n al refrigerador
Estilo 1:
1. Desenchufe el refrigerador o desconecte el suministro de
energia.
2. Quite la cinta de empaque de la tuberia gris enrollada en la
parte trasera del refrigerador.
3. Se necesita un acoplamiento de 1/4"x 1/4"para conectar la
tuberia de agua a una linea domestica de agua existente.
Enrosque la tuerca provista sobre el acoplamiento en el
extreme de la tuberia de cobre.
NOTA: Apriete la tuerca a mano. Luego aprietela dos vueltas
con una Ilave de tuercas. No apriete demasiado.
A B c D
A. Tuberfade agua al D.Acoplamiento (provisto)
refrigerador E. F_rula (adquirida)
B. Tuerca (provista) F.Tuerca (adquirida)
C. Bulbo
4. ABRA la valvula de cierre.
5. Revise si hay fugas. Apriete aquellas tuercas o conexiones
que tengan fugas (incluidas las conexiones en la valvula).
6. Enchufe el refrigerador o reconecte el suministro de energia.
7. Enjuague el sistema de agua. Vea la secci6n "Despachadores
de agua y hielo".
NOTA: Puede tomar hasta 24 horas para que su fabrica de hielo
empiece a producir hielo.
Estilo 2:
1. Desenchufe el refrigerador o desconecte el suministro de
energia.
2. Quite la cinta de empaque de la tuberia gris enrollada en la
parte trasera del refrigerador.
3. Enrosque la tuerca provista sobre la valvula de agua come se
muestra.
17
NOTA: Apriete la tuerca a mane. Luego aprietela dos vueltas
con una Ilave de tuercas. No apriete demasiado.
A
B
A.Bulbo
B.Tuerca (provista)
4. ABRA la valvula de cierre.
5. Revise si hay fugas. Apriete aquellas tuercas o conexiones
que tengan fugas (incluidas las conexiones en la valvula).
6. Enchufe el refrigerador o reconecte el suministro de energ[a.
7. Enjuague el sistema de agua. Vea la seccidn "Despachadores
de agua y hielo".
NOTA: Puede tomar hasta 24 horas para que su fabrica de hielo
empiece a producir hielo.
USODESU REFRIGERADOR
Para su comodidad, los controles de su refrigerador han sido
programados en la fabrica. Cuando instale su refrigerador por
primera vez asegQrese que los controles tengan la programaci6n
original. El control del refrigerador y el control del congelador
deberian estar en la "posici6n intermedia".
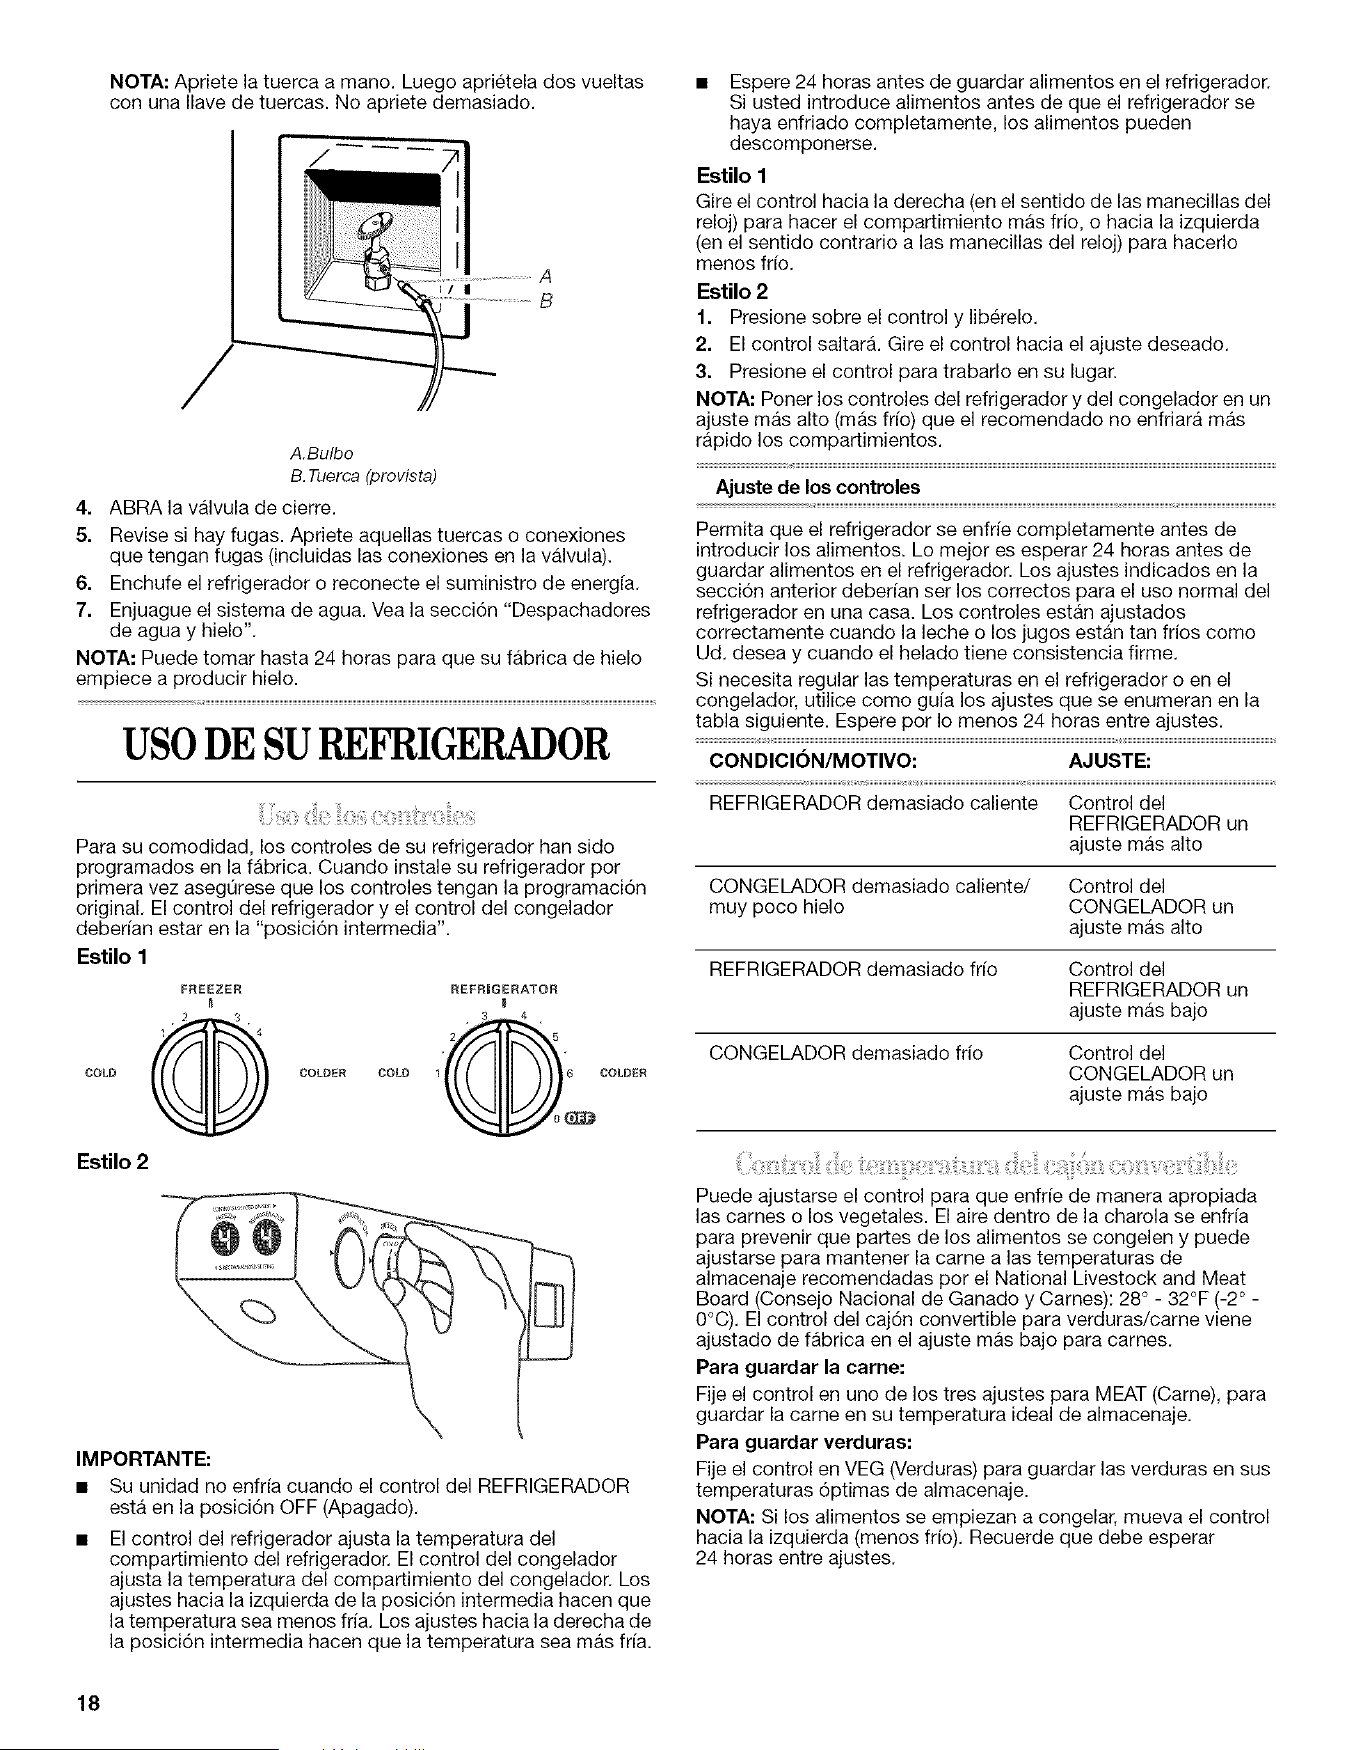
Estilo 1
COLD COLDER COLD
REFF_GERATO_
Estilo 2
IMPORTANTE:
• Su unidad no enfria cuando el control del REFRIGERADOR
esta en la posici6n OFF (Apagado).
• El control del refrigerador ajusta la temperatura del
compartimiento del refrigerador. El control del congelador
ajusta la temperatura del compartimiento del congelador. Los
ajustes hacia la izquierda de la posici6n intermedia hacen que
la temperatura sea menos fria. Los ajustes hacia la derecha de
la posici6n intermedia hacen que la temperatura sea mas fria.
• Espere 24 horas antes de guardar alimentos en el refrigerador.
Si usted introduce alimentos antes de que el refrigerador se
haya enfriado completamente, los alimentos pueden
descomponerse.
Estilo 1
Gire el control hacia la derecha (en el sentido de las manecillas del
reloj) para hacer el compartimiento mas frio, o hacia la izquierda
(en el sentido contrario alas manecillas del reloj) para hacerlo
menos fr[o.
Estilo 2
1. Presione sobre el control y liberelo.
2. El control saltara. Gire el control hacia el ajuste deseado.
3. Presione el control para trabarlo en su lugar.
NOTA: Poner los controles del refrigerador y del congelador en un
ajuste mas alto (mas fr[o) que el recomendado no enfriara mas
rapido los compartimientos.
Ajuste de los controles
Permita que el refrigerador se enfrie completamente antes de
introducir los alimentos. Lo mejor es esperar 24 horas antes de
guardar alimentos en el refrigerador. Los ajustes indicados en la
seccidn anterior deber[an set los correctos para el use normal del
refrigerador en una casa. Los controles estan ajustados
correctamente cuando la leche o los jugos estan tan frios come
Ud. desea y cuando el helado tiene consistencia firme.
Si necesita regular las temperaturas en el refrigerador o en el
congelador, utilice como guia los ajustes que se enumeran en la
tabla siguiente. Espere por Io menos 24 horas entre ajustes.
CONDICION/MOTIVO: AJUSTI=:
REFRIGERADOR demasiado caliente Control del
REFRIGERADOR un
ajuste mas alto
CONGELADOR demasiado caliente/ Control del
muy poco hielo CONGELADOR un
ajuste mas alto
REFRIGERADOR demasiado frio Control del
REFRIGERADOR un
ajuste mas bajo
CONGELADOR demasiado frio Control del
CONGELADOR un
ajuste mas bajo
Puede ajustarse el control para que enfr[e de manera apropiada
las carnes o los vegetales. El aire dentro de la charola se enfr[a
para prevenir que pares de los alimentos se congelen y puede
ajustarse para mantener la carne alas temperaturas de
almacenaje recomendadas por el National Livestock and Meat
Board (Consejo Nacional de Ganado y Carnes): 28 ° - 32°F (-2 ° -
0°C). El control del cajdn convertible para verduras/carne viene
ajustado de fabrica en el ajuste mas bajo para carnes.
Para guardar la carne:
Fije el control en uno de los tres ajustes para MEAT (Came), para
guardar la carne en su temperatura ideal de almacenaje.
Para guardar verduras:
Fije el control en VEG (Verduras) para guardar las verduras en sus
temperaturas 6ptimas de almacenaje.
NOTA: Si los alimentos se empiezan a congelar, mueva el control
hacia la izquierda (menos fr[o). Recuerde que debe esperar
24 horas entre ajustes.
18
Usted puede controlar el nivel de humedad en el caj6n hermetico
para verduras, Regule el control a cualquier ajuste entre Bajo
(LOW) y Alto (HIGH),
LOW (bajo-posicidn abierta) para el mejor almacenamiento de
frutas y verduras con cascaras.
HIGH (Alto - posicidn cerrada) para el mejor almacenamiento de
vegetales de hoja frescos.
El aire fresco del congelador es dirigido hacia el dep6sito de
la puerta del refrigerador directamente por debajo de los
orificios de ventilaci6n.
NOTA: El compartimiento para productos lacteos y el portalatas
no son enfriados,
Control del dep6sito enfriador de la puerta
El control del dep6sito enfriador de la puerta esta situado del lado
izquierdo del compartimiento del refrigerador.
A ¸
A. Control enfriador de la puerta
Gire el control en la direcci6n de las manecillas del reloj
(derecha) para reducir el flujo de aire frio hacia el dep6sito y
hacerlo menos fifo.
Gire el control en la direcci6n opuesta de las manecillas del
reloj (izquierda) para incrementar el flujo de aire frio hacia el
depdsito y hacerlo mas frfo,
RECUERDE:
• Deje transcurrir 24 horas para la producci6n del primer Iote de
hielo. Deshagase de los tres primeros Iotes de hielo
producidos.
• La calidad del hielo dependera de la calidad del agua que
suministre a su fabrica de hielo. Evite la conexidn de su
fabrica de hielo a un suministro de agua blanda. Los quimicos
para ablandar el agua (como la sal) pueden da_ar ciertos
componentes de la fabrica de hielo y producir un hielo de muy
baja calidad. Si no se puede evitar el use de un suministro de
agua blanda, asegQrese de que el ablandador de agua este
funcionando correctamente y que goce de un buen
mantenimiento.
• Nunca use instrumentos afilados para romper el hielo en el
dep6sito o en el balde. Esto puede da_ar el balde y el
mecanismo de despachado.
• No guarde nada encima ni dentro de la fabrica de hielo o del
dep6sito.
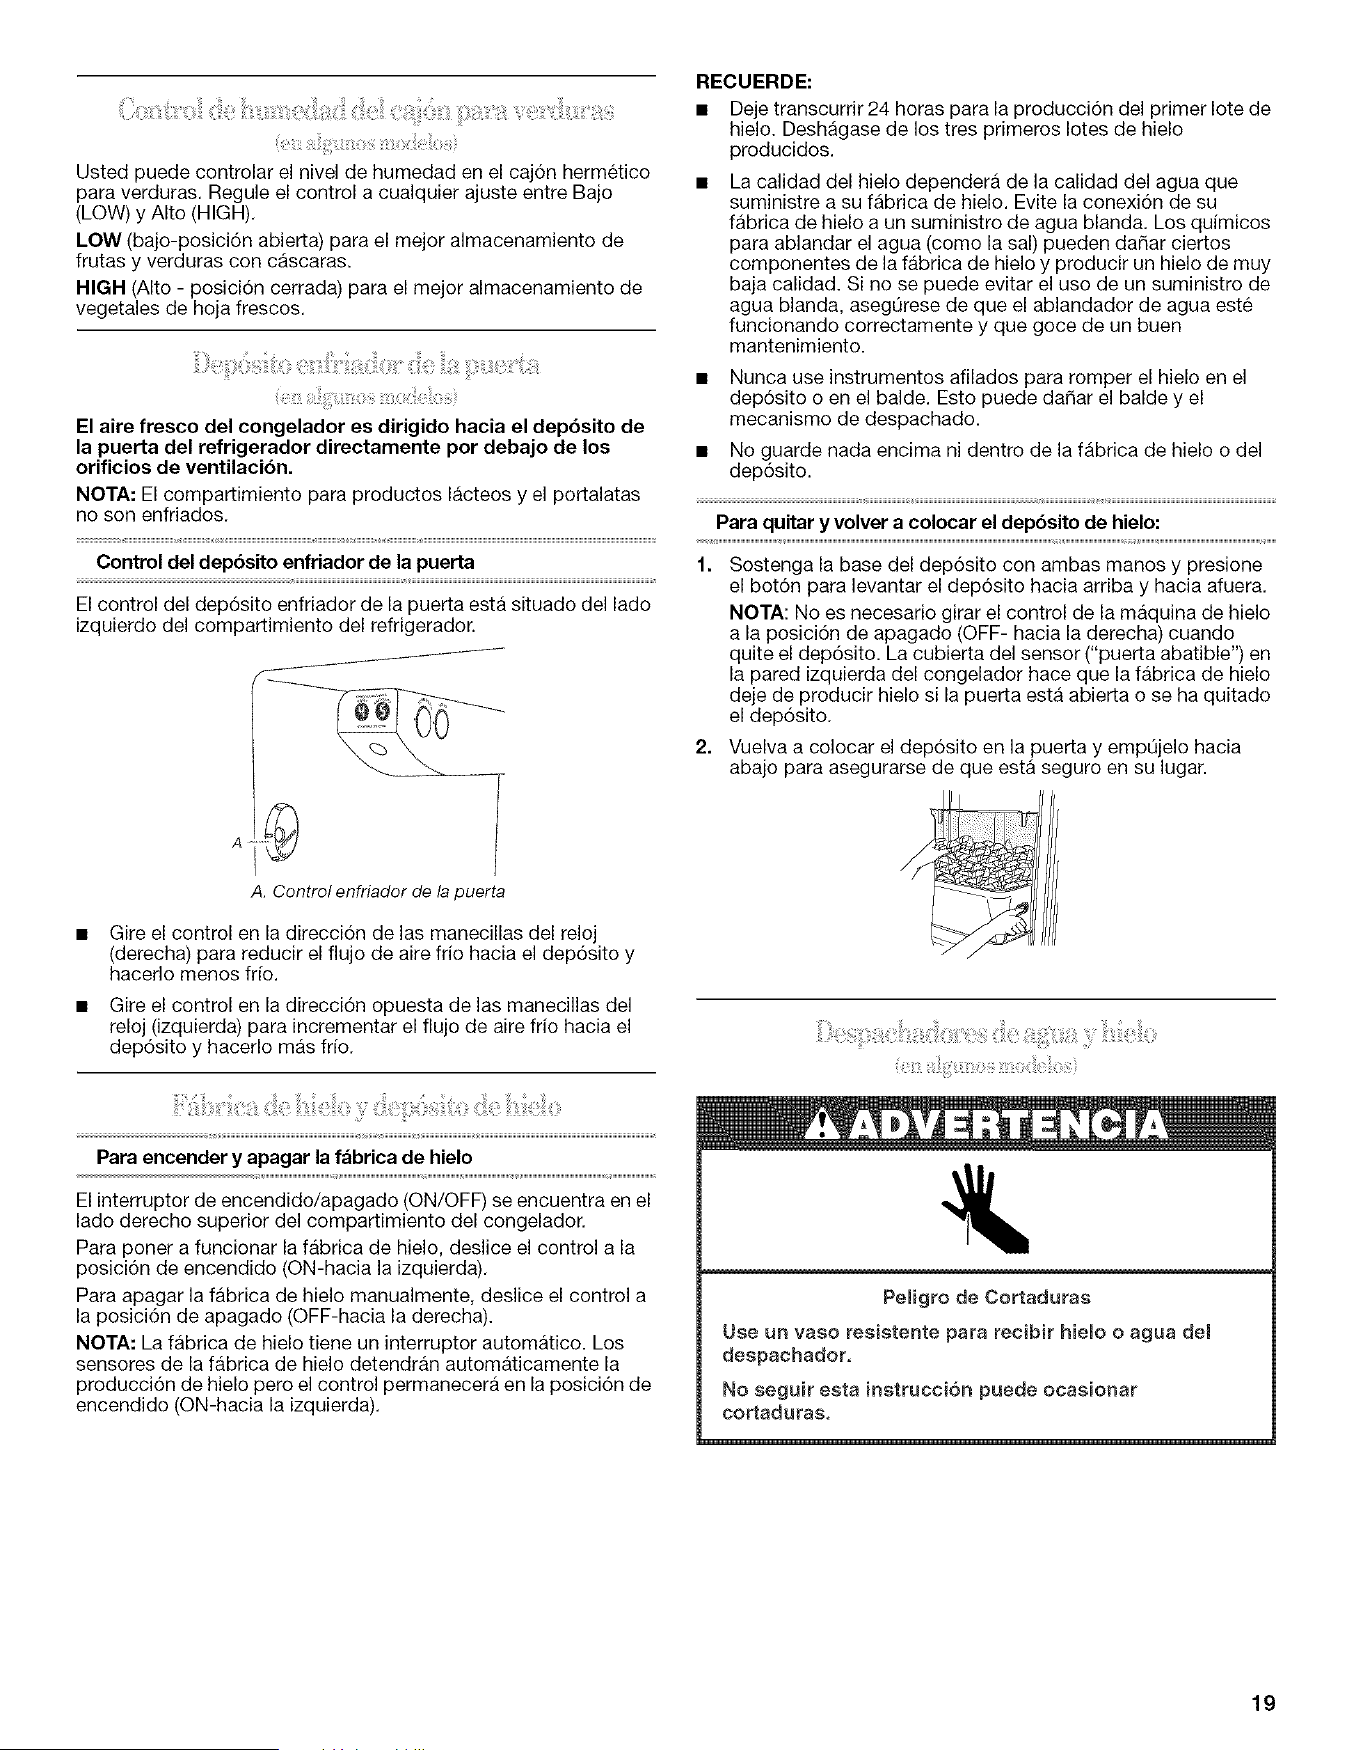
Para quitar y volver a colocar el dep6sito de hielo:
1. Sostenga la base del dep6sito con ambas manos y presione
el bot6n para levantar el dep6sito hacia arriba y hacia afuera,
NOTA: No es necesario girar el control de la maquina de hielo
a la posicidn de apagado (OFF- hacia la derecha) cuando
quite el depdsito. La cubierta del sensor ("puerta abatible") en
la pared izquierda del congelador hace que la fabrica de hielo
deje de producir hielo si la puerta esta abierta o se ha quitado
el dep6sito,
2. Vuelva a colocar el depdsito en la puerta y empQjelo hacia
abajo para asegurarse de que esta seguro en su lugar.
Para encender y apagar la fabrica de hielo
El interruptor de encendido/apagado (ON/OFF) se encuentra en el
lado derecho superior del compartimiento del congelador.
Para poner a funcionar la fabrica de hielo, deslice el control a la
posici6n de encendido (ON-hacia la izquierda),
Para apagar la fabrica de hielo manualmente, deslice el control a
la posici6n de apagado (OFF-hacia la derecha).
NOTA: La fabrica de hielo tiene un interruptor automatico. Los
sensores de la fabrica de hielo detendran automaticamente la
producci6n de hielo pero el control permanecera en la posicidn de
encendido (ON-hacia la izquierda).
Peligro de Cortaduras
Use un vaso resistente para recibir hielo o agua det
despachador,
No eeguir esta instrucci6n puede ocasionar
cortadurae,
19
El despachador de agua
IMPORTANTE:
• El sistema de distribuci6n no funcionara cuando la puerta del
congelador este abierta.
• Despues de haber conectado el refrigerador a un suministro
de agua, enjuague el sistema de agua dispensando agua en
un recipiente resistente hasta que haya enjuagado y
descartado de 2 a 3 galones (de 8 a 12 L) de agua, o per
aproximadamente de 5 minutos despues de que el agua
comience a salir. El agua que usted saca y descarta limpia el
sistema y ayuda a despejar el aire de las lineas. A medida
que sale aire de las lineas, es posible que salgan chorros de
agua repentinos del despachador.
• Deje que pasen varias horas para que el refrigerador se enfrie
y pueda enfriar el agua.
• Haga salir suficiente agua cada semana para mantener un
suministro fresco.
Para despachar agua:
1. Oprima un vase contra la barra del despachador de agua.
2. Retire el vaso para detener la salida del agua.
El despachador de hielo
El sistema de distribuci6n no funcionara cuando la puerta del
congelador este abierta. El hielo se distribuye del recipiente de
almacenamiento de la fabrica de hielo en el congelador cuando se
presione la barra del despachador.
Dependiendo de su modelo, usted puede tenet una o mas de las
opciones siguientes: la posibilidad de seleccionar hielo picado o
en cubos, una luz especial que se enciende cuando usted utiliza
el despachador o una opci6n de cierre para evitar que salga hielo
involuntario.
NOTA: Algunos modelos despachan hielo en cubos y hielo
picado. Antes de sacar hielo, seleccione el tipo de hielo que
desea.
Para obtener hielo picado, el hielo es triturado antes de set
despachado. Esto puede retrasar un poco la distribuci6n del hielo
picado. El ruido proveniente del triturador de hielo es normal y los
trozos de hielo pueden variar en tamale. Cuando cambia de la
posici6n de hielo picado a la posici6n de hielo en cubos, caen
unas onzas de hielo picado junto con los primeros cubos.
Para despachar hielo:
1. Oprima el bot6n del tipo de hielo que desee.
2. Oprima con un vaso resistente la barra del despachador de
hielo. Sostenga el vaso junto al orificio del despachador para
que el hielo no caiga fuera del vaso.
IMPORTANTE: No necesita aplicar mucha presi6n a la barra
para activar el despachador de hielo. Oprimir mucho no hara
que el despachador funcione con mas rapidez o produzca
mayor cantidad de hielo.
3. Retire el vase para detener la salida del hielo.
La luz del despachador
Style 1: La luz del despachador puede encenderse oprimiendo el
bot6n de ON.
Style 2: Cuando use el despachador, la palanca encendera
automaticamente la luz. Si usted quiere que la luz este encendida
continuamente, puede elegir ON (Encendida) o NIGHT LIGHT
(Automatica).
ON (Encendida}: Presione el bot6n de luz (LIGHT) para encender
la luz del despachador.
AUTO (Luz Nocturna}: Presione el bot6n de luz (LIGHT) pot
segunda vez para seleccionar el modo de luz nocturna. La luz del
despachador se ajustara automaticamente para ponerse mas
brillante a medida que la habitaci6n se ilumine mas y mas tenue a
medida que la habitaci6n se oscurezca.
OFF (Apagada): Presione el bot6n de luz (LIGHT) pot tercera vez
para apagar la luz del despachador.
Las luces del despachador son del tipo LED y no deberian
necesitar cambiarse. Si le parece que las luces del despachador
no funcionan, fijese si no esta bloqueado el detector de luz (en el
mode de Luz nocturna). Para obtener mas informaci6n, vea
"Soluci6n de problemas".
El cierre del despachador (en algunos modelos)
Su despachador puede apargarse para facilitar la limpieza o para
evitar que sea activado involuntario por ni_os o animales
domesticos.
NOTA: La funci6n de cierre no interrumpe el flujo electrico a la
unidad, a la fabrica de hielo o a la luz del despachador.
Unicamente desactiva las barras del despachador.
Estilo 1: Oprima el bot6n de LOCK (Cierre) para apagar el
despachador. Oprima el bot6n de UNLOCK (Reactivaci6n) para
reactivar el despachador
Estilo 2: Presione y sostenga el bot6n bloqueo desactivado
(LOCK OUT) para apagar el despachador. Presione el bot6n
bloqueo desactivado (LOCK OUT) para desbloquear el
despachador.
NOTA: No use con agua que no sea microbiolbgicamente
segura o que sea de calidad desconocida sin desinfectarla
adecuadamente antes o despues del sistema. Pueden usarse
sistemas certificados para la reduccibn de quistes en aguas
desinfectadas que puedan contener quistes filtrables.
Luz de estado del filtro de agua (en algunos modelos)
La luz de estado del filtro de agua le ayudara a saber cuando
cambiar el filtro de agua. La luz cambiara de verde a amarilla. Esto
le dira que es casi tiempo de cambiar el filtro de agua. Se
recomienda reemplazar el filtro de agua cuando la luz de estado
cambie a rojo O cuando el flujo de agua al despachador de agua
o a la fabrica de hielo disminuya sensiblemente.
Despues de cambiar el filtro de agua, reajuste la luz de estado del
filtro de agua. La luz de estado cambiara de rojo a verde cuando
se reajuste el sistema.
Filtro de agua sin indicador (en algunos modelos)
Si su refrigerador no tiene la luz indicadora de estado, usted debe
cambiar el filtro de agua cada 6 6 9 meses segQn el uso. Si el flujo
de agua hacia el despachador de agua o a la fabrica de hielo
disminuye sensiblemente antes de que pasen 6 meses, cambie el
filtro mas seguido.
i
Uso del despachador sin el filtro de agua
Puede usar el despachador sin un filtro de agua. El agua no estara
filtrada.
1. Quite el filtro de agua.
2. Deslice la tapa del extreme del filtro y vuelva a colocar la tapa
en la rejilla de la base.
IMPORTANTE: No descarte la tapa. Es parte de su
refrigerador. Guarde la tapa para usarla con el filtro de
reemplazo.
3. Gire la tapa hasta que quede firmemente en su lugar.
20
CUIDADODESU REFRIGERADOR
4. No es necesaria una limpieza rutinaria del condensador en
Pemigro de Expmosi6n
Use un limpiador no inflamabme,
No seguir esta instrucci6n puede ocasionar mamuerte,
explosi6n o incendioo
Tanto la seccidn del refrigerador como la del congelador se
descongelan automaticamente. No obstante, limpie ambas
secciones mas o menos una vez al mes para evitar la
acumulaci6n de olores. Limpie los derrames de inmediato.
IMPORTANTE: Debido a que el aire circula entre ambas
secciones, los olores que se formen en una seccidn pasaran a la
otra. Para eliminar los olores, limpie completamente ambas
secciones. Para evitar la transferencia de olores y la
deshidrataci6n de los alimentos, envuelva o tape bien los
alimentos.
Para limpiar su refrigerador:
NOTA: No use productos de limpieza abrasivos o asperos, como
aerosoles para ventanas, productos de limpieza para fregar,
liquidos inflamables, ceras para limpieza, detergentes
concentrados, blanqueadores o productos de limpieza que
contengan productos de petr61eo en las partes de plastico, en el
interior yen los revestimientos o juntas de la puerta. No use
toallas de papel, estropajos para fregar u otros utensilios de
limpieza asperos.
1. Desenchufe el refrigerador o desconecte el suministro de
energia.
2. Lave a mano, enjuague y seque todas las partes
desmontables y las superficies interiores meticulosamente.
Use una esponja limpia o un pado liso y un detergente suave
en agua tibia.
3. Lave las superficies externas metalicas pintadas y de acero
inoxidable con una esponja limpia o un paso liso y detergente
suave con agua tibia.
ambientes de funcionamiento normal en el hogar. Si el
ambiente es particularmente grasoso o polvoriento, o si hay
bastante transito de mascotas en el hogar, el condensador
debera limpiarse cada dos o tres meses para asegurar la
maxima eficacia.
Si necesita limpiar el condensador:
• Quite la rejilla de la base.
• Use una aspiradora con un cepillo suave para limpiar la
rejilla, las Areas abiertas detras de la rejilla y el Area de la
superficie frontal del condensador.
• Vuelva a colocar la rejilla de la base cuando termine.
Enchufe el refrigerador o reconecte el suministro de energfa.
NOTA: No todos los focos son adecuados para su refrigerador.
AsegQrese de cambiar el foco con otro que sea del mismo
tamaSo, forma y vatiaje. La luz del despachador requiere de un
foco de 10 Watts de use pesado y las demas luces requieren un
foco de 40 Watts para electrodomesticos. Puede conseguir los
focos con su distribuidor.
1. Desenchufe el refrigerador o desconecte el suministro de
energia.
2. Si se indica, quite la pantalla de la luz.
NOTA: Para limpiar la pantalla de la luz, lavela con agua tibia y
un detergente Ifquido. Enjuague y sequela pantalla
meticulosamente.
3. Quite el foco y reemplacelo con uno del mismo tamaSo, forma
y vatiaje.
4. Si se indica, vuelva a colocar la pantalla.
5. Enchufe el refrigerador o reconecte el suministro de energia.
21
#
SOLUCIONDEPROBLEMAS
Primero pruebe las soluciones sugeridas aqui para evitar el
costo innecesario del servicio. Hay acumulacibn de humedad en el interior
El refrigerador no enfria Verifique Io siguiente:
• _,Estan bloqueados los orificios de ventilaci6n en el
• &Se han colocado los controles de temperatura en la
posicibn media? Los controles estan prefijados de fabrica
para la posici6n correcta media. Despues de conectar la
electricidad, espere 1 hora antes de verificar la temperatura.
NOTA: El ajustar los controles en la posici6n mas fria no enfriara
ning0n compartimiento mas rapido.
Las luces no funcionan
• &Esta desconectado el cable electrico? Conecte a un
contacto de pared de conexi6n a tierra de 3 terminales.
• &Esta flojo un foco o se ha quemado? Vea la secci6n
"C6mo cambiar los focos",
&Se ha fijado en ON (Encendido) la luz del despachador?
La luz del despachador funcionara solamente cuando se
presionen las barras. Si usted desea que la luz del
despachador este continuamente encendida, fije la luz del
despachador en ON o NIGHT LIGHT (Luz nocturna). Vea
"Despachadores de agua y hielo".
&Se ha fijado la luz del despachador en NIGHT LIGHT? Si
la luz del despachador se ha fijado en el modo automatico,
asegL_rese de que no este bloqueado el sensor de la luz. Vea
"Despachadores de agua y hielo",
La temperatura est_ demasiado caliente
Verifique Io siguiente:
• _,Estan bloqueados los orificios de ventilaci6n en cualquiera
de los compartimientos?
• 8Se abre(n) la(s) puerta(s) con frecuencia?
• _,Se acaba de agregar una gran cantidad de alimentos al
refrigerador o al congelador?
• 8Se han ajustado los controles correctamente de acuerdo con
las condiciones circundantes?
Parece que el motor funciona excesivamente
Verifique Io siguiente:
• _,Esta la temperatura ambiente mas caliente que Io normal?
• _,Se acaba de agregar una gran cantidad de alimentos al
refrigerador?
• 8Se han abierto las puertas a menudo?
• 8No estan las puertas completamente cerradas?
• 8Estan sucios los serpentines del condensador?
NOTA: Su nuevo refrigerador funcionara por periodos mas largos
que su refrigerador anterior debido al motor de alto rendimiento,
refrigerador?
• _,Se abre(n) la(s) puerta(s) con frecuencia?
• _,Esta hQmeda la habitaci6n?
• _,Se han ajustado los controles correctamente de acuerdo con
las condiciones circundantes?
• _,Se ha completado un ciclo de descongelaci6n automatica?
Las puertas no cierran completamente
Verifique Io siguiente:
• _,Hay paquetes de comida que impiden que se cierre la
puerta?
• _,Esta el dep6sito o el balde de hielo mal colocado?
• _,Se desmontaron las puertas durante la instalaci6n de la
unidad y no se volvieron a instalar correctamente?
Es dificil abrir las puertas
• &Estan las empaquetaduras sucias o pegajosas? Limpie
las empaquetaduras con un jabSn suave y agua tibia,
La fabrica de hielo no produce hielo o no produce suficiente
hielo
Verifique Io siguiente:
• _,Esta el braze de cierre de alambre o el interrupter
(dependiendo del modelo) de la fabrica de hielo en la posici6n
OFF (Apagado)?
• _,Esta abierta la valvula de cierre de la tubefia del agua al
refrigerador?
• &Esta la temperatura del congelador Io suficientemente
fria para hacer hielo? Espere 24 horas despues de haber
conectado la fabrica de hielo para que se produzca hielo.
• &Se acaba de instalar la f_brica de hielo? Deje transcurrir
72 horas para que la fabrica de hielo comience a producir
hielo.
&Tiene agua el molde de la fabrica de hielo o no se ha
producido hielo? Verifique que su refrigerador haya side
conectado al suministro de agua de su casa y que la valvula
de cierre este abierta,
• &Se acaba de sacar una gran cantidad de hielo? Deje
transcurrir 24 horas para que la fabrica de hielo se
restablezca,
• &Tiene un filtro de agua instalado en el refrigerador? Este
filtro puede estar obstruido o haberse instalado
incorrectamente.
&Se trab6 un cubo de hielo en el brazo eyector de la
fabrica de hielo?
En los modelos con dep6sito de hielo interior, saque el hielo
del brazo eyector con un utensilio de plastico. En modelos
con balde de hielo ubicado en la puerta del congelador, puede
tener acceso a la fabrica de hielo oprimiendo la puerta del
sensor de hielo que se encuentra en el lade izquierdo superior
del interior del congelador. Mientras oprime la puerta del
sensor, eleve la puerta de servicio de la fabrica de hielo y quite
el hielo del brazo eyector con un utensilio de plastico.
22
El hielo tiene real sabor, mal olor o un color grisaceo
Verifique Io siguiente:
• 6Son nuevas las conexiones de plomeria, las cuales producen
un hielo descolorido o de mal sabor?
• _,Se han guardado los cubos de hielo por mucho tiempo?
• _,Se necesita limpiar el congelador y el dep6sito o balde de
hielo?
• _,Se han envuelto debidamente los alimentos en el congelador
o el refrigerador?
• &Contiene el agua minerales (como el azufre)? Podria ser
necesario instalar un filtro para eliminar los minerales.
• &Tiene un filtro de agua instalado en el refrigerador? Un
descoloramiento o un color gris del hielo indican que el
sistema de filtrado de agua necesita enjuagarse mas,
El despachador de hielo no funciona debidamente
Verifique Io siguiente:
• _,Esta cerrada completamente la puerta del congelador?
• _,Se ha instalado correctamente el dep6sito o el balde de
hielo?
• _,Hay hielo en el balde?
• _,Se ha congelado el hielo en el dep6sito o balde de hielo?
• _,Hay hielo atascado en el conducto de salida?
• &Se ha agregado hielo incorrecto en el dep6sito o balde?
Use Qnicamente el hielo producido por su fabrica de hielo
actual.
&Se ha derretido el hielo alrededor del espiral metalico en
el balde de hielo? Descarte los cubos de hielo y limpie el
balde completamente.
&El despachador de hielo se atasca mientras vierte el
hielo "picado"? Cambie el bot6n de hielo de "picado" a "en
cubos". Si despacha el hielo en cubos correctamente, oprima
el bot6n para hielo "picado" y comience a despachar de
nuevo.
&Se ha mantenido el brazo del despachador oprimido por
mucho tiempo? Cuando el brazo se mantiene oprimido
mucho tiempo, se interrumpe la distribuci6n de hielo. Espere
tres minutos para que el motor del despachador se
reposicione antes de usarlo de nuevo.
El despachador de agua no funciona debidamente
Verifique Io siguiente:
• _,La valvula de cierre de agua no esta abierta, instalada
incorrectamente o atascada?
• _,Esta la tuberia conectada a la fuente de agua?
• _,Hay una enroscadura en la tuberia de agua de la casa?
• &No se ha Ilenado el sistema de agua? El sistema de agua
debe Ilenarse la primera vez que se usa.
• &Se ha conectado el refrigerador a una tuberia de agua
fria con una presi6n de por Io menos 30 Ibs./pulg.2? La
presi6n de agua de la casa determina el flujo del
despachador.
• &Tiene un filtro de agua instalado en el refrigerador? Este
filtro puede estar obstruido o haberse instalado
incorrectamente.
Hay fugas de agua o hielo en el despachador
Verifique Io siguiente:
• _,No se ha puesto el vaso debajo del despachador el tiempo
suficiente?
• _,Se ha atascado un cubo de hielo en el conducto y mantiene
abierta la escotilla?
El agua del despachador no esta Io suficientemente fria
NOTA: El agua del despachador se enfria solamente a 50°F
(10°C),
• &Se ha instalado el refrigerador por primera vez o se ha
despachado una gran cantidad de agua recientemente?
Deje transcurrir 24 horas para que el refrigerador se enfr[e
completamente.
• &No se ha usado el despachador de agua recientemente?
Puede set que el primer vaso de agua no este frio. Descarte el
agua del primer vaso.
23
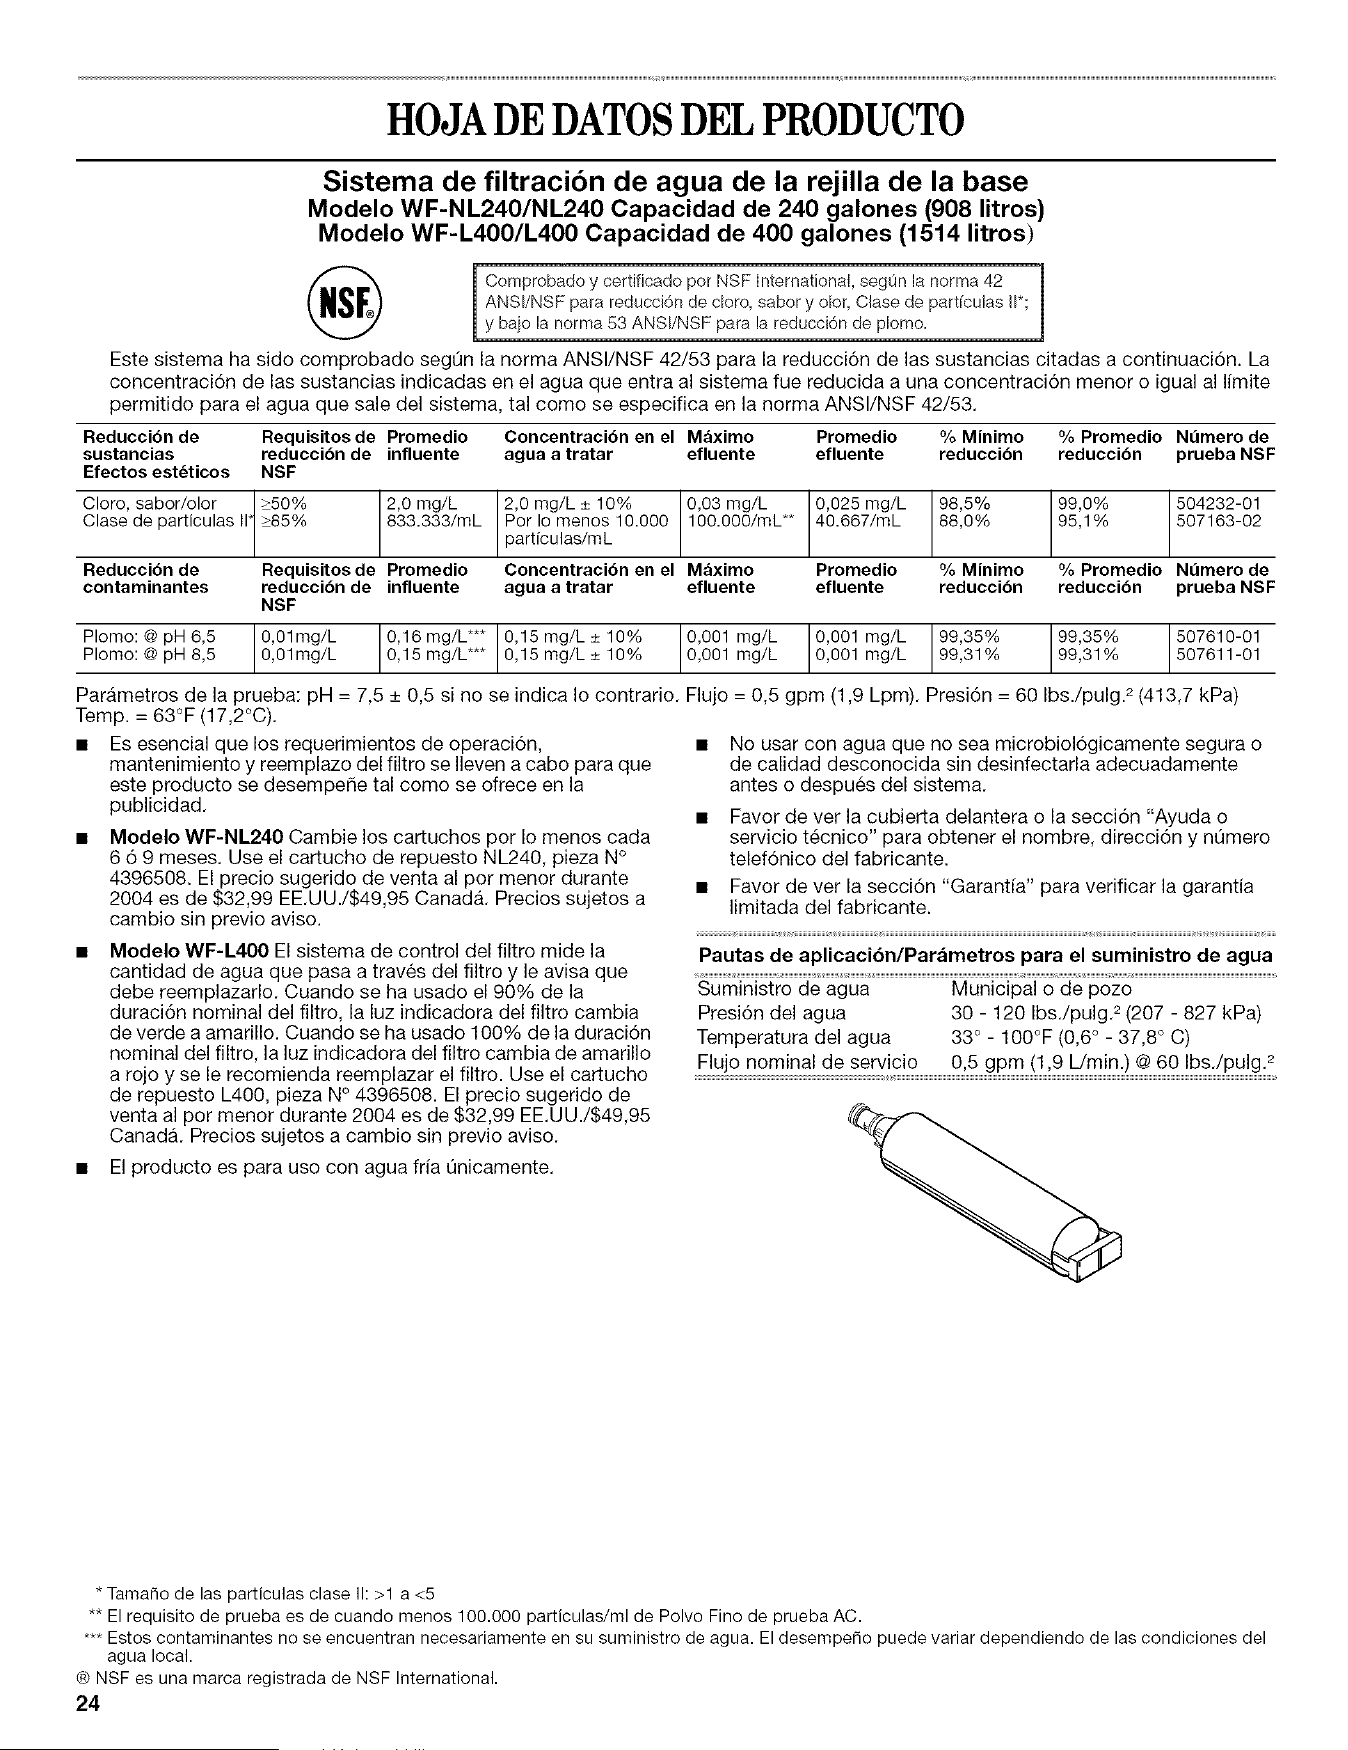
HOJADEDATOSDELPRODUCTO
Sistema de filtracibn de agua de la rejilla de la base
Modelo WF-NL240/NL240 Capacidad de 240 galones (908 litros)
Modelo WF-L400/L400 Capacidad de 400 galones (1514 litros)
Comprobadoy certificado por NSF International,seg0n la norma 42
ANSI/NSF para reducci6ndo doro, saber y olor, Clase do particulas II*;
y baio la norma 53 ANSI/NSFpara la reducci6ndo plomo.
Este sistema ha sido comprobado seg0n la norma ANSI/NSF 42/53 para la reducci6n de las sustancias citadas a continuaci6n. La
concentraci6n de las sustancias indicadas en el agua que entra al sistema fue reducida a una concentraci6n menor o igual al limite
permitido para el agua que sale del sistema, tal como se especifica en la norma ANSI/NSF 42/53.
Reduccibn de
sustancias
Efectos est_ticos
Cloro, sabor/olor J
Clase de particulas II
Reducci_n de
contaminantes
Promedio % Minimo % Promedio Numero de
efluente reducci_n reducci_n prueba NSF
Requisitosde Promedio Concentracibn en el M_ximo
reducci_n de influente agua a tratar efluente
NSF
_50% 2,0 mg/L 2,0 mg/L _+10% 0,03 mg/L
_85% 833.333/mL Por Io menos 10.000 100.000/mL**
particulas/mL
Requisitosde Promedio Concentracibn en el M_ximo
reducci_n de influente agua a tratar efluente
NSF
0,01mg/L 0,16 mg/L*** 0,15 mg/L _+10% 0,001 mg/L
0,01mg/L 0,15 mg/L*** 0,15 mg/L _+10% 0,001 mg/L
0,025 mg/L 98,5%
40.667/mL 88,0%
Promedio % Minimo
efluente reducci_n
99,0% 504232-01
95,1% 507163-02
%Promedio Numerode
reducci_n prueba NSF
Plomo: @ pH 6,5 0,001 mg/L 99,35% 99,35% 507610-01
Plomo: @ pH 8,5 0,001 mg/L 99,31% 99,31% 507611-01
Parametros de la prueba: pH = 7,5 _+0,5 si no se indica I0 contrario. Flujo = 0,5 gpm (1,9 Lpm). Presi6n = 60 Ibs./pulg. 2 (413,7 kPa)
Temp. = 63°F (17,2°C).
• Es esencial que los requerimientos de operaci6n,
mantenimiento y reemplazo del filtro se Ileven a cabo para que
este producto se desempe_e tal como se ofrece en la
publicidad.
• Modelo WF-NL240 Cambie los cartuchos por Io menos cada
6 6 9 meses. Use el cartucho de repuesto NL240, pieza N°
4396508. El precio sugerido de venta al por menor durante
2004 es de $32,99 EE.UU./$49,95 CanadA. Precios sujetos a
cambio sin previo aviso.
• Modelo WF-L400 El sistema de control del filtro mide la
cantidad de agua que pasa a traves del filtro y le avisa que
debe reemplazarlo. Cuando se ha usado el 90% de la
duraci6n nominal del filtro, la luz indicadora del filtro cambia
de verde a amarillo. Cuando se ha usado 100% de la duraci6n
nominal del filtro, la luz indicadora del filtro cambia de amarillo
a rojo y se le recomienda reemplazar el filtro. Use el cartucho
de repuesto L400, pieza N° 4396508. El precio sugerido de
venta al por menor durante 2004 es de $32,99 EE.UU./$49,95
CanadA. Precios sujetos a cambio sin previo aviso.
• El producto es para uso con agua fria Onicamente.
• No usar con agua que no sea microbiol6gicamente segura o
de calidad desconocida sin desinfectarla adecuadamente
antes o despues del sistema.
• Favor de ver la cubierta delantera o la secci6n "Ayuda o
servicio tecnico" para obtener el nombre, direcci6n y nOmero
telef6nico del fabricante.
• Favor de vet la secci6n "Garantia" para verificar la garantia
limitada del fabricante.
Pautas de aplicaci6n/Parametros para el suministro de agua
Suministro de agua Municipal o de pozo
Presi6n del agua 30 - 120 Ibs./pulg. 2(207 - 827 kPa)
Temperatura del agua 33 ° - 100°F (0,6 ° - 37,8 ° C)
Flujo nominal de servicio 0,5 gpm (1,9 L/min.) @60 Ibs./pulg. 2
* Tamale de las particulas clase I1:>1 a <5
** El requisito de prueba es de cuando menos 100.000 particulas/ml de Polvo Fino de prueba AC.
***Estos contaminantes no se encuentran necesariamente en su suministro de agua. El desempe_o puede variar dependiendo de las condiciones del
agua local.
® NSF es una marca registrada de NSF International.
24
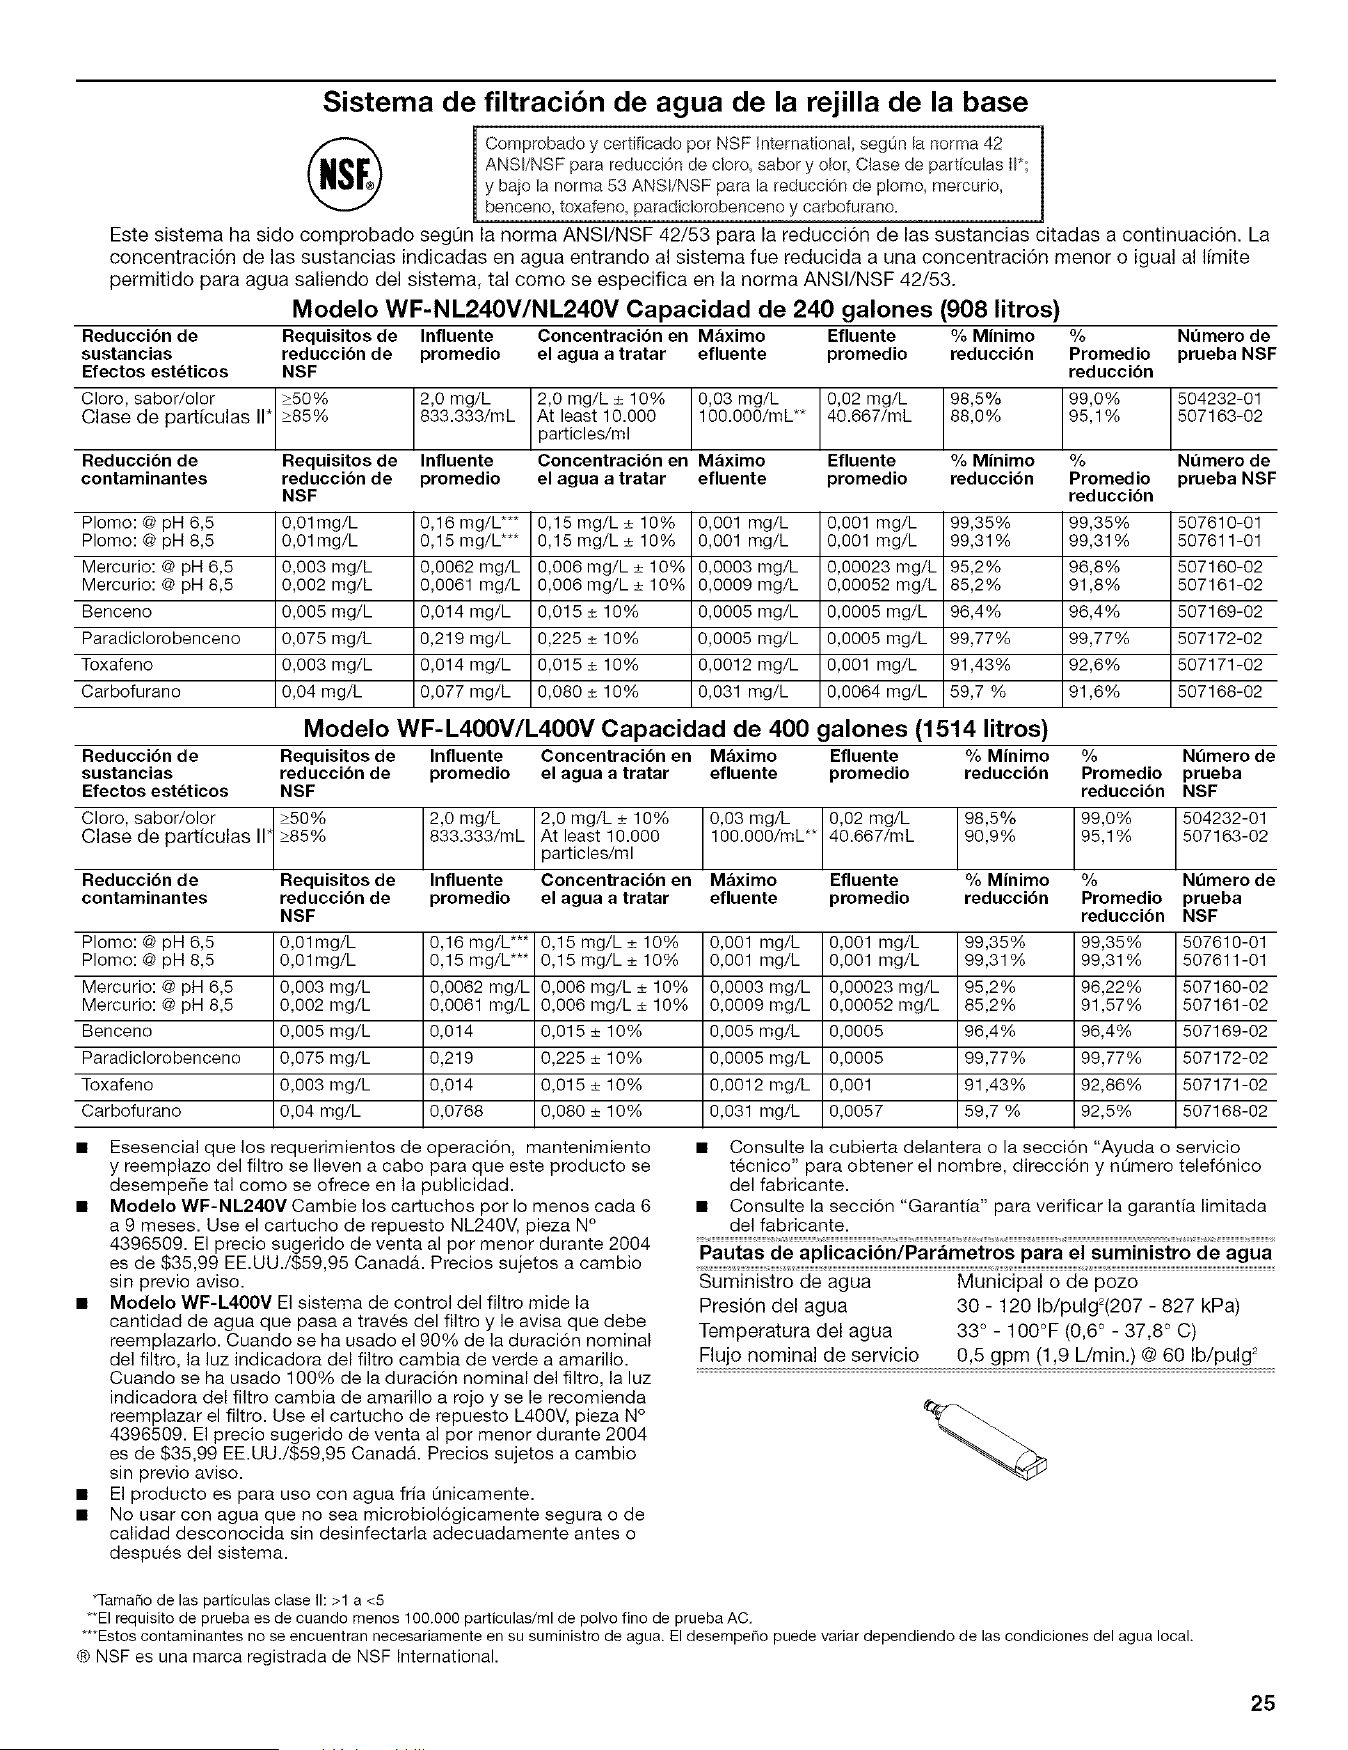
Sistema de filtracibn de agua de la rejilla de la base
Comprobado y certificado por NSF International, seg0n la norma 42
ANSI/NSF para reducci6n do cloro, sabor y olor, Ctase do particulas II*;
y baio la norma 53 ANSI/NSF para la reducci6n do plomo, mercurio,
benceno, toxafeno, paradiclorobenceno y carbofurano.
Este sistema ha sido comprobado segt]n la norma ANSl/NSF 42/53 para la reducci6n de las sustancias citadas a continuaci6n. La
concentraci6n de las sustancias indicadas en agua entrando al sistema fue reducida a una concentraci6n menor o igual al I[mite
permitido para agua saliendo del sistema, tal como se especifica en la norma ANSI/NSF 42/53.
Modelo WF-NL240V/NL240V Capacidad de 240 galones 1908 litros)
Reduccibn de Requisitos de Influente Concentracibn en M_ximo Efluente % Minimo % Nt_mero de
sustancias reducci6n de promedio el agua a tratar efluente promedio reducci6n Promedio prueba NSF
Efectos est_ticos NSF reducci6n
Cloro, sabor/olor I1" 250% 2,0 mg/L 2,0 mg/L _+10% 0,03 mg/L 0,02 mg/L 98,5% 99,0% 504232-01
Clase de part[culas 285% 833.333/mL Atparticles/mlleast10.000 100.000/mL** 40.667/mL 88,0% 95,1% 507163-02
Reducci6n de Requisitos de Influente Concentracibn en M_ximo Efluente % Minimo % Nt_mero de
contaminantes reducci6n de promedio el agua a tratar efluente promedio reduccibn Promedio prueba NSF
NSF reducci6n
Plomo: (-®pH 6,5 0,01mg/L 0,16 mg/L*** 0,15 rag/L_+ 10% 0,001 mg/L 0,001 mg/L 99,35% 99,35% 507610-01
Plomo: @ pH 8,5 0,01 mg/L 0,15 mg/L*** 0,15 mg/L _+10% 0,001 mg/L 0,001 mg/L 99,31% 99,31% 507611-01
Mercurio: @ pH 6,5 0,003 mg/L 0,0062 mg/L 0,006 mg/L _+10% 0,0003 mg/L 0,00023 mg/L 95,2% 96,8% 507160-02
Mercurio: @ pH 8,5 0,002 mg/L 0,0061 mg/L 0,006 mg/L _+10% 0,0009 mg/L 0,00052 mg/L 85,2% 91,8% 507161-02
Benceno 0,005 mg/L 0,014 mg/L 0,015 _+10% 0,0005 mg/L 0,0005 mg/L 96,4% 96,4% 507169-02
Paradiclorobenceno 0,075 mg/L 0,219 mg/L 0,225 _+10% 0,0005 mg/L 0,0005 mg/L 99,77% 99,77% 507172-02
Toxafeno 0,003 mg/L 0,014 mg/L 0,015 _+10% 0,0012 mg/L 0,001 mg/L 91,43% 92,6% 507171-02
Carbofurano 0,04 mg/L 0,077 mg/L 0,080 _+10% 0,031 mg/L 0,0064 mg/L 59,7 % 91,6% 507168-02
Modelo WF-L4OOV/L4OOV Capacidad de 400 galones 11514 litros)
Reduccibn de Requisitos de Influente Concentracibn en Mbximo Efluente % Minimo % Nt_mero de
sustancias reducci6n de promedio el agua a tratar efluente promedio reducci6n Promedio prueba
Efectos est_ticos NSF reducci6n NSF
Cloro, sabor/olor | 250% 2,0 mg/L 2,0 mg/L _+10% 0,03 mg/L 0,02 mg/L 98,5% 99,0% 504232-01
Clase de particulas 117285% 833.333/mL At least 10.000 100.000/mL** 40.667/mL 90,9% 95,1% 507163-02
/ particles/ml
Reducci6n de Requisitos de Influente Concentracibn en Maximo Efluente % Minimo % Nt_mero de
contaminantes reducci6n de promedio el agua a tratar efluente promedio reducci6n Promedio prueba
NSF reducci6n NSF
Plomo: (-®pH 6,5 0,01mg/L 0,16 mg/L*** 0,15 mg/L _+10% 0,001 mg/L 0,001 mg/L 99,35% 99,35% 507610-01
Plomo:@pH8,5 0,01mg/L 0,15 mg/L*** 0,15mg/L_+ 10% 0,001 mg/L 0,001 mg/L 99,31% 99,31% 507611-01
Mercurio: @ pH 6,5 0,003 mg/L 0,0062 mg/L 0,006 mg/L _+10% 0,0003 mg/L 0,00023 mg/L 95,2% 96,22% 507160-02
Mercurio: @ pH 8,5 0,002 mg/L 0,0061 mg/L 0,006 mg/L _+10% 0,0009 mg/L 0,00052 mg/L 85,2% 91,57% 507161-02
Benceno 0,005 mg/L 0,014 0,015 _+10% 0,005 mg/L 0,0005 96,4% 96,4% 507169-02
Paradiclorobenceno 0,075 mg/L 0,219 0,225_+ 10% 0,0005 mg/L 0,0005 99,77% 99,77% 507172-02
Toxafeno 0,003 mg/L 0,014 0,015_+ 10% 0,0012 mg/L 0,001 91,43% 92,86% 507171-02
Carbofurano 0,04 mg/L 0,0768 0,080 _+10% 0,031 mg/L 0,0057 59,7 % 92,5% 507168-02
• Esesencial que los requerimientos de operaci6n, mantenimiento
y reemplazo del filtro se Ileven a cabo para que este producto se
desempefie tal como se ofrece en la publicidad.
• Modelo WF-NL240V Cambie los cartuchos por Io menos cada 6
a 9 meses. Use el cartucho de repuesto NL240V, pieza N°
4396509. El precio sugerido de venta al por menor durante 2004
es de $35,99 EE.UU./$59,95 CanadA. Precios sujetos a cambio
sin previo aviso.
• Modelo WF-L4OOV El sistema de control del filtro mide la
cantidad de agua que pasa a trav6s del filtro y le avisa que debe
reemplazarlo. Cuando se ha usado el 90% de la duraci6n nominal
del filtro, la luz indicadora del filtro cambia de verde a amarillo.
Cuando se ha usado 100% de la duraci6n nominal del filtro, la luz
indicadora del filtro cambia de amarillo a rojo y se le recomienda
reemplazar el filtro. Use el cartucho de repuesto L4OOV, pieza N °
4396509. El precio sugerido de venta al por menor durante 2004
es de $35,99 EE.UU./$59,95 CanadA. Precios sujetos a cambio
sin previo aviso.
• El producto es para use con agua fria Onicamente.
• No usar con agua que no sea microbiol6gicamente segura o de
calidad desconocida sin desinfectarla adecuadamente antes o
despu6s del sistema.
• Consulte la cubierta delantera o la secci6n "Ayuda o servicio
t6cnico" para obtener el nombre, direcci6n y nOmero telef6nico
del fabricante.
• Consulte la secci6n "Garantia" para verificar la garantia limitada
del fabricante.
Pautas de aplicaci6n/Parametros para el suministro de agua
Suministro de agua Municipal o de pozo
Presi6n del agua 30 - 120 Ib/pulg2(207 - 827 kPa)
Temperatura del agua 33 ° - 100°F (0,6 ° - 37,8 ° C)
Flujo nominal de servicio 0,5 gpm (1,9 L/min.) @ 60 Ib/pulg 2
*TamaSo de las particulas clase I1:>1 a <5
**El requisito de prueba es de cuando menos 100.000 particulas/ml de polvo fino de prueba AC,
**_Estos contarninantes no se encuentran necesariarnente en su surninistro de agua. El desernpeSo puede variar dependiendo de las condiciones del agua local.
(¢ NSF es una marca registrada de NSF International.
25

J
GARANTIADELREFRIGERADORWHIRLPOOL®
GARANTIA TOTAL POR UN AI_IO PARA EL REFRIGERADOR
Durante un a_o a partir de la fecha de compra, siempre y cuando se de a este refrigerador (excluyendo el filtro de agua) un uso y
mantenimiento de conformidad con las instrucciones adjuntas o provistas con el producto, Whirlpool Corporation se hara cargo del
costo de las piezas de repuesto FSP ® y del gasto del trabajo de reparaciTn para corregir defectos en los materiales o en la mane de
obra. El servicio debera set suministrado por una compadia de servicio designada por Whirlpool.
En los modelos con un filtro de agua: garantia limitada de 30 dias del filtro de agua. Durante 30 dias a partir de la fecha de compra,
siempre y cuando se de al filtro un uso y mantenimiento de conformidad con las instrucciones adjuntas o provistas con el producto,
Whirlpool Corporation se hara cargo del costo de las piezas de repuesto para corregir defectos en los materiales o en la mane de obra.
GARANTIA TOTAL DEL SEGUNDO AL QUINTO AI_IO PARA LAS PARTES DEL SISTEMA
DE REFRIGERACION SELLADO COMO SE INDICA
Del segundo al quinto a_o de la fecha de compra, siempre y cuando se de a este refrigerador un use y mantenimiento de conformidad
con las instrucciones adjuntas o provistas con el producto, Whirlpool Corporation se hara cargo del costo de las piezas de repuesto
FSP® y del gasto del trabajo de reparaciTn para corregir defectos en los materiales o en la mane de obra del sistema de refrigeraciTn
sellado. Estas partes son: compresor, evaporador, condensador, secador y los tubes conectores. El servicio debera ser suministrado
per una compaSia de servicio designada per Whirlpool.
Whirlpool Corporation no pagara por:
1. Visitas de servicio tecnico para corregir la instalaci6n de su refrigerador, para ense_arle a usar su refrigerador, para cambiar fusibles
domesticos o para corregir la instalaciTn electrica o de la tuberia de la casa, para cambiar focos de luz, o para reemplazar otros
filtros de agua diferentes de los que se mencion6 antes.
2. Reparaciones cuando su refrigerador se use de un modo diferente al domestico familiar de una familia.
3. Recogida y entrega. Su refrigerador esta diseSado para set reparado en el hogar.
4. Da_os causados por accidente, alteraciTn, use indebido, abuso, incendio, inundaci6n, instalaci6n incorrecta, actos fortuitos o el
empleo de productos no aprobados por Whirlpool Corporation o Whirlpool Canada Inc.
5. Cualquier perdida de comida debido alas fallas del producto.
6. Reparaciones de piezas o sistemas como resultado de modificaciones no autorizadas que se hayan efectuado en el
electrodomestico.
7. Piezas de repuesto o gastos de reparaciTn para unidades que se empleen fuera de los Estados Unidos o CanadA.
8. En CanadA, gastos de viaje o de transporte para clientes que residen en zonas distantes.
WHIRLPOOL CORPORATION Y WHIRLPOOL CANADA INC. NO SE RESPONSABILIZARAN
POR DAI_IOS INCIDENTALES O CONSECUENTES
Algunos estados o provincias no permiten la exclusiTn o limitaci6n de da_os incidentales o consecuentes, de mode que esta exclusi6n
o limitaci6n quizas no le corresponda. Esta garantia le otorga derechos legales especificos, y es posible que usted tenga tambien otros
derechos, los cuales varian de un estado a otro o de una provincia a otra.
Esta garantia no tiene vigor fuera de los cincuenta Estados Unidos y CanadA. P6ngase en contacto con el distribuidor
autorizado de Whirlpool para determinar si corresponde otra garantia.
Si necesita servicio tecnico, consulte primero la secciTn "Soluci6n de problemas" de este libro. Despues de consultar la secci6n
"SoluciTn de problemas", puede encontrar ayuda adicional en la secci6n "Ayuda o servicio tecnico" o al Ilamar al Centre de interacciTn
del cliente de Whirlpool al 1-800-283-1301 (gratuito) desde cualquier lugar de los EE.UU. En CanadA, pTngase en contacto con su
compaSia designada de Whirlpool Canada Inc. o Ilame al 1-800-807-6777.
8/01
26
p p
GUIDED'UTILISATIONETD'ENTRETIENDUREFRIGERATEUR
Assistance ou service
Si vous avez besoin d'assistance ou de service, consulter d'abord
la section "Depannage". On peut obtenir de I'aide supplementaire
en telephonant au Centre d'interaction avec la clientele au
1-800-253-1301 de n'importe ou aux E.-U., ou en ecrivant a :
Whirlpool Corporation
Customer Interaction Center
553 Benson Road
Benton Harbor, MI 49022-2692
Au Canada, pour installation et service, appeler le
1-800-807-6777. Pour assistance, composer le 1-800-461-5681
du lundi au vendredi - de 8 h 00 a 18 h 00 (HNE) - et le samedi de
8 h 30 a 16 h 30 (HNE), ou ecrire a :
Whirlpool Canada Inc.
Centre d'interaction avec la clientele
1901 Minnesota Court
Mississauga, Ontario L5N 3A7
Des informations peuvent egalement _tre obtenues en visitant
notre site sur www.whirlpool.com.
Au Canada, visitez www.whirlpool.com/canada.
Darts votre correspondance, veuillez indiquer un numero de
telephone ou I'on peut vous joindre dans la journee.
Conservez ce manuel et votre re£u de vente ensemble pour
r_f_rence ult_rieure. Pour le service sous garantie, vous
devez presenter un document prouvant la date d'achat ou
d'installation.
Inscrivez les renseignements suivants au sujet de votre appareil
menager pour vous aider a obtenir assistance ou service en cas
de besoin. Vous devrez connaftre le numero de modele et le
numero de serie au complet. Vous trouverez ces renseignements
sur la plaque signaletique situee sur la paroi interne du
compartiment de refrigeration.
Nora du marchand
Num_ro de s_rie
Adresse
Num_ro de tdl_phone
Num_ro de module
Date d'achat
Pour commander des filtres de rechange, composer le
1-800-442-9991 et demander le numero de piece indique ci-
dessous ou contacter votre marchand autorise Whirlpool. Au
Canada, composer le 1-800-461-5681.
Nettoyant et poll pour acier inoxydable : Commander la piece
n° 4396095
Cartouche de filtre interieur standard : Commander la piece
n° 4396508 (NL240/L400), n ° 4396509 (NL240V et L400V)
SECURITEDU REFRIGERATEUR
Votre s_curit_ et celle des autres est tr_s importante.
Nous donnons de nombreux messages de securite importants dans ce manuel et sur votre appareil menager. Assurez-vous de
toujours lire tousles messages de securite et de vous y conformer.
Veici le symbole d'alerte de securite.
Ce symbole d'alerte de securite vous signale les dangers potentiels de deces et de blessures graves & vous
et a d'autres.
Tousles messages de securite suivront le symbole d'alerte de securite et le mot "DANGER" eu
"AVERTISSEMENT". Ces mots signifient :
Risque possible de deces ou de blessure grave si vous ne
suivez pas immediatement les instructions.
Risque possible de deces ou de blessure grave si vous
ne suivez pas les instructions.
Tousles messages de securite vous diront quel est le danger potentiel et vous disent comment reduire le risque de blessure et
ce qui peut se produire en cas de non-respect des instructions.
27
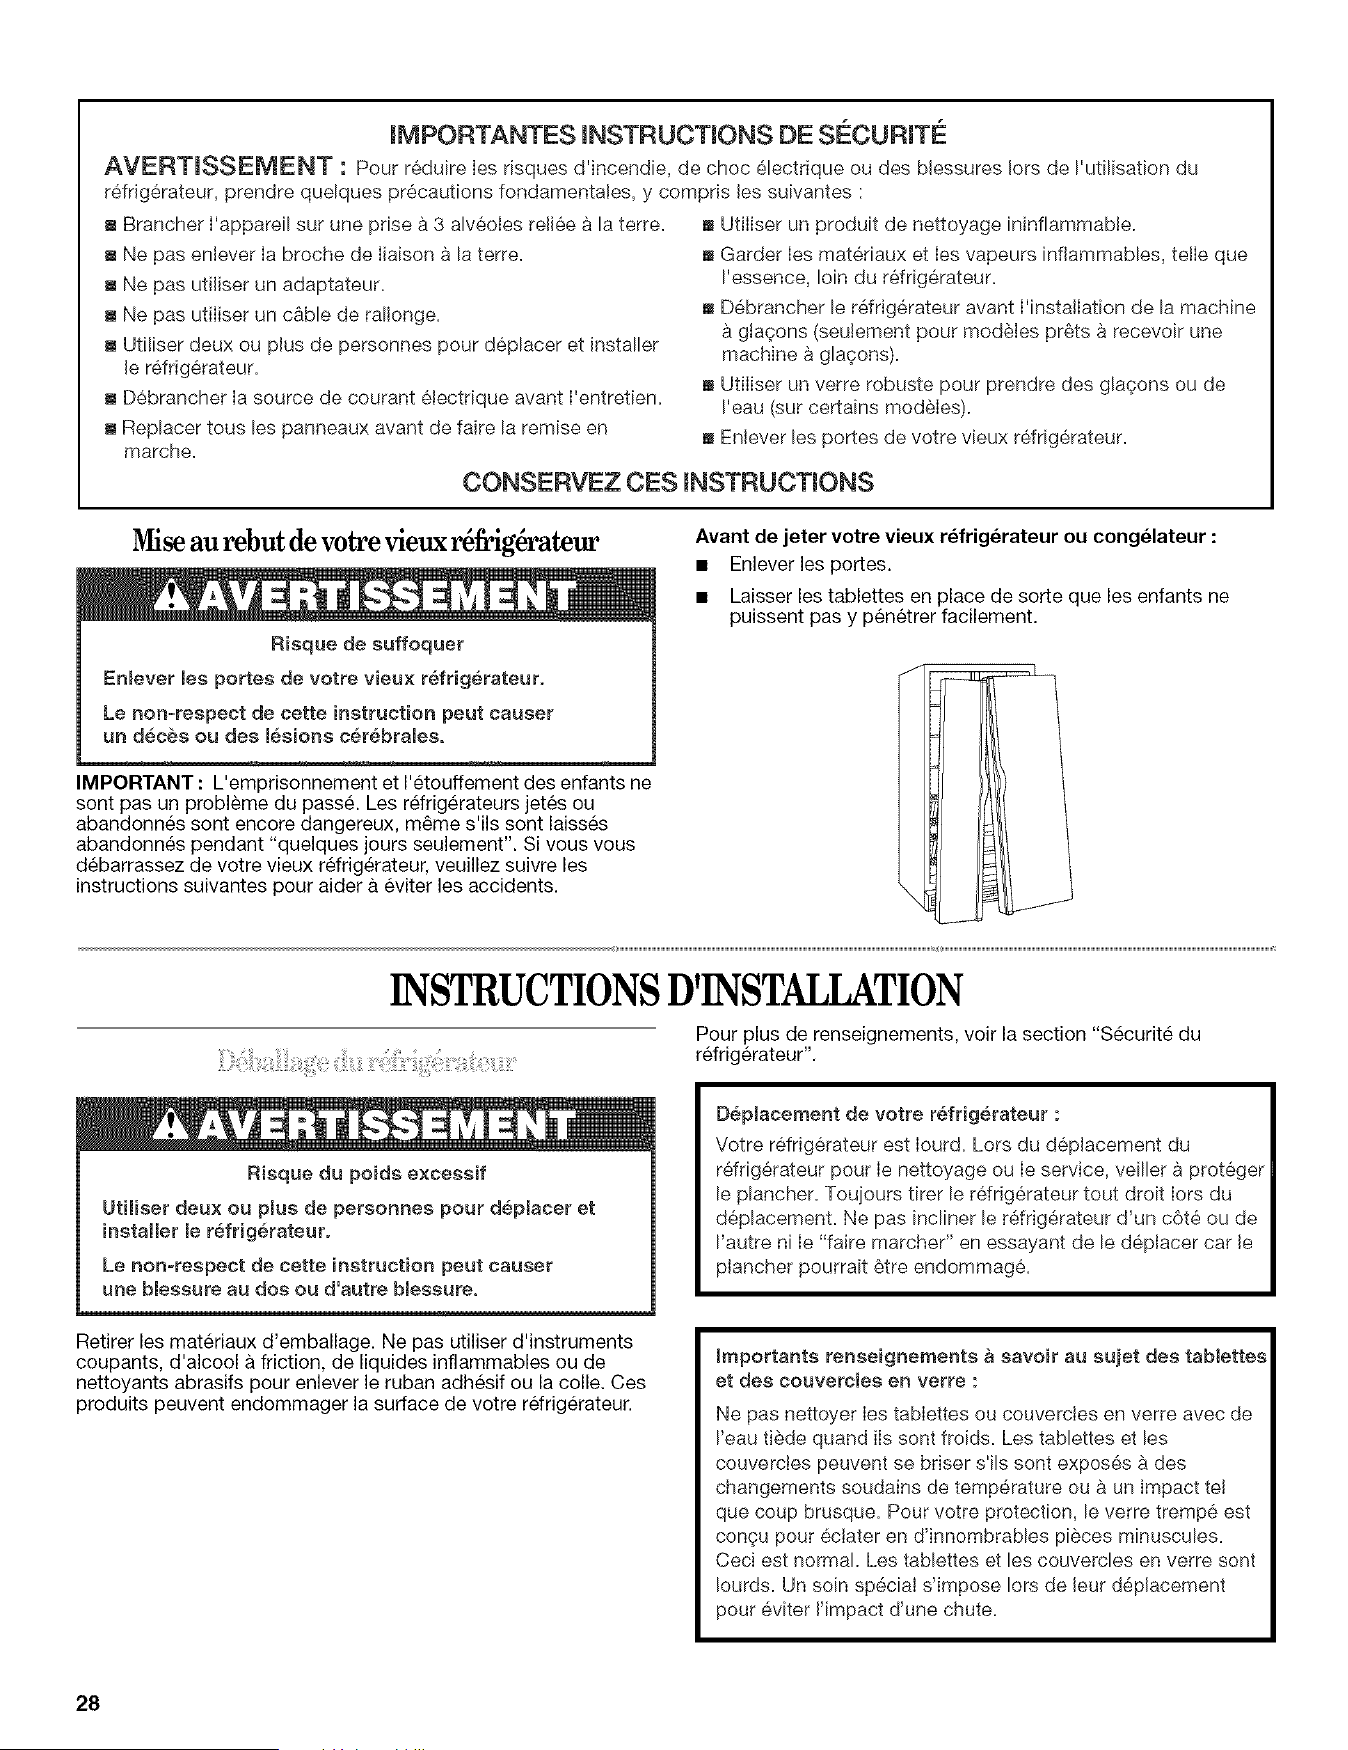
JMPORTANTES iNSTRUCTiONS DE SECURff¢:
AVERTISSEMENT : pour reduire Ies risques d'incendie, de choc electrique ou des blessures lots de I'utilisation du
refrig6rateur, prendre quelques pr6cautions fondamentales, y compris les suivantes :
• Brancher I'appareil sur une prise & 3 alveoles reliee a la terre.
• Ne pas enlever Ia broche de liaison a la terre.
• Ne pas utiliser un adaptateur.
• Ne pas utiliser un c&ble de rallonge.
• Uti!iser deux ou plus de personnes pour deplacer et installer
le refrig6rateur.
• Debrancher Ia source de courant electrique avant I'entretien.
• Replacer tousles panneaux avant de faire la remise en
marche.
_, Utiliser un produit de nettoyage ininfiammable.
_, Garder Ies materiaux et Ies vapeurs inflammables, tetle que
I'essence, loin du refrig6rateur.
_, D6brancher le r(_frigerateur avant I'installation de la machine
glagons (seulement pour modules pr_ts a recevoir une
machine a glagons).
_, Utiliser un verre robuste pour prendre des glagons ou de
I'eau (sur certains modeles).
• Enlever les portes de votre vieux refrig6rateur.
CONSERVEZ CES iNSTRUCTiONS
Mise au rebut de votre vieux r6frig6rateur
Risque de suff•quer
Enmever les p•rtes de votre vieu× refrigerateur.
Le non=respect de cette instructi•n peut causer
un deces ou des lesions c6rebra_es.
Avant de jeter v•tre vieux r_frigerateur ou cong_lateur :
• Enlever les portes.
• Laisser les tablettes en place de sorte que les enfants ne
puissent pas y pen6trer facilement.
IMPORTANT : L'emprisonnement et I'etouffement des enfants ne
sont pas un probleme du pass& Les refrigerateurs jetes ou
abandonnes sent encore dangereux, m_me s'ils sent laisses
abandonnes pendant "quelques jours seulement". Si vous vous
debarrassez de votre vieux refrigerateur, veuillez suivre lea
instructions suivantes pour aider a eviter les accidents.
INSTRUCTIONSD'INSTALLATION
Pour plus de renseignements, voir la section "Securite du
refrigerateur".
Risque du poids excessif
Utiliser deux ou plus de personnes pour deplacer et
installer le refrigerateuro
Le r_on-respect de cette instruction peut causer
une blessure au dos ou d"autre blessure.
Retirer les materiaux d'emballage. Ne pas utiliser d'instruments
coupants, d'alcool a friction, de liquides inflammables ou de
nettoyants abrasifs pour enlever le ruban adhesif ou la colle. Ces
produits peuvent endommager la surface de votre refrigerateur.
Deplacement de votre refrigerateur :
Votre refrigerateur est Iourd. Lots du deplacement du
r_frig_rateur pour Ie nettoyage ou Ie service, veiller a proteger
le plancher. Toujours tirer le r(_frigerateur tout droit Iors du
deplacement. Ne pas incliner le refrigerateur d'un c(St_ ou de
I'autre n[ Ie "faire marcher" en essayant de le deplacer car le
plancher pourrait _tre endommag&
Importants renseignements a savoir au sujet des tabiettes
et des couvercies en verre :
Ne pas nettoyer Ies tabIettes ou couverctes en verre avec de
I'eau tiede quand ils sent froids. Les tablettes et les
couverctes peuvent se briser s'ils sent exposes & des
changements soudains de temperature ou a un impact te!
que coup brusque. Pour votre protection, le verre trempe est
congu pour _ctater en d'innombrables pieces minuscules.
Ceci est normal. Les tablettes et les couvercles en verre sent
Iourds. Un soin speciaI s"impose lots de leur d_placement
pour eviter Rmpact d'une chute.
28
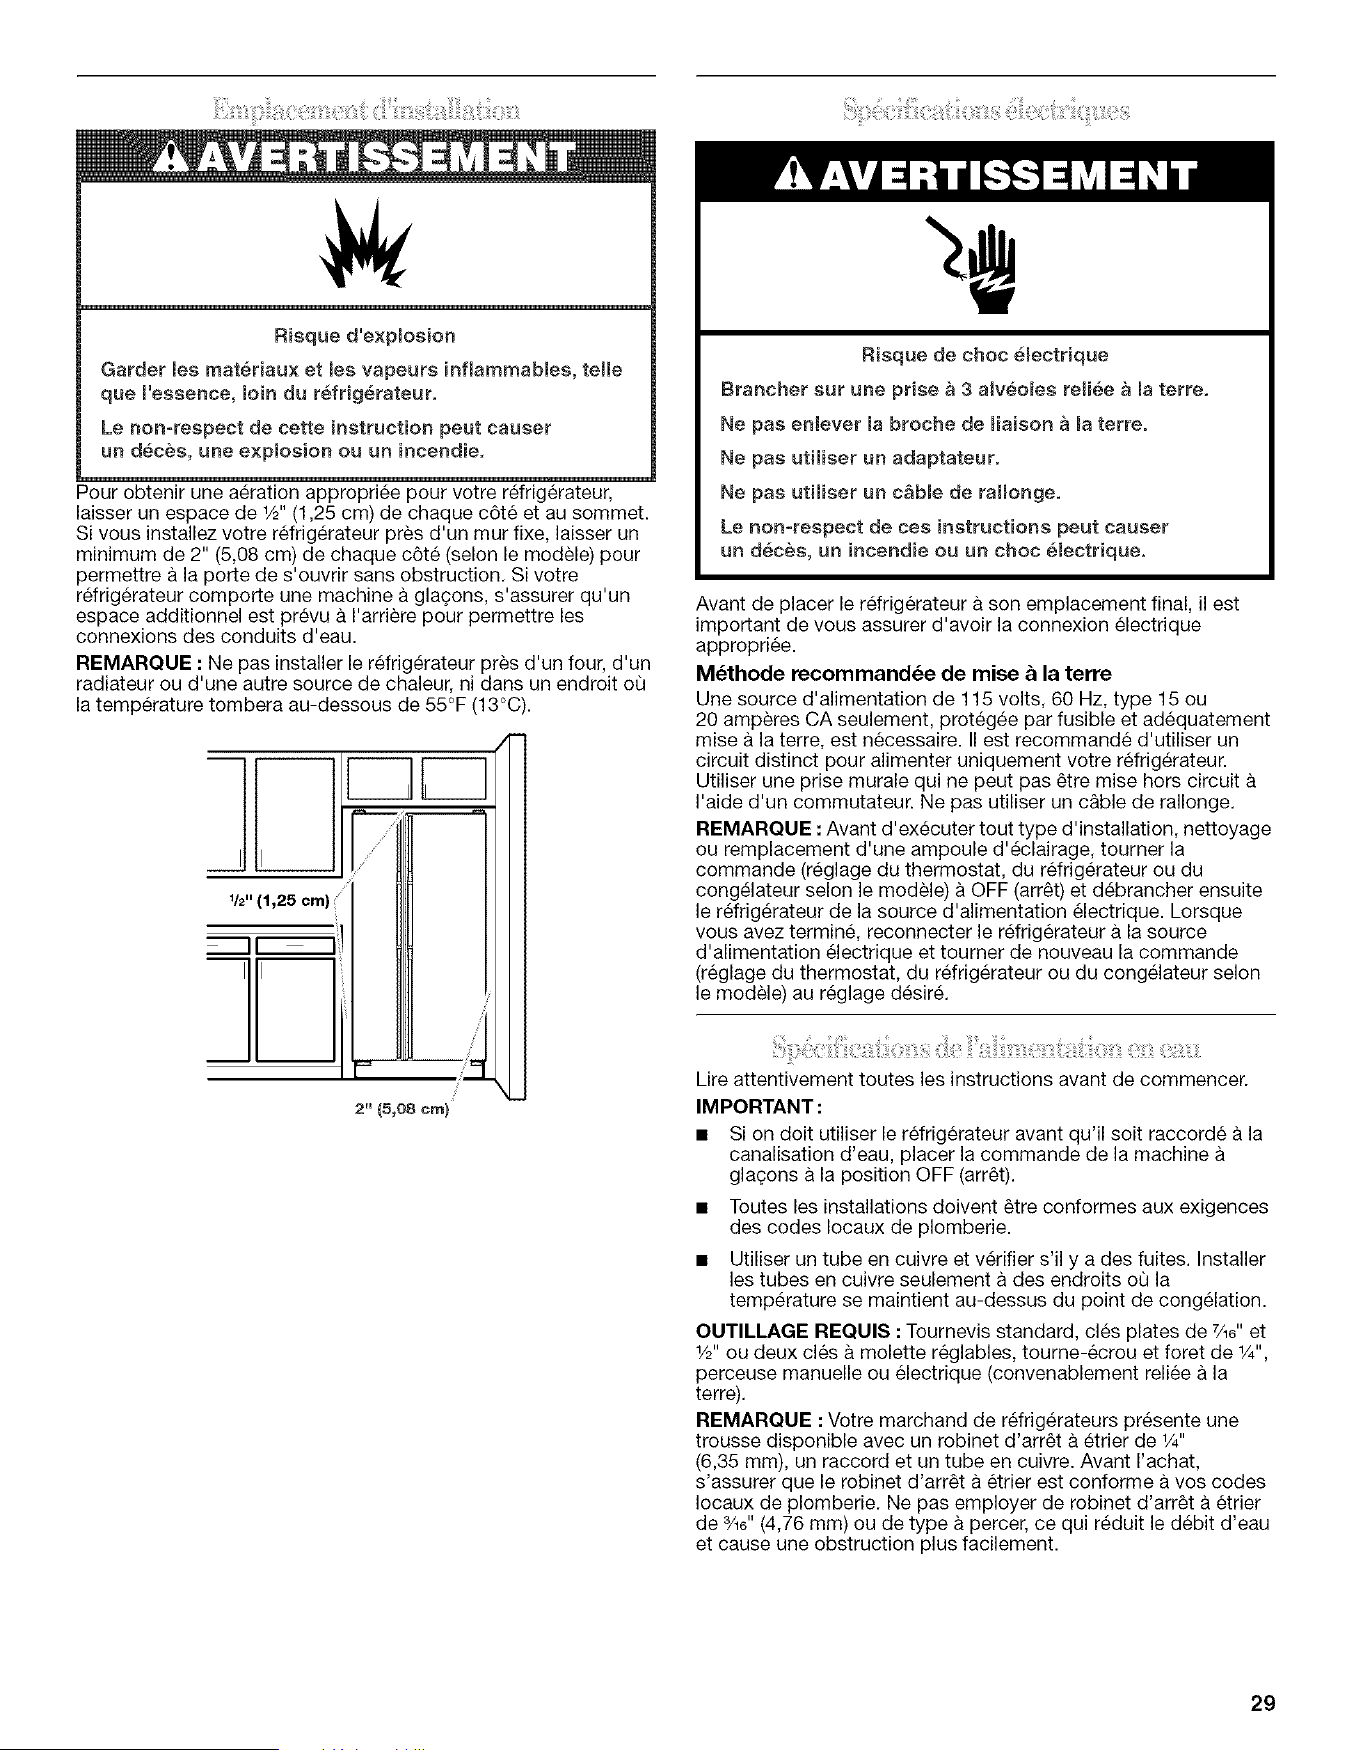
Risque d"e×plosion
Garder les rnateriaux et les vapeurs inflammables, teHe
que I"essence, loin du refrigerateur,
Le non-respect de cette instruction peut causer
un deces, une explosion ou un incendie,
Pour obtenir une aeration appropriee pour votre refrigerateur,
laisser un espace de 1/2"(1,25 cm) de chaque c6te et au sommet.
Si vous installez votre refrigerateur pres d'un mur fixe, laisser un
minimum de 2" (5,08 cm) de chaque c6te (selon le modele) pour
permettre a la porte de s'ouvrir sans obstruction. Si votre
refrigerateur comporte une machine a gla(_ons, s'assurer qu'un
espace additionnel est prevu a I'arriere pour permettre les
connexions des conduits d'eau.
REMARQUE : Ne pas installer le refrigerateur pres d'un four, d'un
radiateur ou d'une autre source de chaleur, ni dans un endroit ou
la temperature tombera au-dessous de 55°F (13°C).
1/2" (1,25 cm) f
ii li!
ILL__
r_ • r-
//
/
2" (5,08 ore)
Risque de choc electrique
Brancher sur une prise a 3 alveomes retiee a la terre.
Ne pas enlever la broche de miaison & materre.
Ne pas utiliser un adaptateur.
Ne pas utiliser un cSbme de raHonge.
Le non-respect de ces instructions peut causer
un deces, un incendie ou un choc eiectrique.
Avant de placer le refrigerateur a son emplacement final, il est
important de vous assurer d'avoir la connexion electrique
appropriee.
M_thode recommand_e de raise _ la terre
Une source d'alimentation de 115 volts, 60 Hz, type 15 ou
20 amperes CA seulement, protegee par fusible et adequatement
mise a la terre, est necessaire. II est recommande d'utiliser un
circuit distinct pour alimenter uniquement votre refrigerateur.
Utiliser une prise murale qui ne peut pas _tre mise hors circuit
I'aide d'un commutateur. Ne pas utiliser un c&ble de rallonge.
REMARQUE : Avant d'executer tout type d'installation, nettoyage
ou remplacement d'une ampoule d'eclairage, tourner la
commande (reglage du thermostat, du refrigerateur ou du
congelateur selon le modele) a OFF (arr_t) et debrancher ensuite
le refrigerateur de la source d'alimentation electrique. Lorsque
vous avez termine, reconnecter le refrigerateur a la source
d'alimentation electrique et tourner de nouveau la commande
(reglage du thermostat, du refrigerateur ou du congelateur selon
le modele) au reglage desir&
Lire attentivement toutes les instructions avant de commencer.
IMPORTANT :
• Si on dolt utiliser le refrigerateur avant qu'il soit raccorde a la
canalisation d'eau, placer la commande de la machine
glagons a la position OFF (arr_t).
• Toutes les installations doivent _tre conformes aux exigences
des codes Iocaux de plomberie.
• Utiliser un tube en cuivre et verifier s'il y a des fuites. Installer
les tubes en cuivre seulement a des endroits ou la
temperature se maintient au-dessus du point de congelation.
OUTILLAGE REQUIS : Tournevis standard, cles plates de 7/16"et
1/2"ou deux cles & molette reglables, tourne-ecrou et foret de 1/4",
perceuse manuelle ou electrique (convenablement reliee & la
terre).
REMARQUE : Votre marchand de refrigerateurs presente une
trousse disponible avec un robinet d'arr_t & etrier de 1/4"
(6,35 mm), un raccord et un tube en cuivre. Avant I'achat,
s'assurer que le robinet d'arr_t a etrier est conforme a vos codes
Iocaux de plomberie. Ne pas employer de robinet d'arr_t a etrier
de 3/16"(4,76 mm) ou de type & percer, ce qui reduit le debit d'eau
et cause une obstruction plus facilement.
29

Pression de I'eau
Une alimentation en eau froide avec une pression entre 30 et
120 Ib/po 2(207 - 827 kPa) est necessaire pour faire fonctionner le
distributeur d'eau et la machine a glagons. Si vous avez des
questions au sujet de la pression de votre eau, appeler un
plombier qualifie agre&
Alimentation en eau par osmose inverse
IMPORTANT : La pression de I'alimentation en eau entre le
systeme d'osmose inverse et la valve d'arrivee d'eau du
refrigerateur dolt _tre entre 30 et 120 Ib/po 2(207 - 827 kPa).
Si un systeme de purification de I'eau par osmose inverse est
raccorde a votre alimentation en eau froide, la pression de I'eau
au systeme dolt _tre d'un minimum de 40 a 60 Ib/po 2 (276 -
414 kPa).
Si la pression de I'eau au syst_me d'osmose inverse est inferieure
40 - 60 Ib/po 2(276 - 414 kPa) :
• Verifier pour voir si le filtre du systeme d'osmose inverse est
bloque et le remplacer si necessaire.
• Laisser le reservoir du systeme d'osmose inverse se remplir
apres une utilisation intense.
• Si votre refrigerateur a une cartouche de filtre & eau, celle-ci
peut reduire encore plus la pression de I'eau Iorsqu'elle est
utilisee avec un systeme d'osmose inverse. Retirer la
cartouche du filtre a eau. Voir "Systeme de filtration d'eau".
Si vous avez des questions au sujet de la pression de votre eau,
appeler un plombier qualifie agre&
_!:il_i_,_i:X!:0,¸_::_i:}iii_i!!i!,i_iiiii__i_!!_ii:iiii:;_i:ii_;!i!_iiiili_;__ii_iiii_:_i_ii_iiii_i_iiiili:!!i;ii!__ii;iiiii_i::_ii;:ii_,;_;ili_i:!i!_::iii_iii_
Lire attentivement toutes les instructions avant de commencer.
IMPORTANT : Si on dolt utiliser le refrigerateur avant qu'il soit
raccorde a la canalisation d'eau, placer la commande de la
machine a glagons a la position OFF (arr6t).
Raccordement a une canalisation d'eau
1. Debrancher le refrigerateur ou deconnecter la source de
courant electrique.
2. FERMER le robinet principal d'arrivee d'eau. OUVRIR le
robinet de puisage le plus proche pendant une p_riode
suffisante pour que la canalisation d'eau se vide.
3. Trouver une canalisation d'eau froide verticale de
1/_,,(12,7 mm) a 1W' (3,18 cm) pres du rdrigerateur.
IMPORTANT :
S'assurer qu'il s'agit de la canalisation d'eau froide.
Un conduit horizontal fonctionnera, mais percer par le
dessus de la canalisation et non pas par le dessous. Ainsi,
I'eau ne risquera pas d'arroser la perceuse. Ceci emp_che
egalement les sediments qu'on trouve normalement dans
I'eau de s'accumuler dans le robinet d'arr_t.
4=
Pour determiner la Iongueur du tube en cuivre requise, il faut
mesurer la distance entre le point de connexion inferieur
gauche a I'arriere du refrigerateur et le tuyau d'arrivee d'eau.
Ajouter une Iongueur de 7 pi (2,1 m) pour permettre le
deplacement du refrigerateur pour le nettoyage. Utiliser un
tube en cuivre de 1/4"(6,35 mm) de diametre exterieur. Veiller
ce que le tube soit coupe d'equerre aux deux extremites.
5. /_,I'aide d'une perceuse electrique reliee a la terre, percer un
trou de 1/4,,(6,35 mm) dans le tuyau de canalisation d'eau
froide choisie.
G ........•................B
A. Canalisation d'eau froide
B. Bride de prise en charge
C. Tube en cuivre
D. Ecrou de compression
E. Bague de compression
F. Robinet d'arr_t
G. £-crou de serrage
6. Fixer le robinet d'arr_t sur la canalisation d'eau froide avec la
bride de prise en charge. Verifier que le raccord du robinet est
bien engage dans le trou de W' (6,35 cm) perce dans la
canalisation et que la rondelle d'etancheite est placee sous la
bride de prise en charge. Serrer I'ecrou de serrage sur la tige
du robinet. Serrer soigneusement et uniformement les vis
fixant la bride de prise en charge sur la tuyauterie afin que la
rondelle forme une jonction etanche. Ne pas serrer
excessivement car ceci pourrait provoquer I'ecrasement du
tube en cuivre.
7. Enfiler I'ecrou et la bague de compression du raccord sur le
tube en cuivre comme on le volt sur I'illustration. Inserer
I'extremite du tube aussi loin que possible dans I'ouverture de
sortie du robinet. Visser I'ecrou du raccord de compression
sur le raccord de sortie avec une cle a molette. Ne pas serrer
excessivement.
8. Placer le bout libre du tube dans un contenant ou evier et
OUVRIR le robinet principal d'arrivee d'eau et laisser I'eau
s'ecouler par le tube jusqu'a ce que I'eau soit limpide.
FERMER le robinet principal d'arrivee d'eau. Enrouler le tube
en cuivre.
Raccordement au refrigerateur
Style 1
1. Debrancher le refrigerateur ou deconnecter la source de
courant electrique.
2. Enlever le ruban gomme d'expedition du tube gris, en
serpentin pour I'eau, a I'arriere du refrigerateur.
3. Un raccord de W' x 1A"est necessaire pour connecter le
conduit pour I'eau a une canalisation d'eau existante de la
maison. Enfiler I'ecrou dans le joint a I'extremite du tube de
cuivre.
REMARQUE : Serrer I'ecrou a la main. Ensuite le serrer avec
une cle deux tours de plus. Ne pas serrer excessivement.
A B C D E F
A. Tube vers le D. Raccord (fourni)
r_frig_rateur E. Virole (a acheter)
B. E-crou (fourni) _ E-crou (a acheter)
C. Renflement
30
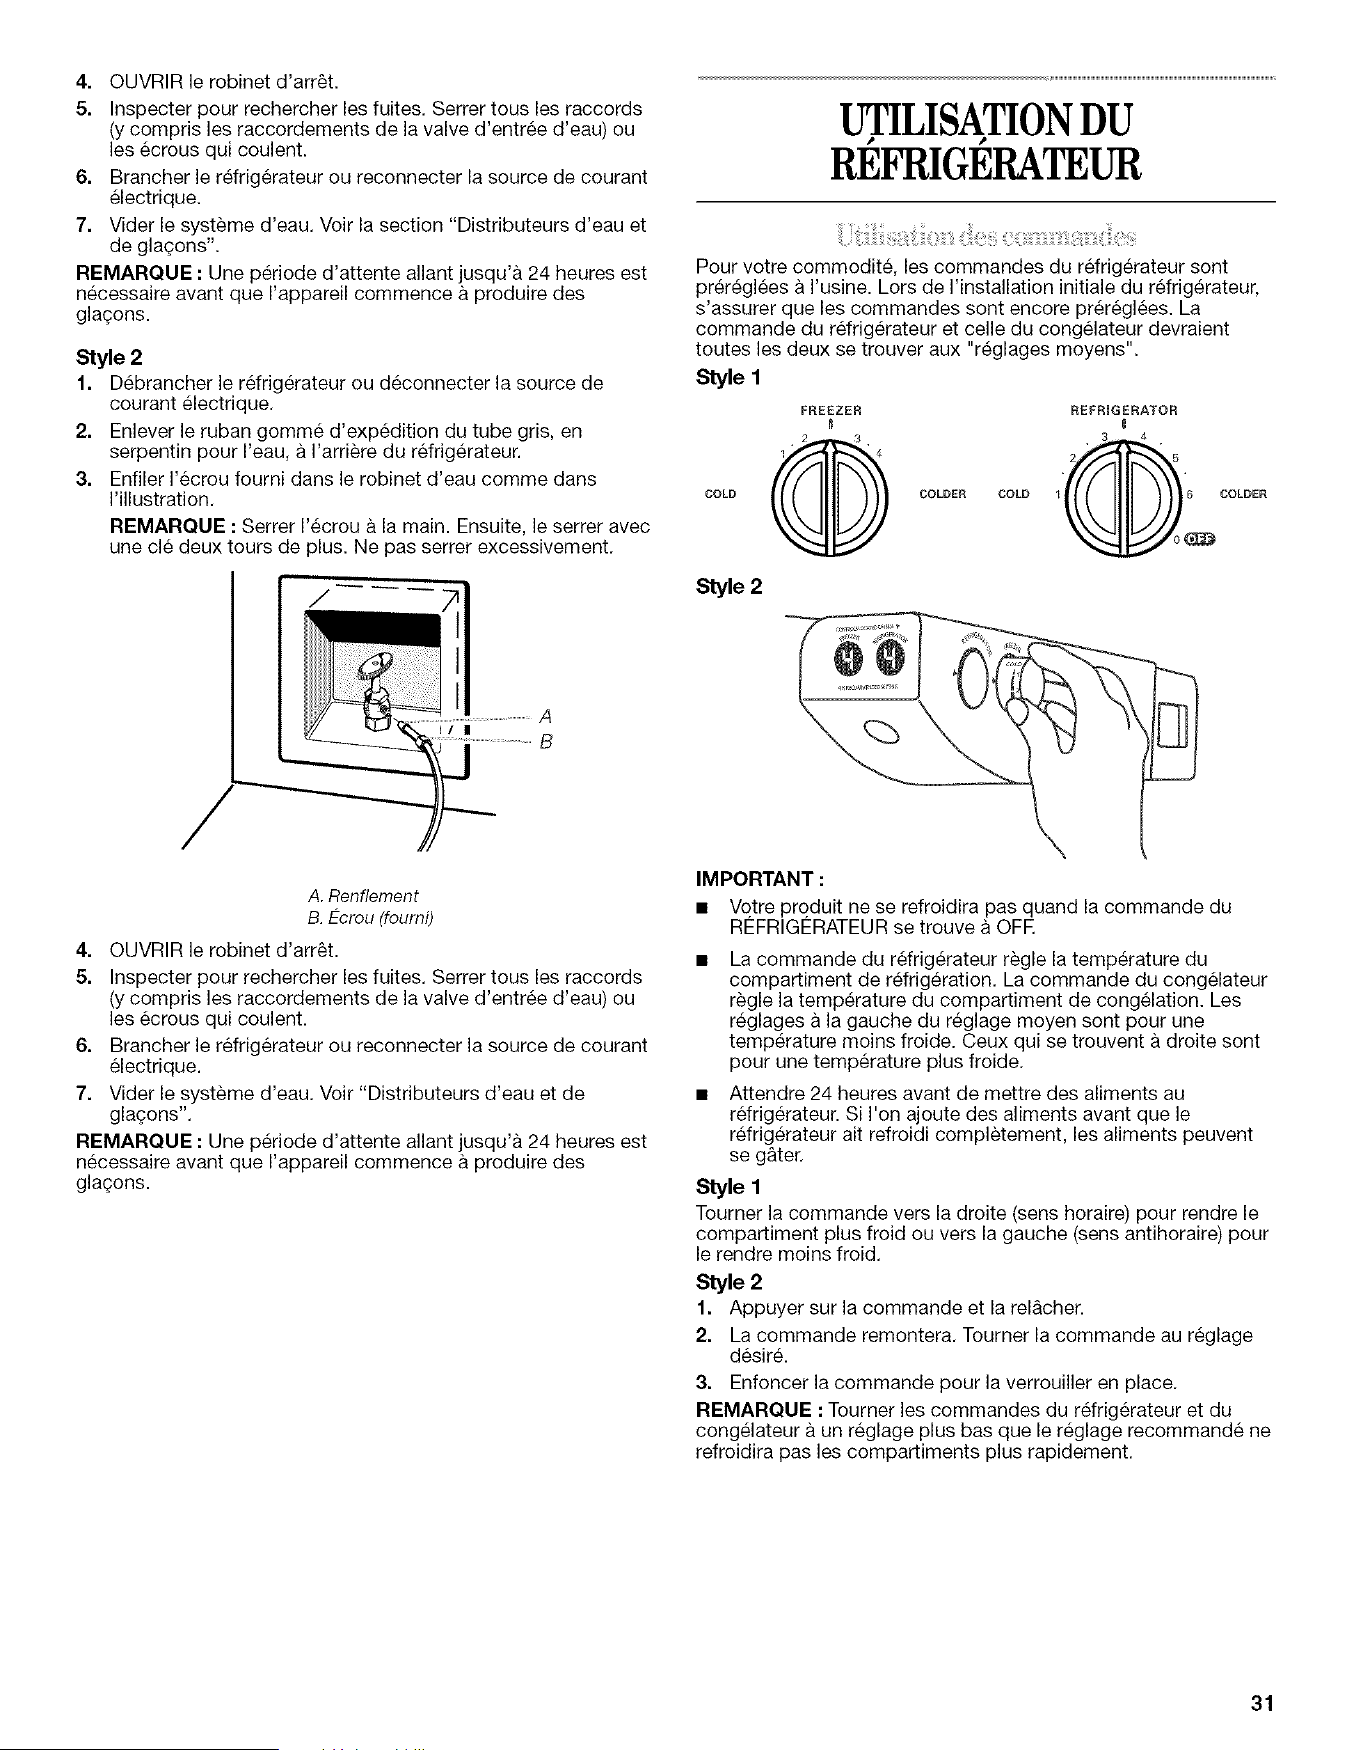
4. OUVRIR le robinet d'arr_t.
5. Inspecter pour rechercher les fuites. Serrer tous les raccords
(y compris les raccordements de la valve d'entree d'eau) ou
les ecrous qui coulent.
6. Brancher le refrigerateur ou reconnecter la source de courant
electrique.
7. Vider le syst_me d'eau. Voir la section "Distributeurs d'eau et
de glagons".
REMARQUE : Une periode d'attente allant jusqu'a 24 heures est
necessaire avant que I'appareil commence a produire des
gla(_ons.
Style 2
1. Debrancher le refrig@ateur ou deconnecter la source de
courant electrique.
2. Enlever le ruban gomme d'expedition du tube gris, en
serpentin pour I'eau, a I'arriere du refrigerateur.
3. Enfiler I'ecrou fourni dans le robinet d'eau comme dans
I'illustration.
REMARQUE : Serrer I'ecrou a la main. Ensuite, le serrer avec
une cle deux tours de plus. Ne pas serrer excessivement.
A
Ill
B
UTILISATIONDU
• ]
REFRIGERATEUR
Pour votre commodite, les commandes du refrig@ateur sont
pr@eglees a I'usine. Lors de I'installation initiale du refrigerateur,
s'assurer que les commandes sont encore prer6gl6es. La
commande du refrigerateur et celle du congelateur devraient
toutes les deux se trouver aux "reglages moyens".
Style 1
COLD
FREEZER
• 2
COLDER COLD
REFRmGERATOR
J
, 3 4
1 6 COLDEF_
Style 2
A. Renflement
B. E-crou (foumi)
4. OUVRIR le robinet d'arr_t.
5. Inspecter pour rechercher les fuites. Serrer tous les raccords
(y compris les raccordements de la valve d'entree d'eau) ou
les ecrous qui coulent.
6. Brancher le refrig6rateur ou reconnecter la source de courant
electrique.
7. Vider le systeme d'eau. Voir "Distributeurs d'eau et de
glagons".
REMARQUE : Une p@iode d'attente allant jusqu'a 24 heures est
necessaire avant que I'appareil commence a produire des
gla(_ons.
IMPORTANT :
• Votre produit ne se refroidira pas quand la commande du
REFRIGERATEUR se trouve a OFR
• La commande du refrig@ateur regle la temp@ature du
compartiment de refrigeration. La commande du congelateur
regle la temp@ature du compartiment de congelation. Les
reglages a la gauche du reglage moyen sont pour une
temp@ature moins froide. Ceux qui se trouvent a droite sent
pour une temperature plus froide.
• Attendre 24 heures avant de mettre des aliments au
refrig@ateur. Si I'on ajoute des aliments avant que le
refrig@ateur ait refroidi completement, les aliments peuvent
se g&ter.
Style 1
Tourner la commande vers la droite (sens horaire) pour rendre le
compartiment plus froid ou vers la gauche (sens antihoraire) pour
le rendre moins froid.
Style 2
1. Appuyer sur la commande et la rel&cher.
2. La commande remontera. Tourner la commande au reglage
desire.
3. Enfoncer la commande pour la verrouiller en place.
REMARQUE : Tourner les commandes du refrigerateur et du
congelateur a un reglage plus basque le reglage recommande ne
refroidira pas les compartiments plus rapidement.
31

Ajustement des commandes
Donner au refrigerateur le temps de refroidir completement avant
d'y ajouter des aliments. II est preferable d'attendre 24 heures
avant de placer les aliments au refrigerateur. Les reglages
indiques dans la section precedente devraient 6tre corrects pour
I'utilisation normale du refrigerateur domestique. Les reglages
sent faits correctement Iorsque le lait ou le jus est aussi froid que
vous I'aimez et Iorsque la creme glacee est ferme.
S'il est necessaire d'ajuster les temperatures dans le refrigerateur
ou congelateur, utiliser les reglages indiques dans le tableau ci-
dessous comme guide. Attendre au moins 24 heures entre les
ajustements.
CONDITION/RAISON : AJUSTEMENT :
REFRIGERATEUR trop tiede Regler la commande
du REFRIGCRATEUR
un degre plus haut
CONGI2LATEUR trop tiede/trop peu Regler la commande
de gla9ons du CONGI2LATEUR
un degre plus haut
RCFRIGCRATEUR trop froid Regler la commande
du REFRIGCRATEUR
un degre plus bas
CONGI2LATEUR trop froid Regler la commande
du CONGI2LATEUR
un degre plus bas
La commande peut _tre ajustee pour bien refroidir les viandes ou
les legumes. L'air a I'interieur du contenant est refroidi pour
emp_cher les "petits espaces" de congelation et peut _tre regle
pour garder les viandes aux temperatures recommandees
d'entreposage de 28 ° a 32°F (de -2 ° & 0°C) tel que recommande
par I'Office national du betail et des viandes. La commande du
tiroir convertible a legumes/viande est prereglee au reglage le plus
bas pour la viande.
Pour garder la viande :
Regler la commande a un des trois reglages MEAT (viande) pour
garder la viande a la temperature ideale.
Pour garder les I_gumes :
Regler la commande & VEG (legumes) pour garder les legumes &
la temperature ideale,
REMARQUE : Si les aliments commencent a congeler, deplacer
la commande vers la gauche (moins froid). Ne pas oublier
d'attendre 24 heures entre les ajustements.
i_ ¸¸_,i_ _
On peut contr61er le degre d'humidite dans le bac a legumes
etanche. La commande peut _tre ajustee a n'importe quel reglage
entre LOW et HIGH.
LOW (bas)(ouvert) pour une meilleure conservation des fruits et
des legumes a pelures.
HIGH (eleve)(ferme) pour une meilleure conservation des legumes
frais eta feuilles.
De I'air froid du congelateur passe directement au compartiment
de la porte sous les events.
REMARQUE : Le compartiment & produits laitiers et la grille
cannettes ne sont pas froids.
Commande du compartiment fraicheur
La commande du compartiment fraicheur se trouve sur le c6te
gauche du compartiment du refrigerateur.
A. Commande du
compartiment
fratcheur
Tourner la commande dans le sens horaire (vers la droite) pour
diminuer la circulation d'air froid dans le compartiment et le
rendre ainsi moins froid.
Tourner la commande dans le sens antihoraire (vers la gauche)
pour augmenter la circulation d'air froid dans le compartiment
et le rendre ainsi plus froid.
Mise en marche/arr_t de la machine a glagons
Le commutateur ON/OFF se trouve en haut, a droite du
compartiment de congelation.
Pour mettre en marche la machine a gla(_ons, glisser le
commutateur vers la position ON (vers la gauche).
Pour arr_ter manuellement la machine a gla(_ons, glisser le
commutateur vers la position OFF (vers la droite).
REMARQUE : La machine & gla_ons s'arr_te automatiquement.
Le detecteur de la machine & glagons arr_tera automatiquement
la production de glagons mais le commutateur restera en position
ON (vers la gauche).
,&,NOTER :
• Accorder 24 heures pour produire la premiere quantite de
gla_ons. Jeter les trois premieres quantites de glagons
produites.
• La qualite de vos gla(;ons sera seulement aussi bonne que la
qualite de I'eau fournie a votre machine & gla9ons. Eviter de
brancher la machine a gla9ons a un approvisionnement d'eau
adoucie. Les produits chimiques adoucisseurs d'eau (tels que
le sel) peuvent endommager des pieces de la machine
glagons et causer une pietre qualite des gla(;ons. Si une
alimentation d'eau adoucie ne peut pas _tre evitee, s'assurer
que I'adoucisseur d'eau fonctionne bien et qu'il est bien
entretenu.
• Ne jamais utiliser un objet pointu pour briser les gla(_ons dans
le bac. Cette action peut endommager le bac et le mecanisme
du distributeur.
• Ne pas garder quoi que ce soit sur le dessus ou dans la
machine a gla9ons ou dans le bac a gla9ons.
Pour retirer et r_installer le bac a glagons :
1. Tenir la base du bac a gla_ons a deux mains et appuyer sur la
declenche pour pouvoir soulever et retirer le bac.
REMARQUE : II n'est pas necessaire de pousser le
commutateur de la machine a glagons vers la position OFF
(vers la droite) Iorsqu'on enleve le bac. Le couvercle du
detecteur ("porte a clapet"), sur la paroi gauche du
congelateur, interrompt la production de glagons Iorsque la
porte est ouverte ou que le bac n'est pas en place.
32
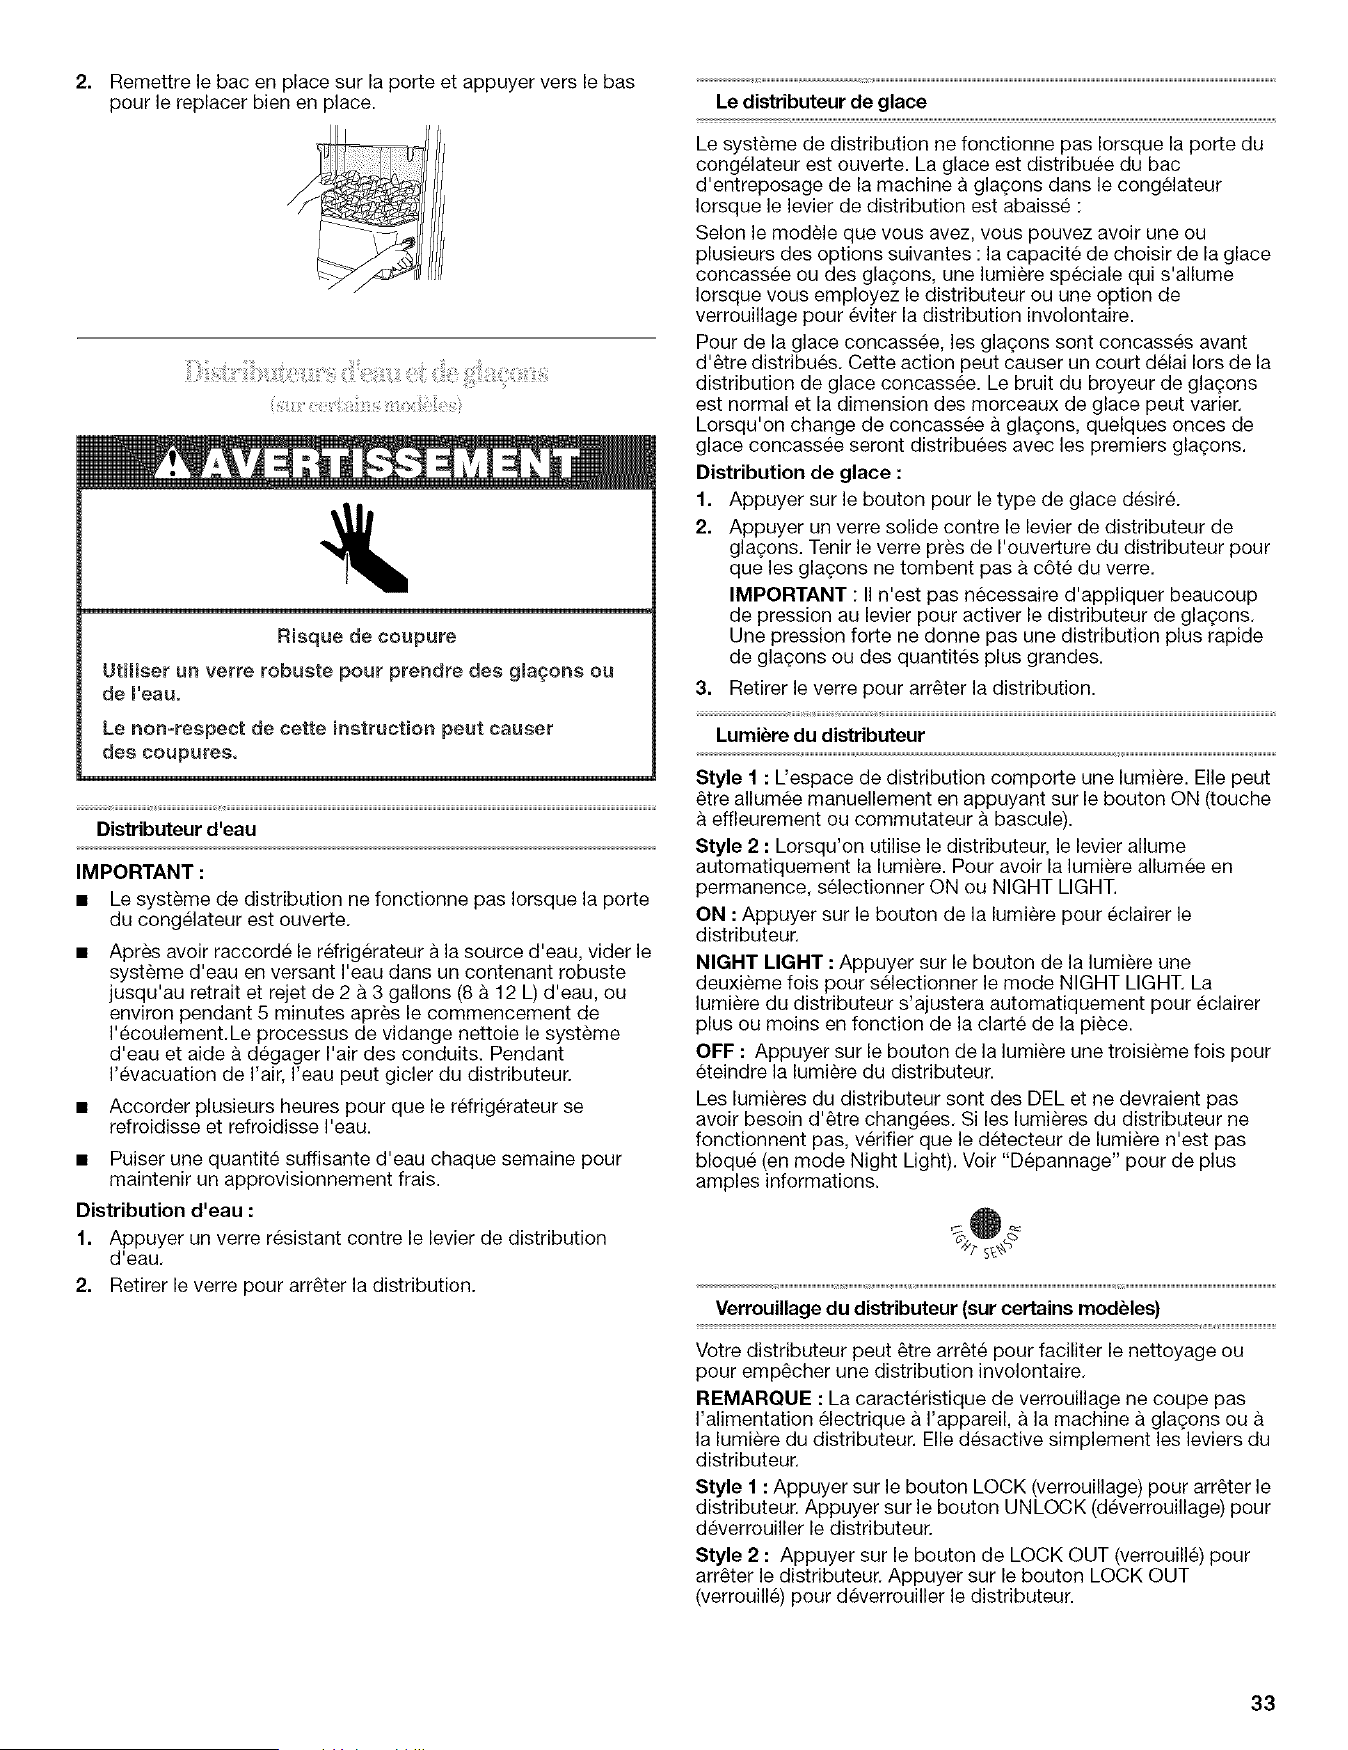
2. Remettre le bac en place sur la porte et appuyer vers le bas
pour le replacer bien en place.
Risque de coupure
UtHiser un verre robuste pour prendre des gla_ons ou
de m'eauo
Le non-respect de cette instruction peut causer
des coupures.
Distributeur d'eau
IMPORTANT :
• Le syst_me de distribution ne fonctionne pas Iorsque la porte
du congelateur est ouverte.
• Apres avoir raccorde le refrigerateur a la source d'eau, vider le
systeme d'eau en versant I'eau darts un contenant robuste
jusqu'au retrait et rejet de 2 & 3 gallons (8 & 12 L) d'eau, ou
environ pendant 5 minutes apres le commencement de
I'ecoulement.Le processus de vidange nettoie le systeme
d'eau et aide a degager I'air des conduits. Pendant
I'evacuation de I'air, I'eau peut gicler du distributeur.
• Accorder plusieurs heures pour que le refrigerateur se
refroidisse et refroidisse I'eau.
• Pulser une quantite suffisante d'eau chaque semaine pour
maintenir un approvisionnement frais.
Distribution d'eau :
1. Appuyer un verre resistant contre le levier de distribution
d'eau.
2. Retirer le verre pour arr_ter la distribution.
Le distributeur de glace
Le systeme de distribution ne fonctionne pas Iorsque la porte du
congelateur est ouverte. La glace est distribuee du bac
d'entreposage de la machine a glat_ons darts le congelateur
Iorsque le levier de distribution est abaisse :
Selon le modele que vous avez, vous pouvez avoir une ou
plusieurs des options suivantes : la capacite de choisir de la glace
concassee ou des glagons, une lumiere speciale qui s'allume
Iorsque vous employez le distributeur ou une option de
verrouillage pour eviter la distribution involontaire.
Pour de la glace concassee, les gla(_ons sont concasses avant
d'etre distribues. Cette action peut causer un court delai lots de la
distribution de glace concassee. Le bruit du broyeur de gla(_ons
est normal et la dimension des morceaux de glace peut varier.
Lorsqu'on change de concassee a gla9ons, quelques onces de
glace concassee seront distribuees avec les premiers gla9ons.
Distribution de glace :
1. Appuyer sur le bouton pour le type de glace desire.
2. Appuyer un verre solide contre le levier de distributeur de
gla9ons. Tenir le verre pres de I'ouverture du distributeur pour
que les glagons ne tombent pas a c6te du verre.
IMPORTANT : II n'est pas necessaire d'appliquer beaucoup
de pression au levier pour activer le distributeur de gla(_ons.
Une pression forte ne donne pas une distribution plus rapide
de gla(_ons ou des quantites plus grandes.
3. Retirer le verre pour arr_ter la distribution.
Lumi_re du distributeur
Style 1 : L'espace de distribution comporte une lumiere. Elle peut
_tre allumee manuellement en appuyant sur le bouton ON (touche
effleurement ou commutateur a bascule).
Style 2 : Lorsqu'on utilise le distributeur, le levier allume
automatiquement la lumiere. Pour avoir la lumiere allumee en
permanence, selectionner ON ou NIGHT LIGHT.
ON " Appuyer sur le bouton de la lumiere pour eclairer le
distributeur.
NIGHT LIGHT : Appuyer sur le bouton de la lumiere une
deuxieme fois pour selectionner le mode NIGHT LIGHT. La
lumi_re du distributeur s'ajustera automatiquement pour eclairer
plus ou moins en fonction de la clarte de la piece.
OFF " Appuyer sur le bouton de la lumiere une troisieme fois pour
eteindre la lumiere du distributeur.
Les lumieres du distributeur sont des DEL et ne devraient pas
avoir besoin d'etre changees. Si les lumieres du distributeur ne
fonctionnent pas, verifier que le detecteur de lumiere n'est pas
bloque (en mode Night Light). Voir "Depannage" pour de plus
amples informations.
Verrouillage du distributeur (sur certains modules)
Votre distributeur peut _tre arr_te pour faciliter le nettoyage ou
pour emp_cher une distribution involontaire.
REMARQUE : La caracteristique de verrouillage ne coupe pas
I'alimentation electrique a I'appareil, a la machine a glagons ou
la lumiere du distributeur. Elle desactive simplement les leviers du
distributeur.
Style 1 : Appuyer sur le bouton LOCK (verrouillage) pour arr_ter le
distributeur. Appuyer sur le bouton UNLOCK (deverrouillage) pour
deverrouiller le distributeur.
Style 2 : Appuyer sur le bouton de LOCK OUT (verrouille) pour
arr_ter le distributeur. Appuyer sur le bouton LOCK OUT
(verrouille) pour deverrouiller le distributeur.
33
REMARQUE : Ne pas utiliser ce produit pour le filtrage d'une
eau microbiologiquement pollute ou de qualite inconnue en
I'absence d'un dispositif de desinfection ad_quat avant ou
apr_s le systbme. Les syst_mes certifies pour la r_duction de
kyste peuvent _tre utilis_s pour I'eau d_sinfect_e qui peut
contenir des kystes flltrables.
T_moin lumineux de I'_tat du filtre h eau (sur certains modules)
Le temoin lumineux de I'etat du filtre & eau vous aidera & savoir
quand changer le filtre a eau. Le temoin lumineux passera du vert
au jaune, Ceci indique qu'il est presque temps de changer le filtre.
II est recommande de remplacer le filtre a eau Iorsque le temoin
lumineux de I'etat du filtre a eau passe au rouge OU Iorsque le
debit d'eau a votre distributeur ou a la machine a glagons diminue
de faq,on marquee.
Apres avoir change le filtre a eau, regler de nouveau le temoin
lumineux de I'etat du filtre a eau. Le temoin lumineux de I'etat du
filtre passera du rouge au vert des que le systeme sera restaure.
Filtre a eau sans indicateur lumineux (sur certains modbles)
Si votre refrigerateur n'est pas muni du temoin lumineux de I'etat
du filtre a eau, vous devez changer le filtre a eau tousles 6
9 mois selon I'utilisation, Si le debit d'eau au distributeur ou a la
machine a gla(_ons diminue de fagon marquee avant que 6 mois
ne se soient ecoules, remplacer le filtre a eau plus souvent.
Utilisation du distributeur sans filtre a eau
II est possible de faire fonctionner le distributeur sans utiliser de
filtre a eau, L'eau ne sera pas filtree.
1. Enlever le filtre a eau.
2. Faire glisser le couvercle de I'extremite du filtre et le replacer
dans la grille de la base.
IMPORTANT: Ne pas jeter le couvercle. II fait partie de votre
refrigerateur. Conserver le couvercle pour I'utiliser avec le filtre
de rechange.
3. Faire pivoter le couvercle jusqu'a ce qu'il soit bien en place.
ENTRETIENDU
REFRIGERATEUR
Risque d'expiosion
Utiliser un produit de nettoyage ininflammab_eo
Le non-respect de cette instruction peut causer un deces,
une explosion ou un incendieo
Les sections de refrigeration et de congelation se degivrent
automatiquement. Toutefois, nettoyer les deux sections au moins
une fois par mois pour emp_cher une accumulation d'odeurs.
Essuyer les renversements immediatement.
IMPORTANT : Comme I'air circule entre les deux sections, toutes
les odeurs formees dans une section seront transferees a I'autre.
Vous devez nettoyer a fond les deux sections pour eliminer les
odeurs. Pour emp_cher le transfert d'odeurs et I'assechement
des aliments, envelopper ou recouvrir hermetiquement les
aliments.
Nettoyage de votre r_frig_rateur :
REMARQUE : Ne pas utiliser des nettoyants abrasifs tels que les
nettoyants a vitre en atomiseurs, nettoyants a recurer, liquides
inflammables, cires nettoyantes, detergents concentres, eaux de
Javel ou nettoyants contenant du petrole sur les pieces en
plastique, les garnitures interieures et de portes ou les joints de
portes. Ne pas utiliser d'essuie-tout, tampons a recurer ou autres
outils de nettoyage abrasifs.
1. D_brancher le refrigerateur ou deconnecter la source de
courant _lectrique.
2. Laver a la main, rincer et secher les pieces amovibles et les
surfaces internes a fond. Utiliser une eponge propre ou un
linge doux et un detergent doux dans de I'eau tiede.
3. Laver les surfaces exterieures en acier inoxydable ou en metal
peint avec une eponge propre ou un linge doux et un
detergent doux dans de I'eau tiede.
4. Le condenseur n'a pas besoin d'etre nettoye souvent dans
des conditions de fonctionnement normales. Si
I'environnement est particulierement graisseux, poussiereux,
ou s'il y a des animaux domestiques dans la maison, le
condenseur devrait _tre nettoye tous les deux ou trois mois
pour assurer une efficacite maximum.
Si vous avez besoin de nettoyer le condenseur :
• Retirer la grille de la base.
• Utiliser un aspirateur a brosse douce pour nettoyer la
grille, les endroits ouverts derriere la grille et la surface
I'avant du condenseur.
• Replacer la grille de la base Iorsqu'on a termine.
5. Brancher le refrigerateur ou reconnecter la source de courant
electrique,
REMARQUE : Votre refrigerateur ne pourra pas accommoder
toutes les ampoules pour les appareils menagers. S'assurer de
faire le remplacement par une ampoule de grosseur, de forme et
de puissance semblables. La lampe du distributeur demande une
ampoule pour service intense de 10 watts et toutes les autres
lampes demandent une ampoule d'appareil menager de 40 watts.
Les ampoules de remplacement sont disponibles de votre
marchand.
1. Debrancher le refrigerateur ou deconnecter la source de
courant electrique.
2. Enlever le protecteur d'ampoule s'il y a lieu.
REMARQUE : Pour nettoyer le protecteur d'ampoule, le laver
I'eau tiede et avec un detergent liquide. Bien rincer et secher
le protecteur d'ampoule.
3. Enlever I'ampoule d'eclairage et la remplacer par une de
m_me taille, forme et puissance.
4. Replacer le protecteur d'ampoule s'il y a lieu.
5. Brancher le refrigerateur ou reconnecter la source de courant
electrique.
34
DEPANNAGE
Essayer les solutions sugger_es ici d'abord afin d'_viter le cot3t d'une visite de service non n_cessaire.
Le r_frig_rateur ne refroidit pas
• Les commandes de temperature ne sont-elles pas reglees
aux r_glages moyens? Les commandes sont prer6gl6es
I'usine au reglage moyen approprie. Apres avoir connecte le
courant, attendre 1 heure et verifier la temperature.
REMARQUE : Ajuster les commandes au reglage le plus froid ne
refroidira aucun compartiment plus vite.
Les ampoules n'_clairent pas
• Le cordon d'alimentation _lectrique est-il debranch_?
Brancher sur une prise & 3 alveoles reli_e a la terre.
• Une ampoule d'_clairage est-elle desserr_e dans la
douille ou grillee? Voir la section "Remplacement des
ampoules d'eclairage".
• La lumi_re du distributeur est-elle r_gl_e sur ON? La
lumiere du distributeur ne fonctionnera que si les leviers sont
actives. Si on souhaite avoir la lumiere du distributeur en
permanence, regler la lumiere du distributeur sur ON ou
NIGHT LIGHT. Voir la section "Distributeurs d'eau et de
glagons".
• La lumi_re du distributeur est-elle r_gl_e sur NIGHT
LIGHT? Si le distributeur est regle en mode NIGHT LIGHT,
verifier que le detecteur de luminosite du distributeur n'est pas
bloque. Voir la section "Distributeurs d'eau et de glace".
La temperature est trop _lev_e
V_rifier ce qui suit :
• Les ouvertures d'aeration sont-elles bloquees dans un
compartiment ou I'autre?
• La ou les porte(s) sont-elles ouvertes frequemment?
• Vient-on d'ajouter une grande quantite d'aliments dans le
refrigerateur ou le congelateur?
• Les reglages sont-ils corrects pour les conditions existantes?
Le moteur semble trop tourner
V_rifier ce qui suit :
• La temperature ambiante est-elle plus elevee que d'habitude?
• Vient-on d'ajouter une grande quantite d'aliments dans le
refrigerateur?
• Les portes sont-elles ouvertes frequemment?
• Les portes sont-elles fermees completement?
• Les serpentins du condenseur sont-ils sales?
REMARQUE : Votre nouveau refrigerateur fonctionnera plus
Iongtemps que I'ancien a cause de son moteur a haute efficacite.
II y a une accumulation d'humidit_ a I'int_rieur
Les portes ne ferment pas compl_tement
V_rifier ce qui suit :
• Les emballages d'aliments emp_chent-ils la porte de fermer?
• Le bac a gla(_ons est-il en bonne position?
• Les portes ont-elles ete enlevees durant I'installation de
I'appareil et mal reinstallees?
Les portes sont difficiles a ouvrir
• Les joints collent-ils ou sont-ils sales? Nettoyer les joints au
savon doux et & I'eau tiede.
La machine a glaqons ne produit pas ou pas suffisamment de
glaqons
V_rifier ce qui suit :
• Le bras de commande en broche ou commutateur d'arr_t de
la machine a glagons (selon le modele) est-il en position OFF
(arr_t)?
Le robinet d'arr_t de la canalisation d'eau est-il ouvert?
La temperature du congelateur est-elle assez froide pour
produire des glaqons? Attendre 24 heures apres le
raccordement de la machine a gla_ons avant qu'elle produise
des glat;ons.
La machine a gla£ons vient-elle d'6tre install_e? Attendre
72 heures pour que la production de glagons ne commence.
Y a-t-il de I'eau dans le moule de la machine a gla_ons ou
aucun gla£_on n'a _t_ produit? S'assurer que le refrigerateur
a ete raccorde a une canalisation d'eau et que le robinet
d'arr_t de la canalisation est ouvert.
Une grande quantit_ de gla_ons vient-elle d'etre enlev_e?
Attendre 24 heures pour que la machine a gla_ons produise
plus de gla(_ons.
Y-a-t-il un filtre a eau install_ sur le r_frig_rateur? Le filtre
peut _tre obstrue ou installe incorrectement.
Un glagon est-il coince dans le bras ejecteur de la
machine a glagons?
Sur les modeles avec un bac d'entreposage de gla(;ons
I'interieur, enlever le gla(;on du bras ejecteur avec un ustensile
en plastique. Sur les modeles avec un bac a gla(;ons situe
dans la porte du congelateur, acceder a la machine a glagons
en baissant la porte du detecteur a glagons sur le c6te
superieur gauche de I'interieur du congelateur. Tout en
baissant la porte du detecteur, soulever la porte de service de
la machine a glagons et retirer le gla(;on de I'ejecteur avec un
ustensile en plastique.
V_rifier ce qui suit :
• Les ouvertures d'aeration sont-elles bloquees dans le
refrigerateur?
• La ou les porte(s) sont-elles ouvertes frequemment?
• La piece est-elle humide?
• Les reglages sont-ils corrects pour les conditions existantes?
• Le programme autodegivreur vient-il de se terminer?
35
Got3t,odeur ou couleur grise des gla£ons
V_rifier ce qui suit :
• Les raccords de plomberie sont-ils neufs et causent-ils une
decoloration et un mauvais goQt des gla9ons?
• Les glagons ont-ils ete gardes trop Iongtemps?
• Le bac & glagons a-t-il besoin d'etre nettoye?
• Les aliments dans le congelateur ou le refrigerateur sont-ils
bien enveloppes?
• L'eau contient-il des mineraux (tel que du soufre)?
L'installation d'un filtre peut _tre requise afin d'enlever les
mineraux.
Y-a-t-il un filtre a eau install_ sur le r_frig_rateur? Une
decoloration grise ou foncee de la glace indique que le
syst_me de filtration de I'eau a besoin d'un rin9age
additionnel.
Le distributeur de gla£ons ne fonctionne pas correctement
V_rifier ce qui suit :
• La porte du congelateur est-elle completement fermee?
• Le bac a glagons est-il installe correctement?
• Y-a-t-il des glagons dans le bac?
• Les glagons ont-ils gele dans le bac?
• Un gla9on est-il coince dans la goulotte?
• Les mauvais glaqons ont-ils _t_ ajout_s au bac? Utiliser
seulement des gla_ons produits par la machine a gla_ons
courante.
• La glace a-t-elle fondu autour de la tige (spirale en m_tal)
dans le bac a gla£;ons? Vider les gla_ons et nettoyer le bac
completement.
• La machine a gla£_ons fonctionne-t-elle incorrectement
Iors de la distribution de glace "pil_e" ("crushed ice"}?
Changer le reglage "crushed" (glace pilee) pour le reglage
"cubed" (glagons). Si les glagons sont correctement
distribues, abaisser le bouton a "crushed" pour obtenir de la
glace pilee et reprendre la distribution.
• Le bras de distribution a-t-il _t_ retenu trop Iongtemps?
Les gla_ons cesseront d'etre distribues Iorsque le bras est
retenu trop Iongtemps. Attendre trois minutes pour que le
moteur du distributeur soit regle de nouveau avant d'etre
utilis&
Le distributeur d'eau ne fonctionne pas correctement
V_rifier ce qui suit :
• Le robinet d'arr_t d'eau est-il ouvert, installe incorrectement
ou obstrue?
• La canalisation d'eau est-elle connectee a la source?
• La canalisation de la source d'eau du domicile comporte-t-elle
une deformation?
• Le syst_me d'eau s'est-il rempli? Le systeme d'eau dolt _tre
rempli avant la premiere utilisation.
• Le r_frigerateur est-il connecte a une canalisation d'eau
froide avec une pression d'au moins 30 Ib/po2? La pression
de I'eau du domicile determine le debit du distributeur.
• Y-a-t-il un filtre a eau installe sur le refrigerateur? Le filtre
est peut-_tre obstrue ou installe incorrectement.
De I'eau ou de la glace fuit du distributeur
V_rifier ce qui suit :
• Retient-on le verre sous le distributeur assez Iongtemps?
• Un glagon est-il coince dans la goulotte, ce qui maintient la
porte de distribution ouverte?
L'eau du distributeur n'est pas assez froide
REMARQUE : L'eau du distributeur est refroidie & seulement
50 ° F (10 ° C).
• Vient-on d'installer le r_frig_rateur ou une grande quantit_
d'eau a-t-elle _t_ distribute r_cemment? Accorder
24 heures pour que le refrigerateur se refroidisse
completement.
• N'a-t-on pas r_cemment distribu_ de I'eau? Le premier
verre d'eau peut ne pas _tre froid. Jeter le premier verre d'eau.
36
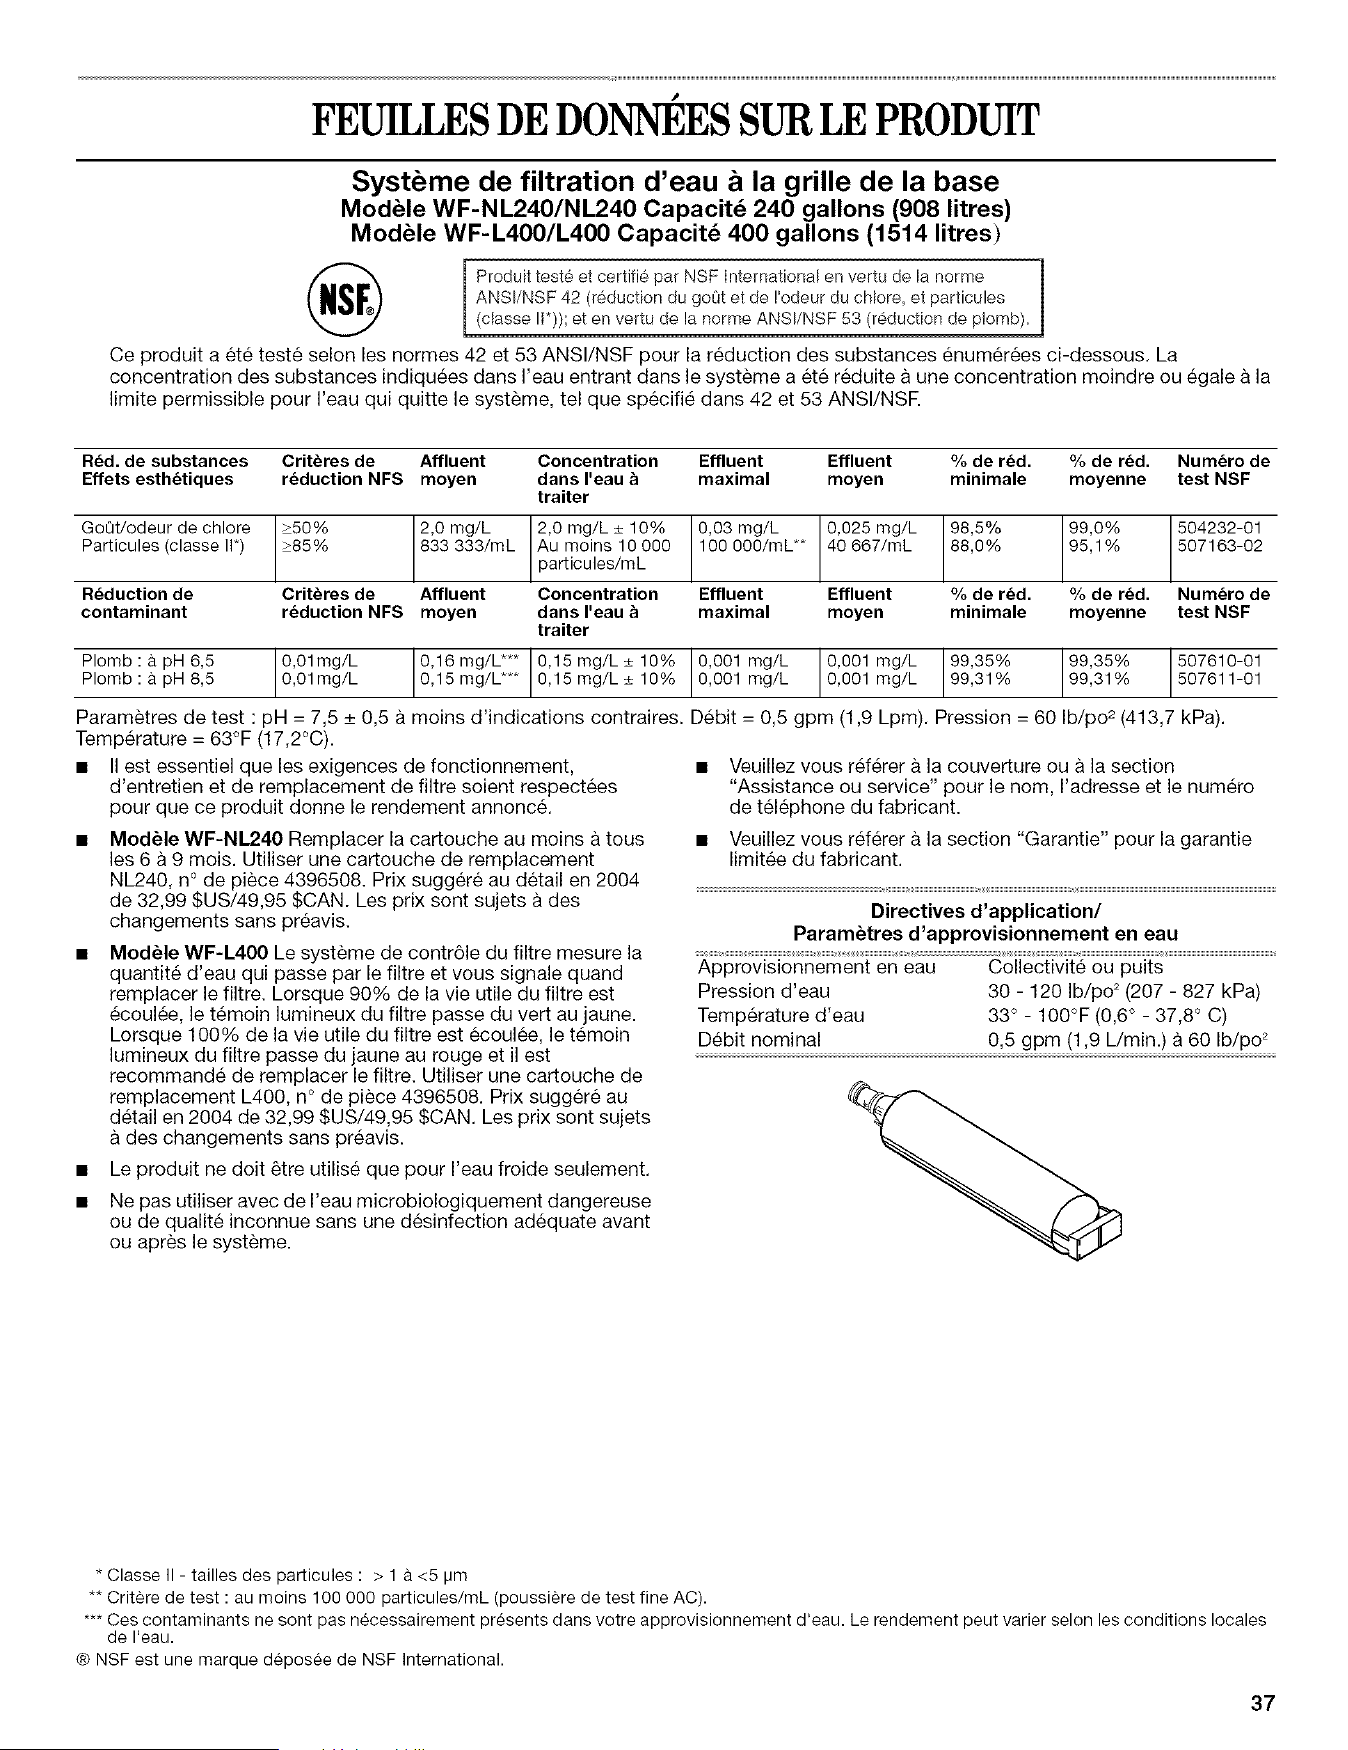
FEUILLESDEDONNEESSURLE PRODUIT
Systeme de filtration d'eau h la grille de la base
ModUle WF-NL240/NL240 Capacit_ 240 gallons (908 litres)
ModUle WF-L400/L400 Capacit_ 400 gallons (1514 litres)
Produit test_ et certifi_ par NSF Internationalen vertu de la norme
ANSI/NSF 42 (reductiondu go0t et de !'odeurdu cMore, et particules
(dasse II*));et en vertu de la norme ANSI/NSF 53 (r_ductionde p!omb).
Ce produit a ete teste selon les normes 42 et 53 ANSI/NSF pour la reduction des substances enumerees ci-dessous. La
concentration des substances indiquees dans I'eau entrant dans le systeme a et6 reduite h une concentration moindre ou egale a la
limite permissible pour I'eau qui quitte le syst_me, tel que specifie dans 42 et 53 ANSl/NSR
Rdd. de substances Crit_res de Affluent Concentration Effluent Effluent % de r_d. % de r_d. Num_ro de
Effets esth_tiques r_duction NFS moyen dans I'eau & maximal moyen minimale moyenne test NSF
traiter
GoOt/odeur de chlore _50% 2,0 mg/L 2,0 mg/L _+10% 0,03 mg/L 0,025 mg/L 98,5% 99,0% 504232-01
Particules (classe I1") 285% 833 333/mL Au moins 10 000 100 000/mL** 40 667/mL 88,0% 95,1% 507163-02
particules/mL
R_duction de Crit_res de Affluent Concentration Effluent Effluent % de r_d. % de r_d. Num_ro de
contaminant r_duction NFS moyen dans I'eau & maximal moyen minimale moyenne test NSF
traiter
Plomb : h pH 6,5 0,01mg/L 0,16 mg/L*** 0,15 mg/L _+10% 0,001 mg/L 0,001 mg/L 99,35% 99,35% 507610-01
Plomb : h pH 8,5 0,01mg/L 0,15 mg/L*** 0,15 mg/L _+10% 0,001 mg/L 0,001 mg/L 99,31% 99,31% 507611-01
Parametres de test : pH = 7,5 + 0,5 a moins d'indications contraires. Debit = 0,5 gpm (1,9 Lpm). Pression = 60 Ib/po 2 (413,7 kPa).
Temperature = 63°F (17,2°C).
• II est essentiel que les exigences de fonctionnement,
d'entretien et de remplacement de filtre soient respectees
pour que ce produit donne le rendement annonce.
• Mod_le WF-NL240 Remplacer la cartouche au moins h tous
les 6 a 9 tools. Utiliser une cartouche de remplacement
NL240, n° de piece 4396508. Prix sugger6 au detail en 2004
de 32,99 $US/49,95 SCAN. Les prix sont sujets a des
changements sans preavis.
• ModUle WF-L400 Le systeme de contr61e du filtre mesure la
quantite d'eau qui passe par le filtre et vous signale quand
remplacer le filtre. Lorsque 90% de la vie utile du filtre est
ecoul6e, le temein lumineux du filtre passe du vert au jaune.
Lorsque 100% de la vie utile du filtre est eceul6e, le temein
lumineux du filtre passe du jaune au rouge et il est
recommande de remplacer le filtre. Utiliser une cartouche de
remplacement L400, n° de piece 4396508. Prix sugger6 au
detail en 2004 de 32,99 $US/49,95 SCAN. Les prix sent sujets
des changements sans preavis.
• Le produit ne dolt _tre utilise que pour I'eau froide seulement.
• Ne pas utiliser avec de I'eau microbiologiquement dangereuse
ou de qualite inconnue sans une desinfection adequate avant
ou apres le systeme.
• Veuillez vous referer h la couverture ouh la section
"Assistance ou service" pour le nom, I'adresse et le numero
de telephone du fabricant.
• Veuillez vous referer a la section "Garantie" pour la garantie
limitee du fabricant.
Directives d'application/
Param_tres d approvisionnement en eau
Approvisionnement en eau Collectivite ou puits
Pression d'eau 30 - 120 Ib/po 2(207 - 827 kPa)
Temperature d'eau 33 ° - 100°F (0,6 ° - 37,8 ° C)
Debit nominal 0,5 gpm (1,9 L/min.) a 60 Ib/po 2
* Classe II - tallies des par_icules : > 1 a <5 IJm
** Critere de test : au moins 100 000 particules/mL (poussiere de test fine AC).
*** Ces contaminants ne sont pas n_cessairement presents dans votre approvisionnement d'eau. Le rendement peut varier selon les conditions locales
de I'eau.
® NSF est une marque d_pos_e de NSF International.
37
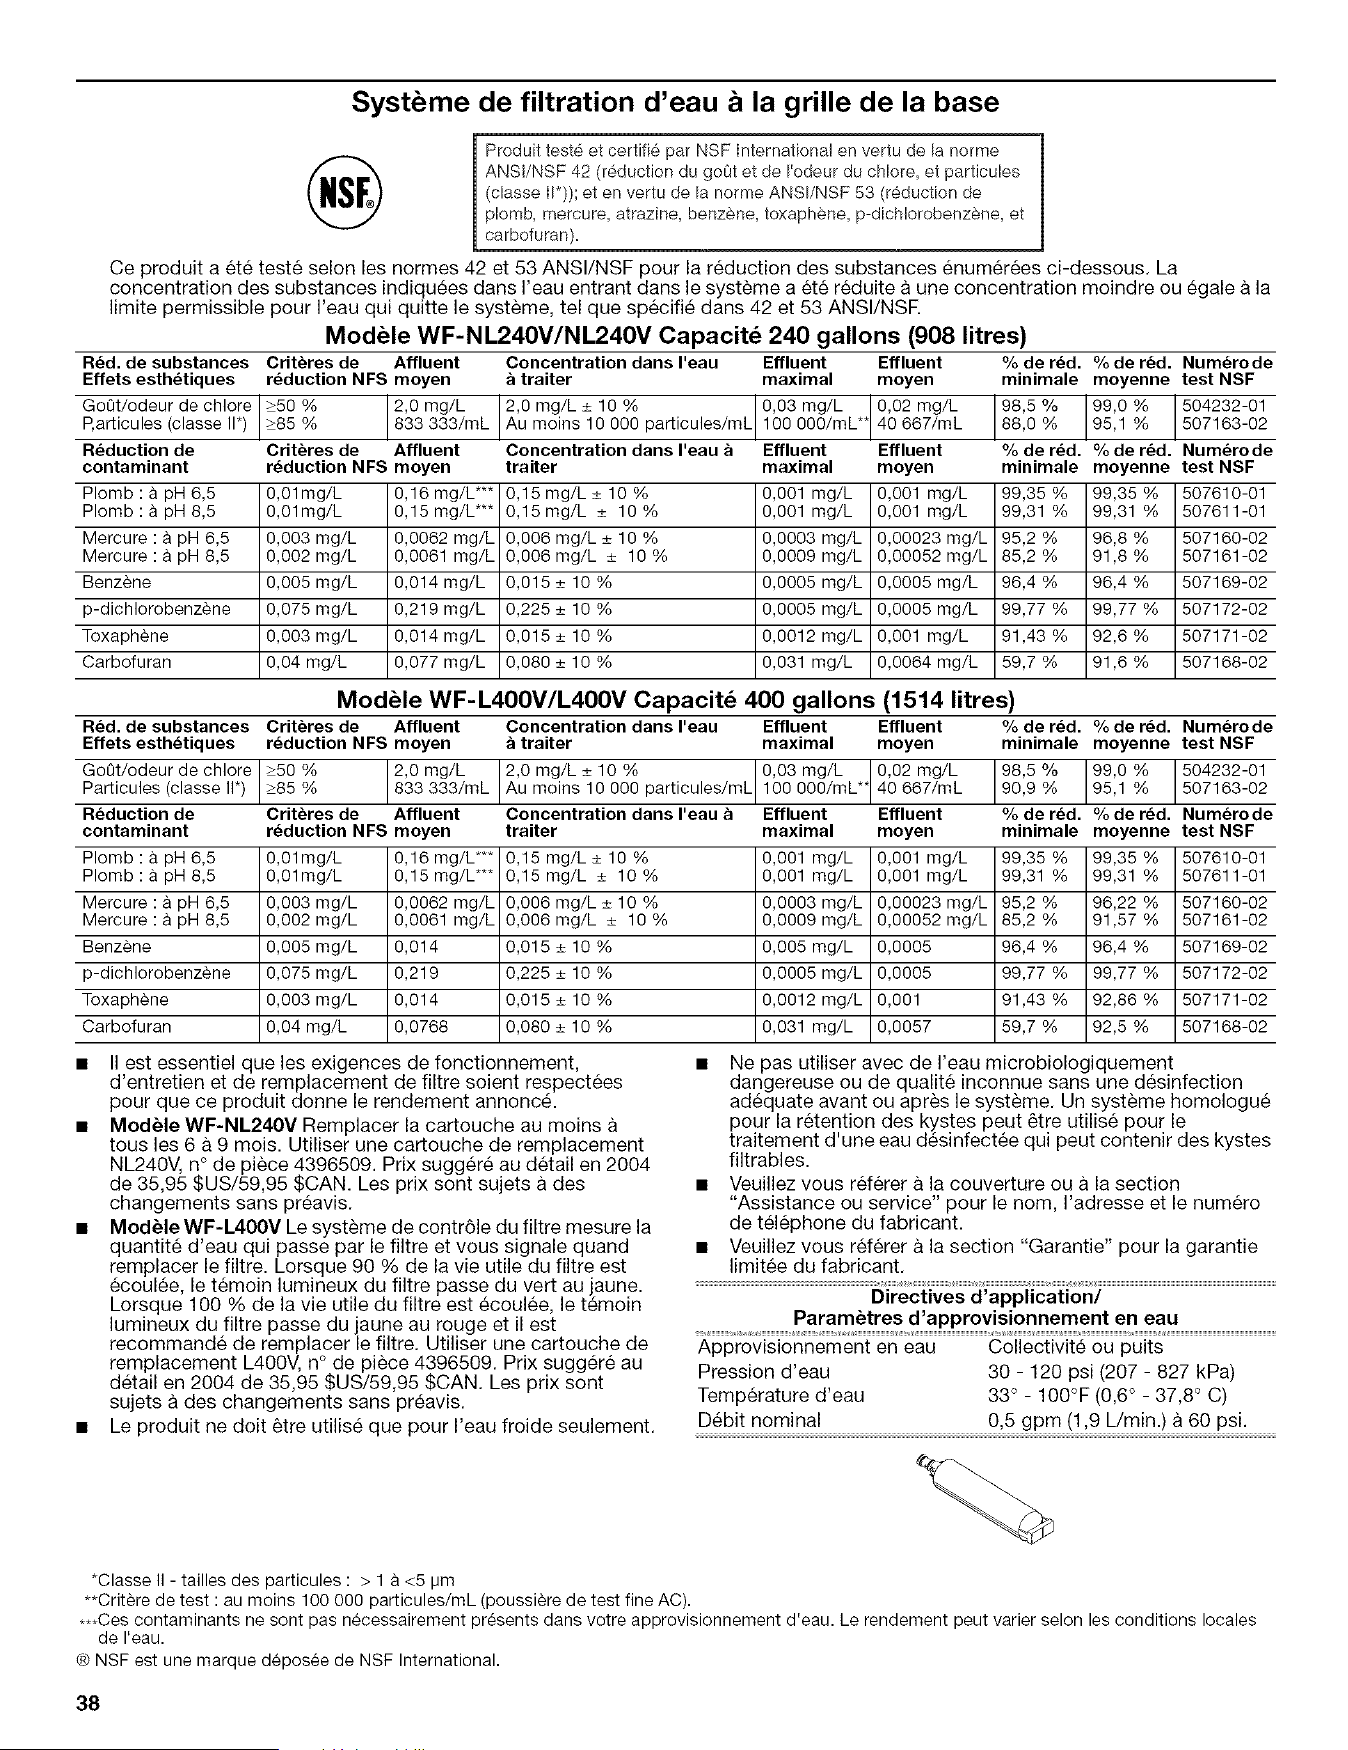
Systeme de filtration d'eau a la grille de la base
Produit test_ et certifi_ par NSF Internationa! en vertu de la norme
ANSI/NSF 42 (r_duction du go0t et de I'odeur du chlore, et particules
(classe II*)); et en vertu de la norme ANSI/NSF 53 (r_duction de
plomb, mercure, atrazine, benz&ne, toxaph_ne, p-dichlorobenz&ne, et
earbofuran).
Ce produit a ete teste selon les normes 42 et 53 ANSI/NSF pour la reduction des substances enumerees ci-dessous. La
concentration des substances indiqu_es dans I'eau entrant dans le syst_me a et6 reduite a une concentration moindre ou egale a la
limite permissible pour I'eau qui quitte le systeme, tel que specifie dans 42 et 53 ANSl/NSF.
ModUle WF-NL240V/NL240V Capacit6 240 gallons (908 litres)
R6d. de substances
Effets esth6tiques
Got3t/odeur de chlore
P,ar_icules (classe I1")
R6duction de
contaminant
Plomb : a pm 6,5
Plomb : a pH 8,5
Mercure : a pH 6,5
Mercure : a pH 8,5
Benz_ne
p-dichlorobenz_ne
Toxaph_ne
Carbofuran
Crit_res de Affluent Concentration dans I'eau Effluent Effluent % de r6d. % de r6d. Num6ro de
r6duction NFS rnoyen _ traiter maximal rnoyen rninimale rnoyenne test NSF
_50 % 2,0 mg/L 2,0 mg/L _+10 % particules/mL 0,03 mg/L 0,02 mg/L 98,5 % 99,0 % 504232-01
_85 % 833 333/mL Au mo ns 10 000 100 000/mL** 40 667/mL 88,0 % 95,1% 507163-02
Concentration dans I'eau _ Effluent Effluent % de r6d. % de r6d. Num6ro de
traiter maximal rnoyen rninimale rnoyenne test NSF
507610-01
507611-01
Crit_res de Affluent
r6duction NFS moyen
0,01mg/L 0,16 mg/L***
0,01mg/L 0,15 mg/L***
0,003 mg/L 0,0062 mg/L
0,002 mg/L 0,0061 mg/L
0,005 mg/L 0,014 mg/L
0,075 mg/L 0,219 mg/L
0,003 mg/L 0,014 mg/L
0,04 mg/L 0,077 mg/L
0,15 mg/L_+ 10 %
0,15mg/L _+ 10%
0,006 mg/L _+10 %
0,006mg/L _+ 10 %
0,015 _+10 %
0,225 _+10 %
0,015 _+10 %
0,080 _+10 %
0,001 mg/L
0,001 mg/L
0,0003 mg/L
0,0009 mg/L
0,0005 mg/L
0,0005 mg/L
0,0012 mg/L
0,031 mg/L
0,001 mg/L
0,001 mg/L
0,00023 mg/L
0,00052 mg/L
0,0005 mg/L
0,0005 mg/L
0,001 mg/L
0,0064 mg/L
99,35 % 99,35 %
99,31% 99,31%
95,2 % 96,8 % 507160-02
85,2 % 91,8 % 507161-02
96,4 % 96,4 % 507169-02
99,77 % 99,77 % 507172-02
91,43 % 92,6 % 507171-02
59,7 % 91,6 % 507168-02
R6d. de substances
Effets esth6tiques
GoOt/odeur de chlore
Particules (classe II*)
R6duction de
contaminant
Plomb : a. pH 6,5
Plomb : a pH 8,5
Mercure : a pH 6,5
Mercure : a pH 8,5
Benz_ne
p-dichlorobenz_ne
Toxaph_ne
Carbofuran
ModUle WF- L400V/L400V Capacit6 400 gallons (1514 litres)
Crit_res de Affluent Concentration dans I'eau Effluent Effluent % de r6d. % de r6d. Num6ro de
r6duction NFS rnoyen & traiter maximal rnoyen minirnale rnoyenne test NSF
_50 % 2,0 mg/L 2,0 mg/L _+10 % particules/mL 0,03 mg/L 0,02 mg/L 98,5 % 99,0 % 504232-01
_85 % 833 333/mL Au mo ns 10 000 100 000/mL** 40 667/mL 90,9 % 95,1% 507163-02
Crit_res de Affluent
r6duction NFS moyen
0,01mg/L 0,16 mg/L***
0,01mg/L 0,15 mg/L***
0,003 mg/L 0,0062 mg/L
0,002 mg/L 0,0061 mg/L
0,005 mg/L 0,014
0,075 mg/L 0,219
0,003 mg/L 0,014
0,04 mg/L 0,0768
Concentration dans I'eau & Effluent Effluent
traiter maximal moyen
0,001 mg/L
0,001 mg/L
0,0003 mg/L
0,0009 mg/L
0,005 mg/L
0,0005 mg/L
0,0012 mg/L
0,031 mg/L
0,001 mg/L
0,001 mg/L
0,00023 mg/L
0,00052 mg/L
0,0005
0,0005
0,001
0,0057
%der6d. %der6d. Num6rode
minirnale rnoyenne test NSF
99,35 % 99,35 % 507610-01
99,31% 99,31% 507611-01
95,2 % 96,22 % 507160-02
85,2 % 91,57 % 507161-02
96,4 % 96,4 % 507169-02
99,77 % 99,77 % 507172-02
91,43 % 92,86 % 507171-02
59,7 % 92,5 % 507168-02
0,15 mg/L_+ 10 %
0,15 mg/L _+ 10 %
0,006 mg/L _+10 %
0,006 mg/L _+ 10 %
0,015 _+10 %
0,225 _+10 %
0,015 _+10 %
0,080 _+10 %
• II est essentiel que les exigences de fonctionnement,
d'entretien et de remplacement de filtre soient respectees
pour que ce produit donne le rendement annonce.
• ModUle WF-NL240V Remplacer la cartouche au moins
tousles 6 a 9 mois. Utiliser une cartouche de remplacement
NL240V, n° de piece 4396509. Prix suggere au detail en 2004
de 35,95 $US/59,95 SCAN. Les prix sont sujets a des
changements sans preavis.
• ModUle WF-L400V Le syst_me de contr61e du filtre mesure la
quantite d'eau qui passe par le filtre et vous signale quand
remplacer le filtre. Lorsque 90 % de la vie utile du filtre est
ecoulee, le temoin lumineux du filtre passe du vert au jaune.
Lorsque 100 % de la vie utile du filtre est ecoulee, le temoin
lumineux du filtre passe du jaune au rouge et il est
recommande de remplacer le filtre. Utiliser une cartouche de
remplacement L400V, n ° de piece 4396509. Prix suggere au
detail en 2004 de 35,95 $US/59,95 SCAN. Les prix sont
sujets a des changements sans preavis.
• Le produit ne dolt _tre utilise que pour I'eau froide seulement.
• Ne pas utiliser avec de I'eau microbiologiquement
dangereuse ou de qualite inconnue sans une desinfection
adequate avant ou apres le systeme. Un systeme homologue
pour la retention des kystes peut _tre utilise pour le
traitement d'une eau desinfectee qui peut contenir des kystes
filtrables.
• Veuillez vous referer & la couverture ou a la section
"Assistance ou service" pour le nom, I'adresse et le numero
de telephone du fabricant.
• Veuillez vous referer a la section "Garantie" pour la garantie
limitee du fabricant.
i
Directives d application/
Param_tres d'approvisionnement en eau
Approvisionnement en eau Collectivite ou puits
Pression d'eau 30 - 120 psi (207 - 827 kPa)
Temperature d'eau 33 ° - 100°F (0,6 ° - 37,8 ° C)
Debit nominal 0,5 gpm (1,9 L/min.) a 60 psi.
*Classe II - tallies des particules : > 1 a <5 pm
**Critere de test : au moins 100 000 particules/mL (poussi_re de test fine AC).
***Ces contaminants ne sont pas n_cessairement presents dans votre approvisionnement d'eau. Le rendement peut varier selon les conditions locales
de I'eau.
® NSF est une marque d_pos_e de NSF International.
38
GARANTIEDUREFRIGERATEURWHIRLPOOL®
GARANTIE COMPLI_TE DE UN AN
Pendant un an & compter de la date d'achat, Iorsque ce refrigerateur (& I'exclusion du filtre & eau) est utilise et entretenu conformement
aux instructions jointes a ou fournies avec le produit, Whirlpool Corporation paiera pour les pieces de rechange FSP ®et les frais de
main-d'oeuvre pour corriger les vices de materiaux ou de fabrication. Les reparations doivent _tre effectuees par un etablissement de
service designe par Whirlpool.
Sur les modeles avec filtre a eau : garantie limitee de 30 jours du filtre & eau. Pendant 30 jours a compter de la date d'achat, Iorsque ce
filtre est utilise et entretenu conformement aux instructions jointes a ou fournies avec le produit, Whirlpool Corporation paiera pour le
remplacement des pieces pour corriger les vices de materiaux et de fabrication.
GARANTIE COMPLI_TE DE LA DEUXII_ME A LA CINQUII_ME ANNI_E INCLUSIVEMENT SUR LES COMPOSANTS DU SYSTI_ME
DE RI_FRIGI_RATION SCELLI_ (VOIR CI-DESSOUS)
De la deuxieme a la cinquieme annee inclusivement a compter de la date d'achat, Iorsque ce refrigerateur est utilise et entretenu
conformement aux instructions jointes a ou fournies avec le produit, Whirlpool Corporation paiera pour les pieces de rechange FSP et
les frais de main-d'oeuvre pour corriger les vices de materiaux ou de fabrication du systeme de refrigeration scelle. Ces pieces
comprennent : compresseur, evaporateur, condenseur, dispositif de sechage et tubes de raccord. Les reparations doivent _tre
effectuees par un etablissement de service design6 par Whirlpool.
Whirlpool Corporation ne paiera pas pour :
1. Les visites de service pour rectifier I'installation du r6frig6rateur, pour montrer a I'utilisateur comment se servir du r6frig6rateur, pour
remplacer des fusibles, rectifier le c&blage 61ectrique ou la plomberie du domicile ou remplacer des ampoules 61ectriques ou les filtres
eau de rechange sauf ce qui est indique ci-dessus.
2. Les reparations Iorsque le refrigerateur est utilise a des fins autres qu'un usage unifamilial normal.
3. La prise en charge et la livraison du refrigerateur. Le refrigerateur est congu pour _tre repare a domicile.
4. Les dommages imputables a : accident, modification, mesusage, abus, incendie, inondation, mauvaise installation, actes de Dieu,
ou I'utilisation d'un produit non approuve par Whirlpool Corporation ou Whirlpool Canada Inc.
5. Toute perte d'aliments attribuable a une panne du produit.
6. Les reparations de pieces ou systemes imputables a des modifications non autorisees effectuees sur I'appareil.
7. Le coot des pieces de rechange ou de la main-d'oeuvre de reparation pour les appareils utilises en dehors des Ctats-Unis ou du
Canada.
8. Au Canada, les frais de deplacement ou de transport pour les clients qui habitent dans des regions eloignees.
9. Tous frais de main-d'oeuvre pour le remplacement du filtre a eau durant la periode de garantie limitee.
WHIRLPOOL CORPORATION ET WHIRLPOOL CANADA INC. N'ASSUMENT AUCUNE RESPONSABILITI_
POUR LES DOMMAGES FORTUITS OU INDIRECTS.
Certains 12tats ou certaines provinces ne permettent pas I'exclusion ou la limitation des dommages fortuits ou indirects; aussi cette
exclusion ou limitation peut ne pas vous _tre applicable. Cette garantie vous confere des droits juridiques specifiques et vous pouvez
egalement jouir d'autres droits qui peuvent varier d'un Etat ou d'une province a I'autre.
A I'exterieur du Canada et des 50 I_tats des I_tats-Unis, cette garantie ne s'applique pas. Contacter votre marchand Whirlpool
autorise pour d_terminer si une autre garantie s'applique.
Si vous avez besoin de service, consulter d'abord la section "Depannage" de ce manuel. Apres avoir verifie la section "Depannage", on
peut trouver de I'aide supplementaire a la section "Assistance ou service" ou en telephonant au Centre d'interaction avec la clientele
Whirlpool, au 1-800-253-1301 (sans frais) de n'importe ou aux ¢.-U. Au Canada, contacter votre compagnie de service designee par
Whirlpool Canada Inc. ou composer le 1-800-807-6777. 10/02
Conserver ce manuel et le requ de vente ensemble pour
r_f_rence ult_rieure. II faut fournir une preuve d'achat ou de
date d'installation pour le service au titre de la garantie.
Inscrivez les renseignements suivants apropos du refrig_rateur
pour mieux obtenir assistance ou service en cas de besoin. Vous
devez connaitre le numero de modele et le numero de serie
complets. Cette information est indiquee sur la plaque
signaletique se trouvant sur la paroi interne du compartiment de
refrigeration.
Nora du marchand
Adresse
Num_ro de tdl_phone
Num_ro de module
Num_ro de s_rie
Date d'achat
39

2261717
@ 2003 Whirlpool Corporation.
All rights reserved. ® Registered TrademarkfTM Trademark of Whirlpool, U.S.A., Whirlpool Canada Inc. Licensee in Canada
Tous droits r_serv_s. ¢ Marque d@os_e/TM Marque de commerce de Whirlpool, U.S.A.. Emploi licenci_ par Whirlpool Canada Inc. au Canada
3/04
Printed in U.S.A.
Imprim6 aux E.-U.