Loading ...
Loading ...
Loading ...
| |
JG79A03SHO1_En.indd
4
cy
wy
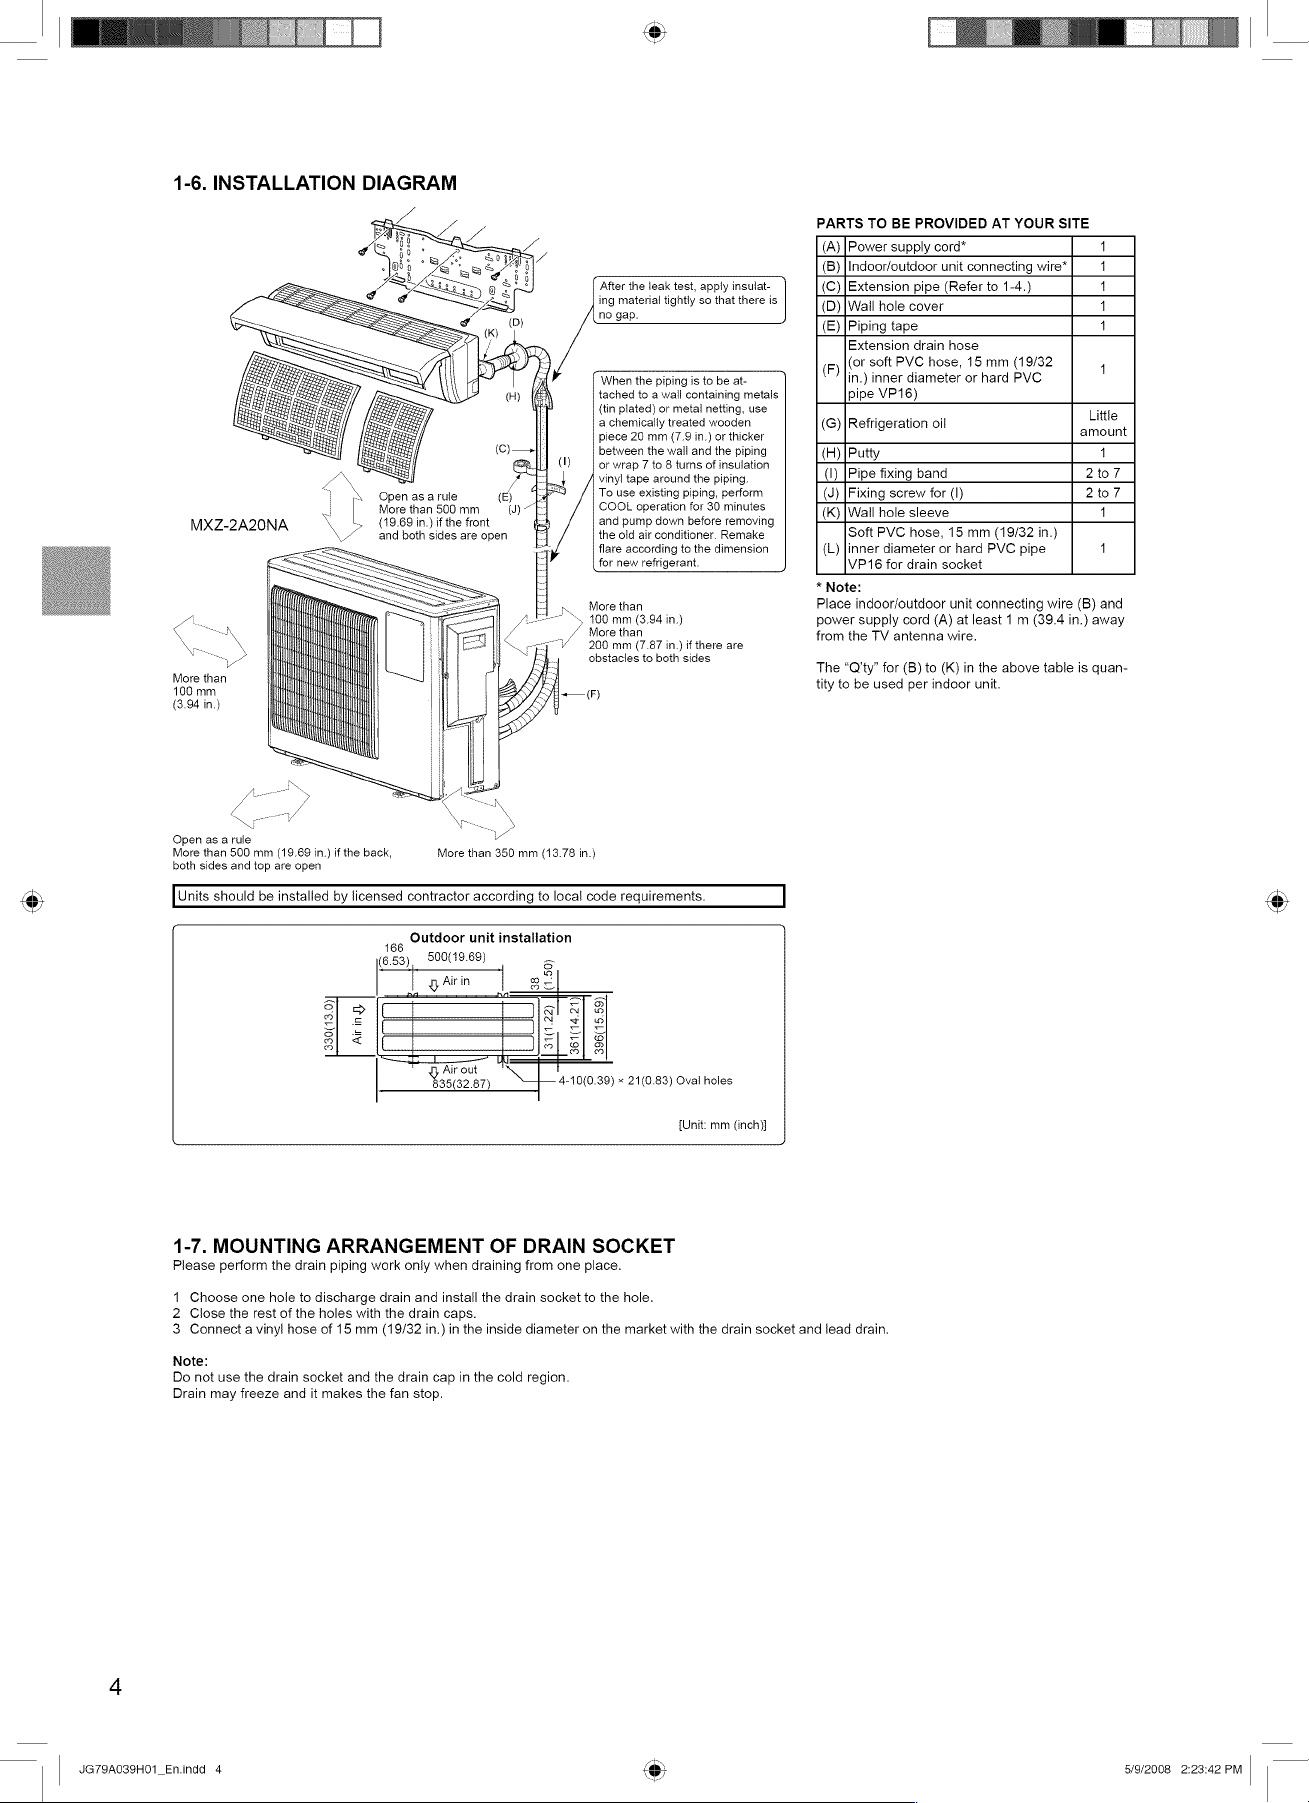
1-6.
INSTALLATION
DIAGRAM
PARTS
TO
BE
PROVIDED
AT
YOUR
SITE
(A)
|
Power
supply
cord*
1
(B)
|
Indoor/outdoor
unit
connecting
wire*
1
After
the
leak
test,
apply
insulat-
(C)|Extension
pipe
(Refer
to
1-4.)
1
ing
material
tightly so
that
there
is
(D)|Wail
hole
cover
1
no
gap.
—
(E)|Piping
tape
1
Extension
drain
hose
(or
soft
PVC
hose,
15
mm
(19/32
—
(F)
Ie
.
1
When
the
piping
is
to
be
at-
in.)
inner
diameter
or
hard
PVC
tached
to
a
wall
containing
metals
pipe
VP
16)
(tin
plated)
or
metal
netting,
use
Little
a
chemically
treated
wooden
(G)|
Refrigeration
oil
t
piece
20
mm
(7.9
in.)
or
thicker
amoun
between
the
wail
and
the
piping
(H)|
Putty
4
or
wrap
7
to
8
turns
of
insulation
1)
[Pipe
fixing
band
2
to7
>
vinyl
tape
around
the
piping.
()
[Pipe
fixing
ban
to
|
o\
Openasarule
To
use
existing
piping,
perform
(J)
|
Fixing
screw
for
(I)
2to7
Z
More
than
500
mm
COOL
operation
for
30
minutes
(K)|Wall
hole
sleeve
1
MXZ-2A20NA
(19.69
in.)
if
the
front
and
pump
down
before
removing
-
and
both
sides
are
open
the
old
air
conditioner.
Remake
Soft
PVC
hose,
15
mm
(19/32
in.)
flare
according
to
the
dimension
(L)
Jinner
diameter
or
hard
PVC
pipe
1
for
new
refrigerant.
VP16
for
drain
socket
*
Note:
More
than
Place
indoor/outdoor
unit
connecting
wire
(B)
and
~
“S100
mm
(3.94
in.)
/
More
than
y
200
mm
(7.87
in.)
if
there
are
obstacles
to
both
sides
More
than
100
mm
(3.94
in.)
7
Open
as
a
rule
L
More
than
500
mm
(19.69
in.)
if
the
back,
More
than
350
mm
(13.78
in.}
both
sides
and
top are
open
[Units
should
be
installed
by
licensed
contractor
according
to
local
code
requirements.
166
Outdoor
unit
installation
(6.53),
500(19.69)
1.50)
g
Air
in
Air
indy
|
361(14.21
|
330(13.0)]
4-10(0.39)
x
21(0.83)
Oval
holes
(Unit:
mm
(inch)}
1-7.
MOUNTING
ARRANGEMENT
OF
DRAIN
SOCKET
Please
perform
the
drain
piping
work
only
when
draining
from
one
place.
1
Choose
one
hole
to
discharge
drain
and
install
the
drain
socket
to
the
hole.
2
Close
the
rest
of
the
holes
with
the
drain
caps.
3
Connect
a
vinyl
hose
of
15
mm
(19/32
in.)
in
the
inside
diameter
on
the
market
with
the
drain
socket
and
lead
drain.
Note:
Do
not
use
the
drain
socket
and
the
drain
cap
in
the
cold
region.
Drain
may
freeze
and
it
makes
the fan
stop.
power
supply
cord
(A)
at
least
1
m
(39.4
in.)
away
from
the
TV
antenna
wire.
The
“Q’ty”
for
(B)
to
(K)
in
the
above
table
is
quan-
tity
to
be
used
per
indoor
unit.
las
7
5/9/2008
2:23:42
PM
|
|
Loading ...
Loading ...
Loading ...