Confirming the accessories
3
Inserting the batteries
5
Operating range of the remote control unit
6
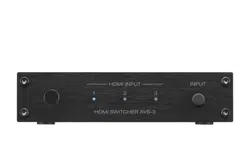
Part names and functions
7
Front panel
7
Rear panel
8
Side panel
9
Remote control unit
10
Connections
Connections
11
Basic connections
11
Connecting an external control device
14
Operations
Operations
15
Operating with the HDMI control (CEC) function
15
Operating with the remote control unit
16
Operating with the AVR control function
17
Troubleshooting
Troubleshooting
20
Appendix
Trademark information
23
Specifications
Specifications
24
Contents Connections Operations Troubleshooting Appendix Specifications
2
Front panel Rear panel Side panel Remote
Thank you for purchasing this Denon product.
To ensure proper operation, please read this owner’s manual carefully before using the product.
After reading this manual, be sure to keep it for future reference.
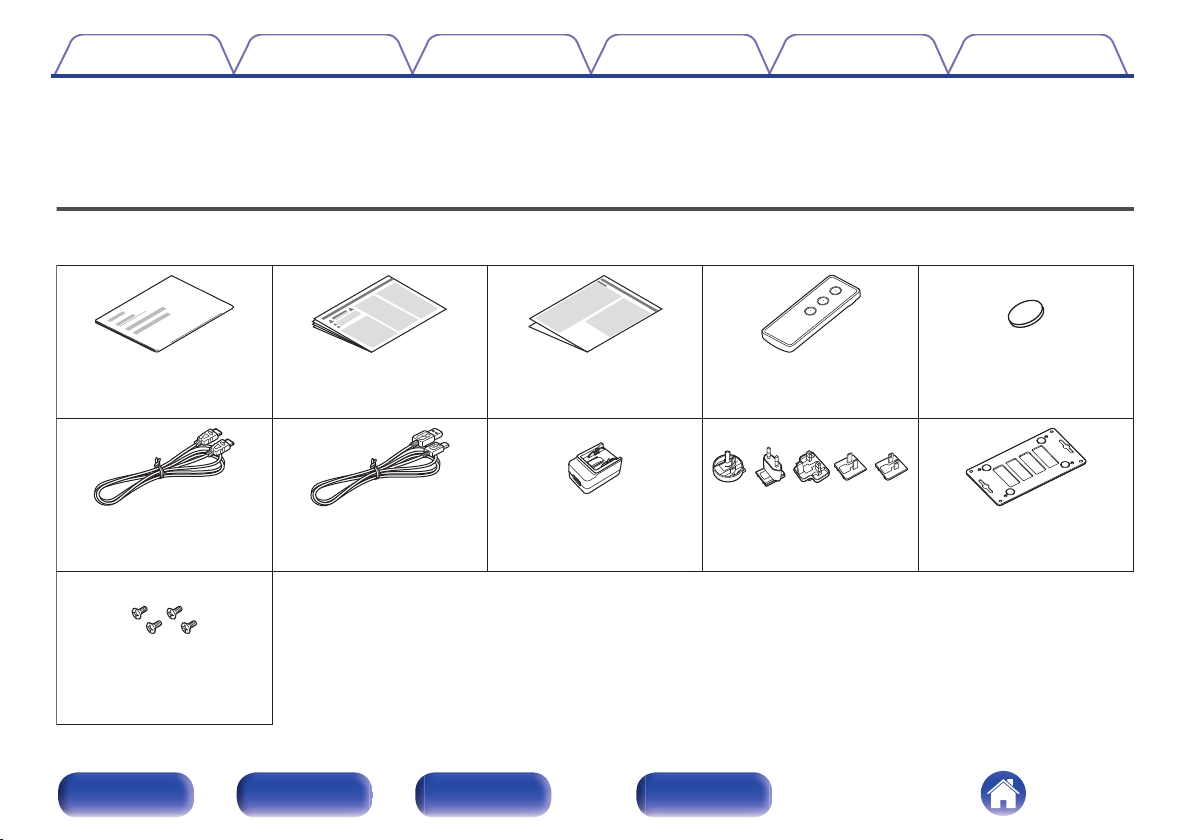
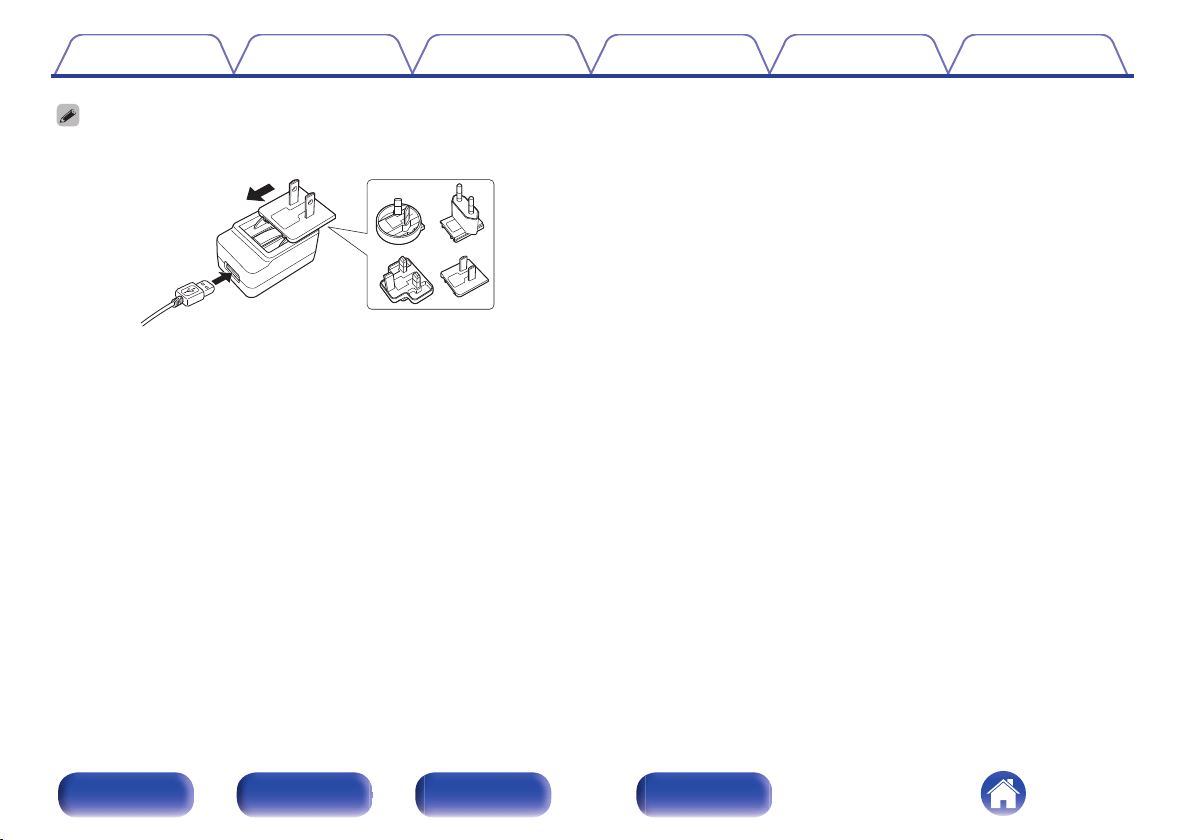
Confirming the accessories
Check that the following parts are supplied with the product.
.
AC adapter
AC adapter plugs
(5 types)
Power supply cable
(USB type,
approx. 4’10”/1.5 m)
HDMI cable
(40 Gpbs,
approx. 4’10”/1.5 m)
Mounting screws
(4 pieces)
Battery
(CR2032)
Remote control unit
(RC-1247)
Cautions on Using BatteriesSafety InstructionsQuick Start Guide
Wall-mount bracket
Contents Connections Operations Troubleshooting Appendix Specifications
3
Front panel Rear panel Side panel Remote
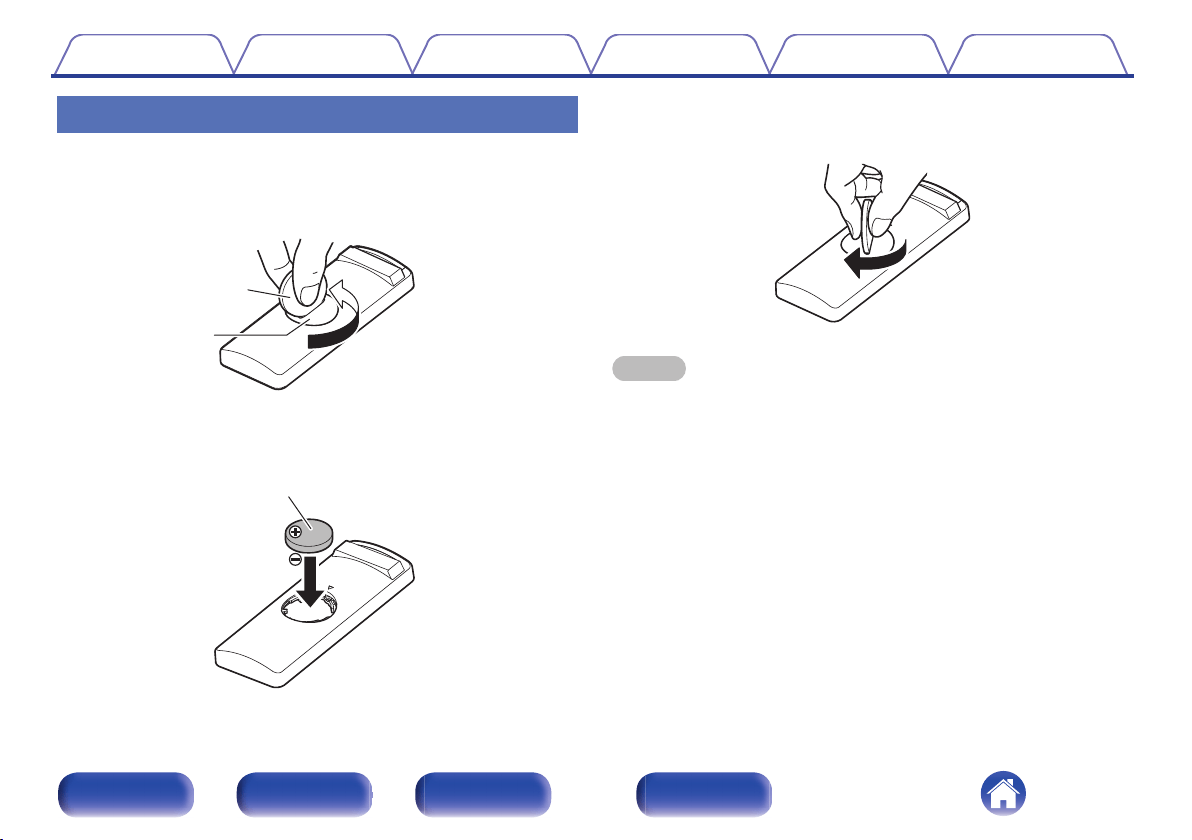
Inserting the batteries
1
Insert a coin or other item into the slot on the battery
cover, turn counterclockwise, and remove the battery
cover.
.
Coin etc.
Battery cover
2
Confirm that the direction of the battery is correct and
then insert the battery.
.
Battery (CR2032)
3
While pressing down on the battery cover from above,
turn the coin or other item clockwise.
.
NOTE
0
If the battery should have a leakage, immediately replace and dispose of the
battery. In this case, there is a risk of burn when the liquid comes in contact with
skins or clothes, so a great care should be taken. If the liquid accidentally comes in
contact, wash with tap water and consult a doctor.
0
Remove the batteries from the remote control unit if it will not be in use for long
periods.
Contents Connections Operations Troubleshooting Appendix Specifications
5
Front panel Rear panel Side panel Remote
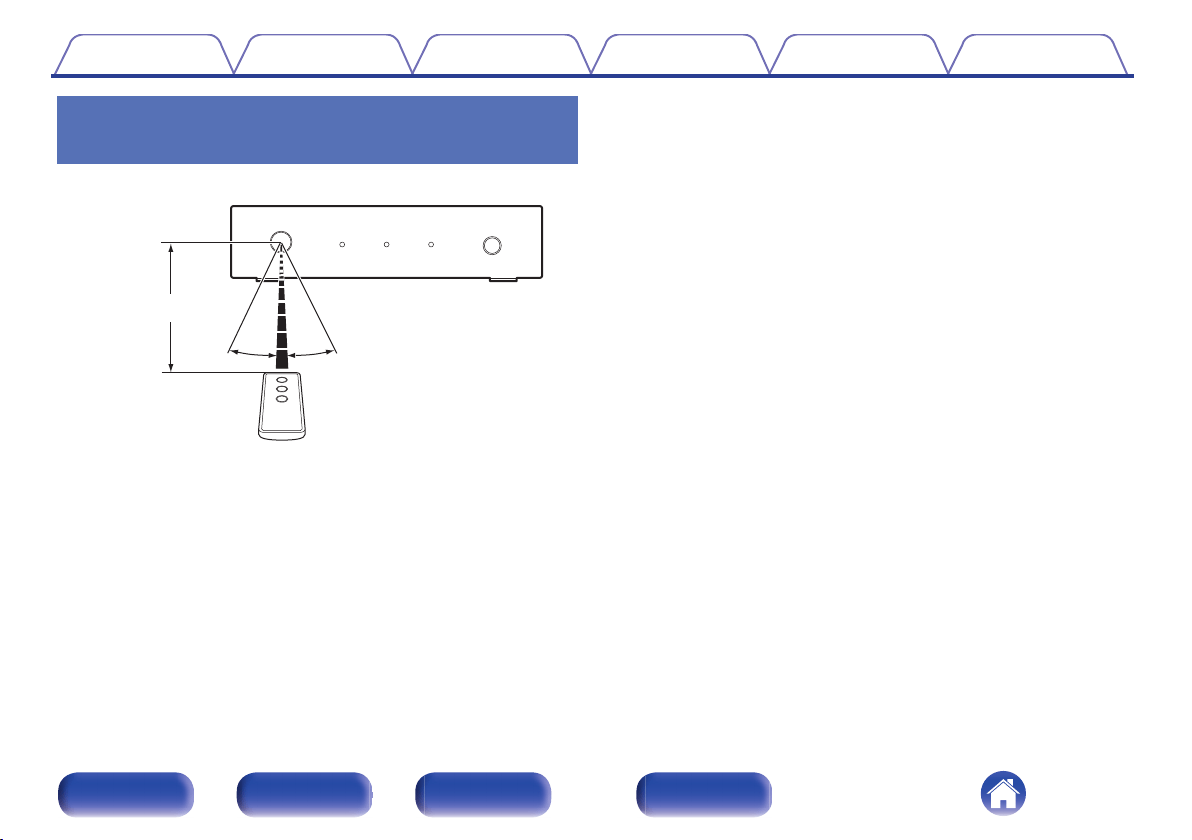

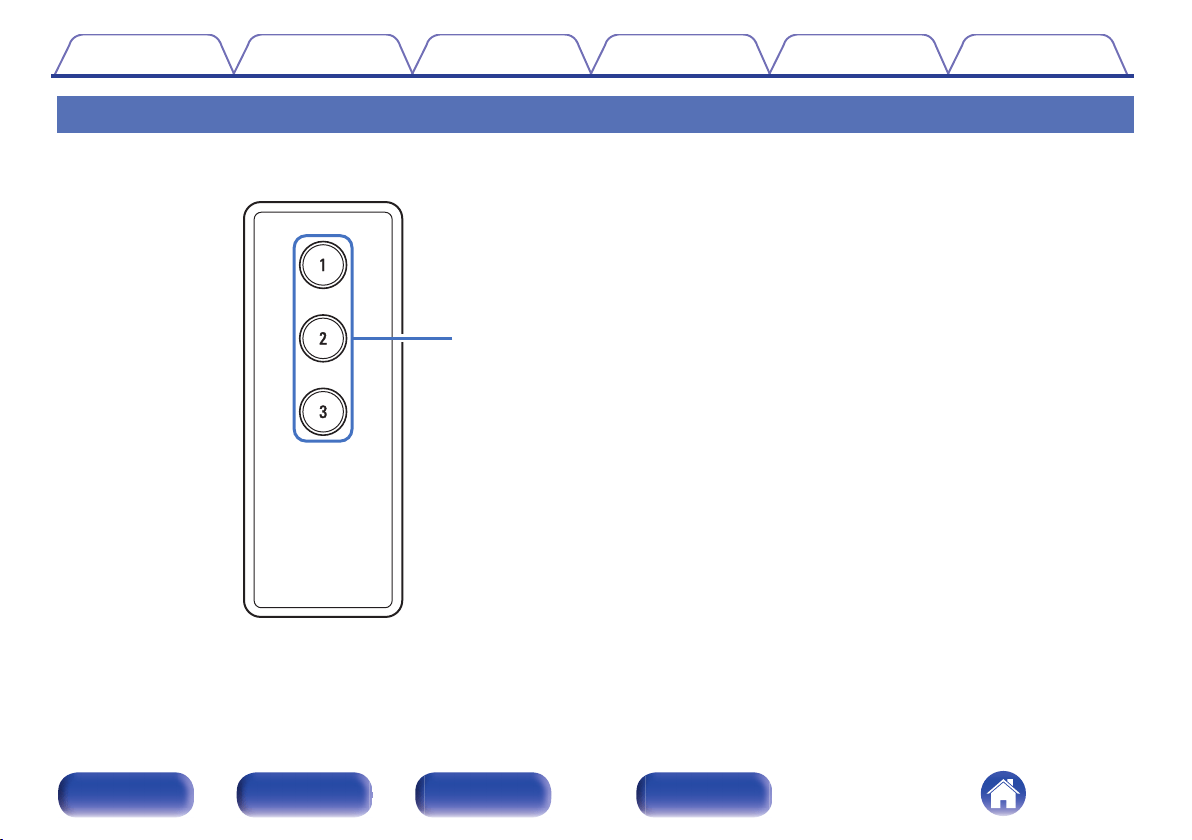
Part names and functions
Front panel
.
qw e
A
Remote control sensor
This receives signals from the remote control unit. (v p. 6)
Point the remote control unit at this sensor when operating it.
B
HDMI input indicators (HDMI INPUT 1 - 3)
The number of the HDMI input that is currently selected is lit.
This is lit as follows according to the power status of this unit:
0
Power on: Blue
0
Standby: Red
0
The power of this unit is linked to the power status of the HDMI devices
connected to HDMI connectors 1 to 3 and automatically turns on.
0
When the HDMI CONTROL switch is OFF:
Links to the power of the device that is connected to the currently selected
HDMI input.
0
When the HDMI CONTROL switch is ON:
Links to the power of the devices that are connected to HDMI connectors 1
to 3.
C
Input switching button (INPUT)
This selects the HDMI input.
When the button is pressed, the HDMI input switches.
Contents Connections Operations Troubleshooting Appendix Specifications
7
Front panel Rear panel Side panel Remote
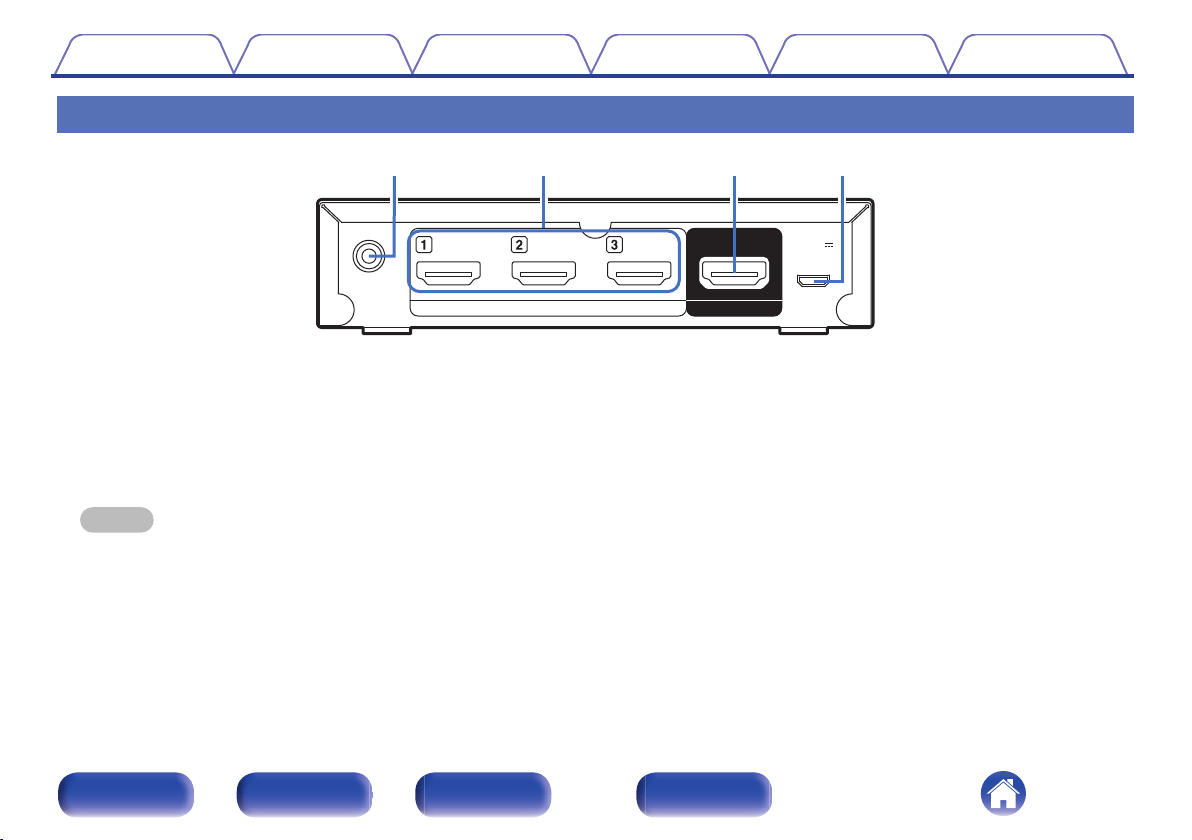
Rear panel
.
HDMI IN HDMI OUT
5V/1A
DC IN
IN
IR
REMOTE CONTROL
(FLASHER)
wqer
A
Remote control jack (REMOTE CONTROL (FLASHER) IN)
This jack can be used to connect and control this unit externally with a
separately sold IR repeater when this unit is positioned where the
remote control signal cannot reach.
Refer to “Connecting an external control device” (v p. 14) for how to
connect.
NOTE
0
This will disable remote sensor reception of this unit.
B
HDMI input connectors (HDMI IN 1 - 3)
These connect game consoles, media players, or other HDMI source
devices.
C
HDMI output connector (HDMI OUT)
This outputs the selected HDMI input signal.
D
DC input connector (DC IN)
This connects the supplied AC adapter.
Using an AC adapter other than the one supplied may cause fault.
Contents Connections Operations Troubleshooting Appendix Specifications
8
Front panel Rear panel Side panel Remote

Side panel
.
qw
A
AVR control switch (AVR CONTROL)
You can use the remote control unit for your Denon AV receiver/AV
amplifier to switch the HDMI input of this unit.
If using the HDMI control (CEC) function or the supplied remote control
unit to change the HDMI input of this unit, keep this switch turned OFF.
If using the AVR control function, it is necessary to change the settings
and connections from the AV receiver/AV amplifier in advance. Refer to
“Operating with the AVR control function” (v p. 17) for more
information.
B
HDMI control switch (HDMI CONTROL)
If using the HDMI control (CEC) function, turn this ON. This links to
devices compatible with HDMI control (CEC) and changes the HDMI
input of this unit.
Refer to “Operating with the HDMI control (CEC) function” (v p. 15)
for how to operate using the HDMI control (CEC) function.
Contents Connections Operations Troubleshooting Appendix Specifications
9
Front panel Rear panel Side panel Remote
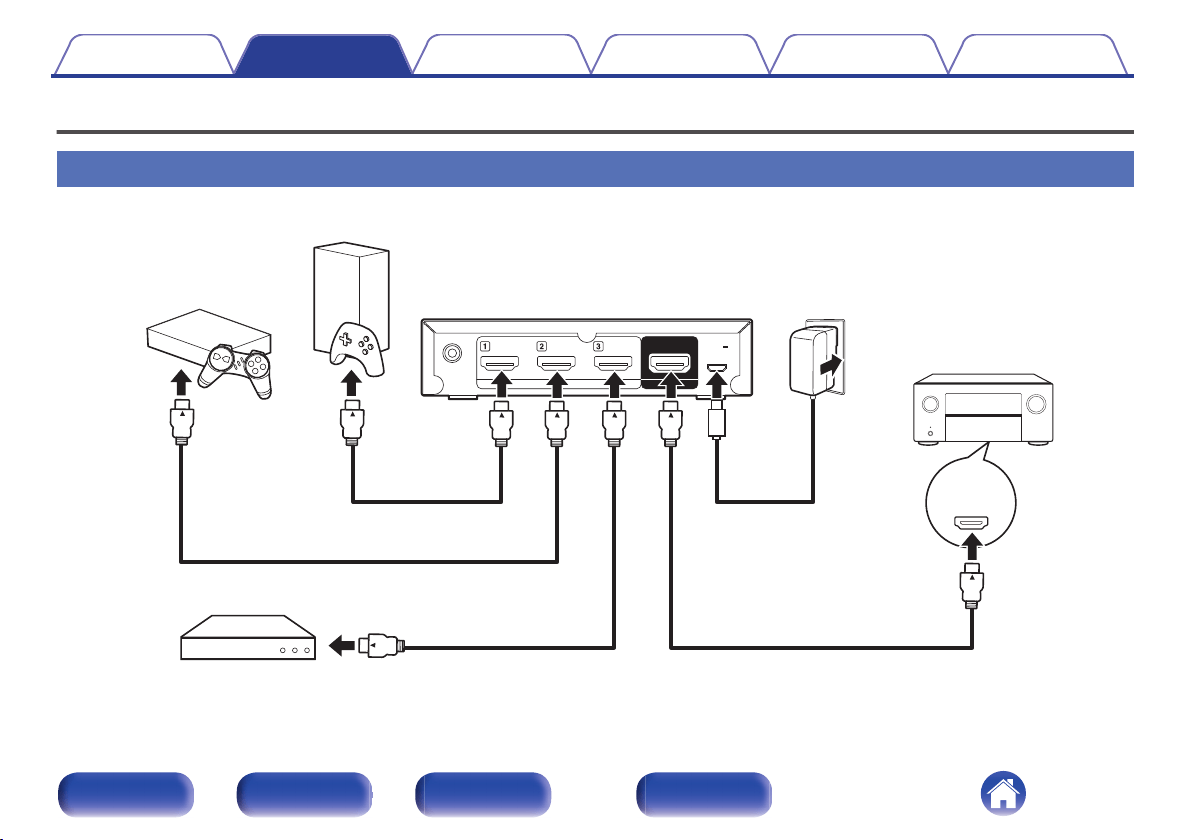
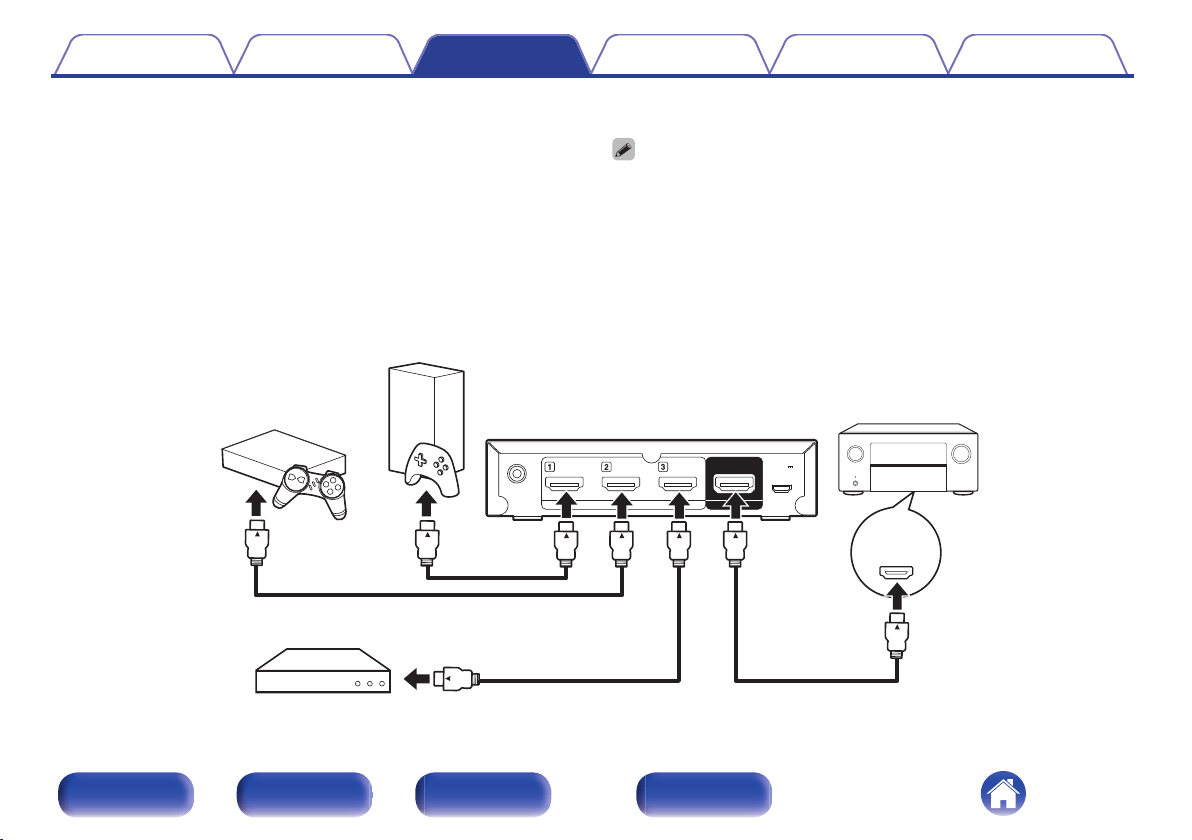
Connections
Basic connections
.
8K
HDMI IN
HDMI IN HDMI OUT
5V/1A
DC IN
IN
IR
REMOTE CONTROL
(FLASHER)
Game console
Game console
This unit AC adapter
Power supply cable
(supplied)
AV receiver /
AV amplifier
Media player
HDMI cable
(sold separately)
HDMI cable
(sold separately)
HDMI cable (supplied)
HDMI cable
(sold separately)
1
1
12
3
Contents
Connections Operations Troubleshooting Appendix Specifications
11
Front panel Rear panel Side panel Remote
1
Use separately sold HDMI cables to connect game
consoles or other source devices to HDMI input
connectors 1 to 3 of this unit.
2
Use the supplied HDMI cable to connect an 8K-
compatible HDMI input connector of an AV receiver/AV
amplifier to the HDMI output connector of this unit.
3
Connect the supplied AC adapter.
0
When connecting this unit to devices that are compatible with the 8K and 4K
120Hz video, use certified Ultra High Speed HDMI cables. If you use a different
HDMI cable, the video may not be displayed or other problems may occur.
Contents Connections Operations Troubleshooting Appendix Specifications
12
Front panel Rear panel Side panel Remote
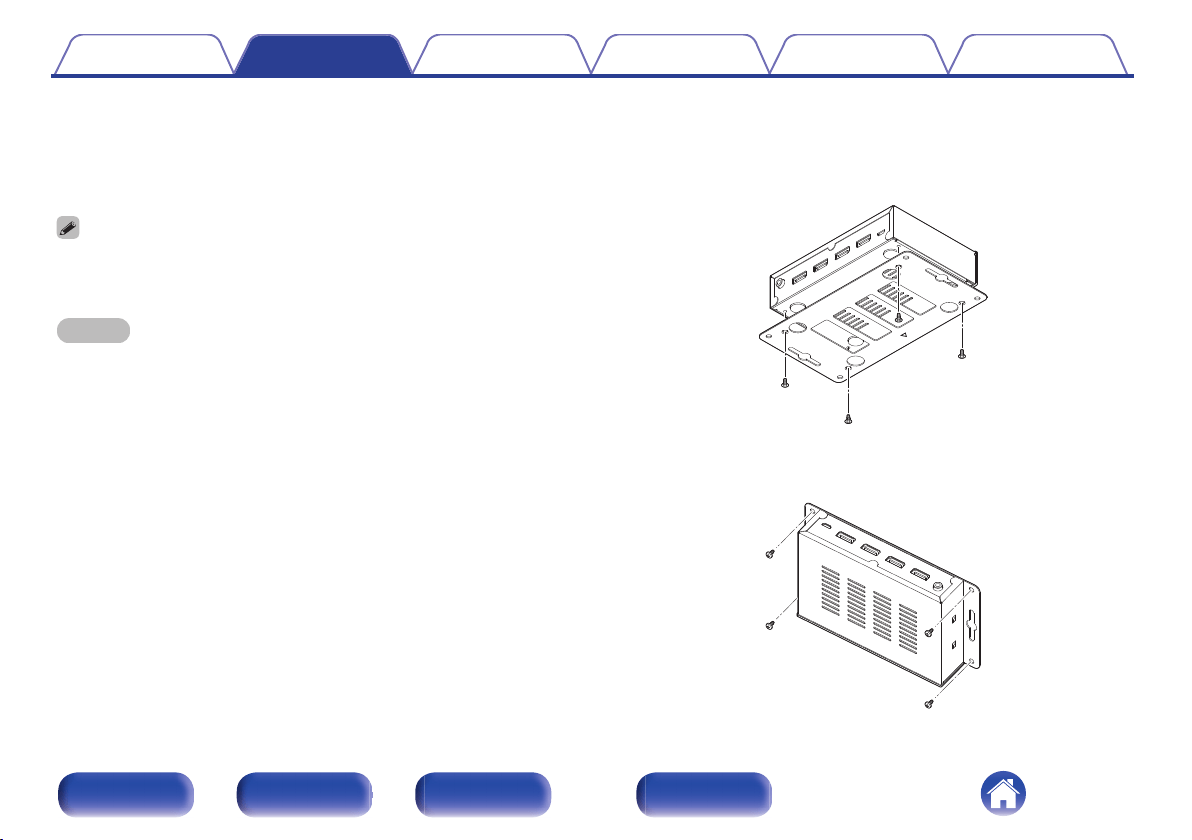
o
When mounting this unit to a wall
You can use the supplied wall-mount bracket to mount this unit to a
wall.
To ensure your safety, ask a professional to mount it to the wall.
0
When you mount this unit to a wall, use a commercially available IR repeater
(separately sold) to receive signals from the remote control. Refer to “Connecting
an external control device” (v p. 14) for more information.
NOTE
0
When you mount the wall-mount bracket to this unit, be sure to use the supplied
self- tapping screws. Using screws other than those supplied may cause fault.
0
To prevent people from accidentally pulling or tripping over the connector cable
and causing this unit to fall over, be sure to fix the cable to a wall or other location.
After mounting, be sure to confirm that it is safe. Also, perform regular inspections
to confirm that there is no possibility of falling.
0
Denon does not bear responsibility for any injuries or accidents due to
inappropriate mounting locations or mounting methods.
1
Mount the wall-mount bracket to this unit using the
supplied screws.
Attach the wall-mount bracket with the side with the u mark facing
outward.
.
2
Fix this unit to the wall using separately sold wall-
mount screws.
.
Contents
Connections Operations Troubleshooting Appendix Specifications
13
Front panel Rear panel Side panel Remote
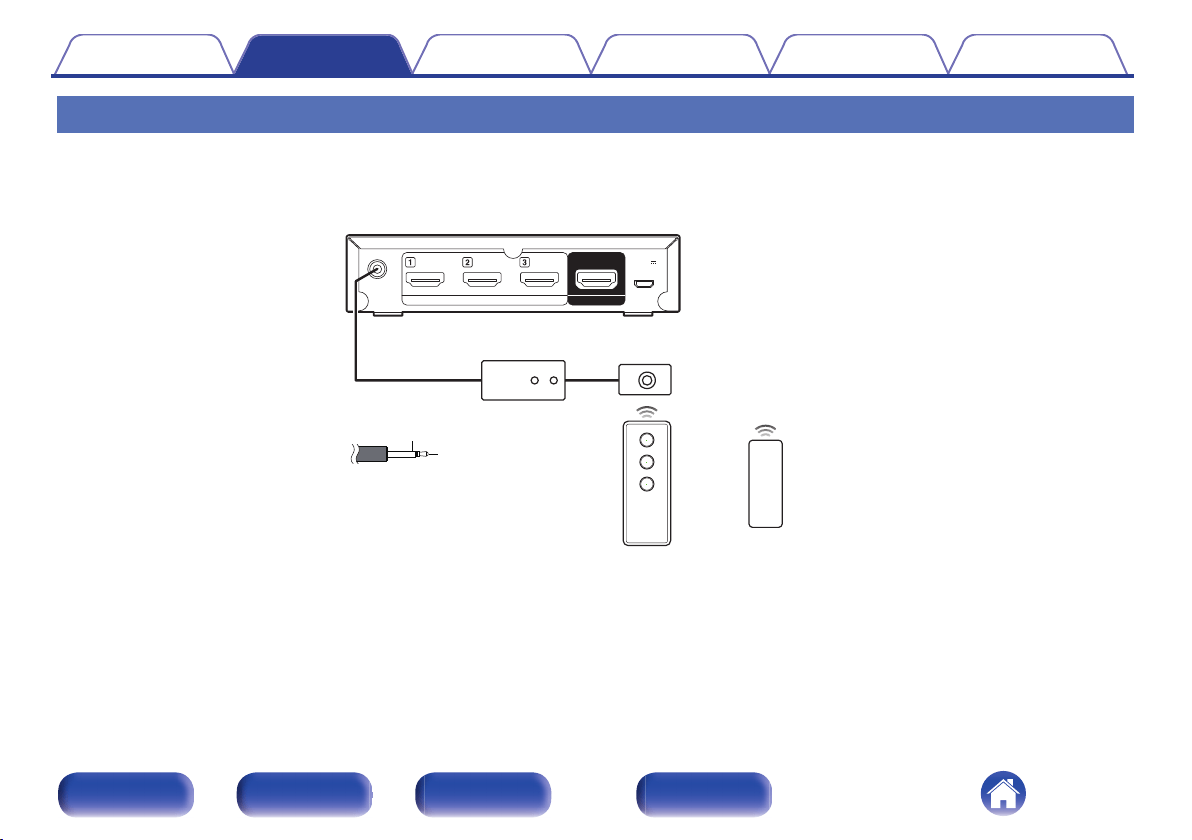
Connecting an external control device
Even if you put this unit in a cabinet or another location where the remote control signal cannot reach, if you connect a commercially available IR repeater
(separately sold), you can operate this unit using the remote control unit.
This will disable remote sensor reception of this unit.
.
This unit
GND
Signal
Monaural mini-plug cable
(Sold separately)
Universal remote
IR repeater IR receiver
or
HDMI IN HDMI OUT
5V/1A
DC IN
IN
IR
REMOTE CONTROL
(FLASHER)
Contents
Connections Operations Troubleshooting Appendix Specifications
14
Front panel Rear panel Side panel Remote
Operations
Operate using one of the following methods.
Operating with the HDMI control (CEC)
function
1
Turn the HDMI CONTROL switch on the side panel of
this unit ON.
2
Turn on the power of all source devices (such as game
consoles) connected to this unit with HDMI cables, the
AV receiver/AV amplifier, and the TV.
3
Enable the HDMI control (CEC) function for all devices.
0
For source devices that have settings to link to other devices and
turn them on when the source device power is turned on, enable
those settings. Refer to the manual for each device for more
information about the settings.
4
Turn the power of the TV to standby, and then confirm
that the power of this unit, the source devices, and the
AV receiver/AV amplifier also turn to standby.
If the power is turned off for all source devices connected to this unit,
the HDMI input indicators of this unit are lit in red.
5
Turn on the power of the source device you want to
use, and then confirm that the power of this unit, the
AV receiver/AV amplifier, and the TV turn on, and that
the HDMI input switches correctly.
The indicator for the selected HDMI input is lit in blue.
0
If the source device has an auto standby function, it is recommended to enable the
auto standby function so that the power turns off automatically when not in use.
0
Depending on the specifications of the source device or TV that is connected,
some functions may not be available.
Contents
Connections Operations Troubleshooting Appendix Specifications
15
Front panel Rear panel Side panel Remote
Operating with the remote control unit
1
Turn on the power of the source device you want to
use.
2
On the supplied remote control unit, press the HDMI
input source select button (1 to 3) to perform playback.
The indicator for the selected HDMI input is lit in blue.
0
You can also select an HDMI input by pressing the INPUT button
on the main unit.
3
Switch the input source for the AV receiver/AV
amplifier to the HDMI input connected to this unit.
4
Switch the input for the TV to the HDMI input connected
to the AV receiver/AV amplifier.
Contents Connections Operations Troubleshooting Appendix Specifications
16
Front panel Rear panel Side panel Remote
Operating with the AVR control
function
If you have an 8K-compatible Denon AV receiver/AV amplifier, you can
use the remote control unit for the AV receiver/AV amplifier to switch the
HDMI input for this unit.
The 8K, GAME, and MEDIA PLAYER buttons on the remote control unit
for the AV receiver/AV amplifier can be used to switch the HDMI input for
this unit as follows.
Buttons on remote control unit for AV
receiver/AV amplifier
Input selection on this
unit
8K HDMI 1
GAME HDMI 2
MEDIA PLAYER HDMI 3
NOTE
0
This function cannot be used on the AVR-X8500H, AVC-X8500H, AVR-X8500HA,
or AVC-X8500HA. It is recommended to use the learning function on the remote
control unit for the AV receiver/AV amplifier.
If you want to use the AVR control function, change the settings and
connections for the AV receiver/AV amplifier according to the following
procedure.
o
Positioning
1
Turn the AVR CONTROL switch on the side panel of
this unit ON.
2
Position this unit close to your AV receiver/AV amplifier
so that the remote control sensor on this unit can
receive remote control signals from the AV receiver/AV
amplifier.
.
This unit
AV receiver /
AV amplifier
Remote control sensor
Contents
Connections Operations Troubleshooting Appendix Specifications
17
Front panel Rear panel Side panel Remote
o
Connecting
1
Connect the source devices connected to the HDMI
input connectors for 8K, GAME, and MEDIA PLAYER on
the back of the AV receiver/AV amplifier to HDMI input
connectors 1 to 3 on this unit.
2
Connect the HDMI output connector on this unit to an
8K-compatible HDMI input connector on the AV
receiver/AV amplifier.
0
The number of the 8K-compatible HDMI input connector varies depending on the
specifications of AV receiver/AV amplifier. Connect after referring to the manual for
AV receiver/AV amplifier.
0
When connecting this unit to devices that are compatible with the 8K and 4K
120Hz video, use certified Ultra High Speed HDMI cables. If you use a different
HDMI cable, the video may not be displayed or other problems may occur.
.
8K
HDMI IN
HDMI IN HDMI OUT
5V/1A
DC IN
IN
IR
REMOTE CONTROL
(FLASHER)
Game console
Game console
This unit
AV receiver /
AV amplifier
Media player
Contents
Connections Operations Troubleshooting Appendix Specifications
18
Front panel Rear panel Side panel Remote
o
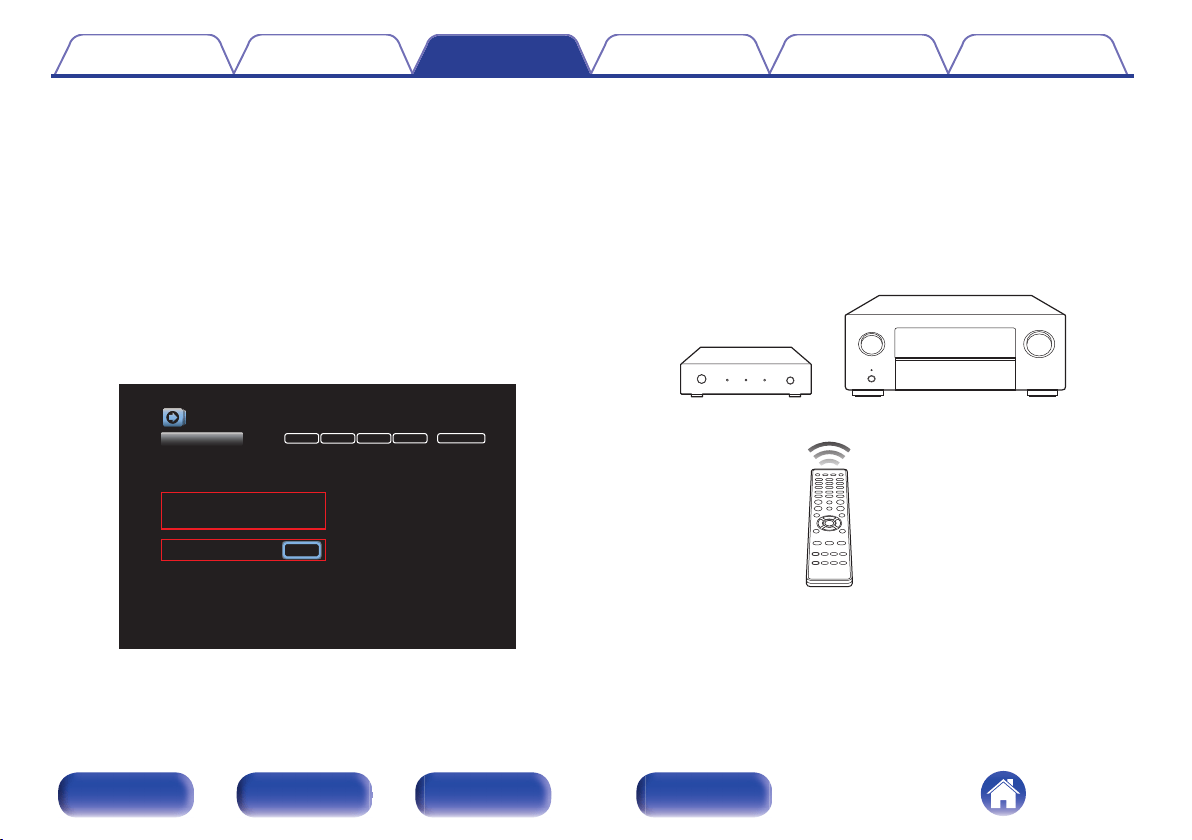
Configuring the settings for an AV receiver/AV
amplifier
1
Open the “Inputs” - “Input Assign” settings screen
from the menu for the AV receiver/AV amplifier.
2
Configure the settings to assign 8K-compatible HDMI
connectors (6(8K) or 7(8K))
z
to the HDMI input
connectors of the 8K, Game, and Media Player input
sources.
z
The 8K-compatible HDMI connectors vary depending on the specifications
of your AV receiver/AV amplifier. Configure the settings according to the
specifications of AV receiver/AV amplifier.
.
DIGITAL ANALOGHDMI VIDEO INPUT MODE
Inputs/Input Assign
Set Defaults
CBL/SAT
DVD
Blu-ray
Media Player
Game
AUX
8K
TV Audio
1
2
3
6
(8K)
6
(8K)
-
6
(8K)
-
1
2
-
-
-
3
-
-
VIDEO1
COMP1
-
-
COMP2
VIDEO2
-
-
COAX
-
-
-
OPT2
-
-
OPT1
Changes HDMI input assignments
CD - 4 -
AUTO
AUTO
HDMI
HDMI
AUTO
ANALOG
HDMI
DIGITAL
ANALOG
-
o
Operating
1
Press the 8K, GAME, or MEDIA PLAYER button on the
remote control unit for the AV receiver/AV amplifier.
The inputs for this unit and for the AV receiver/AV amplifier switch
simultaneously. The HDMI input for this unit that corresponds to the
signal received from the button is selected.
.
This unit
AV receiver /
AV amplifier
Contents
Connections Operations Troubleshooting Appendix Specifications
19
Front panel Rear panel Side panel Remote
Troubleshooting
If a problem should arise, first check the following:
1. Are the connections correct?
2. Is the set being operated as described in the owner’s manual?
3. Are the other devices operating properly?
0
If steps 1 to 3 above do not improve the problem, restarting the device may improve the problem.
Remove and re-insert the power cord of the unit.
If this unit does not operate properly, check the corresponding symptoms in this section.
If the symptoms do not match any of those described here, consult your dealer as it could be due to a fault in this unit. In this case, disconnect the power
immediately and contact the store where you purchased this unit.
o
Power does not turn on / Power is turned off
0
Confirm that the AC adapter is plugged into the outlet.
0
Check all connections to HDMI connectors.
0
Check whether the adapter plug for the AC adapter is attached correctly to the AC adapter.
0
Use the AC adapter supplied with this unit.
0
Confirm that the power is turned on for the source device connected to the selected HDMI input. The power for this unit is linked to the power of the
source device connected to the HDMI input connector, and automatically turns on or to standby.
Contents
Connections Operations Troubleshooting Appendix Specifications
20
Front panel Rear panel Side panel Remote

o
Power automatically turns off
0
This unit is linked to the power of the source device connected to the HDMI input connector, and automatically turns to standby.
o
Operations cannot be performed through the remote control unit
0
The battery is used up. Replace it with a new battery (CR2032).
0
Operate the remote control unit within a distance of about 23 ft/7 m from this unit and at an angle of within 30°.
0
Remove any obstacle between this unit and the remote control unit.
0
The orientation of the coin type lithium battery (CR2032) is incorrect. Confirm that the q mark on the battery is facing upward.
0
The set’s remote control sensor is exposed to strong light (direct sunlight, inverter type fluorescent bulb light, etc.). Move the set to a place in which the
remote control sensor will not be exposed to strong light.
0
This will disable remote sensor reception of this unit.
o
No video is shown on the TV
0
Check the connections for all devices.
0
Insert connection cables all the way in.
0
Check whether you have mistaken the HDMI input connector for the HDMI output connector or vice versa.
0
Confirm that the power of the source device is turned on.
0
Confirm that the correct inputs are selected for this unit, the AV receiver/AV amplifier, and the TV.
0
Confirm that the resolutions of the source device and the TV are correct.
0
When enjoying content that is copyright-protected with HDCP 2.2 or HDCP 2.3, use a source device and TV that are compatible with HDCP 2.2 or
HDCP 2.3.
0
Use a certified Ultra High Speed HDMI cable to enjoy 8K or 4K 120Hz videos.
Contents
Connections Operations Troubleshooting Appendix Specifications
21
Front panel Rear panel Side panel Remote
o
Inputs of this unit cannot be switched with the HDMI control (CEC) function
0
Check whether the HDMI CONTROL switch on the side panel of this unit is turned ON.
0
Check whether the HDMI control function settings are enabled for all devices connected to this unit. In the settings for the connected source devices, if
there are settings to link to and turn on other devices when the power is turned on, enable those settings as well.
0
The specifications for HDMI control vary by device. If the source device has an auto standby function, it is recommended to enable the auto standby
function so that the power turns off automatically when not in use.
0
When you make connection related changes such as connecting an additional HDMI device, the link operation settings may be initialized. Turn off this
unit and devices connected via HDMI, and turn them on again.
0
Depending on the connected devices and settings, the HDMI control function may not work. If the problem is not fixed even after confirming the above,
use the remote control unit to change the inputs for this unit directly.
o
The inputs for this unit change when this unit receives the signals of the remote control supplied
with the AV receiver/AV amplifier
0
The AVR CONTROL switch on the side panel of this unit is turned ON. If you do not want to use it, turn the switch OFF.
Contents
Connections Operations Troubleshooting Appendix Specifications
22
Front panel Rear panel Side panel Remote
Trademark information
.
The terms HDMI, HDMI High-Definition Multimedia Interface, and the
HDMI Logo are trademarks or registered trademarks of HDMI Licensing
Administrator, Inc.
HDR10+™ logo is a trademark of HDR10+ Technologies, LLC.
Contents Connections Operations Troubleshooting Appendix Specifications
23
Front panel Rear panel Side panel Remote
Specifications
o
Video
Resolution: 480i, 480p, 576i, 576p, 720p 50/60, 1080i 50/60, 1080p 24/25/30/50/60/100/120
4K 24/25/30/50/60/100
AB
/120
AB
, 8K 24
AB
/25
AB
/30
AB
/50
AB
/60
AB
Color: Deep Color, x.v. Color, Adobe RGB, Adobe YCC601, sYCC601, BT.2020
HDR: HDR10, HDR10+, Dynamic HDR, Hybrid Log-Gamma
HDMI features: HDMI control (CEC), 3D, ALLM (Auto Low Latency Mode), VRR (Variable Refresh Rate),
QMS (Quick Media Switching), QFT(Quick Frame Transport)
Maximum data rate: 40 Gbps
HDCP Compliance: HDCP 1.4/2.3
o
Audio
Audio Format: LPCM (2ch, 7.1ch) / Dolby Digital / DTS / Dolby Atmos / Dolby TrueHD /
Dolby Digital Plus / DTS:X / DTS-HD Master Audio / DTS-HD High Resolution Audio /
DTS Express / DSD / MPEG-2 AAC / MPEG-4 AAC / MPEG-H
(Works with all audio formats supported by the connected AV receiver/AV amplifier)
Contents Connections Operations Troubleshooting Appendix Specifications
24
Front panel Rear panel Side panel Remote
o
AC adapter
Manufacturer: CUI INC
Address: 20050 SW 112th Ave. Tualatin, OR 97062
Model identifier: SMI5-5-V-I38-C9
Input voltage: AC 100 - 240 V
Input AC frequency: 50/60 Hz
Output voltage: 5.0 V
Output current: 1.0 A
Output power: 5 W
Average active efficiency: 75.5 %
Efficiency at low load (±10 %): 74.3 %
No-load power consumption: 0.075 W
o
General
Operating temperature: 41 °F - 95 °F (5 °C - 35 °C)
Power supply: AC 100 - 230 V, 50/60 Hz
Power consumption: 2.3 W
Power consumption in standby mode: 0.2 W
For purposes of improvement, specifications and design are subject to change without notice.
Contents
Connections Operations Troubleshooting Appendix Specifications
25
Front panel Rear panel Side panel Remote
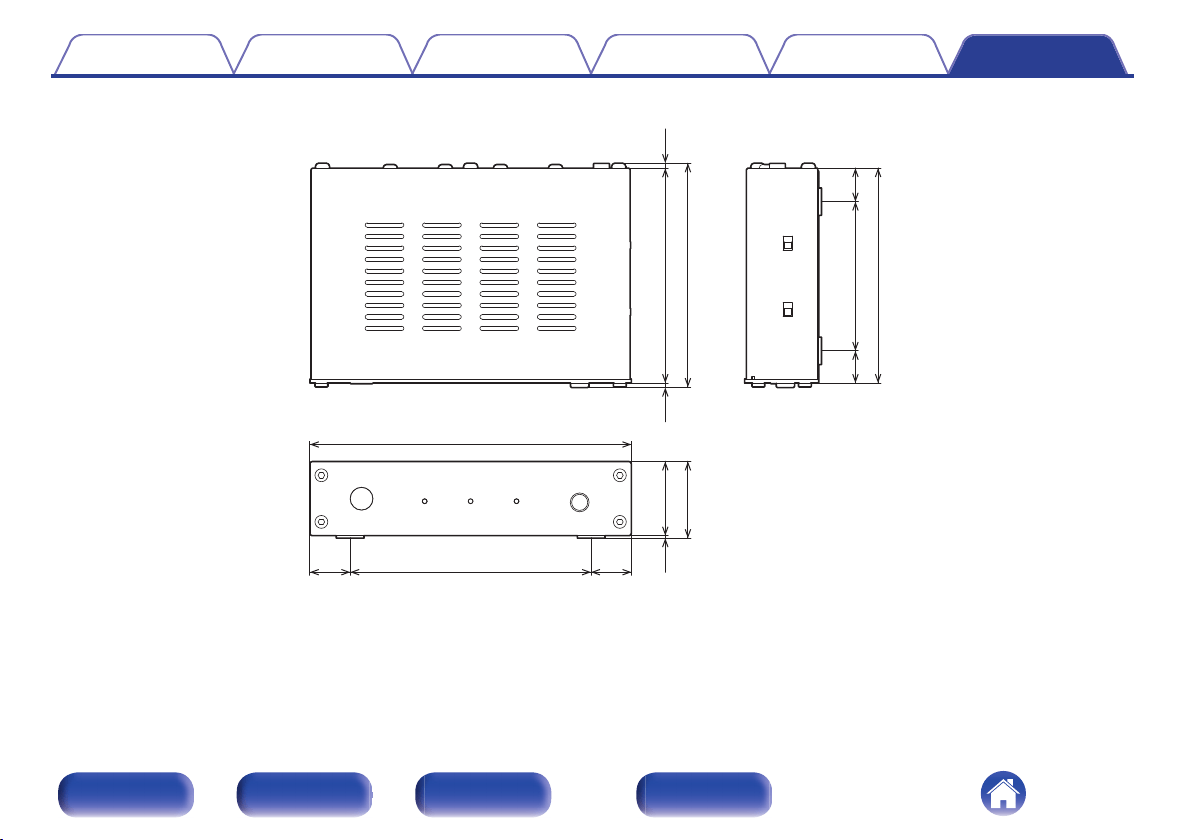
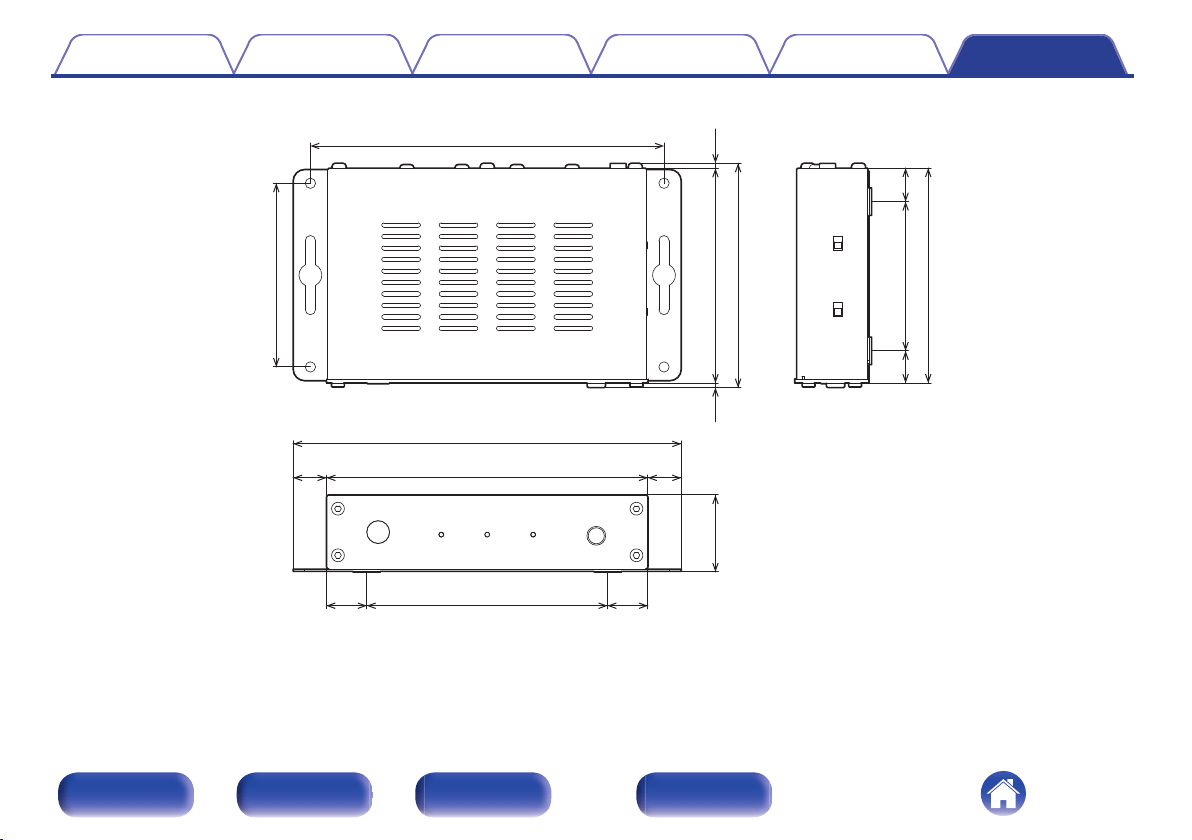
n
When mounting a wall-mount bracket
.
5.5 (140)
0.6
(14.5)
0.6
(14.5)
6.7 (169)
3.2 (80)
6.1 (154)
4.1 (105)
0.7
(17.5)
0.7
(17.5)
0.6
(14)
0.6
(15)
2.5 (65)
3.7 (94)
0.1
(2)
0.1
(2)
3.9 (98)
3.7 (94)1.3 (34)
o
Weight: 0.7 lb (300 g) (When not mounting a wall-mount bracket)
Contents Connections Operations Troubleshooting Appendix Specifications
27
Front panel Rear panel Side panel Remote

.
www.denon.com
3520 10816 00AD
©2021 Sound United. All Rights Reserved.
28