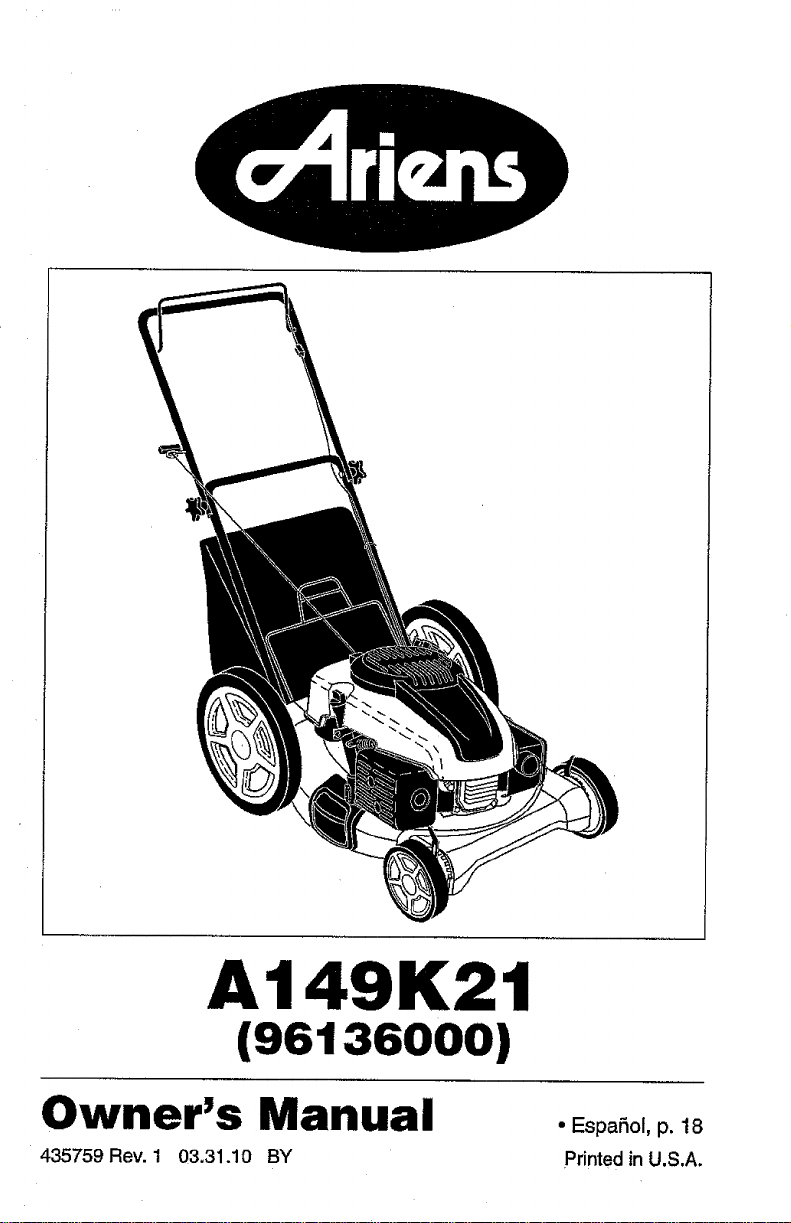
A149K21
(96136000)
Owner's Manual
435759 Rev. 1 03.31.10 BY
• EspaSol, p. 18
Printed in U.S.A.
Safety Rules .......................................... 2-4
Product Specifications .............................. 4
Assembly / Pre-Operation ........................ 5
Operation ............................................... 6-9
Maintenance Schedule ........................... 10
Maintenance ...................................... 10-I2
Service and Adjustments ........................ 13
Storage .............................................. 14-15
Troubleshooting ................................. 15-16
Repair Parts....................................... 32-33
Warranty ................................................. 36
IMPORTANT" This cutting machine is
capable of amputating hands and feet and
throwing objects. Failure to observe the
following safety instructions could result in
serious injury or death.
,&Look for this symbol to point out impor-
tant safety precautions, It means
CAUTION!
• Do not operate the machine while under
the influence of alcohol or drugs.
• Never operate machine in wet grass.
Always be sure of your footing: keep a
firm hold on the handle; walk, never run.
• Disengage the self-propelled mech-
anism or drive clutch on mowers so
equipped before starting the engine.
• If the equipment should start to vibrate
abnormally, stop the engine (motor) and
check immediately for the cause. Vibra-
tion is generally a warning of trouble.
• Always wear safety goggles or safety
glasses with side shields when operating
mower.
U, SLOPE OPERATION
Slopes are a major factor related to slip &
fall accidents which can result in severe
{njury.All slopes require extra caution. If
you feel uneasy on a slope, do not mow it.
DO"
° Mow across the face of slopes: never
up and down. Exercise extreme caution
when changing direction on slopes.
• Remove obstacles such as rocks, tree
limbs, etc.
• Watch for holes, ruts, or bumps. Tall
grass can hide obstacles.
DO NOT:
• Do not trim near drop-offs, ditches or
embankments. The operator could lose
footing or balance.
• Do not trim excessively steep slopes.
• Do not mow on wet grass. Reduced
footing could cause slipping.
III. CHILDREN
Tragic accidents can occur if the operator
is not alert to the presence of children.
Children are often attracted to the machine
and the mowing activity. Never assume
that children will remain where you last
saw them.
• Keep children out of the trimming area
and under the watchful care of another
responsible adult.
• Be alert and turn machine off if children
enter the area.
• Before and while walking backwards,
look behind and down for small children.
• Never allow children to operate the
machine.
° Use extra care when approaching blind
corners, shrubs, trees, or other objects
that may obscure vision.
IV. SAFE HANDLING OF GASOLINE
Use extreme care Jr1handlinggasoline.
Gasoline is extremely flammable and the
vapors are explosive.
o Extinguish all cigarettes, cigars, pipes
and other sources of ignition.
- Use only an approved container.
• Never remove gas cap or add fuel with
the engine running. Allow engine to cool
before refueling.
° Never refuel the machine indoors.
• Never store the machine or fuel contain-
er where there is an open flame, spark
or pilot light such as a water heater or
on other appliances.
• Never fill containers inside a vehicle, on
a truck or trailer bed with a plastic liner,
Always place containerson the ground
away from your vehicle before filling.
• Remove gas-powered equipment from
the truck or trailer and refuel it on the
ground. Ifthis is not possible, then
refuel such equipment with a portable
container, rather than from a gasoline
dispenser nozzle.
• Keep the nozzle in contact with the rim
of the fuel tank or container opening at
all times until fueling is complete. Do
not use a nozzle lock-open device.
• Iffuel is spilled on clothing, change
clothing immediately.
• Never overfill fuel tank. Replace gas
cap and tighten securely.
V. GENERAL SERVICE
• Never run a machine inside a closed
area.
• Never make adjustments or repairs with
the engine (motor) running. Disconnect
the spark plug wire, and keep the wire
away from the plug to prevent accidental
starting.
• Keep nuts and bolts, especially blade
attachment bolts, tight and keep equip-
ment in good condition.
• Never tamper with safety devices.
Check their proper operation regularly.
• Keep machine free of grass, leaves, or
other debris build-up. Clean oil or fuel
spitFage.Allow machine to cool before
storing.
• Stop and inspect the equipment if you
strike an object. Repair, if necessary,
before restarting.
• Never attempt to make wheel height
adjustments while the engine isrunning.
° Grasscatchercomponentsaresubject
towear,damage,anddeterioration,
whichcouldexposemovingpartsor
allowobjectstobethrown.Frequently
checkcomponentsandreplacewith
manufacturer'srecommendedparts,
whennecessary,
• Mowerbladesaresharpandcancut.
Wraptheblade(s)orweargloves,and
useextracautionwhenservicingthem.
• Donotchangetheenginegovernorset-
tingoroverspeedtheengine.
° Maintainorreplacesafetyandinstruc-
tionlabels,asnecessary,
&WARNING:Thislawnmowerisequippedwithaninternalcombustionengineand
shouldnotbeusedonornearanyunimprovedforest-covered,brush-coveredor
grass-coveredlandunlesstheengine's exhaust system is equipped with a spark
arrester meeting applicable local or state laws (ifany). If a spark arrester is used, it
should be maintained in effective working order by the operator.
In the state of California the above is required by law (Section 4442 of the California
Public Resources Code). Other states may have similar laws, Federal laws apply on
federal lands.
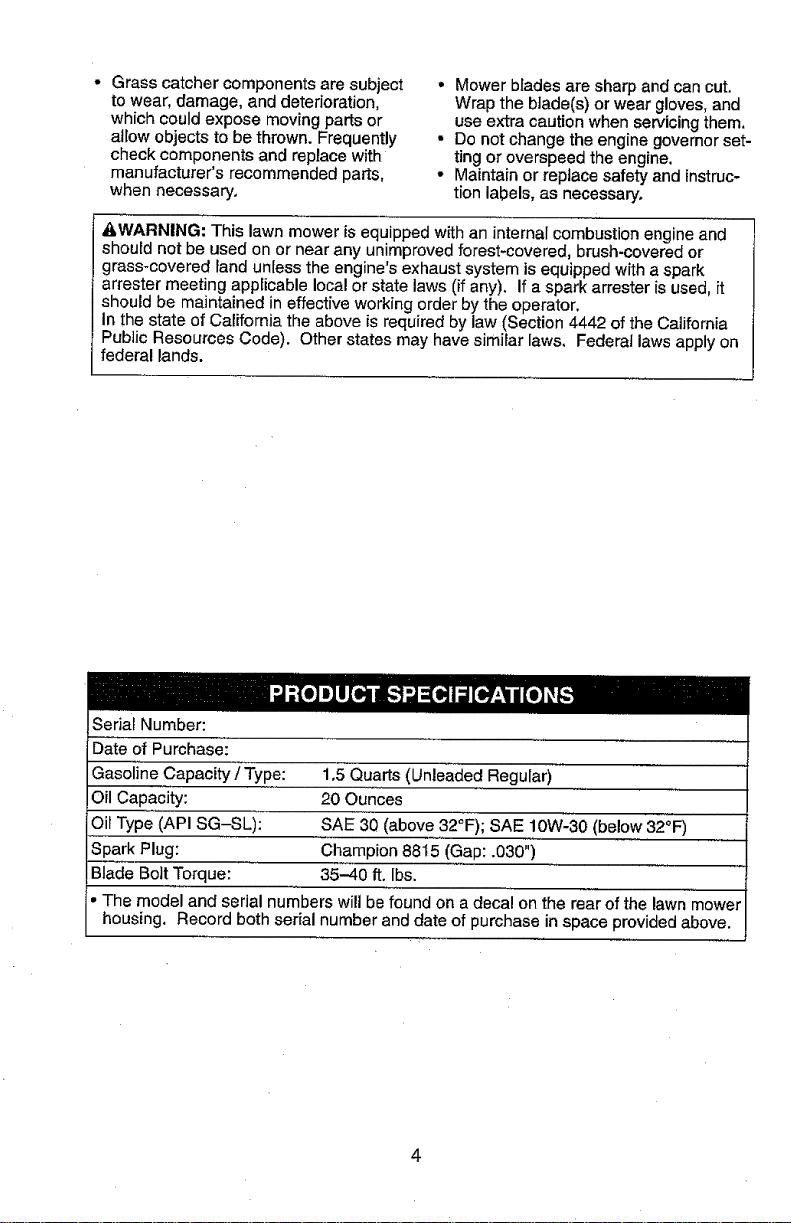
Serial Number:
Date of Purchase;
Gasoline Capacity /Type: 1.5 Quarts (Unleaded Regular)
Oil Capacity: 20 Ounces
Oil Type (API SG-SL): SAE 30 (above 32°F); SAE 10W-30 (below 32°F)
Spark Plug: Champion 8815 (Gap: .030")
Blade Bolt Torque: 35-40 ft. lbs.
The model and serial numbers will be found on a decal on the rear of the lawn mower
housing, Record both serial number and date of purchase in space 3rovided above.
4
Read these instructions and this manual in
its entirety before you attempt to assemble
or operate your new lawn mower.
IMPORTANT: This lawn mower is shipped
WITHOUT OILOR GASOLINE inthe engine.
Your new lawn mower has been assem-
bled at the factory with the exception of
those parts left unassembied for shipping
purposes, To ensure safe and proper
operation of your lawn mower, all parts
and hardware you assemble must be tight-
ened securely. Use the correct tools as
necessary to ensure proper tightness. All
parts such as nuts, washers, bolts, etc.,
necessary to complete the assembly have
been placed in the parts bag.
TO REMOVE MOWER FROM CARTON
I. Remove loose parts includedwith
mower.
2. Cut down two end corners of carton
and lay end panel down flat.
3. Remove all packing materials except
padding between upper and lower
handle and padding holding operator
presence control bar to upper handle.
4. Roll lawn mower out of carton and
check carton thoroughly for additional
loose parts.
HOW TO SET UP YOUR MOWER
TO UNFOLD HANDLE
IMPORTANT: Unfold handle carefullyso
as not to pinchor damage control cables.
1. Raise handlesuntillowerhandlesection
locksinto place in mowing position.
2. Remove protective padding, raise up-
perhandle section intoplace on lower
handleand tightenboth handle knobs.
3. Remove handie padding holding
operatorpresence controlbar to upper
handle.
Your lawn mower handle can be adjusted
for your mowing comfort. Refer to "AD-
JUST HANDLE" in the Service and Adjust-
ments section of this manual.
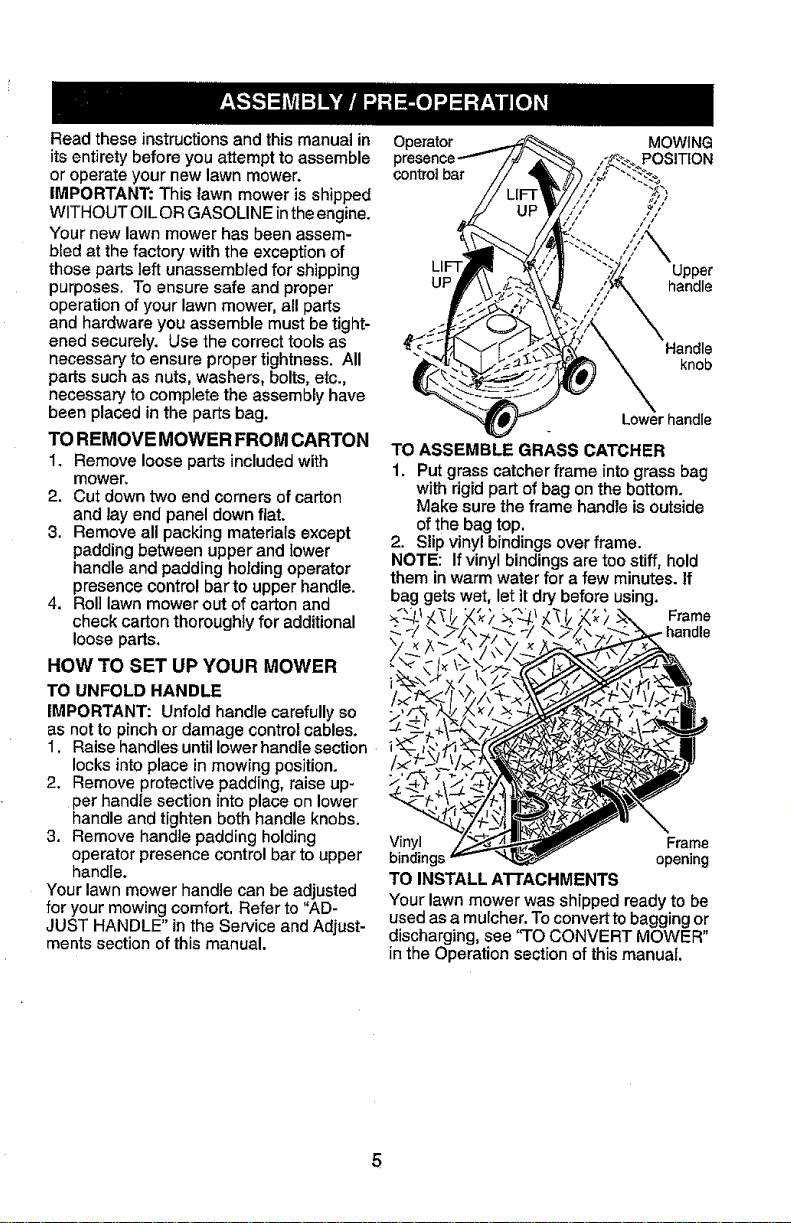
Operator MOWING
POSITION
controlbar
Upper
UP handle
Handle
knob
Lowerhandle
TO ASSEMBLE GRASS CATCHER
1, Put grass catcher frame into grass bag
with rigid part of bag on the bottom.
Make sure the frame handle is outside
of the bag top.
2. Slip vinyl bindings over frame.
NOTE: If vinyl bindings are too stiff, hold
them in warm water for a few minutes. If
bag gets wet, let itdry before using.
Frame
Vinyl Frame
bindings opening
TO INSTALL ATTACHMENTS
Your lawn mower was shipped ready to be
used asa muicher. To convert tobagging or
discharging,see 'TO CONVERT MOWER"
in the Operation section of this manual
5
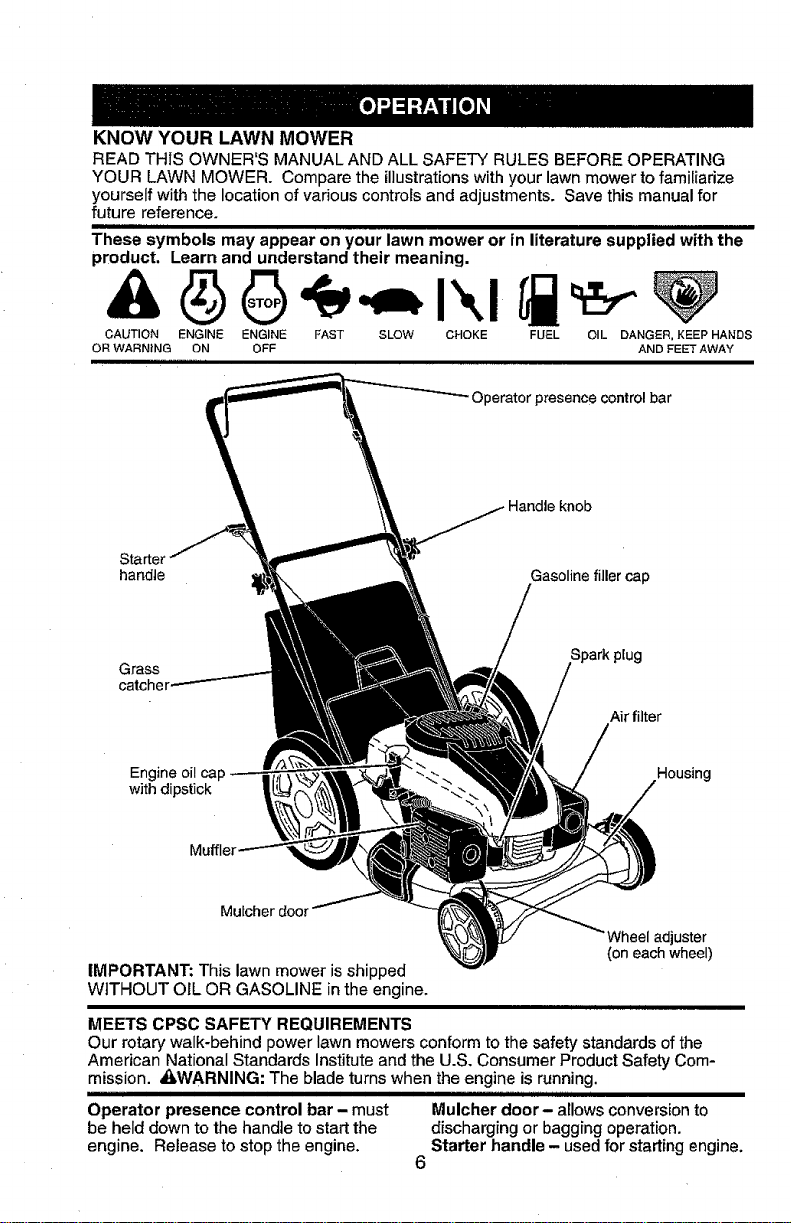
KNOW YOUR LAWN MOWER
READ TH_SOWNER'S MANUAL AND ALL SAFETY RULES BEFORE OPERATING
YOUR LAWN MOWER. Compare the illustrations with your lawn mower to familiarize
yourself with the location of various controls and adjustments. Save this manual for
future reference.
lllllll,llll,l,iillillHll,,,lll,ll,llllll
These symbols may appear on your lawn mower or in literature supplied with the
product. Learn and understand their meaning.
CAUTION ENGINE ENGINE FAST SLOW CHOKE FUEL OIL DANGER, KEEP HANDS
OR WARNtNG ON OFF AND FEET AWAY
lll,iHlllll,ll,llIHlIHII
-Operator presence controlbar
Starter
handle Gasoline fillercap
Grass
catchc
Air filter
Engine oil Housing
with dipstick
Mulcher door
adjuster
(oneachwheel)
IMPORTANT: This lawn mower is shipped
WITHOUT OIL OR GASOLINE in the engine.
iiiii ui ii [ i i
MEETS CPSC SAFETY REQUIREMENTS
Our rotary walk-behind power lawn mowers conform to the safety standards of the
American National Standards Institute and the U.S. Consumer Product Safety Com-
mission. AWARNING: The blade turns when the engine is running.
iiiiiiiiiiiiiiiiiiiiiiiiiii1[ iiiiiiiiiiiiiiiiiiiiiiii luliiiiii i1[i iii i i II iiiii i
Operator presence control bar - must Mulcher door- allows conversion to
be held down to the handle to start the discharging or bagging operation.
engine. Release to stop the engine. Starter handle - used for starting engine.
6

Theoperationofanylawn
mowercanresultinforeign
objectsthrownintotheeyes,
which can result in severe
eye damage. Always wear
safety glasses or eye shields while oper-
ating your lawn mower or performing any
adjustments or repairs. We recommend a
standard safetyglasses orwide vision safety
mask worn over spectacles.
HOW TO USE YOUR LAWN MOWER
ENGINE SPEED
Engine speed was set at the factory for
optimum performance. It is not adjustable.
ENGINE ZONE CONTROL
_LCAUTION: Federal regulations require
an engine control to be installed on this
lawn mower in order to minimize the
risk of blade contact injury. Do not under
any circumstances attempt to defeat the
function of the operator control. The blade
turns when the engine is running.
• Your lawn mower is equipped with an
operator presence control bar which
requires the operator to be positioned
behind the lawn mower handle to start
and operate the lawn mower.
TO ADJUST CUTTING HEIGHT
Raise wheels for low cut and lower wheels
for high cut, adjust cutting height tosuit
your requirements. Medium position is
best for most lawns.
° To change cutting height, squeeze ad-
juster lever toward wheel. Move wheel
upor down to suit your requirements. Be
sure all wheels are in the same setting.
NOTE; Adjuster isproperly positioned when
plate tab inserts into hole in lever. Also, 9-
position adjusters (ifsoequipped) allow lever
to be positioned between the plate tabs.
LEVERBACKWARD Platetab
TO LOWERMOWER
LEVERFORWARDTO RAISEMOWER Lever
TO CONVERT MOWER
Your lawn mower was shipped ready to be
used as a mulcher. Toconvert to bagging
or discharging:
REAR BAGGING
, Lift rear door of the lawn mower and
place the grass catcher frame hooks
onto the door pivot pins.
- To convert to mulching or discharging
operation, remove grass catcher and
close rear door.
Pivot " Rear
Grass
catcher
handle
Catcherframehook
SIDE DISCHARGING
• Rear doormust be closed.
° Open mulcher door and install dis-
charge deflector under door as shown.
• Mower isnow ready for discharging
operation.
° To convert to mulching or bagging opera-
tion, discharge deflector must be removed
and mulcher door must be closed.
SIMPLE STEPS TO REMEMBER WHEN
CONVERTING YOUR LAWN MOWER
FOR MULCHING -
1. Rear door closed.
2, Mutcher door closed,
FOR REAR BAGGING -
1. Grass catcher installed.
2. Mu[cher door closed.
FOR SIDE DISCHARGING -
1. Rear door closed.
Discharge deflector installed.
AUTiON: Do not run your lawn mower
without rear door closed,clipping deflector
or approved grass catcher in place. Never
attempt to operate the lawn mower with the
rear door removed or propped open.
Open mulchLdoor
Install
discharg,
7 deflector
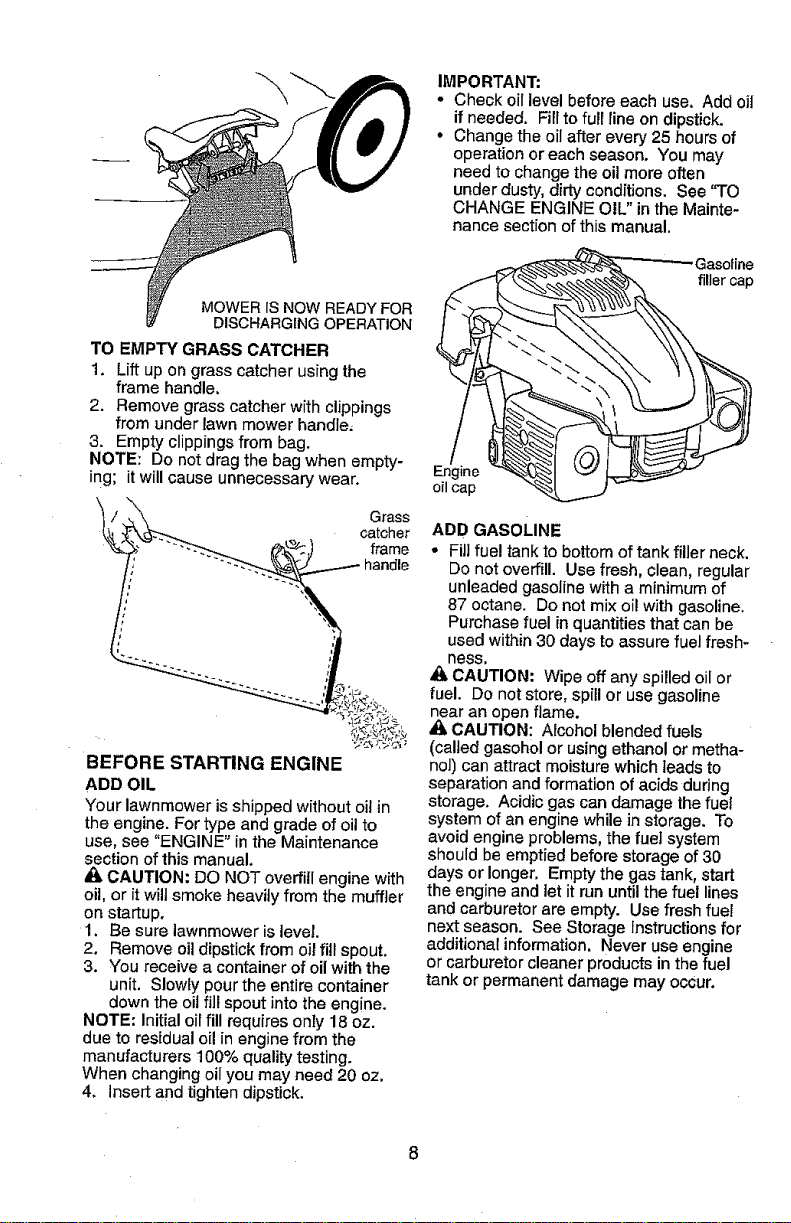
MOWERISNOWREADYFOR
DISCHARGINGOPERATION
TO EMPTY GRASS CATCHER
1. Lift up on grass catcher using the
frame handle,
2. Remove grass catcher with clippings
from under lawn mower handle,
3. Empty clippings from bag,
NOTE: Do not drag the bag when empty-
ing; it will cause unnecessary wear.
BEFORE STARTING ENGINE
ADD OIL
Your lawnmower isshipped without oil in
the engine. For type and grade of oil to
use, see "ENGINE" in the Maintenance
section ofthis manual.
_1_CAUTION: DO NOT overfill engine with
oil, or it wiltsmoke heavily from the muffler
on startup,
1, Be sure lawnmower is level.
2. Remove oil dipstick from oil fill spout,
3. You receive a container of oil with the
unit. Slowly pour the entire container
down the oil fill spout into the engine.
NOTE: Initial oil fill requires only 18 oz.
due to residual oil in engine from the
manufacturers 100% quality testing.
When changing oil you may need 20 oz,
4, Insert and tighten dipstick.
IMPORTANT:
• Check oil levelbefore each use. Add oil
if needed, Fill to full line on dipstick.
• Change the oil after every 25 hours of
operation or each season, You may
need to change the oil more often
under dusty, dirty conditions. See 'q'O
CHANGE ENGINE OIL" in the Mainte-
nance section of this manual.
filler cap
Engine
oil cap
ADD GAsoLINE
• FIll fue! tankto bottom of tank filler neck.
Do not overfill. Use fresh, clean, regular
unleaded gasoline with a minimum of
87 octane. Do not mix oil with gasoline.
Purchase fuel in quantities that can be
used within 30 days to assure fuel fresh-
ness.
A CAUTION: Wipe off any spilled oil or
fuel. Do not store, spill or use gasoline
near an open flame,
• i, CAUTION: Alcohol blended fuels
(called gasohol or using ethanol ormetha-
nol) can attract moisture which leads to
separation and formation of acids during
storage. Acidic gas can damage the fuel
system of an engine while in storage. To
avoid engine problems,the fuel system
should be emptied before storage of30
days or longer, Empty the gas tank, start
the engine and let it run until the fuel lines
and carburetor are empty. Use fresh fuel
next season. See Storage Instructions for
additional information. Never use engine
or carburetor cleaner products in the fuel
tank or permanent damage may occur.
TO STOP ENGINE
• To stop engine, releaseoperator pres-
ence controlbar.
TO START ENGINE
NOTE: Due to protective coatingson the
engine, a small amount ofsmoke may be
present duringthe initialuse of the product
and should be considerednormal.
NOTE: Your engineis equipped withan
automatic choke system. No primingor
choking is required before starting.
• To start engine, hold operator presence
control bar down to the handle and pull
starter handle quickly. Do not allow
starter rope to snap back.
MOWING TIPS
CAUTION: Do not use de-thatcher
blade attachments on your mower, Such
attachments are hazardous, willdamage
your mower and could void your warranty.
• Under certain conditions,such as very
tall grass, it may be necessary to raise
the height of cut to reduce pushing effort
and to keep from overloading the engine
and leaving clumpsof grass clippings.
tt may also be necessary to reduce
ground speed and/or run the lawn
mower over the area a second time,
• For extremely heavy cutting,reduce the
width of cut by ovedapping previously
cut path and mow slowly.
° For better grass bagging and most cut-
ting conditions, the engine speed should
be set inthe FAST position.
• Pores incloth grass catchers can
become filled with dirt and dust with use
and catcherswill collectless grass. To
prevent this, regularly hose catcher off
with water and let dry before using.
• Keep top of engine around starter clear
and clean of grass clippings and chaff.
This will help engine air flow and extend
engine life.
MULCHING MOWING TIPS
IMPORTANT: For best performance,
keep mower housing free of built-up
grass and trash. See "CLEANING" in the
Maintenance section of this manual.
• The special mulching blade will recut
thegrass clippings many times and
reduce them in size so that as they fall
onto the lawn they will disperse into
the grass and not be noticed. Also, the
mulched grass wilt biodegrade quickly to
provide nutrients for the lawn. Always
mulch with your highest engine (blade)
speed as this will provide the best recut-
ting action of the blades.
• Avoid cutting your lawn when it iswet.
Wet grass tends to form clumps and
interferes with the mulching action. The
best time to mow your lawn is the early
afternoon. At this time the grass has
dried, yet the newly cut area willnot be
exposed to direct sunlight.
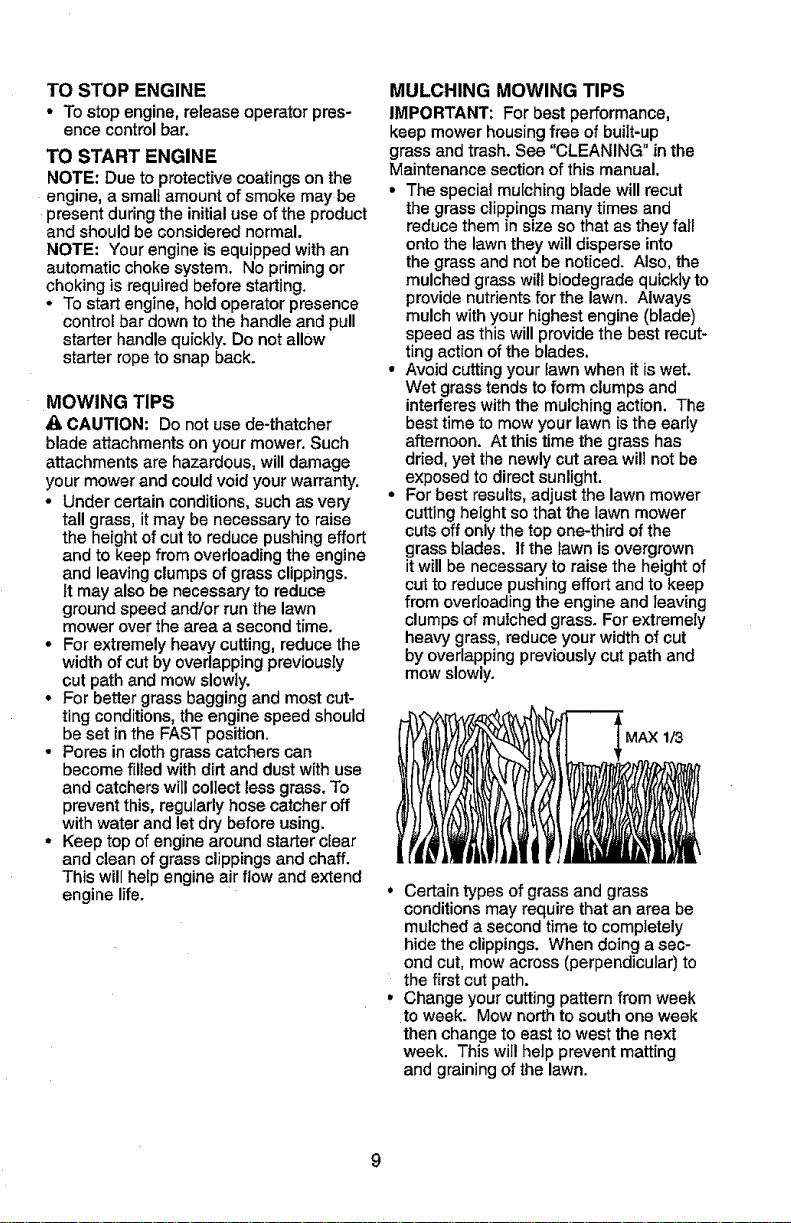
• For best results, adjust the lawn mower
cutting height so that the lawn mower
cuts off only the top one-third of the
grass blades, it the lawn is overgrown
it will be necessary to raise the height of
cut to reduce pushing effort and to keep
from overloading the engine and leaving
clumps of mulched grass. For extremely
heavy grass, reduce your width of cut
by overlapping previously cut path and
mow slowly.
INt1111_\|1I
MAX 1/3
• Certain types of grass and grass
conditionsmay require that an area be
mulched a second time to completely
hide the clippings. When doing a sec-
ond cut, mow across (perpendicular) to
the first cut path.
• Change your cuttingpattern from week
to week. Mow north to south one week
then change to east to west the next
week. This will help prevent matting
and graining of the lawn.
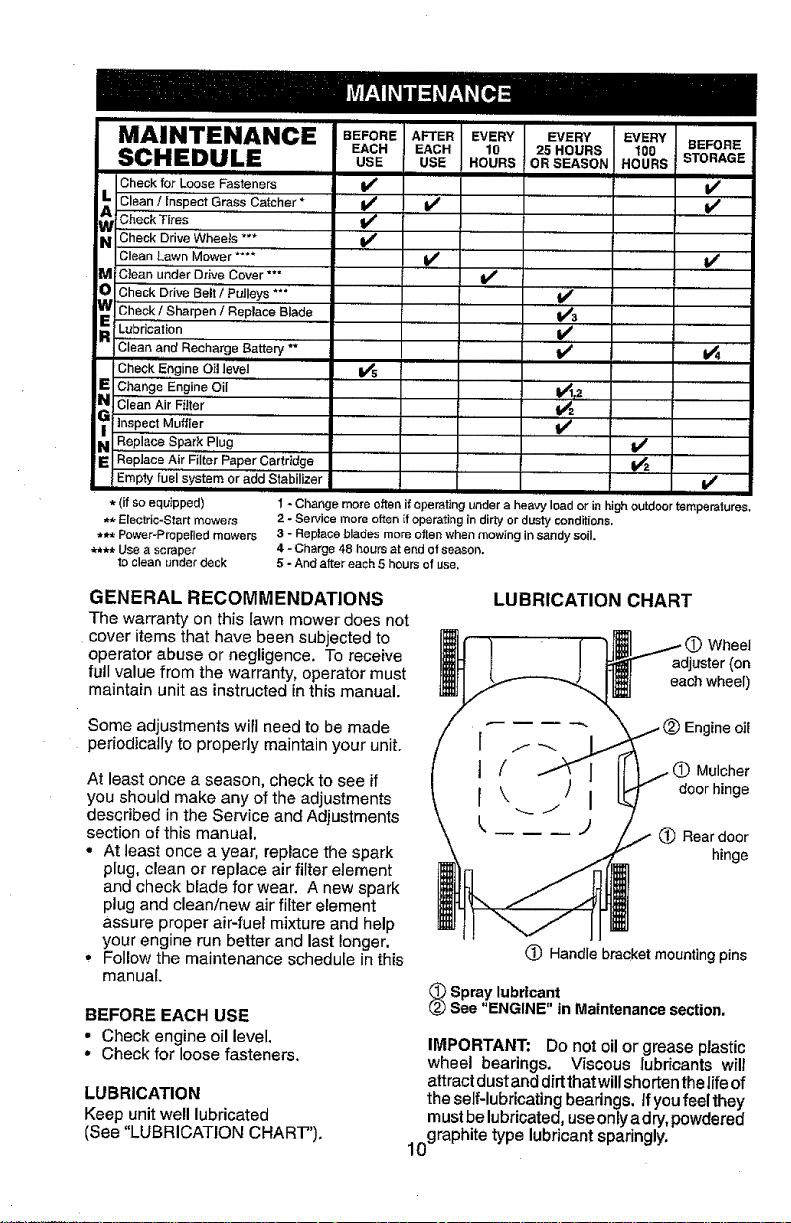
MAINTENANCE BEFORE AFTER EVERY
EACH EACH 10
SCHEDULE use use HOURS
ii i i
Check for Loose Fasteners
L Clean / Inspect Grass Catcher * "1/
Check Tires ......... V'
N_ Check Drive Wheets ***
Clean Lawn Mower ****
M 'C}ean under Drive Cover'*"
O Check Drive Belt / Pulleys ***
E_ Check Sharpen / Blade
Rap!ace
R Lubrication
Clean and Recharge Battery *"
Check Engine Oil level " li_
l_ Change Engine Oil
Clean Air Fitter
tnspect Muffler
N Replace Spark Plug
E Replace Air Filter Paper Cartridge
Empty fuel system or add Stabilizer
• (if so equ}pped)
• * Electric=Start mowers
• ** Power-Propelled mowers
• *** Use a scraper
to clean under deck
i
1/
V',
ii
EVE"Y BEFO.E
25 HOURS 100
ORSEASON HOURS iSTORAGE
,,I,/
V_,,,
V. ,, ,
=/3
I/
v' v_
_r a ,
v_
v'
v'
V'
I * Change more often if operating under a hea,,_' load or in high outdoor temperatures,
2 - Service more often if operating in dirty or dust':/conditions.
3 - Repiase blades more often when mow;ng in sandy soil
4 - Charge 48 hours at end of season,
5 - And after each 5 hours of use.
GENERAL RECOMMENDATIONS
The warranty on this Iawn mower does not
cover items that have been subjected to
operatorabuse or negligence. To receive
fulI value from the warranty, operator must
maintain unit as instructedinthis manual.
LUBRICATION CHART
Wheel
adjuster (on
each wheeI)
Some adjustments wirl need to be made
periodicallyto property maintain your unit.
At least once a season, check to see if
you should make any of the adjustments
described in the Service and Adjustments
section of this manual.
• At least once a year, replace the spark
plug, clean or replace air filter element
and check blade for wear. A new spark
plug and clean/new air filter element
assure proper air-fuel mixture and help
your engine run better and last longer.
• Follow the maintenance schedule inthis
manual.
BEFORE EACH USE
• Check engine oil level.
• Check for loosefasteners.
LUBRICATION
Keep unit well lubricated
(See "LUBRICATION CHART").
Engine oi{
(_ Mulcher
door hinge
(_ Rear door
hinge
(_) Handle bracket mounting pins
_ Spray lubricant
See 'ENGINE" in Maintenance section,
IMPORTANT: Do not oil or grease plastic
wheel bearings. Viscous lubricants wilt
attract dustand dirtthatwill shorten the lifeof
the self-lubricating bearings. Ifyou feelthey
mustbe lubricated, use onlyadry, powdered
0graphite type lubricant sparingly.
1
LAWN MOWER
Always observe safety rules when per-
forming any maintenance.
TIRES
• Keep tires free of gasoline, oil, or insect
control chemicals which can harm rubber.
• Avoid stumps, stones, deep ruts, sharp
objects and other hazards that may
cause tire damage.
BLADE CARE
For best results, mower blade must be kept
arp. Replace bent or damaged blades.
CAUTION: Use on[y a replacement
blade approved by the manufacturer of
your mower. Using a blade not approved
by the manufacturer of your mower is
hazardous, could damage your mower and
void your warranty.
TO REMOVE BLADE
1. Disconnect spark p|ug wire from spark
plug and place wire where it cannot
come in contact with plug.
2, Turn lawn mower on its side. Make
sure air filter and carburetor are up.
3. Use a wood block between blade and
mower housing to prevent blade from
turning when removing blade bolt,
NOTE: Protect your hands with gloves
and/orwrap blade with heavy cloth.
4. Remove blade bolt by turning counter-
clockwise.
5, Remove blade and attaching hardware
(bolt,Iockwasherand hardened washer).
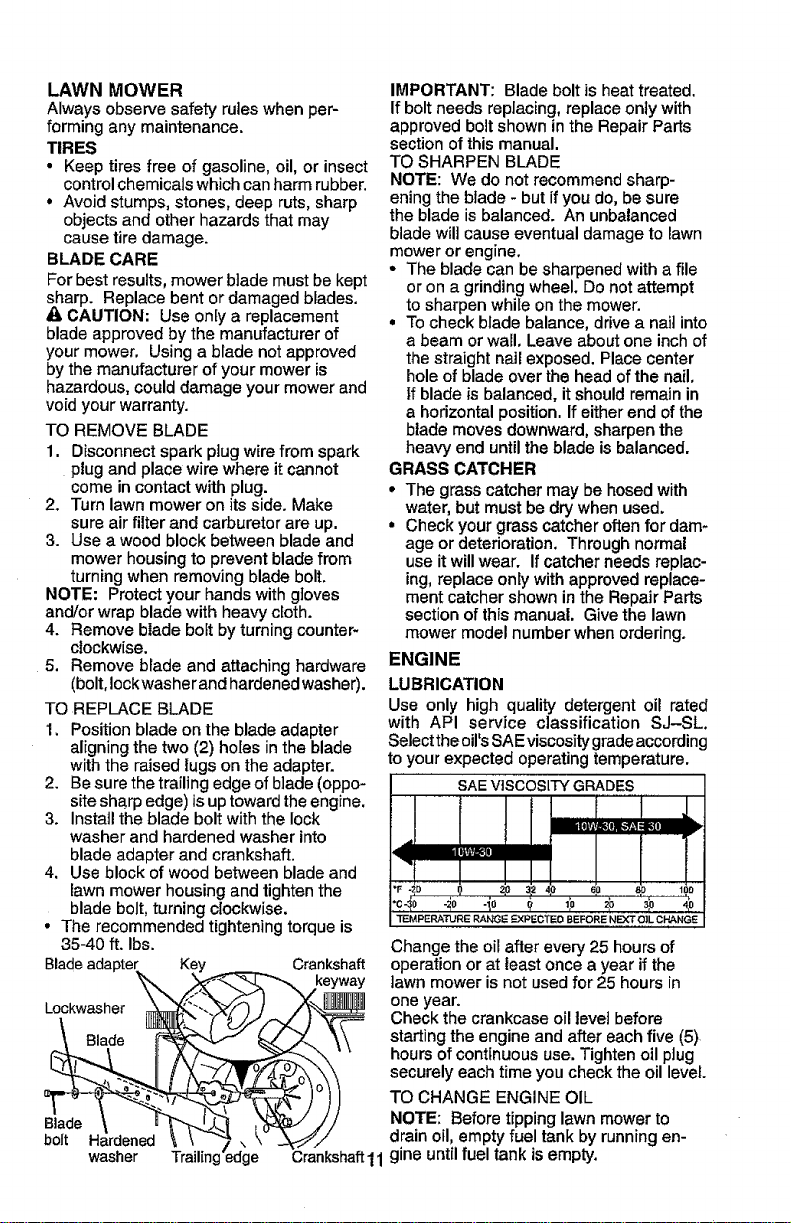
TO REPLACE BLADE
1. Position blade on the blade adapter
aligning the two (2) ho[es in the blade
with the raised lugs on the adapter.
2. Be sure the trailing edge of blade (oppo-
sitesharp edge) isup toward the engine.
3. Install the blade bolt with the lock
washer and hardened washer into
blade adapter and crankshaft.
4, Use block of wood between blade and
lawn mower housing and tighten the
blade bolt, turning clockwise.
• The recommended tightening torque is
35-40 ft. Ibs.
Bladeadapter Crankshaft
Lockwasher '_
Blade \ u
bolt Hardened
washer Trailing' Crankshaft11
IMPORTANT: Blade bolt is heat treated.
If bolt needs replacing, replace only with
approved bolt shown in the Repair Parts
section of this manual.
TO SHARPEN BLADE
NOTE: We do not recommend sharp-
ening the blade - but if you do, be sure
the blade is balanced. An unbalanced
blade will cause eventual damage to lawn
mower or engine,
• The blade can be sharpened with a file
or on a grinding wheel, Do not attempt
to sharpen while on the mower.
• To check blade balance, drive a nail into
a beam or wall, Leave about one inch of
the straight nail exposed. Place center
hole of blade over the head of the nail,
ff blade is balanced, it should remain in
a horizontal position. If either end of the
blade moves downward, sharpen the
heavy end until the blade is balanced.
GRASS CATCHER
• The grass catcher may be hosed with
water, but must be dry when used,
• Check your grass catcher often for dam-
age or deterioration, Through normal
use it will wear. Ifcatcher needs replac-
ing, replace only with approved replace-
ment catcher shown inthe Repair Parts
section of this manual. Give the lawn
mower model number when ordering.
ENGINE
LUBRICATION
Use only high quality detergent oil rated
with API service classification SJ-SL.
Select the oil'sSAE viscosity gradeaccording
to your expected operating temperature,
SAE VISCOSITY GRADES
I,
4 mm
/
•F-2o o _ 3_ 4 eo eo loo
3_MPERATURE I_NGE _'PECTEO BEFORE NEXT OILCHANGE
Change the oil after every 25 hours of
operationor at least once a year if the
lawn mower is not used for 25 hours in
one year.
Check the crankcase oil level before
starting the engine and after each five (5)
hours of continuous use, Tighten oil plug
securely each time you check the oil level.
TO CHANGE ENGINE OIL
NOTE: Before tipping lawn mower to
drain oil, empty fuel tank by running en-
gine until fuel tank isempty.
1.Disconnectsparkplugwirefromspark
plugandplacewirewhereitcannot
comeincontactwithplug.
2. Removeengineoilcap;layasideona
cleansurface.
3. Tip lawn mower on its side as shown
and drain oil into a suitable container.
Rock lawn mower back and forth to re-
move any oil trapped inside of engine.
4. Wipe off any spilled oil from lawn
mower or side of engine.
5. Slowly pour oil down the oil fill spout,
stopping every few ounces to check the
oil level with the dipstick.
6. Stop adding oil when you reach the
FULL mark on the dipstick. Wait a
minute to allow oil to settle.
7, Continue adding small amounts of oil,
rechecking the dipstick until oil level
settles at FULL, DO NOT overfill, or
engine will smoke heavily from the muf-
fler on startup.
8. Always be sure to retighten oit dipstick
before starting engine.
9. Reconnect spark plug wire to plug,
MUFFLER
Inspect and replace corroded muffler as it
could create a fire hazard and/or damage.
AIR FILTER
Your engine will not run properlyand may
be damaged by using adirty air filter,
Replace the air filter every 100hours of
operation or every season, whichever oc-
curs first. Service air cleaner more often
under dusty conditions.
TO CLEAN AIR FILTER
1. Remove cover.
2. Carefully remove cartridge.
3, Clean by gently tapping on a flat sur-
face. If very dirty, replace cartridge.
_CAUTION: Petroleum solvents, such as
kerosene, are not to be used to clean car-
tridge, They may cause deterioration of the
cartridge. Do not oil cartridge. Do not use
pressurized air to clean or dry cartridge.
4. Install cartridge, then replace cover. 12
Cartridge \ Slot
3over Backplate
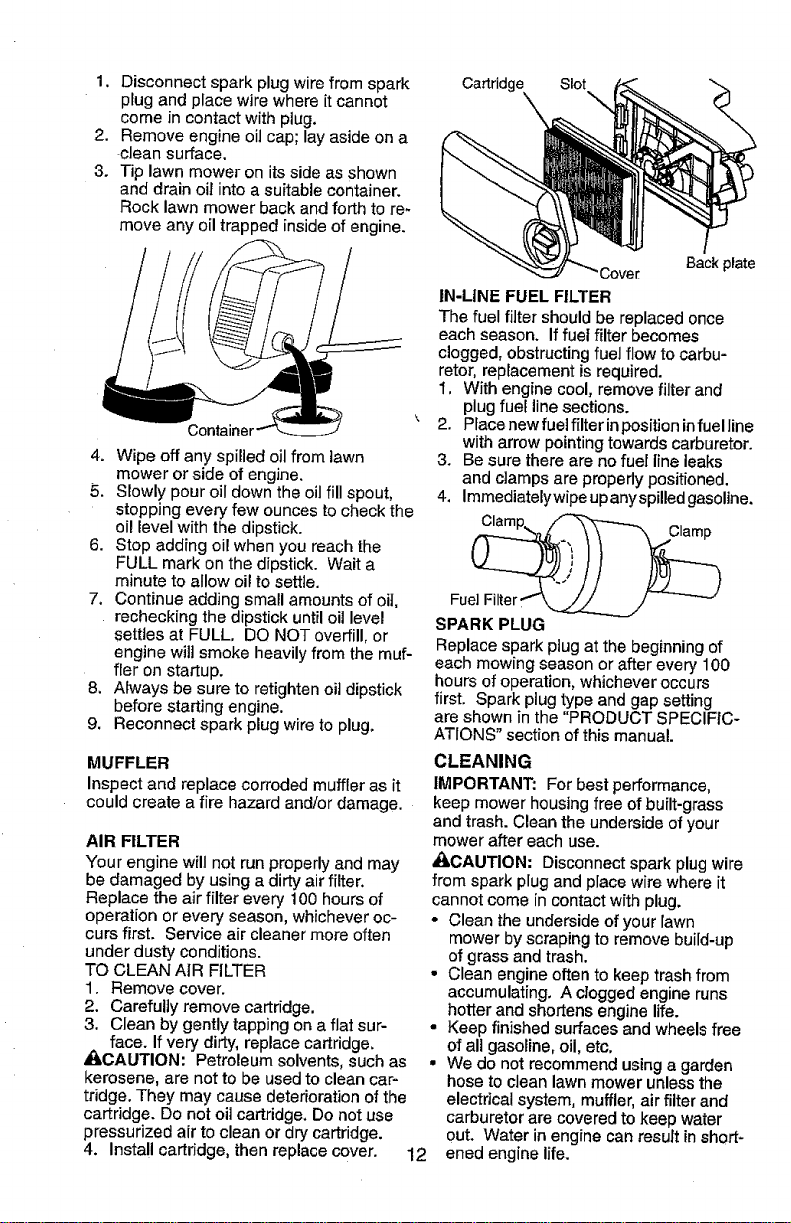
IN-LINE FUEL FILTER
The fuel filter should be replaced once
each season. If fuel filter becomes
clogged, obstructing fuel flow to carbu-
retor, replacement is required.
I, With engine cool, remove filter and
plug fuel line sections.
2. Pface new fuelfilter in position infuelline
with arrow pointing towards carburetor.
3. Be sure there are no fuel line leaks
and clamps are properlypositioned.
4. Immediately wipeupanyspi!led gasoline.
SPARK PLUG
Replace spark plugat the beginningof
each mowingseason or afterevery 100
hoursofoperation,whicheveroccurs
first. Spark plugtype and gap setting
are shown in the "PRODUCT SPECIFIC-
ATIONS" section of this manual.
CLEANING
IMPORTANT: For best performance,
keep mower housing free of built-grass
and trash. Clean the underside ofyour
mower after each use.
_t_CAUTION: Disconnect spark plug wire
from spark plug and place wire where it
cannot come in contact with plug.
• Clean the underside of your lawn
mower by scraping to remove build-up
of grass and trash.
• Clean engine often to keep trash from
accumulating, A clogged engine runs
hotter and shortens engine life.
• Keep finished surfaces and wheels free
of all gasoline, oil,etc,
= We do not recommend using a garden
hose to clean lawn mower unless the
electrical system, muffler, air filter and
carburetor are covered to keep water
out. Water inengine can result inshort-
ened engine life.
•1=WARNING: To avoid serious iniury, Mowing
before performing any service and A po,sition
adjustments:
1. Release control bar and stop engine.
2. Make sure the blade and all moving
parts have completely stopped.
3. Disconnect spark plug wire from spark
plug and place wire where it cannot Hairpin
come in contact with plug. c°tter"--_
Mounting-'3
pin
LAWN MOWER
-TOADJUST CUTTING HEIGHT
See 'q'O ADJUST CU-I-FING HEIGHT" in
the Operation sectionof this manual.
-<4 Mowing __<_
I 2oX. position / /
I t l
I / /
i 1 l
U4 oket f U4
LOW POSITION HIGHPOSITION
REAR DEFLECTOR
The rear deflector, attached between the
rear wheels of your mower, is provided to
minimize the possibilitythatobjects wilt
be thrown out of the rear of the mower
into the operator mowing position, if the
deflectorbecomes damaged, it should be
replaced.
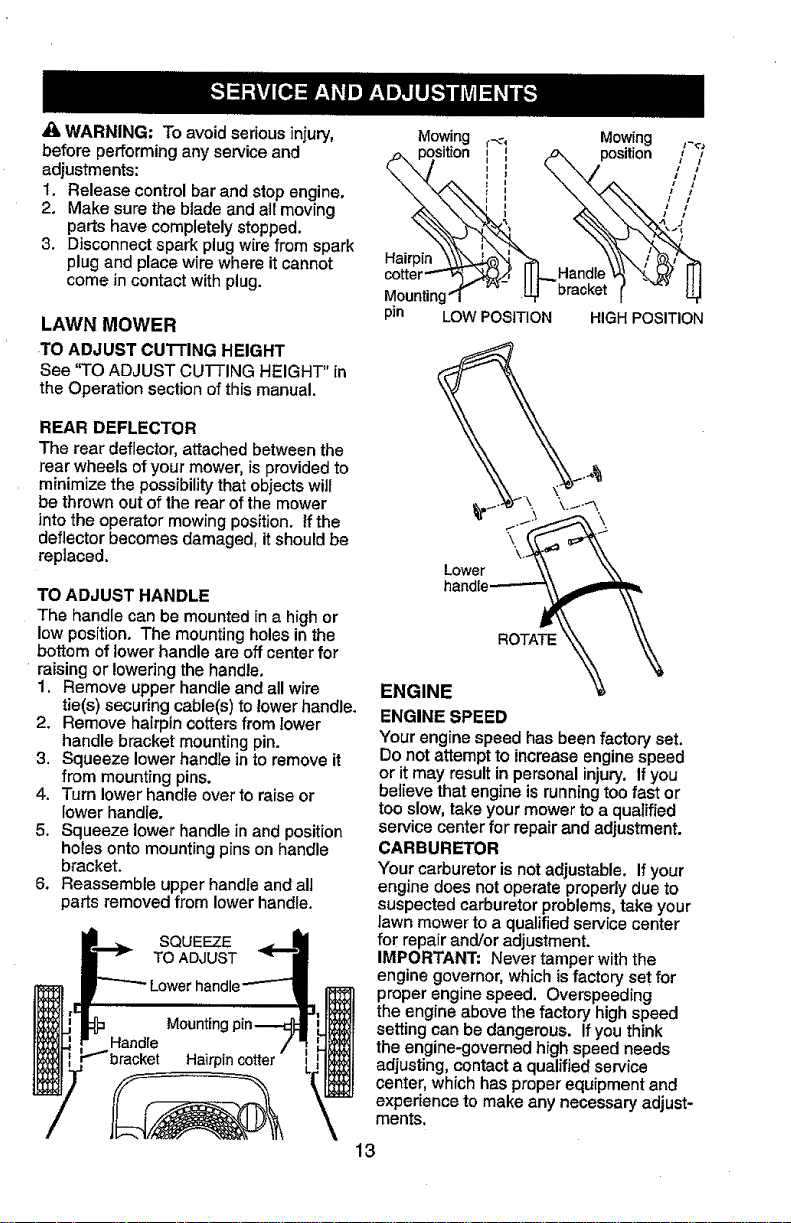
TO ADJUST HANDLE
The handle can be mountedin a high or
low position. The mounting holes in the
bottom of lowerhandle are off center for
raising or lowering the handle.
1. Remove upper handle and all wire
tie(s) securing cable(s) to lower handle.
2. Remove hairpin cotters from lower
handle bracket mounting pin.
3. Squeeze lower handle in to remove it
from mounting pins.
4. Turn lower handle over to raise or
lower handle.
5. Squeeze lower handle in and position
holes onto mounting pins on handle
bracket.
6. Reassemble upper handle and all
parts removed from lower handle.
SQUEEZE
TO ADJUST
_owerhandle--"-- I
Mountingpin-----_l
Handle / _ U_I
bracket Hairpin otte, IJl! l
\
\
Lower
ROTATE
ENGINE
ENGINE SPEED
Your engine speed has been factory set.
Do not attemptto increaseengine speed
or it may resultin personalinjury. If you
believe that engine isrunningtoo fast or
tooslow, take yourmower to a qualified
service center for repairand adjustment.
CARBURETOR
Your carburetor is not adjustable. If your
engine does not operate propedy due to
suspected carburetorproblems, take your
lawn mower to a qualified service center
for repair and/or adjustment.
iMPORTANT: Never tamper with the
engine governor, which is factory set for
proper engine speed. Overspeeding
the engine above the factory high speed
setting can be dangerous. Ifyou think
the engine-governed high speed needs
adjusting, contact a qualified service
center, which has proper equipment and
experience to make any necessary adjust-
ments.
13
Immediately prepare your lawn mower for Operator
storage at the end of the season or if the I
unit will not be used for 30 days or more. controlbar
LAWN MOWER
When lawn mower is to be stored for a
period of time, clean it thoroughly, remove
all dirt, grease, leaves, etc. Store in a
clean, dry area
1 Clean entire fawn mower (See
"CLEANING" inthe Maintenance sec-
tion of this manual),
2 Lubricate as shown in the Maintenance
section of this manual.
3 Be sure that all nuts, bolts, screws, and
pins are securely fastened. Inspect
moving parts for damage, breakage
and wear Replace if necessary
4. Touch up all rusted or chipped paint
surfaces; sand lightly before painting
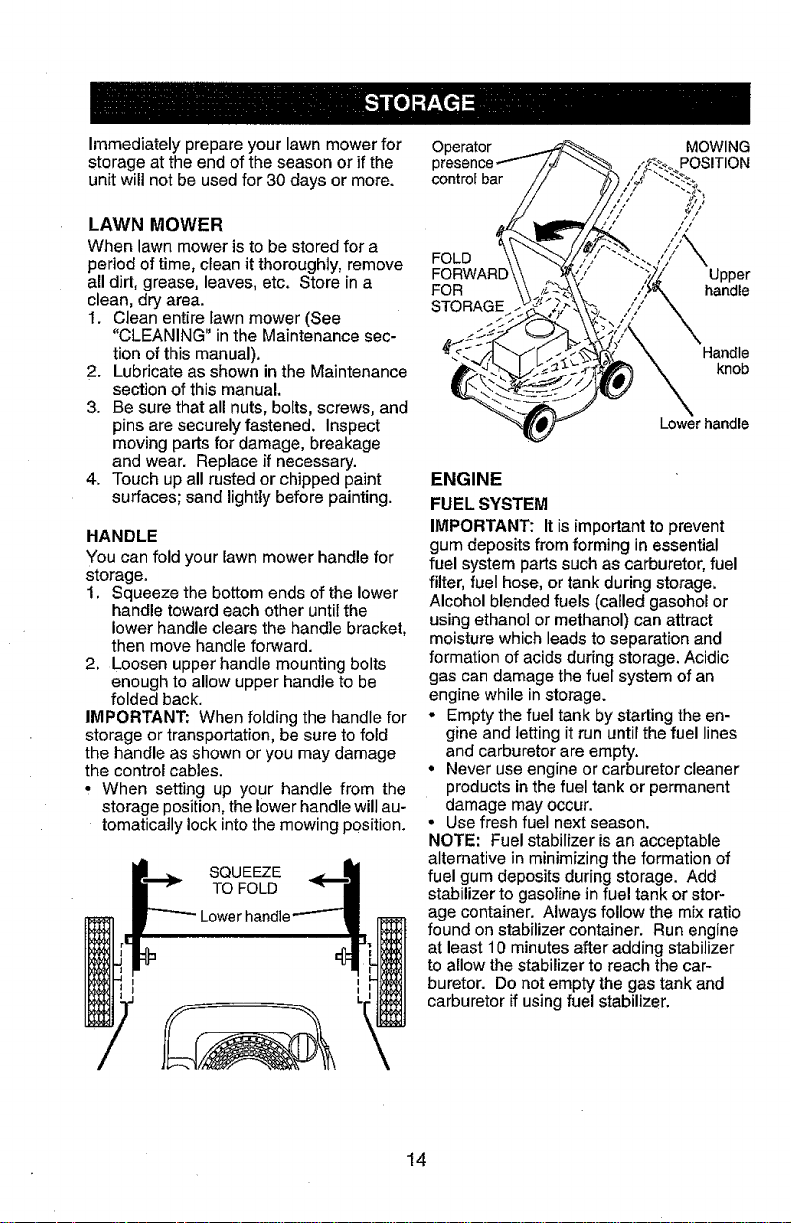
HANDLE
You can fold your lawn mower handle for
storage.
1, Squeeze the bottom ends of the lower
handle toward each other until the
lower handle clears the handle bracket,
then move handle forward
2, Loosen upper handle mounting bolts
enough to allow upper handle to be
folded back
IMPORTANT: When folding the handle for
storage or transportation, be sure to fold
the handle as shown or you may damage
the control cables
• When setting up your handle from the
storage position, the lower handle will au-
tomatically lock into the mowing position.
MOWING
POSITION
FOLD
FORWARD Upper
FOR handle
STORAGE
Handle
knob
Lower handle
ENGINE
FUEL SYSTEM
IMPORTANT: Itis important to prevent
gum depositsfrom forming in essential
fuel system parts such as carburetor, fuel
filter, fuel hose, or tank during storage,
Alcohol blended fuels (called gasohol or
using ethanol or methanol) can attract
moisture which leads to separation and
formation of acids during storage. Acidic
gas can damage the fuel system of an
engine while instorage.
• Empty the fuel tank by starting the en-
gine and letting it run until the fuel lines
and carburetor are empty.
• Never use engine or carburetor cleaner
products in the fuel tank or permanent
damage may occur
• Use fresh fuel next season.
NOTE: Fuel stabilizer is an acceptable
alternative in minimizing the formation of
fuel gum deposits during storage Add
stabilizer to gasoline in fuel tank or stor-
age container Always follow the mix ratio
found on stabilizer container Run engine
at least 10 minutes after adding stabilizer
to allow the stabilizer to reach the car-
buretor. Do not empty the gas tank and
carburetor if using fuel stabilizer.
14

ENGINE OIL
Drain oil (with engine warm) and replace
with clean engine oil. (See "ENGINE" in
the Maintenance section of this manual).
CYLINDER
I. Remove spark plug.
2. Pour one ounce (29 ml) of oil through
spark plug hole into cylinder,
3. Pull starter handle slowly a few times to
distribute oil,
4. Replace with new spark plug.
OTHER
° Do not store gasoline from one season
to another.
• Replace your gasoline can if your can
startsto rust. Rust and/or dirt in your
gasoline will cause problems.
• If possible,store your unit indoors and
cover it to protect it from dust and dirt,
• Cover your unit with a suitable protec-
tive cover that does not retain moisture.
Do not use plastic. Plastic cannot
breathe, which allows condensation to
form and will cause your unit to rust,
IMPORTANT: Never cover mower while
engine and exhaust areas are still warm.
D-CAUTION: Never store the lawn mower
with gasoline in the tank inside a building
where fumes may reach an open flame
or spark. Allow the engine to cool before
storing Inany enclosure.
TROUBLESHOOTING - See appropriate section in manual unless directed
to a qualified Sewice Center.
PROBLEM ...................CAUSE ........................... I,,,,,,,,,,CORRECTION ................
Does not start
1. Dirty air filter.
2. Out of fuel.
3. Stale fuel.
4. Water in fuel.
5. Spark plug wire is
disconnected.
6. Bad spark plug.
7. Loose blade or broken
blade adapter,
8. Control bar in released
position.
9. Control bar defective.
I0. Fuel valve lever (if so
equipped) in OFF position.
11.Weak battery (if equipped),
12.Disconnected battery
connector (if equipped).
Clean/replace air filter,
Fill fuel tank,
Empty rue! tank and refill tank
with fresh, clean gasoline.
Empty fuel tank and refill tank
with fresh, clean gasoline.
Connect wire to plug.
1.
2.
3.
4.
5,
6. Replace spark plug.
7. Tighten blade bolt or
replace blade adapter.
8. Depress controlbar to
handle.
9, Replace control bar.
10.Turn fuel valve lever
to the ON position.
11. Charge battery.
12. Connect battery to engine.
15
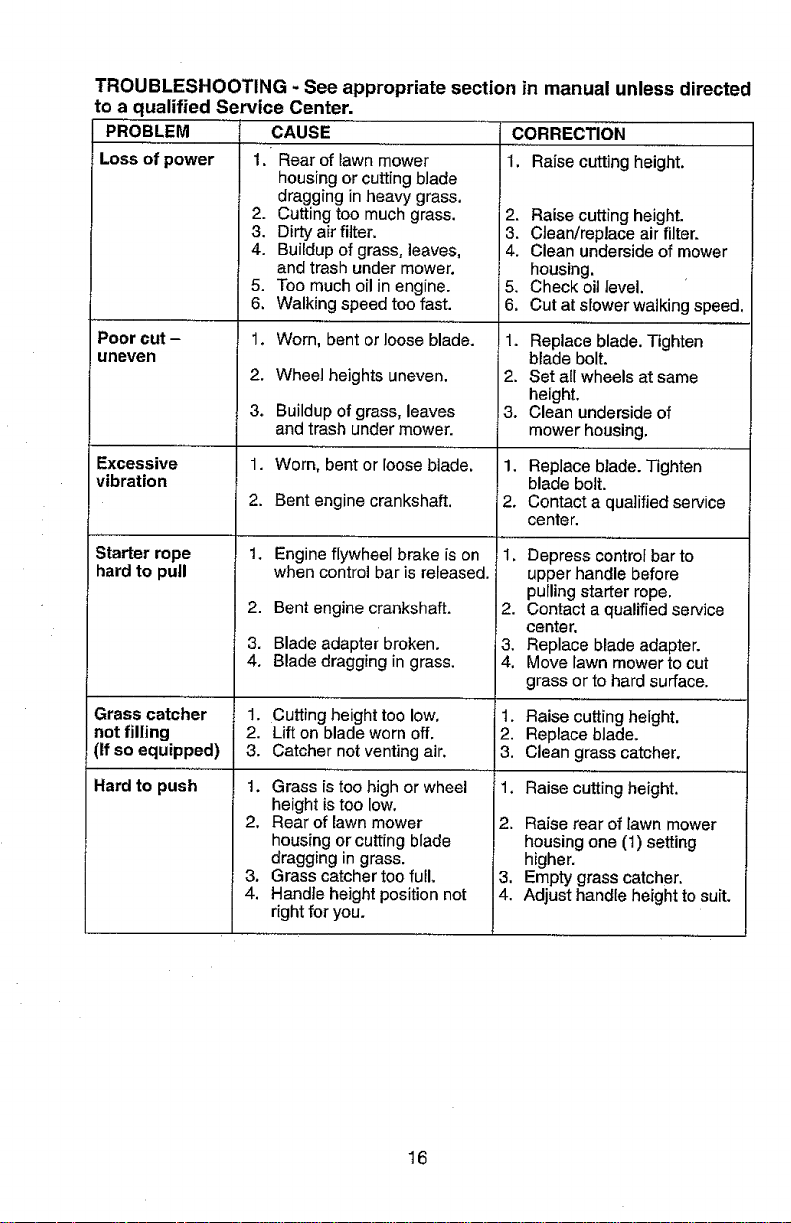
TROUBLESHOOTING. See appropriate section in manual unless directed
to a qualified Service Center.
PROBLEM CAUSE
Loss of power 1. Rear of lawn mower
Poor cut -
uneven
Excessive
vibration
Starter rope
hard to pull
Grass catcher
not filling
(It so equipped)
Hard to push
housing or cuttingblade
dragging in heavy grass.
2. Cutting too much grass.
3. Dirty air filter.
4. Buildup of grass, leaves,
and trash under mower.
5. Too much oil in engine.
6. Walking speed too fast.
1. Worn, bent or loose blade.
2. Wheel heights uneven.
3. Buildup of grass, leaves
and trash under mower.
1. Worn, bent or loose blade.
2. Bent engine crankshaft.
1. Engine flywheel brake is on
when control bar is released, i
2. Bent engine crankshaft.
3. Blade adapter broken.
4. Blade dragging ingrass.
1. Cutting height too low.
2. Lift on blade worn off.
3. Catcher not venting air.
1. Grass is too high or wheel
height istoo low.
2. Rear of lawnmower
housing or cutting blade
dragging in grass.
3. Grass catcher too full.
4. Handle height position not
right for you.
CORRECTION'
1. Raise cutting height.
2. Raise cutting height.
3. Clean/replace air filter.
4. Clean underside ofmower
housing.
5. Check oil Jevel,
6. Cut at slower walking speed,
t. Replace blade. Tighten
blade bolt.
2. Set all wheels at same
height.
3. Clean underside of
mower housing.
1. Replace blade. Tighten
blade bolt.
2. Contact a qualified service
center.
1. Depress control bar to
upper handle before
pulling starter rope.
2. Contact a qualified service
center.
3. Replace blade adapter.
4. Move lawn mowerto cut
grass or to hard surface.
1. Raise cutting height.
2. Replace blade.
3. Clean grass catcher.
1. Raise cutting height.
2. Raise rear of lawn mower
housing one (1) setting
higher.
3. Empty grass catcher.
4. Adjust handle height to suit.
16
Reglas de Seguridad ................................ 17-19
Especificaciones del Producto ....................... 19
Montaje / Pre-Operaci6n ............................... 20
Operaci6n ................................................. 21-24
Programa de Mantenimiento ......................... 25
Mantenimiento .......................................... 25-27
Servicio y Adjustes ........................................ 28
Almacenamiento ....................................... 29-30
ldentificasi6n de problemas ...................... 30-31
Panes de repuesto .................................. 32-33
Garantfa ......................................................... 36
IMPORTANTE: Esta maquina cortadaora es
capaz de amputar las manos y los manos y
los pies y de lanzar objetos. Si no se observan
las instrucciones de seguridad siguientes se
pueden producir lesiones graves o la muerte.
_ll,Busque este s{mbolo qua sefiata las precau-
clones de seguridad de importancia. Quiere
deck- iiiATENCION!!! iIiESTE ALERTO!!!
SU SEGURIDAD ESTA COMPROMETIDA.
_IbADVERTENCIA: Siempre desconecte el
alambre de Is bu|[a y p6ngalo _)nde no pueda
entrar en contacto con la bujfa, para evitar el
arranque por accidente, durante la preparaci6n,
eI transporte, el ajuste o cuando se hagen
reparaciones.
_I_ADVERTENCIA: Los boreas, terminaies y
aocesorios relatives de ta bater[a contienen
plomoo compuestosde plomo, productos
quimicos conocidosen et Estado de California
comocausa de c_ncer y defectos al naeimiento
u otrosdafios reproductivos. Lavar las manos
pu_s de mantpularlos.
RECAUCION: El tubo de escape del motor,
algunosde sue constituyentes y algunos com-
ponentes delvehiculo contienen o desprenden
productosquimicosoonocidosen e! Estado de
California como cause de c&ncery defectos al
nacimiento u otros dafios reproductivos.
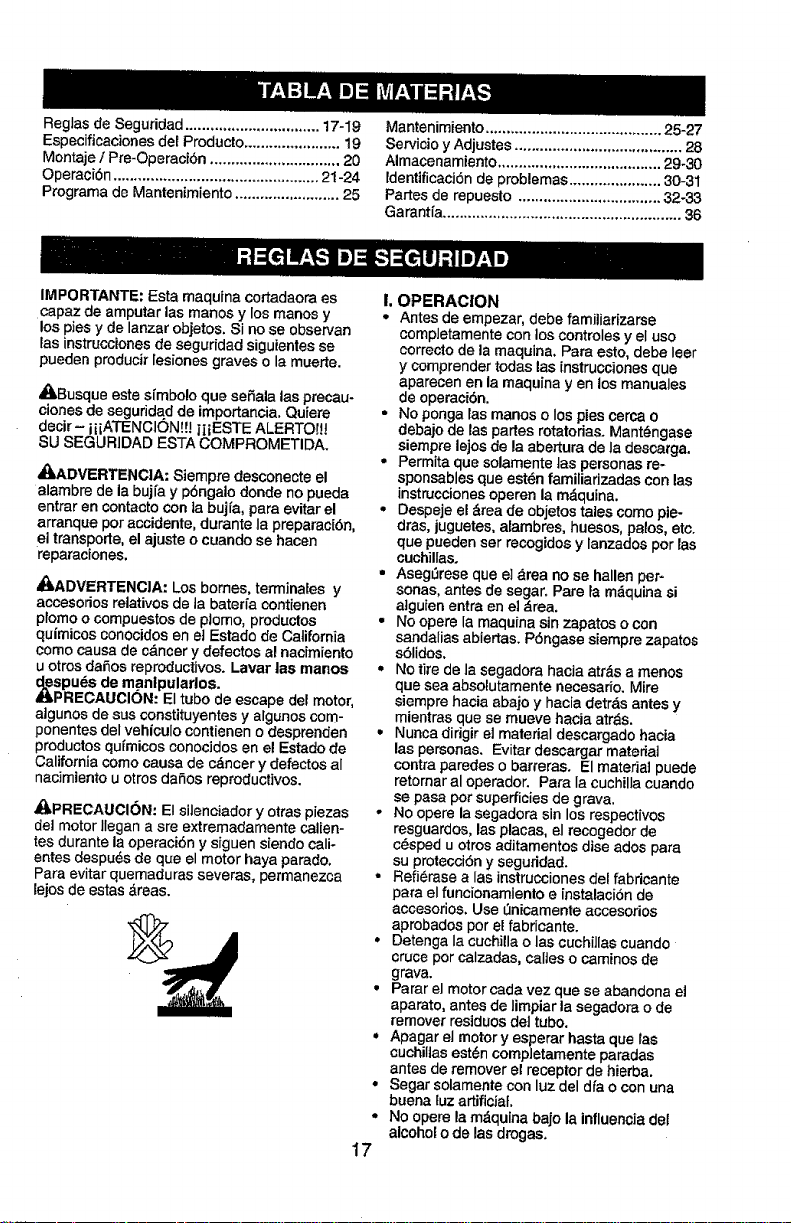
4_PRECAUCI6N: El silenciador y otras piezas
del motor llegan a ere extremadamente calien-
tee durante la operaci6n y siguen siendo cali-
entes despu_s de qua el motor haya parado,
Pare evitar quemaduras severas, permanezca
lejos de estas €_reas.
i, OPERACION
• Antes de empezar, debe familiarizarse
compJetamentecon Icecontrolas y el uso
correcto de la maquina, Para esto, debe leer
y comprender todas las instrucciones qua
aparecen en la maquina yen los manualas
de operaci6n.
• No ponga las manos o los pies cerca o
debajo de las partes rotatorias. Mant_ngase
siempre lejos de la abertura de la descarga.
• Permita qua solamente tas personas re-
sponsablas que est6n familiadzadas conlas
instn.lccionesoperen la m&qulna.
• Despeje el &rea de objetos tales como pie-
dras, juguetes, alambres, huesos, palos, etc.
qua pueden eer recogldos y tanzados por las
cuchillas.
• AsegLirese qua eL_rea no se hallen per-
sonas, antes de segar, Pare la m_.quinasi
atguienentre en el ,_rea.
• No opera la maquina sin zapatos o con
sandalias abiertas. P6ngase siemprezapatos
s61idos.
• No tire de la segadora haole atr_s a manes
que sea absolutamente necesario. Mire
siempre hacia abajo y hacie detr&s antes y
mientras qua se mueve hacia atr,_s.
• Nunca didgir et material descargado hacia
las personas. Evitar descargar material
contra paredes o barreras. El material puede
retornar al operador. Pare Ia cuchilJacuando
se pasa pot superficiesde grave.
° No opere la segadora sin los respectivos
resguardos, las places, el recogedor de
c6sped u circe aditamentos dlse ados pare
su protecci6n y seguridad.
° Refi6rase a las instrucciones del fabdcante
pare el funcionamiento e instalaci6n de
accesorios, Use _nicamente accesorios
aprobados por el fabric,ante.
• Detenga Ia cuchilta o las cuchiJtas cuando
cruce por calzadas, callas o caminos de
grava.
• Parer el motorcada vez qua se abandona el
aparato, antes de limpiar la segadora o de
remover residuos del tubo.
• Apagar el motor y esperar haste qua las
cuchillasast_n completamente parades
antes de remover el receptor de hierba.
° Sager solamente con luz del dfa o con una
buena luz artificial
• No opere lam_quina bajo la influenciadel
alcoho[ o de tas drogas,
17
• Nunca opere ]a maquina cuando la hierba
est_ mojada. Asegerese siempre de tener
buena tracci6n en sus pies; mantenga el
mango firmemente y camine; nunca corra.
- Desconectar el mecanismo de propulsion
aut6noma o el embrague de transmisi6n en
las segadoras que Iotienen antes de poner
en marcha el motor.
• Si el equipo empezara a vibrar de una
manera anormaI, pare el motor y revise de
inmediato para avedguar Ia causa. General-
mente la vibraci6n suele indicar que existe
alguna averfa.
° Siempre use gafas de seguridad o anteojos
con protecci6n lateral cuando opere la sega-
dora.
IL OPERACION SOBRE LAS CUESTAS
Los accidentes ocurren con m_s frecuencia en
las cuestas. Estos accidentes ocurren debido a
resbaladas o caidas, las cuales pueden resultar
en graves lesiones. Operar la recortadora en
cuestas requiere mayor concentraci6n. Si se
siente inseguro en una cuesta, no la recorte.
HACER:
• Puede recortar a trav_s de la supefficie de
Ia cuesta, nunca hacia arriba y hacia abajo.
Proceda con extrema precauci6n cuando
cambie de direcci6n en Ias cuestas.
• Renueva todos los objetos extrafios, tales
como guijarros, ramas, etc.
• Debe prestar atenci6n a hoyos, baches o
protuberancias. Recuerde que [a hierba a]ta
puede esconder obst&culos.
NO HACER:
• No recorte cerca de pendientes, zanjas o
terraplenes. El operador puede perder Ia
tracci6n en los pies o el equilibrio.
• No recorte cuestas demasiado inclinadas.
• No recorte en hierba mojada. 13 reducci6n
en ia tracci6n de la pisada puede causar
resbalones.
ill NI_IOS
Se pueden producir accidentes tr&gicos si el
operador no presta atenci6n a la presencia
de los nifios. A menudo, los nifios se sienten
atrafdos por ta maquina y pot ta actividad de
Ia siega. Nunca suponga que los nifios van a
permanecer en el mismo [ugar donde los rio
por L_ltimavez.
° Mantenga a los ni6os alejados de] Area de
Ia siega y bajo el cuidado estricto de otra
persona adulta responsable.
• Est_ alerta y apague la mAquina si hay nifios
que entran al Area.
• Antes y cuando este retrocediendo, mire
hacia atrAs y hacia abajo para verificar si hay
nifios pequefios.
° Nunca permita que los nifios operen la mA-
quina.
• Tenga un cuidado extra cuando se acerque
a esquinas donde no hay visibilidad, a los
arbustos, Arboles u otros objetos que pueden
interfedr con su Ifnea de visi6n.
IV. MANEJO SEGURO DE GASOLINA
Usar mucha atenci6n cuando se rnaneja gaso-
lina. La gasolina es extremamente inflamabley
los vapores son explosives.
• Apagar todos los cigarrillos, cigarros, pipas y
otras fuentes de ignici6n.
• Usar solo un contenedor apropiado.
• Nunca quitar el tap6n de la gasolina o aSadir
carburante con el motor en marcha. Esperar
que el motor se enfffe antes de repostar la
gasolina.
• Nunca repostar la maquina al intedor de un
local.
° Nunca guardar la m_,quina o el contenedor
de gasolina donde hay una llama abierta,
chispa o luz piloto como una catdera uotros
dispositivos.
• Nunca Ilenar contenedores en un vehfculo, en
un cami6n o caravana con unforro de pl&stico.
Colocar siempre los contenedoresen el sue]o
lejosde su veh[culo antes de Ilenar.
• Quitar equipos que funcionan con gasolina
del cami6n o caravana y repostar en el
suelo. Si esto no es posible, repostar dicho
equipo con un contenedor portati], mas bien
que con una tobera de gasolina.
• Mantener la tobera en contacto con el bordo
del dep6sito de carburante o de la apertura
del contenedor siempre hasta terminar el
abastecimiento. No usar un dispositivo de
cierre-apertura de la tobera.
° Si e[carburante cae en la ropa que se lleva,
cambiarsela inmediatamente.
• Nunea Ilenar en exceso el dep6sito de
carburante. Colocar el tap6n de la gasolina y
apretar de modo seguro.
V. SERVIClO
• Nunca haga funcionar una mdquina dentro
de un _rea cerrada.
• Nunca haga ajustes o reparaciones mientms
el motor est_ en marcha. Desconecte el
cable de la bujia, y mant_ngalo a cierta
distancia de 6sta para prevenir un arranque
accidental.
• Mantenga las tuercas y los pernos, espe-
cialmente los pernos del accesorio de la
cuchilla, apretados y mantenga el equipo en
buenas condiciones.
• Nunca manipule de forma indebidalos
dispositivos de seguridad. Controle regular-
mente su funcionamiento correcto.
° Mantenga Ia m_quina tibre de hierba, hojas
u otras acumulaciones de desperdicio.
Limpie los derrames de aceite o combustible.
Permita que la mAquina se enfrfe antes de
almacenaria.
° Pare e inspeccione el equipo si le pega a un
objeto. Reparelo, si es necesario, antes de
hacerto arrancar.
° En ning_n caso hay que regular ta altura de
las ruedas mientras el motor estA en marcha.
18
Los componentes del receptor de lahierba
van sujetos a desgaste, daSos y deterioro,
que pueden exponer tas partes en mov-
imiento o permitir qua objetos seen dispara+
dos. Controlar frecuentemente y cuando sea
necesario sustituir con partes aconsejadas
por elfabdcante+
• Las cuchillas de la segadora est&n afiladas
y pueden cortar. Cubdr las hojas o Ilevar
guantes, y utilizer precauciones especiales
cuando se efect_a mantenimiento sobre las
mismas+
• No cambie eJajuste (tel regulador del motor
ni exceda su veJocidad.
. Mantener o sustftuir las etiquetas de
seguridad e instrucciones, cuando sea
necesario+
_ADVERTENCIA: Este segadora viene equipado con un motor de combusti6n interne y no se
debe usar sobre, o cerca, de un terreno no desarrollado cubiertode bosques, de arbustoso de
cesped, o menos que el sistema de escape del motorvenga equipado con un amortiguador de
chispas que cumpla con las leyes locales o estatales (si existen)+ Sise usa un amorliguador de
chispas, el operador debe mantenedo en condicionesde trabajo eficientes_.
En el estado de California, la tey exige Io anterior(SecciSn 4442 del "California Pub]ic Re-
sources Code"). Otros estados pueden contarcon otras leyes parecidas+ Lasteyes federales
se apiican en la tierras federales.
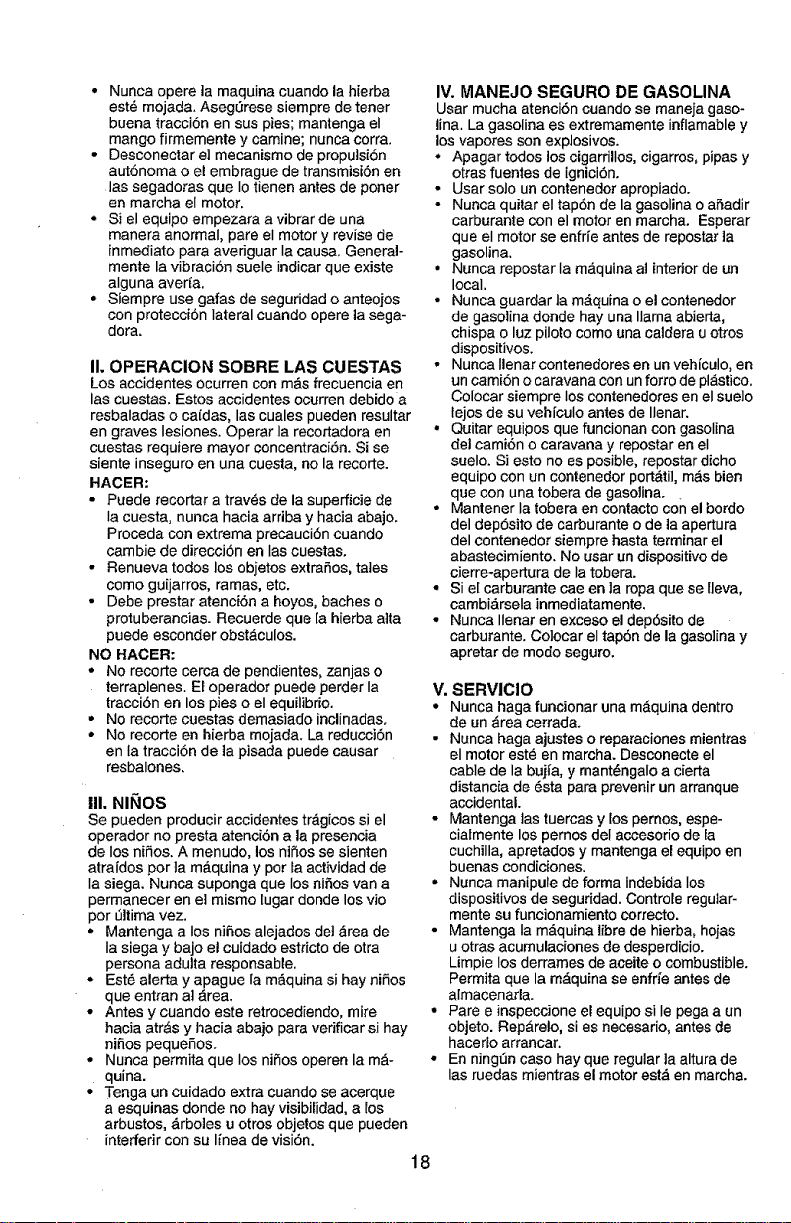
NDmero de Sede:
Fecha de Compra:
Capacidad y Tipo de Gasoline: 1.5 Cuartos (Regular sin Plomo)
Tipo de Aceite (API SG-SL): SAE 30 (Sobre 32°F); SAE 10W-30 (Debajo 32°F)
Capacidad de Aceite: 20 Onzas
Bujfa (Abertura: .030") Champion 8815
TorsiSn del Perno de la CuchilJa: 35-40 ft, Ibs.
El ndmero del nodelo y el de serie se encuentran en la calcomania adjuntaala parte trasera
de la+eajade la segadora. Debe registrar tanto el nemero de serie come la fecha de compra y
mantengalos en un lugar seguro pare refencia an el futuro.
19
Lea estas instrucciones y este manual comple-
tamente antes de tratar de montar u operar su
segadora nueva.
IMPORTANTE: Este cortac_sped viene SIN
ACEITE O GASOLINA en el motor.
Su segadora nueva ha sido montada en la
f,_brica con la excepci6n de aquellas partes que
se dejaron sin montar por razones de env{o.
Todas Ias partes como las tuercas, las arande-
las, los pernos, etc., que son necesadas para
completar el montaje ban sido co[ocadas en Ia
bolsa de partes. Para asegurarse que su sega-
dora funcione en forma segura y adecuada,
todas las partes y los art_culos de ferreter{a que
se monten tienen que ser apretados segura-
mente. Use Ias herramientas correctas, come
sea necesario, para asegurar que se apdeten
adecuadamente.
PARA REMOVER LA SEGADORA DE
LA CAJA DE CARTON
1. Remueva las partes sueltas que se incJuyen
con la segadora.
2. Corte las dos esquinas de los extremos
de ta caja de cart6n y genda ef panel del
extremo piano.
3, Remueva todo el matedal de empaque, e×-
cepto Ia curia entre el mango superior y _1
inferior, y la curia que sujeta la barra de los
control que exige Ia presencia del operador
junto con el mango superior.
4. Haga rodar la segadora hacia afuera de la
caja de cart6n y revfsela cuidadosamente
para verificar si todav{a quedan partes
sueltas adicionales.
COMO PREPARAR SU SEGADORA
PARA DESDOBLAR EL MANGO
IMPORTANTE: Despliegue e{ mango con
mucho cuidado para no pellizcar o dafiar los
cables de control.
t. Levante los mangos hasta que la secci6n
del mange inferior se asegure en su lugar,
en la posici6n para segar.
2. Remueva la curia protectora, levante la sec-
ci6n del mango superior hasta su lugar en
el mango inferior, y apriete ambas manillas
det mango.
3. Remueva la cuSa del mango que sujeta ta
barra de los control que exige la presencia
del operador junto con el mango supedor.
El mango de la segadora puede ajustarse
seg_n le acomode para segar. Refi_rase a
"AJUSTE DEL MANGO" en Iasecci6n de
Servicio y Ajustes de este manual.
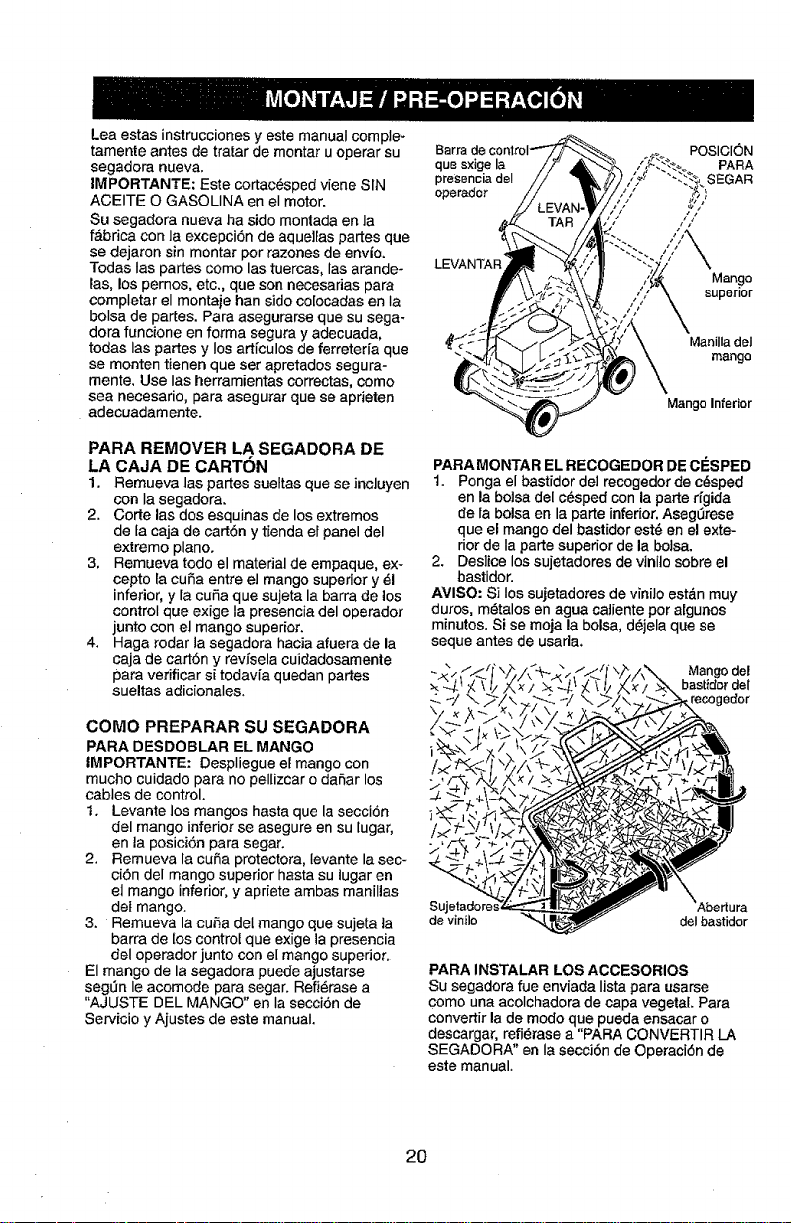
POSICION
que s×ige la PARA
presencia deI SEGAR
operador
,//
LEVANTAR
Mango
superior
ManilIa deI
mango
Mango Inferior
PARA MONTAR ELRECOGEDOR DECF_SPED
1. Ponga el bastidor dei recogedorde cdsped
en la bolsa del c6sped con la parte dgida
de Tabolsa en la parte inferior, AsegLirese
que el mango del bastidor est_ en el exte-
rior de Iaparte superior de la bolsa.
2. Deslice los sujetadores de vinito sobre el
bastidor.
AVISO: Si los sujetadores de vinilo est_n muy
duros, m6talos en agua catiente por aIgunos
minutos. Si se moja la bolsa, d6jela que se
seque antes de usarla,
de vinilo deI bastidor
PARA INSTALAR LOS ACCESORIOS
Su segadera rue enviada Iista para usarse
como una acolchadora de capa vegetal. Para
convertir la de modo que pueda ensacar o
descargar, refi_rase a "PARA CONVERTIR LA
SEGADORA" en Ia secci6n de Operaci6n de
este manual.
2O
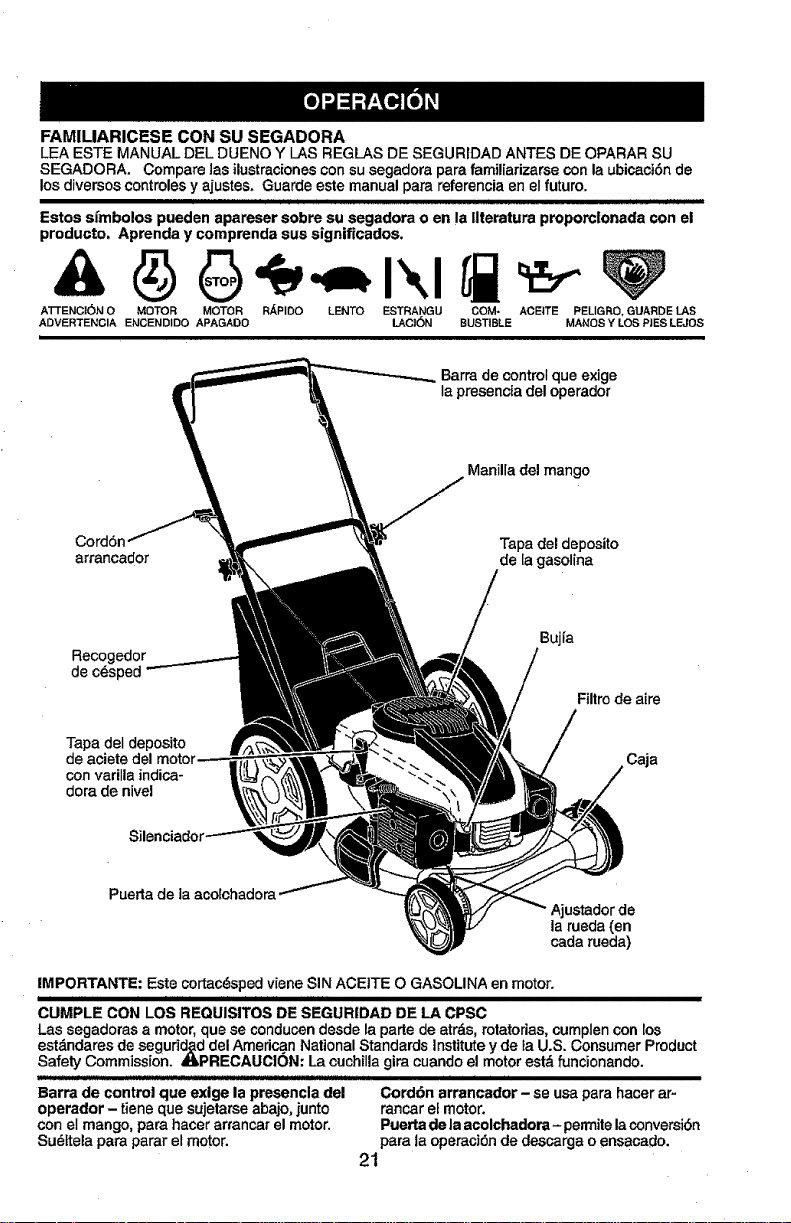
FAMILIARICESE CON SU SEGADORA
LEA ESTE MANUAL DEL DUENO Y I_AS REGLAS DE SEGURIDAD ANTES DE OPARAR SU
SEGADORA. Compare ]as ilustracionescon su segadora parafamiliarizarse con la ubicaci6n de
losdiversos controles y ajustes. Guarde este manual para referencia en el future.
iiiiiiiii iii iiu i I i J iii iii )IH]IIII
Estos simbolos pueden apareser sobre su segadora o en la tlteratura proporclonada con el
producto. Aprenda y comprenda sus significados.
ATTENCI(_N O MOTOR MOTOR RAPIDO LENTO ESTRANGU COM- ACEITE PELIGRO, GLIARDE LAS
ADVERTENGIA ENCENDIDO APAGAIDO LACK_N BUST|BLE MANOS Y LOS PJESLEJOS
i
Barra de controlque exige
Ia presencia del operador
Manilladel mango
Cord6n Tapa del deposito
arrancador de la gasolina
Recogedor
de c6sped
Tapa deI deposito
de aeiete de
con varilla indica-
dora de nivel
Filtrode aire
,Caja
Puerta de ta acolchadora
ustadorde
la rueda (en
cada rueda)
IMPORTANTE: Este cortac_sped viene SIN ACEITE O GASOLINA en motor.
I I I III II I I IIIIII I IIIII I IIIII I III III
CUMPLE CON LOS REQUlSITOS DE SEGURIDAD DE LA CPSC
Las segadoras a motor,que se conducendesde la parte de atr&s, rotatodas, cumplencon los
est,_ndaresde seguddx_ddel American National Standards Institute y de la U.S. Consumer Product
Safety Commission. 41_PRECAUCION, La cuchillagira cuando el motor est&funcionando.
Barra de control que exige la presencla del Cord6n arrancador - se usa para hacer ar-
operador - tiene que sujetarse abajo,junto rancar el motor.
con el mango, para hacer arrancar el motor. Puerta dela acolchadora- perrnitelaconversi6n
Su_ltela para parar el motor, para ta operaciSnde descarga o ensacado.
21
La operaciSn de cualquier
segadora puede hacer que
saEtenobjetos ex_raSos dentro de
sus ojos, ]o que puede producir
daSos graves en _stos. Siempre
use anteojos de seguridad o protecciSn para
los ojos mientras opere su segadora o cuando
haga ajustes o reparaciones. Recomendamos
gafas o una mascara de seguddad de visiSn
amplia de seguridad usada sobre las gafas.
COMO USAR SU SEGADORA
VELOClDAD DEL MOTOR
La velocidad del motor se establecio en Iafa-
brica para un rendimiento 6ptimo. La velocidad
no se puede ajustar.
CONTROL DE ZONA DEL MOTOR
PREQAUCION: Las regulaciones federales
exigen qua se instale un control para el motor
en esta segadora para reducir a un mrnimo el
riesgo de lesionarse debido al contacto con la
cuchilla. Por ning_n motivo trate de eliminar
Ia funciSn del control deeoperador. La cuchilla
gira cuando el motor est& funcionando.
• Su segadora viene equipada con una barra
de controles que exigen la presencia del
operador, Io que requiere que el operador
est6 detr&s deI mango de [a segadora para
hacerla arrancar y operarla.
PARA AJUSTAR LA ALTURA DE CORTE
Levante Ias ruedas para el corte bajo y baje las
ruedas para el corte alto., ajuste {a altura de
corte para que se acomode a sus requisitos. La
posici6n del medio es Iamejor para la mayoria
de los c6spedes.
• Para cambiar la altura de corte, empuje la
palanca del ajustador hacia la rueda. Mueva
la rueda hacia arriba o hacia abajo de modo
que se acomode a sus requisitos. Aseg_rese
que todas Ias ruedas queden igualmente
ajustadas.
AVISO: El ajustador esta correctamente
colocado cuando Ias orejas de la placa est,_n
insertadas en el agujero dei mango. Tambi6n,
los ajustes de 9 posiciones (si equipado) per-
miten que el mango pueda ser movido entre las
orejas de Ia placa.
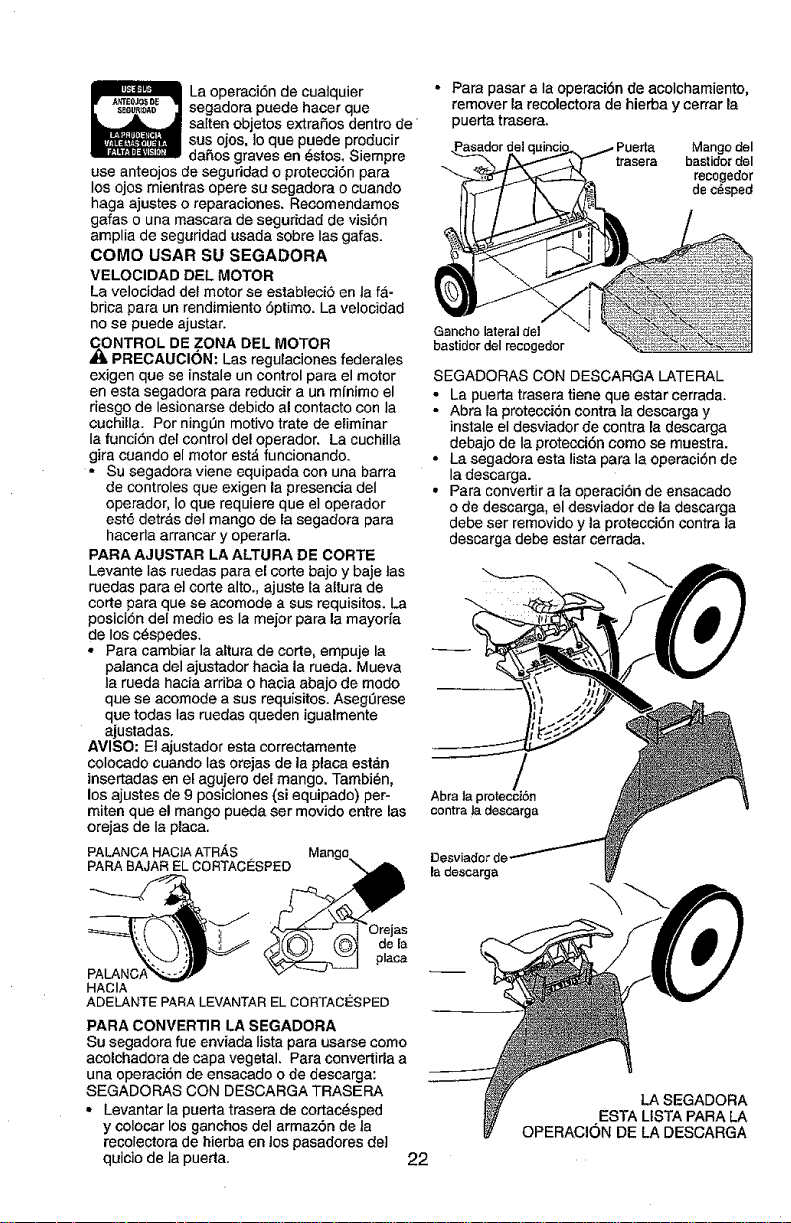
PALANCAHACJAATR_,S Mango
PARABAJARELCORTACESPED \.,_
;i
\,_, 1;\lI.:_-4L..>_ M([( )?} (O)_ de_a
PALANC,_._ v '_ placa
HACIA
ADELANTEPARALEVANTARELCORTACESPED
PARA CONVERTIR LA SEGADORA
Su segadora fue enviada Iista para usarse como
acolchadora de capa vegetal. Para eonvertirla a
una operaciSn de ensacado o de descarga:
SEGADORAS CON DESCARGA TRASERA
• Levantar la puerta trasera de cortac6sped
y colocar los ganchos del armaz6n de la
recolectorade hierba en los pasadores del
quicio de la puerta. 22
• Para pasar a Ia operaci6n de acolchamiento,
remover ra recolectora de hierba y cerrar la
puerta trasera.
Mango del
trasera bastidordel
mcogedor
de c_sped
Gancho lateral del
bastidor deI recogedor
SEGADORAS CON DESCARGA LATERAL
• La puerta trasera tiene que estar cerrada.
• Abra la protecci6n contra }a descarga y
instale el desviador de contra ra descarga
debajo de Iaprotecci6n como se muestra.
* La segadora esta lista para la operaciSn de
la descarga.
, Para convertir a [a operaci6n de ensacado
o de descarga, el desviador de la descarga
debe ser removido y la protecci6n contra la
descarga debe estar cerrada,
/
AbralaprotecciSn
contraladescarga
Desviador de
la descarga
LA SEGADORA
ESTA LtSTA PARA LA
OPERACIC)N DE LA DESCARGA
PASOS SIMPLES DE RECORDAR
CUANDO CONVIERTA SU SEGADORA
PARAACOLCHAMIENTO -
1. La plancha acolchadora trasera instalada,
2. La protecci6n contra la descarga cerrada.
PARA ENSACAMIENTO TRASERO -
1. La plancha acolchadora trasera removida.
2. Recogedor del cesped instalado.
3. La protecci6n contra la descarga cerrada,
PARA DESCARGA LATERAL-
1. La plancha acolchadora trasera instalada.
La desviador de la descarga instalada.
PRECAUCI(3N: No haga funcionar su
segadora sin la plata de la acolchadora, el
desviador de recortes o sin el recogedor
c6sped aprobados en su Iugar. Nunca trate de
operar la segadora cuando se haUaremovido
la puerta trasera o cuando se ha removido a
puerta trasera o cuando est_ un poco abierta.
PARA VACIAR EL RECOGEDOR DE ClaSPED
1, Levante el recogedorde c_sped usando el
mango del bastidor_
2. Remueva el recogedor de c_sped, con los re-
cortes,de debajo delmango de tasegadora.
3. Vacfe los recortesde Is boise.
AVISO: No arrastre labolsa cuando la vacfe;
se producirdun desgaste innecesano,
\ Mangodel
bastidordel
recogedor
ANTES DE HACER
ARRANCAR EL MOTOR
AGREGUE ACEITE
Su segadora fue enviada sin aceite en el motor,
Para el tipo y el grade del aceite a utilizar, yea
el "MOTOR" en la secci6n del Mantenimiento
de este manual.
,_PRECAUCl6N: NO sobrellene el motor con
aceite, o fumar& pesa demante del silenciador
cuando Eovalla a arrancar.
1. Aseg_rese que la segadora este nivelada.
2. Remueva Ia varila medidora de aceite de]
tubo de desarga de aceite.
3. Usted recibe un envase de aceite con la
unidad. Vierta lentamente el envase entero
de aceite en el tubo de relleno del motor,
AVISO: El terrapl6n initial del aceite requiere
solamente 18 onzas deb{do ataceite residual
en el motor de la prueba de calidad de 100%
de] fabricante. AI cambiar el aceite puede
necesitar 20 onzas.
4. Inserte y apdete Ia vadlla medidora de
acelte.
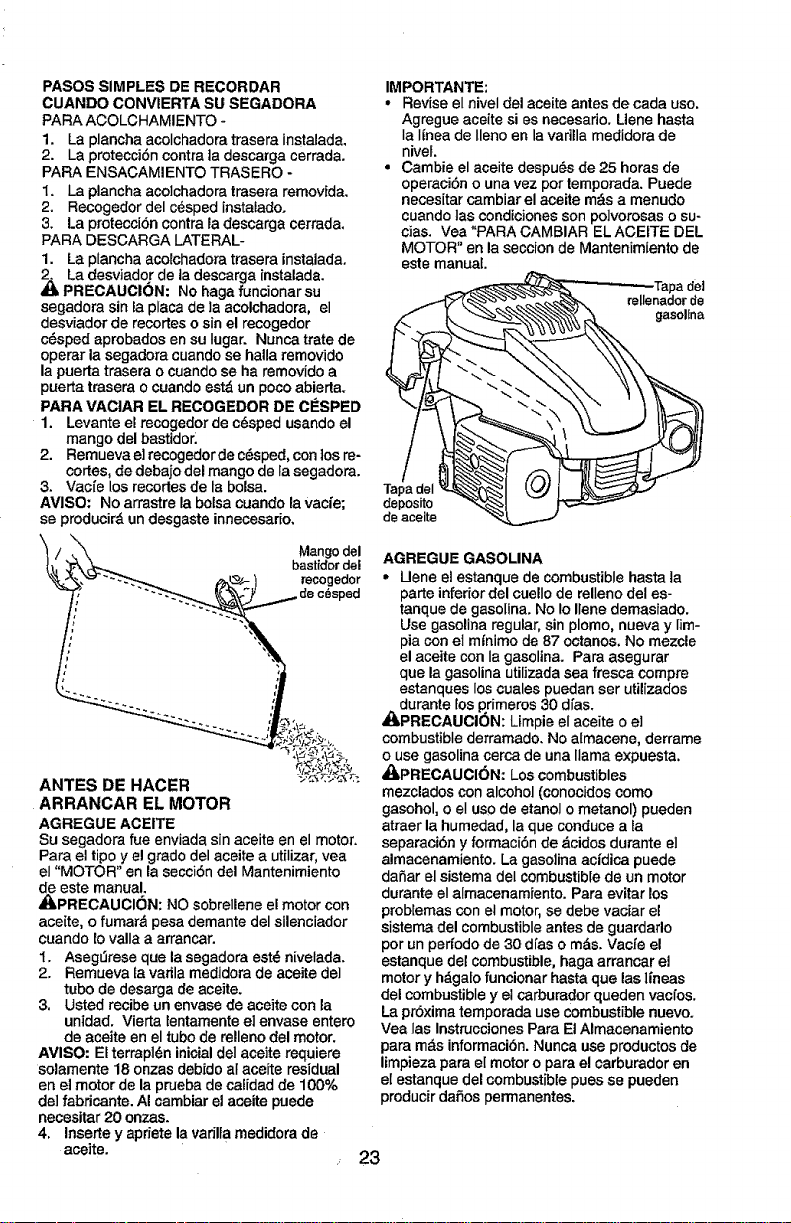
IMPORTANTE:
• Revise el nivel del aceite antes de cada uso.
Agregue aceite si es necesado. Uene hasta
Ia Iinea de lleno en lavarilla medidora de
niveL
• Cambie el aceite despu_s de 25 horas de
operaci6n o una vez pot temporada, Puede
necesitar cambiar el aeeite rods a menudo
cuando las condiciones son po]vorosas o su-
cias. Vea "PARA CAMBIAR EL ACEITE DEL
MOTOR" en la secoion de Mantenimiento de
este manual
rellenador de
gasoltna
Tapa deI
deposito
de aceite
AGREGUE GASOLINA
° Uene el estanque de combustible hasta la
parte inferior del cuello de relleno del es-
tanque de gasolina. No Io Ilene demasiado.
Use gasolina regular, sin plomo, nueva y Iim-
pia con el m_nimode 87 octanos, No mezcle
el aceite con la gasolina. Para asegurar
que la gasolina utilizada sea fresca compre
estanques los cuales puedan set utilizados
_l=durante Ios primeros30 dfas.
PRECAUCION: Limpie el aceite o el
combustible derramado. No almacene, derrame
o use gasolina eerca de una llama expuesta.
_PRECAUCI6N: Los combustibles
mezclados con alcohol (conocidos como
gasohol, o el us0 de etanol o metanol) pueden
atraer la humedad, laque conduce a la
separaci6n y formaci6n de _cidos durante el
almaeenamiento. La gasolina acidica puede
daSar el sistema deI combustiblede un motor
durante el almacenamiento. Para evitar los
problemas con el motor, se debe vaciar el
sistema del combustible antes de guardarlo
por un perfodo de 30 dias o m&s. Vacfe el
estanque del combustible, haga arrancar el
motor y hdgalo funcionar hasta que las lfneas
del combustible y el carburador queden vacfos.
La pr6xima ternporada use combustible nuevo.
Vea las Instrucciones Para El AImacenamiento
para m_s informaci6n. Nunca use productos de
limpieza para el motor o para el carburador en
el estanque del combustible pues se pueden
producir dafios permanentes.
23
PARA PARAR EL MOTOR
• Para parar e! motor, suelte la barra de con-
troles que exigen la presencia del operador,
PARA HACER ARRANCAR EL MOTOR
AVISO: Debido a las capas protectoras del mo-
tor, una cantidad pequeSa de humo puede es-
tar presente durante el use iniciat del producto
y se debe eonsiderar normal.
AVISO: Su motor viene equipado con un
sistema de estrangulaci6n automAtico. No
requiere ser cebado o obturado antes de
arrancar.
• Para hacer arrancar un motor, sujete la barra
de contro]es que exigen la presencia del
operador abajo en el mango y tire el mango
del arrancador rApidamente. No permita que
el cord6n arrancador se devuefva abruptam-
ente.
ONSEJOS PARA SEGAR
RECAUCION: No utilizar dispositivosanti-
paja de la hoja en la segadora ya que estos
accesorios son peligrosos, pueden dahar su
segadora y anular su garantia-
• Bajo ciertas condicJones, tat come cesped
muy alto, puede ser necesado el elevar
la altura del eorte para reducir el esfuerzo
necesario para empujar la segadora y para
evitar sobrecargar el motor, dejando men-
tones de recortes de c_sped. Puede que sea
necesario reducir la velocidad deI recorddo
y/o haga funcionar la segadora sobre el Area
per segunda vez.
• Para un corte muy pesado, reduzca el ancho
del corte pasando parcialmente per encima
deI lugar anteriormente cortado y siegue
lentamente.
- Para un meier ensacado del c_sped y para Ia
mayofia de las eondiciones de corte, la velo-
cidad del motor debe ajustarse a la posici6n
de R.APIDO.
• Los pores en los recogedores de c_sped de
tela pueden Ilenarse con mugre y polvo con
el use y los reeogedores recaudarAn menos
c6sped, Para evitar 6ste, rocfe el recogedor
con ta manguera de agua regularmente y
d_jelo secarse antes de usarlo.
• Mantenga la parle superior dei motor, alred-
edor del arrancador, despejada y sin recortes
de c6sped y paja. Esto ayudarA el flujo del
aire del motor y extender& su duraci6n.
CONSEJOS PARA SEGAR Y ACOLCHAR
IMPORTANTE: Para obtener el meier
rendimientomantenga Iacaja de lasegadora
sin acumulacion de cesped y basura, Vea
"LIMP]E.ZA" en Ia seccion de Mantenimento de
este manual.
• La cuchilla acolchadora especial va a velvet
a cortar los recortes de c_sped muchas
veces, y los reduce en tamaSo, de mode que
si se caen on el c_sped se van a dispesar
entre este y no se van a notar. Tambi_n, el
c6sped acolchado se va a deshacer rapi-
damente entregando substancias nutritivas
para el c_sped. Siempre acolche con la
velocidad del motor (cuchilla) mAs aita, pues
asf se obtendr& la meier acci6n de recorte de
las cuchillas.
• Evite cortar el c6sped cuando este mojado,
El c6sped mojado tiende a formar montones
e interfiere con Ia acci6n de acolchade.
La meier hera para segar el c6sped es
temprano en la tarde. A esa hera 6ste se ha
secado y el Area reci_n cortada no quedarA
expuesta al sol directo.
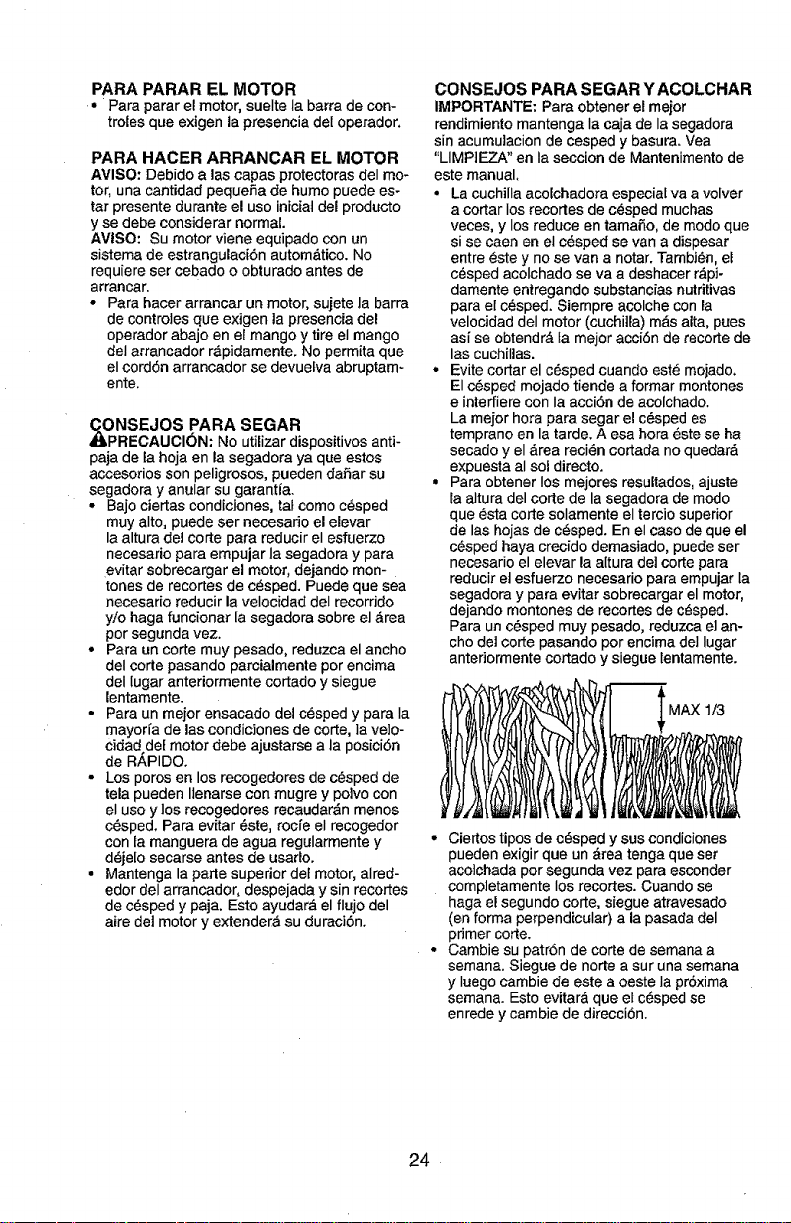
• Para obtener los mejores resultados, ajuste
la altura del corte de la segadora de mode
que _sta corte solamente el tercio superior
de las hojas de c_sped. En el case de que el
c6sped haya crecido demasiado, puedeser
necesario el elevar la a[tura de] corte para
reducir el esfuerzo necesario para empujar la
segadora y para evitar sobrecargar el motor,
dejando montones de recortes de c_sped.
Para un c6sped muy pesado, reduzca e] an-
cho del corte pasando per encima de] lugar
antedormente cortado y siegue lentamente.
MAXI_
• Ciertos tipos de c_sped y sus condiciones
pueden exigir que un Area tenga que set
acotchada per segunda vez para esconder
completamente los reeortes. Cuando se
haga el segundo corte, siegue atravesado
(on forma perpendicular) a la pasada del
primer corte.
- Cambie su patr6n de corte de semana a
semana. Siegue de notre a sur una semana
y Iuego cambie de este a oeste Ia pr6xima
semana. Esto evitar& que etc_sped se
enrede y cambie de direcciOn.
24
PROGRAMA DE ........
MANTENIMIENTO
iiiii i
Revisar st hay Su]etado_s Sueltos
S Limpiar/tespecc;o'nar e| Recr)gedor de G_,ped" "V _ V'
E controlar los Neumdlicos ..... • V'
G Gontrolar las Ruadas Mortices "** V'
i Lirnpi_Ha Segadora .... V _
D ump_r debaJo Jzt Cubiorta de ta 'TrarLsmisiSn --"
O ,R__i_rla=corre,syI=_Poteas{rnpu!_d_"-
a Revisar / Afilar / Cambiar _ Cuchilla
!A Lub ri_ci6n
Limpiar f Recargar fa Baterla *"
,, i ,HHll
Rev{sar e! niveI de! Aceite V_
O Limpiar el FiiL,_ de A]re
T Ir',speccionar elS,i,Ienc_ador ..... ,.......
O .C.ar.bia,Ia8uji.
,,,,,,,,,,,, ,,
ANTES DESPUES CADA CADA CADA ANTESDEL
DECADA DECADA 10 25 HORASO 100 ALMACE-
USO USO HORASTEMPORADAHORAS NAMIENTO
IIIIIII I II I I I
v' I,,'
V
v"
...... VP
V'3
i/
i,,i
v_
v'
i,,'
v_R Cambiar eI Cartacho de P_,pel del Fi|tro de AJre
Vaciar el s_s{ema de_ catbaran_e
o aSadir un eslabilizadar de c_.rburaa_e. V'
,m,H,HH ;HI HHH HH I
* (Sl vione equ[p_do) 1 - Cambiar m_s a mettudo cuande se opare bajo c_rga pesada o en amble ntes can arias temparateras.
*_- Segad_r-,_s _n Arranque E_¢_r_.o 2 - Oar ,servicto m&s a menada cuando as _pera en condicionas sucias o pa_varoaas=
,x_ Segadotas con Poder P_opulsar 3 - C_tmbie las cuchll|as m_s a menudo c_ando siague en ter_eno arenosa,
**** Utilizat una casqueta p_m _impiar 4 - Cargar pot 48 horas _I _n de I_,temporade.
debajo de I_.cubie rt_ deI corl_c_sped 5 - Y despt_a de 5 horas d_ tencion_miente,
RECOMENDACIONES GENERALES
La garant{a de esta segadora no cubre los
articulos que ban estado sujetos al abuso o a
}a negligencia del operador. Para recibir todo
el valor de la garant{a, el operador tiene que
mantener Ia segadora seg_n las instrucciones
descritas en este manual.
Hay algunos ajustes que se tienen que hacer
en forma periSdica para poder mantener su
unidad adecuadamente.
AI menos una vez cada estaciSn comprobar
si es necesario efectuar los ajustes deseritos
en las secciones de Servicio y Ajustes de este
manual.
• Una vez aI aho, cambie la buji'a,limp[e o
cambie el elemento del filtro de aire y revise
si la cuchilla est,. desgastada. Una bujia
nueva y un elemento del filtro de aire limpio!
nuevo aseguran }amezcla de aire-com-
bustible adecuada y ayudan a que su motor
funcione mejor y que dure mds.
• Siga el programa de mantenimiento en este
manual.
ANTES DE CADA USO
• Revise el niveldel aceite del motor.
• Revise si hay sujetadores sueltos.
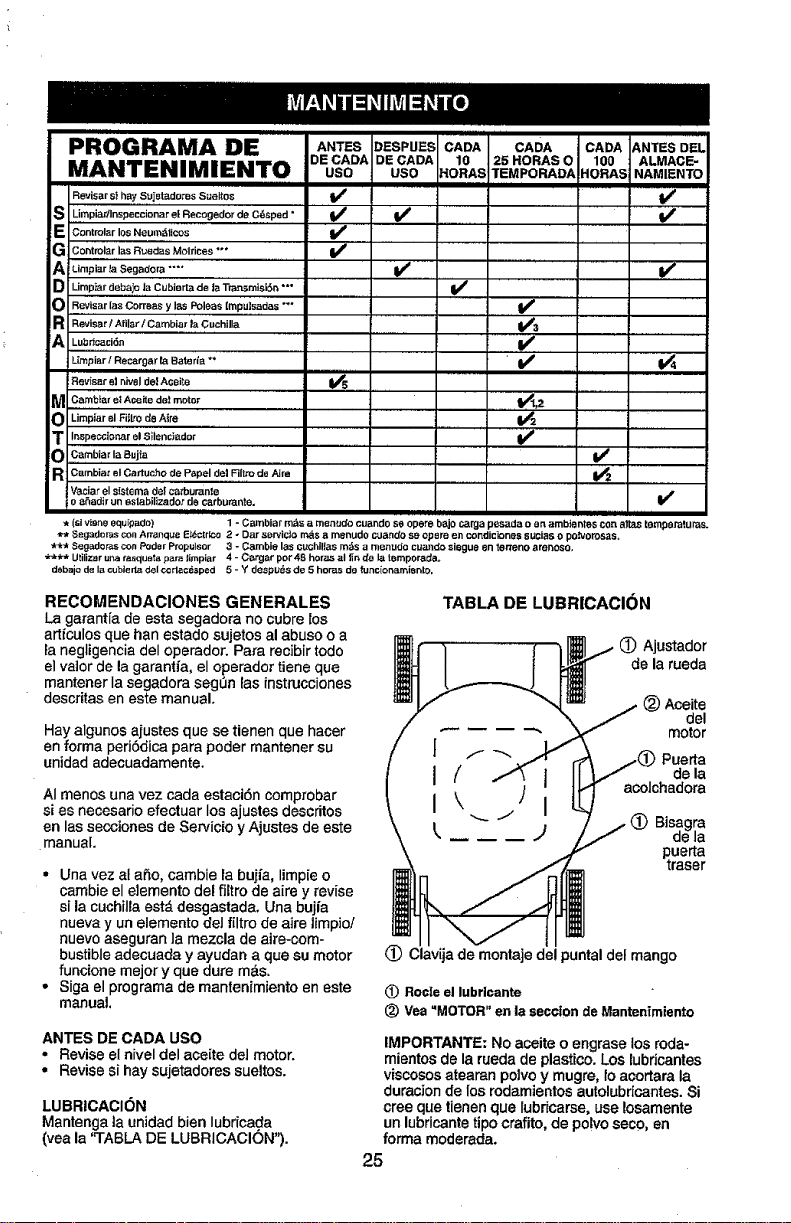
LUBRICACII_N
Mantenga ta unidadbien lubricada
(yea la 'q'ABLA DE LUBRICACION").
TABLA DE LUBRICACI()N
(_) Ajustador
de la rueda
(_ Aceite
del
motor
Puerta
de la
acoJchadora
(_ Bisagra
de la
Ptuerta
raser
Clavija de montaje del puntal del mango
(!) Rocheel lubrlcante
(_) Vea "MOTOR" en la seccton de Mantenimiento
IMPORTANTE: No aceite o engrase los roda-
mientos de la rueda de plastico. Los lubricante_s
viscososatearan polvo y mugre, lo acortara la
duracion de los rodamientos autolubricantes.Si
cree que tienen que {ubdcarse,use !osamente
un lubricantetipocrafito, de po!voseco, en
forma moderada.
25
SEGADORA
Siempre observe las regJas de seguddad cu-
ando haga el rnantenimiento.
LLANTAS
• Mantenga tas ltantas sin gasofina, aceite o
substancJas quimicas para control de insec-
tos que pueden daSar la goma.
o Evite los tocones, las piedras, tas gr[etas pro-
fundas, los objetos afilados y otros peligros
que pueden da£=ara tas Ilantas.
CUIDADO DE LA CUCHILLA
Para obtener los mejores resultados, la cuchilla
de la segadora tienen que mantenerse afilada.
mbie la cuchilla dob[ada o daSada.
PRECAUC!ON: Usar sotamente la hoja
de repuesto aprobada por el fabricante de su
cortac6sped. Usar una hoja no aprobada por el
fabricante de su cortac6sped es peligroso, pu-
ede daSar su cortac_sped y anular su garant[a.
PARA REMOVER LA CUCHILLA
1. Desconecte el alambrede labujfay p6ngaloen
donde no pueda entrar encontacto con L=sta.
2. Haga descansar la segadora en su Iado,
Aseg_rese que et filtro de aire y que el
carburador queden rnirando hacia arriba.
3. Use un bloque de madera entre IacuchiI]a
y la caja de la segad0ra para evitar que la
cuchitla gire cuando se Ie quite el perno.
AVISO: Proteja sus manos con guantes yio
envuelva la cuchilla con una tela gruesa,
4. Remueva el perno de ]a cuchilla gir&ndoIo
en el sentido contrario en que giran Ias
maniI]as del reloj.
5. Remueva Ia cuchitla y los art[cu[os de fer-
reter[a adjuntadores (el perno, la arandela
de seguridad y ]a arandela endurecida).
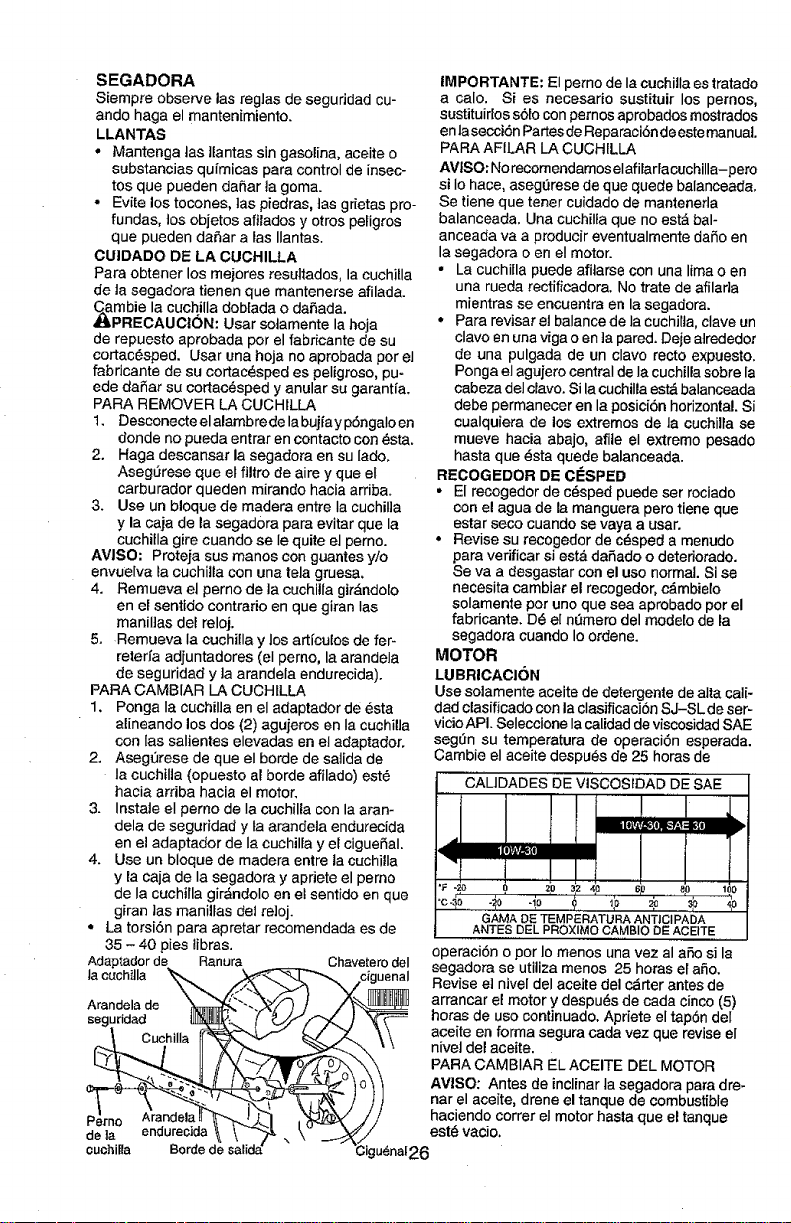
PARA CAMBIAR LA CUCHtLLA
1. Ponga Ia cuchilla en el adaptador de esta
al[neando los dos (2) agujeros en Ia cuchilla
con [as salientes elevadas en el adaptador.
2. Aseg_rese de que el borde de salida de
Ia cuchilia (opuesto al borde afilado) est6
hacia arriba hacia el motor.
3. Instate el pemo de Ia cuchilla con la aran-
dela de seguridad y fa arandela endurecida
en el adaptador de Ia cuchil[a y el cigueSal.
4. Use un bloque de madera entre la cuchilla
y la caja de Ia segadora y apdete el pemo
de Ia cuchiIla gir&ndolo en el sentido en que
giran las maniltas del re]oj.
• La torsiSn para apretar recomendada es de
35 - 40 pies libras.
Adaptadorde Ranura Chaveterodel
la cuchiila
Arandela de
seguridad
IMPORTANTE: El perno de la cuchilla es tratado
a calo. Si es necesario sustituir los pernos,
sustituir[os s61ocon pemosaprobados mostrados
enlasecciSn PartesdeReparaci6n deeste manual
PARA AFfLAR LA CUCH[LLA
AVtSO: Norecomendamos elafilarla cuchilla-pero
si Iohace, aseg,3rese de que quede balanceada.
Se tiene que tener cuidado de mantenerla
balanceada. Una cuehilta que no est_ bal-
anceada va a producir eventualmente daSo en
la segadora o en el motor.
• La cuchiila puede afi_arsecon una lima o en
una rueda rectificadora. No trate de afilada
mientras se encuentra en la segadora.
• Para revisar el balance de la cuchilta, clave un
clavo en una viga oen ]a pared. Deje atrededor
de una pulgada de un clavo recto expuesto.
Ponga el agujero central de IacuchilEasobre la
cabeza del ciavo. Si lacuchilla est& balanceada
debe permanecer en la posiciSnhorizontal. Si
cualquiera de los extremos de la cuchillase
mueve hacia abajo, afile el extremo pesado
hasta que _sta quede balanceada.
RECOGEDOR DE CESPED
• El recogedor de c_sped puede ser rociado
con el agua de la manguera pero tiene que
estar seco cuando se vaya a usar.
• Revise su recogedor de e_sped a menudo
para vedficar si est&daSado o deteriorado.
Se va a desgastar con el uso normal. Si se
necesita cambiar el recogedor, c_mbiefo
solamente por uno que sea aprobado por el
fabricante. D_ el nemero del modelo de la
segadora cuando Io ordene.
MOTOR
LUBRICAOION
Use soiamente aceite de detergente de alta call-
dad clasificado con laclasificaeiSn SJ-SL de ser-
vicioAPI. Seleccione Iacalidad de viscosidadSAE
segOn su ternperatura de operaciSn esperada.
Cambie el aceite despu6s de 25 horas de
CALIDADES DE VISCOStDAD DESAE
i
•_.zo o '_o 3z ,_e 6p eo loo
GAMA DE TEMPERATURA ANTICIPADA
ANTES ,DEL PROXIMO CAMBIO DE ACEITE
operaci6n o por 1omenos una vez al aSo si la
segadora se utiliza menos 25 horas el aSo.
Revise e] nivel del aceite del c_rter antes de
arrancar el motor y despu6s de cada cinco (5)
horas de uso continuado. Apriete el tap(_ndel
aceite en forma segura cada vez que revise el
nive] del aceite.
PARA CAMBIAR EL ACEITE DEL MOTOR
AVISO: Antes de inclinarla segadora para dre-
nar el aceite, drene el tanque de combustible
haciendo correr el motor hasta que el tanque
est_ ratio.
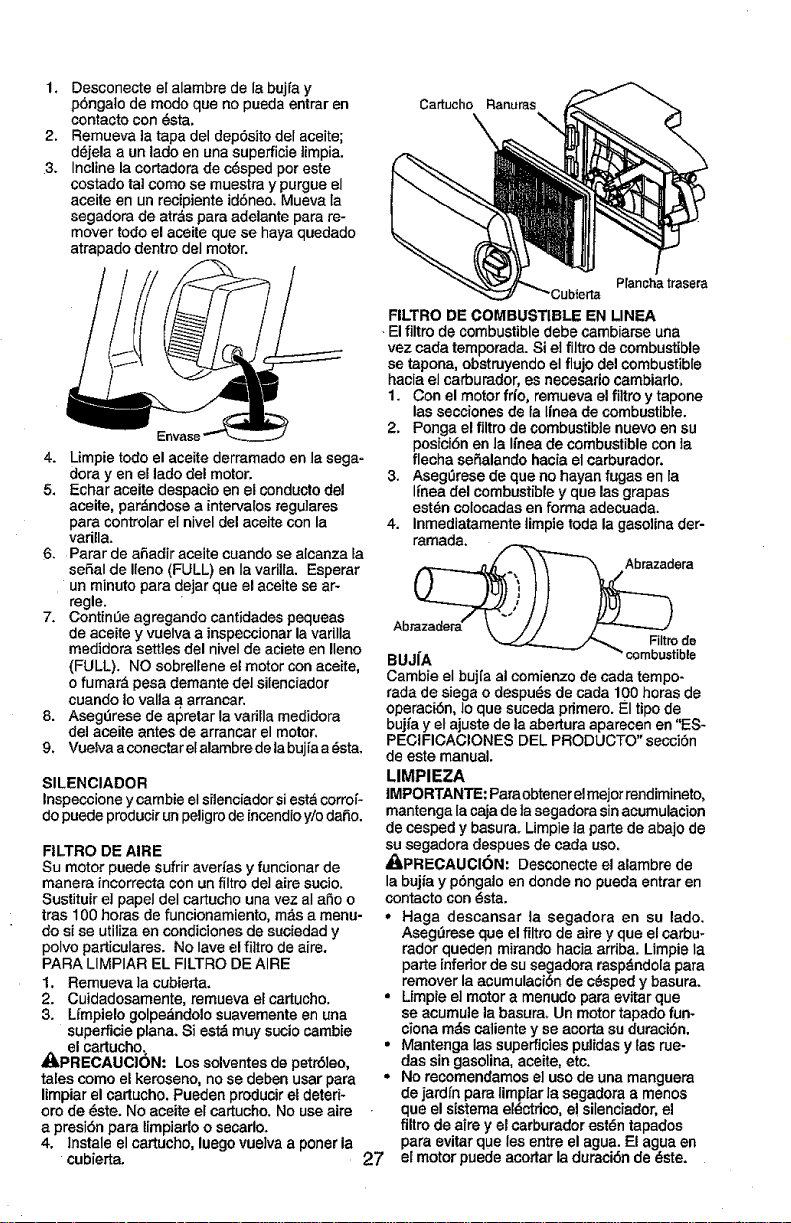
1, Desconecteelalambredelabujfay
p6ngatodemodoquenopuedaentraren
contactocon6sta.
2. Remueva]atapadeldep6sitodelaceite;
d_jelaaunladeenunasuperficietimpia.
3. Incline la cortadora de c_sped por este
costado tal comose muestra ypurgue el
aceite en un recipiente id6neo. Mueva fa
segadora de atr&s pare adelante pare re-
mover todo el aceite que se haya quedado
atrapado dentro del motor.
Cartucho Rarturas
Plancha trasera
4. Limpie todo el aceite derramado en la sega-
dora y en el lado del motor.
5, Echar aceite despacio en el conducto del
aceite, par,_ndose a intervalos regulares
pare controlar el nivel del aceite con la
varilla.
6. Parer de afiadir aceite cuando se alcanza la
sefiaI de Ileno (FULL) en Ia varilla. Esperar
un minuto pare dejar que el aceite se ar-
regle.
7. ContinLIe agregando cantidades pequeas
de aceite y vuelva a inspeccionarla varilla
medidora settles del niveI de aciete en Ileno
(FULL). NO sobrellene el motor con aceite,
o fumar_ pesa demante del silenciador
cuando Io valla a arrancar.
8. Aseg_rese de apretar la vadlla medidora
Gelaeeite antes de arrancar el motor,
9, Vuelva aconectar etalambre delabujia a_sta.
SILENCIADOR
Inspeccione y cambie el silenoiador si est_ corrof-
dopuede producir unpeligro deincendio y/o dafio.
FILTRO DE AIRE
Su motor puede sufriraverias y funcionar de
manera incorrecta con un filtro de] aire sucio,
Sustituir e] papeI deI cartucho una vez aI aSo o
tras 100 horas de funcionamiento, m_s a menu-
do si se utiliza en condiciones de suciedad y
polvo particulares. No lave el fi]tro de aire.
PARA LIMPIAR EL FILTRO DE AIRE
1, Remueva la cubierta.
2. Cuidadosamente, remueva el cartucho.
3. Umpielo golpeandolo suavemente en una
superficie plane. Si est_ muy sueio cambie
el cartucho.
_I=PRECAUCI6N: Los solventes de petr61eo,
tales como el keroseno, no se deben user pare
limpiar el eartuoho,Pueden producir et deteri-
oro de _ste. No aceite el cartucho, No use aire
a presibn pare limpiado o secarlo.
4. lnstale el eartucho, luego vuelva a poner la
cubierta.
FILTRO DE COMBUSTIBLE EN LINEA
•El filtro de combustibledebe cambiarse una
vez carla temporada. Si elfiltro de combustible
se tapone, obstruyendoel flujo del combustible
hacia el carburador, es necesario cambiarlo.
1. Con el motor frio, remueva el filtro ytapone
las secoiones de Ia linea de combustible.
2. Ponga el filtrode combustible nuevo en su
posici6n en la linea de combustiblecon la
flecha seSalando hacia el carburador.
3. Aseg0rese de que no hayan fugas en la
I_neaGelcombustibley que las grapes
est_n colocadas en forma adecuada.
4. Inmediatarnente limpie toda la gasoline tier-
ramada. /_ era
BUJIA
Cambie el buj[a al comienzo de cada tempo-
rada de siege o despu_s de cada 100 horas de
operaci6n, lo que suceda pdmero. El tipo de
bujfa y et ajuste de la abertura aparecon en "ES-
PECIFICACIONES DEL PRODUCTO" seecibn
de este manual.
LIMPIEZA
IMPORTANTIE: Pareobtener el mejorrendimineto,
mantenga lacaja de]a segadora sin aeumulacion
de eesped y basura. Limpie la parte de abajo de
su segadora despues de cada uso.
_,PRECAUCl6N: Desconecte el alambre de
la bujia y p6ngalo en donde no pueda entrar en
contacto con _sta.
* Haga deseansar ta segadora en su lado.
Asegdrese que el filtro de aire y que el carbu-
rador queden mirando hacia ardba. Limpie la
parte inferior de su segadora rasp&ndola para
remover la acumulacibn de cSsped y basura.
. Limpie e] motor a menudo pare evitar que
se acumule la basura. Un motor tapado fun-
ciona rods catiente y se acorta su duraciSn.
* Mantenga las superficies pulidas y las rue-
das sin gasolina, aceite, etc.
* No recomendamos el uso de una manguera
de jardfn pare limpiar la segadora a menos
que el sistema el_ctdco, e! silenciador,el
filtrode aire y el carburador est_n tapados
pare evitar que les entre el agua. El ague en
el motorpuede aeortar laduraci6n de 6ste.27
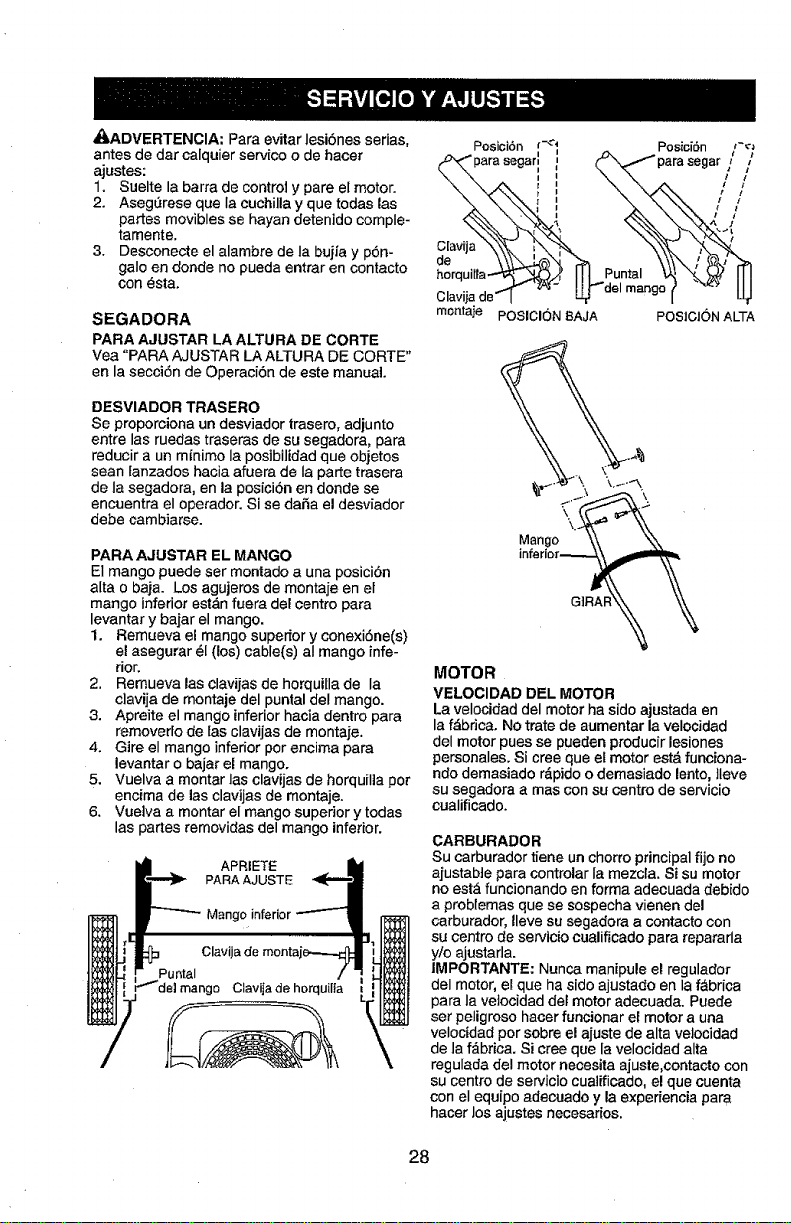
_t_ADVERTENCIA: Para evitar lesi6nes serias,
antes de dar calquier servico o de hacer
ajustes:
1. Suelte la barra de control y pare el motor.
2. AsegL_reseque Ia euchilla y que todas las
partes movibles se hayan detenido comple-
tamente.
3. Desconecte el alambre de la bujia y p6n-
gale en donde no pueda entrar en contacto
con _sta.
SEGADORA
PARA AJtJSTAR LA ALTURA DE CORTE
Vea "PARA AJUSTAR LA ALTURA DE CORTE"
en la secci6n de Operaci6n de este manual
DESVIADOR TRASERO
Se proporciona un desviador trasero, adjunto
entre las ruedas traseras de su segadora, para
reducir a un minimo la posibilidad que objetos
sean tanzados hacia afuera de Ia parte trasera
de la segadora, en la posici6n en donde se
encuentra el operador. Si se daSa el desviador
debe cambiarse.
PARA AJUSTAR EL MANGO
El mango puede set montado a una posici6n
alta o baja. Los agujeros de montaje en el
mango inferior estanfuera del centro para
levantar y bajar el mango.
1. Remueva el mango supeflor y conexi6ne(s)
el asegurar _1(los) cable(s) aI mango infe-
rior.
2, Remueva las clavijas de horquilla de la
clavija de montaje del puntal del mango.
3. Apreite el mango inferior hacia dentro para
removerlo de las clavijas de montaje.
4. Gire el mango inferior por encima para
levantar 0 bajar el mango.
5. Vuelva a montar las clavijas de horquiI]a pot
encima de las clavijas de montaje.
6. Vuelva a montar el mango superior y todas
las partes removidas del mango inferior.
APRIETE
PARA AJUSTE
Mango inferior
PuntaI
Clavijadehorquilia
Posici6n r-_4 Posici6n _'_
..parasegar! _x'--._-"para segar/
horqui_ta-_j, I!LP,u,ntam v_ \N"
Clavijade.-"_ "z'_" L_del mango( _"
monta._e POSICIONBAJA POSICIC)NALTA
MOTOR
VELOCIDAD DEL MOTOR
La velocidad del motorha sidoajustada en
la f&brica. No trate de aumentar lavelocidad
del motor pues se pueden producir lesiones
personales. Si cree que el motor estA funciona-
ndo demasiado r&pido o demasiado lento, Ileve
su segadora a mas con su centro de servicio
cualificado.
CARBURADOR
Su carburador tiene un chorro principalfijo no
ajustable para controlar Ia mezcla. Si su motor
no est,_funcionando en forma adecuada debido
a problemas que se sospecha vienen del
carburador, Ileve su segadora a contacto con
su centro de servicio cualJficadopara repararla
y/o ajustada.
IMPORTANTE: Nunca manipule el regulador
deI motor, el que ha sido ajustado en la f&brica
para la vetocidad del motor adecuada. Puede
ser peligroso hacer funcionar el motor a una
velocidad por sobre el ajuste de alta velocidad
de la fAbrica. Si eree que la velocidad alta
regulada del motor necesita ajuste,contacto con
su centro de servicio cuatificado, el que cuenta
con el equipo adecuado y la experiencia para
hacer los ajustes necesarios.
28
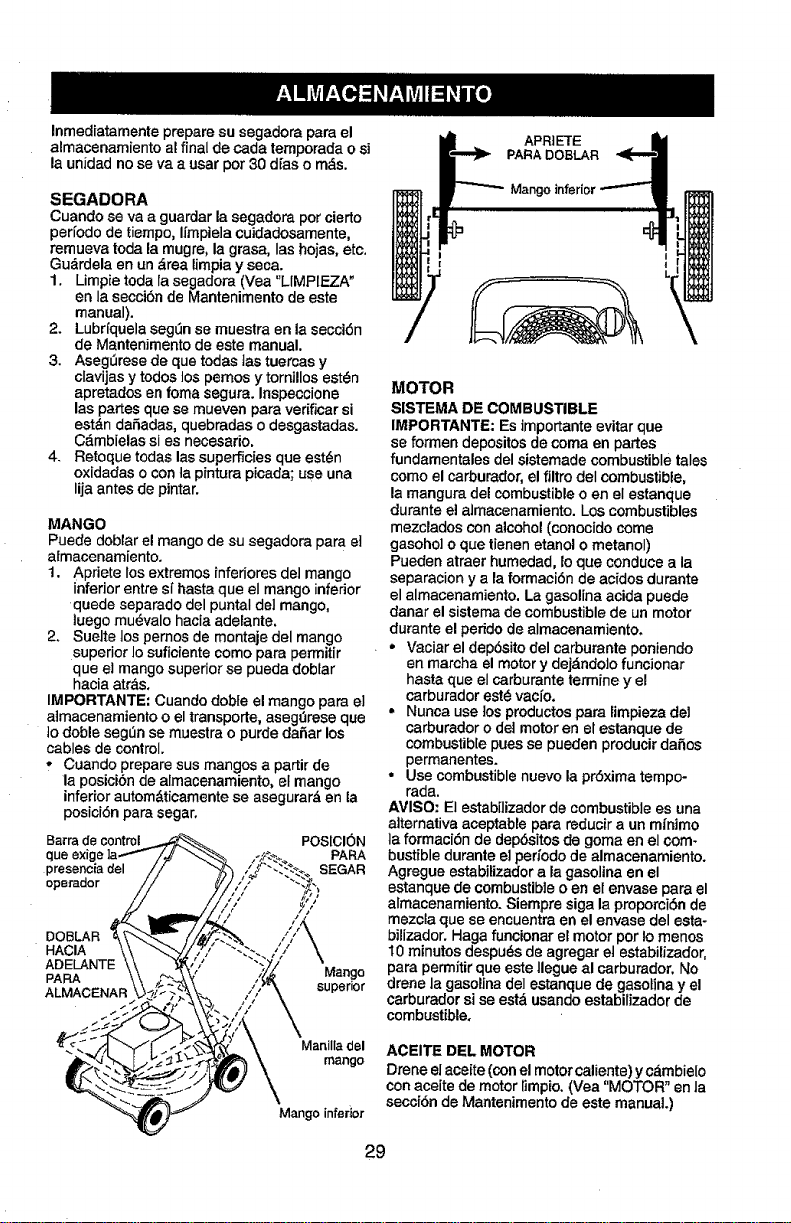
Inmediatamente prepare su segadora para el
almacenamiento a[ final de cada temporada o si
la unidad no se va a usar pot 30 d_as o rn_s.
SEGADORA
Cuando se va a guardar la segadora pot cierto
perfodo de tiempo, I{mpie]a cuidadosamente,
remueva toda la mugre, la grasa, Ias hojas, etc.
Gu_rdela en un area limpia y seca.
1. Limpie toda {a segadora (Vea "L{MPI_A"
en la secciSn de Mantenimento de este
manual).
2. Lubrfquela seg_n se muestra en la secci6n
de Mantenimento de este manual.
3. Aseg_rese de que todas tas tuercas y
clavijas y todos los pemos y tornillos est6n
apretados en foma segura. Inspeccione
las panes que se mueven para vedficar si
estdn daSadas, quebradas o desgastadas.
C_.mbielas si es necasado.
4. Retoque todas las superficies que est(_n
oxidadas o con ta pintura picada; use una
lija antes de pintar.
MANGO
Puede doblar e!mango de su segadora para et
almacenamiento.
1. Apriete los extremos inferiores del mango
infedor entre sf hasta que el mango infedor
quede separado del puntaI de1mango,
luego mu_valo hacia adelante,
2. Suelte los pemos de montaje del mango
superior 1osuficiente como para permitir
que el mango superior se pueda dobtar
hacia atr_s,
IMPORTANTE: Cuando dob{e el mango para el
aimaeenamiento o el transporte, asegt_rese que
_odoble segSn se muestra o purde dafiar los
cables de control.
, Cuando prepare sus mangos a partir de
la posici6n de alrnacanamiento, et mango
inferior autom&ticarnente se asegurar& en la
posici6n para segar,
Barra de contm{ POSICION
PARA
presenoia del SEGAR
operador
DOBLAR
HACIA
ADELANTE
PARA Mango
ALMACENAF superior
ManilIa del
mango
Mango inferior
APRtETE
PARA DOBLAR
inferior
MOTOR
SISTEMA DE COMBUSTIBLE
IMPORTANTE: Es importante evitarque
se formen depositosde coma en partes
fundamentales del sistemade combustible tales
como elcarburador, el filtro deI combustible,
la mangura del combustible o en el estanque
durante el aJrnacenamiento. Los combustibles
mezclados con alcohol (conocido come
gasoho] o que tienen etanol o rnetanol)
Pueden atraer hurnedad, Io que conduce a la
separation y a laformaci6n de acidos durante
el almaeenamiento. La gasolina aoida puede
danar el sistema de combustiblede un motor
durante el peddo de almacenamiento.
• Vaciar el dep6sito del carburante poniendo
en marcha el motor y dej__ndoJofuncionar
hasta que el carburante terrnine y el
carburador est_ vacfo.
• Nunca use los productos para limpieza del
carburador o del motor en el estanque de
combustible pues se pueden produeir dafios
permanentes.
, Use combustible nuevo la pr6xirna tempo-
rada.
AVlSO: El estab[lizador de combustible es una
altemativa aceptable para reducir a un m{nimo
]a formaci6n de dep6sitos de goma en el com-
bustible durante el periodo de almacenamiento.
Agregue estabilizador a la gasolina en el
estanque de comnbustibleo en el envase para el
almacenamiento. Siempre siga la proporci6n de
mezcla que se encuentra en el envase del esta-
bilizador. Haga funcionar el motor pot !o rnenos
10 minutos despu6s de agregar et estabilizador,
para permitir que este llegue al carburador. No
drene la gasolina de] estanque de gasotina y el
carburador si se est& usando estabilizador de
combustible.
ACEITE DEL MOTOR
Drene elaceite (con el motorcaliente) y cdmbie{o
con aceite de motorlimpio. (Vea "MOTOR" en la
secci6n de Mantenimento de este manual.)
29

ClLINDRO
1, Remueva Iabujia.
2. Vacie una onza (29 mI) de aceite a trav6s
del agujero de la bujia en el cilindro,
3. Tire la manilla de arranque lentamente unas
cuantas veces para distribuir el aceite.
4. Vuelva a montar la nueva bujia,
OTROS
° No guarde Ia gasolina de una temporada a Ia
otra.
• Cambie el envase de ]a gasolina si se emp-
ieza a oxidar. La oxidaci6n y/o la mugre en
su gasolina producir_n prob]emas,
° Si es posibte, guarde su unidad en un recinto
cerrado y cdbrala para protegerla contra el
polvo y ta mugre,
° Cubra su unidad con un forro protector
adecuado que no retenga la humedad. No
use pl_stico, El pl&stico no puede respirar, Io
que permite Iaformaci6n de condensaci6n,
to que producir_ la oxidaci6n de su unidad,
IMPORTANTE: Nunca cubra la segadora
mientras el motor y las areas de escape todavia
estan calientes,
_IbPREOAUCI6N: Nunca almacene Ia
segadora con gasolina en el estanque dentro
de un edificio en donde los gases pueden
alcanzar una llama expuesta o una chispa.
Permita que se enfrie el motor antes de
almacenada en algSn recinto cerrado,
SOLUCION DE PROBLEMAS - Vea la secci6n apropiada en el manual amenos que
estd dirigido a un centro de servico cualificado.
PROBLEMA CORRECCION
No arranca
CAUSA
1, Filtro de afresucio,
2. Sin combustible,
3, Combustfble rancio,
4. Agua en el combustible.
5. Alambre de la buj[a desconectado.
6. Bujia mala.
!7, Cuchilla suelta o adaptador
de la cuchilla quebrado.
8. Barra de control en Ia
posiciSn suella.
9. Barra de control defectuosa,
10. V_lvula del combustible (si equ-
ipada) esta en la posici6n OFF,
11. Bateria d_bi (si equipada).
I2, Desconecte el conector
de la bateria (si equipada),
1, Limpie!cambieel filtro de aire.
2. Llene el estanque de combustible.
3, Vaciar e[estanque y vuelva a
Ilenarto con combustible limpio
y nuevo.
4. Vaciar el estanque y vuelva a
Ilenarto con combustible timpio
y nuevo,
5. Conec_e etalambre a la bujfa.
6. Cambie la bujfa,
7. Apriete el perno de la cuchilla
cambie el adaptador de la cuchilla.
8, Presione la barra de control
hacia el mango,
9, CambJe la barra de control,
10_Gire a la v_lvula det combustible
a la posici6n ON.
11, Cague la baterfa,
12. Conecte la bateria al motor.
3O

SOLUCION DE PROBLEMAS - Vea la secci6n apropiada en el manual amenos que
est_ dirigido a un centro de servico cualificado.
PROBLEMA CAUSA
Falta de 1. Cuchilla desgastada, doblada
fuerza o suelta.
2. Altura de las ruedas dispareja.
Mal corte-
disparejo
Vibraci6n
exceslva
Cord6n
arrancadot
diffcil de tirar
Recogedor de
c_sped no se
Ilena (si viene
equ|pado)
Diffcil de
empuJar
3. Velocidad del motor lenta.
4. Acumulaci6n de c6sped, hojas o
basura debajo de tasegadora.
5. Demasiado aceite en motor.
6. Velocidad de recorrido
demasiado rdpida.
1. Cuchilla desgastada0 doblada
o suelta.
2. Altura de fas ruedas dispareja.
3. Acumulaoi6n de c_sped, hojas o
basura debajo de la segadora.
I. Cuchilla desgastada, doblada
o suelta.
2. CigueSal del motor doblado.
1.
2.
3.
4.
El freno del volante del motor
est_ aplicado cuandose
suelta la barra de control,
CigueSal del motor doblado.
Adaptador de la cuchilla quebrado.
La cuchillase arrastra en
el c6sped.
1. Altura de corte demasiado baja,
2. Levantamiento de la cuchi[Ia
desgastado.
3. Recogedor sin ventilaci6n de aire.
1. Elc_sped est_ demasiado alto o la
altura de Ia rueda demasiado baja.
2. Parte trasera de Ia
caja!cuchiliade la segadora
arrastr,_ndose en el cdsped,
3. Recogedor de c_sped
demasiado Ileno,
4. Posici6n de la altura del mango
no aclecuada para usted.
CORRECC|ON
1. Ajuste a la posici6n de
"Corte m_.s alto."
2, Ajuste a la posici6n de
"Corte m_s alto."
3. Limpie/cambie el filtro de aire.
4. Limpie la parte inferior de la
caja de Ia segadora,
5. Revise el nivel del aceite.
6, Code a una velocidad de
recorrido mas lenta.
1. Cambie ]acuchilla. Apriete el perno
de la cuchilta.
2. Ajuste todas Ias ruedas a la misma
altura.
3. Limpie Ia parte inferiorde la
caja de la segadora.
1. Cambie la cuchilla. Apdete el
perno de la cuchilla.
2. P6ngase en contacto con eucentro
de servicio cualificado,
1. Presione la barra de control
hacia el mango superior antes
de tirar el cord6n arrancador.
2. P6ngase en contacto con su centro
de servicio cualificado.
3, Cambie el adaptador de la cuchilla.
4. Mueva la segadora a un lugar
en donde elc_sped ha sido
cortado o a una superficie firme
para haeer arrancar el motor,
2.
3.
1.
2.
3.
4.
Eleve la altura de code.
Cambie las cuchillas.
Limpie el recogedor de c6sped.
Eleve la altura de corte.
Eleve la parte trasera de la caja de
la segadora (1) un lugar m&s alto.
Vacfe el recogedor de c6sped.
Ajuste la altura del mango de
modo que le acomode.
31
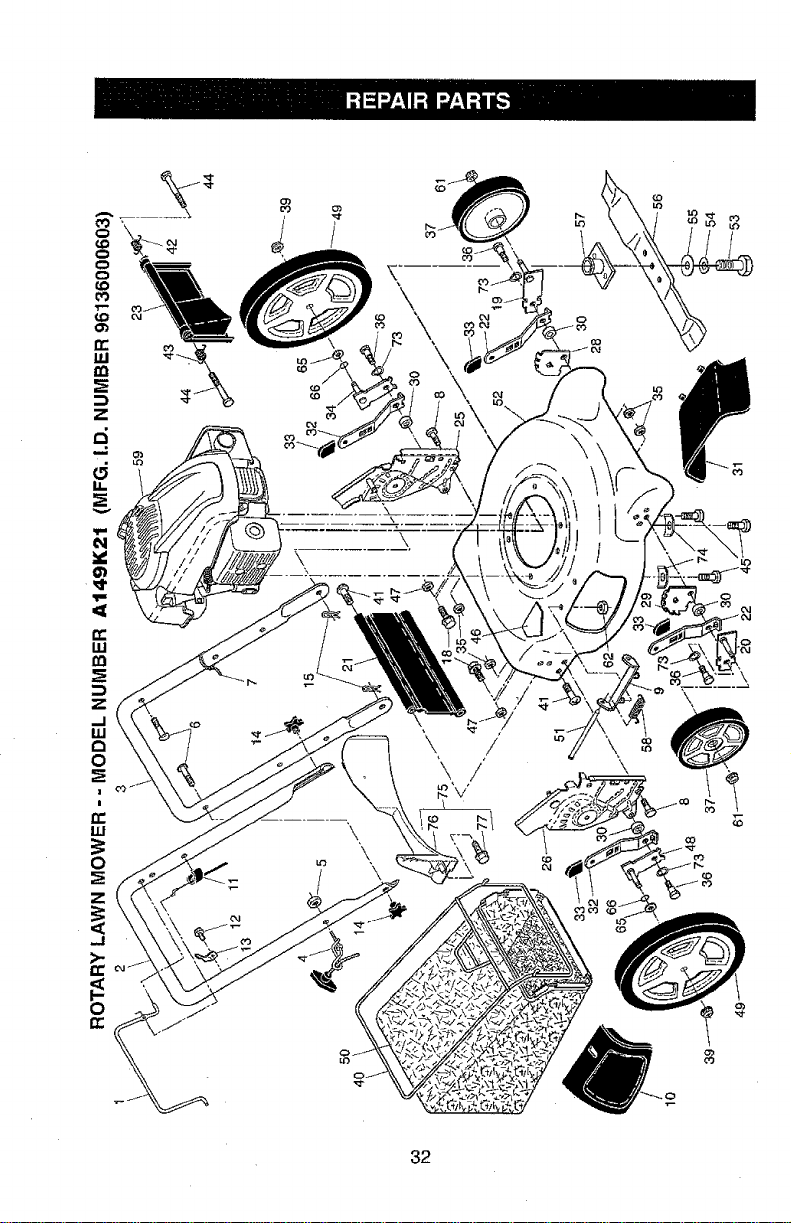
\
\
\
32
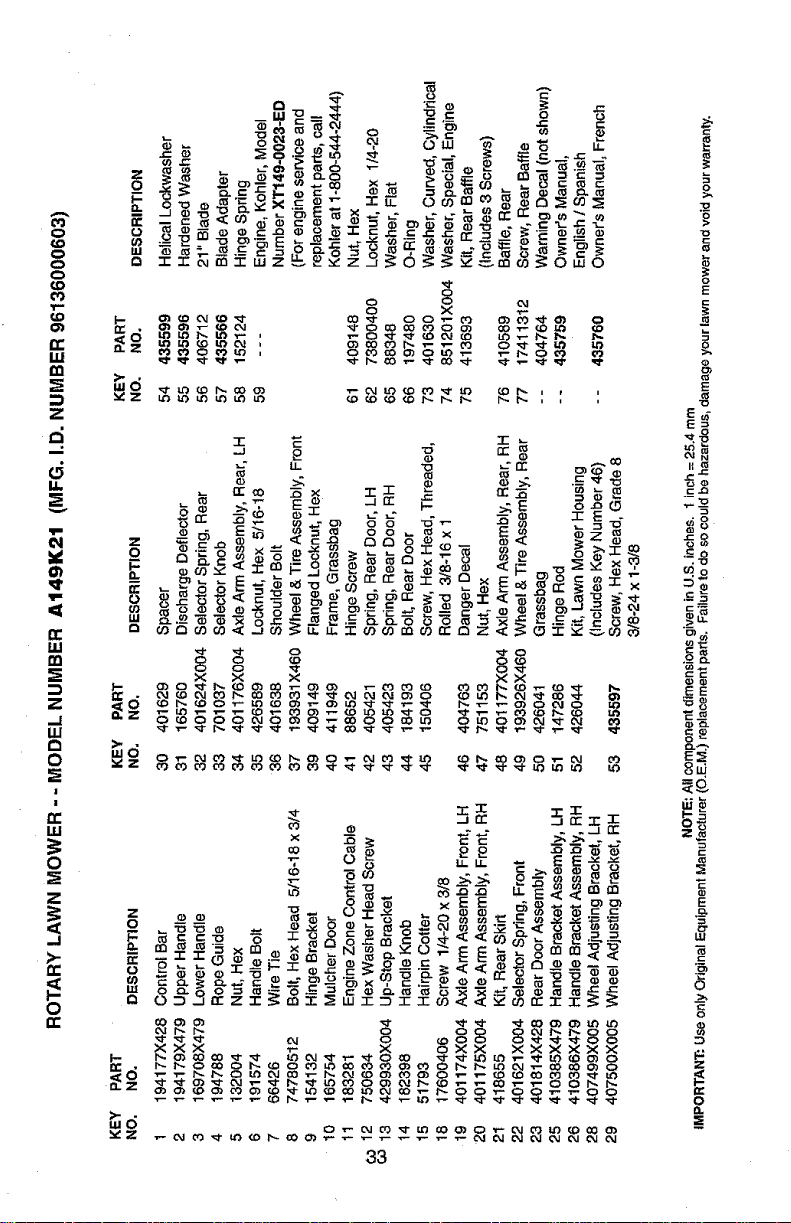
o
o
I11
rn
_D
Z
1,6
!11
m
Z
,_1
i11
0
|
i
ILl
0
Z
0
z
o
I--
ILl
1,--
_d
_z
[
D
...o
I-
_d
vX
_ W "o
_'_ _._o
o_-e
__s° _'o " _ 'Z "5
"r' fn n" L:LIZ _
0 X
' _0__ _
" E _ e-=.m
__ _ ._ oo
x _ _
SNN_N N NNNN
Z _
_-_
o_3_ =_'-zz_
_ _ _-
_ _ o__
0_ X_ __
_ _ .__
o_o_
_o_<<
N oN _N o
33
E
E
E
E_
_N
_8
_o
c_
,___.
_E
_g
g_
8w
g
N
E
g
o
g
z)
o
n

SERVICE NOTES
34

SERVICE NOTES
35

LIMITED WARRANTY
The Manufacturer warrants to the original consumer purchaser that this productas
manufactured is free from defects in materials and workmanship. For a period of
two (2) years from date of purchase by the original consumer purchaser, we will re-
pair or replace, at our option, without charge for parts or labor incurred in replacing
parts, any part which we find to be defective due to materials or workmanship. This
Warranty issubject to the following limitations and exclusions.
1.This warranty does not apply to the engine, transaxle/transmission components,
battery (except as noted below) or components parts thereof. Please refer to the
applicable manufacturer's warranty on these items.
2.Transportation charges for the movement of any power equipment unit or at-
tachment are the responsibility of the purchaser. Transportation chargesfor any
parts submitted for replacement under this warranty must be paid by the pur-
chaser unless such return is requested by the manufacturer,
3.Battery Warranty: On products equipped with a Battery, we will replace, without
charge to you, any battery which we find to be defective in manufacture, during
the first ninety (90) days of ownership. After ninety (90) days, we will exchange
the Battery, charging you 1/12 of the price of a new Battery for each full month
from the date of the original sale. Battery must be maintained in accordance with
the instructions furnished.
4. The Warranty period for any productsused for rental or commercial purposes is
limited to 45 days from the date of original purchase.
5.This Warranty applies only to products which have been properly assembled,
adjusted, operated, and maintained inaccordance with the instructions furnished.
This Warranty does not apply to any product which has been subjected to al-
teration, misuse, abuse, improper assembly or installation, delivery damage, or to
normal wear of the product.
6. Exclusions: Excluded from this Warranty are belts, blades, blade adapters, nor-
mal wear, normal adjustments, standard hardware and normal maintenance.
7. In the event you have aclaim under this Warranty, you must return the product to
an authorized service dealer.
Should you have any unanswered questions concerning this Warranty, contact:
HOP In Canada contact:
Customer Service Department HOP
9335 Harris Corners Parkway Customer Service Department
Charlotte, NC 28269 USA 5855 Terry Fox Way
Mississauga, Ontario LSV 3E4
giving the model number, serial number and date of purchase of your product and
the name and address of the authorized dealer from whom it was purchased.
THIS WARRANTY DOES NOT APPLY TO INCIDENTAL OR CONSEQUENTIAL
DAMAGES AND ANY IMPLIED WARRANTIES ARE LIMITED TO THE SAME
TIME PERIODS STATED HEREIN FOR OUR EXPRESSED WARRANTIES.
Some areas do not allow the limitation of consequential damages or limitations
of how long an implied Warranty may last,so the above limitations or exclusions
may not apply to you. This Warranty gives you specific legal rights, and you may
have other rights which vary from locale to locale.
This is a limited Warranty within the meaning of that term as defined in the Mag-
nuson-Moss Act of 1975.