
TOP MOUNT REFRIGERATOR MODELS RTD2300, RTD2100, RTD1900, RTD19EO, RTF1900
TABLE OF CONTENTS
Page
About Your May_ag ............................................................................................... 1
For Future Reference .......................................................................................... 1
Consumer Publications ........................................................................................ 1
Installation .............................................................................................................. 2
General Features .................................................................................................. 3
Operating the Refrigerator ................................................................................. 4
• "l_m_perature Controls .................................................................................. 4
• Energy" Saver Switch .................................................................................... 4
• Warm Cabinet Surfhces ............................................................................... 4
Adjusting the Refrigerator and Freezer Interiors ......................................... 5 6
• Refrigerator Interior .................................................................................... 5
Sure-Lock Shelves ................................................................................... 5
Door Bins ................................................................................................. 5
Keepers .................................................................................................... 5
• Freezer Interior ............................................................................................ 6
Freezer Shelves ....................................................................................... 6
Speeial Storage Areas ........................................................................................... 6-8
• Crispers ......................................................................................................... 6
• Meat/Cheese Drawer ...................................................................................
• Wine Rack ..................................................................................................... 7
• Covered Dairy Compartment ...................................................................... 7
• Egg Cradle ....................................................................................................
Energy Saving Tips ............................................................................................... 8
Food Storage Tips ................................................................................................. 8 11
• Fresh Food Storage ...................................................................................... 8-9
° Frozen Food Storage .................................................................................... 9
• Food Storage Chart ...................................................................................... 10-11
Ice Service .............................................................................................................. 12
• T_st Ice Cube Trays .................................................................................... 12
• Automatic Ice Maker ................................................................................... 12
Care and Cleaning ................................................................................................ 13-14
• Refrigerator Exterior and Interior ............................................................... 13
• Cleaning Under the Refrigerator ................................................................ 13
• Cleaning the Condenser. ............................................................................. 13
• Cleaning the Defrost Pan ............................................................................. 13
• Replacing the Interior Lights ...................................................................... 13
• Cleaning Chart ............................................................................................. 14
Non-Use Periods .................................................................................................... 15
• Vacations ....................................................................................................... 1,5
° Moving .......................................................................................................... 15
Important Personal Safety Instructions ........................................................... 15
To Avoid Unnecessary Service Calls .................................................................. 16
Warranty ................................................................................................................. ]7
ABOUT YOUR MAYTAG FOR FUTURE REFERENCE
(2mgratulations on your choice of' a Maytag
re[rigerator! As you llSe VOIIFnc\v refrigerator we
kr)ow _ou will appreciate the many [eatures that
provide exeelhmt perfbrmanee, case o[ cleaning,
convenience and dependabilit)-.
It is impo,_ant to understand how your new
r{'ffigerator operates before xou use it. On the
fbllox_dng pages }ou wili find"a wealth of
i_formation regarding all aspects of your
refrigerator. B}' following the Mstmctions
carefhl[), you will be able to }ully enjoy and
properly maintain your M_fftag refrigerator.
Should you have an} questions about using yollr
Ma}tag reffigerato< contact us, Be stnv to
prmJde the model and serial nmnbers of your
refrigerator,
For _hture reference we suggest 5o,, retain this
mmmal after recording the model numbe_; serial
mm_ber (six numbers and two letters) and
rex4sion mmJ3er of this refrigerator in tile spaces
provided below.
This iM))rmation ('an be f{)llIld till t]'R' data
sticker located at the top front interior o[ the
refrigerator eompartment. (See example below.)
MAYTAG _a_Et_ c-._-L)
tlEWTON IA _,_x _ ,_<
Model Number
Serial Number
Revision Number
MAYTAG CONSUMER EDUCATION
ONE DEPENDABIIJTY SQ[ ARE
NE\VI?ON, I()V_)_ ,51)208
(515) 791-8911
(M{m Ffi..Sam 5tmlCentralTime)
NOTE: For sePdce and warrant\ information
see pages 16 17,
CONSUMER PUBLICATIONS
Vor mow infk}rmatioli about appliances, order the f'ol!oxx_ng items from Ma)lag tit the prices indicated.
Send your name. address, booklet title, filrm number and payment to: Ma)lag (2resumer Education, One
Dep(m(labili!) Square, Newton, IA 50208. Allow "1-6weeks [i}r {](qRelT,
Appliance Bn}_ng (;uides ....................................................................................................... 50e EACIt
\Vast_er 21 ]YG
Drxer 212YG
I)ishwashel" 213YG
Electric Range 214YG
(;as Range -- 215YG
tleI'rigerator -- 276YG
Before _2}u Call (avoidil]g mme{:essa,'v servic{ calls) -- z()6YG ............................................. 50C
El'_el]4")-Savings Tips -- 3,92YG ............................................................................................... 50¢
PAGE 1
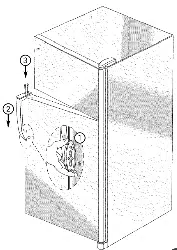
INSTALLATION
Remove and discalx] cantilever shelf" packing
clips ]ocated just above each shelfwhe_> it hooks
onto the frame. To remme plastic clips, :_dggle
tile clips sideways and pull straight out.
Locating Your Refrigerator
l. Allow a free tlow of air through the front base
grille.
Your model should not be iitstalled where the
room temperatm'e x_411go below 55 degrees
F., beea isc it will not ruli
:_" ' t're(t,,e,_tl } enough
to maintain proper temperature in the freezer.
, For ease of installation, you should leave a
space of about I/2 inch [)etx_een the
refrigerator and adjacent wails or c_Ninets. If'
the refrigerator is pIaeed with the hinge side
against a wall. you may want to have
additional space so the" door can be opened
wider.
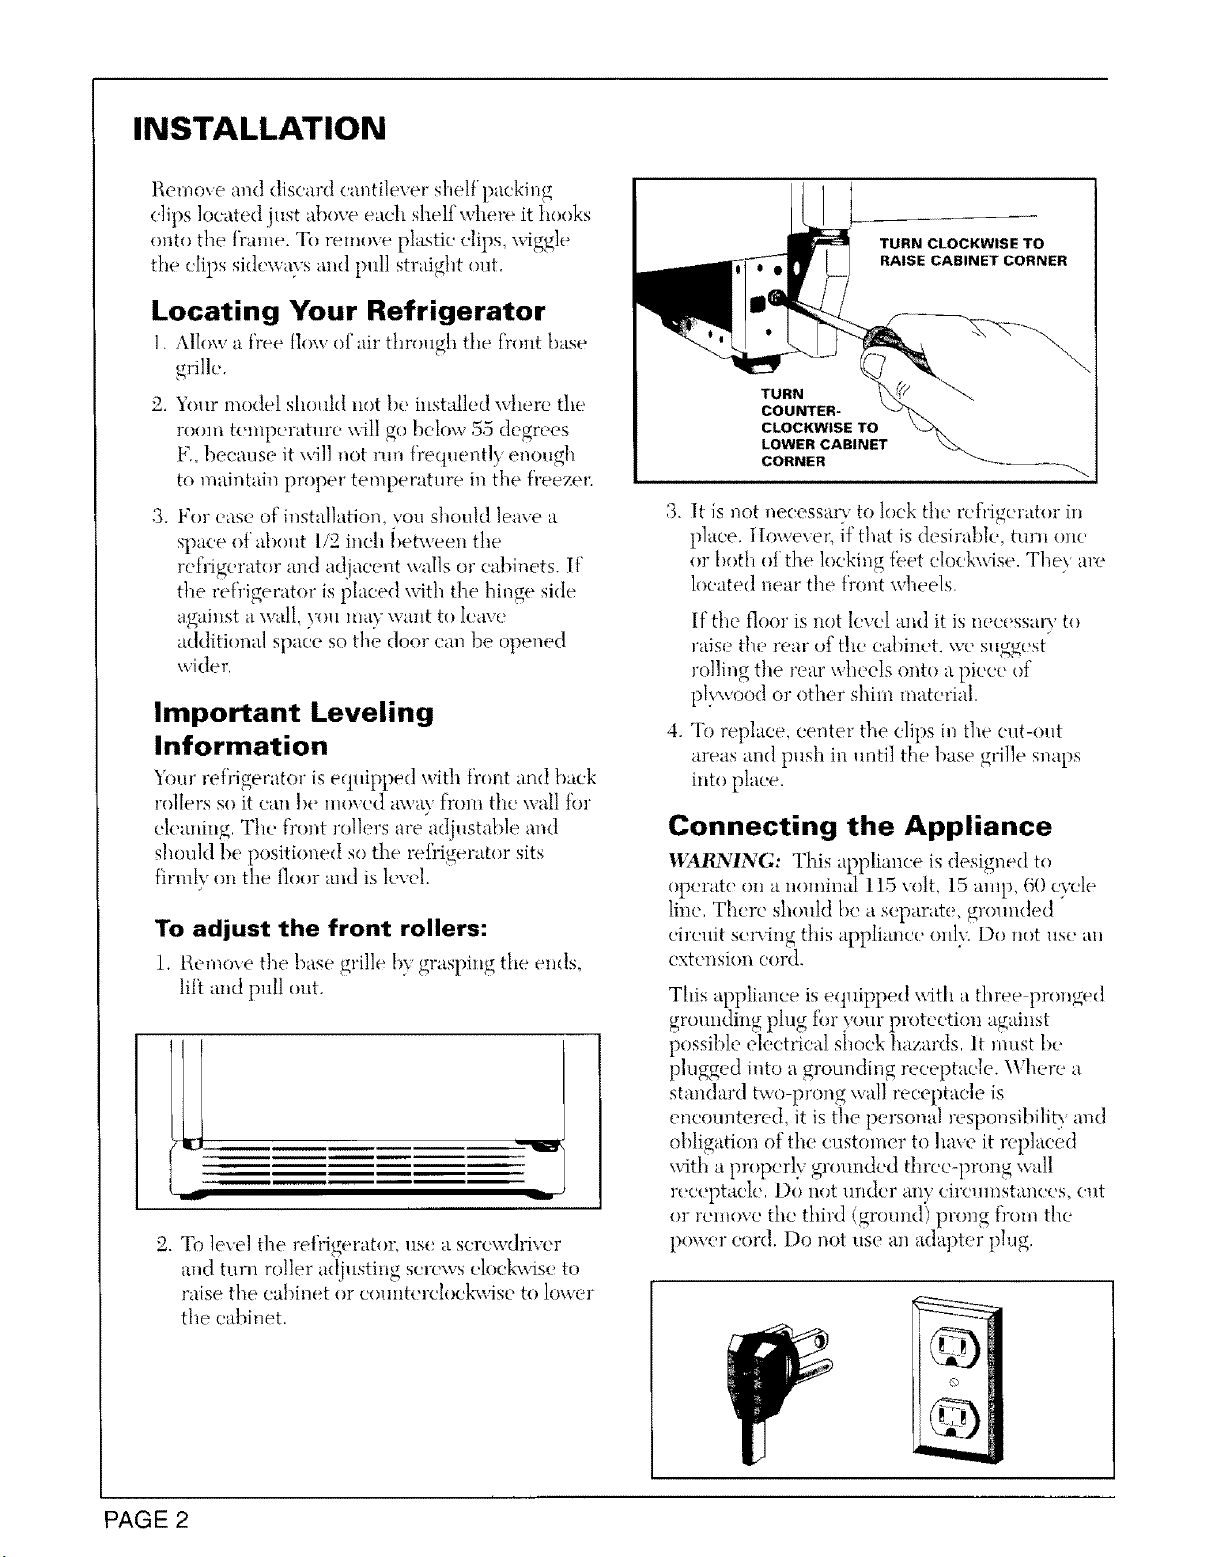
Important Leveling
Information
_7,ur refrigerator is equipped with front and back
rollers so it can be moved away from the wall for
cleaning. The front rollers are adjustable and
should be positioned so the refrigerator sits
firmly on the floor and is level.
To adjust the front rollers:
1. Remove the base grille by_gras.l_in_.......the ends,
literand pull out.
'I
_2.
"Ik_level the refrigerator, use a screwdriver
and turn roller adjusting screws clockwise to
raise the cabinet or eountercloelG:4se to lower
the cabinet.
TURN CLOCKWISE TO
RAISE CABINET CORNER
TURN
COUNTER-
CLOCKWISETO
LOWER CABINET
CORNER
3.
It is not neeessarv to lock the refrigerator it_
place, tloweve_; {f that is desirable, turn one
or both of the lockh_g {bet clockwise. They are
located near the f'r(mt wheels.
.
If the floor is not level and it is necessa,_' to
raise the rear of the cabinet, we suggest
rolling the rear wheels onto a piece of
ply, rood or other shim material.
To replace, center the clips in the cut-out
areas and push in until the base grille smq)s
into plaee.
Connecting the Appliance
WAKNING: This appliance is designed to
operateon a nominal 115 volt, 15amp, 60 cycle
line,There shouldbe a separate,grounded"
circuit se_vh:g this appliance only. Do not use :m
extensioi:cord.
This appliance is equipped :_4th a three pronged
gr{mnding plug for :,'our protection against
possible electrk_a] shock hazards. It must b,•
plugged into a grounding receptacle. Where a
standard two-prong wall receptacle is
encountered, it is the personal responsibilit 3 and
obligation of the customer to haxe it replaced
_ith a properly grounded three-prong wall
receptacle. Do notunder any cireumstmiees, eut
or remove the third (ground) prong fi'om the
power cord. Do not use an adapter plug.
©
PAGE 2

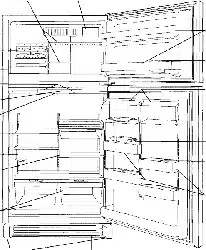
GENERAL FEATURES
Adjustable Freezer
Shelves
Freezer Light
Ice Cube
Trays
Ice
Controls
Energy
Switch
Lighting
Meat
Drawer
Glass
Shelves
Crispers
\
Bins
Keeper
2 Dairy
Compartments
Cradle
Keeper
ustable
Door Bins
Adjustable
Front Rollers
Base Grille
Fc.atures vai) according to model.
PAGE 3
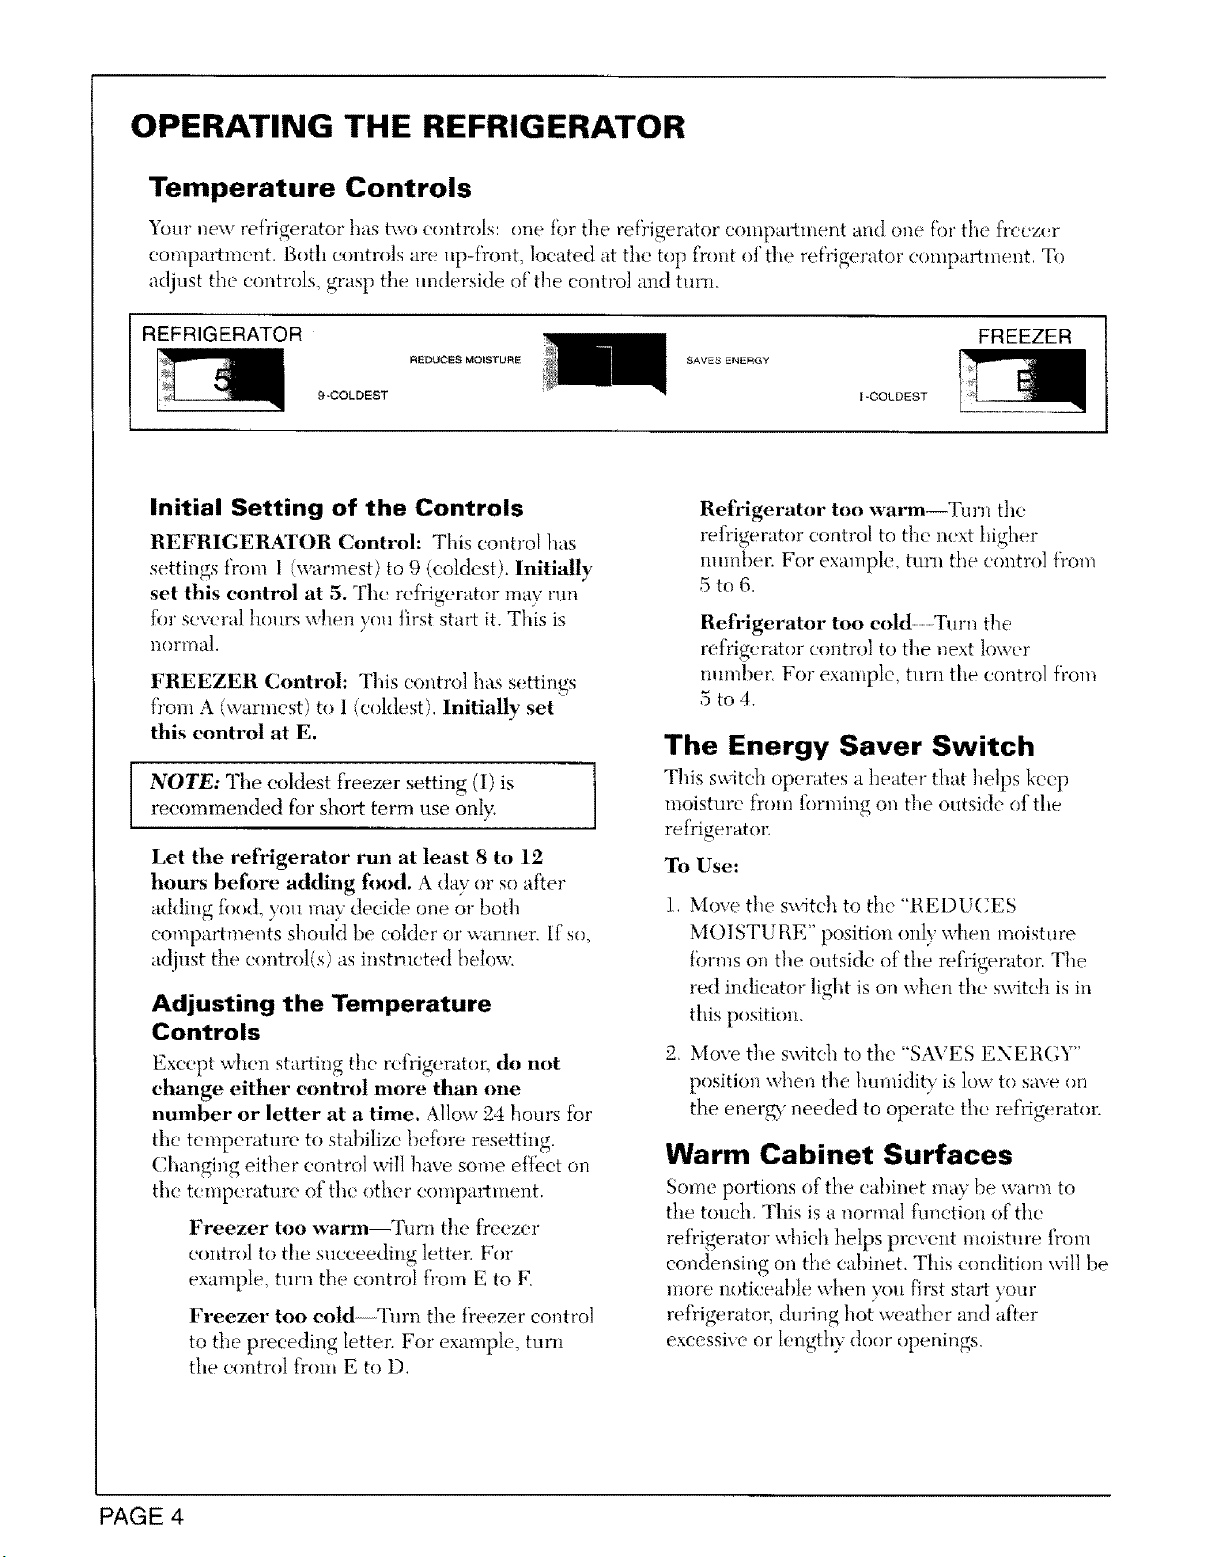
OPERATING THE REFRIGERATOR
Temperature Controls
Your new refdgerator has lavo controls: one (br the refrigerator comparhnent and one f}n_the fYeezer
compartment, Both controls are up-float, located at the top front of the refrigerator compartment, To
adjust the controls, grasp the underside of"the control and tunl.
REFRIGERATOR
RIIDtIC$S MOISTIaRE SAVES _NKRGY
9-COLDEST I-COLDEST
FREEZER
Initial Setting of the Controls
REFRIGEIE_TOR Controh This control }tits
settings from 1 (warmest) to 9 (coldest). Initi'_ly
set this control at 5. The refrigerator may run
fin"several hours when you first start it. This is
llorma].
FREEZER Control: This eontrol has settings
from A (warmest) to 1 (coldest) Initially set
this control at E.
NOTE: The coldest freezer setting (I) is l
recommended for short term use only*,
/
Let the refrigerator run at least 8 to 12
hours before adding food. A day or so after
adding {bod_ you may decide one or both
compartments should be colder or warmer. If so,
adjust the control(s) as instructed below.
Adjusting the Temperature
Controls
Except when starting the refrigerator, do not
change either contrnl more than one
nmnber or letter at a time. Allow 24 horn's for
the temperatuw to stabilize bef'(n'e resetting.
Changing either control will have some effect on
the temperat, m" of the other compartment.
Freezer too warm--Turn the freezer
control to the succeeding letter. For
example, turn the control from E to E
Freezer too cold Turn the freezer control
to the preceding letter. For example, turn
the control from E to D.
Refrigerator too warm--Tun_ the
refiigerator control to the next higher
nmnbe_: For example, turn the control from
5to6.
Refrigerator too cold Turn the
refdgerator control to the next lower
mm_ber, For example, turn the control from
5 to4.
The Energy Saver Switch
This switch operates a heater that helps k('ep
moisture from t))rming on the outside of the
refrigerator:
To Use:
1. Move the s_ite]t to the "REDUCES
MOISTURE" position only when moistm'e
fbrms on the outside of the refrigerator The
red indicator light is on when the sx_qtch is in
tiffs position.
2. Move the switch to the "SAVES ENEtlGY"
position when the humidity is low to sa_e on
the enerD' needed to operate the refrigerator.
Warm Cabinet Surfaces
Some portions (d the cabinet may be warm to
the touch. This is a normal f'n,lction of the
refrigerator a4fieh helps prevent moistme from
condensing on the cabinet, This condition will be
more noticeable when .VOll tlrSt start your
reffigerato¢ dudng hot weather and after
excessive or lengthy door openings,
PAGE 4
ADJUSTING THE REFRIGERATOR AND FREEZER INTERIORS
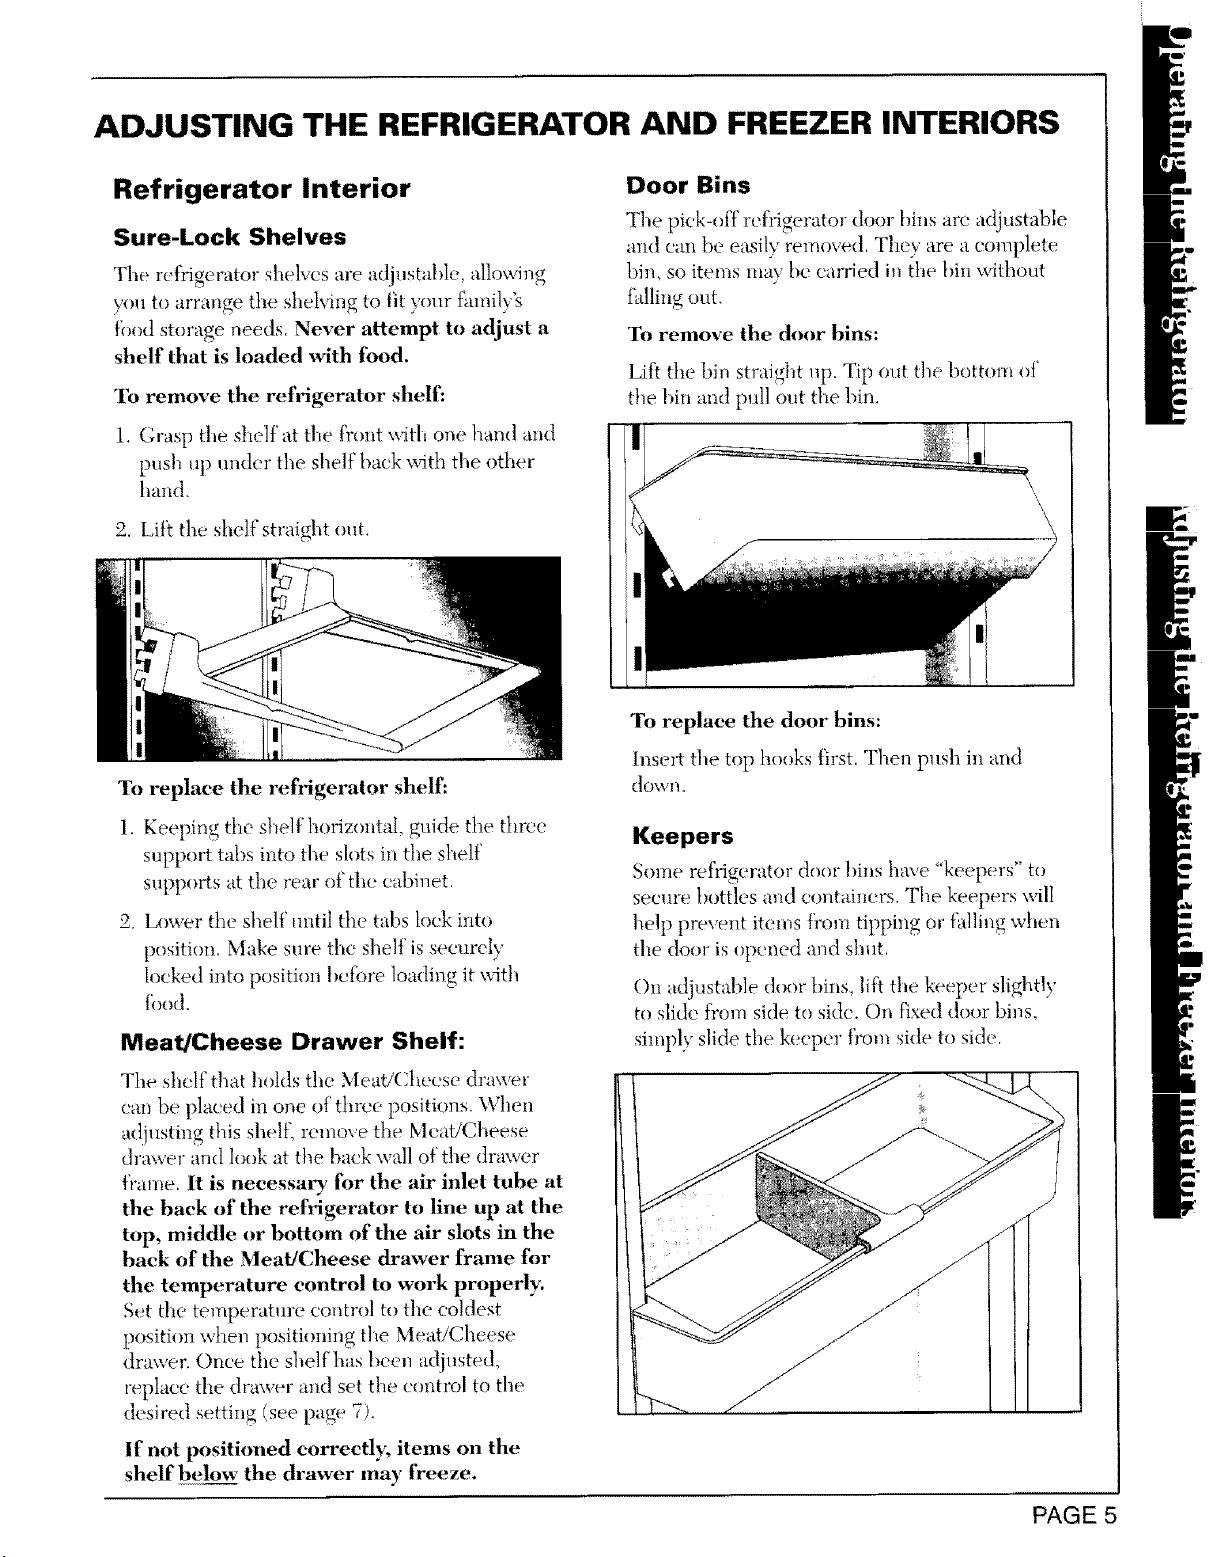
Refrigerator Interior
Sure-Lock Shelves
The refrigerator shelves are adjustable, allowing
you to arrange the shelving to fit your fiunily's
}})od storage needs. Never attempt to adjust a
shelf that is loaded with food.
1b remove the refrigerator shell':
1. Grasp the shelf at the front with one hand and
push _q) under the shelf back with the other
hand.
2. Lift the shelf straight out.
Door Bins
The pick-off refiigerator door bins are adjustable
and can be easily removed, They are a complete
bin, so items may be carried in the bin without
i_dling out,
To remove the door bins:
Lift the bin straight up. Tip out the bottom of
the bin and pull out the bin.
To replace the refrigerator shelf.'
1. Keeping the shelf horizontal, guide the three
support tabs into the slots in the shelf
supports at the rear of the cabinet,
2. Lower the shelf until the tabs lock into
position. Make sure the shelf is securely
locked into position before loading it with
{ood.
Meat/Cheese Drawer Shelf:
The shelf that hohts the MeatJeheese drawer
can be placed in one of three positions. When
a@_sting this shell remove the Meat/Cheese
drawer and look at the back wall of the drawer
l)'ame, It is neeessary for the air inlet tube at
the back of the refrigerator to line up at the
top, middle or bottom of the air slots in the
back of the Meat/Cheese drawer frame for
the temperature control to work properly.
Set the temperature control to the coldest
position when positioning the Meat/Cheese
drawer, Once the shelf has been adjusted,
replace the drawer and set the control to the
desired setting see page 7).
If not positioned eorreetl); items on the
shelf below the drawer may tYeeze.
To replace the door bins:
Insert the top hooks first. Then push in and
down.
Keepers
Some refrigerator door bins have "keepers" to
secure bottles a_M containers. The keepers will
help prevent items fl'om tipping or }'alling when
the door is opened and shut,
On adjustable door |)ins, lift the keeper slightly
to slide |rom side to side. On ['ixe(t door bins,
simply slide the keeper fYom side to side.
PAGE 5
i
[
I
Freezer Interior
Freezer Shelves
The freezer shelves {'an be adjusted to am" {}f
f'our positions to acc{mml{}date the fbod l£)ad.
"lb remove tile shelf:
1. I_ifTup on th{' sh{'lf and push to the right,
2. Tilt the left side of the shelf up and remove.
To replace the shelf:
1. Tilt the shelf and insert the right rod ends int{}
the upper portion of the o})]ong holes in the
fie{,zer wall.
2. I,ower the left side of the shelf and insert into
the obl{nlg holes on the letT side, Make smc
the shelf" is s_:(!ure hot'ore loading.
SPECIAL STORAGE AREAS
Crispers
There are two crisper drawers in yore Maytag
re}'rigerator. The Varl Crispers {illox_the
amount of m{}isture in the drawer to t)e
{'ontrolled For storing fi_fits {}rxegetables.
Setting the Vari Crisper Control
M{}ve tile slide control to "FttUITS" f{}ra low
moisture enviro]unc]lt aud to 'VEGETABI_ES"
for high moisture,
FRUITS _ VEGETABLES
To remove the Crisper Drawers:
l. Pull out to the stop position.
2. Tilt tip the drawer fix}nt and pull out.
To replace the Crisper Drawers:
1. Align the dr_aver rollers in the tracks.
2. Lift the drawer fi'{}nt and push in,
To remove the Crisper Shelf."
1, Remove the crisper drawers.
2. Caret'ullv remoxe the glass insert, tleach in
from the underside and tilt up.
3. Lift the front of the crisper shelf and pldl out,
It may be necessa] T to remove the lo,a er
rehigerator s}l{']_,es so the crisper shvlf can bc
tilt{'d ti}r removal.
To replaee the Crisper Shelfi
Reverse the pr{_ee(lllre fbr remoxing the {rispcr
shelt2
PAGE 6
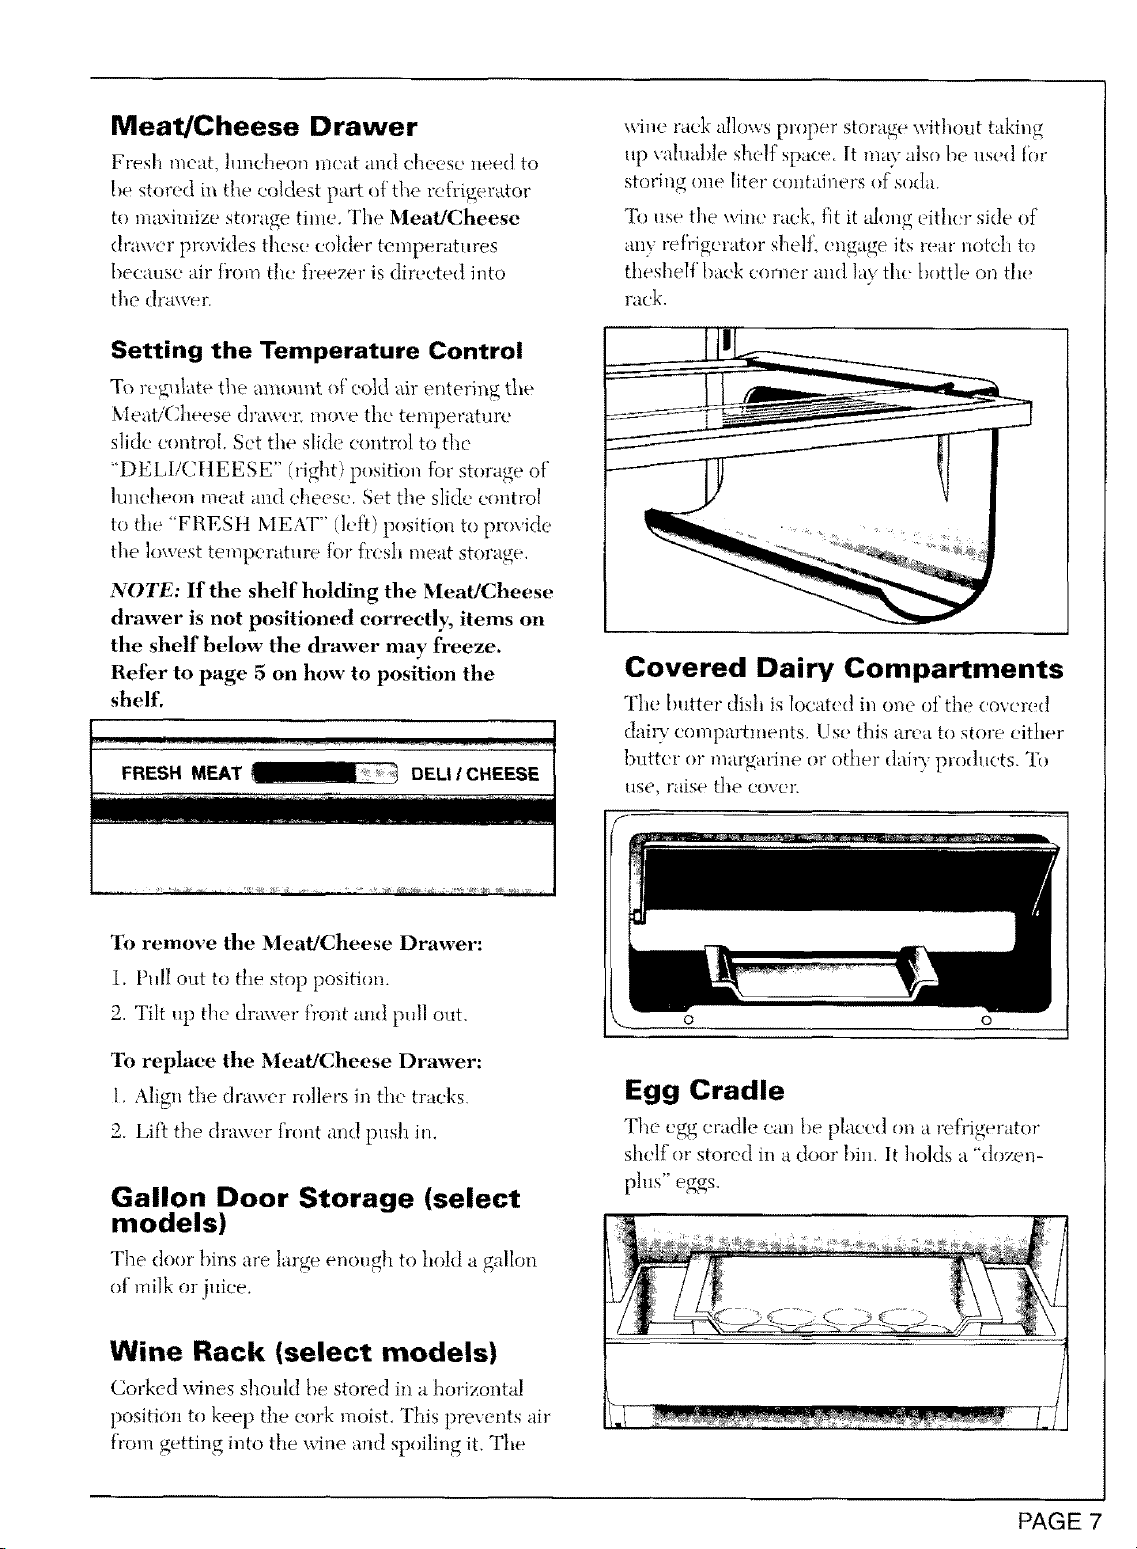
Meat/Cheese Drawer
Fresh m_at, luncheon nleat and cheese need to
he stored ilt die coldest part o[the refrigeraor
to maLximize storage time. The Meat/Cheese
drawer provides these colder temperatures
t)ecatlSe tti! [i-ol't_ the fleezer is diweted into
the drawer.
Setting the Temperature Control
To regulate the amount o[ cold air entering the
Meat/Cheese drmver, move the temperature
slide control Set the slide control to the
"DELl/CHEESE" (right) position for storage of"
luncheon meat mid cheese. Set the slide control
to the "FREStt MEAT" (left) position to provide
the lowest temperature for ficsh meat storage.
NOTE: If the shelf holding the Meat/Cheese
drawer is not positioned correctly, ilems on
the shelf below the drawer nmy freeze.
Refer to page 5 on how to position the
shelf,
FRESH MEAT _ DELl iCHEESE
To remove the Meat/Cheese Drawer:
I. Pull out to the stop position.
2. Tilt up the drawer front aml pull out.
To replace the Meat/Cheese Drawer:
1, Align the drawer rollers in the tracks,
2. Lift the drawer front and push in.
Gallon Door Storage (select
models)
The door bins are large enough to hoht a gallon
of milk or juice.
wine rack allows proper storage without taking
ut) \a[uahle shelf space. It m_w also he use(t for
storing one liter ctmtainers of soda.
To use the wiltc rack_ fit it ahmg either side of
any refrigerator shelI_ engage its rear ,oteh to
theshelf hack comer and lay the bottle on the
rack.
Covered Dairy Compartments
The butter dish is located in one of the covered
daily compartments, Use this area to store either
butter or margarine or other dair) products, qb
use, raise the cover,
O .....
Egg Cradle
Th__egg cradle can be placd on a M'rigerator
shelf or stored in a door bin, It holds it "dozen-
plus" eggs.
Wine Rack (select models)
Corked wines should be st.red in a horizontal
position to keep the cork moist. This prevents air
from getting into the wine and spoiling it. The
PAGE 7
ENERGY SAVING TIPS FOOD STORAGE TIPS
i.
5,
3.
4_
5,
6.
.
8.
Locate the refrigerator away from heat
producing applianees such as tile range or
dishwasher, heat vents and direct sunlight.
l,eveI the refrigerator and do not block
ventilation around the front grille.
Keep the freezer filll to near capaei_' so less
cold air will escape during door openings.
When less than two thirds f_ll, place milk
cartons half fi_ll of water in the freezer.
Let hot dishes coo! slightly betk_re putting into
the refrigerator or freeze:r.
Cover liquids.
Clean the refrigerator condenser coils eve U
8-4 months, more often if you have pets (see
page 13).
Wipe moisture from the outside of eontainers
befi_re plaeing them into the refrigerator.
Set tile Energ T Saver switch to the "SAVES
ENEIIGY'" position unless moisture forms on
the outside of the refrigerator.
9. Avoid opening the doors too often.
Fresh Food Storage
The tYesh fbod compartment ofa refi'igerator
should be kept bem_een 34°F and 40°F with an
optinmm temperature of 37°E To cheek the
temperature, pIace art appliance thermometer in
a glass of water and place in the center of' the
refrigerator. Check after 24 hours. If the
temperature is above 40°F adjust the controls as
explained on page 4.
Avoid overcrowding the refrigerator shelves.
Overcrowding reduces the circulation of air
arom_d the food and results in uneven cooling.
Leave breathing space around food containers
for best cooling resuhs.
The storage requirements for different foods
vary' depending on flle temperature and
moisture needed. Refer to the Food Storage
Chart on pages 10-11 for approximate
storage times. To mNntain the best possible
quality_ keep the following considerations
in mind:
Meat and Cheese
• 'Ib maximize storage time store these items in
the Meat/Cheese drawer, t_efer to page 7 for
temperature settings.
Fruits and Vegetables
• Storage in the crisper drawers traps moisture
to help keep frtfits and vegetables fresh, The
Vari Crisper allows the moisture level to be
adjusted depending on what is stored in the
crisper. Generall> fruits need low moisture
and vegetables need high moisture, t{efer to
page 6 f?Jrsetting the control.
• Fruit and vegetable quality affects the length
of storage. Quali_ can vaU from item to item,
variety to variety and season to season+ For
example, a rainy growing season can cause
lettuce to be brown when purchased or brovm
more quickly. Sort fruits and vegetables before
storage and use bruised or soft items first.
Discard those shox,Angsigns of decay.
PAGE 8
° When storing vegetables, the crispers will
per[brm better if they are at least two-thirds
fhll. If they are less than tavo-thirds th[1, always
store vegetahles in plastic bags or airtight
containers to reduce moisture loss.
• Alwavs wrap odorous fbods such as onions and
cabbage so the odor does not transfer to other
fbods.
• While vegetables need a certain amount of
moisture to remain fresh, too much moisture
can shorten storage times {espeekdly lettuee).
Be sm'e the vegetables are well drained before
storing. It may Mso be helptid to place a Iayer
of paper towels in the bottom of the bag to
absorb all_i excess tooist!lFe,
Dairy Food
• Store butt(r and margarine in the Dai U
Compartments {bund in the refi-igerator doo_t
• Most dairy foods such as milk, cream, sour
cream and cottage cheese hax,e freshness dates
on their cartons for appropriate length of
storage, Store these [hods in the original carton
and ref)igerate immediately after purehasing
and each use. Close carton lids tightly to keep
out air and odors.
° Occasionally mold x_411develop on tile surface
of hard cheeses (Swiss, Cheddar, Parmesan).
The moldy areas can be trimmed away and the
remaining cheese wiI1 still be flavorful and saib
to eat.
Frozen Food Storage
The fi'eezer compartment of a refrigerator
should be kept at ()°F or lower, qb check the
freezer, place an appliance thermometer
between the frozen packages and cheek after 24
hours. A f?eezer operates inore efficiently when
it is at least two4hirds full. If not this full, it will
be helpful to fill milk cartons half IChllof water
and place them in the freezer.
Refer to the Food Storage Chart on pages
10-11 for approximate storage times. For/:he
best results when fi-eezing foods, fol!ow these
guidelines:
Packaging Foods for Freezing
° \Vhen freezing fruits and vegetables select
fresh, top-quality products.
° Use a freezer wrap that is _dr-, moisture- and
vapor-proof Some good choices are heavy-
duty aluminum fbiL {)eezer plastic wrap,
polyethylene-coated freezer paper; freezer
bags or airtight containers. Force as much air
out o["the packages as possible and be sure
they are tightly sealed. Trapped air ean cause
the food to do_ out, change color am! develop
an off-flavor (freezer bunQ.
Fresh meats and poult U can be left in the
store wr_q)ping when freezing for less than two
wccks. For longer storage, ovev, vrap with a
suitable freezer wrap. Do not refi'eeze meat
that has completely thawed.
Loading the Freezer
° Avoid adding too much warm food to the
freezer at one time. Tl-fis overloads the freezer,
slows the rate of fi>ezing and can raise the
temperatme of alma@ frozen fi)ods.
° Place tile packages in the coktest part of the
freezer first (against the walls or bottom of the
compartment} to insure the food fi*eezes as
quickly as possible. Leave atlittle space
between tile packages so cold air (:an circulate.
° Avoid storing hard-to-freeze foods such as ice
cream and orange juice on the freezer door
shelves. These foods are best stored in the
freezer interior where the temperature varies
less with door openings.
Foods That Don't Freeze Well
• Some toods cmmot be frozen sueeessfidly
because the freezing causes them to
deteriorate. These include:
potatoes (unless mashed)
eream filIings
cooked egg whites
SOtlr creaul
salad greens
luncheon meat
soft cheeses (cream, cottage, processed)
mayonnaise
milk and ereaul
gelatin salads
bananas
citrus fruits
PAGE 9
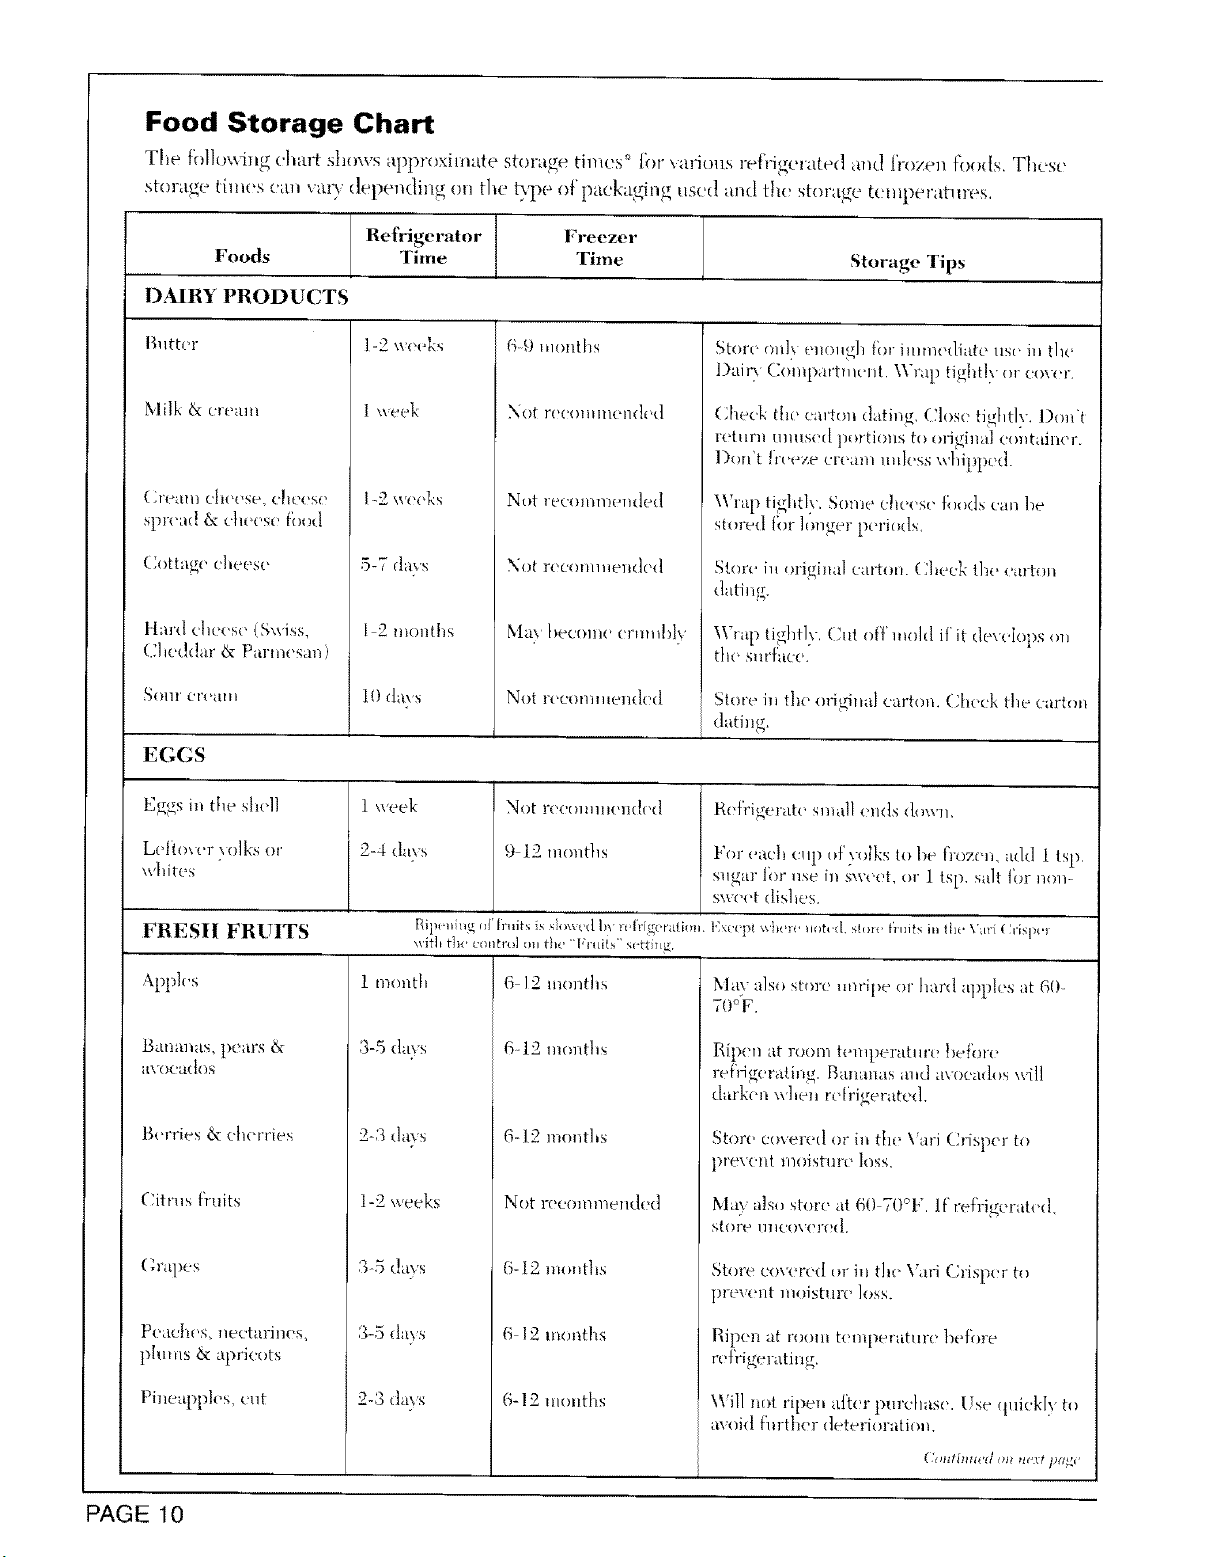
Food Storage Chart
The fblloxxmgchine shows approximato storage times '_tbr \aM(ms refrigerat(,d and frozen [hods, Those
storage times can _ai)' depending on the t),t,e of packaging used and tho storage temperatures,
Refrigclnttor Freezer
Foods Time Time Storage Tips
D?HRY PRODUCTS
P,uttor 1-2 weeks 69 months
Milk & cream
(]it:'at/l 0h( _'se, chc('s(?
spr('ad & oh( ('so fbod
Cottage cheese
ltard oboes(, (Swiss,
Cheddar& Parm('san)
SOlll' CFt_4I[H
EGCS
I week
I--:2weeks
5-7 days
I 2 months
10 (tins
_¢)t F(?t'OIIIII/('II(I(Rt
Not recommended
Not r('eommelJ(lcd
Ma_ become crHmblv
Not F('COHIIIIUIId(?d
5;t(r(' onl\ell(re<d/ i%rimmediate use i_Jthe
])all) Conipartnlent, \Vrap tif_htly or cover.
Check till' carton (tatin,_. (Tlosc tightly, l)ont
retrain rams(x[ portions to original (x)iltaincr
Don't frl,,,ze cr(.am mil(,ss wllippcd.
Wrap tightly, Some cheese fi)o(ls can be
stored tbr longer periods,
Stow in oriRhmI carton. Check tlw carton
datinfr.
Wrap tightly. Cut offmold if it devcIops o_1
the sm'}"<lc(,.
Store in the ori_iilal carton.Check tile car_(m
dating.
Ef_gs in the shell
L('Rox_q+xolks or
whites
2-4 days
NOt IX?(?OllllliOll([t'd
9 12 months
]
lh!fri_eratcsmallendsdo_n,
For _'ach cup of'yolks to be froze'n, add 1 tsp.
s_lgar t})ruse in swcot, or 1 lsp, salt for non .....
swc('t dis]ies.
FRESH FRUITS Bipe,i t,g,fhl,its is _ v.cd v " gorali ,n E×cui x, , , t ,d, s{o,{, if,dis in lht. Vari (?,'isl_._
_dth the cnnh'o] /hi t}w [gr{ti{s"S_&tt_ r _gr
1 month 6 12 u_onthsApples
Banmms, pears &
avocados
Berries & oherries
Cih'us fruits
Crapes
P('acIws, nectarines,
plunls & apri,:ots
Pine_q>ples, cut
3-5 days
1-2 weeks
&5 days
6q2 months
6-12 months
Not 1x?(,o!lllllt_lld(td
6-I2 m(mths
612 months
6-12 months
May also store unripe or hard apples at 60
7(Y'F.
Rip(m at room t_,mperatm'u be{bre
re'{'ifi_or0,lhig, t=lalmn<_ls{lltt] avocados will
darkon \V]l_yll r( ['ri_erated.
Stow covered or hi the Vari C1G'spcr I{o
prev(.nt moisture loss.
May also store at 6(') -A)°b."If'refrigerated,
S( OF(¢ Ill ICOVtT!'(?d,
Store Coy( r(({ or in tile Vari Crisper to
pl-_W('llt ]l/oisDlrO ]oss+
l4_ipori tit rooll! t('niperaturc before
r_fi-igeratmg.
Will not ripen after purciiasc. [se quickly to
avoid fluthor deterioration.
(.<(ugtimW(] 0_ tiv._t ])a_i'
PAGE 10

Food Storage Chart (continued)
Refrigerator Freezer
Foods Time Time Storage Tips
SjII(X_ x U_('[_])]CS I<{'IltLIJl] fl OSII T(IIIg,('S_ ill _1 lll(liS[ PIl\iIOltlll{qt[, t!l{'\ d_o,ld bc stored in the Vari
FRESH VEGETABLES {;ri_p,,__id_ the (ontml on the "'Vc!._{'tahcs "s{'tthg. It tD' clispP,_ :m. "ull.story ,, _ctabh s m
l)]asth ]la F, or pl_:,th ccmt:ti_,r,; to i._,s i,itt nv,}islure]ms
2:3 days
AsparaMls
13russcls spr{_uts 6(
broccoli
Cdbba_Z- &cclcrv
Canliilowcr& stmp
bCilllS
C _iFFCdS, }O,I'.S ]lips.
}cots, radishes &
tlu-nips
Greta, peas & lima 3-5 days
b¢,alL_;
l,ettucc & other salad 1week
,_1"eO1 IS
Onions, }Ireel; :3-5 da_.s
Peppers & cucumb{>rs ] wcck
FRESH POULTRY & FISH
Chickeli 1-2 da_s
Tnrkey, duck & goose 1-2 (ta:,'s
Fish I-'2 days
3 5 days
1-2 weeks
] week
2 _ ccks
1-2 days
:3-5daks
3-5 (ta\ s
:3-5 days
12 days
3-5 days
FREStt MEATS
Bc('f, ground
B(ef, roast & st{ al<
Pork
Veal
Sausage ground
Lamb
8-12 months
8-I2 mouths
Not rc'commcnded
8-12 inorlths
8-12 months
8-12 months
Not r{'c{mmtemhx!
8-12 ..mths
8-12 months
l)on't wash bctb]'{' ref'ri1('rati]t_. Storu iu th{,
crisper.
\Vrap {_d{_r{>ustb{}ds & ]('[Hg{,rate in th{' urispcr,
Wrap odorous foods & l>fi4_{q-atc in the c]'ispcr
Wrap (}d{}rous f'oo(ls & reiiig{'ratei]i ill{' {']ist}{'l.
Remov{" tops. Wrap odorous to(}(ts a.d
rcfri_erat{ in the crisp( r.
l,eavc in l}{_(ts& r(,I]-igerate.
Wash. Drain well. RefriRcratu ill the crisper.
\Vrap odorous foods & rcf'rigeratc in CdSl)cr
Wrap (}{1orous }k}ods & rc{'rigeratc in c]ispc]'.
6 12 montl)s (hm be k(pt in its ori_!ina] i}acka_in_ f{}r
"_-BlllOIlt]lS re'[rig{'rati{m. Pla{'c in the Meal/(_heesc
drawer with c{nltrol (m t]ic "FllESIt MEAT"
1 2 inonths setting. VChen ficcziu_ lom4{.'r Ilmu 2 weeks,
ovcrwrap with suilable ffe{"z{'r wrap.
4-6 months
9-12 mouths
6-9 months
4-6 IlIollt}ls
1 23inotaths
9-12 mo.flis
Can b{' kept in original j}ackaghlg f'or
rcf'rigeration, Place in the Meat!(;hccsc
dr0P,v(!r wit]] coim'ol {hi the "'FRF2SII MEAT"
S{ ttiI'_, _VhoFl {'r{:'t'zill!{ io!lgcr thalt 2, v/{?cks,
oveD._'rap wit[-i suitabl_' {'r(,(.z{>r"_Vy_Ip,
PROCESSED MEATS
7 ( t_l\S
7 (]a_s
7 days
5 {tai's
3 {tak's
3-5 clays
F];mkf_trters
Haln, whole
half*
slices
I,_IIII(rhtX)H 1/t (_it'[
Sausage, s]nokc(]
1 n]outh l'r{}cessed m(:,ats should b{" tightly wrapped
and stored in the MeatlCheese di'aw('r with
2 weeks the control ()i] the "DELIICtlEESE" setting,
i-3 months
I-3 months
1-2 m{mths
Not recommended Uno }oll(xt, vaC!lllil'_-p0.cked humh{,tm lil{';t.{
Ilia} )(' kept up to 2 ',recks.
7 days Not ri'{X)Mlilioll(]c{t ..............
°S_*u]'_P_: Umt{,d Slab's l)ppartt/tci{t <}f \/_k ih]m': }gum Mal!,,_ til _ It slil]llc (2{x}pi,t:/_h{, [,]%l<,t!xi<inSi t'tri{'t ' ]{>'_t;t Slate tiilit{ r-dl_
PAGE 1
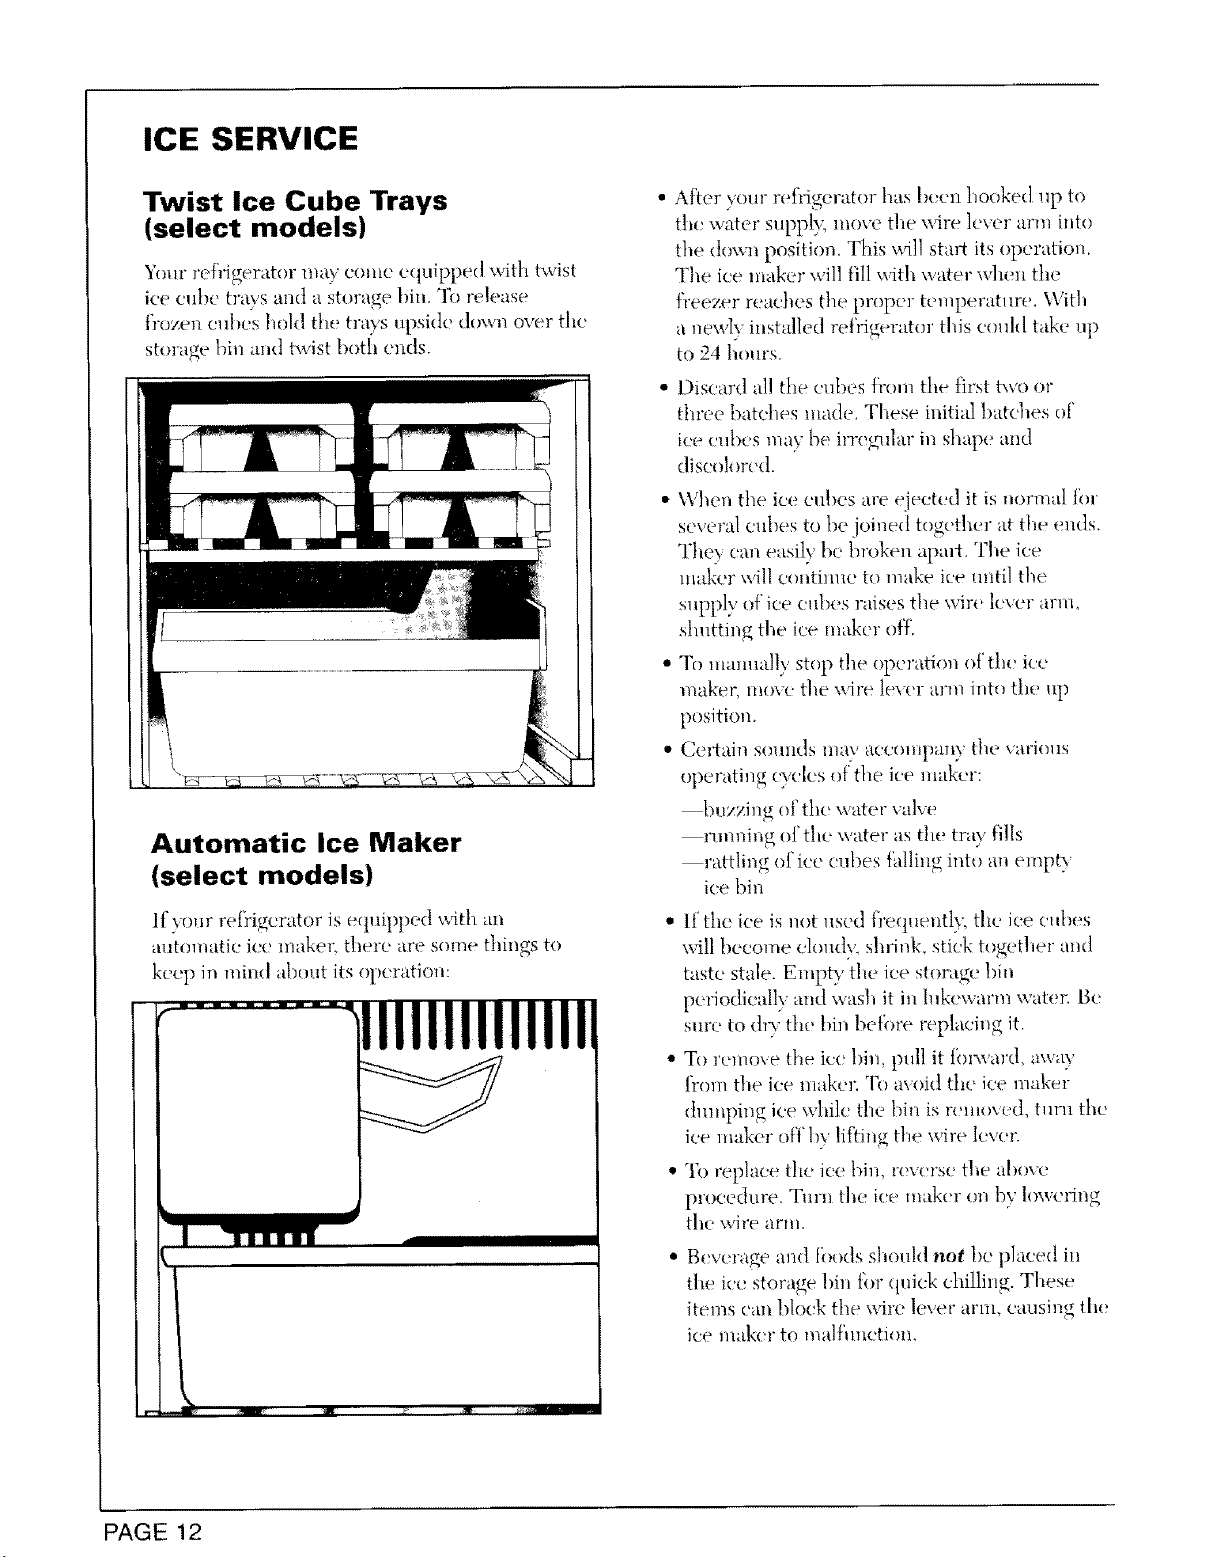
ICE SERVICE
Twist Ice Cube Trays
(select models)
Ymr refiigerator may come equipped with twist
ice cube tra\s and a storage bin. 71) release
frozen cukis hold the trays upside down over tile
storage bin and twist both ends.
Automatic Ice Maker
(select models)
If your refrigerator is equipped with an
automatic ice lllaker, there are some things to
keep in mind about its operation:
......... 'lllllllllllll
I
I IIIIIIIII
After your refi'igeraor has been hooked up to
the water supply, move the wire lever arm into
the douql position. This udll start its operation.
The ice maker will fill udth water when the
fl'eeT.er reaches the proper temperature. With
a neMy instMled refrigerator this could take up
to '24 hours.
Discard al! die cubes fi-om the first two or
three batches made, These initial batches of
ice cubes ma,_ be irregular in shape and
discolored.
• When the ice cubes are ejected it is normal tot
several cubes to be joined together at the ends.
Thes can easily be broken apart. The ice
ma!,£er ud!! col;throe to make ice until the
s_pply of ice cubes raises the wire lever arm_
strutting the ice maker off"
• To manually stop the operation of the' ice
maker, move tile wire lexer arm into the up
position.
,, Certain sounds may accompany the various
operating cycles of"the k:e maker:
buzzing of the water valve
rumaing of the water as the tray ('ills
rattling of ice cubes l:alling into an empty
ice bin
• If tile ice is not used frequentl}; t!!e ice cubes
will become cloudy, shdnk, stick together and
taste stale. Emp_"the ice storage bin
periodically and wash it in lukewarm water: Be
sure to dry' the bin before replacing it.
• To remo\ e the ice hi,, pull it tbm'ard_ away
from the ice maker. To avoid the ice maker
dmnpit*g ice while the bin is returned, turn tile
ice maker o|'f by lifting the wire lever
• 3b replace tile ice bin, re;erse t!te above
procedure. Turn the ice maker (m by lowering
the wire arm.
• Beverage and fbods s!,ould not be placed in
the ice storage !)ilL for quick chilling. These
items can block the wire lever arm, causing the
ice maker to malfm_etion.
PAGE 12
CARE AND CLEANING
Refrigerator Exterior and
Interior
lletbr to the chart on the next page when
cleaning the refrigerator.
CAUTION: Disconnect tile power cord beff)re
cleaning. Also, do not touch refrigerated
surfaces with wet or damp hands. Damp objects
stick to cold metal surfaces. Before cleaning the
freezer, al!ow it to warm up. Mlow glass shelves
to warm up before immersing in warm water.
NOTE: The drain plug is located under the
crisper drawers on the bottom of the
refrigerator compartment. Pull str_dght up to
remove. If it becomes clogged, remove and
flush the drain line ,Mth baking soda and hot
water. This water x_411drain into the defrost pan.
(See below for cleaning the defrost pan.)
Cleaning Under the
Refrigerator
5_mr refrigerator can be rolled out ffor cleaning
the floor underneath. Simply un!ock the front
roller locks (see page 2). Pull the refrigerator
straight out from the wall.
Cleaning the Condenser
The area around the condenser should be
cleaned every 3-4 months for ef_'icient operation
(clean more ()i}en if"there are pets in the home).
"Ib do so, first unplug the refrigerator. Then
thoroughly vaenuln the dirt and lint from the
front and open end of the coudenser. The
condenser can be reached through the right
front base opening. See page :2for removing the
base grille.
Cleaning the Defrost Pan
The defrost water drains into a shallow pan
heneath the cabinet and evaporates. This pan
should be cleaned periodically with warm sndsv
water.
To remove the defrost pan:
1. Remove the base grille (see page 2).
2. Lif} the pan up and pull out.
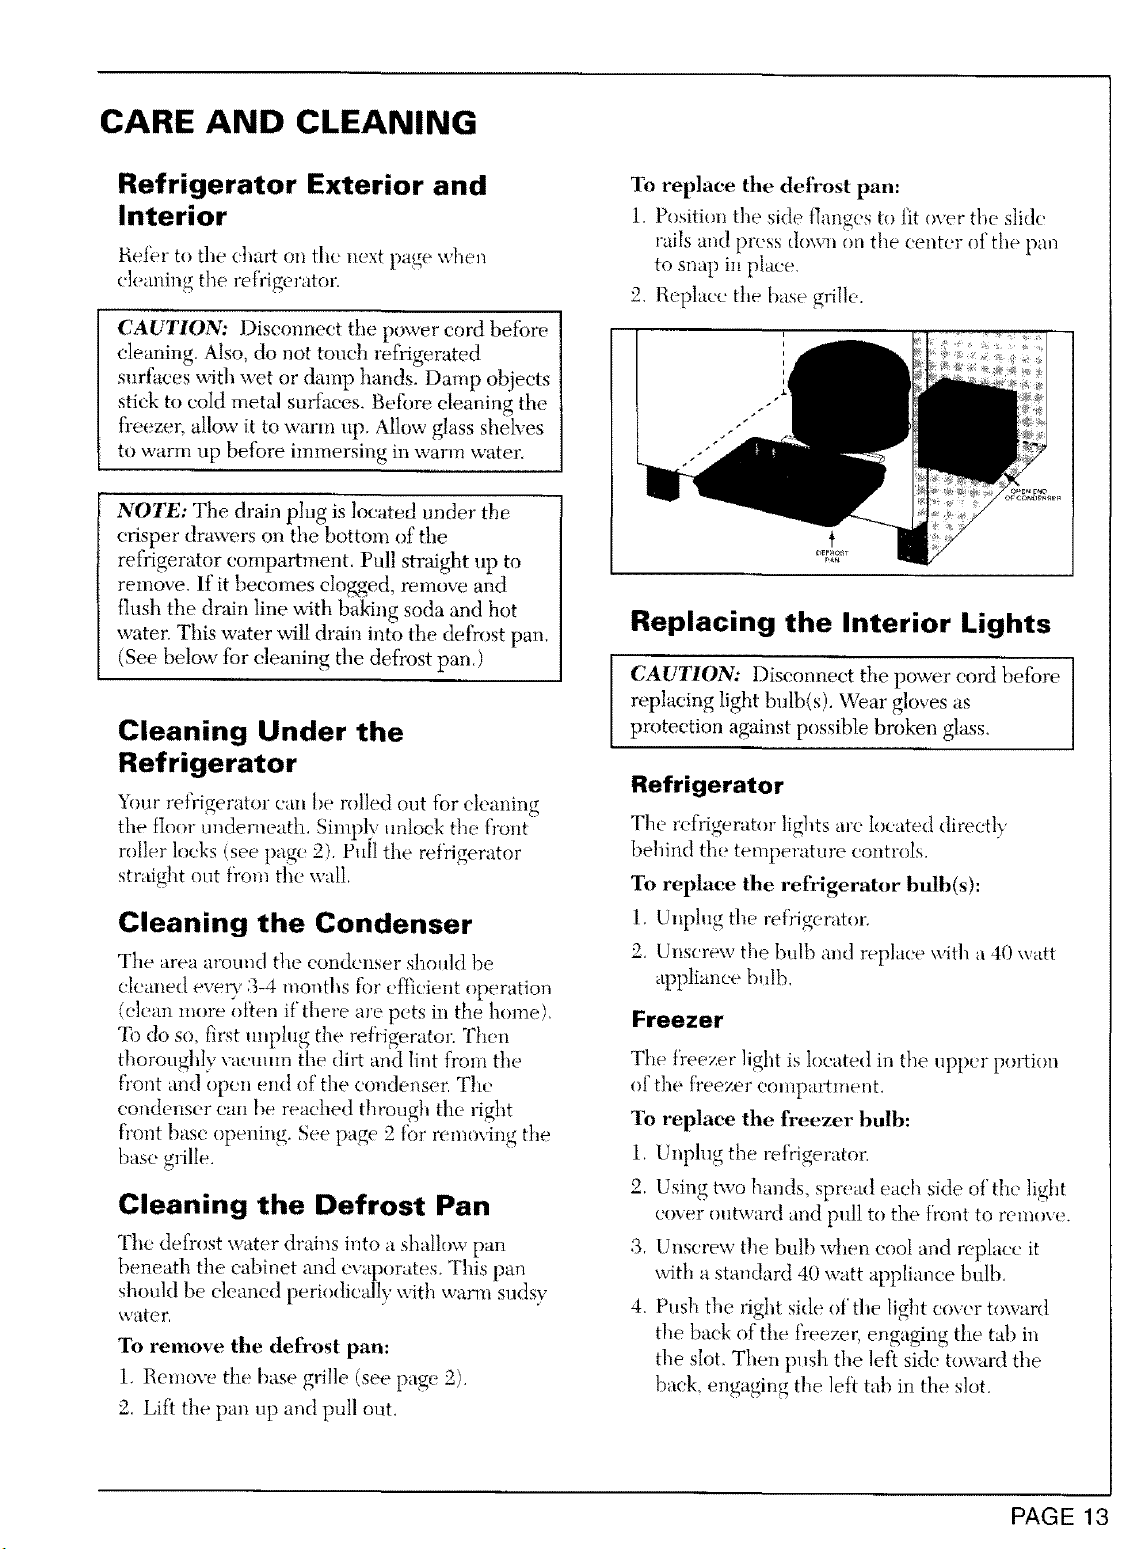
To replace the de]¥ost pan:
1, Position the side flanges to fit over the slide
rails mid press dox_ql on the eenter of the pan
to snap in place.
2, Replace the base grille.
Replacing the Interior Lights
CAUTION: Disconnect the power cord before ]
replacing light bulb(s). Wear gloves as
Iprotection against possible broken glass.
Refrigerator
The refrigerator lights arc located directly'
behind the temperature controls.
To replace the re|Mgerator bulb(s):
1. Unplug the refrigerator.
2. Unscrew the bulb and replace with a 40 watt
appliance bulb,
Freezer
The freezer light is located in the upper pol_ion
of the freezer compartment.
1b replaee the freezer bulb:
1. Unplug the refiqgerator.
2. Using two hands, spread eaeh side of the light
cover outward arm pull to the front to remove.
,3. IYnscrew tile bulb xd_en cool and replace it
with a standard 40 watt appliance bulb.
4. Push the right side of the light cover towaM
the back of the freezer, engaging the tab in
the slot. Then push the lef} side toward the
back, engaging the ]eft tab in the slot.
PAGE 13
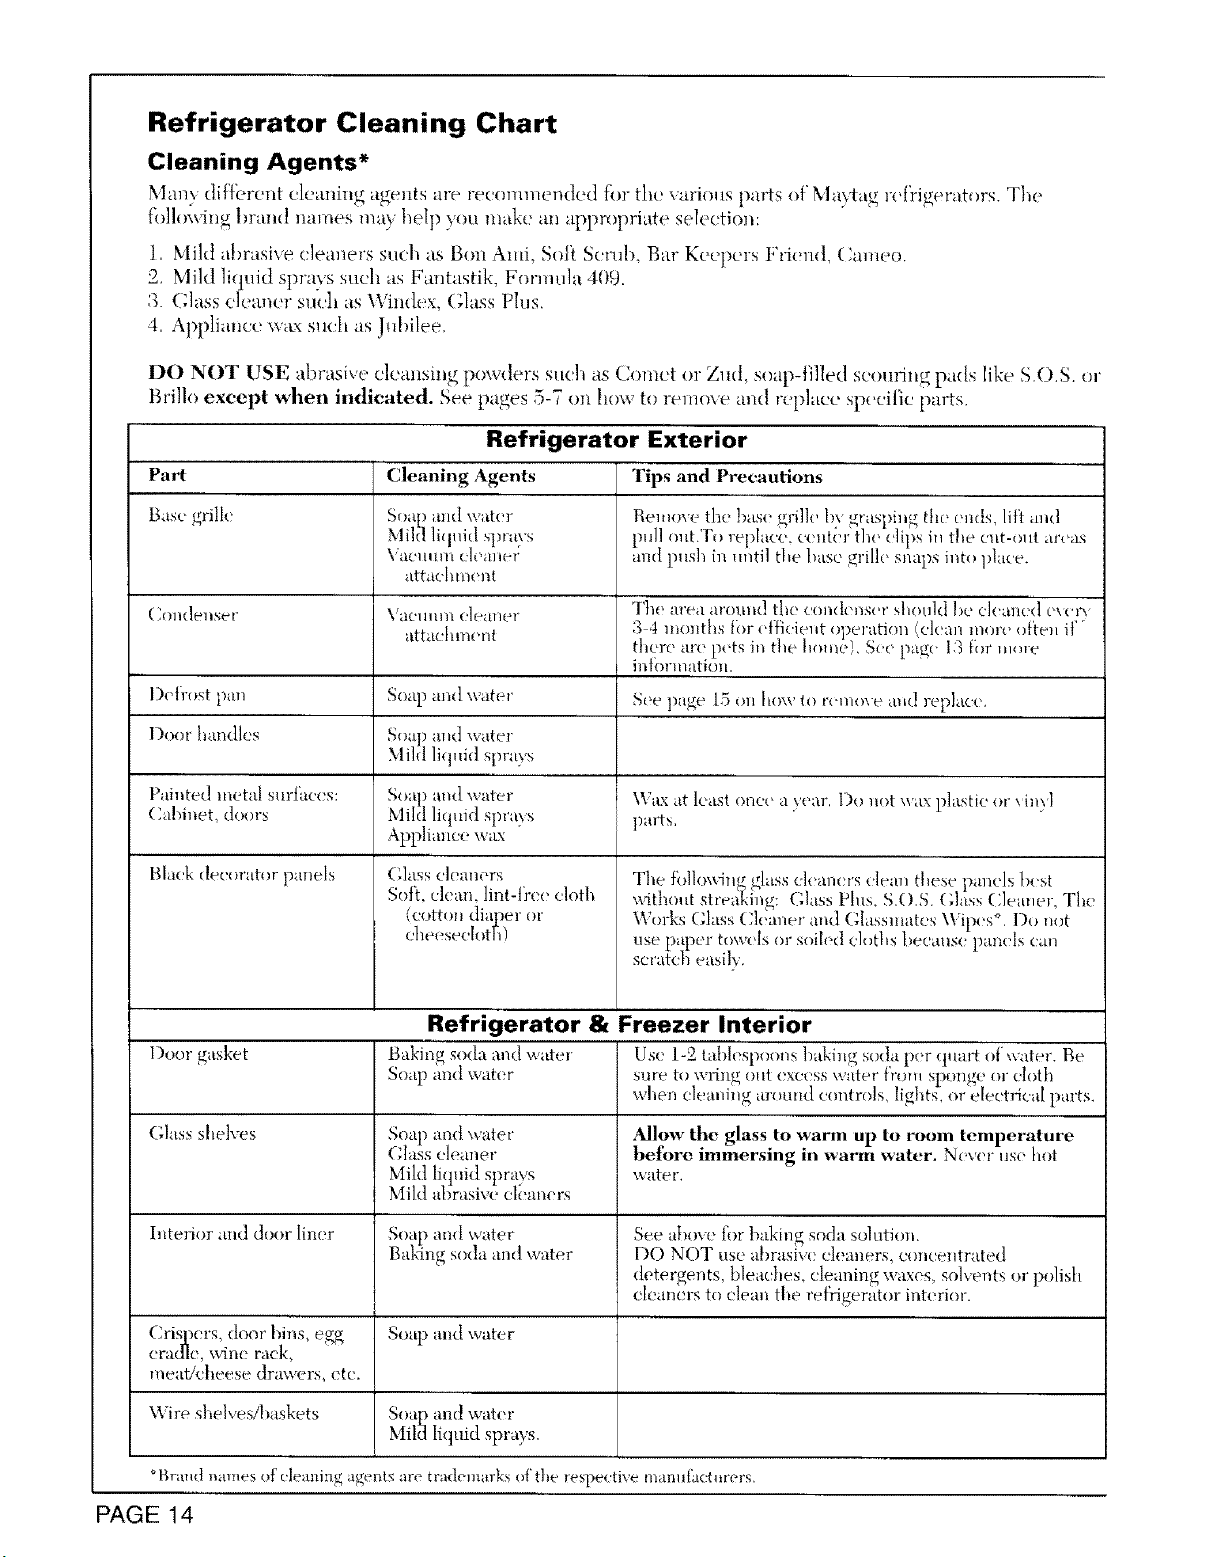
Refrigerator Cleaning Chart
Cleaning Agents*
_'l_.lll_ r dif_q_ent cleaning agents are recommended ft. the various parts of Ma_lag reffif_erators. The
fi)llo_ing brand names may h{4p you mak{:' an appropria{e sele(ti{m:
I.Mild a!)rasixe cleaners such as Bon Ami, Sol}. Scrub, Bar Keepers l;'riend, (:ameo.
2. Mild liquid sprays such as Fantastik, Formula 409.
3. (;lass cleaner such as Windex, Glass Plus.
4. Applhmc{. w_x such as Jubilee.
DO NOT USE abrasive cleansing powders such as Comet or Zu{I, soap-filled scoudng pads like S.O.S. or
Bri]lo exeepi when indicated. See pages 5-7 on how to remove and rep]a{'c speeit]c parts,
Refrigerator Exterior
Pal_ Cleaning Agents Tips and Precautions
Base grill{? Soap mvd water Remove the base grill{, I)x Irasphvg the elids lit} avid
Mil_I liquid st)rays pull out/Vw repIaee, c( nti?]£the ('lips iv, the cut-old areas
• y\'acuun:_ eh:'ane,: and push m until the l}ase _rille snaps into place.
attachment
(£ondenser
\_t&'IVlII)I eleaner
attachment
The area around the e{}n(h?Hs{,r shot]ld ])e clean{xl e_erv
3 4 months tbr {'t}_eient operation (elean vnoH, often if"
there are pets in the home). See p_tlv, 13 for more
ivd{)rmati(m.
So&p av](t wafe'r
Soap and water
MI]{t liquid sprays
Soap and water
Mild liquid spr:i*_rs
Appliance xwLx "
(;]ass cleaners
Soft, clemL lint-flee cloth
(cotton diaper or
eheeseeI{}th)
I)eth}st pan See ])af{e 15 vm how Iv}r{'mm e aBd replace.
Door handl{ s
Painted metal surfi_ces: Wax at least once a year. I)o not wax plastic or _inv]
Cabinet doors parts,
Bldek dee{}rator panels
The fi.41owhl_<lass cleaners {.lean these panels best
without strc_12:ing; (;lass Plus, S.O.S. {;],ss Clea, er, The
Works Glass {:leaner and Glassmates \Vipvs °, I)o not
use paper towels or s{vi[ed c]{}thstvewaus(i panels cm
ser:ffch easily.
Refrigerator & Freezer Interior
Door gasket Baking soda and wate_ Use 1-2 ta|}h!sp{xm.s l:}aking soda per quart of \va_er. Be
Soap and water sure to \;ring out exeess water from Sl){mge or cloth
when cleani]Ug a]'v}tmd eontrols, lights-, or eleetH(..aI parts.
Glass shelves Soap and water Allow tile glass to warm up to rooln tenlperalure
Glass cleaner before immersing in warfft water. Never i-is{ hot
Mih] liquid sprays water.
Mik] abra,dve cleaners
hvterior and door liner Soap and water See above for baking soda solution.
Baldng soda and water DO NOT use abrasM> {']e;mers, concentrated
{tetergents bleaches cleanin_ waxes, solxents or polish
cleaners to elem'_ the rehigerator interior.
CrisAx_rs, door bins, e_ Soap and water
era{lie, sxa2neraek_
meat/cheese drawers, etc.
\Vire sl_elvestba.skets Soap and water
Mild liquid sprays.
°Brand names of eleani_.g agents are trademarks {}1'tile respective m mul{2vetm'ers.
PAGE 14
NON-USE PERIODS
Vacations
Kvou will bc gone _br a month or less, leave the
controls at the usHa[ settings.
I)m'hl_ l()ng_r absen(:es:
a/ rem,}xe all food,
1))slmt ot]"Lhvice mak_r (if'instaH(:d) and the
valve wh¢'re .v°u tapped into the wat(r line
to supply fl_e refi'igerator,
(') (]Js('omlect the rcfrj_t_r.ator from t]_a
electrical outlet.
d) oh:an and dlT thercffiEerator thoroughly
includhlg the dcl)-ost pan,
(') l_,a,,v the doors opeu to prevent odors,
Moving
\Vh(?ll lnoving, f()IlOWsteps _(t m_(lcr Vacations.
in addition, remove and caret)ally pack any it(ml,_
that are easily, removabl('. Ship the reffigerator m
ml upriglat positiot_ with th( doors taped strut,
IMPORTANT PERSONAL SAFETY INSTRUCTIONS
1. To prevent possibilit) of hazard ([tie to
ul(x.trical shock, never plug the ref)'igerator
into a receptacle which has not been
,_r(_un(lcd adcquat(4y mid ill accor_lail(,e" wJt]l
the local and natiomd electrical codes. See the
grounding insh_lctions (m page 2,
2, Uni)lu_ the wffigcrator beti)re cleaning the
condenser or repl;tcin_ a light bulb.
3. In case o{'power lid]rec, milfimize door
openings. If"the power failure is of a long
(turatitm, protect the fbod bv placin_ blocks of
(tp, ice on top of'the ])ackag(-s or check with a
local frozen fb()(ls locker plat_t about
temporm) stora,¢e. Frozen tbo(ls whict_ have
tllawcd completely sho_lld ,or be refiozen.
4. Any electrical :.e_Mcc cor(I thai becomes
fra) ed or (lama_cd shoukt be immediately
repaired or rel)l _c,d. Never m@ug your
appliance b) 1)_dling on the po_u_r cord.
5. Yore" refi'igerator should not be operated in
the presence (ff explosive f'mncs.
6. llcmove the doors f'rom am out-olLuse
r(_frig..nator to prevent C]fi](]entrapment and
su}}})catioll.
7. Children should not climb, han_ or staud on
the shrives of this refrigerator.
PAGE 15

TO AVOID UNNECESSARY SERVICE CALLS...
Bet})re calling a service technician, check the t)_llowil_g list fbr pc)ssit)k_ troubles that you can remedy
wittlout difficulty,
The refrigerator won't run
The refrigerator runs too hmg!too
frequently
• the tentperaum' control turned _o "Off"
• the po'._ er cord ]lot phtg,gcd i_
• no power it th(' electrical ford
• thecileuithreakcl trippedoldie hous('lii_{'blown
• modern re_)'igerators aw Ta_g('r a_d I'llll COI([{q'. xxhi(.h ]e_[llirps nl_}re
l'llllllill_ time to l}ro_ide 11101"t' S_;t!)](' t(qlIppl'ktfAll'(_S
• the condensm u('uds tie;rail g tsl'l' p_lg_' 11 )
• the co_trol set too cold
• lm)hmgcd door _>penings
" the base grille blocked
• [00 Ii][t!'tX ({O()l _l)[){'IliT/_r5
* the' door not st alin_ (due to at pac'kag( _lr a (olltaiacr tm[din_ door *lpell)
Noisy operation • iim .ois(' .orma[ air 15_x_
NOTE: Addhi0_ d i .)_r_ mtd commas ar*_ used lo • the (lehost pan not i)_)sitio_led correc!l\
)ru_ide im noved pcMi)_mart(e 'l'h¢_lclk_rc. normd • tilt' (!a[_i_lc_ tlo{ I('vt']
(lI)( ] Li[lltg q(?l I]I(_S I/;1\ !3(' i) II)I'(Y Iiotic( _d_[_ _ tlLatt tin the
m_d_.l it wpla*x,d " • kk weak [](ior
Odor in the cabinet • odor producing ti;(_ds :J_olfld }_e co_ er.d or x_rapp('d
• the interior lmelis cleanil_g
• (]_e defi'ost pall ilceds cl(miin_
Warm air from the cabinet bottom • 1 (}rnta[ air [low t()r cinldel/ser
The cabinet vibrates * tile _at)in(_t _(_t level
• aweak floor
Water on the back wall of the fresh • :l ilorillal dcl3"ost t'olictition to ciiniHlvl ilioistllt(. Lo flY(' ({l'f]'f/_;t palt
food compartment
%Vater on the floor under the cabinet * the def)'ost pal'° n'dssill_ Or lio[ ])ositi(med prop_'rlx
Foods dLw out • the' l_aCkag_.s _ot wrapped (!r seali'd properl}
• the crisper ilol tightl) closed
The cabinet light not working • tile !)nlh h_:'rl0d ()lit
° IIO po\v(-r _tt t}_(' <)uric{
The refrigerator compartment too ° the rt'l)i_4erator ('()ntroI set too Wai'li/ - s(_( _ t)il_(" | lo ad,i_st
warm ° proIol_(,d door opeiihlgS
Tim ret¥1gerator compartment ton cold * tile r_d'rir4erator co!/h'lll s('t too co](I st'(' I'nl_e 4 to adjllst
The freezer compartment ton tvarnl * t]lO t)-t'('zer cola[rt>] 5('1 too \vttrnl - see i)aK(' 4 to ad_st
• imflong_'ddoor openings
Sizzling sound in the freezer " a normal soml(_ cau_,e(l l)) (h@ost \_ _m'r (]l'illl)[li!_ (_1_({ef'ros[ m(<(-h;t_lisli
Moisture collects on the outside surface • h_)thul_lid weather iIl(:rl'its('s ('oil(It'liSki[iOll lll(Y, W ('lll'r;_ _l',tq" 5>\_i_c:h to
<'lit'duct' Mi)ist'cir( >'"pos/tiol_
The ice cubes evaporate • <_old air illoviii}_ (lx('r the it.., c'u{)es wh('n not used refztllarl?.
The automatic ice maker not • ttw stop ttrlii ill ()FV (u t) l)t)sitJ(m
operating (optional) • tt,, _at('r s*q)pl? _m'n(:d oi}
• the \tat('r ])rl'ssllro _oo ]o\v
• t]lO t}m'(_Ztq ' tO0 "_,itrln
NOTE: I:or thrther assistance contact VOllr Ma}tag dealer or Maft3.ff, (]!/SIOmIT St'Ix'it!c,', [3.5, 1-,_J(t0-(]SS-cag()0
(]amida 1-S00-6SS-2002
PAGE 16
MAYTAG REFRIGERATOR WARRANTY
Full One Year Warran D,
For one (1) year from the date el'original retail purchase, any pm_iwhich fails in normal home use \_qllbe
repaired or replaced free of charge.
Limited Warranty
Second thnl Fifth Year -- major refrigeration components:
After the first year and through the fifth year after tile date of original retai! purchase Maytag x_qllrepair or
replace, at its option, [ree of eharae to the owner fi-_rparts and lab(_rany part of the setded refi'igeration
system (consisting of the compressor, evaporator, eondenser_ drier and connecting tubing) and tile cabinet
[iner (exclusive of the door liner) whieh fidls in normal home use. Trip charges, travel and transporlatioTL if
required, shall be the responsibilit?; of the owner.
Second Year -- other parts:
Other parts which fail in normal home use during tile second year tb]lowJng date of orighml retail purchase
will be repait>d or replace free of charge for fl-_epart itself', with the owner pa)4ng all other costs, including
labor and trip charges.
Ice Maker - when pun'hased with the refrigerator and installed by the dealer the ice maker will be considered
part of the re|'rigerator for warrant}' purposes,
This |itll warranty and the limited warrant 3' q_ply only when the appliance is loeated in the United States or
Canada.
LIMITATION OF LIABILII_"
The warrantor, Maytag Company, shall not be liable }br any incidental or consequential damages, inehMing _bod
loss. Some states do not allow the exclusion or limitations o|' consequential damages, so the above limitations or
exclusion may not apply to you.
To Receive Warranty Service
To lo_,ate an authorized service eompany in yore"area, contact the Maytag dealer from whom your
appliance was purchased or call May-tagCustomer Service. Should you not receix e satisfacto_T
warranty ser'dee, call or write:
Maytag Customer Service
240 Edwards St. S.E.
Cleveland, TN 37311
U.S. 1-800-688-9900
CANADA 1-800-688-2002
V_qleneont_u:ting Customer Serviee be sure to provide tile model and serial number of 5,our
appliance, the name and address of' the deaIer from whom you purchased tile appliance, and the
date of purchase,
This Wammt), gives 2_)iispecific legal fights, a.d yot_may also have other rights which vary f?om
state to state,
Should you still have a problem, \vr{te tr); Major Appliance Consumer Action Program. 2(1North Waeker Drive, Chicago,
Illinois 60606, MACAP is an industD" sponsored bllt independent group of consumer experts who receive and act on
complaints f)'om appliance ox_llers,
NOTE. When writing about _il]unsolved sel"viee problem, please iuelmte the [bllox_dngin_brmati_m:
(a) Your name, address and telephone number;
(b) Model num})_r serial 31uniber and re\isiOll number (fimnd on the top _]'ont interleaf of the ref}igerator
compartment);
(c) Name and address ofxr_ur dealer and tile date the appliance was bonght;
(d) A clear description of'the problem yon are Mxing.
PAGE 17