Loading ...
Loading ...
Loading ...
5
BEFORE FIRST USE
• Read all of the instructions included in this manual.
• Remove any packaging material and labels from the Kitchen Machine.
• All parts of the Kitchen Machine need to be thoroughly cleaned before being used for the
rst time. (See “Care and Maintenance” section).
PREPARATION
1. Sit the appliance on a water-resistant, dry, stable, level surface.
2. Route the cable so it doesn’t overhang, and can’t be tripped over or caught.
3. Don’t plug the appliance in until you have nished assembling it.
GENERAL USE
RAISING THE ARM
1. Ensure the Kitchen Machine is switched off and unplugged.
2. Turn the arm lock lever to the unlock position.
3. The arm will lift, with your assistance, allowing removal/replacement of the stainless steel
bowl and/or mixing attachments.
4. At its uppermost position the arm will lock into place and the arm lock lever will return to
the lock position.
LOWERING THE ARM
CAUTION: Keep hands and items clear of the arm pivoting area to avoid injury or damage
to the appliance.
1. Ensure the required mixing attachment is correctly tted and the mixing bowl is in position.
(See “Fitting the Bowl” and “Fitting/Removing Attachments” sections)
2. Turn the arm lock lever to the unlock position.
3. Gently lower the arm by pressing down on the top of the Kitchen
Machine until it locks into position.
4. The arm lock lever will return to the lock position.
FITTING THE BOWL
1. Raise the arm before tting or removing the bowl.
2. Fit the bowl into the recess in the base and turn the bowl clockwise
until it locks.
3. To remove, turn the bowl anti-clockwise then lift it off the base.
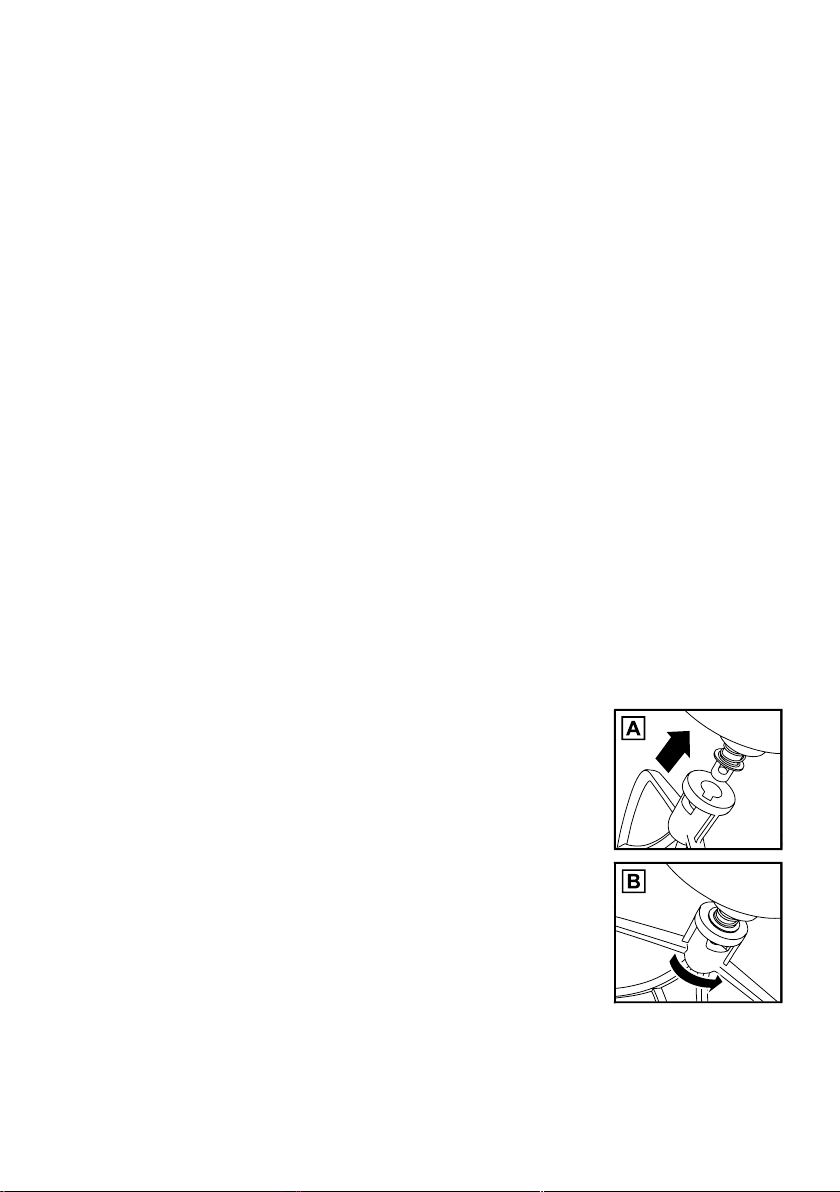
FITTING/REMOVING ATTACHMENTS
Switch off, unplug and raise the arm before tting or removing
attachments.
1. Align the slot in the attachment with the pin on the drive shaft (Fig
A).
2. Push the attachment onto the drive shaft then turn it anti-clockwise to lock it in place
(Fig B).
To remove an attachment, push the attachment upwards slightly then turn it clockwise and
withdraw it from the shaft.
8
1 2
3
9
4
5
6
7
8
1 2
3
9
4
5
6
7
Loading ...
Loading ...
Loading ...