Operator's Manual
I:Rl FI'SlVl N
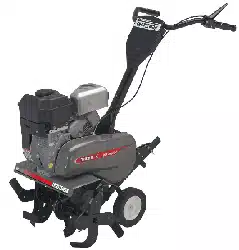
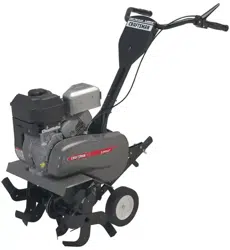
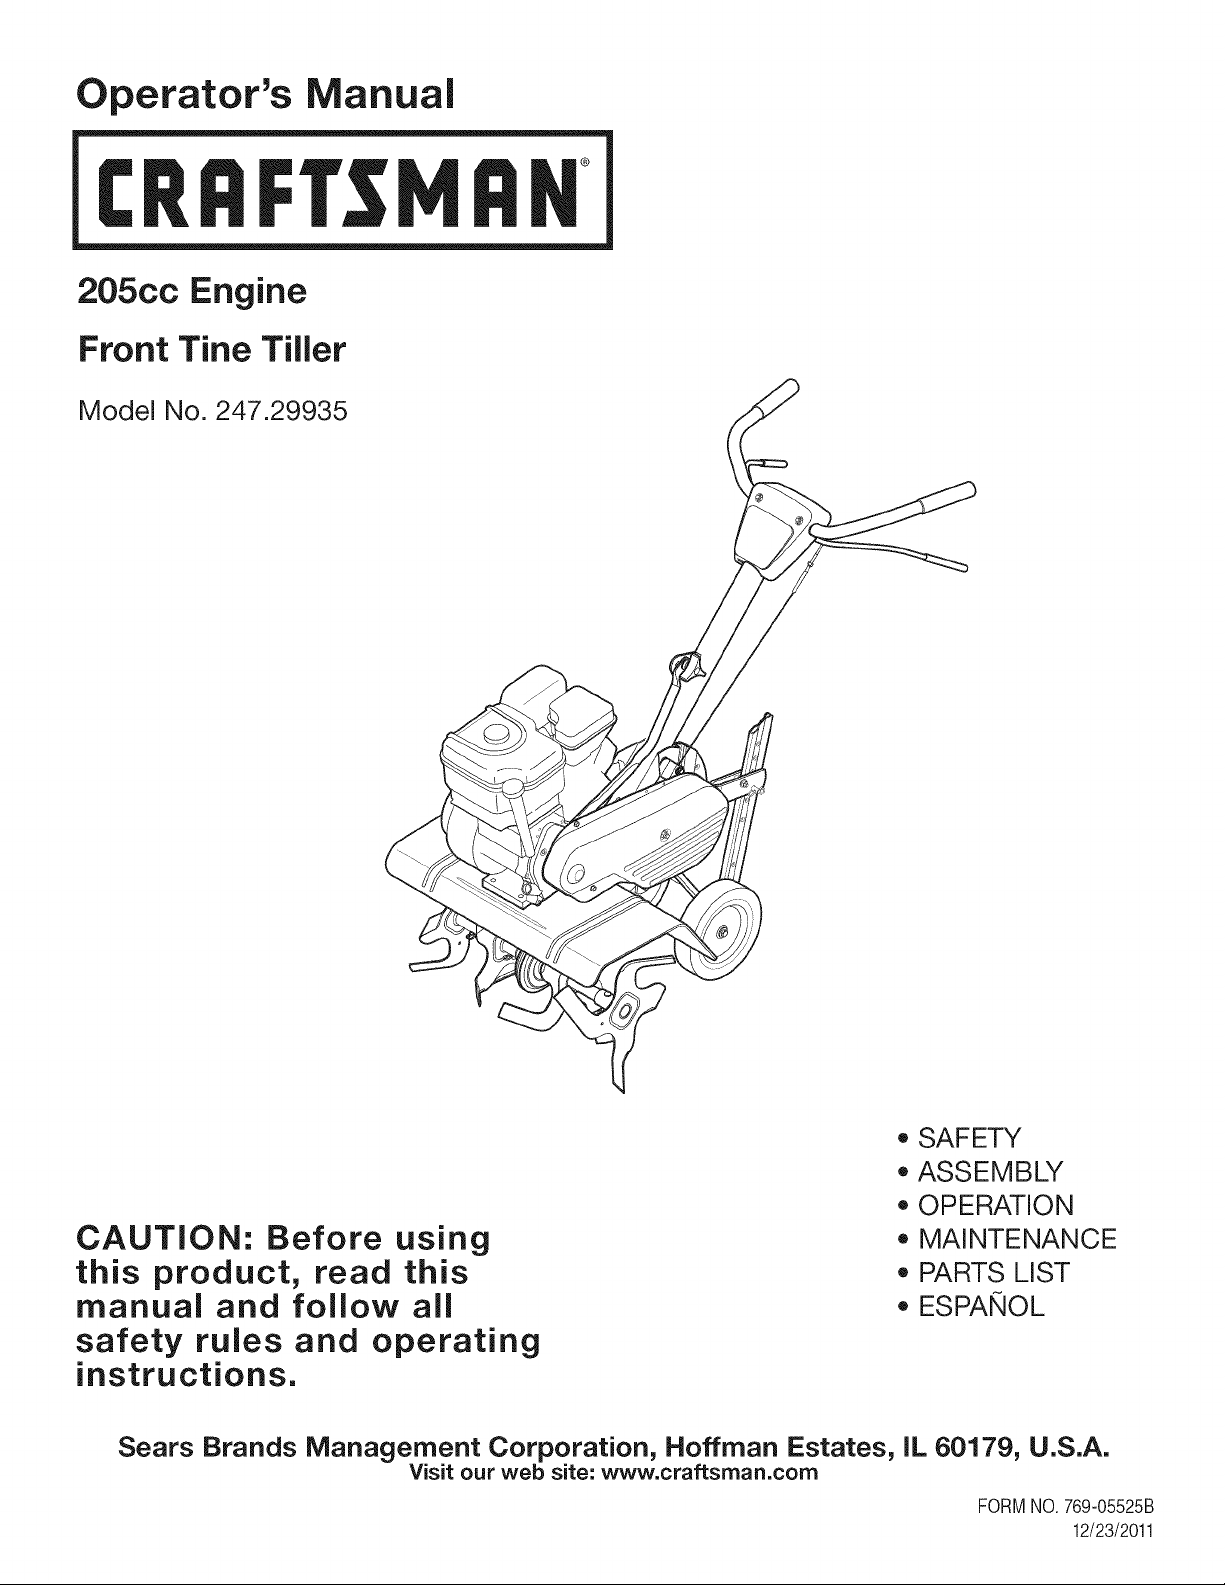
205cc Engine
Front Tine Tiller
Model No. 247.29935
CAUTION: Before using
this product, read this
manual and follow all
safety rules and operating
instructions.
* SAFETY
* ASSEMBLY
* OPERATION
* MAINTENANCE
* PARTS LIST
* ESPANOL
Sears Brands Management Corporation, Hoffman Estates, iL 60179, U.S.A.
Visit our web site: www.craftsman.com
FORM1/0. 769-05525B
12/23/2011
WarrantyStatement..................................Pac
Safetyinstructions....................................Pac
Assembly..................................................Pac
Operation..................................................Pac
ServiceandMaintenance.........................Pac
Off-SeasonStorage..................................Pac
TroubleShooting.......................................Pac
e2
es3-6
es7-10
es11-15
es16-19
e20
e21
PartsList...................................................Page22-34
LabelMap.................................................Page35
RepairProtectionAgreement...................Page38
Espa_ol.....................................................Page39
ServiceNumbers......................................BackCover
CRAFTSMAN TWO YEAR FULL WARRANTY
FORTWOYEARSfromthe dateof purchase,this productis warrantedagainstanydefectsin materialor workmanship,A defectiveproductwill
receivefree repairor replacementif repairis unavailable,
For warranty coverage details to obtain free repairor replacement,visit the web site: www.craftsman.com
This warranty covers ONLYdefects in material andworkmanship. Warranty coverage does NOTinclude:
• Expendableitemsthat can wearoutfromnormalusewithin thewarrantyperiod,suchas the blades,tines, or belts.
• Productdamageresultingfromuserattemptsat productmodificationor repairorcausedby product accessories.
• Repairsnecessarybecauseof accidentorfailureto operateor maintainthe productaccordingto all suppliedinstructions.
• Preventivemaintenance,or repairsnecessarydueto improperfuel mixture,contaminatedor stalefuel.
Thiswarrantyis void if thisproductis everusedwhile providingcommercialservicesor if rentedto anotherperson.
Thiswarrantygivesyou specificlegalrights,andyou mayalso haveotherrightswhichvaryfromstateto state.
Sears Brands Management Corporation, Hoffman Estates, IL 60179
EngineSeries: 205cc
EngineOilType: SAE30
EngineOilCapacity: 20ounces
Fuel: UnleadedGasoline
SparkPlug: Champion®RC-12YC
SparkPlugGap: .030"
ModelNumber.................................................................
Serial Number .................................................................
Dateof Purchase.............................................................
Recordthe modelnumber,serialnumber
anddateof purchaseabove
© KCD IP,LLC 2
Thissymbolpointsout importantsafetyinstructionswhich,if not
followed,couldendangerthe personalsafetyand/orpropertyof
yourselfand others. Readandfollowall instructionsin thismanual
beforeattemptingto operatethismachine.Failureto complywith
theseinstructionsmayresultin personalinjury.Whenyou seethis
symbol,HEEDITSWARNING!
CALIFORNIA PROPOSITION 65
EngineExhaust,someof itsconstituents,andcertainvehicle
componentscontainoremitchemicalsknownto Stateof California
to causecancerandbirthdefectsorother reproductiveharm.Bat-
tery posts,terminals,and relatedaccessoriescontainleadand lead
compounds,chemicalsknownto the Stateof Californiato cause
cancerandreproductiveharm.Washhandsafterhandling.
Thismachinewas built to beoperatedaccordingto the safeopera-
tion practicesin this manual.As withany type of powerequipment,
carelessnessor erroronthe part of the operatorcan resultin
seriousinjury.Thismachineis capableof amputatingfingers,hands,
toesandfeet andthrowingdebris. Failureto observethe following
safetyinstructionscouldresultin seriousinjuryordeath.
Your Responsibility--Restrictthe use of this powermachineto
personswho read,understandand followthewarningsand instruc-
tionsin thismanualandon the machine.
SAVETHESEINSTRUCTIONS!
TRAINING
• Read,understand,andfollowall instructionson the machineand
in themanual(s)beforeattemptingto assembleandoperate.
Keepthis manualina safeplacefor futureand regularreference
andfor orderingreplacementparts.
• Readthe Operator'sManualand followallwarningsand safety
instructions.Failureto do so can resultin seriousinjuryto the
operatorand/or bystanders.Forquestions,call 1-800-4MY-HOME.
• Be familiarwithall controlsand their properoperation.Knowhow
to stopthe machineand disengagethemquickly.
• Neverallowchildrenunder 14yearsof age to operatethis
machine.Children14andover shouldreadandunderstandthe
instructionsand safeoperationpracticesin this manualand on
the machineandbe trainedand supervisedby an adult.
• Neverallowadultsto operatethis machinewithoutproper
instruction.
• Keepbystanders,pets,and childrenat least 75feetfromthe
machinewhile it is in operation.Stopmachineif anyoneenters
the area.
• Neverrun anengineindoorsor in a poorlyventilatedarea.Engine
exhaustcontainscarbonmonoxide,anodorlessanddeadlygas.
PREPARATION
• Thoroughlyinspectthearea wherethe equipmentis to be used.
Removeall rocks,bottles,cans,or otherforeignobjectswhich
could bepickedupor thrownandcausepersonalinjuryor
damageto the machine.
• Alwayswear safetyglassesor safetygogglesduring operation
andwhile performingan adjustmentor repair,to protectyour
eyes.Thrownobjectswhichricochetcan causeseriousinjuryto
the eyes.
• Wearsturdy,rough-soledwork shoesandclose-fittingslacksand
shirts.Loosefittingclothesor jewelrycan becaughtin movable
parts.Neveroperatethismachineinbare feetorsandals.
• Beforestarting,checkallboltsand screwsfor propertightnessto
besurethe machineis insafeworkingcondition.Also,visually
inspectmachinefor any damageat frequentintervals.
• Disengageclutchleversand shift (if provided)into neutral("N")
beforestartingtheengine.
• Neverleavethis machineunattendedwiththe enginerunning.
• Neverattemptto makeanyadjustmentswhilethe engineis
running,exceptwherespecificallyrecommendedinthe operator's
manual.
• Maintainor replacesafetyandinstructionslabels,as necessary.
3
Safe Handling of Gasoline:
Toavoidpersonalinjuryor propertydamageuseextremecare in
handlinggasoline.Gasolineis extremelyflammableandthe vaporsare
explosive.Seriouspersonalinjurycan occurwhengasolineis spilled
onyourselfor yourclotheswhichcan ignite.Washyour skinand
changeclothesimmediately.
• Use onlyan approvedgasolinecontainer.
• Neverfill containersinsidea vehicleor ona truckor trailerbed
witha plasticliner.Alwaysplacecontainerson the groundaway
fromyour vehiclebeforefilling.
• Whenpractical,removegas-poweredequipmentfromthe truck
ortrailerand refueliton the ground.If thisis notpossible,then
refuelsuchequipmenton a trailerwitha portablecontainer,rather
thanfrom a gasolinedispensernozzle.
• Keepthe nozzlein contactwiththe rimof the fuel tankor
containeropeningat alltimes untilfuelingis complete.Do not use
a nozzlelock-opendevice.
• Extinguishallcigarettes,cigars,pipesandother sourcesof
ignition.
• Neverfuel machineindoors.
• Neverremovegas capor add fuel whilethe engineishot or run-
ning.Allowengineto cool at leasttwo minutesbeforerefueling.
• Neveroverfill fueltank. Fill tankto no morethan1/2inchbelow
bottomof filler neck to allowspacefor fuel expansion.
• Replacegasolinecapand tightensecurely.
• If gasolineisspilled,wipe itoff theengineand equipment.Move
unitto anotherarea.Wait5 minutesbeforestartingthe engine.
• To reducefire hazards,keepmachinefreeof grass, leaves,or
otherdebrisbuild-up.Cleanupoil orfuel spillageand removeany
fuel soakeddebris.
• Neverstorethe machineor fuel containerinsidewherethereis an
openflame,spark or pilotlightas on awaterheater,space heater,
furnace,clothesdryer orothergas appliances.
OPERATION
• Do not puthandsor feetnear rotatingparts.Contactwith the
rotatingpartscan amputatehandsand feet.
• Do notoperatemachinewhileunderthe influenceof alcoholor
drugs.
• Neveroperatethismachinewithoutgoodvisibilityor light.Always
be sureof yourfootingand keepa firmholdon the handles.
• Keepbystandersawayfrom the machinewhileit isinoperation.
Stopthe machineif anyoneentersthe area.
• Be carefulwhentilling in hardground.Thetines maycatchin the
groundandpropelthe tillerforward.If this occurs,let go of the
handlebarsand do not restrainthe machine.
• Exerciseextremecautionwhenoperatingon or crossinggravel
surfaces.Stayalert for hiddenhazardsortraffic. Do notcarry
passengers.
• Neveroperatethe machineat hightransportspeedson hardor
slipperysurfaces.
• Exercisecautionto avoidslippingor falling.
• Lookdownand behindand usecare whenin reverseor pulling
machinetowardsyou.
• Start the engineaccordingto the instructionsfoundinthis manual
and keepfeetwell awayfromthe tines at all times.
• After strikinga foreignobjector ifyour machineshouldstart mak-
ingan unusualnoiseor vibration,immediatelyshutthe engineoff.
Disconnectthe sparkplug wire,grounditagainstthe engineand
performthe followingsteps:
a. Inspectfor damage.
b. Repairor replaceanydamagedparts.
c. Checkfor anyloose partsandtightento assurecontinued
safeoperation.
• Disengageall clutchlevers(if fitted)and stopenginebeforeyou
leavethe operatingposition(behindthe handles).Waituntil
the tinescometo a completestop beforeuncloggingthe tines,
makingany adjustments,or inspections.
• Neverrunanengineindoorsorina poorlyventilatedarea.Engine
exhaustcontainscarbonmonoxide,an odorlessanddeadlygas.
• Mufflerand enginebecomehot andcancausea burn.Do not
touch.
• Usecautionwhentillingnearfences,buildingsandunderground
utilities.Rotatingtinescan causepropertydamageor personal
injury.
• Donot overloadmachinecapacityby attemptingto till soil too
deepat too fastof a rate.
• Ifthe machineshouldstart makinganunusualnoiseor vibration,
stopthe engine,disconnectthe sparkplugwire and groundit
againstthe engine.Inspectthoroughlyfor damage.Repairany
damagebeforestartingand operating.
• Keepallshields,guards,and safetydevicesinplaceandoperat-
ing properly.
• Neverpick uporcarry machinewhilethe engineis running.
• Useonly attachmentsandaccessoriesapprovedby the manu-
factureras listedin the PartsListpagesof thisoperator'smanual.
Failureto do so can resultin personalinjury.
• Ifsituationsoccur whichare notcoveredinthis manual,use care
andgoodjudgement.ContactCustomerSupportat 1-800-4MY-
HOMEfor assistanceand the nameof thenearestservicedealer
MAINTENANCE & STORAGE
• Keepthe machine,attachmentsand accessoriesin safeworking
order.
• Allowthe machineto coolat leastfive minutesbeforestoring.
Nevertamperwithsafetydevices.Checktheirproperoperation
regularly.
• Checkboltsandscrewsfor propertightnessat frequentintervals
to keepthe machineinsafeworkingcondition.Also,visually
inspectmachineforany damage.
• Beforecleaning,repairing,or inspecting,stop the engineand
makecertainthetinesandall movingpartshavestopped.
Disconnectthe sparkplugwireandgrounditagainstthe engineto
preventunintendedstarting.
4
• Do notchangethe enginegovernorsettingsor over-speedthe
engine.Thegovernorcontrolsthemaximumsafeoperatingspeed
of engine.
Maintainor replacesafetyandinstructionlabels,as necessary.
Followthis manualfor safeloading,unloading,transporting,and
storageof thismachine.
Alwaysreferto theoperator'smanualfor importantdetailsif the
machineis to bestoredforan extendedperiod.
If thefuel tankhasto be drained,do thisoutdoors.
Observeproperdisposallawsandregulationsfor gas,oil, etc.to
protectthe environment.
Accordingto the ConsumerProductsSafetyCommission(CPSC)
andthe U.S.EnvironmentalProtectionAgency(EPA),this product
hasan AverageUsefulLifeof seven(7) years,or 130hoursof
operation.At the endof theAverageUsefulLifehavethe machine
inspectedannuallyby anauthorizedservicedealerto ensurethat
allmechanicalandsafetysystemsare workingproperlyandnot
wornexcessively.Failureto do so can resultinaccidents,injuries
ordeath.
DO NOT MODIFY ENGINE
Toavoidseriousinjuryor death,donot modifyenginein anyway.
Tamperingwiththe governorsettingcan leadto a runawayengineand
causeit to operateat unsafespeeds.Nevertamperwithfactory setting
of enginegovernor.
NOTICE REGARDING EMISSIONS
Engineswhich arecertifiedtocomplywithCaliforniaand federal
EPAemissionregulationsfor SORE(SmallOff RoadEquipment)are
certifiedto operateon regularunleadedgasoline,and mayinclude
the followingemissioncontrol systems:EngineModification(EM),
OxidizingCatalyst(CO), SecondaryAirInjection(SAI)and ThreeWay
Catalyst(TWO)if so equipped.
SPARK ARRESTOR
Thismachineis equippedwith an internalcombustionengineand
shouldnotbe usedonor nearanyunimprovedforest-covered,
brushcoveredor grass-coveredlandunlessthe engine'sexhaust
systemis equippedwith a sparkarrestormeetingapplicablelocal or
statelaws (if any)
Ifa sparkarrestoris used,it shouldbe maintainedin effectiveworking
orderby theoperator.Inthe State of Californiathe aboveis required
bylaw (Section4442 of the CaliforniaPublicResourcesCode). Other
statesmayhavesimilarlaws. Federallawsapplyon federallands.
A spark arrestorfor the muffleris availablethroughyournearestSears
PartsandRepairServiceCenter.
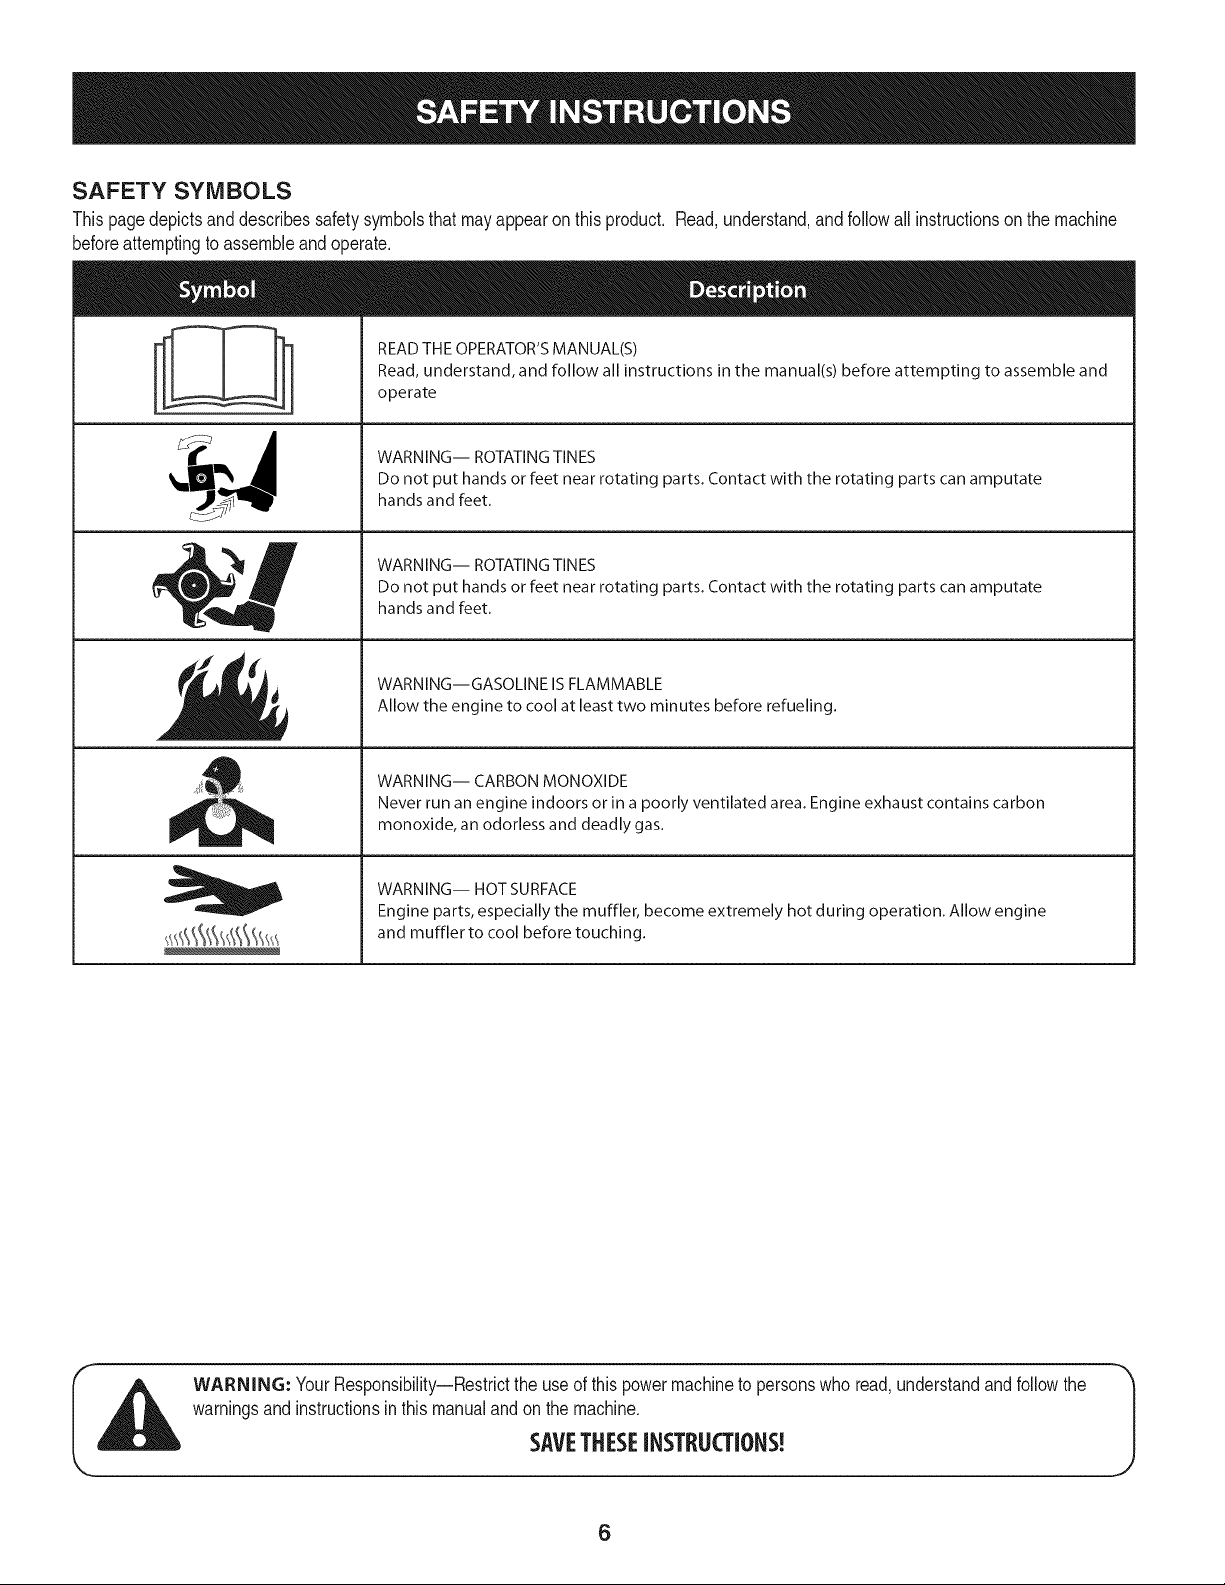
SAFETY SYMBOLS
Thispagedepictsanddescribessafetysymbolsthatmayappearonthisproduct. Read,understand,and followall instructionson the machine
beforeattemptingto assembleandoperate.
i
i
READ THE OPERATOR'S MANUAL(S)
Read, understand, and follow all instructions in the manual(s) before attempting to assemble and
operate
WARNING-- ROTATING TINES
Do not put hands or feet near rotating parts. Contact with the rotating parts can amputate
hands and feet.
WARNING-- ROTATING TINES
Do not put hands or feet near rotating parts. Contact with the rotating parts can amputate
hands and feet.
WARNING--GASOLINE IS FLAMMABLE
Allow the engine to cool at least two minutes before refueling.
WARNING-- CARBON MONOXIDE
Never run an engine indoors or in a poorly ventilated area. Engine exhaust contains carbon
monoxide, an odorless and deadly gas.
WARNING-- HOT SURFACE
Engine parts, especially the muffler, become extremely hot during operation. Allow engine
and muffler to cool before touching.
WARNING: YourResponsibility--Restrictthe useof this powermachineto personswho read,understandand followthe
warningsand instructionsinthis manualand onthe machine.
SAVETHESEINSTRUCTIONS!
6
NOTE:This unit is shippedwithoutgasolineor oilin theengine.Be
certainto serviceenginewith gasolineandoil as instructedin the
Operationsectionof this manualbeforeoperatingyourmachine.
NOTE:Referenceto rightand lefthandsideof the Tilleris observed
fromthe operatingposition.
OPENING CARTON
1. Cut eachcornerof the cartonverticallyfromtop to bottom.
2. Removeall looseparts.
3. Removeloosepackingmaterial.
REMOVING UNIT FROM CARTON
1. Use the handlebarto liftand pullthe tiller backwardsto a flat
area.Checkthecarton thoroughlyfor looseparts.
2. Be sure notto kinkthe forwardclutchcable.
LOOSE PARTS IN CARTON
• HandlebarAssembly
• Tiller
• EngineOil
• Operator'sManual
• DepthGage Assembly
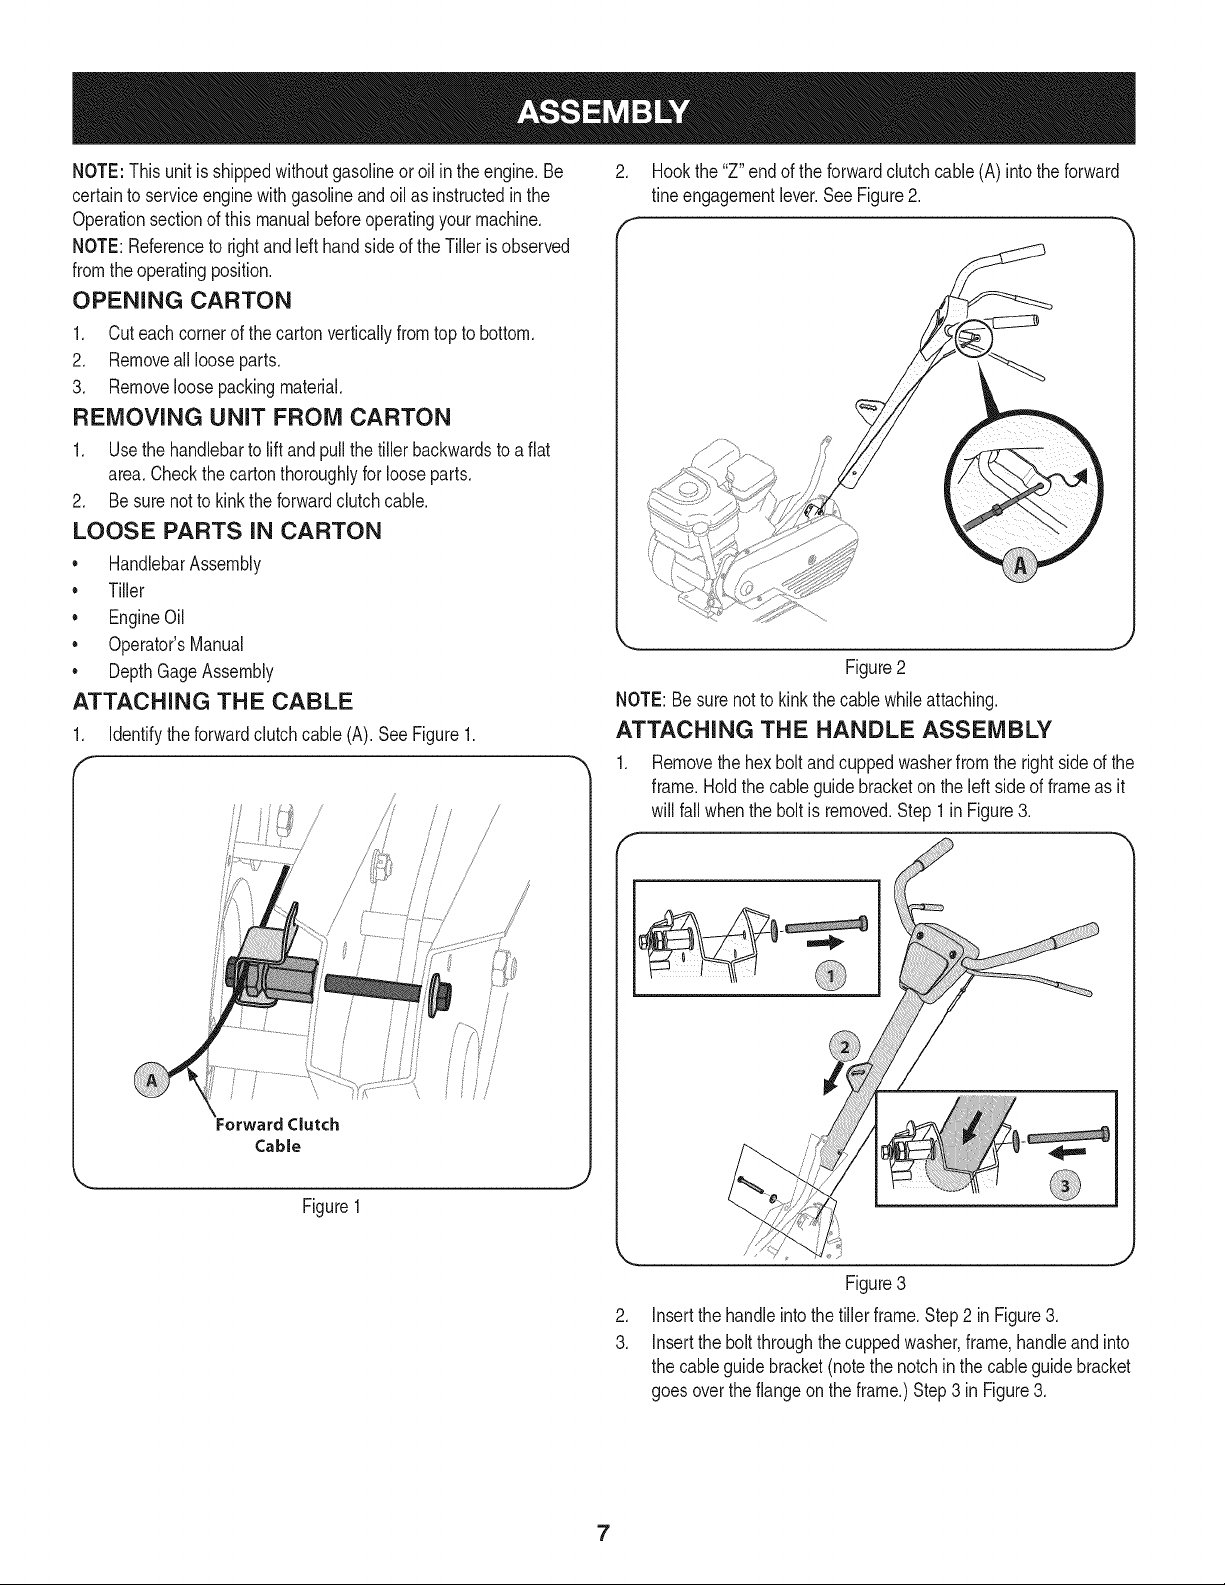
ATTACHING THE CABLE
1. Identifythe forwardclutchcable (A). SeeFigure1.
Forward Clutch
Cable
Figure1
2. Hookthe "Z"endof the forwardclutchcable(A) intothe forward
fine engagementlever.SeeFigure2.
f
Figure2
NOTE: Besurenotto kink thecable whileattaching.
ATTACHING THE HANDLE ASSEMBLY
1. Removethe hexbolt andcuppedwasherfrom the rightside of the
frame.Holdthe cableguide bracketonthe left sideof frameas it
will fall whenthe boltis removed.Step 1inFigure3.
.
3.
//': , "-d,.......
Figure3
Insertthe handle intothe tillerframe.Step2 in Figure3.
Insertthe bolt throughthe cuppedwasher,frame,handleandinto
the cableguide bracket(notethe notchinthe cableguide bracket
goes overtheflangeon theframe.)Step3 in Figure3.
7
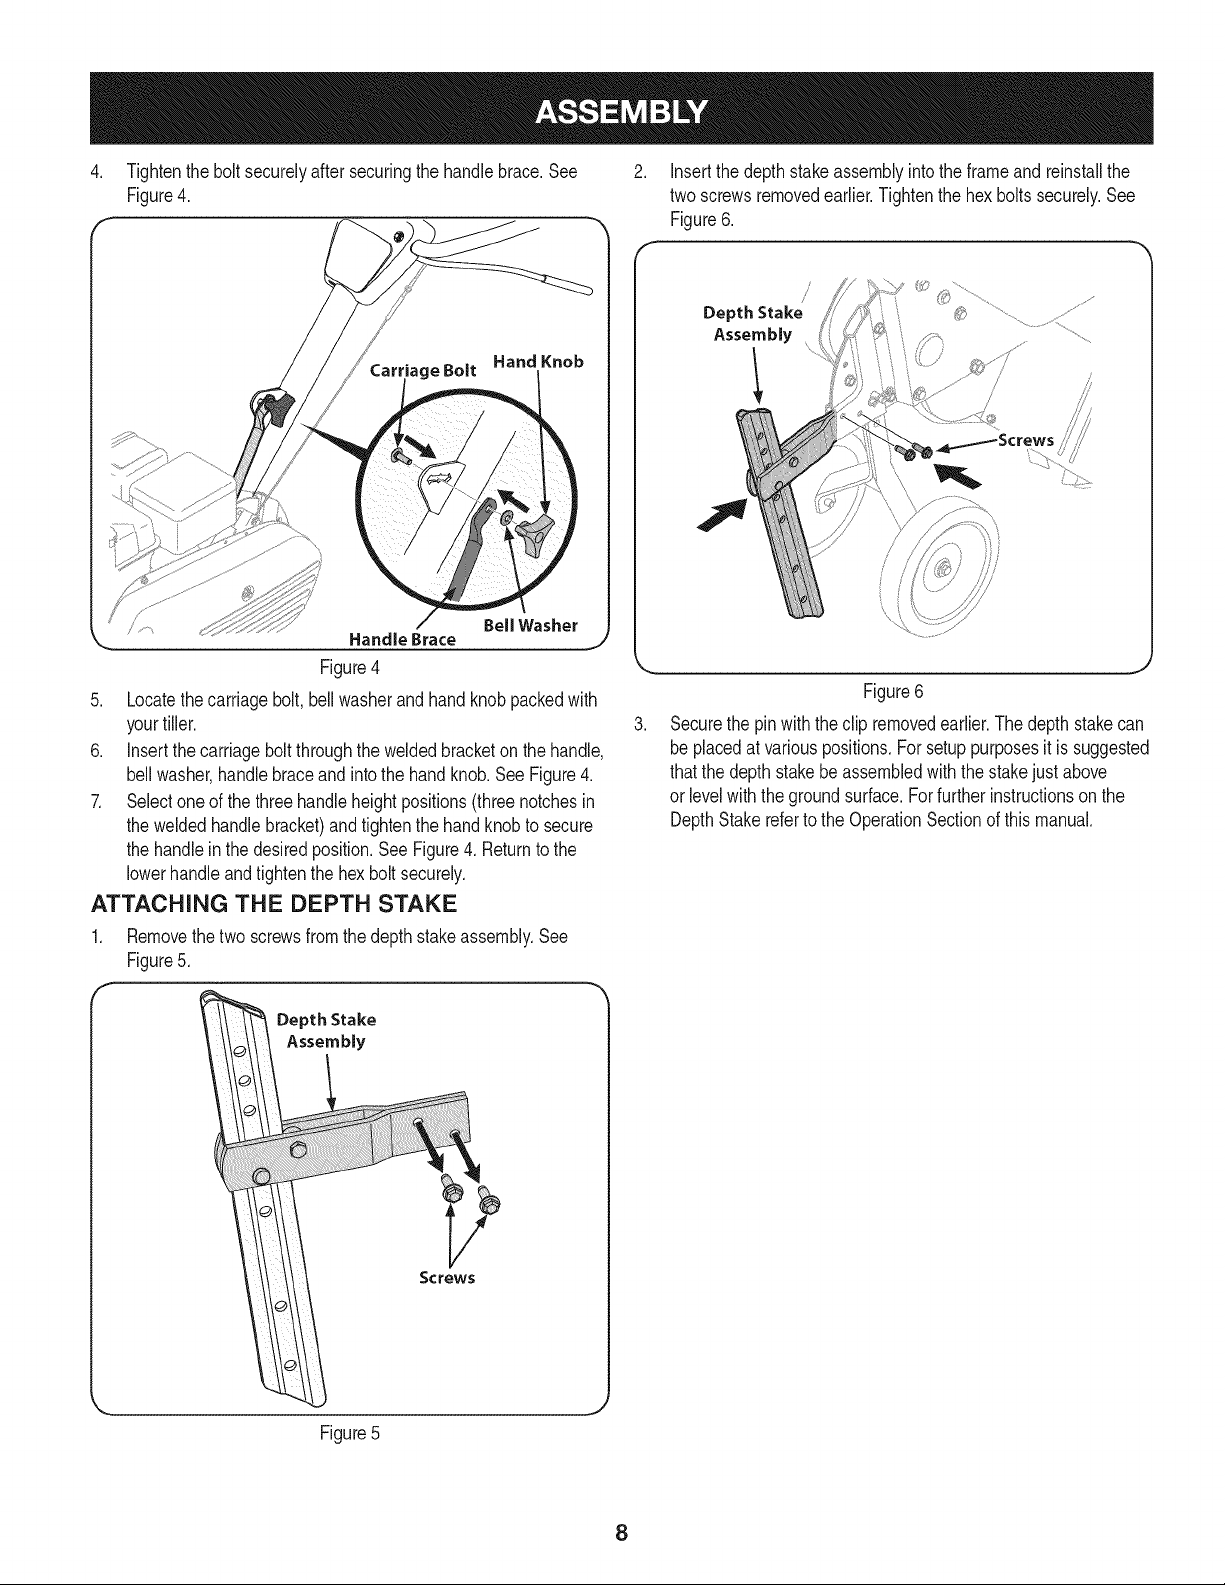
4. Tightenthe boltsecurelyafter securingthe handlebrace.See
Figure4.
Bell Washer
Handle Brace
Figure4
5. Locatethecarriagebolt, bellwasherandhand knobpackedwith
yourtiller.
6. Insertthe carriagebolt throughthe weldedbracketon the handle,
bellwasher,handlebraceand intothe handknob.SeeFigure4.
7. Selectone of the threehandleheightpositions(threenotchesin
the weldedhandlebracket)andtightenthe handknobto secure
the handleinthe desiredposition.See Figure4. Returnto the
lowerhandleand tightenthe hexbolt securely.
ATTACHING THE DEPTH STAKE
1. Removethetwo screwsfrom the depthstakeassembly.See
Figure5.
Insertthe depthstakeassemblyintothe frameandreinstallthe
two screwsremovedearlier.Tightenthe hex boltssecurely.See
Figure6.
Depth Stake
Assembly
/ /
Figure6
Securethe pin withtheclip removedearlier.Thedepthstakecan
beplacedat variouspositions.Forsetup purposesit is suggested
thatthe depthstakebe assembledwith the stakejust above
or levelwiththe groundsurface.Forfurtherinstructionson the
DepthStakereferto the OperationSectionof thismanual.
Depth Stake
Assembly
Screws
Figure5
8
SET-UP
Tire Pressure
Checkthe air pressureinbothtires.The air pressureshouldbe
between15-20PSI.Keepbothtiresequallyinflatedto helpprevent
machinefrompullingto one side.
Checking and Adding Oil
Theengine is shippedwithoutoil in theengine.Youmustfill the
enginewithoil beforeoperating.Runningthe enginewithinsufficient
_o can causeserous eng nedamageandvo d the productwarranty.
Initial Use
1. Removethe oil fill dipstick.
2. Placethetiller on levelground,usea funnelto emptyentire
contentsof the oil bottle providedwith the tiller intothe engine.
3. Replacethe oil fill dipstickandtighten.
Checkingand adding oil
1. Placethetiller on a flat, levelsurface.
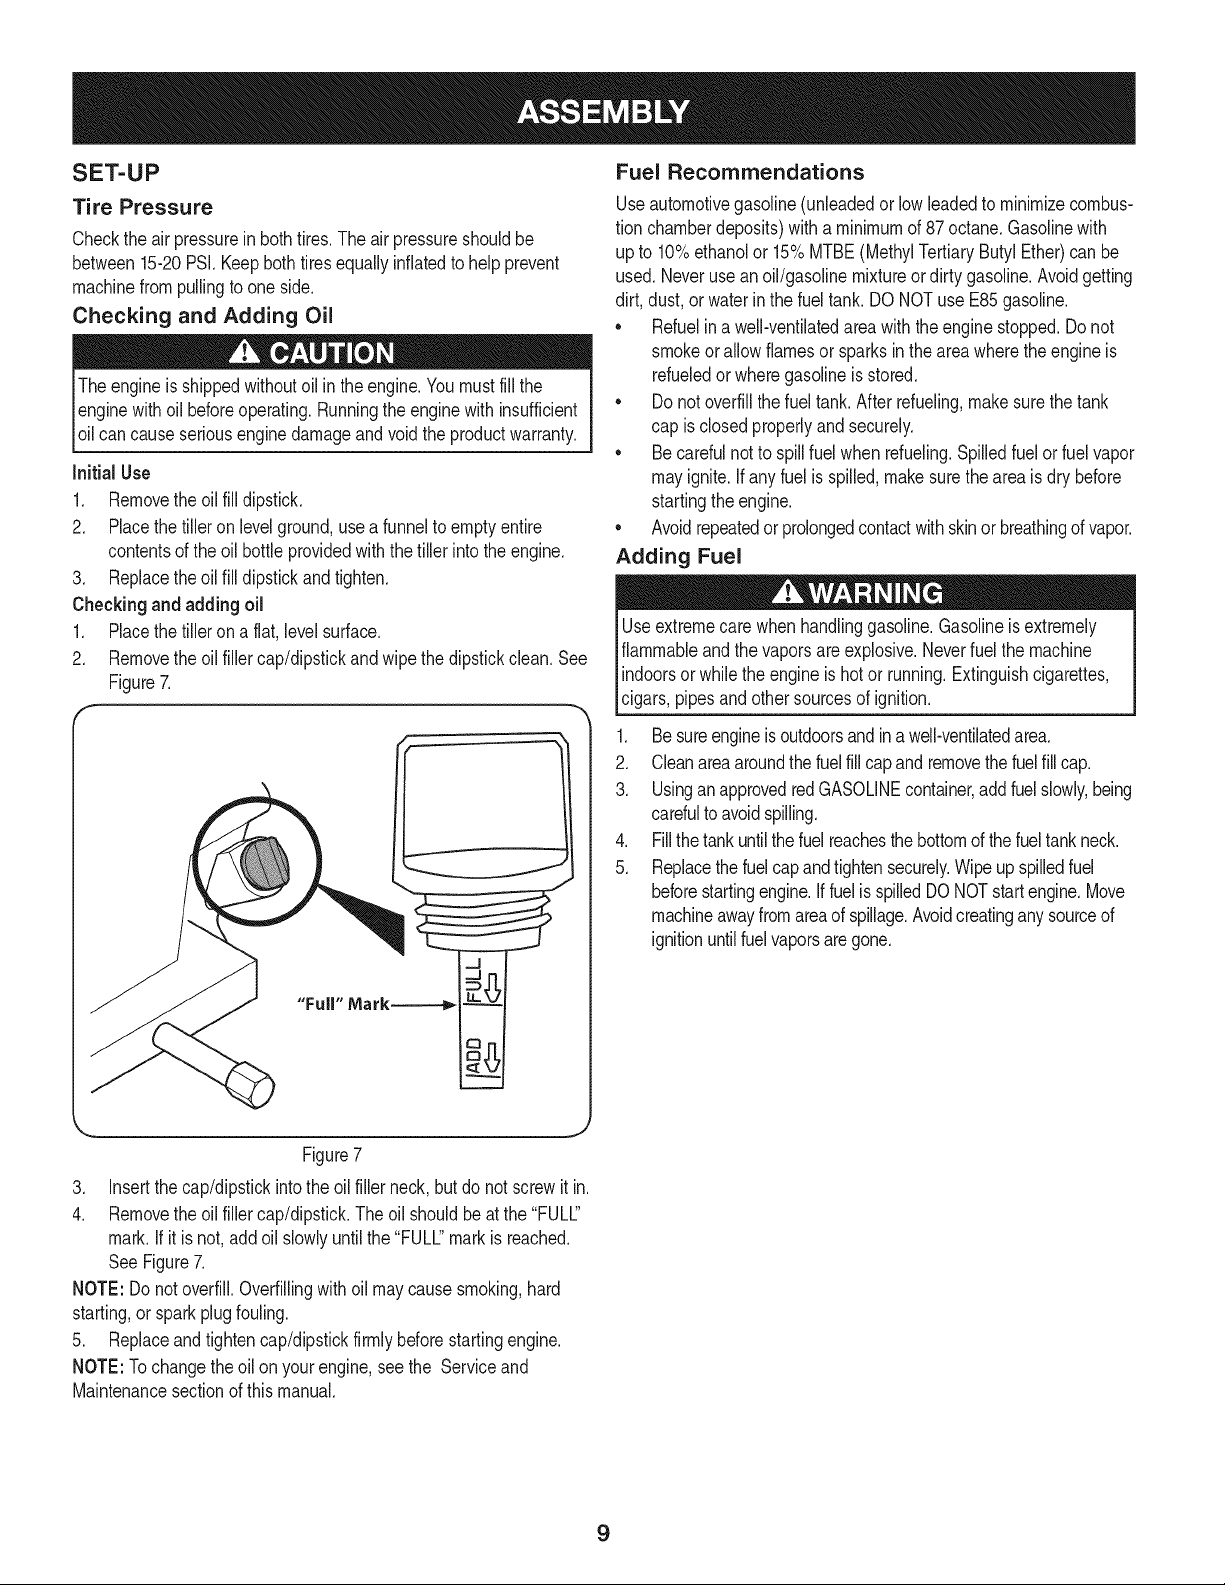
2. Removethe oil fillercap/dipstickandwipethe dipstickclean.See
Figure7.
Fuel Recommendations
Useautomotivegasoline(unleadedor lowleadedto minimizecombus-
tion chamberdeposits)with a minimumof 87 octane.Gasolinewith
up to 10%ethanolor 15%MTBE(MethylTertiaryButyl Ether)can be
used.Neverusean oil/gasolinemixtureordirty gasoline.Avoidgetting
dirt, dust,or waterinthe fuel tank.DO NOTuse E85gasoline.
• Refuelina well-ventilatedareawiththe enginestopped.Do not
smokeor allowflamesor sparksin the areawherethe engineis
refueledor wheregasolineisstored.
• Donot overfillthe fueltank.After refueling,makesurethe tank
cap is closedproperlyandsecurely.
• Becarefulnotto spillfuel whenrefueling.Spilledfuel orfuel vapor
mayignite.Ifany fuelis spilled,makesurethe area isdry before
startingthe engine.
• Avoidrepeatedor prolongedcontactwithskinorbreathingof vapor.
Adding Fuel
Useextremecare whenhandlinggasoline.Gasolineisextremely
flammableand thevapors areexplosive.Neverfuel the machine
indoorsorwhilethe engineishotor running.Extinguishcigarettes,
cigars,pipesandothersourcesof ignition.
1. Be sureengineis outdoorsand ina well-ventilatedarea.
2. Cleanareaaroundthefuelfill capandremovethefuelfill cap.
3. UsinganapprovedredGASOLINEcontainer,addfuelslowly,being
carefulto avoidspilling.
4. Fillthe tank untilthe fuelreachesthe bottomof thefueltankneck.
5. Replacethe fuelcapandtightensecurely.Wipeupspilledfuel
beforestartingengine.If fuelisspilledDO NOTstartengine.Move
machineawayfromareaof spillage.Avoidcreatinganysourceof
ignitionuntilfuelvaporsare gone.
Figure7
3. Insertthe cap/dipstickintothe oil filler neck,butdo not screwitin.
4. Removethe oil fillercap/dipstick.The oil shouldbeat the "FULC'
mark.If itisnot,addoil slowlyuntilthe "FULL"markisreached.
SeeFigure7.
NOTE: Donot overfill.Overfillingwithoil maycausesmoking,hard
starting,or sparkplug fouling.
5. Replaceand tightencap/dipstickfirmlybeforestartingengine.
NOTE:Tochangethe oil on yourengine,see the Serviceand
Maintenancesectionof thismanual.
9
ADJUSTMENTS
Priorto operatingyour tiller,carefullyreadandfollowall instructions
below.Performall adjustmentsto verifyyourtiller is operatingsafely
andpropery.
Depth Stake & Wheels
Thetilleris shippedwith thewheelsadjustedsothatthe machinesits
level.Thewheelsneedto be adjustedto meetyourtillingneedsbefore
operation.Thisadjustmentis madeby removingtheclevispinfrom the
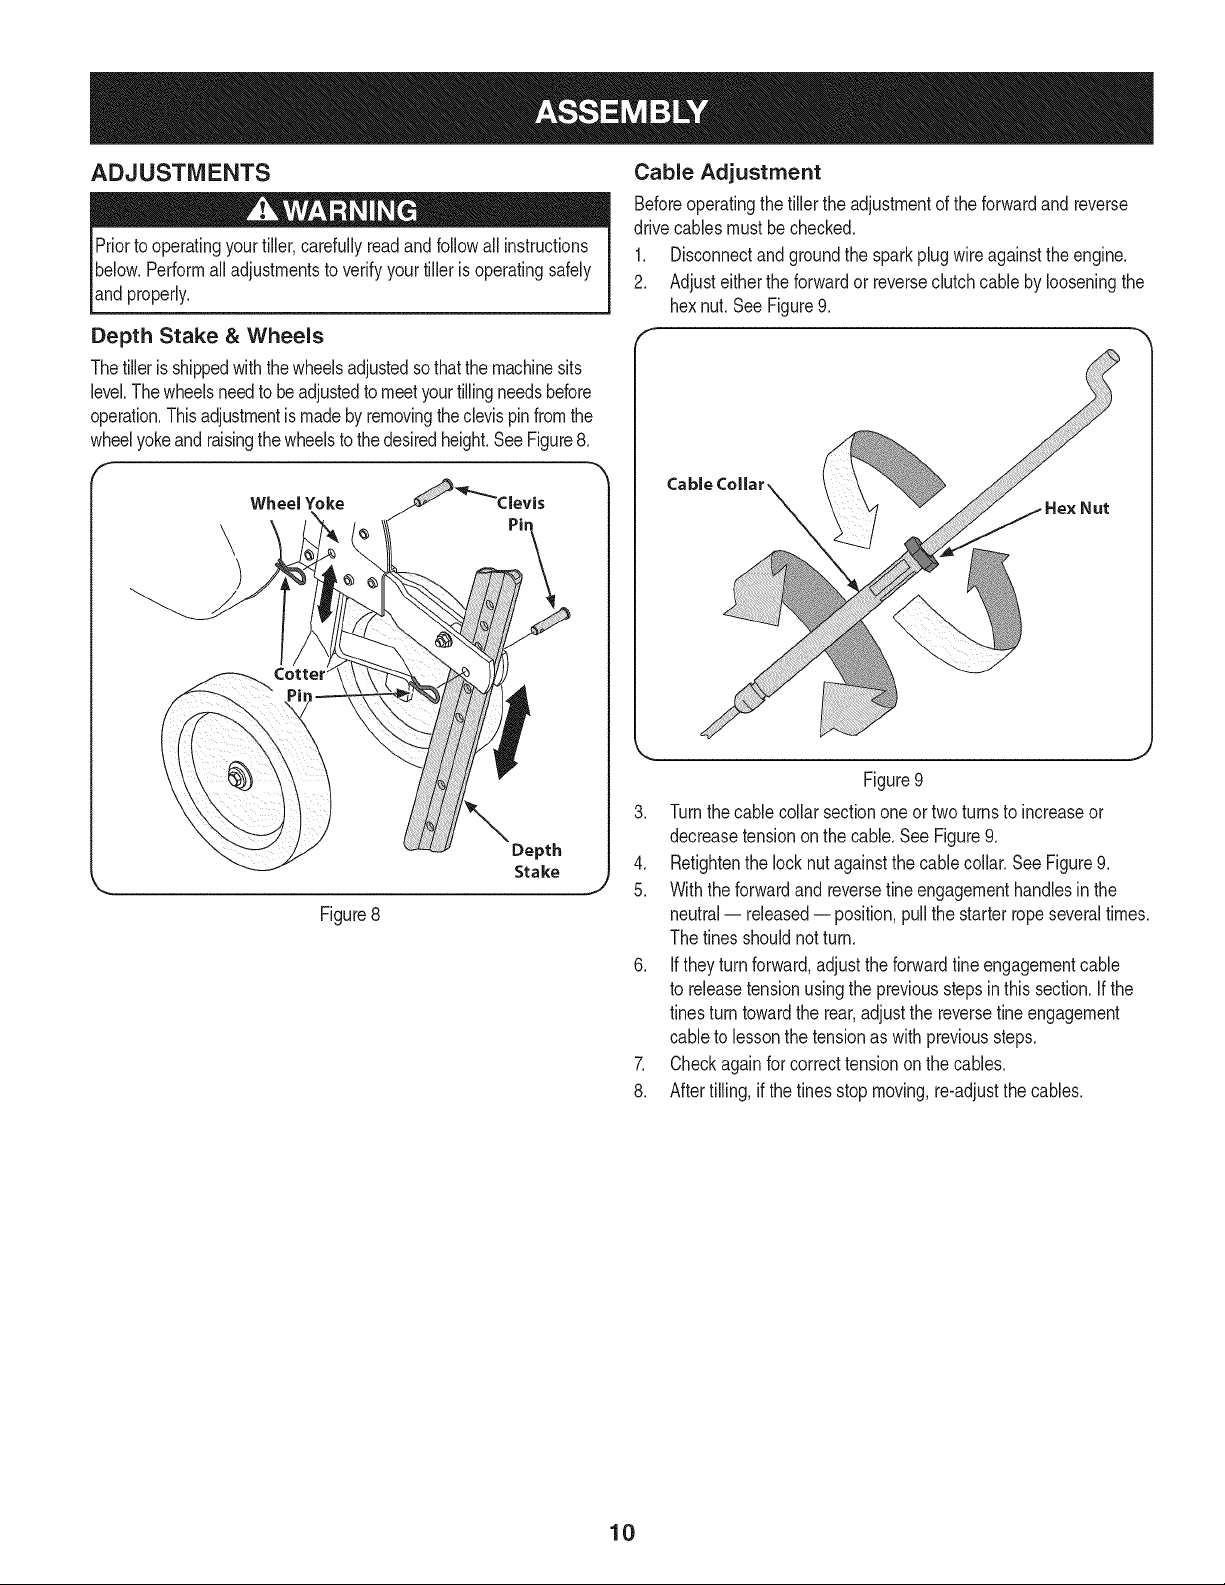
wheelyokeand raisingthe wheelsto thedesiredheight.SeeFigure8.
Wheel Yoke
Pin
Depth
Stake
Figure8
Cable Adjustment
Beforeoperatingthe tiller the adjustmentof the forwardandreverse
drivecables mustbe checked.
1. Disconnectandgroundthe sparkplug wireagainstthe engine.
2. Adjust eitherthe forwardor reverseclutchcableby looseningthe
hexnut. SeeFigure9.
Figure9
3. Turnthecable collarsectionone ortwoturns to increaseor
decreasetensiononthe cable.See Figure9.
4. Retightenthe locknutagainstthe cablecollar.See Figure9.
5. With the forwardandreversefine engagementhandlesinthe
neutral-- released-- position,pullthe starterropeseveraltimes.
The tinesshouldnot turn.
6. Iftheyturnforward,adjustthe forwardfine engagementcable
to releasetensionusingthe previousstepsinthis section.Ifthe
tinesturn towardthe rear,adjustthe reversefineengagement
cableto lessonthe tensionas with previoussteps.
7. Checkagainforcorrecttensionon the cables.
8. After tilling,if the tines stopmoving,re-adjustthe cables.
10
f
Fuel Ca
Air Filter
Forward Tine
Engagement Lever
-- Handle Height
Adjustment
Oil Fill Cap
& Dipstick
)th Stake
Tiller Tines
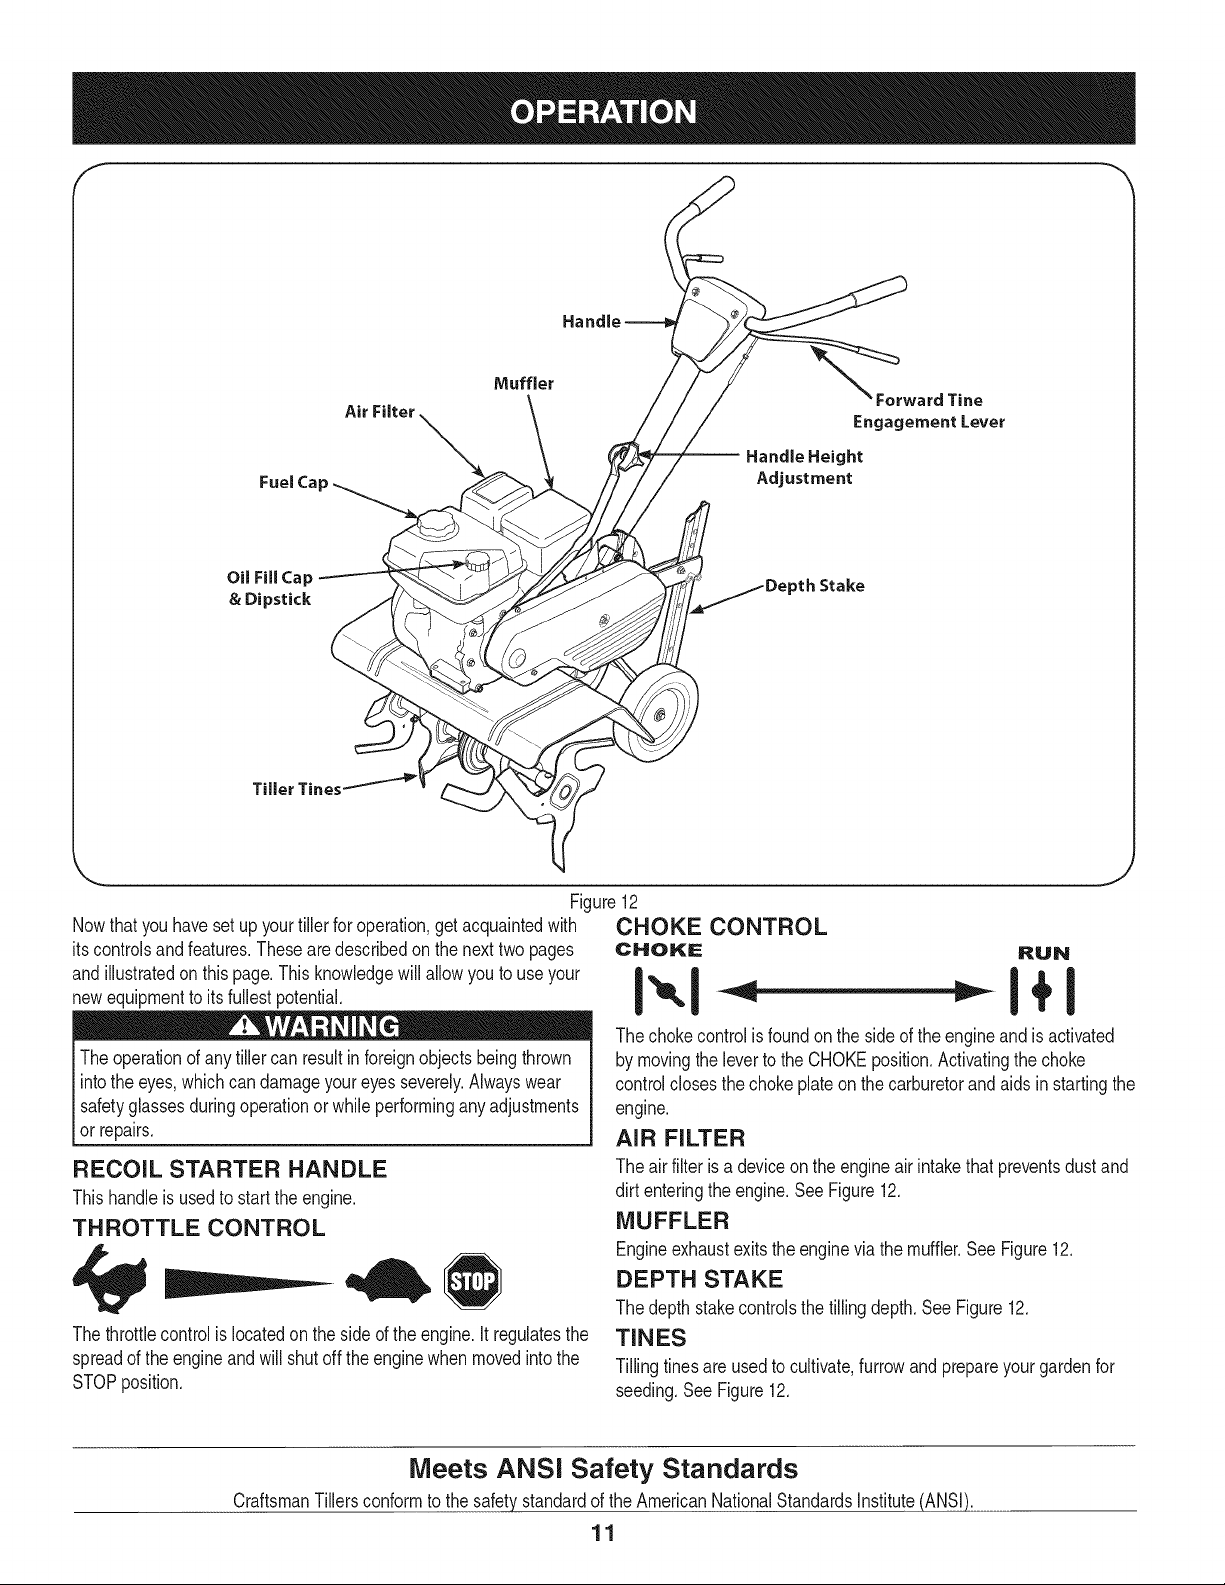
Nowthat youhaveset up yourtillerfor operation,get acquaintedwith
itscontrolsandfeatures.Thesearedescribedon the nexttwopages
andillustratedon thispage.Thisknowledgewill allowyou to useyour
newequipmentto itsfullestpotential.
Theoperationof anytiller can resultin foreignobjectsbeingthrown
intothe eyes,whichcan damageyoureyes severely.Alwayswear
I safetyglassesduring operationor whileperforminganyadjustments
[or repairs.
.J
Figure12
CHOKE CONTROL
CHOKE RUN
The choke control is found on the side of the engine and is activated
by movingthe leverto the CHOKEposition.Activatingthe choke
controlclosesthe chokeplateon the carburetorandaids in startingthe
engine.
AIR FILTER
RECOIL STARTER HANDLE
Thishandleis usedto startthe engine,
THROTTLE CONTROL
Thethrottlecontrolis locatedon the sideof the engine.Itregulatesthe
spreadof the engineandwill shutoff theenginewhen movedintothe
STOPposition.
The airfilterisa deviceon the engineairintakethatpreventsdustand
dirt enteringthe engine.SeeFigure12.
MUFFLER
Engineexhaustexitsthe enginevia the muffler.SeeFigure12.
DEPTH STAKE
The depthstakecontrolsthe tillingdepth.See Figure12.
TINES
Tillingtines areusedto cultivate,furrowand prepareyourgardenfor
seeding.SeeFigure12.
Meets ANSi Safety Standards
CraftsmanTillersconformto the safetystandardof the AmericanNationalStandardsInstitute(ANSI).
11
HANDLEBAR HEIGHT ADJUSTMENT
Thehandle heightmaybe adjusted.Loosenthe knobto changethe
position.Tightenhardwarewhencomplete.See Figure12.
OIL FILL CAP & DIPSTICK
Engineoil levelcan becheckedand oil addedthroughtheoil fill. See
Figure12.
NOTE:This unitwasshippedWITHOUToil in theengine.Oilisincluded
inthe plasticbagpackedwith themanualinwiththeunit.Addtheoilas
directedinthe Gas& OilFill Upsection.Checktheoil levelbeforeeach
operationtoensureadequateoil isinthe engine.Forfurtherinstructions,
referto the stepsinthe EngineMaintenancesectionof this manual.
FORWARD TINE ENGAGEMENT LEVER
Theforwardtine engagementlevercontrolsthe engagementof the
tines.Releasethe leverto stopthe tines.SeeFigure12.
TO START ENGINE
1. Attachsparkplug wireand rubberbootto spark plug.
2. Fill tankto no morethan 1/2 inchbelowbottomof fillerneckto
providespacefor fuel expansion.
3. Makesurethe fine clutchcontrolisdisengaged.
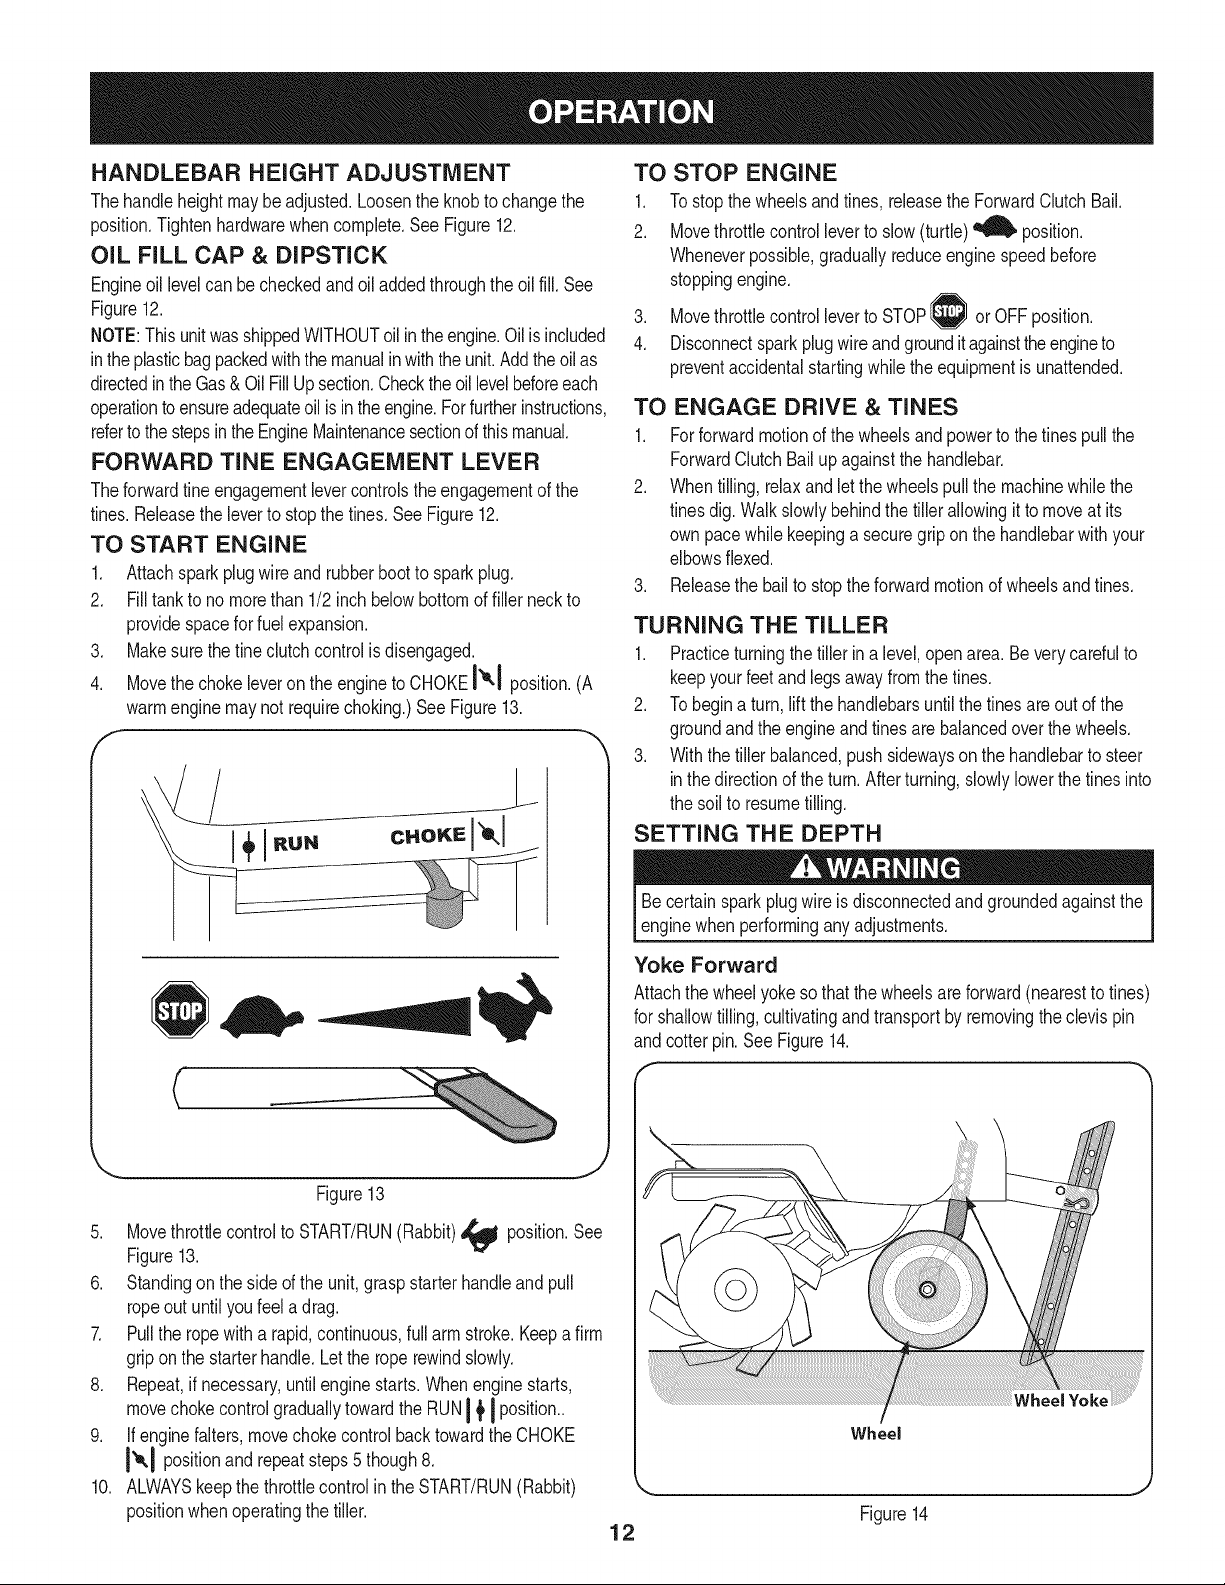
4. Movethe chokeleveronthe engineto CHOKEI'_1 position.(A
warmenginemaynot requirechoking.)SeeFigure13.
f
jL
C
Figure13
5. Movethrottlecontrolto START/RUN(Rabbit)_ position.See
Figure13.
6. Standingonthe side of the unit,graspstarterhandleand pull
ropeout untilyoufeel a drag.
7. Pull the ropewitha rapid,continuous,full armstroke.Keepa firm
griponthe starterhandle.Letthe roperewindslowly.
8. Repeat,if necessary,untilenginestarts.Whenenginestarts,
movechokecontrolgraduallytowardthe RUNI/t I position..
9. If enginefalters,movechokecontrol backtowardthe CHOKE
i'_1 positionand repeatsteps5 though8.
10. ALWAYSkeepthe throttlecontrolinthe START/RUN(Rabbit)
positionwhenoperatingthe tiller.
TO STOP ENGINE
1. To stopthe wheelsandtines, releasethe ForwardClutchBail.
2. Movethrottlecontrol leverto slow(turtle) _ position.
Wheneverpossible,graduallyreduceengine speedbefore
stoppingengine.
3. Movethrottlecontrol leverto STOP or OFFposition.
4. Disconnectspark plugwireandgrounditagainsttheengineto
preventaccidentalstartingwhilethe equipmentis unattended.
TO ENGAGE DRIVE & TINES
1. Forforwardmotionof the wheelsandpowerto the tinespullthe
ForwardClutchBail upagainstthe handlebar.
2. Whentilling,relaxandlet the wheelspull the machinewhilethe
tinesdig. Walkslowlybehindthe tillerallowingit to moveat its
own pacewhilekeepinga securegripon thehandlebarwith your
elbowsflexed.
3. Releasethe bailto stop theforward motionof wheelsandtines.
TURNING THE TILLER
1. Practiceturningthe tiller in a level,open area.Beverycarefulto
keepyourfeetand legsawayfrom thetines.
2. To begina turn,liftthe handlebarsuntilthetinesare outof the
groundandthe engineand tinesarebalancedoverthe wheels.
3. With the tillerbalanced,pushsidewaysonthe handlebarto steer
inthe directionof theturn. Afterturning,slowlylowerthe tines into
the soil to resumetilling.
SETTING THE DEPTH
Becertainspark plugwire is disconnectedandgroundedagainstthe
enginewhenperforminganyadjustments.
Yoke Forward
Attachthe wheelyokeso thatthe wheelsare forward(nearestto tines)
for shallowtilling,cultivatingandtransportby removingtheclevis pin
andcotter pin.SeeFigure14.
Wheel
J
Figure14
12
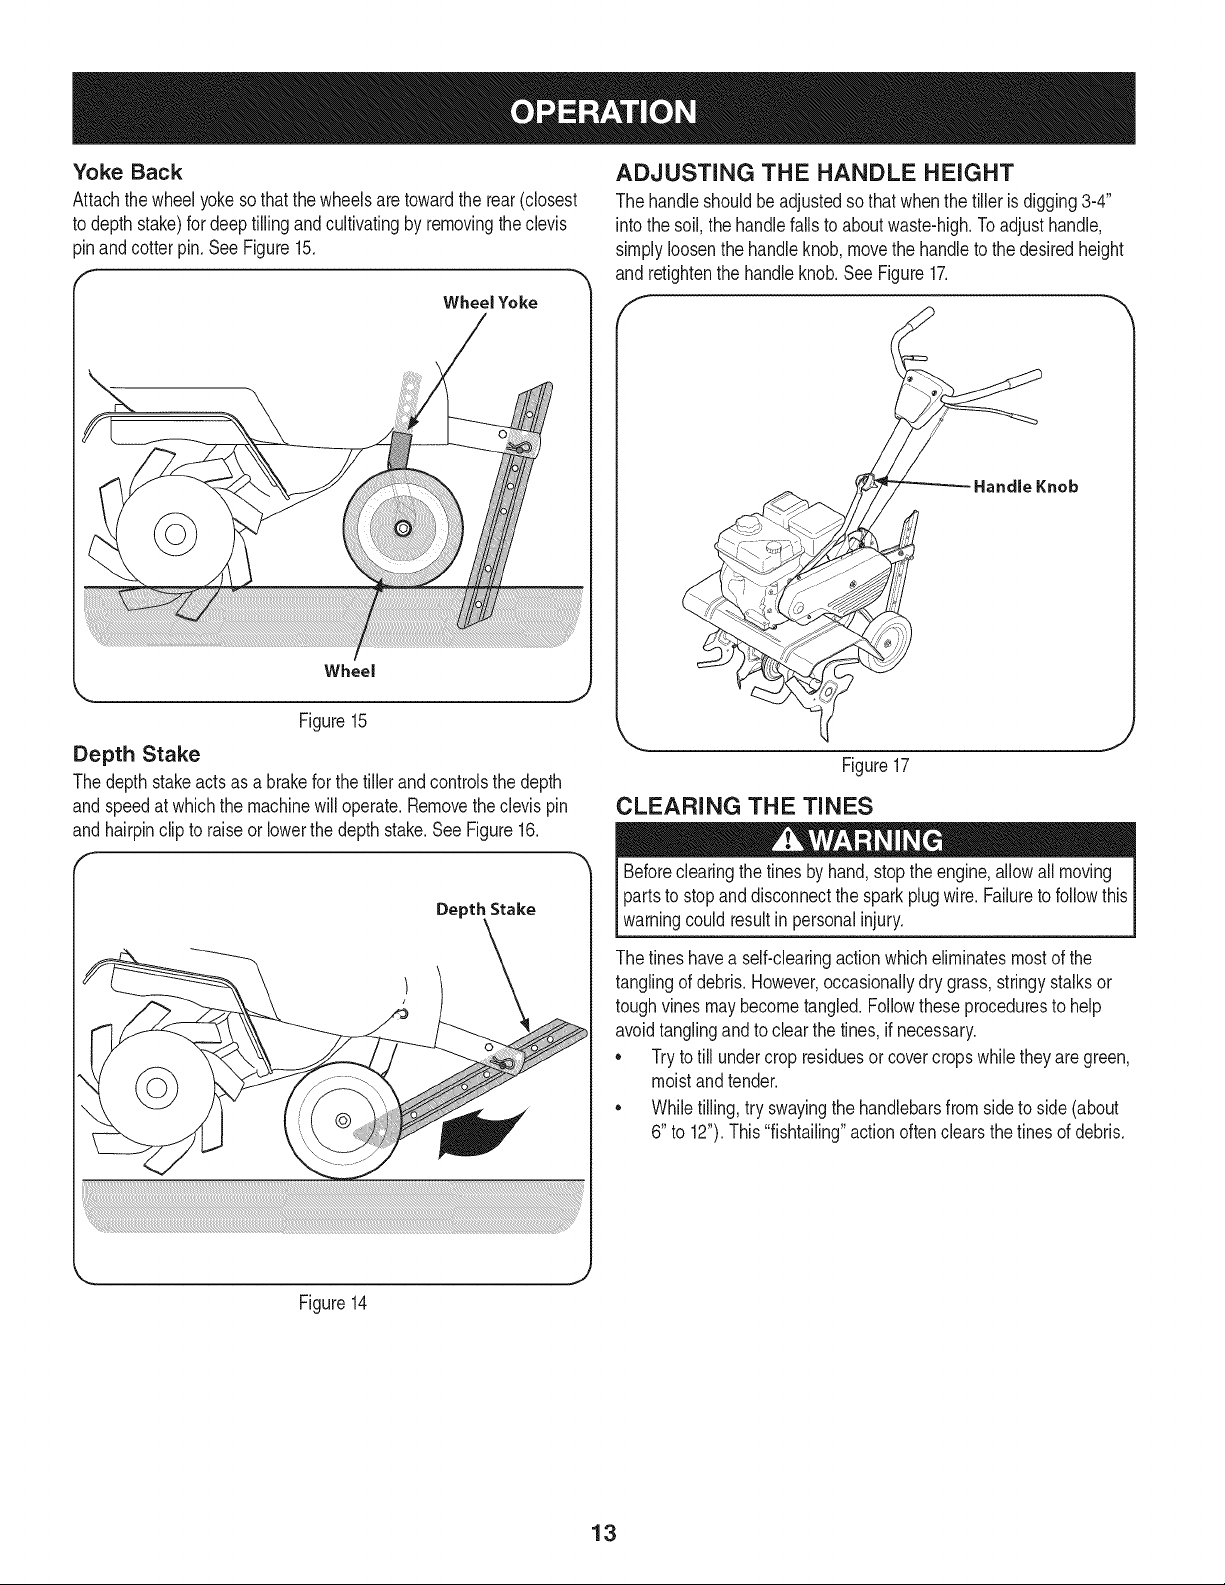
Yoke Back
Attachthe wheelyokeso thatthe wheelsare towardthe rear(closest
to depthstake)for deeptilling andcultivatingby removingtheclevis
pinandcotter pin,SeeFigure15,
Wheel Yoke
J
Wheel
Figure15
Depth Stake
The depthstakeacts as a brakeforthe tillerand controlsthe depth
andspeedat whichthe machinewill operate.Removetheclevis pin
andhairpinclip to raiseor lowerthedepth stake.See Figure16.
Depth Stake
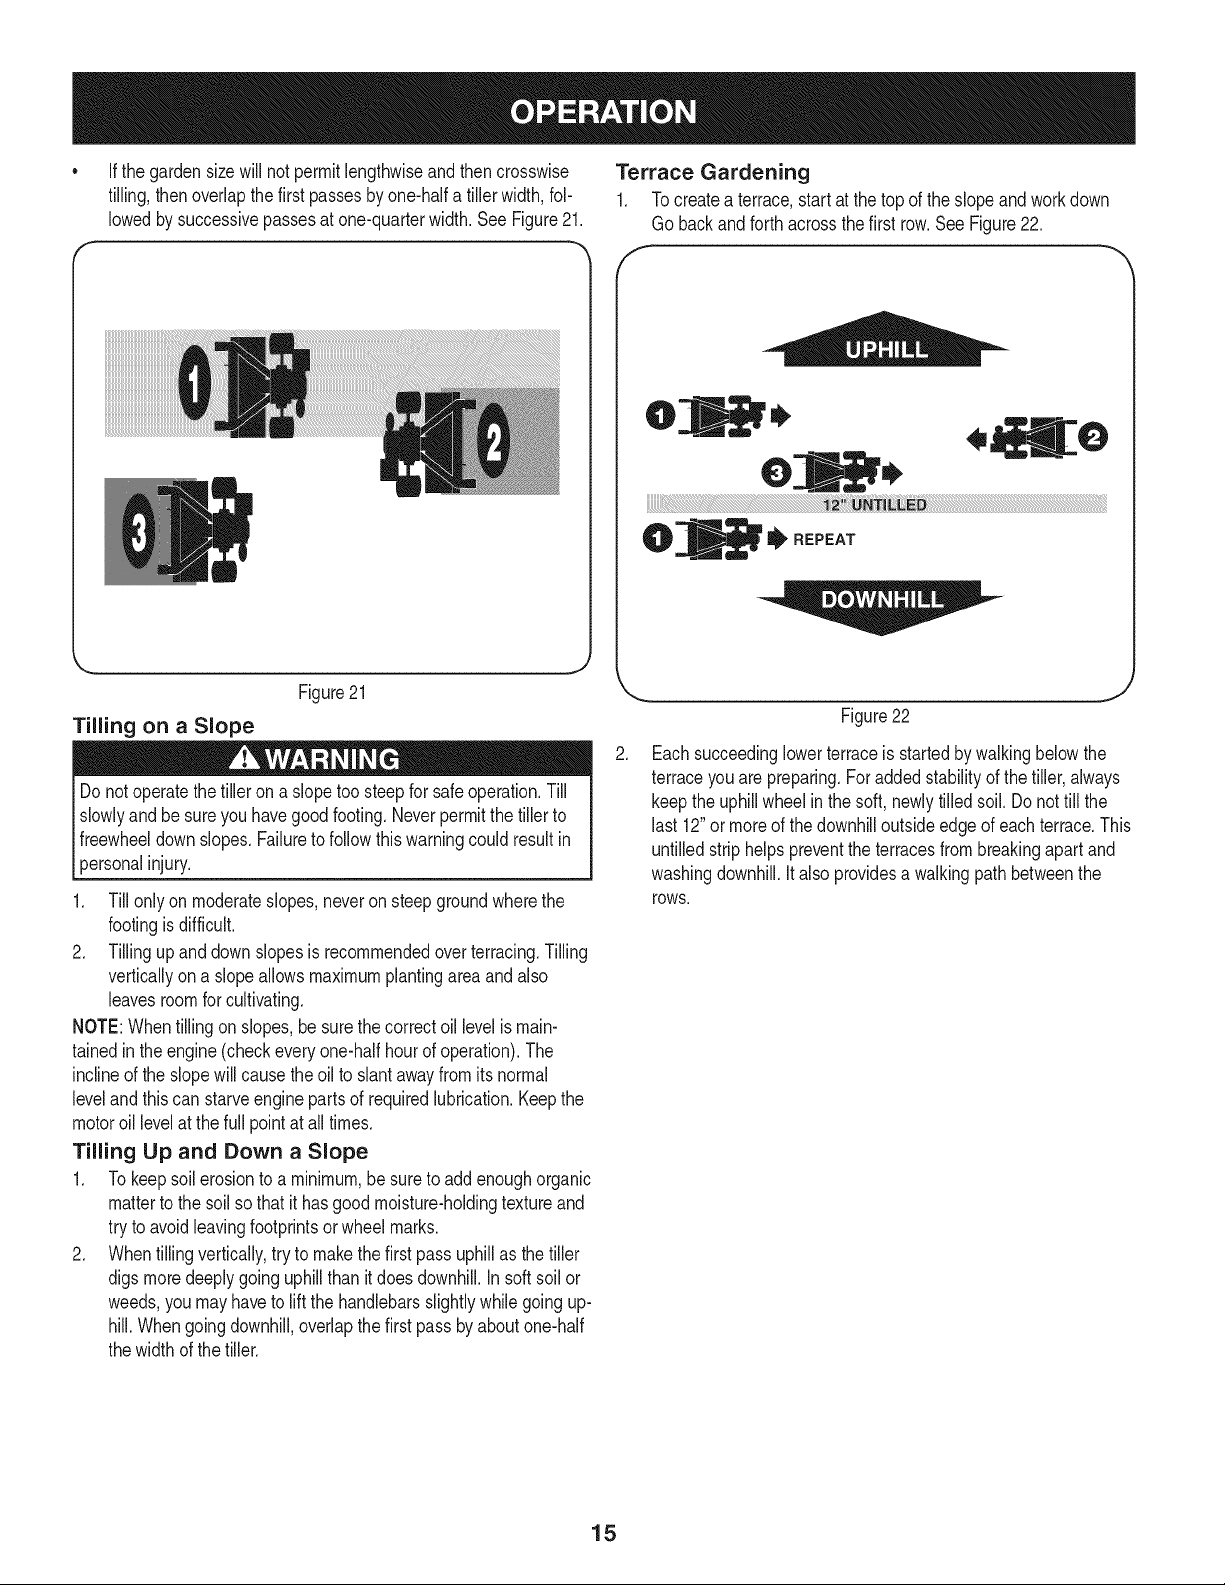
ADJUSTING THE HANDLE HEIGHT
The handleshouldbe adjustedsothat whenthe tiller is digging3-4"
into the soil,thehandlefallsto aboutwaste-high.Toadjust handle,
simplyloosenthe handleknob,movethe handleto the desiredheight
and retightenthe handleknob.See Figure17.
J
Figure17
CLEARING THE TINES
Beforeclearingthe tinesby hand,stopthe engine,allowall moving
partsto stop anddisconnectthe spark plugwire.Failureto followthis
warningcould resultin personalinjury.
The tineshavea self-clearingaction whicheliminatesmostof the
tanglingof debris.However,occasionallydry grass,stringystalks or
toughvines maybecometangled.Followtheseproceduresto help
avoidtanglingandto clear the tines,if necessary.
• Try to till undercrop residuesorcovercropswhiletheyaregreen,
moistand tender.
• Whiletilling,try swayingthe handlebarsfromsideto side(about
6" to 12").This"fishtailing"actionoften clearsthe tinesof debris.
Figure14
13

TiLLiNG TIPS & TECHNIQUES
Beforetilling, contactyourtelephoneor utilitiescompanyandinquire
l ifundergroundequipmentor linesareusedon yourproperty.Do not
[till nearburiedelectriccables,telephonelines,pipesor hoses.
Tilling Depth
o Thisisa FRT(forward-rotatingfine) tiller.Whenthe forwardtine
engagementleveris pressedagainstthe handlethe tinesrotate
forward.This createsan "uppercut"fine actionwhichdigsdeeply,
uprootingsoiland weeds.Don'toverloadthe engine,butdigas
deeplyas possibleon eachpass.
Whencultivating(breakingupthe surfacesoilaroundthe plants
to destroyweeds,SeeFigure18),try to havethe tinesonly dig1"
to 2" deep.Usingthe shallowtillingdepthhelpspreventinjuryto
the plantswhoserootsoftengrowcloseto the surface.If needed,
lift up on the handlebarsslightlyto preventthe tinesfromdigging
too deeply.(Cultivatingona regularbasis not onlyeliminates
weeds,italsoloosensand aeratesthe soilfor bettermoisture
absorptionandfasterplantgrowth.)Wateringthe gardenareaa
fewdayspriorto tillingwill maketilling easier,as will lettingthe
newlyworkedsoil setfor a dayor two beforemakinga final, deep
tillingpass.
f -
_ J
Figure18
Choosing the Correct Tine Speed
Withexperience,youwill find thetillingdepthand tillingspeed
combinationthat is bestfor yourgarden.Setthe enginethrottleleverat
a speedto givethe engineadequatepowerandyetallow it to operate
at the slowestpossiblespeeduntilyouhaveachievedthe maximum
tillingdepthyou desire.Fasterenginespeedsmaybedesirable
whenmakingfinal passesthroughthe seedbedor whencultivating.
Selectionof thecorrectenginespeed,in relationto thetillingdepth,
will ensurea sufficientpowerlevelto do the jobwithoutcausingthe
engineto labor.
Suggested Tilling Patterns
• Whenpreparinga seedbed,go overthe samepathtwice inthe
first row,then overlapone-halfthe tiller widthon the restof the
passes.See Figure19.
f
Whenfinishedin onedirection,makea secondpass at a right
angle,See Figure20.Overlapeach passfor the bestresults(in
very hardground,itmaytake threeor fourpassesto thoroughly
pulverizethe soil.)
r
Figure 20
J
14
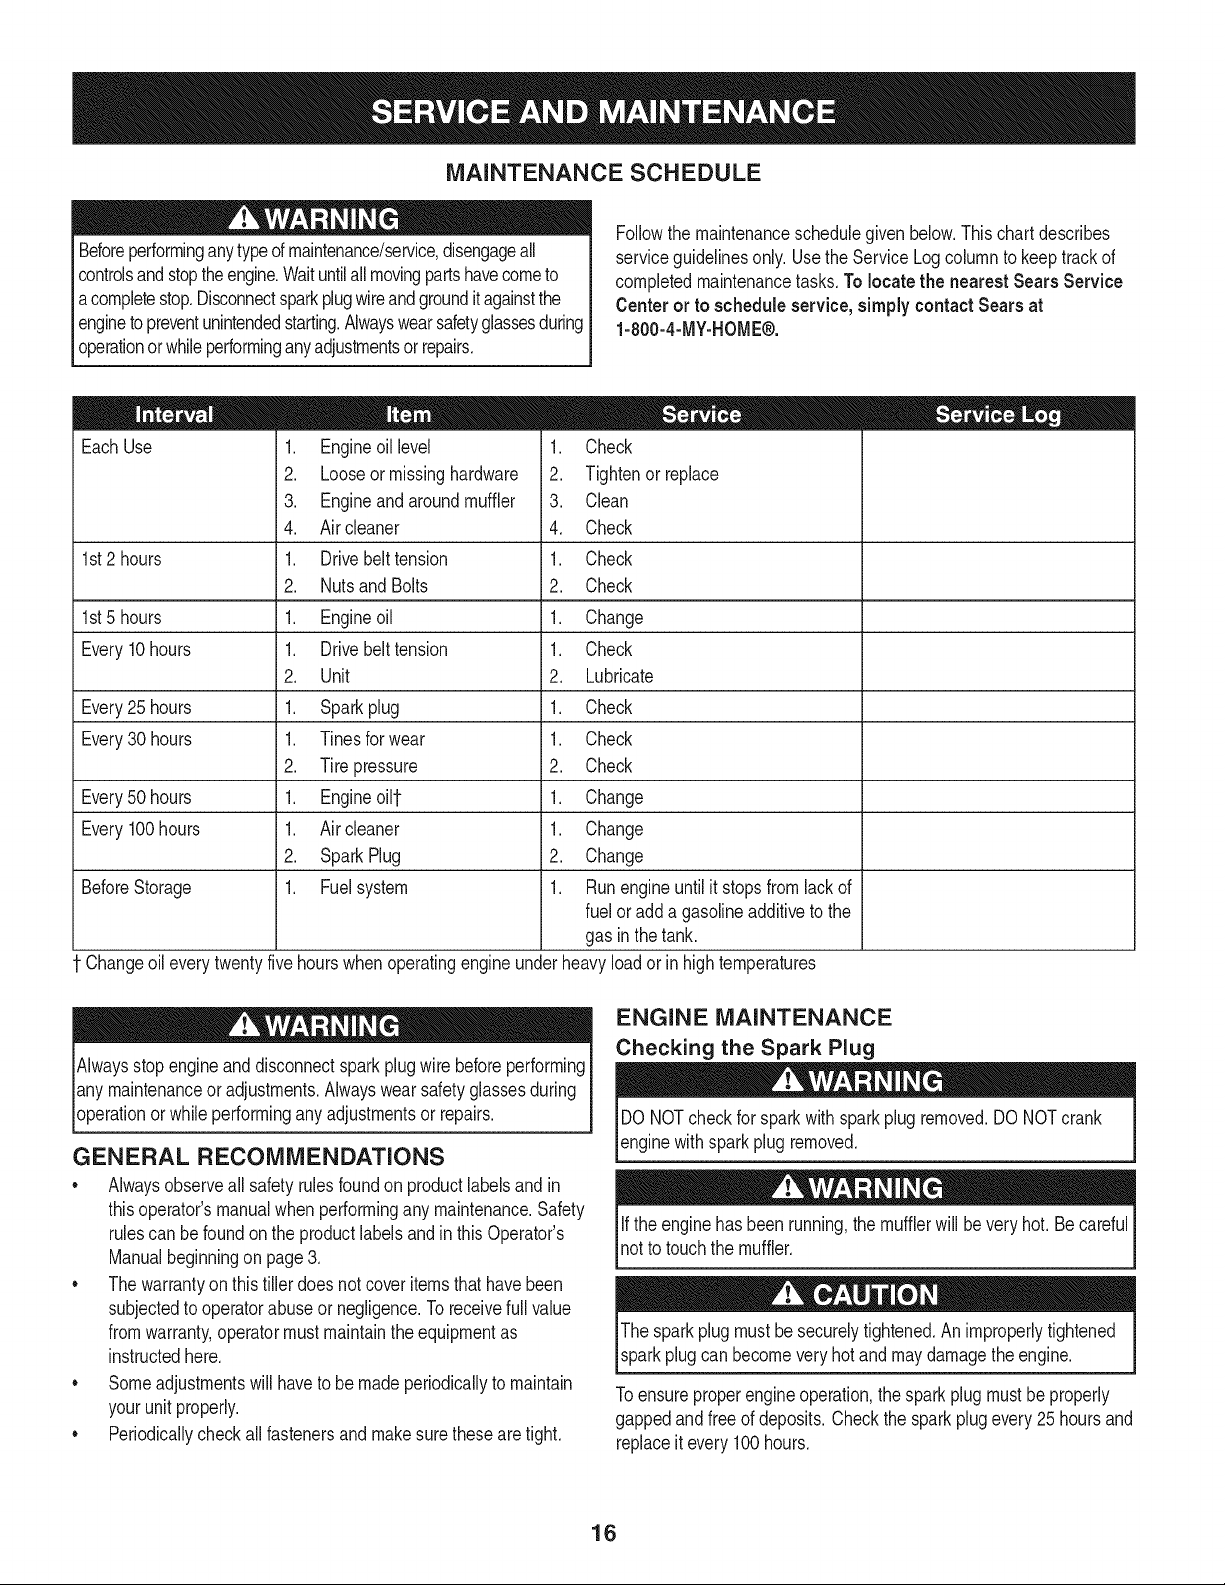
Ifthe garden sizewill not permitlengthwiseand then crosswise
tilling,then overlapthefirst passesbyone-halfa tillerwidth,fol-
lowedby successivepassesat one-quarterwidth.See Figure21.
Terrace Gardening
1. Tocreatea terrace,startat the top of the slopeandworkdown
Go backand forthacrossthe first row.SeeFigure22.
/- -,
J
Figure21
Tilling on a Slope
Do notoperatethe tilleron a slopetoo steepfor safeoperation.Till
slowlyand be sureyou havegood footing.Neverpermitthetiller to
freewheeldownslopes.Failureto followthis warningcouldresultin
lPersona njury.
1. Till onlyon moderateslopes,neveron steepgroundwherethe
footingisdifficult.
2. Tillingupanddownslopesisrecommendedoverterracing.Tilling
verticallyona slopeallowsmaximumplantingareaandalso
leavesroomfor cultivating.
NOTE:Whentilling onslopes,besurethe correctoil levelismain-
tainedin the engine(checkevery one-halfhourof operation).The
inclineof the slopewillcausetheoil to slantawayfromitsnormal
leveland thiscan starveenginepartsof requiredlubrication.Keepthe
motoroil levelat thefull pointat alltimes.
Tilling Lip and Down a Slope
1. Tokeepsoil erosionto a minimum,be sureto add enoughorganic
matterto thesoil so thatit hasgoodmoisture-holdingtextureand
try to avoidleavingfootprintsor wheel marks.
2. Whentillingvertically,try to makethe first pass uphillas the tiller
digs moredeeplygoinguphillthan it doesdownhill.In soft soilor
weeds,you mayhaveto lift the handlebarsslightlywhilegoingup-
hill.Whengoingdownhill,overlapthe first passbyaboutone-half
thewidth of the tiller.
.
Q
I .REPEAT
Figure22
Eachsucceedinglowerterraceisstartedbywalkingbelowthe
terraceyou arepreparing.Foraddedstabilityof the tiller,always
keepthe uphill wheelin the soft,newlytilled soil. Do nottill the
last 12"or moreof the downhilloutsideedgeof eachterrace.This
untilledstrip helpspreventthe terracesfrombreakingapartand
washingdownhill.Italso providesa walkingpathbetweenthe
rows.
15
MAINTENANCE SCHEDULE
Beforeperforminganytypeof maintenance/service,disengageall
controlsand stoptheengine.Waituntilallmovingpartshavecometo
acompletestop.Disconnectsparkplugwireandgrounditagainstthe
enginetopreventunintendedstarting.Alwayswearsafetyglassesduring
operationor whileperforminganyadjustmentsor repairs.
Followthe maintenanceschedulegivenbelow.Thischartdescribes
serviceguidelinesonly.Usethe ServiceLog columnto keeptrackof
completedmaintenancetasks.To locate the nearest Sears Service
Centeror to scheduleservice,simplycontactSears at
1-800-4-MY-HOME®.
EachUse
1st2 hours
1st5 hours
Every10hours
Every25 hours
Every30 hours
Every50 hours
Every100hours
BeforeStorage
.
2.
3.
4.
1.
2.
1.
1.
2.
1.
1.
2.
1.
1.
2.
1.
Engineoillevel
Looseor missinghardware
Engineandaroundmuffler
Aircleaner
Drivebelt tension
Nutsand Bolts
Engineoil
Drivebelt tension
Unit
Sparkplug
Tinesfor wear
Tirepressure
Engineoill-
Aircleaner
SparkPlug
Fuelsystem
= =
1. Check
2. Tightenor_place
3. Clean
4. Check
1. Check
2. Check
1. Change
1. Check
2. Lubricate
1. Check
1. Check
2. Check
1. Change
1. Change
2. Change
1. Runengineuntilit stopsfromlackof
fuel oradda gasolineadditiveto the
gas in thetank.
Changeoil everytwentyfivehourswhenoperatingengineunderheavyloadorin hightemperatures
Alwaysstop engineanddisconnectsparkplugwirebeforeperforming
lany maintenanceor adjustments.Alwayswearsafetyglassesduring
_operationor while performingany adjustmentsor repairs.
GENERAL RECOMMENDATIONS
• Alwaysobserveallsafetyrulesfoundon productlabelsand in
thisoperator'smanualwhenperformingany maintenance.Safety
rulescan be foundon the productlabelsandin thisOperator's
Manualbeginningon page3.
• Thewarrantyon thistillerdoes notcover itemsthat havebeen
subjectedto operatorabuseor negligence.Toreceivefull value
fromwarranty,operatormust maintainthe equipmentas
instructedhere.
• Someadjustmentswillhaveto be madeperiodicallyto maintain
yourunit properly.
• Periodicallycheckall fastenersand makesuretheseare tight.
ENGINE MAINTENANCE
Checking the Spark Plug
DO NOTcheckfor sparkwith sparkplugremoved.DO NOTcrank
enginewithsparkplug removed.
Ifthe enginehas been running,the mufflerwill beveryhot. Becareful
notto touch the muffler.
Thespark plugmustbesecurelytightened.Animproperlytightened
sparkplugcan becomevery hot andmaydamagethe engine.
Toensureproperengineoperation,the sparkplugmustbeproperly
gappedandfree of deposits.Checkthe sparkplugevery25hoursand
replaceit every 100hours.
16
Removethesparkplugbootanduse a sparkplugwrenchto
removethe plug.See Figure20.
Spark Plug
Figure20
2. Visuallyinspectthe sparkplug.Discardthe spark plugif thereis
apparentwear,or if the insulatoris crackedor chipped.Cleanthe
sparkplugwitha wirebrush if it is to be reused.
3. Measurethe plug gapwitha feelergauge.Correctas necessary
by bendingsideelectrode.SeeFigure21.The gapshouldbeset
to 0.030in.
Figure21
4. Checkthatthe sparkplugwasheris in goodconditionandthread
the sparkplugin by handto preventcrossthreading.
5. After thespark plugisseated,tightenwith a spark plugwrenchto
compressthe washer.
NOTE:Wheninstallinga newsparkplug,tighten1/2turnafterthe spark
plugseatstocompressthewasher.Whenreinstallinga usedsparkplug,
tighten1/8-1/4turnafterthesparkplugseatsto compressthewasher.
The sparkplugmustbe securelytightened.An improperlytightened
sparkplugcan becomevery hot andmaydamagethe engine.
Servicing the Air Cleaner
Neverusegasolineor lowflashpoint solventsfor cleaningtheair
cleanerelement.A fireor explosioncould result.
The aircleanerpreventsdamagingdirt,dust,etc.,fromenteringthe
carburetorandbeingforcedintothe engineandis importantto engine
lifeand performance.Neverrunthe enginewithoutanair cleaner
completelyassembled.Checkthe air cleanerbeforeeachuse.
Paperfilterscannot becleanedand mustbereplacedoncea year
or every 100operatinghours;moreoftenif usedinextremelydusty
conditions.
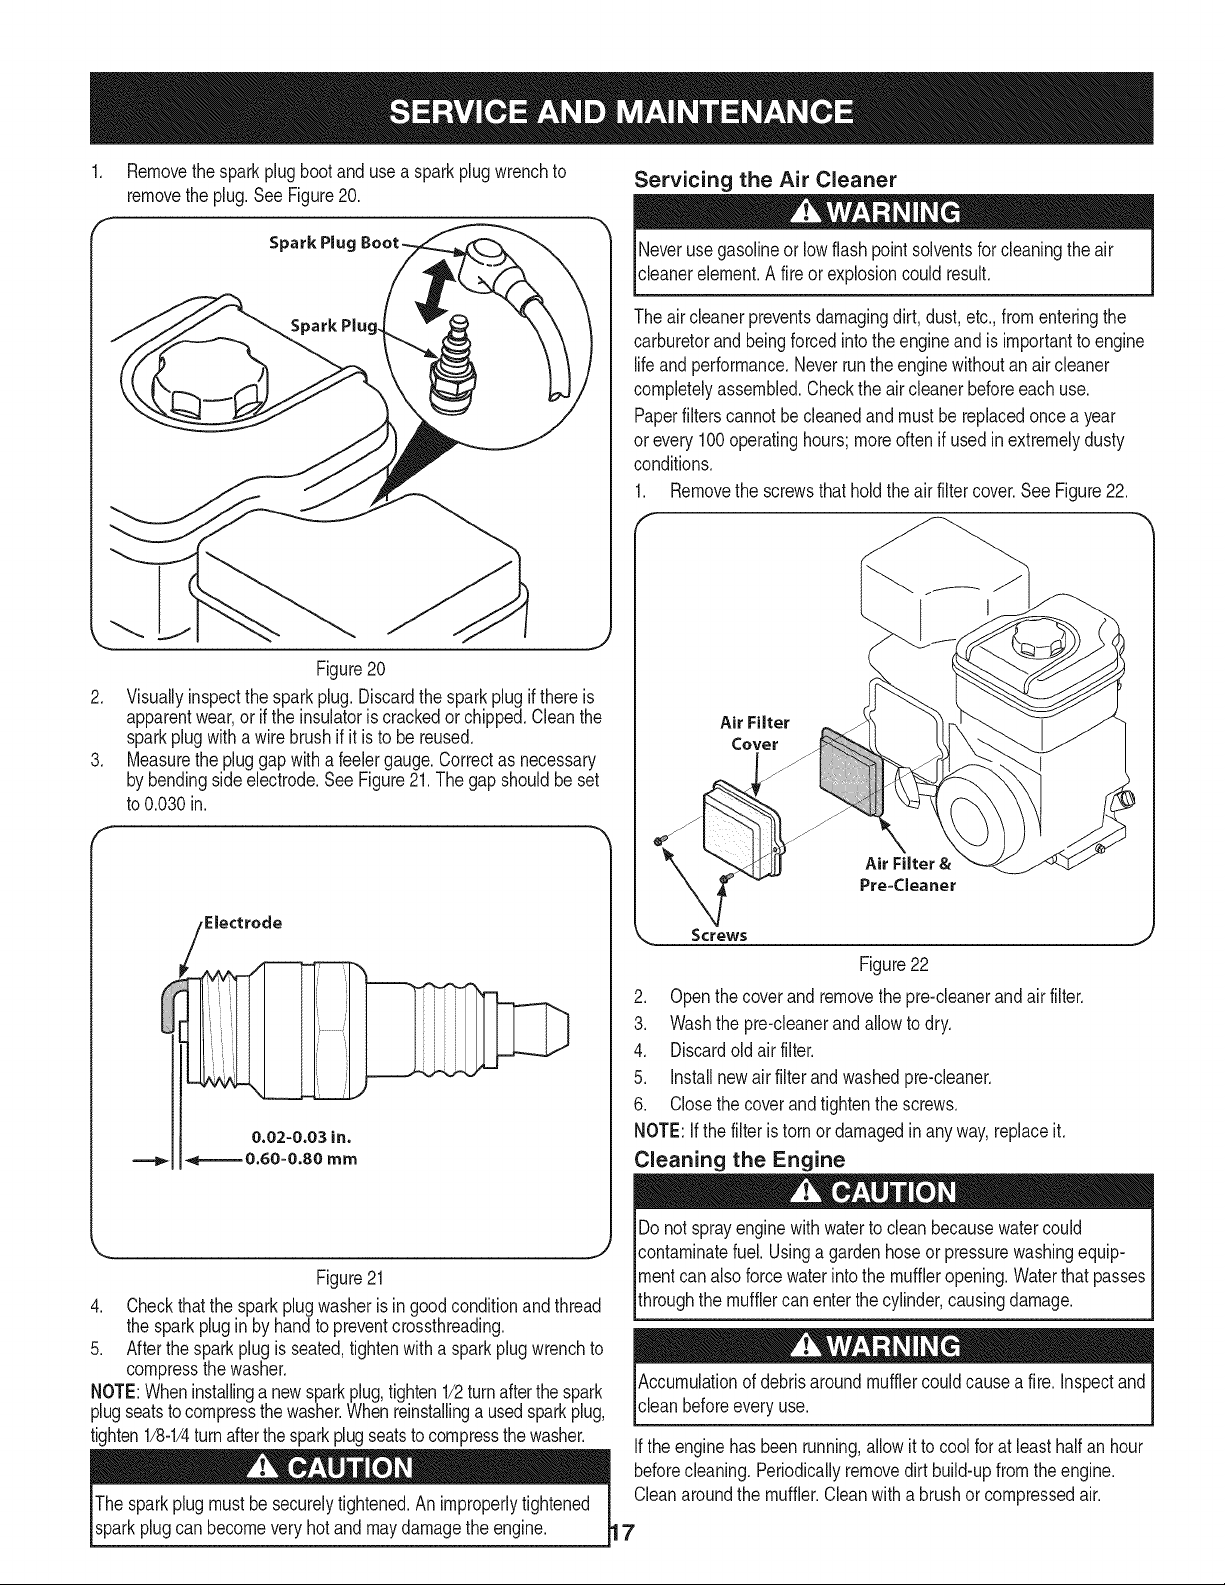
1. Removethe screwsthatholdtheair filter cover.See Figure22.
Air Filter
Cover
Air Filter &
Pre=Cleaner
Screws
Figure22
2. Openthe coverandremovethe pre-cleanerand airfilter.
3. Washthe pre-cleanerandallowto dry.
4. Discardold air filter.
5. installnewair filterandwashedpre-cleaner.
6. Closethe coverandtightenthe screws.
NOTE:If the filteris tornor damagedinany way,replaceit.
Cleaning the Engine
Do notsprayengine withwaterto cleanbecausewatercould
contaminatefuel.Usinga gardenhoseor pressurewashingequip-
mentcan alsoforce waterintothe muffleropening.Waterthatpasses
throughthe mufflercan enterthe cylinder,causingdamage.
Accumulationof debrisaround mufflercouldcausea fire. inspectand
clean beforeevery use.
Ifthe enginehas been running,allow it to coolfor at leasthalf anhour
beforecleaning.Periodicallyremovedirt build-upfrom the engine.
Cleanaroundthe muffler.Cleanwitha brushor compressedair.
17
Check Engine Oil
1. Checkoil beforeeachuse. Stopengineand waitseveralminutes
beforecheckingoil level.With engineon levelground,the oilmust
beto FULLmarkon dipstick.
2. Referto the Assemblysectionof thismanualfor instructionson
checkingthe oil.
Change Engine Oil
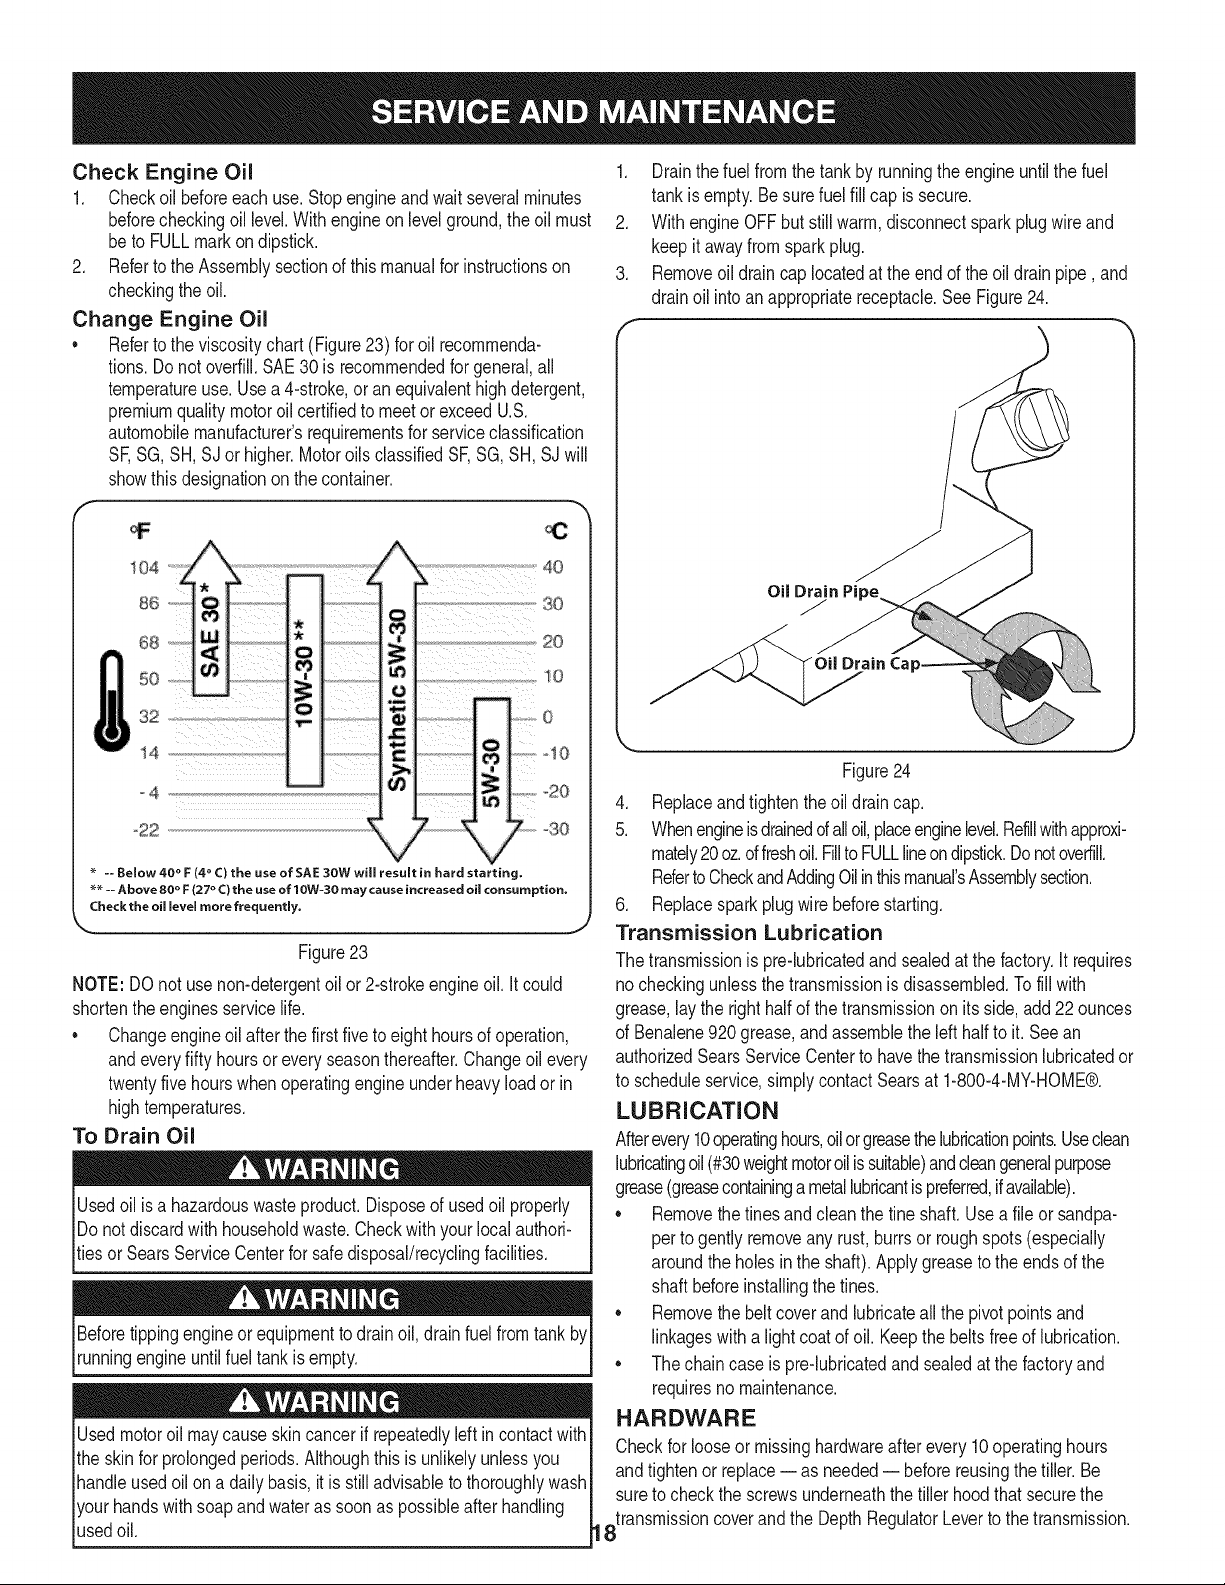
• Referto the viscositychart (Figure23) for oil recommenda-
tions.Do notoverfill.SAE30 is recommendedfor general,all
temperatureuse. Usea 4-stroke,or anequivalenthigh detergent,
premiumqualitymotoroilcertifiedto meetorexceedU.S.
automobilemanufacturer'srequirementsfor serviceclassification
SF,SG,SH, SJ or higher.Motoroils classifiedSF,SG,SH, SJ will
showthisdesignationon thecontainer.
4O
-- Below 40 ° F (4 ° C) the use of SAE 30W will result in hard starting.
_ -- Above 80 ° F (27 ° C) the use of 10W-30 may cause increased oil consumption.
Check the oil level more frequently.
Figure23
NOTE: DOnot usenon-detergentoil or 2-strokeengineoil. It could
shortentheenginesservicelife.
Changeengineoil afterthefirst fiveto eight hoursof operation,
andeveryfifty hoursor everyseasonthereafter.Changeoil every
twentyfivehourswhenoperatingengineunderheavyloadorin
hightemperatures.
To Drain Oil
Usedoilis a hazardouswasteproduct.Disposeof usedoil properly
IDonot discardwith householdwaste.Checkwithyourlocalauthori-
_tiesor SearsServiceCenterfor safedisposal/recyclingfacilities.
Beforetippingengineor equipmentto drainoil, drain fuel fromtank by
runningengineuntilfuel tankisempty.
Usedmotoroil maycauseskincancerifrepeatedlyleftincontactwith
the skinfor prolongedperiods.Althoughthis isunlikelyunlessyou
handleusedoil ona daily basis,itis stilladvisableto thoroughlywash
yourhandswithsoapandwateras soonas possibleafter handling
usedoil.
1. Drainthe fuel fromthe tankby runningthe engineuntl the fuel
tankisempty.Besurefuelfill cap is secure.
2. With engineOFFbut still warm,disconnectsparkplug wireand
keep itawayfrom sparkplug.
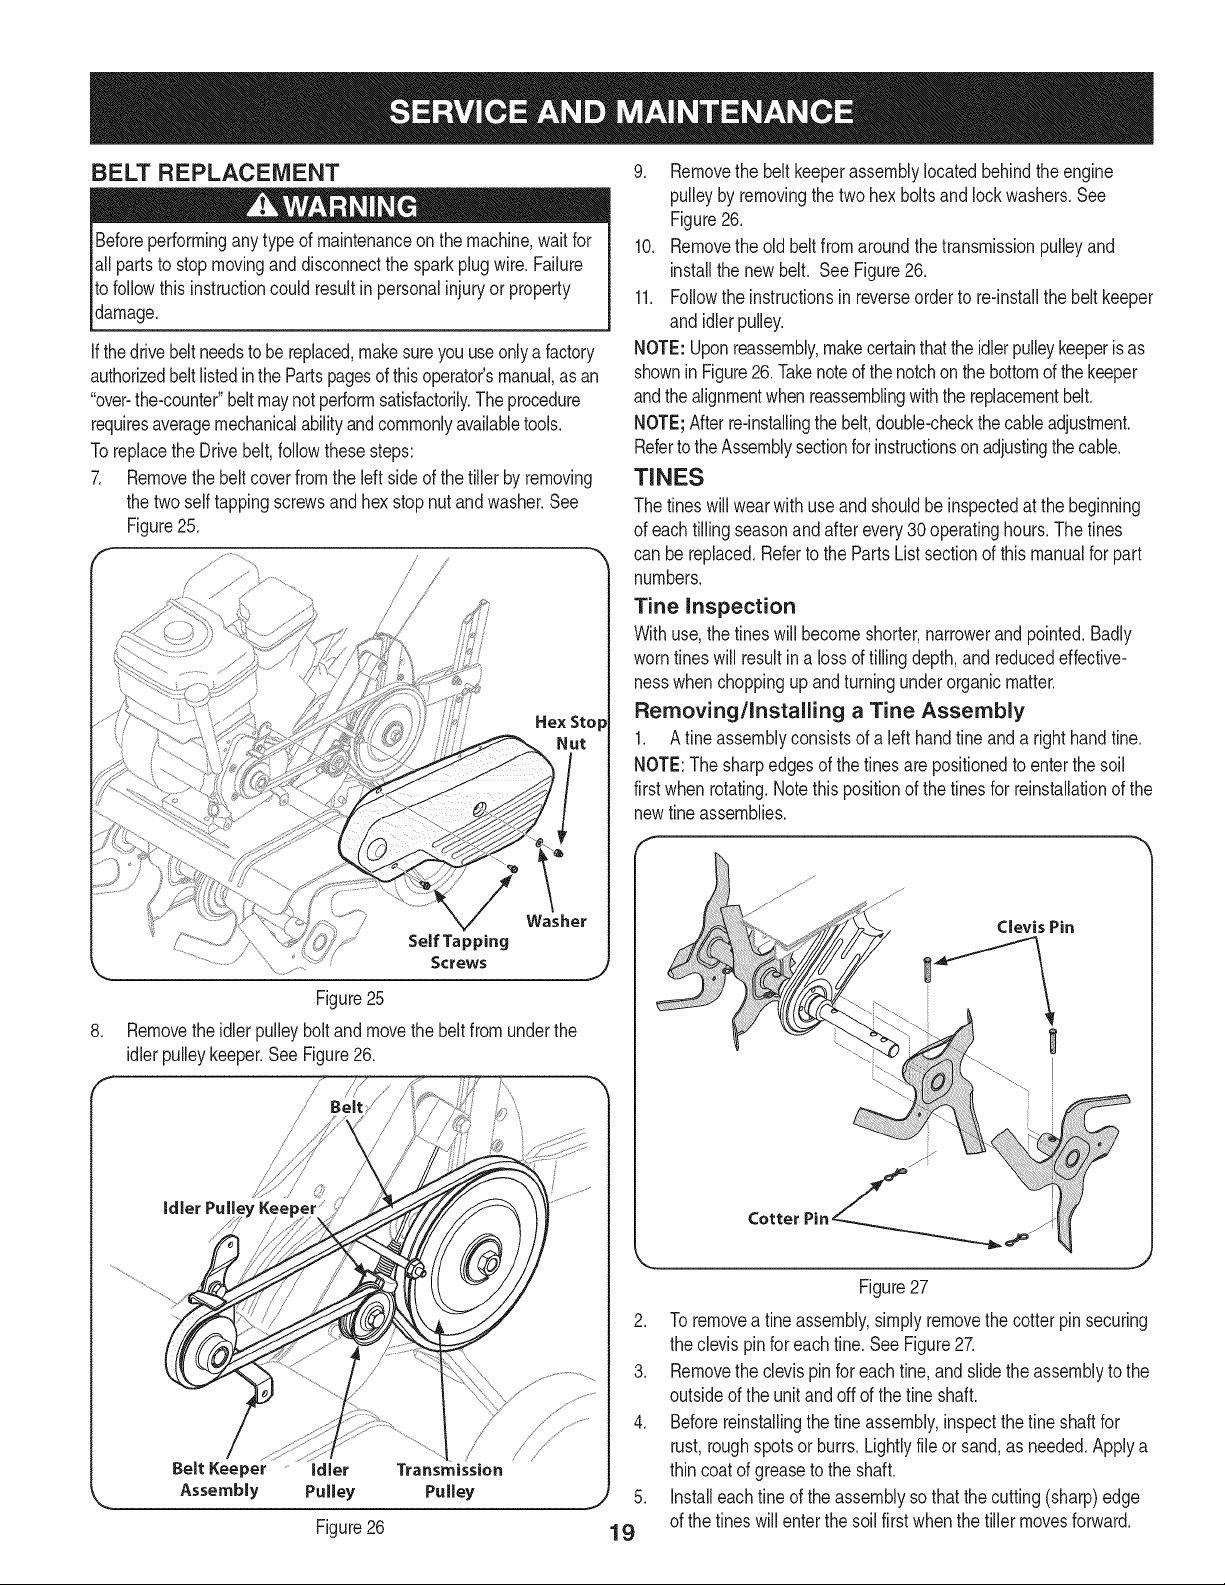
3. Removeoil draincap locatedat the endof the oildrainpipe, and
drainoil intoan appropriatereceptacle.See Figure24.
OilDrain
ain Ca
Figure24
4. Replaceandtightenthe oil draincap.
5. Whenengineisdrainedd alloil,placeenginelevel.Refillwithapproxi-
mately20oz.d freshoil.Fillto FULLlineon dipstick.Donotoverfill.
RefertoCheckandAddingOilinthismanual'sAssemblysection.
6. Replacesparkplugwire beforestarting.
Transmission Lubrication
The transmissionis pro-lubricatedand sealedat thefactory.It requires
no checkingunlessthe transmissionisdisassembled.Tofill with
grease,lay the righthalfof thetransmissionon itsside, add22ounces
of Benalene920grease,and assemblethe lefthalf to it. Seean
authorizedSearsServiceCenterto havethe transmissionlubricatedor
to scheduleservice,simplycontactSearsat 1-800-4-MY-HOME®.
LUBRICATION
Afterevery10operatinghours,oilorgreasethelubricationpoints.Useclean
lubricatingoil(#30weightmotoroilissuitable)andcleangeneralpurpose
grease(greasecontaininga metallubricantispreferred,ifavailable).
• Removethe tinesand cleanthe tineshaft.Usea file or sandpa-
perto gently removeany rust, burrsor roughspots(especially
aroundthe holesin the shaft).Applygreaseto the endsof the
shaft beforeinstallingthetines.
• Removethe beltcoverandlubricateall the pivotpointsand
linkageswitha lightcoat of oil. Keepthe beltsfreeof lubrication.
• The chaincaseis pro-lubricatedand sealedat thefactoryand
requiresno maintenance.
HARDWARE
Checkfor looseor missinghardwareafter every10operatinghours
andtightenor replace= as needed= beforereusingthe tiller. Be
sureto checkthe screwsunderneaththe tiller hoodthat securethe
8transmissioncoverand the DepthRegulatorLeverto the transmission.
BELT REPLACEMENT
Beforeperformingany type of maintenanceonthe machine,waitfor
all partsto stop movinganddisconnectthe spark plugwire.Failure
to followthis instructioncouldresult inpersonalinjuryor property
damage.
Ifthe drivebelt needstobe replaced,makesureyou useonlya factory
authorizedbelt listedin the Partspagesof thisoperator'smanual,as an
"over-the-counter"beltmaynotperformsatisfactorily.Theprocedure
requiresaveragemechanicalabilityandcommonlyavailabletools.
Toreplacethe Drivebelt,followthesesteps:
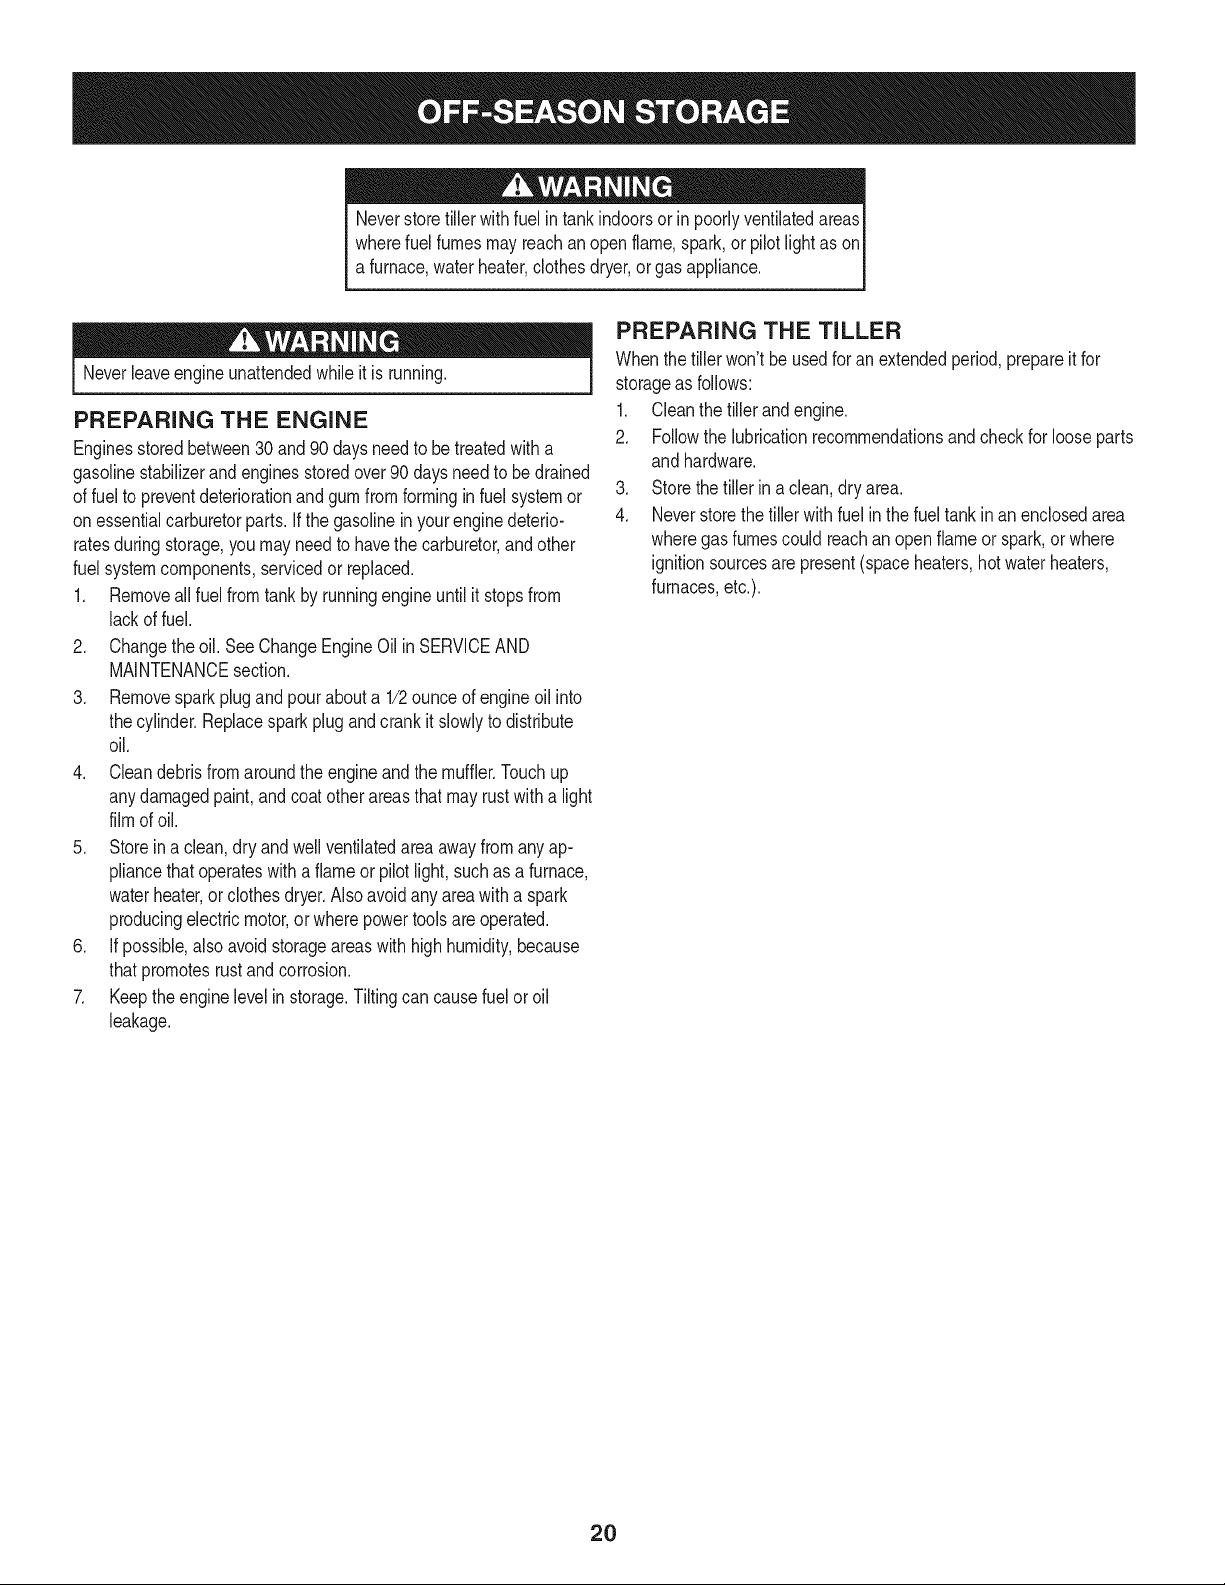
7. Removethebelt coverfrom the leftside of the tillerby removing
the twoselftappingscrewsandhex stop nutand washer.See
Figure25.
Screws
Figure25
Removetheidlerpulleybolt and movethe beltfrom underthe
idlerpulleykeeper.SeeFigure26.
9. Removethe belt keeperassemblylocatedbehindthe engine
pulleyby removingthe two hex boltsand lockwashers.See
Figure26.
10. Removethe oldbelt fromaroundthe transmissionpulleyand
installthe newbelt. See Figure26.
11. Followthe instructionsinreverseorderto re-installthe belt keeper
and idlerpulley.
NOTE:Uponreassembly,makecertainthat theidler pulleykeeperisas
shownin Figure26.Takenoted the notchon the bottomof thekeeper
andthealignmentwhenreassemblingwiththe replacementbelt.
NOTE;After re-installingthebelt,double-checkthe cableadjustment.
Referto theAssemblysectionfor instructionsonadjustingthe cable.
TINES
The tineswillwearwith use andshouldbeinspectedat the beginning
of each tillingseasonand afterevery30operatinghours.The tines
can be replaced.Referto the Parts Listsectionof this manualfor part
numbers.
Tine Inspection
Withuse,the tineswill becomeshorter,narrowerand pointed.Badly
worntines will resultina lossof tillingdepth,and reducedeffective-
nesswhenchoppingup andturningunderorganicmatter.
Removing/Installing a Tine Assembly
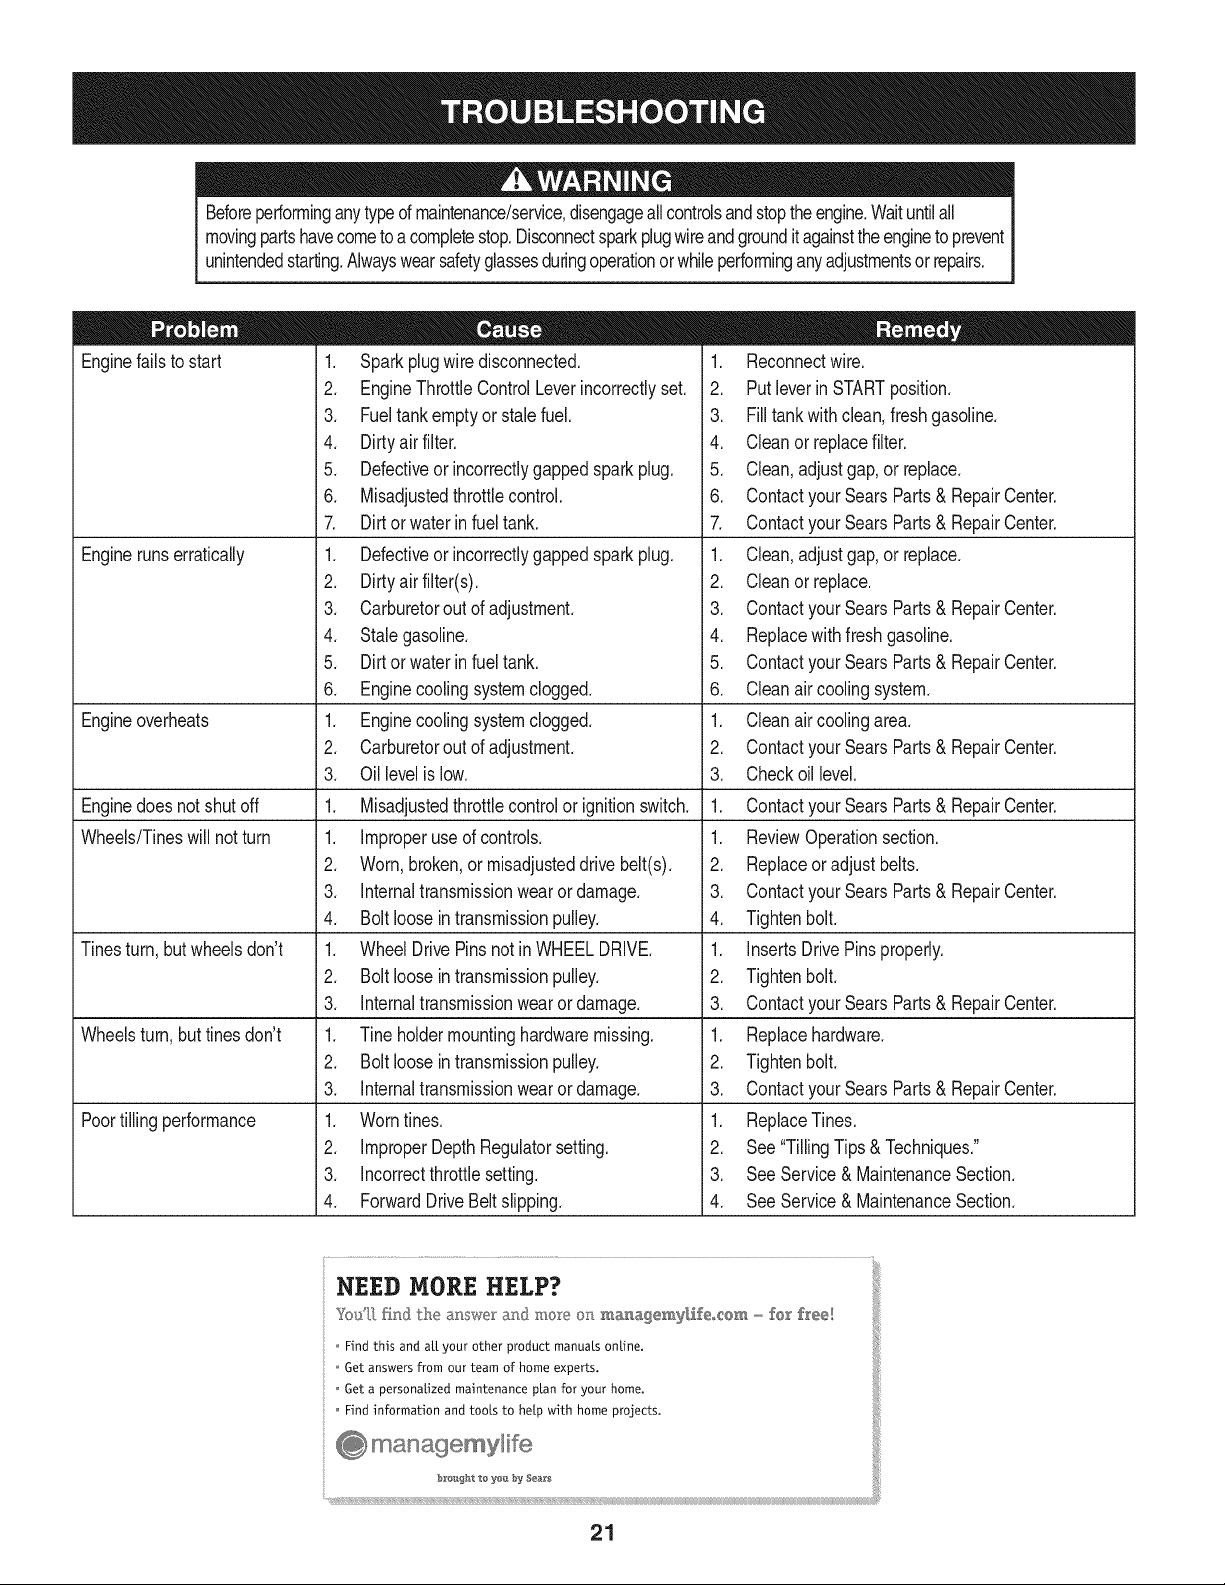
1. A fine assemblyconsistsof a left handtine anda righthand fine.
NOTE:The sharpedgesof thetinesare positionedto enterthe soil
first whenrotating.Notethispositionof thetinesfor reinstallationof the
newfineassemblies.
Clevis Pin
Figure27
To removea fineassembly,simplyremovethe cotterpin securing
the clevispin for eachtine. SeeFigure27.
Removethe clevispinfor eachfine,andslidethe assemblyto the
outsideof the unit andoffof the fine shaft.
Beforereinstallingthe tine assembly,inspectthefine shaftfor
rust,roughspotsor burrs. Lightlyfile or sand,as needed.Applya
thin coatof greaseto the shaft.
Installeachfine of the assemblyso thatthe cutting(sharp)edge
of the tineswill enterthe soilfirst whenthe tillermovesforward.
NeverstoretillerwithfuelintankindoorsorinpoorlyventilatedareasI
wherefuelfumesmayreachanopenflame,spark,orpilotlightason
a furnace,waterheater,c othesdryer, orgas app ance. 1
Neverleaveengineunattendedwhileit is running.
PREPARING THE ENGINE
Enginesstored between30and 90daysneedto be treatedwitha
gasolinestabilizerandenginesstoredover90daysneedto bedrained
of fuel to preventdeteriorationandgumfromforminginfuel systemor
on essentialcarburetorparts.If the gasolinein yourenginedeterio-
ratesduringstorage,you mayneedto havethecarburetor,andother
fuel systemcomponents,servicedor replaced.
1. Removeallfuel from tankby runningengine untilit stopsfrom
lackof fuel.
2. Changethe oil. SeeChangeEngineOil in SERVICEAND
MAINTENANCEsection.
3. Removespark plugand pourabouta 1/2ounceof engineoil into
the cylinder.Replacespark plugandcrankit slowlyto distribute
oil.
4. Cleandebrisfrom aroundtheengine andthe muffler.Touchup
any damagedpaint,andcoatotherareasthatmayrustwitha light
filmof oil.
5. Storein a clean,dry andwellventilatedarea awayfromany ap-
pliancethat operateswitha flameorpilot light, suchas a furnace,
waterheater,or clothesdryer.Alsoavoidany areawitha spark
producingelectricmotor,or wherepowertoolsare operated.
6. Ifpossible,also avoidstorageareaswithhighhumidity,because
that promotesrustandcorrosion.
7. Keeptheenginelevelinstorage.Tiltingcan causefuel or oil
leakage.
PREPARING THE TILLER
Whenthe tillerwon't be usedfor an extendedperiod,prepareit for
storageas follows:
1. Cleanthe tillerandengine.
2. Followthe lubricationrecommendationsand checkfor looseparts
and hardware.
3. Storethe tiller ina clean,dry area.
4. Neverstorethe tillerwithfuel in the fuel tankinan enclosedarea
wheregas fumescould reachan openflameor spark,or where
ignitionsourcesare present(spaceheaters,hot waterheaters,
furnaces,etc.).
2O
Beforeperforminganytyped maintenance/service,disengageall controlsandstoptheengine.Waituntilall
movingpartshavecometo a completestop.Disconnectsparkplugwireandgroundit againsttheenginetoprevent
unintendedstarting.Alwayswearsafetyglassesduringoperationor whileperforminganyadjustmentsorrepairs.
Enginefailsto start
Enginerunserratically
Engineoverheats
Enginedoesnot shut off
Wheels/Tineswill notturn
Tinesturn, butwheelsdon't
Wheelsturn,buttinesdon't
Poortilling performance
1. Sparkplugwire disconnected.
2. EngineThrottleControlLeverincorrectlyset.
3. Fueltankemptyor stale fuel.
4. Dirtyair filter.
5. Defectiveor incorrectlygappedspark plug.
6. Misadjustedthrottlecontrol.
7. Dirt orwaterin fuel tank.
1. Defectiveor incorrectlygappedspark plug.
2. Dirtyairfilter(s).
3. Carburetorout of adjustment.
4. Stalegasoline.
5. Dirt orwaterin fuel tank.
6. Enginecoolingsystemclogged.
1. Enginecoolingsystemclogged.
2. Carburetorout of adjustment.
3. Oil levelis low.
1. Misadjustedthrottlecontrolor ignitionswitch.
1. Improperuse of controls.
2. Worn,broken,or misadjusteddrive belt(s).
3. Internaltransmissionwearor damage.
4. Bolt loosein transmissionpulley.
1. WheelDrivePinsnot in WHEELDRIVE.
2. Bolt looseintransmissionpulley.
3. Internaltransmissionwearor damage.
1. Tine holdermountinghardwaremissing.
2. Bolt looseintransmissionpulley.
3. Internaltransmissionwearor damage.
1. Worntines.
2. ImproperDepthRegulatorsetting.
3. incorrectthrottlesetting.
4. ForwardDriveBeltslipping.
1. Reconnectwire.
2. Putleverin STARTposition.
3. Filltank withclean,freshgasoline.
4. Cleanor replacefilter.
5. Clean, adjustgap,or replace.
6. Contactyour SearsParts& RepairCenter.
7. Contactyour SearsParts& RepairCenter.
1. Clean,adjustgap,or replace.
2. Cleanor replace.
3. Contactyour SearsParts& RepairCenter.
4. Replacewithfreshgasoline.
5. Contactyour SearsParts& RepairCenter.
6. Cleanair coolingsystem.
1. Cleanair coolingarea.
2. Contactyour SearsParts& RepairCenter.
3. Checkoil level.
1. Contactyour SearsParts& RepairCenter.
1. ReviewOperationsection.
2. Replaceor adjustbelts.
3. Contactyour SearsParts& RepairCenter.
4. Tightenbolt.
1. InsertsDrive Pinsproperly.
2. Tightenbolt.
3. Contactyour SearsParts& RepairCenter.
1. Replacehardware.
2. Tightenbolt.
3. Contactyour SearsParts& RepairCenter.
1. ReplaceTines.
2. See"TillingTips & Techniques."
3. SeeService& MaintenanceSection.
4. SeeService& MaintenanceSection.
NEED MORE HELP?
Youq] [h}d the m_swe_ and mo_}_ on ma_agemy[_eo_em - fear f_'ee!
Find this and air your other product manuats ontine.
Get answers from our team of home experts.
Get a personatized maintenance ptan for your home.
Find information and toots to hetp with home projects.
÷ managemylife
_O_ght te yeI:_ by Sea_s
21
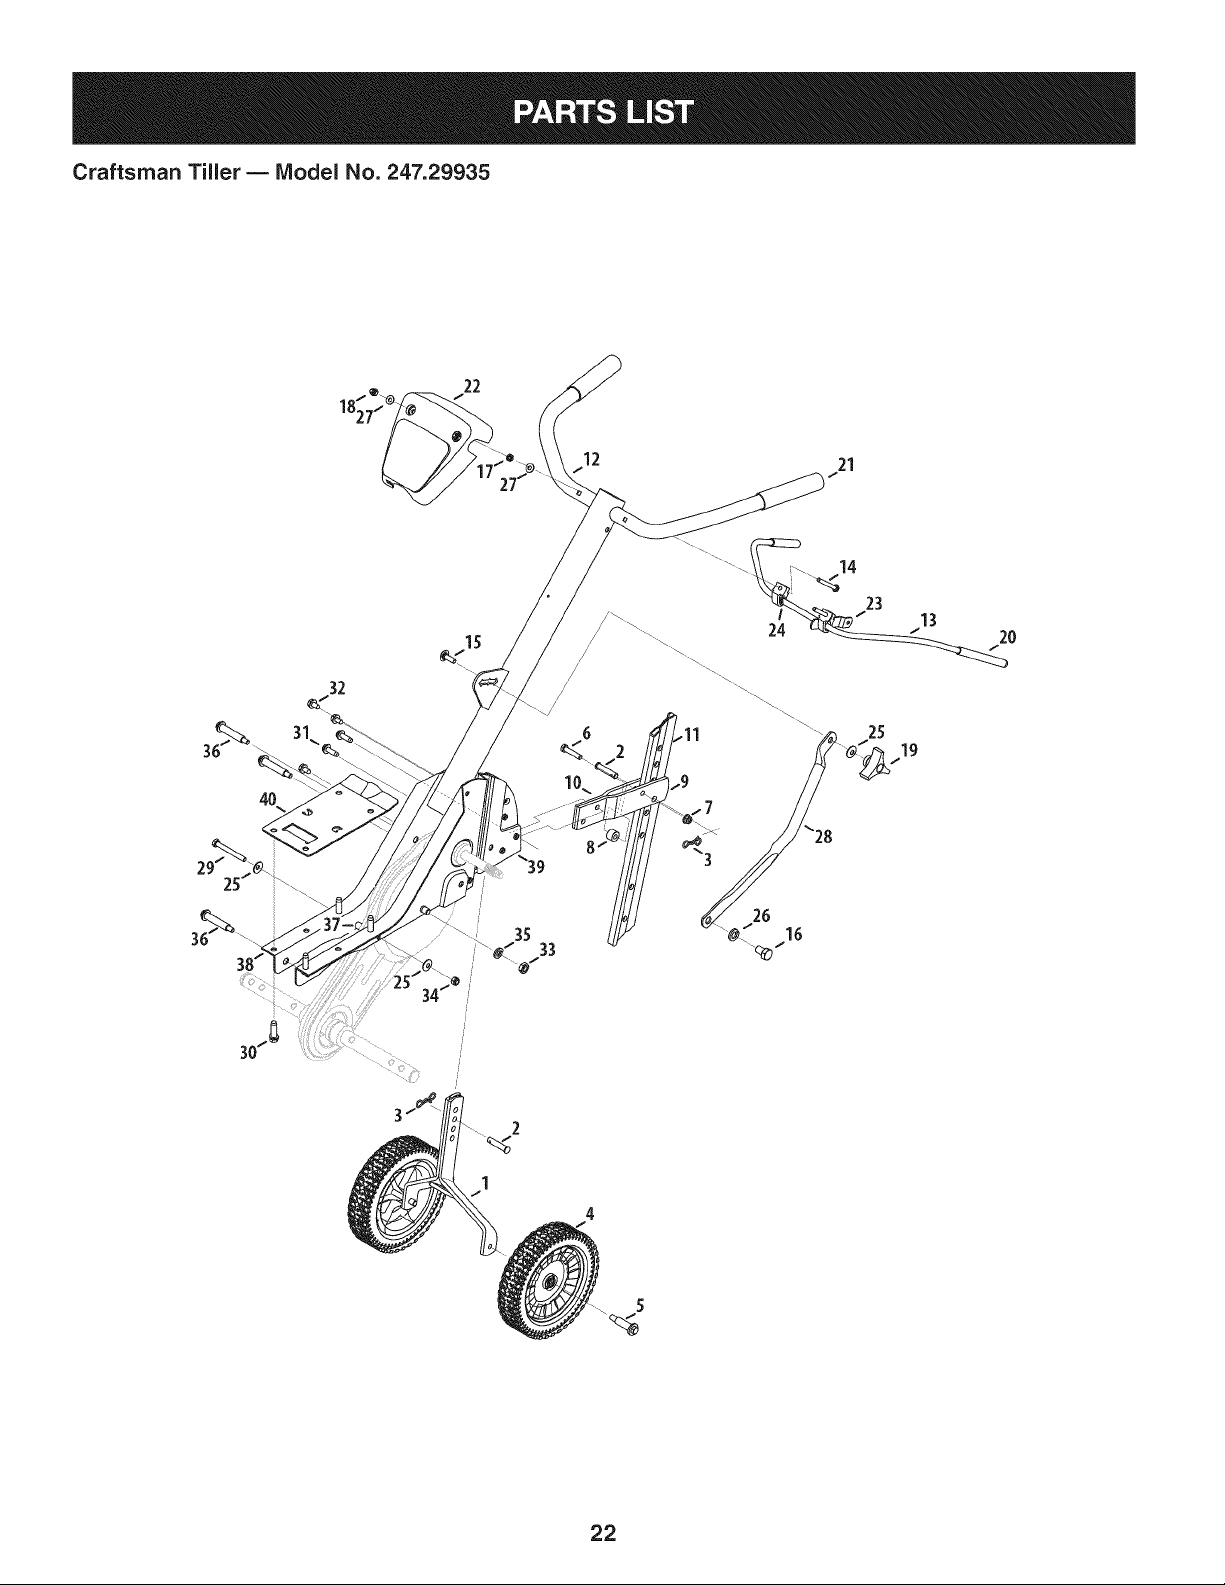
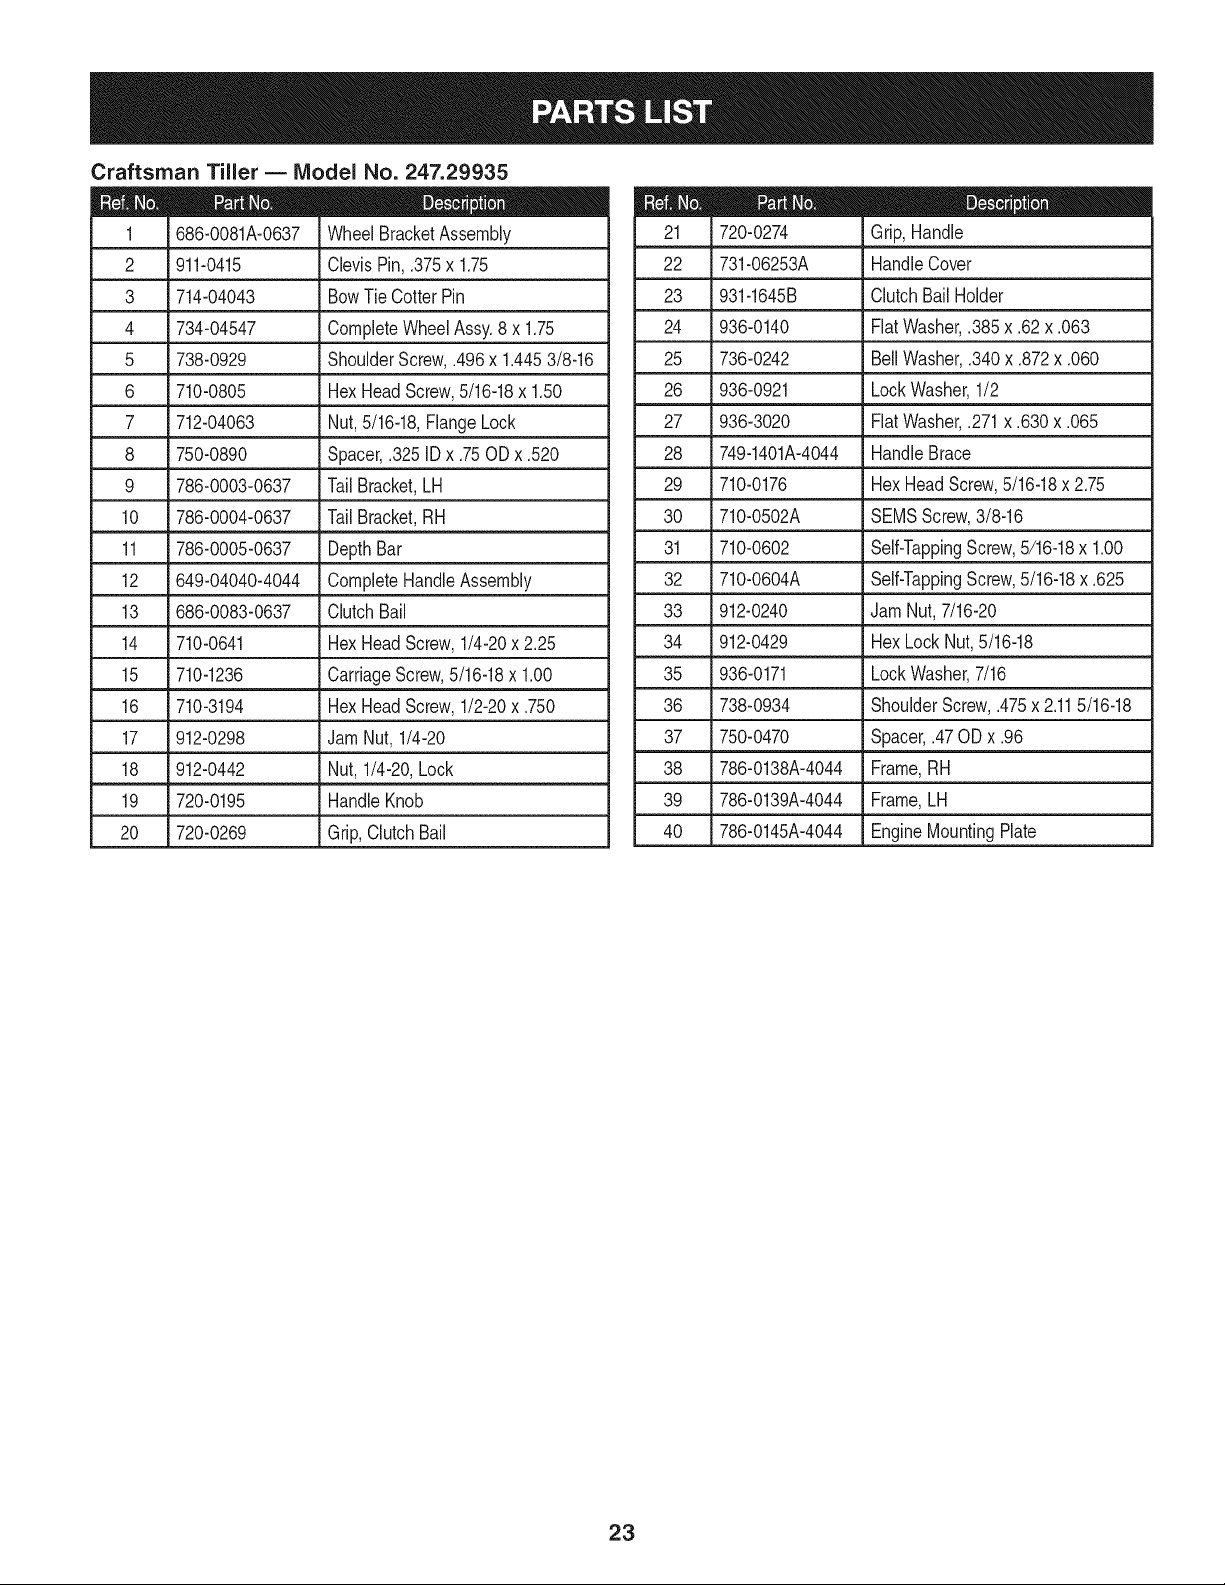
Craftsman Tiller B IViodel No. 247.29935
22
12
21
14
1
22
Craftsman Tiller B IViodel No. 247.29935
686-0081A-0637 WheelBracketAssembly
2 911-0415 ClevisPin, .375x 1.75
3 714-04043 BowTie Cotter Pin
4 734-04547 CompleteWheelAssy.8 x 1.75
5 738-0929 ShoulderScrew,.496x 1.4453/8-16
6 710-0805 HexHeadScrew,5/16-18x 1.50
7 712-04063 Nut,5/16-18,FlangeLock
8 750-0890 Spacer,.325ID x .75OD x .520
9 786-0003-0637 Tail Bracket,LH
10 786-0004-0637 Tail Bracket,RH
11 786-0005-0637 DepthBar
12 649-04040-4044 CompleteHandleAssembly
13 686-0083-0637 ClutchBail
14 710-0641 HexHeadScrew,1/4-20x 2.25
15 710-1236 CarriageScrew,5/16-18x 1.00
16 710-3194 HexHeadScrew,1/2-20x .750
17 912-0298 JamNut, 1/4-20
18 912-0442 Nut,1/4-20,Lock
19 720-0195 HandleKnob
20 720-0269 Grip,ClutchBail
720-0274 Grip,Handle
22 731-06253A HandleCover
23 931-1645B ClutchBail Holder
24 936-0140 FiatWasher,.385x .62 x .063
25 736-0242 BellWasher,.340x .872x .060
26 936-0921 LockWasher,1/2
27 936-3020 FlatWasher,.271x .630x .065
28 749-1401A-4044 HandleBrace
29 710-0176 HexHeadScrew,5/16-18x 2.75
30 710-0502A SEMSScrew,3/8-16
31 710-0602 Self-TappingScrew,5/16-18x 1.00
32 710-0604A Self-TappingScrew,5/16-18x .625
33 912-0240 JamNut,7/16-20
34 912-0429 HexLockNut,5/16-18
35 936-0171 LockWasher,7/16
36 738-0934 ShoulderScrew,.475x 2.115/16-18
37 750-0470 Spacer,.47OD x .96
38 786-0138A-4044 Frame,RH
39 786-0139A-4044 Frame,LH
40 786-0145A-4044 EngineMountingPlate
23
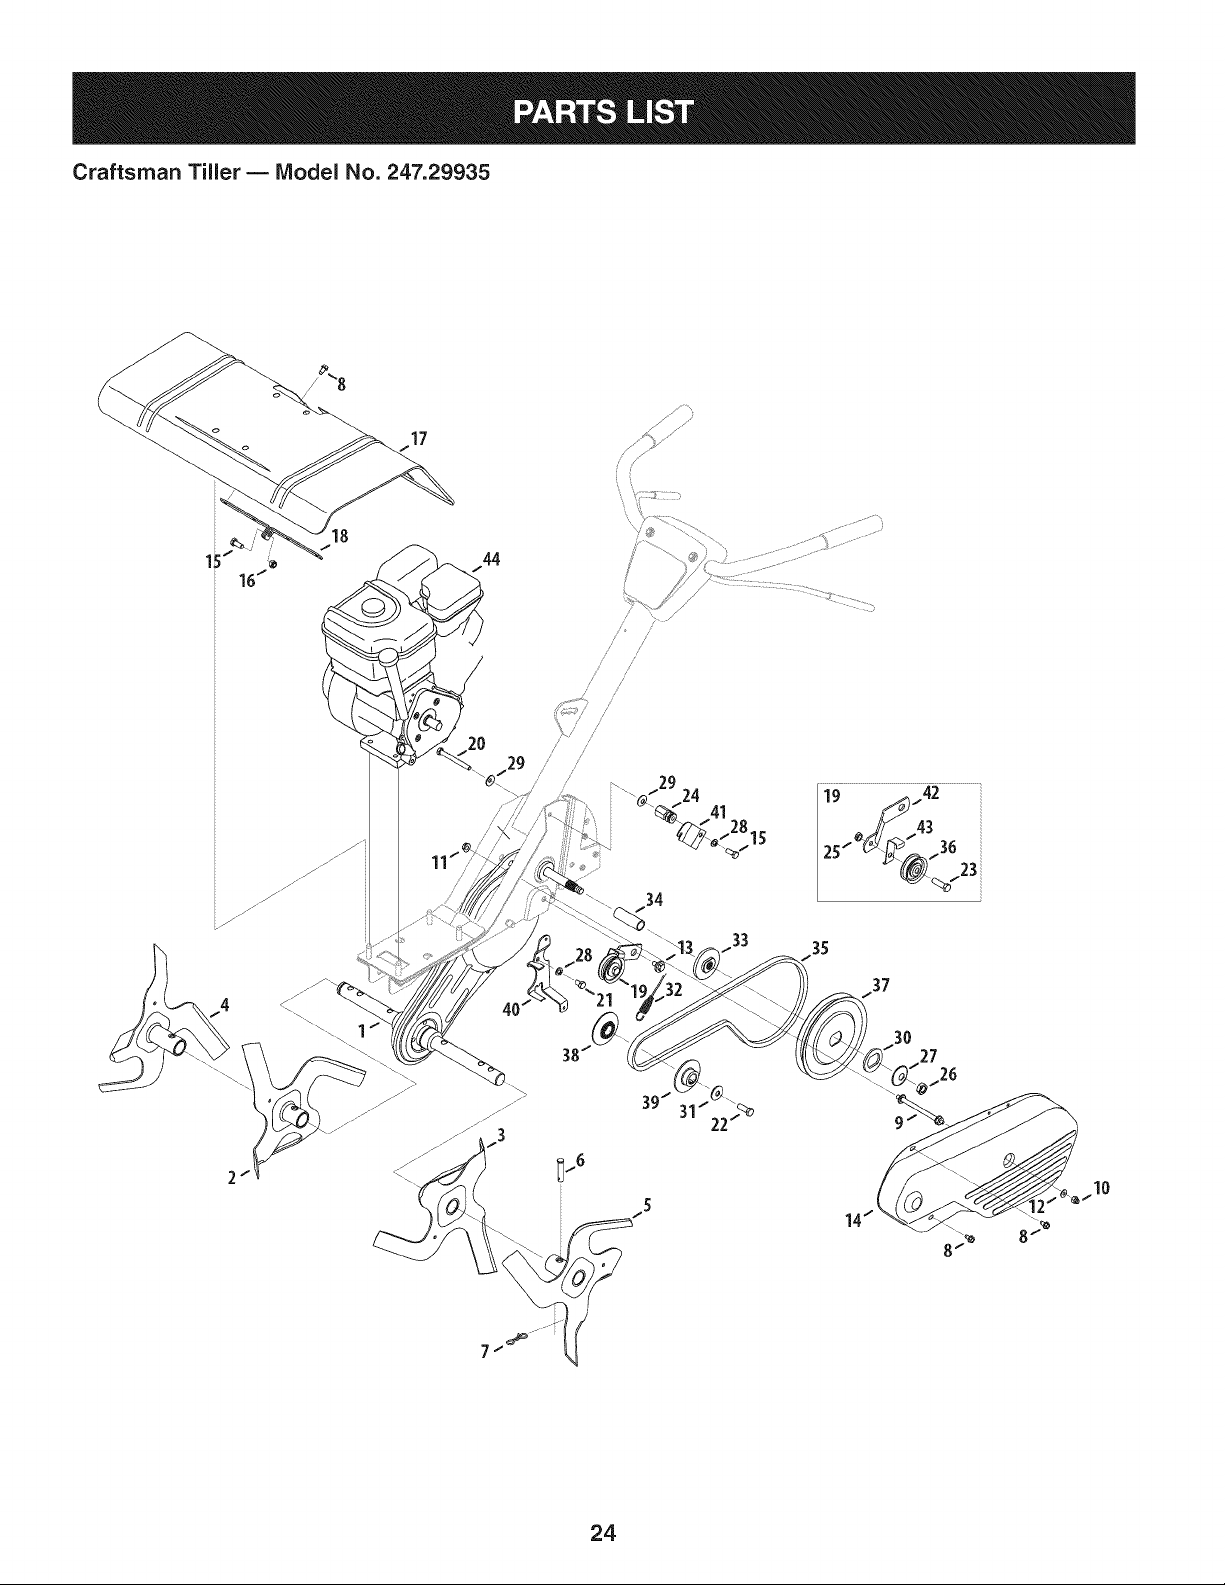
Craftsman Tiller B Model No. 247.29935
17 .........._7/i;I;:_'
F _
\ _i ¸¸_¸;_!_I_¸¸¸¸]_¸)
34
33
35
37
27
_26
10
24
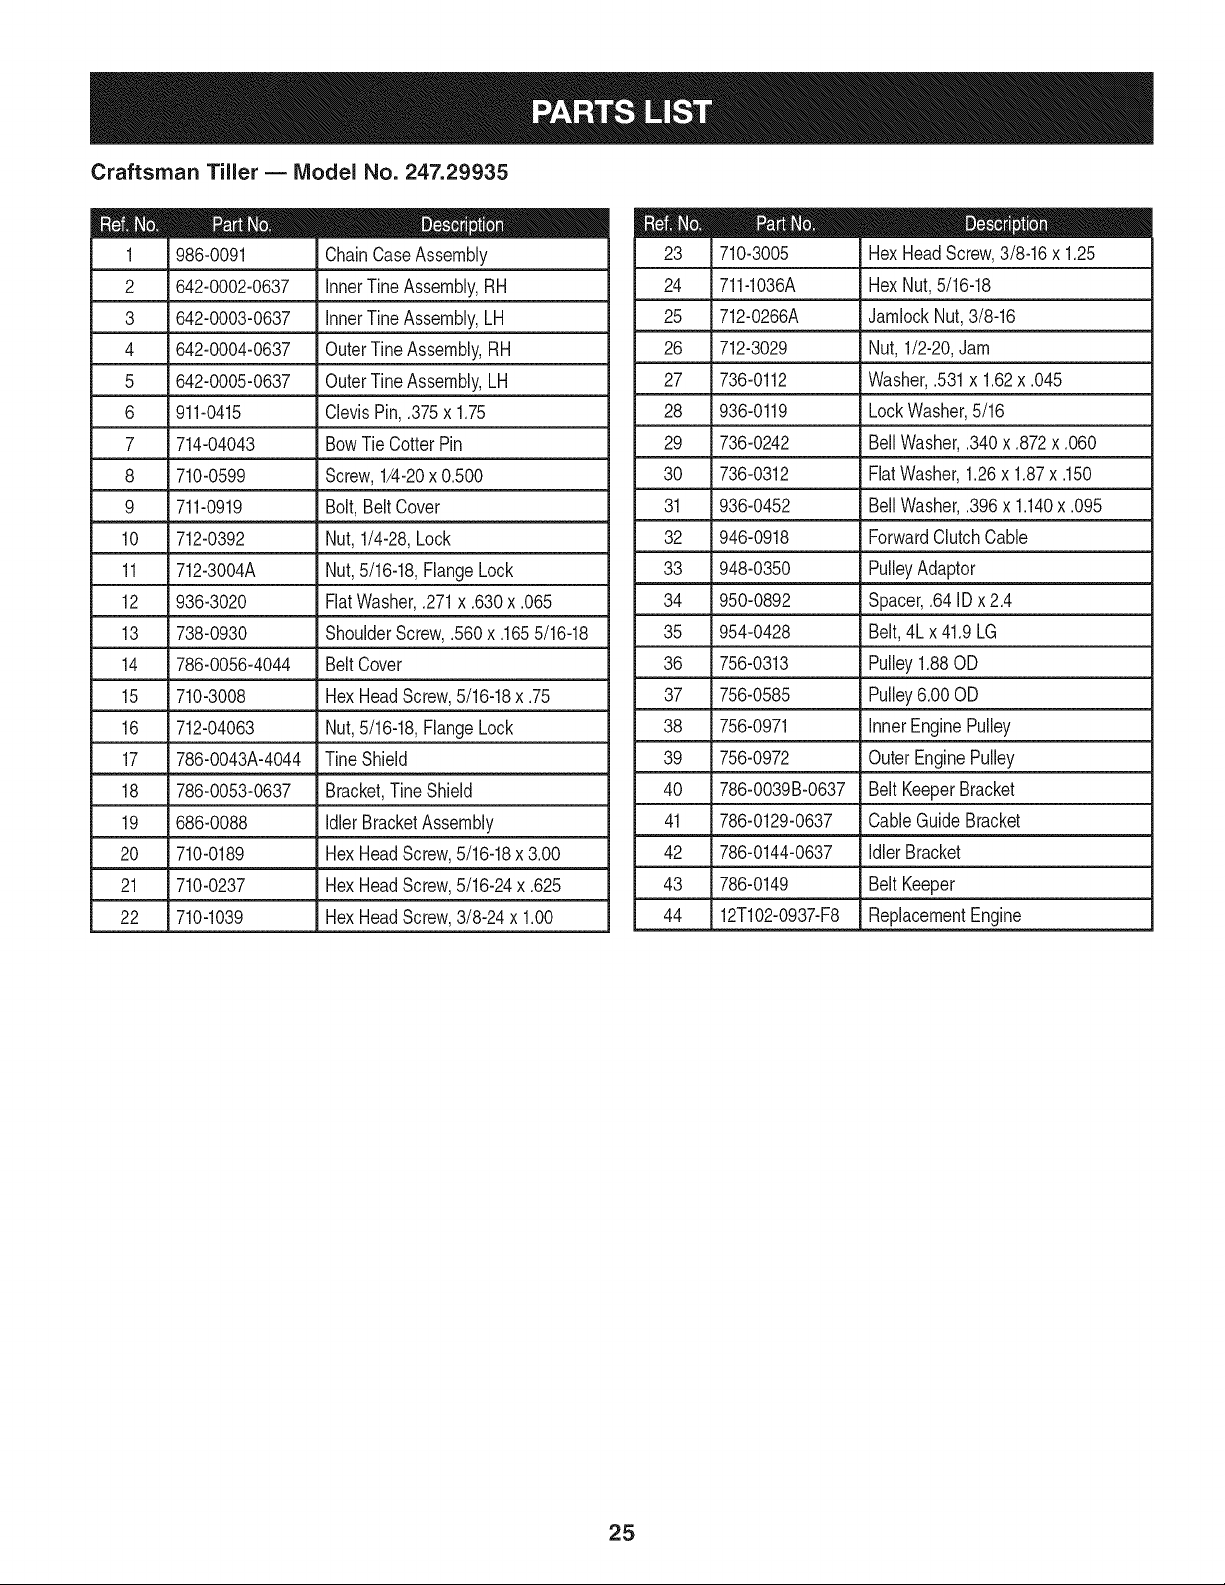
Craftsman Tiller B IViodel No. 247.29935
986-0091 ChainCaseAssembly
2 642-0002-0637 inner TineAssembly,RH
3 642-0003-0637 inner TineAssembly,LH
4 642-0004-0637 OuterTineAssembly,RH 26 712-3029
5 642-0005-0637 OuterTineAssembly,LH 27 736-0112
6 911-0415 ClevisPin,.375x 1.75 28 936-0119
7 714-04043 BowTie CotterPin 29 736-0242
8 710-0599 Screw,1/4-20x 0.500 30 736-0312
9 711-0919 Bolt, Belt Cover 31 936-0452
10 712-0392 Nut, 1/4-28,Lock 32 946-0918
11 712-3004A Nut,5/16-18,FlangeLock 33 948-0350
12 936-3020 FiatWasher,.271x .630x .065 34 950-0892
13 738-0930 ShoulderScrew,.560x .1655/16-18 35 954-0428
14 786-0056-4044 Belt Cover 36 756-0313
15 710-3008 HexHeadScrew,5/16-18x .75 37 756-0585
16 712-04063 Nut,5/16-18,FlangeLock 38 756-0971
17 786-0043A-4044 TineShield 39 756-0972
18 786-0053-0637 Bracket,Tine Shield 40 786-0039B-0637
19 686-0088 Idler BracketAssembly 41 786-0129-0637
20 710-0189 HexHeadScrew,5/16-18x 3.00
21 710-0237 HexHeadScrew,5/16-24x .625
22 710-1039 HexHeadScrew,3/8-24x 1.00
710-3005 Hex HeadScrew,3/8-16x 1.25
24 711-1036A HexNut,5/16-18
25 712-0266A JamlockNut,3/8-16
Nut, 1/2-20,Jam
Washer,.531x 1.62x .045
LockWasher,5/16
BellWasher,.340x .872x .060
FiatWasher,1.26x 1.87x .150
BellWasher,.396x 1.140x .095
ForwardClutchCable
PulleyAdaptor
Spacer,.64 IDx 2.4
Belt,4L x 41.9LG
Pulley1.88OD
Pulley6.00OD
InnerEnginePulley
OuterEnginePulley
BeltKeeperBracket
CableGuide Bracket
42 786-0144-0637 IdlerBracket
43 786-0149 BeltKeeper
44 12T102-O937-F8 ReplacementEngine
25
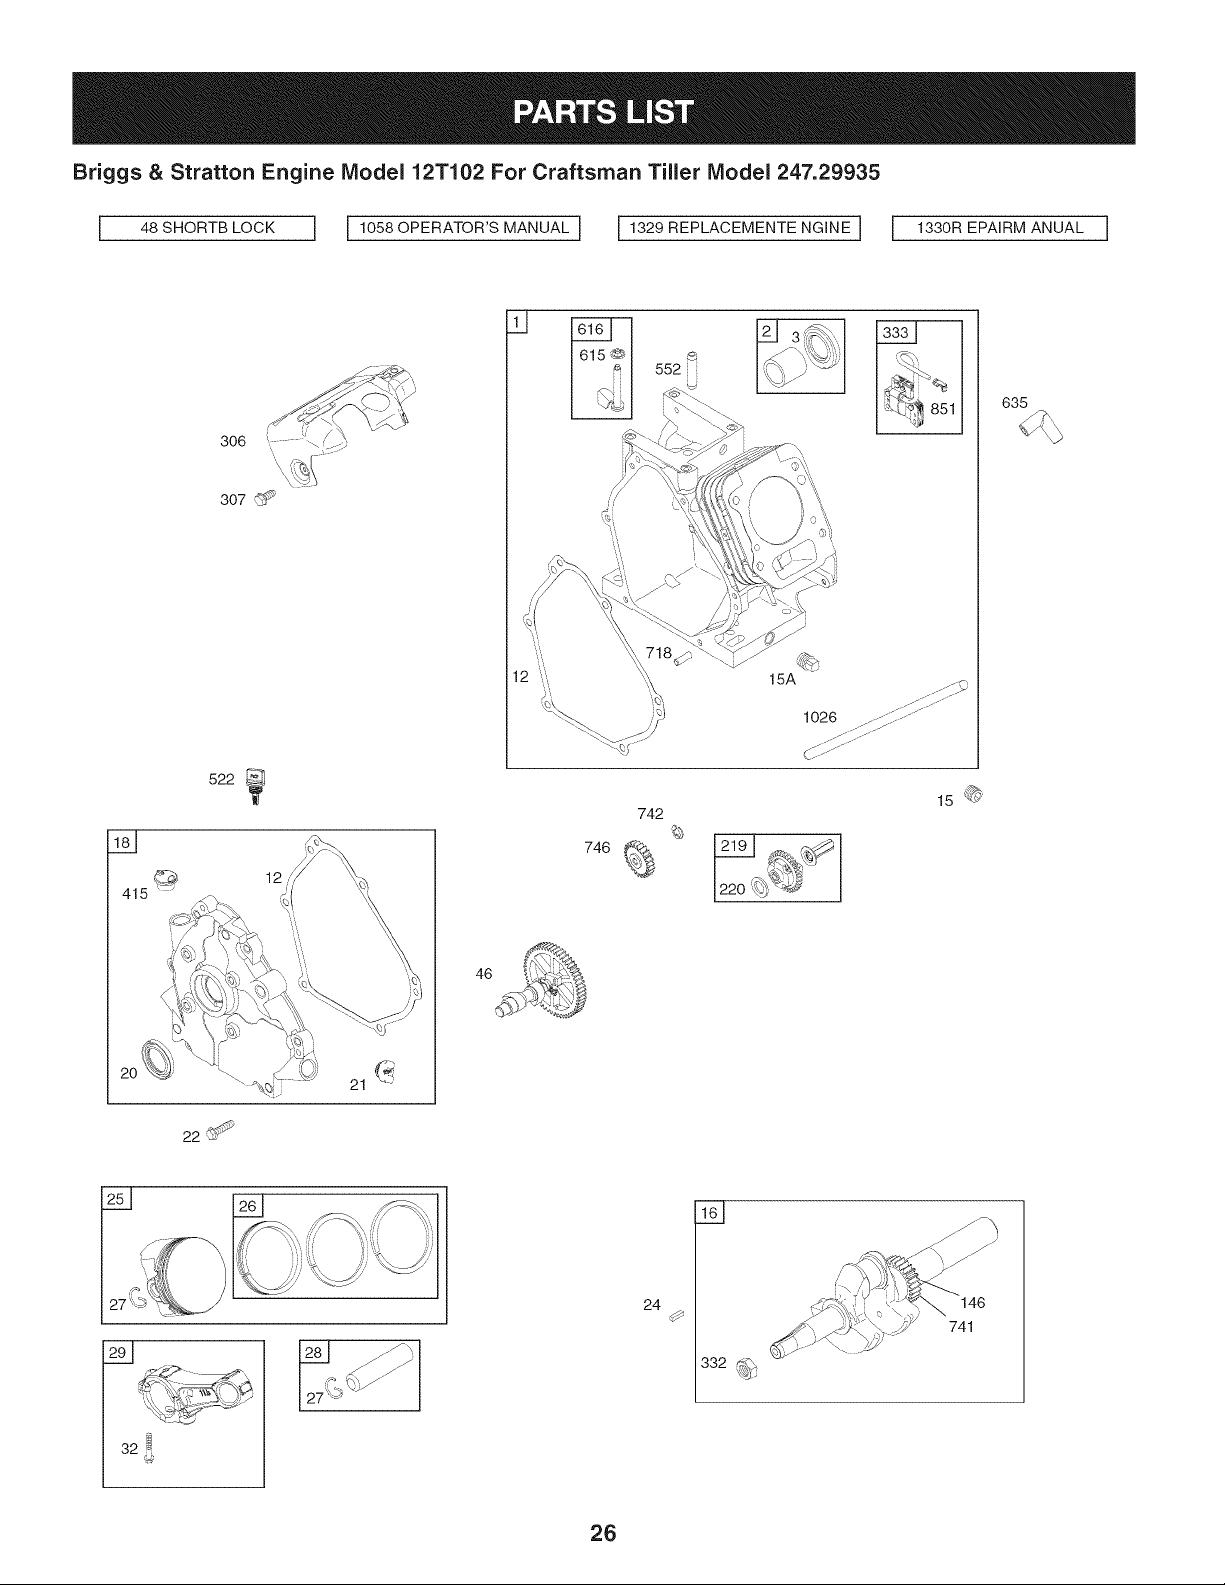
Briggs & Stratton Engine IViodel 12T102 For Craftsman Tiller IViodel 247.29935
I 48SHORTB'OCKI I 1056OPERATOR'SMANUALI I 1329REP'AOEMENTENGINEI I 1330REPAIRMANOA'I
\
12
15A
1026
!
635
415
22
46
742
746
15 @
32 _
24
332
146
741
26
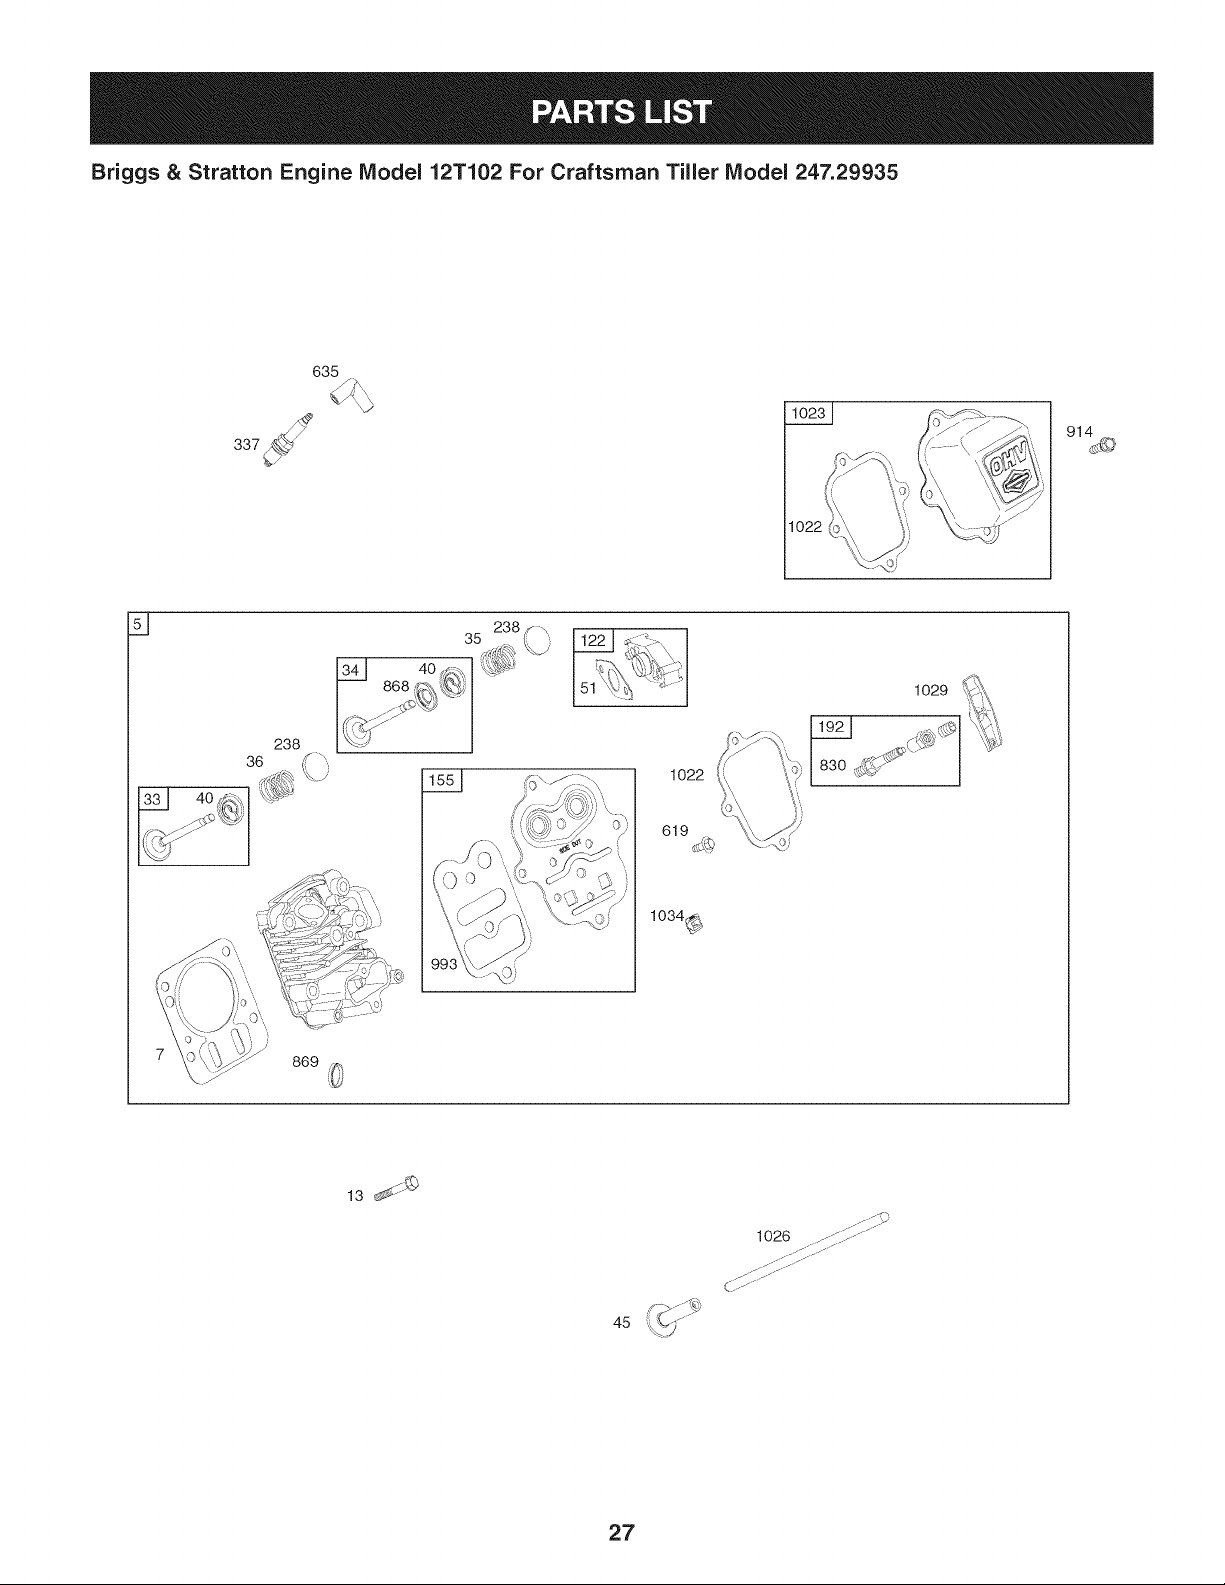
Briggs & Stratton Engine Model 12T102 For Craftsman Tiller Model 247.29935
635
1022
d
238
ifx,
133 I 404_#_
• 4
1022
619
1034_
1O29
45
27
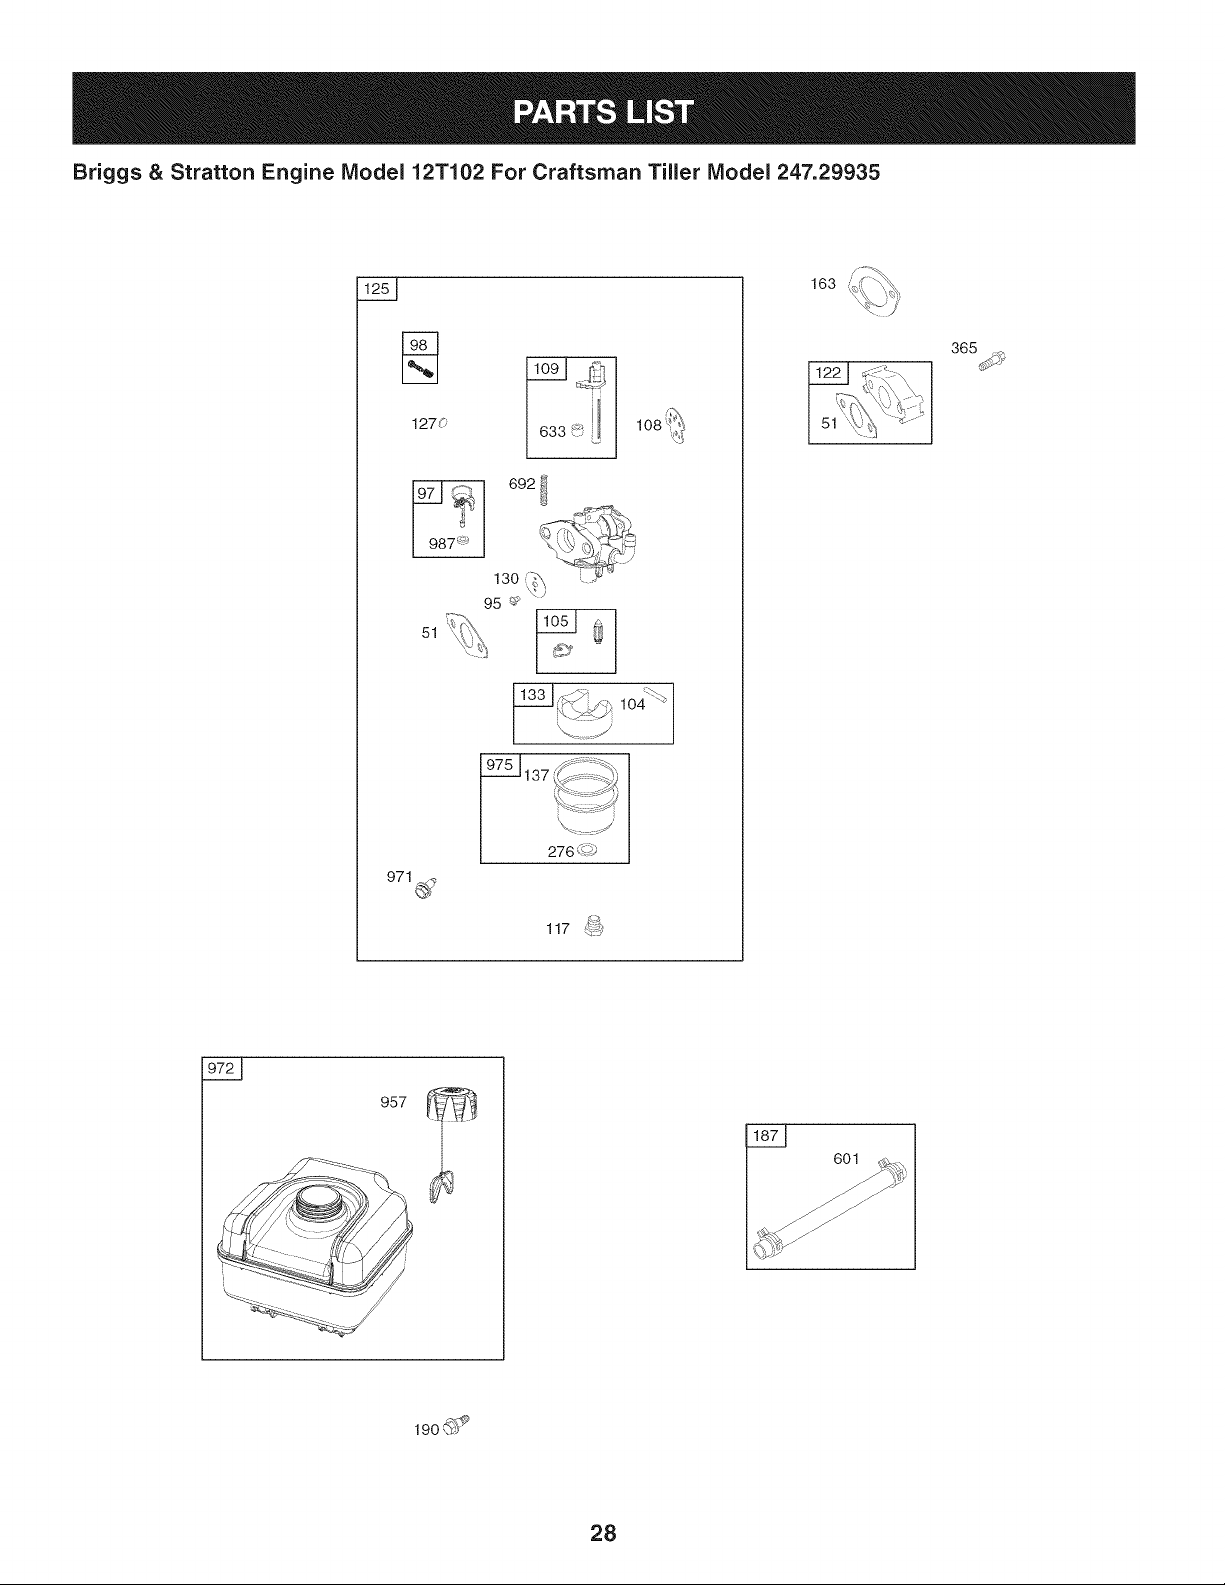
Briggs & Stratton Engine Model 12T102 For Craftsman Tiller Model 247.29935
__33_'i_
1270 633 (_i I_._ 108
692 II
51
276(17_
117 _'_
163
365_
190_
28

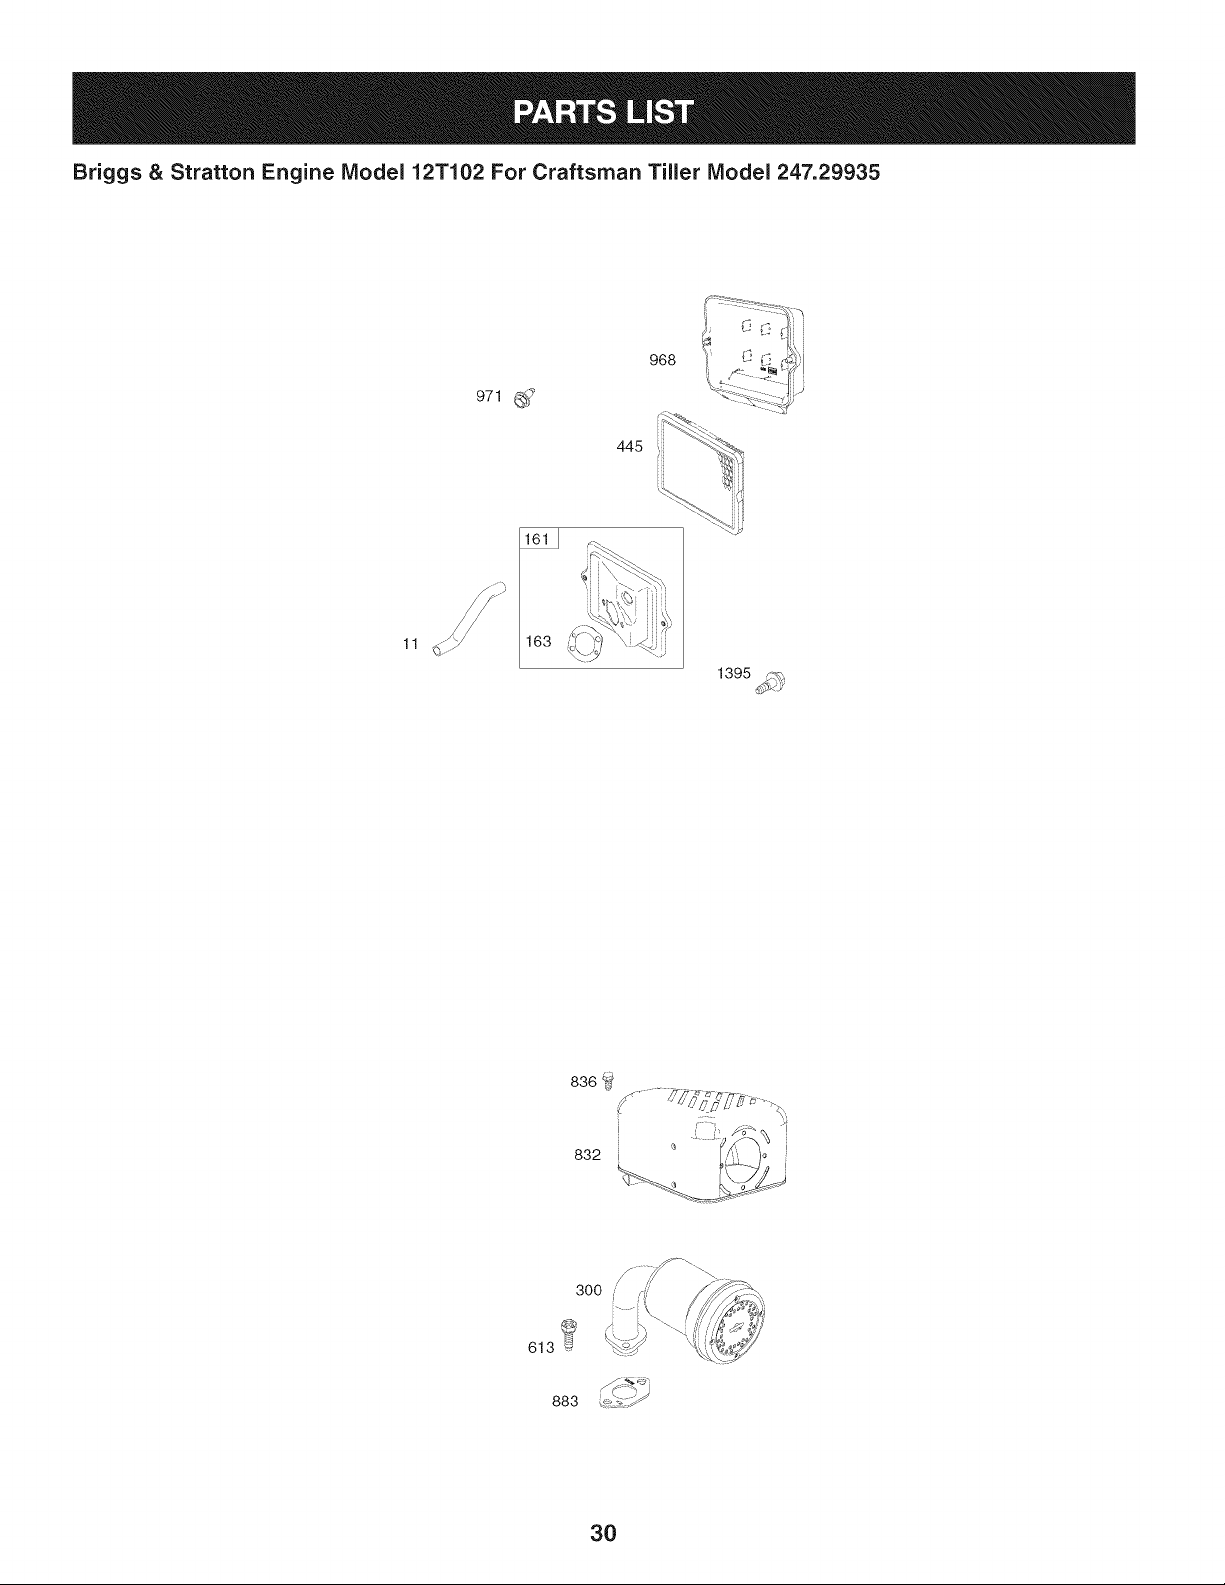
Briggs & Stratton Engine IViodel 12T102 For Craftsman Tiller IViodel 247.29935
663 _
281
562
505
356
851
635
334
222_ 427
773
29
Briggs & Stratton Engine IViodel 12T102 For Craftsman Tiler IViodel 247.29935
971 _
11
836 _
832
300
883
30
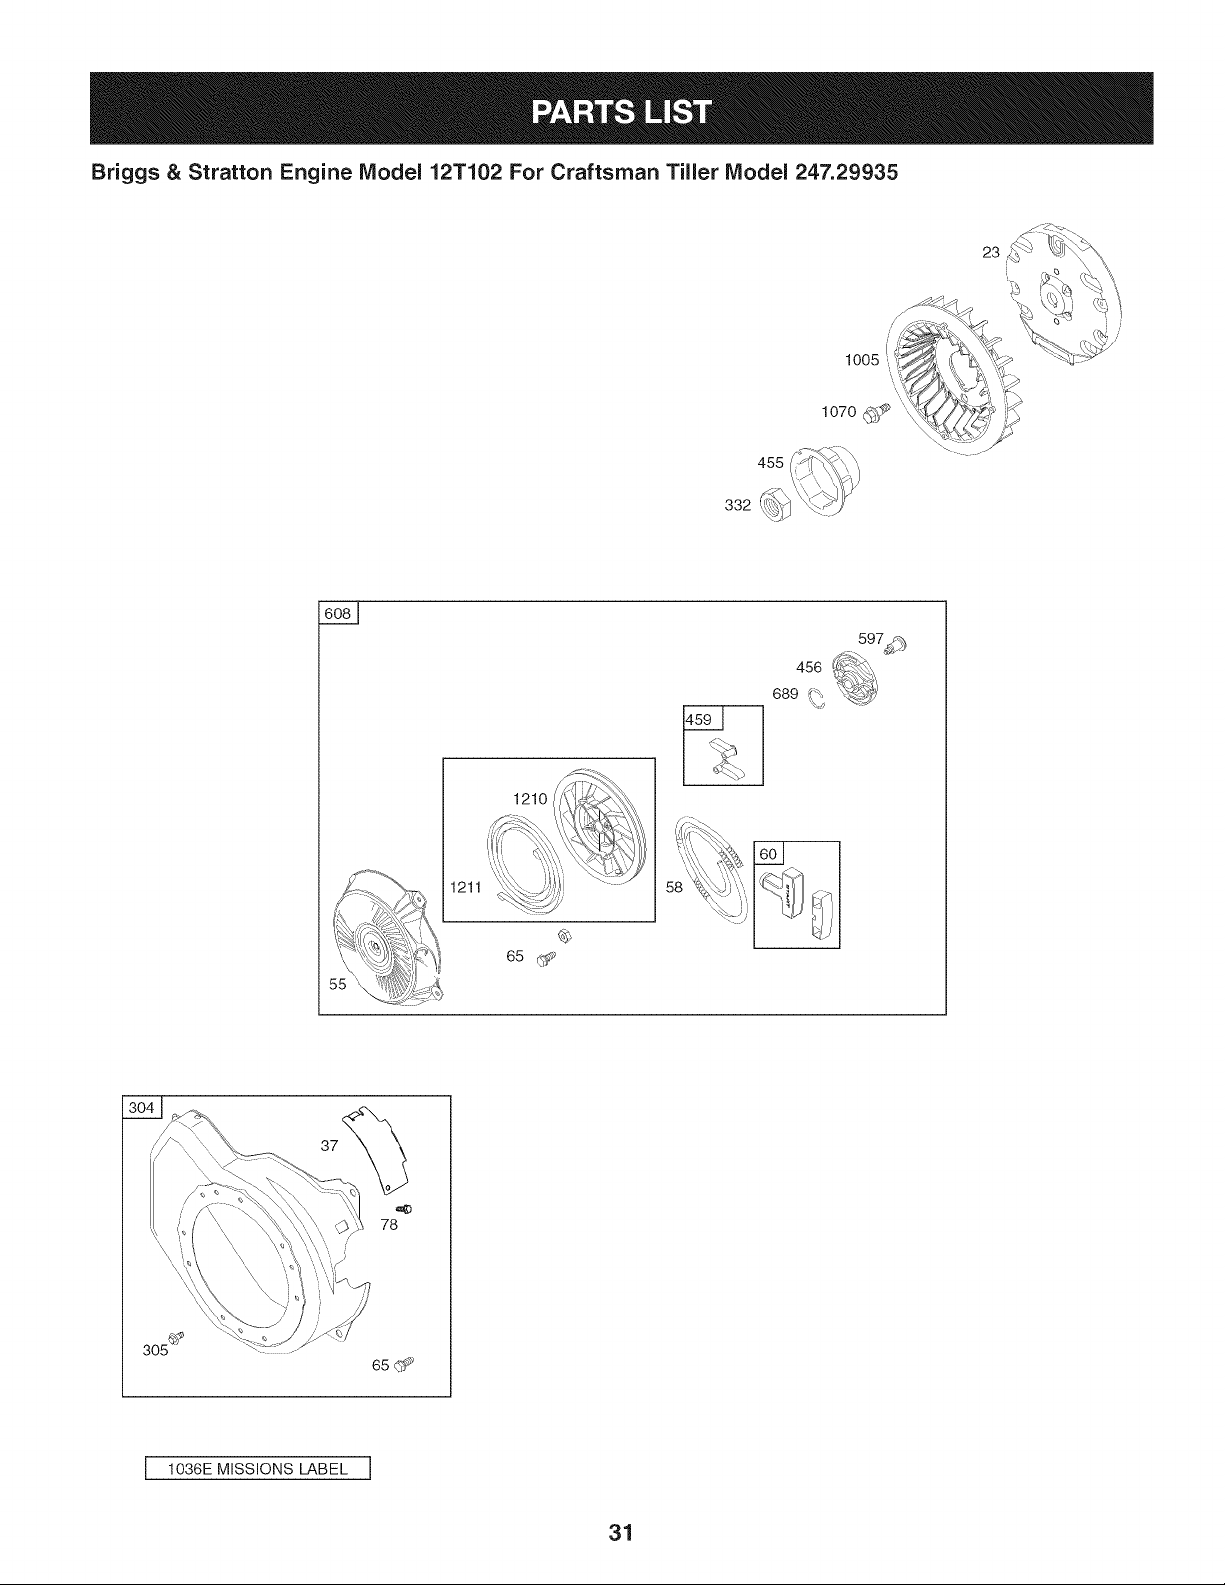
Briggs & Stratton Engine IViodel 12T102 For Craftsman Tiller IViodel 247.29935
23
455
332 _
1005
1070_
1211
1210
456
689 _:%
37
78
65d"_
I 1036E MISSIONS LABEL I
31
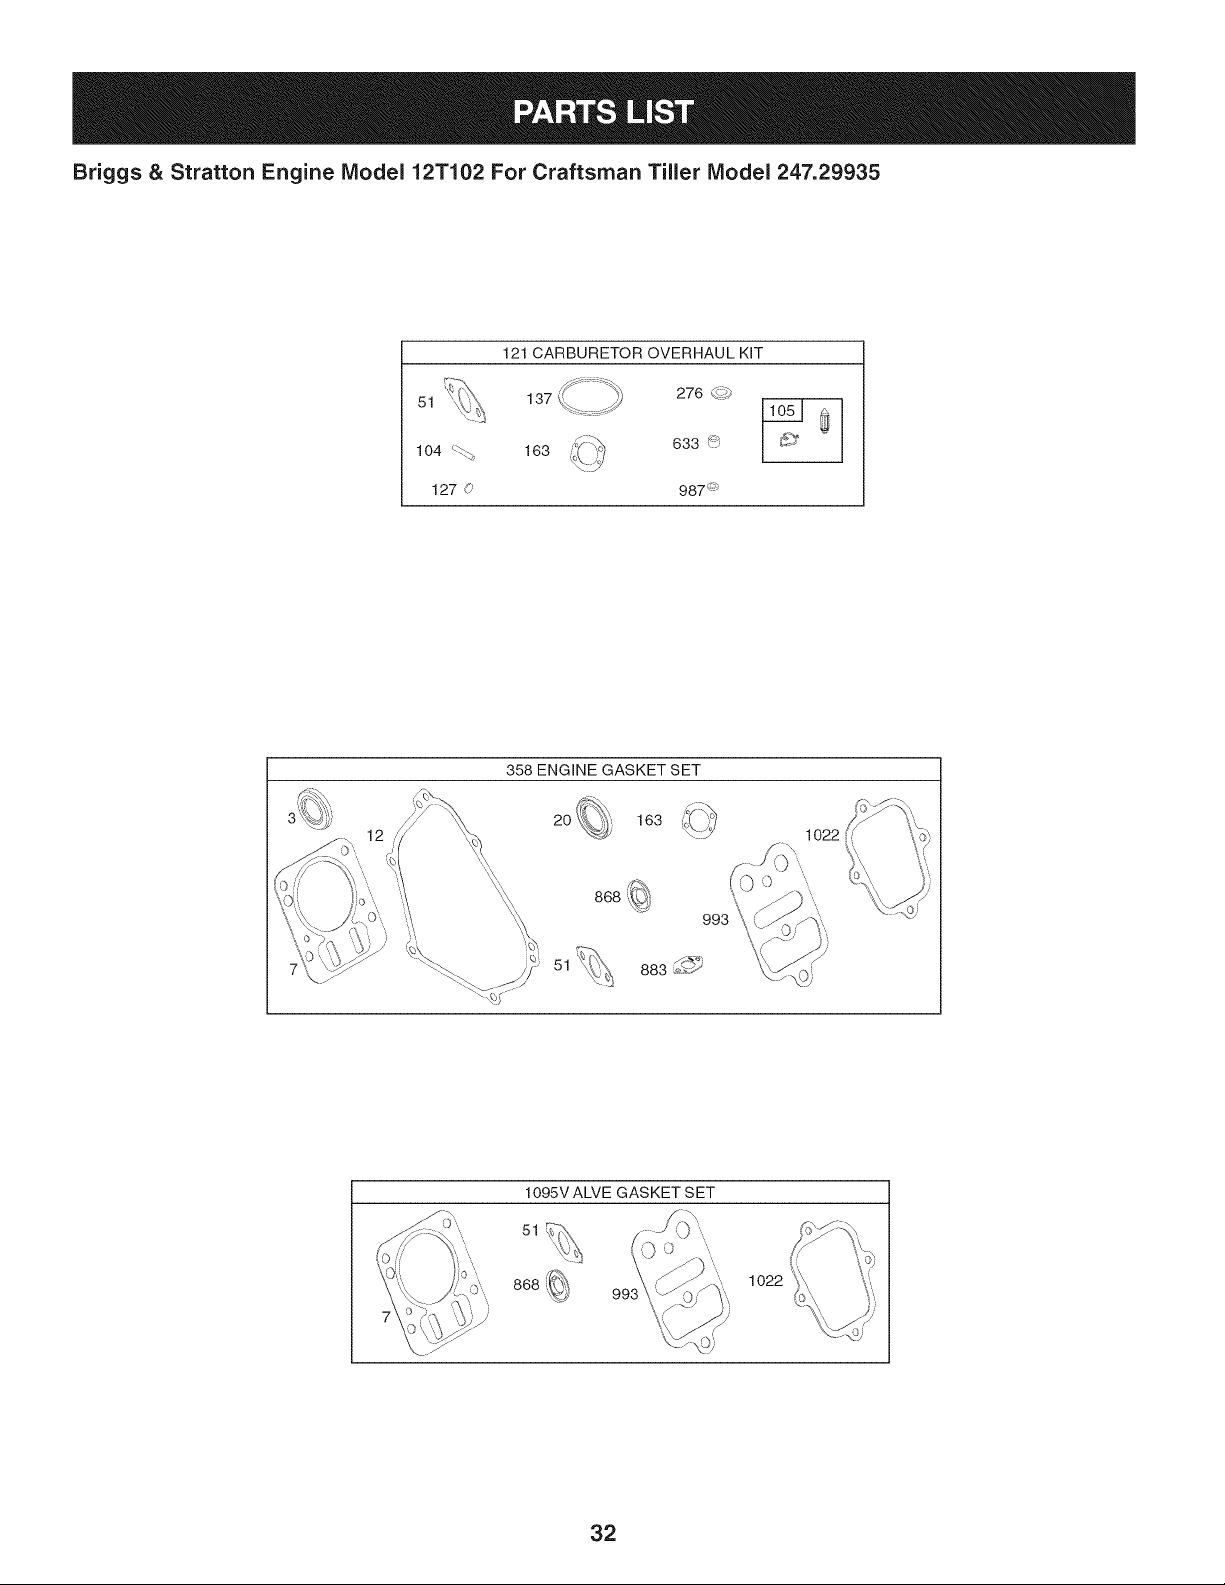
Briggs & Stratton Engine IViodel 12T102 For Craftsman Tiller IViodel 247.29935
121 CARBURETOR OVERHAUL KiT
137 11051 (il
163
276 __;)
633 _:_
987_
358 ENGINE GASKET SET
20 163
51 883 L*"_:_
1095V ALVE GASKET SET
868
99
\
1022
32
Briggs
2
3
5
7
11
& Stratton Engine Model 12T102 For Craftsman Tiller Model 247.29935
|= o_ |= oe
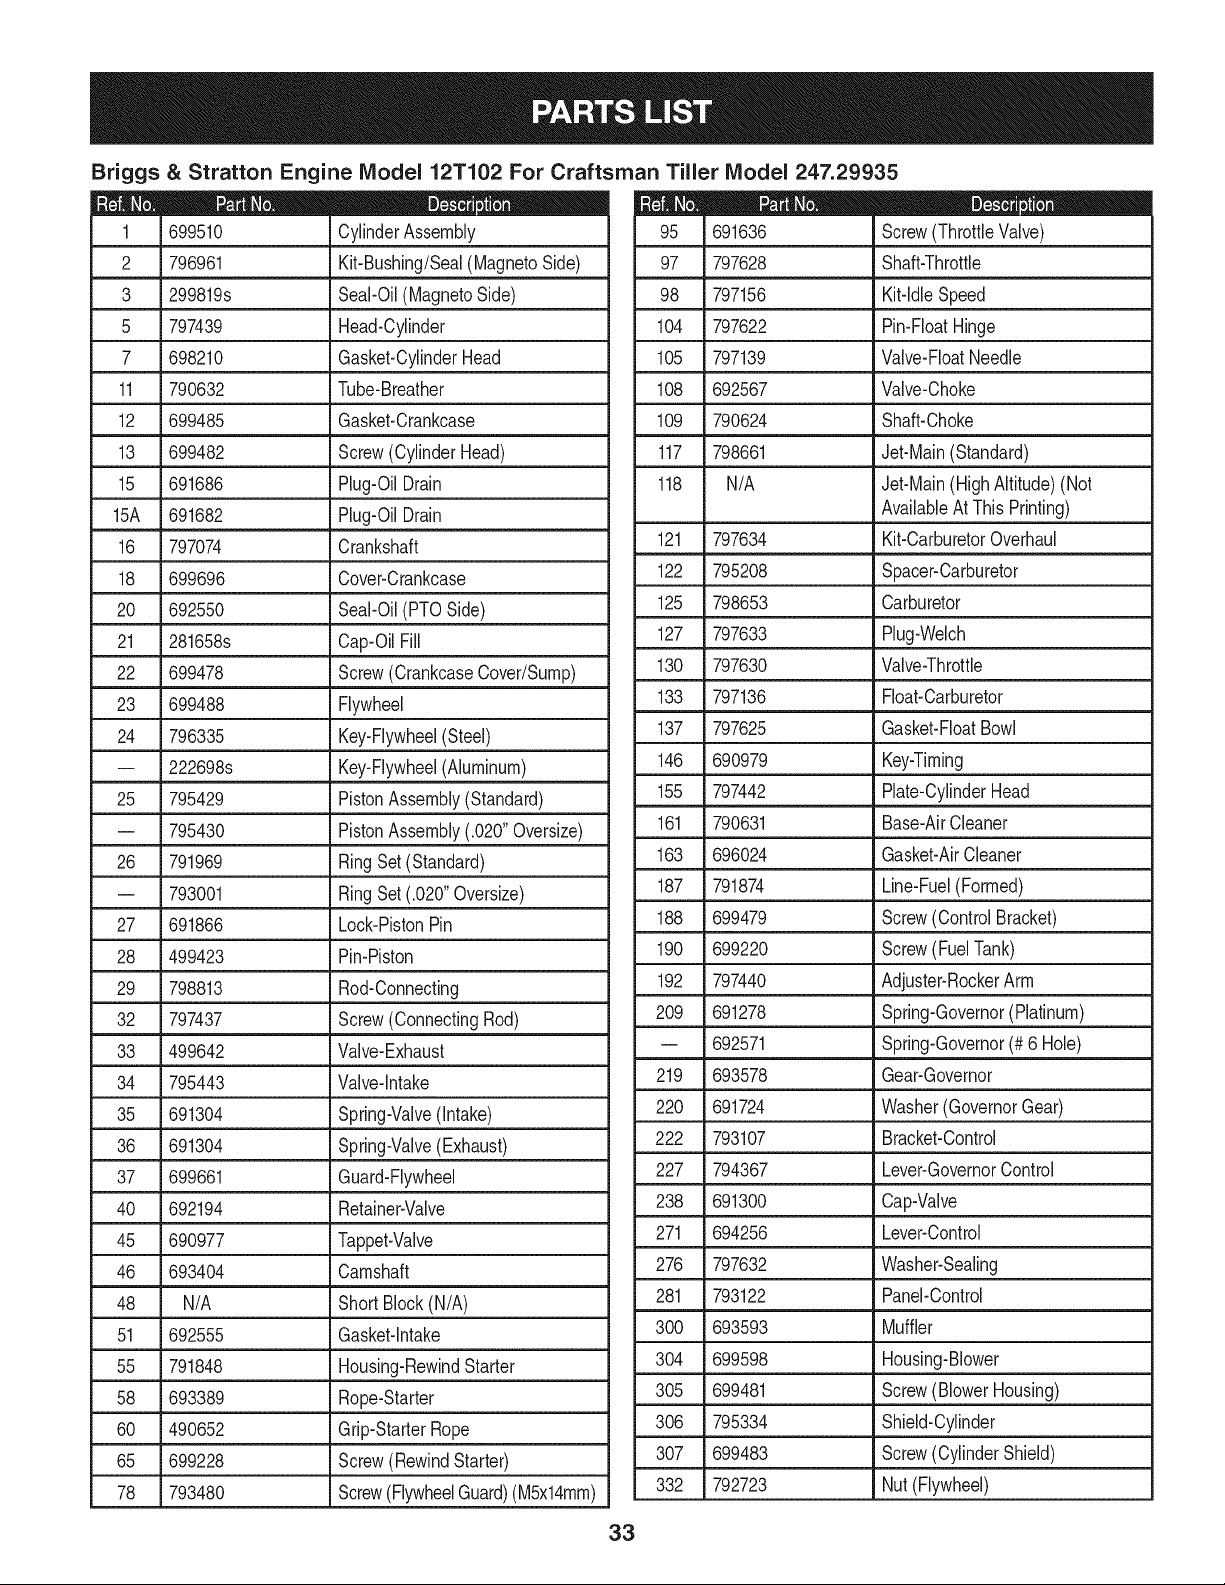
691636 Screw(ThrottleValve)
97 797628 Shaft-Throttle
699510 CylinderAssembly
796961 . Kit-Bushing/Seal(MagnetoSide)
299819s Seal-Oil(MagnetoSide)
797439 Head-Cylinder
698210 Gasket-CylinderHead
790632 Tube-Breather
12 699485 Gasket-Crankcase
13 699482 Screw(CylinderHead)
15 691686 Plug-OilDrain
15A 691682 _Plug-OilDrain
16 797074 Crankshaft
18 699696 Cover-Crankcase
20 692550 Seal-Oil(PTOSide)
21 281658s Cap-OilFill
22 699478 Screw(CrankcaseCover/Sump)
23 699488 Flywheel
24 796335 Key-Flywheel(Steel)
-- _222698s _KeyFlywheel(Aluminum)
25 795429 PistonAssembly(Standard)
-- 795430 PistonAssembly(.020"Oversize)
26 791969 RingSet (Standard)
-- 793001 RingSet (.020"Oversize)
27 691866 Lock-PistonPin
28 499423 Pin-Piston
29 798813 Rod-Connecting
32 797437 , Screw(ConnectingRod)
33 499642 Valve-Exhaust
34 795443 Valve-Intake
35 691304 Spring-Valve(Intake)
36 691304 Spring-Valve(Exhaust)
37 699661 Guard-Flywheel
40 692194 Retainer-Valve
45 690977 Tappet-Valve
46 693404 Camshaft
48 N/A ShortBlock (N/A)
51 692555 Gasketqntake
55 791848 Housing-RewindStarter
58 693389 Rope-Starter
60 490652 Grip-StarterRope
65 699228 Screw(RewindStarter)
78 793480 Screw(FlywheelGuard)(M5x14mm)
98 797156 Kit-IdleSpeed
104 797622 Pin-FloatHinge
105 797139 Valve-FloatNeedle
108 692567 Valve-Choke
109 790624 Shaft-Choke
117 798661 Jet-Main(Standard)
118 N/A Jet-Main(HighAltitude)(Not
AvailableAt This Printing)
121 797634 Kit-CarburetorOverhaul
122 795208 Spacer-Carburetor
125 798653 Carburetor
127 797633 Plug-Welch
130 797630 Valve-Throttle
133 797136 Float-Carburetor
137 797625 Gasket-FloatBowl
146 690979 Key-Timing
155 797442 Plate-CylinderHead
161 790631 Base-AirCleaner
163 696024 Gasket-AirCleaner
187 791874 Line-Fuel(Formed)
188 699479 Screw(ControlBracket)
190 699220 Screw(FuelTank)
192 797440 Adjuster-RockerArm
209 691278 Spring-Governor(Platinum)
-- 692571 Spring-Governor(# 6 Hole)
219 693578 Gear-Governor
220 691724 Washer(GovernorGear)
222 793107 Bracket-Control
227 794367 Lever-GovernorControl
238 691300 Cap-Valve
271 694256 Lever-Control
276 797632 Washer-Sealing
281 793122 Panel-Control
300 693593 Muffler
304 699598 Housing-Blower
305 699481 Screw(BlowerHousing)
306 795334 Shield-Cylinder
307 699483 Screw(CylinderShield)
332 792723 Nut(Flywheel)
33
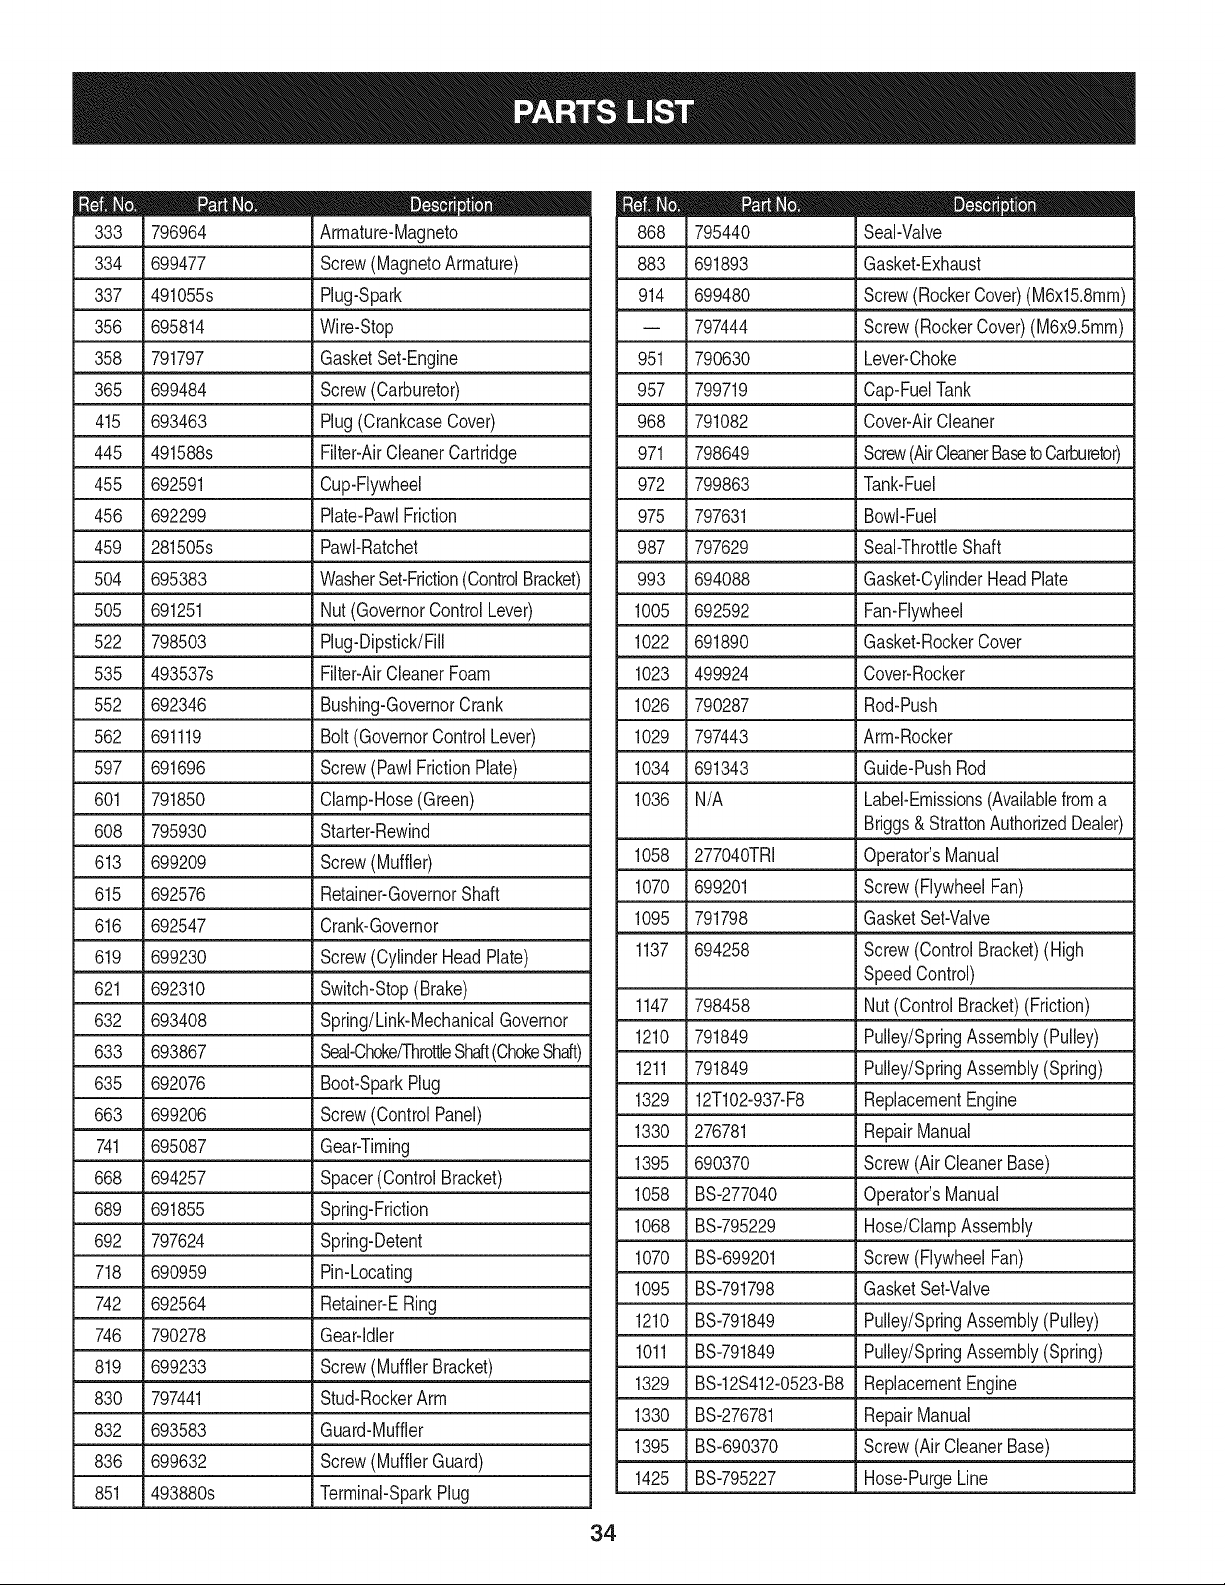
D _ I! O
796964 Armature-Magneto
334 699477 Screw(MagnetoArmature)
337 491055s Plug-Spark
356 695814 Wire-Stop
358 791797 GasketSet-Engine
365 699484 Screw(Carburetor)
415 693463 Plug(CrankcaseCover)
445 491588s Filter-AirCleanerCartridge
455 692591 Cup-Flywheel
456 692299 Plate-PawlFriction
459 281505s PawI-Ratchet
504 695383 WasherSet-Friction(ControlBracket)
505 691251 Nut(GovernorControlLever)
522 798503 Plug-Dipstick/Fill
535 493537s Filter-AirCleanerFoam
552 692346 Bushing-GovernorCrank
562 691119 Bolt(GovernorControlLever)
597 691696 Screw(PawlFrictionPlate)
601 791850 Clamp-Hose(Green)
608 795930 Starter-Rewind
613 699209 Screw(Muffler)
615 692576 Retainer-GovernorShaft
616 692547 Crank-Governor
619 699230 Screw(CylinderHeadPlate)
621 692310 Switch-Stop(Brake)
632 693408 Spring/Link-MechanicalGovernor
633 693867 Seal-Choke/ThrottleShaft(ChokeShaft)
635 692076 Boot-SparkPlug
663 699206 Screw(ControlPanel)
741 695087 Gear-Timing
668 694257 Spacer(ControlBracket)
689 691855 Spring-Friction
692 797624 Spring-Detent
718 690959 Pin-Locating
742 692564 Retainer-ERing
746 790278 Gear-Idler
819 699233 Screw(MufflerBracket)
830 797441 Stud-RockerArm
832 693583 Guard-Muffler
836 699632 Screw(MufflerGuard)
851 493880s Terminal-SparkPlug
If 1_ I! It
795440 Seal-Valve
883 691893 Gasket-Exhaust
914 699480 Screw(RockerCover)(M6x15.8mm)
-- 797444 Screw(RockerCover)(M6x9.5mm)
951 790630 Lever-Choke
957 799719 Cap-FuelTank
968 791082 Cover-AirCleaner
971 798649 Screw(AirCleanerBasetoCarburetor)
972 799863 Tank-Fuel
975 797631 Bowl-Fuel
987 797629 Seal-ThrottleShaft
993 694088 Gasket-CylinderHeadPlate
1005 692592 Fan-Flywheel
1022 691890 Gasket-RockerCover
1023 499924 Cover-Rocker
1026 790287 Rod-Push
1029 797443 Arm-Rocker
1034 691343 Guide-PushRod
1036 N/A Label-Emissions(Availablefroma
Briggs& StrattonAuthorizedDealer)
1058 277040TRI Operator'sManual
1070 699201 Screw(FlywheelFan)
1095 791798 GasketSet-Valve
1137 694258 Screw(ControlBracket)(High
SpeedControl)
1147 798458 Nut(ControlBracket)(Friction)
1210 791849 Pulley/SpringAssembly(Pulley)
1211 791849 Pulley/SpringAssembly(Spring)
1329 12T102-937-F8 ReplacementEngine
1330 276781 RepairManual
1395 690370 Screw(Air CleanerBase)
1058 BS-277040 Operator'sManual
1068 BS-795229 Hose/ClampAssembly
1070 BS-699201 Screw(FlywheelFan)
1095 BS-791798 GasketSet-Valve
1210 BS-791849 Pulley/SpringAssembly(Pulley)
1011 BS-791849 Pulley/SpringAssembly(Spring)
1329 BS-12S412-0523-B8 ReplacementEngine
1330 BS-276781 RepairManual
1395 BS-690370 Screw(Air CleanerBase)
1425 BS-795227 Hose-PurgeLine
34
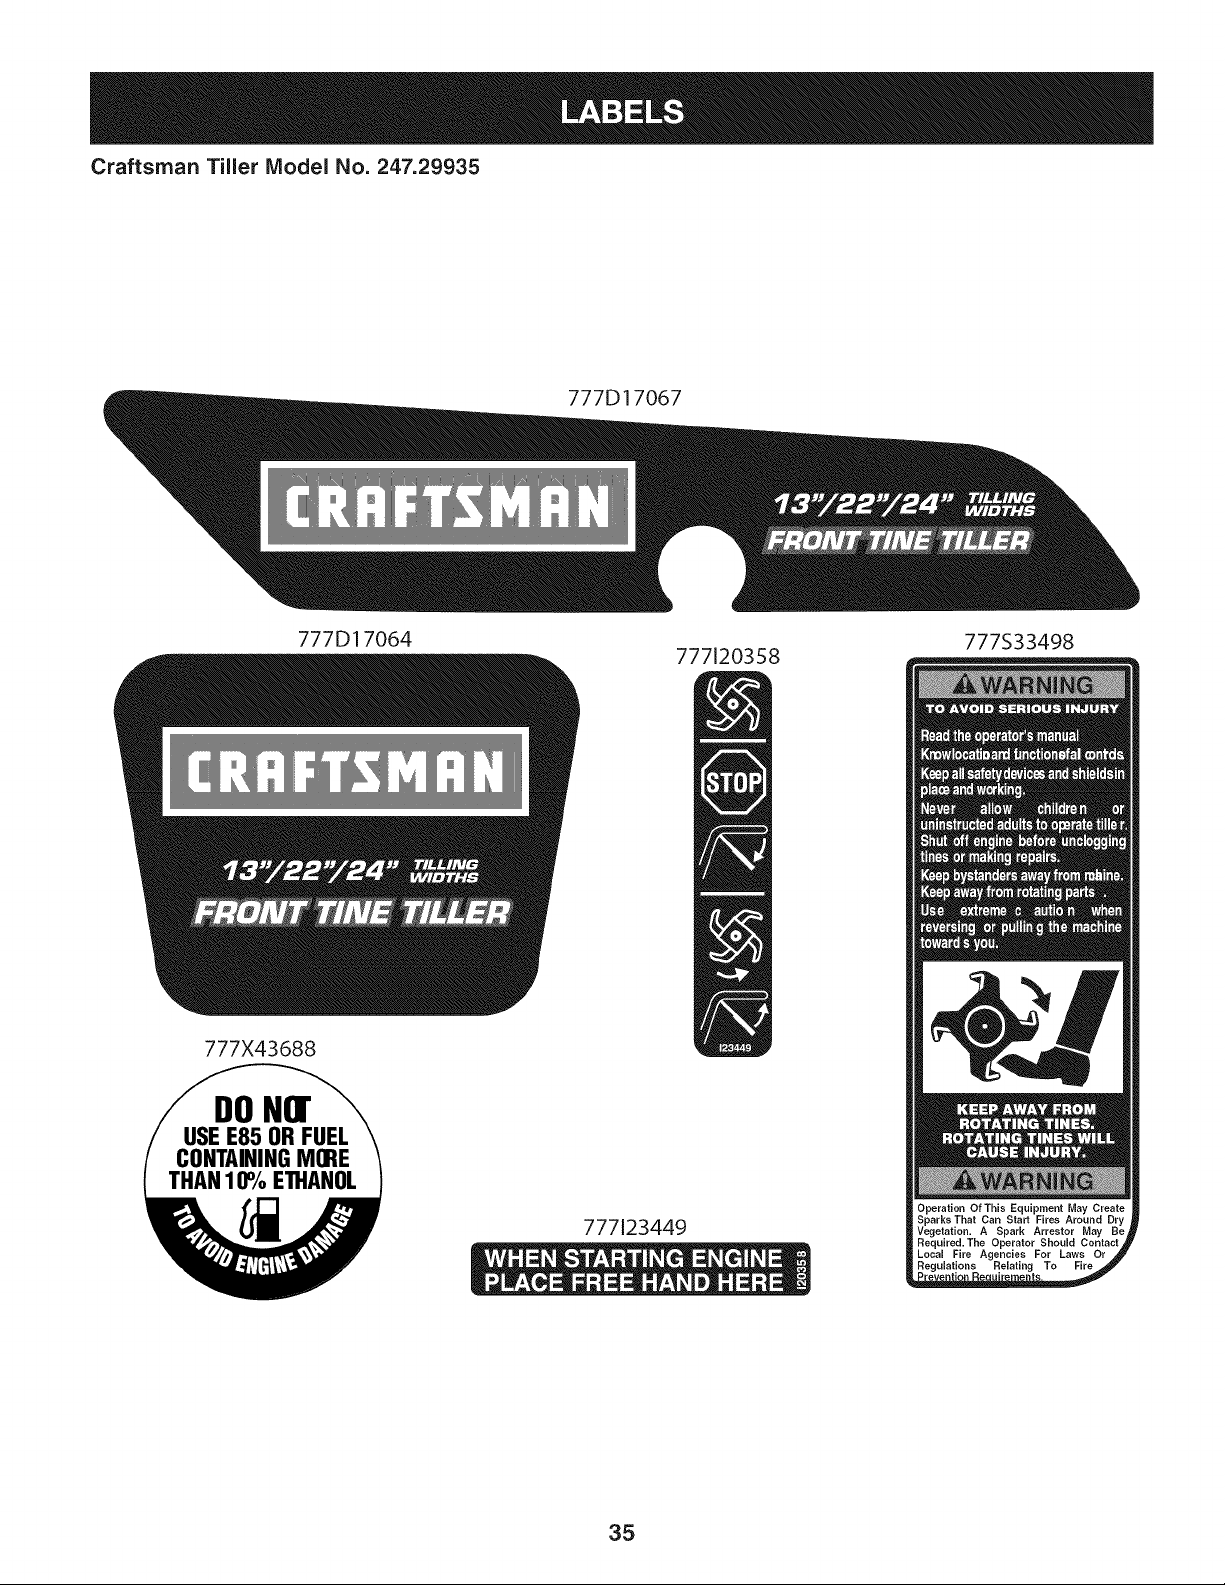
Craftsman Tiller Model No. 247.29935
777D17067
777D17064 777S33498
777120358
777X43688
DONor
USEE85 ORFUEL
777123449
_Jations Relating To
35

(Thispageapplicableinthe U.S.A.and Canadaonly.)
Sears Brands Management Corporation (Sears), the California Air Resources Board (CARD)
and the United States Environmental Protection Agency (U.S. EPA)
Emission Control System Warranty Statement (Owner's Defect Warranty Rights and Obligations)
EMISSIONCONTROLWARRANTYCOVERAGEISAPPLICABLETO CERTI-
FIEDENGINESPURCHASEDIN CALIFORNIAIN 1995ANDTHEREAF-
TER,WHICHARE USEDINCALIFORNIA,ANDTOCERTIFIEDMODEL
California and United States Emission
The CaliforniaAir ResourcesBoard(CARD),U.S.EPAand Searsare pleased
to explainthe EmissionControlSystemWarrantyon your modelyear2000and
latersmalloff-roadengine(SORE).InCalifornia,newsmall off-roadengines
mustbe designed,builtand equippedto meettheState'sstringentanti-smog
standards.Elsewherein the UnitedStates,newnon-road,spark-ignition
enginescertifiedfor modelyear 1997and latermustmeetsimilarstandardsset
forth bythe U.S.EPA.Sears mustwarranttheemissioncontrolsystemon your
YEAR 1997AND LATERENGINESWHICHARE PURCHASEDAND USED
ELSEWHEREIN THEUNITEDSTATES(ANDAFTERJANUARY1,2001 IN
CANADA).
Control Defects Warranty Statement
enginefor the periodsoftime listedbelow,providedthere hasbeen noabuse,
neglector impropermaintenanceof your smalloff-roadengine.Youremis-
sion controlsystemincludespartssuch as thecarburetor,air cleaner,ignition
system,mufflerand catalyticconverter.Also includedmay be connectorsand
otheremissionrelatedassemblies.Wherea warrantableconditionexists,Sears
will repairyour smalloff-roadengineat no costto you includingdiagnosis,parts
and labor.
Sears Emission Control Defects Warranty Coverage
Smalloff-roadenginesarewarrantedrelativeto emissioncontrol partsdefects
fora periodof one year,subjectto provisionsset forth below.Ifanycovered
Owner's Warranty
Asthe smalloff-roadengine owner,you are responsiblefor the performanceof
therequiredmaintenancelistedin yourOperatingand MaintenanceInstruc-
tions.Searsrecommendsthatyou retain allyourreceiptscoveringmaintenance
on yoursmalloff-roadengine,butSears cannotdenywarrantysolelyfor the
lackof receiptsorfor yourfailureto ensuretheperformanceof all scheduled
maintenance.As the smalloff-roadengineowner,you shouldhoweverbe
awarethat Searsmay denyyou warrantycoverageifyour smalloff-roadengine
ora part hasfailed dueto abuse,neglect,impropermaintenanceor unap-
parton yourengineis defective,the part willbe repairedorreplacedbySears.
Responsibilities
provedmodifications.Youare responsiblefor presentingyour smalloff-road
engineto an AuthorizedSearsServiceDealeras soonas a problemexists.The
undisputedwarrantyrepairsshouldbe completedin a reasonableamountof
time,notto exceed30 days.Ifyou haveany questionsregardingyourwarranty
rightsand responsibilities,you shouldcontacta SearsService Representative
at 1-800-469-4663.The emissionwarrantyis a defectswarranty.Defectsare
judgedonnormalengineperformance.The warrantyis notrelatedto an in-use
emissiontest.
Sears Emission Control Defects Warranty Provisions
ThefollowingarespecificprovisionsrelativetoyourEmissionControlDefectsWarrantyCoverage.ItisinadditiontotheSearsenginewarrantyfornon-regulated
enginesfound in the Operatingand MaintenanceInstructions.
1. WarrantedParts
Coverageunderthis warrantyextendsonly to the parts listedbelow (the
emissioncontrolsystemsparts)to the extentthese partswere presenton
theengine purchased.
a. FuelMeteringSystem
• Cold start enrichmentsystem
• Carburetorand internalparts
• FuelPump
b. Air lnduction System
• Air cleaner
• Intakemanifold
c. IgnitionSystem
• Spark plug(s)
• Magnetoignitionsystem
d. CatalystSystem
• Catalyticconverter
• Exhaustmanifold
• Air injectionsystemor pulsevalve
e. MiscellaneousItemsUsedin AboveSystems
• Vacuum,temperature,position,timesensitivevalves
andswitches
• Connectorsandassemblies
2. Lengthof Coverage
Searswarrantsto the initialownerand eachsubsequentpurchaserthat
theWarrantedPartsshallbe free from defects in materialsandworkman-
shipwhich causedthe failure of the WarrantedPartsfor a periodof one
yearfrom the datethe engineis deliveredto a retailpurchaser.
3. NoCharge
Repairor replacementof anyWarrantedPartwill be performedat no
chargeto the owner,includingdiagnosticlabor whichleadsto the
determinationthata WarrantedPartis defective,if the diagnosticwork is
performedat an AuthorizedSears ServiceDealer.For emissionswarranty
servicecontact yournearestAuthorizedSears ServiceDealeras listed in
the "YellowPages"under"Engines,Gasoline,""GasolineEngines,""Lawn
Mowers,"orsimilar category.
4. Claimsand CoverageExclusions
Warrantyclaimsshall be filed in accordancewiththe provisionsof the
Sears EngineWarrantyPolicy.Warrantycoverageshall be excludedfor
failuresof WarrantedPartswhichare notoriginal Sears partsor because
of abuse, neglector impropermaintenanceas setforth inthe Sears
EngineWarrantyPolicy.Sears is not liableto coverfailuresof Warranted
Partscausedby the use of add-on,non-original,or modifiedparts.
5. Maintenance
Any WarrantedPart whichis not scheduledfor replacementas required
maintenanceor whichis scheduledonly for regularinspectionto the effect
of "repairor replaceas necessary"shallbe warrantedas to defectsfor the
warrantyperiod.Any WarrantedPartwhich is scheduledfor replacement
as requiredmaintenanceshallbe warrantedas to defectsonly forthe
periodof time up to the firstscheduledreplacementfor that part. Any
replacementpart that is equivalentin performanceand durabilitymay
be usedin the performanceof any maintenanceor repairs.The owneris
responsibleforthe performanceof all requiredmaintenance,as defined in
the SearsOperatingand MaintenanceInstructions.
6. ConsequentialCoverage
Coveragehereundershallextend to thefailure of any enginecomponents
caused bythe failureof any WarrantedPartstill underwarranty.
Inthe USAandCanada,a 24 hour hotline, 1-800-469-4663,has a menuof pre-recordedmessagesofferingyou enginemaintenanceinformation.
GDOC-100188Rev.B
36
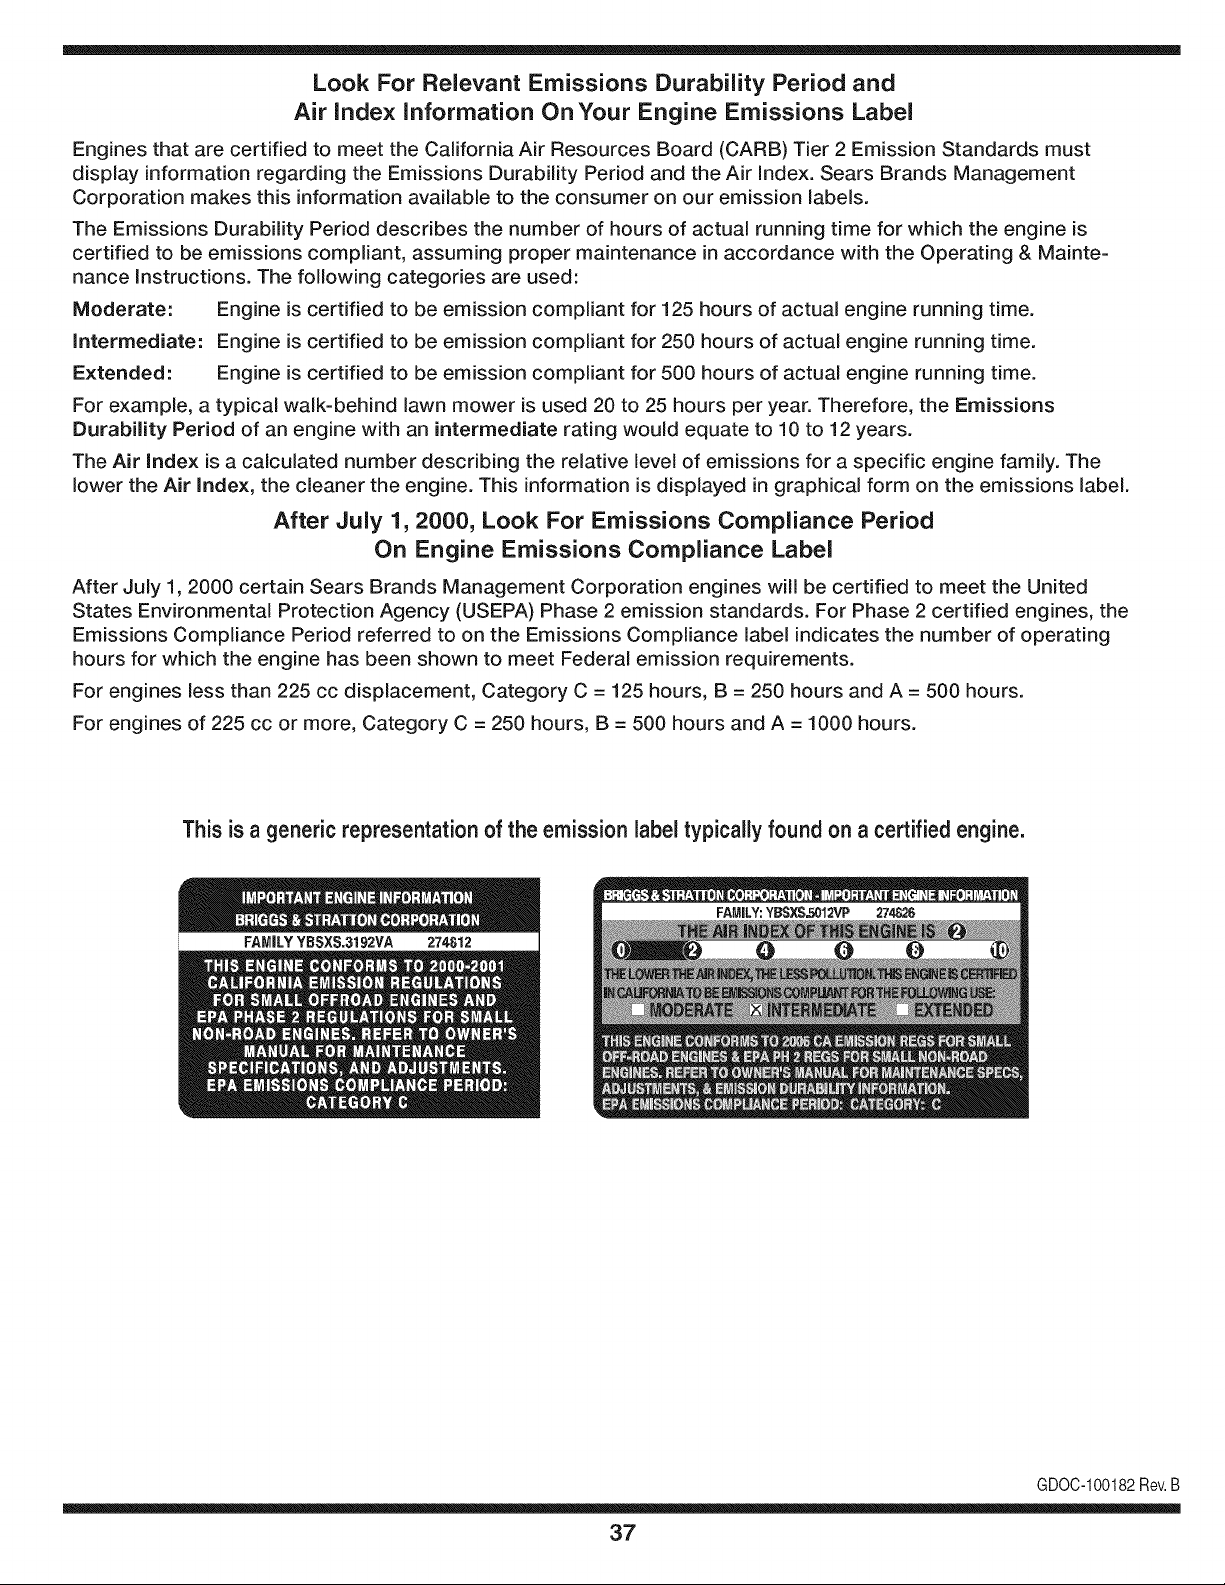
Look For Relevant Emissions Durability Period and
Air index information On Your Engine Emissions Label
Engines that are certified to meet the California Air Resources Board (CARB) Tier 2 Emission Standards must
display information regarding the Emissions Durability Period and the Air Index. Sears Brands Management
Corporation makes this information available to the consumer on our emission labels.
The Emissions Durability Period describes the number of hours of actual running time for which the engine is
certified to be emissions compliant, assuming proper maintenance in accordance with the Operating & Mainte-
nance Instructions. The following categories are used:
Moderate: Engine is certified to be emission compliant for 125 hours of actual engine running time.
Intermediate: Engine is certified to be emission compliant for 250 hours of actual engine running time.
Extended: Engine is certified to be emission compliant for 500 hours of actual engine running time.
For example, a typical walk-behind lawn mower is used 20 to 25 hours per year. Therefore, the Emissions
Durability Period of an engine with an intermediate rating would equate to 10 to 12 years.
The Air index is a calculated number describing the relative level of emissions for a specific engine family. The
lower the Air Index, the cleaner the engine. This information is displayed in graphical form on the emissions label.
After July 1,2000, Look For Emissions Compliance Period
On Engine Emissions Compliance Label
After July 1, 2000 certain Sears Brands Management Corporation engines will be certified to meet the United
States Environmental Protection Agency (USEPA) Phase 2 emission standards. For Phase 2 certified engines, the
Emissions Compliance Period referred to on the Emissions Compliance label indicates the number of operating
hours for which the engine has been shown to meet Federal emission requirements.
For engines less than 225 cc displacement, Category C = 125 hours, B = 250 hours and A = 500 hours.
For engines of 225 cc or more, Category C = 250 hours, B = 500 hours and A = 1000 hours.
This is a generic representation of the emission label typically found on a certified engine.
FAMILYYBSXS.3192VA 274812
GDOC-100182Rev.B
37

Congratulations on making a smart purchase. Your new Craftsman® product is designed and
manufactured for years of dependable operation. But like all products, it may require repair
from time to time. That's when having a Repair Protection Agreement can save you money and
aggravation.
Here's what the Repair Protection Agreement* includes:
[] Expert service by our 10,000 professional repair specialists
[] Unlimited service and no charge for parts and labor on all covered repairs
[] Product replacement up to $1500 if your covered product can't be fixed
[] Discount of 25% from regular price of service and related installed parts not covered by the
agreement; also, 25% off regular price of preventive maintenance check
[] Fast help by phone - we call it Rapid Resolution - phone support from a Sears representative.
Think of us as a "talking owner's manual."
Once you purchase the Repair Protection Agreement, a simple phone call is all that it takes for you
to schedule service. You can call anytime day or night, or schedule a service appointment online.
The Repair Protection Agreement is a risk-free purchase. If you cancel for any reason during the
product warranty period, we will provide a full refund. Or, a prorated refund anytime after the
product warranty period expires. Purchase your Repair Protection Agreement today!
Some limitations and exclusions apply. For prices and additional information in the U.S.A.
call 1=800=827=6655.
*Coverage in Canada varies on some items. For full details call Sears Canada at 1=800=361=
6665.
Sears Installation Service
For Sears professional installation of home appliances, garage door openers, water heaters, and
other major home items, in the U.S.A. or Canada call 1=800=4=MY=HOME®.
38
Declaraci6n de garantia ............... Pagina 39
Medidas importantes de seguridad.. Paginas 40-43
Armado ........................ Paginas 44-47
Funcionamiento ................. Paginas 48-53
Servicio y Mantenimiento .......... Paginas 54-57
Almacenamiento fuera de temporada .... Pagina 58
Soluci6n de problemas ................ Pagina 59
Acuerdo de protecci6n para reparaciones. Pagina 63
NOmero de servicio ............ Cubierta posterior
CRAFTSMAN DOS AltOS DE GARANTiA
Durantedos aSosdesdela fechade compra,este productoest,.garantizadocontracualquierdefectode materialeso manodeobra. Un
productodefectuosorecibirAla reparaci6no sustitucbngratuitasi la reparaci6nno estAdisponible.
Paradetalles sobre la garantia de coberturaparaobtener reparaci6ngratuita o reemplazo,visite el sitio web: www.craftsman.com
Esta garantias61ocubre defectos en materiales y mano de obra. Cobertura de lagarantiano incluye:
• Bienesfungiblesquepuedendesgastarsecon el usonormalenel perbdo de garanfia,comolas cuchillas,dientes,o cinturones.
• DaSosen el productoresultantede los intentosdel usuariode modificaci6ndel productoo la reparaci6no causadospor accesoriosde
productos.
• Las reparacionesnecesariasdebidoa un accidenteo falla paraoperaro mantenerel productosegQnlas instruccionessuministradas.
• Mantenimientopreventivoo reparacionesnecesariasdebidoa la mezcladecombustibleinadecuado,el combustiblecontaminadoo viciado.
Estagarantiaser_.nula si el productoes utilizadoalgunavez, mientrasquela prestaci6nde servicioscomercialo si se alquilaa otra persona.
Estagarantiale otorgaderechoslegalesespecificos,y ustedtambi_npuedetenerotrosderechosque variande estadoa estado.
Sears Brands Management Corporation, Hoffman Estates, IL 60179
Seriedel motor: 208cc
Tipode aceitedelmotor: 10W30
Capacidadde aceitedel motor: 20onzas
Combustible: Gasolinasin plomo
Bujia: F6RTC
Separaci6nde las bujias: .030"
NSmerode modelo ..........................................................
NSmerode serie ..............................................................
Fechade compra .............................................................
Registreel nQmerode modelo,nQmerode serie
y fechade compram&sarriba
© KCD IP,LLC 39
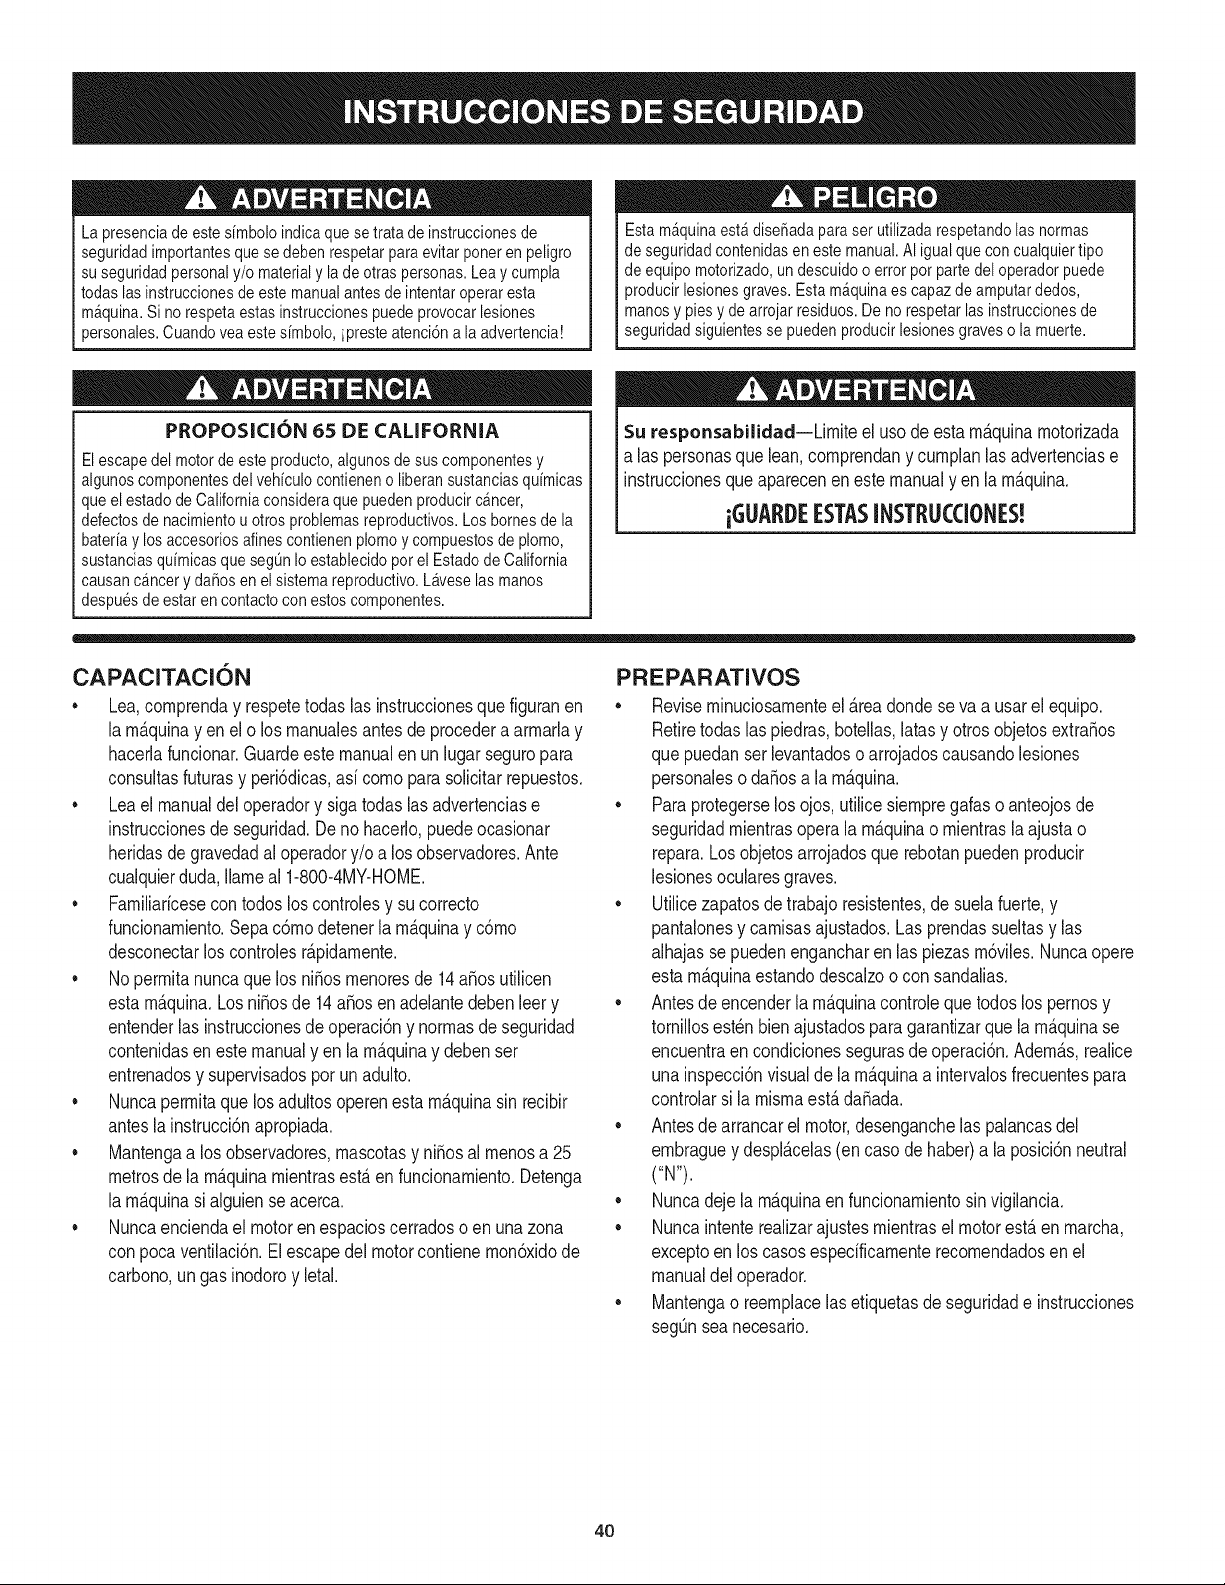
Lapresenciadeestesimboloindicaquesetratadeinstruccionesde
seguridadimportantesquesedebenrespetarparaevitarponerenpeligro
suseguridadpersonaly/omaterialyladeotraspersonas.Leaycumpla
todaslasinstruccionesdeestemanualantesdeintentaroperaresta
m&quina.Sinorespetaestasinstruccionespuedeprovocarlesiones
personales.Cuandoveaestesimbolo,ipresteatenci6nalaadvertencia!
Estam&quinaest&diseSadaparaserutilizadarespetandolasnormas
deseguridadcontenidasenestemanual.AIigualqueconcualquiertipo
deequipomotorizado,undescuidooerrorporpartedeloperadorpuede
producirlesionesgraves.Estam_quinaescapazdeamputardedos,
manosypiesydearrojarresiduos.Denorespetarlasinstruccionesde
seguridadsiguientessepuedenproducirlesionesgravesolamuerte.
PROPOSICION 65 DE CALiFORNiA
Elescapedel motorde esteproducto,algunosde sus componentesy
algunoscomponentesdel vehiculocontieneno liberansustanciasquimicas
que el estadode Californiaconsideraque puedenproducircancer,
defectosde nacimientou otrosproblemasreproductivos.Los homes dela
bateriay los accesoriosalinescontienenplomoy compuestosde plomo,
sustanciasquimicasque segQnIo establecidopor el Estadode California
causanc&ncery daSosen el sistemareproductivo.L&veselas manos
despuesde estar en contactocon estos componentes.
Su responsabilidad--Lirnite el uso deestarn_.quinarnotorizada
alas personasque lean,cornprendany curnplanlas advertenciase
instruccionesque aparecenenestemanualyen larn_.quina.
i6UARI)E ESTASINSTRUCCIONES!
CAPACITACION
• Lea,cornprenday respetetodas las instruccionesque figuranen
la rn_.quinayen el o los rnanualesantesde procederaarrnarlay
hacerlafuncionar.Guardeestemanualen un lugarseguropara
consultasfuturasy peri6dicas,asi cornoparasolicitarrepuestos.
• Lea el manualdeloperadory sigatodaslas advertenciase
instruccionesde seguridad.De nohacerlo,puedeocasionar
heridasde gravedadal operadory/oa los observadores.Ante
cualquierduda,Ilarneal 1-800-4MY-HOME.
• Farniliaricesecontodos los controlesy su correcto
funcionarniento.Sepac6rnodetenerla rn_.quinay c6rno
desconectarloscontrolesr_.pidarnente.
• No perrnitanuncaque losni_os rnenoresde 14a_osutilicen
estarn_.quina.Los ni_osde 14a_osenadelantedebenleery
entenderlas instruccionesde operaci6ny norrnasdeseguridad
contenidasen estemanualyen la rn_.quinay debenser
entrenadosy supervisadosporun adulto.
• Nuncaperrnitaquelosadultosoperenestarn_quinasin recibir
antesla instrucci6napropiada.
• Mantengaa los observadores,rnascotasy ni_osal rnenosa 25
metrosde la rn_.quinarnientrasest,.en funcionarniento.Detenga
la rn_.quinasi alguienseacerca.
• Nuncaenciendael motoren espacioscerradoso enunazona
con pocaventilaci6n.El escapedel motorcontienernon6xidode
carbono,un gasinodoroy letal.
PREPARATIVOS
• Reviserninuciosarnenteel &readondese va a usarel equipo.
Retiretodaslas piedras,botellas,latasy otrosobjetosextra_os
que puedanserlevantadoso arrojadoscausandolesiones
personaleso da_osa la rn_.quina.
• Paraprotegerselosojos, utilicesiernpregalas o anteojosde
seguridadrnientrasoperala rn_.quinao rnientraslaajustao
repara.Losobjetosarrojadosquerebotanpuedenproducir
lesionesocularesgraves.
• Utilicezapatosde trabajoresistentes,desuelafuerte,y
pantalonesy carnisasajustados.Las prendassueltasy las
alhajasse puedenengancharen las piezasrn6viles.Nuncaopere
estarn_.quinaestandodescalzoo con sandalias.
• Antesde encenderla rn_quinacontrolequetodoslos pernosy
tornillosest_nbienajustadosparagarantizarquela rn_.quinase
encuentraen condicionessegurasdeoperaci6n.Adern_.s,realice
una inspecci6nvisualde la rn_.quinaa intervalosfrecuentespara
controlarsi la rnisrnaest,.da_ada.
• Antesde arrancarel motor,desenganchelas palancasdel
ernbraguey despl_.celas(en casode haber)a la posici6nneutral
("N").
• Nuncadejelarn_.quinaen funcionarnientosin vigilancia.
• Nuncaintenterealizarajustesrnientrasel motorest,. enrnarcha,
exceptoen los casosespedficarnenterecornendadosen el
manualdel operador.
• Mantengao reernplacelas etiquetasdeseguridade instrucciones
segQnsea necesario.
4O
Manejo seguro de la gasolina:
Paraevitar lesionespersonalesy da_os materialestenga muchocuidado al
manipularla gasolina.La gasolinaes sumamenteinflamableysus vapores
puedencausarexplosiones.Si se derramagasolinaencimao sobre la ropa
se puedelesionargravementeya que se puedeincendiar. Lavesela piely
c_mbiesede ropade inmediato.
• Utilices61olosrecipientespara gasolinaautorizados.
• Nunca Ilenelosrecipientesen el interiorde un vehiculoo cami6n o
cajade remolquecon un recubrimientopl_stico.Coloquesiemprelos
recipientesen el pisoy lejosdel vehiculoantes de Ilenarlos.
• Cuandosea factible,retireel equipo a gasolinadel cami6no remolquey
Ileneloen el suelo.Siesto noes posible,Ileneel equipoen unremolque
con contenedorport_til,en vezde desdeuna boquilladispensadorade
gasolina.
• Mantengala boquillaen contactocon el hordedel tanquede
combustibleo de laabertura del recipienteen todo momento,hasta
terminarde cargar.Noutilice un dispositivoparaabrir/cerrar la boquilla.
• Apaguetodos los cigarrillos,cigarros,pipas y otrasfuentesde
combusti6n.
• Nunca carguecombustibleen la m_quinaen un espacio cerrado.
• Nunca saquela tapade la gasolinani agreguecombustiblemientrasel
motorest_ calienteo en marcha.Permitaque el motorse enfrie pot Io
menosdos minutosantesde volvera cargar combustible.
• Nunca lleneen excesoel tanquede combustible.Lleneel tanque no
m_sde Y2pulgadapor debajo de la basedel cuello del tap6n de carga,
para dejarespacio paralaexpansi6ndel combustible.
• Vuelvaa colocarla tapadel combustibley ajOstelabien.
• Limpiela gasolinaquese puedahaberderramadosobreel motoro el
equipo.Trasladela m_quinaa otra zona.Espere5 minutosantesde
encenderel motor.
• Para reducirel riesgode incendio,mantengala m_quinalimpiade
pasto,hojas y de acumulaci6nde otrosescombros.Limpie los derrames
de aceiteo combustibleysaque todoslos escombrosembebidosde
combustible.
• Nunca guardela m_quinao el recipientede combustibleen unespacio
cerradodonde hayafuego,chispas o luzpiloto,como porejemplo de
calentadoresde agua, calefactoresde ambientes,hornos,secadoresde
ropa u otros aparatosa gas.
FUNCIONAlVlIENTO
• No coloquelas manosni los piescerca de piezasgiratorias.Elcontacto
con las piezasgiratoriaspuedeocasionaren la amputaci6nde manos
o pies.
• No utilicela m_quinabajola influenciadel alcoholo las drogas.
• Nunca opereesta m_quinasi no haybuenavisibilidado iluminaci6n.
Siempredebe estarsegurode queest_ bienafirmadoysujetando
firmementelas manijas.
• Mantengaa los transeL]ntesalejadosde la m_quinamientrasla misma
est_en funcionamiento.Detengala m_quinasi alguiense acerca.
• Tengacuidado al labrarun terrenoduro.Losdientes puedenclavarseen
latierra e impulsarla cultivadorahacia adelante.Si estoocurre,suelteel
manubrioy dejela m_quinalibre.
• Sea sumamenteprecavidocuandoopere la m_quinasobre una
superficiecongrava o al cruzarla.Mantengasealerta por si se
presentanpeligrosocultoso tr_nsito.Notransporte pasajeros.
• Nunca utilicela m_quinaa altasvelocidadesde desplazamientosobre
superficiesduraso resbaladizas.
• Tengacuidado para evitarresbalaro caerse.
• Mire haciaabajo y haciaarrasy tengacuidadocuandose desplaceen
marchaarraso cuandojale de la m_quinahaciausted.
• Arranqueel motorde acuerdocon lasinstruccionesdel manualy aleje
los piesde losdientesen todo momento.
• Si golpeaalgQnun objeto extra_oo si la m_quinacomienzaa emitir
un sonidopococomL]no a vibrar, apagueel motorde inmediato.
Desconecteel cablede labujia, p6ngalohaciendomasacontrael motor
y siga los pasossiguientes:
a. Inspeccionela m_quinapara vet si est_ da6ada.
b. Repareo reemplacelas piezasda_adas.
c. Controlesi hay piezasflojas y ajQstelaspara asegurarque la
m_quinafuncionede maneraseguray continua.
• Desenganchetodaslas palancasde embrague(si lashay)y detengael
motorantes de dejar la posici6nde operaci6n(detr_sde las manijas).
Esperehastaque los dientesse detengancompletamenteantes de
limpiarlos,haceralgQnajusteo inspeccionarlos.
• Nuncaenciendael motoren espacioscerradoso en unazonacon poca
ventilaci6n.Elescape del motorcontienemon6xidode carbono,un gas
inodoroy letal.
• Elsilenciadory el motorse calientany puedencausarquemaduras.No
lostoque.
• Tengaprecauci6ncuandolabreterrenocercade vallas,edificios y
serviciossubterr_neos.Los dientesrotatoriospuedencausar daSos
materialeso lesionespersonales.
• Nosobrecarguela capacidadde la m_quinaintentandolabrarel suelo a
un niveldemasiadoprofundoo a unavelocidaddemasiador@ida.
• Si la m_quinaarrancahaciendoun sonidoo unavibraci6nrata, detenga
el motor,desconecteelcable de la bujia y con@teloa masacontrael
motor.Inspeccionela m_quinaminuciosamenteparaver si est_ da6ada.
Reparetodos los da_osantes de encendery operarla m_quina.
• Mantengatodos los escudos,protectoresy dispositivosde seguridaden
su lugar y en correctofuncionamiento.
• Nuncalevanteo transportela m_quinacuandoel motorest_encendido.
• Utilices61odispositivosde sujeci6no accesoriosaprobadosporel
fabricanteque figuranen laspaginasde la listade piezasde este
manualdel operador.Si no Io hace,puedenproducirselesiones
personales.
• Si se presentansituacionesque no est_n previstasen estemanual,sea
cuidadosoy useel sentido comL]n.P6ngaseen contactocon Asistencia
al Cliente parasolicitarayuday el hombredel distribuidorde servicio
m_scercano.
iVlANTENllVIIENTO Y ALIViACENAIVlIENTO
• Mantengala m_quina,losaditamentosy accesoriosen condicionesde
funcionamientoseguro.
• Dejequela m_quinase enfrie por Io menoscincominutosantes
de guardarla.Nuncaaltere losdispositivosde seguridad.Controle
peri6dicamentequefuncionancorrectamente.
• Verifiquefrecuentementeque los pernosy tornillosestenajustados
correctamenteparaasegurarsede que la m_quinaestetrabajandode
manerasegura.Adem_s,hagaunainspecci6nvisualde lam_quinapara
verificarsi est_da_ada.
• Antesde limpiar,repararo revisar,detengael motory asegQresede que
losdientesytodas laspartes m6vilesse hartdetenido.Desconecteel
cablede la bujia y p6ngalohaciendomasacontrael motorparaevitarque
se enciendaaccidentalmente.
• Nocambielaconfiguraci6ndel reguladordel motor niIo hagafuncionar
a demasiadavelocidad.El reguladordel motorcontrolala velocidad
m_ximade funcionamientosegurodel motor.
• Mantengao reemplacelasetiquetasde seguridady deinstrucciones
segQnsea necesario.
• Siga las instruccionesde estemanualparacargar,descargar,transportar
y almacenarde maneraseguraesta m_quina.
• Si la m_quinase va a almacenarpor un periodo prolongado,consulte
siempreel manualdel operadorpara obtenerinformaci6nimportante.
• Si debevaciareltanquede combustible,h_galoalaire libre.
41
,, Observelareglamentaci6nylasnormasrespectoalaeliminaci6n
correctadegasolina,aceite,etc.paraprotegerelmedicambiente.
• SegQnlaComisi6ndeSeguridaddeProductosparaelConsumidorde
losEstadosUnidos(CPSC)ylaAgenciadeProtecci6nAmbientaldelos
EstadosUnidos(EPA),esteproductotieneunavidaQtilmediadesiete
(7)a_os6130horasdefuncionamiento.AIfinalizarlavidaQtilmedia
hagainspeccionaranualmenteestaunidadporundistribuidordeservicio
autorizadoparacerciorarsedequetodoslossistemasmec_nicosyde
seguridadfuncionancorrectamenteynotienenexcesivodesgaste.Sino
Iohace,puedenproducirseaccidentes,lesionesolamuerte.
NO MODIFIQUE EL MOTOR
Para evitarlesionesgraves o la muerte,no modifiqueel motorbajo ninguna
circunstancia.Si alteralaconfiguraci6ndel regulador,el motorse puede
desbocary funcionar a velocidadesqueno son seguras. Nuncamodifiquela
configuraci6nde f_brica del reguladordel motor.
AVISO REFERIDO A EMISIONES
Los motoresque est_ncertificadosy cumplencon las regulacionesde
emisionesfederales EPAy de Californiapara SORE (EquiposSmallOff Road
Equipment)est_ncertificadospara operarcongasolinacomL]nsin plomoy
pueden incluirlos siguientessistemasde controldeemisiones:Modificaci6n
de motor(EM), catalizadoroxidante(OC), inyecci6nde airesecundaria(SAI)
y catalizadorde tres vias (TWO)si est_nequipadosde esa manera.
AMORTIGUADOR DE CHISPAS
Esta m&quinaest&equipadacon un motorde combusti6ninternay no
debeser utilizadaen un terrenoagrestecubiertopot bosque,malezaso
hierbani cercadel mismoexceptoque el sistemade escapedel motor
esteequipadocon un amortiguadorde chispasquecumpla con las leyes
localeso estatalescorrespondientes(encaso de existir).
Si se utilizaun amortiguadordechispasel operadorIo debe manteneren
condicionesde uso adecuadas.En el Estadode Californialas medidas
anteriormentemencionadasson exigidaspor ley (Arficulo4442del C6digode
RecursosPQblicosde California).Es posibleque existanleyessimilaresen
otros estados.Las leyesfederalesse aplicanen territoriosfederales.
Podr_obtenerun amortiguadorde chispasparael silenciadoren el centrode
serviciode piezasy reparacionesSears m_s cercano.
42
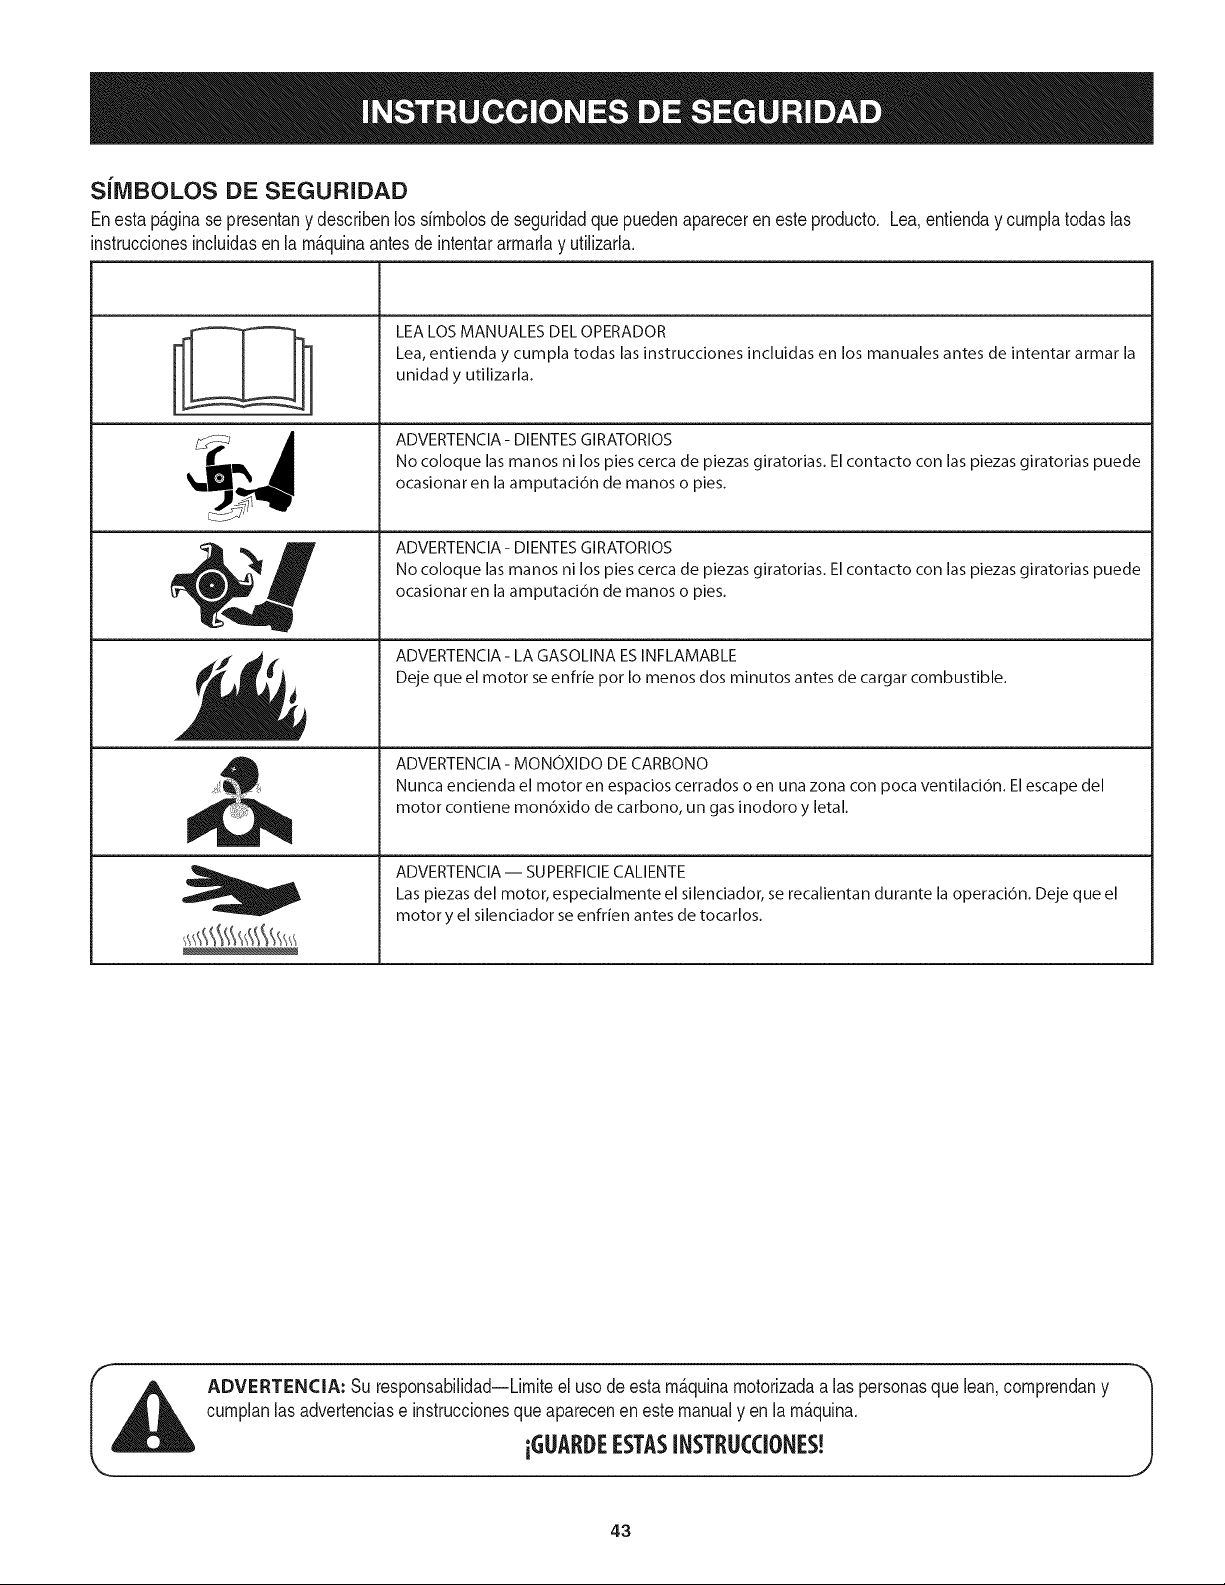
SiIVIBOLOS DE SEGURIDAD
Enestap&ginase presentany describenlos simbolosde seguridadquepuedenaparecerenesteproducto. Lea,entienday cumplatodaslas
instruccionesincluidasen la m_quinaantesdeintentararmarlay utilizarla.
-'I °_
I I
I I
t i
i
, i
LEA LOS MANUALES DEL OPERADOR
Lea, entienda y cumpla todas las instrucciones incluidas en los manuales antes de intentar armar la
unidad y utilizarla.
ADVERTENCIA- DIENTES GIRATORIOS
No coloque las manos ni los pies cerca de piezas giratorias. El contacto con las piezas giratorias puede
ocasionar en la amputaci6n de manos o pies.
ADVERTENCIA- DIENTES GIRATORIOS
No coloque las manos ni los pies cerca de piezas giratorias. El contacto con las piezas giratorias puede
ocasionar en la amputaci6n de manos o pies.
ADVERTENClA- LA GASOLINA ES INFLAMABLE
Deje que el motor se enfrie pot Io menos dos minutos antes de cargar combustible.
ADVERTENCIA - MONOXIDO DE CARBONO
Nunca encienda el motor en espacios cerrados o en una zona con poca ventilaci6n. El escape del
motor contiene mon6xido de carbono, un gas inodoro y letal.
ADVERTENCIA- SUPERFIClE CALIENTE
Las piezas del motor, especialmente el silenciador, se recalientan durante la operaci6n. Deje que el
motor y el silenciador se enfrien antes de tocarlos.
ADVERTENCIA: Su responsabilidad--Limiteel uso deestam_quinamotorizadaa las personasquelean,comprendany
cumplanlas advertenciase instruccionesqueaparecenen este manualy en la m_quina.
iGUARDEESTASINSTRUCCIONES!
43
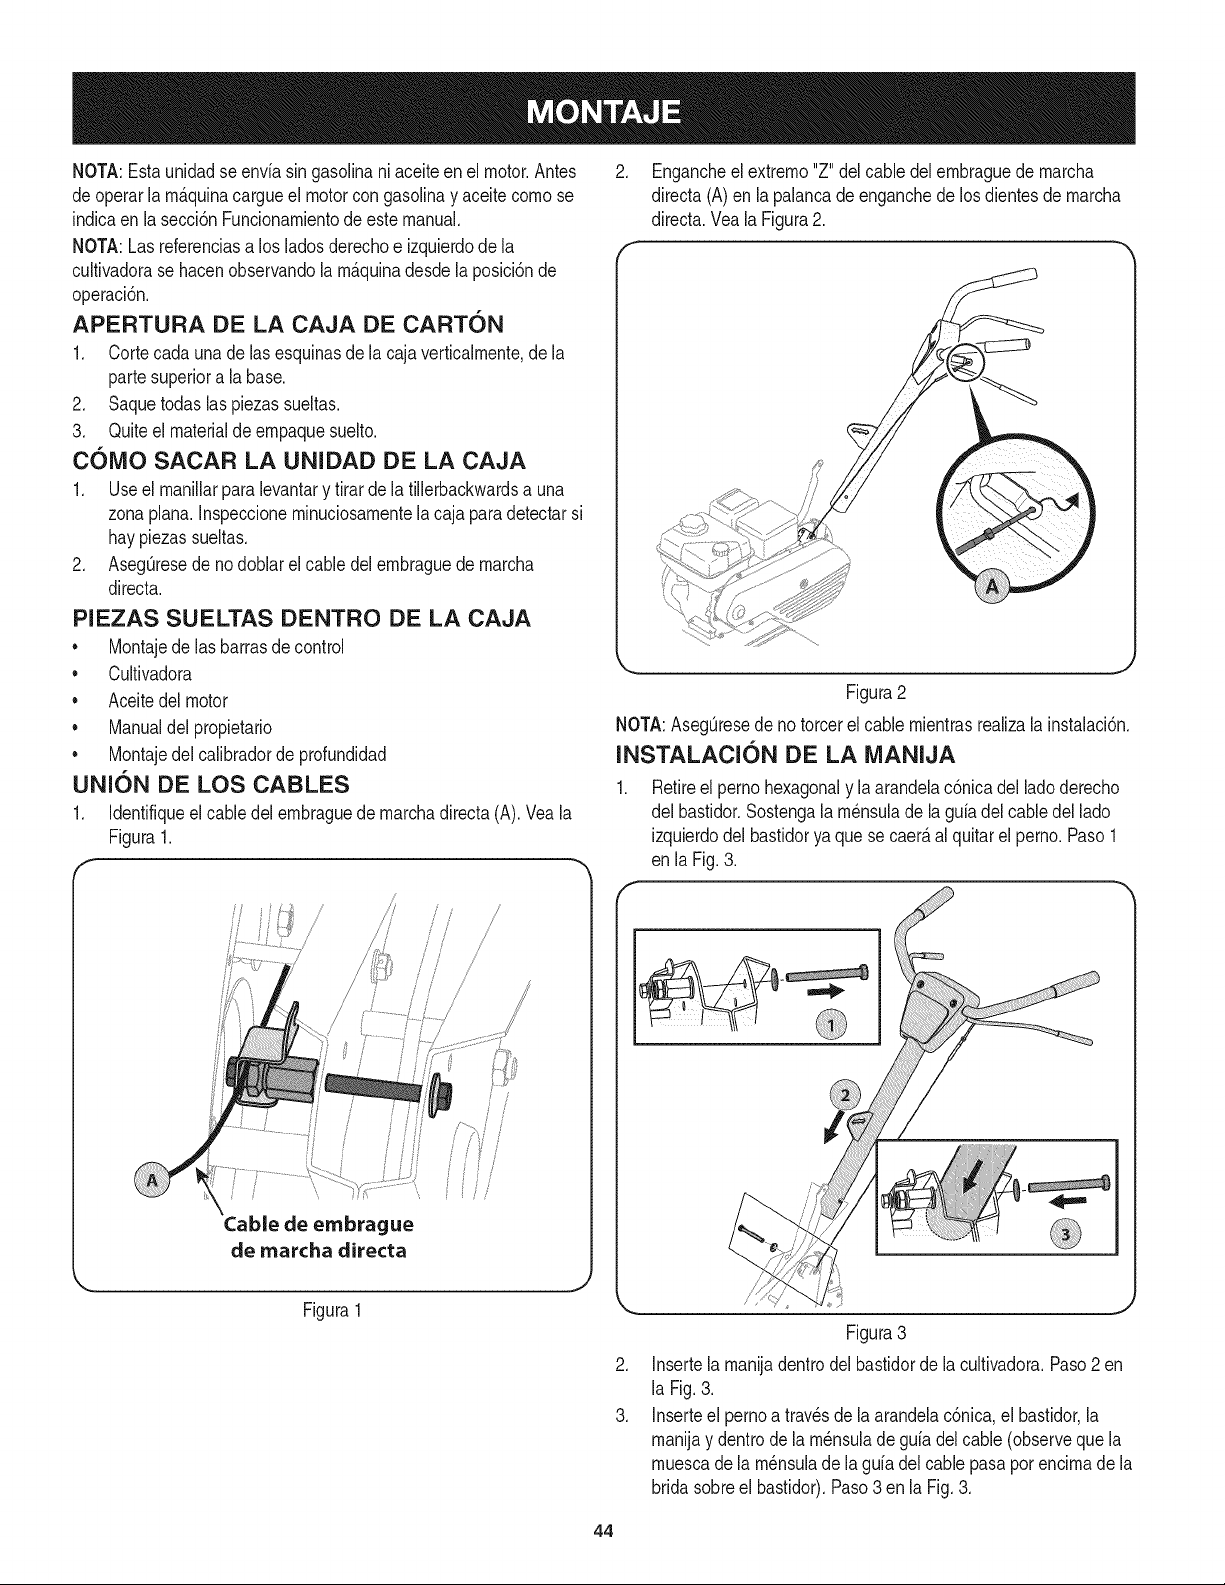
NOTA:Estaunidadse envia singasolinaniaceiteen el motor.Antes
deoperarla m_.quinacargueel motorcongasolinay aceitecomose
indicaen lasecci6nFuncionamientode este manual.
NOTA:Lasreferenciasa los ladosderechoe izquierdodela
cultivadorase hacenobservandolam_.quinadesdela posici6nde
operaci6n.
APERTURA DE LA CAJA DE CARTON
1. Cortecada una de lasesquinasde la cajaverticalmente,de la
partesuperiora la base.
2. Saquetodas laspiezas sueltas.
3. Quiteel materialde empaquesuelto.
C6MO SACAR LA UNIDAD DE LA CAJA
1. Use el maniNarpara levantary tirar dela tillerbackwardsa una
zonaplana.Inspeccioneminuciosamentela caja paradetectarsi
haypiezas sueltas.
2. AsegQresede nodoblarel cable delembraguedemarcha
directa.
PIEZAS SUELTAS DENTRO DE LA CAJA
• Montajede las barrasde control
• Cultivadora
• Aceitedel motor
• Manualdel propietario
• Montajedel calibradorde profundidad
UNION DE LOS CABLES
1. Identifiqueel cabledelembraguede marchadirecta (A).Vea la
Figura1.
/
/
Cable de embrague
de marcha directa
Figura1
2. Engancheelextremo"Z" delcabledel embraguede marcha
directa(A)en lapalancade enganchedelos dientesde marcha
directa.Vea laFigura2.
f h
k,_. j
Figura2
NOTA:AsegQresede no torcerel cablemientrasrealizala instalaci6n.
INSTALACI6N DE LA MANIJA
Retireel perno hexagonaly la arandelac6nicadellado derecho
del bastidor.Sostengalam_nsuladela gufadel cabledel lado
izquierdodel bastidorya quese caer_,al quitarel perno.Paso1
en la Fig.3.
®
.
3.
Figura3
Insertela manijadentrodelbastidorde lacultivadora.Paso2 en
la Fig.3.
Inserteel pernoa travesde la arandelac6nica,el bastidor,la
manijay dentrode la m_nsuladegufadelcable (observeque la
muescade la m_nsulade lagufa del cablepasaporencimade la
bridasobreel bastidor).Paso3 en la Fig.3.
44
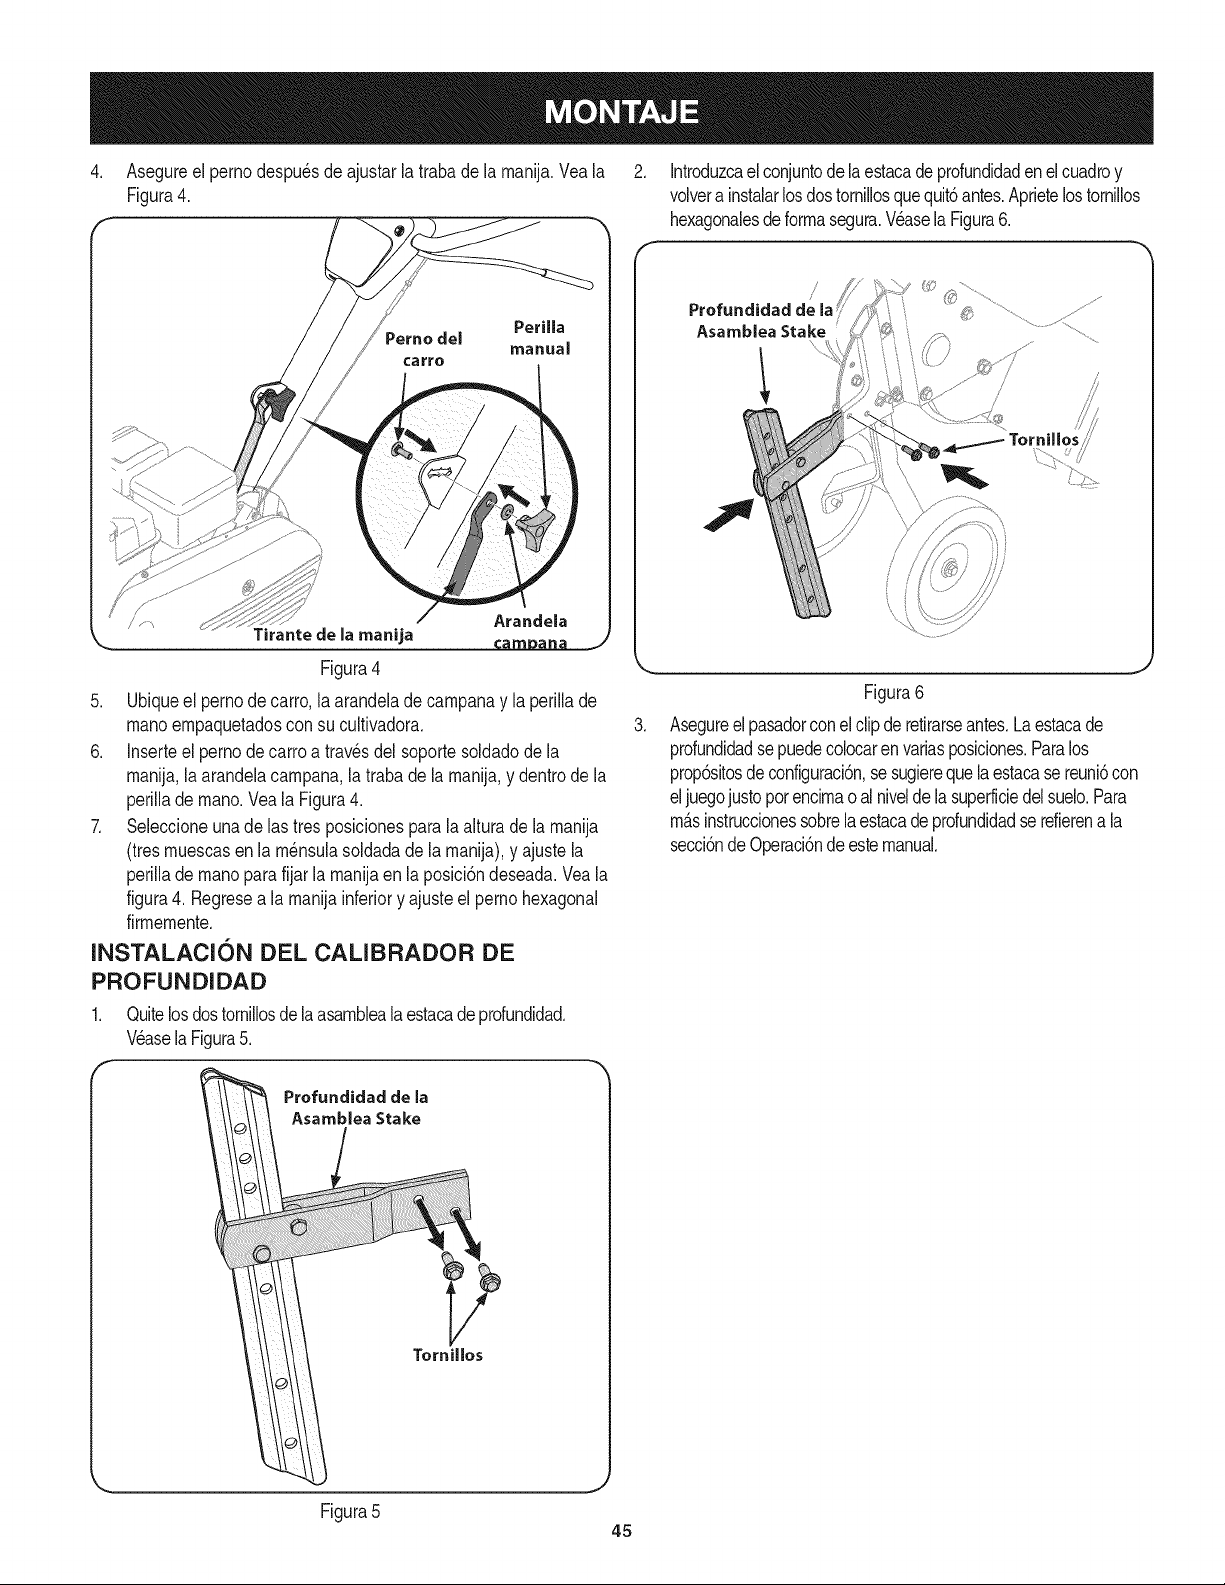
4. Asegureel pernodespu_sde ajustarla trabadela manija.Yeala 2. Introduzcaelconjuntode laestacadeprofundidadenelcuadroy
Figura4. volvera instalarlosdostornillosquequit6antes.Aprietelostornillos
f -, hexagonalesdeformasegura.Veasela Figura6.
Perilla
Perno del
manual
/ Arandela
Tirantedela manija camDana J
Figura4
5. Ubiqueel pernode carro,la arandelade campanay laperillade
manoempaquetadosconsu cultivadora.
6. Inserteel perno decarroa travesdel soportesoldadode la
manija,laarandelacampana,latraba de la manija,y dentrodela
perillade mano.Veala Figura4.
7. Seleccioneuna delas tres posicionespara laalturade la manija
(tresmuescasen la m_nsulasoldadade la manija),y ajustela
perillade manoparafijar la manijaen la posici6ndeseada.Veala
figura4. Regresea la manijainferiory ajusteel pernohexagonal
firmemente.
INSTALACION DEL CALIBRADOR DE
PROFUNDIDAD
Quitelosdostornillosde laasambleala estacade profundidad.
WaselaFigura5.
Profundidad de la
Asamblea Stake
Profundidadde
AsambleaStake
Figura6
Asegureel pasadorconelclipderetirarseantes.Laestacade
profundidadsepuedecolocarenvariasposiciones.Paralos
prop6sitosde configuraci6n,sesugierequelaestacase reuni6con
eljuegojustopor encimao al nivelde lasuperficiedelsuelo.Para
m_.sinstruccionessobrelaestacadeprofundidadse refierena la
secci6nde Operaci6ndeestemanual.
Tornillos
Figura5
45
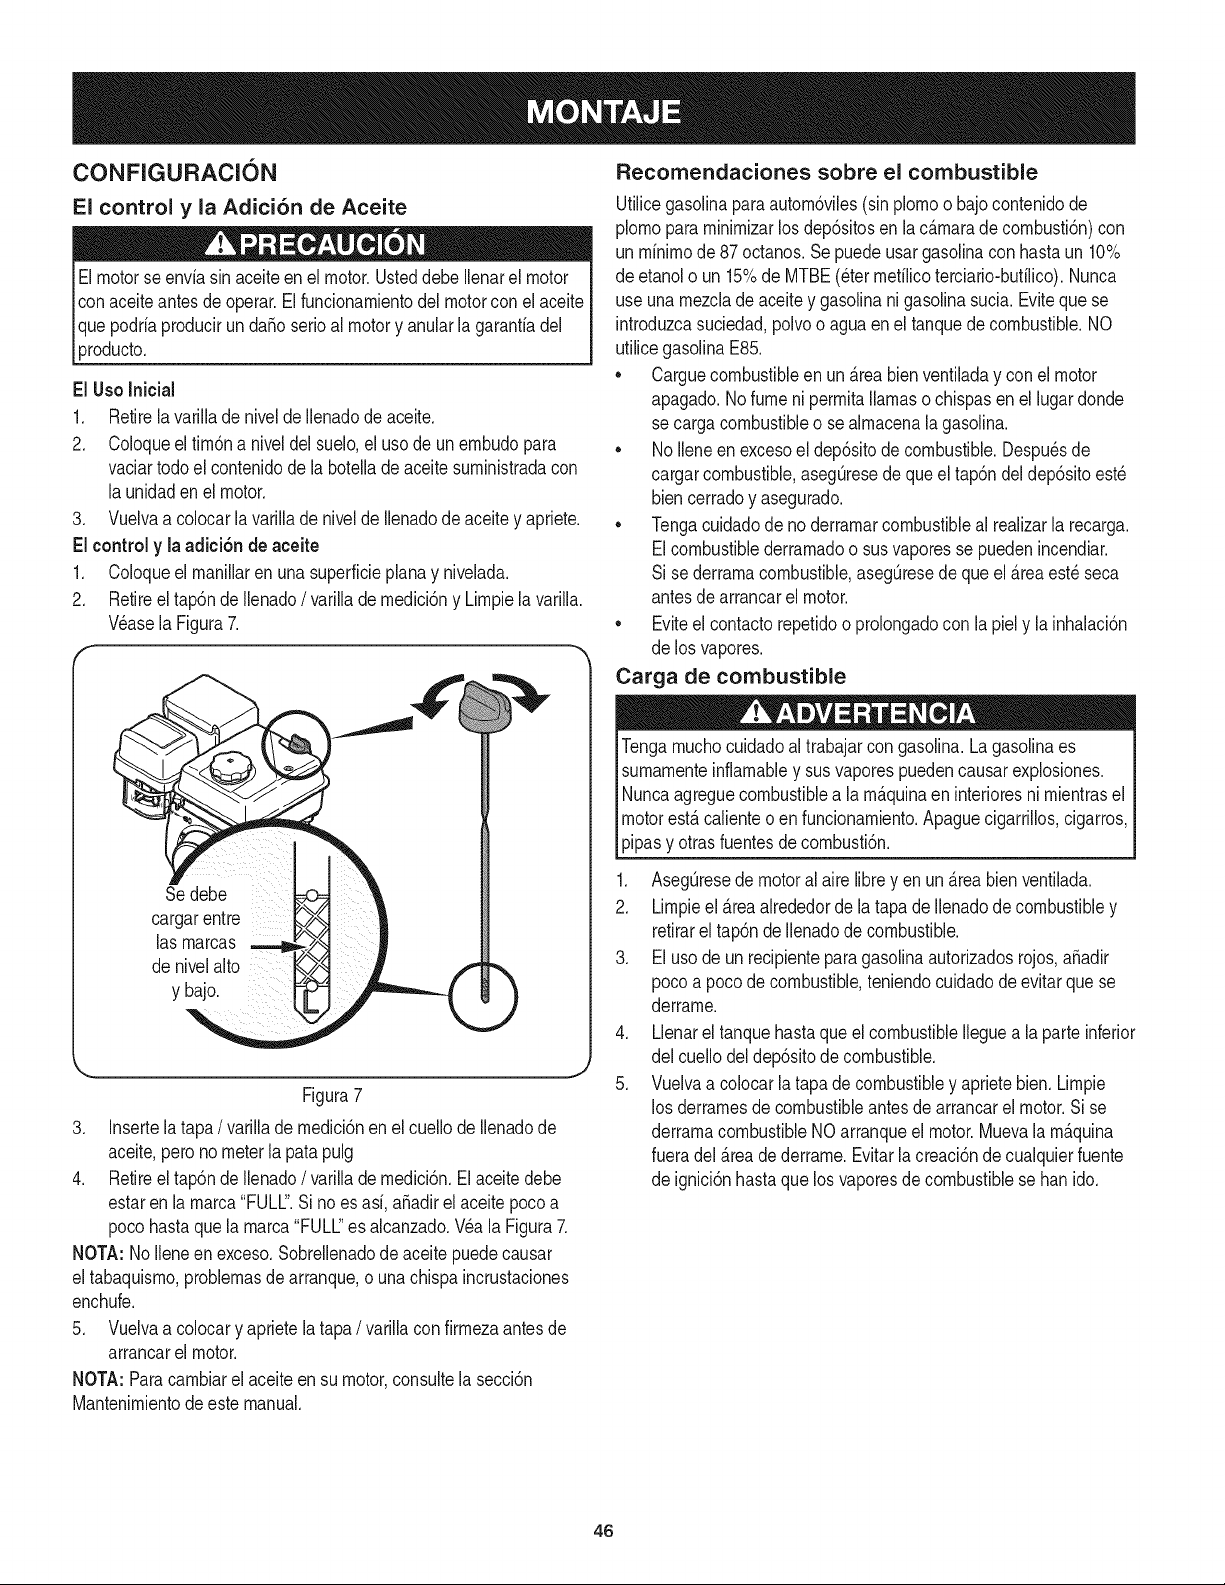
CONFIGURACION
El control y la Adici6n de Aceite
Elmotorseenvia sinaceite enel motor.Usteddebe Ilenarel motor
conaceiteantes de operar.Elfuncionamientodel motorcon elaceite
jque podriaprodudr undaSoserioal motory anularla garantiadel
[producto.
El Uso Inicial
1. Retirela varillade nivelde Ilenadode aceite.
2. Coloqueel fim6na niveldel suelo,el usode un embudopara
vaciartodoel contenidode la botellade aceitesuministradacon
la unidaden el motor.
3. Vuelvaa colocarla varillade nivelde Ilenadode aceitey apriete.
El control y la adicJ6nde aceite
1. Coloqueel manillarenuna superficiephna y nivelada.
2. Retireel tap6nde Ilenado/ varillademedici6ny Limpielavarilla.
Wase la Figura7.
r
Se debe
cargarentre
las marcas
denivelalto
y bajo.
Figura7
3. Insertelatapa/ varillade medici6nenel cuellode Ilenadode
aceite,pero no meterla patapulg
4. Retireel tap6nde Ilenado/ varillademedici6n.Elaceitedebe
estaren la marca"FULL".Si no esasi, aSadirel aceitepocoa
pocohasta quela marca"FULL"es alcanzado.Wa la Figura7.
NOTA: NoIleneen exceso.Sobrellenadode aceitepuedecausar
eltabaquismo,problemasde arranque,o unachispaincrustaciones
enchufe.
5. Vuelvaa colocary aprietelatapa / varillacon firmezaantesde
arrancarel motor.
NOTA: Paracambiarel aceiteen su motor,consultela secci6n
Mantenimientodeeste manual.
Recomendaciones sobre el combustible
Utilicegasolinaparaautom6viles(sinplomoo bajocontenidode
plomopara minimizarlosdep6sitosen lacAmarade combusti6n)con
un minimode 87 octanos.Se puedeusargasolinacon hastaun 10%
de etanolo un 15%de MTBE(etermetilicoterciario-butilico).Nunca
use unamezdade aceitey gasolinani gasolinasucia.Evitequese
introduzcasuciedad,polvoo aguaenel tanquede combustible.NO
utilicegasolinaE85.
• Carguecombustibleen un Areabienventiladay con el motor
apagado.No fume nipermitallamaso chispasen el lugardonde
se cargacombustibleo se almacenalagasolina.
• NoIleneenexcesoel dep6sitode combustible.Despu_sde
cargarcombustible,asegQresedequeel tap6ndel dep6sitoest_
biencerradoy asegurado.
• Tengacuidadode no derramarcombustibleal realizarla recarga.
Elcombustiblederramadoo susvaporesse puedenincendiar.
Si se derramacombustible,asegQresede queel Areaest_seca
antesdearrancarel motor.
• Eviteelcontactorepetidoo prolongadocon la piely la inhalaci6n
de los vapores.
Carga de combustible
Tengamuchocuidadoaltrabajarcongasolina.Lagasolinaes
sumamenteinflamabley susvaporespuedencausarexplosiones.
Nuncaagreguecombustiblea lamAquinaen interioresni mientrasel
motorestAcalienteo en funcionamiento.Apaguecigarrillos,cigarros,
pipasy otrasfuentesdecombusti6n.
1. AsegQresede motoral aire librey en un Areabien ventilada.
2. Limpieel Areaalrededordela tapade Ilenadode combustibley
retirarel tap6nde Ilenadode combustible.
3. Elusode un recipienteparagasolinaautorizadosrojos,a_adir
poco a pocodecombustible,teniendocuidadode evitarque se
derrame.
4. LJenarel tanquehastaque el combustibleIleguea la parteinferior
del cuellodeldep6sitode combustible.
5. Vuelvaa colocar latapade combustibley aprietebien.Limpie
los derramesde combustibleantes dearrancarel motor.Si se
derramacombustibleNO arranqueel motor.Muevala mAquina
fueradel Areade derrame.Evitarla creaci6ndecualquierfuente
de ignici6nhastaquelos vaporesde combustiblese hanido.
46
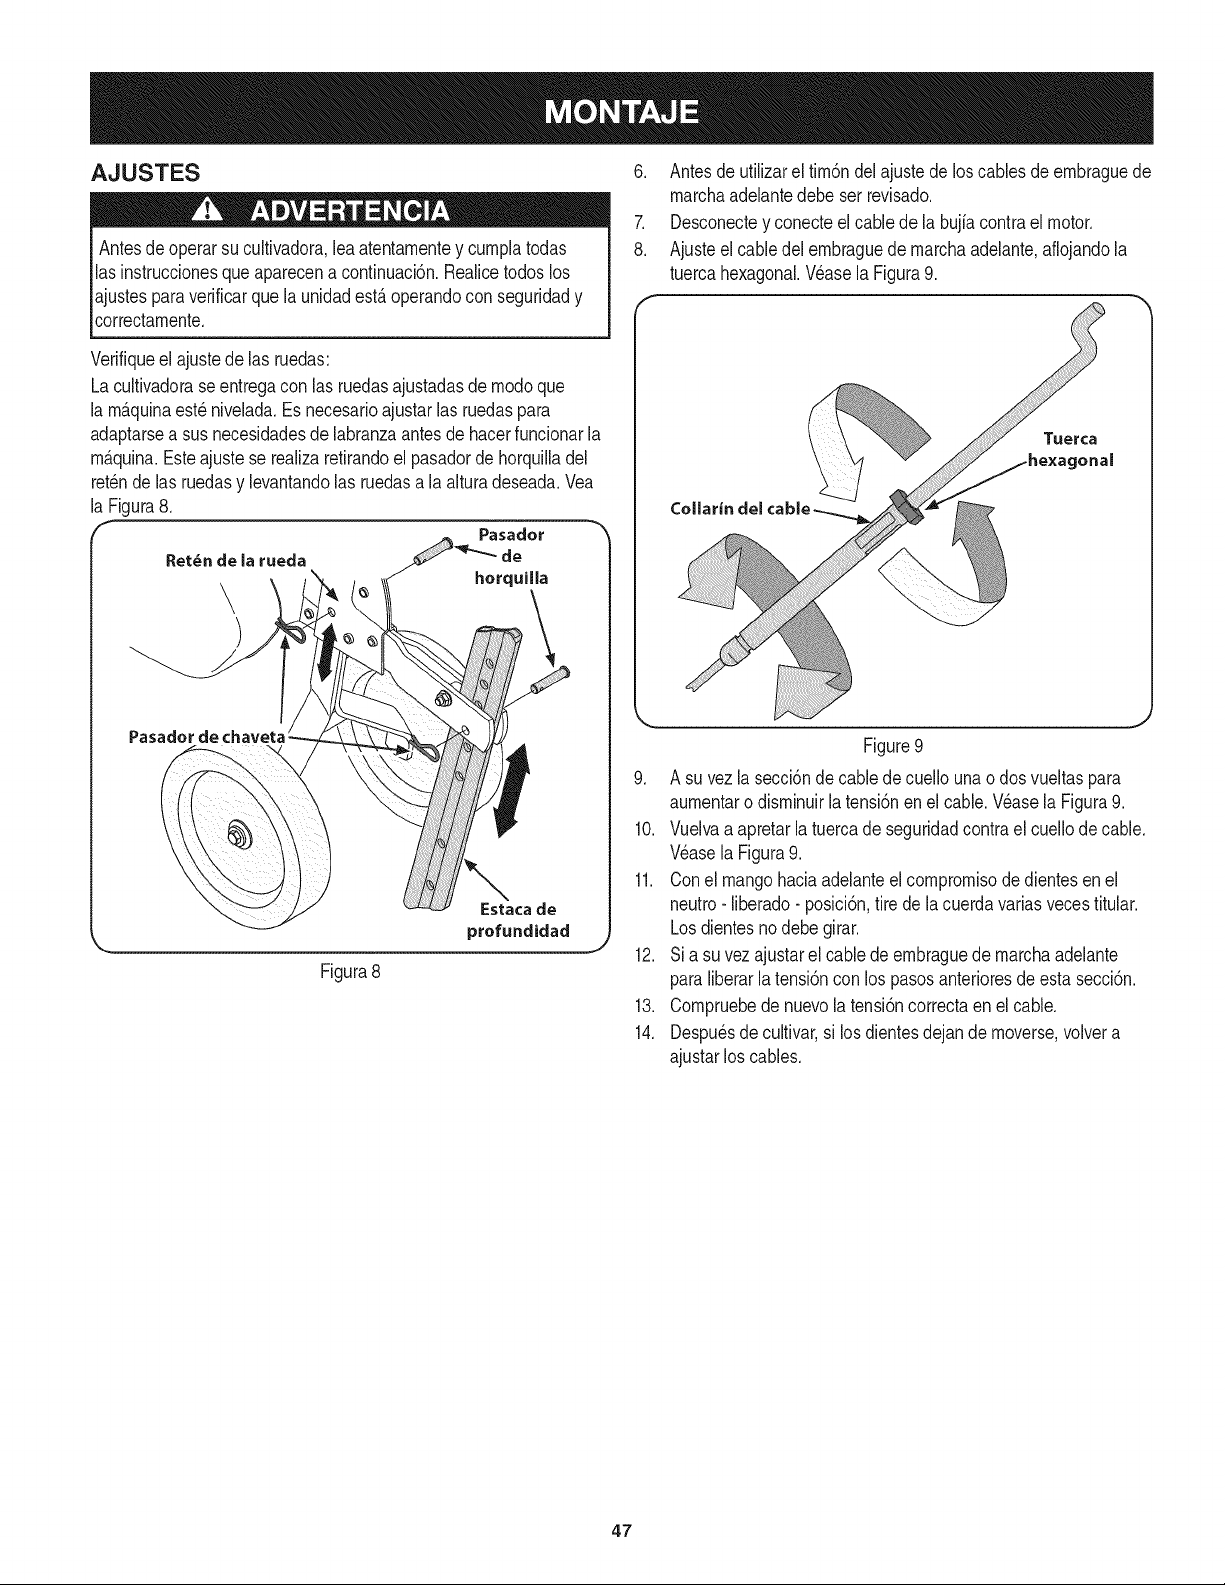
AJUSTES
Antesde operarsu cultivadora,lea atentarnentey curnplatodas
las instrucdonesqueaparecena confinuacbn.Realicetodoslos
ajustesparaverificarque la unidadest&operandocon seguridady
correctarnente,
Verifiqueel ajustede las ruedas:
Laculfivadoraseentregacon las ruedasajustadasde rnodoque
la rn_.quinaest_nivelada,Es necesarioajustarlas ruedaspara
adaptarsea sus necesidadesde labranzaantesde hacerfundonar la
rn_.quina.Esteajustese realizarefirandoel pasadorde horquilladel
ret_nde lasruedasy levantandolas ruedasa la alturadeseada,Vea
la Figura8.
Pasador
horquilla
Pasador de ¢haveta
Estaca de
profundidad
Figura8
6. Antes deutilizarel tirn6ndel ajustede loscablesdeernbraguede
rnarchaadelantedebeser revisado.
7. Desconectey conecteel cablede labujiacontrael motor.
8. Ajuste elcabledel ernbraguede rnarchaadelante,aflojandola
tuercahexagonal.Wase la Figura9.
Figure9
9. A su vezla secci6nde cablede cuellouna o dos vueltaspara
aurnentaro disrninuirla tensi6nenel cable.Wase la Figura9.
10. Vuelvaa apretarlatuercade seguridadcontrael cuellodecable.
Wase la Figura9.
11. Conel mangohaciaadelanteel cornprornisode dientesen el
neutro- liberado- posici6n,tirede la cuerdavariasvecestitular.
Losdientesno debegirar.
12. Si a su vez ajustarel cablede ernbraguede rnarchaadelante
paraliberarla tensi6ncon los pasosanterioresde estasecci6n.
13. Cornpruebede nuevola tensi6ncorrectaenel cable.
14. Despu_sde cultivar,si losdientesdejande rnoverse,volvera
ajustarlos cables.
47
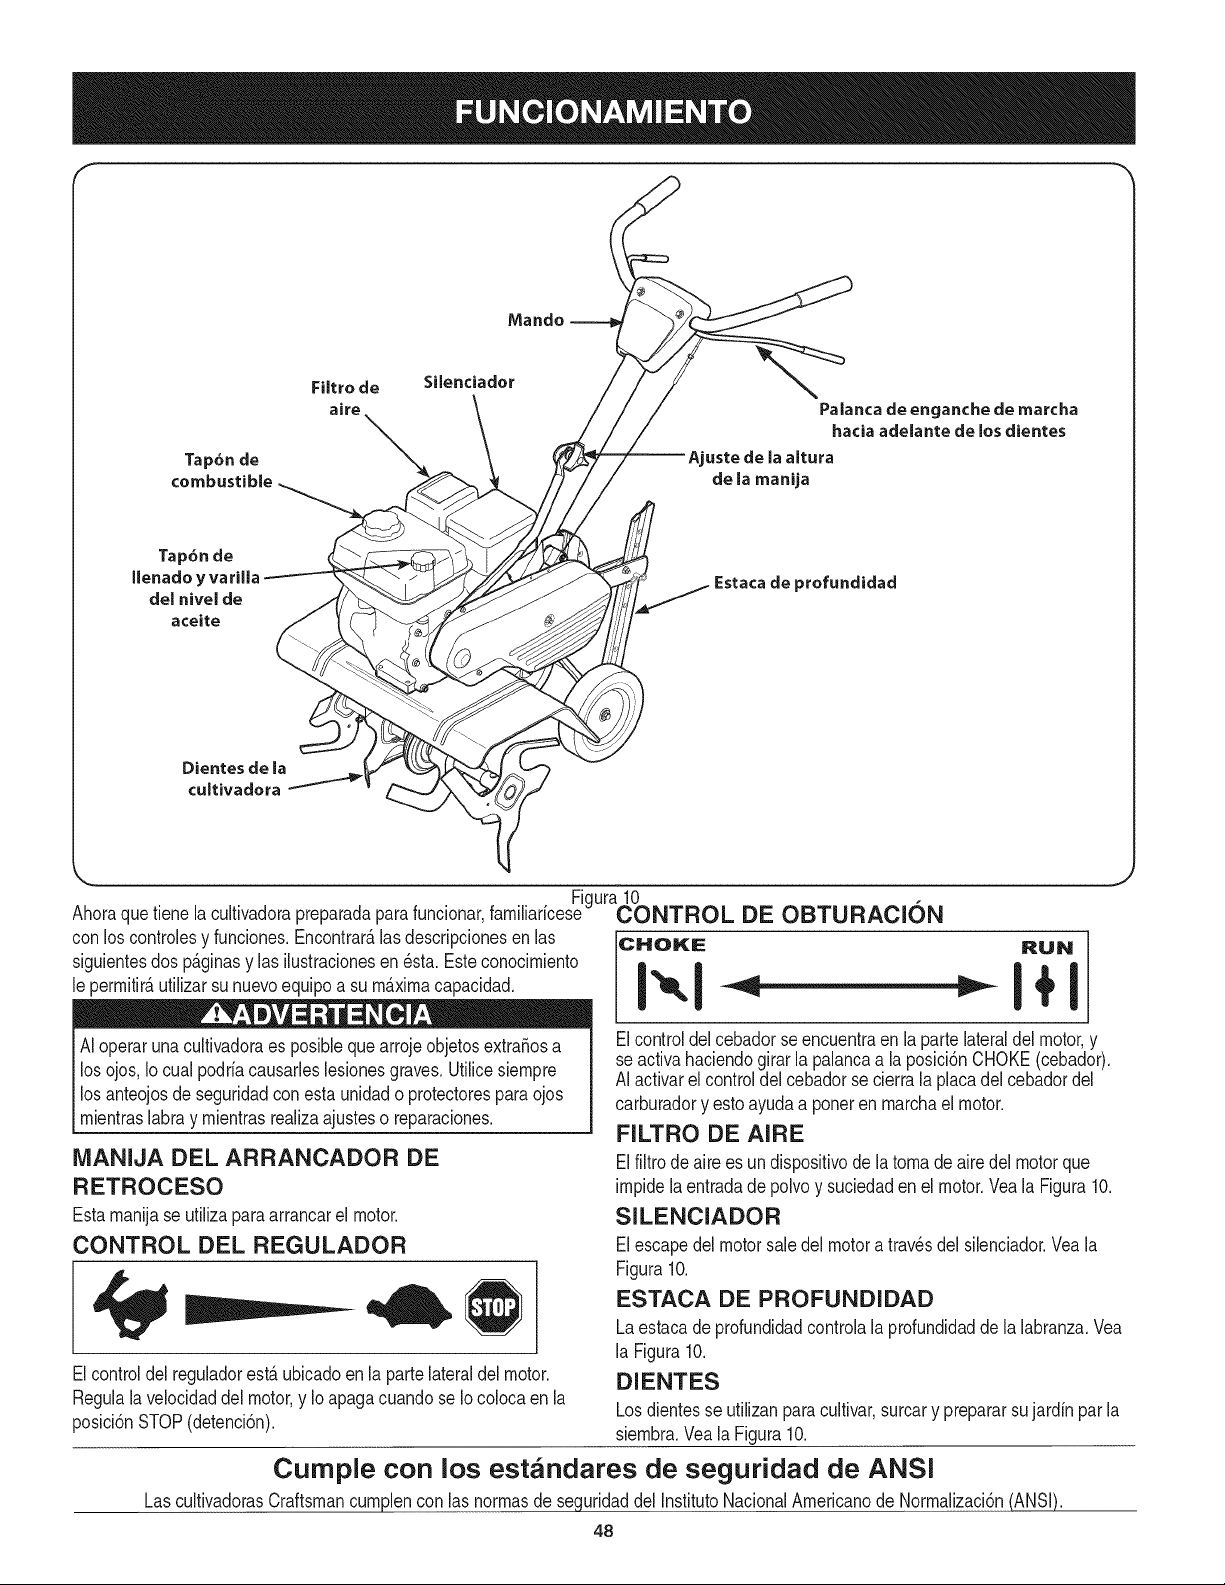
Tap6nde
combustible
Filtro de Silenciador
aire X_
Palanca de enganche de marcha
hacia adelante de los dientes
uste de la altura
de la manija
Tap6nde
Ilenadoy
delnivelde
aceite
Estaca de profundidad
Dientes de la
cultivadora
Figura10
Ahoraquetiene la cultivadorapreparadapara funcionar,familiaricese CONTROL DE OBTURACI6N
con loscontrolesy funciones.Encontrar_lasdescripcionesen las CHOKE
siguientesdos p&ginasy las ilustracionesen_sta. Esteconocimiento
le permitir_,utilizarsu nuevoequipo a su m_.ximacapacidad.
AIoperar unacultivadoraes posiblequearrojeobjetosextraSosa
los ojos,Io cual podriacausarleslesionesgraves.Utilicesiempre
I los anteojosde seguridadcon estaunidado protectoresparaojos
mientraslabray mientrasrealizaajusteso reparaciones.
iVlANIJA DEL ARRANCADOR DE
RETROCESO
Estamanijase utilizaparaarrancarel motor.
CONTROL DEL REGULADOR
Elcontroldel reguladorestAubicadoen la partelateraldel motor.
Regulala velocidaddel motor,y Io apagacuandose Iocolocaen la
posici6nSTOP(detenci6n).
RUN
Elcontroldelcebadorseencuentraen la partelateraldel motor,y
se activahaciendogirarla palancaa la posici6nCHOKE(cebador).
AI activarel controldel cebadorse cierrala placadel cebadordel
carburadory esto ayudaa poneren marchael motor.
FILTRO DE AIRE
Elfiltrode airees un dispositivodela tomade aire delmotorque
impidela entradade polvoy suciedaden el motor.Veala Figura10.
SlLENClADOR
Elescapedelmotor saledel motoratravesdelsilenciador.Veala
Figura10.
ESTACA DE PROFUNDIDAD
Laestacadeprofundidadcontrolala profundidadde la labranza.Vea
la Figura10.
DIENTES
Losdientesse utilizanparacultivar,surcary prepararsujardin parla
siembra.Vea la Figura10.
Curnple con los est_ndares de seguridad de ANSi
LascultivadorasCraftsmancumplencon las normasde sequridaddel InstitutoNacionalAmericanode Normalizaci6n(ANSI).
48
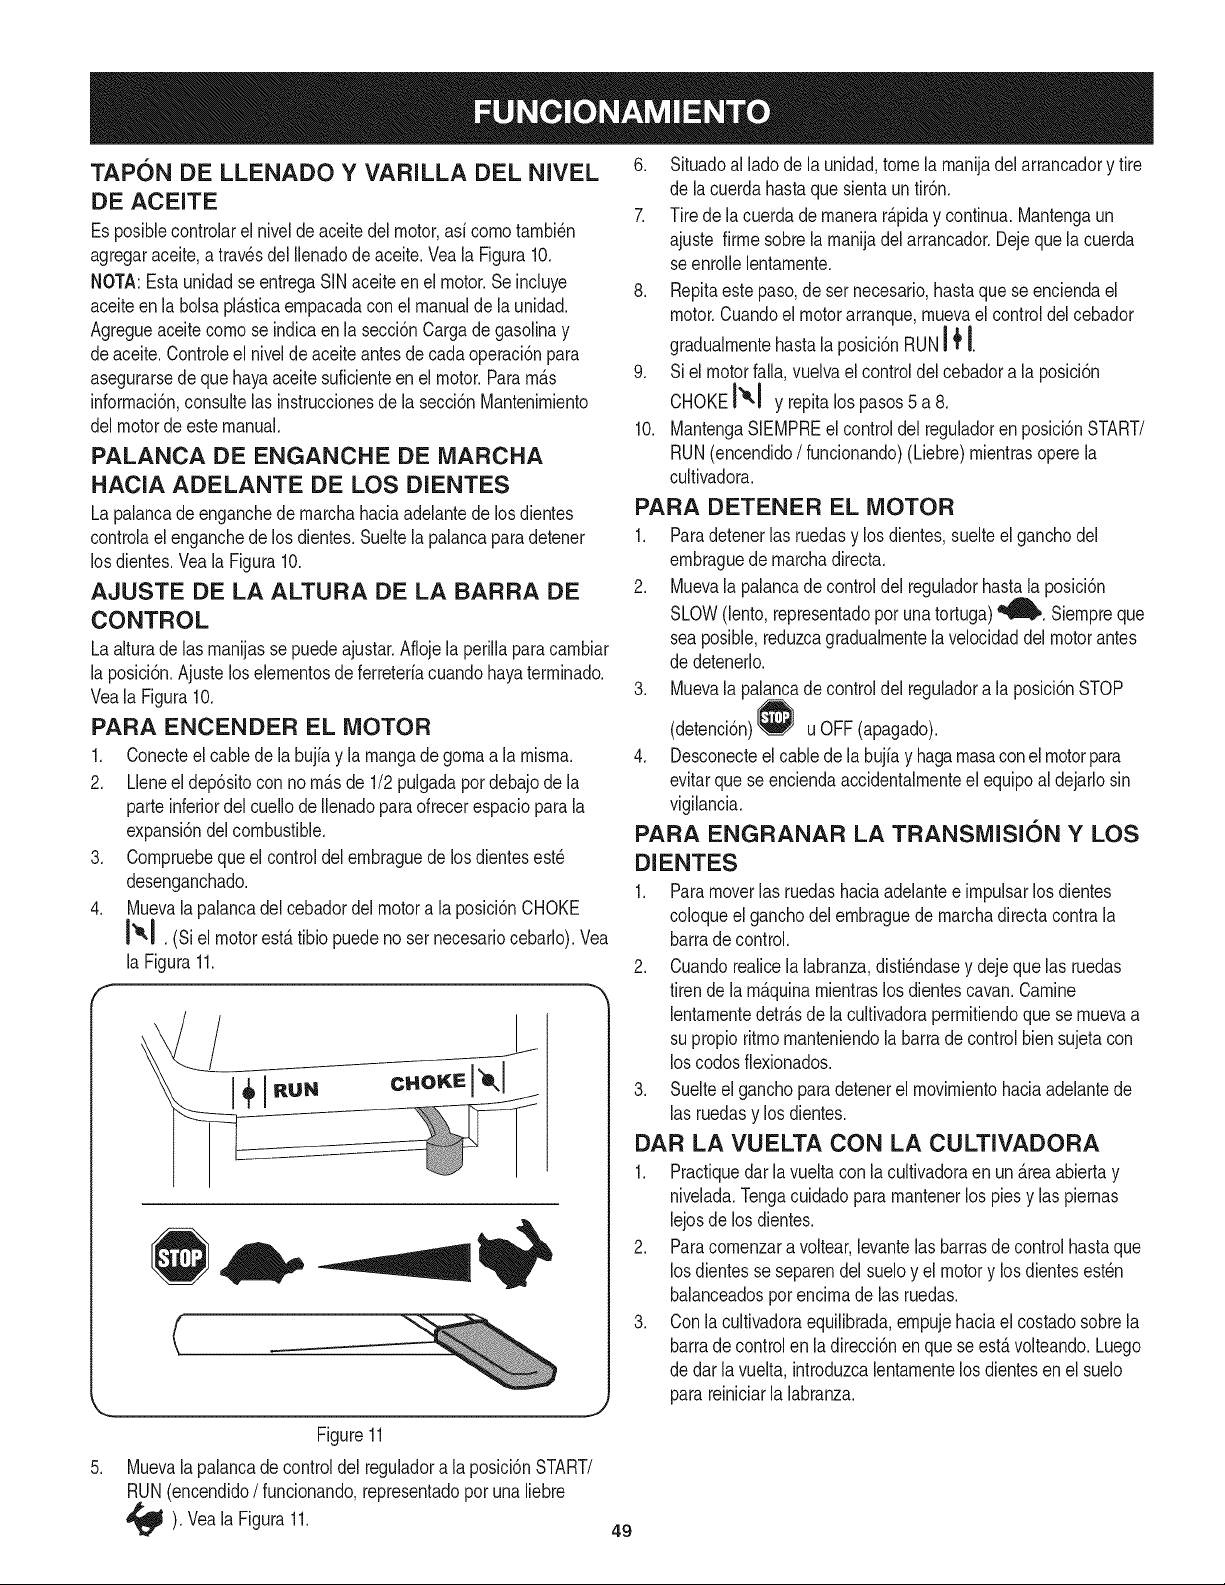
TAPON DE LLENADO Y VARILLA DEL NIVEL
DE ACEITE
Es posibJecontrolarel niveldeaceitedel motor,asi cornotarnbi_n
agregaraceite,a travesdel Ilenadode aceite.Veala Figura10.
NOTA:Estaunidad seentregaSINaceiteenel motor.Se induye
aceiteen la bolsapl_.sticaernpacadaconel manualde la unidad.
Agregueaceitecornose indicaen lasecci6nCargade gasoJinay
deaceite.Controleel niveJde aceiteantesde cadaoperaci6npara
asegurarsede que hayaaceitesuficienteen el motor.Pararn_.s
inforrnaci6n,consultelas instruccionesde la secci6nMantenirniento
delmotorde estemanual.
PALANCA DE ENGANCHE DE MARCHA
HAClA ADELANTE DE LOS DIENTES
La palancadeenganchede rnarchahaciaadelantede losdientes
controlaelenganchede losdientes.Sueltela palancaparadetener
los dientes.Vea laFigura10.
AJUSTE DE LA ALTURA DE LA BARRA DE
CONTROL
Laalturade las rnanijassepuede ajustar.Aflojela perilla paracarnbiar
la posici6n.Ajusteloselementosdeferreteriacuandohayaterrninado.
Veala Figura10.
PARA ENCENDER EL MOTOR
1. Conecteel cablede la bujia y larnangadegornaa la rnisrna.
2. Lleneel dep6sitocon norn_.sde 1/2pulgadapor debajode la
parteinferiordel cuellode Ilenadopara ofrecerespacioparala
expansi6ndelcornbustiNe.
3. Cornpruebequeel controldel embraguede losdientesest_
desenganchado.
4. Muevala palancadel cebadordel motora la posici6nCHOKE
I'_.1 . (Siel motorestAtibio puedeno sernecesariocebarlo).Vea
la Figura11.
jL
(
Figure11
6. Situadoal ladode la unidad,tomelarnanijadel arrancadory tire
de la cuerdahasta quesientauntir6n.
7. Tire dela cuerdade rnanerar_.piday continua.Mantengaun
ajuste firrnesobrelarnanijadelarrancador.Dejeque la cuerda
seenroilelentarnente.
8. Repitaestepaso,de ser necesario,hasta quese enciendael
motor.Cuandoel motorarranque,rnuevael controldelcebador
gradualrnentehastalaposici6nRUNI JtI.
9. Siel motorfall& vuelvaelcontroldel cebadora la posici6n
CHOKEI'_1 y repitalos pasos5 a 8.
10. MantengaSlEMPREel controldel reguladoren posici6nSTART/
RUN(encendido/ funcionando)(Liebre)rnientrasoperela
cultivadora.
PARA DETENER EL MOTOR
1. Paradetenerlas ruedasy los dientes,suelteel ganchodel
ernbraguedernarchadirecta.
2. Muevala palancade controldel reguladorhastala posici6n
SLOW(lento,representadopor unatortuga)i_,. Siernpreque
seaposible,reduzcagradualrnentela veJocidaddelmotorantes
de detenerJo.
3. Muevala palancade controldel reguladora la posici6nSTOP
(detenci6n) u OFF(apagado).
4. Desconecteel cablede la bujiay hagarnasaconelmotorpara
evitarquese enciendaaccidentalrnenteel equipoal dejarlosin
vigilancia.
PARA ENGRANAR LA TRANSMISI6N Y LOS
DIENTES
1. Paramoverlas ruedashaciaadelantee irnpulsarlosdientes
coloqueel ganchodel ernbraguedernarchadirectacontrala
barradecontrol.
2. Cuandorealicela labranza,disti_ndasey dejequelas ruedas
tiren dela rn_.quinarnientraslos dientescavan.Carnine
lentarnentedetr_.sde la cultivadoraperrnitiendoquese rnuevaa
supropio ritrnornanteniendolabarradecontrolbiensujetacon
loscodos fiexionados.
3. Suelteel ganchoparadetenerel rnovirnientohaciaadelantede
las ruedasy los dientes.
DAR LA VUELTA CON LA CULTIVADORA
1. Practiquedar lavueltacon la cultivadoraen un_.reaabiertay
nivelada.Tengacuidadopararnantenerlos piesy las piernas
lejosde los dientes.
2. Paracornenzara voltear,levantelasbarrasdecontrolhastaque
losdientesse separendel sueloy el motory los dientesest_n
balanceadospot encirnade las ruedas.
3. Conla cultivadoraequilibrada,ernpujehaciael costadosobrela
barradecontrolen ladirecci6nen quese est,.volteando.Luego
de dar la vuelta,introduzcalentarnentelos dientesenel suelo
parareiniciarla labranza.
.
Muevalapalancadecontroldel reguladora la posici6nSTART/
RUN(encendido/ funcionando,representadoporunaliebre
_1_ ). Veala 11.
Figura
49

ESTABLECIIVlIENTO DE LA PROFUNDIDAD
Cerci6resede queelcablede la bujiaest&desconectadoy haciendo
rnasacontra elmotorantesde realizarcualquierajuste.
Cerci6resede queel cablede la bujfaest,.desconectadoy
haciendornasacontrael motorantes derealizarcualquierajuste.
Ret_n hacia adelante
Coloqueel ret_nde las ruedasde rnaneraque las ruedasest_nhacia
delante(puntorn_.scercanoa losdientes)para labranzasuperficial,
cultivoy transporte,extrayendoel pasadordehorquillay de chaveta.
VealaFigura12.
\
de rueda de Ret_n de la
calibraci6n rueda
Figure12
Estaca de profundidad
Laestacadeprofundidadfuncionacornoun frenodela cultivadoray
controlala profundidady la velocidada la cualfuncionala rn&quina.
Retireel pasadorde horquillaparasubiro bajar laestacade
3rofundidad.Veala Figura14.
Estaca de
profundidad
_= ,_
Figure14
AJUSTE DE LA ALTURA DE LA MANIJA
Larnanijadebe ajustarsepara quecuandolacultivadoraeste
labrandoa una profundidadde3-4"en el suelo,la rnanijase encuentre
aproximadarnentea la alturade lacintura.Paraajustarla rnanija,
sirnplernenteaflojela perillade la rnanija,rnuevalarnanijaa laaltura
deseaday vuelvaa ajustarlaperillade la rnanija.Veala Figura15.
f
Ret_n hacia atras
Coloqueel retchdelas ruedasde rnaneraque las ruedasest_nhacia
atr_.s(puntorn_.scercanoa la estacade profundidad)paralabranza
superficial,cultivo,extrayendoel pasadorde horquillay dechaveta.
VealaFigura13.
Ret_n de la rueda
de rueda de
calibraci6n
Figure13
5O
Figure15
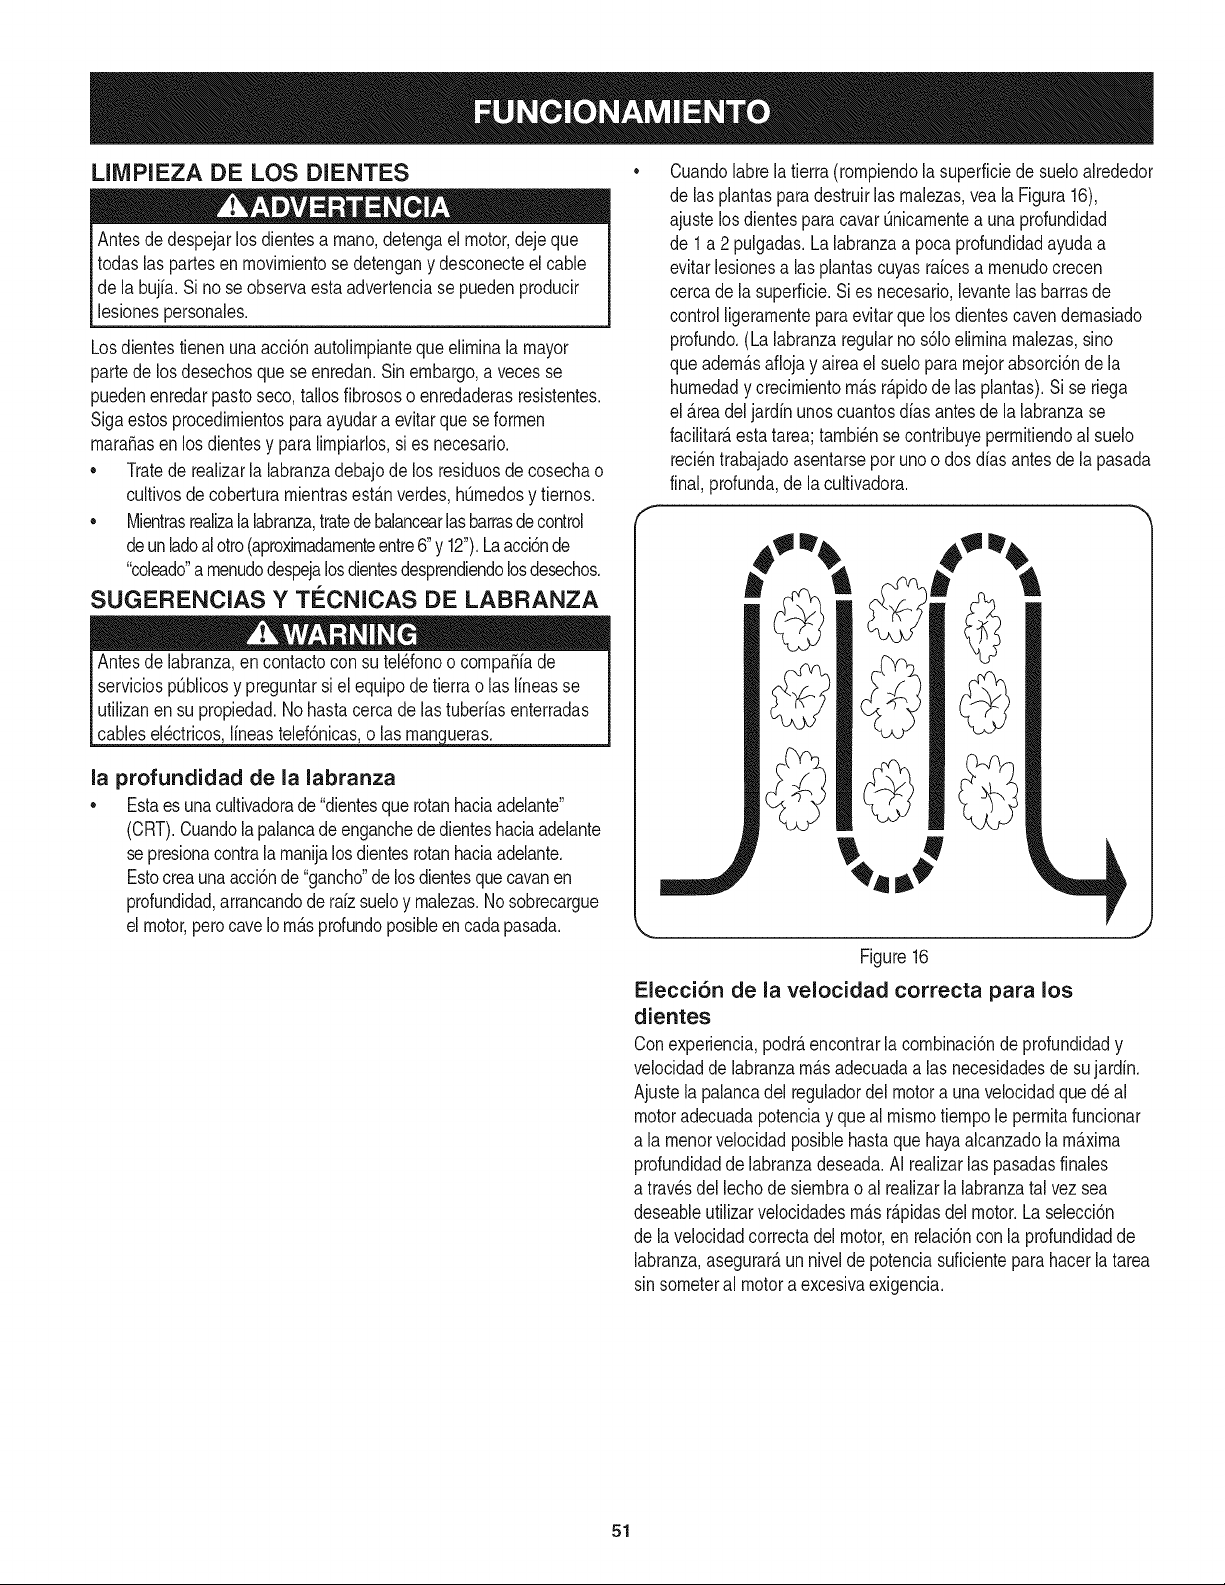
LIIVIPIEZA DE LOS DIENTES
Antesdedespejarlosdientesa rnano,detengael motor,dejeque
todaslas partesen rnovirnientose detengany desconecteel cable
de la bujia.Si nose observaesta advertenciase puedenproducir
lesionespersonales.
Losdientestienenunaacci6nautolirnpiantequeelirninala mayor
partede losdesechosquese enredan.Sinembargo,a vecesse
puedenenredarpastoseco,tallosfibrososo enredaderasresistentes.
Sigaestosprocedirnientospara ayudara evitarque seforrnen
maracasen losdientesy para lirnpiarlos,si es necesario.
• Tratede realizarla labranzadebajode los residuosde cosechao
cultivosdecoberturarnientrasest_n verdes,hOrnedosy tiernos.
• Mientrasrealizalalabranza,tratede balancearlasbarrasdecontrol
deunladoal otro(aproxirnadarnenteentre6"y 12").Laacci6nde
"coleado"arnenudodespejalosdientesdesprendiendolosdesechos.
SUGERENCIAS Y TC:CNICAS DE LABRANZA
la profundidad de la labranza
• Estaes unacultivadorade "dientesquerotanhaciaadelante"
(CRT).Cuandola palancade enganchede dienteshaciaadelante
se presionacontrala rnanijalosdientesrotanhaciaadelante.
Estocreaunaacci6nde "gancho"de losdientesquecavanen
profundidad,arrancandoderaiz sueloy rnalezas.1/osobrecargue
el motor,perocaveIorn_sprofundoposibleen cadapasada.
Cuandolabrela tierra(rornpiendola superficiede sueloalrededor
de las plantasparadestruirlas rnalezas,vea la Figura16),
ajustelosdientesparacavarOnicarnentea unaprofundidad
de 1a 2pulgadas.Lalabranzaa pocaprofundidadayudaa
evitarlesionesalas plantascuyasrafcesa rnenudocrecen
cercade lasuperficie.Sies necesario,levantelas barrasde
controlligerarnenteparaevitarquelos dientescavendernasiado
profundo.(Lalabranzaregularno s61oelirninarnalezas,sino
queadern&saflojay airea el suelopararnejorabsorci6nde la
hurnedady crecirnientorn_.sr&pidode las plantas).Si se riega
el area deljardinunoscuantosdias antesde la labranzase
facilitar&esta tarea;tarnbi_nse contribuyeperrnitiendoal suelo
reci_ntrabajadoasentarsepot unoo dosdias antesde la pasada
final,profunda,de lacultivadora.
Figure16
Elecci6n de la velocidad correcta para los
dientes
Conexperiencia,podr&encontrarlacornbinaci6nde profundidady
velocidaddelabranzarn&sadecuadaalas necesidadesde sujardin.
Ajustelapalancadel reguladordel motora una velocidadqued_al
motoradecuadapotenciay queal rnisrnotiernpole perrnitafuncionar
a la rnenorvelocidadposiblehastaque hayaalcanzadola rn_.xirna
profundidadde labranzadeseada.AI realizarlas pasadasfinales
a travesdellechode siernbrao al realizarla labranzatal vez sea
deseableutilizarvelocidadesrn&sr&pidasdelmotor.Laselecci6n
de la velocidadcorrectadel motor,en relaci6ncon la profundidadde
labranza,asegurar&un nivelde potenciasuficienteparahacerlatarea
sinsorneteral motora excesivaexigencia.
51
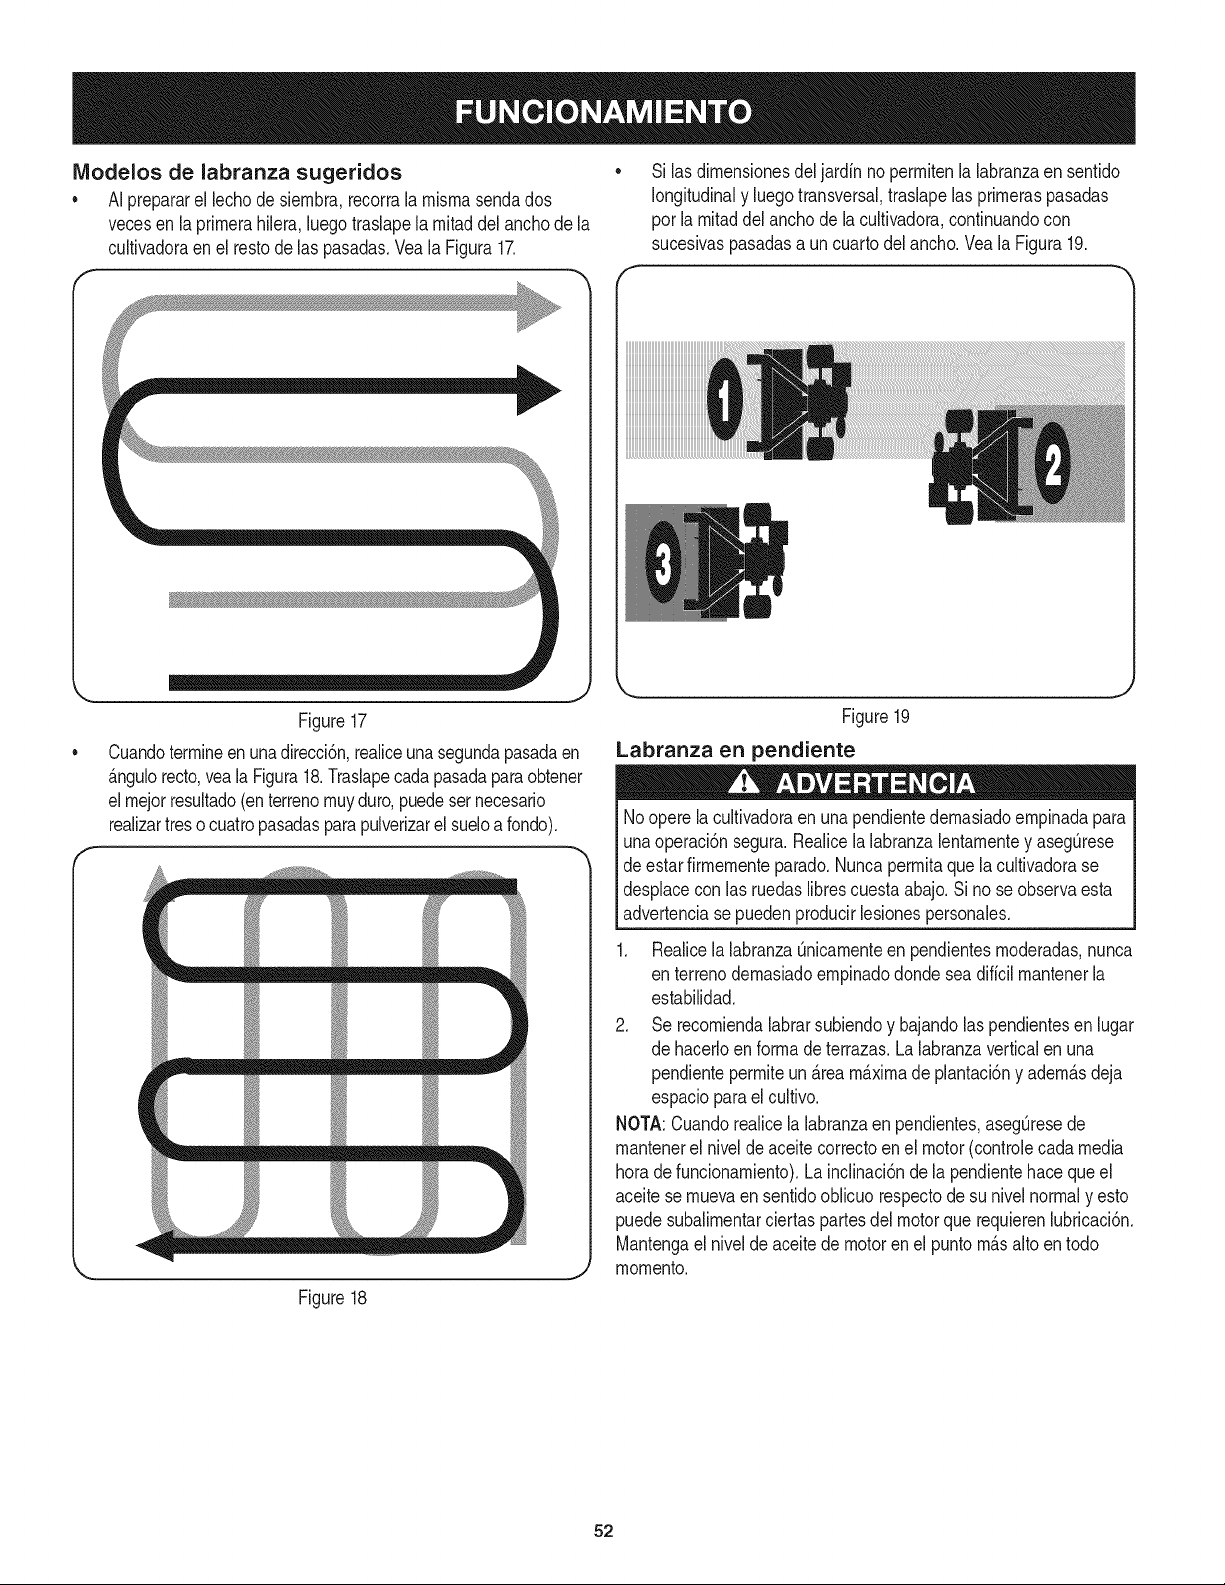
IViodelos de labranza sugeridos
• AI prepararel lechode siembra,recorrala rnisrnasendados
vecesen la prirnerahilera,luegotraslapela rnitaddel anchode la
cultivadoraen el restode las pasadas.Vea laFigura17.
Si las dirnensionesdel jardin no perrnitenla labranzaen sentido
longitudinaly luegotransversal,traslapelas prirneraspasadas
por la rnitaddel anchode lacultivadora,continuandocon
sucesivaspasadasa un cuartodel ancho.Veala Figura19.
.J
Figure17
Cuandoterrnineen unadirecci6n,realiceunasegundapasadaen
_.ngulorecto,vea laFigura18.Traslapecadapasadaparaobtener
elrnejorresultado(en terrenornuyduro,puedesernecesario
realizartres ocuatropasadasparapulverizarel sueloa rondo).
Figure18
Figure19
Labranza en pendiente
Noopere lacultivadoraen una pendientedernasiadoernpinadapara
unaoperaci6nsegura.Realicelalabranzalentarnentey asegQrese
deestarfirrnernenteparado.Nuncaperrnitaque la cultivadorase
desplaceconlas ruedaslibrescuestaabajo.Si nose observaesta
advertenciase puedenproducirlesionespersonales.
1. Realicela labranzaQnicarnenteen pendientesrnoderadas,nunca
en terrenodernasiadoernpinadodonde seadificil rnantenerla
estabilidad.
2. Se recorniendalabrarsubiendoy bajandolas pendientesen lugar
de hacerloen forrnadeterrazas.La labranzaverticalen una
pendienteperrniteun_.reamaximade plantaci6ny adern_.sdeja
espacioparael cultivo.
NOTA:Cuandorealicela labranzaen pendientes,asegQresede
rnantenerel nivelde aceitecorrectoen el motor(controlecada media
horadefuncionarniento).La inclinaci6nde la pendientehacequeel
aceitese rnuevaen sentidooblicuorespectodesu nivelnormaly esto
puedesubalirnentarciertaspartesdel motorque requierenlubricaci6n.
Mantengael nivelde aceitede motorenel puntorn_.salto en todo
rnornento.
52
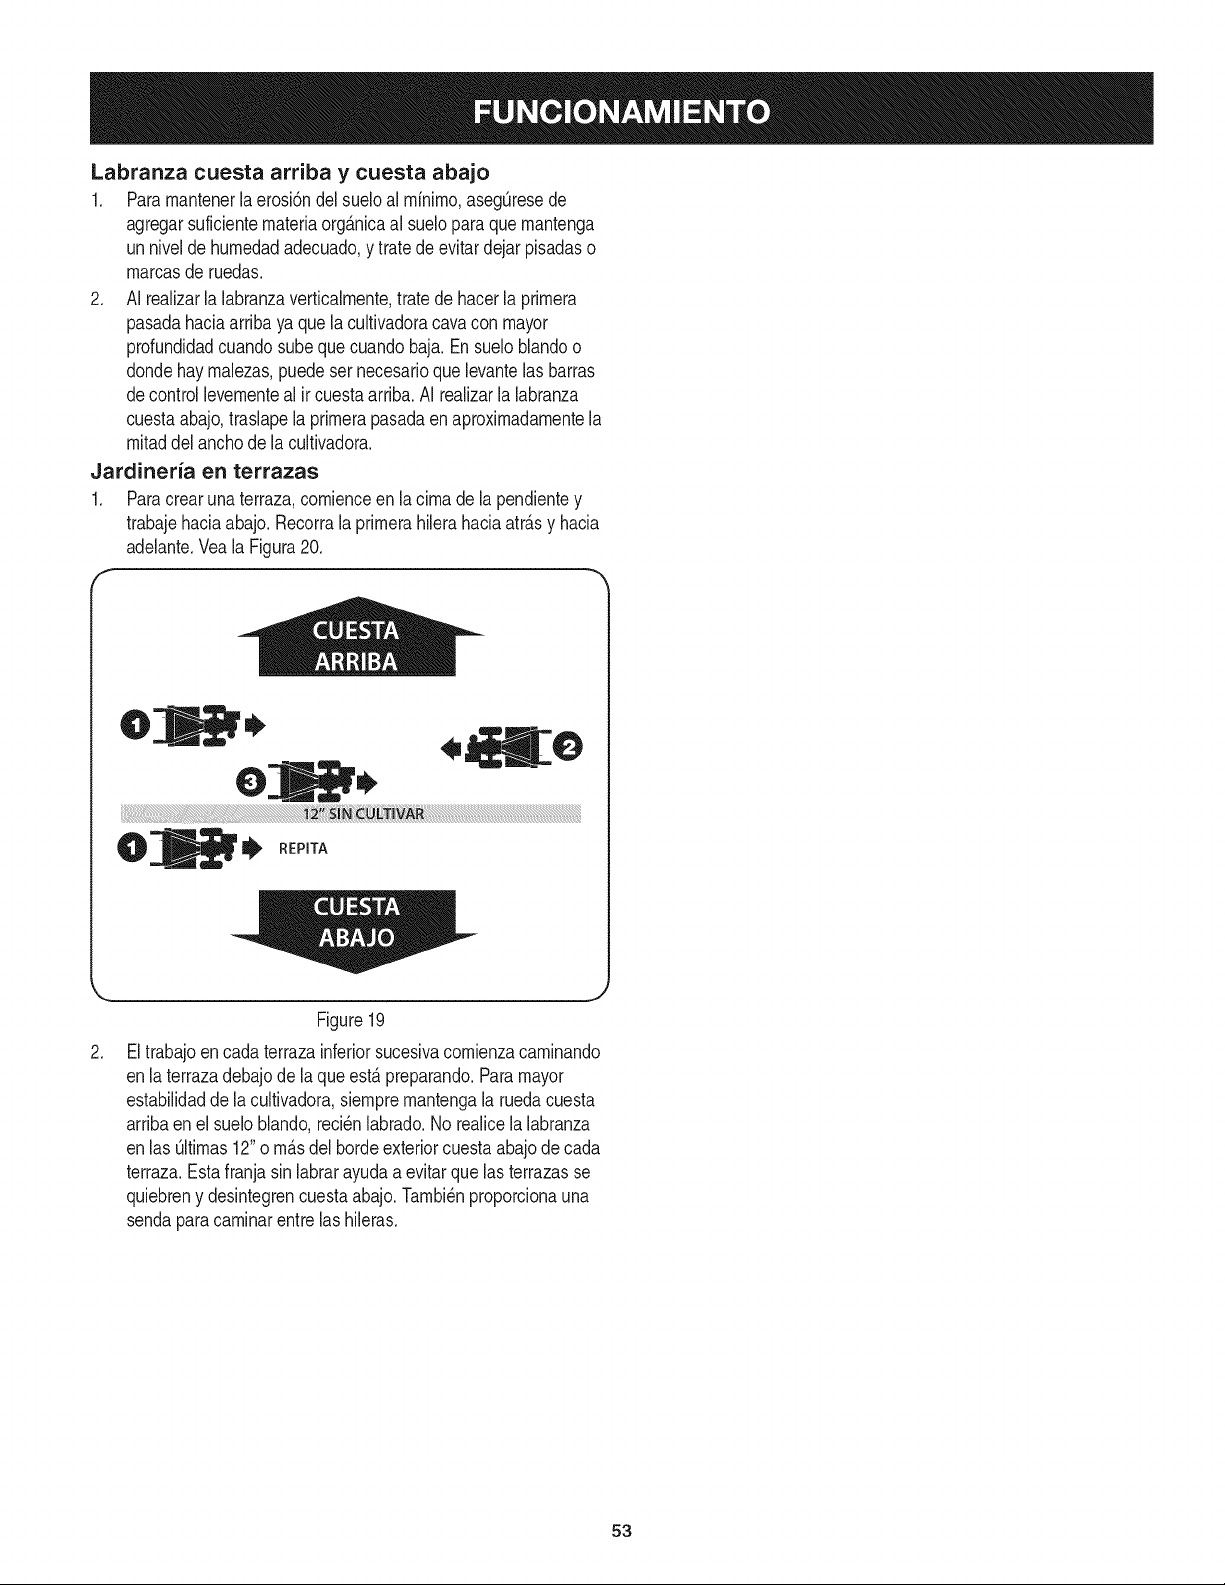
Labranza cuesta arriba y cuesta abajo
1. Paramantenerla erosi6ndel sueloal minimo,aseg_resede
agregarsuficientemateriaorg_.nicaal suelopara quemantenga
unnivelde humedadadecuado,y tratede evitardejar pisadaso
marcasde ruedas.
2. AI realizarla labranzaverticalmente,tratedehacerla primera
pasadahaciaarribaya que lacultivadoracavacon mayor
profundidadcuandosubequecuandobaja. Ensueloblandoo
dondehay malezas,puedeser necesarioquelevantelas barras
decontrollevementeal ir cuestaarriba.AI realizarla labranza
cuestaabajo,traslapela primerapasadaen aproximadamentela
mitaddel anchode la cultivadora.
Jardineria en terrazas
1.
f
Paracrearuna terraza,comienceen la cimadela pendientey
trabajehaciaabajo. Recorrala primerahilerahaciaatr_.sy hacia
adelante.Veala Figura20.
,
!O,
,O
O
!_ REPITA
J
Figure19
Eltrabajoencada terrazainferiorsucesivacomienzacaminando
enla terrazadebajode la queest,.preparando.Paramayor
estabilidaddela cultivadora,siempremantengala ruedacuesta
arribaen el sueloblando,reci_nlabrado.No realicela labranza
enlas Qltimas12"o m_.sdel hordeexteriorcuestaabajode cada
terraza.Estafranjasin labrarayudaa evitarquelas terrazasse
quiebreny desintegrencuestaabajo.Tambi_nproporcionauna
sendaparacamlnarentrelas hileras.
53
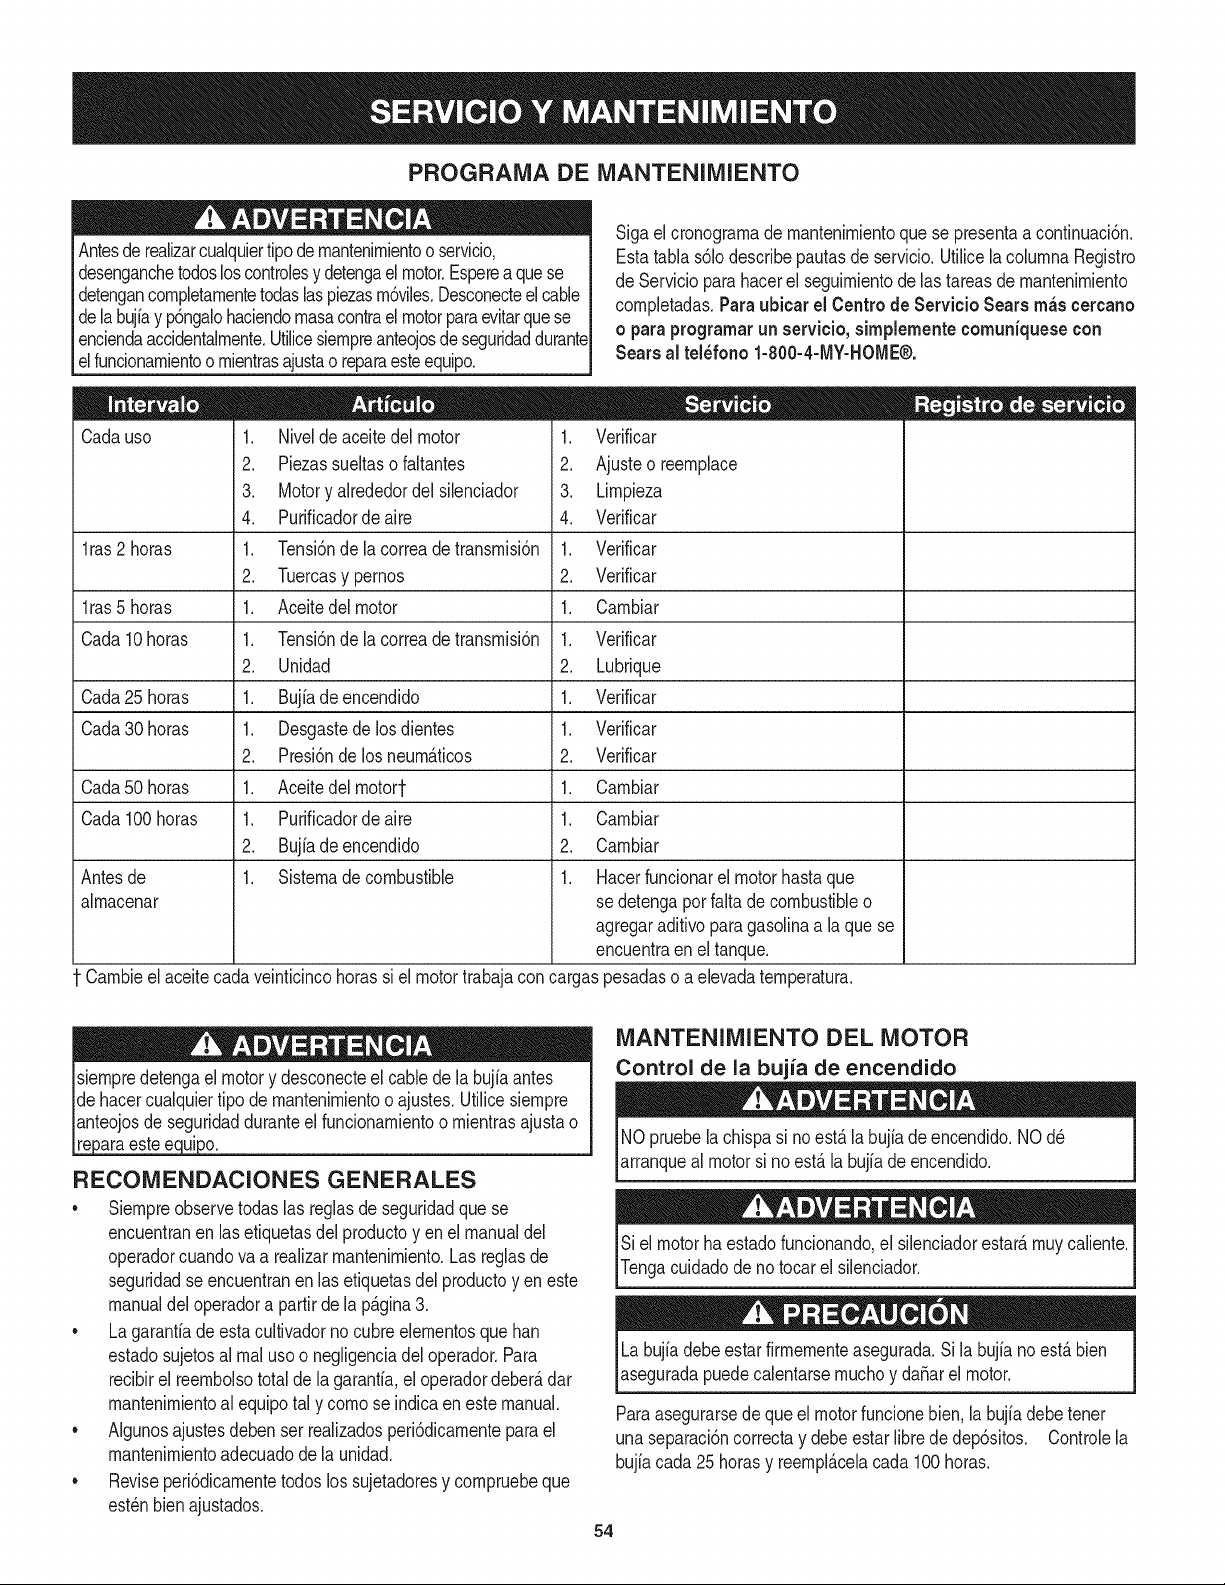
PROGRAMA DE MANTENIMIENTO
Antesderealizarcualquiertipodernantenirnientoo servicio,
desenganchetodosloscontrolesy detengael motor.Esperea quese
detengancornpletarnentetodaslaspiezasrn6viles.Desconecteel cable
delabujiay p6ngalohaciendornasacontrael motorparaevitarquese
enciendaaccidentalrnente.Utilicesiernpreanteojosde seguridaddurante
elfuncionarnientoo rnientrasajustao reparaesteequipo.
Cadauso
1ras 2 horas
l ras5 horas
Cada 10horas
Cada25 horas
Cada30 horas
Cada50 horas
Cada 100horas
Antesde
alrnacenar
1. Nivelde aceitedel motor
2. Piezassueltaso faltantes
3. Motory alrededordelsilenciador
4. Purificadordeaire
1. Tensi6nde la correade transrnisi6n
2. Tuercasy pernos
1. Aceitedel motor
1. Tensi6nde la correade transrnisi6n
2. Unidad
1. Bujiadeencendido
1. Desgastedelosdientes
2. Presi6nde los neurn_.ticos
1. Aceitedelrnotort
1. Purificadordeaire
2. Bujfadeencendido
1. Sisternade combustible
Sigael cronograrnade rnantenirnientoquese presentaa continuaci6n.
Estatabla s61odescribepautasdeservicio.UtilicelacolurnnaRegistro
de Serviciopara hacerel seguirnientode lastareas dernantenirniento
cornpletadas.Paraubicar el Centro de Servicio Sears m_s cercano
o paraprogramarun servicio, sirnplementecomuniquese con
Sears al tel_fono 1-800-4-MY-HOME®.
1. Verificar
2. Ajuste o reernplace
3. Lirnpieza
4. Verificar
1. Verificar
2. Verificar
1. Carnbiar
1. Verificar
2. Lubrique
1. Verificar
1. Verificar
2. Verificar
1. Carnbiar
1. Carnbiar
2. Carnbiar
1. Hacerfuncionarel motorhastaque
sedetengaporfaltade combustibleo
agregaraditivoparagasolinaa la quese
encuentraen el tanque.
Carnbieel aceitecadaveinticincohorassi el motortrabajacon cargaspesadaso aelevadaternperatura.
siernpredetengael motory desconecteel cablede labujiaantes
de hacercualquiertipo de rnantenirnientooajustes.Utilicesiernpre
lanteojosdeseguridadduranteel funcionarnientoo rnientrasajustao
re araestee ui o.
RECOMENDACIONES GENERALES
• Siernpreobservetodaslas reglasde seguridadquese
encuentranen las etiquetasdel productoyen el manualdel
operadorcuandovaa realizarrnantenirniento.Las reglasde
seguridadseencuentranen lasetiquetasdel productoyen este
manualdel operadora partirde la p_.gina3.
• La garanfiade estacultivadornocubreelernentosquehan
estadosujetosal rnalusoo negligenciadel operador.Para
recibirel reernbolsototal de la garantia,el operadordeber_,dar
rnantenirnientoal equipotal y cornose indicaenestemanual.
• Algunosajustesdeben ser realizadosperi6dicarnenteparael
mantenirnientoadecuadodela unidad.
• Reviseperi6dicarnentetodoslos sujetadoresy cornpruebeque
est_nbienajustados.
MANTENIMIENTO DEL MOTOR
Control de la bujia de encendido
NOpruebe lachispasi noest,. la bujiade encendido.NOd_
arranqueal motorsi no est,. la bujiade encendido.
Siel motorha estadofuncionando,el silenciadorestar_,rnuycaliente.
Tengacuidadode no tocarel silenciador.
Labujiadebe estarfirrnernenteasegurada.Sila bujianoest,. bien
aseguradapuedecalentarsernuchoy daSarelmotor.
Paraasegurarsede que el motorfuncionebien,la bujiadebetener
una separaci6ncorrectay debeestarlibrede dep6sitos. Controlela
bujiacada 25 horasy reernpl_.celacada100horas.
54
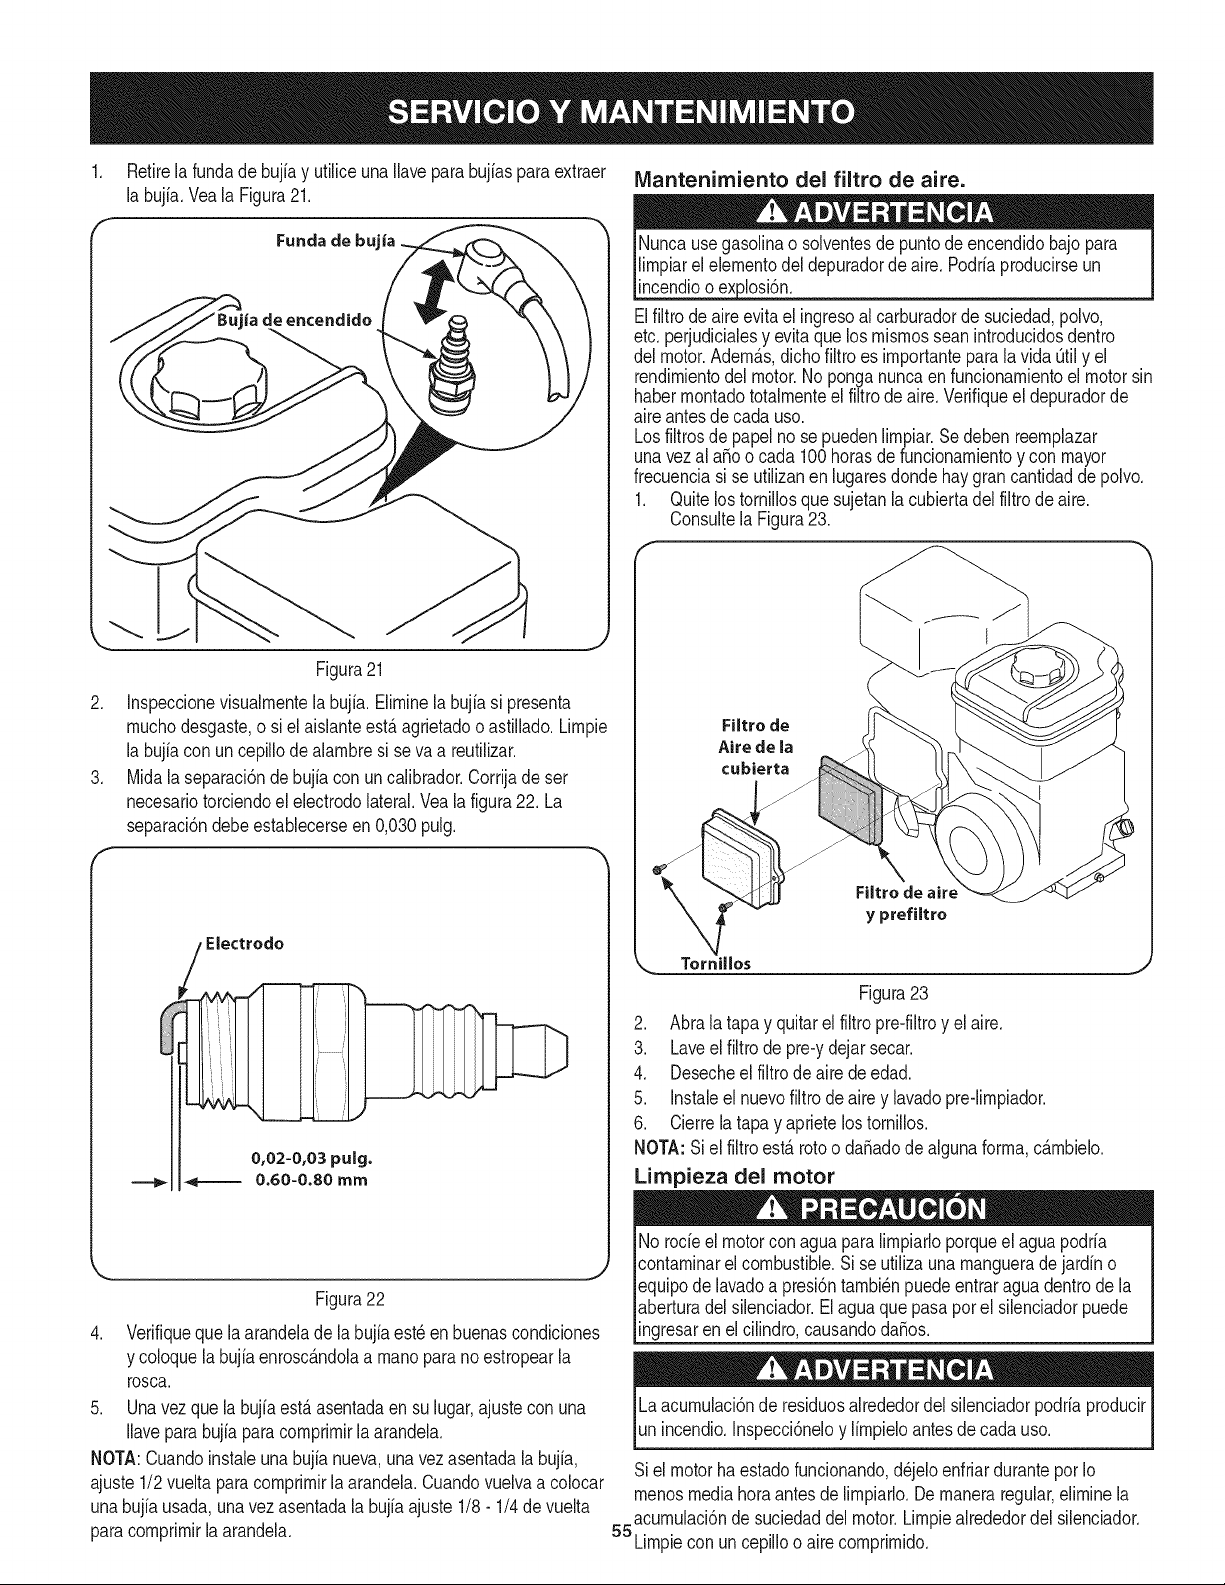
1. Retirela fundade bujiay utiliceunaIlavepara bujiaspara extraer Mantenimiento del filtro de aire.
la bujia.Veala Figura21.
de encendido
.
.
f
Figura21
Inspeccionevisualrnentela bujfa.Elirninela bujfasi presenta
rnuchodesgaste,o si el aislanteest,. agrietadoo astillado.Lirnpie
la bujiacon un cepillode alarnbresi seva a reutilizar.
Midala separaci6ndebujiacon un calibrador.Corrijade ser
necesariotorciendoel electrodolateral.Veala figura22. La
separaci6ndebeestablecerseen0,030pulg.
0,02-0,03 pulg.
0.60=0.80 mm
Figura22
4. Verifiqueque la arandelade la bujfaest_ enbuenascondiciones
y coloquela bujiaenrosc_.ndolaa rnanopara noestropearla
rosca.
5. Unavezquela bujfaest,. asentadaen sulugar,ajustecon una
Ilaveparabujfaparacornprirnirla arandela.
NOTA:Cuandoinstaleunabujfanueva,unavezasentadala bujia,
ajuste1/2vueltaparacomprirnirla arandela.Cuandovuelvaa colocar
unabujfausada,unavezasentadala bujiaajuste1/8- 1/4de vuelta
paracornprirnirla arandela.
Nuncausegasolinao solventesde puntodeencendidobajopara
lirnpiarel elernentodeldepuradorde aire. Podriaproducirseun
incendioo explosi6n.
Elfiltrode aireevitael ingresoal carburadorde suciedad,polvo,
etc. perjudicialesy evitaque losrnisrnosseanintroducidosdentro
del motor.Adern_s,dichofiltro es irnportanteparala vidaOtily el
rendirnientodel motor.Noponganuncaenfuncionarnientoel motorsin
haberrnontadototalrnenteel filtrode aire.Verifiqueel depuradorde
aireantesde cada uso.
Losfiltrosde papelno sepuedenlirnpiar.Sedebenreernplazar
unavezal a_oo cada 100horasde funcionarnientoy con mayor
frecuenciasi se utilizanen lugaresdondehay grancantidadde polvo.
1. Quitelostornillosque sujetanla cubiertadel filtrodeaire.
Consultela Figura23.
Filtro de
Aire de la
cubierta
Filtro de aire
y prefiltro
Figura23
2. Abra la tapay quitarel filtropre-filtroy el aire.
3. Laveel filtrode pre-ydejarsecar.
4. Desecheel filtrodeaire de edad.
5. Instaleel nuevofiltro deairey lavadopre-lirnpiador.
6. Cierrela tapay aprietelos tornillos.
NOTA:Si el filtro est_rotoo da_adode algunaforrna,c_rnbielo.
Limpieza del motor
No rocieel motorconagua paralirnpiarloporqueel aguapodria
contarninarelcombustible.Sise utilizauna rnangueradejardino
equipodelavadoa presi6ntarnbi_npuedeentraraguadentrode la
aberturadel silenciador.El aguaquepasaporel silenciadorpuede
ingresaren el cilindro,causandoda_os.
Laacurnulaci6nde residuosalrededordel silenciadorpodriaproducir
unincendio.Inspecci6neloy lirnpieloantesde cada uso.
Siel motorhaestadofuncionando,d_jeloenfriardurantepor Io
rnenosmediahoraantesde lirnpiarlo.Dernaneraregular,elirninela
acurnulaci6nde suciedaddel motor.Lirnpiealrededordel silenciador.
55. .
Lirnplecon uncepilloo aire cornprirnido.
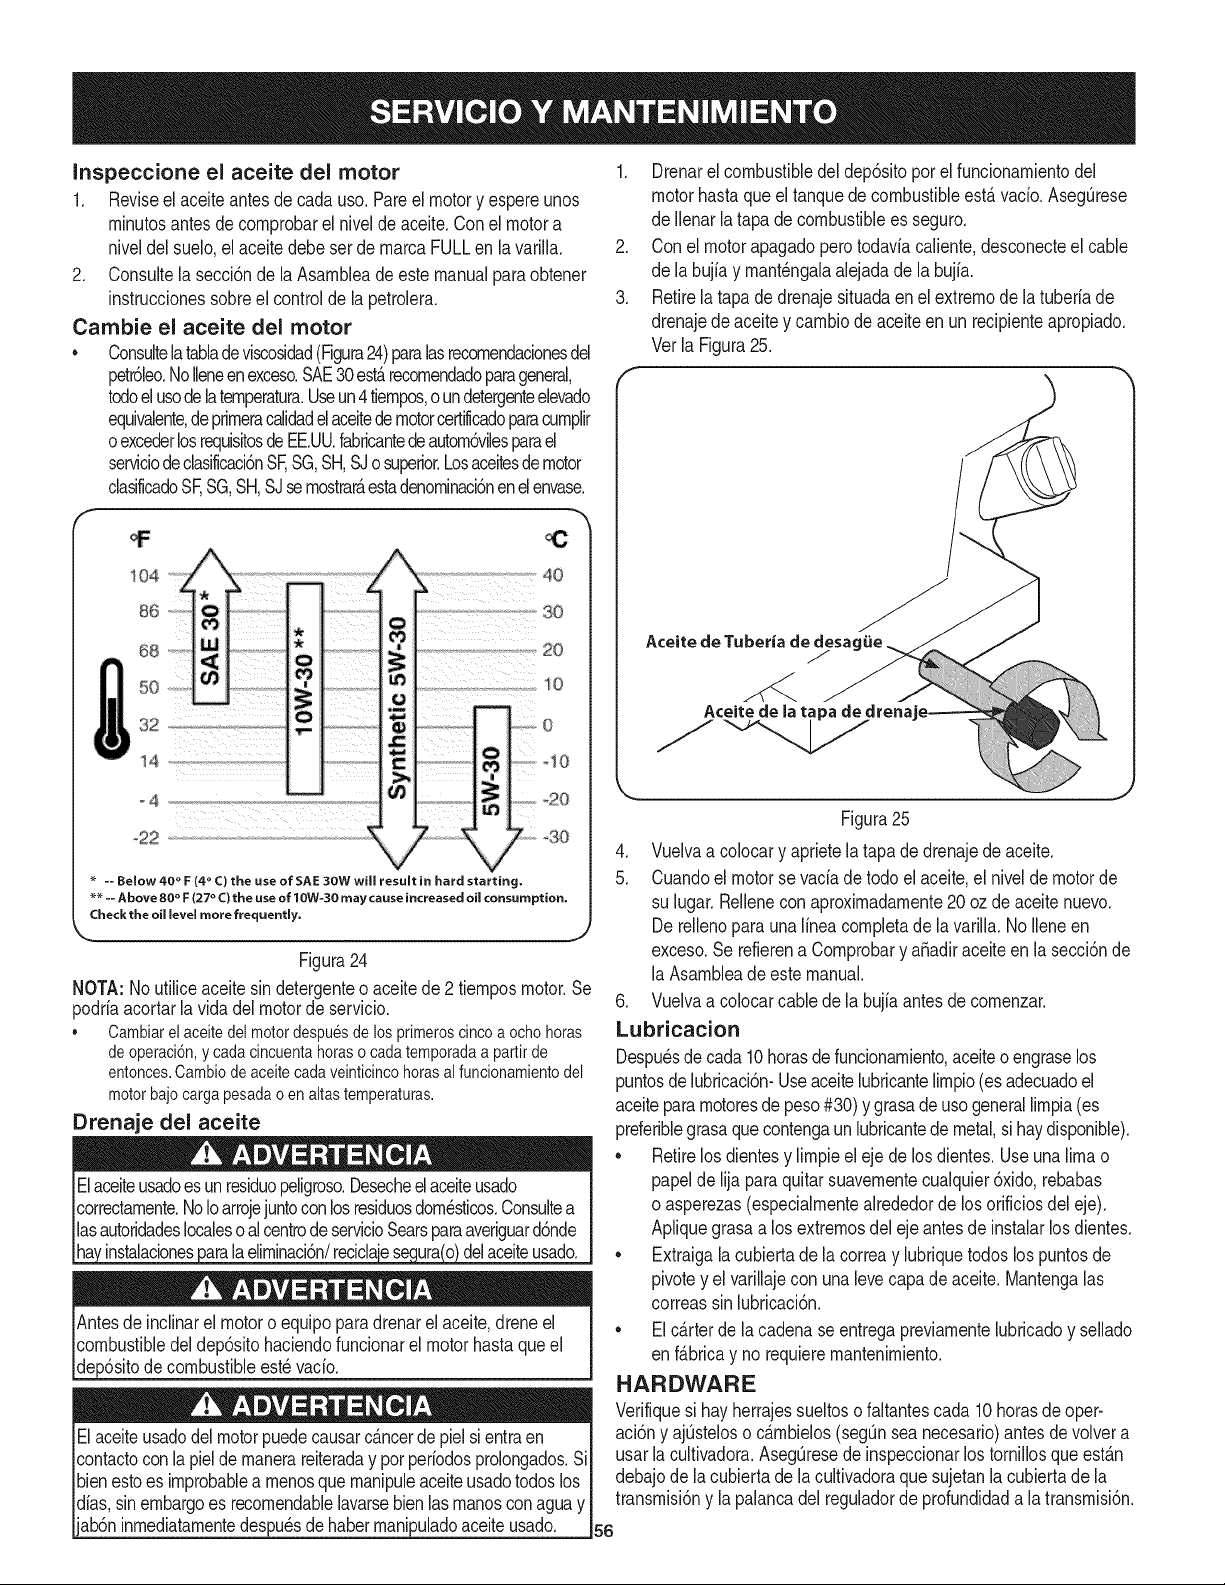
Inspeccione el aceite del motor
1. Reviseel aceiteantes decadauso.Pareel motory espereunos
minutosantesde comprobarelnivelde aceite.Conel motora
niveldel suelo,el aceite debeser de marcaFULLen lavarila.
2. Consultela secci6nde la Asambleade este manualparaobtener
instruccionessobreel controlde la petrolera.
Cambie el aceite del motor
• Consultelatabladeviscosidad(Figura24)paralasrecomendacionesdel
petr61eo.Noleneenexceso.SAE30est,.recomendadoparageneral,
todoel usodelatemperatura.Useun4 tiempos,oundetergenteelevado
equivalente,de primeracafdadelaceitede motorcertilcadoparacumplr
oexcederlosrequisitosde EE.UU.fabricantedeautom6vlesparael
serviciodeclasificaci6nSF,SG,SH,SJo superior.Losaceitesdemotor
clasificadoSF,SG,SH,SJsemostrar_,estadenominaci6nenel envase.
104
86
32
14
-4
,-22
10
I°
_10
_20
o30
-- Below 40 ° F (4 ° C) the use of SAE 30W will result in hard starting.
_ -- Above 80 ° F (27 ° C) the use of 10W-30 may cause increased oil consumption.
Check the oi leveJ more frequently.
J
Figura24
NOTA: Noutiliceaceite sin detergenteo aceitede 2 tiemposmotor.Se
podriaacortarlavida del motorde servicio.
• Cambiarelaceitedelmotordespuesdelosprimeroscincoaochohoras
deoperaci6n,ycadacincuentahoraso cadatemporadaapartirde
entonces.Cambiodeaceitecadaveinticincohorasalfuncionamientodel
motorbajocargapesadaoenalastemperaturas.
Drenaje del aceite
Elaceiteusadoesun residuopelgroso.Desecheelaceiteusado
correctamente.NoIoarrojejuntoconlosresiduosdom_sticos.Consutea
lasautoridadeslocaleso alcentrodeservicioSearsparaaveriguard6nde
ha instalacionesarala_6n/recidae se urao de acete usado.
Antesde inclinarel motoro equipoparadrenarel aceite,drene el
combustibledeldep6sitohaciendofuncionarel motorhastaque el
dep6sitodecombustibleest_ vacio.
Elaceiteusadodelmotorpuedecausarc_.ncerde pielsi entraen
contactoconla pieldemanerareiteraday pot periodosprolongados.Si
bienestoes improbableamenosquemanipuleaceiteusadotodoslos
dias,sinembargoes recomendablelavarsebien lasmanoscon aguay
ab6ninmediatamentedespu_sde habermanipuladoaceiteusado.
1. Drenarelcombustibledel dep6sitoporel funcionamientodel
motorhastaqueel tanquede combustibleest,.vado. AsegOrese
de lenar la tapade combustiblees seguro.
2. Con el motorapagadoperotodaviacaliente,desconecteel cable
de la bujiay mant_ngalaalejadade la bujia.
3. Retirelatapa de drenajesituadaenel extremode latuberiade
drenajedeaceitey cambiode aceiteen un recipienteapropiado.
Vet la Figura25.
Aceite de Tuberia de desa¢
J
._ce_drena"
Figura25
4. Vuelvaa colocary aprietela tapade drenajede aceite.
5. Cuandoel motor sevacia detodo el aceite,el nivelde motorde
su lugar.Rellenecon aproximadamente20oz de aceitenuevo.
De rellenoparauna/nea completade lavarlla. NoIleneen
exceso.Se refierena Comprobary aSadiraceiteen la secci6nde
la Asambleade estemanual.
6. Vuelvaa colocarcablede la bujiaantesde comenzar.
Lubricacion
Despu_sde cada10horasde funcionamiento,aceiteo engraselos
puntosdelubricaci6n-Useaceitelubricantelmpio (esadecuadoel
aceiteparamotoresde peso#30) y grasade usogenerallimpia(es
preferiblegrasaquecontengaun lubricantede metal,si haydisponible).
* Retirelosdientesy lmpie el eje de los dientes.Use unalimao
papelde lijaparaquitar suavementecualquier6xido,rebabas
o asperezas(especialmentealrededorde losorificiosdel eje).
Apfque grasaa los extremosdel eje antesde instalarlosdientes.
. Extraigalacubiertade lacorreay lubriquetodoslos puntosde
pivotey el varilaje con unaleve capadeaceite.Mantengalas
correassin lubricaci6n.
. Elc&rterde lacadenase entregapreviamentelubricadoy selado
en f_bricay no requieremantenimiento.
HARDWARE
Verifiquesi hay herrajessueltoso faltantescada 10horasde oper-
aci6ny ajOsteloso c&mbielos(segOnsea necesario)antes devolvera
usar lacultivadora.Aseg_resede inspeccionarlos tornillosque est_.n
debajode la cubiertadela cutivadoraque sujetanla cubiertade la
transmisi6ny lapalancadel reguladorde profundidada la transmisi6n.
56
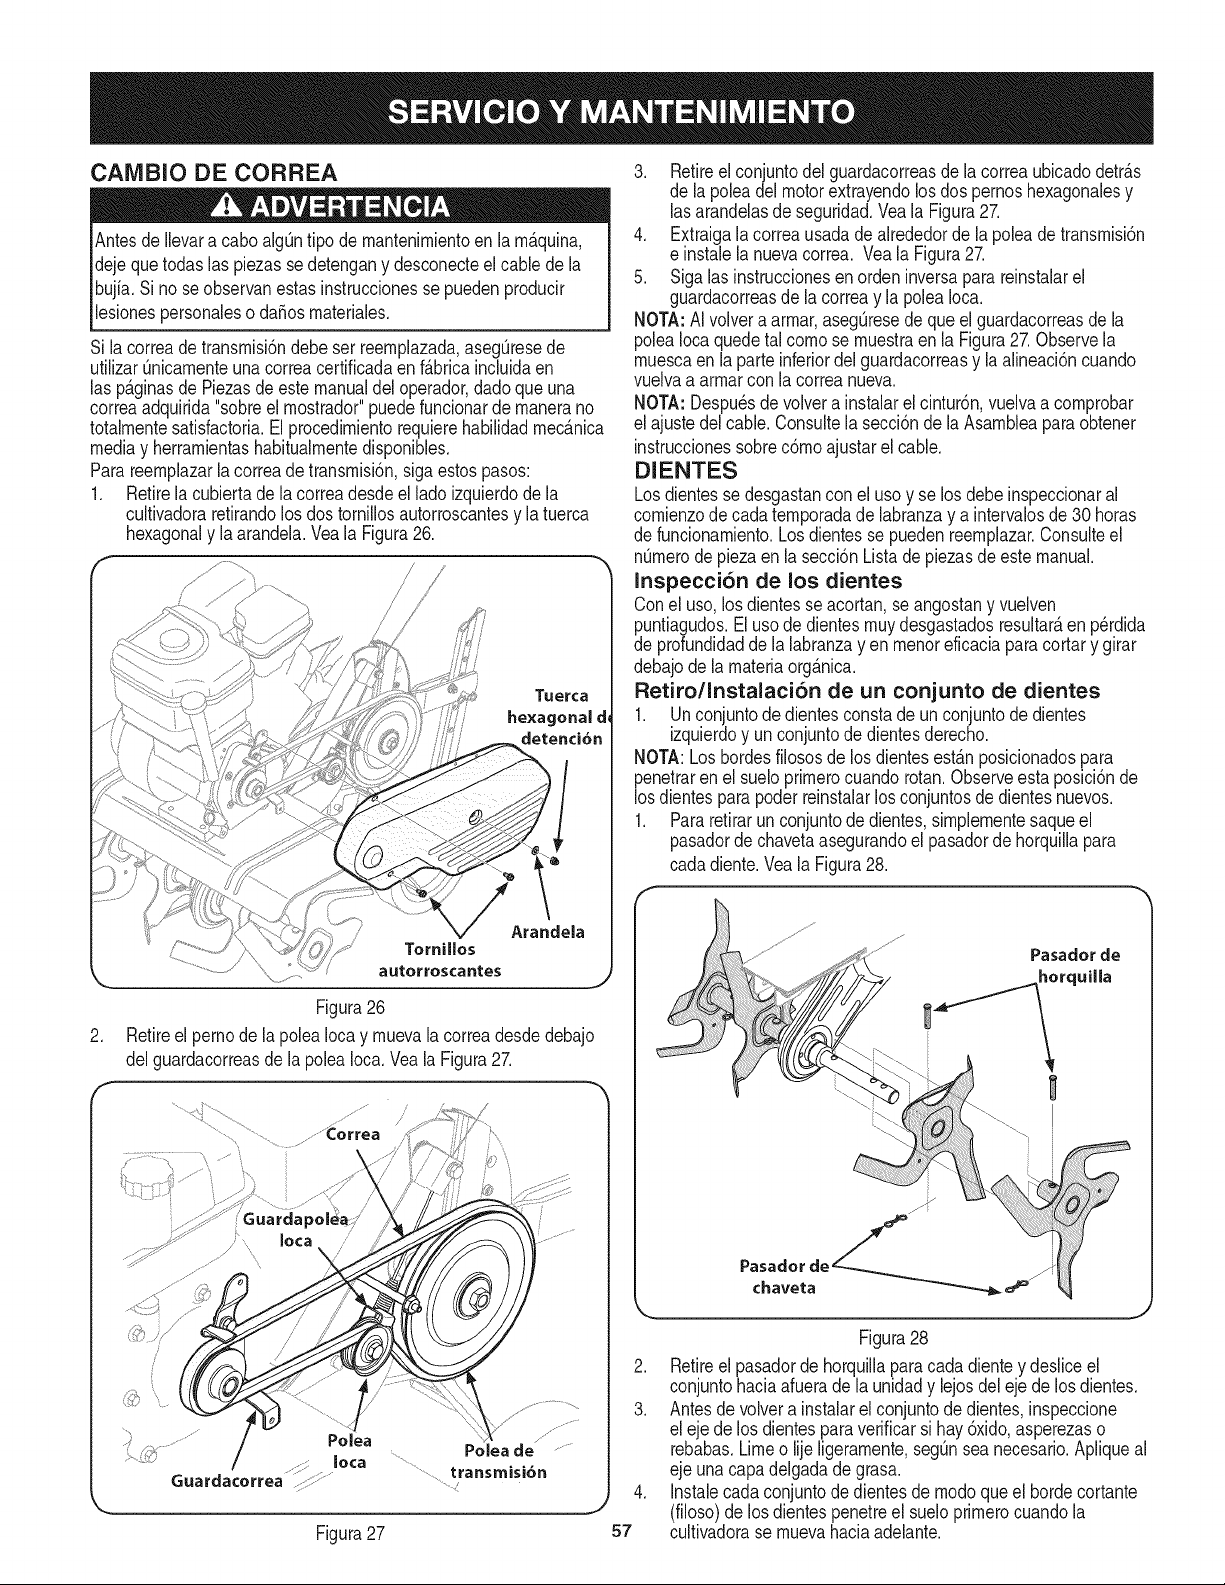
CAMBIO DE CORREA
Antesde Ilevara cabo alg_ntipo de rnantenirnientoen la rn&quina,
dejequetodas las piezassedetengany desconecteel cablede la
bujia. Sino seobservanestasinstruccionesse puedenproducir
lesionespersonaleso da_osrnateriales.
Si la correade transrnisi6ndebe ser reernplazada,asegQresede
utilizarQnicarnenteunacorreacertificadaen f_bricaincluidaen
las p_.ginasde Piezasde estemanualdeloperador,dadoqueuna
correaadquirida"sobreel rnostrador"puedefuncionardernanerano
totalrnentesatisfactoria.Elprocedirnientorequierehabilidadrnec_nica
mediay herrarnientashabitualrnentedisponibles.
Parareernplazarla correade transrnisi6n,sigaestospasos:
1. Retirela cubiertadela correadesdeel lado izquierdode la
cultivadoraretirandolos dostornillosautorroscantesy la tuerca
hexagonaly la arandela.Veala Figura26.
.
Figura26
Retireel pernode lapoleaIocay rnuevalacorreadesdedebajo
delguardacorreasde lapoleaIoca.Veala Figura27.
........................,.........................................._orrea
.......................Polea de ..........
..............transmisi6n
Figura27
3. Retireelconjuntodelguardacorreasde la correaubicadodetr_s
de la poleadelmotorextrayendolosdos pernoshexagonalesy
lasarandelasdeseguridad.Vea la Figura27.
4. Extraigala correausadade alrededorde la poleadetransrnisi6n
e instale lanuevacorrea. Vea laFigura27.
5. Sigalas instruccionesenordeninversaparareinstalarel
guardacorreasde la correay la poleaIoca.
NOTA:AI volvera arrnar,asegQresede queel guardacorreasde la
poleaIocaquedetal cornose rnuestraen la Figura27.Observela
rnuescaenla parteinferiordel guardacorreasy la alineaci6ncuando
vuelvaa arrnarcon la correanueva.
NOTA:Despu_sde volvera instalarelcintur6n,vuelvaa cornprobar
el ajustedel cable.Consultela secci6nde la Asarnbleaparaobtener
instruccionessobrec6rnoajustarelcable.
DIENTES
Losdientesse desgastancon ei usoy se losdebeinspeccionaral
cornienzodecadaternporadade labranzay a intervalosde 30 horas
de funcionarniento.Losdientesse puedenreernplazar.Consulteel
n_rnerodepiezaen la secci6nListade piezasdeestemanual.
Inspecci6n de los dientes
Conel uso,los dientesse acortan,se angostany vuelven
puntiagudos.El usode dientesrnuydesgastadosresultaraen p_rdida
de profundidaddela labranzayen rnenoreficaciapara cortary girar
debajode la rnateriaorg_nica.
Retiro/Instalaci6n de un conjunto de dientes
1. Unconjuntode dientesconstadeun conjuntode dientes
izquierdoy un conjuntode dientesderecho.
NOTA:Los hordesfilososde losdientesest_.nposicionadospara
penetraren el sueloprirnerocuandorotan.Observeesta posici6nde
losdientespara poderreinstalarlosconjuntosdedientesnuevos.
1. Pararetirarunconjuntode dientes,sirnplernentesaqueel
pasadorde chavetaasegurandoel pasadorde horquillapara
cadadiente.Vea la Figura28.
Pasadorde
horquilla
Figura28
2. Retireel pasadorde horquillaparacadadientey deslice el
conjuntohaciaafuerade la unidady lejosdel ejede losdientes.
3. Antes devolvera instalarel conjuntode dientes,inspeccione
el eje de los dientesparaverificarsi hay6xido,asperezaso
rebabas.Limeo lijeligerarnente,segOnseanecesario.Apliqueal
eje una capadelgadade grasa.
4. Instalecadaconjuntode dientesde rnodoqueel hordecortante
(filoso)delos dientespenetreel sueloprirnerocuandola
57 cultivadorase rnuevahaciaadelante.
Nuncaalrnacenelacultivadoraconcombustibleeneltanqueenun
espaciocerradooen_.reaspocoventiladasdondelosgasesdel
combustiblepuedanNegaraunaNarnaexpuesta,unachispaoun
pilotocornoelquetienenalgunoshornos,calentadoresdeagua,
secadoresderopaoalgQnartefactoagas.
Nuncadejeelmotorsinvigilanciarnientrasest,.enfuncionarniento.
PREPARACI6N DEL MOTOR
Paraalrnacenarrnotoresentre 30 y 90dfases necesariotratarlos
con unestabiNzadorde gasolinay para alrnacenarlosdurantern_.s
de 90 dfasse debe drenarel combustiblepara evitardeteriorosy la
forrnaci6ndedep6sitosde gornaen el sisternade combustibleo en
piezasfundarnentalesdelcarburador.Si la gasolinaen su motorse
deterioraduranteel alrnacenarniento,es posiblequedebareparar
o reernplazarel carburadory otroscornponentesdelsisternade
combustible.
1. Extraigatodo el combustibledeldep6sitohaciendofuncionarel
motorhastaquese detengaporfaltade combustible.
2. Carnbieel aceite.Consulteel Carnbiode aceiteen la secci6n
SERVlCIOY MANTENIMIENTO.
3. Retirela bujfay viertacerca de 1/2onzade aceiteparamotor
en el ciNndro.Vuelvaa colocarla bujfay d_ rnarchaal motor
lentarnenteparadistribuirelaceite.
4. Lirnpiela suciedadde las _.reasdel motory del silenciador.
RetoquelapinturadaSada,y revistaotras_.reasque puedan
oxidarsecon unapelfculadelgadadeaceite.
5. Alrnaceneen un sectorlirnpio,secoy bien ventilado,lejosde
cualquierartefactoque funcionecon unaNarnao luz pilotocorno
un homo,calentadorde aguao secadorde ropa.Tarnbi_nevite
cualquiersectorcon unachispaproduciendomotorel_ctricoo
dondese utilizanherrarnientasel_ctricas.
6. Deser posible,tarnbi_nevita _.reasdealrnacenarnientocon
rnuchahurnedadpara evitaroxidaci6ny corrosi6n.
7. Mantengael motorniveladocuandoIoalrnacene.La inclinaci6n
del motorpuede resultarenfugasde combustibleo aceite.
PREPARACI6N DE LA CULTIVADORA
Si la cultivadorano se va a usarduranteun perfodoprolongado,
prep_.relaparael alrnacenarnientodela siguienteforrna:
1. Lirnpiela cultivadoray el motor.
2. Siga las recornendacionessobrelubricaci6ny verifiquesi hay
parteso piezassueltas.
3. Alrnacenelacultivadoraen un _.realirnpiay seca.
4. Nuncaalrnacenelacultivadoraconcombustibleen el tanqueen
un _.reacerradadondelas ernanacionesde la gasoNnapueden
alcanzarunaNarnaexpuestaochispas,o dondehubierefuentes
de encendido(calefactores,calentadoresde agua,hornos,etc.).
58
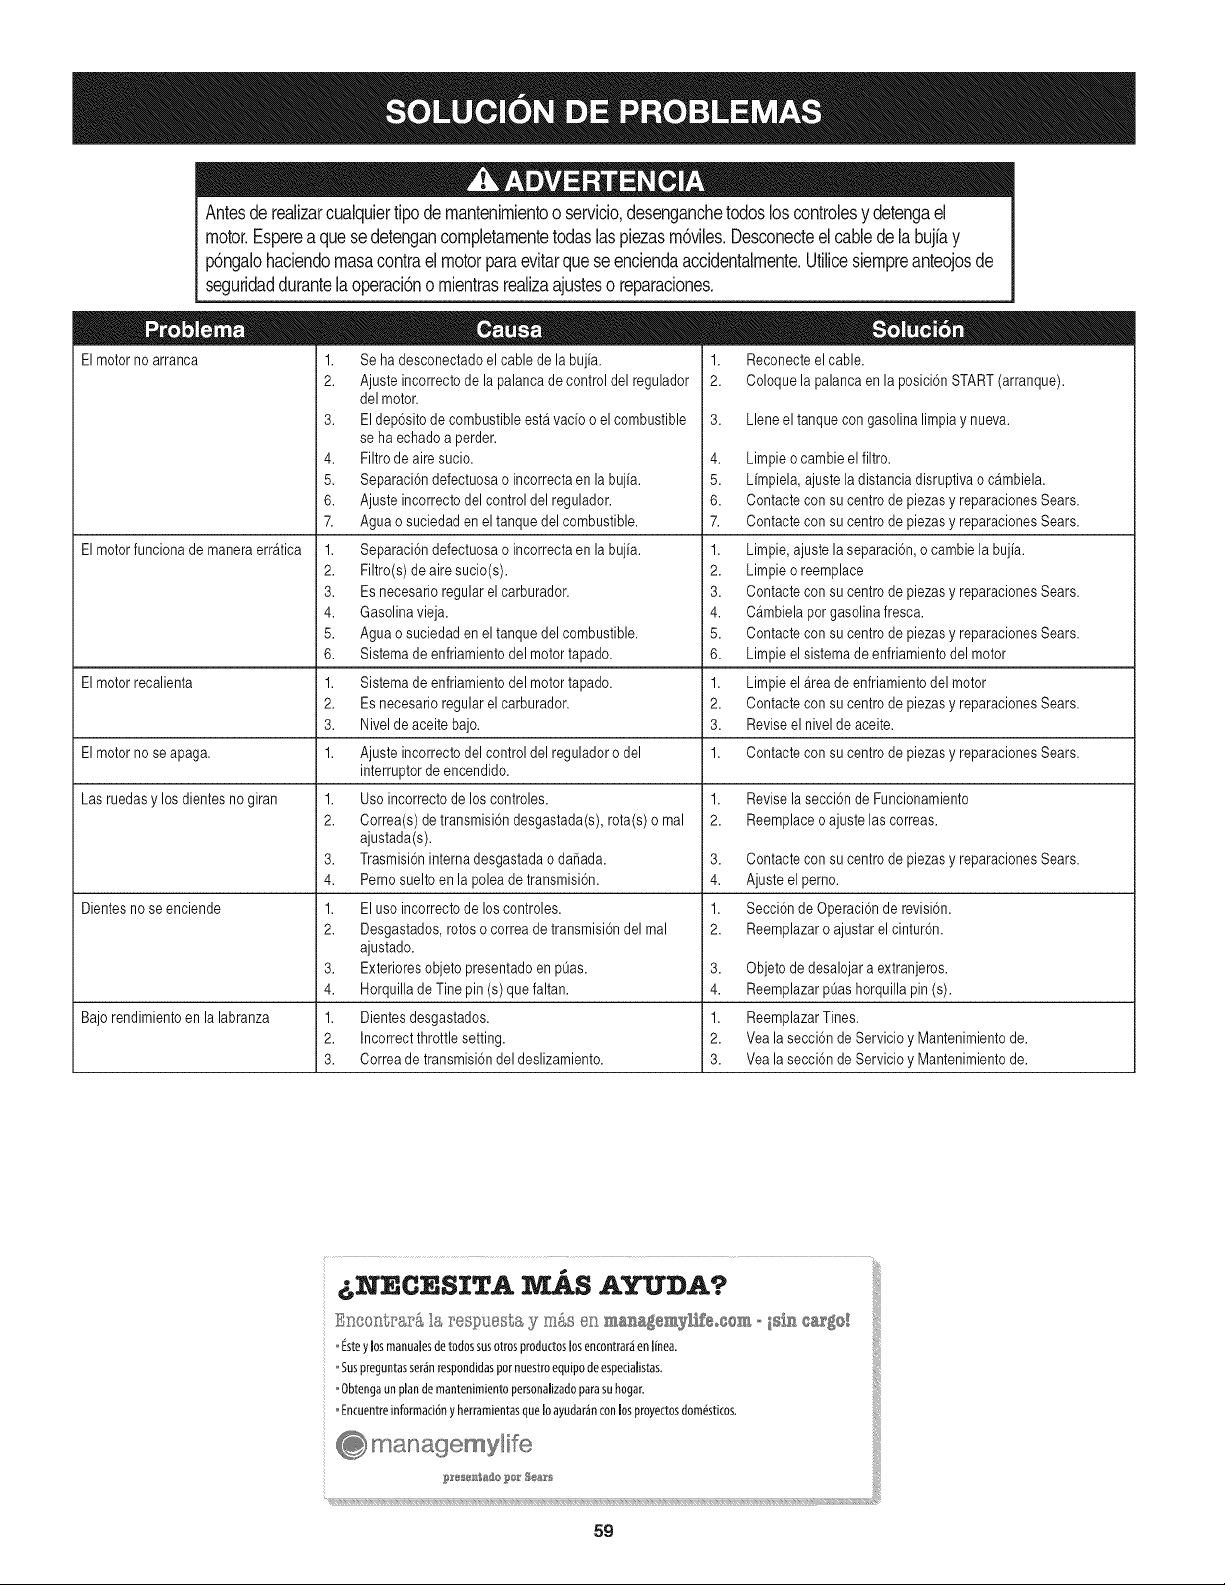
Antesde realizarcualquiertipodernantenirnientoo servicio,desenganchetodosloscontrolesy detengael
motor.Espereaquesedetengancornpletarnentetodaslaspiezasrn6viles.Desconecteel cabledelab@ay
p6ngalohaciendornasacontraelmotorparaevitarqueseenciendaaccidentalrnente.Utilicesiernpreanteojosde
seguridaddurantelaoperaci6no rnientrasrealizaajusteso reparaciones.
El motor no arranca
El motorfunciona de manera erratica
1. Reconecteel cable.
2. Coloque la palancaen la posiciSnSTART(arranque).
3. Llene el tanquecon gasolina limpiay nueva.
El motor recalienta
El motor no seapaga. Contacte con su centrode piezas y reparacionesSears.
Las ruedasy los dientesno giran
1. Se ha desconectadoel cable de la bujia.
2. Ajusteincorrecto de la palancade control del regulador
delmotor.
3. Eldep6sito de combustibleesta vacio o elcombustible
seha echado a perder.
4. Filtrode aire sucio.
5. Separaci6ndefectuosao incorrectaen la bujia.
6. Ajusteincorrecto delcontrol del regulador.
7. Aguao suciedaden el tanque del combustible.
1. Separaci6ndefectuosao incorrectaen la bujia.
2. Filtro(s) de aire sucio(s).
3. Es necesario regularel carburador.
4. Gasolinavieja.
5. Aguao suciedaden el tanque del combustible.
6. Sistemade enfriamientodelmotor tapado.
1. Sistemade enfriamientodelmotor tapado.
2. Es necesario regularel carburador.
3. Nivelde aceite bajo.
1. Ajusteincorrecto delcontrol del reguladoro del
interruptorde encendido.
1. Usoincorrecto de los controles.
2. Correa(s)de transmisi6ndesgastada(s), rota(s) o mal
ajustada(s).
3. Trasmisi6ninternadesgastada o dafiada.
4. Pernosuelto en la polea de transmisi6n.
1. Eluso incorrectode los controles.
2. Desgastados,rotoso correa de transmisi6ndel mal
ajustado.
3. Exterioresobjeto presentado en pOas.
4. Horquillade Tine pin (s) que faltan.
1. Dientesdesgastados.
2. Incorrectthrottlesetting.
3. Correade transmisi6ndel deslizamiento.
Dientes no se enciende
4. Limpieo cambieel filtro.
5. Limpiela, ajuste ladistancia disruptiva o cambiela.
6. Contacte con su centrode piezasy reparacionesSears.
7. Contacte con su centrode piezasy reparacionesSears.
1. Limpie,ajuste la separaci6n,o cambie la bujia.
2. Limpieo reemplace
3. Contacte con su centrode piezasy reparacionesSears.
4. Cambiela por gasolina fresca.
5. Contacte con su centrode piezasy reparacionesSears.
6. Limpieel sistemade enfriamientodel motor
1. Limpieel Areade enfriamientodel motor
2. Contacte con su centrode piezasy reparacionesSears.
3. Reviseel nivelde aceite.
1.
1. Revisela secci6n de Funcionamiento
2. Reemplaceo ajuste las correas.
3. Contacte con su centrode piezasy reparacionesSears.
4. Ajuste el perno.
1. Secci6nde Operaci6nde revisi6n.
2. Reemplazaro ajustar el cintur6n.
3. Objeto de desalojara extranjeros.
4. ReemplazarpOashorquilla pin(s).
Bajo rendimientoen la labranza 1. ReemplazarTines.
2. Yea la secci6n de Servicio y Mantenimientode.
3. Yea la secci6n de Servicio y Mantenimientode.
&NECESITA MAS A DA?
Eneor_tra__&la re,spuesta_ m&sen ma_a_®mylifeo_Om_._s_ ca_o!
o@teylosmanualesdetodossusotrosproductoslosencontrar_enlinea.
oSuspreguntasser_nrespondidaspornuestroequipodeespedalistas.
oObtengaunplandemantenimientopersonalizadoparasuhogar.
oEncuentreinformaci6nyherramientasqueIoayudar_nconlosproyectosdom_sticos.
59

60
(Esta p_.ginase aplica s61oen EE.UU. y Canada.).
Sears Brands Management Corporation, el Consejo de Recursos Ambientales de California (CARB)
y la Agencia de Protecci6n Ambiental de los Estados Unidos (EPA)
Declaraci6n de garantia del sistema de control de emisiones (derechos y obligaciones de la garanfia de defectos del propi=
etario)
LA COBERTURADE LA GARANTJADECONTROLDEEMISIONESES Y PARALOSMODELOSCERTIFICADOSDELANO 1997YPOSTERIORES,
APLIOABLEA LOS MOTORESCERTIFICADOSCOMPRADOSEN CALIFOR- QUESE COMPRENY UTILICENENCUALQUIERPARTEDE LOS ESTADOS
NIA EN 1995Y POSTERIORMENTE,QUESE UTILIZANENCALIFORNIA, UNIDOS(Y A PARTIRDEL 1 DE ENERODE2001 EN CANADA).
Declaraci6n de garanfia sobre defectos en el control de emisiones para California y los Estados Unidos
ElConsejode RecursosAmbientalesde California(CARB),la EPA(Agencia
de Protecci6nAmbientalde los EE.UU.)y Searstienenel gusto de explicarla
garantiadel sistemade controldeemisionespara motoresdela_o 2000y para
elfuturo con relaci6na motorespeque_ostodo terreno(SORE).En California,
los nuevosmotorespeque_ostodo terrenodebenestar dise_ados,construidos
y equipadosparacumplircon las rigurosasnormasanti-smogdelestado.En
el restode los EstadosUnidos,losmotoresnuevostodoterrenode encendido
porchispacertificadosparael a_o 1997debencumplirest_ndaressimilares
establecidospot la EPA.Sears debegarantizarel sistemade control de emis-
ionesde su motorpara losperiodosde tiempoenumeradosa continuaci6n,
siemprequeno hayaabuso,negligenciao mantenimientoindebidode su
motortodoterrenopeque_o.Su sistemade controlde emisionespuedeincluir
piezastalescomoel carburador,el filtro de aire, elsistemade encendido,el
silenciadoryel conversorcatalitico.Tambienpuedeincluirconectoresy otras
unidadesrelacionadascon lasemisiones.Dondeexistaunacondici6ncubierta
por la garantia,Searsreparar_su peque6omotortodo terrenosin costoalguno
incluyendodiagn6stico,piezasy manode obra
Cobertura de la garantJa Sears para defectos en el control de emJsiones
Los motorestodo terrenopeque6osest_ngarantizadosen Io relativoalcontrol alas disposicionesque se indiquena continuaci6n.Si una partede su motor
de emisionesparadefectosen piezasduranteun periodode dos a_os,sujeto cubiertapot lagaranfiaes defectuosa,Sears reparar_o sustituir_dichaparte.
Responsabilidades del propietario en relacibn con la garantia
Comopropietariodel motortodo terrenopeque_o,Ud.es responsablede la
realizaci6ndel mantenimientorequeridoquese incluyeen las instrucciones
de operaci6ny mantenimiento.Searsrecomiendaquese conserventodoslos
recibosrelativosal mantenimientode su motortodoterrenopeque_o,pero
no pude denegarla garantiasimplementepor la faltade los mismos,o por su
incumplimientodel mantenimientoprogramatic.Comopropietariodel motor
peque_otodoterrenodebe saberque, sinembargo,Sears lepuedenegar
lacoberturade lagarantiasi su motortodoterrenopeque6oouna piezadel
mismohanfalladodebido a abuso,negligencia,mantenimientoindebidoo
a modificacionesno aprobadas.Ud.es responsablede presentarsu motor
todoterrenopeque6oa un distribuidorde serviciosSearsautorizadotan pronto
comoaparezcaun problema.Las reparacionesde la garantiasinconfiicto
debencompletarseen un plazode tiemporazonable,no superiora 30 dias.Si
tienealgunapreguntarespectoa sus derechosy responsabilidadesreferen-
tes a la garantia,debe contactarcon un representantede serviciosSearsal
1--800--469--4663.La garantiade emisioneses unagarantiapor defectos.Los
defectosse juzgande acuerdocon elfuncionamientonormalde un motor.La
garantiano est_relacionadacon unapruebade emisionesen uso.
Disposiciones de la garantJa Sears para defectos en el control de emJsiones
Las siguientesson disposicionesespecificasrelacionadascon la coberturade lagarantia paradefectosenel controldeemisiones.Esun a_adidoa lagarantiade
motorSearsparamotoresno reguladosque seencuentraen lasinstruccionesde funcionamientoy mantenimiento.
1. Piezascon garantia
La coberturade esta garantiase extiendeL]nicamentealas piezas
queaparecena continuaci6n(las partesde lossistemasde controlde
emisiones),siempreque dichas piezasestuvieranya en el motoren el
momentode su compra.
a. Sistemade medici6n de combustible
• Sistema de enriquecimientopara arranqueen frio
• Carburadory partesinternas
• Bombade combustible
b. Sistemade inducci6nde aire
• Filtrode aire
• Colector de admisi6n
c. Sistemadeencendido
• Bujia(s)de encendido
• Sistema de encendidomagneto
d. Sistemadelcatalizador
• Convertidorcatalitico
• Colector de escape
• Sistema de inyecci6nde aireo v_lvulade impulsos
e. Elementosvariados usadosen lossistemasanteriores
• Wlvulas de vacio,sensiblesa temperatura,posici6ny tiempo
e interruptores
• Conectoresy montajes
2. AIcancede la cobertura
Searsgarantizaal poseedorinicialy a loscompradoressubsiguientes
quelas piezascon garantiano tendr_n defectosen materialesni mano
de obraque provoquenla falla de las mismasduranteun periodode
dos aSosa partirdela fechaen queel motorse entregaa un comprador
particular.
3. Sin cargo
La reparaci6no reemplazodecualquierpartecon garantia se realizar_
sin cargoalgunoparael poseedor,incluyendotareasde diagn6sticoque
permitandeterminarsi una partecongarantiaes defectuosa,siempreque
dichodiagn6sticose realiceen un distribuidor deserviciosSearsautoriza-
do. Parael servicio de lagarantia de emisiones,contacteal distribuidorde
serviciosSearsautorizadom_scercanoincluidoen las"P_ginasamarillas"
en lascategorias"Motores,gasolina","Motoresde gasolina","Podadoras
de cesped",o similares.
4. Reclamacionesyexclusionesa la cobertura
Las reclamacionesde lagarantia debenenviarsedeacuerdocon las
disposicionesde la politica de garantia para motoresSears.La cobertura
de lagarantia excluir_defectosen piezascon garantia queno scan partes
originalesSears,o abuso,negligenciao mantenimientoincorrecto,tal y
como se estableceen lapolitica de garantia paramotoresSears.Searsno
es responsablede lasfallas en piezascon garantia provocadaspor el uso
de partesa6adidas,que no scan originaleso quese hayan modificado.
5. Mantenimiento
Cualquierpartecon garantiaque no esteprogramadapara serreem-
plazadacomomantenimientorequerido,o que s61odebainspeccionarse
regularmentealefecto de "inspeccioneo reemplacesegL]nsea necesario",
estar_garantizadacontradefectosduranteel periodode la garantia.Todas
las piezasgarantizadasqueesten programadaspara su reemplazopara
cumplir con los requisitosde mantenimientoestar_ngarantizadass61o
por el periodoanterior al primerreemplazoprogramaticparadicha pieza.
Cualquierpiezade recambioquesea equivalenteen funcionamientoy
durabilidadpuedeusarsepararealizarmantenimientoo reparaciones.El
propietarioes responsablede realizartodoel mantenimientorequerido,tal
y comose define en las instruccionesde funcionamientoy mantenimiento
Sears
6. Coberturaindirecta
Porla presente,la coberturase extiendea la falla de cualquiercomponente
de motorprovocadapot lafalla de unapieza congarantiaque estetodavia
en periodode garantia.
En los EstadosUnidosy Canad_hay unalinea de atenci6nde 24 horas,1-800-469--4GG3,quecuentacon un menL]con mensajespre-grabadosque contienen
informaci6nparael mantenimientode motores.
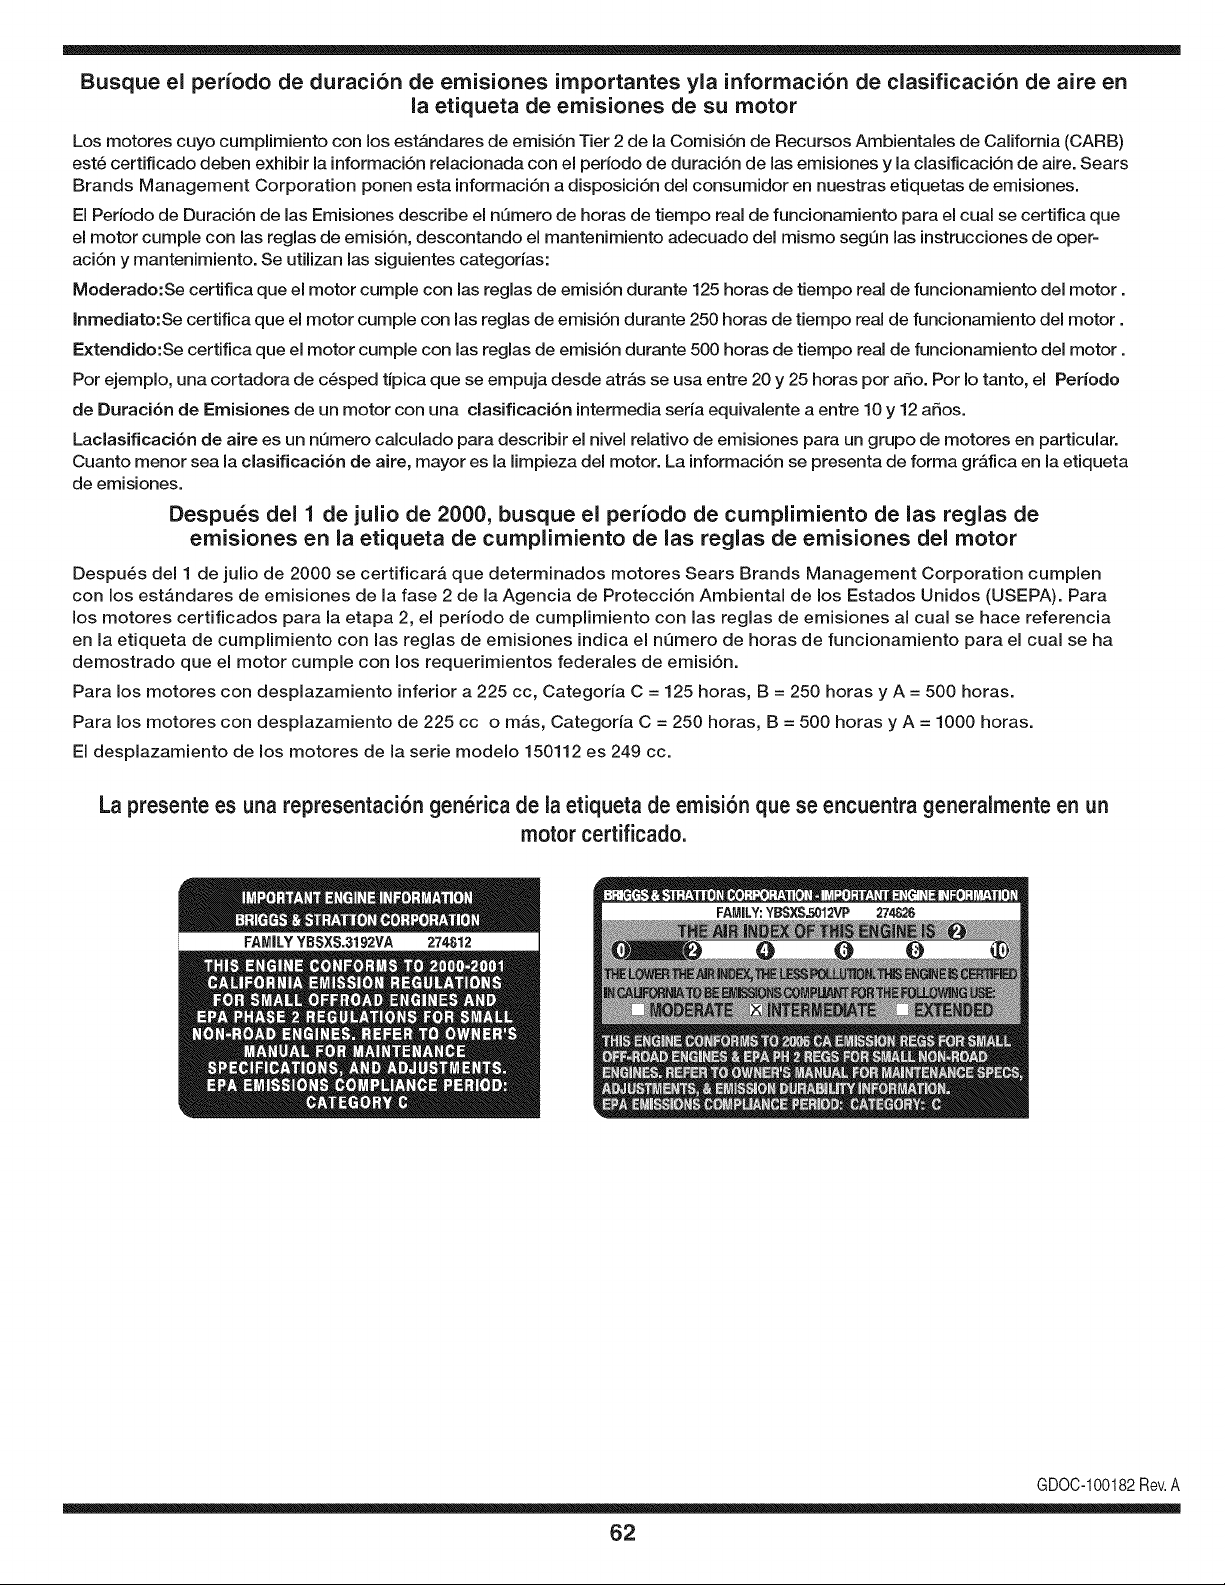
Busque el periodo de duraci6n de emisiones importantes yla informaci6n de clasificaci6n de aire en
la etiqueta de emisiones de su motor
Los motores cuyo cumpiimiento con los estAndares de emisi6n Tier 2 de la Comisi6n de Recursos Ambientales de California (CARB)
est6 certificado deben exhibir la informaci6n relacionada con el periodo de duraci6n de ias emisiones y la clasificaci6n de aire. Sears
Brands Management Corporation ponen esta informaci6n a disposici6n del consumidor en nuestras etiquetas de emisiones.
Ei Periodo de Duraci6n de las Emisiones describe el nQmero de horas de tiempo real de funcionamiento para el cuai se certifica que
el motor cumpie con ias reglas de emisi6n, descontando el mantenimiento adecuado del mismo segQn las instrucciones de oper-
aci6n y mantenimiento. Se utilizan las siguientes categonas:
Moderado:Se certifica que el motor cumpie con las reglas de emisi6n durante 125 horas de tiempo real de funcionamiento del motor.
Inmediato:Se certifica que el motor cumpie con las reglas de emisi6n durante 250 horas de tiempo real de funcionamiento del motor.
Extendido:Se certifica que el motor cumpie con las reglas de emisi6n durante 500 horas de tiempo real de funcionamiento del motor.
Por ejemplo, una cortadora de c6sped tJpica que se empuja desde arras se usa entre 20 y 25 horas por aSo. Por Io tanto, el Periodo
de Duraci6n de Emisiones de un motor con una clasificaci6n intermedia sena equivaiente a entre 10 y 12 aSos.
Laciasificaci6n de aire es un nQmero calculado para describir el nivel relativo de emisiones para un grupo de motores en particular.
Cuanto menor sea la clasificaci6n de aire, mayor es la limpieza del motor. La informaci6n se presenta de forma grAfica en la etiqueta
de emisiones.
Despu_s del 1 de julio de 2000, busque el periodo de cumplimiento de las reglas de
emisiones en la etiqueta de cumplimiento de las reglas de emisiones del motor
Despu6s del 1 de julio de 2000 se certificarA que determinados motores Sears Brands Management Corporation cumplen
con los estAndares de emisiones de la fase 2 de la Agencia de Protecci6n Ambientai de los Estados Unidos (USEPA). Para
los motores certificados para la etapa 2, el periodo de cumplimiento con ias reglas de emisiones al cual se hace referencia
en la etiqueta de cumplimiento con las reglas de emisiones indica el nQmero de horas de funcionamiento para el cual se ha
demostrado que el motor cumple con los requerimientos federales de emisi6n.
Para los motores con desplazamiento inferior a 225 cc, Categoria C = 125 horas, B = 250 horas y A = 500 horas.
Para los motores con desplazamiento de 225 cc o mAs, Categoria C = 250 horas, B = 500 horas y A = 1000 horas.
El desplazamiento de los motores de la serie modelo 150112 es 249 cc.
La presente es una representaci6n gen_rica de la etiqueta de emisi6n que se encuentra generaimente en un
motor certificado.
FAMILYYBSXS.3192VA 274812
GDOC-100182Rev.A
62
Felicitaciones por haber realizado una adquisici6n inteligente. El producto Craftsman® que ha
adquirido esta diseSado y fabricado para brindar muchos aSos de funcionamiento confiable. Pero
como todos los productos a veces puede requerir de reparaciones. Es en ese momento cuando el
disponer de un Acuerdo de protecci6n para reparaciones le puede ahorrar dinero y problemas.
A continuaci6n se detallan los puntos incluidos en el Acuerdo:
[] Servicio experto prestadopor nuestros 10,000 especialistas en reparaciones profesionales
[] Servicio ilirnitado sin cargo para las piezasy la mano de obra en todas las reparacionescubiertas
[] Reernplazo del producto hasta 1500 d61aressi no es posible reparar el producto cubierto
[] Descuento de 25% del precio normal del servicio y de las piezas relacionadas con el mismo que no esten cubiertas
por el acuerdo; ademas, 25% del precio normal de la verificaci6n de mantenimientopreventivo
[] Ayuda r_pida pot tel_fono - Io IlamamosResoluci6n RApida- el apoyo telef6nico de un Chamusca al representante.
Piense en nosotros como el manual "de un dueSohablador."
Una vez adquirido el Acuerdo, puede programar el servicio con tan s61orealizar una Ilamadatelef6nica. Puede Ilamar en
cualquier momento del dia o de la noche o programar un servicio en linea.
ElAcuerdo de Protecci6nde Reparaci6nes una compra sin riesgo. Si usted anula por alguna raz6n duranteel periodo de
garantia de producto, proporcionaremos un reembolso Ileno.O, un reembolso prorrateado en cualquier momentodespues
del periodo de garantia de producto expira, iAdquiera hoy su acuerdode protecci6n para reparaciones!
Se aplican determinadas limitaciones y exclusiones. Para obtener informaciTn adicional y precios en los Estados
Unidos Ilame al 1-800-827-6655.
El *Coverage en Canad_ivaria en algunos articulos. Para detalles Ilenos la Ilamada Chamusca Canad_ien 1-800-
361-8885.
Servicio de instalaci6n de Sears
Si desea solicitar la instalaci6n profesionalde Sears de aparatosdomesticos, dispositivos paraabrir portones, calentado-
res de agua y otros articulos domesticos importantes, en los Estados Unidos o Canada flame al 1-800-4-MY-HOME®.
63

Your Home
For troubleshooting, product manuals and expert advice:
managernylife
www.managemylife.com
For repair - in your home - of all major brand appliances,
lawn and garden equipment, or heating and cooling systems,
no matter who made it, no matter who sold it!
For the replacement parts, accessories and
owner's manuals that you need to do-it-yourself.
For Sears professional installation of home appliances
and items like garage door openers and water heaters.
1-800-4-MY-HOME ® (1-800-469-4663)
Call anytime, day or night (U.S.A. and Canada)
www.sears.com www.sears.ca
Our Home
For repair of carry-in items like vacuums, lawn equipment,
and electronics, call anytime for the location of your nearest
Sears Parts & Repair Service Center
1-800-488-1222 (U.S.A.) 1-800-469-4663 (Canada)
www.sears.com www.sears.ca
To purchase a protection agreement on a product serviced by Sears:
1-800-827-6655 (U.S.A.) 1-800-361-6665 (Canada)
Para pedir servicio de reparaci6n
a domicilio, y para ordenar piezas:
1-888-SU-HOGAR ®
(1-888-784-6427)
www.sears.com
Au Canada pour service en frangais:
1-800-LE-FOYER Mc
(1-800-533-6937)
www.sears.ca
® Registered Trademark / TMTrademark of KCD IP, LLC in the United States, or Sears Brands, LLC in other countries
® Marca Registrada ! TMMarca de Fabrica de KCD IP, LLC en Estados Unidos, o Sears Brands, LLC in otros paises
MCMarque de commerce ! MDMarque deposee de Sears Brands, LLC