Installation and operating instruction
Aircirculation Heater
Instrucciones de instalación y operación Calefactor de
circulación de aire
Notice de montage et de Fonctionnement Chauffage
par circulation d‘air
PALMA
US
ES
FR
2
Operating instructions .................................................................................................................................................... 3
Instrucciones de funcionamiento .......................................................................................................................... 21
Notice d‘utilisation ........................................................................................................................................................ 39
US
ES
Index
Do not drink any alcohol or take any drugs before or during
the installation of the Palma Heater and follow the safety
instructions carefully.
Read all instructions first before installing the
Palma Heater!
Ne buvez pas d‘alcool et ne prenez pas de drogue avant
ou pendant le montage du Chauffage Palma
et suivez attentivement les conseils de sécurité.
Lisez les instructions avant d‘installer le chauffage Palma !
No beba alcohol ni consuma drogas antes o durante la
instalación del Calefactor Palma y siga cuidadosamente las
instrucciones de seguridad.
¡Lea todas las instrucciones antes de instalar el
Calefactor Palma!
FR
3
Introduction
This manual is intended for the Palma RAW and Palma. The Palma RAW consists of an air circulation
heater. The Palma consists of the air circulation heater and a wet room thermostat Thermol.The
electric air circulation heater Palma and Palma RAW serves to control the
temperature of greenhouses and conservatories.
Thermo 2 (Palma Digital only) Palma
Device type Digital-Thermostat Device type Air circulation heater
Power supply 110VAC ±10%, 50/60Hz Power supply 110VAC ±10%, 50/60Hz
Max. breaking capacity
1500 W Maximum performance 1500 W
Max. switching current 16 A
Maximum power
consumption
9,0 A
Control range: ± 0 – 90 °F Control range 32 to 185 °F
Distinction rate ± 2 °F Controller tolerance: ± 41 °F
Input < 1,5 W Input < 1,5 W
Protection class II Protection class I
Protective system IP X4 Protective system IP X4
Sensor length: approx. 5ft Dimensions 11 x 8 x 12.5“
US
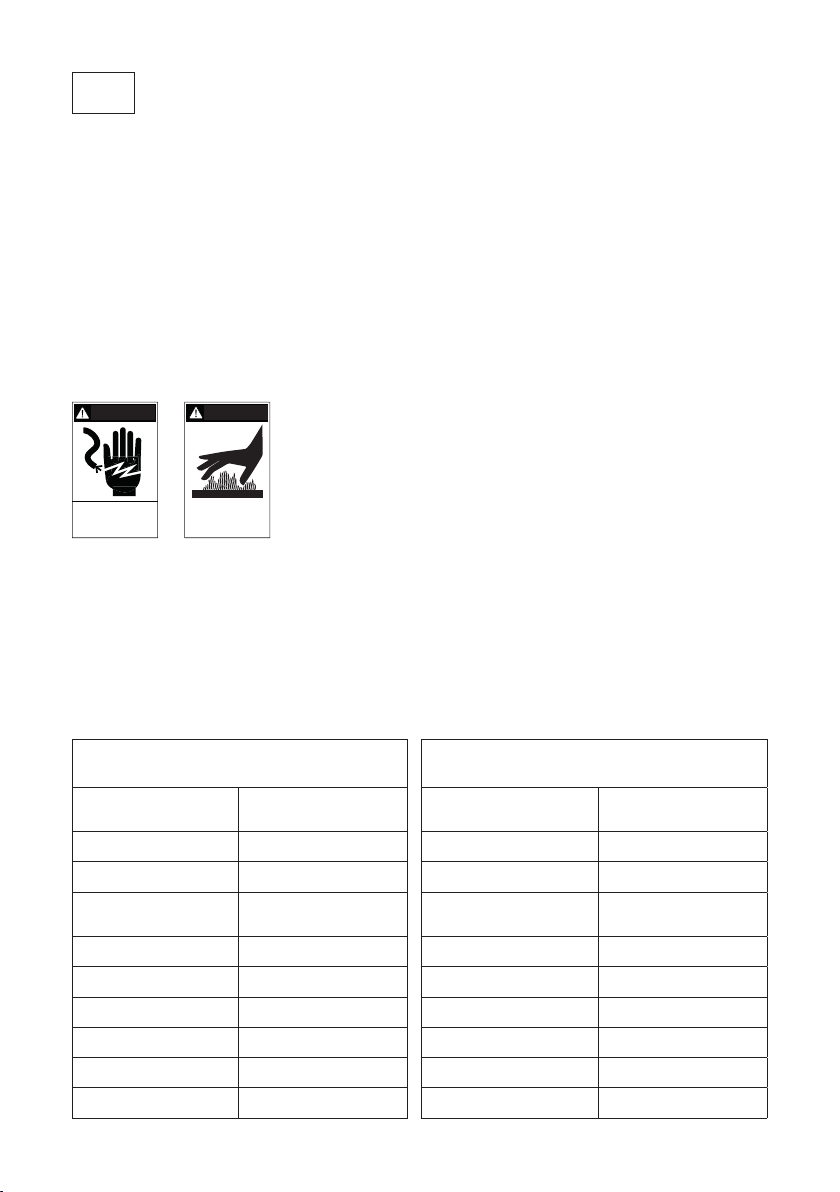
WARNING!
To reduce the risk of fire, electric shock, or personal injury, read
carefully and follow these instructions as well as the general
advice on safety and risks before installation. Keep this leaflet in a
safe place for future reference. If you have any doubt about the sa-
fety of the unit seek the advice of an expert. If the unit is used in a
greenhouse make sure that the electrical connections are carried
out by qualified personnel.

4
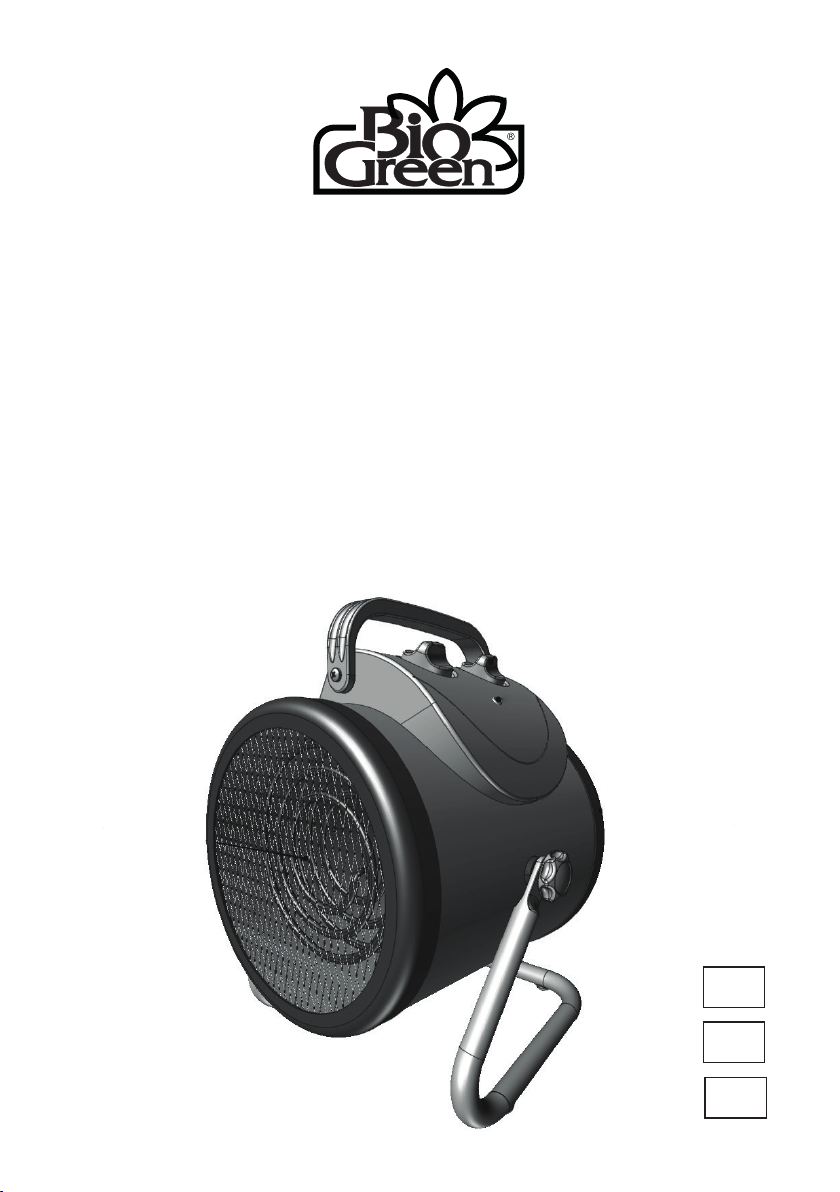
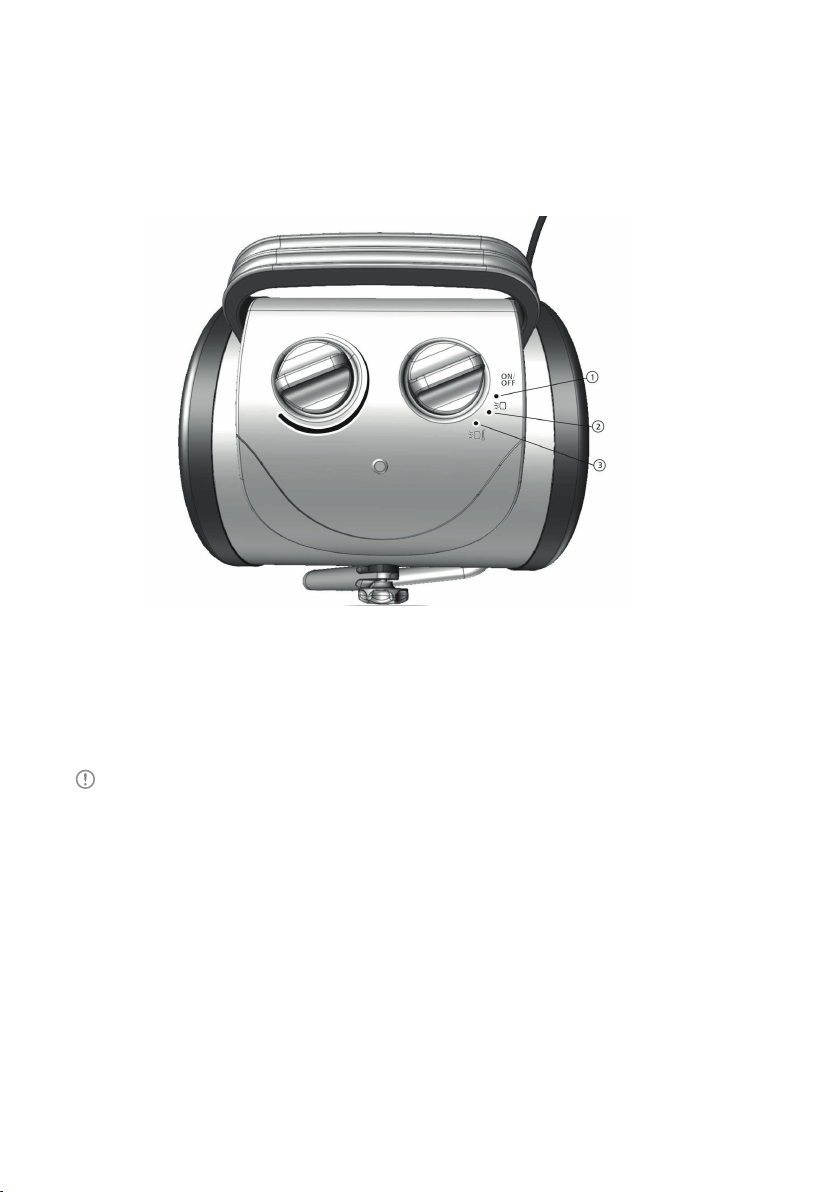
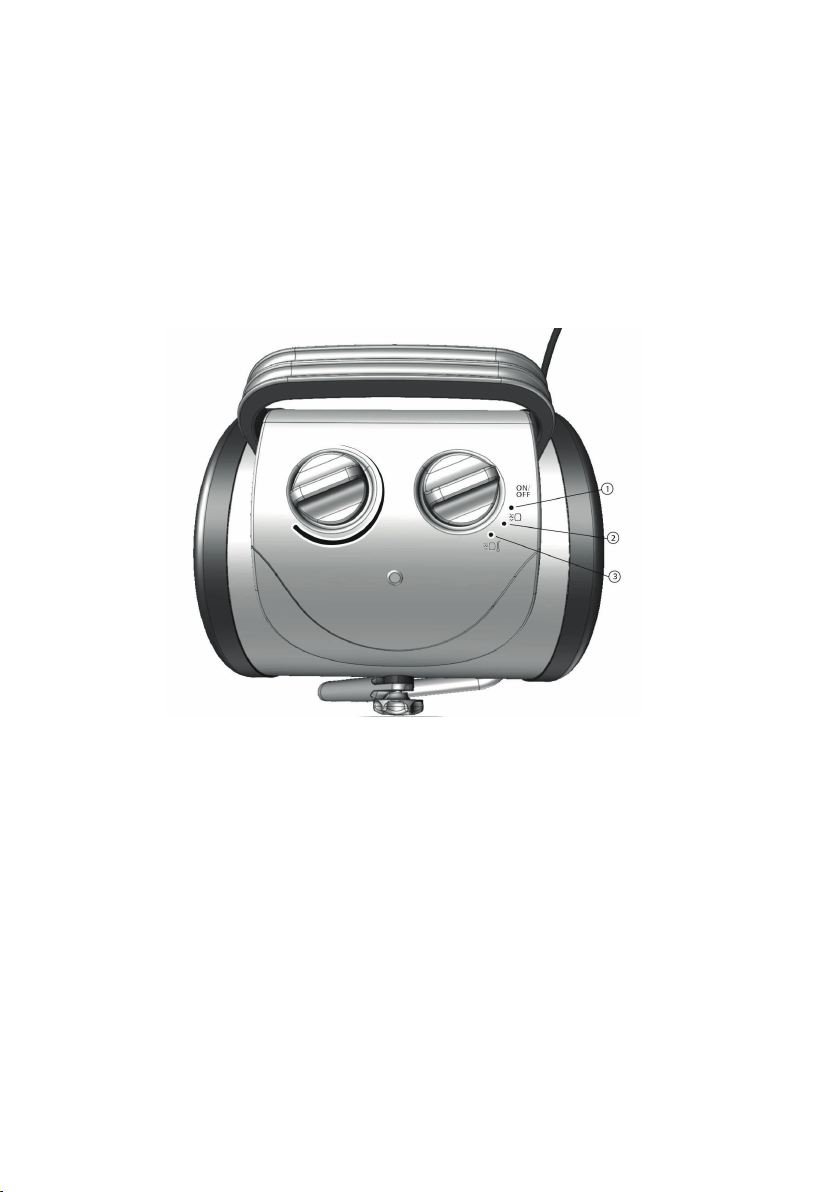
Image 1
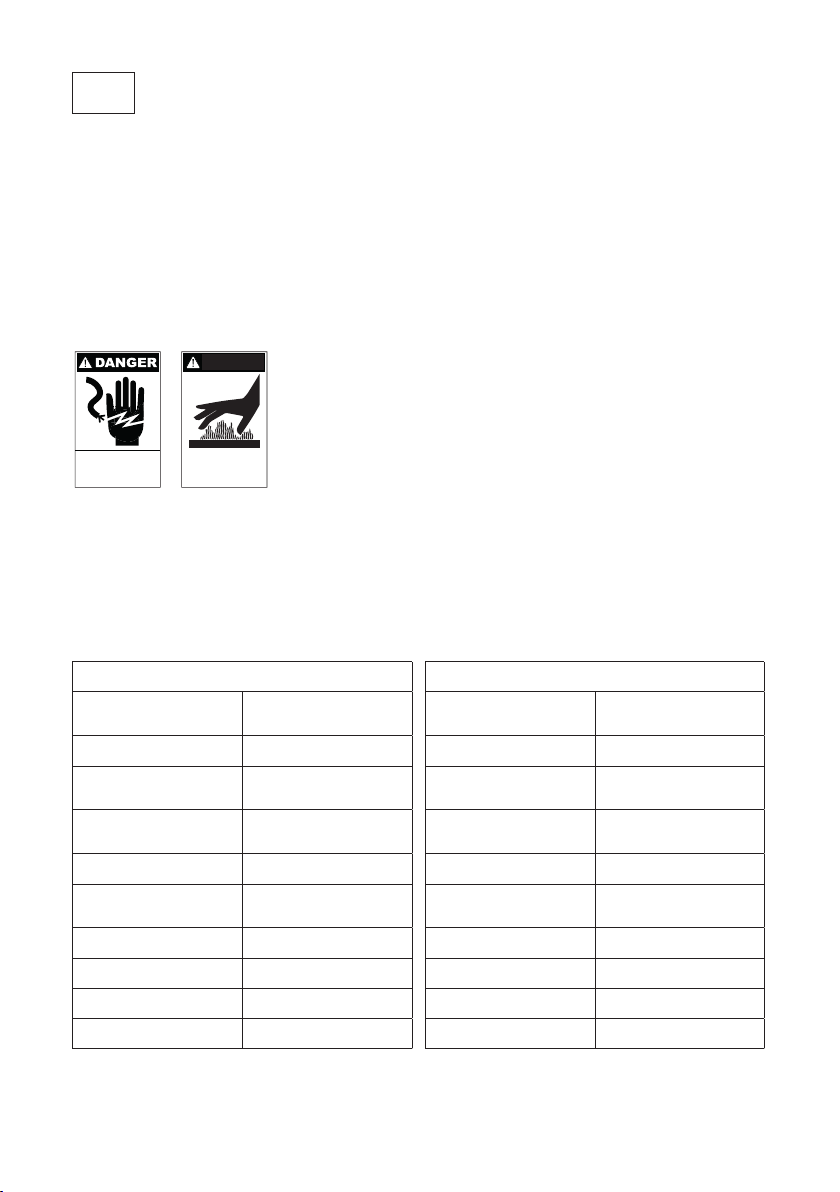
1.2 Main component parts
Palma-Digital (1)
1. Air intake opening
2. Air output opening
3. Thermostat switch
4. Selector switch
5. Operation lamp
5
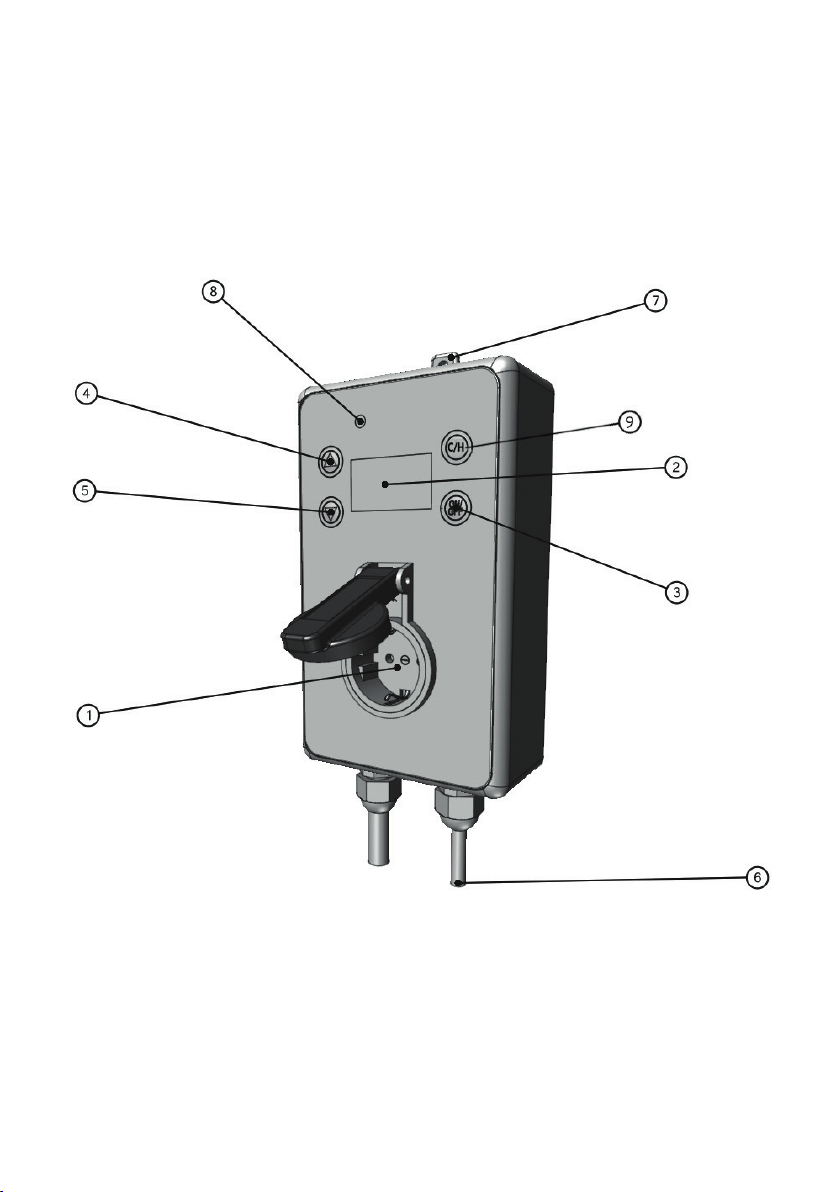
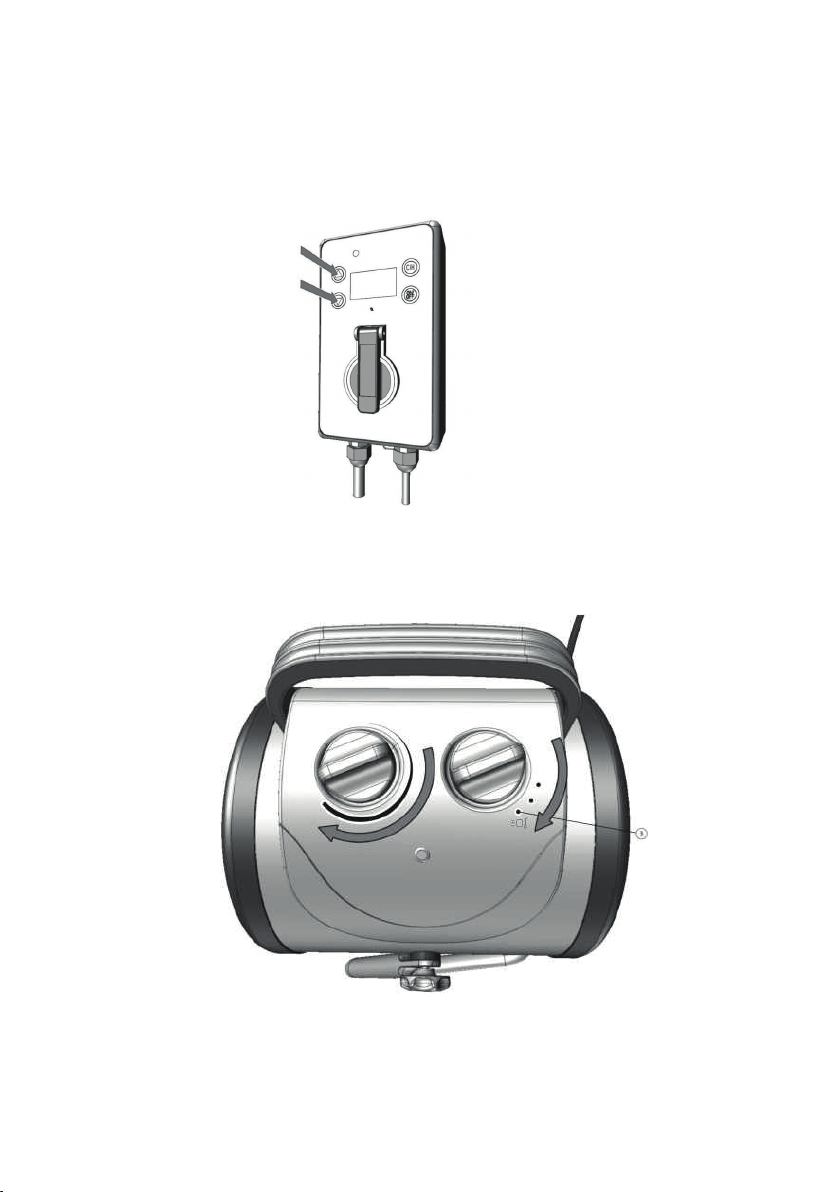
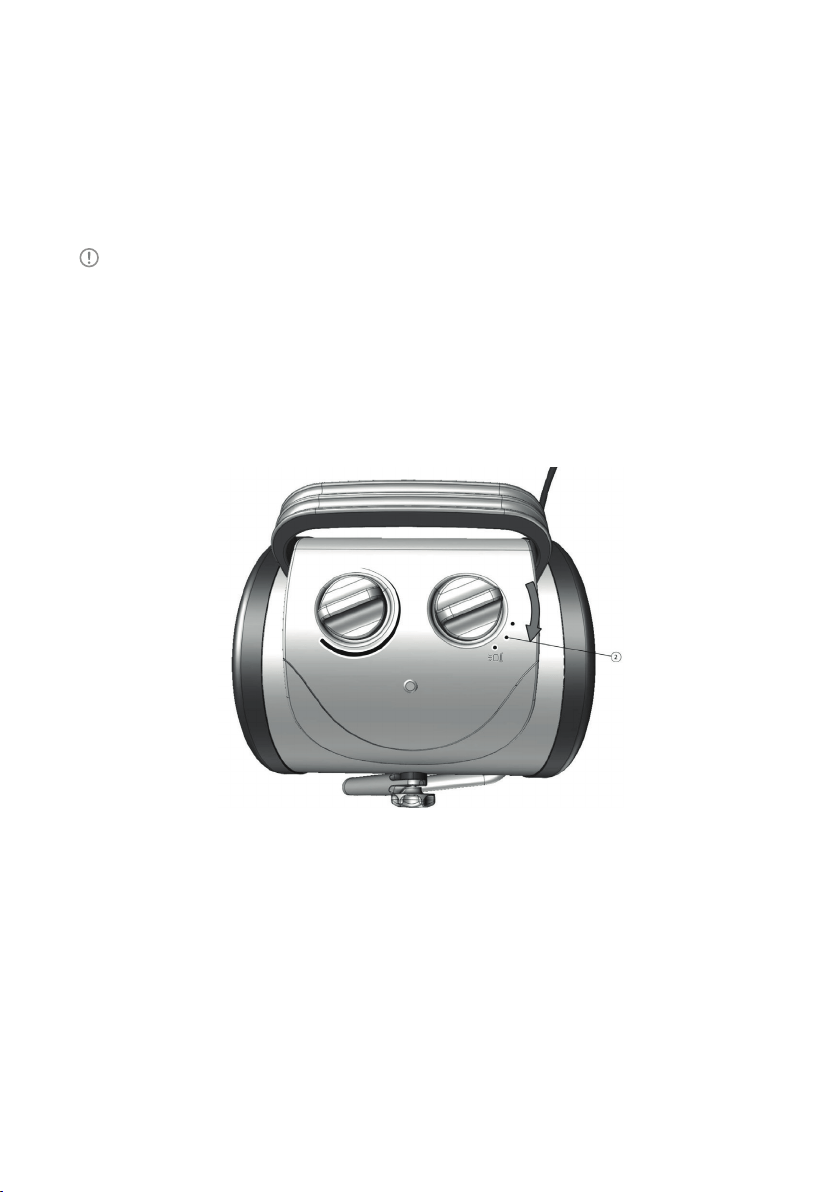
”Thermo 2” (2) (optional)
1. Socket of the Thermo 2
2. Display
3. On/off button
4. Button up
5. Button down
6. Thermometer
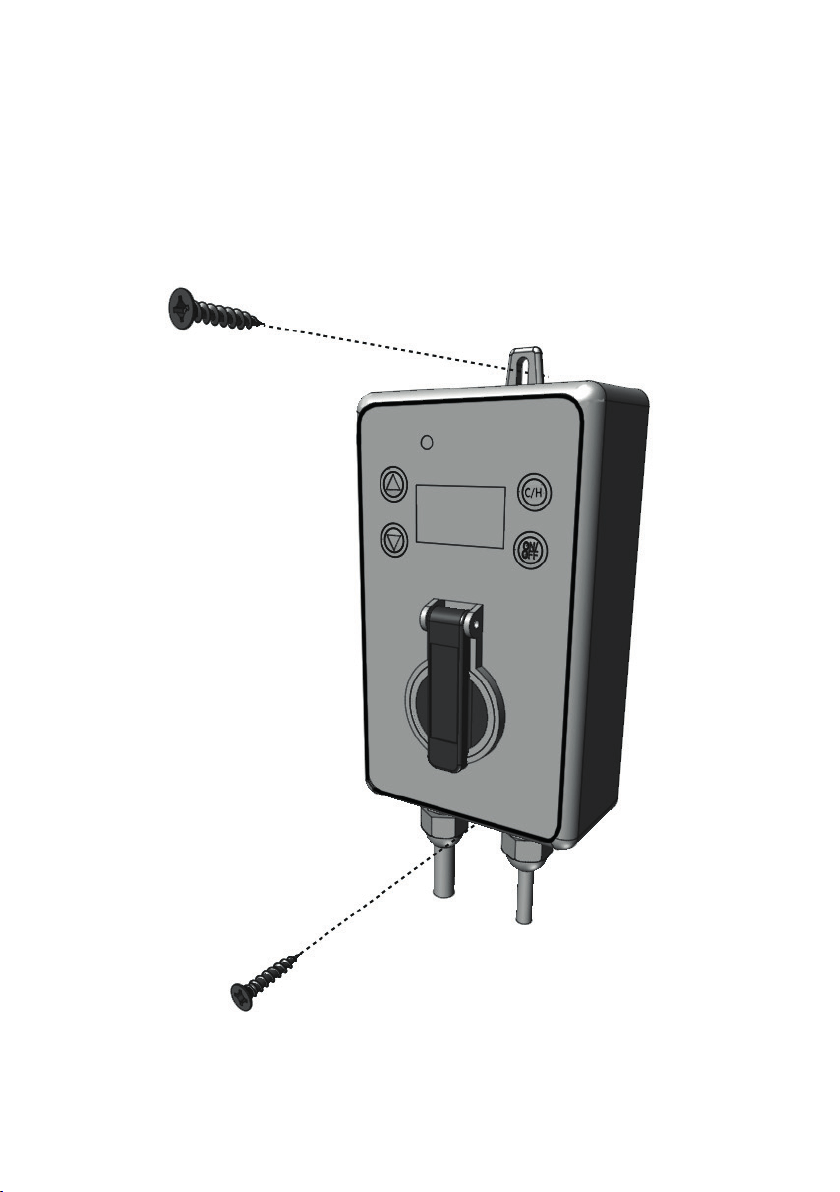
7. 2x Mounting holes
8. On/off indication lamp
9. Heating / cooling mode
Image 2

6
2. Preventive measures and safety instructions
2.1
Warning!
A warning indicates the risk of damage to the user or the
product if the user does not carry out the procedures with care.
Please note!
A comment makes the user aware of possible problems.
2.2 Safety and hazard notes
Warning!
Keep the product out of reach of children.
Please note! This device is not designed for use by persons (including children) who have limited
physical, sensory or mental capabilities and also not by persons with insufficient experience or
knowledge of handling this product except where they are monitored or instructed by a person who
is responsible for their safety.
Please note! After unpacking the device and before initial operation please ensure that the
device and all the relevant accessories are in good working order. If transport damage is ascertained
then please contact the corresponding distributor or manufacturer immediately.
Please note! Consult a specialist if you have any doubts regarding the functioning, safety or
connection of the device.
Warning!
The device is not suitable for use in cattle breeding areas.
Warning!
These operating instructions form a constituent part of the device and should
be kept in a safe place. If the device is passed on to a third party then these instructions should be
passed on with it.
Warning!
Never submerge the device in water.
Warning!
The guarantee is not valid if the repairs are not carried out correctly.
Warning!
In commercial premises the accident prevention regulations of the employers liabi-
lity insurance association for electrical equipment and facilities must be observed.
Warning!
Never pour liquids over the device. In the event that this happens remove the plug
from the socket and consult a specialist.

7
Please note!
This device is not designed for use by persons (including children) who have
limited physical, sensory or mental capabilities and also not by persons with insufficient
experience or knowledge of handling this product except where they are monitored or
instructed by a person who is responsible for their safety.
Please note!
After unpacking the device and before initial operation please ensure that the
device and all the relevant accessories are in good working order. If transport damage is
ascertained then please contact the corresponding distributor or manufacturer immediately.
Please note!
Consult a specialist if you have any doubts regarding the functioning, safety or
connection of the device.

8
3. Installation
Warning! Do not leave the packaging materials (plastic bags, polystyrene, nails etc.) within
reach of children as they represent potential hazards.
Warning!
Electrical devices may only be operated in wet rooms connected to a residual
current circuit breaker.
Warning!
Before initial operation of the device please ensure that this connection is provided
at the planned connection location.
Warning!
The installation location must be selected so that the devices cannot be sprayed
with water or fall into water in any event.
Warning!
This device is only approved for connection to 110VAC, 50/60Hz AC Voltage. It
must be protected from heavy soiling and moisture. Different uses to those described above
can lead to damage to the device, e.g. short circuit, electric shock etc. Always follow the
safety and installation instructions.
Warning!
The device must be disconnected from the mains supply when opening the cover
or removing parts.
Only transport it using the carrying handle that is designed for this purpose.
Please note! Lay the connection cables in such a way that nobody can trip over them and
they cannot be crushed or come into contact with hot objects.
Please note! Only use extension cables that are compatible with the output and in
accordance with the valid safety regulations for the device.
Please note! Make sure that the devices are disconnected from the mains power before and
during installation.
9
Image 3
When using the Palma heater you have the choice of operation with or without the included
wet room thermostat Thermo 2. However for exact temperature regulation and energy-saving
operation we urgently recommend using the Thermo 2.
10
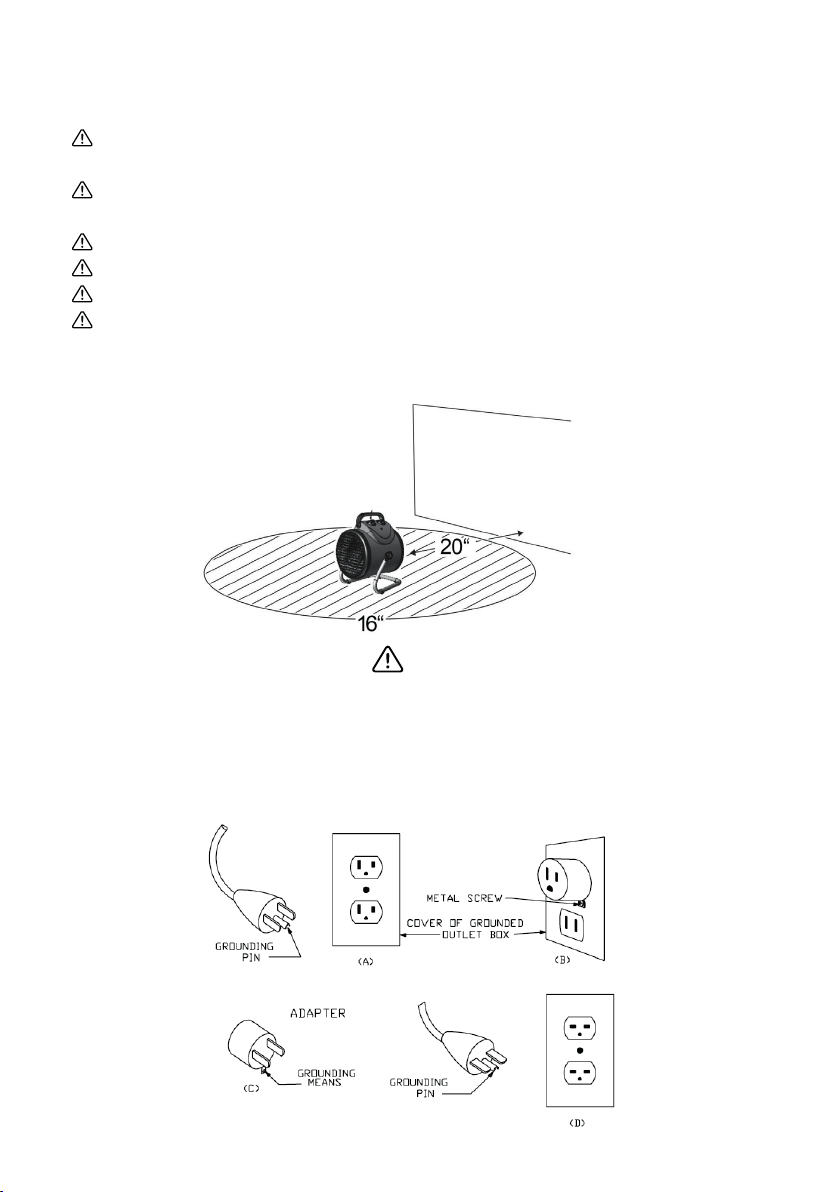
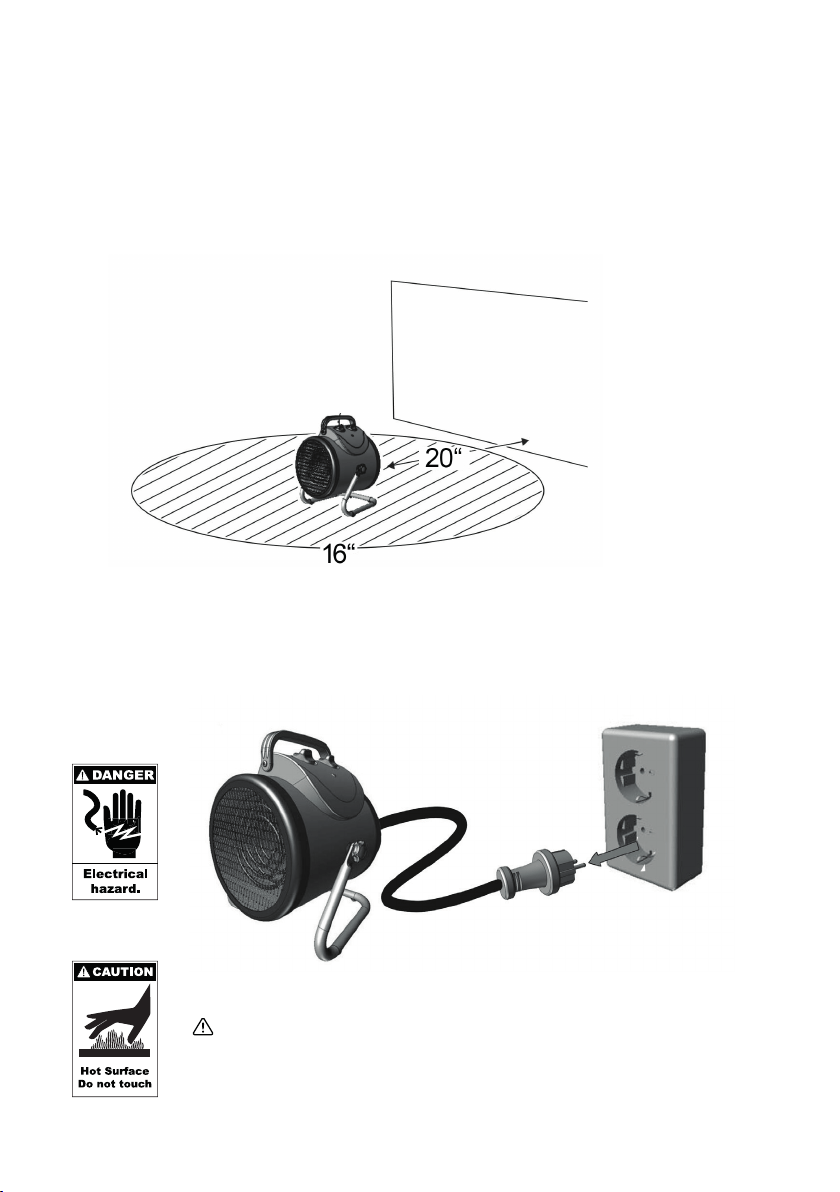
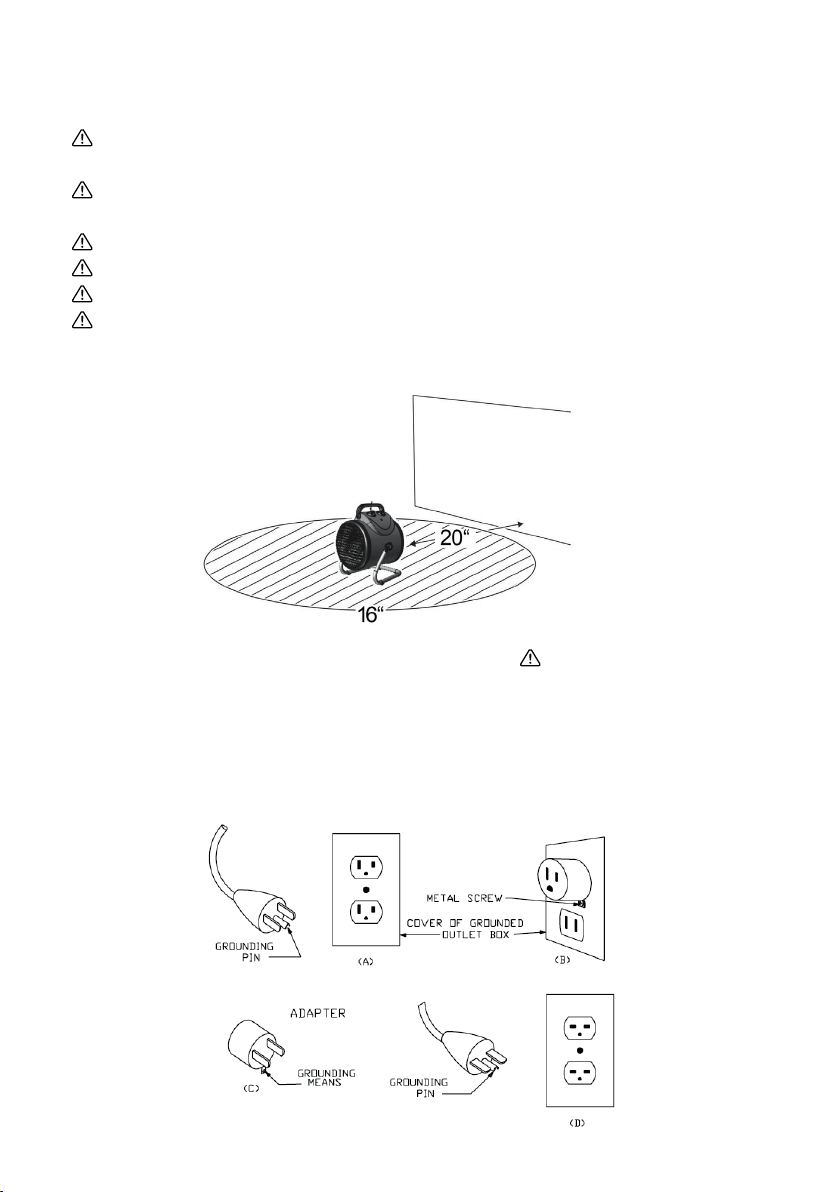
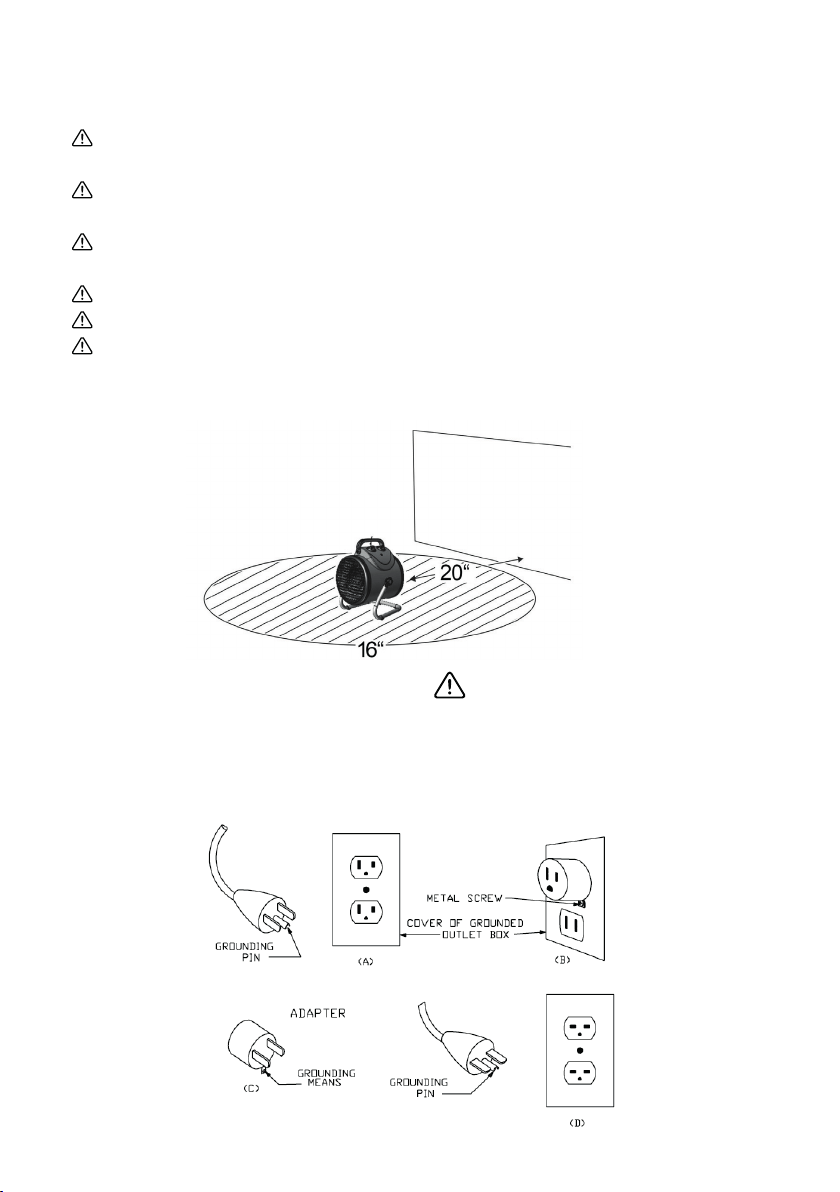
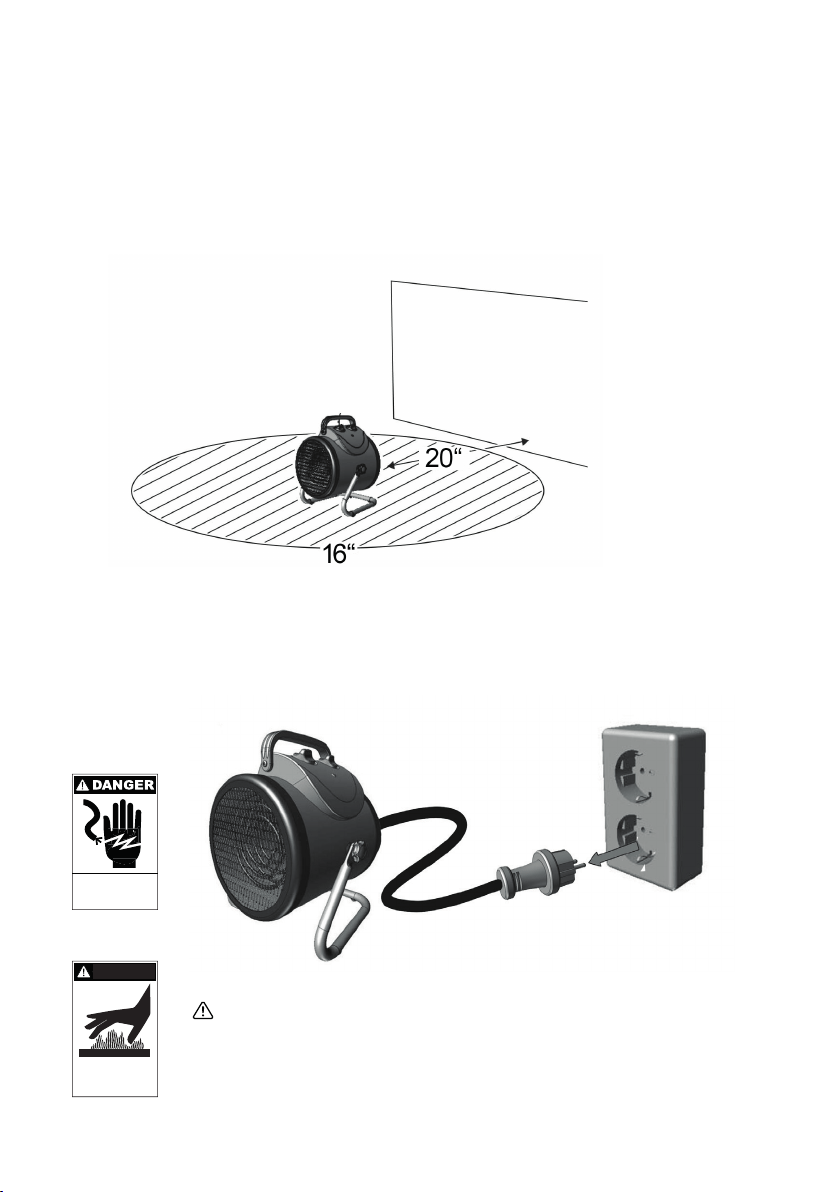
3.2 Installation of Palma heater
Warning!
The distance from the inflammable objects should be at least 20”. Adjust the
heater so that there is a distance of at least 16” between the wall and the air intake opening.
Warning!
A free space of 1.5 meters should be left in front of the output opening if possible.
Place the heater in your greenhouse (4).
Warning! Never install the device close to taps, wash basins or other water sources.
Warning! Only use this device indoors.
Warning!
Do not cover the heater.
Warning!
Do not insert any objects into the openings on the device as this risks injury,
electric shock or damage to the device.
This heater is for use on 110VAC, 50/60Hz.
Warning! Never try to operate the device using a
different voltage.
The cord has a plug as shown at A in below figure. An adapter as shown at C is
available for connecting three-blade grounding-type plugs to two-slot receptacles. The green
grounding lug extending from the adapter must be connected to a permanent ground such as a
properly grounded outlet box. The adapter should not be used if a three-slot grounded receptacle
is available.
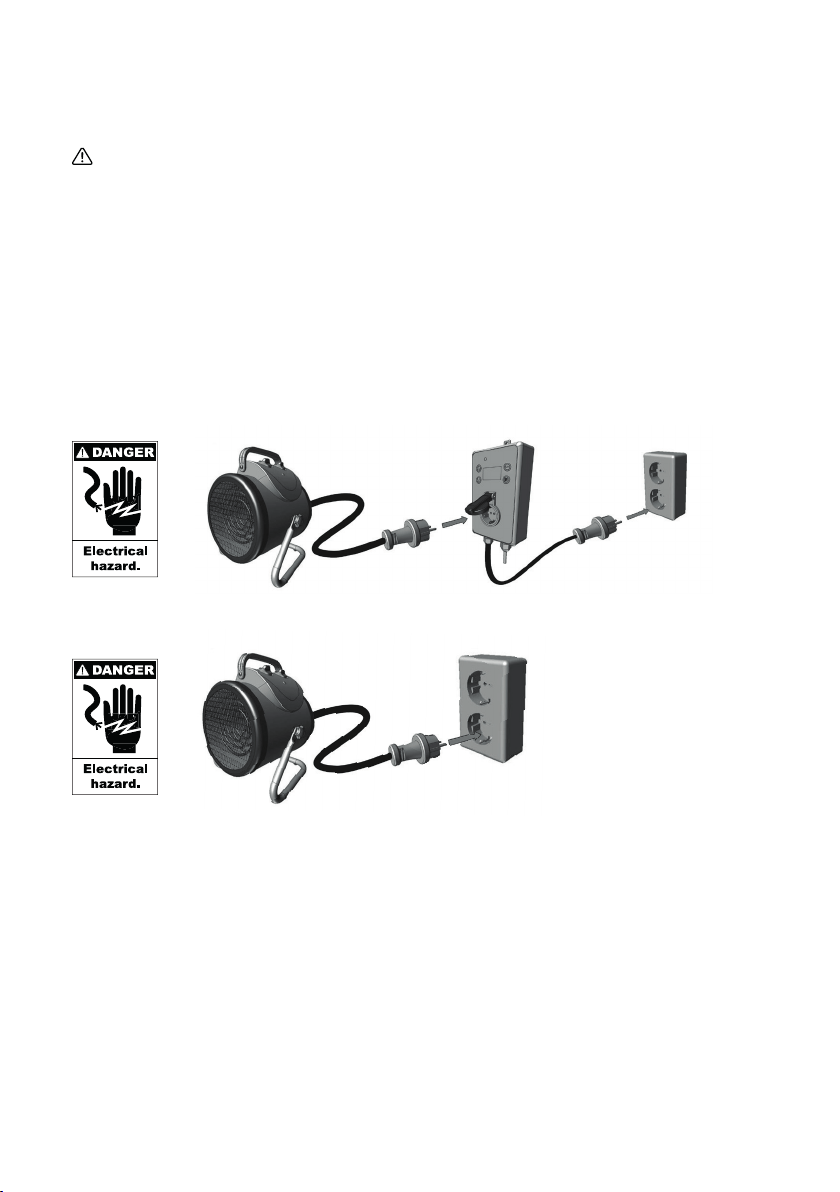
11
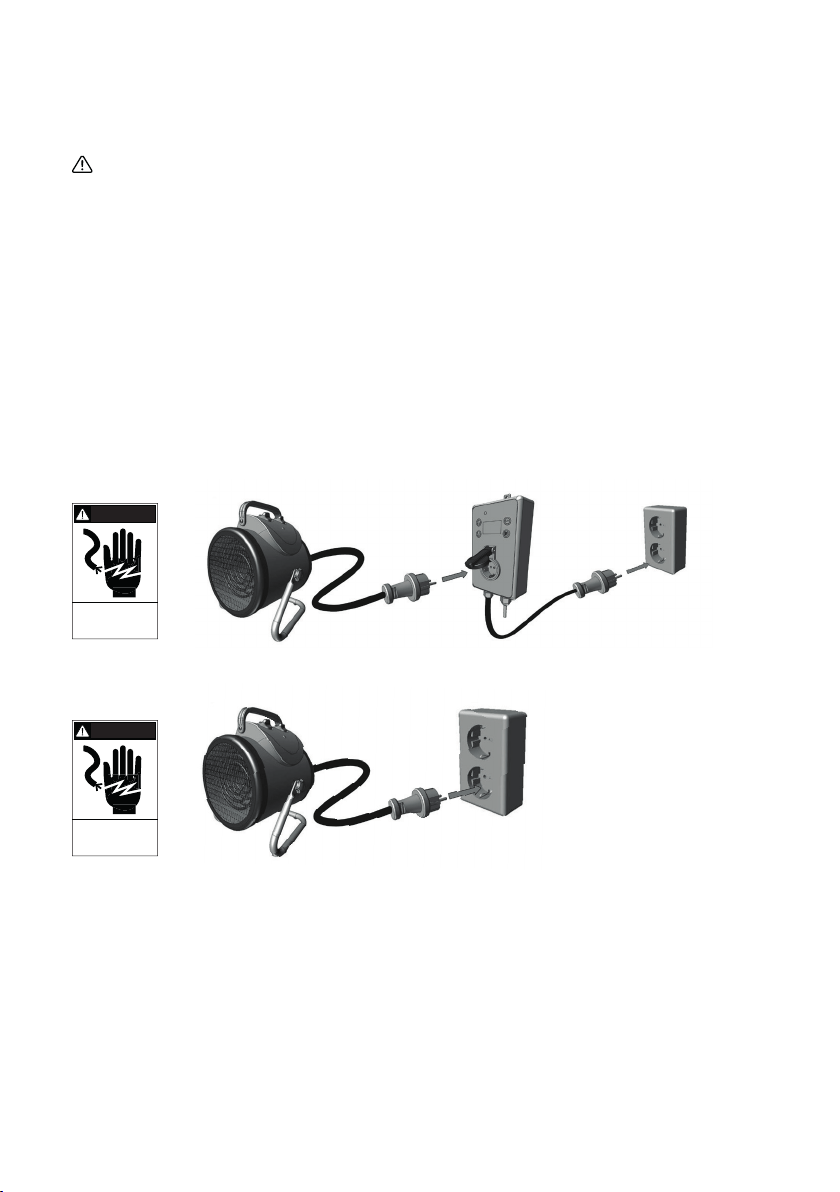
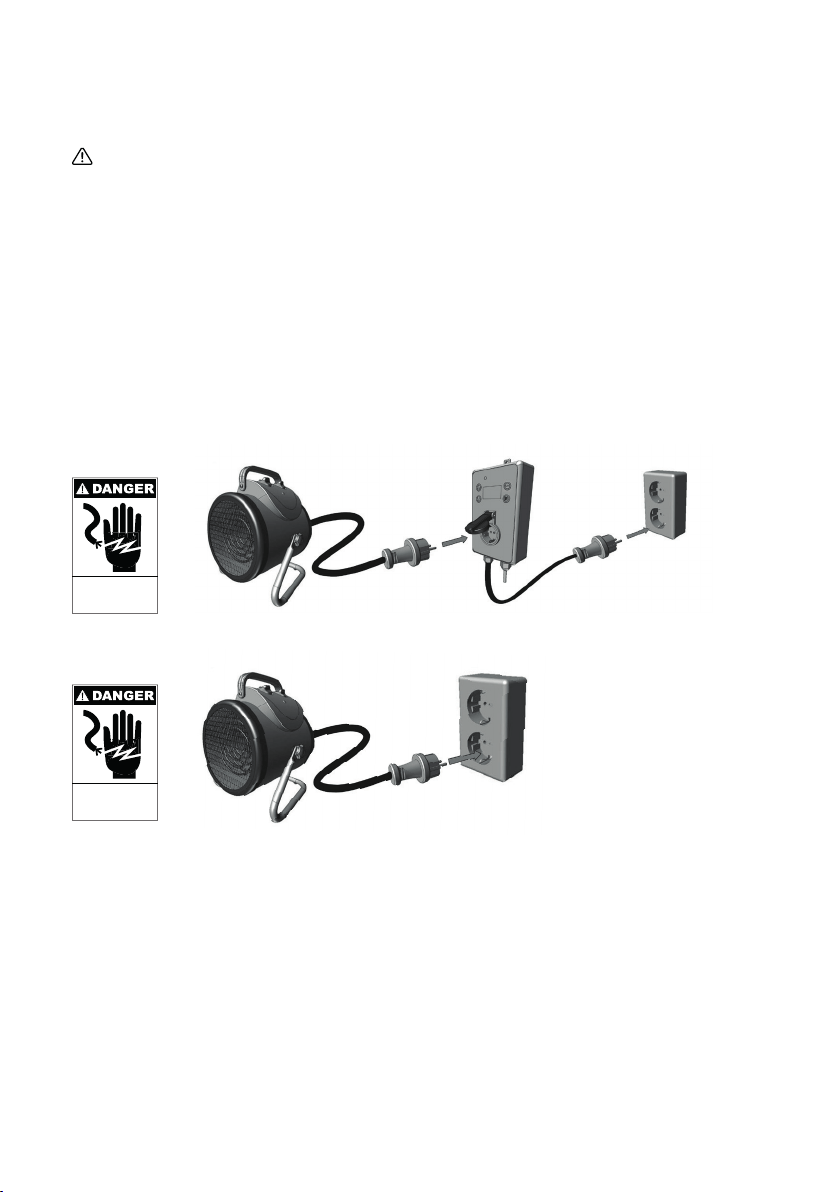
Now insert the mains plug into the socket of the Thermo 2(5) or, if operating without the
Thermo 2, directly into the mains socket (6).
Warning! Never insert or remove the power plug with wet hands.
When using a multiple socket
or an extension cable please ensure that the maximum current carrying capacity is not exceeded.
Cable drums must always be completely unrolled. Do not wrap the connection cable around the de-
vice and never operate the device with wound cable.
Never pull the power cord itself; only remove
the plug from the socket holding the grips on the mains plug.
To set the Palma RAW to wintermode, see section 4.2.
To set the Palma to wintermode, see section 4.3.
To set the summer mode, see section 4.4.
Image 5
Image 6

12
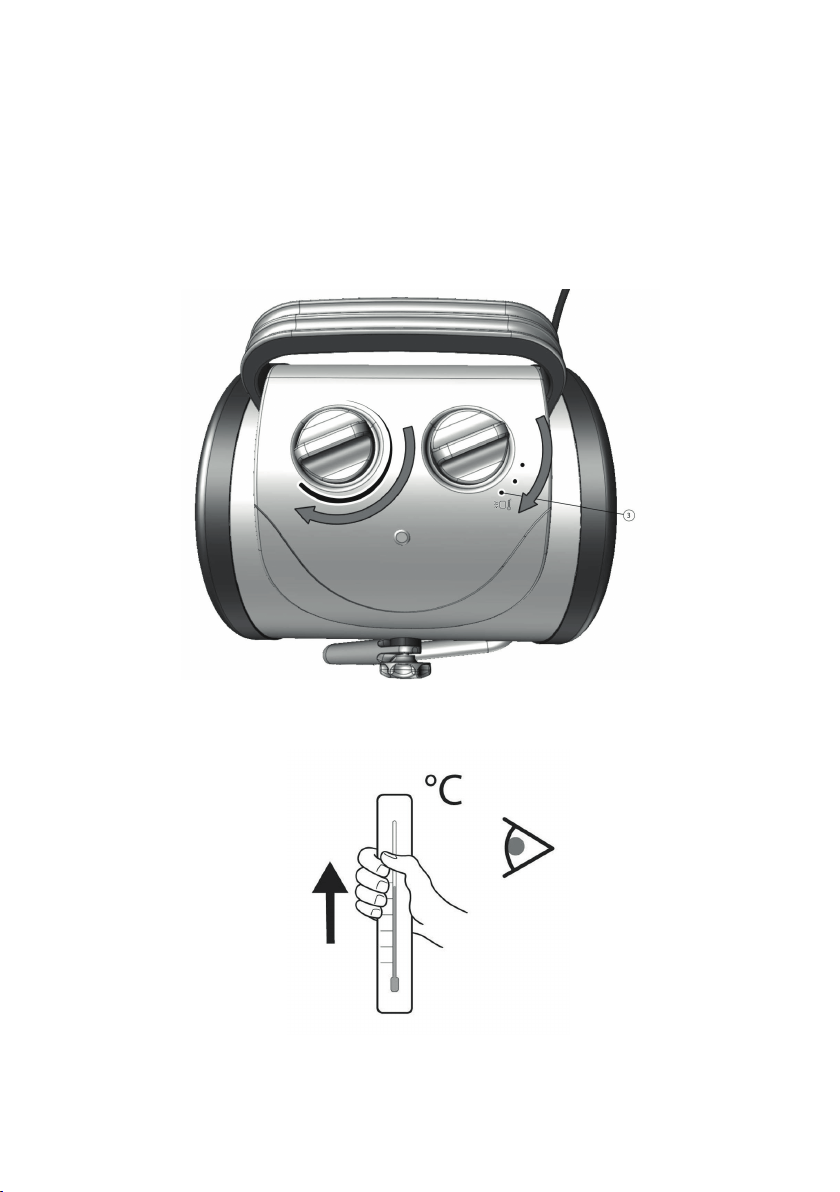
4. Use the Palma and Palma RAW
4.1 General operation
The Palma air circulation heater is fitted with a selector switch and a thermostat. Use the selector
switch to choose one of the 3 possible operating modes. Set the desired room temperature using
the thermostat. An integrated operation lamp indicates heating operation (7).
Image 7
13
4.2 Use the Palma RAW in winter mode
Select position 3 as the mode on the selector switch and set the thermostat to maximum. The
operation lamp will light up when the Palma 2.0 RAW starts with heating (8).
Image 8
Check the room temperature using a thermometer (9) .
Image 9

14
When the desired room temperature is reached then slowly turn the thermostat in an anticlockwise
direction until the operation lamp switches off (10).
The heater will now maintain the set temperature by re-starting the heating function when the
room temperature falls below this level. In the event of temperature discrepancies you may need
to adjust this a little.
Please note!
Unfortunately it is not possible to print a temperature scale on the thermostat
switch as behavior will differ depending on size, insulation, filling level and location of each
greenhouse.
Image 10

15
4.3 Use the Palma in winter mode
Set the desired room temperature on the wet room thermostat Thermo 2 (11). The setting can
be found in the Thermo 2 operating instructions.
Select position 3 as the mode on the selector switch. And set the heater thermostat to the
maximum setting (12).
Image 11
Image 12

16
The wet room thermostat Thermo 2 will now take over temperature regulation and the Palma
heater will be switched on if the room temperature falls below the set level. If the temperature is
reached then the heater will switch off again.
4.4 Use the Palma and Palma RAW in summer mode
Please note!
The Thermo 2 is not required for summer operation. Just plug the Palma
heater directly into a mains socket. In the summer months use of the air circulation mode can
achieve substantial reduction of the greenhouse temperature.
Select mode 2 on the selector switch of the Palma heater and open the door or the roof
window on your greenhouse (13). The position of the thermostat switch is irrelevant here.
The greenhouse air that is heated by the sun is constantly circulated by the air circulation mode
and thus moved outside. At the same time this measure regulates the humidity in the greenhouse
and promotes the pollination of your plants.
Image 13
17
4.5 Safety feature
Temperature controlled circuit breaker: If the device overheats the temperature-controlled circuit
breaker will switch the device off temporarily. To switch the device back on, turn the heater off for
5 to 10 minutes to cool down (14).
Another reason for the shutdown would be blockage of the intake or outlet opening.
• In this case please remove the corresponding objects (14). It could also be an indication that
the ventilator has failed. • In this case switch the heater off, remove the plug (15) and contact an
authorized specialist to arrange repair.
Image 14
Image 15
Warning! The casing heats up during operation. Install the in such a way that
accidental contact is avoided. The device only cools slowly after it is switched off.
Only transport it using the carrying handle that is designed for this purpose.

18
5 Cleaning, maintenance, environment and disposal
5.1 Cleaning and maintenance
Warning! Switch the device off before each cleaning and leave it to cool for approximately 30
minutes before beginning cleaning.
Warning! Do not use any abrasive, caustic or cleaning materi-
als. Clean the casing with a damp cloth (not wet), vacuum cleaner or feather duster.
5.2 Environment and disposal
Please note! Only dispose of devices at a corresponding collection centre.
Please note! Only authorized specialists are permitted to carry out repairs on the device.
Please contact the manufacturer or distributor in this regard.
Warning! Incorrectly executed repairs can represent a hazard for the user and other persons.
The manufacturer does not accept responsibility for any damage caused by frost, insufficient heating
performance for the room dimensions or insufficient heat insulation.
6.
MANUFACTURER’S REPRESENTATIONS AND WARRANTIES
CTL
c/o Bio Green Inc.
2881 Busse Road,
Elk Grove Village, IL 60007
United States
Email:
These Representations and Warranties are applicable to all customers (the “Customers” and
each, individually, a “Customer”) purchasing products (the “Products”) manufactured by Bio
Green oHG (the “Company”).
1. Warranty and Limitations:
1.1. Company warrants solely to the original purchaser of the Products that for the Warranty
Period (as defined below), the Products will be free from defects in materials and workmans-
hip under normal use, and will conform to Company’s published specifications of the Products.
Notwithstanding the foregoing, Company retains its right to deviate from its published specifi-
cations due to the latest innovations and improvements in function and design of the Products.
1.2. The foregoing warranty is subject to the proper storage, transportation and use of the Pro-
ducts, and does not include defects due to normal wear and tear or deterioration.
1.3. Customer shall immediately, but in any event no later than eight (8) days following deli-
very of the Product, inspect the Products for conformity and visible defects. Customer shall
give Company immediate written notice of any non-conformities or visible defects regarding

19
the Products. In the event that Customer fails to provide the Company within eight (8) days
following delivery of the Products with notice of any non-conformities or visible defects, any
warranty claims in this regard shall be deemed waived.
1.4. Customer shall immediately notify Company in writing of any other defects of the Products
and return such defective Product. Prior to any shipment of a defective Product, Customer shall
contact Company first at the address provided in 1.9. Company’s sole obligation under the fore-
going warranty is, at Company’s option and in its sole discretion, to repair, replace or exchange
the defective Product. Any repaired, replaced or exchanged Products shall be subject to this
warranty, following their repair, replacement or exchange. If Company has received notificati
-
on from Customer, and no defects of the Product could be discovered, Customer shall bear the
costs that Company incurred as a result of the notice. It shall be in Company’s sole discretion to
determine if the Product has a defect. In no event shall Company bear the costs of disassembly.
1.5. With respect to orders made to custom, any defects of the Products caused by Customer’s
specifications are excluded from the warranty set forth in 1.1.
1.6. Company also makes no warranty that the Products manufactured under an order made to
custom do not infringe the intellectual property or other proprietary rights of any third party
and Customer is solely responsible for assuring that such Products do not so infringe.
1.7. The “Warranty Period” begins on the date of delivery of the Product to Customer, and cont-
inues to be in effect for twenty-four (24) months. The “Warranty Period” shall be suspended for
the time of repair, replacement or exchange until the repaired, exchanged or replaced product
has been returned to Customer.
1.8. Company does not authorize any person or party to assume or create for it any other obliga
-
tion or liability in connection with the Products except as set forth herein.
1.9. All requests and notices under this Warranty shall be directed to:
CTL
c/o Bio Green Inc.
2881 Busse Road,
Elk Grove Village, IL 60007
United States
Email:
1.10. THE WARRANTY SET FORTH IN SECTION 1.1 IS MADE IN LIEU OF ALL OTHER WARRANTIES
(WHETHER EXPRESS OR IMPLIED), RIGHTS OR CONDITIONS, AND CUSTOMER ACKNOWLEDGES
THAT EXCEPT FOR SUCH LIMITED WARRANTY, THE PRODUCTS ARE PROVIDED “AS IS.” COM-
PANY SPECIFICALLY DISCLAIMS, WITHOUT LIMITATION, ALL OTHER WARRANTIES, EXPRESS
OR IMPLIED, OF ANY KIND, INCLUDING, WITHOUT LIMITATION, THE IMPLIED WARRANTIES OF
MERCHANTABILITY AND FITNESS FOR A PARTICULAR PURPOSE, NON-INFRINGEMENT, AND
THOSE WARRANTIES ARISING FROM A COURSE OF PERFORMANCE, A COURSE OF DEALING OR
TRADE USAGE.

20
2. Limitation of Liability:
2.1. IN NO EVENT SHALL COMPANY BE LIABLE FOR ANY INDIRECT, INCIDENTAL, PUNITIVE, SPE
-
CIAL OR CONSEQUENTIAL DAMAGES, INCLUDING BUT NOT LIMITED TO, DAMAGES FOR LOSS
OF PROFITS, REVENUE, GOODWILL OR USE, INCURRED BY CUSTOMER OR ANY THIRD PARTY,
WHETHER IN AN ACTION IN CONTRACT, TORT, STRICT LIABILITY, OR IMPOSED BY STATUTE, OR
OTHERWISE, EVEN IF ADVISED OF THE POSSIBILITY OF SUCH DAMAGES. COMPANY’S LIABILITY
FOR DAMAGES ARISING OUT OF OR IN CONNECTION WITH THIS AGREEMENT SHALL IN NO
EVENT EXCEED THE PURCHASE PRICE OF THE PRODUCTS. IT IS AGREED AND ACKNOWLED-
GED THAT THE PROVISIONS OF THIS AGREEMENT ALLOCATE THE RISKS BETWEEN COMPANY
AND CUSTOMER, THAT COMPANY’S PRICING REFLECTS THIS ALLOCATION OF RISK, AND BUT
FOR THIS ALLOCATION AND LIMITATION OF LIABILITY, COMPANY WOULD NOT HAVE ENTERED
INTO THIS AGREEMENT.
2.2. IN JURISDICTIONS THAT LIMIT THE SCOPE OF OR PRECLUDE LIMITATIONS OR EXCLUSION
OF REMEDIES OR DAMAGES, OR OF LIABILITY, SUCH AS LIABILITY FOR GROSS NEGLIGENCE
OR WILLFUL MISCONDUCT OR DO NOT ALLOW IMPLIED WARRANTIES TO BE EXCLUDED, THE
LIMITATION OR EXCLUSION OF WARRANTIES, REMEDIES, DAMAGES OR LIABILITY SET FORTH
ABOVE ARE INTENDED TO APPLY TO THE MAXIMUM EXTENT PERMITTED BY APPLICABLE LAW.
CUSTOMER MAY ALSO HAVE OTHER RIGHTS THAT VARY BY STATE, COUNTRY OR OTHER JU-
RISDICTION.
21
Introducción
Este manual está dirigido a Palma RAW y Palma 2.0. Palma RAW es un calefactor de circulación de
aire. Palma está compuesto por un calefactor de circulación de aire y un termostato de ambiente
Thermol. Los sistemas de calefacción de circulación de aire Palma y Palma 2.0 RAW sirven para
controlar la temperatura de invernaderos y jardines de invierno.
Thermo 2
(Solamente está incluido con la PALMA Digital)
Palma
Tipo de dispositivo Termostato digital Tipo de dispositivo
Calefacción por
circulación de aire
Fuente de alimentación
110VAC ±10%, 50/60Hz
Fuente de alimentación
110VAC ±10%, 50/60Hz
Máx. capacidad de ruptura
1500 W Rendimiento máximo 1500 W
Máx. Corriente de
conmutación
16 A
Consumo de energía
máximo
9,0 A
Rango de control: ± -58 – 90 °F Rango de control 32 to 185 F
Índice de distinción ± 2 °F Control de tolerancia ± 5 °C / 41 °F
Entrada < 1,5 W Entrada < 1,5 W
Clase de protección II Clase de protección I
Sistema de protección IP X4 Sistema de protección IP X4
Longitud de sensor: approx. 5ft Dimensiones 11 x 8 x 12.5“
ES
¡ADVERTENCIA!
Para reducir el riesgo de incendio, descargas eléctricas o lesiones
personales, lea y siga cuidadosamente estas instrucciones, así
como advertencias generales de seguridad y riesgos antes de la
instalación. Mantenga este folleto en un lugar seguro para futuras
consultas. Si tiene alguna duda en cuanto a la seguridad del artí-
culo, contacte con un experto. Si utiliza la unidad en un invernade-
ro, asegúrese de que las conexiones eléctricas sean realizadas por
personal cualificado.
ELECTRICIDAD
PELIGRO
SUPERFICIE
CALIENTE
NO TOQUE
CUIDADO

22
Imagen 1
1.2 Componentes
Palma-Digital (1)
1. Apertura de aire adicional
2. Abertura de salida de aire
3. Interruptor del termostato
4. Interruptor selector
5. Luz de funcionamiento

23
”Thermo 2” (2) (opcional)
1. Conector de Thermo 2
2. Pantalla
3. Botón de encendido/apagad
4. Botón hacia arriba
5. Botón hacia abajo
6. Termómetro
7. 2x Agujeros de montaje
8. Luz indicadora de encendido/apagado
9. Modo de calefacción/enfriamiento
Imagen 2

24
2. Medidas preventivas e instrucciones de seguridad
2.1
¡Advertencia! Una advertencia indica el riesgo de daños para el usuario o el producto
si el usuario no lleva a cabo los procedimientos cuidadosamente.
¡Por favor tenga en cuenta!
Los comentarios advierten al usuario de posibles
problemas.
2.2 Indicaciones de seguridad y peligro
¡Advertencia! Mantenga el producto fuera del alcance de los niños.
¡Por favor tenga en cuenta! Este dispositivo no está diseñado para ser utilizado por personas
(incluidos niños) que poseen capacidades físicas, sensoriales o mentales limitadas y tampoco por per-
sonas con experiencia o conocimiento insuficientes sobre la manipulación de este producto, excepto
bajo la vigilancia o instrucción de una persona responsable de su seguridad.
¡Por favor tenga en cuenta! Tras desembalar el dispositivo y antes utilizar por primera vez, por
favor asegúrese de que el dispositivo y todos los accesorios correspondientes están en buen estado
de funcionamiento. En caso de que se hayan dado daños durante el transporte, por favor, póngase en
contacto con el distribuidor o fabricante correspondiente inmediatamente.
¡Por favor tenga en cuenta! Consulte a un especialista si tiene alguna duda sobre el funcionamien-
to, la seguridad o la conexión del dispositivo.
¡Advertencia! El dispositivo no es adecuado para su uso las áreas de reproducción de ganado.
¡Advertencia! Estas instrucciones de uso son parte del dispositivo y deben mantenerse en un lugar
seguro. Si el dispositivo pasa a un tercero, entonces estas instrucciones deben acompañar al aparato.
¡Advertencia! Nunca sumerja el dispositivo en agua.
¡Advertencia! La garantía se perderá si las reparaciones no se llevan a cabo correctamente.
¡Advertencia! En establecimientos comerciales, es necesario observar las normas de prevención
de accidentes de la asociación de seguros de responsabilidad de empleados para equipos e instalaci-
ones eléctricas.
¡Advertencia! Nunca vierta líquidos sobre el equipo. En el caso de que esto ocurra quite el enchu-
fe de la toma de corriente y consulte a un especialista.

25
¡Por favor tenga en cuenta! Este dispositivo no está diseñado para ser utilizado por personas
(incluidos niños) que poseen capacidades físicas, sensoriales o mentales limitadas y tampoco por per-
sonas con experiencia o conocimiento insuficientes sobre la manipulación de este producto, excepto
bajo la vigilancia o instrucción de una persona responsable de su seguridad.
¡Por favor tenga en cuenta! Tras desembalar el dispositivo y antes de utilizar por primera vez, por
favor asegúrese de que el dispositivo y todos los accesorios correspondientes están en buen estado
para funcionar. En caso de que se hayan dado daños durante el transporte, por favor, póngase en
contacto con el distribuidor o fabricante correspondiente inmediatamente.
¡Por favor tenga en cuenta! Consulte a un especialista si tiene alguna duda sobre el funcionamien-
to, la seguridad o la conexión del dispositivo.

26
3. Instalación
¡Advertencia! No dejar los materiales de embalaje (bolsas de plástico, poliestireno, clavos, etc.) al
alcance de los niños, ya que representan peligros potenciales.
¡Advertencia! Los aparatos eléctricos sólo deben ser puestos en cuartos húmedos conectados a
un disyuntor de corriente residual.
¡Advertencia! Antes de utilizar por primera vez el dispositivo, por favor asegúrese de que la cone-
xión se realiza en un lugar con conexión planificado.
¡Advertencia! El lugar de instalación debe seleccionarse de manera que los dispositivos no pue-
dan ser rociados con agua o caer en el agua en cualquier caso..
¡Advertencia! Este dispositivo sólo está certificado solo para conexiones a 110VAC, 50 / 60Hz
Corriente Alterna. Debe protegerse de excesiva suciedad y humedad. Cualquier utilización distinta
a la descrita anteriormente puede dar lugar a daños en el dispositivo, por ejemplo, cortocircuito,
descarga eléctrica, etc. Siga siempre las instrucciones de instalación y seguridad.
¡Advertencia! El aparato debe estar desconectado de la red eléctrica cuando se abre la cubierta
o se quitan partes. Sólo se debe transportar utilizando el asa de transporte que está diseñada para
este propósito.
¡Por favor tenga en cuenta! Coloque los cables de conexión de manera que nadie pueda tropezar
con ellos y que no puedan ser aplastados o entrar en contacto con objetos calientes.
¡Por favor tenga en cuenta! Utilice solo alargadores que sean compatibles con la salida y de
acuerdo con las normas de seguridad válidas para el dispositivo.
¡Por favor tenga en cuenta! Asegúrese de que los dispositivos están desconectados de la red
eléctrica antes y durante la instalación.

27
Imagen 3
Al utilizar el calefactor Palma, tendrá la opción de operar con o sin el termostato de ambiente
húmedo Thermo 2 incluido con el aparato. Sin embargo, para una regulación de la temperatura
exacta y ahorro de energía, se recomienda encarecidamente utilizar el Thermo 2.
28
3.2 Instalación del calefactor Palma
¡Advertencia! La distancia a objetos inflamables debe ser de al menos de 50 cm. Ajuste el calenta-
dor de modo que haya una distancia de al menos 40 cm. entre la pared y la abertura de toma de aire.
¡Advertencia! A ser posible, se debe dejar un espacio libre de 1,5 metros en frente de la abertura
de salida. Coloque el calefactor en su invernadero (4).
¡Advertencia! Nunca instale el dispositivo cerca de grifos, lavabos u otras fuentes de agua.
¡Advertencia! Utilice este dispositivo solo en interiores.
¡Advertencia! No cubra el calefactor.
¡Advertencia! No introduzca ningún objeto en las aberturas en el dispositivo, ya que corre el
riesgo de lesiones, descargas eléctricas o daños en el dispositivo.
Este calefactor es para ser utilizado en 110VAC ±10%, 50/60Hz.
¡Advertencia! Nunca trate de
utilizar el dispositivo con un voltaje diferente. El cable tiene un enchufe tal y como se muestra en A
en la figura a continuación. Un adaptador como se muestra en C está disponible para la conexión
de enchufes a tierra de tres clavijas a receptáculos de dos ranuras. El terminal de tierra verde que
sale del adaptador debe conectarse a una tierra permanente, tal como un enchufe con toma de
tierra. El adaptador no debe ser utilizado si hay una toma de corriente de tres ranura disponible.
29
Ahora introduzca el enchufe en la toma de Thermo 2(5) o, si se opera sin Thermo 2, directamente
en la toma de corriente (6).
¡Advertencia! Nunca inserte o retire el cable de alimentación con las manos mojadas. Al utilizar
un enchufe múltiple o un cable de extensión, por favor asegúrese de que no se exceda la capacidad
máxima de corriente. Las bobinas de cable deben estar siempre completamente desenrolladas. No
enrolle el cable de conexión alrededor del dispositivo y nunca lo opere con un cable en mal estado.
Nunca tire del cable de alimentación; solo retire el enchufe de la toma sujetando los agarres del
enchufe de la red.
Para configurar RAW Palma 2,0 en modo de invierno, vea la sección 4.2.
Para configurar Palma 2,0 en modo de invierno, vea la sección 4.3.
Para configurar el modo verano, vea la sección 4.4.
Imagen 5
Imagen 6
ELECTRICIDAD
PELIGRO
ELECTRICIDAD
PELIGRO

30
4. Uso de Palma y Palma RAW
4.1 Funcionamiento general
El calefactor de circulación de aire Palma está equipado con un interruptor selector y un termo-
stato. Utilice el selector para elegir uno de los 3 modos de funcionamiento posibles. Ajuste la
temperatura ambiente deseada usando el termostato. La luz de funcionamiento integrada indica el
modo de calefacción (7).
Imagen 7

31
4.2 Uso de Palma RAW en modo invierno
Seleccione la posición 3 como el modo en el interruptor selector y ajuste el termostato al máximo.
La luz de funcionamiento se iluminará cuando Palma RAW comience a funcionar (8).
Imagen 8
Revise la temperatura ambiente usando un termómetro (9) .
Imagen 9
32
Cuando se alcanza la temperatura deseada en la habitación, gire lentamente el termostato en
sentido anti-horario hasta que el indicador de funcionamiento se apague (10).
Ahora el calentador mantendrá la temperatura programada y volverá a iniciar la función de cale-
facción cuando la temperatura ambiente descienda por debajo de este nivel. En caso de diferenci-
as de temperatura, es posible que tenga que ajustar esto un poco.
¡Por favor tenga en cuenta! Por desgracia, no es posible mostrar una escala de temperatura en
el interruptor del termostato, ya que el comportamiento será diferente dependiendo del tamaño,
aislamiento, el nivel de llenado y la ubicación de cada invernadero.
Imagen 10
33
4.3 Uso de Palma en modo invierno
Ajustar la temperatura deseada en el termostato de ambiente húmedo Thermo 2 (11). La configura-
ción se puede encontrar en el manual de instrucciones de Thermo 2.
Seleccione la posición 3 en el interruptor selector. Y fije el termostato del
calentador al máximo (12).
Imagen 11
Imagen 12

34
El termostato de ambiente húmedo Thermo 2 se hará cargo de la regulación de la temperatura,
y el calefactor Palma se encenderá si la temperatura ambiente desciende por debajo del nivel
ajustado. Si se alcanza la temperatura deseada el calentador se apagará de nuevo.
4.4 Uso de Palma y Palma RAW en modo verano
¡Por favor tenga en cuenta! Thermo 2 no es necesario para el funcionamiento en verano. Solo
tiene que conectar el calefactor Palma directamente a una toma de corriente. En el uso durante los
meses de verano, el modo de circulación de aire puede conseguir una reducción sustancial de la
temperatura del invernadero.
Seleccione el Modo 2 en el interruptor de selección del calefactor Palma y abra la puerta o la
ventana del techo en su invernadero (13). La posición del interruptor del termostato es irrelevante
aquí.
Gracias al modo de circulación de aire, el aire del invernadero que se calienta por el sol circula
constantemente, y por lo tanto es movido hacia fuera. Al mismo tiempo, esta medida regula la
humedad en el invernadero y promueve la polinización de sus plantas.
Imagen 13

35
4.5 Características de seguridad
Disyuntor de temperatura controlada: Si el dispositivo se recalienta, el disyuntor de temperatura
controlada apagará el dispositivo de forma temporal. Para volver a encender el dispositivo, apa-
gue el calefactor durante 5 a 10 minutos para enfriarlo (14).
Otra razón para el apagado sería el bloqueo de la entrada o la salida de apertura.
• En este caso, por favor, elimine los objetos correspondientes (14). También podría ser un indi-
cador de que el ventilador ha fallado. • En este caso, apague el calefactor, quite el tapón (15) y
póngase en contacto con un especialista autorizado para organizar la reparación..
Image 14
Imagen 15
¡Advertencia! La carcasa se calienta durante el funcionamiento. Instalar de tal
manera que se evite el contacto accidental. El dispositivo se enfría lentamente
después de su apagado. Sólo se debe transportar utilizando el asa de transporte
que está diseñada para este propósito.
ELECTRICIDAD
PELIGRO
SUPERFICIE
CALIENTE
NO TOQUE
CUIDADO

36
5 Limpieza, mantenimiento, medioambiente y residuos
5.1 Cleaning and maintenance
¡Advertencia! Apague el dispositivo antes de cada limpieza y deje que se enfríe durante unos 30
minutos antes de comenzar la limpieza
¡Advertencia! No utilice materiales cáusticos, abrasivos o
de limpieza. Limpiar la carcasa con un paño húmedo (no mojado), una aspiradora o plumero.
5.2 Medioambiente y eliminación de residuos
¡Por favor tenga en cuenta! Sólo deshacerse de los dispositivos en un centro de recolección
correspondiente.
¡Por favor tenga en cuenta! Solo se permite que especialistas autorizados realicen reparaciones
en el dispositivo. Por favor, póngase en contacto con el fabricante o distribuidor en este sentido.
¡Advertencia! Las reparaciones ejecutadas incorrectamente pueden representar un peligro para
el usuario y otras personas. El fabricante no se hace responsable de los daños causados por las
heladas, el rendimiento de calefacción insuficiente para las dimensiones de la sala o de aislamiento
térmico insuficiente.
6.
REPRESENTACIONES Y GARANTÍAS DEL FABRICANTE
CTL
c/o Bio Green Inc.
2881 Busse Road,
Elk Grove Village, IL 60007
United States
Email:
Estas Representaciones y Garantías son aplicables a todos los clientes (los „Clientes“ y a cada
uno de forma individual, un „Cliente“) que compren los productos (los „Productos“) fabricado
por Bio Verde oHG (la „Compañía”)
1. Garantías y limitaciones:
1.1. La Compañía garantiza únicamente al comprador original de los productos que en el
Período de Garantía (el cual se define más adelante), los productos no presentarán defectos
en materiales ni fallas de fábrica bajo condiciones normales de uso, y que cumplirán con las
especificaciones de los productos publicadas por la Compañía. No obstante lo anterior, la em-
presa conserva su derecho de apartarse de sus especificaciones publicadas debido a las últimas
innovaciones y mejoras en la función y el diseño de los productos.
1.2. La garantía precedente está sujeta al almacenamiento, transporte y uso adecuado de los
productos, y no incluye los defectos debidos al desgaste normal por el uso o deterioro.
1.3. El Cliente deberá inmediatamente, pero en ningún caso después de ocho (8) días siguientes

37
al envío del Producto, revisar estos Productos para conformidad y defectos visibles. El Cliente
deberá dar aviso inmediato de la empresa por escrito de todos los casos de incumplimiento o
defectos visibles con respecto a los productos. En el caso de que el Cliente no proporcione a la
Compañía dentro de los ocho (8) días siguientes a la entrega de los productos un aviso de los
casos de incumplimiento o defectos visibles, cualquier reclamo de garantía en este sentido se
considerará cancelado.
1.4. El Cliente deberá notificar inmediatamente a la empresa por escrito de cualquier otros
defecto de los productos y devolver el Producto defectuoso. Antes de cualquier envío de un
producto defectuoso, el Cliente deberá ponerse en contacto con la empresa por primera vez en
la dirección indicada en el apartado 1.9. La única obligación de la Compañía bajo la presente
garantía es, a elección de la empresa y a su sola discreción, reparar, reemplazar o sustituir el
producto defectuoso. Cualquiera de los Productos reparados, sustituidos o cambiados estarán
sujetos a esta garantía, después de su reparación, sustitución o cambio. Si la empresa ha reci
-
bido notificación por parte del Cliente, y no se descubren defectos en el Producto, el cliente
correrá con los gastos de desmontaje.
1.5. Con respecto a los pedidos realizados a la medida, los defectos de los productos causados
por las especificaciones de los clientes están excluidos de la garantía mencionada en el apar
-
tado 1.1.
1.6. La Compañía tampoco garantiza que los Productos fabricados en virtud de una orden de en-
cargo no infrinjan la propiedad intelectual u otros derechos de propiedad de terceros y el Clien-
te es el único responsable de asegurar que estos Productos no contravengan dichos derechos.
1.7. El „Período de Garantía“ comienza en la fecha de entrega del Producto al Cliente, y per
-
manece en vigencia durante veinticuatro (24) meses. El „Período de Garantía“ se suspenderá
durante el tiempo de reparación, sustitución o cambio hasta que el producto reparado, cambi
-
ado o sustituido haya sido devuelto al Cliente.
1.8. La Compañía no autoriza a ninguna persona o parte a asumir o crear para ello cualquier
otra obligación o responsabilidad en relación con los Productos, excepto como se establece en
el presente documento.
1.9. Todas las solicitudes y notificaciones bajo esta Garantía deben ser dirigidas a:
CTL
c/o Bio Green Inc.
2881 Busse Road,
Elk Grove Village, IL 60007
United States
Email:
1.10. LA GARANTÍA PRESENTADA EN LA SECCIÓN 1.1 SE APLICARÁ EN LUGAR DE TODAS LAS
OTRAS GARANTÍAS (YA SEA EXPRESA O IMPLÍCITA), DERECHOS O CONDICIONES, Y EL CLIENTE
RECONOCE QUE EXCEPTO POR DICHA GARANTÍA LIMITADA, LOS PRODUCTOS SE PROPORCI-
ONAN „TAL CUAL“. LA COMPAÑÍA NIEGA ESPECÍFICAMENTE, SIN LIMITACIÓN, TODAS DEMÁS
GARANTÍAS, EXPRESAS O IMPLÍCITAS, DE NINGÚN TIPO, INCLUYENDO, SIN LIMITACIÓN, LAS
GARANTÍAS IMPLÍCITAS DE COMERCIALIZACIÓN Y APTITUD PARA UN PROPÓSITO PARTICU-
LAR, NO INFRACCIÓN, Y LAS GARANTÍAS DERIVADAS DEL RENDIMIENTO, TRANSACCIÓN O USO
COMERCIAL.

38
2. Limitación de responsabilidad:
2.1. EN NINGÚN CASO LA EMPRESA SERÁ RESPONSABLE DE CUALQUIER DAÑO INDIRECTO,
INCIDENTAL, PUNITIVO, ESPECIAL O DERIVADOS, INCLUYENDO PERO NO LIMITADO A, DAÑOS
POR PÉRDIDA DE GANANCIAS, INGRESOS, FONDO DE COMERCIO O USO, INCURRIDO POR EL
CLIENTE O UN TERCERO, YA SEA EN UNA ACCIÓN CONTRACTUAL, AGRAVIO, RESPONSABILI-
DAD OBJETIVA O IMPUESTA POR LEY, O DE OTRO MODO, INCLUSO SI SE ADVIRTIÓ DE LA PO-
SIBILIDAD DE TALES DAÑOS. LA RESPONSABILIDAD DE LA EMPRESA POR DAÑOS DERIVADOS
DE O EN RELACIÓN CON ESTE ACUERDO EN NINGÚN CASO EXCEDERÁ EL PRECIO DE COMPRA
DE LOS PRODUCTOS. SE ACEPTA Y RECONOCE QUE LAS DISPOSICIONES DE ESTE ACUERDO
ASIGNAN LOS RIESGOS ENTRE COMPAÑÍA Y EL CLIENTE, ESA FIJACIÓN DE PRECIOS POR PARTE
DE LA COMPAÑÍA REFLEJA ESTA ASIGNACIÓN DISTRIBUIDA DE RIESGO, Y SI NO FUESE POR
ESTA ASIGNACIÓN Y LIMITACIÓN DE RESPONSABILIDAD, LA EMPRESA NO HABRÍA FIRMADO
ESTE ACUERDO.
2.2. EN JURISDICCIONES QUE LIMITAN EL ALCANCE O QUE AFECTAN LAS LIMITACIONES O
EXCLUSIÓN DE COMPENSACIONES O DAÑOS, O DE RESPONSABILIDAD, COMO LA RESPONS
-
ABILIDAD EN NEGLIGENCIA O POR ACCIÓN DELIBERADA NO PERMITEN QUE LAS GARANTÍAS
IMPLÍCITAS SEAN EXCLUIDAS, LA LIMITACIÓN O EXCLUSIÓN DE GARANTÍAS, COMPENSACIO-
NES, DAÑOS O RESPONSABILIDAD ESTABLECIDA ANTERIORMENTE, ESTÁ CONTEMPLADA LA
APLICACIÓN EN LA MEDIDA MÁXIMA PERMITIDA POR LA LEY. EL CLIENTE PUEDE TENER OTROS
DERECHOS QUE PUEDEN VARIAR SEGÚN EL ESTADO, PAÍS U OTRA JURISDICCIÓN.
39
Introduction
Cette notice est destinée au Palma RAW, Palma. Le Palma RAW est composé d’un chauffage par
circulation d’air et d’un thermostat conçus pour les pièces humides. Les chauffages Palma RAW et
Palma servent à contrôler la température des serres et des jardins d’hiver.
Thermo 2 (Palma Digital uniquement) Palma
Type d‘appareil Thermostat digital Type d‘appareil
Chauffage à
circulation d‘air
Alimentation électrique 110VAC ±10%, 50/60Hz
Alimentation électrique
110VAC ±10%, 50/60Hz
Capacité de coupure
max.
1500 W Performance maximum 1500 W
Courant de commutati
-
on max.
16 A
Consommation
d‘électricité maximum
9,0 A
Plage de contrôle ± -58 – 90 °F Plage de contrôle 32 to 185 F
Taux de différence ± 2 °F
Régulateur de toléran
-
ce
± 5 °C / 41 °F
Alimentation < 1,5 W Alimentation < 1,5 W
Classe de protection II Classe de protection I
Système de protection IP X4 Système de protection IP X4
Longueur du senseur approx. 5ft Dimensions 11 x 8 x 12.5“
FR
AVERTISSEMENTS !
Pour réduire les risques d‘incendie, de chocs électriques, ou de
blessures, lisez et suivez attentivement ces instructions ainsi que
les consignes générales sur la sécurité et les risques avant le mon-
tage. Conservez ce manuel dans un endroit sûr à titre de référen-
ce. Si vous avez des doutes sur la sécurité de l‘appareil, consultez
un spécialiste. Si l‘appareil est utilisé dans une serre, assurez-vous
que la connexion électrique est installée par un professionnel
qualifié.
Danger
électrique
Surface chaude
ne touche pas
PRUDENCE

40
Image 1
1.2 Eléments principaux
Palma-Digital (1)
1. Ouverture d’arrivée d’air
2. Ouverture de sortie d’air
3. Interrupteur du thermostat
4. Interrupteur de sélection
5. Voyant de fonctionnement

41
”Thermo 2” (2) (en option)
1. Prise de courant du Thermo 2
2. Affichage
3. Bouton On/off
4. Bouton d’augmentation
5. Bouton de diminution
6. Thermomètre
7. 2x trous de montage
8. Voyant On/off
9. Mode chauffage / refroidissement
Image 2

42
2. Mesures de prévention et consignes de sécurité
2.1
Avertissement !
Un avertissement indique un risque de dégât/blessure pour
l’utilisateur ou le produit si l’utilisateur ne suit pas minutieusement les procédures .
Veuillez noter !
Un commentaire pour prévenir l’utilisateur
qu’il peut y avoir des problèmes éventuels.
2.2 Indications pour les dangers et la sécurité
Avertissement !
Tenir le produit hors de portée des enfants.
Veuillez noter ! Cet appareil n’est pas conçu pour être utilisé par des personnes (dont les enfants)
qui ont des capacités physiques, sensorielles et mentales limitées ou les personnes qui n’ont pas
assez d’expérience ou de connaissances pour manipuler ce produit, sauf si elles sont supervisés par
une personne responsable de leur sécurité.
Veuillez noter ! Après le déballage et avant la première utilisation, assurez-vous que l’appareil
et tous les accessoires correspondants sont en bon état de fonctionnement. Si il y a eu des dégâts
pendant le transport, veuillez contacter le distributeur ou le fabricant pertinent.
Veuillez noter ! Consultez un spécialiste si vous avez des doutes concernant le fonctionnement, la
sécurité ou la connexion de l’appareil.
Avertissement !
L’appareil ne peut pas être utilisé dans les zones d’élevage d’animaux.
Avertissement !
Ces consignes d’utilisation appartiennent à l’appareil et doivent être conservé-
es dans un endroit sûr. Si l’appareil est transféré à un tiers ces instructions doivent l’accompagner.
Avertissement !
Ne plongez jamais l’appareil dans l’eau.
Avertissement !
La garantie n’est pas valable si les réparations ne sont
pas effectuées correctement.
Avertissement !
Dans les structures commerciales, les règles de prévention des accidents de
l’association des assurances de responsabilité des employeurs en matière d’installations électriqu-
es, doivent être respectées.
Avertissement !
Ne versez jamais de liquide sur l’appareil. Si cela arrivait, débranchez la prise
du secteur et consultez un spécialiste.

43
Veuillez noter !
Cet appareil n’est pas conçu pour être utilisé par des personnes (dont des
enfants) qui ont des capacités physiques, sensorielles ou mentales limitées. Cela est aussi valable
pour les personnes qui n’ont pas assez d’expérience ou de connaissances pour utiliser cet appareil,
à moins qu’elles soient supervisées par une personne responsable de leur sécurité.
Veuillez noter !
Après le déballage et avant la première utilisation, assurez-vous que l’appareil
et tous les accessoires correspondants sont en bon état de fonctionnement. S’il y a eu des dégâts
pendant le transport, veuillez contacter le distributeur ou le fabricant pertinent.
Veuillez noter !
Consultez un spécialiste si vous avez des doutes concernant le fonctionnement,
la sécurité ou la connexion de l’appareil.

44
3. Installation
Avertissement ! Ne laissez pas l’emballage (sacs plastiques, polystyrène, clous, etc.) à la portée
des enfants car ils représentent un danger potentiel.
Avertissement !
Les appareils électriques utilisés dans les pièces humides doivent être branchés
sur un disjoncteur à courant résiduel uniquement.
Avertissement !
Avant la première utilisation, assurez-vous que l’appareil est bien connecté à
l’endroit prévu à cet effet.
Avertissement !
L’emplacement de l’installation doit être choisi de manière à ce que les appa-
reils ne soient, en aucun cas, en contact avec l’eau.
Avertissement !
Cet appareil est uniquement agréé pour la connexion sur une prise de secteur
110VAC, 50/60Hz AC. Il doit être protégé contre la salissure et l’humidité importantes. Des utili-
sations différentes de celles citées ci-dessus peuvent entraîner des dégâts sur l’appareil ou son
utilisateur, par un exemple un court-circuit, un choc électrique, etc. Suivez toujours les consignes de
sécurité et d’installation.
Avertissement !
Lorsque vous ouvrez le couvercle ou que vous retirez des pièces, l’appareil doit
être débranché de la prise. Transportez toujours l’appareil à l’aide de la poignée de transport prévue
à cet effet.
Veuillez noter ! Installez les câbles de connexion de manière à ce que personne ne puisse trébu-
cher et qu’ils ne soient pas écrasés ou qu’ils n’entrent jamais en contact avec des objets chauds.
Veuillez noter ! Utilisez uniquement des rallonges compatibles avec la puissance de sortie et
conformes aux règles de sécurité valables pour cet appareil.
Veuillez noter ! Assurez-vous que les appareils sont débranchés de la prise de secteur avant et
pendant l’installation.

45
Image 3
Lorsque vous utilisez le chauffage Palma, vous pouvez utiliser ou non le thermostat inclus pour
pièces humides Thermo 2. Cependant, pour une régulation précise de la température et un foncti-
onnement économe en énergie, nous vous recommandons fortement d’utiliser Thermo 2.
46
3.2 Installation du chauffage Palma
Avertissement !
L’appareil doit se trouver à au moins 20” des objets inflammables. Placez le
chauffage de manière à ce qu’il y ait un espace de 16” entre le mur et l’ouverture d’arrivée d’air.
Avertissement !
Il doit y avoir un espace de 1.5 mètres devant l’ouverture de la sortie si possible..
Placez le chauffage dans votre serre (4).
Avertissement ! N’installez jamais l’appareil près des robinets, des lavabos ou d’autres sources
d’eau.
Avertissement ! Utilisez cet appareil à l’intérieur.
Avertissement ! Ne pas recouvrir le chauffage.
Avertissement !
N’insérez pas d’objets dans les ouvertures de l’appareil. Risque de blessure, de
choc électrique ou de dégât sur l’appareil !
Ce chauffage doit être utilisé sur 110VAC, 50/60Hz.
Avertissement ! N’essayez jamais de faire
fonctionner l’appareil avec un voltage différent. Le câble a une prise comme vous le voyez sur A dans
le croquis ci-dessous. Comme vous le voyez sur C, un adaptateur est disponible pour connecter les pri-
ses à 3 dents à des socles à 2 fentes. La cosse verte qui sort de l’adaptateur doit être connectée à une
prise de terre permanente. L’adaptateur ne doit pas être utilisé si un socle à trois fentes est disponible.
47
Maintenant insérez la prise de secteur dans la prise du Thermo 2(5) ou, si vous l’utilisez sans le
Thermo 2, directement dans la prise de secteur.
Avertissement ! Ne branchez ou ne débranchez jamais la prise de courant avec les mains
mouillées. Si vous utilisez une multiprise ou une rallonge, assurez-vous que la capacité de courant
maximale n’est pas dépassée. Les enrouleurs de câbles doivent toujours être complètement déroulés.
N’enroulez pas le câble de connexion autour de l’appareil et ne faites pas fonctionner l’appareil avec
un câble enroulé. Ne tirez jamais sur la corde ; retirez la prise en la tenant par les rayures sur la tête
de la prise.
Pour régler le Palma RAW sur le mode hiver, voir section 4.2.
Pour régler le Palma sur le mode hiver, voir section 4.3.
Pour régler le mode hiver, voir section 4.4.
Image 5
Image 6
Danger
électrique
Danger
électrique
48
4. Utiliser le Palma et le Palma RAW
4.1 Fonctionnement général
Le chauffage à circulation d’air Palma est équipé d’un sélecteur de mode et d’un thermostat. Utili-
sez le bouton sélecteur pour choisir l’un des 3 modes de fonctionnement. Réglez la température de
la pièce désirée à l’aide du thermostat. Un voyant intégré indique que le chauffage est en marche.
(7).
Image 7

49
4.2 Utiliser le Palma RAW en mode hiver
Sélectionnez la position 3 avec le sélecteur de mode et réglez le thermostat au maximum. Le voy-
ant s’allumera lorsque le Palma RAW se mettra à chauffer (8).
Image 8
Vérifiez la température en utilisant un thermomètre (9) .
Image 9

50
Lorsque la température désirée est atteinte, tournez doucement le thermostat dans le sens contrai-
re des aiguilles d’une montre jusqu’à ce que le voyant de fonctionnement s’éteigne (10).
Le chauffage va maintenant maintenir le réglage de la température en redémarrant la fonction
chauffage lorsque la température descend en dessous de ce niveau. Il se peut qu’ il y ait des err-
eurs dans la température, vous aurez peut-être besoin de l’ajuster un peu.
Veuillez noter !
Malheureusement, vous ne pouvez pas imprimer une échelle de température
sur l’interrupteur du thermostat car le fonctionnement peut varier selon la taille, l’isolation, le
niveau de remplissage et l’emplacement de chaque serre.
Image 10

51
4.3 Utiliser le Palma en mode hiver
Réglez le thermostat de pièce humide Thermo 2 (11) à la température désirée de la pièce. Le régla-
ge se trouve dans la notice du Thermo 2.
Sélectionnez la position 3 du sélecteur de mode. Et réglez le thermostat du chauffage dans la
position maximale (12).
Image 11
Image 12
52
Le thermostat Thermo 2 pour pièces humides va désormais s‘occuper de la régulation de la
température et le chauffage Palma s‘allumera si la température de la pièce descend plus bas que
le niveau réglé. Si la température est atteinte le chauffage s‘éteindra encore automatiquement.
4.4 Utiliser le Palma et le Palma RAW en mode été
Veuillez noter !
Le Thermo 2 n‘est pas nécessaire pour le fonctionnement en mode été. Il suffit
de brancher directement le chauffage Palma sur la prise de secteur. Durant les mois d‘été, l‘utilisa-
tion du mode circulation d‘air peut réduire efficacement la température de la serre..
Sélectionnez le mode 2 sur le sélecteur de mode du chauffage Palma et ouvrez la fenêtre de toit
de votre serre (13). Inutile de régler la position de l‘interrupteur du thermostat dans ce cas là.
L‘air de la serre chauffé par le soleil circule grâce au mode circulation d‘air et il est donc évacué
à l‘extérieur. Cette opération régule aussi le taux d‘humidité de la serre et favorise la pollinisation
de vos plantes.
Image 13
53
4.5 Fonction de sécurité
Disjoncteur de contrôle de température. Si l‘appareil est en surchauffe, le disjoncteur qui contrôle
la température va éteindre l‘appareil temporairement. Pour rallumer l‘appareil, éteignez le chauf-
fage et attendez qu‘il refroidisse pendant 5 à 10 minutes (14).
Un autre cause d‘arrêt peut être le blocage de l‘ouverture d‘entrée ou de sortie.
• Dans ce cas, enlevez les objets correspondants (14). Le problème peut aussi indiquer que le ven-
tilateur est en panne. • Dans ce cas, éteignez le chauffage, débranchez la pris (15) et contactez un
spécialiste agréé pour effectuer les réparations nécessaires.
Image 14
Image 15
Avertissement ! Le boîtier chauffe pendant quand l‘appareil fonctionne.
Installez-le de manière à ce qu‘il ne provoque pas d‘incidents. L‘appareil refroidit
uniquement lorsqu‘il est éteint. Transportez-le uniquement à l‘aide de la poignée
de transport prévues à cet effet.
Danger
électrique
Surface chaude
ne touche pas
PRUDENCE

54
5 Nettoyage, entretien, environnement et élimination
5.1 Nettoyage et entretien
Avertissement ! Eteignez l’appareil avant et pendant le nettoyage et laissez le refroidir pendant
30 minutes environ avant de le nettoyer.
Avertissement ! N’utilisez pas de produits de nettoya-
ge, de produits caustiques ou abrasifs. Nettoyez le boîtier avec un chiffon humide (pas mouillé), un
aspirateur ou un plumeau.
5.2 Environnement et élimination
Veuillez noter ! Jetez les appareils dans les centres de traitement des
déchets adaptés uniquement.
Veuillez noter ! Seuls les spécialistes agréés ont le droit de faire des réparations sur l’appareil.
Veuillez contacter le fabricant ou le distributeur à ce sujet.
Avertissement ! Les réparations mal exécutées représentent un danger pour l’utilisateur et les
autres personnes. Le fabricant n’assume pas la responsabilité des dégâts provoqués par le gel, la
production de chauffage insuffisante par rapport à la taille d’une pièce ou le manque de thermo
isolation.
6.
REPRÉSENTATIONS ET GARANTIES DU FABRICANT
CTL
c/o Bio Green Inc.
2881 Busse Road,
Elk Grove Village, IL 60007
United States
Email:
Ces représentations et garanties s‘appliquent à tous les Clients (les „Clients“ et chaque, indivi-
duellement, un „Client“) qui achètent des Produits (les „Produits“) fabriqués par Bio Green oHG
(l‘“Entreprise)
1. Garanties et Limites :
1.1. L‘Entreprise garantie uniquement à l‘acheteur initial des Produits, pendant la période de
garantie (définie ci-dessous), que les Produits ne comportent aucun défaut de matériel et de fa-
brication dans des conditions d‘utilisation normales et qu‘ils sont conformes aux spécifications
publiées des Produits. Toutefois, l‘Entreprise se réserve le droit de s‘écarter de ces spécifications
publiées suite aux innovations récentes et aux améliorations de la fonction et de la conception
des Produits.
1.2. La garantie précédente dépend des conditions de stockage, du transport et de l‘utilisation
des Produits et ne comprend pas les défauts causés par l‘usure ou la détérioration naturelle.

55
1.3. Le Client doit immédiatement, mais dans tous les cas pas plus tard que huit (8) jours
suivant la livraison du Produit, inspecter les Produits pour vérifier la conformité et les défauts
visibles. Le Client doit immédiatement avertir par écrit l‘Entreprise en cas de non conformité
ou de défauts visibles des Produits. Si le Client néglige de fournir à l‘Entreprise un avis écrit
concernant la non-conformité et ou les défauts visibles, toutes les réclamations de garantie à
ce sujet seront caduques.
1.4. Le Client doit immédiatement avertir l‘Entreprise par écrit si le Produit comporte d‘autres
défauts et renvoyer ce Produit défectueux. Avant de renvoyer ce Produit défectueux, le Client
doit d‘abord contacter l‘Entreprise à l‘adresse fournie dans la section 1.9. L‘unique obligation de
l‘Entreprise selon les conditions de la garantie précédente est, au choix et à la seule discréti-
on de l‘Entreprise, de réparer, de remplacer ou d‘échanger le Produit défectueux. Tout Produit
réparé, remplacé ou échangé est soumis à cette garantie, après la réparation, le replacement
ou l‘échange. Si l‘Entreprise a reçu une notification écrite du Client et qu‘aucun défaut n‘a pu
être détecté sur le Produit, le Client devra prendre en charge les coûts encourus par l‘Entreprise
conséquemment à cette notice. Seule l‘Entreprise peut déterminer, à sa seule discrétion si le
Produit est défectueux. En aucun cas, l‘Entreprise ne prendra en charge les couts de démontage.
1.5. En ce qui concerne les commandes sur mesure, tous les défauts des Produits engendrés suite
aux spécifications des Clients sont exclus de la garantie présentée dans la section1.1.
1.6. L‘Entreprise ne garantie pas non plus que les Produits fabriqués selon une commande sur
mesure n‘enfreignent pas la propriété intellectuelle ou les droits de propriété de tout tiers et il
relève de la seule responsabilité du Client de s‘assurer que de tels Produits ne les enfreignent
pas.
1.7. La „Période de Garantie“ débute à la date de livraison du Produit au Client et est valable
pendant vingt-quatre (24) mois. La „Période de Garantie“ sera suspendue pendant la période
de réparation, de remplacement ou d‘échange jusqu‘à ce que le Produit réparé, échangé ou
remplacé soit rendu au Client.
1.8. L‘Entreprise n‘autorise aucune personne ou tiers à endosser ou créer tout autre obligation
ou responsabilité en relation avec les Produits à l‘exception de ce qui est stipulé dans la pré
-
sente.
1.9. All requests and notices under this Warranty shall be directed to:
CTL
c/o Bio Green Inc.
2881 Busse Road,
Elk Grove Village, IL 60007
United States
Email:

56
1.10. LA GARANTIE CITÉE DANS LA SECTION 1.1 REMPLACE TOUTES LES AUTRES GARANTIES
(QU‘ELLES SOIENT EXPLICITES OU IMPLICITES, LES DROITS OU LES CONDITIONS ET LE CLIENT
RECONNAIT QUE, SAUF POUR UNE TELLE GARANTIE LIMITÉE, LES PRODUITS SONT FOURNIS
„EN L‘ÉTAT“. L‘ENTREPRISE DÉCLINE EXPRESSÉMENT, SANS LIMITATIONS, TOUTES LES AUTRES
GARANTIES, EXPLICITES OU IMPLICITES, EN TOUS GENRES, DONT, LES GARANTIES SANS LIMIT-
ATIONS, LES GARANTIES IMPLICITES DE VALEUR MARCHANDE ET D‘ADAPTATION A UN USA-
GE QUELCONQUE, NON-ONTREFACON, ET CES GARANTIES QUI RÉSULTENT DES MODALITÉS
D‘ÉXÉCUTION, DE PRATIQUES COMMERCIALES OU DE NÉGOCIATION.
2. Limitations de la responsabilité :
2.1. EN AUCUN CAS L‘ENTREPRISE SERA RESPONSABLE DES DOMMAGES INDIRECTS, ACCIDEN-
TELS, PUNITIFS, SPÉCIAUX OU CONSÉQUENTS COMPRENANT MAIS NON LIMITÉS À LA PERTE
DE BÉNÉFICES, DE REVENUES, DE CLIENTÊLE OU D‘UTILISATION SUBIS PAR LE CLIENT OU UN
TIERS, QU‘ILS SOIENT EN ACTION DANS LE CONTRAT, ACTE DELICTUEL, RESPONSABILITÉ AB
-
SOLUE OU STIPULÉE PAR LA LOI, OU AUTRE, MEME SI ELLE A ÉTÉ PREVENUE DE LA POSSIBILITÉ
DE TELS DOMMAGES. LA RESPONSIBILITÉ DE L‘ENTREPRISE POUR LES DOMMAGES EN DEHORS
OU CONCERNANT CE CONTRAT NE DOIT PAS DÉPASSER LE PRIX D‘ACHAT DES PRODUITS. IL
EST CONVENU ET ACCEPTÉ QUE LES PROVISIONS DE CE CONTRAT REPARTISSENT LES RISQUES
ENTRE L‘ENTREPRISE ET LE CLIENT, QUE LA TARIFICATION DE L‘ENTREPRISE REFLÈTE CETTE
RÉPARTITION DES RISQUES, MAIS QUE SI CE N‘EST QUE POUR CETTE RÉPARTITION ET CETTE
LIMITE DE RESPONSABILITÉ, L‘ENTREPRISE N‘AURAIT PAS SIGNÉ CE CONTRAT.
2.2. DANS LES JURIDICTIONS QUI LIMITENT L‘ÉTENDUE OU EXCLUENT LES LIMITATIONS OU
LES EXCLUSIONS DE RECOURS OU DE DOMMAGES, OU DE RESPONSABILITÉ, COMME LA RES-
PONSABILITÉ POUR GROSSE NÉGLIGENCE OU POUR FAUTE INTENTIONNELLE OU QUI N‘AU-
TORISENT PAS L‘EXCLUSION DES GARANTIES IMPLICITES, LA LIMITATION OU L‘EXCLUSION DES
GARANTIES, LES RECOURS, LES DOMMAGES OU LA RESPONSABILITÉ PRÉSENTÉS CI-DESSUS
SONT CONÇUS POUR ÊTRE APPLIQUÉS DANS LES LIMITES AUTORISÉES PAR LA LOI. LES CLI-
ENTS PEUVENT AUSSI AVOIR D‘AUTRES DROITS QUI VARIENT SELON L‘ÉTAT, LE PAYS OU UNE
AUTRE JURIDICTION.

57

58

59

CTL
c/o Bio Green Inc.
2881 Busse Road,
Elk Grove Village, IL 60007
United States
www.biogreen-products.com
PALMA USA VER. 2 – 20161012-BG