1
To prevent possible SERIOUS INJURY or DEATH from electrocution:
• Be sure power is NOT connected BEFORE installing the receiver.
To prevent possible SERIOUS INJURY or DEATH from a moving gate
or garage door:
• ALWAYS keep remote controls out of reach of children. NEVER
permit children to operate, or play with remote control transmitters.
• Activate gate or door ONLY when it can be seen clearly, is properly
adjusted, and there are no obstructions to door travel.
• ALWAYS keep gate or garage door in sight until completely closed.
NEVER permit anyone to cross path of moving gate or door.
WWARNARNINGING
CAUTIONCAUTION
WWARNARNINGING
W
W
ARN
ARN
ING
ING
To prevent possible SERIOUS INJURY or DEATH, the use of
CONSTANT OPERATION on residential openers is PROHIBITED.
When a receiver is used to activate a commercial door opener, a
reversing edge MUST be installed on the bottom of the door. Failure to
install a reversing edge under these circumstances may result in
SERIOUS INJURY or DEATH to persons trapped beneath the door.
COMMERCIAL ACCESS CONTROL RECEIVER
MODEL STAR1000
Control
Station
Receiver Without
Faceplate
Single Operator
9 - 30 volts AC/DC
250 mA max
Power Supply
APPLICATION
The STAR1000 is a high capacity single channel commercial access
control receiver for commercial door operators, and dry contact triggered
devices. The STAR1000 is compatible with Security: 2.0™ remote
controls and wireless keyless entries, Security: 2.0™ Passport and
Passport Lite remote controls. This receiver is compatible with
HomeLink
®
. For programming or compatibility information visit
www.homelink.com. The receiver capacity is 1,000 devices and can be
any combination of remote controls and wireless keyless entries. The
receiver is watertight according to IPX44 specification.
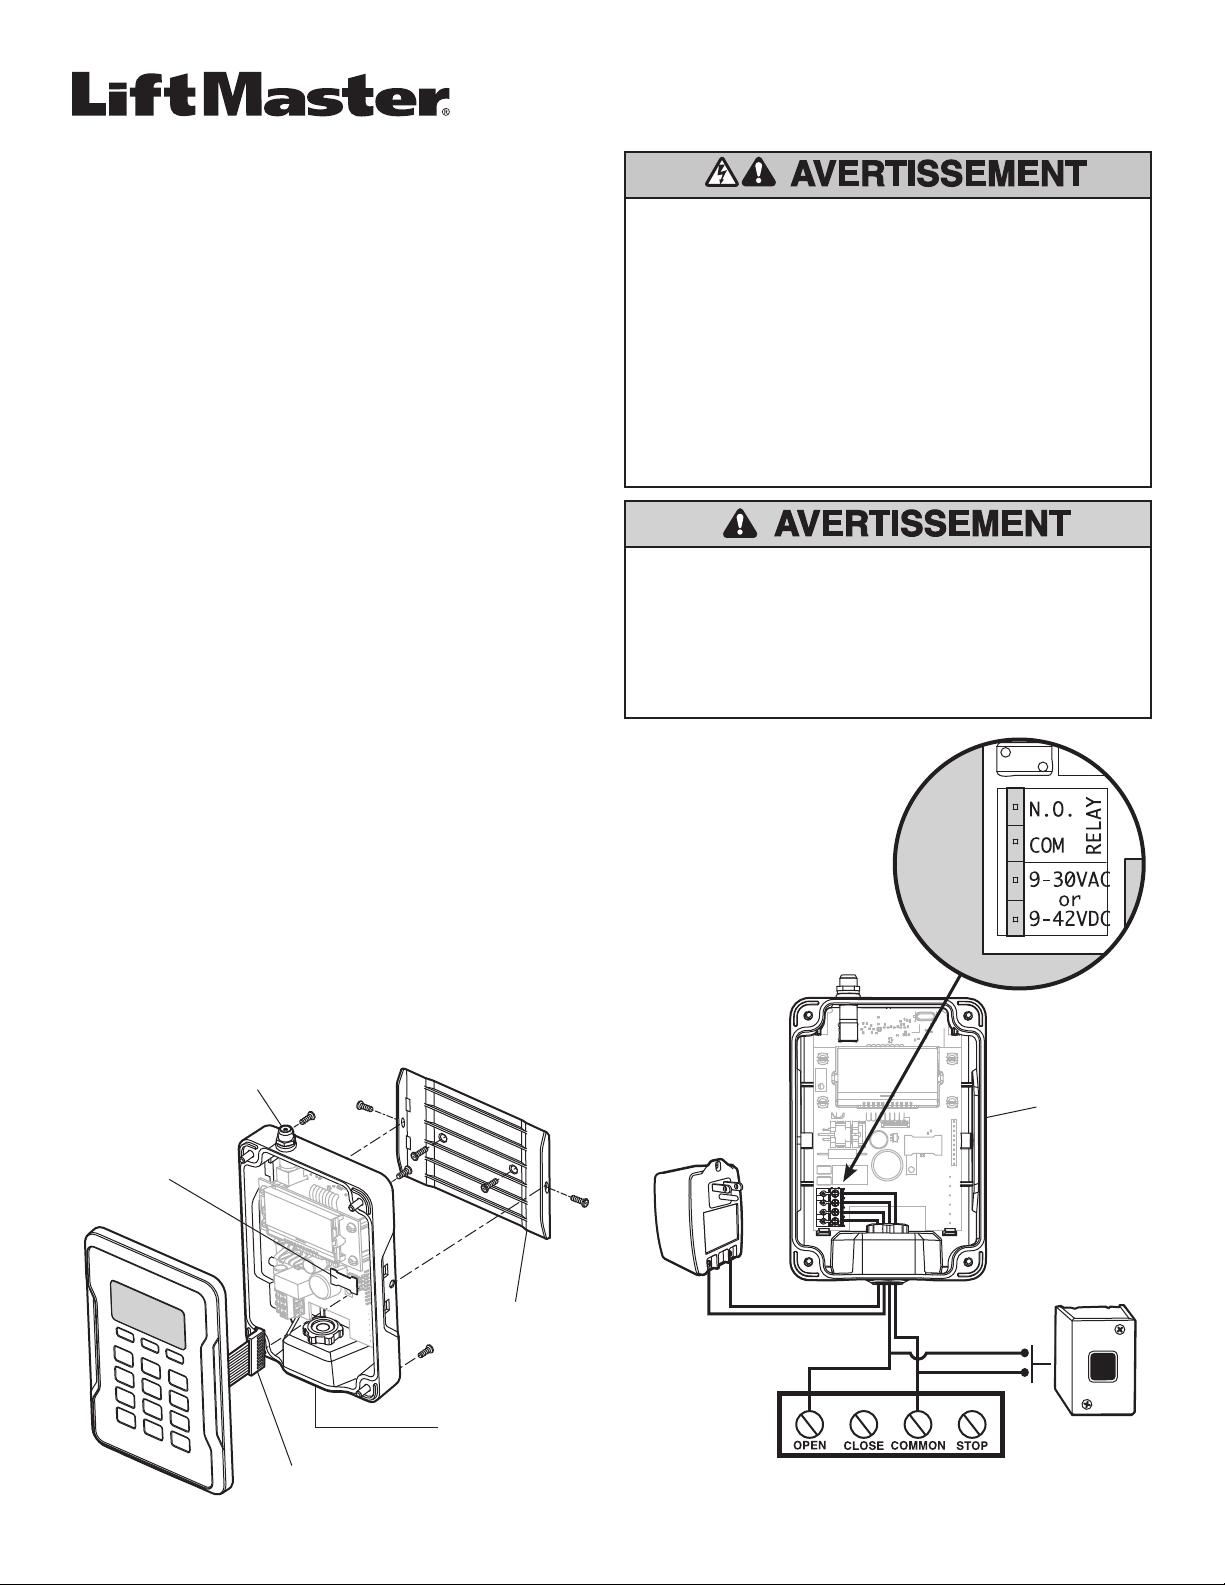
INSTALLATION
1. Select a convenient location near the operator to be controlled by the
receiver within “line of sight” of the intended transmitting location.
NOTE: Do not mount LCD screen in direct sunlight. Avoid mounting
the receiver in a metal enclosure or near other wireless receiving or
transmitting devices.
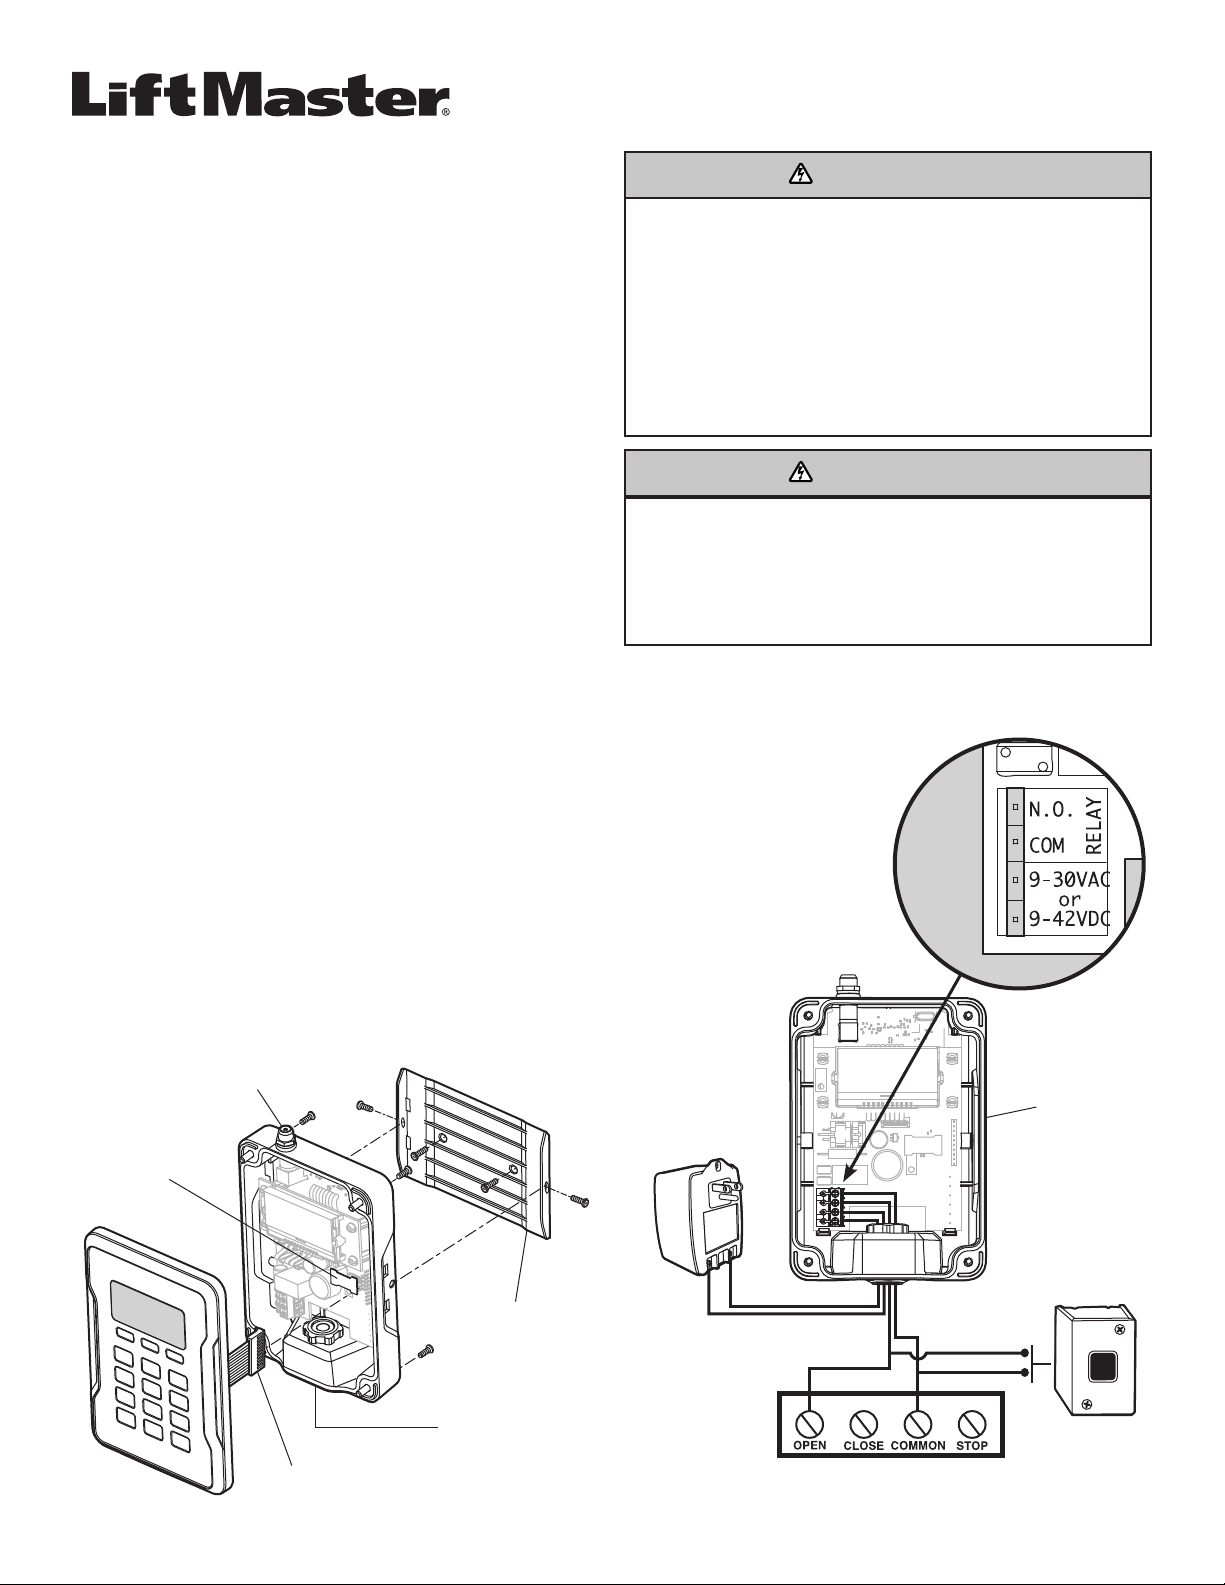
2. Mount the bracket to the desired surface with appropriate hardware
(not provided) (Figure 1).
3. Remove the 4 (#8) screws on the back of the receiver and remove the
faceplate. Unplug the keypad connector from the control board.
NOTE: Be careful not to damage the keypad cable while removing the
faceplate.
4. Make wiring connections (Figure 2). Refer to your gate or commercial
door operator owner’s manual for more specific information.
5. Reconnect the keypad connector to the board (labeled J9).
6. Secure the faceplate with the 4 (#8) screws previously removed.
7. Install the antenna provided.
NOTE: Use the optional 86LM or 86LMT antenna extension kit
(see page 4) to mount the remote antenna as high and far from
metallic objects as possible for best radio range.
8. Snap the receiver onto the mounting bracket and secure with the
(#8) screws provided.
9. Tighten the watertight connector to secure and seal the wiring.
Figure 1
Mounting Bracket
Watertight Connector
Keypad Connector
Antenna
Connector
Figure 2
Backup Memory
Module
Relay
Connection
Power
Connection
WWARNARNINGING
CAUTIONCAUTION
WWARNARNINGING
W
W
ARN
ARN
ING
ING
2
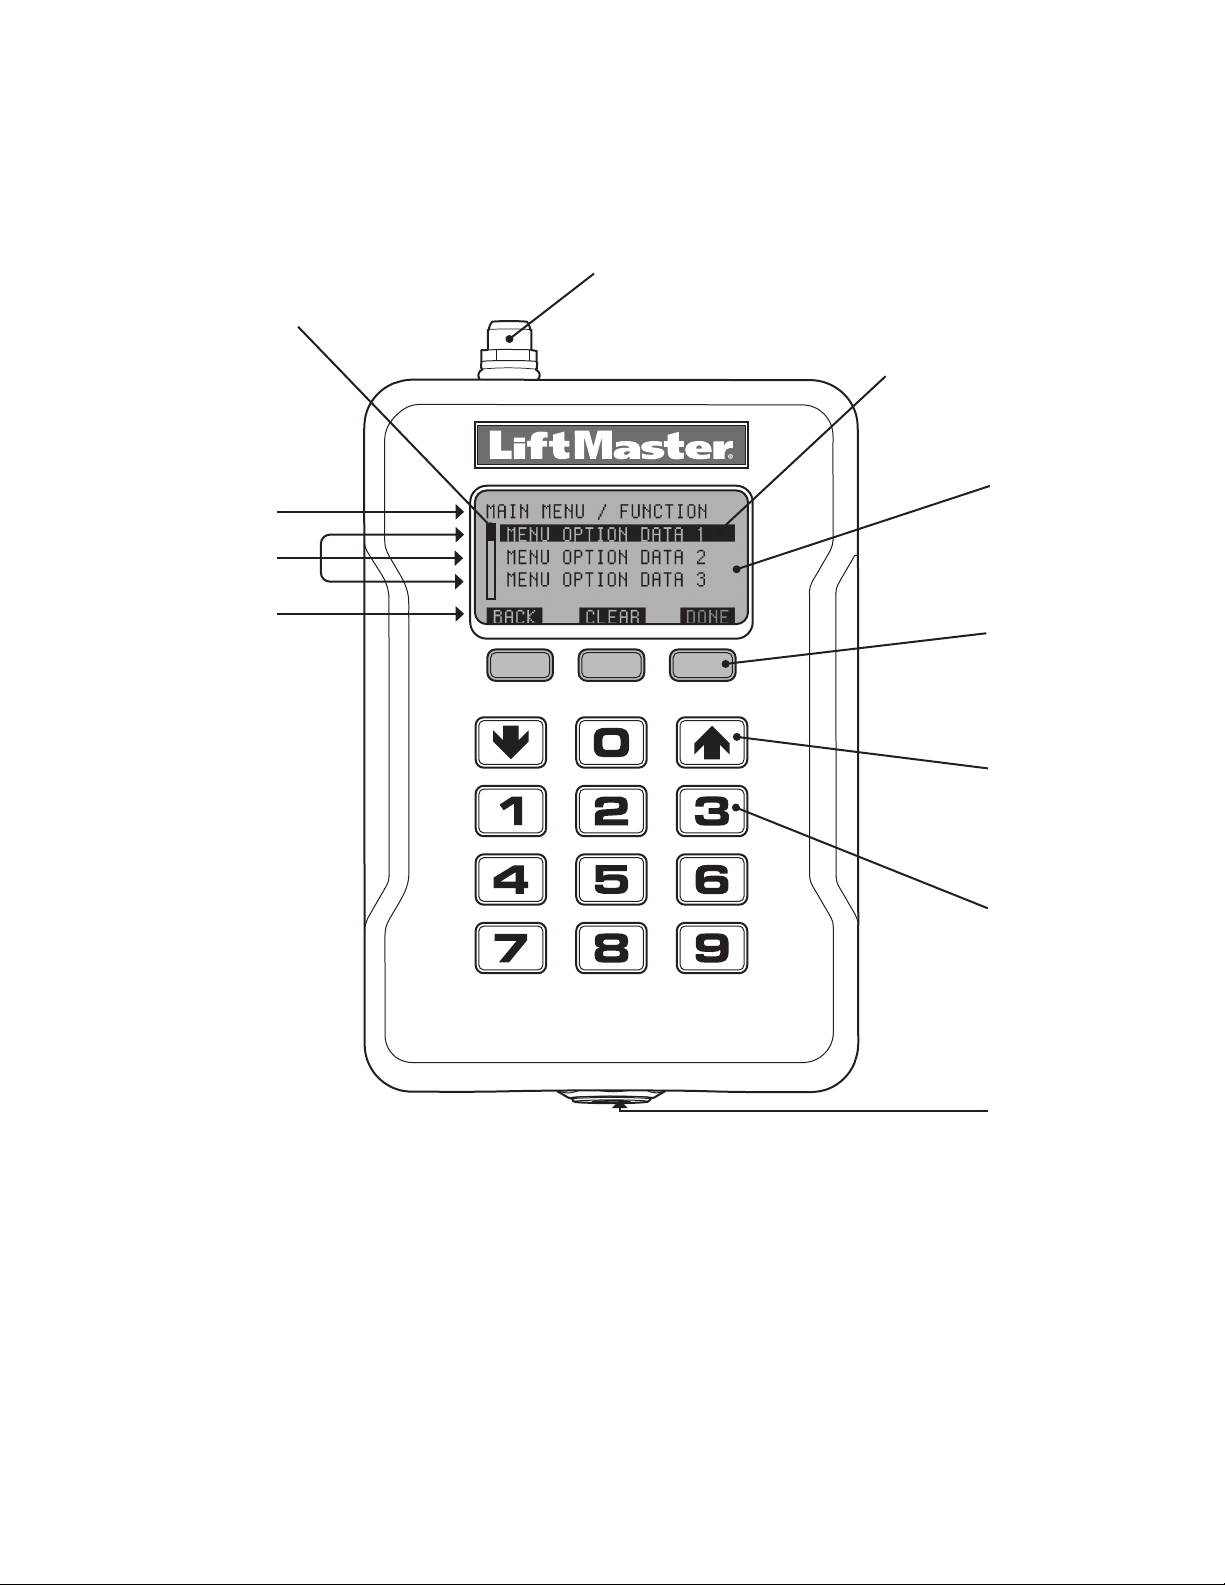
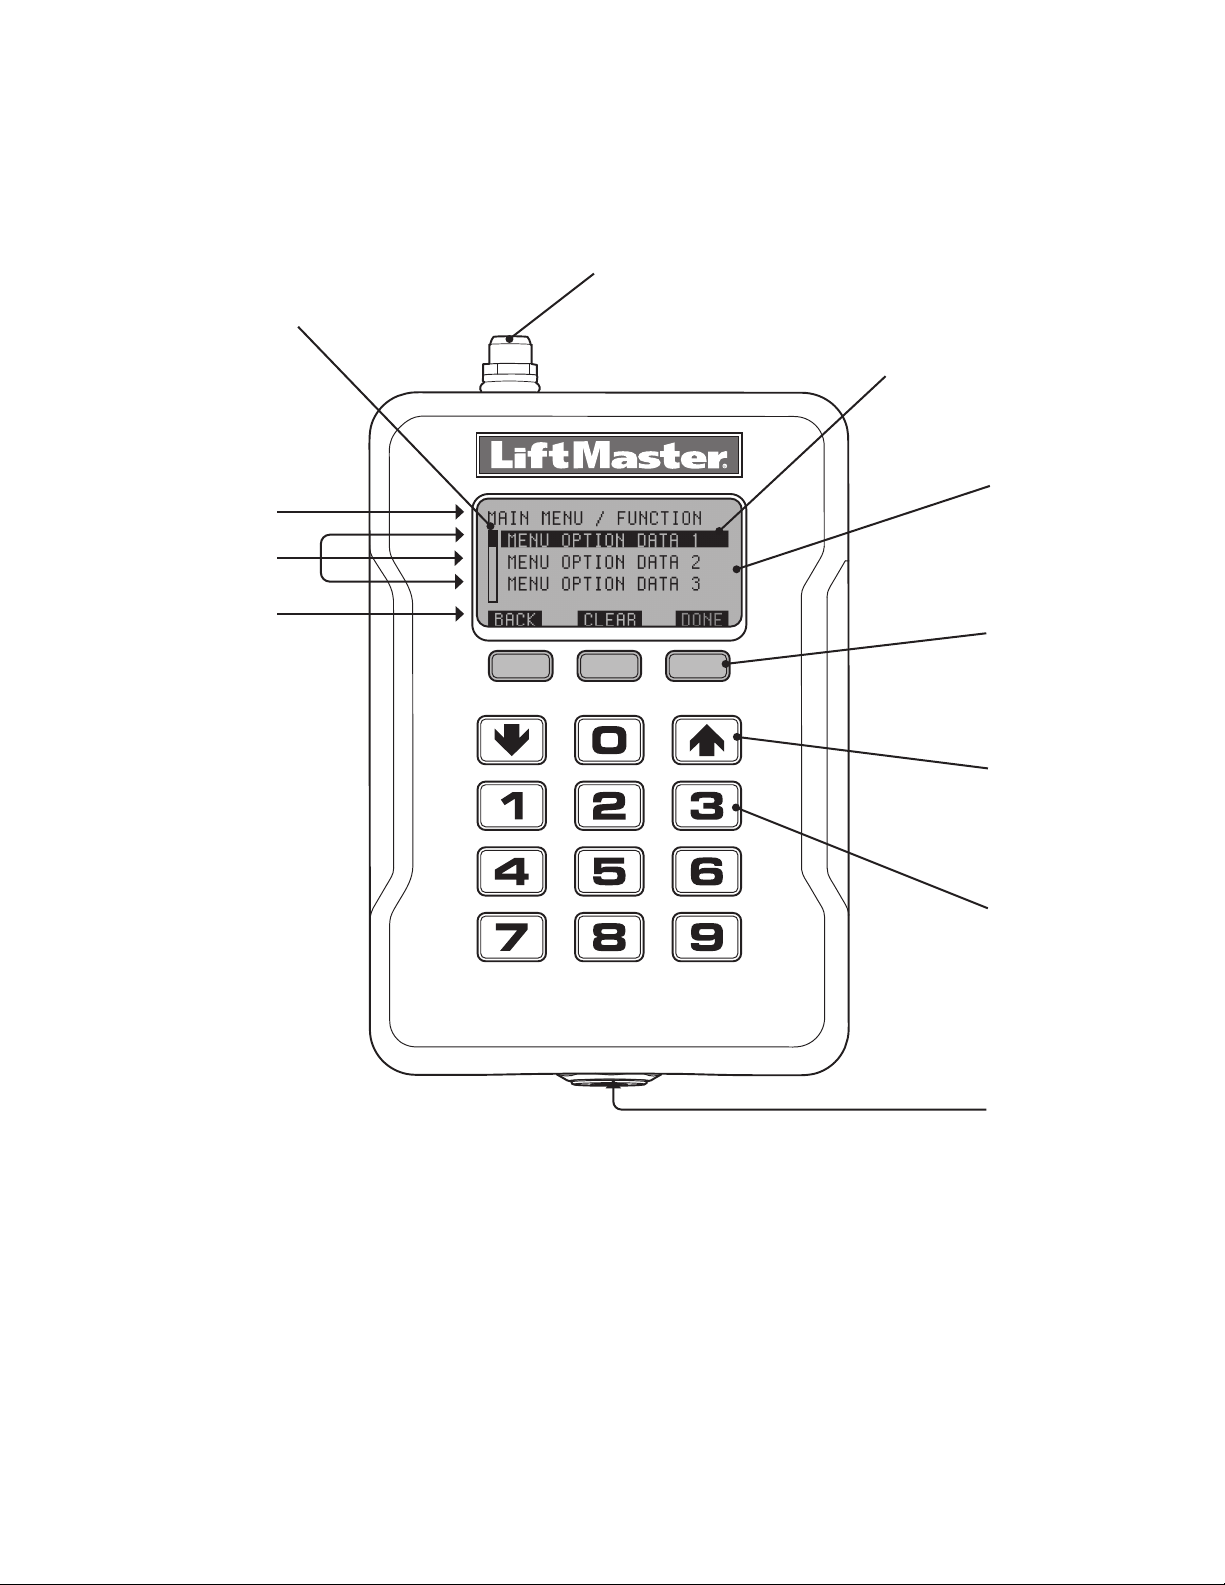
Antenna Connection
For the direct antenna or
the antenna extension kit.
“SOFT” Keys
Soft key functions
are defined by the
label on line 5 of the
display. The
functions change
according to the
menu selection.
LCD Screen
System
programming and
status display.
Down/Up Keys
For navigation in
the menus.
Numeric Keypad
Numeric data is
entered through the
numeric keypad.
Insert wiring
USER INTERFACE
The STAR1000 user interface consists of a 22 character by 5 line LCD
display, 3 “soft keys”, Down/Up arrows and a numeric keypad.
PROGRAMMING
The receiver has the ability to learn a combination of remote control
transmitters and keyless entries up to 1,000 devices. See page 4 for a
complete list of compatible accessories. Audible and visual warnings
occur when the receiver capacity is exceeded. After 30 seconds of
inactivity, the receiver times out and the LiftMaster
®
logo is displayed.
Select “UNLOCK” and enter the PIN to continue.
Initial PIN set up:
The PIN restricts access to authorized administrators only. If you omit
this step, anyone will be able to program the receiver. Upon initial power
up, the system firmware revision is displayed for 5 seconds followed
by the LiftMaster
®
logo. When a key is pressed, “CREATE PIN?”
is displayed.
1. Press “YES” to create PIN.
2. If the PIN is lost you may request a reset code by pressing "RESET."
You will be provided with a 5 digit serial number. Login to partner
portal and go to https://partner.liftmaster.com/utility.
Enter the Serial Number to retrieve the master code.
Once master code is retrieved, come back to the RESET option, and
after obtaining the serial number press Next.
Enter the master code from the partner portal.
Enter the new PIN.
Re-Enter the new PIN. You will hear a beep from the unit when the PIN
has been successfully programmed.
Note: Resetting the PIN does not clear data or settings on the
STAR1000 and PPWR. 6
3. Enter a 6-digit PIN, and press “YES”; enter the 6-digit PIN a second
time and press “YES” to program the PIN. If you make a mistake,
press “CLEAR” to change your entry. To exit the enter PIN screen,
select “BACK”.
4. When your 6-digit PIN is programmed correctly, the LCD display
reads “KEYPAD UNLOCKED”. Select “OK” to continue to the Main
Menu. After 30 seconds of inactivity, the receiver times out and
the LiftMaster
®
logo is displayed. Select “UNLOCK” and enter PIN
to continue.
Line 1:
Menu and function mode.
Lines 2, 3, and 4:
Menu selections and data.
Line 5:
Soft key function modes.
Scroll Indicator
If more than 3 options exist, a scroll
indicator appears on the left margin of
lines 2, 3, and 4. The scroll indicator
shows the relative position within the list.
Menu/Data selection
shown in inverse font.

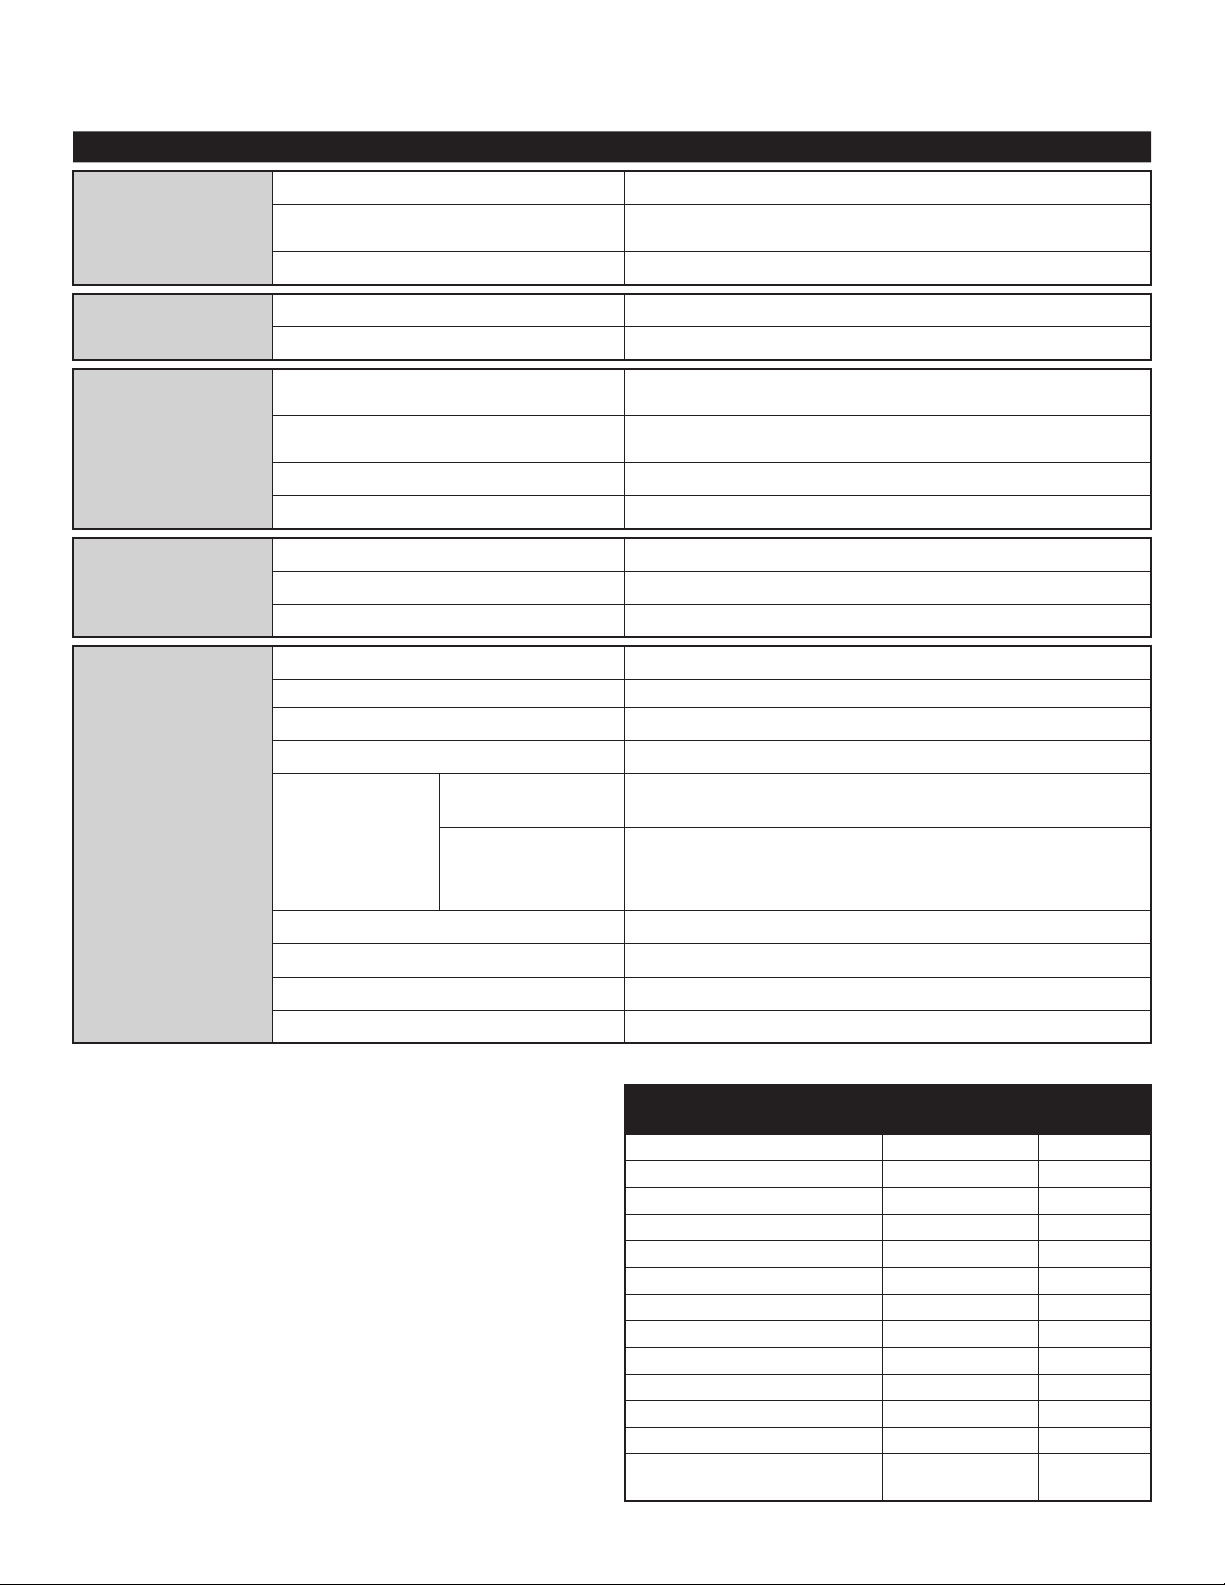
3
MAIN MENU COMMAND DESCRIPTION
LEARN MENU
LEARN DEVICE Program a device to the receiver.
BLOCK LEARN DEVICE Block program a range of devices to the receiver.
LEARN TO LOC # Program a device to a 4-digit number location.
DELETE MENU
DELETE DEVICE Delete a specified device that has been programmed to the receiver.
DELETE ALL DEVICES Delete all programmed devices.
SUSPEND MENU
SUSPEND DEVICE Temporarily disables the function of a specified device that has been
programmed to the receiver.
SUSPEND ALL DEVICES Temporarily disables the function of ALL devices programmed to the
receiver.
UNSUSPEND DEVICE Re-enable the function of a suspended device.
UNSUSPEND ALL DEVICES Re-enable the function of ALL suspended devices.
QUERY MENU
LOC # USED Displays a range of used locations starting from a specified location.
LOC # AVAILABLE Displays a range of empty locations starting from a specified location.
LOC # SUSPENDED Displays a range of suspended locations starting from a specified
location.
SETTINGS
CHANGE PIN Change the 6-digit PIN number for the receiver.
DEALER INFO Display and edit the dealer 11-digit contact phone number.
FIRMWARE VERSION Displays the current firmware version.
BEEP Turn the audible feedback on or off.
MEMORY DUPLICATE MEMORY Creates a memory backup. A backup memory module must be
installed.
RESTORE MEMORY Restores a memory backup from a memory module.
NOTE: Content of memory backup module will over-write any
information already stored in the receiver memory.
RELAY Sets the relay activation time from .25 to 1 second.
CONTRAST Press Down or Up arrows to adjust LCD contrast.
LANGUAGE Sets menu language: English (Default), Spanish, and French.
FACTORY DEFAULT Reset receiver to factory default settings.
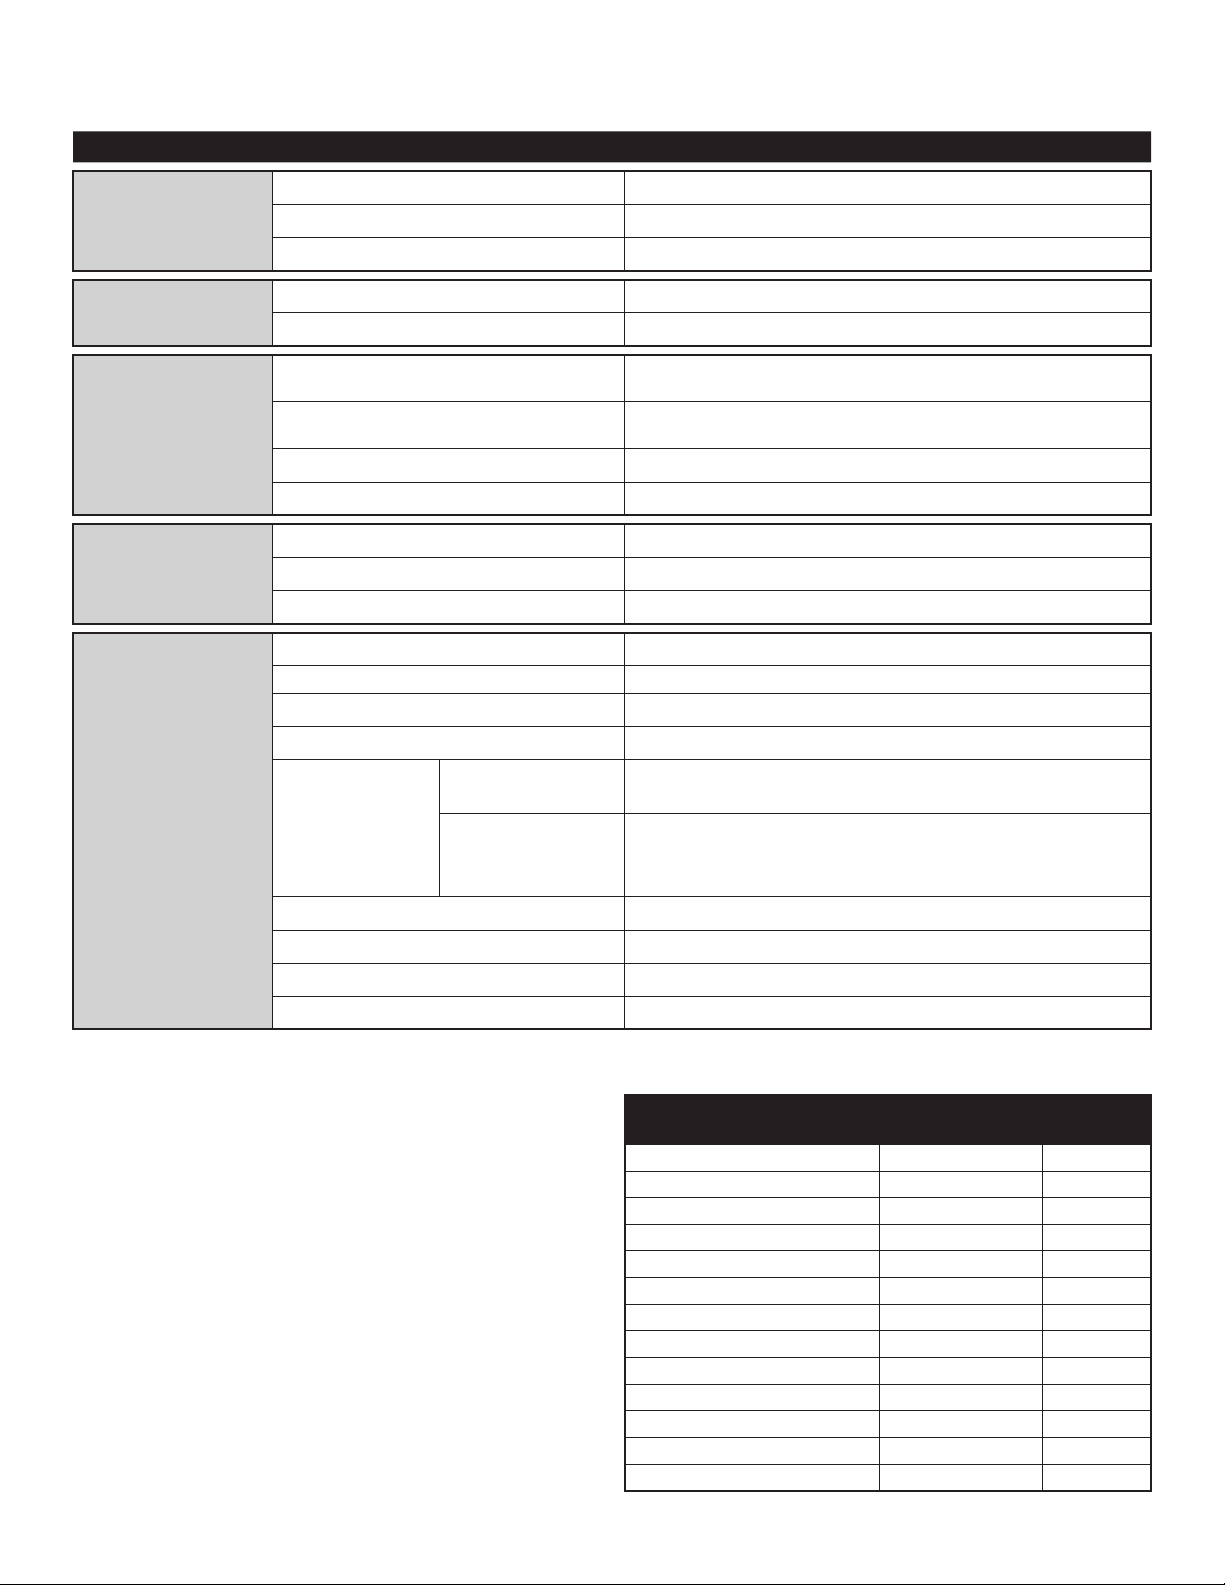
PROGRAMMING COMMANDS
The table below describes the commands used to program the receiver.
DIAGNOSTICS
The receiver emits a series of audible beeps to signal programming and
error events. The table at right lists all of the events and their audible
notifications. The On/Off column indicates that the audible notification for
the event may be disabled in the BEEP SETTINGS menu.
EVENT AUDIBLE
NOTIFICATIONS
ON/OFF
Key press Single YES
Successful Add Double
Successful Delete Triple
Successful Suspend Double
Successful Unsuspend Double
Master PIN entry error Long
Programming error Long
Location out of range Long
Generic Success Double
Generic Error Long
Received unknown Tx Slow YES
Received known Tx Double YES
Received known suspended Tx Long YES
4
FOR TECHNICAL SUPPORT DIAL OUR TOLL FREE NUMBER:
1-800-528-2806
NOTICE: To comply with FCC and or Industry Canada rules (IC), adjustment or modifications of this
receiver and/or transmitter are prohibited, except for changing the code setting or replacing the
battery. THERE ARE NO OTHER USER SERVICEABLE PARTS.
Tested to Comply with FCC Standards for Home or office use. Operation is subject to the following
two conditions: (1) this device may not cause harmful interference, and (2) this device must accept
any interference received, including interference that may cause undesired operation.
SPECIFICATIONS
System Capacity ......................................................... 1000 devices
Supply Voltage .......................................................... 9 - 30 Volts AC, 9 - 42 Volts DC
Operating Current ........................................................ 50 mA Maximum
Stand By Current......................................................... 30 mA Maximum
Surge Suppression ....................................................... 6.0 kV Min
Operating Temp Range .................................................... -40°C to +65°C @ 50% Rh, -40°F to +149°F @ 50% Rh
Storage and Shipping Temp Range........................................... -40°C to +85°C @ 50% Rh
Code Format ............................................................
Security: 2.0™ Only
Relay Contact Rating...................................................... 1 amp @ 24V AC/DC
COMPATIBLE ACCESSORIES
Remote Controls......................................................... 892LT, 894LT, 891LM, 893LM, 890MAX, 893MAX,
PPV3M, PPK3M, PPK3PHM, PPLV1-xxx, PPLK1-xxx,
PPLK1PH-xxx
Keypads ............................................................... 877LM, 877MAX, and 878MAX
Antenna Extension Kits:
15' Extension Kits .................................................... 86LM
25' Extension Kits .................................................... 86LMT
24VAC Transformer for screw terminals....................................... 95LM
REPAIR PARTS
Antenna................................................................ K76-36681
Mounting Bracket ........................................................ K13-36651-1
5
Pour prévenir d'éventuelles BLESSURES GRAVES, voire MORTELLES suite à
une électrocution :
• S'assurer que l'alimentation est COUPÉE AVANT d'installer le récepteur.
Pour prévenir d'éventuelles BLESSURES GRAVES ou LA MORT dues à un
portail ou une porte de garage en mouvement :
• Garder EN TOUT TEMPS les télécommandes hors de portée des enfants. NE
JAMAIS Permettre à un enfant d’utiliser ou de jouer avec des émetteurs de
télécommande.
• Actionner la barrière ou la porte UNIQUEMENT lorsqu’elle est clairement
visible, correctement ajustée et libre de toute entrave lorsqu’elle est en
mouvement.
• Garder EN TOUT TEMPS la barrière ou la porte dans votre champ visuel
jusqu’à la fermeture complète. NE JAMAIS permettre à quiconque de
franchir le chemin du mouvement d’une barrière ou d’une porte.
ATTENTION
ATTENTION
AVERTISSEMENT
AVERTISSEMENT
AVERTISSEMENT
AVERTISSEMENT
AVERTISSEMENT
AVERTISSEMENT
Pour prévenir d'éventuelles BLESSURES GRAVES ou LA MORT, une
UTILISATION CONSTANTE des ouvre-portes ou barrières résidentielles est
INTERDITE.
Quand un récepteur est utilisé pour activer un ouvre-porte commercial, une
arête de renvoi DOIT être installeé au bas de la porte. Si vous n’installez pas
d’arête de renvoi dans ces circonstances, il s’en suit des risques de
BLESSURES GRAVES ou MORTELLES pour les personnes piégées sous
la porte.
ATTENTION
ATTENTION
AVERTISSEMENT
AVERTISSEMENT
AVERTISSEMENT
AVERTISSEMENT
AVERTISSEMENT
AVERTISSEMENT
RÉCEPTEUR DE COMMANDE D’ACCÈS COMMERCIALE
MODÈLE STAR1000
Commande
Station
Récepteur sans
sa plaque
Module opérateur unique
9 – 30 Volts C.A./C.C.
250 mA max
Alimentation électrique
APPLICATION
Le STAR1000 est un récepteur de contrôle d’accès commercial 1 canal haute
capacité pour ouvre-portes commerciaux et appareils actionnés de contact sec. Le
STAR1000 est compatible avec les télécommandes Security: 2.0™ et entrées sans
clé et sans fil et les télécommandes Security: 2.0™ Passport et Passport Lite. Ce
récepteur est compatible avec HomeLink
®
. Pour information sur la compatibilité ou
la programmation, visitez : www.homelink.com. La capacité du récepteur est de
1 000 appareils et prend en charge n’importe quelle combinaison de
télécommandes et entrées sans clé et sans fil. Le récepteur est étanche
conformément à la spécification IPX44.
INSTALLATION
1. Choisissez un endroit commode près du mécanisme d’ouverture devant être
contrôlé par le récepteur dans la ligne de visée de l’endroit destiné à la
transmission.
REMARQUE : Ne pas monter l’écran LCD en pleine lumière du jour. Éviter de
monter le récepteur dans un boîtier en métal ou près d’autres appareils sans fil
qui reçoivent ou transmettent des ondes.
2. Monter le support sur la surface choisie avec les outils de fixation adéquats.
(non fournis) (Figure 1).
3. Retirer les 4 vis (#8) sur l’arrière du récepteur et retirer la plaque. Débrancher le
connecteur du clavier du panneau de commande.
REMARQUE : Attention de ne pas endommager le câble du clavier quand vous
retirez la plaque.
4. Brancher les fils (Figure 2). Se référer au manuel du propriétaire de votre
ouvre-porte ou actionneur de barrière commerciales pour les informations
particulières.
5. Rebrancher le connecteur du clavier sur le panneau (étiqueté J9).
6. Sécuriser la plaque avec les 4 vis (#8) précédemment retirées.
7. Installer l’antenne fournie.
REMARQUE : Utiliser le nécessaire de rallonge d’antenne 86LM ou 86LMT en
option (voir page 8) pour monter l’antenne distante aussi haut et loin que
possible de tout objet métallique pour obtenir une meilleure portée radio.
8. Adapter le récepteur sur le support de montage et le sécuriser à l’aide des vis
(#8) qui sont fournies.
9. Serrer le connecteur étanche pour sécuriser et sceller le câblage.
Figure 1
Support de Fixation
Connecteur étanche
Connecteur de clavier
Antenne
Connecteur
Figure 2
Mémoire de
secours Module
Relais
Connexion
Alimentation
Connexion

6
Prise d'antenne
Pour l’antenne directe ou le
nécessaire d’extension d’antenne.
Touches fonctions
Les fonctions des
touches fonctions sont
définies par l’étiquette
sur la ligne 5 de
l’affichage. Les
fonctions changent
selon la sélection de
menu.
Programmation et
affichage de l’état du
système de l’écran
LCD.
Touches Haut/Bas
Pour naviguer dans
les menus.
Clavier numérique
Les données
numériques sont
saisies sur le clavier
numérique.
Insérer le câblage.
INTERFACE UTILISATEUR
L’interface utilisateur du STAR1000 comporte un écran LCD de 22 caractères sur
5 lignes, 3 touches fonctions , des flèches Haut/Bas et un clavier numérique.
PROGRAMMATION
Le récepteur est capable d’apprendre une combinaison d’émetteurs de
télécommande et d’entrées sans clé comptant jusqu’à 1 000 appareils. Voir la
page 8 pour une liste complète des accessoires compatibles. Des avertissements
sonores et visuels se produisent quand la capacité du récepteur est dépassée.
Après 30 secondes d’inactivité, le récepteur se coupe automatiquement et le logo
de LiftMaster
®
s’affiche. Sélectionner « UNLOCK » (déverrouiller) et entrer le code
NIP pour continuer.
Configuration initiale du NIP :
Le NIP limite l’accès uniquement aux administrateurs autorisés. Si vous omettez
cette étape, n’importe qui sera en mesure de programmer le récepteur. Lors de la
mise sous tension initiale, la version du micrologiciel du système s’affichera
pendant 5 secondes, suivie du logo LiftMaster
®
. Quand vous appuyez sur une
touche, le message « CREATE PIN? » (Créer NIP?)
1. Appuyer sur « YES » (Oui) pour créer le code NIP. Si vous perdez le code NIP,
vous pouvez demander un code de réinitialisation en appuyant sur « RESET »
(Réinitialiser).
2. Si le code NIP est perdu, vous pouvez demander un code de réinitialisation en
appuyant sur « RESET » (réinitialisation) Vous recevrez un numéro de série à 5
chiffres. Connectez-vous au portail des partenaires et allez sur https://partner.
liftmaster.com/utility. Entrez le numéro de série pour récupérer le code maître.
Une fois le code maître récupéré, revenez à l’option RESET (réinitialisation), et
après avoir obtenu le numéro de série, appuyez sur Next (Suivant).
Entrez le code maître du portail partenaire.
Entrez le nouveau code NIP
Entrez à nouveau le nouveau code NIP. L’appareil émet un bip lorsque le code
NIP a été programmé avec succès.
Remarque : La réinitialisation du code NIP n’efface ni les données ni les
paramètres du STAR1000 et du PPWR.
3. Taper un NIP à 6 chiffres, et appuyer sur « YES » ; taper le NIP à 6 chiffres une
deuxième fois et appuyer sur « YES » pour programmer le NIP. Si vous faites
une erreur, appuyez sur « CLEAR » (Effacer) pour changer votre saisie. Pour
quitter l’écran de saisie du NIP, sélectionner « BACK » (Retour).
4. Une fois que votre NIP à 6 chiffres a été correctement programmé, l’affichage
LCD affichera le message « KEYPAD UNLOCKED » (Clavier déverrouillé).
Sélectionner « OK » pour continuer jusqu’au Menu principal. Au bout de 30
secondes d’inactivité, le récepteur se coupera automatiquement et le logo de
LiftMaster
®
s’affichera. Choisir « UNLOCK » (Déverrouiller) et saisir le NIP pour
continuer.
Ligne 1 :
Menu et mode fonctions.
Lignes 2, 3 et 4 :
Sélections de menus
et données.
Ligne 5 :
Modes de fonction des
touches fonctions.
Indicateur de défilement
Si plus de 3 options sont disponibles, un
indicateur de défilement apparaît dans la marge
gauche des lignes 2, 3 et 4. Cet indicateur
affiche la position relative dans la liste.
Toute sélection de menu ou
de données s’affiche en
caractères inversés.
7
MENU PRINCIPAL COMMANDE DESCRIPTION
MENU APPRENTISSAGE
APPRENDRE APPAREIL Programmer un appareil sur le récepteur.
BLOQUER APPRENTISSAGE APPAREIL Bloquer la programmation d’une plage d’appareils sur le récepteur.
APPRENDRE N° LOC Programmer un appareil sur un emplacement numérique à 4 chiffres.
MENU SUPPRIMER
SUPPRIMER APPAREIL Supprimer un appareil spécifié qui a été programmé sur le récepteur.
SUPPRIMER TOUS LES APPAREILS Supprimer tous les appareils programmés.
MENU ARRÊTER
ARRÊTER APPAREIL Désactive temporairement la fonction d’un appareil spécifié qui a été programmé
sur le récepteur.
ARRÊTER TOUS LES APPAREILS Désactive temporairement la fonction de TOUS les appareils programmés sur le
récepteur.
REDÉMARRER APPAREIL Réactive la fonction d’un appareil arrêté.
REDÉMARRER TOUS LES APPAREILS Réactive la fonction de TOUS les appareils arrêtés.
MENU INTERROGER
LOC # UTILISÉ Affiche une plage d’emplacements utilisés à partir d’un emplacement spécifié.
LOC # DISPONIBLE Affiche une plage d’emplacements vides à partir d’un emplacement spécifié.
LOC # ARRÊTÉS Affiche une plage d’emplacements arrêtés à partir d’un emplacement spécifié.
PARAMÈTRES
CHANGER NIP Changer le numéro NIP à 6 chiffres d’un récepteur.
INFO REVENDEUR Affiche et modifie le numéro de téléphone à 11 chiffres du revendeur.
VERSION DU MIRCOLOGICIEL Affiche la version actuelle du micrologiciel.
BIP Active ou désactive le signal sonore.
MÉMOIRE DUPLIQUER MÉMOIRE Crée une mémoire de secours. Un module de mémoire de secours doit avoir été
installé.
RESTAURER MÉMOIRE Restaure une sauvegarde de mémoire à partir d’un module de mémoire.
REMARQUE : Le contenu du module de mémoire de secours remplacera toute
donnée déjà stockée dans la mémoire du récepteur.
RELAIS Définit le délai d’activation du relais de 0.25 à 1 seconde.
CONTRASTE Appuyer sur les flèches Haut ou Bas pour régler le contraste de l’affichage LCD.
LANGUE Définit la langue des menus : anglais (par défaut), espagnol et français.
DÉFAUT USINE Réinitialise le récepteur aux paramètres défauts d’usine.
COMMANDES DE PROGRAMMATION
Le tableau ci-dessous décrit les commandes utilisées pour programmer le récepteur.
DIAGNOSTICS
Le récepteur émet une série de bips sonores pour signaler des événements de
programmation et des erreurs. Le tableau de droite dresse la liste de tous les
événements et leurs notifications sonores. La colonne Marche/Arrêt indique que la
notification sonore de l’événement peut être désactivée en utilisant le menu
PARAMÈTRES BIP.
ÉVÉNEMENT NOTIFICATIONS
SONORES
MARCHE/
ARRÊT
Utilisation d'une touche Une seule OUI
Ajout réussi Double
Suppression réussie Triple
Arrêt réussi Double
Redémarrage réussi Double
Erreur de saisie du NIP de référence Long
Erreur de programmation Long
Emplacement hors plage Long
Réussite, générique Double
Erreur, générique Long
Réception d’un Tx inconnu Lent OUI
Réception d’un Tx connu Double OUI
Réception d’un Tx arrêté connu Long OUI

8
POUR DE L’ASSISTANCE TECHNIQUE, COMPOSEZ NOTRE NUMÉRO GRATUIT :
1-800-528-2806
AVIS : Les règles de la FCC et d’Industrie Canada (IC) interdisent tout ajustement ou toute modifi
cation de ce récepteur ou émetteur, sauf pour modifi er le code ou pour remplacer la pile. IL
N'EXISTE AUCUNE AUTRE PIÈCE SUSCEPTIBLE D'ÊTRE ENTRETENUE PAR L'UTILISATEUR.
Conformité vérifi ée pour répondre aux normes de la FCC dans le cadre d'une utilisation domestique
ou au bureau. Le fonctionnement est assujetti aux deux conditions suivantes : (1) ce dispositif ne
provoque pas d'interférences nuisibles et (2) il doit accepter les interférences reçues y compris
celles qui pourraient provoquer un fonctionnement indésirable.
CARACTÉRISTIQUES
Capacité du système...................................................... 1 000 appareils
Tension de l’alimentation .................................................. 9 - 30 Volts C.A., 9 - 42 Volts C.C.
Courant de fonctionnement................................................. 50 mA maximum
Courant de veille ......................................................... 30 mA maximum
Limite de surtension ...................................................... 6.0 kV Min
Plage de températures de fonctionnement ..................................... -40°C à +65°C à 50% HR, -40°F à +149°F @ 50% HR
Plage de températures pour le remisage et l’expédition ........................... -40°C à +85°C à 50% HR
Format du code..........................................................
Sécurité: 2.0™ seulement
Valeur nominale du contact de relais ......................................... 1 amp à 24V C.A./C.C.
ACCESSOIRES COMPATIBLES
Télécommandes ......................................................... 892LT, 894LT, 891LM, 893LM, 890MAX, 893MAX,
PPV3M, PPK3M, PPK3PHM, PPLV1-xxx, PPLK1-xxx,
PPLK1PH-xxx
Claviers................................................................ 877LM, 877MAX, et 878MAX
Nécessaire de rallonge d’antenne :
Nécessaire de rallonge 15 pieds (4,5 m)................................... 86LM
Nécessaire de rallonge 25 pieds (7,5 m)................................... 86LMT
Transformateur 24V C.A. pour bornes à vis .................................... 95LM
PIÈCES DE RECHANGE
Antenne................................................................ K76-36681
Support de montage ..................................................... K13-36651-1

9
Para evitar posibles LESIONES GRAVES o INCLUSO LA MUERTE por
electrocución:
• ANTES de instalar el receptor, asegúrese de que la energía eléctrica NO esté
conectada.
Para evitar posibles LESIONES GRAVES o INCLUSO LA MUERTE causada por
la puerta en movimiento:
• SIEMPRE conserve los controles remotos lejos del alcance de los niños.
NUNCA permita que los niños hagan funcionar o jueguen con los
transmisores del control remoto.
• SOLO active la puerta cuando pueda verla claramente, esté correctamente
ajustada y no haya ninguna obstrucción en su recorrido.
• SIEMPRE mantenga la puerta de garaje a la vista hasta que esté
completamente cerrada. NUNCA permita que alguien cruce por debajo de
una puerta de garaje mientras se está cerrando.
PRECAUCIÓN
ADVERTENCIA
ADVERTENCIA
ADVERTENCIA
ADVERTENCIA
Para evitar posibles LESIONES GRAVES o INCLUSO LA MUERTE, se PROHÍBE
el FUNCIONAMIENTO CONSTANTE en abre-puertas residenciales.
Cuando se utiliza un receptor para activar un abre-puertas comercial, DEBE
instalarse un borde de inversión de movimiento en la parte inferior de la puerta.
No instalar un borde de inversión de movimiento bajo estas circunstancias,
puede ocasionar LESIONES GRAVES o INCLUSO LA MUERTE a las personas
atrapadas debajo de la puerta.
PRECAUCIÓN
ADVERTENCIA
ADVERTENCIA
ADVERTENCIA
ADVERTENCIA
RECEPTOR DE CONTROL
DE ACCESO COMERCIAL
MODELO STAR1000
Estación de
control
Receptor sin
placa frontal
Operador individual
9 – 30 voltios CA/CC
250 mA máx.
Alimentación de energía
APLICACIÓN
El STAR1000 es un receptor de control de acceso comercial de un canal y de alta
capacidad para operadores de puertas comerciales y dispositivos de activación
por contacto seco. El STAR1000 es compatible con los controles remotos
Security: 2.0™ y las entradas con llave digital inalámbrica, y con los controles
remotos Passport y Passport Lite de Security: 2.0™. Este receptor es compatible
con HomeLink
®
. Para información de programacion o de compatibilidad, visite
www.homelink.com. La capacidad del receptor es de 1,000 dispositivos y puede
ser de cualquier combinación de controles remotos y entradas con llave digital
inalámbrica. El receptor es hermético de acuerdo con la especificación IPX44.
INSTALACIÓN
1. Elija una ubicación conveniente cerca del operador para que sea controlado por
el receptor dentro de la “línea de visibilidad” de la ubicación desde la cual se
pretende transmitir.
NOTA: No monte la pantalla LCD en dirección a la luz del sol. Evite montar el
receptor en una estructura metálica o cerca de otros dispositivos receptores o
de transmisión inalámbrica.
2. Monte la ménsula en la superficie deseada con el herraje adecuado.
(no incluido) (Figura 1).
3. Retire los 4 tornillos (N.° 8) de la parte posterior del receptor y retire la placa
frontal. Desconecte el conector del teclado del tablero de control.
NOTA: Tenga cuidado de no dañar el cable del teclado mientras retira la placa
frontal.
4. Realice las conexiones del cableado (Figura 2). Consulte el manual del
propietario del operador de puertas comerciales para obtener información más
específica.
5. Vuelva a conectar el conector del teclado al tablero (marcado como J9).
6. Asegure la placa frontal con los 4 tornillos (N.° 8) previamente retirados.
7. Instale la antena que viene incluida.
NOTA: Utilice el juego opcional de extensión de antena 86LM u 86LMT
(consulte la página 12) para montar la antena remota lo más alto y lejos posible
de objetos metálicos para un mejor alcance radial.
8. Coloque el receptor en la ménsula de montaje y asegúrelo con los tornillos
(N.° 8) provistos.
9. Ajuste el conector hermético para asegurar y sellar el cableado.
Figura 1
Ménsula de montaje
Conector hermético
Conector del teclado
Antena
Conector
Figura 2
Memoria de
reserva Módulo
Relé
Conexión
Energía
Conexión
10
Conexión de la antena
Para la antena directa o el juego
de extensión de la antena.
Teclas
“PROGRAMABLES”
Las funciones de las
teclas programables
están definidas por la
etiqueta en la línea 5
de la pantalla. Las
funciones cambian de
acuerdo con la
selección del menú.
Pantalla de
programación y estado
del Sistema de la
pantalla del LCD.
Teclas hacia
arriba/abajo
Para la navegación en
los menús.
Teclado numérico
Se ingresan datos
numéricos a través del
teclado numérico.
Insertar el cableado
INTERFAZ DE USUARIO
La interfaz de usuario de STAR1000 consiste en una pantalla LCD de 5 líneas por 22 caracteres,
3 “teclas programables”, flechas hacia arriba/abajo y un teclado numérico.
PROGRAMACIÓN
El receptor tiene la capacidad de programar una combinación de transmisores de
control remoto y entradas con llave digital de hasta 1,000 dispositivos. Consulte la
página 12 para obtener una lista completa de accesorios compatibles. Se producen
alertas visuales y sonoras cuando se ha excedido la capacidad del receptor.
Después de 30 segundos de inactividad, se suspende el funcionamiento del
receptor y se muestra el logotipo de LiftMaster
®
. Seleccione “DESBLOQUEAR” e
ingrese el PIN para continuar.
Configuración inicial del PIN:
El PIN restringe el acceso para que puedan acceder solo los administradores
autorizados. Si omite este paso, cualquier persona podrá programar el receptor. Al
encenderlo por primera vez, se mostrará la revisión del firmware del sistema por 5
segundos, seguido por el logotipo de LiftMaster
®
. Al presionar una tecla,
aparecerá la opción “¿CREAR PIN?”
1. Presione “SÍ” para crear un PIN. Si se pierde el PIN, podrá solicitar un código
presionando “REINICIAR”.
2. Si perdió el PIN, puede solicitar un código de reinicio presionando "RESET". Se
le proporcionará un número de serie de 5 dígitos. Inicie al portal del socio e
ingrese a https://partner.liftmaster.com/utility. Ingrese el número de serie para
recuperar el código maestro.
Una vez recuperado el código maestro, vuelva a la opción RESET, y después de
obtener el número de serie presione Next.
Ingrese el código maestro del portal del socio.
Ingrese el nuevo PIN.
Vuelva a ingresar el nuevo PIN. Oirá un pitido de la unidad cuando se haya
programado el PIN con éxito.
Nota: Reiniciar el PIn no borra los datos o configuraciones del STAR1000 y
PPWR.
3. Ingrese un PIN de 6 dígitos y presione “SÍ”; ingrese el PIN de 6 dígitos por
segunda vez y presione “SÍ” para programar el PIN. Si comete un error,
presione “LIMPIAR” para cambiar los datos que ingresó. Para salir de la
pantalla para ingresar el PIN, seleccione “ATRÁS”.
4. Cuando su PIN de 6 dígitos esté programado correctamente, se leerá en la
pantalla del LCD: “TECLADO DESBLOQUEADO”. Seleccione “ACEPTAR” para
continuar e ir al Menú principal. Después de 30 segundos de inactividad, se
suspende el funcionamiento del receptor y se muestra ellogotipo de
LiftMaster
®
. Seleccione “DESBLOQUEAR” e ingrese el PIN para continuar.
Línea 1:
Modo de menú y función.
Líneas 2, 3 y 4:
Selecciones y datos del menú.
Línea 5:
Modos de función de teclas
programables.
Indicador de desplazamiento
Si existen más de 3 opciones, aparecerá
el indicador de desplazamiento en el
margen izquierdo de las líneas 2, 3 y 4.
El indicador de desplazamiento muestra
la posición relativa dentro de la lista.
La selección del Menú y datos se
muestra con caracteres invertidos.
11
MENÚ PRINCIPAL COMANDO DESCRIPCIÓN
MENÚ DE
PROGRAMACIÓN
PROGRAMAR DISPOSITIVO Programar un dispositivo al receptor.
BLOQUEAR LA FUNCIÓN DE PROGRAMAR
DISPOSITIVO
Bloquear la función Programar un dispositivo al receptor.
PROGRAMAR AL # DE UBICACIÓN Programar un dispositivo a una ubicación de 4 dígitos.
MENÚ ELIMINAR
ELIMINAR DISPOSITIVO Eliminar un dispositivo específico que ha sido programado al receptor.
ELIMINAR TODOS LOS DISPOSITIVOS Eliminar todos los dispositivos programados.
MENÚ DETENER
DETENER DISPOSITIVO Desactiva temporalmente la función de un dispositivo específico que ha sido
programado al receptor.
DETENER TODOS LOS DISPOSITIVOS Desactiva temporalmente la función de TODOS los dispositivos programados al
receptor.
REACTIVAR DISPOSITIVO Reactiva la función de un dispositivo detenido.
REACTIVAR TODOS LOS DISPOSITIVOS Reactiva la función de TODOS los dispositivos detenidos.
MENÚ DE CONSULTA
# DE UBICACIÓN USADO Muestra un rango de ubicaciones utilizadas a partir de una ubicación específica.
# DE UBICACIÓN DISPONIBLE Muestra un rango de ubicaciones vacías a partir de una ubicación específica.
# DE UBICACIONES DETENIDAS Muestra un rango de ubicaciones detenidas a partir de una ubicación específica.
CONFIGURACIONES
CAMBIAR PIN Cambia el PIN de 6 dígitos para el receptor.
INFORMACIÓN DEL DISTRIBUIDOR Muestra y edita el número de teléfono de contacto de 11 dígitos del distribuidor.
VERSIÓN DEL FIRMWARE Muestra la versión actual del firmware.
BEEP Enciende o apaga las respuestas sonoras.
MEMORIA DUPLICAR MEMORIA Crea una memoria de reserva. Se debe instalar un módulo de reserva de
memoria.
REESTABLECER
MEMORIA
Restablece una reserva de memoria desde un módulo de memoria.
NOTA: El contenido del módulo de reserva de memoria sobrescribirá cualquier
información que esté almacenada en la memoria del receptor.
RELÉ Configura el tiempo de activación del relé desde .25 hasta 1 segundo.
CONTRASTE Presione las flechas hacia arriba o abajo para ajustar el contraste del LCD.
IDIOMA Establece el idioma del menú: inglés (predeterminado), español y francés.
AJUSTES DE FÁBRICA Reinicia el receptor con los ajustes de fábrica.
COMANDOS DE PROGRAMACIÓN
La tabla a continuación describe los comandos que se utilizan para programar el receptor.
DIAGNÓSTICOS
El receptor emite una serie de señales sonoras o beeps que indican casos de
programación y error. La tabla en la derecha enumera todos los casos y sus
notificaciones sonoras. La columna de Encendido/Apagado indica que la
notificación sonora del caso puede estar desactivada en el menú CONFIGURACIÓN
DE BEEP.
CASO NOTIFICACIONES
SONORAS
Encendido/
Apagado
Pulsar tecla Uno SÍ
Adición exitosa Dos
Eliminación exitosa Tres
Suspensión exitosa Dos
Desactivación exitosa Dos
Error en el ingreso del máster PIN Largo
Error de programación Largo
Ubicación fuera de rango Largo
Éxito genérico Dos
Error genérico Largo
Transmisión desconocida recibida Lento SÍ
Transmisión conocida recibida Dos SÍ
Transmisión conocida detenida
recibida
Largo SÍ

© 2022, The Chamberlain Group LLC.
All Rights Reserved
Touts droits réservés
114-5680-000 Todos los derechos reservados
PARA OBTENER ASISTENCIA TÉCNICA, LLAME A NUESTRO NÚMERO GRATUITO:
1-800-528-2806
AVISO: para cumplir con las normas de la FCC y/o de la IC (Industry Canada), queda prohibido
realizar ajustes o modifi caciones en este receptor y/o transmisor, excepto para cambiar la confi
guración del código o para reemplazar la batería. NO HAY OTRAS PIEZAS QUE EL USUARIO PUEDA
REPARAR.
Probado para cumplir con las normas de la FCC para uso en la ofi cina o en el hogar. La operación
está sujeta a las dos condiciones siguientes: (1) este dispositivo no puede causar interferencias
perjudiciales y, (2) este dispositivo debe aceptar cualquier interferencia recibida, incluyendo
cualquier interferencia que pueda ocasionar un funcionamiento no deseado.
ESPECIFICACIONES
Capacidad del sistema .................................................... 1,000 dispositivos
Voltaje de tensión ........................................................ 9 - 30 Voltios de CA, 9 - 42 Voltios de CC
Corriente en funcionamiento................................................ 50 mA máxima
Corriente en stand by ..................................................... 30 mA máxima
Supresión de sobretensión ................................................. 6.0 kV Min
Rango de temperatura en funcionamiento ..................................... -40°C a +65°C a 50% Rh, -40°F a +149°F a 50% Rh
Rango de temperatura para almacenar y enviar ................................. -40°C a +85°C a 50% Rh
Formato del código.......................................................
Security: 2.0™ Solo
Capacidad de contacto del relé .............................................. 1 amp a 24V CA/CC
ACCESORIOS COMPATIBLES
Controles remotos ....................................................... 892LT, 894LT, 891LM, 893LM, 890MAX, 893MAX,
PPV3M, PPK3M, PPK3PHM, PPLV1-xxx, PPLK1-xxx,
PPLK1PH-xxx
Teclados ............................................................... 877LM, 877MAX, y 878MAX
Juegos de extensión de antena:
Juegos de extensión de 15 pies (4,5 metros) ............................... 86LM
Juegos de extensión de 25 pies (7,6 metros) ............................... 86LMT
Transformador para terminales de tornillo de 24 VCA ............................ 95LM
PIEZAS DE REPUESTO
Antena................................................................. K76-36681
Ménsula de montaje ...................................................... K13-36651-1