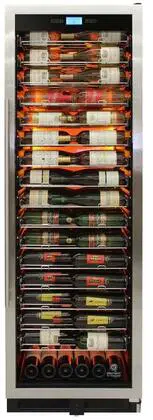
STAINLESS STEEL WINE & BEVERAGE COOLER
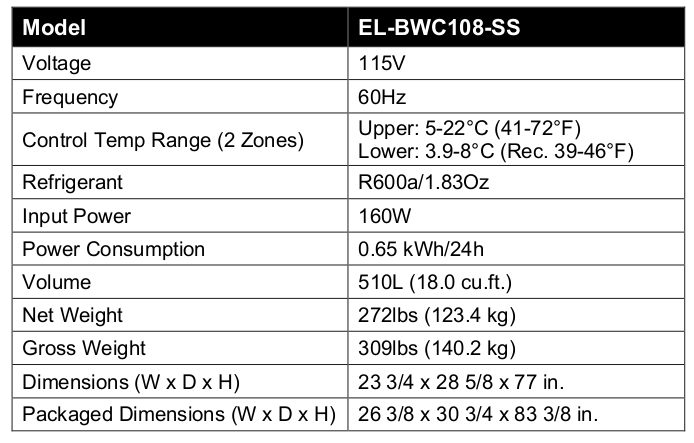
Model: EL-BWC108-SS
A PROUD HERITAGE OF EXPERIENCE & QUALITY
IMPORTANT SAFETY INSTRUCTIONS
To reduce the risk of fire. electrical shock o1 your appliance. follow these basic precaution:
+ Do not operate this or any other appliance with a damaged cord.
+ Do not operate if housing is removed or damaged.
+ Exercise caution and use reasonable supervision when appliance is used near children. Never allow children to operate. play with or crawl inside the appliance. Keep packing materials away from children.
+ Before performing any maintenance or cleaning. ensure that the unit is unplugged or that the power line is. disconnected.
+ Do not clean appliance with flammable fluids. Do not store or use gasoline or other flammable vapors and liquids in the vicinity of this or any other appliance. The fumes can create a fire hazard orexplosion
+ Exercise caution when moving and installing the unit. The cooler is heavy and may require two or more people when moving the unit to prevent strain or injury.
+ To ensure proper ventilation for your appliance. the front of the unit must be completely unobstructed. Choose a well-ventilated area with temperatures above 60 °F and below 90 °F.
+ Locate the unit away from direct sunlight and sources of heat (stove. heater. radiator. etc.). This unit is intended for indoor use only and must be installed in an area protected from the elements.
+ Place the appliance on a solid. level surface.
+ Do not attempt to repair or replace any part of your appliance unless it is specifically recommended in this manual. All other servicing should be referred to a qualified technician.
+ Connect to properly polarized outlets only. It is recommended that a separate circuit. serving only your appliance be provided. Use receptacles that cannot be turned off by a switch or pull chain. Be sure that the plug is fully inserted into the receptacle
+ Ifthe appliance is going to be used in an area that is prone to power surges/outages. it is suggested that you use a power surge protector. The surge protector that you select must have a surge block high enough to protect the appliance it is connected to. Damages due to power surges are not considered a manufacturer covered defect and will void your product warranty.
+ To protect against electric shock. do not immerse appliance. plug or cord in water or other liquids. Avoid locating the unit in moist areas.
+ This appliance is designed to be built-in (fully-recessed) or freestanding.
+ Do not use this appliance for other than its intended purpose. For indoor. household use only.
+ Do not operate the unit with wet hands. while standing on a wet surface or while standing in water.
+ Do not use solvent-based cleaning agents or abrasives on the interior of the cooler. These cleaners may damage or discolor the interior.
+ Keep fingers out of pinch point areas and be careful when closing doors if children are around.
+ This appliance is designed for storing and cooling wines. Do not store perishable food or medical products within the unit
+ When disposing of refrigerated appliances. special handling is often required. It is the consumer's responsibilty to comply with federal and local regulations when disposing of this product.
+ Do not slide your wine cooler into place.
+ WARNING: Risk of child entrapment and suffocation. Before you throw away this or an old unit. take off the door. Leave the shelves in place. so that children may not easily climb inside.
DANGER — RISK OF FIRE OR EXPLOSION. FLAMMABLE REFRIGERANT USED. TO BE REPAIRED ONLY BY TRAINED SERVICE PERSONNEL. DO NOT PUNCTURE REFRIGERANT TUBING.
ELECTRICAL CONNECTION
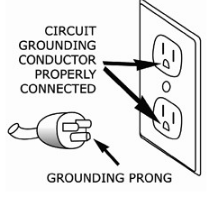
Improper use of the grounded plug can result in the risk of electrical shock.
If the power cord is damaged. frayed or shows cracks or abrasions across its length. have it replaced at an authorized service center.
For your protection. this unit is equipped with a 3-conductor cord set that has a molded 3-prong grounding-type plug. and should be used in combination with a properly connected grounding type outlet.
+ Donot under any circumstances cut or remove the third ground prong from the power cord supplied. For personal safety. this appliance must be properly grounded.
+ Do not kink or pinch the power supply cord of appliance.
+ The cord should be secured behind the unit and not left exposed or dangling to prevent accidental injury.
+ A standard electrical supply (115V AC only. 60Hz. 15A). properly grounded in accordance with the National Electrical Code and local codes and ordinances. is required.
+ Never unplug the unit by pulling the power cord. To disconnect the appliance. always grip the plug firmly and pull straight out from the wall outlet. When moving the unit. be careful not to damage the power cord.
+ The unit should always be plugged into its own individual electrical outlet with a voltage rating that matches the rating label on the unit.
Extension Cord
CAUTION: It is strongly recommended that you do not use an adapter or an extension cord with this unit.
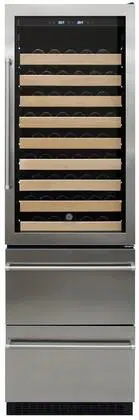
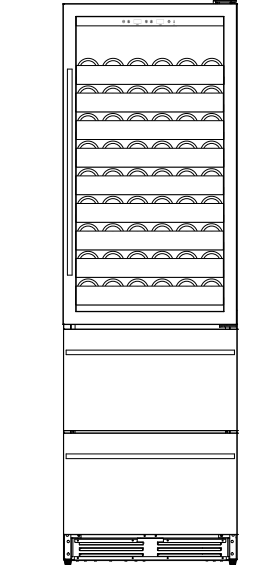
PARTS AND SPECIFICATIONS
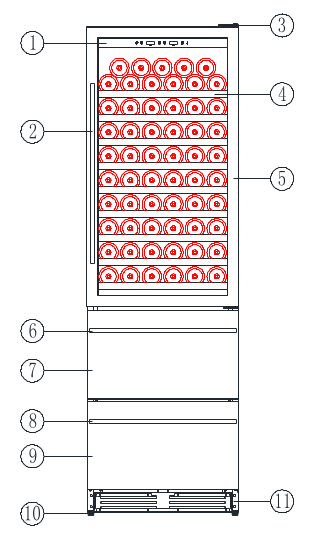
1. Control Panel
2. Glass Door Handle
3. Door Hinge
4. Storage Shelf
5. Glass Door
6. 54L Drawer Handle
7. 54L Drawer Door
8. 45L Drawer Handle
9. 45L Drawer Door
10. Adjustable Feet
11. Kickplate
Note: This wine & beverage cooler is designed to store approximately 100-108 standard Bordeaux 750 mi bottles and 100 beverage cans. Storing large andlor oddly shaped bottles (including champagne and sparkling wine bottles) will decrease the capacity of your cooler. Bottles can be double stacked loosely. but do not slide the rack out if stored this way. If double stacking. use iton a lower she.
INSTALLATION
Remove all packing material before using your wine cooler.
IMPORTANT: Before connecting the unit to a power source. let it stand upright for approximately 24 hours. This will reduce the possibility of a malfunction in the cooling system from handling during transportation.
Clean the interior surface with lukewarm water and a soft cloth.
This unit is designed for freestanding and built in installation and indoor use only. Position the unit in a dry and well-ventilated place. Avoid placing the wine cooler near any source of heat or moisture. or in direct sunlight. Do NOT install the unit ina location with an ambient temperature that will fall below 60°F.
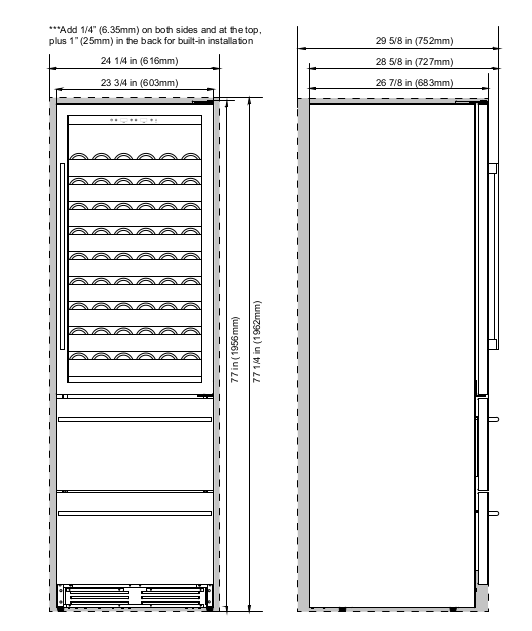
For built-in installation. leave a 1/4” (6.35mm) space on each side and at the top of the wine cooler to ensure proper air circulation to cool the compressor and condenser. Also. be sure to not obstruct the front exhaust vent with any objects as this may affect the unit from performing properly.
For freestanding installation. leave 3.15” (8cm) of space at the back. 2” (5cm) of space on each side. and unlimited clearance at the top of the wine cooler are suggested to ensure proper air circulation to cool the compressor and condenser. Do not place underneath a table. counter top. or anything of the sort as this will not allow for proper air circulation.
Do not slide the unit into place. When moving your wine cellar. please do not incline it more than 45 degrees.
Place the wine cooler on a flat. level surface strong enough to support it when it is fully loaded. To level the appliance. adjust the front leveling legs at the bottom of the unit.
For best performance it is recommended that you install the appliance in a location with an ambient temperature range between 64-78°F (18-26°C). If the ambient temperature is above or below recommended temperatures. the performance of the unit may be affected.
It is recommended that you do not install the appliance near an oven. radiator or other heating source. Direct sunlight may affect the acrylic coating and heat sources may increase electrical consumption. Don't install in a location where the temperature will fall below 60°F (16°C). For best performance. do not install the appliance behind a cabinet door or block the base grille.
Avoid locating the unit in moist areas.
Plug the beverage cooler into an exclusive. properly installed-grounded wall outlet.
After plugging the appliance into a wall outlet. please allow the unit to cool down for 3 to 4 hours before placing wine bottles or beverage cans inside.
ANCHORING TO THE WALL
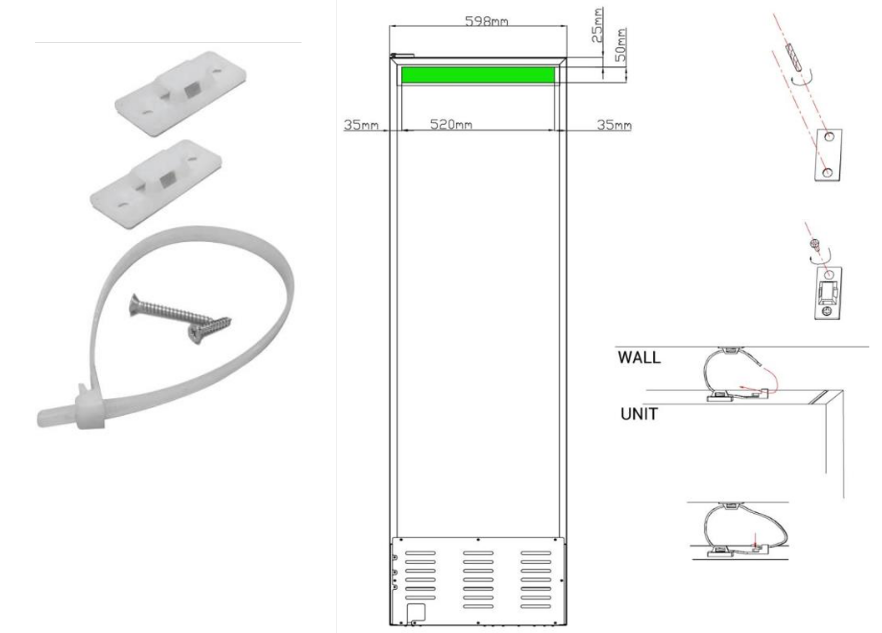
1. On the back of the appliance. attach brackets in the same zones shown using adhesive straps. Mark and drill pilot holes for the screws about 8mm into the appliance. Then use a screwdriver to tighten the screws all the way into the appliance.
2. Position the appliance in the desired location. Locate wall studs behind the appliance and mark the location where the bracket on the back of the appliance lines up with a stud. Move the appliance away from the wall and position bracket on the mark. Mark and drill pilot holes into the center of the stud with a 3/32” drill bit. Attach a bracket to the stud with the long screws provided.
3. Move the appliance into its final position. taking care to line up the wall bracket close enough to the bracket on the back of the appliance to strap them together. Thread a strap through the brackets as shown in the illustration. Tighten the straps until snug. Do not over-tighten.
CAUTION: This product is not intended to be a substitute for proper supervision. Manufacturer assumes no. liability for improper installation or excessive loads placed on screws. brackets. or straps.
Straps should be periodically adjusted. tested. and replaced.
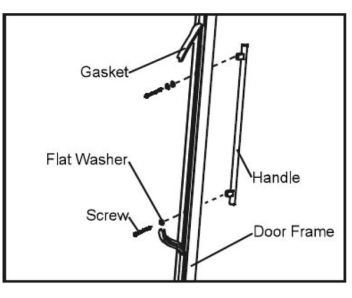
INSTALLING THE HANDLE
This wine cooler includes a stainless handle that is not required to operate this unit. To install the handle please follow the below instructions:
+ Pull away the door gasket in the area where the handle is to be installed. You can see two designated holes for handle installation. The gasket is easily displaced by hand. no tools are necessary.
+ Install the handle tightly as shown below with the two screws. lock washers and flat washers provided. (DO NOT over tighten as this will cause damage to the handle assembly and stainless steel surface of the glass door).
+ Replace the door gasket to its original position.
OPERATING YOUR WINE COOLER
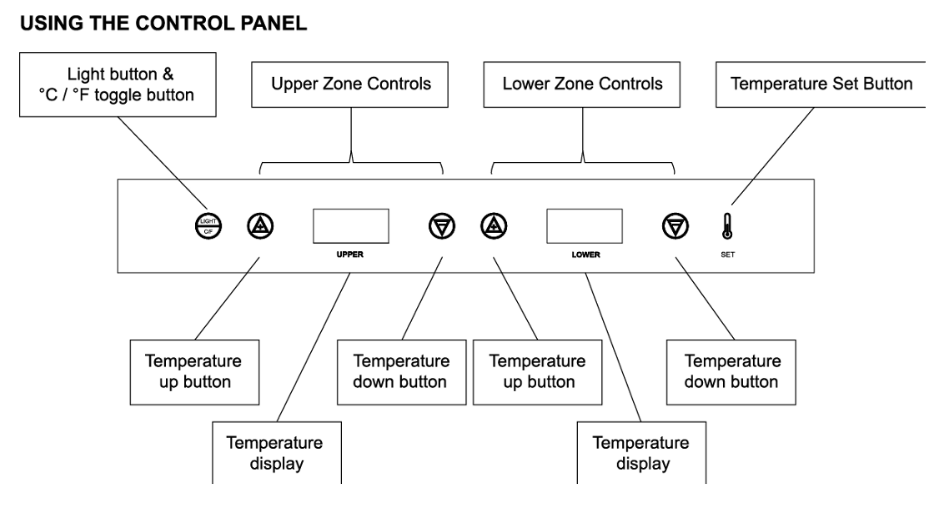
The controls of your wine cooler
The wine cellar should be placed in an area where the ambient temperature range is between 18-26 degrees. If the ambient temperature is above or below this range. the performance of the unit may be affected. For example. placing your unit in extreme cold or hot conditions may cause interior temperatures to fluctuate. Upper Zone: 5-22°C (41°F - 72°F). Lower Drawer: 3.9-8°C (Rec. 39°F - 46°F)
To set the desired temperature for the upper or lower zone. press the Temperature Set button. and then use the Temperature up and down buttons to set the zone to the desired temperature.
The Light button can be used to tum the light within the cooler on and off. °C/°F - To toggle the temperature display between Celsius and Fahrenheit. press the button for 3 seconds.
NOTE: If the unit is unplugged. power lost. or turned off. you must wait 3 to 5 minutes before restarting the unit. The unit contains compressor protection which will prevent the unit from starting until this time period has elapsed. When you use the wine cooler for the first time or restart the wine cooler after having been shut off for a long time. there could be a few degrees variance between the temperature you select and the one indicated on the LED readout. This is normal and once the wine cooler is running for a few hours the display will be correct.
SETTING A TEMPERATURE
The Wine Cellar has a wide enough temperature range to store either red or white wine. depending on your preference. Different varietals of wine require different temperature settings. Red wine is generally stored between 10°C (50°F) and 18°C (65°F). while white wines are stored between 4°C (40°F) and 10°C (50°F). White wine can be stored at red wine temperatures for a short period of time (less than three months). and flash chilled before serving.
You can set the temperature as you desire by touching the UP or DOWN button. When you touch the buttons for the first time. the LED readout will show the original temperature set at the manufacturing facility. Each push of the button will adjust the temperature by one degree in the desired direction. Please be aware that the desired temperatures may fluctuate depending on whether the interior light is ON or OFF and depending on the orientation of the bottles.

PLEASE NOTE: In the event of a power interruption. all previous temperature settings will be automatically saved and each compartment will return to the previous temperature setting. If the unit is unplugged. loses power. or is turned off. you must wait 3 to 5 minutes before restarting. Attempting to restart the wine cellar before this time has elapsed may prevent it from starting. When you use the wine cellar for the first time or restart the wine cellar after having been shut off for a long time. there will be a few degrees variance between the temperature you select and the one indicated on the LED readout for the first few hours of operation. After a few hours of operation. the temperature will normalize to the displayed temperature.
STORING WINE & BEVERAGES
While bottles and cans may vary in size and dimension. approximately 100-108 traditional Bordeaux 750ml wine bottles and
100 beverage cans could be stored in this unit. The actual number of bottles you may be able to store may vary from the amount quoted.
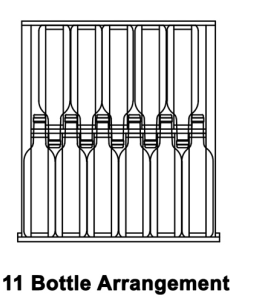
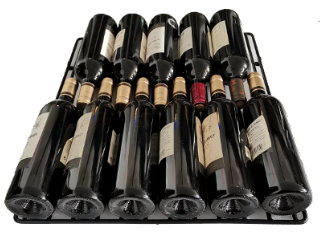
You can place 11 standard wine bottles on each full-size shelf in the upper zone. In the lower zone. you can place 100 beverage cans in the two drawers combined. Bottle capacities are approximately maximums when storing traditional Bordeaux 750ml wine bottles and include bulk storage.
NOTE: Wine bottles on bottom rack cannot be longer than approximately 12 inches.
RACKING CONFIGURATION
Disperse your bottles evenly throughout the unit so as not to concentrate weight in any one area. This also helps to provide an even temperature range throughout the unit. Make sure that bottles are not all grouped together either at the top or bottom of the cabinet. The maximum capacity per shelf is 20kgs.
Never try to pull out more than one rolling shelf at a time as it can cause the appliance to tip forward. To avoid damaging the door gasket. ensure that the door is fully opened when pulling the shelves out of the rail compartment.
+ The slide-out shelves allow bottles of wine to be viewed and removed more easily. You can remove a shelf to accommodate larger diameter bottles on the shelf below it.
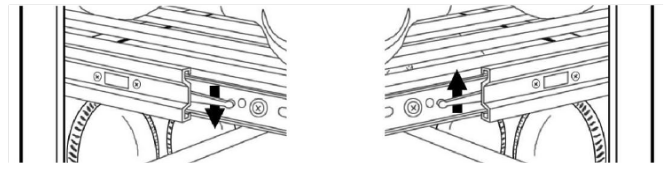
+ To remove a shelf. pull it out as far as you can. There are levers on each side of the shelf near the rollers. Left the lever on the left-hand side and push down the lever on the right hand side to remove the shelf from the tracks.
+ When removing the shelf from the rail compartment. make sure to remove all items first. Then move the shelf to the position where the notch of the shelf is exactly under the plastic post and lift the shelf. In order to replace the shelf. repeat steps described above in reverse.
MOVING RACKS
The shelves have smooth glide-out rollers that are adjustable in 1 1/4" increments to accommodate larger bottles according to your needs. To move a sliding shelf. first remove all bottles. and then remove the sliding shelf by sliding guides from walls. making sure not to mix up the right and left guides.
Then refit the sliding shelf as shown below:
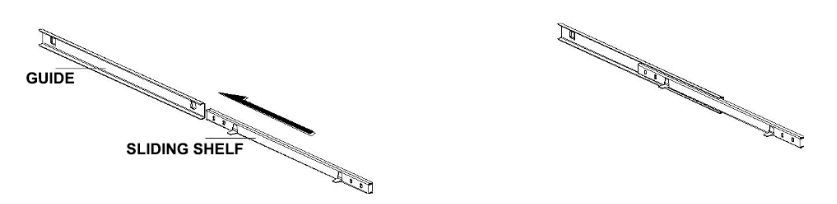
These adjustable shelves allow you to customize the interior of the cabinet to accommodate your specific collection.
CLEANING YOUR BEVERAGE COOLER
IMPORTANT: Always unplug the unit before cleaning or performing maintenance. Never use harsh cleansers or scouring pads to clean any part of the unit.
Turn off the power. unplug the appliance. and remove all items including shelves.
Wash the inside surfaces with a warm water and baking soda solution. The solution should be about 2 tablespoons of baking soda to a quart of water.
Wash the shelves with a mild detergent solution.
Wring excess water out of the sponge or cloth before cleaning control panels or any electrical parts.
Wash the outside cabinet with warm water and mild liquid detergent. Rinse well and wipe dry with a clean soft cloth.
DEFROSTING
+ The unit defrost automatically.
+ The evaporator behind the rear wall of the unit defrosts automatically. The condensate collects in the drainage channel behind the rear wall of the unit. and flows through the drainage hole into the drip tray by the compressor where it evaporates.
POWER FAILURE
Most power failures are corrected within a few hours and should not affect the temperature of your appliance. If the power is off for an extended period of time. proper steps should be taken to protect your contents.
INACTIVITY
If the unit will not be used for a period of less than three weeks. leave the cooler operating. If the period of inactivity is several months. remove all items and turn the unit off. Clean and dry the interior thoroughly. Leave the door open slightly to prevent any possible moisture build-up.
MOVING YOUR WINE COOLER
Before moving your wine cooler. first be sure to remove all items from the cooler.
+ Securely tape down any loose items. such as shelves. inside the unit.
+ Turn the adjustable leg up to the base to avoid damage.
Tape the door shut.
+ Ensure that the unit stays securely in the upright position during transportation. Protect the outside of the appliance with a blanket or similar item.
ENERGY SAVING TIPS
+ The unit should be located in the coolest area of the room away from heat sources or direct sunlight.
+ Ensure that the unit has proper allowances on all sides for proper ventilation. Never cover any air vents.
+ Only open the cooler door for as long as necessary. Frequent opening of the door will affect internal temperature.
PROBLEMS WITH YOUR WINE COOLER
Door will not close properly
- The wine cellar is not level.
- The shelves are out of position
- The door gasket is dirty
- A bottle in the cellar is too long.
Wine Cellar does not operate
- Not plugged in or the appliance is turned off.
- The circuit breaker tripped or a fuse has blown out.
- Check that unit is plugged into the wall socket.
- Make sure the wall socket has power. If outlet is controlled by a wall switch. make sure switch is set to on. Test wall socket functionality by testing another electrical appliance in the power socket.
Wine Cellar is not cold enough
- + Check the temperature control setting
- + External environment may require a higher setting
- + The door is opened too often.
- + The door is closed completely.
- The door gasket is not sealing properly.
Wine Cellar is turning on and off frequently
- + The room temperature is hotter than normal.
- + The door is opened too often
- + The door is not closed completely.
- +The temperature control is not set correctly.
- The door gasket does not seal properly.
Light does not work
- Not plugged in or the appliance is turned off.
- The circuit breaker tripped or a fuse has blown.
- The light bulb has burned out.
- The light button is “OFF”
Power is ON but the unit will not cool
- Make sure there are at least 3 to 5 bottles in the unit. When using the unit for the first time. it can take up to 24 hours to reach the desired temperature.
- If the room temperature is at the high end of the ambient temperature range. it may have more difficulty achieving a low internal temperature.
- To achieve accurate temperature control. the unit should not be used or operated in any of the following locations
- + Ina sunny place. a room with poor air circulation such as a garage or near another heat-producing appliance such as a dishwasher. oven or refrigerator.
- + With an outlet shared with a refrigerator. as the refrigerator will drain power from the wine cellar
- Make sure the cooler has proper clearances at side and rear and is located in a well-ventilated area
- Door is not closed tichtly or is being opened too frequently.
Vibrations
- Check to make sure the wine cooler is on a level surface.
- The rattling noise may come from the flow of refrigerant. As each cycle ends you may hear gurgling noises caused by the flow of the refrigerant
- This is normal
Wine Cellar seems to make too much noise
- A faint humming noise may come from the flow of the refrigerant. which is normal
- As each cycle ends. you may hear gurgling sounds caused by the flow of refrigerator in your wine cellar.
- Contraction and expansion of the inside walls may cause popping and crackling noises
- The wine cellar is not on a level surface.
Fan is always running
- This is simply a function of the cooling system. The lower the setting. the more the fan will run. If the room is very warm. the cooler will run more
- The unit has been designed to run continuously when operating at the lower temperatures
Condensation forming inside of the cabinet
- + Condensation occurs when too much ambient air gets into the cabinet.
- + Wipe off the doors and walls and leave door closed as long as possible.
- + Check that the door gasket and the charcoal filter are properly in place.
Frost appears in cabinet (on back)
- + Either too much humidity or too low of temperature inside cabinet.
- + Unplug cooler and allow to manually defrost. Reconnect when ice has melted. If problem persists. contact for service instructions.
SERVICE & IMPORTANT NOTICE
Upon receipt and inspection of unit. the supply cord must be replaced if it is damaged. Contact our customer service at 1-800-777-8466 or info[at]vinotemp.com
The manufacturer has a policy of continuous improvement on its products and reserves the right to change materials and specifications without notice.
WARNING: Please do not place the unit within reach of children. For adult use only.
Contact info[at]vinotemp.com with any questions or visit www.vinotemp.com