User Manual Air Conditioner
OPERATING INSTRUCTIONS
Normal Sounds
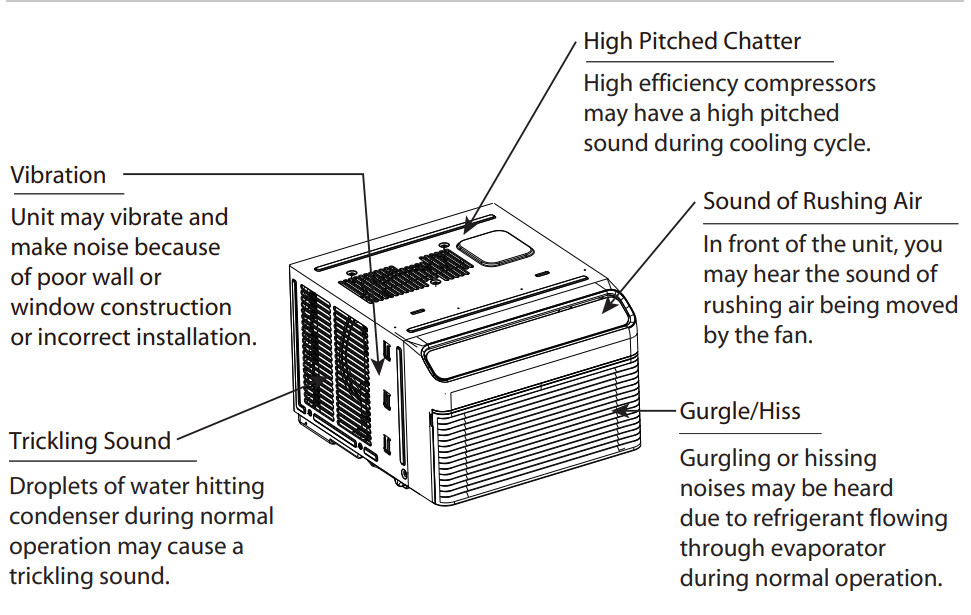
NOTICE: All the illustrations in this manual are for explanation purpose only. The actual installation may vary.
Air Conditioner Features
WARNING To reduce the risk of fire, electrical shock, or injury to people or property, read the SAFETY PRECAUTIONS before operating this appliance.
NOTICE
- The relative humidity of the room should be less than 80%. If the unit is used in a condition with a relative humidity over 80%, there will be condensed water on the surface of the unit.
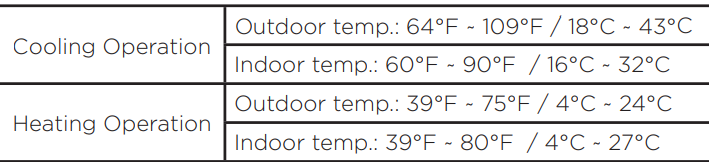
- Performance may be reduced outside of these operating temperatures.
NOTICE Always wait 3 minutes when turning the unit off and then on again, or when changing from cool to fan and back to cool. This prevents damage from occurring to the compressor.
To begin operating the air conditioner, follow these steps:
- Plug in the air conditioner (be sure to follow the power cord instructions).
- Turn the power on to the air conditioner, using the ON/OFF button.
- Set the thermostat to the coldest temperature setting.
- Select the Cool mode setting.
- Adjust the louver for comfortable air flow (see Air Directional Louvers).
- Once the room has cooled, adjust the thermostat to the setting you find most comfortable.
- Make sure the air flow inside and outside is not obstructed by anything.
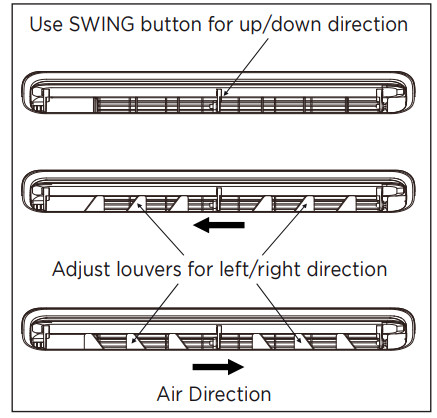
Air Directional Louvers
The louvers will allow you to direct the air flow up or down (on some models) and left or right throughout the room as needed. Use the SWING button until the desired up/down direction is obtained. Move the louvers from side to side until the desired left/right direction is obtained.
ELECTRONIC CONTROL OPERATING INSTRUCTIONS

Operation buttons
- ON/OFF button
- Press
 ON/OFF button to turn unit on or off.
- NOTE: The unit will automatically initiate the Energy Saver function under cool, Dry, and Auto modes.
- ECO button
- Press ECO button to initiate this function. This function is available on COOL, DRY, and AUTO (only AUTO-COOLING and AUTO-FAN) modes. The fan will continue to run for 3 minutes after the compressor shuts off. The fan then cycles on for 2 minutes at 10 minute intervals until the room temperature is above the set temperature, at which time the compressor turns back on and Cooling Starts.
- Press ECO button for 3 seconds to initiate the filter feature. This feature is a reminder to clean the Air Filter for more efficient operation. The LED (the light above the button) will illuminate after 250 hours of operation.
- FAN button
- Press Fan button to select the Fan Speed in four steps-Auto, Low, Med or High. Each time the button is pressed, the fan speed mode is shifted. For some models, the fan speed can not be adjusted.
-
 buttons
- Press
 button to change temperature setting.
- NOTE: Press or hold either button until the desired temperature is shown on the display. This temperature will be automatically maintained anywhere between 60°F (16°C) and 86°F (30°C). If you want the display to read the actual room temperature, see “To Operate on Fan Only” section.”
- MODE button
- To choose operating mode, press the MODE button. Each time you press the button, a mode is selected in a sequence that goes from Heat, Auto, Cool, Dry and Fan. The indicator light beside the button will be illuminated and will remain on once that mode is selected. The unit will automatically initiate the Energy Saver function under Heat, Cool, Dry, and Auto (only Auto-Cooling and Auto-Fan) modes.
- To operate on Auto feature:
- When you set the air conditioner to Auto mode, it will automatically select cooling or fan only operation, depending on what temperature you have selected and the current room temperature.
- The air conditioner will control the roomntemperature automatically based on thentemperature you set.
- In this mode, the fan speed cannot be adjusted, it starts automatically at a speed according to the room temperature.
- To operate on COOL mode:
- Choose Cool Mode to set the cooling function. Use the Up and Down buttons to choose the desired temperature. When Cool Mode is selected, the fan speed can be adjusted by pressing the fan button.
- To operate on Dry mode:
- In this mode, the air conditioner will generally operate as a dehumidifier. Since the conditioned space is a closed or sealed area, some degree of cooling will continue. On Dry mode, the fan speed is not adjustable.
- To operate on Fan Only:
- Use this function only when cooling is not desired, such as for room air circulation or to exhaust stale air (on some models). (Remember to open the vent during this function, but keep it closed during cooling for maximum cooling efficiency.) You can choose any fan speed you prefer.
- In Fan only mode, the temperature is not adjusted.
- To operate on HEAT mode (Cooling models without):
- Choose Heat Mode to set the heating function. Use the Up and Down buttons to choose the desired temperature. When Heat Mode is selected, the fan speed can be adjusted by pressing the fan button.
- If the outdoor side temperature is below 39°F, the machine will shut off and display ‘LO’.
- TIMER button
- Press Timer button, the TIMER indicator light illuminates. lt indicates the Auto Start or Auto Stop program is initiated. For some units, continuing to press the Timer button will cancel the timer settings.
- Press or hold the button to change the Auto time by 0.5 hour increments, up to 10 hours, then at 1 hour increments up to 24 hours. The control will count down the time remaining until start.
- The selected time will register in 5 seconds, and the system will automatically revert back to display the previous temperature setting or room temperature when the unit is on. When the unit is off, there is no display.
- Turning the unit ON or OFF at any time or adjusting the timer setting to 0.0 will cancel the Auto Start/ Stop timed program.
- SWING button
- Used to initiate the Auto swing feature. When the operation is ON, pressing the SWING button can stop the louver at the desired angle.
- Wireless operation (on some models):
- For the first time to use Wifi function, press the SWING button for 3 seconds to initiate the Wifi connection mode. The LED DISPLAY shows ‘AP’ to indicate you can set Wifi connection. If connection (router) is successful within 8 minutes, the unit will exit Wifi connection mode automatically and the Wireless indicator illuminates. If connection is failure within 8 minutes, the unit exits Wifi connection mode automatically. After Wifi connection is successful, you can press and hold POWER and DOWN
 buttons at the same time for 3 seconds to turn off Wifi function and the LED DISPLAY shows ‘OF’ for 3 seconds, press POWER and UP
  buttons at the same time to turn on Wifi function and the LED DISPLAY shows ‘On’ for 3 seconds.
- FRESH operation (on some models):
- Press SWING and TIMER buttons at the same time for 3 seconds to initiate FRESH feature and the FRESH light illumiantes on some models, the LED DISPLAY shows ‘On’ for 3 seconds. The ion generatoris energized and will help to purify the air inside. Press it for 3 seconds again to stop the FRESH feature and the FRESH light turn dark on some models, the LED DISPLAY shows ‘OF’ for 3 seconds for some units.
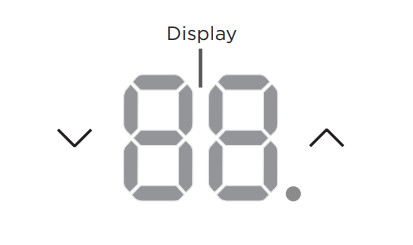
DISPLAYS
LED Display:
Shows the set temperature in “°C” or “°F” and the Auto-timer settings. While on Fan Only mode, it shows the room temperature. If the room temperature is too high or low, it will display “ HI” or “ LO”. The control is capable of displaying temperature in degrees Fahrenheit or degrees Celsius. To convert from one to the other, press and hold the buttons at the same time for 3 seconds.
Error codes:
The unit may stop operation due to a malfunction with the unit. If this occurs, an error code may appear on the display like below. Wait 10 minutes as the problem may resolve itself. If not, disconnect the power, then connect it again. Turn the unit on. If the problem persists, disconnect the power and contact customer service.
Error code appears and begins with the letters as the following in the window display of indoor unit:
EH(xx), EL(xx), EC(xx) , PH(xx), PL(xx), PC(xx)
NOTICE If the unit turns off unexpectedly due to the power being cut, it will automatically restart with the previous function setting when the power resumes.
CARE AND CLEANING
CAUTION Clean your air conditioner occasionally to keep it looking new. Be sure to unplug the unit before cleaning to prevent shock or fire hazards.
Air Filter Cleaning
The air filter should be checked at least once every two weeks to see if cleaning is necessary. Trapped particles in the filter can build up and cause an accumulation of frost on the cooling coils and reduce performance.
- Grasp the filter by the center and pull up and out.
- Wash the filter using warm water. Rinse filter thoroughly.
- Gently shake excess water from the filter. Be sure the filter is thoroughly dry before replacing.
- Instead of washing, you may also vacuum the filter clean rather than washing.

NOTICE Never use hot water over 104°F (40°C) to clean the air filter. Never attempt to operate the unit without the air filter.
Cabinet Cleaning
- Be sure to unplug the air conditioner to prevent shock or fire hazard. The cabinet and front may be dusted with an oil-free cloth or washed with a cloth dampened in a solution of warm water and mild liquid dishwashing detergent. Rinse thoroughly and wipe dry.
- Never use harsh cleansers, wax, or polish on the air conditioner.
- Be sure to wring excess water from the cloth before wiping around the controls. Excess water in or around the controls will cause damage to the air conditioner.
- Plug in air conditioner.
Winter Storage
If you plan to store the air conditioner during the winter, remove it carefully from the window according to the installation instructions. Be careful not to spill any potentially standing water from the unit’s base pan. If water is present, carefully drain it. Cover the unit with plastic or return it to the original carton.
TROUBLESHOOTING
Problem & Solution
- Air conditioner does not start.
- Wall plug disconnected. Push plug firmly into wall outlet.
- House fuse blown or circuit breaker tripped. Replace fuse with time delay type or reset circuit breaker.
- Plug Current Device Tripped. Press the RESET button.
- Power is OFF. Turn power ON.
- Air from unit does not feel cold enough.
- Room temperature below 60°F (16°C). Cooling may not occur until room temperature rises above 60°F (16°C).
- Temperature sensor behind the air filter is touching the cold coil. Try to move it so it does not contact the cold coil.
- Set to a lower temperature.
- Compressor stopped when changing modes. Wait 3 minutes after set to the COOL mode.
- Check for potential obstructions blocking the outdoor intake/ exhaust. Clear any obstructions.
- Air conditioner cooling, but room is too warm- ice forming on cooling coil behind air filter.
- Outdoor temperature below 64°F (18°C). To defrost the coil, set to FAN ONLY mode.
- Air filter may be dirty. Clean filter. Refer to Care and Cleaning section. To defrost, set to FAN ONLY mode.
- Thermostat set too cold for night-time cooling. To defrost the coil, set to FAN ONLY mode. Then, set temperature to a higher setting.
- Air conditioner cooling, but room is too warm- NO ice forming on cooling coil behind air filter.
- Dirty or restricted air filter. Clean filter. Refer to Care and Cleaning section.
- Temperature is set too high, set temperature to a lower setting.
- Air directional louvers positioned improperly. Position louvers for better air distribution.
- Front of unit is blocked by drapes, blinds, furniture, etc. - restricts air distribution. Clear obstruction in front of unit.
- Any open doors, windows, or registers may allow cold air to escape. Close any doors, windows, or registers.
- The room may be too warm. Allow additional time to remove “stored heat” from walls, ceiling, floor and furniture.
- Air conditioner turns on and off rapidly.
- Dirty or restricted air filter. Clean air filter.
- Outside temperature extremely hot. Set FAN speed to a higher setting to bring air past cooling coils more frequently.
- Check for potential obstructions blocking the outdoor intake/ exhaust. Clear any obstructions.
- Noise when unit is cooling.
- Air movement sound. It is normal to hear the airflow. If too loud, set to a slower FAN setting.
- Window vibration - poor installation. Refer to installation instructions or check with installer.
- Water dripping INSIDE when unit is cooling.
- Improper installation. Tilt air conditioner slightly to the outside to allow water drainage. Refer to installation instructions - check with installer.
- Water dripping OUTSIDE when unit is cooling.
- Unit removing large quantity of moisture from humid room. This is normal during excessively humid days.
- Remote sensing deactivating prematurely (some models).
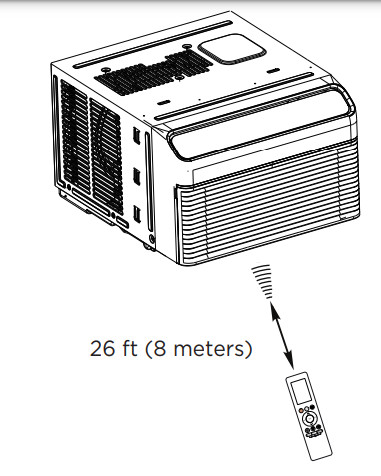
- Remote control not located within range. Place remote control within 26 feet (8 m) and pointed in the general direction of the air conditioner unit.
- Remote control signal obstructed. Remove obstruction
- Room too cold.
- Set temperature too low. Increase set temperature.
- Noise when unit starts.
- A “da-da” sound may occur for thirty seconds when the unit is turned on due to the compressor starting. It is normal.
- Heat mode does not start or the machine displays ‘LO’
- Wait for the outdoor temperature to rise above the minimum heat pump operating temperature.
- Unit will not connect to WiFi or App does not work (some models).
- For additional support and troubleshooting tips, follow the link in this QR code:
-

REMOTE CONTROL AND APP INSTRUCTIONS
Handling the Remote Control
Location of the remote control
Use the remote control within a distance of 26 ft. (8m) from the air conditioner, pointing it towards the unit. The unit will beep when it receives a signal.
CAUTION
- The air conditioner will not operate if curtains, doors or other materials block the signals from the remote control to the unit.
- Prevent any liquid from spilling onto the remote control. Do not expose the remote control to direct sunlight or heat.
- If the infrared signal receiver on the indoor unit is exposed to direct sunlight, the air conditioner may not function properly. Use curtains to prevent the sunlight from falling on the receiver.
- If other electrical appliances react to the remote control, either move these appliances or consult your local dealer.
Inserting and Replacing Batteries
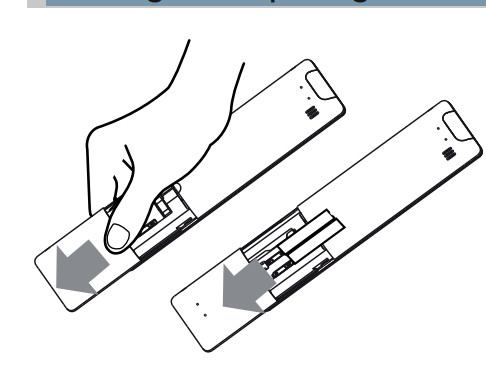
Your air conditioning unit may come with two batteries (some units). Put the batteries in the remote control before use.
- Slide the back cover from the remote control downward, exposing the battery compartment.
- Insert the batteries, paying attention to match up the (+) and (-) ends of the batteries with the symbols inside the battery compartment.
- Slide the battery cover back into place.
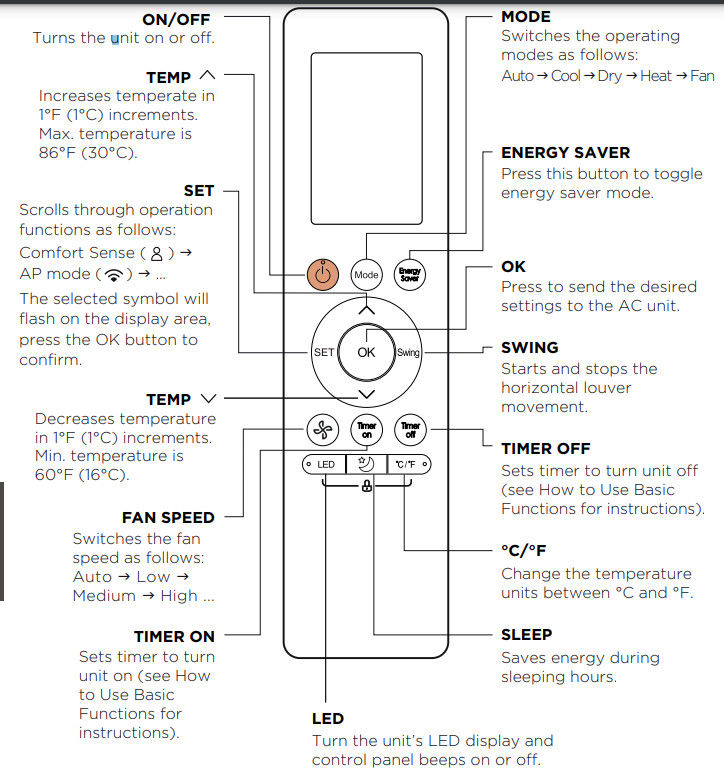
Remote Control Specifications

Function Buttons
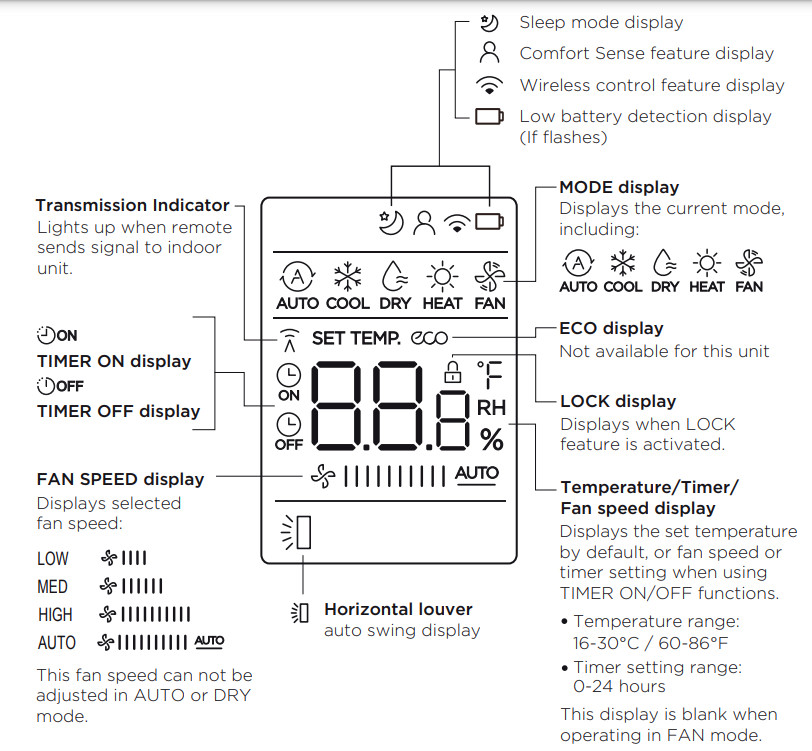
Remote Screen Indicators
Information is displayed when the remote control is powered on.
Setting the TIMER
TIMER ON/OFF - Set the amount of time after which the unit will automatically turn on/off.
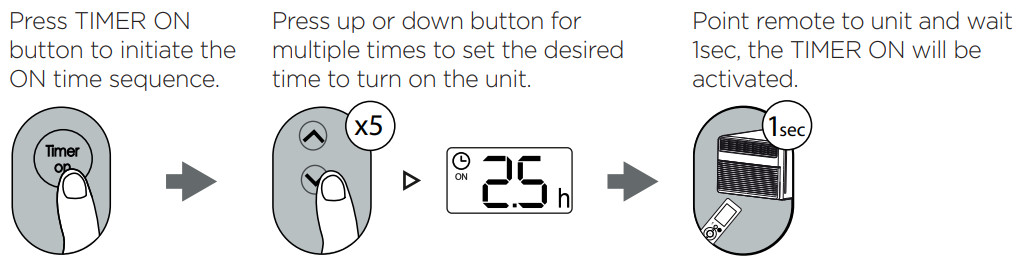
TIMER ON SETTING
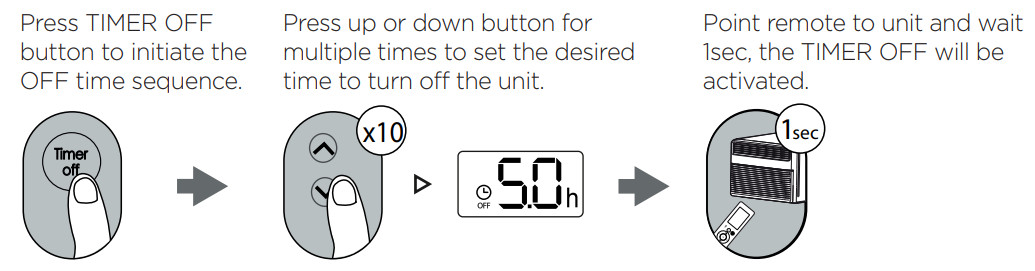
TIMER OFF SETTING
NOTICE
- When setting the TIMER ON or TIMER OFF, the time will increase by 30 minutes increments with each press, up to 10 hours. After 10 hours and up to 24, it will increase in 1 hour increments. (For example, press 5 times to get 2.5h, and press 10 times to get 5h,). The timer will revert to 0.0 after 24.
- Cancel either function by setting its timer to 0.0h.
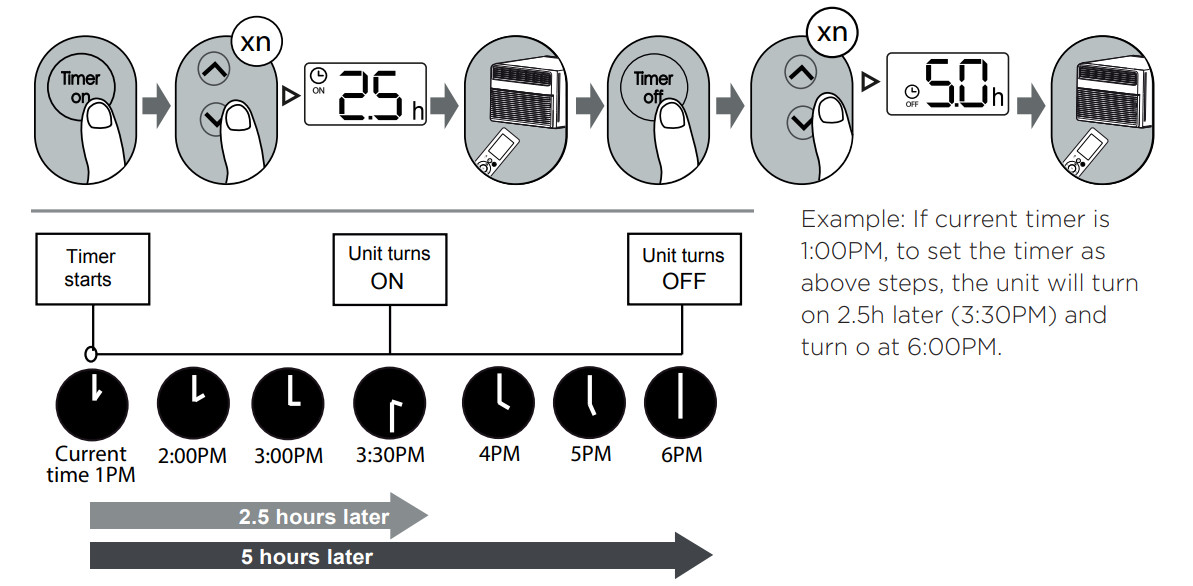
TIMER ON & OFF SETTING (EXAMPLE)
Keep in mind that the time periods you set for both functions refer to hours after the current time.
DECLARATION OF CONFORMITY
We hereby declare that this AC is in compliance with the essential requirements and other relevant provisions of Directive 1999/5/EC.
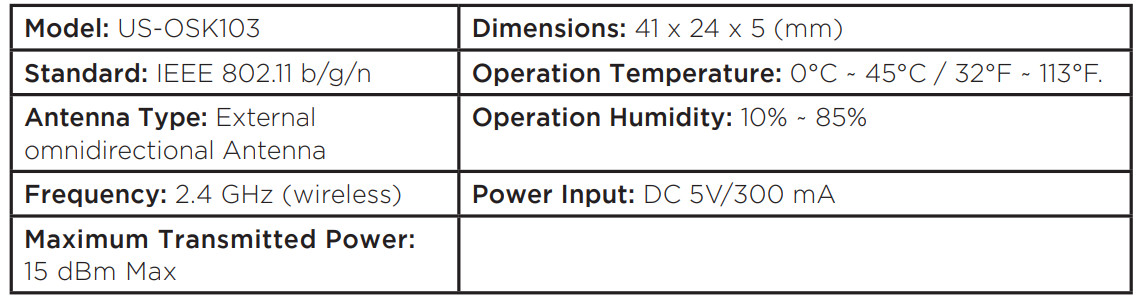
SPECIFICATION OF WIRELESS MODULE
PRECAUTIONS
- Supports operating systems: iOS 7+ or Android 4+.
- In the event of a OS update, there may be a delay between the update of the OS and a related software update during which your OS may or may not be supported until a new version is released. Your specific mobile phone or problems in your network may prevent the system from working and Midea will not be responsible for any problems that could be caused by incompatibility or network issues.
- This Smart AC only supports WPA-PSK/WPA2-PSK (recommended) encryption.
- To ensure proper scanning of the QR code, your smart phone must have at least a 5-megapixel camera.
- Due to unstable network connectivity, requests may time out. If this happens, rerun the network configuration.
- Due to unstable network connectivity, commands may time out. If this happens, the smartphone app and the actual product may display conflicting information. The information displayed on the actual product is always the most accurate available. Refresh the app to re-sync.
NOTICE: Midea will not be responsible for any problems that could be caused by incompatibility or network issues, your wireless router and mobile phone.