Owner's Manual
Manual Del Propietario
Vacuum Cleaner
@
Aspiradora
Model, Modelo
116.38099
116.38109
116.39099
116.39109
116.31200A
CAUTION:
Read and follow all
safety and operating
instructions before first
use of this product.
CUIDADO:
Lea y sigue todas las
instrucciones de operaci6n
y seguridad antes del uso de
este producto,
Sears, Roebuck and Co., Hoffman Estates, IL 60179 U.S.A.
www.sears.com
Part No, C_1ZAMM3_U_-437_793
Impreso en EUA
Printed in U,S.A.
Before Using Your New Vacuum ....... 2
Kenmore Vacuum Cleaner Warranty .°. 2
Important Safety Instructions ......... 3
Parts and Features .................. 4
Assembly instructions .............. 5-6
Operating Instructions ................. 7
Pile Height Selection and Setting ........ 7
Releasing the Handle .................. 8
ON/OFF Switch ..................... 8
Attachments .......................... 8-9
Attachment Use Chart ................ 9
Vacuuming Tips .................... t 0
Vacuum Cleaner Care ............... 10
Vacuum Storage .................... 10
Cleaning Exterior and Attachments ..... 1I
Dust Bag Changing ............... 11-12
Motor Safety Filter Cleaning ........... 12
Belt Changing and Agitator Cleaning ,, 13-14
Agitator Servicing ................... 15
Agitator Assembly ..................... 15
Light Bulb Changing ................. 16
Clog Removal ..................... 17
Motor Protector ..................... 17
Troubleshooting ...................... 18
Requesting Service .......... Back Cover
Please read this guide. It will help you assemble and operate your new Kenmore vacuum in
the safest and most effective way,
For more information about the care and operation, call your nearest Sears store. You will
need the complete model and serial numbers when requesting information, Your vacuum's
model and serial numbers are located on the Model and Serial Number Plate,
Use the space below to record the model number and serial number of your new Kenmore
vacuum.
Model Noo
Serial No,
Date of Purchase
Keep this book and your sales check (receipt) in a safe place for future reference.
LIMITED ONE YEAR WARRANTY ON KENMORE VACUUM CLEANER
This warranty is for one year from the date of purchase, and includes only private household
vacuum cleaner use. During the warranty year, when this vacuum cleaner is operated and
maintained according to the owner's manual instructions, Sears will repair any defects in
material or workmanship free of charge,
This warranty excludes vacuum bags, belts, light bulbs, and filters, which are expendable parts
and become worn during normal use.
For warranty service, return this vacuum cleaner to the nearest Sears Service Center in
the United States.
This warrant,/applies only while this product is in use in the United States. This warranty gives
you specific legal rights, and you may also have other rights which vary from state to state.
Sears, Roebuck and Co., D/817 WA, Hoffman Estates, IL 60179
2
WARNING
Your safety is important to us.To reduce the risk of fire, electrical shock, injury
to persons or damage when using your vacuum cleaner, follow basic safety pre-
cautions including the following:
Read this manual before assembling or
using your vacuum cleaner.
Use your cleaner only as described in
this manuai. Use only with Sears recom-
mended attachments.
To reduce the risk of electrical shock -
Do not use outdoors or on wet surfaces°
Disconnect electrical supply before any
servicing or cleaning. Failure to do so
could result in electrical shock or person-
al injury.
Always turn cleaner off before unplug-
ging.
Do not unplug by pulling on cord. To
unplug, grasp the plug, not the cord.
De not use with damaged cord or plugo If
cleaner is not working as it should, has
been dropped, damaged, left outdoors, or
dropped into water, return it to a Sears
Service Center/Department.
Do not pull or carry by cord, use cord as
a handle, close door on cord, or pull cord
around sharp edges or corners° Do not
run cleaner over cord. Keep cord away
from heated surfaces.
Do not leave cleaner when plugged in.
Unplug from outlet when not in use and
before servicing.
Do not allow to be used as a toy, Close
attention is necessary when used by or
near children.
Do not handle plug or cleaner with wet
hands,
Do not put any objects into openings.
SAVE THESE
Do not use with any opening blocked;
keep free of dust, lint, hair and anything
that may reduce air flow.
Keep hair, loose clothing, fingers, and all
parts of body away from openings and
moving parts.
Do not use cleaner without dust bag
and/or filters in place.
Always change the dust bag after vacu-
uming carpet cleaners or freshener, pow-
ders and fine dust° These products clog
the bag, reduce airflow and can cause
the bag to burst. Failure to change bag
could cause permanent damage to the
cleaner.
Do not use the cleaner to pick up sharp
hard objects, small toys, pins, paper
clips, etc. They may damage the cleaner
or dust bag.
Do not pick up anything that is burning
or smoking, such as cigarettes, matches,
or hot ashes.
Do not use cleaner to pick up flammable
or combustible liquids (gasoline, cleaning
fluids, perfumes, etc.), or use in areas
where they may be present. The fumes
from these substances can create a fire
hazard or explosion.
Use extra care when cleaning on stairs.
Do not put on chairs, tables, etc. Keep
on floor.
You are responsible for making sure that
your vacuum cleaner is not used by any-
one unable to operate it properly.
INSTRUCTION
Proper assembly and safe use of your vacuum cleaner are your responsibilities. Your
cleaner is intended only for household use. Read this Owner's Manual carefully for
important use and safety information. This guide contains safety statements under
warning and caution symbols. Please pay special attention to these boxes and follow
any instructions given. WARNING statements alert you to such dangers as fire, electri-
cal shock, burns and personal injury. CAUTION statements alert you to such dangers
as personal injury andlor property damage.
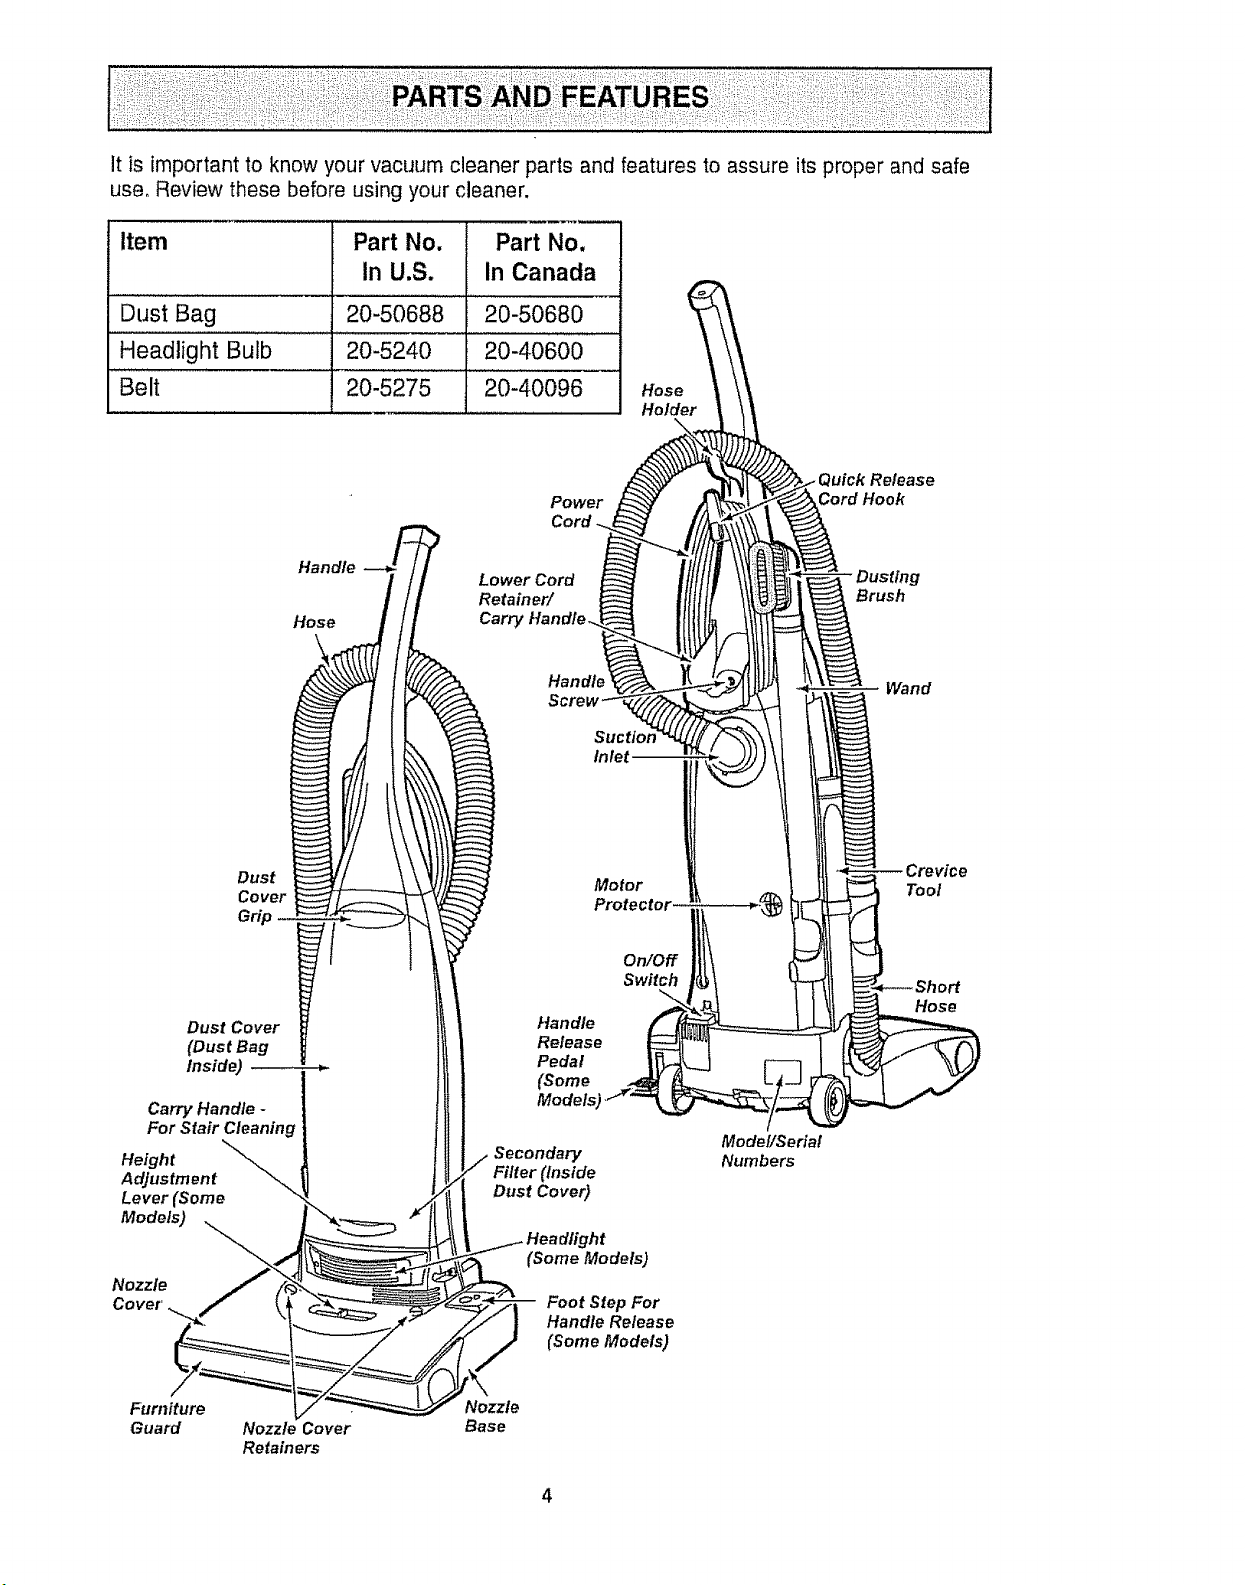
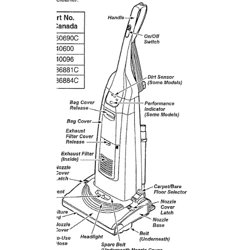
Itisimportanttoknowyourvacuumcleanerpartsandfeaturestoassureitsproperandsafe
use,Reviewthesebeforeusingyourcleaner.
item Part No, Part No,
In U.S. In Canada
Dust Bag 20-50688 20-50680
Headlight Bulb 20-5240 20-40600
Belt 20-5275 20-40096 Hose
Holder
Hand_
Power
Cord
Lower Cord
Retainer/
uick Release
Cord Hook
Brush
Handle
Wand
Dust
Cover
Grip
Dust Cover
(Dust Bag
Inside)
Carry Handle -
For Stair Cleaning
Height
Adjustment
Lever (Some
Models)
Nozzle
Inlet
Motor l
Protector
On/Off
Switch
Handle
Release
Pedal
(Some
Secondary
Filter (inside
Dust Cover)
Headlight
(Some Models)
Foot Step For
Handle Release
(Some Models)
Model/Serial
Numbers
Tool
Hose
Fundture
Guard
Nozz/e Cover
Retainers
Nozzle
Base
Before assembling vacuum, check the
PACKING LIST on the cover of the separate
Repair Parts LisL Use this list to verify that
you have received all the components of
your new Kenmore vacuum_
E• wAR. .G....................
Electrical Shock Hazard
Do not plug into the electrical sup-
ply until the assembly is complete,
Failure to do so could result in elec-
trical shock or injury.
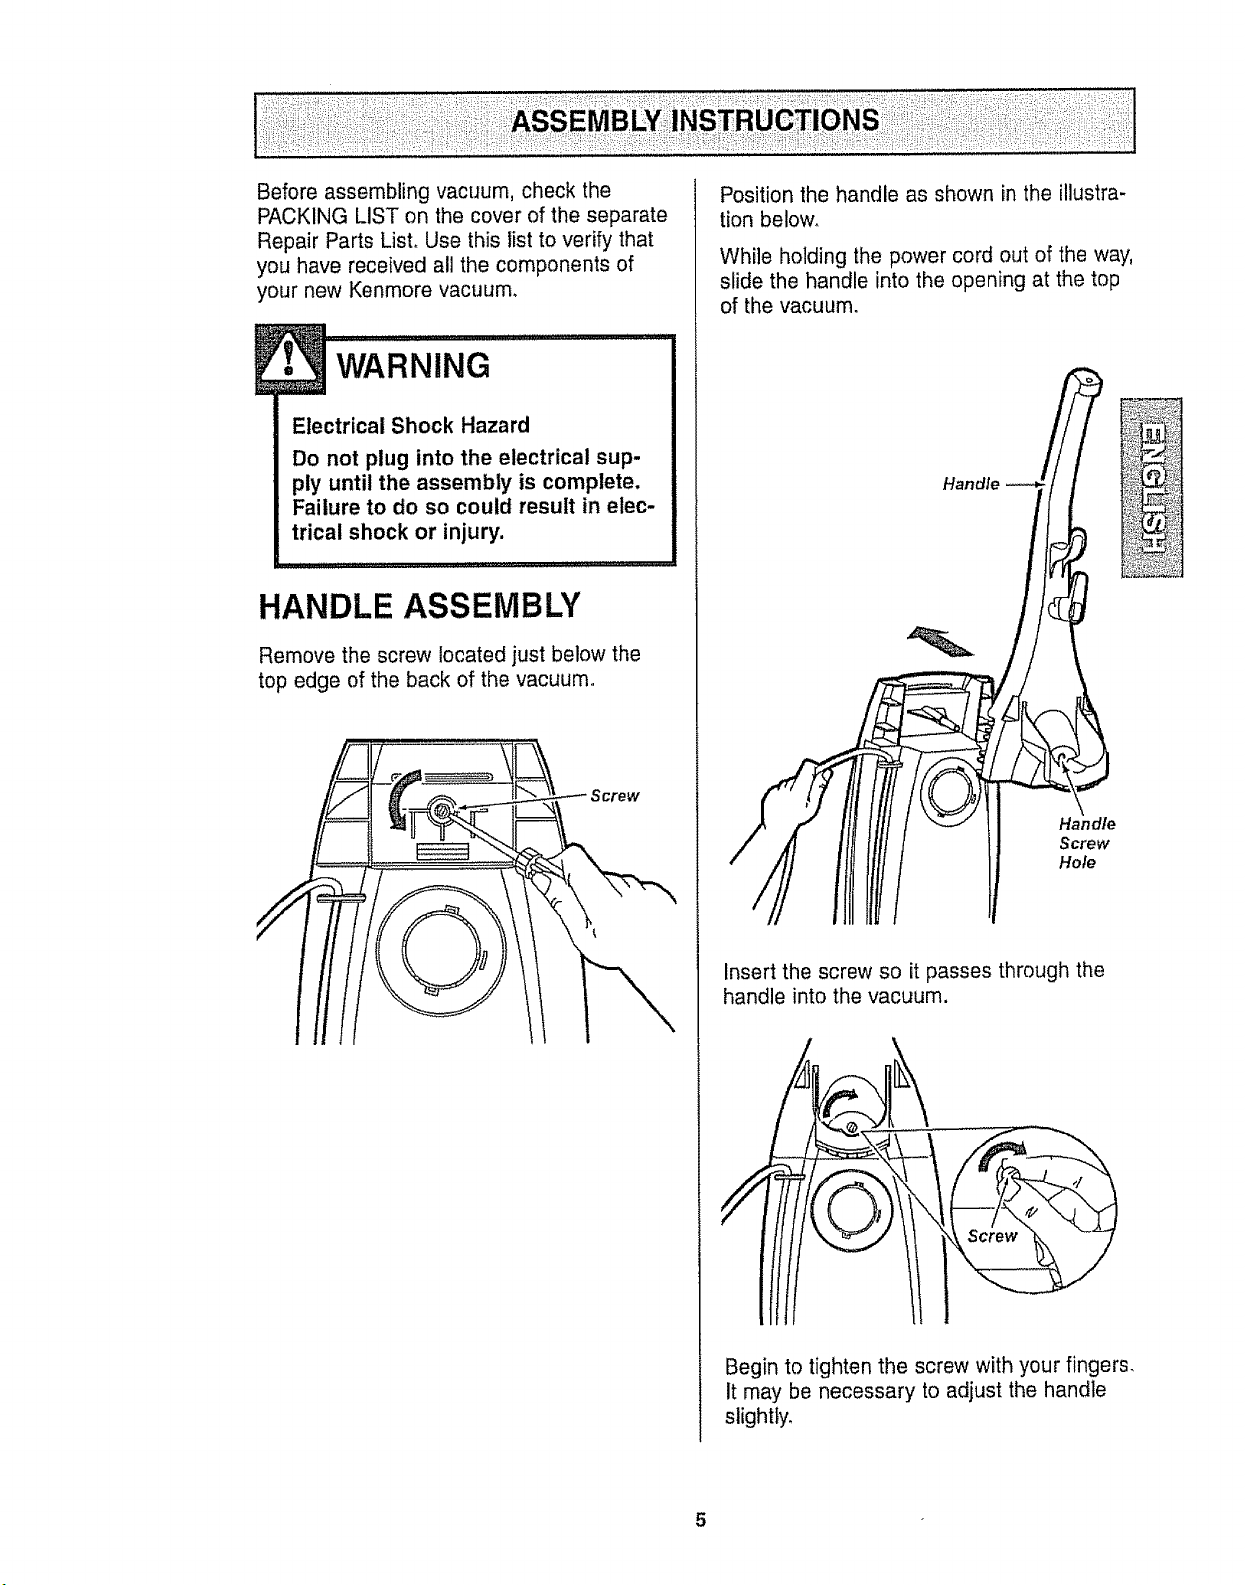
HANDLE ASSEMBLY
Remove the screw located just below the
top edge of the back of the vacuum.
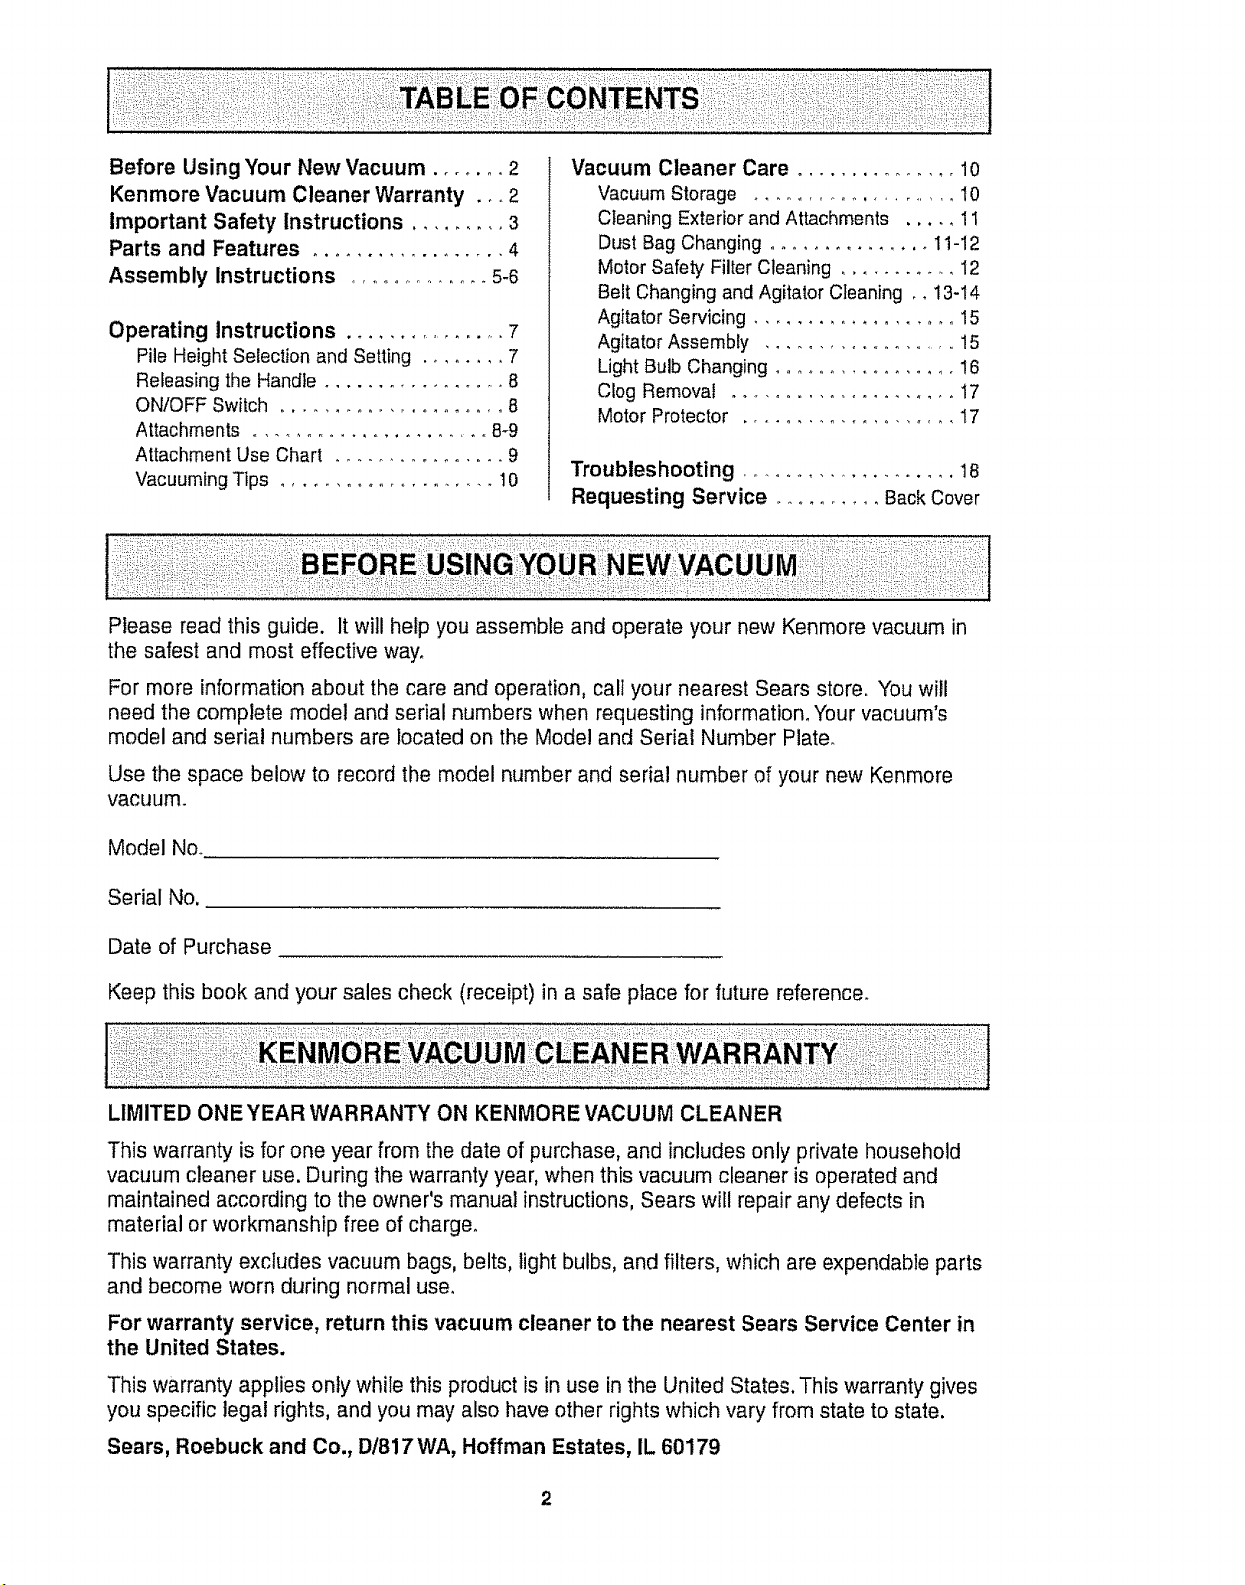
Position the handle as shown in the illustra-
tion below.
While holding the power cord out of the way,
slide the handle into the opening at the top
of the vacuum.
Handle
,@
Handle
Screw
Hole
Insert the screw so it passes through the
handle into the vacuum.
!
Begin to tighten the screw with your fingers.
It may be necessary to adjust the handle
slightly.
CAUTiO-N.............................
Do not overtighten,
Overtightening could strip the screw
holes.
Do not operate the cleaner without
the screw in place.
Using a screwdriv-
er, tighten the
screw,
CORD ASSEMBLY
Make sure the quick release cord hook is in
the upright position° Remove the wire tie
from the power cord.,
Lock the cord into
place by forcing it
into the locking
notch on the body
of the quick
release cord hook
as shown, This
helps keep the
power cord out
from under the
vacuum cleaner
agitator_
I
I
I
Quick Release
Cord
Power
Lower Cord
Retainer,
Wrap tile
power cord
around the
quick release
cord hook
and lower
cord retainer,
then lock the
power cord
plug onto the
power cord.
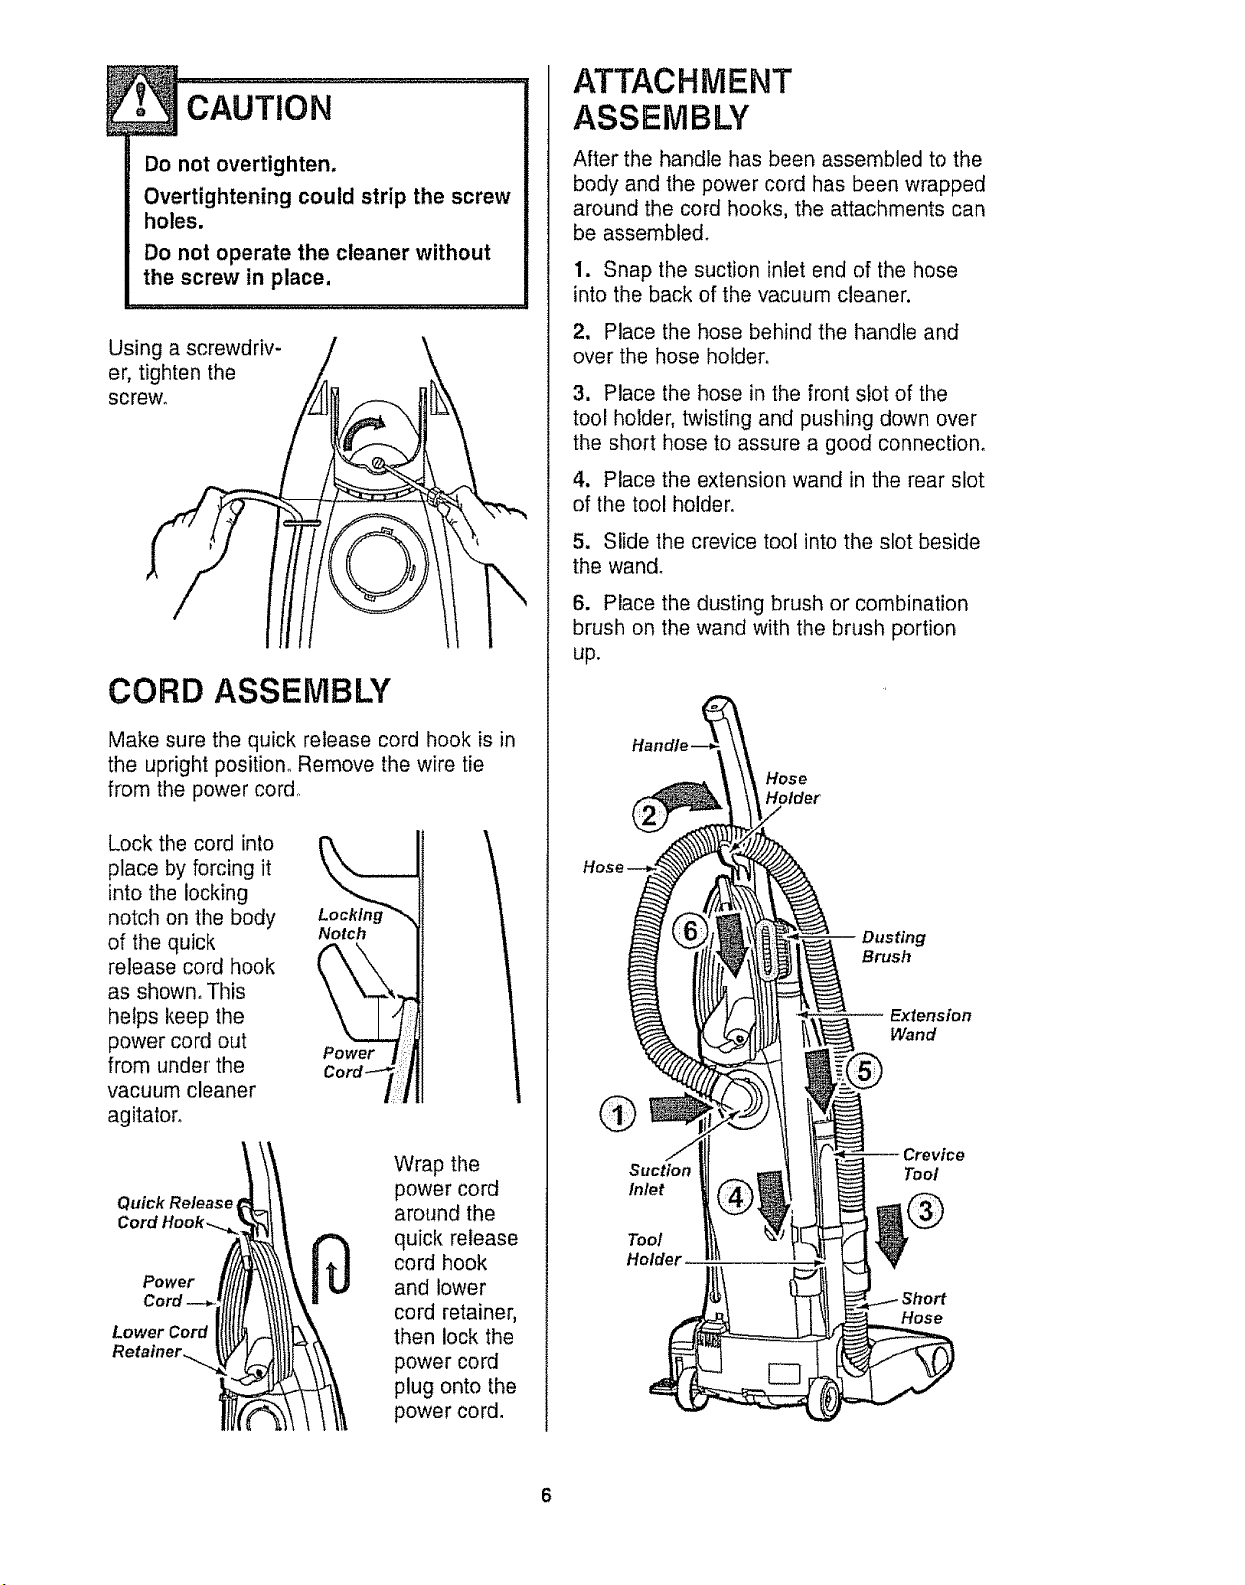
ATTACHMENT
ASSEMBLY
After the handle has been assembled to the
body and the power cord has been wrapped
around the cord hooks, the attachments can
be assembled.
1. Snap the suction inlet end of the hose
into the back of the vacuum cleaner.
2, Place the hose behind the handle and
over the hose holder.
3. Place the hose in the front slot of the
tool holder, twisting and pushing down over
the short hose to assure a good connection°
4. Place the extension wand in the rear slot
of the tool holder.
5. Slide the crevice tool into the slot beside
the wand.
6. Place the dusting brush or combination
brush on the wand with the brush portion
up.
Hose
Holder
Dusting
Brush
Extension
Wand
Suction
inlet
Tool
Holder
-- Crevice
Tool
®
Hose
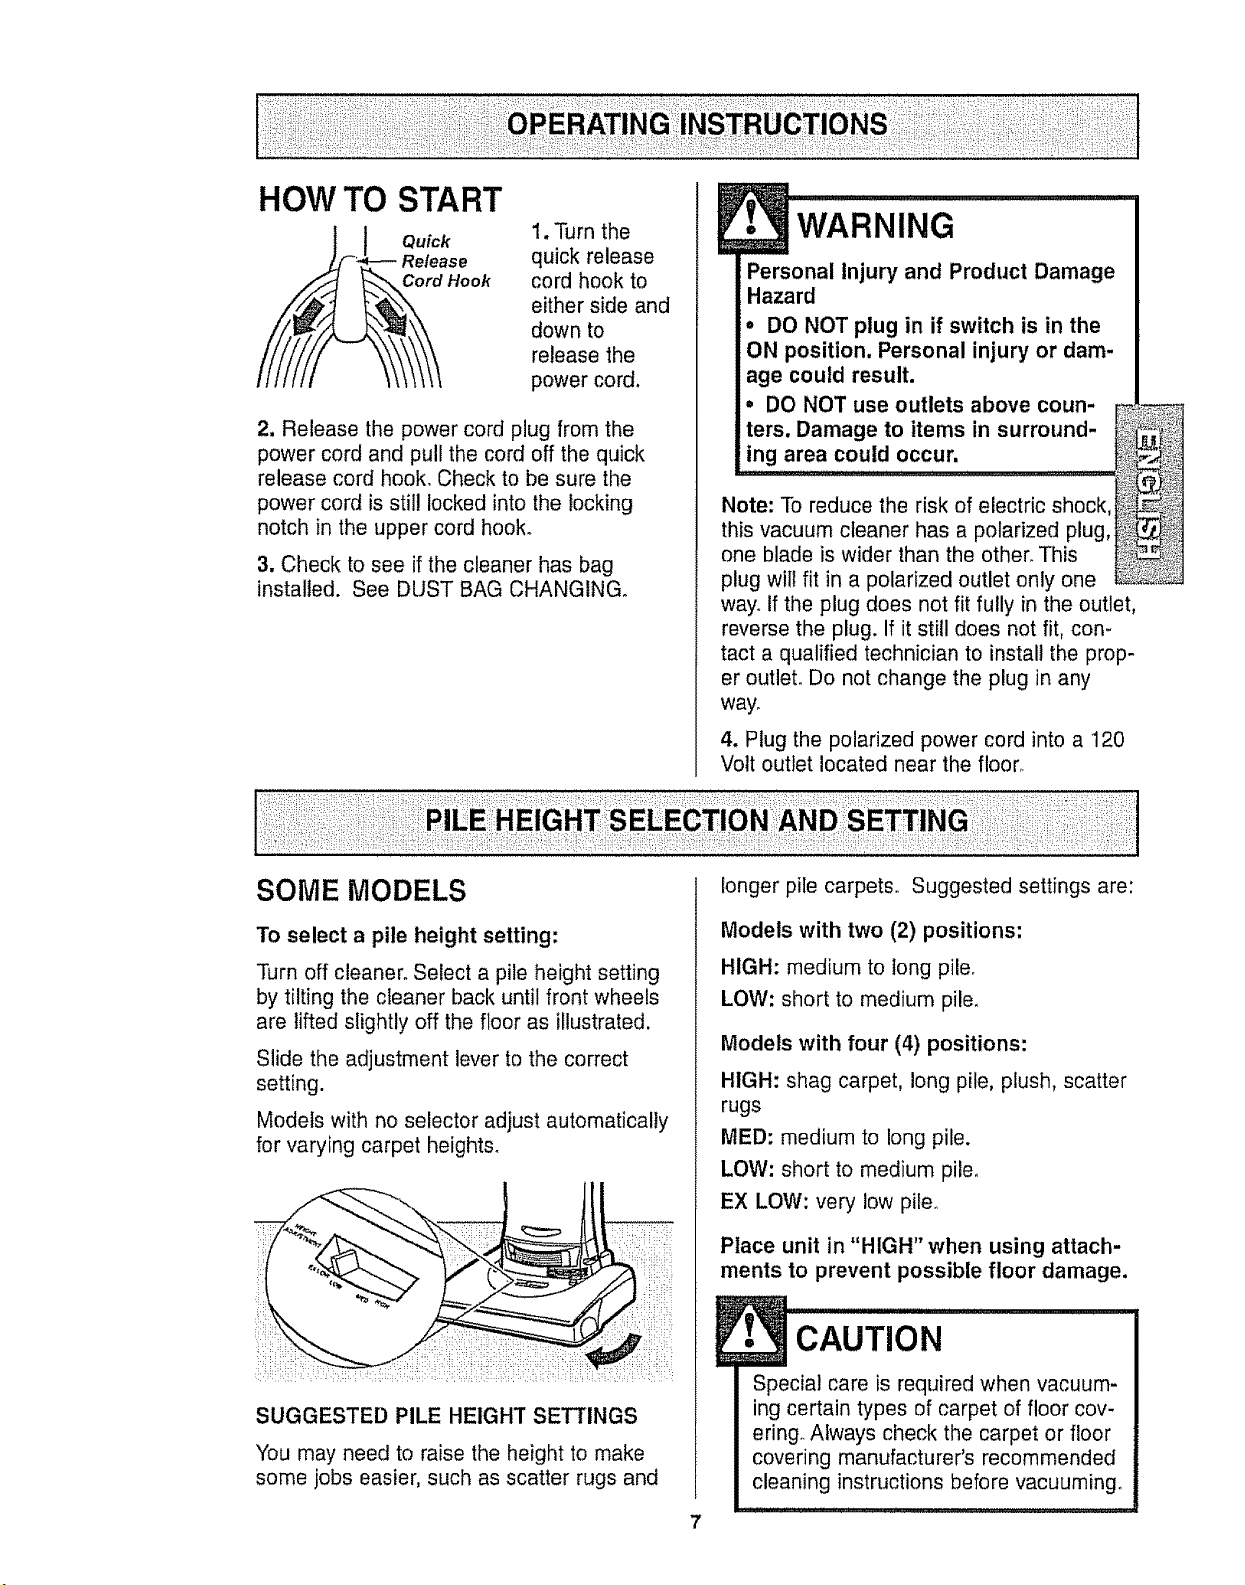
HOW TO START
Release
Hook
1, Turn the
quick release
cord hook to
either side and
down to
release the
power cord.
2, Release the power cord plug from the
power cord and pull the cord off the quick
release cord hook. Check to be sure the
power cord is still locked into the locking
notch in the upper cord hook.
3, Check to see if the cleaner has bag
installed. See DUST BAG CHANGING.
!• WARNING
Personal Injury and Product Damage
Hazard
• DO NOT plug in if switch is in the
ON position. Personal injury or dam-
age could result.
. DO NOT use outlets above coun-
ters. Damage to items in surround-
ing area could occur.
Note: To reduce the risk of electric shock,
this vacuum cleaner has a polarized plug,
one blade is wider than the other. This
plug will fit in a polarized outlet only one
way. if the plug does not fit fully in the outlet,
reverse the plug. If it still does not fit, con-
tact a qualified technician to install the prop-
er outlet. Do not change the plug in any
way.
4, Plug the polarized power cord into a 120
Volt outlet located near the floor.
SOME MODELS
To select a pile height setting:
Turn off cleaner. Select a pile height setting
by tilting the cleaner back until front wheels
are lifted slightly off the floor as illustrated.
Slide the adjustment lever to the correct
setting.
Models with no selector adjust automatically
for varying carpet heights.
SUGGESTED PILE HEIGHT SETTINGS
You may need to raise the height to make
some jobs easier, such as scatter rugs and
7
Models with two (2) positions:
HIGH: medium to tong pile.
LOW: short to medium pile.
Models with four (4) positions:
HIGH: shag carpet, long pile, plush, scatter
rugs
MED: medium to long pile.
LOW: short to medium pile.
EX LOW: very low pile.
Place unit in "HIGH" when using attach-
ments to prevent possible floor damage.
!. CAUTiON
Special care is required when vacuum-
ing certain types of carpet of floor cov-
ering. Always check the carpet or floor
covering manufacturer's recommended
cleaning instructions before vacuuming.
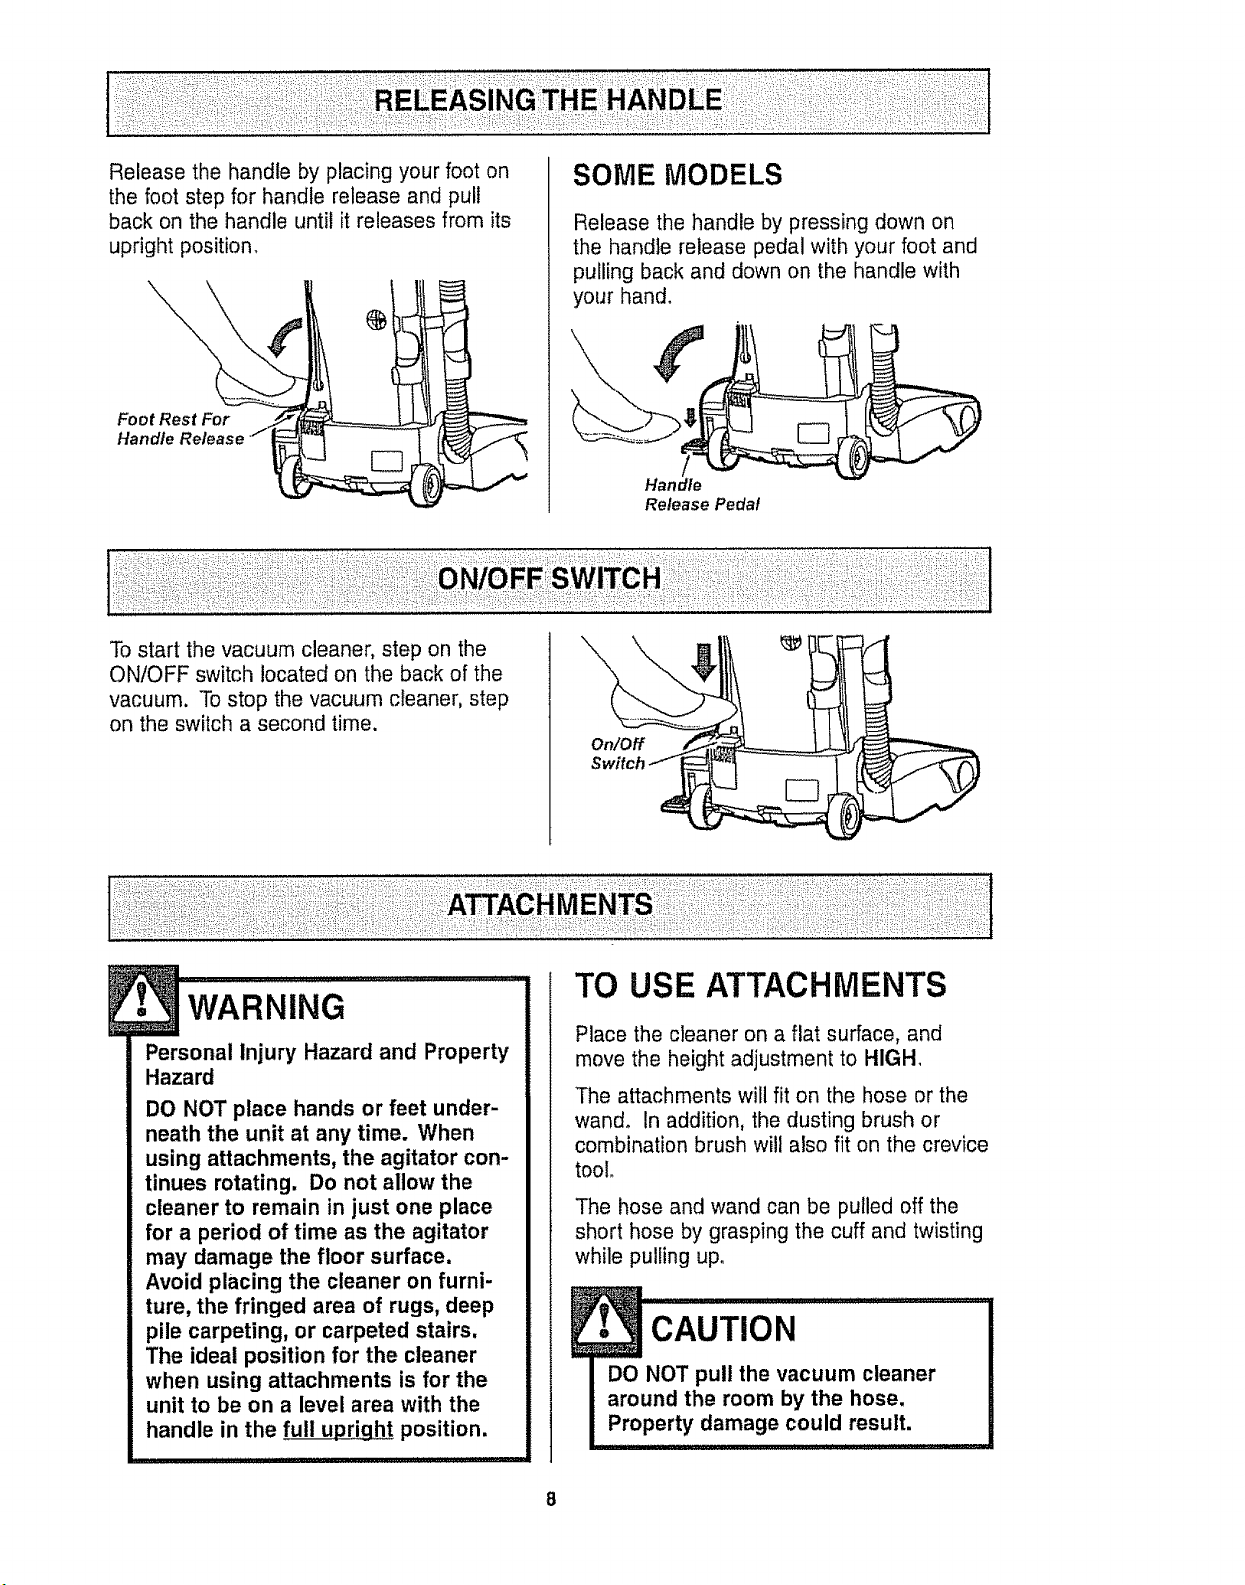
Releasethehandlebyplacingyourfooton
thefootstepforhandlereleaseandpull
backonthehandleuntilitreleasesfromits
uprightposition.
\
Foot Rest For
SOME MODELS
Release the handle by pressing down on
the handle release pedal with your foot and
pulling back and down on the handle with
your hand.
Handle
Release Pedal
To start the vacuum cleaner, step on the
ON/OFF switch located on the back of the
vacuum. To stop the vacuum cleaner, step
on the switch a second time.
On/Off
WAR I, ,I ................ ...........
Personal injury Hazard and Property
Hazard
DO NOT place hands or feet under-
neath the unit at any time. When
using attachments, the agitator con-
tinues rotating. Do not allow the
cleaner to remain in just one place
for a period of time as the agitator
may damage the floor surface.
Avoid placing the cleaner on furni-
ture, the fringed area of rugs, deep
pile carpeting, or carpeted stairs,
The ideal position for the cleaner
when using attachments is for the
unit to be on a level area with the
handle in the full upright position.
TO USE ATTACHMENTS
Place the cleaner on a flat surface, and
move the height adjustment to HIGH.
The attachments will fit on the hose or the
wand. In addition, the dusting brush or
combination brush will also fit on the crevice
tool.
The hose and wand can be pulled off the
short hose by grasping the cuff and twisting
while pulling up.
CAUTION
The attachments can be added to the hose
if the item to be cleaned is not far from the
cleaner. The hose on some models will
expand.
Note: When cleaner is turned on, the hose
on some models will have a tendency to
collapse due to suction of the cleaner.
if more reach is needed, the wand can be
attached to the hose and the attachments
can be added to the wand.
. CAuT'o....................i
When using attachments, be careful
not to overextend the hose length
when reaching. Trying to reach
beyond the hose reach could cause
the cleaner to tip over,
SOME MODELS
An extra wand, without tabs, is included.
This extra wand can be added to the wand
with tabs for extra reach_ Insert wand and
twist a quarter of a turn to secure fit°
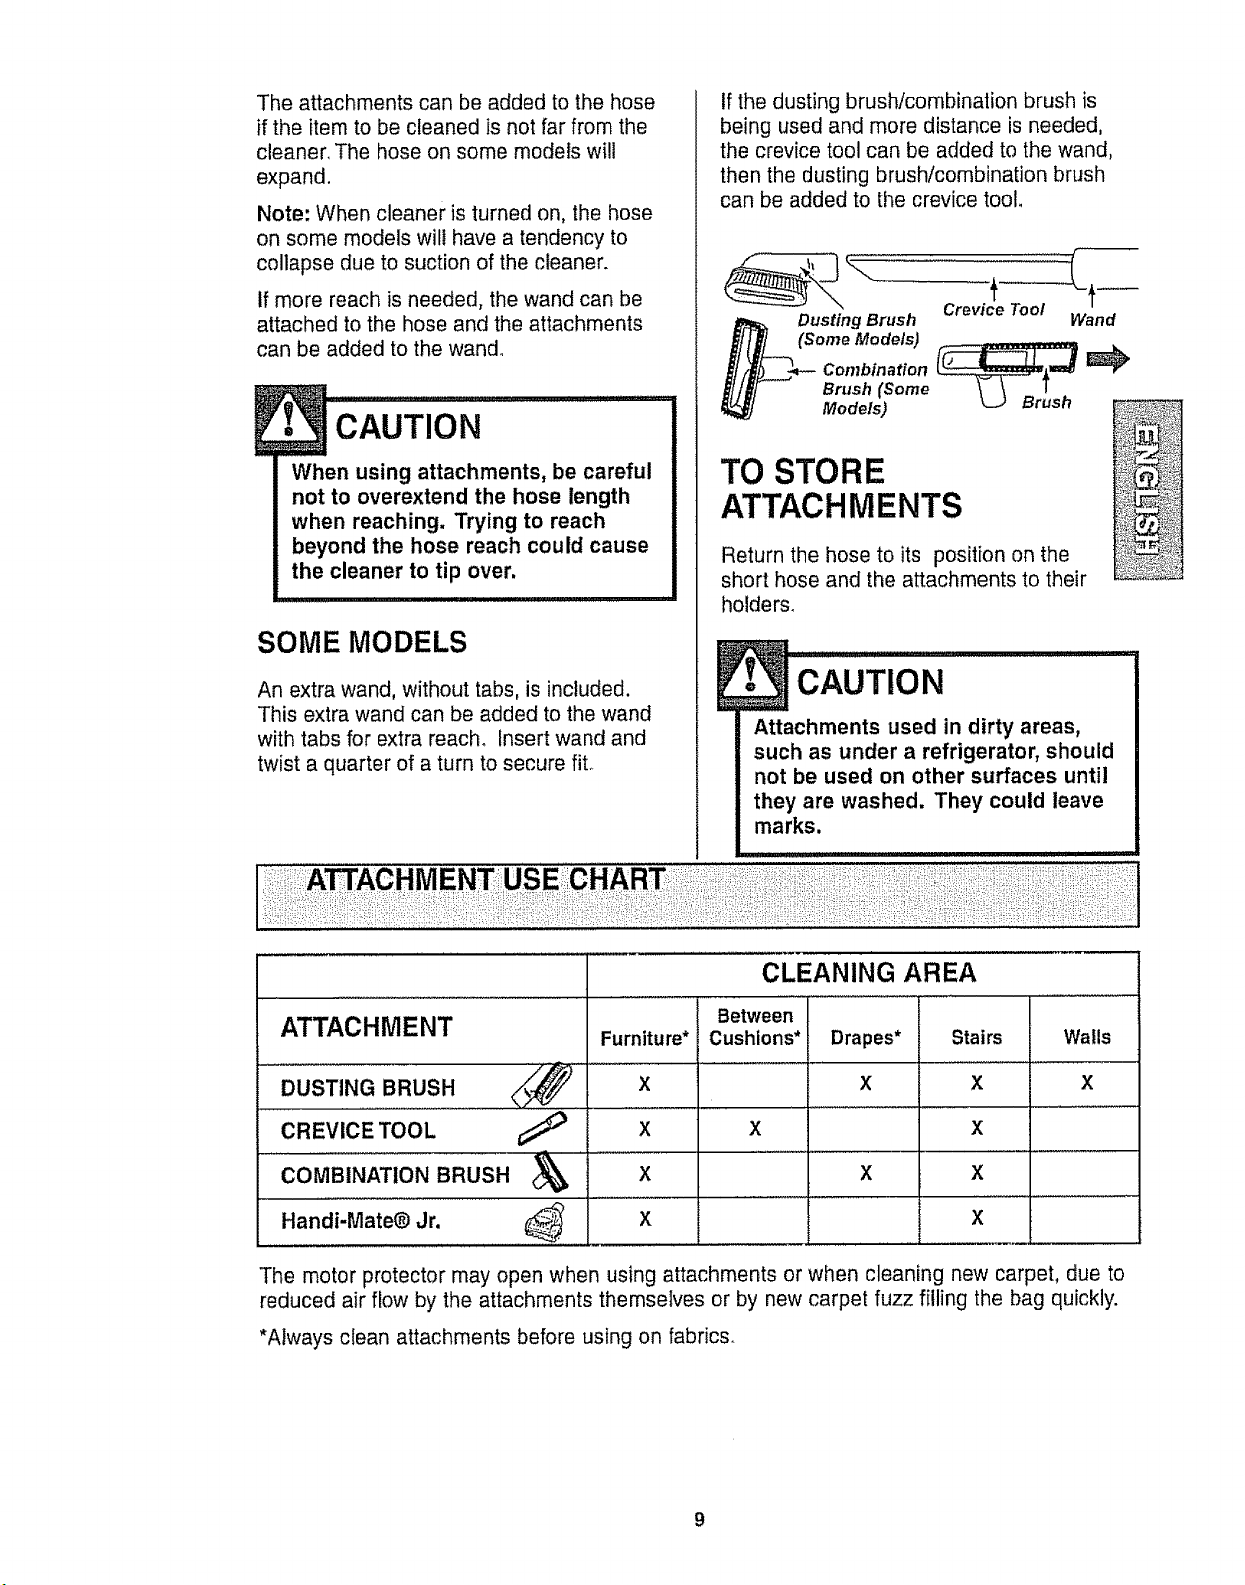
If the dusting brush/combination brush is
being used and more distance is needed,
the crevice tool can be added to the wand,
then the dusting brush/combination brush
can be added to the crevice tool.
Crevice Tool
Dusting Brush Wand
(Some Models)
Combination
Brush (Some
Models) ....
TO STORE
ATTACHMENTS
Return the hose to its position on the
short hose and the attachments to their
holders.
cAUTiON ..........
Attachments used in dirty areas,
such as under a refrigerator, should
not be used on other surfaces until
they are washed. They could leave
marks.
ATTACHMENT
.....D'UsTING BRUSH <_/_'"
CREVICE TOOL
CLEANING AREA
Between
Furniture* Cushions* Drapes*
X
................. X .............
X X
COMBINATION BRUSH X X
Handi-Mate@ jr, X
Stairs
X
X
Walls
x
X
X
The motor protector may open when using attachments or when cleaning new carpet, due to
reduced air flow by the attachments themselves or by new carpet fuzz filling the bag quickly.
*Always clean attachments before using on fabrics.
9
Personal Injury Hazard
Use care if vacuum cleaner is
placed on stairs. If it falls, personal
injury or property damage could
result,
Carpet edges
Guide either side or the front of the nozzle
along a baseboard° The full length brushes
help remove trapped dirt at carpet edges.
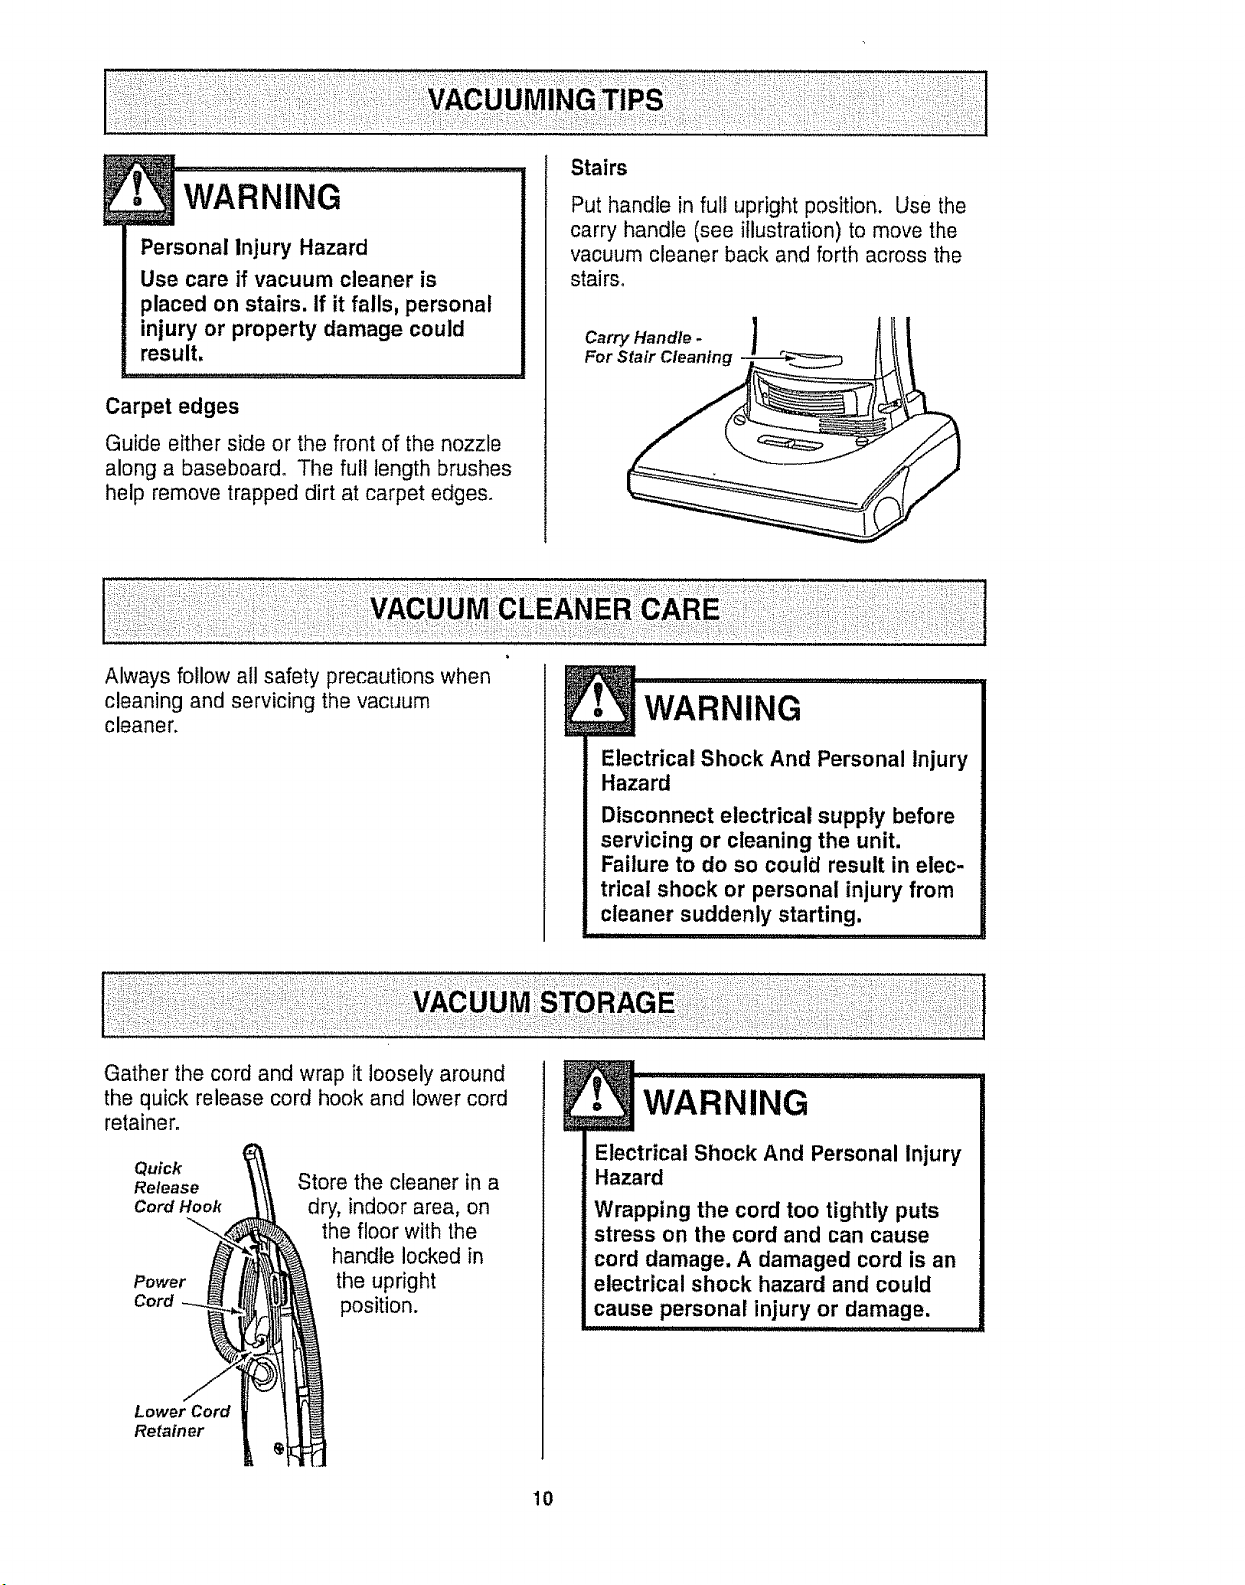
Put handle in full upright position. Use the
carry handle (see illustration) to move the
vacuum cleaner back and forth across the
stairs°
Carry Handle.
For Stair Cleaning
=!
Always follow all safety precautions when
cleaning and servicing the vacuum
cleaner.
! WARNi iG
Electrical Shock And Personal Injury
Hazard
Disconnect electrical supply before
servicing or cleaning the unit.
Failure to do so could result in elec-
trical shock or personal injury from
cleaner suddenly starting.
Gather the cord and wrap it loosely around
the quick release cord hook and lower cord
retainer.
Quick
Release
Cord Hook
Lower Cord
Retainer
Store the cleaner in a
dry, indoor area, on
the floor with the
handle locked in
the upright
position.
E• WARNING ......
Electrical Shock And Personal Injury
Hazard
Wrapping the cord too tightly puts
stress on the cord and can cause
cord damage, A damaged cord is an
electrical shock hazard and could
cause personal injury or damage.
10

UnplugcordfromwalloutleLDONOTdrip
wateroncleaner.
Cleanexteriorusingaclean,softcloththat
hasbeendippedinasolutionofmildliquid
detergent and water, then wrung dry. Wipe
dry after cleaning.
To reduce static electricity and dust build-
up, wipe outer surface of cleaner and
attachments.
Wash attachments in warm soapy water,
rinse and air dry. Do not clean in dish-
washer.
. cAuT,oNI
Do not use attachments if they
are wet. Attachments used m
dirty areas, such as under a
refrigerator, should not be used
on other surfaces until they are
washed. They can leave marks.
TO REMOVE DUST BAG
Dust
Cover
Pull outward on
the dust cover
grip, located
near the top of
the dust cover
and remove the
cover. Lay
cover aside_
Grasp the dust
bag collar and .r'_._
pull gently,
carefully remov-
ing the dust
bag°
Throw away the used dust bag,
Do not reuse,
Check the
dirt tube and
the motor
safety filter_
If either is
blocked,
check the
TROU-
BLESHOOT-
ING chart.
Dirt
Motor
Safety
c Au ioN....
NEVER REUSE A DUST BAG. Very
fine materials, such as carpet fresh-
ener, face powder, fine dust, plaster,
soot, etc. can clog the bag and
cause it to burst before it is full.
Change bag more often when vacu-
uming these materials.
11
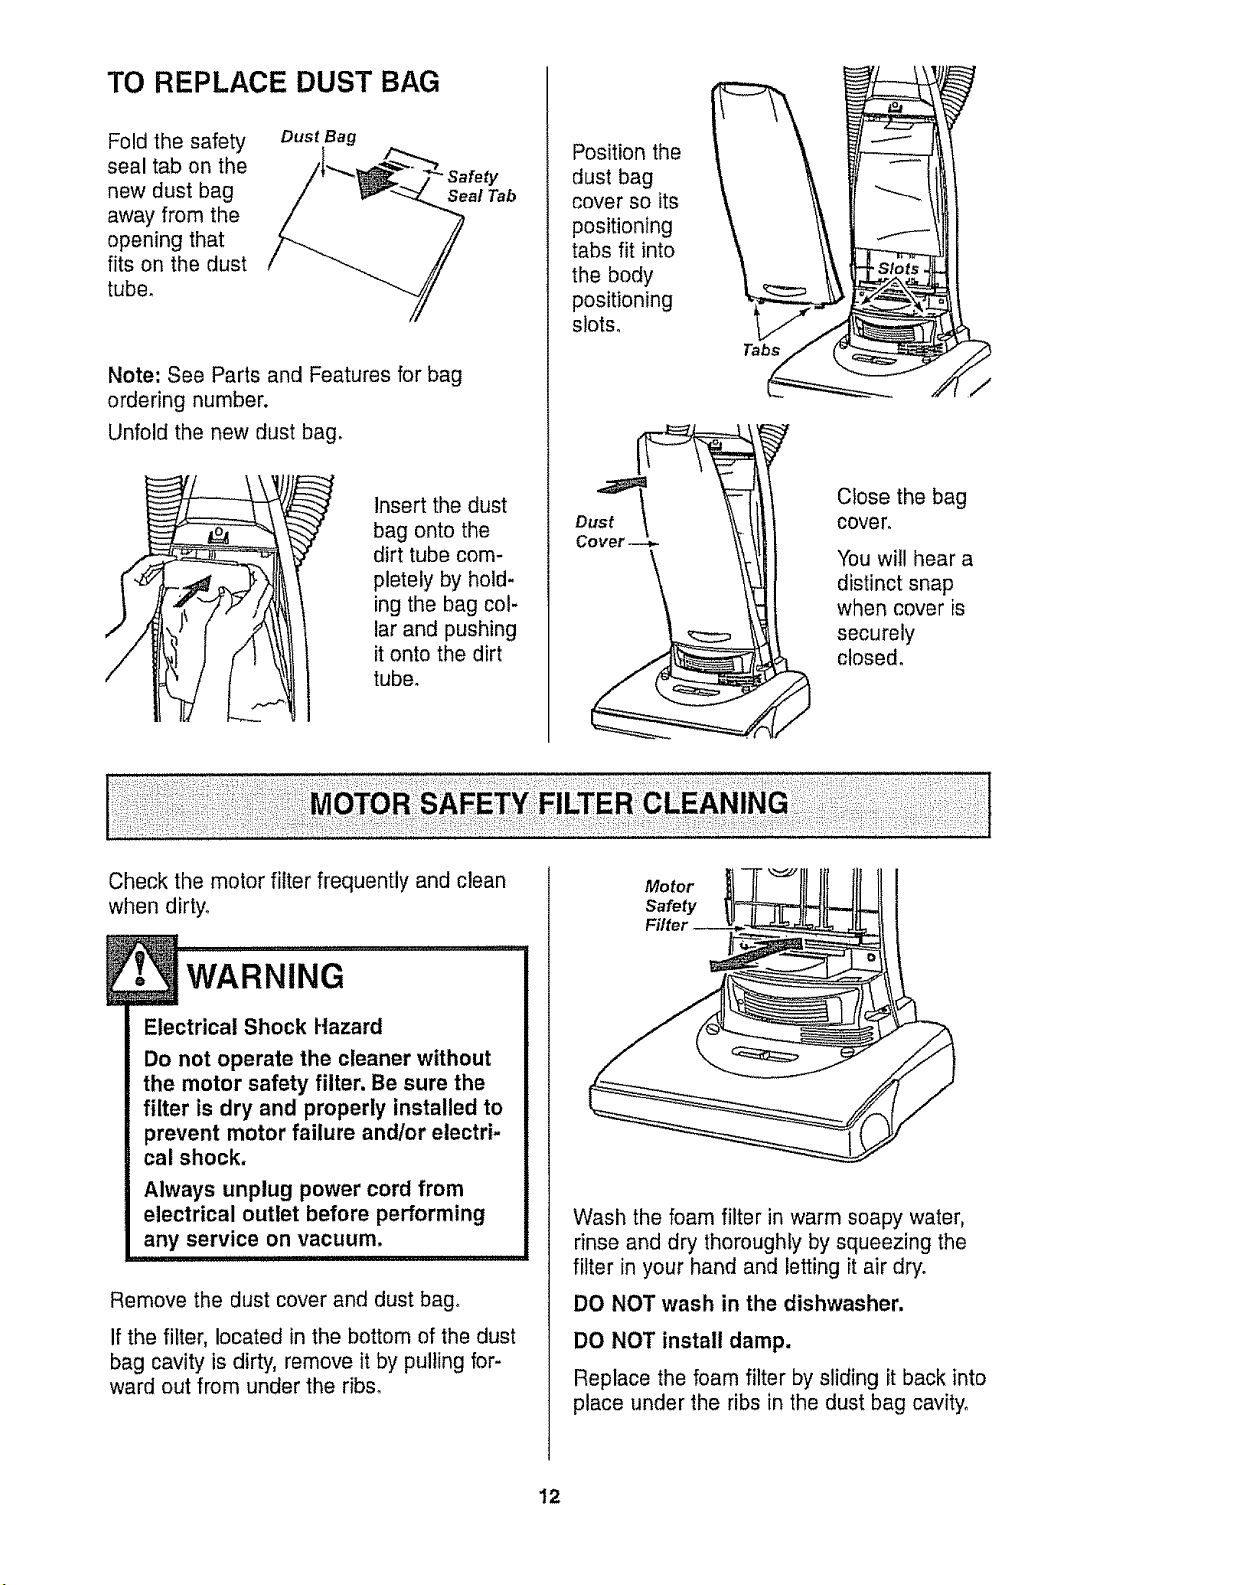
TO REPLACE DUST BAG
Fold the safety
seal tab on the
new dust bag
away from the
opening that
fits on the dust
tube.
Dust Bag
Seal Tab
Note: See Parts and Features for bag
ordering number.
Unfold the new dust bag,
Insert the dust
bag onto the
dirt tube com-
pletely by hold-
ing the bag col-
lar and pushing
it onto the dirt
tube.
Position the
dust bag
cover so its
positioning
tabs fit into
the body
positioning
slots,
Cover
Tabs
Close the bag
cover.
You will hear a
distinct snap
when cover is
securely
closed.
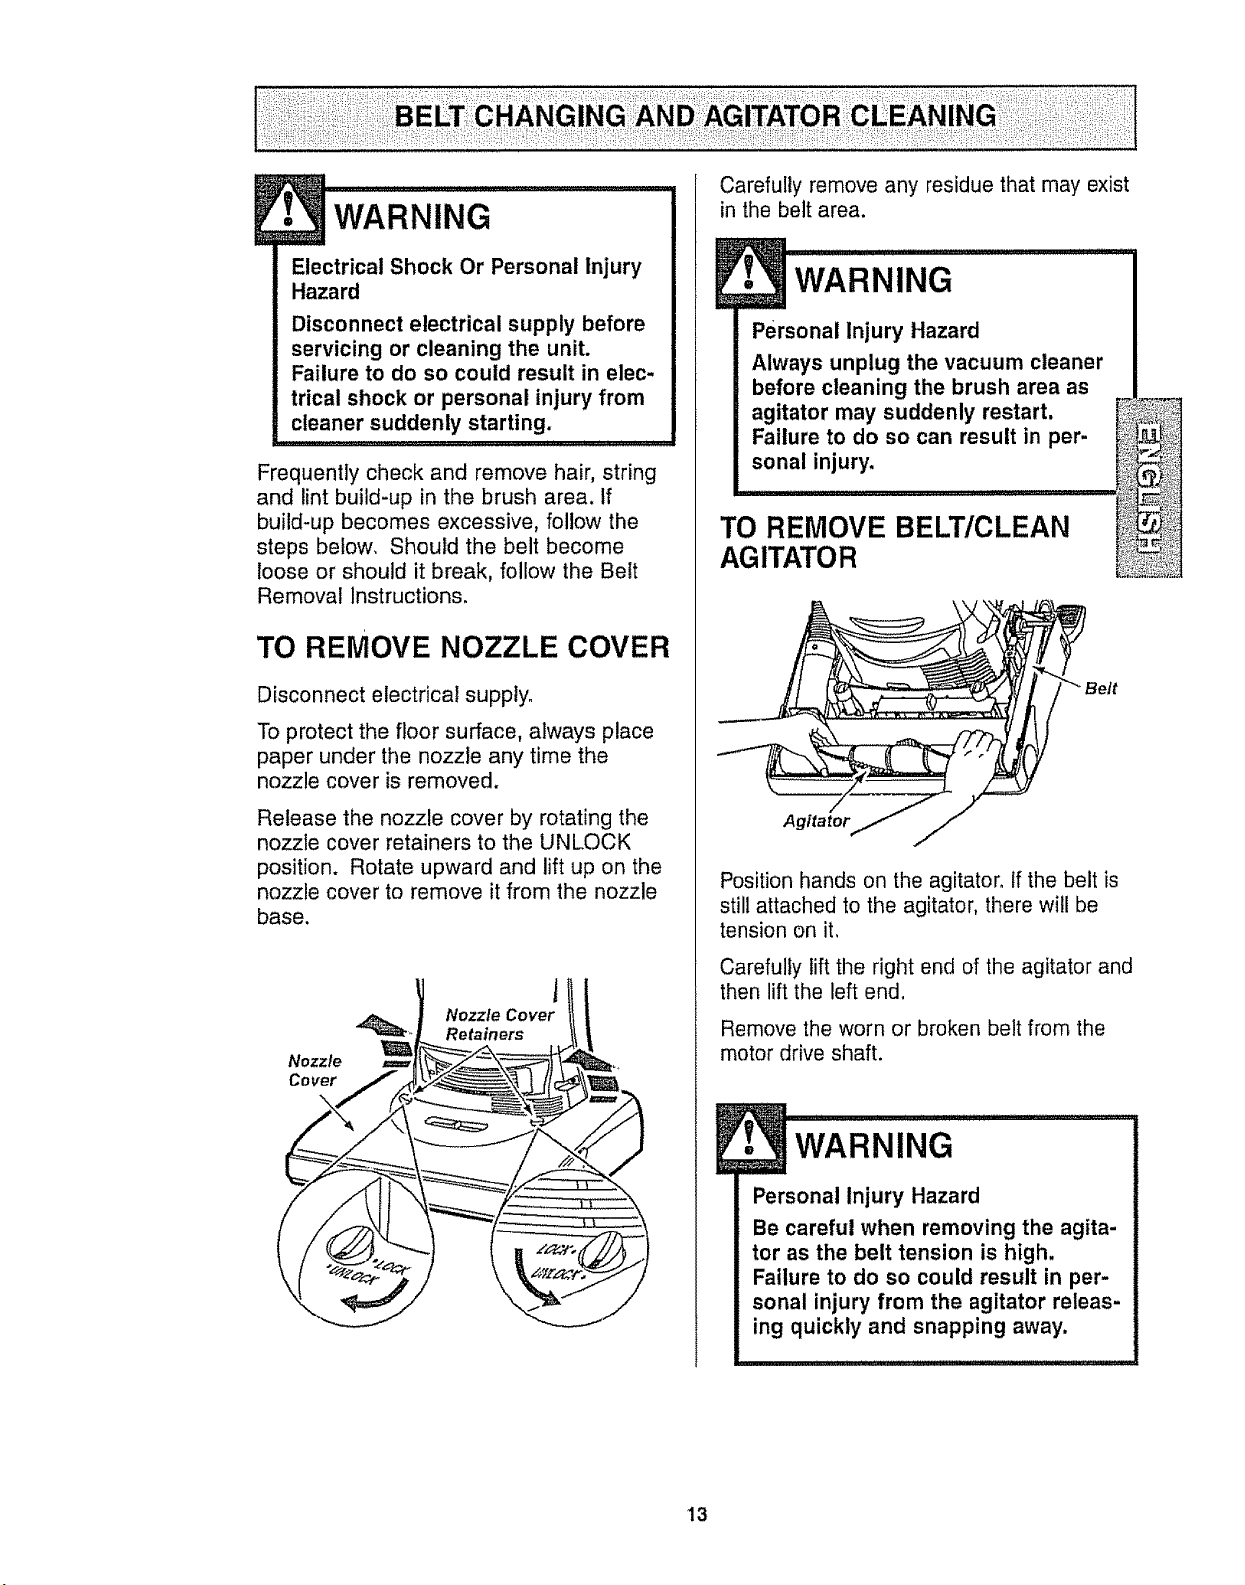
Check the motor filter frequently and clean
when dirty.
Electrical Shock Hazard
Do not operate the cleaner without
the motor safety filter. Be sure the
filter is dry and properly installed to
prevent motor failure andlor electri-
cal shock.
Always unplug power cord from
electrical outlet before performing
any service on vacuum,
Remove the dust cover and dust bag.
If the filter, located in the bottom of the dust
bag cavity is dirty, remove it by pulling for-
ward out from under the ribs°
Motor
Safety
Wash the foam filter in warm soapy water,
rinse and dry thoroughly by squeezing the
filter in your hand and letting it air dry.
DO NOT wash in the dishwasher,
DO NOT install damp.
Replace the foam filter by sliding it back into
place under the ribs in the dust bag cavity,
12
J WARNING
Electrical Shock Or Personal Injury
Hazard
Disconnect electrical supply before
servicing or cleaning the unit.
Failure to do so could result in elec-
trical shock or personal injury from
cleaner suddenly starting.
Frequently check and remove hair, string
and lint build-up in the brush area. tf
build-up becomes excessive, follow the
steps below, Should the belt become
loose or should it break, follow the Belt
Removal Instructions.
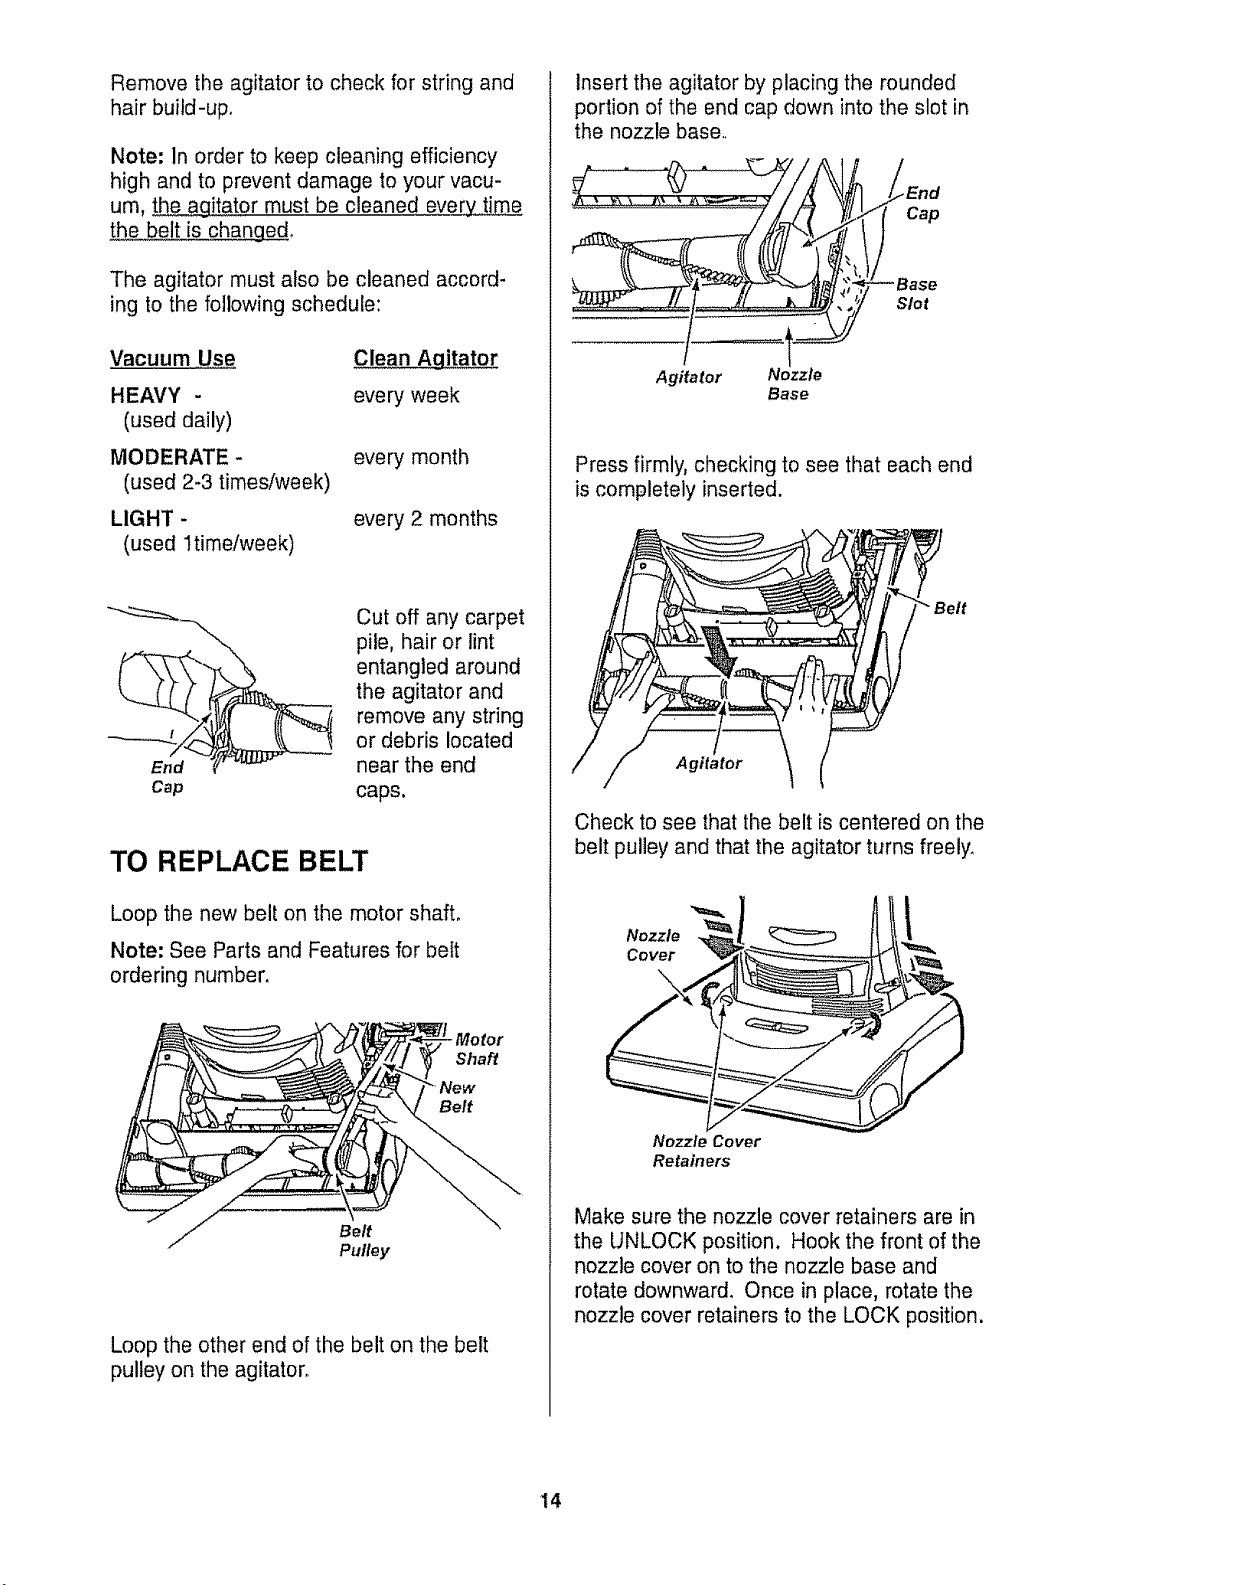
TO REMOVE NOZZLE COVER
Disconnect electrical supply.
To protect the floor surface, always place
paper under the nozzle any time the
nozzle cover is removed.
Release the nozzle cover by rotating the
nozzle cover retainers to the UNLOCK
position. Rotate upward and lift up on the
nozzle cover to remove it from the nozzle
base.
Nozzle
Cover
\
t
Nozzle Cover
Retainers
Carefully remove any residue that may exist
in the belt area.
• VARN NG ........
Personal Injury Hazard
Always unplug the vacuum cleaner
before cleaning the brush area as
agitator may suddenly restart.
Failure to do so can result in per-
sonal injury.
TO REMOVE BELT/CLEAN
AGITATOR
Agitator
Position hands on the agitator_ If the belt is
still attached to the agitator, there will be
tension on it,
Carefully lift the right end of the agitator and
then lift the left end,
Remove the worn or broken belt from the
motor drive shaft.
E• WARNING .............. !
Personal Injury Hazard
Be careful when removing the agita-
tor as the belt tension is high.
Failure to do so could result in per-
sonal injury from the agitator releas-
ing quickly and snapping away.
13
Remove the agitator to check for string and
hair build-upo
Note: In order to keep cleaning efficiency
high and to prevent damage to your vacu-
um, the agitator must be cleaned every time
the belt is changed.
The agitator must also be cleaned accord-
ing to the following schedule:
Vacuum Use
HEAVY -
(used daily)
MODERATE -
(used 2-3 times/week)
LIGHT -
(used 1time/week)
Clean Agitator
every week
every month
every 2 months
Cap
Cut off any carpet
pile, hair or lint
entangled around
the agitator and
remove any string
or debris located
near the end
caps.
TO REPLACE BELT
Loop the new belt on the motor shaft.
Note: See Parts and Features for belt
ordering number.
Shaft
" New
Belt
Belt
Pulley
Loop the other end of the belt on the belt
pulley on the agitator.
Insert the agitator by placing the rounded
portion of the end cap down into the slot in
the nozzle base.
Agitator
Base
Cap
Slot
Press firmly, checking to see that each end
is completely inserted.
Belt
Agitator
Check to see that the belt is centered on the
belt pulley and that the agitator turns freely.
Nozzle
Cover
X
Nozzle Cover
Retainers
Make sure the nozzle cover retainers are in
the UNLOCK position. Hook the front of the
nozzle cover on to the nozzle base and
rotate downward. Once in place, rotate the
nozzle cover retainers to the LOCK position.
14
!.I_ WARNING
Electrical Shock Or Personal Injury
Hazard
Disconnect electrical supply before
servicing or cleaning the unit. Failure
to do so could result in electrical
shock or personal injury from clean-
er suddenly starting.
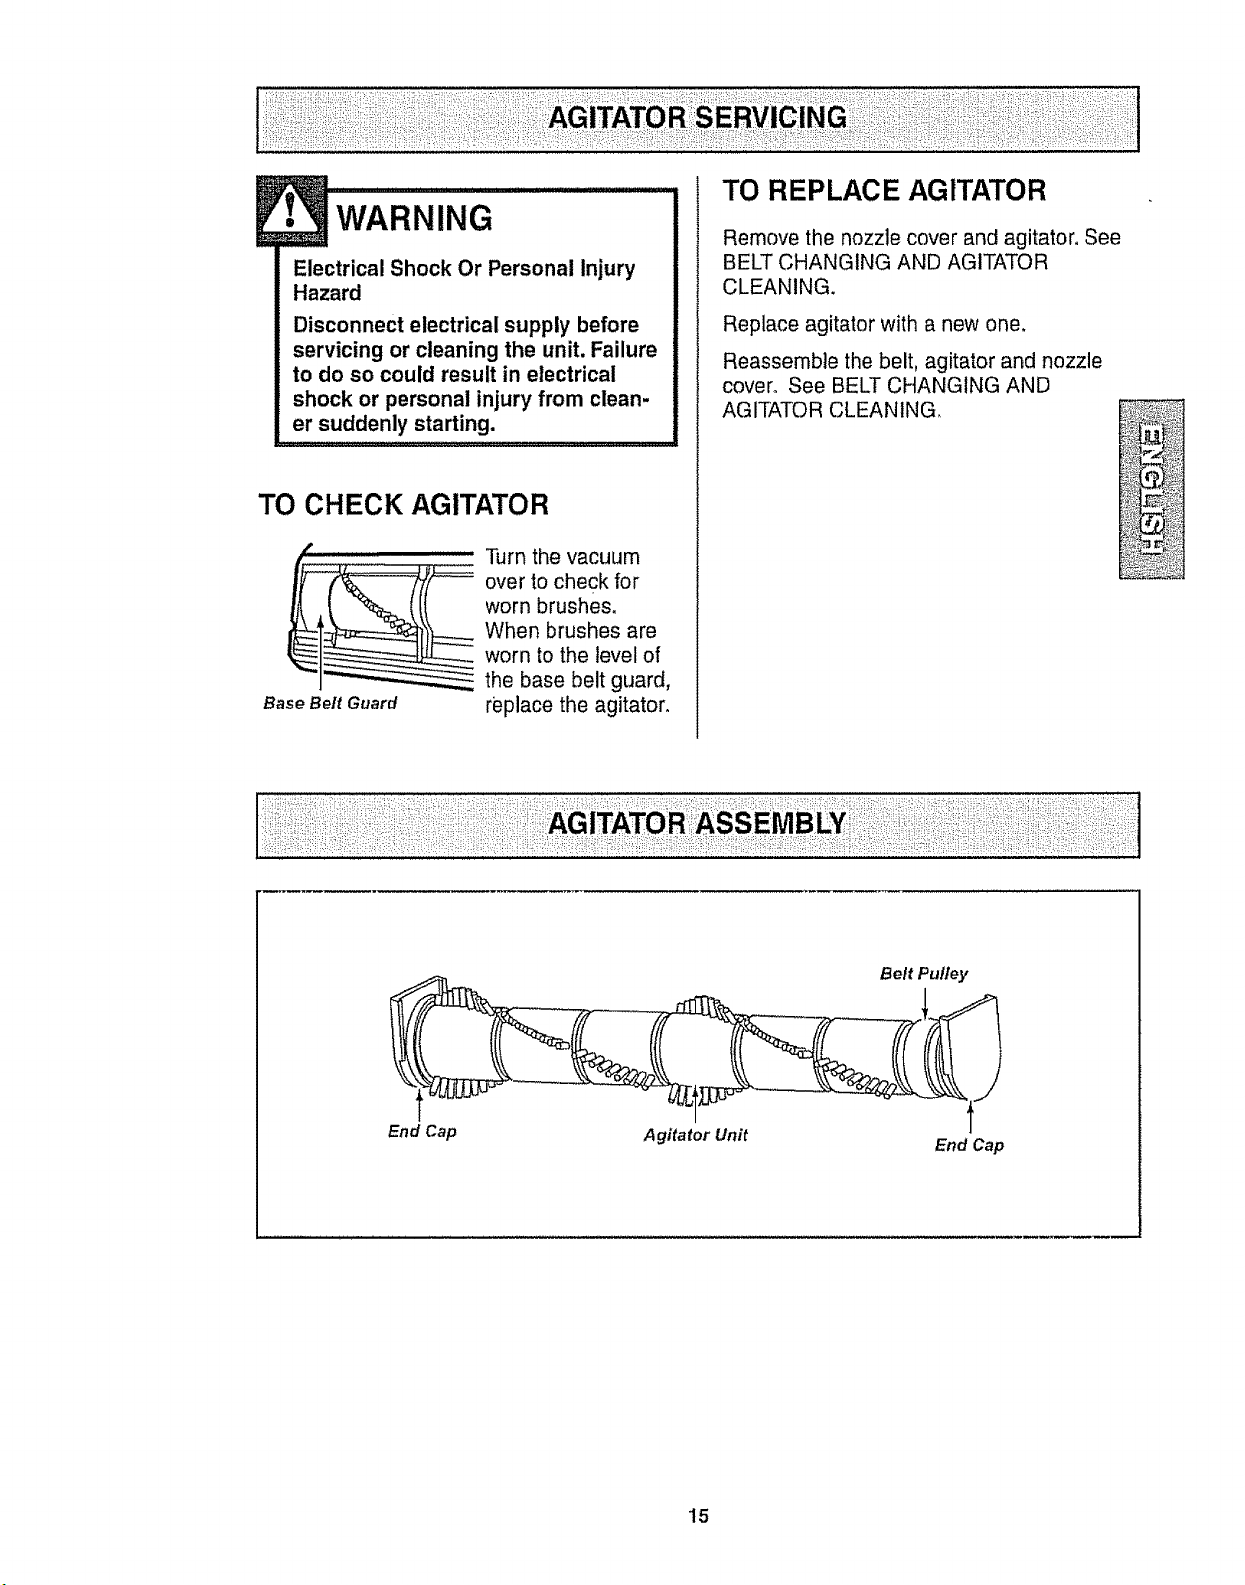
TO CHECK AGITATOR
I--
Base Belt Guard
Turn the vacuum
-- over to check for
worn brushes,
When brushes are
worn to the level of
the base belt guard,
replace the agitator.
TO REPLACE AGITATOR
Remove the nozzle cover and agitator, See
BELT CHANGING AND AGITATOR
CLEANING.
Replace agitator with a new one.
Reassemble the belt, agitator and nozzle
cover_ See BELT CHANGING AND
AGITATOR CLEANING.
Belt Pulley
End Cap
15
WA _ N'_ N G ....... r ...............
Electrical Shock Or Personal Injury
Hazard
Disconnect electrical supply before
servicing or cleaning the unit.
Failure to do so could result in elec-
trical shock or personal injury from
cleaner suddenly starting.
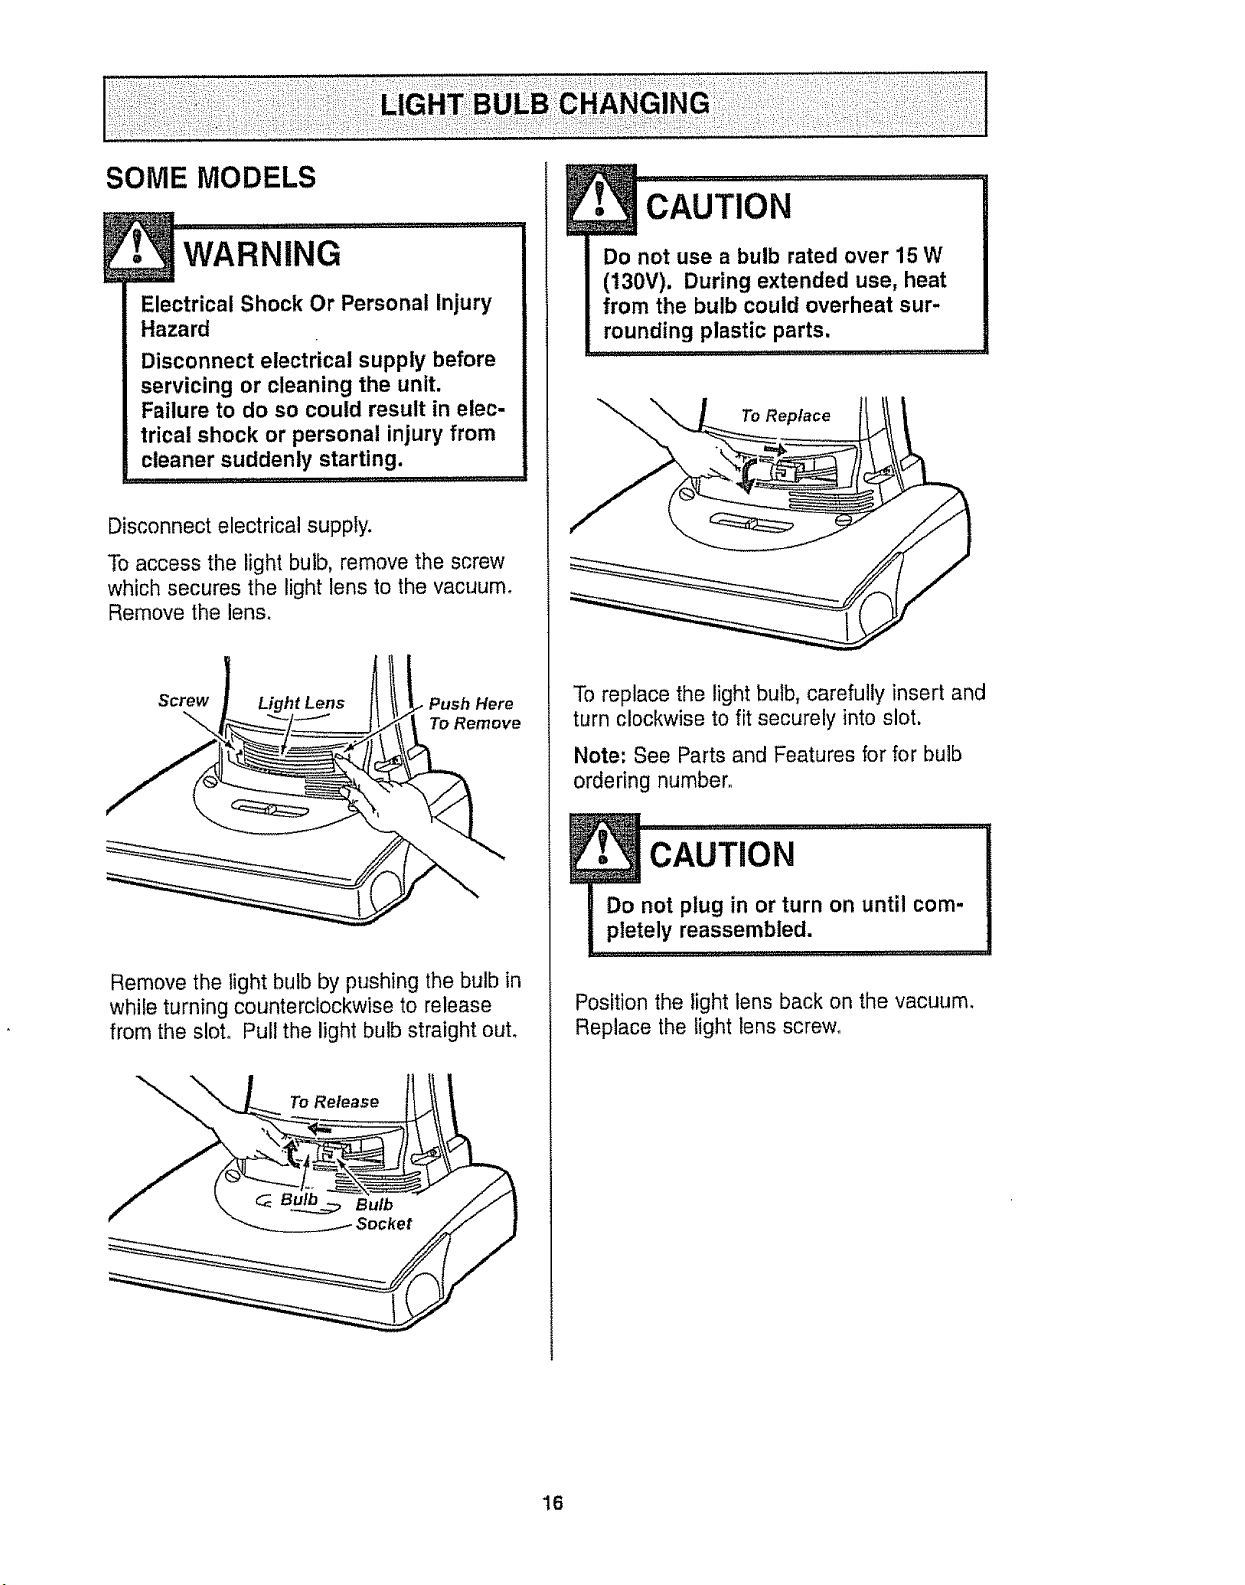
Disconnect electrical supply.
To access the light bulb, remove the screw
which secures the light lens to the vacuum.
Remove the lens.
Screw Light Lens Push Here
To Remove
Remove the light bulb by pushing the bulb in
whiEe turning counterclockwise to release
from the slot. Pull the light bulb straight ouL
To Release
• CAUTION ...........................
Do not use a bulb rated over 15 W
(130V). During extended use, heat
from the bulb could overheat sur-
rounding plastic parts.
To Replace
To replace the light bulb, carefully insert and
turn clockwise to fit securely into slot.
Note: See Parts and Features for for bulb
ordering number°
• cAu'TIoN ...................
Do not plug in or turn on until com-
pletely reassembled.
Position the light lens back on the vacuum.
Replace the light lens screw°
16
WARfaiNn .....
Electrical Shock Or Personal Injury
Hazard
Disconnect electrical supply before
servicing or cleaning the unit,
Failure to do so could result in elec-
trical shock or personal injury from
cleaner suddenly starting.
For best cleaning results, keep the airflow
passage clear.
Unplug the power cord from the outlet
If the cleaner does not seem to have ade-
quate suction, first check for a full bag or fil-
ter which is clogged. See DUST BAG
CHANGING, and MOTOR SAFETY FILTER
CLEANING.
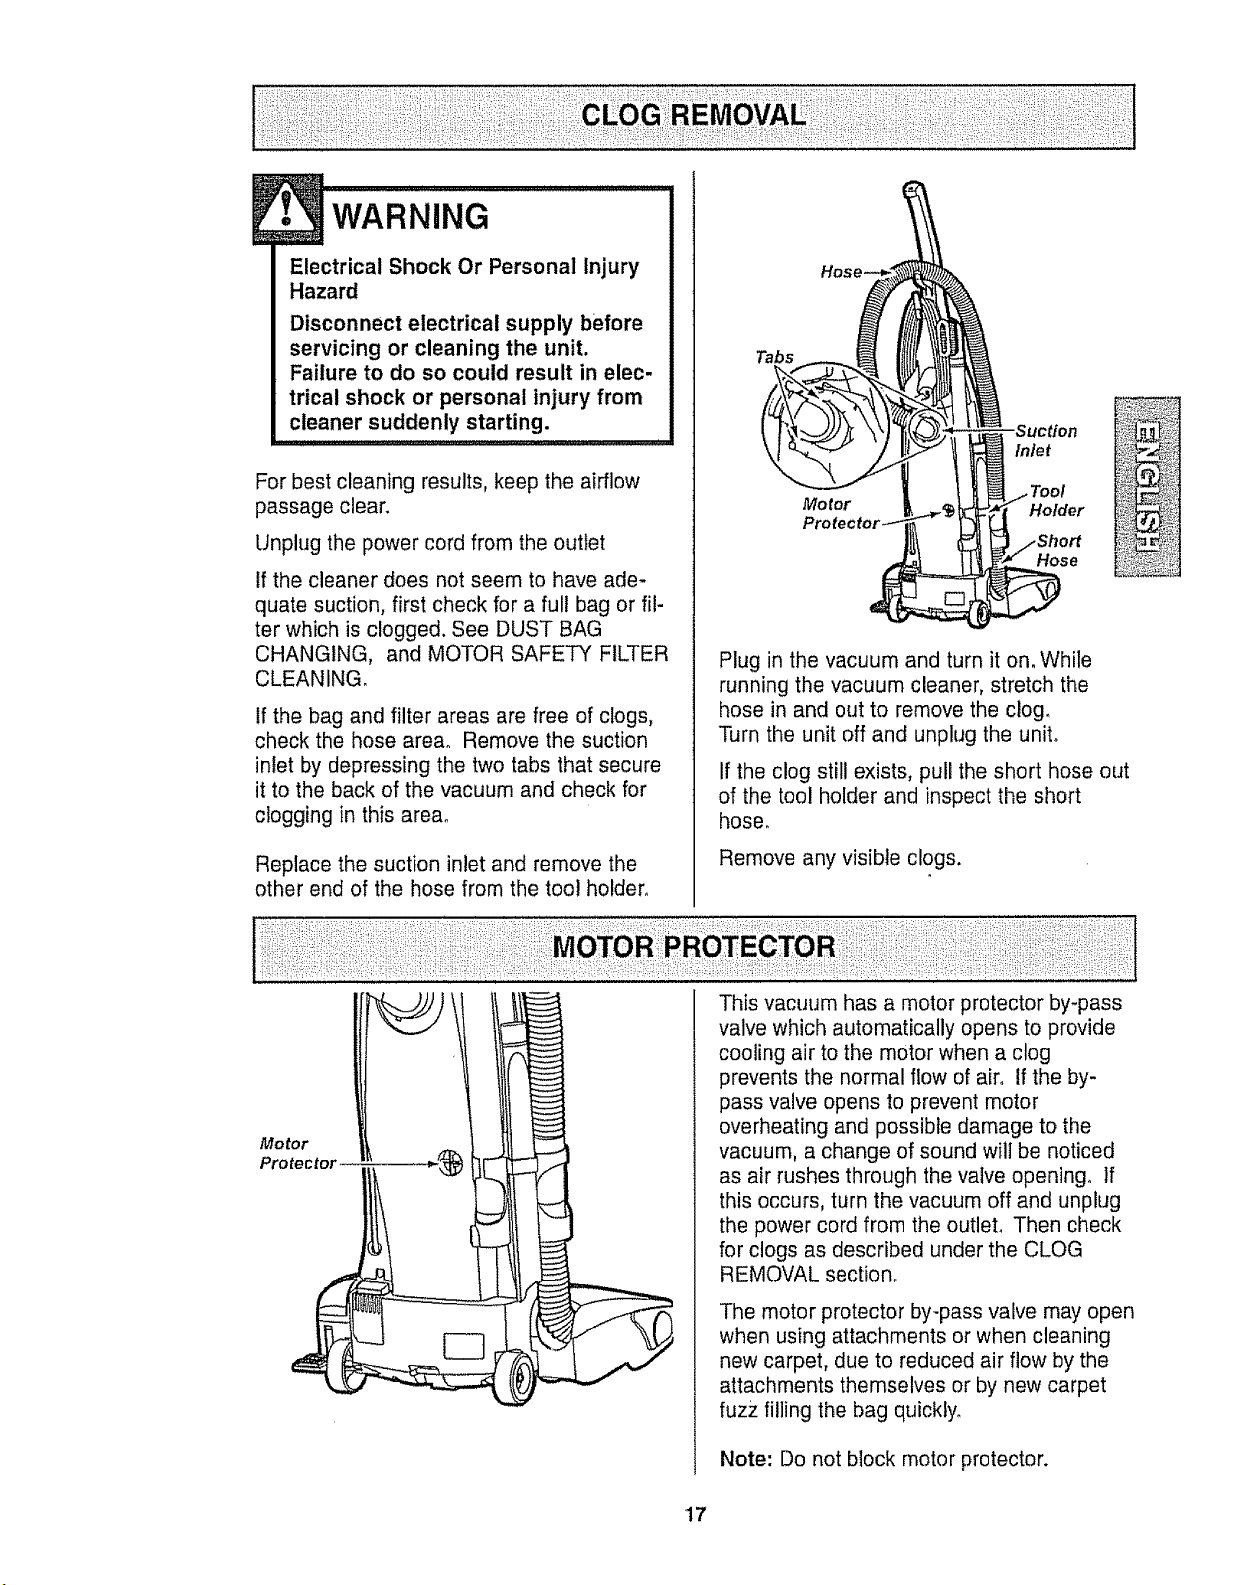
If the bag and filter areas are free of clogs,
check the hose area° Remove the suction
inlet by depressing the two tabs that secure
it to the back of the vacuum and check for
clogging in this area.
Replace the suction inlet and remove the
other end of the hose from the too! holder.
Tabs
Inlet
Holder
Hose
Plug in the vacuum and turn it on. While
running the vacuum cleaner, stretch the
hose in and out to remove the clog_
Turn the unit off and unplug the unit.
If the clog still exists, pull the short hose out
of the tool holder and inspect the short
hose_
Remove any visible clogs.
Motor
Protector ....! ., _ [
This vacuum has a motor protector by-pass
valve which automatically opens to provide
cooling air to the motor when a clog
prevents the normal flow of air. If the by-
pass valve opens to prevent motor
overheating and possible damage to the
vacuum, a change of sound will be noticed
as air rushes through the valve opening° If
this occurs, turn the vacuum off and unplug
the power cord from the outlet. Then check
for clogs as described under the CLOG
REMOVAL section_
The motor protector by-pass valve may open
when using attachments or when cleaning
new carpet, due to reduced air flow by the
attachments themselves or by new carpet
fuzz filling the bag quickty.
Note: Do not block motor protector.
17
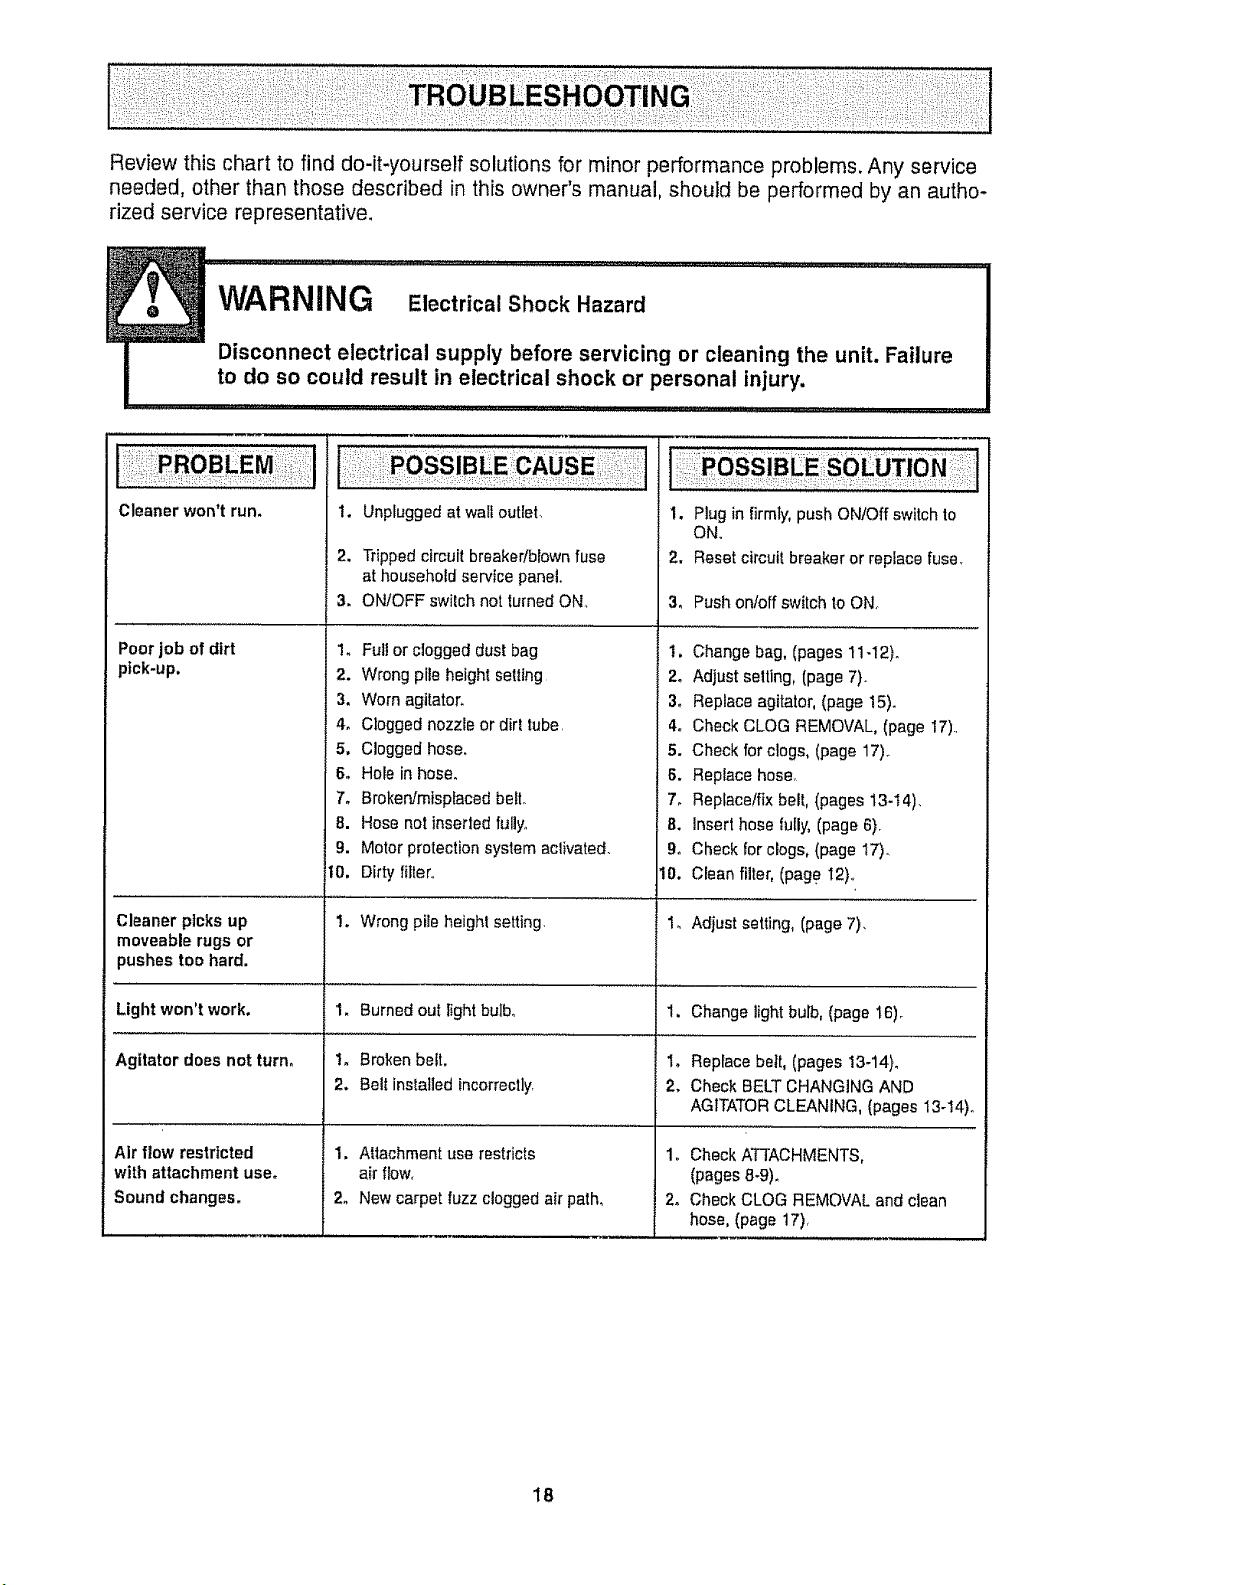
Review this chart to find do-it-yourself solutions for minor performance problems. Any service
needed, other than those described in this owner's manual, should be performed by an autho-
rized service representative.
Cleaner won't run. 1.
2.
3.
Poor job of dirt !.
pick-up. 2.
Cleaner picks up
moveable rugs or
pushes too hard.
Light won't work.
Agitator does not turn,
Air flow restricted
with attachment use,
Sound changes=
Unplugged at wall cutter.
Tripped circuit breaker/blown fuse
at household service pane[,
ON/OFF switch not turned ON.
Ful! or clogged dust bag
Wrong pile height setltng
3. Worn agitator.
4. Clogged nozzle or did tube,
5. Clogged hose.
6. Hole in hose_
7. Broken/mbpbced bell
8. Hose not inserled fully.,
9. Motor protection system aclivated.
10, Dirty filter.,
1. Wrongpile height setting.
1. Burned out light bulbo
1. Broken belt.
2. Belt installed incorrectly,
1. Attachment use restricts
air flow,
2. New carpet fuzz clogged air path,
1. Plug in firmly, push ON/Off switch to
ON,,
2. Reset circuit breaker or replace fuse.
3_ Pushonloff switch to ON_
1. Change bag, (pages 11-12}o
2_ Adjust setting, (page 7)-
3. Replace agitator, (page 15).
4o Check CLOG REMOVAL, (page 17).,
5. Check for clogs, (page 17)o
6. Replace hose,
7_ Replace/fix belt, (pages 13-I4).
8. Insert hose fully,(page 6).
9o Check for clogs,(page t7).
10, Crean filter, (page I2)o
!, Adiust setting, (page 7),
1.
1o
2,
Change light bulb, (page 16)_
Replace belt, (pagee 13-14).
Check BELT CHANGING AND
AGITATORCLEANING, (pages 13-14)o
1. Check ATTACHMENTS,
(pages8-9)o
2o Check CLOG REMOVAL and clean
hose, (page 17),
18
Antes de usar su aspiradora nueva ...... 1
Garantia de la aspiradora de Kenmore •.,, 1
Instrucciones importantes de
seguridad ............................ 2
Piezasy caracterfsticas ................ 3
Instruccionesde ensamblamiento ...... 4-5
Instrucciones de operacibn ............. 6
Ajuste y selecci6nde nivelde pe!ode la
allombra ................................... 6
Desprendimientodel mango .............. 7
fnterruptorde encendido!apagado ......... 7
Accesorios ................................ 7-8
Cuadro de usede los accesorios .......... 8
Sugerencias para aspirar ................ 9
Cuidado de la aspiradora .............. 9
Almacenamiento de la aspiradora ......... 9
Limpieza del exterior y de los accesorios .. o10
Cambio de la bolsa parapolvo ........ 10-11
Limpieza del filtro de seguridad del
motor .............................. 11
Cambio de la correa y limpiezadet
agilador ......................... 12-13
Cuidado detagitador ......................... 14
Ensamble del agitador ................. 14
Cambio de la bombilla ................. 15
C6mo eliminar los residues de basura
en losconductos ...................... 16
Protector de motor .................... 16
Reconocimtento de problemas ......... 17
lnformaci6n de servicio ..... CubiertaTrasera
Perfavor lea esta guia que le ayudara a assemblary operar su aspiradoranueva de Kenmore en una manera
m_s seguray effectiva.
Para mas informaci6nacerca del cuidado y operaci6nde esta aspirador, flamea su tienda Sears mas cercana,
Cuando prequnte per informaci6nusted necisitar_,el nt3merocompletede serie y modelo de la aspiradora que
est_ locado en taplaca de los n0meros de modelo y serieo
Use el espacio de abajo para registrarel ntJmerode modeto y serie parasu nuevaaspiradorade Kenmore.
Numero de Modelo
Nt]mero de Serie
Fechade Compra
Matenga estelibro y su reciboen u lugar seguropara referenciasfuturas_
GARANT[A LIMITADADEUN AhtODE LAASPIRADORA KENMORE
Esta garantia es per un are desde la fecha de compra, e incluye sotamenteetuse de laaspiradora en
hogares privados.Duranteel a#,ode garantfa,cuando la aspiradoraes operada y mantenidade acuerdo a]
manual de instrucciones del dueno,Searsreparar#,cualquier defectoen materialeso fabricaci6n libre de cargo_
Esta garantfa excluyelasbolsas de colecci6n, correas,lamparilfas,y filtros, lascuales son partes gastablesque
se deterioran conel use normal.
Para el servicio de garantia,retorne esta aspiradora al Centre de ServicioSears m_s cercanoen los
Estados Unities,
Esta garantiase aptica solamentemientraseste producto est,_enuseen los Eslados Unidos.Esta garantfa le
da a ustedderechos legalesespecificos, y usted puede tenet tambi_n otros derechos los cualesvarian de
estado a estado_
Sears, Roebuck and Co., D1817WA, HoffmanEstates,IL 60179
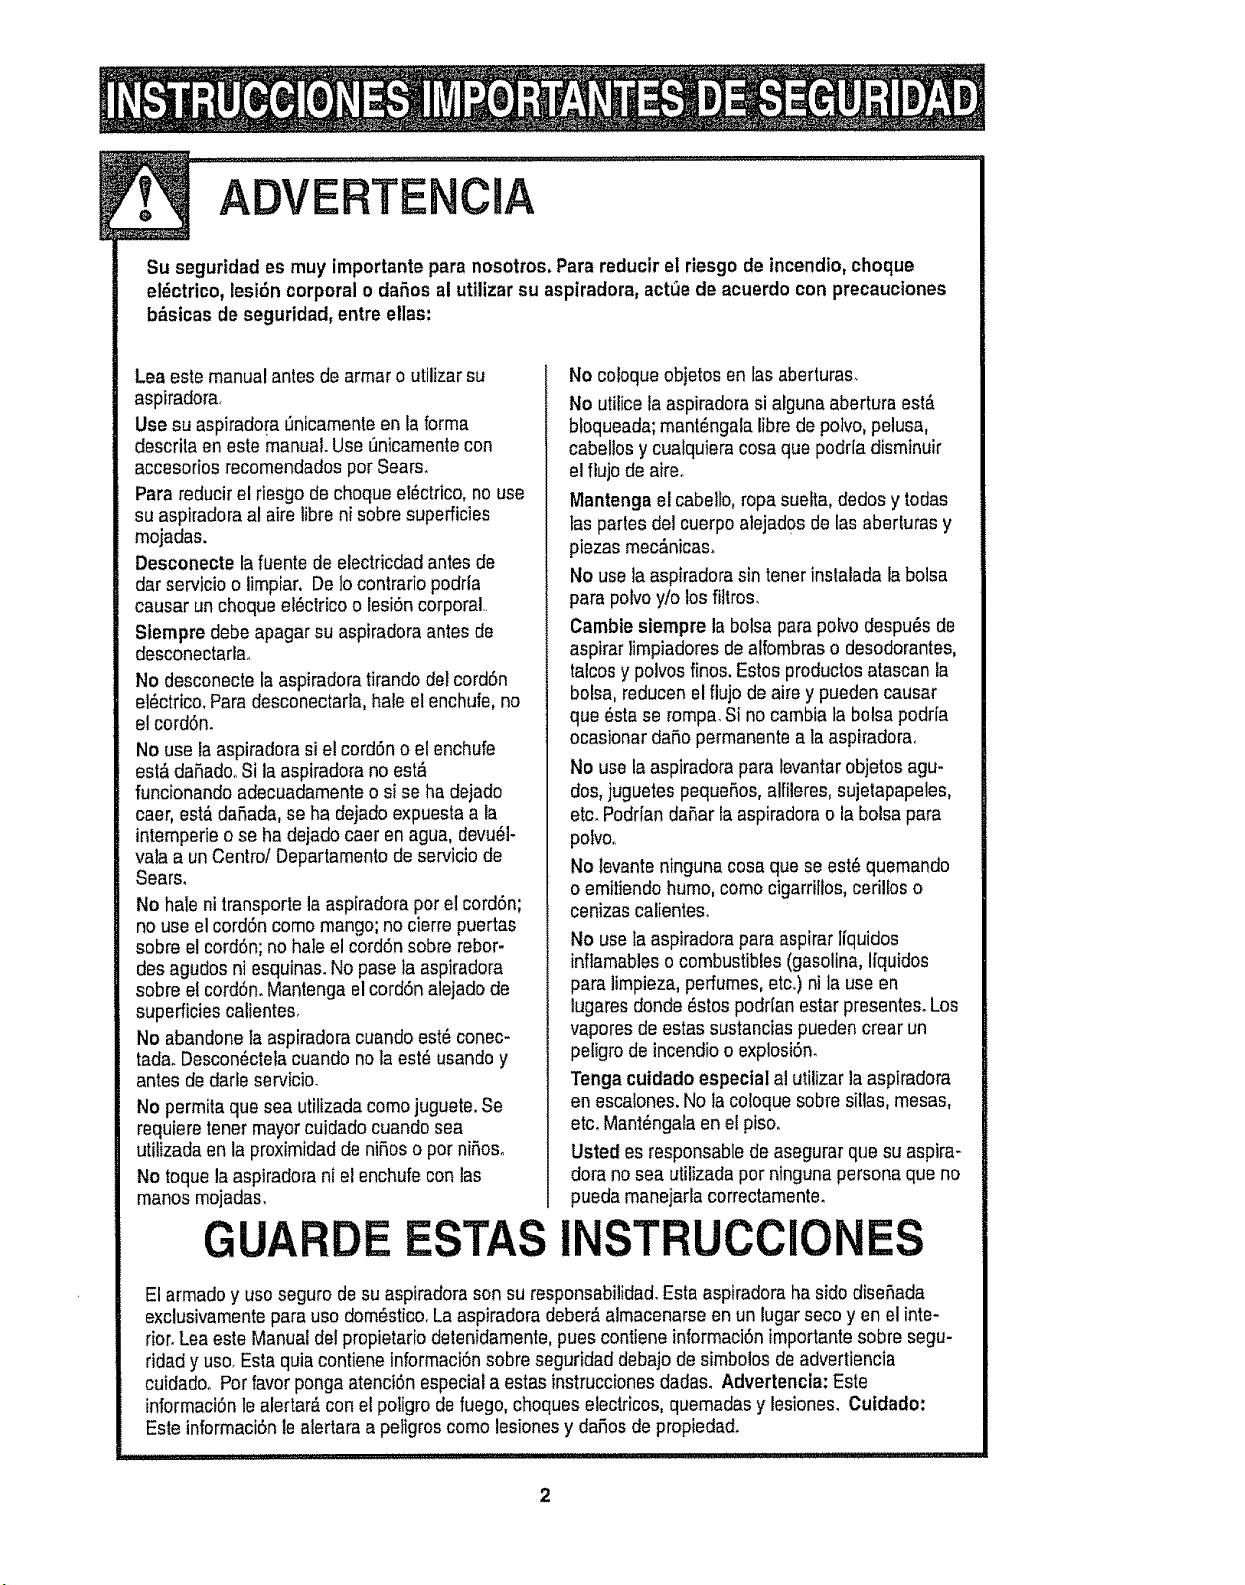
ADVERTENCIA
Su seguridad es muy importante para nosotros, Para reducir el riesgo de incendio, choque
el_ctrico, lesi6n corporal o dafos al utilizar su aspiradora, actSe de acuerdo con precauctones
b_sicas de seguridad, entre elias:
Lea este manual antesde armar o utilizar su
aspiradora<
Use su aspiradora0nicamenteen laforma
descrita en este manual. Use 0nicamentecon
accesorios recomendadospot Sears.
Para reducirel riesgode choqueet_ctrico,no use
su aspiradoraal aire libre ni sobre superficies
mojadas.
Desconecte la fuente de electricdadantes de
dar servicioo limpiar, De1ocontrario podria
causar unchoque et_ctricoo lesi6n corporal..
Slempre debe apagar su aspiradoraantes de
desconectarla,.
No desconecte la aspiradoratirandodel cord6n
el_ctrico. Para desconectada,hale el enchufe,no
el cord6n.
No use la aspiradorasi el cord6no el enchufe
est& daSadooSi la aspiradorano est_
funcionando adecuadamenteo si se ha dejado
caer, est_daSada,se ha dejado expuestaa la
intemperie o se ha dejado caer en agua, devu_l-
vala a un Centro! Departamentode servicio de
Sears,
No hale ni transportela aspiradorapor el cord6n;
no use el cord6n como mango;no cierre puertas
sobre e! cord6n;no hale el cord6nsobre rebor-
desagudos ni esquinas.No paseta aspiradora
sobre el cord6n.Mantenga elcord6n alejado de
superficies calientes.
No abandone la aspiradoracuando est_ conec-
tada. Descon_ctelacuando no la est_ usandoy
antes de darle servicio.
No permita que sea utilizadacomojuguete. Se
requiere tenet mayorcuidadocuando sea
utilizada en la proximidadde niSoso por niSoso
No toque la aspiradorani elenchufe conlas
manos mojadas.
GUARDE
No coloqueobjetos en las aberturas.
No utilice laaspiradora sialguna abertura est_
btoqueada;mant_ngalalibre de potvo,pelusa,
cabellos y cualquieracosa que podr[a disminuir
el flujo de aireo
Mantenga e!cabello, ropa suefta,dedos y todas
tas parles del cuerpoalejados de las aberturas y
piezas mec_nicas_
No usela aspiradorasin tener inslalada b bolsa
para polvoy/o losfiltros_
Gamblesiempre la bolsapara pobo despu6sde
aspirar Iimpiadoresdealfombraso desodorantes,
talcosy polvosfinos. Estosproductosatascan la
bolsa, reducenelflujo de aire y pueden causar
que _sta se rompa.Si no cambia tabolsapodrfa
ocasionar daSo permanentea la aspiradora,
No use laaspiradora para levantarobjetos agu-
dos,juguetes pequeSos,alfileres,sujetapapeles,
etc.Poddan daSarla aspiradorao la bolsapara
pobo°
No levanteningunacosaque seest_quemando
o emitiendo humo, como cigarrillos,cerillos o
cenizascalientes,
No use la aspiradorapara aspirar lfquidos
inflamableso combustibles(gasolina, i[quidos
para limpieza,perfumes, etc.)ni la use en
lugaresdonde _stos podr[anestar presentesoLos
vaporesde estassustanciaspueden crear un
pe{igrode incendioo explosi6n_
Tenga cuidadoespecial al utilizar la aspiradora
en escalones. Nola cotoque sobresillas, mesas,
etc.Mant_ngala en el piso,
Usted es responsablede asegurar que su aspira-
dora no sea utilizada por ninguna personaque no
pueda manejarlacorrectamente°
INSTRUCClONES
El armadoy usoseguro de su aspiradorason su responsabilidad.Esta aspiradoraha sido diseRada
exclusivamentepara uso dom_stico.La aspiradoradeber&almacenarseen un bgar secoyen el inte-
rior.Lea este Manualdel propietariodetenidarnente,pues contiene informaci6nimportantesobre segu-
ridad yuso. Esta quia contiene informaci6nsobre seguridad debajode simbolosde advertiencia
cuidadooPor favorponga atenci6n especiala estasinstruccionesdadas. Advertencta: Este
informaci6nlealertar_ con el poligro de fuego, choques electricos,quemadas y lesiones. Cutdado:
Este informaci6nie alertaraa petigroscomo lesionesy daSosde propiedad.
2
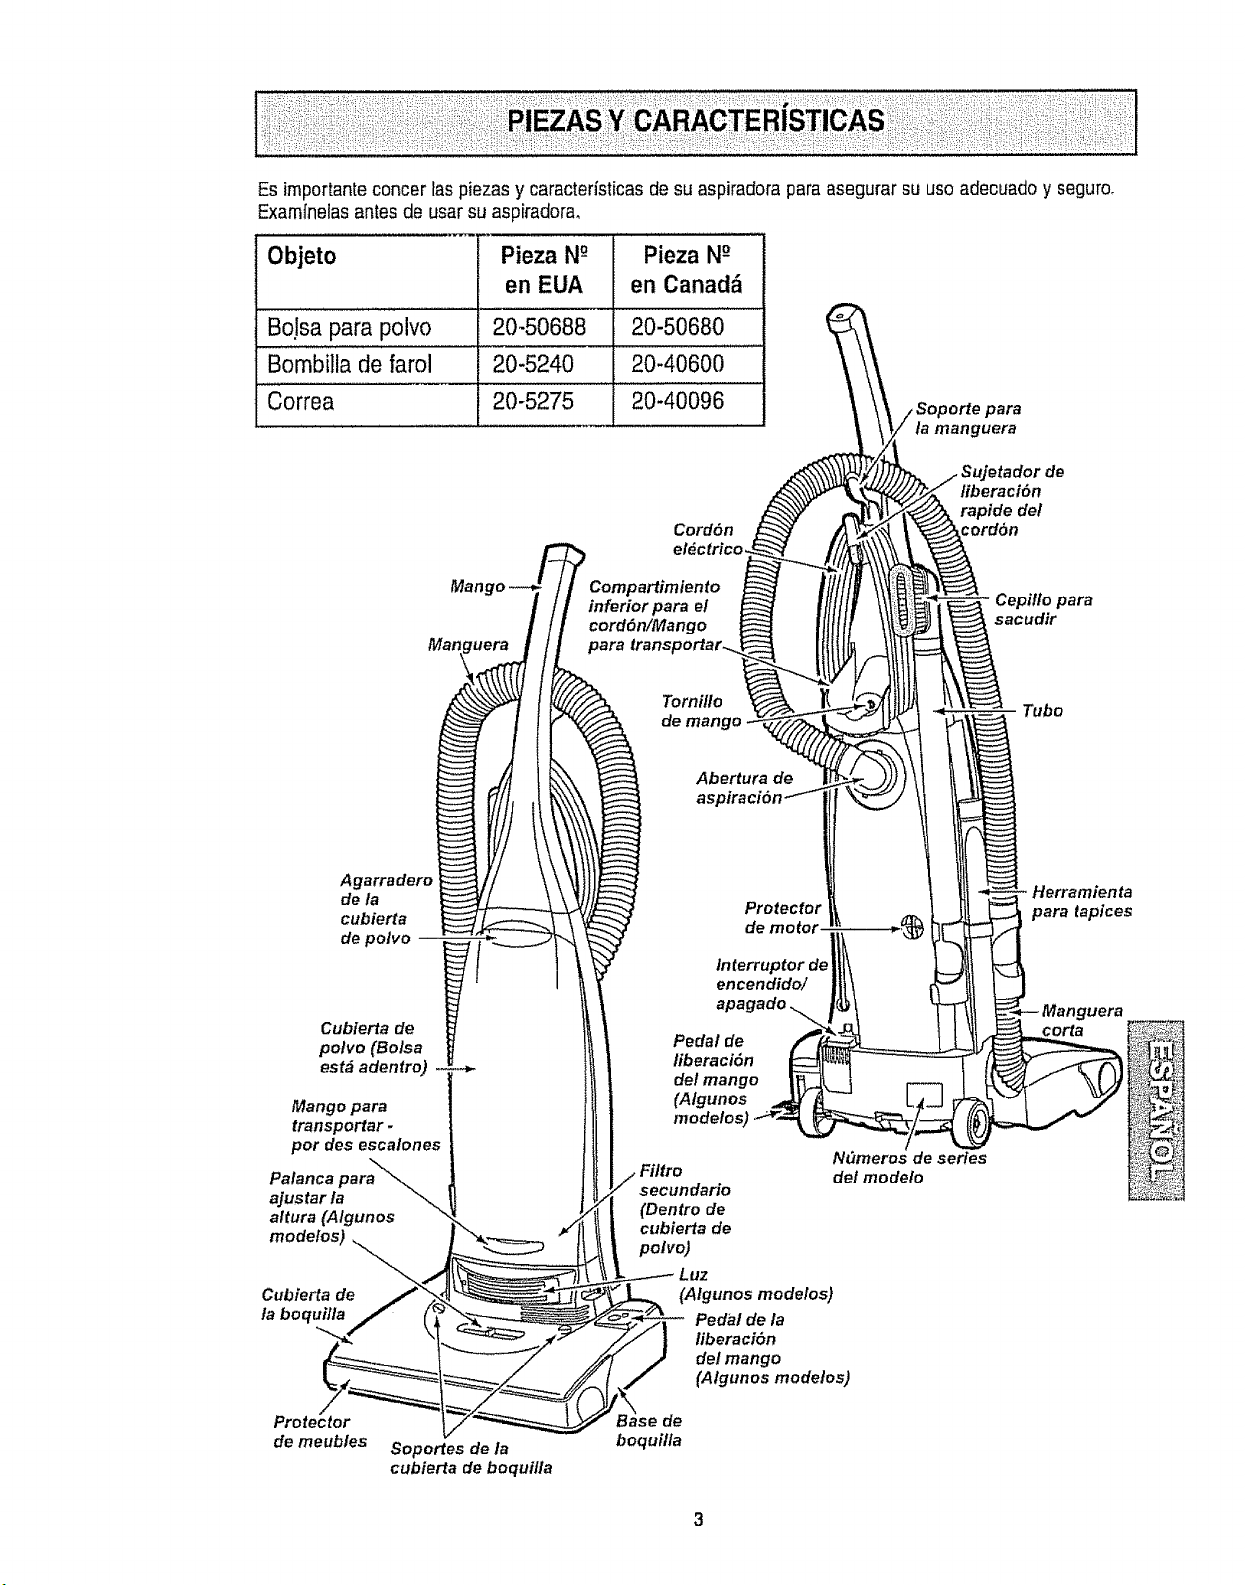
Esimportante concerfas piezasy caracteristicas desu aspiradora paraasegurarsu uso adecuado y seguro,
Examfnerasantes de usar suaspiradora,
Objeto Pieza N°- Pieza No-
en EUA en Canad_
Bolsa para polvo 20-50688 20-50680
Bombilla de farol 20-5240 20-40600
Correa 20-5275 20-40096
Cord6n
_orte para
la manguera
odor de
liberaci6n
cordbn
Compartimiento
inferior para el
cord6n/Mango
para
Cepitlo para
sacudir
Torni!lo
de mango
_Tubo
Abertura de
Agarradero
de la
cubierta
de polvo
Cubierta de
polvo (Bolsa
est_ adentro)
Mango para
transportar.
por des escatones
Palanca para
ajustar la
altura (Algunos
modelos) _
Cubierta de
la boquilla
Protector
de meubles Soportes de la
cubierta de boquilla
Protector
de motor
Interruptor de
encendido/
apagado _,_
Pedal de
liberaciSn
del mango
(A[gunos
modelos)
•Filtro
secundario
(Dentro de
cubierta de
polvo)
(Algunos modelos)
Pedal de la
fiberaci6n
del mango
(Algunos modelos)
de
boquilla
N_meros de series
del modelo
ienta
para tapices
coma
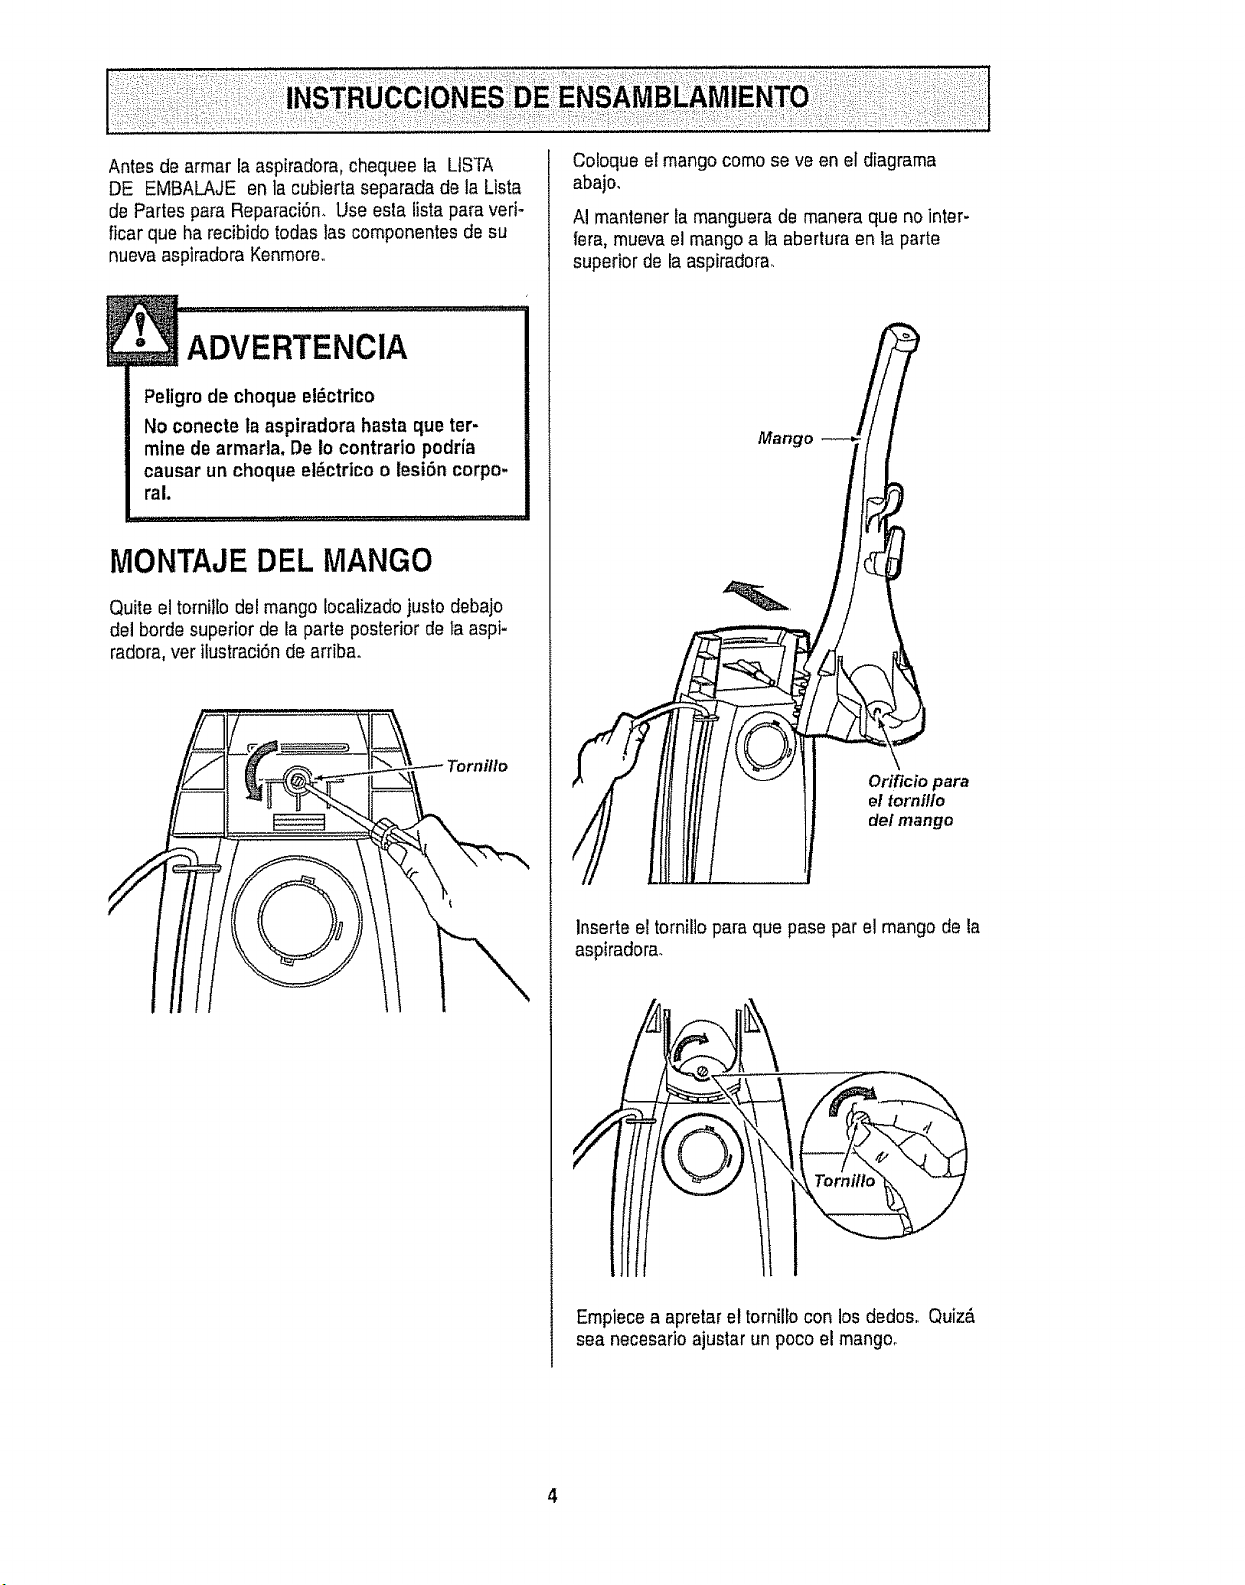
Antes de armar la aspiradora, chequee la LtSTA
DE EMBALAjE en la cubierta separadade la Lista
de Partes para ReparaciSn. Use esla lista para veri-
fbar que ha recibido todas lascomponentes de su
nuevaaspiradora Kenmore,,
ADVERTENOiA
Peligrode choque el_ctrico
No conecte la aspiradora hasta que ter-
mine de armada, De !ocontrario podria
causar un choque el_ctrico o lesi6n corpo-
ral.
MONTAJE DEL MANGO
Quite eltornillodel mango Iocalizadojusto debajo
del borde superiorde la parte posterior de la aspi-
radora,ver ilustraciSnde arribao
Coloque el mangocome se ve en el diagrama
abajo,
AI mantener la manguerade maneraque no inter-
iera, mueva el mangoa la abertura en laparte
superior de la aspiradora.
Mango
Orificio para
el tornilfo
del mango
Inserteel tornillopara que pase par el mango de la
aspiradora.
Empiecea apretar eltornillo con losdedos. Quiz_
sea necesarioajustar un poco el mango,
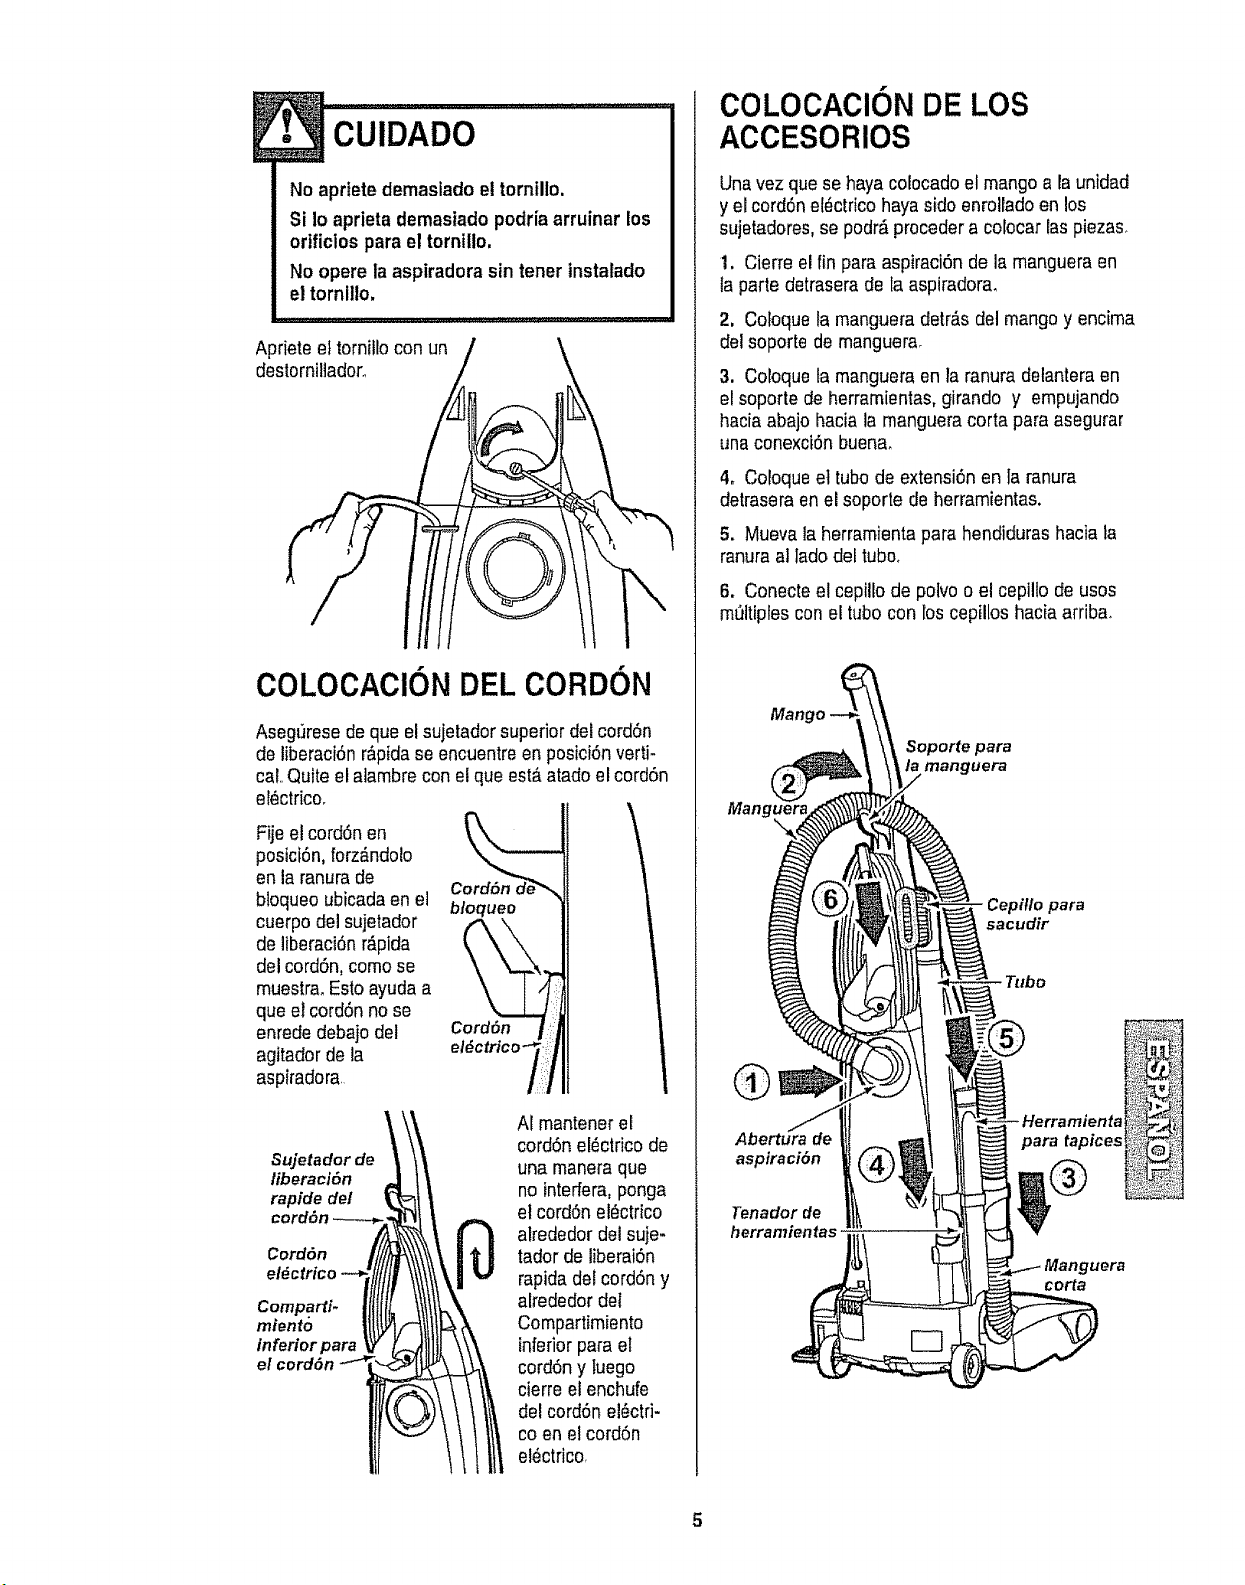
! cuiDADO ...........
No apriete demaslado eltornillo,
Si !oaprieta demasiado podriaarruinar los
orificios para el tornillo.
No opere la aspiradora sin tener tnstalado
el tornitto,
L
Apriete el tornillocon un I \t
destornillador_
COLOCACION DEL CORDON
Asegt]rese do que elsujetador superiordel cordon
de IiberaciOnr&pidase encuentreen posiciOnverti-
cal..Quite el alambrecon el que est,. atadoel cordon
el_ctrico_
Fijeel cordonon
posiciOn,forz#,ndolo
en la ranurade
bloqueo ubicadaen el
cuerpodel sujetador
de liberaciOnr_pida
del cordon, como so
muestra.Esto ayudaa
que el cordon no se
enrededebajo del
agitadorde la
aspiradora
Sujetadorde
liberaci6n
rapide det
co_
Cord6n
Comparti.
miento
inferior para
el cordon
AI mantener el
cordon el_ctricode
una maneraque
no interfera,ponga
et cordon el_ctrico
alrededor del suje-
tador de liberaiOn
rapida del cordon y
alrededor det
Compartimiento
inferiorpara et
cordon y luego
cierre el enchufe
del cordon el0ctri-
coen el cord6n
el_ctrico,
COLOCACl6N DE LOS
ACCESORIOS
Unavez que sehaya colocadoel mango ala unidad
y elcordonetL,ctrico hayasido enrollado en los
sujetadores,se podr,_proceder a colocar las piezas,
1, Cierre el fin pare aspiraciOnde la mangueraen
la parte detrasera de la aspiradora.
2, Coloque la mangueradetr_s del mangoy encima
delsoporte de manguera.
3. Coloque la manguera en la ranura delanteraen
el soporte de herramientas,girando y empujando
haciaabajo hacia la mangueracorta pareasegurar
unaconexciOnbuena.
4. Coloqueet tubo de extension en la ranura
detraseraen el soporte de herramientas.
5. Mueva la herrarnientapare hendiduras hacia ta
ranuraal lado del tube,
6, Conecteel cepillo de polvo o elcepilto de usos
mt_ltiptescon el tubo con los cepillos haciaarriba.
Mango
Soporte pare
manguera
Cepiflo para
sacudir
aspiraciOn
Tenador de
herramientas
,uera
corta
Sujetadorde
liberaci6n
cord6n
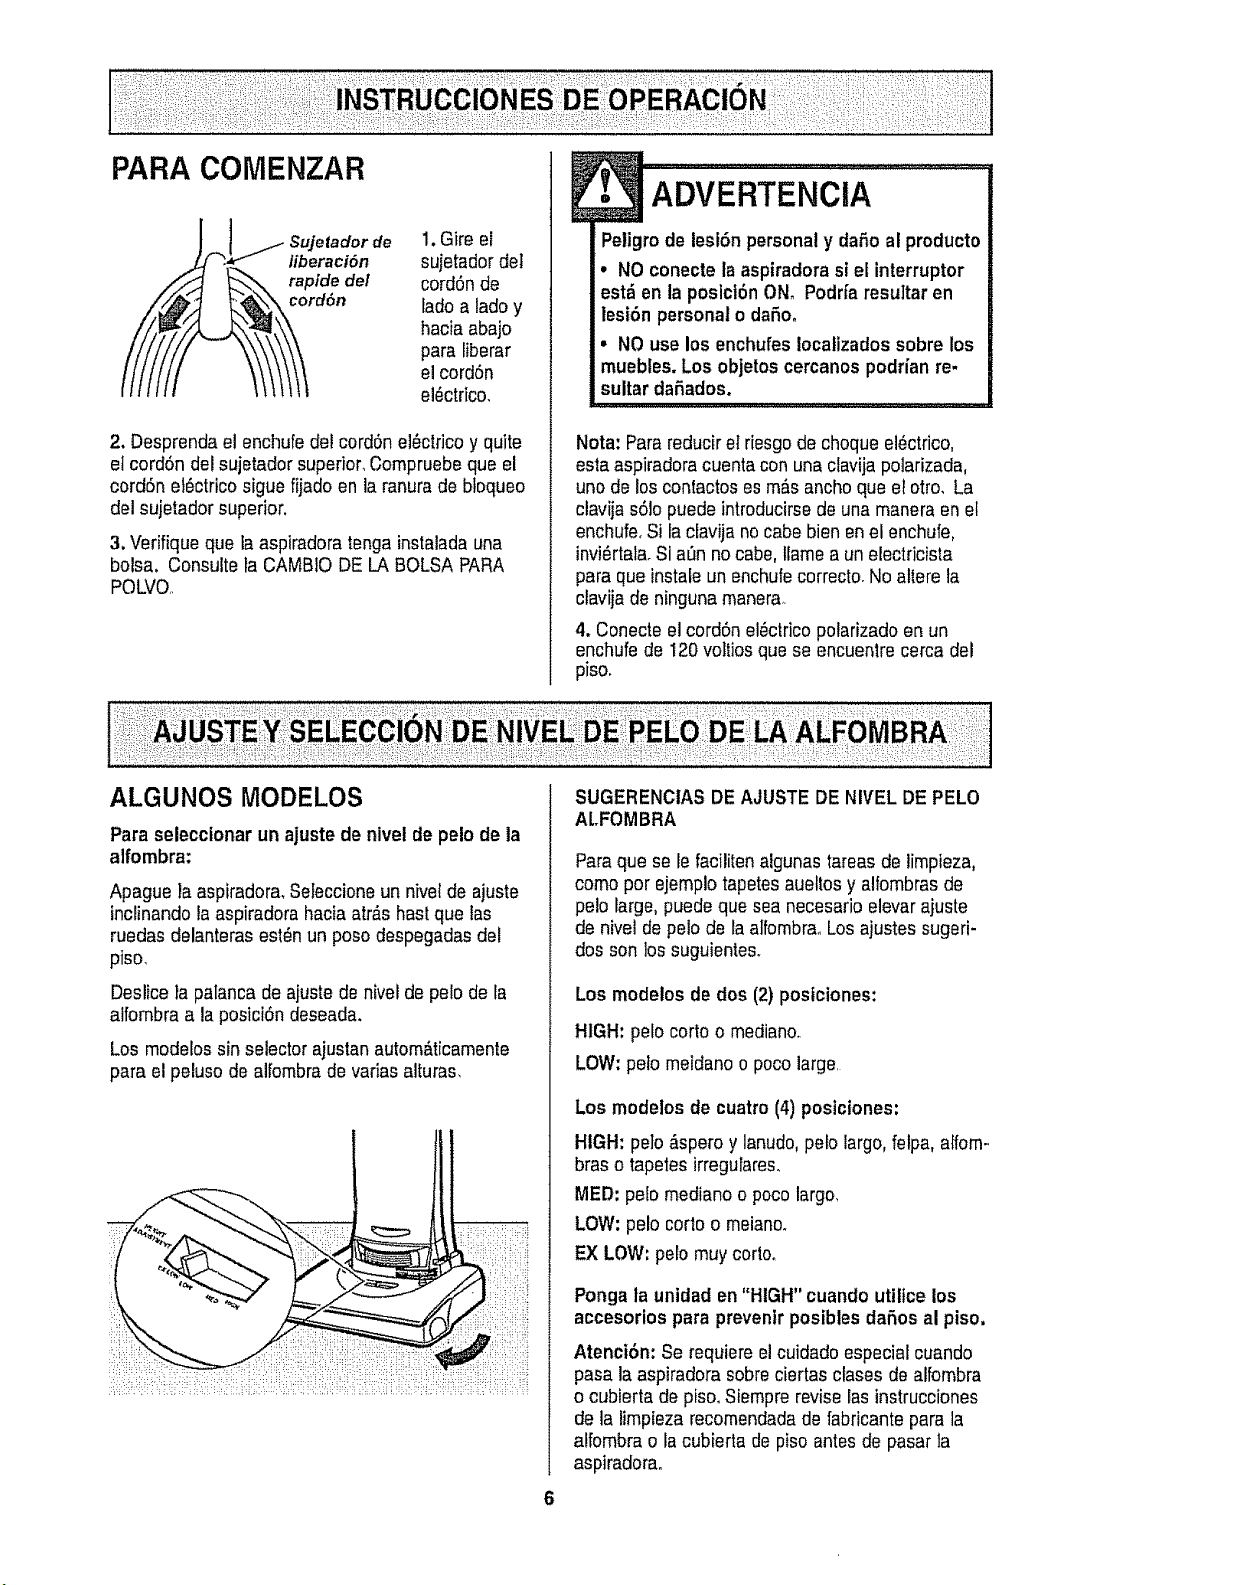
1. Gire el
sujetador del
cord6n de
lado a lade y
hacia abajo
pare liberar
el cord6n
el6ctrico.
2. Desprenda el enchufe del cord6nel_ctrico y quite
e!cord6n del sujetador superior. Compruebeque el
cord6n et6ctrico sigue fijadoen la ranurade btoqueo
del sujetador superior.
3, Verifique que la aspiradoratenga instalada una
boise. Consulteta CAMBIO DE LA BOLSA PARA
POL\.JO,.
Peligro de lesi6n personaly dafio al producto
• NOconecte la aspiradorasi el interruptor
estden la posici6nONo Podria resultar en
lesi6n personalo dafio.
• NOuse los enchufes Iocalizadossobre los
muebles.Los objetoscercanospodrJanre.
sultarda5ados.
Nota: Parereduciret riesgode choque el6ctrico,
esiaaspiradoracuenta con una clavija polarizada,
uno de los contactoses m_.sanchoque el otro. La
clavijas61opuede introducirsede una manera en el
enchufe,Sira clavija nocabe bien en el enchufe,
invi6rtala.Si a_n no cabe, llamea un electricista
para que instaleun enchufecorrecto.No altere ta
clavijade ningunamanera.
4, Conecteel cord6n el6ctrico polarizadoen un
enchufede 120 voltiosque se encuentre cerca del
piso,
Para seleccionar un ajuste de nivel de pelode la
alfombra:
Apague la aspiradora,Seteccioneun nivelde ajuste
inclinandola aspiradora haciaatr,_shastque las
ruedas delanteras est_n un posodespegadas del
piso.
Deslice }a palanca de ajusto de nivel de pelo de la
alfombra a la posici6n deseada.
Losmodelos sin selector ajustan autom_ticamente
para el peluso de alfombra de varies alturas,
SUGERENClAS DE AJUSTEDE NIVEL DE PELO
ALFOMBRA
Paraque se le facilitenalgunas tareas de limpieza,
como por ejemplotapetes aueltos y alfombrasde
pelo large,puede que seanecesario elevarajuste
de nivel de pelo de la alfombra_Losajustes sugeri-
dos son los suguientes_
Los modelos de dos (2) posiciones:
HIGH; pefocorto o medianoo
LOW: pelo meidano o poco large.
Los modelos de cuatro(4) posiciones:
HIGH: peto,_speroy lanudo,polo largo,felpa, alfom-
braso tapeles irregufares_
MED: pelo medianoo pocolargo,
LOW: pelo corio o meiano.
EX LOW; pelo muy corto,.
Pongala unidad en"HIGH" cuando utiltce los
accesorios pare prevenirposibles daSos al piso.
Atenci6n: Se requiere el cuidadoespecial cuando
pasa laaspiradora sobreciertas clases de alfombra
o cubierta de piso,Siemprerevise las instrucciones
de la timpiezarecomendadade fabricantepare la
alfombra o la cubierta de pisoantes de pasar ta
aspiradora°
6
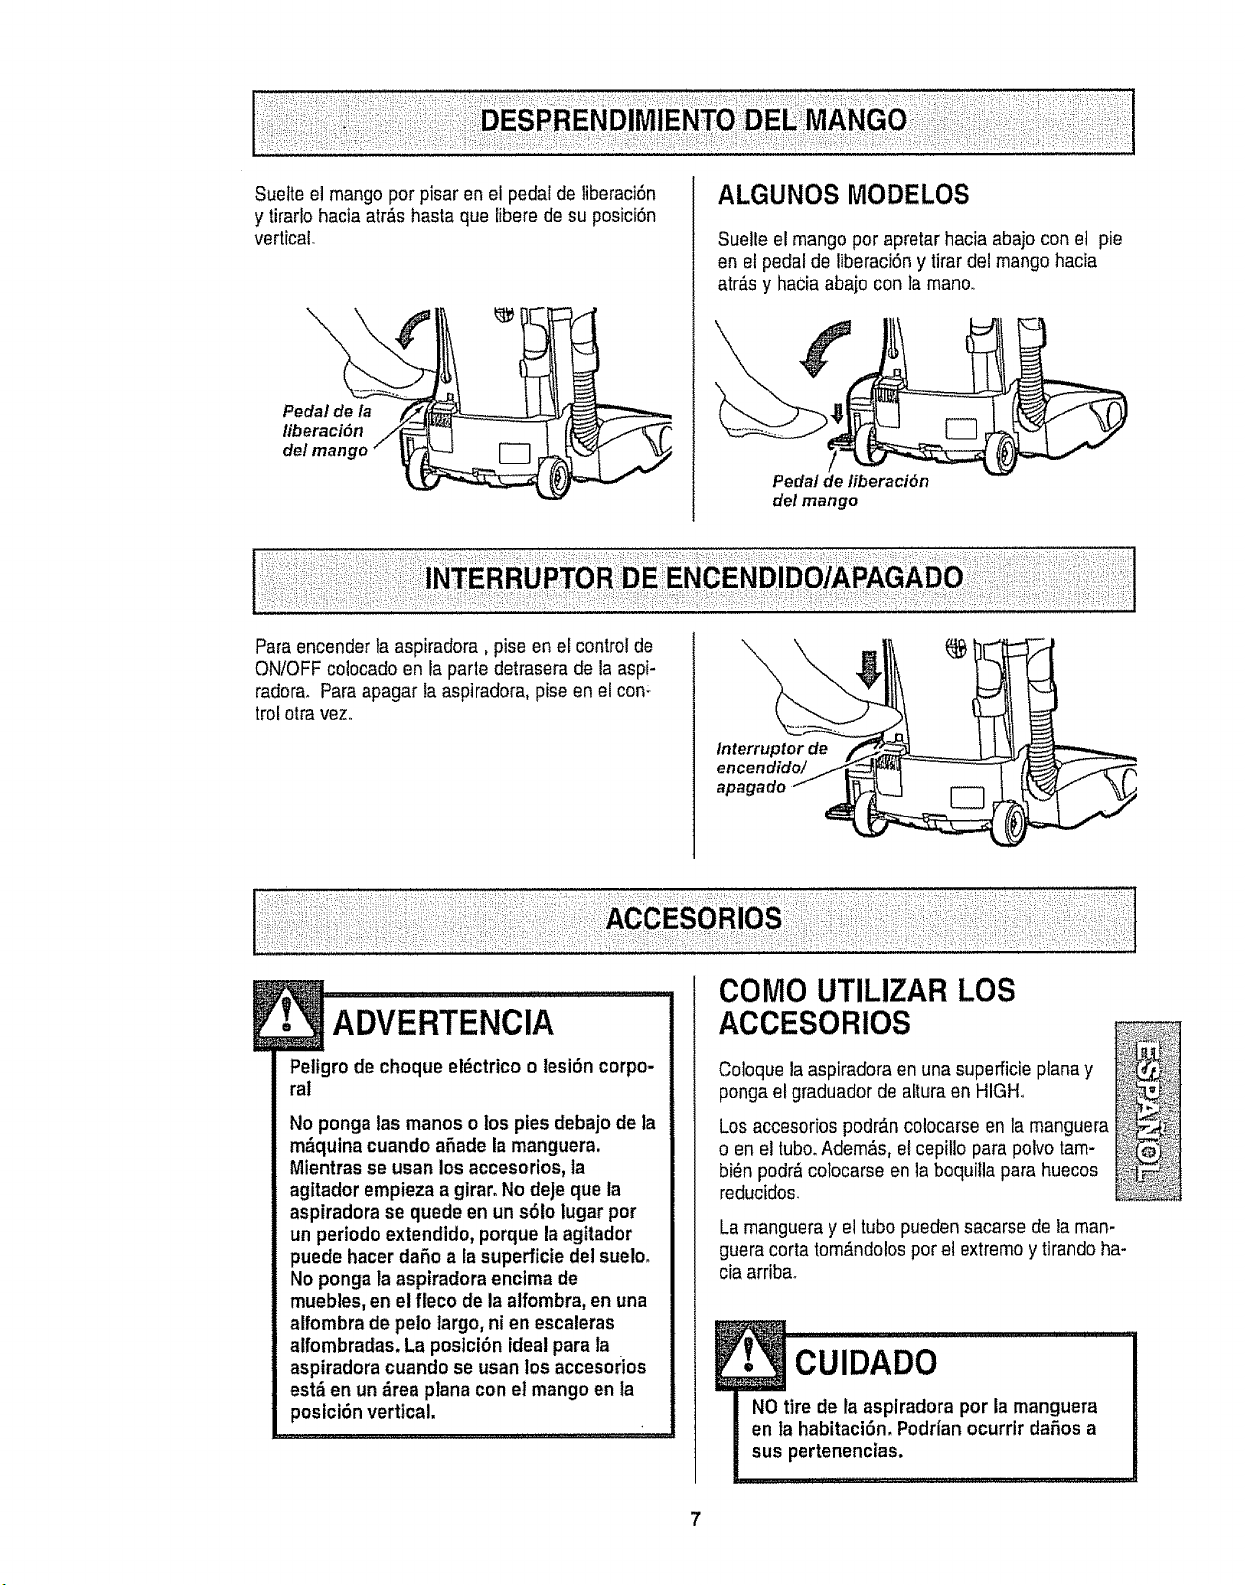
Suelteelmangoperpisarenelpedaldeliberaci6n
ylirarlohaciaatr,_shastaqueliberedesuposici6n
vertical
Pedal de la
liberaci6n
del mango
ALGUNOS MODELOS
Suelle el mango per apretar hacia abajo con et pie
en el pedal de liberaci6ny tirar del mango hacia
atr_s y haCiaabajo con la mane..
Pedal de liberaci6n
del mango
Para encenderla aspiradora, piseen el control de
ON/OFF colocado en la parle detrasera de la aspF
radera. Paraapagar la aspiradora,pise en elcon-
trol otravez..
Interrupter de
encendido/
E ADVERTENCiA
Peligro de choque elEictricoo tesi6n corpo-
ral
No ponga las manos olos pies debajode la
m_quina cuando aSade la manguera.
Mientras se uean los accesorios,ta
agttador empiezaa giraroNo deJeque la
aspiradora se quedeen un s61olugar pot
un periodoextendido, porque laagttador
puede hacer daSo a la superficiedel sueloo
No ponga la aspiradoraencima de
muebles, en elfleco de laatfombra,en una
alfombra de pelo largo,ni en escaleras
alfombradas. La posici6n ideal para la
aspiradora cuando se usan los accesorios
est_ en un _rea plana con et mango en la
poslci6n vertical.
come UTILIZAR LOS
ACCESORIOS
Coloquelaaspiradora en una superficie planay
ponga el graduador de altura en HIGHo
Los accesorios podr_.ncolocarse en la manguera
o en el tube.Adem_s, el cepillo para polvetam-
bi_n podr_ colocarse en la boquiila para huecos
reducidos.
Lamanguera y el tubo puedensacarse de iaman-
guera corta tom_ndolos pot et extremoytirando ha-
cia arribao
7
Losaccesorios sepueden conectara la manguerasi
el objetoque se desea limpiar no est_ tejos de la
aspiradora. La manguera,en atgunosmodelos,se
expandir&.
Nota: Cuando la aspiradoraest_ prendida,ta
manguera,en algunos modelos,tender_,a caerse
debidoa la succi6n de la aspiradora.
Si desearues extensi6n,puede conectarettubea la
mangueray losaccesorios altube.
E_ CUiDADo
A!utilizar los accesories para limpiar, tenga
cuidadode no sobrepasar el alcance de la
manguera, Si !o hace, podrfa ocasionar que
la aspiradora se caiga.
I
ALGUNOS tViODELOS
Se incluye un tube extra, sinpestaSas,para un ma-
yor alcanceoEl tubeextra se puede conectar artube
con pestafias para Iograrun mayoralcance_Intro-
duzca el tubey d_le un cuarto de vuelta para asegu-
rado+
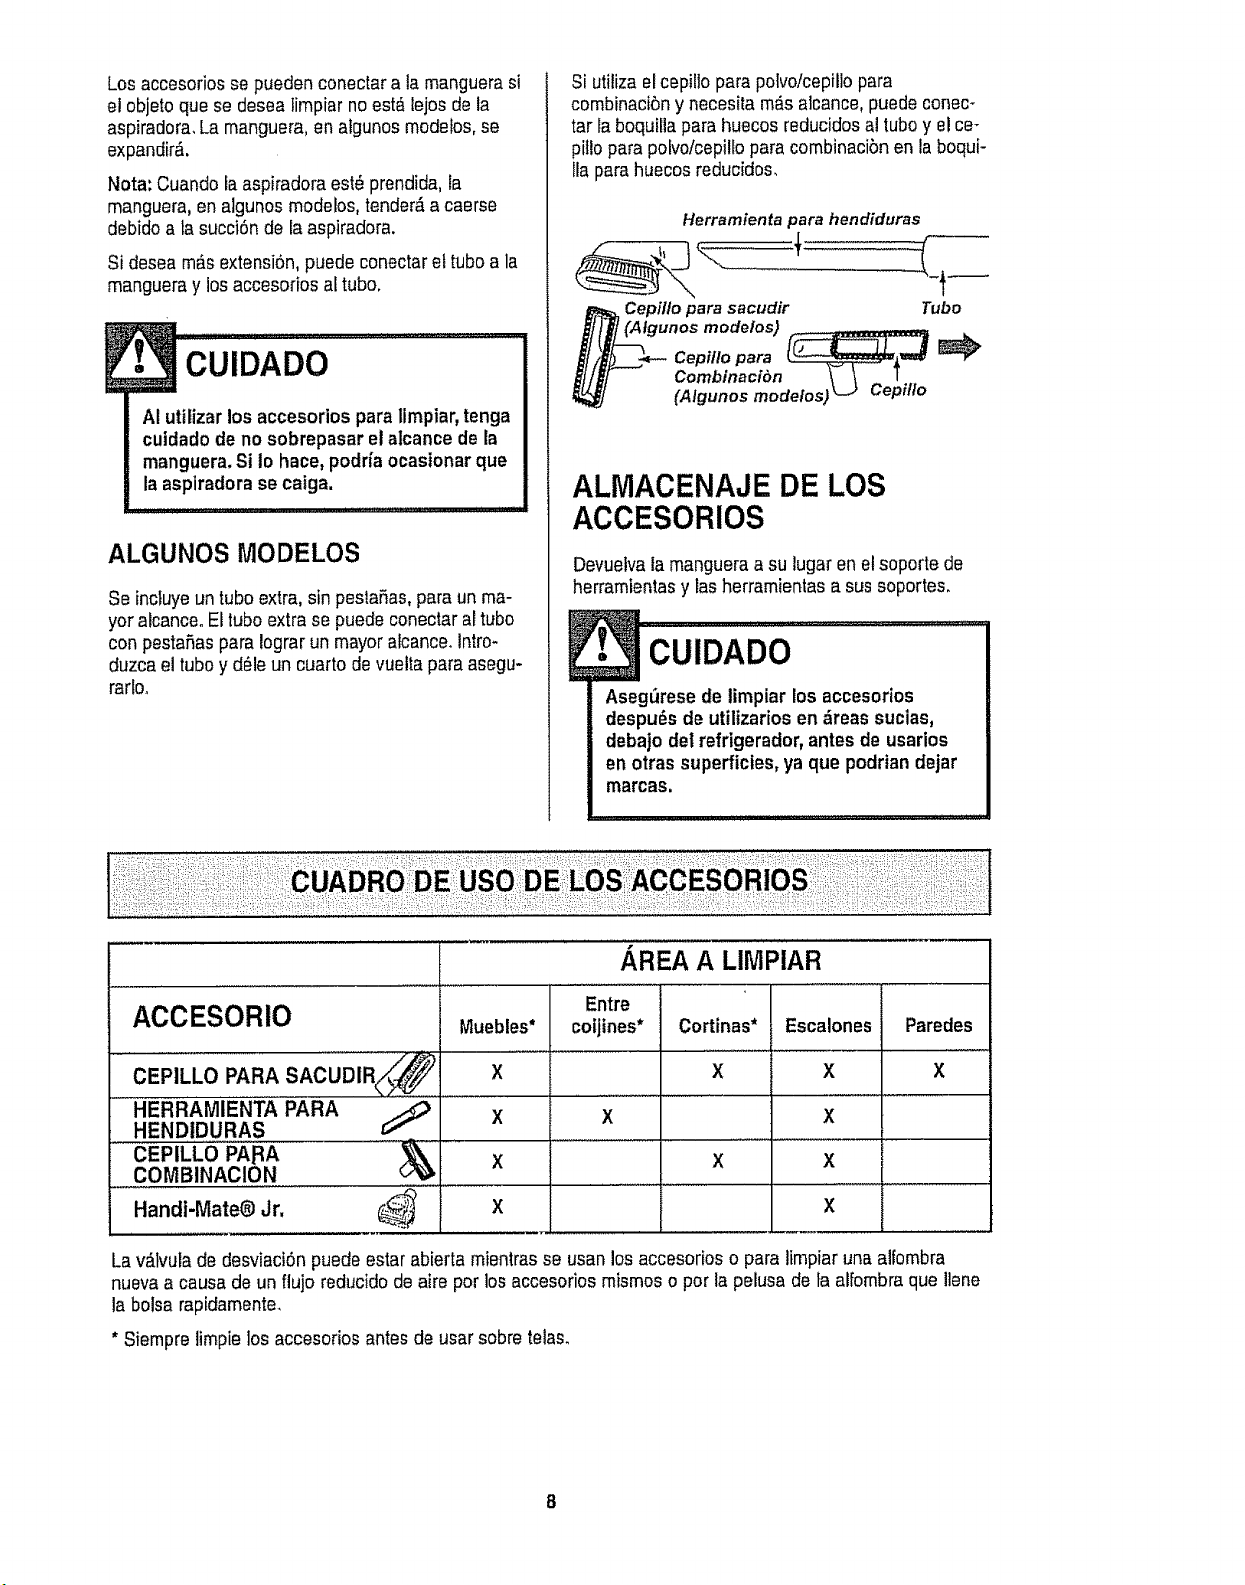
Si utiiiza elcepi[lopara polvofcepiliopara
combinacibny necesita m_,salcance,puede conec+
tar la boquiltapara huecos reducidos al tubey el ce-
pitlopara polvo/cepillopara combinacibnen la boqui-
tlapara huecos reducidos_
Herramienta para hendiduras
Cepi/Io para sacudir Tube
i/tl ,+u°osmodo,o,) L
.,._ _- co..,o.o.. f_._,.J E¢,
_//#_'-" Combinaci6n "_ t
(Algunos modelos) L_ Cepillo
ALMACENAJE DE LOS
ACCESORIOS
Devuelvatamangueraa su lugaren el soporte de
herrarnientasy lasherramientas a sus soportes+
E
W
rT_ CUIDAnn ......,...........
Aseg_rese de limpiar los accesorios
despuds de utilizarios en dreas sucias,
debajo del refrigerador, antesde usarios
en otras superficies,ya que podrian dejar
marcas.
ACCESORIO Muebles*
cEPILLO PARA sAcUDIR ' X "
HERRAMIENTA PARA _ X
HENDIDURAS
CEPILLO PA[RA _,_,,
X
COMBINACION
............................. _' X
AREA A LIMPIAR
Entre
coijines*
X
Cortinas*
X
X
Handi-Mate®Jr.
Escalones
Paredes
X X
X
X
X
,,,, ,, ,,,,,,,,,,,,,,,
Lav_.lvulade desviaci6npuede estar abierta mientrasse usan los accesorios o para limpiar una alfornbra
nueva a causa de un flujo reducidode aire per losaccesorios mismos o per la pelusa de faaifombra que Ilene
la bolsa rapidamente_
* Siemprelimpie los accesorios antes de usar sobretelas.
• ADVERTENCIA
Peligro de lesi6n personal
Actue con precauci6n si colocala aspira-
dora sobreescalones. Si se cae, podria
causar lesl6n personalo da_o a la propie-
dad.
Orillas de aifombras
Gufe uno de loscostados o la parte anterior de ]a
boquilla a 1olargo del borde de la pared_Loscepi-
Ilos largosayudan a aspirar la tierra atrapada en
las orillas de lasalfombras_
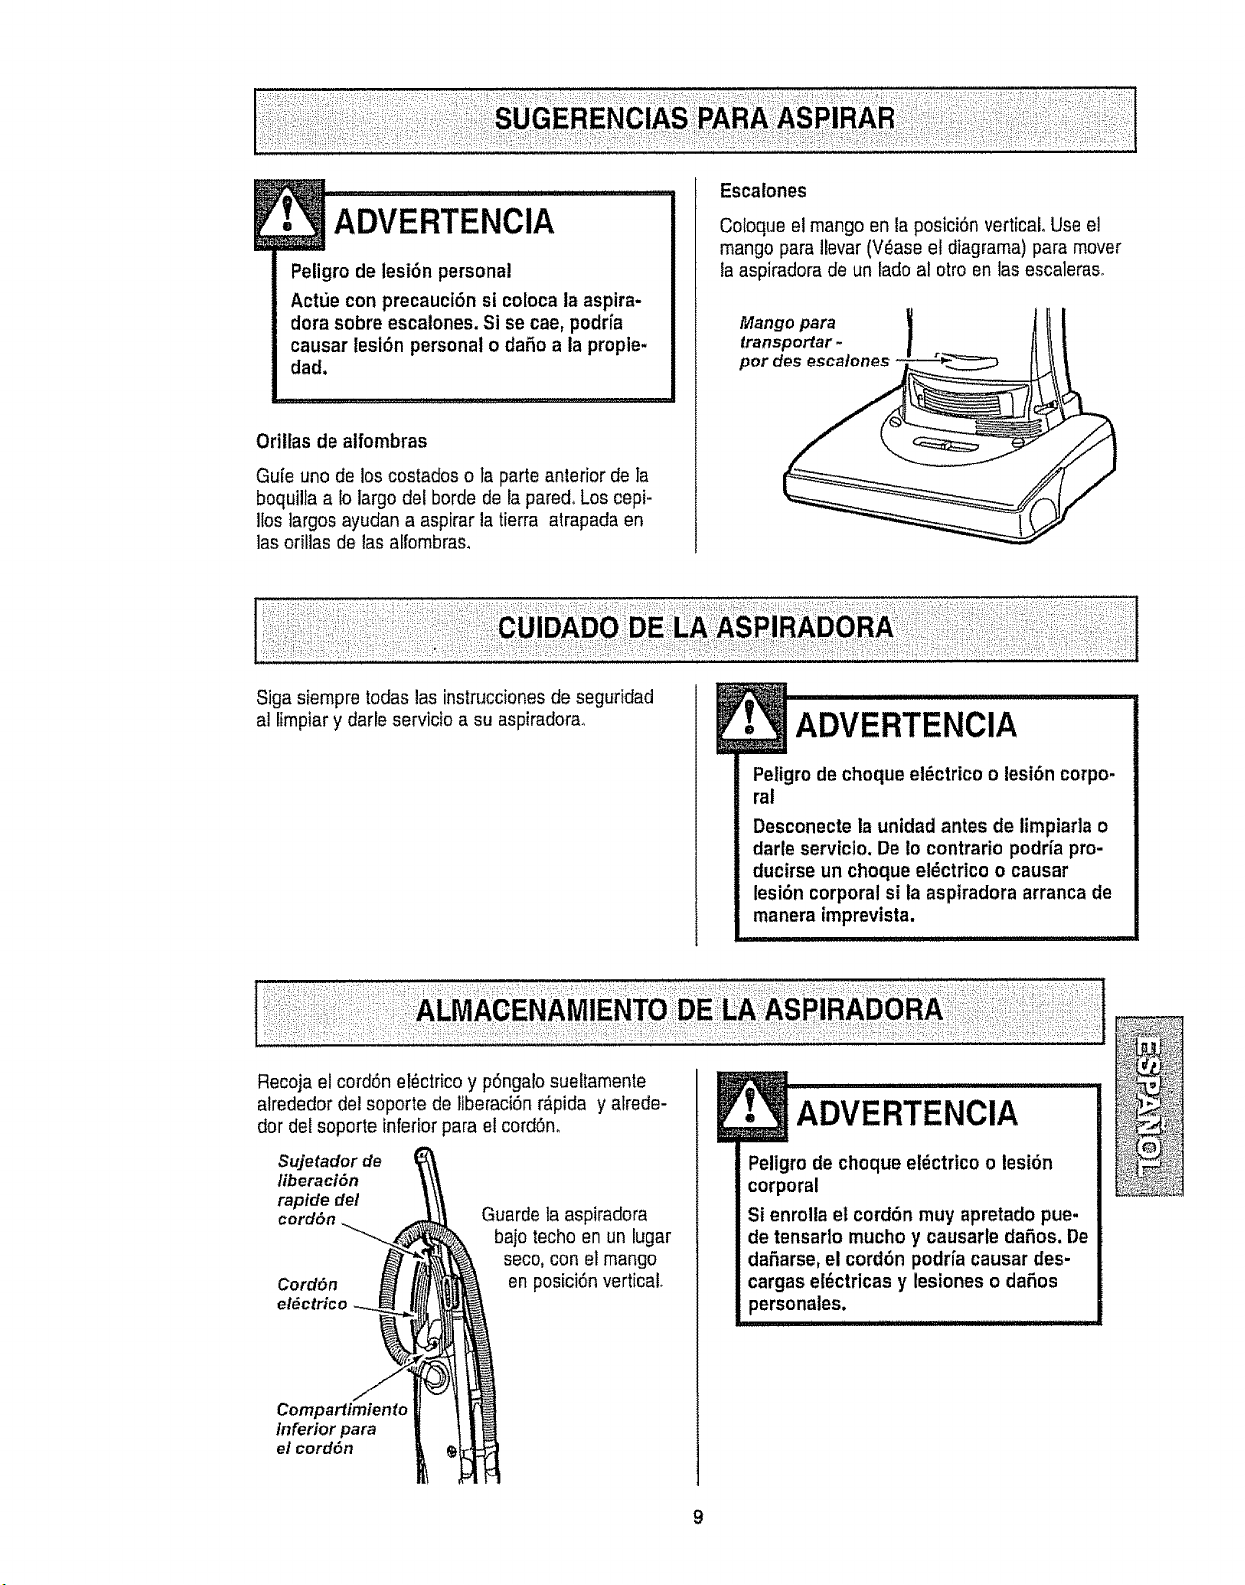
Coloqueel mango en la posici6n vertical Use el
mangopara Ilevar (V@aseet diagrama) paramover
taaspiradorade un lado al otto en las escaleraso
Mango para
transportar -
por des escatones
Siga siempre todaslasinstruccionesde seguridad
al limpiary darle servicio a su aspiradora.,
ADVERTENCIA
Peligro de choque el_ctrico o lesi6ncorpo-
ral
Desconectela unidad antes de limpiada o
darle servicio, De Io contrario podrfa pro-
ducirse un choque el_ctrico o causar
lesi6n corporal si la asptradora arrancade
manera imprevista.
Recoja elcord6n el_ctricoy p6ngalo sueltamente
alrededor del soporte deliberaci6nrdpida y alrede-
dor del soporte inferior para el cord6no
Sujetador de
liberaci6n
rapide del
Cord6n
el_ctrico
Guarde la aspiradora
bajo techo en un lugar
seco,con el mango
en posici6n vertical.
Compa_irniento
inferior para
el cord6n
ADVERTENCIA
Peligrode choque et_ctricoo lesi6n
corporal
Si enrolla el cord6n muy apretado pue-
de tensarlo mucho y causarle da£=os.De
dafiarse, el cordbn podrfa causar des-
cargas el_ctricas y lesiones o daSoe
personales.

Desconecteercord6nel_ctricodolaclavijadela
pared°NOchoreeagua sobre laaspiradora,
Limpie el exterior con un trapo suavey limpio,que
ha sido exprimido despu_s de remojaren una solu-
ci6n de agua y detergente ltquidoligero.Sequeel
exterior con un trapo seco despu6s de limpiaro
Limpie la superficie exterior del recept6cutoy de los
accesorios parareducir la electricidad esl&ticay Ia
acumutaci6nde polvo_
Lave los accesoriosen agua tibiajabonosa,
enjuague y deje secar al aire.No los lave en lava-
dora de platoso
J. ou,oAoo ..................I
No use los accesorios si est_n mojados,
Los accesoriosque se utilicenen _reas
sucias, debajo del refrigerador,no deben
usarseen otras superficiessin antes ser
lavados. Podrlandejar marcas.
PARA QUITAR LA BOLSA PARA
POLVO
Tire hacia afuera
del agarraderode
la cubierta de
polvo cotocado
cerca de taparle
superior de la
cubierta de polvoy
quite la cubierta.
P6ngalaa un lado.
Tomela bolsa para
polvo por el collar
y quitela concui-
dadoo
Tire tabolsa usadaa la basura_
NO la vuelva a usar.
Reviseel tubo
de basuray el
filtro de segu-
ridad del mo-
tor.
Si estuvieran
bloqueados,
consulte la ta-
bla de diag-
n6stico de
problemas.
Tubo de
Ftltro de
seguridad
CUIDADO
NUNCA REUTILICEUNA BOLSA PARA
POLVO.Los materiales muy finos, tales
como desodorantes para alfombras,talco
facial, polvofine, yeso, hollfn,pelusa de
aifornbrasnuevas, etc. pueden atascar ta
bolsa y causar que se rompaantes do que
est6 ltena. Cambiela bolsa m_s segutdo
cuando aspire este tipo de materiales.
10
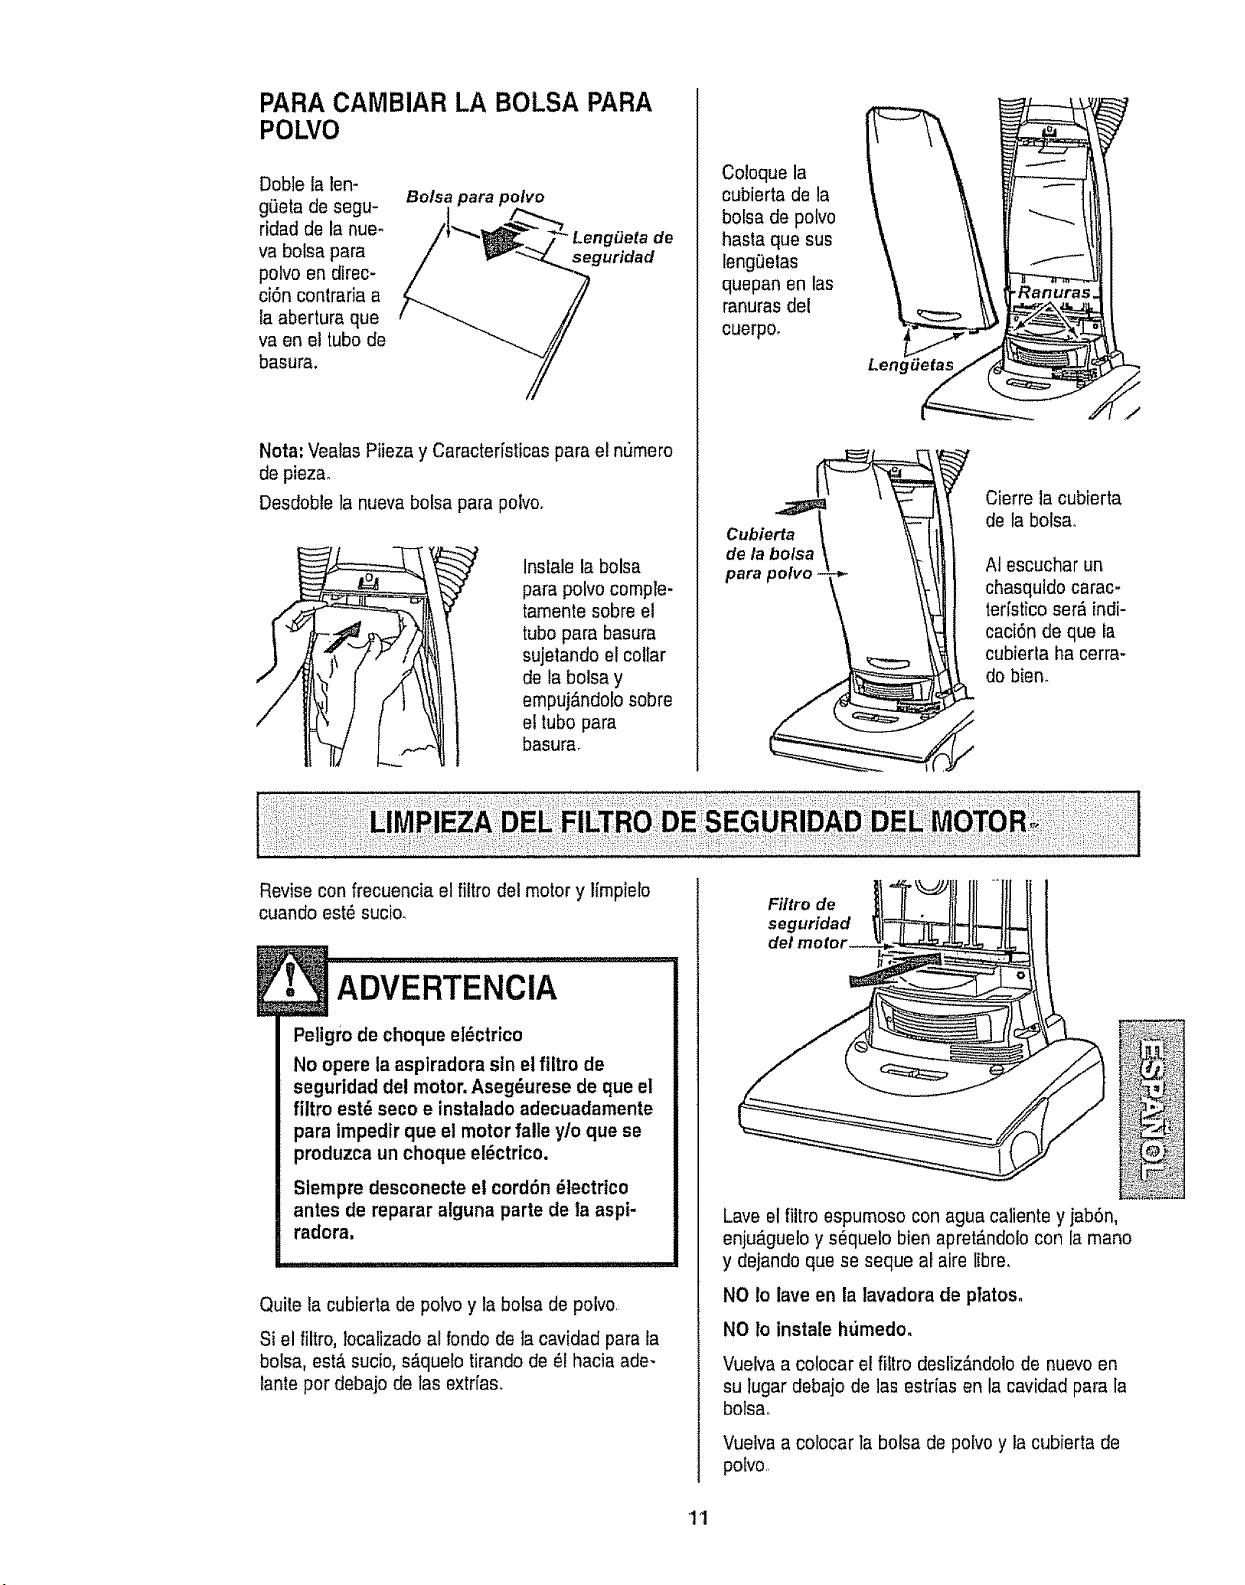
PARACAMBIAR LA BOLSA PARA
POLVO
DoNe la len-
gieta de segu-
ridad de la nue-
va botsa para
polvo en direc-
ciSncontraria a
taabertura que
va en el tube de
basura,
Bolsa para polvo
Leng_eta de
seguridad
Nora: VeaiasPiiezay Caracteristicaspara etnimero
de pieza.
Desdoble la nuevabolsapara polvo.
Instalela bolsa
para polvocomple-
tamentesobre el
tubo para basura
sujetando el collar
de la bolsay
empuj&ndolosobre
ettubepara
basurar
Coloque la
cubierta de la
bolsa de polvo
hasta que sus
lengL_etas
quepan en las
ranurasdel
cuerpo.
Cubierta
de la bolsa
para polvo,
Lengi
/
Cierre la cubierta
de la bolsao
Atescuchar un
chasquido carac-
teristico ser_ indi-
caeiOnde que fa
cubierla ha cerra-
do bieno
;i : ,!!
Revise confrecuencia el filtro del motor y limpiele
cuando est_ sucio.
! ADVERTENClA
Peligrode choque el_ctdco
No opere la asplradorasin elfiltro de
seguridad dei motor.Aseg_urese de que el
fiitro est_ seco e instaladoadecuadamente
para lmpedirque el motorfalle y/o que se
pmduzca un choque el_ctrico.
Stempredesconecteet cord6n _lectrico
antes de repararalguna parte de la aspi-
radora.
Quite la cubierta de polvoy la bolsa de polvo.
Si el filtro,Iocalizadoal rondode ia cavidadpara ta
bolsa, est&sucio,s_.quelotirando de _I haciaade-
lantepor debajo de las extrias.
Fi/tro de
seguridad
N
Lave elfiltro espumoso con agua caliente y jabdn,
enju_.gueloy sOquelobien apret_ndolocon la mano
y dejando que se seque al aire libre,
NO 1olave en la lavadora de ptatos.
NO to instale h_Jmedo°
Vueivaa colocar el fiftro desliz&ndolode nuevoen
su fugar debajo de lasestrias en la cavidad para la
botsa,
Vuelvaa colocar la bolsa de potvoy la cubierta de
pofvo.
11
ADVERTENClA
Petigrode choque el_ctrico o lesi6n corpo-
ral
Desconectela unidadantes de limpiarlao
darleservicio.De !ocontrario podrta produ-
cirse un choque et_ctricoo causar lest6n
corporalsi la asptradoraarrancade manera
imprevista.
Frecuentementerevise el _.readel ceplIo y quite
lodo pelo,cord6n o pelusa que se hayaacumulado.
Di la acumulaci6nes excesiva,siga las instruc-
ciones a continuaci6n. Si la correa se aflojara o
rompiera,siga 1asinstrucciones para quitar la cor-
rea°
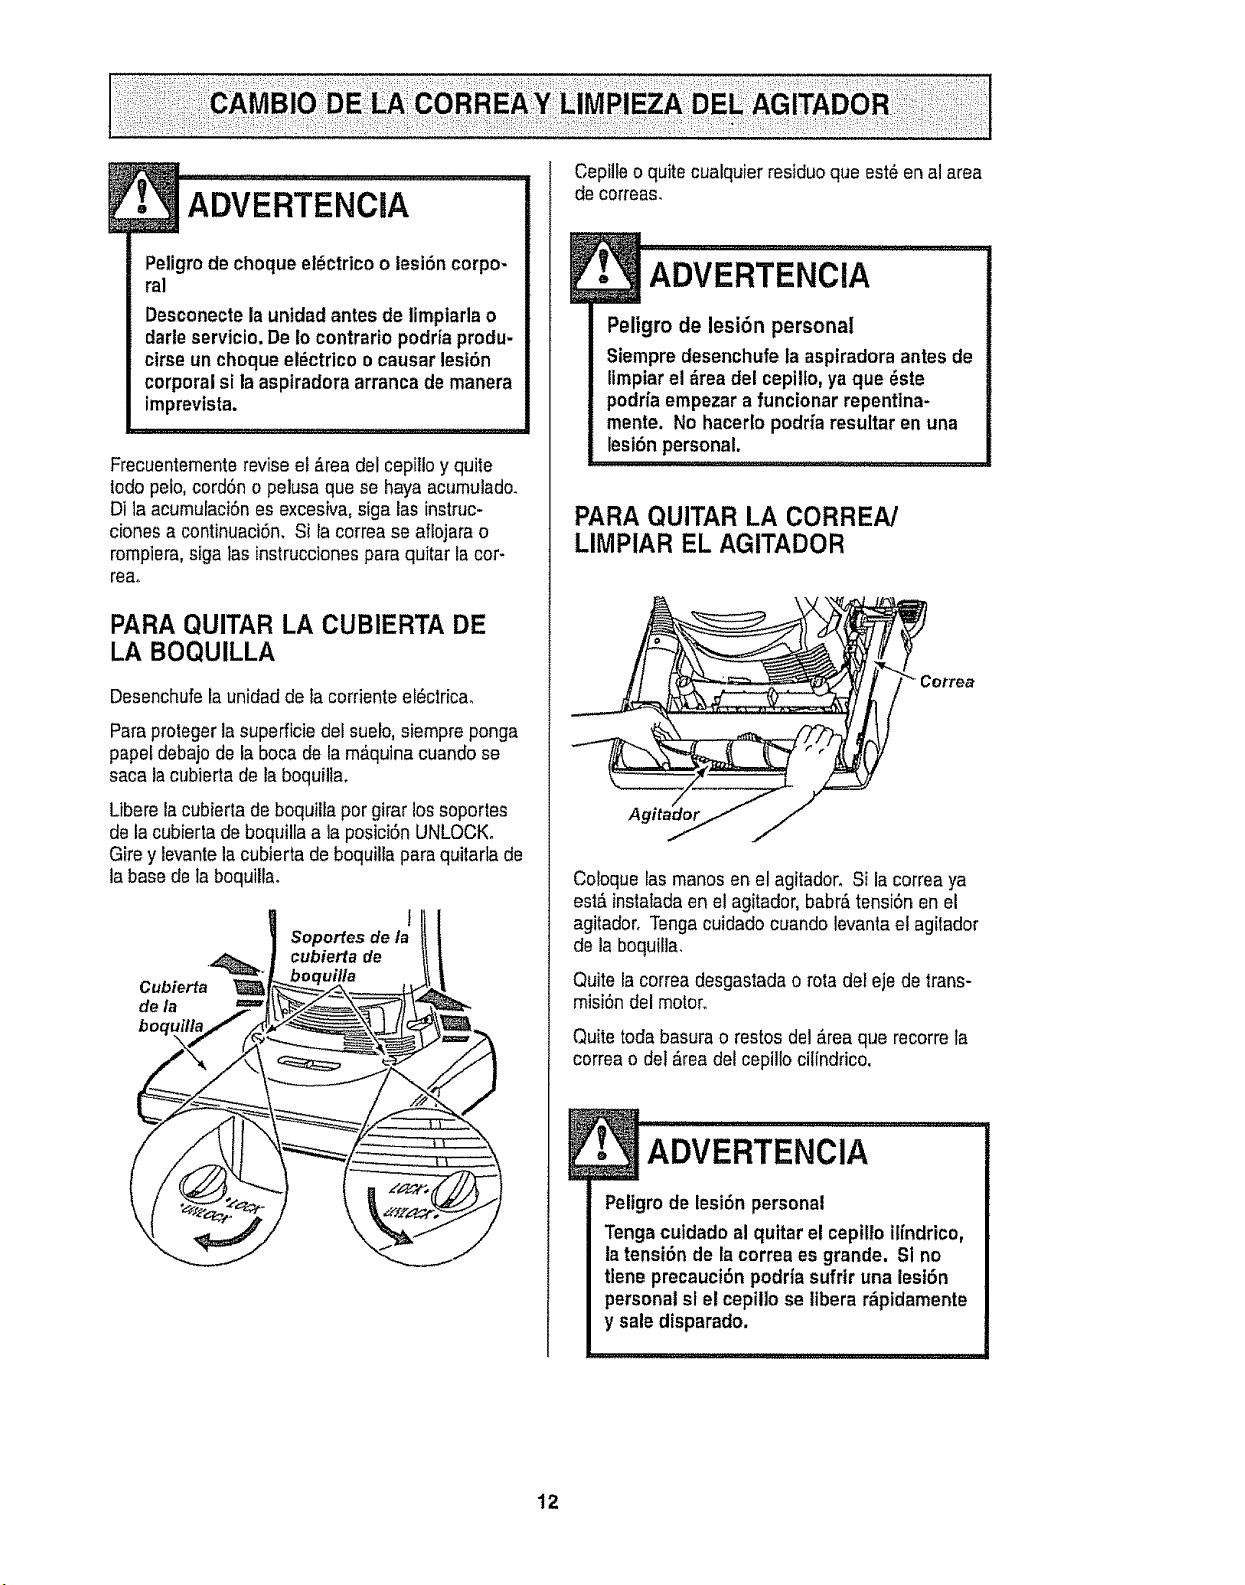
PARA QUITAR LA CUBIERTA DE
LA BOQUlLLA
Desenchufela unidad de ta corfiente el_ctricao
Paraprotegerlasuperficie del suelo, siempre ponga
papel debajo de la boca de la m_quina cuandose
saca lacubierta de la boquita.
Libere lacubierta de boqutla por girar lossoportes
de la cubierta de boquilla a la posici6n UNLOCK.
Gire y levante la cubierta de boquilla paraquitarla de
la basede ta boqulla.
Cubierta
de la
boc
f
Soportesdela
cubiertade
ruilla
Ceplle o quitecualquier residuoque est_ en al area
de correas.
! ADVERTENCiA............
Peligm de lesi6n personal
Siempredesenchufe la aspiradora antesde
limpiarel _rea del cepillo,ya que _ste
podriaempezar a funcionar repentlna-
mente. No hacerlo podriaresultar en una
lesi6n personal.
!
PARA QUITAR LA CORREN
LIMPIAR EL AGITADOR
I
Coloque las manos en el agitador, Si la correaya
est,_instatadaen e!agitador, babr,_tensi6n en el
agitadoroTengacuidadocuando levanta el agitador
de la boquila.
Quite la correa desgastadao rota del eje de trans-
misi6n del motor..
Quite todabasurao restos del _rea que recorre ta
correao del _rea del cepillo cilindrico.
!
Peligro de lesi6n personal
Tenga cuidadoal quitar el cepillo ilindrico,
la tensi6n de lacorrea es grande. SI no
tlene precauci6n podrfasufrir una lesi6n
personalst el cepillose libera r_pidamente
y sale disparado.
12
Concuidadoquitelaagitadorparavetsisehan
acumuladohilosypelo.
Nota:Paramantenerunaaltaeficienciadelimpieza
yevitarelda5oataaspiradora,bay.que limpiarel
agitador cadavez que se cambia la correa,.
Tambi_nhay que limpiar el agitador segunet sigu-
ienie horario:
El uso de ia Limpie el
aspiradora
Frecuente - cada semana
(usada dirariamente)
Moderado - cada mes
(usada 2 o 3 veces
por semana)
Ligero - cada 2 meses
(usada I vez pot semana)
Tapa del -_ "_"_
extremo
Corte pelusa, el
pelo o la borra
enredadosen el
agilador y guiteel
hilo o los restos
ubicacadosen las
tapas del extremoo
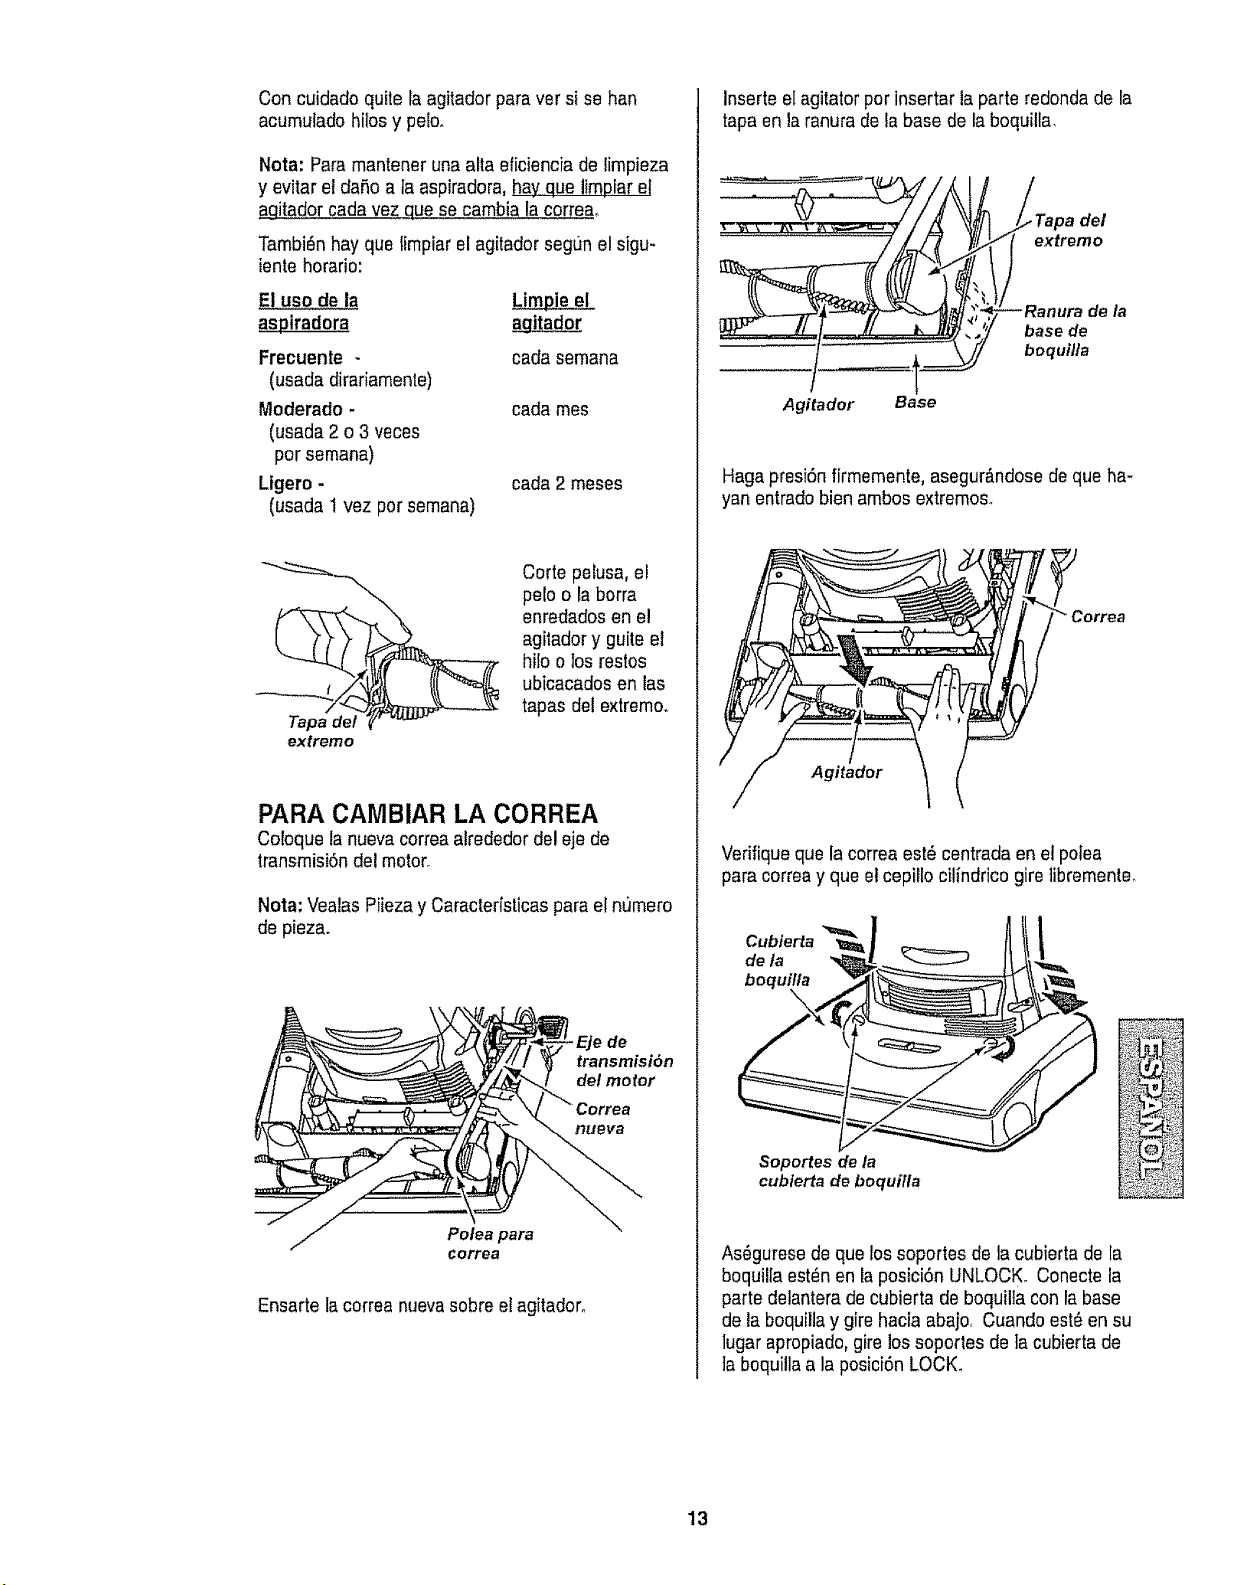
PARA CAMBIAR LA CORREA
Coloque tanuevacorreaalrededor del eje de
transmisi6n del motor.
Nota: VealasPiiezay Caracterfsticaspara el numero
de pieza.
de
transmisi6n
del motor
Polea para
correa
Ensarte la correa nuevasobre el agitation
Inserte el agitator por insertar ta parte redondade la
tapaen la ranura de la base de laboquilla,
Agitador
Base
dei
extremo
de la
base de
boquil/a
Hagapresi6nfirmemente, asegur_.ndosedeque ha-
yan entradobien ambos extremos.
Agitador
Verifiqueque la correa est_ centrada en etpolea
para correay que el cepillocilindrico gire libremente,
Soportes de la
cubierta de boquifla
As6gurese de que los soportes de la cubierta de la
boquilla est_n en ia posici6n UNLOCK° Conectela
parte delanterade cubierta de boquilfa con labase
de la boquillay gire haciaabajo, Cuandoest_ en su
lugar apropiado,gire los soporles de ]acubierta de
ta boquillaa la posiciSnLOCK_
13
ADVERTENCl/ .......
Peligrode choqueel_ctrlco o test6n corpo-
ral
Desconectela unidad antesde limpiarla o
darle servicio, Deio contrado podrta produ-
ctrseun choqueel_ctrico o causer lesi6n
corporal si laaspiradora arrancade manera
imprevista.
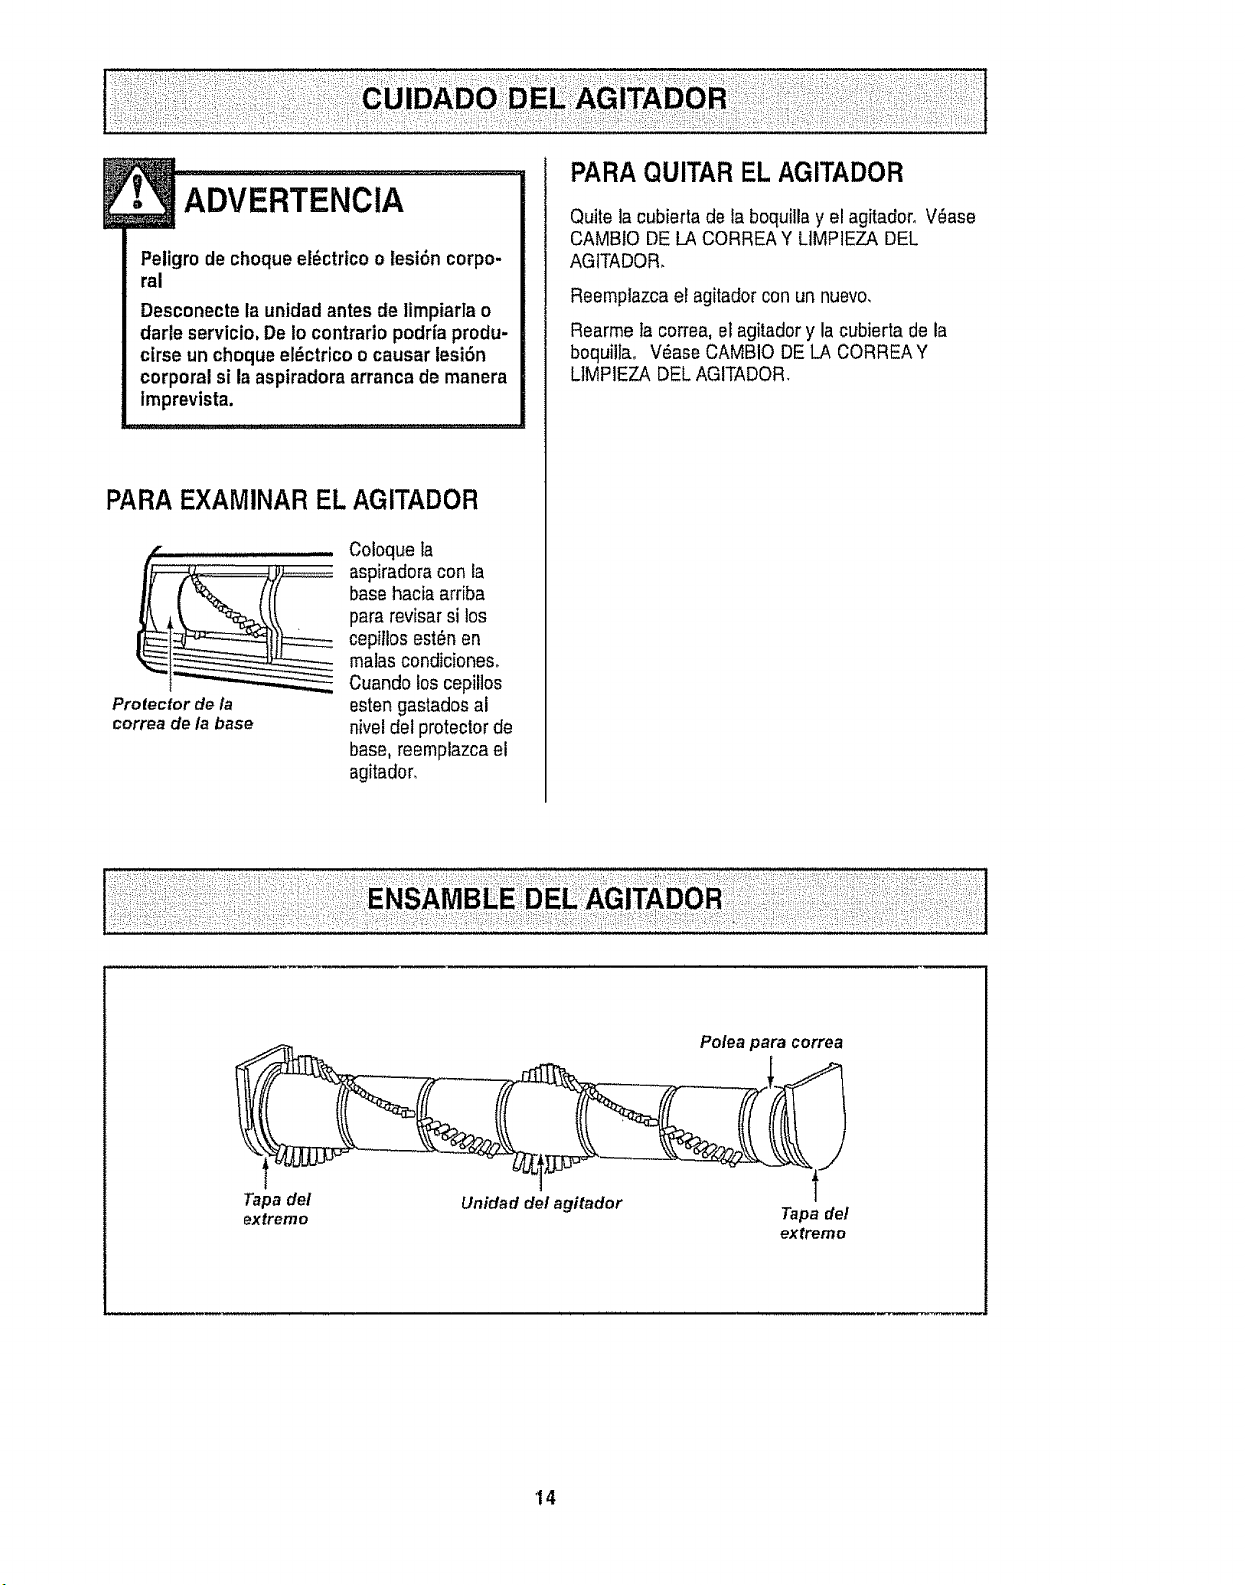
PARA EXAMINAR EL AGITADOR
Protectorde/a
correade/a base
Coloque la
aspiradoracon la
base haciaarriba
para reviser si los
cepillos est_n en
males condicioneso
Cuando loscepilios
esten gastadosal
nivel del protectorde
base, reemplazcael
agitadoro
PARAQUITAR EL AGITADOR
Quite la cubierta de la boquilia y el agitadoroV_ase
CAMBIO DELA CORREAY LiMPIEZA DEL
AGITADOR,
Reemplazcael agitadorcon un nuevo,
Rearme Ia coffee, el agitadory la cubierta de la
boquilla,, V_ase CAMBIO DELA CORREAY
LIMPIEZA DELAGITADOR,
Ta
extremo
Polea pare correa
_a del Unidad de/agitador Tapa de/
exfremo
14
ALGUNOS MODELOS
F• ADVERTENCIA
Peligrodechoque eldctricoo lesi6n corpo-
ral
Desconectela untdadantes de limpiarla o
darle servicio. De!ocontrario podria produ-
ctrseun choqueel_ctrtcoo causar lesi6n
corporal si laaspiradora arrancade manera
imprevista.
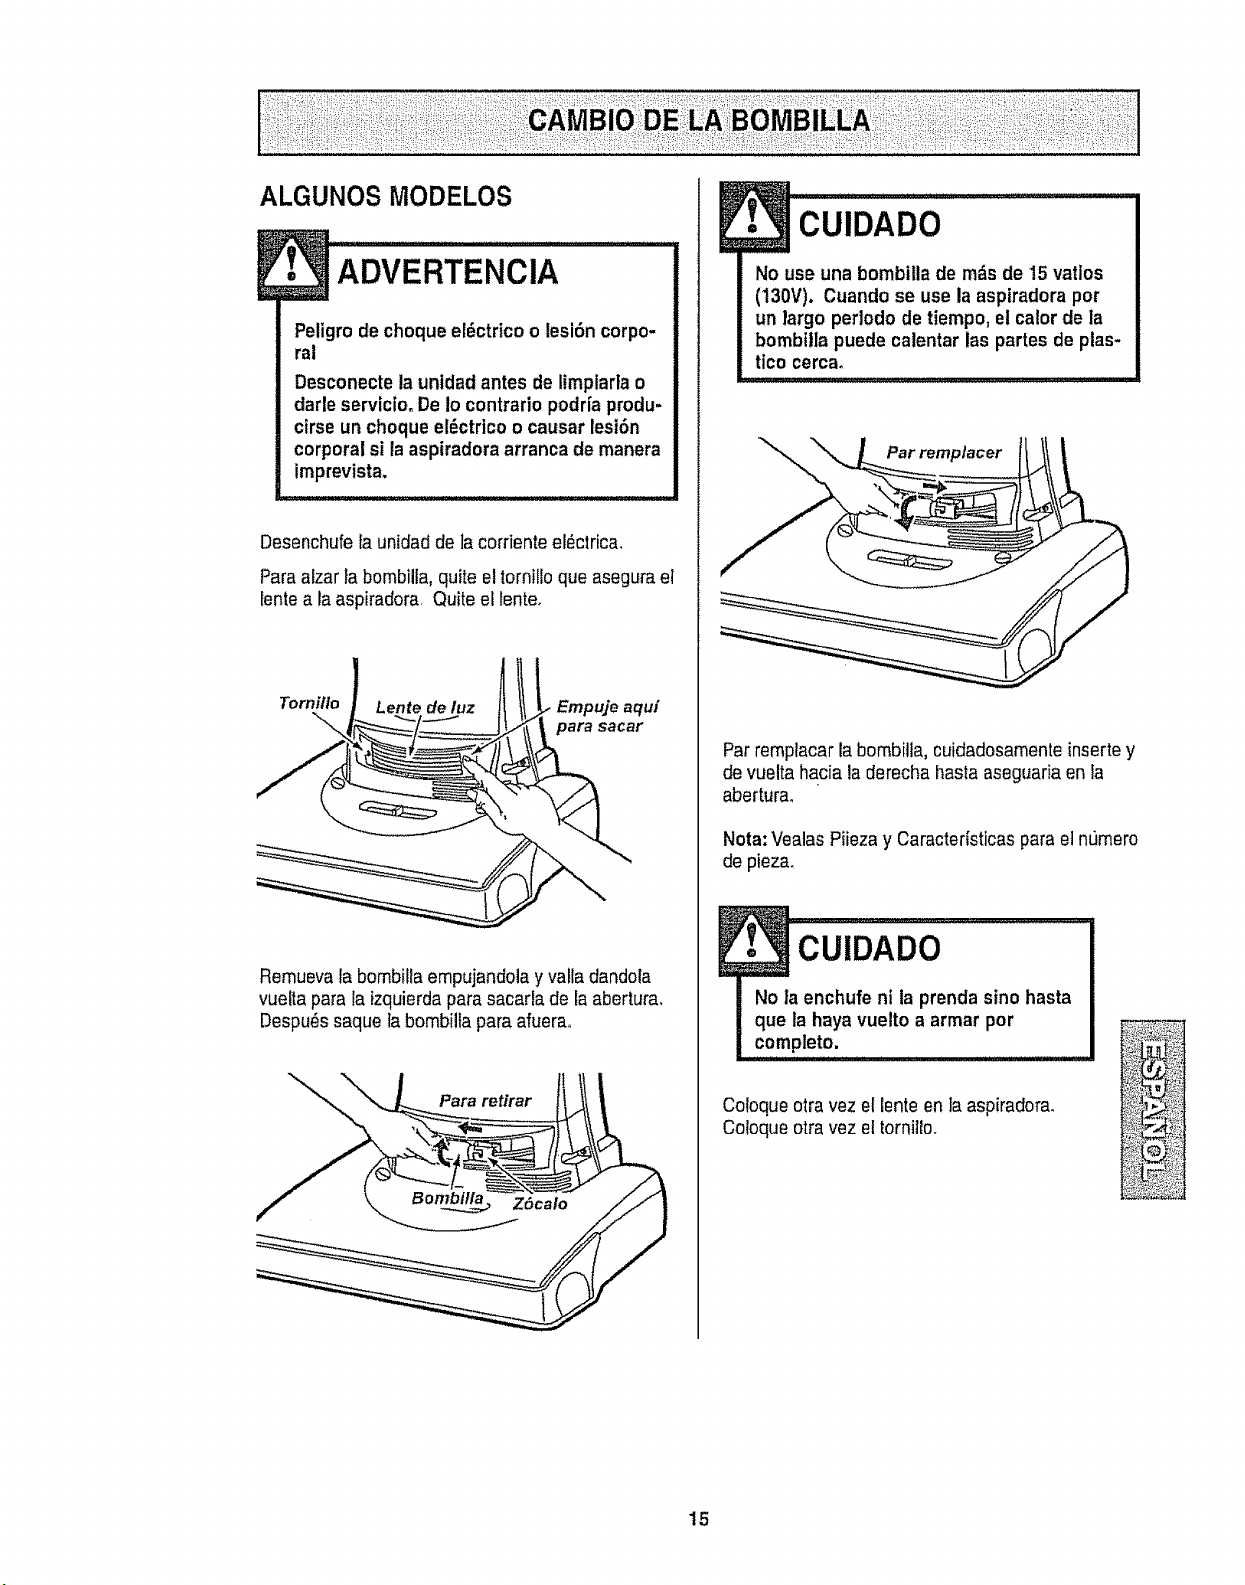
Desenchufela unidad de ta corriente el_ctrica,
Paraalzar la bombilla, quits el tornilloque asegurael
lentea laaspiradora, Quite ellente°
Tornitlo Lente de luz aqui
para sacar
Remuevala bombiflaempujandola yvatla dandola
vuelta para la izquierdapara sacarla de la abertura,
Despu_ssaque tabombilfa para afuerao
! CUIDADO
No use una bombilla de m_s de !5 vatlos
(130V). Cuando se use la aspiradorapor
un largo perlodo de tiempo, el calorde ia
bombttlapuede calentar las partes de plas-
tico cerca.
Par remplacer
Par remplacar la bombilla, cuidadosamenteinserte y
de vuelta hacia la derecha hasta aseg_zariaen la
abertura.
Nota:VealasPiiezay Caracterlsticas paraet numero
de pieza,
Coloqueotra vez el lenteen laaspiradora,
Co!oqueotra vez el tornillo,
<__:?1_,*,,'_ff'#¢!;}::;"
15
Peligrode cheque el_ctrico o lesi6ncorpo-
ral
Desconecteia unidad antesde timpiarlao
darleservtcto.De 1ocontrario podriaprodu-
cirse un cheque el_ctrico o causar lesi6n
corporalsi la aspiradora arranca demanera
imprevista°
Paraobtener los mejores resultadosde limpieza,
mantenga timpios losconductos de paso del aire..
Desenchufeel cerd6n de la corrienteel#ctrica..
Si considera que la aspiradorano aspirabien,ase-
g0rese primerode que tabolsano est_ llenay de
que el filtro no est_ atascado..Consulle las CAMBIO
DE LA BOLSA PARAPOLVOy LIMPIEZA DEL
FILTRODE SEGURIDADDEL MOTOR_
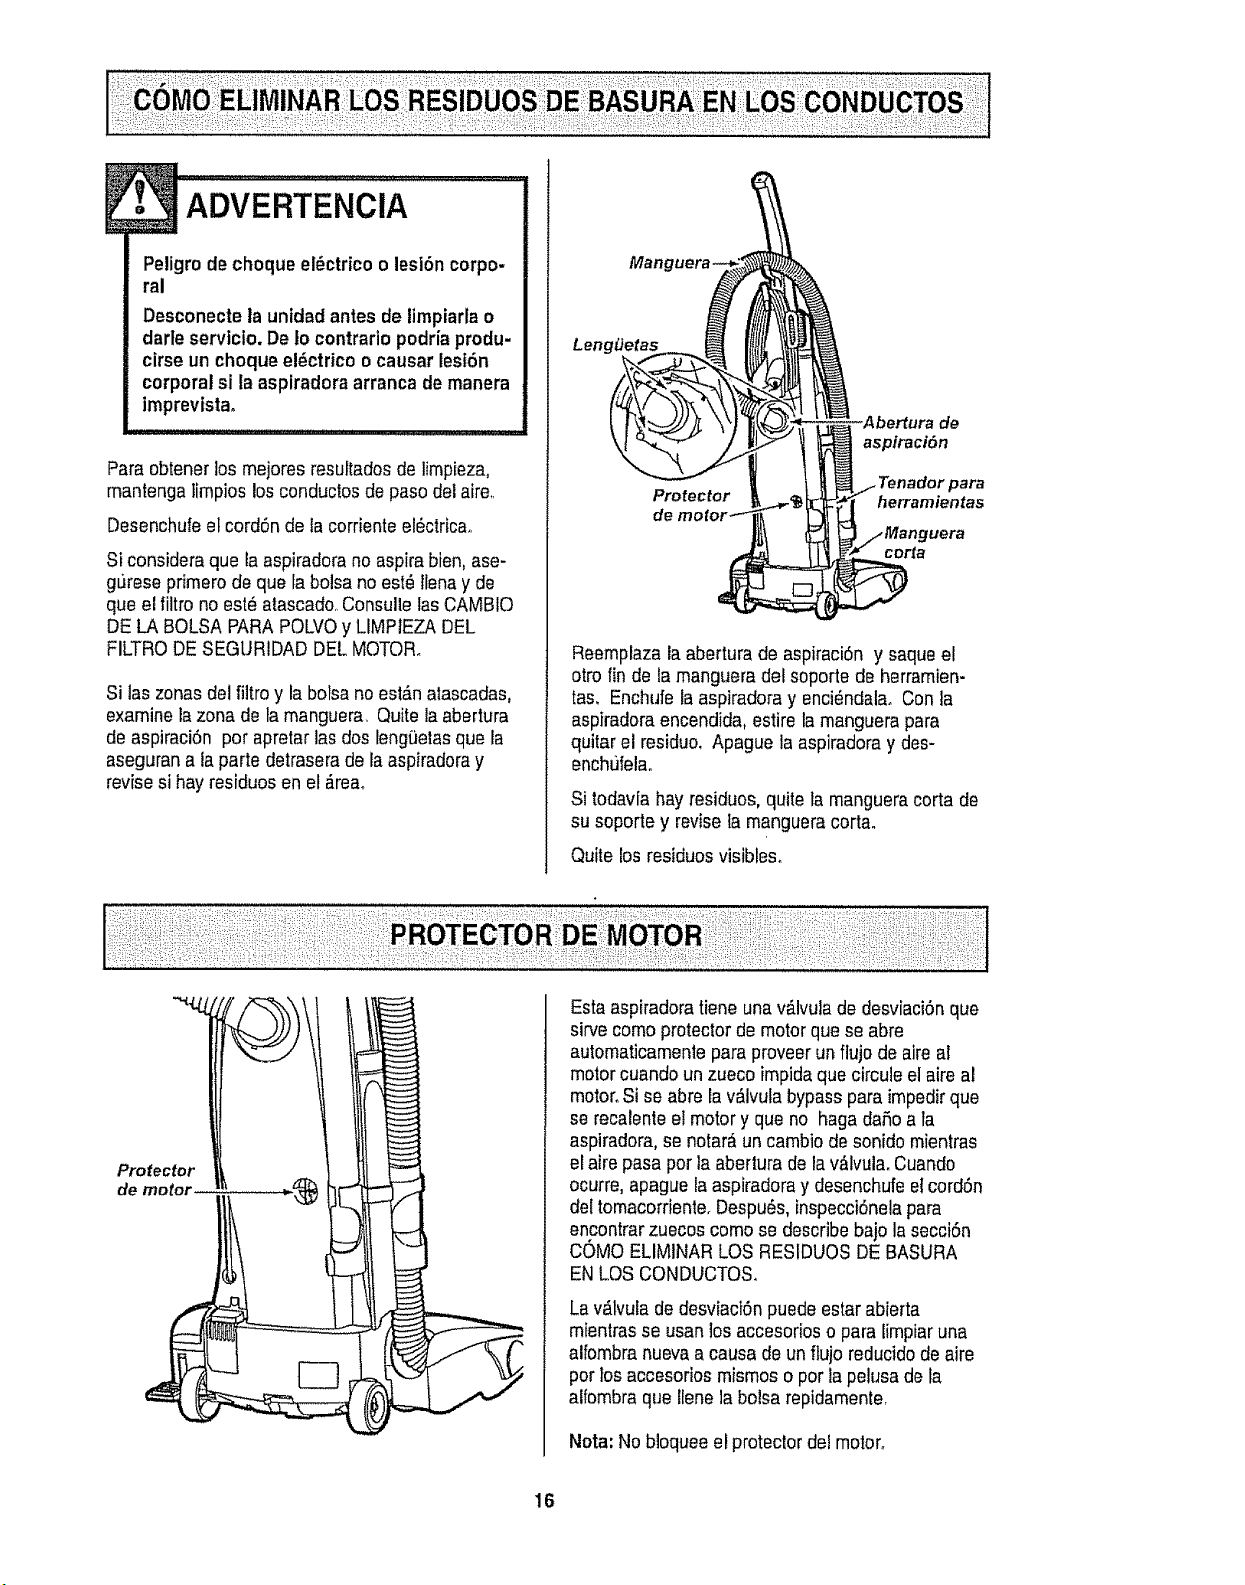
Si laszonas del filtro y la bolsano est,_natascadas,
examine la zona de la manguera. Quite la abertura
de aspiraci6n per apretar lasdos leng_etasque la
asegurana laparte detrasera de laaspiradoray
revise si hayresidues en el _rea.
Leng#etas
Protector
de
de
aspiraci6n
para
herramientas
corta
Reemplazala abertura de aspiraci6n y saqueel
otro fin de la manguera del soporte de herramien-
tas, Enchufe la aspiradoray enci6ndala. Con la
aspiradora encendida, estire la manguera para
quitar el residue, Apague la aspiradora y des-
enchufela.
Si todavfa hay residues, quitela mangueracorta de
su soporte y revise la mangueracortao
Quite los residues visibles°
Protector
de motol
Esta aspiradoratieneuna v&lvulado desviaci6nque
sirve come protectorde motor que se abre
automaticamentepara proveerun flujo de aire al
motorcuando un zueco impidaque circule el aire al
motor.Si se abre la v_,lvulabypasspara impedirque
se recalente el motor y qua no haga daSoa la
aspiradora, so notar_ un cambio de sonidomientras
el aire pasa per la abertura de la v&lvula.Cuando
ocurre, apague laaspiraderay desenchufeelcord6n
del tomacorriente. Despu6s,inspecci6nelapara
encontrar zuecoscome so describebajo la secci6n
COMO ELIMINAR LOS RESIDUES DEBASURA
ENLOS CONDUCTOS,
La v,_lvulade desviaci6npuede estar abierta
mientrasse usan los accesorioso para Eimpiaruna
alfombra nuevaa causa de unflujo reducidode aire
per los accesorios rnismoso per la pelusade la
alfornbraque ilene la balsa repidamente.
Nota: Nobloquee el protectordel motor_
16
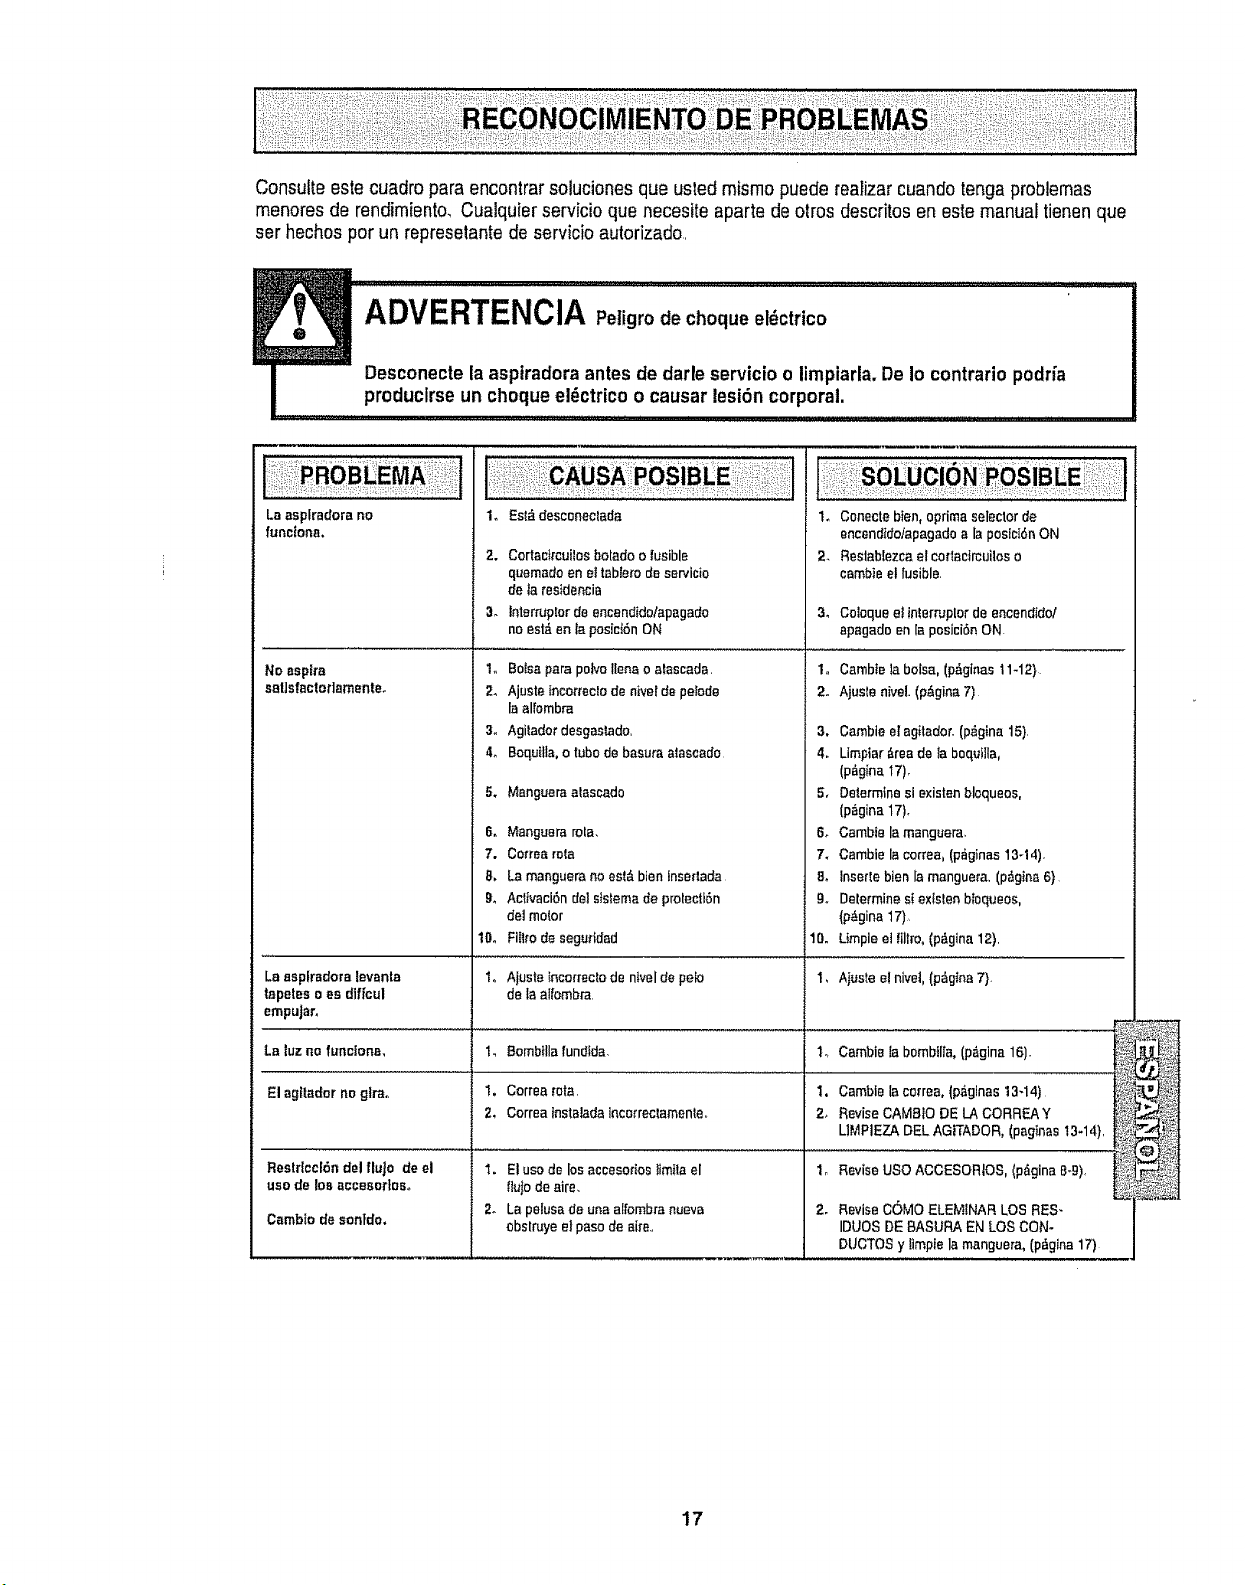
Consulteestecuadroparsencontrarsolucionesqueustedmismopuedereafizarcuandotongaproblemas
menoresderendimiento_CualquierservicioquenecesiteapartedearrasdescritosenestemanuaJtienenque
serhechosperunrepresetantedeservicioautorizado,,
ADVERTENCIA Peligrode choque eldctrico
I ..................Desconectela aspiradora antes de darleservicio o limpiarla.De Io contrario podria
producirseun choque eldctricoo causar lesion corporal.
Lsasplradorano
functona.
No aspire
sst]sfactodamenteo
2.
3_
Est_desceneelada
Cortscitcuilosbotsdo ofusible
quemadoen el tsbtetodeser¢icia
de tsrestdencia
Interrupterde eneendido/apagado
noest,.en taposict6nON
1_ Batespars pairs liens o atascada.
2_ Ajuste tncormctodenivetdepelode
tasffombra
3. Agitsdor desgas!ado.
4. BoquHla,otube de basuraatascedo
5, Mangueraslascado
6. Msnguerarole.
7. Cotrea re_.a
8, La manguerano est,,bien Inserlada
g_ Actfvaci6ndel sIstemadeprotectl6n
de]motor
10o FiIttodesegu_tdad
1. Conectebien,optimaselectorde
encendIdeiapagadoa IsposlcI6nON
2. Reslablezcael codactrcuiloso
cambieelfusible.
3.
Coloquee!interrupterdeencsndidol
epagadoon la posici6nON.
I. CambIe!s balsa,(p_ginas11-12}
2. Ajusle nivel.(p_gina7)
3. Cambiee!agitador.(p,_gina15).
4. Limptar_reade Is boqutlla,
(p_gina 17),
5, Determinesi existenblequses,
(p_gina17).
6. Cambtela manguera,
7. Cambielacortes, (p_ginas13-14).
8_ Insertsbien Ismsngueta,(p_gins6)
9. Deletmine stexlslenbloquees,
(p_ginat7),
10. Ltmpleel tlll_'o,(p_gina12).
1,
Laasplradoralevanla i,, Ajustetncotmctode ntveldepeb Aiustee!nivet,(p_gtns7}.
t_petesoes dlffcul de la slfombra.
empujar.
La luzno functone, i_ Bombtllsfundtds. 1_ Cambisiabombflla,(p_gina16).
El agttadorno gtra. I, Correarots. 1, CambleIscotrea,(p_glnas13-14)
2, Correatnstsiadalncorreclamenleo 2_ ReviseCAk,IBIO DELA CORREAY
UMPIEZADELAGITADOR,(pagtnas13.14).
RestdcclOndel lluJo deel Reviseuse ACCESORiOS,(p_gina8-g),
use de los sccesortos,,
2.
Csmblode sonldo,
1. El usedo losaccesotioslimtla el
l]utodesire.
2_ Lapelusade una alfombranueva
obslruye elpasodesite,,
ReviseCOMe ELEMINARLOSRES-
IDUES DEBASURAEN LOSCON-
DUCTOSy Iimpfela manguera,(p_gina17)
17
_-_::;:!;'::':i_¸ ......
Getit fixed, at your home orourst
]•i!•i:?!?:i_
•_z_• _
_:ii!_:•ii¸
:iii::/i!:ii:i:i
•ii:?::_}:ii
:i_•!i: !/_i
:•:_•• ;i:•i
=
Your Home
For repair - in your home - of all major brand appliances,
lawn and garden equipment, or heating and cooling systems,
no matter who made it, no matter who sold it!
For the replacement parts, accessories and
owner's manuals that you need to do-it-yourself.
For Sears professional installation of home appliances
and items like garage door openers and water heaters.
1-800-4-MY-HOME ® Anytime, day or night
(1-800-469-4663) (U,S.A, and Canada)
www.sears.oom www.sears.ca
Our Home
For repair of carry-in products like vacuums, lawn equipment,
and electronics, call or go on-line for the nearest
Sears Parts and Repair Center.
1-800-488-1222 Anytime, day or night (I.JoSoA_only)
www.sears.com
To purchase a protection agreement on a product serviced by Sears:
1-800-827-6655 (usA.) 1-800-361-6665 (Canada)
::k:•::::::]:i
;•!ii:•}i:{
::::::::)::::i::.
Para pedir serviciode reparacbn
a domicilio,y para ordenar piezas:
1..888.SU-HOGARsM
(1.888-784.6427)
Au Canada pour service en fran£:ais:
1.800.LE-FOYER Mc
(1-80o-533-6937)
www,searsoca
.,_ L¸
©Sears,Roebuckand C,or
® Registered Trademark/m Trademark / sMService Mark of Sears, Roebuck and Co,
® Marca Regtstrada / TMMarca de F&brica/ saMarca de Servicio de Sears, Roebuck and Coo
MCMarque de commerce 1MOMarque d_pos6e de Sears, Roebuck and Co,,