Home
Bookmarks
Home
Karcher
Karcher 1.106-220.0 User Manual
Page 3
Karcher 1.106-220.0 K2100PS
User Manual - Page 3
For 1.106-220.0.
PDF File Manual
,
38 pages
,
Read Online
|
Download pdf file
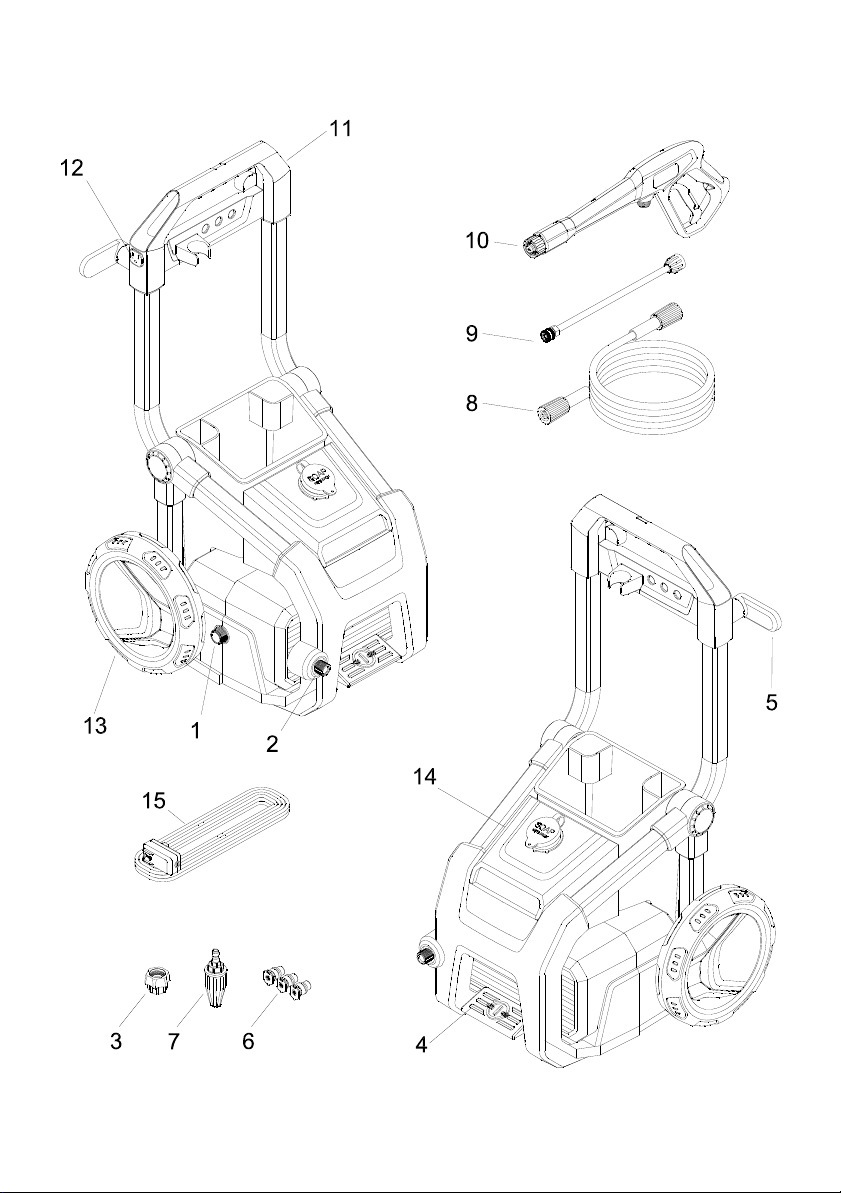
Machine Parts List
1. Water Inlet
2. High Pressure Outlet
3. Hose Connector
4. ON/Off Pedal
5. Power Cord Cleat
6. Nozzles
7. Turbo Nozzle
8. High Pressure Hose
9. Spray Wand
10. Spray Gun
11. Handle
12. Plug Storage
13. Wheel
14. Detergent Tank
15. Power Cord
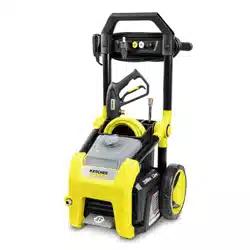
K2100PS Pressure Washer
Contents
Specifications
Customer Service
Registration
Warranty
USA Customer Service
Canada Customer Service
Mexico Customer Service
Safety Instructions
Hazard Levels
Important Safety Instructions
Water Supply (Cold Water Only)
Ground Fault Circuit Interrupter Protection
Intended Use
Owner/User Responsibility
Assembly Instructions
1. Insert wheels into the body of the machine. Secure with axle pin.
2. Push the handle into place.
3. Install the hose connector to the water inlet.
4. Attach nozzles to handle.
5. Thread one end of the high pressure hose tightly onto the high pressure outlet on the unit.
6. Thread the other end of the high pressure hose onto the spray gun inlet.
Initial Start-Up
1. Thread the garden hose onto the water inlet connector and hand tighten.
2. Connect the garden hose to the cold water source and turn the water completely on.
3. Attach the spray wand to the spray gun by pressing the gun into the wand and hand tightening the threading of the gun onto the wand.
4. Pull the lever on the trigger gun to make sure that water is flowing freely and that all air has been purged from the device.
GFCI Instructions
1. Plug the Ground Fault Circuit Interrupter (GFCI) into a working outlet.
2. Press “TEST”, then press “RESET” to assure proper connection.
Operation Instructions
High Pressure Operation
1. Install the nozzle with the quick connect on the end of the wand by pulling the collar back, inserting the soap nozzle, then pushing the collar back. Check to make sure that Nozzle is secure.
2. Turn on the machine by stepping down on the foot pedal. The motor starts when the trigger of the gun is pulled and shuts off when the trigger is released.
3. Unlock the Spray Gun safety lock. Switch on the device by pulling on the lever of the trigger gun.
4. Switch off the device by releasing the lever of the trigger gun. High pressure remains in the device.
Using the Accessories
Using the Nozzles
Working with Detergents
1. Install the soap nozzle into the quick connect on the end of the wand by pulling the collar back, inserting the soap nozzle, then pushing the collar back. Check to make sure that Nozzle is secure.
2. Fill the soap tank with Kärcher detergent.
3. Turn on the pressure washer by stepping on the foot pedal. Pull trigger to operate unit. Liquid detergent is drawn into the unit and mixed with water. Apply detergent to work area. Do not allow detergent to dry on surface.
4. To rinse, replace the soap nozzle with the 15° nozzle and pull trigger to operate.
5. Cleaning Up: Always run fresh water through the detergent tank when done to flush any remaining detergents from the injection system.
Taking a Break
five minutes or more
1. Release trigger and engage gun safety lock.
2. Turn pressure washer OFF by stepping on the foot pedal.
Shutting Down & Cleaning Up
1. Turn the machine off by stepping on the foot pedal and unplug the cord from the outlet.
2. Turn off the water source.
3. Press trigger to release water pressure.
4. Release trigger and engage the gun safety lock.
5. Disconnect the garden hose from the water inlet on the machine.
6. Unthread and disconnect the high pressure hose from the machine.
Winterizing & Long Term Storage
1. Disconnect all water connections.
2. Turn on the machine for a few seconds, until the water which had remained in the pump exits, turn off immediately.
3. Do not allow high-pressure hose to become kinked.
4. Store the machine and accessories in a room which does not reach freezing temperatures. DO NOT store near furnace or other sources of heat as it may dry out the pump seals.
Maintenance Instructions
Cleaning the Water Inlet Filter
1. Disconnect the connector from the water inlet.
2. Rinse out the water inlet filter in warm water.
3. Thread the connector into the water inlet.
Maintenance
Cleaning Tips
Deck Cleaning
House Siding
Cement Patios, Brick and Stone
Cars, Boats and Motorcycles
Barbecue Grills, Outdoor Power Equipment and Gardening Tools
Patio and Lawn Furniture
Optional Accessories
Pump Guard
Troubleshooting
K2100PS Pressure Washer
Contenu
Spécifications
Symbole d'alerte de sécurité
Mesures De Sécurité Importantes
Approvisionnement En Eau (Eau Froide Seulement)
Protection par disjoncteur différentiel de fuite à la terre
Instructions De Montage
1. Insérer les roues dans le corps de la machine. Fixer la tige d'essieu.
2. Tirer la poignée en place.
3. Installer le raccord de boyau sur l'entrée d'eau.
4. Fixez les buses au pistolet.
Instructions De Fonctionnement
1. Vissez une extrémité du tuyau haute pression fermement sur la sortie haute pression de l'appareil.
2. Vissez l'autre extrémité du tuyau à haute pression sur l'entrée du pistolet.
3. Insérer le tube de vaporisation dans le pistolet vaporisateur. L'appuyer contre le ressort tenseur et tourner en position verrouillée.
4. Visser le boyau d'arrosage dans le raccord d'entrée d'eau et serrer à la main.
5. Raccorder le boyau d'arrosage à la source d'eau froide et ouvrir l'eau complètement.
6. Brancher le disjoncteur différentiel de fuite à la terre (DDFT) dans une prise qui fonctionne. Nous vous recommandons de tester le DDFT dans le cadre de la procédure de démarrage chaque fois que vous utilisez la machine. Pour apprendre comment...
7. Déverrouiller le verrou de sécurité du pistolet vaporisateur. Déclencher le pistolet pour éliminer l'air emprisonné. Attendre qu'un flux constant d'eau émerge de la buse de vaporisation.
8. Actionner la machine et appuyant sur la pédale.
Utilisation Des Accessoires
Utilisation des Buses
Travailler Avec Des Détergents
1. Installer la buse à savon au raccord rapide à l'extrémité du tube.
2. Remplir le réservoir de savon avec le détergent Kärcher.
3. Actionner la machine à laver à pression en appuyant sur la pédale. Tirer sur le déclencheur pour actionner l'appareil. Le détergent liquide est aspiré dans l'appareil et mélangé avec l'eau. Appliquer le détergent à la zone de travail. Ne...
4. Pour rincer, remplacer la buse à savon par la buse à 15° et tirer sur le déclencheur pour actionner.
5. Nettoyage : Toujours faire couler de l'eau fraîche à travers le réservoir de détergent lorsque vous avez terminé afin de rincer le détergent restant du système d'injection.
Prendre Une Pause...cinq minutes ou plus
1. Relâchez la gâchette et mettez le verrou de sécurité du pistolet.
2. Arrêter la machine à laver à pression en appuyant sur la pédale.
Arrêt Et Entretien
1. Arrêter la machine en appuyant sur la pédale et en débranchant le cordon de la prise.
2. Fermez la source d'eau.
3. Appuyez sur la gâchette pour relâcher la pression d'eau.
4. Relâchez la gâchette et mettez le verrou de sécurité du pistolet.
5. Débrancher le boyau d'arrosage de l'entrée d'eau de la machine.
6. Dévisser et débrancher le boyau à haute pression de la machine.
Entreposage À Long Terme Et Pour Hiver
1. Débranchez tous les raccords d'eau.
2. Faites fonctionner l'appareil pendant quelques secondes, jusqu'à ce que l'eau qui restait dans la pompe sorte. Arrêtez immédiatement le moteur.
3. Évitez de plier le boyau à haute pression.
4. Rangez l'appareil et les accessoires dans un endroit où il n'y a pas de risque de gel. NE rangez PAS l'appareil près d'une fournaise ou d'autres sources de chaleur puisque cela pourrait assécher les joints d'étanchéité de la pompe.
Instructions D'entretien
Nettoyage du filtre d'entrée d'eau
1. Débrancher le raccord de l'entrée d'eau.
2. Rincer le filtre d'entrée d'eau dans l'eau chaude.
3. Visser le raccord dans l'entrée d'eau.
Entretien
Conseils De Nettoyage
Nettoyage de la terrasse
Parements de maison
Patio de ciment, de briques et de pierres
Automobiles, bateaux et motocyclettes
Barbecues, équipements motorisés d'extérieur et outils de jardin
Patio et meubles de jardin
Accessoires optionnels
Pump Guard
Guide De Dépannage
Page 3/38
Page 1
Page 2
Page 3
Page 4
Page 5
Page 6
Page 7
Page 8
Page 9
Page 10
Page 11
Page 12
Page 13
Page 14
Page 15
Page 16
Page 17
Page 18
Page 19
Page 20
Page 21
Page 22
Page 23
Page 24
Page 25
Page 26
Page 27
Page 28
Page 29
Page 30
Page 31
Page 32
Page 33
Page 34
Page 35
Page 36
Page 37
Page 38
Contents
Table of Contents
Search
Previous
Next
Troubleshooting
Bookmarks
Loading ...
Loading ...
Loading ...
Loading ...
Loading ...
File type: PDF
File name: 5991880_1-106-220-0.pdf
File size: 3.88 MB
File Language: English
Pages: 38
Author: Karcher
File created: 2021-11-23
Published: 2022-08-21
Updated: 2023-04-23
Download File
Table of Contents
×
Machine Parts List
2
1. Water Inlet
2
2. High Pressure Outlet
2
3. Hose Connector
2
4. ON/Off Pedal
2
5. Power Cord Cleat
2
6. Nozzles
2
7. Turbo Nozzle
2
8. High Pressure Hose
2
9. Spray Wand
2
10. Spray Gun
2
11. Handle
2
12. Plug Storage
2
13. Wheel
2
14. Detergent Tank
2
15. Power Cord
2
K2100PS Pressure Washer
4
Contents
4
Specifications
4
Customer Service
4
Registration
4
Warranty
4
USA Customer Service
4
Canada Customer Service
4
Mexico Customer Service
5
Safety Instructions
5
Hazard Levels
5
Important Safety Instructions
5
Water Supply (Cold Water Only)
7
Ground Fault Circuit Interrupter Protection
7
Intended Use
8
Owner/User Responsibility
8
Assembly Instructions
8
1. Insert wheels into the body of the machine. Secure with axle pin.
8
2. Push the handle into place.
8
3. Install the hose connector to the water inlet.
8
4. Attach nozzles to handle.
9
5. Thread one end of the high pressure hose tightly onto the high pressure outlet on the unit.
9
6. Thread the other end of the high pressure hose onto the spray gun inlet.
9
Initial Start-Up
9
1. Thread the garden hose onto the water inlet connector and hand tighten.
9
2. Connect the garden hose to the cold water source and turn the water completely on.
9
3. Attach the spray wand to the spray gun by pressing the gun into the wand and hand tightening the threading of the gun onto the wand.
9
4. Pull the lever on the trigger gun to make sure that water is flowing freely and that all air has been purged from the device.
10
GFCI Instructions
10
1. Plug the Ground Fault Circuit Interrupter (GFCI) into a working outlet.
10
2. Press “TEST”, then press “RESET” to assure proper connection.
10
Operation Instructions
10
High Pressure Operation
10
1. Install the nozzle with the quick connect on the end of the wand by pulling the collar back, inserting the soap nozzle, then pushing the collar back. Check to make sure that Nozzle is secure.
10
2. Turn on the machine by stepping down on the foot pedal. The motor starts when the trigger of the gun is pulled and shuts off when the trigger is released.
11
3. Unlock the Spray Gun safety lock. Switch on the device by pulling on the lever of the trigger gun.
11
4. Switch off the device by releasing the lever of the trigger gun. High pressure remains in the device.
11
Using the Accessories
11
Using the Nozzles
11
Working with Detergents
12
1. Install the soap nozzle into the quick connect on the end of the wand by pulling the collar back, inserting the soap nozzle, then pushing the collar back. Check to make sure that Nozzle is secure.
12
2. Fill the soap tank with Kärcher detergent.
13
3. Turn on the pressure washer by stepping on the foot pedal. Pull trigger to operate unit. Liquid detergent is drawn into the unit and mixed with water. Apply detergent to work area. Do not allow detergent to dry on surface.
13
4. To rinse, replace the soap nozzle with the 15° nozzle and pull trigger to operate.
13
5. Cleaning Up: Always run fresh water through the detergent tank when done to flush any remaining detergents from the injection system.
13
Taking a Break
13
five minutes or more
13
1. Release trigger and engage gun safety lock.
13
2. Turn pressure washer OFF by stepping on the foot pedal.
13
Shutting Down & Cleaning Up
14
1. Turn the machine off by stepping on the foot pedal and unplug the cord from the outlet.
14
2. Turn off the water source.
14
3. Press trigger to release water pressure.
14
4. Release trigger and engage the gun safety lock.
14
5. Disconnect the garden hose from the water inlet on the machine.
14
6. Unthread and disconnect the high pressure hose from the machine.
14
Winterizing & Long Term Storage
15
1. Disconnect all water connections.
15
2. Turn on the machine for a few seconds, until the water which had remained in the pump exits, turn off immediately.
15
3. Do not allow high-pressure hose to become kinked.
15
4. Store the machine and accessories in a room which does not reach freezing temperatures. DO NOT store near furnace or other sources of heat as it may dry out the pump seals.
15
Maintenance Instructions
15
Cleaning the Water Inlet Filter
15
1. Disconnect the connector from the water inlet.
15
2. Rinse out the water inlet filter in warm water.
15
3. Thread the connector into the water inlet.
15
Maintenance
15
Cleaning Tips
16
Deck Cleaning
16
House Siding
16
Cement Patios, Brick and Stone
16
Cars, Boats and Motorcycles
17
Barbecue Grills, Outdoor Power Equipment and Gardening Tools
17
Patio and Lawn Furniture
17
Optional Accessories
17
Pump Guard
17
Troubleshooting
18
K2100PS Pressure Washer
21
Contenu
21
Spécifications
21
Symbole d'alerte de sécurité
21
Mesures De Sécurité Importantes
21
Approvisionnement En Eau (Eau Froide Seulement)
23
Protection par disjoncteur différentiel de fuite à la terre
24
Instructions De Montage
24
1. Insérer les roues dans le corps de la machine. Fixer la tige d'essieu.
24
2. Tirer la poignée en place.
24
3. Installer le raccord de boyau sur l'entrée d'eau.
24
4. Fixez les buses au pistolet.
25
Instructions De Fonctionnement
25
1. Vissez une extrémité du tuyau haute pression fermement sur la sortie haute pression de l'appareil.
25
2. Vissez l'autre extrémité du tuyau à haute pression sur l'entrée du pistolet.
25
3. Insérer le tube de vaporisation dans le pistolet vaporisateur. L'appuyer contre le ressort tenseur et tourner en position verrouillée.
25
4. Visser le boyau d'arrosage dans le raccord d'entrée d'eau et serrer à la main.
25
5. Raccorder le boyau d'arrosage à la source d'eau froide et ouvrir l'eau complètement.
26
6. Brancher le disjoncteur différentiel de fuite à la terre (DDFT) dans une prise qui fonctionne. Nous vous recommandons de tester le DDFT dans le cadre de la procédure de démarrage chaque fois que vous utilisez la machine. Pour apprendre comment...
26
7. Déverrouiller le verrou de sécurité du pistolet vaporisateur. Déclencher le pistolet pour éliminer l'air emprisonné. Attendre qu'un flux constant d'eau émerge de la buse de vaporisation.
26
8. Actionner la machine et appuyant sur la pédale.
26
Utilisation Des Accessoires
27
Utilisation des Buses
27
Travailler Avec Des Détergents
27
1. Installer la buse à savon au raccord rapide à l'extrémité du tube.
28
2. Remplir le réservoir de savon avec le détergent Kärcher.
28
3. Actionner la machine à laver à pression en appuyant sur la pédale. Tirer sur le déclencheur pour actionner l'appareil. Le détergent liquide est aspiré dans l'appareil et mélangé avec l'eau. Appliquer le détergent à la zone de travail. Ne...
28
4. Pour rincer, remplacer la buse à savon par la buse à 15° et tirer sur le déclencheur pour actionner.
28
5. Nettoyage : Toujours faire couler de l'eau fraîche à travers le réservoir de détergent lorsque vous avez terminé afin de rincer le détergent restant du système d'injection.
28
Prendre Une Pause...cinq minutes ou plus
29
1. Relâchez la gâchette et mettez le verrou de sécurité du pistolet.
29
2. Arrêter la machine à laver à pression en appuyant sur la pédale.
29
Arrêt Et Entretien
29
1. Arrêter la machine en appuyant sur la pédale et en débranchant le cordon de la prise.
29
2. Fermez la source d'eau.
29
3. Appuyez sur la gâchette pour relâcher la pression d'eau.
29
4. Relâchez la gâchette et mettez le verrou de sécurité du pistolet.
29
5. Débrancher le boyau d'arrosage de l'entrée d'eau de la machine.
29
6. Dévisser et débrancher le boyau à haute pression de la machine.
30
Entreposage À Long Terme Et Pour Hiver
30
1. Débranchez tous les raccords d'eau.
30
2. Faites fonctionner l'appareil pendant quelques secondes, jusqu'à ce que l'eau qui restait dans la pompe sorte. Arrêtez immédiatement le moteur.
30
3. Évitez de plier le boyau à haute pression.
30
4. Rangez l'appareil et les accessoires dans un endroit où il n'y a pas de risque de gel. NE rangez PAS l'appareil près d'une fournaise ou d'autres sources de chaleur puisque cela pourrait assécher les joints d'étanchéité de la pompe.
30
Instructions D'entretien
30
Nettoyage du filtre d'entrée d'eau
30
1. Débrancher le raccord de l'entrée d'eau.
30
2. Rincer le filtre d'entrée d'eau dans l'eau chaude.
30
3. Visser le raccord dans l'entrée d'eau.
30
Entretien
30
Conseils De Nettoyage
31
Nettoyage de la terrasse
31
Parements de maison
31
Patio de ciment, de briques et de pierres
31
Automobiles, bateaux et motocyclettes
32
Barbecues, équipements motorisés d'extérieur et outils de jardin
32
Patio et meubles de jardin
33
Accessoires optionnels
33
Pump Guard
33
Guide De Dépannage
34
Search:
×
Search