Howtogetthebestfrom
..
Energy-savingtips
p5zyxwvutsrqponmlkjihgfedcbaZYXWVUTSRQPONMLKJIHGFEDCBA
p6
Surfacetooting
p7
Ovencoo!dng
p13
Howtouse the
self-cleaningloweroven
p24
Questions?
UsetheProblemSolver
p31
YourDirect Line toQneml Electric
The GEhwer Centef$00.626.2000
UseandCareof
model
JHP63v
i;eklrelJsiRgYolirl?dng~, . , . .- ,~
safety Instructions. . . . . . . . . i3,4
F
~~~~ygy.~avingTips . . . . . . . . . “ .5
Feature’sof Yoi3rRange . . . . . ...6
Surfdcecooking . . . . . . . . ..+. .~
The3-in-Iunit...............$
Howto Griddle.. .. . . .. .. . ...~
HO~l~C~fl~i~~Ti~S . . . . . . ..$..9
SurfaceCookitigGuide. . ...10. 11
AutomaticTimeraridClock. . ..12
UsingYourOven. . . .-. . . . . ...13
BakiHg. . . . . . . . . . . . . . . . ..i. l4
BakingGuide. . . . . . . ..+ . . . ..~~
Roasting. . . . . . . . . . . . . . ..”...~~
MeatThermometer. . . . ...9..17
RoastingGuide. ..~~ . . . . . . . ..~~
Broiling . . . . . . . . . . . . . . ..+ b.~9
Broilingwith
MeatThermometer . . . . . ...20
B~oilingGuide . . . . . . . . . . . . . ..2l
Rotisserie. . . . . . . . . . .-. . . . ...22
RotisserieTimeand
TemperatureGuide. . . . . . ...23
OperatingtheSelf-Cleaning
LowerOven . . . . . . . . ...24.25
Careand Cleaning . ..”l ..,.26,-9
RemovableOvenDoor . . . . . ...27
CleaningGuide--. . . . .-. . ...28.29
If}fiu Need Service.“.. . . . . ...29
ExhaustSystem . . . . . . . . . . . ..~~
TheProblemSolver . . . . . . . ...31
W~arranty. . . . . . . . . .. BackCover
It isintendedtohelpyouoperateand
maintainyournewrangeproperly.
Keepithandyforanswerstoyour
questions.
Ifyoudon’tunderstandsomething
or needmorehelp,write(include
yourphonenumber):
ConsumerAffairs
GeneralElectricCompany
AppliancePark
Louisville,KY40225
writedownthemodeI
andserialnumbers.
You’llfindthemon alabellocated
onthefrontoftherangebehindthe
ovendoor.
Thesenumbersarealsoonthe
ConsumerProductOwnership
RegistrationCardthatcamewith
yourrange.Beforesendinginthis
card,pleasewritethesenumbers
here:
Model Number
Serial Number
Usethesenumbersin any
correspondenceor servicecalls
concerningyourrange.
Immediately contactthedealer(or ;._.
builder)thatsoldyoutherange.
save time a~ld money.
Before
you request
.—
service.e *
..
-.
ChecktheProblemSolveron
.-
page31.It listsminorcausesof
operatingproblemsthatyoucan
correctyourself.
.—
2
b;lsic?ilfet}lprec:iutiollsshouldbe
;Qilt>iveti,iniit]dillgthefollowing:
s t~scthisapplianceonlyforits
intendeduseasdescribedinthis
manual,
@Besureyourapplianceis
properlyinstalledandgrounded
bya qualifiedtechnicianin
accordancewiththeprovided
installationinstructions.
@Don’tattempttorepairor
replaceanypartofyourrange
unlessit isspecifically
recommendedinthisbook.All
otherservicingshouldbereferred
toa qualifiedtechnician.
QBeforeperforminganyservice,
DISCONNE~ THERANGE
WERSUPPLYATTHE
USEHOLDDISTNBUTION
a wearproper clothing.Loose
fittingor hanginggarmentsshould
neverbewornwhileusingthe
appliance,Flammablematerial
couldbe ignitedifbroughtin
contactwithhotheatingelements
andmaycausesevereburns,
e use onlydry potholders—
Moistor damppotholdersonhot
surfacesmayresultinburnsfrom
steam.Donotletpotholderstouch
hotheatingelements.Donotuse
a towelorotherbulkycloth.
@Neveruseyourappliancefor
Warmingor heatingtheroom,
e Storige in or onappliaMce—
Flammablematerialsshouldnot
bestoredinanovenor near
surfaceunits.
e Keephoodand greasefilten
cleantomaintaingoodventing
andtoavoidgreasefires.
@Donot let Cookinggrease
or otherflammablematerials
accumulatein the rangeor
near it.
@Donot usewateron grease
fir~s.Neverpickup a framing
pan. smother flamingpau on
Rem@mber:The inside surface _- --:
oftheovenmaybehotwhenthe
-.
surfaceCookixkgU12%S:
@useProper Pan size—”This
applianceisequippedwithoneor
moresurfaceunitsofdifferent
size.SeIectutensilshavingflat
bottomslargeenough.tocoverthe
surfaceunitheatingelement.The
useofundersizedutensilswill
exposea portionoftheheating
elementtodirectcontactandmay
resultinignitionofclothing.
Properrelationshipofutensilto
burnerwillalsoimproveefficiency.
@Neverleavesurfaceud~
mattendedat tigh hat setiings,
Boilovercausessmokingand
greasyspilloversthatmaycatch
onfire.
~Besuredrippansandventducts
arenotcoveredandareinplace.
Theirabsenceduringcooking
coulddamagerangepartsand
wiring.
@~~~y~~~~~]~~~~~~f~~~~~
linedrip pans oranywhereinthe
ovenexceptasdescribedinthis
book.Misusecouldresultina
shock,firehazard,or damageto
therange.
@Onlycertaintypesofglass,
glass/cetic, cetic, -en-,
orotherglazedcontainersare
suitableforrange-topservice;
othersmaybreakbecauseofthe
suddenchangeintemperature.
(SeeSectionon “Surface
Cooking”forsuggestions.)
@Tonlinimizeburns, ignitionof
flammablematerials,and
spillage;thehandleofa container
shouldbepositionedsothatit is
turnedtowardthecenterofthe
rangewithoutextendingover
nearbysurfaceunits.
e Dan9timlllerseor soak
removablesurfaceunits.Don9t
put themin a dislR$Yashere
@.Aiwaysturnsurfaceunitto
ofiFbeforeremovingutensil,
~Keepa~~eyeonfoodsbeing
friedatHIGHor MEDIU?ti
HIGHheats.
@Toavoidthe possibilityofa
bwn or elwtricshQck9alwaysbe
Cerhinthat the coRtroIsfor all
surfaceUtik areat Om psition
and all Coilsare coolbefore
attenlptingtoremovethe unit.
@~hen flamingfoodsunder
the hood, twn the fan off.The
fan9if operating,mayspread
the flame.
@Foodsfor fryingShouldbe ?dS
dry aspossible.Frostonfrozen
foodsor moistureonfreshfoods
cancausehotfattobubbleupand
oversidesofpan.
:-..
—
@Uselittlefatforeffective
shallowor deep-fatfrying.Filling
thepantoofi~ offit cancause
spilloverswhenfoodisadded.
e If acombinationofoi]sor fats
WMbeusedinfrying,stirtogether
beforeheating,or asfatsmelt
slowly.
@Alwaysheat fat slowly,and
watchas it heats.
*Usedeepfatthermometer
wheneverpossibleto prevent
overheatingfatbeyondthe
smokingpoint.
—
..
SAVETHESE
msTRucTIoNs i
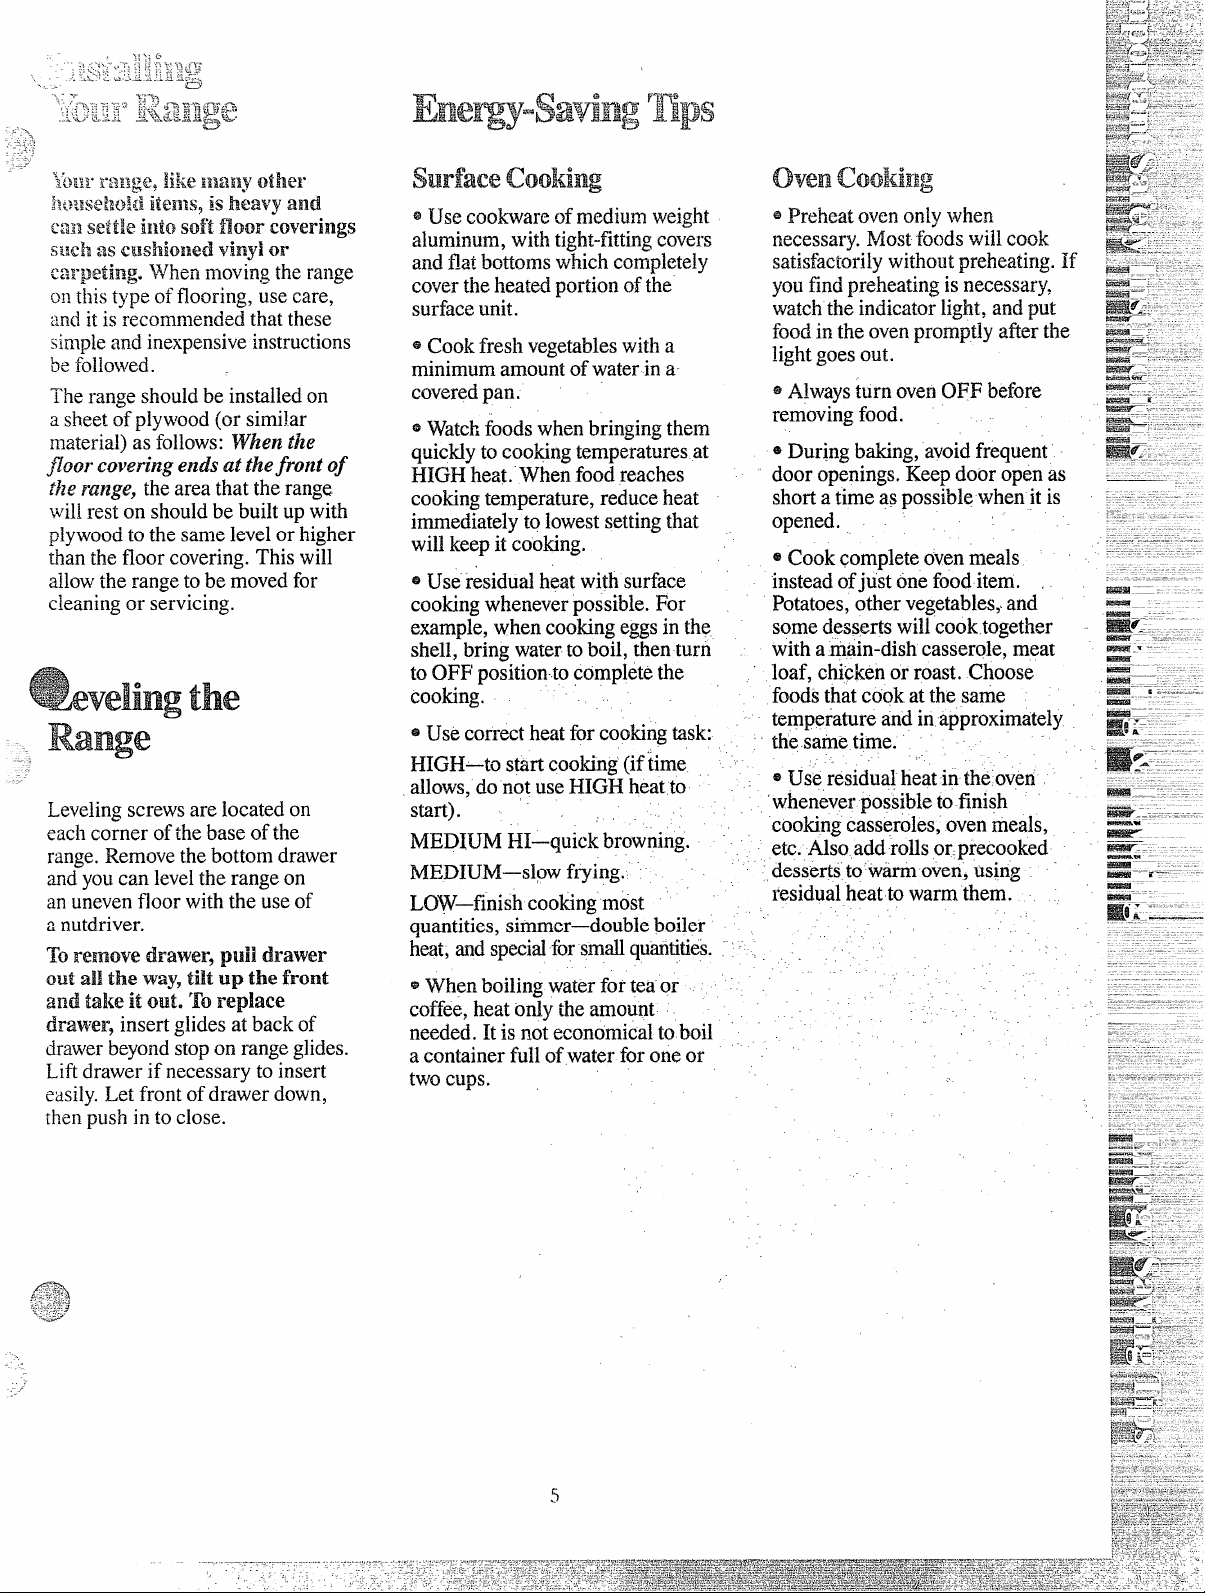
Therangeshouldbe installedon
a sheetof plywood(or similar
material)as follows:l~hen the
J~QoY’Co$’eringendsat thefront of
flzera~~ge,theareathattherange
wilirest on shouldbe builtupwith
plywoodto the samelevelor higher
tian thefloorcovering.Thiswill
allowthe rangetobe movedfor
cleaningor servicing.
Iing the
Range
Levelingscrewsare locatedon
eachcornerofthebaseofthe
range.Removethebottomdrawer
andyoLlcan levelthe rangeon
an unevenfloorwiththe useof
2 nutdriver.
Toremove drawer, pulildrawer
outal! the wayy ti~t up the front
andtake it out. ‘roreplace
drawer, insertglidesat backof
drawerbeyondstopon rangeglides.
Liftdrawerif necessaryto insert
easily.Let frontofdrawerdown,
~henpushin to close.
surfacecooking
@Use
cookwareofmediumweight
aluminum,withtight-fittingcovers
andflatbottomswhichcompletely
coveytheheatedportionofthe
surfaceunit.
* Cookfresh vegetableswitha
minimumamountofwaterin a
coveredpan.
~Watchfoodswhenbringingthem
quicklyto cookingtemperaturesat
HIGHheat. Whenfoodreaches
cookingtemperature,reduceheat
immediatelyto lowestsettingthat
willkeepit cooking,
~Useresidualheatwithsurface
cookingwheneverpossible.For
example,whencookingeggsin the
shell,bringwatertoboil, thenturn
to OFF position-tocompletethe
cooking.
@Usecorrectheatforcookingtask:
HIGH—tos~rt coobg (iftirne
allows,do notuseHIGHheatto
st2rt).
!.
MEDIUMHI—quickbrowning.
MEDIUM—slowfrying.
LOW—finishcookingmost
quantities,simmer—doubleboiler
hwt, andspecialforsm~ quantities.-
@Whenboilingwaterforteaor
coffee,heatody theamount
needed.It is noteconomicalto boil -
a containerfullof waterfor oneor
twocups.
..
.-
-.
5
. ....
~Preheatovenon~ywhen
necessary.Mostfoodswilicook
satisfactorilywithoutpreheating.If
youfindpreheatingis necessary,
watchtheindicatorlight,andput
foodin the ovenpromptlyaftezthe
lightgoesout.
@AlwaysturnovenOFFbefore
removingfood.
@Duringbaking,avoidfrequent
dooropenings.Keepdooropenas
shorta timeas possiblewhenit is
opened.
@Cookcompleteovenmeals
insteadofjust onefooditem. ,
Potatoes,othervegetables,.and
somedessertswillcooktogether
witha main-dishcasserole,meat
loaf, chickenor roast. Choose
foodsthatcookat the same
temperatureandin approximately
thesame time. ~
.-
,.
~Use residualheatin theoven
wheneverpossibleto finish
cookingcasseroles,ovenmeals,
etc.Alsoaddrollsor.precooked
dessertsto‘warmoven,using
residualheatto warmthem.
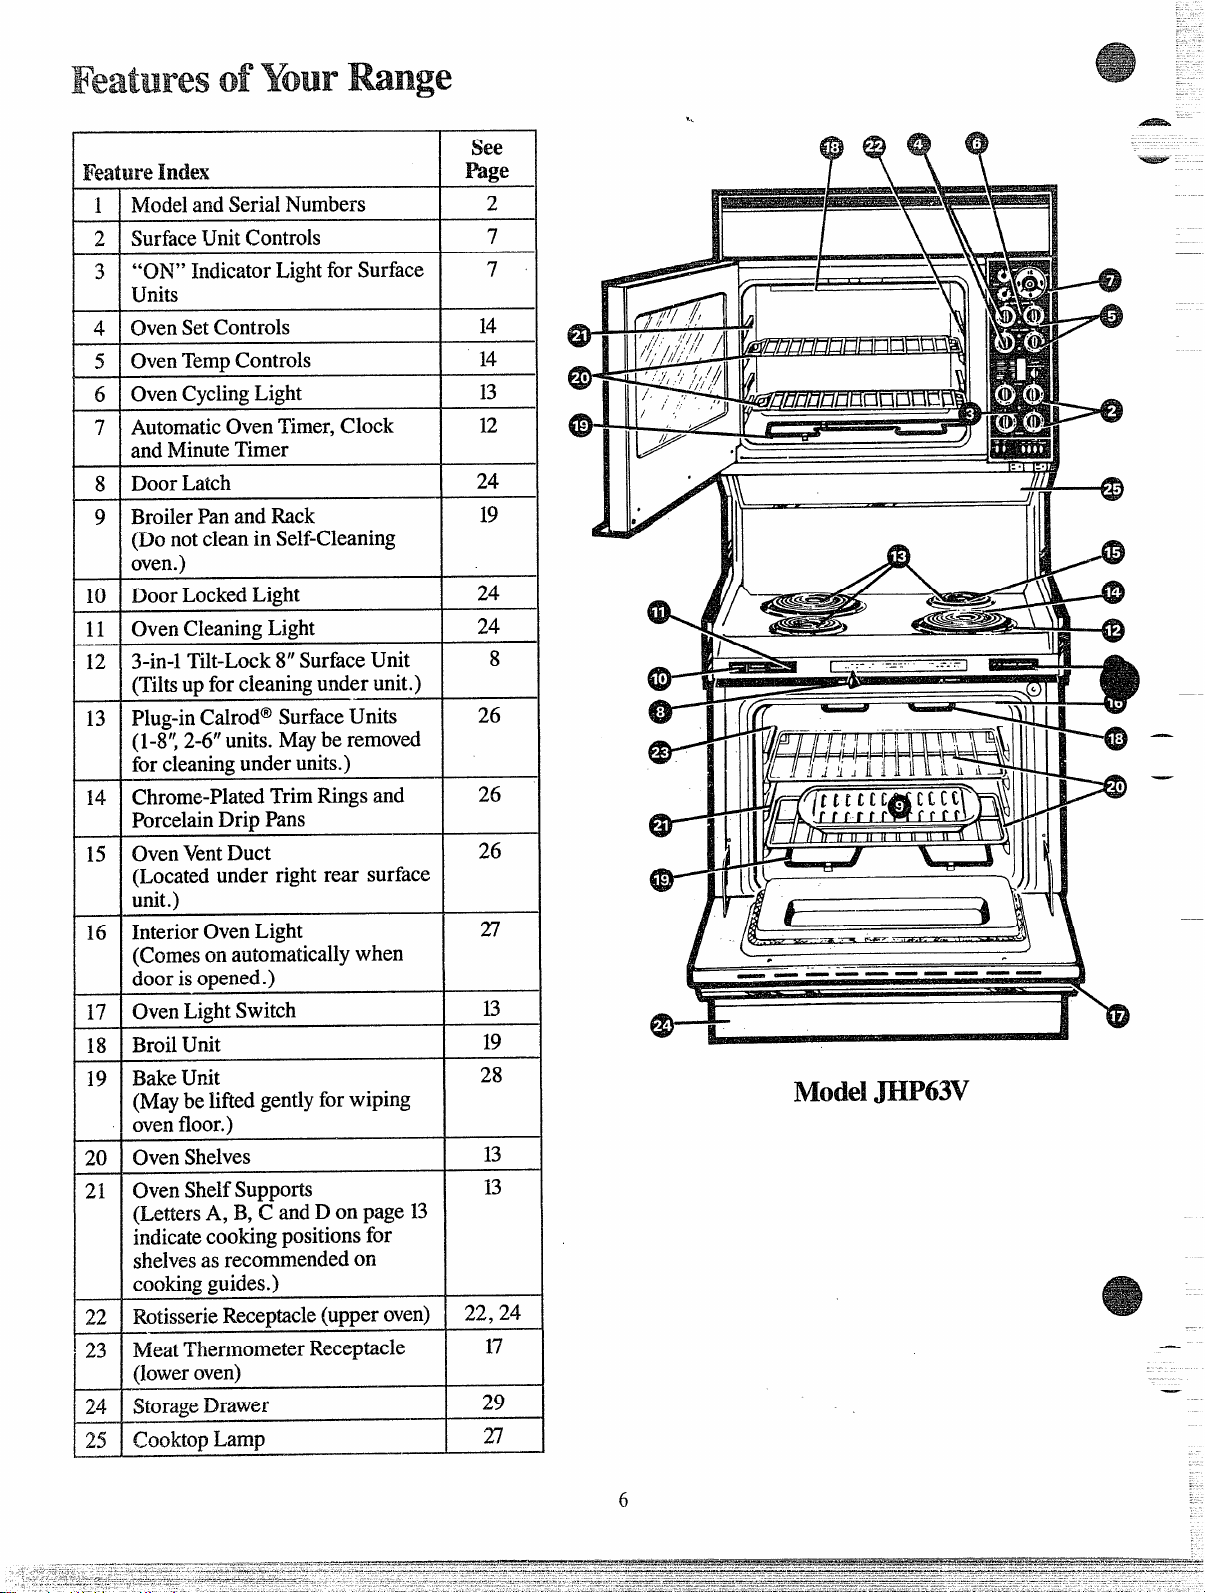
FeaturesoflburRange
FeatureIndex
see
mge
2ModelandSerialNumbers
SurfaceUnitControls
“ON” IndicatorLightfor Surface
Units
OvenSetControls
OvenTempControls
OvenCyclingLight
AutomaticOvenTimer,Clock
andMinuteTimer
DoorLatch
BroilerPanand ~ck
(Do notcleanin Self-Cleaning
oven.)
DoorLockedLight
OvenCleaningLight
3-in-1Tilt-Lock8“SurfaceUnit
(Tiltsup for cleaningunderunit.)
Plug-inCalrod@SurfaceUnits
(1-8’;2-6”units.Maybe removed
for cleaningunderunits.)
‘chrome-PlatedTrimRingsand
PorcelainDrip Pans
OvenVentDuct
(Locatedunder right rear surface
unit.)
InteriorOvenLight
(Comeson automaticallywhen
door is opened.)
OvenLightSwitch
BroilUnit
BakeUnit
(Maybeliftedgentlyfor wiping
ovenfloor.)
OvenShelves
OvenShelfSupports
(LettersA,B,C andD on page 13
indicatecookingpositionsfor
shelvesas recommendedon
cookingguides.)
RotisserieReceptacle(upperoven)
—
MeatThermometerReceptacle
(loweroven)
StorageDrawer
CooktopLamp
7
7
14
14
13
12
24
I
8
19
9
24
24
8
26
26
26
27
16
ii
,_ ..- ———— ———
13
19
28
ModelmP63V
13
20
22,24
-—
—
23
z
29
27
6
.

—
Yoursurfaceunitsandcontrolsare
desigi]edtogiveyouan infinite
choiceofheatsettingsforsurface
unitcooking.
AtbothOFF andHIGHpositions,
thereisa slightnichesocontrol
“clicks”atthosepositions;“click”
onHIGHmarksthehighestsetting;
thelowestsettingisbetweenthe
wordsLOWandOFF.Ina quiet
kitchenyoumayhearslight
“clicking”soundsduringcooking,
indicatingheatsettingsselected
arebeingmaintained.
Switchingheatstohighersettings
alwaysshowaquickerchangethan
switchingto lowersettings.
Howtosetthecontrols
—.
step 1
Graspcontrolknobandpushin. . .
Step
2
cookingGuide
Quickstartforcooking;
bringwatertoboil.
MED
HI
MED
WM
Fastfry,panbroil;maintain =
fastboilonlargeamountof ‘@-
food. -
Sauteandbrown;maintain
slowboilonlargeamount
offood.
CookafierstartingatHIGH;
cookwithlittlewaterin
coveredpan.
Steamrice,cereal;maintain
servingtemperatureofmost
foods.
N~E:
1. AtHIGH,MEDHI, neverleave
foodunattended.Boiloverscause
smoking;greasyspilloversmay
catchfire.
2. AtWARM,LOW,melt
chocolate,butteronsmallunit.
Turneitherclockwiseorcounter-
clockwiseto desiredheatsetting.
Controlmustbepushedintoset
onlyfromOFFposition.When
controiis inanypositionother
thanOFF,itmayberotated
withoutpushingin.
BesureyouturncontroltoOFF
whenyoufinishcooking.An
indicatorlightwi~lglowwhenANY
heatonanysurfaceunitison.
7
—
.—
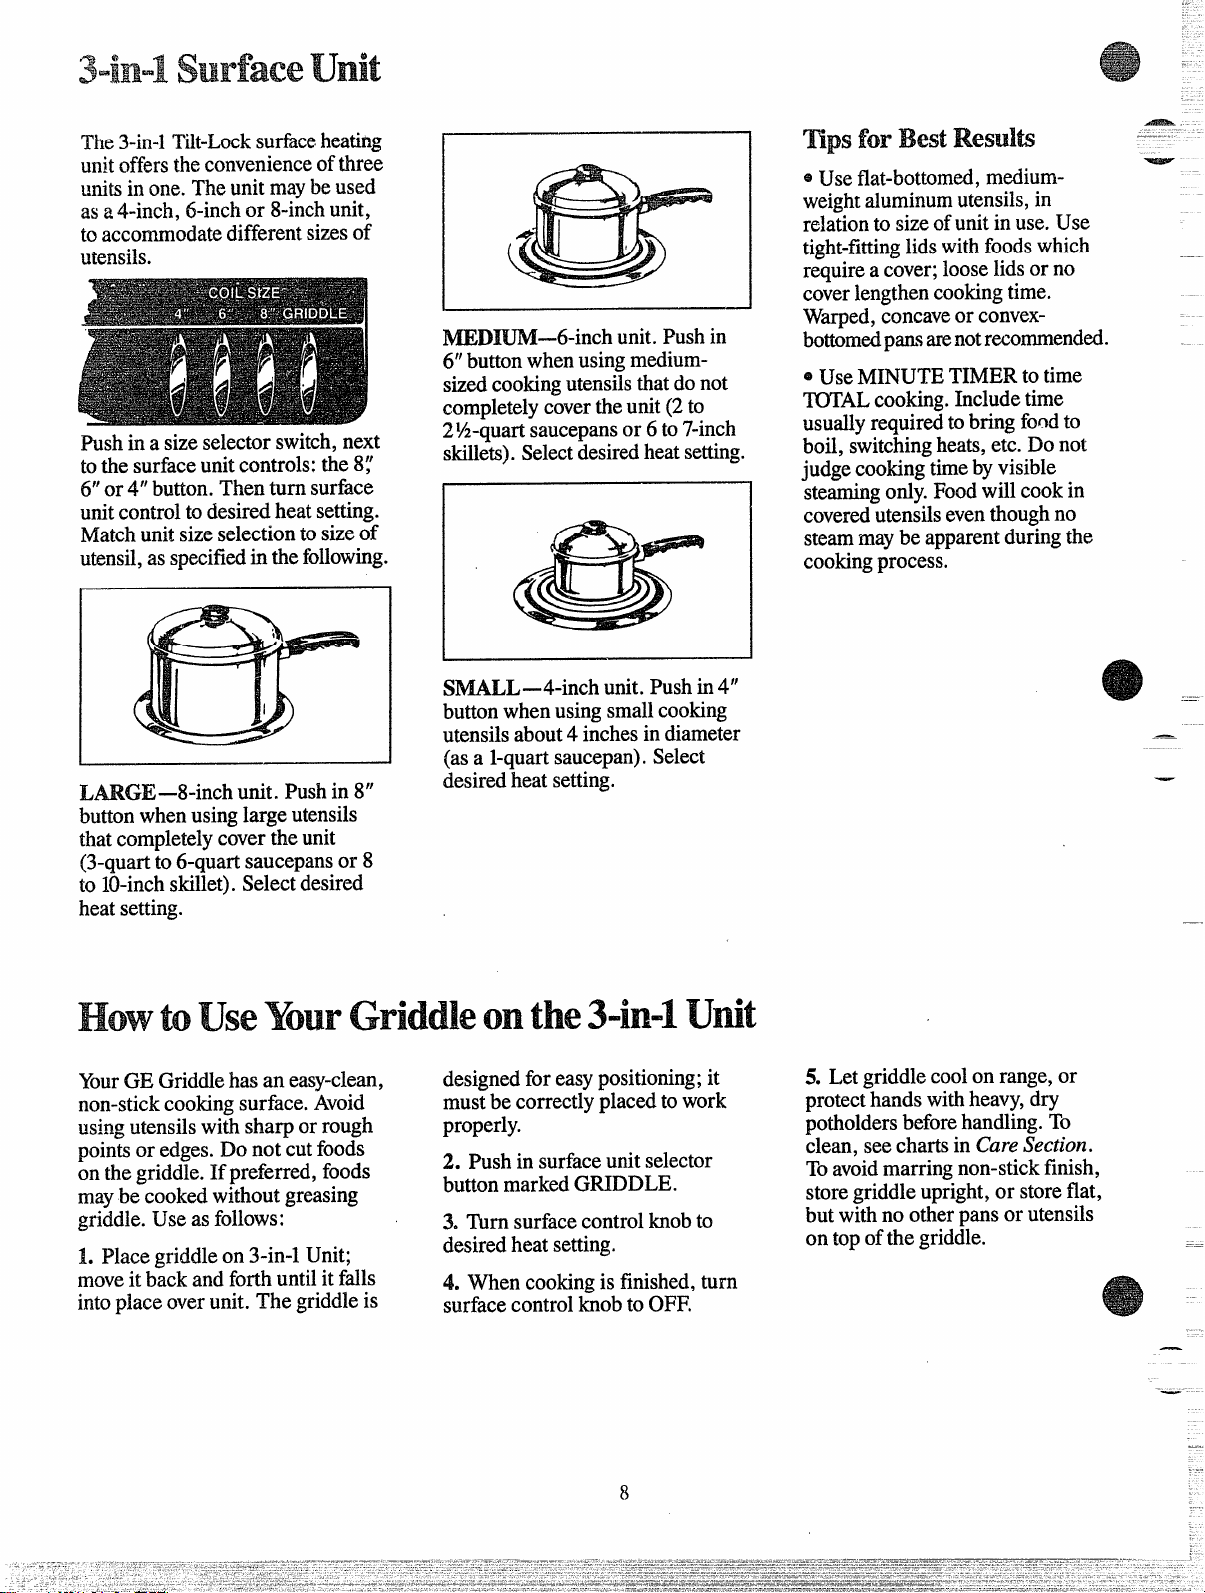
3“in”lsurfaceunit
The3-in-lTfit-Locksufice heating
unitofferstheconvenienceofthree.
unitsin one. Theunitmaybe used
as a 4-inch,6-inchor 8-inchunit,
to accommodatedifferentsizesof
utensils.
Pushin a sizeselectorswitch,next
tothe surfaceunitcontrols:the $:
6“or 4“button.Thenturn surface
unitcontrolto desiredheatsetting.
Matchunitsizeselectionto sizeof
utensil,as specifiedin thefollowing.
L
L~GE–8-inch unit. Pushin 8“
buttonwhenusinglargeutensils
thatcompletelycovertheunit
(3-quartto 6-quartsaucepansor 8
to 10-inchskillet).Selectdesired
heatsetting.
~Dm—6-inch unit.Pushin
6“buttonwhenusingmedium-
sizedcookingutensilsthatdonot
completelycovertheunit(2 to
2%-quartsaucepansor 6 to7-inch
skillets).Selectdesiredheatsetting.
S~LL—4-inch unit.Pushin4“
buttonwhenusingsmallcooking
utensilsabout4 inchesin diameter
(as a l-quartsaucepan).Select
desiredheatsetting.
HowtoUseYourGriddleonthe3-in-=1Utit
YourGE Griddlehas an easy-clean,
designedfor easypositioning;it
non-stickcookingsurface.Avoid
mustbe correctlyplacedto work
usingutensilswithsharp
orrough properly.
pointsor edges.Do not cutfoods
on thegriddle.If preferred,foods
maybe cookedwithoutgreasing
griddle.Use as follows:
1. Placegriddleon 3-in-1Unit;
2. Push in surfaceunitselector
buttonmarkedGNDDLE.
3. Turnsurfacecontrolknobto
desiredheatsetting.
moveit b~ckand forthuntilit falls
4. Whencookingis finished,turn
intoplaceoverunit. The griddleis
surfacecontrolknobto OFF.
8
mpsforBestResul@
~Use flat-bottomed,medium-
weightaluminumutensils,in
relationto sizeofunitin use.Use
tight-fittinglidswithfoodswhich
requirea cover;looselidsor no
coverlengthencookingtime.
Warped,concaveor convex-
bottomedpmsarenotr~ommended.
~UseMINUTETIMERto time
~AL cooking.Includetime
usuallyrequiredtobringfoodto
boil, switchingheats,etc. Do not
judgecookingtimebyvisible
steamingonly.Foodwillcookin
coveredutensilseventhoughno
steammaybeapparentduringthe
cookingprocess.
—_
—
5. Letgriddlecoolon range,or
protec~handswithheavy,dry
potholdersbeforehandling.To
clean,seechartsin CareSection.
Toavoidmarringnon-stickfinish,
storegriddleupright,or storeflat,
but withno otherpansor utensils
on topof the griddle.
—
—
—..
.-
--
.-
A. Yes,butonlyuseutensils
designedforcanningpurposes.Check
themanufacturer’sinstructionsand
recipesfor preservingfoods.Be
surecanneris flat-bottomedand
fitsoverthecenterofyourCalrod@
Llnit.Sincecanninggenerateslarge
amountsofsteam,be carefulto
al,oidburilsfrox~steamor heat.
Canningshou~donlybe doneon
surfaceunits.
Q. Can 1covermy drip panswith
foil?
A. No. Cleanas recommendedin
CleaningGuide.
—
—
Q. CanI use specialcooking
equipment,likean orientalwok,
onanysurfaceunits?
A. Utensilswithoutflatsurfaces
are notrecommended.Thelifeof
yoursurfaceunitcanbe shortened
andtherangetopcanbe damaged
fromthehighheatneededforthis
typeof cooking.
Q. WhyamI notgettingtheheat
I needfrommyunitseventhough
I havetheknobson the right
setting?
A. Afierturningsurfaceunitoff
andmakingsureit is cool, checkto
makesurethatyourplug-inunits
are securelyfastenedintothe
surfaceconnection.
Q. Whydo myutensilstiltwhenI
piacethemonthesurfaceunit?
A. Becausethe surfaceunitis
notflat. Makesurethatthe “feet”
on yourCalrod”unitsaresitting
tightlyin the rangetop indentation
andthe reflectorringis flatonthe
rangesurface.
Q. Whyis the porcelainfinishon
mycontainerscomingoff?
A. If youset yourCalrod@unit
higherthanrequiredfor the
containermaterial,andleaveit, the
finishmaysmoke,crack,pop,or
burndependingonthe potor pan.
Also,a too highheatfor long
periods,andsmallamountsofdry
food,maydamagethe finish.
cantingTips
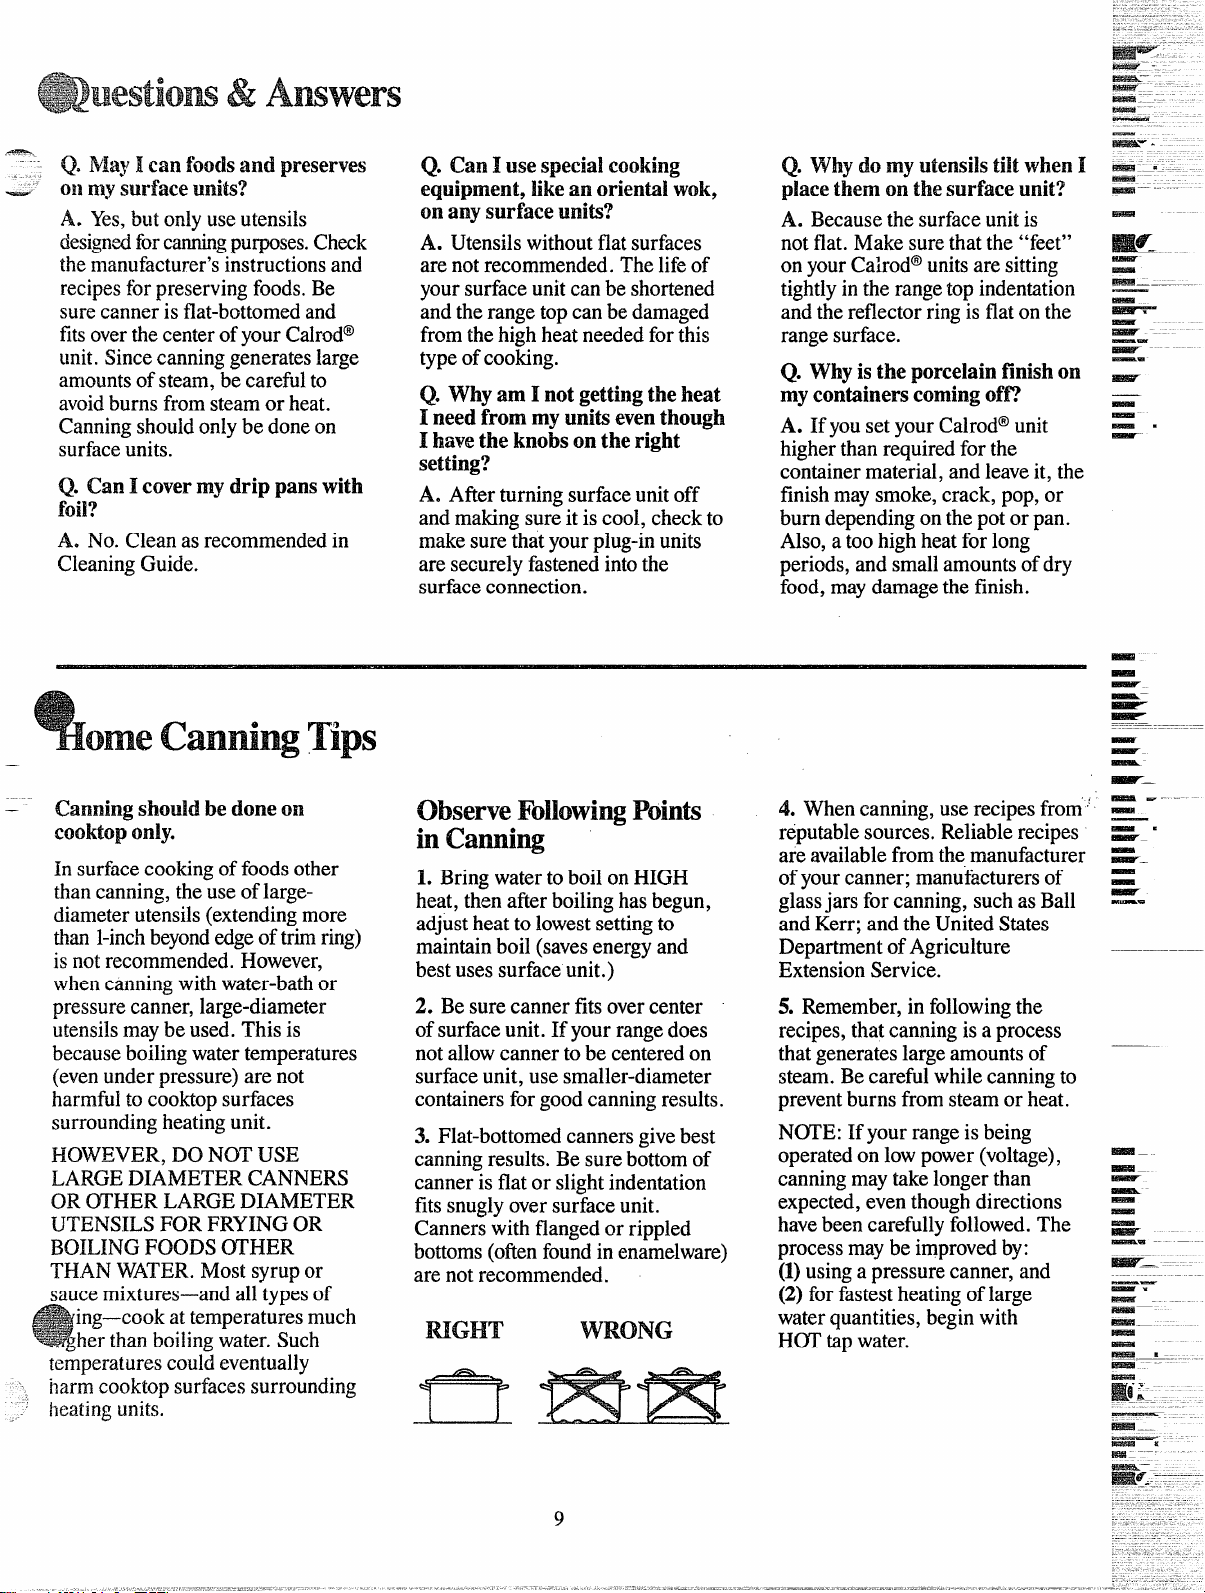
Canningshouldbe doneon
cooktop-on~y.
In surfacecookingof foodsother
thancanning,theuse oflarge-
diameterutensils(extendingmore
thanl-inchbeyondedgeoftrimring)
is notrecommended.However,
whencanningwithwater-bathor
pressurecanner,large-diameter
utensilsmaybe used.This is
becauseboilingwatertemperatures
(evenunderpressure)are not
harmfulto cooktopsurfaces
surroundingheatingunit.
HOWEVER,DO NOTUSE
LARGEDIAMETERCANNERS
OROTHERLARGEDIAMETER
UTENSILSFORFRYINGOR
BOILINGFOODSOTHER
THANWATER.Mostsyrupor
saucemixtures—andalltypesof
ing—cookat temperaturesmuch
her thanboilingwater.Such
temperaturescouldeventually
harmcooktopsurfacessurrounding
Ileatingunits.
observe Followi~ Poin@
incanni~
1. Bringwaterto boilon HIGH
heat,then afterboilinghasbegun,
adjustheatto lowestsettingto
maintainboil (savesenergyand
bestusessurfaceunit.)
2. Besurecannerfitsovercenter
of surfaceunit.If yourrangedoes
notallowcannerto be centeredon
surfaceunit,use smaller-diameter
containersfor goodcanningresults.
3. Flat-bottomedcannersgivebest
canningresults.Besure bottomof
canneris flator slightindentation
fitssnuglyoversurfaceunit.
Cannerswithflangedor rippled
bottoms(ofienfoundin enamelware)
are notrecommended.
mGHT
WRONG
4. Whencanning,userecipesfrom:
reputablesources.Reliablerecipes
are availablefromthemanufacturer
ofyourcanner;manufacturersof
glassjars for canning,suchasBall
andKerr; andthe UnitedStates
Departmentof Agriculture
ExtensionService.
5. Remember,in followingthe
recipes,thatcanningis a process
thatgenerateslargeamountsof
steam.Becarefulwhilecanningto
preventbums fromsteamor heat.
N~E: If yourrangeis being
operatedon lowpower(voltage),
canningmaytakelongerthan
expected,eventhoughdirections
havebeencarefullyfollowed.The
processmaybe improvedby:
(1)usinga pressurecanner,and
(2)for fastestheatingof large
waterquantities,beginwith
HOTtapwater.
-
-
-=
-
=-. ---
=~...-
-.
-–
9
.
surfacecookingGuide
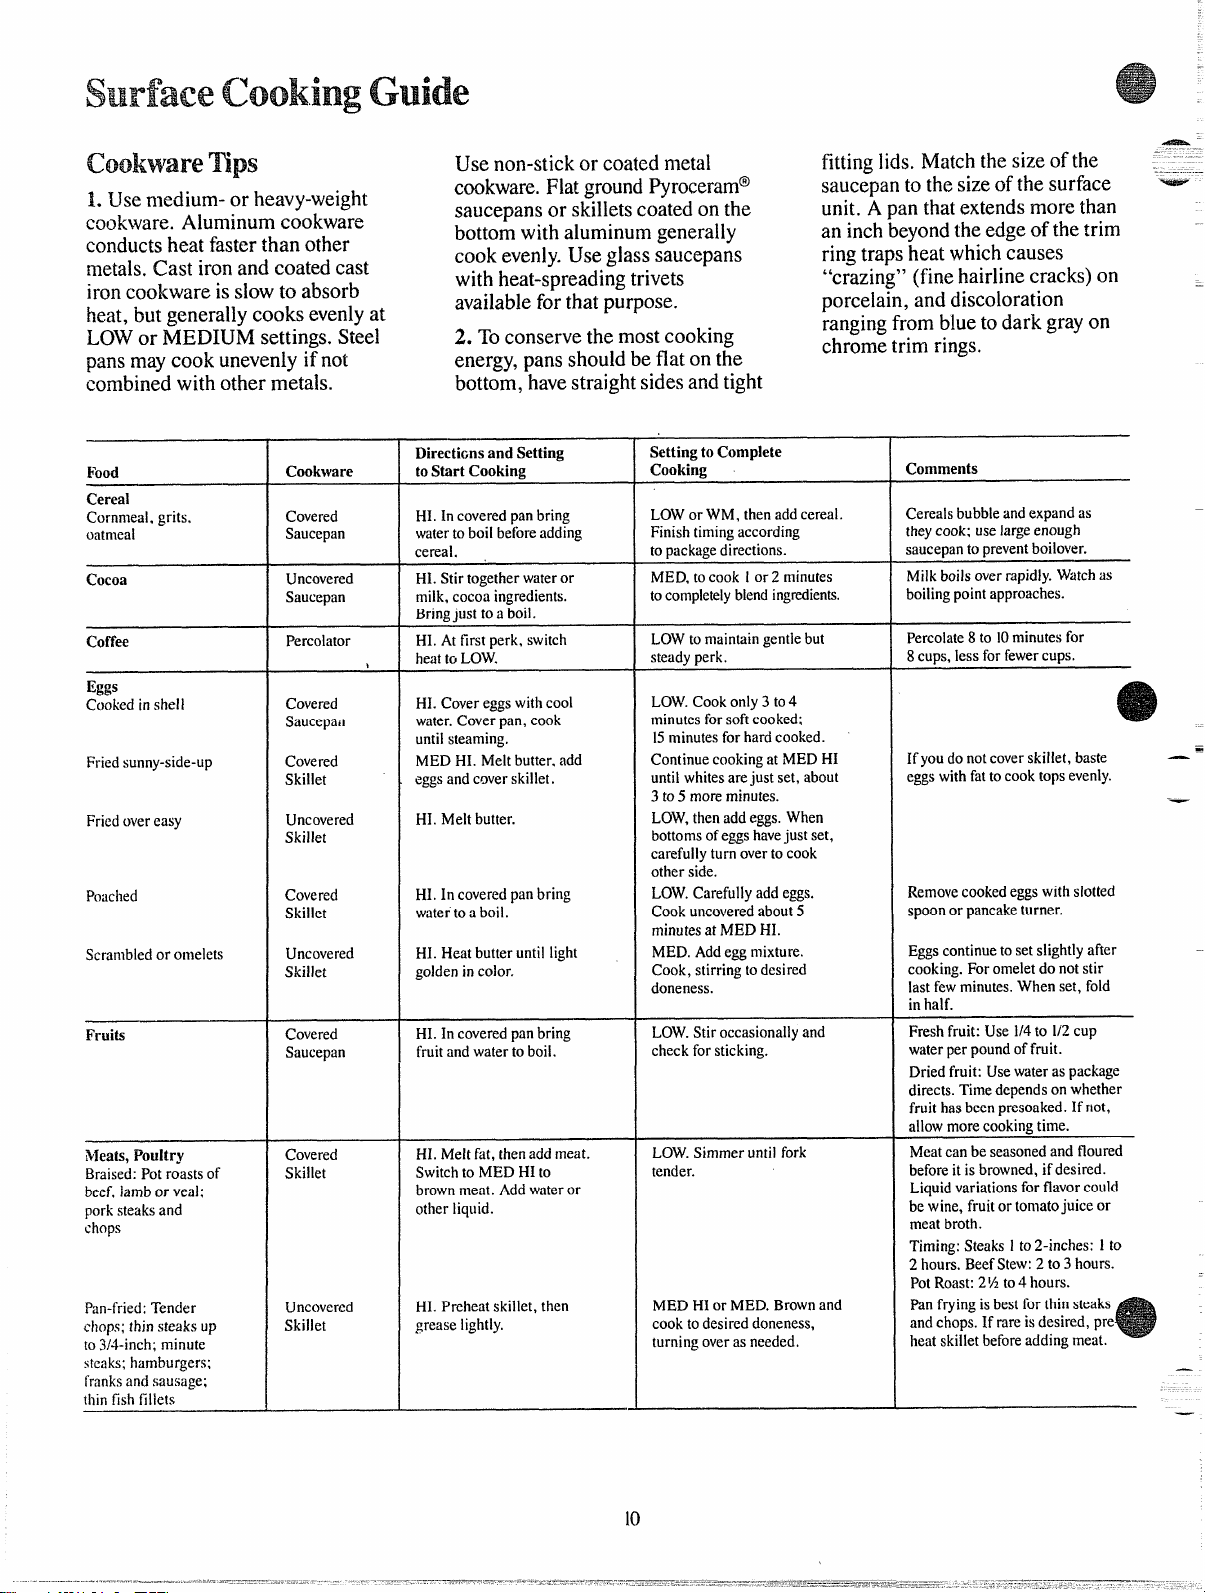
Cookw’aremps Usenon-stickor coatedmetal
fittinglids.Matchthesizeof the
cookware.FlatgroundPyroceram@
saucepanto thesizeof the surface
saucepansor skilletscoatedon the
unit.A pan thatextendsmorethan
bottomwithaluminumgenerally
an inchbeyondtheedgeof thetrim
cookevenly.Useglasssaucepans ringtrapsheatwhichcauses
withheat-spreadingtrivets
“crazing”(finehairlinecracks)on
availableforthatpurpose. Porcelain,and discoloration
1.tJse medium-or heavy-weight
cookware.Aluminumcookware
conductsheatfasterthan other
metals.Cast ironand coatedcast
ironcookwareis slowto absorb
heat,butgenerallycooksevenlyat
LOWor MEDIUMsettings.Steel
pansmaycookunevenlyif not
combinedwithothermetals.
~angingfromblueto darkgrayon
chrometrim rings.
2. Toconservethe mostcooking
energy,pansshouldbeflat on the
bott~rn,-havestraightsidesandtight
Setting toComplete
Cooking
Comments
Directions andSetting
to Start CookingFood Cook\vare
Cereal
Cornmeal,grits,
oatmeal
Cerealsbubbleandexpandas
theycook;uselargeenor.rgh
sauceDanto r)reventboilover.
Covered
Saucepan
HI.Incoveredpanbring
watertoboilbeforeadding
cereal.
HI.Stirtogetherwateror
milk,cocoaingredients.
Bringiusttoirboil.
LOWor WM, thenaddcereal.
Finishtimingaccording
topackagedirections.
MED,tocook1or 2 minutes
tocompletelyblendingredients.
Cocoa
Milkboilsoverrapidly.Watchas
boilingpointapproaches.
Uncovered
Saucepan
LOWtomaintaingentlebut
steadyperk.
Percolate8 to 10minutesfor
8
CUDS. lessforfewercuDs.
HI.Atfirst perk,switch
heattoLOW.
Coffee Percolator
I
Eggs
Cookedinshell Covered
Sallcepail
HI.Covereggswithcool
water,Coverpan,cook
untilsteaming.
MEDHI. Meltbutter.add
eggs
andcoverskillet.
LOW.Cookonly3to4
minutesforsoftcooked;
15minutesforhardcooked.
If youdonotcoverskillet,baste —
=
eggswithfattocooktopsevenly.
–—
Covered
Skillet
ContinuecookingatMEDHI
untilwhitesarejust set, about
3 to5 moreminutes.
Friedsunny-side-up
Uncovered
Skillet
HI. Meltbutter.
LOW,thenaddeggs.When
bottomsofeggshavejust set,
carefullyturnovertocook
otherside.
Friedovereasy
Removecookedeggswithslotted
spoonor pancaketurner.
HI. In coveredpanbring
watertoa boil.
LOW.Carefullyaddeggs.
Cookuncoveredabout5
minutesat MEDHI.
MED.Addeggmixture.
Cook,stirringtodesired
doneness.
Poached
Covered
Skillet
Eggscontinueto setslightlyafter
—
cooking.Foromeletdo notstir
lastfewminutes.Whenset, fold
inhalf.
Scrambledor omelets Uncovered
Skillet
HI. Heatbutteruntillight
goldenincolor.
LOW.Stiroccasionallyand
checkforsticking.
Fruits
Freshfruit:Use 1/4to1/2cup
waterperpoundof fruit.
Driedfruit:Usewateraspackage
directs.Timedependsonwhether
fruithasbeenpresoaked.If riot,
allowmorecookingtime.
Covered
Saucepan
HI.In coveredpanbring
fruitandwatertoboil.
Meatcanbe seasonedandfloured
beforeit is browned,ifdesired.
Liquidvariationsforflavorcould
bewine,fruitor tomatojuiceor
meatbroth.
Timing:Steaks1to2-inches:1to
2 hours.BeefStew:2 to 3hours.
PotRoast:2%to4 hours.
Panfryingisbestforthinsteaks
andchops.If rareisdesired,pre
heatskilletbeforeaddingmeat.
NIeats,Poultry
Braised:Potroastsof
beef,lambor veal;
porksteaksand
chops
Covered
Skillet
HI.Meltfat, thenaddmeat.
Switchto MEDHIto
brownmeat. Addwateror
otherliquid.
LOW.Simmeruntilfork
tender.
MEDHIor MED.Brownand
cooktodesireddoneness,
turningoveras needed.
Pan-fried:Tender
chops;thinsteaksup
to3/4-inch;minute
steaks;hamburgers;
franksandsausage;
Uncovered
Skillet
HI. Preheatskillet,then
greaselightly.
—
thinfishfillets
—
10
—
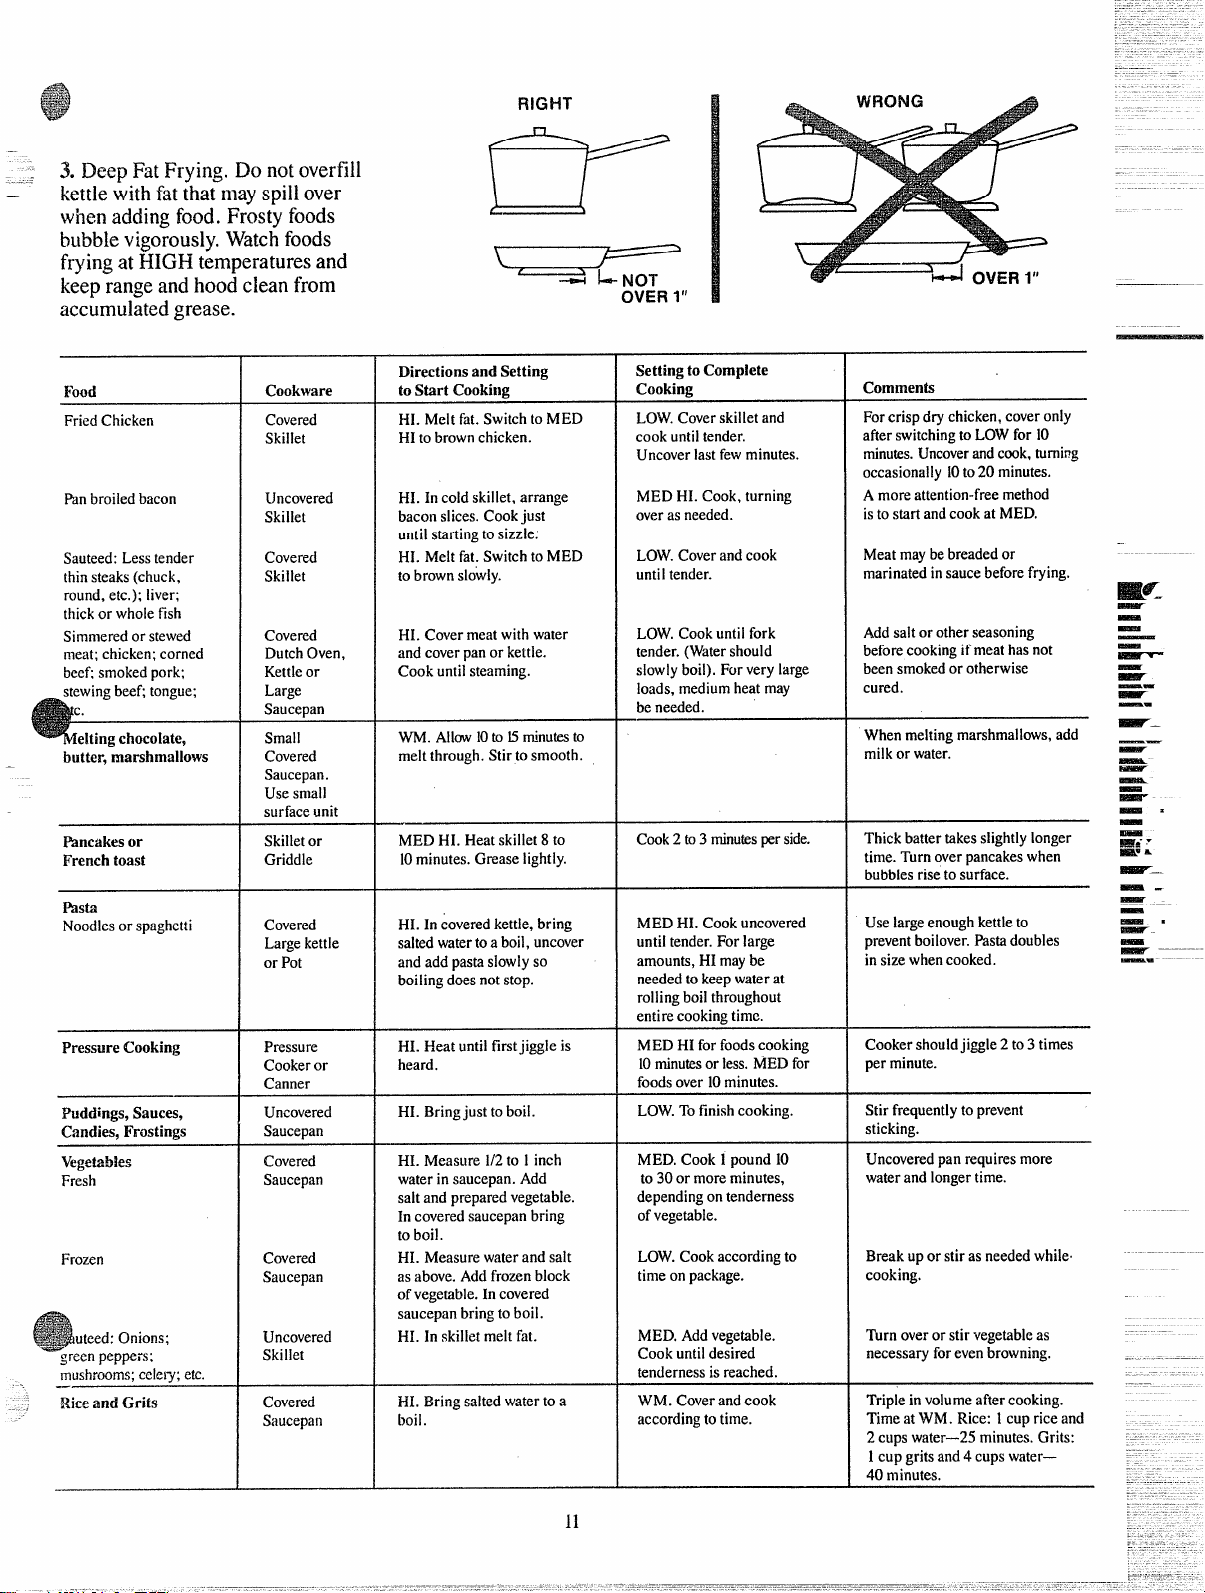
‘. 3. DeepFatFrying.Do notoverfill
—
kettlewithfatthat mayspillover
wilenaddingfood.Frostyfoods
bubblevigorously.Watchfoods
fryingat HIGHtemperaturesand
keeprangeandhoodcleanfrom
accumulatedgrease.
OVER 1“
Settingto Complete
Cooking
Directions andSetting
to Start Cookhlg
HI. Meltfat.Switchto MED
HItobrownchicken.
Comments
Food
Cookware
LOW.Coverskilletand
cookuntiltender.
Uncoverlastfewminutes.
Forcrispdrychicken,coveronly
afterswitchingtoLOWfor 10
minutes.Uncoverandcook,turning
occasionally10to20minutes.
FriedChicken
Covered
Skillet
MEDHI. Cook,turning
overasneeded.
A moreattention-freemethod
isto startandcookat MED.
Panbroiledbacon Uncovered
Skillet
HI. Incoldskillet,arrange
baconslices.Cookjust
untilstartingtosizzle.
HI. Meltfat.Switchto MED
tobrownslowly.
Meatmaybebreadedor
marinatedinsaucebeforefrying,
Covered
Skillet
LOW.Coverandcook
untiltender.
Sauteed:Lesstender
thinsteaks(chuck,
round,etc.); liver;
thickor wholefish
Addsaltor otherseasoning
beforecookingif meathasnot
beensmokedor otherwise
cured.
HI. Covermeatwithwater
andcoverpanor kettle.
Cookuntilsteaming.
LOW.Cookuntilfork
tender.(Watershould
slowlyboil).Forverylarge
loads,mediumheatmay
beneeded.
Simmeredor stewed
meat;chicken;corned
becfismokedpork;
Covered
DutchOven,
Kettleor
Large
Saucepan
Small
Covered
Saucepan.
Usesmall
surfaceunit
stewingbeefitongue;
Whenmeltingmarshmallows,add
milkorwater.
WM.Allow10to 15tinum to
meltthrough.Stirtosmooth.
b~~tter,marshmallows
Mncakesor
Frenchtoast
MEDHI. Heatskillet8 to
10minutes.Greaselightly.
Cook2to3 minutesperside.
Thickbattertakesslightlylonger
time.Turnoverpancakeswhen
bubblesriseto surface.
Skilletor
Griddle
%Sta
Noodlesor spaghetti
MEDHI. Cookuncovered
untiltender.Forlarge
amounts,HI maybe
neededtokeepwaterat
rollingboilthroughout
entirecookingtime.
Uselargeenoughkettleto
preventboilover.Pastadoubles
insizewhencooked.
Covered
Largekettle
or Pot
HI. In coveredkettle,bring
saltedwatertoa boil,uncover
andaddpastaslowlyso
boilingdoesnotstop.
Cookershouldjiggle2to3 times
perminute.
Stirfrequentlytoprevent
sticking.
Uncoveredpanrequiresmore
waterandlongertime.
HI. Heatuntilfirstjiggleis
heard.
MEDHI forfoodscooking
10minutesor less.MEDfor
foodsover10minutes.
LOW.Tofinishcooking.
PressureCooking
Pressure
Cookeror
Canner
Uncovered
Saucepan
Covered
Saucepan
Puddings,Sauces,
Candies,Frostings
Vegeta9!es
Fresh
HI. Bringjust toboil.
MED.Cook1pound10
to 30or moreminutes,
dependingontenderness
ofvegetable.
H1.Measure1/2to 1inch
waterinsaucepan.Add
saltandpreparedvegetable.
Incoveredsaucepanbring
toboil.
HI. Measurewaterandsalt
as above.Addfrozenblock
ofvegetable.Incovered
saucepanbringtoboil.
HI. In skilletmeltfat.
LOW.Cookaccordingto
timeonpackage.
Breakuporstir as neededwhile.
cooking.
Frozen
Covered
Saucepan
MED.Addvegetable.
Cookuntildesired
tendernessis reached.
WM.Coverandcook
accordingtotime,
Turnoveror stir vegetableas
necessaryforevenbrowning.
Uncovered
Skillet
Tripleinvolumeaftercooking.
TimeatWM. Rice: 1cupriceand
2 cupswater—25minutes.Grits:
1cupgritsand4 cupswater—
40minutes,
Covered
Saucepan
HI. Bringsaltedwaterto a
boil.
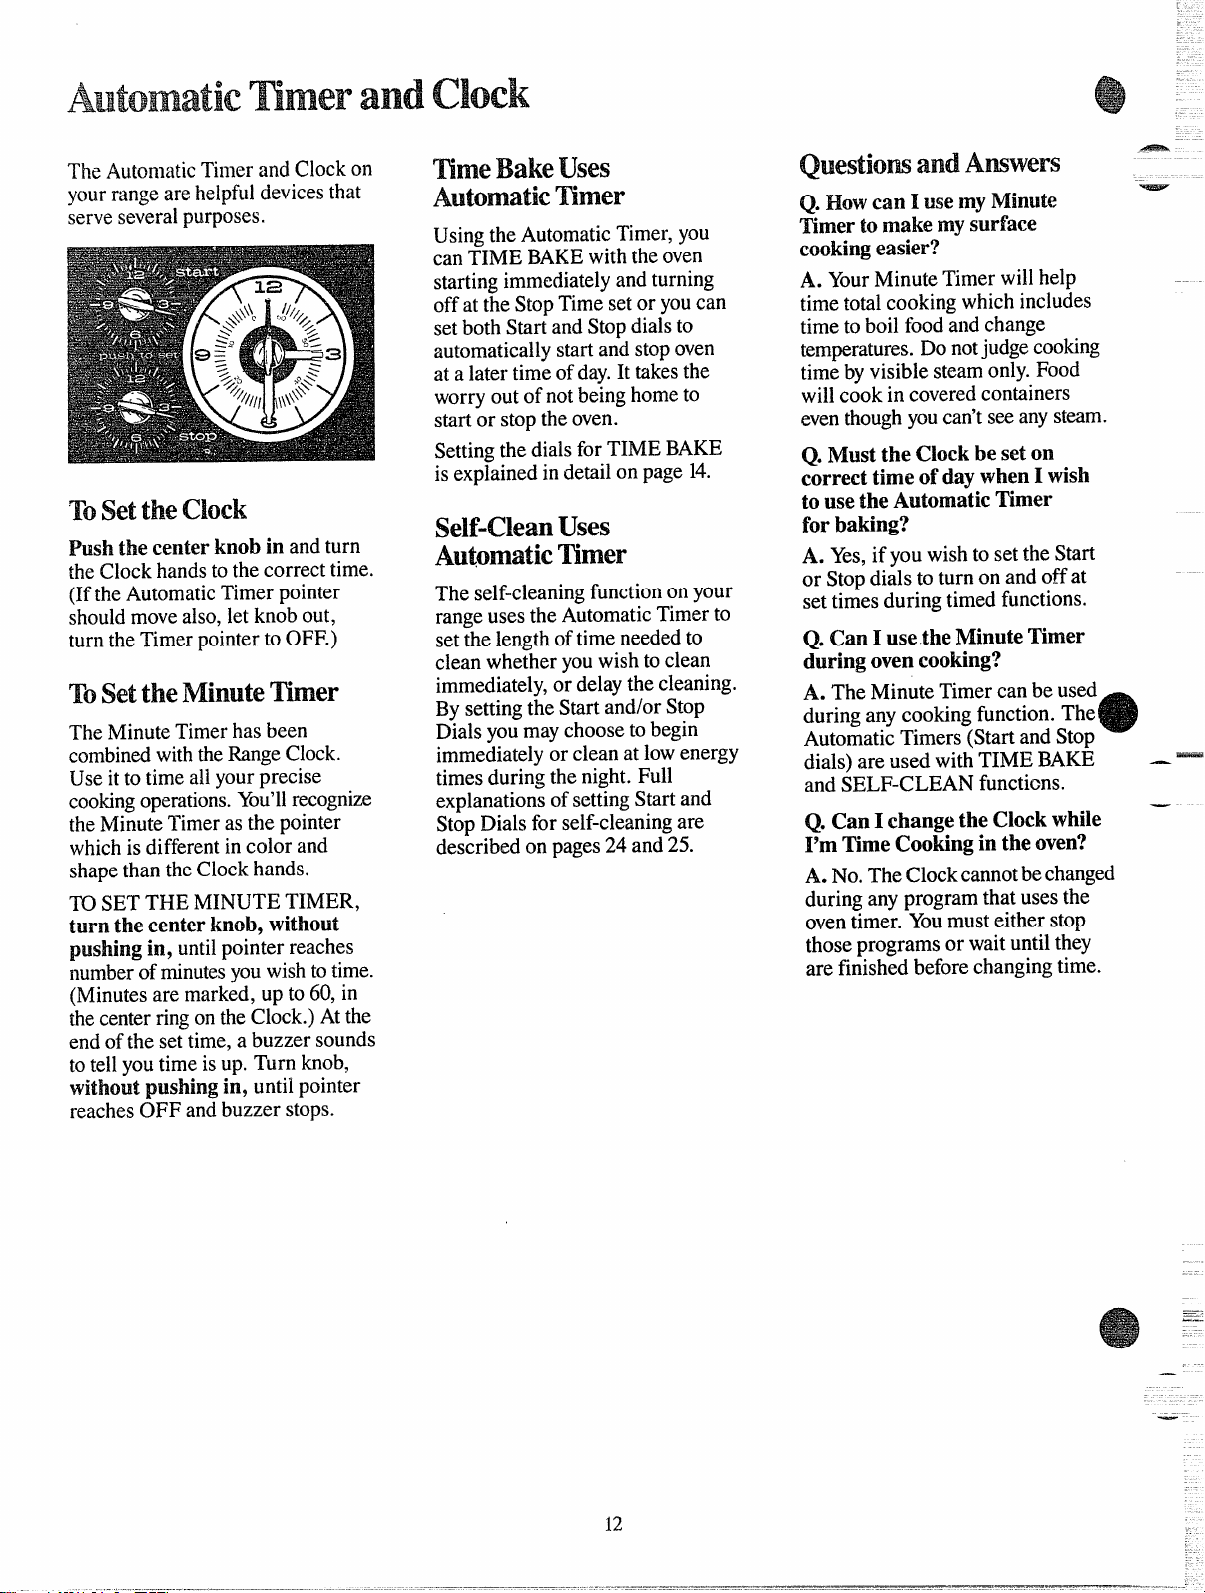
TheAutomaticTimerandClockon
yourrangearehelpfuldevicesthat
serveseveralpurposes.
Tosettheclock
fish the centerknobin andturn
theClockhandstothecorrecttime.
(IftheAutomaticTimerpointer
shouldmovealso,letknobout,
turntheTimerpointerto OFF.)
To
settheMinutemmer
TheMinuteTimerhasbeen
combinedwiththeRangeClock.
Useit to timeallyourprecise
cookingoperations.You’llrecognize
theMinuteTimeras the pointer
whichis differentin color and
shapethantheClockhands.
TOSETTHE MINUTETIMER,
turnthe centerknob,without
pushingin,untilpointerreaches
numberofminutesyouwishto time.
(Minutesare marked,up to 60,in
thecenterringontheClock.)Atthe
endofthe settime,a buzzersounds
to tellyoutimeis up. Turnknob,
without pushingin9untilpointer
reachesOFF andbuzzerstops.
mmeBakeuses
Automaticmmer
UsingtheAutomaticTimer,you
canTIME BAKEwiththeoven
startingimmediatelyandturning
offat theStopTimesetor youcan
setbothStartandStopdialsto
automaticallystartandstopoven
at a latertimeofday.It takesthe
worryoutof notbeinghometo
startor stoptheoven.
Settingthe dialsfor TIMEBAKE
is explainedindetailon page14.
Self-CleanUses
Automatic~mer
Theself-cleaningfunctiononyour
rangeusesthe AutomaticTimerto
setthe lengthoftimeneededto
cleanwhetheryouwishto clean
immediately,or delaythecleaning.
Bysettingthe Startand/orStop
Dialsyoumaychoosetobegin
immediatelyor cleanat lowenergy
timesduringthenight.Full
explanationsof settingStartand
StopDialsfor self-cleaningare
describedonpages24and 25.
QuestiomandAmwers ‘-
Q.Howcan 1usemyMinute
~
Timerto makemysurface
cookingeasier?
A.YourMinuteTimerwillhelp
timetotalcookingwhichincludes
timeto boilfoodand change
temperatures.Do notjudgecooking
timeby visiblesteamonly.Food
willcookin coveredcontainers
eventhoughyoucan’tseeanysteam.
Q.Mustthe Clockbe set on
correcttimeof daywhenI wish
to usethe Automatic~mer
forbaking?
A.Yes,if youwishto setthe Start
or Stopdialsto turn on andoff at
settimesduringtimedfunctions.
Q.CanI use theMinuteTimer
duringovencooking?
A. The MinuteTimercanbe used
duringanycookingfunction.The
AutomaticTimers(StartandStop
dials)are used withTIMEBAKE —-
andSELF-CLEANfunctions.
Q. CanI changethe Clockwhile –
I’m~me Cookingin theoven?
A. No.TheClockcannotbechanged
duringanyprogramthatusesthe
oventimer.Youmusteitherstop
thoseprogramsor waituntilthey
are finishedbeforechangingtime.
—
—
._
.-
—
eJsingYouroven
BeforeusingYouroven
1. Lookat thecontrols.Besure
youunderstandhowto set them
properly.Readoverthedirections
fortheAutomaticOvenTimerso
youunderstandits usewiththe
controls.
2. Checkthe oveninterior.Look
at theshelves.Takea practicerun
at removingand replacingthem
properly,to givesure, sturdy
support.
3. Readovertheinformationand
tipsthatfollow.
4. Keepthisbookhandyso youcan
referto it, especiallyduringthe
firstweeksofgettingacquainted
withyourrange.
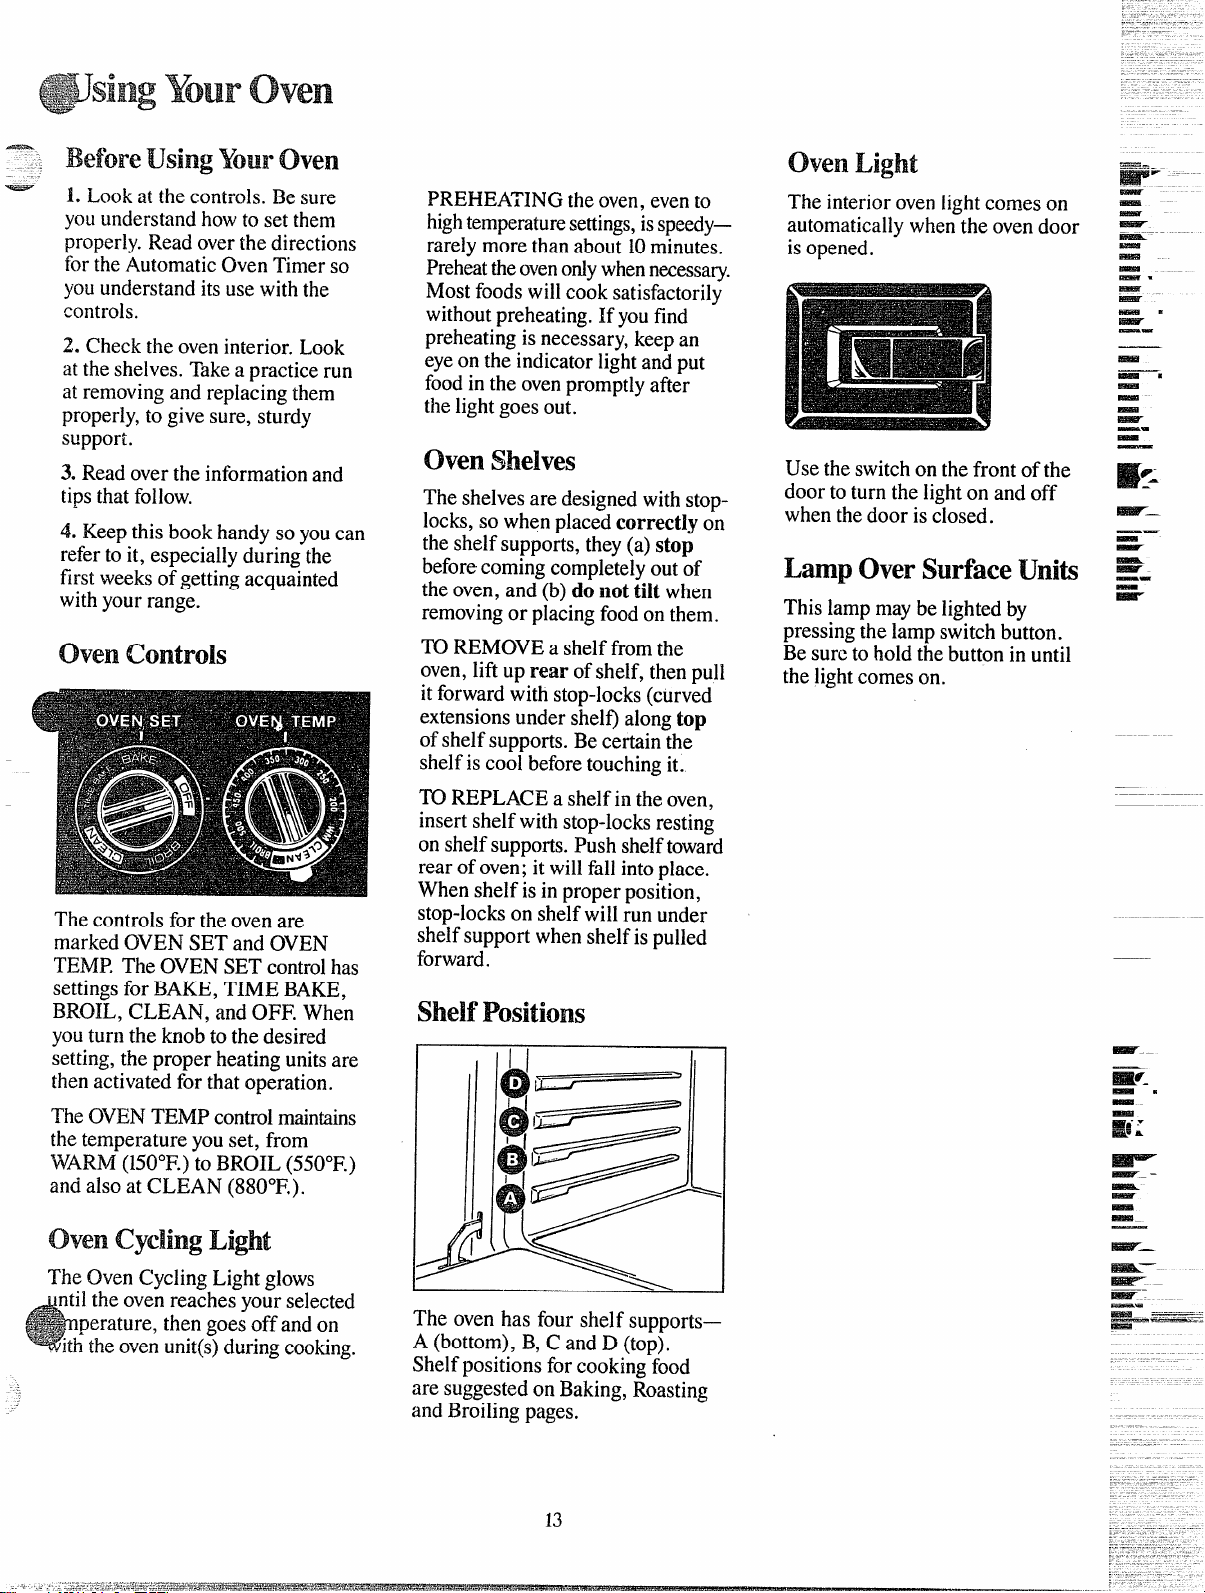
ovencontrols
Thecontrolsfor theovenare
markedOVENSETand OVEN
TEMP.TheOVENSETcontrolhas
settingsfor BAKE,TIME BAKE,
BROIL,CLEAN,and OFF.When
youturn the knobto the desired
setting,the properheatingunitsare
thenactivatedfor thatoperation.
TheOVENTEMPcontrolmaintains
thetemperatureyouset, from
‘WARM(150°F.)to BROIL(550°F.)
andalsoat CLEAN (880*F.).
ovencycling Light
TheOvenCyclingLightglows
1the ovenreachesyourselected
perature,thengoesoffandon
theovenunit(s)duringtooting.
PREHEATINGtheoven,evento
hightemperaturesettings,isspeedy–
rarelymorethanabout10minutes.
Preheattheovenofiywhennecessary.
Mostfoodswillcooksatisfactorily
withoutpreheating.If youfind
preheatingis necessary,keepan
eyeon the indicatorlightandput
foodin the ovenpromptlyafter
thelightgoesout.
ovenshelves
Theshelvesare designedwithstop-
locks,so whenplacedcorrectlyon
theshelfsupports,they(a) stop
beforecomingcompletelyoutof
theoven,and (b)do nottilt when
removingor placingfoodonthem.
TOREMOVEa shelffromthe
oven,liftup rear of shelf,thenpull
it forwardwithstop-locks(curved
extensionsundershel~ alongtop
of shelfsupports.Becertainthe
shelfis coolbeforetouchingit.
~ REPLACEa shelfin theoven,
insertshelfwithstop-locksresting
on shelfsupports.Pushshelftoward
rearof oven;it willfallintoplace.
Whenshelfis in properposition,
stop-lockson shelfwillrun under
shelfsupportwhenshelfis pulled
forward.
shelf Positions
II
The ovenhas four shelf supports—
A (bottom),B,C andD (top).
Shelfpositionsforcookingfood
are suggestedon Baking,Roasting
andBroilin~~apes.
OvenLight
Theinteriorovenlightcomeson
automaticallywhenthe ovendoor
is opened.
Usethe switchon thefrontof the
doorto turn thelighton andoff
whenthedooris closed.
LampOverSurfaceUnib
Thislampmaybe lightedby
pressingthe lampswitchbutton.
Besureto holdthebuttonin until
thelightcomeson,
m—-
r.
w–.
—.
m– ->
— .—.-—_
—.— .
-
Baking
—
}Vhencookinga foodforthefirst
timein yournewoven,usetime
givenon recipesas a guide.Oven
thermostats,overa periodofyears,
may“drift”fromthe factorysetting
anddifferencesin timingbetween
an old anda newovenof 5 to 10
minutesare notunusualandyou
maybeinclinedto thinkthatthenew
ovenis notperformingcorrectly.
However,yournewovenhasbeen
setcorrectlyat thefactoryandis
moreaptto be accuratethanthe
ovenit replaced.
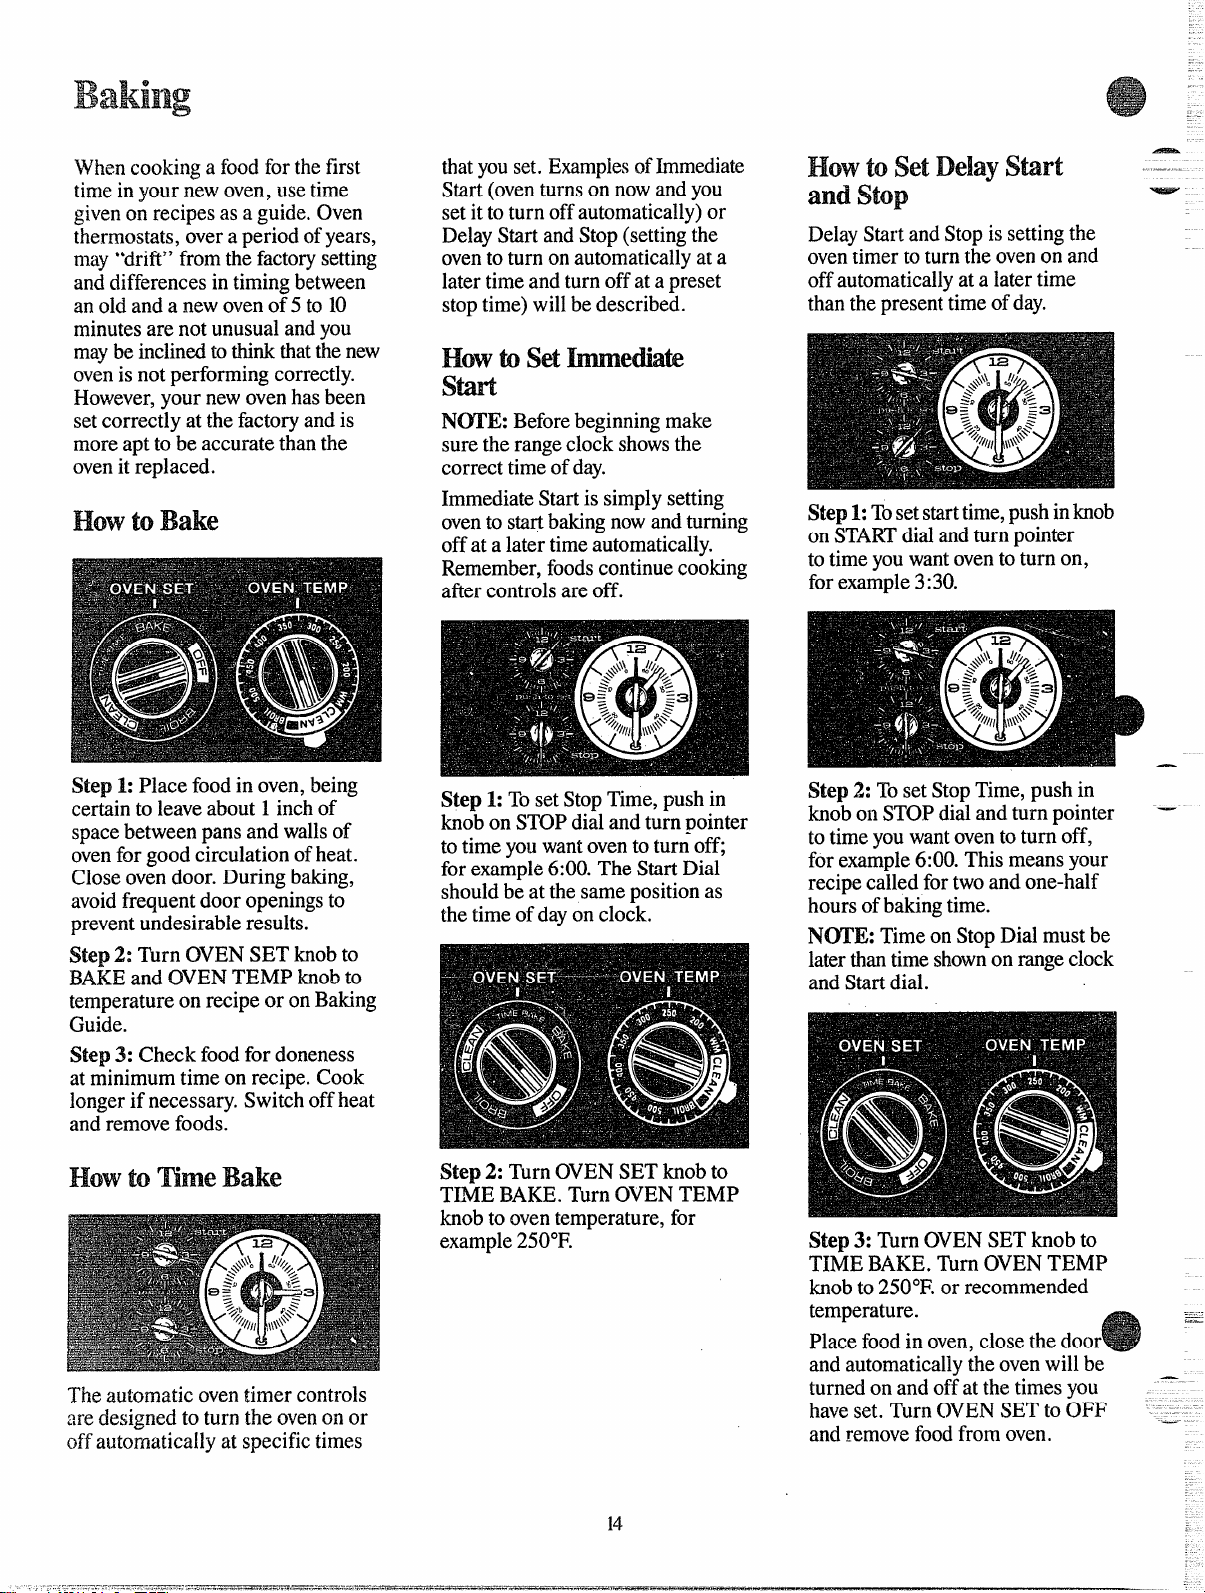
HowtoBake
Step 1:Placefoodin oven,being
certainto leaveabout1 inchof
spacebetweenpansand wallsof
ovenfor goodcirculationofheat.
Closeovendoor.Duringbaking,
avoidfrequentdooropeningsto
preventundesirableresults.
Step 2: firn OVENSETknobto
BAKEand OVENTEMP knobto
temperatureon recipeor onBaking
Guide.
Step 3: Checkfoodfor doneness
at minimumtime on recipe.Cook
longerif necessary.Switchoffheat
andremovefoods.
HowtommeBake
thatyouset.ExampiesofImmediate
Start(oventurnson nowandyou
setit to turn offautomatically)or
DelayStartandStop(settingthe
ovento turn on automaticallyat a
latertimeandturnoffata preset
stoptime)willbe described.
N~E: Beforebeginningmake
surethe rangeclockshowsthe
correcttimeofday.
ImmediateStartis simplysetting
ovento startbakingnowandturning
offat a latertimeautomatically.
Remember,foodscontinuecooking
afiercontrolsareoff.
Step 1:TosetStopTime,pushin
knobon STOPdialandturn pointer
to timeyol.Iwantovento turnoffi
for example6:00.The StartDial
shouldbe at thesamepositionas
thetimeof dayon clock.
Step2: TurnOVENSETknobto
TIMEBAKE.TurnOVENTEMP
knobto oventemperature,for
example250”F.
Theautomaticoventimer controls
aredesignedto turn the ovenon or
offal~tomaticallyat specifictimes
14
DelayStartandStopis settingthe
oventimerto turnthe ovenon and
offautomaticallyat a latertime
thanthepresenttimeofday.
Step1:Tosetstarttime,pushinknob
on STARTdialandturnpointer
to timeyouwantovento turn on,
forexample3:30.
—
Step 2: TosetStopTime,push in
knobon STOPdidandturnpointer ‘—
to timeyouwantoventoturn off,
for example6:00.Thismeansyour
recipecalledfortwoand one-half
hoursofbakingtime.
N~E: TimeonStopDialmustbe
laterthantimeshownon rangeclock
and Startdial.
Step3: TurnOVENSETknobto
TIMEBAKE.~rn OVENTEMP
knobto 250”F.or recommended
temperature.
..
---
—
Placefoodin oven,closethedoor
andautomaticallythe ovenwillbe
turnedon andoffat thetimesyou -
haveset. TurnOVENSETto
OFF ---
andremovefoodfrom oven.
——
@aking Guide
~
~ 1.Aluminumpansconductheat
“-”
quickly.For mostconventional
baking,light,shinyfinishesgenerally
givebestresults.Theyprevent
overbrownirtgin thetimeit takes
forheatto cookthecenterareas.
Dull(satin-finish)bottomsurfaces
ofpansare recommendedforcake
2. Darkor non-shinyfinishes,
glassandPyroceram@utensilsoften
absorbheat, whichmayresultin
dry,crispcrusts. Reduceovenheat
25°F.if lightercrustsaredesired.
Preheatcastiron forbakingsome
foodsforrapidbrowningwhen
foodis added.
pansandpie platesto be surethose
3. Preheatingtheovenis notalways
areasbrowncompletely.
necessary,especiallyfor foods
whichcooklongerthan 30to40 :----~
minutes.For foodwithshort
cookingtimes,preheatinggives
bestappearanceandcrispness. ‘.- :
4. Openthe ovendoorto check
food-aslittleas possibleto prevent
unevenheatingandto saveenergy.
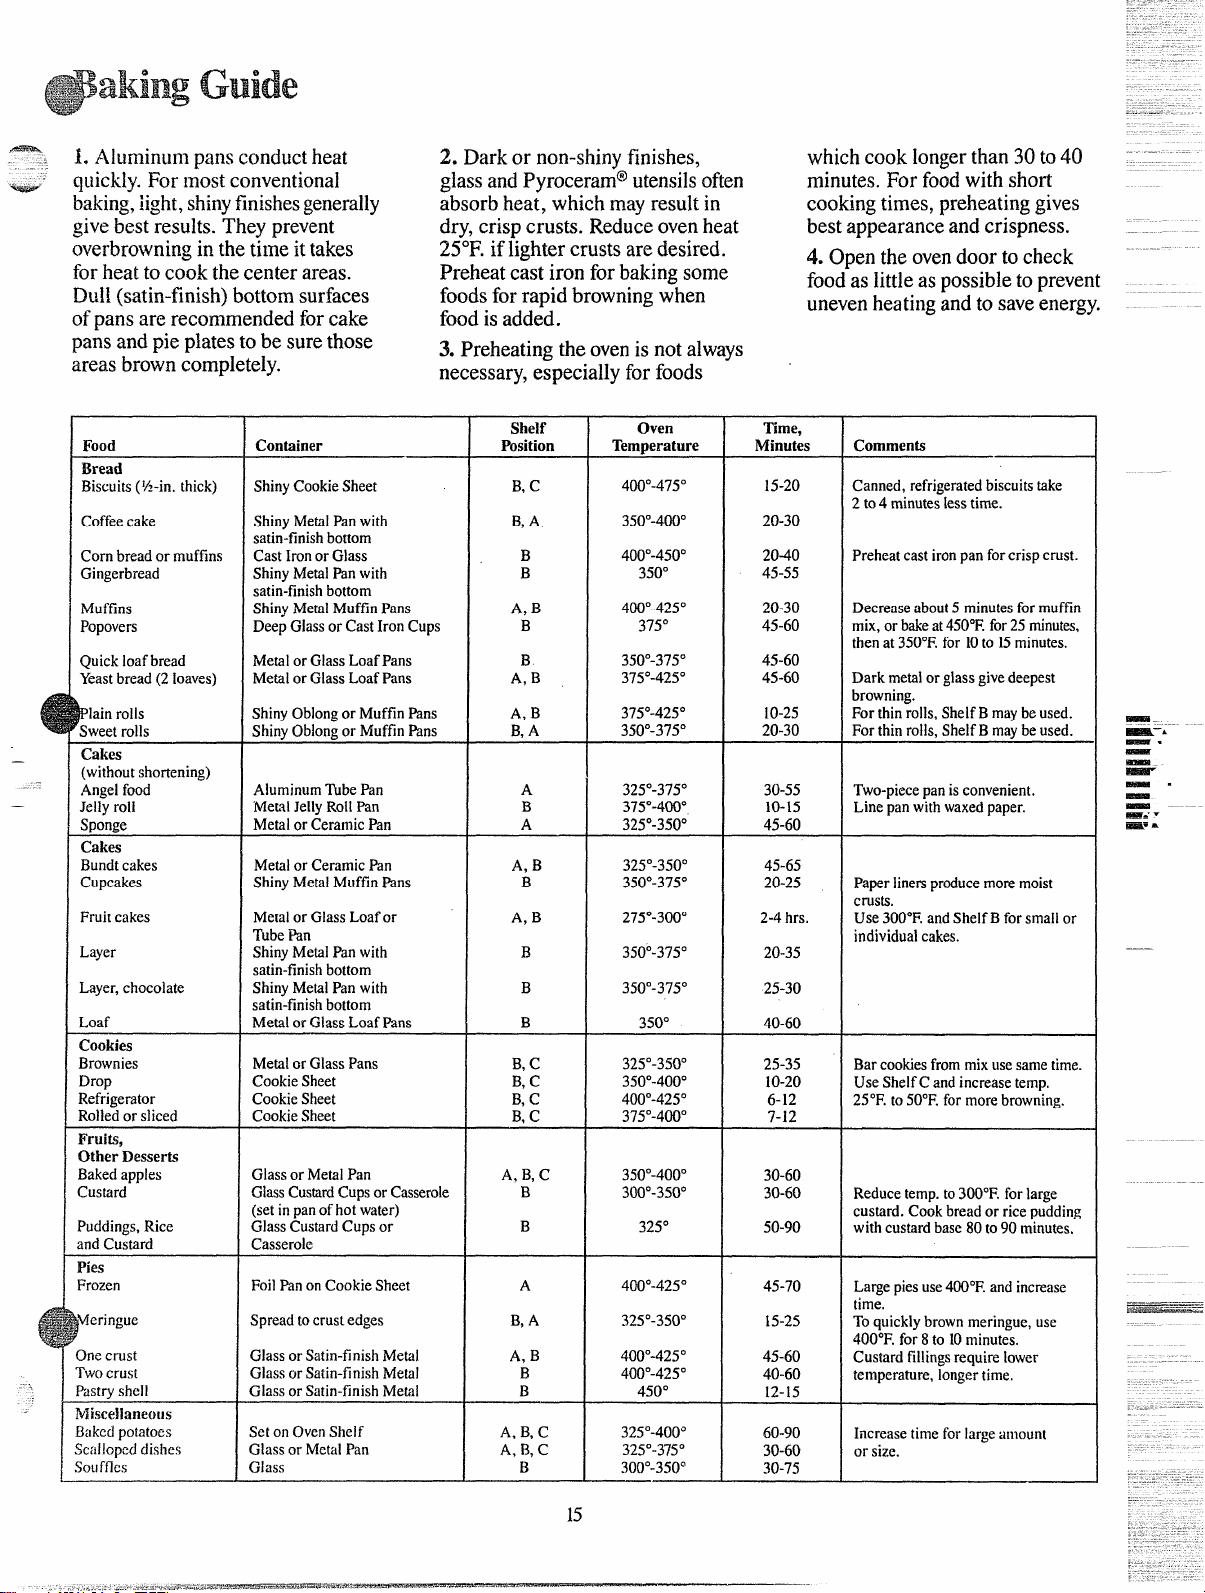
Shelf Oven
Time,
Food
Container Position
Temperature
Minutes Comments
Bread
Biscuits(%-in.thick) ShinyCookieSheet
B,C
400°-4750 15-20 Canned,refrigeratedbiscuitstake
2 to4 minuteslesstime.
Coffeecake
ShinyMetalPanwith
B,A
350°-4000 20-30
satin-finishbottom
Cornbreadormuffins
CastIronor Glass
B
400°-4500 2040 Preheatcast ironpanforcrispcrust.
Gingerbread
ShinyMetalPanwith
B 350°
45-55
satin-finishbottom
Muffins
ShinyMetalMuffinPans
A, B
400°-4250 20-30 Decreaseabout5 minutesformuffin
Popovers
DeepGlassor CastIronCups
B 375° 45-60
mix,orbakeat450°F.for25minutes,
thenat 350”F.for 10to 15minutes.
Quickloafbread Metalor GlassLoafPans
B 350°-3750 45-60
Yeastbread(2 loaves)
MetalorGlassLoafPans
A, B
375°-4250 45-60 Darkmetalor glassgivedeepest
F
browning.
lainrolls ShinyOblongor MuffinPans
A, B 375°-4250 10-25
Forthinrolls,ShelfBmaybeused.
Sweetrolls ShinyOblongor MuffinPans
B,A
350°-3750 20-30 Forthinrolls,ShelfBmaybeused.
Cakes
(withoutshortening)
Angelfood
Aluminum~be Pan
A 325”-375°
30-55 Two-piecepanis convenient.
Jellyroll
‘Me~~IJellyRollPan
B 375°-4000 10-15
Linepanwithwaxedpaper.
Sponge
MetalorCeramicPan
A
325°-3500 45-60
Cakes
Bundtcakes Metalor CeramicPan A, B 325°-3500 45-65
Cupcakes ShinyMetalMuffinPans
B
350°-375” 20-25 Paperlinersproducemoremoist
crusts.
Fruitcakes Metalor GlassLoafor A, B 275°-300” 2-4hrs.
Use300”F.andShelfB forsmallor
TubePan
individualcakes.
Layer ShinyMetalPanwith
B
350°-3750
20-35
satin-finishbottom
Layer,chocolate ShinyMetalPanwith
B
350°-3750 25-30
satin-finishbottom
Loaf
MetalorGlassLoafPans B
350° 40-60
Cookies
Brownies MetalorGlassPans B,C 325°-3500
25-35 Barcookiesfrommixusesametime.
Drop CookieSheet
B,C 350°-400”
10-20
UseShelfCandincreasetemp.
Refrigerator CookieSheet B,C 400°-4250
6-12
25°F.to50°F.formorebrowning.
Rolledor sliced CookieSheet B,C 375°-4000
7-12
Fruits,
Other Desserts
Bakedapples GlassorMetalPan A. B,C 350°-4000
30-60
Custard GlassCustardCupsor Casserole
B
300°-3500 30-60
Reducetemp.to300”F.forlarge
(setinpanof hotwater)
custard.Cookbreador ricepudding
Puddings,Rice GlassCustardCupsor
B
325°
50-90 withcustardbase80to90minutes,
andCustard Casserole
Pies
Frozen FoilPanonCookieSheet
A
400°-4250
45-70
Largepiesuse400”F.andincrease
time.
~Meringue Spreadtocrustedges B,A 325°-3500
15-25
Toquicklybrownmeringue,use
400”F.for8to 10minutes.
Onecrust GlassorSatin-finishMetal
A, B 400°-4250
45-60
Custardfillingsrequirelower
Twocrust Glassor Satin-finishMetal
B
400°-4250
40-60
temperature,longertime,
Pastryshell Glassor Satin-finishMetal
B
450°
12-15
Miscellaneous
Bakedpotatoes SetonOvenShelf
A, B,C
325°-400”
60-90
Increasetimeforlargeamount
Scallopeddishes Glassor MetalPan A, B,C
325”-3’75°
30-60
or size.
Souffles Glass
B 300°-350”
30-75
———..—
___.__A=
——
—-
15
Roastingiscookingbydry heat.
Tendermeatorpoultrycanbe
roasteduncoveredinyouroven.
Roastingtemperatures,which
shouldbelowandsteady,keep
spatteringtoaminimum.When
roasting,it isnotnecessaryto
sear,baste,coveror addwater
toyourmeat.
Roastingisreallyabaking
procedureusedformeats.Therefore,
ovencontrolsaresettoBAKE.(You
mayheara slightclickingnoiseto
indicatetheovenisworking
properly.)Roastingis easy;just
followthesesteps:
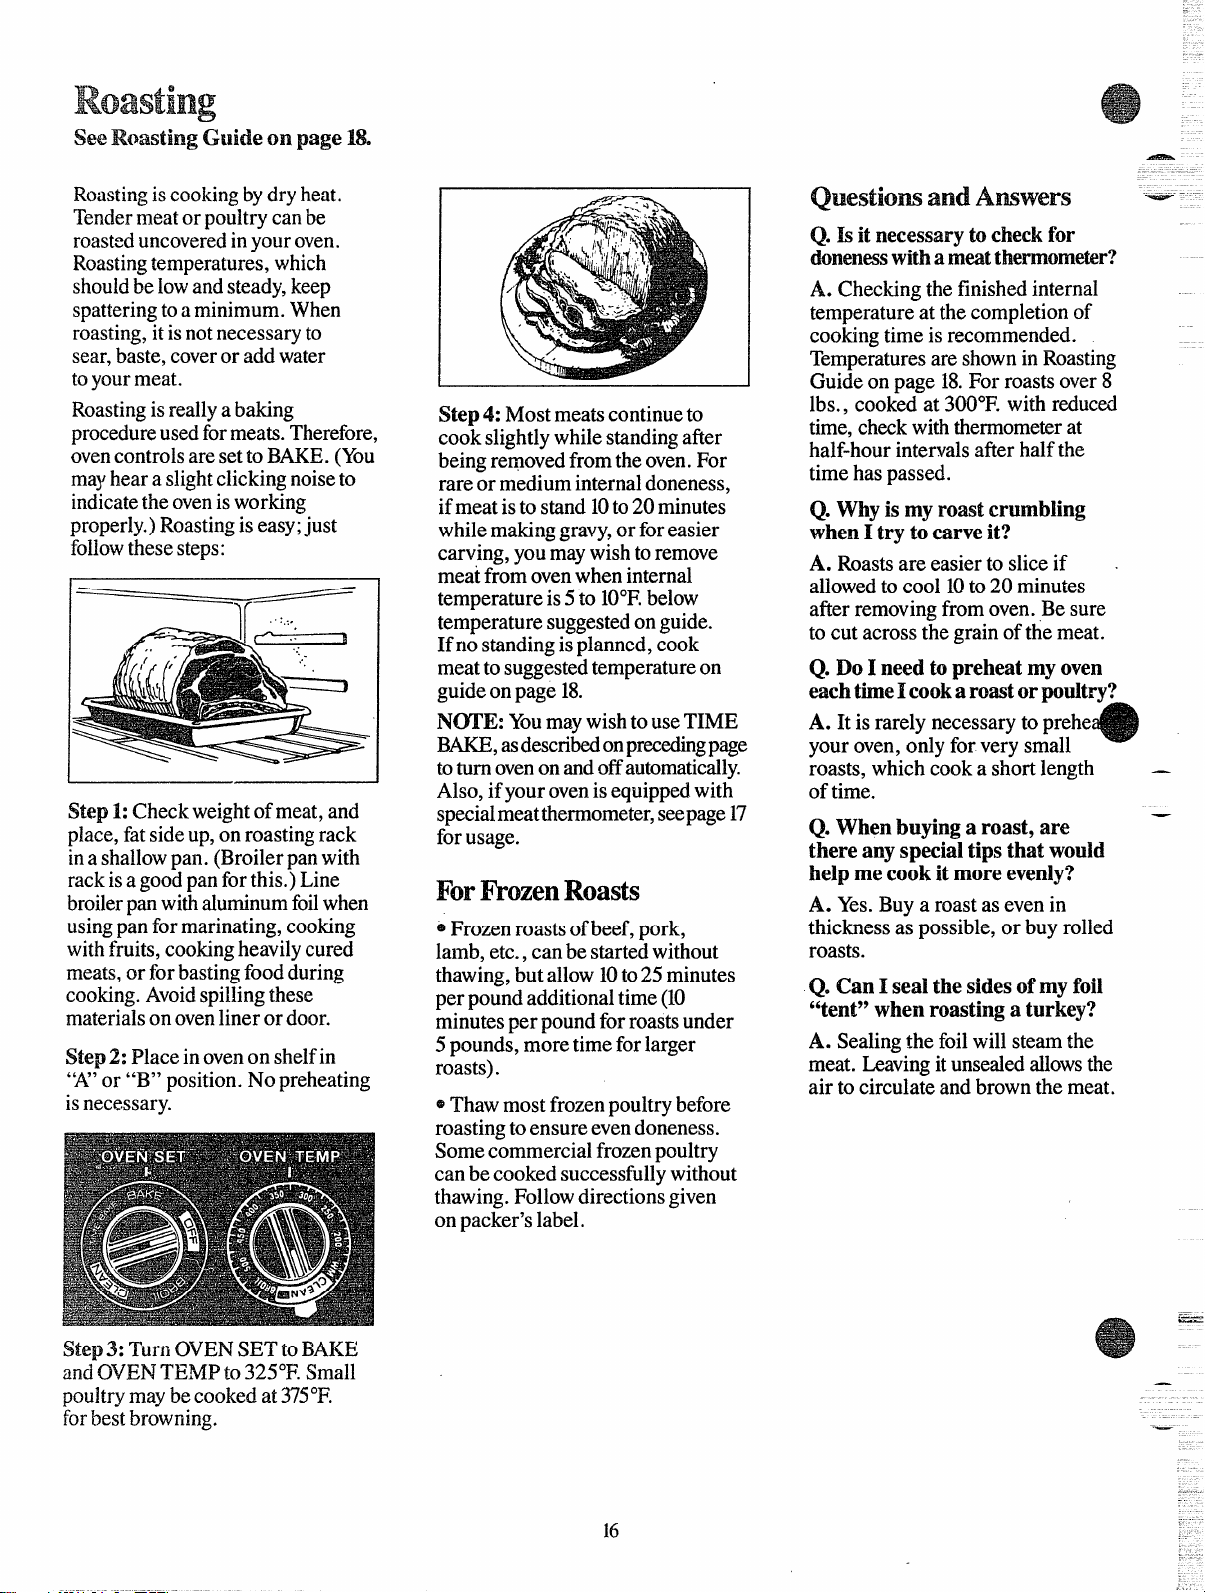
Step 1:Checkweightofmeat,and
place,fatsideup,on roastingrack
ina shallowpan. (Broilerpanwith
rackisa goodpanforthis.)Line
broilerpanwithaluminumfoilwhen
usingpanformarinating,cooking
withfruits,cookingheavilycured
meats,or forbastingfoodduring
cooking.Avoidspillingthese
materialson ovenlineror door.
Step2:Placeinovenonshelfin
“A’or “B” position.Nopreheating
isnecessary.
Step3: TurnOVENSETtoBAKE
andOVENT’E.MPto 325”F.Small
poultrymaybecookedat375°F.
forbestbrowning.
Step4: Mostmeatscontinueto
cookslightlywhilestandingafter
beingre~ovedfromtheoven.For
rareor mediuminternaldoneness,
ifmeatis to stand10to20 minutes
whilemakinggravy,or foreasier
carving,youmaywishtoremove
meatfromovenwheninternal
temperatureis5 to 10”F.below
temperaturesuggestedonguide.
If no standingisplanned,cook
meattosuggestedtemperatureon
guideonpage18.
N~E: YoumaywishtouseTIME
BAKE,asdescribedonprecedingpage
toturnovenonandoffautomatically.
Also,ifyourovenisequippedwith
specialmeatthermometer,seepage17
forusage.
Por Rozen
Roasts
@
Frozenroastsofbeef,pork,
lamb,etc.,canbestartedwithout
thawing,butallow10to25minutes
perpoundadditionaltime(10
minutesper poundfor roastsunder
5 pounds,moretimeforlarger
roasts).
@Thawmostfrozenpoultrybefore
roastingtoensureevendoneness.
Somecommercialfrozenpoultry
canbecookedsuccessfullywithout
thawing.Followdirectionsgiven
onpacker’slabel.
QuestiomandAmwers ‘-+--.-
Q.k it necessaryto checkfor
donenesswithameatthermometer?
A. Checkingthefinishedinternal
temperatureat thecompletionof
cookingtimeis recommended.
Temperaturesareshownin Roasting
Guideonpage 18.For roastsover8
lbs., cookedat 300”F.with reduced
time,checkwiththermometerat
half-hourintervalsafierhalfthe
timehaspassed.
Q. Whyis my roastcrumbling
when1try to carveit?
A. Roastsare easierto sliceif ,
allowedto cool 10to 20 minutes
afierremovingfromoven.Besure
to cutacrossthe grainofthemeat.
Q.Do I needto preheatmyoven
eachtirrieI cooka romtorwtitrv?
e
A. It is rarelynecessaryto~rehe”
youroven,onlyfor verysmall
roasts,whichcooka sh-ortlength —
oftime.
Q.Whenbuyinga roast,are
thereanyspecialtipsthatwould
helpme cookit moreevenly?
A. Yes.Buya roastas evenin
thicknessas possible,or buyrolled
roasts.
Q. CanI sealthe sidesofrnyfoil
“tent”whenroastinga turkey?
A. Sealingthe foilwill steamthe
meat.Leavingitunsealedallowsthe
air to circulateandbrownthemeat.
—
---
--
16
.
—
Formanyfoods,especially
roastsandpoultry,in!ernalfood
—
temperatureis thebesttestfor
doneness.The meatthermometer
takestheguessworkout ofroasting
bycookingfoodstothe exact
donenessyouwant.The meat
thermometerhasa skewer-like
probeatone endofthe cableanda
two-prongedplugat the other.Use
handleofplugandprobe,rather
thancable,wheninsertingand
removingthesepartsfrommeat
and/orovenwallreceptacle.Afier
preparingmeatandplacingin
roastingpan on rack, followthe
stepsbelowforproperuseofmeat
thermometer.
i 1
‘1
I J
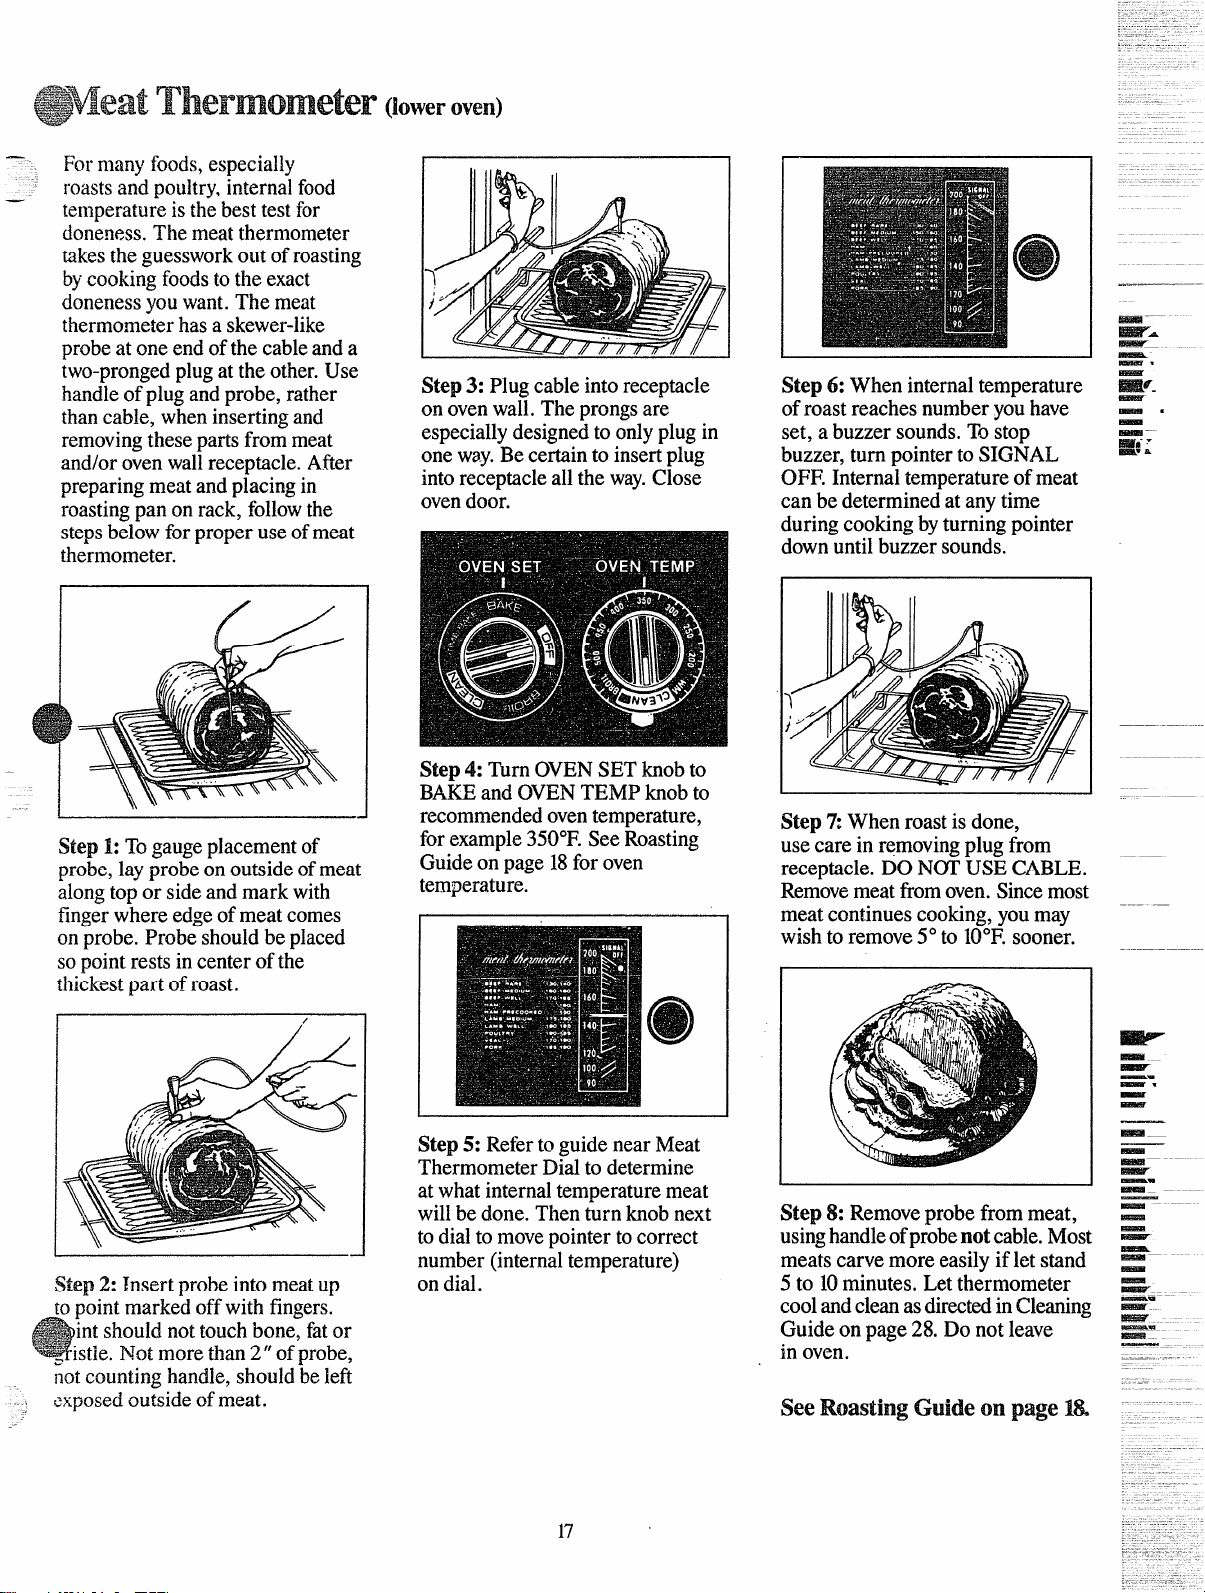
Step 1:Togaugeplacementof
probe,layprobeon outsideofmeat
alongto~or sideandmark with
fingerwhereedgeofmeatcomes
onprobe.Probeshouldbeplaced
sopointrestsin centerofthe
thickestpart of roast.
Step 2: Insertprobeintomeatup
topointmarkedoffwithfingers.
intshouldnottouchbone,fator
stie.Not morethan2” ofprobe,
notcountinghandle,shouldbeleft
exposedoutsideofmeat.
Step3: Plugcableintoreceptacle
on ovenwall.Theprongsare
especiallydesignedto onlyplugin
oneway.Becertainto insertplug
intoreceptacleallthe way.Close
ovendoor.
Step 4: TurnOVENSETknobto
BAKEand OVENTEMPknobto
recommendedoventemperature,
forexample350°F.SeeRoasting
Guideon page18for oven
temperature.
Step 6: Wheninternaltemperature
ofroastreachesnumberyouhave
set, a buzzersounds.Tostop
buzzer,turn pointerto SIGNAL
OFF.Internaltemperatureof meat
can be determinedat anytime
duringcookingbyturningpointer
downuntilbuzzersounds.
Step %Whenroastis done,
usecare in removingplugfrom
receptacle.DONOTUSE CABLE.
Removemeatfromoven.Sincemost
meatcontinuescooking,youmay
wishto remove5° to 10°F.sooner.
Step5: RefertoguidenearMeat
ThermometerDialto determine
at whatinternaltemperaturemeat
willbe done.Thenturn knobnext
Step 8: Removeprobefrommeat,
to dialto movepointertocorrect
usinghandleofprobenotcable.Most
number(internaltemperature) meatscarvemoreeasilyif let stand
on dial. 5 to 10minutes.Letthermometer
coolandcleanasdir~tedinCleaning
Guideon page28.Do not leave
in oven.
SeeRoasting Guide on page I&
~.. .
—w
~--
-.
—_w
w–
—.
17
RoastingGuide
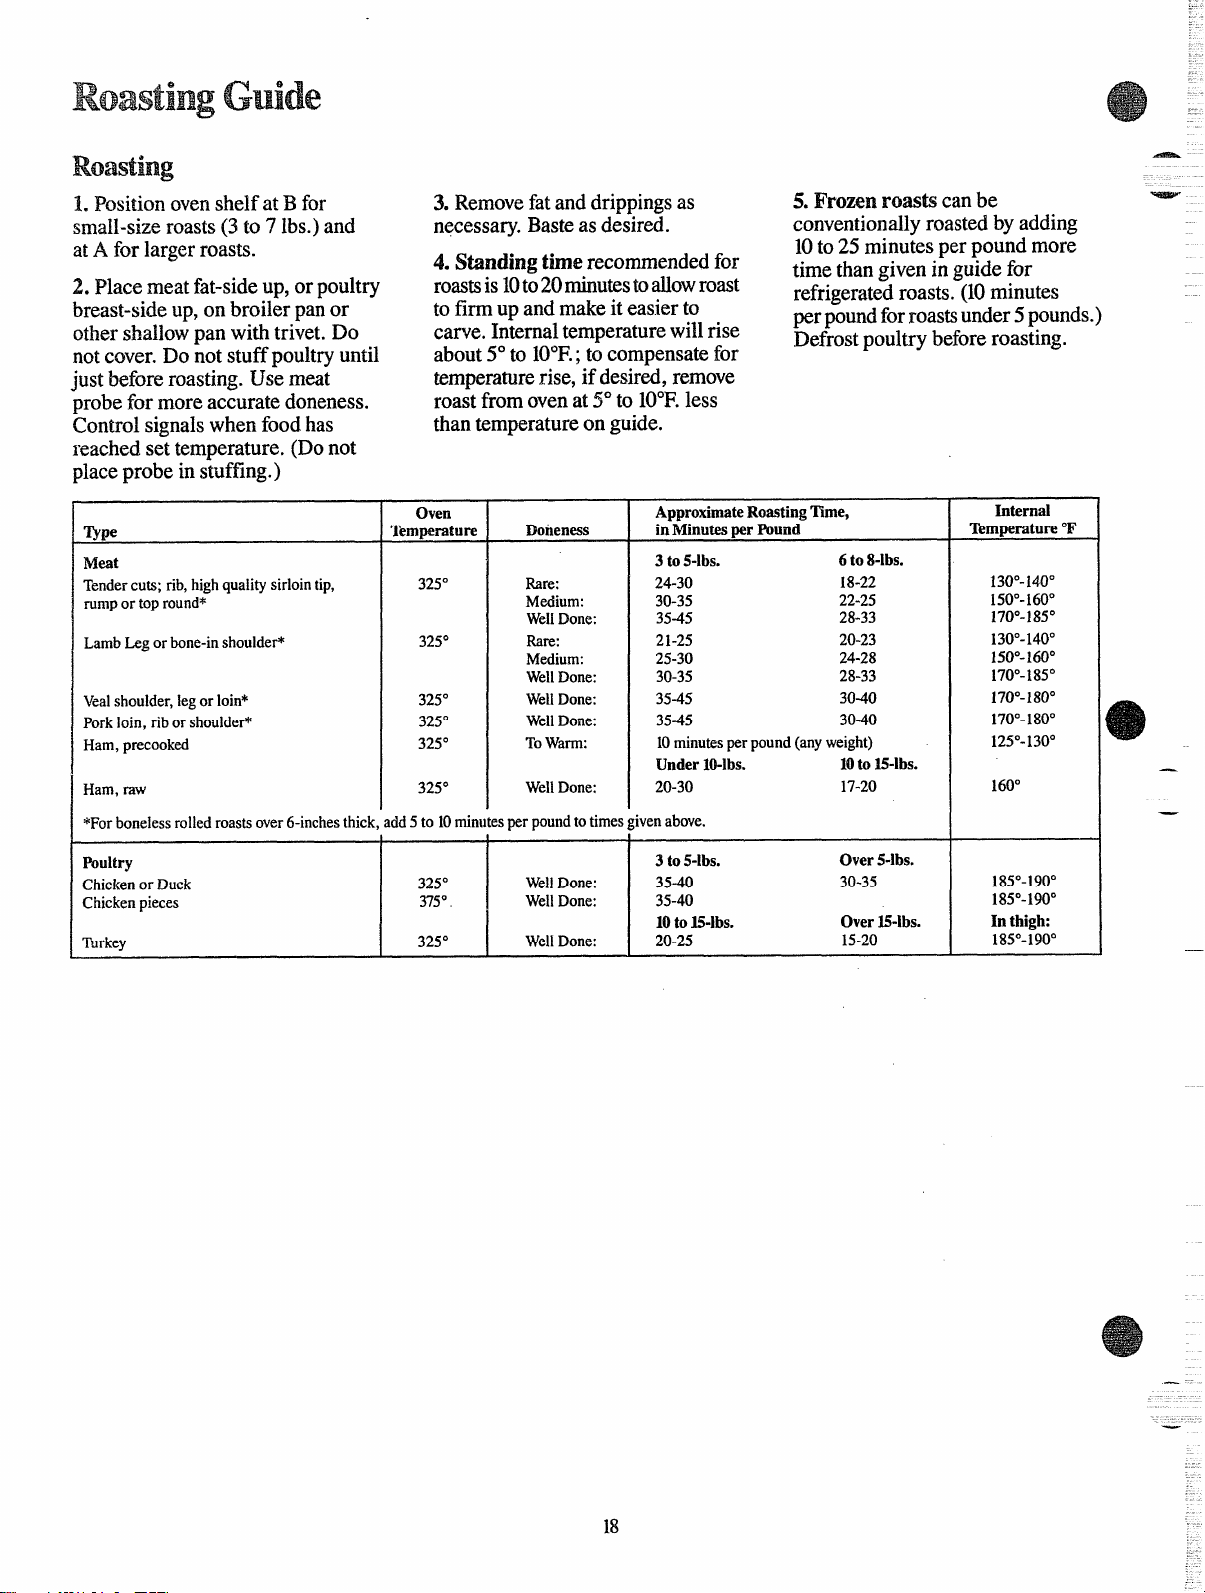
1. Positionovenshelfat B for
3. Removefatanddrippingsas
5. Frown roasfi canbe
~
small-sizeroasts(3 to 7 lbs.)and necessan. Basteasdesired.
conventionallyroastedbyadding
.
atA for largerroasts. “
2. Placemeatfat-sideup,or poultry
breast-sideup,on broilerpanor
othershallowpan withtrivet.Do
notcover.Do notstuffpoultryuntil
just beforeroasting.Use meat
probefor moreaccuratedoneness.
Controlsignalswhenfoodhas
reachedsettemperature.(Donot
placeprobein stuffing.)
4. Stinding the recommendedfor
roastsis 10to20minutesto~ow roast
to firmup andmakeit easierto
carve.Intirnaltemperaturewillrise
about5°to 10”F.;to compensatefor
temperaturerise, if desired,remove
roastfromovenat5°to 10”F.less
thantemperatureon guide.
10to 25 minutesperpoundmore
timethangivenin guidefor
refrigeratedroasts.(10minutes
perpoundforroastsunder5pounds.)
Defrostpoultrybeforeroasting.
Oven
ApproximateRoasting Time,
Internal
Type Temperature
Doneness
in Minutes per Wund
Temperature ‘F
Met
3 to 5-lbs. 6 to $-lbs.
Tendercuts; rib,highqualitysirlointip,
325°
Rre:
24-30 18-22
130°-140°
rumportopround*
Medium: 30-35
22-25
150°-160°
WellDone:
35-45 28-33 1700-185°
Lambhg orbone-inshoulder*
325° Rare:
21-25
20-23
130°-1400
Medium: 25-30 24-28 150°-160°
WellDone:
30-35 28-33
170°-1850
Vealshoulder,legor loin*
325°
WellDone: 35-45
30-40 170°-1800
Porkloin,ribor shoulder*
325°
WellDone: 35-45 30-40
170°-180°
Ham,precooked
325°
ToWarm:
10minutesperpound(anyweight)
125°-1300
Under I&lbs.
10tO 15-lbs.
Ham,raw
325°
WellDone: 20-30 17-20
160°
*Forbonelessrolledroastsover6-inchesthick,add5 to 10mimltesper poundtotimesgivenabove.
Poultry
3 to 5-ibs. Over 5-lbs.
Chickenor Duck
325°
WellDone: 35-40 30-35
185°-1900
Chickenpieces
375°.
WellDone: 35-40
185°-1900
10 to E-lbs. Over15-lbs. In thigh:
~rkey 325°
WellDone: 20-25 15-20
185°-1900
.
—
—
. .... ...................,-—.—...——.———.—..——————.———.
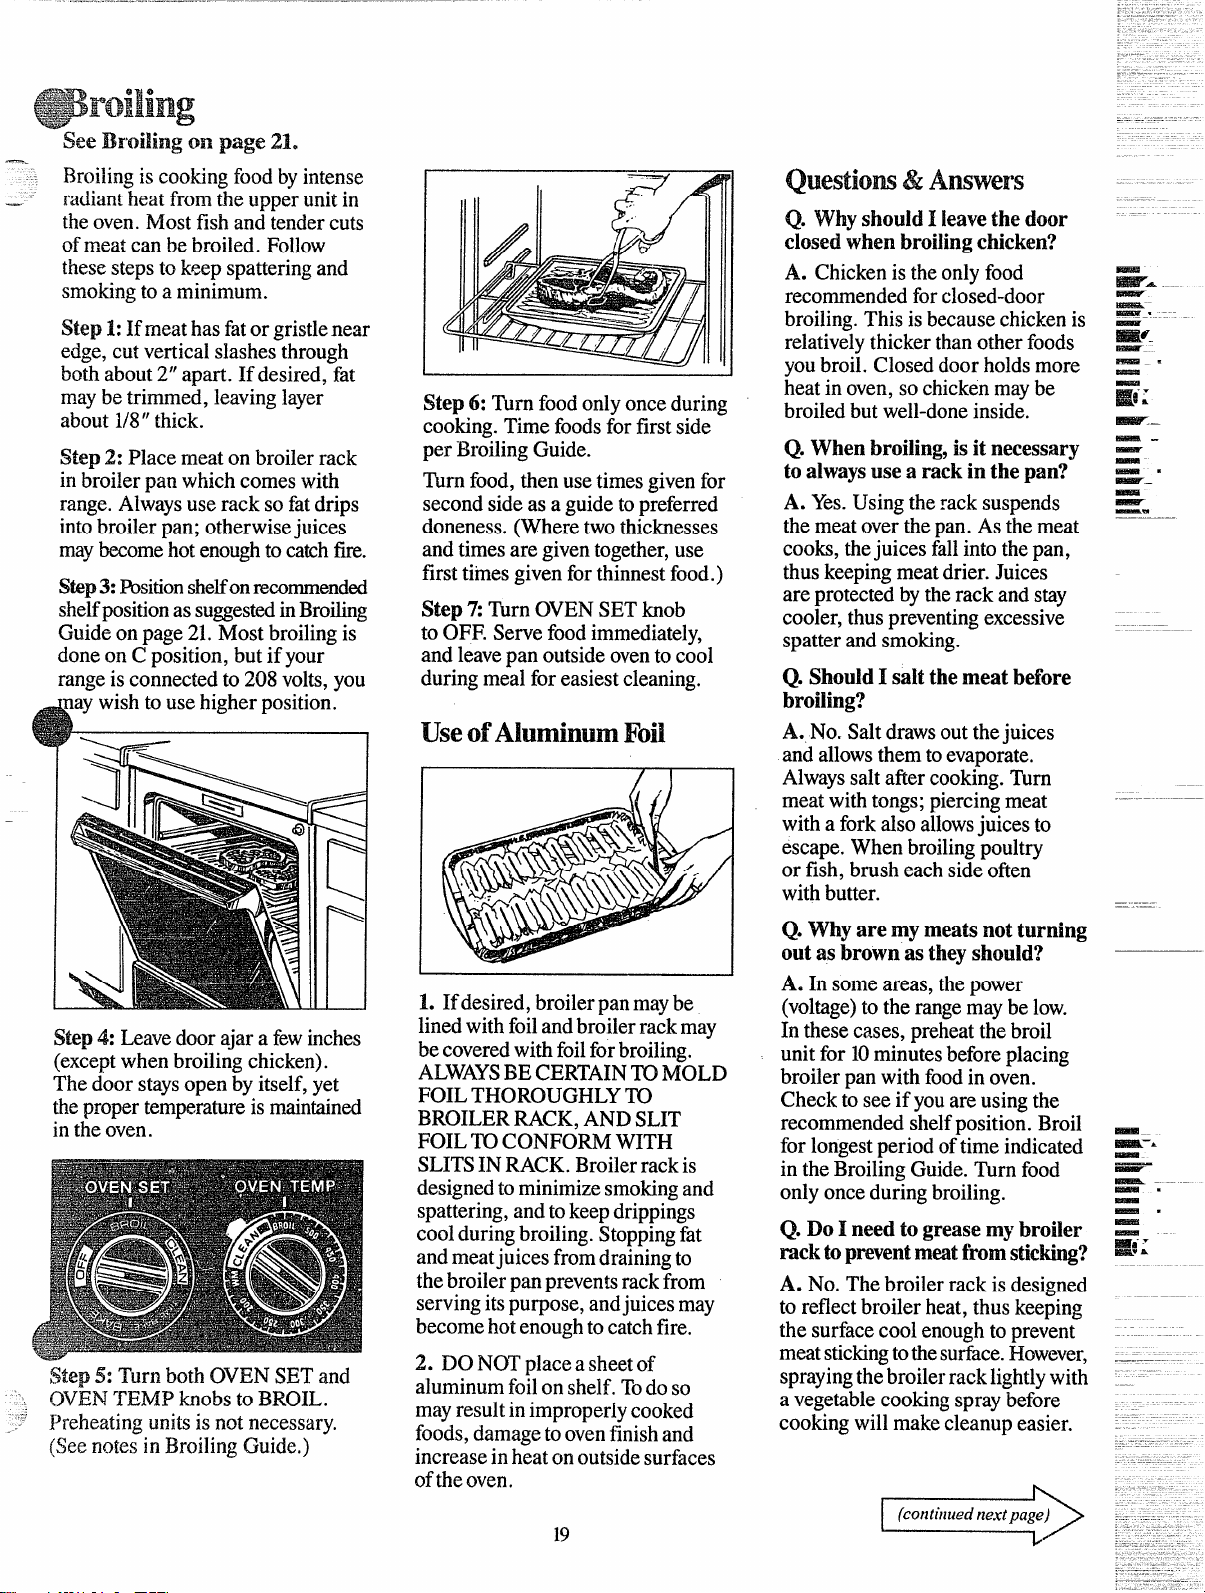
seeBroiling on page 21.
—_
Broilingis cookingfoodbyintense
.
radiantheatfromthe upperunitin
theoven.Mostfish and tendercuts
ofm,eatcan bebroiled.Follow
thesestepsto k~epspatteringand
smokingto a minimum.
Step 1:If meathasfatorgristlenear
edge,cutverticalslashesthrough
bothabout2“apart. If desi~ed,fat
maybe trimmed,leavinglayer
about1/8”thick.
Step 2: Placemeaton broilerrack
in broilerpan whichcomeswith
range.Alwaysuserack so fatdrips
intobroilerpan; otherwisejuices
maybecomehotenoughto catchfire.
S&p3:Wsitionshe~on~commended
shelfpositionassuggestedinBroiling
Guideon page21.Mostbroilingis
doneon C position,butif your
rangeis connectedto 208volts,you
naywishto usehigherposition:
I
Step4: Leavedoorajara fewinches
(exceptwhenbroilingchicken).
Thedoor staysopenby itself,yet
thepropertemperatureis maintained
in theoven.
Step 5:
TurnbothOVENSETand
OVENTEMP knobstOBROIL.
_.; Preheatingunitsis notnecessary.
(Seenotesin BroilingGuide.)
Step 6: firn foodonlyonceduring
cooking.Timefoodsfor firstside
per BroilingGuide.
~m food,thenusetimesgivenfor
secondsideas a guidetopreferred
doneness.(Wheretwothicknesses
andtimesare giventogether,use
first.timesgivenforthinnestfood.)
Step %TurnOVENSETknob
to OFF. Servefoodimmediately,
andleavepan outsideovento cool
duringmealfor easiestcleaning.
UseofAIuminumFoil
1. Ifdesired,broilerpanmaybe
linedwithfoilandbroilerrackmay
becoveredwithfoilforbroiling.
ALWAYSBECERTAIN~ MOLD
FOILTHOROUGHLY~
BROILERRACK,ANDSLIT
FOIL~ CONFORMWITH
SLITSIN RACK.Broilerrackis
designedto minimizesmokingand
spattering,andtokeepdrippings
coolduringbroiling.Stoppingfat
andmeatjuicesfromdrainingto
thebroilerpanpreventsrackfrom
servingitspurpose,andjuicesmay
becomehotenoughtocatchfire.
2. DONOTplacea sheetof
aluminumfoilon shelf.Todoso
mayresultinimproperlycooked
foods,damagetoovenfinishand
increasein heatonoutsidesurfaces
oftheoven.
19
Questiom&Answers
Q. WhyshouldI leavethe door
closedwhenbroilingchicken?
A. Chickenis theonlyfood
recommendedforclosed-door
broiling.Thisis becausechickenis
relativelythickerthanotherfoods
youbroil. Closeddoorholdsmore
heatin oven,so chickenmaybe
broiledbut well-doneinside.
Q. Whenbroiling,is it necessary
to alwaysuse a rackin the pan?
A. Yes.Usingtheracksuspends
themeatoverthepan. Asthemeat
cooks,thejuicesfallintothepan,
thuskeepingmeatdrier.Juices
areprotectedbytherackandstay
cooler,thuspreventingexcessive
spatterandsmoking.
Q. Should1saltthemeatbefore
broiling?
A. No. Saltdrawsoutthe juices
andallowsthemtoevapor~te.
Alwayssaltafiercooking.Turn
meatwithtongs;piercingmeat
witha forkalsoallowsjuicesto
escape.Whenbroilingpoultry
or fish, brusheachsideofien
withbutter.
Q.Whyaremymeatsnotturning
outas brownastheyshould?
AeIn someareas,thepower
(voltage)to therangemaybe low.
In thesecases,preheatthebroil
unitfor 10minutesbeforeplacing
broilerpanwithfoodin oven.
Checkto see if youare usingthe
recommendedshelfposition.Broil
for longestperiodoftimeindicated
in the BroilingGuide.Turnfood
onlyonceduringbroiling.
Q. Do I needto greasemybroiler
racktopreventmmtfmmsticking?
A. No. Thebroilerrack is designed
to reflectbroilerheat,thuskeeping
the surfacecoolenoughto prevent
meatstickingtothesurface.However,
sprayingthebroilerracklightlywith
a vegetablecookingspraybefore
cookingwillmakecleanupeasier.
1
(continttedne.rtpage)
b
-–.
-
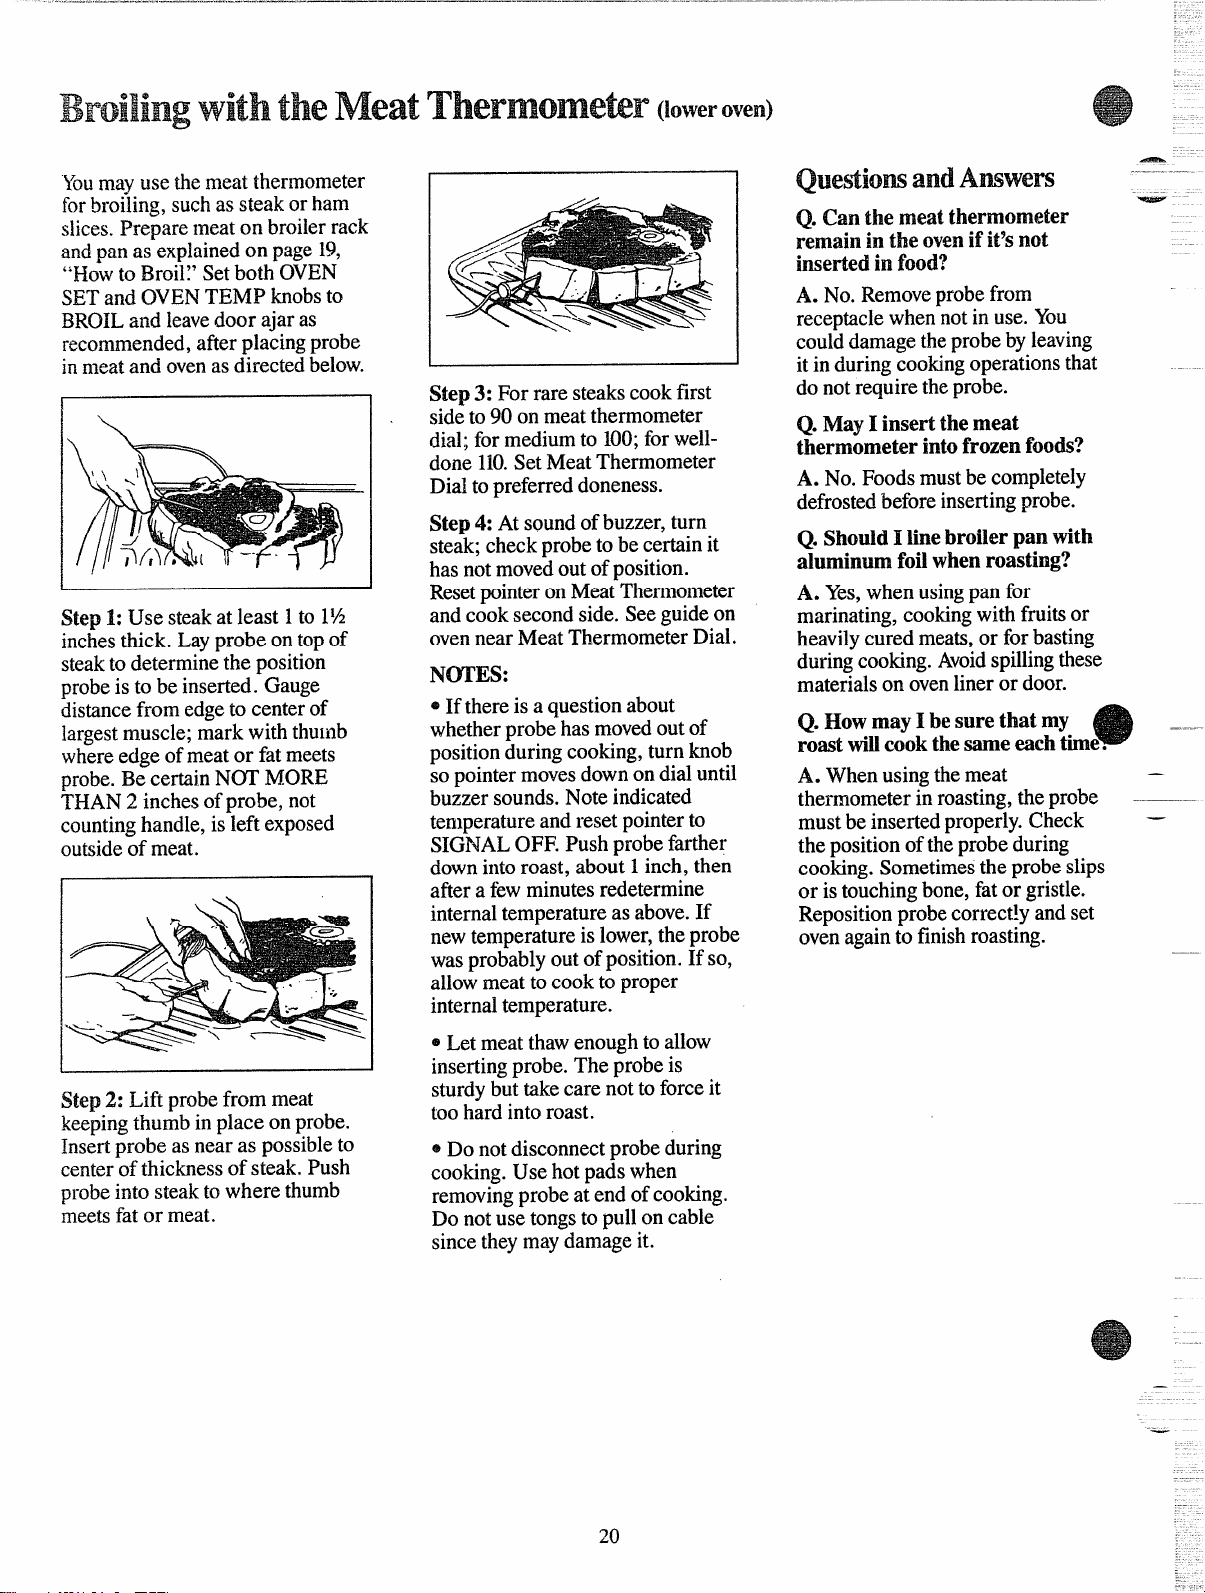
Youmayuse themeatthermometer
forbroiling,suchas steakor ham
slices.Preparemeaton broilerrack
andpanas-explainedon page19,
“HOWto Broil:’Setboth OVEN
SETand OVENTEMP knobsto
BROILand leavedoor ajar as
recommended,afierplacingprobe
inmeatand ovenas directedbelow.
Step 1: Use steakat least 1to 1%
inchesthick. Layprobeon topof
steakto determinethe position
probeis to be inserted.Gauge
distancefrom edgeto centerof
largestmuscle;mark with thu~nb
whereedgeofmeator fatmeets
probe.Be certainN~ MORE
THAN2 inchesofprobe, not
countinghandle,is left exposed
outsideof meat.zyxwvutsrqponmlkjihgfedcbaZYXWVUTSRQPONMLKJIHGFEDCBA
I
Step2: Lift probefrom meat
keepingthumbin place on probe.
Insertprobeas near as possibleto
centerof thicknessof steak. Push
probeintosteakto where thumb
meetsfator meat.
Step 3: For rare steakscookfirst
sideto 90 on meatthermometer
dial;for mediumto 100;forwell-
done110.SetMeatThermometer
Dialto preferreddoneness.
Step 4: At soundofbuzzer,turn
steak;checkprobeto be certainit
has notmovedoutof position.
ResetpointeronMeatThermometer
andcooksecondside.Seeguideon
ovennearMeatThermometerDial.
N~ES:
@If thereis a questionabout
whetherprobehasmovedoutof
positionduringcooking,turnknob
so pointermovesdownon dialuntil
buzzersounds.Noteindicated
temperatureandresetpointerto
SIGNALOFF.Pushprobefarther
downintoroast, about1 inch,then
afiera fewminutesredetermine
internaltemperatureas above.If
newtemperatureis lower,theprobe
wasprobablyoutof position.If so,
allowmeatto cookto proper
internaltemperature.
@Let meatthawenoughto allow
insertingprobe.The probeis
sturdybuttakecare notto forceit
toohard intoroast.
@Do notdisconnectprobeduring
cooking.Use hotpadswhen
removingprobeat endof cooking.
Do notuse tongsto pullon cable
sincetheymaydamageit.
QuestiomandAmwen
Q.Canthe meatthermometer
remainin the ovenif it9snot
insertedin food?
A. No.Removeprobefrom
receptaclewhennotin use.You
couiddamagetheprobebyleaving
it in duringcookingoperationsthat
do notrequiretheprobe.
Q. May 1insertthemeat
thermometerintofrozenfoo~?
A. No. Foodsmustbe completely
defrosted‘beforeinsertingprobe.
Q. ShouldI linebroilerpanwith
aluminumfoilwhenroasting?
A. Yes,whenusingpanfor
marinating,cookingwithfruitsor
heavilycuredmeats,or forbasting
duringcooking.Avoidspillingthese
materialson ovenlineror door.
Q.HowmayI be surethatmy
roastwillcookthesameeachtke.
A. Whenusingthemeat
—
thermometerin roasting,theprobe -—-–
mustbe insertedproperly.Check —
the positionof theprobeduring
cooking.Sometimesthe probeslips
or is touchingbone,fator gristle.
Repositionprobecorrect!yandset
ovenagainto finishroasting.
—
-
20

Toslash,cut crosswisethrough
outerfat surfacejust to theedgeof
themeat. Use tongsto turn meat
overto preventpiercingmeatand
losingjuices.
6. Broilerdoesnotneed tobe
preheated.However,for verythin
foods,or to increasebrowning,
preheatif desired.
7. Frozen $teaks canbe
conventionallybroiledby
positioningthe ovenshelfat next
lowestshelfpositionandincreasing
cookingtimegivenin thisguide
1%timesper side.
+-
1. Alwaysusebroilerpanandrack
thatcomeswithyouroven.It is
designedto minimizesmokingand
spatteringbytrappingjuicesin the
shieldedlowerpart ofthepan.
2. Ovendoorshouldbe ajar for
mostfoods;thereis a special
positionon door whichholdsdoor
o~encorrectlv.
—
-K
4. If desired,marinatemeatsor
chickenbeforebroiling.Or brush
withbarbecuesaucelast5 to 10
minutesonly.
W---
5. Whenarrangingfoodon pan,
.-
-
a
3. Forsteaks~ndchops,slashfat
do notlet fatty;dges hangover
sides,whichcouldsoilovenwith
evenlyaroundoutsideedgesofmeat.
fatdripping.
8. If yourrangeis connectedto =
208Volts,rare steaksmaybe broiled -
——
-
bypreheatingbroilheaterand
positioningtheovenshelfone
positionhigher.
...
I
Quantity andlor
I
Shelf
I
First Side
Food
Second Side
Time, MinuteszyxwvutsrqponmlkjihgfedcbaZYXWVUTSRQPONMLKJIHGFEDCBA
I
Comments
I Thickness
~ Position I Time, Minutes
I
Bacon
k-lb. (about8
I
c
I
3%
thinslices)
3%
I
Arrangeinsinglelayer.
I
Ground Beef
WellDone
1
l-lb.(4 patties)
1/2to %-in.thick
c 7
Spaceevenly.
Upto 8pattiestakeaboutsametime.
4-5
~-inchthick
(1to 1%-lbs.)
l~li
7
9
13
7-8
14-16
20-25
Steakslessthan1inchcookthrough
beforebrowning.Panfryingis
recommended.
Slashfat.
Medium
—
WellDone
Wre
— Medium
WellDone
Chicken
llA-in.thick
(2to2%-lbs.)
1:1:
1whole A
35
(2to2%-lbs.),
splitlengthwise
10-15
Reducetimesabout5 to 10minutesper
sidefor cut-upchicken.Brusheachside
withmeltedbutter.Broilwithskin “
downfirstandbroilwithdoorclosed.
r
Bakery Products
Bread(Toast)or
ToasterPastries
EnglishMuffins
1
‘/2
Spaceevenly.PlaceEnglishmuffins
cut-side-upandbrushwithbutter,if
desired.
2 to4 slices
1:134
1%-2
1pkg.(2)
2 (split)
I
LobsterTails
(6 to8-02.each)
2-4 B
13-16
Donot
Cutthroughbackofshell.Spread
turnover.
open.Brushwithmeltedbutter
beforeandafterhalftime.
5
Handleandturnverycarefully.
Brushwithlemonbutterbeforeand
duringcookingif desired.Preheat
broilertoincreasebrowning.
8 Increasetimes5 to 10minutesperside
for 1%-inchthickor homecured.
fish
I
l-lb.fillets%to c 5
lA-in.thick
F
Ham Slices
(precooked)
Pork Chops
WellDone
l-in.thick
I
B
I
8
2(% inch)
2 (l-in.thick)
about1lb.
c
10
B
13
c
8
c 10
c 10
B 17
10
Slashfat.
13
2(! inch)
about10to 12oz.
2(1%inch)
about1lb.
4-7
Slashfat.
10
4-6
12-14
‘.,L
Wienersandsimilar
precc>okedsausages,
bratwurst
l-lb. pkg.(10)
IC16
1-2
If desired,splitsausagesinhalf
lengthwiseinto5 to6-inchpieces.
21
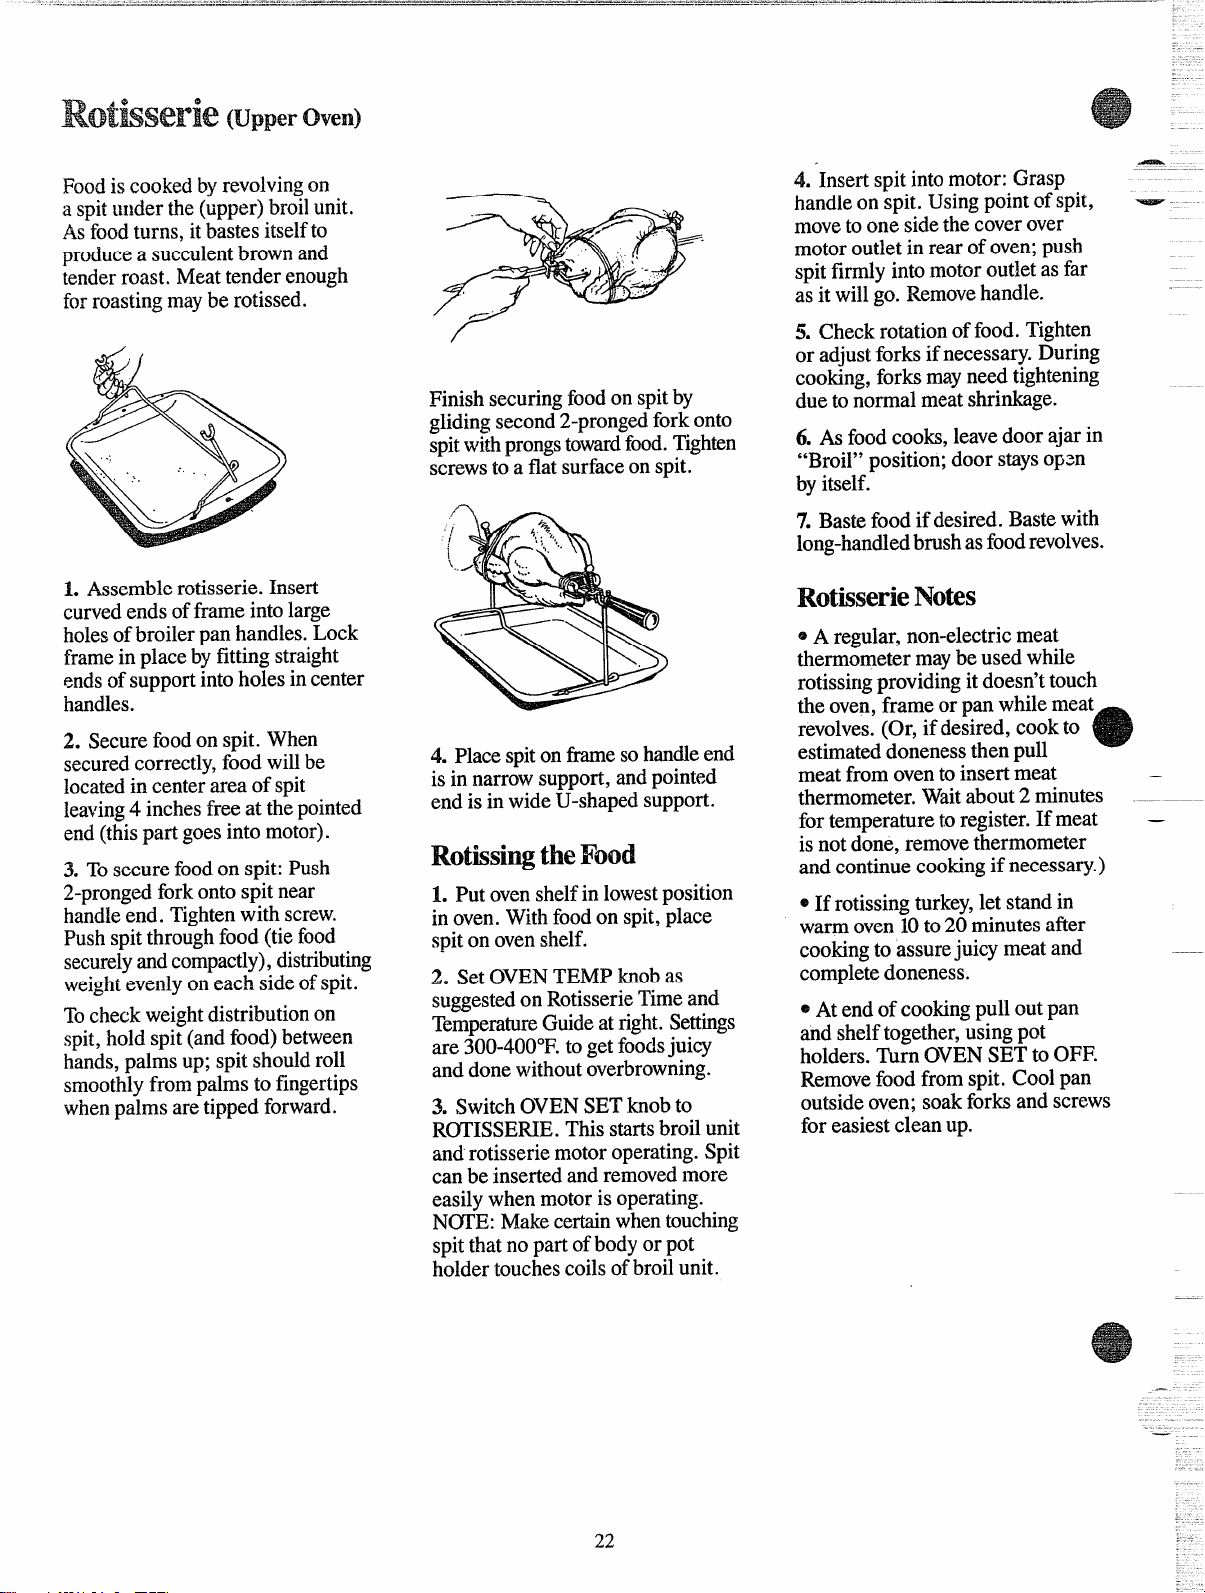
Rotkserie(upper oven)
Foodis cookedbyrevolvingon
a spitunderthe(upper)broilunit.
Asfoodturns, it bastesitselfto
producea succulentbrownand
tenderroast. Meattenderenough
forroastingmaybe rotissed.
1. Assemblerotisserie.Insert
curvedendsofframeintolarge
holesofbroilerpan handles.Lock
framein placeby fittingstraight
endsofSUpportintoholesincenter
handles.
2. Securefoodon spit.When
securedcorrectly,foodwillbe
locatedin centerareaof spit
leaving4 inchesfree at thepointed
end(thispart goesinto motor).
3. Tosecurefoodon spit:Push
2-prongedforkontospit
near
handleend. Tightenwithscrew.
Pushspitthroughfood (tiefood
securelymd compactly),distributing
weightevenlyoneach sideofspit.
Tocheckweightdistributionon
spit,holdspit(andfood)between
hands,palmsup;spit shouldroll
smoothlyfrompalmsto fingertips
whenpalmsaretippedforward.
Finishsecuringfoodon spitby
glidingsecond2-prongedforkonto
spitwiti prongstowardfti. Tighten
screwsto a flatsurfaceon spit.
4. Placespitonframesohandleend
is in narrowsupport,andpointed
endis in wideU-shapedsupport.
Rotissiq theFood
1. Putovenshelfin lowestposition
in oven.Withfoodon spit,place
spiton ovenshelf.
2. SetOVENTEMPknobas
suggestedon RotisserieTimeand
TemperatureGuideat right.Settings
are 300-400”F.to getfoodsjuicy
anddonewithoutoverbrowning.
3. SwitchOVENSETknobto
ROTISSEWE.Thisstartsbroilunit
androtisseriemotoroperating.Spit
canbe insertedandremovedmore
easilywhenmotoris operating.
N~E: Makecertainwhentouching
spitthatno part ofbodyor pot
holdertouchescoilsof broilunit.
—
4. Insertspit intomotor:Grasp
handleon spit. Usingpointofspit,
moveto one sidethe coverover
motoroutletin rearof oven;push
spitfirmlyintomotoroutletas far
as it willgo. Removehandle.
5. Checkrotationoffood.Tighten
or adjustforksif necessary.During
cooking,forksmayneedtightening
dueto normalmeatshrinkage.
6. As foodcooks,leavedoorajarin
“Broil”position;door staysopen
byitself.
7. Bastefoodif desired.Bastewith
long-handledbrushasfoodrevolves.
RotisserieNo&s
.——
o A regular,non-electricmeat
thermometermaybe used while
rotissingprovidingit doesn’ttouch
the oven,frameor pan whilemeat
revolves.(Or, if desired,cookto
estimateddonenessthenpull
e
meatfrom oventoinsertmeat
—
thermometer.Waitabout2 minutes –..
for temperatureto register.If meat —
is notdone,removethermometer
andcontinuecookingif necessary.)
~If rotissingturkey,let standin
warmoven10to20 minutesafier
cookingto assurejuicymeatand
completedoneness.
~At endof cookingpull outpan
andshelftogether,usingpot
holders.TurnOVENSET to OFF.
Removefoodfromspit. Coolpan
outsideoven;soakforksand screws
for easiestcleanup.
22
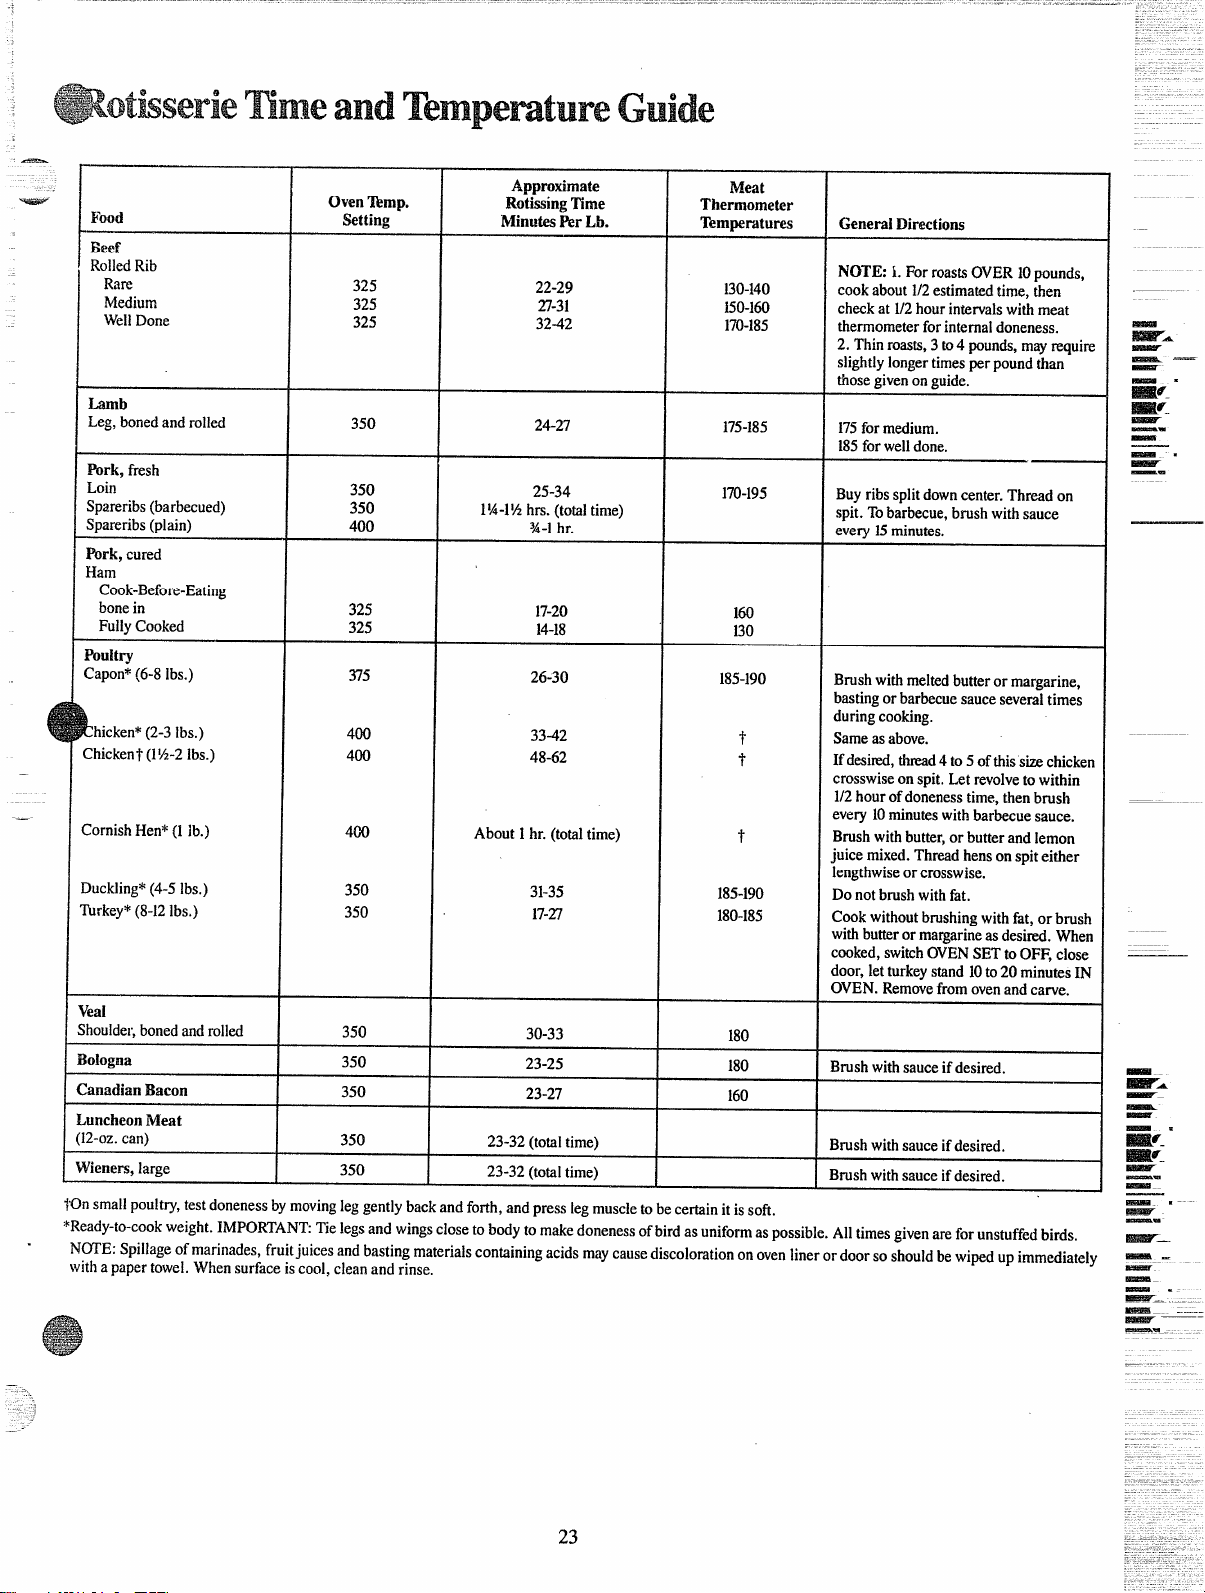
@otkserie mmeandTempemtureGuide
.—
-.
——
I
Approfiate
Meat
Oven ~mp.
Rotissing Time Thermometer
Food
Setting Nlinutes Per Lb. Temperatures
GeneralDirWtiom
Beef
RolledRib
NOTE:1.Forroas~$OVER10pounds,
Rare 325 22-29
130-140
cookabout1/2estimatedtime,then
Medium
325 27-31 150-160 checkat 1/2hourintervalswithmeat
WellDone
325
32-42
170-185
thermometerforinternaldoneness.
2. Thinroasts,3 to4 pounds,mayrequire
slightlylongertimesperpoundthan
thosegivenonguide.
-b
Leg, bonedandrolled
350
24-27 175-185 175formedium.
185forwelldone.
Pork, fresh
Loin
350
25-34 170-195
Buyribssplitdowncenter.Threadon
Spareribs(barbecued)
350
1%-1%hrs. (totaltime)
spit.Tobarbecue,brushwithsauce
Spareribs(plain) 400
%-1hr.
every15minutes.
Pork, cured
Ham
Cook-Before-Eating
bonein 325 17-20
160
FullyCooked 325
14-18
130
Poultry
Capon*(6-8lbs.)
375
26-30
185-190
Brushwithmeltedbutteror margarine,
bastingor barbecuesauceseveraltimes
k
duringcooking.
hicken*(2-3Ibs.) 400
33-42
t
Sameas above.
Chicken7(1%-2Ibs.)
400
48-62
T
If desired,&d 4 to 5 ofthisSk chicken
crosswiseonspit.Letrevolvetowithin
1/2hourofdonenesstime,thenbrush
every10minuteswithbarbecuesauce.
CornishHen*(1\b.) 400
About1hr. (totaltime)
-t
Brushwithbutter,or butterandlemon
juice mixed.Threadhensonspiteither
lengthwiseor crosswise.
Duckling*(4-5lbs.)
350
31-35 185-190
Donotbrushwithfat.
~rkey* (8-12Ibs.)
350 17-27
180-185
Cookwithoutbrushingwithfat, or brush
withbutterormargarineas desired.When
cooked,switchOVENSETtoOFF,cIose
door,letturkeystand10to20minutesIN
OVEN.Removefromovenandcarve.
Veal
Shoulder,bonedandrolled 350
30-33
180
Bologna
350
23-25
180 Brushwithsauceifdesired.
?anadianBacon
350
23-27
160
.uncheon Meat
12-oz.
can)
350
23-32(totaltime)
Brushwithsauceifdesired.
Wieners,large 350
23-32(totaltime)
Brushwithsauceif desired.
(
(
1
.
J
s
E
(
;
v
Ion smallpoultry,testdonenessbymovingleggentlybackandforth,andpresslegmuscleto becertainit is soft.
*Ready-to-cookweight.IMPORTANTTielegsandwingscloseto bodytomakedonenessofbirdas uniformas possible.Alltimesgivenareforunstuffedbirds.
.
NOTE:Spillageofmarinades,fruitjuicesandbastingmaterialscontainingacidsmaycausediscolorationonovenlineror doorso shouldbewipedupimmediately
withapapertowel.Whensurfaceiscool,cleanandrinse.
=#_ “zyxwvutsrqponmlkjihgfedcbaZYXWVUTSRQPONMLKJIHGFEDCBA
mf-
—.
-
—
—
23
—.
Opel”atingthe
Befowsettingoven
self-cleaning bwer oven
—
Caution:Chrometrimrings
aroundthe surfaceunitsshould
neverbecleanedinthe self-
cleaningoven.Neithershould
reflectorpansoffoilor shiny
chrome.
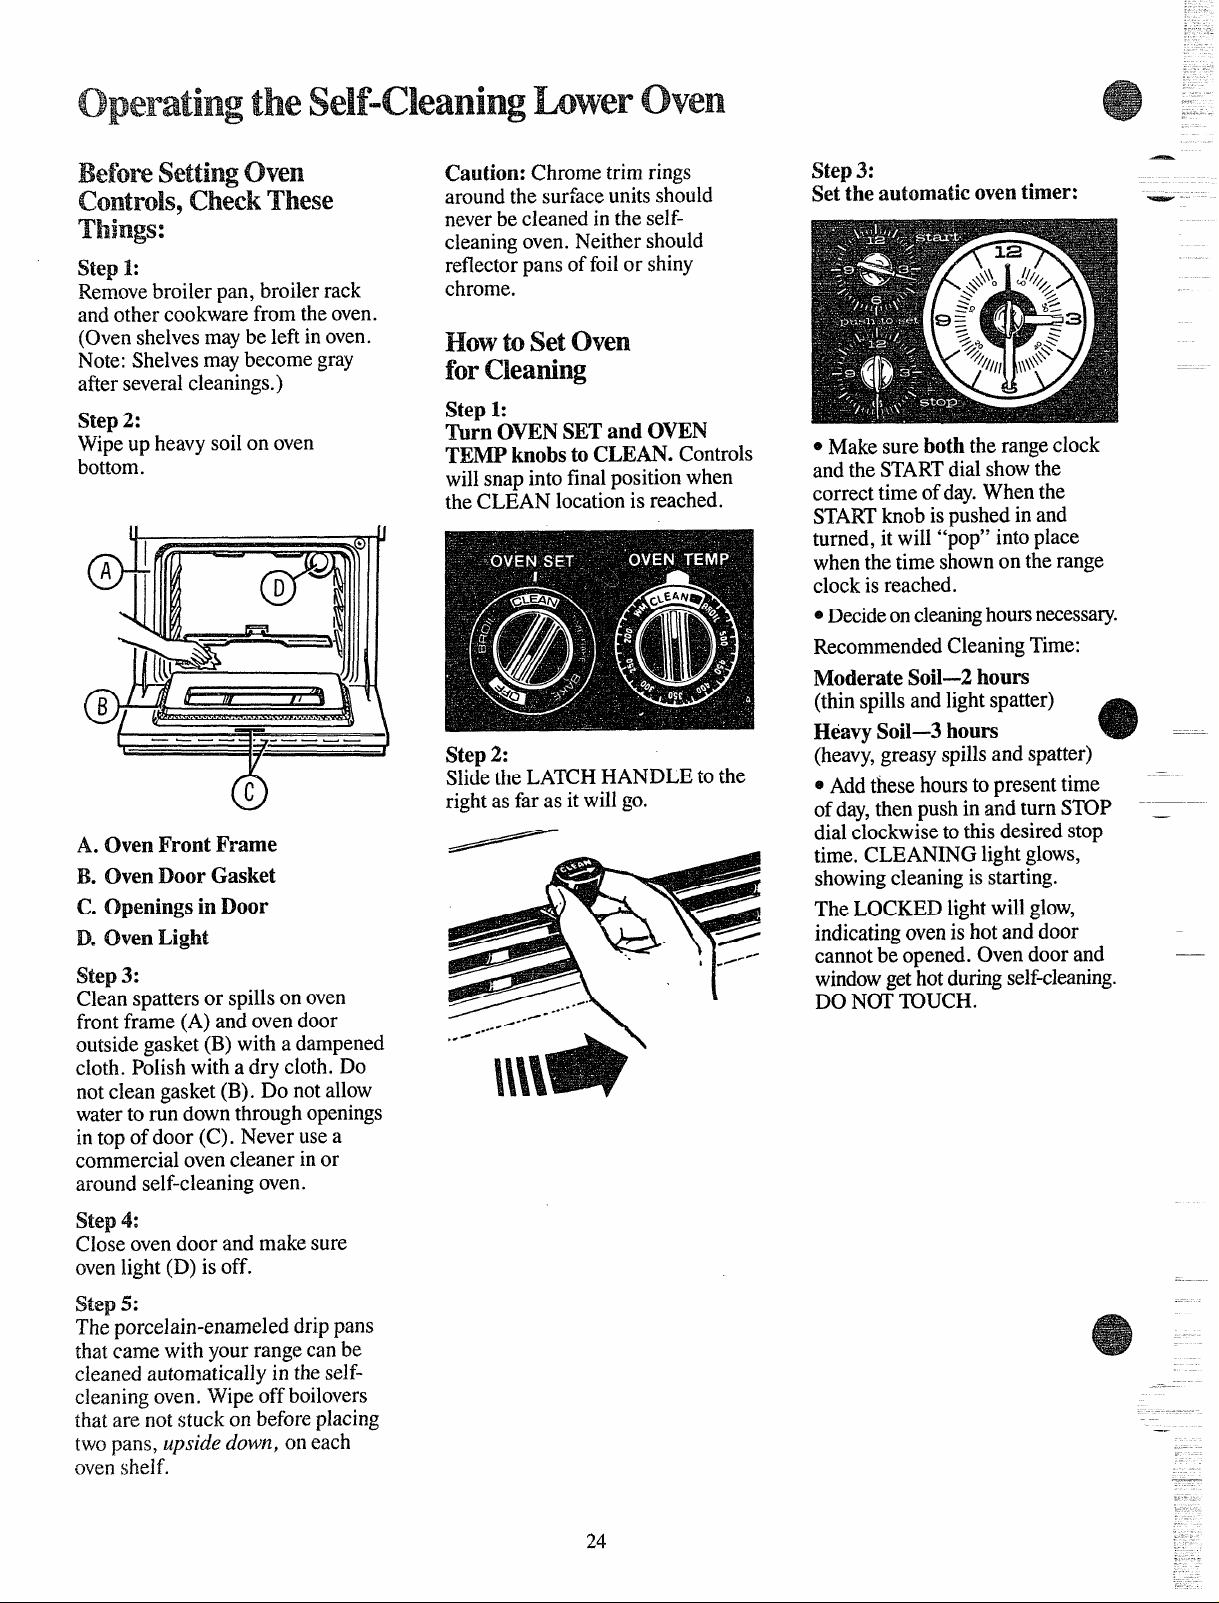
step3:
Settheautomaticoventimer:
—-
Controls,chick These
Things:
step1:
Removebroilerpan, broilerrack
andothercookwarefromtheoven.
(Ovenshelvesmaybe leftin oven.
Note:Shelvesmaybecomegray
afterseveralcleanings.)
step 2:
Wipeup heavysoilon oven
bottom.
HowtoSetOven
forCBeating
Step1:
~rn OVENSETandOVEN
TEW knobsto CLEAN.Controls
willsnapintofinalpositionwhen
theCLEANlocationis reached.
@Makesureboth the rangeclock
andthe STARTdialshowthe
correcttimeofday.Whenthe
STARTknobis pushedinand
turned,it will “pop”intoplace
whenthetimeshownon therange
clockis reached.
e Decideoncleaninghoursnecessary.
RecommendedCleaningTime:
ModerateSoil—2hours
-y
———— .
.—— - —
(thinspillsandlightspatter)
HeavySoii—3hours
@
Step
2:
Slidethe LATCHHANDLEto the
rightas far as it willgo.
(heav~,greasyspillsand spatter)
—
e Addthesehoursto presenttime
ofday,thenpushin and turnS~P
dialclockwiseto thisdesiredstop
time.CLEANINGlightglows,
showingcleaningis starting.
——
A. OvenFrontFrame
B. OvenDoorGasket
C. Openingsin Door
TheLOCKEDlightwillglow,
indicatingovenis hotanddoor
cannotbe opened.Ovendoorand
windowgethotduringself-cleaning.
DON(YI’~?JCH.
DeOvenLight
Step 3:
Cleanspattersor spillson oven
frontframe(A) andovendoor
outsidegasket(B)witha dampened
cloth.Polishwitha dry cloth.Do
notcleangasket(B). Do notallow
waterto run downthroughopenings
in topof door (C). Neverusea
commercialovencleanerin or
aroundself-cleaningoven.
step4:
Closeovendoorand makesure
ovenlight(D) is off.
step5:
Theporcelain-enameleddrippans
thatcamewith yourrangecanbe
cleanedautomaticallyin theself-
cleaningoven,Wipeoff boilovers
thatare notstuckon beforeplacing
twopans,upsidedown,on each
ovenshelf.
—
—.
24
-- FoilolvThesestepsafter
— self-cleaning
After cleaningiscomplete,the
ovendoorwill staylockeduntilthe
ovencoolsaridtheLOCKEDlight
goesoff. Thistakesabout30
minutes.
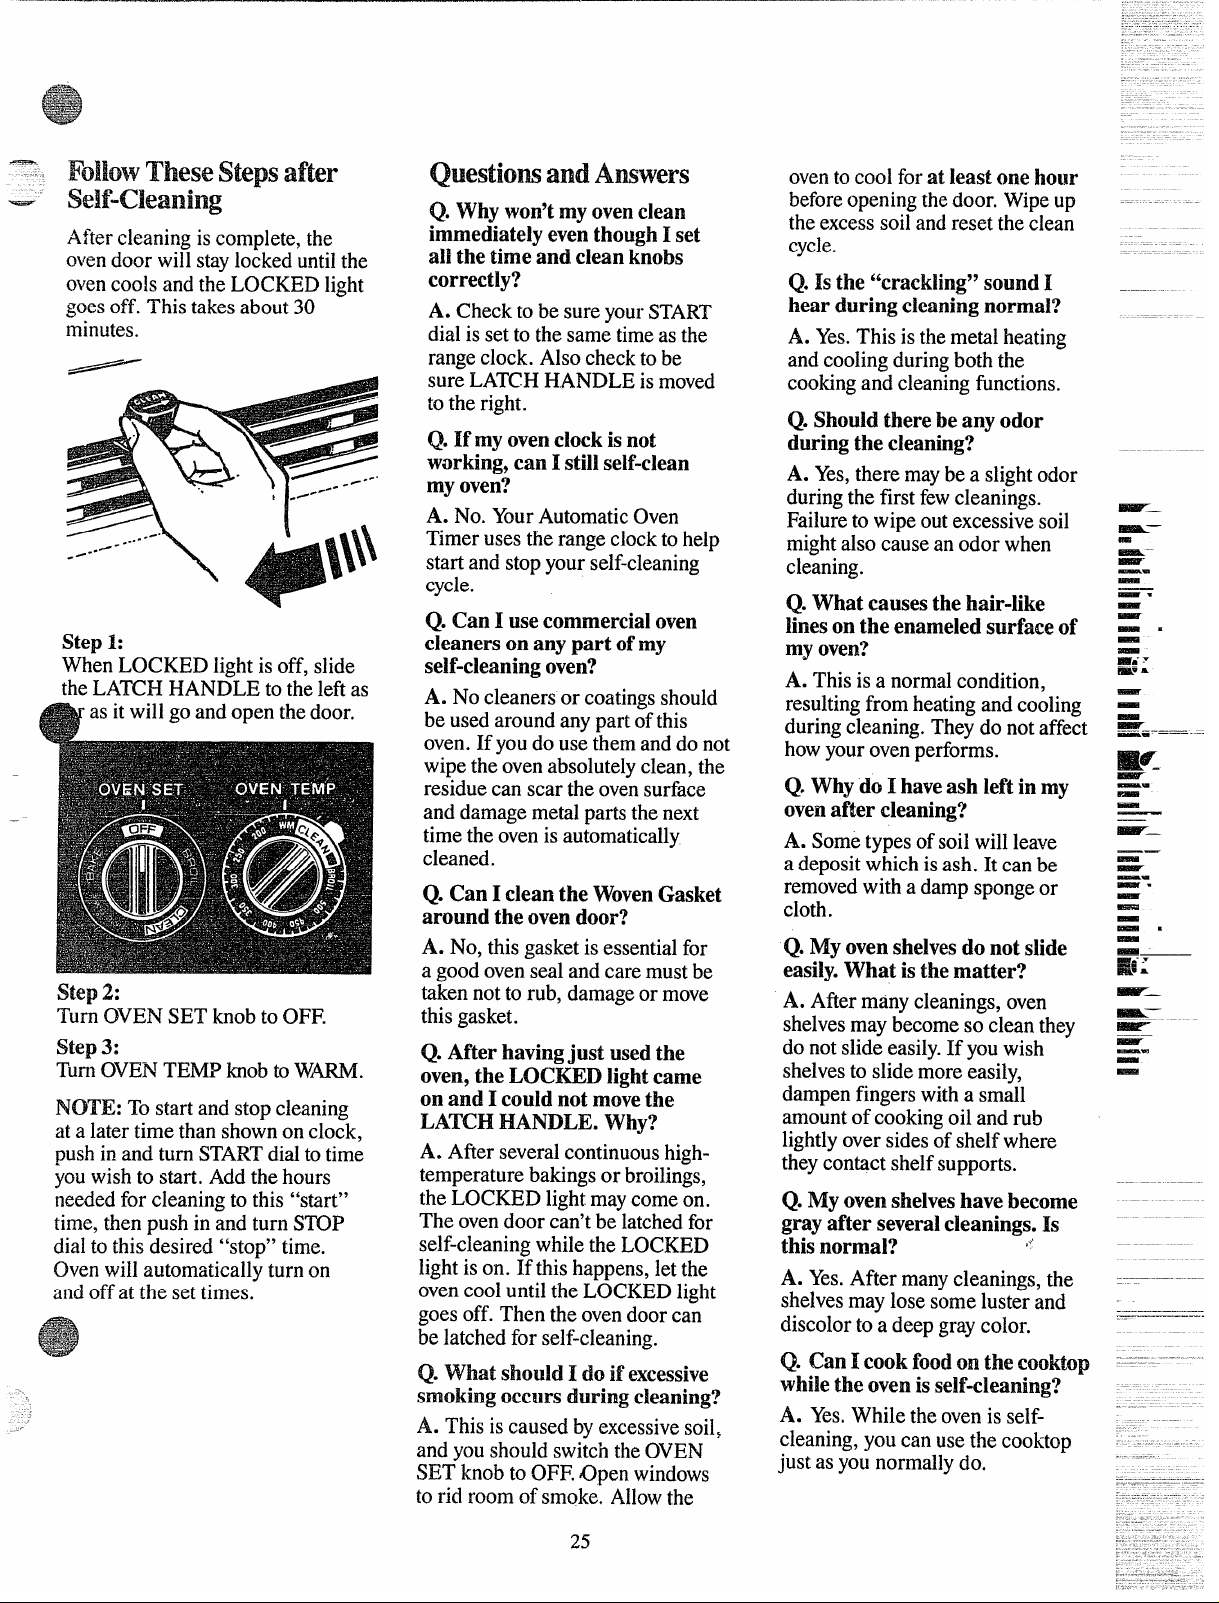
Step
1:
WhenLOCKEDlightis off,slide
theLATCHHANDLEto theleftaszyxwvutsrqponmlkjihgfedcbaZYXWVUTSRQPONMLKJIHGFEDCBA
Step2:
TurnOVENSETknobto OFF.
Step 3:
TurnOVENTEMPknobtoWW.
NOTE: Tostartandstopcleaning
at a latertime thanshownonclock,
pushin and turn STARTdialtotime
youwishto start. Addthehours
neededfor cleaningto this “start”
time,thenpushin andturn S~P
dialto this desired“stop”time.
Ovenwillautomaticallyturn on
andoffat the settimes.
QuestiowandAmwers
Q.Whywon’tmyovenclean
immediatelyeventhoughI set
allthe timeandcleanknobs
correctiy?
A. Checkto besureyourSTART
dialis setto thesametimeas the
rangeclock.Alsochecktobe
sureLATCHHANDLEis moved
to theright.
Q. It’myovenclockis not
working,can I still self-clean
my oven?
A. No. YourAutomaticOven
Timerusestherangeclockto help
startand stopyourself-cleaning
cycle.
Q. Can 1 usecommercialoven
cleaners on any part of’my
self-cleaningoven?
A. No cleanersor coatingsshould
be usedaroundanypart ofthis
oven.If youdo use themanddo not
wipethe ovenabsolutelyclean,the
residuecan scarthe ovensurface
anddamagemetalpartsthenext
timethe ovenis automatically
cleaned.
Q. CanI cleanthe WovenGasket
aroundthe ovendoor?
A. No, thisgasketis essentialfor
a goodovensealandcaremustbe
takennotto rub, damageor move
thisgasket.
Q. After havingjust usedthe
oven,the LOC=D lightcame
on and 1could not movethe
LATCHHANDLE.Why?
A. Afierseveralcontinuoushigh-
temperaturebakingsor broilings,
the LOCKEDlightmaycomeon.
Theovendoor can’tbe latchedfor
self-cleaningwhilethe LOCKED
lightis on. If thishappens,letthe
ovencooluntilthe LOCKEDlight
goesoff. Thenthe ovendoorcan
be latchedfor self-cleaning.
IQ.What should I do if excessive
smokingoccurs during cleaning?
A. Thisis causedbyexcessivesoil,
andyoushouldswitchtheOVEN
SETknobto OFF.Open windows
to rid roomof smoke.Allowthe
25
ovento coolfor at least one hour
beforeopeningthedoor. Wipeup
theexcesssoilandresettheclean
cycle.
Q. Is the “crackling” sound I
hear during cleaningnormal?
A. Yes.Thisis themetalheating
andcoolingduringboththe
cookingandcleaningfunctions.
Q. Should there be any odor
during the cleaning?
A. Yes,theremaybea slightodor
duringthefirst fewcleanings.
Failureto wipeoutexcessivesoil
mightalsocausean odorwhen
cleaning.
Q. What causesthe hair-like
lineson the enameledsurface of
my oven?
A. Thisis a normalcondition,
resultingfromheatingandcooling
duringcleaning.Theydo notaffect
howyourovenperforms.
Q. Why do 1haveash left in my
ovenafter cleaning?
A. Sometypesofsoilwillleave
a depositwhichis ash. It canbe
removedwitha dampspongeor
cloth.
Q. My ovenshelvesdo not s~ide
easily.What is the matter?
A. Aftermanycleanings,oven
shelvesmaybecomeso cleanthey
do notslideeasily.If youwish
shelvesto slidemoreeasily,
dampenfingerswitha small
amountof cookingoil and rub
lightlyoversidesof shelfwhere
theycontactshelfsupports.
Q. My ovenshelveshave become
gray after severalcleanings.1s
this normal?
,1,
A. Yes.Aftermanycleanings,the
shelvesmaylosesomelusterand
discolorto a deepgraycolor.
Q. Can 1cookfoodon the cooktop
whilethe ovenis self-cleaning?
A. Yes.Whiletheovenis self-
cleaning,youcan usethecooktop
just as younormallydo.
careand cleating
—
~Do notimmerseplug-insurface ‘
unitsin liquidsofanykind.
~
Propercareandcleaningare
importantso yourRangewillgive
youe~lcientandsatisfactoryservice.
Followthesedirectionscarefillyin
cuing foryourrangeto assuresafe
andpropermaintenance.
grease,maycatchfire. Tomake
cleaningeasier,theplug-insurface
unitsareremovable.
@Do notbendtheplug-insurface
unitplugterminals.
R
R
@Do not attemptto clean,adjust
or in anywayrepairtheplug~in
receptacle.
mlt-bek 3-h-l
surfaceHeatingUtit
Theporcelainenamelfinishis
sturdybut breakableif misused.
Thisfinishis acidresistant.
However,anyacidfoodsspilled
(suchas fruitjuices,tomato,or
vinegar)shouldnotbe permitted
toremainon thefinish.
TheTilt-Lock3-in-1surfaceunitis
To Caean:
stationaryand cannotbe removed.
It canbe lifiedupwardandlocked
in thatpositionforcleaningunder
theunit. Be certain the unit is
coolbefore liftingthe CON.
@Wipearoundthe edgesofthe
surfaceunitopeningin the range
top. Cleanthe areabelowtheunit.
Rinseallwashedareaswith a damp
clothor sponge.
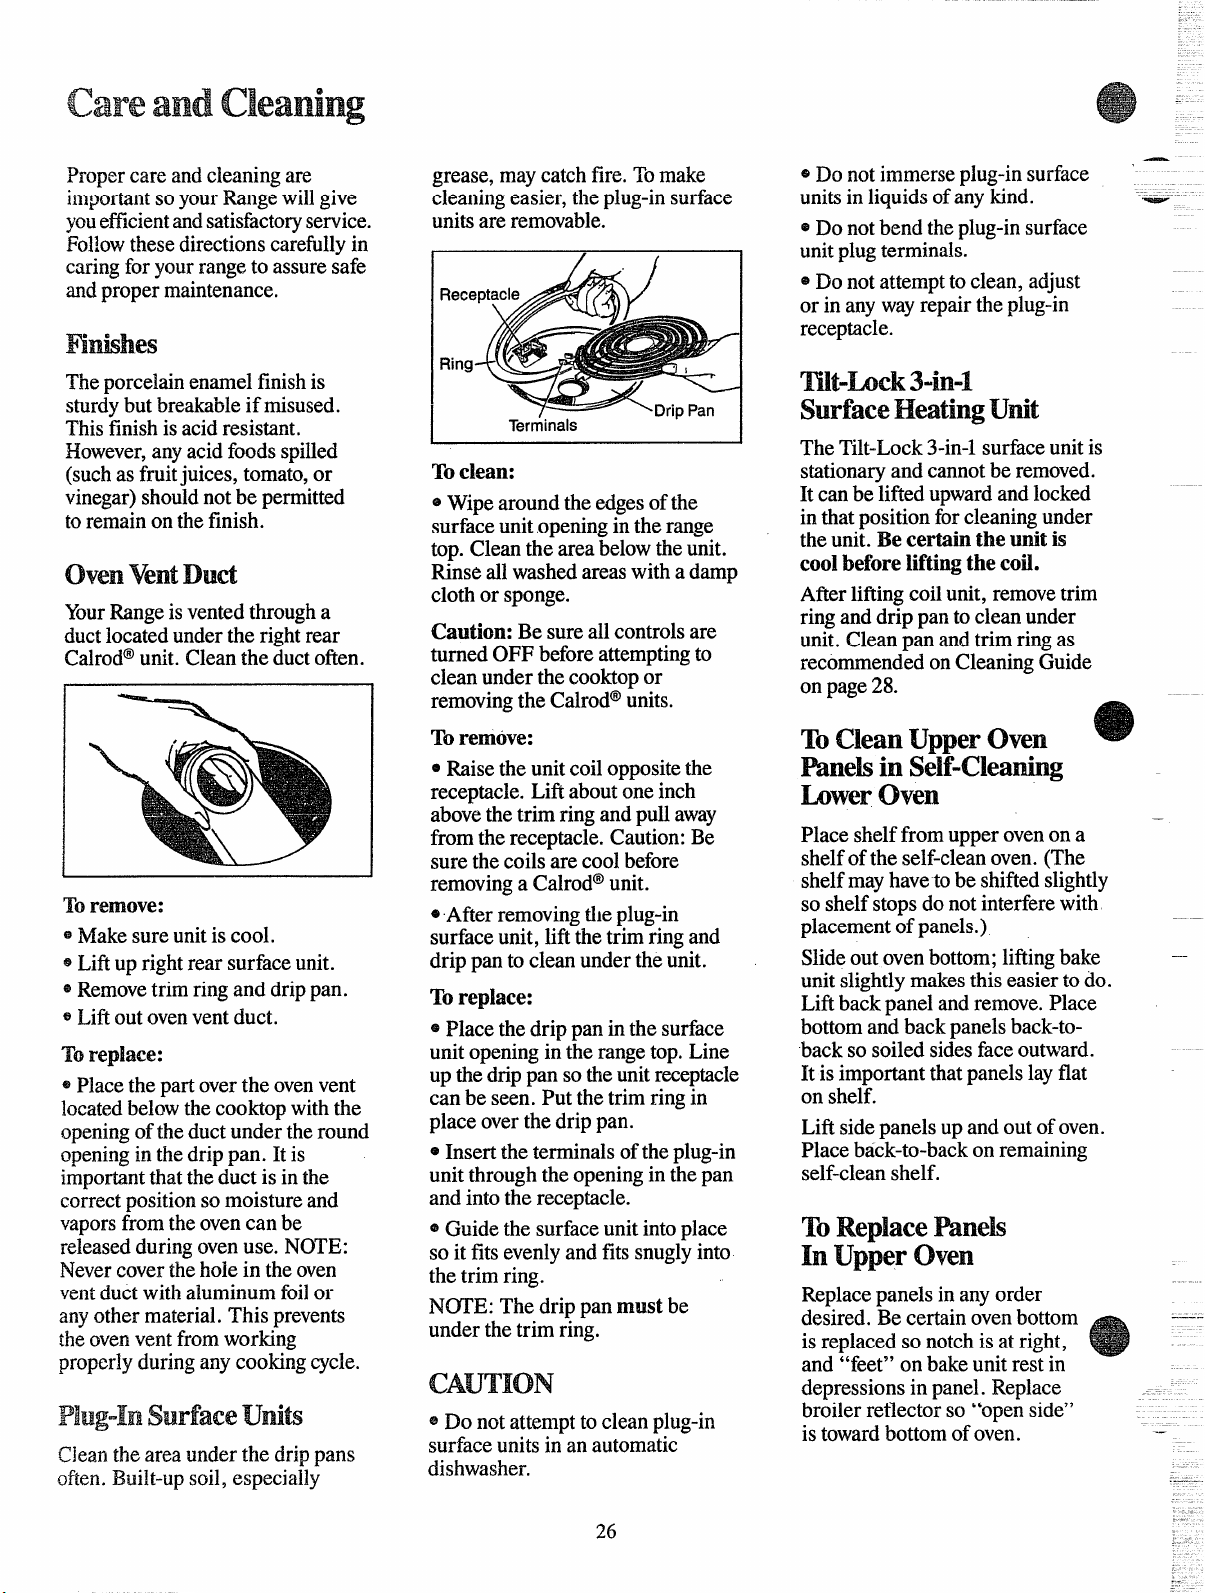
ovenventDud
Afierliftingcoilunit, removetrim
ringanddrip panto cleanunder
unit.Cleanpan andtrim ringas
recommendedonCleaningGuide
YourRangeis ventedthrougha
ductlocatedunderthe rightrear
Calrod@unit. Cleanthe ductoften.
Caution:Be sureallcontrolsare
turnedOFF beforeattemptingto
cleanunderthe cooktopor
removingthe Calrod”units.
on page28.
ToCleanUpperOven
To remOve:
@Raisethe unitcoiloppositethe
receptacle.Liftaboutoneinch
abovethe trim ringandpullaway
fromthe receptacle.Caution:Be
surethe coilsare coolbefore
removinga Calrod@unit.
hwer Oven
Placeshelffromupperovenon a
shelfofthe self-cleanoven.(The
shelfmayhaveto be shiftedslightly
so shelfstopsdo notinterferewith
placementof panels.)
Toremove:
@Afier removingthe plug-in
surfaceunit, liftthe trimring and
drip panto cleanundertheunit.
~Makesureunitis cool.
~Liftup rightrear surfaceunit.
@Removetrimringand drippan.
~Liftoutovenventduct.
Slideoutovenbottom;liftingbake --
unitslightlymakesthiseasierto do.
Lifibackpanelandremove.Place
bottomand backpanelsback-to-
backso soiledsidesfaceoutward.
It is importantthatpanelslayflat
on shelf.
To replace:
@Placethedrip panin thesurface
unitopeningin the rangetop.Line
up thedrippan sotheunitreceptacle
can be seen. Put thetrim ringin
placeoverthedrip pan.
To replace:
@Placethe partoverthe ovenvent
locatedbelowthecooktopwiththe
openingof theductundertheround
openingin thedrip pan. It is
importantthattheduct is in the
correctpositionso moistureand
vaporsfromtheovencan be
releasedduringovenuse. NOTE:
Nevercovertheholein theoven
ventductwithaluminumfoilor
anyothermaterial.This prevents
theovenventfromworking
properlyduringanycookingcycle.
Lift sidepanelsup andoutofoven.
Placeback-to-backon remaining
self-cleanshelf.
@Insertthe terminalsoftheplug-in
unitthroughtheopeningin thepan
and intothe receptacle.
ToReplaceWneIs
In upper oven
~Guidethe surfaceunitintoplace
so it fitsevenlyandfits snuglyinto
the trim ring.
Replacepanelsin anyorder
desired.Be certainovenbottom
is replacedso notchis at right,
and “feet” on bakeunitrest in
N~E: Thedrip pan must be
underthetrim ring.
CAUTION
depressionsin panel. Replace
broilerreflectorso “openside”
@Do not attemptto cleanplug-in
surfaceunitsin an automatic
dishwasher.
is towardbottomofoven.
-—
Cleanthearea underthe drippans
often.Built-upsoil, especially
..—.
26
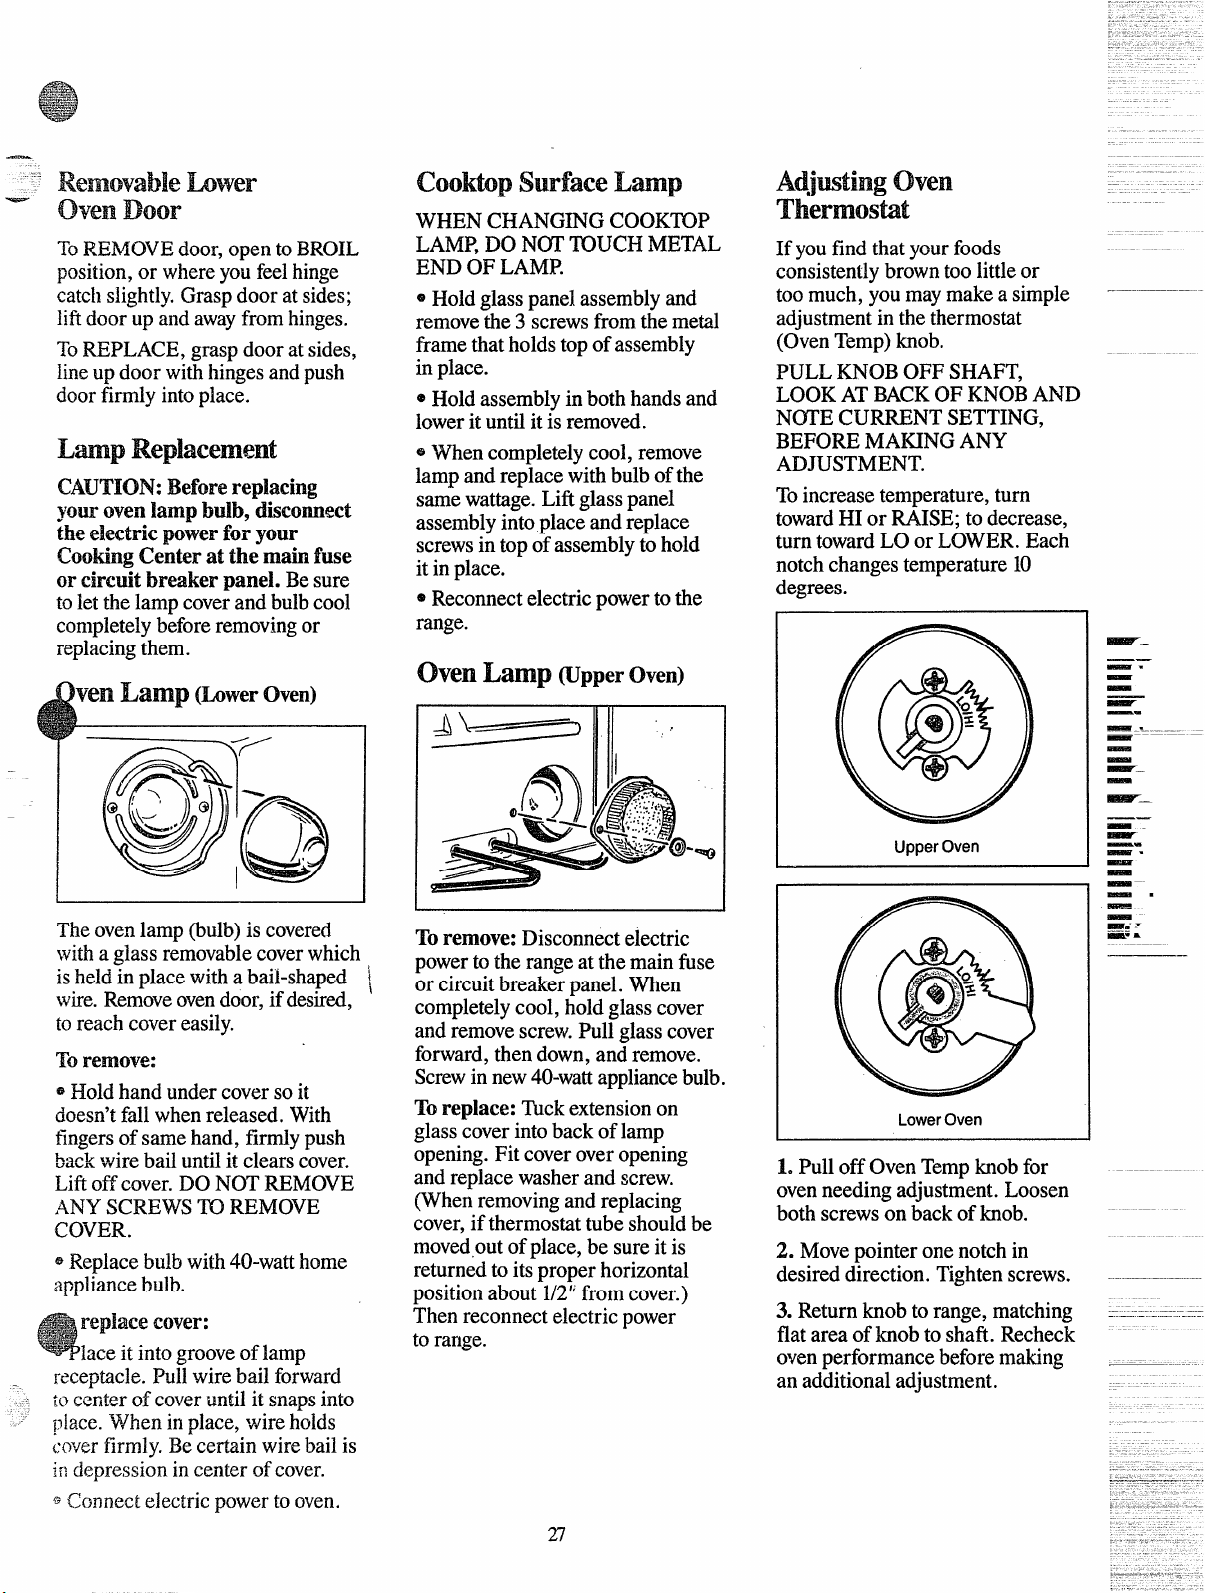
—
ToREMOVEdoor,opento BROIL
position,or whereyoufeelhinge
catcf~slightly.Graspdoor at sides;
liftdoorup andawayfromhinges.
ToREPLACE,graspdooratsides,
lineup doorwithhingesandpush
doorfirmlyintoplace.
L-p Replacement
CAUTION:Beforereplacing
you ovenlampbulb?discomect
theelectricWwerforyour
CootingCenterat the mak fuse
or circuitbreakerpanel.Besure
tolet thelampcoverandbulbcool
completelybeforeremovingor
replacingthem.
Theovenlamp(bulb)is covered
witha glassremovablecoverwhich
isheld~nplacewitha bail-shaped \
wire.Removeovendoor,if desired,
toreachcovereasily.
T’ remove:
@Holdhandundercoverso it
doesn’tfallwhenreleased.With
fingersof samehand, firmlypush
backwirebailuntilit clearscover.
Lifioffcover.DONOTREMOVE
ANYSCREWS~ REMOVE
COVER.
@Replacebulbwith40-watthome
appliancebulb.
replacecover:
laceit intogrooveof lamD
receptacle.Pufiwirebail fo~ward
i~>centerof coveruntilit snapsinto
~~lace.Whenin place,wireholds
;overfi~mly.Bece@in wirebailis
indepressionin centerof cover.
@Connectelectricpowerto oven.
Coowp surfaceLmp
WHENCHANGINGCOOK~P
LAMP,DON~ ~UCH METAL
ENDOF LAMP.
~Holdglasspanelassemblyand
removethe 3 screwsfromthe metal
framethatholdstopof assembly
in place.
@Holdassemblyin bothhandsand
lowerituntilit is removed.
~Whencompletelycool, remove
lampandreplacewithbulbof the
samewattage.Liftglasspanel
assemblyintoplaceandreplace
screwsin topof assemblyto hold
it in place.
@Reconnectelectricpowerto the
range.
OV~~ ~a~~ ~pper Oven)
Toremove:Disconnectelectric
powerto therangeat themainfise
or circuitbreakerpanel.When
completelycool,holdglasscover
andremovescrew.Pull glasscover
forward,thendown,and remove.
Screwin new40-wattappliancebulb.
Toreplace:~ck extensionon
glasscoverintobackof lamp
opening.Fit coveroveropening
andreplacewasherand screw.
(Whenremovingandreplacing
cover,if thermostattubeshouldbe
moved,outof place,be sureit is
returnedto itsproperhorizontal
positionabout1/2’;fromcover.)
Thenreconnectelectricpower
to range.
Adjmtingoven
Thermostat
If youfind thatyourfoods
consistentlybrowntoolittleor
toomuch,youmaymakea simple
adjustmentin thethermostat
(OvenTemp)knob.
PULLKNOBOFF SHAFT,
LOOKATBACKOF KNOBAND
N~E CURRENTSETTING,
BEFOREMAKINGANY
ADJUSTMENT.
Toincreasetemperature,turn
towardHI or RAISE;to decrease,
turntowardLO or LOWER.Each
notchchangestemperature10
degrees.
~
f~
*Z
+
Upper Oven
LowerOven
1. Pulloff OvenTempknobfor
ovenneedingadjustment.Loosen
bothscrewson backof knob.
2. Movepointeronenotchin
desireddirection.Tightenscrews.
3. Returnknobto range,matching
flatarea of knobto shaft. Recheck
ovenperformancebeforemaking
an additionaladjustment.
——
-.
—
- –%–. –––
_—
-
—.
-.
-
27
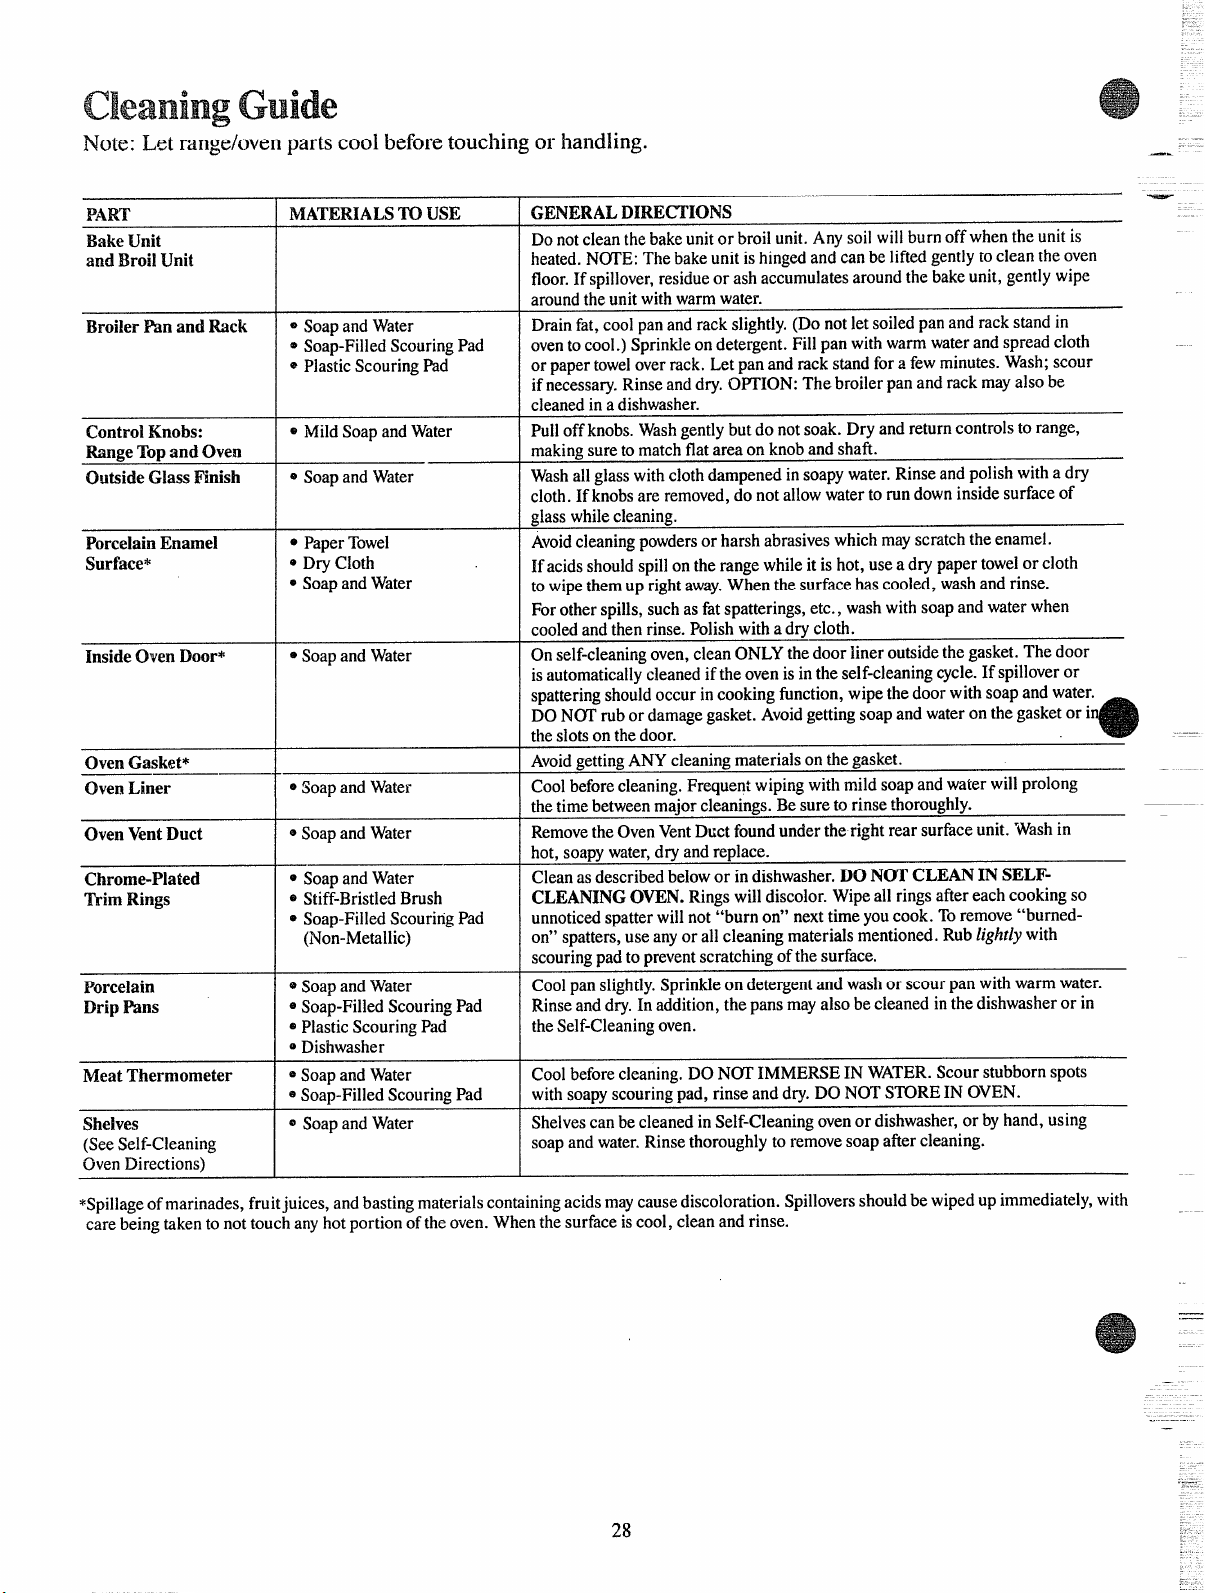
Guide
Noie: Let range/ovenparts cool beforetouching or handling.
—.
PART
BakeUnit
and Broil Unit
Broiler %n and Rack
Control Knobs:
MnEe
Topand Oven
Outside Glass Wnish
PorcelainEnamel
Surface*
Inside Oven Door*
OvenGasket*
Oven Liner
Oven VentDuct
Chrome-Plated
Trim Rings
Porcelain
Drip Pans
Meat Thermometer
Shelves
(See Self-Cleaning
Oven Directions)
MATERIALS~ USE
*
Soapand Water
* Soap-Filled Scouring Pad
e Plastic Scouring Pad
~ Mild Soap and Water
e
Soapand Water
o Paper Towel
e Dry C1oth
o Soapand Water
o
Soapand Water
o
Soapand Water
~ Soapand Water
e Soapand Water
e Stiff-Bristled Brush
e Soap-Fiiied Scouring Pad
(Non-Metaiiic)
~
Soapand Water
e Soap-Fiiied Scouring Pad
e Piastic Scouring Pad
* Dishwasher
~
Soapand Water
e Soap-Fiiied Scouring Pad
@Soapand Water
—
GENERALDIRE~IONS
Donotcieanthebakeunitor broiiunit.Anysoilwiliburnoffwhentheunitis
heated.NOTE:Thebakeunitishingedandcanbe iiftedgentiyto cieantheoven
floor.If spiiiover,residueor ashaccumulatesaroundthebakeunit,gentiywipe
aroundtheunitwithwarmwater.
Drainfat,cooipanandracksiightly,(Donotlet soiiedpanandrackstandin
oventocooi.)Sprirddeondetergent.Filipanwithwarmwaterandspreadcioth
or papertoweioverrack.Let panandrackstandfora fewminutes.Wash;scour
if necessary.Rinseanddry.OPTION:Thebroiierpanandrackmayaisobe
cieanedina dishwasher.
Puiioffknobs.Washgentiybutdo notsoak. Dryandreturncontroisto range,
makingsureto matchflatareaon knobandshafi.
Washaiigiasswithclothdampenedinsoapywater.Rinseandpoiishwitha dry
cioth.If knobsare removed,donotailowwatertorundowninsidesurfaceof
~iasswhiiecleaning.
Avoidcieaningpowdersor harshabrasiveswhichmayscratchtheenamel.
Ifacidsshouldspiiionthe rangewhiieit is hot,usea drypapertoweior cioth
towipethemuprightaway.Whenthesurfacehascooied,washandrinse,
Forotherspiils,suchas fatsmatterings,etc., washwithsoapandwaterwhen
cooledandthenrinse.Poiishwitha drycloth.
Onseif-cleaningoven,cieanONLYthedooriineroutsidethegasket.Thedoor
is automaticallycieanedif theovenis intheseif-cleaningcycle.Ifspiiioveror
spatteringshouidoccurin cookingfunction,wipethedoorwithsoapandwater.
DON~ rubor damagegasket.Avoidgettingsoapandwateronthegasketor i
thesiotsonthedoor.
AvoidgettingANYcleaningmateriaisonthegasket.
Cooibeforecleaning.Frequentwipingwitilmiidsoapandwaterwiiiprolong
—
thetimebetweenmajorcieanings.Besureto rinsethoroughly.
RemovetheOvenVentDuctfoundundertherightrearsurfaceunit. Washin
hot,soapywater,dryandreplace.
Cieanasdescribedbeiowor indishwasher.
DO NOT CLEAN IN SELF-
CLEANINGOVEN. Ringswilidiscolor.Wipeaii ringsafiereachcookingso
unnoticedspatterwiiinot “burnon” nexttimeyoucook.Toremove“burned-
on”spatters,use anyor ali cieaningmateriaismentioned.Rublightlywith
scouringpadto preventscratchingofthe surface.
Cooipansiightiy.Sprinkleon detergentandwashor scourpanwithwarmwater.
Rinseanddry.Inaddition,the pansmayaisobecieanedinthedishwasheror in
theSeif-Cleaningoven.
Cooibeforecieaning.DON~ IMMERSEIN WATER.Scourstubbornspots
withsoapyscouringpad, rinseanddry.DONOTS~RE IN OVEN.
Sheivescanbecieanedin Seif-C1eaningovenor dishwasher,or byhand,using
soapandwater.Rinsethoroughlyto removesoapaftercieaning.
*Spiiiageof marinades, fruit juices, and basting materiais containing acids maycause discoloration. Spiiloversshouid be wiped upimmediately,with
carebeingtakentonot touchanyhotportionoftheoven.Whenthe surfaceis cooi,cieanandrinse.
.
28
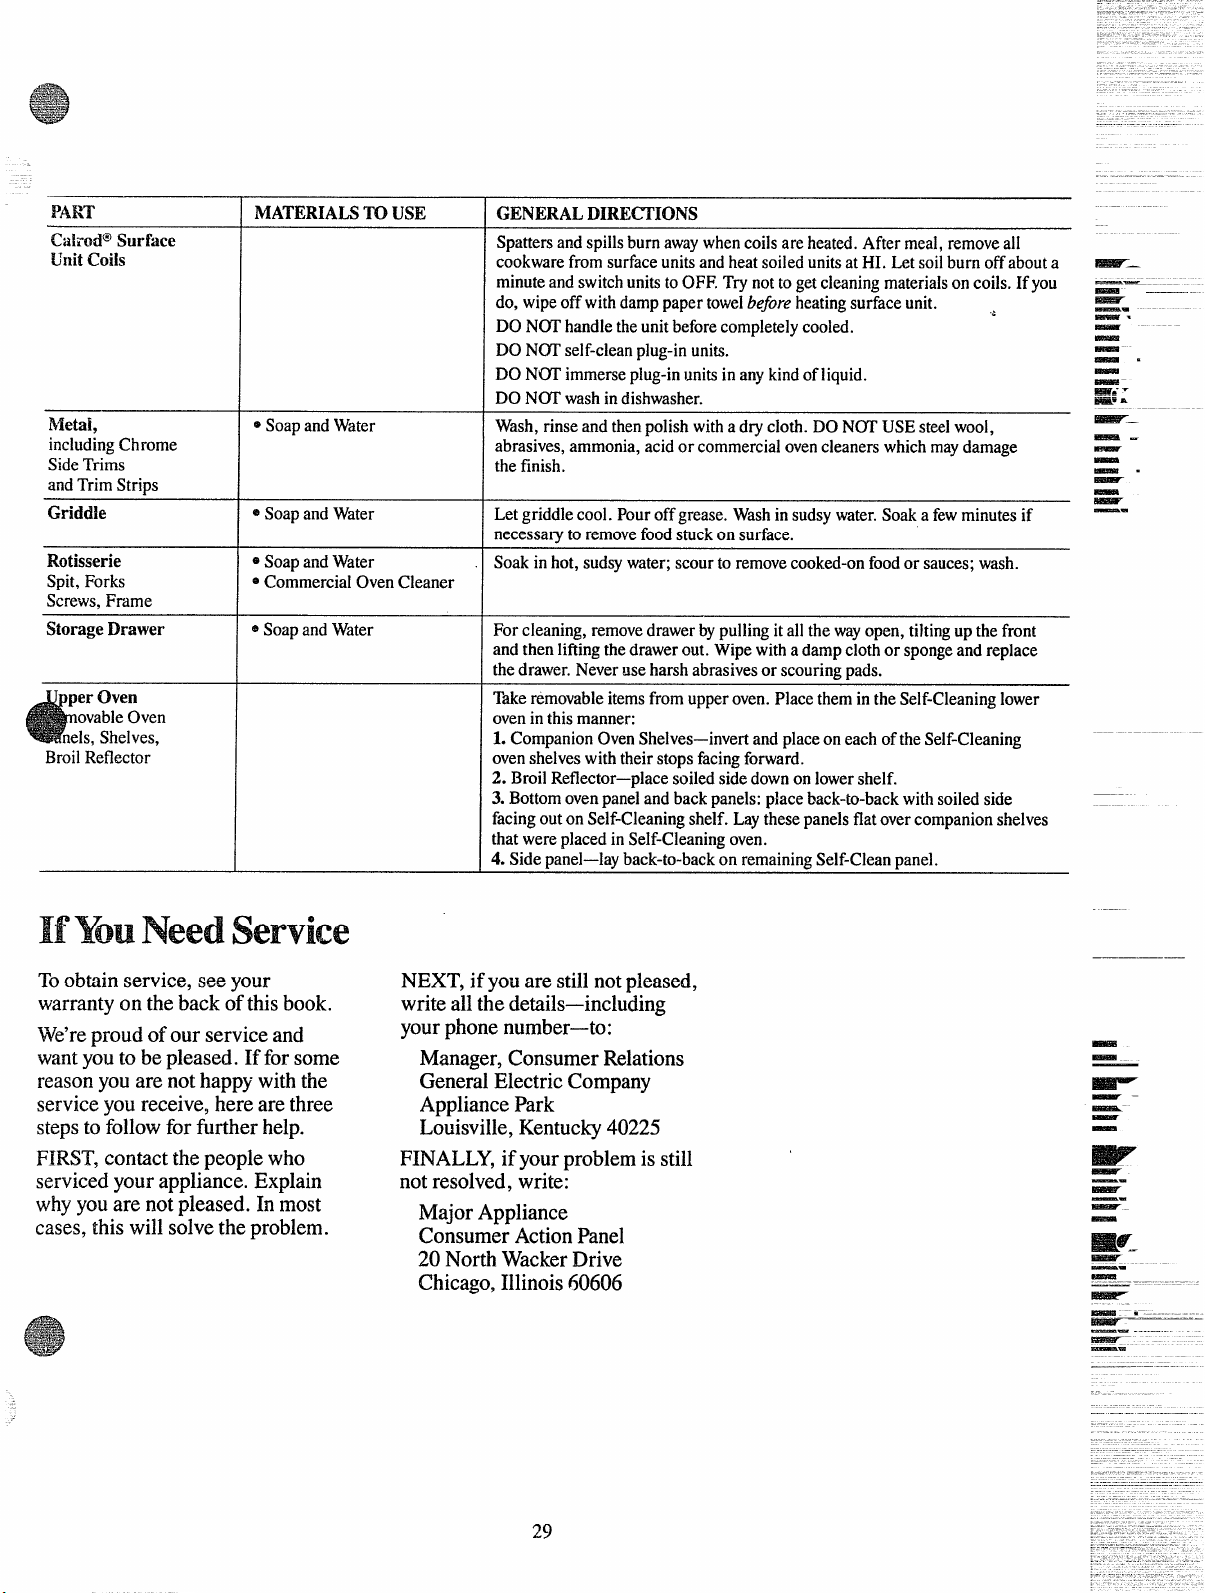
PART
] N~ATERIALS~USE
GENERAL DIREHIONS
Spattersandspillsburnawaywhencoilsareheated.Aftermeal,removeall
cookwarefromsurfaceunitsandheatsoiledunitsat HI. Letsoilburnoffabouta
minuteandswitchunitsto OFF.Trynottogetcleaningmaterialsoncoils.Ifyou
do, wipeoffwithdamppapertowelbeforeheatingsurfaceunit.
a
DONOThandletheunitbeforecompletelycooled.
DON~ self-cleanplug-inunits.
DON~ immerseplug-inunitsin anykindofliquid.
DONCYI’washindishwasher.
Unit Coils
-.
--- ___
~
Nietai,
~ SoapandWater
includingChrome
SideTrims
andTrimStrips
Wash,rinseandthenpolishwitha drycloth.DON~ USEsteelwool,
abrasives,ammonia,acidorcommercialovencleanerswhichmaydamage
thefinish.
Griddle
* SoapandWater Let griddlecool.Pouroffgrease.Washinsudsywater.Soaka fewminutesif
necessaryto removefoodstuckonsurface.
Soakinhot, sudsywater;scourto removecooked-onfoodorsauces;wash.
Rotisserie
Spit,Forks
Screws,Frame
~SoapandWater
OCommercialOvenCleaner
Storage Drawer ~SoapandWater Forcleaning,removedrawerbypullingit allthe wayopen,tiltingupthefront
andthenliftingthedrawerout. Wipewitha dampclothor spongeandreplace
thedrawer.Neveruseharshabrasivesor scouringpads.
I
BroilReflector
Takeremovableitemsfromupperoven.PlacethemintheSelf-Cleaninglower
ovenin thismanner:
1. CompanionOvenShelves—invertandplaceoneachoftheSelf-Cleaning
ovenshelveswiththeirstopsfacingforward.
2. BroilReflector-placesoiledsidedownonlowershelf.
3.Bottomovenpanelandbackpanels:placeback-to-backwithsoiledside
facingoutonSelf-Cleaningshelf.Laythesepanelsflatovercompanionshelves
thatwereplacedin Self-Cleaningoven.
4. Sidepanel—layback-to-backon remainingSelf-Cleanpanel.
IfYouNeedservice
Toobtainservice,see your
warrantyon.thebackof thisbook.
NEXT,if youare stillnotpleased,
writeallthe details-including
yourphonenumber—to:
We’reproudof our serviceand
wantyouto be pleased.If forsome
reasonyouare nothappywiththe
serviceyoureceive,hereare three
stepsto followforfurtherhelp.
FIRST,contactthepeoplewho
servicedyourappliance.Explain
whyyouare not pleased.In most
cases,this willsolvethe problem.
Manager,ConsumerRelations
GeneralElectricCompany
AppliancePark
Louisville,Kentuc@40225
FINALLY,if yourproblemis still
notresolved,write:
MajorAppliance
ConsumerActionPanel
20 NorthWackerDrive
Chicago,Illinois60606
—–
~-
—
-
mfl-
—.
-–=. — ~.
-
- .—–-..–.––.-
~——- —
29
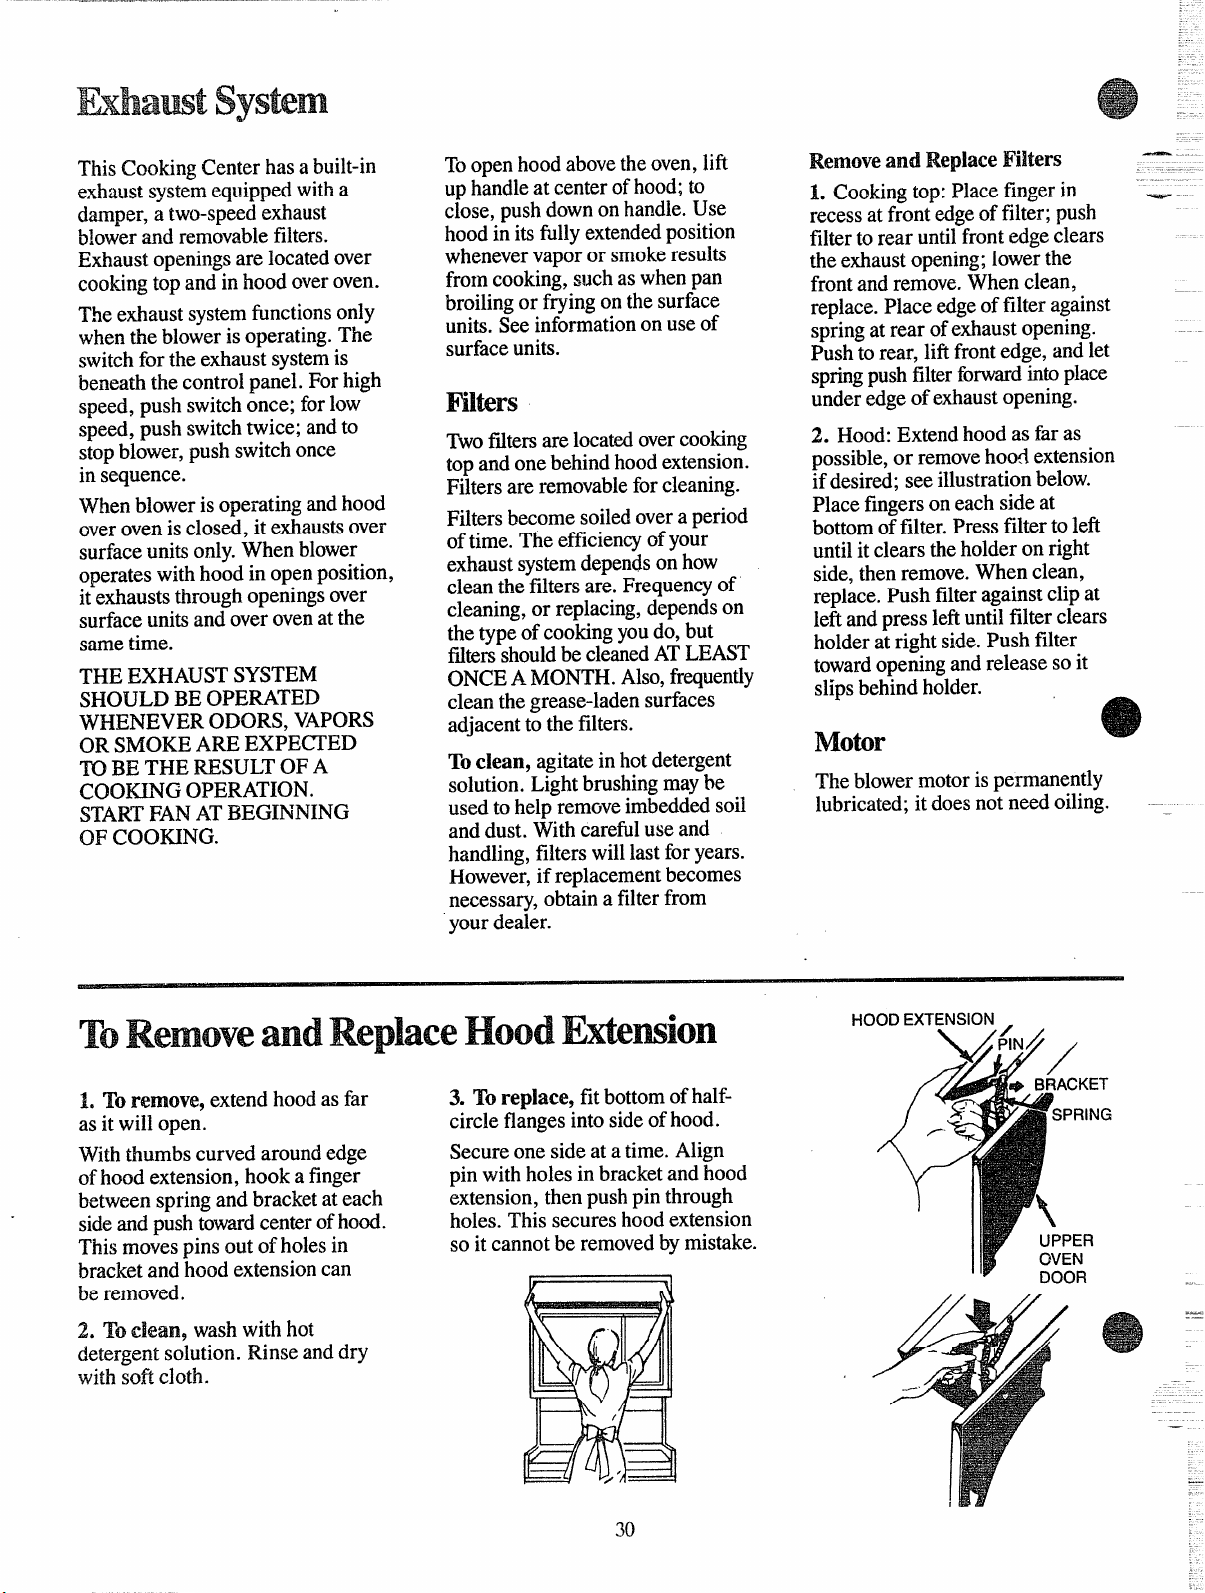
............
Rhamt System
s
ThisCookingCenterhasa built-in
exhaustsystemequippedwitha
damper,a two-speedexhaust
blowerand removablefilters.
Exhaustopeningsare locatedover
cooktngtopand in hoodoveroven.
Theexhaustsystemfunctionsonly
whenthe bloweris operating.The
switchfor the exhaustsystemis
beneaththe controlpanel.Forhigh
speed,push switchonce;forlow
speed,push switchtwice; andto
stopblower,pushswitchonce
in sequence.
Whenbloweris opezatingandhood
overovenisclosed,it exhaustsover
surfaceunitsonly.Whenblower
operateswithhoodin openposition,
it exhauststhroughopeningsover
surfaceunitsandoverovenatthe
sametime.
THEEXHAUSTSYSTEM
SHOULDBEOPERATED
WHENEVERODORS,VAPORS
ORSMOKEAREEXPE~ED
TOBE THE RESULTOFA
COO~G OPERATION.
STARTFANATBEGINNING
OF COOKING.
Toopenhoodabovetheoven,lift
uphandleat centerofhood;to
close,pushdownon handle.Use
hoodin itsfullyextendd position
whenevervaporor smokeresults
fromcooking,s~~chas whenpan
broilingor fryingonthesurface
units.Seeinformationon useof
surfaceunits.
Hlters
Twofaltersarelocatedovercooking
topandonebehindhoodextension.
Filtersare removablefor cleaning.
Filtersbecomesoiledovera period
oftime. Theefficiencyofyour
exhaustsystemdependson how
cleanthefiltersare. Frequencyof
cleaning,or replacing,dependson
thetypeofcookingyoudo,but
faltersshouldbe cleanedATLEAST
ONCEA MONTH.Also,frquently
cleanthegrease-ladensurfaces
adjacentto the filters.
Toclean, agitatein hotdetergent
solution.Lightbrushingmaybe
usedto helpremoveimbeddedsoil
anddust. Withcarefuluse and
handling,filterswilllastforyears.
However,if replacementbecomes
necessary,obtaina filterfrom
yourdealer.
Removeand ReplaceFilters --
1. Cookingtop:Placefingerin
recessatfrontedgeof filter;push
filterto rear untilfrontedgeclears
theexhaustopening;lowerthe
frontandremove.Whenclean,
replace.Placeedgeoffilteragainst
springat rear ofexhaustopening.
Pushto rear, liftfrontedge,andlet
springpushfilterforwardintoplace
underedgeofexhaustopening.
2. Hood:Extendhoodas far as
possible,or removehoodextension
if desired;seeillustrationbelow.
Placefingersoneachsideat
bottomoffilter.Pressfiltertolefi
untilit clearstheholderon right
side,thenremove.Whenclean,
replace.Pushfilteragainstclipat
lefiandpressleftuntilfilterclears
holderat rightside.Push filter
towardopeningandreleaseso it
sli~sbehindholder.
x
Motor
—–
Theblowermotorispe~manently
lubricated;it doesnot needoiling. ----
ToRemoveandReplaceHoodEtiemion
1. T’ remove, extendhoodas far
3. Toreplace, fitbottomofhalf-
as it will open.
circleflangesintosideof hood.
Withthumbscurvedaroundedge Secureonesideat a time.Align
ofhoodextension,hooka finger
pin withholesin bracketandhood
betweenspringandbracketat each
extension,thenpushpin through
sideandpushtowardcenterofhood.
holes.Thissecureshoodextension
ThismovesDinsout of holesin
so it cannotbe removedbymistake.
bracketandkood extensioncan
be removed.
2. To elean9washwith hot
detergentsolution.Rinseanddry
withSOftcloth.
HOOD EXTENSION .
IIF
OVEN
DOOR
.—
_—
30
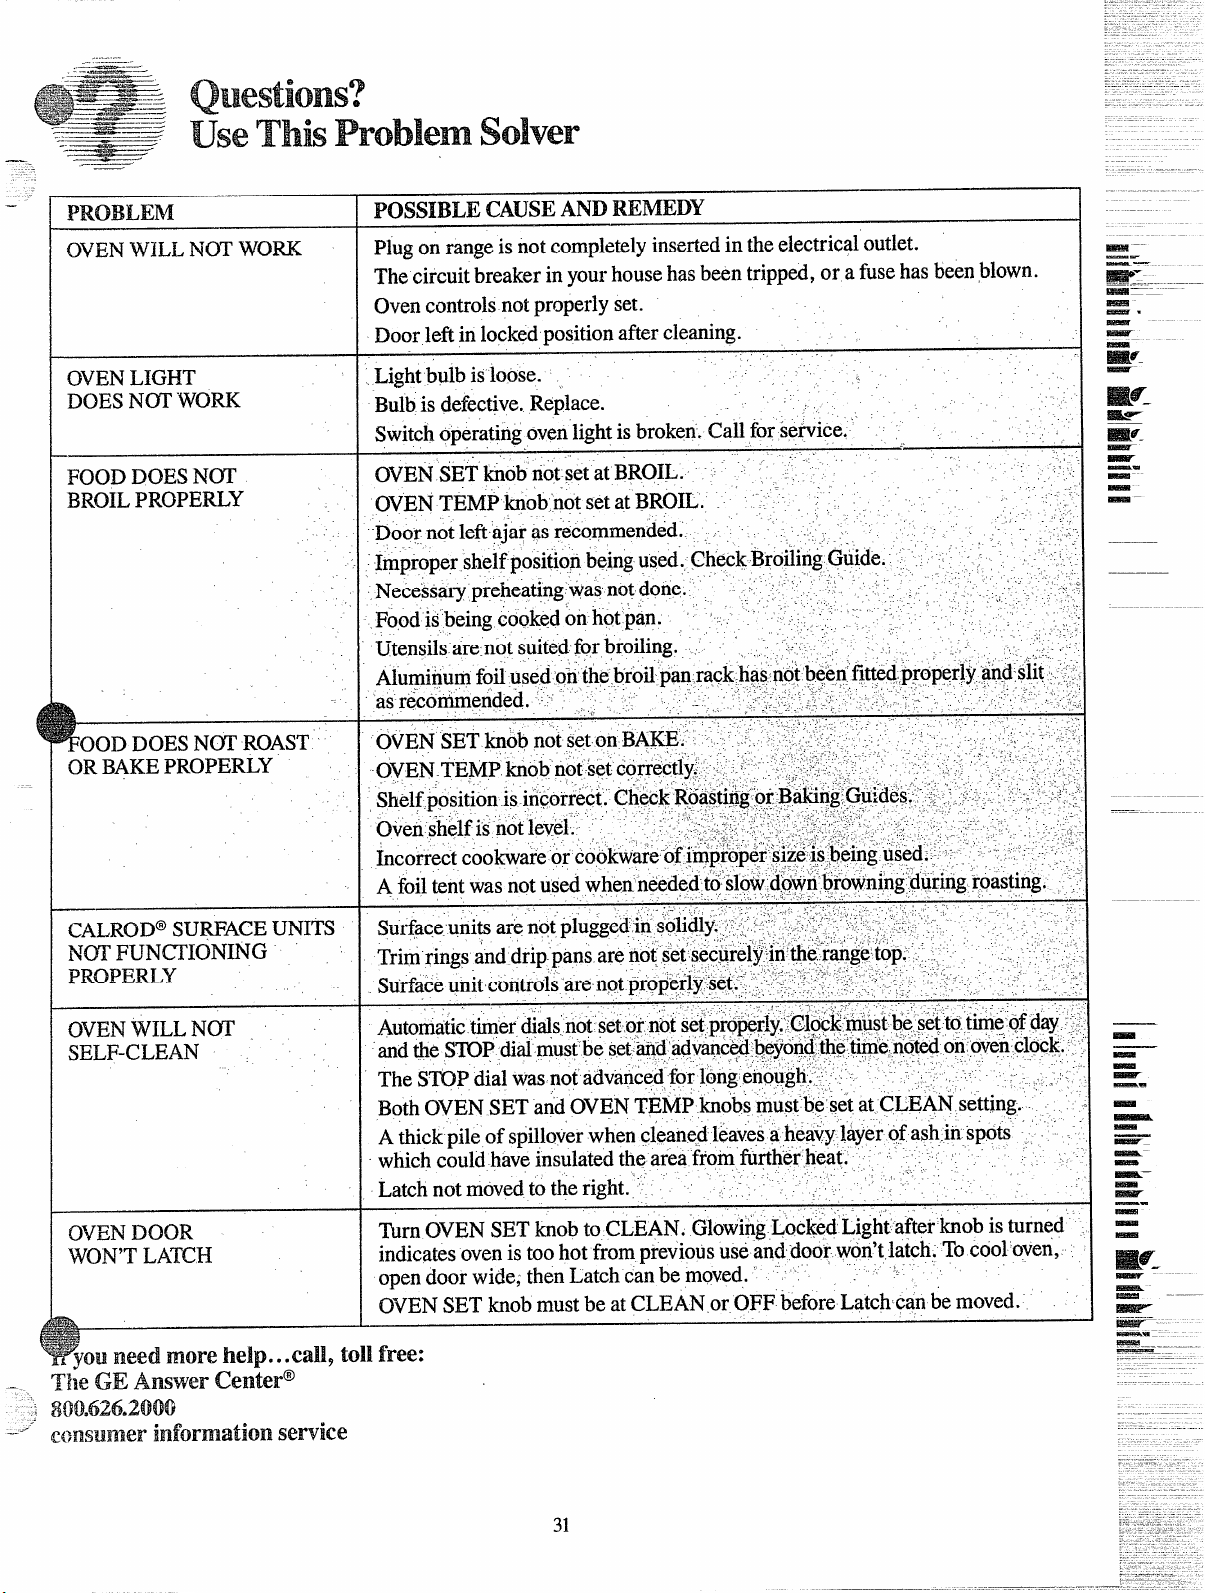
...—..
... .—-—.
————
Qklestions?
UseThisProblemSolver
.---————
-—4
. . —.
PROBLEM
OVENWILLNOTWORK
OVENLIGHT
DOESN~ WORK
FOODDOESNm
BROILPROPERLY
OODDOESN~ ROAST
ORBAKEPROPERLY
CALROD@SU~ACE UNITS
NOTFUN~IONING
PROPERLY
OVENWILLN~
SELF-CLEAN
OVENDOOR
WON’TLATCH
POSSIBLECAUSEANDRE~DY
Plugon rangeis not completelyinsertedin theelectricaloutlet.
Thecircuitbreakerin yourhousehasbeentripped,or a fusehasbeenblown.
Ovencontrolsnotproperlyset.
Doorleftin lockedpositionaftercleaning.
TurnOVENSETknobto CLEAN.‘Glowi~g,Lock+dLight’afterknobis turned
indicatesovenis too hot fromprevioususeanddoorwon’tlatch.Tocooloven,
opendoor wide;thenLatchcanbe moved. ‘
OVENSETknobmustbeat CLEANor OFF beforeLatchcapbe moved.
TlieGEAnswer cenier@
—
, 800=626.2000
“- c4>nsuEmerinformation service
-----
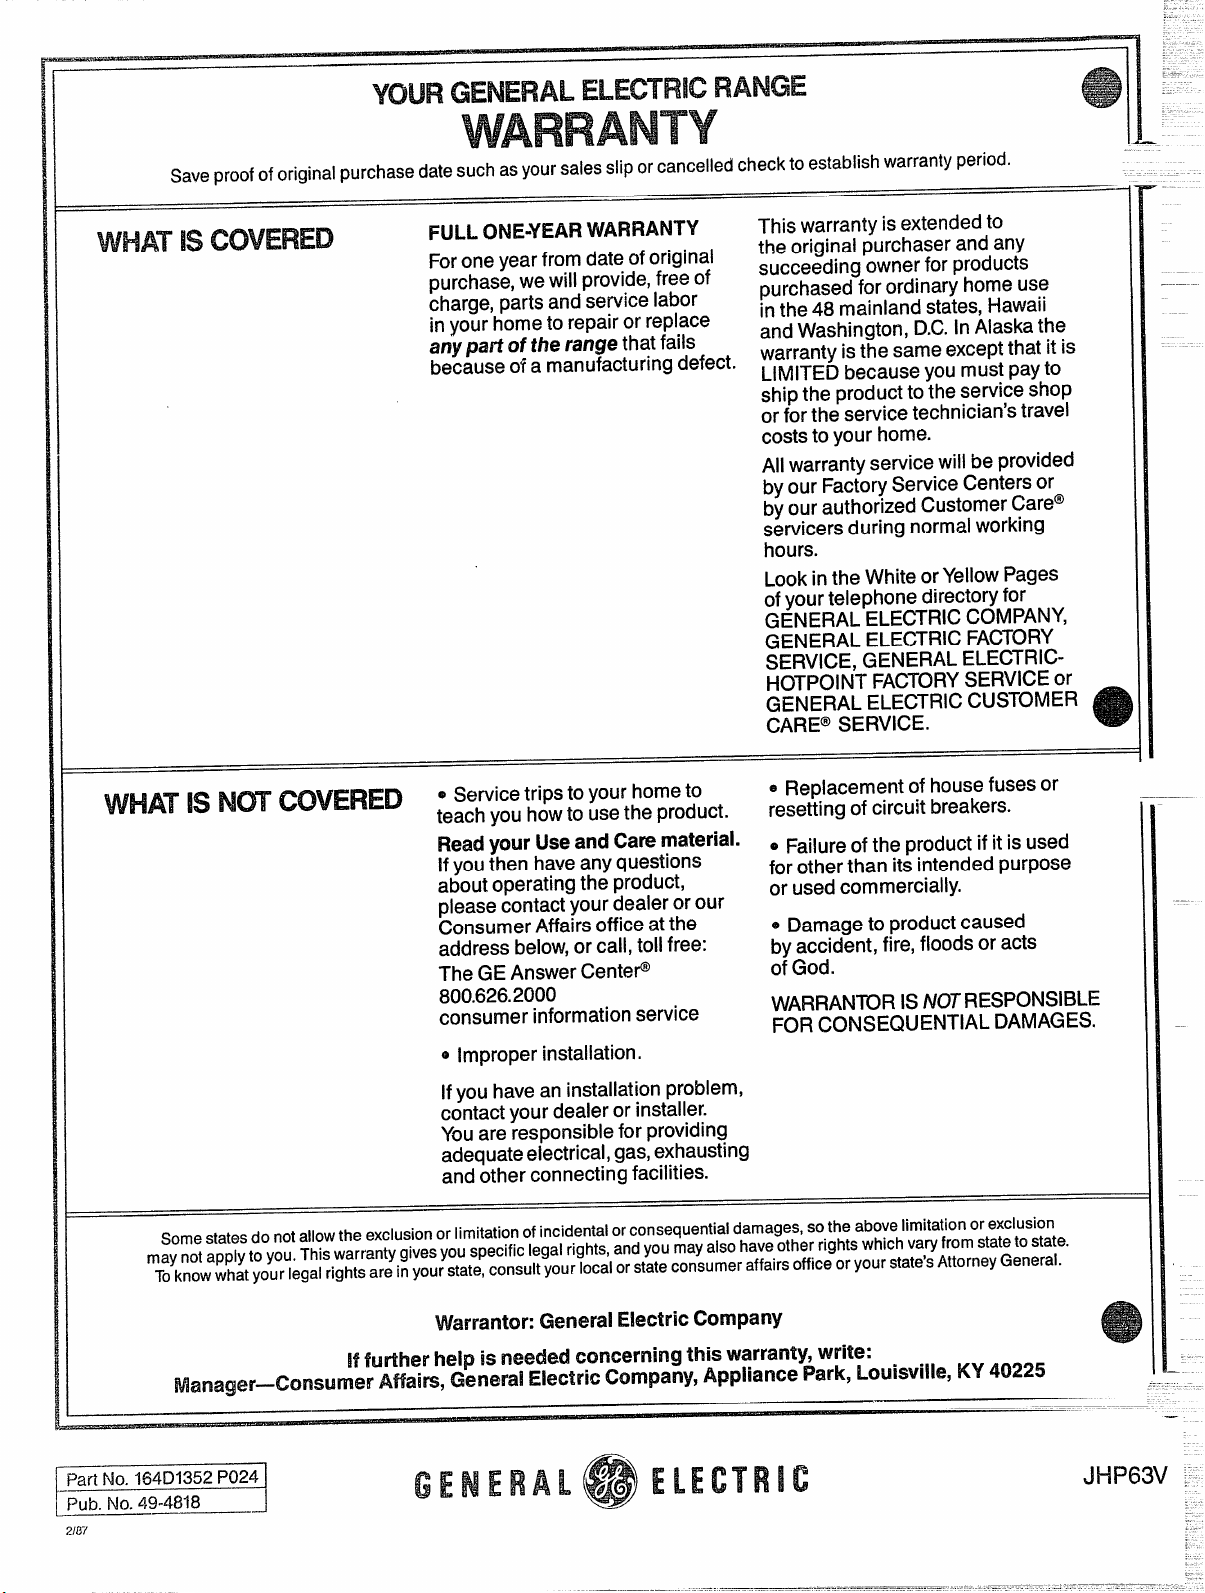
YOURGENERALELEmR1cRANGE
WARRANTY
Saveproof of original purchase date such as your sales slip or cancelled check to establish warranty period.
WHAT!s COVERED
FULL ONEWEARWARRANTY
This warranty is extended to
For one year from date of original
the original purchaser and any
purchase, we will provide,free of
succeeding owner for products
charge, parts and service labor
purchased for ordinary home use
in your home to repair or replace
in the 48 mainland states, Hawaii
any pafi of the range that fails
and Washington, D.C.In Alaska the
because of a manufacturing defect.
warranty is the same except that it is
LIMITED because you must pay to
ship the product to the service shop
or for the service technician’s travel
costs to your home.
All warranty service will be provided
by our Factory Service Centers or
by
our authorized Customer Care”
servicers during normal working
hours.
Look in the White or Yellow Pages
of your telephone directory for
GENERAL ELE~RIC COMPANY,
GENERAL ELECTRIC FACTORY
SERVICE, GENERAL ELECTRIC-
HOTPOINT FACTORYSERVICE or
GENERAL ELECTRIC CUSTOMER
CARE@SERVICE.
WHATIs Nm COVERED
~ Service trips to your home to
teach you how to use the product.
Read your Use and Cam material.
If you then have any questions
about operating the product,
please contact your dealer or our
Consumer Affairs office at the
address below,or call, toll free:
The GE Answer Cente@
800.626.2000
consumer information service
~ ReD1acementof house fuses or
rese~tingof circuit breakers.
e Failure of the product if it is used
for other than its intended purpose
or used commercially.
~ Damage to product caused
by accident, fire, floods or acts
of God.
WARRAN~R IS NOTRESPONSIBLE
FOR CONSEQUENTIAL DAMAGES.
~ Improper installation.
If you have an installation problem,
contact your dealer or installer.
You are responsible for providing
adequate electrical, gas, exhausting
and other connecting facilities.
Some states do not allow the exclusion or limitation of incidental or consequential damages, so the above limitation or exclusion
may not apply to you. This warranty gives you specific legal rights, and you may also have other rights which vary from state to state.
To know what your legal rights are in your state, consult your local or state consumer affairs office or your state’s Attorney General.
Warrantor: General E!fectricCompany
If futiher help is needed concerning this warranty, write:
Manager—Consumer Atiaim, General Electric Company, Appliance Park, Louisville, KY 40225
—
[
_Part ~0. 164 D1352 P024 ]
Pub. No. 49-4818
J
JHP63V:“

