Use & Care Guide
Manual de Uso y Cuidado
Kenmore
V uu_ CI n
116o10325
Vacuum Cleaner Help Line:
1-877-531-7321
8:00am-5:00pm EST, M-F
Sears Brands Management Corporation
Hoffman Estates, IL 60179 USA
www.kenmore.com
Before Using Your New Vacuum Cleaner .................................................................................. 2
Packing List ....................................................................................................................................... 2
Kenmore Vacuum Cleaner Warranty .......................................................................................... 3
Important Safety Instructions ........................................................................................................ 4
Parts and Features ........................................................................................................................... 5
Assembty Instructions ................................................................................................................. 6-7
Operating Instructions ................................................................................................................ 8-11
Performance/Safety Features ................................................................................................. 12-13
Vacuum Cleaner Care .............................................................................................................. 14-21
Troubleshooting ....................................................................................................................... 23-24
Requesting Assistance Or Service ...................................................................................... Back page
Please read this guide. It will help you assemble and operate your new I<enmore vacuum
cleaner in the safest and most effective way.
For more information about vacuum cleaner care and operation, call the Vacuum Cleaner
Help Line at 1-877-531-7321. You will need the complete model and serial numbers when
requesting information. Your vacuum cleaner's model and serial numbers are located on the
Model and Serial Number Plate.
Use the space below to record the model number and serial number of your new I<enmore
vacuum cleaner.
Model No.
Serial No.
Date of Purchase
Keep this book and your sales check (receipt) in a safe place for future reference.
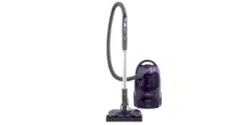
Your KENMORE VACUUM CLEANER is packaged with the following parts and
components assembled separately in the carton:
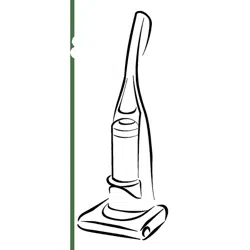
1 CrossOver Body 1 Pet HandiMate
1 Nozzle 1 Telescoping Wand
1 Floor Brush 1 Quick Start Guide
1 Handle & Hose Assembly 1 Use & Care Guide
1 Combination Tool 1 Repair Parts List
Each of the above assemblies are shown in detail inside the Repair Parts List.
-2-
KENMORE LiMiTED WARRANTY
FOR ONE YEAR from the date of sale this product is warranted against defects in ma-
terial or workmanship when it is assembled, operated and maintained according to all
supplied instructions.
WITH PROOF OF SALE, a defective appliance wilt be replaced free of charge.
For warranty coverage details to obtain free replacement, visit the web page:
www. ken more.cam/wa rra nty.
This warranty does not cover filters or belts, which are expendable parts that can wear
out from normal use within the warranty period.
This warranty is void if this product is ever used for other than private household
purposes.
This warranty gives you specific legal rights, and you may also have other rights which
vary from state to state.
Sears Brands Management Corporation, Hoffman Estates, IL 60179
-3-
Read all instructions in this guide before assembling or using your vacuum cleaner.
WARNING:
Your safety is important to us. To reduce the risk of fire, electrical shock, injury to
persons or damage when using your vacuum cleaner, follow basic safety
precautions including the following:
Use your vacuum cleaner only as
described in this manual. Use only with
Sears recommended attachments.
Disconnect electrical supply before
servicing or cleaning out the brush area.
Failure to do so could result in the brush
unexpectedly starting, causing personal
injury from moving parts.
Do not leave vacuum cleaner when
plugged in. Unplug from outlet when
not in use and before performing
maintenance.
To reduce the risk of electrical shock -
Do not use outdoors or on wet surfaces.
Do not allow to be used as a toy. Close
attention is necessary when used by or
near children.
Do not use with a damaged cord or
plug. if vacuum cleaner is not working
as it should, has been dropped,
damaged, left outdoors, or dropped in
water, return it to a Sears Service
Center for assessment before using
again.
Do not pull or carry by cord, use cord
as a handle, close a door on cord, or
pull cord around sharp edges or
corners. Do not run vacuum cleaner
over cord. Keep cord away from
heated surfaces.
Do not unplug by pulling on cord. To
unplug, grasp the plug, not the cord.
Do not handle plug or vacuum cleaner
with wet hands.
Do not put any objects into openings.
Do not use with any opening blocked;
keep free of dust, tint, hair, and
anything that may reduce air flow.
Keep hair, loose clothing, fingers, and
all parts of body away from openings
and moving parts.
Turn off all controls before unplugging.
Use extra care when cleaning on stairs.
Do not put on chairs, tables, etc. Keep
on floor.
Do not use vacuum cleaner to pick up
flammable or combustible liquids
(gasoline, cleaning fluid, perfumes, etc.),
or use in areas where they may be
present. The fumes from these
substances can create a fire hazard or
explosion.
Do not pick up anything that is burning
or smoking, such as cigarettes, matches,
or hot ashes.
Do not use vacuum cleaner without dust
cup and/or filters in place.
Always clean the dust cup after
vacuuming carpet cleaners or freshener,
powders, and fine dust. These products
clog the filters, reduce airflow and can
cause damage to the vacuum cleaner.
Failure to clean the dust cup could
cause permanent damage to the
vacuum cleaner.
Do not use the vacuum cleaner to pick
up sharp hard objects, small toys, pins,
paper clips, etc. They may damage the
vacuum cleaner or dust cup.
Unplug before connecting Pet
HandiMate
You are responsible for making sure
that your vacuum cleaner is not used by
anyone unable to operate it properly.
SAVE THESE iNSTRUCTiONS
Proper assembly and safe use of your vacuum cleaner are your responsibilities. Your
vacuum cleaner is intended for Household use. Read this Use & Care Guide carefully for
important use and safety information. This guide contains safety statements under
warning and caution symbols.
-4-
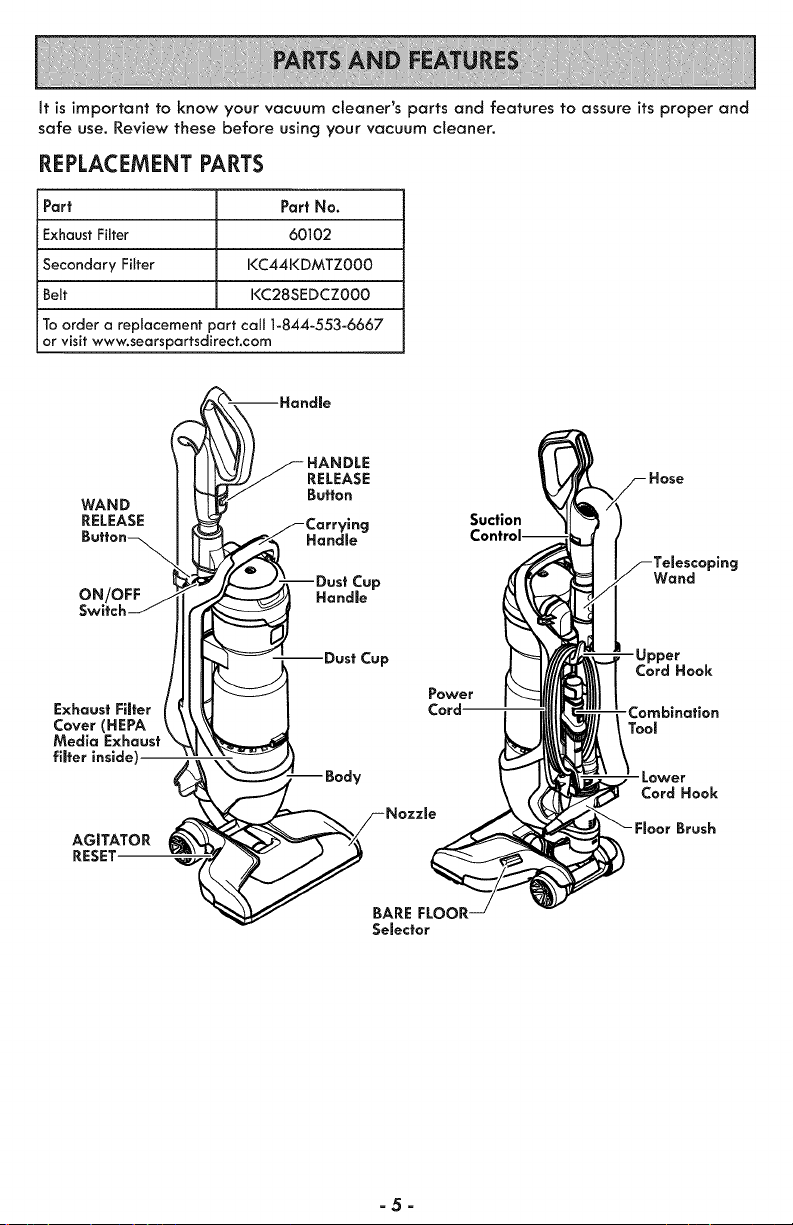
It is important to know your vacuum cleaner's parts and features to assure its proper and
safe use. Review these before using your vacuum cleaner.
REPLACEMENT PARTS
Part Part No.
Exhaust Filter 60102
Secondary Filter KC44KDMTZ000
Belt KC28SEDCZO00
To order a repJacement part caJl 1-844-553-6667
or visit www.searspartsdirect.com
WAND 1
ON/OFF /
Switch_
Exhaust Filter /
Cover (HEPA \
Media Exhaust"
filter inside)
AGITATOR
RESET-
Suction
Wand
Cord Hook
Tool
Cord Hook
Brush
=5=
Please pay special attention to these hazard alert boxes, and follow any instruc-
_ tions given. WARNING statements alert you to such hazards as fire, electric
shock, burns and personal injury. CAUTION statements alert you to such hazards
as personal injury and/or property damage.
Before assembling the vacuum cleaner,
check the PACKING LIST. (Page2) Use this
list to verify that you have received all the
components of your new I<enmore
vacuum cleaner.
1. Place the
body onto the
nozzle until
body snaps into
place.
Body
N
2. Insert the hose
into body until the
hose snaps into
place.
3. Insert the
handle into wand
until the handle
snaps into place.
J 4. Insert the
Telescoplng telescoping wand
Wand-_L, I_ into the floor
brush until the
wand snaps into
1__ place.
5. Insert hose clip
into the slot on the
telescoping wand.
Hose
Clip-_
/
_-Slot
6. Place the floor brush onto the socket.
Brush
;ocket
-6-
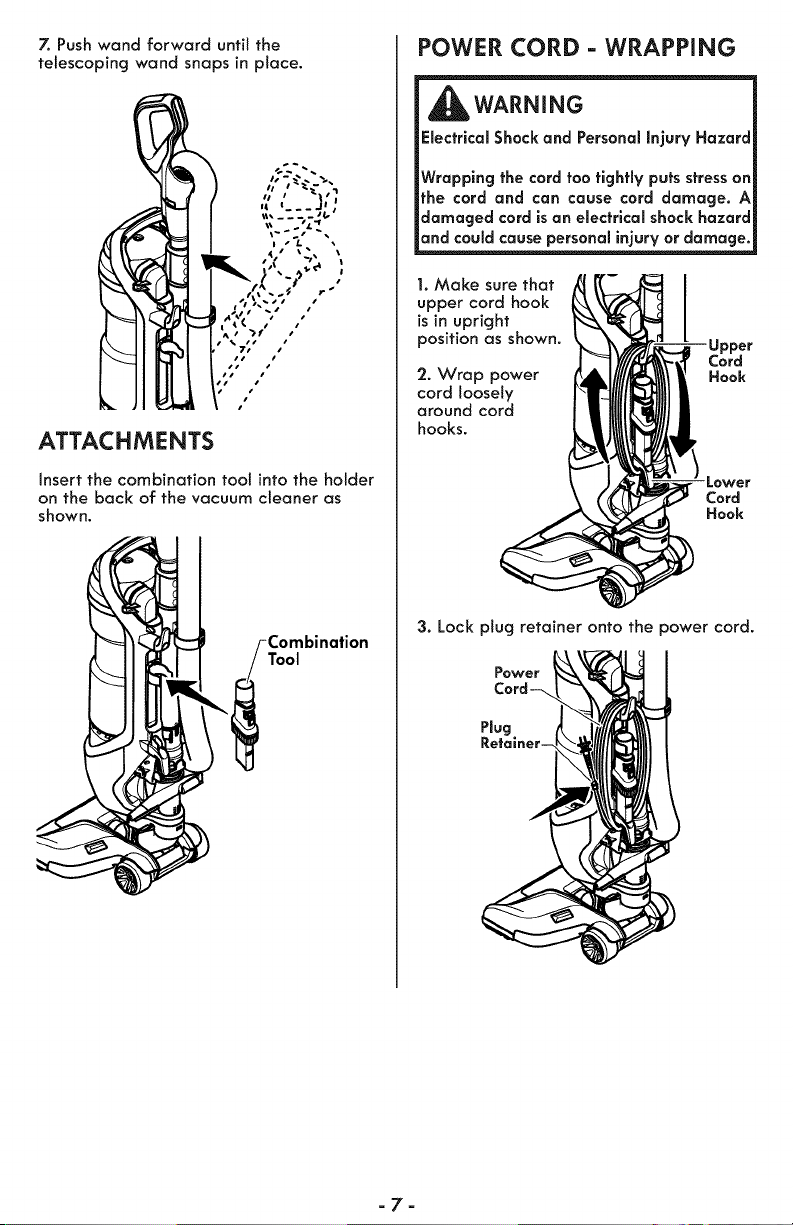
7. Push wand forward until the
telescoping wand snaps in place.
ATTACHMENTS
Insert the combination tool into the holder
on the back of the vacuum cleaner as
shown.
FCombination
POWER CORD - WRAPPING
WARNING
Electrical Shock and Personal Injury Hazard
Wrapping the cord too tightly puts stress on
the cord and can cause cord damage. A
damaged cord is an electrical shock hazard
and could cause personal injury or damage.
1. Make sure that
upper cord hook
is in upright
position as shown.
2. Wrap power
cord loosely
around cord
hooks.
Cord
Hook
- Lower
Cord
Hook
3. Lock plug retainer onto the power cord.
Power
Plug
-7-
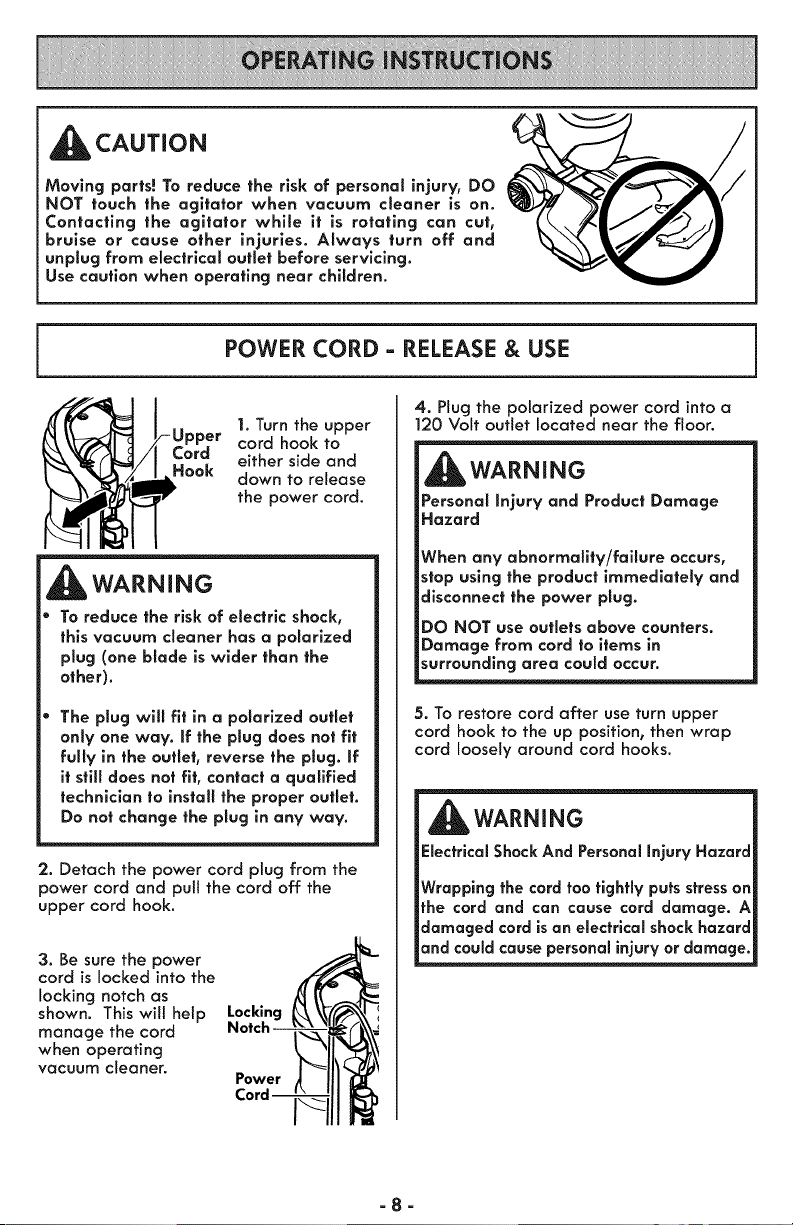
_CAUTION
Moving parts! To reduce the risk of personal injury, DO
NOT touch the agitator when vacuum cleaner is on.
Contacting the agitator while it is rotating cart cut,
bruise or cause other injuries. Always turn off and
unplug from electrical outlet before servicing.
Use caution when operating near children.
POWER CORD - RELEASE & USE
1. Turn the upper
cord hook to
Cord either side and
•{oak down to release
the power cord,
WARNING
To reduce the risk of electric shock,
this vacuum cleaner has a polarized
plug (one blade is wider than the
other).
The plug will fit in a polarized outlet
only one way. if the plug does not fit
fully in the outlet, reverse the plug. if
it still does not fit, contact a qualified
technician to install the proper outlet.
Do not change the plug in any way.
2. Detach the power cord plug from the
power cord and pull the cord off the
upper cord hook.
3. Be sure the power
cord is locked into the
locking notch as
shown. This will help
manage the cord
when operating
vacuum cleaner.
Locking
4. Plug the polarized power cord into a
120 Volt outlet located near the floor,
WARNING
Personal Injury and Product Damage
Hazard
When any abnormality/failure occurs,
stop using the product immediately and
disconnect the power plug.
DO NOT use outlets above counters.
Damage from cord to items in
surrounding area could occur.
5. To restore cord after use turn upper
cord hook to the up position, then wrap
cord loosely around cord hooks.
WARNING
Electrical Shock And Personal injury Hazard
Wrapping the cord too tightly puts stress on
the cord and can cause cord damage. A
damaged cord is an electrlcal shock hazard
and could cause personal injury or damage.
-8-
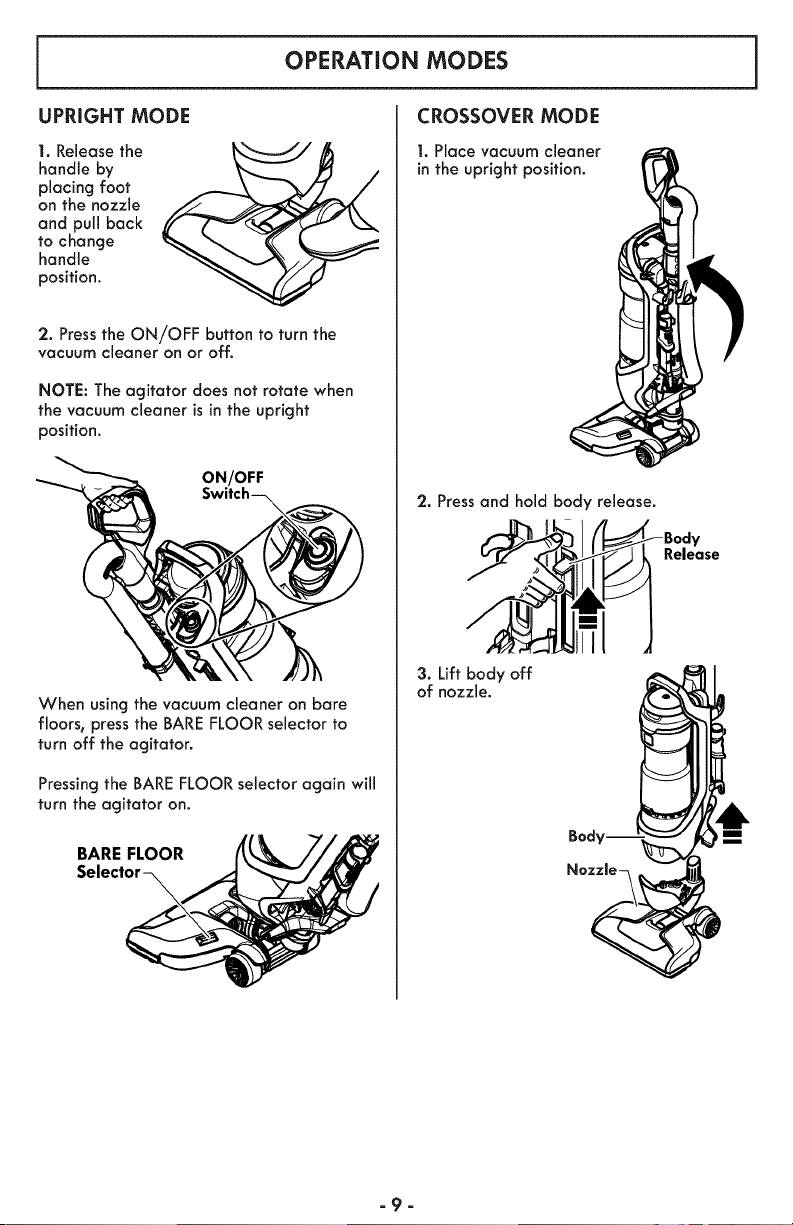
OPERATION MODES
UPRIGHTMODE
1. Release the
handle by
placing foot
on the nozzle
and pu[[ back
to change
handle
position.
'2. Press the ON/OFF button to turn the
vacuum cleaner on or off.
NOTE: The agitator does not rotate when
the vacuum cleaner is in the upright
position.
ON/OFF
When using the vacuum cleaner on bare
floors, press the BARE FLOOR selector to
turn off the agitator.
Pressing the BARE FLOOR selector again will
turn the agitator on.
BARE FLOOR
CROSSOVER MODE
1. Place vacuum cleaner
in the upright position.
'2. Press and hold body release.
3. Lift body off
of nozzle.
Release
-9-
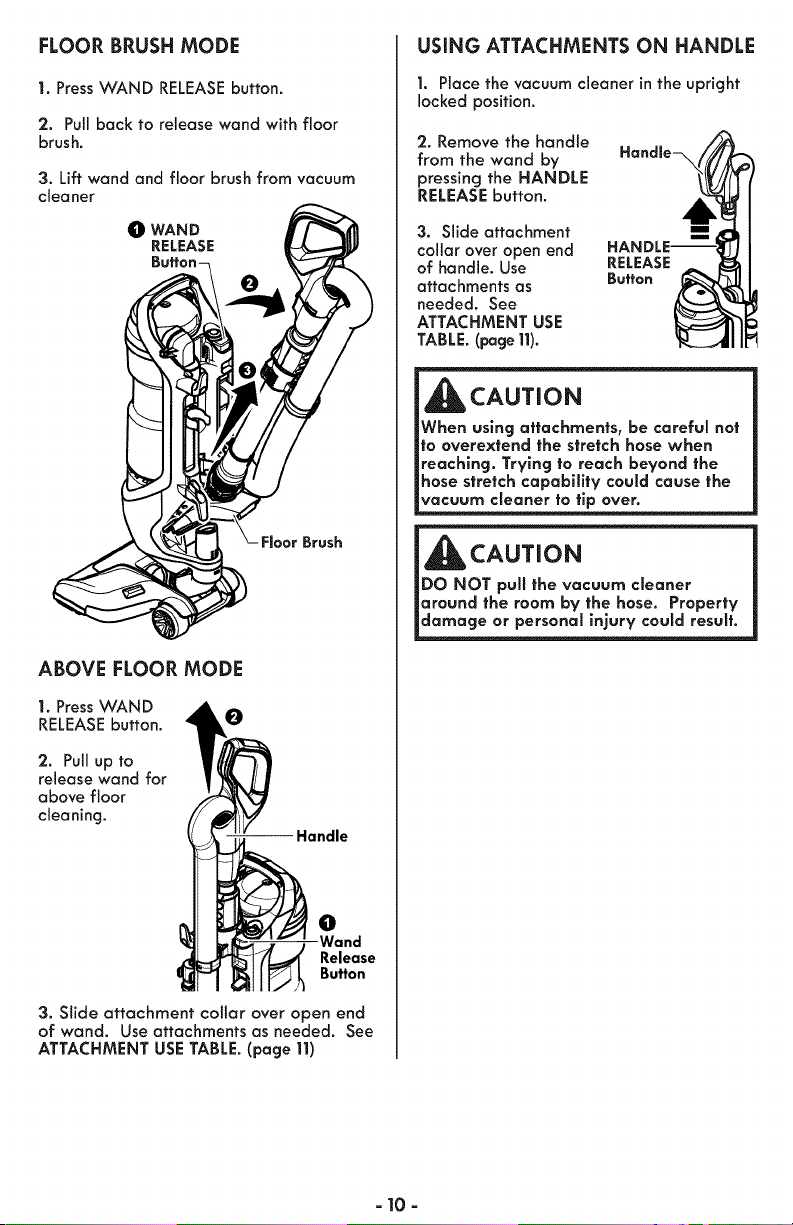
FLOOR BRUSH MODE
1. PressWAND RELEASEbutton.
2. Pull back to release wand with floor
brush.
3. Lift wand and floor brush from vacuum
cleaner
O WAND
RELEASE
ABOVE FLOOR MODE
1. PressWAND
RELEASEbutton. O
2. Pullup to
release wand for
above floor
cleaning.
-- Handle
O
Release
Button
3. Slide attachment collar over open end
of wand. Use attachments as needed. See
ATTACHMENT USE TABLE. (page 11)
USING ATTACHMENTS ON HANDLE
1. Place the vacuum cleaner in the upright
locked position.
2. Remove the handle
from the wand by
pressing the HANDLE
RELEASE button.
3. Slide attachment
collar over open end
of handle. Use
attachments as
needed. See
ATTACHMENT USE
TABLE. (page 11).
RELEASE
Button
_CAUTION
When using attachments, be careful not
to overextend the stretch hose when
reaching. Trying to reach beyond the
hose stretch capability could cause the
vacuum cleaner to tip over.
i AUTION
_DO NOT pull the vacuum cleaner
_around the room by the hose. Property
_damage or personal injury could result.
- 10 -
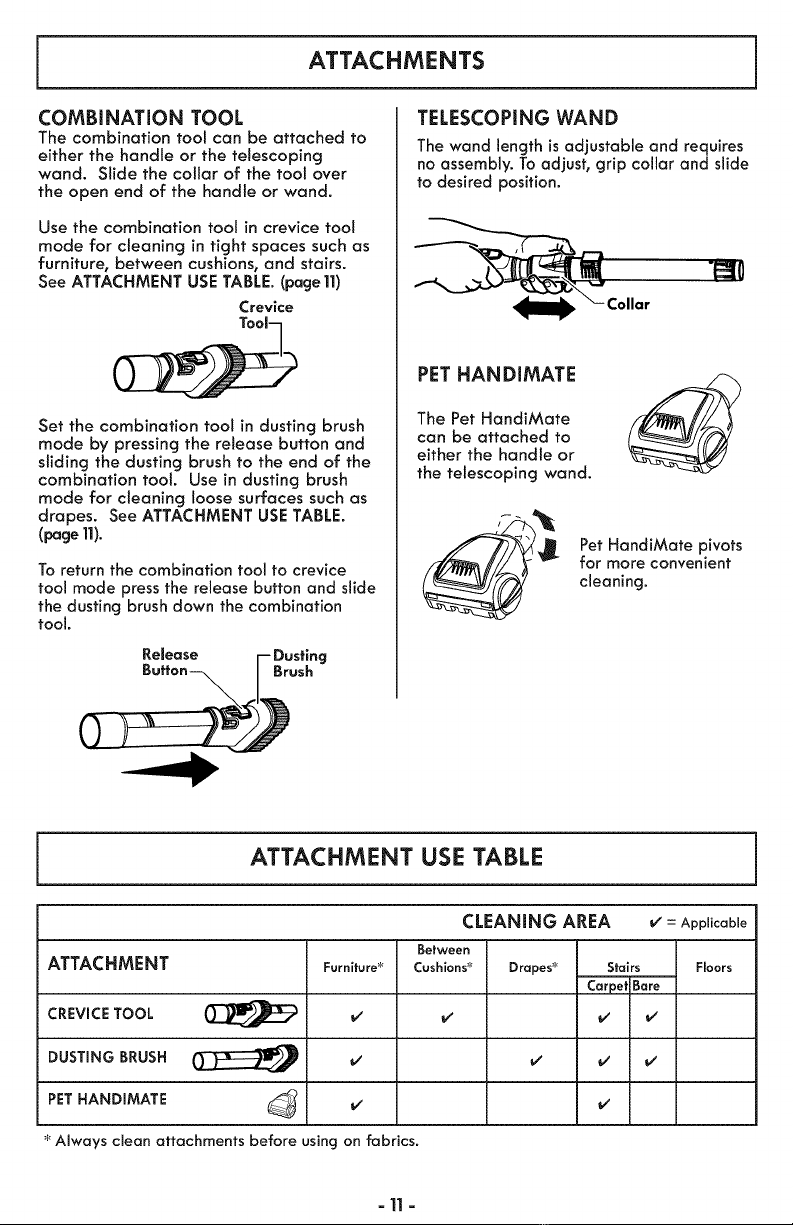
ATTACHMENTS
TELESCOPINGWANDCOMBiNATiON TOOL
The combination tool can be attached to
either the handle or the telescoping
wand. Slide the collar of the tool over
the open end of the handle or wand.
Use the combination tool in crevice toot
mode for cleaning in tight spaces such as
furniture, between cushions, and stairs.
See ATTACHMENT USE TABLE. (page 11)
Crevice
Set the combination tool in dusting brush
mode by pressing the release button and
sliding the dusting brush to the end of the
combination toot. Use in dusting brush
mode for cleaning loose surfaces such as
drapes. See ATTACHMENT USE TABLE.
(page 11).
To return the combination tool to crevice
tool mode press the release button and slide
the dusting brush down the combination
tool.
The wand length is adjustable and requires
no assembly. To adjusb grip collar and slide
to desired position.
PET HANDIMATE
The Pet HandiMate
can be attached to
either the handle or
the telescoping wand.
Pet HandiMate pivots
for more convenient
cleaning.
ATTACHMENT USE TABLE
CLEANING AREA v" = Applicable
Between
ATTACHMENT Furniture* Cushions* Drapes* Stairs Floors
Carpe| Bare
CREVICE TOOL
DUSTING BRUSH
PET HANDIMATE
* Always clean attachments before using on fabrics.
- 11 -
MOTOR PROTECTION SYSTEM
THERMAL PROTECTOR
This vacuum cleaner has a thermal
protector which automatically trips to
protect the vacuum cleaner suction motor.
if a clog prevents the normal flow of air
to the motor, the thermal protector turns
the motor off automatically. This allows
the motor to cool in order to prevent
possible damage to the vacuum cleaner.
To reset thermal protector: Turn the
vacuum cleaner off and unplug the power
cord from the outlet to allow the vacuum
cleaner to cool and the thermal
protectors to reset.
CAUTION
Always return the vacuum cleaner to the
upright position before using the hose
and attachments. Failure to do so may
result in overheating of the agitator
motors and can cause the thermal
protectors to trip.
[beck for and remove clogs, and empty
dust cup if necessary. Also check and
replace any clogged filters. Wait
approximately 50 minutes before
restarting vacuum cleaner.
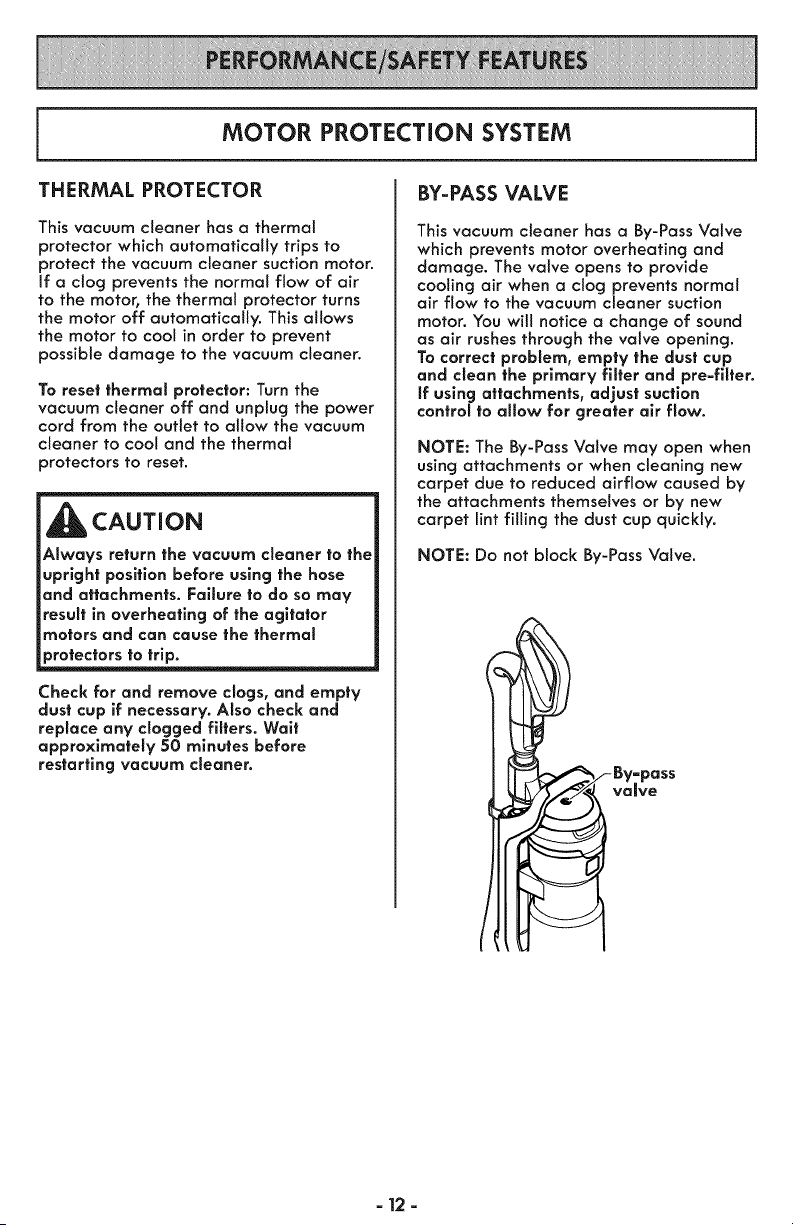
BY-PASS VALVE
This vacuum cleaner has a By-Pass Valve
which prevents motor overheating and
damage. The valve opens to provide
cooling air when a clog prevents normal
air flow to the vacuum cleaner suction
motor. You will notice a change of sound
as air rushes through the valve opening.
To correct problem, empty the dust cup
and clean the primary filter and pre-filter.
if using attachments, adjust suction
control to allow for greater air flow.
NOTE: The By-Pass Valve may open when
using attachments or when cleaning new
carpet due to reduced airflow caused by
the attachments themselves or by new
carpet lint filling the dust cup quickly.
NOTE: Do not block By-Pass Valve.
-By-pass
Valve
- 12 -
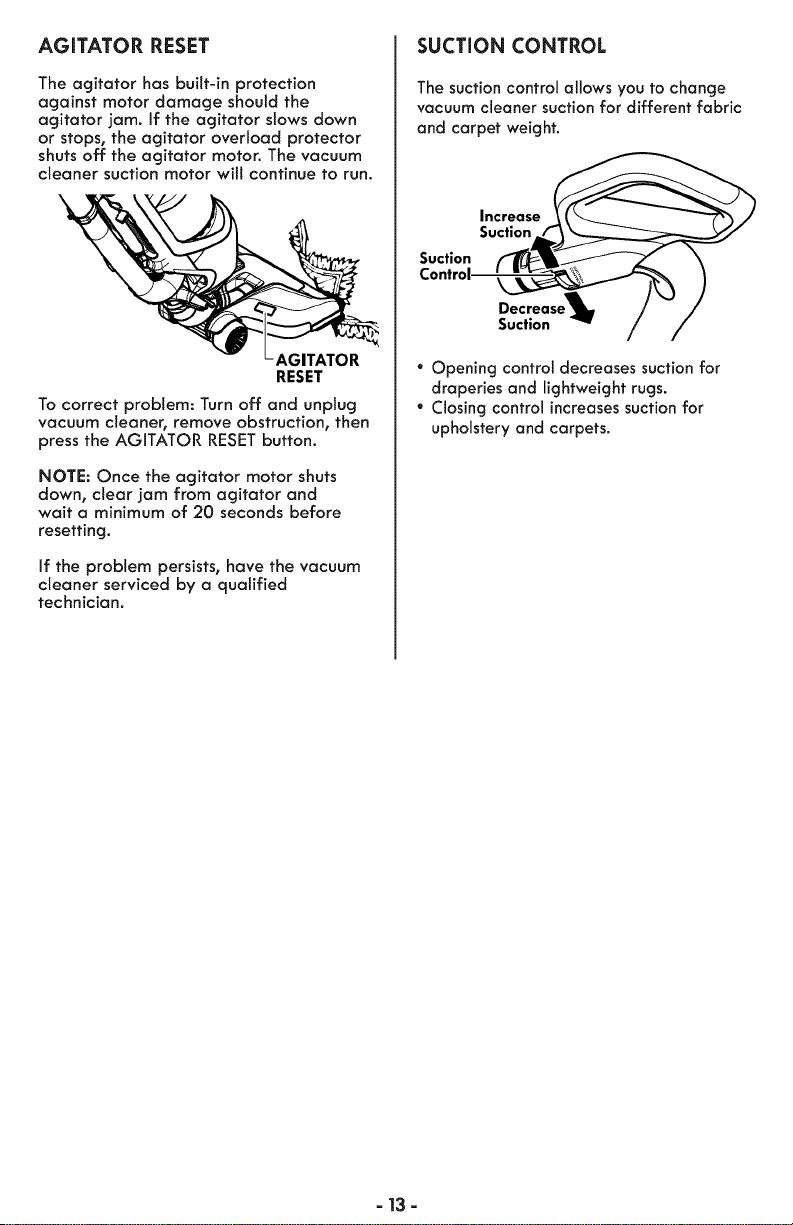
AGITATOR RESET
The agitator has built-in protection
against motor damage should the
agitator jam. If the agitator slows down
or stops, the agitator overload protector
shutsoff the agitator motor. The vacuum
cleaner suction motor will continue to run.
RESET
To correct problem: Turn off and unplug
vacuum cleanern remove obstruction, then
press the AGITATOR RESET button.
NOTE: Once the agitator motor shuts
down, clear jam from agitator and
wait a minimum of 20 seconds before
resetting.
If the problem persists, have the vacuum
cleaner serviced by a qualified
technician.
SUCTION CONTROL
The suction control allows you to change
vacuum cleaner suction for different fabric
and carpet weight.
Increase
Suction
Suction
Control-
Dec"_ease_J_f
Suction _"
* Opening control decreases suction for
draperies and lightweight rugs.
* Closing control increases suctionfor
upholstery and carpets.
- 13-

Always follow all safety precautions when performing maintenance to the vacuum cleaner.
WARNING
Electrical Shock And Personal injury Hazard
Disconnect electrical supply before servicing or cleaning the vacuum cleaner. Failure to do
so could result in electrical shock or personal injury from vacuum cleaner suddenly
starting.
CLEANING EXTERIOR AND ATTACHMENTS
1. Turn off and unplug vacuum cleaner. DO
NOT drip water on vacuum cleaner.
2. To clean exterior, or to reduce static elec-
tricity and dust build-up, wipe outer surface
of vacuum cleaner and attachments. Use a
clean, soft cloth that has been dipped in a
solution of mild liquid detergent and water,
then wrung dry. Wipe dry after cleaning.
Wash crevice tool and dusting brush in
warm soapy water, rinse and air dry. Do not
clean in dishwasher.
CAUTION
Do not use attachments if they are wet.
Attachments used in dirty areas, such
as under a refrigerator, should not be
used on other surfaces until they are
washed. They could leave marks.
VACUUM CLEANER STORAGE
Replace hose and wand in storage position
if necessary(see Page 6 & 7).
Gather the cord and wrap it loosely around
the upper and lower cord hooks. Lock plug
retainer onto the power cord.
Store the vacuum cleaner in a dry, indoor
area, on the floor with the handle locked in
the upright position.
WARN I NG
Electrical Shock And Personal injury Hazard
Wrapping the cord too tightly puts stress on
the cord and can cause cord damage. A
damaged cord is an electrical shock hazard
and could cause personal injury or damage.
=14 =
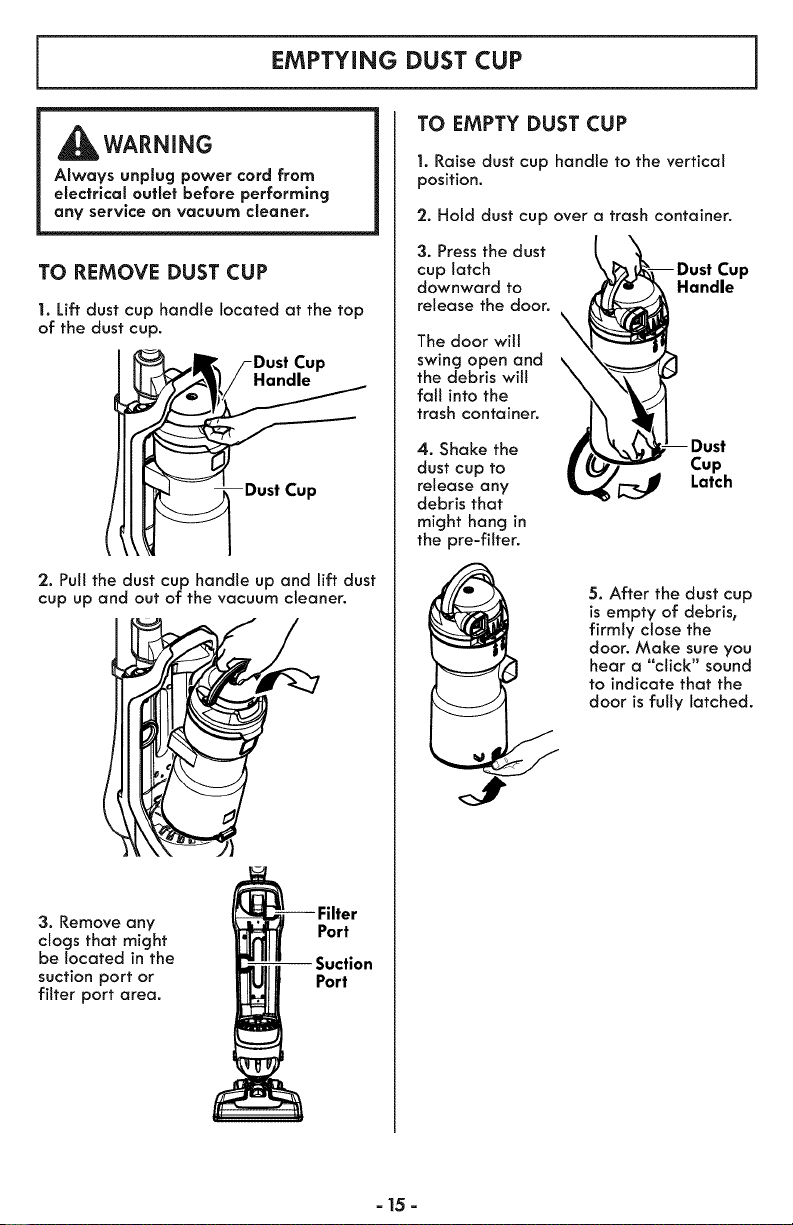
EMPTYING DUST CUP
WARNING
Always unplug power cord from
electrical outlet before performing
any service on vacuum cleaner.
TO REMOVE DUST CUP
1. Lift dust cup handle located at the top
of the dust cup.
Handle
2. Pull the dust cup handle up and lift dust
cup up and out of the vacuum cleaner.
3. Remove any
clogs that might
be located in the
suction port or
filter port area.
Port
Port
TO EMPTY DUST CUP
1. Raise dust cup handle to the vertical
position.
2. Hold dust cup over a trash container.
3. Press the dust
cup latch Cup
downward to Handle
release the door.
The door wilt
swing open and \
the debris will
\
fall into the
trash container.
4. Shake the
dust cup to
release any
debris that
might hang in
the pre-fiiter.
Cup
Latch
5. After the dust cup
is empty of debris,
firmly close the
door. Make sure you
hear a "click" sound
to indicate that the
door is fully latched.
= 15 =
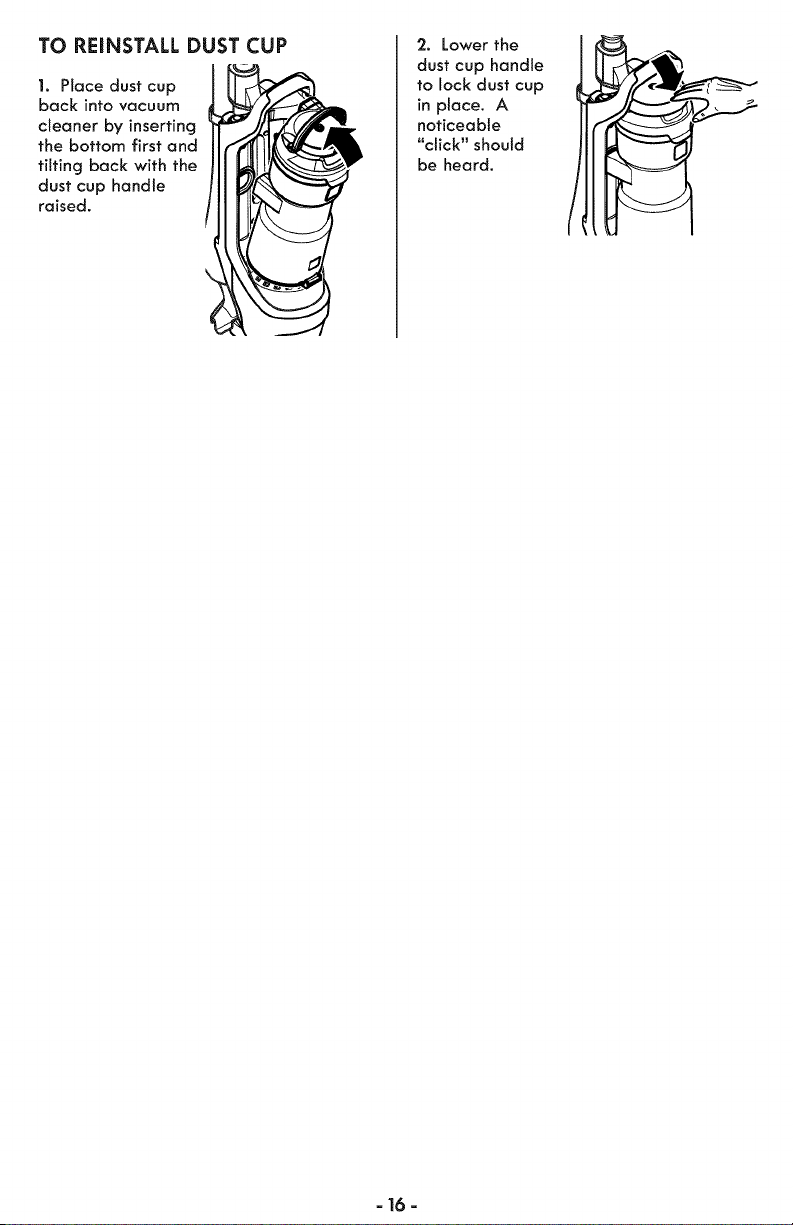
TO REINSTALL DUST CUP
1. Place dust cup
back into vacuum
cleaner by inserting
the bottom first and
tilting back with the
dust cup handle
raised.
2. Lower the
dust cup handle
to lock dust cup
in place, A
noticeable
"click" should
be heard,
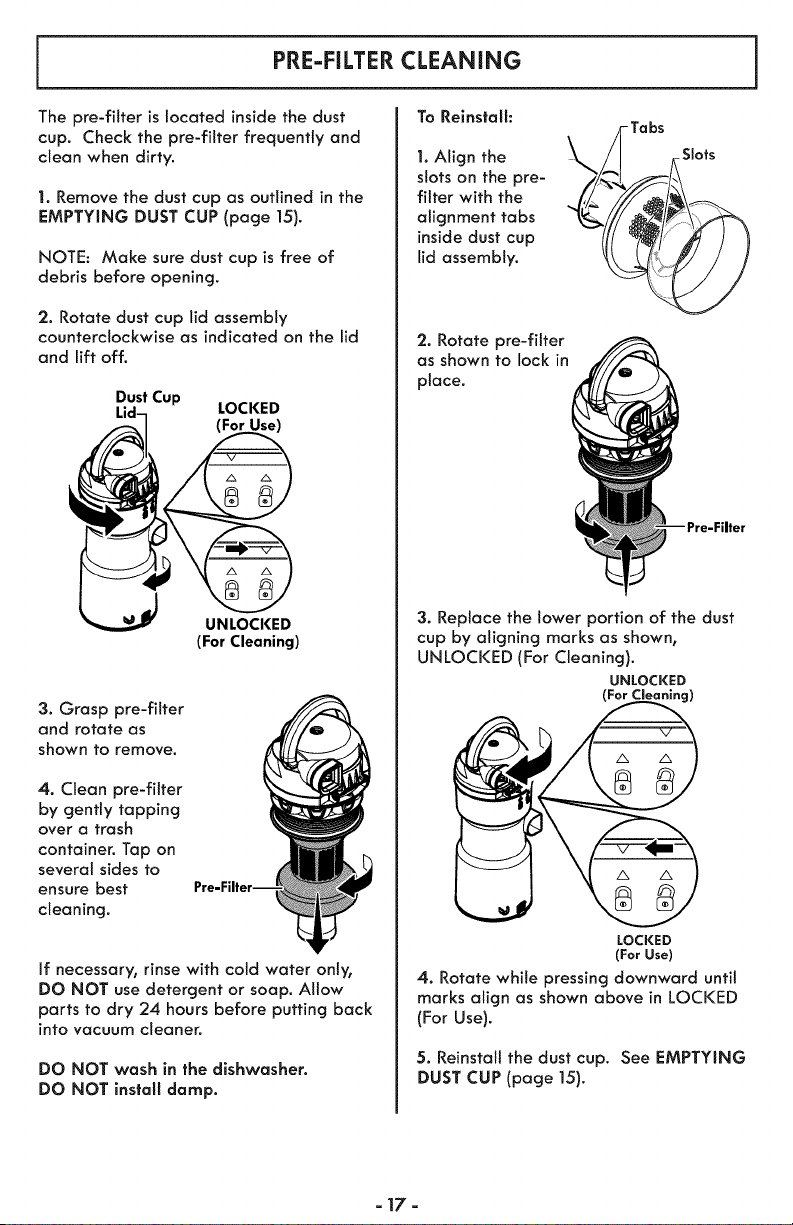
PRE-FILTER CLEANING
To Reinstalh
The pre-filter is located inside the dust
cup. Check the pre-filter frequently and
clean when dirty,
1. Remove the dust cup as outlined in the
EMPTYING DUST CUP (page 15),
NOTE: Make sure dust cup is free of
debris before opening.
2. Rotate dust cup lid assembly
counterclockwise as indicated on the lid
and lift off,
Dust Cup LOCKED
;e)
UNLOCKED
(For Cleaning)
3. Grasp pre-fitter
and rotate as
shown to remove.
4. Clean pre-fitter
by gently tapping
over a trash
container. Tap on
several sides to
ensure best
cleaning.
If necessary, rinse with cold water only,
DO NOT use detergent or soap. Allow
parts to dry 24 hours before putting back
into vacuum cleaner.
DO NOT wash in the dishwasher.
DO NOT install damp.
1. Align the
slots on the pre-
filter with the
alignment tabs
inside dust cup
lid assembly.
Tabs _ Slots
'2. Rotate pre-filter
as shown to lock in
place.
3. Replace the lower portion of the dust
cup by aligning marks as shown,
UNLOCKED (For Cleaning).
UNLOCKED
(For =ning)
LOCKED
(For Use)
4. Rotate while pressing downward until
marks align as shown above in LOCKED
(For Use),
5. Reinstall the dust cup, See EMPTYING
DUST CUP (page 15).
=17=
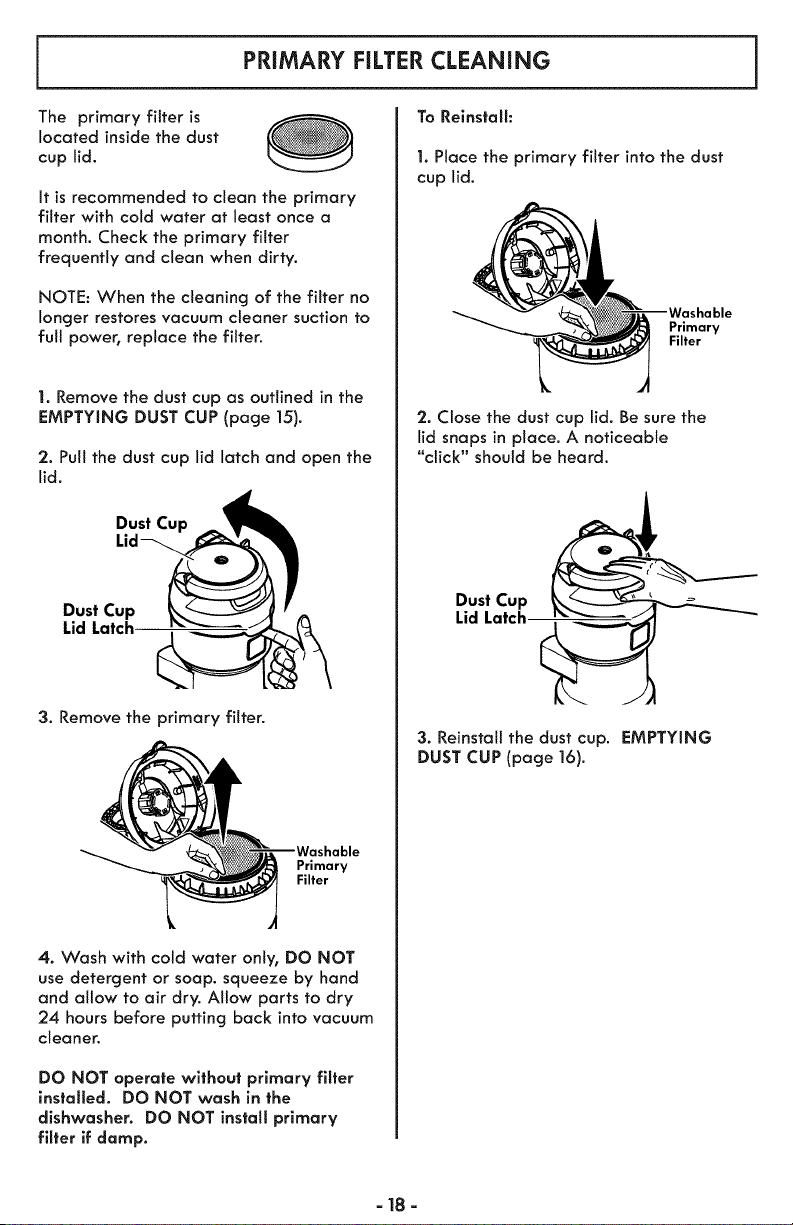
PRIMARY FILTER CLEANING
The primary filter is
located inside the dust
cup lid.
It is recommended to clean the primary
filter with cold water at least once a
month, Check the primary filter
frequently and clean when dirty.
NOTE= When the cleaning of the filter no
longer restores vacuum cleaner suction to
full power_ replace the filter.
1. Remove the dust cup as outlined in the
EMPTYING DUST CUP (page 15).
'2. Pull the dust cup lid latch and open the
lid.
Dust Cup ___J_
3. Remove the primary filter.
Primary
Filter
4. Wash with cold water only, DO NOT
use detergent or soap. squeeze by hand
and allow to air dry. Allow parts to dry
24 hours before putting back into vacuum
cleaner.
DO NOT operate without primary filter
installed. DO NOT wash in the
dishwasher. DO NOT install primary
filter if damp.
To Relnstalh
1. Place the primary filter into the dust
cup lid.
Primary
Filter
'2. Close the dust cup lid. Be sure the
lid snaps in place. A noticeable
"click" should be heard.
Dust Cup
Lid Latch
3. Reinstall the dust cup. EMPTYING
DUST CUP (page 16).
=18 =
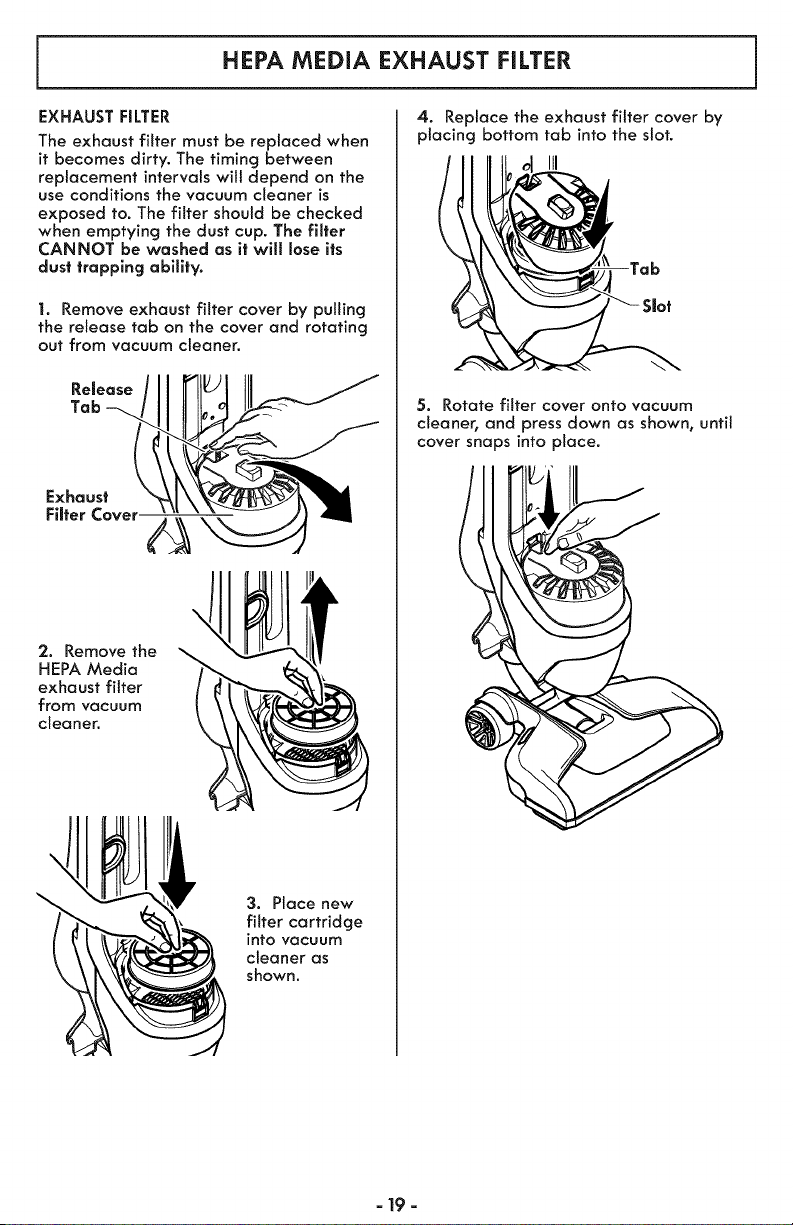
HEPA MEDIA EXHAUST FILTER
EXHAUST FILTER
The exhaust filter must be replaced when
it becomes dirty. The timing between
replacement intervals wilt depend on the
use conditions the vacuum cleaner is
exposed to. The filter should be checked
when emptying the dust cup. The filter
CANNOT be washed as it will lose its
dust trapping ability.
1. Remove exhaust filter cover by pulling
the release tab on the cover and rotating
out from vacuum cleaner.
Release
Tab
2. Remove the
HEPA Media
exhaust filter
from vacuum
cleaner.
3. Place new
filter cartridge
into vacuum
cleaner as
shown.
4. Replace the exhaust filter cover by
placing bottom tab into the slot.
;Jot
5. Rotate filter cover onto vacuum
cleaner, and press down as shown, until
cover snaps into place.
- 19 -

BELT CHANGING
Replace belt whenever a burning rubber
smell caused by excessive slippage
OCCURS,
1. Lay vacuum cleaner on floor with the
bottom up and nozzle flat.
2. Release lower plate by rotating the
lower plate latches to the UNLOCK
position. Lift off lower plate.
Lower
PJafe
_ CAUTION
3. Remove agitator by carefully lifting
out.
4. Remove worn or broken belt.
5. Clean agitator (see AGITATOR,
CLEANING p. 21).
6. Loop new belt around motor shaft and
agitator.
7. Reinstall agitator back into nozzle by
placing end caps into grooves.
End
Slot
Belt Agitator
8. Reinstall lower plate by aligning tabs
on front edge of lower plate with slots in
the nozzle and rotating to installed
position.
Tabs
Slots
9. Press lower plate onto nozzle and
secure by rotating the lower plate latches
to the LOCI( position.
Latches
- 20 -
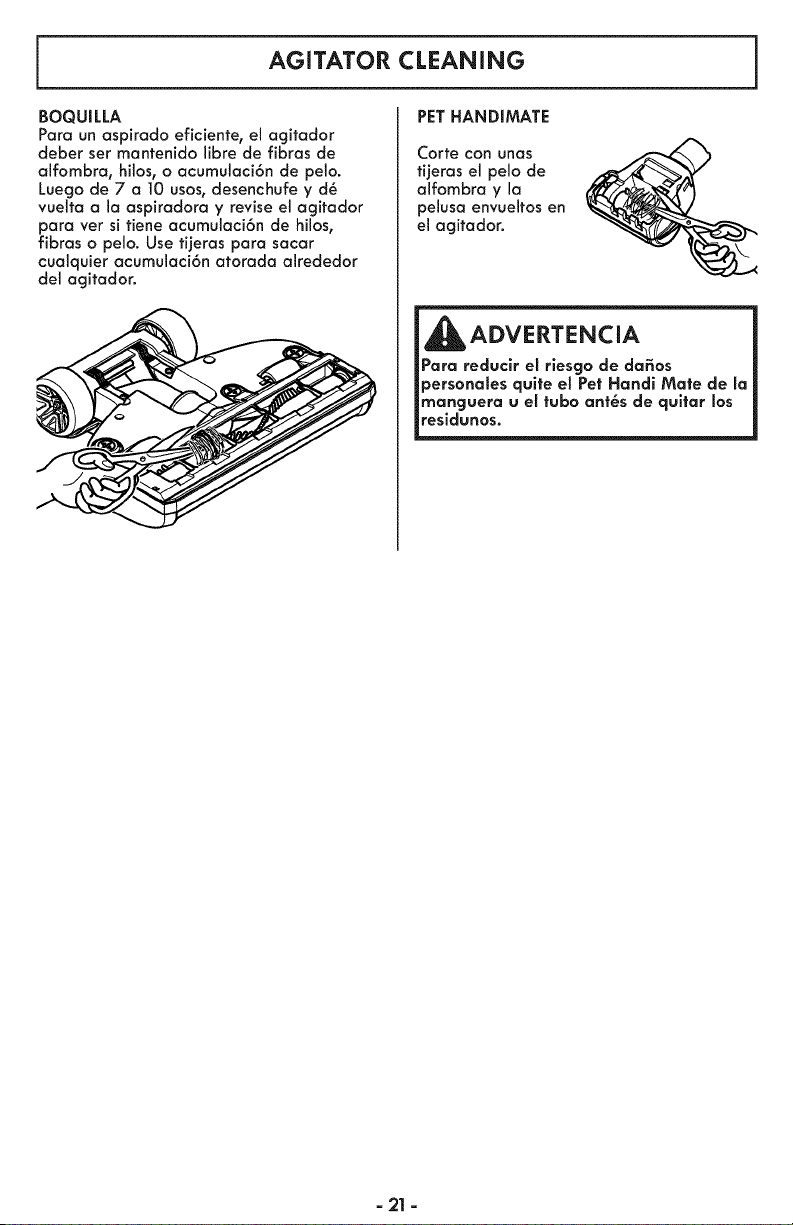
AGITATOR CLEANING
PET HANDIMATEBOQUILLA
Para un aspirado eficiente, el agitador
deber set mantenido libre de fibras de
alfombra, hilos, o acumulaci6n de pelo.
Luego de 7 a 10 usos, desenchufe y d6
vuelta a la aspiradora y revise el agitador
para vet si tiene acumulaci6n de hilos,
fibras o pelo. Use tijeras para sacar
cualquier acumulaci6n atorada akededor
del agitador.
Corte con unas
tijeras el pelo de
alfombra y la
pelusa envueltos en
el agitador.
i DVERTENCIA 1
_Para reducir eJ rlesgo de dafios |
_personales quite el Pet Handi Mate de la|
_manguera u el tubo ant6s de qultar los |
resldunos.
- 21 -

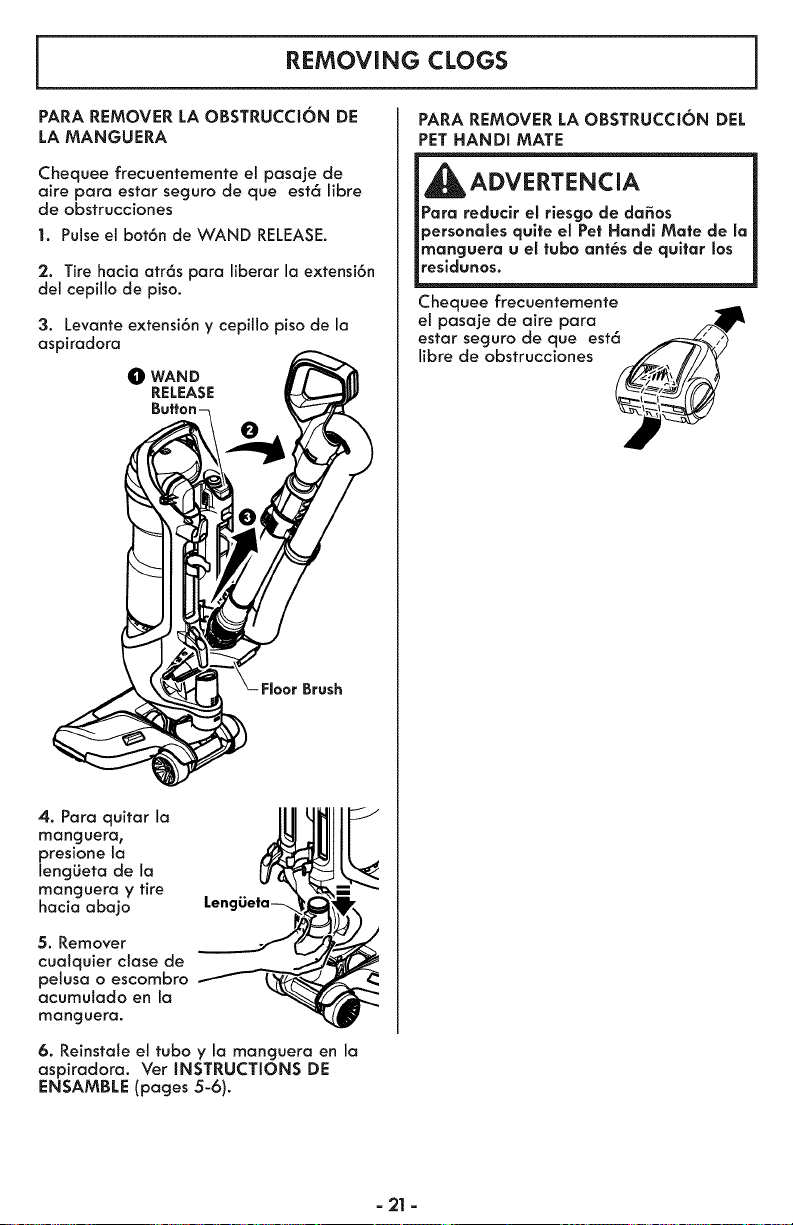
REMOVING CLOGS
TO REMOVE CLOG FROM HOSE
Frequently check air path to make sure it
is free of obstructions
1. Press WAND RELEASE button.
'2. Pull back to release wand with floor
brush.
3. Lift wand and floor brush from vacuum
cleaner
_) WAND
RELEASE
4. To remove hose,
press tab on hose
cuff and pull down.
5. Remove any
clogs or residue in
hose.
6. Reinstall hose
and wand onto
vacuum cleaner.
See ASSEMBLY
(pages 6-7).
Tab
TO REMOVE CLOG FROM PET
HANDIMATE
=
CAUTION
_To reduce the risk of injury from
Jmovlng parts, remove Pet HandiMate
_from vacuum hose or wand before
servicing.
Frequently check air
path to make sure it is
free of obstructions
=22 =
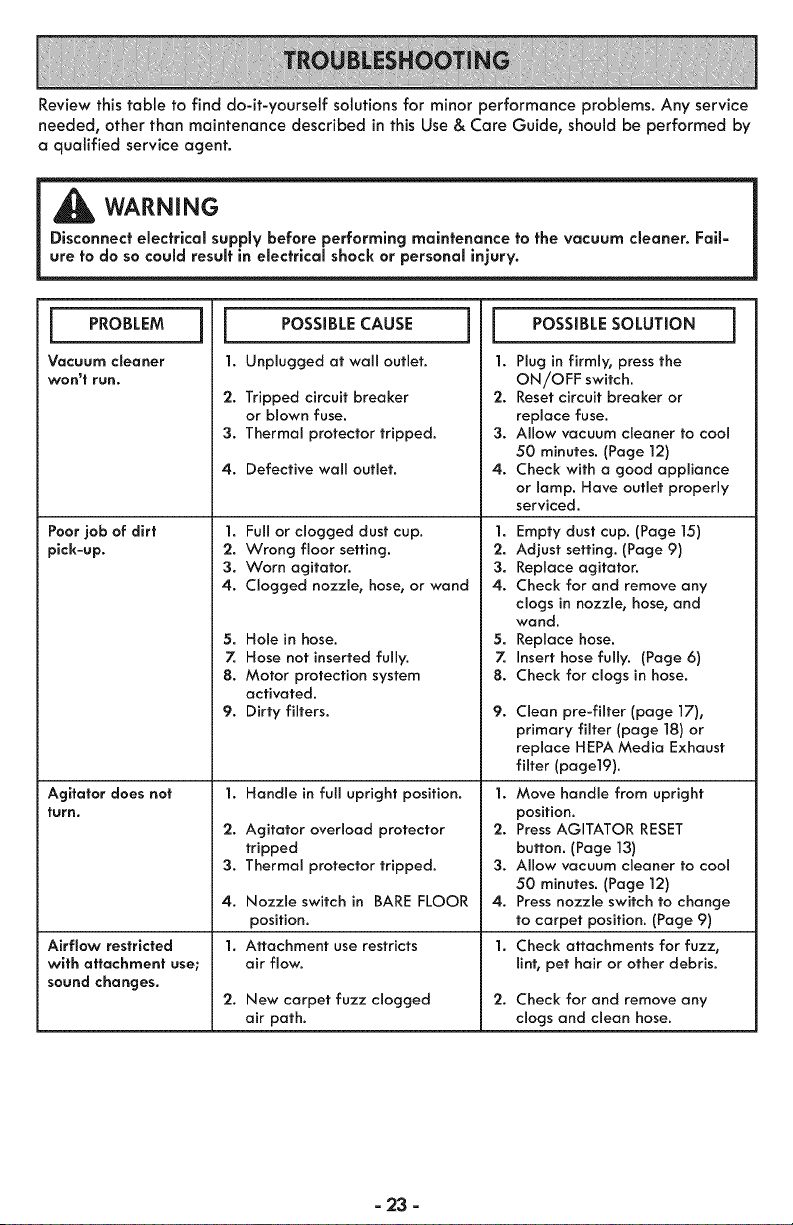
Review this table to find do-it-yourself solutions for minor performance problems. Any service
needed, other than maintenance described in this Use & Care Guide, should be performed by
a qualified service agent.
WARNING
Disconnect electrical supply before performing maintenance to the vacuum cleaner. Fail=
ure to do so could result in electrical shock or personal injury.
I PROBLEM
Vacuum cleaner
WOn't run.
1. Unplugged at wall outlet.
2. Tripped circuit breaker
or blown fuse.
3. Thermal protector tripped.
4. Defective wall outlet.
1.
2.
3.
4.
2.
Poor job of dirt
pick-up.
Agitator does not
turn.
Airflow restricted
with attachment use;
sound changes.
I
5.
7.
8.
9.
1.
2.
3.
4.
3.
4.
Full or clogged dust cup. 1.
Wrong floor setting. 2.
Worn agitator. 3.
Clogged nozzle, hose, or wand 4.
Hole in hose. 5.
Hose not inserted fully. 7.
Motor protection system 8.
activated.
Dirty filters. 9.
Handle in full upright position. 1.
Agitator overload protector 2.
tripped
Thermal protector tripped. 3.
Nozzle switch in BARE FLOOR 4.
position.
1. Attachment use restricts
air flow.
l OSSIBLE SOLUTION ]
I. Plug in firmly, press the
ON/OFF switch.
Reset circuit breaker or
replace fuse.
Allow vacuum cleaner to cool
50 minutes. (Page 12)
Check with a good appliance
or lamp. Have outlet properly
serviced.
2.
2. New carpet fuzz clogged
air path.
Empty dust cup. (Page 15)
Adjust setting. (Page 9)
Replace agitator.
Check for and remove any
clogs in nozzle, hose, and
wand.
Replace hose.
Insert hose fully. (Page 6)
Check for clogs in hose.
Clean pre-filter (page 17),
primary filter (page ]8) or
replace HEPA Media Exhaust
filter (page19).
Move handle from upright
position.
Press AGITATOR RESET
button. (Page ]3)
Allow vacuum cleaner to cool
50 minutes. (Page ]2)
Press nozzle switch to change
to carpet position. (Page 9)
Check attachments for fuzz,
lint, pet hair or other debris.
Check for and remove any
clogs and clean hose.
=23 =
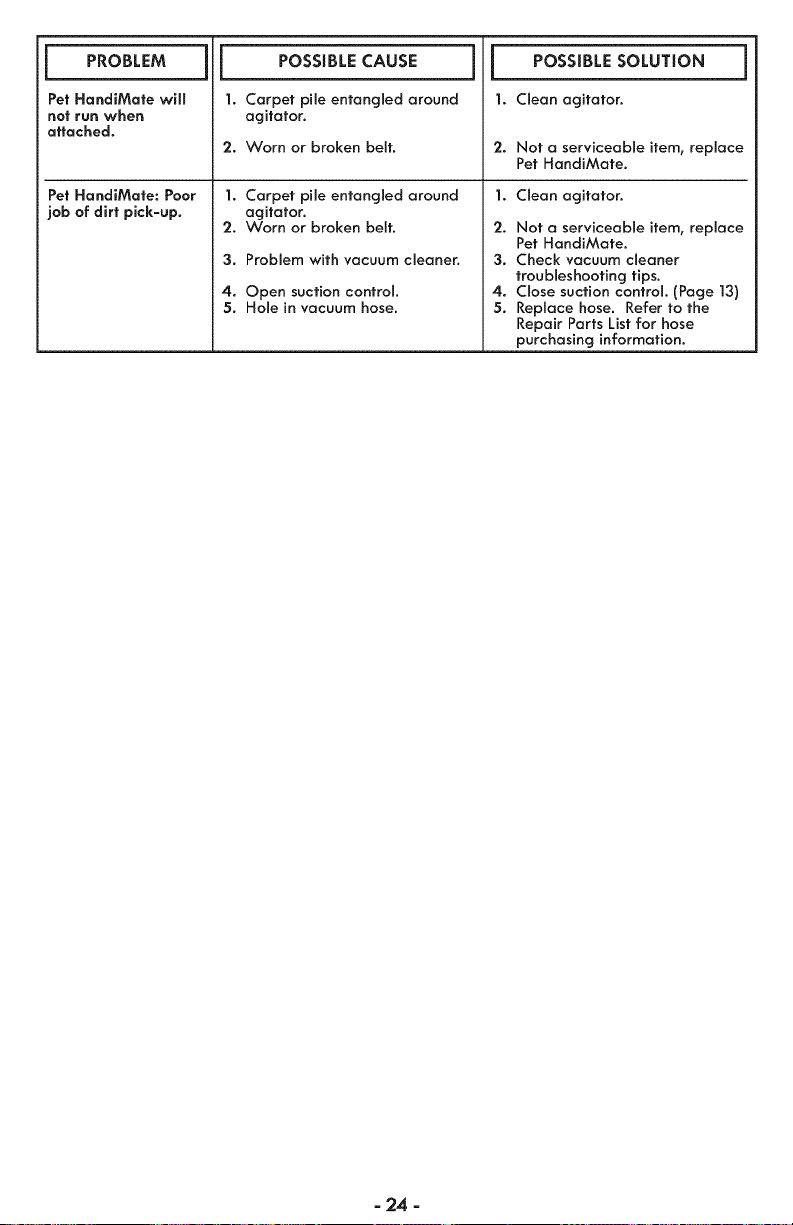
I PROBLEM
Pet HandiMate will
not run when
attached.
Pet HandiMate: Poor
job of dirt pick-up.
i POSSIBLE CAUSE
1. Carpet pile entangled around
agitator.
2. Worn or broken belt.
1. Carpet pile entangled around
agitator.
2. Worn or broken belt.
3. Problem with vacuum cleaner.
4. Open suction control.
5. Hole in vacuum hose.
Jl
1.
2.
1.
2.
3.
4.
5.
POSSIBLE SOLUTION
Clean agitator.
1
Not a serviceable item, replace
Pet HandiMate.
Clean agitator.
Not a serviceable item, replace
Pet HandiMate.
Check vacuum cleaner
troubleshooting tips.
Close suction control. (Page ]3)
Replace hose. Refer to the
Repair Parts List for hose
purchasing information.
24
Antes de usar su aspiradora nueva ..............................................................................................1
Lista de embataje .............................................................................................................................1
Garanfia de la aspiradora de Kenmore ......................................................................................2
Instrucciones importantes de secjuridad .....................................................................................3
Piezas y caracteristicas de la aspiradora ...................................................................................4
Instrucciones de ensamble .........................................................................................................5-6
Instrucciones de operaci6n ......................................................................................................7-10
Performance/Safety Features .................................................................................................11-12
Cuidado de la aspiradora .......................................................................................................13-21
Reconocimiento de problemas .............................................................................................22-23
Informaci6n de aslstencla o servlclo ..........................................................................Back pagge
Pot favor lea esta cjufa que le ayudara a ensarnblar y operar su aspiradora nueva de
Kenmore en una manera m6s secjura y efectiva.
Para mas informaci6n acerca del cuidado y operaci6n de esta aspiradora, Ilame a la Lfnea
de Ayuda de Aspiradoras ai 1-877-531-7321. Cuando precjunte por informaci6n usted
necesitar6 el n6mero completo de serie y modelo de la aspiradora que est6 Iocalizado en la
placa de los n6meros de modelo y serie.
Use el espacio de abajo para recjistrar el n6mero de modelo y serie para su nueva
aspiradora de Kenrnore.
N6mero de Modelo:
N0mero de Serie:
Fecha de Compra:
Mantencja este libro y su recibo en un lucjar secjuro para futuras referencias.
Su ASPIRADOR KENMORE se empaca con las sicjuientes piezas y componentes
pot separado:
] Cuerpo ] Pet HandiMate
] Boquitla ] Tubo telesc6pico
1 Cepilto para pisos 1 Gufa r6pida
1 Ensamble de manguera y manija 1 Manual de uso V cuidado
1 CepiHo para combinaci6n 1 Lista de partes de Servicio
Cada uno de estos ensambtes es mostrado detaltadamente en la lista de piezas para
reparaci6n.
-1-

Garanfialimitada de Kenmore
DURANTE un a_o a partir de la fecha de compra este producto est6 garantizado
contra defectos de materiales o mano de obra cuando sees ensamblado
correctamente, operado y mantenido seg6n las instrucciones suministradas.
CON LA PRUEBA DE COMPRA, el aparato defectuoso ser6 remplazado sin costo.
Para los detalles de la cobertura de garantra, para obtener el reemplazo gratuito, visite
la p6gina web: www.kenmore.com/warranty.
Esta garanHa no cubre filtros o correas, los cuales son partes gastables las cuales se
deterioran con el uso normal en el periodo de garanHa.
Esta garantra queda anulada si este producto se utiliza para otros prop6sitos que no
sean de uso dom_sticos.
Esta garantra le otorga derechos legales especfficos, y usted podrra tener otros
derechos que varran en funci6n de cada estado.
Sears Brands Management Corporation, Hoffman Estates, IL 60179
=2=
Lea fodas las instrucclones en este manual antes de armar o usar su aspiradora.
ADVBITENCIA:
Su seguridad es muy importante pora nosotros. Para reducir el riesgo de incendio,
choque el6ctrico, lesi6n corporal o dafios al utilizar su aspiradora, act6e de acuerdo
con los precouciones b6sicos de seguridad, entre elias:
Use su aspiradora solamente como se
describe en este manual. Use solamente
con accesorios recomendados por
Sears.
Desconecte la fuente de etectricidad
antes de hacer el servicio o limpiar el
6rea del cepilto. La fatta de hacer esto
puede resultar en et sObito arranque del
cepillo.Causando lesiones personales
pot partes en movimiento.
No deje la aspiradora cuando est6
enchufada. Desenchufe del
tomacorriente cuando no est6 en usa y
antes de hacer et servicio.
Poro reducir et riesgo de choque
et6ctrico - No la use afuera o sobre
superficies mojadas.
No permito que se la use como un
juguete. Ponga especial atenci6n
cuando es usada pot o cerca de nifios.
No la use con un cord6n o clavija
da_ados. Sila aspiradora no est6
trabajando como debe, se la ha dejado
caer, da_ado, dejada afuera, o
volteada en et agua, ret6rnela a un
Centro de Servicio Sears.
No la jale o arrastre det cord6n, use el
cord6n como una manUa, cierre una
puerta sobre el cord6n, o tire del
cord6n alrededor de bordes afilados o
esquinas. No pose ta aspiradora sobre
et cord6n. Mantenga el cord6n lejos de
superficies calientes.
No desenchufe tirando del cord6n. Para
desenchufar, tome la clavija, no el
cord6n.
No tome la clavija o la aspiradora con
las manos mojadas.
No ponga ningOn objeto en las
aberturas.
No la use con ninguna abertura
bloqueada; mant6ngala libre de polvo,
hilachas, pelo, y cuatquier cosa que
pueda reducir la circulaci6n del aire.
SAVE THESE
Mantenga et pelo, ropas sueltas, dedos,
y todas los partes det cuerpo lejos de
aberturas y partes en movimiento.
Apague todos los controles antes de
desenchufar.
Use cuidado extra cuando limpie
escaleras.
No la ponga sobre sillas, mesas, etc.
Mant6ngala sobre el piso.
No use la aspiradora para levantar
Irquidos inflamables o combustibles
(gasolina, fluido de limpiar, perfumes,
etc.), o la use en 6teas donde puedan
estar presentes. Los vapores de estas
substancias pueden crear un peligro de
incendio o explosi6n.
No levante nada que est_ ardiendo o
echando humo, tat como cigarrillos,
f6sforos, o cenizas calientes.
No use la aspiradora sin et contenedor
de polvo y/o filtros en su lugar.
Siempre cambie el contenedor de polvo
despu6s de limpiar la alfombra,
limpiadores o refrescantes, polvos, y
polvo fino. Estos productos obstruyen los
filtros, reducen la circulaci6n del aire y
pueden causar daSo a la aspiradora. La
falla en limpiar el contenedor de polvo
puede causar daSo permanente a la
aspiradora.
No use la aspiradora para levantar
objetos duros afilados, peque_os
juguetes, alfiteres, sujetapapeles, etc.
Ellos pueden daSar la aspiradora o el
contenedor de polvo.
Desenchufe antes de conectar el Pet
HandiMate
Usted es responsable de estar seguro de
que su aspiradora no es usada por
alguien incapaz de operarla
correctamente.
INSTRUCTIONS
Proper assembly and safe use of your vacuum cleaner are your responsibilities. Your
vacuum cleaner is intended for Household use. Read this Use & Care Guide carefully for
important use and safety information. This guide contains safety statements under
warning and caution symbols.
-3-
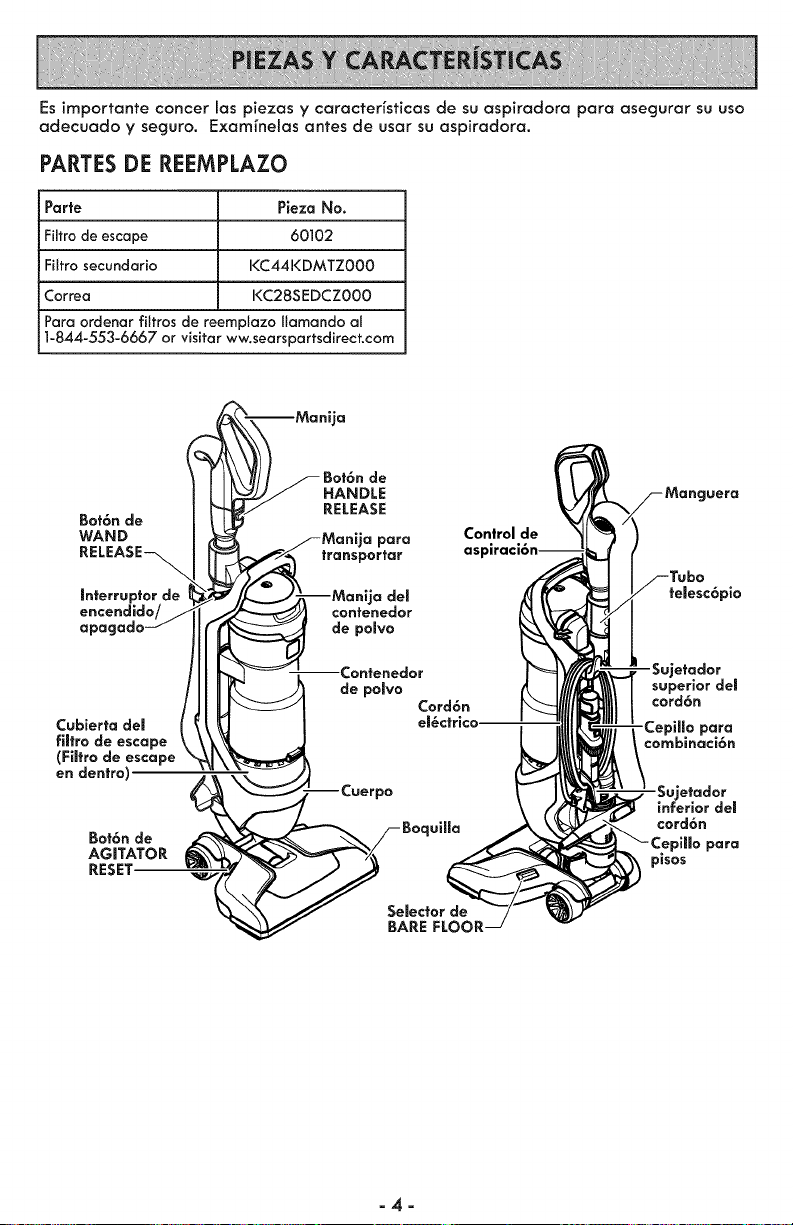
Es importante concer las piezas y caracterfsticas de su aspiradora para asegurar su uso
adecuado y seguro. Exam_nelas antes de usar su aspiradora.
PARTES DE REEMPLAZO
Parte Pieza No.
Filtro de escape 60102
FiJtro secundario I<C44KDMTZ000
Correa KC28SEDCZ000
Para ordenar fiitros de reempJazo liamando al
1-844-553-6667 or visitar ww.searspartsdirect.com
Interrupter de
encendido/ /
apagado -j
Cubierta del i
filtro de escape
(Filtro de escape
en dentro)
Bot6n de ____., .,/._
HANDLE Manguera
RELEASE
Control dne i__ )
a para , ..
transpartar asplraclo
./-E.,_L J 1F Tub°
--Manija del _1r _ Y telesc6pio
confenedor _1__
de polvo
--.Contenedor Sujetader
de polvo superior del
Card6n cord6n
el_ctrico-
para
combinaci6n
Bot6n de
AGITATOR
RESET.
Selector de
BARE FLOOR
cord6n
_illo para
pisos
-4-
Por favor ponga atenci6n especial a los cuadros que le alertaran de posibles peligros
Advertencia: Este informaci6n le alertar6 de peligro de fuego, choques el6ctricos,
quemadas y lesiones. Cuidado: Este informaci6n le alertara de peligros como lesiones
y daffos de propiedad.
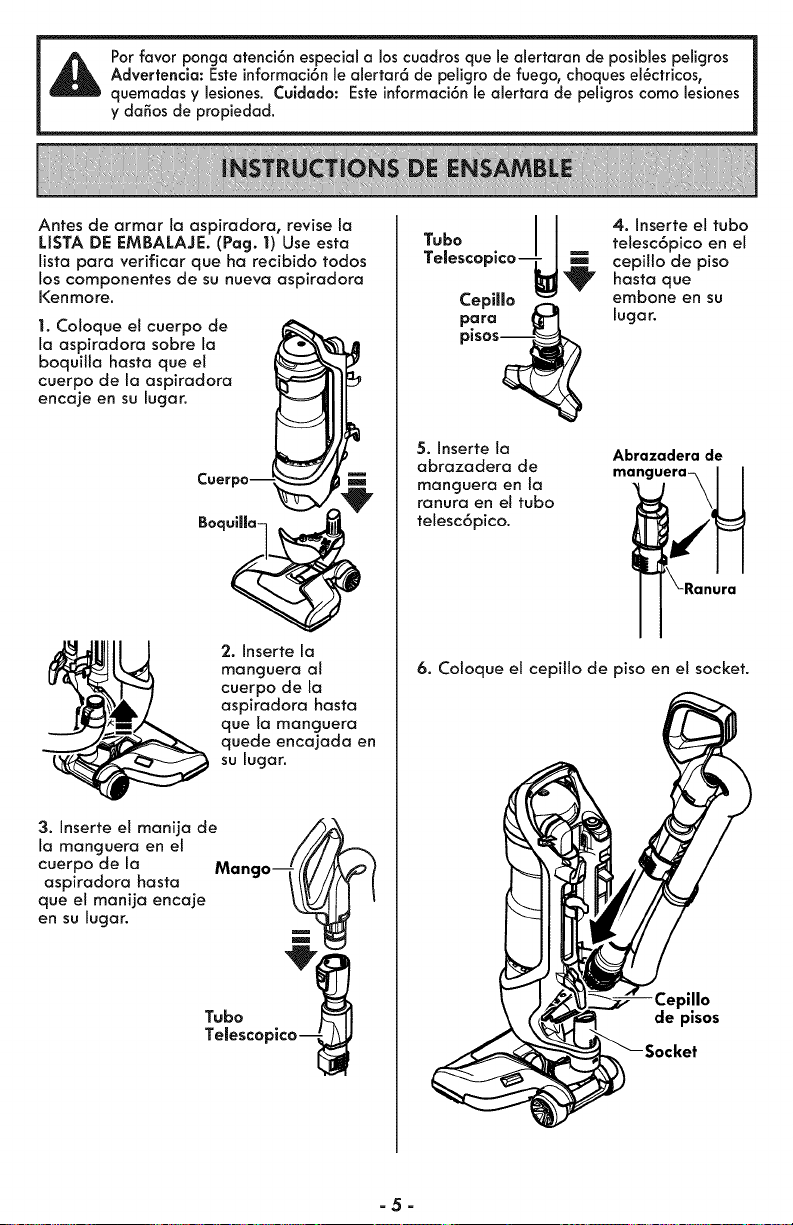
Antes de armar la aspiradoro, revise la
LISTA DE EMBALAJE. (Pag. 1) Use esta
listo para verificar que ha recibido todos
los componentes de su nuevo ospirodoro
Kenmore.
1. Coloque el cuerpo de
la aspiradora sobre la
boquillo hasta que el
cuerpo de la aspiradora
encoje en su lugor.
Cuerpo -_j
Boquilla
2. Inserte la
manguera al
cuerpo de la
ospiradora hasta
que Io manguera
quede encojodo en
su lugar.
3. Inserte el manija de
Io manguera en el
cuerpo de la Mare
aspiradora hasta
que el manijo encoje
en su lugor.
!
I
4. Inserte el tubo
Tubo telesc6pico en el
_, cepillo de piso
hasta que
Cepillo _ embone en su
para _l'-[ lugar.
plsos_
5. Inserte la
Abrazadera de
abrazadera de manguera__ 1 I
manguera en la
°n°e..boE'M
telescdpico.
\Ranura
6. Coloque el cepilto de piso en el socket.
_illo
de pisos
locket
-5-
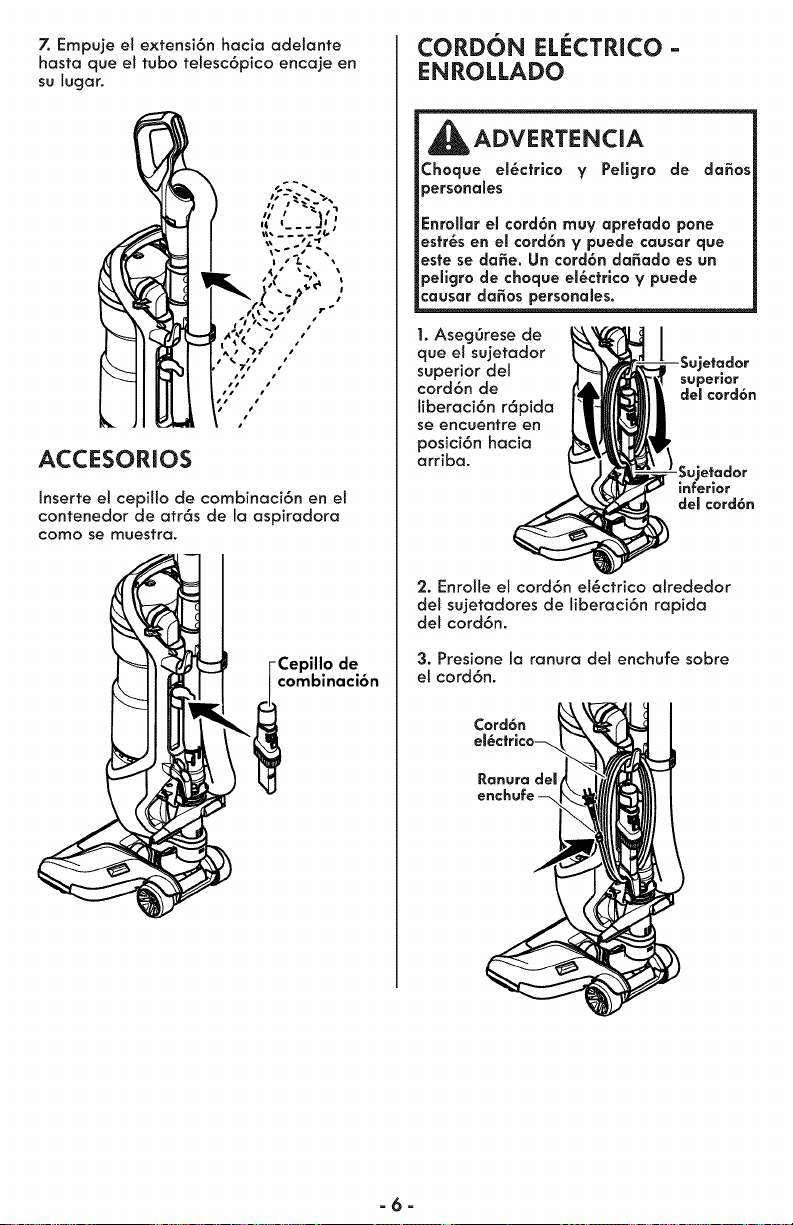
7. Empuje el extensi6n hacia adetante
hasta que el tubo telesc6pico encaje en
su lugar.
ACCESORIOS
Inserte el cepilto de combinaci6n en el
contenedor de atr6s de la aspiradora
como se muestra.
CORDON EL_:CTRICO-
ENROLLADO
ADVERTENCIA
Choque el_ctrico ¥ Peligro de dodos
personales
Enrollar el cord6n rnuv apretado pone
estr_s en el cord6n y puede causar que
este se dafie. Un cord6n da_ado es un
peffgro de choque el_ctrlco y puede
cousor dodos personoles.
1. Aseg6rese de
que el sujetador
superior del
cord6n de
liberaci6n r6pida
se encuentre en
posici6n hacia
arriba.
etador
superior
del cord6n
-Sujetador
inferior
del cord6n
2. Enrotle el cord6n el_ctrico alrededor
del sujetadores de liberaci6n rapida
del cord6n.
3. Presione la ranura del enchufe sobre
el cord6n.
Cord6n
-6-
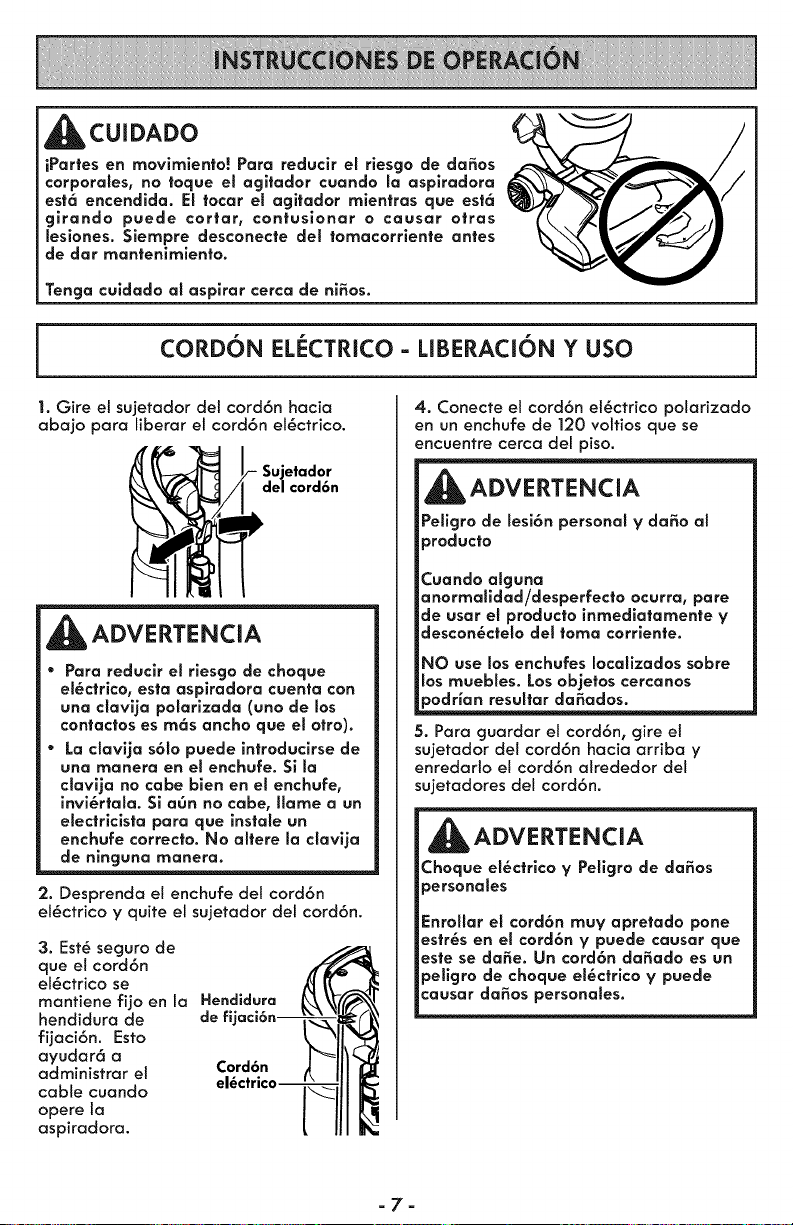
_CUIDADO
iPartes en movimiento! Para reducir el riesgo de dafios
corporales, no toque el agltador cuando la asplradora
est6 encendida. El tocar et agitador mientras que est6
girando puede cortar, contusionar o causar otras
lesiones. $iempre desconecte del tornacorrlente antes
de dar mantenimiento.
Tenga culdado al asplrar cerca de ni_os.
CORDON EL_:CTRICO = LIBERACION Y USO
1. Gire el sujetador dei cord6n hacia
abajo para liberar el cord6n el6ctrico.
Sujetador
del cord6n
ADVERTENCIA
Para reduclr el riesgo de choque
el_ctrico, esta asplradora cuenta con
una clavlja polarizada (uno de los
contactos es rn6s ancho que el otto).
La clavlja s61opuede introducirse de
una manera en el enchufe. Si la
clavija no cabe bien en el enchufe,
invi6rtala. Si a0n no cabe, Ilarne a un
electricista para que instale un
enchufe correcto. No altere la davlja
de ninguna rnanera.
2. Desprenda et enchufe del cord6n
el&ctrico y quite el sujetador del cord6n.
3. Est_ seguro de
queet cord6n
el_ctrico se
manfiene fijo en la Hendldura
hendidura de de ffjaci6n--
fijaci6n. Esto
ayudar6 a
administrar el Cord6n
cable cuando el_ctrico--
opere la
aspiradora.
4. Conecte el cord6n el_ctrico polarizado
en un enchufe de ]20 voltios que se
encuentre cerca del piso.
ADVERTENCIA
Peligro de lesi6n personal ¥ da_o al
producto
Cuando alguna
anorrnalidad/desperfecto ocurra, pare
de usar et producto inmediatarnente y
descon6ctelo del toma corriente.
NO use los enchufes Iocallzados sobre
los rnuebles. Losobjetos cercanos
podHan resultarda_ados_.
5. Para cjuardar el cord6n, gire el
sujetador det cord6n hacia arriba y
enredarlo el cord6n akededor del
sujetadores del cord6n.
ADVERTENCIA
Choque el_ctrico y Peligro de dafios
personales
Enrollar el cord6n rnuy apretado pone
estr6s en el cord6n y puede causar que
este se dafie. Un cord6n da_ado es un
peligro de choque el6ctrico ¥ puede
causar da_os personales.
-7-
MODALIDADES DE OPERACION
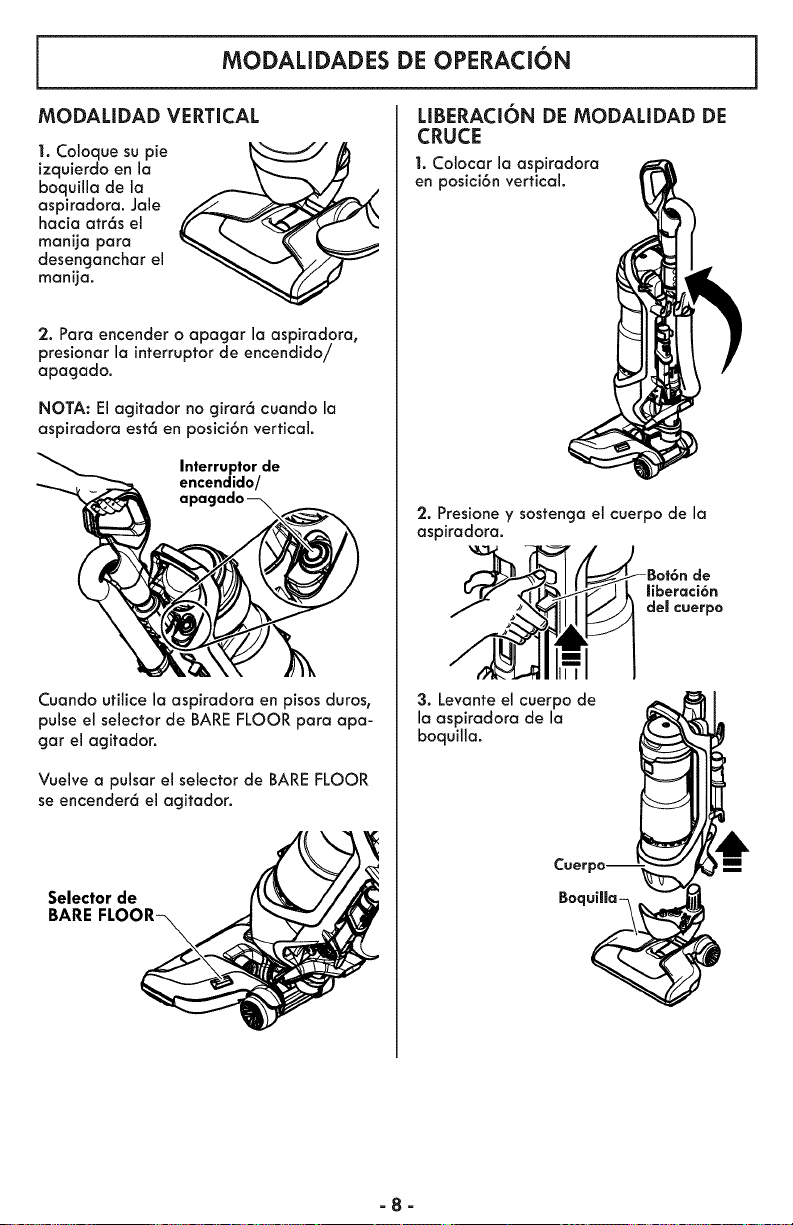
MODALIDAD VERTICAL
1. Coloque su pie
izquierdo en la
boquilla de la
aspiradora. Jale
hacia atr6s el
manija para
desenganchar el
manija.
2. Para encender o apagar la aspiradora0
presionar la interruptor de encendido/
apagado.
NOTA: El agitador no girar6 cuando la
aspiradora est6 en posici6nvertical.
Interruptor de
encendido/
Cuando utilice la aspiradora en pisosduros,
pulse el selector de BARE FLOOR para apa-
gar el agitador.
Vuelve a pulsar el selector de BARE FLOOR
se encender6 el agitador.
Selector de
BARE FLOOR-_
LIBERACI6N DE MODALIDAD DE
CRUCE
1. Colocar la aspiradora
en posici6nvertical.
2. Presione y sostenga el cuerpo de la
aspiradora.
de
liberaci6n
del cuerpo
3. Levanteel cuerpo de
la aspiradora de la
boquilla.
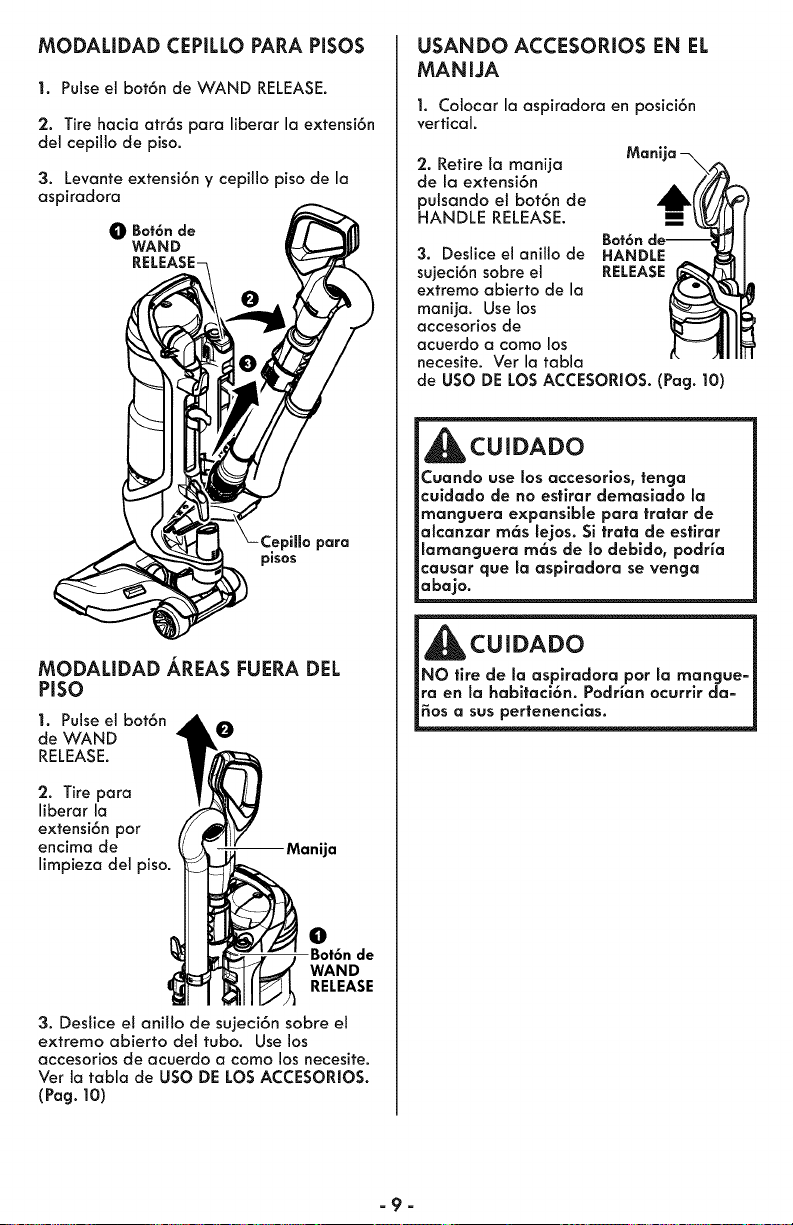
MODALIDAD CEPILLO PARA PISOS
1. Pulse el bot6n de WAND RELEASE.
2. Tire hacia atr6s para liberar la extensi6n
del cepillo de piso.
3. Levante extensi6n y cepiJlo piso de la
aspiradora
_]t Bof6n de
WAND
RELEA!
MODALIDAD AREAS FUERA DEL
PISO
1. Pulse el bot6n
de WAND O
RELEASE.
2. Tire para
liberar la
extensi6n per
encima de
limpieza del piso.
O
WAND
RELEASE
3. Deslice el anillo de sujeci6n sobre el
extremo abierto del tuba. Use los
accesorios de acuerdo a como los necesite.
Vet la tabla de USO DE LOS ACCESORIOS.
(Pag. 10)
USANDO ACCESORIOS EN EL
MANIJA
1. Colocar la aspiradora en posici6n
vertical.
Mani"
2. Retire la manija
de la extensi6n
pulsando el bot6n de
HANDLE RELEASE.
J
Bot6n
3. Deslice el anillo de HANDLE
sujeci6n sobre el RELEASE
extremo abierto de la
manija. Use los
accesorios de
acuerdo a como los
necesite. Vet la tabla
de USO DE LOS ACCESORIOS. (Pag. 10)
_CUIDADO
Cuando use los accesorios, tenga
cuidado de no estirar demasiado la
manguera expansible para tratar de
alcanzar m6s lejos. Si trata de estlrar
lamanguera m6s de Io debido, podHa
causar que la asplradora se venga
abajo.
i c0,oAoo i
_NO tire de la aspiradora pot la mangue-_
_ra en la habitaci6n..PodHan ocurrlr da-
_os a sus pertenencias.
-9-
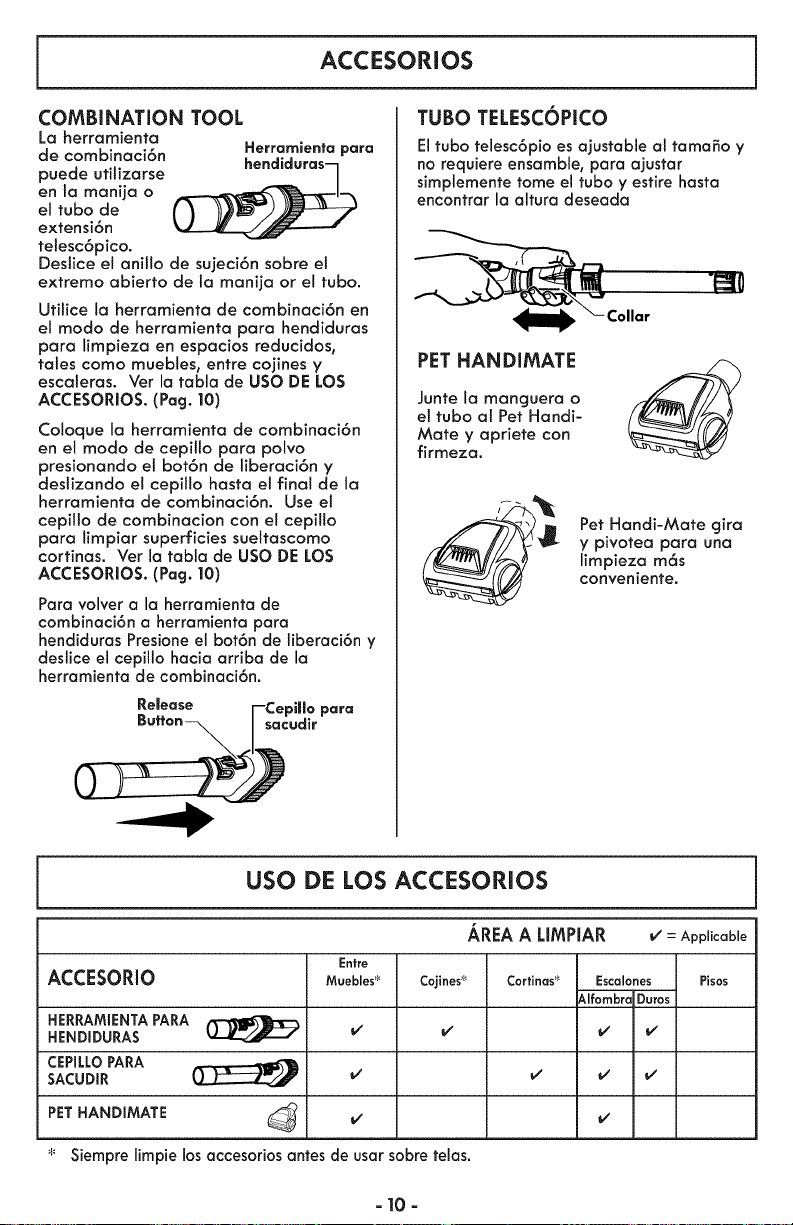
ACCESORIOS
TUBO TELESCOPICO
COMBINATION TOOL
La herramienta
de combinaci6n Herramienfa para
puede utitizarse
en la manija o
el tubo de
extensi6n
tetesc6pico.
Destice el anil!o de sujeci6n sabre el
extremo abierto de la manija or e! tubo.
Utilice la herramienta de combinaci6n en
el modo de herramienta para hendiduras
para limpieza en espacios reducidos,
tales como muebles, entre cojines y
escateras. Ver la tabla de USO DE LOS
ACCESORIOS. (Pag. 10)
Coloque la herramienta de combinaci6n
en el modo de cepillo para polvo
presionando el bot6n de liberaci6n y
deslizando el cepiilo hasta et final de la
herramienta de combinaci6n. Use el
cepilLo de combinacion con et cepil!o
para timpiar superficies sueltascomo
cortinas. Ver la tabla de USO DE LOS
ACCESORIOS. (Pag. |0)
Para volver a la herramienta de
combinaci6n a herramienta para
hendiduras Presione el bot6n de liberaci6n y
deslice el cepillo hacia arriba de la
herramienta de combinaci6n.
Release
El tubo telesc6pio es ajustable al tamafio y
no requiere ensamble, para ajustar
simplemente tome el tubo y estire hasta
encontrar la altura deseada
,_111111__- Collar
PET HANDIMATE
Junte la manguera o
et tubo al Pet Handi-
Mate y apriete con
firmeza.
Pet Handi-Mate gira
y pivotea para una
limpieza m6s
conveniente.
USO DE LOS ACCESORIOS
AREA A LIMPIAR v" = Applicable
Entre
ACCESORIO Muebles _ Cojines _ Cortinas _ Escalones Pisos
-_lfombra Duros
HERRAMIENTAPARA
HENDIDURAS _ _ _
CEPILLOPARA
SACUDIR i/ _/ _,' _/
PETHANDIMATE
Siempre limpie los accesorios antes de usar sobre felas.
- 10 -
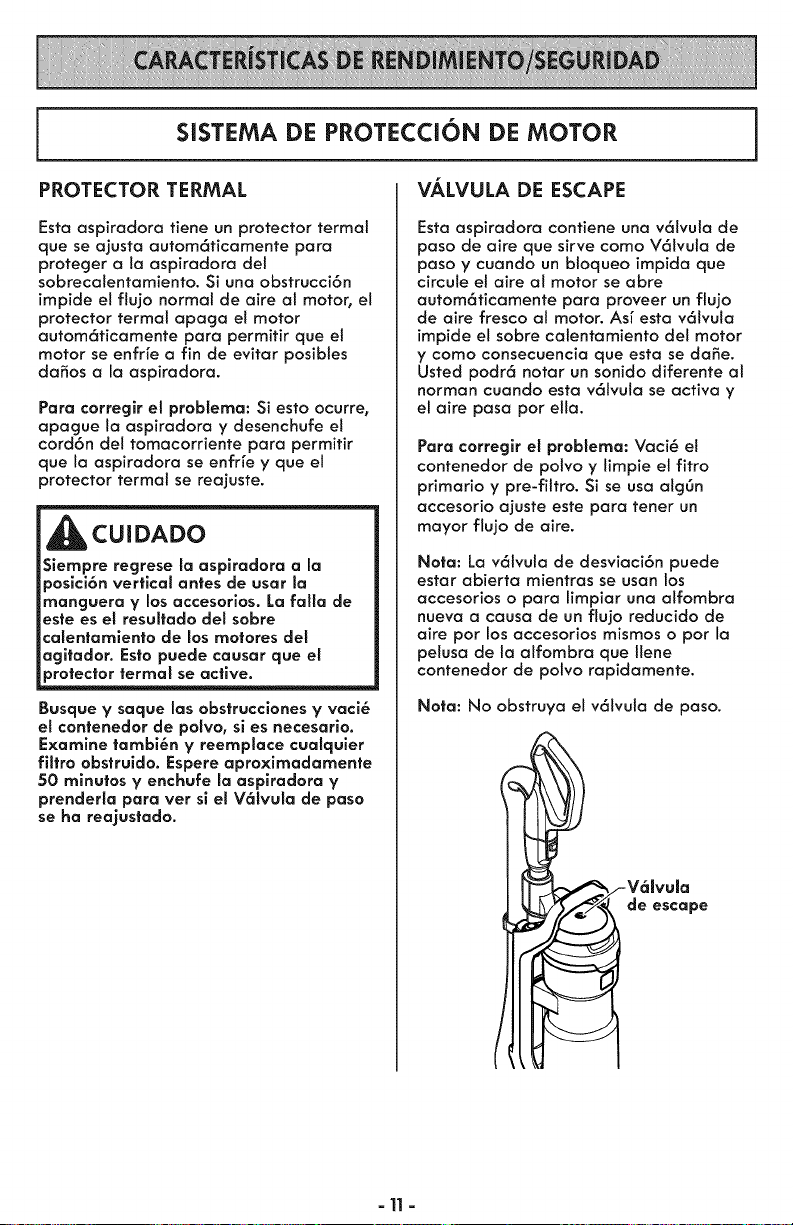
SISTEMA DE PROTECCION DE MOTOR
PROTECTOR TERMAL
Esta aspiradora fiene un protector termal
que se ajusta autom6ficamente para
proteger a ia aspiradora del
sobrecalentamiento. Si una obstrucci6n
impide el flujo normal de aire at motor, el
protector termai apaga el motor
autom6ficamente para permitir queet
motor se enfr[e a fin de evitar posibies
da_os a la aspiradora.
Para corregk el problema: Si esto ocurre,
apague la aspiradora y desenchufe el
cord6n del tomacorriente para permitir
que la aspiradora se enfr[e y que el
protector termal se reajuste.
CUIDADO
Siempre regrese la asplradora a la
posici6n vertical antes de usar la
manguera V los accesorios. La falla de
este es el resultado del sobre
calentamiento de los motores del
agitador. Estopuede causar que el
Busque y saque las obstrucclones y vaci6
el contenedor de polvo, sl es necesario.
Examine tarnbi6n V reemplace cualquier
filtro obstruido. Espere aproximadamente
50 minutos V enchufe la aspiradora V
prenderla para vet sl el V61vula de paso
se ha reajustado.
VALVULA DE ESCAPE
Esta aspiradora confiene una v61vuta de
paso de aire que sirve coma V61vula de
paso y cuando un bloqueo impida que
circule et aire al motor se abre
autom6ticamente para proveer un flujo
de aire fresco al motor. As[ esta v61vula
impide el sobre calentamiento del motor
y como consecuencia que esta se dane.
Usted podr6 notar un sonido diferente at
norman cuando esta v61vula se activa y
el aire pasa por ella.
Para corregir el probiema: Vaci6 et
contenedor de potvo y limpie el fitro
primario y pre-filtro. Si se usa algOn
accesorio ajuste este para tener un
mayor flujo de aire.
Nota: La v6tvula de desviaci6n puede
estar abierta mientras se usan los
accesorios o para limpiar una alfombra
nueva a causa de un flujo reducido de
aire por los accesorios mismos o par la
pelusa de la alfombra que llene
contenedor de polvo rapidamente.
Nota: No obstruya el v61vula de paso.
- 11 -
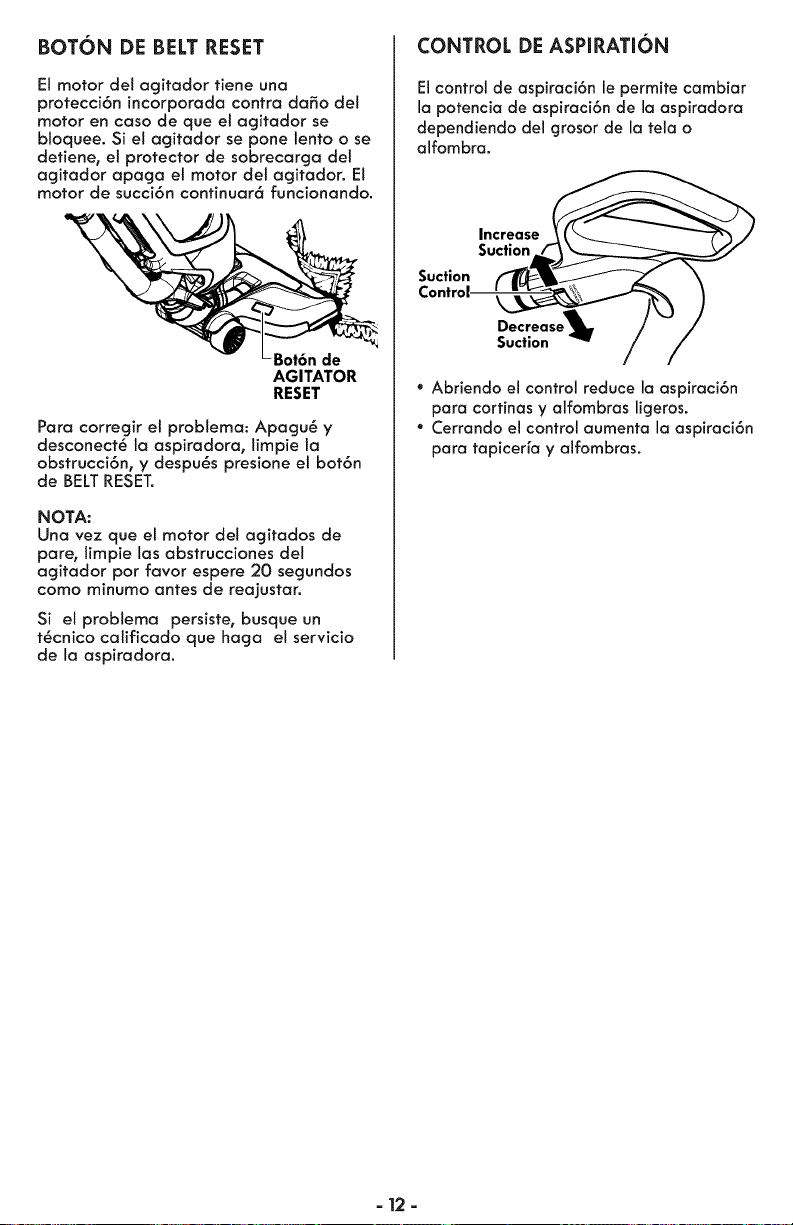
BOTON DE BELT RESET
El motor det agitador tiene una
protecci6n incorporada contra dafio de!
motor en caso de que el agitador se
bloquee. Si el agitador se pone lento o se
detiene, el protector de sobrecarga del
agitador apaga el motor del agitador. El
motor de succi6n continuar6 funcionando.
Bot6n de
AGITATOR
RESET
Para corregir el problema: Apagu@ y
desconect_ la aspiradora, limpie la
obstrucci6n, y despu_s presione el bot6n
de BELTRESET.
NOTA:
Una vez que el motor del agitados de
pare, limpie las abstrucciones det
agitador por favor espere 20 segundos
como minumo antes de reajustar.
Si el probiema persiste, busque un
t_cnico calificado que haga el servicio
de la aspiradora.
CONTROL DE ASPIRATION
El control de aspiraci6n le permite cambiar
la potencia de aspiraci6n de la aspiradora
dependiendo del grosor de la tela o
alfombra.
Increase
Suction
Suction
Control
Dec'_ease_
Suction -'_
* Abriendo el control reduce la aspiraci6n
para cortinas y alfombras ligeros.
* Cerrando el control aumenta la aspiraci6n
para tapicer_a y alfombras.
- 12 -
Siga siempre todas las instrucciones de seguridad antes de efectuar el mantenimiento a
su aspiradora.
ia_ ADVERTENCIA
Peligro de choque et_ctrlco o lesi6n corporal
Desconecte la unldad antes de efectuar et rnantenimiento a su asplradora. De Io
contrarlo podria producirse un choque el_ctrico o causar lesi6n corporal sl la asplradora
rranca de rnanera irnprevlsta.
LIMPIEZA DEL EXTERIOR Y DE LOS ACCESORIOS
1. Desconecte el cord6n el_ctrico de la
clavija de la pared. NO rocie agua sobre
la aspiradora.
2. Para limpiar el exterior 6 reducir la
est6tica y la acumulaci6n de polvo limpi_
con un trapo suave y limpio, que ha sido
exprimido despu_s de remojar en una
soluci6n de agua y detergente Ifquido
ligero. Seque el exterior con un trapo
seco despu_s de limpiar.
Lave et cepi!lo para conbinaci6n y la
herramienta para hendiduras en agua
tibia jabonosa, enjuague y deje secar at
aire. No los lave en lavadora de platos.
CUIDADO
No use los accesorios si estan mojados.
Los accesorios que se utillcen en _reas
sucias, debajo del refrigerador, no
deben usarse en otras superficies sin
antes set lavados. Podrian dejar
rNarcas.
ALMACENAMIENTO DE LA ASPIRADORA
Reemplace la manguera y el tube si es
necesario (ver p6gina 5 & 6).
Recoja et cord6n y enrollarlo en los
sujetadores superior e inferior, sin que
quede muy apretado. Asegure la ranura
det enchufe sobre el cord6n de poder (ver
p6gina 6).
Guarde la aspiradora bajo techo en un
lugar seco, con el manija en posici6n
vertical.
ADVERTENCIA
Choque el_ctrico y Peligro de da_os
personales
Enrollar el cord6n muy apretado pone
estr_s en el cord6n ¥ puede causar que
este se daSe. Un cord6n daSado es un
pellgro de choque el_ctrlco y puede
causar da_os personales.
= 13=
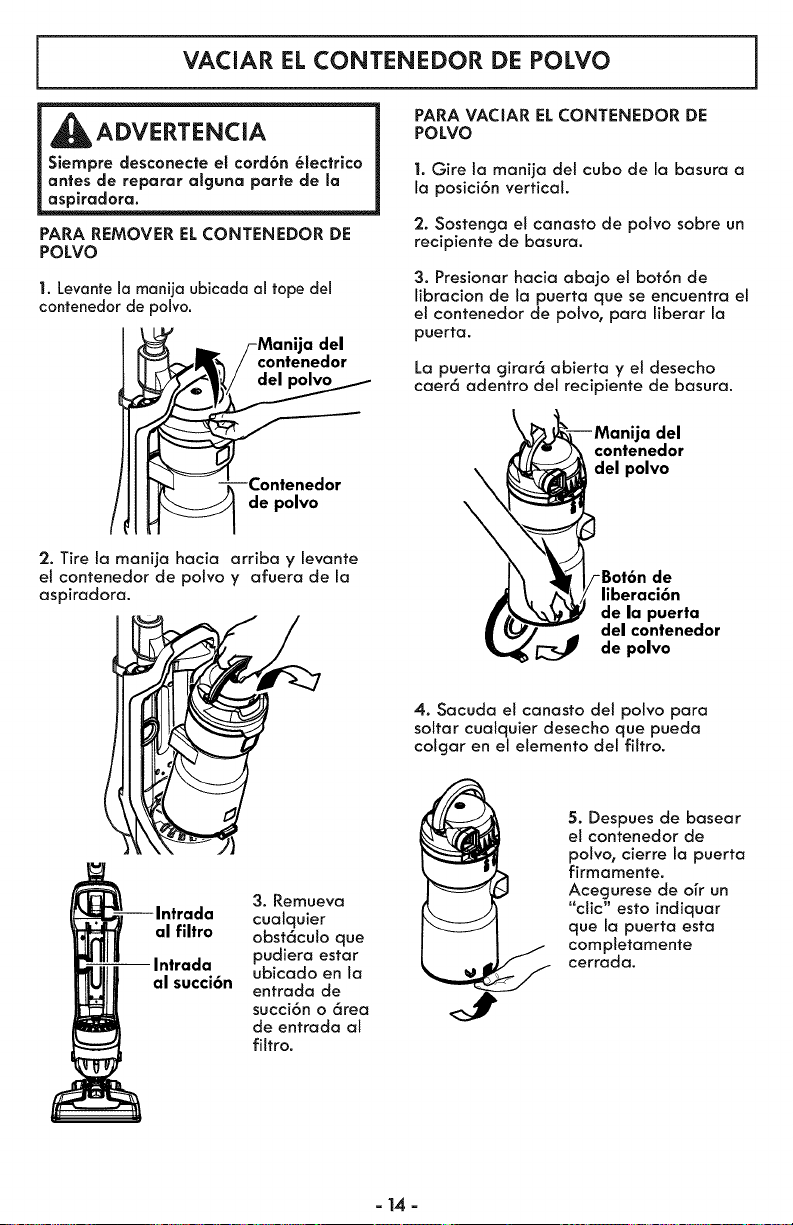
VACIAR EL CONTENEDOR DE POLVO
ADVERTENCIA
Siempre desconecte el cord6n _.lectrico
antes de reparar alguna parte de la
asplradora.
PARA REMOVER ELCONTENEDOR DE
POLVO
1. Levante Io manija ubicada al tope del
contenedor de polvo.
a del
contenedor
de polvo
2. Tire la manija hacia arriba y levante
el contenedor de polvo y afuera de la
aspiradora.
PARA VACIAR EL CONTENEDOR DE
POLVO
1. Gire la manija del cuba de la basura a
la posici6n vertical.
2. Sostenga el canasto de polvo sabre un
recipiente de basura.
3. Presionar hacia abajo el bot6n de
libracion de la puerta que se encuentra el
el contenedor de polvo, para liberar la
puerta.
La puerta girar6 abierta y el desecho
caer6 adentro del recipiente de basura.
\
del
contenedor
del polvo
de
liberaci6n
de la puerta
del contenedor
de polvo
4. Sacuda el canasto det polvo para
soltar cuatquier desecho que pueda
colgar en el elemento del filtro.
al filtro
Intrada
al succi6n
3. Remueva
cualquier
obst6culo que
pudiera estar
ubicado en la
entrada de
succi6n o 6tea
de entrada al
filtro.
5. Despues de basear
el contenedor de
polvo, cierre la puerta
firmamente.
Acegurese de oir un
"clic" esto indiquar
que la puerta esta
completamente
cerrada.
=14 =
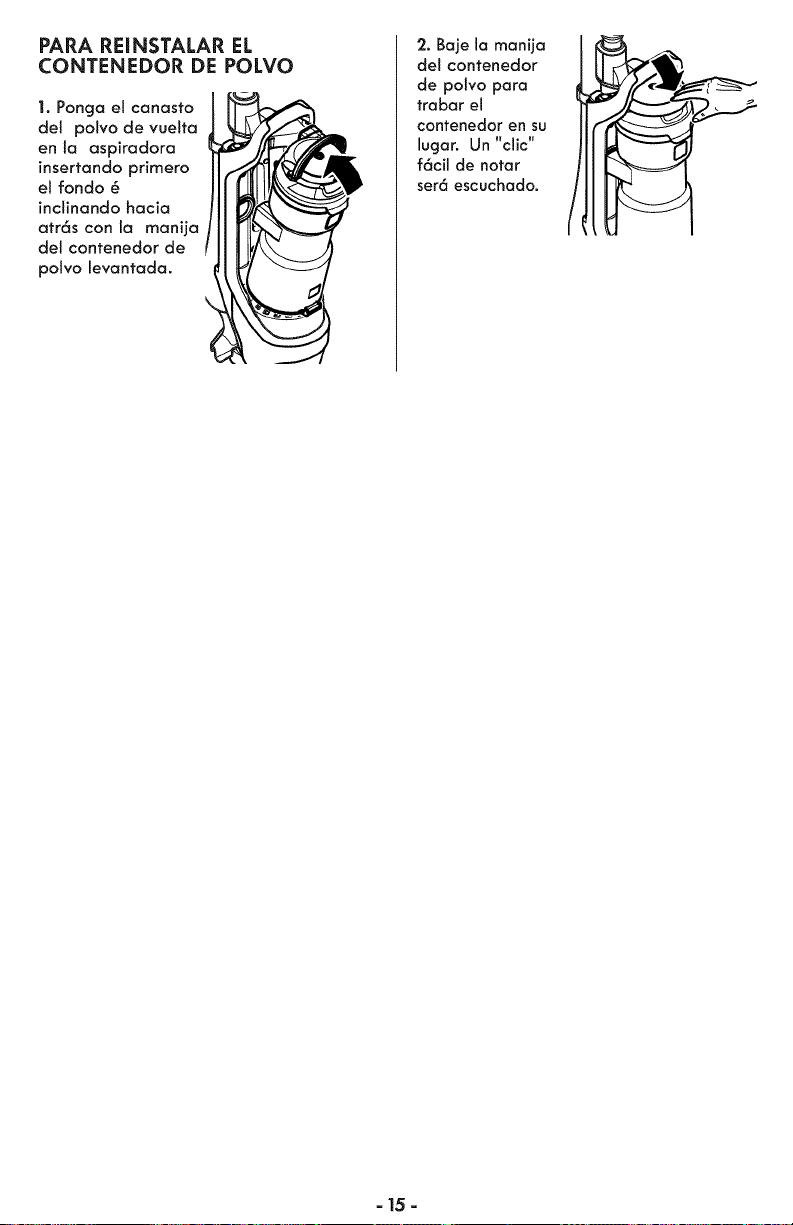
PARA REINSTALAR EL
CONTENEDOR DE POLVO
1. Ponga el canasto
det polvo de vuelta
en la aspiradora
insertando primero
el rondo 6
inclinando hacia
atr6s con la manija
del contenedor de
polvo levantada.
2. Baje la manija
del contenedor
de polvo para
trabar el
contenedor en su
lugar. Un "clic"
f6cil de notar
set6 escuchado.
= 15 =
LIMPIEZA DEL PRE-FILTRO i
El pre-fittro se encuentra dentro det
contenedor de polvo. Inspeccione con
frecuencia el pre-filtro y Ifmpielo si est6
sucio
1. Retirar el contenedor de polvo. Vea
PARA REMOVER ELCONTENEDOR DE
POLVO (P6g 14).
NOTA: Vaci_ el contenedor de polvo.
2. Rotar la tapa superior del contenedor
de polvo hacia la izquierda (como esta
indicado en la tapa), y levantarla.
Tapa superior
de/contenedor
de CERRADO
(Pa
ABIERTO
(Para Vaciar)
3. Tome el pre-fiitro
y girarlo coma se
muestra para
removerlo.
4. Limpie el pre-
fiitro golpe6ndoto
suavemente sabre
un recipiente de
basura.
Ere-
Enjuague con agua
fr_a 6nicamente, NO
use ningOn
detergente o jab6n.
Dejar que las partes sequen por Io menos
24 horas antes de ponerlas en la
aspiradora.
NO lavarlas en la lavadora de trastes.
NO las instale h0medas.
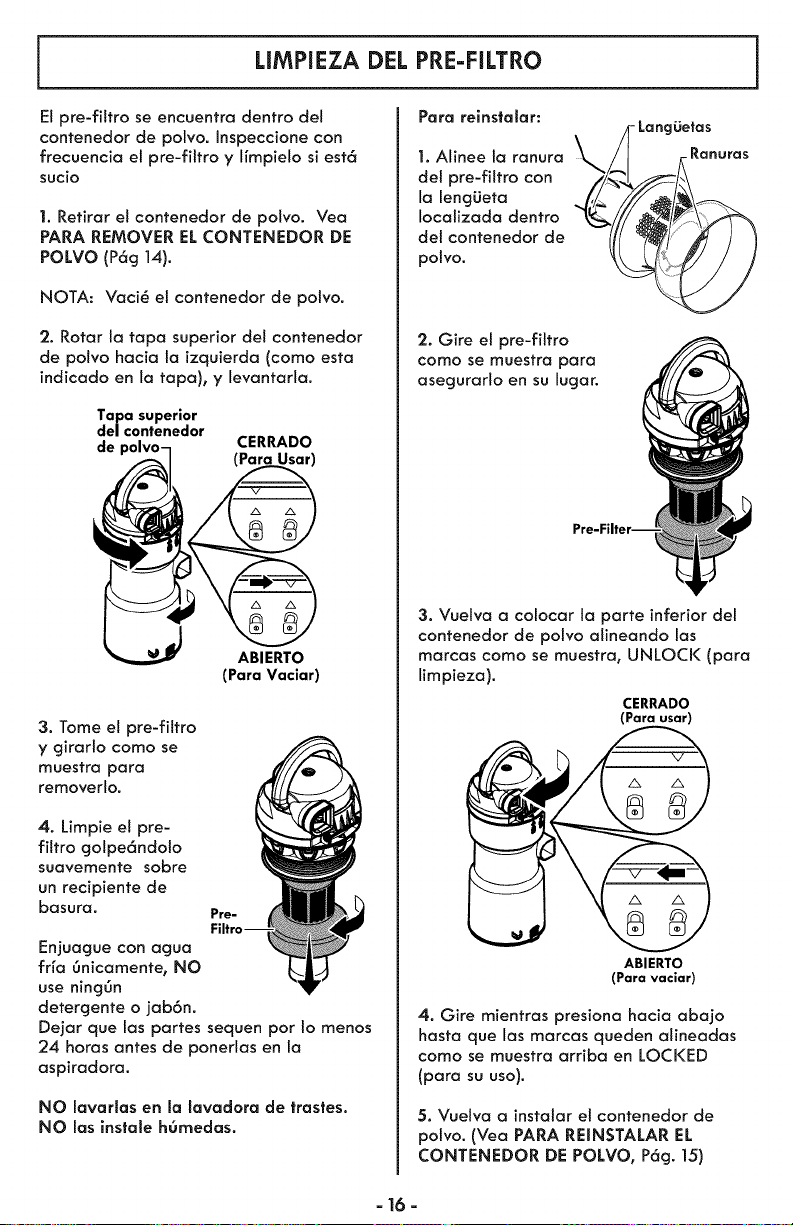
Para reinstalar:
/_ LangLietas
\
1. Alinee la ranura _,,,
/ I
Ranuras
d el pre-filtro con _-'-,,_1/ __
la lengUeta
Iocalizada dentro
del contenedor de
polvo. _
2. Gire et pre-fittro
coma se muestra para
asegurarlo en su lugar.
3. Vuelva a colocar la parte inferior del
contenedor de polvo alineando las
marcas como se muestra, UNLOCK (para
limpieza).
CERRADO
(Para usar)
ABIERTO
(Para vaciar)
4. Gire mientras presiona hacia abajo
hasta que las marcas queden alineadas
coma se muestra arriba en LOCKED
(para su usa).
5. Vuelva a instalar el contenedor de
polvo. (Vea PARA REINSTALAR EL
CONTENEDOR DE POLVO, P6g. 15)
- 16 -
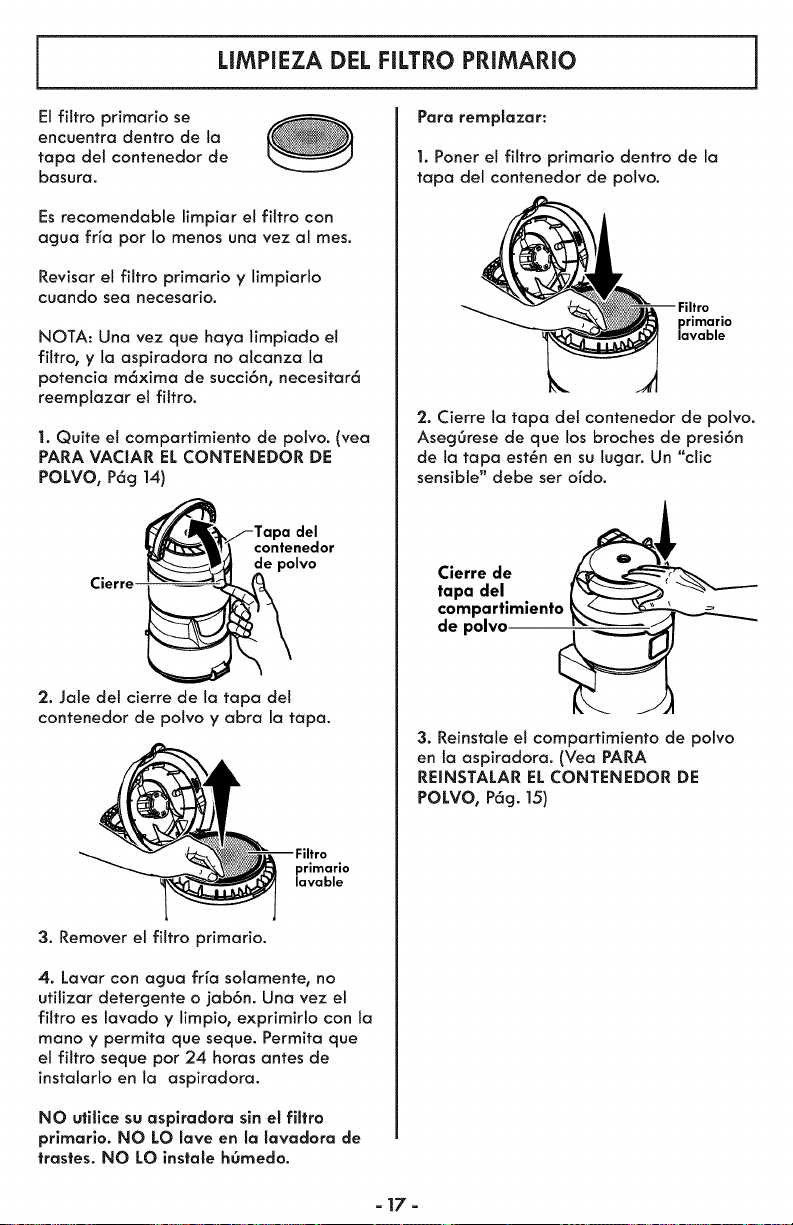
LIMPIEZA DEL FILTRO PRIMARIO
El filtro primorio se
encuentra dentro de Io
tapa det contenedor de
bosuro.
Es recomendoble limpiar e! fittro con
oguo fifo por Io menos una vez ol mes.
Revisor el fittro primario y limpiorlo
cuondo sea necesorio.
NOTA: Una vez que hoya limpiado et
filtro, y la aspiradora no alconzo la
potencia m6xima de succi6n, necesitor6
reemplozar el fittro.
1. Quite et compartimiento de polvo. (veo
PARA VACIAR ELCONTENEDOR DE
POLVO, P6g 14)
Cierre
del
contenedor
de polvo
2. Jale del cierre de la tapa del
contenedor de polvo y obro la topa.
primario
lavable
3. Remover el filtro primorio.
4. Lavar con agua frfa solamente, no
ufilizor detergente o jab6n. Una vez el
filtro es lavado y limpio, exprimirlo con Io
mano y permita que seque. Permito que
et filtro seque pot 24 horas antes de
instolarlo en la ospirodora.
NO ufilice su aspiradora sin el filtro
primario. NO LO lave en la lavadora de
trastes. NO LO instale hOmedo.
Para remplazar:
1. Poner el filtro primario dentro de Io
topo del contenedor de polvo.
primario
lavable
'2. Cierre ta tapa del contenedor de polvo.
Aseg6rese de que los broches de presi6n
de la tapo est_n en su lugar. Un "clic
sensible" debe set ordo.
3. Reinstale et compartimiento de polvo
en la aspiradora. (Vea PARA
REINSTALAR EL CONTENEDOR DE
POLVO, P6g. ]5)
=17=
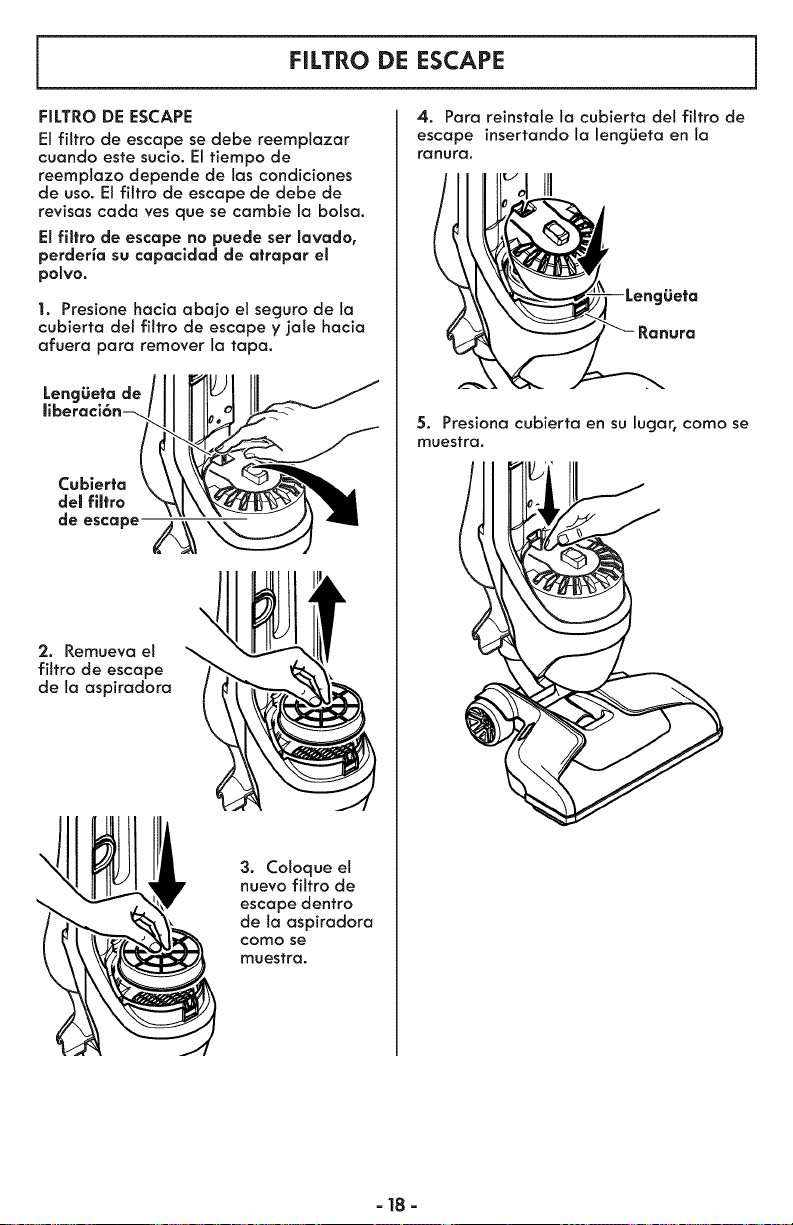
FILTRO DE ESCAPE
FILTRO DE ESCAPE
El fittro de escape se debe reemplazar
cuando este sucio. El tiempo de
reempiazo depende de las condiciones
de usa. El fittro de escape de debe de
revisas cada yes que se cambie la balsa.
EI filtra de escape no puede set lavado,
perderia su capacldad de atrapar el
polvo.
1. Presione hacia abajo el seguro de la
cubierta del filtro de escape y jale hacia
afuera para remover la tapa.
Leng_Jeta de
liberaci6n_
Cubierta
del filtro
de escape
2. Remueva el
filtro de escape
de la aspiradora
3. Coloque el
nuevo filtro de
escape dentro
de ta aspiradora
coma se
muesfra.
4. Para reinstale la cubierta del filtro de
escape insertando la lengLieta en la
ranura.
Ill
5. Presiona cubierta
en su lugar, coma se
muestra.
- 18 -

CAMBiO DE LA CORREA
ADVERTENCIA
Pellgra de choque el_ctrlco a lesi6n corporal
Desconecte la unidad antes de efectuar el
mantenimienta a su aspiradara.
Remplace la correa cuando huela a Ilanta
quemada esto causado par el excesivo
resbalamiento de la correa.
1. Recostar la aspiradora con la parte de
atr6s hacia arriba y la boquilla plana.
2. Para liberar la base inferior, gire tos
PaeStit!osde la base inferior a la posici6n
bierto" (UNLOCK).
Pestillos
CUIDADO
El eje del too|or puede estar callen|e.
3. Sacar et agitador levant6ndolo
cuidadosamente.
4. Saque la correa gastada o rata.
5. Limpie el agitador (Vet LIMPIEZA DEL
AGITADOR, p&g 20).
6. Cotoque la nueva correa en el eje del
motor y el agitador.
7. Coloque el agitador en las ranuras de
la boquilla.
Eje del
motor-
Tapa del
extremo_
Ag
8. Reinstate el plato inferior alineando
las leng[Jetas en el frente del plato
inferior con las ranuras en la boquilla
Gire a la posici6n correcta.
Lengi
Rarluras
9. Presione el plato inferior sabre la
boquilla y aseg6relo girando los ,pestitlos ,,
de ta base inferior a la posici6n cerrado
(LOCi<).
=19 =
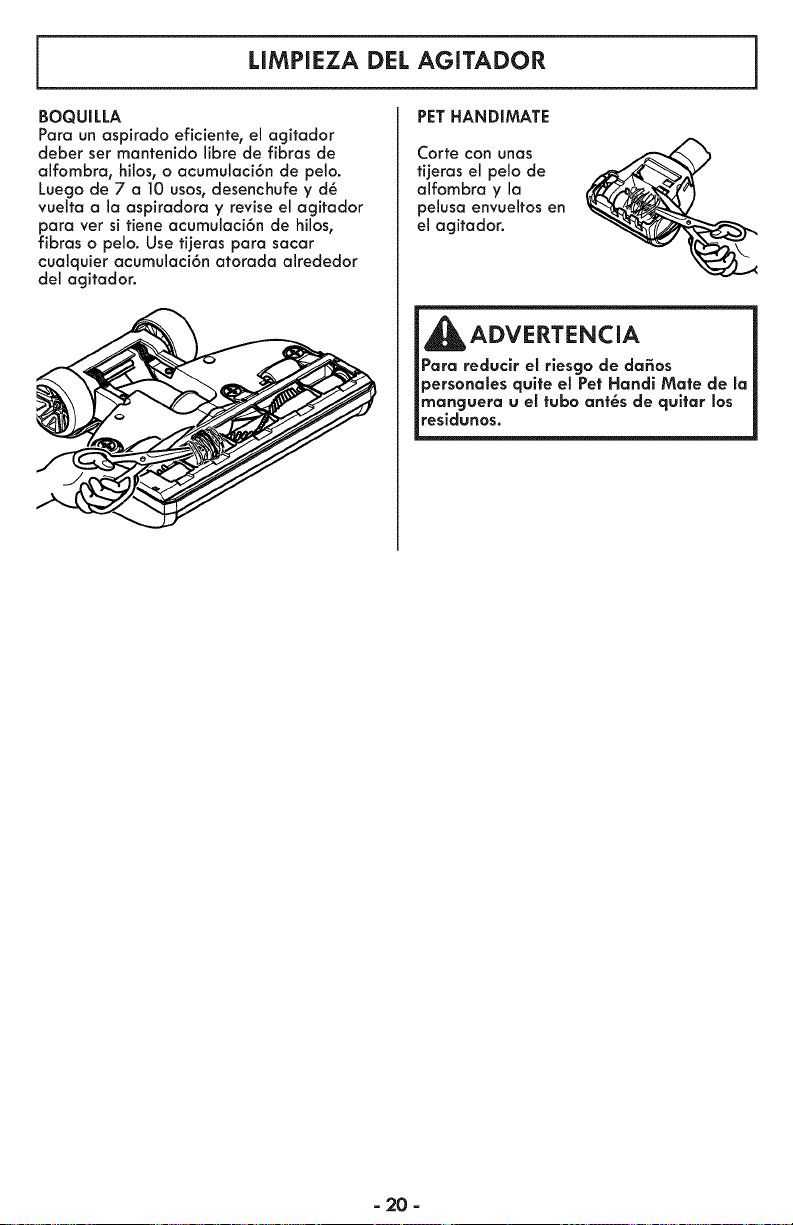
LIMPIEZA DEL AGITADOR
PET HANDIMATEBOQUILLA
Para un aspirado eficiente, el agitador
deber set mantenido libre de fibras de
alfombra, hilos, o acumulaci6n de pelo.
Luego de 7 a 10 usos, desenchufe y d_
vuelta a la aspiradora y revise el agitador
para vet si tiene acumulaci6n de hilos,
fibras o pelo. Use tijeras para sacar
¢ualquier acumulaci6n atorada alrededor
del agitador.
Carte con unas
tijeras el pelo de
alfombra y la
pelusa envueltos en
el agitador.
i DVERTENCIA 1
_Para reducir eJ rlesgo de dafios |
_persanales quite el Pet Handi Mate de la|
_ma.nguera u el tuba ant_s de qultar los |
resldunos.
- 20 -
REMOVING CLOGS
PARA REMOVER LA OBSTRUCCION DE
LA MANGUERA
Chequee frecuentemente el pasaje de
aire para estar seguro de que est6 libre
de obstrucciones
1. Pulse el bot6n de WAND RELEASE.
"2. Tire hacia atr6s para liberar la extensi6n
del cepillo de piso.
3. Levante extensi6n y cepillo piso de la
aspiradora
_]I WAND
RELEASE
_-FIoor Brush
4. Para quitar la
monguera,
presione la
lengLJeta de la
manguera y tire
hacia abajo
5. Remover
cualquier clase de
petusa o escombro
acumutado en la
manguera.
Lenc
6. Reinstale et tubo y la manguera en la
aspiradora. Ver INSTRUCTIONS DE
ENSAMBLE (pages 5-6).
PARA REMOVER LA OBSTRUCCION DEL
PET HANDI MATE
. m
_Para reducir el rlesgo de daSos |
_personales quite el Pet Handi Mate de la |
lmanguera u el tubo ant6s de qultar los |
resldunos.
Chequee frecuentemente
el
pasaje de aire para ,_-4_
estar seguro de que est6 _----_,,,;_
libre de obstrucciones f ///W
- 21 -
Revise este recuadro para encontrar soluciones a problemas que puede corregir usted
mismo. Cualquier otto servicio debe set realizado par SEARS u otto agente de servicio
calificado.
ADVERTENCIA Peligro de cheque el_ctrlco
Desconecte la aspiradora antes de efectuar el mantenirniento a su aspiradora. De
Io contrarlo podr_a produclrse un choque el_ctrlco o causar lesi6n corporal.
I ROBLEMA i
La aspiradora no
enciende
4.
No aspira 1.
satisfactoriamente.
2.
3.
4.
5.
6.
7.
8.
9.
ES agitador no 1.
funciana.
2.
3.
4.
1.
2.
Restricci6n del flujo
con el uso de los
accesories; cambia
de sonido.
I CAUSA POSIBLE 1
1. Est6 desconectada.
2. Cortacircuitos bofodo o fusible
quemado en el toblero de
servicio de la residencia.
3. Protector termal acfivado.
Toma-corrienfe defecfuoso.
El contenedor de polvo Ilena o
atascado.
Ajuste incorrecto de nivel de
pelo de la alfombra.
Agitador desgostado.
Boquilla, o sujetador de la
balsa, afascada.
Manguera afoscoda.
Monguera rata.
La manguera no esf6 bien
insertodo.
Acfivoci6n del sistemo de
protecci6n del motor.
Filtros de seguridad.
Mango en posici6n vertical.
Sobrecorga del agitador
ocfivado.
Protector t_rmico acfivado.
Inferruptor es en la posici6n
FLOOR.
El usa de los accesorios limita el
flujo de aire.
La pelusa de uno alfombro
nueva obstruye el paso de aire.
I SOLUCION POSIBLE I
1. Conecte bien, seleccione la
funci6n deseoda en el control
manual.
2. Restablezca el cortacircuitos
o cambie el fusible.
3.
4.
1.
2.
3.
4.
5.
6.
7.
Desconecte la aspiradora y
permita que se enfri_, el
protectort_rmicose ocfivara
por si solo. (P6g 11)
Pru_belo con otro aparoto o
16mpora. H6golo reparar
apropiadamente.
Vacie el contenedor del
polvo. (P6g ]4)
Ajuste el nivel. (P6g 8)
Cambie elagitador.
Revise y eliminar los residuos
de basuro en los conductos en
laboquilla, la manija, y eltubo.
Revisela monguera par residuos.
Cambie Io monguero.
Inserte bien la manguera.
8. Determine si exisfen bloqueos.
(P6g 18-19)
9. Limpie el pre-filtro (p6g ]6 ),
el filfro primario (p6g ]7 )0 o
cambie el filtrodel escape.
(P6g ]8)
1. Mueva el mango de la
posici6n vertical.
2. Reajuste la sobrecarga del
agitador. (Pag ]2)
3. Desconecfe la aspiradora y
permita que se enfri_ par 50
minutes. (P6g ]1)
4. Mueva el interrupter de la
posici6n CARPET. (P6g 8)
1. Revise ACCESORIOS. (P6g 8)
2.
Revise y eliminor los residuos
de basura en los conductos en
la boquilla, la manija, y el tubo.
- 22 -
I ROBLEMA i
El Pet Handi Mate
no funciona alrededor
cuando est6
instalado.
No recoge bien
la basura.
I CAUSA POSIBLE
1. Pila de la alfombra enredada
del agifador.
2. Correa desgasfada o rofa.
1. Pila de la alfombra enredada
alrededor del agifador.
2. Correa desgastada o rota.
3. Problema con la aspiradora.
4. Control de aspiraci6n abierfo.
5. Perforaciones en la manguera
de aspiraci6n.
11
1.
2.
1.
2.
3.
4.
5.
SOLUCION POSIBLE
Limpieel agitador.
I
Esta pieza no se puede
arreglar. Devuelva a una
fiendo o centro de servicio de
Sears para que se Io cambien
si est6 bajo garanfia.
Limpie el agifador.
Esta pieza no se puede
arreglar. Devuelva a una
fiendo o cenfro de servicio de
Sears para que se Io cambien
si est6 bajo garanfia.
Consulte la secci6n de
sugerencias para la
aspiradora.
Cierre el tubo de
aspiraci6n. (P6g 11)
Cambie la manguera puede
obtenerse encentro. Consulte la
lista de piezas de reparaci6n
para adquirir informoci6n de la
compra de la manguera.
- 23 -

Kenmoreo
For Sears Home Services in-home repair
of all Kenmore major appliances.
For the replacement parts, accessories and
Use & Care Guides that you need to do-it-yourself.
For professional installation of major home appliances
and items like air conditioners and water heaters.
1-844-553-6667
www.kenmore.com
In Canada 1-800-469-4663
www.sears.ca
Call anytime for the location of your nearest
Sears Parts & Repair Service Center